user guide - wisbey dental
TRANSCRIPT

Hi-TechDiagnosticsServiceMAKERS OF DENTAL, VETERINARY AND MEDICAL EQUIPMENTwww.velopex.com
Operation andMaintenance manual
Extra - X Xtender
(USA only)
USER GUIDE
WARNING:Do not plug into the electrical mains power supply beforereading this manual - or before filling the machine withliquids
Register your machine by returning the Warranty Cardto enable full customer support.
Automatic X-Ray Film Processor
Machine serial number to bequoted on all correspondence:
C US
I/LIT0050P Extra-X Manual English Iss.5 Issued: 11/10/11


This equipment can only be serviced by technically qualified
engineers, trained on Velopex machines, and is not designed
to be serviced by the end user other than as specified in this
manual.
Extra-X & Xtender.
Office: UK
Medivance Instruments LimitedBarretts Green Road, HarlesdenLondon, NW10 7AP, UKTel: +44 (0)20 8965 2913Fax: +44 (0)20 8963 1270
Office: USA
Velopex International Inc.105 East 17th Street, St CloudFlorida, 34769, USATel: +1 (407) 957 3900Fax: +1 (407) 957 3927
Office: France
Velopex International14 route de Montreuil le GastB.P.45, 35520 Melesse, FranceTel: +33 (0) 2.99.13.22.59Fax: +33 (0) 2.99.13.22.60


ii
Machine Accessories and Extras Supplied
16 USA - Chemical Container Cap - Developer
17 USA Chemical Container Cap - Fixer
18 Worldwide - Developer Pourer (Non-USA)
19 Worldwide - Fixer Pourer (Non-USA)
20 Cleaning Brush
Velopex Processor
21 Turning Tool
22 UK - Electricity Supply Cord
23 USA - Electricity Supply Cord
24 Continental - Electricity Supply Cord
25 Blank Endo Slide
20
19
18
28 Chemical Change Record Sheet
29 Quick Start Guide
30 Warranty Registration Card
31 Manual CD
21
22
24
23
25
26
27
31
28
30
16
17
29
or
or
26 Cleaning Tablets
27 Water Re-Circulation Tubes
1 Velopex X-Ray Film Processor - Left Side
2 Lid Lock
3 Film Collector
4 Endo Slide
5 On/Off Power Switch
6 Viewer Cover
7 Daylight Loader viewing Window
8 Hand entry port/Glove
9 Daylight Loader Lid
10 Daylight Loader - Left Side
11 Daylight Loader Coupling Points/Studs
12 Film Entry Guide
13 Transport Module
14 Service Technician Interface
15 Display
1
23
4
56
7
8
9
1011
12
13
14 15

Table Of Symbols
USA - WhiteWorldwide - Blue/Green

22
27TR
OU
BLE
SH
OO
TIN
GIN
STA
LLA
TIO
NO
PER
ATI
ON
MA
INTE
NA
NC
E
Contents

Specification
H
D
W
Width (W) 510mm / 20”
Depth (D)Inc. Loader
470mm / 18½”740mm / 29”
Height (H) 340mm / 13½”
Weight: EmptyFull Tanks
21Kg / 46¼lb27Kg / 59½lb
Tank Capacity 3.8litres / 6¾Imp Pints each
Operating Temperatures:
DeveloperFixer
Water- should not exceed 280C (82.40F) 25.50C (770F) / 300C (860F)300C (860F) / 330C (91.40F)
Electric Supply 100-120V, 200-240V, 50/60Hz
Warm-up Time 10 min. approx.
Film Feed Speed 470mm / 18½” per min.
Max. Film Width 260mm / 10¼”
Processing time*: DryWet-EndodonticFast Speed
4 min. approx.2 min. approx.2 min. approx.
Input Power 1150W
Environmental Conditions: Indoor use Only
Environment Temperature 50C-260C (410F-78.80F)
Maximum Relative Humidity 80%
* in the unit’s first few cycles, processing time can vary between four and five minutes. Then the process time will stabilise around four and a half minutes.
INST
ALL
ATI
ON
½⅓⅞
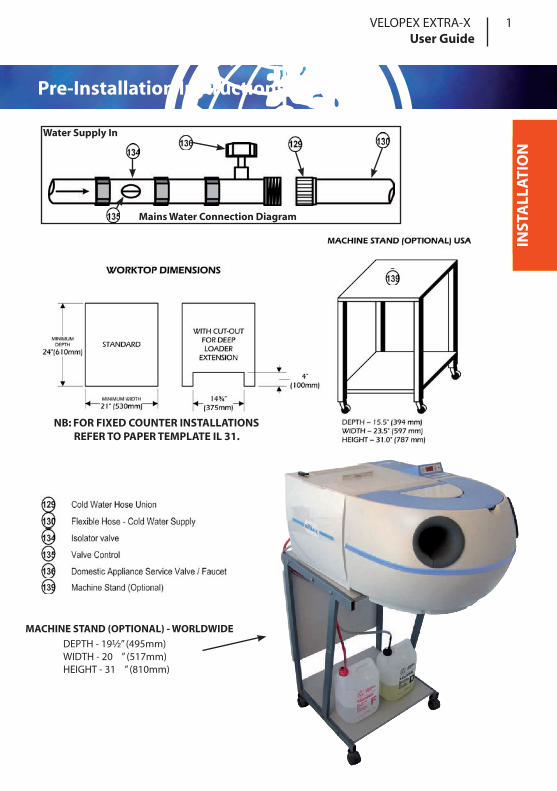
Pre-Installation Instructions
INST
ALL
ATI
ON
VELOPEX EXTRA-X 1 User Guide

INST
ALL
ATI
ON
INST
ALL
ATI
ON
Pre-Installation Instructions (Cont.)
2 VELOPEX EXTRA-X User Guide
• Sitting of the VELOPEX
When using the machine in daylight or a darkroom, avoid sources of intense light.
Do not mount the unit under a window, fluorescent light or flood lamp.
IMPORTANT NOTE: A well ventilated position is mandatory.
The ambient temperature must be below 26ºC (78.8ºF) and above 5ºC (41ºF) to
prevent lengthy warm-up temperatures.
Prevent sitting the machine above or near other electrical or mechanical equipment.
Surfaces susceptible to water or chemical damage should be avoided, such as
carpeted areas.
1. COUNTER PLAN
2. ELECTRICAL SUPPLY
3. COMMERCIAL WATER SUPPLY
(REFER TO MACHINE LOCATION AND DRILLING TEMPLATE IL-31)a) Use a counter that will support a minimum of 91Kg (200lbs).b) With a minimum height of 79cm (31in).c) With a minimum width of 53cm (21in).d) With a minimum depth of 61cm (24in).This will give you a working area of 0.32 sq.m (3.5 sq.ft)(See page 1).
a) Refer to specification table, page v.b. The power source must be within one metre (3 feet) of the machine above the counter and well separated from the water supply. It should be easily accessible for operation and maintenance.
ATTENTION! Use only the hoses supplied with this machine.a) Water temperature no higher than 26º (78.8ºF).b) A water valve adjusted to a water flow rate of 1.0ltr/min (0.27 gal/min).c) The supply should be fitted with an Isolating Valve just prior to the main On/Off faucet/valve which should be adjusted before installation to limit water flow to delivery rate of 1.0ltr/min (0.27gal/min).

INST
ALL
ATI
ON
Pre-Installation Instructions (Cont.)
INST
ALL
ATI
ON
VELOPEX EXTRA-X 3 User Guide
IMPORTANT NOTE: The water inlet hose supplied with this machine is not a standard Domestic Applicance Hose. It is fitted with a water flow restrictor valve designed to deliver water at a max. Rate of 1.0ltr/min (0.27gal/min). It is suitable for all installations where the mains water supply is rated between 0.2 & 10.0 Bar. However, for installations without mains water supply, e.g.: where a header tank is employed (min. height 1.83m (6ft.) above machine) a standard hose without restrictor must be used and the flow regulated to 1.0ltr/min (0.27gal/min) with the separate Control Valve.
4. DRAIN
5. VELOPEX free standing Machine Stand.
WARNING: X-ray radiation can be harmful to patient, technician and dentist. Inadequate lead shielding of the darkroom or film storage area will also cause fogging from exposure of films to stray x-ray radiation. Consult your local codes, Health Department or Dental Equipment Dealer for proper construction of darkroom or placement of film processing equipment in the vicinity of x-ray radiation sources.
NOTE: Pictures are for instruction only and are not necessarily identical to product.
d) The output side of the Mains On/Off faucet/valve must have a 3/4” male thread (see diagram on page 1). The faucet/valve should be situated in such a position that it can be easily turned off each day.
a) A corrosion resistant PVC drainpipe 38mm (1.5 in) diameter with a length of 56-61cm (22-24 inches).NOTE: The Drains Pipe should not rise higher than 102mm (4.0 in.) below the bottom of the machine (see page 1).
USA:A) Shelf dimensions 49.5cm (19.5 in.) by 51.6cm (20.3 in.).b) Shelf heigh “lower” 22.9cm (9in.) and “upper” 78.7cm (31in.).WORLDWIDE:a) Shelf dimensions 39.4cm (15.1in.) by 59.7cm (23.5in.).b) Shelf height “lower” 22.9cm (9in.) and “upper” 81.0cm (31.9in.)

INST
ALL
ATI
ON NOTE: For unpacking and lifting the machine into position it is important to have
assistance.
The machine comes in a single carton.
Check contents of the box, see page ii.
NOTE: Pictures are for instruction only and are not necessarily identical to product.
1. Lift the machine from the carton and position on counter top. Remove
outer and inner packaging, including carry-straps and tape securing
film-catcher. The transport modules are protected by internal packing
pieces: these must be discarded.
2. Connect the Water Waste hose to the back of the machine.
3. Cut hoses to allow 200-300mm (8-12 inches) to be inserted into the waste
outlet stand-pipe, ensuring no loops or kinks are left in them. Place hoses
in drain. They must not rise higher than the outlet on the back of the machine.
WARNING: Any rise in the height of these pipes above the level of the outlet on the
machine will cause incomplete drainage, and could cause the machine to flood.
Keep Dry This Side UpFragile
Pre-Installation Instructions (Cont.)
INST
ALL
ATI
ON
4 VELOPEX EXTRA-X User Guide
INST
ALL
ATI
ON
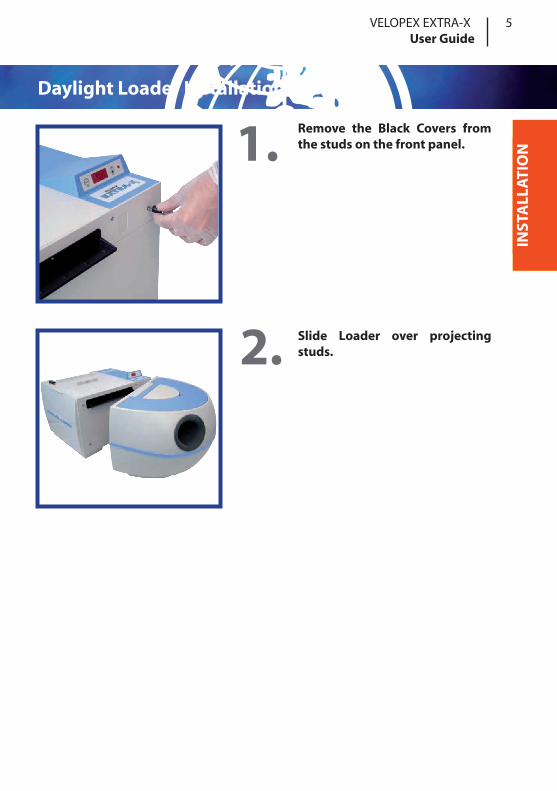
Daylight Loader Installation
INST
ALL
ATI
ON1.
2.
VELOPEX EXTRA-X 5 User Guide
Remove the Black Covers from the studs on the front panel.
Slide Loader over projecting studs.

INST
ALL
ATI
ON
Daylight Loader Installation (Cont.)
INST
ALL
ATI
ON 3.
4a.
4b.
6 VELOPEX EXTRA-X User Guide
Lift Lid.
Secure Loader with black knobs screwed onto Studs now positioned inside the Loader (as illustrated in 4b).
TIP: Black knobs are located inside the Loader.
INST
ALL
ATI
ON
INST
ALL
ATI
ON
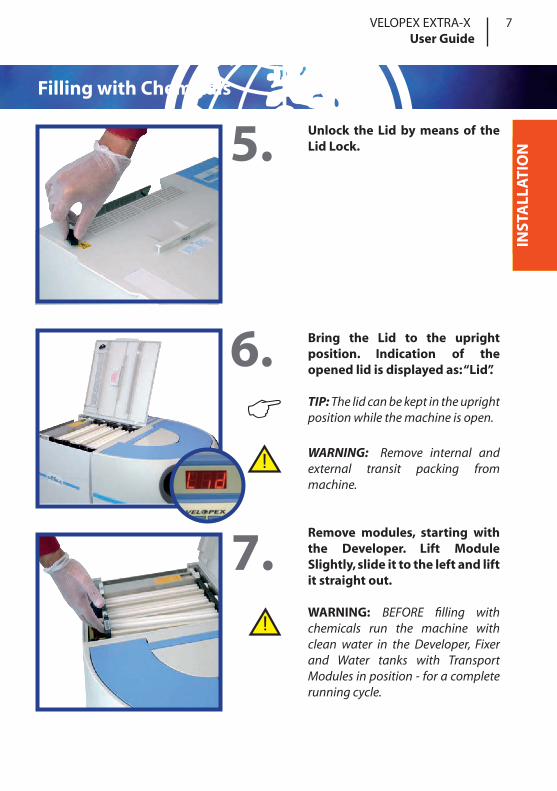
Filling with Chemicals
INST
ALL
ATI
ON5.
6.
7.
VELOPEX EXTRA-X 7 User Guide
Unlock the Lid by means of the Lid Lock.
Bring the Lid to the upright position. Indication of the opened lid is displayed as: “Lid”.
TIP: The lid can be kept in the upright position while the machine is open.
WARNING: Remove internal and external transit packing from machine.
Remove modules, starting with the Developer. Lift Module Slightly, slide it to the left and lift it straight out.
WARNING: BEFORE filling with chemicals run the machine with clean water in the Developer, Fixer and Water tanks with Transport Modules in position - for a complete running cycle.

INST
ALL
ATI
ON
Filling with Chemicals (Cont.)
INST
ALL
ATI
ON 8.
9.
10.
8 VELOPEX EXTRA-X User Guide
When Filling with “ready to use” chemicals, the solution level required is marked by the longer rib inside the tank.
TIP: Use VELOPEX chemicals designed for your unit. If unobtainable use ONLY a proprietary chemical available.When using “One Plus One” chemical, fill to lower rib in tank then top-up to the higher rib level with water. Always read and follow instructions on bottle.
WARNING: DO NOT use chemistry or film designed for manual processing.
Fill Fixer and Developer tanks in that order with their respective chemical solutions.
WARNING: Ensure machine is disconnected from mains power supply whilst filling.
Lower Transport Modules carefully into their respective tanks. Top up if required - should be one inch (2.5cm) below the top of the tank, level with Drain Tube overflow.
WARNING: Should there be any spillage of the Fixer into Developer tanks this MUST be wiped clean before filling with Developer.

INST
ALL
ATI
ON
(USA Re-Circulation Plumbing Layout with Re-Circulated Water Supply)
(USA Re-Circulation Plumbing Layout with Mains Water Supply)
Filling with Chemicals (Cont.)
INST
ALL
ATI
ON11.
VELOPEX EXTRA-X 9 User Guide
GENERAL PLUMBING LAYOUT OPTIONS
BACK OF MACHINE
DEVELOPER FIXER WATER
BACK OF MACHINE
DEVELOPER FIXER
FRESH MAINSWATER IN
WATER DRAIN
WATER OVERFLOW
INST
ALL
ATI
ON
BACK OF MACHINE
DEVELOPER FIXER
FRESH MAINSWATER IN
USED
WATER OUT
BACK OF MACHINE
DEVELOPER FIXER WATER
(USA Re-Circulation Plumbing Layout with Mains Water Supply)
(USA Re-Circulation Plumbing Layout with Re-Circulated Water Supply)
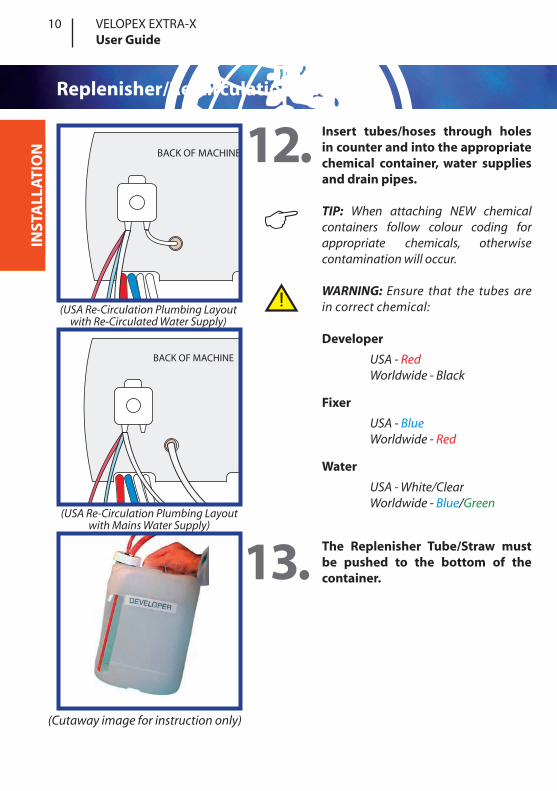
Replenisher/Re-circulation Pump
INST
ALL
ATI
ON 12.
13.
(Cutaway image for instruction only)
10 VELOPEX EXTRA-X User Guide
Insert tubes/hoses through holes in counter and into the appropriate chemical container, water supplies and drain pipes.
TIP: When attaching NEW chemical containers follow colour coding for appropriate chemicals, otherwise contamination will occur.
WARNING: Ensure that the tubes are in correct chemical:
Developer
Fixer
Water
The Replenisher Tube/Straw must be pushed to the bottom of the container.
USA - RedWorldwide - Black
USA - BlueWorldwide - Red
USA - White/ClearWorldwide - Blue/Green

INST
ALL
ATI
ON
Replenisher/Re-circulation Pump (Cont.)
INST
ALL
ATI
ON
VELOPEX EXTRA-X 11 User Guide
Each time the machine is initiated, a charge of chemical will be injected into the machine tank. The overflow will return to the same containers.
TIP: The machine can be linked up in a replenishment mode by diverting the waste chemicals into separate containers for both Developer and Fixer. This mode of replenishment is more costly to run than re-circulation.
For Water Re-Circulation remove tubes from packaging. Dip tube ends into a cup of boiling water for at least 30 seconds and swiftly sleeve onto the fittings. Screw the elbow connector onto the water inlet.
VERY IMPORTANT: Before draining chemicals replace with empty containers of at least 5 litres (1 gallon) capacity. Machine tanks may then be drained by unscrewing the drain tubes in each tank. When machine chemical tanks are completely empty, remove full waste containers, and replace with those appropriate for the system in use. Refill machine (follow sections 6-15).
14.
15.

OP
ERA
TIO
N
Operating the Processor
12 VELOPEX EXTRA-X User Guide
1. Turn on Water Supply (if not already on) or make sure water inlet hose is properly located in the appropiate water tank.
WARNING: Make sure all hoses are connected properly and drain pipes are in place.Always turn water supply off at night.
Plug in electric cord and switch on mains power supply. The machine will then run through a high speed cycle.
WARNING: Always turn mains switch off at night.
Incorrect temperature is indicated when the message on the LED display reads “tLO”. Ready to use is indicated by three horizontal central lines and cooling down is indicated in the lines descending from left to right.
TIP: The time taken to achieve the correct temperature depends on the room temperature (usually 10-20 min.).
2.
3.

Operating the Processor (cont.)
OP
ERA
TIO
N
Operating the Processor (Cont.)
OP
ERA
TIO
N
(Image for instruction ONLY, Lid is closed when operating machine)
VELOPEX EXTRA-X 13 User Guide
4. The Velopex is equipped with automatic stand-by mode. Touch the Film Entry Slot to initiate processing.
WARNING: Before placing in the machine, intra oral film packets should be wiped clean of all mouth contaminants.
Open Daylight Loader and place film inside, Close and lock Lid.
WARNING: Always remove old film wrappers from inside the loader.
Put hands through Loading Gloves and strip wrapping from film, insert film into Entry Slot. Touch the Film Entry Slot to initiate processing. A bleep will indicate film detected.
TIP: Intra oral film can be processed via the film guides across the width of the film entry slot for ease of patient identification.
5.
6.

Operating the Processor (Cont.)
OP
ERA
TIO
N
(Image for instruction only)
14 VELOPEX EXTRA-X User Guide
7. Extra Oral films - Ensure Loader Lid is closed before loading cassette or processing film.
WARNING: Extra Oral films areextremely light sensitive. When loading Extra-Oral film always have the viewer cover in place to avoid film fogging.
When the message on the LED display reads “E21” or “E22”, top up Chemicals (See Display error code list on page 21 and Installation sections 6-12). If a re-circulation pump is installed, chemical tanks will be full unless the reservoir containers are empty.
TIP: Before processing run through “clean-up film” or any spare extra oral film. This helps to clean the transport system.
WARNING: The same film may be used for this purpose for one week, after which discard the old film and use a fresh one.
Feed films squarely into the film entry slot. Touch the Film Entry Slot to initiate processing.
TIP: Use this opportunity to reload your cassette to minimise handling time.
WARNING: Do not remove hands from Daylight Loader until the film has completely entered the machine. Remember to replace lid on the film storage box before removing hands.
8.
9.

Operating the Processor (Cont.)
OP
ERA
TIO
N
VELOPEX EXTRA-X 15 User Guide
10. All films are collected in the Film Catcher at the rear of the machine.
TIP: You will find the small films collected in pockets, which are aligned with the entry slots on the front film entry guide. The larger films are collected by the film catcher.
WARNING: At the end of the day turn off water and main electric switch.
For quick viewing of intra oral X-Rays use the Endo Slide. To use: press the Endo Slide FULLY down, by pressing the latch and lowering the slide.
TIP: This procedure is only “Dry-to-Wet”, which means the film should be washed with water and hung up to dry when needed for archiving.
WARNING: The Endo Slide must be returned to the up position before further processing. If not, a jam will occur with extra-oral films.
11.
INTRA ORAL FILM ONLY

Operating the Processor (Cont.)
OP
ERA
TIO
N16 VELOPEX EXTRA-X User Guide
12. When using Endo facility, feed in Endo film through the Fourth slot from the right on the film loading guide.
TIP: When using a daylight loader it is easy to count the ribs on the entry slot and feel your way to the Fourth slot.
WARNING: Make sure the film is fed squarely, and the short edge is the leading edge.
Remove film from ENDO slot.
WARNING: Make sure the film does not fall back into the Velopex - remove it as soon as it emerges.
For Reference, the machine will display a countdown in seconds from the start to the end of the process. The first cycle after switching the machine on will be a fast Test Cycle. Every cycle thereafter will run for 350 seconds.
TIP: If the lid is opened during a cycle, closing it will initiate a “350 cycle”. This cycle tests the unit and clears any residue. It will not develop films.
13.
14.

(Use Turning Tool to Release Over-Tightened Drain Tubes)
MA
INTE
NA
NC
E
Velopex Processor Cleaning
MA
INTE
NA
NC
E
VELOPEX EXTRA-X 17 User Guide
1. It is suggested that the VISCHECK Quality Manager be used to ensure consistent quality X-Rays.
TIP: Regular use of this product will ensure that the quality of the film processing and reduce the risk of retakes. Vischeck will also tell you when to change the chemicals. Vischeck is available from your Velopex stockist.
Unlock the Lid (see section 6, page 4).
WARNING: Carry out the cleaning routine each chemical change or approx. once every four weeks, according to use.
Drain Tanks by unscrewing drain tubes (refer to image in next section). Remove Modules.
TIP: Tip the Module and lean it on the edge of the tank letting it drain before completely removing.
WARNING: The Modules are wet with chemicals; handle with care. May cause staining or corrosion of surfaces, skin and eye irritation. Wipe away and spillage immediately or flush with copious amounts of water.
2.
3.

MA
INTE
NA
NC
E
Velopex Processor Cleaning (Cont.)
(Worldwide drain tube)
(Images for instruction ONLY)
(Images for instruction ONLY)
18 VELOPEX EXTRA-X User Guide
4. Replace Drain Tubes. Hand screw the drain tubes in, do not over tighten them. Make sure the “O”-Ring is at the bottom of the pipe.
WARNING: Check that drain tubes are secure before refilling with Chemicals - FINGER TIGHT - Do Not Over Tighten.
Clean the Modules using the Velopex Cleaning Tablets: Drain Chemical and Water tanks. Re-fill with fresh cold water.
WARNING: Do not allow cleaning solution to drain into containers containing processing chemicals - FOLLOW INSTRUCTIONS SUPPLIED WITH CLEANING TABLETS.
Replace the modules in their tanks and run for one cycle. Drain tanks again, remove Modules and re-fill with fresh cold water.
WARNING: Always return a Module to the tank it was removed from e.g. Developer-to-Developer.
5.
6.

MA
INTE
NA
NC
E
Velopex Processor Cleaning (Cont.)
MA
INTE
NA
NC
E(Images for instruction ONLY)
VELOPEX EXTRA-X 19 User Guide
7. Add Velopex Cleaning Tablets three per tank. Replace Modules and run for two cycles at operating temperature.
WARNING: DO NOT FILL THE DRYER TANK WITH WATER!
Dryer Module Cleaning - Place Dryer Module in container or sink filled with fresh cold water. Add three Velopex Cleaning Tablets and soak for at least 10 minutes. Rinse thoroughly with water to remove all cleaning solution.
WARNING: Make sure you drip-dry the module before replacing in the dryer compartment.
Module cleaning - Immerse the Modules in a tank/sink filled with hot water and scrub with the supplied brush around the gears and rolled ends.
TIP: Use the turning tool; turn the gears and belts by hand to assist in thorough cleaning.
WARNING: DO NOT use boiling water; it will damage the modules. Use ONLY cold water when cleaning the machine tanks.
8.
9.

Velopex Processor Cleaning (Cont.)
MA
INTE
NA
NC
E20 VELOPEX EXTRA-X User Guide
10. Remove old film wrappers from daylight loader. Wipe clean the interior of loader.
TIP: The interior of the daylight loader should be cleaned with cold sterilising solution, wipe dry after appropriate period.
Fill up with Chemicals (See section 9, page 8). For best results, use VELOPEX chemicals.
TIP: Use the chart provided and keep a note of the date when chemicals were changed. Process a Vischeck strip to produce the master reference strip and place in position on the Quality chart (follow Vischeck instruction for use).
11.
(Images for instruction ONLY)

DisplayCharacters
Description Actions
E01 Cassette temperature sensor s/c Call for Service
E02 Cassette temperature sensor o/c Call for Service
E03 Dryer temperature sensor s/c Call for Service
E04Dryer temperature sensor o/c
or Connection to Main PCBCall for Service
E05 Fixer temperature sensor s/c Call for Service
E06 Fixer temperature sensor o/c Call for Service
E07 Developer temperature sensor s/c Call for Service
E08 Developer temperature sensor o/c Call for Service
E10 Fan motor running slow Call for Service
E11 Transport turns count not zero Call for Service
E12 Transport motor overloaded
1. Switch off the Machine.2. Clean the Gears on the Modules.3. Switch on the Machine.4. If still E12 - Call for Service
E13Transport motor not running
when required
1. Switch off the Machine2. Clean the gears on the Modules.3. Switch on the Machine.4. If still E13 - Call for Service
E14Excessive Fixer & Developer
temperatureCall for Service
E15 Dryer temperature too high Call for Service
E18 Dryer power duty cycle too low Call for Service
E21 Developer level low Re-fill with chemical
E22 Fixer level low Re-fill with chemical
E33 Watchdog relay test failure (Low) Call for Service
E34 Watchdog relay test failure (High) Call for Service
tLOEither Developer or Fixer tank
temperature is lowWait for the correct temperature
LId Lid switch open Close lid
TRO
UB
LE S
HO
OTI
NG
Display Error Codes
TRO
UB
LE S
HO
OTI
NG
VELOPEX EXTRA-X 21 User Guide

over
hea
tin
g
TRO
UB
LE S
HO
OTI
NG
Troubleshooting
22 VELOPEX EXTRA-X User Guide
Entr
y g
uid
e
Entr
y g
uid
e

Do
no
t re
mov
e yo
ur
han
ds
ou
t o
f th
e h
and
en
try
slee
ves
bef
ore
th
e fil
m h
asfe
d c
om
ple
tely
into
th
e m
ach
ine.
Fo
g a
t o
ne
end
on
ly o
f th
e fil
m in
dic
ates
pre
mat
ure
rem
oval
of h
and
s fr
om
day
ligh
t lo
ader
).
Troubleshooting (Cont.)
TRO
UB
LE S
HO
OTI
NG
VELOPEX EXTRA-X 23 User Guide

Troubleshooting (Cont.) Troubleshooting (Cont.)
TRO
UB
LE S
HO
OTI
NG
24 VELOPEX EXTRA-X User Guide

Troubleshooting (Cont.)
TRO
UB
LE S
HO
OTI
NG
Troubleshooting (Cont.)
TRO
UB
LE S
HO
OTI
NG
VELOPEX EXTRA-X 25 User Guide

Troubleshooting (Cont.)
Sho
uld
a t
ank
fail
to d
rain
do
wn
fully
wh
en t
he
dra
in t
ub
es a
re r
emov
ed, i
t w
illp
rob
ably
be
bec
ause
th
e w
aste
ou
tlet
pip
e is
no
t ly
ing
flat
bu
t ri
sin
g b
efo
reen
teri
ng
the
was
te p
ipe.
Th
e ta
nk
will
then
take
its
leve
l fro
m th
is p
oin
t. C
orr
ect
this
by
ensu
rin
g t
hat
all
was
te e
xit
pip
es d
o n
ot
rise
ab
ove
cou
nte
r to
ple
vel.
Ch
eck
for k
inks
in p
ipes
.
Troubleshooting (Cont.) Troubleshooting (Cont.)
TRO
UB
LE S
HO
OTI
NG
26 VELOPEX EXTRA-X User Guide

Machine Installation
Service Log
TRO
UB
LE S
HO
OTI
NG
VELOPEX EXTRA-X 27 User Guide

Hi-TechDiagnosticsServiceMAKERS OF DENTAL, VETERINARY AND MEDICAL EQUIPMENTwww.velopex.com
ETL LISTED/ENREGISTRÉ ETLCONFORMS TO/CONFORME À
UL 61010-1THIS PRODUCT HAS BEEN TESTED TO
THE REQUIREMENTS OF
CAN/CSA-C22.2 No. 61010-1 SECOND EDITION INCLUDING AMENDMENT 1 OR A LATER VERSION OF THE SAME STANDARD INCORPO-RATION THE SAME LEVEL OF TESTING
REQUIREMENTS. C No. 113778ETL Testing Laboratories
C US