user guide what you can do with this machine -...
TRANSCRIPT

Read this manual carefully before you use this machine and keep it handy for future reference. For safe and correct use, be sure to read the Safety Information in "Read This First" before using the machine.
For information not in this manual, refer to the HTML/PDF files on the supplied CD-ROM.
Appendix
Troubleshooting
Adding Paper and Toner
Web Image Monitor
Document Server
Scan
Fax
Copy
Getting Started
What You Can Do with This MachineUser Guide


TABLE OF CONTENTSHow to Read the Manuals.................................................................................................................................6
Symbols Used in the Manuals.......................................................................................................................6
Model-Specific Information...............................................................................................................................7
Names of Major Features..................................................................................................................................8
1. What You Can Do with This Machine
I Want to Save Paper.........................................................................................................................................9
I Want to Convert Documents to Electronic Formats Easily..........................................................................10
I Want to Register Destinations.......................................................................................................................11
I Want to Operate the Machine More Effectively.........................................................................................12
You Can Customize the [Home] Screen as You Like.....................................................................................13
You Can Make Copies Using Various Functions...........................................................................................14
You Can Print Data Using Various Functions.................................................................................................15
You Can Utilize Stored Documents.................................................................................................................16
You Can Send and Receive Faxes without Paper.........................................................................................17
You Can Send and Receive Faxes Using the Internet...................................................................................19
You Can Use the Facsimile and the Scanner in a Network Environment....................................................21
You Can Prevent Information Leakage (Security Functions).........................................................................22
You Can Monitor and Set the Machine Using a Computer.........................................................................23
You Can Prevent an Unauthorized Copy.......................................................................................................24
2. Getting Started
Guide to Names and Functions of Components............................................................................................25
Guide to Components (mainly Europe).................................................................................25
Guide to Components (mainly Asia)......................................................................................27
Guide to Components (mainly North America)....................................................................30
Guide to Functions of the Machine's Options................................................................................................33
Guide to Functions of the Machine's External Options (mainly Europe)............................33
Guide to Functions of the Machine's External Options (mainly Asia).................................34
Guide to Functions of the Machine's External Options (mainly North America)................34
Guide to the Names and Functions of the Machine's Control Panel...........................................................36
How to Use the [Home] Screen......................................................................................................................39
Adding Icons to the [Home] Screen...........................................................................................................40
Registering Functions in a Program.................................................................................................................45
Example of Programs...................................................................................................................................47
1

Turning On/Off the Power..............................................................................................................................49
Turning On the Main Power........................................................................................................................49
Turning Off the Main Power........................................................................................................................49
When the Authentication Screen is Displayed...............................................................................................51
User Code Authentication Using the Control Panel..................................................................................51
Logging In Using the Control Panel............................................................................................................51
Logging Out Using the Control Panel.........................................................................................................52
Placing Originals..............................................................................................................................................53
Placing Originals on the Exposure Glass (mainly Europe)..................................................53
Placing Originals on the Exposure Glass (mainly Asia).......................................................53
Placing Originals on the Exposure Glass (mainly North America)......................................54
Placing Originals in the Auto Document Feeder.......................................................................................55
3. Copy
Basic Procedure................................................................................................................................................57
Auto Reduce/Enlarge......................................................................................................................................59
Duplex Copying...............................................................................................................................................61
Specifying the Original and Copy Orientation.........................................................................................63
Combined Copying.........................................................................................................................................64
One-Sided Combine...................................................................................................................................65
Two-Sided Combine....................................................................................................................................66
Copying onto Custom Size Paper from the Bypass Tray..............................................................................69
Copying onto Envelopes.................................................................................................................................70
Sort....................................................................................................................................................................72
Changing the Number of Sets....................................................................................................................72
Storing Data in the Document Server.............................................................................................................74
4. Fax
Basic Procedure for Transmissions (Memory Transmission)..........................................................................75
Sending Originals Using the Exposure Glass (Memory Transmission)...................................................76
Registering a Fax Destination......................................................................................................................77
Deleting a Fax Destination..........................................................................................................................78
Transmitting while Checking Connection to Destination (Immediate Transmission)...................................80
Sending Originals Using the Exposure Glass (Immediate Transmission)................................................81
Canceling a Transmission................................................................................................................................82
2

Canceling a Transmission Before the Original Is Scanned......................................................................82
Canceling a Transmission While the Original Is Being Scanned.............................................................82
Canceling a Transmission After the Original Is Scanned (While a Transmission Is in Progress)...........83
Canceling a Transmission After the Original Is Scanned (Before a Transmission Is Started)................83
Sending at a Specific Time (Send Later)........................................................................................................85
Storing a Document.........................................................................................................................................86
Sending Stored Documents.........................................................................................................................87
Printing the Journal Manually..........................................................................................................................89
5. Print
Quick Install......................................................................................................................................................91
Displaying the Printer Driver Properties..........................................................................................................92
Standard Printing..............................................................................................................................................93
When Using the PCL 6 Printer Driver..........................................................................................................93
Locked Print.......................................................................................................................................................94
Sending a Locked Print File.........................................................................................................................94
Printing a Locked Print File Using the Control Panel..................................................................................94
Hold Print..........................................................................................................................................................96
Sending a Hold Print File.............................................................................................................................96
Printing a Hold Print File Using the Control Panel.....................................................................................96
Stored Print........................................................................................................................................................98
Sending a Stored Print File..........................................................................................................................98
Printing a Stored Print File Using the Control Panel...................................................................................99
6. Scan
Basic Procedure When Using Scan to Folder.............................................................................................101
Creating a Shared Folder on a Computer Running Windows/Confirming a Computer's Information.........................................................................................................................................................................102
Registering an SMB Folder.......................................................................................................................104
Deleting an SMB Registered Folder.........................................................................................................107
Entering the Path to the Destination Manually........................................................................................107
Basic Procedure for Sending Scan Files by E-mail......................................................................................109
Registering an E-mail Destination.............................................................................................................110
Deleting an E-mail Destination.................................................................................................................111
Entering an E-mail Address Manually.....................................................................................................112
3

Basic Procedure for Storing Scan Files........................................................................................................113
Checking a Stored File Selected from the List.........................................................................................114
Specifying the File Type................................................................................................................................115
Specifying Send Settings...............................................................................................................................116
7. Document Server
Storing Data...................................................................................................................................................117
Printing Stored Documents............................................................................................................................119
8. Web Image Monitor
Displaying Top Page.....................................................................................................................................121
Viewing Received Fax Documents Using Web Image Monitor.................................................................123
9. Adding Paper and Toner
Loading Paper into Paper Trays...................................................................................................................125
Loading Paper into the Bypass Tray.............................................................................................................127
Settings to Use the Bypass Tray under the Printer Function....................................................................128
Loading Orientation-Fixed Paper or Two-Sided Paper..............................................................................132
Recommended Paper Sizes and Types........................................................................................................135
Thick Paper.................................................................................................................................................139
Envelopes...................................................................................................................................................140
Adding Toner.................................................................................................................................................143
Sending Faxes or Scanned Documents When Toner Has Run Out......................................................144
Disposing of Used Toner...........................................................................................................................145
10. Troubleshooting
Indicators........................................................................................................................................................147
When an Indicator for the [Check Status] Key Is Lit....................................................................................148
Panel Tone......................................................................................................................................................150
When You Have Problems Operating the Machine...................................................................................151
When Messages Are Displayed on the Control Panel...............................................................................157
Messages Displayed When Using the Copy/Document Server Function...........................................157
Messages Displayed When Using the Facsimile Function.....................................................................159
Messages Displayed When Using the Printer Function..........................................................................172
Messages Displayed When Using the Scanner Function......................................................................186
When Messages Are Displayed on Your Computer Screen.....................................................................201
Messages Displayed When Using the Scanner Function......................................................................201
4

11. Appendix
Trademarks.....................................................................................................................................................207
INDEX...........................................................................................................................................................209
5

How to Read the Manuals
Symbols Used in the Manuals
This manual uses the following symbols:
Indicates points to pay attention to when using the machine, and explanations of likely causes of papermisfeeds, damage to originals, or loss of data. Be sure to read these explanations.
Indicates supplementary explanations of the machine's functions, and instructions on resolving usererrors.
This symbol is located at the end of sections. It indicates where you can find further relevant information.
[ ]Indicates the names of keys on the machine's display or control panels.
Indicates instructions stored in a file on a provided CD-ROM.
(mainly Europe and Asia), (mainly Europe), or (mainly Asia)
(mainly North America)
Differences in the functions of Region A and Region B models are indicated by two symbols. Read theinformation indicated by the symbol that corresponds to the region of the model you are using. Fordetails about which symbol corresponds to the model you are using, see p.7 "Model-SpecificInformation".
6

Model-Specific InformationThis section explains how you can identify the region your machine belongs to.
There is a label on the rear of the machine, located in the position shown below. The label containsdetails that identify the region your machine belongs to. Read the label.
CMR641
The following information is region-specific. Read the information under the symbol that corresponds tothe region of your machine.
(mainly Europe and Asia)
If the label contains the following, your machine is a region A model:
• CODE XXXX -27, -29
• 220–240 V
(mainly North America)
If the label contains the following, your machine is a region B model:
• CODE XXXX -17
• 120–127 V
• Dimensions in this manual are given in two units of measure: metric and inch. If your machine is aRegion A model, refer to the metric units. If your machine is a Region B model, refer to the inchunits.
• If your machine is a region A model and "CODE XXXX -27" is printed on the label, see" (mainly Europe)".
• If your machine is a region A model and "CODE XXXX -29" is printed on the label, see" (mainly Asia)".
7

Names of Major FeaturesIn this manual, major features of the machine are referred to as follows:
• Auto Document Feeder ADF
8

1. What You Can Do with This MachineYou can search for a description by what you want to do.
I Want to Save Paper
BRL059S
Printing multi-page documents on both sides of sheets (Duplex Copy)
See "Duplex Copying", Copy/ Document Server .
Printing multi-page documents and received faxes on a single sheet (Combine (Copier/Fax))
See "Combined Copying", Copy/ Document Server .
See "Combine Two Originals", Fax .
Printing received faxes on both sides of sheets (2 Sided Print)
See "Two-Sided Printing", Fax .
Converting received faxes to electronic formats (Paperless Fax)
See "Confirming/Printing/Deleting Received and Stored Documents", Fax .
Sending files from the computer without printing them (LAN-Fax)
See "Sending Fax Documents from Computers", Fax .
Checking how much paper is saved ([Information] screen)
See "How to Use the [Information] Screen", Getting Started .
9

I Want to Convert Documents to ElectronicFormats Easily
BQX138S
Sending scan files
See "Basic Procedure for Sending Scan Files by E-mail", Scan .
Sending the URL of the folder in which scan files are stored
See "Sending the URL by E-mail", Scan .
Storing scan files in a shared folder
See "Basic Procedure When Using Scan to Folder", Scan .
Storing scan files on media
See "Basic Procedure for Saving Scan Files on a Removable Memory Device", Scan .
Converting transmitted faxes to electronic formats and sending them to a computer
See "Overview of Folder Transmission Function", Fax .
Managing and using documents converted to electronic formats (Document Server)
See "Relationship between Document Server and Other Functions", Copy/ Document Server .
1. What You Can Do with This Machine
10

I Want to Register Destinations
BRL060S
Using the control panel to register destinations in the Address Book
See "Registering Entered Destinations to the Address Book", Fax .
See "Registering a destination in the address book manually", Scan .
Using Web Image Monitor to register destinations from a computer
See "Registering Internet Fax Destination Information Using Web Image Monitor", Fax .
Downloading destinations registered in the machine to the LAN-Fax driver destination list
See "Using the machine's Address Book as the LAN-Fax destination list", Fax .
I Want to Register Destinations
11

I Want to Operate the Machine MoreEffectively
BQX139S
Registering and using frequently-used settings (Program)
See "Registering Functions in a Program", Convenient Functions .
Registering frequently-used settings as initial settings (Program as Defaults (Copier/DocumentServer/Fax/Scanner))
See "Changing the Default Functions of the Initial Screen", Convenient Functions .
Registering frequently-used printing settings to the printer driver
See "Using One Click Presets", Print .
Changing the initial settings of the printer driver to frequently-used printing settings
See "Displaying the Printing Preferences Dialog Box", Print .
Adding shortcuts to frequently used programs or Web pages
See "Adding Icons to the [Home] Screen", Convenient Functions .
Changing the order of the function and shortcut icons
See "Changing the Order of Icons on the [Home] Screen", Convenient Functions .
1. What You Can Do with This Machine
12

You Can Customize the [Home] Screen as YouLikeThe icons of each function are displayed on the [Home] screen.
CMQ001
• You can add shortcuts to often used programs or Web pages to the [Home] screen. The programsor Web pages can be recalled easily by pressing the shortcut icons.
• You can display only the icons of functions and shortcuts that you use.
• You can change the order of the function and shortcut icons.
• For details about the features on the [Home] screen, see "How to Use the [Home] Screen", GettingStarted .
You Can Customize the [Home] Screen as You Like
13

You Can Make Copies Using Various Functions
CMQ002
• You can make copies in full color. You can switch the color copy mode depending on the type oforiginals used and the desired finish.
• You can adjust the color tones and image quality of your copies.
• You can reduce or enlarge the copy image. With the Auto Reduce/Enlarge function, the machineautomatically calculates the reproduction ratio based on the sizes of the originals and the paperyou have specified.
• Copier functions such as Duplex and Combine allow you to save on paper by copying multiplepages onto single sheets.
• You can copy onto various types of paper such as envelopes and OHP transparencies.
• You can sort copies.
• See Copy/ Document Server .
1. What You Can Do with This Machine
14

You Can Print Data Using Various Functions
CMQ003
• This machine supports network and local connections.
• You can send PDF files directly to the machine for printing, without having to open a PDFapplication.
• You can print or delete print jobs stored on the machine's hard disk, which have been previouslysent from computers using the printer driver. The following types of print jobs can be selected:Sample Print, Locked Print, Hold Print, and Stored Print.
• You can collate printed paper.
• If the PictBridge card is installed, you can connect a PictBridge-compatible digital camera to thismachine using a USB cable. This allows you to print the photographs stored on the camera usingthe camera's own interface.
• You can print files stored on a removable memory device and specify print conditions such as printquality and print size.
• See Print .
You Can Print Data Using Various Functions
15

You Can Utilize Stored DocumentsYou can store files scanned in copier, facsimile, printer, or scanner mode on the machine's hard disk.With Web Image Monitor, you can use your computer to search for, view, print, delete, and sendstored files via the network. You can also change print settings and print multiple documents (DocumentServer).
CJQ603
• You can retrieve stored documents scanned in scanner mode to your computer.
• Using the file format converter, you can download documents stored in copier, Document Server,or printer mode to your computer.
• For details about the Document Server in copier mode and how to use the Document Server, see"Storing Data in the Document Server" and "Document Server", Copy/ Document Server .
• For details about the Document Server in printer mode, see "Saving and Printing Using theDocument Server", Print .
• For details about the Document Server in fax mode, see "Storing a Document", Fax .
• For details about the Document Server in scanner mode, see "Storing and Saving the ScannedDocuments", Scan .
1. What You Can Do with This Machine
16

You Can Send and Receive Faxes withoutPaperReception
You can store and save received fax documents as electronic formats in the machine's hard diskwithout printing them.
CJQ604
You can use Web Image Monitor to check, print, delete, retrieve, or download documents usingyour computer (Storing received documents).
• See "Confirming/Printing/Deleting Received and Stored Documents", Fax .
Transmission
You can send a fax from your computer over the network (Ethernet or wireless LAN) to thismachine, which then forwards the fax via its telephone connection (LAN-Fax).
You Can Send and Receive Faxes without Paper
17

CJQ605
• To send a fax, print from the Windows application you are working with, select LAN-Fax asthe printer, and then specify the destination.
• You can also check the sent image data.
• For details about the machine's settings, see "Network Settings Requirements", Connecting theMachine/ System Settings .
• For details about how to use the function, see "Fax via Computer", Fax .
1. What You Can Do with This Machine
18

You Can Send and Receive Faxes Using theInternet
[email protected]@xxx.com
xxx.xxx.xxx.xxx
[email protected]@xxx.com
xxx.xxx.xxx.xxx
CJQ606
E-mail Transmission and Reception
This machine converts scanned document images to e-mail format, and transmits and receives thisdata over the Internet.
• To send a document, specify an e-mail address instead of dialing the destination telephonenumber (Internet Fax and e-mail transmission).
• This machine can receive e-mail messages via Internet Fax or from computers (Internet FaxReception and Mail to Print).
• Internet Fax compatible machines and computers that have e-mail addresses can receive e-mail messages via Internet Fax.
IP-Fax
The IP-Fax function sends or receives documents between two facsimiles directly via a TCP/IPnetwork.
• To send a document, specify an IP address or host name instead of a fax number (IP-FaxTransmission).
• This machine can receive documents sent via Internet Fax (IP-Fax Reception).
• Using a VoIP gateway, this machine can send to G3 facsimiles connected to the publicswitched telephone network (PSTN).
• For details about settings, see "Network Settings Requirements", Connecting the Machine/ SystemSettings .
You Can Send and Receive Faxes Using the Internet
19

• For details about how to transmit and receive documents over the Internet, see "Transmission" and"Reception", Fax .
1. What You Can Do with This Machine
20

You Can Use the Facsimile and the Scanner ina Network Environment
CJQ607
• You can send scan files to a specified destination using e-mail (Sending scan files by e-mail).
• You can send scan files directly to folders (Sending scan files by Scan to Folder).
• You can use this machine as a delivery scanner for the ScanRouter delivery software*1 (Networkdelivery scanner). You can save scan files in the delivery server or send them to a folder in acomputer on the same network.
• You can use Web Services on Devices (WSD) to send scan files to a client computer.
*1 The ScanRouter delivery software is no longer available for sale.
• See Fax , Scan , or Connecting the Machine/ System Settings .
You Can Use the Facsimile and the Scanner in a Network Environment
21

You Can Prevent Information Leakage(Security Functions)
CJQ608
• You can protect documents from unauthorized access and stop them from being copied withoutpermission.
• You can control the use of the machine, as well as prevent machine settings from being changedwithout authorization.
• By setting passwords, you can prevent unauthorized access via the network.
• You can erase or encrypt the data on the hard disk to prevent the information from leaking out.
• You can limit the volume of the usage of the machine for each user.
• See Security Guide .
1. What You Can Do with This Machine
22

You Can Monitor and Set the Machine Using aComputerUsing Web Image Monitor, you can check the machine's status and change the settings.
CJQ609
You can check which tray is running out of paper, register information in the Address Book, specify thenetwork settings, configure and change the system settings, manage jobs, print the job history, andconfigure the authentication settings.
• See Connecting the Machine/ System Settings or Web Image Monitor Help.
You Can Monitor and Set the Machine Using a Computer
23

You Can Prevent an Unauthorized CopyYou can print embedded pattern on paper to prevent them from being copied.
CJQ613
• Using the printer driver, you can embed a pattern in the printed document. If the document iscopied on a machine with the Copy Data Security unit, protected pages are grayed out in thecopy, preventing confidential information from being copied. Protected fax messages are grayedout before being transmitted or stored. If a document protected by unauthorized copy guard iscopied on a machine that is equipped with the Copy Data Security unit, the machine beeps tonotify users that unauthorized copying is being attempted.
If the document is copied on a machine without the Copy Data Security Unit, the hidden textbecomes conspicuous in the copy, showing that the copy is unauthorized.
• Using the printer driver, you can embed text in the printed document for unauthorized copyprevention. If the document is copied, scanned, or stored in a Document Server by a copier ormultifunction printer, the embedded text appears conspicuous in the copy, discouraging suchunauthorized copying.
• For details, see the printer driver Help, Print , and Security Guide .
1. What You Can Do with This Machine
24

2. Getting StartedThis chapter describes how to start using this machine.
Guide to Names and Functions of Components
Guide to Components (mainly Europe)
• Do not obstruct the ventilation holes by placing objects near them or leaning things against them. Ifthe machine overheats, a fault might occur.
Front and right view
CMR601
17
8
11
9
10
12
2
3
4
5
6
13
1. Exposure glass cover or ADF
(The illustration shows the ADF.)
Lower the exposure glass cover or the ADF over originals placed on the exposure glass.
If you load a stack of originals in the ADF, the ADF will automatically feed the originals one by one.
2. Exposure glass
Place originals face down here.
3. Control panel
See p.36 "Guide to the Names and Functions of the Machine's Control Panel".
4. Front cover
Open to access the inside of the machine.
25

5. Paper tray
Load paper here.
6. Paper tray unit (Tray 2 and Tray 3)
Load paper here.
7. Ventilation holes
Prevent overheating.
8. Main power switch
To operate the machine, the main power switch must be on. If it is off, turn the switch on.
9. Bypass tray
Use to copy or print on OHP transparencies and label paper (adhesive labels).
10. Extender
Pull this extender out when loading A4 , 81/2 × 11 or larger size paper in the bypass tray.
11. Paper guides
When loading paper in the bypass tray, align the paper guides flush against the paper.
12. Lower right cover
Open this cover when a paper jam occurs.
13. Right cover
Open this cover to remove jammed paper fed from the paper tray.
Front and left view
CMR602
1
23
1. Internal tray guide
Open out and raise the end fence to support large paper.
2. Extenders
Raise these extenders to support large paper.
2. Getting Started
26

3. Internal tray
Copied/printed paper and fax messages are delivered here.
Rear and left view
CMR634
1
1. Ventilation holes
Prevent overheating.
Guide to Components (mainly Asia)
• Do not obstruct the ventilation holes by placing objects near them or leaning things against them. Ifthe machine overheats, a fault might occur.
Front and right view
CMR601
17
8
11
9
10
12
2
3
4
5
6
13
Guide to Names and Functions of Components
27

1. ADF
Lower the ADF over originals placed on the exposure glass.
If you load a stack of originals in the ADF, the ADF will automatically feed the originals one by one.
2. Exposure glass
Place originals face down here.
3. Control panel
See p.36 "Guide to the Names and Functions of the Machine's Control Panel".
4. Front cover
Open to access the inside of the machine.
5. Paper tray
Load paper here.
6. Paper tray unit (Tray 2 and Tray 3)
Load paper here.
7. Ventilation holes
Prevent overheating.
8. Main power switch
To operate the machine, the main power switch must be on. If it is off, turn the switch on.
9. Bypass tray
Use to copy or print on OHP transparencies and label paper (adhesive labels).
10. Extender
Pull this extender out when loading A4 , 81/2 × 11 or larger size paper in the bypass tray.
11. Paper guides
When loading paper in the bypass tray, align the paper guides flush against the paper.
12. Lower right cover
Open this cover when a paper jam occurs.
13. Right cover
Open this cover to remove jammed paper fed from the paper tray.
2. Getting Started
28

Front and left view
CMR602
1
23
1. Internal tray guide
Open out and raise the end fence to support large paper.
2. Extenders
Raise these extenders to support large paper.
3. Internal tray
Copied/printed paper and fax messages are delivered here.
Rear and left view
CMR634
1
1. Ventilation holes
Prevent overheating.
Guide to Names and Functions of Components
29

Guide to Components (mainly North America)
• Do not obstruct the ventilation holes by placing objects near them or leaning things against them. Ifthe machine overheats, a fault might occur.
Front and right view
CMR601
17
8
11
9
10
12
2
3
4
5
6
13
1. ADF
Lower the ADF over originals placed on the exposure glass.
If you load a stack of originals in the ADF, the ADF will automatically feed the originals one by one.
2. Exposure glass
Place originals face down here.
3. Control panel
See p.36 "Guide to the Names and Functions of the Machine's Control Panel".
4. Front cover
Open to access the inside of the machine.
5. Paper tray
Load paper here.
6. Paper tray unit (Tray 2 and Tray 3)
Load paper here.
7. Ventilation holes
Prevent overheating.
8. Main power switch
To operate the machine, the main power switch must be on. If it is off, turn the switch on.
2. Getting Started
30

9. Bypass tray
Use to copy or print on OHP transparencies and label paper (adhesive labels).
10. Extender
Pull this extender out when loading A4 , 81/2 × 11 or larger size paper in the bypass tray.
11. Paper guides
When loading paper in the bypass tray, align the paper guides flush against the paper.
12. Lower right cover
Open this cover when a paper jam occurs.
13. Right cover
Open this cover to remove jammed paper fed from the paper tray.
Front and left view
CMR602
1
23
1. Internal tray guide
Open out and raise the end fence to support large paper.
2. Extenders
Raise these extenders to support large paper.
3. Internal tray
Copied/printed paper and fax messages are delivered here.
Guide to Names and Functions of Components
31

Rear and left view
CMR634
1
1. Ventilation holes
Prevent overheating.
2. Getting Started
32

Guide to Functions of the Machine's Options
Guide to Functions of the Machine's External Options (mainlyEurope)
CMR603
1 2
4
3
1. Exposure glass cover
Lower this cover over originals.
2. ADF
Load a stack of originals here. They will feed in automatically.
3. Internal tray 2
If you select this as the output tray, copied/printed paper or fax messages are delivered here face down.
4. Paper tray unit (Tray 2 and Tray 3)
Holds up to 500 sheets of paper. Up to two trays can be stacked.
Guide to Functions of the Machine's Options
33

Guide to Functions of the Machine's External Options (mainly Asia)
CMR604
2
1
1. Internal tray 2
If you select this as the output tray, copied/printed paper or fax messages are delivered here face down.
2. Paper tray unit (Tray 2 and Tray 3)
Holds up to 500 sheets of paper. Up to two trays can be stacked.
Guide to Functions of the Machine's External Options (mainly NorthAmerica)
CMR604
3
1 2
1. Internal tray 2
If you select this as the output tray, copied/printed paper or fax messages are delivered here face down.
2. Handset
Used as a receiver when a fax unit is installed.
Allows you to use the On Hook Dial and Manual Dial functions. It also allows you to use the machine as atelephone.
2. Getting Started
34

3. Paper tray unit (Tray 2 and Tray 3)
Holds up to 500 sheets of paper.
Guide to Functions of the Machine's Options
35

Guide to the Names and Functions of theMachine's Control PanelThis illustration shows the control panel of the machine with options fully installed.
CMR606
1 4 5 632
7
8
9
10
11121314151718 16
1920
1. [Home] key
Press to display the [Home] screen. For details, see p.39 "How to Use the [Home] Screen".
2. Function keys
No functions are registered to the function keys as a factory default. You can register often used functions,programs, and Web pages. For details, see "Configuring function keys", Getting Started .
3. Display panel
Displays keys for each function, operation status, or messages. See "How to Use the Screens on the ControlPanel", Getting Started .
4. [Reset] key
Press to clear the current settings.
5. [Program] key (copier, Document Server, facsimile, and scanner mode)
• Press to register frequently used settings, or to recall registered settings.
2. Getting Started
36

See "Registering Frequently Used Functions", Convenient Functions .
• Press to program defaults for the initial display when modes are cleared or reset, or immediately afterthe main power switch is turned on.
See "Changing the Default Functions of the Initial Screen", Convenient Functions .
6. Main power indicator
The main power indicator goes on when you turn on the main power switch.
7. [Energy Saver] key
Press to switch to and from Sleep mode. See "Saving Energy", Getting Started . When the machine is inSleep mode, the [Energy Saver] key flashes slowly.
8. [Login/Logout] key
Press to log in or log out.
9. [User Tools/Counter] key
• User Tools
Press to change the default settings to meet your requirements. See "Accessing User Tools", Connectingthe Machine/ System Settings .
• Counter
Press to check or print the counter value. See "Counter", Maintenance and Specifications .
You can find out where to order expendable supplies and where to call when a malfunction occurs. You canalso print these details. See "Checking Enquiry Using the User Tools", Maintenance and Specifications .
10. [Simple Screen] key
Press to switch to the simple screen. See "Switching Screen Patterns", Getting Started .
11. [ ] key (Enter key)
Press to confirm values entered or items specified.
12. [Start] key
Press to start copying, printing, scanning, or sending.
13. [Clear] key
Press to delete a number entered.
14. [Stop] key
Press to stop a job in progress, such as copying, scanning, faxing, or printing.
15. Number keys
Use to enter the numbers for copies, fax numbers and data for the selected function.
16. Communicating indicator, Fax Received indicator, Confidential File indicator
• Communicating indicator
Lights continuously during data transmission and reception.
• Fax Received indicator
Lights continuously while data other than personal box or Memory Lock file is being received and storedin the fax memory.
See "Substitute Reception", Fax .
Guide to the Names and Functions of the Machine's Control Panel
37

• Confidential File indicator
Lights continuously while personal box data is being received.
Blinks while Memory Lock file is being received.
See "Personal Boxes" and "Printing a File Received with Memory Lock", Fax .
17. [Check Status] key
Press to check the machine's system status, operational status of each function, and current jobs. You can alsodisplay the job history and the machine's maintenance information.
18. Data In indicator (facsimile and printer mode)
Flashes when the machine is receiving print jobs or LAN-Fax documents from a computer. See Fax andPrint .
19. Media access lamp
Lights up when a removable memory device is inserted in the media slot or accessed.
20. Media slots
Use to insert an SD card or a USB memory.
2. Getting Started
38

How to Use the [Home] ScreenThe icons of each function are displayed on the [Home] screen.
You can add shortcuts to frequently used programs or Web pages to the [Home] screen. The icons ofadded shortcuts appear on the [Home] screen. The programs or Web pages can be recalled easily bypressing the shortcut icons.
To display the [Home] screen, press the [Home] key.
CMR615
9
5
6
8
1
2
4
3
7
1. [Copier]
Press to make copies.
For details about how to use the copy function, see Copy/ Document Server .
2. [Printer]
Press to make settings for using the machine as a printer.
For details about how to make settings for the printer function, see Print .
3. [Document Server]
Press to store or print documents on the machine's hard disk.
For details about how to use the Document Server function, see Copy/ Document Server .
4. Shortcut icon
You can add shortcuts to programs or Web pages to the [Home] screen. For details about how to registershortcuts, see p.40 "Adding Icons to the [Home] Screen". The program number appears on the lower left ofthe shortcut icon.
How to Use the [Home] Screen
39

5. Home screen image
You can display an image on the [Home] screen, such as a corporate logo. To change the image, see"Displaying the Image on the [Home] Screen", Convenient Functions .
6. [Scanner]
Press to scan originals and save images as files.
For details about how to use the scanner function, see Scan .
7. [Facsimile]
Press to send or receive faxes.
For details about how to use the fax function, see Fax .
8. [Browser]
Press to display Web pages.
For details about how to use the browser function, see Convenient Functions .
9. /
Press to switch pages when the icons are not displayed on one page.
Adding Icons to the [Home] Screen
You can add shortcuts to programs stored in copier, facsimile, or scanner mode, or Web pagesregistered in Favorites using the browser function.
You can also review icons of functions and embedded software applications that you deleted from the[Home] screen.
• Shortcuts to programs stored in Document Server mode cannot be registered to the [Home] screen.
• Shortcut names of up to 32 characters can be displayed in a standard screen. If the name of theshortcut is longer than 32 characters, the 32nd character is replaced with "...". Only 30 characterscan be displayed in a simple screen. If the name of the shortcut is longer than 30 characters, the30th character is replaced with "...".
• For details about how to make a program, see p.45 "Registering Functions in a Program".
• For details about the procedure for registering Web pages to Favorites, see "Specifying theSettings for Favorites", Convenient Functions .
• Shortcuts to Web pages that are registered to Favorites by User cannot be registered to the [Home]screen. To register the shortcuts, register Web pages to Common Favorites. For details about kindsof Favorites, see "Specifying the Settings for Favorites", Convenient Functions .
• For details about the procedure for registering a shortcut using the [Program] screen, see"Registering a Shortcut to a Program to the [Home] Screen", Convenient Functions .
• You can register up to 72 function and shortcut icons. Delete unused icons if the limit is reached. Fordetails see "Deleting an Icon on the [Home] Screen", Convenient Functions .
2. Getting Started
40

• You can change the position of icons. For details, see "Changing the Order of Icons on the [Home]Screen", Convenient Functions .
Adding icons to the [Home] screen using Web Image Monitor
1. Start Web Image Monitor.
For details, see "Using Web Image Monitor", Connecting the Machine/ System Settings .
2. Log in to Web Image Monitor as an administrator.
For details, see Security Guide .
3. Point to [Device Management], and then click [Device Home Management].
4. Click [Edit Icons].
5. Point to [ Icon can be added.] of the position that you want to add, and then click [Add].
6. Select the function or shortcut icon you want to add.
7. Click [OK] four times.
Adding icons to the [Home] screen using the User Tools
In the following procedure, a shortcut to a copier program is registered to the [Home] screen.
1. Register a program.
2. Press the [User Tools/Counter] key.
CMR633
How to Use the [Home] Screen
41

3. Press [Edit Home].
4. Press [Add Icon].
5. Press [Select Icon to Add].
6. Press [Program].
2. Getting Started
42
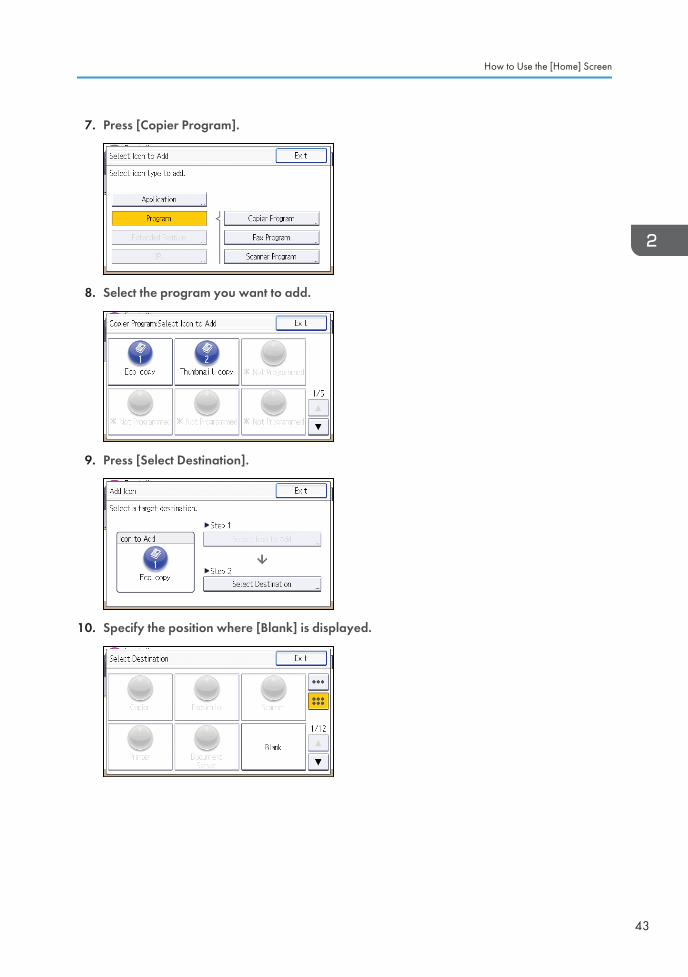
7. Press [Copier Program].
8. Select the program you want to add.
9. Press [Select Destination].
10. Specify the position where [Blank] is displayed.
How to Use the [Home] Screen
43

11. Press [Exit].
12. Press the [User Tools/Counter] key.
• Press [ ] on the upper-right corner of the [Select Destination] screen to check the position on thesimple screen.
2. Getting Started
44

Registering Functions in a ProgramDepending on the functions, the number of programs that can be registered is different.
• Copier: 25 programs
• Document Server: 25 programs
• Facsimile: 100 programs
• Scanner: 25 programs
The following settings can be registered to programs:
Copier:
Color mode, paper tray, Orig. (Settings for Originals), Auto Reduce/Enlarge, Red./Enlg.(Reduce/Enlarge), Other Func. (Other functions), number of copies
Document Server (on the initial document print screen):
2 Sided: Top to Top, 2 Sided: Top to Bottom, Sort, Other Func. (Other functions), number of prints
Facsimile:
Transmission type, memory transmission/immediate transmission, Select Destination from AddressBook (except for folder destinations), Manual Entry, TX Status Report, Send Settings (except forSubject and Sender Name)
Scanner:
Original, Send Settings (except for File Name, Security Settings in File Type, Sender Name, andUser Name and Password in Store File)
This section explains how to register functions in a program using copier function as an example.
1. Press the [Home] key on the top left of the control panel, and press the [Copier] icon onthe [Home] screen.
CMR612
2. Edit the copy settings so all functions you want to store in a program are selected.
Registering Functions in a Program
45

3. Press the [Program] key.
CMT001
4. Press [Program].
5. Press the program number you want to register.
6. Enter the program name.
7. Press [OK].
8. Press [Exit] twice.
• The number of characters you can enter for a program name varies depending on the functions asfollows:
• Copier: 34 characters
• Document Server: 34 characters
• Facsimile: 20 characters
• Scanner: 34 characters
• When a specified program is registered as the default, its values become the default settings, whichare displayed without pressing the [Program] key, when modes are cleared or reset, and after themachine is turned on. See "Changing the Default Functions of the Initial Screen", ConvenientFunctions .
• When the paper tray you specified in a program is empty and if there is more than one paper traywith the same size paper in it, the paper tray prioritized under [Paper Tray Priority: Copier] or[Paper Tray Priority: Facsimile] in the [Tray Paper Settings] tab will be selected first. For details, see"System Settings", Connecting the Machine/ System Settings .
2. Getting Started
46

• Programs are not deleted by turning the power off or by pressing the [Reset] key unless theprogram is deleted or overwritten.
• Program numbers with next to them already have settings made for them.
• Programs can be registered to the [Home] screen, and can be recalled easily. For details, see"Registering a Shortcut to a Program to the [Home] Screen", Convenient Functions and p.40"Adding Icons to the [Home] Screen". Shortcuts to programs stored in Document Server modecannot be registered to the [Home] screen.
Example of Programs
Copier mode
Program name Program description Effect
Eco copy Specify [Cmb. 2 Sides] under[Combine] in [Other Func.].
You can save paper and toner.
Thumbnail copy Specify [Cmb. 1 Side] under[Combine] in [Other Func.].
You can copy up to four pages ontoone side of a sheet, so that you cansave paper.
Scanner mode
Program name Program description Effect
Easy PDF scan In [Send Settings], select [FullColour] under [Type of Original],and select [PDF] under [File Type].Then enter the business details suchas "London branch: daily report"under [File Name].
You can scan documents efficiently.
Highcompression PDFscan
In [Send Settings], select [FullColour] under [Type of Original] and[High Compress. PDF] under [FileType].
You can compress the data size ofscanned documents, so that you cansend and store them.
Long-termstorage scan
Select [PDF/A] under [File Type] in[Send Settings].
You can easily digitize documents to"PDF/A" file format, which is suitablefor long-term storage.
Registering Functions in a Program
47

Program name Program description Effect
Digital signaturescan
In [Send Settings], specify [PDF],[High Compress. PDF], or [PDF/A] in[File Type], and also specify [DigitalSignature].
You can add a digital signature to animportant document such as acontract, so that any data tamperingcan be detected.
Dividing file scan Specify [Divide] in [Send Settings]. You can scan a multiple pageoriginal as one file by splitting it intogroups of a specified number ofpages.
High resolutionscan
Specify settings to save scanneddata in TIFF format. Also, specify ahigher resolution under [Resolution]in [Send Settings].
Scanned documents maintain muchof the detail of the originals, but thesize of the data may be quite large.
Batch documentscan
Select [Batch] in [Send Settings]. You can apply multiple scans to alarge volume of originals and sendthe scanned originals.
Facsimile mode
Program name Program description Effect
Transmissionresult notificationfax
Select [Preview] and specify [EmailTX Results] in [Send Settings].
You can check whether thetransmission settings are correctbefore and after transmission.
Specified timefax transmission
Specify [Send Later] in [SendSettings].
You can send a fax at a specifiedtime.
Departmental faxtransmission
Specify [Fax Header Print] under[Option Setting] in [Send Settings].
This setting can be used if thereceiver specifies forwardingdestinations by senders.
• Depending on the options installed, some functions cannot be registered. For details, see "FunctionsRequiring Optional Configurations", Getting Started .
• The names of programs given above are just examples. You can assign any name to a programaccording to your objectives.
• Depending on your business details or the type of documents to be scanned, registering a programcannot be recommended.
2. Getting Started
48

Turning On/Off the PowerThe main power switch is on the right side of the machine. Turning off this switch makes the main powerindicator on the right side of the control panel go off. When this is done, machine power is off. When thefax unit is installed, fax files in memory may be lost if you turn this switch off. Use this switch only whennecessary.
Turning On the Main Power
• Do not turn off the main power switch immediately after turning it on. Doing so may result indamage to the hard disk or memory, leading to malfunctions.
1. Make sure the power cord is firmly plugged into the wall outlet.
2. Turn on the main power switch.
The main power indicator goes on.
CMR635
Turning Off the Main Power
• When disconnecting the power cord from the wall outlet, always pull the plug, not the cord.Pulling the cord can damage the power cord. Use of damaged power cords could result in fireor electric shock.
• After turning the machine's power off, wait at least a few seconds before turning it back on. If themessage "Turn main Power Switch off" appears, turn the machine's power off, wait 10 seconds ormore, and then turn it back on again. Never turn the power back on immediately after turning it off.
Turning On/Off the Power
49

• Before unplugging the power cord plug, turn off the main power switch and make sure the mainpower switch indicator turns off. Not doing so may result in damage to the hard disk or memory,leading to malfunctions.
• Do not turn off the power while the machine is in operation.
1. Turn off the main power switch.
The main power indicator goes out.
2. Getting Started
50
When the Authentication Screen is DisplayedIf Basic Authentication, Windows Authentication, LDAP Authentication, or Integration ServerAuthentication is active, the authentication screen appears on the display. The machine only becomesoperable after entering your own Login User Name and Login Password. If User Code Authentication isactive, you cannot use the machine until you enter the User Code.
If you can use the machine, you can say that you are logged in. When you go out of the operable state,you can say that you are logged out. After logging in the machine, be sure to log out of it to preventunauthorized usage.
• Ask the user administrator for the Login User Name, Login Password, and User Code. For detailsabout user authentication, see Security Guide .
• User Code to enter on User Code Authentication is the numerical value registered in the AddressBook as "User Code".
User Code Authentication Using the Control Panel
This section explains the procedure for logging in to the machine using the control panel while UserCode Authentication is active.
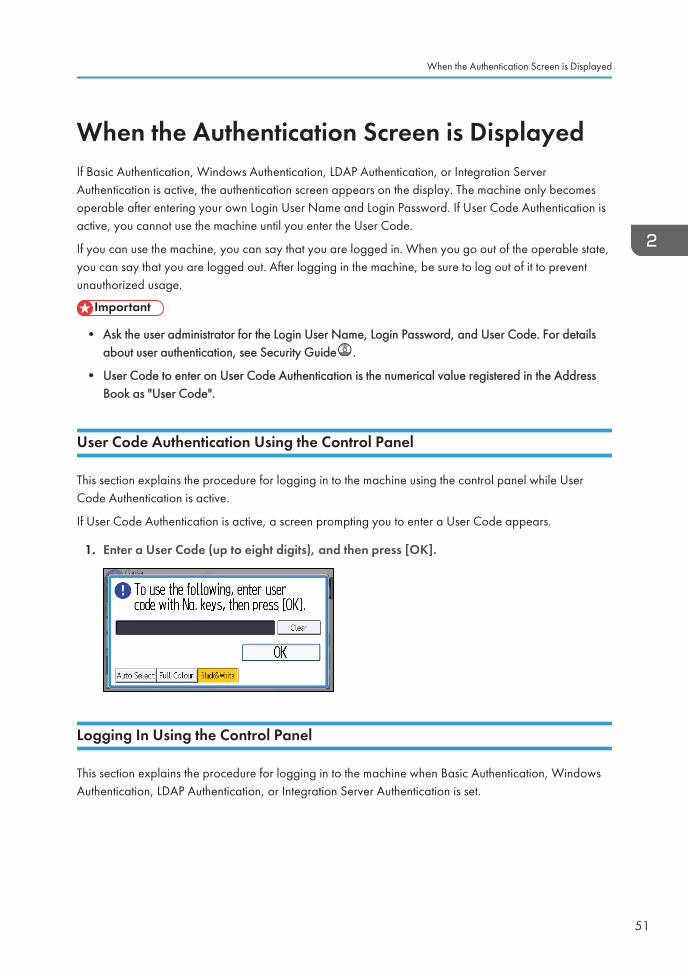
If User Code Authentication is active, a screen prompting you to enter a User Code appears.
1. Enter a User Code (up to eight digits), and then press [OK].
Logging In Using the Control Panel
This section explains the procedure for logging in to the machine when Basic Authentication, WindowsAuthentication, LDAP Authentication, or Integration Server Authentication is set.
When the Authentication Screen is Displayed
51

1. Press [Login].
2. Enter a Login User Name, and then press [OK].
3. Enter a Login Password, and then press [OK].
When the user is authenticated, the screen for the function you are using appears.
Logging Out Using the Control Panel
This section explains the procedure for logging out the machine when Basic Authentication, WindowsAuthentication, LDAP Authentication, or Integration Server Authentication is set.
• To prevent use of the machine by unauthorized persons, always log out when you have finishedusing the machine.
1. Press the [Login/Logout] key.
CMR636
2. Press [Yes].
2. Getting Started
52

Placing Originals
Placing Originals on the Exposure Glass (mainly Europe)
• Do not lift the ADF forcefully. Otherwise, the cover of the ADF might open or be damaged.
1. Lift the ADF or the exposure glass cover.
2. Place the original face down on the exposure glass. The original should be aligned to therear left corner.
Start with the first page to be scanned.
CMS001
11
1. Positioning mark
3. Lower the ADF or the exposure glass cover.
Placing Originals on the Exposure Glass (mainly Asia)
• Do not lift the ADF forcefully. Otherwise, the cover of the ADF might open or be damaged.
1. Lift the ADF.
2. Place the original face down on the exposure glass. The original should be aligned to therear left corner.
Start with the first page to be scanned.
Placing Originals
53

CMS001
11
1. Positioning mark
3. Lower the ADF.
Placing Originals on the Exposure Glass (mainly North America)
• Do not lift the ADF forcefully. Otherwise, the cover of the ADF might open or be damaged.
1. Lift the ADF.
2. Place the original face down on the exposure glass. The original should be aligned to therear left corner.
Start with the first page to be scanned.
CMS001
11
1. Positioning mark
3. Lower the ADF.
2. Getting Started
54

Placing Originals in the Auto Document Feeder
Be sure not to load the original untidily. Doing so may cause the machine to display a paper misfeedmessage. Also, be sure not to place originals or other objects on the top cover. Doing so may cause amalfunction.
1. Adjust the original guides to the original size.
2. Place the aligned originals squarely face up in the ADF.
Do not stack originals beyond the limit mark.
The first page should be on the top.
When placing originals that are longer than A4 or 81/2 × 11 , open the extenders.
1
2
CMS003
1. Limit mark
2. Original guides
Placing Originals
55

2. Getting Started
56

3. CopyThis chapter describes frequently used copier functions and operations. For the information not includedin this chapter, see Copy/ Document Server on the supplied CD-ROM.
Basic ProcedureTo make copies of originals, place them on the exposure glass or in the ADF.
When placing the original on the exposure glass, start with the first page to be copied. When placingthe original in the ADF, place them so that the first page is on the top.
(mainly Europe)
About placing the original on the exposure glass, see p.53 "Placing Originals on the Exposure Glass(mainly Europe)".
(mainly Asia)
About placing the original on the exposure glass, see p.53 "Placing Originals on the Exposure Glass(mainly Asia)".
(mainly North America)
About placing the original on the exposure glass, see p.54 "Placing Originals on the Exposure Glass(mainly North America)".
About placing the original in the ADF, see p.55 "Placing Originals in the Auto Document Feeder".
To copy onto paper other than plain paper, specify the paper type in User Tools according to the weightof the paper you are using. For details, see "System Settings", Connecting the Machine/ System Settings
.
The following procedure explains copying onto paper whose size and orientation matches that of theoriginals exactly.
1. Press the [Home] key on the top left of the control panel, and press the [Copier] icon onthe [Home] screen.
CMR612
57

2. Make sure no previous settings remain.
When there are previous settings remaining, press the [Reset] key.
3. Select the paper tray containing the paper that is the same size and orientation as theoriginals.
4. Make sure that [Use Paper Tray Settg] is selected.
When [Use Paper Tray Settg] is selected, the paper size and orientation of the tray you haveselected will appear in [Orig.].
5. Place the originals.
6. Make desired settings.
7. Enter the number of copies with the number keys.
The maximum copy quantity that can be entered is 99.
8. Press the [Start] key.
When placing the original on the exposure glass, press the [ ] key after all originals are scanned.Some functions such as Batch mode may require that you press the [ ] key when placing originalsin the ADF. Follow the messages that appear on screen.
9. When the copy job is finished, press the [Reset] key to clear the settings.
3. Copy
58

Auto Reduce/EnlargeThe machine automatically calculates the reproduction ratio based on the sizes of the originals and thepaper you have specified. The machine will rotate, enlarge, or reduce the image of the originals to fitthem to the paper.
CKN008
• You cannot use the bypass tray with this function.
• If you select a reproduction ratio after pressing [Auto Reduce/Enlarge], [Auto Reduce/Enlarge] iscanceled and the image cannot be rotated automatically.
This is useful to copy different size originals to the same size paper.
If the orientation in which your original is placed is different from that of the paper you are copying onto,the machine rotates the original image by 90 degrees and fits it on the copy paper (Rotate Copy).
For details about Rotate Copy, see "Rotate Copy", Copy/ Document Server .
1. Press [Orig.].
2. Press [Original's Orientation].
Auto Reduce/Enlarge
59

3. Select the original orientation, and then press [OK].
4. Press [Original's Size].
5. Specify the original size, and then press [OK] twice.
6. Press [Auto Reduce/Enlarge].
7. Select the paper tray.
8. Place the originals, and then press the [Start] key.
3. Copy
60

Duplex CopyingCopies two 1-sided pages or one 2-sided page onto a 2-sided page. During copying, the image isshifted to allow for the binding margin.
CKN009
• You cannot use the bypass tray with this function.
There are two types of Duplex.
1 Sided 2 Sided
Copies two 1-sided pages on one 2-sided page.
2 Sided 2 Sided
Copies one 2-sided page on one 2-sided page.
The resulting copy image will differ according to the orientation in which you place your originals ( or).
Original orientation and completed copies
To copy on both sides of the paper, select the original and copy orientation according to how youwant the printout to appear.
Original Placing originalsOrig.'s
OrientationOrientation Copy
Top to Top
Top to Bottom
Duplex Copying
61

Original Placing originalsOrig.'s
OrientationOrientation Copy
Top to Top
Top to Bottom
1. Press [Other Func.].
2. Press [Duplex].
3. Select [1 Sided 2 Sided] or [2 Sided 2 Sided] according to how you want thedocument to be output.
To change the original or copy orientation, press [Orientation].
To specify the original orientation is whether readable or unreadable, press [Orig.'s Orientation].
4. Press [OK] twice.
5. Select the paper tray.
6. Place the originals, and then press the [Start] key.
3. Copy
62

Specifying the Original and Copy Orientation
Select the orientation of the originals and copies if the original is two-sided or if you want to copy ontoboth sides of the paper.
• Top to Top
CKN011
• Top to Bottom
CKN012
1. Press [Orientation].
2. Select [Top to Top] or [Top to Bottom] for [Original] if the original is two-sided.
3. Select [Top to Top] or [Top to Bottom] for [Copy].
4. Press [OK].
Duplex Copying
63

Combined CopyingThis mode can be used to select a reproduction ratio automatically and copy the originals onto a singlesheet of copy paper.
The machine selects a reproduction ratio between 25 and 400%. If the orientation of the original isdifferent from that of the copy paper, the machine will automatically rotate the image by 90 degrees tomake copies properly.
Orientation of the original and image position of Combine
The image position of Combine differs according to original orientation and the number of originalsto be combined.
• Portrait ( ) originals
CNU005
• Landscape ( ) originals
CNU006
Placing originals (originals placed in the ADF)
The default value for the copy order in the Combine function is [From Left to Right]. To copyoriginals from right to left in the ADF, place them upside down.
• Originals read from left to right
3. Copy
64

CKN010
• Originals read from right to left
CKN017
One-Sided Combine
Combine several pages onto one side of a sheet.
CKN014
• You cannot use the bypass tray with this function.
There are four types of One-Sided Combine.
1 Sided 2 Originals Cmb. 1 Side
Copies two 1-sided originals to one side of a sheet.
1 Sided 4 Originals Cmb. 1 Side
Copies four 1-sided originals to one side of a sheet.
2 Sided 2 Pages Cmb. 1 Side
Copies one 2-sided original to one side of a sheet.
Combined Copying
65

2 Sided 4 Pages Cmb. 1 Side
Copies two 2-sided originals to one side of a sheet.
1. Press [Orig.].
2. Press [Original's Size].
3. Specify the original size, and then press [OK] twice.
4. Press [Other Func.].
5. Press [Combine].
6. Select [1 Sided] or [2 Sided] for [Original].
If you selected [2 Sided], you can change the orientation by pressing [Orientation].
To specify the original orientation is whether readable or unreadable, press [Orig.'s Orientation].
7. Press [Cmb. 1 Side].
8. Select the number of originals to combine.
9. Press [OK] twice.
10. Select the paper tray.
11. Place the originals, and then press the [Start] key.
Two-Sided Combine
Combines various pages of originals onto two sides of one sheet.
3. Copy
66

CKN074
• You cannot use the bypass tray with this function.
There are four types of Two-Sided Combine.
1 Sided 4 Originals Cmb. 2 Sides
Copies four 1-sided originals to one sheet with two pages per side.
1 Sided 8 Originals Cmb. 2 Sides
Copies eight 1-sided originals to one sheet with four pages per side.
2 Sided 4 Pages Cmb. 2 Sides
Copies two 2-sided originals to one sheet with two pages per side.
2 Sided 8 Pages Cmb. 2 Sides
Copies four 2-sided originals to one sheet with four pages per side.
1. Press [Orig.].
2. Press [Original's Size].
3. Specify the original size, and then press [OK] twice.
4. Press [Other Func.].
5. Press [Combine].
6. Select [1 Sided] or [2 Sided] for [Original].
To specify the original orientation is whether readable or unreadable, press [Orig.'s Orientation].
Combined Copying
67

7. Press [Cmb. 2 Sides].
8. Press [Orientation].
9. Select [Top to Top] or [Top to Bottom] for [Original] and/or [Copy], and then press [OK].
10. Select the number of originals to combine.
11. Press [OK] twice.
12. Select the paper tray.
13. Place the originals, and then press the [Start] key.
3. Copy
68

Copying onto Custom Size Paper from theBypass TrayPaper that has a horizontal length of 139.0–600.0 mm (5.48–23.62 inches) and a vertical length of76.2–216.0 mm (3.00–8.50 inches) can be fed in from the bypass tray. Note however that thelimitation on the horizontal and vertical length range will vary depending on which options are installed.
• When prints are delivered to the internal tray 2:
Horizontal length: 210.0–600.0 mm (8.27–23.62 inches), vertical length: 139.7–216.0 mm(5.50–8.50 inches)
1. Load the paper face down in the bypass tray.
The bypass tray ( ) is automatically selected.
2. Press the [ ] key.
3. Press [Paper Size].
4. Press [Custom Size].
5. Enter the horizontal size with the number keys, and then press [ ].
6. Enter the vertical size with the number keys, and then press [ ].
7. Press [OK] twice.
8. Place the originals, and then press the [Start] key.
Copying onto Custom Size Paper from the Bypass Tray
69

Copying onto EnvelopesThis section describes how to copy onto regular size and custom size envelopes. Envelopes should befed from the bypass tray.
Specify the thickness of the paper according to the weight of the envelopes you are printing on. Fordetails about the relationship between paper weight and paper thickness and the sizes of envelopes thatcan be used, see p.135 "Recommended Paper Sizes and Types".
About handling envelopes, supported envelope types, and how to load envelopes, see p.140"Envelopes".
Before using this function, select [Envelope] for [Paper Type: Bypass Tray] under [Tray Paper Settings] inUser Tools. For details, see "System Settings", Connecting the Machine/ System Settings .
• The Duplex function cannot be used with envelopes. If the Duplex function is specified, press [1Sided 2 Sided:TtoT] to cancel the setting.
To copy onto custom size envelopes, you must specify the envelope's dimensions. Specify the horizontaland vertical length of the envelope.
CNU010
CNU004
: Horizontal
: Vertical
3. Copy
70

1. Place the original face down on the exposure glass. The original should be aligned to therear left corner.
CMS001
11
1. Positioning mark
2. Load the envelopes face down in the bypass tray.
The bypass tray ( ) is automatically selected.
3. Press the [ ] key.
4. Press [Paper Size].
5. Specify the envelope size, and then press [OK].
6. Press [OK].
7. Press the [Start] key.
Copying onto Envelopes
71

SortThe machine assembles copies as sets in sequential order.
CKN018
Depending on which options are installed on your machine, this function might not be available. Fordetails, see "Functions Requiring Optional Configurations", Getting Started .
1. Press [Other Func.].
2. Press [Sort], and then press [OK].
3. Enter the number of copy sets using the number keys.
4. Select the paper tray.
5. Place the originals, and then press the [Start] key.
Changing the Number of Sets
You can change the number of copy sets during copying.
• This function can be used only when the Sort function is selected.
1. While "Copying..." is displayed, press the [Stop] key.
3. Copy
72

2. Enter the number of copy sets with the number keys.
3. Press [Continue].
Copying starts again.
Sort
73

Storing Data in the Document ServerThe Document Server enables you to store documents being read with the copy feature on the hard diskof this machine. Thus you can print them later applying necessary conditions.
You can check the stored documents from the Document Server screen. For details about the DocumentServer, see p.117 "Storing Data".
Depending on which options are installed on your machine, this function might not be available. Fordetails, see "Functions Requiring Optional Configurations", Getting Started .
1. Press [Other Func.].
2. Press [ ].
3. Press [Store File].
4. Enter a file name, user name, or password if necessary.
5. Press [OK] twice.
6. Select the paper tray.
7. Place the originals.
8. Make the scanning settings for the original.
9. Press the [Start] key.
Stores scanned originals in memory and makes one set of copies. If you want to store anotherdocument, do so after copying is complete.
3. Copy
74

4. FaxThis chapter describes frequently used facsimile functions and operations. For the information notincluded in this chapter, see Fax on the supplied CD-ROM.
Basic Procedure for Transmissions (MemoryTransmission)This section describes the basic procedure for transmitting documents using Memory Transmission.
You can specify the fax, IP-Fax, Internet Fax, e-mail, or folder destinations. Multiple types of destinationcan be specified simultaneously.
• It is recommended that you call the receivers and confirm with them when sending importantdocuments.
• If there is a power failure (the main power switch is turned off) or the machine is unplugged forabout 12 hours, all the documents stored in memory are deleted. As soon as the main powerswitch is turned on, the Power Failure Report is printed to help you check the list of deleted files. See"Turning Off the Main Power / In the Event of Power Failure", Troubleshooting .
1. Press the [Home] key on the top left of the control panel, and press the [Facsimile] icon onthe [Home] screen.
CMR612
2. Make sure "Ready" appears on the screen.
75

3. Make sure [Immed. TX] is not highlighted.
4. Place the original into the ADF.
5. Configure the scan and transmission settings in "Send Settings".
6. Specify a destination.
You can enter the destination's number or address directly or select from the Address Book bypressing the destination key.
If you make a mistake, press the [Clear] key, and then enter again.
7. When sending the same original to several destinations (broadcasting), specify the nextdestination.
8. If you send documents to Internet Fax or e-mail destinations or enable the "Email TXResults" function, specify a sender.
9. Press the [Start] key.
Sending Originals Using the Exposure Glass (Memory Transmission)
1. Make sure [Immed. TX] is not highlighted.
2. Place the first page of the original face down on the exposure glass.
3. Specify a destination.
4. Make the scan settings you require.
5. Press the [Start] key.
6. Place the next original on the exposure glass within 60 seconds when you send multipleoriginals, and then repeat steps 4 and 5.
Repeat this step for each page.
4. Fax
76

7. Press the [ ] key.
The machine dials the destination and starts transmission.
Registering a Fax Destination
1. Press the [User Tools/Counter] key.
2. Press [Address Book Mangmnt].
3. Press [New Program].
4. Press [Names].
5. Press [Name].
The name entry display appears.
6. Enter the name, and then press [OK].
7. Press [ ] to display [Title 1], [Title 2] and [Title 3].
8. Press [Title 1], [Title 2] or [Title 3] to select the key for the classification you want to use.
The keys you can select are as follows:
• [Frequent]: Added to the page that is displayed first.
• [AB], [CD], [EF], [GH], [IJK], [LMN], [OPQ], [RST], [UVW], [XYZ], [1] to [10]: Added to thelist of items in the selected title.
You can select [Frequent] and one more key for each title.
9. Press [OK].
10. Press [Exit].
11. Press [Fax Dest.].
Basic Procedure for Transmissions (Memory Transmission)
77

12. Press [Fax Destination].
13. Enter the fax number using the number keys, and then press [OK].
14. Specify optional settings such as "SUB Code", "SEP Code", and "International TX Mode".
To specify [SUB Code], [SEP Code], or [Sub-add./UUI], press [Adv. Features].
15. Press [OK].
16. Press [Exit].
17. Press [OK].
18. Press the [User Tools/Counter] key.
Deleting a Fax Destination
• If you delete a destination that is a specified delivery destination, messages to its registeredPersonal Box, for example, cannot be delivered. Be sure to check the settings in the fax functionbefore deleting any destinations.
1. Press the [User Tools/Counter] key.
2. Press [Address Book Mangmnt].
3. Press [Change].
4. Press [Fax Dest.].
5. Select the name whose fax destination you want to delete.
Press the name key, or enter the registered number using the number keys.
You can search by the registered name, user code, fax number, folder name, e-mail address, or IP-Fax destination.
6. Press [Fax Dest.].
7. Press [Fax Destination].
4. Fax
78

8. Press [Clear], and then press [OK].
9. Press [OK].
10. Press [Exit].
11. Press [OK].
12. Press the [User Tools/Counter] key.
Basic Procedure for Transmissions (Memory Transmission)
79

Transmitting while Checking Connection toDestination (Immediate Transmission)Using Immediate Transmission, you can send documents while checking the connection to thedestination.
You can specify fax or IP-Fax destinations.
If you specify Internet Fax, e-mail, folder destinations, and group or multiple destinations, thetransmission mode is automatically switched to Memory Transmission.
• It is recommended that you call the receivers and confirm with them when sending importantdocuments.
1. Press the [Home] key on the top left of the control panel, and press the [Facsimile] icon onthe [Home] screen.
CMR612
2. Make sure "Ready" appears on the screen.
3. Press [Immed. TX].
4. Place the original into the ADF.
5. Select the scan settings you require.
6. Specify a destination.
If you make a mistake, press the [Clear] key, and then enter again.
7. Press the [Start] key.
4. Fax
80

Sending Originals Using the Exposure Glass (Immediate Transmission)
1. Press [Immed. TX].
2. Place the first page face down on the exposure glass.
3. Specify a destination.
4. Make the scan settings you require.
5. Press the [Start] key.
6. Place the next original on the exposure glass within 10 seconds when you send multipleoriginals, and then repeat steps 4 and 5.
Repeat this step for each page.
7. Press the [ ] key.
Transmitting while Checking Connection to Destination (Immediate Transmission)
81

Canceling a TransmissionThis section explains how to cancel a fax transmission.
Canceling a Transmission Before the Original Is Scanned
Use this procedure to cancel a transmission before pressing the [Start] key.
1. Press the [Reset] key.
CMK001
Canceling a Transmission While the Original Is Being Scanned
Use this procedure to cancel scanning or transmitting of the original while it is being scanned.
1. Press the [Stop] key.
CMK002
2. Press [Cancel Scan.] or [Cancel TX].
Depending on the transmission mode and function you use, either [Cancel Scan.] or [Cancel TX] isdisplayed.
4. Fax
82

Canceling a Transmission After the Original Is Scanned (While a TransmissionIs in Progress)
Use this procedure to delete a file that is being sent after the original is scanned.
All the scanned data is deleted from memory.
1. Press the [Stop] key.
CMK002
You can also press [Comm. Status/Print], and then [Check/Stop Transmission File].
2. Press [Standby File List].
3. Select the file you want to cancel.
If the desired file is not shown, press [ ] or [ ] to find it.
4. Press [Cancel TX].
To cancel another file, repeat steps 3 through 4.
5. Press [OK].
6. Press [Exit].
After pressing [Check/Stop Transmission File] under [Comm. Status/Print] in step 1, press [Exit]twice.
Canceling a Transmission After the Original Is Scanned (Before a TransmissionIs Started)
Use this procedure to delete a file stored in memory before its transmission has started.
Canceling a Transmission
83

1. Press [Comm. Status/Print].
2. Press [Check/Stop Transmission File].
3. Press [Display File List].
4. Select the file you want to cancel.
If the desired file is not shown, press [ ] or [ ] to find it.
5. Press [Cancel TX].
To cancel another file, repeat steps 4 through 5.
6. Press [OK].
7. Press [Exit] three times.
4. Fax
84

Sending at a Specific Time (Send Later)Using this function, you can instruct the machine to delay transmission of your fax document until aspecified later time.
This allows you to take advantage of off-peak telephone charges without having to be by the machine atthe time.
Use Memory Transmission for this function. Immediate Transmission is not possible.
• If the machine is switched off for about 12 hours, all fax documents stored in memory are lost. Ifdocuments are lost for this reason, a Power Failure Report is automatically printed when the mainpower switch is turned on. Use this report to check the list of lost documents. See "Turning Off theMain Power / In the Event of Power Failure", Troubleshooting .
1. Press [Send Settings].
2. Press [ ], and then press [Send Later].
3. Enter the time, and then press [ ].
(mainly Europe and Asia)
Enter the time (24 hour format) using the number keys.
(mainly North America)
Enter the time using the number keys, and then select [AM] or [PM].
When entering numbers smaller than 10, add a zero at the beginning.
4. Press [OK] twice.
Sending at a Specific Time (Send Later)
85

Storing a DocumentYou can store and send a document at the same time. You can also just store a document.
The following information can be set for the stored documents as necessary:
User Name
You can set this function if necessary to know who and what departments stored documents in themachine. A user name can be selected from the Address Book or entered manually.
File Name
You can specify a name for a stored document. If you do not specify a name, scanned documentswill be automatically assigned names such as "FAX0001" or "FAX0002".
Password
You can set this function so as not to send to unspecified people. A four to eight digit number canbe specified as a password.
You can also change the file information after storing files.
1. Place the original, and then specify the scan settings you require.
Specify the "Original Orientation" setting correctly. If you do not, the top/bottom orientation of theoriginal will not be displayed correctly in the preview.
2. Press [Send Settings].
3. Press [ ] three times, and then press [Store File].
4. Select [Store to HDD] or [Store to HDD Send].
Select [Store to HDD Send] to send documents after they are stored.
Select [Store to HDD] to store documents.
4. Fax
86

5. Set the user name, file name, and password as necessary.
• User Name
Press [User Name], and then select a user name. To specify an unregistered user name, press[Manual Entry], and then enter the name. After specifying a user name, press [OK].
• File Name
Press [File Name], enter a file name, and then press [OK].
• Password
Press [Password], enter a password using the number keys, and then press [OK]. Re-enter thepassword for confirmation, and then press [OK].
6. Press [OK] twice.
7. If you have selected [Store to HDD Send], specify the receiver.
8. Press the [Start] key.
Sending Stored Documents
The machine sends documents stored with the facsimile function in the Document Server.
The documents stored in the Document Server can be sent again and again until they are deleted.
The stored documents are sent with the scan settings made when they were stored.
You can select the following transmission methods:
Original Stored File
The machine sends the originals, and then stored files.
Stored file Original
The machine sends the stored files, and then originals.
This function cannot be used with the following functions:
• Immediate Transmission
• Parallel Memory Transmission
• On Hook Dial
• Manual Dial
Storing a Document
87

1. Press [Send Settings].
2. Press [ ] four times, and then press [Select Stored File].
3. Select the documents to be sent.
When multiple documents are selected, they are sent in the order of selection.
• Press [File Name] to place the documents in alphabetical order.
• Press [Date] to place the documents in order of programmed date.
• Press [Queue] to arrange the order of the documents to be sent.
To view details about stored documents, press [Details].
Press the Thumbnails key to switch the screen to thumbnail display.
4. If you select a document with a password, enter the password using the number keys,and then press [OK].
5. Specify "TX Method" as necessary.
Press [TX Method], select [Original Stored File] or [Stored file Original], and then press [OK].
6. Press [OK] twice.
7. To add an original to stored documents, place the original, and then select any scansettings you require.
8. Specify the destination, and then press the [Start] key.
4. Fax
88

Printing the Journal ManuallyTo print the Journal manually, select the printing method: "All", "Print per File No.", or "Print per User".
All
Prints the results of communications in the order made.
Print per File No.
Prints only the results of communications specified by file number.
Print per User
Prints the results of communications by individual senders.
1. Press [Comm. Status/Print].
2. Press [Print Journal].
3. Select the printing method.
4. If you selected "Print per File No." in step 3, enter a 4-digit file number using the numberkeys.
5. If you selected "Print per User" in step 3, select a user from the list, and then press [OK].
6. Press the [Start] key.
7. Press [Exit] twice.
Printing the Journal Manually
89

4. Fax
90

5. PrintThis chapter describes frequently used printer functions and operations. For the information not includedin this chapter, see Print on the supplied CD-ROM.
Quick InstallYou can install the printer drivers easily from the CD-ROM provided with this machine.
Using Quick Install, the PCL 6 printer driver is installed under network environment, and the StandardTCP/IP port will be set.
When the machine is connected to a client computer via parallel connection, the printer port is set to[LPT1].
• Manage Printers permission is required to install the drivers. Log on as an Administrators groupmember.
1. Quit all applications. (Do not close this manual.)
2. Insert the provided CD-ROM into the computer's CD-ROM drive.
If the [AutoPlay] dialog box appears, click [Run AUTORUN.EXE].
3. Select an interface language, and then click [OK].
4. Click [Quick Install].
5. The software license agreement appears in the [License Agreement] dialog box. Afterreading the agreement, click [I accept the agreement.], and then click [Next].
6. Select the machine model you want to use in the [Select Printer] dialog box.
For network connection via TCP/IP, select the machine whose IP address is displayed in [ConnectTo].
For parallel connection, select the machine whose printer port is displayed in [Connect To].
7. Click [Install].
8. Configure the user code, default printer, and shared printer as necessary.
9. Click [Continue].
The installation starts.
If the [User Account Control] dialog box appears, and then click [Yes] or [Continue].
10. Click [Finish].
When you are prompted to restart your computer, restart it by following the instructions thatappear.
11. Click [Exit] in the first window of the installer, and then take out the CD-ROM.
91

Displaying the Printer Driver PropertiesThis section explains how to open the printer driver properties from [Devices and Printers].
• Manage Printers permission is required to change the printer settings. Log on as an Administratorsgroup member.
• You cannot change the machine default settings for individual users. Settings made in the printerproperties dialog box are applied to all users.
1. On the [Start] menu, click [Devices and Printers].
2. Right-click the icon of the printer you want to use.
3. Click [Printer properties].
5. Print
92

Standard Printing
• The default setting is duplex printing. If you want to print on only one side, select [Off] for theduplex setting.
• If you send a print job via USB 2.0 while the machine is in Low Power mode or Sleep mode, anerror message might appear when the print job is complete. In this case, check if the document wasprinted.
When Using the PCL 6 Printer Driver
1. Click the WordPad menu button in the upper left corner of the window, and then click[Print].
2. In the [Select Printer] list, select the printer you want to use.
3. Click [Preferences].
4. In the "Job Type:" list, select [Normal Print].
5. In the "Document Size:" list, select the size of the original to be printed.
6. In the "Orientation:" list, select [Portrait] or [Landscape] as the orientation of the original.
7. In the "Input Tray:" list, select the paper tray that contains the paper you want to printonto.
If you select [Auto Tray Select] in the "Input Tray:" list, the source tray is automatically selectedaccording to the paper size and type specified.
8. In the "Paper Type:" list, select the type of paper that is loaded in the paper tray.
9. Select [Color] or [Black and White] in the "Color/ Black and White:" list.
10. If you want to print multiple copies, specify a number of sets in the "Copies:" box.
11. Click [OK].
12. Start printing from the application's [Print] dialog box.
Standard Printing
93

Locked Print
Sending a Locked Print File
1. Click the WordPad menu button in the upper left corner of the window, and then click[Print].
2. In the "Select Printer" list, select the printer you want to use.
3. Click [Preferences].
4. In the "Job Type:" list, click [Locked Print].
5. Click [Details...].
6. Enter a User ID in the "User ID:" box, and then enter a password in the "Password:" box.
7. Click [OK].
8. Change any other print settings if necessary.
9. Click [OK].
10. Start printing from the application's [Print] dialog box.
Printing a Locked Print File Using the Control Panel
• When printing is completed, the stored file will be deleted.
1. Press the [Home] key on the top left of the control panel, and press the [Printer] icon onthe [Home] screen.
CMR612
5. Print
94

2. Press the [Print Jobs] tab.
3. Press [Locked Jobs].
4. Select the files you want to print.
You can select all the Locked Print files at once by pressing [All Jobs] after selecting a file.
5. Press [Print].
6. Enter the password using the number keys, and then press [OK].
7. To change the print settings of the document, press [Det.Settings].
8. Enter the number of copies using the number keys if necessary, and then press [ResumePrt.].
Locked Print
95

Hold Print
Sending a Hold Print File
1. Click the WordPad menu button in the upper left corner of the window, and then click[Print].
2. In the "Select Printer" list, select the printer you want to use.
3. Click [Preferences].
4. In the "Job Type:" list, click [Hold Print].
5. Click [Details...].
6. Enter a User ID in the "User ID:" box.
You can optionally set a file name of a Hold Print file.
7. To specify the print time of the document, select the [Set Print Time] check box, and thenspecify the time.
You can specify the time in 24-hour format.
8. Click [OK].
9. Change any other print settings if necessary.
10. Click [OK].
11. Start printing from the application's [Print] dialog box.
Printing a Hold Print File Using the Control Panel
• When printing is completed, the stored file will be deleted.
1. Press the [Home] key on the top left of the control panel, and press the [Printer] icon onthe [Home] screen.
CMR612
5. Print
96

2. Press the [Print Jobs] tab.
3. Press [Hold Jobs].
4. Select the files you want to print.
You can select all the Hold Print files at once by pressing [All Jobs] after selecting a file.
5. Press [Print].
6. To change the print settings of the document, press [Det.Settings].
7. Enter the number of copies using the number keys if necessary, and then press [ResumePrt.].
Hold Print
97

Stored Print
Sending a Stored Print File
1. Click the WordPad menu button in the upper left corner of the window, and then click[Print].
2. In the "Select Printer" list, select the printer you want to use.
3. Click [Preferences].
4. In the "Job Type:" list, select the print method to be used for Stored Print files.
You can select four methods of Stored Print:
To use the Stored Print (Shared) and Store and Print (Shared) functions, authentication must beenabled beforehand. For details, see Security Guide .
• Stored Print
Stores the file in the machine and prints it later using the control panel.
• Store and Print
Prints the file at once and also stores the file in the machine.
• Stored Print (Shared)
Stores the file in the machine and allows any user who has print privileges to print the file laterusing the control panel.
• Store and Print (Shared)
Prints the file immediately and also stores the file in the machine. Any user who has printprivileges can print any stored file afterward.
5. Click [Details...].
6. Enter a User ID in the "User ID:" box.
You can optionally set a file name and a password of a Stored Print file.
7. Click [OK].
8. Change any other print settings if necessary.
9. Click [OK].
10. Start printing from the application's [Print] dialog box.
5. Print
98

Printing a Stored Print File Using the Control Panel
• The stored documents are not deleted even after the printing has been completed. For theprocedure to delete the documents, see "Deleting Stored Print files", Print .
1. Press the [Home] key on the top left of the control panel, and press the [Printer] icon onthe [Home] screen.
CMR612
2. Press the [Print Jobs] tab.
3. Press [Stored Jobs].
4. Select the files you want to print.
You can select all the Stored Print files at once by pressing [All Jobs] after selecting a file.
5. Press [Print].
If you set the password in the printer driver, enter the password.
If multiple print files are selected, and some of these require a password, the machine prints filesthat correspond to the entered password and files that do not require a password. The number offiles to be printed is displayed on the confirmation screen.
6. To change the print settings of the document, press [Det.Settings].
7. Enter the number of copies using the number keys if necessary, and then press [ResumePrt.].
Stored Print
99

5. Print
100

6. ScanThis chapter describes frequently used scanner functions and operations. For the information notincluded in this chapter, see Scan on the supplied CD-ROM.
Basic Procedure When Using Scan to Folder
• Before performing this procedure, refer to "Preparation for Sending by Scan to Folder", Scanand confirm the details of the destination computer. Also refer to "Registering Folders", Connectingthe Machine/ System Settings , and register the address of the destination computer to theaddress book.
1. Press the [Home] key on the top left of the control panel, and press the [Scanner] icon onthe [Home] screen.
CMR612
2. Make sure that no previous settings remain.
If a previous setting remains, press the [Reset] key.
3. Press the [Folder] tab.
4. Place originals.
5. If necessary, select [Send Settings] or [Original], and specify scan settings according tothe original you want to scan.
Example: Scanning the document in color/duplex mode, and saving as a PDF file.
101

• Press [Original], and then press [2 Sided].
• Press [Send Settings]. Select [Type of Original], and then press [Full Colour].
• Press [Send Settings]. Select [File Type], and then press [PDF].
6. Specify the destination.
You can specify multiple destinations.
7. Press the [Start] key.
Creating a Shared Folder on a Computer Running Windows/Confirming aComputer's Information
The following procedures explain how to create a shared folder on a computer running Windows, andhow to confirm the computer's information. In these examples, Windows 7 Ultimate is the operatingsystem, and the computer is a member in a network domain. Write down the confirmed information.
Step 1: Confirming the user name and computer name
1. Confirm the user name and the name of the computer you will send scanned documentsto.
2. On the [Start] menu, point to [All Programs], then [Accessories], and then click on[Command Prompt].
3. Enter the command "ipconfig/all", and then press the [Enter] key.
4. Confirm the name of the computer.
The computer's name is displayed under [Host Name].
You can also confirm the IPv4 address. The address displayed under [IPv4 Address] is the IPv4address of the computer.
5. Next, enter the command "set user", and then press the [Enter] key. (Be sure to put aspace between "set" and "user".)
6. Confirm the user name.
The user name is displayed under [USERNAME].
Step 2: Creating a shared folder on a computer running Microsoft Windows
Create a shared destination folder in Windows and enable sharing. In the following procedure, acomputer which is running under Windows 7 Ultimate and participating in a domain is used as anexample.
• You must log in as an Administrators group member to create a shared folder.
6. Scan
102

• If "Everyone" is left selected in step 6, the created shared folder will be accessible by all users. Thisis a security risk, so we recommend that you give access rights only to specific users. Use thefollowing procedure to remove "Everyone" and specify user access rights.
1. Create a folder, just as you would create a normal folder, in a location of your choice onthe computer.
2. Right-click the folder, and then click [Properties].
When using Windows XP, right-click the folder, and then click [Sharing and Security].
3. On the [Sharing] tab, select [Advanced Sharing...].
When using Windows XP, on the [Sharing] tab, select [Share this folder].
Proceed to step 5.
4. Select the [Share this folder] check box.
5. Click [Permissions].
6. In the [Group or user names:] list, select "Everyone", and then click [Remove].
7. Click [Add...].
8. In the [Select Users or Groups] window, click [Advanced...].
9. Specify one or more object types, select a location, and then click [Find Now].
10. From the list of results, select the groups and users you want to grant access to, and thenclick [OK].
11. In the [Select Users or Groups] window, click [OK].
12. In the [Groups or user names:] list, select a group or user, and then, in the [Allow] columnof the permissions list, select either the [Full Control] or [Change] check box.
Configure the access permissions for each group and user.
13. Click [OK].
Step 3: Specifying access privileges for the created shared folder
If you want to specify access privileges for the created folder to allow other users or groups to accessthe folder, configure the folder as follows:
1. Right-click the folder created in step 2, and then click [Properties].
2. On the [Security] tab, select [Edit...].
3. Click [Add...].
4. In the [Select Users or Groups] window, click [Advanced...].
5. Specify one or more object types, select a location, and then click [Find Now].
6. From the list of results, select the groups and users you want to grant access to, and thenclick [OK].
Basic Procedure When Using Scan to Folder
103

7. In the [Select Users or Groups] window, click [OK].
8. In the [Groups or user names:] list, select a group or user, and then, in the [Allow] columnof the permissions list, select either the [Full Control] or [Change] check box.
9. Press [OK] twice.
Registering an SMB Folder
1. Press the [User Tools/Counter] key.
2. Press [Address Book Mangmnt].
3. Press [New Program].
4. Press [Names].
5. Press [Name].
The name entry display appears.
6. Enter the name, and then press [OK].
7. Press [ ] to display [Title 1], [Title 2] and [Title 3].
8. Press [Title 1], [Title 2] or [Title 3] to select the key for the classification you want to use.
The keys you can select are as follows:
• [Frequent]: Added to the page that is displayed first.
• [AB], [CD], [EF], [GH], [IJK], [LMN], [OPQ], [RST], [UVW], [XYZ], [1] to [10]: Added to thelist of items in the selected title.
You can select [Frequent] and one more key for each title.
9. Press [OK].
10. Press [Exit].
6. Scan
104

11. Press [Auth. Info].
12. Press [Folder Authentication].
13. Press [Specify Other Auth. Info].
When [Do not Specify] is selected, the SMB User Name and SMB Password that you havespecified in [Default User Name/Password (Send)] of File Transfer settings are applied.
14. Press [Change] under "Login User Name".
15. Enter the login user name of the destination computer, and then press [OK].
16. Press [Change] under "Login Password".
17. Enter the password of the destination computer, and then press [OK].
18. Enter the password again to confirm, and then press [OK].
19. Press [OK].
20. Press [Exit].
21. Press [Folder].
22. Check that [SMB] is selected.
23. Press [Enter] under "Path".
24. Press [Enter] or [Browse Network], and then specify the folder.
To specify a folder, you can either enter the path manually or locate the folder by browsing thenetwork.
25. Press [Connection Test] to check the path is set correctly.
26. Press [Exit].
If the connection test fails, check the settings, and then try again.
Basic Procedure When Using Scan to Folder
105

27. Press [OK] three times.
28. Press the [User Tools/Counter] key.
Locating the SMB folder manually
1. Press [Enter] under "Path".
2. Enter the path where the folder is located.
For example: if the name of the destination computer is "User", and the folder name is "Share", thepath will be \\User\Share.
If the network does not allow automatic obtaining of IP addresses, include the destinationcomputer's IP address in the path. For example: if the IP address of the destination computer is"192.168.0.191", and the folder name is "Share", the path will be \\192.168.0.191\Share.
3. Press [OK] four times.
If the format of the entered path is not correct, a message appears. Press [Exit], and then enter thepath again.
Locating the SMB folder using Browse Network
1. Press [Browse Network].
The client computers sharing the same network as the machine appear.
Network display only lists client computers you are authorized to access.
2. Select the group that contains the destination computer.
3. Select the computer name of the destination computer.
Shared folders under it appear.
6. Scan
106

You can press [Up One Level] to switch between levels.
4. Select the folder you want to register.
5. Press [OK] four times.
Deleting an SMB Registered Folder
1. Press the [User Tools/Counter] key.
2. Press [Address Book Mangmnt].
3. Press [Change].
4. Press [Folder].
5. Select the name whose folder you want to delete.
Press the name key, or enter the registered number using the number keys.
You can search by the registered name, user code, fax number, folder name, e-mail address, or IP-Fax destination.
6. Press [Folder].
7. Press the protocol which is not currently selected.
8. Press [OK] twice.
9. Press the [User Tools/Counter] key.
Entering the Path to the Destination Manually
1. Press [Manual Entry].
Basic Procedure When Using Scan to Folder
107

2. Press [SMB].
3. Press [Enter] in [Destination].
4. Press [Enter] on the right side of the path field.
5. Enter the path for the folder.
In the following example path, the shared folder name is "user" and the computer name is"desk01":
\\desk01\user
6. Press [OK].
7. Depending on the destination setting, enter the user name for logging in to the computer.
Press [Enter] to the right of the user name field to display the soft keyboard.
8. Depending on the destination setting, enter the password for logging in to the computer.
Press [Password] for the password to display the soft keyboard.
9. Press [Connection Test].
A connection test is performed to check whether the specified shared folder exists.
10. Check the connection test result, and then press [Exit].
11. Press [OK].
6. Scan
108

Basic Procedure for Sending Scan Files by E-mail
1. Press the [Home] key on the top left of the control panel, and press the [Scanner] icon onthe [Home] screen.
CMR612
2. Make sure that no previous settings remain.
If a previous setting remains, press the [Reset] key.
3. Press the [Email] tab.
4. Place originals.
5. If necessary, select [Send Settings] or [Original], and specify scan settings according tothe original you want to scan.
Example: Scanning the document in color/duplex mode, and saving as a PDF file.
• Press [Original], and then press [2 Sided].
• Press [Send Settings]. Select [Type of Original], and then press [Full Colour].
• Press [Send Settings]. Select [File Type], and then press [PDF].
6. Specify the destination.
You can specify multiple destinations.
7. Press [ ] in [Send Settings] twice, select [Sender Name], and then specify the e-mailsender (originator).
Basic Procedure for Sending Scan Files by E-mail
109

8. To use the Message Disposition Notification function, select [Send Settings], press [ ] fourtimes, and then press [Reception Notice].
If you select [Reception Notice], the selected e-mail sender will receive e-mail notification when thee-mail recipient has opened the e-mail.
9. Press the [Start] key.
Registering an E-mail Destination
1. Press the [User Tools/Counter] key.
2. Press [Address Book Mangmnt].
3. Press [New Program].
4. Press [Names].
5. Press [Name].
The name entry display appears.
6. Enter the name, and then press [OK].
7. Press [ ] to display [Title 1], [Title 2] and [Title 3].
8. Press [Title 1], [Title 2] or [Title 3] to select the key for the classification you want to use.
The keys you can select are as follows:
• [Frequent]: Added to the page that is displayed first.
• [AB], [CD], [EF], [GH], [IJK], [LMN], [OPQ], [RST], [UVW], [XYZ], [1] to [10]: Added to thelist of items in the selected title.
You can select [Frequent] and one more key for each title.
9. Press [OK].
10. Press [Exit].
11. Press [Email].
6. Scan
110

12. Press [Email Address].
13. Enter the e-mail address.
14. Press [OK].
15. Press [Use Email Address for], and then select [Email/Internet Fax Dest.] or [Internet FaxDestination Only].
If [Email/Internet Fax Dest.] is specified, registered e-mail addresses appear in both the internet faxaddress display and E-mail address display on the fax function screen, and in the address displayon the scanner function screen.
If [Internet Fax Destination Only] is specified, registered e-mail addresses only appear in theinternet fax display on the fax function screen.
16. Press [OK].
17. If you want to use Internet fax, press [Send via SMTP Server], and set to [On].
18. Press [OK].
19. Press [Exit].
20. Press [OK].
21. Press the [User Tools/Counter] key.
Deleting an E-mail Destination
1. Press the [User Tools/Counter] key.
2. Press [Address Book Mangmnt].
3. Press [Change].
Basic Procedure for Sending Scan Files by E-mail
111

4. Press [Email].
5. Select the name whose e-mail address you want to delete.
Press the name key, or enter the registered number using the number keys. You can search by theregistered name, user code, fax number, folder name, e-mail address, or IP-Fax destination.
6. Press [Email].
7. Press [Email Address].
8. Press [Delete All], and then press [OK].
9. Press [Exit].
10. Press [OK].
11. Press the [User Tools/Counter] key.
Entering an E-mail Address Manually
1. Press [Manual Entry].
2. Press [Enter] under [Destination].
3. Enter the e-mail address.
4. Press [OK].
6. Scan
112

Basic Procedure for Storing Scan Files
• You can specify a password for each stored file. Files that are not password-protected can beaccessed by other users on the same local area network using DeskTopBinder. We recommendthat you protect stored files from unauthorized access by specifying passwords.
• Scan file stored in the machine may be lost if some kind of failure occurs. We advise against usingthe hard disk to store important files. The supplier shall not be responsible for any damage that mayresult from the loss of files. For long-term storage of files, we recommend the use of DeskTopBinder.For details, contact your local dealer, or see the documentation for DeskTopBinder.
1. Press the [Home] key on the top left of the control panel, and press the [Scanner] icon onthe [Home] screen.
CMR612
2. Make sure that no previous settings remain.
If a previous setting remains, press the [Reset] key.
3. Place originals.
4. Press [Send Settings].
5. Press [ ] four times, and then press [Store File].
6. Press [Store to HDD].
7. If necessary, specify file information, such as [User Name], [File Name], and [Password].
• User Name
Basic Procedure for Storing Scan Files
113

Press [User Name], and then select a user name. To specify an unregistered user name, press[Manual Entry], and then enter the name. After specifying a user name, press [OK].
• File Name
Press [File Name], enter a file name, and then press [OK].
• Password
Press [Password], enter a password, and then press [OK]. Re-enter the password forconfirmation, and then press [OK].
8. Press [OK] twice.
9. If necessary, press [Send Settings] or [Original] to configure settings for resolution andscan size.
10. Press the [Start] key.
Checking a Stored File Selected from the List
This section explains how to preview a file selected from the list of stored files.
1. Press [Send Settings].
2. Press [ ] four times, and then press [Select/Manage Stored File].
3. From the list of stored files, select the file you want to check.
You can select more than one file.
4. Press [Preview].
6. Scan
114

Specifying the File TypeThis section explains the procedure for specifying the file type of a file you want to send.
File types can be specified when sending files by e-mail or Scan to Folder, sending stored files by e-mailor Scan to Folder, and saving files on a removable memory device.
You can select one of the following file types:
• Single Page: [PDF], [High Compress. PDF], [PDF/A], [TIFF/JPEG]
If you select a single-page file type when scanning multiple originals, one file is created for eachsingle page and the number of files sent is the same as the number of pages scanned.
• Multi-page: [PDF], [High Compress. PDF], [PDF/A], [TIFF]
If you select a multi-page file type when scan multiple originals, scanned pages are combined andsent as a single file.
Selectable file types differ depending on the scan settings and other conditions. For details aboutfile types, see "Notes About and Limitations of File Types", Scan .
1. Press [Send Settings].
2. Press [File Type].
3. Select a file type.
4. Press [OK] twice.
Specifying the File Type
115

Specifying Send Settings1. Press [Send Settings].
2. Specify resolution, scan size, and other settings, as required.
3. Press [OK].
6. Scan
116

7. Document ServerThis chapter describes frequently used Document Server functions and operations. For the informationnot included in this chapter, see Copy/ Document Server on the supplied CD-ROM.
Storing DataThis section describes the procedure for storing documents on the Document Server.
• A document accessed with a correct password remains selected even after operations arecomplete, and it can be accessed by other users. After the operation, be sure to press the [Reset]key to cancel the document selection.
• The user name registered to a stored document in the Document Server is to identify the documentcreator and type. It is not to protect confidential documents from others.
• When turning on the fax transmission or scanning by the scanner, make sure that all otheroperations are ended.
File Name
A file name such as "COPY0001" and "COPY0002" is automatically attached to the scanneddocument. You can change the file name.
User Name
You can register a user name to identify the user or user group that stored the documents. To assignit, select the user name registered in the Address Book, or enter the name directly. Depending onthe security setting, [Access Privileges] may appear instead of [User Name]. For details about theAddress Book, see "Registering Addresses and Users for Facsimile/Scanner Functions",Connecting the Machine/ System Settings .
Password
To prevent unauthorized printing, you can specify a password for any stored document. Aprotected document can only be accessed if its password is entered. If a password is specified forthe documents, the key icon appears on the left side of the file name.
117

1. Press the [Home] key on the top left of the control panel, and press the [Document Server]icon on the [Home] screen.
CMR612
2. Press [To Scanning Scrn.].
3. Press [User Name].
4. Specify a user name, and then press [OK].
The user names shown are names that were registered in the Address Book. To specify a name notshown in the screen, press [Manual Entry], and then enter a user name.
5. Press [File Name].
6. Enter a file name, and then press [OK].
7. Press [Password].
8. Enter a password with the number keys, and then press [OK].
You can use four to eight digits for the password.
9. For double-check, enter the password again, and then press [OK].
10. Select the paper tray.
11. Place the original.
12. Specify the original scanning conditions.
13. Press the [Start] key.
The original is scanned. The document is saved in the Document Server.
After scanning, a list of stored documents will be displayed. If the list does not appear, press [FinishScanning].
7. Document Server
118

Printing Stored DocumentsPrints stored documents on the Document Server.
The items you can specify on the printing screen are as follows:
• Paper tray
• The number of prints
• [2 Sided: Top to Top], [2 Sided: Top to Bottom]
• [Sort]
• [Margin Adjustment]
For details about each function, see Copy/ Document Server .
1. Select a document to be printed.
2. When printing two or more documents at a time, repeat step 1.
Up to 30 documents can be printed.
3. When specifying printing conditions, press [To Printing Screen], and then configure printsettings.
4. Enter the number of print copies with the number keys.
The maximum quantity that can be entered is 99.
5. Press the [Start] key.
Printing Stored Documents
119

7. Document Server
120

8. Web Image MonitorThis chapter describes frequently used Web Image Monitor functions and operations. For theinformation not included in this chapter, see Connecting the Machine/ System Settings on thesupplied CD-ROM or Web Image Monitor Help.
Displaying Top PageThis section explains the Top Page and how to display Web Image Monitor.
• When entering an IPv4 address, do not begin segments with zeros. For example: If the address is"192.168.001.010", you must enter it as "192.168.1.10".
1. Start your Web browser.
2. Enter "http://(machine's IP address or host name)/" in your Web browser's URL bar.
Top Page of Web Image Monitor appears.
If the machine's host name has been registered on the DNS or WINS server, you can enter it.
When setting SSL, a protocol for encrypted communication, under environment which serverauthentication is issued, enter "https://(machine's IP address or host name)/".
Web Image Monitor is divided into the following areas:
1
2
3
5
4
CMM004
1. Menu area
If you select a menu item, its content will be shown.
2. Header area
The dialog box for switching to the user mode and administrator mode appears, and each mode's menu willbe displayed.
The link to Help and dialog box for keyword search appears.
121

3. Refresh/Help
(Refresh): Click at the upper right in the work area to update the machine information. Click the Webbrowser's [Refresh] button to refresh the entire browser screen.
(Help): Use Help to view or download Help file contents.
4. Basic Information area
Displays the basic information of the machine.
5. Work area
Displays the contents of the item selected in the menu area.
8. Web Image Monitor
122

Viewing Received Fax Documents Using WebImage Monitor
1. Start Web Image Monitor.
2. Click [Fax Received File] on the [Print Job/Stored File] menu in the left pane.
3. If you have programmed a user code for the stored reception file, enter the code, andthen press [OK].
If the programmed user code was deleted from the Address Book, a message indicating incorrectuser code entry appears. If this is the case, reprogram a user code.
4. Click the property icon of the desired fax document.
5. View the content of the fax document.
6. To download the received fax document, select [PDF], [PDF/A], or [Multi-page: TIFF],and then click [Download].
When you select [PDF], make the necessary "PDF File Security Settings" before clicking[Download]. Adobe Acrobat Reader/Adobe Reader starts and the selected document isdisplayed.
7. Quit Web Image Monitor.
Viewing Received Fax Documents Using Web Image Monitor
123

8. Web Image Monitor
124

9. Adding Paper and TonerThis chapter describes how to load paper into the paper tray and recommended paper sizes and types.
Loading Paper into Paper TraysEvery paper tray is loaded in the same way.
In the following example procedure, paper is loaded into tray 1.
• If a paper tray is pushed vigorously when putting it back into place, the position of the tray's sidefences may slip out of place.
• Check the paper edges are aligned at the right side.
• When loading a low number of sheets, be sure not to squeeze the side fences in too tightly. If theside fences are squeezed too tightly against the paper, the edges may crease or the paper may bemisfed.
1. Carefully pull out the paper tray until it stops.
CMS004
2. Square the paper and load it print side up.
Do not stack paper over the limit mark.
CMS005
3. Carefully slide the paper tray fully in.
125

• Various sizes of paper can be loaded in the paper trays by adjusting the positions of side fencesand end fence. For details, see "Changing the Paper Size in the Paper Trays", Paper Specificationsand Adding Paper .
9. Adding Paper and Toner
126

Loading Paper into the Bypass TrayUse the bypass tray to use OHP transparencies, adhesive labels, translucent paper, and paper thatcannot be loaded in the paper trays.
• The maximum number of sheets you can load at the same time depends on paper type. Do notload paper over the limit mark. For the maximum number of sheets you can load, see p.135"Recommended Paper Sizes and Types".
1. Open the bypass tray.
CMS006
2. Insert the paper face down until you hear the beep.
3. Align the paper guides to the paper size.
If the guides are not flush against the paper, images might be skewed or paper misfeeds mightoccur.
CMS007
• When you use the bypass tray, it is recommended to load the paper in orientation.
• When copying from the bypass tray, see "Copying from the Bypass Tray", Copy/ DocumentServer . When printing from a computer, see p.128 "Settings to Use the Bypass Tray under thePrinter Function".
Loading Paper into the Bypass Tray
127

• Certain types of paper might not be detected properly when placed on the bypass tray. If thishappens, remove the paper and place it on the bypass tray again.
• Pull the extender out when loading A4 , 81/2 × 11 or larger size paper in the bypass tray.
• When the [Panel Key Sound] is turned off, it will not sound if you load paper into the bypass tray.For details about [Panel Key Sound], see "System Settings", Connecting the Machine/ SystemSettings .
• When loading thick paper or OHP transparencies, specify the paper size and the paper type.
• Letterhead paper must be loaded in a specific orientation. For details, see, p.132 "LoadingOrientation-Fixed Paper or Two-Sided Paper".
• You can load envelopes into the bypass tray. Envelopes must be loaded in a specific orientation.For details, see p.140 "Envelopes".
Settings to Use the Bypass Tray under the Printer Function
• If you select [Machine Setting(s)] in [Bypass Tray] under [Tray Setting Priority] in [System] of thePrinter Features menu, the settings made using the control panel have priority over the printer driversettings. For details, see "System", Print .
• The default setting of [Bypass Tray] is [Driver/Command].
• Settings remain valid until they are changed. After printing, be sure to clear settings for the nextuser.
• For details about setting printer drivers, see "Printing Documents", Print .
• (mainly Europe and Asia)
• [A4 ] is the default setting for [Printer Bypass Paper Size].
• (mainly North America)
• [81/2 × 11 ] is the default setting for [Printer Bypass Paper Size].
9. Adding Paper and Toner
128

Setting the paper size using the control panel
1. Press the [User Tools/Counter] key.
CMR633
2. Press [Tray Paper Settings].
3. Press [ ].
4. Press [Printer Bypass Paper Size].
5. Select the paper size.
6. Press [OK].
7. Press the [User Tools/Counter] key.
• When loading thick paper or OHP transparencies, specify the paper size and the paper type.
Setting custom size paper using the control panel
1. Press the [User Tools/Counter] key.
CMR633
2. Press [Tray Paper Settings].
3. Press [ ].
4. Press [Printer Bypass Paper Size].
Loading Paper into the Bypass Tray
129

5. Press [Custom Size].
If a custom size is already specified, press [Change].
6. Press [Vertical].
7. Enter the size of the paper using the number keys, and then press the [ ] key.
8. Press [Horizontal].
9. Enter the size of the paper using the number keys, and then press the [ ] key.
10. Press [OK] twice.
11. Press the [User Tools/Counter] key.
• When loading thick paper, specify the paper size and the paper type.
Setting thick paper or OHP transparencies using the control panel
• Certain types of OHP transparencies for color printing cannot be used. For details about types thatcan be used, contact your sales or service representative.
• Use A4 or 81/2 × 11 size OHP transparencies, and specify their size.
• When you load OHP transparencies, check the front and back of the sheets, and place themcorrectly.
• When printing onto OHP transparencies, remove printed sheets one by one.
1. Press the [User Tools/Counter] key.
CMR633
2. Press [Tray Paper Settings].
3. Press [ ].
4. Press [Printer Bypass Paper Size], and then specify the paper size.
5. Press [OK].
6. Press [Paper Type: Bypass Tray].
9. Adding Paper and Toner
130

7. Press [Paper Type].
8. Select the paper type, and then press [OK].
To load thick paper, make sure that [Plain Paper] is selected.
Press [OHP (Transparency)] when loading OHP transparencies.
9. When printing onto thick paper, press [Paper Thickness]. When printing onto OHPtransparencies, proceed to step 11.
10. Select the paper thickness, and then press [OK].
11. Press the [User Tools/Counter] key.
• We recommend that you use specified OHP transparencies.
• For details about paper thickness, see "System Settings", Connecting the Machine/ System Settings.
Loading Paper into the Bypass Tray
131

Loading Orientation-Fixed Paper or Two-SidedPaperOrientation-fixed (top to bottom) or two-sided paper (for example, letterhead paper, punched paper, orcopied paper) might not print correctly, depending on how the originals and paper are placed.
Settings for the User Tools
• Copier mode
Specify [On] for [Letterhead Setting] in [Input/Output] under the Copier/Docu. ServerFeatures menu, and then place the original and paper as shown below.
• Printer mode
Specify [Auto Detect] or [On (Always)] for [Letterhead Setting] in [System] under the PrinterFeatures menu, and then place the paper as shown below.
For details about the letterhead settings, see "Copier/Document Server Features", Copy/Document Server , or "Printer Features", Print .
Original orientation and paper orientation
The meanings of the icons are as follows:
Icon Meaning
Place or load paper scanned or printed side face up.
Place or load paper scanned or printed side face down.
• Original orientation
Original orientation Exposure glass ADF
Portrait ( )
9. Adding Paper and Toner
132

Original orientation Exposure glass ADF
Landscape ( ) • Copy
• Scanner
• Paper orientation
• Copier mode
Copy side Paper trays Bypass tray
One-sided
Two-sided Unavailable
• Printer mode
Print side Paper trays Bypass tray
One-sided
Two-sided Unavailable
• In printer mode:
• To print on letterhead paper when [Auto Detect] is specified for [Letterhead Setting], you mustspecify [Letterhead] as the paper type in the printer driver's settings.
Loading Orientation-Fixed Paper or Two-Sided Paper
133

• If a print job is changed partway through printing from one-sided to two-sided printing, one-sided output after the first copy may be printed facing a different direction. To ensure allpaper is output facing the same direction, specify different input trays for one-sided and two-sided printing. Note also that two-sided printing must be disabled for the tray specified forone-sided printing.
• For details about how to make two-sided prints, see "Printing on Both Sides of Sheets", Print.
• In copier mode:
• For details about how to make two-sided copies, see p.61 "Duplex Copying".
9. Adding Paper and Toner
134

Recommended Paper Sizes and TypesThis section describes recommended paper sizes and types.
• If you use damp or curled paper, a paper jam may occur.
• Do not use paper designed for inkjet printers, as these may stick to the fusing unit and cause amisfeed.
• When you load OHP transparencies, check the front and back of the sheets, and place themcorrectly, or a misfeed might occur.
• For details about and recommendations concerning thick paper, see p.139 "Thick Paper".
• For details about various details about and recommendations concerning envelopes, see p.140"Envelopes".
Tray 1
Paper type and weight Paper size Paper capacity
60–163 g/m2 (16 lb. Bond–90lb. Index)
Plain Paper 1–Thick Paper 2
Select the paper size using theSystem Settings menu:
A4 , A5 , B5 JIS , 81/2 ×11 , 51/2 × 81/2
250 sheets
60–163 g/m2 (16 lb. Bond–90lb. Index)
Plain Paper 1–Thick Paper 2
Custom size:
Vertical: 139.5–216.0 mm
Horizontal: 210.0–297.0 mm
Vertical: 5.50–8.50 inches
Horizontal: 8.27–11.69 inches
250 sheets
Recommended Paper Sizes and Types
135

Trays 2 and 3
Paper type and weight Paper size Paper capacity
60–163 g/m2 (16 lb. Bond–90lb. Index)
Plain Paper 1–Thick Paper 2
Select the paper size using theSystem Settings menu:
A4 , A5 , B5 JIS ,
81/2 × 14 , 81/2 × 13 ,81/2 × 11 , 81/4 × 14 ,81/4 × 13 , 8 × 13 , 71/4 ×101/2 , 51/2 × 81/2 , 81/2× 12
500 sheets
60–163 g/m2 (16 lb. Bond–90lb. Index)
Plain Paper 1–Thick Paper 2
Custom size:
Vertical: 139.5–216.0 mm
Horizontal: 210.0–356.6 mm
Vertical: 5.50–8.50 inches
Horizontal: 8.27–14.03 inches
500 sheets
Bypass tray
Paper type andweight
Paper size Paper capacity
60–220 g/m2 (16lb. Bond–80 lb.Cover)
Plain Paper 1–ThickPaper 3
Select the paper size *1:
A4 , A5 , A6 , B5 JIS , B6 JIS ,81/2 × 14 , 81/2 × 13 , 81/2 × 11 ,81/4 × 14 , 81/4 × 13 , 8 × 13 , 8 ×10 , 71/4 × 101/2 , 51/2 × 81/2 ,16K , 81/2 × 12
• Plain Paper 1–PlainPaper 2: 100 sheets
• Middle Thick–ThickPaper 3: *3
9. Adding Paper and Toner
136

Paper type andweight
Paper size Paper capacity
60–220 g/m2 (16lb. Bond–80 lb.Cover)
Plain Paper 1–ThickPaper 3
Custom size *2:
Vertical: 76.2–216.0 mm
Horizontal: 139.0–600.0 mm
Vertical: 3.00–8.50 inches
Horizontal: 5.48–23.62 inches
• Plain Paper 1–PlainPaper 2: 100 sheets
• Middle Thick–ThickPaper 3: *3
Translucent paper A4 10 sheets
OHP transparencies A4 , 81/2 × 11 10 sheets
Label paper(adhesive labels)
A4 , 81/2 × 11 1 sheet
Envelopes Select the paper size *1:
41/8 × 91/2 , 37/8 × 71/2 , C5 Env, C6 Env , DL Env
*3
*1 For copier mode, see "Copying onto Regular Size Paper from the Bypass Tray", Copy/ DocumentServer . For printer mode, see p.129 "Setting the paper size using the control panel".
*2 Enter the paper size. For copier mode, see "Copying onto Custom Size Paper from the Bypass Tray",Copy/ Document Server . For printer mode, see p.129 "Setting custom size paper using the controlpanel".
*3 Do not stack over the limit mark. The number of sheets you can load in the paper tray varies dependingon the weight and condition of the paper.
Paper Thickness
Paper Thickness *1 Paper weight
Plain Paper 1 60–74 g/m2 (16–20 lb. Bond)
Plain Paper 2 75–81 g/m2 (20 lb. Bond)
Middle Thick 82–105 g/m2 (20–28 lb. Bond)
Thick Paper 1 106–130 g/m2 (28–35 lb. Bond)
Thick Paper 2 131–163 g/m2 (35 lb. Bond–90 lb. Index)
Thick Paper 3 164–220 g/m2 (90 lb. Index–80 lb. Cover)
Recommended Paper Sizes and Types
137

*1 Print quality will decrease if the paper you are using is close to the minimum or maximum weight.Change the paper weight setting to thinner or thicker.
• Certain types of paper produce noise when delivered. This noise does not indicate a problem andprint quality is unaffected. (Translucent paper and OHP transparencies can produce noise whendelivered.)
• The paper capacity described in the tables above is an example. Actual paper capacity might belower, depending on the paper type.
• When loading paper, make sure the stack height does not exceed the limit mark of the paper tray.
• If multiple sheet feeding occurs, fan sheets thoroughly or load sheets one by one from the bypasstray.
• Flatten out curled sheets before loading them.
• When loading envelopes, see p.140 "Envelopes".
• When using paper of 60–65 g/m2 (16–17 lb. Bond), we recommend that you specify [SpecialPaper 1] for paper type in order to get better output quality.
• When loading thick paper of 106–220 g/m2 (28 lb. Bond–80 lb. Cover), see p.139 "ThickPaper".
• When copying or printing onto letterhead paper, the paper placing orientation is differentdepending on which function you are using. For details, see p.132 "Loading Orientation-FixedPaper or Two-Sided Paper".
• When copying or printing onto small paper such as envelopes, the copy/print speed is slower thanusual.
• If you load paper of the same size and same type in two or more trays, the machine automaticallyshifts to the other tray when the first tray in use runs out of paper. This function is called Auto TraySwitching. (However, if the paper type of one tray is recycled or special paper, the settings of theother trays must be the same for the Auto Tray Switching function to work.) This saves interrupting acopy run to replenish paper when making a large number of copies. You can specify the papertype of the paper trays under [Paper Type: Tray 1]–[Paper Type: Tray 3]. For details, see "SystemSettings", Connecting the Machine/ System Settings . For the setting procedure of the Auto TraySwitching function, see "Copier/Document Server Features", Copy/ Document Server .
• When loading label paper:
• We recommend that you use specified label paper.
• Place one sheet at a time.
• After pressing [ ], press [Paper Type], and then select [Thick Paper 1] or [Thick Paper 2].
• When loading OHP transparencies:
• When copying onto OHP transparencies, see "Copying onto OHP Transparencies", Copy/Document Server .
9. Adding Paper and Toner
138

• When printing on OHP transparencies from the computer, see p.130 "Setting thick paper orOHP transparencies using the control panel".
• Fan OHP transparencies thoroughly whenever you use them. This prevents OHPtransparencies from sticking together, and from feeding incorrectly.
• Remove copied or printed sheets one by one.
• The copy/print speed may be slower than usual.
• When loading translucent paper:
• Remove copied or printed sheets one by one.
• When loading translucent paper, always use long grain paper, and set the paper directionaccording to the grain.
• Translucent paper easily absorbs humidity and becomes curled. Remove curl in the translucentpaper before loading.
• When loading coated paper:
• To print on coated paper from the bypass tray or paper trays: press the [User Tools/Counter]key, press [Tray Paper Settings], and then, for each tray's [Paper Type] be sure to specify[Coated Paper] for [Paper Type]. Specify the thickness of the paper under [Paper Thickness]according to the weight of the paper you are printing on.
• When loading coated sheets, fan them for each use.
• If coated sheets of paper jam, make noise, or if more than one sheet is fed at a time, feedthem from the bypass tray one at a time.
Thick Paper
This section gives you various details about and recommendations concerning thick paper.
When loading thick paper of 106–163 g/m2 (28 lb. Bond–90 lb. Index) in the paper trays, or 106–220 g/m2 (28 lb. Bond–80 lb. Cover) in the bypass tray, follow the recommendations below toprevent misfeeds and loss of image quality.
• Store all your paper in the same environment - a room where the temperature is 20–25 °C (68–77 °F) and the humidity is 30–65%.
• When loading thick paper in the paper trays, be sure to load at least 20 sheets. Also, be sure toposition the side and end fences flush against the paper stack.
• When loading thick paper, set the paper direction according to its grain, as shown in the followingdiagram:
Recommended Paper Sizes and Types
139

Direction of papergrain
Paper trays Bypass tray
Not recommended
• When copying or printing onto thick paper, the copy/print speed is slower than usual.
• Select [Thick Paper 1], [Thick Paper 2], or [Thick Paper 3] in [Tray Paper Settings] under the SystemSettings menu.
• Even if thick paper is loaded as described above, normal operations and print quality might still notbe possible, depending on the paper type.
• Prints might have prominent vertical creases.
• Prints might be noticeably curled. Flatten out prints if they are creased or curled.
Envelopes
This section gives you various details about and recommendations concerning envelopes.
• Do not use window envelopes.
• Fan the envelopes before loading them to separate them and prevent the glue on them fromcausing them to stick together. If fanning does not prevent them sticking together, load them one byone. Note that some types of envelopes cannot be used with this machine.
• Misfeeds might occur depending on the length and shape of the flaps.
• Before loading envelopes, press down on them to remove any air from inside, flatten out all fouredges. If they are bent or curled, flatten their leading edges (the edge going into the machine) byrunning a pencil or ruler across them.
In copier mode
When copying onto envelopes, load them according to the applicable orientation shown below.Load the envelopes in the same direction as the original.
9. Adding Paper and Toner
140

How to load envelopes
Orientation ofenvelopes
Exposure glass Bypass tray
Side-openingenvelopes
• Flaps: closed
• Side to be scanned:face down
• Flaps: closed
• Side to be printed:face down
When loading envelopes, specify the envelope type and thickness. For details, see p.70 "Copyingonto Envelopes".
In printer mode
When printing onto envelopes, load them according to the applicable orientation shown below:
How to load envelopes
Types of envelopes Bypass tray
Side-opening envelopes
• Flaps: closed
• Side to be printed: face down
Recommended Paper Sizes and Types
141

When loading envelopes, select "Envelope" as the paper types using both the User Tools andprinter driver, and specify the thickness of envelopes. For details, see "Printing on Envelopes", Print
.
To print on envelopes that are loaded with their bottom edge pointing toward the back of themachine, rotate the print image by 180 degrees using the printer driver.
Recommended envelopes
For information about recommended envelopes, contact your local dealer.
For details about the sizes of envelopes you can load, see p.135 "Recommended Paper Sizes andTypes".
• Load only one size and type of envelope at a time.
• Output quality on envelopes may be uneven if parts of an envelope have differing thicknesses. Printone or two envelopes to check print quality.
• When copying or printing onto envelopes, the copy/print speed is slower than usual.
• Flatten out prints if they are creased or curled.
• Check the envelopes are not damp.
• High temperature and high humidity conditions can reduce print quality and cause envelopes tobecome creased.
• Depending on the environment, copying or printing on envelopes may wrinkle them even if theyare recommended.
• Certain types of envelopes might come out creased, dirtied, or misprinted. If you are printing asolid color on an envelope, lines may appear where the overlapped edges of the envelope make itthicker.
9. Adding Paper and Toner
142

Adding TonerThis section explains precautions when adding toner, how to send faxes or scanned documents whenthe toner has run out, and how to dispose of used toner.
• Do not incinerate toner (new or used) or toner containers. Doing so risks burns. Toner will igniteon contact with naked flame.
• Do not store toner (new or used) or toner containers anywhere near naked flames. Doing sorisks fire and burns. Toner will ignite on contact with naked flame.
• Do not use the cleaner to suck spilled toner (including used toner). Sucked toner may causefiring or explosion due to electrical contact flickering inside the cleaner. However, it is possibleto use the cleaner designed for dust explosion-proof purpose. If toner is spilled over the floor,sweep up spilled toner slowly and clean remainder with wet cloth.
• Do not crush or squeeze toner containers. Doing so can cause toner spillage, possibly resultingin dirtying of skin, clothing, and floor, and accidental ingestion.
• Store toner (new or used), toner containers, and components that have been in contact withtoner out of reach of children.
• If toner or used toner is inhaled, gargle with plenty of water and move into a fresh airenvironment. Consult a doctor if necessary.
• If toner or used toner gets into your eyes, flush immediately with large amounts of water. Consulta doctor if necessary.
• If toner or used toner is swallowed, dilute by drinking a large amount of water. Consult a doctorif necessary.
Adding Toner
143

• When removing jammed paper or replacing toner, avoid getting toner (new or used) on yourclothing. If toner comes into contact with your clothing, wash the stained area with cold water.Hot water will set the toner into the fabric and make removing the stain impossible.
• When removing jammed paper or replacing toner, avoid getting toner (new or used) on yourskin. If toner comes into contact with your skin, wash the affected area thoroughly with soap andwater.
• Always replace the toner cartridge when a notification appears on the machine.
• Fault may occur if you use toner other than the recommended type.
• When adding toner, do not turn off the main power. If you do, settings will be lost.
• Store toner where it will not be exposed to direct sunlight, temperatures above 35 °C (95 °F), orhigh humidity.
• Store toner on a flat surface.
• Do not shake the toner cartridge with its mouth down after removing it. Residual toner may scatter.
• Do not repeatedly install and remove toner cartridges. This will result in toner leakage.
Follow the instruction on the screen regarding how to replace a toner cartridge.
• If " Toner Cartridge is almost empty." appears, the toner has almost run out. Have a replacementtoner cartridge at hand.
• If appears when there is still toner in the cartridge, hold the cartridge with the opening upward,shake it well, and then reinstall it.
• You can check the name of the required toner and the replacement procedure using the [ AddToner] screen.
• For details about how to check contact number where you can order supplies, see "Enquiry",Maintenance and Specifications .
Sending Faxes or Scanned Documents When Toner Has Run Out
When the machine has run out of toner, the indicator on the display lights. Note that even if there is notoner left, you can still send faxes or scanned documents.
9. Adding Paper and Toner
144

• If number of communications executed after the toner has run out and not listed in the automaticallyoutput Journal exceeds 200, communication is not possible.
1. Make sure the machine is in facsimile or scanner mode.
2. Perform transmission operation.
The error message disappears.
• Any reports are not printed.
Disposing of Used Toner
This section describes what to do with used toner.
Toner cannot be re-used.
Pack used toner containers in the container's box or a bag to prevent the toner from leaking out of thecontainer when you dispose of it.
(mainly Europe and Asia)
If you want to discard your used toner container, please contact your local sales office. If you discard itby yourself, treat it as general plastic waste material.
(mainly North America)
Please see our local company website for information on the recycling of supply products, or you canrecycle items according to the requirements of your local municipalities or private recyclers.
Adding Toner
145

9. Adding Paper and Toner
146

10. TroubleshootingThis chapter describes basic troubleshooting procedures.
IndicatorsThis section describes the indicators displayed when the machine requires the user to remove misfedpaper, to add paper, or to perform other procedures.
Indicator Status
: Paper Misfeed indicator Appears when a paper misfeed occurs.
For details about removing jammed paper, see "RemovingJammed Paper", Troubleshooting .
: Original Misfeed indicator Appears when an original misfeed occurs.
For details about removing jammed paper, see "RemovingJammed Paper", Troubleshooting .
: Load Paper indicator Appears when paper runs out.
For details about loading paper, see "Loading Paper",Paper Specifications and Adding Paper .
: Add Toner indicator Appears when toner runs out.
For details about adding toner, see "Adding Toner",Maintenance and Specifications .
: Waste Toner Full indicator Appears when the waste toner bottle is full.
Contact your sales or service representative.
: Service Call indicator Appears when the machine is malfunctioning or requiresmaintenance.
: Open Cover indicator Appears when one or more covers of the machine areopen.
147

When an Indicator for the [Check Status] KeyIs LitIf an indicator for the [Check Status] key lights up, press the [Check Status] key to display the [CheckStatus] screen. Check the status of each function in the [Check Status] screen.
[Check Status] screen
1
2CNY002
43
1. [Mac/ApliStat] tab
Indicates the status of the machine and each function.
2. Status icons
Each icon that can be displayed is described below:
: The function is performing a job.
: An error has occurred on the machine.
: An error has occurred in the function being used. Or, the function cannot be used because an error hasoccurred on the machine.
3. Messages
Displays a message that indicates the status of the machine and each function.
4. [Check]
If an error occurs in the machine or a function, press [Check] to view details.
Pressing [Check] displays an error message or the corresponding function screen. Check the error messagedisplayed on the function screen and take the appropriate action.
• p.157 "Messages Displayed When Using the Copy/Document Server Function"
• p.159 "Messages Displayed When Using the Facsimile Function"
• p.172 "Messages Displayed When Using the Printer Function"
• p.186 "Messages Displayed When Using the Scanner Function"
The following table explains problems that cause the indicator to light:
10. Troubleshooting
148

Problem Causes Solutions
Documents and reports donot print out.
The paper output tray is full. Remove the prints from the tray.
Documents and reports donot print out.
There is no paper left. Load paper. For details about loadingpaper, see "Loading Paper", PaperSpecifications and Adding Paper .
An error has occurred. A function which has thestatus "Error Occurred" inthe [Check Status] screen isdefective.
Press [Check] in the function which theerror has occurred. Then check thedisplayed message, and takeappropriate action. For details abouterror messages and their solutions, seep.157 "When Messages AreDisplayed on the Control Panel".
You can use other functions normally.
The machine is unable toconnect to the network.
A network error hasoccurred.
• Press [Check] in the functionwhich error is occurred. And thencheck the displayed message,and take appropriate action. Fordetails about error messages andtheir solutions, see p.157 "WhenMessages Are Displayed on theControl Panel".
• Check that the machine iscorrectly connected to thenetwork, and that the machine iscorrectly set. For details abouthow to connect the network, see"Interface Settings", Connectingthe Machine/ System Settings .
• For details about connecting tothe network, contact youradministrator.
• If the indicator is still lit even aftertrying to solve the problem asdescribed here, contact yourservice representative.
When an Indicator for the [Check Status] Key Is Lit
149

Panel ToneThe following table describes the meaning of the various beep patterns that the machine produces toalert users about left originals and other machine conditions.
Beep pattern Meaning Causes
Single short beep Panel/screen inputaccepted.
A control panel or screen key waspressed.
Short, then long beep Panel/screen input rejected. An invalid key was pressed on thecontrol panel or screen, or the enteredpassword was incorrect.
Single long beep Job completed successfully. A Copy/Document Server Featuresjob has finished.
Two long beeps Machine has warmed up. When the power is turned on or themachine exits Sleep mode, themachine has fully warmed up and isready for use.
Five long beeps Soft alert An auto reset was performed throughthe Simple Screen of the Copy/Document Server function, theFacsimile function, or the Scannerfunction.
Five long beeps repeatedfour times.
Soft alert An original has been left on theexposure glass or paper tray is empty.
Five short beeps repeatedfive times.
Strong alert The machine requires user attentionbecause paper has jammed, the tonerneeds replenishing, or other problemshave occurred.
• Users cannot mute the machine's beep alerts. When the machine beeps to alert users of a paperjam or toner request, if the machine's covers are opened and closed repeatedly within a shortspace of time, the beep alert might continue, even after normal status has resumed.
• You can select to enable or disable beep alerts. For details about Panel Key Sound, see "GeneralFeatures", Connecting the Machine/ System Settings .
10. Troubleshooting
150

When You Have Problems Operating theMachineThis section describes common problems and messages. If other messages appear, follow theinstructions displayed.
Problem Causes Solutions
The [Facsimile] or [Scanner]icon does not appear on the[Home] screen even thoughthe copier screen appearswhen the machine is turnedon using the main powerswitch.
Functions other than thecopier function are not yetready.
Functions appear on the [Home]screen when they become ready foruse. Time required varies by function.Wait a little longer.
The machine has just beenturned on and the User Toolsscreen is displayed, but theUser Tools menu has itemsmissing.
Functions other than thecopier function are not yetready.
Functions appear in the User Toolsmenu when they become ready foruse. Time required varies by function.Wait a little longer.
The lamp remains lit and themachine does not enterSleep mode even though the[Energy Saver] key waspressed.
• The ADF is open.
• The machine iscommunicating withexternal equipment.
• The hard disk is active.
• Close the ADF.
• Check if the machine iscommunicating with externalequipment.
• Wait a little longer.
The display is off. The machine is in SleepMode.
Press the [Energy Saver] key or the[Check Status] key to cancel SleepMode.
Nothing happens when the[Check Status] key or the[Energy Saver] key ispressed.
The main power switch isturned off.
Turn on the main power switch.
"Please wait." appears. This message appears whenyou press the [Energy Saver]key.
Wait for a while. If the machine doesnot get ready in five minutes, contactyour service representative.
When You Have Problems Operating the Machine
151

Problem Causes Solutions
"Please wait." appears. This message appears whenthe machine is warming up.
• Wait until the messagedisappears. Do not turn off themain power switch while themessage is displayed.
• If the machine does not get readyin nine minutes, contact yourservice representative.
"Please wait." appears. This message appears whenyou change the tonercartridge.
• Wait until the messagedisappears. Do not turn off themain power switch while themessage is displayed.
• If the message does notdisappear in six minutes, contactyour service representative.
"Memory is full. Do youwant to store scanned file?"appears.
The scanned originalsexceed the number ofsheets/pages that can bestored on the hard disk.
• Press [Yes] to store pages thathave been scanned. Deleteunnecessary files by pressing[Delete File].
• Press [No] if you are not storingpages that have been scanned.Delete unnecessary files bypressing [Delete File].
"Self checking..." appears. The machine is performingimage adjustmentoperations.
The machine may perform periodicmaintenance during operations. Thefrequency and duration ofmaintenance depends on the humidity,temperature, and printing factors suchas number of prints, paper size, andpaper type. Wait for the machine toget ready.
The user code entry screen isdisplayed.
Users are restricted by UserCode Authentication.
For details about how to log in whenUser Code Authentication is enabled,see "When the Authentication Screen isDisplayed", Getting Started .
10. Troubleshooting
152

Problem Causes Solutions
The Authentication screenappears.
Basic Authentication,Windows Authentication,LDAP Authentication orIntegration ServerAuthentication is set.
Enter your Login User Name and LoginPassword. For details about theAuthentication screen, see "When theAuthentication Screen is Displayed",Getting Started .
"Authentication has failed."appears.
The entered Login UserName or Login Password isnot correct.
For details about the correct Login UserName and Login Password, seeSecurity Guide .
"Authentication has failed."appears.
The machine cannot performauthentication.
For details about authentication, seeSecurity Guide .
"You do not have theprivileges to use thisfunction." continues to bedisplayed even though youhave entered a valid username.
The logged in user namedoes not have permission forthe selected function.
For details about how to setpermissions, see Security Guide .
An error message remains,even if misfed paper isremoved.
• When a misfeedmessage appears, itremains until you openand close the cover asrequired.
• Paper is still jammed inthe tray.
Remove misfed paper, and then openand close the cover. For details aboutremoving jammed paper, see"Removing Jammed Paper",Troubleshooting .
An error message remains,even if consumables arereplaced and/or misfedpaper is removed.
This may occur if the HDD isnot installed.
Press the [Start] key.
Original images are printedon the reverse side of thepaper.
You may have loaded thepaper incorrectly.
• Load paper into the paper traywith the print side up.
• Load paper into the bypass traywith the print side down.
When You Have Problems Operating the Machine
153

Problem Causes Solutions
Misfeeds occur frequently. The tray's side or end fencesmay not be set properly.
• Remove misfed paper. For detailsabout removing jammed paper,see "Removing Jammed Paper",Troubleshooting .
• Check that the side or end fencesare set properly. Also, check thatthe side fences are locked. Fordetails about setting the side andend fences, see "Changing thePaper Size", Paper Specificationsand Adding Paper .
Misfeeds occur frequently. Copy paper size setting isnot correct.
• Remove misfed paper. For detailsabout removing jammed paper,see "Removing Jammed Paper",Troubleshooting .
• Set the proper paper size. Fordetails about specifying papersize with the control panel, see"Changing Paper Size Settings",Paper Specifications and AddingPaper .
Cannot print in duplexmode.
You have selected a papertray that is not set for duplexprinting.
Change the setting for "Apply 2-sided"in [System Settings] to enable duplexprinting for the paper tray. For detailsabout setting "Apply 2-sided", see"Tray Paper Settings", Connecting theMachine/ System Settings .
Cannot print in duplexmode.
Duplex printing cannot bedone with paper set in thebypass tray.
When using duplex printing, makesettings to use paper from a tray otherthan the bypass tray.
"Turn main Power Switch off"appears.
The machine does not shutdown normally when themain power switch is turnedoff, and then immediatelyturned on.
Turn off the main power switch. Waitfor ten seconds or more after themachine shuts down, and then turn iton again.
10. Troubleshooting
154

Problem Causes Solutions
"Shutting down... Pleasewait. Main power will beturned off automatically.Maximum waiting time: 3minute(s)" appears.
The shut down procedurehas begun because the mainpower switch was turned offwhile the machine was instandby mode or performingan operation.
Follow the message that appears andwait until the machine has shut down.Do not turn on the main power switchwhile this message is displayed. If themain power switch has been turned on,follow the message that appears. Fordetails about turning the main powerswitch on and off, see "Turning On/Offthe Power", Getting Started .
An error has occurred whenthe Address Book ischanged from the displaypanel or Web ImageMonitor.
The Address Book cannot bechanged while deleting themultiple stored documents.
Wait a while, and then retry theoperation.
Cannot use Web ImageMonitor to print documentsstored in Document Server.
When print volume limits arespecified, users cannot printbeyond their print volumelimit. Print jobs selected byusers who have reachedtheir print volume limits willbe canceled.
• For details about specifying printvolume limits, see Security Guide
.
• To view the status of a print job,see [Print Job History]. In WebImage Monitor, click [Job] on the[Status/Information] menu. Andthen click [Print Job History] in"Document Server".
"Internal cooling fan isactive." appears, and thefan is running.
Large print runs will causethe machine's interior to heatup, triggering the coolingfan. The fan willautomatically begin runningwhen the print run reachesapproximately 600 sheets ofA4 . (Installationenvironment : 10 °C 32 °C)
The fan will run for about 30 minutes.The fan will emit noise, but this isnormal and the machine will beoperable while the fan is running.
"Home is in use by anotherfunction." appears.
The [Home] screen is beingedited by another function.
Wait for a while, and then try to createthe shortcut on the [Home] screenagain.
When You Have Problems Operating the Machine
155

Problem Causes Solutions
"The image data size is notvalid. See the manual forrequired data." appears.
The image data size is notvalid.
For details about file size for shortcutimage, see "Customizing the [Home]Screen", Convenient Functions .
"The format of the imagedata is not valid." appears.
The file format of the shortcutimage to be added is notsupported.
The file format of shortcut images to beadded must be JPEG. Specify theimage again.
• If you cannot make copies as you want because of paper type, paper size, or paper capacityproblems, use recommended paper. For details about recommended paper, see p.135"Recommended Paper Sizes and Types".
• Using curled paper often causes misfeeds, soiled paper edges, or slipped positions whileperforming stack printing. When using curled paper, take the stiffness out of the paper with yourhands to straighten out the curl, or load the paper up side down. Also, lay paper on a flat surfaceto prevent paper from curling, and do not lean it against the wall.
10. Troubleshooting
156

When Messages Are Displayed on the ControlPanel
Messages Displayed When Using the Copy/Document Server Function
This section describes the machine's main messages. If other messages appear, follow their instructions.
• If you cannot make copies as you want because of the paper type, paper size or paper capacityproblems, use recommended paper. For details about recommended paper, see p.135"Recommended Paper Sizes and Types".
• For messages that are not listed here, see p.151 "When You Have Problems Operating theMachine".
Message Causes Solutions
"Check paper size." An irregular paper size isset.
If you press the [Start] key, the copywill start using the selected paper.
"Clean the scanning glass.(Located next to theexposure glass.)"
The scanning glass or guideplate of the ADF is dirty.
Clean them. For details about how toclean the machine, see "MaintainingYour Machine", Maintenance andSpecifications .
"2 Sided Copy is notavailable with this papersize. Select another papersize or cancel 2 SidedCopy."
A paper size not available inDuplex mode has beenselected.
Select a proper paper size. For detailsabout Duplex mode, see "DuplexCopying", Copy/ Document Server
.
"Exceeded max. number ofpages per file. Do you wantto store the scanned pagesas 1 file?"
The number of scannedpages exceeds the capacityper file of the DocumentServer.
• If you want to store the scannedpages as a file in the DocumentServer, press [Yes].
• If you do not want to storescanned pages, press [No].Scanned data is deleted.
"Exceeded the maximumnumber of sheets that can beused. Copying will bestopped."
The number of pages theuser is permitted to copy hasbeen exceeded.
For details about how to check thenumber of copies available per user,see Security Guide .
When Messages Are Displayed on the Control Panel
157

Message Causes Solutions
"File being stored exceededmax. number of pages perfile. Copying will bestopped."
The scanned originals havetoo many pages to store asone document.
Press [Exit], and then store again withan appropriate number of pages.
"Maximum number of sets isn."
(A figure is placed at n.)
The number of copiesexceeds the maximum copyquantity.
You can change the maximum copyquantity from [Max. Copy Quantity] in[General Features] under [Copier/Doc. Srvr. Featr.]. For details aboutMax. Copy Quantity, see "GeneralFeatures", Copy/ Document Server .
"Orig. scanned for diffrntfnctn."
A function of the machineother than the Copierfunction is being used suchas the Document Serverfunction.
Cancel the job that is being processed.For example, press [Exit], and thenpress the [Home] key. Next, press the[Document Server] icon on the [Home]screen, and then press the [Stop] key.When the message appears on thescreen, follow the instructions to cancelthe job.
"Please wait." The destination list is beingupdated from the networkusing Web Image Monitor.
Wait until the message disappears. Donot turn off the main power switchwhile this message is displayed.Depending on the number ofdestinations to be updated, there maybe some delay before you can resumeoperation. Operations are not possiblewhile this message is displayed.
"The selected file(s)contained file(s) withoutaccess privileges. Onlyfile(s) with access privilegeswill be deleted."
You have tried to delete fileswithout the authority to doso.
Files can be deleted by the person whocreated the file. To delete a file whichyou are not authorized to delete,contact the person who created thefile.
"You do not have theprivileges to use thisfunction."
The logged in user namedoes not have permission forthe selected function.
For details about how to setpermissions, see Security Guide .
10. Troubleshooting
158

When the memory becomes full while using the copy/document server function
Message Causes Solutions
"Memory is full. nn originalshave been scanned. Press[Print] to copy scannedoriginals."
"nn" in the messagerepresents a changeablenumber.
The scanned originalsexceed the number of pagesthat can be stored inmemory.
• Press [Print] to copy scannedoriginals and cancel the scanningdata.
• Press [Clear Memory] to cancelthe scanning data and not copy.
"Press [Continue] to scanand copy remainingoriginals."
The machine checked if theremaining originals shouldbe copied, after the scannedoriginals were printed.
• Remove all copies, and then press[Continue] to continue copying.
• Press [Stop] to stop copying.
• If you set [Memory Full Auto Scan Restart] in [Input/Output] of User Tools to [On], even if thememory becomes full, the memory overflow message will not be displayed. The machine will makecopies of the scanned originals first, and then automatically proceed to scan and to copy theremaining originals. In this case, the resulting sorted pages will not be sequential. For details aboutMemory Full Auto Scan Restart, see "Input/Output", Copy/ Document Server .
Messages Displayed When Using the Facsimile Function
This section describes the machine's main messages. If other messages appear, follow their instructions.
• Settings that can be confirmed in System Settings or Facsimile Features on the control panel canalso be confirmed from Web Image Monitor. For details about how to confirm the settings fromWeb Image Monitor, see Web Image Monitor Help.
Message Causes Solutions
"Cannot find the specifiedpath. Please check thesettings."
The name of the computer orfolder entered as thedestination is wrong.
Check that the computer name and thefolder name for the destination arecorrect.
When Messages Are Displayed on the Control Panel
159

Message Causes Solutions
"Check whether there areany network problems."
[13-10]
The alias telephone numberyou entered is alreadyregistered on the gatekeeperby another device.
• Check that the correct alias phonenumber is listed in [H.323Settings] of [Facsimile Features].For details about H.323 Settings,see "Initial Settings", Fax .
• For details about networkproblems, contact youradministrator.
"Check whether there areany network problems."
[13-11]
Cannot access gatekeeper. • Check that the correct gatekeeper address is listed in [H.323Settings] of [Facsimile Features].For details about H.323 Settings,see "Initial Settings", Fax .
• For details about networkproblems, contact youradministrator.
"Check whether there areany network problems."
[13-17]
Registering of user name isrejected by SIP server.
• Check that the correct SIP ServerIP Address and SIP User Nameare listed in [SIP Settings] of[Facsimile Features]. For detailsabout SIP Settings, see "InitialSettings", Fax .
• For details about networkproblems, contact youradministrator.
"Check whether there areany network problems."
[13-18]
Cannot access SIP server. • Check that the correct SIP ServerIP Address is listed in [SIPSettings] of [Facsimile Features].For details about SIP Settings, see"Initial Settings", Fax .
• For details about networkproblems, contact youradministrator.
"Check whether there areany network problems."
[13-24]
The password registered forthe SIP server is not the sameas the password registeredfor this machine.
For details about network problems,contact your administrator.
10. Troubleshooting
160

Message Causes Solutions
"Check whether there areany network problems."
[13-25]
In [Effective Protocol], the IPaddress is not enabled, or anincorrect IP address has beenregistered.
• Check that "IPv4" in [EffectiveProtocol] is set to "Active" in[System Settings]. For detailsabout Effective Protocol, see"Interface Settings", Connectingthe Machine/ System Settings .
• Check that the correct IPv4address is specified for themachine in [System Settings]. Fordetails about IPv4 address, see"Interface Settings", Connectingthe Machine/ System Settings .
• For details about networkproblems, contact youradministrator.
"Check whether there areany network problems."
[13-26]
The "Effective Protocol" and"SIP Server IP Address"settings are different, or anincorrect IP address has beenregistered.
• Check that the correct IP addressis specified for the machine in[System Settings]. For detailsabout IP address, see "InterfaceSettings", Connecting theMachine/ System Settings .
• For details about networkproblems, contact youradministrator.
When Messages Are Displayed on the Control Panel
161

Message Causes Solutions
"Check whether there areany network problems."
[14-01]
The DNS server, SMTPserver, or folder specified fortransfer to was not found, orthe destination for InternetFax around (not through) theSMTP server could not befound.
• Check that the following settingsin [System Settings] are listedcorrectly.
• DNS server
• Server name and IP addressfor the SMTP Server
For details about these settings,see "Interface Settings" or "FileTransfer", Connecting theMachine/ System Settings .
• Check that the folder for transfer iscorrectly specified.
• Check that the computer in whichthe folder for transfer is specifiedis correctly operated.
• Check that the LAN cable iscorrectly connected to themachine.
• For details about networkproblems of the destinations,contact the administrator of thedestinations.
• For details about networkproblems, contact youradministrator.
10. Troubleshooting
162

Message Causes Solutions
"Check whether there areany network problems."
[14-09]
E-mail transmission wasrefused by SMTPauthentication, POP beforeSMTP authentication, or loginauthentication of thecomputer in which the folderfor transfer is specified.
• Check that User Name andPassword for the followingsettings in [System Settings] arelisted correctly.
• SMTP Authentication
• POP before SMTP
• Fax Email Account
For details about these settings,see "File Transfer", Connecting theMachine/ System Settings .
• Check that the user ID andpassword for the computer withthe folder for forwarding arecorrectly specified.
• Check that the folder forforwarding is correctly specified.
• Confirm that the computer with thefolder for forwarding is properlyworking.
• For details about networkproblems, contact youradministrator.
"Check whether there areany network problems."
[14-33]
E-mail addresses for themachine and theadministrator are notregistered.
• Check that the correct EmailAddress is listed in [Fax EmailAccount] of [System Settings]. Fordetails about Fax Email Account,see "File Transfer", Connecting theMachine/ System Settings .
• For details about networkproblems, contact youradministrator.
When Messages Are Displayed on the Control Panel
163

Message Causes Solutions
"Check whether there areany network problems."
[15-01]
No POP3/IMAP4 serveraddress is registered.
• Check that the correct ServerName or Server Address is listedin [POP3/IMAP4 Settings] of[System Settings]. For detailsabout POP3/IMAP4 Settings, see"File Transfer", Connecting theMachine/ System Settings .
• For details about networkproblems, contact youradministrator.
"Check whether there areany network problems."
[15-02]
Cannot log in to the POP3/IMAP4 server.
• Check that the correct User Nameand Password are listed in [FaxEmail Account] of [SystemSettings]. For details about FaxEmail Account, see "File Transfer",Connecting the Machine/ SystemSettings .
• For details about networkproblems, contact youradministrator.
"Check whether there areany network problems."
[15-03]
No machine e-mail addressis programmed.
• Check that the correct machine e-mail address is specified in[System Settings]. For detailsabout settings of e-mail address,see "File Transfer", Connecting theMachine/ System Settings .
• For details about networkproblems, contact youradministrator.
10. Troubleshooting
164

Message Causes Solutions
"Check whether there areany network problems."
[15-11]
Cannot find the DNS serveror POP3/IMAP4 server.
• Check that the following settingsin [System Settings] are listedcorrectly.
• IP address of the DNSServer
• the server name or IPaddress of the POP3/IMAP4 server
• the port number of thePOP3/IMAP4 server
• Reception Protocol
For details about these settings,see "Interface Settings" or "FileTransfer", Connecting theMachine/ System Settings .
• Check that the LAN cable iscorrectly connected to themachine.
• For details about networkproblems, contact youradministrator.
"Check whether there areany network problems."
[15-12]
Cannot log in to the POP3/IMAP4 server.
• Check that the following settingsin [System Settings] are listedcorrectly.
• the user name and passwordfor [Fax Email Account]
• the user name and passwordfor POP before SMTPauthentication
For details about these settings,see "File Transfer", Connecting theMachine/ System Settings .
• For details about networkproblems, contact youradministrator.
When Messages Are Displayed on the Control Panel
165

Message Causes Solutions
"Connection with LDAPserver has failed. Check theserver status."
A network error has occurredand connection has failed.
Try the operation again. If the messageis still shown, the network may be busy.
Check the settings for LDAP server in[System Settings]. For details aboutsettings for LDAP server, see"Programming the LDAP server",Connecting the Machine/ SystemSettings .
"Error occurred, andtransmission wascancelled."
• Original jammed duringImmediate Transmission.
• A problem occurred inthe machine, or noiseoccurred on thetelephone line.
Press [Exit], and then send thedocuments again.
"Exceeded max. number todisplay. Max. No.: n"
(A figure is placed at n.)
The number of search resultshas exceeded the maximumnumber of items that can bedisplayed.
Search again after changing thesearch conditions.
"Exceeded time limit forLDAP server search. Checkthe server status."
A network error has occurredand connection has failed.
• Try the operation again. If themessage is still shown, thenetwork may be busy.
• Check that the correct settings forLDAP server are listed in[Administrator Tools] of [SystemSettings]. For details about LDAPserver, see "Programming theLDAP server", Connecting theMachine/ System Settings .
10. Troubleshooting
166

Message Causes Solutions
"Functional problemoccurred. Stoppedprocessing."
The main power switch wasturned off while the machinewas receiving a document byInternet Fax.
Even if you turn the main power switchback on immediately, depending onthe mail server, the machine might notbe able to resume reception of theInternet Fax if the timeout period hasnot expired. Wait until the mail server'stimeout period has expired, and thenresume reception of the Internet Fax.For details about reception of theInternet Fax, contact youradministrator.
"Functional problems withfacsimile. Data will beinitialized."
There is a problem with thefax.
Record the code number shown on thescreen, and then contact your servicerepresentative. Other functions can beused.
"LDAP server authenticationhas failed. Check thesettings."
A network error has occurredand connection has failed.
Make settings correctly for the username and the password for LDAPserver authentication.
"Orig. scanned for diffrntfnctn."
A function of the machineother than the Facsimilefunction is being used such asthe Document Serverfunction.
Before sending a file by fax, cancel thejob in progress. For example, press[Exit], and then press the [Home] key.Press the [Document Server] icon onthe [Home] screen. Next, press the[Stop] key. When the messageappears on the screen, follow theinstructions to cancel the job.
"Put original back, check itand press the Start key."
Original jammed duringMemory Transmission.
Press [Exit], and then send thedocuments again.
"Some invalid destination(s)contained. Do you want toselect only validdestination(s)?"
The specified group containsfax destinations, e-maildestinations, and/or folderdestinations, either of whichare incompatible with thespecified transmissionmethod.
In the message that appears at eachtransmission, press [Select].
When Messages Are Displayed on the Control Panel
167
Message Causes Solutions
"Some page(s) are almostblank. To cancel press theStop key."
The first page of thedocument is almost blank.
The original's blank side might havebeen scanned. Be sure to place youroriginals correctly. For details aboutdetermining the cause of blank pages,see "Detecting Blank Pages", Fax .
"The selected file(s)contained file(s) withoutaccess privileges. Onlyfile(s) with access privilegeswill be deleted."
You tried to delete adocument for which you donot have permission todelete.
To check your access permission forstored documents, or to delete adocument you do not have permissionto delete, see Security Guide .
"Updating the destinationlist... Please wait. Specifieddestination(s) or sender'sname has been cleared."
The destination list is beingupdated from the networkusing Web Image Monitor.
Wait until the message disappears. Donot turn off the main power switchwhile this message is displayed.Depending on the number ofdestinations to be updated, there maybe some delay before you can resumeoperation. Operation is not possiblewhile this message is displayed.
"You do not have theprivileges to use thisfunction."
The logged in user namedoes not have permission forthe selected function.
For details about how to setpermissions, see Security Guide .
"The destination cannot beselected because itscertificate is not currentlyvalid."
The user certificate(destination certificate) hasexpired.
A new user certificate must be installed.For details about the user certificate(destination certificate), see SecurityGuide .
"The group destinationcannot be selected becauseit contains a destination witha certificate that is notcurrently valid."
The user certificate(destination certificate) hasexpired.
A new user certificate must be installed.For details about the user certificate(destination certificate), see SecurityGuide .
"Transmission cannot beperformed because thecertificate used for the S/MIME signature is notcurrently valid."
The device certificate (S/MIME) has expired.
A new device certificate (S/MIME)must be installed. For details abouthow to install a device certificate (S/MIME), see Security Guide .
10. Troubleshooting
168

Message Causes Solutions
"The program contains adestination(s) with acertificate that is notcurrently valid. Thedestination(s) cannot berecalled."
The user certificate(destination certificate) hasexpired.
A new user certificate must be installed.For details about the user certificate(destination certificate), see SecurityGuide .
"The specified destinationfor Email TX Result, which isregistered to the program,has a certificate that is notcurrently valid. Thedestination cannot berecalled."
The user certificate(destination certificate) hasexpired.
A new user certificate must be installed.For details about the user certificate(destination certificate), see SecurityGuide .
"The specified dest. forEmail TX Result, which isregistered to program,contains a dest. that has acertificate that is notcurrently valid. The dest.cannot be recalled."
The user certificate(destination certificate) hasexpired.
A new user certificate must be installed.For details about the user certificate(destination certificate), see SecurityGuide .
"Transmission cannot beperformed because thecertificate for encryption isnot currently valid."
The user certificate(destination certificate) hasexpired.
A new user certificate must be installed.For details about the user certificate(destination certificate), see SecurityGuide .
"XXX cannot be YYYbecause the devicecertificate used for the S/MIME signature is notcurrently valid."
(XXX and YYY indicate theuser action.)
The device certificate (S/MIME) has expired.
A new device certificate (S/MIME)must be installed. For details abouthow to install a device certificate (S/MIME), see Security Guide .
"Email TX Result cannot beset because the specifieddestination's certificate isnot currently valid."
The user certificate(destination certificate) hasexpired.
For details about the user certificate(destination certificate), see SecurityGuide .
When Messages Are Displayed on the Control Panel
169

Message Causes Solutions
"The program contains adestination(s) that does nothave a certificate."
There is no user certificate(destination certificate).
For details about the user certificate(destination certificate), see SecurityGuide .
"The specified destinationfor Email TX Result, which isregistered to the program,has no certificate forencryption."
There is no user certificate(destination certificate).
For details about the user certificate(destination certificate), see SecurityGuide .
"The specified destinationsfor Email TX Result, which isregistered to the program,contain a destination(s) thathas no certificate forencryption."
There is no user certificate(destination certificate).
For details about the user certificate(destination certificate), see SecurityGuide .
"The device certificate usedfor the S/MIME signature isnot currently valid. XXXwhich is registered to theprogram cannot berecalled."
(XXX indicates the e-maildestination(s) ordestination(s) for [Email TXResults].)
The device certificate (S/MIME) has expired.
For details about the device certificate(S/MIME), see Security Guide .
"XXX cannot be YYYbecause there is a problemwith the device certificateused for the S/MIMEsignature. Check the devicecertificate."
(XXX and YYY indicate theuser action.)
There is no device certificate(S/MIME), or the certificateis invalid.
For details about the device certificate(S/MIME), see Security Guide .
10. Troubleshooting
170

Message Causes Solutions
"XXX cannot be recalledbecause there is a problemwith the device certificateused for the S/MIMEsignature."
(XXX indicates the e-maildestination(s) ordestination(s) for [Email TXResults].)
There is no device certificate(S/MIME), or the certificateis invalid.
For details about the device certificate(S/MIME), see Security Guide .
"The PDF Digital Signature'sdevice certificate is notcurrently valid. The emaildestination(s) which isregistered to the programcannot be recalled."
The device certificate (PDFwith digital signature) hasexpired.
A new device certificate (PDF withdigital signature) must be installed. Fordetails about how to install a devicecertificate (PDF with digital signature),see Security Guide .
"XXX cannot be YYYbecause the PDF DigitalSignature's devicecertificate is not currentlyvalid."
(XXX and YYY indicate theuser action.)
The device certificate (PDFwith digital signature) hasexpired.
A new device certificate (PDF withdigital signature) must be installed. Fordetails about how to install a devicecertificate (PDF with digital signature),see Security Guide .
"XXX cannot be YYYbecause there is a problemwith the PDF DigitalSignature's devicecertificate. Check the devicecertificate."
(XXX and YYY indicate theuser action.)
There is no device certificate(PDF with digital signature),or the certificate is invalid.
A new device certificate (PDF withdigital signature) must be installed. Fordetails about how to install a devicecertificate (PDF with digital signature),see Security Guide .
"The email destination(s)which is registered to theprogram cannot be recalledbecause there is a problemwith the PDF DigitalSignature's devicecertificate."
There is no device certificate(PDF with digital signature),or the certificate is invalid.
A new device certificate (PDF withdigital signature) must be installed. Fordetails about how to install a devicecertificate (PDF with digital signature),see Security Guide .
When Messages Are Displayed on the Control Panel
171

• If "Check whether there are any network problems." appears, the machine is not correctlyconnected to the network or the settings of the machine are not correct. If you do not need toconnect to a network, you can specify the setting so this message is not displayed, and then the[Check Status] key no longer lights. For details about how to do this, see "Parameter Settings", Fax
. If you reconnect the machine to the network, be sure to set "Display" by configuring theappropriate User Parameter.
• If the paper tray runs out of paper, "Cannot print fax message. Load paper." appears on thescreen, asking you to add paper. If there is paper left in the other trays, you can receive documentsas usual, even if the message appears on the screen. You can turn this function on or off with"Parameter Settings". For details about how to do this, see "Parameter Settings", Fax .
When the memory becomes full while using the facsimile function
Message Causes Solutions
"Memory is full. Cannot scanmore. Transmission will bestopped."
The memory is full. If you press [Exit], the machine returnsto standby mode and starts transmittingthe stored pages.
Check the pages that have not beensent using the Communication ResultReport, and then resend those pages.
Messages Displayed When Using the Printer Function
This section describes the principal messages that appear on the display panel, error logs or reports. Ifother messages appear, follow their instructions.
Status messages
Message Status
"Hex Dump Mode" In Hex Dump mode, the machine receives data in hexadecimal format.Press [Job Reset] to cancel Hex Dump mode.
"Suspended job exists." Printing was temporarily stopped by SmartDeviceMonitor for Client.
You can resume printing via [My Job List] in SmartDeviceMonitor forClient, or via the Web Image Monitor. To resume printing via WebImage Monitor, ask your system administrator first.
10. Troubleshooting
172

Message Status
"Offline" The machine is offline.
"Please wait." This message might appear for a second or two while the machine ispreparing, performing initial adjustments, or adding toner. Wait awhile.
"Printing..." The machine is printing. Wait a while.
"Ready" This is the default ready message. The machine is ready for use. Noaction is required.
"Resetting job..." The machine is resetting the print job. Wait until "Ready" appears onthe display panel.
"Setting change..." The machine is changing settings. You cannot use the control panelwhile this message is displayed. Wait a while.
"Waitg. for prt.data" The machine is waiting for the next data to print. Wait a while.
"Job suspended." Printing was temporarily suspended because [Job Operation] or the[Stop] key was pressed.
"Updating certif..." The @Remote certificate is being updated. Wait a while.
Messages displayed on the control panel when using the printer function
• Before turning the main power switch off, see p.49 "Turning On/Off the Power".
Message Causes Solutions
"Cannot connect with thewireless card. Turn the mainpower switch off, then checkthe card."
• The wireless LANboard was not insertedwhen the machine wasturned on.
• The wireless LANboard was pulled outafter the machine wasturned on.
• The settings are notupdated although theunit is detected.
Turn off the main power switch, andthen confirm the wireless LAN board isinserted correctly. And then, turn on themain power switch again. If themessage appears again, contact yourservice representative.
When Messages Are Displayed on the Control Panel
173

Message Causes Solutions
"Cannot connect with theBluetooth interface. Checkthe Bluetooth interface."
• The Bluetooth interfaceunit was installed whilethe machine was turnedon.
• The Bluetooth interfaceunit was removed whilethe machine was turnedon.
Turn off the main power switch, andthen confirm that the Bluetoothinterface unit was installed correctly.And then, turn on the main powerswitch again. If the message appearsagain, contact your servicerepresentative.
"Hardware Problem:Ethernet"
An error has occurred in theEthernet interface.
Turn off the main power switch, andthen back on again. If the messageappears again, contact your servicerepresentative.
"Hardware Problem: HDD" An error has occurred in thehard disk.
Turn off the main power switch, andthen back on again. If the messageappears again, contact your servicerepresentative.
"Hardware Problem: ParallelI/F"
An error has occurred in theIEEE 1284 interface board.
Turn off the main power switch, andthen back on again. If the messageappears again, contact your servicerepresentative.
"Hardware Problem: USB" An error has occurred in theUSB interface.
Turn off the main power switch, andthen back on again. If the messageappears again, contact your servicerepresentative.
"Hardware Problem:Wireless Card"
(A "wireless LAN board" or"Bluetooth interface unit" isreferred to as a "wirelesscard".)
The wireless LAN board canbe accessed, but an errorwas detected.
Turn off the main power switch, andthen confirm the wireless LAN board isinserted correctly. And then, turn on themain power switch again. If themessage appears again, contact yourservice representative.
10. Troubleshooting
174

Message Causes Solutions
"Hardware Problem:Wireless Card"
(A "wireless LAN board" or"Bluetooth interface unit" isreferred to as a "wirelesscard".)
• The Bluetooth interfaceunit was connectedwhile the machine wasturned on.
• The Bluetooth interfaceunit was removed whilethe machine was turnedon.
Turn off the main power switch, andthen confirm the Bluetooth interface unitis inserted correctly. And then, turn onthe main power switch again. If themessage appears again, contact yourservice representative.
"Out of paper in n. Loadpaper of the following sizeand type. To cancel thecurrent job, press [JobReset]."
(A figure is placed at n.)
The printer driver settings areincorrect or the tray does notcontain paper of the sizeselected in the printer driver.
Check that the printer driver settingsare correct, and then load paper of thesize selected in the printer driver intothe input tray. For details about how tochange the paper size, see "Changingthe Paper Size", Paper Specificationsand Adding Paper .
"Tray setg. do not matchspcfd siz&yp. Select newtray or use sz&typ below."
The printer driver settings areincorrect or the tray does notcontain paper of the size ortype selected in the printerdriver.
• Check that the printer driversettings are correct, and then loadpaper of the size selected in theprinter driver into the input tray.For details about how to changethe paper size, see "Changing thePaper Size", Paper Specificationsand Adding Paper .
• Select the tray manually tocontinue printing, or cancel aprint job. For details about how toselect the tray manually, or cancela print job, see "If an Error Occurswith the Specified Paper Size andType", Print .
"n ppr siz msmtch Select newtray or use ppr size below."
(A tray name is placed at n.)
The size of the paper in thetray does not match thepaper size specified in theprinter driver.
Select a tray containing paper that isthe same size as the specified papersize.
"Problem: Printer Font Error" An error has occurred in thefont settings.
Contact your service representative.
When Messages Are Displayed on the Control Panel
175

Message Causes Solutions
"Problems with the wirelessboard. Please call service."
(A "wireless LAN board" or"Bluetooth unit" is referred toas a "wireless board".)
The machine has detected aBluetooth failure, or it couldnot detect a Bluetooth unit. Itmay be incorrectly installed.
Check that the Bluetooth unit is installedproperly, or contact your servicerepresentative.
"The selected file(s)contained file(s) withoutaccess privileges. Onlyfile(s) with access privilegeswill be deleted."
You have tried to delete fileswithout the authority to doso.
To check your access permission forstored documents, or to delete adocument you do not have permissionto delete, see Security Guide .
"Updating the destinationlist... Please wait. Specifieddestination(s) or sender'sname has been cleared."
The destination list is beingupdated from the networkusing Web Image Monitor.
Wait until the message disappears. Donot turn off the main power switchwhile this message is displayed.Depending on the number ofdestinations to be updated, there maybe some delay before you can resumeoperation. Operations are not possiblewhile this message is displayed.
"You do not have theprivileges to use thisfunction."
The logged in user namedoes not have permission forthe selected function.
For details about how to setpermissions, see Security Guide .
Messages during Direct print from a removable memory device
Message Causes Solutions
"Unable to access thespecified memory storagedevice."
The memory device usedcannot be recognized.
For details about the recommendedmemory devices for the Direct printingfunction from removable memorydevices, contact your servicerepresentative. The USB flash memorythat features password protection orother security features may not worknormally.
10. Troubleshooting
176

Message Causes Solutions
"Exceeded the limit value fortotal data size of theselected files. Cannot selectmore files."
• The size of the selectedfile exceeds 1 GB.
• The total size of theselected files exceeds 1GB.
Files or groups of files larger than 1 GBcannot be printed.
• When the total size of the multiplefiles that are selected exceeds 1GB, select files separately.
• When the size of selected fileexceeds 1 GB, print by using afunction other than the Directprinting function from removablememory devices.
You cannot select files of differentformats at the same time.
Other messages
This section describes likely causes of and possible solutions for the error messages that are printed onthe error logs or reports.
Message Causes Solutions
"86: Error" Parameters of the controlcode are invalid.
Check the print settings.
"91: Error" Printing was canceled by theauto job cancel function dueto a command error.
Check that the data is valid.
"92: Error" Printing was canceledbecause [Job Reset] or the[Stop] key was selected onthe machine's control panel.
Perform the print operation again ifnecessary.
"98: Error" The machine could notaccess the hard diskcorrectly.
Turn off the main power switch, andthen back on again. If the messageappears frequently, contact yourservice representative.
When Messages Are Displayed on the Control Panel
177

Message Causes Solutions
"Address Book is currently inuse by another function.Authentication has failed."
The machine currentlycannot performauthentication because theAddress Book is being usedby another function.
Wait a while, and then retry theoperation.
"Unauthorized CopyPrevention error occurred.Job cancelled."
You tried to store a file in theDocument Server when[Unauthorized CopyPrevention] was specified.
Only when using PCL 6 / PostScript3
On the printer driver, select a jobtype other than [DocumentServer] in "Job Type:" or deselect[Unauthorized Copy Prevention].
"Unauthorized CopyPrevention error occurred.Job cancelled."
The [Enter User Text:] fieldon the [Unauthorized CopyPrevention for PatternDetails] screen is blank.
Only when using PCL 6 / PostScript3
On the printer driver's [DetailedSettings] tab, click [Effects] in"Menu:". Select [UnauthorizedCopy Prevention], and then click[Details] to display [UnauthorizedCopy Prevention for PatternDetails]. Enter text in [Enter UserText:].
"Unauthorized CopyPrevention error occurred.Job cancelled."
The resolution is set to avalue less than 600 dpiwhen [Unauthorized CopyPrevention] is specified.
On the printer driver, set the resolutionto 600 dpi or higher, or deselect[Unauthorized Copy Prevention].
"Auto-registration of userinformation has failed."
Automatic registration ofinformation for LDAPAuthentication or WindowsAuthentication failedbecause the Address Book isfull.
For details about automatic registrationof user information, see Security Guide
.
"Cannot store data of thissize."
The paper size exceededthe capacity of theDocument Server.
Reduce the paper size of the file thatyou want to send to a size that theDocument Server can store. Customsize files can be sent but not storedafterward.
10. Troubleshooting
178

Message Causes Solutions
"Classification Code isincorrect."
The classification code hasnot been entered, or theclassification code has beenentered incorrectly.
Enter the correct classification code.
"Classification Code isincorrect."
The classification code is notsupported with the printerdriver.
Select Optional for classification code.For details about how to specifyclassification code settings, see"Configuring Classification Codes",Print .
"Collate has beencancelled."
Collate was canceled. Turn off the main power switch, andthen back on again. If the messageappears again, contact your servicerepresentative.
"Command Error" An RPCS command erroroccurred.
• Check if the communicationbetween the computer and themachine is working correctly.
• Check if the correct printer driveris being used.
• Check if the machine's memorysize is set correctly in the printerdriver.
• Check that the printer driver is themost up-to-date version available.
"Compressed Data Error." The printer detected corruptcompressed data.
• Check the connection betweenthe computer and the printer.
• Check that the program you usedto compress the data isfunctioning correctly.
"Data storage error." You tried to print a SamplePrint, Locked Print, HoldPrint, or Stored Print file, orto store a file in theDocument Server when thehard disk wasmalfunctioning.
Contact your service representative.
When Messages Are Displayed on the Control Panel
179

Message Causes Solutions
"Document Server is notavailable to use. Cannotstore."
You cannot use theDocument Server function.
• For details about using DocumentServer function, contact youradministrator.
• For details about how to setpermissions, see Security Guide
.
"Duplex has beencancelled."
Duplex printing wascanceled.
• Select the proper paper size forthe duplex function. For detailsabout paper, see "Specificationsfor the Main Unit", Maintenanceand Specifications .
• Change the setting for "Apply 2-sided" in [System Settings] toenable duplex printing for thepaper tray. For details aboutsetting "Apply 2-sided", see "TrayPaper Settings", Connecting theMachine/ System Settings .
"Error has occurred." A syntax error, etc.,occurred.
Check that the PDF file is valid.
"Exceeded max. capacity ofDocument Server. Cannotstore."
The hard disk became fullafter a file was stored.
Delete some of the files stored in theDocument Server or reduce the sizethat you want to send.
"Exceeded max. number offiles of Document Server.Cannot store."
The maximum file capacityof the Document Server wasexceeded.
Delete some of the files stored in theDocument Server.
"Exceeded max. number offiles to print for temporary/stored jobs."
While printing a SamplePrint, Locked Print, HoldPrint, or Stored Print file, themaximum file capacity wasexceeded.
Delete unneeded files stored in themachine.
10. Troubleshooting
180

Message Causes Solutions
"Exceeded max. number offiles. (Auto)"
While using the error jobstore function to storeNormal Print jobs as HoldPrint files, the maximum filecapacity for file storage orHold Print file management(automatic) was exceeded.
Delete Hold Print files (automatic) orunneeded files stored in the machine.
"Exceeded max. number ofpages of Document Server.Cannot store."
The maximum pagecapacity of the DocumentServer was exceeded.
Delete some of the files stored in theDocument Server or reduce the numberof pages that you want to send.
"Exceeded max. number ofpages to print fortemporary/stored jobs."
While printing a SamplePrint, Locked Print, HoldPrint, or Stored Print file, themaximum page capacitywas exceeded.
• Delete unneeded files stored inthe machine.
• Reduce the number of pages toprint.
"Exceeded max. pages.Collate is incomplete."
The number of pagesexceeds the maximumnumber of sheets that youcan use Collate with.
Reduce the number of pages to print.
"Exceeded max. number ofpages. (Auto)"
While using the error jobstore function to storeNormal Print jobs as HoldPrint files, the maximumpage capacity wasexceeded.
• Delete unneeded files stored inthe machine.
• Reduce the number of pages toprint.
"Exceeded the maximum unitcount for Print Volume Use.The job has beencancelled."
The number of pages theuser is permitted to print hasbeen exceeded.
For details about Print Volum. UseLimit., see Security Guide .
"Failed to obtain file system." PDF direct printing could notbe performed because thefile system could not beobtained.
Turn off the main power switch, andthen back on again. If the messageappears again, contact your servicerepresentative.
"File system is full." PDF file does not print outbecause the capacity of thefile system is full.
Delete all unnecessary files from thehard disk, or decrease the file size sentto the machine.
When Messages Are Displayed on the Control Panel
181

Message Causes Solutions
"HDD is full." The hard disk became fullwhile printing a SamplePrint, Locked Print, HoldPrint, or Stored Print file.
• Delete unneeded files stored inthe machine.
• Reduce the data size of theSample Print, Locked Print, HoldPrint, or Stored Print file.
"HDD is full." When printing with thePostScript 3 printer driver,the hard disk capacity forfonts and forms has beenexceeded.
Delete unneeded forms or fontsregistered in the machine.
"HDD is full. (Auto)" The hard disk became fullwhile using the error jobstore function to storeNormal Print jobs as HoldPrint files.
• Delete unneeded files stored inthe machine.
• Reduce the data size of theTemporary Print file and/or theStored Print file.
"I/O buffer overflow." An input buffer overflowoccurred.
• In [Printer Features], under[System], set [Memory Usage] to[Font Priority].
• In [Printer Features], under [HostInterface], select [I/O Buffer],and then set the maximum buffersize to a larger value.
• Reduce the number of files beingsent to the machine.
"Information for userauthentication is alreadyregistered for another user."
The user name for LDAPAuthentication or IntegrationServer Authentication wasalready registered in adifferent server with adifferent ID, and aduplication of the user nameoccurred due to a switchingof domains (servers), etc.
For details about User Authentication,see Security Guide .
10. Troubleshooting
182
Message Causes Solutions
"Insufficient Memory" A memory allocation erroroccurred.
PCL 5c
Select a lower resolution on theprinter driver. For details abouthow to change the resolutionsetting, see the printer driver Help.
PCL 6
Select a lower resolution on theprinter driver. For details abouthow to change the resolutionsetting, see the printer driver Help.
On the printer driver's [DetailedSettings] tab, click [Print Quality]in "Menu:", and then select[Raster] in the "Vector/Raster:"list. In some cases, it will take along time to complete a print job.
PostScript 3
Select a lower resolution on theprinter driver. For details abouthow to change the resolutionsetting, see the printer driver Help.
"Memory Retrieval Error" A memory allocation erroroccurred.
Turn off the main power switch, andthen back on again. If the messageappears again, replace the RAM. Fordetails about replacing the RAM,contact your service representative.
"No response from theserver. Authentication hasfailed."
A timeout occurred whileconnecting to the server forLDAP Authentication orWindows Authentication.
Check the status of the server.
"Output tray has beenchanged."
The output tray waschanged because the papersize of the specified outputtray is limited.
Specify the proper output tray.
When Messages Are Displayed on the Control Panel
183

Message Causes Solutions
"Print overrun." Images were discardedwhile printing.
PCL 5c
Select a lower resolution on theprinter driver. For details abouthow to change the resolutionsetting, see the printer driver Help.
PCL 6
Select a lower resolution on theprinter driver. For details abouthow to change the resolutionsetting, see the printer driver Help.
PostScript 3
Select a lower resolution on theprinter driver. For details abouthow to change the resolutionsetting, see the printer driver Help.
"Printing privileges have notbeen set for this document."
The PDF document you havetried to print has noprivileges to print.
Contact the owner of the document.
"Receiving data failed." Data reception was aborted. Resend the data.
"The selected paper size isnot supported. This job hasbeen cancelled."
Job Reset is automaticallyperformed if the specifiedpaper size is incorrect.
Specify the correct paper size, andthen print the file again.
"Sending data failed." The machine received acommand to stoptransmission from the printerdriver.
Check if the computer is workingcorrectly.
"The print job has beencancelled because capturefile(s) could not be stored:Exceeded max. memory."
The hard disk became fullafter a file was stored.
Delete the files stored in the DocumentServer or reduce the file size to be sent.
"The print job has beencancelled because capturefile(s) could not be stored:Exceeded max. number offiles."
The maximum file capacityof the Document Server wasexceeded.
Delete the files stored in the DocumentServer.
10. Troubleshooting
184

Message Causes Solutions
"The print job has beencancelled because capturefile(s) could not be stored:Exceeded max. No. ofpages per file."
The maximum pagecapacity of the DocumentServer was exceeded.
Delete some of the files stored in theDocument Server or reduce the numberof pages that you want to send.
"The selected paper type isnot supported. This job hasbeen cancelled."
Job Reset is automaticallyperformed if the specifiedpaper type is incorrect.
Specify the correct paper type, andthen print the file again.
"You do not have a privilegeto use this function. This jobhas been cancelled."
The entered Login UserName or Login Password isnot correct.
Check that the Login User Name andLogin Password are correct.
"You do not have a privilegeto use this function. This jobhas been cancelled."
The logged in user is notallowed to use the selectedfunction.
For details about how to setpermissions, see Security Guide .
"You do not have a privilegeto use this function. Thisoperation has beencancelled."
The logged in user does nothave the privileges toregister programs or changethe paper tray settings.
For details about how to setpermissions, see Security Guide .
Messages during Direct print from a removable memory device
Message Causes Solutions
"99: Error" This data cannot be printed.The specified data is eithercorrupt or not supported bythe Direct printing functionfrom removable memorydevices.
Check that the data is valid. For detailsabout the kinds of data supported bythe Direct printing function fromremovable memory devices, see"Direct Printing from a RemovableMemory Device", Print .
If printing does not start, contact your service representative.
• The contents of errors may be printed on the Configuration Page. Check the Configuration Page inconjunction with the error log. For details about how to print the Configuration Page, see "List / TestPrint", Print .
When Messages Are Displayed on the Control Panel
185

Messages Displayed When Using the Scanner Function
This section describes likely causes of and possible solutions for the error messages that appear on thecontrol panel. If a message not described here appears, act according to the message.
Message Causes Solutions
"Authentication with thedestination has failed. Checksettings. To check the currentstatus, press [Comm. Status/Print]."
The entered user name orpassword was invalid.
• Check that the user name andpassword are correct.
• Check that the ID and passwordfor the destination folder arecorrect.
• A password of 128 or morecharacters may not berecognized.
"Cannot communicate withPC. Contact theadministrator."
WSD (Device) protocol orWSD (Scanner) protocol isdisabled.
For details about how to enable ordisable the WSD protocol, see SecurityGuide .
"Connection with thedestination has failed. Checkthe settings. Entered pathname might be incorrect, orfirewall and security settingsmight be blocking networkconnectivity."
The destination computername or folder name isinvalid.
Check whether the computer name andthe folder name for the destination arecorrect.
10. Troubleshooting
186

Message Causes Solutions
"Connection with thedestination has failed. Checkthe settings. Entered pathname might be incorrect, orfirewall and security settingsmight be blocking networkconnectivity."
An antivirus program or afirewall is preventing themachine connecting to yourcomputer.
Antivirus programs and firewalls canprevent client computers fromestablishing connection with thismachine.
• If you are using anti-virussoftware, add the program to theexclusion list in the applicationsettings. For details about how toadd programs to the exclusionlist, see the anti-virus softwareHelp.
• To prevent a firewall blocking theconnection, register the machine'sIP address in the firewall's IPaddress exclusion settings. Fordetails about the procedure forexcluding an IP address, see yourfirewall's Help.
"Cannot start scanningbecause communication wasfailed."
Scan Profile is not set on theclient computer.
Set Scan Profile. For details about howto do this, see "Changing a ScanProfile", Scan .
"Cannot start scanningbecause communication wasfailed."
The [Take no action] settinghas been selected on theclient computer, forcing theclient computer to remaininactive when it receivesscan data.
Open scanner properties, click the[Events] tab, and then select [Start thisprogram] as the computer's responseon receipt of scan data. For details, seeyour operating system's Help.
"Cannot start scanning.Check the setting(s) on thePC."
The Scan Profile might beincorrectly configured.
Check the Scan Profile configuration.
When Messages Are Displayed on the Control Panel
187

Message Causes Solutions
"Cannot write on thememory storage device.Check the memory storagedevice and machinesettings."
The memory device is faulty,or the file name contains acharacter that cannot beused.
• Check to see if the memory deviceis defective.
• Check the memory device. Itmight be unformatted, or itsformat might be incompatible withthis machine.
• Check the file name set at the timeof scanning. For details about thecharacters that can be used in filenames, see "Available Charactersand How to Enter Them", GettingStarted .
"Cannot write on thememory storage devicebecause remaining freespace is insufficient."
• The memory device isfull and scan datacannot be saved.
• Even if the memorydevice appears to havesufficient free space,data might not besaved if the maximumnumber of files that canbe saved is exceeded.
• Replace the memory device.
• If the document is scanned assingle-page or divided multiplepages, data already written to thememory device is saved as is.Replace the memory device, andthen press [Retry] to save theremaining data, or press [Cancel]to redo the scan.
"Cannot write on thememory storage devicebecause the device is write-protected."
The memory device is write-protected.
Unlock the write-protection on thememory device.
"Connection with LDAPserver has failed. Check theserver status."
A network error hasoccurred and connectionhas failed.
• Try the operation again. If themessage is still shown, thenetwork may be busy.
• Check that the correct settings forLDAP server are listed in[Administrator Tools] of [SystemSettings]. For details about LDAPserver, see "Programming theLDAP server", Connecting theMachine/ System Settings .
10. Troubleshooting
188

Message Causes Solutions
"The data could not be sentbecause the PC timed outbefore it was sent."
A time out occurred whenusing WSD Scanner. Timeouts occur when too muchtime passes betweenscanning an original andsending its data. Thefollowings are likely causesof time outs:
• Too many originals perset.
• Misfed originals.
• Transmission of otherjobs.
• Reduce the number of originals,and then scan again.
• Remove any misfed original, andthen scan again.
• Use Scanner Journal to checkthere are no jobs awaitingtransmission, and then scanagain.
"Entered protection code fordestination is incorrect.Please re-enter."
The correct protection codewas not entered.
Make sure the protection code iscorrect, and then enter it again. Fordetails about a protection code, see"Registering a Protection Code",Connecting the Machine/ SystemSettings .
"Entered user code is notcorrect. Please re-enter."
You have entered anincorrect user code.
Check the authentication settings, andthen enter a correct user code.
"Exceeded max. email size.Sending email has beencancelled. Check [Max.Email Size] in ScannerFeatures."
The file size per page hasreached the maximum e-mail size specified in[Scanner Features].
Change the [Scanner Features] settingsas follows:
• Increase the e-mail size limit in[Max. Email Size].
• Change the [Divide & SendEmail] setting to [Yes (per Page)]or [Yes (per Max. Size)]. Fordetails about these settings, see"Send Settings", Scan .
"Exceeded max. number todisplay. Max. No.: n"
(A figure is placed at n.)
Search results haveexceeded the max.displayable number.
Search again after changing thesearch conditions.
When Messages Are Displayed on the Control Panel
189

Message Causes Solutions
"Exceeded max. datacapacity. Check thescanning resolution, thenpress the Start key again."
The scanned data exceededmaximum data capacity.
Specify the scan size and resolutionagain. Note that it may not be possibleto scan very large originals at a highresolution. For details about the settingsfor scan function, see "Relationshipbetween Resolution and Scan Size",Scan .
"Exceeded max. datacapacity. Check resolution,then reset n orig."
(A figure is placed at n.)
The scanned originalexceeded maximum datacapacity.
Specify the scan size and resolutionagain. Note that it may not be possibleto scan very large originals at a highresolution. For details about the settingsfor scan function, see "Relationshipbetween Resolution and Scan Size",Scan .
"Exceeded max. number ofalphanumeric characters forthe path."
The maximum number ofspecifiable alphanumericcharacters in a path hasbeen exceeded.
The maximum number of characterswhich can be entered for the path is256. Check the number of charactersyou entered, and then enter the pathagain.
"Exceeded max. number ofalphanumeric characters."
The maximum enterablenumber of alphanumericcharacters has beenexceeded.
Check the maximum number ofcharacters which can be entered, andthen enter it again. For details aboutthe maximum enterable number ofcharacters, see "Values of Various SetItems for Transmission/Storage/Delivery Function", Scan .
"Exceeded max. number offiles which can be sent at thesame time. Reduce thenumber of the selected files."
The number of filesexceeded the maximumnumber possible.
Reduce the number of files, and thensend them again.
"Exceeded max. number offiles which can be used inDocument Server at thesame time."
The maximum number offiles that can be stored in theDocument Server has beenexceeded.
Check the files stored by the otherfunctions, and then delete unneededfiles. For details about how to deletefiles, see "Deleting Stored Documents",Copy/ Document Server .
10. Troubleshooting
190

Message Causes Solutions
"Exceeded max. number ofpages per file. Do you wantto store the scanned pagesas 1 file?"
The file being stored hasexceeded the maximumnumber of pages for one file.
Specify whether to store the data ornot. Scan the pages that were notscanned, and then store them as a newfile. For details about storing files, see"Storing and Saving the ScannedDocuments", Scan .
"Exceeded max. number ofstandby files. Try again afterthe current file is sent."
The maximum number ofstandby files was exceeded.
There are 100 files waiting in thesending queue for e-mail, Scan toFolder, or delivery functions. Wait untilfiles have been sent.
"Exceeded max. number ofstored files. Cannot send thescanned data as capturingfiles is unavailable."
Too many files are waiting tobe delivered.
Try again after they have beendelivered.
"Exceeded max. pagecapacity per file. Press[Send] to send the scanneddata, or press [Cancel] todelete."
The number of scannedpages exceeded themaximum page capacity.
Select whether to send the data thathas already been scanned.
"Exceeded max. pagecapacity per file. Press[Write] to write the scanneddata to the memory storagedevice, or press [Cancel] todelete."
The scan could not becompleted because themaximum number of pagesthat can be scanned by thismachine was exceededduring writing to the memorydevice.
Reduce the number of documents to bewritten to the memory device, and thentry again.
"Exceeded maximumnumber of files to store.Delete all unnecessary files."
Too many files are waiting tobe delivered.
Try again after they have beendelivered.
When Messages Are Displayed on the Control Panel
191

Message Causes Solutions
"Exceeded time limit forLDAP server search. Checkthe server status."
A network error hasoccurred and connectionhas failed.
• Try the operation again. If themessage is still shown, thenetwork may be busy.
• Check that the correct settings forLDAP server are listed in[Administrator Tools] of [SystemSettings]. For details about LDAPserver, see "Programming theLDAP server", Connecting theMachine/ System Settings .
"LDAP server authenticationhas failed. Check thesettings."
The user name andpassword differ from thoseset for LDAP Authentication.
For details about LDAP Authentication,see Security Guide .
"Memory device erroroccurred. Check the memorydevice."
A non-writable medium isbeing used.
Use a different medium.
"Memory is full. Cannotscan. The scanned data willbe deleted."
Because of insufficient harddisk space, the first pagecould not be scanned.
• Wait for a while, and then retrythe scan operation.
• Reduce the scan area or scanningresolution. For details aboutchanging scan area and scanningresolution, see "Various ScanSettings", Scan .
• Delete unneeded stored files. Fordetails about how to delete storedfiles, see "Deleting a Stored File",Scan .
"Memory is full. Do youwant to store scanned file?"
Because there is not enoughfree hard disk space in themachine for storing in theDocument Server, only someof the pages could bescanned.
Specify whether to use the data or not.
10. Troubleshooting
192

Message Causes Solutions
"Memory is full. Press [Write]to write the current scanneddata to the memory storagedevice, or press [Cancel] todelete."
The scan could not becompleted because therewas insufficient hard diskmemory at the time of savingto the memory device.
Select whether or not to save thescanned document to the memorydevice.
"Memory is full. Scanninghas been cancelled. Press[Send] to send the scanneddata, or press [Cancel] todelete."
Because there is not enoughfree hard disk space in themachine for delivering orsending by e-mail whilestoring in the DocumentServer, only some of thepages could be scanned.
Specify whether to use the data or not.
"Memory storage device notdetected. Insert the device."
There is no memory deviceinserted.
Insert a memory device, or check tosee whether the memory device isproperly inserted in the media slot.
"No paper. Load paper ofone of the following sizes."
No paper is set in thespecified paper tray.
Load paper of the sizes listed in themessage. For details about loadingpaper, see "Loading Paper", PaperSpecifications and Adding Paper .
"Orig. scanned for diffrntfnctn."
A function of the machineother than the Scannerfunction is being used suchas the Copier function.
Cancel the job that is being processed.For example, press [Exit], and thenpress the [Home] key. Next, press the[Copier] icon on the [Home] screen,and then press the [Stop] key. Whenthe message appears on the screen,follow the instructions to cancel the job.
"Output buffer is full.Sending the data has beencancelled. Please try againlater."
Too many jobs are instandby state, and sendingwas canceled.
Retry sending after sending jobs instandby state completes.
"SMTP authentication emailaddress and administratoremail address mismatch."
The SMTP authentication e-mail address and theadministrator's e-mailaddress do not match.
For details about how to set SMTPauthentication, see "File Transfer",Connecting the Machine/ SystemSettings .
When Messages Are Displayed on the Control Panel
193
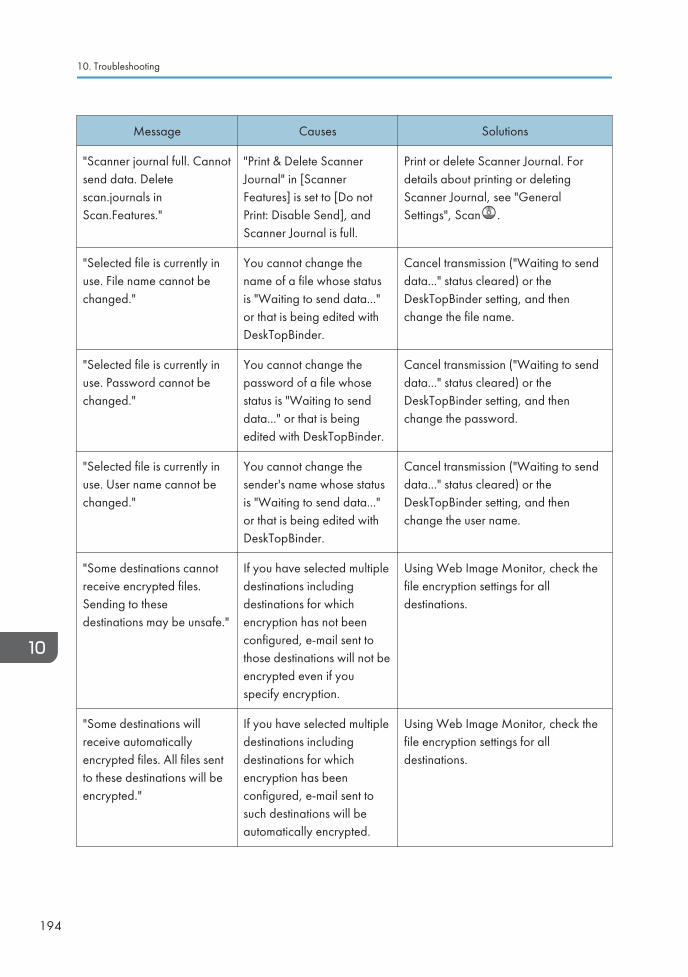
Message Causes Solutions
"Scanner journal full. Cannotsend data. Deletescan.journals inScan.Features."
"Print & Delete ScannerJournal" in [ScannerFeatures] is set to [Do notPrint: Disable Send], andScanner Journal is full.
Print or delete Scanner Journal. Fordetails about printing or deletingScanner Journal, see "GeneralSettings", Scan .
"Selected file is currently inuse. File name cannot bechanged."
You cannot change thename of a file whose statusis "Waiting to send data..."or that is being edited withDeskTopBinder.
Cancel transmission ("Waiting to senddata..." status cleared) or theDeskTopBinder setting, and thenchange the file name.
"Selected file is currently inuse. Password cannot bechanged."
You cannot change thepassword of a file whosestatus is "Waiting to senddata..." or that is beingedited with DeskTopBinder.
Cancel transmission ("Waiting to senddata..." status cleared) or theDeskTopBinder setting, and thenchange the password.
"Selected file is currently inuse. User name cannot bechanged."
You cannot change thesender's name whose statusis "Waiting to send data..."or that is being edited withDeskTopBinder.
Cancel transmission ("Waiting to senddata..." status cleared) or theDeskTopBinder setting, and thenchange the user name.
"Some destinations cannotreceive encrypted files.Sending to thesedestinations may be unsafe."
If you have selected multipledestinations includingdestinations for whichencryption has not beenconfigured, e-mail sent tothose destinations will not beencrypted even if youspecify encryption.
Using Web Image Monitor, check thefile encryption settings for alldestinations.
"Some destinations willreceive automaticallyencrypted files. All files sentto these destinations will beencrypted."
If you have selected multipledestinations includingdestinations for whichencryption has beenconfigured, e-mail sent tosuch destinations will beautomatically encrypted.
Using Web Image Monitor, check thefile encryption settings for alldestinations.
10. Troubleshooting
194

Message Causes Solutions
"Some invalid destination(s)contained. Do you want toselect only validdestination(s)?"
The specified group containse-mail destinations and Scanto Folder destinations, eitherof which are incompatiblewith the specifiedtransmission method.
In the message that appears at eachtransmission, press [Select].
"Some of selected files arecurrently in use. They couldnot be deleted."
You cannot delete a filewhich is waiting to betransmitted ("Waiting tosend data..." statusdisplayed) or whoseinformation is beingchanged withDeskTopBinder.
Cancel transmission ("Waiting to senddata..." status cleared) or theDeskTopBinder setting, and then deletethe file.
"Some page(s) are almostblank. To cancel press theStop key."
The first page of thedocument is almost blank.
The original's blank side might havebeen scanned. Be sure to place youroriginals correctly.
"The entered file namecontains invalid character(s).Enter the file name againusing any of the following 1byte characters. " 0 to 9 ", "A to Z ", " a to z ", " . - _""
The file name contains acharacter that cannot beused.
• Check the file name specified atthe time of scanning. For detailsabout characters that can be usedin file names, see "AvailableCharacters and How to EnterThem", Getting Started .
• Check the file name specified atthe time of scanning. The filename specified in the SendingScan Files to Folders functioncannot contain the followingcharacters:
\ / : * ? " < > |
The file name cannot start or endwith a period ".".
"The number of destinationsthat can be enteredmanually at the same time isas shown above."
The e-mail has too manydestinations.
Split the destinations into two or moregroups.
When Messages Are Displayed on the Control Panel
195

Message Causes Solutions
"The number of destinationsthat can be specified at thesame time is as shownabove."
The e-mail has too manydestinations.
Split the destinations into two or moregroups.
"The selected file(s)contained file(s) withoutaccess privileges. Onlyfile(s) with access privilegeswill be deleted."
You have tried to delete fileswithout the authority to doso.
To check your access permission forstored documents, or to delete adocument you do not have permissionto delete, see Security Guide .
"Transmission has failed.Insufficient memory in thedestination hard disk. Tocheck the current status,press [Comm. Status/Print]."
Transmission has failed.There was not enough freespace on the hard disk of theSMTP server, FTP server, orclient computer at thedestination.
Allocate sufficient space.
"Transmission has failed. Tocheck the current status,press [Comm. Status/Print]."
While a file was being sent,a network error occurredand the file could not be sentcorrectly.
If the same message appears againafter scanning again, the cause couldbe a mixed network, or else networksettings were changed during WSDscanner transmission. For details aboutnetwork error, contact youradministrator.
10. Troubleshooting
196

Message Causes Solutions
"Updating the destination listhas failed. Try again?"
A network error hasoccurred.
• Check whether the server isconnected.
• Antivirus programs and firewallscan prevent client computers fromestablishing connection with thismachine.
• If you are using anti-virussoftware, add the programto the exclusion list in theapplication settings. Fordetails about how to addprograms to the exclusionlist, see the anti-virussoftware Help.
• To prevent a firewallblocking the connection,register the machine's IPaddress in the firewall's IPaddress exclusion settings.For details about theprocedure for excluding anIP address, see yourfirewall's Help.
"Updating the destinationlist... Please wait. Specifieddestination(s) or sender'sname has been cleared."
A specified destination orsender's name was clearedwhen the destination list inthe delivery server wasupdated.
Specify the destination or sender'sname again.
"Updating the destinationlist... Please wait. Specifieddestination(s) or sender'sname has been cleared."
The destination list is beingupdated from the networkusing Web Image Monitor.
Wait until the message disappears. Donot turn off the main power switchwhile this message is displayed.Depending on the number ofdestinations to be updated, there maybe some delay before you can resumeoperation. Operations are not possiblewhile this message is displayed.
When Messages Are Displayed on the Control Panel
197

Message Causes Solutions
"You do not have theprivileges to use thisfunction."
The logged in user namedoes not have permission forthe selected function.
For details about how to setpermissions, see Security Guide .
"Exceeded max. datacapacity. Check theresolution and the ratio andthen press the Start keyagain."
The data being scanned istoo large for the scale ratiospecified in [Specify Size].
Reduce the resolution or [Specify Size]value, and then try to scan the originalagain.
"The size of the scanneddata is too small. Check thescanning resolution, thenpress the Start key again."
The data being scanned istoo small for the scale ratiospecified in [Specify Size].
Specify a higher resolution or a largesize in [Specify Size], and then try toscan the original again.
"Not all of the image will bescanned."
If the scaling factor specifiedin "Reproduction Ratio" istoo large, part of the imagemay be lost.
• Reduce the scaling factor in"Reproduction Ratio", and then tryto scan the original again.
• If displaying the entire image isnot necessary, press the [Start]key to start scanning with thecurrent scaling factor.
"Not all of the image will bescanned."
Using "Reproduction Ratio"to scale down a largedocument may cause part ofthe image to be lost.
• Specify a large size in [SpecifySize], and then try to scan theoriginal again.
• If displaying the entire image isnot necessary, press the [Start]key to start scanning with thecurrent scaling factor.
"Check original'sorientation."
Documents may sometimesnot be scanned dependingon a combination of itemssuch as the specified scalingfactor and document size.
Change the orientation of the original,and then try to scan the original again.
"The Digital Signature'sdevice certificate hasexpired. The file cannot besent."
The device certificate (PDFwith digital signature) hasexpired.
A new device certificate (PDF withdigital signature) must be installed. Fordetails about how to install a devicecertificate (PDF with digital signature),see Security Guide .
10. Troubleshooting
198

Message Causes Solutions
"XXX cannot be YYYbecause the DigitalSignature's device certificateis not currently valid."
(XXX and YYY indicate theuser action.)
The device certificate (PDFwith digital signature) hasexpired.
A new device certificate (PDF withdigital signature) must be installed. Fordetails about how to install a devicecertificate (PDF with digital signature),see Security Guide .
"The Digital Signature'sdevice certificate is invalid.The file cannot be sent."
There is no device certificate(PDF with digital signature),or the certificate is invalid.
A new device certificate (PDF withdigital signature) must be installed. Fordetails about how to install a devicecertificate (PDF with digital signature),see Security Guide .
"XXX cannot be YYYbecause there is a problemwith the Digital Signature'sdevice certificate. Check thedevice certificate."
(XXX and YYY indicate theuser action.)
There is no device certificate(PDF with digital signature),or the certificate is invalid.
A new device certificate (PDF withdigital signature) must be installed. Fordetails about how to install a devicecertificate (PDF with digital signature),see Security Guide .
"XXX cannot be YYYbecause there is a problemwith the device certificateused for the S/MIMEsignature. Check the devicecertificate."
(XXX and YYY indicate theuser action.)
There is no device certificate(S/MIME), or the certificateis invalid.
A new device certificate (S/MIME)must be installed. For details abouthow to install a device certificate (S/MIME), see Security Guide .
"XXX cannot be YYYbecause the devicecertificate used for the S/MIME signature is notcurrently valid."
(XXX and YYY indicate theuser action.)
The device certificate (S/MIME) has expired.
A new device certificate (S/MIME)must be installed. For details abouthow to install a device certificate (S/MIME), see Security Guide .
When Messages Are Displayed on the Control Panel
199

Message Causes Solutions
"Transmission cannot beperformed because thecertificate used for the S/MIME signature is notcurrently valid."
The device certificate (S/MIME) has expired.
A new device certificate (S/MIME)must be installed. For details abouthow to install a device certificate (S/MIME), see Security Guide .
"The destination cannot beselected because itscertificate is not currentlyvalid."
The user certificate(destination certificate) hasexpired.
A new user certificate must be installed.For details about the user certificate(destination certificate), see SecurityGuide .
"The group destinationcannot be selected becauseit contains a destination witha certificate that is notcurrently valid."
The user certificate(destination certificate) hasexpired.
A new user certificate must be installed.For details about the user certificate(destination certificate), see SecurityGuide .
"Transmission cannot beperformed because thecertificate for encryption isnot currently valid."
The user certificate(destination certificate) hasexpired.
A new user certificate must be installed.For details about the user certificate(destination certificate), see SecurityGuide .
10. Troubleshooting
200

When Messages Are Displayed on YourComputer Screen
Messages Displayed When Using the Scanner Function
This section describes likely causes of and possible solutions for the main error messages displayed onthe client computer when using the TWAIN driver. If a message not described here appears, actaccording to the message.
Message Causes Solutions
"Any of Login User Name,Login Password or DriverEncryption Key is incorrect."
The entered Login UserName, Login Password, orDriverEncryp.Key wasinvalid.
Check your Login User Name, LoginPassword, or DriverEncryp.Key, andthen enter them correctly. For detailsabout Login User Name, LoginPassword, and DriverEncryp.Key, seeSecurity Guide .
"Authentication succeeded.However, the accessprivileges for scannerfunction has been denied."
The logged in user namedoes not have permission forscanner function.
For details about how to setpermissions, see Security Guide .
"Call Service"
"Please call your servicerepresentative."
An unrecoverable error hasoccurred in the machine.
Contact your service representative.
"Cannot add any morescanning mode."
The maximum number ofregisterable scan modes hasbeen exceeded.
The maximum number of modes thatcan be stored is 100. Delete unneededmodes.
"Cannot connect to thescanner. Check the networkAccess Mask settings in UserTools."
An access mask is set. For details about an access mask,contact your administrator.
"Cannot find "XXX" scannerused for the previous scan."YYY" will be used instead."
("XXX" and "YYY" indicatescanner names.)
The main power switch ofthe previously used scanneris not set to "On".
Check whether the main power switchof the scanner used for the previousscan is turned on.
When Messages Are Displayed on Your Computer Screen
201

Message Causes Solutions
"Cannot find "XXX" scannerused for the previous scan."YYY" will be used instead."
("XXX" and "YYY" indicatescanner names.)
The machine is notconnected to the networkcorrectly.
• Check that the previously usedscanner is connected to thenetwork correctly.
• Cancel the personal firewall ofthe client computer. For detailsabout firewall, see WindowsHelp.
• Use an application such as telnetto make sure SNMPv1 orSNMPv2 is set as the machine'sprotocol. For details about how tocheck this, see "RemoteMaintenance Using telnet",Connecting the Machine/ SystemSettings .
• Select the scanner used for theprevious scan.
"Cannot specify any morescanning area."
The maximum number ofregisterable scan areas hasbeen exceeded.
The maximum number of scanningareas that can be stored is 100. Deleteunneeded scanning areas.
"Clear Misfeed(s) in ADF." A paper misfeed hasoccurred inside the ADF.
• Remove jammed originals, andthen insert them again. For detailsabout how to remove jammedpaper, see "Removing JammedPaper", Troubleshooting .
• When a misfeed occurs, replacethe jammed originals.
• Check whether the originals aresuitable to be scanned by themachine.
"Communication error hasoccurred on the network."
A communication error hasoccurred on the network.
Check whether the client computer canuse the TCP/IP protocol.
10. Troubleshooting
202

Message Causes Solutions
"Error has occurred in thescanner driver."
An error has occurred in thedriver.
• Check whether the network cableis connected correctly to the clientcomputer.
• Check whether the Ethernet boardof the client computer isrecognized correctly byWindows.
• Check whether the clientcomputer can use the TCP/IPprotocol.
"Error has occurred in thescanner."
The application-specifiedscan conditions haveexceeded the setting rangeof the machine.
Check whether the scanning settingsmade with the application exceed thesetting range of the machine.
"Fatal error has occurred inthe scanner."
An unrecoverable error hasoccurred on the machine.
An unrecoverable error has occurredin the machine. Contact your servicerepresentative.
"Insufficient memory. Closeall other applications, thenrestart scanning."
Memory is insufficient. • Close all the unnecessaryapplications running on the clientcomputer.
• Uninstall the TWAIN driver, andthen reinstall it after restarting thecomputer.
When Messages Are Displayed on Your Computer Screen
203

Message Causes Solutions
"Insufficient memory. Reducethe scanning area."
Scanner memory isinsufficient.
• Reset the scan size.
• Lower the resolution.
• Set with no compression. Fordetails about the settings, seeTWAIN driver Help.
The problem may also be due to thefollowing causes:
• Scanning cannot be performed iflarge values are set for brightnesswhen using halftone or highresolution. For details about therelationship between scansettings, see "Relationshipbetween Resolution and ScanSize", Scan .
• If a misfeed occurs, you might notscan an original. Remove themisfeed, and then scan theoriginal again.
"Invalid Winsock version.Please use version 1.1 orhigher."
You are using an invalidversion of Winsock.
Install the operating system of thecomputer or copy Winsock from theoperating system CD-ROM.
"No User Code is registered.Consult your systemadministrator."
Access is restricted with usercodes.
For details about User CodeAuthentication, see Security Guide .
"No response from thescanner."
The machine or clientcomputer is not connected tothe network correctly.
• Check whether the machine orclient computer is connected tothe network correctly.
• Disable the client computer's ownfirewall. For details about firewall,see Windows Help.
"No response from thescanner."
The network is crowded. Wait for a while, and then try toreconnect.
10. Troubleshooting
204

Message Causes Solutions
"Scanner is in use for otherfunction. Please wait."
A function of the machineother than the Scannerfunction is being used suchas the Copier function.
• Wait for a while, and thenreconnect.
• Cancel the job that is beingprocessed. For example, press[Exit], and then press the [Home]key. Next, press the [Copier] iconon the [Home] screen, and thenpress the [Stop] key. When themessage appears on the screen,follow the instructions to cancelthe job.
"Scanner is not available onthe specified device."
The TWAIN scanner functioncannot be used on thismachine.
Contact your service representative.
"Scanner is not available.Check the scannerconnection status."
The machine's main powerswitch is off.
Turn on the main power switch.
"Scanner is not available.Check the scannerconnection status."
The machine is notconnected to the networkcorrectly.
• Check whether the machine isconnected to the networkcorrectly.
• Deselect the personal firewallfunction of the client computer.For details about firewall, seeWindows Help.
• Use an application such as telnetto make sure SNMPv1 orSNMPv2 is set as the machine'sprotocol. For details about how tocheck this, see "RemoteMaintenance Using telnet",Connecting the Machine/ SystemSettings .
When Messages Are Displayed on Your Computer Screen
205

Message Causes Solutions
"Scanner is not available.Check the scannerconnection status."
Network communication isnot available because themachine's IP address couldnot be obtained from thehost name. If only "IPv6" isset to [Active], the IPv6address might not beobtained.
• Check whether the machine's hostname is specified in the NetworkConnection Tool. For the WIAdriver, check the [NetworkConnection] tab in the properties.
• Use Web Image Monitor to set"LLMNR" of "IPv6" to [Active].
• In Windows XP, IPv6 addressescannot be obtained from the hostname. Specify the machine's IPv6address in the NetworkConnection Tool.
"Scanner is not ready.Check the scanner and theoptions."
The ADF cover is open. Check whether the ADF cover isclosed.
"The name is already in use.Check the registerednames."
You tried to register a namethat is already in use.
Use another name.
10. Troubleshooting
206

11. AppendixThis chapter describes the trademarks.
TrademarksAdobe, Acrobat, PostScript, PostScript 3, and Reader are either registered trademarks or trademarks ofAdobe Systems Incorporated in the United States and/or other countries.
The Bluetooth® word mark and logos are registered trademarks owned by Bluetooth SIG, Inc. and anyuse of such marks by Ricoh Company, Ltd. is under license.
Microsoft, Windows, Windows Server, and Windows Vista are either registered trademarks ortrademarks of Microsoft Corp. in the United States and/or other countries.
PictBridge is a trademark.
The SD is a trademark of SD-3C, LLC.
UNIX is a registered trademark of The Open Group.
The proper names of the Windows operating systems are as follows:
• The product names of Windows XP are as follows:
Microsoft® Windows® XP Professional
Microsoft® Windows® XP Home Edition
Microsoft® Windows® XP Media Center Edition
Microsoft® Windows® XP Tablet PC Edition
• The product names of Windows Vista are as follows:
Microsoft® Windows Vista® Ultimate
Microsoft® Windows Vista® Business
Microsoft® Windows Vista® Home Premium
Microsoft® Windows Vista® Home Basic
Microsoft® Windows Vista® Enterprise
• The product names of Windows 7 are as follows:
Microsoft® Windows® 7 Home Premium
Microsoft® Windows® 7 Professional
Microsoft® Windows® 7 Ultimate
Microsoft® Windows® 7 Enterprise
• The product names of Windows Server 2003 are as follows:
Microsoft® Windows Server® 2003 Standard Edition
Microsoft® Windows Server® 2003 Enterprise Edition
207

• The product names of Windows Server 2003 R2 are as follows:
Microsoft® Windows Server® 2003 R2 Standard Edition
Microsoft® Windows Server® 2003 R2 Enterprise Edition
• The product names of Windows Server 2008 are as follows:
Microsoft® Windows Server® 2008 Standard
Microsoft® Windows Server® 2008 Enterprise
• The product names of Windows Server 2008 R2 are as follows:
Microsoft® Windows Server® 2008 R2 Standard
Microsoft® Windows Server® 2008 R2 Enterprise
Other product names used herein are for identification purposes only and might be trademarks of theirrespective companies. We disclaim any and all rights to those marks.
11. Appendix
208

INDEX
2 Sided Print.............................................................9
A
Address book11, 77, 78, 104, 106, 107, 110, 111
ADF...........................................8, 25, 28, 30, 33, 55
Authentication screen............................................51
Auto Document Feeder...........8, 25, 28, 30, 33, 55
Auto Reduce/Enlarge....................................14, 59
B
Beep alert............................................................150
Bypass tray................................26, 28, 31, 69, 127
C
Canceling a transmission...............................82, 83
Check Status key...........................................38, 148
Check Status screen............................................148
Checking a stored file.........................................114
Clear key................................................................37
Combine......................................................9, 14, 64
Communicating indicator......................................37
Confidential File indicator.....................................37
Control panel.....................................25, 28, 30, 36
Converting documents to electronic formats.......10
Copier....................................................................57
Copy Data Security unit........................................24
Copy orientation....................................................63
Counter key............................................................37
Creating a shared folder....................................102
Custom size paper........................................69, 129
D
Data In indicator....................................................38
Display panel.........................................................36
Document Server........10, 16, 74, 86, 87, 117, 119
Duplex..............................................................14, 61
Duplex Copy.....................................................9, 61
E
E-mail address...................................110, 111, 112
E-mail destination...............................110, 111, 112
Energy Saver key..................................................37
Enter key.................................................................37
Envelope........................................................70, 140
Error message. 157, 159, 172, 173, 177, 186, 201
Exposure glass.............................25, 28, 30, 53, 54
Exposure glass cover......................................25, 33
Extender..............................................26, 28, 29, 31
External options...............................................33, 34
F
Fax destination................................................77, 78
Fax Received indicator.........................................37
File type................................................................115
Folder destination..............................104, 106, 107
Front cover................................................25, 28, 30
Function keys.........................................................36
H
Handset..................................................................34
Hold Print.........................................................15, 96
Home key...............................................................36
Home screen.............................................13, 39, 40
How to Read the Manuals......................................6
I
Icon............................................................39, 40, 41
Immediate Transmission..................................80, 81
Indicator...............................................................147
Information screen...................................................9Installing the printer driver....................................91
Internal tray...............................................27, 29, 31
Internal tray 2..................................................33, 34
Internal tray guide....................................26, 29, 31
Internet Fax............................................................19
IP-Fax......................................................................19
J
Journal....................................................................89
L
LAN-Fax.............................................................9, 17
Loading orientation-fixed paper........................132
Loading paper............................................125, 127
Loading two-sided paper...................................132
Locked Print.....................................................15, 94
Logging in to the machine.....................................51
Logging out the machine.......................................52
209

Login key................................................................37
Login/Logout key..................................................37
Logout key..............................................................37
Lower right cover......................................26, 28, 31
M
Main power indicator...........................................37
Main power switch............................26, 28, 30, 49
Media access lamp...............................................38
Media slots............................................................38
Memory.......................................................159, 172
Memory Transmission.....................................75, 76
Message. 151, 157, 159, 172, 173, 177, 186, 201
Model-specific information.....................................7
N
Names of major features........................................8Number keys..........................................................37
O
OHP transparency..............................................130
One-Sided Combine.............................................65
Options...................................................................33
Orientation-fixed paper......................................132
P
Paper capacity....................................................135
Paper guide..............................................26, 28, 31
Paper size....................................................129, 135
Paper thickness....................................................135
Paper tray.........................................26, 28, 30, 125
Paper tray unit.......................26, 28, 30, 33, 34, 35
Paper type............................................................135
Paper weight........................................................135
Paperless Fax.....................................................9, 17
Placing originals.......................................53, 54, 55
Preventing information leakage...........................22
Printer......................................................................93
Printer Bypass Paper Size..........................128, 129
Printer driver properties.........................................92
Problem................................................................151
Program.....................................................12, 45, 47
Program as Defaults..............................................12
Program key...........................................................36
Q
Quick install...........................................................91
R
Region A...................................................................7Region B...................................................................7Registering destinations.........................................11
Reset key................................................................36
Right cover................................................26, 28, 31
Running out of toner............................................144
S
Sample Print...........................................................15
Saving paper...........................................................9Scan to E-mail...............................................21, 109
Scan to Folder...............................................21, 101
Security functions...................................................22
Send Later..............................................................85
Send Settings.......................................................116
Sending stored documents...................................87
Shared folder.......................................................102
Shortcut icon.......................................12, 39, 40, 41
Simple Screen key.................................................37
SMB folder.........................................104, 106, 107
Sort...................................................................14, 72
Standard printing...................................................93
Start key.................................................................37
Status message....................................................172
Stop key.................................................................37
Stored Print................................................15, 98, 99
Storing a document...............................................86
Storing data...........................................................74
Storing received documents.................................17
Storing scan files.................................................113
Symbols....................................................................6
T
Thick paper.................................................130, 139
Toner...................................................143, 144, 145
Trademark............................................................207
Tray 2.....................................26, 28, 30, 33, 34, 35
Tray 3.....................................26, 28, 30, 33, 34, 35
Turning off the power............................................49
Turning on the power............................................49
210

Two-Sided Combine.............................................66
Two-sided paper.................................................132
U
Unauthorized copy prevention............................24
Used toner...........................................................145
User code authentication......................................51
User Tools key.......................................................37
User Tools/Counter key.......................................37
V
Ventilation holes....................26, 27, 28, 29, 30, 32
W
Web Image Monitor............................23, 121, 123
211

MEMO
212 EN GB EN US EN AU D118

© 2011

D118-7500AUENUSENGBEN