user guide (web) - z-wave
TRANSCRIPT

User Guide (Web)
Table of Contents
About this Manual Copyright Notice
Section 1 Overview Package Content
eZLO Hub Controller Product Specification Z-Wave Protocol Description
Section 2 Configuration Getting Started and New User Registration How To Edit User Profile How To Reset Password How to Add an eZLO Hub To The App
How to Connect eZLO Hub to the Internet with a TP Ethernet Cable How to Connect eZLO Hub to the Internet with WiFiect an eZLO Hub to Another Z-Wave Controller
How to Add a Z-Wave Device to the eZLO Hub How to Reassign a Z-Wave Device From one eZlo Hub to Another How to Connect an eZLO Hub to Another Z-Wave Controller How to Swap the Roles of a Primary And a Secondary eZLO Hub
How to Manage your Z-Wave Device with eZLO App If Your Z-Wave Device Doesn’t Work
How to Manage My eZLOs Page Features
Section 3 Sharing eZLOs
Section 4 Maintenance How to View eZLO Events How to Clean an eZLO Hub How to Switch eZLO Hub from Ethernet to Wifi How to Switch eZLO Hub from Wifi to Ethernet How to Work with eZLO Firmware
How to Discover the eZLO Hub’s Firmware Version How to Update eZLO Hub Firmware Manually
How to Remove an eZLO How to Remove all Devices From eZLO Hub How to Replicate an eZLO Hub How to Backup and Restore eZLO Hub Settings
How to Backup your eZLO Hub Settings How to Restore your eZLO Hub Settings
Appendix 1: Working With Various Z-Wave Devices Smart Power Strips Door/Window Sensors Multisensors How to perform Z-Wave Network Reconstruction
2
Appendix 2. Terminology Nodes, Controllers and Home Control Groups Controlled and Supported Command Classes Replication and Backup
Appendix 3. Warranty Appendix 4. How to Get Support Appendix 5. Safety Measures and Cautions Appendix 6. Compliance information Appendix 7. Disposal and Recycling Information
3
About this Manual This user guide describes how to configure and use the eZLO web-based application.
Copyright Notice Copyright © 2017 by eZLO. All rights reserved. Any redistribution or reproduction of a part or all of the content in any form is prohibited other than the following:
● You may print or download to a local hard disk extracts for your personal and noncommercial use only.
● You may copy the content to individual third parties for their personal use, but only if you acknowledge the website as the source of the material.
● You may not distribute or commercially exploit the content, or transmit the content or store it in other websites or any form of electronic retrieval system.
4

Section 1 Overview The eZLO Smart Home hub serves as a mobile controller for automatic heating, air-conditioning, window coverings, security systems, lighting, and many other integrated devices. It is a security-enabled Z-Wave Plus product that is able to use encrypted Z-Wave Plus messages to communicate to other security enabled Z-Wave Plus products. The eZLO app allows you to manage these integrated devices through a web interface. You can buy eZLO-compatible devices at the eZLO store. Note. Secure Z-Wave data exchange is possible only if both interacting devices support it. Use the eZLO app to:
● Manage multiple home locations with multiple eZLO hubs ● Share home locations with other users ● Share rooms with family members ● See 'What happened' in your home ● Manage your 'Favorite' devices from the same screen
Package Content The eZLO hub package includes the following:
● eZLO Hub ● Power Adapter ● Ethernet Cable
eZLO Hub Product Specification The eZLO hub is a smart plug that is connected to the plug outlet. The product conforms to the following specifications: Description Specification
Model EZ001-1
Operating Temperature -20 -+ 70 °C
Power Requirements 5V@2A (AC voltage, DC input)
Power Consumption 7.5W/2W (Max/Idle in Watts)
Ethernet 10Base-T, 100Base-TX, 1000Base-T IEEE 802.3 Standards
Wi-Fi Compatible w/ IEEE 802.11b/g/n Standard
Bluetooth BT2.1+EDR | BT3.0 | BT4.0
Z-Wave ZM5202 (EU — 865.2 MHz, US — 926.3 MHz)
USB Port 2x USB 2.0 Host
Display 7x Status LEDs
5

Z-Wave Protocol Description Z-Wave is today’s leading wireless home control technology. This international standard currently covers over 1700 smart living solutions for controlling home and office safety, energy, heat, HVAC, and light control. Unlike other rival technologies, Z-Wave:
● Works on a quiet frequency
Z-Wave operates at 865-922 MHz, so you can be sure that no other devices will interrupt or distort the signal — this is not necessarily the case with other protocols that work on a crowded 2.4 GHz frequency.
● Ensures interoperability
Z-Wave products from different manufacturers and categories can be a part of the same Z-Wave network.
● Uses a source-routed mesh network architecture
Every non-battery powered Z-Wave device (including your eZLO hub) works as a repeater in addition to its primary functionality. If a battery-powered Z-Wave device has a listening mode, it can also work as a repeater. So the more devices you connect to your network, the stronger and more dependable the Z-Wave signal in your apartment is going to be, and therefore the data exchange between devices becomes much more reliable.
The eZLO hub allows connecting to any Z-Wave device that satisfies the following requirements:
● It must support all the required command classes. ● Its operating frequency should be standard for your region and coincide with the operating
frequency of your eZLO hub. IMPORTANT NOTES: If your Z-Wave device does not meet these requirements you will be unable to add it to the eZLO hub. For the best results only use a Z-Wave certified device.
6

Section 2 Configuration This section describes how to:
● Register and sign on to eZLO app ● Add an eZLO Hub ● Add Z-Wave devices ● Manage Z-Wave devices
Figure 1 eZLO Hub
1. Power Indicator
2. Ethernet Indicator
3. Wireless Indicator
4. Ready Indicator
5. Error Indicator
6. Message Indicator
7. Z-Wave Inclusion/Exclusion Indicator
8. Antenna
9. Soft Reset Button
10. Factory Reset Button
11. LAN Port
12. USB Port
13. AC/DC Input
7

Getting Started and New User Registration 1. Go to the EZLO main page.
When you access the application via the web browser:
● If you are a new user you are prompted to create a New Account. Follow the steps below to create an eZLO app account.
● If you already have an eZLO app account the application remembers your User Name and Password. Login with your Email address and password (skip to step 7 in the following procedure).
8

2. Click . The Sign Up dialog box is displayed.
3. In the New Account dialog box, enter your user Name, Email Address, Password and Confirm
Password. Make sure the Email Address is valid.
A valid email address satisfies the following conditions:
● The format of email addresses is local-part@domain where the local-part may be up to 64 characters long and the domain name may have a maximum of 252 characters, the entire email address to be no more than 254 characters long.
● The local-part of the email address may use any of these ASCII characters: ● Uppercase and lowercase Latin letters (A-Z, a-z) (ASCII: 65-90, 97-122) ● Digits 0 to 9 (ASCII: 48-57) ● These special characters: !#$%&'*+-/=?^_`{|}~ (ASCII: 33, 35-39, 42, 43, 45, 47, 61, 63, 94-96,
123-126) ● Character . (dot), ASCII 46, provided that it is not the first or last character, and provided also that
it does not appear consecutively (e.g. [email protected] is not allowed). ● The domain name part of an email address has to conform to strict guidelines: it must match the
requirements for a hostname: consisting of letters, digits, hyphens and dots 4. Choose a Password and identical (repeat) password that is:
● At least 8 characters long ● Maximum 100 characters ● Only uppercase and lowercase Latin letters (A–Z, a–z), digits 0-9 and special characters
$@^`,|%;.~()/{}:?[]=-+_#! ● Combined letters and numbers
5. Click Sign up.
The app confirms “User Added.”
Note: If you enter an invalid password, or two different passwords in the fields “Password” and “Confirm Password,” a warning notification is displayed. If this happens re-enter the password. Make sure that the password meets the requirements, for example, it is at least eight characters long.
9

6. Go to your email Inbox and check for a Confirm Email Address message from the eZLO app.
Wait up to 10 minutes for this message to appear in the Inbox. If this message does not appear in the Inbox after this time has passed check your Spam email folder.
7. Click on the link in the eZLO app email to confirm the email address.
Note: If you do not confirm the email address you will receive an error message when you try to Sign In.
8. When the eZLO app Sign in page appears after the email address confirmation, enter your email address in the first field, and your password in the field below this, and click Sign in. When you Sign in you accept eZLO app’s Terms of Use.
Note: If you forget your password you can easily reset it. See How To Reset Password for more details.
9. If you are a new user the eZLO app’s main page is blank. A Wizard prompts you to add an eZLO hub. See How to Add an eZLO Hub To The App for details. If you do not want to add an eZLO hub immediately close the wizard. You can add an eZLO hub later with the Add eZLO option. For details see How to Add an eZLO Hub To The App.
10. If one or more eZLO hubs have previously been connected to the current user’s account, you can:
● Click on the Autoconnect to nearest eZLO link to connect to the closest available eZLO hub. Note: this feature can work incorrectly if you connect to the Internet using proxy servers. If applicable, enable geolocation on the device you run the eZLO app on for better results).
● Alternatively, enter the name of a device controlled through the eZLO app in the Search device field, and click on the magnifying glass symbol. The application locates this device and connects to it.
How to Edit the User Profile
User details appear on the left margin of the eZLO app main page. You can edit this information:
1. To associate a new image with this user, click Pick Image. Select a photo from your computer.
10
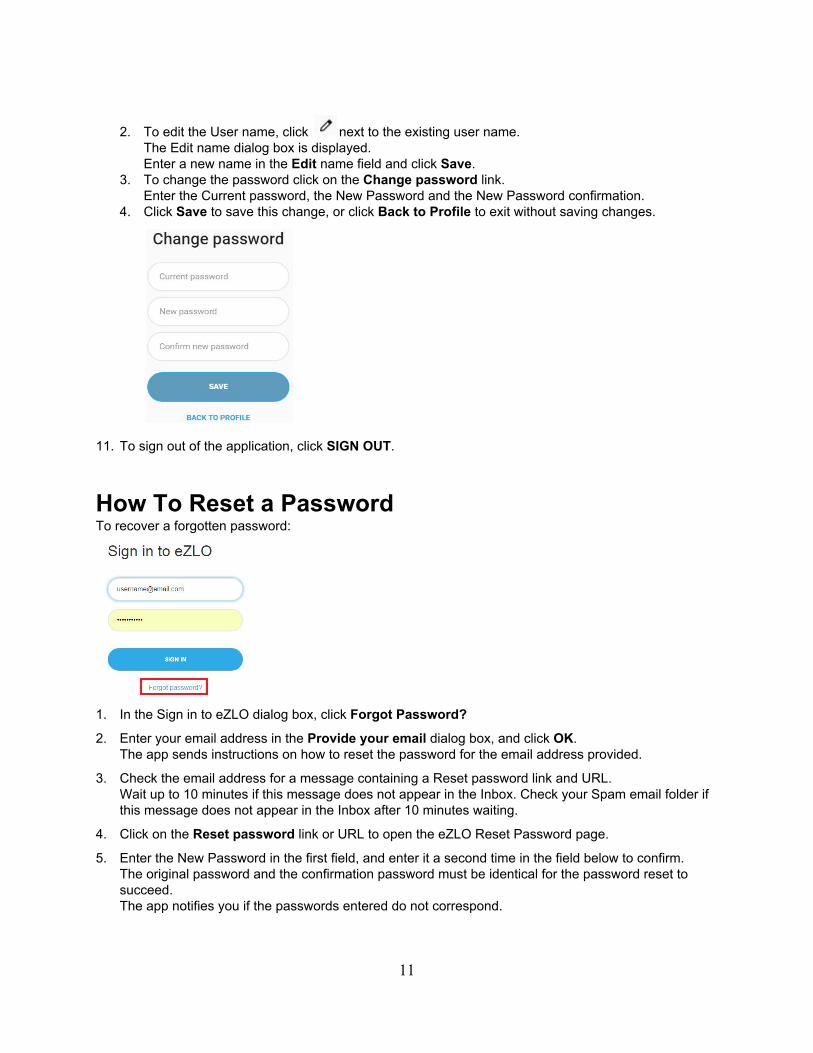
2. To edit the User name, click next to the existing user name. The Edit name dialog box is displayed. Enter a new name in the Edit name field and click Save.
3. To change the password click on the Change password link. Enter the Current password, the New Password and the New Password confirmation.
4. Click Save to save this change, or click Back to Profile to exit without saving changes.
11. To sign out of the application, click SIGN OUT.
How To Reset a Password To recover a forgotten password:
1. In the Sign in to eZLO dialog box, click Forgot Password?
2. Enter your email address in the Provide your email dialog box, and click OK. The app sends instructions on how to reset the password for the email address provided.
3. Check the email address for a message containing a Reset password link and URL. Wait up to 10 minutes if this message does not appear in the Inbox. Check your Spam email folder if this message does not appear in the Inbox after 10 minutes waiting.
4. Click on the Reset password link or URL to open the eZLO Reset Password page.
5. Enter the New Password in the first field, and enter it a second time in the field below to confirm. The original password and the confirmation password must be identical for the password reset to succeed. The app notifies you if the passwords entered do not correspond.
11

6. Click OK and Done.
7. Return to the eZLO Sign in page and enter your email address and the new password. Sign in succeeds and the eZLO app main menu is displayed.
How to Add an eZLO Hub to the App To set up the eZLO hub you require a power outlet, and an Ethernet or Wi-Fi connection. This section describes how to add an eZLO hub in the web version of the eZLO app. For information on how to configure the hub for the mobile application, refer to the eZLO User Guide (Mobile). The procedure differs slightly when the eZLO hub owner wants to add an eZLO hub operating on a different network to the one they are currently using. They can add the hub remotely, or via a web browser on a tablet connected to a 3G/4G network. In the latter case they need to enter the hub’s serial number in one of the wizard pages (see step 5 below). The serial number is printed on a sticker attached to the bottom of the eZLO hub unit.
1. Plug the eZLO hub to the power outlet, connect the Ethernet cable (for an illustration, refer to Figure 1
eZLO Hub) . Wait until the backlight LED blinks blue. This takes approximately 2 minutes. Figure 2 eZLO Hub Plug
2. Connect the Ethernet cable from the eZLO hub to the Internet-enabled router.
The eZLO hub connects to the server.
3. Wait until the hub’s rim LED changes from a blue to a green-color, and the central LED becomes yellow.
4. Sign in to the eZLO app
12

5. Click to open the New eZLO web connection wizard. The opening page of the wizard prompts you to connect the eZLO to the power unit.
Note: To exit the wizard for any reason click X Close in the upper right corner of the page.
6. After the eZLO hub is connected, click NEXT. The wizard prompts you to check that the eZLO power indicator is lit. For the location of this indicator see Figure 1 eZLO Hub
7. If the power indicator is lit, click NEXT. The wizard prompts you to select a connection mode.
Note: If a wizard step appears to take too long to execute, click on the “No I was waiting too long” link for troubleshooting information.
13

8. Select the desired connection mode. For the WiFi connection option see Connect with WiFi.
How to Connect an eZLO Hub to the Internet with a TP Ethernet Cable 1. Select the Connect with Cable option.
The wizard prompts you to connect the eZLO hub and a router with a LAN cable.
2. Verify that the LAN cable connection is in place and click NEXT.
14
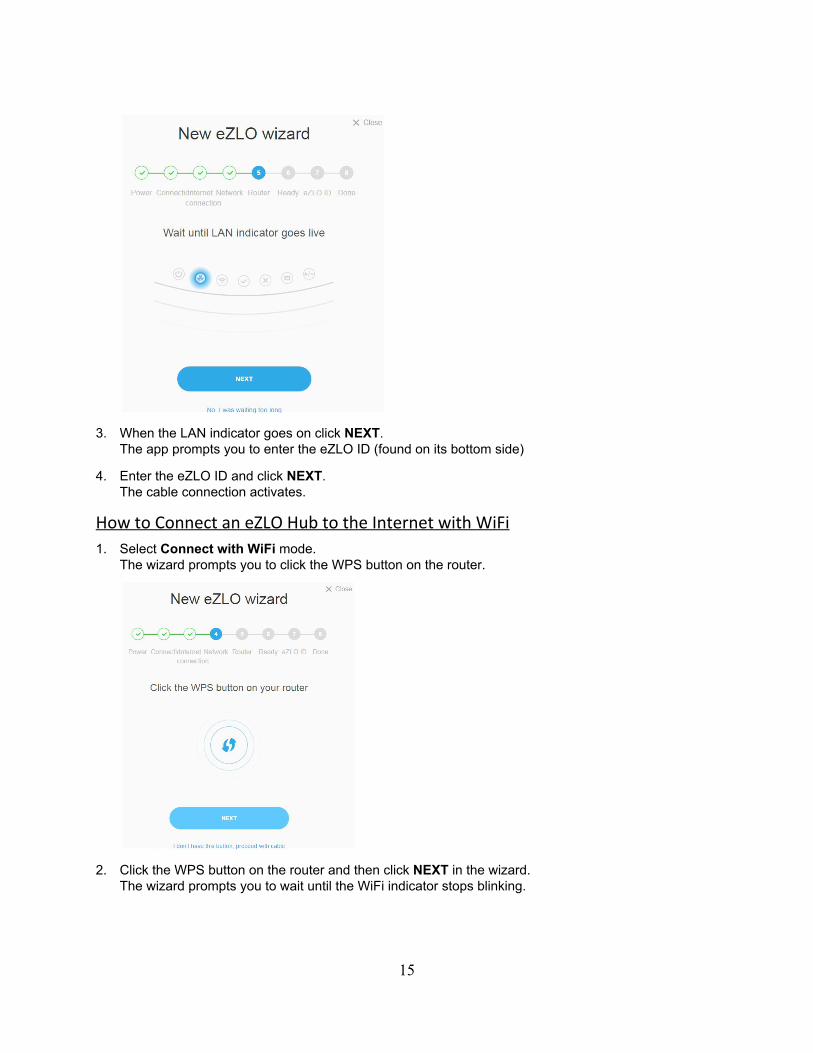
3. When the LAN indicator goes on click NEXT. The app prompts you to enter the eZLO ID (found on its bottom side)
4. Enter the eZLO ID and click NEXT. The cable connection activates.
How to Connect an eZLO Hub to the Internet with WiFi
1. Select Connect with WiFi mode. The wizard prompts you to click the WPS button on the router.
2. Click the WPS button on the router and then click NEXT in the wizard. The wizard prompts you to wait until the WiFi indicator stops blinking.
15
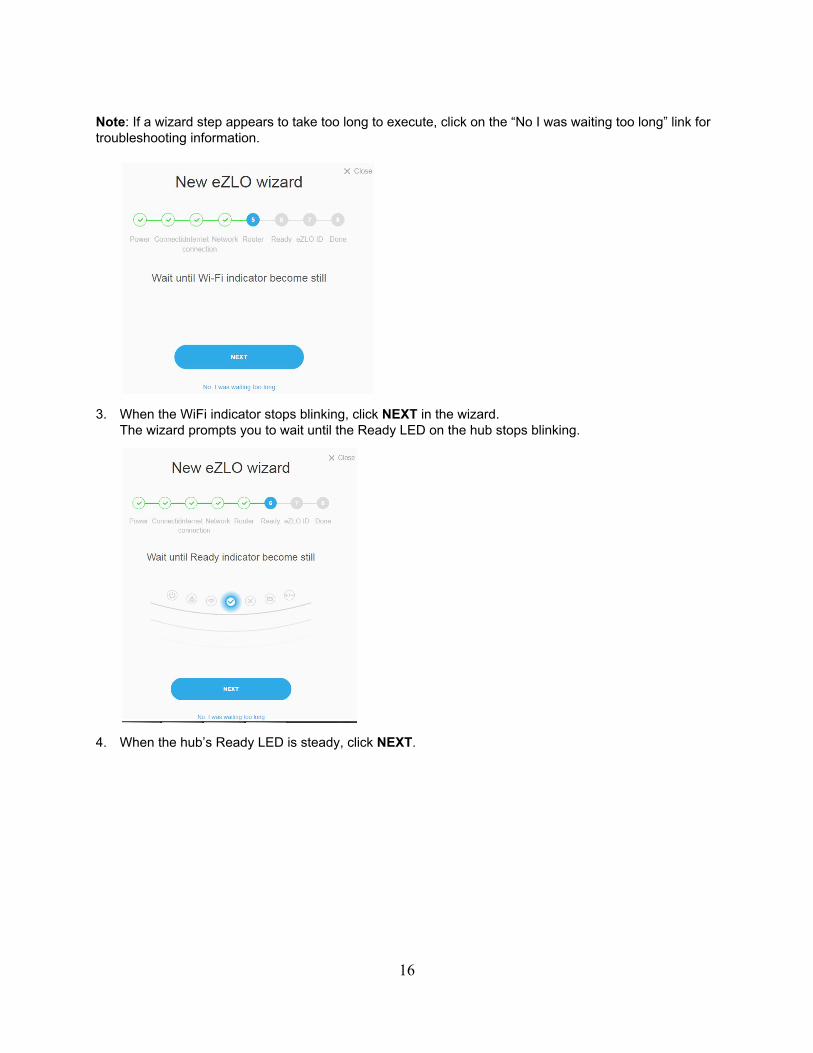
Note: If a wizard step appears to take too long to execute, click on the “No I was waiting too long” link for troubleshooting information.
3. When the WiFi indicator stops blinking, click NEXT in the wizard. The wizard prompts you to wait until the Ready LED on the hub stops blinking.
4. When the hub’s Ready LED is steady, click NEXT.
16
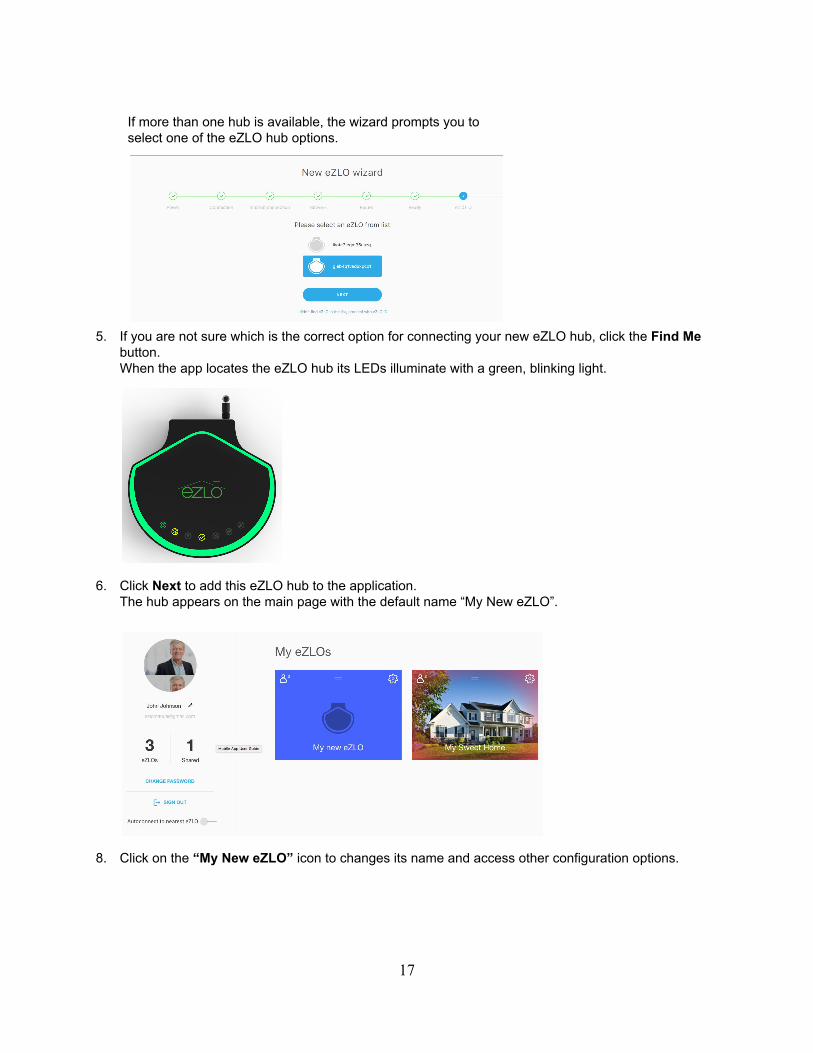
If more than one hub is available, the wizard prompts you to select one of the eZLO hub options.
5. If you are not sure which is the correct option for connecting your new eZLO hub, click the Find Me button. When the app locates the eZLO hub its LEDs illuminate with a green, blinking light.
6. Click Next to add this eZLO hub to the application. The hub appears on the main page with the default name “My New eZLO”.
8. Click on the “My New eZLO” icon to changes its name and access other configuration options.
17
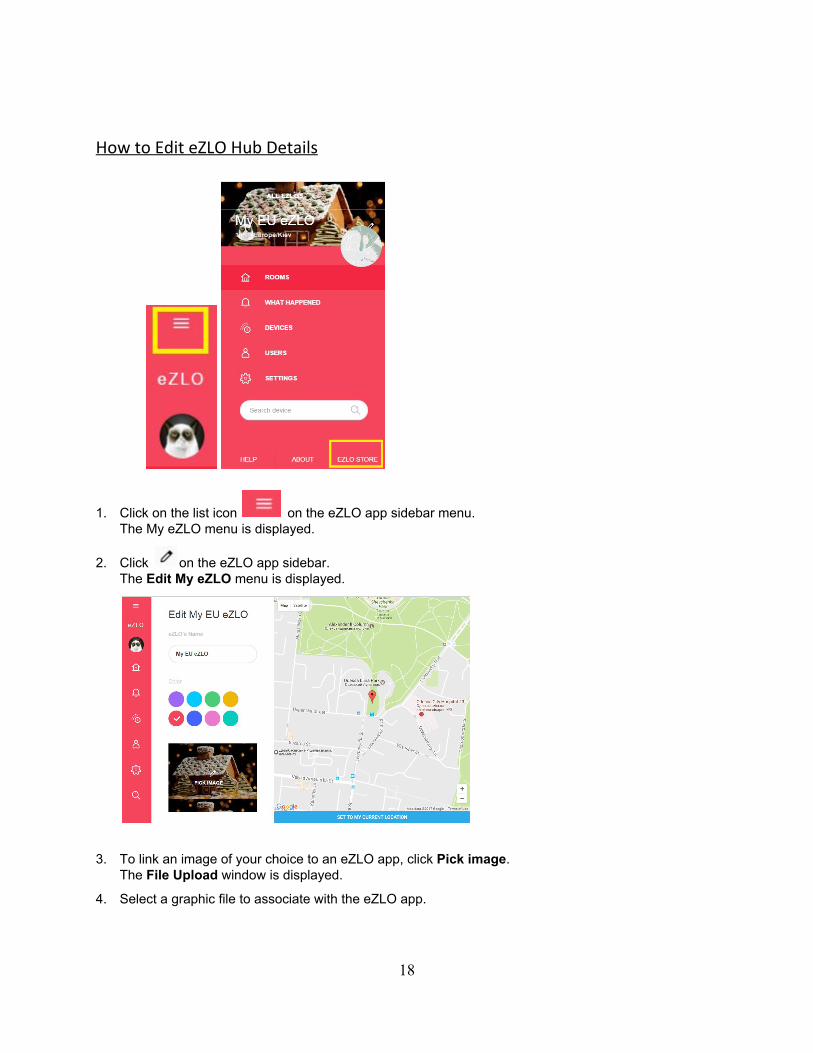
How to Edit eZLO Hub Details
1. Click on the list icon on the eZLO app sidebar menu. The My eZLO menu is displayed.
2. Click on the eZLO app sidebar. The Edit My eZLO menu is displayed.
3. To link an image of your choice to an eZLO app, click Pick image. The File Upload window is displayed.
4. Select a graphic file to associate with the eZLO app.
18
5. To change the eZLO app name, enter a new name in the field provided.
6. To change the eZLO app color, click the circle with the color you like.
7. To set the application to the user’s current location, click Set to my Current Location. The application identifies the user’s current location, and adjusts its clock accordingly.
Note: If you use proxy software, your real location may differ from the one that the geolocation functionality reports.
8. Alternatively, change your location directly on the map. Drag and drop the location flag to set a new location. The zoom feature allows you to find and select your location precisely.
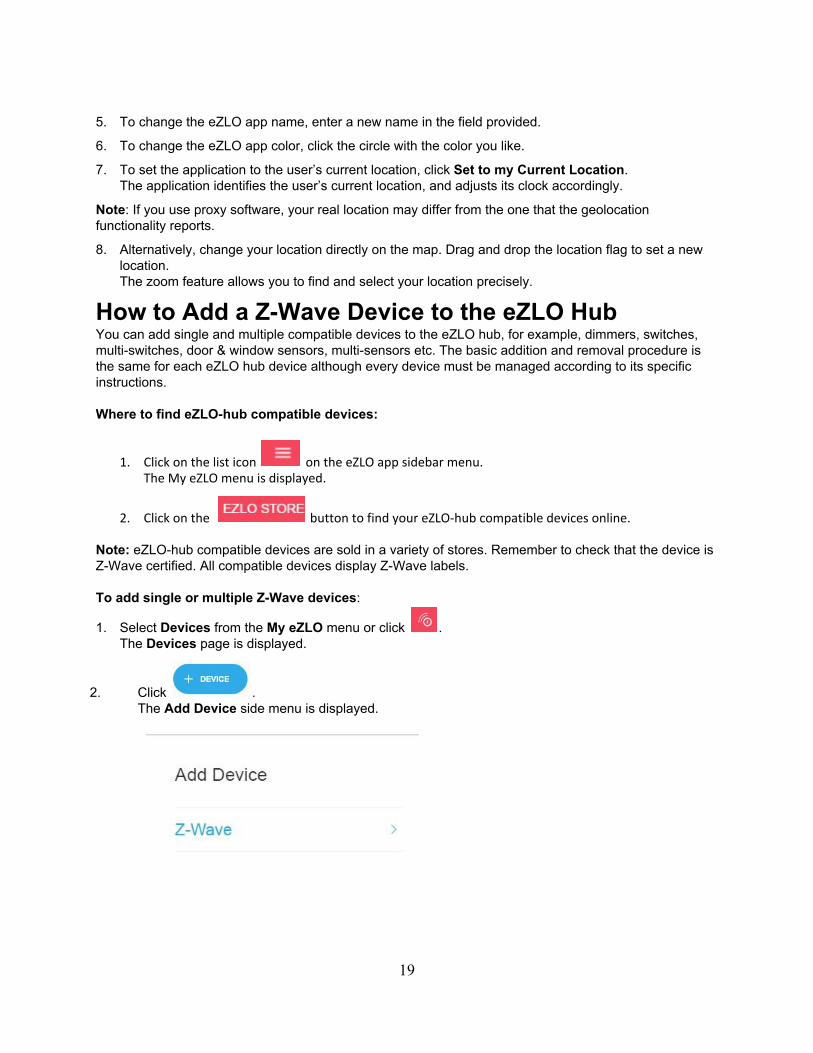
How to Add a Z-Wave Device to the eZLO Hub You can add single and multiple compatible devices to the eZLO hub, for example, dimmers, switches, multi-switches, door & window sensors, multi-sensors etc. The basic addition and removal procedure is the same for each eZLO hub device although every device must be managed according to its specific instructions. Where to find eZLO-hub compatible devices:
1. Click on the list icon on the eZLO app sidebar menu. The My eZLO menu is displayed.
2. Click on the button to find your eZLO-hub compatible devices online. Note: eZLO-hub compatible devices are sold in a variety of stores. Remember to check that the device is Z-Wave certified. All compatible devices display Z-Wave labels. To add single or multiple Z-Wave devices:
1. Select Devices from the My eZLO menu or click . The Devices page is displayed.
2. Click . The Add Device side menu is displayed.
19

3. Click Z-Wave.
The eZLO app shows a Z-Wave device addition in progress. The Z-Wave Indicator LED on the eZLO hub turns green to show that it is now in Adding Mode.
4. Follow the procedure described in the device’s user instructions to add it to the eZLO hub.
The eZLO hub’s rim LED changes from a blue to a green-colored light.
A progress bar indicates that the Z-Wave device addition is proceeding. Finally a notification appears on the screen to confirm that the device was added to the eZLO hub. The device is identified by its default name.
5. Click Not Assigned, and select a room from the Room List.
20

6. On the room page, click . The Edit room menu is displayed.
7. Enter the Device Name.
8. From the Device Room drop down menu, select to assign the device to this room or another room.
9. Click Save to assign the new device to the selected room.
10. Click on the Rooms in the main menu to display a list of the rooms, choose the room with the new device and manage it from there. Alternatively, Go to Devices on the main menu and find your device in the lists in order to manage it.
Note: To add another eZLO hub or a third-party controller (as an Inclusion Controller) to your current eZLO Hub, or third-party controller, enable Learn mode (for eZLO Hub see p.5 in the How to Connect
21
one eZLO Hub to Another Z-Wave Hub section) on the future Inclusion controller and follow the Inclusion procedure on your Primary Controller (eZLO Hub or third-party controller). For third-party controllers these procedures appear in the device documentation.
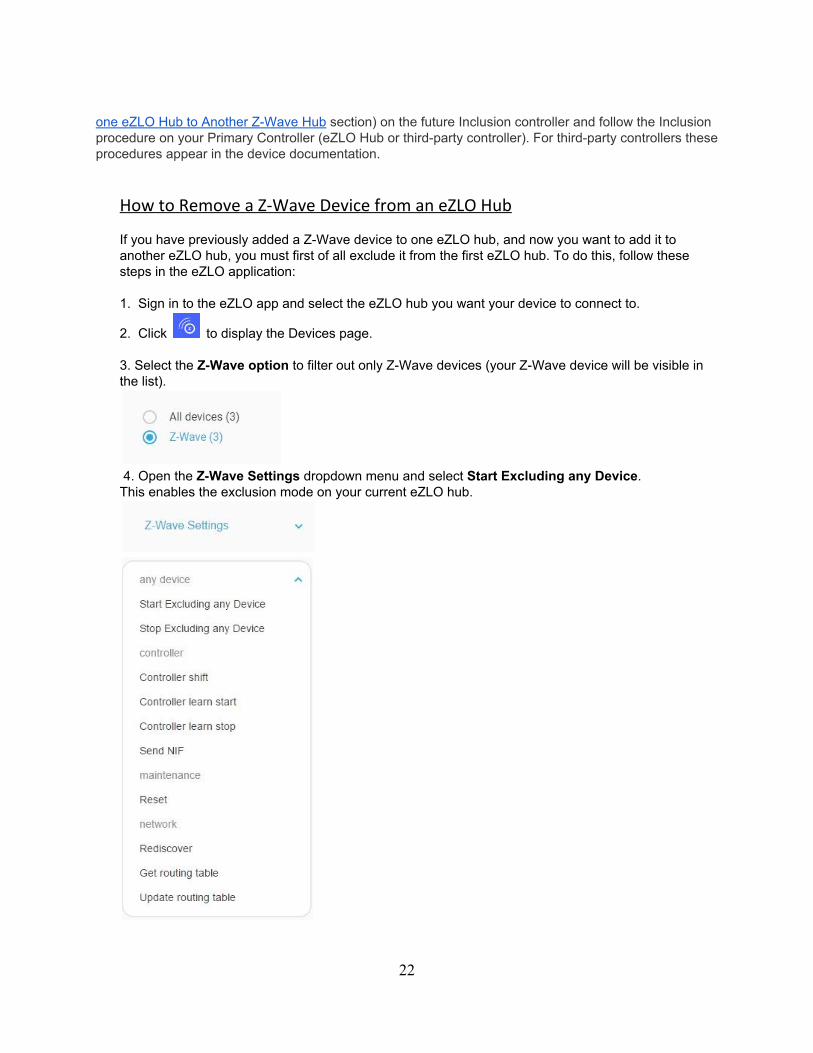
How to Remove a Z-Wave Device from an eZLO Hub If you have previously added a Z-Wave device to one eZLO hub, and now you want to add it to another eZLO hub, you must first of all exclude it from the first eZLO hub. To do this, follow these steps in the eZLO application: 1. Sign in to the eZLO app and select the eZLO hub you want your device to connect to.
2. Click to display the Devices page. 3. Select the Z-Wave option to filter out only Z-Wave devices (your Z-Wave device will be visible in the list).
4. Open the Z-Wave Settings dropdown menu and select Start Excluding any Device. This enables the exclusion mode on your current eZLO hub.
22
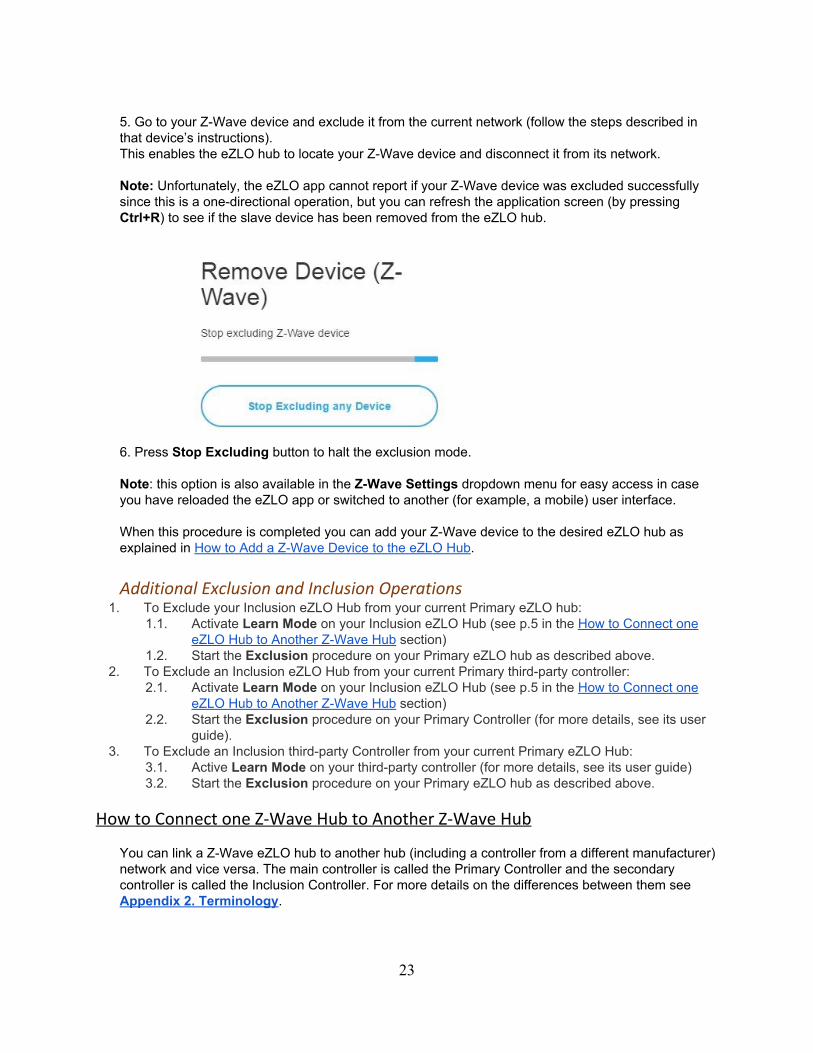
5. Go to your Z-Wave device and exclude it from the current network (follow the steps described in that device’s instructions). This enables the eZLO hub to locate your Z-Wave device and disconnect it from its network. Note: Unfortunately, the eZLO app cannot report if your Z-Wave device was excluded successfully since this is a one-directional operation, but you can refresh the application screen (by pressing Ctrl+R) to see if the slave device has been removed from the eZLO hub.
6. Press Stop Excluding button to halt the exclusion mode. Note: this option is also available in the Z-Wave Settings dropdown menu for easy access in case you have reloaded the eZLO app or switched to another (for example, a mobile) user interface. When this procedure is completed you can add your Z-Wave device to the desired eZLO hub as explained in How to Add a Z-Wave Device to the eZLO Hub.
Additional Exclusion and Inclusion Operations 1. To Exclude your Inclusion eZLO Hub from your current Primary eZLO hub:
1.1. Activate Learn Mode on your Inclusion eZLO Hub (see p.5 in the How to Connect one eZLO Hub to Another Z-Wave Hub section)
1.2. Start the Exclusion procedure on your Primary eZLO hub as described above. 2. To Exclude an Inclusion eZLO Hub from your current Primary third-party controller:
2.1. Activate Learn Mode on your Inclusion eZLO Hub (see p.5 in the How to Connect one eZLO Hub to Another Z-Wave Hub section)
2.2. Start the Exclusion procedure on your Primary Controller (for more details, see its user guide).
3. To Exclude an Inclusion third-party Controller from your current Primary eZLO Hub: 3.1. Active Learn Mode on your third-party controller (for more details, see its user guide) 3.2. Start the Exclusion procedure on your Primary eZLO hub as described above.
How to Connect one Z-Wave Hub to Another Z-Wave Hub
You can link a Z-Wave eZLO hub to another hub (including a controller from a different manufacturer) network and vice versa. The main controller is called the Primary Controller and the secondary controller is called the Inclusion Controller. For more details on the differences between them see Appendix 2. Terminology.
23

To connect your eZLO hub to another controller as an Inclusion controller: 1. Make sure both controllers are excluded from any Z-Wave networks (see How to clean an eZLO
section).
2. Click in the My eZLOs sidebar of the main eZLO hub page. The Devices page is displayed.
3. Select the Z-Wave checkbox. 4. Open the Z-Wave Settings dropdown menu and select Controller Learn Start.
Note: if you want to interrupt this process, you can select Controller Learn Stop option in the Z-Wave Settings dropdown menu.
5. To start the Inclusion process on Controller to which eZLO Hub is connecting, see this controller’s user guide.
Notes:
● if you want to add a third-party controller to your eZLO Hub, start Controller Learn mode on the third-party controller (see its user guide) and start the Inclusion process on your eZLO Hub. The included Controller will be connected to your Primary controller and listed in its devices list.
● If an eZLO hub becomes an Inclusion controller, its Z-Wave Settings options are different from
those available for an eZLO Primary Controller.
● You can’t manage your eZLO hub via another primary controller: any Basic command sent will be ignored.
How to Shift Primary Controller Functions from an eZLO hub to another Z-Wave Controller and Vice Versa
24

Once you have a Primary eZLO hub and another Z-Wave controller in your Z-Wave network, you can easily swap their roles.
1. Click in the My eZLOs sidebar of the main eZLO hub page. The Devices page is displayed.
2. Click in the My eZLOs sidebar of your primary eZLO hub page. 3. Select the Z-Wave checkbox. 4. If you want to shift settings from an eZLO Hub or a 3rd-party Controller (follow its user
instructions), open the Z-Wave Settings dropdown menu and select Controller Shift.
5. Start Learn Mode on the control to which you want to shift all the settings of the Primary Controller. The main hub will become secondary or vice versa.
Note: If your third-party Z-Wave controller is a Primary controller and your eZLO hub is an Inclusion controller in your Z-Wave network, if you want to swap their roles refer to your third-party controller’s user guide to learn how you to perform the Controller Shift operation on it. Before starting this operation, enable Controller Learn Mode on your eZLO hub (see p.5 in the How to Connect one eZLO Hub to Another Z-Wave Hub section).
How to Manage your Z-Wave Device The eZLO app provides users with real-time information on device status, and it enables them to easily manage their Z-Wave devices. This section describes how to: ● Find out to which room a certain device is assigned ● Change a device’s room assignment ● Manage a device ● Exclude a device ● View full device information ● Remove a Failed device
25
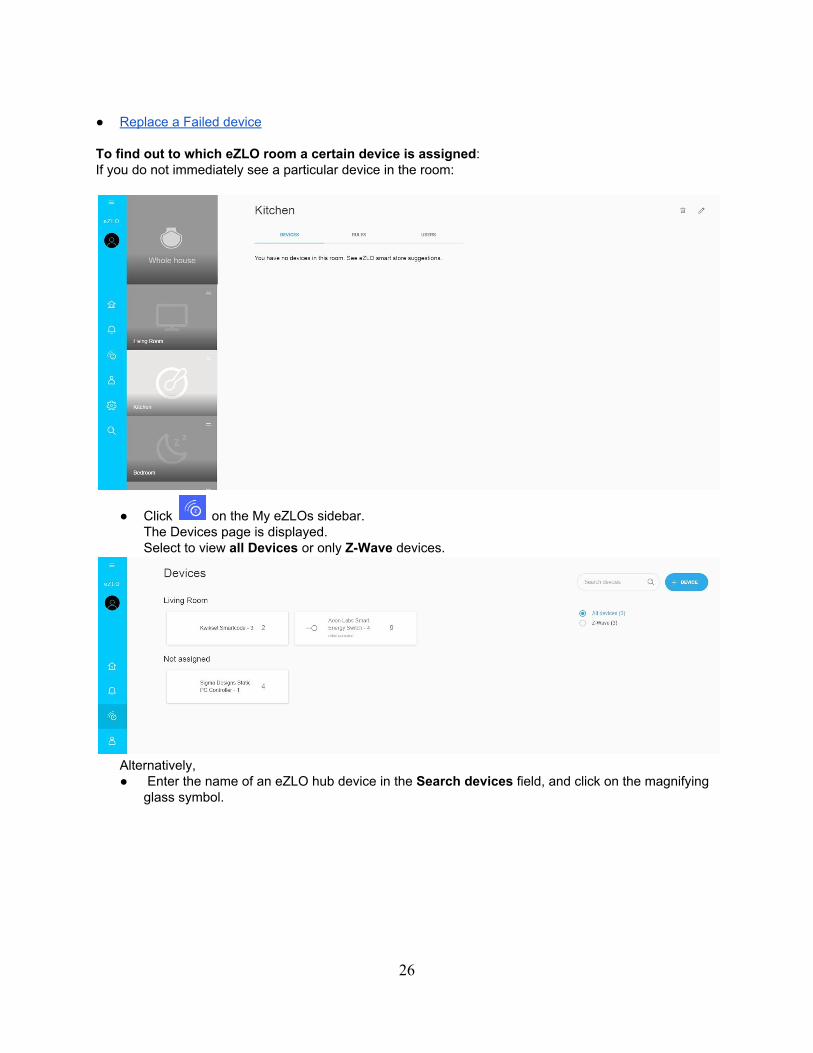
● Replace a Failed device To find out to which eZLO room a certain device is assigned: If you do not immediately see a particular device in the room:
● Click on the My eZLOs sidebar. The Devices page is displayed. Select to view all Devices or only Z-Wave devices.
Alternatively, ● Enter the name of an eZLO hub device in the Search devices field, and click on the magnifying
glass symbol.
26

To change a device’s room assignment:
1. Select the device and click (right-side menu).
The Edit item dialog box is displayed.
2. From the Device Room drop-down list select another room, for example, the Bedroom. 3. Click Save to reassign the device to the selected room.
The device disappears from its original room and reappears in the new room. The device’s settings, for example, temperature or brightness, remain unchanged.
To manage a device:
The EZLO hub’s device controls change in response to user actions in the application, or at physical device locations. For example, the virtual controls displayed in the eZLO app pages enable a user to increase or reduce a dimmer’s light power by turning the device control between its maximum and minimum brightness settings, or they could click on switch controls to turn on and off a four-position smart switch. The application display also changes if a user alters the physical device settings. For example, if they press the button on a switch to turn it off, the eZLO app display changes to show its virtual controls in an OFF position. To change device settings:
1. Go to the room where the device is located and click on the device label.
27

2. Click on the device control to change the settings.
The device operation changes as the control is moved.
Note: If you switch off the device and switch it on again, it remembers its last eZLO app power setting.
Temperature units may be displayed in either Celsius or Fahrenheit. To change the unit type the eZLO app uses:
1. Click on the My eZLOs sidebar. The Settings page is displayed.
2. Click on CO to display temperatures in Celsius or on FO to display temperatures in Fahrenheit. To exclude a device:
28

1. Go to the room where the device is located, select the device, and click on the Exclude icon. The Devices page is displayed. The red “Exclusion” LED lights up on the eZLO hub.
2. Follow the procedure described in the device’s user instructions to exclude it from the eZLO hub.
The eZLO hub’s rim light changes from a blue to a green-colored light.
The device is excluded from the eZLO hub and is no longer displayed by the application. The LED color changes back to blue.
To view full device information:
1. Go to the room where the device is located, select the device, and click . The Devices log is displayed. It includes device status details, and information on multiple instances of the same device (for example, a four position smart switch.)
29

You can also organize the devices details display according to date and rooms through the “What Happened” menu. For further details see the description of this menu in the How to view eZLO events. If Your Z-Wave Device Doesn’t Work
In certain situations a device might fail, for example, if it is disconnected from its power source, if it is taken out of the eZLO hub’s range, or if a defect occurs in the device. For about 30 seconds after failing the application tries to reach it and during this time the virtual device controls continue to operate. As soon as the application recognizes the device has failed a “Device is Unreachable” notification is displayed when you click on this device’s icon.
To remove a Failed device:
The failure notification gives access to the Failed device’s Delete and Replace options.
30

1. Click Delete to remove the device. The eZLO hub removes the fail device from its device listing. There is no need to press any button on the actual device.
To replace a Failed device:
You can replace a Failed device in one room with another device of the exactly same model. To do so:
1. Click the Replace button on the “THIS DEVICE IS UNREACHABLE” notification.
2. Physically remove the Failed device and replace it with an identical device.
3. Follow the replacement device’s user instructions to set it up. When the replacement device is connected, the eZLO hub will try to recognize it. If it succeeds, the “Device is successfully replaced” notification will appear on the screen.
5. Refresh the web page and see that device is now reachable. The hub identifies it as the original device.
31
How to Manage My eZLOs Page Features You can change the arrangement of the My eZLOs sidebar and other features of this page.
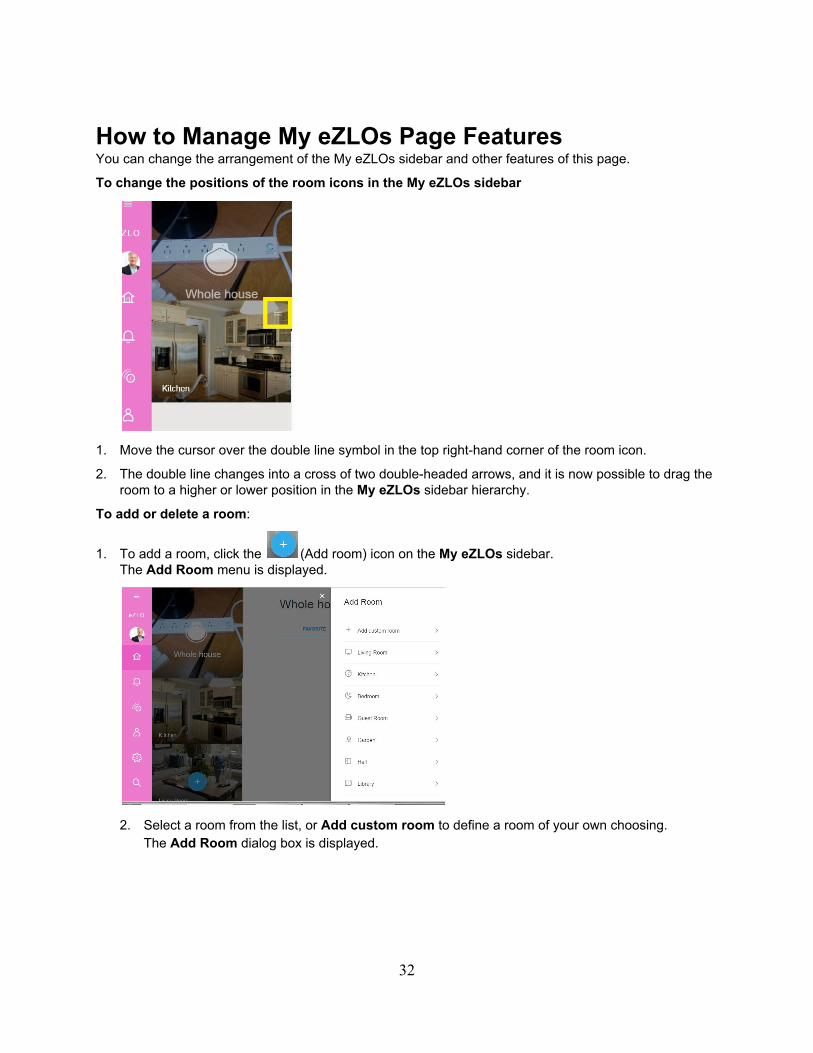
To change the positions of the room icons in the My eZLOs sidebar
1. Move the cursor over the double line symbol in the top right-hand corner of the room icon.
2. The double line changes into a cross of two double-headed arrows, and it is now possible to drag the room to a higher or lower position in the My eZLOs sidebar hierarchy.
To add or delete a room:
1. To add a room, click the (Add room) icon on the My eZLOs sidebar. The Add Room menu is displayed.
2. Select a room from the list, or Add custom room to define a room of your own choosing. The Add Room dialog box is displayed.
32

3. Click Pick Image. Select an image from your computer to associate with this room.
4. For a customized room, enter a room name
5. Click ADD. The room is displayed on the My eZLOs sidebar. You can assign devices to the new room, manage devices in the room, share the room, or use any of the other functions available in this room.
6. To delete a room, select the room and click in the room menu. If this room contains eZLO hub devices the application issues a warning when a delete request is made.
33
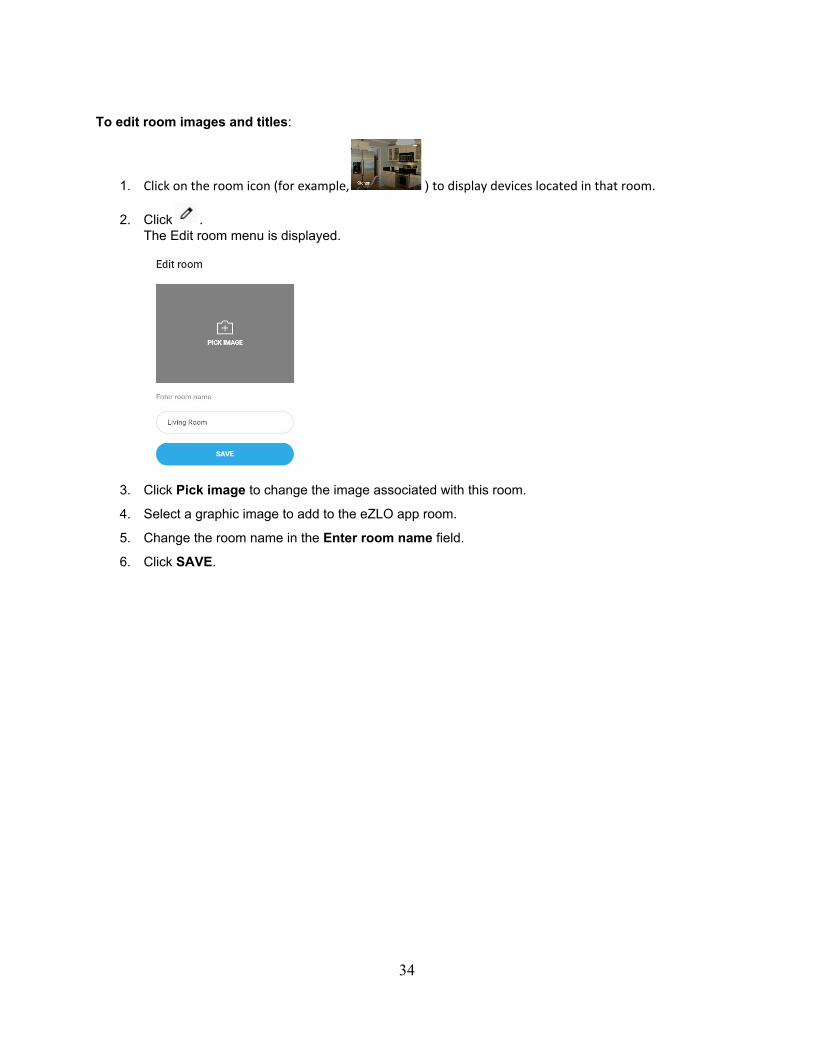
To edit room images and titles:
1. Click on the room icon (for example, ) to display devices located in that room.
2. Click . The Edit room menu is displayed.
3. Click Pick image to change the image associated with this room.
4. Select a graphic image to add to the eZLO app room.
5. Change the room name in the Enter room name field.
6. Click SAVE.
34
Section 3 Sharing eZLO Hubs Access to an eZLO hub can be shared with existing users whose identities are stored in the eZLO app, or with new users invited by an email. It is possible to initiate sharing from the Users menu or from a specific room menu, but the sharing rights you can give vary between these menus.
The application remembers users who have previously been invited to share it, or given access to specific rooms; the names of these existing users are automatically added to a “Users to share with” list. However, if a user is removed from the list of shared users, they will no longer appear on this list.
The eZLO app recognizes three types of users according to their permissions:
● Owners have unrestricted access to all the application’s features. They can share rooms with anyone via email or a selection from the existing users list. If they initiate this request from a room menu it is only possible to share user rights, but if they initiate it from the Users’ menu they may share both user and administrator rights with existing users or new users invited by email. Owners may also un-share rooms with both these categories of shared users.
● Administrators can manage all rooms and devices but they cannot change eZLO hub or network settings, backup or restore an eZLO hub, or update its firmware. They may add or delete rooms, set eZLO Hub rules and share rooms with other users. However, administrators can only share user rights with existing users and un-share this user type. They also cannot un-share a user from a single room; if they select to un-share a user, this removes that user from every room.
● Users only receive access to the rooms shared with them, and view and manage devices in these rooms. They do not have the right to share rooms with anyone else.
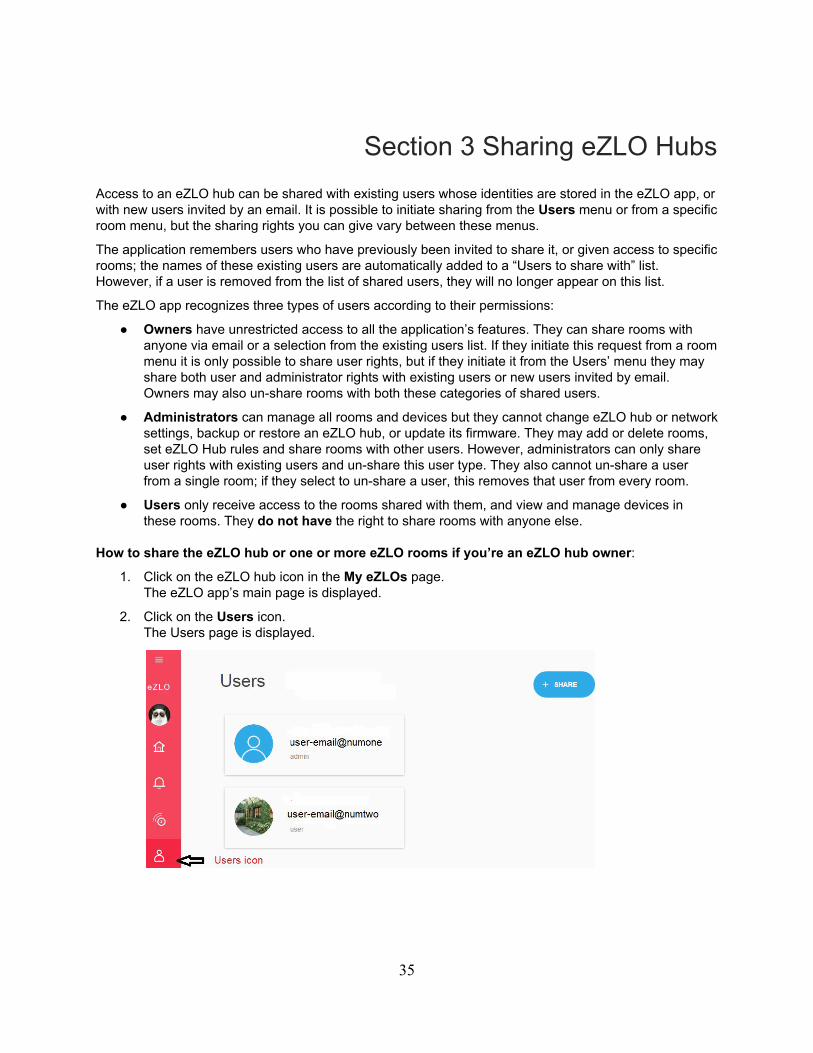
How to share the eZLO hub or one or more eZLO rooms if you’re an eZLO hub owner:
1. Click on the eZLO hub icon in the My eZLOs page. The eZLO app’s main page is displayed.
2. Click on the Users icon. The Users page is displayed.
35

3. Click .
The Share options menu is displayed.
4. Select Share to existing user to share rooms with previously added users. The Share to existing users options appear.
5. Select one or more entries from the Users column.
6. Alternatively, invite new users to share the eZLO hub (or devices in specific rooms) through the via E-mail share option. The Share via E-mail options display.
36

7. Enter the email address of the user to which the eZLO hub or a specific room will be shared. 8. To give the shared user Administrator rights, or only User rights, toggle the eZLO Administrator
switch. 9. If you select to share with just User rights you can decide to share all or only certain rooms.
Select rooms to share from the Rooms column. You must select at least one room for sharing. When the shared user logs into this eZLO app they only see the rooms shared with them, and any devices located in these rooms.
10. Click Share to activate sharing. A notification is displayed showing that the invitation to share the eZLO hub, or specific rooms, has been sent.
How to share a room from the room menu:
1. The share option for specific rooms via email only is also available from a room menu — click on the Users option (upper right screen corner) to activate it. The Share Via E-mail option is displayed.
37

2. Click . The Share Via E-mail panel is displayed.
3. Enter the email address of the user you want to share the current room with.
4. Click Share to give the new user access to the room. A notification is displayed showing that the invitation to share the eZLO hub, or specific rooms, has been sent.
5. Once the room is shared this user is added to the “Users to share with” list.
How to cancel sharing the Ezlo hub with a certain user:
The eZLO hub owner can easily prohibit access to a particular user:
1. Login into the app with the eZLO hub owner User Name and Password.
2. Click to open the Users page Find the icon for the shared administrator/user whose access you want to prohibit.
3. Click on the icon on the right to the username.
38
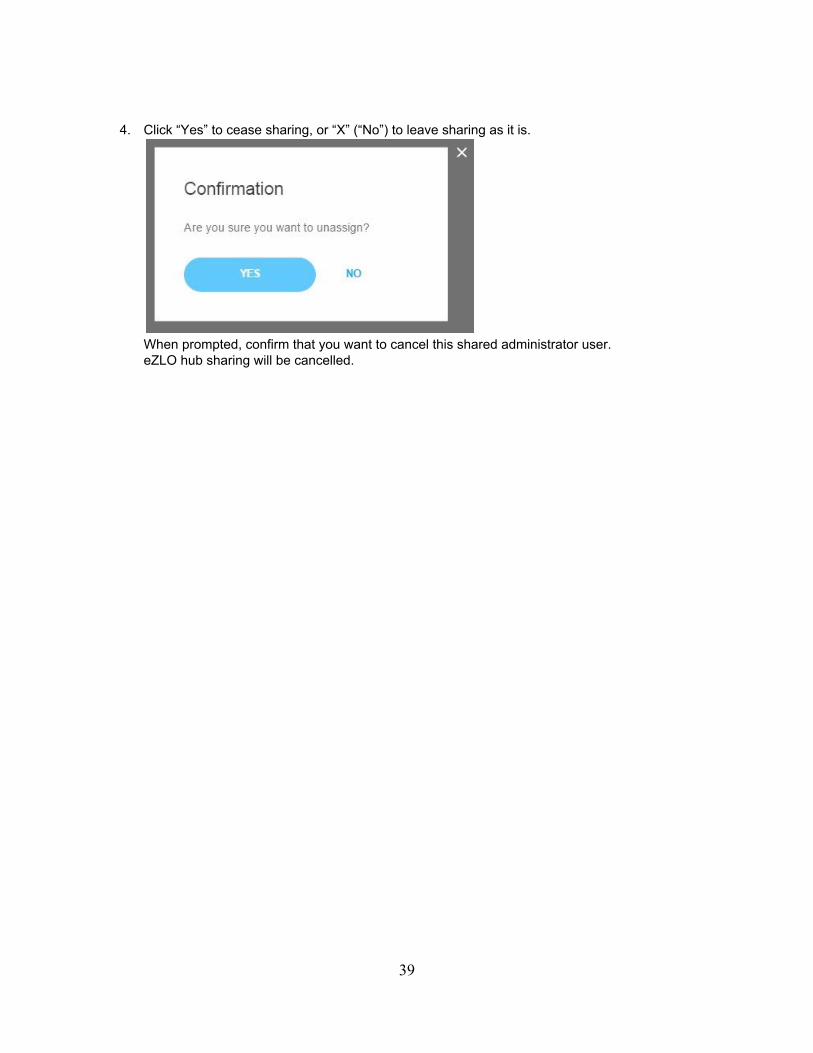
4. Click “Yes” to cease sharing, or “X” (“No”) to leave sharing as it is.
When prompted, confirm that you want to cancel this shared administrator user. eZLO hub sharing will be cancelled.
39
Section 4 Maintenance This section describes maintenance procedures that must be performed regularly (for example, firmware update) or might need to be done on occasion. The procedures described are:
● Viewing eZLO events
● Cleaning an eZLO
● Switching the eZLO hub from Ethernet to WiFi
● Switching the eZLO hub from Wifi to Ethernet
● Working with eZLO firmware
● Removing an eZLO
● Removing all devices from an eZLO
● Replicating an eZLO
● eZLO backup and restore
● eZLO hub settings backup
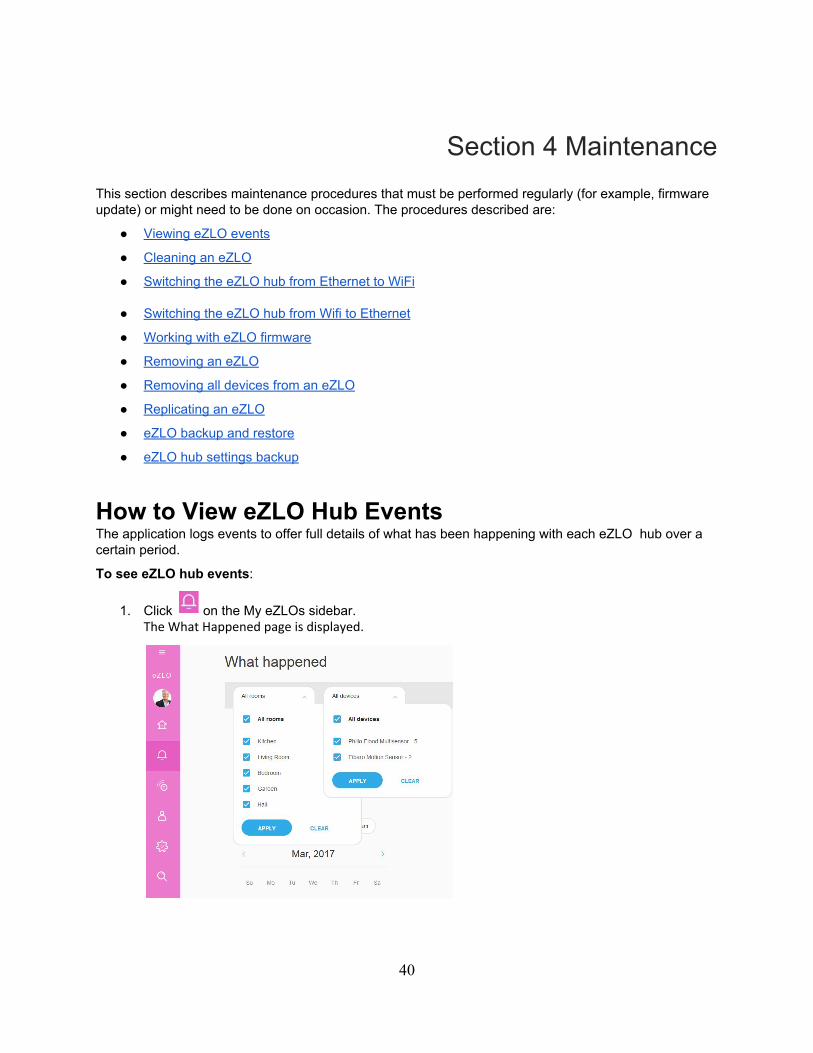
How to View eZLO Hub Events The application logs events to offer full details of what has been happening with each eZLO hub over a certain period.
To see eZLO hub events:
1. Click on the My eZLOs sidebar. The What Happened page is displayed.
40
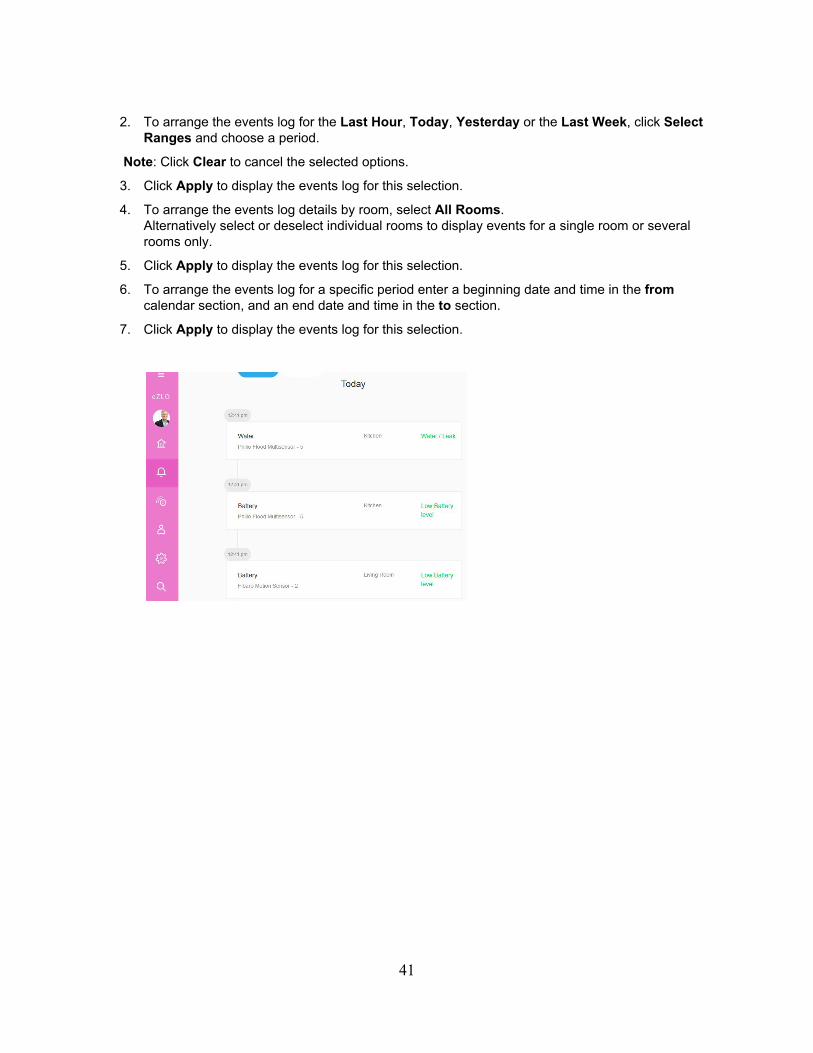
2. To arrange the events log for the Last Hour, Today, Yesterday or the Last Week, click Select
Ranges and choose a period.
Note: Click Clear to cancel the selected options.
3. Click Apply to display the events log for this selection.
4. To arrange the events log details by room, select All Rooms. Alternatively select or deselect individual rooms to display events for a single room or several rooms only.
5. Click Apply to display the events log for this selection.
6. To arrange the events log for a specific period enter a beginning date and time in the from calendar section, and an end date and time in the to section.
7. Click Apply to display the events log for this selection.
41

How to Clean an eZLO Hub To return an eZLO hub to its factory default settings:
1. Click on the My eZLOs sidebar. The Settings page is displayed.
2. Click Clean eZLO.
3. Click Yes when prompted to confirm, or No if you decide not to clean the eZLO hub.
4. If you confirm the Clean eZLO request, the eZLO hub returns to its default settings. The My eZLOs page is displayed. The image of the cleaned eZLO hub now displays a default name and color.
5. Click on the eZLO hub image. The rooms display no images, and there are no devices assigned to this eZLO hub. There are five predefined rooms: Living room. Kitchen, Bedroom, Garden and Hall.
Alternatively, you can return an eZLO hub to its factory default settings in the next way:
1. Select your eZLO hub and click on the app’s sidebar. The Devices page is displayed.
2. Select Z-Wave to filter out only Z-Wave devices. 3. Open the Z-Wave Settings menu. 4. Click Reset.
After the settings will be reverted to the factory defaults.
Note: If this controller is the Primary controller for your network, resetting it will result in the nodes in your network being orphaned and it will be necessary after the reset to exclude and re-include all of the nodes in the network. If this controller is being used as a secondary controller in the network, use this procedure to reset this controller only in the event that the network primary controller is missing or otherwise inoperable.
42
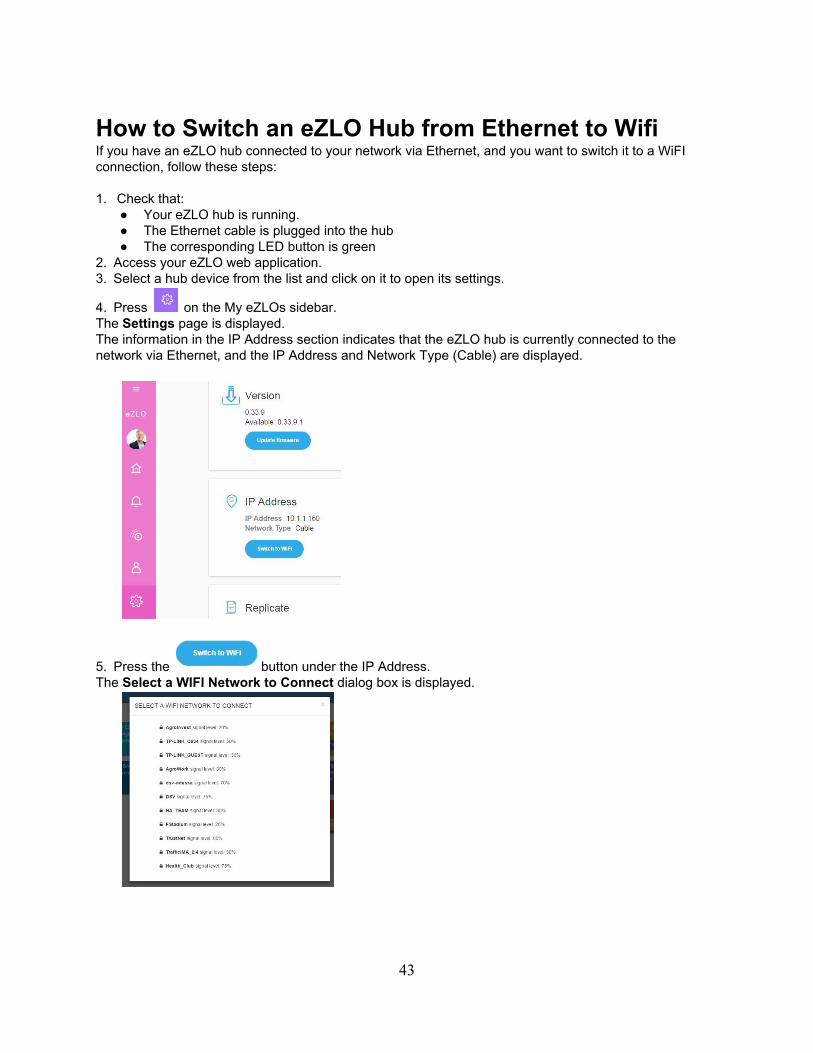
How to Switch an eZLO Hub from Ethernet to Wifi If you have an eZLO hub connected to your network via Ethernet, and you want to switch it to a WiFI connection, follow these steps: 1. Check that:
● Your eZLO hub is running. ● The Ethernet cable is plugged into the hub ● The corresponding LED button is green
2. Access your eZLO web application. 3. Select a hub device from the list and click on it to open its settings.
4. Press on the My eZLOs sidebar. The Settings page is displayed. The information in the IP Address section indicates that the eZLO hub is currently connected to the network via Ethernet, and the IP Address and Network Type (Cable) are displayed.
5. Press the button under the IP Address. The Select a WIFI Network to Connect dialog box is displayed.
43
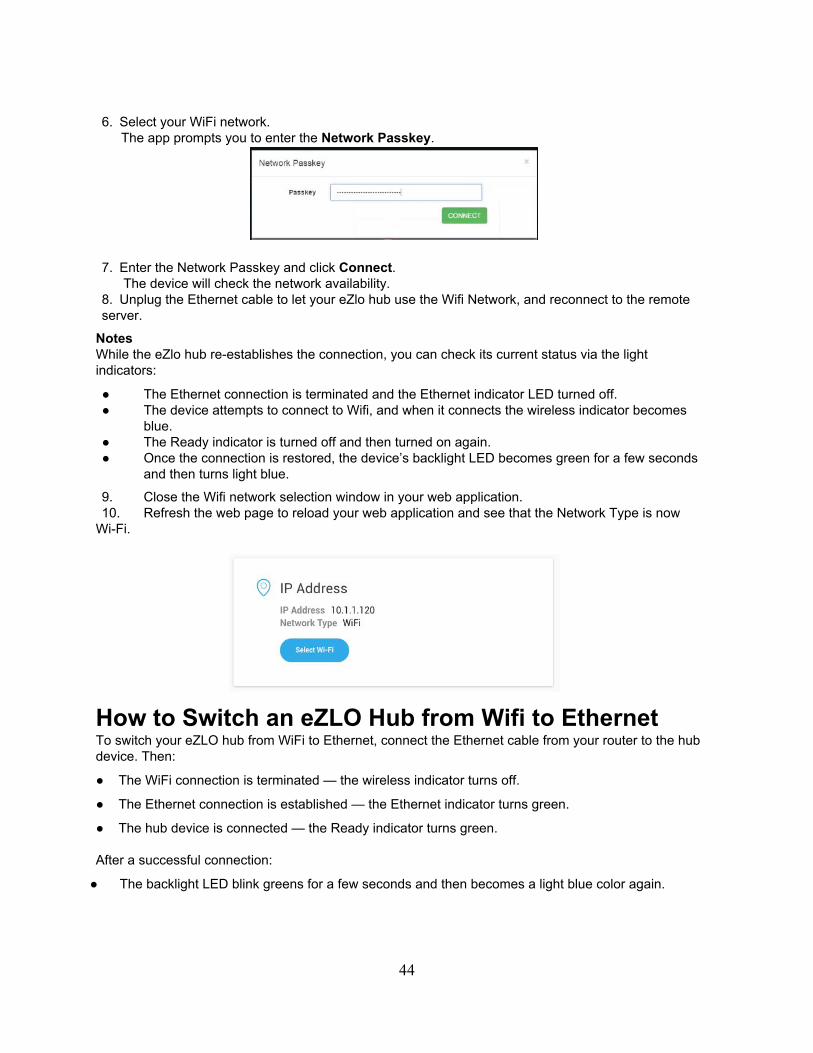
6. Select your WiFi network.
The app prompts you to enter the Network Passkey.
7. Enter the Network Passkey and click Connect. The device will check the network availability.
8. Unplug the Ethernet cable to let your eZlo hub use the Wifi Network, and reconnect to the remote server.
Notes While the eZlo hub re-establishes the connection, you can check its current status via the light indicators:
● The Ethernet connection is terminated and the Ethernet indicator LED turned off. ● The device attempts to connect to Wifi, and when it connects the wireless indicator becomes
blue. ● The Ready indicator is turned off and then turned on again. ● Once the connection is restored, the device’s backlight LED becomes green for a few seconds
and then turns light blue.
9. Close the Wifi network selection window in your web application. 10. Refresh the web page to reload your web application and see that the Network Type is now
Wi-Fi.
How to Switch an eZLO Hub from Wifi to Ethernet To switch your eZLO hub from WiFi to Ethernet, connect the Ethernet cable from your router to the hub device. Then:
● The WiFi connection is terminated — the wireless indicator turns off.
● The Ethernet connection is established — the Ethernet indicator turns green.
● The hub device is connected — the Ready indicator turns green. After a successful connection:
● The backlight LED blink greens for a few seconds and then becomes a light blue color again.
44

● In the Settings page (on the My eZLOs sidebar), the eZlo hub connection type changes from WiFi to Cable.
How to Work with eZLO Hub Firmware Regular firmware updates enables eZLO to enhance smart hub functionalities and operations, and it also allows for quick fixes of any problems that might arise. The eZLO hub might have one of three types of firmware version:
● Up to date ● Outdated supported version ● Outdated unsupported version
How to Discover the eZLO Hub’s Firmware Version Open the eZLO web app and select an eZLO hub:
● If you see a message asking you to update the device, the firmware version is outdated and may be no longer supported. In this case, you might not be able to manage this device from the web app until you update the firmware.
● If a newer firmware version is released while you have the eZLO app open, when you go to the Settings screen a message is displayed asking you to update firmware. If you don’t select Update firmware, you may not be able to manage this device from the web app. When you update the firmware the app shows that an update is in progress.
45
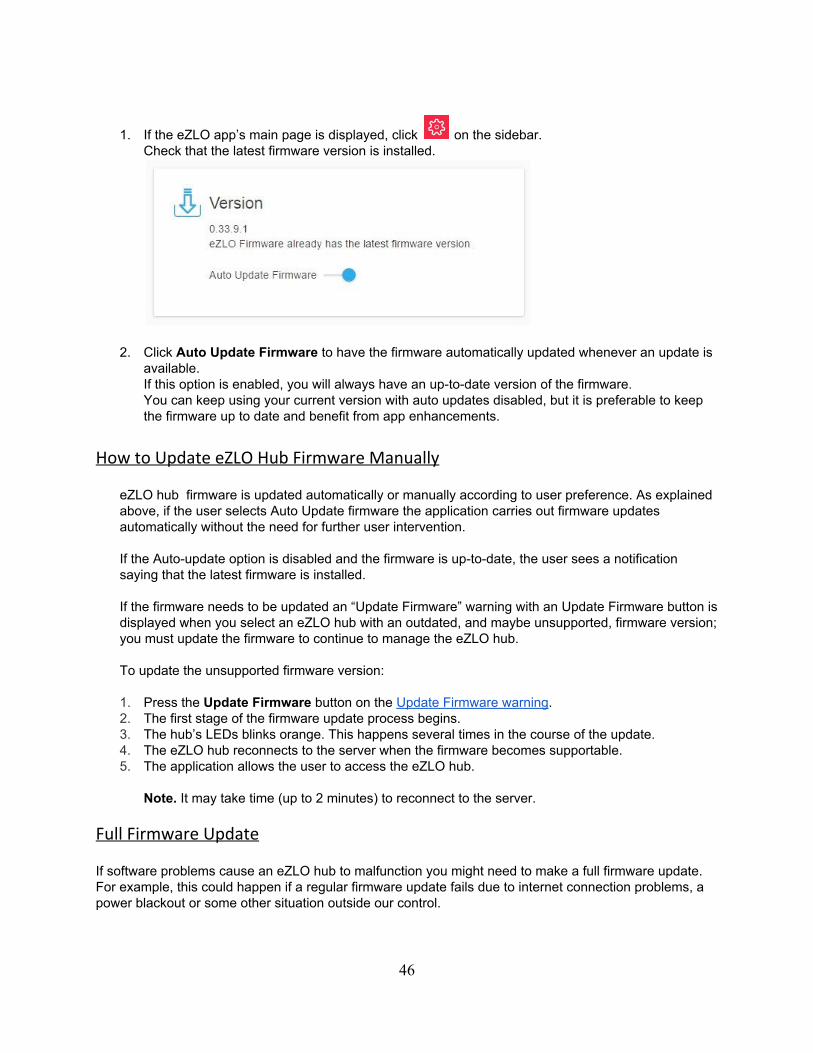
1. If the eZLO app’s main page is displayed, click on the sidebar. Check that the latest firmware version is installed.
2. Click Auto Update Firmware to have the firmware automatically updated whenever an update is available. If this option is enabled, you will always have an up-to-date version of the firmware. You can keep using your current version with auto updates disabled, but it is preferable to keep the firmware up to date and benefit from app enhancements.
How to Update eZLO Hub Firmware Manually
eZLO hub firmware is updated automatically or manually according to user preference. As explained above, if the user selects Auto Update firmware the application carries out firmware updates automatically without the need for further user intervention. If the Auto-update option is disabled and the firmware is up-to-date, the user sees a notification saying that the latest firmware is installed. If the firmware needs to be updated an “Update Firmware” warning with an Update Firmware button is displayed when you select an eZLO hub with an outdated, and maybe unsupported, firmware version; you must update the firmware to continue to manage the eZLO hub. To update the unsupported firmware version: 1. Press the Update Firmware button on the Update Firmware warning. 2. The first stage of the firmware update process begins. 3. The hub’s LEDs blinks orange. This happens several times in the course of the update. 4. The eZLO hub reconnects to the server when the firmware becomes supportable. 5. The application allows the user to access the eZLO hub.
Note. It may take time (up to 2 minutes) to reconnect to the server.
Full Firmware Update If software problems cause an eZLO hub to malfunction you might need to make a full firmware update. For example, this could happen if a regular firmware update fails due to internet connection problems, a power blackout or some other situation outside our control.
46

The full firmware update deletes the old firmware, downloads the latest firmware and installs it on the eZLO hub. This update does not affect the eZLO data and settings. To make a full firmware update:
1. Make sure that the eZLO ethernet cable and DC power cables are connected to the eZLO hub and that it is switched ON.
2. Press and hold down the Reset button on the back of the eZLO hub. 3. Disconnect the eZLO hub from its DC power source. 4. (The button marked 9 in Figure 1 eZLO Hub). 5. Reinsert the DC cable into the eZLO hub while keeping the Reset button pressed down. 6. When the eZLO backlight LED becomes a solid yellow release the Reset button.
5. When the Error Indicator and Message Indicator LEDs (the 5th and 6th LEDs) blink quickly, give
a single, short press on the Reset button. The eZLO backlight LED blinks green three times and one time yellow, or inversely.
6. Wait as the eZLO hub reboots and the Full Firmware Update is completed. At this point the eZLO hub should become connected to the server, and the Ready Indicator LED turn yellow.
47
How to Remove an eZLO Hub If you have a fully operating eZLO hub connected to the Internet, you can remove it from your eZLO app. To do so follow these steps:
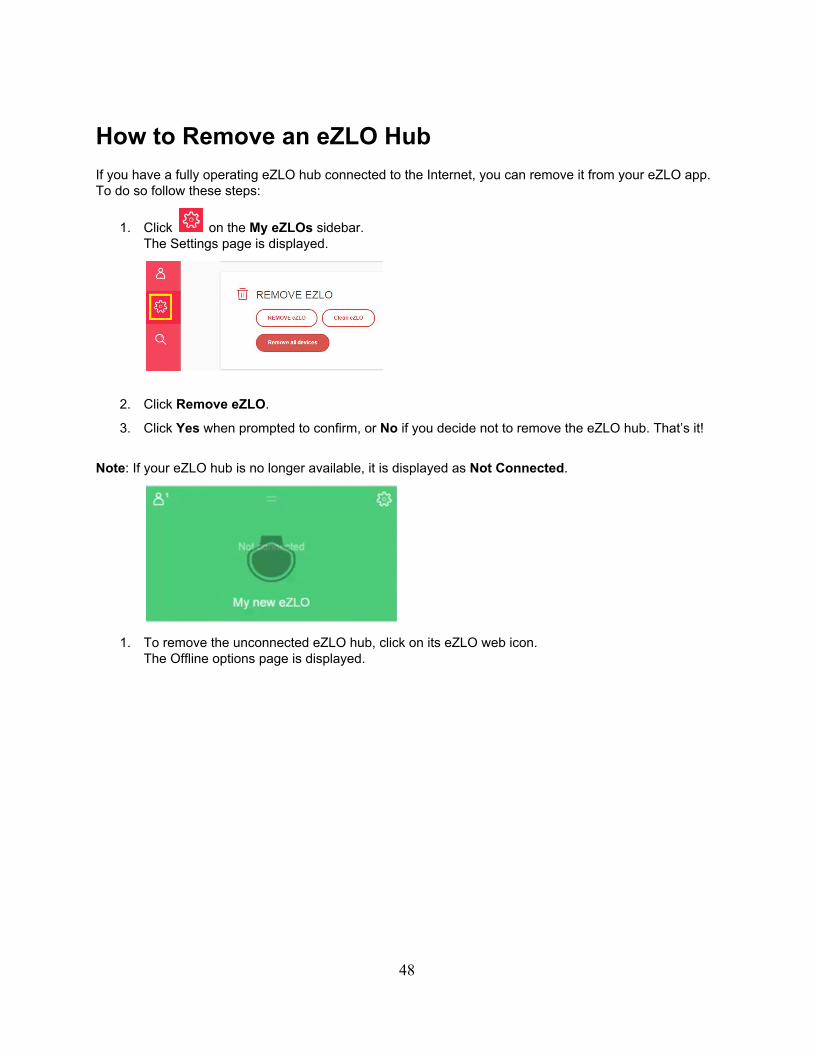
1. Click on the My eZLOs sidebar. The Settings page is displayed.
2. Click Remove eZLO.
3. Click Yes when prompted to confirm, or No if you decide not to remove the eZLO hub. That’s it!
Note: If your eZLO hub is no longer available, it is displayed as Not Connected.
1. To remove the unconnected eZLO hub, click on its eZLO web icon. The Offline options page is displayed.
48

2. Select REMOVE eZLO. 3. Click Yes when prompted to confirm, or No if you decide not to remove the unconnected eZLO
hub.
How to Remove all Devices From eZLO Hub If you want to disconnect and remove all the devices from an eZLO hub:
1. Click on the My eZLOs sidebar. The Settings page is displayed.
2. Click Remove all Devices.
3. Click Yes when prompted to confirm, or No if you decide not to remove all the devices from the eZLO hub. REMEMBER this action cannot be undone.
4. Return to the My eZLOs page and open the eZLO hub’s menu.
5. Open the Devices menu from the My eZLOs sidebar. The devices displayed previously have all been removed.
49
How to Replicate an eZLO Hub In certain situations you may want to transfer all of your eZLO hub settings, the list of devices and user data to another eZLO hub device. This procedure is called replication.
For example, if a device is offline due to a power supply interruption, or a failure in the eZLO hub, it is possible to replicate its settings, device list and user data to another eZLO hub.
Replica image creation is done automatically, unless you have the Replicate to Cloud switch toggled off in the eZLO app’s Settings page.
You can only copy the replica image to an eZLO hub that was not used for the original replica image creation.
Note: The replica image cannot be restored to the eZLO hub from which it was replicated.
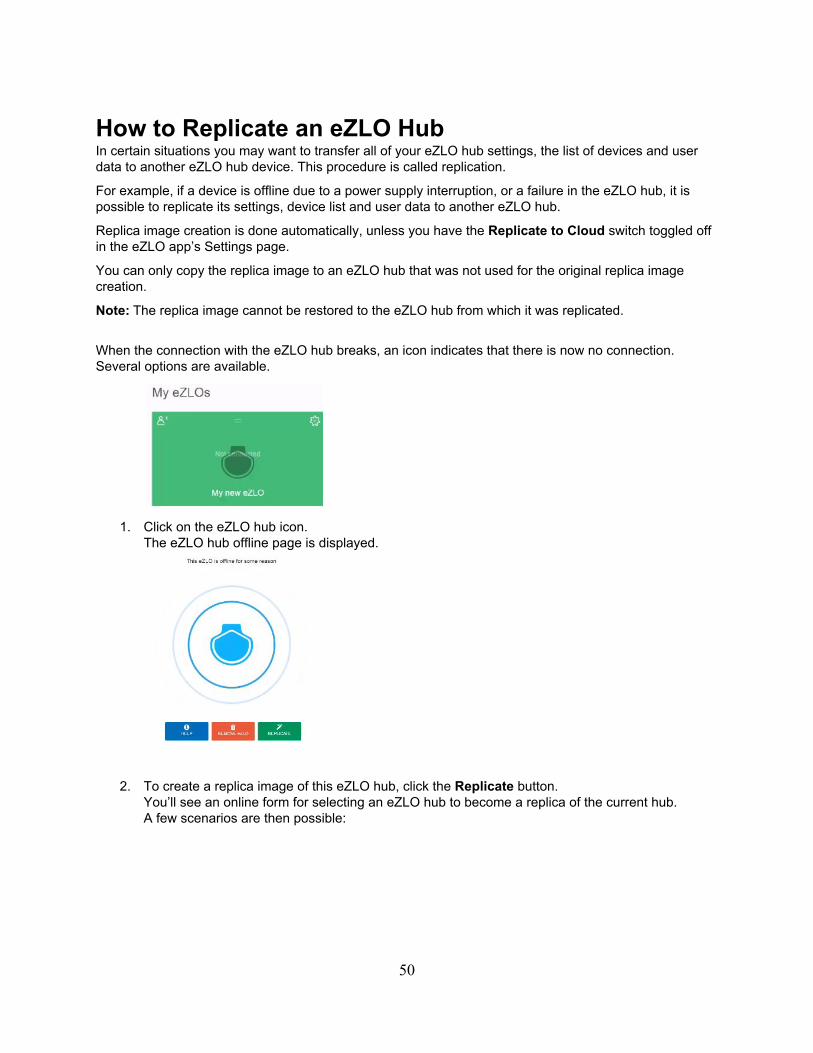
When the connection with the eZLO hub breaks, an icon indicates that there is now no connection. Several options are available.
1. Click on the eZLO hub icon. The eZLO hub offline page is displayed.
2. To create a replica image of this eZLO hub, click the Replicate button. You’ll see an online form for selecting an eZLO hub to become a replica of the current hub. A few scenarios are then possible:
50

a) If you already have other eZLO hubs connected to the same Z-Wave network, their serial numbers will be retrieved automatically and appear in the list for selection. Choose a hub from the list and click the Replicate button to replicate to it the current eZLO hub.
b) If you have a free eZLO hub not connected to your Z-Wave network, you’ll need to type its serial number manually, and only then click Replicate to make it a replica of the current hub.
c) If you have an eZLO hub added to another Z-Wave network, you will be unable to make it a replica of the current hub until you Reset or clean it. Trying to replicate it before then will result in an error message.
3. After clicking Replicate, press Continue to confirm.
● The latest created replica image will be set on the new eZLO hub. ● The old eZLO hub will disappear from your account. ● The new eZLO hub will have the same settings as the old one: the same names, images,
locations, pictures, rooms, devices, favorites, rules and the list of shared users.
Note: If you have the Replicate to Cloud switch in the Settings window toggled off, there will be no replica recorded and you will be unable to perform step 3 above.
51

How to Backup and Restore eZLO Hub Settings Once you’ve set up your eZLO hub, you can save all of its settings in a backup copy. The backup process creates an image of an eZLO hub with the list of slave devices connected to the hub, and the device and eZLO settings. With the aid of this backup you can easily restore the previous eZLO hub configuration. It is recommended to make a backup before doing any changes that might cause a loss of the date. You should also perform a backup if you want to use an eZLO hub in a different place temporarily and plan to later re-install it in its initial smart home location. It is possible to create a number of backups as long as you give each one a unique name. A backup copy includes the:
● eZLO hub name ● A color you picked to represent the hub in the web app ● A list of all devices this eZLO hub manages along with their settings and their assigned rooms
Note: A backup can only be used on the eZLO hub from which it was made.
In addition to the two manual backups, two automatic backups made by the system are available for restoring eZLO hub settings. Therefore the user may have as many as four system backups to choose from.
Note: ● For reliability reasons, the eZLO hub creates automatic backups every night at ~03:00 AM. ● Our servers store the two latest automatic backups and up to two manual backups.
How to Backup your eZLO Hub Settings
1. Click on the My eZLOs sidebar. The Settings page is displayed. Information on the last backup is displayed.
3. Click Backup. The application prompts for a backup name. Note: You can keep only up to two backup copies of your eZLO hub, so if you create a third copy the first
one will be removed from the server.
52

4. Enter a name into the Backup name field. The term “Backup” cannot be assigned as the backup name. The chosen name should have at least one symbol and it should not be used by an already existing manual backup.
5. Click Backup to start. A progress bar is displayed. Once the backup is completed it will be listed as the latest eZLO backup 6. Once the backup copy is created, you can close the dialog window and continue using the web app. How to Restore your eZLO Hub Settings
1. Click on the My eZLOs sidebar. The Settings page is displayed. Information on the last backup is displayed. 2. Click Restore.
4. Select the backup copy you want to restore.
5. Click Restore. A progress bar indicates the status of the backup process.
53

6. Once the backup copy is restored, close the dialog window and refresh the web app for the changes to take effect.
54

Appendix 1: Working With Various Z-Wave Devices Smart Power Strips Smart power strips help you to expand the number of supported electrical outlets and to shut off the power of the connected appliances. They come in very useful when you have electronic devices with a standby mode: turning them off zeros power consumption and switches off all those LEDs that might annoy you at night. How To Add a Smart Power Strip to an eZLO hub:
1. Click on the My eZLOs sidebar.. The Devices page is displayed.
2. Click . The Add Device side menu is displayed.
3. Select 'Z-Wave' from the dropdown menu. Your eZLO hub switches into inclusion mode.
4. Press a button on your Z-Wave smart strip. The eZLO will immediately find and recognize your device (the Z-Wave Inclusion/Exclusion indicator blinks during this stage)
5. Assign the device to a room of your choice. 6. Press Save Changes.
Your smart strip will appear in the list of the devices assigned to the room of your choice. How To Manage a Smart Power Strip in an eZLO Hub Via the eZLO hub you can control the power of the outlets on your smart power strip.
1. Go to the room where the smart power strip is assigned and select any newly added switch to access the strip control window. You can see live energy consumption and switch any outlet on your smart power strip on and off by clicking on the corresponding captions.
55

The smart strip information for Aeon Labs Smart Strip
Under the Hood: Working with Command Classes of Smart Strips If you open the Devices tab of your eZLO hub menu and select your smart power strip from the list, you can access all available command classes from the dropdown menu.
56

You can enable and disable certain command classes to limit the functionality of the smart power strip you want to manage.
● ’Switch’ type command classes are used to enable/disable all or particular power outlets. ● 'Meter_kWh' type command classes let you access and see the energy consumption of every
power outlet (so disabling them prohibits this access). ● Other types of command classes are service classes, and classes used by the eZLO hub
internally to properly communicate with your smart power strips. Door/Window Sensors Door and window sensors help ensure the safety of your home and let you know when doors or windows get opened or closed. They work as proximity sensors. They are composed of a magnet and a reed switch: once the door or a window is opened, the magnet is pulled away and the contacts in the reed switch get opened, and vice versa. How To Add a door/window sensor to an eZLO Hub
1. Click in the My eZLOs sidebar. The Devices page is displayed.
2. Click . The Add Device side menu is displayed.
3. Select 'Z-Wave' from the dropdown menu. 4. Your eZLO will switch into inclusion mode. 5. Pull off and reinsert the battery into your door/window sensor to make sure it is not in a sleep
mode. 6. Press a Z-Wave button on the sensor.
The eZLO app will immediately find and recognize your device (the Z-Wave Inclusion/Exclusion indicator will blink during this stage)
7. Assign the device to a room of your choice. 8. Press Save Changes.
The door/window sensor will appear in the list of the devices assigned to the room of your choice. How To Manage a Door/Window sensor in an eZLO Hub The eZLO hub app only allows you to see the status of your door/window sensor. Go to the room to where the sensor is assigned to immediately see its status (Open or Close) on its image.
You can also select a newly added sensor and view its info window. From here you can view the same information displayed in a graphic format. You can also see the battery indicator and check when it’s time to switch cells.
57

The door/window sensor information for Aeon Labs D/W Sensor Multisensors Multisensors track several types of activity simultaneously. They might include a motion sensor, a CO/CO2 sensor, a humidity sensor, a temperature sensor and others. Usually, a multisensor is a single battery-powered device that regularly sends information tracked to the available Z-Wave hub. How To Add a multisensor sensor to an eZLO Hub
1. Click in the My eZLOs sidebar. The Devices page is displayed.
2. Click . The Add Device side menu is displayed.
3. Select 'Z-Wave' from the newly appeared dropdown menu. The eZLO hub switches into inclusion mode.
4. Pull off and reinsert the battery into your multisensor to make sure it is not in a sleep mode. 5. Press a Z-Wave button on the sensor.
eZLO will immediately find and recognize your device (the Z-Wave Inclusion/Exclusion indicator will blink during this stage).
6. Assign the device to a room of your choice. 7. Press Save Changes.
The multisensor will appear in the list of the devices assigned to the selected room. How To Manage a multisensor in eZLO Hub
58
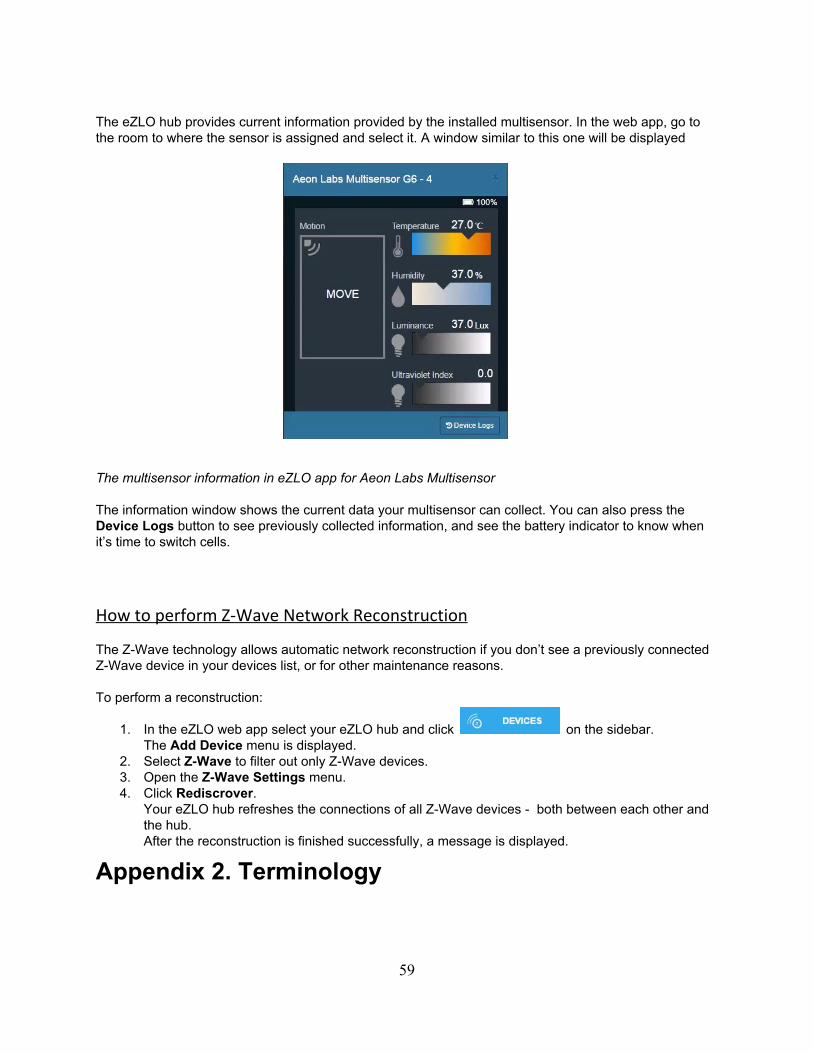
The eZLO hub provides current information provided by the installed multisensor. In the web app, go to the room to where the sensor is assigned and select it. A window similar to this one will be displayed
The multisensor information in eZLO app for Aeon Labs Multisensor The information window shows the current data your multisensor can collect. You can also press the Device Logs button to see previously collected information, and see the battery indicator to know when it’s time to switch cells. How to perform Z-Wave Network Reconstruction The Z-Wave technology allows automatic network reconstruction if you don’t see a previously connected Z-Wave device in your devices list, or for other maintenance reasons. To perform a reconstruction:
1. In the eZLO web app select your eZLO hub and click on the sidebar. The Add Device menu is displayed.
2. Select Z-Wave to filter out only Z-Wave devices. 3. Open the Z-Wave Settings menu. 4. Click Rediscrover.
Your eZLO hub refreshes the connections of all Z-Wave devices - both between each other and the hub. After the reconstruction is finished successfully, a message is displayed.
Appendix 2. Terminology
59

Nodes, Controllers and Home Control Groups Nodes are controllers or slaves based on their Role Type. The term Unknown device refers to: 1) Devices that belong to a Home Control Group but are not supported by an eZLO Hub. 2) Devices that do not fit into any of the Home Control Groups managed by the eZLO Hub. As a Universal Controller, eZLO Hub supports Basic Command Class and thus it can send Basic ON/OFF commands to turn ON/OFF every individual Unknown Device. Note: Unknown Devices can only be controlled with Basic ON/OFF commands. Note: Controller devices can also be handled as Unknown Devices if they do not fit into any of the Home Control Groups managed by eZLO Hub. Home Control Groups (HCG) are logical groups with various Z-Wave Plus Device Types mapped in them. Controllers are designed to control one or more Home Control Groups. They are classified as either Dedicated or Universal.
● A Dedicated Controller must only control one Home Control Group. It may control Unknown
Devices via the Basic Command Class, and the optional implemented controlled command classes in the controller.
● A Universal Controller controls multiple Home Control Groups. It MUST be able to control Unknown Devices with the Basic Command Class together with the optional implemented controlled command classes. It MUST provide individual control of Unknown Devices that have been included in the network.
Note: All controls for sending Controlled Commands are displayed in the eZLO Hub web interface according to the type/role the device reports to the eZLO Hub. For example, for Switch devices the “Switch” control graphic is displayed, and for thermostats - the “Temperature Setpoint” graphic is displayed etc. By their enabled properties, controllers can also be Primary, Inclusion, SIS and Secondary.
The Primary Static Controller (SC) will automatically update a SUC (Static Update Controller) if present in the Z-Wave network. Only one Primary controller is allowed in the Z-Wave network.
If the SC is the first node in a network it will automatically be configured to act as Primary SC.
If the SC is not the first node in a network it will automatically be configured to act as Secondary SC.
Several Secondary SCs are allowed in the Z-Wave network.
The Static Inclusion Server (SIS) enables other controllers to include/exclude nodes in the network on its behalf. The SIS is the Primary controller in the network because it has the latest update of the network topology and capability to include/exclude nodes in the network. When including additional controllers to the network they become Inclusion controllers because they have the capability to include/exclude nodes in the network on behalf of the SIS. The SIS cannot shift its primary role to other controllers in the network.
Note: eZLO Hub automatically assing SIS role to itself if it’s the first SC in the network.
60

The inclusion SC has the capability to include/exclude nodes in the network on behalf of the SIS. The inclusion SC’s network topology is dated from last time a node was included or it requested a network update from the SIS and therefore it can’t be classified as a primary controller. A Primary controller has full functionality for adding, managing, replacing and excluding devices and controllers. A network always has a Primary controller, and there can be only a single instance of it. Secondary controllers have the most limited functionality; they are used to control only existing devices in the network. Controlled and Supported Command Classes
Command Class is a concept which describes how different Z-Wave devices should send commands to exchange (request/report/analyze) device functionality data, for example, commanding devices to turn On/Off, requesting temperature/humidity/voltage values from different sensors etc.
All commands are sent in a form of short frames with the following structure:
<Command Class ID>
<Command ID>
<Specific Command data>
There are strict instructions which must be followed regarding particular Command Classes, so Z-Wave devices of different manufacturers can interact using these instructions without problems. A device can support and/or control a given Command Class. If a Command Class is supported, the node implements all the Command Class functionalities and it can be set and read back by other nodes. When a Command Class is supported, the whole Command Class has to be implemented. If a Command Class is controlled, the node permits the exchange of data, the read function and/or set other nodes supporting the Command Class. Nodes controlling Command Classes may use only a subset of the commands within a Command Class (for example, only Set commands). Even when using a Command Class partially for control, this usage must comply with the Command Class requirements. Slave nodes may also control Command Classes. For example, a Set Command sent to Association Group destinations is a form of Command Class control. When Command Class control is mandated by the Device Type, a controlling node must permit data exchange, the read function and set other nodes using the given Command Class. The controlling node must also be able to use all commands of the controlled Command Class. An Association Command Class allows and defines communication between devices. It is also used for adding or removing nodes to/from an association group.
61
An Association Group is a group of multiple devices that is treated as a single device and thus controlled with a single command. Usually association groups unite similar devices as they all receive the same command. Each association group must include the following information: — A grouping identifier — A maximum number of devices that can be added to the group — A description of how the association group is used and/or triggered by the product Associations can be created via a central controller or an End Point. When creating an End Point association, the Association Set command is sent to the actual End Point; not to the Root Device (Controller). The device or subdevice can have a fixed number of nodes in their association group (not more than 5). Association group 1 is always reserved for the Z-Wave Plus Lifeline service, and it should not be assigned for any other purpose. The actual Device Type of a given product specifies mandatory commands which the device must be able to send to a Lifeline group destination. A manufacturer may add support for additional commands that can be sent to the Lifeline group. A Multi Channel command class is used to set communications between one or more items in a Multi device. eZLO Hub can control Multi Channel devices, but it doesn’t support Multi Channel command classes. For example: if a slave device supporting a Multi Channel command class has a few components (such as a smart strip with a few power outlets), eZLO will treat each channel as a device item and will send commands to each item. Each channel will be represented by an individual control in the UI. NIF (Network Information Frame) is a service frame which contains a list of Supported Command Classes. Sending it may be useful for advanced Smart Home users and can be initiated on the Settings page of an eZLO Hub by selecting the Z-Wave tick, opening the Z-Wave Settings drop-down menu and selecting the Send NIF option.
62
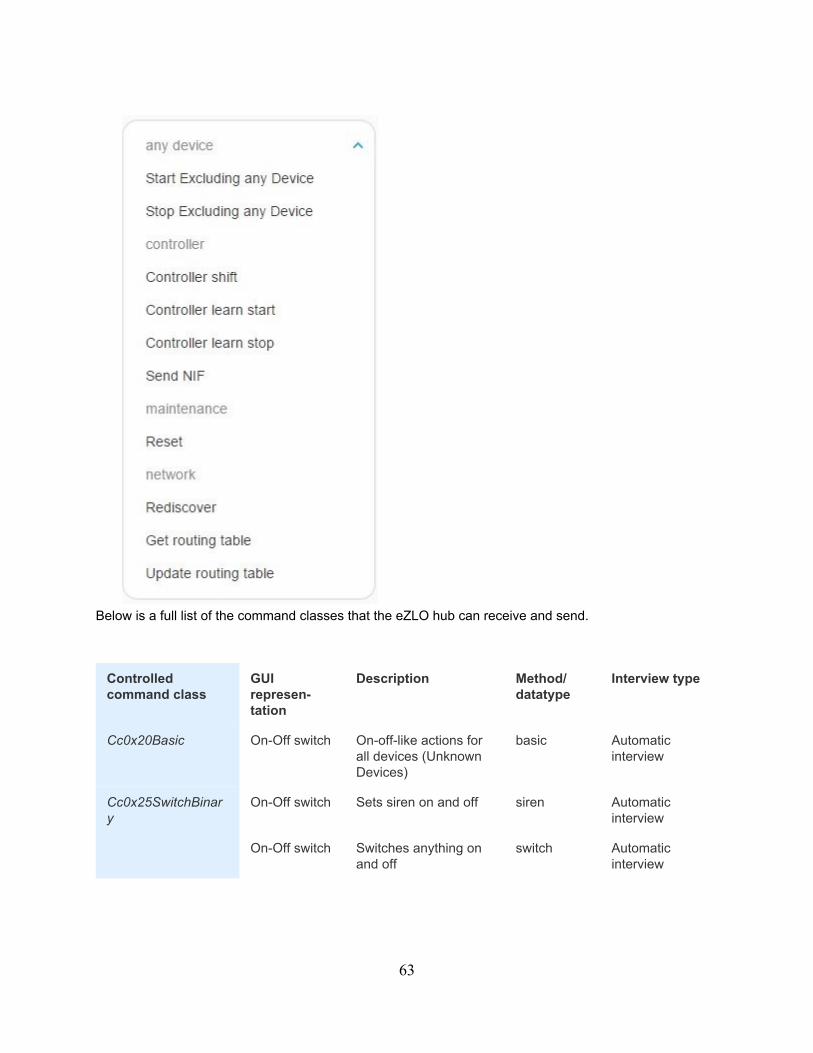
Below is a full list of the command classes that the eZLO hub can receive and send.
Controlled command class
GUI represen- tation
Description Method/ datatype
Interview type
Cc0x20Basic On-Off switch On-off-like actions for all devices (Unknown Devices)
basic Automatic interview
Cc0x25SwitchBinary
On-Off switch Sets siren on and off siren Automatic interview
On-Off switch Switches anything on and off
switch Automatic interview
63

Cc0x26SwitchMultilevel
Multilevel round switch
Sets 0-100 level to a dimmer device
dimmer Automatic interview
Multi-position knob
Sets an operating state to a siren (off/siren/strobe/siren+strobe)
siren_strobe Automatic interview
Cc0x2bSceneActivation
Not used in UI
Activates a scene as a key-fob (or similar) in a rule block
remote Automatic interview
Cc0x32Meter As rule block THEN
Resets meter (such as kWh)
reset_meter Automatic interview
Cc0x33ColorControl Not used in UI (no controls)
Sets RGB color to each color: 0 >= COLOR >= 100
rgbcolor Automatic interview
Cc0x40ThermostatMode
Multi-position knob
Sets the work mode for thermostat devices. Modes are received during interview
thermostat_mode
Automatic interview
Cc0x43ThermostatSetPoint
Temperature setter
Sets the temperature (F or C) setpoint for thermostat devices
thermostat_setpoint
Automatic interview
Cc0x44ThermostatFanMode
Multi-position knob
Sets the fan mode for thermostat devices. Modes are got during interview
thermostat_fan_mode
Automatic interview
Cc0x5bCentralScene
Not used in UI
Activating a central scene in a rule block
remote Automatic interview
Cc0x62DoorLock Lock-unlock switch
Lock or unlock the door lock devices
door_lock Automatic interview
Cc0x63UserCode Not used in UI
Set the usercode for user in door lock device memory
usercode Automatic interview
Cc0x66BarrierOperator
Switch-like or barrier-like animated
Operates the barrier (close/open)
barrier Automatic interview
Cc0x70Configuration
Not used in UI
Sets the configuration values in some cases
configuration_device_code
Automatic interview
64
Cc0x73PowerLevel Not used in UI
Pushes the powerlevel test with powerlevel
powerlevel_test
Automatic interview
Cc0x81Clock Not used in UI
Sets the clock time of the device (the controller's time)
clock Automatic interview
Cc0x84WakeUp Not used in UI
Sets the wakeup time for sleeping device (fixed interval)
wakeup Automatic interview
Cc0x85Association Button with group add / remove (2 groups only)
Sets the association to group or removes association from group
association Automatic interview
Cc0x87Indicator Not used in UI
Sets the indicator state, but not used at the moment
indicator Automatic interview
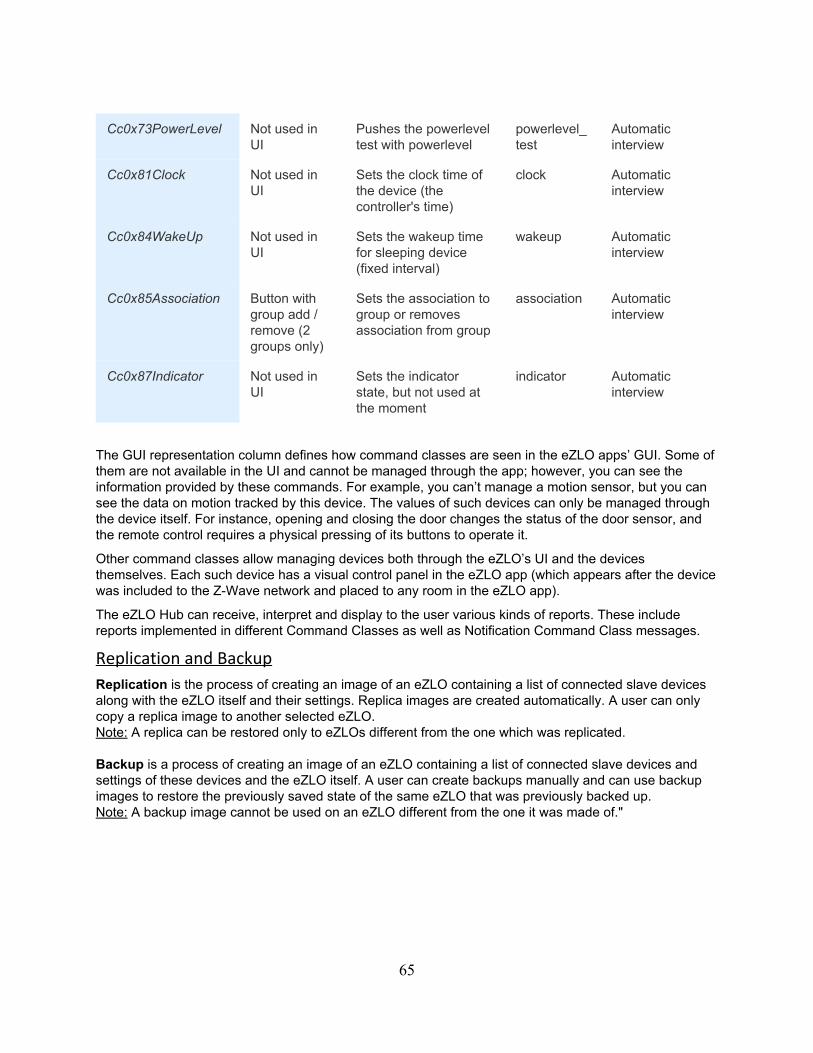
The GUI representation column defines how command classes are seen in the eZLO apps’ GUI. Some of them are not available in the UI and cannot be managed through the app; however, you can see the information provided by these commands. For example, you can’t manage a motion sensor, but you can see the data on motion tracked by this device. The values of such devices can only be managed through the device itself. For instance, opening and closing the door changes the status of the door sensor, and the remote control requires a physical pressing of its buttons to operate it.
Other command classes allow managing devices both through the eZLO’s UI and the devices themselves. Each such device has a visual control panel in the eZLO app (which appears after the device was included to the Z-Wave network and placed to any room in the eZLO app).
The eZLO Hub can receive, interpret and display to the user various kinds of reports. These include reports implemented in different Command Classes as well as Notification Command Class messages.
Replication and Backup
Replication is the process of creating an image of an eZLO containing a list of connected slave devices along with the eZLO itself and their settings. Replica images are created automatically. A user can only copy a replica image to another selected eZLO. Note: A replica can be restored only to eZLOs different from the one which was replicated. Backup is a process of creating an image of an eZLO containing a list of connected slave devices and settings of these devices and the eZLO itself. A user can create backups manually and can use backup images to restore the previously saved state of the same eZLO that was previously backed up. Note: A backup image cannot be used on an eZLO different from the one it was made of."
65

Appendix 3. Warranty Appendix 4. How to Get Support Please visit https://support.ezlo.com/ to explore our Knowledge Base, engage with our User Community, have a live chat with one of our representatives, leave feedback or file a ticket if you’ve faced a trouble. You can also contact our technical support by calling +18622082085 via the phone or Skype.
Appendix 5. Safety Measures and Cautions Appendix 6. Compliance information Appendix 7. Disposal and Recycling Information
66