user guide swyft
TRANSCRIPT

USER GUIDE
SWYFT Service Requestor

2
SWYFT User Guide – Service Requestor
Contents
SWYFT Important Links 3
SWYFT Customer Application – First Steps 5
Step 1: Download & Install the Customer App 5
a) Android 5
b) iOS (iPhone) 5
Step 2: Create password 6
Step 3: Login 7
Step 4: Create a Ticket 8
Service Request 8
Step 5: Cancel a ticket 11
Step 6: Tickets Overview 13
Step 7: Service Reports 14
Step 8: Reset password 15
Step 9: Edit profile 17
SWYFT Service Requestor CMS – First Steps 19
Step 1: Create a password 19
Step 2: Login 20
Step3: Add a new end user to your CMS Webpage 21
Step 4: Create a Site 23

3
SWYFT User Guide – Service Requestor
Step 5: Connect to your Service Provider 25
Step 6: Assign a job to a service providing company 26
Step 7: View the ticket history 28
a) Navigate to ticket list 28
b) How to open a ticket 28
c) How to see the data 29
Step 8: Update your Profile 30
Step 9: Reset password 31
Step 10: Cancel a ticket 33
SWYFT Important Links
Important Links Web:
Login CMS Account: https://sg-swyft.siemens.com/externalcms/login.aspx
Login Customer Account Web: https://sg-swyft.siemens.com/webportal/customer/index

4
SWYFT User Guide – Service Requestor
Working with SWYFT Customer Application Flow Chart:

5
SWYFT User Guide – Service Requestor
SWYFT Customer Application – First Steps
Step 1: Download & Install the Customer App
a) AndroidGo to your Google Play Store. Enter ‘SWYFT customer’ into the search line. Download and Install App.
b) iOS (iPhone)Open your App Store. Enter ‘SWYFT Customer’ into the search line. Download and Install App.
1
2

6
SWYFT User Guide – Service Requestor
Step 2: Create password
1) After downloading the app from the Appstore, you should receive an email from the SWYFT account of the
company you are working for, if your account already has been created. Check your email inbox (as well as
the spam folder etc.) Open the email.
2) Click on “Create Password”.
3) Enter a new password and confirm.
4) Tick the box to agree with the Terms of use and Privacy.
5) Tab on on ‘Submit’.
2
4
3
5

7
SWYFT User Guide – Service Requestor
Step 3: Login
1) Open the Application SWYFT Customer and the following will occur. Tab on “Log in”.
2) Enter your email address, your password and select the applicable country.
3) Tab on ‘Log in’.
4) You will now see the Landing Page of the App being displayed.
1
2
3
4

8
SWYFT User Guide – Service Requestor
Step 4: Create a Ticket
a) Service Request
1) Tab on the button ‘Request Service’.
2) Select the button “Service request”.
3) Select a Site and a Product brand from the drop-down menus and scroll down.
4) Select a Product type, add a part number. Tab on ‘Next’ to continue.
5) Select an Urgency Level. Tab on ‘done to set an Urgency Level.
6) Tab on ‘Find service support’.
1
2
3
4
5
6 7
Site name

9
SWYFT User Guide – Service Requestor
7) An overview of your request with the ID number opens. Tab on ‘Done’ to go back to the landing screen.
b) Preventive Maintenance
1) Tab on the button ‘Request Service’.
2) Tab on the ‘Preventive Maintenance’ Button.
3) Select a date and time for the Preventive Maintenance.
4) Tab on ‘Set’ to enter a date and time.
1
2
3
4
6
7
8
9
Site name
5
Site name

10
SWYFT User Guide – Service Requestor
5) Select a site from the drop-down menu. Afterwards, tab on ‘OK’.
6) Choose Product Type.
7) Tab on Next. 8) Enter a report issue as well as one or more supporting pictures on an optional basis by tabbing on the ‘+’
buttons. 9) Tab on ‘Next’, to continue.
10) Tab on ‘Find service support’ to submit.
11) The service has been requested. Tab on ‘Done’ to conclude the requesting process.
10
11
Site name
Site name

11
SWYFT User Guide – Service Requestor
Step 5: Cancel a ticket
1) Tab on the ‘Status’ Tab. 2) Tab on the ticket you want to cancel.
3) Tab on the ‘Cancel’ button.
4) Tab on ‘Yes’ to cancel.
1
2
3
4
5

12
SWYFT User Guide – Service Requestor
5) A second confirmation window will pop up. If you are still sure to cancel, tab on ‘Yes’.
6) Select a reason for your cancel. 7) Tab on ‘Submit’.
8) Tab on ‘OK’.
6
7 8

13
SWYFT User Guide – Service Requestor
Step 6: Tickets Overview
1) Switch tab on the three different tabs: ‘Pending’, ‘In Progress’ and ‘Closed’.
2) To get further information on a certain ticket, just tab on it.
1
1 1
2

14
SWYFT User Guide – Service Requestor
Step 7: Service Reports
1) Click on the ‘Service Reports’ Tab.
2) Tab on the current ticket which you want to see the report.
3) You can scroll down to see the whole service report. Tab on the blue colored link ‘Open in Browser’ to open the service report in a browser tab.
1
2
3

15
SWYFT User Guide – Service Requestor
Step 8: Reset password
1) If you forgot your password and need to reset it, tab on the button ‘Forgot Password?’ on your Login Page on the App.
2) The following page will open. Select your country and enter your email adress to reset your password. Tab on ‘Next’.
3) The following notification will open. A link to reset your password has now been sent to your email. Tab on ‘OK’.
1
2
2
3
4
5
5
5

16
SWYFT User Guide – Service Requestor
4) Check your Email inbox (as well your Spam folder etc.). Open the Email. You have received a temporary password to login.
5) Go to your Login page of the SWYFT Customer App. Enter your email address as well as the temporary password. Tab on ‘Login’.

17
SWYFT User Guide – Service Requestor
Step 9: Edit profile
1) If you want to edit your profile, tab on the Pencil button in the top right corner of your landing screen.
2) Now you can edit your personal information or change your password as well as getting information on the
Privacy Policy and Terms & Conditions of SWYFT.
3) Tab on ‘Edit profile’ to be able to change your contact details and your profile picture.
4) To confirm your changes tab on ‘Update’ profile.
1
2
3
4

18
SWYFT User Guide – Service Requestor
Working with SWYFT – Service Requestor CMS Flow Chart:
Step 1: Create Password
Step 2: Login
Step 3: Add new End User
Step 4: Create new Site
Step 5: Connect to Service Provider
Step 6: Assign Job
Step 7: View Ticket History
Step 8: Update Profile (if any)
Step 9: Reset Password (if any)
Step 10: Cancel a Ticket

19
SWYFT User Guide – Service Requestor
SWYFT Service Requestor CMS – First Steps Step 1: Create a password
After your SWYFT CMS Account has been created for you, you should have received an Email from SWYFT CMS ([email protected])
1) Set a new password regarding the requirements, .Click on ‘Submit’.
2) After setting a new Password, the Login page will appear.
Click here
EX: Service_1

20
SWYFT User Guide – Service Requestor
Step 2: Login 1) Go the SWYFT Website (https://sg-swyft.siemens.com/externalcms/login.aspx) and login with Your account
• Email • Password • Location: ‘Vietnam’ • Login
2) Your Landing Page of the CMS SWYFT Account.
1
2
3
4

21
SWYFT User Guide – Service Requestor
Step 3: Add a new end user to your CMS Webpage
1) Click on ‘My Management’
2) Click on Site/ Personal Management
3) Click on ‘End User’.
4) Click on the ‘+’ button to create a new item and add End User Details.
1 2
3
4

22
SWYFT User Guide – Service Requestor
5) Enter: Contact Person, Email Address and Contact Number.
6) Click on ‘Save’ to add the End User to the list.
7) Click on the ‘Send email’ button, to send email to create a password for End customer SWYFT account.
5
6
7

23
SWYFT User Guide – Service Requestor
Step 4: Create a Site To ensure, that the Engineer that will provide the service to your End User is able to find your location easily, you should create a site. In the following steps it is shown how to do this.
1) Click on ‘My Management’.
2) Click on Site/ Personal Management.
3) Click on “Site”.
4) Click on the ‘+’ to add a site.
1 2
3
4

24
SWYFT User Guide – Service Requestor
5) Enter Site name.
6) Search site Location in Google Map.
7) Enter Site Address.
The Entry of the newly added site will be shown as in the example below.
6
7
5

25
SWYFT User Guide – Service Requestor
Step 5: Connect to your Service Provider
In order to be able to assign services to a service providing company you need to connect with them (like platforms such as Facebook or Instagram). To get connected follow the steps below:
1) Click ‘Service Provider “
2) Click on ‘Connections’.
3) Click on the grey shaded area ‘All service provider’.
4) Insert the name of the Service Provider in the Search Field.
5) Click on ‘Search’. The Service Provider appears as shown in the example below. 6) Click on ‘Connect”
7) An invitation to connect has now been sent to the Service Provider. After the other party has accepted, you will find this company under the ‘Connected’- Tab.
1
2
3
4 5
6

26
SWYFT User Guide – Service Requestor
Step 6: Assign a job to a service providing company
To receive a service request from your End User and assign it to a service providing company, your End User must have created a password for their SWYFT account with the email they have received when you added them to your End User list.
1) Home will appear on your CMS Landing Page.
2) Click on the ‘Action’ Button.
3) choose the option ‘Assign Job to a Service Provider’.
1 2
3

27
SWYFT User Guide – Service Requestor
4) Choosing a Service Provider.
5) click on ‘Assign Job’.
6) Status ‘Service Provider assigned’ below the ticket number.
7) The Service Provider will now assign an Engineer and the Engineer will get in contact with your End User to complete the job. On the view below you are able to check the current status.
4
5
6

28
SWYFT User Guide – Service Requestor
Step 7: View the ticket history
a) Navigate to ticket list
1) Click on the ‘Service Request Tickets’ tab on the sidebar on the right side.
2) Click on ‘Ad hoc Ticket List’ or on ‘Preventive Maintenance Ticket List’.
b) How to open a ticket
Click on the blue colored ticket number
1
2
1

29
SWYFT User Guide – Service Requestor
c) How to see the data
1) The contact details of all the parties connected to the job: End User, Service Requestor (you), Service
Provider and Engineer.
2) Job information, Service Report of a completed job, either as PDF or JPG File.
3) Change tab to get deeper information on the Job Activities, the Job Task, the Equipment and the Material used.

30
SWYFT User Guide – Service Requestor
Step 8: Update your Profile
1) Click on the icon or your name on the top right corner.
2) Click on ‘profile’.
3) Change information. 4) Add a profile picture. 5) Change your password.
1
2
3 5
4

31
SWYFT User Guide – Service Requestor
Step 9: Reset password
1) Open the Login page (https://sg-swyft.siemens.com/externalcms/login.aspx).
2) Enter the applicable country.
3) Click ‘Forgot Password?’.
4) Insert your email address. 5) Calculated number. 6) Click on ‘Send Email’.
3
4
5
2
6
32
SWYFT User Guide – Service Requestor
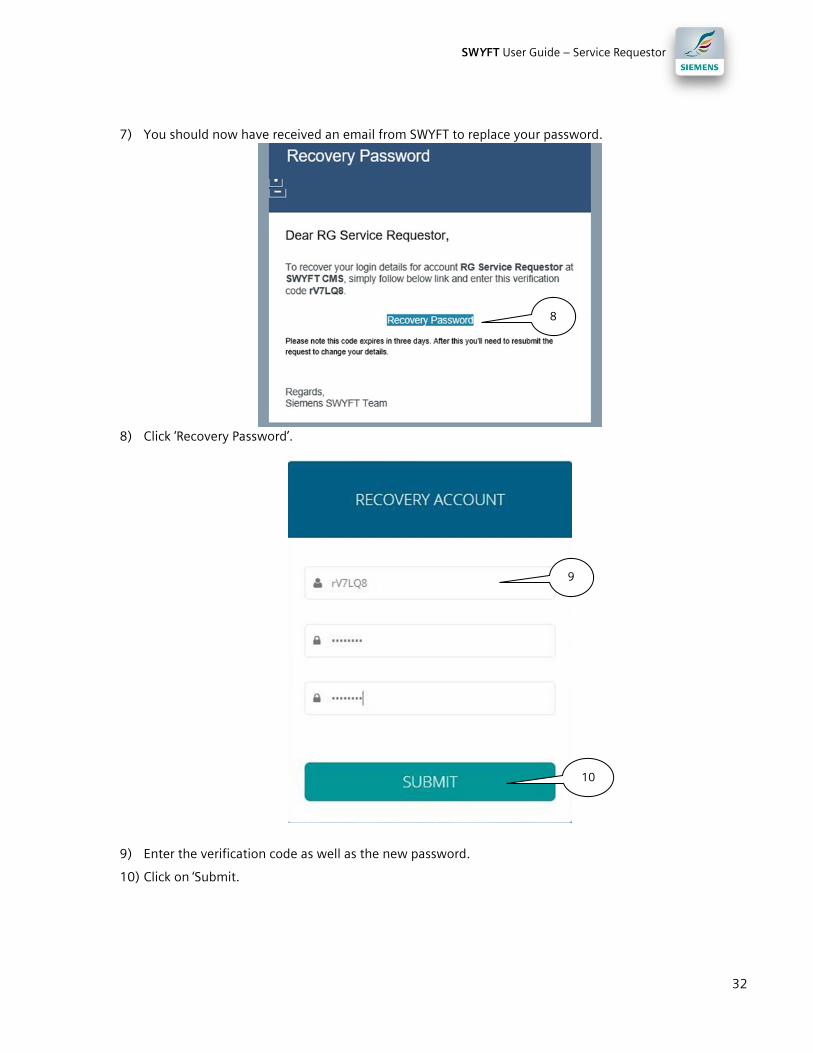
7) You should now have received an email from SWYFT to replace your password.
8) Click ‘Recovery Password’.
9) Enter the verification code as well as the new password.
10) Click on ‘Submit.
8
9
10

33
SWYFT User Guide – Service Provider
Step 10: Cancel a ticket
1) Click on the ‘Action’ 2) Click on ‘Mark as Cancel’.
3) Choose an option from the drop-down menu or select ‘Other’.
4) Click on ‘Submit’.
1
2
3
4