user guide (scanner)
TRANSCRIPT

Document Centre
400/350/250 Series
User Guide (Scanner)

Adobe and Photoshop are trademarks of Adobe Systems Imcorporated which may be registeredin certain jurisdictions.
Microsoft, Windows, Windows NT are registered trademarks of Microsoft Corporation in the U.S. and other countries.
NetWare is a registered trademark of Novell, Inc.Salutation is a trademark of Salutation Consortium, Inc.
All product/brand names are trademarks or registered trademarks of the respective holders.Permission has been obtained from Microsoft Corporation for use of software screen shots.
1. This manual is copyrighted with all rights reserved. Under the copyright laws, this manualmay not be copied, in whole or part, without the written consent of the publisher.
2. Parts of this manual are subject to change without prior notice.3. We welcome any comments on ambiguities, errors, omissions, or missing pages.4. Never attempt any procedure on the machine that is not specifically described in this manual.
Unauthorized operation can cause faults or accidents. Fuji Xerox is no liable for any problemsresulting from unauthorized operation of the equipment.
XEROX, The Document Company, and Ethernet are registered trademarks and may beregistered in certain jurisdictions.
Important

i
Preface
Thank you for purchasing the Xerox Document Centre 400/350/250 series. This guide provides all thenecessary operating instructions and precautions for the use of Document Centre 400/350/250 seriesscan feature.
To get the most out of the Document Centre 400/350/250 series, please read this guide carefully in itsentirety.

ii
Table of Contents
Types of Manuals
How to Use this Guide
Chapter 1 Before Using the Scanner
1.1 Overview ............................................................................................................................................ 2
1.1.1 Scanning with the mailbox .............................................................................................. 2
1.1.2 CentreWare Scanning Services (optional) ....................................................................... 3
1.2 Required Environment ....................................................................................................................... 4
1.3 Setting up the Document Centre for Using Mailbox Feature............................................................ 5
1.3.1 Starting up the Salutation ................................................................................................. 5
1.3.2 Setting up the SubNet Mask/Gateway Address ............................................................... 7
1.3.3 Creating a mailbox ........................................................................................................... 9
1.4 Setting up the Document Centre for Using CentreWare Scanning Services .................................. 11
1.4.1 Starting up the agent (UDP) ........................................................................................... 11
1.4.2 Setting up the SubNet Mask/Gateway Address ............................................................. 13
1.4.3 Starting up the ftp Client ................................................................................................15
1.5 Installing the Network Scanner Utility ............................................................................................ 17
1.5.1 Required environment .................................................................................................... 17
1.5.2 Installation ...................................................................................................................... 18
1.5.3 Uninstallation ................................................................................................................. 20
Chapter 2 Operating the Document Centre
2.1 Scanning Documents ........................................................................................................................ 24
2.1.1 Storing scanned document into the mailbox ................................................................. 24
2.1.2 Storing scanned document into the server (defining the Job Template) ....................... 26
2.2 Specifying Various Features(Mailbox) ............................................................................................ 28
2.2.1 Selecting the resolution level ......................................................................................... 28
2.2.2 Selecting the document type .......................................................................................... 29
2.2.3 Selecting the density level ............................................................................................. 29
2.2.4 Selecting the scan size ...................................................................................................30
2.2.5 Scanning documents at the specified ratio .................................................................... 31
2.2.6 Scanning documents in various sizes ............................................................................ 32
2.2.7 Scanning two-sided documents ..................................................................................... 33
2.3 Deleting Stored Documents ............................................................................................................. 34
2.4 Custom Presets for Scanning Features ............................................................................................ 36
iii
Chapter 3 Operating the Client (Personal Computer)
3.1 Using the Network Scanner Driver .................................................................................................. 40
3.1.1 Importing the stored documents from the mailbox ....................................................... 40
3.1.2 Changing display of the scanner name .......................................................................... 45
3.1.3 Changing import settings ............................................................................................... 47
3.2 How to Use the Mailbox Viewer ...................................................................................................... 48
3.2.1 Confirm/delete/import the stored document in a mailbox ............................................ 48
3.2.2 Setting up the properties of mailbox viewer.................................................................. 53
Chapter 4 Precautions and Limitations
4.1 Precautions and Limitations............................................................................................................. 56
Appendix
A Printing Job Template Server Settings ............................................................................................. 58
B Application Software ....................................................................................................................... 60
Index ............................................................................................................................................................... 61

iv
The following explains the manuals of the Document Centre 400/350/250 series.
Types of manuals
We provide the following manuals for optimum usage of the Document Centre 400/350/250 series.
Document Centre 400/350/250 Series User Guide (Copier)
Comes with the main frame. Explains the handling of the main frame and the copierfunctions.
Document Centre 400/350/250 Series User Guide (Facsimile)
Comes with the fax kit or machine with the fax function. Explains the fax functions.
Document Centre 400/350/250 Series User Guide (Printer)
Comes with the printer kit or machine with the printer function. Explains the printerfunctions as well as the printer control panel operation method.
Document Centre 400/350/250 Series User Guide(Network Print Environment)
Comes with the Interface Kit (for Ethernet 100BaseTX/5)Explains the installation and precautions for printing operation connecting the network.
Document Centre 400/350/250 Series User Guide (Scanner)
Comes with Interface Kit (Ethernet 100BaseTX/5)Explains how to use the network scanner functions.
Other Manuals
Other manuals are provided with the optional product or the software come with themain frame.
Types of Manuals

v
How to Use this Guide
Background knowledge
Read this guide in detail before using the scan function of Document Centre 400/350/250. If you are not familiar with the operating environment for the scan function, readthe relevant manuals first.Opearting environment to which the Document Centre 400/350/250 is to be connectedrefers to personal computers, networks, and the respecitve operating systems and appli-cations.
Preparation
This guide is targeted at users who are using Document Centre 400/350/250 NetworkScanner. Read the contents of this guide from the first step. You may skip sectionsabout the options you do not purchase.
Organization
The following is a summary of each chapter.
Chapter 1 Before using the Scanner
This chapter contains the summary of scan function and preparation on using the net-work scanner.
Chapter 2 Operating the Document Centre
This chapter describes how to scan the document at the Document Centre 400/350/250.
Chapter 3 Operating the Client (Personal Computer)
This chapter describes import of the stored document from the mailbox of the Docu-ment Centre 400/350/250 to a personal computer using client personal computer.
Chapter 4 Precautions and Limitations
This chapter describes precaution and limitation for using scan function.
Appendix
This section provides information on the references of scan function.

vi
Conventions
1. The following icons are used in this guide.
Indicates important information and must be read in detail.
Indicates supplementary information.
Indicates relevant reference.
2. The following symbols are used in this guide.
" " • A reference is made to a section or sections in this guide or
other guides.
Bold Face • This symbol indicates the buttons on the touch paneldisplay and the control panel of the Document Centre 400/350/250 and the windows, commands, dialogues, andbuttons on dialogue boxes which may be displayed whenthe operation environment is Windows®.

Before Usingthe Scanner
1.1. Overview ................................................................................................. 2
1.2. Required Environment ............................................................................ 4
1.3. Setting up the Document Centre for Using Mailbox Feature.................. 5
1.4. Setting up the Document Centre for
Using CentreWare Scanning Services............................................... 11
1.5. Installing the Network Scanner Utility .................................................. 17

2
1.1 Overview
The Document Centre 400/350/250 Network Scanner provides the following features.
· The scan feature by using the mailbox in the Document Centre 400/350/250· The scan feature by using the CentreWare Scanning Services (optional)The following explains the summary of each scan function.
1.1.1 Scanning with the mailbox
You can store a document in the mailbox by scanning it with the Document Centre 400/350/250. The stored data can be imported at the personal computer (client) connectedto a network.You can also import the data sent from other facsimile to your mailbox of the Docu-ment Centre.
"Document Centre 400/350/250 User Guide (Facsimile)" for details of mailbox fea-ture.
Facsimile
Mailbox
Scan a documentSend to Mailbox
Document Centre
Network
Personal Computer (Client)
Import the required document from the mailbox of the Document Centre.
Before U
sing the Scanner
1
3
1.1 Overview
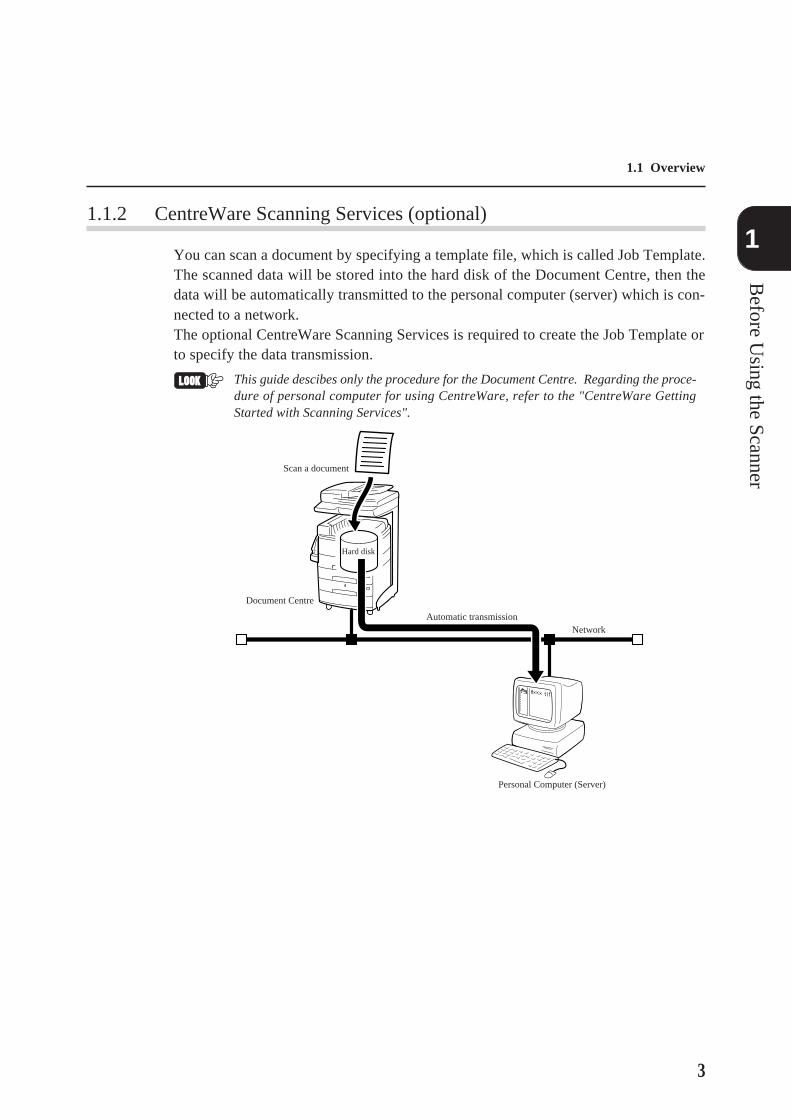
1.1.2 CentreWare Scanning Services (optional)
You can scan a document by specifying a template file, which is called Job Template.The scanned data will be stored into the hard disk of the Document Centre, then thedata will be automatically transmitted to the personal computer (server) which is con-nected to a network.The optional CentreWare Scanning Services is required to create the Job Template orto specify the data transmission.
This guide descibes only the procedure for the Document Centre. Regarding the proce-dure of personal computer for using CentreWare, refer to the "CentreWare GettingStarted with Scanning Services".
Hard disk
Scan a document
Document Centre
NetworkAutomatic transmission
Personal Computer (Server)
4
This section describes the required environment to use the scan feature.
Document Centre
The following options are needed for the Document Centre.· Fax unit (The model not installed the fax feature.)
· 4M Memory (for facsimile)
· Built-in hard disk for printer (when using CentreWare Scanning Services.)
· RAM module
Personal Computer (Client)
The personal computer as a client must be installed either of following operation sys-tem.· Microsoft® Windows® 95/Windows® 98 operating system
· Microsoft® Windows NT® operating system Version 4.0
Personal Computer (Server)
When using the CentreWare Scanning Services, the personal computer as a client mustbe installed to the following operation system.· Microsoft® Windows NT® operating system Version 4.0
Network
The Document Centre and personal computer should be connected with the networkand can communicate with the protocol, TCP/IP.
1.2 Required Environment

Before U
sing the Scanner
1
5
▼
1.3 Setting up the Document Centre forUsing Mailbox Feature
The following preparation is necessary to scan a document by using the mailbox.
· Activate Salutation (define IP address).· Define Subnet mask/Gateway address.· Register the mailbox.The procedure for setting up is as follows.
1.3.1 Starting up the Salutation
On the printer control panel of the Document Centre, start up the Salutation and definethe IP address according to the procedure as shown below.
You do not need to define the IP address if it already exists. (The screen for defining theIP address will not be displayed in the following case.)
(Display of the maintenance mode)
(The printer power is on.)
(Display of the menu)
2. Press or a few times.
3. Press .
5. Press .
▼
▼
6. Press or a few times.▼
From next page Continued on next page..
4. Press or a few times.
▼
▼
▼
1. Press Menu .

6
1.3 Setting up the Document Centre for Using Mailbox Feature
To previous page
▲
12. Press Menu .
▼
7. Press .
8. Press or a few times.
▼
9. Press Eject/Set .
From previous page
10. Use , , or to enter IP address.
11. Press Eject/Set .
13. Press the power on/off.
14. Press Clear All on the control panel of main frame.
Fax ReceivingMode
Custom Presets
Setup Menu
Billing Meter
Job Memory
Print Report/List
Copy Fax
Scan
Make sure that the Scan button is displayed on the
menu screen of touch panel display of the main
frame.
▼
▼
▼
▼

Before U
sing the Scanner
1
7
1.3 Setting up the Document Centre for Using Mailbox Feature
1.3.2 Setting up the SubNet Mask/Gateway Address
On the printer control panel of the Document Centre, set up the subnet mask and gate-way address according to the procedure shown below.
(The printer power is on.)
(Display of the menu)
2. Press or a few times.
(Display of maintenance mode)
1. Press Menu .
4. Press or a few times.
3. Press .
5. Press .
▼
▼
6 Press .
▼
▼
▼
▼
7. Press or a few times.▼
8. Press .
▼
9. Use , , or to enter SubNet Mask.▼
▼From next page Continued on next page
▼

8
1.3 Setting up the Document Centre for Using Mailbox Feature
From previous pageTo previous page
▲
▼
16. Press Menu .
11. Press .
▼
12. Press or a few times.▼
13. Press .
▼
14. Use , , or to enter address.▼
▼15. Press Eject/Set .
10. Press Eject/Set .

Before U
sing the Scanner
1
9
1.3 Setting up the Document Centre for Using Mailbox Feature
1.3.3 Creating a mailbox
Create a mailbox to store the scanned document. You can create the mailbox using thecontrol panel of main frame.
You can create up to 200 mailboxes.
Fax ReceivingMode
Custom Presets
Setup Menu
Billing Meter
Job Memory
Print Report/List
Copy Fax
Scan
Select Setup Menu on the Menu screen.
If the screen on the left is not displayed, pressFeature Selection to display the screen.
CloseSetup Menu
Sub-dial
Speed Dial
Comment
Job Memory Mailbox
Group Dial
Local FaxInformation
Select Mailbox .
0 1 ( Not in Use )0 2 ( Not in Use )0 3 ( Not in Use )0 4 ( Not in Use )0 5 ( Not in Use )0 6 ( Not in Use )0 7 ( Not in Use )0 8 ( Not in Use )0 9 ( Not in Use )1 0 ( Not in Use )
Mailbox No. Mailbox Name
NextPage
Prev.Page
Select Item.
CloseSetup - Mailbox
Enter/Change
Select a required mailbox number directly or use [↑]or [↓].
Select Enter/Change.

10
1.3 Setting up the Document Centre for Using Mailbox Feature
Close
Password
Mailbox No. 0 0 1Enter/Change
Delete
(0000-9999)( Not in Use )
ChangePassword
Enter/ChangeName
Mailbox Name
Use numeric keypad to enter Password.Enter a password by using the keypad, and selectClose.
The password must be unique.
Close
Password
Mailbox No. 0 0 1Enter/Change
Delete
(0000-9999)( In Use-No Name )
ChangePassword
Enter/ChangeName
Mailbox Name
Select Enter/Change Name to enter the name formailbox.
If you do not enter the name, go to Step .
t
j
0
s
i
9
r
h
8
q
g
7
z
p
f
6
y
o
e
5
n
d
4
w
m
c
3
v
l
b
2
u
k
a
1
x
Mailbox No. 0 0 1-Enter/Change Name SaveCancel
Symbol
Shift
Space
Backspace
Alpha-numeric
Scanner
Enter the name using the keyboard on the screen, andselect Save.
"Document Centre 400/350/250 User Guide (Fac-simile)" for entering text.
Close
Password
Mailbox No. 0 0 1Enter/Change
Delete
(0000-9999)Scanner
ChangePassword
Enter/ChangeName
Mailbox Name
Select Close.
Select Clear All .

Before U
sing the Scanner
1
11
1.4 Setting up the Document Centre forUsing CentreWare ScanningServices
The following preparation is necessary to scan a document by using CentreWare Scanning Services.
· Activate agent (UDP) (define IP address)· Define SubNet Mask/Gateway Address· Activate ftp ClientThe procedure for setting up is as follows.
When the setting for the Document Centre is completed, install the CentreWare Scanning Servicesreferring to the "CentreWare Getting Started with Scanning Services".
1.4.1 Starting up the agent (UDP)
To define the job template server using the Scan Admin Wizard of CentreWare Scan-ning Services, start up the agent (UDP) on the Document Centre.On the control panel of Document Centre, start up the agent (UDP) and define the IPaddress.
You do not need to define the IP address if it already exists. (The screen to define the IPaddress will not be displayed in the following case.)
(The printer power is on.)
(Display of the menu)
2. Press or a few times.
(Display of the maintenance mode)
1. Press Menu .
3. Press .
5. Press .
▼
▼
▼
▼
▼
▼
6. Press or a few times.▼
From next page Continued on next page...
4. Press or a few times.

12
1.4 Setting up the Document Centre for Using CentreWare Scanning Services
To previous page
▲
12. Press Menu .
7. Press .▼
8. Press or a few times.▼
▼9. Press Eject/Set .
▼
From previous page
10. Use , , or to enter IP address.▼
▼11. Press Eject/Set .
Before U
sing the Scanner
1
13
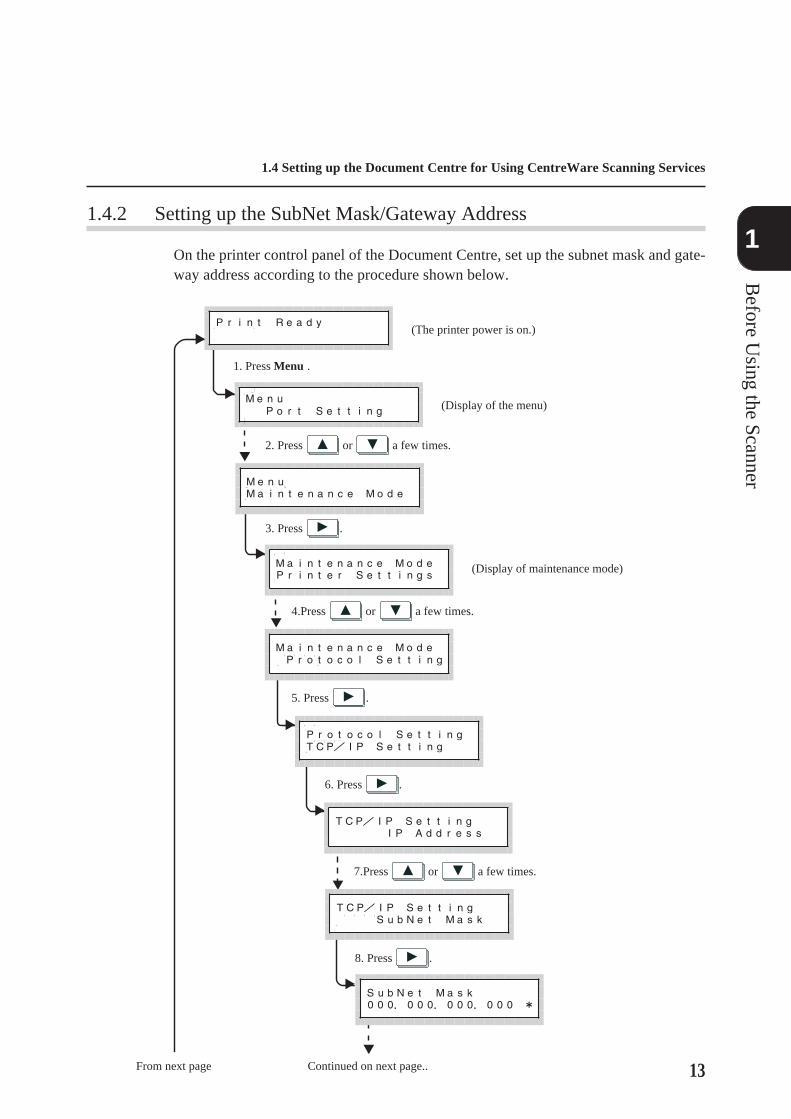
1.4.2 Setting up the SubNet Mask/Gateway Address
On the printer control panel of the Document Centre, set up the subnet mask and gate-way address according to the procedure shown below.
(The printer power is on.)
(Display of the menu)
2. Press or a few times.
(Display of maintenance mode)
1. Press Menu .
4.Press or a few times.
3. Press .
5. Press .
▼
▼
6. Press .
▼
▼
▼
▼
▼
7.Press or a few times.▼
8. Press .
▼
▼
1.4 Setting up the Document Centre for Using CentreWare Scanning Services
From next page Continued on next page..

14
From previous pageTo previous page
▲
▼
16. Press Menu .
11.Press a few times.
▼
12. Press or a few times.▼
13. Press .
▼
14. Use , , or to enter
address.▼
▼15. Press Eject/Set .
10. Press Eject/Set .
9. Use , , or to enter SubNet Mask.
▼
1.4 Setting up the Document Centre for Using CentreWare Scanning Services
Before U
sing the Scanner
1
15
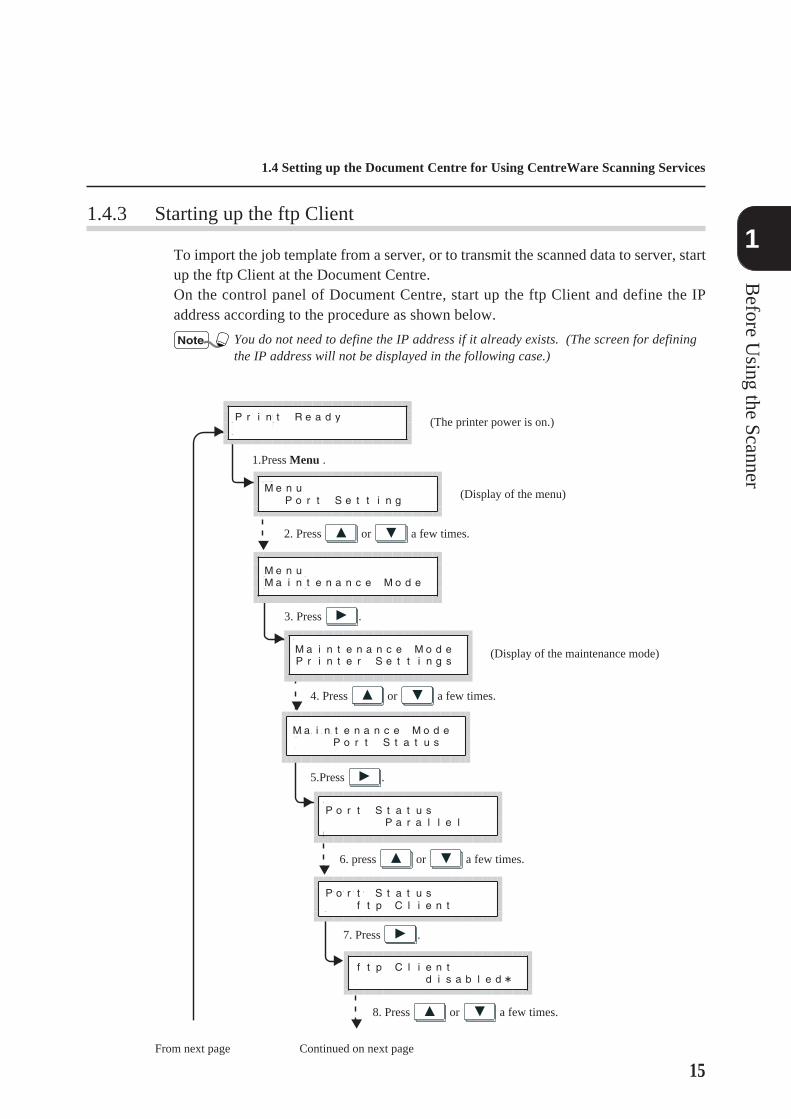
1.4.3 Starting up the ftp Client
To import the job template from a server, or to transmit the scanned data to server, startup the ftp Client at the Document Centre.On the control panel of Document Centre, start up the ftp Client and define the IPaddress according to the procedure as shown below.
You do not need to define the IP address if it already exists. (The screen for definingthe IP address will not be displayed in the following case.)
(The printer power is on.)
(Display of the menu)
2. Press or a few times.
(Display of the maintenance mode)
1.Press Menu .
3. Press .
5.Press .
▼
▼
▼
▼
▼
▼
6. press or a few times.▼
From next page Continued on next page
4. Press or a few times.
7. Press .
▼
8. Press or a few times.▼
1.4 Setting up the Document Centre for Using CentreWare Scanning Services
16
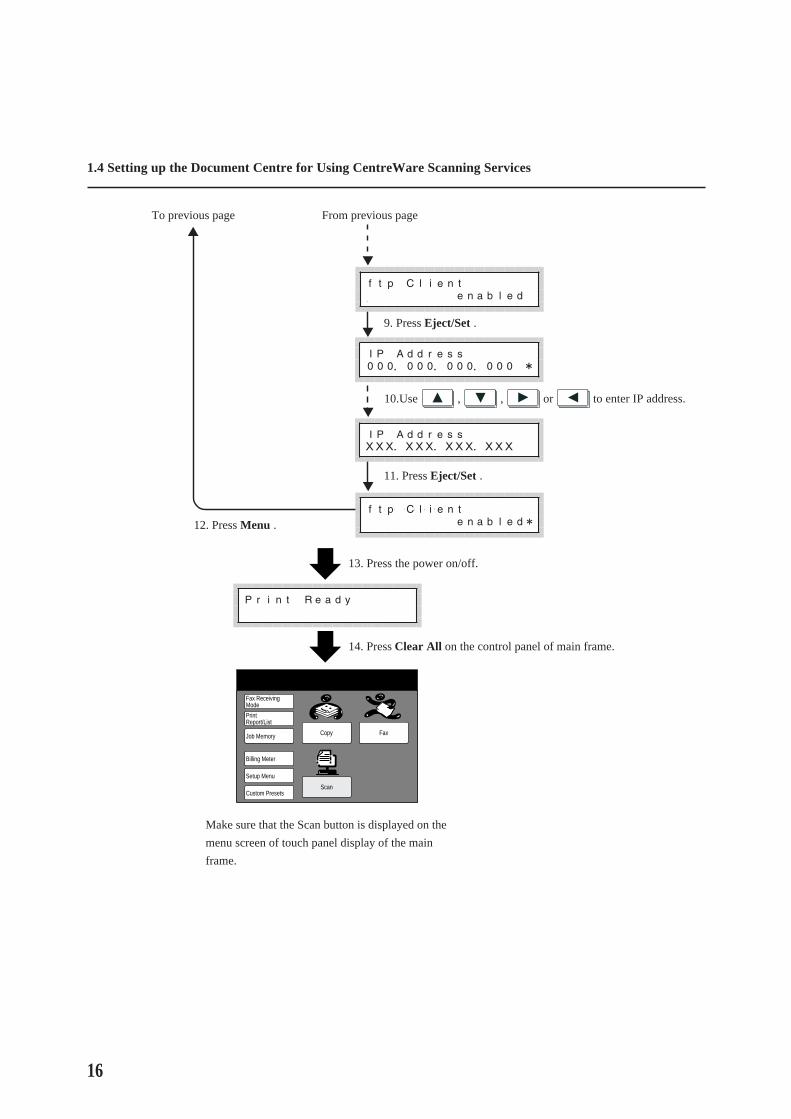
To previous page
▲
12. Press Menu .
▼
▼9. Press Eject/Set .
From previous page
10.Use , , or to enter IP address.▼
▼11. Press Eject/Set .
13. Press the power on/off.
14. Press Clear All on the control panel of main frame.
Fax ReceivingMode
Custom Presets
Setup Menu
Billing Meter
Job Memory
Print Report/List
Copy Fax
Scan
Make sure that the Scan button is displayed on the
menu screen of touch panel display of the main
frame.
1.4 Setting up the Document Centre for Using CentreWare Scanning Services
Before U
sing the Scanner
1
17
1.5 Installing the Network ScannerUtility
Network Scanner utility is the software which allows you to access to stored data in the mailbox frompersonal computer. This section describes the installation or uninstallation for the network scannerutility.
Refer to the CentreWare Getting Started with Scanning Services to install the CentreWare ScanningServices.
1.5.1 Required environment
To install the Network Scanner utility, a personal computer must meet all the followingrequirements.
Target operation system
The following operation systems are applicable to the utility.· Microsoft® Windows® 95/98 operating system
· Microsoft® Windows NT® operating system Version 4.0
Personal computer
The target computer must meet all the following requirements.· Running i486DX4/100 MHz procecessor or above (Pentium 100 MHz or above is
recommended.)
· 32 Mbyte memory or above.
· 25 Mbyte or above free hard disk space (The areas for storing scanned data is notincluded)
Network
A personal computer has to be connected with network and can communicate with theprotocol, TCP/IP.
Click My Computer, Control Panel, then Network, make sure the TCP/IP is added onthe menu.
Target application software
To import the data storing in the mailbox to the software, the software must be appli-cable to the interface, TWAIN.
Refer to "Appendix B Application Software" for the applications that have been testedto operate with the Document Centre 400/350/250 scanner.

18
1.5.2 Installation
The Network Scanner utility includes of the following two softwares.· Network Scanner Driver
Scan driver to import a data storing in the mailbox of the Document Centre or theAble to the software which applicable to the TWAIN.
· Mailbox ViewerSoftware to observe, import or delete data storing in the mailbox of the DocumentCentre or the Able.
You can install two softwares at a time by the following installation.
Procedure
Start Windows® 95, Windows® 98 or Windows NT® 4.0, click Start and Run.The Run dialogue box will be displayed.
Insert the PCL Driver/Network Utility CD-ROM into the CD-ROM drive. Typethe drive name (e.g.E:) and the path name (\English\Utility\Win95_98\SCN or\English\Utility\NT40\SCN) , then click OK . The drive name may be differentaccording to your system (personal computer).
1.5 Installing the Network Scanner Utility

Before U
sing the Scanner
1
19
Click Next and continue with the installation.
When the installation is completed, the following dialog box is displayed. ClickYes, I want to restart my computer now. , then Finish.
The installation is completed and the Windows is restarted automatically.
1.5 Installing the Network Scanner Utility

20
1.5.3 Uninstallation
This section describes the procedure to remove the installed Network Scanner Utilitiesin Microsoft® Windows®.
Procedure
Start Windows® 95, Windows® 98 or Windows NT® 4.0. Double-click My com-puter, Control Panel, then Add/Remove Programs Properties.
Click Fuji Xerox Network Scanner Utility , then Add/Remove.
1.5 Installing the Network Scanner Utility

Before U
sing the Scanner
1
21
Click Yes.
1.5 Installing the Network Scanner Utility

This page is intentionally left blank.

Operating theDocumentCentre
2.1 Scanning Documents ......................................................................... 24
2.2 Specifying Various Features (Mailbox) ............................................ 28
2.3 Deleting Stored Documents .............................................................. 34
2.4 Custom Presets for Scanning Features .............................................. 36

24
2.1 Scanning Documents
This section describes how to scan documents using Document Centre.
There are two methods for scanning documents.
· Store the scanned data to the mailbox.· Specify the job template and scan a data, then transmit to server.
(When using the CentreWare Scanning Services)Refer to the corresponding steps according to your selection.
2.1.1 Storing scanned document into the mailbox
The basic procedure to scan a document and to store into a mailbox is as follows.
Load documents.
Fax ReceivingMode
Custom Presets
Setup Menu
Billing Meter
Job Memory
Print Report/List
Copy Fax
Scan
Select Scan on the Menu screen.
If the Menu screen is not displayed, press Fea-ture Selection on the control panel a few times.
If the Scan button is not displayed, refer to "1.3.1Starting up the Salutation" to check the settings.
300 dpi
200 dpi
Scan Resolution
Text/Halftone
Halftone
Text
Document Type Lighter/Darker
Other
Basic Features Feature MenuUser CustomiseFeatures
Scan to File: Not selected
Select [Mailbox] to store images.Fax Memory 100%
Mailbox
Select Mailbox .
• "1.3.3 Creating a mailbox" to make new mail-box.
• If the Mailbox button is not displayed, refer to"1.3.1 Starting up the Salutation" to check thesettings.

Operating the D
ocument C
entre
2
25
2.1 Scanning Documents
Mailbox No.
(1-200)
Password
(0000-9999)
1
Cancel
Save
Mailbox
Select
Enter Mailbox No. and password, then select [Save].
Fax Memory 100% Enter the number of the mailbox to store documentusing the keypad, then select Select.
Mailbox No.
(1-200)
Password
(0000-9999)
1
Cancel
Save
Mailbox
Select
Enter Mailbox No. and password, then select [Save].
Fax Memory 100% Enter the password using the keypad, then select Save.The password will be displayed as ****.
300 dpi
200 dpi
Scan Resolution
Text/Halftone
Halftone
Text
Document Type Lighter/Darker
Other
Feature Menu
Scan to File: Mailbox No. 1 [Scanner]
Ready to ScanLoad documents and press [Start]. Image storedin Mailbox can be retrieved from the Client PC.
Fax Memory 100%
Mailbox
Not Stored
Delete StoredDocuments
Basic Features User CustomiseFeatures
Select other features as required.
2.2 Specifying Various Features for details ofscanning features.
Press Start.
The scanning starts, and the scanned document isstored into the Mailbox.

26
2.1.2 Storing scanned document into the server (defining the Job Template)
This section describes how to scan documents using the CentreWare Scanning Services(optional).You can scan a document by the file (job template) which is pre-set the scanning fea-tures and required server.The scanned data are converted as TIFF format, and are transmitted to the requiredserver.You should create the job template on your personal computer by using the Job Tem-plate Utility of CentreWare Scanning Services, then store it in a server.The Document Centre will automatically import the stored Job template in a server.
Load documents.
Fax ReceivingMode
Custom Presets
Setup Menu
Billing Meter
Job Memory
Print Report/List
Copy Fax
Scan
Select Scan on the Menu screen.
If the Menu screen is not displayed, press Fea-ture Selection on the control panel a few times.
If the Scan button is not displayed, refer to "1.4.3Starting up the ftp client" to confirm the setting.
Scan to File: Not Selected
Job Template
Select [Job Template] to scan images.Fax Memory 100%
Documents are scanned according to the settingsin the selected template. They are saved into the file system on the network computer.
Select Job Template.If the Job Template button is not displayed, referto "1.4.3 Starting up the ftp client" to confirm thesetting.
If the Salutaion is running, the display differs fromthe figure as shown left.
2.1 Scanning Documents

Operating the D
ocument C
entre
2
27
Close
UpdateTemplate
Select required template.File repository and Scan feature have beenselected. (Max of 100 templates can be displayed.)
Job Template
Fax Memory 100%
1 default
Prev.Page
NextPage
TemplateDescription
2 Scanned Image
No. (Unselected)
3 Scanned Image
Select the required job template directly. If the jobtemplate that you are created is not displayed, selectUpdate Template.
Close
UpdateTemplate
Job Template
Fax Memory 100%
1 default
Prev.Page
NextPage
TemplateDescription
2 Scanned Image (Photo)
No. 2 [Scanned Image (Photo) ]
3 Scanned Image (Text)
Ready to scanSelect [Template Description] for details.(Max of 100 templates can be displayed.)
• When the Template Description button is se-lected during selecting any job template, de-tailed description is displayed. However, if youdo not added the description when creating thejob template, it is not displayed.
• When the Review button is pressed on the con-trol panel during selecting any job template,you can confirm the contents of settings for eachjob template.
Press Start.
The scanning starts and the data is stored in the harddisk of the machine, then it is automatically trans-mitted to a server.
2.1 Scanning Documents

28
This section describes the setting of various scanning features at the Document Centre.
The available scan features are as follows.
· Scan Resolution· Document Type· Lighter/Darker (Density level)· Scan Size· Reduce/Enlarge (Scan ratio)· Mixed size documents· 2-Sided DocumentsSelect various scanning features according to the procedure below if necessary.
2.2.1 Selecting the resolution level
You can select the resolution level for various documents to be scanned.Resolution levels are 200 dpi(factory-set), 300 dpi, 400 dpi, and 600 dpi
300 dpi
200 dpi
Scan Resolution
Text/Halftone
Halftone
Text
Document Type Lighter/Darker
Other
Basic Features Feature MenuUser CustomiseFeatures
Scan to File: Mailbox No. 1 [Scanner]
Ready to ScanLoad documents and press [Start]. Image storedin Mailbox can be retrieved from the Client PC.
Fax Memory 100%
Mailbox
Not Stored
Delete StoredDocuments
Display the Basic Features screen, select the requiredresolution.
If you select 400 dpi or 600 dpi, select Other.
You can also select Scan Resolution on the Fea-ture Menu screen.
Scan Resolution Close
200 dpi
300 dpi
400 dpi
600 dpi
Select [Mailbox] to store images.Fax Memory 100% After selecting the resolution, select Close.
2.2 Specifying Various Features(Mailbox)•@
Operating the D
ocument C
entre
2
29
2.2 Specifying Various Features (Mailbox)
2.2.2 Selecting the document type
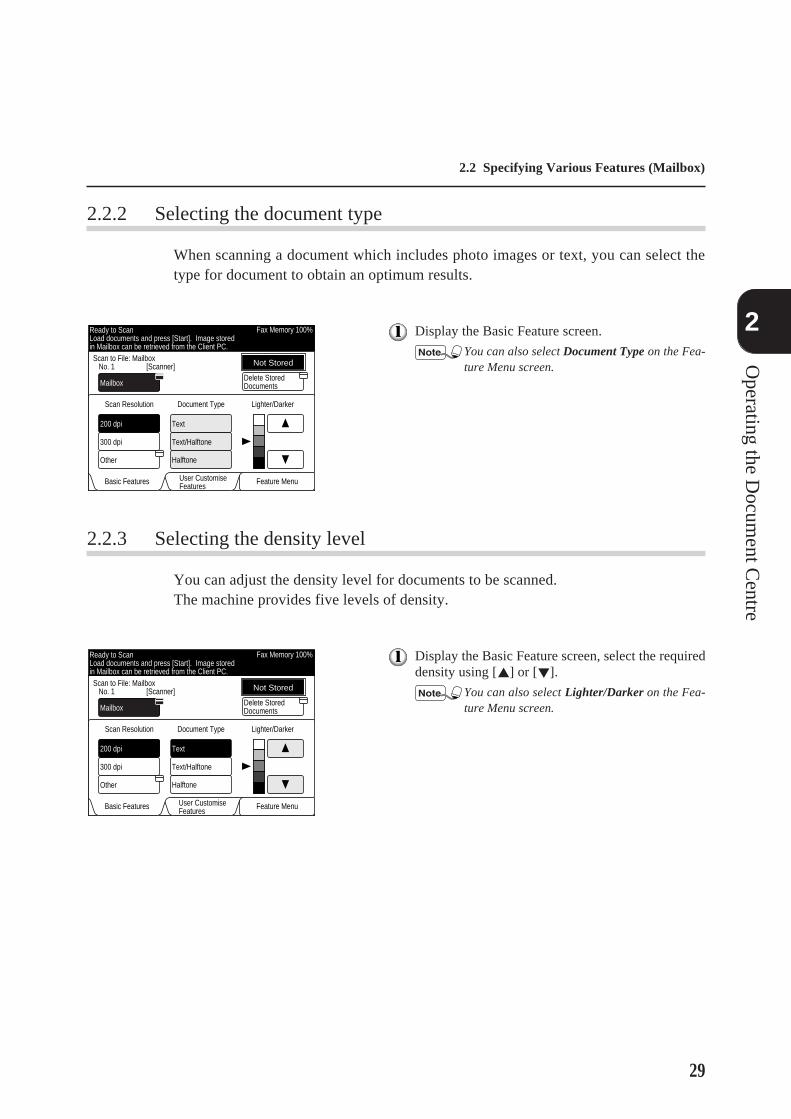
When scanning a document which includes photo images or text, you can select thetype for document to obtain an optimum results.
300 dpi
200 dpi
Scan Resolution
Text/Halftone
Halftone
Text
Document Type Lighter/Darker
Other
Basic Features Feature MenuUser CustomiseFeatures
Scan to File: Mailbox No. 1 [Scanner]
Ready to ScanLoad documents and press [Start]. Image storedin Mailbox can be retrieved from the Client PC.
Fax Memory 100%
Mailbox
Not Stored
Delete StoredDocuments
Display the Basic Feature screen.
You can also select Document Type on the Fea-ture Menu screen.
2.2.3 Selecting the density level
You can adjust the density level for documents to be scanned.The machine provides five levels of density.
300 dpi
200 dpi
Scan Resolution
Text/Halftone
Halftone
Text
Document Type Lighter/Darker
Other
Basic Features Feature MenuUser CustomiseFeatures
Scan to File: Mailbox No. 1 [Scanner]
Ready to ScanLoad documents and press [Start]. Image storedin Mailbox can be retrieved from the Client PC.
Fax Memory 100%
Mailbox
Not Stored
Delete StoredDocuments
Display the Basic Feature screen, select the requireddensity using [▲] or [▼].
You can also select Lighter/Darker on the Fea-ture Menu screen.

30
2.2.4 Selecting the scan size
You can select the document size when scanning. This feature is used to scan the sizeyou specified while ignoring actual size of document.
The scan sizes are: Auto (factory-set), B5,B4 ,A5 ,A4 ,A4 , or A3 .
In case of using the document feeder, if the original size is smaller than the scanningsize, the machine scans the document at original size.
Feature Menu
Lighter/Darker
Reduce/Enlarge
2-SidedDocuments
Mixed SizeDocumentsScan Size
ScanResolution
User CustomiseFeaturesBasic Features
Document Type
Not StoredScan to File: Mailbox No. 1 [Scanner]
Mailbox Delete StoredDocuments
Ready to ScanLoad documents and press [Start]. Image storedin Mailbox can be retrieved from the Client PC.
Fax Memory 100% Select Scan Size on the Feature Menu.
Scan Size CloseCancel
Auto
B 5
A 5
A 4
B 4 A 4
A 3
Ready to ScanLoad documents and press [Start]. Image storedin Mailbox can be retrieved from the Client PC.
Fax Memory 100% Select the required scan size, then Close.
2.2 Specifying Various Features (Mailbox)

Operating the D
ocument C
entre
2
31
2.2.5 Scanning documents at the specified ratio
You can reduce or enlarge the image of document when scanning.You can specify the ratio from 50 to 400% at 200 dpi,300 dpi or 400 dpi, from 50 to133% at 600 dpi.
The Reduce/Enlarge is factory-set to 100%.
Feature Menu
Lighter/Darker
Reduce/Enlarge
2-SidedDocuments
Mixed SizeDocumentsScan Size
ScanResolution
User CustomiseFeaturesBasic Features
Document Type
Not StoredScan to File: Mailbox No. 1 [Scanner]
Mailbox Delete StoredDocuments
Ready to ScanLoad documents and press [Start]. Image storedin Mailbox can be retrieved from the Client PC.
Fax Memory 100% Select Reduce/Enlarge on the Feature Menu screen.
Reduce/Enlarge CloseCancel
100
(50-400)
%100%
Ready to ScanLoad documents and press [Start]. Image storedin Mailbox can be retrieved from the Client PC.
Fax Memory 100% Select the required ratio using [▲] or [▼], then se-lect Close.
2.2 Specifying Various Features (Mailbox)

32
2.2.6 Scanning documents in various sizes
You can set various size of documents at one time.If you do not select this feature, the machine scans all of the documents as the same sizeas the first fed document.
When you specify the scan size, the documents are scanned by the specified size.
Feature Menu
Lighter/Darker
Reduce/Enlarge
2-SidedDocuments
Mixed SizeDocumentsScan Size
ScanResolution
User CustomiseFeaturesBasic Features
Document Type
Not StoredScan to File: Mailbox No. 1 [Scanner]
Mailbox Delete StoredDocuments
Ready to ScanLoad documents and press [Start]. Image storedin Mailbox can be retrieved from the Client PC.
Fax Memory 100% Select Mixed Size Document on the Feature Menuscreen.
Loading documents
Load all the documents into the document feederalong the fixed document guide and adjust the docu-ment guide so that it just touches the widest docu-ment.
2.2 Specifying Various Features (Mailbox)
Operating the D
ocument C
entre
2
33
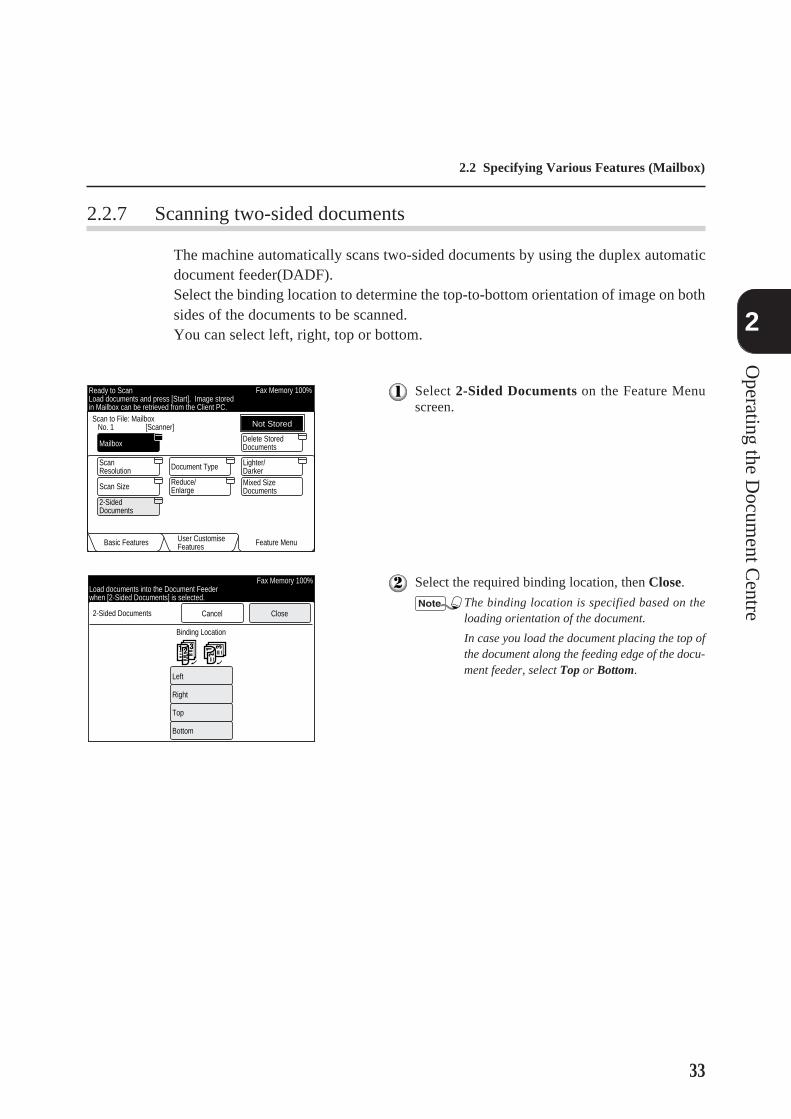
2.2.7 Scanning two-sided documents
The machine automatically scans two-sided documents by using the duplex automaticdocument feeder(DADF).Select the binding location to determine the top-to-bottom orientation of image on bothsides of the documents to be scanned.You can select left, right, top or bottom.
Feature Menu
Lighter/Darker
Reduce/Enlarge
2-SidedDocuments
Mixed SizeDocumentsScan Size
ScanResolution
User CustomiseFeaturesBasic Features
Document Type
Not StoredScan to File: Mailbox No. 1 [Scanner]
Mailbox Delete StoredDocuments
Ready to ScanLoad documents and press [Start]. Image storedin Mailbox can be retrieved from the Client PC.
Fax Memory 100% Select 2-Sided Documents on the Feature Menuscreen.
2-Sided Documents CloseCancel
Binding Location
Left
Right
Top
Bottom
Load documents into the Document Feederwhen [2-Sided Documents] is selected.
Fax Memory 100% Select the required binding location, then Close.The binding location is specified based on theloading orientation of the document.
In case you load the document placing the top ofthe document along the feeding edge of the docu-ment feeder, select Top or Bottom.
2.2 Specifying Various Features (Mailbox)

34
You can delete the stored documents from your mailbox.
Fax ReceivingMode
Custom Presets
Setup Menu
Billing Meter
Job Memory
Print Report/List
Copy Fax
Scan
Select Scan on the Menu screen.
If the screen on the left is not displayed, pressFeature Selection to display the screen.
If the Scan button is not displayed, refer to "1.3.1Starting up the Salutation" to confirm the setting.
300 dpi
200 dpi
Scan Resolution
Text/Halftone
Halftone
Text
Document Type Lighter/Darker
Other
Basic Features Feature MenuUser CustomiseFeatures
Scan to File: Not selected
Select [Mailbox] to store images.Fax Memory 90%
Mailbox
Select Mailbox .
• "1.3.3 Creating a mailbox" to make new mail-box.
• If the Mailbox button is not displayed, Refer to"1.3.1 Starting up the salutation" to confirm thesetting.
Mailbox No.
(1-200)
Password
(0000-9999)
Cancel
Save
Mailbox
Select
Enter Mailbox No. and password, then select [Save].
Fax Memory 90% Enter the mailbox number which you need to deleteusing the keypad.
Mailbox No.
(1-200)
Password
(0000-9999)
1
Cancel
Save
Mailbox
Select
Enter Mailbox No. and password, then select [Save].
Fax Memory 90% Select Select.
2.3 Deleting Stored Documents

Operating the D
ocument C
entre
2
35
2.3 Deleting Stored Documents
Mailbox No.
(1-200)
Password
(0000-9999)
1
Cancel
Save
Mailbox
Select
Enter Mailbox No. and password, then select [Save].
Fax Memory 90% Enter the password using the keypad, then select Save.The password will be displayed as ****.
300 dpi
200 dpi
Scan Resolution
Text/Halftone
Halftone
Text
Document Type Lighter/Darker
Other
Basic Feature Feature MenuUser CustomiseFeatures
Scan to File: Mailbox No. 1 [Scanner]
Ready to ScanLoad documents and press [Start]. Image storedin Mailbox can be retrieved from the Client PC.
Fax Memory 90%
Mailbox
Stored
Delete StoredDocuments
Select Delete Stored Documents.
Stored
SelectDocument No.
Close
<Document No.>
(0001-1000)
Deleted Stored Documents
All Documents
Delete
Select an option to delete documents.Fax Memory 90%
Scan to File: Mailbox No. 1 [Scanner]
If you want to specify the document to be deleted,select Select Document No. If you want to delete allthe documents, select All Documents.When selecting Select Document No., enter the docu-ment number you need to delete using the keypad.
You can confirm the document number on theStored Document List. As for the printing of theStored Document List , refer to the "User Guide(Facsimile)".
Stored
SelectDocument No.
Close
<Document No.>
(0001-1000)
0 0 0 1
Deleted Stored Documents
All Documents
Delete
Scanned Image 1998.7.2112 F34
Document Type Stored Date
Fax Memory 90%
Scan to File: Mailbox No. 1 [Scanner]
Select [Delete] to delete stored documents.Select Delete.
When the message of confirmation is displayed,select Yes.

36
2.4 Custom Presets for ScanningFeatures
Using the Custom Presets feature, you can change the factory-set of a feature to a frequently used oneto reduce the number of setting steps for scan jobs.
The factory-set items that can be changed are as follows.
Screen Default (4.Scan Default)
You can set the screen appears at first when you select Scan.Scan Screen
You can set the features displaying on the User Customise Features for each item.Scan Features
You can set the following items.· Scan Resolution
· Document Type
· Lighter/Darker
Execute the following procedure when necessary.
Fax ReceivingMode
Custom Presets
Setup Menu
Billing Meter
Job Memory
Print Report/List
Copy Fax
Scan
Select Custom Presets on the Menu screen.
If the screen on the left is not displayed, pressFeature Selection on the control panel to displaythe screen.
PrintingPriority
CloseCustom Presets
Copy Screen
Reports Copy Features
Timers
Audio
Diagnostics
ScreenDefaults Fax Screen
Fax Features
ScanFeatures
ScanScreen
Select the required item.
For example, select Scan Features.

Operating the D
ocument C
entre
2
37
Close
Enter/Change
Select Item.
Item Status
Custom Presets-Scan Features
1.Scan Resolution 200 dpi2.Document Type Text3.Lighter/Darker Normal
Select the required item by touching the screen, or byselecting with [↑] or [↓].
For example, select 1. Scan Resolution.
Select Enter/Change.
1.Scan Resolution Close
200 dpi
300 dpi
400 dpi
600 dpi
Cancel
Select the required resolution.
Select Save.
Press Clear All .
2.4•@•@•@•@•@Custom Presets for Scanning Features

This page is intentionally left blank.

3.1 Using the Network Scanner Driver ................................................... 40
3.2 How to Use the Mailbox Viewer....................................................... 48
Operating theClient (PersonalComputer)

40
Using the network scanner driver, you can import the stored image from the mailbox to a personalcomputer (client) via network.
This section explains how to use the Network Scanner Driver.
"1.5 Installing the Network Scanner Utility" for details of installation.
3.1.1 Importing the stored documents from the mailbox
The procedure when importing the stored documents from the mailbox of the Docu-ment Centre to the application software is as follows.
Procedure
Activate the Windows® 95, Windows® 98 or Windows NT® 4.0, then start up theapplication software.
The application software must be compatible with the TWAIN interface.
"Appendix B Application Software" to confirm the activable application soft-ware.
Click the command to select the scanner (source) on the File menu.
The screen as shown below is Docuworks V3.0(E). The command name forselecting the scanner (source) differs depending on the software.
3.1 Using the Network Scanner Driver
Operating the C
lient (Personal C
omputer)
3
41
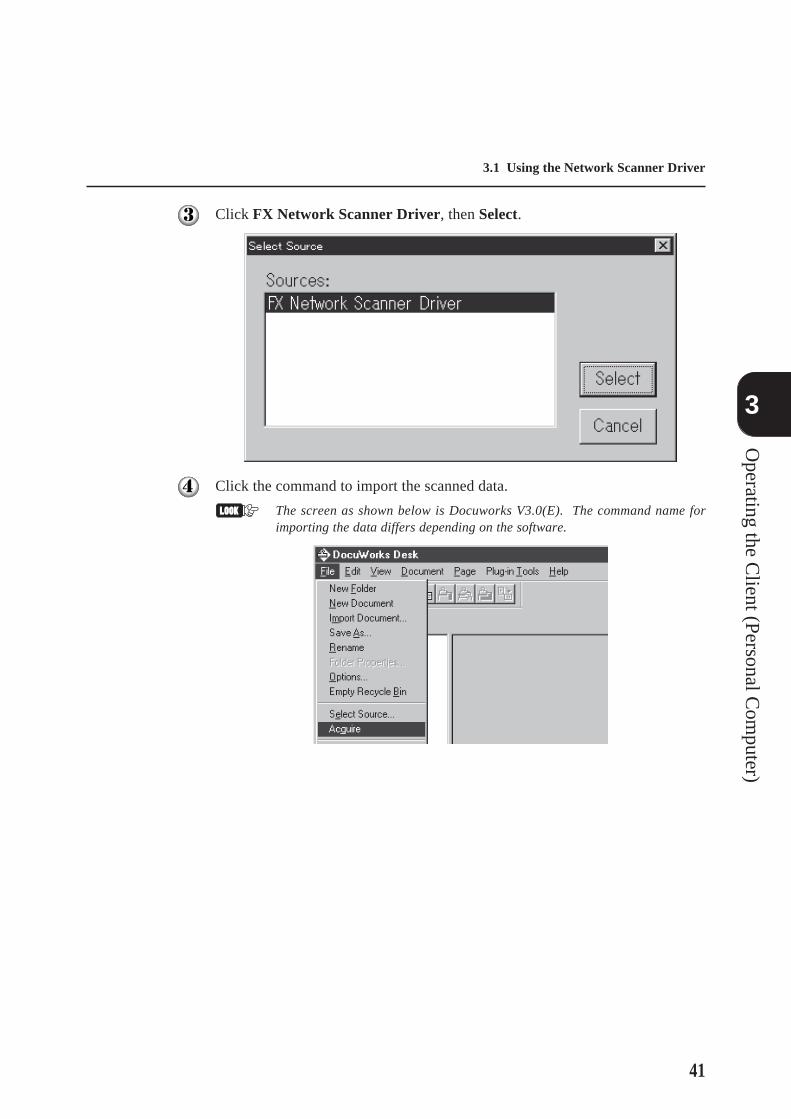
Click FX Network Scanner Driver, then Select.
Click the command to import the scanned data.
The screen as shown below is Docuworks V3.0(E). The command name forimporting the data differs depending on the software.
3.1 Using the Network Scanner Driver

42
Click the scanner name of the Document Centre or the Able on the dialog box asshown below, then Select Scanner.
• You can change the way of displaying scanner names by clicking the ChangeDisplay button.
• When the Document Centre or the Able is connected to the same network asyour computer, the scanner names are displayed automatically. If you wantto another network, click Change Display, then enter the IP address andscanner name(product name).
"3.1.2 Changing displaying of the scanner name" for changing the scannername, or connecting to other network.
Enter the required Mailbox No. from 1 to 200.
3.1 Using the Network Scanner Driver

Operating the C
lient (Personal C
omputer)
3
43
Enter the password for the mailbox (four digits), then click Open Mailbox.
Click Save a Password to eliminate the procedure from Step 5 to 7 for the nexttime.
Click the file to be imported, then Import .
Scanner NameDisplays the connected Document Centre or Able.
Mailbox No.Displays the mailbox number.
File No.The number assigned at the Document Centre or the Able to identify the documents.
3.1 Using the Network Scanner Driver

44
File TypeDisplays the document type.There are three file types:
· Scanned Image : The data scanned at the Document Centre or Able.
· Received Fax : The document received at a mailbox using fax feature.
· Stored for Polling : The documents stored in mailbox for polling.
DateDisplays the date when the document was stored in the mailbox.
TotalDisplays the total number of pages of the files. When the File List Mode is set to File,the Page will be displayed and indicates the current page.
SizeDisplays the paper size of the documents.
CompressDisplays the compressed format. There are three types: MH,MR and MMR.
MH, MR and MMR are coding schemes for fax feature. The compressed format forscanned image is defined according to the setting of the Document Type of the Docu-ment Centre that you specified.
Change ScannerClick to change the scan tool (Document Centre or Able).
SettingClick to select the way of displaying the document or importing method.
"3.1.3 Changing import settings" for details.
When the Import button is pressed, the dialog box as shown below appears and thedata will be transferred.
The data is imported to activating software, the documents in a mailbox is deleted.
The network scanner driver extends the compressed data, and imports them to a soft-ware in BMP format.
3.1 Using the Network Scanner Driver

Operating the C
lient (Personal C
omputer)
3
45
3.1.2 Changing display of the scanner name
You can change the way to display the scanner name on the dialog box.Click Change Display on the scanner selection dialog box (see 3.1.1 Step 5 or 3.2.1Step2.) to specify the scanner name.Select the required scanner to be changed the name by referring to the following.
NetworkWhen this button is on, the machine searches the host name at the following order. Ifthe host name that meets the IP address of the connected machine is registered, it willbe displayed the corresponding host name as a scanner name.
① HOSTS file on the system directory of the Windows® (no extension).
• HOSTS file is on the \Windows\system at Windows®95, on the \Winnt\system32\drivers\etc at Windows NT®4.0. However, the directory name (Windows/Winnt) installedthe Windows® differs depending on environment.
• When you want to display the host name by using HOSTS file, use Note Pad toopen the HOSTS file, leave space between IP address and host name.
② DNS(Domain Name Service)
If the host name is registered in DNS, the domain name will also be displayed.
If there is no applicable host name, the Document Centre 250/350/400 or the AbleModel-PR II)+IP address is displayed.
3.1 Using the Network Scanner Driver

46
Local FileWhen specifying the file while this button is on, the host name which is specified in thefile will be displayed as the scanner name.Specify the file using the HOSTS file format.
Example:
123.45.123.45 Document Centre- No.1
Other ScannersWhen you connect the Document Centre or the Able which is already connected withother network, specify it as follows.
You should setup the machine so that it can be used in TCP/IP environment when con-necting with the Document Centre or the Able which is already connected with othernetwork.
① Select the Display other network scanner checkbox.
② Click Add.
③ Enter the IP address of the Document Centre or the Able to be connected and corre-sponding scanner name, then click OK .
3.1 Using the Network Scanner Driver

Operating the C
lient (Personal C
omputer)
3
47
3.1.3 Changing import settings
You can change the displaying of document or importing method when importing thedocument from the mailbox.
Click Setting to change the setting on the dialog box (see step 8 on 3.1.1).
Specify the required setting by referring to the following.
Negative ImageReverse the colour between black and white areas when importing the document tosoftware.
File List ModeSelect the display method of stored file list by file or page.If your software does not indicate the file consisting of plural pages, click Page toimport it page by page.
Save asSpecifies a directory which is temporarily used to save the document during importing.Specify a directory that has large empty capacity.
3.1 Using the Network Scanner Driver

48
3.2 How to Use the Mailbox Viewer
The mailbox viewer provides the following features.
· Confirming the documents stored in mailbox.· Deleting the stored documents from mailbox.· Acquiring the documents stored in the mailbox at periodic intervals. When the new documents are
stored in the mailbox, the personal computer informs you by a sound or icon.· Importing the new document from the mailbox and save it as the TIFF format.The following explains how to use the mailbox viewer.
1.5 Installing the Network Scanner Utility
3.2.1 Confirm/delete/import the stored document in a mailbox
This section describes how to confirm, delete, and import and save the document storedin the mailbox of the Document Centre or the Able by using the mailbox viewer.
Procedure
Activate Windows® 95, Windows® 98 or Windows NT® 4.0. Click Start on thetask bar, then select Mailbox Viewer on the Fuji Xerox Network Scanner Util-ity.
When you specify another programme folder name, the display of Fuji XeroxNetwork Scanner Utility is changed to the specified name.

Operating the C
lient (Personal C
omputer)
3
49
Click the Document Centre or the Able from the list, then Select Scanner.
You can change the display of scanner name by clicking Change Display.
When the Document Centre or the Able is connected to as the same network asyour computer, the scanner names are displayed automatically. If you want todisplay it from another network, click Change Display, enter the IP address andscanner name(product name).
3.1.2 Changing displaying of the scanner for changing the scanner name, orconnecting to other network.
Enter the mailbox number in which the document is stored (1-200).
3.2 How to Use the Mailbox Viewer

50
Enter the password for the mailbox (four digits), click Open Mailbox.
Click Save a Password to eliminate the procedure from Step 5 to 7 for the nexttime.
Operate the required features referring to the detailed explanation as shown below.
Scanner NameDisplays the connected Document Centre or Able.
Mailbox No.Displays the mailbox number.
3.2 How to Use the Mailbox Viewer

Operating the C
lient (Personal C
omputer)
3
51
File No.Displays the number assigned at the Document Centre or Able to identify the docu-ments.
File TypeDisplays the document type.There are three file types:
· Scanned Image : The data scanned at the Document Centre or Able.
· Received Fax : The document received at a mailbox using fax feature.
· Stored for Polling : The documents stored in mailbox for polling.
DateDisplays the date when the document was stored in the mailbox.
TotalDisplays the total number of pages of the files.
SizeDisplays the paper size of the documents.
CompressDisplays the compressed format. There are three types: MH, MR or MMR.
MH, MR and MMR are coding schemes for fax feature. The compressed format forscanned image is defined according to the setting of [Document Type] you specified.
UpdateClick to display the latest document in the mailbox.If you have clicked the checkbox of Import all existing documents. on the Settingdialog box, this button will be changed to Import .
As for the setting up of importing document property, see "3.2.2 Setting up the proper-ties of Mailbox Viewer"
DeleteDeletes the highlighted document.
Change ScannerClick to change the scan tool (Document Centre or Able).
SettingClick to select the operating of mailbox viewer or importing features.
"3.2.2 Setting up the properties of Mailbox Viewer" for the details of setting up.
QuitClick to quit the mailbox viewer.
3.2 How to Use the Mailbox Viewer

52
Importing the document stored in the Mailbox
If you have clicked the Import all existing documents. checkbox on the Setting dialogbox, the Setting button as shown figure below is changed to the Import button.
For the setting up of importing document property, see "3.2.2 Setting up the propertiesof Mailbox Viewer".
When clicking the Import button, all of the stored documents will be imported, andsaved with the specified directory (intialization is c: \temp) as the TIFF format.At this time, the file name is as follows.IP address - Mailbox No. - File No. - Date - Time.tifExample : 123045123045-003-0013-980721-1824.tif
3.2 How to Use the Mailbox Viewer

Operating the C
lient (Personal C
omputer)
3
53
3.2.2 Setting up the properties of mailbox viewer
You can specify the operation of mailbox viewer and importing feature.
To set the properties, click Setting on the mailbox viewer dialog box (see Step 5 on3.2.1).
Specify the properties as required.
Get information, when restoring your windows.By clicking this checkbox, you can get the document listed in the mailbox when dis-playing the mailbox viewer dialog box from the task bar.
Set TimerYou can set the interval of updating information within a range of 3 to 60 minutes.
Import all existing documents.You can automatically import all documents from the mailbox by clicking thecheckbox. When this checkbox is clicked, the Update button will be changed to theImport button.
3.2 How to Use the Mailbox Viewer

54
Import PropertiesYou can specify the required compression type, drive and/or folder and convert the fileto application format by clicking to display the dialog box.
The Connect Application is not currently available.
NotificationSpecifies how to notify a file which is newly arrived when the mailbox viewer is shownas a task bar or icon.
· Animation : Notify with a change of the icon.
· Sound : Notify with a sound.Click Browse... to specify a sound file (ExtensionWAV).
When the sound card is not provided in your personal computer, you cannot specify asound file (Extension WAV).
File TypeSelect the document type to be displayed in the Mailbox Viewer dialog box.There are three file types:
· Scanned Image : The data scanned at the Document Centre or the Able.
· Received Fax : The document received at a mailbox using fax feature.
· Stored for Polling : Stores the documents to mailbox for polling.
3.2 How to Use the Mailbox Viewer

4.1 Precautions and Limitations .................................................................. 56
Precautionsand Limitations

56
4.1 Precautions and Limitations
This section describes the precautions and limitations of using this scanner.
As for the precautions and limitations of Network Scanner Driver or mailbox viewer, refer toReadme.txt on the \English\Utility \Win95_98 \SCN or \English\Utility \NT40\SCN of the PCL Driver/Network Utility CD-ROM.
Starting up the Salutation or ftp Client
After activating the Salutation or ftp Client using the Document Centre printer controlpanel, switch off the power for machine, then switch on the power.
Using the Network Scanner Driver and the Mailbox Viewer at the same time.
You cannot access to the Document Centre or the Able by using the Mailbox Viewerand the Network Scanner Driver at the same time.
Importing from several personal computers
You cannot import the document from the Document Centre by using the networkscanner driver or the mailbox viewer while another computer is importing.
Printing stored document
You cannot print the scanned document by selecting Retrieve Docs to Print of theMailbox button on the Fax Feature Menu screen of the Document Centre.
Retrieve from the Mailbox of the Document Centre
When the remote terminal is retrieving a document from the mailbox of the DocumentCentre, You cannot transmit the scanned document.
Using the CentreWare Scanning Services
You can retrieve a maximum of 100 templates by using the Document Centre.
Using the TIFF file
The TIFF file that is created with the CentreWare Scanning Services or the MailboxViewer is compressed as either MMR, MR or MH format. When opening these files,use the corresponding software with these compression format.

Appendix
A Printing Job Template Server Settings .................................................... 58
B Application Software ............................................................................... 60

58
A Printing Job Template ServerSettings
This section describes how to print the Job Template Server Settings by using the Document Centre.
The Job Template Server Settings is listed the settings for the Template Storing Server set by the ScanAdmin Wizard on the CentreWare Scanning Services (optional).
You can print the Job Template Server Settings by operating the printer control panel of the DocumentCentre to print the Job Template Server Settings.
▼
(The printer power is on.)
(Display of the menu)
2. Press or a few times.
(Display of the print utility)
▼
1. Press Menu .
4. Press or a few times.
6. Press Eject/Set .
(The Job Template Server Settings will be
printed.)
3. Press .
▼
5. Press .
▼
▼
▼
▼
(It will be back to the
state of power on.
You can receive the
data.)
▼

59
Appendix
Example
Appendix A Printing Job Template Server Settings

60
Applicable software is as follows.
Application Windows®95 Windows®98 WindowsNT®4.0
Fuji Xerox Co.,ltd DocuWorks V3.02(ENG)
ScanSoft, Inc TextBridge PRO98
Adobe Systems, Inc. Adobe Photoshop Ver. 4.0
Adobe Systems, Inc. Adobe Photoshop Ver. 5.0
WANG Laboratories, Inc. Imaging for windows95
WANG Laboratories, Inc. Imaging for Windows Release 1.1
Eastman Software, Inc Imaging for Windows
Microsoft Corporation Picture It! Ver. 2.0
Visioneer, Inc PaperPort Ver. 4.0
Xerox Corporation Pagis PRO97
• The applications above have been verified to operate with the Document Centre400/350/250 Scanner as of Feb.1999.
• All product/brand names are trademarks or registered trademarks of the respectiveholders.
B Application Software

61
Ind
ex
Index
A
Animation ..................................................................54
Application Software ................................................60
C
CentreWare Scanning Services ...................................3
Change Scanner .........................................................44
Compress ...................................................................44
Creating a mailbox ......................................................9
Custom Presets for Scanning Features .....................36
D
Defining the Job Template ........................................26
Deleting Stored Documents ......................................34
Density level ..............................................................29
Document type ..........................................................29
F
File List Mode ...........................................................47
File Type ............................................................ 44, 54
G
Gateway Address .........................................................7
Get information, when restoring
your windows. ...........................................................53
I
Import all existing documents ..................................53
Import Properties.........................................................5
Importing the stored document in the
Mailbox .....................................................................52
Importing the stored documents to the
application .................................................................40
Installation
Procedure ...............................................................18
Required environment ...........................................17
IP address ....................................................................5
J
Job Template................................................................3
Job Template Server Settings ....................................58
L
Local File ...................................................................46
M
Mailbox Viewer
How to use .............................................................48
Installation .............................................................18
Mixed Size Documents .............................................32
N
Negative Image..........................................................47
Network .....................................................................45
Network Scanner Driver
How to use .............................................................40
Installation .............................................................18
Notification ...............................................................54
O
Other Scanners ..........................................................46
Overview .....................................................................2
P
Precautions and Limitations .....................................56
R
Received Fax .............................................. 44, 51, 54
Reduce/Enlarge .........................................................31
Required environment .................................................4

62
Index
S
Save as .......................................................................47
Scan Features ............................................................36
Scan Resolution .........................................................28
Scan Screen ...............................................................36
Scan Size ...................................................................30
Scanned Image ........................................... 44, 51, 54
Scanning
Storing scanned document into the
Mailbox .................................................................24
Storing scanned document into the
server .................................................................... 26
Scanning with the mailbox .........................................2
Screen Default ...........................................................36
Set Timer ...................................................................53
Setting up the Document Centre for Using
CentreWare Scanning Services .............................11
Setting up the Document Centre for Using
Mailbox Feature ..........................................................5
Sound .........................................................................54
Specifying Various Features ......................................28
Starting up the agent (UDP) ......................................11
Starting up the ftp Client ...........................................15
Starting up the Salutation ............................................5
Stored for Polling ....................................... 44, 51, 54
Storing scanned document into the
Mailbox .....................................................................24
Storing scanned document into the
server .........................................................................26
SubNet Mask ...............................................................7
T
Two-Sided Documents ..............................................33
U
Uninstallation ............................................................20

Customer Response Sheet
Document Centre 400/350/250 Series User Guide (Scanner) (DE-0475E2)To improve our publications, we would appreciate your feedback regarding this manual. Please takea few moments to complete and return this form to us.
●●●●● About Yourself1. How often do you use the manual?
[ ] Daily [ ] Weekly [ ] Monthly [ ] Infrequently
2. When would you usually refer to the manual?[ ] doing a usual operation [ ] using unfamiliar features [ ] solving a problem
3. Which part of the manual do you refer to frequently?Chapter/Section/Page:
4. Where do you keep the manual?
5. (Optional)Your Name: Occupation:Company:Address:
●●●●● About the ManualStrongly Neutral StronglyAgree Disagree
1. It is handy. 1 2 3 4 5
2. It is easy to read. 1 2 3 4 5
3. Titles of chapters and sections make sense. 1 2 3 4 5
4. Information is logically placed. 1 2 3 4 5
5. Referencing is easy. 1 2 3 4 5
6. Content is easy to understand. 1 2 3 4 5
7. The step-by-step instructions are easy to follow. 1 2 3 4 5
8. All necessary information is included. 1 2 3 4 5
9. Illustrations aid in the understanding of content. 1 2 3 4 5
10. The use of color is effective 1 2 3 4 5
Other comments (if any):
After completing this form, detach and send it to the address below. (Please use your own envelope andpostage stamp. Thank you for your cooperation.
Fuji Xerox Co., LtdDocument Engineering DepartmentKSP R&D Bldg.3-2-1 Sakado, Takatsu-ku,Kawasaki-shi, Kanagawa-ken213-0012Japan
○ ○ ○ ○ ○ ○ ○ ○ ○ ○ ○ ○ ○ ○ ○ ○ ○ ○ ○ ○ ○ ○ ○ ○ ○ ○ ○ ○ ○ ○ ○ ○ ○ ○ ○ ○ ○ ○ ○ ○ ○ ○ ○ ○ ○ ○ ○ ○ ○ ○ ○ ○ ○ ○ ○ ○ ○ ○ ○ ○ ○ ○ ○ ○ ○ ○ ○ ○ ○ ○ ○ ○ ○ ○ ○✄

This page is intentionally left blank.

Document Centre 400/350/250 Series User Guide (Scanner)
Fuji Xerox Co., Ltd.2-17-22, Akasaka, Minato-kuTokyo 107-0052, Japan DE-0475E2 (Edition 2)
Copyright© 1999 by Fuji Xerox Co., Ltd.Printed in Japan