user guide - rubimages-liberty.netdna-ssl.com user guide.pdf · arrive airpoint™ - 2011 - bymg -...
TRANSCRIPT

User Guide
AirPoint™ 2011-BYMG

2
Arrive AirPoint™ - 2011 - BYMG - User Guide
Arrive AirPoint™
Doc. Ver.AAP-2011-BYMG-802-001
1. Contents
1. Introduction ................................................................... 6
1.1 Document Scope ..................................................... 6
1.2 Product overview .................................................... 6
1.3 Arrive AAP-2011-BYMG Panel description ......... 7
1.4 ArriveAAP-2011-BYMGSpecifications ................ 8
2. System Requirements.................................................... 9
3. Preparing Your Site ........................................................ 9
4. Hardware Installation .................................................. 10
5. User Experience ............................................................ 11
6. Setting up a connection .............................................. 12
6.1 Making a Peer-To-Peer (P2P) Wireless Connection ............................................................. 12
6.1.1 Apple AirPlay wireless mirroring in P2P connection ...................................................... 13
6.1.2 WiFi Direct – Miracast wireless mirroring in P2P connection ........................................... 16
6.1.2.1 Android Wireless Display (Android 4.2 or higher ) ........................ 17
2011 BYMG
User Guide

3
Copyright © 2017 Arrive Systems, Inc. All rights reserved.
6.1.3 Intel WiDi Application ........................... 18
6.1.4 Windows 8.1/10 Wireless Display ....... 19
6.2 Advanced WiFi enabled connection ................. 21
6.2.1 Connecting the Arrive AirPoint device to a WiFi network. ........................................... 22
7. Advanced Setup Menu using Airfun utility .............. 27
7.1 Network .................................................................. 27
7.1.1 WiFi Connection .................................... 28
7.1.2 Virtual AP Setup .................................... 30
7.2 Audio ....................................................................... 34
7.3 Video ....................................................................... 35
7.4 System ..................................................................... 35
7.5 Assign web console password ............................ 36
7.6 Change the SSID Name ........................................ 38
7.7 Add Signage ........................................................... 41

4
Arrive AirPoint™ - 2011 - BYMG - User Guide
COPYRIGHT NOTICE
No part of this document may be reproduced or transmitted in any form, or by any means without the prior written permission of Arrive® (ARRIVE). ARRIVE reserves the rights to modify its documentation and product features, including theircharacteristics,specifications,accessoriesandanyotherinformationstatedhereinwithoutnotice.Theofficialprintoutof any information shall prevail should there be any discrepancy between the information contained herein and the information contained in that printout. This product and related documentation are proprietary to ARRIVE.
This document does not provide you with any legal rights to any intellectual property in any ARRIVE product. You may copy and use this document for your internal, reference purposes.
Disclaimer
THE SPECIFICATIONS, INFORMATION, DESIGNS, STATEMENTS, AND RECOMMENDATIONS (COLLECTIVELY, “INFORMATION”) REGARDING THE PRODUCTS IN THIS MANUAL ARE SUBJECT TO CHANGE WITHOUT NOTICE,AND ALL IMAGES ARE FOR REFERENCE USE ONLY. FINISHED GOODS, PACKAGING,AND PRODUCTS WILL BE PROVIDED WITH USER DESIGNS AND GRAPHIC ELEMENTS INCLUDING PACKAGING DESIGN ELEMENTS THAT MAY VARY FROM THE IMAGES SHOWN IN THIS DOCUMENT. E&OE. ALL STATEMENTS, INFORMATION, AND RECOMMENDATIONS IN THIS MANUAL ARE BELIEVED TO BE ACCURATE BUT ARE PRESENTED WITHOUT WARRANTY OF ANY KIND, EXPRESS OR IMPLIED. USERS MUST TAKE FULL RESPONSIBILITY FOR THEIR APPLICATION OF ANY PRODUCTS. ARRIVE DISCLAIMS ALL WARRANTIES, INCLUDING, WITHOUT LIMITATION, THE WARRANTY OF MERCHANTABILITY, FITNESS FOR A PARTICULAR PURPOSE AND NON-INFRINGEMENT OR ARISING FROM A COURSE OF DEALING, USAGE, OR TRADE PRACTICE. IN NO EVENT SHALL ARRIVE OR ITS INFORMATION SOURCES AND SUPPLIERS BE LIABLE FOR ANY INDIRECT, SPECIAL, CONSEQUENTIAL, OR INCIDENTAL DAMAGES, INCLUDING, WITHOUT LIMITATION, LOST PROFITS, LOSS OR DAMAGE TO DATA ARISING OUT OF THE USE OR INABILITY TO USE THIS MANUAL, EVEN IF ARRIVE OR ITS SUPPLIERS HAVE BEEN ADVISED OF THE POSSIBILITY OF SUCH DAMAGES.
ALL TRADEMARKS AND INFORMATION ARE OWNED BY THE RESPECTIVE OWNERS OF THE TRADEMARKS AND INFORMATION, WHETHER ACKNOWLEDGED OR NOT IN THIS DOCUMENT. ARRIVE DOES NOT CLAIM ANY OWNERSHIP OF ANY TRADEMARK OR TRADENAME MENTIONED IN THE INFORMATION EXCEPT FOR THE ARRIVE TRADE NAMES – ARRIVE, ARRIVE FACEPOINT, ARRIVE INFOPOINT, ARRIVE ROOMPOINT, ARRIVE CONTROLPOINT, ARRIVE EYEPOINT, ARRIVE TOUCHPOINT, ARRIVE VIEWPOINT, ARRIVE VOICEPOINT, ARRIVE SOUNDPOINT, ARRIVE ONEPOINT, ARRIVE EDGELESS MEDIA, THE ARRIVE LOGO, ARRIVE MEDIAPOINT, AND ARRIVE AIRPOINT. IMAC, IPHONE, IPAD, AIRPLAY, AND IOS ARE EITHERTRADEMARKSORREGISTEREDTRADEMARKSOFAPPLE,INC.INTHEU.S.A.AND/OROTHERCOUNTRIES.ANDROIDANDGOOGLEPLAYAREEITHERTRADEMARKSORREGISTEREDTRADEMARKSOFGOOGLE,INC.INTHEU.S.A.AND/OROTHERCOUNTRIES.SAMSUNGISATRADEMARKORREGISTEREDTRADEMARKOFSAMSUNG,INC.INTHEU.S.A.AND/OROTHER COUNTRIES. HDMI IS EITHER A TRADEMARK OR REGISTERED TRADEMARK OF HDMI LICENSING, LLC. INC. IN THE U.S.A.AND/OROTHERCOUNTRIES.WIFI,WIFIPROTECTEDACCESS(WPA),WIFIDIRECT,ANDMIRACASTAREREGISTEREDTRADEMARKSOFWIFIALLIANCEINTHEINTHEU.S.A.AND/OROTHERCOUNTRIES.AIRFUNISTHEPROPERTYANDTRADEMARKOFREALTEKSEMICONDUCTORCORP.INTHEU.S.A.AND/OROTHERCOUNTRIES.WINDOWS,WINDOWS7,AND WINDOWS 8 ARE EITHER TRADEMARKS OR REGISTERED TRADEMARKS OF MICROSOFT CORPORATION IN THE U.S.A. AND/OROTHERCOUNTRIES.OTHERTRADEMARKS,REGISTEREDTRADEMARKS,ANDTRADENAMESMAYBEUSEDINTHIS DOCUMENT TO REFER TO EITHER THE ENTITIES CLAIMING THE MARKS AND NAMES, OR THEIR PRODUCTS ARE THE PROPERTY OF THEIR RESPECTIVE OWNERS . ARRIVE DISCLAIMS ANY PROPRIETARY INTEREST IN THE MARKS AND NAMES OFOTHERS.THISLISTMAYNOTNECESSARILYBECOMPLETEANDALL-INCLUSIVE.ARRIVEISNOTRESPONSIBLEFORERRORS IN TYPOGRAPHY OR PHOTOGRAPHY. E&OE.
Fictional user of “Visionergy” and/or “Verity” name in examples
ArriveSystemsInc.usesavarietyoffictionalcompaniesinthedocumentationandtrainingmaterialforitsproducts.ARRIVEdocumentationandlearningmaterialsoftencontainfictionalscenariosanddescriptionsofhowourproductscanbe deployed and used in these scenarios. Some examples depicted herein such as the corporate name “Visionergy” and/or “Verity”,justlike“Contoso”isgenerallyusedbyMicrosoft®.Thesenamesareprovidedforillustrationonlyandarefictitious.No real association or connection is intended or should be inferred. Any Internet Protocol (IP) addresses and phone numbers used in this document are not intended to be actual addresses and phone numbers. Any examples, command display output, networktopologydiagrams,andotherfiguresincludedinthedocumentareshownforillustrativepurposesonly.Anyuseofactual IP addresses or phone numbers in illustrative content is unintentional and coincidental.
ARRIVE disclaims ownership of the brand or use or association of the name “Visionergy” and/ or “Verity” as a real business or business entity and does not recommend the use of this name by others for a similar purpose of creating examples to avoid confusion.Thedomainvisionergy.comissettoreflecttoarrivesys.com.

5
Copyright © 2017 Arrive Systems, Inc. All rights reserved.
Use of Trademarks, Registered Trademarks, and other Protected Names and Symbols
This manual may make reference to trademarks, registered trademarks, and other protected names and/or symbols of third-party companies not related in any way to Arrive Systems, Inc.. Where they occur these references are for illustrative purposes only and do not represent an endorsement of a product or service by Arrive Systems, Inc., or an endorsement of the product(s) to which this manual applies by the third-party company in question. Regardless of any direct acknowledgment elsewhere in the body of this document, Arrive Systems, Inc. hereby acknowledges that all trademarks, registered trademarks, service marks, and other protected names and/or symbols contained in this manual and related documents are the property of their respective holders.
FCC Compliance Statement
This equipment has been tested and found to comply with the limits for a Class B digital device, pursuant to part 15 of the FCC Rules. These limits are designed to provide reasonable protection against harmful interference in a residential installation. This equipment generates, uses and can radiate radio frequency energy and, if not installed and used in accordance with the instructions, may cause harmful interference to radio communications. However, there is no guarantee that interference will not occur in a particular installation. If this equipment does cause harmful interference to radio or televisionreception,whichcanbedeterminedbyturningtheequipmentoffandon,theuserisencouragedtotrytocorrectthe interference by one or more of the following measures:
• Reorient or relocate the receiving antenna.
• Increase the separation between the equipment and receiver.
• Connecttheequipmentintoanoutletonacircuitdifferentfromthattowhichthereceiverisconnected.
• Consult the dealer or an experienced radio/Display technician for help.

6
Introduction
Arrive AirPoint™ - 2011 - BYMG - User Guide
1. Introduction
Congratulations and thank you for purchasing Arrive AirPoint™ 2011 BYMG!
1.1 Document ScopeThe purpose of this document is to familiarize the user with the product, and provide a guide on the AAP-2011-BYMG installation and use.
1.2 Product overviewArrive AirPoint™ 2011-BYMG (referred herein as the ‘unit’/AirPoint device) is a dual band, universal wireless presentation gateway embedded with the Arrive AirPoint 2.0 software that supports Apple AirPlay, WiFi Miracast and Intel WiDi on the same integrated platform.
AirPoint 2011 provides wireless screen mirroring for BYOD presentations. It does not require any downloads to be made to personal devices as applications or programs, nor does it require dongles or other devices to be connected to the user’s WiFi capable presentation device. It is part of Arrive’s MediaPoint™ product line, and marks the industry’s first generationof universally integrated devices – supporting the most commonly used wireless video connectivity platforms in a single device.
Note: Supports Apple AirPlay – tested till version iOS 10; and Windows 10 OS.
Features
• Dual band 2.4 and 5 GHz wireless transmitter
• Powered via USB
• Built-in universal wireless media receiver for BYODs that support Apple Airplay, Samsung Smart View and WiFi Miracast wireless screen mirroring.
• Enables wireless screen mirroring one at a time from wireless connected iPad,iPad Mini, iPhone (4 or later), and iPod Touch (4th gen. or later) devices that support Apple AirPlay. Connect Android tablets and smartphones, Samsung Galaxy smartphones and tablets and Windows 8.1/10 laptops and tablets seamlessly using WiFi Miracast; and Intel WiDi devices to.
• Transmits wireless Audio and Video sync and play back.
• Eliminates the need for client applications to be downloaded on the users personal Apple iOS, Android and Windows devices.
• Eliminates the need for dongles, HDMI nodes or break-out USB senders to be connected and disconnected each time

7
Introduction
Copyright © 2017 Arrive Systems, Inc. All rights reserved.
Packaging Contents
• 1x AAP-2011-BYMG
• 1x 2.4GHz / 1x 5GHz WiFi Antenna
• 1x USB Adapter
• 1x Mounting Kit
• 1x Installation Guide
System Requirements
• HDMI enabled display device (i.e. television, projector)
• 802.11n/g Wireless enabled video source device (i.e. Smartphone, computer)
• HDMI cable
• Available USB port as power source
1.3 Arrive AAP-2011-BYMG Panel description
1
2 34
56
78
9
Figure 1: Parts of the AAP-2011-BYMG
8
Introduction
Arrive AirPoint™ - 2011 - BYMG - User Guide
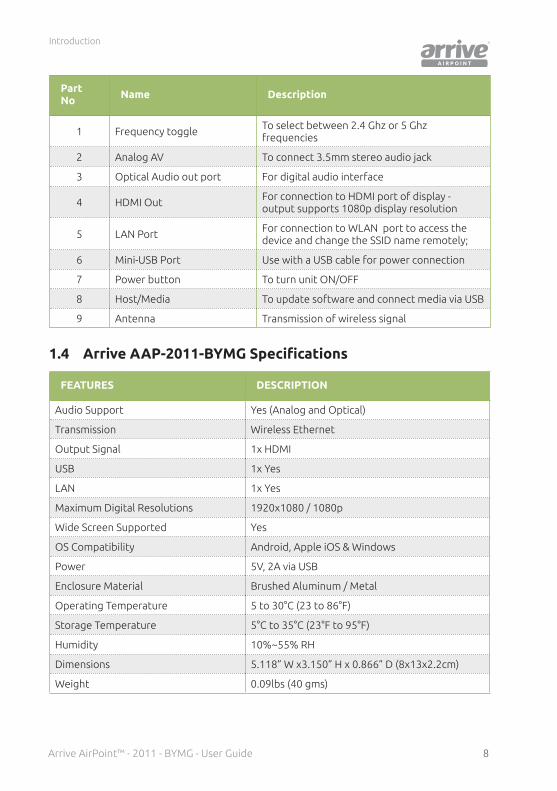
Part No Name Description
1 Frequency toggle To select between 2.4 Ghz or 5 Ghz frequencies
2 Analog AV To connect 3.5mm stereo audio jack
3 Optical Audio out port For digital audio interface
4 HDMI Out For connection to HDMI port of display - output supports 1080p display resolution
5 LAN Port For connection to WLAN port to access the device and change the SSID name remotely;
6 Mini-USB Port Use with a USB cable for power connection
7 Power button To turn unit ON/OFF
8 Host/Media To update software and connect media via USB
9 Antenna Transmission of wireless signal
1.4 Arrive AAP-2011-BYMG Specifications
FEATURES DESCRIPTION
Audio Support Yes (Analog and Optical)
Transmission Wireless Ethernet
Output Signal 1x HDMI
USB 1x Yes
LAN 1x Yes
Maximum Digital Resolutions 1920x1080 / 1080p
Wide Screen Supported Yes
OS Compatibility Android, Apple iOS & Windows
Power 5V, 2A via USB
Enclosure Material Brushed Aluminum / Metal
Operating Temperature 5 to 30°C (23 to 86°F)
Storage Temperature 5°C to 35°C (23°F to 95°F)
Humidity 10%~55% RH
Dimensions 5.118” W x3.150” H x 0.866” D (8x13x2.2cm)
Weight 0.09lbs (40 gms)
9
System Requirements
Copyright © 2017 Arrive Systems, Inc. All rights reserved.
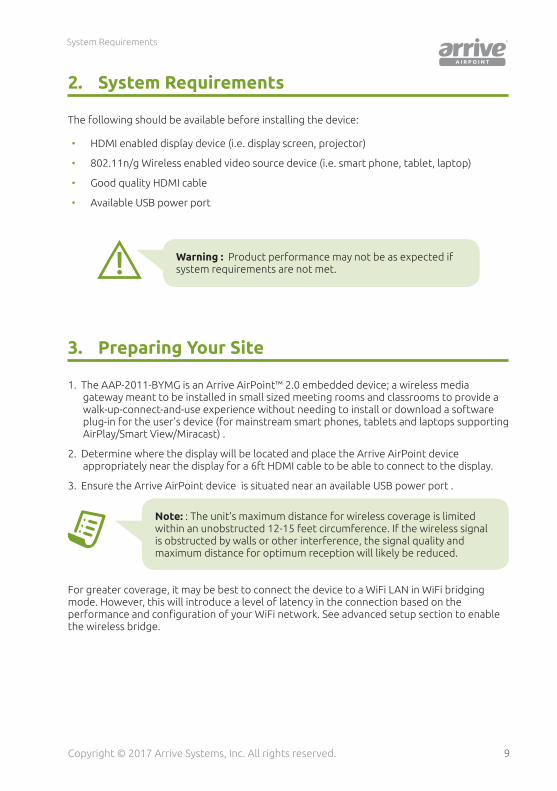
2. System Requirements
The following should be available before installing the device:
• HDMI enabled display device (i.e. display screen, projector)
• 802.11n/g Wireless enabled video source device (i.e. smart phone, tablet, laptop)
• Good quality HDMI cable
• Available USB power port
Warning : Product performance may not be as expected if system requirements are not met.
3. Preparing Your Site
1. The AAP-2011-BYMG is an Arrive AirPoint™ 2.0 embedded device; a wireless media gateway meant to be installed in small sized meeting rooms and classrooms to provide a walk-up-connect-and-use experience without needing to install or download a software plug-in for the user’s device (for mainstream smart phones, tablets and laptops supporting AirPlay/Smart View/Miracast) .
2. Determine where the display will be located and place the Arrive AirPoint device appropriately near the display for a 6ft HDMI cable to be able to connect to the display.
3. Ensure the Arrive AirPoint device is situated near an available USB power port .
Note: : The unit’s maximum distance for wireless coverage is limited within an unobstructed 12-15 feet circumference. If the wireless signal is obstructed by walls or other interference, the signal quality and maximum distance for optimum reception will likely be reduced.
For greater coverage, it may be best to connect the device to a WiFi LAN in WiFi bridging mode. However, this will introduce a level of latency in the connection based on the performanceandconfigurationofyourWiFinetwork.Seeadvancedsetupsectiontoenablethe wireless bridge.

10
Hardware Installation
Arrive AirPoint™ - 2011 - BYMG - User Guide
4. Hardware Installation
1. Connect the antennas to the device.
2. Connect an HDMI video cable from the HDMI-out port to the HDMI-in port of a display.
3. Connect the Mini-USB end of the USB cable to the AirPoint and the other end to a USB port to provide power. This can be directly from a main electrical outlet using the USB adapter plug, or from the USB port of a laptop/PC, or from an Arrive MediaPoint or HuddlePoint USB charging port.
4. Turn on the AirPoint , and the boot-up screen ( Figure 2 )willflashontheconnecteddisplay. A tutorial screen follows.
Figure 2: Arrive AirPoint Boot-up screen
USB Power
OpticalAudio Out
Analog AVWiDi Pin
ARRIVE-AP***
Local Host: xxx.xxx.xxx.xx
*GHz Active
HDMI
Image from wireless connected device can be displayed one at a time
Figure 3: Connecting the AirPoint to a display
11
User Experience
Copyright © 2017 Arrive Systems, Inc. All rights reserved.
5. User Experience
On-screen Display
Arrive AirPoint uses a standardized on-screen display to convey the basic connection instructions for wireless access to the device. It provides the hostname, IP address, and SSID logincodeforthespecificArriveAirPointdevice.
The boot-up screen transitions to this ready-to-connect user tutorial screen which, by default uses the Peer-to-Peer mode, signifying that the device is ready to receive wireless communications.
WiDi Pin
ARRIVE-AP***
Local Host: xxx.xxx.xxx.xx
*GHz Active
5
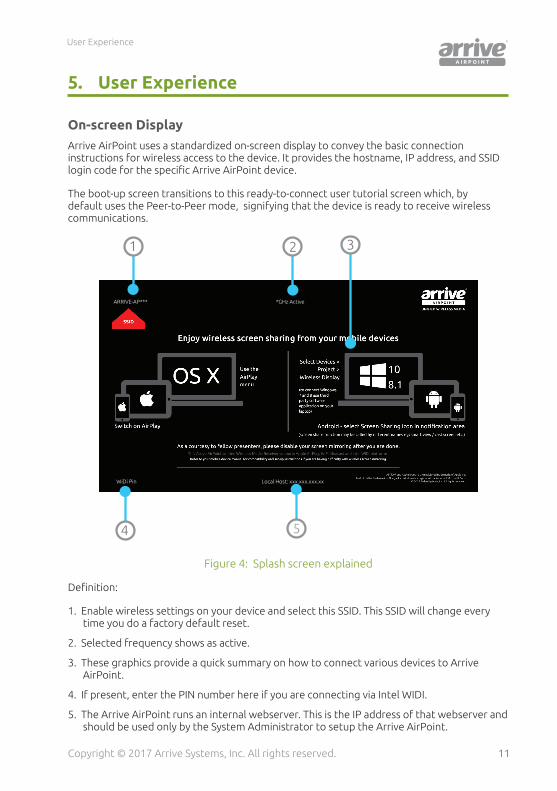
Figure 4: Splash screen explained
Definition:
1. Enable wireless settings on your device and select this SSID. This SSID will change every time you do a factory default reset.
2. Selected frequency shows as active.
3. These graphics provide a quick summary on how to connect various devices to Arrive AirPoint.
4. If present, enter the PIN number here if you are connecting via Intel WIDI.
5. The Arrive AirPoint runs an internal webserver. This is the IP address of that webserver and should be used only by the System Administrator to setup the Arrive AirPoint.
12
Setting up a connection
Arrive AirPoint™ - 2011 - BYMG - User Guide
6. Setting up a connection
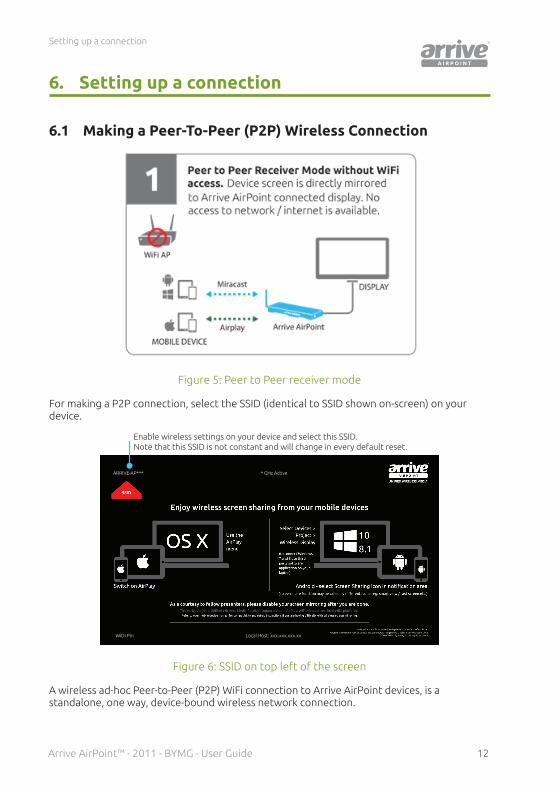
6.1 Making a Peer-To-Peer (P2P) Wireless Connection
Figure 5: Peer to Peer receiver mode
For making a P2P connection, select the SSID (identical to SSID shown on-screen) on your device.
WiDi Pin
ARRIVE-AP***
Local Host: xxx.xxx.xxx.xx
* GHz Active
Enable wireless settings on your device and select this SSID. Note that this SSID is not constant and will change in every default reset.
Figure 6: SSID on top left of the screen
A wireless ad-hoc Peer-to-Peer (P2P) WiFi connection to Arrive AirPoint devices, is a standalone, one way, device-bound wireless network connection.
13
Setting up a connection
Copyright © 2017 Arrive Systems, Inc. All rights reserved.
In this mode, the AirPoint device acts as a media receiver allowing only single incoming connections. Multiple connections are not possible. The network is ad hoc because it does not rely on a pre-existing infrastructure, such as routers in wired networks or access points in managed (infrastructure) wireless networks. Instead, each device provides the ability for a one-way receiving only network connection to be made with connected mobile and user wireless devices such as smartphones, tablets and laptops equipped with a compatible 802.11 WiFi capability.
Note: In peer-to-peer (P2P) mode, connection is one user at a time. Remember that you need to disconnect your BYOD media from the screen to allow others to connect.
6.0.1 Apple AirPlay wireless mirroring in P2P connection
In P2P mode, the Apple iOS device directly communicates with the AirPoint device as a virtual access point in Ad-Hoc mode. This connection provides the ability for the AirPoint device to beidentifiedasanaccesspoint,andaone-to-oneAirPlay™connectionisestablishedwithoutneeding access from a WiFi LAN.
AirPlay Mirroring
AirPlay Mirroring enables users of certain AirPlay compatible devices to display whatever is on their device’ screen on AirPlay compatible Arrive AirPoint. This allows users to show presentations, websites, videos, or other content from their device on to a big screen display that the Arrive AirPoint device is attached to. This is achieved via WiFi.
In order to understand the AirPlay system it is necessary to divide it into two components:
• AirPlay
• AirPlay Mirroring
Forourdocumentationpurposes,wearefocusingspecificallyonAirPlayMirroringwhichisthe capability that is integrated in Arrive AirPoint systems.
Apple Devices that support Airplay Mirroring are:
• iPhone 4s and later models
• iPad 2 and later models
AirPlay Mirroring in OS X takes advantage of the hardware capabilities of recent Macs to deliver high frame rates while maintaining optimal system performance. The following Mac models support AirPlay Mirroring when using OS X Mountain Lion or later:
• iMac (from Mid 2011 or later)
• Mac mini (from Mid 2011 or later)
• MacBook Air (from Mid 2011 or later)
• MacBook Pro (from Early 2011 or later)
• Mac Pro (from Late 2013 or later)
14
Setting up a connection
Arrive AirPoint™ - 2011 - BYMG - User Guide
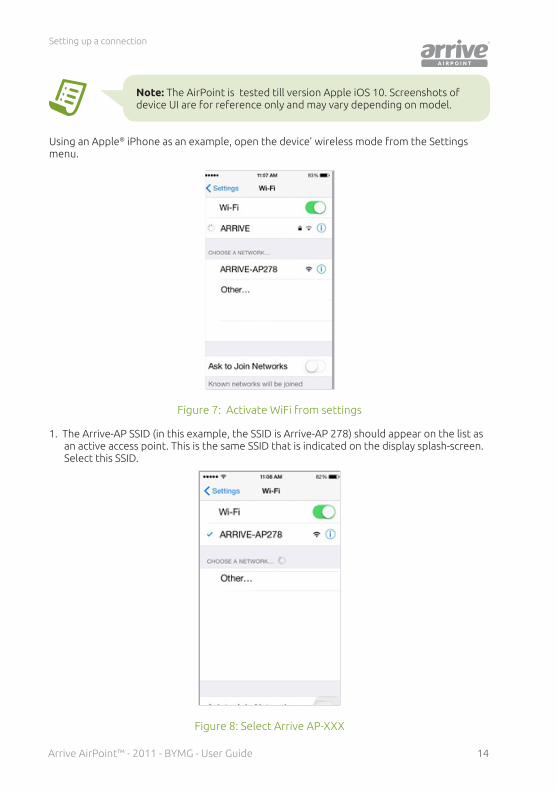
Note: The AirPoint is tested till version Apple iOS 10. Screenshots of device UI are for reference only and may vary depending on model.
Using an Apple® iPhone as an example, open the device’ wireless mode from the Settings menu.
Figure 7: Activate WiFi from settings
1. The Arrive-AP SSID (in this example, the SSID is Arrive-AP 278) should appear on the list as an active access point. This is the same SSID that is indicated on the display splash-screen. Select this SSID.
Figure 8: Select Arrive AP-XXX

15
Setting up a connection
Copyright © 2017 Arrive Systems, Inc. All rights reserved.
2. Once the SSID is selected, go to the Apple device’ home screen, open the Utilities and click on AirPlay Mirroring. The Arrive AP should be recognized as an AirPlay device.
Figure 9: Tap on AirPlay mirroring on the utilities screen
3. The Arrive AP (shown as SSID on the AirPoint splash screen) wireless mirroring from the Apple device to the display using AirPoint is now enabled. Everything on the Apple device now displays on the screen wirelessly.
Figure 10: Enable mirroring on AirPlay menu
16
Setting up a connection
Arrive AirPoint™ - 2011 - BYMG - User Guide
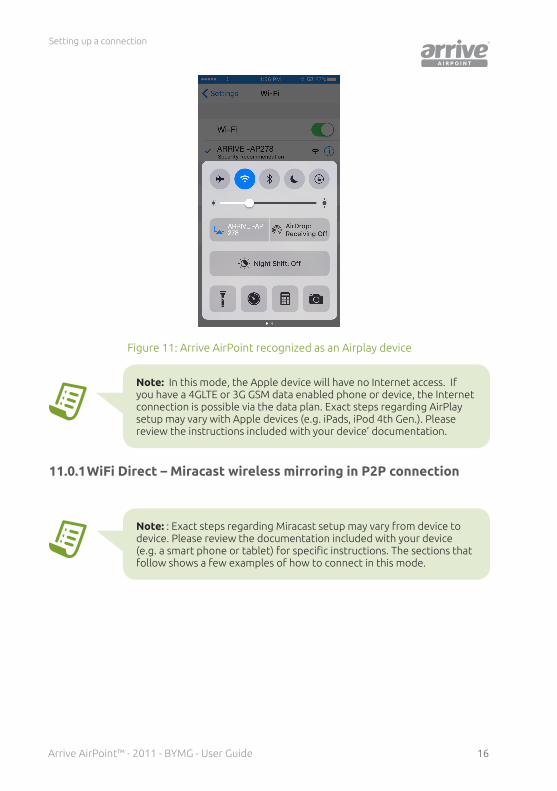
Figure 11: Arrive AirPoint recognized as an Airplay device
Note: In this mode, the Apple device will have no Internet access. If you have a 4GLTE or 3G GSM data enabled phone or device, the Internet connection is possible via the data plan. Exact steps regarding AirPlay setup may vary with Apple devices (e.g. iPads, iPod 4th Gen.). Please review the instructions included with your device’ documentation.
11.0.1 WiFi Direct – Miracast wireless mirroring in P2P connection
Note: : Exact steps regarding Miracast setup may vary from device to device. Please review the documentation included with your device (e.g.asmartphoneortablet)forspecificinstructions.Thesectionsthatfollow shows a few examples of how to connect in this mode.
17
Setting up a connection
Copyright © 2017 Arrive Systems, Inc. All rights reserved.
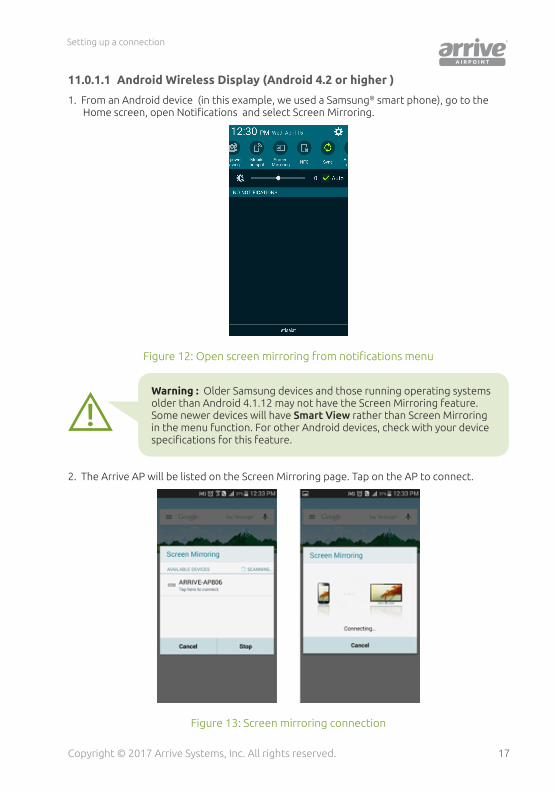
11.0.1.1 Android Wireless Display (Android 4.2 or higher )
1. From an Android device (in this example, we used a Samsung® smart phone), go to the Homescreen,openNotificationsandselectScreenMirroring.
Figure 12: Openscreenmirroringfromnotificationsmenu
Warning : Older Samsung devices and those running operating systems older than Android 4.1.12 may not have the Screen Mirroring feature. Some newer devices will have Smart View rather than Screen Mirroring in the menu function. For other Android devices, check with your device specificationsforthisfeature.
2. The Arrive AP will be listed on the Screen Mirroring page. Tap on the AP to connect.
Figure 13: Screen mirroring connection

18
Setting up a connection
Arrive AirPoint™ - 2011 - BYMG - User Guide
3. Once connected, users will be able to mirror device content on the screen.
Figure 14: Disconnect device from Arrive AP
The connection is 1-on-1 : One device to one Arrive AirPoint Receiver at a time. The connected device has to disconnect before another device can connect.
While a connection is “live” the Arrive AirPoint Receiver’s unique SSID becomes invisible from other devices and also does not allow access to its settings (the IP address is invisible) – in other words, it becomes a dedicated receiver for the connected device for the duration of the live connection.
As soon as the live connection is disconnected, the AirPoint SSID and IP address become visible indicating that the device is ready to connect again.
14.0.1 Intel WiDi Application
1. Open the WiDi software included with your WiDi enabled computer system, and check for connected adapters.
2. The adapter will be listed under detected adapters, simply select the detected Arrive “adapter” and click Connect.
Figure 15: Connected Adapter on Intel WiDi

19
Setting up a connection
Copyright © 2017 Arrive Systems, Inc. All rights reserved.
3. Your computer screen will now be shared wirelessly on the display.
15.0.1 Windows 8.1/10 Wireless Display
1. Launch the charm window by swiping-in from the right side of the screen or press Windows Key + C and select Devices (or search for Device Settings from the metro interface).
2. Select Project, then connect to a wireless display.
Figure 16: Windows 10- Connecting to a wireless display
Figure 17: Windows 8.1 - Adding a Wireless display
3. Select Project, then Add or connect a wireless display. If you see an “Add a wireless display” option, your computer supports Miracast. To actually project to a Miracast device, tap or click the “Add a wireless display” option.
Select the ARRIVE-AP*** from the list of devices. Selecting your receiver begins the secure pairing of your Windows 8.1/10 device to the Miracast receiver. After pairing is finished,you’llbeabletoprojectyourfullWindows8.1/10experiencewirelesslyontoyour big screen. To extend projection, open Devices and tap Project again (or press Windows key + P), and then tap Extend.
20
Setting up a connection
Arrive AirPoint™ - 2011 - BYMG - User Guide
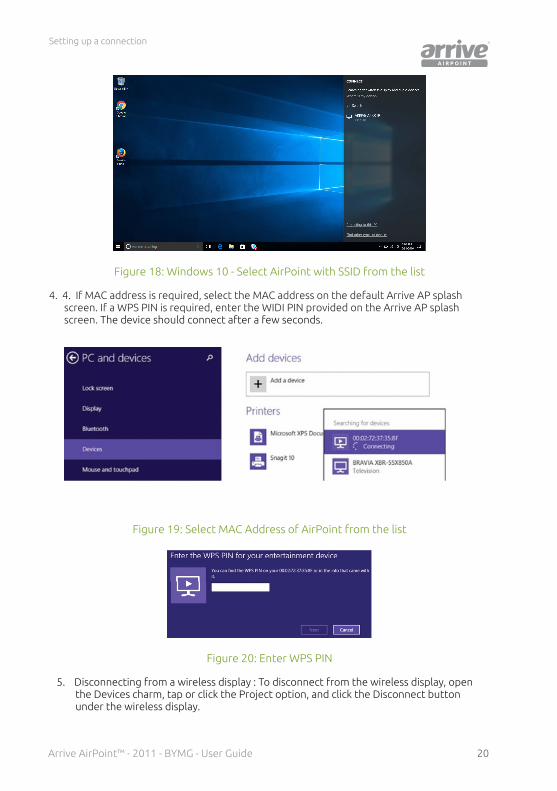
Figure 18: Windows 10 - Select AirPoint with SSID from the list
4. 4. If MAC address is required, select the MAC address on the default Arrive AP splash screen. If a WPS PIN is required, enter the WIDI PIN provided on the Arrive AP splash screen. The device should connect after a few seconds.
Figure 19: Select MAC Address of AirPoint from the list
Figure 20: Enter WPS PIN
5. Disconnecting from a wireless display : To disconnect from the wireless display, open the Devices charm, tap or click the Project option, and click the Disconnect button under the wireless display.
21
Setting up a connection
Copyright © 2017 Arrive Systems, Inc. All rights reserved.
If you move your PC beyond the range of the wireless display (such as to another room), or if you make your PC sleep or hibernate, the two devices will disconnect. You can also disconnect the wireless display manually by swiping in from the right edge of the screen, and then tap on Devices.(If you’re using a mouse, point to the lower-right corner of the screen, move the mouse pointer up, and then click Devices.)
Tap or click Project, and then tap or click Disconnect.
Note: Some Windows 8.1 machines may have problems connecting in Miracast mode. Please ensure you are using the latest Graphics drivers and Wireless drivers for your computer. Contact your manufacturer for support.
Another way to establish if Miracast is enabled on your Windows 8.1 device is to Run the DxDiag.exe utility on the machine. (It is normally provided as a default on Windows machines). Save the diagnostics as a textfile.ItshouldclearlylistMiracastasanintegratedfeatureoftheOSif Miracast is enabled on your device.
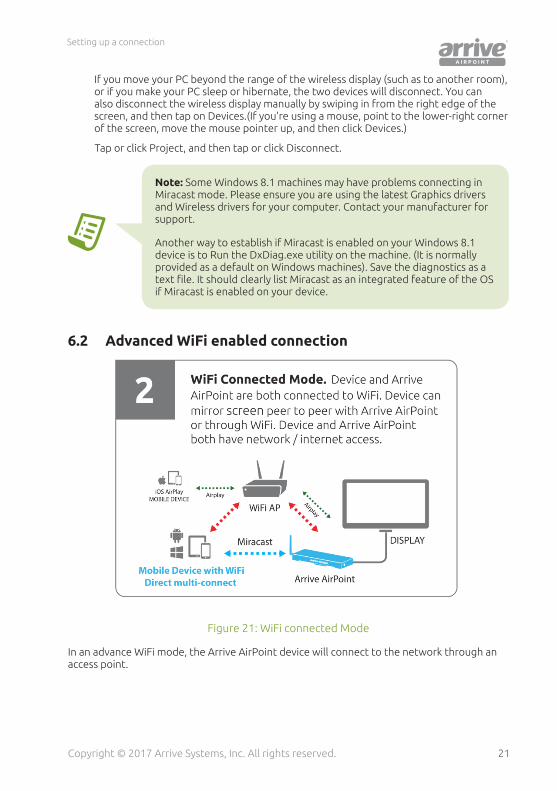
6.2 Advanced WiFi enabled connection
Figure 21: WiFi connected Mode
In an advance WiFi mode, the Arrive AirPoint device will connect to the network through an access point.
22
Setting up a connection
Arrive AirPoint™ - 2011 - BYMG - User Guide
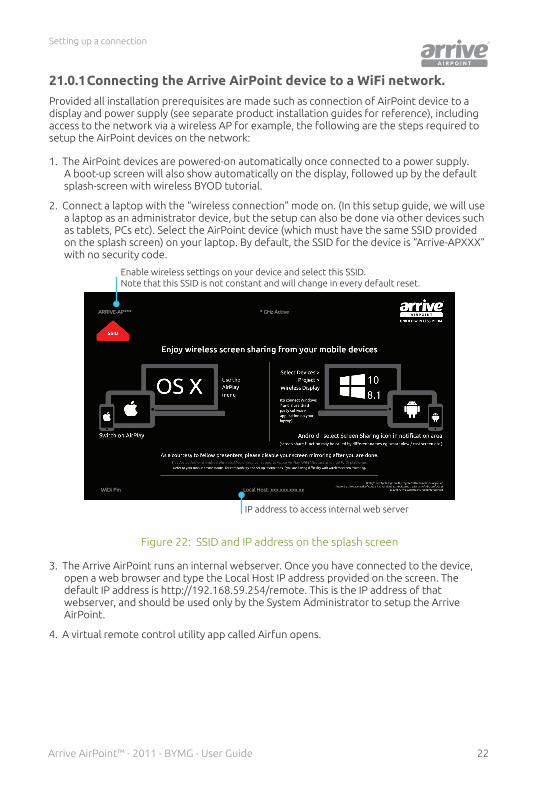
21.0.1 Connecting the Arrive AirPoint device to a WiFi network.
Provided all installation prerequisites are made such as connection of AirPoint device to a display and power supply (see separate product installation guides for reference), including access to the network via a wireless AP for example, the following are the steps required to setup the AirPoint devices on the network:
1. The AirPoint devices are powered-on automatically once connected to a power supply. A boot-up screen will also show automatically on the display, followed up by the default splash-screen with wireless BYOD tutorial.
2. Connect a laptop with the “wireless connection” mode on. (In this setup guide, we will use a laptop as an administrator device, but the setup can also be done via other devices such as tablets, PCs etc). Select the AirPoint device (which must have the same SSID provided on the splash screen) on your laptop. By default, the SSID for the device is “Arrive-APXXX” with no security code.
WiDi Pin
ARRIVE-AP***
Local Host: xxx.xxx.xxx.xx
* GHz Active
Enable wireless settings on your device and select this SSID. Note that this SSID is not constant and will change in every default reset.
IP address to access internal web server
Figure 22: SSID and IP address on the splash screen
3. The Arrive AirPoint runs an internal webserver. Once you have connected to the device, open a web browser and type the Local Host IP address provided on the screen. The default IP address is http://192.168.59.254/remote. This is the IP address of that webserver, and should be used only by the System Administrator to setup the Arrive AirPoint.
4. A virtual remote control utility app called Airfun opens.
23
Setting up a connection
Copyright © 2017 Arrive Systems, Inc. All rights reserved.
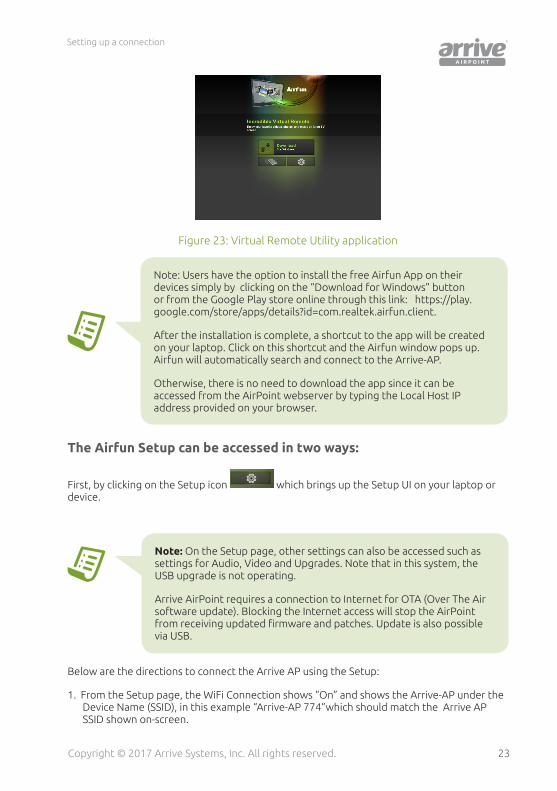
Figure 23: Virtual Remote Utility application
Note: Users have the option to install the free Airfun App on their devices simply by clicking on the “Download for Windows” button or from the Google Play store online through this link: https://play.google.com/store/apps/details?id=com.realtek.airfun.client.
After the installation is complete, a shortcut to the app will be created on your laptop. Click on this shortcut and the Airfun window pops up. Airfun will automatically search and connect to the Arrive-AP.
Otherwise, there is no need to download the app since it can be accessed from the AirPoint webserver by typing the Local Host IP address provided on your browser.
The Airfun Setup can be accessed in two ways:
First, by clicking on the Setup icon which brings up the Setup UI on your laptop or device.
Note: On the Setup page, other settings can also be accessed such as settings for Audio, Video and Upgrades. Note that in this system, the USB upgrade is not operating.
Arrive AirPoint requires a connection to Internet for OTA (Over The Air software update). Blocking the Internet access will stop the AirPoint fromreceivingupdatedfirmwareandpatches.Updateisalsopossiblevia USB.
Below are the directions to connect the Arrive AP using the Setup:
1. From the Setup page, the WiFi Connection shows “On” and shows the Arrive-AP under the Device Name (SSID), in this example “Arrive-AP 774”which should match the Arrive AP SSID shown on-screen.
24
Setting up a connection
Arrive AirPoint™ - 2011 - BYMG - User Guide
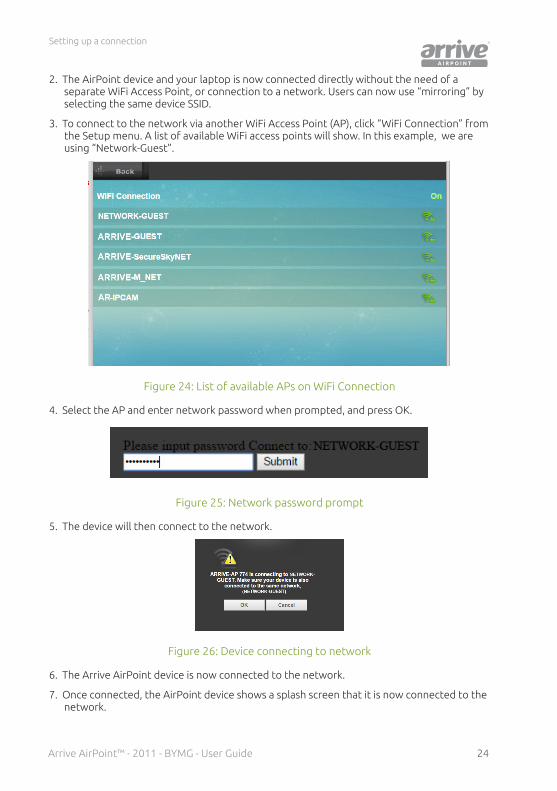
2. The AirPoint device and your laptop is now connected directly without the need of a separate WiFi Access Point, or connection to a network. Users can now use “mirroring” by selecting the same device SSID.
3. To connect to the network via another WiFi Access Point (AP), click “WiFi Connection” from the Setup menu. A list of available WiFi access points will show. In this example, we are using “Network-Guest”.
Figure 24: List of available APs on WiFi Connection
4. Select the AP and enter network password when prompted, and press OK.
Figure 25: Network password prompt
5. The device will then connect to the network.
Figure 26: Device connecting to network
6. The Arrive AirPoint device is now connected to the network.
7. Once connected, the AirPoint device shows a splash screen that it is now connected to the network.
25
Setting up a connection
Copyright © 2017 Arrive Systems, Inc. All rights reserved.
WiDi Pin
ARRIVE-AP***
Local Host: xxx.xxx.xxx.xx
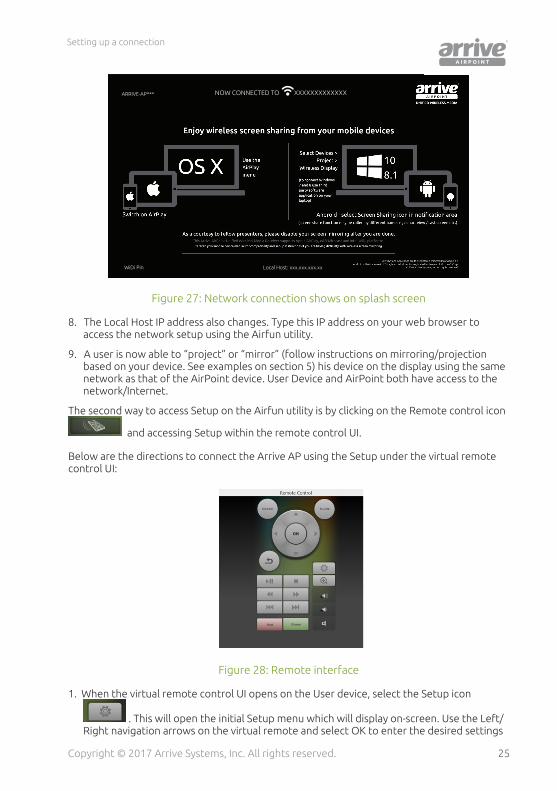
NOW CONNECTED TO XXXXXXXXXXXXX
Figure 27: Network connection shows on splash screen
8. The Local Host IP address also changes. Type this IP address on your web browser to access the network setup using the Airfun utility.
9. A user is now able to “project” or “mirror” (follow instructions on mirroring/projection based on your device. See examples on section 5) his device on the display using the same network as that of the AirPoint device. User Device and AirPoint both have access to the network/Internet.
The second way to access Setup on the Airfun utility is by clicking on the Remote control icon
and accessing Setup within the remote control UI.
Below are the directions to connect the Arrive AP using the Setup under the virtual remote control UI:
Figure 28: Remote interface
1. When the virtual remote control UI opens on the User device, select the Setup icon
. This will open the initial Setup menu which will display on-screen. Use the Left/Right navigation arrows on the virtual remote and select OK to enter the desired settings

26
Setting up a connection
Arrive AirPoint™ - 2011 - BYMG - User Guide
page.TheinitialmenuwillallowmodificationforLanguage/TVSystem/WiFiConnection/and Virtual AP Setup.
Figure 29: Initial set up menu
Language: Select your desired language for the interface.
TV System:ConfiguretheAirPointdevicetouseaspecificresolutionifneededdependingon your display.
Note: : It is recommended to leave this option as HDMI Auto
WiFi Connection (optional)
You may want to connect the device to your WiFi network for one of the following reasons:
a. Create a network bridge. When your mobile device is connected to the AirPoint device SSID directly, this option enables you to still browse the Internet or access your LAN.
b. Access the AirPoint device remote interface from your LAN instead of a direct connection to its SSID.
Please see Advanced Setup for detailed instructions.
Virtual AP Bridge
Select one of the following options:
a. Bridge to Wireless – This will bridge the AirPoint device network with your wireless LAN so that you can access the Internet or LAN devices through the AirPoint device.
b. Virtual AP only – Devices connected to the AirPoint device network can only access the AirPoint device .
Save Change: Remember to save all changes made on the initial setup in order to apply said changes.

27
Advanced Setup Menu using Airfun utility
Copyright © 2017 Arrive Systems, Inc. All rights reserved.
7. Advanced Setup Menu using Airfun utility
After the initial setup is done, the advanced setup menu can be accessed by tapping on the same Setup icon on the virtual remote.
Once on the Setup page, Use the Left/Right navigation arrows on the virtual remote and select OK to enter the desired settings page for Network / Audio / Video / System. Use the Return button to go to the previous page or standby screen.
7.1 NetworkClick on Network to access settings for WiFi Connection and Virtual AP Setup.
Figure 30: Setup page
Figure 31: Network options
28
Advanced Setup Menu using Airfun utility
Arrive AirPoint™ - 2011 - BYMG - User Guide
SETUP TYPE DESCRIPTION
WiFi Connection Connect to Internet via Wireless AP router (see section 6.1.1)
Virtual AP Peer-to-Peer Mode
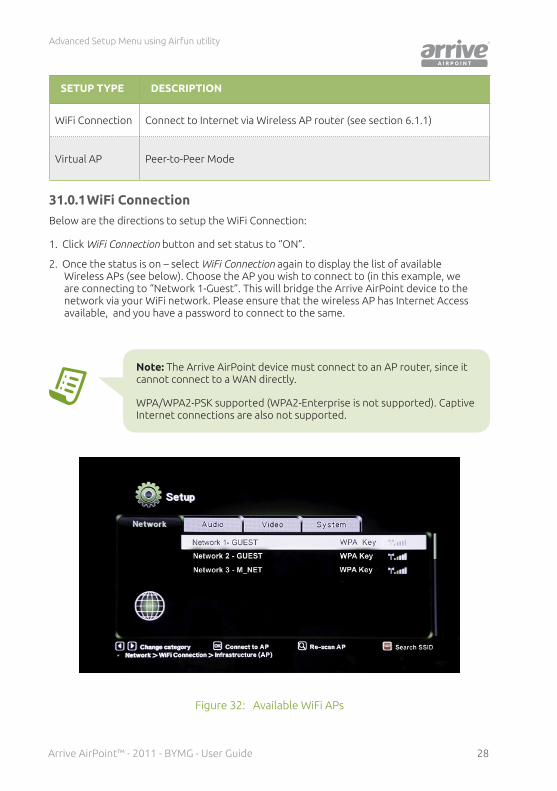
31.0.1 WiFi Connection
Below are the directions to setup the WiFi Connection:
1. Click WiFi Connection button and set status to “ON”.
2. Once the status is on – select WiFi Connection again to display the list of available Wireless APs (see below). Choose the AP you wish to connect to (in this example, we are connecting to “Network 1-Guest”. This will bridge the Arrive AirPoint device to the network via your WiFi network. Please ensure that the wireless AP has Internet Access available, and you have a password to connect to the same.
Note: The Arrive AirPoint device must connect to an AP router, since it cannot connect to a WAN directly.
WPA/WPA2-PSK supported (WPA2-Enterprise is not supported). Captive Internet connections are also not supported.
Figure 32: Available WiFi APs

29
Advanced Setup Menu using Airfun utility
Copyright © 2017 Arrive Systems, Inc. All rights reserved.
3. Press OK to display the on-screen keyboard. Enter the password information via the on-screen keyboard using the virtual remote control UP / DWN / LEFT and RIGHT keys. Press the OK button to select.
The virtual keyboard has choices for lower and upper case alphabets, symbols, and delete. The input history on the right side of the keyboard shows previously entered characters.
Figure 33: Virtual Keyboard
Figure 34: Arrive AP Device connecting to the network
4. Once WiFi network password is accepted, the Arrive-AP device will connect to the network.
30
Advanced Setup Menu using Airfun utility
Arrive AirPoint™ - 2011 - BYMG - User Guide
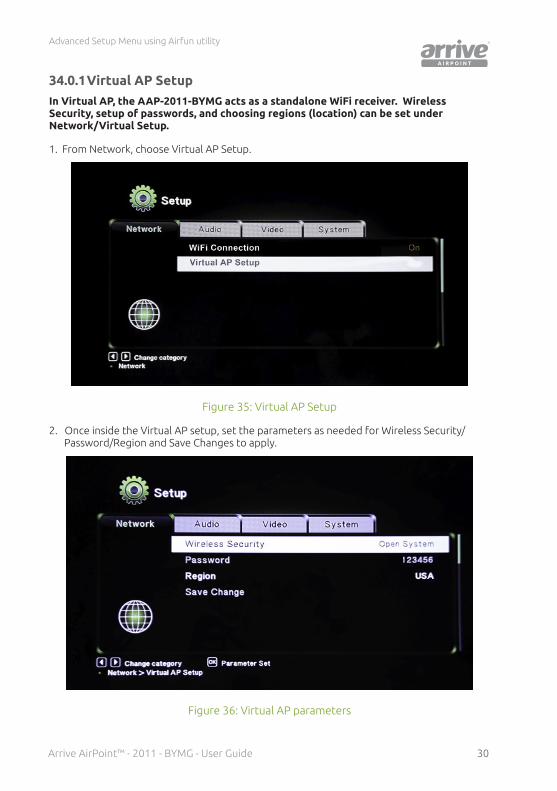
34.0.1 Virtual AP Setup
In Virtual AP, the AAP-2011-BYMG acts as a standalone WiFi receiver. Wireless Security, setup of passwords, and choosing regions (location) can be set under Network/Virtual Setup.
1. From Network, choose Virtual AP Setup.
Figure 35: Virtual AP Setup
2. Once inside the Virtual AP setup, set the parameters as needed for Wireless Security/Password/Region and Save Changes to apply.
Figure 36: Virtual AP parameters
31
Advanced Setup Menu using Airfun utility
Copyright © 2017 Arrive Systems, Inc. All rights reserved.
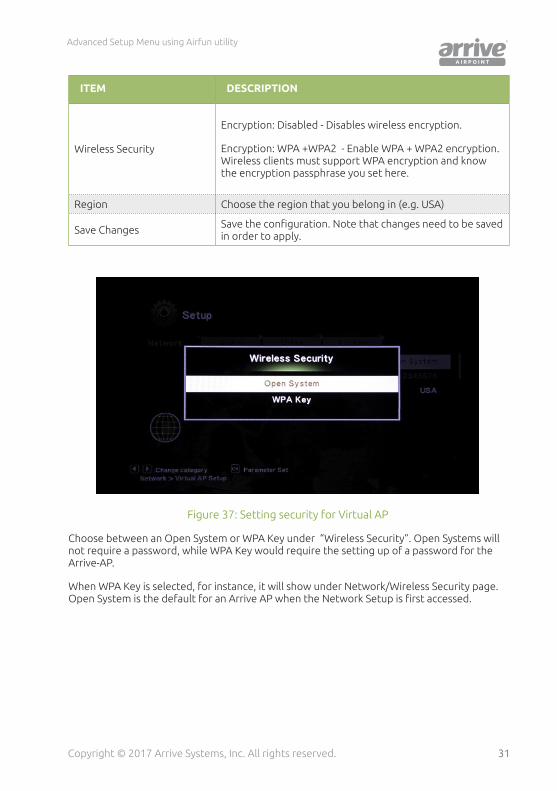
ITEM DESCRIPTION
Wireless Security
Encryption: Disabled - Disables wireless encryption.
Encryption: WPA +WPA2 - Enable WPA + WPA2 encryption. Wireless clients must support WPA encryption and know the encryption passphrase you set here.
Region Choose the region that you belong in (e.g. USA)
Save Changes Savetheconfiguration.Notethatchangesneedtobesavedin order to apply.
Figure 37: Setting security for Virtual AP
Choose between an Open System or WPA Key under “Wireless Security”. Open Systems will not require a password, while WPA Key would require the setting up of a password for the Arrive-AP.
When WPA Key is selected, for instance, it will show under Network/Wireless Security page. OpenSystemisthedefaultforanArriveAPwhentheNetworkSetupisfirstaccessed.

32
Advanced Setup Menu using Airfun utility
Arrive AirPoint™ - 2011 - BYMG - User Guide
Figure 38: Select WPA Key
Figure 39: WPA Key as selected parameter in Wireless Security
Note: Please consult the Arrive AirPoint Network Deployment Guide for more about P2P and Network connections.
33
Advanced Setup Menu using Airfun utility
Copyright © 2017 Arrive Systems, Inc. All rights reserved.
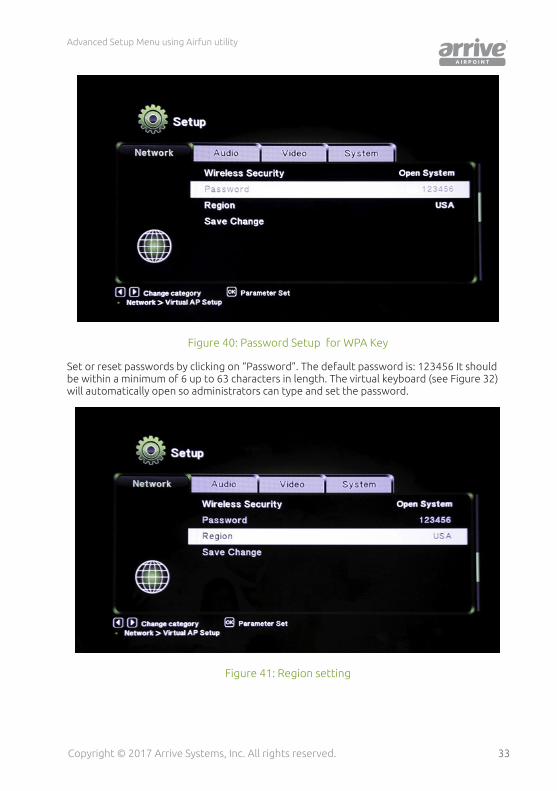
Figure 40: Password Setup for WPA Key
Set or reset passwords by clicking on “Password”. The default password is: 123456 It should be within a minimum of 6 up to 63 characters in length. The virtual keyboard (see Figure 32) will automatically open so administrators can type and set the password.
Figure 41: Region setting
34
Advanced Setup Menu using Airfun utility
Arrive AirPoint™ - 2011 - BYMG - User Guide
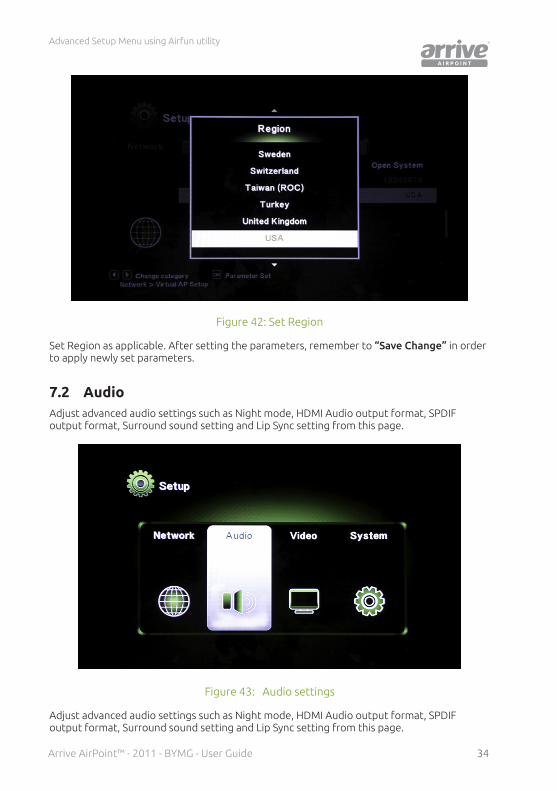
Figure 42: Set Region
Set Region as applicable. After setting the parameters, remember to “Save Change” in order to apply newly set parameters.
7.2 AudioAdjust advanced audio settings such as Night mode, HDMI Audio output format, SPDIF output format, Surround sound setting and Lip Sync setting from this page.
Figure 43: Audio settings
Adjust advanced audio settings such as Night mode, HDMI Audio output format, SPDIF output format, Surround sound setting and Lip Sync setting from this page.
35
Advanced Setup Menu using Airfun utility
Copyright © 2017 Arrive Systems, Inc. All rights reserved.
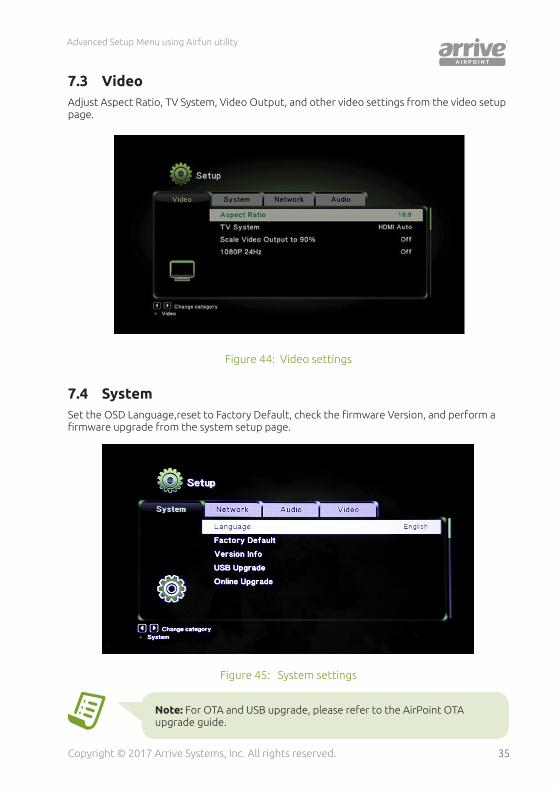
7.3 VideoAdjust Aspect Ratio, TV System, Video Output, and other video settings from the video setup page.
Figure 44: Video settings
7.4 SystemSettheOSDLanguage,resettoFactoryDefault,checkthefirmwareVersion,andperformafirmwareupgradefromthesystemsetuppage.
Figure 45: System settings
Note: For OTA and USB upgrade, please refer to the AirPoint OTA upgrade guide.

36
Advanced Setup Menu using Airfun utility
Arrive AirPoint™ - 2011 - BYMG - User Guide
7.5 Assign web console password1. Go to device Setting - WIFI - Choose Arrive SSID ****
Figure 46: Device settings-WiFi
2. Go to splash page from browser for the Airpoint Local host
WiDi Pin
ARRIVE-AP***
Local Host: xxx.xxx.xxx.xx
*GHz Active
Figure 47: AirPoint Local host

37
Advanced Setup Menu using Airfun utility
Copyright © 2017 Arrive Systems, Inc. All rights reserved.
From the browser, type local host to open Airfun.
1. Open the settings page by clicking on the settings/gear icon).
Figure 48: Setting button
2. From Settings page, choose Modify Password.
3. Type a new password and press OK.
Figure 49: Change password
38
Advanced Setup Menu using Airfun utility
Arrive AirPoint™ - 2011 - BYMG - User Guide
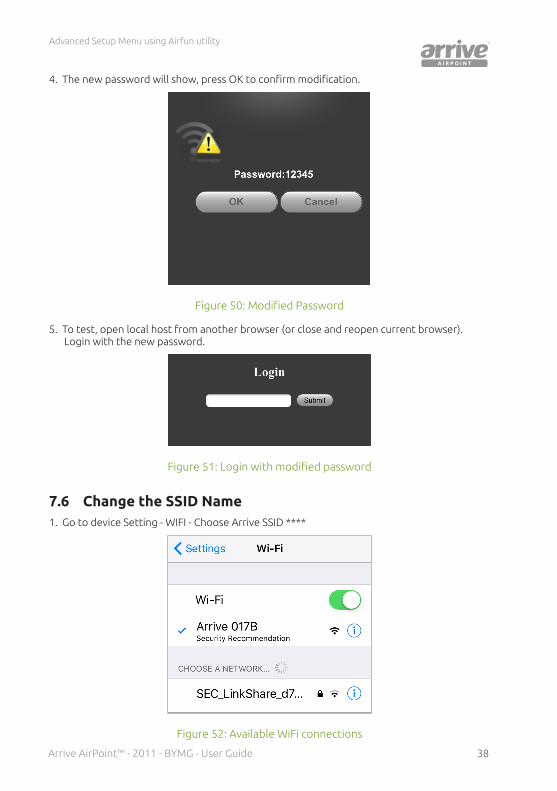
4. Thenewpasswordwillshow,pressOKtoconfirmmodification.
Figure 50: ModifiedPassword
5. To test, open local host from another browser (or close and reopen current browser). Login with the new password.
Figure 51: Loginwithmodifiedpassword
7.6 Change the SSID Name1. Go to device Setting - WIFI - Choose Arrive SSID ****
Figure 52: Available WiFi connections

39
Advanced Setup Menu using Airfun utility
Copyright © 2017 Arrive Systems, Inc. All rights reserved.
2. Go to splash page from browser for the Airpoint Local host
WiDi Pin
ARRIVE-AP***
Local Host: xxx.xxx.xxx.xx
*GHz Active
Figure 53: AirPoint Local host
3. From the browser, type local host to open Airfun. Open the settings page by clicking on the settings/gear icon).
Figure 54: Setting button

40
Advanced Setup Menu using Airfun utility
Arrive AirPoint™ - 2011 - BYMG - User Guide
4. From the Settings page, choose Device Name (SSID) and type an SSID. Press OK.
Figure 55: Device Name SSID
5. ThenewSSIDwillshow,pressOKtoconfirmmodification.
Figure 56: ModifiedSSID
6. To check, go to device setting (ex. smartphone), select WIFI to view list of connections, including the newly added SSID.
41
Advanced Setup Menu using Airfun utility
Copyright © 2017 Arrive Systems, Inc. All rights reserved.
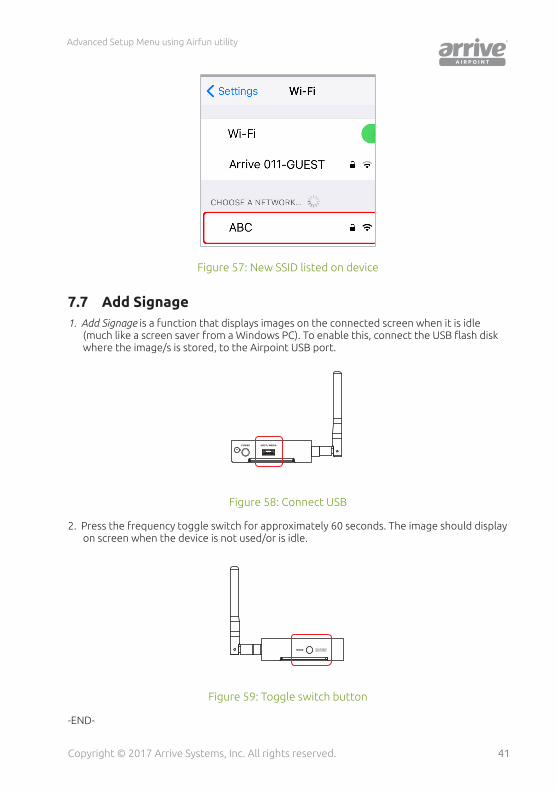
Figure 57: New SSID listed on device
7.7 Add Signage1. Add Signage is a function that displays images on the connected screen when it is idle
(muchlikeascreensaverfromaWindowsPC).Toenablethis,connecttheUSBflashdiskwhere the image/s is stored, to the Airpoint USB port.
Figure 58: Connect USB
2. Press the frequency toggle switch for approximately 60 seconds. The image should display on screen when the device is not used/or is idle.
Figure 59: Toggle switch button
-END-

42Arrive AirPoint™ - 2011 - BYMG - User Guide
Arrive CarePoint Support Services
Thank You for choosing us to serve you. Your suggestions for Arrive AirPoint™ are welcome.
To make a technical support request, please contact ARRIVE Technical Support at our support page: http://arrivesys.com/support/#contact
The peripheral product warranty related to AirPoint enabled devices can be found at http://www.arrivesys.com/warranty.
Additional Resources
Our goal is to ensure that our customers receive exceptional service from the best resource available to answer questions quickly and accurately. We work to resolve our customers’ product-specificquestionsandconcernshowever,whencustomersareexperiencingissuesoutside the scope of ARRIVE products, we will refer customers to the appropriate resource who is best equipped to assist with those issues. These resources may be the customer’s internalpersonnel,anARRIVE-authorizedbusinesspartner,acertifiedconsultant,orathird-party provider.
Topics that are not covered under an Arrive CarePoint program, where an ARRIVE Customer Support team member will proactively provide the most appropriate alternative resource, include:
• Training:ARRIVEAcademyisthebestresourcefortraining-offeringclassroomtraining,real-time learning, custom training, and self-study guides. Visit ARRIVE Academy to search and register for courses and products, and monitor your learning progress through training tracks.
• Performing software, product, application, or job-related activities, such as software installation, data entry, creating reports, etc.*
• Assisting with third-party software (installation, training, trouble-shooting, integration, etc.).
• Providingorganization-specificconsultingorconsultingadvice.
• Repairing data or database issues caused by user error or third-party software.
Note: *References in this document to third-party software, products or applications, does not encompass all third-party software, products and applications that ARRIVE provides (directly or through an authorized ARRIVE Business Partner) as part of a customer’s solution.

43Copyright © 2017 Arrive Systems, Inc. All rights reserved.
This page left intentionally blank.

44
1. Introduction 5
Arrive AirPoint™ - 2011 - BYMG - User Guide
1. Contents
2. 1. Introduction 5
2.1 1.1 Document Scope 5
2.2 1.2 Product overview 5
2.3 1.3 Features 5
3. 2. Before you start™ 6
4. 3. Access ing Arrive ControlPoint™ for FacePoint 6
4.1 3.1 How to book a meeting? 9
4.2 3.2 In Room session meeting 11
4.3 3.3 Collaboration session 15
4.4 3.4 Managing contents in a collaboration meeting room 19
4.5 3.5 Extend/End a meeting 20
4.6 3.6 Settings 22
4.7 3.7 Virtual Keyboard & Mouse 25
4.8 3.8 Room Controls 26
4.9 3.9 Schedule meeting through Microsoft Outlook 30
www.arrivesys.com
Arrive Systems, Inc. Email: [email protected]