user guide - premium water filtration manufacturer
TRANSCRIPT

User Guide
Reverse Osmosis Undersink Water Filter Systems
For correct operation & installation, it is essential to observe these instructions.JUL2021
RO Series
2 Installation & Operation Manual Copyright © Puretec Ltd 2021
What's Inside
What’s inside
Introduction ......................................................................................................................................... 3
Operation ............................................................................................................................................... 3
Cartridge Replacement ................................................................................................................. 3
System Installation ......................................................................................................................... 4
Installation Requirements ........................................................................................................... 4
Cartridge Installation ..................................................................................................................... 5
Installation Procedure ................................................................................................................. 5
Parts Diagram ................................................................................................................................... 7
Battery Installation ......................................................................................................................... 8
Quick Connect Fittings .................................................................................................................. 9
Cartridge Changeout ................................................................................................................... 10
Use Guidelines ................................................................................................................................ 11
Substance Reduction .................................................................................................................. 11
Warranty ............................................................................................................................................ 12
Puretec Customer Service
Thank you for purchasing Puretec drinking water filter system. Your system is a proven performer manufactured from only quality materials and components and will give years of ‘spring fresh’ water free of impurities if maintained properly.
The Puretec RO series system cartridges need replacing regularly to maintain optimum performance. This is a simple procedure when following instructions. For cartridge replacements contact your nearest Puretec stockist.
The system is designed for metropolitan supply water but can be used in other situations. For other types of water supply please contact your local Puretec stockist or call our Puretec Customer Service Help line prior to installing the tap.
Customer Service Help line 1300 140 140 (Australia) 0800 130 140 (New Zealand).
This product contains a button battery. Accidental ingestion may occur and can be fatal. Please keep out of reach from infants. If you suspect an accidental ingestion please contact emergency services.

3 Reverse Osmosis Undersink Water Filter Systems
Introduction
Minimum and Maximum Operating Conditions
Condition Minimum Maximum
Inlet Pressure 300 kPa 500 kPa Inlet Temperature 0°C 30°C Inlet TDS 50 mg/L 2,000 mg/L Inlet Hardness 0 mg/L (0 grain) 171 mg/L (10 grain) Inlet Silt Density Index 0 5 NTU
Operation
The Puretec RO series system is designed to run economically for many years, dependent on the initial installation and periodical maintenance.
Flush systems for 10 minutes after any period of non-use more than 2 days. For a period of non-use of 2 weeks or more, it may be necessary to replace cartridge.
Chrome Plated Surface - should only be cleaned with liquid detergent or soap and water. Under no circumstance should any abrasive or acid based cleaning agents be used.
Installation Note: A water filter system/tap, like any product, has a limited life and may eventually fail. Also sometimes failure happens early due to unforeseen circumstances. To avoid possible property damage, this product should be regularly examined for leakage and/or deterioration and replaced when necessary. A drain pan, plumbed to an appropriate drain or outfitted with a leak detector, should be used in those applications where any leakage could cause property damage, and/or the water supply should be turned off if no one is home/present.
INSTALLATION SHOULD BE COMPLETED BY QUALIFIED TRADESPEOPLE. FAULTY OPERATION DUE TO UNQUALIFIED PERSONS WILL RESULT IN VOIDED WARRANTY COVERAGE.
Cartridge Replacement
To maintain the high quality of the purified water, the cartridge needs changing every 6 months (dependent on water quality and usage).
When replacing cartridge, ensure you reset the LED reminder light by removing/replacing the battery from the rubber seat. Please refer to page 8 for a detailed diagram.
Order MC051 & CB951 for a replacement cartridges and RET1812-75 for replacement membrane to suit your RO270 system.

4 Installation & Operation Manual Copyright © Puretec Ltd 2021
System Installation
This system comes complete with an installation kit enabling it to be connected to 13 mm (½”) copper pipe (cold supply only - hot water should be filtered prior to heating). Included is a control valve incorporating backflow prevention, anti hammer, flow control and pressure limiting capabilities according to Australian Standards in full compliance with the relevant laws.
Caution: This product must be installed in accordance with local plumbing regulations by a licensed plumber.
Installation Requirements
1 13 mm (½”) cold water line.
2 Supply pressure: 300 - 870* kPa.
3 Supply temperature 0° - 30 °C (protect from freezing).
4 Suitable location for faucet.
Alternative fittings may be required if being connected to anything other than 15 mm (½”) copper pipe. No electrical or drainage requirements needed.
*If pressure exceeds 500kPa an approved pressure limiting device needs to be fitted.
Parts Included
System Installation
RO System Faucet MC051 Cartridge CB951 Cartridge RO Membrane
Tank Spanner Multivalve Drain Clamp SmartTeeTM Shut Off Valve

5 Reverse Osmosis Undersink Water Filter Systems
Installation Procedure
Cartridge Installation
1. Unscrew filter housings using the spanner wrench (supplied). Membrane housing cap can be unscrewed by hand.
2. Install new cartridges and replace housings, screwing them up HAND TIGHT ONLY. MC051 filter is on the inlet side and CB951 on the outlet side. Install RET1812 on membrane housing. See Figure 1 (page 7).
NOTE: When removing the membrane from the packaging, only remove the outer shrinkwrap packaging, DO NOT remove any other packaging from the membrane.
Installation Procedure
Important Note: Do not cut the BLACK tube when installing this system.
1. Find a convenient location for the filter system under the sink taking into consideration ease of access and best use of cupboard space. Allow 30 mm clearance under the system for cartridge replacement. Using self-tapping screws provided, attach the filter system to the cupboard wall in the desired location. Choose a location where water spillage will not cause damage and out of direct sunlight.
2. Isolate water supply. Uninstall the connections on the cold water line and connect the SmartTee™ (see Fig 3). Reinstall the previous connection to the Tee Valve.
3. Connect the pressure limiting MultiValve to the SmartTee™ with a length of GREEN tubing. See Figures 1, 3 & 4.
4. Select location on kitchen sink to install faucet. Make sure there is adequate access under the bench top for the hoses. The faucet supplied with the system requires a Ø12 mm (½”) hole. Use a centre punch to locate the position to drill. Drill a pilot hole and gradually enlarge until you have the correct size hole.
5. To install the faucet, connect spout to the base of the faucet, ensuring that the white circlip is flush with the groove on the spout. Push down on the spout cap until it clicks, then tighten by hand. Once connected, place the escutcheon and O-ring supplied onto the base of the tap. Insert into the counter top or sink and place the plastic washer, lock washer and locking nut onto the thread and tighten, ensuring the tap is in the correct position on the bench. Then place the olive in the 1/4” compression nut, then onto the 1/4” tube and the olive Insert into the end of the tube and attach to the tap thread. Connect the BLUE tube to the faucet.
Note: Reverse osmosis systems are unique in that they flush the impurities away. Therefore every RO systems has both pure PRODUCT water and dirty REJECT water. The ratio of product to reject is generally about one to two. The Reject water is usually dispensed down the drain although it can be directed to the garden if desired. To be environmentally friendly, the Puretec RO system has a built in shut off valve so that when the storage tank is full it stops producing water.
6. Install the drain clamp by drilling a 4 mm hole in the waste pipe. Position the drain clamp above the trap. Connect 1/4” (BLACK) drain tube to drain clamp and tighten compression nut. Do not allow drain tube to protrude more than 10 mm into drain, making sure the holes in the drain and the clamp are exactly aligned. This can be done by inserting a thin Phillips screwdriver through them whilst tightening the clamp.
6 Installation & Operation Manual Copyright © Puretec Ltd 2021
Installation Procedure
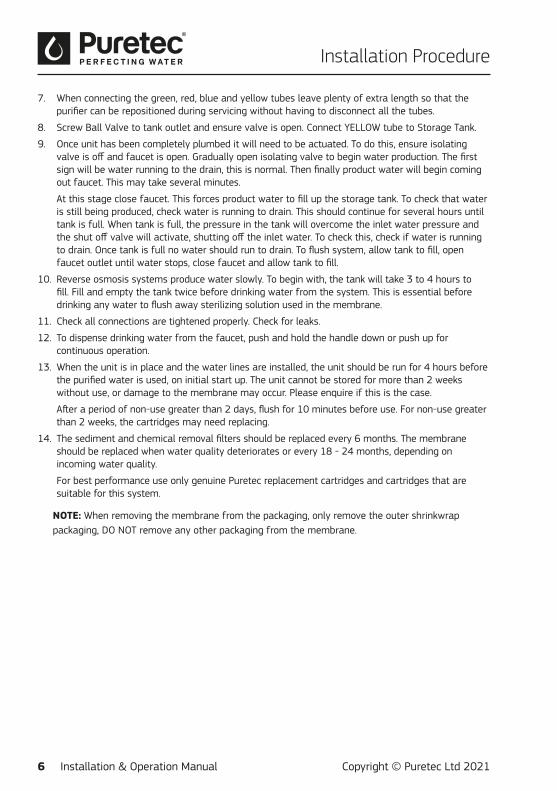
7. When connecting the green, red, blue and yellow tubes leave plenty of extra length so that the purifier can be repositioned during servicing without having to disconnect all the tubes.
8. Screw Ball Valve to tank outlet and ensure valve is open. Connect YELLOW tube to Storage Tank.
9. Once unit has been completely plumbed it will need to be actuated. To do this, ensure isolating valve is off and faucet is open. Gradually open isolating valve to begin water production. The first sign will be water running to the drain, this is normal. Then finally product water will begin coming out faucet. This may take several minutes.
At this stage close faucet. This forces product water to fill up the storage tank. To check that water is still being produced, check water is running to drain. This should continue for several hours until tank is full. When tank is full, the pressure in the tank will overcome the inlet water pressure and the shut off valve will activate, shutting off the inlet water. To check this, check if water is running to drain. Once tank is full no water should run to drain. To flush system, allow tank to fill, open faucet outlet until water stops, close faucet and allow tank to fill.
10. Reverse osmosis systems produce water slowly. To begin with, the tank will take 3 to 4 hours to fill. Fill and empty the tank twice before drinking water from the system. This is essential before drinking any water to flush away sterilizing solution used in the membrane.
11. Check all connections are tightened properly. Check for leaks.
12. To dispense drinking water from the faucet, push and hold the handle down or push up for continuous operation.
13. When the unit is in place and the water lines are installed, the unit should be run for 4 hours before the purified water is used, on initial start up. The unit cannot be stored for more than 2 weeks without use, or damage to the membrane may occur. Please enquire if this is the case.
After a period of non-use greater than 2 days, flush for 10 minutes before use. For non-use greater than 2 weeks, the cartridges may need replacing.
14. The sediment and chemical removal filters should be replaced every 6 months. The membrane should be replaced when water quality deteriorates or every 18 - 24 months, depending on incoming water quality.
For best performance use only genuine Puretec replacement cartridges and cartridges that are suitable for this system.
NOTE: When removing the membrane from the packaging, only remove the outer shrinkwrap packaging, DO NOT remove any other packaging from the membrane.

7 Reverse Osmosis Undersink Water Filter Systems
No. CODE DESCRIPTION
1 KASV47 SMART TEE™ ½”M X ½”F X 1/4”T
2 KTU4G GREEN FLEXIBLE TUBING
3 PVM45PH PRESSURE LIMITING VALVE
4 KTU4G GREEN FLEXIBLE TUBING
5 KSA44 STRAIGHT ADAPTOR
6 FP10Q FILTER HOUSING
7 MC051 SEDIMENT REMOVAL FILTER
8 CB951 CHEMICAL REMOVAL FILTER
9 TUBE NUT & FERRULE – NOT SOLD SEPARATELY
10 TUBE INSERT – NOT SOLD SEPARATELY
11 FAUCET NUT LOCK & WASHER – NOT SOLD SEPARATELY
12 BLACK LOCATING WASHER – NOT SOLD SEPARATELY
13 BLACK WASHER – NOT SOLD SEPARATELY
14 ESCUTCHEON PLATE – NOT SOLD SEPARATELY
15 DFU180 HIGH LOOP FAUCET
16 RA-HM MEMBRANE HOUSING
17 RA-CL4 DRAIN CLAMP
18 KSOVE44N TANK BALL VALVE
No. CODE DESCRIPTION
19 RA-T3.2 STORAGE TANK
20 RA-VSOC SHUT OFF VALVE
21 RA-VCE CHECK VALVE
22 FPBKRO ASSEMBLY WALL MOUNT HOUSING
23 RET1812-75 REVERSE OSMOSIS MEMBRANE
24 KTU4BL BLUE FLEXIBLE TUBING
25 KTU4W WHITE FLEXIBLE TUBING
26 KTU4Y YELLOW FLEXIBLE TUBING
27 KTU4BK BLACK FLEXIBLE TUBING
28 KEA44 ELBOW ADAPTOR
29 RA-FR50 FLOW RESTRICTOR
30 FPOR O-RING
32
1
4
28
1628
29
21
25
22
SEDIMENT CHEMICAL
7 8
5 5
24
17
18
19
12
10
1413
15
11
9
GREEN TUBE
BLACK TUBE
BLUETUBE
YELLOW TUBE
IN TANK
OUT TANK
MAINS WATER
26
25
20
6
23
27
Figure 1 - Parts Diagram
Parts Diagram
MINIMUM 30MM CLEARANCE FOR CARTRIDGE CHANGES.
30
8 Installation & Operation Manual Copyright © Puretec Ltd 2021
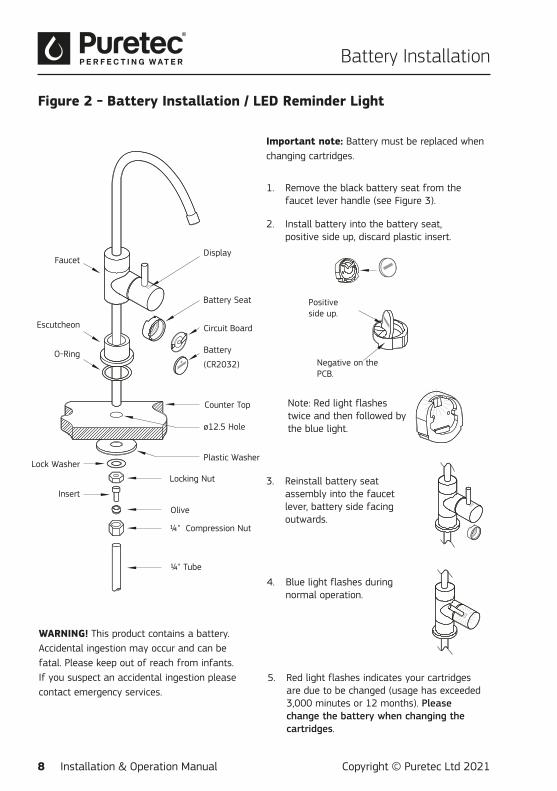
Battery Installation
Figure 2 - Battery Installation / LED Reminder Light
1. Remove the black battery seat from the faucet lever handle (see Figure 3).
2. Install battery into the battery seat, positive side up, discard plastic insert.
Note: Red light flashes twice and then followed by the blue light.
3. Reinstall battery seat assembly into the faucet lever, battery side facing outwards.
Important note: Battery must be replaced when changing cartridges.
5. Red light flashes indicates your cartridges are due to be changed (usage has exceeded 3,000 minutes or 12 months). Please change the battery when changing the cartridges.
Positive side up.
Negative on the PCB.
4. Blue light flashes during normal operation.
Display
Battery Seat
Circuit Board
Battery
(CR2032)
Counter Top
Plastic WasherLock Washer
Locking Nut
Insert
1/4" Compression Nut
1/4" Tube
Olive
O-Ring
Escutcheon
Faucet
ø12.5 Hole
WARNING! This product contains a battery. Accidental ingestion may occur and can be fatal. Please keep out of reach from infants. If you suspect an accidental ingestion please contact emergency services.

9 Reverse Osmosis Undersink Water Filter Systems
Quick Connect Fittings
Figure 3 - SmartTee™ Quick Connect Fitting
2. Cut the tube square and push into into the tube stop (inside the collet). For metal tube; remove burrs and chamfer tube end to prevent O-ring seal being damaged.
6. Push the collet against the quick connect nut and slide tube out of fitting.
3. The fitting grips before it seals. Ensure the tube is pushed all the way into the tube stop.
4. Once the tube is secured in position, turn the quick connect nut clockwise to secure.
Note: Hand tighten only. Do not overtighten.
1. Turn the quick connect nut on the SmartTee™ anticlockwise to release the collet.
5. Turn the quick connect nut on the SmartTee™ anticlockwise to release the collet.
DISCONNECTION PROCEDURE

10 Installation & Operation Manual Copyright © Puretec Ltd 2021
Cartridge Changeout
To change the filter cartridges adhere to the following procedure.
1. Close the Smart Tee™ valve to prevent water flow and close tank valve.
2. Relieve water pressure by operating faucet lever.
3. When removing housings place a container underneath to catch any spillage. Unscrew filter housings using the spanner wrench and discard cartridges. Membrane housing cap can be unscrewed by hand.
4. Cleanse the inside of the housing using warm water. Check O-ring and lubricate with food grade silicone lubricant or similar. Replace O-ring if kinked or damaged.
5. Install new cartridges and replace housing, screwing them up HAND TIGHT ONLY. MC051 filter is on the inlet side and CB951 on the outlet side. Install RET1812-75 on membrane housing. See Figure 1 (page 7).
NOTE: When removing the membrane from the packaging, only remove the outer shrinkwrap packaging, DO NOT remove any other packaging from the membrane.
6. Restore water supply & check for leaks, rectifying them before leaving the unit.
1. Cut the tube square and push in to the tube stop. For metal tube remove burrs and chamfer tube end to prevent O-Ring seal being damaged.
DISCONNECTION PROCEDURE
4. Push collet against body and slide tube out of fitting.
2. Fitting grips before it seals. Ensure tube is pushed in to tube stop.
3. Tube is secured in position.
Figure 4 - How To Use Quick Connect Fittings

11 Reverse Osmosis Undersink Water Filter Systems
Use Guidelines
Use Guidelines
• Operating pressure 300 - 500 kPa.
• Ideal tank pressure when empty 34 - 48 kPa (5 - 7 psi).
• Operating temperature 0 - 30 °C (protect from freezing).
• Maximum flow 270 litres per day.
• This system must be installed according to local plumbing codes by a licensed plumber on the cold water line - mains only.
• Replacement Cartridges: See Cartridge Changeout section
• This system requires regular replacement of the filter cartridge to maintain proper operation. Varying chlorine, sediment, or organic substance levels may affect replacement frequency.
• Be sure to change the filter cartridges at least every 8,000 litres or 6 months which ever occurs first; or whenever you detect a change in taste, odour, or decrease in flow. 8,000 litres is approximately equal to using 20 litres daily for one year.
• Do not install in sunlight or outdoors.
• For use with PTFE tape only.
• Any use of liquid sealants will void warranty.
Caution: Do not use with water that is microbiologically unsafe or of unknown quality without adequate disinfection before or after the system.
Substance Reduction
Class Pass Comment
Particular Reduction III YES 75% or more
Taste, Odour, Chlorine Reduction IV YES 75% or more
Cryptosporidium & Giardia Cyst Removal IIc YES 99.9% or more

12 Installation & Operation Manual Copyright © Puretec Ltd 2021
Notes Puretec water care products are designed, manufactured and supported by Puretec Pty Ltd the name you can trust for viable and proven water solutions. The complete range of Puretec products are developed, refined, made to meet and exceed stringent specifications for the worldwide market.
Important: Sales of products are subject to our Terms and Conditions which are available upon request. All specifications, information and photos are a guide only and are subject to change without notice. Please ring to confirm details. Warning: For correct operation of this appliance it is essential to observe manufacturer’s instructions.
Warranty
Any claim under this warranty must be made within 3 years of the date of purchase of the product. This product is warranted to be free of defect of material and workmanship for 3 years from date of purchase. 3 year warranty is 1 year parts and labour, plus 2 years parts only. Excludes cartridges.
To make a claim under the warranty, take the product and proof of purchase to place where you purchased the product, and they will lodge a Warranty Request with Puretec.
Puretec will pay your reasonable, direct expenses of claiming under this warranty. You may submit details and proof of your expense claim to place of purchase for consideration.
The warranty only applies if the product was used and/or installed in accordance with the user guide and/or installation instructions. This warranty is given in lieu of all other express or implied warranties and manufacturer shall in no circumstance be held liable for damages consequential or otherwise or delays caused or faulty manufacturing except as excluded by law.
Applicable to all above, is that the warranties need to be approved by Puretec to ensure product was not incorrectly used, installed or claimed. False and incorrect claims will be pursued at Puretec’s discretion, including chargeable inspection and labour costs incurred.
Warranty

13 Reverse Osmosis Undersink Water Filter Systems
Warranty
Warranty/AustraliaThis warranty is given by Puretec Pty Ltd, ABN 44 164 806 688, 37-43 Brodie Road, Lonsdale SA 5160, telephone no. 1300 140 140 and email at [email protected].
This warranty is provided in addition to other rights and remedies you have under law: Our goods come with guarantees which cannot be excluded under the Australian Consumer Law. You are entitled to replacement or refund for a major failure and to compensation for other reasonably foreseeable loss or damage. You are also entitled to have the goods repaired or replaced if the goods fail to be of acceptable quality and the failure does not amount to a major failure.
Warranty/New ZealandThis warranty is given by Puretec Ltd, Reg. No 4464398, PO Box 875 Cambridge 3450 NZ, telephone no. 0800 130 140 and email at [email protected].
This warranty is provided in addition to other rights and remedies you have under law: Our goods come with guarantees which cannot be excluded under the Consumer Guarantees Act. You are entitled to replacement or refund for a major failure and to compensation for other reasonably foreseeable loss or damage. You are also entitled to have the goods repaired or replaced if the goods fail to be of acceptable quality and the failure does not amount to a major failure.

14 Installation & Operation Manual Copyright © Puretec Ltd 2021
This page was intentionally left blank.

15 Reverse Osmosis Undersink Water Filter Systems
This page was intentionally left blank.
