user guide individual version final - cengage learning · 6.5 keyboard mastery ... • numeric...
TRANSCRIPT
MicroType 4 Individual
Site Workstation Network
User Guide
Australia • Canada • Mexico • Singapore • Spain • United Kingdom • United States
MicroType 4 User Guide
2
COPYRIGHT © 2006 by Thomson South-Western, a part of the Thomson Corporation. Thomson, the Star logo, and South-Western are trademarks used herein under license. Printed in the United States of America 1 2 3 4 5 6 7 8 9 0 DU 08 07 06 05 04 03 02 The text of this publication, or any part thereof, may be reproduced for use in classes for which MicroType 4 is the adopted software package. It may not be reproduced in any manner whatsoever for any other purpose without the prior written permission of the publisher. For more information, contact South-Western 5191 Natorp Boulevard Mason, OH 45040 Or visit our Internet site at www.swlearning.com. For permission to use material from this text or product, contact us by Phone: 1-800-730-2214 Fax: 1-800-730-2215 www.thomsonrights.com Microsoft and Windows are registered trademarks of Microsoft Corporation. Apple, Macintosh, Mac, and LaserWriter are registered trademarks, and Balloon Help and System 8 are trademarks of Apple Computer, Inc., registered in the U.S. and other countries. Software developed by Lûcrum Inc., Cincinnati, OH, USA, and Ascendum Systems Pvt. Ltd, Bangalore, INDIA
MicroType 4 User Guide
3
Table of Contents
Table of Contents ................................................................................................. 3 Table of Figures.................................................................................................... 4 SECTION 1 OVERVIEW.......................................................................................... 7
1.1 Introduction.............................................................................................. 7 1.2 MicroType 4 Features................................................................................ 7
SECTION 2 INSTALLATION PROCEDURES ............................................................. 9 2.1 System Requirements ............................................................................... 9 2.2 Installation Procedures............................................................................. 9
SECTION 3 GETTING STARTED WITH MICROTYPE 4 ........................................... 10 3.1 Introduction To Getting Started.............................................................. 10 3.2 New Student Registration ....................................................................... 11 3.3 Taking the Skill Analysis Timed Writing .................................................. 13 3.4 Navigating the Main Menu....................................................................... 14 3.5 Quick Review .......................................................................................... 15 3.6 Textbook Keying ..................................................................................... 16 3.7 Timed Writings ....................................................................................... 16
SECTION 4 ALPHABETIC KEYBOARDING............................................................. 19 4.1 Introduction To Alphabetic Keyboarding................................................. 19 4.2 Key Presentation..................................................................................... 19 4.3 Navigating Alphabetic Keyboarding ........................................................ 19 4.4 Lesson Design......................................................................................... 21 4.5 Warm Up................................................................................................. 21 4.6 Learn Key................................................................................................ 22 4.7 Combine Keys ......................................................................................... 23 4.8 Improve Keystroking .............................................................................. 23 4.9 Timed Practice ........................................................................................ 24 4.10 Build Skill................................................................................................ 25 4.11 Game (Key-A-Shot)................................................................................. 26 4.12 Lesson Report ......................................................................................... 27 4.13 Preferences............................................................................................. 28
SECTION 5 NUMERIC KEYBOARDING.................................................................. 29 5.1 Introduction to Numeric Keyboarding..................................................... 29 5.2 Key Presentation..................................................................................... 29 5.3 Navigating Numeric Keyboarding............................................................ 29 5.4 Lesson Design......................................................................................... 30 5.5 Warm Up................................................................................................. 30 5.6 Learn Key................................................................................................ 31 5.7 Combine Keys ......................................................................................... 32 5.8 Improve Keystroking .............................................................................. 33 5.9 Timed Practice ........................................................................................ 33 5.10 Build Skill................................................................................................ 34 5.11 Game (Connect It) .................................................................................. 36 5.12 Lesson Report ......................................................................................... 38 5.13 Preferences............................................................................................. 39
SECTION 6 KEYBOARDING SKILL BUILDER ........................................................ 40 6.1 Introduction to Keyboarding Skill Builder ............................................... 40 6.2 Navigating Keyboarding Skill Builder ...................................................... 40 6.3 Lesson Design......................................................................................... 41 6.4 Assessment............................................................................................. 41 6.5 Keyboard Mastery ................................................................................... 42 6.6 Improve Technique................................................................................. 43 6.7 Sentences ............................................................................................... 43 6.8 Paragraphs ............................................................................................. 45 6.9 Measurement Writing ............................................................................. 47 6.10 Game (Mystery Puzzle)........................................................................... 48 6.11 Lesson Report ......................................................................................... 49 6.12 Preferences............................................................................................. 50
SECTION 7 NUMERIC KEYPAD ............................................................................ 51 7.1 Introduction to Numeric Keypad............................................................. 51 7.2 Key Presentation..................................................................................... 51
MicroType 4 User Guide
4
7.3 Navigating Numeric Keypad.................................................................... 51 7.4 Lesson Design......................................................................................... 52 7.5 Warm Up................................................................................................. 52 7.6 Learn Key................................................................................................ 53 7.7 Improve Keystroking .............................................................................. 54 7.8 Build Skill................................................................................................ 54 7.9 Game (Plate Spinner) ............................................................................. 55 7.10 Lesson Report ......................................................................................... 57 7.11 Keypad Practice ...................................................................................... 58 7.12 Keypad Timed Writings ........................................................................... 59 7.13 Preferences............................................................................................. 60
SECTION 8 Word Processor ................................................................................ 61 8.1 Introduction to Word Processor.............................................................. 61 8.2 Navigating the word processor ............................................................... 61 8.3 Creating a New Document....................................................................... 61 8.4 Opening/Saving a Document .................................................................. 62 8.5 Printing a Document ............................................................................... 62 8.6 Formatting Documents ........................................................................... 62 8.7 Finding/Replacing Text........................................................................... 67 8.8 Taking a Timed Writing........................................................................... 67
SECTION 9 STUDENT REPORTS........................................................................... 70 9.1 Introduction to Student Reports ............................................................. 70 9.2 Lesson Report ......................................................................................... 70 9.3 Summary Report ..................................................................................... 70 9.4 Keypad Timed Writings ........................................................................... 73 9.5 Top Ten Lists........................................................................................... 74 9.6 Certificate of Completion ........................................................................ 74 9.7 Performance Graphs ............................................................................... 74
APPENDIX A TROUBLESHOOTING TIPS .............................................................. 76

MicroType 4 User Guide
5
Table of Figures Figure 3-1 Student Log In Dialog Box..................................................10 Figure 3-1.2 Assign Class Dialog Box .....................................................11 Figure 3-2.1 New Student Dialog Box without Distance Learning Enabled12 Figure 3-2.2 New Student Dialog Box with Distance Learning Enabled ..13 Figure 3-3 Main Menu..........................................................................14 Figure 3-4 Timed Writings Selection ....................................................17 Figure 4-1 Alphabetic Keyboarding Lesson Menu .................................20 Figure 4-2 Alphabetic Keyboarding (Lesson 3: Learn h and e) .............20 Figure 4-3 Alphabetic Keyboarding (Lesson Report) ............................21 Figure 4-4 Alphabetic Keyboarding (Warm Up)....................................22 Figure 4-5 Alphabetic Keyboarding (Learn Key)...................................22 Figure 4-6 Alphabetic Keyboarding (Combine Keys) ............................23 Figure 4-7 Alphabetic Keyboarding (Improve Keystroking) .................24 Figure 4-8 Alphabetic Keyboarding (Timed Practice) ...........................24 Figure 4-9 Alphabetic Keyboarding (Build Skill)...................................25 Figure 4-10 Alphabetic Keyboarding (Key-A-Shot).................................26 Figure 4-11 Alphabetic Keyboarding (Lesson Report) ............................28 Figure 5-1 Numeric Keyboarding Lesson Menu.....................................30 Figure 5-2 Numeric Keyboarding (Warm Up) .......................................31 Figure 5-3 Numeric Keyboarding (Learn Key) ......................................31 Figure 5-4 Numeric Keyboarding (Combine Keys)................................32 Figure 5-5 Numeric Keyboarding (Improve Keystroking).....................33 Figure 5-6 Numeric Keyboarding (Timed Practice)...............................34 Figure 5-7 Numeric Keyboarding (Build Skill) .....................................35 Figure 5-8 Numeric Keyboarding (Connect It) .....................................36 Figure 5-9 Connect It Game Board .......................................................37 Figure 5-10 Numeric Keyboarding (Lesson Report)................................38 Figure 6-1 Keyboarding Skill Builder Lesson Menu...............................40 Figure 6-2 Keyboarding skill builder (Assessment) ..............................42 Figure 6-3 Keyboarding Skill Builder (Keyboard Mastery)....................42 Figure 6-4 Keyboarding Skill Builder (Improve Technique)..................43 Figure 6-5 Keyboarding Skill Builder (Sentences - Speed) ...................44 Figure 6-6 Keyboarding Skill Builder (Sentences—Accuracy) ...............45 Figure 6-7 Keyboarding Skill Builder (Paragraph - Speed) ...................46 Figure 6-8 Keyboarding Skill Builder (Paragraph - Accuracy)...............47 Figure 6-9 Keyboarding Skill Builder (Measurement Writing) ..............48 Figure 6-10 Keyboarding Skill Builder (Mystery Puzzle).........................49 Figure 6-11 Keyboarding Skill Builder (Lesson Report)..........................50 Figure 7-1 Numeric Keypad Lesson Menu.............................................51 Figure 7-2 Numeric Keypad (Warm Up)...............................................52 Figure 7-3 Numeric Keypad (Learn Key) ..............................................53 Figure 7-4 Numeric Keypad (Improve Keystroking) .............................54 Figure 7-5 Numeric Keypad (Build Skill) ..............................................55 Figure 7-6 Numeric Keypad (Plate Spinner) .........................................56 Figure 7-7 Numeric Keypad (Lesson Report)........................................58 Figure 7-8 Keypad Practice ..................................................................59 Figure 7-9 Keypad Timed Writings .......................................................60 Figure 8-1 Word Processor Toolbar ......................................................61 Figure 8-2 Word Processor Ruler..........................................................61 Figure 8-3 Font Dialog Box...................................................................63 Figure 8-4 Page Settings Dialog Box ....................................................64
MicroType 4 User Guide
6
Figure 8-5 Headers Window .................................................................65 Figure 8-6 Page Settings Dialog Box from Format Menu ......................66 Figure 8-7 Insert Break Window ..........................................................66 Figure 8-8 Find Dialog Box ...................................................................67 Figure 8-9 Count-up/Count-down Timer Options .................................68 Figure 9-1 Sample Lesson Report.........................................................71 Figure 9-2 Sample Summary Report.....................................................72 Figure 9-3 Sample Keypad Timed Writings Report ...............................73 Figure 9-4 Sample Top Ten List (Key-A-Shot) ......................................74 Figure 9-5 Sample Performance Graph.................................................75

MicroType 4 User Guide
7
SECTION 1 OVERVIEW
1.1 Introduction The MicroType 4 software is a keyboarding program that consists of a tutorial, reinforcement activities, educational games, and a word processor. All of these components are combined in one comprehensive package that will help the student to master the basic keyboarding skills. This application also includes a new feature called Web Reporter, which enables the student’s distance-learning programby allowing the instructor to access the student’s keyboarding reports through the Internet. This manual provides the necessary information to help the student install the software and prepare it for use. Other sections discuss each major feature of the MicroType 4 software. There are also troubleshooting tips that are provided in the event the student runs into any problems while using the program.
1.2 MicroType 4 Features As the student begins to explore the MicroType 4 software, he/she will discover that it contains numerous features that will enhance the learning process. The following list briefly describes the major features of the product.
• Alphabetic Keyboarding — Includes 20 lessons that teach the alphabetic keys, shift keys, SPACE
BAR, ENTER/RETURN, CAPS LOCK, TAB, and the basic punctuation keys. Every lesson includes several different activities to learn new keys, combine keys, improve keystroking, and build skill. The Key-A-Shot game challenges the student to improve his/her keyboarding skills. A Lesson Report reflects the student’s performance for each activity
• Numeric Keyboarding — These 16 lessons teach the top-row number keys and the more
commonly used symbols. The Numeric Keyboarding section provides the same basic activities as the Alphabetic Keyboarding module. However, the activities that emphasize on building skill include both sentences and paragraphs for the student to key. He/she can also access the Timed Writings feature from the lesson menu to analyze his/her progress. The Connect It game allows him/her to earn game time by keying drill lines
• Keyboarding Skill Builder – In these 25 lessons, the student can improve his/her keyboarding
speed and control after he/she learns the alphabetic and numeric key reach. The student can also choose to work on improving speed or accuracy. Also included in these 25 lessons are 5 Assessment lessons that will analyze errors and prescribe the focus mode (Speed or Accuracy) based on the student’s performance for lessons in Keyboarding Skill Builder. Lesson activities include Keyboard Mastery, Improve Technique, Sentences, Paragraphs, and Measurement Writing. More difficult drills challenge the student as and when he/she moves from lesson to lesson. The Mystery Puzzle game reinforces keyboarding skills by encouraging the student to work on improving speed and accuracy
as he/she earns extra game chances. The student can also access the Timed Writings feature from
the lesson menu to analyze his/her progress
• Numeric Keypad — The student learns the numeric keypad operation by completing the four
lessons in this section. Additional options allow the student to practice using the numeric keypad and analyze his/her keypad skill. The Plate Spinner game provides a fun way to practice the reaches learned in each lesson.
• Skill Analysis — The Skill Analysis feature allows MicroType 4 to diagnose the student’s keying
ability prior to beginning the lessons. After he/she completes the Skill Analysis timed writing, the program will suggest the appropriate lesson mode.
• Word Processor —This is a full-featured word processor that includes numerous formatting
options, a spell checker, and a built-in timer. The student can practice his/her keyboarding skills, key letters and reports, and take a speed-timed writing. The student can also choose a countdown timer for speed-timed writings. He/she can select a 15 or 30 second, 1, 2, 3, 5 minute time writing.

MicroType 4 User Guide
viii
For production work, the student can set a count-up timer. Even if he/she saves his/her work and continues the next day, the count-up timer records the results accurately.
• Textbook Keying - Textbook Keying allows the student to key drill lines and paragraphs directly from a textbook that has been downloaded by his/her instructor. On completion of keying, the program displays the total number of errors and the gwam (gross word a minute) rate.
• Timed Practice – The Timed Practice lesson part emphasizes increasing the student’s keying speed. The program presents paragraphs for the student to key and makes use of error analysis functions to analyze the errors. On completion of time, the program displays the number of errors and gwam rate.
• Timed Writings — This option evaluates every keystroke and classifies the keying errors by category (e.g., misspelled word, capitalization, transposed characters, etc.).
• Quick Review — The quick review section presents drill lines to practice the following: Alphabetic Keys, Numeric Keys, Easy Lines, ENTER/RETURN, SPACE BAR, SHIFT KEYS, CAPS LOCK, and TAB.
• Games — Each of the keyboarding course segments (Alphabetic Keyboarding, Numeric Keyboarding, Keyboarding Skill Builder, and Numeric Keypad) incorporates a game in all lessons. These games are designed to be fun, but still emphasize improving keyboarding.
• Movies and 3-D Viewer — Movies and 3-D viewers are available throughout the lessons. The student can watch demonstrations of proper posture and keying technique, control models illustrating correct finger placement on the keyboard, and adjust finger and wrist positions using the slider bar image.
• Emphasis on Correct Technique — Acquiring correct keyboarding technique is the primary objective of beginning keyboarding instruction. Correct keyboarding technique includes proper body, hand, and finger position; proper keystroking technique; proper spacing and shifting technique; and immediate return at the ends of lines. The movies, 3-D viewers, photos and technique hints presented throughout the lessons reinforce correct keyboarding technique.
• Flexible Processing — The MicroType 4 software constantly monitors the student’s inputs and provides different processing methods during each lesson. The program accepts only correct responses while the student learns a new key. As he/she works to improve his/her keystroking skill, the software checks for both speed and accuracy. Skill building exercises emphasize on increasing speed, but the program analyzes his/her input to verify that the input meets minimum accuracy standards.
• Graphic Character — A graphic character called Keyfer introduces new keys and guides the student throughout the tutorial.
• Student Performance Records — The MicroType 4 software includes numerous reports that keep the student informed about his/her progress. Some of the reports include: Lesson Reports, Summary Report, Diagnostic Report, and Class Summary Report.
• BACKSPACE/DELETE — By default, the BACKSPACE/DELETE key is available. However, the student can control whether the BACKSPACE/DELETE key is available as and when he/she completes the various keyboarding lessons. When appropriate, the program indicates the status of the BACKSPACE/DELETE key.
• Extensive On-Line Help — On-line help is available throughout the program. The student has to simply click the help button to instantly access information about the feature he/she is working on.
• Keyboarding Preferences — The program includes preset software Preferences that the student can customize. He/she has to use these to control the sound, disable the BACKSPACE/DELETE key, change the games mode from real time to delayed action, and more.
• Distance Learning - This option allows the student to enable or disable the distance learning feature whenever he/she wants. Enabling the Distance Learning will enable the student to upload his/her reports to a central database where the instructor can view them through the Report Viewer on the Internet
MicroType 4 User Guide
Section 2 Installation Procedures 9
SECTION 2 INSTALLATION PROCEDURES
2.1 System Requirements
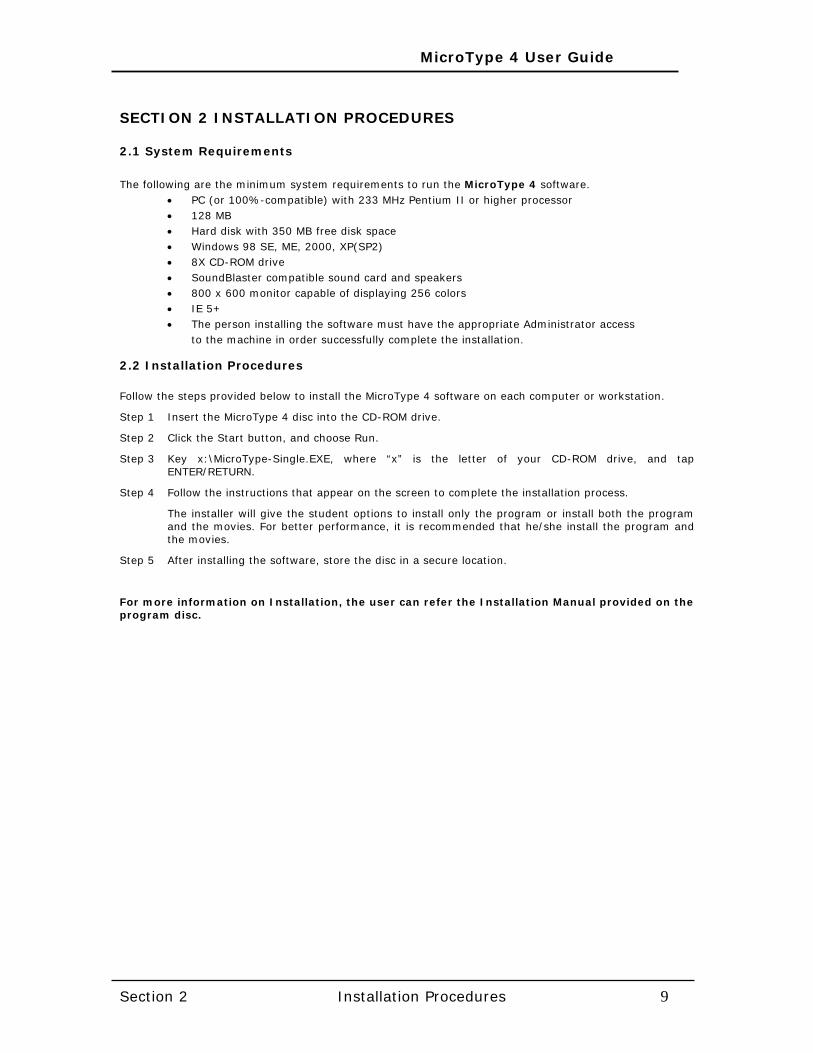
The following are the minimum system requirements to run the MicroType 4 software.
• PC (or 100%-compatible) with 233 MHz Pentium II or higher processor • 128 MB • Hard disk with 350 MB free disk space • Windows 98 SE, ME, 2000, XP(SP2) • 8X CD-ROM drive • SoundBlaster compatible sound card and speakers • 800 x 600 monitor capable of displaying 256 colors • IE 5+ • The person installing the software must have the appropriate Administrator access
to the machine in order successfully complete the installation.
2.2 Installation Procedures Follow the steps provided below to install the MicroType 4 software on each computer or workstation.
Step 1 Insert the MicroType 4 disc into the CD-ROM drive.
Step 2 Click the Start button, and choose Run.
Step 3 Key x:\MicroType-Single.EXE, where “x” is the letter of your CD-ROM drive, and tap ENTER/RETURN.
Step 4 Follow the instructions that appear on the screen to complete the installation process.
The installer will give the student options to install only the program or install both the program and the movies. For better performance, it is recommended that he/she install the program and the movies.
Step 5 After installing the software, store the disc in a secure location.
For more information on Installation, the user can refer the Installation Manual provided on the program disc.
MicroType 4 User Guide
Section 3 Getting Started With MicroType 4 10
SECTION 3 GETTING STARTED WITH MICROTYPE 4
3.1 Introduction to Getting Started This section includes the start-up instructions for the MicroType 4 software and explains how to create a new student record. Student Preferences and the log in procedures are also discussed to help the student. The student will follow the steps given below:
1. Turn on the computer.
2. Click the Start button on the Taskbar and select Programs. Select the South-Western Keyboarding program group and click MicroType 4. Click anywhere on the splash screen to remove it and bring up the Log In dialog box.
3. Select the appropriate name from the list that appears in the Log In dialog box. Then, enter the correct password to continue.
4. When using the program for the first time, click the New User button and complete the New Student Registration dialog box.
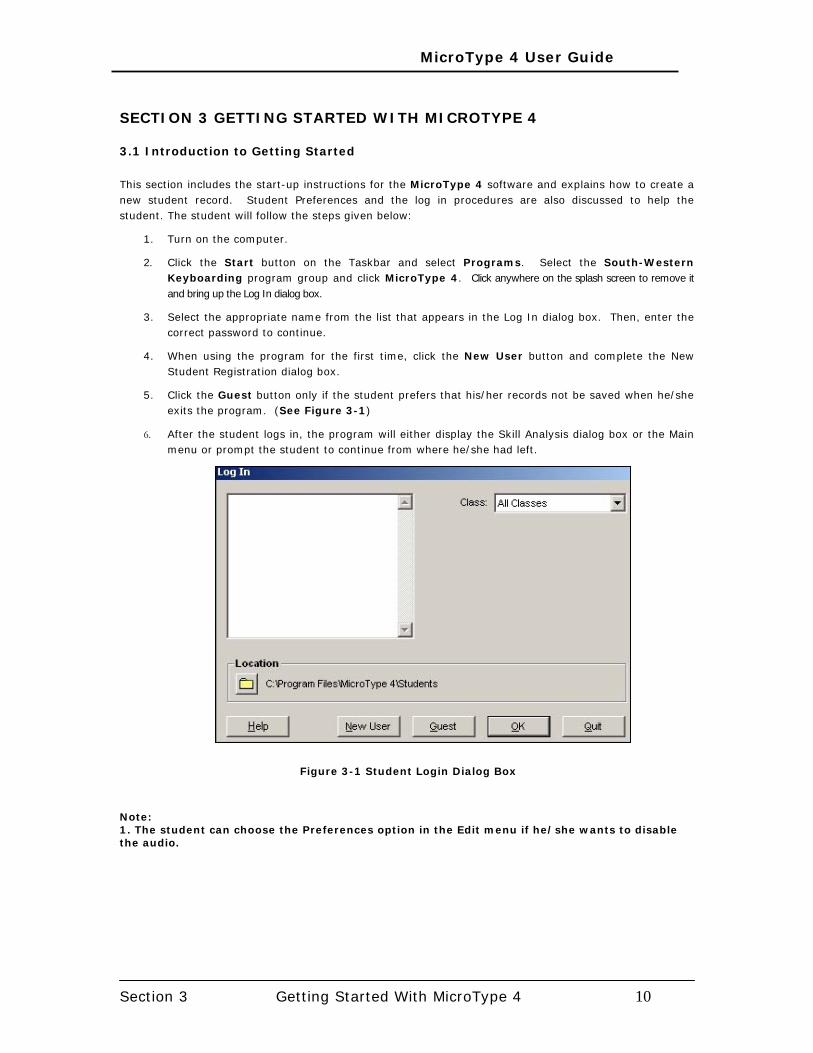
5. Click the Guest button only if the student prefers that his/her records not be saved when he/she exits the program. (See Figure 3-1)
6. After the student logs in, the program will either display the Skill Analysis dialog box or the Main menu or prompt the student to continue from where he/she had left.
Figure 3-1 Student Login Dialog Box
Note: 1. The student can choose the Preferences option in the Edit menu if he/she wants to disable the audio.
MicroType 4 User Guide
Section 3 Getting Started With MicroType 4 11
Assign Class
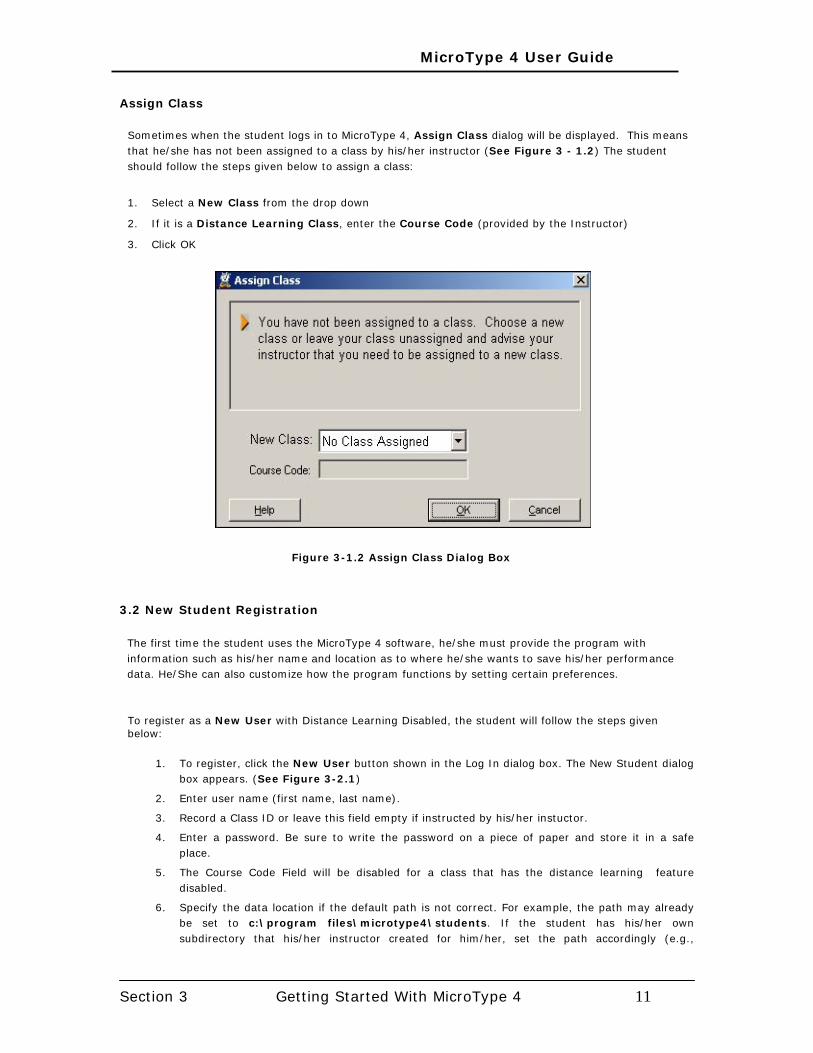
Sometimes when the student logs in to MicroType 4, Assign Class dialog will be displayed. This means that he/she has not been assigned to a class by his/her instructor (See Figure 3 - 1.2) The student should follow the steps given below to assign a class:
1. Select a New Class from the drop down
2. If it is a Distance Learning Class, enter the Course Code (provided by the Instructor)
3. Click OK
Figure 3-1.2 Assign Class Dialog Box
3.2 New Student Registration
The first time the student uses the MicroType 4 software, he/she must provide the program with information such as his/her name and location as to where he/she wants to save his/her performance data. He/She can also customize how the program functions by setting certain preferences. To register as a New User with Distance Learning Disabled, the student will follow the steps given below:
1. To register, click the New User button shown in the Log In dialog box. The New Student dialog box appears. (See Figure 3-2.1)
2. Enter user name (first name, last name).
3. Record a Class ID or leave this field empty if instructed by his/her instuctor.
4. Enter a password. Be sure to write the password on a piece of paper and store it in a safe place.
5. The Course Code Field will be disabled for a class that has the distance learning feature disabled.
6. Specify the data location if the default path is not correct. For example, the path may already be set to c:\program files\microtype4\students. If the student has his/her own subdirectory that his/her instructor created for him/her, set the path accordingly (e.g.,

MicroType 4 User Guide
Section 3 Getting Started With MicroType 4 12
c:\program files\microtype4\students\lopez). The student can click on the Folder button to browse through the directories. If he/she is saving to a floppy disk, insert a formatted disk into the drive. Select A:\ or B:\ for the data location depending on which drive holds his/her data disk.
7. Click the OK button to create a new student record.
Figure 3-2.1 New Student Dialog Box without Distance Learning Enabled
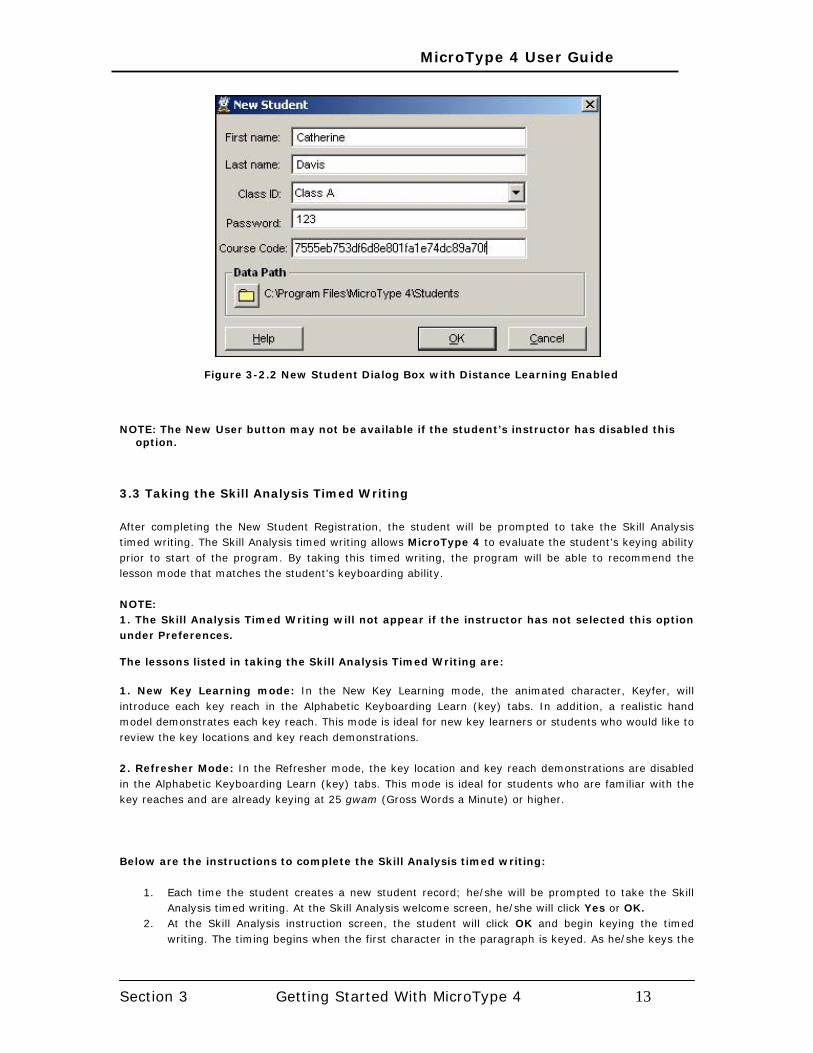
To register as a New User for a Distance Learning-enabled class, the student will follow the steps given below:
1. To register, click the New User button shown in the Log In dialog box. The New Student dialog box appears. (See Figure 3-2.2)
2. Enter your name (first name, last name).
3. Record a Class ID (A distance learning class)
4. Enter a password. Be sure to write the password on a piece of paper and store it in a safe place.
5. Enter the course code provided by his/her instructor.
6. Specify the data location if the default path is not correct. For example, the path may already be set to c:\program files\microtype4\students. If the student has his/her own subdirectory that the instructor created, set the path accordingly (e.g., c:\program files\microtype4\students\lopez). The student can click on the Folder button to browse through the directories. If he/she is saving to a floppy disk, insert a formatted disk into the drive. Select A:\ or B:\ for the data location depending on which drive holds his/her data disk.
7. Click the OK button to create a new student record.
MicroType 4 User Guide
Section 3 Getting Started With MicroType 4 13
Figure 3-2.2 New Student Dialog Box with Distance Learning Enabled
NOTE: The New User button may not be available if the student’s instructor has disabled this option.
3.3 Taking the Skill Analysis Timed Writing After completing the New Student Registration, the student will be prompted to take the Skill Analysis timed writing. The Skill Analysis timed writing allows MicroType 4 to evaluate the student’s keying ability prior to start of the program. By taking this timed writing, the program will be able to recommend the lesson mode that matches the student’s keyboarding ability.
NOTE: 1. The Skill Analysis Timed Writing will not appear if the instructor has not selected this option under Preferences.
The lessons listed in taking the Skill Analysis Timed Writing are:
1. New Key Learning mode: In the New Key Learning mode, the animated character, Keyfer, will introduce each key reach in the Alphabetic Keyboarding Learn (key) tabs. In addition, a realistic hand
model demonstrates each key reach. This mode is ideal for new key learners or students who would like to review the key locations and key reach demonstrations. 2. Refresher Mode: In the Refresher mode, the key location and key reach demonstrations are disabled in the Alphabetic Keyboarding Learn (key) tabs. This mode is ideal for students who are familiar with the key reaches and are already keying at 25 gwam (Gross Words a Minute) or higher. Below are the instructions to complete the Skill Analysis timed writing:
1. Each time the student creates a new student record; he/she will be prompted to take the Skill Analysis timed writing. At the Skill Analysis welcome screen, he/she will click Yes or OK.
2. At the Skill Analysis instruction screen, the student will click OK and begin keying the timed writing. The timing begins when the first character in the paragraph is keyed. As he/she keys the
MicroType 4 User Guide
Section 3 Getting Started With MicroType 4 14
writing, the text will scroll at a pace that matches his/her keying speed. The text will scroll only as fast as he/she keys.
3. When time is up, the program will display the student’s gwam rate and number of errors. He/she will click OK, and then click the Print button to print the results or click the back icon to go back to the Main menu.
4. When the student has completed the Skill Analysis timed writing, the program will recommend a lesson mode.
5. He/she will click OK to continue to the keyboarding lessons.
The student can take the Skill Analysis timed writing again by clicking Skill Analysis from the Edit menu on the tool bar. Repeating the Skill Analysis timed writing can help him/her to measure his/her progress while working through MicroType 4. A Skill Analysis Summary Report is available for the student by clicking Summary Report from the Reports menu.
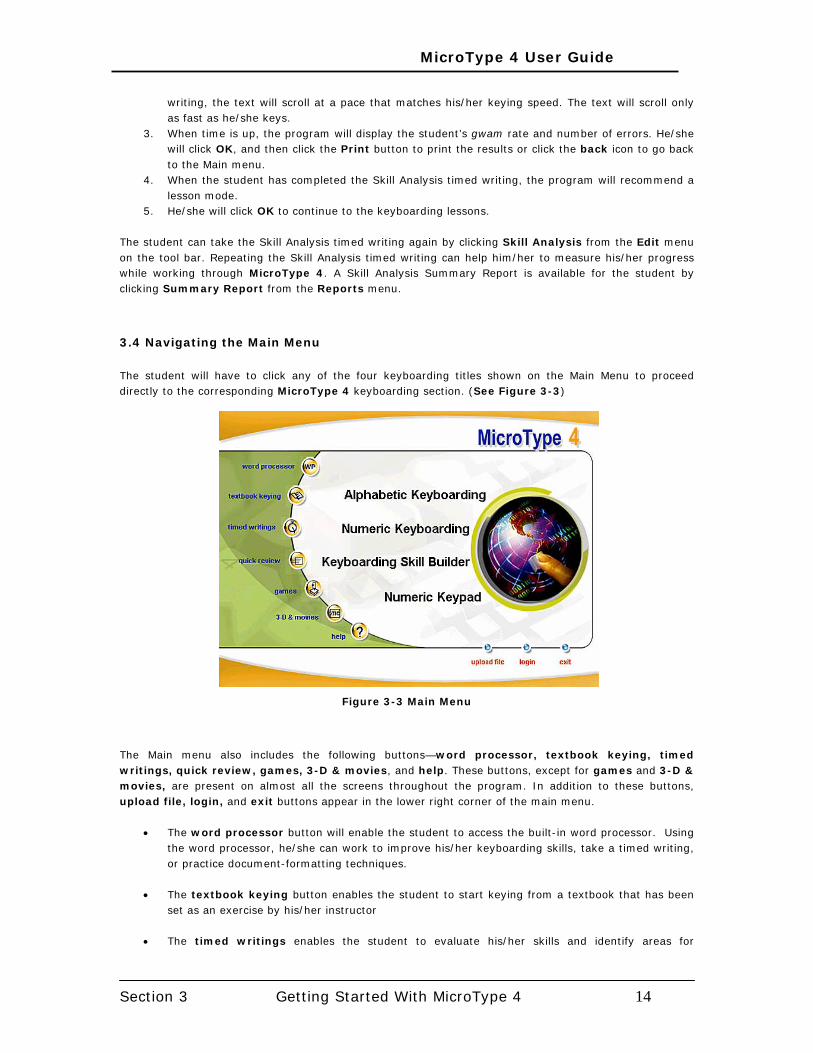
3.4 Navigating the Main Menu The student will have to click any of the four keyboarding titles shown on the Main Menu to proceed directly to the corresponding MicroType 4 keyboarding section. (See Figure 3-3)
Figure 3-3 Main Menu
The Main menu also includes the following buttons—word processor, textbook keying, timed writings, quick review, games, 3-D & movies, and help. These buttons, except for games and 3-D & movies, are present on almost all the screens throughout the program. In addition to these buttons, upload file, login, and exit buttons appear in the lower right corner of the main menu.
• The word processor button will enable the student to access the built-in word processor. Using the word processor, he/she can work to improve his/her keyboarding skills, take a timed writing, or practice document-formatting techniques.
• The textbook keying button enables the student to start keying from a textbook that has been
set as an exercise by his/her instructor • The timed writings enables the student to evaluate his/her skills and identify areas for
MicroType 4 User Guide
Section 3 Getting Started With MicroType 4 15
additional practice. Timed Writings measure both speed and accuracy. Besides, timed writings also provide extensive error analysis
• The quick review button allows the student to practice a particular technique area
• The games in MicroType 4 provide fun ways to improve keyboarding skills. The games button
enables the student to choose a game
• The movies discuss keyboarding issues and demonstrate various keyboarding techniques. The 3-D & movies button enables the student to select a movie. He/she can use the buttons below a movie to pause the movie, or jump to the beginning or end of the movie. To exit the movie, the student will click the back button
• MicroType 4 has 3-D viewers that let the student interactively manipulate three-dimensional
keyboarding scenes. The 3-D & movies button enables the student to access a viewer. The mouse cursor or the arrow keys enables the student to rotate the scene
• The student can always click the help button to display on-line help information. The help button
appears on almost every screen throughout the program. Whenever the student needs assistance with a particular feature of the program, the on-line help is always available
• The exit button enables the student to exit the program. He/she can also quit the program by
choosing Exit from the File menu
• The login button displays the Log In dialog box.
• Click upload file button electronically transfers the student’s reports to the central database, from where the Instructor will access the reports through the Internet using Web Reporter
3.5 Quick Review The Quick Review section presents drill lines for the student to key. If he/she meets the accuracy requirement, the actual rate (orange) and the goal rate (yellow) appear in the upper right corner of the notebook. The goal rate is two gwam higher than the actual rate. The program challenges the student to key the same line at or above the goal rate (yellow). If he/she meets or exceeds the goal, the new rate appears in green. Otherwise, the program displays the gwam in red and prompts the student to try again to reach the goal rate. The student can access Quick Review from the Main menu by clicking the Quick Review button. The Quick Review feature lets the student practice his/her keyboarding skills for Alphabetic Keys, Numeric Keys, Easy Lines, ENTER/RETURN, SPACE BAR, SHIFT Keys, CAPS LOCK, and TAB Key.
The Quick Review Report displays the Average gwam for each section attempted. The Report includes the date of the attempt, and lists information for both current and previous attempts for each section. A BACKSPACE/DELETE icon appears next to the sections where the student used the BACKSPACE/DELETE key. To print the report, he/she has to click the Print button in the lower right corner of the notebook. The Quick Review Report will appear on screen. Click the Print button in the upper left corner to print.
NOTES:
1. The indicator in the lower left corner of the notebook shows the status of the BACKSPACE/DELETE key.
MicroType 4 User Guide
Section 3 Getting Started With MicroType 4 16
3.6 Textbook Keying
Textbook Keying allows to the student to improve his/her keyboarding skills by helping him/her to key in exercises from a textbook that has been downloaded by his/her instructor. This feature can be accessed by clicking on the Textbook Keying button that appears on the Main Menu and also on all the screens throughout the application. On completion of Textbook Keying, MicroType 4 displays the errors using the error analysis functions. The total number of errors and gwam are also displayed. NOTES: 1. Only an instructor will be able download/add a textbook. 2. The timer does not start until the student keys the first character in a drill line.
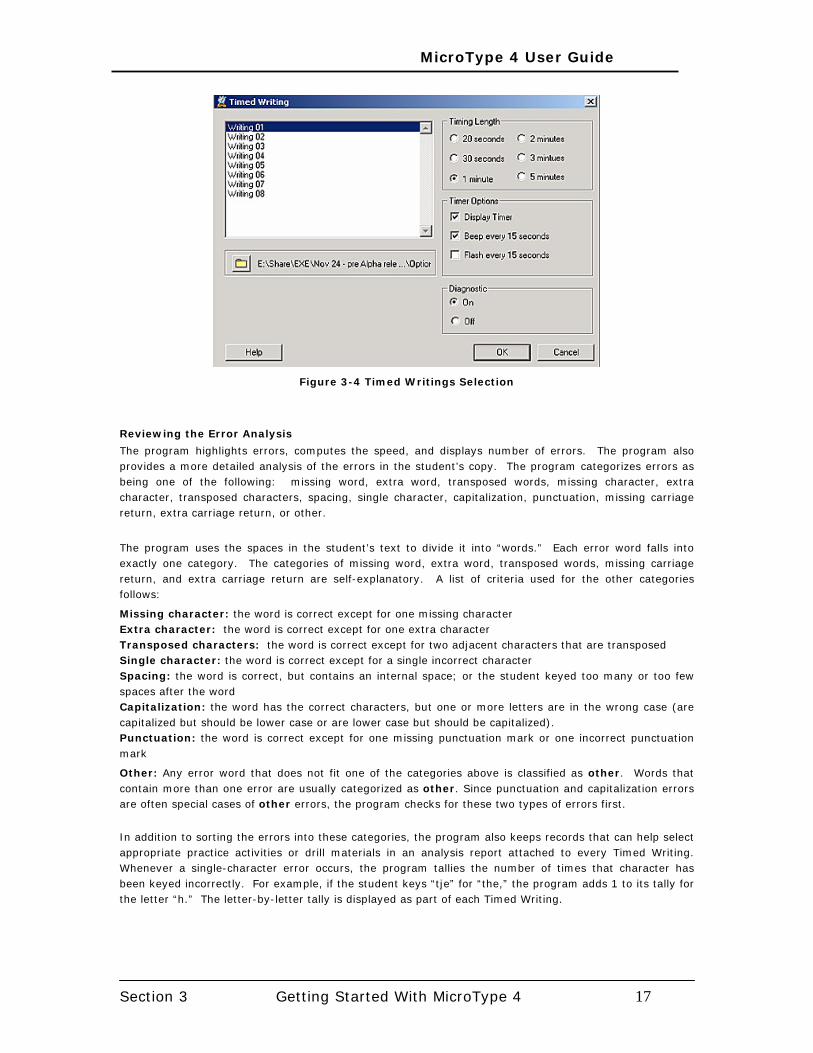
3.7 Timed Writings The program provides thirteen timed writings that can be used for evaluating the student’s skills and identifying possible areas for practice. Each writing can be used for a 1, 2, 3, or 5 minutes and 30 or 20 seconds timed writing.
Taking a Timed writing
After selecting the length of time and the timed writing (See Figure 3-4), as the student starts keying the writing, the text will scroll at a pace that matches his/her keying speed. The text will scroll only as fast as he/she keys. Once he/she finishes the timed writing or the time elapses, a message pops up prompting the student to go for second attempt, he/she taps Yes if he/she wants to continue. To print his/her timed writing, he/she clicks the Print icon that appears on the bottom right of the screen. This displays the timed writing report, then he/she clicks the Print button at the upper left corner of the page.
The BACKSPACE/DELETE key is available in the timed writings if the option has been turned on for the Keyboarding Skill Builder section.
When time has elapsed, the program highlights the errors and displays the student’s speed and number of errors. A message pops up prompting him/her to go for a second attempt The student taps Yes to continue taking the timed writing. The student should always tap ENTER/RETURN at the end of the last sentence. To end a timed writing before time expires, he/she taps the ESC key or clicks the back icon at the bottom right corner of the screen.
MicroType 4 User Guide
Section 3 Getting Started With MicroType 4 17
Figure 3-4 Timed Writings Selection
Reviewing the Error Analysis
The program highlights errors, computes the speed, and displays number of errors. The program also provides a more detailed analysis of the errors in the student’s copy. The program categorizes errors as being one of the following: missing word, extra word, transposed words, missing character, extra character, transposed characters, spacing, single character, capitalization, punctuation, missing carriage return, extra carriage return, or other.
The program uses the spaces in the student’s text to divide it into “words.” Each error word falls into exactly one category. The categories of missing word, extra word, transposed words, missing carriage return, and extra carriage return are self-explanatory. A list of criteria used for the other categories follows:
Missing character: the word is correct except for one missing character Extra character: the word is correct except for one extra character Transposed characters: the word is correct except for two adjacent characters that are transposed Single character: the word is correct except for a single incorrect character Spacing: the word is correct, but contains an internal space; or the student keyed too many or too few spaces after the word Capitalization: the word has the correct characters, but one or more letters are in the wrong case (are capitalized but should be lower case or are lower case but should be capitalized). Punctuation: the word is correct except for one missing punctuation mark or one incorrect punctuation mark
Other: Any error word that does not fit one of the categories above is classified as other. Words that contain more than one error are usually categorized as other. Since punctuation and capitalization errors are often special cases of other errors, the program checks for these two types of errors first.
In addition to sorting the errors into these categories, the program also keeps records that can help select appropriate practice activities or drill materials in an analysis report attached to every Timed Writing. Whenever a single-character error occurs, the program tallies the number of times that character has been keyed incorrectly. For example, if the student keys “tje” for “the,” the program adds 1 to its tally for the letter “h.” The letter-by-letter tally is displayed as part of each Timed Writing.
MicroType 4 User Guide
Section 3 Getting Started With MicroType 4 18
The program also keeps tallies for pairs of letters that are frequently interchanged or transposed. Whenever the student’s error fits one of these categories, the tallies are updated. The program keeps records of the following: Interchanged pairs: t/r, m/n, o/i, a/s, e/i, s/d, r/e, v/b, e/d, o/l, g/f Transposed pairs: a/s, e/r, o/p, i/o, o/l
NOTE: 1. No error analysis algorithm is 100 percent accurate all the time. The program’s algorithm is very accurate, but it may on occasion give an incorrect error count or put an error in the wrong category. Such an occurrence is most likely to happen when there are two or more errors in a row.
Printing a Timed writing
To print the student’s timed writing, he/she has to click the Print icon that appears on the bottom right of the screen. This displays the timed writing report, then he/she has to click the Print button at the upper left corner of the page.

MicroType 4 User Guide
Section 4 Alphabetic Keyboarding 19
SECTION 4 ALPHABETIC KEYBOARDING
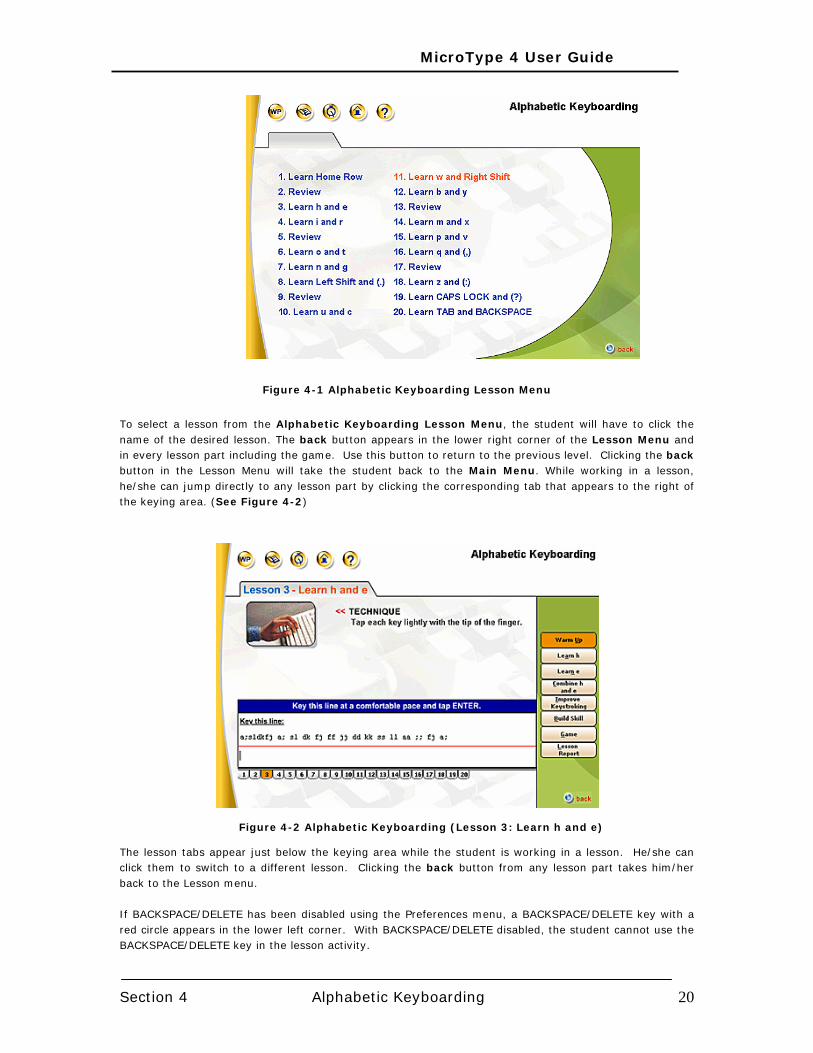
4.1 Introduction To Alphabetic Keyboarding The Alphabetic Keyboarding section consists of 20 lessons. Fifteen of the lessons teach the alphabetic keys and basic punctuation keys at the rate of two keys per lesson (except Lesson 1, which teaches ten keys). Five lessons, interspersed with the new-key lessons, provide a review—and a rest -- for learners. Each lesson can be completed in approximately 20-25 minutes. On average, one lesson should be completed in each practice session—in the sequence presented. Once keys and techniques have been presented, they are used in the remaining lessons. Therefore, skipping ahead forces the use of key reaches and techniques that have not yet been presented. The keyboarding software records which lessons or lesson parts the student has completed as well as the speeds and keying lines for Build Skill activities.
4.2 Key Presentation
The lessons and the keys taught are listed below:
Lesson 1: Learn Home Row
Lesson 2: Review
Lesson 3: Learn h and e
Lesson 4: Learn i and r
Lesson 5: Review
Lesson 6: Learn o and t
Lesson 7: Learn n and g
Lesson 8: Learn Left Shift and (.)
Lesson 9: Review
Lesson 10: Learn u and c
Lesson 11: Learn w and Right Shift
Lesson 12: Learn b and y
Lesson 13: Review
Lesson 14: Learn m and x
Lesson 15: Learn p and v
Lesson 16: Learn q and (,)
Lesson 17: Review
Lesson 18: Learn z and (:)
Lesson 19: Learn CAPS LOCK and (?)
Lesson 20: Learn TAB and BACKSPACE/DELETE
4.3 Navigating Alphabetic Keyboarding Learning to navigate the keyboarding software is very easy since the student can perform almost every operation by simply clicking the buttons and controls that appear throughout the program. Except for Reports, he/she really doesn’t need to use the menu bar options. All of the lessons in the Alphabetic Keyboarding section (See Figure 4-1) utilize the same navigation techniques. Once the student works through a few lessons, he/she will have mastered most of the software’s capabilities. The Alphabetic Keyboarding Lesson menu contains word processor, textbook keying, timed writings, home, and help buttons in the upper left corner. These buttons make navigation across the software faster and effortless.
MicroType 4 User Guide
Section 4 Alphabetic Keyboarding 20
Figure 4-1 Alphabetic Keyboarding Lesson Menu
To select a lesson from the Alphabetic Keyboarding Lesson Menu, the student will have to click the name of the desired lesson. The back button appears in the lower right corner of the Lesson Menu and in every lesson part including the game. Use this button to return to the previous level. Clicking the back button in the Lesson Menu will take the student back to the Main Menu. While working in a lesson, he/she can jump directly to any lesson part by clicking the corresponding tab that appears to the right of the keying area. (See Figure 4-2)
Figure 4-2 Alphabetic Keyboarding (Lesson 3: Learn h and e)
The lesson tabs appear just below the keying area while the student is working in a lesson. He/she can click them to switch to a different lesson. Clicking the back button from any lesson part takes him/her back to the Lesson menu. If BACKSPACE/DELETE has been disabled using the Preferences menu, a BACKSPACE/DELETE key with a red circle appears in the lower left corner. With BACKSPACE/DELETE disabled, the student cannot use the BACKSPACE/DELETE key in the lesson activity.
MicroType 4 User Guide
Section 4 Alphabetic Keyboarding 21
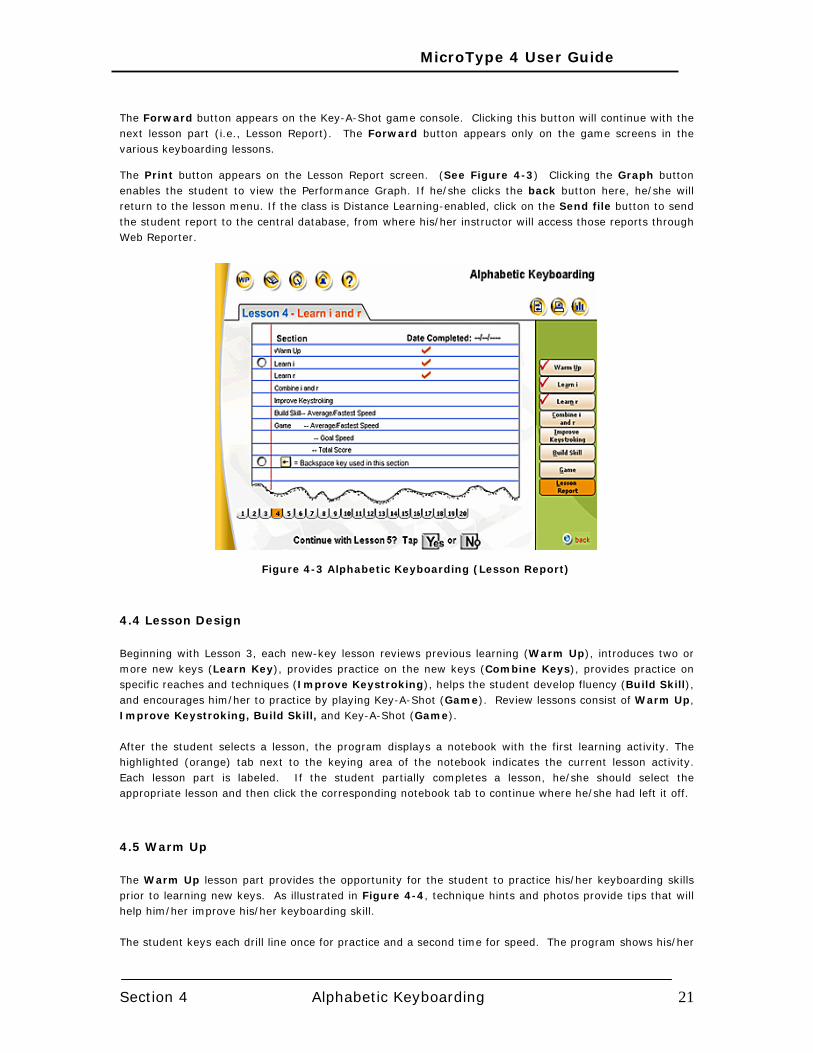
The Forward button appears on the Key-A-Shot game console. Clicking this button will continue with the next lesson part (i.e., Lesson Report). The Forward button appears only on the game screens in the various keyboarding lessons.
The Print button appears on the Lesson Report screen. (See Figure 4-3) Clicking the Graph button enables the student to view the Performance Graph. If he/she clicks the back button here, he/she will return to the lesson menu. If the class is Distance Learning-enabled, click on the Send file button to send the student report to the central database, from where his/her instructor will access those reports through Web Reporter.
Figure 4-3 Alphabetic Keyboarding (Lesson Report)
4.4 Lesson Design Beginning with Lesson 3, each new-key lesson reviews previous learning (Warm Up), introduces two or more new keys (Learn Key), provides practice on the new keys (Combine Keys), provides practice on specific reaches and techniques (Improve Keystroking), helps the student develop fluency (Build Skill), and encourages him/her to practice by playing Key-A-Shot (Game). Review lessons consist of Warm Up, Improve Keystroking, Build Skill, and Key-A-Shot (Game). After the student selects a lesson, the program displays a notebook with the first learning activity. The highlighted (orange) tab next to the keying area of the notebook indicates the current lesson activity. Each lesson part is labeled. If the student partially completes a lesson, he/she should select the appropriate lesson and then click the corresponding notebook tab to continue where he/she had left it off.
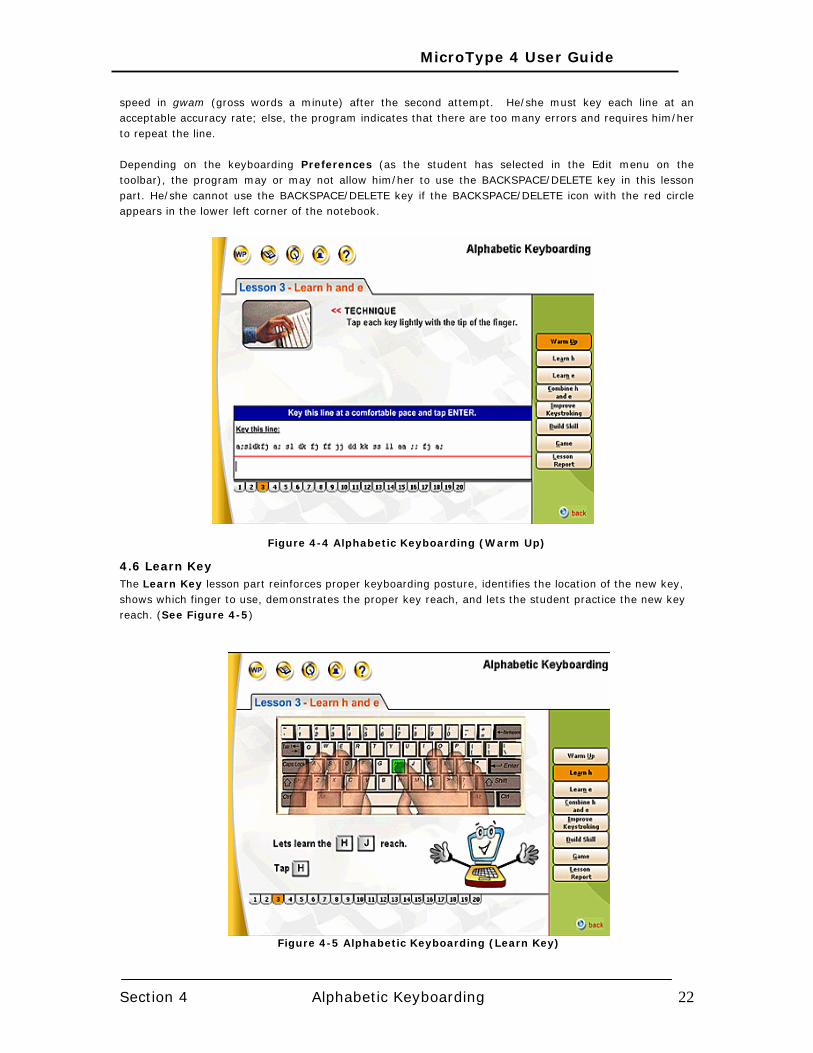
4.5 Warm Up The Warm Up lesson part provides the opportunity for the student to practice his/her keyboarding skills prior to learning new keys. As illustrated in Figure 4-4, technique hints and photos provide tips that will help him/her improve his/her keyboarding skill. The student keys each drill line once for practice and a second time for speed. The program shows his/her
MicroType 4 User Guide
Section 4 Alphabetic Keyboarding 22
speed in gwam (gross words a minute) after the second attempt. He/she must key each line at an acceptable accuracy rate; else, the program indicates that there are too many errors and requires him/her to repeat the line.
Depending on the keyboarding Preferences (as the student has selected in the Edit menu on the toolbar), the program may or may not allow him/her to use the BACKSPACE/DELETE key in this lesson part. He/she cannot use the BACKSPACE/DELETE key if the BACKSPACE/DELETE icon with the red circle appears in the lower left corner of the notebook.
Figure 4-4 Alphabetic Keyboarding (Warm Up)
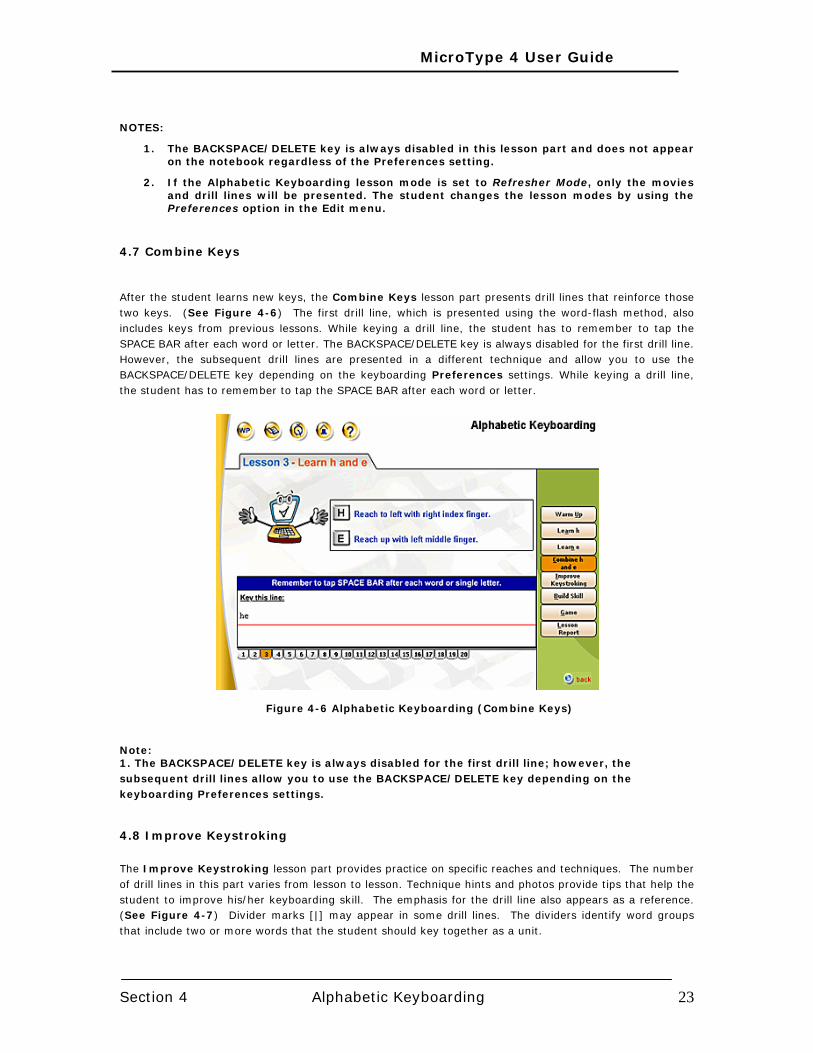
4.6 Learn Key The Learn Key lesson part reinforces proper keyboarding posture, identifies the location of the new key, shows which finger to use, demonstrates the proper key reach, and lets the student practice the new key reach. (See Figure 4-5)
Figure 4-5 Alphabetic Keyboarding (Learn Key)
MicroType 4 User Guide
Section 4 Alphabetic Keyboarding 23
NOTES:
1. The BACKSPACE/DELETE key is always disabled in this lesson part and does not appear on the notebook regardless of the Preferences setting.
2. If the Alphabetic Keyboarding lesson mode is set to Refresher Mode, only the movies and drill lines will be presented. The student changes the lesson modes by using the Preferences option in the Edit menu.
4.7 Combine Keys
After the student learns new keys, the Combine Keys lesson part presents drill lines that reinforce those two keys. (See Figure 4-6) The first drill line, which is presented using the word-flash method, also includes keys from previous lessons. While keying a drill line, the student has to remember to tap the SPACE BAR after each word or letter. The BACKSPACE/DELETE key is always disabled for the first drill line. However, the subsequent drill lines are presented in a different technique and allow you to use the BACKSPACE/DELETE key depending on the keyboarding Preferences settings. While keying a drill line, the student has to remember to tap the SPACE BAR after each word or letter.
Figure 4-6 Alphabetic Keyboarding (Combine Keys)
Note: 1. The BACKSPACE/DELETE key is always disabled for the first drill line; however, the subsequent drill lines allow you to use the BACKSPACE/DELETE key depending on the keyboarding Preferences settings.
4.8 Improve Keystroking
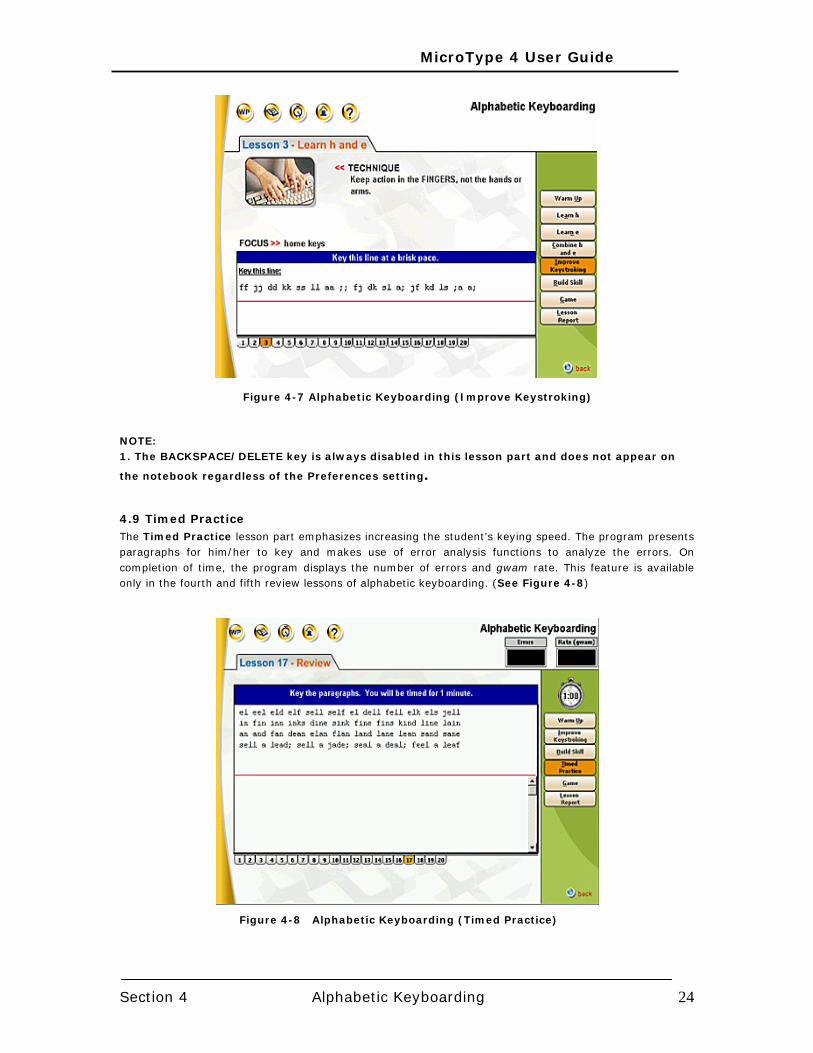
The Improve Keystroking lesson part provides practice on specific reaches and techniques. The number of drill lines in this part varies from lesson to lesson. Technique hints and photos provide tips that help the student to improve his/her keyboarding skill. The emphasis for the drill line also appears as a reference. (See Figure 4-7) Divider marks [|] may appear in some drill lines. The dividers identify word groups that include two or more words that the student should key together as a unit.
MicroType 4 User Guide
Section 4 Alphabetic Keyboarding 24
Figure 4-7 Alphabetic Keyboarding (Improve Keystroking)
NOTE: 1. The BACKSPACE/DELETE key is always disabled in this lesson part and does not appear on
the notebook regardless of the Preferences setting.
4.9 Timed Practice The Timed Practice lesson part emphasizes increasing the student’s keying speed. The program presents paragraphs for him/her to key and makes use of error analysis functions to analyze the errors. On completion of time, the program displays the number of errors and gwam rate. This feature is available only in the fourth and fifth review lessons of alphabetic keyboarding. (See Figure 4-8)
Figure 4-8 Alphabetic Keyboarding (Timed Practice)
MicroType 4 User Guide
Section 4 Alphabetic Keyboarding 25
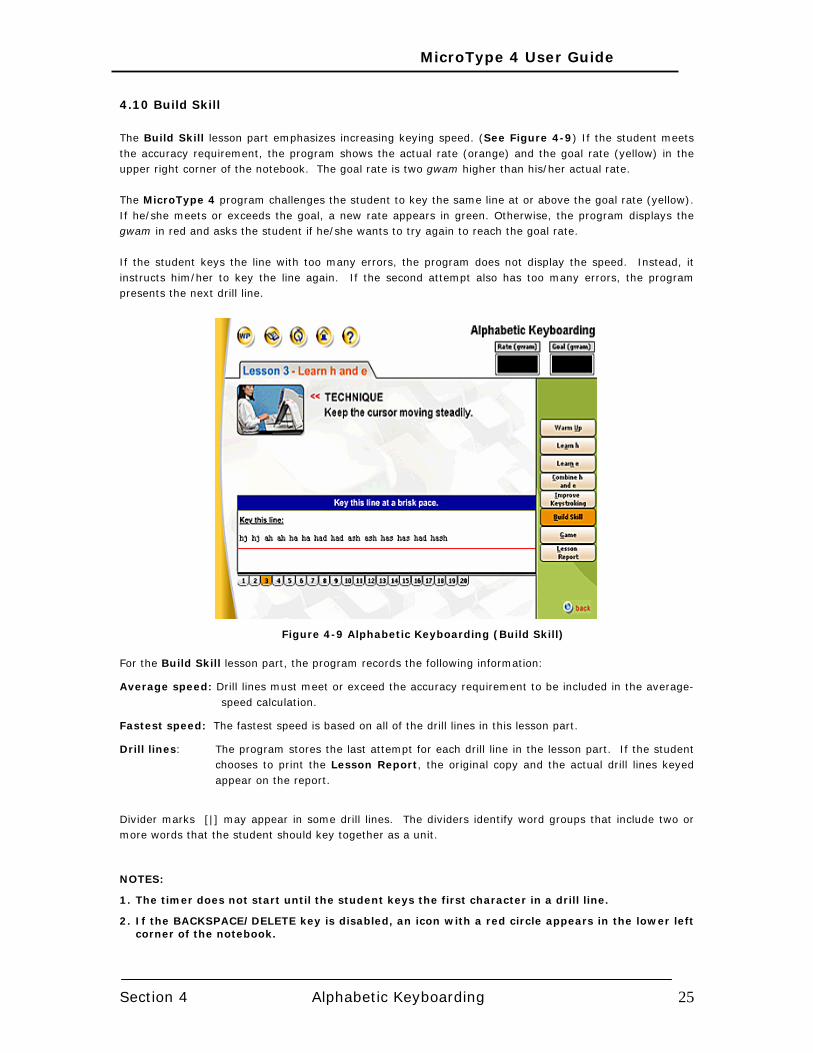
4.10 Build Skill The Build Skill lesson part emphasizes increasing keying speed. (See Figure 4-9) If the student meets the accuracy requirement, the program shows the actual rate (orange) and the goal rate (yellow) in the upper right corner of the notebook. The goal rate is two gwam higher than his/her actual rate. The MicroType 4 program challenges the student to key the same line at or above the goal rate (yellow). If he/she meets or exceeds the goal, a new rate appears in green. Otherwise, the program displays the gwam in red and asks the student if he/she wants to try again to reach the goal rate. If the student keys the line with too many errors, the program does not display the speed. Instead, it instructs him/her to key the line again. If the second attempt also has too many errors, the program presents the next drill line.
Figure 4-9 Alphabetic Keyboarding (Build Skill)
For the Build Skill lesson part, the program records the following information:
Average speed: Drill lines must meet or exceed the accuracy requirement to be included in the average-speed calculation.
Fastest speed: The fastest speed is based on all of the drill lines in this lesson part.
Drill lines: The program stores the last attempt for each drill line in the lesson part. If the student chooses to print the Lesson Report, the original copy and the actual drill lines keyed appear on the report.
Divider marks [|] may appear in some drill lines. The dividers identify word groups that include two or more words that the student should key together as a unit.
NOTES:
1. The timer does not start until the student keys the first character in a drill line.
2. If the BACKSPACE/DELETE key is disabled, an icon with a red circle appears in the lower left corner of the notebook.

MicroType 4 User Guide
Section 4 Alphabetic Keyboarding 26
3. MicroType 4 stores only the most recent keying information if the student completes this lesson part more than once.
4.11 Game (Key-A-Shot) The object of the Key-A-Shot game is for the student to shoot as many balls as he/she can through the hoop by keying quickly and accurately. Points are earned for each shot that he/she makes. By playing the Key-A-Shot game, he/she can have fun while improving his/her keyboarding skill. (See Figure 4-10)
Figure 4-10 Alphabetic Keyboarding (Key-A-Shot)
Beginning a New Game: The gwam goal for a game is approximately 90% of the average speed that the student attained in the Alphabetic Keyboarding Build Skill lesson parts. If he/she hasn’t completed the Build Skill lesson part, the program uses the default goal of 15 words per minute. The score area to the right of the screen shows the following information: Score, Best Score, gwam rate, and gwam goal. As he/she plays the game, a basketball is shot toward the hoop each time a word is keyed correctly. If the student keys the word at or above his/her gwam goal, he/she will make the shot and earn two points. If he/she keys in a word below his/her gwam goal, or inconsistently, he/she will miss the shot. The student should always key each drill line as quickly and accurately as possible. The student should always tap the ENTER/RETURN key at the end of each drill line. If he/she makes too many errors in a drill line, his/her gwam rate will not be included in the final results. Delayed vs. Real-Time Mode: The student can play the game in delayed mode or in real-time mode. (See the Preferences option.) In Delayed Mode, the action occurs after he/she keys the entire drill line and taps ENTER/RETURN. Playing the game in Real-Time mode can be more challenging because it forces the student to emphasize each drill line. As soon as he/she keys a word correctly, the corresponding basketball is shot toward the hoop. Earning Points: When playing Key-A-Shot, the student earns 2 points for each basket he/she makes. He/she earns 20 bonus points for making all of the shots by keying the drill line accurately and meeting or exceeding his/her gwam goal. The student earns 10 bonus points for keying with 100% accuracy but
MicroType 4 User Guide
Section 4 Alphabetic Keyboarding 27
below his/her gwam goal. Earning medals: In addition to the points the student earns, he/she can also obtain a Gold, Silver, or Bronze medal based on his/her performance. The criteria for the medals can be customized and is set by the instructor. The MicroType 4 software keeps a list of the top ten scores for the Key-A-Shot game. Select the Top Ten Lists option in the Reports menu to display the list.
Game Over: The game ends after the student keys all of the drill sets. The program displays the goal speed, average speed, fastest speed, and total score. This information also appears on the Lesson Report. If the student plays the game more than once, MicroType 4 stores only the most recent score for each lesson.
Playing the Game Outside of the Lessons: The Key-A-Shot game is available outside of the lessons by clicking the games button from the Main Menu. The drill lines presented in the Key-A-Shot game outside of the lessons contain all of the alphabetic key reaches; therefore, the student should not begin using the Key-A-Shot game outside of the lessons until he/she has completed the Alphabetic Keyboarding lessons. The gwam goal is approximately 90% of the average speed that he/she has attained in all of the Build Skill parts completed in the Alphabetic Keyboarding lessons. If he/she did not complete a Build Skill part, the program uses the default goal of 15 words per minute.
NOTES:
1. The BACKSPACE/DELETE preference (on or off) used in the Alphabetic Keyboarding lesson also applies to the Key-A-Shot game.
2. The student must set the preferences before beginning a new game.
4.12 Lesson Report The Lesson Report shows the performance for each lesson. (See Figure 4-11) When the student completes the Warm Up, Learn Key, Combine Keys or Improve Keystroking part, a check mark appears next to that item on the report. In addition, the Lesson Report includes the average and fastest speeds for both the Build Skill part and the Key-A-Shot game. The drill lines keyed in the Build Skill section appear on the printed report. The Goal Speed and Total Score for the game are also displayed in the report

MicroType 4 User Guide
Section 4 Alphabetic Keyboarding 28
Figure 4-11 Alphabetic Keyboarding (Lesson Report)
A BACKSPACE/DELETE icon appears next to a lesson part if the student had used the
BACKSPACE/DELETE key. A Refresher Mode icon appears next to each Learn Key lesson part if he/she has completed the lesson part in Refresher Mode. To print the report, the student will have to click the Print button in the upper right corner of the notebook. The Lesson Report will appear on screen. He/she would click the Print button in the upper right corner to print. The Graph button enables the student to view the Performance Graph. A blue box appears around the number of the current lesson on the graph. Click on the Send file button to send the student reports to the central database, from where the instructor will access the student’s reports through Web Reporter.
4.13 Preferences
By setting Preferences, the student can control the following aspects of the Alphabetic Keyboarding section. The student can access his/her personal keyboarding options by choosing the Preferences option from the Edit menu on the tool bar. The Preferences are categorized by section. To change an option, he/she has to simply click the corresponding option.
General Preferences Alphabetic Keyboarding Preferences
• Show lesson movies • BACKSPACE/DELETE allowed
• Play movie audio • Game Delayed Action
• Play narration/effects Audio • Lesson Mode (New key learning/Refresher)
• Use Bookmark
• Two spaces after end punctuation
• Language (English/Spanish)
MicroType 4 User Guide
Section 5 Numeric Keyboarding 29
SECTION 5 NUMERIC KEYBOARDING
5.1 Introduction to Numeric Keyboarding The Numeric Keyboarding consists of 16 lessons. The lessons teach the figure keys and symbols/punctuation keys at the rate of two keys per lesson (except Lesson 15). A review lesson appears after the student learns all of the top-row figures and symbols. Each lesson requires approximately 20-25 minutes. On average, one lesson should be completed each practice session. Keys learned in early lessons are reused systematically in later lessons. Therefore, the student should complete the lessons in the appropriate sequence.
5.2 Key Presentation The lessons and the keys taught are listed as follows:
Lesson 1: Learn 8 and 1
Lesson 2: Learn 9 and 4
Lesson 3: Learn 0 and 5
Lesson 4: Learn 7 and 3
Lesson 5: Learn 6 and 2
Lesson 6: Review
Lesson 7: Learn / and $
Lesson 8: Learn % and -
Lesson 9: Learn # and &
Lesson 10: Learn (and)
Lesson 11: Learn ‘ and “
Lesson 12: Learn _ and *
Lesson 13: Learn @ and +
Lesson 14: Learn! and \
Lesson 15: Learn = and [ ]
Lesson 16 Learn > and <
5.3 Navigating Numeric Keyboarding All of the lessons in the Numeric Keyboarding section utilize the same navigation techniques. The buttons and other control features in this section are almost identical to the Alphabetic Keyboarding section. (For a more detailed description, see the Navigating Alphabetic Keyboarding in Section 4.3)
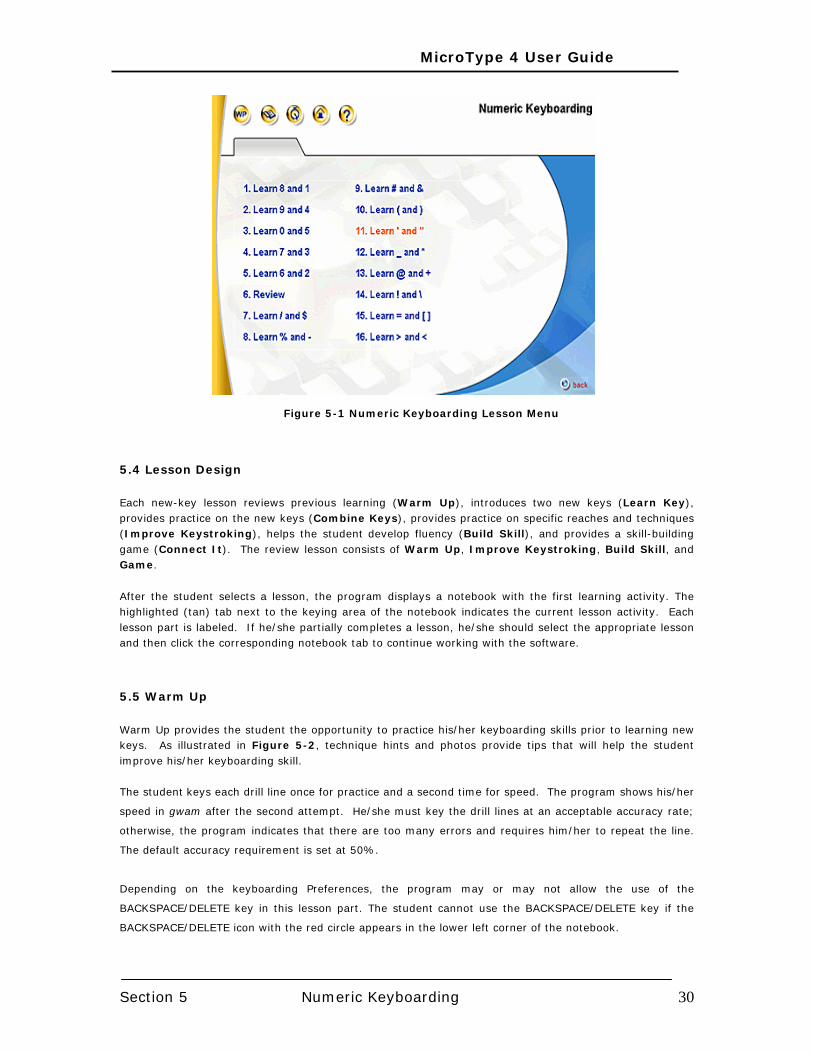
To select a lesson from the Numeric Keyboarding Lesson menu (See Figure 5-1), the student will click the name of the desired lesson. The back button appears on the Lesson menu and in every other lesson part including the game. The student can use this button to return to the previous menu. Clicking the back button in the Lesson Menu takes him/her back to the Main menu.
MicroType 4 User Guide
Section 5 Numeric Keyboarding 30
Figure 5-1 Numeric Keyboarding Lesson Menu
5.4 Lesson Design Each new-key lesson reviews previous learning (Warm Up), introduces two new keys (Learn Key), provides practice on the new keys (Combine Keys), provides practice on specific reaches and techniques (Improve Keystroking), helps the student develop fluency (Build Skill), and provides a skill-building game (Connect It). The review lesson consists of Warm Up, Improve Keystroking, Build Skill, and Game.
After the student selects a lesson, the program displays a notebook with the first learning activity. The highlighted (tan) tab next to the keying area of the notebook indicates the current lesson activity. Each lesson part is labeled. If he/she partially completes a lesson, he/she should select the appropriate lesson and then click the corresponding notebook tab to continue working with the software.
5.5 Warm Up Warm Up provides the student the opportunity to practice his/her keyboarding skills prior to learning new keys. As illustrated in Figure 5-2, technique hints and photos provide tips that will help the student improve his/her keyboarding skill.
The student keys each drill line once for practice and a second time for speed. The program shows his/her
speed in gwam after the second attempt. He/she must key the drill lines at an acceptable accuracy rate;
otherwise, the program indicates that there are too many errors and requires him/her to repeat the line.
The default accuracy requirement is set at 50%.
Depending on the keyboarding Preferences, the program may or may not allow the use of the
BACKSPACE/DELETE key in this lesson part. The student cannot use the BACKSPACE/DELETE key if the
BACKSPACE/DELETE icon with the red circle appears in the lower left corner of the notebook.

MicroType 4 User Guide
Section 5 Numeric Keyboarding 31
Figure 5-2 Numeric Keyboarding (Warm Up)
5.6 Learn Key The Learn Key lesson part reinforces proper keyboarding posture, identifies the location of the new key, shows which finger to use, demonstrates the proper key reach, and lets the student practice the new key reach. (See Figure 5-3)
Figure 5-3 Numeric Keyboarding (Learn Key)
MicroType 4 User Guide
Section 5 Numeric Keyboarding 32
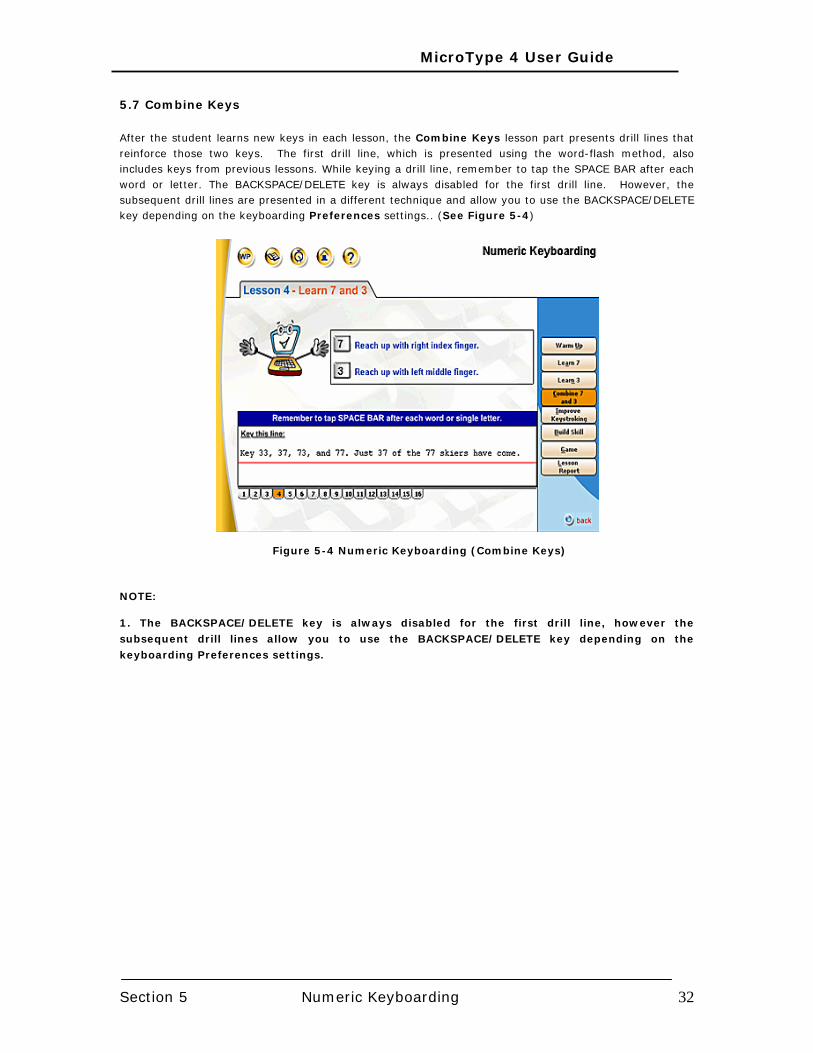
5.7 Combine Keys After the student learns new keys in each lesson, the Combine Keys lesson part presents drill lines that reinforce those two keys. The first drill line, which is presented using the word-flash method, also includes keys from previous lessons. While keying a drill line, remember to tap the SPACE BAR after each word or letter. The BACKSPACE/DELETE key is always disabled for the first drill line. However, the subsequent drill lines are presented in a different technique and allow you to use the BACKSPACE/DELETE key depending on the keyboarding Preferences settings.. (See Figure 5-4)
Figure 5-4 Numeric Keyboarding (Combine Keys)
NOTE:
1. The BACKSPACE/DELETE key is always disabled for the first drill line, however the subsequent drill lines allow you to use the BACKSPACE/DELETE key depending on the keyboarding Preferences settings.

MicroType 4 User Guide
Section 5 Numeric Keyboarding 33
5.8 Improve Keystroking The Improve Keystroking lesson part provides practice on specific reaches and techniques. The number of drill lines in this part varies from lesson to lesson. Technique hints and photos provide tips that help the student to improve his/her keyboarding skill. The emphasis for the drill line also appears. (See Figure 5-5) Divider marks [|] may appear in some drill lines. The dividers identify word groups that include two or more words that the student should key together as a unit.
Figure 5-5 Numeric Keyboarding (Improve Keystroking) NOTE: 1. The BACKSPACE/DELETE key is always disabled in this lesson part and does not appear on the notebook regardless of the Preferences setting.
5.9 Timed Practice
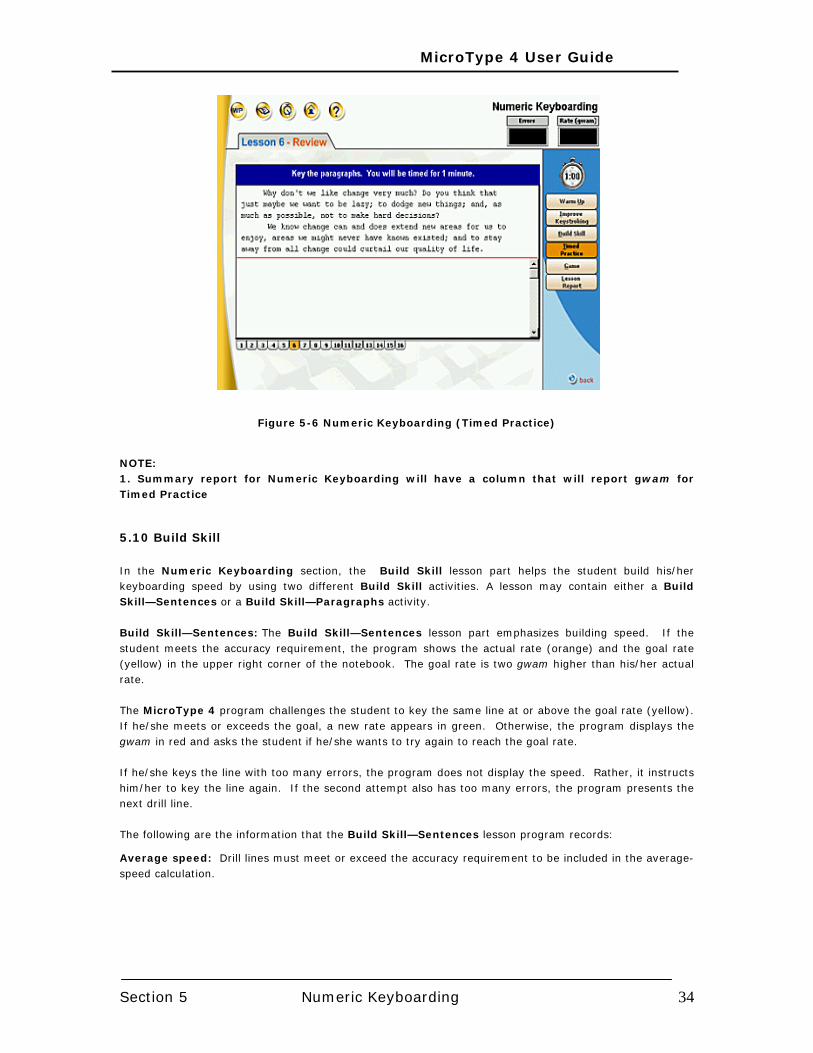
Timed Practice lesson part emphasizes increasing the student’s keying speed. The program presents paragraphs for the student to key and makes use of error analysis functions to analyze the errors. On completion of time, the program displays the number of errors and gwam rate. (See Figure 5-6)
MicroType 4 User Guide
Section 5 Numeric Keyboarding 34
Figure 5-6 Numeric Keyboarding (Timed Practice) NOTE: 1. Summary report for Numeric Keyboarding will have a column that will report gwam for Timed Practice
5.10 Build Skill In the Numeric Keyboarding section, the Build Skill lesson part helps the student build his/her keyboarding speed by using two different Build Skill activities. A lesson may contain either a Build Skill—Sentences or a Build Skill—Paragraphs activity.
Build Skill—Sentences: The Build Skill—Sentences lesson part emphasizes building speed. If the student meets the accuracy requirement, the program shows the actual rate (orange) and the goal rate (yellow) in the upper right corner of the notebook. The goal rate is two gwam higher than his/her actual rate. The MicroType 4 program challenges the student to key the same line at or above the goal rate (yellow). If he/she meets or exceeds the goal, a new rate appears in green. Otherwise, the program displays the gwam in red and asks the student if he/she wants to try again to reach the goal rate. If he/she keys the line with too many errors, the program does not display the speed. Rather, it instructs him/her to key the line again. If the second attempt also has too many errors, the program presents the next drill line. The following are the information that the Build Skill—Sentences lesson program records:
Average speed: Drill lines must meet or exceed the accuracy requirement to be included in the average-speed calculation.
MicroType 4 User Guide
Section 5 Numeric Keyboarding 35
Fastest speed: The fastest speed is based on all of the drill lines in this part.
Drill lines: The program stores the last attempt for each drill line in the lesson part. If the student chooses to print the Lesson Report, the original copy and the actual drill lines keyed appear on the report.
Divider marks [|] may appear in some drill lines. The dividers identify word groups that include two or more words that the student should key together as a unit.
NOTES:
1. The timer does not start until the student keys the first character in a drill line.
2. If the BACKSPACE/DELETE key is disabled, an icon with a red circle appears in the lower left corner of the notebook.
3. MicroType 4 stores only the most recent keying information if the student completes this lesson part more than once.
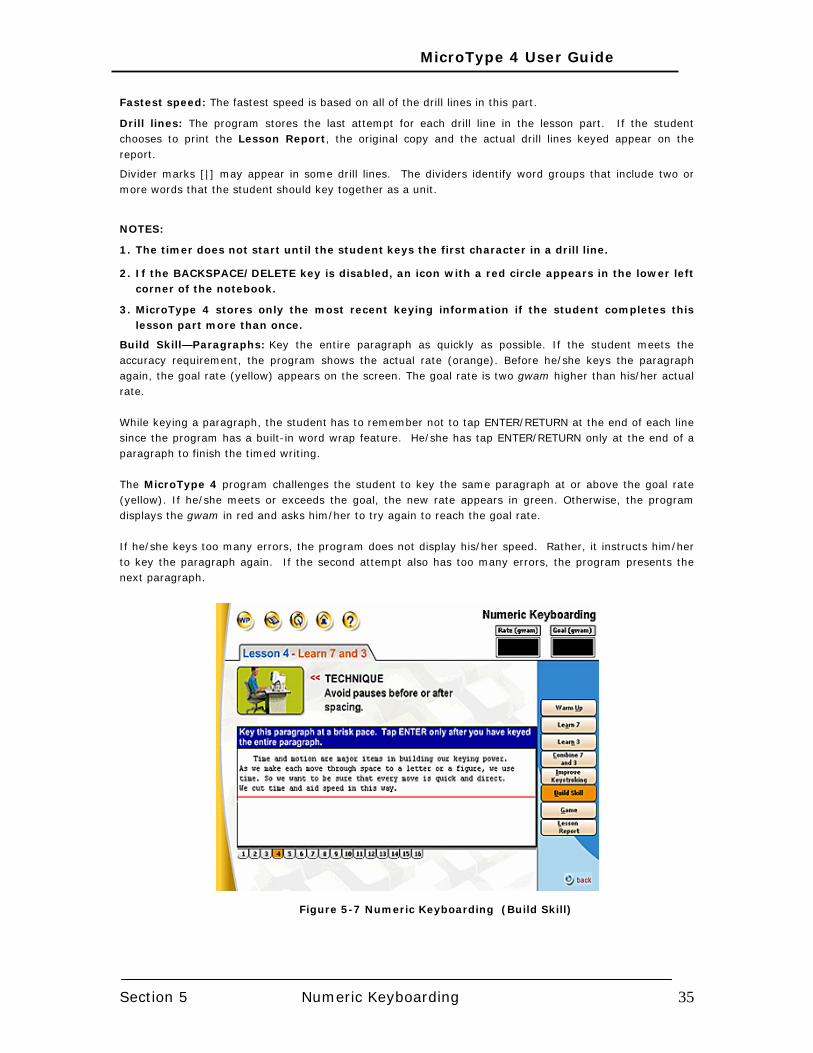
Build Skill—Paragraphs: Key the entire paragraph as quickly as possible. If the student meets the accuracy requirement, the program shows the actual rate (orange). Before he/she keys the paragraph again, the goal rate (yellow) appears on the screen. The goal rate is two gwam higher than his/her actual rate. While keying a paragraph, the student has to remember not to tap ENTER/RETURN at the end of each line since the program has a built-in word wrap feature. He/she has tap ENTER/RETURN only at the end of a paragraph to finish the timed writing. The MicroType 4 program challenges the student to key the same paragraph at or above the goal rate (yellow). If he/she meets or exceeds the goal, the new rate appears in green. Otherwise, the program displays the gwam in red and asks him/her to try again to reach the goal rate. If he/she keys too many errors, the program does not display his/her speed. Rather, it instructs him/her to key the paragraph again. If the second attempt also has too many errors, the program presents the next paragraph.
Figure 5-7 Numeric Keyboarding (Build Skill)
MicroType 4 User Guide
Section 5 Numeric Keyboarding 36
For the Build Skill—Paragraphs lesson part, the program records the following information:
Average speed: A paragraph must meet or exceed the accuracy requirement to be included in the average-speed calculation.
Fastest speed: The fastest speed is based on all of the paragraphs in this lesson part.
Paragraphs: The program stores the last attempt for a paragraph. If the student chooses to print the Lesson Report, the original copy and the actual paragraphs keyed appear on the report.
NOTES:
1. The timer does not start until the student taps the TAB key.
2. If the BACKSPACE/DELETE key is disabled, an icon with a red circle appears in the lower left corner of the notebook.
3. MicroType 4 stores only the most recent keying information if the student completes the lesson part more than once.
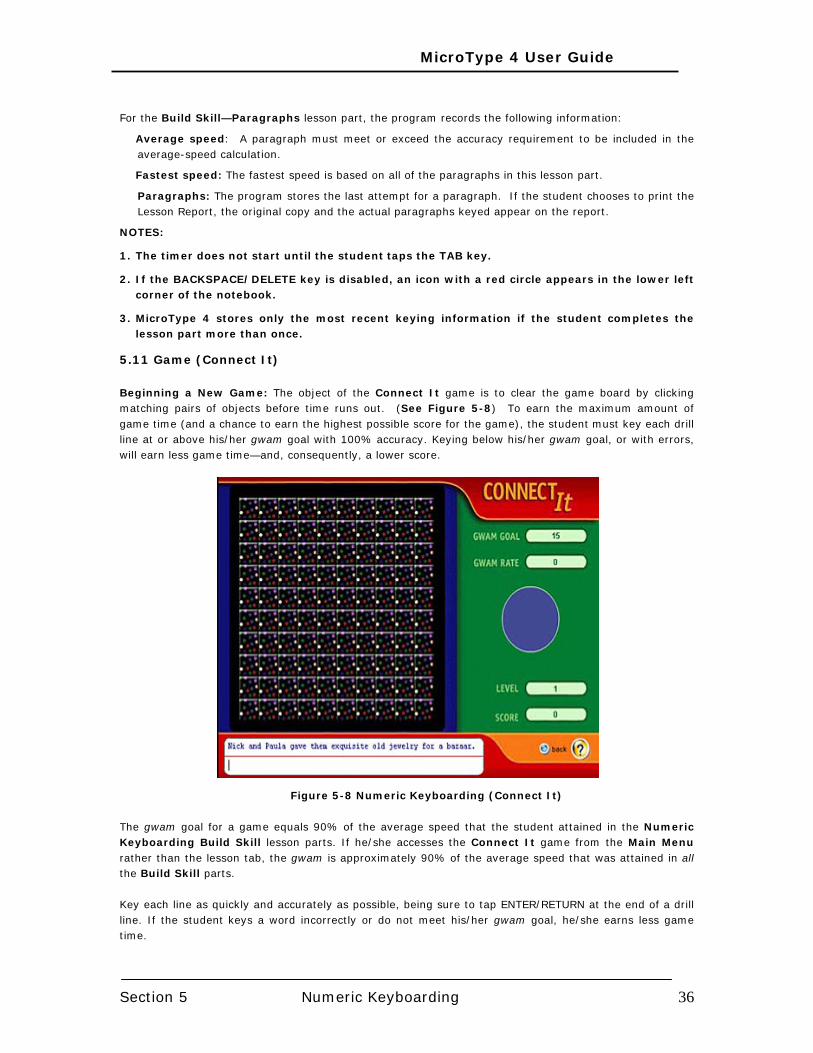
5.11 Game (Connect It) Beginning a New Game: The object of the Connect It game is to clear the game board by clicking matching pairs of objects before time runs out. (See Figure 5-8) To earn the maximum amount of game time (and a chance to earn the highest possible score for the game), the student must key each drill line at or above his/her gwam goal with 100% accuracy. Keying below his/her gwam goal, or with errors, will earn less game time—and, consequently, a lower score.
Figure 5-8 Numeric Keyboarding (Connect It)
The gwam goal for a game equals 90% of the average speed that the student attained in the Numeric Keyboarding Build Skill lesson parts. If he/she accesses the Connect It game from the Main Menu rather than the lesson tab, the gwam is approximately 90% of the average speed that was attained in all the Build Skill parts.
Key each line as quickly and accurately as possible, being sure to tap ENTER/RETURN at the end of a drill line. If the student keys a word incorrectly or do not meet his/her gwam goal, he/she earns less game time.
MicroType 4 User Guide
Section 5 Numeric Keyboarding 37
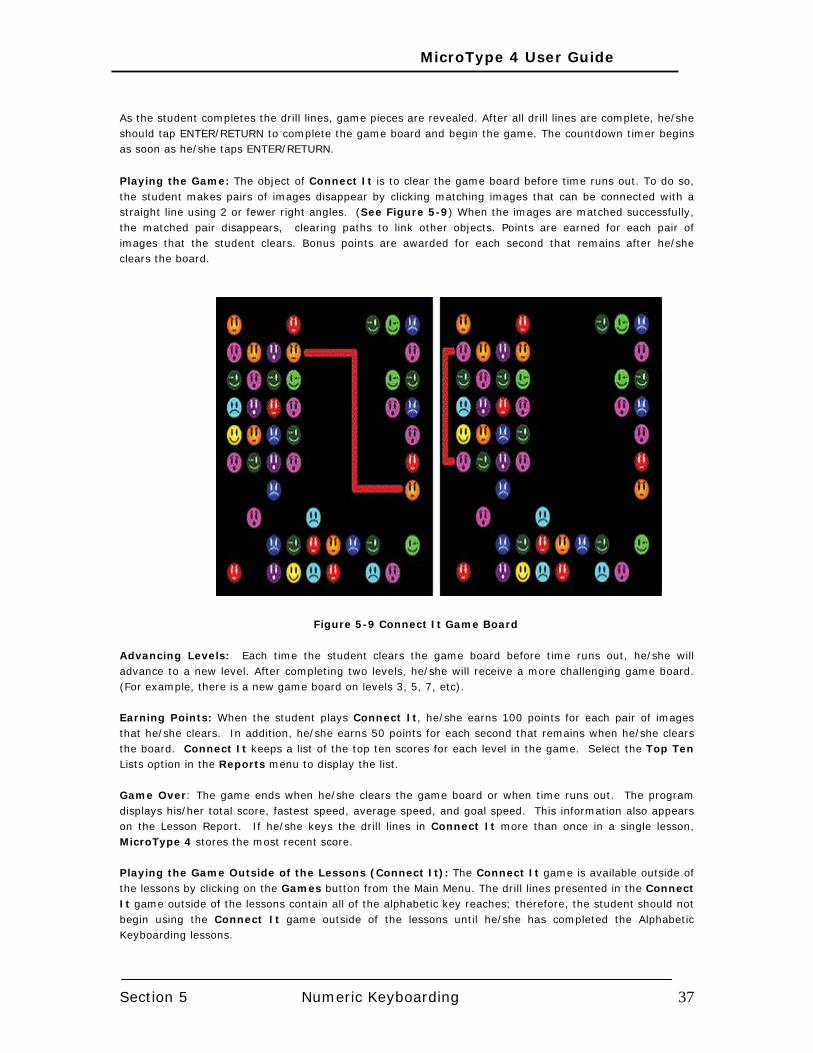
As the student completes the drill lines, game pieces are revealed. After all drill lines are complete, he/she should tap ENTER/RETURN to complete the game board and begin the game. The countdown timer begins as soon as he/she taps ENTER/RETURN. Playing the Game: The object of Connect It is to clear the game board before time runs out. To do so, the student makes pairs of images disappear by clicking matching images that can be connected with a straight line using 2 or fewer right angles. (See Figure 5-9) When the images are matched successfully, the matched pair disappears, clearing paths to link other objects. Points are earned for each pair of images that the student clears. Bonus points are awarded for each second that remains after he/she clears the board.
Figure 5-9 Connect It Game Board
Advancing Levels: Each time the student clears the game board before time runs out, he/she will advance to a new level. After completing two levels, he/she will receive a more challenging game board. (For example, there is a new game board on levels 3, 5, 7, etc).
Earning Points: When the student plays Connect It, he/she earns 100 points for each pair of images that he/she clears. In addition, he/she earns 50 points for each second that remains when he/she clears the board. Connect It keeps a list of the top ten scores for each level in the game. Select the Top Ten Lists option in the Reports menu to display the list.
Game Over: The game ends when he/she clears the game board or when time runs out. The program displays his/her total score, fastest speed, average speed, and goal speed. This information also appears on the Lesson Report. If he/she keys the drill lines in Connect It more than once in a single lesson, MicroType 4 stores the most recent score.
Playing the Game Outside of the Lessons (Connect It): The Connect It game is available outside of the lessons by clicking on the Games button from the Main Menu. The drill lines presented in the Connect It game outside of the lessons contain all of the alphabetic key reaches; therefore, the student should not begin using the Connect It game outside of the lessons until he/she has completed the Alphabetic Keyboarding lessons.

MicroType 4 User Guide
Section 5 Numeric Keyboarding 38
The gwam goal is approximately 90% of the average speed that the student has attained in all of the Build Skill parts completed in the Numeric Keyboarding lessons. If he/she did not complete a Build Skill part, the program uses the Numeric Keyboarding goal specified in the Preferences.
NOTES:
1. The BACKSPACE/DELETE preference (on or off) for Numeric Keyboarding also applies to the Connect It game available from the Games Menu.
2. The student must set the preferences before beginning a new game.
5.12 Lesson Report The Lesson Report shows the performance for each lesson. (See Figure 5-9) When the student completes the Warm Up, Learn Key, Combine Keys, or Improve Keystroking part, a check mark appears next to that item on the report. In addition, the Lesson Report includes the average and fastest speeds for both the Build Skill part and the Connect It game. The drill lines and paragraphs keyed in the Build Skill section appear on the printed report. The goal speed and total score for the game appear on the report, too.
Figure 5-10 Numeric Keyboarding (Lesson Report)
A BACKSPACE/DELETE icon appears next to a lesson part if the student has used the BACKSPACE/DELETE key. To print the report, he/she will click the Print button in the lower right corner of the notebook. The Lesson Report will appear on screen. Click the Print button in the upper left corner to print. The Graph button enables the student to view the Performance Graph. A blue box appears around the number of the current lesson on the graph. Click on the Send file button to send the student reports to the central database, from where the instructor will access those reports through Web Reporter.
MicroType 4 User Guide
Section 5 Numeric Keyboarding 39
5.13 Preferences
By setting Preferences, the student can control the following aspects of the Numeric & Skill Keyboarding section.
General Preferences Numeric & Skill Keyboarding Preferences
• Show lesson movies • Backspace allowed
• Play movie audio
• Play narration/effects Audio
• Use Bookmark
• Two spaces after end punctuation
• Language (English/Spanish)
The student may access his/her personal keyboarding options by choosing the Preferences option from the Edit menu on the tool bar. The Preferences are categorized by section. To change an option, the student has to simply click the corresponding option
MicroType 4 User Guide
Section 6 Keyboarding Skill Builder 40
SECTION 6 KEYBOARDING SKILL BUILDER
6.1 Introduction to Keyboarding Skill Builder
The MicroType 4 Keyboarding Skill Builder section includes 20 lessons of increasing difficulty that help the student to build keying speed and improve control. Also included are 5 Assessments that will analyze errors and prescribe the focus mode (Speed or Accuracy) based on the student’s performance on lessons in Keyboarding Skill Builder. Review the information presented in this section to help the student get the most from the Keyboarding Skill Builder lessons. There is information on navigating the software, lesson design, timed writings, etc. Students should also know all reaches before they begin this section.
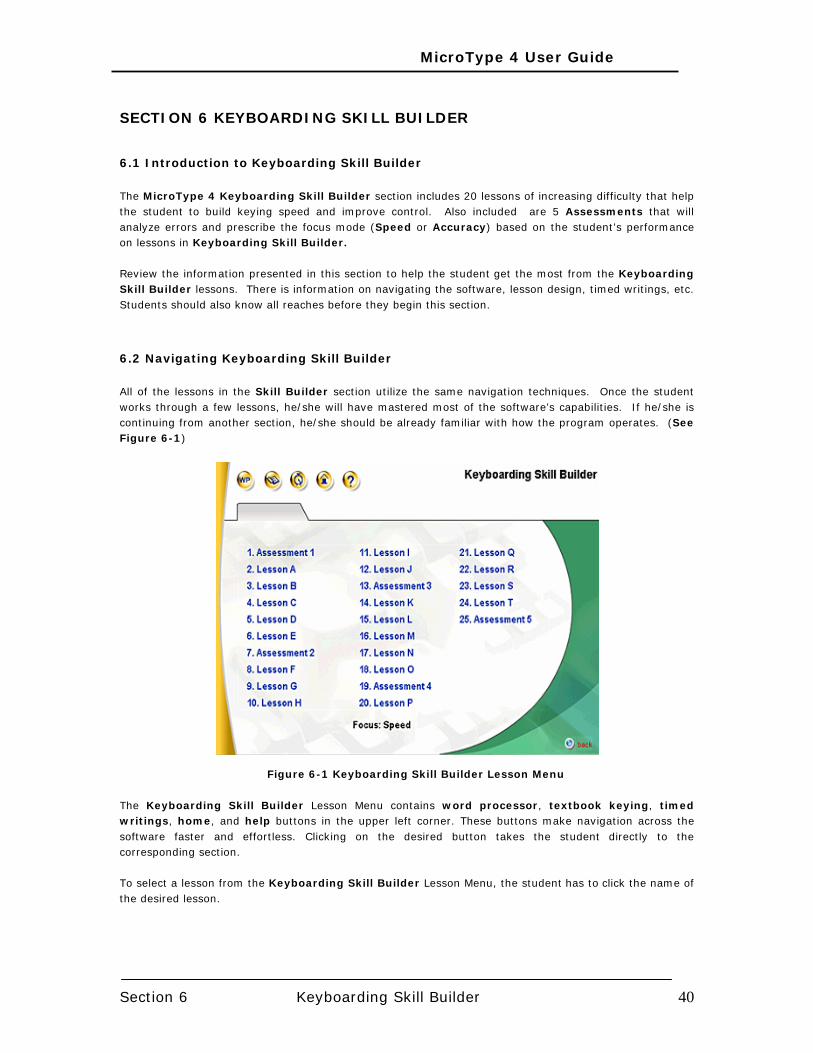
6.2 Navigating Keyboarding Skill Builder All of the lessons in the Skill Builder section utilize the same navigation techniques. Once the student works through a few lessons, he/she will have mastered most of the software’s capabilities. If he/she is continuing from another section, he/she should be already familiar with how the program operates. (See Figure 6-1)
Figure 6-1 Keyboarding Skill Builder Lesson Menu
The Keyboarding Skill Builder Lesson Menu contains word processor, textbook keying, timed writings, home, and help buttons in the upper left corner. These buttons make navigation across the software faster and effortless. Clicking on the desired button takes the student directly to the corresponding section.
To select a lesson from the Keyboarding Skill Builder Lesson Menu, the student has to click the name of the desired lesson.
MicroType 4 User Guide
Section 6 Keyboarding Skill Builder 41
The back button appears on the lesson menu and in every other lesson part including the game. The student can use this button to return to the previous level. Clicking the back button here goes back to the Main menu. While working in a lesson, the student can jump directly to any lesson part by clicking the corresponding tab that appears to the right of the keying area of the notebook. The lesson tabs appear just below the keying area of the notebook in the lessons. The student can click them to switch to a different lesson. Clicking the back button from any lesson part takes him/her back to the Lesson menu. The BACKSPACE/DELETE icon shows the current status of the BACKSPACE/DELETE key determined by the keyboarding Preferences. The BACKSPACE/DELETE key is disabled if an icon with a red circle appears in the lower left corner of the notebook. In some activities, BACKSPACE/DELETE is always disabled. The BACKSPACE/DELETE icon will not appear in these activities.
The Forward button appears on the Mystery Puzzle game console. Clicking this button continues with the next lesson part (i.e., Lesson Report). The Forward button appears only on the game screens in the various keyboarding lessons.
The Print button appears on the Lesson Report screen. Clicking this button prints the report. The Lesson Report will appear on screen. The Print button in the upper left corner to enable the student to print. The Graph button helps the student to view the Performance Graph. Clicking the back button to returns to the Lesson menu. Click on the Send file button to send the student reports to the central database, from where the instructor will access those reports through Web Reporter.
6.3 Lesson Design The program offers twenty lessons. Each 20- to 25-minute lesson can be completed with focus on speed or accuracy. Prior to selecting a lesson, the student may select the focus from the Preferences option in the Edit menu on the tool bar. He/she should NOT change the focus (Speed or Accuracy) halfway through a lesson part. Work done in a lesson part with one focus selected will not appear on the Lesson Report for the same lesson if the other focus is picked. The current focus appears on the lesson menu. Because of differences in copy difficulty, the lessons should be completed in sequence, one lesson per practice session. The Mystery Puzzle game is closely linked with the student’s performance in the Keyboarding Skill Builder section. He/she earns game chances as he/she works through a lesson. Additional chances are awarded for completing each lesson part and for working to improve speed and accuracy.
6.4 Assessment
Assessments are available only under Keyboarding Skill Builder. They will analyze errors and recommend the focus mode - Speed or Accuracy -- in which a student can work in the Keyboarding Skill Builder lessons. There are a total of five assessment lessons. (See Figure 6-2) The exercise under each assessment is simple. It will have a student keying "X" paragraphs in "Y" minutes. On completion of time, the program will display errors and gwam. Errors are analyzed using the error analysis functions. MicroType 4 will track the student’s performance on all five Assessments so that students and instructors may track skill improvements. The results can be seen in the Assessment Lessons Summary Report.
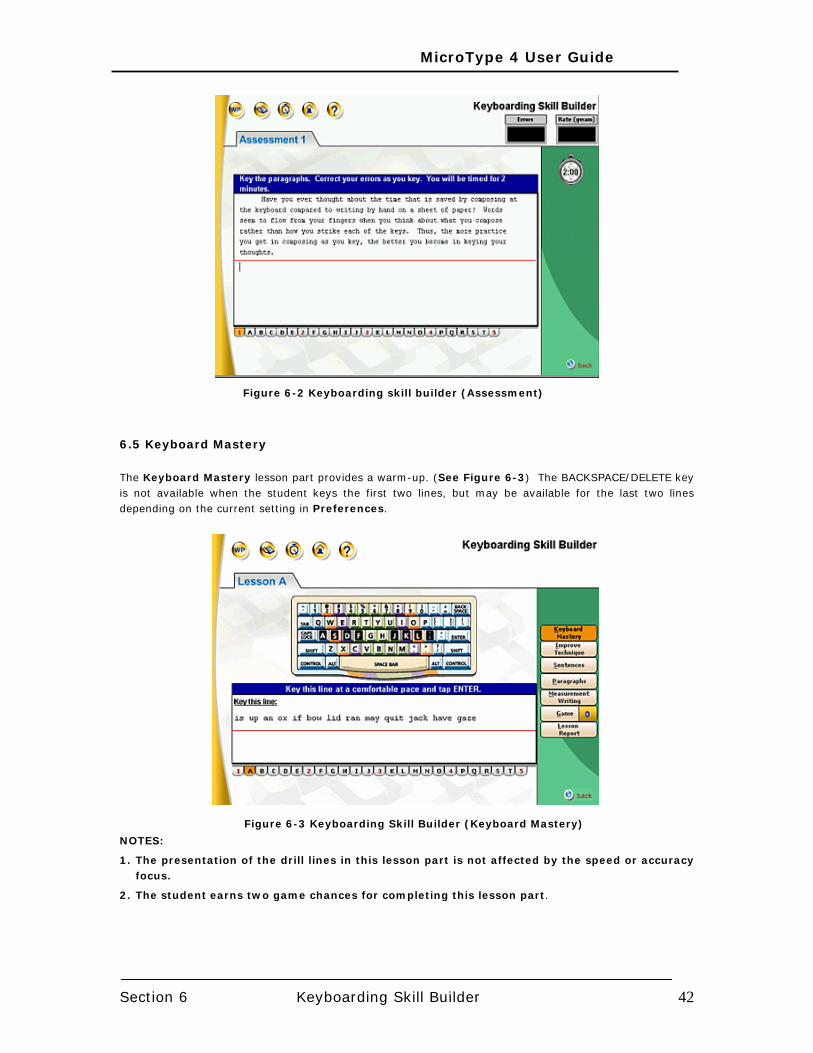
MicroType 4 User Guide
Section 6 Keyboarding Skill Builder 42
Figure 6-2 Keyboarding skill builder (Assessment)
6.5 Keyboard Mastery The Keyboard Mastery lesson part provides a warm-up. (See Figure 6-3) The BACKSPACE/DELETE key is not available when the student keys the first two lines, but may be available for the last two lines depending on the current setting in Preferences.
Figure 6-3 Keyboarding Skill Builder (Keyboard Mastery)
NOTES:
1. The presentation of the drill lines in this lesson part is not affected by the speed or accuracy focus.
2. The student earns two game chances for completing this lesson part.
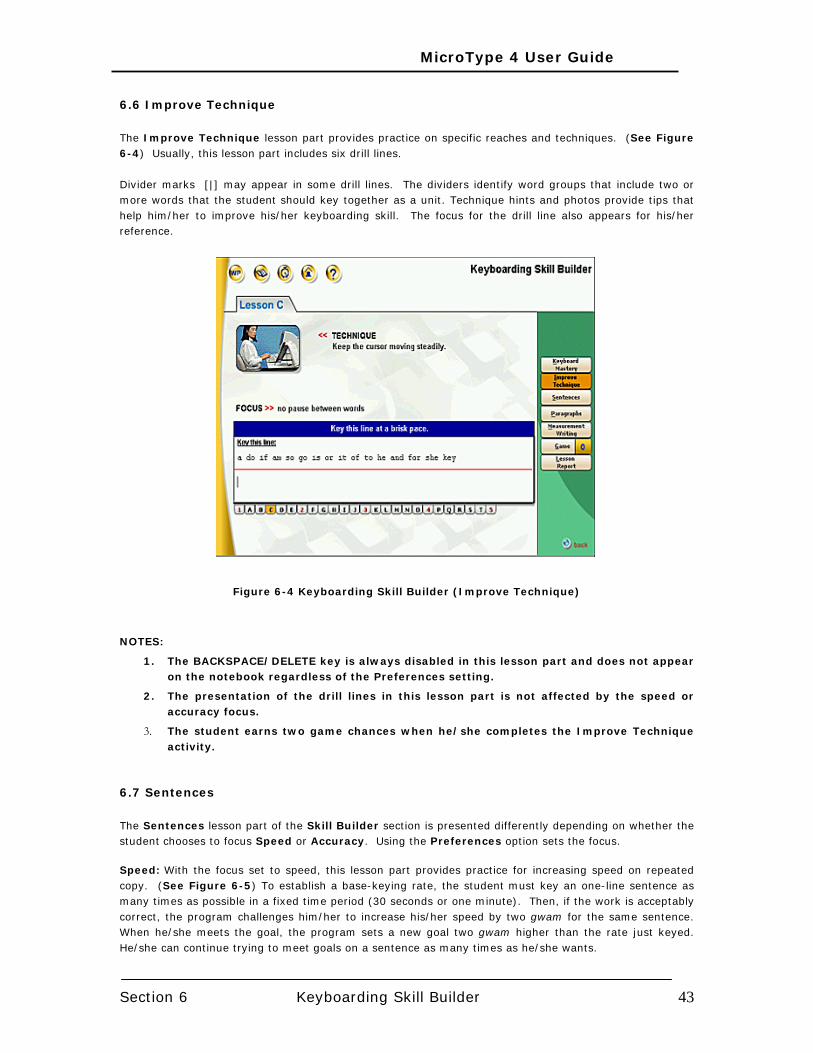
MicroType 4 User Guide
Section 6 Keyboarding Skill Builder 43
6.6 Improve Technique The Improve Technique lesson part provides practice on specific reaches and techniques. (See Figure 6-4) Usually, this lesson part includes six drill lines. Divider marks [|] may appear in some drill lines. The dividers identify word groups that include two or more words that the student should key together as a unit. Technique hints and photos provide tips that help him/her to improve his/her keyboarding skill. The focus for the drill line also appears for his/her reference.
Figure 6-4 Keyboarding Skill Builder (Improve Technique)
NOTES:
1. The BACKSPACE/DELETE key is always disabled in this lesson part and does not appear on the notebook regardless of the Preferences setting.
2. The presentation of the drill lines in this lesson part is not affected by the speed or accuracy focus.
3. The student earns two game chances when he/she completes the Improve Technique activity.
6.7 Sentences The Sentences lesson part of the Skill Builder section is presented differently depending on whether the student chooses to focus Speed or Accuracy. Using the Preferences option sets the focus.
Speed: With the focus set to speed, this lesson part provides practice for increasing speed on repeated copy. (See Figure 6-5) To establish a base-keying rate, the student must key an one-line sentence as many times as possible in a fixed time period (30 seconds or one minute). Then, if the work is acceptably correct, the program challenges him/her to increase his/her speed by two gwam for the same sentence. When he/she meets the goal, the program sets a new goal two gwam higher than the rate just keyed. He/she can continue trying to meet goals on a sentence as many times as he/she wants.
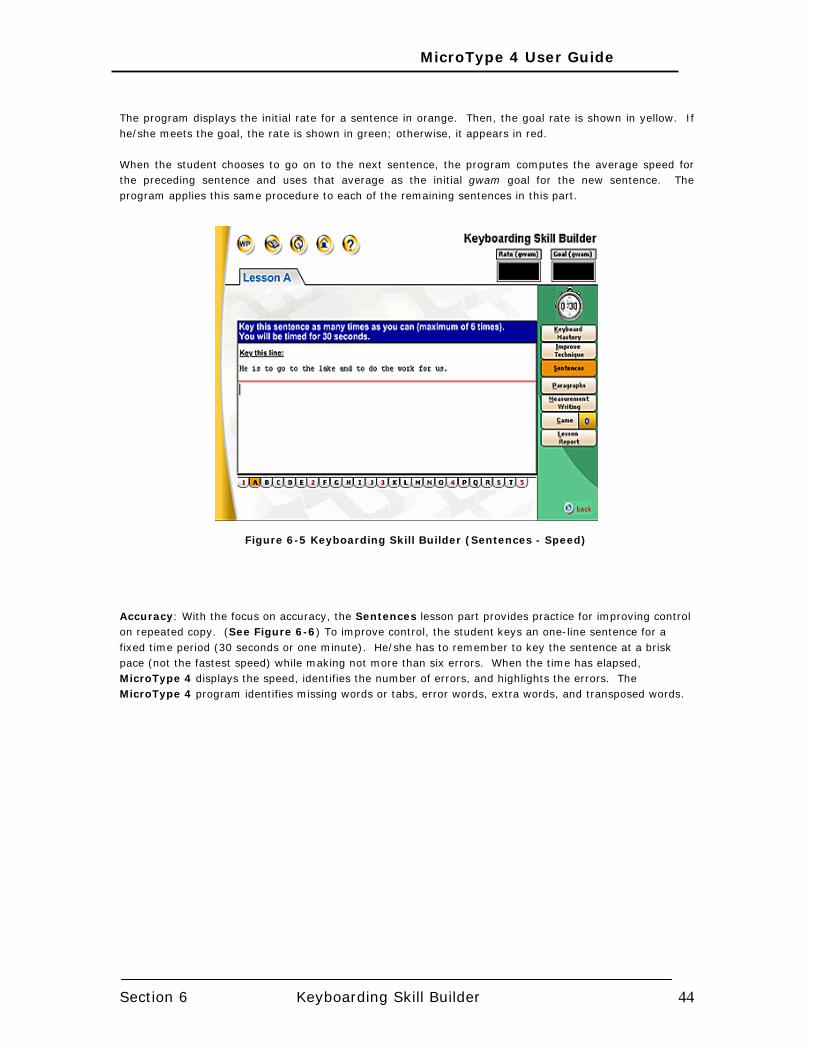
MicroType 4 User Guide
Section 6 Keyboarding Skill Builder 44
The program displays the initial rate for a sentence in orange. Then, the goal rate is shown in yellow. If he/she meets the goal, the rate is shown in green; otherwise, it appears in red. When the student chooses to go on to the next sentence, the program computes the average speed for the preceding sentence and uses that average as the initial gwam goal for the new sentence. The program applies this same procedure to each of the remaining sentences in this part.
Figure 6-5 Keyboarding Skill Builder (Sentences - Speed)
Accuracy: With the focus on accuracy, the Sentences lesson part provides practice for improving control on repeated copy. (See Figure 6-6) To improve control, the student keys an one-line sentence for a fixed time period (30 seconds or one minute). He/she has to remember to key the sentence at a brisk pace (not the fastest speed) while making not more than six errors. When the time has elapsed, MicroType 4 displays the speed, identifies the number of errors, and highlights the errors. The MicroType 4 program identifies missing words or tabs, error words, extra words, and transposed words.
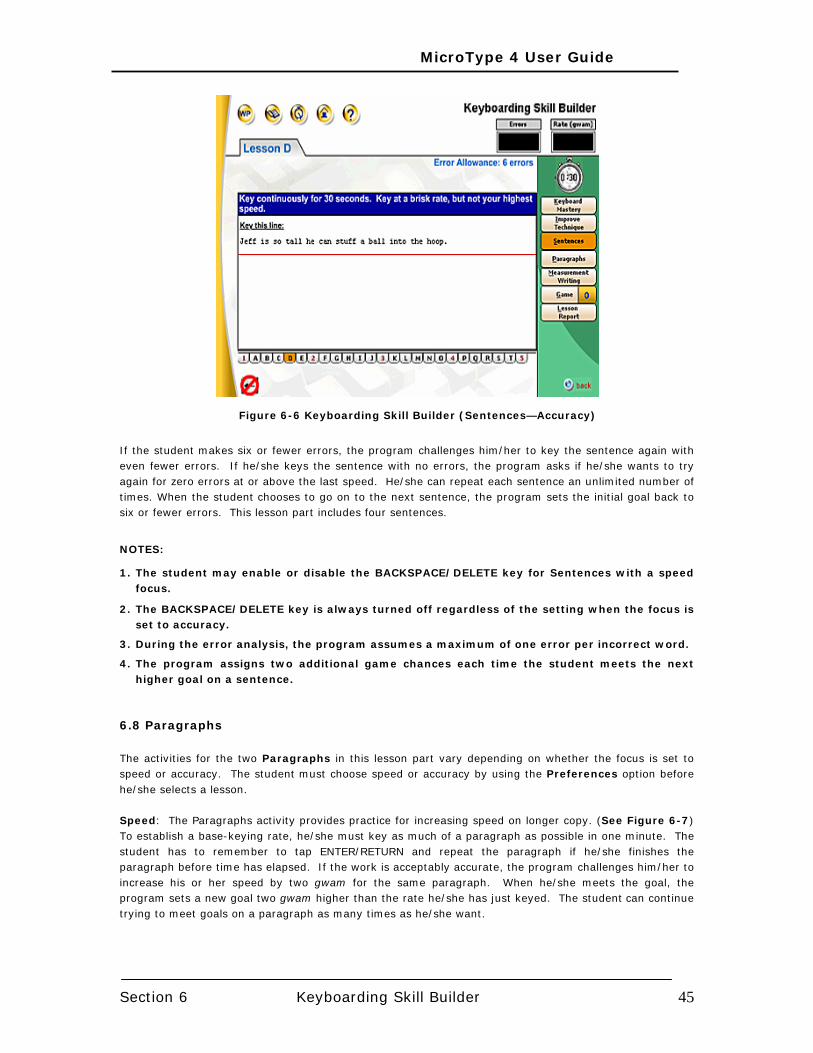
MicroType 4 User Guide
Section 6 Keyboarding Skill Builder 45
Figure 6-6 Keyboarding Skill Builder (Sentences—Accuracy)
If the student makes six or fewer errors, the program challenges him/her to key the sentence again with even fewer errors. If he/she keys the sentence with no errors, the program asks if he/she wants to try again for zero errors at or above the last speed. He/she can repeat each sentence an unlimited number of times. When the student chooses to go on to the next sentence, the program sets the initial goal back to six or fewer errors. This lesson part includes four sentences.
NOTES:
1. The student may enable or disable the BACKSPACE/DELETE key for Sentences with a speed focus.
2. The BACKSPACE/DELETE key is always turned off regardless of the setting when the focus is set to accuracy.
3. During the error analysis, the program assumes a maximum of one error per incorrect word.
4. The program assigns two additional game chances each time the student meets the next higher goal on a sentence.
6.8 Paragraphs The activities for the two Paragraphs in this lesson part vary depending on whether the focus is set to speed or accuracy. The student must choose speed or accuracy by using the Preferences option before he/she selects a lesson.
Speed: The Paragraphs activity provides practice for increasing speed on longer copy. (See Figure 6-7) To establish a base-keying rate, he/she must key as much of a paragraph as possible in one minute. The student has to remember to tap ENTER/RETURN and repeat the paragraph if he/she finishes the paragraph before time has elapsed. If the work is acceptably accurate, the program challenges him/her to increase his or her speed by two gwam for the same paragraph. When he/she meets the goal, the program sets a new goal two gwam higher than the rate he/she has just keyed. The student can continue trying to meet goals on a paragraph as many times as he/she want.
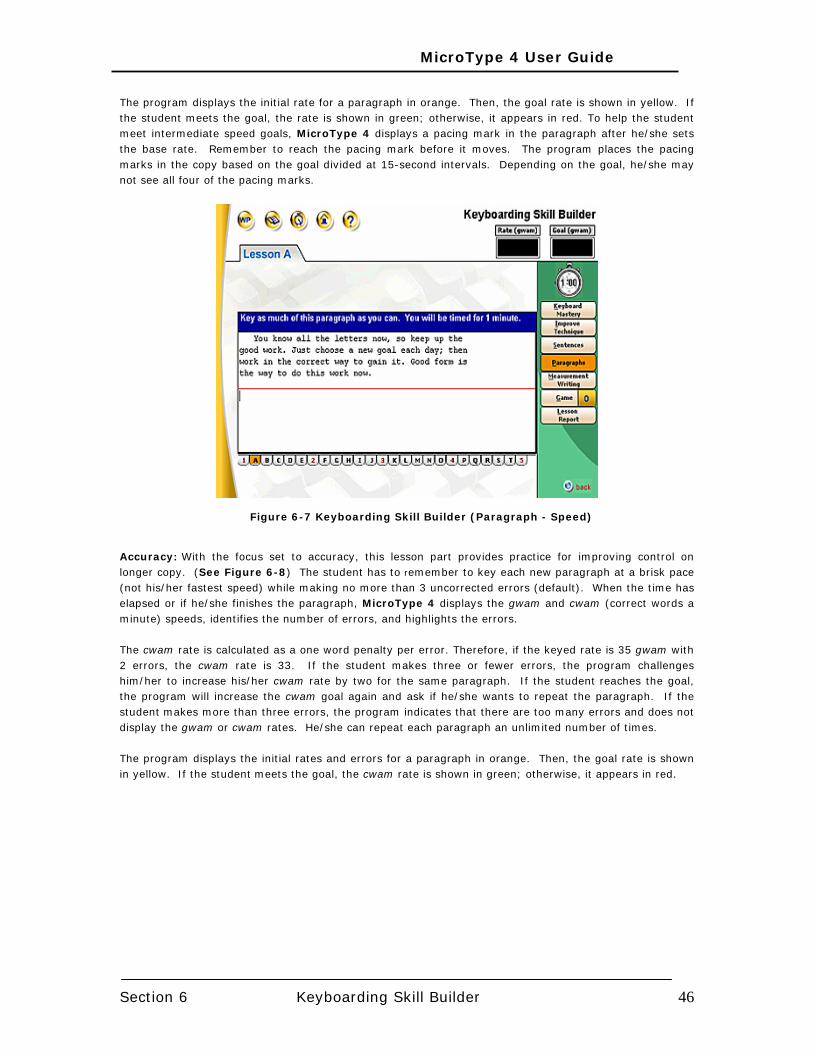
MicroType 4 User Guide
Section 6 Keyboarding Skill Builder 46
The program displays the initial rate for a paragraph in orange. Then, the goal rate is shown in yellow. If the student meets the goal, the rate is shown in green; otherwise, it appears in red. To help the student meet intermediate speed goals, MicroType 4 displays a pacing mark in the paragraph after he/she sets the base rate. Remember to reach the pacing mark before it moves. The program places the pacing marks in the copy based on the goal divided at 15-second intervals. Depending on the goal, he/she may not see all four of the pacing marks.
Figure 6-7 Keyboarding Skill Builder (Paragraph - Speed)
Accuracy: With the focus set to accuracy, this lesson part provides practice for improving control on longer copy. (See Figure 6-8) The student has to remember to key each new paragraph at a brisk pace (not his/her fastest speed) while making no more than 3 uncorrected errors (default). When the time has elapsed or if he/she finishes the paragraph, MicroType 4 displays the gwam and cwam (correct words a minute) speeds, identifies the number of errors, and highlights the errors. The cwam rate is calculated as a one word penalty per error. Therefore, if the keyed rate is 35 gwam with 2 errors, the cwam rate is 33. If the student makes three or fewer errors, the program challenges him/her to increase his/her cwam rate by two for the same paragraph. If the student reaches the goal, the program will increase the cwam goal again and ask if he/she wants to repeat the paragraph. If the student makes more than three errors, the program indicates that there are too many errors and does not display the gwam or cwam rates. He/she can repeat each paragraph an unlimited number of times. The program displays the initial rates and errors for a paragraph in orange. Then, the goal rate is shown in yellow. If the student meets the goal, the cwam rate is shown in green; otherwise, it appears in red.
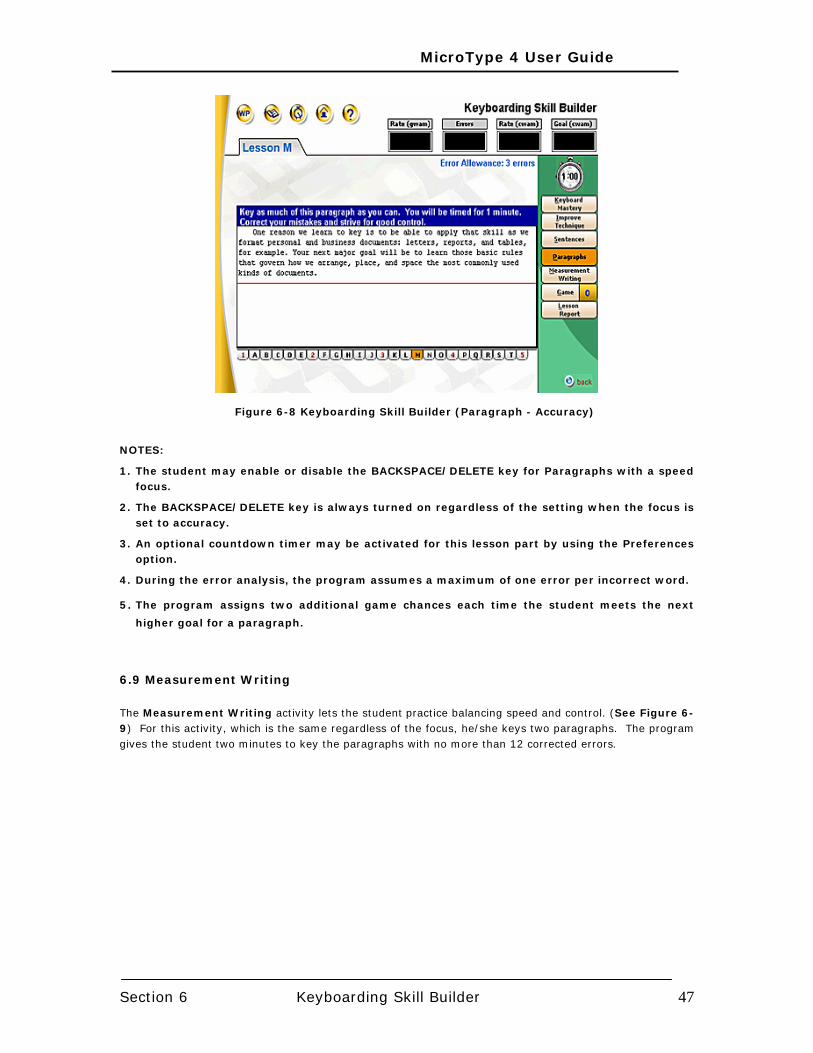
MicroType 4 User Guide
Section 6 Keyboarding Skill Builder 47
Figure 6-8 Keyboarding Skill Builder (Paragraph - Accuracy)
NOTES:
1. The student may enable or disable the BACKSPACE/DELETE key for Paragraphs with a speed focus.
2. The BACKSPACE/DELETE key is always turned on regardless of the setting when the focus is set to accuracy.
3. An optional countdown timer may be activated for this lesson part by using the Preferences option.
4. During the error analysis, the program assumes a maximum of one error per incorrect word.
5. The program assigns two additional game chances each time the student meets the next
higher goal for a paragraph.
6.9 Measurement Writing
The Measurement Writing activity lets the student practice balancing speed and control. (See Figure 6-9) For this activity, which is the same regardless of the focus, he/she keys two paragraphs. The program gives the student two minutes to key the paragraphs with no more than 12 corrected errors.
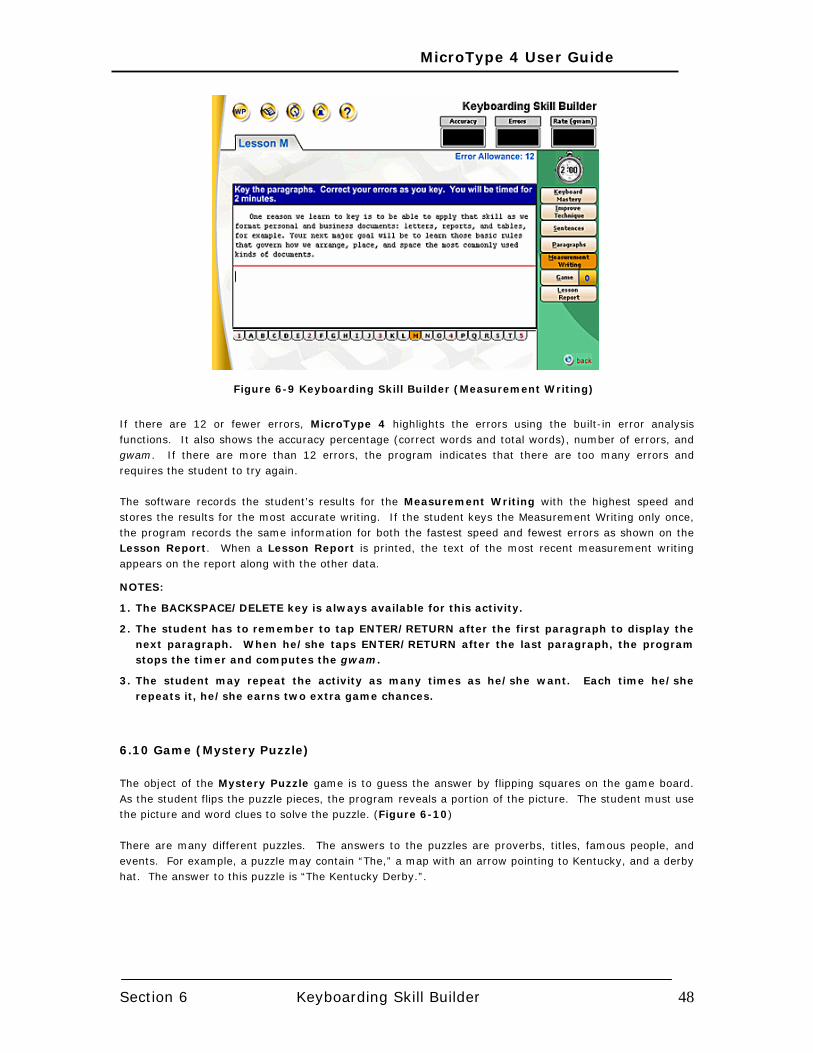
MicroType 4 User Guide
Section 6 Keyboarding Skill Builder 48
Figure 6-9 Keyboarding Skill Builder (Measurement Writing)
If there are 12 or fewer errors, MicroType 4 highlights the errors using the built-in error analysis functions. It also shows the accuracy percentage (correct words and total words), number of errors, and gwam. If there are more than 12 errors, the program indicates that there are too many errors and requires the student to try again. The software records the student’s results for the Measurement Writing with the highest speed and stores the results for the most accurate writing. If the student keys the Measurement Writing only once, the program records the same information for both the fastest speed and fewest errors as shown on the Lesson Report. When a Lesson Report is printed, the text of the most recent measurement writing appears on the report along with the other data.
NOTES:
1. The BACKSPACE/DELETE key is always available for this activity.
2. The student has to remember to tap ENTER/RETURN after the first paragraph to display the next paragraph. When he/she taps ENTER/RETURN after the last paragraph, the program stops the timer and computes the gwam.
3. The student may repeat the activity as many times as he/she want. Each time he/she repeats it, he/she earns two extra game chances.
6.10 Game (Mystery Puzzle) The object of the Mystery Puzzle game is to guess the answer by flipping squares on the game board. As the student flips the puzzle pieces, the program reveals a portion of the picture. The student must use the picture and word clues to solve the puzzle. (Figure 6-10) There are many different puzzles. The answers to the puzzles are proverbs, titles, famous people, and events. For example, a puzzle may contain “The,” a map with an arrow pointing to Kentucky, and a derby hat. The answer to this puzzle is “The Kentucky Derby.”.

MicroType 4 User Guide
Section 6 Keyboarding Skill Builder 49
The student earns two chances to flip a puzzle piece for most lesson parts he/she completes. He/she also earns two extra chances each time he/she meets or exceeds his/her speed or accuracy goal in the Sentences and Paragraphs activities. The more times he/she tries to improve his/her skill, the more chances he/she earns!
Figure 6-10 Keyboarding Skill Builder (Mystery Puzzle)
When the student reveals enough of the tiles that he/she knows the answer, he/she clicks the Guess button and enters a guess. There are no penalties for incorrect guesses. If the student solves the puzzle, the program displays the entire picture and then prompts to begin another puzzle.
Hint: If the student needs additional chances while playing the game, clicking the Chance button enables him/her to return to the lesson. Then, clicking on the Sentences or Paragraphs tab enables him/her to work on building skill. When he/she earns enough chances, he/she can click the Game tab to resume playing the game.
The student need not worry if he/she can’t solve a puzzle! The partially completed puzzle and game chances are stored with the other keying records. When he/she begins the next session, he/she can continue from where he/she had left off regardless of whether he/she wants to work in the same lesson or start a new lesson.
NOTES:
1. Game chances accumulate from session to session unless the student used the Guest button to log in to the program.
2. Some game pieces may be blank.
3. The student may accumulate up to 99 chances.
6.11 Lesson Report The Lesson Report shows the keying performance for the current lesson. (See Figure 6-11) When the student completes the Keyboarding Mastery or Improve Technique activities, a check mark appears on the report. For Sentences and Paragraphs, the student’s average fastest speed is shown. The number of puzzles completed for the current lesson also appears on the report.
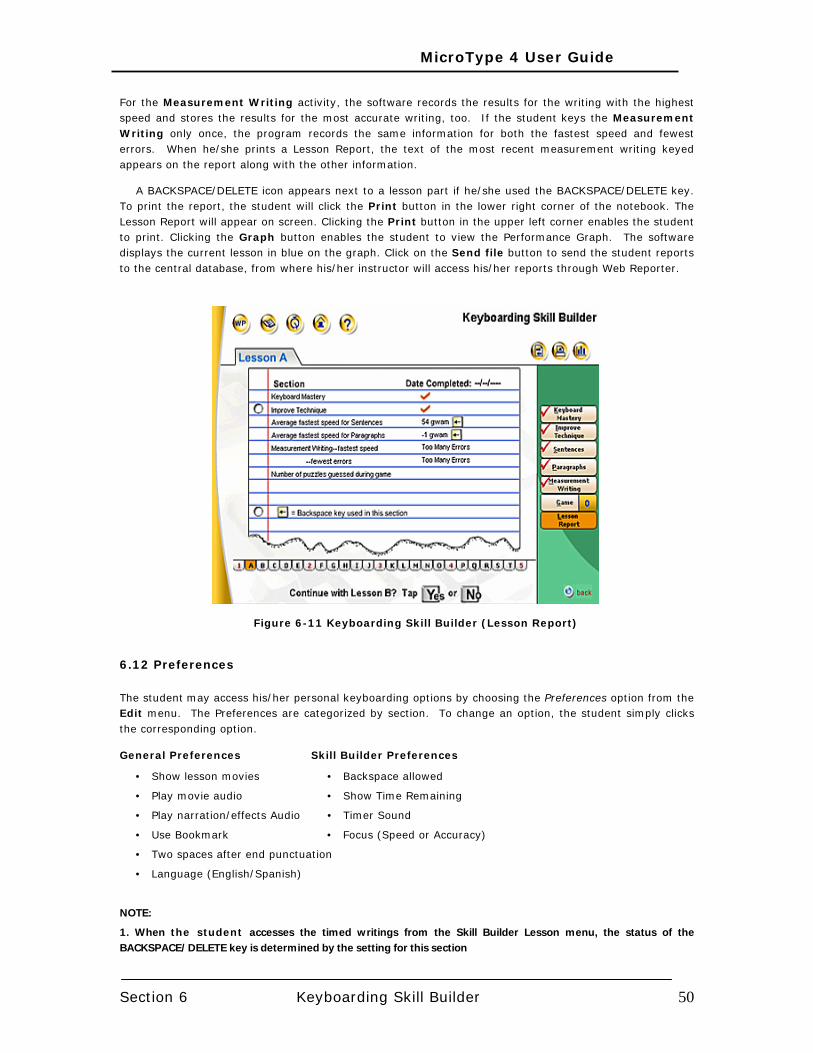
MicroType 4 User Guide
Section 6 Keyboarding Skill Builder 50
For the Measurement Writing activity, the software records the results for the writing with the highest speed and stores the results for the most accurate writing, too. If the student keys the Measurement Writing only once, the program records the same information for both the fastest speed and fewest errors. When he/she prints a Lesson Report, the text of the most recent measurement writing keyed appears on the report along with the other information.
A BACKSPACE/DELETE icon appears next to a lesson part if he/she used the BACKSPACE/DELETE key. To print the report, the student will click the Print button in the lower right corner of the notebook. The Lesson Report will appear on screen. Clicking the Print button in the upper left corner enables the student to print. Clicking the Graph button enables the student to view the Performance Graph. The software displays the current lesson in blue on the graph. Click on the Send file button to send the student reports to the central database, from where his/her instructor will access his/her reports through Web Reporter.
Figure 6-11 Keyboarding Skill Builder (Lesson Report)
6.12 Preferences The student may access his/her personal keyboarding options by choosing the Preferences option from the Edit menu. The Preferences are categorized by section. To change an option, the student simply clicks the corresponding option.
General Preferences Skill Builder Preferences
• Show lesson movies • Backspace allowed
• Play movie audio • Show Time Remaining
• Play narration/effects Audio • Timer Sound
• Use Bookmark • Focus (Speed or Accuracy)
• Two spaces after end punctuation
• Language (English/Spanish)
NOTE:
1. When the student accesses the timed writings from the Skill Builder Lesson menu, the status of the BACKSPACE/DELETE key is determined by the setting for this section
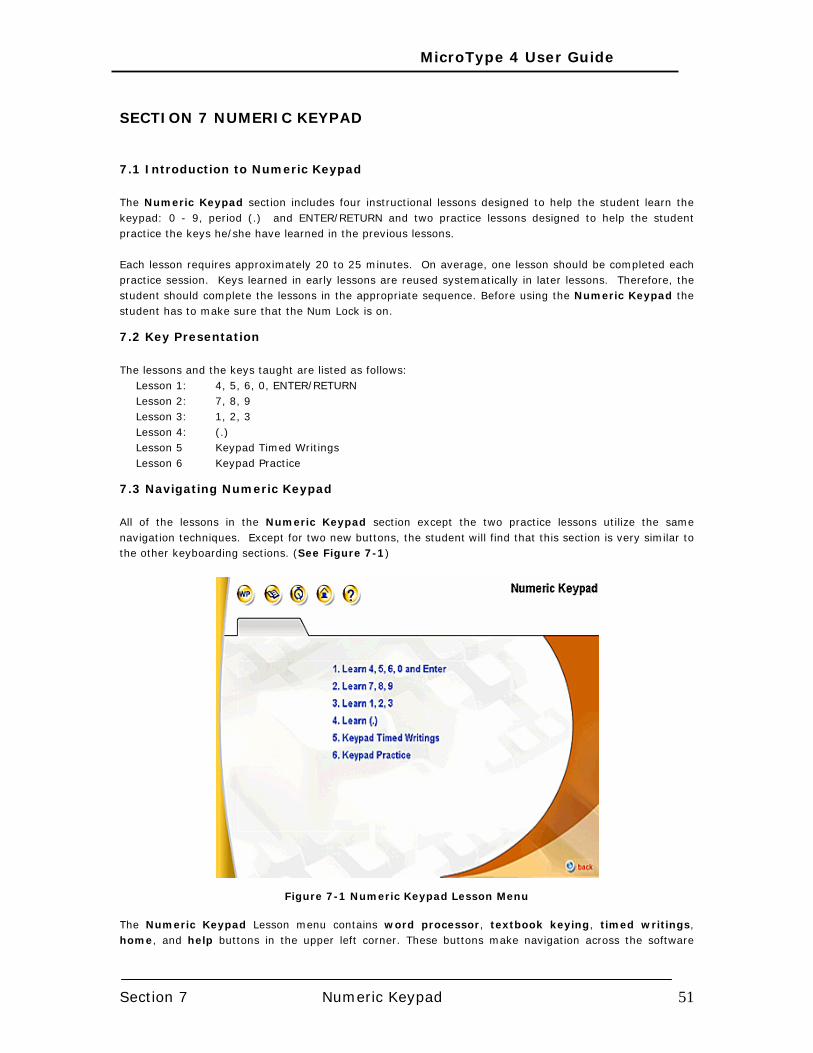
MicroType 4 User Guide
Section 7 Numeric Keypad 51
SECTION 7 NUMERIC KEYPAD
7.1 Introduction to Numeric Keypad The Numeric Keypad section includes four instructional lessons designed to help the student learn the keypad: 0 - 9, period (.) and ENTER/RETURN and two practice lessons designed to help the student practice the keys he/she have learned in the previous lessons. Each lesson requires approximately 20 to 25 minutes. On average, one lesson should be completed each practice session. Keys learned in early lessons are reused systematically in later lessons. Therefore, the student should complete the lessons in the appropriate sequence. Before using the Numeric Keypad the student has to make sure that the Num Lock is on.
7.2 Key Presentation The lessons and the keys taught are listed as follows:
Lesson 1: 4, 5, 6, 0, ENTER/RETURN Lesson 2: 7, 8, 9 Lesson 3: 1, 2, 3 Lesson 4: (.) Lesson 5 Keypad Timed Writings Lesson 6 Keypad Practice
7.3 Navigating Numeric Keypad All of the lessons in the Numeric Keypad section except the two practice lessons utilize the same navigation techniques. Except for two new buttons, the student will find that this section is very similar to the other keyboarding sections. (See Figure 7-1)
Figure 7-1 Numeric Keypad Lesson Menu
The Numeric Keypad Lesson menu contains word processor, textbook keying, timed writings, home, and help buttons in the upper left corner. These buttons make navigation across the software
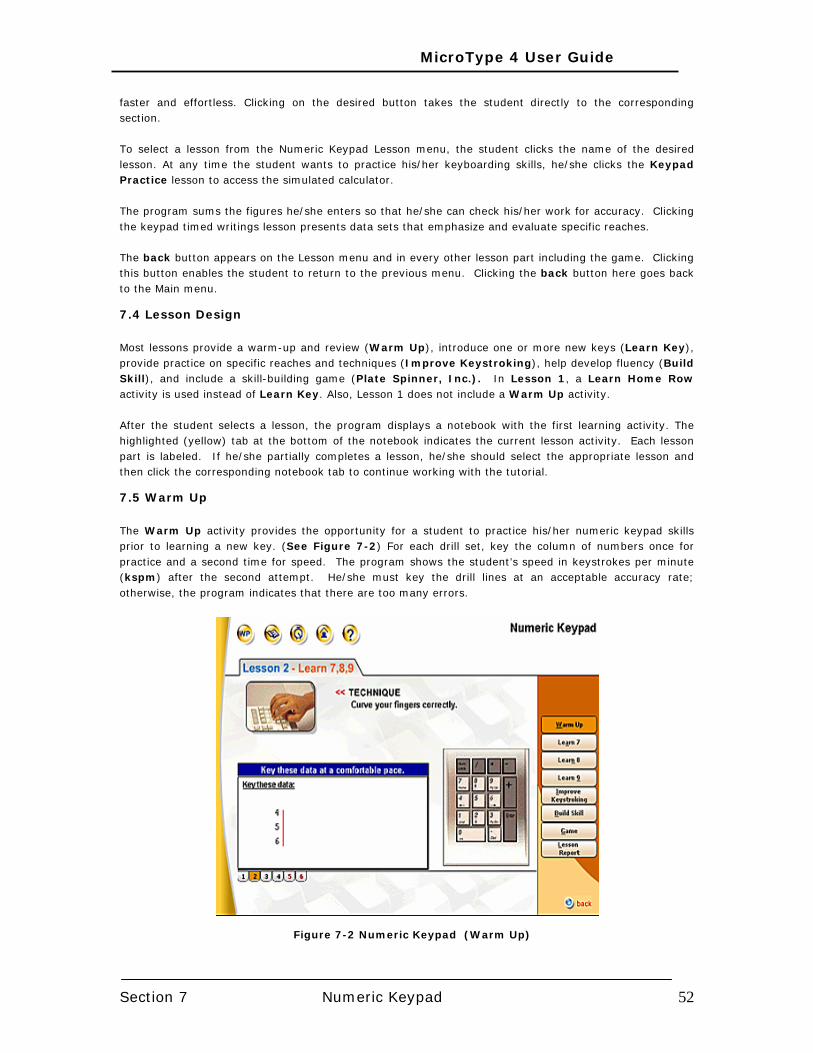
MicroType 4 User Guide
Section 7 Numeric Keypad 52
faster and effortless. Clicking on the desired button takes the student directly to the corresponding section. To select a lesson from the Numeric Keypad Lesson menu, the student clicks the name of the desired lesson. At any time the student wants to practice his/her keyboarding skills, he/she clicks the Keypad Practice lesson to access the simulated calculator. The program sums the figures he/she enters so that he/she can check his/her work for accuracy. Clicking the keypad timed writings lesson presents data sets that emphasize and evaluate specific reaches. The back button appears on the Lesson menu and in every other lesson part including the game. Clicking this button enables the student to return to the previous menu. Clicking the back button here goes back to the Main menu.
7.4 Lesson Design Most lessons provide a warm-up and review (Warm Up), introduce one or more new keys (Learn Key), provide practice on specific reaches and techniques (Improve Keystroking), help develop fluency (Build Skill), and include a skill-building game (Plate Spinner, Inc.). In Lesson 1, a Learn Home Row activity is used instead of Learn Key. Also, Lesson 1 does not include a Warm Up activity. After the student selects a lesson, the program displays a notebook with the first learning activity. The highlighted (yellow) tab at the bottom of the notebook indicates the current lesson activity. Each lesson part is labeled. If he/she partially completes a lesson, he/she should select the appropriate lesson and then click the corresponding notebook tab to continue working with the tutorial.
7.5 Warm Up The Warm Up activity provides the opportunity for a student to practice his/her numeric keypad skills prior to learning a new key. (See Figure 7-2) For each drill set, key the column of numbers once for practice and a second time for speed. The program shows the student’s speed in keystrokes per minute (kspm) after the second attempt. He/she must key the drill lines at an acceptable accuracy rate; otherwise, the program indicates that there are too many errors.
Figure 7-2 Numeric Keypad (Warm Up)
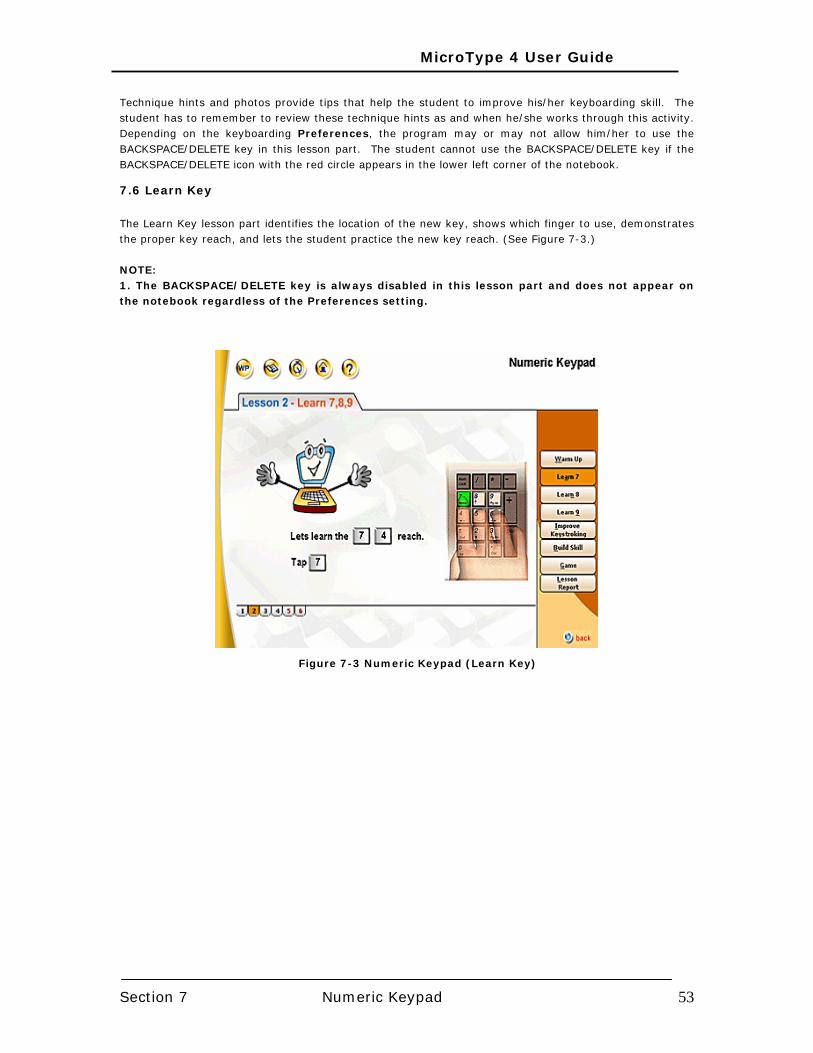
MicroType 4 User Guide
Section 7 Numeric Keypad 53
Technique hints and photos provide tips that help the student to improve his/her keyboarding skill. The student has to remember to review these technique hints as and when he/she works through this activity. Depending on the keyboarding Preferences, the program may or may not allow him/her to use the BACKSPACE/DELETE key in this lesson part. The student cannot use the BACKSPACE/DELETE key if the BACKSPACE/DELETE icon with the red circle appears in the lower left corner of the notebook.
7.6 Learn Key The Learn Key lesson part identifies the location of the new key, shows which finger to use, demonstrates the proper key reach, and lets the student practice the new key reach. (See Figure 7-3.)
NOTE: 1. The BACKSPACE/DELETE key is always disabled in this lesson part and does not appear on the notebook regardless of the Preferences setting.
Figure 7-3 Numeric Keypad (Learn Key)
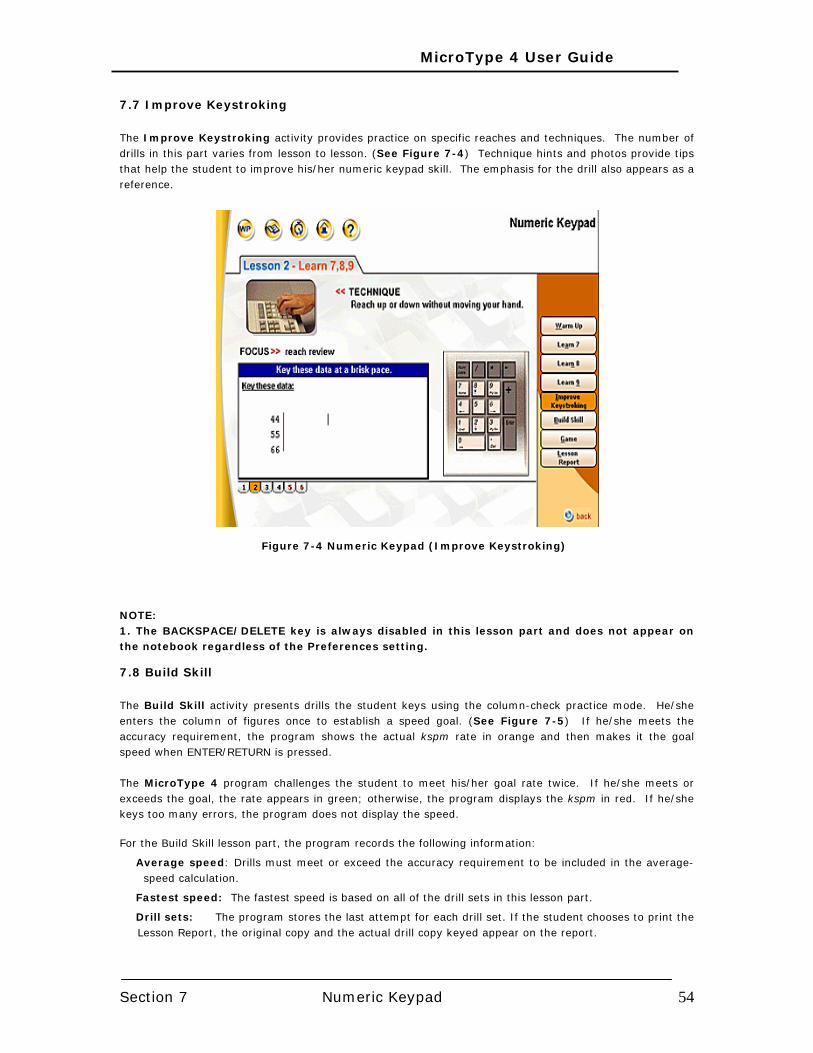
MicroType 4 User Guide
Section 7 Numeric Keypad 54
7.7 Improve Keystroking The Improve Keystroking activity provides practice on specific reaches and techniques. The number of drills in this part varies from lesson to lesson. (See Figure 7-4) Technique hints and photos provide tips that help the student to improve his/her numeric keypad skill. The emphasis for the drill also appears as a reference.
Figure 7-4 Numeric Keypad (Improve Keystroking)
NOTE: 1. The BACKSPACE/DELETE key is always disabled in this lesson part and does not appear on the notebook regardless of the Preferences setting.
7.8 Build Skill The Build Skill activity presents drills the student keys using the column-check practice mode. He/she enters the column of figures once to establish a speed goal. (See Figure 7-5) If he/she meets the accuracy requirement, the program shows the actual kspm rate in orange and then makes it the goal speed when ENTER/RETURN is pressed.
The MicroType 4 program challenges the student to meet his/her goal rate twice. If he/she meets or exceeds the goal, the rate appears in green; otherwise, the program displays the kspm in red. If he/she keys too many errors, the program does not display the speed.
For the Build Skill lesson part, the program records the following information:
Average speed: Drills must meet or exceed the accuracy requirement to be included in the average-speed calculation.
Fastest speed: The fastest speed is based on all of the drill sets in this lesson part.
Drill sets: The program stores the last attempt for each drill set. If the student chooses to print the Lesson Report, the original copy and the actual drill copy keyed appear on the report.
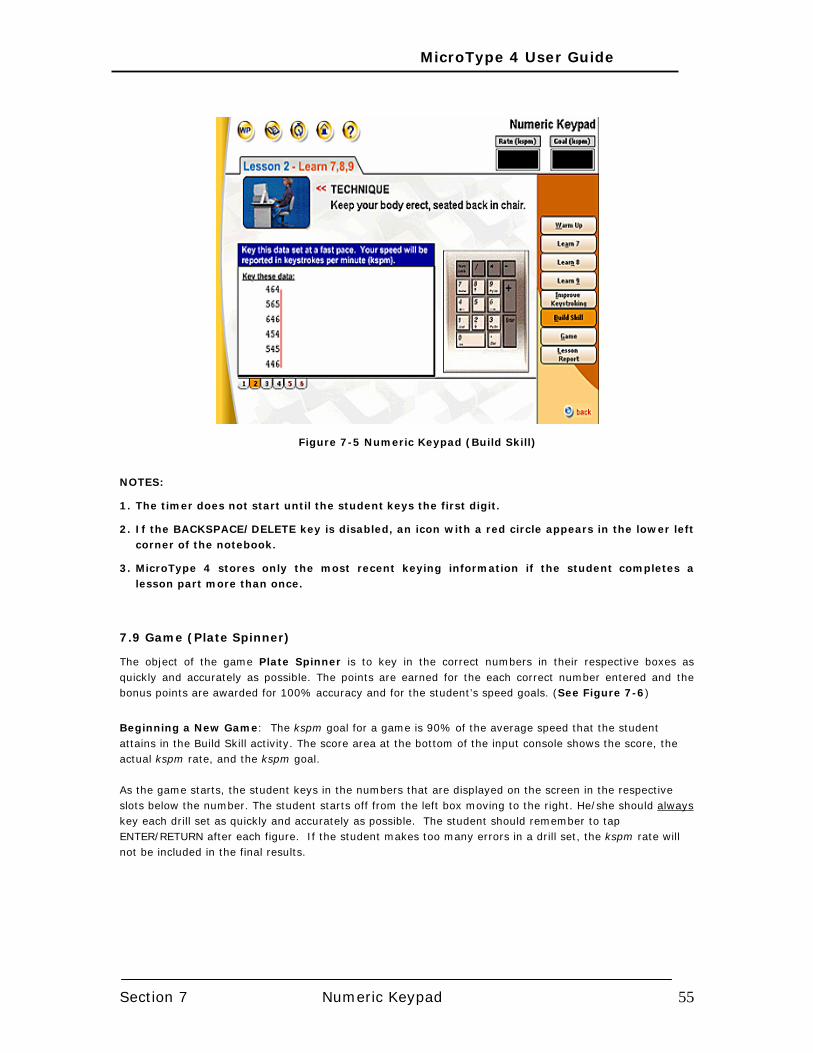
MicroType 4 User Guide
Section 7 Numeric Keypad 55
Figure 7-5 Numeric Keypad (Build Skill)
NOTES:
1. The timer does not start until the student keys the first digit.
2. If the BACKSPACE/DELETE key is disabled, an icon with a red circle appears in the lower left corner of the notebook.
3. MicroType 4 stores only the most recent keying information if the student completes a lesson part more than once.
7.9 Game (Plate Spinner)
The object of the game Plate Spinner is to key in the correct numbers in their respective boxes as quickly and accurately as possible. The points are earned for the each correct number entered and the bonus points are awarded for 100% accuracy and for the student’s speed goals. (See Figure 7-6)
Beginning a New Game: The kspm goal for a game is 90% of the average speed that the student attains in the Build Skill activity. The score area at the bottom of the input console shows the score, the actual kspm rate, and the kspm goal. As the game starts, the student keys in the numbers that are displayed on the screen in the respective slots below the number. The student starts off from the left box moving to the right. He/she should always key each drill set as quickly and accurately as possible. The student should remember to tap ENTER/RETURN after each figure. If the student makes too many errors in a drill set, the kspm rate will not be included in the final results.
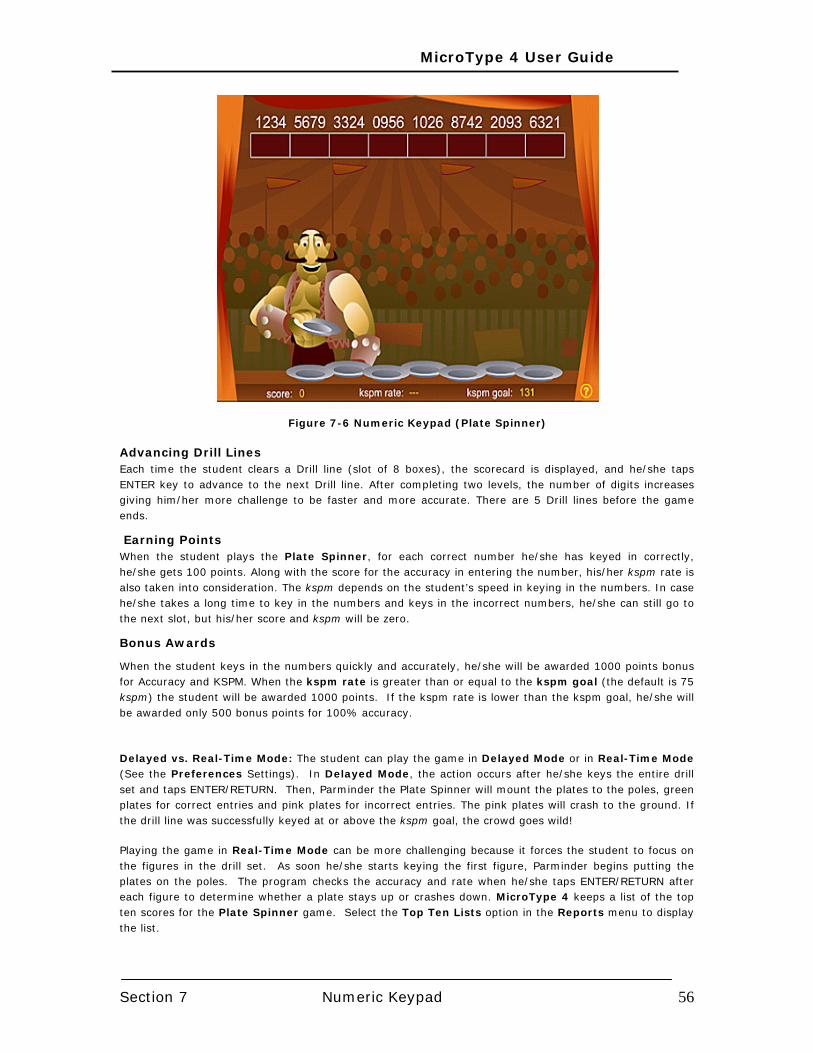
MicroType 4 User Guide
Section 7 Numeric Keypad 56
Figure 7-6 Numeric Keypad (Plate Spinner)
Advancing Drill Lines
Each time the student clears a Drill line (slot of 8 boxes), the scorecard is displayed, and he/she taps ENTER key to advance to the next Drill line. After completing two levels, the number of digits increases giving him/her more challenge to be faster and more accurate. There are 5 Drill lines before the game ends.
Earning Points
When the student plays the Plate Spinner, for each correct number he/she has keyed in correctly, he/she gets 100 points. Along with the score for the accuracy in entering the number, his/her kspm rate is also taken into consideration. The kspm depends on the student’s speed in keying in the numbers. In case he/she takes a long time to key in the numbers and keys in the incorrect numbers, he/she can still go to the next slot, but his/her score and kspm will be zero.
Bonus Awards
When the student keys in the numbers quickly and accurately, he/she will be awarded 1000 points bonus for Accuracy and KSPM. When the kspm rate is greater than or equal to the kspm goal (the default is 75 kspm) the student will be awarded 1000 points. If the kspm rate is lower than the kspm goal, he/she will be awarded only 500 bonus points for 100% accuracy.
Delayed vs. Real-Time Mode: The student can play the game in Delayed Mode or in Real-Time Mode (See the Preferences Settings). In Delayed Mode, the action occurs after he/she keys the entire drill set and taps ENTER/RETURN. Then, Parminder the Plate Spinner will mount the plates to the poles, green plates for correct entries and pink plates for incorrect entries. The pink plates will crash to the ground. If the drill line was successfully keyed at or above the kspm goal, the crowd goes wild!
Playing the game in Real-Time Mode can be more challenging because it forces the student to focus on the figures in the drill set. As soon he/she starts keying the first figure, Parminder begins putting the plates on the poles. The program checks the accuracy and rate when he/she taps ENTER/RETURN after each figure to determine whether a plate stays up or crashes down. MicroType 4 keeps a list of the top ten scores for the Plate Spinner game. Select the Top Ten Lists option in the Reports menu to display the list.
MicroType 4 User Guide
Section 7 Numeric Keypad 57
Game Over: The game ends when the student keys all of the drill sets. The program displays the total score, fastest speed, average speed, and goal speed. This information also appears on the Lesson Report. If the student plays the game more than once in a single lesson, MicroType 4 stores only the most recent score.
Playing the Game Outside of the Lessons: The Plate Spinner game is available outside of the lessons by clicking on the Games button from the Main Menu. The figures presented in the Plate Spinner game outside of the lessons contain all of the keypad numbers; therefore, the student should not begin using the game outside of the lessons until he/she has completed the Numeric Keypad module. The kspm goal is approximately 90% of the average speed that the student had attained in all of the Build Skill parts completed in the Numeric Keypad lessons. If he/she did not complete a Build Skill part, the program uses 75 kspm as the default goal.
NOTE: 1) The BACKSPACE/DELETE setting (on or off) used in the lesson also applies to the game. The student must set the Preferences before beginning a new game.
2). The student will not be able to make any changes after he/she taps the ENTER key in the previous boxes. The BACK SPACE key works till he/she taps the Enter key.
7.10 Lesson Report The Lesson Report shows the performance for each lesson. (See Figure 7-7) When the student completes the Warm Up, Learn Key, or Improve Keystroking activity, a check mark appears next to that item on the report. In addition, the Lesson Report includes the average and fastest speeds for both the Build Skill part and the Plate Spinner game. The drill sets keyed in the Build Skill part appear on the report if it is printed. The goal speed and total score for the game appear on the report, too.
A BACKSPACE/DELETE icon appears next to a lesson part if the student used the BACKSPACE/DELETE key. To print the report, the student will click the Print button in the lower right corner of the notebook. The Lesson Report will appear on screen. He/she clicks the Print button in the upper left corner to print. He/she clicks the Graph button to view the Performance Graph. The software displays the current lesson in blue. Click on the Send file button to send the student reports to the central database, from where the instructor will access the reports through Web Reporter.
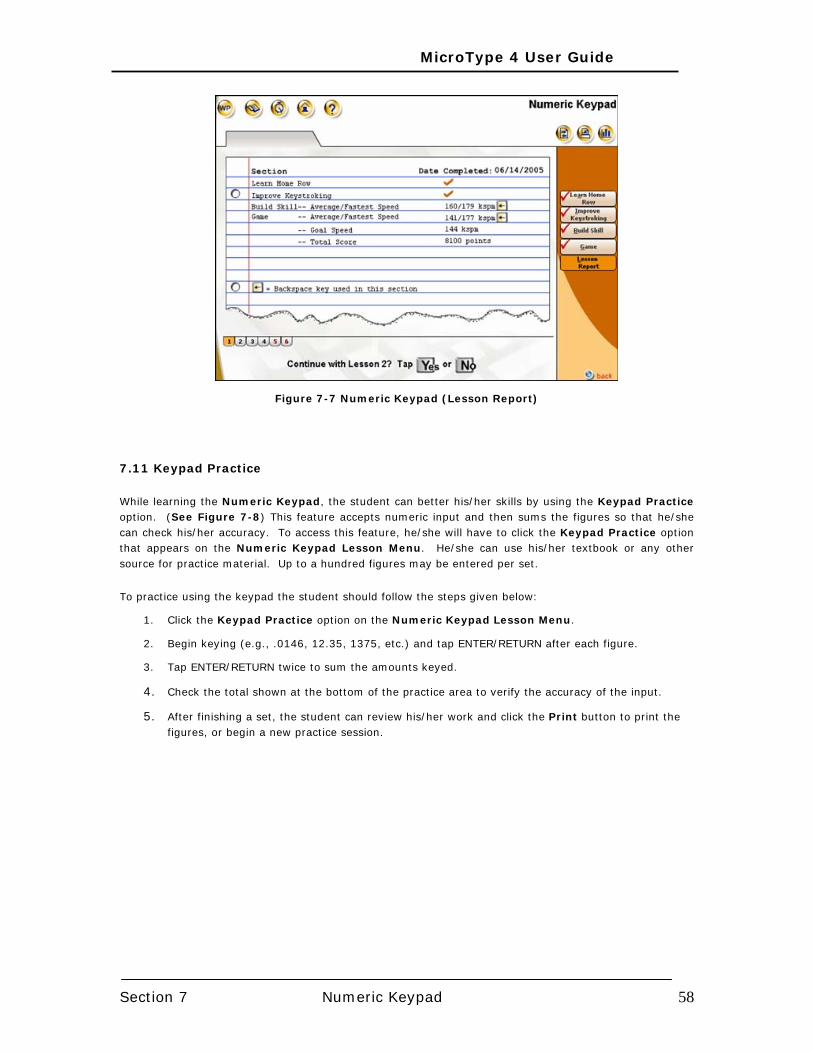
MicroType 4 User Guide
Section 7 Numeric Keypad 58
Figure 7-7 Numeric Keypad (Lesson Report)
7.11 Keypad Practice While learning the Numeric Keypad, the student can better his/her skills by using the Keypad Practice option. (See Figure 7-8) This feature accepts numeric input and then sums the figures so that he/she can check his/her accuracy. To access this feature, he/she will have to click the Keypad Practice option that appears on the Numeric Keypad Lesson Menu. He/she can use his/her textbook or any other source for practice material. Up to a hundred figures may be entered per set.
To practice using the keypad the student should follow the steps given below:
1. Click the Keypad Practice option on the Numeric Keypad Lesson Menu.
2. Begin keying (e.g., .0146, 12.35, 1375, etc.) and tap ENTER/RETURN after each figure.
3. Tap ENTER/RETURN twice to sum the amounts keyed.
4. Check the total shown at the bottom of the practice area to verify the accuracy of the input.
5. After finishing a set, the student can review his/her work and click the Print button to print the figures, or begin a new practice session.

MicroType 4 User Guide
Section 7 Numeric Keypad 59
Figure 7-8 Keypad Practice
NOTE: 1. The BACKSPACE/DELETE key can be enabled/disabled for the Keypad Practice, but the student must set the BACKSPACE/DELETE key before he/she accesses the practice option. The Numeric Keypad Preferences setting controls the BACKSPACE/DELETE key in the Keypad Practice option.
7.12 Keypad Timed Writings The Keypad Timed Writings option, which is available from the Numeric Keypad Lesson Menu, provides additional numeric keypad practice. When the student accesses this option, he/she selects from any of the following timed writings.
The emphasis for each group is presented in the following list.
Group Emphasis 1 Home row
2 Top row
3 Bottom row
4 All rows, no decimals
5 All rows, with decimals
6 Mixed lengths, no decimals
7 Mixed lengths, with decimals
8 Long random numbers, no decimals
9 Long random numbers, with decimals
After the student keys each writing, MicroType 4 shows his/her kspm and errors. (See Figure 7-9) Group statistics including fastest rate, average kspm and error rate appear to the right of the keying area. When he/she finishes a group, the program asks to repeat this exercise. At this time, he/she can click the Print button to print the timed writings keyed along with the performance results (fastest speed, average kspm, and error rate). MicroType 4 automatically stores the performance results after each timed writing. If the student completes the same timed writing several times, the program saves only the
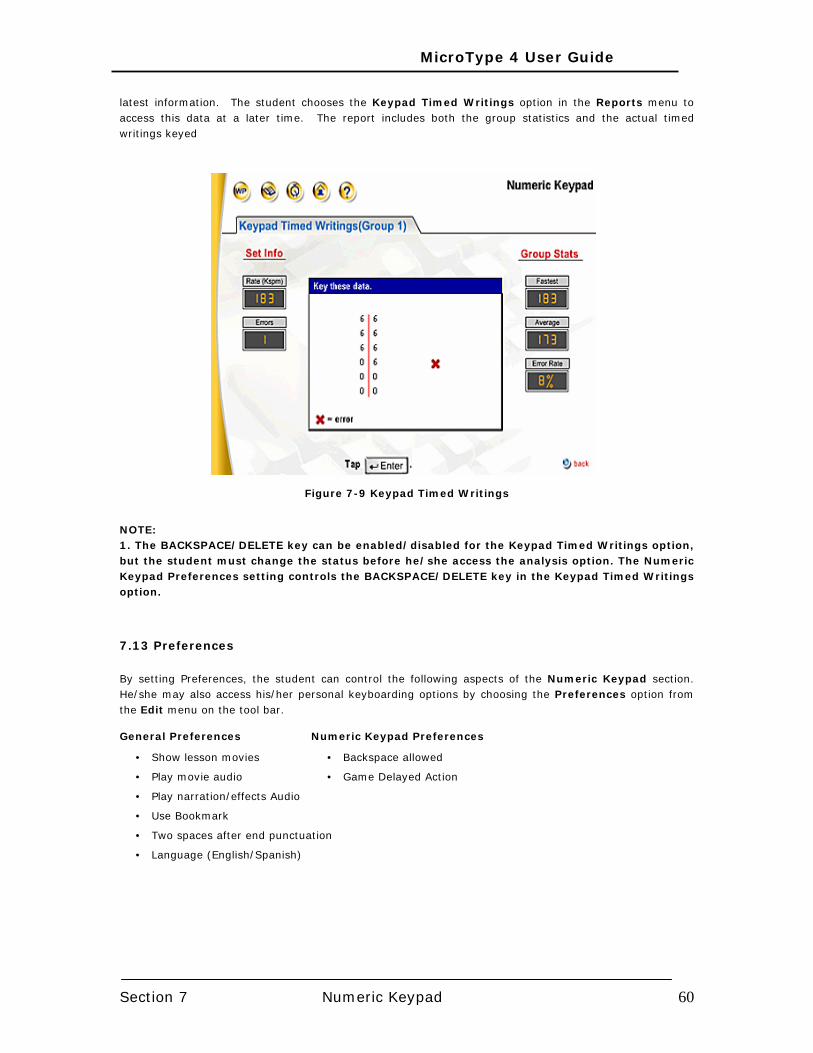
MicroType 4 User Guide
Section 7 Numeric Keypad 60
latest information. The student chooses the Keypad Timed Writings option in the Reports menu to access this data at a later time. The report includes both the group statistics and the actual timed writings keyed
Figure 7-9 Keypad Timed Writings
NOTE: 1. The BACKSPACE/DELETE key can be enabled/disabled for the Keypad Timed Writings option, but the student must change the status before he/she access the analysis option. The Numeric Keypad Preferences setting controls the BACKSPACE/DELETE key in the Keypad Timed Writings option.
7.13 Preferences By setting Preferences, the student can control the following aspects of the Numeric Keypad section. He/she may also access his/her personal keyboarding options by choosing the Preferences option from the Edit menu on the tool bar.
General Preferences Numeric Keypad Preferences
• Show lesson movies • Backspace allowed
• Play movie audio • Game Delayed Action
• Play narration/effects Audio
• Use Bookmark
• Two spaces after end punctuation
• Language (English/Spanish)
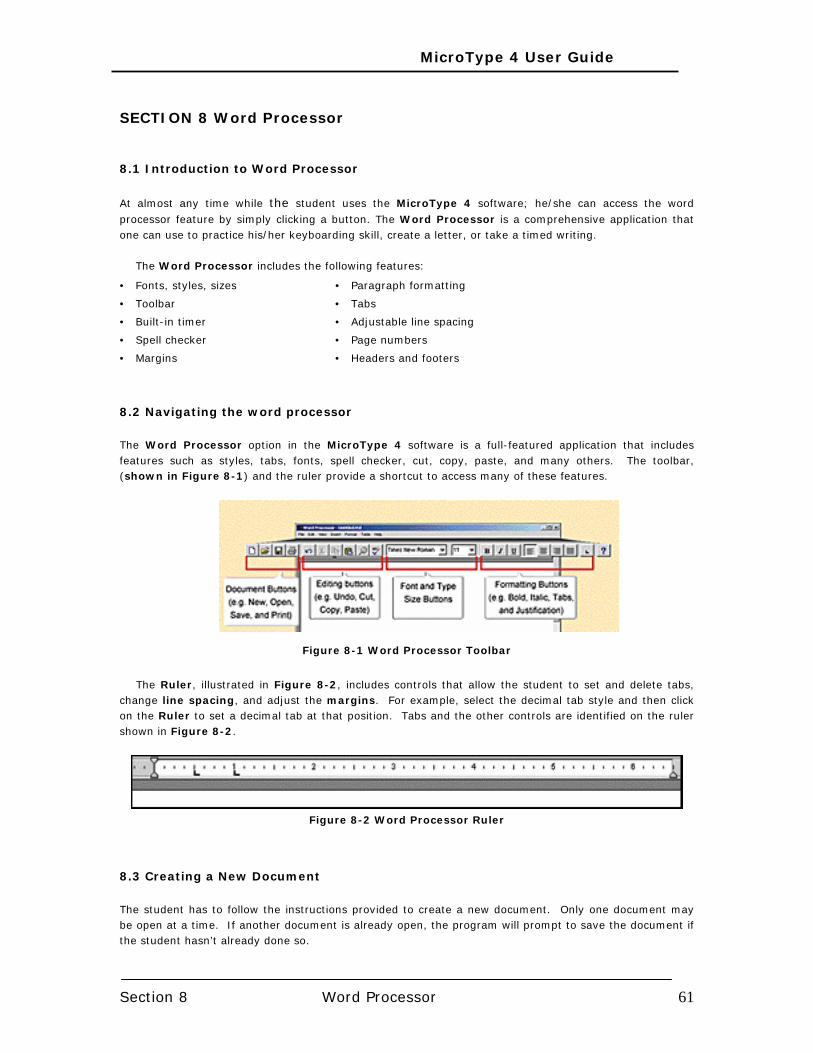
MicroType 4 User Guide
Section 8 Word Processor 61
SECTION 8 Word Processor
8.1 Introduction to Word Processor
At almost any time while the student uses the MicroType 4 software; he/she can access the word
processor feature by simply clicking a button. The Word Processor is a comprehensive application that one can use to practice his/her keyboarding skill, create a letter, or take a timed writing.
The Word Processor includes the following features:
• Fonts, styles, sizes • Paragraph formatting
• Toolbar • Tabs
• Built-in timer • Adjustable line spacing
• Spell checker • Page numbers
• Margins • Headers and footers
8.2 Navigating the word processor The Word Processor option in the MicroType 4 software is a full-featured application that includes features such as styles, tabs, fonts, spell checker, cut, copy, paste, and many others. The toolbar, (shown in Figure 8-1) and the ruler provide a shortcut to access many of these features.
Figure 8-1 Word Processor Toolbar
The Ruler, illustrated in Figure 8-2, includes controls that allow the student to set and delete tabs,
change line spacing, and adjust the margins. For example, select the decimal tab style and then click on the Ruler to set a decimal tab at that position. Tabs and the other controls are identified on the ruler shown in Figure 8-2.
Figure 8-2 Word Processor Ruler
8.3 Creating a New Document The student has to follow the instructions provided to create a new document. Only one document may be open at a time. If another document is already open, the program will prompt to save the document if the student hasn’t already done so.
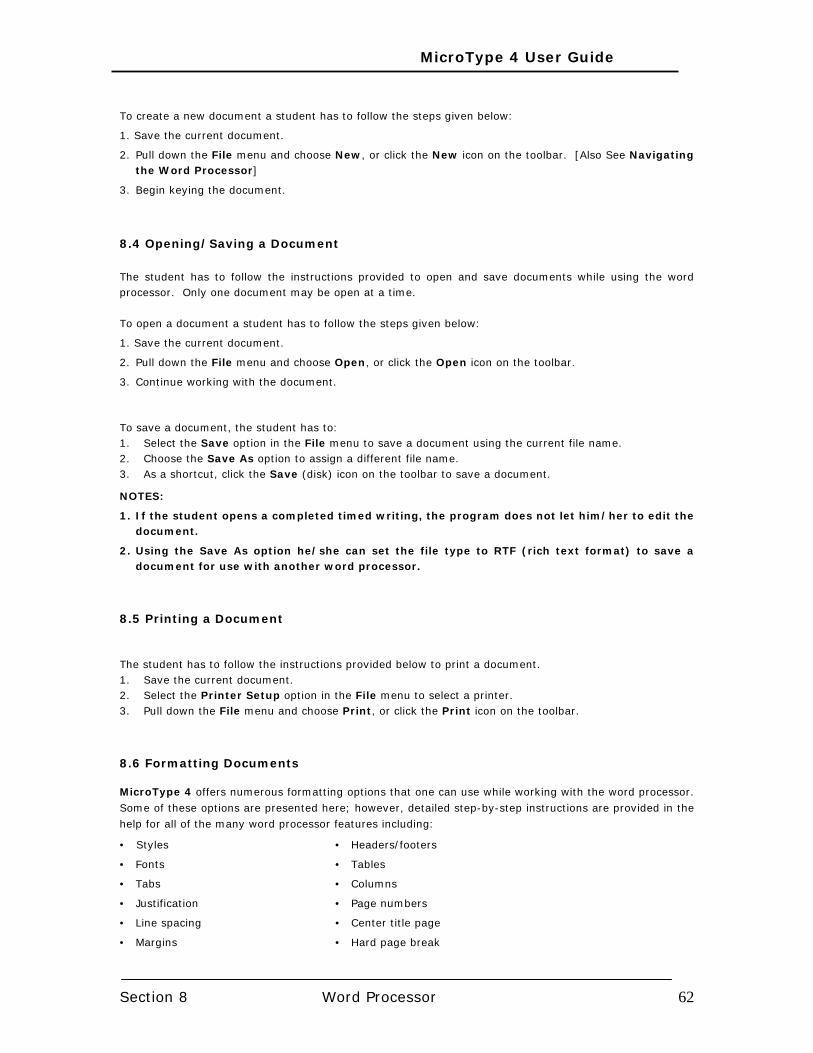
MicroType 4 User Guide
Section 8 Word Processor 62
To create a new document a student has to follow the steps given below:
1. Save the current document.
2. Pull down the File menu and choose New, or click the New icon on the toolbar. [Also See Navigating the Word Processor]
3. Begin keying the document.
8.4 Opening/Saving a Document The student has to follow the instructions provided to open and save documents while using the word processor. Only one document may be open at a time.
To open a document a student has to follow the steps given below:
1. Save the current document.
2. Pull down the File menu and choose Open, or click the Open icon on the toolbar.
3. Continue working with the document.
To save a document, the student has to: 1. Select the Save option in the File menu to save a document using the current file name. 2. Choose the Save As option to assign a different file name. 3. As a shortcut, click the Save (disk) icon on the toolbar to save a document.
NOTES:
1. If the student opens a completed timed writing, the program does not let him/her to edit the document.
2. Using the Save As option he/she can set the file type to RTF (rich text format) to save a document for use with another word processor.
8.5 Printing a Document
The student has to follow the instructions provided below to print a document. 1. Save the current document. 2. Select the Printer Setup option in the File menu to select a printer. 3. Pull down the File menu and choose Print, or click the Print icon on the toolbar.
8.6 Formatting Documents
MicroType 4 offers numerous formatting options that one can use while working with the word processor.
Some of these options are presented here; however, detailed step-by-step instructions are provided in the help for all of the many word processor features including:
• Styles • Headers/footers
• Fonts • Tables
• Tabs • Columns
• Justification • Page numbers
• Line spacing • Center title page
• Margins • Hard page break
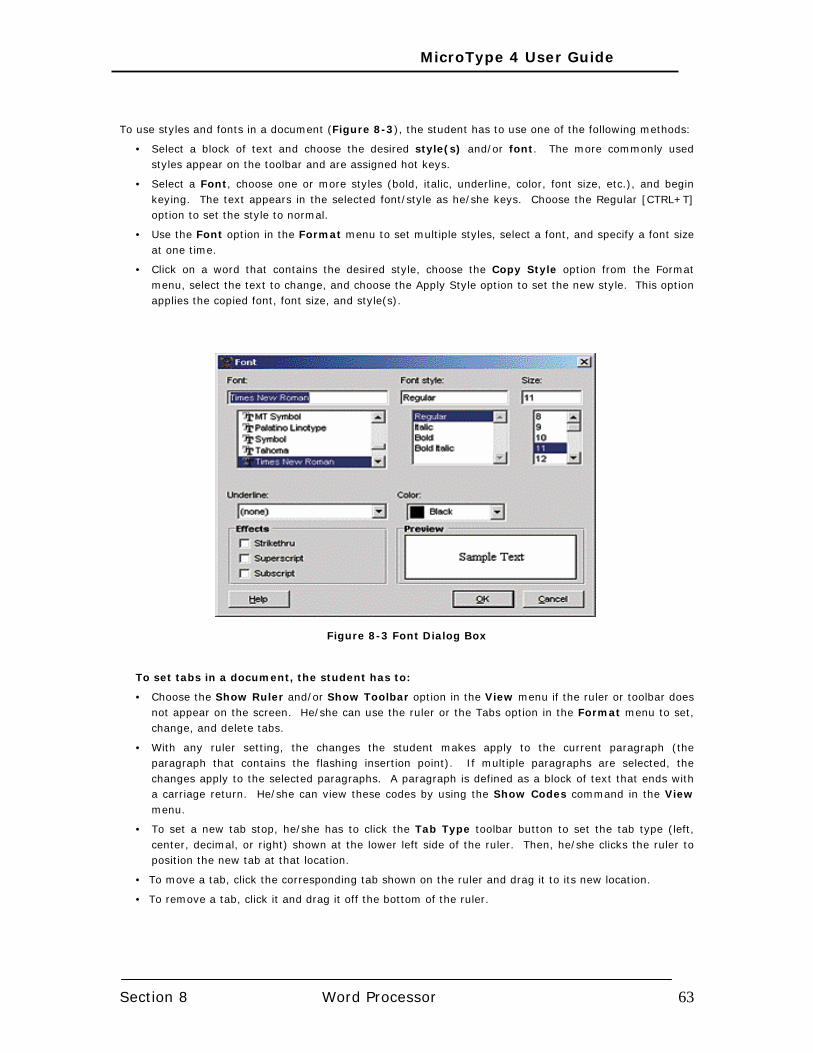
MicroType 4 User Guide
Section 8 Word Processor 63
To use styles and fonts in a document (Figure 8-3), the student has to use one of the following methods:
• Select a block of text and choose the desired style(s) and/or font. The more commonly used styles appear on the toolbar and are assigned hot keys.
• Select a Font, choose one or more styles (bold, italic, underline, color, font size, etc.), and begin keying. The text appears in the selected font/style as he/she keys. Choose the Regular [CTRL+T] option to set the style to normal.
• Use the Font option in the Format menu to set multiple styles, select a font, and specify a font size at one time.
• Click on a word that contains the desired style, choose the Copy Style option from the Format menu, select the text to change, and choose the Apply Style option to set the new style. This option applies the copied font, font size, and style(s).
Figure 8-3 Font Dialog Box
To set tabs in a document, the student has to:
• Choose the Show Ruler and/or Show Toolbar option in the View menu if the ruler or toolbar does not appear on the screen. He/she can use the ruler or the Tabs option in the Format menu to set, change, and delete tabs.
• With any ruler setting, the changes the student makes apply to the current paragraph (the paragraph that contains the flashing insertion point). If multiple paragraphs are selected, the changes apply to the selected paragraphs. A paragraph is defined as a block of text that ends with a carriage return. He/she can view these codes by using the Show Codes command in the View menu.
• To set a new tab stop, he/she has to click the Tab Type toolbar button to set the tab type (left, center, decimal, or right) shown at the lower left side of the ruler. Then, he/she clicks the ruler to position the new tab at that location.
• To move a tab, click the corresponding tab shown on the ruler and drag it to its new location.
• To remove a tab, click it and drag it off the bottom of the ruler.
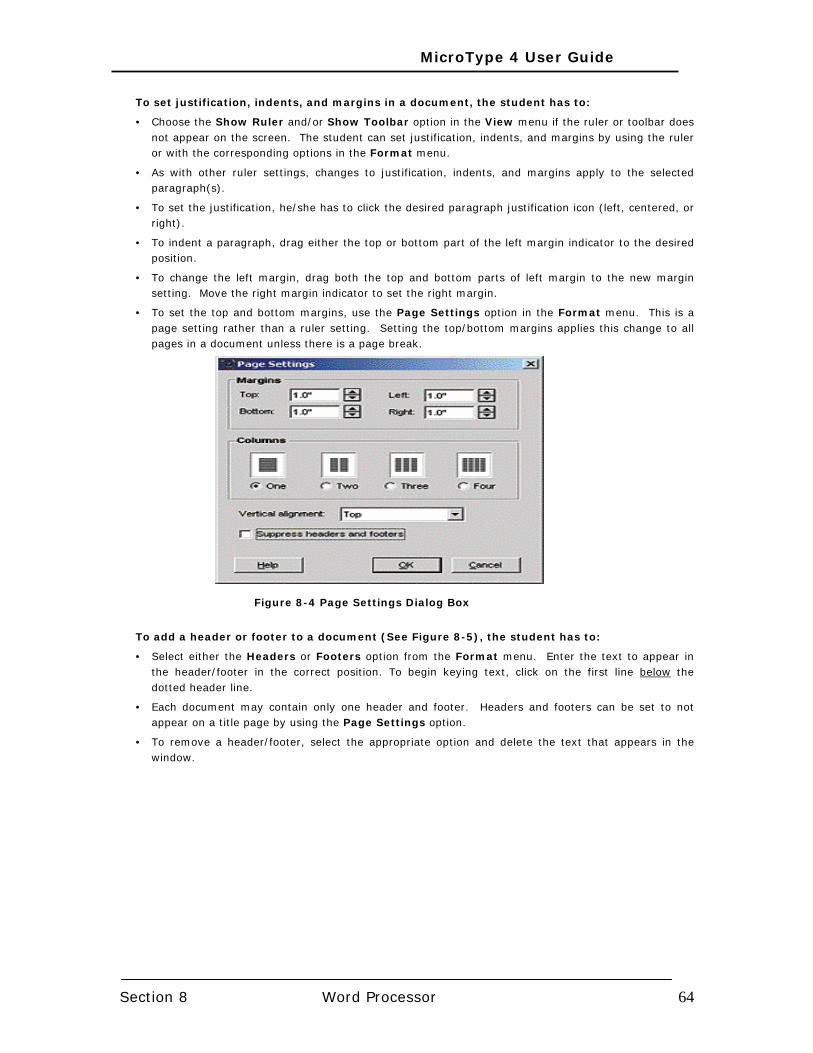
MicroType 4 User Guide
Section 8 Word Processor 64
To set justification, indents, and margins in a document, the student has to:
• Choose the Show Ruler and/or Show Toolbar option in the View menu if the ruler or toolbar does not appear on the screen. The student can set justification, indents, and margins by using the ruler or with the corresponding options in the Format menu.
• As with other ruler settings, changes to justification, indents, and margins apply to the selected paragraph(s).
• To set the justification, he/she has to click the desired paragraph justification icon (left, centered, or right).
• To indent a paragraph, drag either the top or bottom part of the left margin indicator to the desired position.
• To change the left margin, drag both the top and bottom parts of left margin to the new margin setting. Move the right margin indicator to set the right margin.
• To set the top and bottom margins, use the Page Settings option in the Format menu. This is a page setting rather than a ruler setting. Setting the top/bottom margins applies this change to all pages in a document unless there is a page break.
Figure 8-4 Page Settings Dialog Box
To add a header or footer to a document (See Figure 8-5), the student has to:
• Select either the Headers or Footers option from the Format menu. Enter the text to appear in the header/footer in the correct position. To begin keying text, click on the first line below the dotted header line.
• Each document may contain only one header and footer. Headers and footers can be set to not appear on a title page by using the Page Settings option.
• To remove a header/footer, select the appropriate option and delete the text that appears in the window.
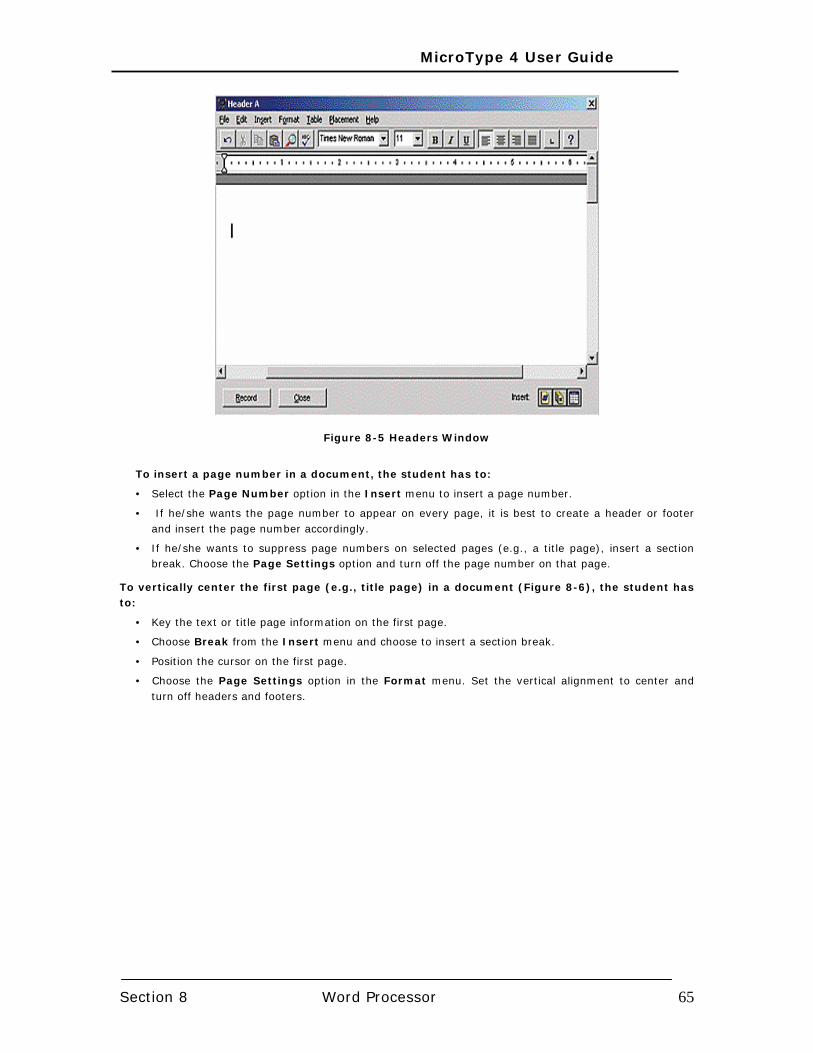
MicroType 4 User Guide
Section 8 Word Processor 65
Figure 8-5 Headers Window
To insert a page number in a document, the student has to:
• Select the Page Number option in the Insert menu to insert a page number.
• If he/she wants the page number to appear on every page, it is best to create a header or footer and insert the page number accordingly.
• If he/she wants to suppress page numbers on selected pages (e.g., a title page), insert a section break. Choose the Page Settings option and turn off the page number on that page.
To vertically center the first page (e.g., title page) in a document (Figure 8-6), the student has to:
• Key the text or title page information on the first page.
• Choose Break from the Insert menu and choose to insert a section break.
• Position the cursor on the first page.
• Choose the Page Settings option in the Format menu. Set the vertical alignment to center and turn off headers and footers.
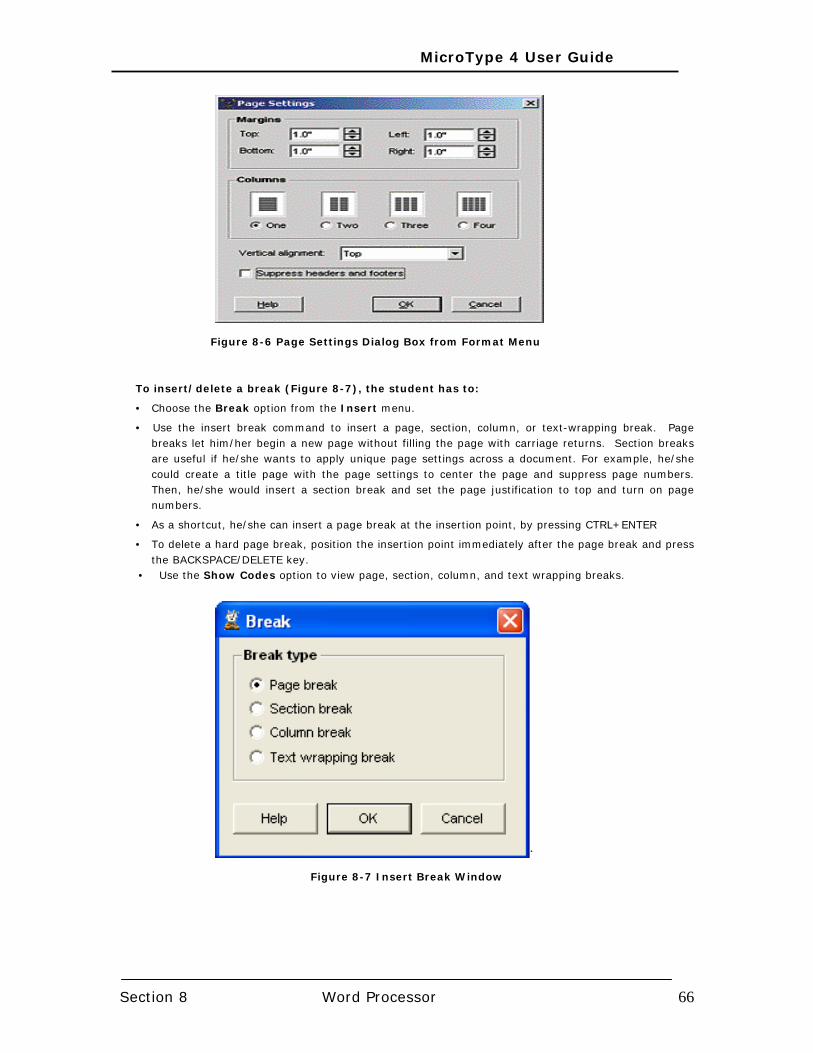
MicroType 4 User Guide
Section 8 Word Processor 66
Figure 8-6 Page Settings Dialog Box from Format Menu
To insert/delete a break (Figure 8-7), the student has to:
• Choose the Break option from the Insert menu.
• Use the insert break command to insert a page, section, column, or text-wrapping break. Page breaks let him/her begin a new page without filling the page with carriage returns. Section breaks are useful if he/she wants to apply unique page settings across a document. For example, he/she could create a title page with the page settings to center the page and suppress page numbers. Then, he/she would insert a section break and set the page justification to top and turn on page numbers.
• As a shortcut, he/she can insert a page break at the insertion point, by pressing CTRL+ENTER
• To delete a hard page break, position the insertion point immediately after the page break and press the BACKSPACE/DELETE key.
• Use the Show Codes option to view page, section, column, and text wrapping breaks.
Figure 8-7 Insert Break Window
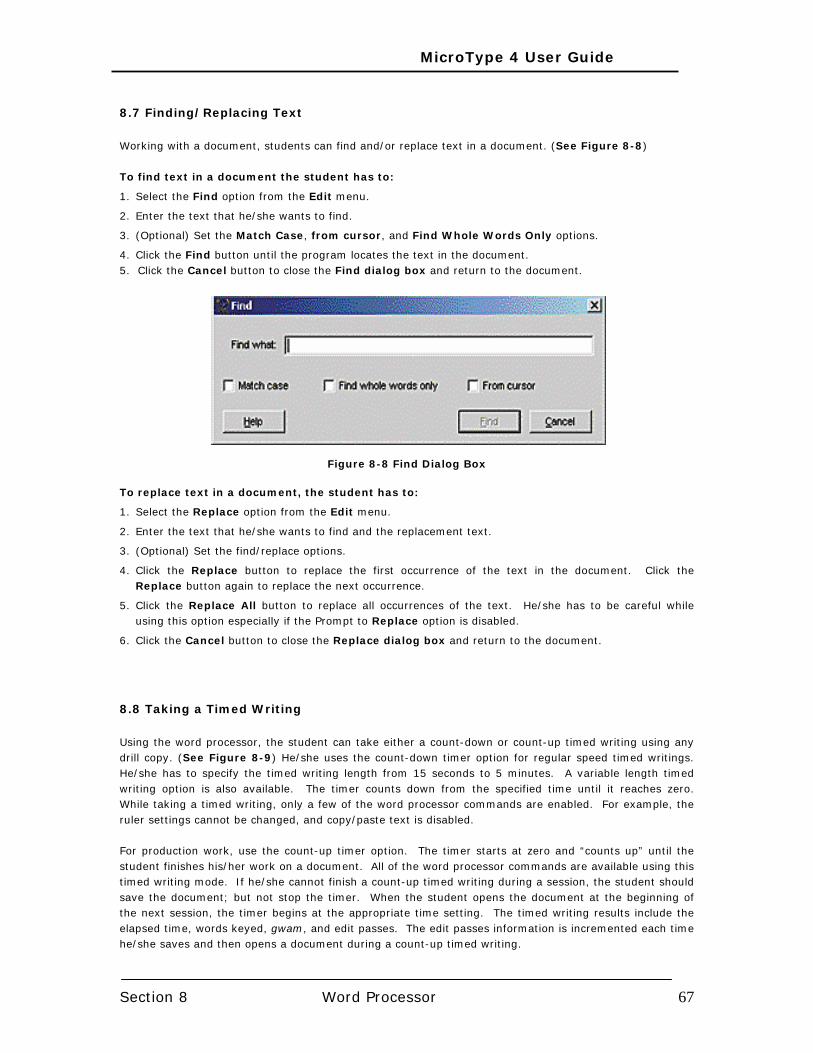
MicroType 4 User Guide
Section 8 Word Processor 67
8.7 Finding/Replacing Text
Working with a document, students can find and/or replace text in a document. (See Figure 8-8)
To find text in a document the student has to:
1. Select the Find option from the Edit menu.
2. Enter the text that he/she wants to find.
3. (Optional) Set the Match Case, from cursor, and Find Whole Words Only options.
4. Click the Find button until the program locates the text in the document. 5. Click the Cancel button to close the Find dialog box and return to the document.
Figure 8-8 Find Dialog Box
To replace text in a document, the student has to:
1. Select the Replace option from the Edit menu.
2. Enter the text that he/she wants to find and the replacement text.
3. (Optional) Set the find/replace options.
4. Click the Replace button to replace the first occurrence of the text in the document. Click the Replace button again to replace the next occurrence.
5. Click the Replace All button to replace all occurrences of the text. He/she has to be careful while using this option especially if the Prompt to Replace option is disabled.
6. Click the Cancel button to close the Replace dialog box and return to the document.
8.8 Taking a Timed Writing Using the word processor, the student can take either a count-down or count-up timed writing using any drill copy. (See Figure 8-9) He/she uses the count-down timer option for regular speed timed writings. He/she has to specify the timed writing length from 15 seconds to 5 minutes. A variable length timed writing option is also available. The timer counts down from the specified time until it reaches zero. While taking a timed writing, only a few of the word processor commands are enabled. For example, the ruler settings cannot be changed, and copy/paste text is disabled. For production work, use the count-up timer option. The timer starts at zero and “counts up” until the student finishes his/her work on a document. All of the word processor commands are available using this timed writing mode. If he/she cannot finish a count-up timed writing during a session, the student should save the document; but not stop the timer. When the student opens the document at the beginning of the next session, the timer begins at the appropriate time setting. The timed writing results include the elapsed time, words keyed, gwam, and edit passes. The edit passes information is incremented each time he/she saves and then opens a document during a count-up timed writing.
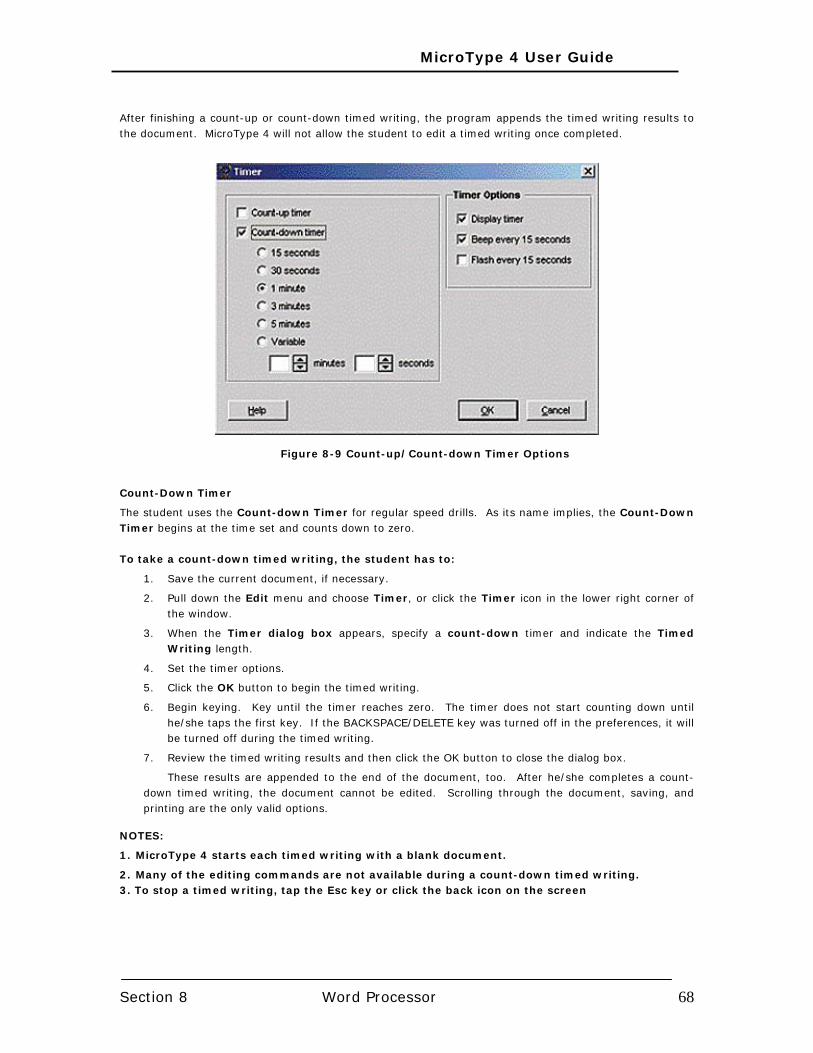
MicroType 4 User Guide
Section 8 Word Processor 68
After finishing a count-up or count-down timed writing, the program appends the timed writing results to the document. MicroType 4 will not allow the student to edit a timed writing once completed.
Figure 8-9 Count-up/Count-down Timer Options
Count-Down Timer
The student uses the Count-down Timer for regular speed drills. As its name implies, the Count-Down Timer begins at the time set and counts down to zero. To take a count-down timed writing, the student has to:
1. Save the current document, if necessary.
2. Pull down the Edit menu and choose Timer, or click the Timer icon in the lower right corner of the window.
3. When the Timer dialog box appears, specify a count-down timer and indicate the Timed Writing length.
4. Set the timer options.
5. Click the OK button to begin the timed writing.
6. Begin keying. Key until the timer reaches zero. The timer does not start counting down until he/she taps the first key. If the BACKSPACE/DELETE key was turned off in the preferences, it will be turned off during the timed writing.
7. Review the timed writing results and then click the OK button to close the dialog box.
These results are appended to the end of the document, too. After he/she completes a count-down timed writing, the document cannot be edited. Scrolling through the document, saving, and printing are the only valid options.
NOTES:
1. MicroType 4 starts each timed writing with a blank document.
2. Many of the editing commands are not available during a count-down timed writing. 3. To stop a timed writing, tap the Esc key or click the back icon on the screen
MicroType 4 User Guide
Section 8 Word Processor 69
Count-Up Timer
The student uses the count-up timer for production work such as letters or reports. The count-up timer begins at zero and “counts up” to a maximum of 99 minutes and 59 seconds. To take a count-up timed writing, the student has to:
1. Save the current document, if necessary.
2. Pull down the Edit menu and choose Timer, or click the Timer (stop watch) icon.
3. When the Timer dialog box appears, specify a count-up timer.
4. Set the timer options.
5. Click the OK button to begin the timed writing.
6. Begin keying.
The timer starts immediately after he/she clicks the OK button to begin the timed writing. If he/she is interrupted, the document can be saved and opened later. When the student opens a count-up timed writing document that is currently in progress, the timer begins from where he/she left off.
7.The student has to stop the timer only when he/she has completely finished a timed writing.
8. Choose Timer from the Edit menu or click the Timer (stop watch) icon.
9. Review the timed writing results and clicks the OK button to close the dialog box. These results are appended to the end of the document, too.
NOTES:
1. Most of the editing functions are available during the count-up timed writing.
2. After the student stops the timed writing, the document cannot be edited. Scrolling through the document, saving, and printing are the only valid options.
3. Since the count-up timer is used for production work, the program does not show the timing results in footer on each page. Rather, the results are appended to the document using a separate page.
4. If he/she shares a printer, include a header or footer with his/her name to help identify the documents.
MicroType 4 User Guide
Section 9 Student Reports 70
SECTION 9 STUDENT REPORTS
9.1 Introduction to Student Reports The MicroType 4 software provides numerous reports that one can generate. These reports include: Lesson Report, Summary Report, Keypad Timed Writings, Top Ten Lists, Certificate of Completion, and Performance Graphs. All of these reports, except the Lesson Report, are accessed by using the Reports menu.
9.2 Lesson Report Every lesson in each of the four keyboarding sections includes a Lesson Report. (See Figure 9-1) This report shows the student’s performance data for the corresponding lesson. The Lesson Report includes the most recent source copy and his/her actual copy for either the Build Skill or Measurement Writing exercises. To display/print a Lesson Report, the student has to:
1. Select the appropriate keyboarding section (Alphabetic Keyboarding, Numeric Keyboarding, Keyboarding Skill Builder, or Numeric Keypad) from the Main menu if necessary.
2. Choose a lesson.
3. Click the Lesson Report tab at the bottom of the notebook to display the report for the lesson.
4. Click the Print button to print the report. The Lesson Report will appear on screen. Click the Print button in the upper left corner to print.
NOTE: 1. For the Skill Builder section, there are actually two sets of Lesson Reports—speed and accuracy. The Lesson Report will show only the performance data for the current emphasis. The Summary Report shows both sets of data.
9.3 Summary Report The information included on the Summary Report reflects the student’s results for the entire MicroType 4 keyboarding tutorial. A partial Summary Report is presented in Figure 9-2. The complete report includes performance data for the following areas:
• Skill Analysis Timed Writing
• Alphabetic Keyboarding
• Numeric Keyboarding
• Keyboarding Skill Builder
• Numeric Keypad
• Timed writings
• Timed Practice (Alphabetic Keyboarding and Numeric Keyboarding only)
• Assessments (Keyboarding Skill Builder only)
NOTES:
1. Summary data is not stored if the student logs in as a Guest.
2. The Summary Report may require up to nine pages to print an entire report. However, the program will skip those sections that do not include any performance data.
3. Only the 100 most recent Timed Writings appear on the Summary Report.
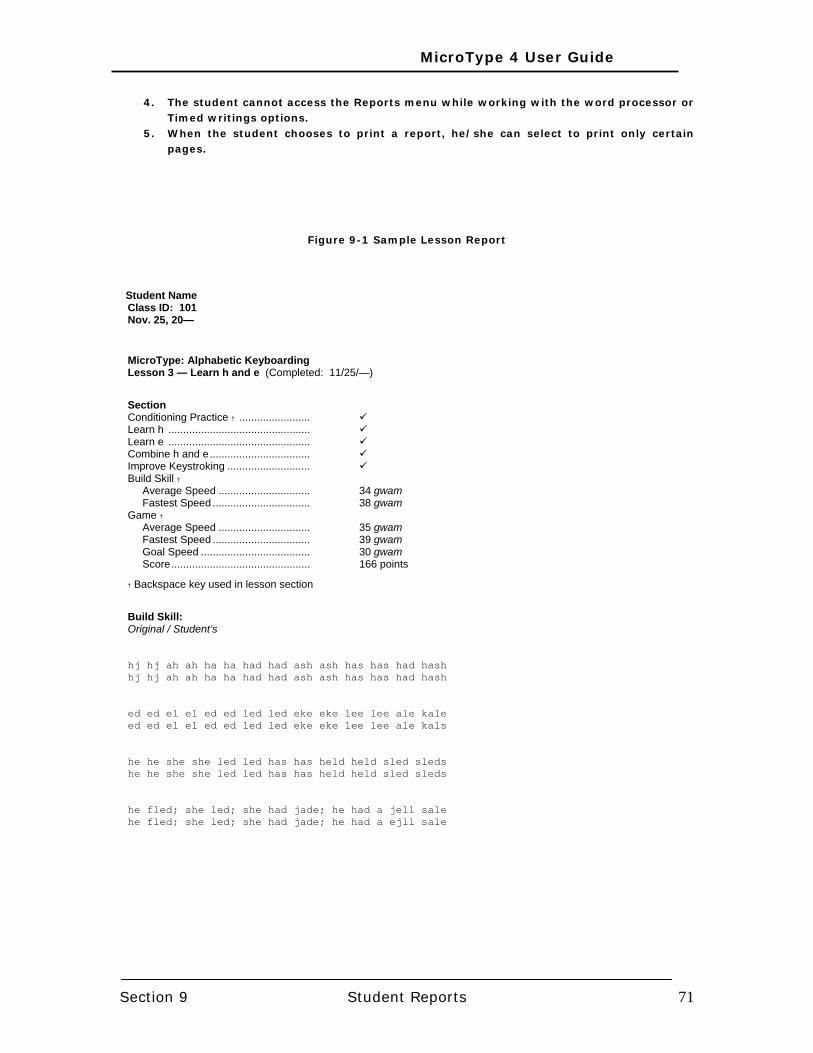
MicroType 4 User Guide
Section 9 Student Reports 71
4. The student cannot access the Reports menu while working with the word processor or Timed writings options.
5. When the student chooses to print a report, he/she can select to print only certain pages.
Figure 9-1 Sample Lesson Report
Student Name
Class ID: 101 Nov. 25, 20—
MicroType: Alphabetic Keyboarding Lesson 3 — Learn h and e (Completed: 11/25/—)
Section Conditioning Practice † ........................ Learn h ................................................ Learn e ................................................ Combine h and e.................................. Improve Keystroking ............................ Build Skill † Average Speed ............................... 34 gwam Fastest Speed ................................. 38 gwam Game † Average Speed ............................... 35 gwam Fastest Speed ................................. 39 gwam Goal Speed ..................................... 30 gwam Score............................................... 166 points
† Backspace key used in lesson section
Build Skill: Original / Student’s hj hj ah ah ha ha had had ash ash has has had hash hj hj ah ah ha ha had had ash ash has has had hash ed ed el el ed ed led led eke eke lee lee ale kale ed ed el el ed ed led led eke eke lee lee ale kals he he she she led led has has held held sled sleds he he she she led led has has held held sled sleds he fled; she led; she had jade; he had a jell sale he fled; she led; she had jade; he had a ejll sale
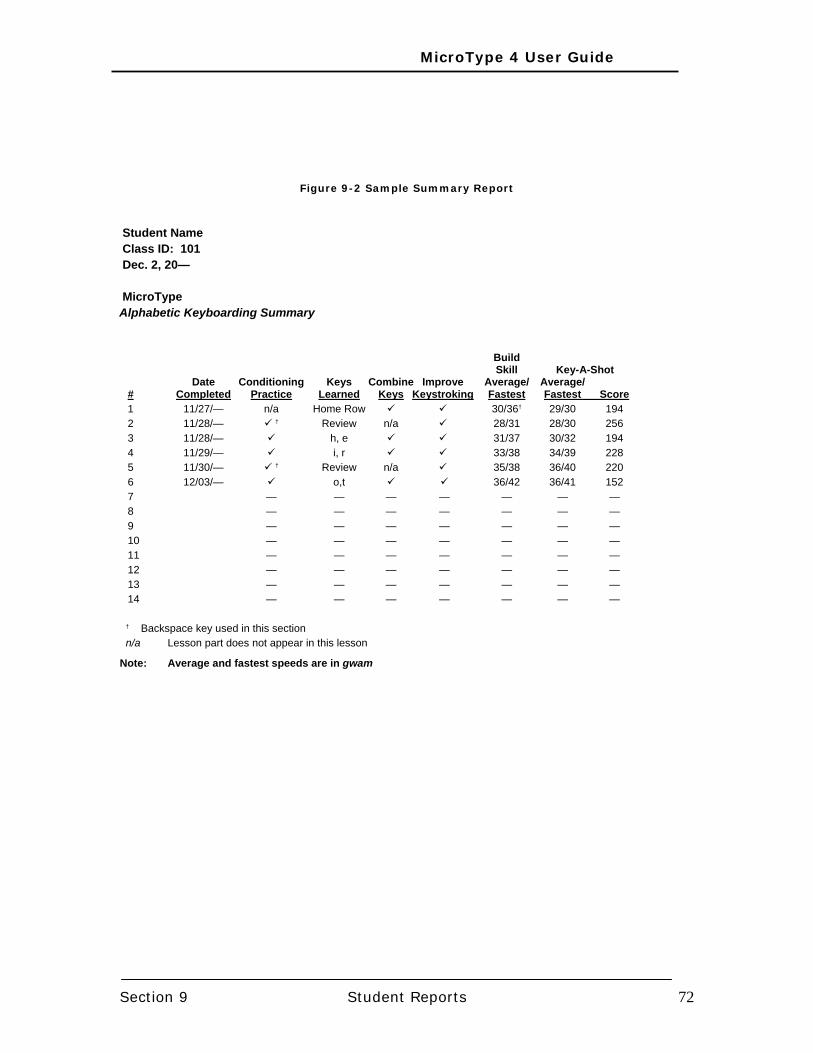
MicroType 4 User Guide
Section 9 Student Reports 72
Figure 9-2 Sample Summary Report
Student Name Class ID: 101 Dec. 2, 20— MicroType Alphabetic Keyboarding Summary Build Skill Key-A-Shot Date Conditioning Keys Combine Improve Average/ Average/ # Completed Practice Learned Keys Keystroking Fastest Fastest Score 1 11/27/— n/a Home Row 30/36† 29/30 194 2 11/28/— † Review n/a 28/31 28/30 256 3 11/28/— h, e 31/37 30/32 194 4 11/29/— i, r 33/38 34/39 228 5 11/30/— † Review n/a 35/38 36/40 220 6 12/03/— o,t 36/42 36/41 152 7 — — — — — — — 8 — — — — — — — 9 — — — — — — — 10 — — — — — — — 11 — — — — — — — 12 — — — — — — — 13 — — — — — — — 14 — — — — — — —
† Backspace key used in this section n/a Lesson part does not appear in this lesson
Note: Average and fastest speeds are in gwam
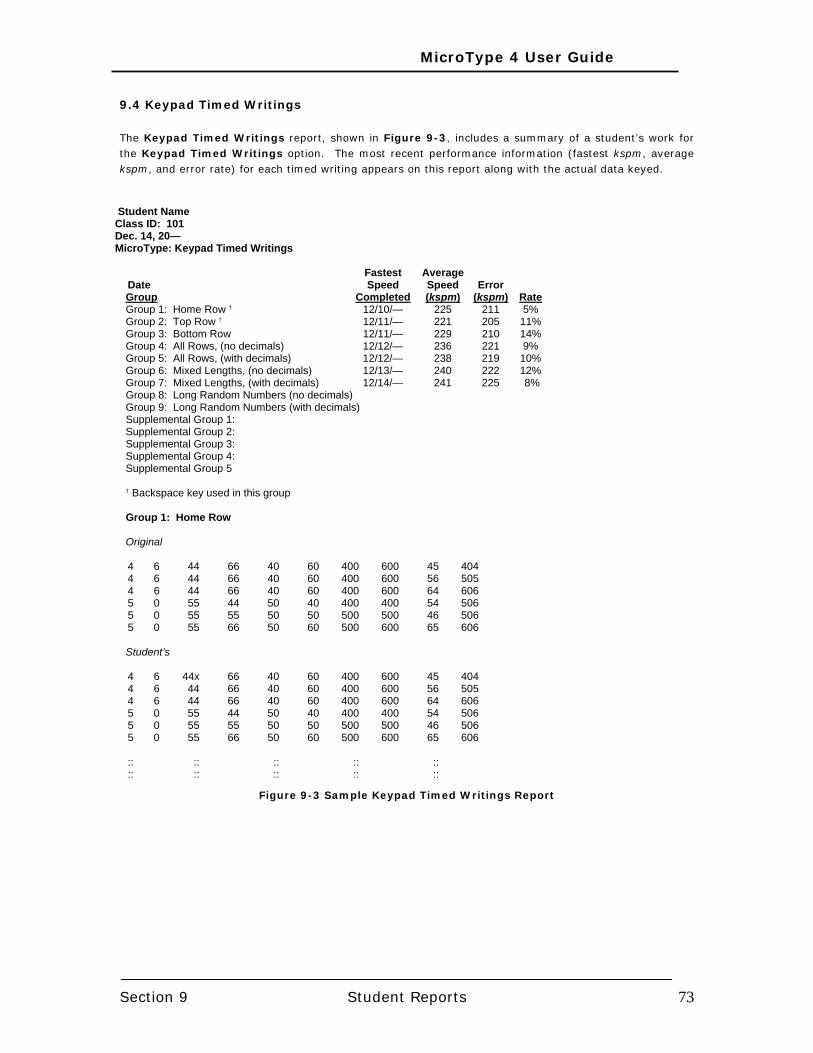
MicroType 4 User Guide
Section 9 Student Reports 73
9.4 Keypad Timed Writings The Keypad Timed Writings report, shown in Figure 9-3, includes a summary of a student’s work for the Keypad Timed Writings option. The most recent performance information (fastest kspm, average kspm, and error rate) for each timed writing appears on this report along with the actual data keyed.
Student Name Class ID: 101 Dec. 14, 20— MicroType: Keypad Timed Writings Fastest Average Date Speed Speed Error
Group Completed (kspm) (kspm) Rate Group 1: Home Row † 12/10/— 225 211 5% Group 2: Top Row † 12/11/— 221 205 11% Group 3: Bottom Row 12/11/— 229 210 14% Group 4: All Rows, (no decimals) 12/12/— 236 221 9% Group 5: All Rows, (with decimals) 12/12/— 238 219 10% Group 6: Mixed Lengths, (no decimals) 12/13/— 240 222 12% Group 7: Mixed Lengths, (with decimals) 12/14/— 241 225 8% Group 8: Long Random Numbers (no decimals) Group 9: Long Random Numbers (with decimals) Supplemental Group 1: Supplemental Group 2: Supplemental Group 3: Supplemental Group 4: Supplemental Group 5 † Backspace key used in this group Group 1: Home Row Original 4 6 44 66 40 60 400 600 45 404 4 6 44 66 40 60 400 600 56 505 4 6 44 66 40 60 400 600 64 606 5 0 55 44 50 40 400 400 54 506 5 0 55 55 50 50 500 500 46 506 5 0 55 66 50 60 500 600 65 606 Student’s
4 6 44x 66 40 60 400 600 45 404 4 6 44 66 40 60 400 600 56 505 4 6 44 66 40 60 400 600 64 606 5 0 55 44 50 40 400 400 54 506 5 0 55 55 50 50 500 500 46 506 5 0 55 66 50 60 500 600 65 606 :: :: :: :: :: :: :: :: :: ::
Figure 9-3 Sample Keypad Timed Writings Report
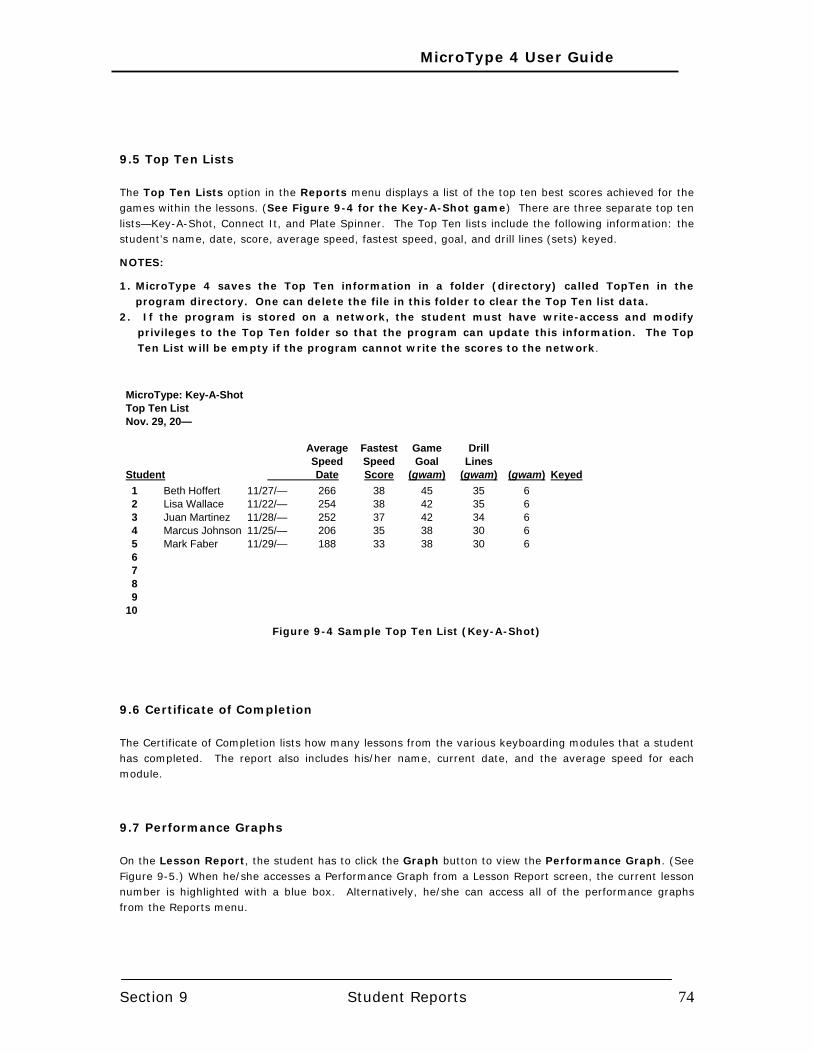
MicroType 4 User Guide
Section 9 Student Reports 74
9.5 Top Ten Lists
The Top Ten Lists option in the Reports menu displays a list of the top ten best scores achieved for the games within the lessons. (See Figure 9-4 for the Key-A-Shot game) There are three separate top ten lists—Key-A-Shot, Connect It, and Plate Spinner. The Top Ten lists include the following information: the student’s name, date, score, average speed, fastest speed, goal, and drill lines (sets) keyed.
NOTES:
1. MicroType 4 saves the Top Ten information in a folder (directory) called TopTen in the program directory. One can delete the file in this folder to clear the Top Ten list data.
2. If the program is stored on a network, the student must have write-access and modify privileges to the Top Ten folder so that the program can update this information. The Top Ten List will be empty if the program cannot write the scores to the network.
MicroType: Key-A-Shot Top Ten List Nov. 29, 20— Average Fastest Game Drill Speed Speed Goal Lines Student Date Score (gwam) (gwam) (gwam) Keyed 1 Beth Hoffert 11/27/— 266 38 45 35 6 2 Lisa Wallace 11/22/— 254 38 42 35 6 3 Juan Martinez 11/28/— 252 37 42 34 6 4 Marcus Johnson 11/25/— 206 35 38 30 6 5 Mark Faber 11/29/— 188 33 38 30 6 6 7 8 9 10
Figure 9-4 Sample Top Ten List (Key-A-Shot)
9.6 Certificate of Completion The Certificate of Completion lists how many lessons from the various keyboarding modules that a student has completed. The report also includes his/her name, current date, and the average speed for each module.
9.7 Performance Graphs
On the Lesson Report, the student has to click the Graph button to view the Performance Graph. (See Figure 9-5.) When he/she accesses a Performance Graph from a Lesson Report screen, the current lesson number is highlighted with a blue box. Alternatively, he/she can access all of the performance graphs from the Reports menu.
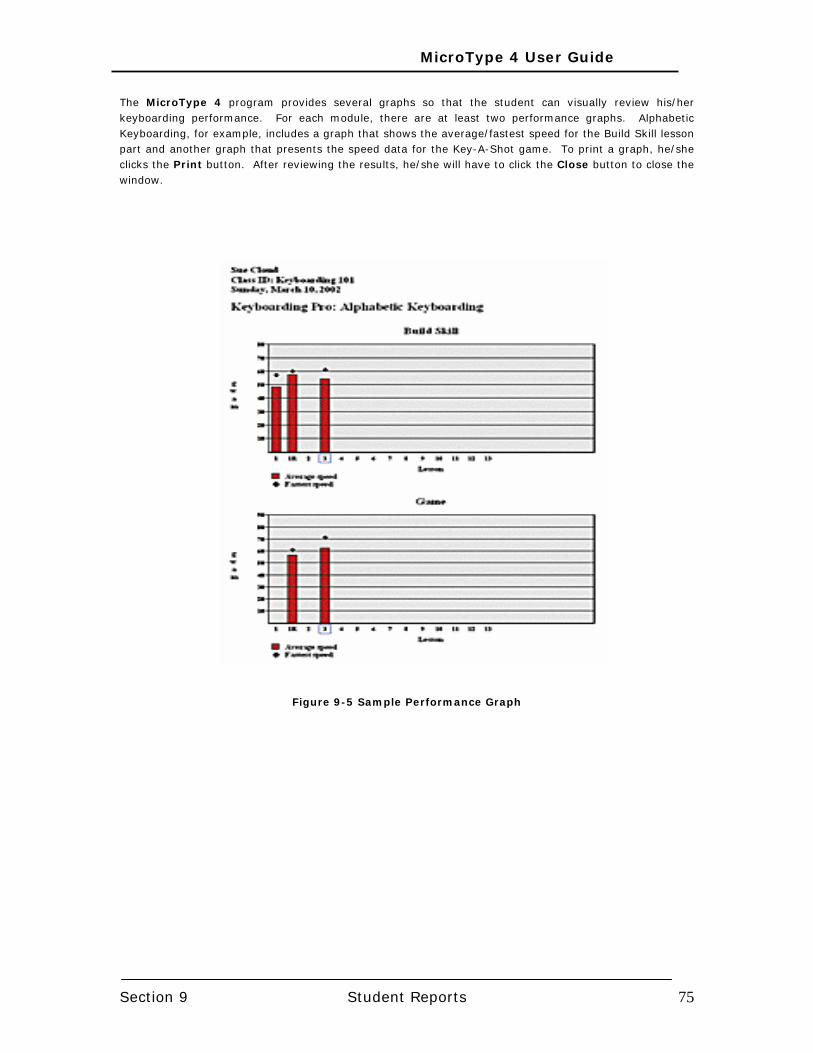
MicroType 4 User Guide
Section 9 Student Reports 75
The MicroType 4 program provides several graphs so that the student can visually review his/her keyboarding performance. For each module, there are at least two performance graphs. Alphabetic Keyboarding, for example, includes a graph that shows the average/fastest speed for the Build Skill lesson part and another graph that presents the speed data for the Key-A-Shot game. To print a graph, he/she clicks the Print button. After reviewing the results, he/she will have to click the Close button to close the window.
Figure 9-5 Sample Performance Graph
MicroType 4 User Guide
Appendix A Troubleshooting Guide 76
APPENDIX A TROUBLESHOOTING TIPS
If the student experiences difficulty using the MicroType 4 software, he/she can refer to the information given in this appendix to correct the problem.
The program seems to stop working when one learns a new key or while keying drill lines. First, make sure that CAPS LOCK is not enabled when entering alphabetic keys. Turn CAPS LOCK off and then try striking the key (a to z). While using the keypad, the NUM LOCK option should be on.
The screen fonts do not seem appropriate, or the reports are not aligned properly. The MicroType 4 software requires the following TrueType fonts: Arial, Courier New, Symbol, Times New Roman, and Wingdings. These fonts are usually installed on all computers at the factory. (For Advanced Users Only) If the fonts are not installed, copy them to the computer and use the Fonts control panel to complete the installation process.
The program replaces selected fonts in an Open Screen document with other fonts. The fonts used by word processing programs such as the Open Screen are stored on each computer. Only those fonts available on any given computer may be used in a document. If one creates a document with a unique font (e.g., Century Gothic) that is available on only one computer in the lab, the program will replace that font with another when one opens that document on a different computer. To resolve this problem, make sure that all the computers have the same fonts.
The movies are slow and not very responsive. Turn off the show lesson movies, play movie audio, and play narration/effects audio preferences if the animations are slow. Although the program attempts to detect if one’s computer has the appropriate sound capabilities, this detection process is not foolproof. Disabling the sound option should significantly improve the animation speed in these cases.
The program does not access the movies when the system was configured to play the movies from the CD-ROM. When one installs the software, he/she has the option to install the movies to the hard drive/network, or leave the movies on the CD-ROM. If the latter option is chosen, each time prior to running the keyboarding software, one must insert the CD-ROM into the disc drive. If the MicroType 4 program does not find a movie because the CD-ROM was not available, the tutorial will skip that movie. If one has the CD-ROM in the drive, but the program does not access the movie, try to re-install the program. The configuration may have changed, causing the program not to be able to find the movies.
The sounds generated by the program do not seem to function properly. Use the Preferences option to turn off the play movie audio and play narration/effects audio preferences. A sound card is required for best results to play the sounds that accompany the animations.
How to delete the Top Ten Lists? To erase the top ten lists, delete the file in the Top Ten directory. This directory is located with the other program files. Delete only the contents, DO NOT delete the directory.
How to uninstall the MicroType 4 software? The installation program installs most of the programs in the Program Files\ MicroType4 directory unless somebody has changed the directory during the installation process. To uninstall MicroType 4, select Uninstall MicroType from the South-Western Keyboarding Program group. If files remain after uninstalling, simply delete all of the files and subdirectories in the MicroType 4 directory. Also delete the student files.