user guide - hexistor user guide.pdf · this user guide provides the steps to set up your siris...
TRANSCRIPT

USER GUIDE

WELCOME TO DATTO SIRIS!We are excited to show you everything that Datto SIRIS has to offer.
This user guide provides the steps to set up your SIRIS device, pair your first target machine, configure your backup settings, and start your first backup.
HAVING TROUBLE? Datto’s Quick Start Install Service is here to help.
Assisted by a Datto Installation Technician, this complimentary service provides Datto Partners with a comprehensive, step-by-step walkthrough of their first SIRIS implementation. For more information, or to schedule an appointment, contact your Datto Sales Executive at US: 888.294.6312 / Canada: 877.811.0577 / EMEA: +44.(0).118.402.9606 / Australia: +61.(02).8488.3159
Whether you need help troubleshooting an issue, want to run through an off-site virtualization test, or have encountered a local disaster, Datto’s Technical Support team is always available to help you. Give us a call at US & Canada: 877.455.6015 / EMEA: +44.(0).118.402.9609 / Australia: +61.(02).8015.6826
Support Hours: 24x7x365
Have an Emergency? Send us an email: [email protected]. A Datto Support Technician will contact you within an hour.
WANT TO LEARN MORE?The Datto Academy helps Datto Partners that are looking to get the most of out of their Datto experience. Datto Academy Basic Online Training is complimentary to every Datto Partner. Log in with your partner credentials at academy.datto.com.
Before you implement your first device, we highly recommend that you familiarize yourself with the Datto Academy and the various lessons that it offers.
Additionally, the Datto Knowledge Base provides extended documentation on how to take full advantage of your Datto appliance, including advanced self-service and
troubleshooting techniques. To log on, go to kb.datto.com.
Thanks again for choosing Datto!

USER GUIDE 1
HARDWARE SETUP ....................................................................2SIRIS 3 X1 ......................................................................................................................2SIRIS 3 Business ..........................................................................................................3SIRIS 3 Professional.....................................................................................................3SIRIS 3 Enterprise ........................................................................................................4
DEPLOY ........................................................................................5
BACKUP AGENTS .......................................................................8
SYNCHRONIZE .........................................................................11Perform a RoundTrip Sync ........................................................................................11
RESTORE ...................................................................................12File Restore ................................................................................................................12Local Virtualization ....................................................................................................13Hybrid Virtualization....................................................................................................Bare Metal Restore ....................................................................................................15Export Image ..............................................................................................................16
ADVANCED ................................................................................17Advanced Device Status .............................................................................................17Network Attached Storage ........................................................................................18Exchange Granular Restore ......................................................................................19
CONFIGURE ...............................................................................20Local Users/Contact ..................................................................................................20Networking .................................................................................................................20Off-Site Synchronization ...........................................................................................22Device Settings ...........................................................................................................23Custom Email Alerts ..................................................................................................23Customize ...................................................................................................................23ownCloud on SIRIS .....................................................................................................24
REPORTS ...................................................................................26Backup Report............................................................................................................26Alert Report ................................................................................................................26Continuity Audit ..........................................................................................................27
NEXT STEPS ..............................................................................27

SIRIS 32
HARDWARE SETUPFirst, set up your new SIRIS on the local network.
Follow the steps below to get started.
1. Connect power cable(s) provided.2. Using the Ethernet cable provided, connect the SIRIS to your local network
via the Primary NIC. Failure to do so can cause the SIRIS to not appear on the local network. Each form factor for SIRIS has a different location for the Primary NIC. Use the images provided to identify the appropriate port.
3. Power on your device.
SIRIS 3 X1Models: X1
1. Power Adapter Connection 6. USB 2.0
2. Video Out 7. Power Button3. Primary NIC 8. 2x USB 3.04. Secondary NIC5. 2x USB 3.0

USER GUIDE 3
SIRIS PROFESSIONALModels: SP1000, SP2000, SP4000, SP6000, and SP10000
1.AC Power Connection 100/240v* Secondary Power Supply Available
6.Primary 10 GB NIC: Inter-net (Required)
2. IPMI Port 7. Secondary 10 GB NIC3. 2 x USB 3.04. Network Port5. Video Out
SIRIS 3 BUSINESSModels: SB500, SB1000, SB2000, and SB2000
1. Power Button 6. 2x USB 3.0
2. Reset Button/LED Indicator 7. Secondary 10 GB NIC
3. USB 3.0 8. Primary 10 GB NIC: In-ternet (Required)
4. AC Power Connection 100/240v 9. Video Out (HDMI/DVI/
DPORT)5. IPMI Port

SIRIS 34
SIRIS ENTERPRISEModels: SE6000, SE12000, SE18000, SE24000, SE36000, SE48000, and
SE60000
1. 2 x AC Power Connection 100/240v 6. Primary 10GB NIC: Internet
(Required)2. OS Drive 7. Secondary 10GB NIC3. Transfer OS Drive 8. IPMI Port4. Network Port 9. 2x USB 3.05. Video Out
DEPLOY
SIRIS NETWORKING REQUIREMENTSThe SIRIS must have access to the Datto Cloud for registration, backup replication, and remote management:
• For registration, TCP posts 22 (ssh), 80 (http), and 443 (https) must be open outbound without a proxy to dattobackup.com (US) or dattobackup.ca (Canada).
• For Cloud infrastructure and device management, the SIRIS must be able to access the following IP ranges:
• 47.19.105.0/24
• 8.34.181.199/32
• 198.49.95.0/24
• 8.34.176.0/24
• To replicate to the Datto Cloud, the SIRIS must have access to country-specific IP ranges. To see the IP ranges for your country, see the Knowledge Base article Datto Networking Requirements.

USER GUIDE 5
REGISTERFrom a computer on the same LAN as the SIRIS, follow these steps:
1. Open a web browser, and go to device.dattobackup.com.
2. You will see a list of Datto appliances on your LAN. Unregistered appliances are listed as backupDevice. Click on the IP address of the SIRIS that you want to set up.
3. Fill out the registration screen, and click
PREPARE TARGET MACHINESEnsure the viability of your backups by making sure that your target machines are healthy:
• Remove any other backup software with a high-level installer that removes registry keys, dll files, and stray folders. These components will conflict with the ShadowSnap backup agent. Reboot the machine to complete the uninstall process.
• Check the status of RAIDs and hard drives (using chkdsk in Windows or fsck in Linux). Make any necessary repairs before installing the Datto backup agent.
• Run defragmentation before deployment of a Datto backup agent. You may continue to run defragmentation after starting a backup chain, but keep in mind that these programs rearrange data on a block level and may cause large incremental backups.
• Check the system and application logs on the target machine for any VSS or hardware errors. Resolve any errors before installing a backup agent.
PAIR TARGET MACHINESOnce you’ve prepared your target machines, you can pair them with the SIRIS.
Protecting a Windows Machine
Choose the Protect tab and click to start the System Backup Wizard. To protect any Windows-based machine, click
and then push-install ShadowSnap right from the wizard.

SIRIS 36
(For more information on backing up machines for the first time using the Wizard, see the Knowledge Base: https://kb.datto.com/hc/en-us/articles/204849630)
Protecting a Linux-based or Mac Machine
Choose the Protect tab , click Add a New Agent, and then click Agent Based Systems to start the System Backup Wizard. Click Legacy Add Agent in the upper right corner.
From there, clicking the Linux or Mac buttons will redirect you to the Datto Knowledge Base with instructions on how to install the appropriate agent package.
More information
For more information on installing an agent on the machine(s) to be protected, see the Knowledge Base:
Windows: https://kb.datto.com/hc/en-us/articles/200555585
Linux: https://kb.datto.com/hc/en-us/articles/204953800
Mac: https://kb.datto.com/hc/en-us/articles/208279223

USER GUIDE 7
ADDEnter the IP address (recommended) or hostname of the system you want to protect. You may enter multiple addresses at once. Click Next to continue setting up your SIRIS.
Follow the next steps by entering your setup preferences for using settings from an existing agent, how often to take local backups, when to send data offsite to the cloud, how long to retain local and cloud storage, and the email addresses to receive screenshot verifications and critical alerts.
NOTE: You can also set device-level alerts in the Datto Partner Portal.
ENCRYPT (OPTIONAL)As part of the process of pairing a target system, you can encrypt your backups with a user-defined passphrase and AES 256 encryption. To encrypt the backups of a protected system, add the passphrase of your choice twice in fields provided.
For full details on Encryption, see the Encrypting Your Backups article.
NOTE: Performing certain operations will require the encryption passphrase. DO NOT LOSE YOUR PASSPHRASE, as Datto cannot recover it for you.
COMPLETING THE PAIRING PROCESSClicking the Next button on the Encryption screen kicks off the pairing process. When it completes successfully, you will see the following:
BACKUP AGENTSWith a target system added, you can return to the Backup Agents page under the Protect tab to Manage Recovery Points, Configure Agent Settings, or Remove Agent. First, configure your Backup Agents settings to fit your needs.
THE DATTO KNOWLEDGE BASE ON: TIPS FOR PROTECTING WINDOWS MACHINESThese Tips ensure that the setup configuration does not depend on the local domain. This can be beneficial during a disaster recovery whereas the local domain could potentially be non-functional.
• The most secure way to protect a system is by using its Static IP Address.
• For machines with dynamic IP addresses please use the fully qualified domain name (FQDN).
• It is never suggested to protect a machine by using its local hostname - such dependencies on local DNS can impede a disaster recovery.
For more in-depth information on SIRIS, go to: kb.datto.com

SIRIS 38
CONFIGURE AGENT SETTINGSThis page allows you to manage and customize the backup settings for each protected machine.
On this page, you can fully customize the settings for each of your protected machines.
Review of all of the settings on this page, and set them to fit your needs. For each setting, there is a detailed description.
Before proceeding with your first backup, you should adjust the following settings:
Backup Interval: Recommended: 60 minutes
Offsite Synchronization Interval: Recommended: Once a day
Local Retention: Recommended Intervals
Retention Operation Time FrameIntradailies to Dailies 5 Days
Dailies to Weeklies 1 Weeks
Weeklies to Monthlies NeverDelete Local After 2 Months
Offsite Retention: Set to your specific needs.
NOTE: If you are using Time-Based Retention, these settings are locked. For more information on our retention policies, see Offsite Cloud Billing Policies.
Backup Schedule: Recommended: During Work Hours e.g., M-F 8-6
Volume Level Backup Control: Use this option to exclude volumes from backup.
TIP: Clicking applies that setting to all protected machines paired with the device.
AGENTLESS BACKUPSAgentless backups allow the SIRIS to back up virtual machines. Note that to perform an agentless backup, you must first pair the Datto appliance with a hypervisor.
You must set up a Hypervisor Connection before performing an Agentless backup. See the section on Hypervisor Connections for more information.
With a confirmed Hypervisor connection, you may begin pairing the virtual machine to your SIRIS.
From the Protect tab, click Add a New Agent. From the System Backup Wizard window, click and select the VM to back up. The rest of the back up process is the same as agent backups.

USER GUIDE 9
TAKE YOUR FIRST BACKUPNow you can start your first backup.
Click the button that is next to your newly paired machine.
After Configuring the Windows Share and Preparing the Image, a blue progress bar will appear to show the progress of your backup.
NOTE: The first backup of a newly protected system may take a significant amount of time to complete, depending on volume size. Subsequent incrementals backups will be faster.
DEVICE OVERVIEWClick to check out the Device Overview page Here you can find an overview of your SIRIS, paired machines, and NAS shares.
SIRIS 310
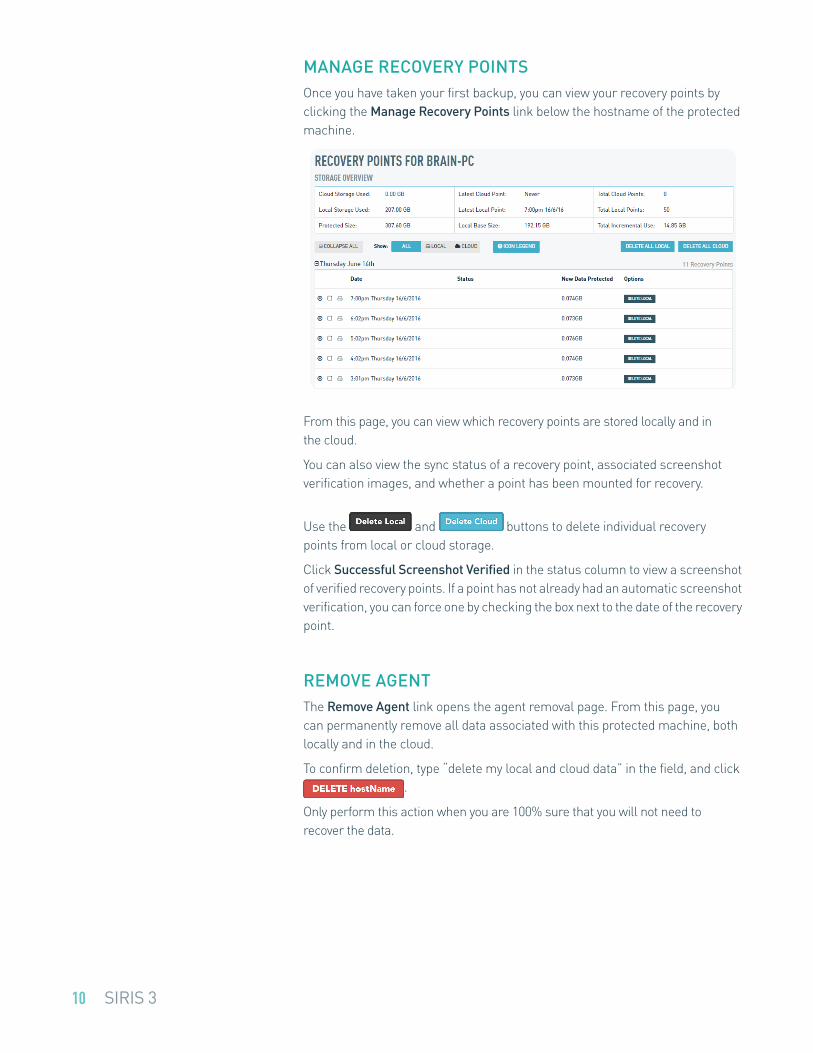
MANAGE RECOVERY POINTSOnce you have taken your first backup, you can view your recovery points by clicking the Manage Recovery Points link below the hostname of the protected machine.
From this page, you can view which recovery points are stored locally and in the cloud.
You can also view the sync status of a recovery point, associated screenshot verification images, and whether a point has been mounted for recovery.
Use the and buttons to delete individual recovery points from local or cloud storage.
Click Successful Screenshot Verified in the status column to view a screenshot of verified recovery points. If a point has not already had an automatic screenshot verification, you can force one by checking the box next to the date of the recovery point.
REMOVE AGENTThe Remove Agent link opens the agent removal page. From this page, you can permanently remove all data associated with this protected machine, both locally and in the cloud.
To confirm deletion, type “delete my local and cloud data” in the field, and click .
Only perform this action when you are 100% sure that you will not need to recover the data.

USER GUIDE 11
SYNCHRONIZEThe synchronization page shows the amount of storage used both locally and in the cloud. It also displays the status of the latest syncs for each protected machine.
From this page, you can perform a RoundTrip synchronization. RoundTrip is complimentary service that seeds your data in the Datto Cloud.
When no RoundTrip drive is attached to the SIRIS, the Please Attach a Roundtrip Drive button will appear slightly faded.
Click to update the exact amount of data that you have stored locally and in the cloud.
PERFORM A ROUNDTRIP SYNCTo start a RoundTrip Sync, connect a Datto RoundTrip, or a personal HDD drive (250GB+), to the SIRIS via one of its available USB 3.0 ports.
To synchronize the local data to the drive, click , select the appropriate drive, and follow the on-screen instructions. For further details on the RoundTrip process, see the Datto Knowledge Base article at https://kb.datto.com/hc/en-us/articles/205941790.
After syncing local data to the RoundTrip drive, promptly ship it to the Datto RoundTrip department in your country. For the address, see the Partner Portal at https://partners.dattobackup.com/policies.php#roundtrip.
THE KNOWLEDGE BASE ON: ROUNDTRIP BEST PRACTICESDatto RoundTrips are often necessary to push the first backup of a new appliance, troubleshoot synchronization issues, or allow a appliance to catch up in case off-site backups fall out of sync from the local appliance.
However, RoundTrip drives are the last step in the Business Continuity process and should only be used as a last resort to alleviate off-site synchronization issues.
Before ordering a RoundTrip, note how the production machine is running locally. If the information that is being backed up in a 24 hour period is more than the bandwidth at the end user site can handle, then a RoundTrip might not be useful. If the Datto appliance is backing up efficiently, in most cases the appliance catch up off-site without the use of a RoundTrip.
Datto recommends that you monitor your backups for two weeks to ensure that everything is running efficiently and then, if necessary, use a RoundTrip.
For more in-depth information on RoundTrips go to: https://kb.datto.com/hc/en-us/articles/205941790

SIRIS 312
RESTOREUse the Restore tab to perform local file restores, launch local virtualizations, image USB BMR environments, and export virtual images. It will also display all active restorations.
To start a recovery, choose the protected machine you need to restore, select which recovery type is required, and then choose the recovery point to recover from.
NOTE: All restore options can only be performed via recovery points that are stored locally on the SIRIS appliance.
FILE RESTOREFor quick access to files, perform a file restore.
Select the protected machine and recovery point, and then click
.File Restores mount recovery points to a Windows (SMB) file share. You can enable access to files via the web.
Select your desired options, and click
After the share is mounted, the SIRIS interface provides you with the applicable options for accessing your data.
When you no longer need access to these files, select .

USER GUIDE 13
LOCAL VIRTUALIZATIONSIRIS can instantly boot local recovery points in a virtual environment.
After selecting the protected machine and recovery point, click .Then, configure the options as described in the next steps.
LOCAL OPTIONSThe Local Virtualization interface presents a variety of options to customize your VM.
CPU CoresAllocate the number of CPU cores to the VM.
System RAMAllocate the desired amount of RAM for your virtualization.
NOTE: If a VM leaves less than 4GB of RAM available on your SIRIS, it may not have enough RAM to run basic system operations. Take this into account when allocating resources to the VM.
Boot DiskSelect the Volume Letter that you want to boot the VM from.
ControllerIf a local virtualization fails, adjust the Storage Controller to match that of the protected machine you are virtualizing. For more information on troubleshooting virtualization controllers, see the Knowledge Base article Agent Configuration - Virtualization Options.
OFFSITE RESTOREAccess offsite virtualization and file restore options in the Partner Portal at partners.datto.com. You can find detailed offsite recovery instructions in the Datto Knowledge Base at kb.datto.com.

SIRIS 314
HYBRID VIRTUALIZATIONSiris 3 can instantly boot cloud recovery points in a virtual environment.
After selecting the protected machine and recovery point, click Start Hybrid
Virtualization. Then, configure the options as described in the next steps.
VIRTUALIZATION OPTIONSThe Virtualization Options interface presents options to customize your VM.
System RAMAllocate the desired amount of RAM for your virtualization.
Storage ControllerIf a virtualization fails, adjust the Storage Controller to match that of the protected machine you are virtualizing. For more information on troubleshooting virtualization controllers, see the Knowledge Base article Agent Configuration - Virtualization Options.
NETWORK OPTIONSIn this section, you can adjust the network options for the VM.
Disconnected: By default, the network adapter is set to disconnected. This prevents a recovery VM from booting with the same IP as a production server.
Bridged to the Primary NIC: Use this option to bridge the VM’s network adapter to the primary NIC of the SIRIS.
TIP: When bridging a VM’s network adapter to the primary NIC, do not give it the same IP address as the SIRIS, as this results in an IP conflict.
Bridged to eth1: Use this option to bridge the VM’s network adapter to the secondary NIC of the SIRIS.
NOTE: Depending on the model of SIRIS, you may see more Ethernet port options.

USER GUIDE 15
Firewalled on a private subnet: This option configures the VM for NAT (Network Address Translation) mode. NAT mode creates an isolated virtual network with Internet access for the VM on the SIRIS.
NOTE: VMs that use this option have the IP Address 10.0.2.15. This gives the VM outbound access without conflicting with production systems.
Firewalled on a private subnet, with no Internet access: This option configures the Virtual Machine for NAT (Network Address Translation) mode, which creates an isolated virtual network without Internet access.
TIP: By default, the VM boots up with a 169 address as it cannot reach a DHCP server. Assign a static IP address and subnet, so that two or more VMs can communicate with each other.
LOCAL VIRTUALIZATION: VM STATUSSelect your settings, and click . Next, click to begin the local virtualization. It takes a moment to construct and mount the VM, and then you can use the toolbar to interact with your VM.
: This command stops the virtualization, which allows you to unmount the VM.
: Stops and unmounts the VM in one step.
: Click to restart the VM.
: Click to download a remote desktop protocol link to the virtual machine. Open the RDP file to connect to the VM.
: Click to send a Ctrl+Alt+Del command to the VM.
: Click to send an Alt+Tab command to the VM.
Once local operations are restored, and you no longer need to run the local virtualization, return to the local virtualization interface for your VM, and click the button.
HYBRID VIRTUALIZATION: VM STATUSSelect your settings, and click Apply. Next, click Mount and Start VM to begin the local virtualization. It takes a moment to construct and mount the VM, and then you can use the toolbar to interact with your VM.
Stop VM: This command stops the virtualization, which allows you to unmount the VM.
Reset VM: Click to restart the VM.
Send CTL+ALT+DEL: Click to send CTRL-ALT-DEL to the VM.
Once local operations are restored, and you no longer need to run the virtualization, return to the virtualization interface for your VM, and click the Stop VM button.

SIRIS 316
BARE METAL RESTOREWith the Bare Metal Restore (BMR) option, you can restore a complete machine to the same, or dissimilar, hardware with the image from a local recovery point.
To begin the BMR process, image a USB drive with the BMR OS. To do so, choose the protected system, select Bare Metal restore, and then click
.
NOTE: This process produces a BMR drive that you can use with any Bare Metal Restore in the future.
Plug a USB drive into one of the USB ports on the appliance. Click to refresh the menu, choose the USB drive, and click
. The imaging process takes a few moments to complete.
NOTE: The BMR imaging process erases all data on the USB attached storage.
The remainder of the USB BMR process is handled through the interface of the target machine.
For a full walkthrough of the USB BMR process, consult the Knowledge Base article: https://kb.datto.com/hc/en-us/articles/205145113
EXPORT IMAGESIRIS appliances can export the native VMDK and VHD files for each local recovery point. These files can be shared on a local Windows share, imported into other hypervisors, or held on USB media for a higher level of backup redundancy.
After selecting your recovery point, click to be brought to the Export Image page. Choose your desired options of exporting and file format and click :
Network Share: Places the desired file format on CIFS/Samba and NFS shares that can be accessed over the local network. After you’re done with your files, select .
USB: You may export the VMDK or VHD file directly to a USB media connected to the appliance.

USER GUIDE 17
After choosing your desired file format, you may choose one of two modes of transfer:
Expand Image to Disk: This mode copies a single image to your external disk and expand it to the full size of the disk. The image will be resized to the minimum possible size to optimize the transfer.
Copy Images to Disk: This mode copies all the images as-is to your external disk along with the VMDK headers. Warning: This mode will not resize the images.
After selecting your desired mode, select the volume you would like transferred to the USB media and click .
ESX: You may export the VMDK of the chosen recovery point directly into an ESX environment from the SIRIS interface. After selecting ESX, input the appropriate ESX credentials and click
After your credentials have been verified, check Create VM, select the desired CPU and RAM allocations for your virtualization, and click connect to access your virtualization.
ADVANCED
ISCSI RESTORENAS shares are recoverable via an iSCSI restore. Choose the iSCSI Share that you want to restore, choose the iSCSI Restore option, then choose the Recovery Point and click
In the recovery screen, click .
When you finish with the restore, you can remove it by clicking .
NOTE: Direct export from the SIRIS interface is only supported for ESX Version 5.0 with API access.
For more details on the ESX export process, see the Knowledge Base article: https://kb.datto.com/hc/en-us/articles/200555085

SIRIS 318
ESX OPTIONSVirtualizing via ESX and performing an ESX upload both require that you first set up a Hypervisor connection. See the section on Hypervisor Connections for more information.
Select the System to restore, the ESX option to use, and then choose a Recovery Point. With the options selected, click
DISKLESS RESTOREDiskless restores let you virtualize your system on any target hardware that's able to boot from a USB. This allows you to virtualize without using the system resources of your Datto appliance.
From the Restore tab, select the system to restore, the Recovery Type, and the point to recover from, then click
ADVANCEDADVANCED DEVICE STATUS

USER GUIDE 19
Global Screenshot QueueThe Global Screenshot Queue shows the queue of all recovery points that are pending Screenshot Verification. Use this page to remove pending recovery points from their queue, or clear the queue entirely, if so desired.
Hardware InformationThis displays detailed information about your SIRIS appliance.
Drive StatusThis displays the ID of your appliance’s drives as well as the current running temperature.
TIP: Click to turn the drive activity lights on or off for your appliance.
ZFS Subsystem Status This section displays advanced information on the status of your appliance’s file system. You can use this information for advanced troubleshooting.Network Attached Storage
SIRIS appliances have an integrated Network Attached Storage (NAS) feature. Using the NAS feature, you can quickly add shared volumes to your local network that will be backed up in the cloud.
To create a new NAS share, choose the File Share tab and click the Add A New Share button to start the process.
You can choose to create a NAS share or an iSCSI share. The type of share you choose depends on how you want to use it.
For iSCSI shares, you can choose to enable one-way or mutual CHAP authentication.

SIRIS 320
For NAS shares, you can make the share public or private. You can enable any of the following protocols to connect to a NAS share: Samba, AFP (Apple Filing Protocol / Time Machine), NFS, FTP, SFTP, Web file browser (accessible from the SIRIS web interface).
For more information about creating File shares on SIRIS, see the Knowledge Base article at: https://kb.datto.com/hc/en-us/articles/208173646.
GRANULAR RESTOREThrough a strategic partnership with Kroll OnTrack, Datto SIRIS appliances can perform granular recovery of mailboxes and workstations for MS Exchange, SharePoint, and MS SQL.
As a part of your monthly service, you will gain access to the Kroll OnTrack page (Advanced tab > Granular Restore), where you can download the OnTrack software and obtain your first 45 day license.
Detailed step by step instructions on installation and usage of Kroll OnTrack PowerControls can be accessed via the Datto Knowledge Base article link on the page.
NOTE: Kroll OnTrack Licenses must be renewed every 45 days.
BACKUP INSIGHTSBackup Insights is a comparison tool that displays data changes between local recovery points for a given Agent. This tool simultaneously mounts two points and calculates the differences.
To get started, select the two recovery points you want to compare, and click .
The recovery points will be mounted and the comparison will be rendered. This may take a moment.

USER GUIDE 21
The resulting comparison will display every file that was modified, added, and/or removed between the two snapshots of this protected machine.
You can restore either version by clicking the filename displayed, or dragging the file to the local system you are accessing the SIRIS interface from.
CONFIGURELOCAL USERS/CONTACTHere you can add new users and manage the permission of those users.
NOTE: Only users that have Web Access Enabled will be able to access the SIRIS interface via remote web or over the LAN. Users without web access enabled will still be able to access the appliance directly, as well as interact with private NAS shares.
You may also update your Device Registration and Support Contact information, if necessary.

SIRIS 322
NETWORKINGThe Network Settings page allows you to customize the networking options for your appliance.
The Network Settings page is broken down into seven sections:
• IP Settings• DNS Servers• Hostname• Windows Networking
• NTP Servers• VNC• SNMP
IP SettingsConfigures the Datto appliance NICs, IP Address, Netmask Gateway, and IP Mode.
DNS ServersConfigures DNS information for the Datto appliance. In a domain environment, you can enter the FQDN for DNS Search Domain, so that the Datto can protect machines by their host names in the event that they have dynamic IP addresses.
TIP: Provide at least one remote DNS server (e.g. Google’s 8.8.8.8). In the event that a disaster occurs to the local DNS Server, the SIRIS will be able to use the remote DNS Server to resolve dattobackup.com to be accessed remotely for virtualization of the local DNS Server (if protected).
HostnameThis field allows you to set the hostname of the SIRIS appliance.
Since hostnames appear in the Datto Partner Portal’s Device List, it’s a good idea to name your appliances with a names that help identify the customer, company, and/or network that they are protecting.
Windows Networking - Workgroup ModeUse this field to join the SIRIS to a domain.
Leave the SIRIS appliances in workgroup mode, so that the device is not dependent on anything on the local domain during disasters.

USER GUIDE 23
NOTE: The option to join a SIRIS appliance to a local domain is provided specifically for deployments where the NAS feature with domain authentication credentials will be used.
NTP ServersThis is where NTP Server(s) can be configured. Default value of ntp.dattobackup.com is sufficient in almost all scenarios. ntp.dattobackup.com is synced with pool.ntp.org.
TIP: Changing the NTP Server may be useful in deployments where the local domain’s time is askew by five minutes or more as a result of not being synchronized with a remote NTP Server.
VNCThis allows you to change the VNC password for the Datto appliance. The default password is the first 8 characters of your backup-admin password. You can find this password in the Partner Portal.
SNMPSNMP provides basic system stats that can be monitored using many common network management tools. Enabling traps allows this appliance to proactively send alerts when issues occur.
Click Enable SNMP & enter your SNMP Management Server & Community string.
Click to complete SNMP configuration.
OFF-SITE SYNCHRONIZATION This page allows you to customize a wide variety of options regarding your off-site backups and how they are synced with Datto’s Cloud.
Off-Site Sync Speed LimitControls the default speed that your SIRIS appliance can send data off-site.
Clicking will automatically set your default speed limit to 50% of the bandwidth detected by the appliance.
NOTE: Your appliance will use as much bandwidth as is provided. Allocating excessive bandwidth can potentially affect the speed of your local network.
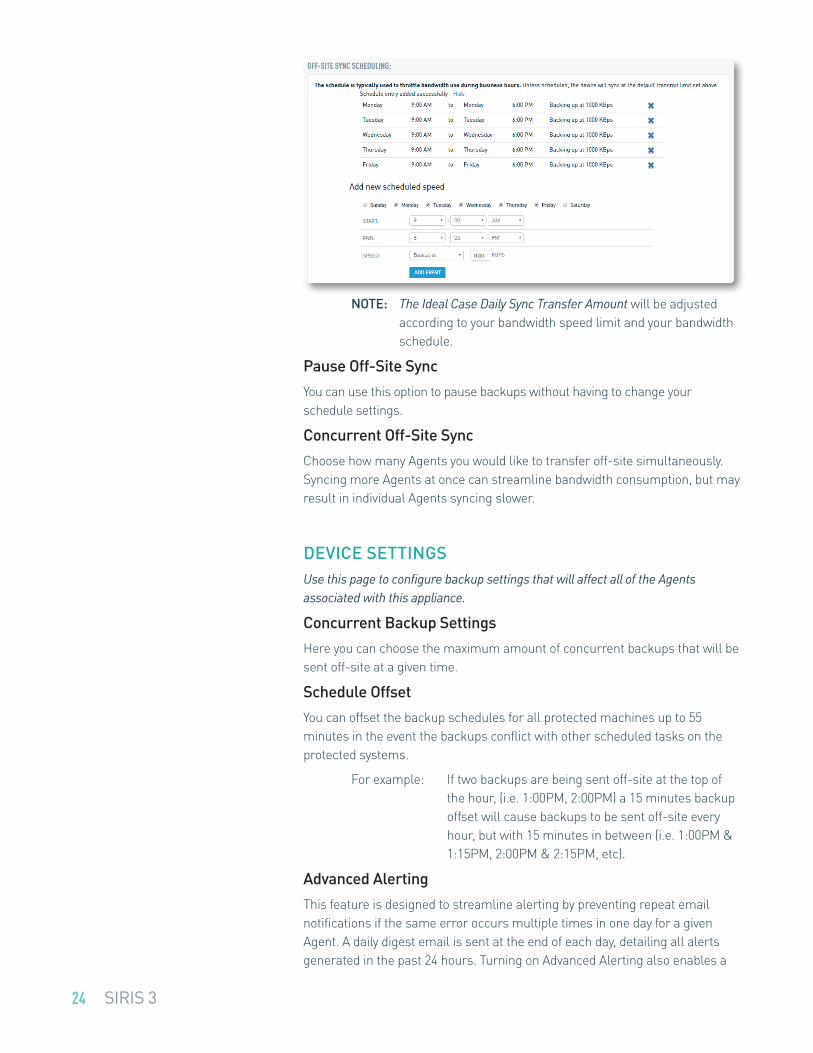
Off-Site Sync SchedulingYou may use the check boxes, pull-downs and fields to set a granular schedule to throttle the amount of bandwidth that the SIRIS uses at specified times during the week. Without a schedule in place, your appliance backs up using the default speed limit.
TIP: You can throttle transfer speeds during business hours, so data synchronizes without affecting bandwidth speeds during regular business hours.
SIRIS 324
NOTE: The Ideal Case Daily Sync Transfer Amount will be adjusted according to your bandwidth speed limit and your bandwidth schedule.
Pause Off-Site SyncYou can use this option to pause backups without having to change your schedule settings.
Concurrent Off-Site SyncChoose how many Agents you would like to transfer off-site simultaneously. Syncing more Agents at once can streamline bandwidth consumption, but may result in individual Agents syncing slower.
DEVICE SETTINGSUse this page to configure backup settings that will affect all of the Agents associated with this appliance.
Concurrent Backup SettingsHere you can choose the maximum amount of concurrent backups that will be sent off-site at a given time.
Schedule OffsetYou can offset the backup schedules for all protected machines up to 55 minutes in the event the backups conflict with other scheduled tasks on the protected systems.
For example: If two backups are being sent off-site at the top of the hour, (i.e. 1:00PM, 2:00PM) a 15 minutes backup offset will cause backups to be sent off-site every hour, but with 15 minutes in between (i.e. 1:00PM & 1:15PM, 2:00PM & 2:15PM, etc).
Advanced AlertingThis feature is designed to streamline alerting by preventing repeat email notifications if the same error occurs multiple times in one day for a given Agent. A daily digest email is sent at the end of each day, detailing all alerts generated in the past 24 hours. Turning on Advanced Alerting also enables a

USER GUIDE 25
new Alert Report in the SIRIS interface which gives a complete historical view of all alerts generated, broken down agent-by-agent.
Disable ScreenshotsThis prevents the local appliance from performing any screenshot verifications on recovery points across all protected machines.
HYPERVISOR CONNECTIONSSetting up a Hypervisor connection allows you to perform Agentless backups as well as to restore using ESX."
Click and enter a Connection Name and select the host type.
Enter the Server Login information and verify the connection. With a confirmed connection, you may begin pairing the virtual machine to your SIRIS.
CUSTOM EMAIL ALERTSUsing the variables provided, you have to the ability to create custom subject
lines for your alerts emails. Simply add in your desired language and text
variable(s) into the text string in the fields provided and click .

SIRIS 326
CUSTOMIZEYou can change the background of your SIRIS interface using the stock images provided, or upload your own custom images to your appliance.
TIP: For best results, use images with an aspect ratio of 16:9.
REPORTSBACKUP REPORTThe Backup Report displays a historical record of various activities for your appliance.
Broken down by protected machine, you can view the amount of times and the success rate for the following backup operations within a specified time frame.
• Screenshots (% Successful)• Forced Backups (% Successful)• Scheduled Backups. (% Successful)
NOTE: The time-frame can be adjusted using the pulldown menu at the top right.
Using , you can generate the list of occurrences for a particular target machine's activity. You may also download this list as a .csv or .pdf file for your own records using .
You can also review the latest screenshot and last successful backup for this protected machine.
STILL AN ALERT REPORT?Alert ReportThe Alert Report shows full details for all of the alerts that have occurred for the protected machines on your appliance.
Total: The total amount of times this particular alert has occurred on the appliance.
Last 24 Hours: The total amount of time this particular alert has occurred in the last 24 hours.
NOTE: This report is only available if Advanced Alerting is enabled on the Device Settings page.

USER GUIDE 27
CONTINUITY AUDITThe continuity audit is a more comprehensive way of looking at all of your backups and screenshots. For each recovery point, the Continuity Audit shows • Whether that recovery point is local, in the cloud, or both• Whether or not there is a screenshot taken for that point, or whether a
screenshot is queued • The local and cloud retention settings on the appliance as they looked
when the backup was taken.
The Continuity Audit allows you to set a custom date range for which recovery points are displayed.
The Export to CSV feature outputs all backups in the specified time period into a single speadsheet file.
NEXT STEPSNow that your protected machines are paired, configured, and backing up to your appliance, your SIRIS appliance is all set for now. We highly recommend that you familiarize yourself the Datto Academy (academy.datto.com) and the Datto Knowledge Base (kb.datto.com) to ensure that you are well versed on your SIRIS device, its features, and the wide variety of disaster recovery methods that are available to you.
Also, you can take your training to the next level by participating in an Advanced Training session. For more information, consult your Datto Sales Executive.