user guide - gatee.eu · user guide what is the difference between using tactical programming card...
TRANSCRIPT

www.gatee.eu
USER GUIDE
Last update on JUNE 20, 2017

02 WWW.GATEE.EU
USER GUIDE
TABLE OF CONTENTS:
1. Introduction ...................................................................................................................................................................................... 1.1 TITAN kits ................................................................................................................................................................................. 1.2 Tactical Programming Card and USB-Link – comparison ...................................................................................... 1.3 Basics ........................................................................................................................................................................................ 1.4 Safety summary ....................................................................................................................................................................2. TITAN Drop-in Module .................................................................................................................................................................. 2.1 Specification .......................................................................................................................................................................... 2.2 Sensors .................................................................................................................................................................................. 2.3 Functions .............................................................................................................................................................................. 2.4 Installation ........................................................................................................................................................................... 2.5 First run ..................................................................................................................................................................................3. USB-Link .......................................................................................................................................................................................... 3.1 General information ......................................................................................................................................................... 3.2 Installation ........................................................................................................................................................................... 3.3 Troubleshooting .................................................................................................................................................................4. GATE Control Station (GCS) ....................................................................................................................................................... 4.1 General information ......................................................................................................................................................... 4.2 Updates ................................................................................................................................................................................. 4.2.1 GATE Control Station update ............................................................................................................................. 4.2.2 USB-Link update ..................................................................................................................................................... 4.2.3 TITAN Drop-in Module: firmware update ...................................................................................................... 4.2.4 Tactical Programming Card: firmware update ............................................................................................. 4.3 TITAN Drop-in Module configuration ......................................................................................................................... 4.4 Sensors .................................................................................................................................................................................. 4.5 Diagnostic Trouble Codes ...............................................................................................................................................5. Tactical Programming Card ....................................................................................................................................................... 5.1 General information ......................................................................................................................................................... 5.2 How to use the Tactical Programming Card ............................................................................................................ 5.2.1 Sensors inspection ................................................................................................................................................ 5.2.2 Advanced functions .............................................................................................................................................. 5.2.3 Diagnostic Trouble Codes ................................................................................................................................... 5.2.4 Indicators .................................................................................................................................................................. 5.3 Functions .............................................................................................................................................................................. 5.3.1 Standard functions ................................................................................................................................................ 5.3.2 Advanced functions ..............................................................................................................................................6. Troubleshooting ........................................................................................................................................................................... 6.1 Motor vibrations ................................................................................................................................................................ 6.2 Trouble codes and warnings (DTC) ............................................................................................................................. 6.3 Frequent problems ...........................................................................................................................................................7. Warranty policy and legal aspects .........................................................................................................................................
3467899
101115262727272829292929313234353738393940414242434444464747495354

03WWW.GATEE.EU
USER GUIDE
1. INTRODUCTION
Congratulations on your new TITAN, the first in the world drop-in AEG Control System with 8
optical sensors. TITAN will transform your AEG into an advanced training weapon system.
Gain a tactical advantage thanks to the extremely fast trigger response, with an option of
adjusting the AEG for each mission with 20 functions. Give your AEG a new lease of life!
With this guide, you will get familiar with all the functions and learn how to use them. Tutorial
videos and the most updated version of the guide are available on our website:
www.gatee.eu/titan .
Configure your TITAN in the field using the outstanding Tactical Programming Card or
simply update the firmware and adjust the settings using the USB-Link and the GATE Control
Station computer App
04 WWW.GATEE.EU
1.1 TITAN KITS
TITAN is a modular system which includes:
TITAN Drop-in Module (rear or front wired)
TITAN Tactical Programming Card
USB-Link for GATE Control Station App
1.
2.
3.
You can buy each module separately or altogether as a complete set.
Kit contents:
TITAN Drop-in Module (rear or front wired)
TITAN Tactical Programming Card
USB-Link for GATE Control Station App
Installation Kit
USB Cable
Quickstart Guides
1.
2.
3.
4.
5.
6.
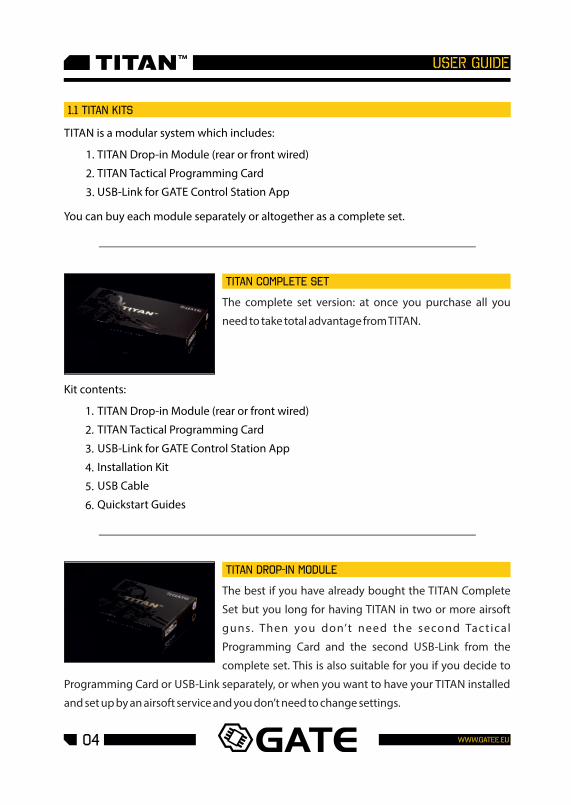
TITAN Complete Set
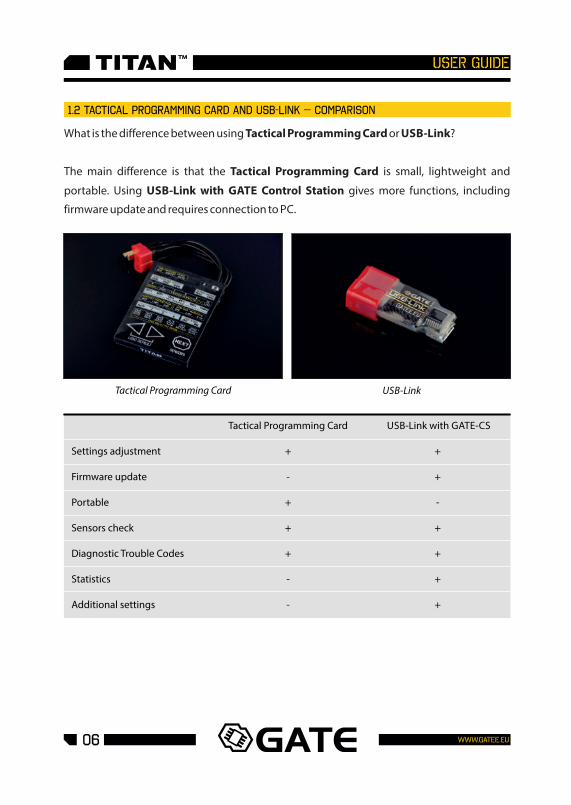
TITAN Drop-in Module
USER GUIDE
The complete set version: at once you purchase all you
need to take total advantage from TITAN.
The best if you have already bought the TITAN Complete
Set but you long for having TITAN in two or more airsoft
guns. Then you don’t need the second Tac t ical
Programming Card and the second USB-Link from the
complete set. This is also suitable for you if you decide to
Programming Card or USB-Link separately, or when you want to have your TITAN installed
and set up by an airsoft service and you don’t need to change settings.

05WWW.GATEE.EU
Kit contents:
TITAN Drop-in Module (rear or front wired)
Installation Kit
Quickstart Guide
1.
2.
3.
Kit contents:
TITAN Tactical Programming Card
Quickstart Guide
1.
2.
Notice: TITAN is not compatible with WARFET Tactical Programming Card.
Kit contents:
USB-Link
USB Cable
Quickstart Guide
1.
2.
3.
TITAN Tactical Programming Card
USB-Link
USER GUIDE
Notice: To run and set up the Drop-in Module, it is necessary to have the TITAN Tactical
Programming Card or USB-Link.
Provides you with very easy access to the TITAN functions'
settings anywhere you are.
Allows to connect TITAN to PC in order to use GATE Control
Station App.
06 WWW.GATEE.EU
1.2 Tactical Programming Card and USB-Link – comparison
Settings adjustment
Firmware update
Portable
Sensors check
Diagnostic Trouble Codes
Statistics
Additional settings
Tactical Programming Card
+
-
+
+
+
-
-
USB-Link with GATE-CS
+
+
-
+
+
+
+
Tactical Programming Card USB-Link
USER GUIDE
What is the difference between using Tactical Programming Card or USB-Link?
The main difference is that the Tactical Programming Card is small, lightweight and
portable. Using USB-Link with GATE Control Station gives more functions, including
firmware update and requires connection to PC.

1.3 BASICS
•
•
•
•
•
•
•
•
07WWW.GATEE.EU
USER GUIDE
Please read this manual before using the device to ensure safe and proper use.
Information contained in this document is subject to updating without notice. Please
check if you have downloaded the latest manual from the Technical Support section of
our website. The Product Warranty Form is also available there.
GATE Menet, Wojtak Sp. J. does not take any responsibility for damages, injuries and
accidents resulting in the use of this product or the use of Air Electric Gun with the
product installed.
You should program your TITAN before the first use.
Check the availability of TITAN software updates on our website every now and then.
Using the most recent software versions ensures stable functioning of the device and
allows for taking advantage from all its features.
This version of TITAN is compatible with most V2 gearboxes.
The device covers must not be removed by the user (e.g. foil or heatshrink tube).
In case you have any difficulties while installing or using this product, we recommend to
email us at [email protected] . Our support team will answer all your questions and send
you some hints.

1.4 Safety summary
•
•
•
•
•
•
•
•
•
•
08 WWW.GATEE.EU
USER GUIDE
We recommend that this product should be installed by an experienced airsoft service.
Before starting installation process, please ensure that your AEG is empty and there are
no BBs inside.
Caution must be exercised to prevent short circuiting the battery as the consequences
can be very dangerous (fire, battery explosion, burn).
Incorrectly connecting positive and negative battery terminals will cause immediate
damage to the drop-in module what is not covered by the warranty and it can lead to fire,
burn or even battery explosion.
For your own safety, you should install an additional fuse between the battery and the
drop-in module. The fuse should be placed very close to the battery. It will protect the
battery in case of: (1) incorrectly connecting positive and negative battery terminals; (2)
shorting the power cords which connect battery and TITAN; (3) mechanical damage to
the drop-in module.
Do not attempt to connect the battery when the barrel of your AEG is directed toward
you, another person or an animal.
When you use the auto cell detection, ensure that your battery is charged. The cell
number may be incorrectly detected if your battery is discharged.
Before an airsoft game, we suggest to check the most recent configuration and delete
the registered Diagnostic Trouble Codes (DTC).
Prevent the USB-Link and the small end of the cable from contact with conductive
materials (e.g. dust, liquid, metal powder).
Do not store or carry flammable liquids, gases, or explosive materials in the same
compartment as the device, its parts, or accessories.

09WWW.GATEE.EU
2.1 Specification
TITAN gives you the option to adjust:
•
•
• F
•
Trigger sensitivity
Pre-cocking mode
ire selector mode
Burst mode
Rate of fire
Low battery warning
Battery protection
Time delays between shots (niper delay)
•
•
•
• s
TITAN is compatible with Tactical Programming Card and USB-Link.They enable (among others) settings adjustment and sensors inspection.
In order to install TITAN, you must learn how to use at least one of them.
WARNING!
PARAMETERS:
Supply voltage:
Current consumption on standby:
Dimensions (max.):
Weight:
3.8-17 V
280 µA (depends on battery type)
47.4 x 28.7 x 13.5 mm [1.9 x 1.13 x 0.53 in]
27.6 g [0.97 oz]
2. TITAN Drop-in Module
USER GUIDE
This version of TITAN is compatible with most V2 gearboxes.
TITAN is an electronic unit installed inside of
a gearbox. It replaces the trigger contacts
and the cut-off lever, which takes control of
your AEG. You can configure your TITAN
using the Tactical Programming Card or
U S B L ink with G AT E Control Stat ion
computer App.

OUTSIDE INSIDEINSIDE
BOTTOM BOARD TOP BOARD
2.2 SENSORS
TITAN has no less than eight sensors:
• 1 gear sensor • 2 selector sensors • 5 trigger sensors
10 WWW.GATEE.EU
USER GUIDE
Thanks to the optical sensors we have eliminated the problem of faulty switches that can
occur in competitors' drop-in mosfets. The trigger has no mechanical connections with the
PCB. This eliminates mechanical stresses and provides for high reliability.
2.3 Functions
TRIGGER SENSITIVITY ADJUSTMENT
CONFIGURABLE FIRE SELECTOR (gen.2)
11WWW.GATEE.EU
USER GUIDE
CYCLE DETECTION
PRE-COCKING (gen.2*)
Five trigger sensors allow you to control trigger sensitivity. You do not have to disassemble your AEG. Just use the Tactical Programming Card or the GATE Control Station App to adjust the trigger to your preferences and level of skills.
Two selector sensors allow you to use up to six fire selector modes, including innovative SEMI-BURST-AUTO mode:• SAFE-SEMI-AUTO• SAFE-SEMI-SEMI• SAFE-SEMI-BURST• SAFE-BURST-AUTO• SAFE-SEMI-BURST/AUTO (short press - BURST, long press - AUTO)• SEMI-BURST-AUTO (SAFE mode via the fast switch SAFE-SEMI-SAFE)
Thanks to the gear sensor, TITAN precisely detects in which position the cycle should finish. Therefore, even the shortest trigger action produces at least one full cycle.Thanks to the cycle detection function you get:
• Automatic BURST – there is no need to set the burst time. You can set the burst between two and 10 shots;• Automatic PRE-COCKING – Pre-cocking is fully operational in SEMI, BURST and AUTO modes. You can simply set the pre-cocking as high, mid or low;• Full cycle - when the pre-cocking is off, TITAN ensures that the gearbox completes a full cycle. You gain a higher reliability.
Victory in the game is often a matter of fractions of seconds. Thanks to PRE-COCKING, you gain a trigger reaction similar to a real gun. It allows for initial spring compression, which speeds up the trigger response significantly.
There are two PRE-COCKING MODES:• AUTO MODE – the spring is automatically compressed after each shot,• SMART MODE – slow trigger action compresses the spring, and fast trigger action fires the shot.And three PRE-COCKING BOOST options: HIGH / MID / LOW
*Now the pre-cocking is fully operational in SEMI, BURST and AUTO modes and there is no need to set the pre-cocking boost manually. There is an option to switch the pre-cocking mode via fire selector (p. 44).Please note: using PRE-COCKING increases wear and tear on the gearbox.
BURST (gen.2*)
12 WWW.GATEE.EU
USER GUIDE
ROF CONTROL
ROF STAB
SMART TRIGGER
SNIPER DELAY
The burst enables you to shoot a pre-determined number of BBs, which is very useful in MILSLIM and when using low-caps. The BURST mode is available after setting the proper fire selector mode. There are two BURST modes:
• FULL – every, even the shortest trigger action fires the pre-determined number of rounds,• TRIG – releasing the trigger while firing stops the burst sequence.
* There is no need to set burst time. You can easily set burst between two and 10 shots.
This enables a reduction in a gun's rate of fire. You use stronger LiPo batteries, and still have a ROF just like in a real gun.
It allows you to change the way the ROF Control works:ON - ROF Control uses PWM to decrease ROF. Thanks to this gearbox works smoothly what decreases wear and tear of AEG internal parts.OFF - ROF Control adds breaks between shots to decrease ROF. It gives you more realistic experience.
It lets you to set delay between each SEMI shots to simulate the delay from reload or recoil. You can set 0.5s, 1s, 2s or 3s delay.
We know how vital the fast trigger response is during combat. This is why we have developed the Smart Trigger function. It enables you to achieve a faster trigger response. It works with the ROF Control System. During the first shot, the microprocessor sets the ROF Control to 100%. After the first shot, it switches to a previously programmed value (e.g. 50%). As a consequence, the first shot is fired at a full ROF, and subsequent shots at a reduced ROF. The best results can be achieved by using a battery with a higher than standard voltage. For example, if you use a 7.4V battery, you can replace it with 11.1V. In this way, you will achieve a faster trigger response with the same rate of fire as with a standard battery.
*Works only when ROF STAB is ON.

AUG MODE
13WWW.GATEE.EU
USER GUIDE
BATTERY PROTECTION (gen.2*)
LOW BATTERY WARNING
SMART FUSE
ADAPTIVE ACTIVE BRAKE
MOSFET
Enjoy two stage trigger. Activate AUG Mode and set two different trigger sensitivities. Pulling the trigger slightly produces SEMI or BURST fire and pulling the trigger further produces BURST or AUTO fire (depending on the fire selector mode).
Protection against Over-Discharge of the Battery. Modern LiPo and LiFe batteries are very sensitive to over-discharge. If you do not want to damage the battery and you care about its service life, this protection is indispensable. The microprocessor monitors the battery voltage constantly. When the voltage drops down to a critical level, it will not allow firing.
*TITAN detects the number of cells automatically. There is no need to reprogram TITAN every time you replace the battery.
When the battery cells' voltage drops to a predefined level, the motor will vibrate at regular intervals.
We have developed an electronic fuse with an accurate current sensor. A combination of current, voltage and temperature measurements makes your AEG installation highly reliable. It protects the MOSFET against overheating, overloading and short-circuiting. If your airsoft gun becomes jammed, the function protects the motor and battery against damage.
It automatically adjusts the motor's braking power according to your needs. This prolongs the lifespan of the motor.
Do you want to achieve a higher ROF and faster trigger response? Are you planning a power upgrade of your gun? In that case, you need a MOSFET.It targets the energy from the battery directly to the motor, bypassing the mechanical trigger contacts. As a result, you gain a higher ROF of the gun and a faster trigger

14 WWW.GATEE.EU
USER GUIDE
DEANS-T READY
COATING
MINI-TAMIYA ADAPTER
14.8V LI-PO READY
BUILT-IN SELF-TEST
PRINTED QUICKSTART
This allows you to quickly check whether the TITAN is working properly. If any problem occurs, the Diagnostic Trouble Codes will indicate where the problem lies.
Thanks to its special conformal coating, the unit is resistant to atmospheric conditions (Military Specification: MIL-V-173C).
The product has factory-fitted low-resistance deans-t connector.
Thanks to the Mini Tamiya Adapter included in the kit, you can smoothly connect the TITAN to a standard battery.
The TITAN can be used with batteries up to and including 14.8V LI-PO. The minimum operating voltage is 3.75V and maximum is 17V.
Make your adventure start more easily with a new product. The quickstart contains basic information and hints.

15WWW.GATEE.EU
USER GUIDE
2.4 Installation
Please, watch carefully the installation video:
https://www.youtube.com/gatemovies
Installation Kit contents:
Selector plate stickers
Female deans-t connector
Mini-tamiya adapter
01
02
03
04
05
06
01
02
03
04
05
06
Motor connectors 2.8 x 0.5 mm[0.11 x 0.02 in]
0.7mm [0.03 in] screw and washers set
0.5mm [0.02 in] screw and washers set
TITAN is an electronic unit installed inside of a gearbox. It replaces the trigger contacts,
cut-off lever and safety lever. TITAN is compatible with most V2 gearboxes. Some gearboxes
might require modification in order to fit the unit.
16 WWW.GATEE.EU
USER GUIDE
You will need:
• cross-head screwdriver
• flat-blade screwdriver
• metal file or milling machine
solvent
grease
programming card or USB-Link and PC
•
•
•
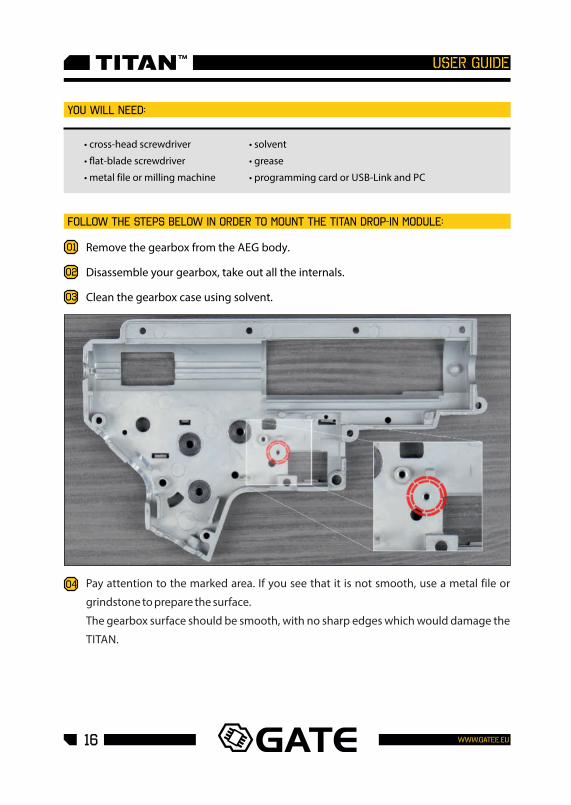
01 Remove the gearbox from the AEG body.
Follow the steps below in order to mount the TITAN Drop-in Module:
02 Disassemble your gearbox, take out all the internals.
03 Clean the gearbox case using solvent.
04 Pay attention to the marked area. If you see that it is not smooth, use a metal file or
grindstone to prepare the surface.
The gearbox surface should be smooth, with no sharp edges which would damage the
TITAN.

17WWW.GATEE.EU
USER GUIDE
05
06
07
08
Detach the drop-in module carefully.
Place the bottom board on the bottom
part of the gearbox. Do not use a screw
yet. Check if the bottom board is laid flat
in the gearbox.
Make sure the electronic components do
not touch the gearbox case.
Use the insulation (black) washer from
the kit. ATTENTION! The insulation
washer must protect the circuit board.
The metal screw and metal washer
cannot touch the board directly. It can
result in short-circuit and TITAN damage
which is not covered by the warranty.

18 WWW.GATEE.EU
USER GUIDE
09
10
11
SCREW SCREW
METAL WASHER INSULATION WASHER
INSULATION WASHER METAL WASHER
GEARBOX GEARBOX
Screw on the bottom board to the case.
Use the original screw or the one from the
TITAN kit.
Check if the screw sticks out of the
gearbox.
If so, add metal washer(s) included in the
kit. Make sure that the metal washer is
placed between the screw and the
insulation washer. It cannot touch the
circuit board directly.
CAUTION! Placing the washers in wrong order will cause short circuit and permanent damage to the TITAN, which is not covered by the warranty.

12
19WWW.GATEE.EU
USER GUIDE
13
14
15
GEAR SENSOR
TRIGGER SENSOR
Check if the top board fits gearbox
without any problems.
Loosen the screw. Adjust the position of
the bottom board.
The distance between the board and the
bearing should be similar as indicated in
the marked area.
Make sure the marked areas are not
covered by board or wires.
Check if sensors are clean and not
covered by wires.

20 WWW.GATEE.EU
USER GUIDE
19
18
17
16 Some gearboxes need modification.
Check if your gearbox has the marked
pins. If so, remove them.
Check if both parts of the gearbox fit
together perfectly.
Mount the trigger without spring. Insert
the TITAN top board. Close the gearbox.
Carefully check if the trigger moves
smoothly and does not touch any TITAN's
components.
Mount the sector gear, trigger with spring
and top TITAN board. Make sure that the
gear does not touch TITAN.

21WWW.GATEE.EU
USER GUIDE
22
23
21
20 Close the gearbox. Tighten two screws on
the top part of the gearbox case.
Prepare selector plate. If selector plate
doesn’t have copper connector, you need
to modify it.
The black surface does not reflect light, so
sensors cannot work properly.
In order to modify the black plate, use the
sticker from the installation kit. At first, try
to use the 'middle' sticker.
ATTENTION! If the selector plate has
copper connector, do not make any
modifications.
Black plate after modification.
The sticker location is very important. It
should be as close to the left side as
possible.

22 WWW.GATEE.EU
USER GUIDE
SENSORS' INSPECTION - Tactical Programming Card
01 Click and hold button NEXT. You will see the current state of sensors.
Connect the programming card to the battery and TITAN
CLICK AND HOLDCLICK AND HOLD
24 Install the selector plate.

23WWW.GATEE.EU
USER GUIDE
SENSORS' INSPECTION - USB-LINK/GATE CONTROL STATION APP
Connect TITAN to your PC through USB-Link. Start the GATE Control Station App.
Go to Configuration. You will see the current state of sensors.
For more information, check USB-Link chapter on page 27.
01'

24 WWW.GATEE.EU
USER GUIDE
02
03
SENSORS’ TEST
Pull the trigger slowly. The TRIGGER
SENSORS LED indicators will light up one by
one. They indicate active sensors. In case of
some trigger models, first sensors might be
active even when the trigger is not pulled.
Check if the sensors recognize the selector
plate. Moving the selector plate, verify if
TITAN detects SAFE, SEMI and AUTO.
25WWW.GATEE.EU
USER GUIDE
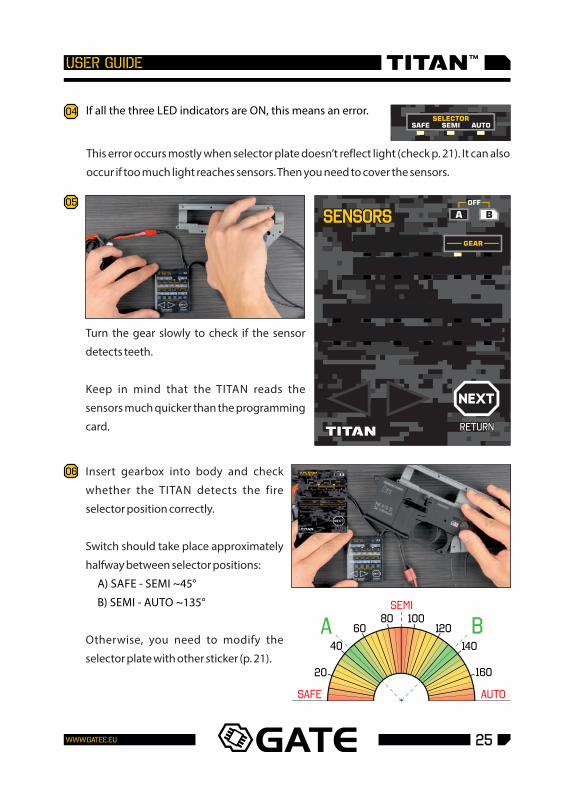
04 If all the three LED indicators are ON, this means an error.
05
06
A) SAFE - SEMI ~45°
B) SEMI - AUTO ~135°
A B
SAFE AUTO
SEMI
This error occurs mostly when selector plate doesn’t reflect light (check p. 21). It can also
occur if too much light reaches sensors. Then you need to cover the sensors.
Turn the gear slowly to check if the sensor
detects teeth.
Keep in mind that the TITAN reads the
sensors much quicker than the programming
card.
Insert gearbox into body and check
whether the TITAN detects the fire
selector position correctly.
Switch should take place approximately
halfway between selector positions:
Otherwise, you need to modify the
selector plate with other sticker (p. 21).

26 WWW.GATEE.EU
USER GUIDE
07
2.5 First run
A few initial shots are 'calibration shots'. TITAN adapts to the gearbox configuration. In order to readapt TITAN, you must restore factory settings. This is necessary e. g. if you
modified gears ratio or replaced motor.
ATTENTION!
Remember! after connecting the device the first time, you should:
•
•
•
download the most updated version of GATE Control Station
make the firmware update
configure the gear type (if your gears are not stock)
If all the sensors work flawlessy, you can assemble the gearbox. Do not use too much
grease. In a critical situation, excessive grease may cover a sensor.
You have successfully installed the drop-in module. Now it's time to configure your TITAN.
Go to the USB-Link chapter (p. 27) or the Tactical Programming Card chapter (p. 39).

27WWW.GATEE.EU
USER GUIDE
3. USB-Link
3.1 General information
Parameters:
Supply voltage:
Current consumption (max.):
Current consumption on standby:
Dimensions:
Weight:
4.5-5.5 V
35 mA
0.5 mA
31.1 x 14 x 8.4 mm [1.22 x 0.55 x 0.33 in]
3.8 g [0.13 oz]
WINDOWS
USB-Link is compatible with the Windows 7 or newer and most of OS X operating systems.
WINDOWS
3.2 Installation
USB-Link enables connecting TITAN or Tactical Programming Card to PC. Thanks to this,
using GATE Control Station app, you can configure drop-in module and make the firmware
update.
Connect the USB-Link to the PC's USB port and wait until Windows will have installed all
necessary drivers.
To check if the drivers are installed, press My Computer with the right mouse button. Next,
choose Properties and then Device Manager.

28 WWW.GATEE.EU
USER GUIDE
USB-Link can glow 3 colours: blue, green, red
3.3 Troubleshooting
Blue – USB-Link is connected to PC, TITAN or Programming Card is not
connected
Find Ports (COM and LPT) and show its contents. If the
USBLink was installed properly, you should see the USB
Serial Port (COM number can vary).
If you cannot see your device on the list or it is accompanied
by exclamation mark, it means that you must install the
device's driver manually. You can download the driver from
here: www.gatee.eu/gcs.
29WWW.GATEE.EU
USER GUIDE
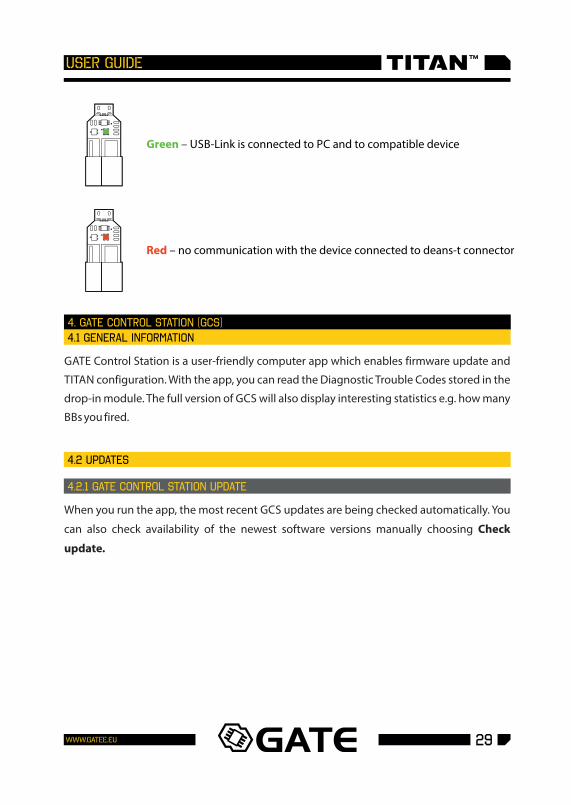
Green – USB-Link is connected to PC and to compatible device
Red – no communication with the device connected to deans-t connector
4. GATE Control Station (GCS)
4.1 General information
4.2 UpdateS
4.2.1 GATE Control Station update
GATE Control Station is a user-friendly computer app which enables firmware update and
TITAN configuration. With the app, you can read the Diagnostic Trouble Codes stored in the
drop-in module. The full version of GCS will also display interesting statistics e.g. how many
BBs you fired.
When you run the app, the most recent GCS updates are being checked automatically. You
can also check availability of the newest software versions manually choosing Check
update.

30 WWW.GATEE.EU
USER GUIDE
When the downloading is done, unzip the file. The newest software version is ready to use.
If the new software version is available, you will see an appropriate statement. Choose
Download to start downloading.

31WWW.GATEE.EU
USER GUIDE
In order to update the USB-Link, follow the steps below:
Connect USB-Link to the USB port of your PC
Run the GATE Control Station
•
•
In the bottom right corner you will see USB-Link: Connected
•
4.2.2 USB-Link update
Check availability of updates for the USB-Link choosing Check update. If the USB-
Link firmware version is outdated, click Upload to start updating.

32 WWW.GATEE.EU
USER GUIDE
In order to make update, follow the steps below:
In the status bar you will see Device: .TITAN•
Connect the TITAN module to USB-Link.•
4.2.3 TITAN Module: firmware update

33WWW.GATEE.EU
USER GUIDE
Cascade connection is forbidden (USB-Link->Tactical Programming Card->TITAN).•
• Check availability of updates choosing Check update. If the current firmware version
is outdated, click Update.

34 WWW.GATEE.EU
USER GUIDE
In order to update the Programming Card, follow the steps below:
Connect the Programming Card to USB-Link. •
In the status bar you will see Device: PROGRAMMING CARD.•
Cascade connection is forbidden (USB-Link->Tactical Programming Card->TITAN).
See diagram on page 33.
•
4.2.4 Tactical Programming Card: firmware update
You can also update the TITAN firmware to
the version which was downloaded on
your computer drive. Choose Manual, and
indicate the proper file. Click Upload.

35WWW.GATEE.EU
USER GUIDE
•
4.3 TITAN Drop-in Module Configuration
Each time you run the GATE Control Station App, the default configuration appears. Click Read to check the current configuration.
ATTENTION:
Check availability of the newest firmware versions for the Tactical Programming Card
choosing Check update. If an update is available, click Upload to start firmware
updating.
TITAN can be configured according to your preferences. The most convenient method of the
device's configuration is the GATE Control Station App.
To modify the already saved configuration, run the GCS and click Read. The current
configuration will appear. After choosing the preferred options, click Save.
36 WWW.GATEE.EU
USER GUIDE
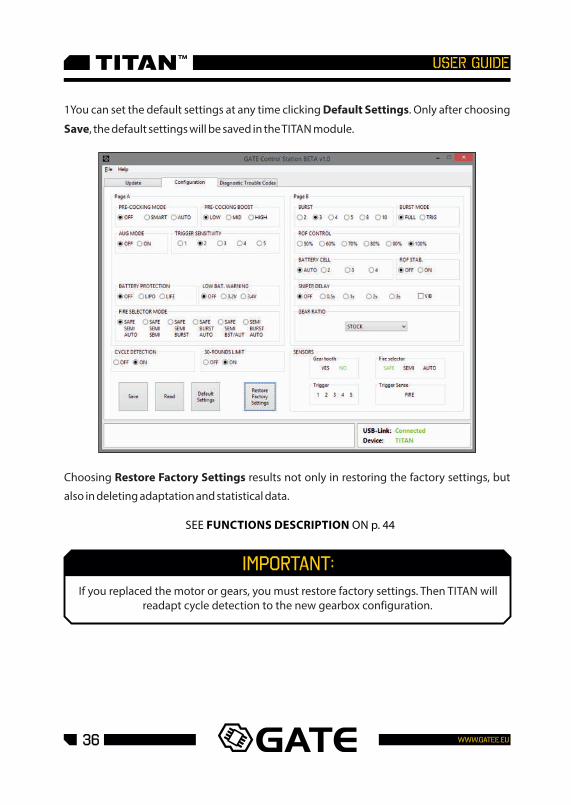
SEE FUNCTIONS DESCRIPTION ON p. 44
If you replaced the motor or gears, you must restore factory settings. Then TITAN will readapt cycle detection to the new gearbox configuration.
IMPORTANT:
1You can set the default settings at any time clicking Default Settings. Only after choosing
Save, the default settings will be saved in the TITAN module.
Choosing Restore Factory Settings results not only in restoring the factory settings, but
also in deleting adaptation and statistical data.
37WWW.GATEE.EU
USER GUIDE
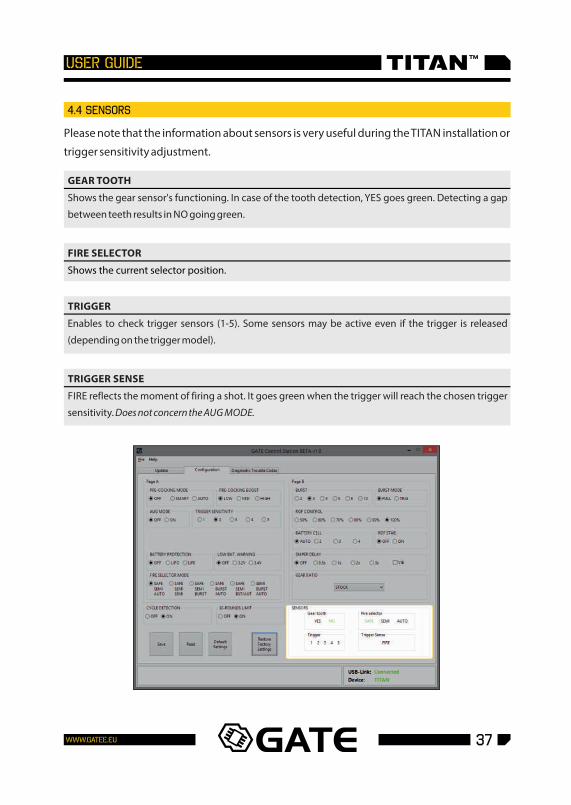
4.4 SENSORS
GEAR TOOTH
FIRE SELECTOR
Shows the current selector position.
TRIGGER
TRIGGER SENSE
Please note that the information about sensors is very useful during the TITAN installation or
trigger sensitivity adjustment.
Shows the gear sensor's functioning. In case of the tooth detection, YES goes green. Detecting a gap
between teeth results in NO going green.
Enables to check trigger sensors (1-5). Some sensors may be active even if the trigger is released
(depending on the trigger model).
FIRE reflects the moment of firing a shot. It goes green when the trigger will reach the chosen trigger
sensitivity. Does not concern the AUG MODE.
38 WWW.GATEE.EU
USER GUIDE
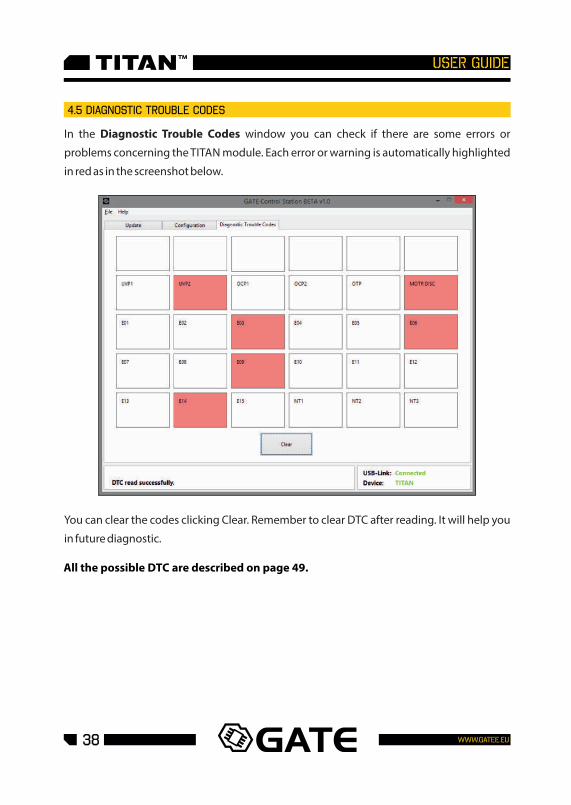
4.5 Diagnostic Trouble Codes
All the possible DTC are described on page 49.
In the Diagnostic Trouble Codes window you can check if there are some errors or
problems concerning the TITAN module. Each error or warning is automatically highlighted
in red as in the screenshot below.
You can clear the codes clicking Clear. Remember to clear DTC after reading. It will help you
in future diagnostic.
39WWW.GATEE.EU
USER GUIDE
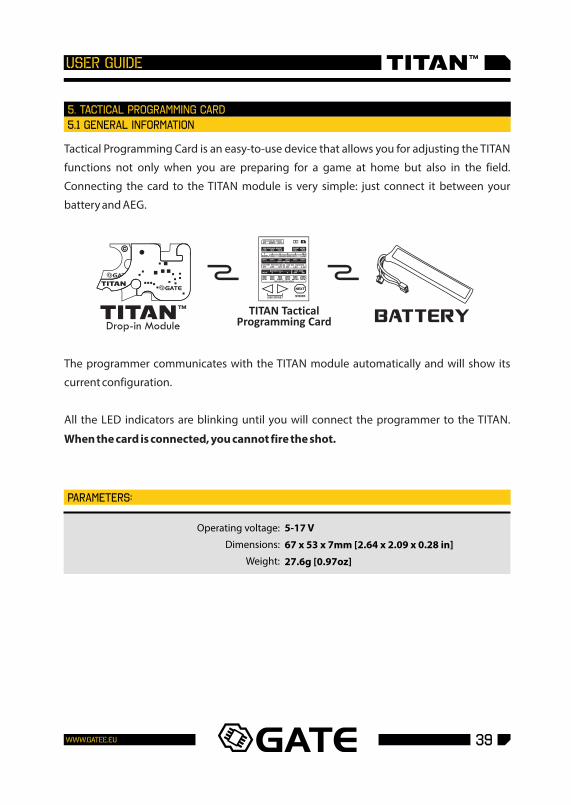
5. Tactical Programming Card
5.1 General information
Parameters:
Operating voltage:
Dimensions:
Weight:
5-17 V
67 x 53 x 7mm [2.64 x 2.09 x 0.28 in]
27.6g [0.97oz]
Tactical Programming Card is an easy-to-use device that allows you for adjusting the TITAN
functions not only when you are preparing for a game at home but also in the field.
Connecting the card to the TITAN module is very simple: just connect it between your
battery and AEG.
The programmer communicates with the TITAN module automatically and will show its
current configuration.
All the LED indicators are blinking until you will connect the programmer to the TITAN.
When the card is connected, you cannot fire the shot.

40 WWW.GATEE.EU
USER GUIDE
5.2 How to use the Tactical Programming Card
DROP-INMODULE
LEDS
TACTICALPROGRAMMING CARD
BUTTON RIGHT
BUTTON LEFT
BATTERY CONNECTOR
B ICON
WHITE DISPLAY
BLACK DISPLAY
BUTTON NEXT
CONTROLLER CONNECTOR
BATTERY
01
A ICON
02
03
ICON ON
BURST - 3
correspondingLED
FIRESELECTOR MODESAFE/SEMI/AUTO
The basic operations and adjusting main settings:
04
05
Connect the battery to the Programming
Card. The LEDs light on and start blinking.
Connect the airsoft gun with TITAN inside to
the Programming Card. All current settings
are displayed on the corresponding LEDs.
When the icon A is ON, check only on the
black display of Programming.
When the icon B is ON, check only on the
white display of the Programming Card.
Click button NEXT to switch between
functions and A/B displays.
41WWW.GATEE.EU
USER GUIDE
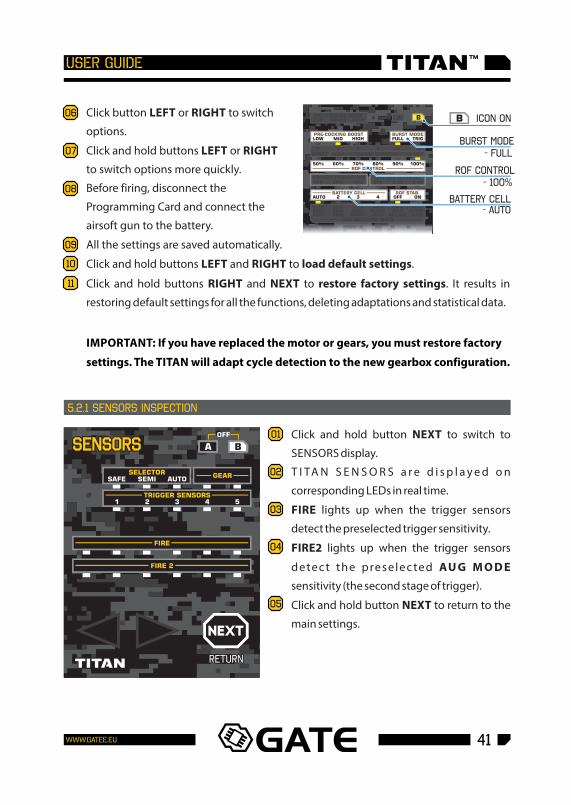
Click button LEFT or RIGHT to switch
options.
Click and hold buttons LEFT or RIGHT
to switch options more quickly.
Before firing, disconnect the
Programming Card and connect the
airsoft gun to the battery.
06
07
ICON ON
BURST MODE- FULL
BATTERY CELL- AUTO
ROF CONTROL- 100%
08
09
10
11
5.2.1 sensors inspection
OFF
RETURN
321 4 5TRIGGER SENSORS
SELECTORSAFE SEMI AUTO
FIRE
FIRE 2
GEAR
All the settings are saved automatically.
Click and hold buttons LEFT and RIGHT to load default settings.
01
02
03
04
05
IMPORTANT: If you have replaced the motor or gears, you must restore factory
settings. The TITAN will adapt cycle detection to the new gearbox configuration.
Click and hold buttons RIGHT and NEXT to restore factory settings. It results in
restoring default settings for all the functions, deleting adaptations and statistical data.
Click and hold button NEXT to switch to
SENSORS display.
T I TA N S E N S O R S a r e d i s p l a y e d o n
corresponding LEDs in real time.
FIRE lights up when the trigger sensors
detect the preselected trigger sensitivity.
FIRE2 lights up when the trigger sensors
detec t the preselec ted AU G M O D E
sensitivity (the second stage of trigger).
Click and hold button NEXT to return to the
main settings.

42 WWW.GATEE.EU
USER GUIDE
5.2.2 ADVANCED FUNCTIONS
BLINKING
S.DELAY VIBONOFF
30-RDS LIMONOFF
CYCLE DETOFF ON
RETURN
GEAR RATIOSTOCK TORQ SPEED DSG
AUG MODE2 3 4 5OFF
2s1s0.5sSNIPER DELAY
OFF 3s
01
02
5.2.3 DIAGNOSTIC TROUBLE CODES (DTC)
01
02UVP1
ON
MOTRDISCUVP2 OCP1 OCP2 OTP
E10E09E08E07 E11 E12
NT1E15E14E13 NT2 NT3
E04E03E02E01 E05 E06
CLEAR DTC
03
04
Click and hold at once buttons LEFT and
NEXT to switch to advanced functions
display.
All current settings are displayed on the
corresponding LEDs.
Click and hold at once buttons LEFT, RIGHT
and NEXT to switch to DTC display.
All the diagnostic trouble codes (since the
last clearance) are displayed on the
corresponding LEDs.
Click and hold button RETURN (NEXT) for
1.5 second to clear DTC.
Click button RETURN (NEXT) to return to the
main settings.

43WWW.GATEE.EU
USER GUIDE
All LEDs blink continuously - TITAN is not connected
Display A
Display B
Diagnostic Trouble Codes Display
Sensors Display
Advanced Functions Display
ON OFF
OFF ON
ON ON
OFF OFF
BLINK BLINK
All LEDs blink three times - default settings are restored
5.2.4 INDICATORS
The LEDs lines turn ON and OFF line by line - it is necessary to u p d a t e p r o g r a m m i n g c a r d firmware
The LEDs turn sequentially one b y o n e - f i r m w a r e u p d a t e progress bar

44 WWW.GATEE.EU
USER GUIDE
5.3 Functions
5.3.1 Functions (A and B DISPLAYS OF the TActical Programming Card)
PRE-COCKING MODE
PRE-COCKING BOOST
BURST
IMPORTANT!
1. Switch to SAFE PRE-COCKING OFF2. Switch to SEMI PRE-COCKING SMART 3. Switch to AUTO PRE-COCKING AUTO
BURST MODE
• OFF – PRE-COCKING is turned off. The full cycles are active.
• SMART – slow trigger action compresses the spring, and fast trigger action fires the shot.
• AUTO – the spring is automatically compressed after each shot.
It enables to determine the spring compression.
Pre-cocking mode can be switched via fire selector – you do not need to use Tactical Programming Card or USB-Link. Switch the selector to SEMI and pull the trigger. After firing the shot, while the trigger is still pulled, switch the selector:
After switching to the selected position, release the trigger. Every time you switch the PRE-COCKING using selector, your action will be confirmed by long motor vibration.
Enables you to fire a pre-determined number of BBs. You can set: 2, 3, 4, 5, 8 or 10 shots.
There are two BURST operating modes:
• FULL – pulling the trigger results in firing a pre-determined number of BBs
• TRIG – releasing the trigger stops the BURST sequence

45WWW.GATEE.EU
USER GUIDE
TRIGGER SENSITIVITY
ROF CONTROL
ROF STAB.
BATTERY CELL
BATTERY PROTECTION
LOW BAT. WARNING
FIRE SELECTOR MODE
Allows you to adjust the trigger to your preferences and level of skills.
Enables a reduction in a gun's rate of fire.
• ON – ROF Control reduces the speed of the motor
• OFF – ROF Control adds breaks between shots to decrease ROF
Enables to set the number of battery cells manually.
Protection against over-discharge of the battery.
When the battery voltage drops to the specified level (in relation to one cell), the motor
will vibrate. You can set: OFF, 3.2V or 3.4V per cell.
Enables determining a firing mode for different selector positions.
46 WWW.GATEE.EU
USER GUIDE
5.3.2 Advanced functions
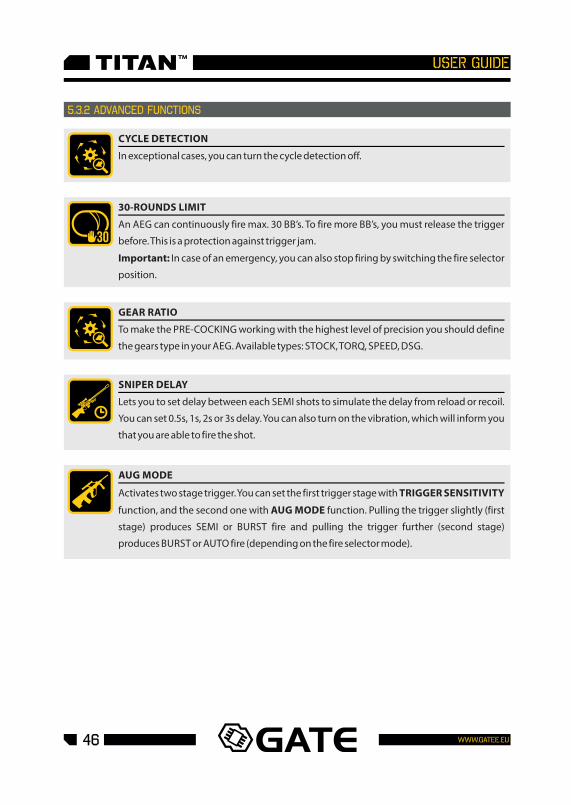
CYCLE DETECTION
30-ROUNDS LIMIT
GEAR RATIO
SNIPER DELAY
AUG MODE
In exceptional cases, you can turn the cycle detection off.
An AEG can continuously fire max. 30 BB’s. To fire more BB’s, you must release the trigger
before. This is a protection against trigger jam.
Important: In case of an emergency, you can also stop firing by switching the fire selector
position.
To make the PRE-COCKING working with the highest level of precision you should define
the gears type in your AEG. Available types: STOCK, TORQ, SPEED, DSG.
Lets you to set delay between each SEMI shots to simulate the delay from reload or recoil.
You can set 0.5s, 1s, 2s or 3s delay. You can also turn on the vibration, which will inform you
that you are able to fire the shot.
Activates two stage trigger. You can set the first trigger stage with TRIGGER SENSITIVITY
function, and the second one with AUG MODE function. Pulling the trigger slightly (first
stage) produces SEMI or BURST fire and pulling the trigger further (second stage)
produces BURST or AUTO fire (depending on the fire selector mode).
47WWW.GATEE.EU
USER GUIDE
6. Troubleshooting
01
VIBRATIONS AFTER CONNECTING THE BATTERY
EXPLANATION
Detection error.
Two cells detected.
Three cells detected.
Four cells detected.
02
VIBRATIONS
1 long low frequency
Information vibrations
EXPLANATION
Low battery warning.
6.1 Motor vibrations
1 long & 2 short low frequency
1 & 1 short long low frequency
03
VIBRATIONS
1 short high frequency
2 short high frequency
3 short high frequency
4 short high frequency
4 short low frequency
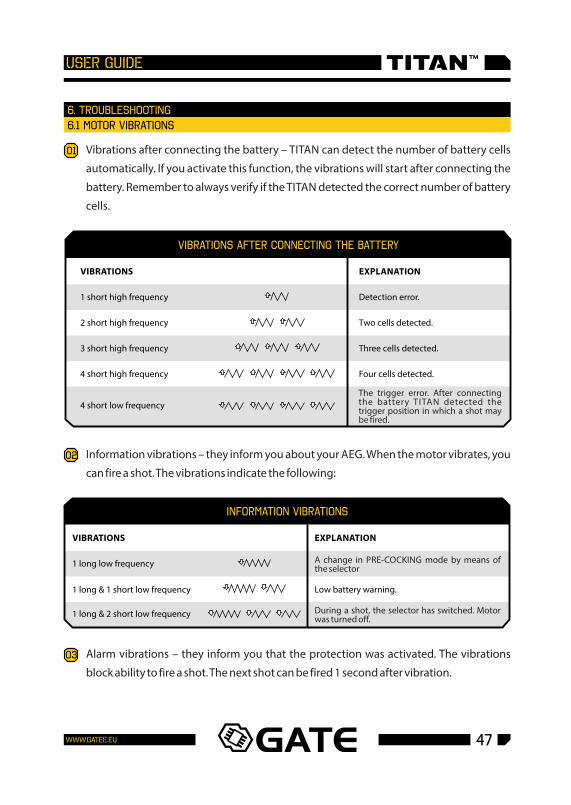
Vibrations after connecting the battery – TITAN can detect the number of battery cells
automatically. If you activate this function, the vibrations will start after connecting the
battery. Remember to always verify if the TITAN detected the correct number of battery
cells.
The trigger error. After connecting the battery TITAN detected the trigger position in which a shot may be fired.
A change in PRE-COCKING mode by means of the selector
During a shot, the selector has switched. Motor was turned off.
Information vibrations – they inform you about your AEG. When the motor vibrates, you
can fire a shot. The vibrations indicate the following:
Alarm vibrations – they inform you that the protection was activated. The vibrations
block ability to fire a shot. The next shot can be fired 1 second after vibration.

48 WWW.GATEE.EU
USER GUIDE
Alarm vibrations
EXPLANATION
Too high current.
The battery is discharged.
VIBRATIONS
1 short low frequency
2 short low frequency
3 short low frequency
UVP1 VIBRATIONS: 2x
Protection against Over-Discharge of the Battery (BATTERY PROTECTION) was activated.
POSSIBLE REASON: WHAT TO DO:
6.2 Trouble codes and warnings (DTC)
UVP2
Voltage dropped under 3.75V which is critical for TITAN to work properly.
POSSIBLE REASON: WHAT TO DO:
- low frequency vibration
The trigger sensor error or the motor was not detected or the device temperature is too high or the selector error.
1. Charge the battery.
2. Check if the battery type and number of cells are
setup correctly.
1. The battery is discharged.
2. The battery type or number of battery cells is set up
incorrectly.
1. Charge the battery.
2. Use a battery with more capacity or more voltage.
3. Do not use any adapters.
4. Use standard or high-torque motors instead of
high-speed.
5. Check and fix the motor wires insulation.
6. Unjam the motor.
7. Replace the motor.
1. The battery is discharged.
2. Inadequate battery type to AEG configuration.
3. Too much electrical resistance between TITAN and
the battery.
4. Motor too strong for the connected battery.
5. Motor connections short circuit.
6. Motor is jammed.
7. Motor is damaged.

49WWW.GATEE.EU
USER GUIDE
ocp1
Overcurrent Protection is activated.
1. Unjam the motor.
2. Replace the motor.
3. Check and fix the motor wires insulation.
1. Motor is damaged.
2. Motor is jammed.
3. Motor connections short circuit.
POSSIBLE REASON: WHAT TO DO:
VIBRATIONS: 1X
Ocp2
TITAN detected current over 220A. Short-circuit protection activated.
1. Check and fix the motor wires insulation.
2. Unjam the motor.
3. Replace the motor.
1. Motor connections short circuit.
2. Motor is jammed.
3. Motor is damaged.
POSSIBLE REASON: WHAT TO DO:
OTP
TITAN temperature is too high. Over-Temperature Protection is activated.
1. Wait until temperature will have dropped.1. Outside temperature is too high in correlation with
the demanding AEG.
2. Frequent short circuits and TITAN electrical
overloads.
POSSIBLE REASON: WHAT TO DO:
MOTOR DISC
TITAN didn't detect the motor.
1. Connect the motor.
2. Replace the motor.
1. Motor is not connected.
2. Motor is damaged.
POSSIBLE REASON: WHAT TO DO:

50 WWW.GATEE.EU
USER GUIDE
E01 - E06 GROUP
E01
E02
E03
E04
E05
E06
Main transistor error.
Break transistor error.
Voltage measurement error.
Temperature sensor error.
Amplifier error.
Other error.
1. Clear the DTC and check if the error still appears.
2. Contact GATE support team at [email protected]
E01 - E06 DTC indicate internal errors.
POSSIBLE REASON: WHAT TO DO:
E07 VIBRATIONS: 3x
TITAN did not detect the sector gear and after 0.2s it cut off the motor.
1. Disassemble the gearbox and check if the gear
sensors are clean.
2. Carry out the sensors' inspection using the Tactical
Programming Card or GCS.
3. In case of a dirty or damaged gear sensor you may
set CYCLE DETECTION to OFF.
1. Gear sensor is damaged or is dirty.
2. Sector gear is damaged.
3. Sector gear is jammed.
4. Motor is damaged.
POSSIBLE REASON: WHAT TO DO:
E09
When battery is being connected, TITAN detects a pulled trigger.
1. Release the trigger.
2. Using the Tactical Programming Card or GCS set a
lower trigger sensitivity.
3. Clean the trigger sensors.
1. Trigger is pulled while connecting the battery.
2. Trigger sensitivity is set too high.
3. Trigger sensors are dirty.
POSSIBLE REASON: WHAT TO DO:
VIBRATIONS: 4x
E08
Fire selector error.
1. Insert the gearbox into the body.
2. Modify the selector plate using the sticker from the
installation kit (p. 21).
1. Outside light affects the fire selector sensor.
2. The selector plate is not reflecting the light.
POSSIBLE REASON: WHAT TO DO:
VIBRATIONS: 3x

51WWW.GATEE.EU
USER GUIDE
E10
During a shot, the selector has switched. Motor was turned off.
1. Carry out the selector sensors' inspection. If the
switch takes place near to one of three selector
positions (SAFE, SEMI, AUTO), you must modify the
selector plate. For more information check page 25.
1. The selector was switched deliberately during a
shot.
2. 2. Sensors detect switching of fire selector at the
edge of selector position. During shooting, vibrations
cause the fire selector to switch.
POSSIBLE REASON: WHAT TO DO:
VIBRATIONS: 3x
E11
Overcurrent Protection 1.
1. Check if the motor is jammed.
2. Check if the motor is damaged.
3. Check if there is short circuit in motor wires.
1. Motor wires' short circuit.
2. Motor is jammed.
3. Motor is damaged.
POSSIBLE REASON: WHAT TO DO:
VIBRATIONS: 1x
E12
Overcurrent Protection 2.
1. Check if the motor is jammed.
2. Check if the motor is damaged.
3. Check if there is short circuit in motor wires.
1. Motor wires' short circuit.
2. Motor is jammed.
3. Motor is damaged.
POSSIBLE REASON: WHAT TO DO:
VIBRATIONS: 1x
E13
Configuration error.
1. Restore factory settings.
2. Install the newest firmware.
3. Contact GATE support team at [email protected]
POSSIBLE REASON: WHAT TO DO:

52 WWW.GATEE.EU
USER GUIDE
E14
Internal error.
Check 'WHAT DO DO' for E01-E06 or E15 and
perform the same actions.
Displays when errors E01-E06 or E15 are detected.
POSSIBLE REASON: WHAT TO DO:
VIBRATIONS: 1x
E15
Voltage measurement error 2.
1. Clear the DTC and check if the error is detected
again.
2. Contact GATE support team at [email protected]
POSSIBLE REASON: WHAT TO DO:
NT1
Test E06 was not performed.
POSSIBLE REASON: WHAT TO DO:
Infromation code.
NT2
Test E01 or E02 cannot be performed because the motor is connected to TITAN.
POSSIBLE REASON: WHAT TO DO:
Infromation code. If you want to perform E01 or E02
test, disconnect the motor.
NT3
Test E15 was not performed.
POSSIBLE REASON: WHAT TO DO:
Infromation code.
Does not require any action.
Does not require any action.
Does not require any action.
53WWW.GATEE.EU
USER GUIDE
6.3 Frequent problems
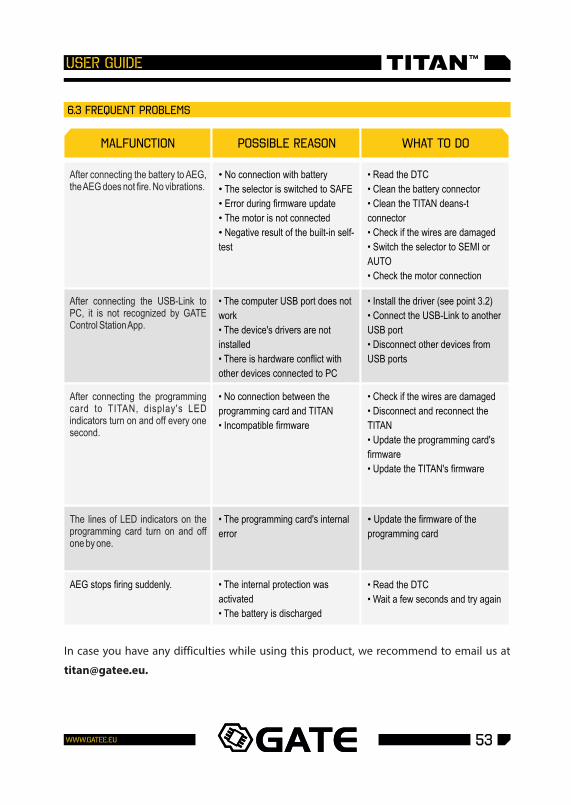
malfunction POSSIBLE REASON WHAT TO DO
• No connection with battery
• The selector is switched to SAFE
• Error during firmware update
• The motor is not connected
• Negative result of the built-in self-
test
• Read the DTC
• Clean the battery connector
• Clean the TITAN deans-t
connector
• Check if the wires are damaged
• Switch the selector to SEMI or
AUTO
• Check the motor connection
• The computer USB port does not
work
• The device's drivers are not
installed
• There is hardware conflict with
other devices connected to PC
• The programming card's internal
error
• No connection between the
programming card and TITAN
• Incompatible firmware
• Install the driver (see point 3.2)
• Connect the USB-Link to another
USB port
• Disconnect other devices from
USB ports
• Update the firmware of the
programming card
• Check if the wires are damaged
• Disconnect and reconnect the
TITAN
• Update the programming card's
firmware
• Update the TITAN's firmware
AEG stops firing suddenly. • The internal protection was
activated
• The battery is discharged
• Read the DTC
• Wait a few seconds and try again
After connecting the battery to AEG, the AEG does not fire. No vibrations.
After connecting the USB-Link to PC, it is not recognized by GATE Control Station App.
After connecting the programming card to TITAN, display's LED indicators turn on and off every one second.
The lines of LED indicators on the programming card turn on and off one by one.
In case you have any difficulties while using this product, we recommend to email us at

54 WWW.GATEE.EU
USER GUIDE
7. Warranty policy and legal aspects
IMPORTANT INFORMATION Please read this information before operating your device. This section contains important terms and conditions with respect to your device. By using this device, you accept those terms and conditions.
EXCLUSION OF LIABILITY GATE Menet, Wojtak Sp. J. is not liable for any damages, injuries or accidents of any kind resulting from the use of this product or airsoft gun with the product installed, including (but not limited to) incidental or special damages to airsoft gun, airsoft gun parts, batteries and gearbox internals.
DISCLAIMER GATE Menet, Wojtak Sp. J. takes no responsibility regarding compliance of the product with the requirements of any law, rule or airsoft restrictions pertaining thereto. INTELLECTUAL PROPERTY Intellectual Property owned by GATE, including but not limited to, devices, accessories, parts, software, documentation, is proprietary to GATE and protected under Polish laws, EU laws, and international treaty provisions. You may not violate the rights of the Intellectual Property and you will not prepare derivative works of or reverse engineer the device or software. No ownership in the Intellectual Property is transferred to you.
GATE LIMITED WARRANTY POLICY GATE Menet, Wojtak Sp. J. warrants that its Product is free from manufacturing and material defects at the date of purchase and for a period of one (1) year from the date of purchase and it is not-extendable. This Limited Warranty is conditioned upon proper use of Product by Purchaser.
1. This Limited Warranty is valid provided that the owner provides a proof of purchase and properly completed warranty form.
2. This Limited Warranty does not cover: (a) defects or damage (eg. mechanical, thermal or chemical) resulting from accident, misuse (misinterpretation of the instructions), abuse, neglect, unusual physical, electrical or electromechanical stress, water immersion, repairs or structural modification of any part of Product, or (b) the Product that has the serial number removed or made illegible; (c) defects or damage from improper operation, maintenance or installation, (d) installation of the products.

55WWW.GATEE.EU
USER GUIDE
CERTIFICATE OF CONFORMITY
PRODUCT DISPOSAL INSTRUCTIONS
3. Requests for warranty are processed as soon as possible, not exceeding seven (7) working days. The company's obligation under this Limited Warranty shall be limited to providing replacement of part/s only.
The symbol shown here means that the product is classed as Electrical or Electronic Equipment and should not be disposed with other household and commercial waste at the end of its working life. The Waste of Electrical and Electronic Equipment (WEEE Directive 2012/19/EU) has been put in place to recycle products using best available recovery and recycling techniques to minimize the impact on the environment. Purchasers shall take any old electrical equipment to waste recycling public centers or points of sale.
GATE Menet, Wojtak Sp. J. hereby declares under our sole responsibility that the product TITAN is in conformity with the essential requirements of the following Directives:EC DIRECTIVE 2011/65/EUThis product has been certified as RoHS Compliant.