user guide for cisco show and share 5.2 - cisco systems, inc
TRANSCRIPT

Americas HeadquartersCisco Systems, Inc.170 West Tasman DriveSan Jose, CA 95134-1706 USAhttp://www.cisco.comTel: 408 526-4000
800 553-NETS (6387)Fax: 408 527-0883
User Guide for Cisco Show and Share 5.2.xAugust 4, 2011
Text Part Number: OL-15765-04

THE SPECIFICATIONS AND INFORMATION REGARDING THE PRODUCTS IN THIS MANUAL ARE SUBJECT TO CHANGE WITHOUT NOTICE. ALL STATEMENTS, INFORMATION, AND RECOMMENDATIONS IN THIS MANUAL ARE BELIEVED TO BE ACCURATE BUT ARE PRESENTED WITHOUT WARRANTY OF ANY KIND, EXPRESS OR IMPLIED. USERS MUST TAKE FULL RESPONSIBILITY FOR THEIR APPLICATION OF ANY PRODUCTS.
THE SOFTWARE LICENSE AND LIMITED WARRANTY FOR THE ACCOMPANYING PRODUCT ARE SET FORTH IN THE INFORMATION PACKET THAT SHIPPED WITH THE PRODUCT AND ARE INCORPORATED HEREIN BY THIS REFERENCE. IF YOU ARE UNABLE TO LOCATE THE SOFTWARE LICENSE OR LIMITED WARRANTY, CONTACT YOUR CISCO REPRESENTATIVE FOR A COPY.
The Cisco implementation of TCP header compression is an adaptation of a program developed by the University of California, Berkeley (UCB) as part of UCB’s public domain version of the UNIX operating system. All rights reserved. Copyright © 1981, Regents of the University of California.
NOTWITHSTANDING ANY OTHER WARRANTY HEREIN, ALL DOCUMENT FILES AND SOFTWARE OF THESE SUPPLIERS ARE PROVIDED “AS IS” WITH ALL FAULTS. CISCO AND THE ABOVE-NAMED SUPPLIERS DISCLAIM ALL WARRANTIES, EXPRESSED OR IMPLIED, INCLUDING, WITHOUT LIMITATION, THOSE OF MERCHANTABILITY, FITNESS FOR A PARTICULAR PURPOSE AND NONINFRINGEMENT OR ARISING FROM A COURSE OF DEALING, USAGE, OR TRADE PRACTICE.
IN NO EVENT SHALL CISCO OR ITS SUPPLIERS BE LIABLE FOR ANY INDIRECT, SPECIAL, CONSEQUENTIAL, OR INCIDENTAL DAMAGES, INCLUDING, WITHOUT LIMITATION, LOST PROFITS OR LOSS OR DAMAGE TO DATA ARISING OUT OF THE USE OR INABILITY TO USE THIS MANUAL, EVEN IF CISCO OR ITS SUPPLIERS HAVE BEEN ADVISED OF THE POSSIBILITY OF SUCH DAMAGES.
Cisco and the Cisco Logo are trademarks of Cisco Systems, Inc. and/or its affiliates in the U.S. and other countries. A listing of Cisco's trademarks can be found at www.cisco.com/go/trademarks. Third party trademarks mentioned are the property of their respective owners. The use of the word partner does not imply a partnership relationship between Cisco and any other company. (1005R)
Wowza Media Server Pro Unlimited © 2006-2009 Wowza Media Systems, Inc. All rights reserved. WOWZA and related logos are registered trademarks of Wowza Media Systems, Inc. Cisco Digital Media Systems are powered by Wowza Media Server Software.
User Guide for Cisco Show and Share 5.2.x
© 2002 – 2011 Cisco Systems, Inc. All rights reserved.

OL-15765-04
C O N T E N T S
Preface 1
About Cisco Show and Share 1What Is Cisco Show and Share? 1What is a Cisco Show and Share Community? 1
Change History 2New in 5.2.3 2New in 5.2.2 3New in 5.2.1 3
C H A P T E R 1 Start Here 1-1
Accessing Cisco Show and Share 1-1
Prerequisites 1-1
Configuration Note for Microsoft Internet Explorer 1-2
Access Cisco Show and Share 1-2
Cisco Show and Share Quick Start 1-4
The Home Page 1-5
The Video Playback Page 1-6
The My Account Page 1-7
The Upload Video Page 1-8
The Record a Video Page 1-9
The Publish Your Video Page 1-10
Basic Navigation 1-12
Screen Elements 1-12
Keyboard Navigation 1-17
Sign In to Cisco Show and Share 1-20
User Roles and Privileges 1-21
Set Your Personal Preferences 1-22
C H A P T E R 2 Browse and Search Videos 2-1
Browse the Featured Videos 2-2
Browse The Public Videos 2-3
Change the Public Videos List View 2-3
Sort the Public Videos 2-4
Filter the Public Videos 2-5
iiiUser Guide for Cisco Show and Share 5.2.x

Contents
Filter by Category 2-5
Filter by Tag 2-6
Filter by Date 2-7
Filter by Keyword 2-8
Navigate Among Your Filtered Results 2-8
Play a Video 2-8
Search for Videos 2-9
Basic Search 2-10
Advanced Search 2-11
Search Tip 2-13
C H A P T E R 3 Play, Comment, Tag, and Share Videos 3-1
Concepts 3-1
The Video Playback Page 3-2
The Video Player 3-3
The Cisco Show and Share 5.2.3 Video Player 3-3
The Cisco Show and Share 5.2.2 and Earlier Video Player 3-5
The Video Information Tabs 3-7
Procedures 3-8
Pause and Play Videos 3-8
Play Videos Full Screen 3-9
Add a Video to Your Favorites List 3-9
Comment on Videos 3-10
Adding a General Comment 3-10
Adding a Timeline Comment 3-10
Flag a Comment as Inappropriate 3-11
Add Tags to Videos 3-11
Rate Videos 3-12
Share Videos 3-12
Copy the Video Link 3-13
Embed the Video in a Web Page 3-14
Send the Video Link in E-Mail 3-16
Play Embedded Videos 3-16
Jump to a Chapter 3-17
Watch Slides 3-18
Read a Transcript 3-19
Download Files 3-20
Troubleshooting 3-21
ivUser Guide for Cisco Show and Share 5.2.x
OL-15765-04

Contents
C H A P T E R 4 Create, Add, and Manage Videos 4-1
Prerequisites 4-1
Procedures 4-1
Record or Upload a Video 4-2
Use a Webcam to Record Video from Your Computer 4-2
Upload or Link to a Video File 4-5
Add Supplemental or Downloadable Files to a Video Package 4-8
Add Slides to a Video 4-8
Add a Text Transcript to a Video 4-9
Add Downloadable Files to a Video 4-9
Save or Publish Your Video 4-10
Reference 4-10
About Video Status 4-10
HTML Supported by the Description Field 4-11
FAQ 4-13
Troubleshooting 4-14
C H A P T E R 5 Edit Video 5-1
About Video Editing 5-1
Limitations and Restrictions 5-2
Procedures 5-3
Open a Video to Edit 5-3
Edit Your Video 5-4
Trim Your Video 5-5
Create Chapters Within Your Video 5-6
Add Transitions Between Segments 5-7
Synchronize Slides to Your Video 5-8
Change the Video Thumbnail 5-10
Save Your Edited Video 5-10
Troubleshooting 5-11
C H A P T E R 7 Publish Your Video 7-1
Procedure 7-1
Access the Publish Your Video Page 7-2
Edit the Video Summary 7-4
Restrict Viewer Access to the Video 7-4
Add the Video to a Category 7-7
Set the Video Interaction Options 7-8
vUser Guide for Cisco Show and Share 5.2.x
OL-15765-04

Contents
Add Related Videos 7-9
Schedule Publication 7-10
Publish the Video 7-11
C H A P T E R 8 Live Events 8-1
Concepts 8-1
What is a “Live-Event?” 8-2
What are “Encoders”? 8-3
What are “Pull” and “Push” Configurations? 8-3
What are “Encoding Formats” (Presets)? 8-4
Understand the Question-and-Answer Workflow 8-4
Procedures 8-5
Create the Draft of a Live Event 8-6
Preview the Draft of a Live Event 8-10
Edit the Draft of a Live Event 8-11
Publish a Listing for Your Live Event 8-13
Start and Administer (Moderate) Your Live Event 8-16
Download Questions From Your Live Event 8-19
Delete Your Live Event 8-21
Reference 8-22
Supported Dimensions for Encoded Video 8-22
Supported Encoding Bitrates for Flash Video on DMEs 8-22
Supported Encoding Profiles for Windows Media on DMEs 8-23
Capture Profiles for Windows Media 9 Conversions 8-23
Capture Profiles for Broadband 8-23
Capture Profiles for Color PDAs 8-24
Capture Profiles for Dial-up Modems and ISDN 8-24
Visual Reference: Administer a Live Event 8-25
Troubleshooting 8-26
C H A P T E R 9 Use Show and Share Author Reports 9-1
About Cisco Show and Share Author Reports 9-1
About the Page View Report 9-2
About the Video View Report 9-3
About the Viewer Aggregation Report 9-4
Changes to Reports Between Cisco Show and Share 5.2.1 and 5.2.2 9-4
Procedures 9-5
Generate Reports 9-5
Export Report Data 9-5
viUser Guide for Cisco Show and Share 5.2.x
OL-15765-04

Preface
Revised: May 31, 2011
• About Cisco Show and Share
• Change History
About Cisco Show and Share • What Is Cisco Show and Share? page -1
• What is a Cisco Show and Share Community? page -1
What Is Cisco Show and Share?Cisco Show and Share is a secured social network for collaboration, communication, learning, and pleasure — unlimited by time and place. People use Cisco Show and Share to improve information, communities, themselves, and each other.
Although user-generated video is central to the Cisco Show and Share experience, we also support text, pictures, audio, and other media. Each community of Cisco Show and Share users builds, shares, and improves upon its own information according to its needs and priorities.
What is a Cisco Show and Share Community?Users of a Cisco Show and Share site become its community. As the site grows and flourishes over time, its community builds a collaborative society and culture. Users whose contributions are the most useful and widely respected will emerge naturally as trusted experts and leaders. Although the community is self-regulating in many ways, site administrators can set and enforce customization and security policies to optimize the site for a broad or narrow purpose. Some such policies might have more of an effect than others do.
For example, if your customized site asks users to log in for full access, then your community might include a combination of registered users and unregistered visitors. In this case, visitors probably can see and do less than registered users can.
1User Guide for Cisco Show and Share 5.2.x
OL-15765-04

Preface
Change HistoryThis change history contains only those updates that apply to Cisco Show and Share users with Visitor, Video Author, Video Publisher, or Live Event User roles. Administrators should visit the Administrator Guide for Cisco Show and Share 5.2.x on Cisco.com for a list of changes to the administration features.
• New in 5.2.3
• New in 5.2.2
• New in 5.2.1
New in 5.2.3
New Supported Languages
You can now display the Cisco Show and Share interface in English, Spanish, or French. See Set Your Personal Preferences, page 1-22, for more information.
Keyboard Navigation
To make Cisco Show and Share more accessible, keyboard navigation of the interface has been added or enhanced. See Keyboard Navigation, page 1-17.
Home Page, My Account Page, and Video Player Page Redesign
The Cisco Show and Share Home page has been redesigned to make it easier to sort and filter the video list. Additionally, private videos that you have access to no longer appear in the video list on the home page. Instead, the appear on the Private tab of your My Account page.
The My Account page (previously called My Show and Share) has been redesigned to make it easier to find the videos that you uploaded and the videos that include you in the restricted viewing list.
The Video Player page features new, sleeker player controls in both the on-page and the fullscreen views. Additionally, functions such as adding a video to your favorites or sharing a video with friends have been made easier to find.
For more information about the screen changes, see the Cisco Show and Share Quick Start, page 1-4.
Video Embedding Option Enhancement
An additional method for embedding Flash videos, one that does not use Javascript, has been added. See Embed the Video in a Web Page, page 3-14 for more information.
Embedded Quick Start Videos
Cisco Show and Share now ships with a series of seven quick start videos. See the Quick Start category on the Cisco Show and Share home page.
2User Guide for Cisco Show and Share 5.2.x
OL-15765-04

Preface
New in 5.2.2For a video tour of these features, see the What’s New in Cisco Show and Share 5.2.2 video on Cisco.com.
Anonymous Comments
Authors have the option of preventing viewers from anonymously commenting on their videos. This option is applied on a video by video basis when the video is published. System administrators can globally prevent viewers from anonymously commenting on videos. If anonymous comments are prevented globally, authors cannot enable it for individual videos.
See Publish Your Video, page 7-1 for the instructions about setting the comment options on a video.
Full Screen Video Playback Controls
Video player controls are now available during full screen playback. Viewers can adjust the volume, pause and play the video, skip forward or backwards a few seconds, or skip to the beginning of the video without leaving full screen mode.
See Play, Comment, Tag, and Share Videos, page 3-1.
Author Reports Update
A new report, Viewer Aggregation, has been added to the author reports in My Account page. This report allows you to see who had been viewing your videos, the number of times they viewed each video, and the average and total play times for each video. Additionally, the fields used to generate have been updated to make it easier to generate the reports.
See Use Show and Share Author Reports, page 9-1.
Unicode Character Support
Support for Unicode characters in video titles, video descriptions, and category names has been added in this release.
New in 5.2.1
Private Category Removal
Private categories are removed from Cisco Show and Share 5.2.1.
In Cisco Show and Share 5.2, you could assign user groups to categories to limit who could view the video listing. The restriction applied only to viewing the list of videos within the category. The viewing restrictions did not apply to the videos themselves. Site visitors could still see videos assigned to private categories if they found them through some other method, such as through a search or using the tag filter.
When you upgrade to Cisco Show and Share 5.2.1, you have the option of making existing private categories public or of removing the category. If you make a private category public, all site visitors will be able to view the list of videos in that category. Removing the private category does not cause the videos to be removed; the videos remain in the system and are available to site visitors. It is just the category that lists the videos that is removed.
In both cases the videos in the category are viewable by all site visitors unless you had previously assigned user group viewing restrictions to the videos themselves.
3User Guide for Cisco Show and Share 5.2.x
OL-15765-04

Preface
Download Recorded Video
In Cisco Show and Share 5.2.1, you have the option of downloading video recorded directly in Show and Share. Previously, you did not have the ability to download the recorded video.
See Create, Add, and Manage Videos, page 4-1.
URL Change
You can now access Cisco Show and Share without having to specify the port number in the URL. For example, instead of typing https://show_and_share.example.com:8443, you can access the Cisco Show and Share server by typing http://show_and_share.example.com. The browser is automatically redirected to the correct port.
4User Guide for Cisco Show and Share 5.2.x
OL-15765-04

OL-15765-04
C H A P T E R 1
Start HereRevised: May 31, 2011
• Accessing Cisco Show and Share, page 1-1
• Cisco Show and Share Quick Start, page 1-4
• Sign In to Cisco Show and Share, page 1-20
• Set Your Personal Preferences, page 1-22
Accessing Cisco Show and Share • Prerequisites, page 1-1
• Configuration Note for Microsoft Internet Explorer, page 1-2
• Access Cisco Show and Share, page 1-2
PrerequisitesBefore you access Cisco Show and Share, you need:
• Access to your network where Cisco Show and Share is hosted.
• A network connection that is fast enough to play a video stream. A dialup connection may result in choppy video playback.
• One of the following web browsers:
– Windows: Microsoft Internet Explorer 7.0 or 8.0, Mozilla Firefox 3.6.3 (see also Configuration Note for Microsoft Internet Explorer, page 1-2).
– Mac OS X: Safari 3.1.2 minimum or Firefox 3.5.3 or later recommended
• A computer that supports screen resolution settings for 1024x768 and greater.
• The HTTP address of your community’s Cisco Show and Share server.
• Access to the Internet from your computer. Cisco Show and Share attempts to contact the Internet to download the plugins needed to play Flash, Windows, or Quicktime media in your browser if they have not been installed previously.
1-1User Guide for Cisco Show and Share 5.2.x

Chapter 1 Start Here Accessing Cisco Show and Share
Configuration Note for Microsoft Internet ExplorerFor Cisco Show and Share to display properly in Microsoft Internet Explorer, you must configure Internet Explorer to check for changes each time that it loads any page from Cisco Show and Share.
Procedure
Step 1 Choose Tools > Internet Options.
Step 2 Click Settings in the Browsing history area.
Step 3 Click the option to check for changes each time.
Step 4 Click OK twice.
Step 5 Stop. You have completed this procedure.
Access Cisco Show and ShareTo access Cisco Show and Share, point your web browser to one of the following URLs, depending upon which version of Cisco Show and Share you are running:
In the above URLs, replace server_name with the name of your Cisco Show and Share server, for example http://video.example.com. Do not use an IP address.
For Cisco Show and Share Version Use this URL
5.2 http://server_name:8080
or
https://server_name:8443
5.2.1 and later http://server_name
1-2User Guide for Cisco Show and Share 5.2.x
OL-15765-04

Chapter 1 Start Here Accessing Cisco Show and Share
Tip If you are not sure which version of Cisco Show and Share you are using, try using the URL for 5.2.1 first. If you receive an error, then you are running 5.2 and should use one of the two URLs for that version.
Note You may receive a security warning to accept the site security certificate when you first access your Cisco Show and Share site. Confirm the security exception to proceed to the site.
When Cisco Show and Share loads, you see a page similar to the one shown in Figure 1-1.
Figure 1-1 The Cisco Show and Share Home Page
When you first access Cisco Show and Share, you access the site as a visitor. Visitors can search, browse, filter, and watch public videos. Visitors might also be able to rate, comment upon, and tag videos if those features were enabled for general use.
Visitors cannot upload or record videos. You must be logged in to access those functions.
Now that you have accessed Cisco Show and Share, see Cisco Show and Share Quick Start, page 1-4 to start using Cisco Show and to see what is available to you as a visitor and as a logged-in user.
1-3User Guide for Cisco Show and Share 5.2.x
OL-15765-04

Chapter 1 Start Here Cisco Show and Share Quick Start
Cisco Show and Share Quick StartThe Cisco Show and Share Quick Start section provides a overview of the Cisco Show and Share interface and features. It is designed to act as a quick reference an to get you acquainted with the most commonly-accessed pages. Each section contains links to where you can find more information about that screen.
Note The screens in this section might look slightly different from those in your site. Your site might use a custom logo and background or be in another language. Additionally, the screens shown in this section are from Cisco Show and Share 5.2.3, which introduced some changes to the interface. You can see more information about those changes in the Preface. Significant changes are also explained in the chapters that detail the usage of the features.
This section contains the following topics:
• The Home Page
• The Video Playback Page
• The My Account Page
• The Upload Video Page
• The Record a Video Page
• The Publish Your Video Page
• Basic Navigation
1-4User Guide for Cisco Show and Share 5.2.x
OL-15765-04

Chapter 1 Start Here Cisco Show and Share Quick Start
The Home PageThe Home page is the starting point of your Cisco Show and Share experience. You can always navigate back to the Home page by clicking Videos in the menu bar.
At the top of the Home page are featured videos. These are videos that your organization want to draw attention to.
Below the Featured Videos are the Public Videos. These are videos that do not have any viewing restrictions attached to them. By default, the newest videos are shown at the top of the list. You can also sort the list by the most watched, the highest rated, or containing the most comments. When sorted by the number of comment, both general comments and timeline comments count towards the comment total for a video.
Note Videos with viewing restrictionsappear on the Private tab in your My Accout page if you have permission to access them. See The My Account Page, page 1-7.
You can filter the public videos by selecting a tag, a category, entering a filter term, or any combination of those methods. You can also change the Public Videos list view.
For more information about browsing and searching for videos from the home page, see Browse and Search Videos, page 2-1.
1-5User Guide for Cisco Show and Share 5.2.x
OL-15765-04

Chapter 1 Start Here Cisco Show and Share Quick Start
The Video Playback PageAny time you click a video, the Video Playback page appears. When the page loads, the video begins to play automatically.
For more information about using the features on the Video Playback page, see Play, Comment, Tag, and Share Videos, page 3-1.
1 Video title and detail information. 2 Video player.
3 Video information tabs. The following tabs may be available, depending upon the features used by the video: Info (video description and tags), Transcript, Chapters, Slides, and Files.
4 Comment area. General comments about the video are shown on the Commentary tab. Comments from the timeline are shown on the Timeline Comments tab.
5 Author information. You can send the author an e-mail message, subscribe to an RSS feed of the author’s videos, or see more videos from the author.
6 Videos related to the current video. The author can choose specific related videos or let the system pick the videos (based on them having tags and categories in common).
1-6User Guide for Cisco Show and Share 5.2.x
OL-15765-04

Chapter 1 Start Here Cisco Show and Share Quick Start
The My Account PageClick My Account in the menu bar to access the My Account page. You must be logged-in to access this page. If you are not logged-in, you will be prompted to do so. See Sign In to Cisco Show and Share, page 1-20.
For more information about Live Events, see Live Events, page 8-1.
For more information about uploading videos, see Create, Add, and Manage Videos, page 4-1.
For more information about video reports, see Use Show and Share Author Reports, page 9-1.
1 Status Updates and Messages. Notifications about comments on your videos and publishing status appear in this area.
2 Add a Video. (Author or Live Event role required) You can start the upload or video record process from this page. You can also configure and schedule a live event.
3 Action Items and Requests. If you are a video approver (if your Show and Share has the Video Approval process enabled), your pending approvals appear in this area.
4 Videos. This area contains the videos you have uploaded, live events you have scheduled, and videos that have viewing restrictions (that you can view).
1-7User Guide for Cisco Show and Share 5.2.x
OL-15765-04
Chapter 1 Start Here Cisco Show and Share Quick Start
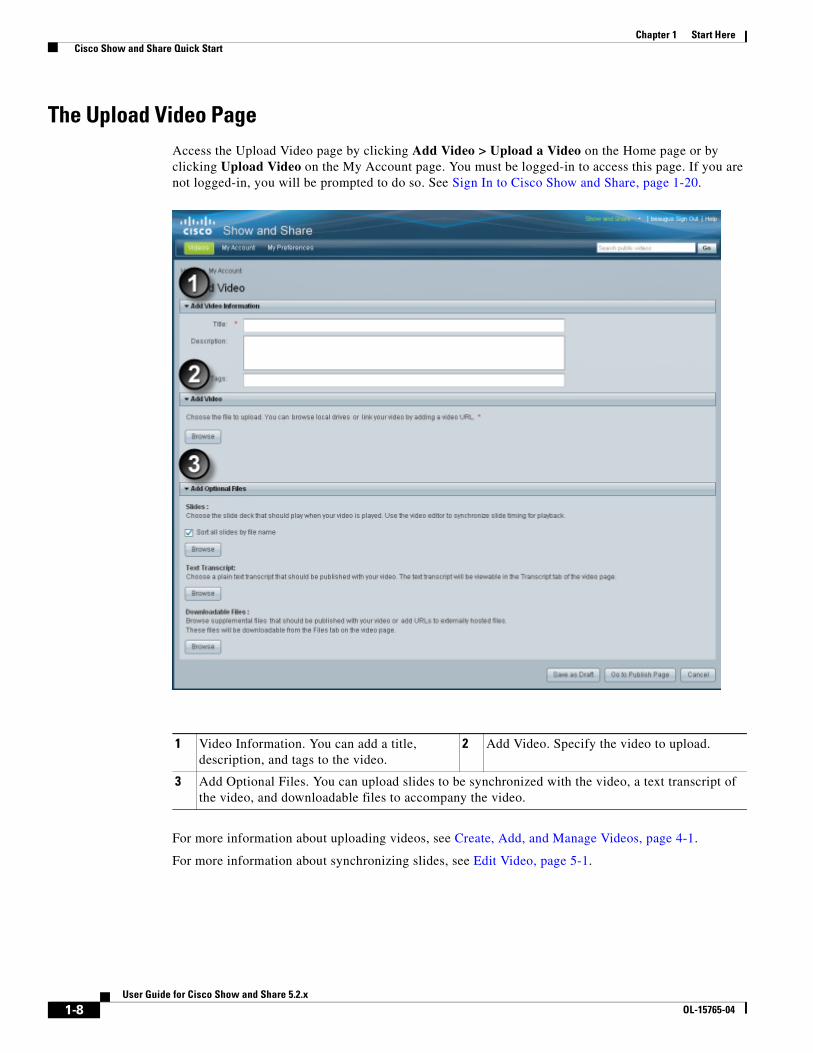
The Upload Video PageAccess the Upload Video page by clicking Add Video > Upload a Video on the Home page or by clicking Upload Video on the My Account page. You must be logged-in to access this page. If you are not logged-in, you will be prompted to do so. See Sign In to Cisco Show and Share, page 1-20.
For more information about uploading videos, see Create, Add, and Manage Videos, page 4-1.
For more information about synchronizing slides, see Edit Video, page 5-1.
1 Video Information. You can add a title, description, and tags to the video.
2 Add Video. Specify the video to upload.
3 Add Optional Files. You can upload slides to be synchronized with the video, a text transcript of the video, and downloadable files to accompany the video.
1-8User Guide for Cisco Show and Share 5.2.x
OL-15765-04

Chapter 1 Start Here Cisco Show and Share Quick Start
The Record a Video PageAccess the Upload Video page by clicking Add Video > Record a Video on the Home page or by clicking Record Video on the My Account page. You must be logged-in to access this page. If you are not logged-in, you will be prompted to do so. See Sign In to Cisco Show and Share, page 1-20.
For more information about recording videos, see Create, Add, and Manage Videos, page 4-1.
For more information about synchronizing slides, see Edit Video, page 5-1.
1 Video Information. You can add a title, description, and tags to the video.
2 Capture Settings. Specify the audio and video capture devices and record your video.
3 Add Optional Files. You can upload slides to be synchronized with the video, a text transcript of the video, and downloadable files to accompany the video.
1-9User Guide for Cisco Show and Share 5.2.x
OL-15765-04

Chapter 1 Start Here Cisco Show and Share Quick Start
The Publish Your Video PageYou must be logged-in to access this page. If you are not logged-in, you will be prompted to do so. See Sign In to Cisco Show and Share, page 1-20.
1 Video Summary. Contains the video information you entered in the Upload Video or Record Video screen. You can edit this information before publishing
2 Page Permissions.You can restrict access to the video, assign it to one or more categories, and disable the following features for the video you are publishing if the features have been enabled globally:
• Commenting on videos
• Commenting anonymously
• Rating videos
• Tagging videos
• Sharing videos
1-10User Guide for Cisco Show and Share 5.2.x
OL-15765-04

Chapter 1 Start Here Cisco Show and Share Quick Start
For more information about publishing videos, see Publish Your Video, page 7-1.
1 Add Related. You can manually specify related videos or have the system automatically select them based on tags and categories assigned to the videos.
2 Scheduling.You can schedule when you want the video to appear in Cisco Show and Share and when you want it removed from public viewing.:
1-11User Guide for Cisco Show and Share 5.2.x
OL-15765-04

Chapter 1 Start Here Cisco Show and Share Quick Start
Basic NavigationThis section contains the following topics:
• Screen Elements, page 1-12
• Keyboard Navigation, page 1-17
Screen Elements
The Header
In Cisco Show and Share, the horizontal area at the top of each page is called the header.
Figure 1-2 Header
The header is useful in several ways.
• Global Navigation, page 1-12
• Basic Search, page 1-13
• Primary Tab Bar, page 1-13
Global Navigation
The headers’s top right corner includes a row of links that you can click. These global navigation links help you to sign in or sign out, for example.
Figure 1-3 Global Navigation Links
Tip You cannot sign in until you have a Cisco Show and Share user account. However, some basic features might be available even before you sign in. To request a user account, contact the administrator for your Cisco Show and Share site.
Global navigation links behave differently in various situations.
• When you have not yet signed in to your user account, a link invites you to sign in. But while you are signed in, that link changes so that you can sign out when you are finished.
• We show a triangle in the global navigation when you can use a link like a menu and choose among applications. The menu expands when you click this triangle. Choose an option in the menu to switch between applications. (We might then ask you to sign in.) You can use only the applications that you are authorized to use. After you open an application, its name replaces the name of whichever application you closed.
1-12User Guide for Cisco Show and Share 5.2.x
OL-15765-04

Chapter 1 Start Here Cisco Show and Share Quick Start
Figure 1-4 Global Navigation Menu
Tip To learn about Cisco Show and Share Administration features, see User Guide for Cisco Show and Share Administration 5.2.x on Cisco.com.
Basic Search
The header also includes a basic search function. Enter a word or phrase in the field, and then click Go.
Figure 1-5 Basic Search
Primary Tab Bar
A row of tabs loads under the Show and Share name. We call this the primary tab bar. Click a tab to move between the major areas in Cisco Show and Share that you are authorized to use.
Until you sign in to your Cisco Show and Share account, some features are hidden from you. These include the My Show and Share tab and everything on it.
Figure 1-6 Primary Tab Bar
Do not confuse the primary tab bar with any secondary tab bar that you might see inside a drawer.
1-13User Guide for Cisco Show and Share 5.2.x
OL-15765-04

Chapter 1 Start Here Cisco Show and Share Quick Start
Drawers
A drawer contains objects and controls that work together in a special way. You can open a drawer or close it at any time, for any reason. While a drawer is closed, you cannot see or work with anything inside it. Later, you might open it again to use it.
Figure 1-7 Toggles to Open or Close a Drawer
Figure 1-8 Closed Drawers
Figure 1-9 Closed and Opened Drawers
1-14User Guide for Cisco Show and Share 5.2.x
OL-15765-04
Chapter 1 Start Here Cisco Show and Share Quick Start
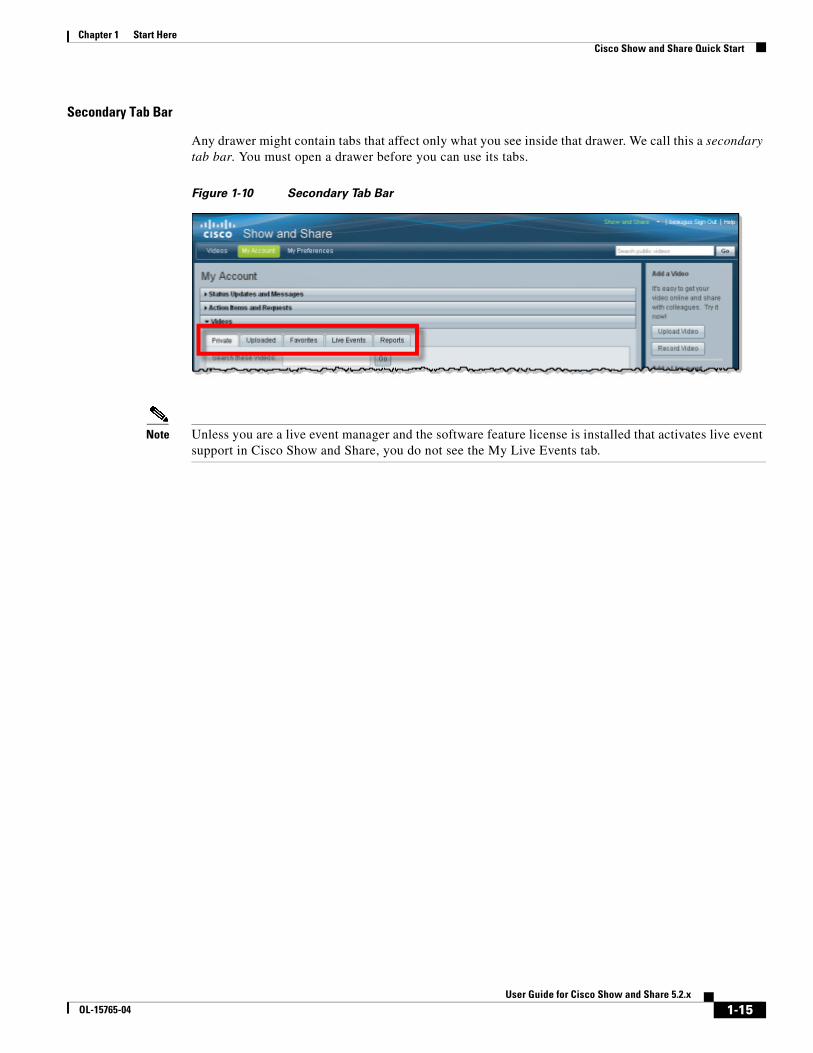
Secondary Tab Bar
Any drawer might contain tabs that affect only what you see inside that drawer. We call this a secondary tab bar. You must open a drawer before you can use its tabs.
Figure 1-10 Secondary Tab Bar
Note Unless you are a live event manager and the software feature license is installed that activates live event support in Cisco Show and Share, you do not see the My Live Events tab.
1-15User Guide for Cisco Show and Share 5.2.x
OL-15765-04

Chapter 1 Start Here Cisco Show and Share Quick Start
Sidebars
Some pages in Cisco Show and Share include a narrow column on the right or left side. This is called a sidebar. The elements in a sidebar help you to jump quickly to another area.
Figure 1-11 Sidebar Examples
Example:Sidebar on left.
Example:Sidebar on right.
1-16User Guide for Cisco Show and Share 5.2.x
OL-15765-04

Chapter 1 Start Here Cisco Show and Share Quick Start
Keyboard Navigation
The following pages support keyboard navigation:
• Login
• Home
• My Account
• Upload Video
• Record a Video
• Publish Video
• Video Playback
• Search Results
The following areas do not support keyboard navigation:
• Create Live Event
• Video Editor
• Administration
• Category chooser and Group chooser (available from the Publish Video page)
See the following sections for more information about using keyboard navigation:
• General Keyboard Navigation, page 1-17
• Navigate the Featured Videos, page 1-18
• Navigate the Public Videos, page 1-18
• Control Video Playback, page 1-19
General Keyboard Navigation
Table 1-1 describes the general navigation features available on pages where keyboard navigation is supported.
Table 1-1 General Navigation
Key Function
Tab Move to the next field. The field can be a link, button, text field, checkbox, drop-down list, drawer, area, or set of options. Selected fields are outlined.
Shift-Tab Move to the next field. The field can be a link, button, text field, checkbox, drop-down list, drawer, area, or set of options. Selected fields are outlined.
Spacebar Activate the highlighted link, open or close the selected drawer, select a checkbox, select the highlighted tab, or select the highlighted item in a list.
Right-Arrow/Left-Arrow
Select an option in a highlighted set of options. Highlight a specific tab in a group of tabs.
ALT-Down-Arrow
Open a dropdown list.
Esc. Close a dropdown list.
Up/Down Arrows
Highlight an item in a list.
1-17User Guide for Cisco Show and Share 5.2.x
OL-15765-04

Chapter 1 Start Here Cisco Show and Share Quick Start
Navigate the Featured Videos
Step 1 Press TAB until the featured videos are highlighted.
Step 2 Use the Left and Right arrow keys to select a featured video.
Step 3 Press the Spacebar to launch the video.
Navigate the Public Videos
Step 1 Press TAB until the first public video in the list is highlighted.
Step 2 To navigate the list:
• Continue to press TAB to highlight the next video in line.
• Press TAB after the last video to highlight the page controls at the bottom of the list. Use the Up and Down arrow keys on the Jump to Page control to change pages or use the Spacebar on the page forward/back buttons and the page numbers to change pages.
Step 3 Press the Spacebar on a highlighted video to launch the video.
1-18User Guide for Cisco Show and Share 5.2.x
OL-15765-04

Chapter 1 Start Here Cisco Show and Share Quick Start
Control Video Playback
Step 1 Press TAB to highlight the video.
Step 2 Use the following to control video playback while the video itself is highlighted:
Step 3 Press TAB again to move the focus to the player controls. Use TAB to move through the controls and Spacebar to activate the control.
Table 1-2 General Navigation
Key Function
Spacebar Play/pause the video.
Right Arrow Move forward.
Left Arrow Move backward
Shift+Right Arrow
Move to next chapter.
Shift+Left Arrow
Move to previous chapter.
Up Arrow Volume Up
Down Arrow Volume Down
1-19User Guide for Cisco Show and Share 5.2.x
OL-15765-04
Chapter 1 Start Here Sign In to Cisco Show and Share
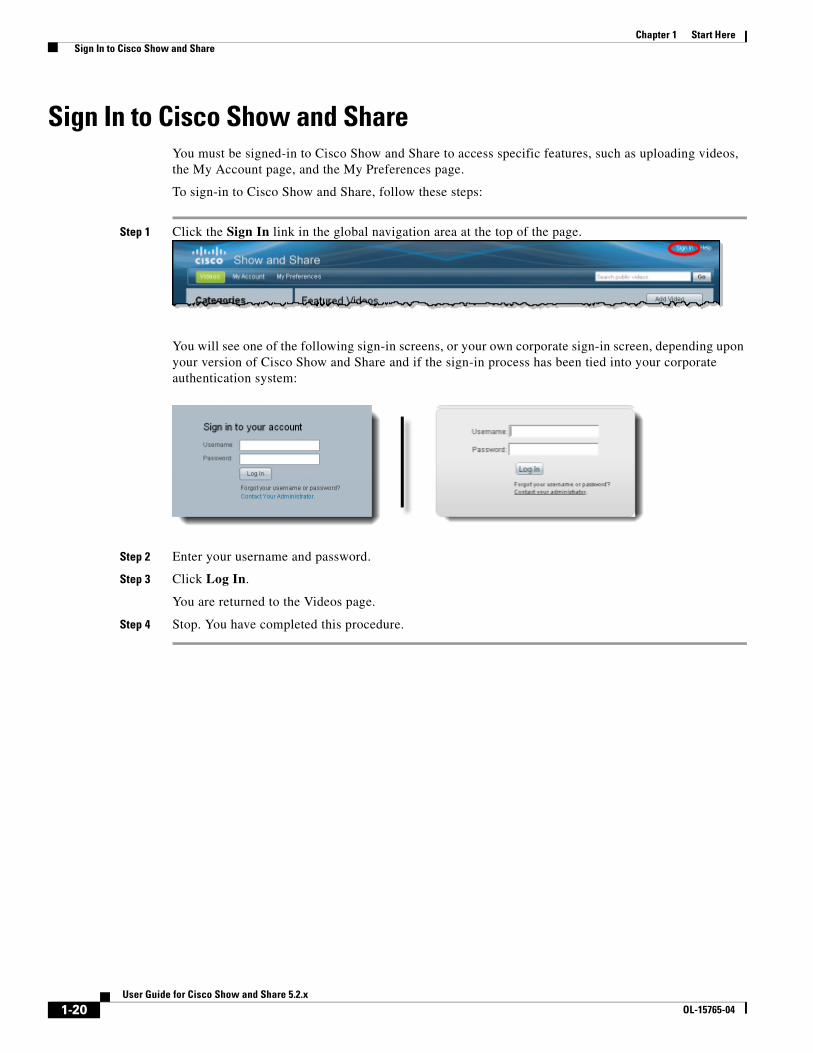
Sign In to Cisco Show and ShareYou must be signed-in to Cisco Show and Share to access specific features, such as uploading videos, the My Account page, and the My Preferences page.
To sign-in to Cisco Show and Share, follow these steps:
Step 1 Click the Sign In link in the global navigation area at the top of the page.
You will see one of the following sign-in screens, or your own corporate sign-in screen, depending upon your version of Cisco Show and Share and if the sign-in process has been tied into your corporate authentication system:
Step 2 Enter your username and password.
Step 3 Click Log In.
You are returned to the Videos page.
Step 4 Stop. You have completed this procedure.
1-20User Guide for Cisco Show and Share 5.2.x
OL-15765-04

Chapter 1 Start Here Sign In to Cisco Show and Share
User Roles and PrivilegesThe following table describes the user roles that are available in Cisco Show and Share. Users may have more than one role. For example, in many installations video authors are also video publishers and live event users.
Users can also have one or more of the administrator roles listed at the bottom of the table. Administrator functions are described in the Administrator Guide for Cisco Show and Share 5.2.x.
Administrators can enable or disable certain features globally or restrict their access to a subset of users. The logic works like this:
• No one can use what an administrator has hidden from everyone.
• You must log in to use what an administrator has reserved for registered users.
• When you are logged in, you cannot use anything whose access rights exclude you.
To gain access to features that have been restricted to registered users by the site administrator, and to be able to upload, record, and edit videos, you must log in to Cisco Show and Share and have the privileges to perform those actions.
Role: What the role can do:
Visitor Visitors can typically browse and view videos. They may also be able to comment on, rate, and tag videos.
Video Author Video Authors upload, record, and edit videos. They can submit videos for publication. They can browse and view videos. They may also be able to comment on, rate, and tag videos.
To record video in Cisco Show and Share, Video Authors must have a video camera and microphone attached to their computer. If they are not built in, they must be USB-based.
Video Publisher Video Publishers approve videos for publication. They can browse and view videos. They may also be able to comment on, rate, and tag videos.
Live Event User Live Event Users edit, publish, administer, and delete live events. They can browse and view videos. They may also be able to comment on, rate, and tag videos.
Category Administrator Category Administrators create and delete categories. They can browse and view videos. They may also be able to comment on, rate, and tag videos.
Reports Administrator Reports Administrators run and view Cisco Show and Share reports. They can browse and view videos. They may also be able to comment on, rate, and tag videos.
Administrator Administrators assign permissions to other users and set site-wide preferences. They can reset your password if you forget yours. They can browse and view videos. They may also be able to comment on, rate, and tag videos.
1-21User Guide for Cisco Show and Share 5.2.x
OL-15765-04

Chapter 1 Start Here Set Your Personal Preferences
Set Your Personal PreferencesWhen you first log in to Cisco Show and Share, the interface is presented in a language chosen by your system administrator. You can change the language displayed to one of the following:
• English
• French
• Spanish
Even though you change the language displayed for your Cisco Show and Share Sessions, it does not change the base language of the system. Features, such as search, will still follow the rules for the base system language.
Procedure
Step 1 Log in to Cisco Show and Share.
Step 2 Click My Preferences in the menu bar.
Step 3 Choose a language from the Select your preferred language list.
Step 4 Click Apply.
1-22User Guide for Cisco Show and Share 5.2.x
OL-15765-04

OL-15765-04
C H A P T E R 2
Browse and Search VideosRevised: May 31, 2011
This section describe ways that you can browse through or search for public videos from the home page. It contains the following topics:
• Browse the Featured Videos, page 2-2
• Browse The Public Videos, page 2-3
• Navigate Among Your Filtered Results, page 2-8
• Play a Video, page 2-8
• Search for Videos, page 2-9
2-1User Guide for Cisco Show and Share 5.2.x

Chapter 2 Browse and Search Videos Browse the Featured Videos
Browse the Featured VideosFeatured videos appear at the top of the home page. Videos are designated as “featured” by the Cisco Show and Share administrators. Refer to your organization’s policies and procedures for information about how videos are determined to be featured videos.
Procedure
Step 1 If not on the home page, click Videos on the primary tab bar.
If featured videos exist, you will see their thumbnails at the top of the page.
Step 2 Click the left and right arrows to browse through featured videos, as needed.
Step 3 (Optional) Click a video to open its video player.
Step 4 Stop. You have completed this procedure.
2-2User Guide for Cisco Show and Share 5.2.x
OL-15765-04

Chapter 2 Browse and Search Videos Browse The Public Videos
Browse The Public VideosWhen you first access the Cisco Show and Share home page, the Public Videos list displays the newest videos at the top of the list. You can change the list view and sort and filter the list to make finding videos easier.
• Change the Public Videos List View, page 2-3
• Sort the Public Videos, page 2-4
• Filter the Public Videos, page 2-5
Change the Public Videos List ViewThe list view buttons appear above the video list. The list view only remains for the session you are currently in. If you sign out or exit, the view reverts to the default list view.
Click a button to change the list view. Table 2-1 describes the views.
Table 2-1 List Views
Button View
(List View)
(Grid View)
(Table View)
2-3User Guide for Cisco Show and Share 5.2.x
OL-15765-04

Chapter 2 Browse and Search Videos Browse The Public Videos
Sort the Public VideosYou can sort the public video list by newness, most views, ratings, or number of comments.
To sort the list, click one of the following options in the Sort By list:
• Newest—The most recently added videos appear at the top of the list. This is the default sort order of the list.
• Most viewed—The videos are sorted in descending order by the number of views.
• Highest rated—The videos are sorted in descending order by rating.
• Most comments—The videos are sorted in descending order by the number of comments. Both general and timeline comments count towards the comment total for a video.
Under certain circumstances, the sort by most viewed list may appear to be out of order. Videos with fewer views can appear higher in the list than a video with more views. This happens when a video author creates a draft of a public video (for example, to edit some of the video information). Views of the draft video count towards the overall video views, but are not reflected in the number of views shown in the Views count of the public video. This situation is corrected when the video author re-publishes the draft video.
2-4User Guide for Cisco Show and Share 5.2.x
OL-15765-04

Chapter 2 Browse and Search Videos Browse The Public Videos
Filter the Public VideosThere are several methods for filtering the Public Videos list. You can use any combination of the following methods to filter the video list. You can also combine these filters with the changed view and sorting to help you quickly find the videos you are looking for.
• Filter by Category, page 2-5
• Filter by Tag, page 2-6
• Filter by Date, page 2-7
• Filter by Keyword, page 2-8
Filter by Category
You can filter the Public Videos list to show only those videos belonging to a selected category.
Step 1 Click a category in the Categories area.
The Home page displays the filtered list of public videos.
If you have nested categories, click the triangle next to the category name to reveal the sub-categories, and then click one of the sub-categories.
Step 2 To remove the category filter, click Categories.
2-5User Guide for Cisco Show and Share 5.2.x
OL-15765-04

Chapter 2 Browse and Search Videos Browse The Public Videos
Filter by Tag
You can filter the Public Videos list to show only those videos that have the selected tag.
Step 1 Click a category in the Common Tags area.
The Public Videos list displays only those videos with the selected tag.
Step 2 To remove the tag filter, click the X to the right of the selected tag.
2-6User Guide for Cisco Show and Share 5.2.x
OL-15765-04

Chapter 2 Browse and Search Videos Browse The Public Videos
Filter by Date
You can filter the list to show only those videos that were published within the last day, week, month, or 90 days.
Step 1 Choose a time frame from the Within list.
The Public Videos list shows only those videos that were published within the selected time frame.
Step 2 To remove the date filter, choose Any time form the Within list.
2-7User Guide for Cisco Show and Share 5.2.x
OL-15765-04

Chapter 2 Browse and Search Videos Navigate Among Your Filtered Results
Filter by Keyword
You can filter the list to show only those videos that match a word or phrase of your choosing. Video titles, descriptions, tags, and user information are included in searches.
Step 1 Enter the word or phrase in the Filter videos field and click Go.
Step 2 To remove the keyword filtering, clear the Filter videos field and click Go.
Navigate Among Your Filtered ResultsPagination controls include the buttons and fields clustered under a table, by which you:
• Set how many rows a table should show per page before it starts to span multiple pages.
• Move from one page to another in a table that spans multiple pages.
• Cause the table to show refreshed data.
Play a VideoAfter you have found the video you were looking for, click the video title or thumbnail to play the video. For more information about playing and interacting with videos, see Play, Comment, Tag, and Share Videos, page 3-1.
2-8User Guide for Cisco Show and Share 5.2.x
OL-15765-04

Chapter 2 Browse and Search Videos Search for Videos
Search for VideosThe following applies to basic and advanced searches:
• Search ignores common words, such as “the” (or the equivalent in the system base language).
• Search ignores special characters, such as punctuation. If you have titles with a special character (non-alphanumeric character), such as an ampersand (&), and you perform a search for that character, you will not receive any search results because the special character is ignored.
• If you search for more than one term, it treats the search as an “and” and does not split the terms across fields that are being searched. For example, if you have a video submitted by a user with the user ID of “user1” and tagged with the tag “tag”, searching for “user1 tag” may not produce the video in the results. This is because the search looks for both user1 and tag in the tags field and user1 and tag in the user ID field. However, you can filter the display on the home page with the desired tag and then search for the user ID.
This section contains the following topics:
• Basic Search, page 2-10
• Advanced Search, page 2-11
2-9User Guide for Cisco Show and Share 5.2.x
OL-15765-04

Chapter 2 Browse and Search Videos Search for Videos
Basic Search
Procedure
Step 1 Enter a search term and then click Go.
The Search Results page appears.
Step 2 You can further refine the search by filtering the results by tag, author, or date published. Clicking one or more of the filter entries in the Filter Results by area.
2-10User Guide for Cisco Show and Share 5.2.x
OL-15765-04

Chapter 2 Browse and Search Videos Search for Videos
Advanced Search
Step 1 Click Go. You do not need to enter a search term.
The Search Results page appears.
Step 2 Click Advanced Search.
The Advanced Search form opens.
Step 3 Enter search terms in the search term fields. You can enter terms in more than one field. If you do, they are treated as if joined by “and”. For example, you can search for an exact phrase and at least one of another list of words:
• All of these words—all of the words must appear in the title, the description, the tags, or the author information. The order that they appear in is unimportant.
• This exact phrase—all of the words must appear in the title, the description, the tags, or the author information. Additionally, they must appear in the exact order.
• At least one of these words—at least one of the words in the list must appear in the video title, the description, the tags, or the author information. The words in the list must be separated by a space.
• Without these words—exclude videos that contain the specified words in the video title, the description, the tags, or the author information. Separate the words with a space. The order that they appear in is unimportant.
2-11User Guide for Cisco Show and Share 5.2.x
OL-15765-04

Chapter 2 Browse and Search Videos Search for Videos
Step 4 (Optional) Specify a category the video must be in:
a. Click Specific category.
A list of categories appears.
b. Select a category from the list.
Step 5 (Optional) Narrow down the fields searched by selecting one of the following options in the That occur field:
• Anywhere—search video titles, descriptions, and tags.
• Page title only—confine the search to the video titles only.
• Description only—confine the search to the video descriptions.
• Tags only—confine the search to the video tags.
Step 6 (Optional) Enter a user name in the Published by field to restrict the results to videos published by a specific author.
Step 7 (Optional) Restrict the search to videos published in a specific date range:
a. Click Between in the Date Published field
Date entry fields appear.
b. Type a date or select one from the date chooser. Leave a date field blank to indicate that there should not be a start or a finish date.
Step 8 (Optional) Restrict the search to videos with a specific rating or better by choosing a rating from the Rated list.
Step 9 Click Search.
The Search Results page appears.
2-12User Guide for Cisco Show and Share 5.2.x
OL-15765-04

Chapter 2 Browse and Search Videos Search for Videos
Step 10 You can further refine the search by filtering the results by tag, author, or date published. Clicking one or more of the filter entries in the Filter Results by area.
Search TipSave your search by bookmarking the URL in the Search Results page. You can then repeat your search or share your searches with others.
2-13User Guide for Cisco Show and Share 5.2.x
OL-15765-04

Chapter 2 Browse and Search Videos Search for Videos
2-14User Guide for Cisco Show and Share 5.2.x
OL-15765-04

OL-15765-04
C H A P T E R 3
Play, Comment, Tag, and Share VideosRevised: May 31, 2011
No matter where you are in the Cisco Show and Share interface, whenever you click on a video thumbnail or title, you are taken to the Video Playback page. The video playback page does more than just let you watch videos, it lets you interact with them by leaving comments, rating them, reading transcripts, watching synchronized slides, and downloading supplemental files.
Topics in this section describe how to play and respond to videos.
• Concepts, page 3-1
• Procedures, page 3-8
• Troubleshooting, page 3-21
ConceptsTo learn more about the video playback page, see the following topics:
• The Video Playback Page, page 3-2
• The Video Player, page 3-3
• The Video Information Tabs, page 3-7
3-1User Guide for Cisco Show and Share 5.2.x

Chapter 3 Play, Comment, Tag, and Share Videos Concepts
The Video Playback PageAny time you click a video, the Video Playback page appears. When the page loads, the video begins to play automatically.
1 Video title and detail information. 2 Video player.
3 Video information tabs. The following tabs may be available, depending upon the features used by the video: Info (video description and tags), Transcript, Slides, and Files.
4 Comment area. General comments about the video are shown on the Commentary tab. Comments from the timeline are shown on the Timeline Comments tab.
5 Author information. You can send the author an e-mail message, subscribe to an RSS feed of the author’s videos, or see more videos from the author.
6 Videos related to the current video. The author can choose specific related videos or let the system pick the videos (based on them having tags and categories in common).
3-2User Guide for Cisco Show and Share 5.2.x
OL-15765-04

Chapter 3 Play, Comment, Tag, and Share Videos Concepts
The Video PlayerThe video player controls changed significantly between Cisco Show and Share 5.2.2 and 5.2.3. Table 3-1 shows the player controls for Cisco Show and Share 5.2.3. Table 3-2 shows the player controls for Cisco Show and Share 5.2.2 and earlier. The instructions in this chapter use the Cisco Show and Share 5.2.3 video player controls.
The Cisco Show and Share 5.2.3 Video Player
1 The video area.
2 The timeline and play head.
3 The player controls. See Table 3-1 for information about the controls.
3-3User Guide for Cisco Show and Share 5.2.x
OL-15765-04

Chapter 3 Play, Comment, Tag, and Share Videos Concepts
Table 3-1 Cisco Show and Share 5.2.3 Video Player Controls
Control Name Details
Pause / Play When the Video Player page first loads, the video plays automatically. Click the pause button to pause the playback. The button becomes a play button when the video is paused.
Progress Indicator
Shows you how far into the video you are and how much time is left until you reach the end of the video.
Favorites button
Adds the video to your Favorites tab on the My Account page.
Timeline comment button
Inserts a timeline comment at the current point in the video.
Closed Captioning Button
Displays or hides closed captions. This option is only available for .wmv files that contained embedded closed captions when uploaded.
Volume control
Controls the volume. Click the speaker icon to mute and unmute the video. Slide the slider left and right to lower or raise the volume.
Share button Click this button to share the video. You can share the video by e-mail, copy a link to the video, or copy code to embed the video in a web page. See Share Videos, page 3-12, for more information about sharing videos.
Fullscreen playback button
Click this button to enter full screen playback mode.
3-4User Guide for Cisco Show and Share 5.2.x
OL-15765-04

Chapter 3 Play, Comment, Tag, and Share Videos Concepts
The Cisco Show and Share 5.2.2 and Earlier Video Player
1 The video area.
2 The timeline and play head.
3 The player controls. See Table 3-2 for information about the controls.
3-5User Guide for Cisco Show and Share 5.2.x
OL-15765-04

Chapter 3 Play, Comment, Tag, and Share Videos Concepts
Table 3-2 Pre-5.2.3 Video Player Controls
Purpose Element Details
Audio Volume
Controls the audio volume level.
1. Move your pointer over the speaker icon to reveal the hidden control.
2. Click the slider to change the audio volume:
• Drag it left to reduce audio volume.
• Drag it right to increase audio volume.
Playback Controls video playback speed and direction:
• Play video or pause it. (The center button is a toggle.)
• Rewind video (left button) or fast-forward through it (right button).
Timeline Comment
Enter a timeline comment.
More Shows options to:
• View the video full-screen.
• Save the video to your “My Favorites” list.
• Share the video:
– By sending the HTML link in e-mail.
– By copying the HTML link to your system clipboard.
– By copying the embed code to your system clipboard.
3-6User Guide for Cisco Show and Share 5.2.x
OL-15765-04

Chapter 3 Play, Comment, Tag, and Share Videos Concepts
The Video Information TabsThe video information tabs contain additional information about the video. Tabs only appear for the features that are associated with the video. For example, if a video has a transcript, the Transcript tab appears. If it does not have a transcript, the Transcript tab is hidden.
Below the video player are to additional tabs:
Note Live events have tabs for asking questions of the speaker and responding to polls instead of the comments tabs.
Table 3-3 Video Information Tabs
Tab Label Description
VoD
Live
Info Shows a description of the video and any tags associated with the video. This tab is available for all videos and is the default tab unless slides have been synchronized to the video.
Y Y
Chapters Shows any chapter markers that the publisher inserted into this video. Click a chapter marker to jump to its position in the video timeline and start playback at that moment.
Y N
Slides Shows any presentation slides that the publisher synchronized with this video. The slide deck advances automatically. Click a slide to jump to its position in the video timeline and start playback at that moment.
If there are slides associated with a video, this tab is the active tab when the page loads.
If slides are not synchronized with the video, this tab is hidden.
Y Y
Transcript Shows any transcript text that the publisher attached to this video. You must scroll the transcript manually. It is not synchronized with video playback.
This tab does not appear if the author has not uploaded a transcript with the video.
Y N
Files Shows any downloadable files that the publisher attached to this video. Click a file to start downloading it.
If there aren’t any files attached to the video, this tab is hidden.
Y Y
Tab Label Description
VoD
Live
Comments Shows any general comments for the video, if commenting is enabled. Y N
Timeline Comments
Shows any timeline comments, if they are enabled. Each such comment is marked on the video timeline. Click one of these marks to read the comment, jump to its position in the video timeline, and start playback at that moment.
Y N
3-7User Guide for Cisco Show and Share 5.2.x
OL-15765-04

Chapter 3 Play, Comment, Tag, and Share Videos Procedures
Procedures • Pause and Play Videos, page 3-8
• Play Videos Full Screen, page 3-9
• Add a Video to Your Favorites List, page 3-9
• Comment on Videos, page 3-10
• Add Tags to Videos, page 3-11
• Rate Videos, page 3-12
• Share Videos, page 3-12
• Play Embedded Videos, page 3-16
• Jump to a Chapter, page 3-17
• Watch Slides, page 3-18
• Read a Transcript, page 3-19
• Download Files, page 3-20
Pause and Play VideosWhen you first access a video, it begins to play by default. You can pause and restart the video at any time.
Procedure
Step 1 Click the pause button to pause the video.
Step 2 To resume playback, click the play button.
Note See Control Video Playback, page 1-19, for information about using the keyboard controls for the video player.
3-8User Guide for Cisco Show and Share 5.2.x
OL-15765-04

Chapter 3 Play, Comment, Tag, and Share Videos Procedures
Play Videos Full ScreenThe Cisco Show and Share 5.2.2 release added playback controls to the full screen playback mode. The controls changed in Cisco Show and Share 5.2.3 to match the changes to the video player controls. See The Video Player, page 3-3.
Procedure
Step 1 On the video playback screen, click the Fullscreen button ( ).
The video opens in full screen mode. The following controls appear below the video:
Step 2 To exit full screen playback, press the ESC key or click the Exit Fullscreen ( ) button.
Add a Video to Your Favorites ListYou can add a video to your Favorites list. Your Favorites list appears as a tab in the Videos drawer on the My Account page. You must be logged in to add a video to your Favorites list.
Procedure
Step 1 On the video playback screen, click the Favorites button.
The video now appears in your My Favorites list on the My Account page.
Step 2 To view your favorite videos, go to My Account > Videos > Favorites.
Table 3-4 Full Screen Player Controls
Element Name Details
Timeline Shows you where you are in the video. You can drag the marker to move to another point in the video. Your location in the video is preserved when you exit full screen mode.
Volume Adjust the volume without leaving full screen mode. Click the speaker icon to quickly mute and unmute the audio.
Pause/Play Click to pause the video. Click the button again to resume. The video remains playing or paused when you switch between standard and full screen playback.
Exit Fullscreen Click to exit full screen mode. You can also press the ESC key to exit full screen mode.
3-9User Guide for Cisco Show and Share 5.2.x
OL-15765-04

Chapter 3 Play, Comment, Tag, and Share Videos Procedures
Comment on VideosYou can comment on videos in two different ways:
• General comments that apply to the whole video. These comments appear below the video on the video playback page. See Adding a General Comment, page 3-10.
• Timeline comment that apply to a specific point in the video. These comments appear in the Timeline Comments tab below the video. Additionally, vertical bar in the video timeline indicates where timeline comments have been entered. See Adding a Timeline Comment, page 3-10.
Both types of comments count towards the total number of comments for a video.
Commenting on videos may not be available if the system administrator has turned off this feature at the system level or if the person who uploaded the video turned off the feature for the video.
In Cisco Show and Share 5.2.2 and earlier, if you add comments to a video that is in the Draft state, the comments are lost when the video is published. In 5.2.3, you cannot add comments to Draft videos.
If you re-publish a video with comments, you are given the option to retain the comments when the video is republished.
You can also flag comments as inappropriate. See Flag a Comment as Inappropriate, page 3-11.
Adding a General Comment
Step 1 Click in the comment box in the Commentary tab below the video. If comments have been added by other users, the comment box appears above the existing comments.
Step 2 Type your comment.
Step 3 Click Add Comment.
Your comment appears at the top of the list. If you are logged-in to Cisco Show and Share, your user name, along with the date and time the comment was entered, appears above your comment. If you are not logged in, ANONYMOUS_USER appears as the user name.
Adding a Timeline Comment
Step 1 Play the video.
Step 2 When the video gets to a point where you want to add a timeline comment, click the Add Timeline Comment button ( ).
Note Timeline comments are not supported with videos in Windows media format. The Add Timeline Comment button does not appear in the playback screen for videos in Windows media format.
The video pauses and the Timeline Comment box appears.
Step 3 Type your comment and click OK.
Your timeline comment appears in the Timeline Comment tab.
3-10User Guide for Cisco Show and Share 5.2.x
OL-15765-04

Chapter 3 Play, Comment, Tag, and Share Videos Procedures
Flag a Comment as Inappropriate
Step 1 Click the Commentary or Timeline Comments tab.
Step 2 Click Report Abuse next to the inappropriate comment.
The system administrators are notified that the comment has been flagged.
Add Tags to VideosYou can add tags to other people’s videos. You cannot add tags to live events.
Note This option may not be available if the system administrator has turned off this feature at the system level or if the person who uploaded the video turned off the feature for the video.
Procedure
Step 1 On the video playback screen, click the Info tab to open it.
The video tags appear at the bottom of the tab.
Step 2 Click in the Add additional tags box.
Step 3 Type in your tags. Each tag is separated by a space. If you have tags that contain more than one word, combine the words with a character such as an underscore (_) or a dash (-). For example, show_and_share.
Step 4 Click Submit.
3-11User Guide for Cisco Show and Share 5.2.x
OL-15765-04

Chapter 3 Play, Comment, Tag, and Share Videos Procedures
Rate VideosYou can rate your own and other people’s videos. Ratings range from a low of zero stars to a high of five stars.
Because ratings increment by one-half of a star at a time, there are 10 possible ratings that you might give. The average all of the submitted ratings for a video appears to everyone.
Note This option may not be available if the system administrator has turned off this feature at the system level or if the person who uploaded the video turned off the feature for the video.
Step 1 Navigate to the Video Player page.
The ratings appear above the video. You will see an Overall rating, which is the average of all the ratings given to the video, and your own rating.
Step 2 Click the stars below the video. You can click in half-star increments.
Step 3 To change your rating after clicking on a star, you need to leave and return to the player page for the video.
Share VideosYou can share videos by sending a link in e-mail, copying the video link, or copying the embed code to use in web pages. See the following topics for more information:
• Copy the Video Link, page 3-13
• Embed the Video in a Web Page, page 3-14
• Send the Video Link in E-Mail, page 3-16
3-12User Guide for Cisco Show and Share 5.2.x
OL-15765-04

Chapter 3 Play, Comment, Tag, and Share Videos Procedures
Copy the Video Link
You can copy the video URL to share in documents, web pages, or chat sessions.
Procedure
Step 1 On the video playback screen, click the Share button below the video.
Step 2 Click Copy Link.
A dialog box displays the URL. Your link will look like one of the following, depending upon which version of Cisco Show and Share you are using:
• Cisco Show and Share 5.2.2 and earlier: https://video.example.com/vportal/VideoPlayer.jsp?ccsid=C-e965df56-c131-4eab-8830-ada085bb0d70:1
• Cisco Show and Share 5.2.3: http://video.example.com/p.jsp?i=2
Step 3 Highlight and copy the URL.
3-13User Guide for Cisco Show and Share 5.2.x
OL-15765-04

Chapter 3 Play, Comment, Tag, and Share Videos Procedures
Embed the Video in a Web Page
You can embed your video in a web page or other type of document that accepts HTML code, such as a blog, a wiki, or a simple HTML page.
There are two types of embed code available: Javascript and Flash. The Flash embed code is only available for videos in one of the Flash formats. For videos in a Windows format, only the Javascript code is available.
Use the Javascript embed code unless the page you are embedding the video into does not support Javascript. Some blogging and wiki products do not allow Javascript to run on their pages. Using the Javascript embed code allows you to track video views for videos embedded in HTML pages. See About the Video View Report, page 9-3, for more information about tracking video views.
The Flash embed code does not allow you to track video views. Use the Flash embed code if the page you are embedding the video into does not support Javascript or if tracking the number of video view is not important.
Procedure
Step 1 On the video playback screen, click the Share button below the video.
Step 2 Click Copy Embed Code.
An dialog box opens with HTML code in it. By default, the Javascript embed code is automatically copied to the clipboard.
Step 3 To use the Flash embed code instead, click Flash.
The Flash embed code is automatically copied to the clipboard.
Step 4 Click OK to close the dialog box.
Step 5 Paste the code in the source of your web document where you want the video to appear.
If you are using a WYSIWYG HTML editor, you must switch to the HTML source view before pasting the code.
To modify the embed code, see: Modifying the Embed Code, page 3-15.
3-14User Guide for Cisco Show and Share 5.2.x
OL-15765-04
Chapter 3 Play, Comment, Tag, and Share Videos Procedures
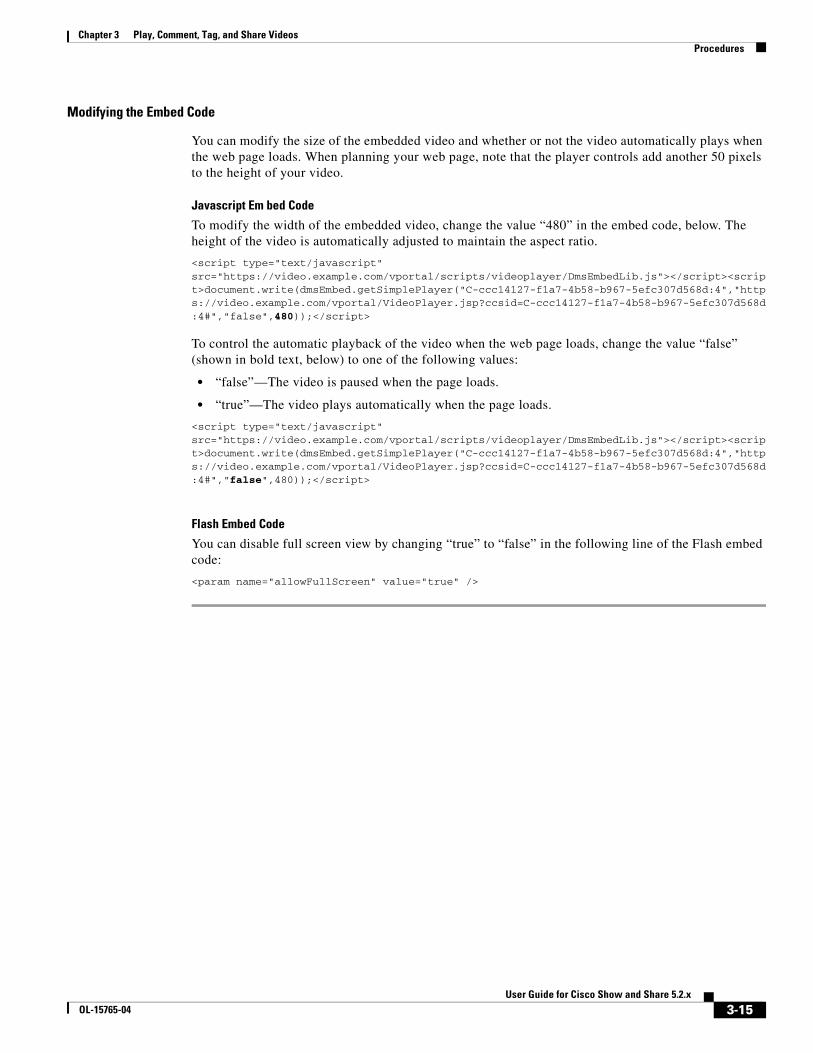
Modifying the Embed Code
You can modify the size of the embedded video and whether or not the video automatically plays when the web page loads. When planning your web page, note that the player controls add another 50 pixels to the height of your video.
Javascript Em bed Code
To modify the width of the embedded video, change the value “480” in the embed code, below. The height of the video is automatically adjusted to maintain the aspect ratio.
<script type="text/javascript" src="https://video.example.com/vportal/scripts/videoplayer/DmsEmbedLib.js"></script><script>document.write(dmsEmbed.getSimplePlayer("C-ccc14127-f1a7-4b58-b967-5efc307d568d:4","https://video.example.com/vportal/VideoPlayer.jsp?ccsid=C-ccc14127-f1a7-4b58-b967-5efc307d568d:4#","false",480));</script>
To control the automatic playback of the video when the web page loads, change the value “false” (shown in bold text, below) to one of the following values:
• “false”—The video is paused when the page loads.
• “true”—The video plays automatically when the page loads.
<script type="text/javascript" src="https://video.example.com/vportal/scripts/videoplayer/DmsEmbedLib.js"></script><script>document.write(dmsEmbed.getSimplePlayer("C-ccc14127-f1a7-4b58-b967-5efc307d568d:4","https://video.example.com/vportal/VideoPlayer.jsp?ccsid=C-ccc14127-f1a7-4b58-b967-5efc307d568d:4#","false",480));</script>
Flash Embed Code
You can disable full screen view by changing “true” to “false” in the following line of the Flash embed code:
<param name="allowFullScreen" value="true" />
3-15User Guide for Cisco Show and Share 5.2.x
OL-15765-04

Chapter 3 Play, Comment, Tag, and Share Videos Procedures
Send the Video Link in E-Mail
You can quickly send a link to the video in an e-mail message.
Prerequisites
• You must have an e-mail account and an e-mail application configured on your system.
• Your e-mail must support UTF-8 character encoding.
Procedure
Step 1 On the video playback screen, click the Share button below the video.
Step 2 Click Send Email.
An e-mail message opens with a link to the video in the body of the message.
Step 3 Add your message and send the e-mail.
Play Embedded VideosWhen you watch a Cisco Show and Share video that is embedded in a web site, only a few of the player controls are available to you: play/pause, the timeline, volume, and full screen.
3-16User Guide for Cisco Show and Share 5.2.x
OL-15765-04

Chapter 3 Play, Comment, Tag, and Share Videos Procedures
If you are viewing and embedded video that has restrictions, you will be prompted to log in to watch the video. Simply enter your Cisco Show and Share login information and click Log In to watch the video.
Embedded videos do not include synchronized slides. You cannot submit general comments or timeline comments for an embedded video.
See Troubleshooting, page 3-21, for information about issues you may encounter when playing videos embedded in web pages.
Jump to a Chapter
Procedure
Step 1 Click the Chapters tab.
Step 2 Click a chapter in the list to jump to that point in the video.
3-17User Guide for Cisco Show and Share 5.2.x
OL-15765-04

Chapter 3 Play, Comment, Tag, and Share Videos Procedures
Watch SlidesThe Slides tab automatically comes to the front if there are synchronized slides associated with the video.
Procedure
Step 1 Click the Slides tab.
The slides appear on the tab. They will change automatically as the video plays.
Step 2 To go through the presentation manually, use the scroll bar to see additional slides.
Step 3 Double-click a slide to jump to that point in the video.
Step 4 If the slides are difficult to read, hover your mouse over the slides and click the popout button ( ).
3-18User Guide for Cisco Show and Share 5.2.x
OL-15765-04

Chapter 3 Play, Comment, Tag, and Share Videos Procedures
Read a TranscriptTranscripts are text files that are uploaded by the video author. They are not synchronized with the video and you cannot use them to navigate through the video.
Procedure
Step 1 Click the Transcript tab.
Step 2 To search the transcript, enter a word or phrase in the Find field and click go. You can continue searching through the transcript by clicking the Next and Previous buttons.
Note Searching the transcript does not navigate you through the video.
Step 3 Click the Hide arrow at the end of the search bar to hide it. You can expand it again later if needed.
3-19User Guide for Cisco Show and Share 5.2.x
OL-15765-04

Chapter 3 Play, Comment, Tag, and Share Videos Procedures
Download Files
Procedure
Step 1 Click the Files tab.
Step 2 Click a file name to download the file.
Note You cannot right-click (Windows) or Ctrl-Click (Mac OS X) a file to download it.
3-20User Guide for Cisco Show and Share 5.2.x
OL-15765-04

Chapter 3 Play, Comment, Tag, and Share Videos Troubleshooting
TroubleshootingWhen I download an attached Microsoft Word, PowerPoint, or Excel file from the Files tab, the saved file has a .zip extension instead of a .docx, .xlsx, or .pptx extension.
This can occur when you download a .docx, .xlsx, or .pptx file from Cisco Show and Share using Microsoft Internet Explorer 8.
To fix the problem, simply change the .zip file extension to the correct file extension after downloading the file.
My embedded video appears as a black box on the web page.
This can have several causes.
1. First use the same web browser you used to access the web page with the embedded video to access Cisco Show and Share. If you receive a security warning, follow the steps for your browser to accept the security certificate. Then try to access the page with the embedded video again.
2. If you did not receive a security warning, this may be caused by opening the HTML page with the embedded video as a file rather than a web page (for example, double-clicking the HTML document in your file system). The HTML page must be served by an HTML server for the embedded video to show correctly.
You can determine whether or not you opened the HTML page as a file by looking at the address bar in your web browser. If you see a standard file path, such as c:\documents\example\index.htm, rather than a URL, such as http://example.com/example/index.htm, then you opened the HTML page as a file rather than a web page served by an HTML server.
When I click on an embedded video to play it, it disappears.When I click on and embedded video to play it, I receive the message “Windows media plugin not installed click here to install.”
This occurs on Mac OS. The video you are trying to play is in a Windows media format and playback is not supported on your OS.
The bottom of my video is cut off.
This may happen with some videos that are played back with the Quicktime plugin.
I cannot fast forward, rewind, or use the play head to skip ahead or go back.
There are several possible causes for this:
• The video is not hosted on a streaming server. When a video is not hosted on a streaming server, it is supplied to you by “progressive download”. In this case, the video starts playing while it is still downloading. You cannot fast forward past the point of where the download is reached.
• You are watching a .wmv video. The Windows media plugin for Firefox doe not allow you to use the fast forward, rewind, or play head to move around the video. If you are using the Internet Explorer browser, you can use the play head to move forward and backwards in the video.
I receive a security warning in my browser when I try to add a comment.
This can happen if the system administrator or the video publisher has prevented anonymous comments for the video and you are not yet logged into the system. This warning is not harmful. To continue, accept the certificate, log into the system, and then leave your comment.
3-21User Guide for Cisco Show and Share 5.2.x
OL-15765-04

Chapter 3 Play, Comment, Tag, and Share Videos Troubleshooting
3-22User Guide for Cisco Show and Share 5.2.x
OL-15765-04

OL-15765-04
C H A P T E R 4
Create, Add, and Manage VideosRevised: May 31, 2011
Topics in this section describe ways that you can contribute video and supplemental files to your Cisco Show and Share community.
• Prerequisites, page 4-1
• Procedures, page 4-1
• Reference, page 4-10
• Troubleshooting, page 4-14
PrerequisitesYou must sign-in to Cisco Show and Share and have Video Author privileges to record or upload video. To record video in Cisco Show and Share, you must have a video capture device built in or attached to your computer. To record audio, you must have a microphone built in or attached to your computer.
ProceduresAdding a video to Cisco Show and Share is accomplished in three easy steps:
1. Record or Upload a Video, page 4-2
2. Add Supplemental or Downloadable Files to a Video Package, page 4-8
3. Save or Publish Your Video, page 4-10
4-1User Guide for Cisco Show and Share 5.2.x

Chapter 4 Create, Add, and Manage Videos Procedures
Record or Upload a VideoYou can add video to Cisco Show and Share in one of two ways:
• Use a Webcam to Record Video from Your Computer, page 4-2
• Upload or Link to a Video File, page 4-5
Use a Webcam to Record Video from Your Computer
We support many built-in and external webcams and microphones so that you can record video easily.
Note When you use this method, Cisco show and Share encodes your video at a resolution of 320 x 240, with a 400 kbps bitrate.
Before You Begin
Exit from all open software except your browser. This makes memory and network bandwidth available for video capture and data transfer.
Procedure
Step 1 Open the Record a Video page:
• Navigate to the Home page and then choose Add Video > Record a Video.
• Navigate to the My Account page and then click Record Video.
If you are not logged-in to Cisco Show and Share, you will be prompted to log in. The Record a Video page appears.
Step 2 Click Allow in response to the Camera and Microphone Access prompt.
This prompt allows Cisco Show and Share to temporarily use your webcam and microphone. To protect your security and privacy, this permission expires when you leave this page or close your browser. Until you respond to this prompt, you cannot do anything else on the Record a Video page.
4-2User Guide for Cisco Show and Share 5.2.x
OL-15765-04

Chapter 4 Create, Add, and Manage Videos Procedures
Tip If you do not see the Camera and Microphone Access prompt, confirm that your computer hardware and software meet all requirements. See http://cisco.com/go/dms/releasenotes. If you are recording from Mac OS X, you may need to reset the zoom setting in your browser by pressing Command+0.
Step 3 Enter a title for your video in the Title field.
This title identifies the video that your webcam will record and any supplemental or downloadable files — such as slides or a text transcript — that you might later package together with it.
Step 4 (Optional) Enter a description for your video in the Description field.
The description you enter appears on the Info tab of your video on the Video Playback page. The Description field supports a small subset of HTML that you can use to format the text. See HTML Supported by the Description Field, page 4-11, for more information.
Step 5 (Optional) Enter tags for your video in the Tags field. You can enter more than one tag for your video. Separate multiple tags with a space.
Step 6 If you have more than one video or audio device attached to you computer, select the ones you want to use for this session from the Video Device and Audio Device drop-down lists in the Capture Settings drawer.
After a few seconds, your webcam should be activated and you should see yourself in the preview window. If you do not see yourself, try choosing a different device.
4-3User Guide for Cisco Show and Share 5.2.x
OL-15765-04

Chapter 4 Create, Add, and Manage Videos Procedures
Step 7 Click Start Capture. Pause for a few seconds, then begin to speak.
Note If your recording lasts for 90 minutes, you are given notice that the recording will automatically shut off. You can cancel the warning and continue recording for longer than the 90 minutes.
While recording, you can do the following:
• Click Pause to pause the recording.
• Click Continue to resume recording.
• Click Start Over to erase the current recording and start again.
If you make a mistake while recording, it might not be necessary to start over. If video editing is enabled for your implementation of Cisco Show and Share, You can use Cisco Show and Share’s editing tools to edit out the mistake. Simply pause for a second and then re-record the part where you made the mistake.
Step 8 Click Pause when you are ready to save your video.
Step 9 (Optional) Click Download a local copy of this video to save a copy of the video locally. The dialog boxes and download location depend upon the browser you are using.
Step 10 Now you can add additional content to the video or save and publish your video. See the following topics for more information:
• Add Supplemental or Downloadable Files to a Video Package, page 4-8
• Save or Publish Your Video, page 4-10
4-4User Guide for Cisco Show and Share 5.2.x
OL-15765-04

Chapter 4 Create, Add, and Manage Videos Procedures
Upload or Link to a Video File
You can upload and publish video files that use supported formats and filename extensions.
Tip You can also upload MP3 audio files.
Note If your installation includes transcoding services from a Cisco MXE, you can also upload the following additioan file types: 3g2, 3gp, avi, mov, mp4v, mpg, mxf, qt, and rm. You can determine that you have a Cisco MXE with your system if, when you upload a file, the status is processing-draft or processing-publish.
Limitations and Restrictions
The maximum file size you can upload is 2 GB.
Procedure
Step 1 Open the Upload Video page:
• Navigate to the Home page and then choose Add Video > Upload a Video.
• Navigate to the My Account page and then click Upload Video.
If you are not logged-in to Cisco Show and Share, you will be prompted to log in. The Record a Video page appears.
FormatFile Extensions Notes
Upload Source
Loca
l
HTT
P
MM
S
RTM
P
RTSP
Windows Media
.wmv
.wma
.asf
.asx
Decoded and played by the Windows Media plug-in.
Note In this release, Windows Media on the Macintosh platform is available only with a Windows emulator.
Y N Y N Y
Adobe Flash video
.flv Decoded and played by the Adobe Flash plug-in. Y Y N Y N
MPEG4 Part 10/H.264
.mp4
.m4vDecoded and played by the Adobe Flash plug-in. Y N N Y Y
4-5User Guide for Cisco Show and Share 5.2.x
OL-15765-04

Chapter 4 Create, Add, and Manage Videos Procedures
Step 2 Enter a title for your video in the Title field.
This title identifies the video and any supplemental or downloadable files — such as slides or a text transcript — that you might later package together with it.
Step 3 (Optional) Enter a description for your video in the Description field.
The description you enter appears on the Info tab of your video on the Video Playback page. The Description field supports a small subset of HTML that you can use to format the text. See HTML Supported by the Description Field, page 4-11, for more information.
Step 4 (Optional) Enter tags for your video in the Tags field. You can enter more than one tag for your video. Separate multiple tags with a space.
Step 5 To upload a video from your computer, do the following:
a. Expand the Add Video drawer.
b. Click Browse.
c. Browse to the local video file and click Open.
Step 6 To link to a video hosted on another server, do the following:
a. Expand the Add Video drawer.
b. Click link your video by adding a video URL.
The fields for linking to a URL appear.
c. Enter a video URL in the URL field.
This URL must be to an actual video file, not to a web page that contains a video. For example, you cannot point to a YouTube page and have the video appear in Cisco Show and Share.
d. (Optional) Add a duration for the video in the Duration field.
This allows Cisco Show and Share to accurately display the length of the video and progress through the video.
e. Click Save URL.
4-6User Guide for Cisco Show and Share 5.2.x
OL-15765-04

Chapter 4 Create, Add, and Manage Videos Procedures
Step 7 (Optional) Check the This video contains closed captioning to preserve embedded closed captioning.
This option is only available for Windows media files. And it only appears if the system uses MXE to transcode video and if the system administrator has allowed bypassing the conversion of Windows media files.
If you selected a Windows media file, and it contains closed captioning or built-in slide synchronization (added outside of Cisco Show and Share), selecting this checkbox preserves your closed captioning or slide synchronization points.
If you do not check the checkbox, and your system automatically transcodes videos on upload, the video is converted to a Flash video format and any embedded closed captioning is lost.
Step 8 Now you can add additional content to the video or save and publish your video. See the following topics for more information:
• Add Supplemental or Downloadable Files to a Video Package, page 4-8
• Save or Publish Your Video, page 4-10
4-7User Guide for Cisco Show and Share 5.2.x
OL-15765-04

Chapter 4 Create, Add, and Manage Videos Procedures
Add Supplemental or Downloadable Files to a Video Package • Add Slides to a Video, page 4-8
• Add a Text Transcript to a Video, page 4-9
• Add Downloadable Files to a Video, page 4-9
Add Slides to a Video
To add slides to your video package, export your slide deck from your slide software as a series of sequentially numbered JPEG images. Then, collect these images together in a compressed ZIP archive.
Tip For best results, export your slides using the following dimensions:— If your viewers mostly use the default slide window: 360x270 pixels— If your viewers mostly use the resizable “tearoff” slide window: 800 x600 pixels.
Procedure
Step 1 Expand the Add Optional Files drawer.
Step 2 Under Slides, click Browse.
Step 3 Browse to the individual .jpg files or to the .zip file that contains your slides. If you are uploading individual .jpg files, you can select multiple files in the dialog box.
Step 4 Click Open.
Step 5 (Optional) Click Sort all slides by file name to cause them to be sorted in alphanumeric order in the slide chooser window.
Tip Later, you can use the video editor to synchronize the playback timing of your slides and video. See Synchronize Slides to Your Video, page 5-8. This is available for Flash videos only.
4-8User Guide for Cisco Show and Share 5.2.x
OL-15765-04

Chapter 4 Create, Add, and Manage Videos Procedures
Add a Text Transcript to a Video
Transcripts are simple text files that contain the text of your video. You need to create them manually. Cisco Show and Share does not create them for you.
If you are saving your transcript as text from a word processing application, choose UTF-8 as the output encoding. If you do not, certain formatting, such as curly quotation marks and apostrophes, may not appear correctly in the transcript tab. Also, Do not add extra returns between paragraphs in your text file. It will result in large gaps between the paragraphs on the Transcripts tab.
Procedure
Step 1 Expand the Add Optional Files drawer.
Step 2 Under Text Transcript, click Browse.
Step 3 Select your text transcript file and click Open.
Add Downloadable Files to a Video
You can upload any number of additional files to your video, such as a presentation, a PDF file, or downloadable media files, to your video. Additionally, you can add links to files that are hosted on another server, such as a web server.
Note Some browsers will automatically play attached media files when they are clicked on. When uploading an audio or video file for viewers to download, create a .zip archive of the video first, and then upload the .zip file.
Limitations and Restrictions
Remote files that you link to must be available through HTTP or HTTPS.
Procedure
Step 1 Expand the Add Optional Files drawer.
Step 2 To upload a file from your computer:
a. Under Downloadable Files, click Browse.
b. Navigate to the file you want to upload.
c. Click Open.
Step 3 To add a link to a file hosted on another server:
a. Under Downloadable Files, click add URLs to externally hosted files.
b. Enter the URL of the file.
c. Click Save URL.
Step 4 Repeat the above steps for each file you want to attach or link to.
4-9User Guide for Cisco Show and Share 5.2.x
OL-15765-04

Chapter 4 Create, Add, and Manage Videos Reference
Save or Publish Your VideoOnce you have recorded or specified the video to upload, added your video information, and attached any supporting files, it is time to save or publish your video.
• If you are going to edit your video, or make some changes later, click Save as Draft.
• If you want to publish your video, either immediately or at some point in the future, click Go to Publish Page.
Note If the approval workflow is enabled for Cisco Show and Share, the Go to Publish Page button is replaced by a Submit for Review button.
• To leave without saving or publishing your video, click Cancel. The video will not be saved to Cisco Show and Share.
Reference • About Video Status, page 4-10
• HTML Supported by the Description Field, page 4-11
• FAQ, page 4-13
About Video StatusWhen you upload a video, you are returned to the My Account page. Typically, your videos will be in the Draft or Published state. If your server is configured to have a Cisco Media Experience Engine convert uploaded videos to a common format, you will see two additional states: Processing - Draft and Processing - Publish. Table 4-1 describes each video status.
Table 4-1 Video Status Descriptions
Status Description
Processing - Draft An uploaded video has been submitted to a Cisco Media Experience Engine for processing. It will be saved as a draft when processing is complete.
Draft The video is saved as a draft. Only you can view the video.
Processing - Publish An uploaded video has been submitted to a Cisco Media Experience Engine for processing. It will be published when processing is complete.
Published The video is published. Anyone with permission can view the video.
Failed An uploaded video has been submitted to a Cisco Media Experience Engine for processing but could not be processed. Click the information icon for more information about the failure.
Approved A video was submitted for publication but needed approval. It was approved.
4-10User Guide for Cisco Show and Share 5.2.x
OL-15765-04

Chapter 4 Create, Add, and Manage Videos Reference
HTML Supported by the Description FieldThe following HTML is supported in the Description field of videos:
HTML Element Usage
<a></a> Creates a hypertext link.
Supported Attributes
• href (required)—Specifies the URL for the link. The URL must include http://.
• target (optional)—Specifies the name of the target window to open the link in. Use _blank to open the link in a new window or tab.
The links created are not underlined or colored. You must use the <u> and <font> elements to manually underline and color your links.
Usage Example<a href="https://video.example.com/vportal/VideoPlayer.jsp?ccsid=C-6cafd231-ff6e-4ca0-b08f-f6306a6c0790:1#" target="_blank">See a sample video</a>
<u></u> Underlines text.
Example UsageYou should <u>underline</u> links to make them stand out.
<i></i> Makes text italic.
Example UsageSee the <i>Cisco Show and Share User Guide</i> for more information.
<b></b> Makes text bold.
Example UsageClick <b>Prepare to Publish</b> to continue.
<p></p> Inserts a paragraph. The line break for the paragraph does not happen before the opening <p> tag; the line break is inserted after the closing </p> tag.
Supported Attributes
align (optional)—Specify the alignment of the paragraph. Valid values are left, right, center, and justify. By default, paragraphs are left justified.
Example Usage<p>This is a paragraph</p><p>This is another</p>
<br> Inserts a line break. Note that you do not use a closing tag.
Example UsageThe next sentence is on a new line.<br>The next sentence.
4-11User Guide for Cisco Show and Share 5.2.x
OL-15765-04

Chapter 4 Create, Add, and Manage Videos Reference
<li></li> Creates a bulleted list.
Do not put each <li></li> on its own line; put them all on one line. If put each <li></li> on its own line, you will end up with large gaps between the bulleted items.
Do not wrap the <li></li> entries with <ul></ul> tags.
Example Usage
<li>Item 1</li><li>Item 2</li><li>Item 3</li>
Result
• Item 1
• Item 2
• Item 3
<img src="image_url" align="left_or_right" />
Inserts an image in the Description field. The image must be hosted on a web server.
Supported Attributes
• src (required)—The URL of the image to be displayed. Must be a URL that begins with http://.
• align (optional)—The horizontal alignment of the image. Valid values are left and right. The default value is left.
• height (optional)—The height of the image, in pixels.
• hspace (optional)—The amount of horizontal space that surrounds the image where no text appears. The default value is 8.
• id (optional)—The identifier for the image. Not really useful in Cisco Show and Share.
• vspace (optional)—The amount of vertical space that surrounds the image where no text appears. The default value is 8.
• width (optional)—Specifies the width of the image, in pixels.
Example<img src="http://example.com/published/images/ShowAndShare.png" />
HTML Element Usage
4-12User Guide for Cisco Show and Share 5.2.x
OL-15765-04

Chapter 4 Create, Add, and Manage Videos Reference
FAQ
Q. Is there a limit to the duration of an uploaded video?
A. No, the limitation is in the amount of storage space your video server has. However, there is a file size limitation of 2 Gb.
Q. Is there a limit to the duration of a video recorded in Cisco Show and Share.
A. No, the limitation is in the amount of storage space your video server has.
Q. Can I change the resolution of recorded video if I use an HD webcam?
A. No, the resolution for video recorded from a webcam is fixed at 320x240.
<font> Change the font. You can use the color, face, and size attributes.
Supported Attributes
You can use one or more of the following attributes:
• color—Specify the text color. You must use hexadecimal (#FFFFFF) values. Color names are not supported. There is a list of hexadecimal color codes here: http://www.webmonkey.com/2010/02/color_charts/
• face—Specify the font face. You can specify a comma-separated list of font names--the first available font will be used. If a specified font face is not available, a substitute font is used.
• size—Specify the size, in points, of the font. You can also use relative sizes, such as +4 or -3.
Example Usage<font size="+2" color=" #0000FF">This Is A Large, Blue Heading</font>
< textformat> </textformat>
Lets you use a subset of paragraph formatting properties.
Supported Attributes
• blockindent—Specifies, in points, the indentation from the left margin to the text in the <textformat></textformat> tags. All lines are indented.
• indent—Specifies, in points, the indentation from the left margin to the first character in the <textformat></textformat> tags. Only the first line is indented.
• leading—Specifies, in points, the amount of vertical space between lines.
• leftmargin—Specifies, in points, the left margin of the paragraph.
• rightmargin—Specifies, in points, the right margin of the paragraph.
HTML Element Usage
4-13User Guide for Cisco Show and Share 5.2.x
OL-15765-04

Chapter 4 Create, Add, and Manage Videos Troubleshooting
TroubleshootingI cannot click Allow in the Adobe Flash Player Settings dialog box when I try to record a video.
If the dialog box does not appear, confirm that your computer hardware and software meet all requirements. See http://cisco.com/go/dms/releasenotes. If you are recording from Mac OS X, you may need to reset the zoom setting in your browser by pressing Command+0.
If that does not work, or if the dialog box appears but you cannot click Allow, do the following:
1. Navigate to a different page (such as the Home page).
2. Right click the page background and choose Settings from the context menu.
The Adobe Flash Player Settings dialog box appears.
3. Select the Allow radio button.
4. Check the Remember checkbox.
5. Click Close.
6. Return to the Record a Video page.
Why do boxes appear in my text transcript or video description?
This is caused by having special characters, such as curly quotes and apostrophes, in the source. This typically occurs in transcripts pasted into text files from a word processing application.
To fix this, open your transcript in a text editor and replace the characters that appear as boxes with their keyboard equivalent.
Why are my slides not synching to the video.
For slide sync to work, your video must be served from a Flash streaming server. Contact your system administrator.
4-14User Guide for Cisco Show and Share 5.2.x
OL-15765-04

OL-15765-04
C H A P T E R 5
Edit VideoRevised: May 31, 2011
Cisco Show and Share includes a built-in video editor to help you add polish to your recorded and uploaded videos. With the video editor, you can:
• Trim out unwanted parts of the video.
• Divide your video into chapters.
• Reorder the playback of the chapters.
• Insert animated transitions between chapters.
• Synchronize a slide show with your video
• Choose a new thumbnail for your video.
Visit the following topics to learn more about the capabilities of and how to use the Cisco Show and Share video editor:
• About Video Editing, page 5-1
• Limitations and Restrictions, page 5-2
• Procedures, page 5-3
• Troubleshooting, page 5-11
About Video EditingThe Cisco Show and Share built-in video editor is nonlinear and nondestructive.
This type of editing does not actually change the original material in any way. Instead, it adds markers and pointers to information that accompanies video frames during playback.
5-1User Guide for Cisco Show and Share 5.2.x

Chapter 5 Edit Video Limitations and Restrictions
Limitations and Restrictions • The Cisco Show and Share editor does not support the editing of Windows media (WMV, WMA,
ASF, ASX) files. You need to edit those files outside of Cisco Show and Share using editing software that supports those formats. Table 5-1 lists the files types and extensions that are editable in the Cisco Show and Share Editor.
• You cannot edit Flash or MPEG4 videos that are reference by URL rather than uploaded.
• For your edits and slide synchronization to appear, the video files must be served from a Flash streaming server.
Table 5-1 Video Format Editing Support
FormatFile Extensions Notes
Windows Media
.wmv
.wma
.asf
.asx
Not editable within Cisco Show and Share.
Adobe Flash video
.flv Editable within Cisco Show and Share.
MPEG4 Part 10/H.264
.mp4
.m4vEditable within Cisco Show and Share.
5-2User Guide for Cisco Show and Share 5.2.x
OL-15765-04

Chapter 5 Edit Video Procedures
Procedures1. Open a Video to Edit, page 5-3
2. Edit Your Video, page 5-4
3. Save Your Edited Video, page 5-10
Open a Video to Edit
Procedure
Step 1 Choose Cisco Show and Share > My Account > My Videos.
Step 2 Click Edit Video in the row that describes your encoded video.
Note To edit a published video, you must first click Manage Video and then Save As Draft. This will create a draft version of the video in addition to the published version. The original published version will remain available to viewers until you publish the new draft.
Cisco Show and Share opens its video editor and loads your video.
5-3User Guide for Cisco Show and Share 5.2.x
OL-15765-04
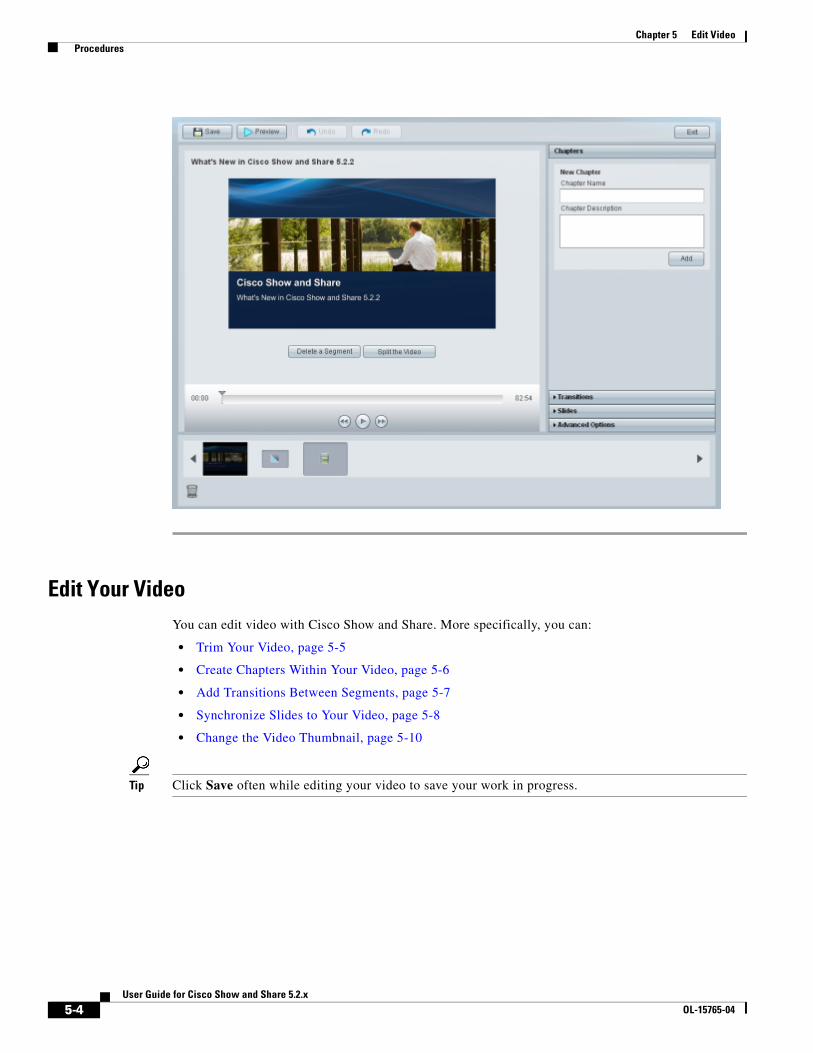
Chapter 5 Edit Video Procedures
Edit Your VideoYou can edit video with Cisco Show and Share. More specifically, you can:
• Trim Your Video, page 5-5
• Create Chapters Within Your Video, page 5-6
• Add Transitions Between Segments, page 5-7
• Synchronize Slides to Your Video, page 5-8
• Change the Video Thumbnail, page 5-10
Tip Click Save often while editing your video to save your work in progress.
5-4User Guide for Cisco Show and Share 5.2.x
OL-15765-04

Chapter 5 Edit Video Procedures
Trim Your Video
Procedure
Step 1 Click Play ( ) to start watching your video.
Step 2 Click Pause ( ) when your video reaches the start of the segment you want to delete.
Step 3 Click Delete a Segment ( ).
New elements appear on and around the timeline.
Step 4 To mark and delete a segment, do the following.
a. Drag the markers ( ) left or right along the timeline to mark the area to delete.
b. Preview what you have marked ( ).
c. Delete what you have marked ( ) or cancel the deletion ( ). Do not move the play head yet, you might want to add a transition effect to this spot to tie together the two parts of the video.
Step 5 (Optional) To add a transition effect:
a. Click Split the Video to split the video at the point where you trimmed it.
The two segments of the video appear in the segment browser below the video.
b. Click the transition placeholder between the two segments.
c. Open the Transitions drawer and click Add for the transition you want to add. See Add Transitions Between Segments, page 5-7, for more information about transitions.
Step 6 Click Save.
5-5User Guide for Cisco Show and Share 5.2.x
OL-15765-04

Chapter 5 Edit Video Procedures
Create Chapters Within Your Video
Procedure
Step 1 Click the Add Chapters drawer on the right to open it if it is closed.
Step 2 Click Play ( ) to start watching your video.
Step 3 Click Pause ( ) when your video reaches a point where you want to add a chapter.
Tip You can also drag the play head to the desired point on the timeline.
Step 4 Use the Chapter Name field to enter a title for the chapter.
Step 5 (Optional) Use the Chapter Description field to enter more detailed information for the chapter.
Step 6 Click Add.
Cisco Show and Share adds a chapter marker ( ) to the timeline, where you paused the playback head ( ).
Note The chapter marker may appear at the previous or next whole second rather than the location of the play head where the video was paused (for example, the marker may appear at 4 seconds rather than 3 seconds). This happens if when you pause the video between the second marks. The marker is placed at the next whole second if the video is paused at x.5 seconds or greater, and at the displayed whole second if it is paused at under x.5 seconds.
You can do the following with the chapter marker:
• You can hover your mouse pointer over the chapter marker to see information about the chapter.
• You can click the delete icon ( ) the chapter summary to remove the chapter.
• You can drag the chapter marker to move it to a new place on the timeline.
Step 7 Click Save.
5-6User Guide for Cisco Show and Share 5.2.x
OL-15765-04

Chapter 5 Edit Video Procedures
Add Transitions Between Segments
Procedure
Step 1 If your video does not have separate segments, move the play head to the place in your video where you want to add a transition and click Split the Video.
The two segments appear in the segment browser below the video. A transition placeholder appears between them.
Step 2 Click a transition placeholder in the segment browser to choose it.
Step 3 Open the Add Transitions drawer if it is closed.
Step 4 Mouseover any transition in the drawer to see its effect animated.
These are the transition effects.
Step 5 Click the Add button above a transition effect to use it.
Tip If you choose the wrong transition effect by mistake, you can drag it from the segment browser to the trash can. Then, simply choose another effect.
Step 6 Click Save.
Wipe right. Wipe left. Wipe up. Wipe down.
Spin out, then in, then out.
Spin out. Diagonal wipe left.
Diagonal wipe right.
Dilate. Fade. Sweep.
5-7User Guide for Cisco Show and Share 5.2.x
OL-15765-04

Chapter 5 Edit Video Procedures
Synchronize Slides to Your Video
Before You Begin
In Cisco Show and Share 5.2.2 and earlier, you must have previously uploaded slides to your video. See Add Supplemental or Downloadable Files to a Video Package, page 4-8, for information about uploading slides to your video.
In Cisco Show and Share 5.2.3 and later, you can upload slides from the edit page.
Procedure
1. If you did not upload slides when you initially uploaded or recorded the video, see Upload Slides, page 5-8.
2. After you have uploaded your slides, synchronize them to the video. See Synchronize Slides, page 5-9
Upload Slides
To add slides to your video package, export your slide deck as a series of sequentially numbered JPEG images. Then, collect these images together in a compressed ZIP archive.
Tip For best results, export your slides using the following dimensions:— If your viewers mostly use the default slide window: 360x270 pixels— If your viewers mostly use the resizable “tearoff” slide window: 800 x600 pixels.
Procedure
Step 1 Open the Slides drawer.
Step 2 Click Add Slides.
Step 3 Browse to the individual .jpg files or to the .zip file that contains your slides. If you are uploading individual .jpg files, you can select multiple files in the dialog box.
Step 4 Click Open.
The slides appear in the slide drawer.
5-8User Guide for Cisco Show and Share 5.2.x
OL-15765-04

Chapter 5 Edit Video Procedures
Synchronize Slides
Procedure
Step 1 Open the Add Slides drawer if it is closed.
Step 2 You can use the zoom slider at the top of the drawer to resize your slides for better legibility.
Step 3 Move the playhead on your video to where you want to add the slide, and then click Add on the slide you want to synchronize to that location.
Tip You can play your video and hover your mouse over the next slide you want to add. Click Add when the playhead gets to the place where you want the slide to appear. This way you can quickly add slides without pausing the playback.
Step 4 Repeat for each slide in the slide deck.
Step 5 Click Save.
5-9User Guide for Cisco Show and Share 5.2.x
OL-15765-04

Chapter 5 Edit Video Procedures
Change the Video Thumbnail
By default, Cisco Show and Share assigns a thumbnail according to the following rules:
If you have a video that is longer than 8 seconds, but the title shot only lasts for 5 seconds, the automatically generated thumbnail may not contain your video title. Or, if you recorded a message, the system may have captured an unflattering facial expression for the thumbnail. Use this procedure to correct the situation.
Procedure
Step 1 Open the Advanced Options drawer if it is closed.
Step 2 Move the playback head to the frame you want to use as the thumbnail.
Step 3 Click Save Thumbnail.
Step 4 Click Save.
Save Your Edited Video
Step 1 Click Save.
Step 2 Click Exit.
You return to the My Account page.
If your video is ... It uses this frame for the thumbnail...
less than 3 seconds long 0 seconds
Between 3 and 8 seconds long 4 seconds
8 seconds or longer 8 seconds
5-10User Guide for Cisco Show and Share 5.2.x
OL-15765-04

Chapter 5 Edit Video Troubleshooting
TroubleshootingQ. My edits do not appear when I play the video back after publishing. Why weren’t they saved?
A. Cisco Show and Share uses nondestructive editing. This means that instead of changing the actual video, Cisco Show and Share inserts markers and pointers to indicate the changes. This type of editing requires the video to be served from a Flash streaming server. If the videos are stored on the Cisco Show and Share server itself, they will be served from a Flash streaming server.
However, quite often the video source is actually stored and served from an external server dedicated to storing large quantities of video files. If the video is being served from another type of server, for example a simple web server, then the edits that you make will not appear during playback. If you experience this problem, contact your system administrator for more information about the type of server being used for the videos.
5-11User Guide for Cisco Show and Share 5.2.x
OL-15765-04

Chapter 5 Edit Video Troubleshooting
5-12User Guide for Cisco Show and Share 5.2.x
OL-15765-04

OL-15765-04
C H A P T E R 7
Publish Your VideoRevised: May 31, 2011
After you have uploaded or recorded a video and made any edits, the final task you have is to publish it. Before you publish your video, you can:
• Update the title, description, and tags.
• Assign it to categories.
• Choose who can see it.
• Disable page options (comments, ratings, tags, and sharing) individually.
• Link to related videos.
• Schedule exactly when it should become visible to other users.
• Schedule exactly when it should be archived (hidden from other users).
ProcedureFollow these steps to publish your video. Only the fist and last steps are mandatory; the other steps are optional items you can perform before publishing your video.
1. Access the Publish Your Video Page, page 7-2
2. (Optional) Edit the Video Summary, page 7-4
3. (Optional) Restrict Viewer Access to the Video, page 7-4
4. (Optional) Add the Video to a Category, page 7-7
5. (Optional) Set the Video Interaction Options, page 7-8
6. (Optional) Add Related Videos, page 7-9
7. (Optional) Schedule Publication, page 7-10
8. Publish the Video, page 7-11
7-1User Guide for Cisco Show and Share 5.2.x

Chapter 7 Publish Your Video Procedure
Access the Publish Your Video PageYou can access the Publish Your Video page from several places within Cisco Show and Share:
The Publish Your Video page appears.
Draft Videos Go to: My Account > Videos > Uploaded. Click Publish.
Upload a Videos Page Click Go to Publish Page.
Record a Video Page Click Go to Publish Page.
Draft Live Event Go to: My Account > Videos > Live Events. Click Publish.
Video Approver Go to: My Account > Action Items and Requests. Click Publish.
1 Video Summary. See Edit the Video Summary, page 7-4, to change this information.
2 Page Permissions. See Add the Video to a Category, page 7-7, Restrict Viewer Access to the Video, page 7-4, and Set the Video Interaction Options, page 7-8, to change this information.
7-2User Guide for Cisco Show and Share 5.2.x
OL-15765-04

Chapter 7 Publish Your Video Procedure
1 Add Related. See Add Related Videos, page 7-9, to add related videos.
2 Scheduling. See Schedule Publication, page 7-10, to schedule when your video should be available to viewers.
7-3User Guide for Cisco Show and Share 5.2.x
OL-15765-04

Chapter 7 Publish Your Video Procedure
Edit the Video SummaryThis is an optional step in publishing your video.
Procedure
Step 1 Expand the Video Summary drawer.
Step 2 Click Edit.
The Title, Description, and Tags fields become editable.
Step 3 Enter the new information in the fields. When entering more than one tag, separate the tags with a space.
Restrict Viewer Access to the VideoThis is an optional step in publishing your video. When you restrict access to a video, it will no longer appear on the Home page. Instead, it will appear in the Private tab of the My Account > Videos page for users that you give access to the video.
You do not need to add yourself to the viewing privileges of videos that you upload. You are automatically given privileges to those videos and the videos will appear on the Private tab on your My Account page.
Procedure
Step 1 Expand the Page Permissions, Categories and Options drawer.
Step 2 Choose Allow only specific users to view this video.
The Group table appears.
Step 3 Click Select Group.
The Group Selector dialog appears.
7-4User Guide for Cisco Show and Share 5.2.x
OL-15765-04

Chapter 7 Publish Your Video Procedure
Step 4 To use one or more groups that you have created, do the following:
a. Select the check box next to the group name. You can select more than one group.
b. Click OK.
Step 5 To pick an existing public group, do the following. Public groups are groups that you or others have created and have given permission for others to use and edit.
a. Click the Public Groups tab.
a. Select the check box next to the group name. You can select more than one group.
b. Click OK.
Step 6 To create a new group, do the following:
a. Click Create New Group.
The Create New Group dialog appears.
7-5User Guide for Cisco Show and Share 5.2.x
OL-15765-04

Chapter 7 Publish Your Video Procedure
b. Type a name for your new group in the Name field. This field is required.
c. Type a description for your new group in the Description field. This field is required.
d. Select Allow others to edit this group if you want to make the group public.
Selecting this option allows other people to add and remove users from this group. They will also be able to delete the group.
If you make the group public, it will not appear on the My Groups tab. Instead, it will appear on the Public Groups tab.
e. Click Add New Users. You must add at least one user to the group to save the group.
The Select Group Users dialog appears.
f. You can page through the list of users or use the search function to find the users to add. Select the check box next to their name to include the user in the group.
g. Click Save to close the Select Group Users dialog box.
h. Click Save Group to close the Create New Group dialog box.
a. Select the check box next to the group name. You can select more than one group.
b. Click OK.
Step 7 To remove a group from the Group table, click the trash can icon next to the group. To disable viewing restrictions (and make the video public), select Allow all users to view this video.
7-6User Guide for Cisco Show and Share 5.2.x
OL-15765-04

Chapter 7 Publish Your Video Procedure
Add the Video to a Category
Procedure
Step 1 Expand the Page Permissions, Categories and Options drawer.
Step 2 Click Categorize my video.
Step 3 Click Select Category.
The category picker appears.
Step 4 Click Expand All to list the available categories or click the triangle icon to the left of a category to expand only that category.
Step 5 Check the check box for each category that you want to use. Uncheck any check boxes, as needed, for categories that you prefer not to use.
Step 6 Click OK to confirm your choices and close the Category Picker.
7-7User Guide for Cisco Show and Share 5.2.x
OL-15765-04

Chapter 7 Publish Your Video Procedure
Set the Video Interaction OptionsYou can disable specific interaction features, such as the ability to comment on a video, on a video-by-video basis if those features have been enabled globally.
You cannot enable a feature for a video if the system administrator has disabled it globally.
Procedure
Step 1 Expand the Page Permissions, Categories and Options drawer.
Step 2 Disable specific features for this video:
To Disable... Select
Comments (general and timeline) Do not allow comments
Anonymous comments Do not allow anonymous users to comment on this video
Selecting this option forces users to log in if they want to leave a comment.
Ratings Do not allow this video to be rated
When sorted by rating, videos with ratings disabled appear higher in the video list than videos with no ratings (a rating of 0).
Tags Do not allow tagging
Viewers will be unable to add additional tags. You can still add tags in the video properties.
Video sharing Do not display embedded video code
This will prevent viewers from being able to embed the video in a web page. They will still be able to share the video through e-mail or by posting a link to the video.
7-8User Guide for Cisco Show and Share 5.2.x
OL-15765-04

Chapter 7 Publish Your Video Procedure
Add Related Videos
Procedure
Step 1 Expand the Add Related drawer.
Step 2 To have Cisco Show and Share automatically choose related videos, choose the Select Automatically option. Related videos are chosen based on the tags and categories they have in common with the video you are publishing.
Step 3 To choose the related videos manually:
a. Select Let me choose.
b. Click Add.
The video Browser appears.
c. Browse through the list using the page controls at the bottom of the Video Browser or search for videos using the Search box. Search looks for the term in video titles, descriptions, tags, and author attributes.
d. Select the check box to the left of the videos you want to include in the Related Videos list.
e. Click OK.
7-9User Guide for Cisco Show and Share 5.2.x
OL-15765-04

Chapter 7 Publish Your Video Procedure
Schedule PublicationBy default, videos are published immediately after you click Publish. You can schedule videos to publish at a later date and time. You can also specify a date and time when the video should no longer be available to viewers (however, it will still appear on your Uploaded video tab on the My Account page).
Procedure
Step 1 Expand the Scheduling drawer.
Step 2 To schedule a date and time for the video to appear:
a. Choose At a scheduled time.
b. Click in the date box and select a date from the calendar that appears.
c. Use the drop-down lists to schedule a specific time.
Step 3 (Optional) To schedule a date and time when viewers should no longer be able to access the video:
a. Check the Archive this video check box.
b. Click in the date box and select a date from the calendar that appears.
c. Use the drop-down lists to schedule a specific time.
7-10User Guide for Cisco Show and Share 5.2.x
OL-15765-04
Chapter 7 Publish Your Video Procedure
Publish the VideoAfter setting any optional video attributes, publish your video.
Procedure
Step 1 (Optional) Click Save and Preview to save your video as a draft and go to the video preview page.
Step 2 Click Publish.
7-11User Guide for Cisco Show and Share 5.2.x
OL-15765-04

Chapter 7 Publish Your Video Procedure
7-12User Guide for Cisco Show and Share 5.2.x
OL-15765-04

OL-15765-04
C H A P T E R8
Live EventsRevised: May 31, 2011
You must be logged in as a live event manager to create or run live events in Cisco Show and Share.
• Concepts, page 8-1
• Procedures, page 8-5
• Reference, page 8-22
• Troubleshooting, page 8-26
Concepts • What is a “Live-Event?” page 8-2
• What are “Encoders”? page 8-3
• What are “Pull” and “Push” Configurations? page 8-3
• What are “Encoding Formats” (Presets)? page 8-4
• Understand the Question-and-Answer Workflow, page 8-4
8-1User Guide for Cisco Show and Share 5.2.x

Chapter 8 Live Events Concepts
What is a “Live-Event?” Some videos in Cisco Show and Share portray events while they occur, in real time. We call this video type a live event.
Other videos show events that occurred in the past. We call this video type on demand.
Note When you output a VoD from a live event stream that includes synchronized slides, you can publish the VoD file after the event is finished. The slides remain synchronized.However, if you have MXE transcoding with Cisco Show and Share or if you edit the file in other video editing software, you will lose the slide synchronization instructions from your live event. This loss occurs because the synchronization data is part of the encoded video. Therefore, this data is lost whenever you re-render or re-encode the video.
Related Topics
• Create the Draft of a Live Event, page 8-6
• Preview the Draft of a Live Event, page 8-10
• Edit the Draft of a Live Event, page 8-11
• Publish a Listing for Your Live Event, page 8-13
• Start and Administer (Moderate) Your Live Event, page 8-16
• Delete Your Live Event, page 8-21
On Demand Authorized audience members can start to watch a Cisco Show and Share video on demand (VoD) file from the moment that it is published until the moment that it is deleted, archived, or hidden. Its availability might span any number of dates and hours, depending on its freshness and continued relevance.
Any Cisco Show and Share audience member can start to watch a VoD from its beginning, no matter when they start to play it. Likewise, any audience member can rewind, skip ahead, or jump to different parts of a VoD at any time.
You can archive or delete your own VoDs at any time. Afterward, they are no longer available.
Live Event Authorized audience members can start to watch a Cisco Show and Share live event stream at a fixed date and time that is reserved in advance.
After the live event is started, audience members who connect late will see the event in progress. They cannot see what came before. During a live event, audience members all see the same thing at the same time. They cannot:
• Watch the stream before the event starts.
• Go backward (rewind).
• Skip ahead (fast-forward).
• Pause.
Later, after the live event is stopped, it is no longer available to anyone. However, if you save the live event stream to an encoded video file, you can then publish that file as a VoD (Window media files only).
8-2User Guide for Cisco Show and Share 5.2.x
OL-15765-04

Chapter 8 Live Events Concepts
What are “Encoders”?In relation to Cisco Show and Share, encoders are devices that convert video and audio to the special formats that computers use. Encoders:
1. Take in the live signals or recorded data that represent video and audio.
2. Convert and compress this information in particular ways.
3. Generate computer-playable media in the form of streams, files, or both.
Eventually, this information becomes available to its potential audience. However, the exact infrastructure, methods, and intermediate steps that make this possible all vary from one network to the next.
Cisco Show and Share is compatible with many encoders from many manufacturers. However, its features help you to manage and operate Cisco Digital Media Encoders (DMEs), specifically.
Related Topics
• What is a “Live-Event?” page 8-2
• What are “Pull” and “Push” Configurations? page 8-3
• What are “Encoding Formats” (Presets)? page 8-4
• Create the Draft of a Live Event, page 8-6
What are “Pull” and “Push” Configurations?At a high level, Cisco Digital Media Encoders (DMEs) support two basic modes of operation, called pull and push. We will ask you to choose one of these whenever you use advanced encoder settings for a live event.
• In pull configurations, the streaming server pulls streams from the encoder. The encoder is passive.
• In push configurations, the encoder pushes streams to the streaming server. The encoder initiates.
Related Topics
• What is a “Live-Event?” page 8-2
Video/Audio Streams Streams are transmitted.
• A multicast stream reaches many computers simultaneously, one time. This method works well for live events, when information confidentiality or protection is of moderate importance.
• A unicast stream reaches one computer at a time, any time. This method works well for video-on-demand, when information confidentiality or protection is of slight importance.
Audiences that receive a stream cannot save or edit it, ordinarily. But they can play it — at their discretion — if their computers are equipped to play it.
Video/Audio Files Files are downloaded manually or cached automatically. This delivery method is ideal for on-demand.
Files reach one computer at a time, any time. This method works well for video-on-demand when information confidentiality or protection is not important.
Audiences that download or cache a file can save it. And they can play or edit it — at their discretion — if their computers are equipped to play or edit it.
8-3User Guide for Cisco Show and Share 5.2.x
OL-15765-04

Chapter 8 Live Events Concepts
• What are “Encoders”? page 8-3
• Create the Draft of a Live Event, page 8-6
What are “Encoding Formats” (Presets)?We will ask you to choose an encoding format whenever you use advanced encoder settings for a live event.
Encoding formats are named collections of settings — presets — for encoders that you use with Cisco Show and Share. We include many of these presets in our factory-defined default settings for Cisco Show and Share. However, the administrators for your Cisco Show and Share community are authorized to create, change, rename, and delete encoding formats at any time.
Each named encoding format specifies:
• A media output type, such as WMV.
• Dimensions, such as 640x480, that are suitable for a particular type of playback device.
• A bandwidth consumption rate that is optimized for the expected network capacity.
• The overall quality (bitrate, frame rate, and more).
Related Topics
• What is a “Live-Event?” page 8-2
• What are “Encoders”? page 8-3
Understand the Question-and-Answer WorkflowLive events in Cisco Show and Share can include options for remote participants to submit written comments and questions. When you use this feature, the workflow can involve several members of your Cisco Show and Share community. This topic describes all phases during the expected sequence of events.
1. Leaders for your Cisco Show and Share community buy and install a feature license.
2. Leaders for your Cisco Show and Share community choose whether to allow audience questions during live events generally.
Note If your community does not allow audience questions generally, this workflow stops here. No one can use this feature while it is turned Off sitewide.
3. You choose if your particular live event should support audience questions and comments.
4. A live event moderator — possibly you — chooses when to start accepting audience questions.
5. Audience members write and send their messages in real time, from the same Cisco Show and Share page where they watch your live event.
8-4User Guide for Cisco Show and Share 5.2.x
OL-15765-04

Chapter 8 Live Events Procedures
6. The live event moderator pre-screens these incoming questions and comments as they arrive. Moderators can:
• Move any high-priority questions to the Presenter’s View tab.
• Move any low-priority questions to the Removed Questions tab, either manually or automatically by keyword.
• Use keyword filters to see and manage only the messages that match those keywords.
7. The presenter then responds to any number of these pre-screened questions and comments. (These are messages that the moderator moved to the Presenter’s View tab.)
The following illustration represents phases 5 through 7 in the question-and-answer workflow.
Procedures • Create the Draft of a Live Event, page 8-6
• Preview the Draft of a Live Event, page 8-10
• Edit the Draft of a Live Event, page 8-11
• Publish a Listing for Your Live Event, page 8-13
• Start and Administer (Moderate) Your Live Event, page 8-16
• Download Questions From Your Live Event, page 8-19
• Delete Your Live Event, page 8-21
8-5User Guide for Cisco Show and Share 5.2.x
OL-15765-04

Chapter 8 Live Events Procedures
Create the Draft of a Live EventYou can prepare for a live event before it will occur. This preparation is considered a “draft.”
Note • No one will see any listing for your live event until you prepare and publish a listing.
• No one can watch your live event until you start it.
Before You Begin
To succeed at this task, you must have Live Event User privileges. In addition:
• Administrators for your Cisco Show and Share community must:
– Install a license to activate support for live events.
– Configure Cisco Show and Share to work with at least one encoder.
Procedure
Step 1 Choose Show and Share from the global navigation.
Step 2 Click My Account, and then click Create a Live Event.
Step 3 Click DME Live Event.
Step 4 (Optional) If the Live Event Basic Setup drawer is closed, click its toggle to open it.
8-6User Guide for Cisco Show and Share 5.2.x
OL-15765-04

Chapter 8 Live Events Procedures
Step 5 Enter a name and description for your live event.
Step 6 (Optional) Enter tags that express important concepts about your live event.
Step 7 Enter the video stream’s URL (on the streaming server), and then choose an encoder from the Encoder list. Never use the Encoder URL except for testing.
Do one of the following:
• Should you use default encoder settings for this live event?
When you use default settings
Default settings are simplified and streamlined for your convenience.
Just enter the date and time manually when your live event will start and stop.
OR
Click to choose a date from a calendar. Then, choose time values from lists.
• Should you use advanced encoder settings for this live event?
When you use advanced settings
In addition to date and time management controls that work like those in the default settings, advanced settings offer rich options for customization.
You can specify the encoding format (preset)1, channel2, and publishing mode3, the signal cable inputs for video4 and audio5, which input standard6 to use, and whether to save a permanent copy of your live event so you can republish it later as a VoD.
1. An encoding format is a named collection of predefined encoder settings. You might think of them as presets. Each encoding format serves a distinct purpose.
2. Your Cisco Show and Share administrator can tell you which ports and modes a particular channel supports.
8-7User Guide for Cisco Show and Share 5.2.x
OL-15765-04

Chapter 8 Live Events Procedures
Step 8 (Optional) If the Live Event Images drawer is closed, click its toggle to open it.
Step 9 Click each of the Browse buttons to choose, one at a time, which JPEG images Cisco Show and Share should use in support of this live event.
• Audiences will see the thumbnail image when they browse through available videos.
• Audiences who try to watch a live event before it actually begins will see the pre-event image until the live-event stream is started.
• Audiences who are connected to a live event after it ends will see the post-event image until the live-event stream is stopped.
Note You cannot save any draft of your live event setup until you choose all of these images.
Step 10 (Optional) If the Optional Items drawer is closed, click its toggle to open it, so that you can turn advanced features On or Off.
Note You cannot see or use any advanced feature here that a Cisco Show and Share administrator has turned Off sitewide.
a. Choose whether to use the Question and Answer module during this live event.
When this module is turned On, remote audience members can submit questions to presenters in real time.
b. Choose whether to use the Polling module during this live event.
When this module is turned On, audiences can respond to polling questions that you ask. Your poll can include any number and combination of true/false questions and multiple-choice questions.
3. Should the streaming server pull streams from the encoder? Or should the encoder push streams to the streaming server? If you are not sure, ask your Cisco Show and Share administrator.
4. The video input options are Composite (RCA) and S-Video.
5. The audio input options are Unbalanced (RCA) and XLR Balanced.
6. The variant of NTSC, PAL, or SECAM that your country uses as its video input standard for television.
8-8User Guide for Cisco Show and Share 5.2.x
OL-15765-04

Chapter 8 Live Events Procedures
When you write a multiple-choice question, you must also write at least two possible answers to the question.
• Click Add more polling replies to add an answer.
• Click to delete an answer.
• Click Add another question to expand upon your poll.
• Click Preview Poll to see your poll as authorized viewers will see it.
Tip Remember, a poll is not a quiz. Poll questions do not measure knowledge. Instead, they measure sentiment, comfort, or familiarity. For this reason, a polling question might never have any “right” or “wrong” answer.
Step 11 (Optional) Click Browse to choose related files for upload. We will attach these files to your live event so that authorized viewers can download them after the event is started.
Note The Related Files feature is visible only after you choose DME Live Event as the live event type.
Step 12 Click Save as Draft.
Step 13 Stop. You have completed this procedure.
8-9User Guide for Cisco Show and Share 5.2.x
OL-15765-04

Chapter 8 Live Events Procedures
What to Do Next
• Would you like to preview your live event draft and confirm that you defined its properties correctly? See the “Preview the Draft of a Live Event” section on page 8-10.
• Would you like to edit your live event draft? See the “Edit the Draft of a Live Event” section on page 8-11.
• Would you like to publish a listing for your live event? See the “Publish a Listing for Your Live Event” section on page 8-13.
• Would you like to start your live event and administer it? See the “Start and Administer (Moderate) Your Live Event” section on page 8-16.
• Would you like to delete your live event draft? See the “Delete Your Live Event” section on page 8-21.
Preview the Draft of a Live EventAfter you save a live event draft and before you publish it, you can preview it.
Before You Begin
To succeed at this task, you must have Live Event User privileges. In addition, you must create and save a live event draft before you can preview it.
Procedure
Step 1 Navigate to the Preview a Live Event page.
a. Click My Account.
b. Ensure that the Videos drawer is opened.
c. Click the Live Events tab.
d. Mouse over the live event draft, and then click Play.
8-10User Guide for Cisco Show and Share 5.2.x
OL-15765-04

Chapter 8 Live Events Procedures
Step 2 Click Back when you are finished.
Step 3 Stop. You have completed this procedure.
What to Do Next
• Would you like to edit your live event draft? See the “Edit the Draft of a Live Event” section on page 8-11.
• Would you like to publish a listing for your live event? See the “Publish a Listing for Your Live Event” section on page 8-13.
• Would you like to start your live event and administer it? See the “Start and Administer (Moderate) Your Live Event” section on page 8-16.
• Would you like to delete your live event draft? See the “Delete Your Live Event” section on page 8-21.
Related Topics
• Create the Draft of a Live Event, page 8-6
Edit the Draft of a Live EventAfter you save a live event draft and before you publish it, you can edit any of its settings.
Before You Begin
To succeed at this task, you must have Live Event User privileges.
Procedure
Step 1 Navigate to the Edit a Live Event page.
a. Click My Accounts.
b. Ensure that the Videos drawer is opened.
c. Click the Live Events tab.
8-11User Guide for Cisco Show and Share 5.2.x
OL-15765-04

Chapter 8 Live Events Procedures
d. Mouse over the live event draft, and then click Manage Video.
The Edit a Live Event page opens.
Step 2 Change options, settings, and values, as needed.
Tip These are the same options, settings, and values that you saved when you created your live event draft.
Step 3 Click Save as Draft.
Step 4 Stop. You have completed this procedure.
What to Do Next
• Would you like to preview your live event draft and confirm that you defined its properties correctly? See the “Preview the Draft of a Live Event” section on page 8-10.
• Would you like to publish a listing for your live event? See the “Publish a Listing for Your Live Event” section on page 8-13.
• Would you like to start your live event and administer it? See the “Start and Administer (Moderate) Your Live Event” section on page 8-16.
• Would you like to delete your live event draft? See the “Delete Your Live Event” section on page 8-21.
Related Topics
• Create the Draft of a Live Event, page 8-6
8-12User Guide for Cisco Show and Share 5.2.x
OL-15765-04

Chapter 8 Live Events Procedures
Publish a Listing for Your Live EventYou can publish a listing for your live event. Doing this helps other Cisco Show and Share community members to plan ahead. An event listing tells them:
• What — You plan to host a live event.
• Why — Its purpose.
• When — Its start and stop times.
• Who — The identities of your scheduled presenters and intended audience.
Before You Begin
To succeed at this task, you must have Live Event User privileges. In addition:
• Administrators for your Cisco Show and Share server must:
– Install a license to activate support for live events.
– Configure Cisco Show and Share to work with at least one encoder.
• You must create and save a live event draft before you can publish a listing for it.
Procedure
Step 1 Navigate to the Publish a Live Event page.
a. Click My Account.
b. Ensure that the Videos drawer is opened.
c. Click the Live Events tab.
d. Mouse over the live event draft, and then click Publish.
The Publish a Live Event page opens.
8-13User Guide for Cisco Show and Share 5.2.x
OL-15765-04

Chapter 8 Live Events Procedures
Step 2 Check values in the Live Event Summary drawer.
Step 3 (Optional) Click Edit to start correcting any values that are wrong.
Note When you click Edit, we close the Publish a Live Event page and open the Edit a Live Event page in its place.
Step 4 Check values in the Category and Permission Options drawer.
Video category Is your live event associated with all of the correct Cisco Show and Share categories?.
• Click Add if any categories are missing from your list.
• Click to delete a category from your list.
Make visible to Will the listing for your live event — and the event itself — be visible to the correct users?
• Click Everyone when your entire Cisco Show and Share community should have access.
• Click Specific people in my organization when access should be restricted in any way.
Users with access
Have you chosen correctly which specific users or groups should have access?
• Click Add if any users or groups are missing from your list.
• Click to delete a user or group from your list.
8-14User Guide for Cisco Show and Share 5.2.x
OL-15765-04

Chapter 8 Live Events Procedures
Step 5 Check values in the Scheduling drawer.
• Click Immediately when you want the listing to become visible right now.
• Click At a scheduled time when you want the listing to become visible at a set time in the future.
a. Click to choose a date from a calendar.
b. Choose time values from the lists.
Step 6 Click OK to publish the listing for your live event.
Step 7 Stop. You have completed this procedure.
What to Do Next
• Would you like to start your live event and administer it? See the “Start and Administer (Moderate) Your Live Event” section on page 8-16.
• Would you like to delete your live event draft? See the “Delete Your Live Event” section on page 8-21.
Related Topics
• Create the Draft of a Live Event, page 8-6
• Edit the Draft of a Live Event, page 8-11
8-15User Guide for Cisco Show and Share 5.2.x
OL-15765-04

Chapter 8 Live Events Procedures
Start and Administer (Moderate) Your Live EventYou can use the Live Event Administration page to turn On the availability of a live event stream. Then, after the stream is started:
• Audiences can watch your live event in real time through Cisco Show and Share.
• You can administer special features as the event moderator.
– Did you activate the “Question and Answer” feature when you prepared your live event draft? If so, audience members can submit questions for the presenters to answer. And then, as the event moderator, you can pre-screen these questions for the presenters before they respond.
– Did you activate the “polling” feature when you created your live event draft? If so, you can run an ad-hoc survey spontaneously during your live event. Or, if you prepared an audience survey and saved it as part of your draft, you can run that survey during your live event. Members of the remote viewing audience can then use Cisco Show and Share to submit their answers to your survey questions.
– If your organization’s encoder is a Cisco Digital Media Encoder (DME), did you activate the “slide show” feature when you created your live event draft? And did you then upload a ZIP archive that contains sequentially numbered JPEG copies of presentation slides for your live event? If so, you can sync the slide deck to your event in real time.
Note Administrators for your Cisco Show and Share server are authorized to turn these special features On or Off, at their discretion. You cannot see or use any feature that is turned Off.
Before You Begin
To succeed at this task, you must have Live Event User privileges. In addition:
• Administrators for your Cisco Show and Share server must:
– Install a license to activate support for live events.
– Configure Cisco Show and Share to work with at least one encoder.
• You must save a live event draft before you can start and administer it.
Procedure
Step 1 Choose Show and Share from the global navigation.
Step 2 Navigate to the Administer a Live Event page.
a. Click My Account.
b. Ensure that the Videos drawer is opened.
c. Click the Live Events tab.
8-16User Guide for Cisco Show and Share 5.2.x
OL-15765-04

Chapter 8 Live Events Procedures
d. Mouse over the live event draft, and then click Administer.
The Administer a Live Event page opens.
Step 3 If your organization uses a Cisco Digital Media Encoder (DME), click Start for Encoder and then Start for Broadcast in the “Main administrative controls” panel to start your live event stream.
OR
If your organization uses a third-party encoder, turn it On in its usual way.
8-17User Guide for Cisco Show and Share 5.2.x
OL-15765-04

Chapter 8 Live Events Procedures
Step 4 Do any or all of the following.
• Would you like to moderate viewer questions and comments?
Use elements on the Questions tab to manage viewer submissions in real time
a. Click icons in the Actions column, at your discretion.
• The blue icon ( ) moves a question to the Presenter’s View tab.
• The green icon ( ) moves a question to the Removed Questions tab.
b. (Optional) Define a filter and turn it On to see only the comments and questions that meet your filtering criteria.
c. (Optional) Define a filter and turn it On to automatically move off-topic comments and questions to the Removed Questions tab when they meet your filtering criteria.
Tip You can turn a filter Off again to disable it temporarily. Or, you can clear its definition to disable it permanently.
• Would you like to conduct an anonymous poll or survey?
Use elements in the Polling Module area to survey your live event viewers anonymously.
a. Click Open polling to start a polling cycle.
b. Show a question to your live event viewers for any length of time.
• Click Display question to audience when you are ready to solicit responses to a question. We will show that question to your viewers. They can then choose one of your prepared responses and submit that response as their vote.
• Click Remove question from audience when you are done with a question. We will hide that question from your viewers. They cannot respond to any question while it is hidden.
Repeat this process for any number of questions, at your discretion.
c. (Optional) Click Display polling results to audience when you want to share your survey results with everyone.
d. Click Close polling to stop the polling cycle.
8-18User Guide for Cisco Show and Share 5.2.x
OL-15765-04

Chapter 8 Live Events Procedures
Step 5 If your organization uses a Cisco Digital Media Encoder (DME), click Stop for Broadcast and then Stop for Encoder in the “Main administrative controls” panel to stop your live event stream.
OR
If your organization uses a third-party encoder, turn it Off in its usual way.
Step 6 Stop. You have completed this procedure.
What to Do Next
• Would you like to edit your live event draft? See the “Edit the Draft of a Live Event” section on page 8-11.
• Would you like to publish a listing for your live event? See the “Publish a Listing for Your Live Event” section on page 8-13.
• Would you like to start your live event and administer it? See the “Start and Administer (Moderate) Your Live Event” section on page 8-16.
• Would you like to delete your live event draft? See the “Delete Your Live Event” section on page 8-21.
Related Topics
• Create the Draft of a Live Event, page 8-6
• Visual Reference: Administer a Live Event, page 8-25
Download Questions From Your Live EventYou can download a list of the questions submitted by your audience during a live event.
Before You Begin
You must have Live Event User privileges, be the administrator of the live event, and be logged into Cisco Show and Share to perform this procedure.
8-19User Guide for Cisco Show and Share 5.2.x
OL-15765-04
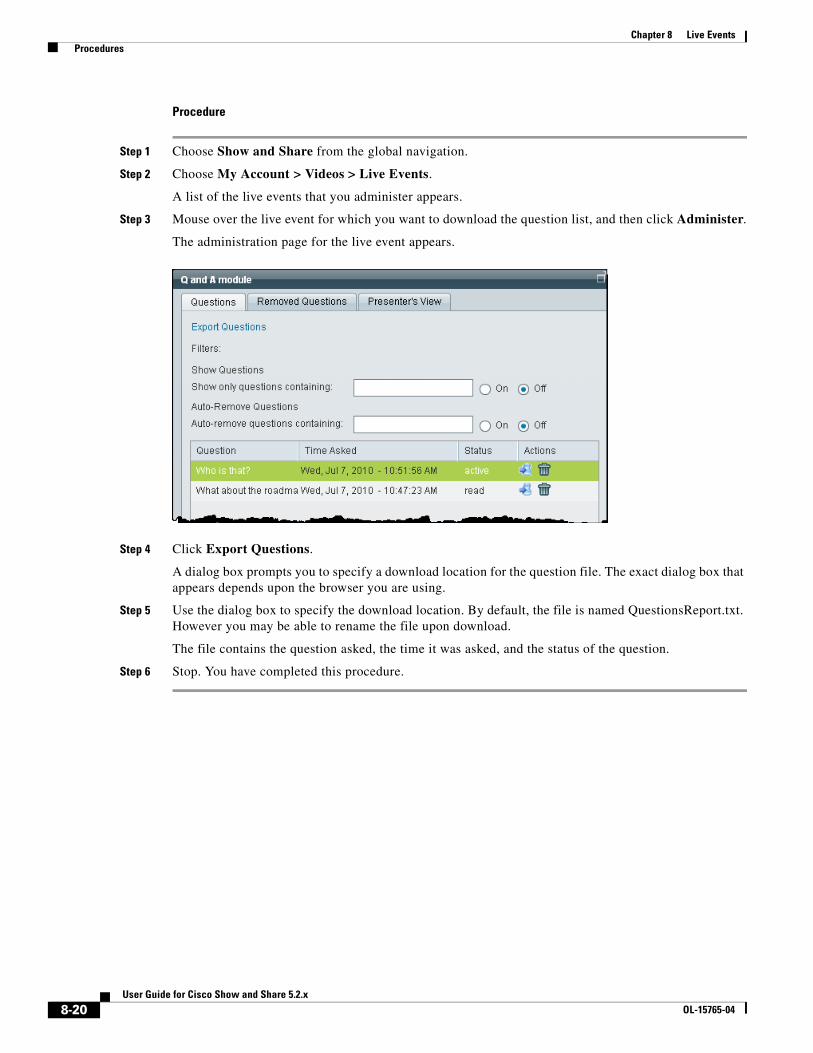
Chapter 8 Live Events Procedures
Procedure
Step 1 Choose Show and Share from the global navigation.
Step 2 Choose My Account > Videos > Live Events.
A list of the live events that you administer appears.
Step 3 Mouse over the live event for which you want to download the question list, and then click Administer.
The administration page for the live event appears.
Step 4 Click Export Questions.
A dialog box prompts you to specify a download location for the question file. The exact dialog box that appears depends upon the browser you are using.
Step 5 Use the dialog box to specify the download location. By default, the file is named QuestionsReport.txt. However you may be able to rename the file upon download.
The file contains the question asked, the time it was asked, and the status of the question.
Step 6 Stop. You have completed this procedure.
8-20User Guide for Cisco Show and Share 5.2.x
OL-15765-04

Chapter 8 Live Events Procedures
Delete Your Live EventYou can delete your live event draft.
Before You Begin
To succeed at this task, you must have Live Event User privileges and be the administrator for the live event you want to delete.
Procedure
Step 1 Choose Show and Share from the global navigation.
Step 2 Navigate to the Delete button.
a. Click My Account.
b. Ensure that the Videos drawer is opened.
c. Click the Live Events tab.
d. Mouse over the live event draft, and then click Delete.
Step 3 When a server prompt asks you, click Yes to confirm the deletion.
8-21User Guide for Cisco Show and Share 5.2.x
OL-15765-04

Chapter 8 Live Events Reference
Step 4 Verify that a system message tells you the deletion was successful.
Step 5 Stop. You have completed this procedure.
Related Topics
• Create the Draft of a Live Event, page 8-6
• Preview the Draft of a Live Event, page 8-10
• Edit the Draft of a Live Event, page 8-11
• Publish a Listing for Your Live Event, page 8-13
• Start and Administer (Moderate) Your Live Event, page 8-16
Reference • Supported Dimensions for Encoded Video, page 8-22
• Supported Encoding Bitrates for Flash Video on DMEs, page 8-22
• Supported Encoding Profiles for Windows Media on DMEs, page 8-23
• Visual Reference: Administer a Live Event, page 8-25
Supported Dimensions for Encoded VideoWe support these dimensions for video. All dimensions are in pixels.
• Show and Share Default 400x300
• FULL 640x480
• CIF 320x240
• QCIF 160x120
• CUSTOM
Supported Encoding Bitrates for Flash Video on DMEsWe support these encoding bitrates for video. All values are in kbps.
• 32
• 40
• 56
• 64
8-22User Guide for Cisco Show and Share 5.2.x
OL-15765-04

Chapter 8 Live Events Reference
• 80
• 96
• 112
• 128
• 160
• 192
• 224
• 256
• 288
• 320
Supported Encoding Profiles for Windows Media on DMEs
Capture Profiles for Windows Media 9 Conversions
• Convert To Windows Media 9 (2M)
• Convert To Windows Media 9 (1.5M)
• Convert To Windows Media 9 (768K)
• Convert To Windows Media 9 (350K)
• Convert To Windows Media 9 (50K) for Mobile Streaming
Capture Profiles for Broadband
Film
• Video for broadband film content (1500 Kbps total)
• Video for broadband film content (768 Kbps)
NTSC
• Video for broadband NTSC (1500 Kbps total)
• Video for broadband NTSC (2 Mbps total)
• Video for broadband NTSC (256 Kbps)
• Video for broadband NTSC (384 Kbps)
• Video for broadband NTSC (768 Kbps)
• Windows Media Video 8 for Broadband (NTSC, 1400 Kbps)
• Windows Media Video 8 for Broadband (NTSC, 700 Kbps)
PAL
• Windows Media Video 8 for Broadband (PAL, 384 Kbps)
• Windows Media Video 8 for Broadband (PAL, 700 Kbps)
8-23User Guide for Cisco Show and Share 5.2.x
OL-15765-04

Chapter 8 Live Events Reference
Variable Bitrate
• Windows Media 8 Best Quality based VBR for Broadband.
• Windows Media 8 Fair Quality based VBR for Broadband
• Windows Media 8 High Quality based VBR for Broadband.
Capture Profiles for Color PDAs
• Video for color PDA devices (150 Kbps)
• Video for color PDA devices (225 Kbps)
Capture Profiles for Dial-up Modems and ISDN
• Video for dial-up modems or LAN (28.8 to 100 Kbps)
• Video for dial-up modems or single channel ISDN (28.8 to 56 Kbps)
• Video with audio emphasis for dial-up modems (28.8 Kbps)
• Video with voice emphasis for dial-up modems (28.8 Kbps)
• Windows Media Video 8 for Dial-up Modems (28.8 Kbps)
• Windows Media Video 8 for Dial-up Modems (56 Kbps)
• Windows Media Video 8 for Dial-up Modems or LAN (28.8 to 100 Kbps)
• Windows Media Video 8 for Dial-up Modems or Single-channel ISDN (28.8 to 56 Kbps)
• Video for e-mail and dual-channel ISDN (128 Kbps)
• Video for LAN, cable modem, or xDSL (100 to 768 Kbps)
• Video for single-channel ISDN (64 Kbps)
• Video for Web servers (28.8 Kbps)
• Video for Web servers (56 Kbps)
• Windows Media 9 (1.5M)
• Windows Media 9 (2M)
• Windows Media 9 (350K)
• Windows Media 9 (50K) for Mobile Streaming
• Windows Media 9 (768K)
• Windows Media Video 8 for Color Pocket PCs (150 Kbps)
• Windows Media Video 8 for Color Pocket PCs (225 Kbps)
• Windows Media Video 8 for LAN, Cable Modem, or xDSL (100 to 768 Kbps)
• Windows Media Video 8 for Local Area Network (100 Kbps)
• Windows Media Video 8 for Local Area Network (256 Kbps)
• Windows Media Video 8 for Local Area Network (384 Kbps)
• Windows Media Video 8 for Local Area Network (768 Kbps)
8-24User Guide for Cisco Show and Share 5.2.x
OL-15765-04

Chapter 8 Live Events Reference
Visual Reference: Administer a Live EventThe top of Administer a Live Event page shows in real time how your live event looks to its audience.
Tip This area is blank until you start the live event stream.
Lower on the Administer a Live Event page are areas where you can:
• Start or stop the live event stream.
• Moderate the written questions and comments that audience members submit for your event’s presenter.
And then, at the bottom of the Live Event Controller page, you can manage audience polling.
Related Topics
• Start and Administer (Moderate) Your Live Event, page 8-16
8-25User Guide for Cisco Show and Share 5.2.x
OL-15765-04

Chapter 8 Live Events Troubleshooting
TroubleshootingThere is a delay between when I select a slide as a Live Event administrator and when it appears on the viewer’s screen
When you select a slide, the slide synchronization information is embedded in the video stream itself. There is a built-in latency of about 7-10 seconds that is used for buffering the video stream (for smoother playback). When the video stream arrives at the viewer’s browser, Cisco Show and Share retrieves the slide indicated by the embedded information. So, although you might see a delay from when you select a slide from the admin console to when it appears on a viewer’s desktop, the delay applies to both the video and the slide and viewers should not notice any lag. This is normal behavior.
8-26User Guide for Cisco Show and Share 5.2.x
OL-15765-04

OL-15765-04
C H A P T E R 9
Use Show and Share Author ReportsRevised: May 31, 2011
Cisco Show and Share includes reporting features that let you know if people are watching your videos and for how long.
• About Cisco Show and Share Author Reports, page 9-1
• Procedures, page 9-5
About Cisco Show and Share Author ReportsAuthors can run three different reports for their videos: Page Views, Video Views, and Viewer Aggregation. Each report can be run for specific video or for all your videos. You can only view reports for videos that you uploaded, however the “superuser” user can view reports for any video.
To learn more about each report and what it can tell you about your video viewership, see the following topics:
• About the Page View Report, page 9-2
• About the Video View Report, page 9-3
• About the Viewer Aggregation Report, page 9-4
• Changes to Reports Between Cisco Show and Share 5.2.1 and 5.2.2, page 9-4
9-1User Guide for Cisco Show and Share 5.2.x
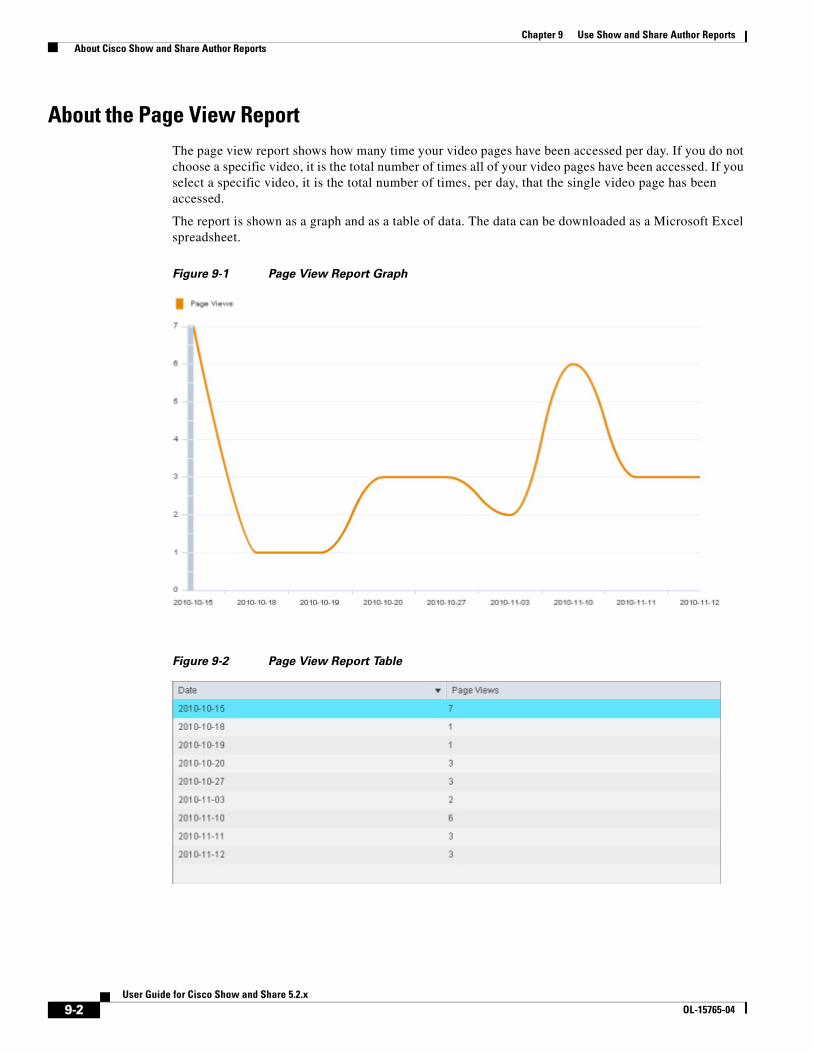
Chapter 9 Use Show and Share Author Reports About Cisco Show and Share Author Reports
About the Page View ReportThe page view report shows how many time your video pages have been accessed per day. If you do not choose a specific video, it is the total number of times all of your video pages have been accessed. If you select a specific video, it is the total number of times, per day, that the single video page has been accessed.
The report is shown as a graph and as a table of data. The data can be downloaded as a Microsoft Excel spreadsheet.
Figure 9-1 Page View Report Graph
Figure 9-2 Page View Report Table
9-2User Guide for Cisco Show and Share 5.2.x
OL-15765-04

Chapter 9 Use Show and Share Author Reports About Cisco Show and Share Author Reports
About the Video View ReportThe video view report shows how many times a video has been played. This differs from the page view report because it counts not only the number of times your video page has been accessed but also the number of times a video has been played when embedded in other web pages using the embed code.
Note If your embedded videos are not set to autoplay when the page is accessed, the number of video views reported when a page with an embedded video may be incremented twice—once when the page containing the embedded video is accessed and once when the video is played.
The report shows how many times the video was viewed, the average play time, and the total play time.
Figure 9-3 Video Views Report Graph
Figure 9-4 Video Views Report Table
9-3User Guide for Cisco Show and Share 5.2.x
OL-15765-04

Chapter 9 Use Show and Share Author Reports About Cisco Show and Share Author Reports
About the Viewer Aggregation ReportThe viewer aggregation report shows which viewers are watching your videos and for how long. For each day that the selected video was viewed, this report shows who watched the video, how many times the viewer watched the video, the average play time for the video, and the total play time for the video. Anonymous users and days with no video views are not shown in the report.
Figure 9-5 Viewer Aggregation Report Table
Changes to Reports Between Cisco Show and Share 5.2.1 and 5.2.2 • The Viewer Aggregation Report was added to Cisco Show and Share 5.2.2.
• The report generation fields were rearranged to make it easier for you to define the report parameters.
Figure 9-6 Report Generation Fields in Cisco Show and Share 5.2.2
Figure 9-7 Report Generation Fields in Cisco Show and Share 5.2.1
9-4User Guide for Cisco Show and Share 5.2.x
OL-15765-04

Chapter 9 Use Show and Share Author Reports Procedures
Procedures • Generate Reports, page 9-5
• Export Report Data, page 9-5
Generate Reports
Before You Begin
This software uses scalable vector graphics in its charting. For browser requirements, see Release Notes for Cisco Digital Media Suite 5.2.x on Cisco.com.
Procedure
Step 1 Log-in to Cisco Show and Share.
Step 2 Navigate to the reports tab:
• For Cisco Show and Share 5.2.3, choose My Account, open the Videos drawer, and then and then click the Reports tab.
• For Cisco Show and Share 5.2.2 and earlier, choose My Show and Share, open the My Account drawer, and then and then click the My Reports tab.
Step 3 Choose the desired report from the Report by list.
Step 4 Select a date range for the report to cover by doing one of the following:
• Choose a pre-defined range from the Date range list.
• Enter a specific range using the Start date and End date fields. You can type a date directly in the field in MM/DD/YYYY format or you can click the calendar button to scroll to the desired date.
Step 5 (Optional) Select a specific video to run the report on:
a. Click to expand the Select video drawer.
A list of your videos appears.
b. If needed, use the Search by Title field to search for a specific title or the sort list to help navigate to the video.
c. Click the video title to select the video.
Step 6 Click the Create report button.
A graph and a table of data for your report appears at the bottom of the page.
Export Report DataYou can export your report data to an Excel spreadsheet.
Procedure
Step 1 Run your report as described in Generate Reports, page 9-5.
9-5User Guide for Cisco Show and Share 5.2.x
OL-15765-04

Chapter 9 Use Show and Share Author Reports Procedures
Step 2 Click the Export to Excel button below the report data table.
Step 3 Depending upon your browser, you may be prompted to open or save the file. Follow the instructions in your browser’s dialog box.
Step 4 If you receive an error when opening the file that the file is not the same format as the extension indicates, click Yes to open the file. This error is harmless and your data will open normally.
Tip Hash marks (#####) in a cell indicate that the data in the cell is wider than the cell size. Simply resize the column to display the data.
9-6User Guide for Cisco Show and Share 5.2.x
OL-15765-04