user guide (exqc)€¦ · · 2013-01-10... check “my profile” ... // under the name stewart...
TRANSCRIPT
User Guide Version 5.7
Stewart Title Guaranty Company
200 Bay Street, Suite 2600
Royal Bank Plaza
Toronto (Ontario) M5J 2J2
For more information, call:
1-888-667-5151
www.stewart.ca/stewartassyst
Stewart Assyst Real Estate powered by Telus® (“Stewart Assyst”) is a web-
based mortgage processing application which links lawyers and notaries to
lenders, streamlining mortgage instruction, processing and
reporting. Stewart Title is strategically aligned with Telus Financial
Solutions to act as the exclusive sales channel for Stewart Assyst in all
Canadian provinces outside of Quebec. All other trademarks contained in
this user guide are the property of their respective owners.
Document version: 5.7
Edition: January 2013 (rebranded Stewart Assyst)
i
TABLE OF CONTENTS
Introduction ................................................................................................................................. 2
About Stewart Assyst Real Estate powered by TELUS® .................................................................... 2
About this Guide .......................................................................................................................... 2
Content ................................................................................................................................. 2
Reference Guide and Online Help ............................................................................................. 3
Accessing Stewart Assyst Real Estate ............................................................................................. 3
Getting Support ............................................................................................................................ 3
Using Stewart Assyst Real Estate – Detailed Process ............................................................... 4
First time login ............................................................................................................................. 4
Accept the Service Contract ..................................................................................................... 4
1 - Check “My Profile” ................................................................................................................... 5
2 - Read Messages ....................................................................................................................... 7
3 - Regularly Check for New Files ................................................................................................... 8
4a - Accept a New File .................................................................................................................. 9
4b - Refuse a File ....................................................................................................................... 10
5 - Review the Specific Mortgage Instructions ............................................................................................... 10
6 - Read Your Notes ................................................................................................................... 11
7 - Review the Pre-Populated Information ................................................................................................ 12
8 - Complete the File Information ................................................................................................ 15
Helpful tips when working on a file ......................................................................................... 15
Update the Information about the Borrower(s) /Guarantor(s) .................................................. 15
Switching Guarantor to Borrower or Borrower to Guarantor .................................................... 16
Verify the Property Address .................................................................................................. 17
Update the Legal Description ................................................................................................ 17
9 - Modify the Funding Dates and Other Dates, if necessary ........................................................... 18
10 - Activate the Cost of Borrowing Requested (Freeze the Mortgage Terms) .................................. 19
11 - Electronically Sign the Preliminary Report and submit it to the Lender ...................................... 20
12 – Generate and Print the Closing Documents ............................................................................ 23
13 - Complete the Transaction ..................................................................................................... 23
14 - Electronically Sign the Final Report/Submit it to the Lender ..................................................... 23
15 - Close the File ...................................................................................................................... 27
Working with Transaction Reports ................................................................................................ 28
About the Transaction Report ................................................................................................ 28
Creating a Transaction Report ................................................................................................ 28
Printing a Transaction Report ................................................................................................. 29
Saving a Transaction Report .................................................................................................. 29
Changing the Password for the Digital Signature ........................................................................... 30

2
Introduction
About Stewart Assyst Real Estate powered by TELUS®
Stewart Assyst Real Estate is an online mortgage processing solution that electronically links lawyers and notaries to
lenders. Stewart Assyst simplifies the way legal forms and mortgage documents are created and managed while
facilitating paperless mortgage transactions.
With Stewart Assyst Real Estate, lawyers/notaries and their staff can complete mortgage files more efficiently with
fewer errors, saving valuable time and money. Participating lenders use Stewart Assyst to deliver mortgage
instructions directly to the desktop of a lawyer/notary. Mortgage terms are pre-populated and locked-in by the lender,
removing the need for manual input. All relevant mortgage forms, schedules and Standard Charge Terms are available
within the electronic file, eliminating the need to search and download documents. Mortgage terms can be frozen 48
hours before closing, eliminating frustrating last minute changes. Preliminary Reports are submitted online and
digitally signed by a lawyer/notary. Digital signatures ensure that only lawyers/notaries in good standing are
processing mortgages using Stewart Assyst. Depending on the province, Stewart Assyst can complement or facilitates
the electronic registration of mortgages. Once a mortgage transaction closes, the Final Report is delivered to the
lender online and digitally signed by a lawyer/notary.
Designed by the legal community for the legal community, Stewart Assyst Real Estate allows lawyers and notaries to
complete a mortgage transaction in the usual manner, without affecting workflow.
The Assyst Real Estate Platform was developed and is maintained by TELUS Financial Solutions, a leader in value-
added transaction processing. Stewart Title is strategically aligned with TELUS to act as the exclusive sales channel for
Stewart Assyst in all Canadian provinces outside of Quebec.
About this Guide
Content
The objective of this User Guide is to describe how lawyers, notaries and their legal assistants can best use Stewart
Assyst Real Estate to process mortgage files more efficiently. This guide has been designed to reflect the standard
workflow of lawyers/notaries processing mortgage transactions; however lawyers/notaries may adapt the process
according to their needs and internal office procedures.
This guide has been designed both for lawyers/notaries and their legal assistants. Issues that can only be addressed by
lawyers/notaries are clearly identified.

3
Reference Guide and Online Help
The Stewart Assyst Real Estate Reference Guide and Online Help are both available in the Help menu accessible from
the Stewart Assyst Real Estate main screen. They are the best sources of information if a more detailed explanation is
required about features and processes.
Accessing Stewart Assyst Real Estate
To access Stewart Assyst Real Estate, go to https://Stewart.assystrealestate.com/rei. A User Name and Password
are required. Both are case sensitive.
In British Columbia, Stewart Assyst Real Estate is also accessible through BC Online
https://www.bconline.gov.bc.ca under the name Stewart Assyst Real Estate.
Some documents in Stewart Assyst Real Estate require the use of the Adobe® Reader™. To download a free
version of the latest Adobe® Reader™, please visit www.adobe.com.
Getting Support
For questions regarding the use of Stewart Assyst Real Estate, or for any technical information, please contact
Stewart Title Software Support.
Software Support: (866) 969-9101
E-mail: [email protected]
Please send comments and suggestions to this address as well.

Stewart Assyst Real Estate powered by TELUS® – User Guide
4
Using Stewart Assyst Real Estate – Detailed
Process
This chapter provides a detailed explanation of every step when using Stewart Assyst Real Estate. Each step includes
explanations, tips, shortcuts, and the corresponding commands to be used.
For further details on the functions presented in this chapter, please refer to the Stewart Assyst Real Estate Reference
Guide or the Online Help, both available in the Help menu accessible from the Stewart Assyst Real Estate main screen.
Here’s how the Stewart Assyst Real Estate main screen looks:
First time login
Accept the Service Contract
When you connect to Assyst Real Estate for the first time, you will have to accept a User Agreement that applies to
every file. When you accept a new file, you can view the agreement by clicking the View Service Agreement button
in the Accept File window.

5
1. Click the checkbox “I accept the terms of this agreement”
2. Click the “I accept” link to log the user into the program. If the “I refuse” link is clicked, a message box
will appear confirming the action. If the action is confirmed the user is returned to the Stewart Assyst Real
Estate login page.
1 - Check “My Profile”
My Profile contains basic information about participating lawyers/notaries, their staff, and their office. Profiles remain
identical from file to file; there is no need to verify it at each working session.
Stewart Assyst Real Estate powered by TELUS® – User Guide
6
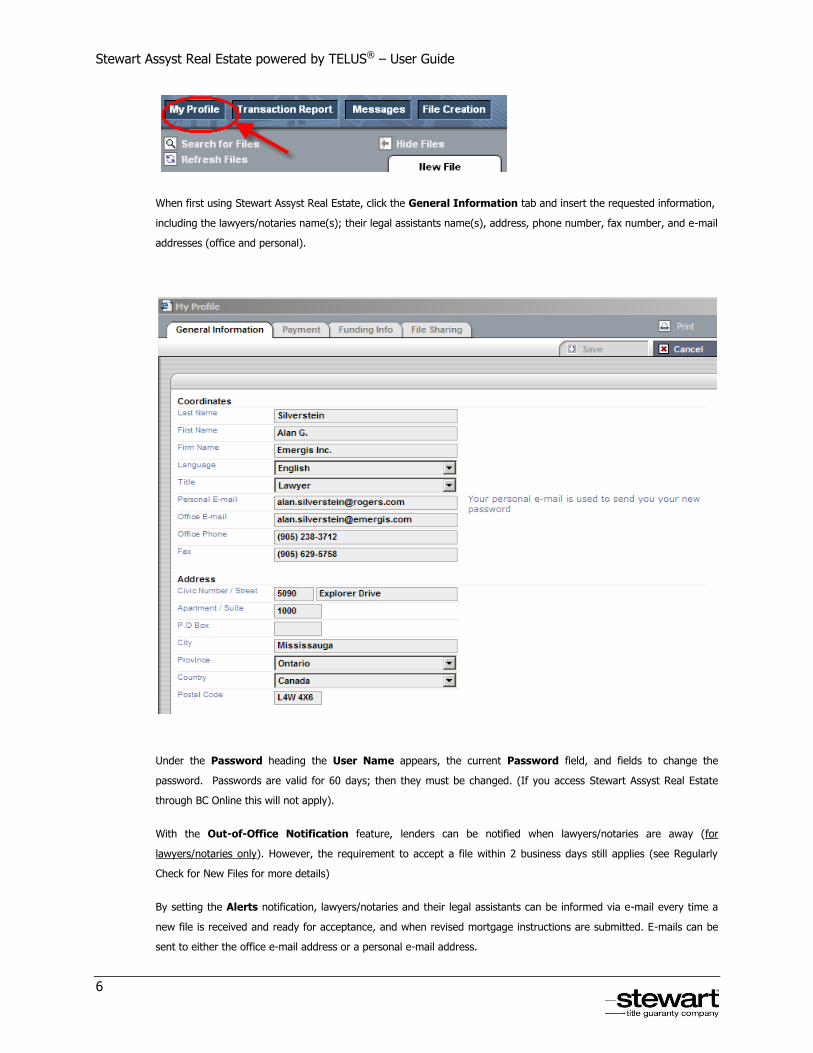
When first using Stewart Assyst Real Estate, click the General Information tab and insert the requested information,
including the lawyers/notaries name(s); their legal assistants name(s), address, phone number, fax number, and e-mail
addresses (office and personal).
Under the Password heading the User Name appears, the current Password field, and fields to change the
password. Passwords are valid for 60 days; then they must be changed. (If you access Stewart Assyst Real Estate
through BC Online this will not apply).
With the Out-of-Office Notification feature, lenders can be notified when lawyers/notaries are away (for
lawyers/notaries only). However, the requirement to accept a file within 2 business days still applies (see Regularly
Check for New Files for more details)
By setting the Alerts notification, lawyers/notaries and their legal assistants can be informed via e-mail every time a
new file is received and ready for acceptance, and when revised mortgage instructions are submitted. E-mails can be
sent to either the office e-mail address or a personal e-mail address.

7
All transactions are paid by credit card, upon acceptance of a file using Stewart Assyst Real Estate. The relevant credit
card information can be inserted in the Payment tab for ongoing use (for lawyers/notaries only). Alternatively, the
Payment tab can be left blank, and the payment details can be entered each time a file is accepted.
If a file is accepted through BCOnline the transaction will be paid from your BCOnline account. Your BCOnline account
information cannot be updated on the Payment tab. Instead, you need to contact the Stewart Assyst Real Estate
service desk at 866-969-9101.
Details how mortgages should be funded appear in the Funding Info tab (for lawyers/notaries only).
In the File Sharing tab, lawyers/notaries can include in their profile the names of their legal assistants who have been
authorized to accept or refuse files; who have access to all files; and who can update their own profile.
Lawyers/notaries can also include the names of other lawyers/notaries who have the delegated right to accept or
refuse files, and have full access to files (this right to delegate applies to lawyers/notaries only)
Legal assistants can manage the lawyers/notaries they work with, in the Legal Counsels tab of the My Profile page.
Check My Profile regularly to ensure the information entered is accurate and up-to-date. Changes and updates can
easily be entered on the system.
2 - Read Messages
The Stewart Assyst Real Estate message system allows lawyers/notaries and their legal assistants to automatically
receive messages sent by the system. New messages automatically appear when starting a new working session. Once
a new message is read, it is archived. Messages include general information about the system and the lenders, and are
not linked to a specific file.
To view archived messages, click the Messages tab.

Stewart Assyst Real Estate powered by TELUS® – User Guide
8
3 - Regularly Check for New Files
New files are displayed in green at the top of the list of files, listed under the borrower’s name. For those files, the
New File tab is the only tab displayed. Until it has been accepted, a new file cannot be processed.
Click the name of a new file in the list of files to view details about the mortgage transaction. Viewing the mortgage
details can help in deciding whether to accept the file. This can be done before a file is formally accepted.
For legal assistants and lawyers/notaries who share files with other lawyers/notaries, new files are displayed under the
name of the lawyer/notaries they work with and responsible for each file.
When notified about a new file in Stewart Assyst Real Estate, lawyers/notaries (and their legal assistants who have
been delegated this right) have 2 business days to consult with the borrower and either accept or refuse the file. The
remaining time is displayed to the right of the borrower’s name in the list of files. Files not accepted within 2 business
days will be returned to the lender.
By setting the alert notification in My Profile, lawyers/notaries and their legal assistants can be informed via e-mail
every time a new file is received (see Check My Profile).

9
4a - Accept a New File
Before beginning work on a new file, it must be accepted. Besides a lawyer/notary, their legal assistants and other
lawyers/notaries can accept a file in the name of the lawyer/notary they work with, if delegated that right. To accept a
file, click Accept under the Accept or Refuse section of the New File tab.
When you accept a new file, you can view the Service Agreement by clicking View Service Agreement button in the
Accept File window.
Once accepted, the file is moved to the list of current files under the name of the lender that assigned it. The new file
is also noted as File Accepted in the Status section of the File tab.
For legal assistants and lawyers/notaries who share files with other lawyers/notaries, and depending on your access
rights, when you accept a file in the name of another lawyer/notary, the file is moved in the list of files under the name
of the lawyer/notary you work with and responsible for this file.
An invoice will be generated automatically upon accepting a new file.
To open the invoice document, double-click on the name of the document or select the document and then click the
Open link in the Documents tab.
Stewart Assyst Real Estate powered by TELUS® – User Guide
10
The invoice can then be printed or saved to a computer in PDF format.
Accepting a new file is the first of the five status checkpoints listed in the Status section of the File tab in Stewart
Assyst Real Estate.
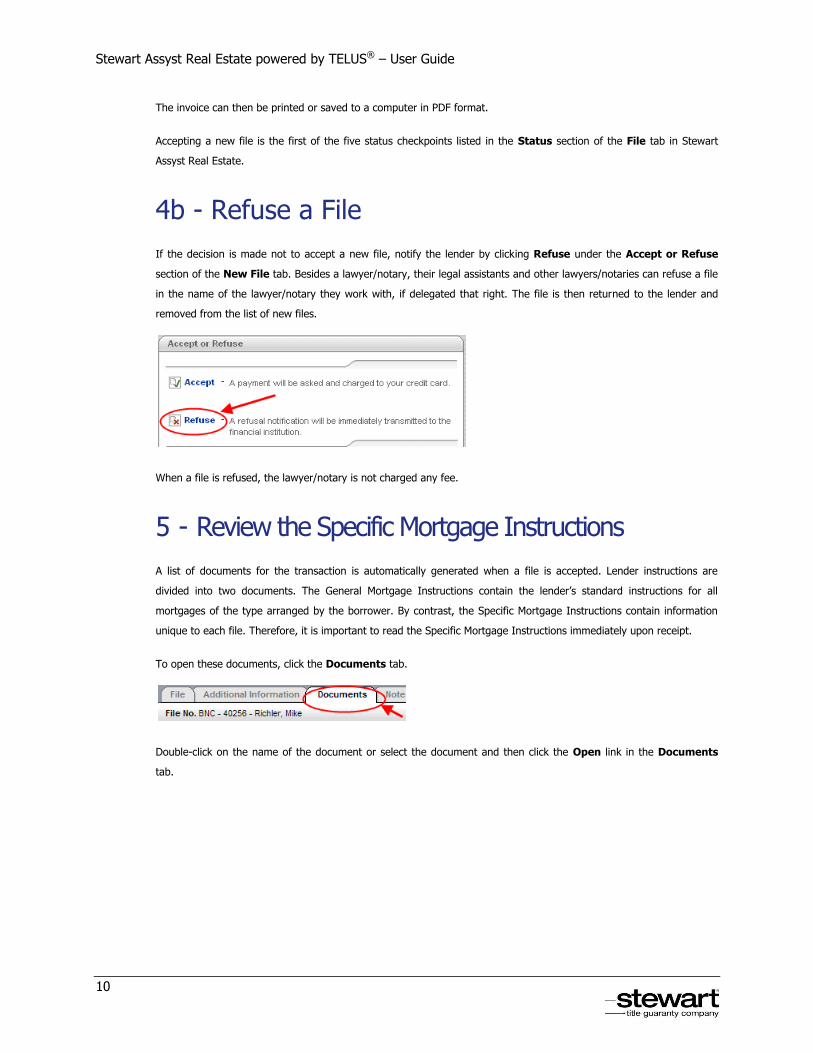
4b - Refuse a File
If the decision is made not to accept a new file, notify the lender by clicking Refuse under the Accept or Refuse
section of the New File tab. Besides a lawyer/notary, their legal assistants and other lawyers/notaries can refuse a file
in the name of the lawyer/notary they work with, if delegated that right. The file is then returned to the lender and
removed from the list of new files.
When a file is refused, the lawyer/notary is not charged any fee.
5 - Review the Specific Mortgage Instructions
A list of documents for the transaction is automatically generated when a file is accepted. Lender instructions are
divided into two documents. The General Mortgage Instructions contain the lender’s standard instructions for all
mortgages of the type arranged by the borrower. By contrast, the Specific Mortgage Instructions contain information
unique to each file. Therefore, it is important to read the Specific Mortgage Instructions immediately upon receipt.
To open these documents, click the Documents tab.
Double-click on the name of the document or select the document and then click the Open link in the Documents
tab.

11
Details of the document generated appear in the Document Details box. For every document generated, Stewart
Assyst Real Estate provides information on the version, date and time it was generated, and the person who created
the document.
As the relevant mortgage terms are entered by the lender pre-populated and locked-in in the Loan section of the File
tab, it is not necessary for the lawyer/notary’s staff to input that information.
All relevant forms, schedules and Standard Charge Terms associated with a file are listed under the Documents tab.
The lender documents available using Stewart Assyst Real Estate may be relied upon as the most current version.
Therefore, do not download documents from the lender’s legal documents website, unless otherwise instructed.
It is useful to print a copy of the Specific Mortgage Instructions once it has been read, so the details of the transaction
are easily accessible.
To print a document, use the Print function in the Documents tab.
Notes from the lender may update the content of the Specific Mortgage Instructions (see Read Your Notes).
Therefore, all notes should be read as soon as possible. Once a new note is added to a file and read, an updated
Specific Mortgage Instructions should be generated and printed.
As the Specific Mortgage Instructions may change while processing the mortgage, all other documents should only be
generated once the file is frozen (see Activate the Cost of Borrowing Requested).
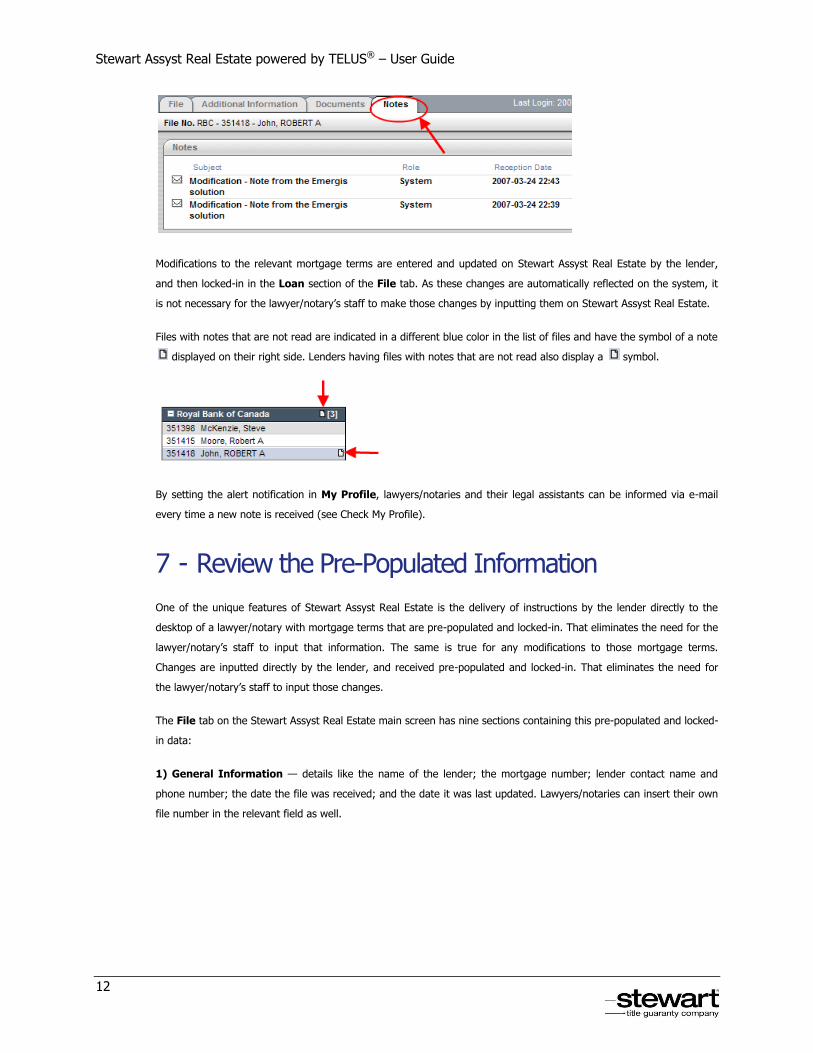
6 - Read Your Notes
Stewart Assyst Real Estate automatically sends a note advising of any changes to the mortgage instructions and terms,
including the principal amount, interest rate, payment, maturity date, and frequency of payments. Review them
immediately upon receipt, as they can affect the work processing a transaction.
Stewart Assyst Real Estate powered by TELUS® – User Guide
12
Modifications to the relevant mortgage terms are entered and updated on Stewart Assyst Real Estate by the lender,
and then locked-in in the Loan section of the File tab. As these changes are automatically reflected on the system, it
is not necessary for the lawyer/notary’s staff to make those changes by inputting them on Stewart Assyst Real Estate.
Files with notes that are not read are indicated in a different blue color in the list of files and have the symbol of a note
displayed on their right side. Lenders having files with notes that are not read also display a symbol.
By setting the alert notification in My Profile, lawyers/notaries and their legal assistants can be informed via e-mail
every time a new note is received (see Check My Profile).
7 - Review the Pre-Populated Information
One of the unique features of Stewart Assyst Real Estate is the delivery of instructions by the lender directly to the
desktop of a lawyer/notary with mortgage terms that are pre-populated and locked-in. That eliminates the need for the
lawyer/notary’s staff to input that information. The same is true for any modifications to those mortgage terms.
Changes are inputted directly by the lender, and received pre-populated and locked-in. That eliminates the need for
the lawyer/notary’s staff to input those changes.
The File tab on the Stewart Assyst Real Estate main screen has nine sections containing this pre-populated and locked-
in data:
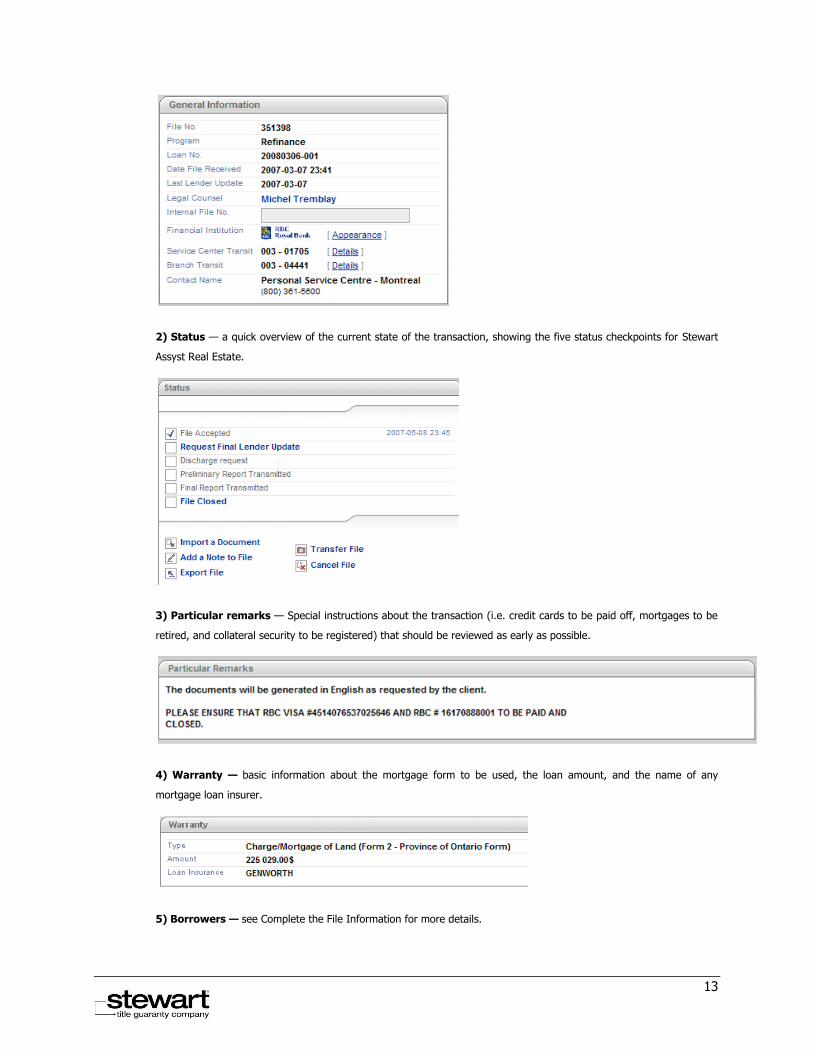
1) General Information — details like the name of the lender; the mortgage number; lender contact name and
phone number; the date the file was received; and the date it was last updated. Lawyers/notaries can insert their own
file number in the relevant field as well.
13
2) Status — a quick overview of the current state of the transaction, showing the five status checkpoints for Stewart
Assyst Real Estate.
3) Particular remarks — Special instructions about the transaction (i.e. credit cards to be paid off, mortgages to be
retired, and collateral security to be registered) that should be reviewed as early as possible.
4) Warranty — basic information about the mortgage form to be used, the loan amount, and the name of any
mortgage loan insurer.
5) Borrowers — see Complete the File Information for more details.

Stewart Assyst Real Estate powered by TELUS® – User Guide
14
6) Property — see Complete the File Information for more details.
7) Loan — the key mortgage details, all of which are pre-populated and locked-in by the lender.
8) Frequency — details of the regular mortgage payments, and any alternative payment arrangement (i.e. weekly, bi-
weekly, or semi-monthly payments).
9) Dates—the key dates for the transaction and the mortgage. See Modify the Funding Date for more information.
A one-page summary of the entire transaction can easily be obtained by clicking the Print button above the Status
section. To ensure the mortgage terms are correct, review them with the borrower as early as possible (or send a copy
of the summary to the borrower, and ask for their comments).

15
8 - Complete the File Information
Transactions on Stewart Assyst Real Estate can be processed once they are accepted. That means it is possible to
complete some information well in advance, even weeks before closing.
With Stewart Assyst Real Estate, most of the relevant mortgage terms are received from the lender pre-populated and
locked-in, eliminating the need to manually input those details, or any changes.
However, the following “raw” information from the lender may be inaccurate or incomplete in the following three
areas:
The full names of the borrower(s) and any guarantor(s)
The property address
Legal description and PIN (Property Identification Number) (Ontario)/Legal description and Parcel Identifier (PID)
(British Columbia)
As lawyers/notaries are responsible for ensuring the accuracy of this information when the mortgage is registered,
lawyers/notaries can modify, add and/or change the “raw” information provided by the lender in these areas, if
necessary.
This updated information will be merged in the various documents to be generated for signature and registration.
Helpful tips when working on a file
Update the Information about the Borrower(s) /Guarantor(s)
Click the black arrow in the Borrower(s) section of the File page to display the “raw” information provided by the
lender about the borrower(s).
Correct and update that information if necessary (including full legal name, and the name of any spouse if spousal
consent is required). Any middle name should be inserted next to the first name in the First Name field. It is not
necessary to complete the Occupation field in Ontario.
Repeat the process for any guarantor(s).

Stewart Assyst Real Estate powered by TELUS® – User Guide
16
Switching Guarantor to Borrower or Borrower to Guarantor
The Switch to Guarantor or Switch to Borrower checkbox allows lawyers/notaries to switch a borrower to a
guarantor, or a guarantor to a borrower, based on client instructions. The change in status is only allowed when a
minimum of one borrower exists on a file after the switch is completed. Otherwise, the change in status will be
refused. Always review the lender’s mortgage instructions to determine if the lender’s written consent is
required before making these changes.
Once the checkbox is clicked, a message will appear, asking for confirmation of the change:

17
Whenever borrower or guarantor status is changed, any documents previously generated will have to be re-generated.
Verify the Property Address
The Property section of the File page displays the “raw” information provided by the lender about the property
address. Correct and update the municipal address of the property/properties to be secured by the mortgage, if
necessary.
This section also contains the priority of the mortgage, and the “raw” legal description of the property as provided by
the lender. As the legal description here is locked-in, any changes must be made via the -Property Identification
fields in the Additional Information tab. However, the province field can’t be changed.
Update the Legal Description
Enter the proper legal description required to register the mortgage in the Property Identification fields in the
Additional Information tab, if necessary. Click the black arrow next to the words Property Identification to
display the “raw” information provided by the lender.

Stewart Assyst Real Estate powered by TELUS® – User Guide
18
Enter the 9 digit PIN number (Ontario) or 9 digit PID number (British Columbia), the Roll Number, and the proper
Legal Description for the property (unit and level for condominium properties) being secured by the mortgage, for a
maximum of 9 lots/units. Ignore the “Strata Box” indicator.
If there are more than 9 lots or units, the additional lots/units will have to be manually inserted into the electronic form
of mortgage prior to registration.
Once the transaction is closed and the mortgage has been registered, enter the registration number and date for the
mortgage (and any deed registered on closing) in the Registration section of the Additional Information tab. Use
the on-screen calendar. This information is only merged when the Final Report is generated.
9 - Modify the Funding Dates and Other Dates,
if necessary
Initially the following four dates are inserted by the lender in the Dates section of the File tab: Funding, Interest
Adjustment, First Payment and Last Payment. If no changes are necessary, no further steps must be taken here.
However, if there are any changes to one or more of these date(s), insert the corrected date(s) before submitting the
Preliminary Report to the lender or activating the Cost of Borrowing Requested. Use the on-screen calendar to
insert the new date(s).

19
These dates are merged in the Mortgage and other closing documents.
Note: It is not necessary to insert a date in the Mortgage Signature field in Ontario.
10 - Activate the Cost of Borrowing Requested
(Freeze the Mortgage Terms)
To avoid any last minute changes to the file, the mortgage terms can be frozen by submitting a Cost of Borrowing
request to the lender. That request must come from the lawyer/notary’s office, not the lender.
Financial Institution Delay and Procedure
Royal Bank of Canada Submit the Cost of Borrowing Request up to 3 business days before meeting
with the borrower to sign the mortgage, by checking the Request Final
Lender Update box in the Status section of the File tab, and submitting it
electronically to the lender. The lender then has one business day to verify the
information and modify the mortgage terms. After that, the mortgage terms
can no longer be changed by the lender using Stewart Assyst Real Estate. Any
changes will be handled directly by the lender with the borrower.
A padlock symbol will appear next to the Request Final Lender Update checkbox 1 business day after it was
checked. This is a reminder that after a file is frozen, the Loan Information can no longer be changed.
Important: Do not freeze the file too soon, as it can lead to unnecessary complications for the borrower if the
mortgage terms change again.

Stewart Assyst Real Estate powered by TELUS® – User Guide
20
The Request Final Lender Update is the second of five status checkpoints listed in the Status section of the File tab in
Stewart Assyst Real Estate.
11 - Electronically Sign the Preliminary Report
and submit it to the Lender
The Preliminary Report must be signed by the lawyer/notary only, using the digital signature issued by the
Certificate Authority designated, then submitted electronically to the lender. The Preliminary Report is not to be
sent to the lender in paper form, or by fax.
To generate the Preliminary Report, click Preliminary Report in the Documents tab, click Generate on the right
hand side, and click Generate in the new tab appearing at the top of the page.
A new line will appear below Preliminary Report. Then double-click on the name of the document or click the Open
link in the Documents tab on the right hand side, and review the Preliminary Report with the Adobe Reader.
When a document is signed the word (Signed) appears next to file name

21
The date and time the Preliminary Report was generated appear under Document Details, along with the name of the
person who created it.
If a new Preliminary Report must be created (i.e. because of a change in mortgage terms or a change in the closing
date), delete the existing report by clicking the Delete button to the right of the Open button. Then generate a new
Preliminary Report.
Once the Preliminary Report is completed and generated, it can be electronically signed and submitted to the lender.
Important: The Preliminary Report can only be electronically signed by a lawyer/notary.
To sign the report, the lawyer/notary must first log into Stewart Assyst Real Estate (the report cannot be signed on a
document that was saved outside of Stewart Assyst Real Estate). Then open the document and click anywhere in the
red box on the Request for Mortgage Funds page:
The Apply Signature to Document is displayed.
Lawyers/notaries then insert the password for their digital signature in the Confirm Password box, and click Sign.
Shortly afterwards, the following appears on screen:

Stewart Assyst Real Estate powered by TELUS® – User Guide
22
Once the preliminary report is signed electronically it is automatically submitted to the lender. The Preliminary
Report Transmitted box in the Status section of the File tab is then automatically checked. Date and time
submission stamps also appear on screen.
Stewart Assyst Real Estate does not determine or dictate when the Preliminary Report must be generated, signed and
submitted to the lender. Therefore, it can be forwarded electronically once all the necessary information is available,
either before or after activating the Cost of Borrowing Requested (See section Activate the Cost of Borrowing
Requested for more details). Often the Preliminary Report is submitted, and the Cost of Borrowing Requested is
activated, at the same time.
Only one Preliminary Report can be digitally signed per file using Stewart Assyst Real Estate.
To print a copy of the Preliminary Report for the file, use the Print function in the Documents tab. As the Preliminary
Report is a PDF file, it can be saved electronically on a computer, too.
The Preliminary Report Transmitted is the third of five status checkpoints listed in the Status section of the File
tab in Stewart Assyst Real Estate.

23
12 – Generate and Print the Closing Documents
Once the file is frozen, the required lender closing documents can be generated and printed, knowing that the
mortgage terms will not change. The information appearing in the File and Additional Information tabs is used for
merging data. The name of the lawyer/notary appearing in the Legal Counsel field in the General Information
section of the File tab and in the Documents tab is also used during the merge.
The process of generating required lender closing documents is the same as generating the Preliminary Report. Start
by clicking the document name in the Documents tab. Then click Generate on the right hand side, and click
Generate in the new tab appearing at the top of the page. A new line will appear below the name of the document to
be generated. Now double-click on the name of the document or click the Open link in the Documents tab, on the
right hand side, and review it with Adobe Reader. To print a document, use the Print function in the Documents tab.
As the document generated is a PDF file, it can be saved electronically on a computer, too.
Once the Mortgage is generated and printed, attach it to the Acknowledgment and Direction, and have all required
parties sign that document.
ONLY THOSE LENDER DOCUMENTS REQUIRED FOR THAT SPECIFIC TRANSACTION ARE DISPLAYED IN THE
DOCUMENTS TAB. THEY MAY BE RELIED UPON AS THE MOST CURRENT VERSION. THEREFORE, DO NOT
DOWNLOAD DOCUMENTS FROM THE LENDER’S LEGAL DOCUMENTS WEBSITE, UNLESS OTHERWISE INSTRUCTED.
As the Specific Mortgage Instructions may change while processing the transaction, documents should only be
generated and printed once the file is frozen. Be sure to keep a copy of the final versions of the Specific Mortgage
Instructions, the Mortgage and Cost of Borrowing Statement in the file.
13 - Complete the Transaction
Complete the transaction in the usual manner, using the lender mortgage documents generated by Stewart Assyst Real
Estate. As Stewart Assyst Real Estate is compatible with electronic registrations, the documents and schedules
generated can be included in the mortgage form submitted for registration electronically.
For British Columbia, the Form B generated on Stewart Assyst Real Estate may be filed electronically through the
platform. Alternatively it may be filed through BC Online or by paper at the appropriate Land Title Office.
14 - Electronically Sign the Final Report/Submit
it to the Lender
Once the transaction is closed and the mortgage has been registered, insert the registration number and the date of
registration for the mortgage (and any deed registered on closing) in the Registration section of the Additional
Information tab. Use the on-screen calendar. Then the Final Report can be generated and submitted to the lender.

Stewart Assyst Real Estate powered by TELUS® – User Guide
24
The Final Report must be signed by the lawyer/notary only, using the digital signature issued by the Certificate
Authority designated, then submitted electronically to the lender. The Final Report is not to be sent to the lender
in paper form, or by fax.
Generating, signing and submitting the Final Report closely resembles the process for Preliminary Reports. To generate
the Final Report, click Report on Title in the Documents tab, and click Generate on the right hand side.
A new line will appear below Report on Title. Double-click on the name of the document or click the Open link in the
Documents tab, on the right hand side, and review the Final Report with the Adobe Reader.
When a document is signed the word (Signed) appears next to file name
The date and time the Final Report was generated appear under Document Details, along with the name of the
person who created it.

25
If a new Final Report must be created, delete the existing report by clicking on the Delete button to the right of the
Open button. Then generate a new Final Report.
Once the Final Report is completed and generated, it can be electronically signed and submitted to the lender.
Important: The Final Report can only be electronically signed by a lawyer/notary
To sign the report, the lawyer/notary must first log into Stewart Assyst Real Estate (the report cannot be signed on a
document that was saved outside of Stewart Assyst Real Estate. Then open the document and click anywhere in the
red box on the Report on Title and Security page.
The Document is not Certified dialog box is displayed.
Click Continue Signing to produce the next screen. The Apply Signature to Document is displayed.

Stewart Assyst Real Estate powered by TELUS® – User Guide
26
Lawyers/notaries then insert the password for their digital signature in the Confirm Password box, and click Sign
and Save.
Shortly afterwards, the following appears on screen:
Once the Final Report is signed electronically it is automatically submitted to the lender. The Final Report
Transmitted box in the Status section of the File tab then is automatically checked. A date and time submission
stamp also appears on screen.

27
In most cases the electronic Final Report is all that needs to be sent to the lender, without any enclosures or
attachments.
The only notable exception in Ontario: the stand-alone written guarantee to be signed by a guarantor, because the
changes to the Land Registration Reform Act permitting documents like deeds and mortgages to be signed and
registered electronically, did not include guarantees.
Only one Final Report can be digitally signed per file using Stewart Assyst Real Estate.
To print a copy of the Final Report for the file, use the Print function in the Documents tab. As the Final Report is a
PDF file, it can be saved electronically on a computer, too.
The Final Report Transmitted is the fourth of five status checkpoints listed in the Status section of the File tab in
Stewart Assyst Real Estate.
15 - Close the File
Once work on a file has been completed and the Final Report sent to the lender electronically, the file can be closed on
the Stewart Assyst Real Estate system. Once closed, a file is removed from the list of files. Information is only
available for 6 months after the file is closed.
Before closing the file on Stewart Assyst Real Estate, be sure to retain copies of the information and documents about
the transaction. This is especially true for the final version of the Specific Mortgage Instructions, the Mortgage, and
the Cost of Borrowing statement.
Files are automatically closed on the Stewart Assyst Real Estate system 30 days after the Final Report is sent to the
lender.
To save a document in PDF format, open it with Adobe Reader, choose File, Save As. Then select a destination folder
on your computer.
To print any page, click the print icon at the top of that page.
To close a file, check the File Closed box in the Status section of the File tab.
File Closed is the last of the five status checkpoints listed in the Status section of the File tab.
Stewart Assyst Real Estate powered by TELUS® – User Guide
28
Working with Transaction Reports
About the Transaction Report
The Transaction Report feature of Stewart Assyst Real Estate provides a list of transactions (invoices and/or credits).
Transaction reports are available by clicking the Transaction Report tab in Stewart Assyst Real Estate.
Users are charged a fee each time a new file is accepted. (Acceptance then appears in the description column in the
transaction report).
All transactions are paid or credited by credit card. The relevant credit card information can be inserted in My Profile
for ongoing use, or it can be entered each time a file is accepted using Stewart Assyst Real Estate.
If a file is cancelled after accepting it, lawyers/notaries should contact the Stewart Assyst Real Estate Service Desk.
Transaction reports can be generated at any time. A report period cannot exceed 31 days. Nor can a report be
generated for a date more than 90 days old.
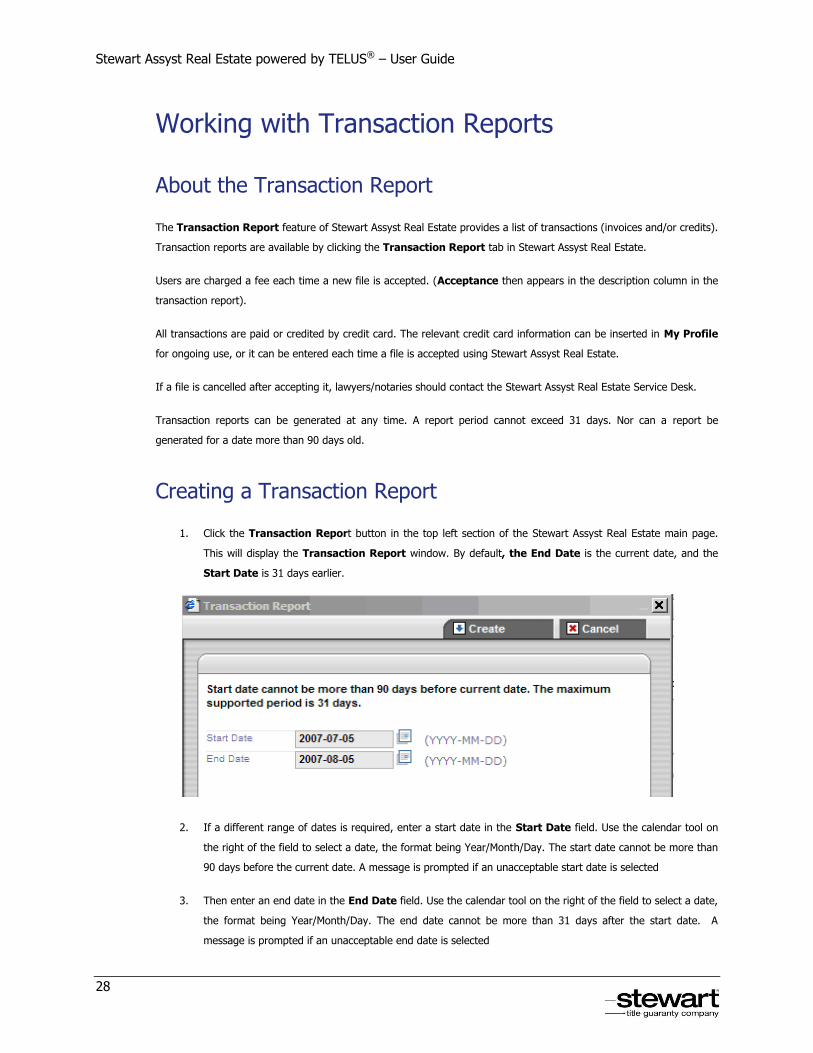
Creating a Transaction Report
1. Click the Transaction Report button in the top left section of the Stewart Assyst Real Estate main page.
This will display the Transaction Report window. By default, the End Date is the current date, and the
Start Date is 31 days earlier.
2. If a different range of dates is required, enter a start date in the Start Date field. Use the calendar tool on
the right of the field to select a date, the format being Year/Month/Day. The start date cannot be more than
90 days before the current date. A message is prompted if an unacceptable start date is selected
3. Then enter an end date in the End Date field. Use the calendar tool on the right of the field to select a date,
the format being Year/Month/Day. The end date cannot be more than 31 days after the start date. A
message is prompted if an unacceptable end date is selected

29
4. To generate a transaction report for the dates chosen, click the Create button. The report is displayed in
HTML format in a Web page in the Internet browser.
Note: In case the report is generated by their legal assistant or another lawyer/notary in the name of the
lawyer/notary they work with, the name of the lawyer/notary must be indicated when generating the transaction
report.
Printing a Transaction Report
The Transaction Report displayed in the Internet browser can be easily printed, by clicking the Print button that
appears on screen.
Saving a Transaction Report
The transaction report displayed in the Internet browser can be easily saved, by using the browser’s Save function.
Stewart Assyst Real Estate powered by TELUS® – User Guide
30
To save a generated report:
1. Minimize the Transaction Report.
2. On returning to the Stewart Assyst Real Estate main screen, click File and then Save As in the Internet
browser. This will open the Save dialog box.
3. Click the Save button to save the transaction report. This will close the Save dialog box and save the report
file on the computer. The Stewart Assyst Real Estate main screen is displayed again.
Reports can be saved in HTML format (Web standard) or text format (here, the layout will be lost).
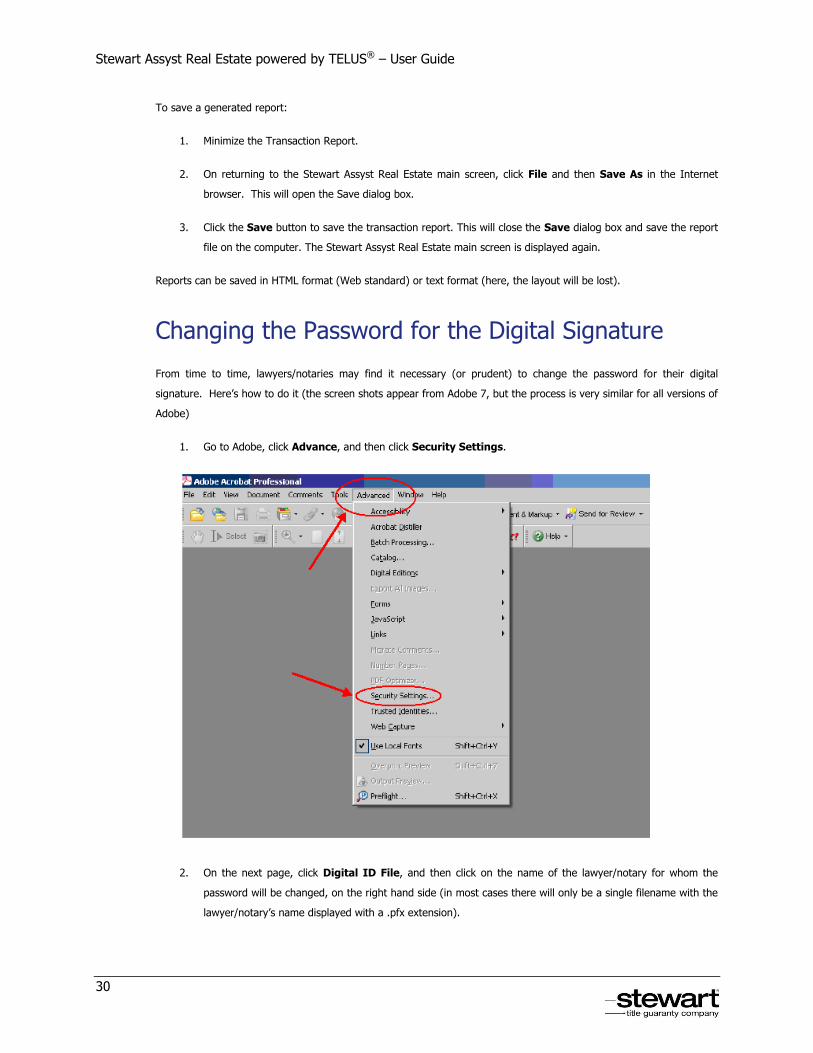
Changing the Password for the Digital Signature
From time to time, lawyers/notaries may find it necessary (or prudent) to change the password for their digital
signature. Here’s how to do it (the screen shots appear from Adobe 7, but the process is very similar for all versions of
Adobe)
1. Go to Adobe, click Advance, and then click Security Settings.
2. On the next page, click Digital ID File, and then click on the name of the lawyer/notary for whom the
password will be changed, on the right hand side (in most cases there will only be a single filename with the
lawyer/notary’s name displayed with a .pfx extension).

31
3. After the file is selected and highlighted, click Change Password which will display the Change Digital ID
File Password.
4. Type the Old Password, the New Password, and the Confirm Password.
5. Click OK.
The password for the Digital Signature has been changed.