user guide circulatory cooling system (version: portable...
TRANSCRIPT
Page 1 of 19
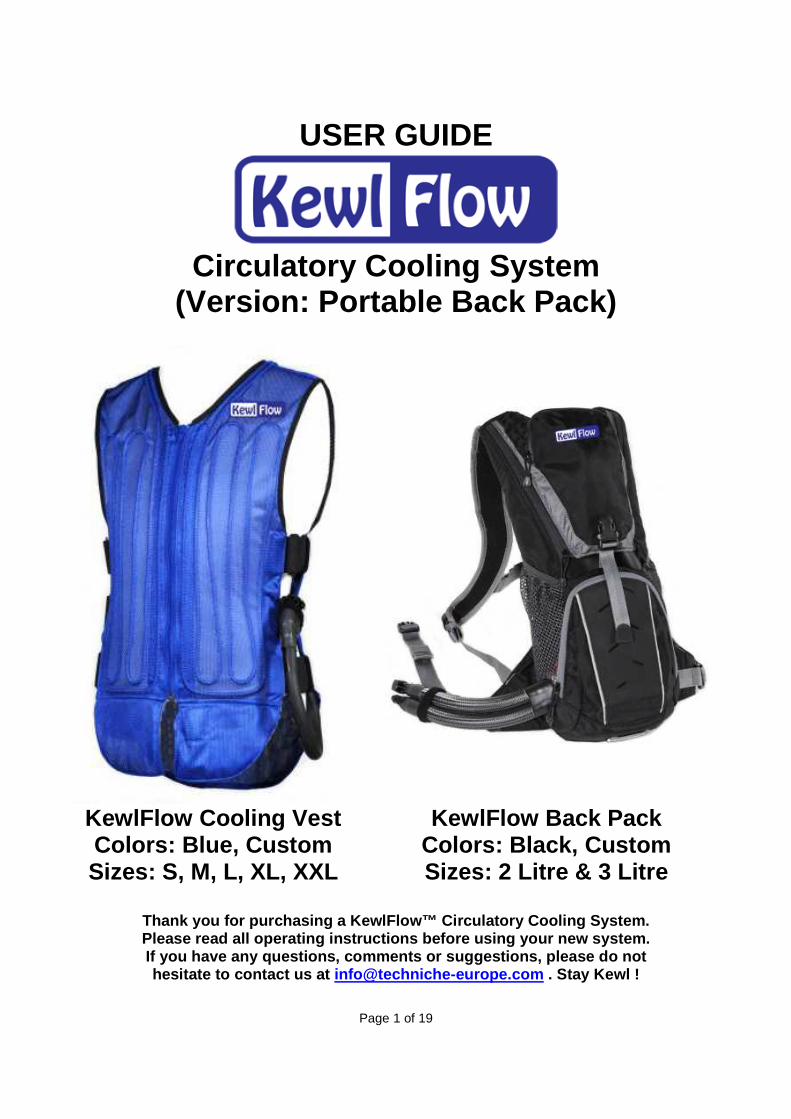
USER GUIDE
Circulatory Cooling System (Version: Portable Back Pack)
KewlFlow Cooling Vest Colors: Blue, Custom Sizes: S, M, L, XL, XXL
KewlFlow Back Pack Colors: Black, Custom Sizes: 2 Litre & 3 Litre
Thank you for purchasing a KewlFlow™ Circulatory Co oling System. Please read all operating instructions before using your new system. If you have any questions, comments or suggestions, please do not hesitate to contact us at [email protected] . Stay Kewl !

Page 2 of 19
KewlFlow™ Power Supply Options Option #1 … Battery Pack (included) Option #2 … 12V Connector (available accessory)
The KewlFlow™ Backpack serves as a source of chilled water for circulation through the KewlFlow™ Cooling Vest. The KewlFlow™ Backpack also doubles as a hydration pack. Together, the KewlFlow™ Backpack and Vest comprise a complete Personal Cooling System.
Key Product Features
• Design features consistent with today’s most popular hydration pack
• 100-ounce (2L) insulated reservoir can be easily removed for cleaning
• Quick and easy to refill with ice and water through a large 3.5-inch diameter external fill port
• Single charge of ice lasts 2 - 4 hours (actual duration dependant on user activity level and
ambient temperature)
• Small, high-efficiency pump circulates ice-chilled water through the cooling vest
• Powered by ten NiMH rechargeable or eight alkaline (single use) AA cells in a quick-change
Power Pack, providing up to eight hours of continuous pump operation per charge
• Rate of cooling can be adjusted to personal preference using the convenient power switch with
LED indicator

Page 3 of 19
• Quick-disconnect fittings for easy connection to the vest
• Also serves as a source of chilled, filtered drinking water (hydration pack) with pump on or off
• Thermally insulated drink tube
• Bite-valve features manual shut-off
• 130-micron inline filter ensures that any particulates in the reservoir are prevented from entering
the drink tube
• Fully adjustable shoulder, waist and sternum straps with quick-snap buckle closures to
comfortably fit all sizes (Waist Belt Extension accessory available to fit larger sizes)
• Back panel with breathable mesh offers enhanced ventilation
• Zippered external top pocket with holder for cell phone or MP3 player includes wire pass-
through for earphones or headset
• Zippered lower pocket with key clip and mesh organizer for on-the-go essentials
• Low-profile design keeps the pack stable and prevents interference with a helmet
• Dimensions: 16.5" x 8" x 4"
• Weight empty (with batteries): 3.07 pounds
Backpack Features List BF Bottom Flap (zippered) BV Bite Valve (for drinking from) DT Drink Tube, thermally insulated to keep your first sip cold FC Fill Cap HL Hang Loop (for storage) HR Hose Retainer (Adjustable Velcro Strap) KC Key Clip MO Mesh Organizer OH Outlet Hose (connects to Vest) PC Power Connector PP Power Pack PS Power Switch with green LED Power-On Indicator PT Pass-Through for Cell Phone or MP3 Player Earphones QD Quick-Disconnect Coupling for Fill Cap RH Return Hose (connects to Vest) RS Reservoir Securing Strap SA Shoulder Strap Adjuster SB Sternum Strap Buckle & Length Adjuster SO Shut-off Lever for Bite Valve SS Shoulder Strap - note that excess length can be rolled up & secured with attached Velcro SV Sternum Strap Vertical Position Adjuster (slides up & down) TF Top Flap (has additional zippered outer storage compartment not shown) VM Ventilated Mesh Back Panels WB Waist Belt, Buckle & Length Adjuster - note that excess length can be rolled up and secured in elastic loop WE Location where Waist Belt Extension is installed (if purchased)
Page 4 of 19
• Weight full (with batteries and reservoir filled to maximum capacity): 8.08 pounds
• Color: Black with grey trim
• Warranty: One year on all materials & workmanship
• Patent pending
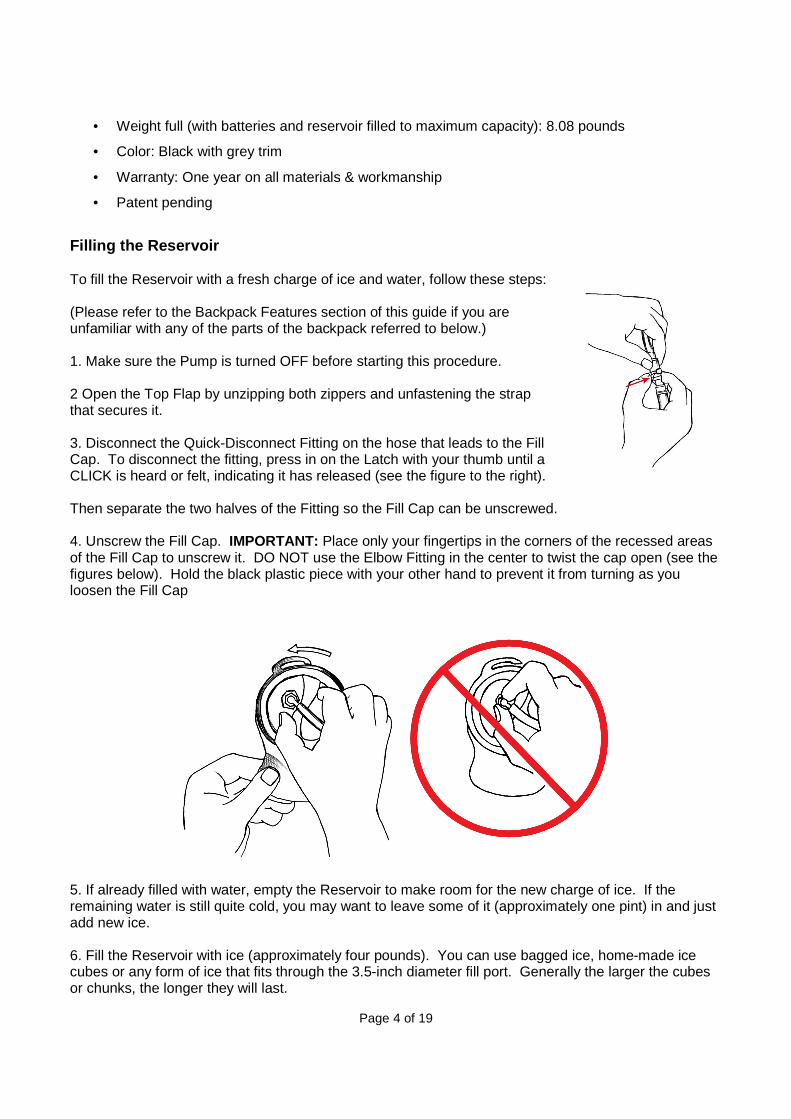
Filling the Reservoir To fill the Reservoir with a fresh charge of ice and water, follow these steps: (Please refer to the Backpack Features section of this guide if you are unfamiliar with any of the parts of the backpack referred to below.) 1. Make sure the Pump is turned OFF before starting this procedure. 2 Open the Top Flap by unzipping both zippers and unfastening the strap that secures it. 3. Disconnect the Quick-Disconnect Fitting on the hose that leads to the Fill Cap. To disconnect the fitting, press in on the Latch with your thumb until a CLICK is heard or felt, indicating it has released (see the figure to the right). Then separate the two halves of the Fitting so the Fill Cap can be unscrewed. 4. Unscrew the Fill Cap. IMPORTANT: Place only your fingertips in the corners of the recessed areas of the Fill Cap to unscrew it. DO NOT use the Elbow Fitting in the center to twist the cap open (see the figures below). Hold the black plastic piece with your other hand to prevent it from turning as you loosen the Fill Cap
5. If already filled with water, empty the Reservoir to make room for the new charge of ice. If the remaining water is still quite cold, you may want to leave some of it (approximately one pint) in and just add new ice. 6. Fill the Reservoir with ice (approximately four pounds). You can use bagged ice, home-made ice cubes or any form of ice that fits through the 3.5-inch diameter fill port. Generally the larger the cubes or chunks, the longer they will last.

Page 5 of 19
7. If all of the water was emptied in Step 5, add approximately one pint (16 ounces) of the coldest water available to the reservoir. Warm water will melt some of the ice, so it is recommended if you are recharging the system and the remaining water is still cold, retain some of it before adding new ice.
Tilting the backpack so the Fill Port is nearly horizontal (as shown in the figure) may help when adding water if you have packed the reservoir to full capacity with ice. A tip on how much water to add: Note that the water is needed solely as the circulating fluid for cooling. If an insufficient amount is added to the new charge, there is a chance the pump may suck in air when the backpack is rotated to the limits of its operating range (see the Range of Operating Positions section of this guide for further definition). Enough water needs to be added to effectively fill all the spaces between the ice cubes or chunks. In general, the smaller the cubes or chunks, the more closely they will pack together, thus requiring less water to fill the spaces in between. Adding more water than is required to fill the spaces between the ice will just melt more of the ice, reducing the time the new charge will provide cooling.
8. Replace the Fill Cap and screw it closed tightly to prevent leaks. IMPORTANT: Place only your fingertips in the corners of the recessed areas of the Fill Cap to tighten it. DO NOT use the Elbow Fitting in the center to twist it closed (see the figures below). Hold the black plastic piece with your other hand to prevent it from turning as you tighten the Fill Cap. When fully tightened, the center bar of the Fill Cap should be in a diagonal orientation with the Elbow Fitting, pointing down and to the right. 9. Reconnect the Quick-Disconnect Fitting halves on the hose to the Fill cap. Press them together until they click, indicating the two halves have latched together. 10. Zip the Top Flap closed and secure it in place with the strap.

Page 6 of 19
Priming the Pump Priming the pump is an essential task that must be performed any time the pump "runs dry," sucks in air and stops pumping water. When the pump is running, if the continuous supply of water from the reservoir to the pump is interrupted, an air bubble may get trapped inside the pump that must be cleared before the pump can resume pumping water. "Priming the pump" is the procedure for clearing that air from the pump by forcing it out of the outlet hose of the backpack, thereby returning the system to proper function. Blowing air into the Bite Valve will create pressure in the Reservoir. That pressure can be used to force water from the Reservoir through the Pump. By pressing open the Quick-Disconnect Fitting on the Outlet Hose, an escape path for any air trapped in the pump is created, allowing the air to be forced out by the pressurized stream of water that follows. The entire pump priming procedure is simple and can be accomplished without even turning on the pump. However, it is advised to turn the pump on once you think you have removed all of the air, to ensure the pump is fully primed and functioning normally before reconnecting the backpack hoses to the vest. Note: The following procedure is best performed outdoors or near a sink or basin to catch the water stream that will come from the outlet hose. The procedure is more easily accomplished when not wearing the backpack, however it can still be performed (in most cases) while wearing the backpack by using the "Alternate Procedure" described on the following pages. Pump Priming Procedure: 1. Disconnect the backpack Outlet and Return Hoses from the vest. Note that the hose with the "Male" fitting is the Outlet (see the Backpack Features section of this guide for further definition). 2. This procedure works best when the backpack has been filled with water to maximum capacity. To fill to capacity, tilt the backpack as shown in the figure to the right: 3. Replace the Fill Cap and connect the Quick-Disconnect Fitting (as described in the Filling the Reservoir section of this guide).
4. Squeeze the Bite Valve in the direction of the slit to open it and blow air into it, inflating the reservoir like you would inflate a balloon. Inflate until the backpack feels tight and firm. 5. Hold the Backpack vertically (as it would be if you were wearing it while standing), but tilt it approximately 45 degrees to the right so the Outlet and Return Hoses are angled upwards as shown in the figure to the right.
Page 7 of 19
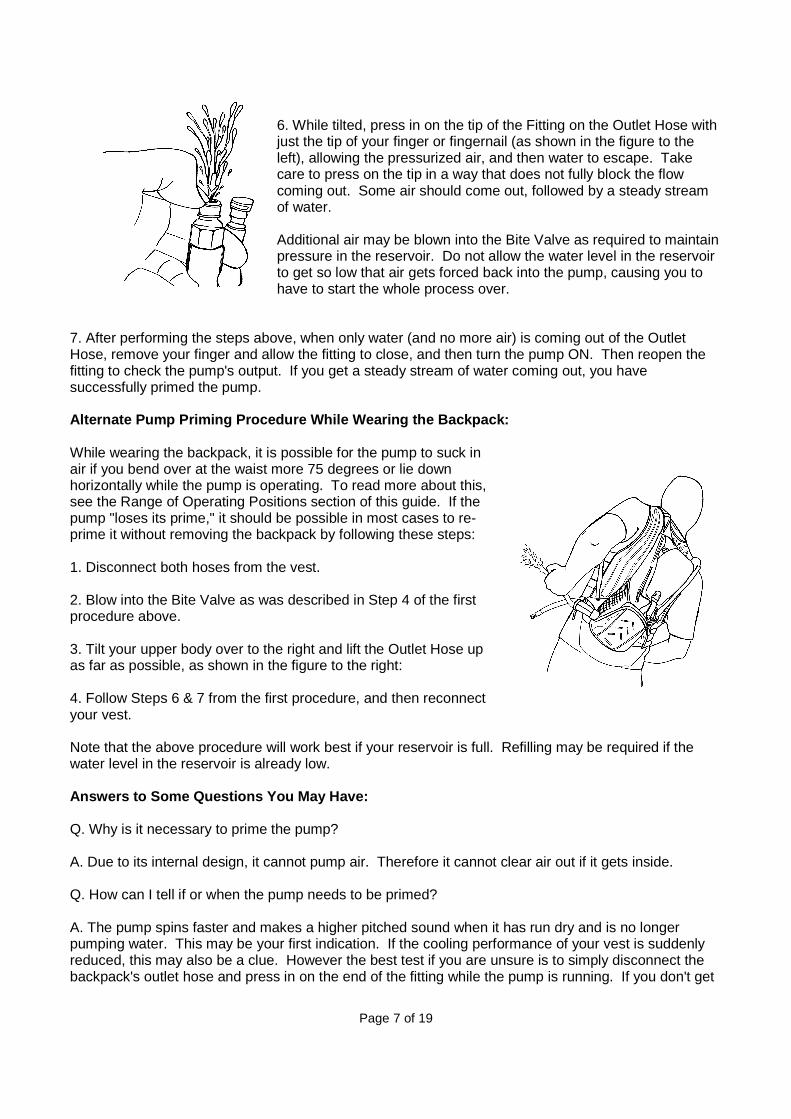
6. While tilted, press in on the tip of the Fitting on the Outlet Hose with just the tip of your finger or fingernail (as shown in the figure to the left), allowing the pressurized air, and then water to escape. Take care to press on the tip in a way that does not fully block the flow coming out. Some air should come out, followed by a steady stream of water. Additional air may be blown into the Bite Valve as required to maintain pressure in the reservoir. Do not allow the water level in the reservoir to get so low that air gets forced back into the pump, causing you to have to start the whole process over.
7. After performing the steps above, when only water (and no more air) is coming out of the Outlet Hose, remove your finger and allow the fitting to close, and then turn the pump ON. Then reopen the fitting to check the pump's output. If you get a steady stream of water coming out, you have successfully primed the pump. Alternate Pump Priming Procedure While Wearing the Backpack: While wearing the backpack, it is possible for the pump to suck in air if you bend over at the waist more 75 degrees or lie down horizontally while the pump is operating. To read more about this, see the Range of Operating Positions section of this guide. If the pump "loses its prime," it should be possible in most cases to re-prime it without removing the backpack by following these steps: 1. Disconnect both hoses from the vest. 2. Blow into the Bite Valve as was described in Step 4 of the first procedure above. 3. Tilt your upper body over to the right and lift the Outlet Hose up as far as possible, as shown in the figure to the right: 4. Follow Steps 6 & 7 from the first procedure, and then reconnect your vest. Note that the above procedure will work best if your reservoir is full. Refilling may be required if the water level in the reservoir is already low. Answers to Some Questions You May Have: Q. Why is it necessary to prime the pump? A. Due to its internal design, it cannot pump air. Therefore it cannot clear air out if it gets inside. Q. How can I tell if or when the pump needs to be primed? A. The pump spins faster and makes a higher pitched sound when it has run dry and is no longer pumping water. This may be your first indication. If the cooling performance of your vest is suddenly reduced, this may also be a clue. However the best test if you are unsure is to simply disconnect the backpack's outlet hose and press in on the end of the fitting while the pump is running. If you don't get

Page 8 of 19
a steady stream of water coming out, you are sure the reservoir is full and your batteries are not low, then you should try re-priming the pump. Q. How does air get into the pump? A. Air is most likely to get "sucked in" when the pump is running and either the level of water in the reservoir gets very low or the backpack is oriented in such a way that the water runs away from the outlet fitting of the reservoir, causing an air bubble to form there. This situation is discussed in the Range of Operating Positions section of this guide. Q. Does the pump need to be re-primed each time I refill the reservoir with ice and water? A. Generally not. If the pump is not running when you pour out the melted ice (water), it will not suck in air, and a small amount of water should remain in the pump. However it is recommended that you not try to shake every last drop of the water out of the reservoir before refilling it, since this could cause the loss of some of the water normally retained inside the pump. Q. Will I need to re-prime the pump after long-term (seasonal) storage? A. Most likely, yes. We recommend that you store the backpack "dry" if it won't be used for several weeks, so when gearing up for the next hot season, it's best to plan on priming the pump and flushing the system to ensure it is clean inside before you begin using it again. Q. I can't seem to get the pump to prime successfully. What should I do? A. Here are few tips that should help:
1. Fill the reservoir as full as you can with water. Don't let the water level in the reservoir get too low. If it gets low enough to let air back into the pump, you will have to start over again.
2. Start with fresh or freshly charged batteries.
3. Be sure to keep the backpack tilted so the hoses are angled upwards approximately 45 degrees
(not vertical) to provide an easy path for the air to leave the pump and flow out of the outlet hose. 4. If additional troubleshooting is required, remove the reservoir (see the Care & Maintenance
section of this guide) and check for any obstructions or kinks in the tubing connecting the reservoir to the pump.
5. If you continue to have difficulty, please contact TechNiche International Customer Support at
[email protected] or call 1-888-823-2665 toll free for additional assistance. Range of Operating Positions The KewlFlow™ Vest and Back Pack can be used in many activities where the wearer may go through a wide range of motion. The backpack will continue to circulate water to the cooling vest during most of those activities, however there are certain positions which may cause an interruption to the flow of water. For example, if the backpack is turned upside-down, an air bubble forms near the outlet of the reservoir, causing the pump (if running at the time) to suck in air. Once this happens, the pump will need to be re-primed (see the Priming the Pump section of this guide for a detailed description of this procedure) in order for water circulation to resume.

Page 9 of 19
This situation can be prevented by turning the pump off when you anticipate that the backpack's tilted position will be outside of the "Green Zone." The Green Operating Zone is defined in the figures below and on the following page:
Green Operating Zone – Rear View As viewed from the back, the Green Operating Zone is the range of motion starting from vertical (standing or sitting up straight) to leaning as far as 75 degrees to the left or right (15 degrees from lying completely on your side).
Page 10 of 19
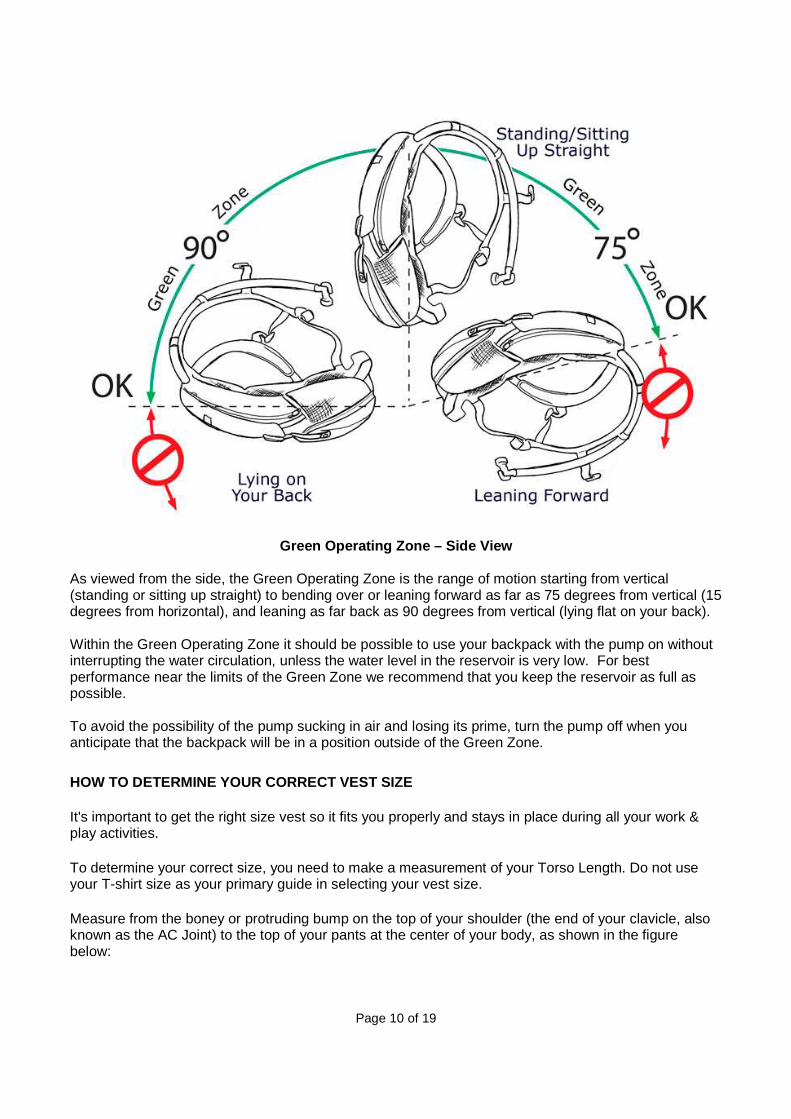
Green Operating Zone – Side View As viewed from the side, the Green Operating Zone is the range of motion starting from vertical (standing or sitting up straight) to bending over or leaning forward as far as 75 degrees from vertical (15 degrees from horizontal), and leaning as far back as 90 degrees from vertical (lying flat on your back). Within the Green Operating Zone it should be possible to use your backpack with the pump on without interrupting the water circulation, unless the water level in the reservoir is very low. For best performance near the limits of the Green Zone we recommend that you keep the reservoir as full as possible. To avoid the possibility of the pump sucking in air and losing its prime, turn the pump off when you anticipate that the backpack will be in a position outside of the Green Zone.
HOW TO DETERMINE YOUR CORRECT VEST SIZE
It's important to get the right size vest so it fits you properly and stays in place during all your work & play activities.
To determine your correct size, you need to make a measurement of your Torso Length. Do not use your T-shirt size as your primary guide in selecting your vest size.
Measure from the boney or protruding bump on the top of your shoulder (the end of your clavicle, also known as the AC Joint) to the top of your pants at the center of your body, as shown in the figure below:

Page 11 of 19
Be sure to follow these instructions when making your Torso Length measurement:
1. Have someone else measure you - Attempting to do this by yourself may cause significant errors in the result.
2. Wear the type of pants or shorts that you plan to use with the vest, and wear them at the height that is "normal" for you. For example, you may wear work pants with a belt at a different height than sports shorts with an elastic waist band.
3. Don't suck in your stomach; doing so may result in a Torso Length measurement that is too short, possibly causing you to order a vest that is too small for you.
4 Use either a fabric (tailor's) tape measure or a piece of string that doesn't stretch. Don't use a metal tape measure; doing so may result in a Torso Length measurement that is too long, possibly causing you to order a vest that is too large for you.
5. Take the measurement on both sides of your body to ensure that the location at the top of your pants is centered. If the two measurements are not equal, you may not be standing straight or measuring to the center of your body at the top of your pants. To correct this, either try again or average the two measurements.
6. Don't wear anything thicker than a thin T-shirt when making this measurement. Wearing a thicker shirt may result in a Torso Length measurement that is too long, possibly causing you to order a vest that is too large for you.
Now compare your measurement to the size chart below to determine your size.
Vest Size Torso Length Chest Waist Small 18" to 20" 30" to 50" 28" to 48"
Medium 20" to 22" 32" to 55" 30" to 52" Large 22" to 24" 35" to 60" 32" to 57"
Extra-Large 24" to 26" 38" to 66" 34" to 62"
ANSWERS TO QUESTIONS YOU MAY HAVE:
Q. How is the Vest supposed to fit and why is it so important to get the right size?
A. The most important thing is to get the right length vest. The elastic straps on the sides provide a very large range of adjustment to accommodate almost anyone's chest & waist size. Please refer to the size chart above to verify that your measurements fit within the range of adjustment for the size vest you plan to order.
If the vest you get is too small, the shirttails won't tuck far enough into your pants. When you raise your arms above your head, they may pull out a little more from your pants. If there is less than 2" of
Page 12 of 19
the shirttails tucked in, they could come out easily, allowing the vest to "ride up" higher on your abdomen. Keeping the lowermost elastic straps tighter will help minimize this.
If the vest you get is too large, the shirttails will tuck fully into your pants and the bottom end of the zipper on the vest may end up below the top of your pants. If the end of the zipper is more than about 1/2" below the top of your pants, the hose coming from the vest won't make it out and over the top edge of your pants unless you pull the vest further up on your body. When you pull the vest up, you will create some slack in the shoulders of the vest. In other words, the shoulders of the vest will no longer be pulled down tightly over the tops of your shoulders. This will happen naturally (even with the correct size vest) when you raise your arms above your head.
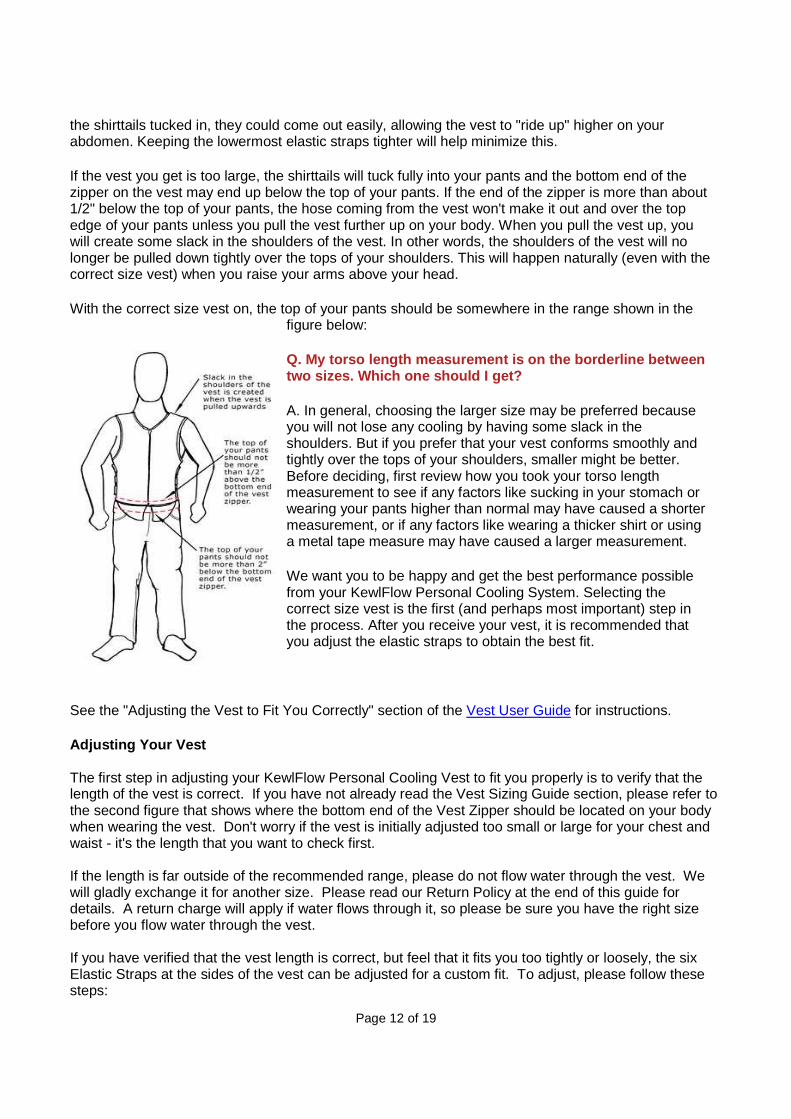
With the correct size vest on, the top of your pants should be somewhere in the range shown in the figure below:
Q. My torso length measurement is on the borderline between two sizes. Which one should I get?
A. In general, choosing the larger size may be preferred because you will not lose any cooling by having some slack in the shoulders. But if you prefer that your vest conforms smoothly and tightly over the tops of your shoulders, smaller might be better. Before deciding, first review how you took your torso length measurement to see if any factors like sucking in your stomach or wearing your pants higher than normal may have caused a shorter measurement, or if any factors like wearing a thicker shirt or using a metal tape measure may have caused a larger measurement.
We want you to be happy and get the best performance possible from your KewlFlow Personal Cooling System. Selecting the correct size vest is the first (and perhaps most important) step in the process. After you receive your vest, it is recommended that you adjust the elastic straps to obtain the best fit.
See the "Adjusting the Vest to Fit You Correctly" section of the Vest User Guide for instructions.
Adjusting Your Vest The first step in adjusting your KewlFlow Personal Cooling Vest to fit you properly is to verify that the length of the vest is correct. If you have not already read the Vest Sizing Guide section, please refer to the second figure that shows where the bottom end of the Vest Zipper should be located on your body when wearing the vest. Don't worry if the vest is initially adjusted too small or large for your chest and waist - it's the length that you want to check first. If the length is far outside of the recommended range, please do not flow water through the vest. We will gladly exchange it for another size. Please read our Return Policy at the end of this guide for details. A return charge will apply if water flows through it, so please be sure you have the right size before you flow water through the vest. If you have verified that the vest length is correct, but feel that it fits you too tightly or loosely, the six Elastic Straps at the sides of the vest can be adjusted for a custom fit. To adjust, please follow these steps:
Page 13 of 19
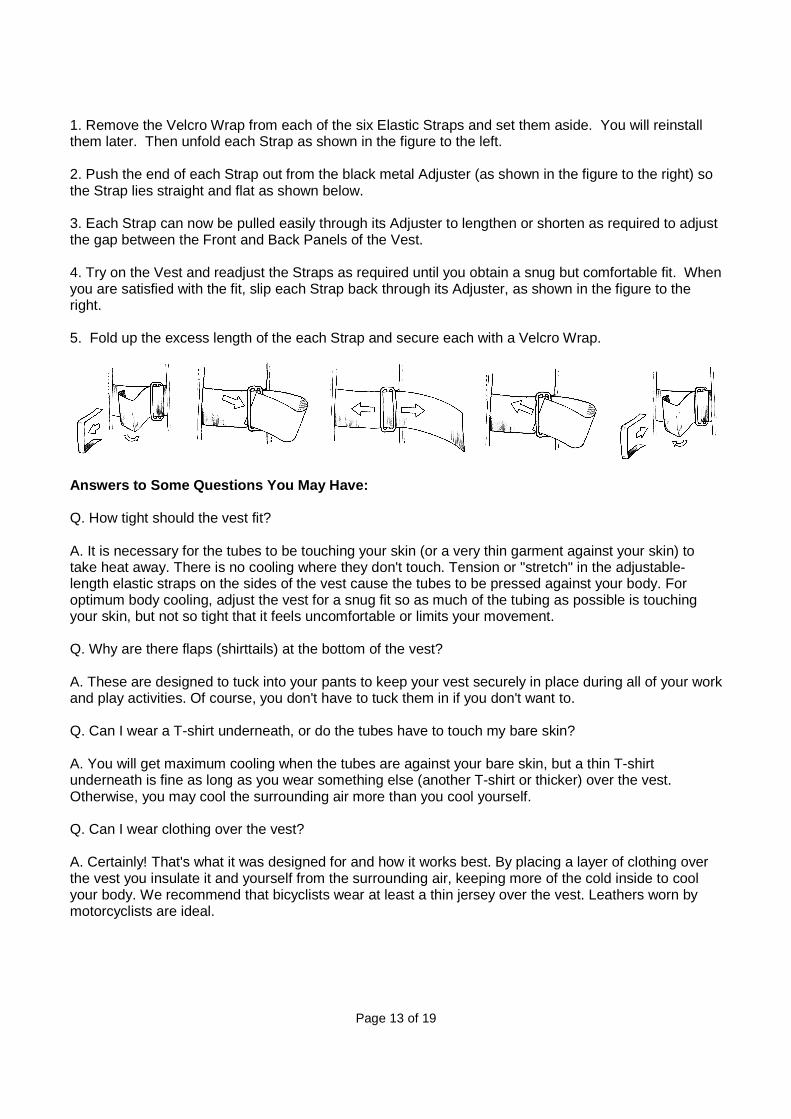
1. Remove the Velcro Wrap from each of the six Elastic Straps and set them aside. You will reinstall them later. Then unfold each Strap as shown in the figure to the left. 2. Push the end of each Strap out from the black metal Adjuster (as shown in the figure to the right) so the Strap lies straight and flat as shown below. 3. Each Strap can now be pulled easily through its Adjuster to lengthen or shorten as required to adjust the gap between the Front and Back Panels of the Vest. 4. Try on the Vest and readjust the Straps as required until you obtain a snug but comfortable fit. When you are satisfied with the fit, slip each Strap back through its Adjuster, as shown in the figure to the right. 5. Fold up the excess length of the each Strap and secure each with a Velcro Wrap.
Answers to Some Questions You May Have: Q. How tight should the vest fit? A. It is necessary for the tubes to be touching your skin (or a very thin garment against your skin) to take heat away. There is no cooling where they don't touch. Tension or "stretch" in the adjustable-length elastic straps on the sides of the vest cause the tubes to be pressed against your body. For optimum body cooling, adjust the vest for a snug fit so as much of the tubing as possible is touching your skin, but not so tight that it feels uncomfortable or limits your movement. Q. Why are there flaps (shirttails) at the bottom of the vest? A. These are designed to tuck into your pants to keep your vest securely in place during all of your work and play activities. Of course, you don't have to tuck them in if you don't want to. Q. Can I wear a T-shirt underneath, or do the tubes have to touch my bare skin? A. You will get maximum cooling when the tubes are against your bare skin, but a thin T-shirt underneath is fine as long as you wear something else (another T-shirt or thicker) over the vest. Otherwise, you may cool the surrounding air more than you cool yourself. Q. Can I wear clothing over the vest? A. Certainly! That's what it was designed for and how it works best. By placing a layer of clothing over the vest you insulate it and yourself from the surrounding air, keeping more of the cold inside to cool your body. We recommend that bicyclists wear at least a thin jersey over the vest. Leathers worn by motorcyclists are ideal.

Page 14 of 19
KewlFlow™ Personal Cooling System Specification & F act Sheet
What is it?: The KewlFlow™ Personal Cooling System is a self-contained highly portable personal
cooling solution combining a lightweight, breathable zippered vest through which ice-chilled water is
circulated from an insulated backpack via a high efficiency battery-powered pump. It’s an affordable,
easy-to-use system that creates a microclimate of cool that easily fits under a T-shirt, jacket or leathers,
providing cooling comfort in a wide variety of activities while allowing maximum mobility.
What does it do?: The System cools the wearer’s upper body, providing long-term relief from heat
stress, even when worn under heavy, insulating clothing (such as motorcycle leathers) and is sure to
appeal to a wide variety of people who work and play in the heat, for whom no other practical &
effective personal cooling solution exists. Economical to operate using ordinary ice and AA batteries in
a quick-change power pack, the system also serves as a source of on-demand, chilled, filtered drinking
water.
Features and Benefits:
• Creates a personal "microclimate of cool" around the wearer’s upper body
• Utilizes NASA-developed space-age technology
• Similar technology is currently used by U.S. Armed Forces helicopter pilots & tank drivers, but those
systems cost $2,000+, and often compromise user mobility
• Easy and convenient to recharge using ordinary ice
• Single charge of ice lasts for 2 - 4 hours (actual duration dependant on user activity level and
ambient temperature)
• Economical to operate - uses only four pounds of ice and rechargeable batteries.
KewlFlow Vest Specifications:
• Thin, lightweight & comfortable - can be worn under a close-fitting shirt, jacket or leathers
• Made of fast-wicking, quick-drying, highly breathable mesh fabric
• Cold water is circulated through a network of more than 50 feet of flexible micro-tubing
• Does not rely on evaporation for cooling - works inside of sealed garments
• Available in small, medium, large and extra large sizes
• Six size-adjustable elastic straps provide a custom fit for a large range of chest and waist sizes,
allowing full range of motion
• Durable, hand washable
• Easy to take on/off with zippered front
• Shirttail design keeps vest in place during activity

Page 15 of 19
• Quick-disconnect fittings on a single, flexible, insulated hose for easy connection to backpack
• Warranty: One year on all materials and workmanship
• Patent pending
KewlFlow Backpack Specifications: • Based on the most popular hydration pack brand
• One hundred-ounce (2L) insulated reservoir can be easily removed for cleaning
• Quick and easy to refill with ice and water through a large 3.5-inch diameter external fill port
• Small high-efficiency pump circulates ice-chilled water through the cooling vest
• Powered by ten NiMH rechargeable or eight alkaline (single use) AA cells in a quick-change Power
Pack, providing up to eight hours of continuous pump operation per charge
• Rate of cooling can be adjusted to personal preference using the convenient on/off switch with LED
indicator
• Quick-disconnect fittings for easy connection to vest
• Bite-valve features manual shut-off
• 130-micron inline filter ensures that any particulates in the reservoir are prevented from entering the
drink tube
• Fully adjustable shoulder, waist and sternum straps with quick-snap buckle closures to comfortably
fit all sizes (Waist Belt Extension accessory available to fit larger size wearers)
• Back panel with breathable mesh offers enhanced ventilation
• Zippered external top pocket with holder for cell phone or MP3 player includes wire pass-through
for earphones or headset
• Zippered lower pocket with key clip and mesh organizer for on-the-go essentials
• Low-profile design keeps pack stable and prevents interference with helmet
• Dimensions: 16.5" x 8" x 4"
• Weight empty (with batteries): 3.07 pounds
• Weight full (with batteries and reservoir filled to maximum capacity): 8.08 pounds
• Color: Black
• Warranty: One year on all materials & workmanship
• Patent pending
Available Accessories:
• Extension Hose allows use of the KewlFlow Cooling Vest without wearing the backpack (for use in
vehicles, wheelchairs, etc.), available in two lengths: 3.5 and 6.5 foot
Page 16 of 19
• 8 foot long 12 Volt Power Cord plugs into the accessory power outlet of your vehicle, eliminating the
need for batteries in the backpack
• Waist Belt Extension available to fit larger sized users
What is the KewlFlow Personal Cooling System and wh at does it do? The KewlFlow Personal Cooling System is composed of a lightweight Cooling Vest through which ice-chilled water is circulated from an insulated Backpack via a battery-powered pump. The system provides the wearer relief from heat stress, even when worn under heavy, insulating clothing and is sure to appeal to a wide variety of people who work and play outdoors, for whom no other practical & effective personal cooling solution exists.
Who will benefit from using the KewlFlow Personal C ooling System? In general, anyone who works or plays in a hot environment, particularly those people who need to be mobile, active and unencumbered by a heavy or wet cooling garment. Some specific examples are:
- Athletes of all types, including auto racers - Outdoor adventurers and tropical tourists - Motorcycle riders, especially those who wear jackets or full (racing) leathers - Bicycle riders, especially mountain bikers and long-distance riders - Construction and event workers, costumed mascots and security guards - Welders, coal miners, foundry workers and other "hot" occupations - Many Others !
What makes the KewlFlow Cooling Vest better than th e other water-cooled garments on the market? As part of our product development process we have tested most of the competitors' offerings and strongly feel we have a vastly superior product in terms of cooling effectiveness, ease of use (particularly taking on/off), durability and value.
How do I fill or "recharge" the system? Simply open the zippered flap on the back of the backpack, release the quick-disconnect fitting on the hose and unscrew the fill cap. Then add four pounds of ice plus one pint of water. Screw the cap back on, reconnect the hose, close the flap and you are ready to go! You can use store-bought ice, home-made ice cubes or any form of ice that fits through the 3.5 inch diameter fill port. See the "Filling the Reservoir" section of our Backpack User Guide for additional details.
How long will the ice last? The ice can last as long as four hours or more, or can melt in as little as 90 minutes in extreme cases. The actual duration depends on many factors which can be divided into two groups: How much "cold" you start with and how rapidly heat is absorbed.
It takes more heat to melt a pound of ice just removed from a deep freezer than a pound of ice that has been sitting out and is beginning to melt, thus the colder the ice you start with, the better. When you add water to that ice (which is necessary for circulation through the pump and vest), it "warms up" the ice, so adding only a minimal amount of the coldest water possible (ice water) is best.

Page 17 of 19
More body heat is generated by a person rigorously exercising than at rest. More heat will be absorbed when the vest is worn tightly against bare skin as compared to loosely over a shirt. In addition, more heat is absorbed from the surrounding environment when the ambient temperature is high and there is nothing worn over the vest. This is why we recommend wearing a lightweight windbreaker-type jacket over the vest to minimize loss of cold to the atmosphere.
The heat absorbed by the water in the vest is in turn, absorbed by the ice, causing it to slowly melt. You will obtain the best cooling performance if you start with the coldest ice, the coldest and least amount of water and minimize your loss of "cold" to the atmosphere by wearing a lightweight garment over the vest.
How long will the batteries last? The water circulation pump in the backpack can run for eight hours or more continuously on a fully charged set of batteries. If run intermittently, the total run time can be even longer. When required, the batteries can be easily changed by removing the quick-change Power Pack (see the "Changing the Batteries" section of our Backpack User Guide).
Won't this feel like pouring ice water on my skin? No, not at all. When the water is circulating, the temperature inside the tubing is 32° F, but the out side of the tubing is approximately 60° F. There is a "t emperature gradient" through the wall of the tubing which controls the heat transfer rate from your skin to the water. The 60° F tubes feel cool against y our skin, not cold.
How do I control the temperature or amount of cooli ng? Use the Power Switch on the backpack's left shoulder strap to turn the pump on & off as needed. See the Backpack Features for more detail. As a point of reference, the volume of water in the vest is cycled through the system approximately four times per minute when the pump is on.
How do I make sure I order the right size vest? See the Vest Sizing Guide on our website. If you do end up receiving a vest that is the wrong size, we will gladly exchange it for you.
How tight should the vest fit? It is necessary for the tubes to be touching your skin (or a very thin garment against your skin) to take heat away. There is no cooling where they don't touch. Tension or "stretch" in the adjustable-length elastic straps on the sides of the vest cause the tubes to be pressed against your body. Adjust the straps so that as much of the tubing as possible is touching your skin, but not so tight that it feels uncomfortable or limits your movement. See the "Adjusting Your Vest" section of our Vest User Guide for information on adjusting the vest to fit you correctly.
Why are there flaps (shirttails) at the bottom of t he vest? These are designed to tuck into your pants to keep your vest securely in place during all of your work & play activities. Of course, you don't have to tuck them in if you don't want to.
Can I wear a T-shirt underneath, or do the tubes ha ve to touch my bare skin? You will get maximum cooling when the tubes are against your bare skin, but a thin T-shirt underneath

Page 18 of 19
is fine as long as you wear something else (another T-shirt or thicker) over the vest. Otherwise, you may cool the surrounding air more than you cool yourself. See the FAQ for more information about wearing clothing over the vest.
Can I wear clothing over the vest? Certainly! That's what it was designed for and how it works best. By placing a layer of clothing over the vest you insulate it and yourself from the surrounding air, thus keeping more of the cold inside to cool your body. We recommend that bicyclists wear at least a thin jersey over the vest. Leathers worn by motorcyclists are ideal.
Isn't that hose coming from the vest a little large in diameter to fit under my jacket? Inside the sponge rubber insulation are eight 3/16" diameter tubes which when "flattened" lay nearly side-by-side, thus reducing the thickness of the bundle of hoses to about one-half of what you see. The sponge rubber insulation additionally ensures user comfort where the hoses exit from under your jacket.
I wear one-piece racing leathers. How do I get the hoses to the outside? You will have to cut a "buttonhole" in your leathers at about waist level. An upholstery shop that makes leather seat covers can probably do this for you. The vertical slit should be about 2-1/4" high. On the inside, back up the slit with a 3" high by 1" wide piece of Velcro Loop (the soft part, not the scratchy) material. In winter, when not using the cooling vest, you can simply place a 3" x 1" piece of Velcro Hook material over the Velcro Loop piece before putting on your leathers to ensure that the slit stays shut. We can provide the pair of Velcro pieces with your order if you tell us you wear racing leathers.
Will the KewlFlow Vest work with other companies' c oolers? If you are an auto racer and already have a chilled water supply but would like to use our vest, then yes, certainly that's possible. Please contact us to purchase the mating quick-disconnect fittings to adapt your chilled water supply to our vest. Simply remove the existing fittings from your chilled water supply source and replace with ours and you should be ready to go!
Will the KewlFlow Vest work with a HANS device? Yes, it should work fine. We purposely routed the tubes connecting the front of the vest to the back as close as possible to the neck and not on the tops of the shoulders so that a HANS device would not pinch the tubes closed.
What maintenance is required? Only periodic cleaning of the water circulation system. See the “Care & Maintenance" section of the Vest User Guide and Backpack User Guide for more information.
Vriesenrot 14
9200 Dendermonde Belgium
