user guide android log into one of your account, go back to the menu and choose the platform you...
TRANSCRIPT

User Guide Android
MWM - edjing, 54/56 avenue du Général Leclerc 92100 Boulogne-Billancourt - FRANCE
Android Android
First Steps 3
Accessing your music library 4
Loading a track 7
Creating your playlists 9
Managing your transitions 11
Editing the BPM 13
Adjusting Audio Settings 15
Using the pre-cueing 18
Using FX and EQ for an effective mix 20
Managing the Automix 23
Activating the Automix 23
Managing my list 24
Changing the settings of the Automix 25
Managing my mixes 27
Saving my mixes 27
Sharing my mixes 29
Changing my skin 31
Contact 32
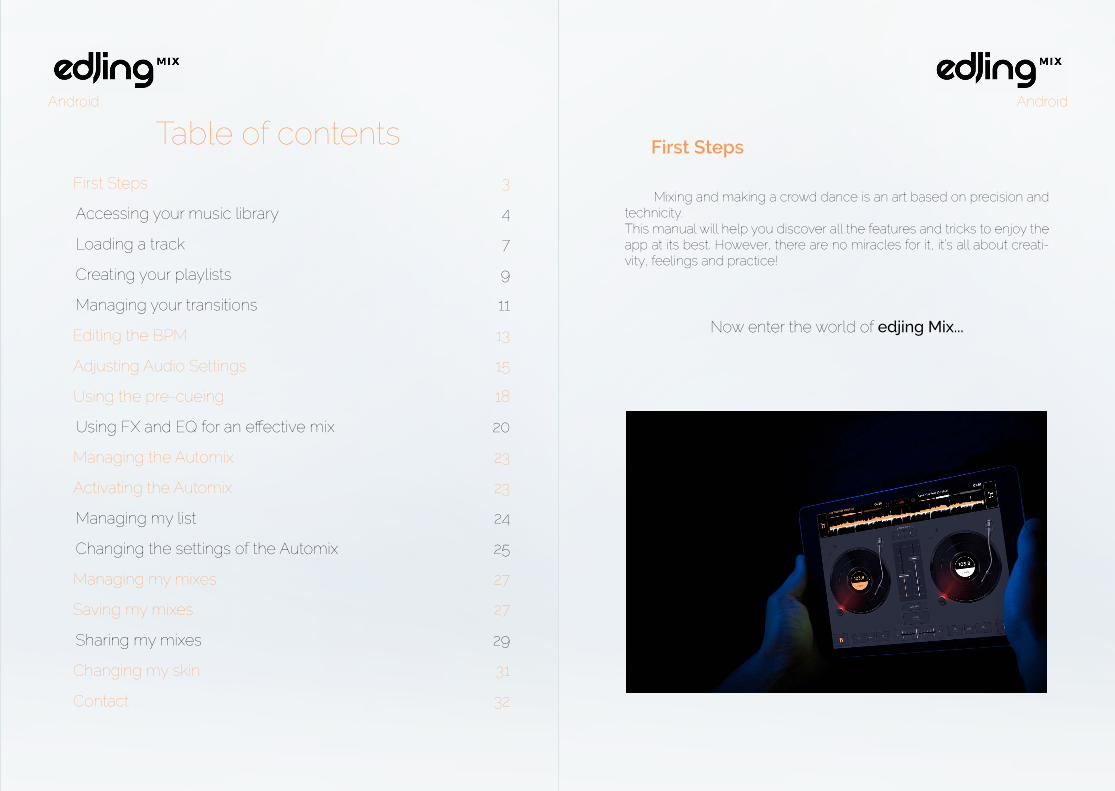
Table of contents First Steps
Mixing and making a crowd dance is an art based on precision and technicity.This manual will help you discover all the features and tricks to enjoy the app at its best. However, there are no miracles for it, it’s all about creati-vity, feelings and practice!
Now enter the world of edjing Mix...
Android Android
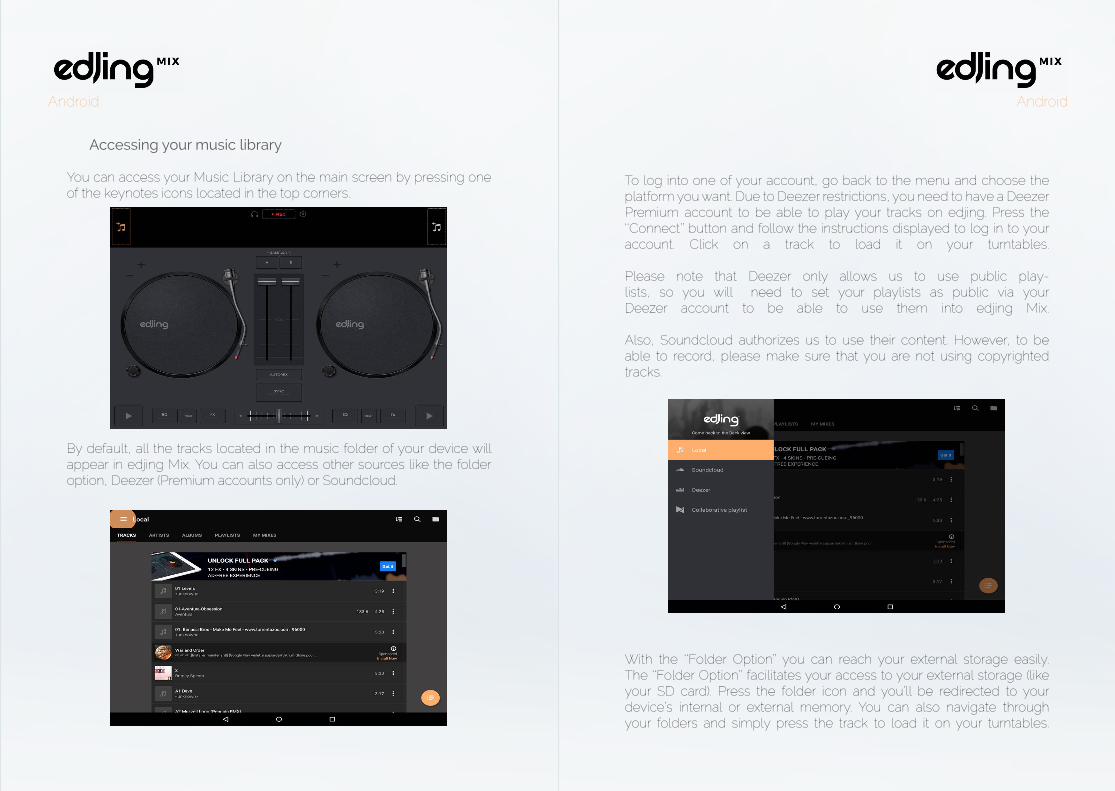
Accessing your music library
You can access your Music Library on the main screen by pressing one of the keynotes icons located in the top corners.
By default, all the tracks located in the music folder of your device will appear in edjing Mix. You can also access other sources like the folder option, Deezer (Premium accounts only) or Soundcloud.
To log into one of your account, go back to the menu and choose theplatform you want. Due to Deezer restrictions, you need to have a DeezerPremium account to be able to play your tracks on edjing. Press the‘‘Connect’’ button and follow the instructions displayed to log in to youraccount. Click on a track to load it on your turntables.
Please note that Deezer only allows us to use public play-lists, so you will need to set your playlists as public via your Deezer account to be able to use them into edjing Mix.
Also, Soundcloud authorizes us to use their content. However, to beable to record, please make sure that you are not using copyrightedtracks.
With the ‘‘Folder Option’’ you can reach your external storage easily.The ‘‘Folder Option’’ facilitates your access to your external storage (likeyour SD card). Press the folder icon and you’ll be redirected to yourdevice’s internal or external memory. You can also navigate throughyour folders and simply press the track to load it on your turntables.

Android Android
The magnifying glass allows you to make a global search.The ‘‘Sort By’’ option (on the left) enables you to sort your tracks byalphabetical order, BPM or duration.You can access the queue by pressing this button : . The queue isthe temporary playlist of your mix session. It will be cleared once youhave closed the app.Once your track is loaded, press play and enjoy the music! To add asecond one to the other deck, repeat the process by pressing the otherkeynote icon.
You are now ready to mix!
Loading a track
You can’t mix without having first loaded a track to your deck. Thus, load some tracks to your decks from the playlists you created.Click on the keynote icon to be redirected to your library.By clicking on the orange keynote icon, the track will be added to deck A, by clicking on the white one, the track will be added to deck B.
To reach your playlists, go to your ‘‘Local’’ library and then click on ‘‘Play-lists’’. Then, select the playlist you made for your DJ set.
Finally, choose the track you want to load to the deck with a simple click.

Android Android
Creating your playlists
As a good DJ, you first need to create your playlists to ensure the smoo-thness of your mix and keep the music uninterrupted.
To do so, click on the keynote icon near the deck of your choice to ac-cess your music library. Click on the 3 dots icon on the right side of your chosen track, press «Add to a playlist», and click on «Create» to name your first playlist.
Name your playlist, press ‘‘Ok’’. Your playlist is created and you can add as many songs as you want to play in your DJ set.
Now your tracks are loaded. We advise you to load tracks that have no more than a 30 BPM lapse in order to mix and beatmatch smoothly.
For further information, you can consult our guide on how to edit the BPM.
It’s time to play the first track. Simply click on the ‘‘Play’’ button on thedeck of your choice. You can record your mix by clicking on the red ’’REC’’icon. It will start recording your mix. Click for a second time on the ’’REC’’button to stop your recording.On the top of your screen, the spectrums and the time are displayed.Spectrums embody the track’s frequency (the track’s shape). Then, it willbe easy for you to beatmatch your tracks.
After editing your mix, it will be automatically saved in your recordings library called «My mixes». To listen to a mix, you just have to go to the «Menu». Then choose «My mixes» and click on the mix of your choice.

Android Android
Managing your transitions
To make a transition you will need to move the crossfader fromthe master deck, the deck on which the track is playing to theslave deck, the deck on which you want to play the next track.
To prepare your transition, you will need to use the crossfader properly.Hence, slide the crossfader towards the master deck (where the track isplaying).
To ease your transition, start playing the slave deck (the second track)before crossfading from one track to another.The crossfader is on the left, you will not hear the second track on yourfinal mix. However, the beats are not matched.
Last but not least, the «SYNC» button (on the main screen) enables you to synchronize the BPM of both tracks on the turntables.Now, both decks are playing and the beats of the slave deck follow thebeats of the master deck.
If you want to set the BPM manually, please conuslt our guide on howto edit the BPM .
You can also add the track to the queue, which will be the temporary playlist of your session.
By a long click (3 seconds) on a track you access the multiselection, that enables you to add several tracks at once to the playlist of your choice.

Android Android
You are now ready to make your transition!
Slide the crossfader to the second deck. Now the slave deck has be-come the master deck and the music only comes from this source (on the right).
Load a track on the other deck and keep mixing! Use FX and EQ as you feel. When you’re done, click on the ‘‘Record’’ icon to end your mix. Save it and share it with your friends!
Tips:
You can use the ‘‘Loop’’ effect for smoother transitions. It lets you select a section of the track and play it over and over again.As the ‘‘SYNC’’ is on, you can loop one of the tunes and both will stay beatmatched. For longer loops, use the ‘‘in’’ (start of your loop) and ‘‘out’’ (end of your loop) buttons.By default, FX are synchronized with the beat but you can disable this option in the settings.You can loop the master deck or the slave deck, it depends on how you want to mix your tracks.
Editing the BPM
After you’ve launched your tracks on the turntables, press the center of the same deck to open the BPM menu.The first and easiest way to increase your BPM is to press the ‘‘Pitch’’ but-ton and hold your finger on it.
Move the cursor around the circle until you’ve reached the adequate BPM. Then, simply remove your finger. The new value will automatically be set as the default BPM. To go back to the initial BPM press the circled arrow. If you’re satisfied, press the cross to go back to the turntable.
If you want to set a temporary BPM, press the ‘‘Edit’’ button.While your track is playing, tap four times in the middle of the vinyl at the BPM you’d like to apply to your track.Wait a few seconds until the app processes the information. The new BPM will then be saved and press the ‘‘√’’ button if you’re satisfied. If you want to try again press the ‘Reset’ button. Finally, press the ‘‘/2’’ or the ‘‘x2’’ to divide or multiply by two the initial BPM of your track.

Android Android
A different way to edit, momentarily, the BPM of your track is to keep your finger on the pitchbend buttons ( ‘‘+’’or ‘‘-’’).They allow you to progressively increase or decrease the BPM of your track. It will go back to normal as soon as you remove your finger.
Please note that the ‘‘Key Lock’’ option helps you saving the initial tonality despite the variation of the pitch. It is turned on automatically. You can still turn it off but it will distort the sound of your track.
Last but not least, the ‘‘SYNC’’ button enables you to synchronize the BPM of the two tracks on the turntables. As already mentioned, we ad-vise you to synchronize tracks that have a difference of +/- 30 BPM. Otherwise, the synchronization will not sound clear.
The position of the crossfader defines which BPM will be applied to both tracks. If the crossfader is on the left side the BPM applied to both tracks will be the BPM from the track on the left turntable. Same logic if the crossfader is on the right side.
Finally, if the crossfader is positioned in the middle, the BPM applied to both tracks will be the BPM of the last track you loaded on the turntable.
Adjusting Audio Settings
To reach the ‘‘Audio Settings’’ first click on the ‘‘Settings’’ icon on the top of the main screen.Then click on ‘‘Audio settings’’. These settings enable you to experience different DJ Mix approaches.
The Vinyl mode lets you choose how you want to visualize the vinyl on your decks. The ‘‘Relative’’ mode disables the synchronization between the vinyl’s movements with the track’s spectrum, only. If you choose the ‘‘Absolute’’ mode, your vinyl’s movements will be the same as those of a real one in terms of position and speed. Hence, you will not be willing to see cue points on the vinyl when in rela-tive mode. You can activate this option only if you select the ‘‘Absolute’’ mode.

Android Android
The ‘‘Time display’’ sets how the track’s duration is displayed above the spectrum of your track. Choose the option you like the most: ‘‘Elapsed’’ or ‘‘Remaining’’.
The ‘‘Crossfader curves‘‘ settings gives you the opportunity to modify the type of transition. The orange curve indicates the track loaded on the ‘‘master’’ deck and the grey curve represents the track on the ‘‘slave’’ deck. The crossing point stands for the time your ‘‘slave’’ deck will substitute the ‘‘master’’ deck. Thus, for a slow transition, ‘‘Dipped’’ is adequate. On the other hand ‘‘Scratch cut’’ is more appropriate for fast and clipped transitions.
The ‘‘Slip mode’’ determines how the spectrum and your track reacts when you touch the vinyl.Once activated, the track’s spectrum will continue to play on even if you keep holding on the vinyl. If you remove your finger, the track will play at the default time.If the option is not activated, the track will stop as long as your finger is on the vinyl.
The ‘‘Pitch Interval’’ is the interval you want to set between your original BPM and your customed one (lower or higher).
By default, the ‘‘Pitch Interval’’ is set at 30%. It is the maximum interval we advise to adopt to preserve the audio quality of your tracks. However, this depends on the kind of mix you want to play.
When the ‘‘Automatic FX synchronization’’ is enabled, the tracks’ beats will be automatically synchronized while using these FX. If they are di-sabled, you will have to set up these FX manually.
The ‘‘Split audio output’’ setting enables you to divide the audio output into two parts in order to use the pre-cueing and to adjust your transition.For further information, consult our guide on the pre-cueing.

Android Android
Using the pre-cueing
During your live set, you often want to preview your next track in your headphones while the current is still playing, this task is called: pre-cueing. This set-up divides the sound between your speakers and your head-phones. While a track is coming out of your speakers, you will have the possibility to hear the next track in your headphones and prepare your mix. By hearing the two tracks in parallel, you’ll be able to launch your transition at the perfect moment and to make successful DJ sets.
To be able to use this feature, you will need:
- the full version of edjing Mix.- 1 split cable (3,5 mm jack stereo male to two 3,5 mm jack mono female).- Speakers- Headphones
Follow these steps:
1. Plug the main cable into your device.2. Plug the left entrance into the speakers.3. Plug the right entrance into your headphones.
Then, load one song on each deck. Activate the pre-cueing by clic-king on the headphones at the top of your screen, once activated the icon turns orange. By default, you’ll be able to hear the track of deck A in your speakers and the track of deck B in your headphones.
When you put the crossfader on one side, the deck on this side be-comes the master deck, you will be able to hear the track loaded on it in your speakers and the one of the slave deck in your headphones.
And now, Play on!

Android Android
Using FX and EQ for an effective mix
A wide range of FX are available. Use them to customize your final mix, its shape, its movements and dynamics. You can access them by clic-king on the FX button at the bottom of each deck.It’s also more fun when the sound texture is changed during a mix.
The EQ is your best ally to change the frequencies during your mix. It helps you making smoother transitions. You can access them by clicking on the EQ button at the bottom of each deck.Four types of EQ are available. You can dispose of three types of frequencies: low (bass), mid, high (treble) and the gain.
Please note that all the effetcs won’t be unlocked in the free version. But you can try them out for 15 minutes before purchasing them.
To unlock the full version of edjing, several options are available:
- You can purchase the full version directly on our ‘‘Store‘‘. To do so, go to the app settings and click on ‘‘Store‘‘. A page will open. Click on the sale price and follow the purchase instructions.
- You can also unlock features by getting free points. To do so, go to the app settings and click on ‘‘Store‘‘. A page will open. Click on ‘‘Get for free‘‘. It will bring you to a new window with a list of rewarded actions to get free points and unlock DJ FXs!

Android Android
Managing the Automix
Activating the Automix
With the Automix feature, edjing Mix enables you to automatically play your sets.
First step : click on the ‘‘Automix’’ button.
The Automix will be launched and manage the transitions automatically. However, you can manage them manually by clicking on ‘‘Start the tran-sition’’.
You can also access the sampler by clicking on the ’’Sampler’’ button of the deck of your choice to use the samples we recorded for you.
By default, the sampler is not linked to your crossfader.
Last but not least, you can link your sampler to the crossfader to be able to manage your sample. You can activate the option ’’Link the sampler to the crossfader’’ by ticking the button under the sampler. Now the sampler is connected to the deck of your choice, and you can use it when the crossfader is on this deck’s side. Meaning, you’ll hear the sounds of the sampler only when the crossfader is on this deck’s side.
If you don’t want the sampler to be linked to one deck, simply untick the linking option and you will be able to use the sampler and hear its sounds over the tracks you are playing, independently from the crossfader posi-tion,
Let’s be creative!

Android Android
Managing my list
To add a track to your Automix list, the easiest way is to press the key-note button in the middle of the screen and navigate through your tracks whether in your local Music Library or via your Soundcloud or Deezer Premium account. The tracks will be inserted where the keynote button is placed.
To move a track within your Automix list, hold your finger on the album cover for at least 3 seconds and drag it to the right or to the left until you find its adequate position. The order of the whole queue will be ove-rhauled.Same thing to delete a track from your list. Keep your finger for at least 3 seconds on the album cover and drag the track up or down until it disap-pears. The order of the whole list will be overhauled.
Changing the settings of the Automix
To manage the transitions between each of the tracks, go to the Automix settings by pressing the gear icon on the right-hand corner at the top of the screen.
To manage the transitions’ duration, click on it in the settings. The transi-tions duration determines the time during which your track will overlap the next one.
Move the cursor along the line between 1 and 60 seconds and press ‘‘OK’’.
To manage the beginning of the transition, press the ‘‘Trigger before the end’’ button in the settings. It defines the moment when, in your track, you want to start the transition towards the next one.
Android Android
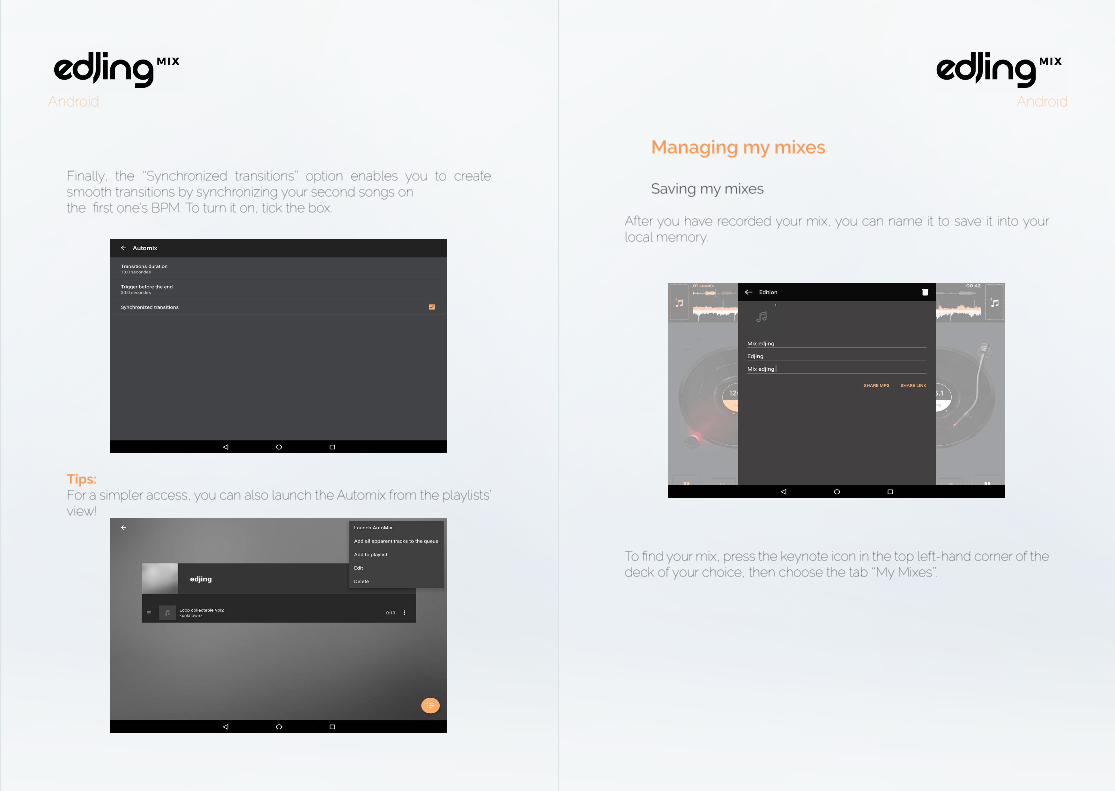
Finally, the ‘‘Synchronized transitions’’ option enables you to create smooth transitions by synchronizing your second songs onthe first one’s BPM. To turn it on, tick the box.
Tips: For a simpler access, you can also launch the Automix from the playlists’ view!
Managing my mixes
Saving my mixes
After you have recorded your mix, you can name it to save it into your local memory.
To find your mix, press the keynote icon in the top left-hand corner of the deck of your choice, then choose the tab ‘‘My Mixes’’.

Android Android
Once you can see all your mixes, choose the one you want to listen to by simply clicking on it. If you want to export it, press the three dots next to it and then click on ‘‘Convert to MP3’’.Wait until your mix is completely converted into MP3 format.
It’s done ! To find your mix, look for the location indicated through your native File Explorer or, depending on your device, through a free File Explorer app.
Sharing my mixes
On the main screen, press the keynote icon in the top left-hand corner to access the library. In the library, choose the tab «My mixes».
Once your mixes appear, press the three dots button next to the chosen mix: two options exist to share it with your friends. The option ‘‘Share mp3’’ allows you to actually share the track with your friends. They will receive it and use it as they would with any other mp3 audio file.
Different platforms are available to share your mix: select the track you want to share and follow the instructions displayed.

Android Android
On the other hand, the ‘‘Share link’’ option allows you to generate and share a URL link through different platforms which makes your mix available for your friends.
Once you’ve chosen the platform, follow the instructions displayed. Be careful ! The link generated will be available for a month only!
Changing my skin
To be able to use this feature, you will need to get the full version of edjing Mix.
To change your skin, first click on the ‘‘Settings’’ icon at the top of your screen.
Then, click on ‘‘Skins‘‘ and select the skin of your choice!
Android
Contact
For any further information, request or suggestion, don’t hesitate to contact us at [email protected], we are always eager to get our users’ impressions!
Our technical team will reply within 72 hours to solve your issue!
Don’t hesitate to rate us on your Store!
Follow us on: