use it to perfect a finish or create special effects
TRANSCRIPT
There is a quality to a wax topcoat that can’t be matched by more durable, modern finishes. The soft sheen and tactile quality of a waxed surface just begs to be touched. Not
only does a waxed surface look good and feel good, but it also helps protect the finish underneath.
Besides being a final coat on finished wood, wax has a number of other uses. It can serve as a minimal finish to maintain a wood’s
natural beauty, or it can give a just-made piece an antique look. Colored waxes can create special effects. Best of all, the tools are simple and the techniques are easy. Whatever your furniture-making ability, your projects will look and feel better after a proper waxing.
Wax polish finishes a finishThe most common use for wax is to apply it as the final layer of finish. It can go on top of any type of finish, from an in-the-wood cou-ple of coats of oil to high-gloss,
Use it to perfect a finish or create special effects
B Y P E T E R G E D R Y S
WaxAll About
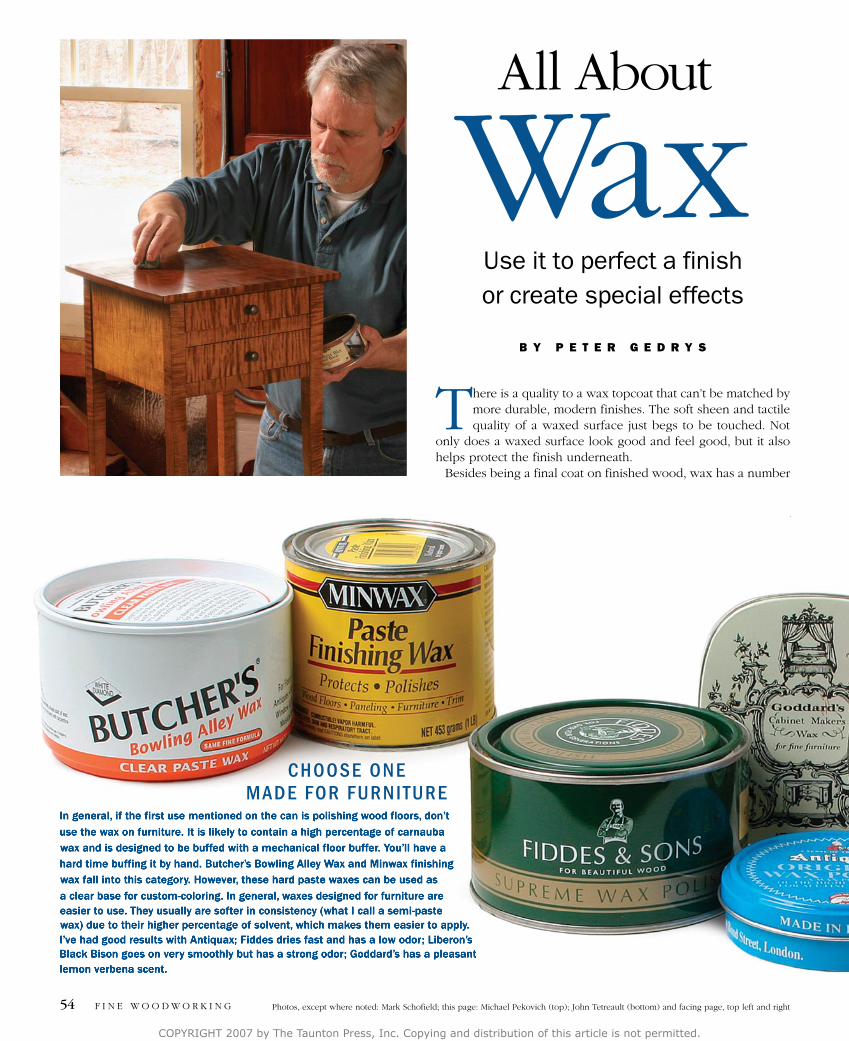
In general, if the first use mentioned on the can is polishing wood floors, don’t use the wax on furniture. It is likely to contain a high percentage of carnauba wax and is designed to be buffed with a mechanical floor buffer. You’ll have a hard time buffing it by hand. Butcher’s Bowling Alley Wax and Minwax finishing wax fall into this category. However, these hard paste waxes can be used as a clear base for custom-coloring. In general, waxes designed for furniture are easier to use. They usually are softer in consistency (what I call a semi-paste wax) due to their higher percentage of solvent, which makes them easier to apply. I’ve had good results with Antiquax; Fiddes dries fast and has a low odor; Liberon’s Black Bison goes on very smoothly but has a strong odor; Goddard’s has a pleasant lemon verbena scent.
of other uses. It can serve as a minimal finish to maintain a wood’s natural beauty, or it can give a just-made piece an antique
look. Colored waxes can create special effects. Best of all, the tools are simple and the techniques are easy. Whatever your furniture-making ability, your projects will look and feel better after a proper waxing.
Wax polish finishes a finishThe most common use for wax is to apply it as the final layer of finish. It can go on top of any type of finish, from an in-the-wood cou-ple of coats of oil to high-gloss,
In general, if the first use mentioned on the can is polishing wood floors, don’t use the wax on furniture. It is likely to contain a high percentage of carnauba wax and is designed to be buffed with a mechanical floor buffer. You’ll have a hard time buffing it by hand. Butcher’s Bowling Alley Wax and Minwax finishing wax fall into this category. However, these hard paste waxes can be used as a clear base for custom-coloring. In general, waxes designed for furniture are easier to use. They usually are softer in consistency (what I call a semi-paste wax) due to their higher percentage of solvent, which makes them easier to apply. I’ve had good results with Antiquax; Fiddes dries fast and has a low odor; Liberon’s Black Bison goes on very smoothly but has a strong odor; Goddard’s has a pleasant lemon verbena scent.
CHOOSE ONE MADE FOR FURNITURE
F I N E W O O D W O R K I N G54 Photos, except where noted: Mark Schofield; this page: Michael Pekovich (top); John Tetreault (bottom) and facing page, top left and right
COPYRIGHT 2007 by The Taunton Press, Inc. Copying and distribution of this article is not permitted.

Buy the right color. Find one that matches the wood and it won’t show in pores and recesses.
If you do one thing after reading this article, I hope you’ll try using a dark wax. As this piece of walnut shows, a clear wax on a dark, open-pored wood can leave white residue in the pores. Even if the pores are filled, the clear wax can leave a
slight haze on a dark surface. Conversely, wax the same color or darker than
the wood can enhance the appearance. See p. 59 for more detail and to learn how dark wax can be used to give an aged look. You can buy wax in a range of wood tones, or you can take clear paste wax and color it yourself. You must first melt the wax, but because wax is flammable, never heat it over an open flame. Instead, place it in a container over heated water, a device known as a double boiler. Add artist’s oils or universal colorants and mix them in thoroughly. Let the wax solidify before use.
Or color your own. If you need only a small amount of colored wax or you want an unusual color, melt some clear paste wax in a container over hot water, and then mix in artist’s oil colors.
Step one is understanding the ingredients
CLEAR-WAX BASICSAlthough brands of wax vary great-ly in price, they all draw from the same limited number of raw waxes and solvents.
The best-known wax is bees-wax. After the honey-comb has been melted and refined, it can be left dark or placed in the sun and bleached. Medium-soft, beeswax produces a medium-gloss finish.
The cheapest component is paraf-fin wax, derived from refining crude oil. Relatively soft and colorless, it serves as the base for many wax blends. Also ob-tained from petroleum is microcrystalline wax, a highly refined and expensive wax that has excellent resistance to water. It is favored by museums because of its neutral pH.
To offset paraffin wax’s softness, man-ufacturers add harder waxes: Carnauba, obtained from scraping the leaves of a Brazilian palm tree, produces a very high shine but is also very hard to buff out when used alone; candelilla, obtained
from the
COLORED WAXIf you do one thing after reading this article, I hope you’ll try using a dark wax. As this piece of walnut shows, a clear wax on a dark, open-pored wood can leave white residue in the pores. Even if the pores are filled, the clear wax can leave a
the wood can enhance the appearance. See p. 59 for more detail and to learn how dark wax can be used to give an aged look.
CLEAR-WAX
Although brands of wax vary great-ly in price, they all draw from the same limited number of raw waxes
The best-known wax is bees-wax. After the honey-
placed in the sun and bleached. Medium-soft, beeswax
COLORED WAX
leaves of a Mexican plant, is much like carnauba, but somewhat softer.
The speed at which a solvent evapo-rates will determine how long you have to wait before you can buff the wax. Traditionally, turpentine was used to dis-solve beeswax, but its relative expense means this medium-paced solvent is rarely used in commercial waxes.
Mineral spirits is the most common solvent and can be formulated for slow or medium-paced evaporation. Faster-evaporating solvents include naphtha and toluene. I avoid toluene waxes such as Briwax (below) for a number of rea-sons. First, I dislike their strong odor; second, toluene is most likely to damage a finish that is not fully cured; third, I find they harden very fast, making them somewhat difficult to work with.
CLEAR WAX
DARK WAX
Raw waxes. Shown from left are bees-wax, paraffin, and carnauba flakes.
Let the wax solidify before use.
Or color your own.of colored wax or you want an unusual color, melt some clear paste wax in a container over hot water, and then mix in artist’s oil colors.
that has excellent resistance to water. It is favored by museums because of its neutral pH.
To offset paraffin wax’s softness, man-ufacturers add harder waxes: Carnauba, obtained from scraping the leaves of a Brazilian palm tree, produces a very high shine but is also very hard to buff out when used alone; candelilla, obtained
from the
Traditionally, turpentine was used to dis-solve beeswax, but its relative expense means this medium-paced solvent is rarely used in commercial waxes.
Mineral spirits is the most common solvent and can be formulated for slow or medium-paced evaporation. Faster-evaporating solvents include naphtha and toluene. I avoid toluene waxes such as Briwax (below) for a number of rea-sons. First, I dislike their strong odor; second, toluene is most likely to damage a finish that is not fully cured; third, I find they harden very fast, making them somewhat difficult to work with.
55M AY / J U N E 2 0 0 7www.finewoodworking.com
COPYRIGHT 2007 by The Taunton Press, Inc. Copying and distribution of this article is not permitted.

rubbed-out shellac. The wax helps to even out the sheen and adds a measure of protection that can be renewed easily. However, don’t be in a rush to apply it: Almost all waxes contain solvents, which can damage a film finish that isn’t fully cured. For most finishes, this means waiting a week; but wait at least a month before applying a paste wax to solvent-based lacquer.
For best results, use an applicator—Using widely available but hard paste waxes, beginners tend to put on too much, then wonder why the surface smears when they try to buff it. The answer is to make a wax applicator.
Take some good, dense cheesecloth and fold it over. Place a small amount of wax on the middle of this pad. Gather up the edges and twist them to form a small knob that encloses the wax. As soon as you rub the surface, the wax will start coming through the cloth evenly and thinly. Although you can use softer semi-paste wax this way, you gain the most benefit when using harder paste waxes. For closed-pore, light-colored woods such as maple, I use a clear wax, but for open-pore woods such as oak or mahogany and darker closed-pore woods like cherry, I use a colored wax.
When you rub the surface, you will apply a very thin film of wax. The applicator prevents you from applying too much. I begin by applying the wax in circles, forcing it into any open pores, and then I give it a once-over with the grain to straighten everything out. If you run out of wax, don’t apply more to the outside of the applicator; just unwrap it and replenish the inside. When
Create a wax applicator. Place some wax in the center of a double thickness of cheesecloth, gather the edges of the cloth together, and twist them closed.
Finish a finish with wax
A thin coat is critical. The cheesecloth applicator allows an even amount of wax to reach the wood. Apply the wax in a circular motion (1). Follow up by giving some light strokes with the grain
(2). Before buffing, wipe the surface with a white non-
abrasive pad; the open weave picks up
any residue (3). Don’t use a col-
ored pad; many contain abrasives.
To raise the shine (4), you can do the final
buffing with a cotton cloth or a paper towel. Turn it frequent-
ly to keep removing surplus wax.
GLOSS LOOK
1 2 3
4
F I N E W O O D W O R K I N G56
COPYRIGHT 2007 by The Taunton Press, Inc. Copying and distribution of this article is not permitted.
finished, you can store the applicator inside the can of wax.
To get the best results, you must wait for the solvent to evaporate before you remove the excess wax and buff the surface. If you do this too soon, you’ll either remove the wax or just move it around. If you wait too long, it becomes progressively harder to remove the surplus. Although the wax won’t get hazy like car polish, it will change from glossy to dull. The time this takes varies by brand and atmospheric conditions, but 20 minutes is average.
Although using the applicator should prevent excess wax, I still rub the dried wax with a white nylon nonabrasive pad (www.woodworker.com). The open weave picks up any thicker patches or small lumps of wax. The final step is to buff the surface with a soft cloth like terrycloth, an old T-shirt, or even a paper towel. Rub the surface vigorously and turn the cloth frequently so that you burnish the wax rather than just redistribute it.
At this stage, if you find you simply can’t get the surface to shine, you probably put on too much wax or let it harden for too long. Rub the surface with a cloth dampened with mineral spirits to remove most of the wax. Wait an hour for the solvent to evaporate, and then reapply the wax more carefully.
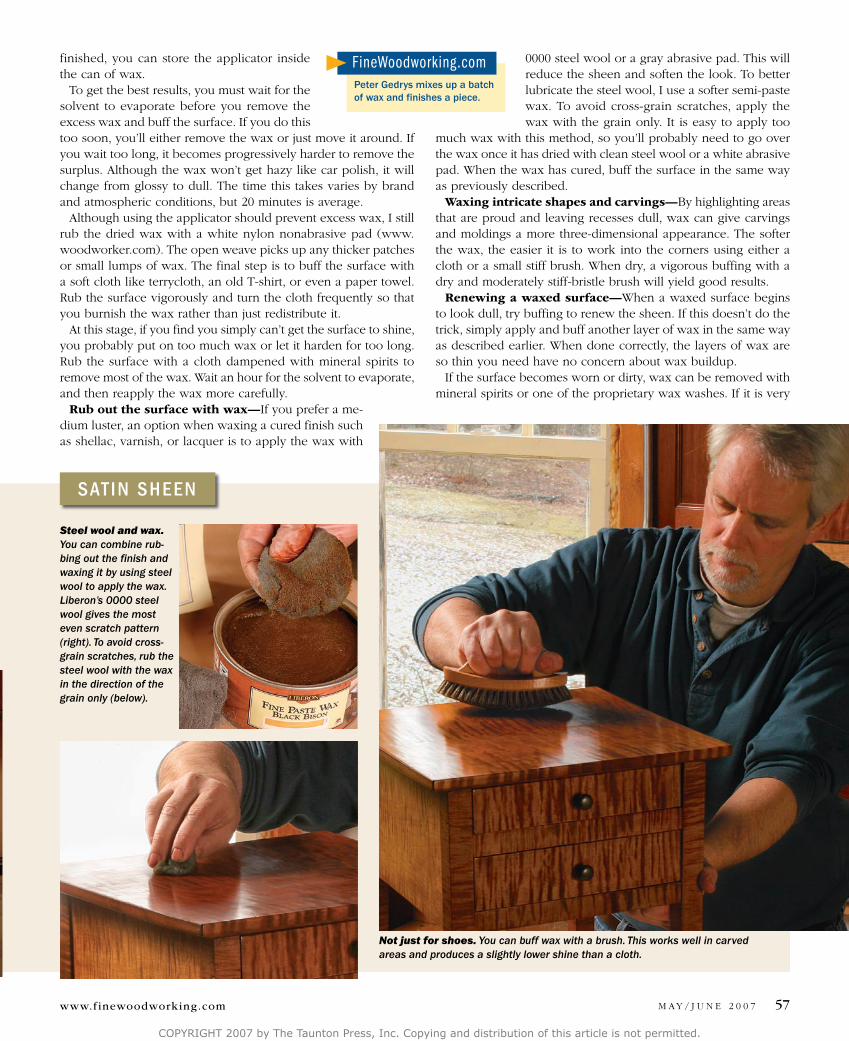
Rub out the surface with wax—If you prefer a me-dium luster, an option when waxing a cured finish such as shellac, varnish, or lacquer is to apply the wax with
Steel wool and wax. You can combine rub-bing out the finish and waxing it by using steel wool to apply the wax. Liberon’s 0000 steel wool gives the most even scratch pattern (right). To avoid cross-grain scratches, rub the steel wool with the wax in the direction of the grain only (below).
Not just for shoes. You can buff wax with a brush. This works well in carved areas and produces a slightly lower shine than a cloth.
SATIN SHEEN
0000 steel wool or a gray abrasive pad. This will reduce the sheen and soften the look. To better lubricate the steel wool, I use a softer semi-paste wax. To avoid cross-grain scratches, apply the wax with the grain only. It is easy to apply too
much wax with this method, so you’ll probably need to go over the wax once it has dried with clean steel wool or a white abrasive pad. When the wax has cured, buff the surface in the same way as previously described.
Waxing intricate shapes and carvings—By highlighting areas that are proud and leaving recesses dull, wax can give carvings and moldings a more three-dimensional appearance. The softer the wax, the easier it is to work into the corners using either a cloth or a small stiff brush. When dry, a vigorous buffing with a dry and moderately stiff-bristle brush will yield good results.
Renewing a waxed surface—When a waxed surface begins to look dull, try buffing to renew the sheen. If this doesn’t do the trick, simply apply and buff another layer of wax in the same way as described earlier. When done correctly, the layers of wax are so thin you need have no concern about wax buildup.
If the surface becomes worn or dirty, wax can be removed with mineral spirits or one of the proprietary wax washes. If it is very
FineWoodworking.comPeter Gedrys mixes up a batch of wax and finishes a piece.
M AY / J U N E 2 0 0 7 57www.finewoodworking.com
COPYRIGHT 2007 by The Taunton Press, Inc. Copying and distribution of this article is not permitted.
grimy, use either 0000 steel wool or a gray abrasive pad with solvent to loosen the wax. Wipe well with paper towels, and then rewax the surface.
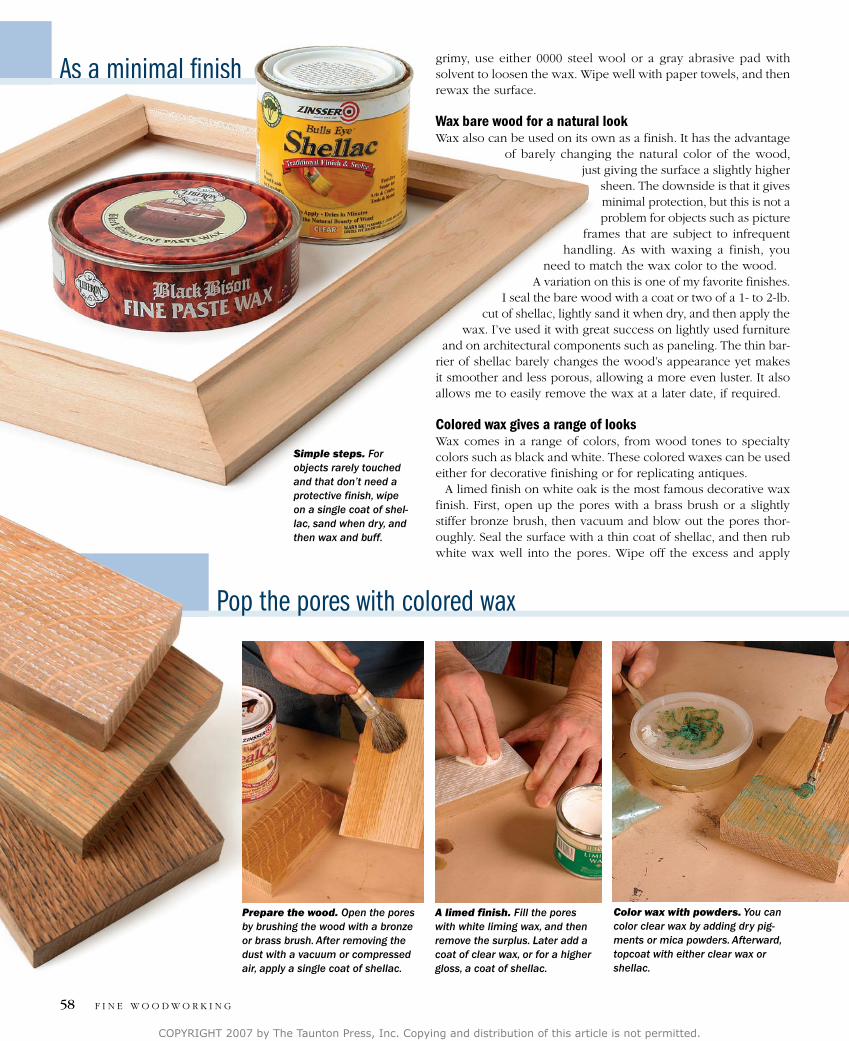
Wax bare wood for a natural lookWax also can be used on its own as a finish. It has the advantage
of barely changing the natural color of the wood, just giving the surface a slightly higher
sheen. The downside is that it gives minimal protection, but this is not a problem for objects such as picture
frames that are subject to infrequent handling. As with waxing a finish, you
need to match the wax color to the wood. A variation on this is one of my favorite finishes.
I seal the bare wood with a coat or two of a 1- to 2-lb. cut of shellac, lightly sand it when dry, and then apply the
wax. I’ve used it with great success on lightly used furniture and on architectural components such as paneling. The thin bar-
rier of shellac barely changes the wood’s appearance yet makes it smoother and less porous, allowing a more even luster. It also allows me to easily remove the wax at a later date, if required.
Colored wax gives a range of looksWax comes in a range of colors, from wood tones to specialty colors such as black and white. These colored waxes can be used either for decorative finishing or for replicating antiques.
A limed finish on white oak is the most famous decorative wax finish. First, open up the pores with a brass brush or a slightly stiffer bronze brush, then vacuum and blow out the pores thor-oughly. Seal the surface with a thin coat of shellac, and then rub white wax well into the pores. Wipe off the excess and apply
Prepare the wood. Open the pores by brushing the wood with a bronze or brass brush. After removing the dust with a vacuum or compressed air, apply a single coat of shellac.
A limed finish. Fill the pores with white liming wax, and then remove the surplus. Later add a coat of clear wax, or for a higher gloss, a coat of shellac.
Color wax with powders. You can color clear wax by adding dry pig-ments or mica powders. Afterward, topcoat with either clear wax or shellac.
Pop the pores with colored wax
As a minimal finish
Simple steps. For objects rarely touched and that don’t need a protective finish, wipe on a single coat of shel-lac, sand when dry, and then wax and buff.
F I N E W O O D W O R K I N G58
COPYRIGHT 2007 by The Taunton Press, Inc. Copying and distribution of this article is not permitted.

either a couple of coats of paste wax or, for a higher sheen, a coat of shellac. Other applications include adding colored pig-ments or mica powders to clear wax to color the pores.
If your taste runs more toward period than contemporary, wax can give furniture an aged appearance. Using wax a shade or two darker than the wood will add accent lines around moldings and carvings. There are brown and black waxes sold as pati-nating waxes, but you can make your own or use dry pigment powders on top of a clear wax.
Don’t use shoe polish. Many include silicone, which will play havoc with any film finish that you apply afterward. •
Peter Gedrys is a professional finisher and restorer in East Haddam, Conn.
Dirt in the crevices. Apply softened paste wax into the nooks and crannies of carvings. Then tap in some rotten-stone with a stiff-bristled brush (top). When the wax has dried, rub the area with crumpled newspaper to remove the bulk of the rotten-stone, and then burnish the high points with a cloth (right). This leaves a line of gray similar to that found on antiques.
Simulate wax buildup. To rep-licate the dark recesses found on antiques, use dark wax in these areas (above), or apply dry pigments to freshly applied clear wax (center). When the wax is dry, burnish the high points with a cloth or a brush (below).
Wax can give an aged appearance
CREATE INSTANT DUST ADD YEARS OF POLISH
M AY / J U N E 2 0 0 7 59www.finewoodworking.com
COPYRIGHT 2007 by The Taunton Press, Inc. Copying and distribution of this article is not permitted.