use & care - whirlpool corporationsave these instructions ... onthe correct surfaceunit....
TRANSCRIPT
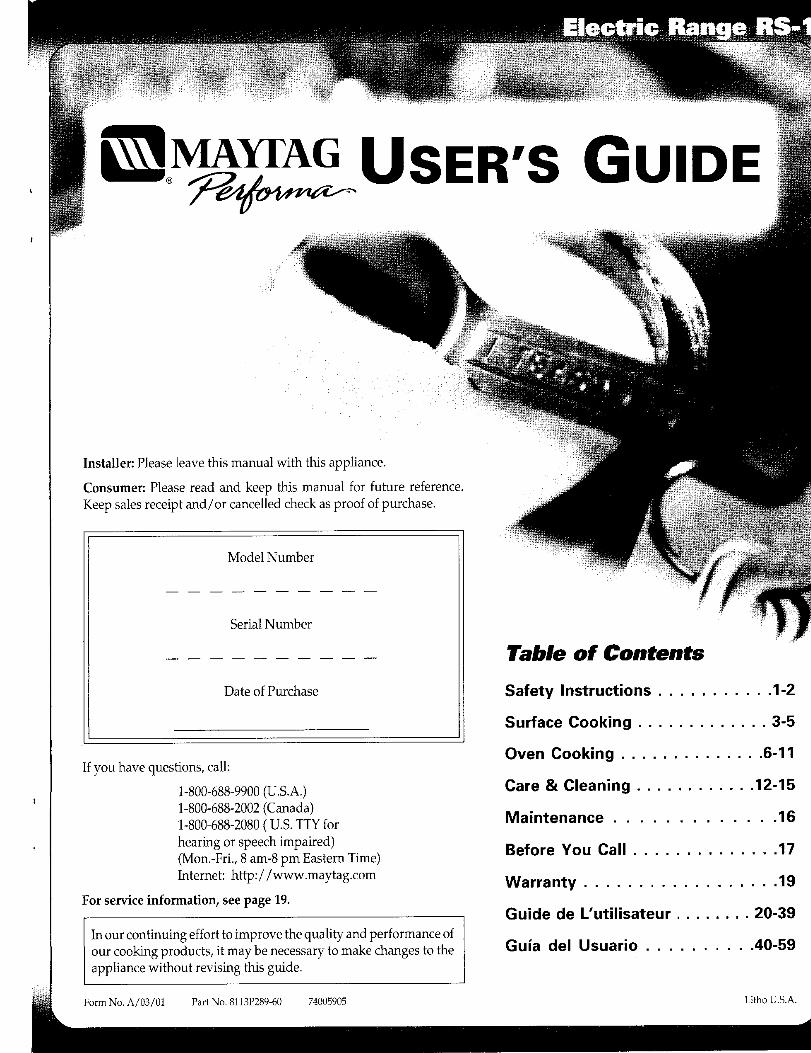
USER'S GUIDE
Installer: Please leave this manual with this appliance.
Consumer: Please read and keep this manual for future reference.Keep sales receipt and/or cancelled check as proof of purchase.
Model Number
Serial Number
Table of Contents
Date of Purchase Safety Instructions ........... 1-2
Surface Cooking ............. 3-5
Oven Cooking .............. 6-11If you have questions, call:
1-800-688-9900(U.S.A.) Care & Cleaning ............ 12-151-800-688-2002(Canada)1-800-688-2080( U.S.TTYfor Maintenance ............. 16
hearing or speech impaired) Before You Call .............. 17(Mon.-Fri.,8 am-8 pm Eastern Time)
Internet: http://www.maytag.com Warranty .................. 19For service information, see page 19.
Guide de L'utilisateur ........ 20-39
In our continuing effort to improve the quality and performance ofour cooking products, it may be necessary to make changes to the Guia del Usuario .......... 40-59appliance without revising this guide.
Form No. A/03/01 Part No. 8113P289-60 74005905 Litho U.S.A.
Important Safetv Instructions
Readand follow all instructionsbefore us- General risk of electricshock, fire,or damage to theing this appliance to prevent the potential appliance. Use foil only as directed in thisriskof fire,electricshock,personal injuryor IlnstrHctions guide.
damage to the appliance as a result of ira- WARNING:NEVERuseappliancedoor,or Aerosol-typecansareEXPLOSIVEwhen ex-properusageofthe appliance.Useappliance drawer,ifequipped,as astep stoolor seat as posed toheat and may be highlyflammable.only forits intended purpose as describedin this may result in possible tipping of the Avoid theiruse or storagenear appliance.this guide, appliance, damage to the appliance, andToensureproper and safeoperation:Appli- serious injuries. Thisappliancehasbeentestedforsafeperfor-
manceusing conventionalcookware.Do notancemustbeproperlyinstalledandgrounded If appliance is installed near a window, use any devices or accessories that are notby a qualifiedtechnician.
proper precautionsshould be taken topre- specificallyrecommendedinthis manual.Do
,_i vent curtains from blowing over surface notuse eyelidcovers,stovetopgrills oradd-W,_RNJJ_G," elements, on oven convectionsystems.The use of de-
vices or accessories that are not expressly
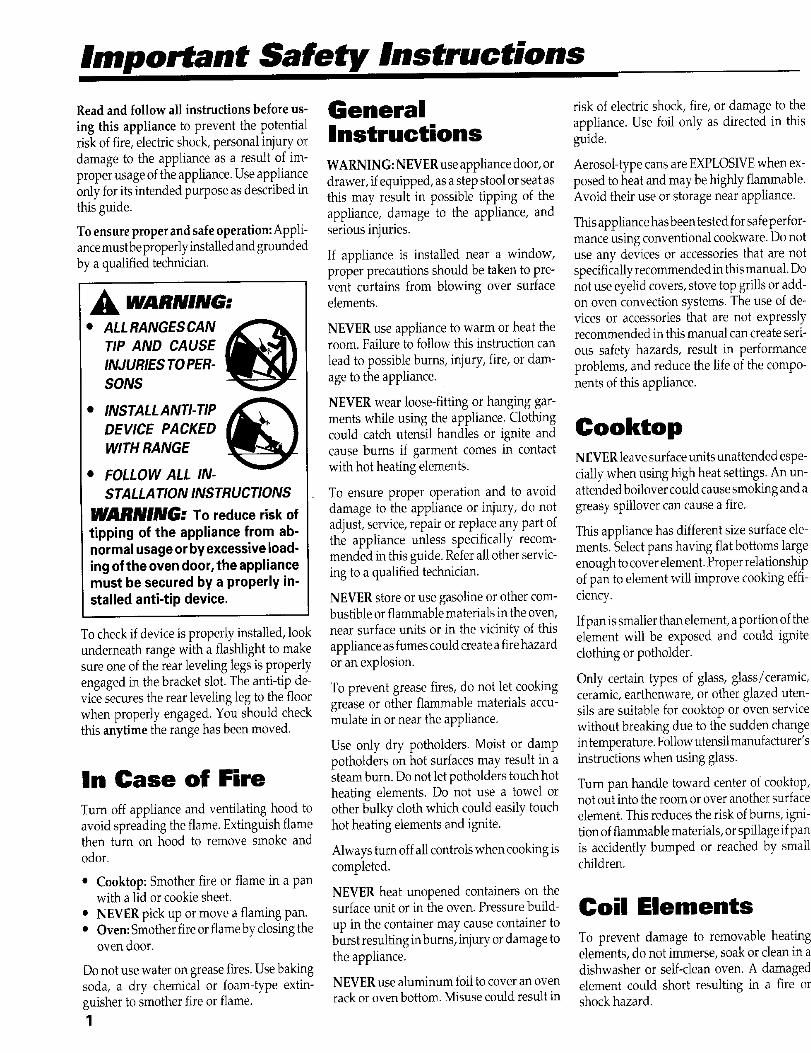
• ALLRANGESCAN NEVERuse applianceto warm or heat the recommendedin thismanual cancreateseri-
TIP AND CAUSE room. Failureto followthis instructioncan ous safety hazards, result in performanceINJURIESTOPER- lead to possibleburns, injury, fire,or dam- problems, and reduce the life of the compo-SONS age to the appliance, nents ofthis appliance.
• INSTALLANTI-TIP _ NEVERwear loose-fittingor hanging gar-ments while using the appliance.Clothing
DEVICE PACKED could catch utensil handles or ignite and CooktopWITHRANGE cause burns if garment comes in contact
• FOLLOW ALL IN- withhot heatingelements. NEVERleavesurfaceunitsunattended espe-ciallywhen using highheat settings.An un-STALLATIONINSTRUCTIONS To ensure proper operation and to avoid attendedboilovercouldcausesmokinganda
WARNING; To reduce riskof damage to the appliance or injury, do not greasyspillovercancause a fire.
tipping of the appliancefrom ab- adjust,service,repairor replaceany part of Thisappliancehas different size surfaceele-normalusageorbyexcessiveload- the appliance unless specifically recom- ments.Selectpans having flatbottoms largeingofthe ovendoor,theappliance mended in thisguide. Referallother servic- enough tocoverelement.Proper relationshipmust be secured by a properly in- ing to a qualifiedtechnician, ofpan to elementwill improve cookingeffi-stalled anti-tip device. NEVERstore or use gasolineor other corn- ciency.
bustibleorflammablematerialsin the oven,
Tocheckifdeviceis properly installed,look near surfaceunits or in the vicinity of this Ifpan is smallerthan element,aportionoftheunderneath range with a flashlightto make applianceasfumescouldcreateaflrehazard element will be exposed and could ignitesure one ofthe rear levelinglegs is properly or an explosion, clothingor potbolder.
engaged in the bracket slot.The anti-tipde- To prevent grease fires, do not let cooking Only certain types of glass, glass/ceramic,vicesecures therear levelingleg to the floor ceramic,earthenware, or other glazed uten-when properly engaged.You should check grease or other flammablematerials accu- sils are suitable for cooktop or oven servicethis anytime the range has beenmoved, mulate inor near the appliance, without breaking due to the sudden change
Use only dry potholders. Moist or damp intemperature.Followutensilmanufacturer'spotholderson hot surfacesmay result in a instructions when using glass.
In Case of Fire steamburn. Donot letpotholderstouchhot Turn pan handle toward centerof cooktop,heating elements. Do not use a towel or notout into theroom oroveranothersurfac_
Turn off appliance and ventilatinghood to other bulky clothwhich could easily touchavoid spreadingthe flame.Extinguishflame hot heating elements and ignite, element.Thisreduces the riskofburns, igni.then turn on hood to remove smoke and tionofflammablematerials,orspillageifparodor. Alwaysturnoffallcontrolswhencookingis is accidenfly bumped or reached by small
completed, children.• Cooktop: Smother fire or flame in a pan
with a lid or cookiesheet. NEVERheat unopened containers on the
• NEVERpickup or move a flamingpan. surfaceunit or in the oven.Pressurebuild- Coil I_lenllellllts• Oven:Smotherfireor flamebyclosingthe up in the container may cause containerto
oven door. burst resultinginburns,injuryordamage to To prevent damage to removable heatin_the appliance, elements, do not immerse,soakor cleanin
Donotuse water on greasefires.Use baking dishwasher or self-cleanoven. A damagedsoda, a dry chemical or foam-type extin- NEVERuse aluminum foiltocoveran oven element could short resulting in a fire olguisher to smotherfire or flame, rackor ovenbottom.Misusecouldresult in shockhazard.1
Makesure drip bowlsarein placeas absence a goodseal.Donot rub, damage,or movethe NEVERallowchildren to sitor stand on anyofthesebowlsduringcookingcoulddamage gasket, part ofappliance.
wiring. Do not use oven cleaners. No commercial Childrenmust be taught that the applianceProtectiveLiners:Donot use aluminum foil oven cleaneror oven liner protectivecoating and utensils in or on it can be hot. Let hotto line surfaceunit drip bowls or oven bot- of any kindshould be used in or around any utensils cool in a safeplace, out of reach oftoms,exceptassuggestedin themanual. Ira- part of the oven. children. Children should be taught that anproper installationof these linersmay resultin a riskof electricshockor fire. Beforeself-cleaningthe oven, removebroiler appliance is not a toy and not to play with
pan, ovenracks and other utensils toprevent controlsor other parts ofthe unit.excessivesmoking,discolorationof the oven
Glass-Ceramic racks or possibledamage to utensils. Ventilating Hoods
Cooktop Wipeupexcessivespillovers,especiallygreasy Clean range hood and filters frequently tospills,beforethecleancycletoprevent smok- preventgrease orother flammablematerials
NEVERcook on brokencooktop. If cooktop ing, flare-upsor flaming, from accumulatingto avoid fires.should break, cleaning solutions andspilloversmaypenetrate the brokencooktop It is normal for the cooktop to becomehot Turn the fanonwhen flamb6ingfoods (suchand createa risk of electricshock.Contacta during a cleancycle.Therefore,avoid touch- as CherriesJubilee)under the hood.
qualifiedtechnicianimmediately, ing the cooktop,door, window or oven ventduring a cleancycle.
Clean cooktop with caution.Somecleaners Important Safetycanproducenoxiousfumesifappliedtoa hotsurface,lfawetsponge, clothorpaper towel Heating Elements Notice andis used on a hot cookingarea, be careful to Warningavoidsteam burn. NEVERtouch surfaceor oven heating ele-
ments, areas near elements,or interior sur- TheCalifomiaSafeDrinkingWaterandToxic
Deep Fat Fryers facesof oven. EnforcementAct of 1986(Proposition65)re-quires the GovernorofCaliforniato publishHeating elements may be hot even though a list of substances known to the State of
Useextremecautionwhenmovingthegrease they are dark in color. Areas near surface California to cause cancer or reproductivepan or disposingof hotgrease.Allowgrease elementsand interiorsurfacesofan ovenmay harm, and requires businessesto warn cus-tocoolbeforeattempting tomove pan. become hot enough to cause burns. During tomers of potential exposures to such sub-
and afteruse, do not touch or let clothingor stances.
Oven otherflammablematerials contactheating el-ements, areas near elements,or interior sur- Users of this appliance are hereby warned
Usecarewhen openingovendoor.Lethotair facesof oven until they have had sufficient thatwhen it isengagedin the self-cleancycle,or steam escapebefore removingor replac- time tocool. there may be low level exposureto some of
the listed substances,includingcarbonmon-ing food. Other potentially hot surfaces include: oxide. Exposurecan be minimizedby prop-Forproperoven operationand performance, Cooktop,areasfacingthe cooktop,ovenvent, erly ventingthe oven to the outdoorsduringdo not block or obstruct oven vent duct. andsurfacesneartheventopening, ovendoor, the self-cleancycle by opening a windowWhen oven is in use, the area near the vent areas around the door and ovenwindow, and/or door in theroomwhere theappliancemay becomehotenough to causeburns, is located.
Alwaysplaceovenracksindesired locations Child Safety IMPORTANTNOTICEREGARDINGPET
while oven is cool. If rack must be moved NEVERleavechildrenalone orunsupervised BIRDS:Never keeppet birds in the kitchenwhile ovenis hot, donot letpotholder touch where applianceis inuse or is hot. orin roomswhere thefumesfromthekitchenhot heatingelement, couldreach.Birdshaveaverysensitiverespi-
CAUTION:NEVERstore items ofinterest to ratorysystem.Fumesreleasedduringan ovenchildrenincabinetsabovean applianceoron self-cleaningcyclemaybeharmful or fatal to
Self-Cleaning backguard of a range. Children climbingon birds.Fumesreleaseddue tooverheatedcook-
Oven appliance,doorordrawertoreachitemscould ing oil, fat,margarine and overheatednon-damage the appliance or be burned or seri- stickcookwaremay be equally harmful.ousIyinjured.
Cleanonlyparts listed in this guide. Do notcleandoor gasket.The gasketis essentialfor
Save These Instructions for Future Reference2
Surface Cooking
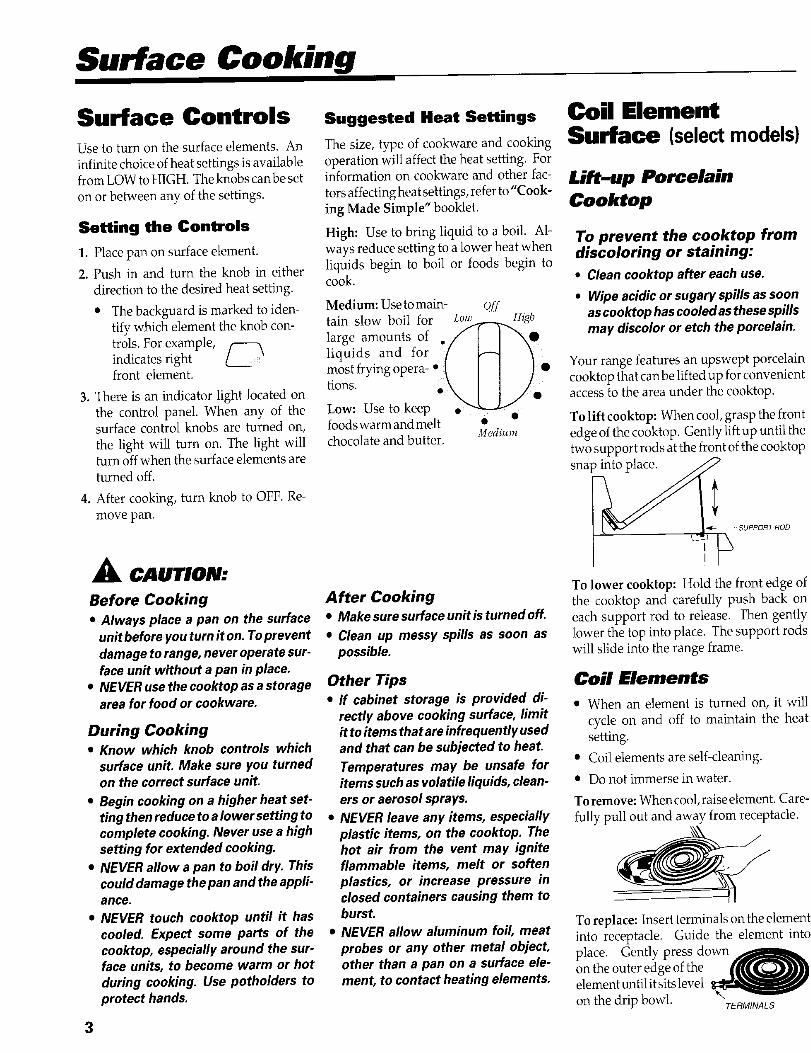
Surface Controls Suggested Heat Settings Coil ElementUse to turn on the surface elements. An The size, type of cookware and cooking Surface (select models)infinite choiceofheat settings is available operation will affect the heat setting. For
from LOWtoHIGH. Theknobscanbeset information on cookware and other fac- Lift.-up Porcelainon or between any of the settings, tors affectingheat settings, referto"Cook-
ing Made Simple" booklet. Cool(topSetting the Controls
High: Use to bring liquid to a boil. AI- To prevent the cooktop from1. Place pan on surface element, ways reduce setting toa lower heat when discoloring or staining:2. Push in and turn the knob in either liquids begin to boil or foods begin to
direction to the desired heat setting, cook. • Cleancooktop after eachuse.• Wipeacidic or sugary spills as soon
• The backguard is marked to iden- Medium: Usetomain- off as cooktop has cooledas these spillstain slow boil for to_,/,-.v,,H_,_b
tify which element the knob con- large amounts of ,// I ] "\\0 may discolor or etch the porcelain.trols. For example, / \ liquids and for [ _ '_indicateSfrontelement.right ? most frying opera- • _ I I ) • Your range features an upswept porcelain
3. There is an indicator light located on _;s:' Use to keep " cooktop that canbe lifted up for conveniente access to the area under the cooktop.the control panel. When any of thesurface control knobs are turned on, foodswarm and melt • • To lift cooktop: When cool,grasp the frontthe light will turn on. The light will chocolate and butter. Medium edge of the cooktop. Gently lift up until theturn off when the surface elements are two support rods at the front ofthe cooktop
turned off. snap_
4. After cooking, turn knob to OFF. Re-move pan.
_-- SUPPORTROD
CAilTION:To lower cooktop: Hold the front edge of
Before Cooking After Cooking the cooktop and carefully push back on• Always place a pan on the surface • Makesure surfaceunitis turned off. each support rod to release. Then gently
unitbefore you turn it on.Toprevent • Clean up messy spills as soon as lower thetop into place.Thesupportrodsdamageto range,neveroperatesur- possible, will slideinto therangeframe.faceunit without a pan in place.
• NEVERusethecooktopasastorage Other Tips Coil Elementsareafor food or cookware. • If cabinet storage is provided di- • When an element is turned on, it M1
rectly above cooking surface, limit cycle on and off to maintain the heaDuring Cooking itto itemsthatare infrequentlyused• Know which knob controls which and that canbe subjected to heat. setting.
surfaceunit. Make sure you turned Temperatures may be unsafe for • Coil elements are self-cleaning.on the correct surfaceunit. itemssuchas volatile liquids, clean- • Donot immersein water.
• Begin cooking on a higher heat set- ersor aerosolsprays. Toremove: Whencool, raiseelement. Carering then reduceto alower setting to • NEVERleave any items, especially fully pull out andawayfrom receptacle.complete cooking. Never usea high plastic items, on the cooktop. The _\ ,setting for extendedcooking, hot air from the vent may ignite
• NEVERallow a pan to boil dry. This flammable items, melt or softencoulddamagethepanandtheappfi- plastics, or increase pressure inance. closedcontainers causing them to
• NEVER touch cooktop until it has burst. Toreplace: Insertterminalsontheelemencooled. Expect some parts of the • NEVERallow aluminum foil, meat into receptacle. Guide the element ink
cooktop, especially around the sur- probes or any other metal object, place. Gentlypressdown/j_I_ _face units, to become warm or hot other than a pan on a surface ele- on the outer edge oftheduring cooking. Use potholders to ment, to contact heating elements, elementuntilitsitslevel
protect hands, on the drip bowl. *"TERMINALS
3
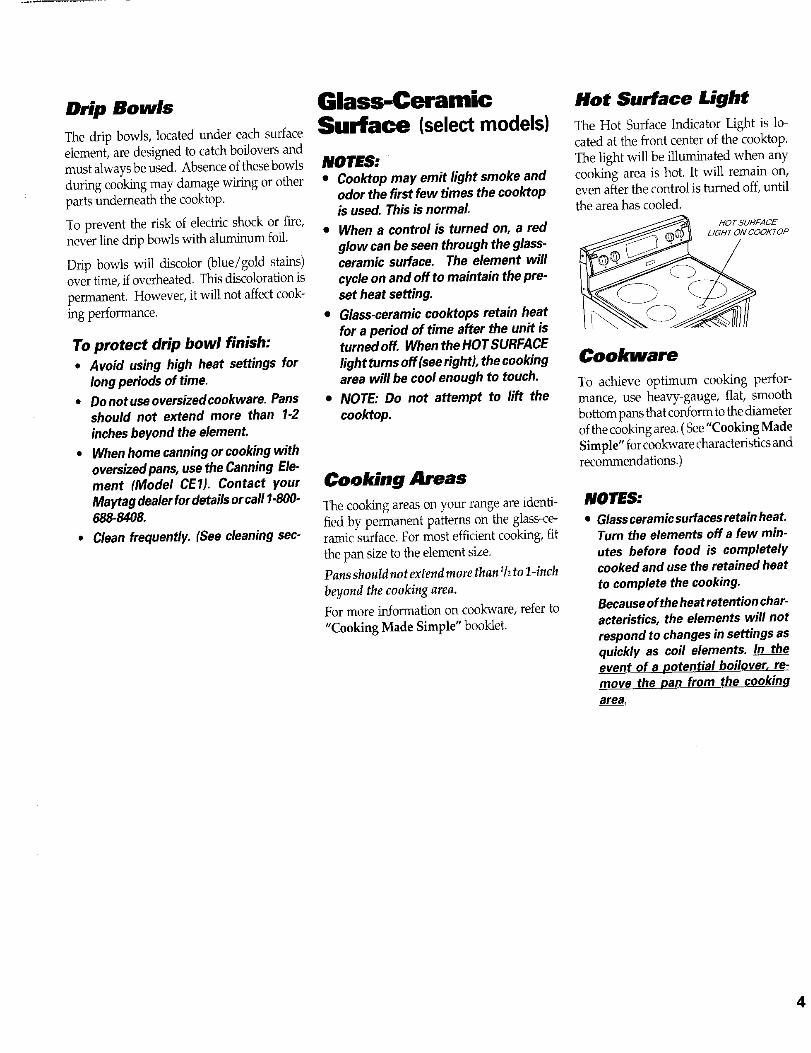
Drip Bowls Glass-Ceramic Not Surface Light
The drip bowls, located under each surface Surface (selectmodels) The Hot Surface Indicator Light is lo-element,are designed to catch boiloversand cated at the front center of the cooktop.must alwaysbe used. Absenceofthesebowls NOTES: The light will be illuminated when anyduring cookingmay damage wiring or other • Cooktop may emit light smoke and cooking area is hot. It will remain on,parts underneath the cooktop, odor the first few timesthe cooktop even after the control is turned off,until
is used. This is normal, tile areahascooled.
To prevent the risk of electricshock or fire, _oa, rropnever linedrip bowls with aluminumfoil, • Whena control is turned on, a red HOTSU,qFAO_"glow canbeseenthrough the glass-
Drip bowls will discolor (blue/gold stains) ceramicsurface. The element willover time,ifoverheated. Thisdiscolorationis cycleon andoff to maintain thepre-permanent. However, it will not affectcook- set heat setting.
ingperformance. • Glass-ceramiccooktops retain heatfor a period of time after the unit is
To protect drip bowl finish: turnedoff. WhentheHOTSURFACE• Avoid using high heat settings for lightturnsoff(seeright),thecooking Cookware
longperiodsof time. areawill be cool enough to touch.To achieve optimum cooking perfor-
• Donotuseoversizedcookware.Pans • NOTE: Do not attempt to lift the mance,useheavy-gauge,flat, smoothshould not extend more than 1-2 cooktop, bottompans thatconformto thediameterinchesbeyondtheelement, ofthecookingarea.(See"Cooking Made
• When home canning orcooking with Simple" forcookwarecharacteristicsandoversizedpans,usetheCanningEle- recommendations.)ment (Model CE1). Contact your CookiBg JOJreas
Maytagdealerfordetailsorcall 1-800- Thecookingareasonyourrangeareidenti- NOTES:688-8408.fled by permanent patterns on the glass-ce- • Glassceramicsurfacesretainheat.
• Cleanfrequently. (Seecleaningsec- ramicsurface.Formostefficientcooking,fit Turnthe elementsoff a few min.the pan size to the element size. utes before food is completelyPansshouldnotextendmorethanlhto l-inch cookedandusethe retainedheat
beyond the cookingarea. to complete the cooking.For more informationon cookware,refer to Becauseoftheheatretention char-"CookingMade Simple"booklet, acteristics,the elements will not
respondto changesin settings asquickly as coil elements. In theevent of a potential boilover, re-move the pan from the cookinqarea.
Surface Cooking. cont.
Tips to Protect the needtoberemovedpromptly.(SeeClean- • DonotslideheavymetalpansacrosstheGlass-Ceraiiiic ing,page 14.) surfacesincethese may scratch.Surface • Makesurethesurfaceand thepanbottom • Donotuse foilor foil-typecontainers.Foil
are clean before turning on to prevent maymeltonto theglass.Ifmetalmeltson• Beforefirst use, cleanthe cooktop. (See scratches, the cooktop, do not use. Call an autho-
Cleaning,page 14.) • Toprevent scratchingor damage, do not rized servicer.• Donot use glasspans.Theymay scratch leave sugar, salt or fats on the cooking • Ifa spilloveroccurswhilecooking,imme-
the surface, area. Wipe the cooktop surface with a diately clean the spill from the cooking• Donotallowplastic,sugar or foodswith cleanclothor paper towelbefore using, area while it is hot to prevent a tough
high sugar contentto melt onto the hot • Neverusea soileddishclothorsponge to cleaningchorelater.Usingextremecare,cooktop. Should this happen, cleanim- clean the cooktop surface. A film will wipe spillwith a cleandry towel.mediately. (SeeCleaning,page 14.) remain which may cause stains on the • Donotallowspillsto remainonthecook-
• Never leta pan boildry as thiswill dam- cookingsurfaceafter the area is heated, ing area or the cooktop trim for a longage the surfaceand pan. • Donotuse asmallpan ona largeelement, period oftime.
• Never use cooktopas a work surfaceor Notonlydoesthiswasteenergy, butitcan • Donotuseabrasivecleansingpowdersorcuttingboard. Never cookfood directly alsoresult in spilloversburning onto the scouring pads which will scratch theon the surface, cookingarea which requiresextraclean- cooktop.
• Neverplacea trivetor wokringbetween ing • Do not use chlorinebleach,ammonia orthe surfaceand pan. These items can • Do not use non-flat specialty items that other cleansers not specificallyrecom-mark or etchthe top. are oversized or uneven such as round mended for use on glass-ceramic.
• Donot slidealuminum pansacrossa hot bottom woks, rippled bottom and/or • To retain the appearance of the glass-surface.Thepansmayleavemarkswhich oversizedcannersand griddles, ceramiccooktop,cleanafter eachuse.
5

Oven CookinThe electronic control is designed for ease in programming. The display window on the control shows thne of day, timer or oventemperatures.
NOTE: Styling and features may differ slightly depending on the model. Control shown above includes self-clean.
Oven Controls that you have set the control for 2. Press• or • pad for HI or LObroil.
two operations. See page 10for additional information.Press, or press and hold, these
pads to enter time, oven tern- For example: If you set the oven toperature or to select HI or LO get bake at 350°F and then set a timing Clean Pad
operation, the indica-broil.Nobeepwillsoundwhen _ (_ Use to set self-cleancycle.
these pads are pressed. V tor light on the Bake _ "Dim"pad will"dim" andthe 1. Closeand lockoven door.
• Press this pad to cancel all _ indicator light on the 2. PressCleanpad."3:00"willappearintheoperations except the Timer _ Timer pad will be "full on." display.and Clock.
The display will show the operation 3. Ovenwill automaticallycleanfor3hours• Function pads are the Bake, Broil, for the pad with the orpressAor• pad to select2to4hours
Clean,Timer, Clock, CookTime, Stop "full on" indicator _ "Full of cleaning.
Time, and Cancel pads. A beep will light. Press the func- _ On" Seepages 12-13for additional information.sound when these pads are pressed, tion pad with the
• All function pads except the Cancel "dim" indicator light Cook Time/Stopto recall that operation. Time Padspad feature an indicator light.
WhenBakeor Broil padispressed, the NOTE: Ifmore than 3Oseconds elapse Use to program the oven to start and stopindicator light will turn on to let you betweenpressingafunction pad anda automatically.
• or • pad, the program will be can-knowthattheovenis set forthis opera- celedandthedisplaywillreturntothe 1. Press Cook Time pad and enter the de-tion. previous display, sired cookingtime.IndicatorlightsonClean, Timer, Clock, 2. Press the Bake pad and enter oven tern-Cook Time and Stop Time pads will Bake Pad perature.flash when the pad is pressed. These 3. To delay the start of cooking, press theindicator lights will stop flashing but Use for baking or roasting. Stop Time pad and enter the time youwill remain lit once the function starts. 1. PressBake pad. wish the oven to turn off.
• Ifanindicatorlightonafunctionpadis 2. Press• or • pad until the correctoven Seepage ll for additional information.lit and you set a second operation: temperature appears in the display.
- Either the control will not accept Seepage 8 for additional information. Setting the Clock:the operation or
Broil Pad 1. Press the Clock pad.- The indicator light on the first pad 2. Press or press and hold the • or • pad
will "dim" slightly and the indica- Use for top browning and broiling, until the correct time of day appears in
tor light on the pad youjust pressed 1. Press Broil pad. the display.will be "full on." This letsyou know 6

Oven Cooking. cont.
Thedisplaywillflashwhenelectricalpower Setting Clock Controlled To Set Control Lock-Outis first supplied to the range or ifthere has Oven Cooking Beepsbeen a power failure. 1. Press and holdboth Stop Time and Can-
1. PressCook Time and Clockpads at the cel pads for three seconds.To recallthe time of day when the timer is same timeand hold for three seconds.displayed, press the Clock pad. 2. "OFF"willappear in thedisplaywhen this
• A singlebeep will sound.Clock time cannot be changed when the feature is activated. Only the clock andoven has been programmed for dock con- • Displaywill show current option, timer functions will operate when Con-
trolled cooking, self-cleanor delayed self- 2. Pressthe • or • pad toselecttheoption trol Lock-Outfeature is activated.clean, number you wish. The current time of Repeat step 1 to deactivate.
day will reappear in the display after
Setting the Timer: four seconds. Oven TemperatureThe timercanbe set fromone minute (0:01) Adjustmentup to 9 hours and 50 minutes (9:50). Cancel Clock Displav
Youmay adjust the oven temperature if youThe timer can be used independently of If you prefer that the time of day not be think the oven is not baking correctly. Toany other oven activity and it can be set displayed: decidehow much tochangethe temperature,while another oven function is operating.TIlE TIMER DOES NOT CONTROL THE To set: Press Clock and Cancel pads at setthetemperature25degreeshigherorlowerOVEN. the same timeand hold for three seconds, than your recipe recommends, then bake,
The results of the "test" should give you an1.Press the Timer pad. When clock display is not shown, press idea of how much toadjust the temperature.
Clockpad tobriefly recallthe timeofday, if2. Press or press and hold the • or • pad desired. NOTE:It is not recommended to adjust the
until the correct time appears in the dis- temperature if onlyone or tworecipes are inplay. Torestore:PresstheClockand Cancelpads question.
at the same timeand hold for three seconds.
• Thetimerwillstartautomatically.The Thetirneofdaywillreappearinthedisplay. To Adiust Oven Temperaturetimer indicator onthe Timer pad willlight whenever the timer is in use.
• One long beep and "End" will be Automatic Oven Turn 1. Press the Bake pad.briefly displayed to signal the end of O_/Sabbatk Mode 2. Enter 550° by pressing • pad.
the timer operation. The ovenwill automaticallyturn offafter12 3. Press and hold the Bake pad for threeTocancel the timer; Press and hold Timer hours, if you accidentallyleave it on. You seconds until 00° appears in the display.pad for three seconds. Time of day will can deactivate this feature, ifdesired. • If the oven temperature was previ-reappear in the display, ously adjusted, the change will be
To Eliminate12 HourTurn displayed. Forexample, if the oven
Off temperature was reduced by 15°,
Control Options 1. Pressthe Clock pad and hold for three the displaywill show -15°.seconds. 4. Pressand hold the • or • pad tochange
Clock Controlled Oven the temperature. Each time a pad is2. Pressand hold the • or • pad until 8:88 pressed, the temperature changesby 5°.
Cooking Beep appears in the display. Current time of• The oven temperature can be in-day will reappear in the display after
Option 1.{defaultoption)Fourbeepsatthe four seconds, creased or decreased by 5 °to 35°.end of cooking, then, one beep every 30secondsforthenextfiveminutesoruntilthe To restore: Repeat steps i and 2.12:00will 5. The time of day will automatically reap-Cancelpad is pressed, appearbrieflyhlthe displayfollowedbythe pear in the display.
Option 2.Fourbeeps at the end of cooking, current time of day. It is not necessary to readjust the oven tern-then, no other beeps, perature if there is a power failure or inter-
Control Lock-Out ruption. Broilingand cleal_ngtemperaturesOption 3.Fourbeeps at the end of cooking, cannot be adjusted.then, one beepevery minute for the next 12 The Control Lock-Out featureprevents thehours or until the Cancelpad is pressed, oven from being turned on.
Baking and Roasting
_ Oven Operation CAUTIONS: cover distorts, warps, or is otherwise damagedduring• Besureallpackingmaterialisremovedfromovenbefore cooking, immediately discard the food and its con-
turning on. tainer. Thefood could be contaminated.
• Do not use oven for storing food or cookware. • Followthe manufacturer's directions when using oven
• Prepared Food Warning: Follow food manufacturer's cooking bags.instructions. If a plastic frozen food containerand/or its
For additional baking and roasting tips, see "Cooking Made Simple" booklet.
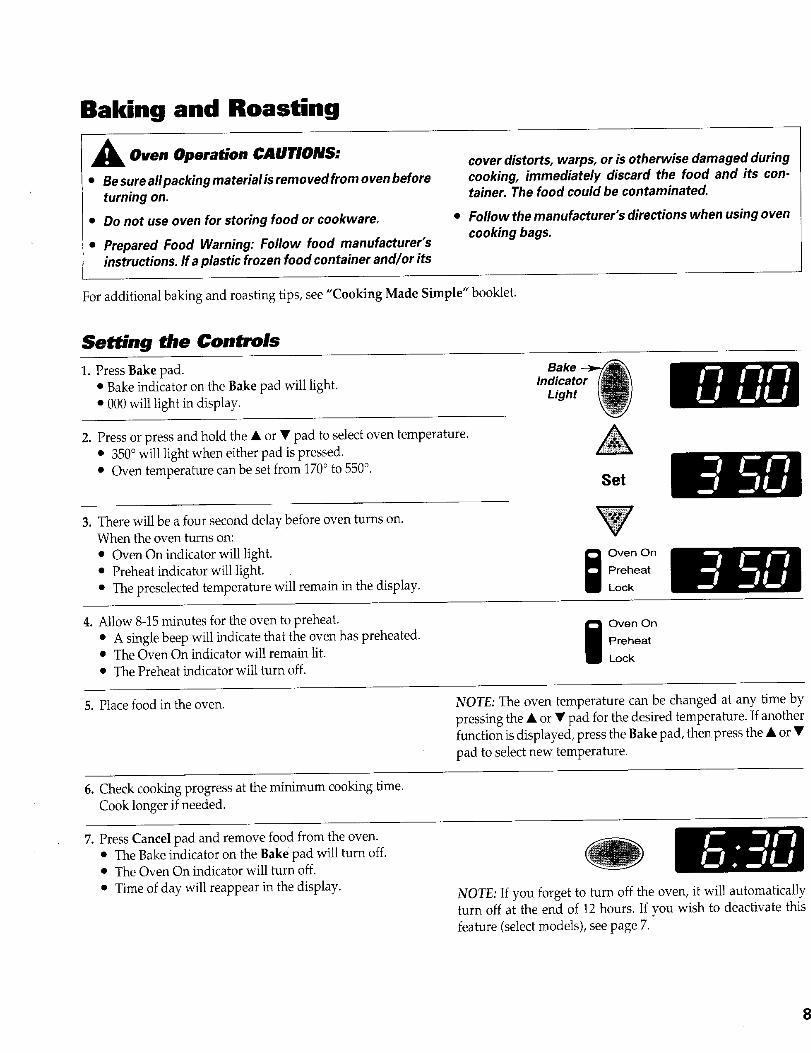
Setting the Controls
1. Press Bake pad. Bake _• Bakeindicator on the Bake pad will light. Indicator {_/_1
• 000will light in display. Light
2. Press or press and hold the • or • pad to selectoven temperature. ,_• 350° will light when either pad is pressed.• Oven temperature canbe set from 170oto 550°.
Set
3. There will be a four second delay before oven turns on. WWhen the oven turns on: V
• Oven On indicator will light. O Oven on
• Preheat indicator will light. " i Preheat• The preselected temperature will remain in the display. Lock
4. Allow 8-15minutes for the oven to preheat. _ Oven On
• A singlebeep will indicate that the oven has preheated. • Preheat• The Oven On indicator will remain lit.• The Preheat indicator will turn off. Lock
5. Place food in the oven. NOTE. The oven temperature can be changed at any time bypressing the • or • pad for the desired temperature. If anotherfunction is displayed, press the Bake pad, then press the • or •pad to selectnew temperature.
6. Check cooking progress at the minimum cooking time.Cook longer if needed.
7. Press Cancel pad and remove food from the oven.• The Bake indicator on the Bake pad will turn off. (_')• The Oven On indicator will turn off.
• Timeof day will reappear in the display. NOTE: If you forget to turn off the oven, it will automaticallyturn off at the end of 12hours. If you wish to deactivate thisfeature (selectmodels), see page 7.

Oven Cooking. cont.
Oven Vent Toreplace:Placerackontheracksupport Half Rack (select models)in the oven; tilt the front end up slightly;
When the oven is in use, the vent and slide rack back until it clears thelock-stop To install in oven: Tabs
surrounding area may become hot position; lower front and slide back into 1. Alwaysinstall ....... %,,*_enough to cause bums. Never block the the oven. naffracKwhen K"
vent opening. OVENVENT: Do not cover an entire rack with alumi- oven is cool AA__ • GLASG-CERAMIC
/_ SURFACE numfoilorplacefoilontheovenbottom. 2. Grasp top cen- _/_ _._ /COIL ELEMENT Baking results will be affected and dam- ter of the half _ Front
age may occur to the oven bottom, rack. Align the side "_
arm support betweenthe top fourth andfifth oven rack guides. Insert the two
Rack Positions tabs on the back frame of the half rackinto theslotson theupper leftrear oftheoven wall.
• On a coilelement surface, besurethe --2 3. Pushfirmlyonthetopsurfaceofthehalfdrip bowl in the vent location has a 4 rackuntilthe tabsslideinto the slotsand
hole in the center. _ the half rack side arm support rests on
Do not cover the _=_ 3drip bowl with alu- 2 the fourth oven rack guide.minum foil. 1 4. Checkforproperinstallationbyplacing
OVENVENT your hand on the top surfaceofthe halfOPENING rack and pressing down firmly.
Oven Light _ RACK 5 (highest position): To remove from the oven:
(select models) _ Used for toasting bread or broiling When the oven is cool,
thin non-fatty foods, grasp the top center ofPush the switch on the control the half rack and pullpanel to turn the oven light on RACK 4: upward until the backand off. Used for most broiling, tabsontherackslideout
of the oven back slots.RACK3:
Oven Racks Used for most baked goodson a cookiesheet or jelly rollpan, layer cakes, fruit NOTES:
A CAIITION: Do not attempt pies, or frozen convenience foods. • Donotusecookwarethatextends
to change the rack position when beyond edge of rack,the oven is hot. RACK2:Used for roasting small cuts of meat, • Forbest results, allow two inches
Your oven has two racks. They are de- casseroles, baking loaves of bread, between the pan placed on thesigned with a lock-stop edge. bundt cakes or custard pies. rack and the oven side wall.
• Whenopening the oven door, al-
'x., © RACK1: low steam and hot air to escape
Used for roasting large cuts of meat before reaching into the oven to
and poultry, frozen pies, dessert remove food.souffles or angel food cake.
• UsecautionwhenremovingitemsMULTIPLERACK COOKING: from the half rack to avoid burns.
• -- Two rack: Use rack positions 2 and 4, • Carefully remove items from theor I and 4. Iower rackto avoid disturbing the
To remove: Pull rack straight out until it half rack.
stops at the lock-stop position; lift up on • "Halfrack" AccessoryKit is avail-the front of the rack and pull out. ablewhen not included with your
range. See your dealer or call1-800-688-8408to order.
9

Broiling• Forbest results, use a pan designed for broiling. • For additional broiling tips, refer to the "Cooking Made Simple" booklet.
Setting the Controls
1. Press the Broil pad. Broil _Indicator {_1• Broilindicator on the Broil pad will light. Light I_]• 000will light in the display.• The Oven On indicator will light. There will be an ¢_ oven On
eight second delay before the oven turns on. I PreheatLock
2. Press the • pad to select HI (high) broil or the • pad HI _ Ato set LO (low) broil.• SelectHI broil for normal broiling. Set• SelectLO broil for low temperature broiling of LO
longer cooking foods such as poultry. -_
3. For optimum browning, preheat broil element for Expect broil times to increase and browning to be slightlythree to four minutes before adding food. lighter if appliance is installed on a 208volt circuit.
4. Place food in the oven. Leave the door open to the first stop position (about 4 inches).
5. Turn meat once about half way through cooking.
6. Press Cancel pad. Remove food and broiler pan from the oven.• The Oven On indicator will turn off.
• The broil indicator on the Broil pad will turn off.• Time of day will reappear in display.
Broiling ChartTotal Cook Time
Type of Meat RackPosition* Doneness (Minutes)**
Bacon 4 Well Done 6-10rain.
Beef Steaks -- 1"thick 4 Medium 15-18min.4 Well 19-23min.
Chicken -- Pieces 3 or 4 Well Done (LO Broil)30-45min.
Fish -- Fillets 4 Flaky 8-12rain.Steaks, 1"thick 4 Flaky 10-15rain.
Ground Beef -- Patties, 3/4" thick 4 Well Done 15-18rain.
Ham -- Precooked Slice,1/2" thick 4 Warm 8-12min.
Pork Chops -- 1"thick 4 Well Done 22-26rain.
*The top rack position is #5.**Broiling times are approximate and may vary depending on the meat.
lO

Oven Cookin .cont.
Clock Controlled Oven CookingTheclockmust be functioning and setat the correct timeofday
A CAUTION: for this feature to operate correctly.
• Highlyperishablefoods suchasdairyproducts, pork, Clock ControlledOvenCookingisusedto turn theovenonpoultry or seafood are not recommended for de- and off at a preset time of day. This feature can be used with
layed cook operations, either oven cooking or self-cleaning.• Immediate Start:Oven turns on immediately and automati-
• Clock controlled baking is not recommended for cally turns off at a preset time.items that require a preheated oven,such as cakes,
• Delayed Start: Delays the start of cooking or cleaning and
I automatically turns off at a preset time.cookiesandbreads.
Cook time can only be set for up to 11hours and 59 minutes(11:59).
Setting the ControlsA
1. Press the Cook Time pad. _• Cook Time indicator on the Cook Time pad will flash. /,_
• 0:00will light in display. _ then Set2. Press or press and hold • or • pad to enter cooking time.
3. Press Bake pad.• Bakeindicator on Bake pad will light. _ _ __
• 000will light in display. _ then Set4. Press or press and hold • or • pad to enter oven temperature.NOTE:Beeps will sound and 000will flash in display ifthe Bake pad is not pressed within four seconds. V
5. IFYOUWISHTO DELAYTHESTARTOFCOOKING:(ifnot, skip to #6)
a. Press Stop Time pad. _ _
• Stop Time indicator on Stop Time pad will flash.b. Press or press and hold • or • pad to enter time of day then Set then
you wish the oven to turn off.c. Press Clock pad. V
• Timeof day will reappear in the display.
6. When the oven turns on, the Oven On indicator will light. _ NOTE:It is notnecessary toset a start time.
The oven temperature will appear in the display. Press the _ Control will determine when to turn theCook Time pad to recall the remaining cook time. oven on based on the cook time you set.
7. Oven will automatically turn off.Four beeps will sound and NOTE:Seepage7ifyouwishtochange"End" will light in the display. A beep will sound every 30 the end of cooking reminder beeps.seconds for the next 5 minutes.
8. Press Cancel pad and beeps will stop. Remove food from oven.
11

Care & Cleanin
Self-Clean Oven Clean oven frame, k _ ,'_ I Some smokeandodormaybedetecteddoor frame (area "._-..... __ _ the first few times the oven is cleaned.
A outside thedoorgas- p..._C_2_Z?_.y:.[A This is normal and will lessen in time,CAUTION: ket) and around the | _//-_¢ ?--_ Smoke may also occur if oven is heavily
e ltignormal forparts of the range to opening in the door __ _Y soiled or if broiler pan was left in oven.
becomehotduringacleancycle, gasket with a non- As oven heats, you may hear sounds ofabrasivecleaningagentsuchasBonAmi* metal parts expanding and contracting.• Avoidtouchingcooktop,door,window,or detergent and water. These areas are This is normal and will not damage oven.
orovenventareaduringacleancycle, notexposed tocleaning temperatures and• Topreventdamageto ovendoor,do should be cleaned to prevent soil from
notattemptto openthedoorwhenthe baking on during the clean cycle. After Self-CleaningLOCKindicatorwordisdisplayed. To prevent damage, do not clean or rub About one hour after the end of the clean
• Donot usecommercialovencleaners the gasket around the oven door. The cycle, theLOCKindicatorwordwill turnontheself-cleanovenfinishoraround gasket is designed to seal in heat during off. At this point, the doorcan be opened.
anypartof theovenastheywill dam- the clean cycle. Some soil may leave a light gray, pew-agethefinishorparts. Wipe up excess grease or spillovers from dery ash which can be removed with a
the oven bottom to prevent excessive damp cloth. If soil remains, it indicatesThe self-clean cycle uses above normal smoking, flare-ups or flaming during the that the clean cyclewas not long enough.cooking temperatures to automatically clean cycle.Forease ofcleaning, theheat- The soil will be removed during the nextclean the entire oven interior, ing element canbe lifted slightly (1inch), clean cycle.
It isnormal for excessiveflare-ups,smok- Wipe up sugary and acid spillovers such If the oven rackswere leftin the oven anding and flaming tooccur during cleaning as sweet potatoes, tomato or milk-based do not slide smoothly after a clean cycle,if the oven is heavily soiled. It is better to sauces.Porcelain enamelis acid resistant, wipe racks and embossed rack supportsclean the oven regularly rather than to not acid proof. Theporeelainfinish may with a small amount of vegetable oil towait until there is aheavybuild-up ofsoil discolor if acidic spills arenot wiped up restore ease of movement.
in the oven. prior to a self-clean cycle. A white discoloration may appear afterDuring the cleaning process, the kitchen cleaning if acidic or sugary foods wereshould be well ventilated to help elimi-natenormalodorsassociatedwithclean- During Clean Cycle not wiped up before the clean cycle.Thisdiscoloration is normal and will NOT
When the LOCKindicator word lights in affectperformance.ing.the display, the door cannot be opened.To prevent damage to door, do not force Fine lines may appear in the porcelain
Before Self-Cleaning dooropenwhentheLOCKindicatorword resulting from the heating and cooling of
Turn off the oven light before cleaning as is displayed, the finish, This is normal and will notaffectperformance,the light may burn out during the cleancycle,
Remove broiler pan, all pans and theoven racksfrom the oven. Theoven racks
will discolor and may not slide easilyafter a self-clean cycle,
*Brand names are registered trademarks ofthe respectivemanufacturers.12

Care & Cleanin .cont.
Setting the Controls to Self-Clean Oven
1. Move door lock lever right to the locked position.
2. Press Clean pad.• Clean indicator on the Clean pad will flash. _\• 3:00will light in display indicating three hours of cleaning time. _
• If door is not closed or locked, "dr" will appear in display. _ _ then Set3. Press • or • pad tochange clean time, if desired.• Select2 hours for light soil up to 4hours for heavy soil.
4. IFYOUWISHTO DELAYTHE STARTOFCLEANING(if not, skip to #5): ,_
a. Press Stop Time pad. _ _ i
b. Press • pad to select the time of day you wish the oven to turn off. then Setc. Press Clock pad and time of day will reappear in display.d. Press Stop Timepad to recall the time you set.
V
5. When the oven turns on: _ OvenOn
• The Oven On indicator will light and Lock indicator will light when oven heats to 400°F' I Preheat• Door cannot be opened when Lock indicator is lit. Lock
I Oven On
6. About one hour after the clean cycle ends, the Lock indicator will turn off. The Preheatoven door canbe opened. Move door lock lever to the left to unlock. Lock
7. Wipe out the oven with a damp cloth to remove powdery ash. If soil remains itindicates the cyclewas not long enough.
TO CANCELCLEANCYCLE: • oven On
WHEN LIGHT1. Press Cancelpad. I Preheat TURNS OFF,Lock + OPEN DOOR.2. If Lock indicator is NOT lit, unlock and open oven door. If Lock indicator is lit,
allow oven to cool about one hour then unlock and open oven door.
13
A Cleaning CAUTIONS:• Besure appliance is off andall parts are cool before • Toprevent staining or discoloration, clean appliance
handling or cleaning. This is to avoid damageand after eachuse.possibleburns. • ff a part is removed, be sure it is correctly replaced.
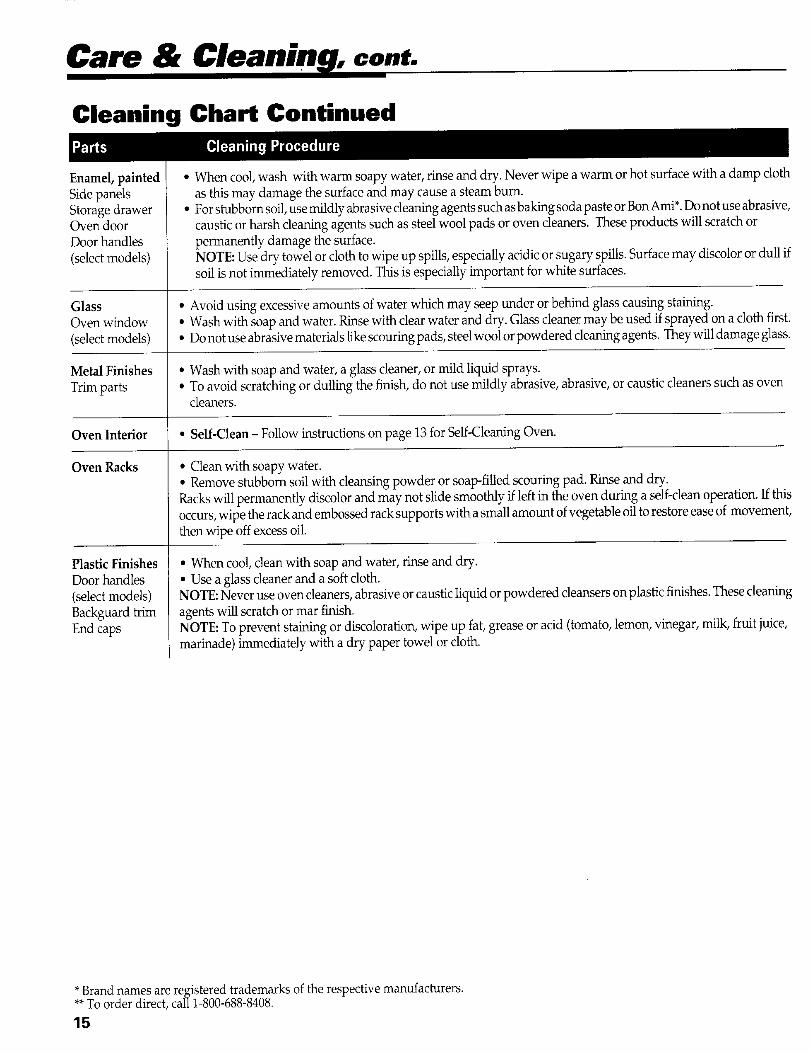
Cleaning ChartParts Cleaning Procedure
Backguard, Porcelainenamel is glass fused on metal and may crackor chip with misuse. It is acid resistant, not acid proof.Cooktop, porcelair All spillovers,especiallyacidicor sugary spillovers,should be wiped up immediately with a dry cloth.enamel • When cool,wash with soapy water, rinse and dry.
• Never wipe off a warm or hot surfacewith a damp cloth. Thismay causecracking or chipping.• Never use oven cleaners,abrasive or causticcleaningagents on exterior finishof range.
Broiler Pan Nevercoverinsert with aluminumfoil as this prevents thefat from draining to thepan below.and Insert • Place soapy clothover insert and pan; let soak to loosen soil.
• Wash in warm soapy water. Use soap tilled scouring pad to remove stubborn soil.• Broilerpan and insert canbe cleaned in dishwasher.
Clock & Control • Toactivate "Control Lock" for cleaning, seepage 7.Pad Area • Wipe with a damp cloth and dry.
• Glasscleanersmay be used if sprayed on a cloth first.DO NOT spray directly on controlpad and display area.
Control Knobs . Removeknobs in the OFFposition by pulling forward.• Wash, rinse and dry. Do not use abrasive cleaningagents as they may scratchthe finish.• Turn on each element to be sure the knobs havebeen correctly replaced.
Cooktop, • Neveruse ovencleaners,chlorinebleach,ammonia orglass cleanerswith ammonia. NOTE-Callan authorizedglass-ceramic servicerif the glass-ceramictop should crack,breakor if metal oraluminum foil should melt on the cooktop.
• Allow the cooktop to cool beforecleaning.• Genera_-A_waysc_eanc__kt__aftereachusewithadamppa_ert_we_andC__kt_pC_ear_ngCreme(PartN_.
20000001)**.Then,buff with a clean dry cloth.NOTE:PermanentstainswilldevelopifsoiIis allowedtocookonbyrepeatedlyusingthecooktopwhensoiled.
• Heavy Soils or Metal Marks - Dampen a "scratct_ess"or "never scratch" scrubbersponge. Apply CooktopCleaningCreme*and scrubto removeas much soilaspossible.Apply athin layerofthe cremeover the soil,coverwith a damp paper towel and let stand30to45minutes (2to3hours for veryheavy soil).Keepmoist bycoveringthepaper towelwith plasticwrap. Scrubagain,thenbuff witha cleandry cloth.NOTE: OnlyuseaCLEAN,DAMpit ,, • ' - ' " " "scratchlesspadthatzssafef_r n_n-st_ckc_c_are. Thepatternandg_assw1_bedamagedif thepad_sn_tdamp,if thepadissoiled,orif anothertypeofpadis used.
• Burned-on or Crusty Soils - Scrub with a "scratchless" or "never scratch" scrubber sponge and .-zCooktopCleaningCreme*.NOTE:Holda razorblade scraperat30°angle and scrapeany remaining /soil.Then,clean as described above. Donotusetherazorbladefor dailycleaningasit maywearthepatternon theglass.
• Melted Sugar or Plastic - Immediately turn element to LOWand scrape sugar or plastic from hot surface to acool area.Then turn element OFFand allowto cool. Clean residue with razor blade scraper and Cooktop
Cleaning Creme*.
Drip Bowls, • When cool, wash after each use, rinse and dry to prevent staining or discoloration.chrome • To clean heavy soil, soak inhot sudsy water, then use mild abrasive cleanersuch as SoftScrub*and a plastic
scouring pad. Do not use abrasivecleaningagents.
*Brandnames are registered trademarks of the respectivemanufacturers.**Toorder direct, call 1-800-688-8408.
14
Care & Cleanin . cont.
Cleaning Chart ContinuedParts Cleaning Procedure
Enamel, painted • When cool,wash with warm soapy water, rinse and dry. Never wipe a warm or hot surfacewith a damp clothSidepanels as this may damage the surfaceand may cause a steam burn.Storage drawer ° Forstubbornsoil,use mildlyabrasivecleaningagents such asbakingsoda paste or BonAmi*.Donotuse abrasive,Oven door causticor harsh cleaningagents such as steel woolpads or oven cleaners. Theseproducts will scratchorDoor handles permanently damage the surface.(selectmodels) NOTE:Use dry towel or clothto wipe up spills,especiallyacidicor sugary spills.Surfacemay discoloror dull if
soilis not immediatelyremoved. This is especiallyimportant for white surfaces.
Glass • Avoid using excessiveamounts of water which may seep under or behind glass causing staining.Oven window • Wash with soap and water. Rinsewith clear water and dry. Glass cleanermay be used if sprayed on a clothfirst.(selectmodels) • Donotuseabrasivematerialslike scouringpads,steelwool orpowdered cleaningagents. They will damage glass.
Metal Finishes • Wash with soap and water, a glass cleaner,or mild liquid sprays.Trimparts • To avoid scratchingor dulling the finish, do not use mildly abrasive, abrasive,or causticcleaners such as oven
cleaners.
Oven Interior ° Self-Clean - Follow instructions on page 13for Self-CleaningOven.
Oven Racks • Cleanwith soapy water.• Removestubborn soilwith cleansingpowder or soap-filledscouring pad. Rinseand dry.Rackswill permanently discolorand may not slide smoothly ifleft in the oven during a self-cleanoperation.If thisoccurs,wipe filerackand embossedrack supports witha small amount ofvegetableoil to restoreease of movement,then wipe off excessoil.
Plastic Finishes ° When cool,clean with soap and water, rinse and dry.Door handles ° Use a glasscleaner and a soft cloth.(selectmodels) NOTE:Never use oven cleaners,abrasiveor caustic liquid or powdered cleanserson plasticfinishes.ThesecleaningBackguardtrim agents will scratch or mar finish.End caps NOTE:To prevent staining or discoloration,wipe up fat, grease or acid (tomato,lemon, vinegar, milk, fruit juice,
marinade) immediately with a dry paper towel or cloth.
*Brandnames are registeredtrademarks ofthe respectivemanufacturers.**Toorder direct,call 1-800-688-8408.15
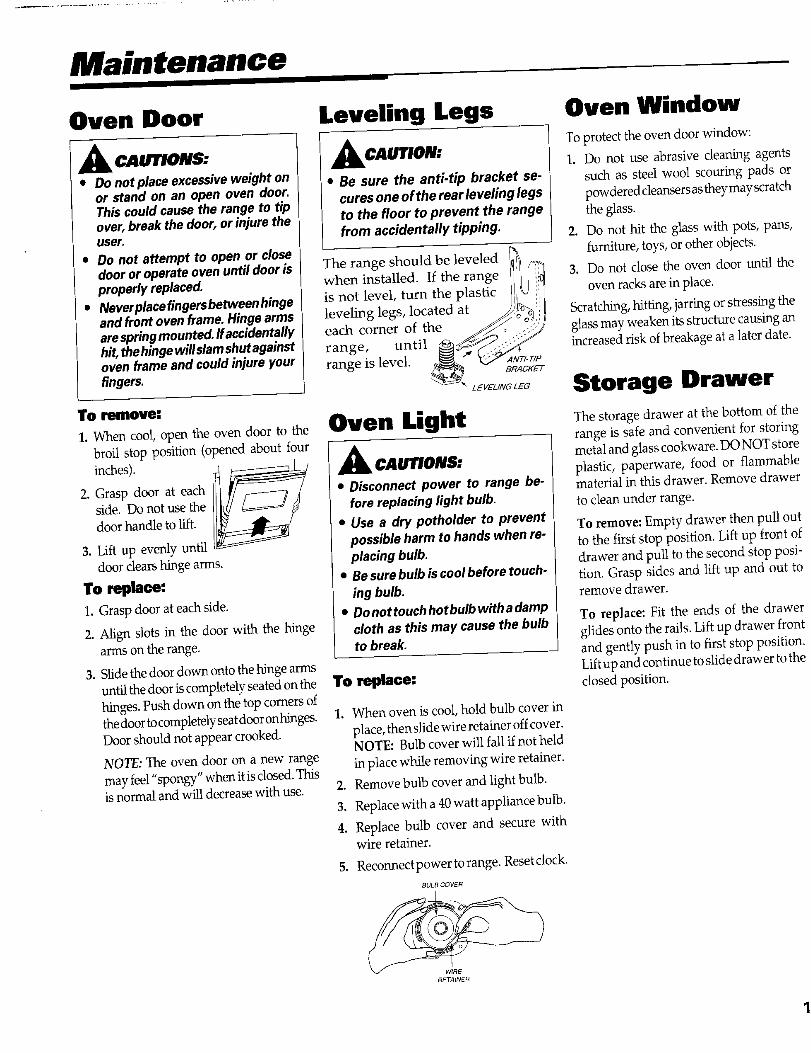
Maintenance
Oven Door Leveling Legs Oven Window
A CAUTIONS: _CAUTION: Toprotect the oven door window:1. Do not use abrasive cleaning agents
• Donot placeexcessiveweight on • Be sure the anti.tip bracket so- suchas steelwool scouringpads oror stand on an open oven door.Thiscould causethe range to tip cures oneof the rear leveiing legs powdered cleansersastheymay scratchover,breakthe door, or injure the to the floor to prevent the range the glass.
user. from accidentally tipping. 2. Do not hit the glasswith pots, pans,• Do not attempt to open or close furniture, toys, or other objects.
door or operateovenuntil door is The range should be leveledproperly replaced, when installed. If the range 3. Do not close the oven door until the
• Neverplacefingersbetween hinge is not level, turn the plastic oven racks are in place.and front oven frame.Hingearms leveling legs, located at Scratching,hitting, jarringor stressingthearespringmounted.Ifaccidentally each corner of the glassmay weaken its structure causing anhit,thehingewillslamshutagainst range, until increased risk ofbreakage at a later date.oven frame and could injure your range is level. _JvT/-r/pfingers.
Storage DrawerTo remove:
1. When cool, open the oven door to the Oven Light The storage drawer at the bottom of thebroil stop position (opened about four range is safe and convenient for storing
inches). _ ACAUTIONS: metal and glasscookware. DO NOT store
plastic, paperware, food or flammable2. Grasp door at each • Disconnect power to range be- material in this drawer. Remove drawer
side. Do not use the fore replacing light bulb. to clean under range.
door handle to lift. • Use a dry potholder to prevent To remove: Empty drawer then pull out3. Lift up evenly until possible harm to hands when re- to the first stop position. Liftup front of
door clears hinge arms. placing bulb. drawer and pull to the second stop posi-To replace: • Besure bulb is coolbefore touch- tion. Grasp sides and lift up and out to
1. Grasp door at each side. ing bulb. remove drawer.
• Donottouchhotbulbwithadamp To replace: Fit the ends of the drawer2. Align slots in the door with the hinge cloth as this may cause the bulbarms on the range, to break, glides onto the rails. Liftup drawer front
and gently push in to first stop position.3. Slidethedoor down onto the hinge arms Liftup and continue toslide drawer to the
until the door is completelyseated onthe To repla©e-" closed position.hinges. Push down on the top comersofthedoortocompletelyseatdooronhinges. 1, When oven is cool, hold bulb cover inDoor should not appear crooked, place, thenslidewire retainer off cover.
NOTE: Bulb cover will fall ifnot held
NOTE: The oven door on a new range inplace while removing wire retainer.may feel"spongy"when itis closed.Thisis normal and will decrease with use. 2. Remove bulb cover and light bulb.
3, Replace with a 40watt appliance bulb.
4, Replace bulb cover and secure withwire retainer.
5. Reconnectpower to range. Resetclock.BULB CGVER
RETAINffR
Before You Call for Service
For most concerns, try these Food not broiling properly or There is a strong odor or lightfirst: smokes excessively, smoke when oven is turned on.
• Checkif oven controlshavebeen prop- • Checkovenrackpositions.Foodmaybe • This is normal for a new range and willerly set. too closetoelement, disappear after a few uses. Initiating a
cleancyclewill"burn off"theodor more• Check to be sure plug is securely in- • Broilelementwas not preheated, quickly.
serted into receptacle. • Aluminum foil was incorrectly used.• Checkorre-setcircuitbreaker. Checkor Never line thebroiler insert with foil. • Turning on a ventilation fan will help
removethe smokeand/or odor.replacefuse. • Oven door was closed during broiling. • There are excessive food soils on the
• Checkpower supply. Leave the door open to the first stopposition (about 4inches), ovenbottom. Usea self-cleancycle.
Part or all of appliance does not • Trim fat frommeat beforebroiling. "F" plus a number appears inwork. • A soiledbroiler pan was used. the display.• Check if surfaceand/or oven controls
havebeenproperly set. Seepgs. 3&8. Oven will not self-clean. • Thisiscalleda faultcode. Ifa fault codeappearsin thedisplayand beepssound,
• Checkifovendoorisunlockedafterself- • Checkto make sure the cycleis not set press the Cancelpad. If the fault codecleancycle. Seepg. 13. for a delayed start, and beeps continue, disconnectpower
• Checkifovenis setfor a delayedcookor • Checkifdoor is closed, to the appliance. Wait a few minutes,cleanprogram. Seepgs. 11&13. then reconnectpower. If fault codeand
beeps still continue, disconnectpowerOven did not clean properly, to the appliance and callan authorized
Baking results not as expected • Longercleaning timemay be needed, servicer.
or differ from previous oven. • Excessivespillovers,especially sugary • If the oven is heavily soiled, excessive• Makesure the oven vent has not been and/or acidicfoods, were not removed flare-upsmay resultin a faultcodedur-
blocked. Seepg. 9for location, prior to the self-cleancycle, inga cleancycle.PressCancelpad and• Checkto make sure range is level, allowthe oventocoolcompletely.Wipe
out the heavy soil, and then reset the• Temperaturesoftenvarybetween anew Oven door will not unlock after cleancycle.If the fault code and beeps
oven and an old one.As ovens age,the self-clean cycle, still continue, disconnectpower to theoventemperatureoften"drifts"andmaybecome hotter or cooler. See pg. 7 for • Oven interior is still hot. Allow about applianceandcallanauthorizedservicer.one hour for the oven to cool after theinstructionson adjusting the oven tem-perature, completionofa self-cleancycle.Thedoor
canbe openedwhen theLOCKindicator• See"Cooking Made Simple" for more word is not displayed.
informationon bakewareand baking.
Moisture collects in oven or onoven window.
• Thisis normalwhen cookingfoodshighin moisture.
• Excessivemoisturewasusedwhenclean-ing the window.
17

Notes
10
Maytag RangeWarranty
What is Not Covered By TheseFullOneYearWarranty-Partsand Warranties:Labor
Forone (1)year from the originalretail 1. Conditions and damages resulting from any of the following:
purchase date, any part which fails in a. Improper installation, delivery, or maintenance.normalhome use willbe repairedor re- b. Any repair,modification, alteration, or adjustment not authorized by themanufac-placedfreeof charge, turer or an authorized servicer.
c. Misuse, abuse, accidents, or unreasonable use.LimitedWarrantiesd. Incorrect electric current, voltage, or supply.SecondThrough Fifth Year- Fromthee. Improper setting of any control.originalpurchasedate,partslistedbelow
whichfail in normalhomeuse will be 2. Warranties are void if the original serial numbers have been removed, altered, orrepairedorreplacedfreeofchargeforthe cannot be readily determined•partitself,withtheownerpayingallothercosts,includinglabor,mileageand trans- 3. Lightbulbs.portation. 4. Products purchased for commercial or industrial use.• ElectronicControls 5. The cost of service or service call to:• ElectricHeating Elements: surface,
broilandbake elements, a. Correct installation errors.
b. Instruct the user on the proper use of the product.CanadianResidentsc. Transport the appliance to the servicer.
The abovewarrantiesorflycoveran ap-plianceinstalledinCanadathathasbeen 6. Consequential or incidental damages sustained by any person as a result of anycertifiedorlistedbyappropriatetestagen- breach of these warranties. Some states do not allow the exclusion or limitation ofdes for complianceto a NationalStan- consequential or incidental damages, so the above exclusion may not apply.dard ofCanadaunlesstheappliancewas
brought into Canada due to transfer of If You Need Serviceresidence from the United States toCanada. • Call the dealer fromwhom yourappliance was purchased orcall Maytag Appliances
Sales Company, Maytag Customer Assistance at 1-800-688-9900, USA orLimitedWarrantyOutside the United 1-800-688-2002,CANADA to locate an authorized servicer.Statesand Canada- PartsOnlyFortwo(2)yearsfromthedateoforiginal • Besure to retain proof of purchase to verify warranty status. Refer to WARRANTYretail purchase, any part which fails in for further information on owner's responsibilities for warranty service.
normalhome usewill be repairedor re- • If the dealer or service company cannot resolve the problem, write to Maytagplacedfree of charge for the part itself, Appliances Sales Company, Attn: CAIR®Center, P.O. Box 2370, Cleveland, TNwith the owner paying all other costs, 37320-2370,or call 1-800-688-9900,USA or 1-800-688-2002,CANADA.includinglabor,mileageand transporta-tion. U.S. customers using TTY for deaf, hearing impaired or speech impaired, call
1-800-688-2080.ThespecificwarrantiesexpressedabovearetheONLYwarrantiespro-oidedbythemanu- NOTE:When writing orcalling about a service problem,please include the followingfacturer.Thesewarrantiesgiveyou specific information:legalrights,and you may alsohaveother a. Your name, address and telephone number;rightswhichvaryfromstatetostate, b. Model number and serial number;
c. Name and address of your dealer or servicer;d. A clear description of the problem you are having;e. Proof of purchase (sales receipt).
• User's guides, service manuals and parts information are available from MaytagAppliances Sales Company, Maytag Customer Assistance.
MAYTAG403 West Fourth Street North • P.O. Box 39 " Newton, Iowa 50208
• • http:/Iwww.maytag,com
19