,use & care manual...important safety mnformat[on to reduce the risk of fire, burns, electric...
TRANSCRIPT

,Use & Care Manual
Over-the-RangeMicrowave Oven
CFMV145, FMV145
m
000000
ooo000000000
0000000
000
Important
Safety Information .. 2-8
GroundingInstructions ........ 9
Features ...... 10, 25-26
Getting Started ..... 11
OperatingInstructions ..... 12-24
Care and
Cleaning ....... 27-31
Troubleshooting ,, 32-33
Consumer
Services
Warranty & Service . . 34-36
READ AND SAVE THESE INSTRUCTIONS pIN31613720_Rev,C06-02JR

IMPORTANT SAFETY INFORMATIONREAD ALL INFORMATIONBEFOREUSING
I_ PRECAUTmONSTO AVOIDPOSSIBLEEXPOSURETOEXCESSIVEMICROWAVE ENERGYFor your safety the information in this manual must be followed to
minimize the risk of fire or explosion or to prevent property damage,
personal injury or/oss of/ire
Do Not A ttempt to oper _te this ovei_
_ith the door open sin{e ope_-doo_
oper _tio]] (aI_ result fi_ ImrmJk]i
exposure to Ini(row_ e eiderSv, It is
_it[l the saR_tv fnter[o( ks.
Do Not Place m_} ob,iect betwe(]_ th(
o'_()/ [FOIl( [_c( _!/(| (]/(_ door or _]]o%
SOil Ot" ()(;Ill(l" t'(!si(h/( (o _c([I)/HI]_(( o!]
S( ;IH)]g" S[I t'[_]_C(!S,
Do Not Operate the o',el_ if it is
dm_ged. [tisplrticular[ importai_t
that tt_e o',en door close properly and
that the_e is no damage t() the:
L doo[" (bent),
9.hing-cs md latches (broken or
loosened),
3.door seals md sea!fi_g sm(i_ces.
The Oven Should Not be a(!iusted ol
repaired b ai_yon( except p['ot)e_Iy
ipaalit]ed ser',ice ))ersl)/mel.
NEED HELP?Help us, help you:In the United States, call: 1-800-944-9044In Canada, call: 1-866-294-9911
Visit the Frigidaire Web Site at http://www.frigidaire.com
P}{_t()re v(}ll (all {()r serxi({_, t]lere are a
t()vvr things "you can do to help us ser_e
"_011 l )et t{'F.
Read this manuaL
It contains instructions to help you use
and m_intain vom" mi{row_,vc t)rot){'rly.
If you received a damaged
oven...immediatclv _onta_t the dealer
(or bttild{'r) that sold you the o_{'n.
Save time and money.
Check the section titled "Trotff)lesl_ooting"
beJore calling. This section hell}s you sol\e
common ])roblems that might occmt If you
do n{'{'d servi{ {', you {an rcl_x knowing
h{'l t) is only ;, t)hon{ • (all _%_r_%.
IMPORTANT SAFETY mNFORMAT[ON
To reduce the risk of fire, burns, electric shock, injury to persons, or exposure
to excessive microwave energy when using your appliance, follow basic
precautions, including the following sections.
SAFETY PRECAUTIONS
This microwave oven is UL and CSA listed for installation over electric and
gas ranges,
This microwave oven is not approved or tested for marine use,
®Reud and {bHow the specific "Precaudons
to .\_oid Possfb[e Exposure to Ex(esshe
Mk ['owaxe Energy" on page 2.
o This _ppliance must be gromlded.
(',omelet on[?, to prop( Jy grom_ded
outlet. Se( Grom_ding lnstrueth)_s
section on page 9.
®Do not mourn this _ppliance o_e_ a sink.
o h/st _11o_ bc_te this _ppliance only in
Iccordance with the p_o_dded
[nst _[lath)]} h}structh)]}s.
®This oxen=the-range oven was designed
[k_r itse o'_er lailges i_o wid(1 thai}
30" (9! cm). It m_x Ix installed oxer
both gas and e]e(t_i( cooking
equipmem.
®Do not operate this appiiance if it has
damaged power cord ox ping, ig it is not
working proper[ b or if it has been
d mmged or dropped.
®Do Hot (:o_(1 or block _!}y ope!/iHgs ol1
the _ppliance.
®Use this appliance only {k)r i_s intended
use _s described in this mantml. [)(1 not
t/se corlosive ch(Ylli(;ais 01 _apors il1 this
_ppliante. This mkrow _xe oxen is
specific _lly designed m [mat, (by or cook
[i_od, md is I_ot imen(k d [i)_ I J)o_ato_v
o_ iI/{h_std J use.

IMPORTANT SAFETY mNFORMATION
READ ALL [NFORMATIONBEFOREUSING
® [)o not StOl( this /ppli:ll](e O[ltdooIs.
Do not use this p_odu(x i/ear wate_
Ibr exampIe, ill a wet base}lie}it, ]}ear
a swimmb/g pool or i}ear a siI/k.
®Keep power co_d _a I_'om heated
st}}7{ Ices.
o [)1) !}()[ il/}]!/e]"se pi)w( 17 co!'d of pl!lg
i]} wat eI'.
_e( dt)ol S/l}7{_(t clt. a]}iH_ i]IStI'/l([iO!}S
b/ th_ Car_ m}d Cle mil}g se(tion(s) o["
tBis maim/I.
®This app[ia]/ce shouk| b( ser3d(ed only
b) quali[ied service personnel. Coma(t
//ea_est authorized se]'_dce g}ciliw {br
examfn/}ion, repair ox a(!iustmem.
®As with my applim}ce, close super_dsio!}
is//ecessa/w when !lsed b,, children.
® ']{_) leduce the t'isk o[ [ire Jn tE!( <Ael}
- Do not oxer_ook Iood. C/_e[ullv
attend appliai}ce if pipet plastic or
odler combustible materials are placed
inside the <)x(n whfle cooking.
- Remove wire twist-ties a_/d }}let l/
handles {k'om paper or plastic
comab/ers be[i_re placing them
illthe <Azel}.
Do }}or llse the o3ell _k_r Stolag(
purposes. Do not le}3e paper pxodu<xs,
cookii}g me_}sils or {)3od i_/ the o_en
whe]} i}ot ill/ise.
l[ materiaIs inside o3el} should ignite,
keep the oxen! door closed, mrn tile
o3en o{l mid discom/ect t!le powet"
cord, or s]ll/t <)[[ power/t the tllse or
circuit breaker pmel. 1[ the doo_ is
ope_/ed, tile [[re may spread.
SAVE THESEINSTRUCTIONS.

IMPORTANT SAFETY INFORMATION
Speda[ Notes About M krowaving
Arcing
l If you see arcing, press the CLEAR/OFF pad and correct the problem. ]
Arcing is the n/i_owme term tbr sp irks
in tile o_en. Arcing is erased b_:
®Metal ov [bil touching the side of
the l)_ (ql.
* Foil not molded to fi)od (uptm:ned
edges act like anteml is).
®Tile metal shelf not installed tolreltiv so
it to!_( t/es tl/e n/i(rowaxe w/tl.
®Metal, such /s twist-ties, poultry pins, or
gold-lhnmed disi_es, in the mklow/_e.
* Recycled paper towels cont lining
sinai1 metal pieces b_ing used in the
l/}icrowa've.
Foods* Do not pop t)op(orn in ?,our mi( ['owa'_e
1)vel/ /li}less i!/ a s])ecial H/iCt'llWa've
_)OpCl)I'n accessorv oI" !l!!_ess VOtl /Ise
_)o_tlorn labeled _1"//se ill !//icl"l)wave
ove!/s.
* Some prodt_cts such _s whole eggs md
seaI_ d (ontainers--[bl ex mlple, _losed
jars--will explod( and should not tx
l/eared ill this n/icrowm e o_en. S_lc[l
//se of tile 11/ic['owa've oven co!lid res{lit
il! b}jm>
®Do not boil eggs in _ IIIiCI'OW I e o'_el}.
Pressure _dll b/_ild _lp insidt egg yolk
and will cm_se it to burst, possibly
res_llting in ii_im" 7.
® Oi/el iting tlle mi( rowaxe with no ff_od
ii}si({t [(1i" _ore t]la11a l!lil!/lte 01 two
ll/a C//lse dal//age to the o'_en aIId
could start / fire. [t incleases the hell
i['Otll/d the ill/g!letFol} al/d cm sho!'tel!
the liti' o[ the o'_en.
®Fllods with unbrllkcl! outer "sldiF' st_ch _s
potatoes, [lot dogs_ sausages, ton/aloes,
apples, chkken [hers and other giblets,
and egg }olks shotlld be pierced to allow
steal// to esc _pe (]111_iI/g cooking.

IMPORTANT SAFETY mNFORMATION
READ ALL [NFORMATIONBEFOREUSING
Safety Fact- SUPERmATEOWATERMicrowaved water and other liquids do not always bubble when they reach
the boiling poing They can actually get superheated and not bubble at all.
Superheated liquid will bubble up out of the cup when it is moved or when
something like a spoon or tea bag is put into ig
To prevent this from happening and causing injury, do not heat any liquid for
more than 2 minutes per cup, After heating, let the cup stand in the
microwave for 30 seconds before moving it or putting anything into it.
o A'_okl beati_xg baby [k_od in glassjacs,
even with tile lid Ix[ft. Make sine ;_l[
ix_limt tood is thoro/lghly cooked. Sth"
ti_od to distxilmte the Ix(at e'_elfl}, ge
c treIill to pre_,em se _ldh_g whex_
warming [ormula or breast milk. Tile
comainer ma ti_eI coolex thin tile milk
re lily is. Alwas test the milk be['ore
[i_eding tile bab_.
®Spomm}eous boiling - Lnd(c _ertain
speci l[ chcm_lst races, liquk/s ma?, st/H to
boil dm:ing or shordv _t_xx"cemo*, d [_'om
the lxli(;rowave overt. '[)) pre'velxt lXHXXXS
[cl:,m splashi_/g Hqltid, we cecomm( nd
tim Ibllowi_/g: belore cem(Mxxg tl/e
COX/taix/e!? [_oul tile ovel!, dlov, the
containex to stmd in tlle o'_en tUx 30 to
40 secox_ds d_er th( o_elx has sImt off.
Do m_t boil liquids in xmrcow-necked
comainexs such as sot_ (h'il/k hordes,
wine flasks and especial1} narco_q}ecked
cotli,( cl*ps. Een if the contaix*er is
opel_ed, excessb e stealxl x:m 1)/liId Ill)
i!}d C//Ise it to bH['St (ix o_el?tlo_%
®Do not de!)'ost _cozen beverages ill
//acrowq,ecked bottles (especially
carbo*/ated bexerages). Ee*/ if the
(xli/tabxer is Ol)( xx(x/, px'ess/l['e Ct!l 1)_/ild
up. '['bis ca*! cruse the (ontahmr to
bm'st, possibly xesuhMg in inim: 7.
o/_()t [{)ods/lld steal_l caix ca/Ise lx{l['llS.
Be cat( I'u[ when openh*g m} comah*ers
o{ hot tbod, including popcorn bags,
cooking pouches a_/d boxes. 'Ii_ pre'_em
possfble h_.jm), direct stem! _w/v {corn
hal!<IS and [hce.
®Do not overxook potatoes. 'F[IQ could
debvdcate a*/d catch fire, cm*sing
1]/ix/age tO VO[ll) ovex}.
®Cook meat md poultry thoxo/_ghly--
melt to/t least m INTERNAI,
temp(xatm'e o{'160F (71 'C). and
po/litcy to/t least m IN'I'ERNAI,
tempexatm'e of 180'F (82'(). Cooki_/g to
these tel//perat!lres/ls{l/fly/)rote(ts
_gainst tood-borne ill*less.

IMPORTANT SAFETY INFORMATIONSpecial Notes About Microwaving
Microwave-Safe CookwareMike sine all cookware _sed in
\o/1_" /_lk _'ow Be oxen/ is s_/itable Jo_
/l/i( !?O_,_/'_il/}4". MOSt glass ( ISSeFOIeS, (ookiI/g
dishes,/neasu['ing cups, ( ustald (ups,
pottei T or chi*m di*merw/re which does
not hm'e metallic trim or glaze with a
metallic sheen cm be used. Some
cookw/re is 1d)eled "suitable lot
How to test for a microwave-safe dish.
®]["roll i['e not s/1£( i["_ dish is _llicI'ow I e-
s/It', use this test: Place il! the o_e_l both
the dish wm are testing and a glass
me/sm'ing cup {]Iled with I c_*p ot
water--set tile measming cup either il!
or llext tll tile dish. Microwas( 30 to 45
seeoi*ds _t high. It the dish heats, it
sho/lk| l/or be !lSed Ik_l I//i¢ row/',big.
It" the dish lemaills cool ai/d only the
water ii* the c_*p heats, then the dish is
ll/i(:rowaxze-s t[__.
® ][vou use i melt thermometer while
cooking, make sine it is sde [i_l use in
I_/iC ['owaxze O'_ ells.
®Some styrofoam tD_ (like those th/t
melt is pa(kaged on} has( a thh/strip of
metal embed(k d ill the bottom. When
!_/kx'owaxzed, the I//etal (all [/[l['l! tile
tloor ogthe o_en or igI/ite i pip(1 towel.
* Do not /ISe re(vc[ed [)lper products.
Re(}ckd paper towels, i/apkii*s m*d
waxed paper can eomail! metal tleeks
which m/cause arcing or ignite. Papel
pIX)d/ICtS cont /inii/g IBlon Of //Vl()//
tiI m/eros sho//ld be/xoided, since the
mav also ignite.
Do ll()t /Ise the l//k:_'owaxze to dlv
//ewspap_ rs.
®Not dl pl _stic wrtp is sl*itable li_l use i_l
microwase o_ ells. (beck the p/ck _ge t_r
proper//se.
®Paper tow_ Is, waxed paper md plastic
wrap (;all b( used to coer dishes ill or(kr
to retaJi! l!/oistllle /I!(/ p['e_el/t spattering.
B( S/l!Te to vel/t pI _stic wrq/so steat//
(i!/ es( _pe.
®(ookwaleln/become hotbecmseof
heat trallsR,lred [rom the heated {)>od.
Pot hok/ers may be i/ee(k d to ha/idle
the cookware.
* "goilable" cooking pouches md tighfl
closed plastk b/gs should be slit, pi(lced
ol seined/s directed IV package. K th_
are /lot, plastic co/fld burst duri_lg ol
immediately d_er co(tkil_g, possibl
res/lltJng ill iI!im'?,. Also, pl tstic stor _ge
comainers s[_ould be at le/st p/rtiall
unco_el( d bec rose they {i>i'm / tight
seal. When cooking l_itb comail/els
tiglltly (o_eled witt_ plastic l_['ap, ['emox e
coveri_ig care!kfliv mid direct steam awa
[['om bands md lice.

IMPORTANT SAFETY mNFORMATION
READ ALL INFORMATIONBEFOREUSING
Microwave-Safe Cookware (continued)®Use {k)fl onIy as directed in this manual.
TV dinn(_s mr_ Ix mk_ou c, ed fl) {'oil
trt s less thin 3/4" (2 cm) high; remo'_e
the top [oil co*,( _ md_eturnthet_a to
the box. Whe_ ush/g loll in the
mfcrowa e o'_e_L keep tile {k)iI u least
] ii/ch (2.5 cm) awa [rom the sides o{"
the ()veil.
®P[ _sdc cookw u'e - PI _sti( c!)okw/_t
desig_)ed {'or mi(_ow c,:e cooking is _erv
usefifl, but should be used care{ifll\.
l_'vel) i!}i(]'OWlVe-sa[( pI/stfc !'_I)tV 1101 be
as tl)Ier mt o[ overcol)ki_/g eonditilms as
I!'e glass or (ela//lic iliatelials /!/d ill/'_
so,'teD o!7 cha_" if sul)ieeted to sholt
p( _iods I)[ o'_e_cookii/g.
In longer exposmes to o_e_cooking, th(
{'ood md cookl_are could ignite. Follow
tiles( guidelil_es:
1. Use microwaxe-sdb plastics only md
use them i_ strk:t compli race with
the eookware I/}al/!i{il(tHleF's
['eco!_!l//eiidatioB s.
_ Do 1lOt I//i(['owa_,e el//pty colitail/ers.
3. Do not pemfit children to use plastic
(:ookw/re withollt co!//l)lete s/ipel'_isio/L
The Exhaust FanThe {hn will operate mtomati(ailv m_der
certabl coliditiol/s (see .\lltol//ati(: Fu!
{bature). 'Ihke (are to p_e'_t nt th( st/rti_/g
md sp_( tding ot accident l[ cooking fireswhile the exhaust {m is in use.
* ( [ea_ tile m/dersi(k o[ the mic_ow_,e
o{}en. Do not aihm grease to build up
on tile microwme or the {m [[lte_s.
®]n the e*,e_/t a grease fire o_) the
sill?{ lee I/l/its 1)eIow the i/liclow P,e oVell,
smother / flamh)g pan o_ tile smg_ce
unit b coxeri_g the pan completely
with / If(I, a cookie sheet or a [lat tra.
®Use c/re whei! cieani_g tile exhaust lira
[liters. ( orrosi_e cleani_g ag(ms, su(b
_s Iv(-b_sed o'vel} cie mers, I!!/ dm//ge
the filters.
®Wh(n p_( p/ri_/g I1 rating Ioods raider
the I//iclow/_,e, 1[11"!1 [he ex]/atlst [ilI} i)i/.
®Never lease surthee //Bits beneath VO/lr
_/ic_'t)wax_e ove!) iii}atteilded at hi_]/heat¸
settil)gs. Boilo'_ers cruse smoM_/g md
g_e/s} spillox(_s that ma} ig_/ite ax)d
spre/d it" the microwa'_e exhaust Em is
operating. '1"o minimize automatic lira
operatioi), use adequate-sized cookware
md use high hell o_) sin'[ace milts o_flv
when _/ecessarv.

IMPORTANT SAFETY INFORMATIONGrounding Instructions/Optional Kits
Grounding Instructions
Ensure proper groundexists before use.
Cons_.f[t _ q/_/iilied ele(t{ickm lit" seP, ice
te(lmi{i m iJ tile groundi{_g i_{str/lctio!_s
ate m)t ( ompl( te]y understood, or if
doubt exists/stowh(ther the q_plimee
is p{opet:ly grounded.
[[ the o//t[et iS / stal{d_lJ_d 2-prol/g l_,al[
outlet, it is yore" persoi/al responsibilit
and ol)iigatioi/ to ila',e it replaced !_ith /
properly gTom/ded 3-pro_/g _alI omlet.
Improper use of the grounding plugcan result in a risk of electric shock.
'['his /ppli race must be grom/d(d. In
tile e'_em o[ all electri( d short {i{cldL
grom{ding ['educes the risk of elect{ic
shock bv p['oxiding m esc/pe wire [i)rtile electric C[l['{e{{t.
'['his /ppli race is equipped with a }}owe{
(ord ]l [{!l/g t gro/l{ldi{ig l_,il'e with /
grounding plug. The pll{g nmst be
plugged imo m omlet dmt is properly
i{_stalled md ground(d.
Do {/or HlId({ a{Iv ci['( IIHISt_H/CeS CIH or
{emove the third (grotmd) p{ong {kom
the power {or(I.
Do i/or use al! /d/pter plug wit[] this
/pt}lia_!(;(.
Do l/(tt use all extel{sion cord with this
applia_/ce. [t the powe{ cord is too short,
ha e a qu/ii_ied elect{icial/ or ser\i{eteelmician ii/stall an outlet {/ear tile
applia{_ce.
For best op( ration, plug this appliance
imo its own electriea[ omlet to prevem
{'Iick_ ['ing of tights, bI(lwil{g o{ 0ase o{
t{ipping og circuit breaker.
Optional Kits
Filler Panel Kits
JX4OWH or JX46WH - White
JX41 or JX46BL - Black
When repla{ing a 36" (91 {m) range
hood, {]lh'r t}anel kits {ill in the additional
width to ]}rovidc a custom lmilt-in
}{1 )1 )e;-ir}{l{{ e.
For installation between {al{inets only;
HOt for c{ld-o/L( abil{et i{lstMlatiol{. Each kit
contains two 3"-wide (8 cm) tiller panels.
Filter Kits
JX81A- Recirculating CharcoalFilter Kit
Fihcr kits arc used _hen the micro_a{c
oven {am{ot t)e {{'nted to the outside.
A{ailabh' at extra cost /i'om your
Frigl daire supplier.
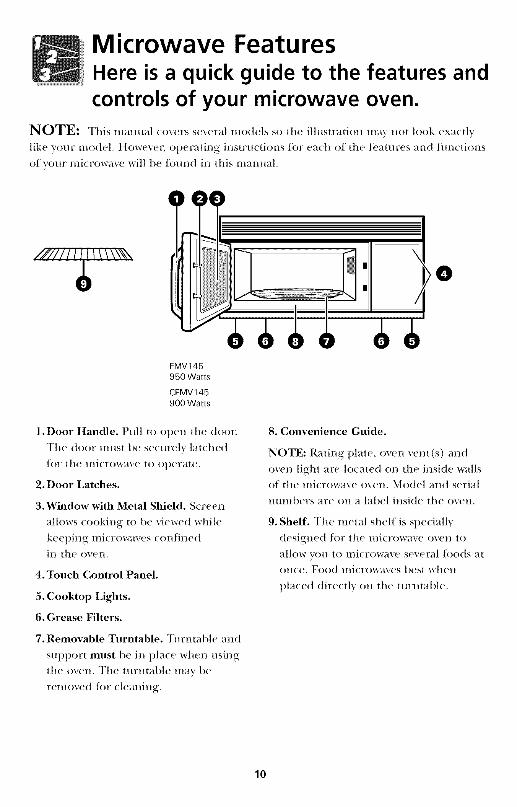
Microwave FeaturesHere is a quick guide to the features and
controls of your microwave oven.
NOTE: This manual (oxcrs scxeral models so the illustradon ma_ not look exa(tlv
like your model. IIowexcr, ot)cradng insu:u(dons for ea(h ot die features and hm(tions
of your mi(rowaxe will be found in this mmmal.
////////I I 1 \ \ \\_\
FMV145
950Watts
CFMV145
900Watts
1.Door Handle. Pull to ot)en tile (toot:The door must be securely latched
/()r the l/ll(row_ive 1o ot)erale.
2. Door Latches.
3._'hldow with Metal Shield. Screen
allows (()()king to be viewed whih'
keeping mi(ro_a_es (onfinedill |he ovel/.
4. Touch Control Panel.
5. Cooktop Lights.
6. Grease Filters.
7. Removable Turntable. Tm:mable and
SUl)l)ort must be in pla(e when using
tile oven. The mrmable may be
removed tor (leaning.
O
8. Conve_tience Guide.
NOTE: Raung plate, oven vent (s) and
oven light are h)cated on ttle inside walls
of the microwave oven. Model and serial
mmlbers are on a label inside tile o_en.
9. Shelf. The metal shelf is specially
designed/i)r the microwave oven to
allow you to micro_ave several/i)()(ts at
()lice. Foo(t H/icrowaves best whell
placed directly on the mrmable.
10

Getting StartedYou can microwave by time or with theconvenience features.
(Throughout this manual, features and appearance may vary from your model.)
©®©®®©®®© ©
Time Features
PressCook Time I & IInr_>5,_ o_tct, oY [wl('(,
Auto/Time Defrostnr_>5,", [wick"
Express Cook
Power Level
Plus 30 Seconds
Enter
An:omit of cooking time.
Am(rant of de/i'osting time.
Starts imme(tiatelv}
Power level 1-]0.
Starts immediately}
®@@@Convenience Features
PressAuto/Time Defrost
Reheat
PopcornI)IY',_,_ 0_2( ("
/5es,s :wice
Beverage
Enter
Food _ eig-ht.
Food t}pe 1-6.
Star_s immediate1 !
3.5 oz. (99 g)
3.0 oz. (85 g)
1.75 oz. (50 g)
Sta:ts imm(di _elv!
Option
!- 3 s_:'_ings
11

Operating Instructions
Changing Power Levels
How to Change the Power Level
The power level may be emered or
(h raged bnlnediatel!, d_er e_te_ii_g tlle
tbat_.li'( time [i)r (()OK TIME TIME
DEFP, OST or EXPRESS COOK. The
powe_ k'_eI may Jso be changed du['ing
time ( o!lll[dow/L
1. Press C()()K TIME or sel( (t
Time Deh'ost
9. Ente_ cooking or de['rosth_g dine.
3, Press POWEP, I EVEI,.
©4. Select desired powe_ le_,el ]-!0.
©©©©©©©GG
DisplayOn/Ofl
\ariable power [exe]s _dd flexibiIit to
!//iC1OW F_e cookil/g. "l'he pow(r le'_els on
the ii/i(i?ow Bze oven e_[l/ t)e (Oral) _['ed to
the sndi_ce milts on _ tinge. Itigh (power
l('_(t 111) or Full power is the tbstest way to
cook and gives you 100% power. Each
power Ie'_eI gixes you microw P,e energy
(e_tain perc(m o1" the dine. Powe_ level 7
is mk;rowa'_e energ?, 70% of the time.
Power le'_eI 3 is energ? 30% of the trine.
A high setth_g (] 0) will cook g_ster but
{))od in_ need mo_( []'equen_ stirring,
lot "dii_g or turnil_g o'_er. Most cooking
wilI be don( on High (power le'_( I 10).
A lowe_ setting will cook more e'_enh md
need less sth'_il_g or _ot _dng o( the Ibod.
S()llIe {'()ods HI/V have better flavoL texttlre
or _pp(a['mce i[one o['the lowe_ s{ttings
is used. [se _ [ower power [ex(1 when
cooking t'()ods thtt hme I tendel_(; to boil
oxen; such as sc Jloped potatoes.
Rest periods (when the nd(row_xe ene_g}
(?cl(s off) ghe din( li)r the [i)od to
"equalize" o[" t_anslbr he_ to the insid(
o[ the tbod. An ex m_ple o[ this is showI_
with power lex([ 3--the d(h'ost ccle. If
mk;rowme energy did not cycle oll. the
i)utside I)lthe [`()od would cook belk)re
the inside wls del2osted.
Here _le s()II/e (x [llll)[es {)[/Ises t()1
Va!?iO[lS power levels:
Power Level Best Uses
High 10 Fish, ba(:on, v{.gcmbh.s, b<>i[filg
l[(luids.
Meal-High 7 ( (,mh, ({>o]<h]g of Inca[ and
poukO; baking casscroh'sand rehe _t[llg.
Medium 5 Slow cooking and _enderizMgSH(Th _S 8JEWS HIld less [(!It(lel
Ctl{S Ol meat.
LOW2 or 3 [)e[]:osfil*g w[l[l(ml cooking;
sirm'nefing; delicate sauces.
Warm 1 Keel)ing _)lod Walln without
{_vercooking; soflelfing t)utten
12

Operating InstructionsTime Features
Cook Time
Cook Time [
\IIovvs _ot_ _(1H_iCFOVv_I( _)_ _IB 1]111e 118
m 99 milmles md 99 se(onds.
Powe_ level 10 (High) is amom _fic _tb seh
bm you n!_y chmge i_ tb_ more Ilexibili_ .
You may op(n tl/e door during Cook
Time m cheek die [ood. (!ose _he door
m(I ]press sr]{ARI]{"tO resume cookfi*g.
1. Pr(ss C()()K TIME,
©2. Enter cooking time.
3oChange power level f[ you don't want
lulI powe*; (P_ess POWER I,EVE[.
Select _ desired powe_ level 1-HL)
©©©©©©©GG
Cook Time II
[ _(1s %o[I <hailge pop, el" ]exeIs
mmmafi(:all)' dining cooking. HI<r< s how
Io do i/:
1. Press (()OK r]{]ME.
2.Enter tile []rst cook time.
3o(hang{ tile power lexel it you d()n'{
want I'ull poweL (Pr{ss POWER [_EVE[.
Selecl _ desbPed power level 1-10.)
4. Press (()OK TIME _g_in.
_ Ell[e!" tile secol/d cook till/e,
6.( hange tile power le{l if you (/()n'_
want fhll powen (Px( ss POVvq'iR [,EVE[,.
Selecl _pow(rl(_el 1-10.)
7. Press sr]{',\RT.
,\{ /he e]_(/o['())ok rFil//( _, Cook rFiH/( II
CO[III[S ,.Io'_,,!k
Nsplay O_/off
4. Pr_. ss STAR l'.
@
13

Operating mnstructionsCooking Guide For Cook Time[& [[
NOTE: Use power level High (10) unless otherwise noted.
Amount Time Comments
] lb. (.45 kg) 6 to 9 rain., In ] ½-qt. oblol:,g glass baking dish,
Med-ltigh (7) )l_lce 1/4 cup w_ltet_
lO-oz. (.28 kg) 5 to 7 rain. In l-qt. casserole.
pa(kage
Vegetable
Asparagus
(t+'esh st>era:s)
(t_'ozen spears)
Beans
(t+'esh green)
(t_'ozen green)
(fi'ozen lima)
Beets
(ti'esh, whole)
Broccoli
(t+'esh _ut)
(fi'esh spears)
(tl?()zen,
chol)l)ed)
(t+'ozen st)era:s)
Cabbage
(fi'esh)
(wedges)
Carrots
(fi'esh, slk ed)
(t+'ozen)
Cauliflower
(tlowerets)(ti'esh, whole)(t+'ozen)
1 lb. (.45 kg)cut in half
10-oz. (.28 kg)package
10-oz. (.28 kg)
package
1 bm/ch
1 bm'tch
(IV+ to 1½ lbs.)
(.57 to .68 kg)
1 bm't( h
(IV+ to 1½ lbs.)
(.57 to .68 kg)
lO-oz. (.28 kg)
pa(kage
10-oz. (.28 kg)
package
1 me(tim_) head
(about 2 lbs.)
( about .90 kg)
1 lb. (.45 kg)
10-oz. (.28 kg)package
1 me(tim_) head
1 me(tim_, head
lO-oz. (.28 kg)
t)a(kage
9 to 11 min.
6 to 8 mi+_,.
6 to 8 mi+_,.
17 to 21 min.
7 to llt min.
9 to 13 min.
5 to 7 min.
5 to 7 min.
8 to 11 min.
7 to 10 min.
7 to 9 min.
5 to 7 min.
9 to 14 n)irt.
llt to 17 min.
5 to 7 min.
In l t/+(tt, casserole, place l/2 cup water.
In 1-qt. casserole, place 2 tablest)oonswater.
In 1-qt. casserole, place 1/4 cup water.
In 2-qt. casserole, place 1/2 cup water.
In 2-qt. casserole, place 1/2 cup water.
In 2-qt. oblong glass baking dish, [)lace
1/4 (tq) v+';+itet_Rotate dish _dter halfof time.
In 1-qt. casserole.
In 1-qt. casserole, place 3 tablest>oonswater.
In 1 t/_,_or 2-qt. casserole, place 1/4 cupwater.
In 2- or 3-qt. casserole, place 1/4 cupwater.
In 1½-qt. casserole, [)lace 1/4 c u l) water.
In 1-qt. casserole, place 2 tablespoonswater.
In 2-qt. casserole, place 1/2 cup water.In 2-qt. casserole, [)lace 1/2 cup water.
In 1-qt. casserole, place 2 tablespoonswater.
14

Operating mnstructionsCooking Guide For Cook Time[& [[
Vegetable Amount Time Comments
Corn
(/i'ozen kernel) lO-oz. (,28 kg) 5 to 7 rain. In l-qt. casserole, place 2 tabh'spoons
package water.
Corn onthe cob
(/i'esh)
(/i'ozen)
Mixed
vegetables(/}'ozen)
Peas
(fi'csh, shelh'd)
(/i'ozen)
Potatoes
(/i'esh, cubed,
white)
(/i'esh, whole,sweet or white)
Spinach(/i'esh)
(]_r)zen,
chopl_edand leat)
Squash
(ti'esh, smnmer
and yellow)
(winter, acorn,
buttermn)
1 to 5 ears
1 e_l+r
2 to 6 ears
10-oz. (.28 kg)
package
2 Ills. tmshelled
10-oz. (.28 kg)
package
4 1)ot _++toes(6 to 8 oz. each
(.17 to .23 kg)
1 (6 to8oz.)
(.17 to .23 kg)
10 to 16 oz.
(.28 to .45 kg)
10-oz. (.28 kg)
package
1 lit. (.45 kg)sliced
1 to 2 squash(abottt 1 113.each)
(about .45 kg
each)
3 to 4 rain.
t)er e;-ir
5 to 6 rain.
3 to 4 rain.
per pal:
5 to 7 rain.
9 to 12 rain.
5 to 7 rain.
9 to 12 rain.
3 to 4 rain.
5 to 7 rain.
5 to 7 rain.
5 to 7 rain.
8 to 11 rain.
In 2-qt. oblong glass baking dish, placecorn. If corn is in husk, use no water;
if corn has been husked, add 1/4 cup
water. Rearrange a/]er half of time.
Place in 2-qt. oblong glass baking dish.
Cover with vented plasti( wrap.
Rearrange atter half of lime.
In 1-qt. casserole, place 3 tablespoonswater.
In 1-qt. casserole, place 1/4 cup water.
In 1-qt. casserole, place 2 tablespoonswater.
Peel and cut into 1 inch cubes. ['lace
in 2-qt. ( asserole with 1/2 cup water.Stir atter half of time.
Pierce with cooking tork. Pla(ein center of the oven. I ,et stand 5
mimnes.
In 2-qt. casserole, place washed spinach.
In l-qt. casserole, place 3 tablesl)oonswater.
In 1 ½-qt. casserole, place 1/4 cup water.
Cut in half and remove fibrous
membranes. In 2-qt. oblong glass
baking dish, place squash cut-side-
down. "Ihrn cut-side-ut) alter 4 minutes.
15

Operating InstructionsTime Features
Time Defrost
Allows vo/_ to de[l'ost lilt the length ol:
time you select. See the De!i:osting Guide
fi)r sugg_ sled dines.
1. Press A[ YI"OiT[ME DEFROST mice.
®9° Enter dei_'osdng time.
3o Pxess ST.\R'[_
@4. Tmn {i_od oxer when tile oxen signals.
5oPxess S'['.\R'[_
(Auto De_¥ost explaioed in the section on
Convemence Featureso)
Powex level 3 is aurora nicatly set, but you
may chmge this {or more tlexfbilhv. D>u
may detk'ost smalI items more quickl b\
xaishlg th( power lexel if'let entering tl/e
time. Howe_er, the wilI ne(d more
{kequem attention than ustml.
Powex le_eI 7 cms tl/e total deli'osting
dine in about [lalQ power level 10 (ms the
total time to approximately !/3. Rot/re ox
stix t))od I_'eq uen tl?,.
At on( h/It o{ s_ Iected d( {)osting time,
ti*e o_en sign/Is TURN. At tlxis time, tm'n
tood oxer and bxe/k/part or rearrange
pieces Ibx moxe exert deh'osdng. Slli(ld
any wu'm _xe/s with stud1 pieces o[ Ibil.
A dull thmnping noise ma be heard
dm'ing d( frosting. This somnl is normal
w!/en tl/e ovex/is ix(it opex'atix/g at
High powen
Defrostin 9 Tips
®Foods {rozen in piper or pl _stic can be
detl"osted in the p/ckage. Tiglxtl} closed
p/ckages should be slit, pierced or
xented AFFER tood has p/rti dI
defrosted. Plastic storage (;ox_tail/ers
sllo!*ld be _t least patti dly uncoxered.
®Family-size, prepackaged i_'ozen dimlers
cm be defrosted and microw_xed, lithe
tood is in / toil container, tx'ansibr it to
/XliCI'OW _xze-s tl_ _ dish.
* Foods tllat spoil easi h, st*oh _s milk,
eggs, fish, smllings, po/dtry md pork,
should not b( allowed to sit out tbr
more thin one hour at{er dehosting.
I{oon/ te_//pe['_ttn'e l)l?oI!!l)tes the gYowth
of l//rm!i*l bacteria.
®For more ex(n d< ti'osting o{"I/rger
[k*oxls, such _sbeei, lm/b md*e/tro_sts,
//se Alxto Del'['ost.
®Be sure large melts u'e completely
deh'osted belore cookh,g.
®Wile_x deJi'osted, {i)od should 1)e (ool but
soil< ned in alI are/s. If still slight1 k},
retllxxx to tile IX/iCI'OW /'_e VEX'} Ill, ell}, or
let it stand _ lew minutes.
16

Operating instructionsDefrosting Guide
Food Time Comments
Breads, Cakes
Bread, buns or rolls (1 p(.)Sweet rolls (_q_prox. ] 2 oz.)( _pprox..34 ks)
Fish and Seafood
Fillets, frozen (! lb.) (.45 ks) 6 m _'_rain. Place block in c tsserole. Turn o_'r m_d
Shellfish, small pieces (1 Fb.) 5 m 7 rain. b_e_k up _l_e_ h_/g the tim(.
(.45 ks)
Fruit
Plastic pouch - I to 2 3 m (; rain.(IO-oz. pack _g_) (.28 ks)
Meat
Bacon (! lb.) (.45 ks)
Franks (! lb.) (.45 ks)
Ground meat (1 II7.) (.45 ks)Roast: beef, lamb,
veal pork
Steaks, chops and cutlets
2 m 5 min.
2 m 5 min.
PoultryChicken, broiler-fryercut up (2JA,to 3 lbs.)(!.13 to 1.36 kg)
Chicken, whole(2_/_,m 3 Ibs.)(!.13 to 1.36 ks)
Cornish hen
Turkey breast (4 to 6 lbs.)(1.8 m 2.7 ks)
5 m 7 rain.
12 m 16 rain.
per lb.
15 m 19 rain.
17 m 2! ram.
7 to 13 min.
per lb.
Place unop(ned p ickag( in o_en.
[,et smi_d 5 minmes _[_e_ deh'ostf_g.
Pl_c_ unop(ned p_ckage in o_en.
Microw Ixejl*st until {i'm_ks can beseparated. [,et sta_d 5 mimaes, ig
_ecess _), to compIete d( [kosting.
'Iiun me_t over a[_er hall" the dme.
Use power le_e] I.
Place unwrapp(d me_t h_ cookh_g dish.'Ihr_ o_er dter h_lf the time md shield
warm u'eas wittl [oil. Whe_ _hfish(d,
separate ]pieces and let strand to (:om]plete
d( [):osting.
Place wrapped chicke_ in dish. UnwrapaI_d tuln o_er _i_er half tile ume. Whe_
finished, sepal:_te pieces and microwax e
to 4 I!/iIlllteS l!l()I'e, if necessar}.
Let strand to tinish deDosth_g.
Place wr _pped chicken in dish..\t_e_ b_t[
the tfme, unwr _p and turn chick(_ o_er.Shield warm areas wi_h Ibil. Finish
de[kosting. I{[necessm), _lm cold w_ter in
the c _vitv umfl giblets (a_ be removed.
Pl_ce unwr _pp(d hen in the o_en breas_-
si(l( -up. "Iiu'n over a[_er haif tl/e time.
Run cool wuet: i_ the c_dt until gibletsCHI "[)e ['ellloved_
Place unwrapped bre _st in dish b_( _st-sid(-down. Aider half the time, turn o_e_md shi(ld w_Hn areas with !oiI. Finish
del}osting. [xt stand ] to 2 horus iI_
reh'iger _mr to complete det}osting.
17

Operating InstructionsTime Features
Express Cook
©©©©©©
This is a quick way to set cooking timefor 1-6 minutes.
P_'ess on_ o{'_he Mim_te (look pads (J_'(m!
] to 6) [k_r ] to 6 miracles of cookie,s4 _t
pl)we* level ] (}. Fol: _xampie, p_<ss the
9 t_d {'o*"2 mim_{es o{"cookiiig time.
The t_owe_ lexel (:a_ be (:ha_g<_d as _ime is
colmti_g down. P_'ess P()WER I _EVEI, a_d
e_te_" !-! O.
Plus 30 Seconds
©You can use this feature two ways:
®]t _ili _dd !_0 seco_lds _o the time
(;omHing dow*_ each time the ]{>adis
p_:essed.
o ]{ ( _1/ be/lsed _s t q_li(;k w_y to s_t
30 seconds ol cooki*_g _ime.
18

Operating instructionsConvenience Features
Auto Defrost
Auto [)efi:ost automatically sets the
defl:osting times and power levels to give
even delrostJHg results/i)r meats, poultry
and fish weighing ut) to 6 t_ounds.
1. Press AUT()!TIME DEFR()ST once.
®2. Using tlle Conversion Guide at right,
enter/i)od weight. For example, press
pads 1 and 2/i)r 1.2 t)oun(ts (1 t)ound,
.'4oumes).
©©©©©©©GG
3. Press START.
@(Thne Defrost is explained hi the Thne
Features section.)
The Auto!Tinle Del_:ost ti'amre gives
VO[I |WO W_lX, S tO de[]'os| []'ozell/i)o(ts.
Press AUTO!TIME DEFR()ST once/i)r
Auto Detrost or t_*iee ti)r Time De/i'ost.
Else Auto DeiPost for meat, 1)oultr} and
fish. Use Time l)eli'ost for most odler
ti'ozen foods.
Conversion Guide
If the weight of food is stated in
t)ouH(ts arid oun(es, the oun( es must
be (onxerted to tenths (.1) of a t)oun(t.
Weight of Weight of Enter FoodFood in Food in WeightOunces Kilograms (tenths of
a pound)
1-2 .03-.07 .1
3 .08 .2
4-5 .11-.14 .3
6-7 .17-.20 .4
8 .22 .5
9-10 .25-.28 .6
11 .31 .7
12-13 .34-.36 .8
14-15 .3(.!-.42 .9
16 .45 1.0
17-18 .48-.50 1.1
19 .53 1.2
20-21 .56-.59 1.3
22-23 .62-.64 1.4
24 .67 1.5
25-26 .70-.73 1.6
27 .76 1.7
28-2(.) .78-.81 1.8
30-31 .84-.87 1.9
32 .90 2.0
33-34 .92-.95 2.1
35-36 .98-1.1 2.2
• Remoxe meat trom package and t)laeeon mierowaxe-safe dish.
• Twice during (tetrost, the oven signals
TURN. At each TURN signal, turn tlle
ti)od over. Remove de/i'osted meat or
shield warm areas with small pie(es
of/i)il.
• After de/i'osting, most meats need io
stand 5 mim_tes to complete de/i'osting.
I,arge roasts should stand/i)r al)out
30 miHutes.
19
Operating InstructionsConvenience Features
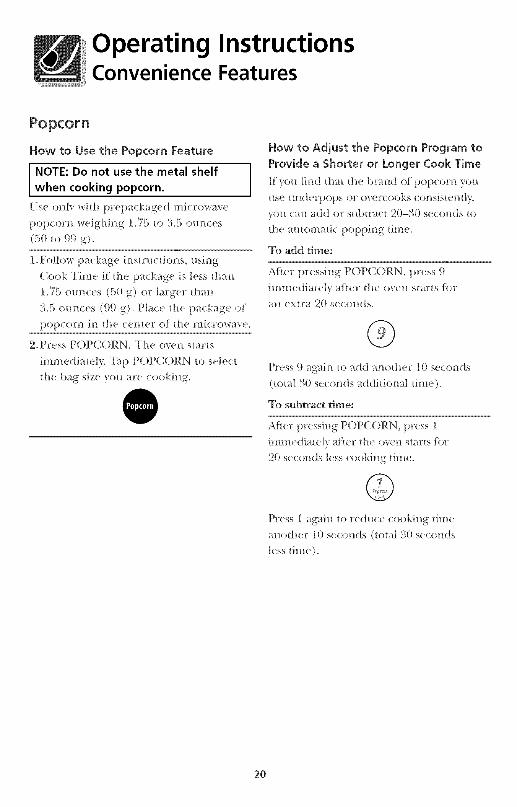
Popcorn
How to Use the Popcorn Feature
NOTE: Do not use the metal shelf I
Iwhen cooking popcorn.
Is( oif[)' _dd! prcp_, kag_ d mk ro_a_e
popcorn _('ighii_g 1.75 to 3.5 ounces
(50 to 99 g).
g i ollow p _ckage i_!strH(tioI/s, HsiI/g
Cook Time if t[l_ p/ckag_ is less thin/
1.75 oun(es (50 g) or large_ th/H
3.5 ounces (99 g). Place die pa(kage o[
pop(:orI/ i!/ tile (eiltet" o_ the !'_lic['o_,_a_ e.
2. Press POPC()RN. Tl_e ()_ei/sta['ls
immediat(l}. "I'_p POPCORN to select
tile bag size you are cookil/g.
How to Adjust the Popcorn Program to
Provide a Shorter or Longer Cook Time
[1 _o_ find that t!_e brmd ot poi)tom you
list! l/I!(]( ['pOpS {lIP o'vel(ooks (:onsistent[},
\ou can _dd or subu [ct 2(}-30 seconds to
the/utomatic popping time.
To add time:
,\tier pr(ssing P()PC()RN, press 9
i_////e(/iu(_} /fie! the o_eH SI _i1s [_l"
_// exn'/ 20 s( coil(is.
Press 9/g_dn to add an(ltll( v !0 sectmds
(umfl 30 s((:onds/ddJ/ionaI _ime).
_l_>subtract time:
After pressing POP(',OP, N, press !
i/lll//edialeI', a[[e£ ]tl( o%(]1 SL}/,IIS ['t)["
20 seco//ds less cookil/g lil//e.
P!'ess [ /g_{ii/ t(t t'edltde (:ooki//g/ira(
mlo_h( v !0 s( co//ds (mull 30 seconds
l( ss /free).
2O

Operating InstructionsConvenience Features
Reheat
'lhe R_h_a_ _amr_ reh_a_s ] _o _ s_r_ngs
man? pr_Gousl? cooked {hods.
1. Pr(ss REH tE \T.
@2. Selec_ {k)od type /-6 fi>r one ser_dng
(see r(hea_ Guid(below).
3. Press 2 or 3 _o xeheat 2 or 3 servings.
4. Press START.
NOTE: Th< s<rvh*g size may b_ cha_g( d
or _dded a[:_<r pressing S'I \RT. Press
mm*b_ r pad 2 or 3.
Beverage
The Bex(rage Ib m,re heats ! to 3 serGngs
O[ all b(_erage.
Press BEVERAGE. '['be oxen star_s
immedi _eb,.
The serving size is u*{omaticallv set _ !,
but can be changed b?. pressing 2 or 3
right ff/ur p_essing BEVERA( E.
Dri_s heated writ the Beverage Feature
may be very hot. Remove the comainur
with care.
Reheat Guide
Food Type Comments
1 Pasta (o,v_ _vith lid o_ _vmed plasd< _rap.
2 Meats, casseroles, pizza (o_e_ with lid o_ _emed plas_k wrap.
3 Fruits and vegetables (o_e_ whh Ikl o_ _emed plasuc wrap.
4 Beverages, B-10 oz. Works [xst with wide mouth mug--do m_t (:oxen;(240-300 m[)
5 Sauces and gravies (o_e_ with lid o_ _em(d plasdc wrap.
B Plate of leftovers (o_e_ with _e_ted plastic wrap.(2 to 3 foods,
4 oz. or .11 kg each)
21

Operating InstructionsOther Features Your Model May Have
Hemp
'rh_ _[E[,P pad displal, s I_m m'e
inlbmmfion md h_lpful hfms. Press
_[EI,P; H_e/_ sekc/ _ {emm'_ p_d.
Cooking Complete Reminder
']'o remind you t[x_ you haxe {'ood in the
ox_m the o_en will dispI_y _T()()D IS
READY' and b_ep once _ mimue mHil
VOtI either o_}ell [he ovell door oF press
CI,EAR!()FE
Clock
ScrollSpeed
The scrolI speed o{"th_ displ _ycm be
chmged. Press mdhold tbeAM!PM pad
about 3 seconds u> bring up the dispIa}.
Select 1-5 [br slow to {_st scroll speed.
Display On/Off
@Nspla_ 0_0ff
To mrn H_e clock display olL press and
hold 0 for abom /hree s< conds.
To redfspl_) /h< do(k, repeau
Start/Pause
@In _dditfon to starting many hmctfons,
STARFiPAUSE alIows you to stop cooking
witilout op( ning the doo_ or (le _ing the
displ _>.
22

Operating mnstructionsOther Features Your Mode[ May Have
Delay Start
Delay Start allows you to set tl/e n/icrowa\e
to delay cooking ul) to 24 hom:s.
1. Press DEI,AY S%\RT.
©2.Enter the time VO/l Wallt the oven to
start. (Be sure the n/icrowa_e clock
shows the correct time of clay.)
3. Select AM or PM.
s_r011SN_
4. Sele(t any (ombination oI A/no!Time
I)eli'ost or Cook Tin/e I & II.
5. Press START
@The Delta Start time will tie displayed plus
"DS." The o_en will automaticalh' start at
the del_ved tilne.
The time of (t_} may be displayed by
pressing CI_()CK.
Surface Light
Bfi_htl_hgOff
Press SU RE\CE l,I('t tT on(e tor bright
light, twi(e tkn: the night light or three
times to tUrll the light off.
Timer On/Off
Tinier ()n!Off operates as a nlimlte timer
and can be used at ally time, even when
the o_en is operating.
1. Press TIMER ()N!()FE
@2.EIHer tilIle VOtl _r_lll| to CO[lllt d()_rn.
3. Press TIMER ()N/OFI_ to start.
@on/off
When time is/q), the oxen will signal.
To turn off the tinier signM, press TIMER
()N/()FF.
NOTE: The timer indicator will be lit
while the timer is ot)erating.
Automatic Fan
All _t/ltOl//ati( t_lll t('}ttllre protects
tile l//icrow_¢_e /i'Ol// tOO IIlllCh heat
rising/i'om the cookto t) below it. It
automatically turns on at low speed if
it sellses too l///lch heat.
If you ]lave ttlrlled the t_lll Oil VO/l l//av
find that you cannot turn it off. The {ml
will automatically turn off when the
illterllal t)arts are cool. It 1//_1_,st_lv Ol/[()r
30 minutes or more a/]er the cookto l) and
microwave comrols are turned off.
23

Operating InstructionsOther Features Your Model May Have
Reminder
The Remin(k r[b m_cc can be used like m
alacm cluck/ud (/u be /lsed /I /H [ilu(,
even wheI_ the u_el_ is upecadng. The
Remiuder time can be set up to 24 ho_*rs
latch
1.Press REMIND.
9. EHt( F {he {ilUC vol/w/u[ the oxel! {o
remind vo_*. (Be sm'c the microw uc
clock shows the correct time o! d_)<)
3.Select AM or PM,
s_011spee_
4. Pcess REMIND. Wbe_/ Remb_der signal
o(cm's, press REMIND to tmu it u[k
The/_emiude_ dine ma) be displayed
IV pressing REMIND.
NO_2: The REM indic ttur wflI rein/in lit
to show that tile Remind( _ is set. '1"o (lear
tile ]_emfuder belilcc it occurs, pcess
REMIND, then 0. The REM indicato_
will no 10//gex be lit.
Child Lock-Out
©Yo/I lU/V Io(k/h( cou_l'OI I)_///(] [o !)!?e_eu[
/he lui(?low/'_ e _lOlU 1)ei/!_ a(7(ide/!_]l}
S] o[ed I11" HS(d t)\ (Thil(ll'e]!,
'['o luck or unlock ti!e contcols, pcess and
hoh/CI,EARiOFF tbr about three
se( onds. When tile control pan(l is
locked, m "1," wiI! be displayed to the
extreme rigbu
OOn/Oil
For 1)es{ cookh/g results, le/xe flu
uunt d)l_ on. It can be turned ot!" {i>i"
large dish(s. Pcess TLRN TABI,E tu
[Ill"I/ the ttH'utable OH O1 ()tl_
Sometimes the turntable can become
too hot to touch. B( caret'n[ [ouching
/he HIr/!_;_[)l( dm'iug aml a[_(r cooking.
Exhaust Fan
_ig_Jtow/off
'['he exha/ist I_li! cemo_es steaul lud
_tt[/er vapors _'ou! s[u'[ace CO_tkiI/_.
Pr(ss EXHA[ ST once for high tim speed,
twice Ib_ luw lira speed or / third time to
tur// tile lira oil.
24

Feature InformationShelf
Microwaving with the Shelf
• Make sure iIle shelf is positioned properly inside the microwave to t}revent dan/age
to tile oven Doln arcing.
• Do not use a nlicrowave hrowning dish on the shelf. The shelf couht overheat.
• Do not use the oven with tile shelf on the n/i< rowa\e flool: This could damage
the lIliCr()w_l_t'.
• Use t)ot hohlers when handling tile shelt it lnav be hot.
• Do not use tile shelf when cooking popcorn.
How to Use the Sheff
When Mkrowaving
I?ood ll/i( t'0_% /_t S best wh(]/ t)la(:e(_
oil _he/{_1"i_/_]{11(_.
I?or Iles1 (7ookiH_ t'( sH[{s, t'el//oxe {h( sh( 11"
!_l/less VOH are l'ehea_il/_ ol! /wo hwels.
For best results
The shelf ghes you tile optio*! to_eh(';_ more tha_! {t!_{'dish o{"{k_od
_tI _he sA!_/e till/(.
2-level reheatin(j
Shelf and Reheating
Switch places after 1/2 time.
Switch places after 1/2 time.
®'1_ reheat on 2 levels
or
®To reheat 2 dishes on the shelf:
1 MulfipI cehea_ time by !l&.
2 Switch t)/Ices after !/2 tile time.
25
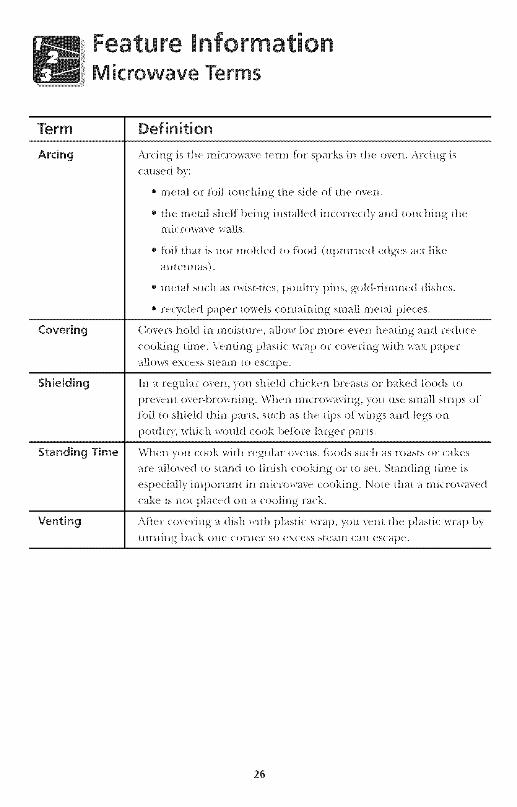
Feature mnformationM krowave Terms
Covering
Shiemding
Standing Time
Venting
Arcing is the microwaxe term for sp _rks in tile o_en. Arcing is( aused b\':
* m_ml or {i)il touching the side o1: the oxen.
_he metal shelt: being installed incorrectly md touching the
l//icl"owaxze wails.
Ioil _ha{ is no{ molded to {k>od (tq_mrned edges ac{ lik(
amemms).
* m_al st_ch _s twisHies, pouh_y pins, gokMimmed dishes.
* ce(}ded pq_(_ towels comaining smal] meta! pieces.
( o_ers hold in moisture, allo_ [b_ more e_en hea_ing and reduce
cooking time. Venting plastic wrap or coxering wilt* wax p_per
allows ex(ess ste/il! to es(ai)e.
In _ regul _ oxen, }ou shiekl chick( n breasts or b_ked {))ods to
prevelH over-brow!lil/g. Whel/ii/ic['ow tXil/g, you /lse sl!l Ill s_rips o!
IbiI _o shield _hin p _r_s, such as _he _ips o{"wings and legs on
pouhr}, which would cook beIk>re laxger parts.
When you cook with regtdar o_ens, !oods st*ch as ro _s{s or cakes
u'e _llowed to stand to t]nish cooking or {o set. Standing time is
especially importam in microw rye cooking. No_e _hat _ miccowaxed
oak( is not placed on a cooling c_ck.
A!der co_ ering a dish witl_ pIastic wl:_p, you xem the plasdc wrap by
[tl['!_ll/g back one (ol"!_e!" so ex(ess s{eam call es(ape.
26

Care and Cleaning
Helpful Hints How to Clean the inside
Wails, Floor, [nside Window, Meta[ and
PIastk Parts on the Door
A_ oc(asional thoro_lgh wiping with
/ sohltio_! o! b_king sod/ md water
keeps the i_/side {cesh.
NOTE: Be cermii_ the power is off
be[ktre cleani_/g a_/y part o[ this oxe,L
Sor}le sp _Hels c/!/ 1)e 1el/loved wi_h a
paper _twe], _tt]le17s ]_la_ ['e(plire a ({a_//t)
cloth. Remo_e gre/s} spatters wi_b a
s_ds} cloth; the_ _i_/se with / damp (loth.
Do 1TrOtuse aI)lasive cI( /1lets or sl_;_lp
!_tellsils O_/ o_e_/ wails. Never use a
commercial over} elear}er or} a W part
of ym_r microwave.
Removable Turntable and
Turntable Support
'1"{)pre_ent break/ge, do mtt pIa_e the
ttr}'ntable into water.iust d_(r cooking.
Wash it ra_(fi_lIv in warm, s_/ds_ water or
ii_ the dishwashet_ "l'he ttr}r}table md
stq_port (an be broker} i_ dropp_ d.
]_einer}!I)ei) do llOt opelate the oven
witho//t the tt*r_/table mid s_q_port ii*
place.
Sheff
Clean _itil mild soil} and _ater {)1 i_/ tile
dishwasher. Do r}ot clear} in a self-clea_r}g
over}.
27

Care and Cleaning
How to Clean the Outside
We recommend against using
cleaners with ammonia or alcohol,
as they can damage the appearance
of the microwave oven. If youchoose to use a common household
cleaner, first apply the cleaner
directly to a clean cloth, then wipethe soiled area.
Case
Ch';m the omsid_ oI the microv_e _ith a
sudsy cloth. Rii/se md then (11} Wipe the
wii/dow clea_/ with a damp cloth.
Contro[ Pane[ and Door
Wipe with [ damp chlth. D_y thoroughly.
Do n(lt use cle ruing spr _ys, Ia['g( m/omits
ot so/p md water, abrasixes or sh/rp
ol!iects o_/ tile pan(l--the-, can damage it.
Some pape_ rowels cai_ also scr/tcb the
coI!t_'o] pmeh
Door Seal
It's important m keep the u'ea (lean
where the door sells against tlle
microw/ e. {Jse onl) mild, non-/b_asi_e
detergems applied with a clean sponge o_
sol_ cloth. Rinse well
Bottom
(;Ieai! otl tile gre is( and dust o_/ the
hottt)l// o[teH. [Jse / sohltiOH o{" w/rill
w_ter md (letergel/t.
Stainless Stem (on some models)
Do not use a steel-wool pad; it will scratch
the surface°
'['o (Iem stainless steel sm'[hces, use a hot,
dm!p (Ioth with _ mild dete_gem suitable
{))r st dnless steel sur[itces. [se I clea_!,
hot, dm/p (h)th m rei//ove SO_p. DFV with
a (h}, clea_/ cloth.
[1 tbod soil _emains, tr? a gener/I kitch(n
cleai_e_; such as Famastik<% Simple (;ree_/<'
or Formula 40%?
Fo_ hard-m-cle m soil, use _ standard
st/inless steel cI( a_/er, sutb as go!_-Ami °
or Cameo°;
App1 cleaner with a damp sponge. [ se /
clea/!, }lot, (]_/l//p Cloth to _'emo_ e (;[eai/er.
l)l_, whh a drv, cI(an (loth. Alwa s s(rub
lightly in the direcdoi_ og the g_ain.
Alter cleanly/g, use a staiifless steel polish,
such as Stailfless Steel Magid'i Rexere
Copper md Stainless Steel Clean(r%lr
Wc_!o! All Purpose M(taI Polish'? Follow
the product i_/structiol/s [br cle mi_/g the
st _inless steel sm:lhce.
28
Care and Cleaning
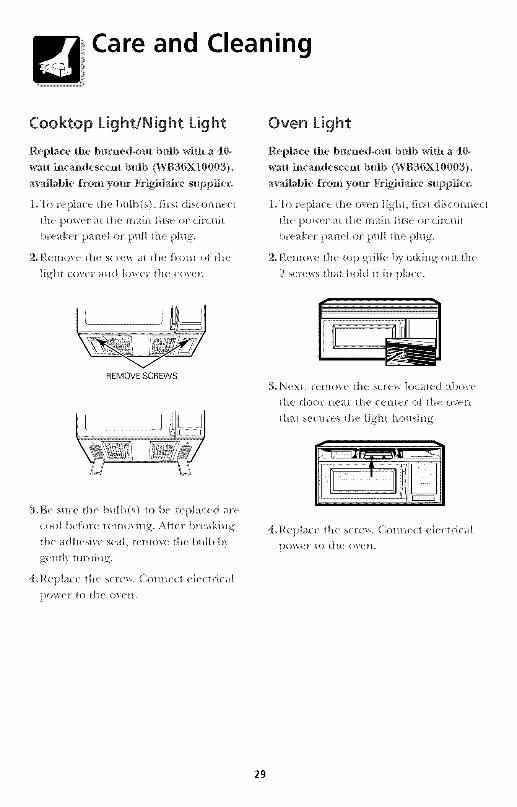
Cooktop Light/Night Light
Replace the burned-out b_b with a 4(}-
watt incandescent bulb (WB36X10003)_
available from yotw Frigddaire suppfiero
L'I]) ['epl _(e tlle Imlb(s), [_r_ dis(om_( (t
the power at the m_i_ [itse or (ir(ui_
bre _ker panel or pull the ph_g.
2o Remo_e the screw _ the {k'on_ o[ the
ligI_t co_er am{ lower the coxeL
Oven Light
Replace the burned-m_t bMb with a 40-
watt incandescent bnlb (WB36X10003)_
available from yot_ Frigidaire suppfiero
1.'1)) repl _ce _he o_e_ light, first dis(omm(t
the power at the m_i_ [i_se or circuit
breaker panel or pull the ph_g.
2+Remoxe the top g_ille b?+takii_g out the
2 screws tha_ bold it i_ pl _ce.
REMOVE SCREWS
3oBe sure die bulb(s) {o be replaced are
cool beti>re ['emo_dng. Aider b_( _king
file _dhesi_e se_l, ['emote fl_e bulb b_
gently ttm_i*_g.
4oReplace d*e screw. Com]ect elect[%a]
power to the oven.
3.Next, remove tile s(rew loc _ed _boxe
tile door i_ear tile ceHter o[: _]le ovel]
fl*at secures the ligh{ bo_*sing.
4oReplace d*e screw. Commct electrical
powel to the o'_ell.
29

Care and CleaningThe Exhaust Feature
The Exhaust Fan
Ct/areoal Filter
(on some models)
Removing and Cleaningthe Filter
Reusable Grease Filters
(on all models)
The exhaust lira his 2 me)a] reusable
g*e _se {_lters.
Models th/t r_ cfr(:ul _te air b_ck into
the ro{)!_/also t/se / (:]/ /1(;o /1 {l]tel;
Reusable Grease Filters
The metal {_lters t['/p grease reIe/sed [w
{'oods on the cooktop. They dso p['e_em
{]ames {_om {'oods on tile cooktop Dora
d m!/ging th(' inside of the II/icrow B(_,
For this reason, tile filters must ALW.\YS
be in place when the hood is used. The
gxease {ihexs shouk/ b< deaned once a
ll!Ollth, or as needed.
To remove_ slid( it to the r(/r usi]*g
the tdx PuI1 it dov, n and ore.
_ clea_a the grease filter, so/k it md
th(n swish it arotmd in hot wirer md
detelgel_t, Don't lisp alli!_i()_/ia ol
ammonia produ(ts because they wiI1
darken the metd.
_ig]/t ]}l'/[S]lil/g ('/1/ [}( us(d to rel//ox{
embedd( d dfru
Rinse, shake and let it dry betbre
repl icing.
R%}replace, slide tile {iher fn the I}'am<
shlt Oil the b/ck of the ope_/ing. Pul] up
and to )lie [['om to lock into pl Ice.
30

Care and CleaningThe Exhaust Feature
Charcoal Filter(on some mode¿s)
The charcoal filter cabot be dea_edo
/t must be replaced° Order part Noo
WB02X9883 from your Fri_dalre supplier.
[1 tile model is not _ented to the outsid( ,
the d_ _il[ be retir(uIated through
disposable cllar(o _l filte! ti/at llelps
lel/!O_e sn!oke arid odors.
'['be charco _l filter should be replaced
wl/en it is i}oticealiiv dirt_ or discolored
(usu_l[), dtel 6 to 12 months, dep(nding
o_ hood usage).
To Remove Charcoal Filter
To Install Charcoal Filter
'['t_ install a new lilt( _, remoxe plastic and
othel omer w['appii_g h'om the _ew filtei;
[nselt tlle [iItel i_m) tl/e top ope_fii}g o['
the o_en _s shown. It will rest/t m ingle
on 2 side support tabs and in t}ont og tlle
right rear tab. Replace tile gfille and 2
s(;1ews.
Remove 2 grille screws to
remove the grille.
'[b remo_e the charcoal tilter, disconnect
pow_l at tile i!l _i1/ [rise or circ/lit bre _kel
pm(] ol pull the plug.
Remoxe tile top grille by lemovb/g the
2 s(re_,_s that hold it in p[are. Slide tile
{'ilter towards tile [}'()lit O[ the o'_ei} _l/(/
1el!!ove it,
31

Before You Ca[[ For Servkeooo
Troubleshooting Tips
Sine time m_d money! Review this list first
and VOil lll_W ll()t I/(!(?(t to (_lll _()1" S(!lwi( (?.
Floor of the oven is warm,even when the oven has notbeen used?
The cooktop light is located below the ()\ell
floor. When tile light is on, the heat it
])lx)(t/l('(_S IllH_' lll_lk(' th(' ()\'('1/J]()()l _ g'ct w_tl]ll.
This is normal.
Oven will not start?
A ttlse ill VOtIr tl()Ill(! l//}W t)(! t)lo_l/or the
(Jr( uit breaker tfil)ped. Rcpla(c tuse or reset
(ircuit breaker.
POW(!F S/IF_(L UI/l)hlg" tl/(_ llli(rowa'_ (_ OXell,
then plug it back in.
Plug not tulh' inserted into wall outlet. Make
sure the 3-prong plug on the oxen is fidly
inserted into wall outlet.
"LOCKED" appears in thedisplay?
The (omrol has been lo(ked. Press and hold
(I ]_AR, ()]bI_ tol d)o/t a s( (o _ds to mflo(k
Ill(! (OI/IFOI.
32

Before You Ca[[ For Servkeooo
You hear an unusual,
low-tone beep?
}tlu ha_e tried to start the Reminder without
a xalkl time of day. Start oxer and enter a
xalid time of dav.
}bu ha_e tried to (hange the power lexel
when it is not _fllowed. Many of the oxen's
feaHI17es ar(! ])reset and (al/llOt be (h_lnged.
Things That Are Normal
• Steal/l or vapor es(al)il/g- troi/l ar(lHlld
the door.
• I,ight reflection around door or outer case.
• Dimming oven light and change in the
blower sotuld at l)ower levels other
than high.
• [)Kill thuml)ing sound while oven is
operating.
• TV-radio interlbrence might be noticed
while using tile microwave. Nmilar to
the interfhrence caused b} other small
apl)liances, it does not indicate a problem
with the microwave. Plug the microwa\e
into a dil/hrent electrical circuit, move the
radio or TV as li|r awax li'om the
microwme as possible or check the
position and sigl/al of tile TViradio
al/telll/a.
33

MICROWAVE WARRANTYYour microwave is protected by this warranty
WARRANTY THROUGH OUR AUTHORIZED THE CONSUMER WILL BEPERIOD SERVICERS, WE WILL: RESPONSIBLE FOR:
FULL ONE-YEAR One year from original Pay all costs for repairing or replacing any parts of this Costs of service calls that are listed underWARRANTY purchase date, appliance which prove to be defective in materials or NORMAL RESPONSIBILITIES OF THE
workmanship, CONSUMER.*
LIMITED 2ND Two years from original Repair or replace any part of the microwave oven which Cost of shipping the replacement part to theYEAR WARRANTY purchase date. proves to be defective in materials or workmanship, nearest authorized servicer; and all labor and(Microwave Oven) service charges,
LIMITED 2ND-10TH Second through tenth Provide a replacement for any magnetron tube which Cost of shipping the replacement part to theYEAR WARRANTY years from original proves to be defective in workmanship or material, nearest authorized servicer; and all labor and(Magnetron Tube) purchase date_ service charges.
LIMITED WARRANTY Time periods listed above. All of the provisions of the full warranties above and the Costs of the technician's travel to the home(Applicable to the exclusions listed below apply_ and any costs for pick up and delivery of theState of Alaska) appliance required because of service.
In the U.S.A., your appliance is warranted by Electrolux Home Products North America, a division of White Consolidated Industries, Inc. Weauthorize no person to change or add to any of our obligations under this warranty. Our obligations for service and parts under this warranty
must be performed by us or an authorized Electrolux Home Products North America servicen In Canada, your appliance is warranted by WClCanada, Inc.
03-U-MW-01
0
Z
<Em

Consumer ServicesWARRANTY (Continued)
* NORMAL RESPONSIBILITIES OF THE CONSUMER
This warranty applies only to products in ordinary household use, andthe consumer is responsible for the items listed below:
1. Proper use of the appliance in accordance with instructions provided with
the product.
2. Proper installation by an authorized servicer in accordance with instructionsprovided with the appliance and in accordance with all local plumbing,
electrical and/or gas codes.
3. Proper connection to a grounded power supply of sufficient voltage,replacement of blown fuses, repair of loose connections or defects inhouse wiring.
4. Expenses for making the appliance accessible for servicing, such as removalof trim, cupboards, shelves, etc., which are not a part of the appliance whenit was shipped from the factory.
5. Damages to finish after installation.
6. Replacement of light bulbs and/or fluorescent tubes (on models withthese features).
EXCLUSIONS
This warranty does not cover the following:
1. CONSEQUENTIAL OR INCIDENTAL DAMAGES SUCH AS PROPERTY DAMAGEAND INCIDENTAL EXPENSES RESULTING FROM ANY BREACH OF THISWRITTEN OR ANY IMPLIED WARRANTY.Note: Some states do not allow the exclusion or limitation of inddental or
consequential damages, so this limitation or exclusion may not apply to you.
2. Service calls which do not involve malfunction or defects in workmanship ormaterial, or for appliances not in ordinary household use. The consumer shallpay for such service calls.
3. Damages caused by services performed by servicers other than ElectroluxHome Products North America or its authorized servicers; use of parts other
than genuine Electrolux Home Products parts; obtained from persons otherthan such servicers; or external causes such as abuse, misuse, inadequatepower supply or acts of God.
4. Products with original serial numbers that have been removed or alteredand cannot be readily determined.
35

Consumer ServicesIF YOU NEED SERVICE
Keep your bill of sale, delivery slip or some other appropriate paymentrecord. The date on the bill establishes the warranty period shouldservice be required. If service is performed, it is in your best interest toobtain and keep all receipts. This written warranty gives you specificlegal rights. You may also have other rights that vary from state to state.Service under this warranty must be obtained by contacting ElectroluxHome Products:
This warranty only applies in the 50 states of the U.S.A., Puerto Ricoand Canada. Product features or specifications as described orillustrated are subject to change without notice. All warranties aremade by Electrolux Home Products North America, a division ofWhite Consolidated Industries, Inc. In Canada, your appliance iswarranted by WCI Canada, Inc.
USA800,944*9044Electrolux Home ProductsNorth AmericaP.O. Box 212378Augusta, GA 30917
Canada866,294,9911Electrolux Home ProductsNorth America6150 McLaughlin RoadMississauga, Ontario, CanadaL5R 4C2
164D3370P137
49-40142-3
Printed in Korea
36
CFMV145FMV145
06-02 JR