university of massachusetts lowell department of...
TRANSCRIPT
1
University of Massachusetts Lowell
Department of Chemistry
Analytical Chemistry Laboratory I
Fall Semester
Instructor: Dr. David K. Ryan

2
List of Experiments
ACID-BASE TITRATIONS
1 Preparation and standardization of 0.l M NaOH and 0.l M HCl solutions using a primary standard KHP
and phenolphthalein indicator
2 Determination of equivalence point using pH titrations of KHP and 0.1 M NaOH with phenolphthalein
indicator
3 Determination of acid content in vinegar by volumetric and potentiometric titration
4 Direct versus back titration for the determination of vitamin C in tablets
5 Evaluation of an antacid by volumetric titration
COMPEXATION TITRATIONS
6 a) Direct titration for the determination of Mg in a sample
b) Determination of Ca by displacement titration
c) Determination of Ca by back titration
d) Determination of water hardness
7 Evaluation of commercial dried milk powder by complexation titration
PRECIPITATION REACTIONS
8 a) Precipitation titration: Determination of percentage Cl- by Mohr's method.
b) Determination of percentage of Cl- in an unknown by gravimetric method
REDOX TITRATION
9 a) Preparation and standardization of KMnO4
b) Determination of iron in its ore
3
Introduction
General information Each week, before the experiment starts, we will meet in the Analytical Laboratory, Olney 309. Prior to
arriving at lab, a brief instructional video describing the experimental concepts, the procedures and safety
considerations will be viewed. We will prepare all the solutions needed in this lab and conduct most of the
experiments there as well. Some experiments may be conducted where the instruments are located and may be
performed in groups. The experiments are designed to take no longer than 4 hours each, if you are properly
prepared.
Laboratory Safety Rules Even though every wet chemical analytical experiment to be carried out in the lab has been tested many,
many times before and every procedure is known in detail, laboratory safety cannot be overlooked. Accidents
do happen from time to time. In order to protect you, your classmates, and the university property, the
following rules will be enforced at all times.
1. Be acquainted with the location and use of facilities and familiar with safety precautions and procedures.
2. Students must wear adequate eye protection at all times. Contact lenses are never permitted to be worn in
the laboratory as vapors can collect under the lenses.
3. Be familiar with the method of operation and all potential hazards involved before engaging in any lab
work. Know the properties, such as flammability, reactivity, corrosiveness, toxicity, etc., of the chemicals
you are using.
4. Responsible behavior is required at all times.
5. No eating, drinking, or smoking in the laboratory.
6. Proper clothing (coverage from the shoulders to the knees) must be worn in the laboratory. No sandals or
open-toed shoes are permitted.
7. Do not fill pipettes by mouth suction.
8. Do not use glassware that has been chipped or broken.
9. Dispose of chemicals according to an approved procedure. Do not dump them down the sink.
10. Report all accidents including minor injuries to your instructor.
11. Clean everything you used and wash your hands thoroughly before leaving the laboratory.

4
Lab reports Reports are due one week after completion of the experiment and should be handed in at the beginning of the
lab period. Though experiments are sometimes performed in groups, lab reports and unknowns are to be done
on an individual basis. Lab reports should be prepared using a word processor using 8.5" x 11" paper and
pages should be numbered. The format should be similar to a journal article (see Analytical Chemistry) with
some differences in emphasis due to the nature of the course. More instrumental details than one normally
finds in journal articles should be included in lab reports. The general format includes the following sections:
Title Page - including the title of the experiment, your name, and the date on which the experiment were
performed.
Abstract - summarizing the work done and reporting major results, including numerical results,
instrumental technique used, instrument used, and the result of the analysis of the unknown. This is not an
introduction or purpose. The abstract is very important and should only be written after your results have
been evaluated completely.
Introduction - describing the basis for the experiment. In general, present the theory behind the technique
utilized. Keep your theory pertinent to the actual measurements taken, use your own words, and use
references where appropriate. Also a block diagram of the instrument to be used should be presented. Cite
your source for this diagram correctly and a description of its components and how it works.
Experimental - brief outline of procedure noting where different from the lab manual. Write in past tense
and in complete sentences. Follow examples shown in the journal Analytical Chemistry. You do not need a
great deal of information here; especially avoid presenting step-by-step instructions or directions. Describe
equipment used including manufacturer and model, preparation of solutions, etc. Less than one page will
almost always be sufficient.
Results - including tables of data, graphs or figures, and data analysis. A description of the data presented
in tables, figures and calculations should be included to increase clarity of reading.
o Tables should be numbered consecutively and consist of row and column format with a title at the
top of the tables. Tables should be designed for ease and clarity of reading.
o Figures should be numbered consecutively with a title at the bottom of the figure. The title should
not just be axes labels on the figure. The X- and Y-axes should be labeled, including units. All lines
should be determined by linear regression. Data points should be made with distinct symbols.
o Data analysis should include the determination of the concentration of the unknowns and the
equation for any linear regression curves that are obtained.
Discussion - containing the following:
o Any observations you make during the experiment,
o A discussion relating your results to the theory,
o A brief summary of any sources of error associated with results, and
o Answers to the numbered questions in the lab manual.
5
References should be in the style of the current chemical literature. Each reference is numbered according
to when it is first used and thereafter is referred to by that number. The references are listed in order at the
end of the report.
Grading Absences from the lab will result in no points for the scheduled experiment. There will be no make-up labs. A
5-point penalty will be exercised for each day the lab report is late. Each lab report counts 10% toward the
total, and the total counts 80% of your final grade, your lab notebook grade makes up the other 20 %. Grading
of lab reports will be done as follows:
Abstract 10
Introduction and theory 20
Experimental 10
Result 20
Data analysis (10)
Graphs and tables (10)
Discussion and questions 30
References 10
Lab notebook The importance of a good lab notebook cannot be overemphasized. Your lab notebook should include enough
information that another experimenter familiar with the field can readily discern what was done and, if
necessary, repeat the work. Even if an observation seems trivial, record it. Later experiments may reveal that
this observation was significant.
All entries into your notebook should be in pen. Pencil is unacceptable. The pages should be numbered
consecutively and several pages at the front should be left blank for an on-going table of contents. With each
experiment, start a new page in your lab notebook and be sure to clearly identify each experiment with a title
and date (each subsequent page should also list the date of the experiment). Each instrument or piece of
equipment used in the experiment should also be documented in your lab notebook. In addition, the structure
of any important compounds used should be identified, and any reaction should be shown as well.
Do not write over numerical entries. Cross out neatly and write the correct value nearby. An example of each
type of calculation should be shown and the final answer should always be rounded to the appropriate number
of significant figures. No results should be rejected unless there is a valid reason for doing so. The reason
should be documented.
Include a brief comments, results and discussion section at the end of each experiment in order to document
your thoughts as you work.

6
Pre-lab Questions for Acid- Base Titrations
1. Distinguish between the terms end point and equivalence point.
2. Is the equivalence point in an acid-base titration always at pH = 7.0? If not, when will it be greater than
pH 7.0?
3. The indicator phenolphthalein is colorless in an acidic solution and is red when the solution becomes
basic. The transition range is @ pH 8.0 - 9.6. Which direction of titration, HCl by NaOH or NaOH by
HCl, would give better precision and accuracy? Or does it matter?
4. Can you use phenolphthalein as the indicator in the titration of acetic acid (pKa =4.757) with NaOH?
How about in the titration of NH4OH (pKa = 9.244) with HCl?
5. At what point in the titration of a weak acid with a strong base is the maximum buffer capacity
reached? This is the point at which a given small addition of base causes the least pH change.
6. If you were assigned to determine a very weak acid HA with a pKa = 10.0 in a sample, how would you
carry out the titration accurately? You may assume that you have sufficient amounts of 0.10 M HCl
and 0.10 M NaOH standard solutions and all kinds of desirable indicators. Outline your method and
explain your theoretical principles together with an estimation of the titration accuracy.
7
Preparation and Standardization of 0.1 M NaOH and 0.1 M HCl
Reagents Needed 50 % NaOH solution
concentrated HCl solution
phenolphthalein indicator solution
primary standard grade potassium hydrogen phthalate (KHP)
Equipment Needed buret, volumetric flask, polyethylene bottle
Procedure Prepare a 50 % (w/w) NaOH solution (25 g in 50 mL). (For a class of less than 10 students 50 mL should be
sufficient.). At this concentration, Na2CO3, which forms from CO2 absorbed from the atmosphere, is only
slightly soluble. Therefore, this solution can be used as a source of carbonate-free NaOH. Be sure that the
solid sodium carbonate (if any) has settled to the bottom of the container. Carefully decant 2.5 mL of the
solution without disturbing any Na2CO3 precipitate and add to 500 mL of distilled or deionized water (if the
water contains significant amounts of H2CO3, it should be boiled and cooled). Mix thoroughly and protect the
solution from unnecessary contact with the atmosphere. Store the solution in a tightly capped polyethylene
bottle. Minimizing the air in the headspace will help reduce the amount of CO2 absorbed.
Concentrated, reagent grade HCl is about 12 N. The amount of acid needed to prepare 1.0 L of 0.1 M HCl is
about 8 mL. The water used does not have to be CO2 free. Store the solution in a capped polyethylene or a
glass-stoppered bottle.
Transfer about 3 g of primary standard KHP to a small beaker and dry for at least 2 hr at 110 °C. Cool in a
desiccator. Weigh out 3 separate samples of 0.9 to 1.0 g (+ 0.001 g) KHP and dissolve each sample in CO2
free water in a 50 mL volumetric flask. Fully mix the solution and transfer to a 250 mL Erlenmeyer flask and
add 2 drops of phenolphthalein indicator to the solution. Then, titrate the KHP solutions with the NaOH. The
endpoint signal is the first pink coloration that persists for 30 s. Repeat the titration for all 3 samples. Calculate
the average concentration of the NaOH solution.
To save time, you can standardize 25 mL of the HCl solution by titrating with the standardized NaOH solution
to the phenolphthalein endpoint. Repeat the titration 3 times and calculate the average concentration of the
HCl solution.
Label your stock solutions with correct concentrations and date. Discard of any waste in the waste container.

8
Potentiometric Acid-Base Titration
Reagents Needed KHP (Potassium Hydrogen Phthalate)
0.1 N NaOH
pH buffer solutions
phenolphthalein indicator solution
Equipment Needed pH meter, pH electrodes, buret, stirring plate, stirring bar
Procedure Accurately weigh out ~1.5 g of dried KHP to the nearest 0.1 mg and dissolve it in water in a 250 mL
volumetric flask. Dilute to the mark and mix well.
Calibrate a pH meter and glass electrode using buffers with pH values of 10.00, 7.00, and 4.00. Rinse the
electrodes well with distilled water and blot them dry with a tissue before immersing in a solution.
Pipet 50.0 mL of the KHP solution into a 250 mL beaker with a magnetic stirring bar and add approximately
50 mL of distilled water. Position the electrode(s) in the liquid so that the stirring bar will not strike the
electrode. [If a combination electrode is used, the small hole near the bottom on the side must be immersed in
the solution.] Allow the electrodes to equilibrate for 1 min (with stirring) and record the pH.
Add 1 drop of phenolphthalein indicator. Titrate the solution with 0.1 N NaOH, first in ~2 mL base aliquots
until you are within ~4 mL of the theoretical equivalence point, then in 0.5 mL base aliquots. Be sure to record
the volume and pH after each addition. Add base drop wise when you are near the pink color end point (record
the volume at which the pink color is observed) and continue until you have passed the pink endpoint. Then
add five more 1 mL aliquots. Record the volume and pH 30 s after each addition.
Discard of any waste in the waste container.
Construct a graph of pH versus Vb (volume of added base). Locate the equivalence point and compare the
equivalence point and the phenolphthalein end point. Use a spreadsheet program to calculate the first and
second derivatives to aid in finding the endpoint (see Harris).

9
Determination of Acid Content in Unknown Samples
Reagents Needed standardized 0.1 N NaOH stock solution
vinegar
vitamin C
phenolphthalein indicator solution
Equipment Needed pH meter, pH electrodes, magnetic stirrer, stirring plate, stir bar, buret, pipet
Procedure Pipet 25 mL of the vinegar into a 250 mL volumetric flask and dilute to the mark with distilled or deionized
water. Mix thoroughly and pipet an aliquot of 50 mL into a 250 mL flask. Add 50 mL of water and 2 drops of
phenolphthalein indicator and titrate with the standardized 0.1 N NaOH to the first permanent pink color.
Calculate the total acidity as grams of CH3COOH per 100 mL of the sample. Repeat the titration using pH
meter.
Direct Titration for Vitamin C Weigh out ~0.5 g of the powdered vitamin C tablets, and transfer to a 250 mL beaker. Dissolve the samples in
100 mL of hot water. Use the pH meter to read the initial pH of the solution.
Add 0.1 N NaOH in increments of 2 mL, and read the pH. As the pH changes more rapidly, take readings at
smaller volume intervals. Continue taking readings after the endpoint as described in experiment 2. Determine
the endpoint and calculate the percentage of ascorbic acid in the vitamin C tablet powder. Also determine the
Ka for ascorbic acid and compare it with literature values.
Discard of any waste in the waste container.

10
Direct Titration vs. Back Titration
Reagents Needed KHP (Potassium Hydrogen Phthalate)
pH buffer solutions
0.1 N HCl
0.1 N NaOH
vitamin C powder
phenolphthalein indicator solution
Equipment Needed pH meter, pH electrode, buret, beaker
Procedure Weigh out enough KHP to standardize a 0.1 N NaOH solution to the phenolphthalein endpoint. Use the
standardized NaOH solution to standardize ~0.1 N HCl.
Weigh out ~0.5 g of the powdered vitamin C tablets and transfer to a 250 mL beaker. Dissolve the samples in
100 mL of hot water and add 2 drops of phenolphthalein. Use the pH meter to record the initial pH of the
solution.
Add more than sufficient amounts of NaOH to the vitamin C samples and titrate the excess NaOH with 0.1 N
HCl standard solution using a pH meter. Compare the results with those obtained from the previous
experiments (Direct titration for Vitamin C).
Discard of any waste in the waste container.

11
Evaluation of Commercial Antacids
The Problem to be Investigated: The acid-neutralizing power of a commercial antacid preparation will be
determined by a titrimetric procedure, and a variety of commercial brands of antacids will be evaluated on the
basis of this procedure.
The Nature of This Investigation: A commercial antacid tablet will be dissolved in a measured excess of
hydrochloric acid, the solution boiled briefly, and the excess hydrochloric acid back-titrated by using a
standard solution of sodium hydroxide with bromphenol blue as the indicator. From the volume and molarity
of the hydrochloric acid and the volume and molarity of the sodium hydroxide solution, the number of moles
of acid neutralized by the tablet will be determined. The weight effectiveness of the preparation will be
calculated by using the weight of the tablet and the neutralizing ability of the tablet. The cost effectiveness will
be determined by using the cost of the tablet and the neutralizing ability.
The data collected by members of the class for the different antacid preparations will be exchanged. By using
the weight effectiveness and the cost effectiveness of the different antacids, the different brands of antacids
will be evaluated.
Introduction The purpose of the common antacids preparations is to neutralize excess stomach acid, which may be
considered to be hydrochloric acid, by reaction with various basic substances in the antacid tablet. The bases
commonly used are metal hydroxides or carbonates, or a mixture of the two. A general equation for the
reaction of hydrochloric acid with a metal hydroxide, M(OH)x, is, shown in equation (1):
M(OH)2 (s) + 2HCl (aq) MCl2 (aq) + 2 H2O (l) (Eq. 1)
The reaction of a metal carbonate, MCO3, with hydrochloric acid is somewhat more complicated, and
proceeds according to equations (2) and (3):
MCO3 (s) + 2 HCl 2 (aq) MCl2 (aq) + H2CO3 (aq) (Eq 2)
H2CO3 (aq) H2O (l) + CO2 (g) (Eq. 3)
Although the actual stoichiometry of these reactions will depend on the identity and oxidation state of the
metal, M, it is easily seen that 1 mole of hydroxide ions will react with 1 mole of hydrogen ions from the
stomach acid, whereas 1 mole of carbonate ions requires 2 moles of hydrogen ions to complete the
neutralization reaction.
However, because both hydroxide ions and carbonate ions are strong bases, the analytical procedure does not
provide a way of differentiating between the two ions, and the result of the analysis is a measure of the acid-
neutralizing power of the tablet. Thus, this procedure will work equally well with either ion or with mixtures
of the two ions.

12
The analysis is performed by adding a measured excess of standard hydrochloric acid to the weighed antacid
tablet, boiling the solution to remove the carbon dioxide, which would interfere with determination of the end
point of the subsequent titration, and then titrating the excess acid with standard sodium hydroxide solution.
The number of moles of hydrochloric acid neutralized can be calculated from equation (4):
# moles of HCl neutralized by tablet D = (# moles of HCl added) – (# of moles NaOH required for back titration) (Eq. 4)
The number of moles of HCl added can be found from equation (5):
# moles of HCl added = (MHCl)(VHCl) (Eq. 5)
where MHCl is the concentration of the hydrochloric acid in moles per liter and VHCl is the volume in liters of
hydrochloric acid used in the analysis. The number of moles of NaOH required for the back titration can be
found from equation (6):
Number of moles of NaOH = (MNaOH)(VNaOH) (Eq. 6)
where MNaOH is the concentration of the sodium hydroxide solution in moles per liter and VNaOH is the volume
in liters. If the cost per tablet of the antacid is known, the cost per moles of hydrochloric acid neutralized can
be calculated by using equation (7):
Cost per moles of HCl neutralized = (cost per tablet) / (# moles of HCl neutralized per tablet) (Eq. 7)
The “effectiveness” of the antacid on a weight basis can be similarly determined, if the weight of the
individual tablet is known, by using equation (8):
# moles of HCl neutralized per gram = (# moles of HCl neutralized per tablet) / (mass of tablet) (Eq. 8)
Various brands of antacids can be analyzed and their relative cost effectiveness and weight effectiveness
compared. Table 1 contains data for two representative antacid samples.
Table 1. Antacids
Brand A Brand B
Cost $ 1.2 per 50 $ 0.40 per 36
Cost per tablet, cents 2.40 1.11
Number of moles of HCl
neutralized per tablet 8.76 x 10
-3 10.08 x 10
-3
Number of moles of HCl
neutralized per gram 6.7 x 10
-3 7.69 x 10
-3
Cost per moles of HCl
neutralized $2.74 $1.07
Reagents Needed antacids
hydrochloric acid
sodium hydroxide
bromphenol blue indicator solution
13
Equipment Needed buret, pipet, Erlenmeyer flask, beaker
Procedure Obtain three tablets of a particular antacid from the laboratory instructor. Avoid touching the tablets with bare
fingers. Record the brand of antacid being analyzed on the data sheet. Obtain approximately 125 mL of 0.8 M
HCl in a clean dry 250 mL beaker and approximately 125 mL of 1 M NaOH in another clean dry 250 mL
beaker. Record the exact concentration to 0.001 M of each solution at the appropriate place on the data sheet.
Keep the beakers dry to prevent dilution of the solutions, which would change their concentrations.
Rinse a clean 25 mL pipet by drawing about 5 mL of discharge distilled water into the pipet with a rubber
bulb. Disconnect the rubber bulb and quickly place a finger over the top of the pipet. Hold the pipet in a nearly
horizontal position and slowly rotate the pipet so that the water comes in contact with the entire inner surface
of the pipet. Discharge the rinse water through the tip of the pipet.
Rinse the pipet with about 5 mL of the standard hydrochloric acid, following the same procedure as when
rinsing the pipet with water. Discard the rinse solution. Repeat this procedure with a second and a third 5 mL
portion of the standard hydrochloric acid.
Mark three 250 mL Erlenmeyer flasks so that they may be differentiated from one another. Carefully pipet
25.00 mL of the standard hydrochloric acid into each 250 mL Erlenmeyer flask by holding the tip of the pipet
against the inside surface of the flask to avoid splattering the solution. After the solution has stopped flowing
from the pipet, continue to hold the pipet vertically for 15 seconds to allow reproducible draining of the pipet.
Remove the last drop of solution on the tip of the pipet by touching the tip of the pipet to the inside surface of
the flask. Measure 40 mL of distilled water in a 100 mL graduated cylinder. Add the water to the standard
hydrochloric acid, increasing the volume to make it convenient for titration.
Place one tablet of the antacid in the weighing dish and determine the weight of the dish plus the tablet to the
nearest 0.1 mg. Repeat this procedure for the second and third samples, recording all three measurements on
the data sheet.
Add one tablet of antacid to the acid solution in one of the Erlenmeyer flasks. Mass the weighing dish and
record the value to the nearest 0.1 mg. Warm the flask and contents to dissolve the tablet. After the tablet has
dissolved, boil the solution briefly to expel any carbon dioxide. Cool the solution and add 10 drops of
bromphenol blue indicator. Swirl the contents of the flask to obtain thorough mixing of the solution. If the
resulting solution is not yellow, consult the laboratory instructor.
Rinse a clean 50 mL buret with three separate 10 mL portions of distilled water. Hold the buret in a nearly
horizontal position and slowly rotate the buret so that the water contacts the entire inner surface of the buret.
Rinse the buret with approximately 5 mL of the sodium hydroxide solution, using the same technique as with
the water. Repeat this procedure with a second 5 mL portion of the standard sodium hydroxide solution.
Clamp the buret to the ring stand and close the buret stopcock. Fill the buret with the sodium hydroxide
solution to a point above the top calibration mark. Withdraw sufficient solution through the tip of the buret
into the 150 mL beaker so that there are no air bubbles trapped in the tip of the buret. Lower the meniscus of

14
the solution by opening the stopcock slowly until the meniscus is at a point on the calibrated portion of the
buret. Read the buret to the nearest 0.01 mL and record the initial buret reading on the data sheet.
Touch the buret tip to the 150 mL beaker to remove any drop adhering to the tip. Remove the 150 mL beaker
from beneath the buret and place the Erlenmeyer flask containing the antacid solution under the buret. Lower
the buret so that the tip is inserted an inch or more into the mouth of the flask, as shown in Figure 1.
Figure 1
Swirl the Erlenmeyer flask with one hand and control the stopcock with the other. Begin to titrate the antacid
sample by slowly adding the standard sodium hydroxide solution. As the titration progresses, the approach of
the end point will be indicated by a momentary appearance of the blue-green end point color where the titrant
first comes in contact with the acid solution. As the end point is approached more closely, these brief flashes
of color will persist for a longer period of time. Reduce the flow of titrant into the antacid. Immediately before
the end point of the titration, when the blue-green color slowly disappears, add the titrant on drop at a time.
The titration is complete when the green color persists in the antacid solution after swirling the flask. Read the
buret to the nearest 0.01 mL and record the final buret reading on the data sheet.
Repeat the titration on the second and third antacid samples. It will probably not be necessary to refill the
buret between samples. The final buret reading for one titration will be the beginning reading for the next
titration.
When all titrations are complete, drain the solution from the buret into the 150 mL beaker and discard the
contents of the beaker into the waste container. Rinse the buret thoroughly three times with distilled water to
remove the sodium hydroxide solution. Rinse all other glassware used in this experiment with distilled water
and put them back on the shelves.
Calculations 1. Calculate the number of moles of hydrochloric acid added in each titration.
2. Calculate the weight of each antacid tablet.
3. Calculate the number of moles of sodium to hydroxide required back titrate the excess hydrochloric
acid.

15
4. Calculate the cost per tablet for the antacid.
5. Calculate the number of moles of hydrochloric acid neutralized per tablet.
6. Calculate the number of moles of hydrochloric acid neutralized per gram.
7. Calculate the average number of moles of hydrochloric acid neutralized per gram.
8. Calculate the average number of moles of hydrochloric acid neutralized per tablet.
9. Calculate the cost of antacid per mole of hydrochloric acid neutralized.
10. Exchange data with students in the class who analyzed other brands of antacids and enter the data on
the data sheet.
11. Evaluate the different brands of antacids analyzed by the class on the basis of cost per mole of HCl
neutralized.

16
COMPLEXATION TITRATIONS WITH EDTA Read the text about the analytical uses of EDTA as a chelating reagent. If you receive the Pre-lab assignments
from your TA, study them before coming to lab. The following experiments include a direct titration of Mg, a
displacement titration of Ca, and a determination of the hardness of natural or tap water.
Reagents Needed concentrated ammonia
ammonium chloride
Eriochrome black T indicator solution
calmagite indicator
ethylenediaminetetraacetic acid (EDTA)
phenolphthalein indicator
methyl red indicator
sodium hydroxide
Equipment Needed volumetric flask, powder funnel, Erlenmeyer flask, buret, watch glass
1. Buffer and indicator solutions
A pH 10 buffer and an indicator solution are needed for these titrations.
1. Buffer Solution (sufficient for 80 to 100 titrations): Dilute 57 mL of concentrated NH3 and 7 g of
NH4Cl in sufficient distilled water to give 100 mL of solution.
2. Eriochrome Black T Indicator (sufficient for about 100 titrations): Dissolve 100 mg of the solid in a
solution containing 15 mL of ethanolamine and 5 mL of absolute ethanol. This solution should be
freshly prepared every two weeks; refrigeration slows its deterioration.
3. Calmagite This is an alternative indicator for EDTA Titrations. It can be prepared by direct dissolution
of the indicator in water. A 0.1 % solution is recommended.
2. Standard 0.01 M EDTA solution
Dry about 4 g of the purified dihydrate Na2H2Y • 2H2O for 1 h at 80°C to remove superficial moisture. Cool to
room temperature in a desiccator. Weigh (to the nearest milligram) about 3.8 g into a 1 L volumetric flask.
Use a powder funnel to ensure quantitative transfer; rinse the funnel well with water before removing it from
the flask. Add 600 to 800 mL of water and swirl periodically. Dissolution may take 15 min or longer. When all
of the solid has dissolved, dilute to the mark with water and mix well.
A. Preparation of Solutions In calculating the molarity of the solution, correct the weight of the salt for the 0.3 % moisture it ordinarily
retains after drying at 80 ºC.

17
Notes
(a) Water used in the preparation of standard EDTA solutions must be totally free of polyvalent cations. If any
doubt about its quality, pass the water through a cation exchange resin before use.
(b) As an alternative, an EDTA solution that is approximately 0.01 M can be prepared and standardized by
direct titration against a Mg2+
solution of known concentration.
To 3.722 g of Na2H2Y • 2H2O in 50 mL of distilled water add an equivalent quantity of MgSO4 •7H2O
(2.465g). Introduce a few drops of phenolphthalein, followed by sufficient sodium hydroxide to turn the
solution faintly pink. Dilute the solution to about 100 mL. When properly prepared, portions of this solution
should assume a dull violet color when treated with pH-10 buffer and a few drops of Eriochrome Black T or
Calmagite indicator.
3. 0.10 M Magnesium–EDTA Complex
Furthermore, a single drop of the 0.01 EDTA solution should cause a color change to blue, whereas an equal
quantity of 0.01 Mg2+
should cause a change to red. If necessary, the composition of the solution can be
adjusted by adding Mg2+
or EDTA until these criteria are met.
A solution of such Mg-EDTA complex is useful for the determination of cations which form complexes that
are more stable than the magnesium complex but for which no indicator is available. Here, the magnesium is
displaced by part of the analyte cations. The remaining uncomplexed analyte and the liberated magnesium are
then titrated with EDTA, Eriochrome black T, or Calmagite being used as the indicator.
B. Procedures
1. Direct Titration of Mg
Submit a clean 500 mL volumetric flask to receive the unknown from your TA, dilute to the mark with water,
and mix thoroughly. Transfer 50.0 mL aliquots to 250 mL Erlenmeyer flasks; add 1 to 2 mL of pH 10 buffer
and 3 to 4 drops of Eriochrome Black T indicator to each. Titrate with 0.01 M EDTA until the color changes
from red to pure blue.
Express the results as parts per million of Mg2+
in the sample.
Notes
The color change tends to be slow in the vicinity of the end point. Care must be taken to avoid over titration.

18
2. Determination of Ca by Displacement Titration
Weigh a sample of the unknown (to the nearest 0.1 mg) into a 500 mL beaker. Cover with a watch glass, and
carefully add 5 to 10 mL of 6 M HCl. After the sample has dissolved, remove CO2 by adding about 50 mL of
deionized water and boiling gently for a few minutes. Cool, add a drop or two of methyl red, and neutralize
with 6 M NaOH until the red color is discharged. Quantitatively transfer the solution to a 500 mL volumetric
flask, and dilute to the mark. Take 50.00 mL aliquots of the diluted solution for titration, treating each as
follows: Add about 2 mL of pH 10 buffer, 1 mL Mg-EDTA solution, and 3 to 4 drops of Eriochrome Black T
or Calmagite indicator. Titrate with standard EDTA to a color change from red to blue.
Report the number of milligrams of CaO in the sample.
3. Determination of Ca by Back-titration
Prepare the sample as directed for the displacement titration of calcium in Procedure 2. To each 50.00 mL
aliquot, add about 2 mL of pH 10 buffer and 4 to 5 drops of Eriochrome Black T or Calmagite indicator. Add
an excess of 0.01 M EDTA solution from a buret, and record the volume taken. Titrate the excess chelating
agent with the standardized Mg2+
solution in Procedure 1 until a color change from blue to red occurs.
Compare the results with those you obtained in Procedure 2.
4. Determination of Water Hardness
Acidify 100.0 mL aliquots of the sample with a few drops of HCl, and boil gently for a few minutes to
eliminate CO2. Cool, add 3 to 4 drops of methyl red, and neutralize with 0.1 M NaOH. Introduce 2 mL of pH
10 buffer, 3 to 4 drops of Eriochrome Black T, and titrate with standard EDTA solution to a color change from
red to pure blue.
Report the results in terms of mg of CaCO3 per liter of water.
Notes
The color change may be sluggish if Mg2+ is absent. In this event, add 1 to 2 mL of the 0.1 M Mg-EDTA
solution before starting the titration.
Discard of any waste in the waste container.

19
Evaluation of Commercial Dried Milk Powders
The Problem to be Investigated: The calcium content of a commercial dried milk powder will be determined
by a titrimetric procedure, and the data will be used to evaluate a variety of commercial milk powders.
The Nature of This Investigation: A dried milk powder sample will be dissolved in water, the solution
buffered at pH 10, and titrated with a standard solution of EDTA to the F-241 indicator end point. From the
volume and molarity of the EDTA solution and the mass of the milk powder sample, the weight percent of
calcium in the milk powder will be determined. The cost per ounce of calcium will be calculated from the cost
of the milk powder and the percent calcium. The data collected by members of the class will be exchanged and
used to evaluate different brands of milk powder.
Introduction Calcium is one of the more important minerals needed for proper nutrition. Milk and milk products are the
most common sources of calcium in the diet. Different brands of dried milk powders can be compared on the
basis of their calcium content and the unit cost of the product.
The analysis for calcium content may be carried out by titration of the suspended milk powder sample with a
solution of ethylenediaminetetraacetic acid, abbreviated as EDTA, the concentration of which is accurately
known. The equation for the titration reaction is shown in Equation (1):
Ca2+
(aq) + HY3-
(aq) CaY2-
(aq) + H+
(aq) (Eq. 1)
where HY3-
is a convenient abbreviation for EDTA species, the structure of which is shown in Figure 1.
Figure 1 Structure of EDTA ion (HY3-
)
The CaY2-
(aq) species formed in the titration reaction is called a complex; therefore this type of titration is
often referred to as a complexometric titration.
Equation (1) shows that 1 mole of calcium reacts with 1 mole of EDTA. The number of moles of calcium in
the milk powder sample can be calculated from Equation (2):
# of moles of calcium in sample = (MEDTA) (VEDTA) (Eq. 2)
where MEDTA is the concentration of EDTA solution in moles per liter and VEDTA is the volume in liters of
EDTA solution required to titrate the calcium in the milk sample.
The number of grams of calcium in the sample can be calculated from Equation (3):

20
# of grams of calcium in sample = (# of moles of calcium in sample) ( gram atomic weight of calcium) (Eq. 3)
The weight percent of calcium in the sample can be calculated from Equation (4):
Weight percent of calcium in sample = 100 (mass of calcium in sample, g) / (mass of sample, g) % (Eq. 4)
Finally, the cost per ounce of calcium in the sample can be found from Equation (5):
Cost per ounce of calcium in sample = 100 (cost per ounce of sample) / (percent calcium in sample) (Eq 5)
Reagents Needed ammonia-ammonium chloride buffer
dried powder milk
EDTA solution
F-241 indicator
Equipment Needed buret, Erlenmeyer flask, beaker, stirring rod
Procedure Obtain from the laboratory instructor approximately 50 mL of an ammonia-ammonium chloride buffer
solution in a clean 100 mL beaker and approximately 200 mL of 0.02 M EDTA solution in a clean, dry 400
mL beaker. Make certain the beaker is dry because the presence of water would dilute the EDTA solution and
change its concentration.
Record the exact concentration of the EDTA solution. Also obtain from the laboratory instructor
approximately 10 g of a sample of milk powder in a clean, dry 100 mL beaker. Make certain the beaker is dry
to prevent the absorption of moisture by the sample, which would change its composition as well as cause
lumping of the sample. Record the brand name or number of the milk powder on the data sheet.
Transfer 5 to 6 g of the sample to a weighing bottle for convenience in the weighing operation. Label three
250 mL Erlenmeyer flasks distinctly and place about 75 to 100 mL of distilled water in each flask. Place the
weighing bottle containing the sample on the balance and weigh it to 0.1 mg. After recording the mass of the
weighing bottle and sample on the data sheet, remove the weighing bottle from the balance, using tongs or a
strip of paper to prevent finger oil from adhering to the weighing bottle. Transfer approximately 1.5 g of milk
powder from the weighing bottle to the first Erlenmeyer flask. Be sure to use a clean, dry spatula. Do not spill
any of the milk powder during this operation. Check the mass of the weighing bottle and contents several
times during this operation, so that no less than 1.35 g nor more than 1.65 g is transferred to the flask. When
the transfer is completed, rinse the spatula into the Erlenmeyer flask with a stream of distilled water from a
wash bottle and dry the spatula with a clean lint free rag.
Return the weighing bottle to the balance pan without touching it with bare fingers. Again weigh the bottle and
contents to 0.1 mg. Record the new mass. Remove the weighing bottle from the balance and again transfer
approximately 1.5 g of milk powder to the second Erlenmeyer flask, following the same procedure as before.

21
After the transfer has been completed, again weigh the weighing bottle and contents to 0.1 mg and record the
mass. The mass of the second milk powder sample is the difference between the mass of the weighing bottle
and contents after removing the first sample and the mass after removing the second sample. Repeat the
process for the third milk powder sample.
Stir the milk powder in each of the Erlenmeyer flasks with a clean stirring rod until no more lumps remain on
the bottom of the flask. Be careful not to spill any of the solution. Rinse the stirring rod with distilled water
before using it in another flask to prevent carrying solution from one flask to another.
Add 10 mL of the ammonia-ammonium chloride buffer to each flask. Swirl each flask thoroughly to mix the
solutions and then add a few grains of F-241 indicator with the tip of a spatula. The correct quantity of
indicator will give the solution a light magenta color after it has dissolved. Do not add too much indicator or
the end point will be difficult to detect.
Rinse a clean 50 mL buret with three separate 10 mL portions of the 0.02 M EDTA solution by holding the
buret nearly horizontal and rolling it to allow the EDTA solution to contact the entire inner surface of the
buret. Drain the solution through the tip each time. Fill the buret with the 0.02M EDTA titrant, remove any air
bubbles trapped between the stopcock and the tip of the buret, and then place the buret in a buret clamp on a
ring stand. Carefully, adjust the meniscus of the titrant close to the 0.00 mL mark by opening the stopcock and
allowing titrant to drop in a beaker. After the meniscus has been adjusted to the 0.00 mL mark, touch the
beaker to the buret tip to remove the last drop of titrant clinging to the tip. Record the starting volume of the
buret.
Replace the beaker with one of the Erlenmeyer flasks containing the milk powder samples. Lower the buret tip
until it is an inch or so below the mouth of the Erlenmeyer flask, as shown in Figure 2. Swirl the flask with
one hand while controlling the rate of flow of the titrant with the other hand. Drain the titrant into the flask at a
fairly rapid rate at first. The approach of the end point will be seen by a change in the color of the solution
from magenta to a reddish-purple. At this point, slow the rate of flow of the titrant. When the solution
becomes a bluish purple, begin adding the titrant 1 drop at a time until the end point is reached. The end point
is indicated by a sky blue color with no trace of red. At the end of the titration read the buret to the nearest
0.01 mL and record the volume of EDTA used.
Figure 2 Position of buret tip in mouth of flask
Repeat the titration for the remaining two milk powder samples by refilling the buret with the 0.02 M EDTA
solution and adjusting the initial level to the 0.00 mL line each time. Record all data.

22
When all titrations are complete, drain the buret and rinse it thoroughly with distilled water. Discard of any
waste in the waste container.
Calculations 1. Calculate the number of moles of calcium in each of the samples.
2. Calculate the number of grams of calcium in each sample.
3. Calculate the weight percent calcium in each of the milk powder samples.
4. Calculate the average weight percent calcium in the milk powder.
5. Calculate the cost per ounce of calcium for the milk powder from the average weight percent calcium
and the posted cost per ounce for the particular brand of milk powder titrated.
23
PRECIPITATION TITRATION Titrations involving precipitation can be carried out either volumetrically or gravimetrically. We will practice
both of these methods in this experiment. Study carefully the text and the Pre-lab assignments before coming
to the laboratory.
Reagents Needed silver nitrate
dichlorofluorescien indicator
potassium chromate indicator
dextrin
concentrated nitric acid
Equipment Needed powder funnel, volumetric flask, glass filtering crucible and apparatus, beaker, rubber policemen, test tube
A. Preparation of Solutions
1. Standard Silver Nitrate Solution
Silver nitrate is obtainable in primary standard purity. It has a high equivalent weight and dissolves readily in
water. The solid as well as its solutions must be scrupulously protected from organic matter and from sunlight.
The reagent is expensive; every effort should be made to avoid waste. Unused solutions should be collected
rather than discarded; similarly, appreciable amounts of silver chloride should be collected.
Use a top-loading balance to transfer the approximate mass of AgNO3 to a clean, dry weighing bottle. Dry at
110 °C for 1 hr but not much longer; cool to room temperature in a desiccator. Weight (to the nearest 0.1 mg)
the bottle and its contents. Using a powder funnel, quickly transfer the contents to a volumetric flask; reweigh
the bottle and any residual solid. Rinse the powder funnel thoroughly. Dissolve the AgNO3, dilute to the mark
and mix well. Calculate the molar concentration of this solution.
Notes
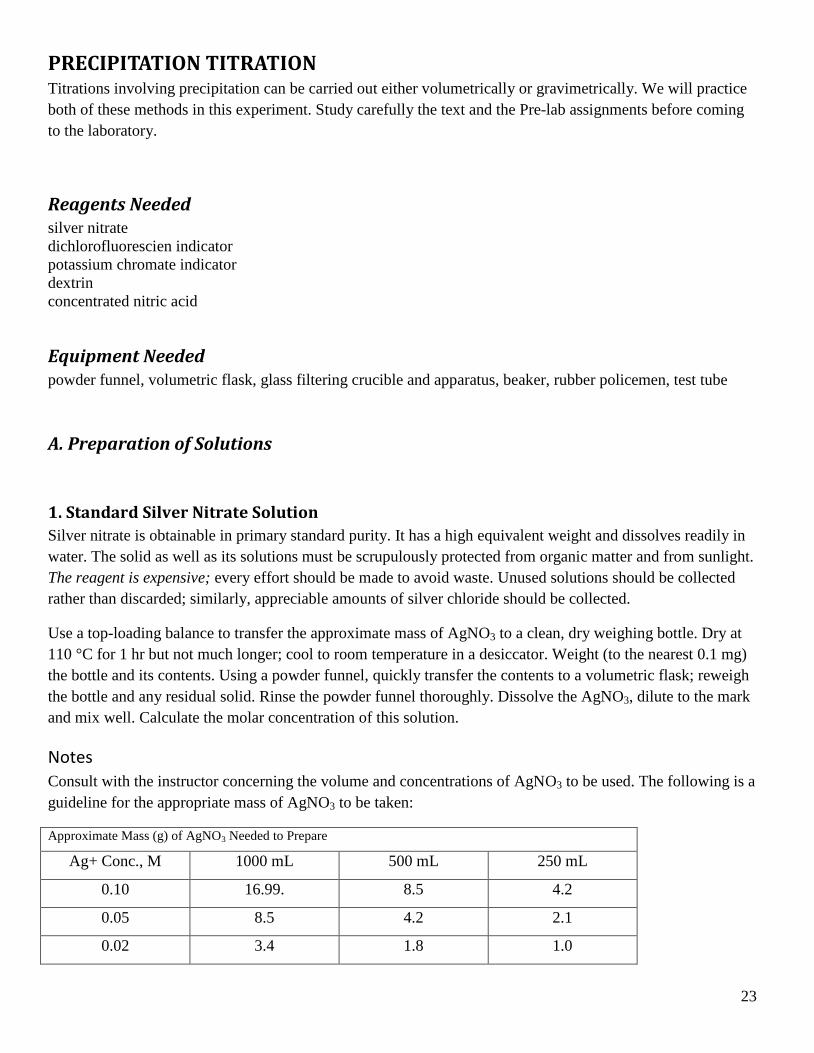
Consult with the instructor concerning the volume and concentrations of AgNO3 to be used. The following is a
guideline for the appropriate mass of AgNO3 to be taken:
Approximate Mass (g) of AgNO3 Needed to Prepare
Ag+ Conc., M 1000 mL 500 mL 250 mL
0.10 16.99. 8.5 4.2
0.05 8.5 4.2 2.1
0.02 3.4 1.8 1.0

24
Prolonged heating causes partial decomposition of AgNO3. Some discoloration may occur, even after only 1
hr at 110 °C; the effect of this decomposition on the purity of the reagent is ordinarily imperceptible.
Silver nitrate solutions should be stored in a dark place when not in use
2. Indicators
Dichlorofluorescein (Fajans Method): Dissolve 0.1 100 mL of 75 % (v/v) ethanol/water solution.
Potassium Chromate (Mohr Method): Dissolve 5 g of Potassium Chromate in 100 mL of water
Procedures:
1. Fajans Method
Dry the unknown at 110 °C for 1 h. Weigh samples into Erlenmeyer flasks and dissolve in an appropriate
volume of distilled or deionized water. Add about 0.1 g of dextrin and 5 drops of indicator. Titrate with
AgNO3 to the first permanent appearance of the pink color of the indicator. Report the percentage of Cl- in the
unknown.
Notes
Use 0.25 g samples for 0.1 M AgNO3 and about half that amount for the 0.05 M reagent. Dissolve the former
in about 200 mL of distilled or deionized water and the latter in about 100 mL. If 0.02 M AgNO3 is to be used,
weigh a 0.4 g sample into a 500 mL volumetric flask, and take 50 mL aliquots for titration.
Colloidal AgCl is sensitive to photodecomposition, particularly in the presence of the indicator; attempts to
perform the titration in direct sunlight will fail. If photo decomposition appears to be a problem, establish the
approximate end point with a rough preliminary titration, and use this information to estimate the volumes of
AgNO3 needed for the other samples. For each subsequent sample, add the indicator and dextrin only after
most of the AgNO3 has been added, and then complete the titration without delay.
2. Mohr Method
Mohr titrations should be performed at room temperature. Elevated temperatures significantly increase the
solubility of Ag2CrO4; its sensitivity as an indicator for this titration undergoes a corresponding decrease.
Gravimetric Method
Clean three fritted glass filtering crucible (medium [M] or fine [F] but not coarse) CD by filling each with
about 5 mL of concentrated HNO3 and letting them stand for a few minutes. Attach each to the filtering
apparatus; and draw the acid through the crucible.
.

25
Rinse with three portions of tap water and then turn off the suction. Add 5 mL of 6 M NH3 and let stand for a
few minutes. Draw the NH3 through the crucible and rinse six to eight times with small portions of distilled
water. Provide each crucible with an identifying mark. Dry the crucibles to constant mass by heating at 110 °C
while the other steps in the analysis are being carried out. The first drying should be for at least 1 h;
subsequent heating periods can be somewhat shorter (30 to 40 min). This process of heating and drying should
be repeated until the mass becomes constant to within 0.2 to 0.3 mg. Place the crucibles in the desiccator.
Transfer the unknown (0.15~ 0.2g) to a weighing bottle and dry it at 110 °C for 1 to 2 h; allow the bottle and
contents to cool to room temperature in a desiccator. Weigh (to the nearest 0.1 mg) individual samples by
difference into 400 mL beakers. Dissolve each sample in about 100 mL of distilled water to which 2 to 3 mL
of 6 M HNO3 has been added.
Slowly, and with good stirring, add 0.1 M AgNO3 to each of the cold sample solutions until AgCl is observed
to coagulate; then introduce an additional 3 to 5 mL. Heat almost to boiling, and digest the solids for about 10
min. Add a few drops of AgNO3 to confirm that precipitation is complete. If more precipitate forms, add about
3 mL AgNO3, digest, and again test for completeness of precipitation. Pour any unused AgNO3 into a waste
container (not into the original reagent bottle). Cover each beaker, and store in a dark place for at least 2 hr
and preferably until the next laboratory period.
Decant the supernatant liquids through weighed filtering crucibles. Wash the precipitates several times while
they are still in the beaker with a solution consisting of 2 to 5 mL of 6 M HNO3 per liter of distilled water;
decant these washings through the filters. Quantitatively transfer the AgCl from the beakers to the individual
crucibles with the streams of wash solution; use rubber policemen to dislodge any particles that adhere to the
walls of the beakers. Continue washing until the filtrates are essentially free of Ag+ ion.
Dry the precipitates at 110 °C for at least 1 hr. Store the crucibles in a desiccators while they cool. Determine
the mass of crucibles and their contents. Repeat the cycle of heating, cooling, and weighing until consecutive
weighing agree to within 0.2 mg. Calculate the percentage of Cl- in the sample.
Upon completion of the analysis, remove the precipitates by gently tapping the crucibles over a piece of wax
paper. Transfer the collected AgCl to a container for silver wastes. Remove the last traces of AgCl by filling
the crucibles with 6 M NH3 and allowing them to stand.
Notes:
Consult with the instructor concerning the appropriate sample size.
Determine the approximate amount of AgNO3 needed by calculating the volume that would be required if the
volume were pure NaCl. Use a separate stirring rod for each sample and leave it in its beaker throughout the
determination.
To test the washing for Ag+ collect a small volume in a test tube and add a few drops of HCl . Washing is
judged complete when little or no turbidity develops.
26
REDOX TITRATIONS
Reagents Needed potassium permanganate
sodium oxalate
sulfuric acid
tin chloride
hydrochloric acid
manganese sulfate
phosphoric acid
Equipment Needed buret, hot plate, glass funnel / crucible
A. Preparation of 0.1 N Potassium Permanganate
Precautions:
Potassium permanganate, a powerful oxidant, is perhaps the most widely used of all standard oxidizing agents.
The color of a permanganate solution is so intense that an indicator is not ordinarily required. The reagent is
readily available at modest cost. On the other hand, the tendency of permanganate to oxidize chloride ion is a
disadvantage because hydrochloric acid is such a useful solvent. The multiplicity of possible reaction products
can at times cause uncertainty regarding the stoichiometry of a permanganate oxidation. Furthermore,
permanganate solutions have limited stability.
Providing that a number of precautions are observed, a permanganate solution possessing reasonable stability
can be obtained. Perhaps the most important varible affecting stability is the catalytic influence of manganese
dioxide. This compound is an inevitable contaminant in solid potassium permanganate; it is also produced
when permanganate oxidizes organic matter in the water used to prepare the solution. Remove of manganese
dioxide by filtration markedly enhances the stability of standard permanganate solutions. Sufficient time must
be allowed for complete oxidation of contaminants in the water before filtration; the solution may be boiled to
hasten the process. Paper cannot be used for filtration because it reacts with permanganate to form the
undesirable dioxide.
Standardized solutions should be stored in the dark. If any solid is detected in the solution, filtration and re-
standardization are necessary. In any event, re-standardization every one to two weeks is a good precautionary
measure.
Procedure: Dissolve 3.2 g of KMnO4 in about 1 L of distilled water. Heat to boiling, and keep hot for about 1 h. Cover,
and let stand overnight. To remove the MnO2 filter the solution through a fine-porosity sintered glass funnel or

27
crucible or through a Gooch crucible with a glass mat. Store the solution in a clean, glass-stoppered bottle, and
keep in the dark when not in use.
Notes:
After filtration, the MnO2 collected on the fritted plate can be removed with dilute H2SO4 containing a few mL
of 3 % H2O2 followed by rinsing with copious amounts of water.
If the standardization and the analysis of the unknown are performed on the same day, the heating and filtering
steps can be omitted.
B. Standardization of Potassium Permanganate against Sodium Oxalate Dry primary standard grade Na2C2O4 for at least 1 h at 110 to 120 ºC. Cool in a desiccator, and weigh 0.2 to
0.3 g samples (to the nearest 0.1 mg) of the dried oxalate into 400 mL beakers; dissolve in approximately 250
mL of 0.9 M H2SO4 with stirring.
Method of McBride. Heat to 80 to 90 ºC, and titrate with the KMnO4, stirring vigorously. The reagent
should be introduced slowly so that the pink color is discharged before further additions are made. If the
solution temperature drops below 60 ºC, reheat. The end point is the first persistent pink color. Determine an
end point blank by titrating an equal volume of the water and sulfuric acid.
Method of Fowler and Bright. Introduce from a buret sufficient permanganate to consume 90 to 95 % of
the oxalate (about 40 mL of 0.1 N KMnO4 for, a 0.3 g sample; a preliminary titration by the McBride method
will provide the approximate volume required). Let stand until the solution is decolorized. Warm to 55 to 60
ºC, and complete the titration, taking the first pale pink color that persists for 30 s as the end point. Determine
an end point correction by titrating 250 mL of 0.9 M sulfuric acid at this same temperature. Correct for the
blank, and calculate the normality. .
Notes:
Any KMnO4 spattered on the sides of the titration vessel should be washed down immediately with a stream of
water.
If the addition of KMnO4 is too rapid, some MnO2 will be produced in addition to Mn2+,
evidence for MnO2
formation is a faint brown discoloration of the solution. The presence of the precipitate is not a serious
problem so long as sufficient oxalate remains to reduce the MnO2 to Mn.2-
; the titration is temporarily
discontinued until the solution clears. The solution must be free of MnO2 at the equivalence point.

28
To measure the volume of KMnO4, take the surface of the liquid as a point of reference. Alternatively, provide
sufficient backlighting with a flashlight or match to permit reading of the meniscus in the conventional
manner.
Permanganate solutions should not be allowed to stand in burets any longer than necessary because
decomposition to MnO2 may occur. Freshly formed MnO2 can be removed from burets and glassware with a
solution of 1 M H2SO4 containing a small amount of 3 % H2O2.
C. Determination of Iron in an Ore
Sample Preparation
0.25 M SnCl2 (for 100 titrations)
Dissolve 60 g of iron free SnCl2.2H2O in 100 mL of concentrated HCl; warm if necessary. After the solution is
complete, dilute to about 1 L, and store in a well-stoppered bottle. A few pieces of mossy Sn in the bottle will
prevent air oxidation of Sn (II).
5% (w/v) HgCl2 (for 100 titrations)
Dissolve 50 g of HgCl2 in about 1 L of water.
Zimmermann-Reinhardt reagent (for 100 titrations)
Dissolve 300g of MnSO4.4H2O in about 1 L of water. Cautiously add 400 mL of concentrated H2SO4 and 400
mL of 85 % phosphoric acid. Dilute to about 3 L.
Ore Samples: Dry the ore for at least 3 h at 105 to 110 °C, cool in a desiccator, and weigh individual samples
into 500 mL Erlenmeyer flasks. A sample of optimum size will require 25 to 40 mL of the standard KMnO4.
Add 10 mL of concentrated HCl and 3 mL of the 0.25 M SnCl2 solution. Cover the flask with a small watch
glass, and heat at just below boiling until the sample is decomposed, as indicated by the disappearance of all of
the dark particles. A pure white residue may remain. A blank consisting of 10 mL of HCl and 3 mL of SnCl2
should be heated for the same length of time. If any of the solutions becomes yellow during the heating, add
another milliliter or two of SnCl2 After the decomposition is complete, remove the excess SnCl2 by adding
approximately 0.2 M KMnO4 drop wise until the solution is just yellow. Dilute to about 15 mL. Add KMnO4
to the blank until the solution just turns pink. Then decolorize with 1 drop of the SnCl2. Carry samples
individually through subsequent steps to minimize air oxidation of iron(II).

29
Reduction of Iron
Heat the solution containing the sample nearly to boiling, and add 0.25 M SnCl2 drop by drop until the yellow
color disappears. Add 2 drops in excess, Cool to room temperature, and rapidly add ~10 mL of the HgCl2
solution. A small quantity of a silky white precipitate of Hg2Cl2 should appear. If no precipitate forms or if the
precipitate is gray due to the presence of Hg, the sample should be discarded. The blank solution should also
be treated with 10 mL of HgCl2 solution.
Titration
After 2 to 3 min add 25 mL of Zimmermann-Reinhardt reagent and 300 mL of water. Titrate immediately with
the KMnO4 to the first faint pink that persists for 15 to 20 s. Do not titrate rapidly at any time. Correct volume
of KMnO4 for the blank titration.
Calculate the % Fe2O3 in the sample.
Discard of any waste in the waste container.