university of bath department of mechanical...
TRANSCRIPT

University of Bath
BATH
BA2 7AY
United Kingdom
Tel +44 (0)1225 388388
University of Bath Department of Mechanical Engineering
Design for FDM Rapid Prototyping Manufacture (Basic)
Prepared by .......................................................................................................... E Sells
Reviewed by ...................................................................................................A Bowyer
Date: 2-Jan-07

Design for RP Manufacture Manual
Mr E Sells Page 2 of 14
EXECUTIVE SUMMARY
This design manual has been designed for use with the Stratasys Dimension Rapid
Prototyping (RP) machine to help you make successful builds.
It introduces general specifications, solutions for cylindrical fits, tappings and springs and
support material awareness. Instructions on saving a Solid Edge part file into the
appropriate format for RP production are also included. Once the reader is familiar with
the concepts, a useful summary of the design data can be found at:
http://reprap.org/bin/view/Main/HintsForUsingTheStratasysDimensionRPMachine

Design for RP Manufacture Manual
Mr E Sells Page 3 of 14
TABLE OF CONTENTS
EXECUTIVE SUMMARY ..................................................................................................2
TABLE OF CONTENTS .....................................................................................................3
TERMINOLOGY.................................................................................................................3
1 INTRODUCTION TO RAPID PROTOTYPING .....................................................4
2 GENERAL DESIGN FOR RAPID PROTOTYPING ..............................................6
2.1 Introduction.........................................................................................................6
2.2 General design specifications .............................................................................6
2.3 Cylindrical fits ....................................................................................................7
2.4 Tapping ...............................................................................................................9
2.5 Springs ..............................................................................................................11
2.6 Support material awareness ..............................................................................12
2.7 Simple Part Conversion to STL Format in SolidEdge v19...............................14
TERMINOLOGY
Some terms which are commonly used throughout the manual:
ABS A plastic based on Acrylonitrile-Butadiene-Styrene copolymers;
used as the build material in the Stratasys Dimension RP machine.
FDM Fused Deposition Method: the specific RP technique used by the
Stratasys machine.
Infill The RP process of filling the volume between critical surfaces of
components with structural material.
Rapid
prototyping
(RP)
A technology which can create parts using fused deposition
modelling and other techniques. Components are designed using
3D solid modelling software package (e.g. SolidEdge) and then
sent to the RP machine which will then automatically manufacture
the component using, in this case, ABS.
All subsequent references within this document to RP refer to the
fused deposition modelling technique. The machine used for this
technique was the Stratasys Dimension rapid prototyping machine.

Design for RP Manufacture Manual
Mr E Sells Page 4 of 14
1 INTRODUCTION TO RAPID PROTOTYPING
Rapid Prototyping is a technology which can create parts by building them up in layers.
There are several techniques used to do this, however, this manual will only be concerned
with the Fused Deposition Modelling (FDM) method employed by the Stratasys
Dimension.
Components are designed using a 3D solid modelling software package (e.g. SolidEdge,
demonstrated in Figure 1) and then sent to the RP machine, which will then automatically
manufacture the component by printing layers of ABS using the FDM method (result
shown in Figure 2).
Figure 1: 3D model of a bracket (250 mm long)
designed in Solid Edge (a solid modelling program).
Figure 2: The result from the RP machine. Note
the necessary support material for the
overhanging feature.
The process starts at the bottom layer where build material is deposited where required.
Once that layer is complete the build is incremented to the next layer, depositing material
on top of the layer below. Occasionally a component design will include overhanging
features (identified in Figure 1). This causes a problem for deposition as the head is
required to print onto a void.
The FDM process solves this by automatically building a support platform (or bridge) on which the build
material can be printed. This support material is be peeled away when the build is completed.
Table 1 outlines the basic steps taken to manufacture a component using RP technology.

Design for RP Manufacture Manual
Mr E Sells Page 5 of 14
Table 1: Step by step demonstration of rapid prototyping manufacture process
Stage Visualisation Details
1
Design is created virtually using a 3D
modeller.
2
The 3D model is pre-processed using a
program from Stratasys called Catalyst: the
design is converted into tool paths for the RP
machine to follow. Red lines represent
component material. Blue lines represent any
support material (required for overhanging
features).
3
Tool path information is sent to the RP
modeller. The modeller is initiated and then
left to manufacture the job.
4
When the RP modeller is finished, the
component is unloaded and support material
is peeled away to give the finished part.
Here the support material can be seen under
the part and in the holes at the left.

Design for RP Manufacture Manual
Mr E Sells Page 6 of 14
2 GENERAL DESIGN FOR RAPID PROTOTYPING
2.1 Introduction
The manufacture of a component with a simple geometry (for example: a stand-alone
cube) requires no additional knowledge to achieve a successful build in the RP machine.
However, as the geometry and component relationships with other components become
more complicated knowledge is required at the design stage to ensure an optimum build.
General constraints of the machine need to be considered (e.g. minimum build wall
thickness), support material should be avoided if possible to ensure an efficient build and
to avoid permanently clogging certain features, holes and shafts with specific fits should be
designed to tolerances that will be specified below and spring components should be
designed to be built in the correct orientation.
2.2 General design specifications
The FDM machine can build anything within a footprint of 210 mm x 210 mm area, up to
a height of 300 mm.
The finished product is made out of ABS.
The product will be accurate to ±0.05 mm.
Minimum wall thickness ~ 0.6 mm.
Typical wall thickness for most designs is 5 mm.
Because the product is made by printing layers, the product has orthotropic strength. It will
be strong along the length of the planes (cf a lego brick) but only half as strong across the
layers.

Design for RP Manufacture Manual
Mr E Sells Page 7 of 14
2.3 Cylindrical fits
The RP machine cannot reproduce fit features (holes and shafts) to the same accuracy as a
traditional workshop machine e.g. lathe or milling machine. Feature dimensions must be
tailored using the charts below to achieve the required fit. Fits vary between two different
situations:
• True (non-RP) shaft fitting to a RP hole
• RP shaft fitting to a RP hole
The following sub-sections detail the design dimensions to achieve the required fits.
2.3.1 RP hole diameter for true (non-RP) shaft
This section is useful for designing holes in the RP component which house standard
cylindrical parts, for example bolts or shafts.
Table 2: Simple metrics for designing RP hole diameters to achieve specific fits to true shaft diameters
Fit type for hole and shaft Design compensation for hole ø (mm) (add to shaft ø)
Interference fit +0.1
Tolerance fit +0.3
Clearance fit +0.4
E.g. Hole ø required for a running fit to a steel shaft, true ø 8.00 mm.
Design hole ø at 8.00 + 0.3 = ø 8.3 mm.
E.g. Hole ø required for a M5 bolt, true ø 5.0 mm. Design hole ø at 5.0 + 0.4 = ø 5.4 mm.

Design for RP Manufacture Manual
Mr E Sells Page 8 of 14
2.3.2 RP hole diameter for RP shaft diameter
For the dimensions of a hole in an RP part to fit to a shaft of another RP component, use the chart in Figure 3.
0
0.1
0.2
0.3
0.4
0.5
3.0 4.0 5.0 6.0 7.0 8.0 9.0
Designed shaft ø (mm)
Addition to hole ø (mm) to achieve desired fit
Interference fit
Tolerance fit
Clearance fit
Poly. (Interference fit)
Poly. (Tolerance fit)
Poly. (Clearance fit)
Figure 3: Mapping for fits between RP shafts and RP holes
E.g. For an RP hole to give a tolerance fit on an RP shaft designed at 6.0 mm, the hole must be designed at ø 6.27 mm.

Design for RP Manufacture Manual
Mr E Sells Page 9 of 14
2.4 Tapping
When using fasteners in an assembly it is often useful to have a tapped hole in an RP
component. There are three different options:
• RP hole diameter for self tapping screws
• RP hole diameter for metric taps
• RP countersink to house a metric nut (recommended)
The following subsections detail the design dimensions for each of the different options.
2.4.1 RP hole diameter for self tapping screws
Table 3: Hole compensation reference table for screw fits
Screw gauge Tapping hole ø (mm) design Clearance hole ø (mm) design
10 4.4 5.2
8 3.8-3.9 4.8
6 3.3-3.4 4.0
4 2.6 (estimate) 3.2
E.g. For a gauge-8 self tapping screw the tapping hole should be designed at ø 3.8 mm and
the clearance hole should be designed at ø 4.8 mm.
2.4.2 RP hole diameter for metric taps
Note: If it is expected that the thread is be used frequently or for heavy duty situations (e.g.
the component is used for testing) the thread is likely to wear quickly. In these situations
therefore it is preferable to use a housed nut (defined in the next section).
Table 4: RP hole diameters for metric taps or nuts
I.S.O Metric
coarse thread
Tapping hole ø
(mm) on the RP
machine
Clearance
hole ø (mm)
M3 2.8 3.4
M4 3.6 4.4
M5 4.5 5.4
M6 5.3 6.4
M8 7.1 8.5
M10 8.8 10.5
E.g. For an M6 bolt the tapping hole should be designed at ø 5.3 mm and the clearance
hole should be designed at ø 6.4 mm.
2.4.3 RP countersink to house a metric nut
The countersink shown in Figure 4 has a rounded hexagonal profile to constrain the nut
axially (the nut will remain in the countersink because of a light push fit) and flats to
provide maximum constraint. The critical dimensions for this design are shown in Figure
5.

Design for RP Manufacture Manual
Mr E Sells Page 10 of 14
Figure 4: Rounded hexagonal countersink to house a nut
Figure 5: Critical dimensions for the rounded hexagonal countersink
Table 5: Design dimensions for the rounded hexagonal countersink
A B C D I.S.O Metric
nut size Clearance hole
ø (mm)
CS rounding ø
(mm)
Hexagonal flat
dist (mm)
CS minimum depth
for flush nut (mm)
M3 3.4 6.3 6.0 2.4
M4 4.4 7.9 7.45 3.0
M5 5.4 9.3 8.45 3.9
M6 6.4 11.5 10.45 5.0
M8 8.5 14.8 13.35 6.3
Keep in mind that the housing must be positioned so that when it is built, the layers run
parallel with the axis of the bolt - otherwise tightening the nut will simply prise the layers
apart.
Design for RP Manufacture Manual
Mr E Sells Page 11 of 14
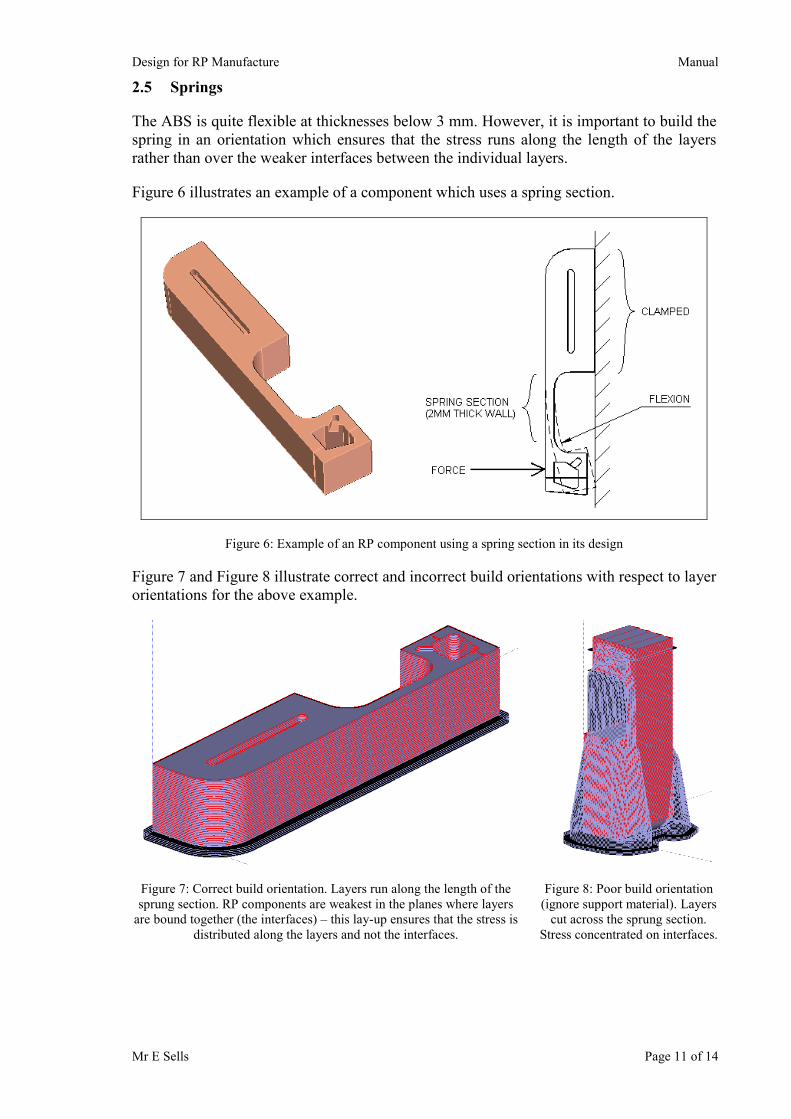
2.5 Springs
The ABS is quite flexible at thicknesses below 3 mm. However, it is important to build the
spring in an orientation which ensures that the stress runs along the length of the layers
rather than over the weaker interfaces between the individual layers.
Figure 6 illustrates an example of a component which uses a spring section.
Figure 6: Example of an RP component using a spring section in its design
Figure 7 and Figure 8 illustrate correct and incorrect build orientations with respect to layer
orientations for the above example.
Figure 7: Correct build orientation. Layers run along the length of the
sprung section. RP components are weakest in the planes where layers
are bound together (the interfaces) – this lay-up ensures that the stress is
distributed along the layers and not the interfaces.
Figure 8: Poor build orientation
(ignore support material). Layers
cut across the sprung section.
Stress concentrated on interfaces.

Design for RP Manufacture Manual
Mr E Sells Page 12 of 14
2.6 Support material awareness
As explained in Section 1, support material will be induced for overhanging features.
Support material should be avoided if possible as it will improve the efficiency of the
build, improve the finish of the component and save time finishing the component
post-manufacture.
A typical approach to avoiding support material is shown in Figure 9.
Figure 9: Approach to avoid the use of support material
Examples of the approach are given below.
2.6.1 Efficient orientation of component during build
Support material can be avoided for simple components by orientating the component
appropriately.
Table 6: Examples of solutions to avoid the use of support material using appropriate orientations
Example 1 Example 2
Component
Support
material Support material induced below overhang
Support material induced into the hole. Difficult
to remove and reduces the quality of the finish.
Orientation
solution
Build with largest flat at the bottom Build with hole axis in the vertical plane

Design for RP Manufacture Manual
Mr E Sells Page 13 of 14
2.6.2 Designing to eliminate the use of support material
Inverse drafts (overhangs) may range from 0 ° to 45 ° without the need for support material. The examples shown in Table 7 assume that the
orientation of the features cannot be changed, therefore 45 ° overhangs have been incorporated into the design solutions to eliminate the use of support
material.
Table 7: Example of design solutions to avoid the use of support material
Example 1 Example 2 Example 3 Example 4
Feature
Horizontal hole Horizontal slot Blind hole (inverted) Vertical counterbored
Design solution
Pointed (45 °) hole Pointed (45 °) slot Coned (45 °) roof Through hole Chamfered (45 °)
countersink

Design for RP Manufacture
Mr E Sells
2.7 Simple Part Conversion to STL Format in SolidEdge v19
The RP machine reads 3D part descriptions in STL format. A Solid Edge part drawing can
easily be converted into an STL format using the following method:
• With the part open, click ‘File’, ‘Save As…’
• Enter a filename (make sure it’s in the correct format as stated on the FDM RP web
site!)
• Click ‘Save as type:’ > “STL documents (*.stl)”
• Click ‘Options’ and ensure parameters match those specified in Figure 10 when
saving as an STL file. Failure to do so, whether changes are made or not, might result
in the creation of a very small STL file.
Figure 10: STL export parameters
• You may select ASCII rather than binary if you need a person-readable file. This
will be much larger than the equivalent binary file.
• Click ‘OK’ on all dialogues