universal reader assistant user guide - dpie.com · universal reader assistant user guide version...
TRANSCRIPT

1
Universal Reader Assistant User Guide
Version 2.7 - Supported Hardware: • M6 and Astra-EX (firmware v4.19.2 and later)• M6e (firmware v1.13.1 and later)• Micro (firmware v1.7.1 and later)• Nano (firmware v1.3.2 and later)• M5e, Compact, USB and Vega (firmware v1.7.1 and later)
875-0068-09 RevA

2
Government Limited Rights Notice: All documentation and manuals were developed at private expense and no part of it was developed using Government funds.
The U.S. Government’s rights to use, modify, reproduce, release, perform, display, ordisclose the technical data contained herein are restricted by paragraph (b)(3) of theRights in Technical Data — Noncommercial Items clause (DFARS 252.227-7013(b)(3)),as amended from time-to-time. Any reproduction of technical data or portions thereofmarked with this legend must also reproduce the markings. Any person, other than theU.S. Government, who has been provided access to such data must promptly notifyThingMagic.
ThingMagic, Mercury, Reads Any Tag, and the ThingMagic logo are trademarks orregistered trademarks of ThingMagic, A Division of Trimble.
Other product names mentioned herein may be trademarks or registered trademarks ofTrimble or other companies.
©2015 ThingMagic – a division of Trimble Navigation Limited. ThingMagic and The Engine in RFID are registered trademarks of Trimble Navigation Limited. Other marks may be protected by their respective owners. All Rights Reserved.d
ThingMagic, A Division of Trimble1 Merrill St.Woburn, MA 01801
09 Revision ASept, 2015

3
Introduction. . . . . . . . . . . . . . . . . . . . . . . . . . . . . . . . . . . . . . . . . . . . . . . . . . . . . . .4
Usage Workflow . . . . . . . . . . . . . . . . . . . . . . . . . . . . . . . . . . . . . . . . . . . . . . . . . . .6
Installing URA . . . . . . . . . . . . . . . . . . . . . . . . . . . . . . . . . . . . . . . . . . . . . . . . . . . .7Standalone Application . . . . . . . . . . . . . . . . . . . . . . . . . . . . . . . . . . . . . . . . . . .7Source and Executable from MercuryAPI SDK . . . . . . . . . . . . . . . . . . . . . . . .7Apple Bonjour mDNS Discovery Service. . . . . . . . . . . . . . . . . . . . . . . . . . . . .8
Starting URA . . . . . . . . . . . . . . . . . . . . . . . . . . . . . . . . . . . . . . . . . . . . . . . . . . . . .9Main Window . . . . . . . . . . . . . . . . . . . . . . . . . . . . . . . . . . . . . . . . . . . . . . . . . .9
Connect . . . . . . . . . . . . . . . . . . . . . . . . . . . . . . . . . . . . . . . . . . . . . . . . . . . . . . . . .10Networked Readers . . . . . . . . . . . . . . . . . . . . . . . . . . . . . . . . . . . . . . . . . . . . .10Serial Readers . . . . . . . . . . . . . . . . . . . . . . . . . . . . . . . . . . . . . . . . . . . . . . . . .12Transport Logging . . . . . . . . . . . . . . . . . . . . . . . . . . . . . . . . . . . . . . . . . . . . . .13Load and Save Profiles . . . . . . . . . . . . . . . . . . . . . . . . . . . . . . . . . . . . . . . . . .13
Basic Reading . . . . . . . . . . . . . . . . . . . . . . . . . . . . . . . . . . . . . . . . . . . . . . . . . . . .15Tag Results Grid . . . . . . . . . . . . . . . . . . . . . . . . . . . . . . . . . . . . . . . . . . . . . . .16Save Data. . . . . . . . . . . . . . . . . . . . . . . . . . . . . . . . . . . . . . . . . . . . . . . . . . . . .16
Settings/Status. . . . . . . . . . . . . . . . . . . . . . . . . . . . . . . . . . . . . . . . . . . . . . . . . . . .17Read Options . . . . . . . . . . . . . . . . . . . . . . . . . . . . . . . . . . . . . . . . . . . . . . . . . .17Performance Metrics . . . . . . . . . . . . . . . . . . . . . . . . . . . . . . . . . . . . . . . . . . . .18Performance Tuning Options. . . . . . . . . . . . . . . . . . . . . . . . . . . . . . . . . . . . . .19Advanced Performance Tuning . . . . . . . . . . . . . . . . . . . . . . . . . . . . . . . . . . . .20Display Options . . . . . . . . . . . . . . . . . . . . . . . . . . . . . . . . . . . . . . . . . . . . . . . .20Reader Diagnostics . . . . . . . . . . . . . . . . . . . . . . . . . . . . . . . . . . . . . . . . . . . . .21Firmware Upgrade. . . . . . . . . . . . . . . . . . . . . . . . . . . . . . . . . . . . . . . . . . . . . .21Data Extensions (Demo Functionality) . . . . . . . . . . . . . . . . . . . . . . . . . . . . . .22
Tag Operations . . . . . . . . . . . . . . . . . . . . . . . . . . . . . . . . . . . . . . . . . . . . . . . . . . .24Workflows . . . . . . . . . . . . . . . . . . . . . . . . . . . . . . . . . . . . . . . . . . . . . . . . . . . .24Write EPC . . . . . . . . . . . . . . . . . . . . . . . . . . . . . . . . . . . . . . . . . . . . . . . . . . . .25Tag Inspector . . . . . . . . . . . . . . . . . . . . . . . . . . . . . . . . . . . . . . . . . . . . . . . . . .28User Memory Editor . . . . . . . . . . . . . . . . . . . . . . . . . . . . . . . . . . . . . . . . . . . .29Lock Tag . . . . . . . . . . . . . . . . . . . . . . . . . . . . . . . . . . . . . . . . . . . . . . . . . . . . .31Untraceable . . . . . . . . . . . . . . . . . . . . . . . . . . . . . . . . . . . . . . . . . . . . . . . . . . .32Authenticate. . . . . . . . . . . . . . . . . . . . . . . . . . . . . . . . . . . . . . . . . . . . . . . . . . .38
Troubleshooting . . . . . . . . . . . . . . . . . . . . . . . . . . . . . . . . . . . . . . . . . . . . . . . . . .48Troubleshooting Table . . . . . . . . . . . . . . . . . . . . . . . . . . . . . . . . . . . . . . . . . . .48Collecting Diagnostic Data for ThingMagic Support . . . . . . . . . . . . . . . . . . .48

Universal Reader Assistant v2.7 User Guide 4
Universal Reader Assistantv2.7
User Guide
Introduction
This document explains how to use the Universal Reader Assistant (URA) application, version 2.7 and later, for testing and performance tuning ThingMagic reader products.
URA is written using the high level MercuryAPI in C# .NET. All the source code for URA is available as part of the MercuryAPI SDK. The MercuryAPI supports Java, .NET and C programming environments. The MercuryAPI Software Development Kit (SDK) contains additional sample applications and source code to help developers get started demoing and developing functionality. For more information on the MercuryAPI see the MercuryAPI Programmers Guide and the MercuryAPI SDK, available on the ThingMagic website.
This document assume you have read the corresponding Hardware Guide for the specific ThingMagic reader being connected to and understand how the reader is connected.
NoteMany features in URA v2.4 and beyond will not work with Astra. For use with Astra it is recommended you request an older version of URA from ThingMagic.

Introduction
Universal Reader Assistant v2.7 User Guide 5
NoteMany of the early screen captures shown in this manual do not show all the tab options that were added later. As of this writing, the complete list of tabs are: “Tag Results”, “Write EPC”, “Tag Inspector”, “User Memory”, “Lock Tag”, “Untraceable”, and “Authenticate”. Although not shown in every screen capture, they are fully explained in the appropriate section.

Usage Workflow
Universal Reader Assistant v2.7 User Guide 6
Usage Workflow
Once URA is installed, see Installing URA section for details, this document will step through the required steps in order to start reading tags and optimizing the reader’s performance for a specific usecase. At a high level the steps required, and corresponding document sections, are as following:
1. Starting URA - This section provides an overview of the main components of the URA application displayed immediately upon startup.
2. Connect - In order to control a reader and have it read tags the reader must first be connected to. This section provides details on connecting to the various types of readers URA can control.
3. Basic Reading - Once a reader connection has been established the Read button can be clicked to start reading tags. As soon as a read is initiated tag data will be displayed in the main Tag Results Grid . This section provides details on display options and saving data.
4. Settings/Status - If tags are being displayed, the next step is optimizing the performance for a particular usecase. This section describes the performance tuning parameters that are available and what they mean, along with status information available.
5. Tag Operations - Once an inventory has been performed tag entries (EPC or Data cells) can be right-clicked on, presenting a variety of individual operations (writing, inspecting, etc.) that can be performed on a specific tag.
6. Troubleshooting - The any of the previously defined steps don’t work this section will help diagnose and resolve the issue.
C A U T I O N !! !
If disconnecting from one reader and connecting to another (or connect-ing to the same, rebooted reader) it is recommended you restart URA. IfURA isn’t restarted the settings may become inconsistent between whatis active on the reader and what is displayed in the URA Settings/Status sec-tion.

Installing URA
Universal Reader Assistant v2.7 User Guide 7
Installing URA
The Universal Reader Assistant application is available in two different packages:
Standalone Application
URA is available as a standalone application, installed using a Windows installer. Follow these steps to download and install URA:
1. Use a web browser to navigate to http://rfid.thingmagic.com/devkit
2. Find the Universal Reader Assistant link under MercuryAPI | Software and click on it. This will begin download URABonjourSetup32.exe (for 32-bit Windows platforms, please contact ThingMagic support for 64-bit Windows)
3. Once downloaded, double-click on URABonjourSetup32.exe and follow the installation instructions.
4. Once complete there will be an entry in the Windows Start menu for ThingMagic | UniversalReaderAssistant
Note: The standalone version maybe newer than the version included in the SDK.
Note: The URABonjourSetup32.exe will also install Apple Bonjour mDNS Discovery Service.
Source and Executable from MercuryAPI SDK
In addition to being available as a standalone application URA, along with all of its source code, is part of the MercuryAPI SDK. URA can be accessed via the SDK as follows:
1. Use a web browser to navigate to http://rfid.thingmagic.com/devkit
2. Find the MercuryAPI SDK link under MercuryAPI | Software and click on it. This will begin download SDK Zip package.
3. Once downloaded, double-click on the zip file to extract its contents.
Once the contents have been extracted the URA Visual Studio project can be found in:
[INSTALLDIR]/cs/Samples/UniversalReaderAssistant2.0
and the pre-built executable, along with the installer can be found in:
[INSTALLDIR]/cs/Samples/exe

Installing URA
Universal Reader Assistant v2.7 User Guide 8
Apple Bonjour mDNS Discovery Service
URA2 uses Apple’s Bonjour service to discover Bonjour enabled Network Readers. If you do not want Bonjour to be installed simply Cancel out of Bonjour installer once its appears during the URA install and it will not be installed. URA2 will continue to be installed even if Bonjour is cancelled.
If not installed the Networked Readers list will be empty during Connect and you’ll need to manually enter the hostname or IP address.

Starting URA
Universal Reader Assistant v2.7 User Guide 9
Starting URA
Main Window
Upon starting up URA you will see the main Tag Results screen as shown in Figure 1.
Figure 1: Startup Tag Results Screen
This screen contains the basic controls for reading, viewing and handling the Tag Results. Across the top of the window are the following controls and status:
Connect button - when clicked this will open the settings panel to the connect section. Once in the connect section the reader to connect to, including Networked Readers and Serial Readers can be specified and connected.
Reader URI - Once connected this will display the URI of the active connection.
LED and Status Message- show the status of the reader connection:
– RED - no connection to any readers
– YELLOW - Connection established to [Reader URI] and reader idle
– GREEN - [Reader URI] actively reading
[Read] - Once connected a Read button will appear.
Broom Icon - Clears the Tag Results display
Disk Icon - Saves the tags shown in the Tag Results displayed to a file. If specific tags are checked it will only save those tags.

Connect
Universal Reader Assistant v2.7 User Guide 10
Connect
Once the Connect button on the Tag Results screen is clicked the connection options will be displayed. The radio button should be clicked to specify the type of reader being connected to. Please reference the specific product’s Hardware Guide for details on how to establish a connection to each reader and how to identify the correct URI (hostname, IP Address, COM port, etc.) to identify it.
Networked Readers
Figure 2: Connect to Network Reader
Finding a reader on the networkIf Apple Bonjour mDNS Discovery Service has been installed the Network Readers dropdown will contain a list of readers discovered on your network, select one and click Connect to continue.
If Bonjour has not been installed, in order to connect to a networked reader (Astra, Astra-EX, M6) the correct reader URI must be entered in the text box next to the Connect button. The specific value depends on the network configuration. The following are typical values for three common configurations, see the Hardware Guide for more details on figuring out the readers address.
Direct to PC connection - if the reader is configured with an ethernet cable going from the host PC directly to the reader the reader’s IP address is likely either using the fallback static address of 10.0.0.101 or using a link local address and can be contacted using the automatic hostname such as M6-XXXXXX or astra-ex-XXXXXX (where XXXXXX is the last 6 digits of the MAC/LAN address, seen on the barcode label)

Connect
Universal Reader Assistant v2.7 User Guide 11
Note: On some systems, especially when using the Direct to PC connection, the hostname must end in “.local” for the connection to succeed. i.e. m6-21071f.local
DHCP on the LAN - the reader should be identifiable using the automatic hostname such as M6-XXXXXX (where XXXXXX is the last 6 digits of the MAC/LAN address, seen on the barcode label) or using the ass
Static IP on the LAN - the assigned IP address should be used.
Once the connection is established the Status LED should change to YELLOW and the Region selection in the Connect section will change to the region of the connected reader as shown in Figure 3. On networked readers the region of operation cannot be changed.
Figure 3: Connected to a Network Reader
Once connected go to WebUI for persistent settingsOnce a connection to a networked reader is established the WebUI button will become active. Clicking on it will open up a browser to the reader’s Web Interface which supports modifying the network configuration and making persistent changes to the Performance Settings of the reader. See the readers’ Hardware Guide for details on using the WebUI.

Connect
Universal Reader Assistant v2.7 User Guide 12
Serial Readers
Figure 4: Connecting to a Serial Reader
Finding the assigned COM portIn order to connect to a serial reader (USB Reader, Vega, M5e/M6e devkits) the correct COM port must be selected from the drop down next to the Connect button. In order for the associated COM port to be displayed the reader must have been connected to the host prior to starting URA. If not, you can click Refresh to try and re-detect COM ports in use. The specific value depends on what the host system has assigned the new connection, typically it will be the last value in the list.
Baud RateIf the reader is using a TTL/RS232 connection and you know the baud rate of reader being connected to you can select it prior to connecting. If you don’t URA will attempt to figure it out. Once connected you can change the baud rate for faster communications, if supported.
For native USB connections the baud rate setting does not apply.
RegionOnce the connection is established the Status LED should change to YELLOW and the Region selection in the Connect section will change to the default region of the connected reader, similar to Figure 3. For Serial Readers, the region will indicate “Select” if the reader is in its default configuration. A region will be displayed if one has been previously selected, saved, and restored automatically on reboot. Reading is not permitted until a region has been selected.

Connect
Universal Reader Assistant v2.7 User Guide 13
Transport Logging
For both connection types if Transport Logging is checked a logfile will be created containing all of the low level communication between URA and the reader. This can be very important to diagnosing a support problem.
When gathering logs for support it is recommended the following process be followed:
1. Prior to connect, check Transport Logging.
2. Click Connect.
3. Navigate to a filesystem location to save the log file and provide a name.
4. Perform the operations to reproduce the problem being debugged
5. Once the problem has been reproduced, Disconnect.
6. Send the log to support.
Load and Save Profiles
Full settings and display options profiles can be saved, for the current running configuration, and loaded using the Save and Load buttons
of the Connect section. Loading and saving profiles supports three different workflows, one for saving and two for loading, as follows:

Connect
Universal Reader Assistant v2.7 User Guide 14
Save ProfileOnce connected to a reader, with it working as desired, the full configuration of the reader, including the reader connected to, all read options, performance settings and display settings can be saved to a URAC (URA Config) file by following these simple steps:
1. Click “Save”
2. File manager pops up in URA.exe directory. The default filename field populated with [reader type]_[readername].urac. This maybe changed as desired.
3. Click “Save” in the file manager to save to the specified file.
Load Profile - Before Reader ConnectIf you have not yet connected to a reader and want to load a previously saved profile and connect to the same reader the profile was saved from the Load operation will both connect to the reader and load the saved profile:
1. With URA Status indicator showing [Red] Disconnected, click “Load”.
2. Select desired *.urac file and “Load”.
3. Load attempts to connect to the Reader URI saved as part of the profile.
4. If the connect fails an error will be displayed and the Load Profile - After Reader is already connected workflow should be followed.
5. If connect succeeds the full saved profile and display options are loaded.
Load Profile - After Reader is already connectedIf you want to load a previously saved profile onto a different reader than it was saved from you must first connect to the reader then load:
1. With URA Status indicator showing [Yellow]] Connected, click “Load”.
2. Select desired *.urac file and “Load”.
3. Since already connected Load ignores reader URI and only loads the profile.
4. The full saved profile and display options are loaded.

Basic Reading
Universal Reader Assistant v2.7 User Guide 15
Basic Reading
Once connected to a reader you can quickly start reading and obtain immediate feedback using default settings. Simply position one or more tags in front of one of the antennas connected to the reader and:
1. Click Read.
This will start a continuous read on all connected antennas in the default configuration. The resulting tags will be displayed in the Tag Results Grid as shown in Figure 5. While reading is active the Status LED will be GREEN.
2. Click Stop Reading to end the search.
In order to change the reading behavior and improve performance for a particular use-case see the Settings/Status section.
Figure 5: Default Tag Results Display

Basic Reading
Universal Reader Assistant v2.7 User Guide 16
Tag Results Grid
As shown in Figure 5, the default displayed tag results show the following columns of data:
# - The order each tag was read.
EPC - The EPC ID of the tag, typically 96-bits of data shown in Hex.
Timestamp - The timestamp when the tag was last seen during this query.
RSSI - The receive signal strength of the tag response, in dBm.
ReadCount - The number of times the tag was read on [Antenna].
In addition to the above fields, additional fields can be displayed using the Display Options settings. These include:
Antenna - the number of the antenna over which the tag was read
Frequency - the channel the reader was on when the tag was read, displayed in kHz (e.g. “915750”)
Phase - The phase, from 0 to 180 degrees, between the outgoing carrier and the signal reflected back by the tag.
Protocol - Protocol used when the tag was read. (e.g. “Gen2”, ISO18000-6B”, IPX64”, etc). (Protocols are selected in the “Read/Write Options” panel. If only “Gen2” is displayed, then you have not applied the appropriate license to the module to read additional protocols.)
If “Antenna” or “Frequency” are chosen, each combination of EPC, Antenna, and Frequency will be displayed on a separate line in the Tag Results Grid.
Clicking on a column header will reorder the displayed tags based on that field.
Save Data
Once reading is stopped and tags are displayed in the Tag Results Grid, the displayed data can be saved to a file by checking the check-box in the far left column for each tag to save; or leave them all unchecked to save all. Select the file to save the data to and click Save.

Settings/Status
Universal Reader Assistant v2.7 User Guide 17
Settings/Status
Upon Connect the Settings/Status slide-out panel, as shown in Figure 6, will be displayed and opened to the Connect section. This panel contains configuration settings for the Tag Results Grid, read behavior and performance tuning, along with status information and a Firmware Upgrade utility. Each section can be independently expanded/collapsed and the entire panel can be pinned in placed or left to open and auto-collapse based on mouse position using the pin icon in the upper right corner of the panel.
Figure 6: Settings/Status Panel
Read Options
This sections allows the basic behavior of a Read operation to be defined (relates to the read method and ReadPlan configuration as defined in the MercuryAPI) for when the Read button is clicked. It contains the following options
Table 1: Read Options
Setting Description
Read Behavior • Read Continuously - Clicking Read causes a continuous read to be run until Stop Reading is clicked. Will read using the RF On/RF Off duty cycle as defined by those settings.
• Read Once - Each click of Read causes a single query for the time specified.
• Optionally select/deselect Fast Search which optimizes performance for maximum re-reads of a few tags.
Protocols The protocols supported by the connected reader will be displayed. Check those to be queried for. When Read is clicked the selected protocols will be cycled through.
Settings/Status
Universal Reader Assistant v2.7 User Guide 18
Performance Metrics
This section displays performance metrics of the active or just performed Read operation:
Antennas • Antennas - The antennas supported by the connected reader will be displayed. Check those to be queried for. When Read is clicked the selected antennas will be cycled through.
• Antenna Detection - Will make only antennas with a detected antenna connection available. Uncheck to make all ports available.
• Switching Method - Specifies how the reader will switch between antennas during a read operation if multiple antennas are selected:
– Equal Time - The RF On or Timeout value specified in the Read Behavior will be divided equally among selected antennas.
– Dynamic - The read cycles through the antennas, moving to the next antenna when no more tags are found on the current antenna. The cycle resets to the first antenna every RF On/Timeout period.
Embedded ReadData
For every tag read the specified memory bank location will also be read for that tag and displayed in the Data column in Tag Results.
• Enable - Displays the embedded read data options to be added to the read operation and adds the Data column.
• Membank - The memory bank to read from.
• Start - The starting WORD address to read from. (0 based)
• Length - The number of WORDs of data to read. Specifying 0 will result in the entire memory bank starting at address Start to be read, up to 128 words.
• UniqueByData - Causes the data read to be used as a unique identifier of the tag. Useful if many tags in the field have the same EPC, read the TID UID and they will be distinguishable.
Filter This will apply a Gen2 Select filter so only tags matching the specified criteria will be read.
• Membank - Memory bank to apply filter on.
• Start - Starting BIT address to apply filter against.
• Filter Data - The value (in Hex) to compare with the data in Membank at Start address.
• Invert - invert the selection, deselect tags that match the filter criteria and return the ones which don’t.
Settings/Status
Universal Reader Assistant v2.7 User Guide 19
Table 2: Performance Metrics
Performance Tuning Options
This section provides a set of options, based on high-level usecase characteristics, allowing the reader performance to be optimized.
Table 3: Performance Tuning Options
Setting Description
Unique Tag Count Total number of unique tags found.
Total Tag Count Total number of tags read, including re-reads of the same tag. Also displays the time during which those tags were read.
ReadRate/Sec Using the Total Tag Count metric, displays the average tags per second.
Setting Description
Read Power Control the amount of RF Power transmitted by the reader, to the antenna, when reading. The RF power directly relates to the range at which the reader can “see” tags, the higher the power, the longer the range.
Tag Population Size
• Automatically adjust settings as tag population changes - Reader dynamically adjusts optimization setting depending on the tag population it detects in the field.
• Optimize for estimated number of tags in the field- If the tag population size is relatively well known and consistent, performance can be increased by optimizing for that size. In this case enter the approximate population size for increased performance.
Read Distance vs. Read Rate
• Maximum tag read rate - Performance is optimized for maximizing the speed of tag to/from reader communications, which results in more tags being read faster. OR
• Maximum Tag read distance - Performance is optimized for reading weaker, harder to read tags.
Note: Mostly applicable to using Battery Assisted Passive Tags. Most Passive Tag applications are range limited by the power output from the antenna, not the reader's ability to "hear" a tag's response.

Settings/Status
Universal Reader Assistant v2.7 User Guide 20
Advanced Performance Tuning
When the Configure Gen2 Settings button is clicked in the Performance Tuning Options section the high-level use-case settings are disabled and the Gen2 Protocol settings can be set directly. See the MercuryAPI Programmers Guide | Performance Tuning section for more details on these settings.
NoteOnce the high-level settings have been configured to maximize performance for a usecase the Configure Gen2 Settings button can be clicked and the corresponding low level settings will be displayed. These settings can then be used in a MercuryAPI application to maintain the performance tunings.
Display Options
This sections allows the content and behavior of the Tag Results Grid to be configured. It contains the following options:
Table 4: Display Options
Tag Response Rate
• Select best choice for population size - used the Tag Population size setting to determine best settings. Only recommended to be used if setting an estimated tag population size.
• Customize tag response rate - adjust between:
– Tags respond more often - tags will re-respond to an on-going inventory as quickly as possible. Not recommended for large populations of tags.
– Tags respond less often -Tags will sleep for their "flag persistence" period, (duration depends on exact setting and tag specifics). This is preferred when trying to inventory large populations of tags as it allows "weaker" tags a chance to respond.
Configure Gen2 Settings
Switches the setting options from the high-level use-case characteristics to low level Gen2 Protocol Settings. See Advanced Performance Tuning
Setting Description
Font Size Set the font size used in the Tag Results Grid. Smaller fonts enable more rows to be visible.
Tag Aging When enabled (checked) the row of a tag will progress through multiple shades of gray as it “ages”, i.e. hasn’t been re-read in subsequent inventory rounds.
Settings/Status
Universal Reader Assistant v2.7 User Guide 21
Reader Diagnostics
This section displays version information about URA and the connected reader. When contacting ThingMagic support for issues found while using URA it is recommended this information be provided.
RFID Engine - type of reader connected to.
Firmware Version - firmware running on the connected reader.
Hardware Version - version of hardware (can be useful to support when issues arise).
Universal Reader Assistant - running version of URA
MercuryAPI Version - version of the MercuryAPI SDK this URA was built with.
Firmware Upgrade
The section provides a means to upgrade the firmware of the connected reader.
To upgrade:
Refresh Rate For most applications, leave this at its default value of 100 ms. If URA is used to read a large tag population (greater than 150 tags) over a very longperiod of time, the URA refresh rate should be changed to 999 msec. This gives the “garbage collection” routine enough time to prevent memory leakage.
Tag Results Column
Additional Columns of tag read meta data can be selected (click check-box in drop-down menu) to be displayed:
• Antenna - The antenna on with the tag was read. If the same tag is read on more than one antenna there will be a tag entry for each antenna on which the tag was read.
• Protocol - The protocol of the tag.
• Frequency - The frequency on which the tag was read, in kHz.
• Phase - Average phase of tag response in degrees (0°-180°)
• TagReadData - The data read when the Tag Data Settings | Read Data option is selected. If the tag doesn’t have the requested data “Read Data failed” will be returned.
TimeStamp Format Select timestamp format to be displayed.
Big Num Selection Settings to optionally display various summary information, while querying, in a big number format.

Settings/Status
Universal Reader Assistant v2.7 User Guide 22
1. Click Choose Firmware and navigate to the filesystem location where the firmware file is located.
2. Select the firmware file and click Open.
3. Click Upgrade.
4. Upon completion the Status message will change to indicate it has completed.
NoteThe latest firmware is always available on http://www.thingmagic.com/index.php/manuals-firmware. It requires a password which can be obtained from ThingMagic Support if you have an active support contract.
NoteThis utility can be used to downgrade firmware also.
Data Extensions (Demo Functionality)
The section provides demo functionality to stream data, as a server, to a network port where client applications can listen and recieve tag read data.
When enabled tag read data will be sent to the specified network port in a tab-delimited format containing “[EPC ID] [Timestamp] [RSSI] [Antenna ID]”, for example:
123422223333444455556666 6/24/2014 1:55:03 PM -22 1
AAAABBBBCCCCDDDDEEEEFFFF 6/24/2014 1:55:03 PM -81 1
Any client that can connect to the specified network port can connect and receive the data.
NoteCurrent functionality is limited to a single client connection
NoteCurrent tag read data is not buffered. If no client is connected tag reads will be not be sent. Once connected tag read data will be seen from the time of connection forward.
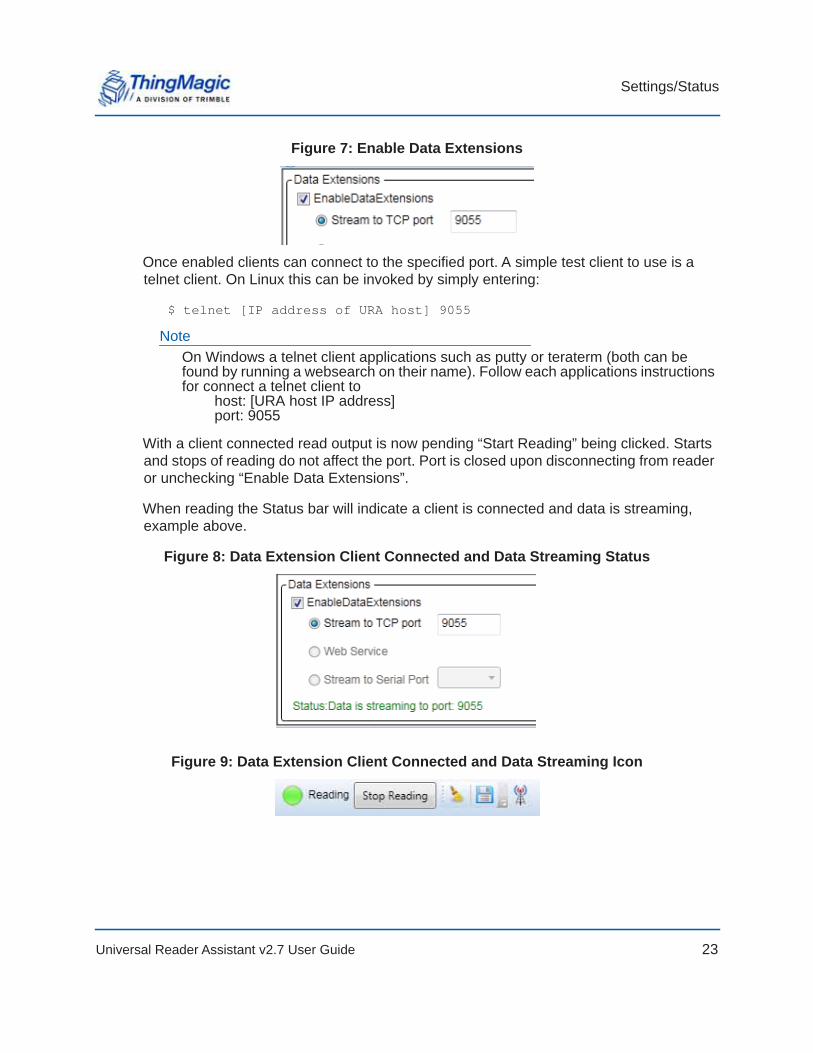
Testing Data ExtensionsTo enable data extensions simply select Enable Data Extensions:
Settings/Status
Universal Reader Assistant v2.7 User Guide 23
Figure 7: Enable Data Extensions
Once enabled clients can connect to the specified port. A simple test client to use is a telnet client. On Linux this can be invoked by simply entering:
$ telnet [IP address of URA host] 9055
NoteOn Windows a telnet client applications such as putty or teraterm (both can be found by running a websearch on their name). Follow each applications instructions for connect a telnet client to
host: [URA host IP address] port: 9055
With a client connected read output is now pending “Start Reading” being clicked. Starts and stops of reading do not affect the port. Port is closed upon disconnecting from reader or unchecking “Enable Data Extensions”.
When reading the Status bar will indicate a client is connected and data is streaming, example above.
Figure 8: Data Extension Client Connected and Data Streaming Status
Figure 9: Data Extension Client Connected and Data Streaming Icon
Tag Operations
Universal Reader Assistant v2.7 User Guide 24
Tag Operations
Universal Reader Assistant 2 currently supports the following individual Tag Operations:
Write EPC
Tag Inspector
User Memory Editor
Lock Tag
Untraceable
Authenticate
All Tag Operations Tabs support two main workflows which define what tag will be operated on.
Workflows
1. User Clicks on one of the tag operation tabs. This causes the following behavior:
First tag to respond is selected. This means when an operation is performed it will be performed on the first tag to respond. If more than one tag is in the field the tag to be operated on is non-deterministic. Clicking Read/Refresh buttons will often provide a warning indicating that more than one tag was found.
The first detected/selected antenna will be used for the operation.
2. User right-clicks on EPC ID or Data (from enabling an Embedded ReadData) cell in the Tag Results Grid and selects a tag operation. This causes the following behavior:
A Select filter will be applied when the selected tag operation is invoked. The select filter to be applied will be shown in the top section of the operation tab.
The antenna the tag was read on (add the Antenna column in Display Options to the Tag Results Grid to see which) will be used for the tag operation.
NoteFollowing workflow #2 does not guarantee the operation will be isolated to a specific tag. If you are not certain if the select critieria only applies to a single tag
Tag Operations
Universal Reader Assistant v2.7 User Guide 25
the Read/Refresh button can be used to check. Clicking it a few times should always show the same data and should not result in any warnings.
NoteThe best way to guarantee the select identifies a single tag is to add an Embedded ReadData on TID memory’s Unique Identifier portion (use length =0) to your Read operation and right-click on the resulting Data cell in the Tag Results Grid.
Once in a tag operations tab most of the Settings/Status options do not apply and will be disabled.
Write EPC
The Write EPC tag operation tab allows the EPC of specific tags to be updated. The tag the operation will be applied to follows the rules defined in the two Tag Operations Workflows.
Once the tag to operate on has been set the WriteEPC tab supports the following workflow:
1. The EPC ID read and written can be represented in several formats. The format used to display the data in the Current and New EPC sections will both be in the selected format:
Hexidecimal - direct hexidecimal representation of the raw data on the tag. This will match the cell value shown in the Tag Results Grid.
ASCII - interprets the data on the tag as ASCII characters. See the http://www.asciitable.com/ for a chart showing the corresponding hexidecimal value an ASCII character represents. Control characters may not be displayable.
Reverse Base 36 - A method to represent an EPC with the fewer characters (19 characters for an EPC that would need 24 characters in hexadecimal). It contains all the uppercase letters of the alphabet plus numbers 0-9.
Note: Perform a Read then switch between the representations to better understand different representations of the same raw data.
2. The Current EPC section will display the EPC of the tag that will be operated on based on the Write to selection. If clicking on Read results in a warning then the tag written to cannot be guaranteed.
3. Once confident the desired tag is setup to be written to, clicking the Write button will cause the New EPC to be written to the tag.

Tag Operations
Universal Reader Assistant v2.7 User Guide 26
ExampleThe following shows a typical scenario of writing a tag’s EPC ID using Workflows 2, selecting a specific tag:
1. A Read operation was performed with an Embedded ReadData on the TID memory bank resulting in the tags as shown in Figure 10.
Figure 10: Tag Results - Tag Operation Workflow 2
2. Right-click on the TID value and select WriteEPC. The tab will switch to the WriteEPC tab with the Select criteria as shown in Figure 11. Since this tag was read on Antenna 3, the write operation will be attempted on antenna 3.
3. This tag’s EPC ID was previously written with ASCII data so switching to ASCII Text shows the ASCII interpretation of the raw data as shown in Figure 11.

Tag Operations
Universal Reader Assistant v2.7 User Guide 27
Figure 11: Write EPC Workflow 2
4. Once a New EPC is entered and Write clicked, if successful, a follow-up Read should show the newly written EPC, as shown in Figure 12.
Figure 12: WriteEPC Successful Write and Read
NoteIf the EPC ID is used for Select (right-click on the EPC cell) the Read operation will not work following a successful write. In general, using the current EPC ID as a

Tag Operations
Universal Reader Assistant v2.7 User Guide 28
select criteria for a write EPC is a bad idea since the operation cannot be easily retried in the event of a partial write.
Tag Inspector
The Tag Inpector tab allows the full contents of a tag’s memory banks to be displayed in context.
Once the tag to operate on has been set the Tag Inspector will read the full contens of all the memory banks of the tag, as long as they exist and are not read-locked and display them as shown in Figure 13.
The Tag Inspector is a useful tool to learn about the varied contents of a Gen2 RFID tag and the meaning of data in specific memory locations. It can also be used as a debugging tool to verify expected contents on specific tags that might be behaving inconsistently. For example, checking to make sure the tag is of the same type (TID Vendor and Model) as other tags in use or verifying expected memory banks exist, are readable and have the expected contents.
NoteIn general the most reliable way to select a tag for inspection is by performing a Read with an Embedded Read TID on full TID contents, then right-clicking on the Data cell for the desired tag to Select on its TID value.

Tag Operations
Universal Reader Assistant v2.7 User Guide 29
Figure 13: Tag Inspector
User Memory Editor
The User Memory Editor tag operation tab allows the contents of User Memory of specific tags to be viewed and updated. The tag the operation will be applied to follows the rules defined in the two Tag Operations Workflows.
Once the tag to operate on has been set the User Memory Editor tab supports the following workflow:
1. The contents of User Memory to be read and written can be represented in two ways:
Addressible Hexidecimal - direct hexidecimal representation of the raw data on the tag. In this mode the data is displayed as individual bytes in a grid showing the specific address within the User Memory bank. Modified, but not yet written, data will be shown in red.

Tag Operations
Universal Reader Assistant v2.7 User Guide 30
Figure 14: Addressible Hex Editor
ASCII Notepad - interprets the data on the tag as ASCII characters. In this mode the data can be displayed and edited as if it were a text file in a text editor. Modified, but not yet written, data will be shown in red.
Figure 15: ASCII Notepad Editor

Tag Operations
Universal Reader Assistant v2.7 User Guide 31
Note: While typing in ASCII Notepad Editor the total space and remaining space available will be shown in red.
2. Once confident the desired data is setup to be written to, clicking the Write to Tag button will cause the data to be written to the tag’s User Memory Bank.
W A R N I N G !
In URA, when a Write to Tag is clicked, whether in the ASCII Editor or Hex Editor the entire contents of the User Memory will be written as shown in the editor. It WILL NOT only write modified data. This can result in long write times for large memory tags.
In URA v2.4 this has been fixed so only the edited bytes will be written.
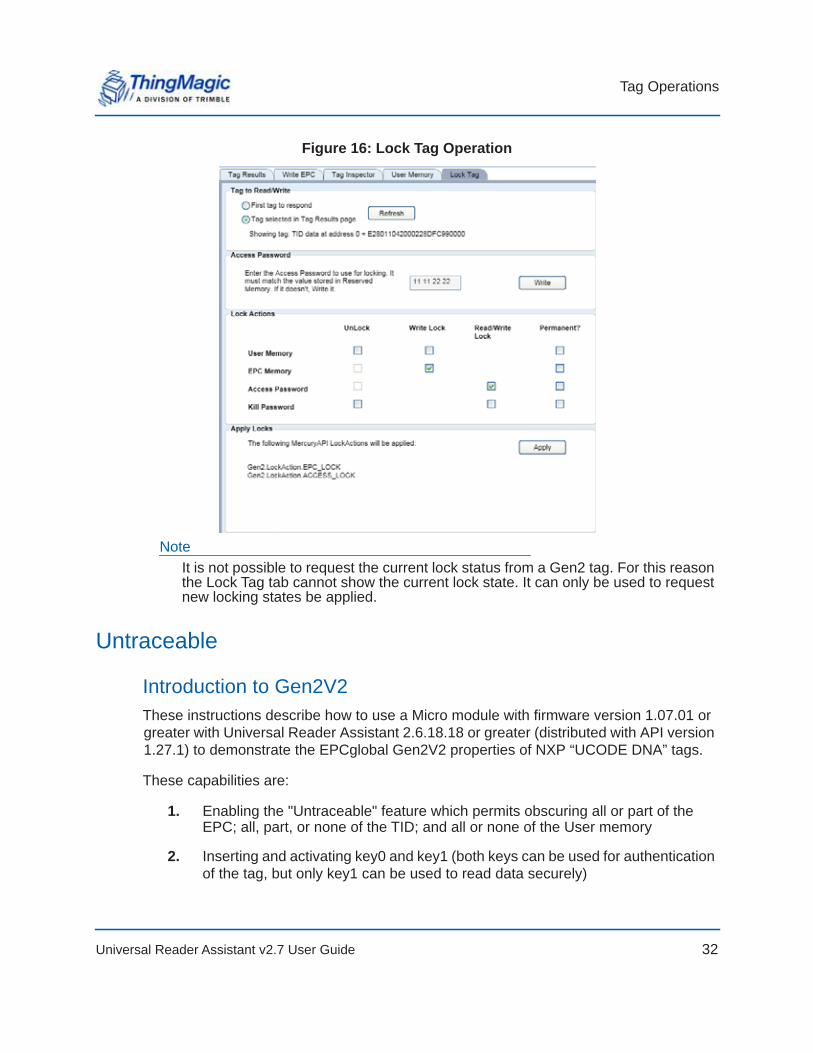
Lock Tag
The Lock Tag operation tab allows the contents of specific tags to be locked and unlocked and the Access Password of the tag to be written. The tag the operations will be applied to follows the rules defined in the two Tag Operations Workflows.
Once the tag to operate on has been set the Lock Tag tab supports the following workflow:
1. Upon tag selection the Access Password is read (if not read-locked) and displayed. In order to lock the contents of a tag first the Access Password should be set to a non-zero value. Contents can be locked with a zero access password but it will not be secure since no password is required to operate on the contents of unlock them.
2. If Access Password Write is clicked the password is written to the tag. From this point on, for locking to work, the Access Password field in URA must match the value written to the Access Password section of Reserved Memory (see the Tag Inspector to see the memory structure)
3. Select the locking operations to be performed and click Apply. The successful, or failed, locks will be indicated in the Apply Locks section.
– If Access Password is selected to be Read/Write Locked when Apply is clicked you will first be prompted to save the value being written to a file so it will be remembered. The saved file will contain the tag’s EPC ID, full TID and the password written. Once the file is saved the locks will be attempted.
Tag Operations
Universal Reader Assistant v2.7 User Guide 32
Figure 16: Lock Tag Operation
NoteIt is not possible to request the current lock status from a Gen2 tag. For this reason the Lock Tag tab cannot show the current lock state. It can only be used to request new locking states be applied.
Untraceable
Introduction to Gen2V2These instructions describe how to use a Micro module with firmware version 1.07.01 or greater with Universal Reader Assistant 2.6.18.18 or greater (distributed with API version 1.27.1) to demonstrate the EPCglobal Gen2V2 properties of NXP “UCODE DNA” tags.
These capabilities are:
1. Enabling the "Untraceable" feature which permits obscuring all or part of the EPC; all, part, or none of the TID; and all or none of the User memory
2. Inserting and activating key0 and key1 (both keys can be used for authentication of the tag, but only key1 can be used to read data securely)

Tag Operations
Universal Reader Assistant v2.7 User Guide 33
3. Ability to read data securely, either by obtaining the data over the air, or asking the tag to store the data in buffer memory, where it is obtained securely.
Note that as with all function tabs, you may either go to the tag and act on the first tag to respond, or you may select a tag in the Tag Results page, left-click on its EPC field, then use the right mouse button to select a tab category. The EPC of that tag will automatically be used to communicate with that tag selectively:
Figure 17: Tag Selection for Advanced Operations
NoteIf you are going to vary the tag's reported EPC length using the Untraceable function, it is best to read the first tag to respond as the selective search for the tag does not automatically adjust to the changing EPC value.
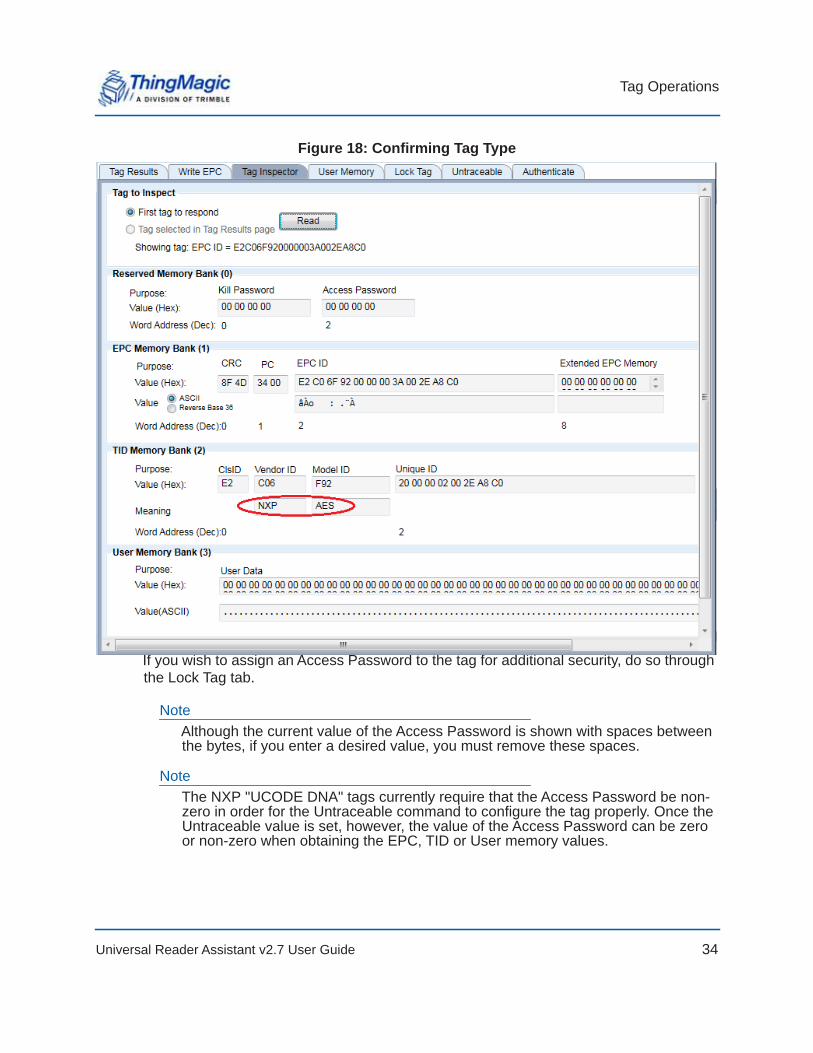
Confirming tag TypeAfter you get URA connected to the Micro, make sure that the tag is readable and it is an NXP AES (also called "DNA") tag:
Tag Operations
Universal Reader Assistant v2.7 User Guide 34
Figure 18: Confirming Tag Type
If you wish to assign an Access Password to the tag for additional security, do so through the Lock Tag tab.
NoteAlthough the current value of the Access Password is shown with spaces between the bytes, if you enter a desired value, you must remove these spaces.
NoteThe NXP "UCODE DNA" tags currently require that the Access Password be non-zero in order for the Untraceable command to configure the tag properly. Once the Untraceable value is set, however, the value of the Access Password can be zero or non-zero when obtaining the EPC, TID or User memory values.

Tag Operations
Universal Reader Assistant v2.7 User Guide 35
Untraceable FunctionYou use the Untraceable function by selecting the options and then pressing "Write to Tag" to send the desired configuration to the tag and activate it. Note that you need to use a non-zero Access Password to set the Untraceable properties. Thereafter, you may define the access password back to all zeroes when reading the allowed tag information, if you wish.
Figure 19: Changing Untraceable Settings
NoteWhen the tag is read, this display does NOT show the current state of the settings for the tag except for the Access password. This display always returns to its default choices and there is no way of knowing what the tag is configured to return for each data field.
Tag Operations
Universal Reader Assistant v2.7 User Guide 36
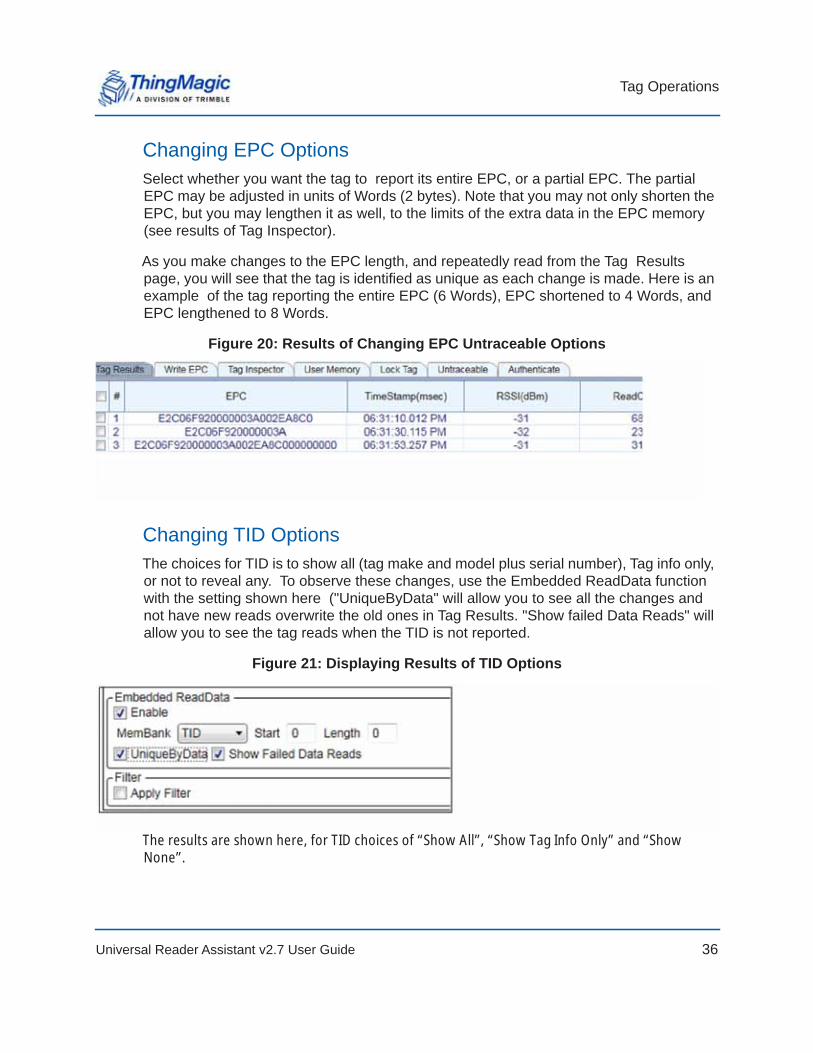
Changing EPC OptionsSelect whether you want the tag to report its entire EPC, or a partial EPC. The partial EPC may be adjusted in units of Words (2 bytes). Note that you may not only shorten the EPC, but you may lengthen it as well, to the limits of the extra data in the EPC memory (see results of Tag Inspector).
As you make changes to the EPC length, and repeatedly read from the Tag Results page, you will see that the tag is identified as unique as each change is made. Here is an example of the tag reporting the entire EPC (6 Words), EPC shortened to 4 Words, and EPC lengthened to 8 Words.
Figure 20: Results of Changing EPC Untraceable Options
Changing TID OptionsThe choices for TID is to show all (tag make and model plus serial number), Tag info only, or not to reveal any. To observe these changes, use the Embedded ReadData function with the setting shown here ("UniqueByData" will allow you to see all the changes and not have new reads overwrite the old ones in Tag Results. "Show failed Data Reads" will allow you to see the tag reads when the TID is not reported.
Figure 21: Displaying Results of TID Options
The results are shown here, for TID choices of “Show All”, “Show Tag Info Only” and “Show None”.

Tag Operations
Universal Reader Assistant v2.7 User Guide 37
Figure 22: Results of Changing TID Untraceable Options
Note that in order to read the TID when "Show Tag Info Only" is active, you must specify that you want to read two words, as shown here:
Figure 23: Requesting 2 Words of TID Data
If you specify a length of "0", no TID data will be returned.
Changing User Data OptionsThe choices for User Data are "Show All" and "Show None".
The settings for Embedded ReadData may be changed to display User data as shown here:
Figure 24: Displaying Results of User Data Options
Note that the NXP UCODE DNA tag does not support reading all User memory with a "0" length. You must specify the length of the data to read.

Tag Operations
Universal Reader Assistant v2.7 User Guide 38
Again, select "Show Failed Data Reads" if you want the tag read results to show when no User data is returned.
Figure 25: Results of Changing User Untraceable Options
Authenticate
The “Authenticate” Tab is used to both insert and activate keys, as well as authenticate tags and obtain encrypted data using those keys.
Activating KeysTwo 16-byte keys are inserted into specific User memory locations, and are activated by writing a specific value into two other User memory locations. The keys may be freely read and edited until activated, at which point those memory locations become inaccessible. The two keys are called "Key0" and "Key1". Either may be used for authenticating the tag, but only Key1 may be used to decrypt data that has been encrypted by the tag.
The key insertion and activation is controlled by the top portion of the "Authenticate" tab. These are the expected results for a tag that has never had a key written to it.

Tag Operations
Universal Reader Assistant v2.7 User Guide 39
Figure 26: Default Unactivated Keys
Note that although the current value is shown with spaces between the bytes, you must enter the desired value without spaces, as shown here:
Figure 27: Entering a Key
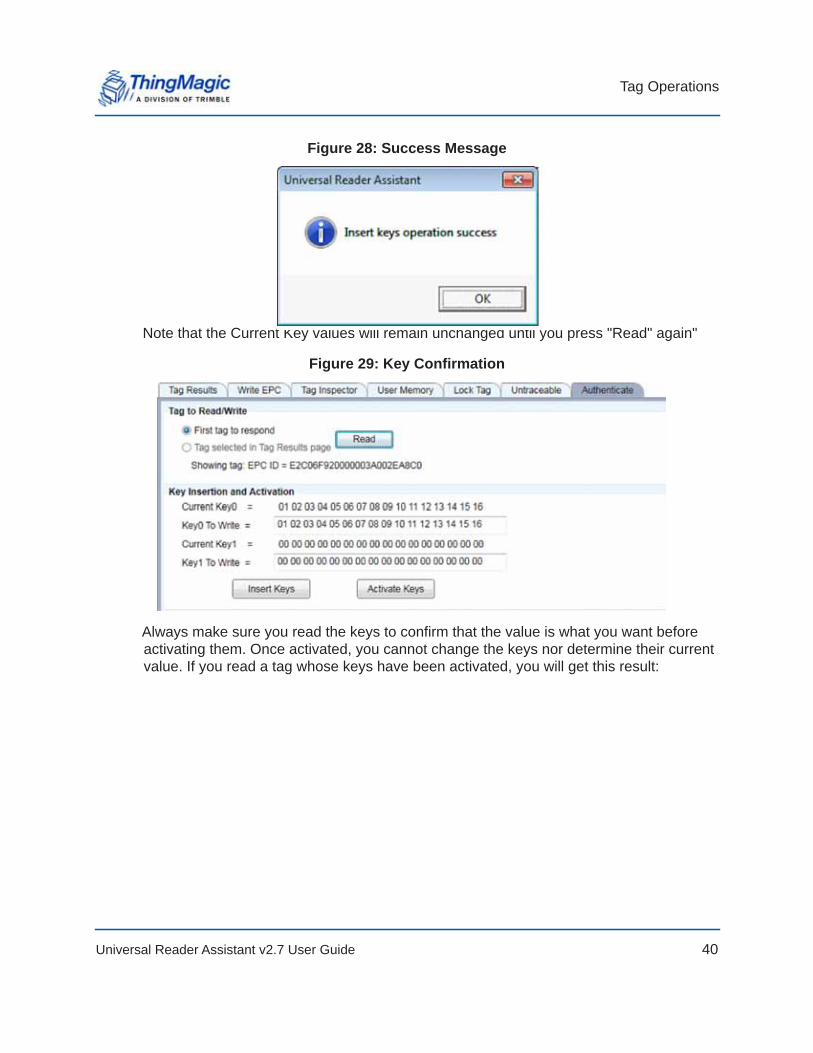
When you press "Insert Keys", this pop-up message will be displayed:
Tag Operations
Universal Reader Assistant v2.7 User Guide 40
Figure 28: Success Message
Note that the Current Key values will remain unchanged until you press "Read" again"
Figure 29: Key Confirmation
Always make sure you read the keys to confirm that the value is what you want before activating them. Once activated, you cannot change the keys nor determine their current value. If you read a tag whose keys have been activated, you will get this result:

Tag Operations
Universal Reader Assistant v2.7 User Guide 41
Figure 30: Obscuring of Keys Following Activation
Note that there is no provision for only activating one of the keys. If you leave any key at its default "0000…" value, it will be activated to that value.
Tag AuthenticationTags are authenticated by having the reader send a random challenge string to the tag, the tag uses its key to encrypt the challenge, and sends the result back. The reader then uses the key to decrypt the message and, if the decrypted message is the one it sent to the tag, it declares the tag authentic.
To authenticate the tag, enter key0 or key1 for the tag and press "Authenticate Key0" or "Authenticate Key1". You will see a success message and the same "Returned Challenge" value as the "Random Challenge" field above, as shown here:

Tag Operations
Universal Reader Assistant v2.7 User Guide 42
Figure 31: Successful Tag Authentication
Key1 may also be used for tag authentication.
If the key entered into the verification field does not match that in the tag, Universal Reader Assistant will still report that the Authentication Failed, as shown below. Note that the Returned Challenge will not match the Random Challenge value.

Tag Operations
Universal Reader Assistant v2.7 User Guide 43
Figure 32: Failed Tag Authentication
If you want to do repeated trials with different Random Challenge values, press "Refresh" by the Random Challenge value and a new random value will be generated.
Obtaining Encrypted Data With AuthenticationYou may obtain encrypted data as well as authenticate the tag by selecting "Enable Returned Data" and selecting which memory location you want returned. Note that data is selected in 64 bit (2 Word) increments. As for Authenticate, the value returned is only valid if the Returned Challenge matches the Random Challenge, as shown here:

Tag Operations
Universal Reader Assistant v2.7 User Guide 44
Figure 33: Successful Authentication wth Returned Data
If the key used to decrypt the data does not match the one in the tag, the Returned Challenge will not match the Random Challenge and the data returned will not be valid. A message indicating that the authentication failed will be displayed as, shown below, and the Returned Challenge value will not match the Random Challenge value. The returned data will be incorrect, but displayed, so that the user can better understand how data encryption security works for Gen2V2 tags.

Tag Operations
Universal Reader Assistant v2.7 User Guide 45
Figure 34: Authentication with Data Failure
Note that the Access Password is security is bypassed when encrypted data is being requested.
Obtaining Encrypted Data from BufferNXP tags have two options for obtaining encrypted data. The normal one is for the tag to backscatter the value. The other option is for the tag to put the data in a buffer for the reader to access. This access must be done before the tag is powered down, so cannot be used to obtain the data later. It is simply a different method for obtaining the data immediately.
This method of obtaining the data is activated by selecting "Read from Buffer". The returned data is displayed as shown here. As with the normal encrypted data read function, it is only supported for Key1.

Tag Operations
Universal Reader Assistant v2.7 User Guide 46
Figure 35: Authenticate with Buffer Data Read Success
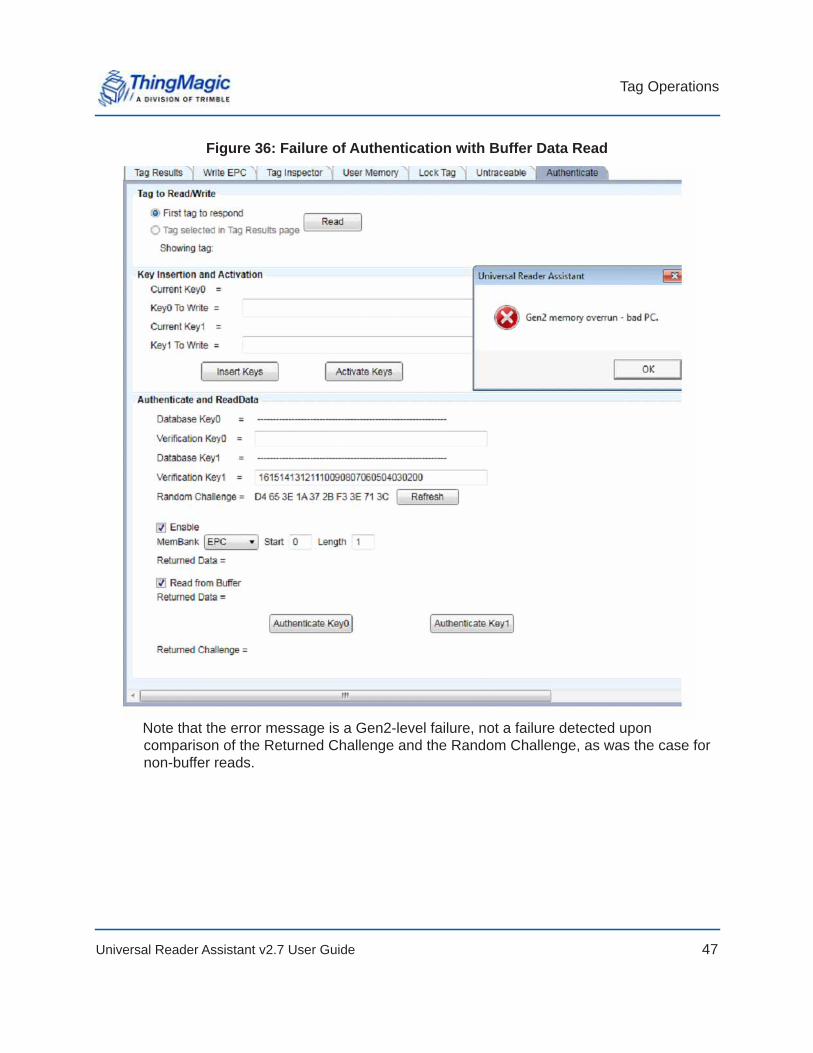
If the key does not match the one programmed into the tag, the authentication will fail, and the following error message will be displayed:
Tag Operations
Universal Reader Assistant v2.7 User Guide 47
Figure 36: Failure of Authentication with Buffer Data Read
Note that the error message is a Gen2-level failure, not a failure detected upon comparison of the Returned Challenge and the Random Challenge, as was the case for non-buffer reads.

Troubleshooting
Universal Reader Assistant v2.7 User Guide 48
Troubleshooting
Troubleshooting Table
Table 5: Common Problems and Solutions
Collecting Diagnostic Data for ThingMagic Support
When experience problems connecting to readers or performing RF (reading, writing) operations it will be necessary to gather the following information to help diagnose the problem. This information will often be the first thing requested when reporting a problem to ThingMagic support.
Problem Path to Solution
Cannot connect to reader • Verify the hostname, IP address or COM port is correct. See the hardware specific guide for more details on setting up a connection.
• For the M6 and Astra-EX the reader control communicate uses the LLRP interface which uses network port 5084. Verify 5084 is not being blocked by the network firewall.
Reader is not reading tags • Verify known good Gen2 tags are near the reader antenna.
• Try modifying the Performance Tuning Options to force tags to respond more frequently
• Check antenna cables on reader
• Increase the Read Power setting in Performance Tuning Options
Reader error LED stays on Following Collecting Diagnostic Data for ThingMagic Support and send to support.
Read “Performance” is slow Performance, as it relates to tag reading, is very usecase dependent. Typically, it comes down to whether you are trying to read lots of tags once or a few tags repeatedly. If the reader settings aren’t correct for your usecase the performance will appear poor.
• Use the Performance Tuning Options to modify the settings for your usecase.
• See the MercuryAPI Programmer’s Guide | Performance Tuning section for details about Gen2 settings and try using the Advanced Performance Tuning options directly.
Errors after a Firmware Upgrade • If the upgrade was of the M6 from v4.7 to a newer version make sure to read the Release Notes of the newer version. There are special steps that must be taken to make that upgrade.
• Try reinstalling the firmware and restarting URA.
Troubleshooting
Universal Reader Assistant v2.7 User Guide 49
1. Transport Logging: Follow the steps to collect transport logs.
2. Collect the Error Log saved in [Windows Start menu] | Documents | URA | tmrlog_[timestamp].txt
3. Reader Serial Number: See the 2d barcode label.
4. Reader Diagnostics
5. Boot Logs (if using a networked reader): Follow the process for collecting boot logs described in the hardware user guide, reboot the reader and save the full output from the console.
6. Physical Configuration: any details available about the number and types of antennas connected, cables used, power supply, etc. and tags being used.
7. Environment: any details about the physical environment the M6 and Astra-EX is being used/tested in. Temperature, humidity, vehicle mounted, office, etc.