universal jam chuck - woodcraft
TRANSCRIPT

Illustrations: Frank Rohrbach III
A s any turner of bowls, plates, and vessels knows, you need a non-marring way to reverse-chuck
your nearly completed work to remove any tenon, waste block, or excess material
that was used to mount the piece by its bottom. Com-mercially available jumbo
jaws and vacuum chucks will oft en do the job, but tend to be
expensive, and may not fi t your existing 4-jaw chuck. Th is is where
shop-made jam chucks come to the rescue. Oft en made as a one-off single-purpose unit, a jam chuck mounts in the lathe headstock and provides a friction-fi t cavity or surface that the turning can “jam” against. Th e tailstock is usually brought into play at the same time to press the work against the jam chuck.
Of all the jam chucks I’ve used, there’s one type I reach for the most. Resembling a sort of doughnut-shaped bowl, this multi-use marvel is the clos-est thing I’ve ever seen to a “univer-sal” jam chuck. Faced with neoprene rubber, its rounded rim will tuck inside larger bowls to grip them. The chuck’s concave center can be used to nestle the rounded top of a small vessel, or to cradle a sphere. It can even be used to drive plates and other flat pieces, using the crest of the chuck’s rim as the bearing surface. In short, this is one lathe workhorse you’re gonna love.
UniversalJAM CHUCK
This shop-made lathe accessory makes fast work of fi nishing up
bowls, plates, and vessels.By Michael Kehs
UniversalJAM CHUCK
Aug/Sept 2017 | woodcraftmagazine.com 55
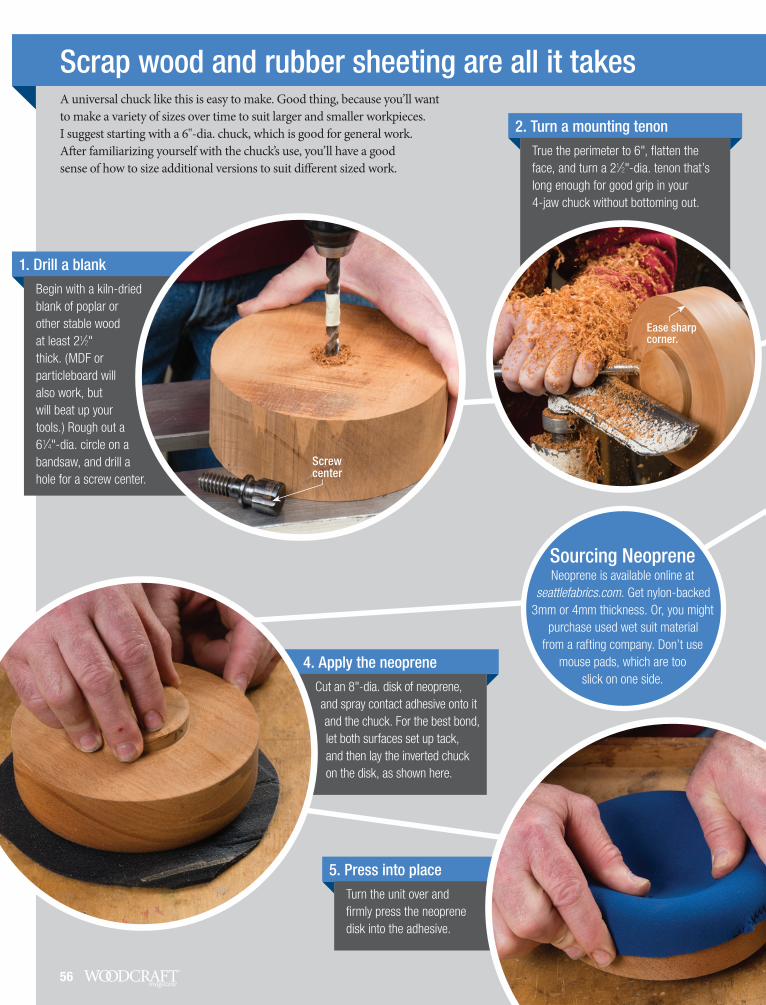
Scrap wood and rubber sheeting are all it takesA universal chuck like this is easy to make. Good thing, because you’ll want to make a variety of sizes over time to suit larger and smaller workpieces. I suggest starting with a 6"-dia. chuck, which is good for general work. After familiarizing yourself with the chuck’s use, you’ll have a good sense of how to size additional versions to suit different sized work.
Begin with a kiln-dried blank of poplar or other stable wood at least 21⁄2" thick. (MDF or particleboard will also work, but will beat up your tools.) Rough out a 61⁄4"-dia. circle on a bandsaw, and drill a hole for a screw center.
True the perimeter to 6", flatten the face, and turn a 21⁄2"-dia. tenon that’s long enough for good grip in your 4-jaw chuck without bottoming out.
Cut an 8"-dia. disk of neoprene, and spray contact adhesive onto it and the chuck. For the best bond, let both surfaces set up tack, and then lay the inverted chuck on the disk, as shown here.
Turn the unit over and firmly press the neoprene disk into the adhesive.
1. Drill a blank
2. Turn a mounting tenon
4. Apply the neoprene
5. Press into place
Sourcing NeopreneNeoprene is available online at
seattlefabrics.com. Get nylon-backed 3mm or 4mm thickness. Or, you might
purchase used wet suit material from a rafting company. Don’t use
mouse pads, which are too slick on one side.
Ease sharp corner.
Screw center
56

Scrap wood and rubber sheeting are all it takes
Jam Chuck Profi le
Photos: John Hamel
Finally, wrap masking tape fully around the perimeter of the chuck, applying it in a clockwise fashion facing the front of the chuck. Note that sometimes the neoprene facing will spring up out of the concavity. No matter; it’ll still work fi ne when pressed back down by the workpiece.
If the neoprene bunches up anywhere at its edge, nip off the excess.
6. Trim the excess
7. Tape the edges
Invert the blank and mount the tenon in a 4-jaw chuck. Start to round over the outer edge while
concurrently hollowing out the center. As you approach fi nal depth, fi nesse the shape by smoothing and rounding the raised edges as shown in the profi le drawing below.
3. Shape the face
21⁄2"
23⁄8"
1⁄4"
9⁄16"
11⁄16" 1"
1"
1"
5⁄8" R
Suit tenon length to 4-jaw chuck. (See text.)
onlineEXTRAGo to woodcraftmagazine.com for a full-sized negative pattern.
Aug/Sept 2017 | woodcraftmagazine.com 57

WitWit
Begin by pressing the warped bowl against the chuck with the tail center located in the original tenon divot. Rotate the bowl by hand and, using the tool rest as a reference, center the bowl between its two widest points, as shown. Secure the setup with the tail center, and turn the tenon and outside of the bowl concentric. Next, invert the bowl, mounting the tenon in your 4-jaw chuck, and re-turn the bowl’s interior. Finally, invert it once more, and finish off the bottom as desired, turning the tenon to a small enough diameter that it can be easily chiseled off once dismounted from the lathe.
The beauty of this chuck design is that it’s largely self-centering. All the same, check for any bounce
when laying the shaft of a turning tool on the edge of a
rotating vessel. Then turn away the tenon to complete the piece.
Pressing the blank against the chuck with the tail center, turn the mounting tenon and underside of the plate as shown. Then mount the tenon in a 4-jaw chuck, and turn the plate’s upper face. Invert one last time, and finish off the bottom.
Rough-turned bowls
Wide, hollow vessels
Plates or other flat projects
A great use for this jam chuck is re-truing and finishing up rough-turned bowls that have been set aside to dry for 6 months or so, warping in the process. As for vessels, the concavity in the chuck’s face provides a nestling space for wide, squat, hollow vessels, as well as bowls with extreme inward-turning lips. This jam chuck is also great when turning the mounting tenon on plates or other flat work that’s too thin for initial mounting with a screw chuck.
Put your chuck to work on bowls, vessels, and plates
58