universal ac power source + ac power analyzer · 4 380820-en-gb_v1.5 3/15 front panel description...
TRANSCRIPT
User's Guide
Universal AC Power Source + AC Power Analyzer Model 380820
380820-en-GB_V1.5 3/15 2
Introduction Congratulations on your purchase of the Extech Model 380820. This Universal AC Power Source and AC Power Analyzer can be used to test products in the range of 85 to 250VAC with a frequency range of 45 to 65Hz. This unit also features a Standby Power Measurement feature (10mW to 100W) for testing desktop and notebook PCs, LCD TVs, AC adaptor/chargers, and other products that continue to use power when connected to AC even though they are not in use. The Power Quality Measurement function can monitor Watts, Power Factor, Voltage, Current and Harmonics and includes a Cost Function Calculation mode for finding a product’s cost per day, month or year. This meter is shipped fully tested and calibrated and, with proper use, will provide years of reliable service.
Safety To ensure safe operation of the equipment and to eliminate the danger of serious injury from short-circuits (arcing), the following safety precautions must be observed:
Prior to connection of the equipment to the mains outlet, check that the available mains voltage corresponds to the voltage setting of the equipment.
Connect the mains plug of the equipment only to a mains outlet with an earth ground connection.
Do not place the equipment on damp or wet surfaces.
Do not subject the equipment to direct sunlight or extreme temperatures.
Do not subject the equipment to extreme humidity or dampness.
Replace a defective fuse only with a fuse of the original rating. Never short circuit the fuse or the fuse housing.
Do not exceed the maximum permissible input rating.
Comply with the warning labels and other information printed on the equipment.
Do not insert metal objects into the equipment by way of the ventilation slots.
Do not place water-filled containers on the equipment.
Do not operate the equipment near strong magnetic fields (motors, transformers, etc.).
Do not subject the equipment to shock or strong vibration.
Keep hot soldering irons away from the equipment.
Allow the equipment to stabilize at room temperature before use.
Do not modify or customize the equipment.
Do not place the equipment face-down on a work surface, table or work bench.
All service and repair must be performed by qualified service personal.
Do not block the ventilation openings of the unit.
This unit must be used within the specified ratings, regular excessive continuous loading may cause damage to the power supply.
The gauge size of the input power cable must be at least 3” (75mm) and the total length of power cable must not exceed 118” (3m)

380820-en-GB_V1.5 3/15 3
Safety Symbols
Please read the statement thoroughly to prevent injury or loss of life, and prevent damage to this product.
Earth/Ground Terminal
~
This unit has been tested and meets or exceeds the following standards: 1. EN61326-1: 2006: (CISPR11, IEC/EN 61000-3-2:2006, IEC/EN
61000-3-3: 1995+A1: 2001+A2: 2005 IEC/EN 61000-4-2/-3/-4/-5/-6/-11)
2. EN61010-1: 2001
AC (Alternating Current)

380820-en-GB_V1.5 3/15 4
Front Panel Description
1. Front Output Socket: Use the following formula to determine the continuous use capability of the output: Time (t) = 100 / Watt (w). For example, 100W power can be continuously output for 1 minute and 50W could be continuously output for 2 minutes. Switch off the tester for 20 minutes (for ventilation) between output sessions.
2. OPER/STBY: Press to enable/disable the output. When the unit is in STBY mode, the output is 0 volts. When the unit is in OPER mode, the power will not output until the voltage level is stable; this is to prevent damage to connected devices from unstable voltage.
3. Backspace: If a typing error is made, use the button to clear the digit to the left.
4. LCD: Liquid Crystal Display
5. RECALL: Recalls stored voltage and frequency values (there are 99 sets of preset values in the memory). The currently selected voltage and frequency values will clear when the RECALL button is pressed. Type a memory location number (1 to 99) and then press the V.ENTER button to confirm. If no data is stored in a particular location, the LCD will display “BLANK number” (e.g. “BLANK 33”). Use the STORE button to save a voltage/frequency value to a memory location.
6. Numeric Keypad: The numeric keypad is a user programming interface.
7. : Moves the cursor to the next digit.
8. OUTPUT FRONT/REAR: Selects the output. Press downward to display the Rear Output status. Press upward to display the Front Output status.
9. : Increases a value.
10. : Decrease a value.
11. POWER ON/OFF: Press to switch the supply ON or OFF.
12. V.ENTER: Press to confirm a program entry.
21
3
4
5 6
7
8
9
1011
13
14
15
16
17
12

380820-en-GB_V1.5 3/15 5
13. $: Calculates the power rate. Type the power rate first, then press $ to confirm. When the unit is in OPER mode, the power rate per day/month/year will be displayed.
14. OCP: Preset value of the Over Current Protection. Type the value for over-current protection and then press OCP to confirm.
15. Hz: Press to enter the frequency programming mode for the front output. Type the desired frequency and then press Hz to confirm.
16. FUNC: Press to view THD (total harmonic distortion), voltage, current, and harmonics (1st to 50th) for the output power.
17. STORE: Press to save the currently programmed voltage and frequency to one of the memory locations (1 to 99) and press V.ENTER to confirm. The currently selected voltage and frequency will be stored in the selected memory location.
1. Ventilation: Please keep these openings clean and always leave room for ventilation at the rear of the unit.
2. POWER INPUT: Socket for external power input (contains a 10A fuse). The input is selectable (110V or 220V) and must match the voltage selected by the Voltage Switch.
3. RS232 Connector: For connection to a PC serial port.
4. Voltage Switch: Selects the voltage (110 or 220V) of the input power.
5. Rear Output Socket
CAUTION! The rear output socket is “LIVE” whenever the instrument power cord is plugged in even when the power supply is shut off.
1 2
3
4
5
!
380820-en-GB_V1.5 3/15 6
Operation
Preparation for use
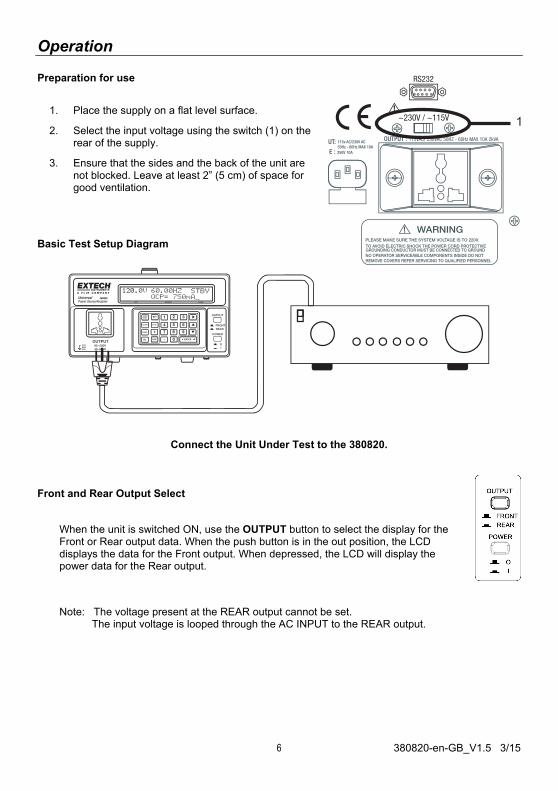
1. Place the supply on a flat level surface.
2. Select the input voltage using the switch (1) on the rear of the supply.
3. Ensure that the sides and the back of the unit are not blocked. Leave at least 2” (5 cm) of space for good ventilation.
Basic Test Setup Diagram
Connect the Unit Under Test to the 380820. Front and Rear Output Select
When the unit is switched ON, use the OUTPUT button to select the display for the Front or Rear output data. When the push button is in the out position, the LCD displays the data for the Front output. When depressed, the LCD will display the power data for the Rear output.
Note: The voltage present at the REAR output cannot be set. The input voltage is looped through the AC INPUT to the REAR output.
1
380820-en-GB_V1.5 3/15 7
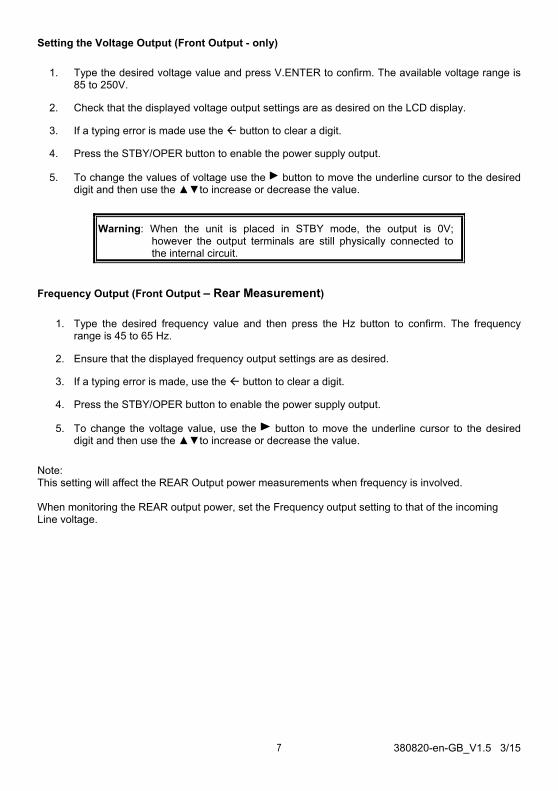
Setting the Voltage Output (Front Output - only)
1. Type the desired voltage value and press V.ENTER to confirm. The available voltage range is 85 to 250V.
2. Check that the displayed voltage output settings are as desired on the LCD display.
3. If a typing error is made use the button to clear a digit.
4. Press the STBY/OPER button to enable the power supply output.
5. To change the values of voltage use the button to move the underline cursor to the desired digit and then use the ▲▼to increase or decrease the value.
Warning: When the unit is placed in STBY mode, the output is 0V; however the output terminals are still physically connected to the internal circuit.
Frequency Output (Front Output – Rear Measurement)
1. Type the desired frequency value and then press the Hz button to confirm. The frequency range is 45 to 65 Hz.
2. Ensure that the displayed frequency output settings are as desired.
3. If a typing error is made, use the button to clear a digit.
4. Press the STBY/OPER button to enable the power supply output.
5. To change the voltage value, use the button to move the underline cursor to the desired digit and then use the ▲▼to increase or decrease the value.
Note: This setting will affect the REAR Output power measurements when frequency is involved. When monitoring the REAR output power, set the Frequency output setting to that of the incoming Line voltage.
380820-en-GB_V1.5 3/15 8
Setting the Over Current Protection (OCP) value (Front Output)
1. Type the desired OCP (Over Current Protection) value and press the OCP button to confirm. The OCP range: is 0.100A to 1.500A. Carefully verify this critical OCP value; this value will not change when the unit is powered OFF.
2. When the unit is in the OPER Output mode, changing the OCP value or the Voltage value will cause the mode to change from OPER to STBY (standby) mode. Therefore pay careful attention to this operation.
Storing and Recalling Voltages and Frequencies (Front Output)
Often used Voltage and Frequency values can be stored in memory for quick recall. This instrument offers 99 memory locations.
To Store:
1. Ensure that the desired voltage and frequency values are correctly set.
2. Press the STORE button (“verify STORE _” appears on display).
3. Assign a memory location number from 1 to 99 using the numeric keypad.
4. Press the V.ENTER button to confirm and save to the memory location.
5. When the unit is in the OPER Output mode, changing the OCP value or the Voltage value will cause the mode to change from OPER to STBY (standby) mode. Therefore pay careful attention to this operation.
To Recall:
1. Press the RECALL button (“Verify RECALL_” appears on display).
2. Select the desired memory location (1 to 99) using the numeric keypad.
3. Press the V.ENTER button to confirm. The previously stored voltage/frequency configuration for the selected memory location will now be recalled.
Note: For an empty memory location, the LCD will display ‘BLANK’

380820-en-GB_V1.5 3/15 9
‘Cost of Electricity’ Function Calculate the cost of electricity in kilowatt-hours (KWh) over a specific period of time using the ‘Cost of Electricity’ function.
1. Program the power cost per KWh and press the $ button.
2. When the unit is in OPER Output Mode, changing the OCP value or the Voltage value will switch the mode from OPER to STBY (standby). Therefore pay careful attention to this operation.
3. In the OPER Mode, press the OPER/STBY button. The cost for the tested instrument per DAY/ MONTH/ YEAR will be displayed (left to right).
4. Press the $ button again to return to the normal power data display mode.
Month YearDay

380820-en-GB_V1.5 3/15 10
Harmonics Display: (Rear Output)
1. The LCD displays the power data of the Rear Output.
2. When the FUNC button is pressed, the LCD will display Voltage, THD and harmonics (n=1~50). Use the ▲▼ buttons to select the harmonics to be displayed.
3. When the FUNC button is pressed again, the LCD will display the value of Current. Press the FUNC button again, the LCD will return to the power source display for the Rear Output.

380820-en-GB_V1.5 3/15 11
Safety
If the power supply does not switch ON or if the previous load was larger than 10A, it is possible that the 10A fuse was blown. Please remove the input power source and check the fuse located under the input power source connector on the rear of the unit. If the fuse is damaged please replace it using a high quality fuse which meets the specified requirements (250V, 10A).
Front Output Overheating Protection
The maximum output for the front output is 100VA (V x A) for 2 minutes. The output duration is longer when the VA is smaller. When VA is less than 25VA, the output is continuous.
If the output value exceeds the specified limits, the output will be placed in STANDBY mode and the LCD will display “OVERHEATED”. A displayed timer indicates the remaining cooling time that must elapse before the unit can be switched ON again; When the displayed timer counts down to zero press the OPER button.
Warning: Switch the unit OFF within 10 minutes of an overheating condition. The unit should then be left idle for 5 minutes after power is switched ON.
PC Interface for Data Acquisition
The 380820 can be connected to a PC where readings can be logged in real-time as they are taken. Transferred reading data can be viewed, plotted, statistically analyzed, printed, and saved in the software program included with the unit. The data can also be exported and saved in a .csv format which can be easily opened in spreadsheet programs. Please refer to the Software User Manual for the 380820 for further instructions.

380820-en-GB_V1.5 3/15 12
Specifications Front Panel Specifications (AC sine wave output, bandwidth 1kHz)
Function Range Resolution Accuracy Comment
Voltage 85V to 250V 0.1V ±1% THD < 2%
Frequency 45Hz to 65Hz 0.01Hz ± 0.1 Hz -
Power 10mW to 100W 0.1mW ± 1 % ± 0.05W -
Current 5mA to 0.6A 0.1mA/ 1mA
± 1 % ± 0.5mA See notes: 1, 2
0.6A to 1.5A ± 1 % ± 5mA
Power Factor PF (0 ~ 1) 0.001PF ± 0.04 -
NOTE 1: The maximum output power is approximately 100VA for duration of 2 minutes; therefore the output current
may be varied according to the voltage value. For example, after setting the voltage to ≧150V, the maximum output
current will be 0.75A.
NOTE 2: The output duration can be longer than 2 minutes if the output is less than 100VA. If the output is less than
25VA then the output can run continuously.
Rear Panel Specifications (Input power is looped through to the REAR output) (Max. 2000VA/220V, 1100VA/110V, AC Measurement)
Function Range Resolution Accuracy
Power 100mW to 2000W 0.1mW/1mW/
0.01W/0.1W/1W
± 1 % ± 0.5W
Voltage 85V to 250V 0.1V ± 1 %
Current 5mA to 0.6A 0.1mA/
1mA/
0.01A
± 1 % ± 5mA
0.6A to 1.5A ± 1 % ± 50mA
1.5A to 10A ± 1 % ± 0.1A
Power Factor PF (0~1) 0.001PF ± 0.04
Frequency 45Hz to 65Hz 0.01Hz ± 0.1Hz
THD THD (0.0 - 20.0%)
0.1%
± 2%
THD (20.0 – 100%) ±3% of reading ±5%
THD (100 – 999.9%) ±10% of reading ±10%
Harmonics Hn (1 – 10th)
0.1mA/ 0.001A/ 0.01A
mA: ±1.4% of reading ±5mA
A: ±1.4% of reading ±0.3A
Hn (11 – 20th) mA: ±4% of reading ±5mA
A: ±4% of reading ±0.3A
Hn (21 – 50th)
Amp range
mA: ±10% of reading ±5mA
A: ±10% of reading ±0.3A
Hn (21 –50th)
mA range
mA: ±20% of reading ±5mA
A: ±20% of reading ±0.3A

380820-en-GB_V1.5 3/15 13
General Specifications
Input Power Source: 110V (90V - 130V) / 220V (200V - 240V), 45Hz – 65Hz, Max. 10A
Power Fuse: 250V 10A
Operation Humidity: ±85% RH
Operation Temperature: 4C to 60C (40°F to 140°F)
Accessories: Power cord, Software CD-ROM, RS232C to USB cable
Dimensions: 260mm x 151mm x 305 mm (10.2” x 5.9” x 12.0”)
Weight: 9.9 kg s (21.8 lb)
Copyright © 2012‐2015 FLIR Systems, Inc. All rights reserved including the right of reproduction in whole or in part in any form
ISO‐9001 Certified
www.extech.com