unit ii open source database...
TRANSCRIPT

UNIT II
OPEN SOURCE DATABASE
http://www.ntchosting.com/mysql/#MySQLs_basic_commands_overview
Introduction
Let us begin with the concept ‘database’ and its management. Database is a
collection of information in a structured way. We can say that it is a collection of a group
of facts. Your personal address book is a database of names you like to keep track of,
such as personal friends and members of your family.
A database can be understood as a collection of related files. How those files are related
depends on the model used. Early models included the hierarchical model (where files are
related in a parent/child manner, with each child file having at most one parent file), and
the network model (where files are related as owners and members, similar to the
network model except that each member file can have more than one owner).
The relational database model was a huge step forward, as it allowed files to be related by
means of a common field. In order to relate any two files, they simply need to have a
common field, which makes the model extremely flexible.
2.1 MySQL: Introduction
MySQL is a SQL (Structured Query Language) database server. SQL is the most
popular database language in the world. MySQL is a client server implementation that
consists of a server daemon mysqld and many different client programs/libraries. The
main goals of MySQL are speed and robustness. The base upon which MySQL is built is
a set of routines that have been used in a highly demanding production environment for
many years. While MySQL is currently still in development it already offers a rich and
highly useful function set.
2.1.1 Features of MySQL
Multi-threaded.
Lots of column types like: signed/unsigned integers 1,2,3,4,8 bytes long, FLOAT,
CHAR, VARCHAR, TEXT, BLOB, DATE, SET and ENUM types.

Join optimizer with one-sweep multi-join (all joins made in one pass).
Full function support in the SELECT and WHERE parts. Example: select
column1+column2 from table where column1/column2 > 0
Full support for SQL GROUP BY and ORDER BY. Support for group functions
(SUM, MAX and MIN).
A privilege and password system with is very flexible and secure. Allows host
based verification.
All password traffic on the net is encrypted.
2.2 Setting Up Account
You can create user accounts in MySQL by one of two methods: Using the
GRANT statement or using the INSERT statement. For the purposes of this chapter I will
be concentrating solely on the GRANT statement and its opposite statement, REVOKE.
If you choose to use an INSERT or UPDATE statement for working with the
grants database, you must use the FLUSH PRIVILEGES statement as well. If you use a
GRANT or REVOKE statement, the database server sees the changes immediately.
If you change a user’s access to a database while they are connected to that
database, the change will not take effect immediately for that user. In addition, if you
change a user’s global privileges or change their password it will not take effect until the
next time they connect. Therefore, you should kill the user’s process in order for the
changes to take effect for these instances.
Two macro-level grants are not listed in Table 12-1: the ALL PRIVILEGES and
USAGE macros. The ALL PRIVILEGES macro can be substituted in a GRANT or
REVOKE statement instead of having to enumerate each of the privileges. The USAGE
macro simply creates the user account with no privileges. In other words, think of the
USAGE macro as a placeholder. It allows the administrator to create the user account and
come back to it later to set privileges.
2.2.1 Adding users and granting privileges

In MySQL, adding a user and granting privileges can occur simultaneously. You
can also add multiple users—with the same privileges—simultaneously. The basic
statement for adding a user and setting privileges is the GRANT statement. The syntax
for the GRANT statement is as follows:
GRANT privilege [(<columnlist>)] [, privilege [(<columnlist>)] ...] ON {<tablename> | * | *.* |
<databasename>.*} TO username(@<host>) [IDENTIFIED BY ‘password’] [REQUIRE
[{SSL| X509}] [CIPHER cipher [AND]] [ISSUER issuer [AND]] [SUBJECT subject]] [WITH
GRANT OPTION]
2.2.2 Deleting users and revoking privileges
The REVOKE statement is used to remove privileges from a user. The syntax for
the REVOKE statement is as follows:
REVOKE privilege [(<columnlist>)] [, privilege [(<columnlist>)] ...] ON [<tablename> | * | *.*
| <databasename>.*] FROM username [, username ...]
The syntax is quite similar to that of the GRANT statement. The REVOKE
statement can apply to a column or columns, databases and tables can be specified and
wild carded and multiple users can be revoked simultaneously.
The ALL PRIVILEGES macro works with the REVOKE statement the same as
with the GRANT statement. This is important to know because if you have granted the
GRANT privilege to the user and use a REVOKE ALL PRIVILEGES statement, the
GRANT option will still be there! Therefore, you must perform a separate statement of
REVOKE GRANT OPTION ... for this occasion.
Issuing a REVOKE statement does not delete the user from the MySQL grants
database. To delete a user from the grants database you must specifically issue a
DELETE statement to remove them from the grants database.
2.2.3 All types of Privileges:
ALL PRIVILEGES: Affects all access types.

ALTER: Gives the user access to alter tables within the access of the
user.
CREATE: Allows the creation of tables.
DELETE: Allows removal of row data in tables that can be accessed.
DROP: Allows the removal of existing tables.
FILE: Allows access to external files for system backup and
restoration.
INDEX: Allows the creation of table indexes.
INSERT: Places data within tables a user may access.
PROCESS: Gives access to the internal listing of current server
processes.
RELOAD: Gives the user access to the FLUSH command.
SELECT: Gives the user access to read data from accessible tables.
SHUTDOWN: Terminates the MySQL service.
UPDATE: Allows the user to modify current table data.
USAGE: Gives the user access to system-usage statistics.
2.2.3 Setting Up a MySQL User Accounts:
For adding a new user to MySQL you just need to add a new entry to user table in
database mysql.
Below is an example of adding new user guest with SELECT, INSERT and UPDATE
privileges with the password guest123 the SQL query is :
mysql> use mysql;
Database changed
mysql> INSERT INTO user (host, user, password, select_priv, nsert_priv,
update_priv) VALUES ('localhost', 'guest', PASSWORD('guest123'), 'Y', 'Y', 'Y');
mysql> FLUSH PRIVILEGES;
mysql> SELECT host, user, password FROM user WHERE user = 'guest';
+-----------+---------+------------------+
| host | user | password |
+-----------+---------+------------------+
| localhost | guest | 6f8c114b58f2ce9e |

+-----------+---------+------------------+
When adding a new user remember to encrypt the new password using PASSWORD()
function provided by MySQL. As you can see in the above example the password mypass
is encrypted to 6f8c114b58f2ce9e.
Notice the FLUSH PRIVILEGES statement. This tells the server to reload the grant
tables. If you don't use it then you won't be able to connect to mysql using the new user
account at least until the server is rebooted.
You can also specify other privileges to a new user by setting the values of following
columns in user table to 'Y' when executing the INSERT query or you can update them
later using UPDATE query.
Another way of adding user account is by using GRANT SQL command;
Following example will ada user zara with password zara123 for a particular database
called TUTORIALS.
root@host# mysql -u root -p password;
Enter password:*******
mysql> use mysql;
Database changed
mysql>GRANT SELECT,INSERT,UPDATE,DELETE,CREATE,DROP ON TUTORIALS.*
TO 'zara'@'localhost' IDENTIFIED BY 'zara123';
This will also create an entry in mysql database table called user.
NOTE: MySQL does not terminate a command until you give a semi colon (;) at the end
of SQL command.
The /etc/my.cnf File Configuration:
Most of the cases you should not touch this file. By default it will have following entries:
Here you can specify a different directory for error log, otherwise you should not change
any entry in this table.
Review Questions
1. Which is the command to provide privileges to the user?

a) Grant b) Create c) Revoke d) none of these
2. Choose the Category MYSQL database belongs to?
a) Relational DBMS b) Object Oriented DBMS c) Hybrid d)
DBMS
3. A table may have how many PRIMARY Keys?
a) One PRIMARY KEY at most
b) Exactly one PRIMARY KEY must be defined
c) At least one PRIMARY KEY must be defined
d) There may be one PRIMARY KEY per column.
4. Is possible to create a new user account which privilege access to a particular column
in a particular table. Say true or false?
5. When the operating system has a case-sensitive file system (as does Linux), MySQL
database and table names are
a) Case-sensitive b) case insensitive
6. Name the Command used to create new user account?
7. Explain the usage of Revoke Command?
8. Choose the Key which is not supported in Mysql?
a) Secondary key b) foreign key c) super key d) primary key
9. Define ACID property?
10. Define Atomicity property?
11. Explain the two ways of creating user account?
2.3 Starting, terminating and writing your own SQL programs
2.3.1 Administrative MySQL Command:
Here is the list of important MySQL command which you will use time to time to work
with MySQL database:
USE Databasename : This will be used to select a particular database in MySQL
workarea.
SHOW DATABASES: Lists the databases that are accessible by the MySQL
DBMS.

SHOW TABLES: Shows the tables in the database once a database has been
selected with the use command.
SHOW COLUMNS FROM tablename: Shows the attributes, types of attributes,
key information, whether NULL is permitted, defaults, and other information for
a table.
SHOW INDEX FROM tablename: Presents the details of all indexes on the
table, including the PRIMARY KEY.
SHOW TABLE STATUS LIKE tablename\G: Reports details of the MySQL
DBMS performance and statistics.
USE/CONNECT: Both the USE and CONNECT statements perform the same
action; the USE statement was added to MySQL for Sybase compatibility. Use
the CONNECT/USE statement to connect to another database from in the CLI.
The syntax for the CONNECT or USE statements is
CONNECT | USE <databasename>
DESCRIBE: The DESCRIBE statement provides much of the same functionality
as the SHOW COLUMNS statement. The DESCRIBE statement, which is
provided to for Oracle compatibility, can be abbreviated as DESC and can also be
utilized with wildcard characters such as underscore (_) and percent (%). The
syntax for the DESCRIBE statement is
DESCRIBE | DESC <tablename> (<columnname> | <wildcard>)
KILL: The KILL statement destroys a specified thread that is using the MySQL
database server. The syntax for the KILL statement is
KILL <threadnumber>
2.3.2 Data Definition Language
Data Definition Language (DDL) refers to the statements and functions used to
create the framework and rules for working with data. Using a DDL statement, you don’t
work with data directly; rather, you create or alter the database itself (or the tables in the
database).
Creating tables
The syntax for the CREATE TABLE statement is

CREATE [TEMPORARY] TABLE [IF NOT EXISTS] <tablename>
[(<create_statement>,...)] [table_options] [select_statement]
As you can see the statement is quite simple on its face. However numerous options,
many of which are beyond the scope of this chapter, make the CREATE TABLE
statement powerful.
The create_statement portion of the statement is where you include specific
information such as column names and types, primary keys, indexes, and constraints. The
sample CREATE TABLE statements for the ecommerce database (shown later in the
chapter) give you a look at column types and some of their options. One frequently asked
question—and source of confusion—is the AUTO_INCREMENT table option. You can
add the AUTO_INCREMENT keyword as a column option when creating a table. A
table can have only one AUTO_INCREMENT column; that column must be a key as
well.
When you insert data into a table with an AUTO_INCREMENT column, the database
automatically adds 1 to the last value of the auto-incremented column. By default, the
AUTO INCREMENT value starts with 1. If you want the database to start with a
different initial value, you can add this preference as a table option when you create the
table.
CREATE TABLE example (ID INT AUTO_INCREMENT PRIMARY KEY)
AUTO_INCREMENT = 10;
In the previous example, the table would be created and the first value inserted into the
table would receive a value of 10 in the ID column.
Deleting tables
The syntax for dropping a table is
DROP TABLE [IF EXISTS] <tablename> (, <tablename>)
The IF EXISTS keywords can be given to prevent an error if the table doesn’t exist. You
can also delete more than one table with the command, as indicated by the (,
<tablename>) syntax.

Delete From
Syntax:
DELETE [LOW PRIORITY or QUICK] FROM table_name [WHERE
where_definition] [ORDER BY order_definition] [LIMIT row_value]
The DELETE FROM command removes data from table_name. If the LOW PRIORITY
argument is specified, the delete process waits until there is no client access to the table.
If the QUICK argument is specified, there will be no merging of table leaves during the
process. DELETE commands with no WHERE arguments delete all data housed in the
given table. The ORDER BY clause can be issued in conjunction with the LIMIT clause
to remove a certain number of records according to their order
within the table.
Altering tables
Inevitably there comes in time in all databases’ lives when their tables will need
to be altered. This can happen for any number of reasons—including a change in business
rules, an upgrade to an application or an oversight during the design of the database. The
syntax for the ALTER TABLE statement is as follows:
ALTER [IGNORE] TABLE tbl_name alter_spec [, alter_spec ...]
alter_specification:
ADD [COLUMN] create_definition [FIRST | AFTER column_name ]
or ADD PRIMARY KEY (index_col_name,...)
or CHANGE [COLUMN] old_col_name create_definitionor MODIFY [COLUMN] create_definitionor DROP [COLUMN] col_nameor DROP PRIMARY KEY/INDEX
2.3.3 Data Manipulation Language
INSERT INTO
Syntax
INSERT [LOW_PRIORITY or DELAYED] [IGNORE] INTO table_name
(column_list) VALUES (value_list)

The INSERT INTO command is the basic mechanism for inserting data into a table. If
the LOW PRIORITY argument is specified, the insert will be delayed until there is no
client access to the designated table. If the DELAYED argument is specified, clients are
allowed to continue as the inserts are bundled for one mass insert. The DELAYED option
may improve speed for large inserts. If the IGNORE argument is specified, inserts that
would duplicate the insertion of a primary key are ignored. Without the IGNORE option
(given a duplicate primary key), the insert terminates.
Example:
insert into manufacturer (ID,name,address,zip,area_code,telephone_number) values
(1,’Small Widget Manufacturer’,’4 Warner Blvd’,’91120’,’818’,’5551212’);
Gathering data with SELECT
By and large, the SELECT statement is used more frequently than the INSERT
statement. Normally you would use the INSERT statement to put data into the database
only once; a query for looking for data uses the SELECT statement more than once. The
actual ratio of queries to inserts is largely determined by the application.
The syntax for the SELECT statement is as follows:
SELECT [STRAIGHT_JOIN] [SQL_SMALL_RESULT] [SQL_BIG_RESULT]
[SQL_BUFFER_RESULT] [HIGH_PRIORITY] [DISTINCT | DISTINCTROW |
ALL] select_expression,...
[INTO {OUTFILE | DUMPFILE} ‘file_name’ export_options]
[FROM table_references [WHERE where_definition] [GROUP BY
{unsigned_integer | col_name | formula} [ASC | DESC], ...] [HAVING
where_definition]
Example:
SELECT * FROM <tablename>;
SELECT * FROM user WHERE user = ‘sing’;
SELECT * FROM user WHERE user LIKE ‘sue%’;

UNION
Syntax
SELECT select_clause UNION [ALL] SELECT select_clause [UNION SELECT
select_clause ...]
The UNION command allows combinations of multiple SELECT statements into a single
return. In the select_clause syntax, only the last statement may contain a declared
ORDER BY or INTO OUTFILE modifier. Identical row data can be returned unless the
ALL option is specified.
UPDATE
Synatx
UPDATE [LOW_PRIORITY] [IGNORE] table_name SET column1=value1 [,
column2=value2, ...] [WHERE where_definition] [LIMIT row_value]
Example:
UPDATE product SET name = ‘Van Halen - Balance’ WHERE ID = 1;
Review Questions
1. Which one is used to view the list of available database in MySQL?
a) Use Databasename b) Show Tables c) Show Databasename d)
none
2. Which of the one belongs to Administrative command?
a) Create table b) create User c) show d) select
3. Which of the one is invalid with respect to Utility and Administrative task?
a) Use DB b) Connect c) show d) Create Table
4. Whcih is the utility used to destroy the current thread using the Mysql DB Server?
a) Delete b) Drop c) Kill d) Optimize
5. A table can have how many Auto increment columns?
a) 1 b) 2 c) 8 b) any number
Part A
1. Define DDL and DML?
2. Explain Different Alter table options?

3. Write MySQL query to add a primary key to already existing table EMP?
4. Write MySQL query to Update the Salary value 8000 for Emp having id=101 in the
Employee table?
5. Write a Mysql Query to select the employees whose name starts with “L” using Like
option of select statement?
2.4 Record Selection Technology
Two main methods are available for exporting data from a MySQL database:
Mysqldump
the SELECT INTO OUTFILE statement
2.4.1 MySqldump
The mysqldump utility is a powerful program for extracting database and table
structure along with the actual data. The mysqldump utility is sufficiently granular so that
you could get the table structure and data from just one table or from all tables of all
databases. If you would just like the table structure with no data you can do that as well.
If you want just the data with no table structure, mysqldump also provides that
functionality. The basic syntax for mysqldump is as follows:
mysqldump [OPTIONS] database [tables]
Note: When given no arguments, mysqldump simply prints a syntax reference
There are two variables that can affect the ability to dump tables with large columns:
max_allowed_packet and net_buffer_length. Both can be set using the -O or --set-
variable switch on the mysqldump command line or in the MySQL configuration file.
The mysqldump utility uses comments (escaped with /* */) to select options that may
only be found in newer versions of MySQL.
For example, when creating a database the IF NOT EXISTS keywords were
introduced in version 3.23.12 of MySQL. The keywords IF NOT EXISTS will be
enclosed in an escape sequence along with the version number. This allows the
functionality of IF NOT EXISTS to be used by those versions that can handle it and
safely ignored without error on those versions that do not include the function. Normal
usage of mysqldump calls for the command along with options such as username and
password followed by the name of the database to dump and (optionally) specific tables
and columns to dump. In Figure 10-27 the mysqldump command is issued to dump just
the db table of the MySQL grants database. The command is as follows:
mysqldump -p mysql db
Specifying records to be dumped
Even we can able to extract more specific than a particular table with mysqldump.
The use of the --where= or -w switch enables you to add a SELECT statement. For
example, to dump only the contents of the user table of the MySQL grants database
where the user is ‘suehring’, the command could be issued:
mysqldump -p “--where=user=’suehring’” mysql user
The where clause can be longer than one argument. For example, the following command
is valid:
mysqldump -p “--where=user=’suehring’ and host = ‘localhost’”mysql user
Controlling the INSERT statement
Two options control how any INSERT statements are done with mysqldump.
These options are -c (--complete-insert), or -e (--extended-insert). The default is
extended-insert.
The commands to reproduce these examples are as follows:
mysqldump -t -p -e “--where=user=’suehring’ and host = ‘localhost’” mysql user
mysqldump -t -p -c “--where=user=’suehring’ and host = ‘localhost’” mysql user
2.4.2 SELECT INTO OUTFILE
Another method for extracting or exporting data from MySQL is with the
SELECT ... INTO OUTFILE statement. This statement is usually run from inside the
MySQL CLI and can produce output much the same as mysqldump. The SELECT INTO
OUTFILE statement is really a SELECT statement at heart, with the INTO OUTFILE
modifier thrown onto the end to send the output of the query into a file. Therefore,

modifiers such as grouping and ordering as well as the WHERE clauses are available for
use with the INTO OUTFILE statement.
The output file when using the INTO OUTFILE modifier is located in the
database’s directory on the server. For example, if your “datadir” for MySQL is
/usr/local/var underneath which appear the directories for the various databases, the
OUTFILE will appear inside the actual database’s directory unless specified otherwise.
As with the mysqldump --tab utility, the SELECT INTO OUTFILE statement produces
the data in a tab-delimited format. This makes it easy to import into a program such as
Microsoft Access.
Unlike the mysqldump utility, the SELECT INTO OUTFILE statement does not
support the selection of all tables from multiple databases. If you want to export the data
to another MySQL server, mysqldump is the better choice. Much the same as
mysqldump, SELECT INTO OUTFILE supports a number of options that control how
the data is exported. These options include FIELDS TERMINATED BY, LINES
TERMINATED BY, FIELDS ENCLOSED BY, and FIELDS ESCAPED BY. These
options work the same as with mysqldump. The file specified in the SELECT ... INTO
OUTFILE statement cannot already exist. If the file exists, the statement will fail.
Review Question
1. Which of the following commands will discard the data and structure of a table named
parts?
2. When the operating system has a case-sensitive file system (as does Linux), MySQL
database and table names are
a) Case-sensitive b) case insensitive
3. Which is the command used to drop the column that used with alter command?
a) drop <column name> b) drop database c) drop index d) drop table
4. What is the main reason for indexing tables?
a) Only index columns may be used in searches
b) Indexes enforce the referential integrity of a table
c) Indexes can speed up the execution of queries
d) Indexes make table maintenance execute more quickly

2.3 SQL DATA TYPES
STRING Data types
The STRING data types encompass all column types used for textual data. In
addition to the NULL value, all STRING types additionally have the empty string value
(‘’). Inserts into STRING types that exceed the maximum allotted length will be
truncated to fit the space allocated.
BLOB
TINYBLOB, BLOB, MEDIUMBLOB, LONGBLOB
BLOB is the STRING datatype used for binary data. Any queries on a BLOB type result
in a case-sensitive return. For example a BLOB type with the value ‘string’ will not be
matched by queries for ‘STRING’. This is opposite to the behavior of the TEXT type.
Data exceeding the maximum size of the column is forcibly truncated after insertion.
Column Type Maximum Size
TINYBLOB 255
BLOB 65535
MEDIUMBLOB 16777215
LONGBLOB 4294967295
CHAR
The CHAR datatype is used for string storage. Designated by CHAR(p) where p
designates the field length, the maximum length for the CHAR type is 255. When stored
the data in the column will pad to the full length (p) of the field with whitespace. Upon
retrieval from the database, the appended whitespace is removed.
TEXT
TINYTEXT, TEXT, MEDIUMTEXT, LONGTEXT
TEXT is the STRING datatype used for character data. Queries upon the TEXT type will
return case insensitive values. For example a TEXT type with the value ‘string’ will be
matched by queries for ‘STRING’. This is opposite to the behavior of the BLOB type.

Column Type Maximum Size
TINYTEXT 255
TEXT 65535
MEDIUMTEXT 16777215
LONGTEXT 4294967295
VARCHAR
The VARCHAR datatype works like the CHAR type except for its data-storage
method. The VARCHAR type removes all trailing whitespace from inserted data.
Designated by VARCHAR (p) where p designates the field length, the maximum length
of the VARCHAR type is 255 characters. In considering space requirements for some
systems, the VARCHAR type should be used as opposed to the CHAR type. The addition
of whitespace trailing all CHAR entities can dramatically increase the space used in a
table containing even very few rows of data.
STRING FUNCTION
ASCII(C) Returns the ASCII value of the given character, C.
CHAR (N, N) Returns the actual character when given an ASCII number(s),
N. CONCAT (S1, S2...) Concatenates (joins) the strings, S1, S2 and so on.
CONCAT_WS (S, S1, S2 ...) concatenates the strings S1, S2 and so on using
separator, S.
FIELD (S, S1, S2,) Returns the number indicating the position of a string, S,
as located in the field list, S1, S2, and so on.
LCASE (S) Converts string, S, into lowercase.
LENGTH (S) Returns the character length of string, S.
LIKE Compares strings via pattern matching.
LOAD_FILE (F) Loads the contents of file, F, as a string.
LPAD (S, N, C) Left-pads the string, S, with the number, N, of characters, C.
LTRIM (S) Trims whitespace from the left of string, S.
POSITION (S in S1) Determines the first position of substring, S, in string,
S1.
REGEXP Compares strings with regular expression pattern matching.

REPLACE(S,O,N) Replaces old string, O, with new string, N, in a given
string, S.
REVERSE(S) Reverses string, S.
RPAD(S,N,C) Right-pads the string, S, with the number, N, of characters, C.
RTRIM(S) Trims whitespace from the right of string, S.
SPACE(N) Returns a string consisting of N spaces.
STRCMP(S1,S2) Compares the two strings, S1 and S2.
TRIM((RS) from S) Remove string, RS, from string, S (see example
following this list)
UCASE(S) Converts string, S, into uppercase.
DATE AND TIME
MySQL includes many functions to work with dates and times. These include
functions for conversion of dates and times and functions to determine where a given date
falls in a year.
Date and time functions with the SELECT statement
Function Name Purpose
CURDATE() Returns the current date.
CURTIME() As with CURDATE, this returns the current time.
DATE_ADD(D, interval) Adds <interval> onto date, D.
DATE_FORMAT(D, format) Returns the date in the format specified,
DATE_SUB(D, interval) Subtracts <interval> from date, D.
DAYNAME(D) Returns the day of the week for a given date in time.
DAYOFMONTH(D) Returns the day of month for a given date, D.
DAYOFWEEK(D) Returns the day of the week that a given date falls upon.
DAYOFYEAR(D) Returns the day of the year for a given date.
FROM_DAYS(D) Returns the actual date that is a number of days, D, away.
FROM_UNIXTIME(S) Converts a Unix/Linux timestamp from native
seconds to a date.
HOUR(T) Return the hour from a given time value, T.

MINUTE(T) Returns the minute value from a given time, T.
MONTH(D) Returns the month value from a given date, D.
MONTHNAME (D) Returns the name of the month from a given date, D.
NOW() Returns the current date and timestamp.
PERIOD_ADD(D,M) Adds the number of months, M, to the given date, D.
PERIOD_DIFF(D1, D2) Subtracts the two dates, D1 and D2.
QUARTER(D) Returns the quarter of the year for the given date, D.
SECOND(T) Returns the second value from a given time, T.
SEC_TO_TIME(S) Converts seconds, S, to a time value.
TIME_TO_SEC(T) Converts a given time, T, to seconds.
TO_DAYS(D) Returns a value for the number of days from now until date, D.
UNIX_TIMESTAMP((D)) Converts date, D, to Unix time or returns current
Unix timestamp.
WEEK(D) Returns the week of the year for a given date, D.
WEEKDAY(D) Returns the day of the week beginning with Monday for a
given date, D.
YEAR(D) Returns the year value for a given date, D.
As you can see, MySQL includes quite a few functions for working with dates and times.
Some functions convert dates and times, some add or subtract dates and time, and some
functions simply provide information.
Review Question
1. Which column type would be most efficient to store data in a column where most
records are going to be 17 to 19 characters? a) CHAR b) VARCHAR c) TEXT d)
BLOB
2. Which is the function that uses pattern matching for string functions?
a) STRCMP b) REGEXP c) Replace d) Reverse
3. Which is the function used to compare the strings?

a) cmp b) like c) Compare d) none
MySQL Sorting Results
We have seen SQL SELECT command to fetch data from MySQL table. When
you select rows, the MySQL server is free to return them in any order, unless you instruct
it otherwise by saying how to sort the result. But you sort a result set by adding an
ORDER BY clause that names the column or columns you want to sort by.
Syntax:
Here is generic SQL syntax of SELECT command along with ORDER BY clause to sort
data from MySQL table:
SELECT field1, field2,...fieldN table_name1, table_name2.ORDER BY field1, [field2...]
[ASC [DESC]]
You can sort returned result on any field provided that filed is being listed out.
You can sort result on more than one field.
You can use keyword ASC or DESC to get result in ascending or descending
order. By default its ascending order.
You can use WHERE...LIKE clause in usual way to put condition.
Using ORDER BY clause at Command Prompt:
This will use SQL SELECT command with ORDER BY clause to fetch data from MySQL table tutorials_tbl
Example:
Try out following example which returns result in ascending order.

root@host# mysql -u root -p password;Enter password:*******mysql> use TUTORIALS;Database changedmysql> SELECT * from tutorials_tbl ORDER BY tutorial_author ASC+-------------+----------------+-----------------+-----------------+| tutorial_id | tutorial_title | tutorial_author | submission_date |+-------------+----------------+-----------------+-----------------+| 2 | Learn MySQL | Abdul S | 2007-05-24 || 1 | Learn PHP | John Poul | 2007-05-24 || 3 | JAVA Tutorial | Sanjay | 2007-05-06 |+-------------+----------------+-----------------+-----------------+3 rows in set (0.42 sec)
mysql>
Verify all the author names are listed out in ascending order.
Using ORDER BY clause inside PHP Script:
You can use similar syntax of ORDER BY clause into PHP function mysql_query(). This function is used to execute SQL command and later another PHP function mysql_fetch_array() can be used to fetch all the selected data.
Example:
Try out following example which returns result in descending order of tutorial author.
<?php$dbhost = 'localhost:3036';$dbuser = 'root';$dbpass = 'rootpassword';$conn = mysql_connect($dbhost, $dbuser, $dbpass);if(! $conn ){ die('Could not connect: ' . mysql_error());}$sql = 'SELECT tutorial_id, tutorial_title, tutorial_author, submission_date FROM tutorials_tbl ORDER BY tutorial_author DESC';
mysql_select_db('TUTORIALS');
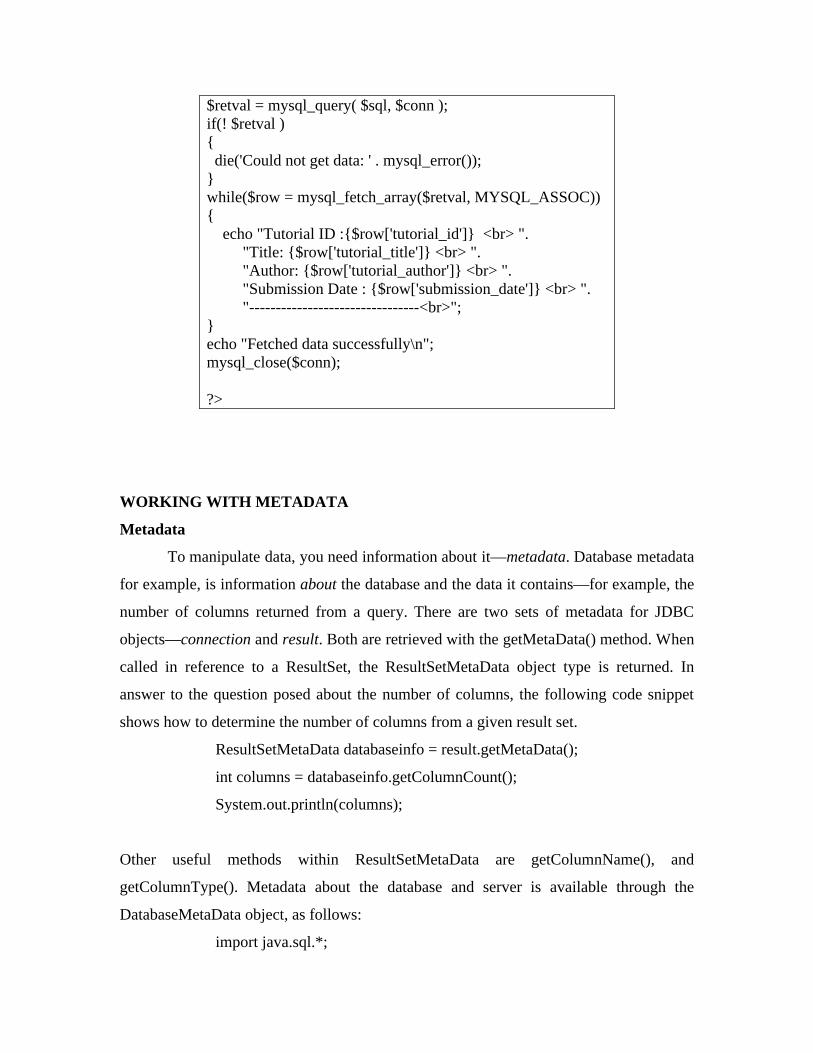
$retval = mysql_query( $sql, $conn );if(! $retval ){ die('Could not get data: ' . mysql_error());}while($row = mysql_fetch_array($retval, MYSQL_ASSOC)){ echo "Tutorial ID :{$row['tutorial_id']} <br> ". "Title: {$row['tutorial_title']} <br> ". "Author: {$row['tutorial_author']} <br> ". "Submission Date : {$row['submission_date']} <br> ". "--------------------------------<br>";} echo "Fetched data successfully\n";mysql_close($conn);
?>
WORKING WITH METADATA
Metadata
To manipulate data, you need information about it—metadata. Database metadata
for example, is information about the database and the data it contains—for example, the
number of columns returned from a query. There are two sets of metadata for JDBC
objects—connection and result. Both are retrieved with the getMetaData() method. When
called in reference to a ResultSet, the ResultSetMetaData object type is returned. In
answer to the question posed about the number of columns, the following code snippet
shows how to determine the number of columns from a given result set.
ResultSetMetaData databaseinfo = result.getMetaData();
int columns = databaseinfo.getColumnCount();
System.out.println(columns);
Other useful methods within ResultSetMetaData are getColumnName(), and
getColumnType(). Metadata about the database and server is available through the
DatabaseMetaData object, as follows:
import java.sql.*;

public class DBMeta {
public static void main(String args[]) {
String url = “jdbc:mysql://localhost/ecommerce”;
Connection con;
try {
Class.forName(“org.gjt.mm.mysql.Driver”);
} catch(java.lang.ClassNotFoundException e) {
System.err.print(“ClassNotFoundException: “);
System.err.println(e.getMessage());}
try {
con = DriverManager.getConnection(url, “suehring”, “evh5150”);
System.out.println(“Connection established!”);
DatabaseMetaData dbmdata = con.getMetaData();
System.out.println(“Database Information”);
System.out.println(“Database name: “ +
dbmdata.getDatabaseProductName()) ;
System.out.println(“Version: “ + dbmdata.getDatabaseProductVersion());
System.out.println(“Driver: “ + dbmdata.getDriverName());
System.out.println(“Version: “ + dbmdata.getDriverVersion());
con.close(); }
catch(SQLException ex) {
System.err.println(“SQLException: “ + ex.getMessage()); } } }
Using Sequences
Sequence is a set of integers 1, 2, 3, ... that are generated in order on demand.
Sequences are frequently used in databases because many applications require each row
in a table to contain a unique value, and sequences provide an easy way to generate them.
This chapter describes how to use sequences in MySQL.
Using AUTO_INCREMENT column:
The simplest way in MySQL to use Sequences is to define a column as
AUTO_INCREMENT and leave rest of the things to MySQL to take care.

Example:
Try out following example. This will create table and after that it will insert few rows in
this table where it is not required to give record ID because its auto incremented by
MySQL.
mysql> CREATE TABLE insect (id INT UNSIGNED NOT NULL
AUTO_INCREMENT, PRIMARY KEY (id), name VARCHAR(30) NOT
NULL, date DATE NOT NULL, origin VARCHAR(30) NOT NULL );
Query OK, 0 rows affected (0.02 sec)
mysql> INSERT INTO insect (id,name,date,origin) VALUES
(NULL,'housefly','2001-09-10','kitchen'),
mysql> INSERT INTO insect (id,name,date,origin) VALUES
(NULL,'millipede','2001-09-10','driveway'),
Query OK, 3 rows affected (0.02 sec)
mysql> SELECT * FROM insect ORDER BY id;
+----+-------------+------------+------------+
| id | name | date | origin |
+----+-------------+------------+------------+
| 1 | housefly | 2001-09-10 | kitchen |
| 2 | millipede | 2001-09-10 | driveway |
| 3 | grasshopper | 2001-09-10 | front yard |
+----+-------------+------------+------------+
Obtain AUTO_INCREMENT Values:
LAST_INSERT_ID( ) is a SQL function, so you can use it from within any client that
understands how to issue SQL statements. otherwise PERL and PHH scripts provide
exclusive functions to retrieve auto incremented value of last record.
Renumbering an Existing Sequence:
There may be a case when you have deleted many records from a table and you want to
resequence all the records. This can be done by using a simple trick but you should be
very careful to do so if your table is having join with other table.

If you determine that resequencing an AUTO_INCREMENT column is unavoidable, the
way to do it is to drop the column from the table, then add it again. The following
example shows how to renumber the id values in the insect table using this technique:
mysql> ALTER TABLE insect DROP id;
mysql> ALTER TABLE insect
-> ADD id INT UNSIGNED NOT NULL AUTO_INCREMENT
FIRST,
-> ADD PRIMARY KEY (id);
Starting a Sequence at a Particular Value:
By default MySQL will start sequence from 1 but you can specify any other number as
well at the time of table creation. Following is the example where MySQL will start
sequence from 100.
mysql> CREATE TABLE insect ( id INT UNSIGNED NOT NULL
AUTO_INCREMENT = 100,PRIMARY KEY (id),name VARCHAR(30) NOT
NULL,date DATE NOT NULL,origin VARCHAR(30) NOT NULL);
Alternatively, you can create the table and then set the initial sequence value with
ALTER TABLE.
mysql> ALTER TABLE t AUTO_INCREMENT =
100;