unit-i - jkmaterials.yolasite.com · unit-i introduction to web technologies: introduction to web...
TRANSCRIPT
UNIT-I
Introduction to Web Technologies: Introduction to web servers like Apache1.1, IIS, XAMPP (Bundle Server), WAMP Server(Bundle Server), handling HTTP Request and Response, installation of above servers

INTRODUCTION TO WEB TECHNOLOGY
• Web technology is related to the interface between web servers and their clients. This information includes markup languages, programming languages & technologies, Databases, business applications.
• Markup languages: – Describe how a document should look when displayed or printed.
– Define how Web pages should look when displayed in a browser
– Define the data contained within a Web document.
• Web Page:
A mixture of text, graphics, sound and animation in the HTML format, to make information accessible in a easy to understand format using the Internet.
• Web Site:
A collection of web pages connected (linked) by Hypertext or clickable links.
• Web Site Storage/Hosting:
After a web site is designed it must be stored on a computer that can be accessed through the Internet and the World-Wide Web .
INTRODUCTION TO WEB SERVERS
• Responds to client requests by providing resources like HTML files, images etc... • Stores and transmits web documents (files). It uses the HTTP protocol to connect to
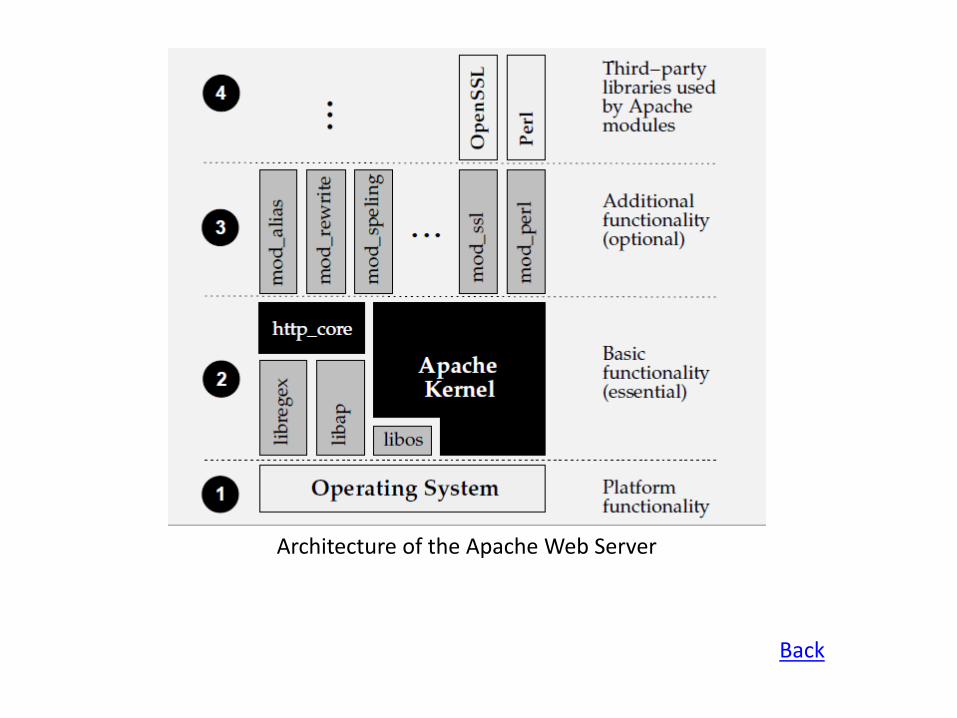
other computers and distribute information. Example: IIS, Apache. • Role of Web server is in figure 1. • Apache In February of 1995, the most popular server software on the Web was the
public domain HTTP daemon developed by Rob McCool at NCSA, University of Illinois, Urbana-Champaign.
Official public release of apache server (0.6.2) was released in April 1995. Later the apache 1.0 was released in December 1st 1995. Architecture of Apache web server
– Most popular flexible and HTTP1.1 compliant web server. – An open source, like BSD license1. – Modular Architecture helps user - easily add functionality to their specific environment.
– provides full source code and comes with an unrestrictive license – Portable runs on all platforms. – Robustness and security
Note: oracle, IBM, RedHat have adopted Apache based solutions for their products.
• Apache Features configurable error messages, DBMS based authentication databases.
• Apache supports password authentication and digital certificate authentication. • Apache has built in search engine and an HTML authorizing tool and also supports
FTP.

Figure 1: The Role of a Web Server
Back
Back
Architecture of the Apache Web Server
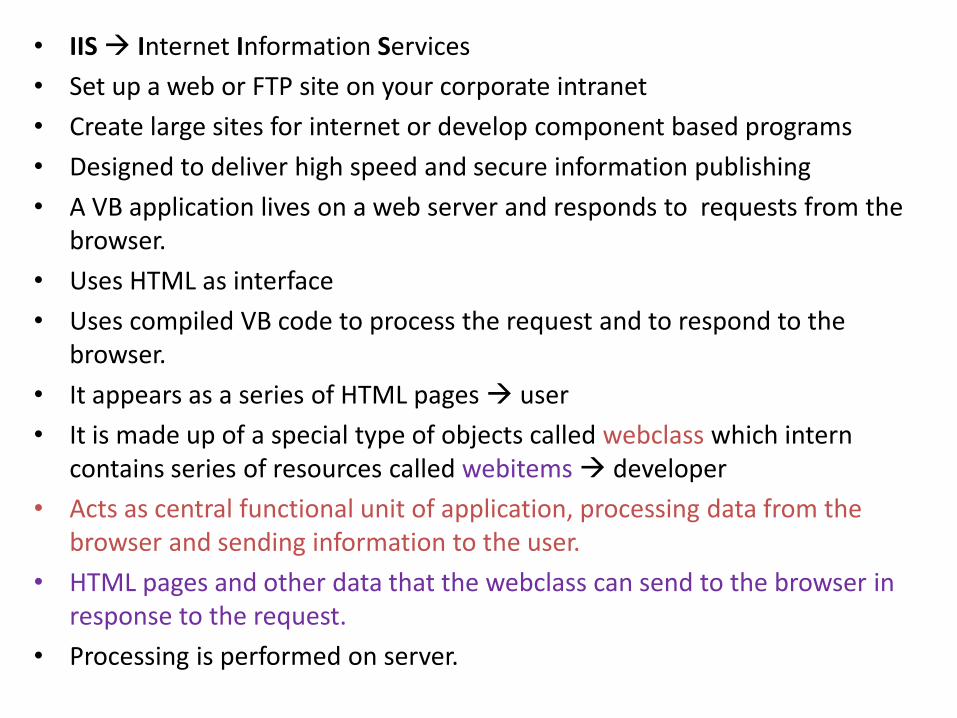
• IIS Internet Information Services
• Set up a web or FTP site on your corporate intranet
• Create large sites for internet or develop component based programs
• Designed to deliver high speed and secure information publishing
• A VB application lives on a web server and responds to requests from the browser.
• Uses HTML as interface
• Uses compiled VB code to process the request and to respond to the browser.
• It appears as a series of HTML pages user
• It is made up of a special type of objects called webclass which intern contains series of resources called webitems developer
• Acts as central functional unit of application, processing data from the browser and sending information to the user.
• HTML pages and other data that the webclass can send to the browser in response to the request.
• Processing is performed on server.

XAMPP (Bundle Server)
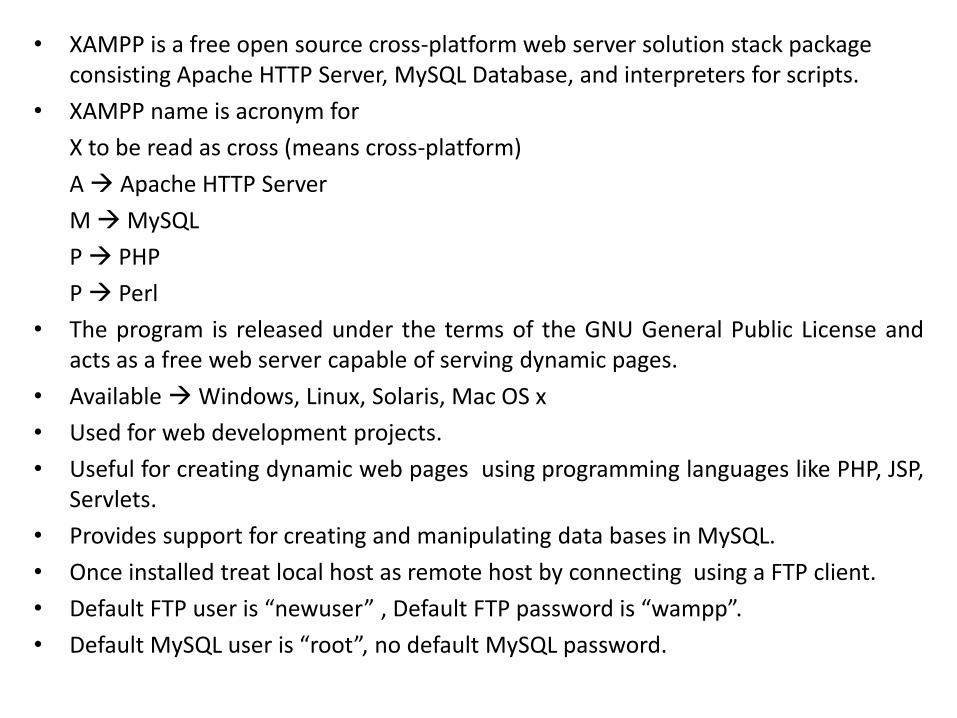
• XAMPP is a free open source cross-platform web server solution stack package consisting Apache HTTP Server, MySQL Database, and interpreters for scripts.
• XAMPP name is acronym for
X to be read as cross (means cross-platform)
A Apache HTTP Server
M MySQL
P PHP
P Perl
• The program is released under the terms of the GNU General Public License and acts as a free web server capable of serving dynamic pages.
• Available Windows, Linux, Solaris, Mac OS x
• Used for web development projects.
• Useful for creating dynamic web pages using programming languages like PHP, JSP, Servlets.
• Provides support for creating and manipulating data bases in MySQL.
• Once installed treat local host as remote host by connecting using a FTP client.
• Default FTP user is “newuser” , Default FTP password is “wampp”.
• Default MySQL user is “root”, no default MySQL password.
WAMP (Bundle Server)
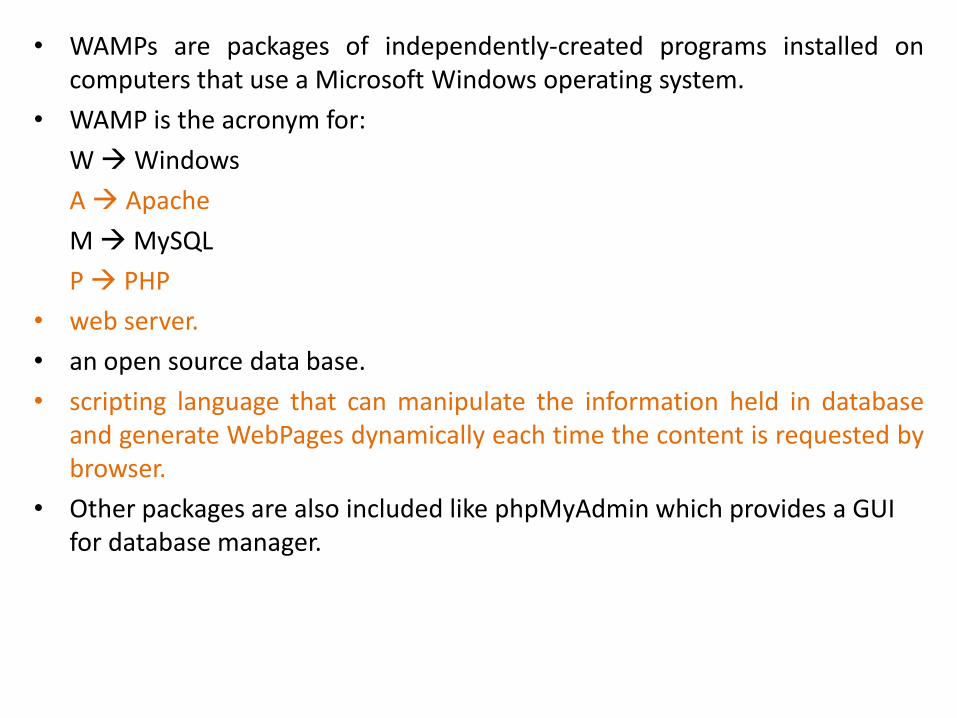
• WAMPs are packages of independently-created programs installed on computers that use a Microsoft Windows operating system.
• WAMP is the acronym for:
W Windows
A Apache
M MySQL
P PHP
• web server.
• an open source data base.
• scripting language that can manipulate the information held in database and generate WebPages dynamically each time the content is requested by browser.
• Other packages are also included like phpMyAdmin which provides a GUI for database manager.
Handling HTTP Request and Response
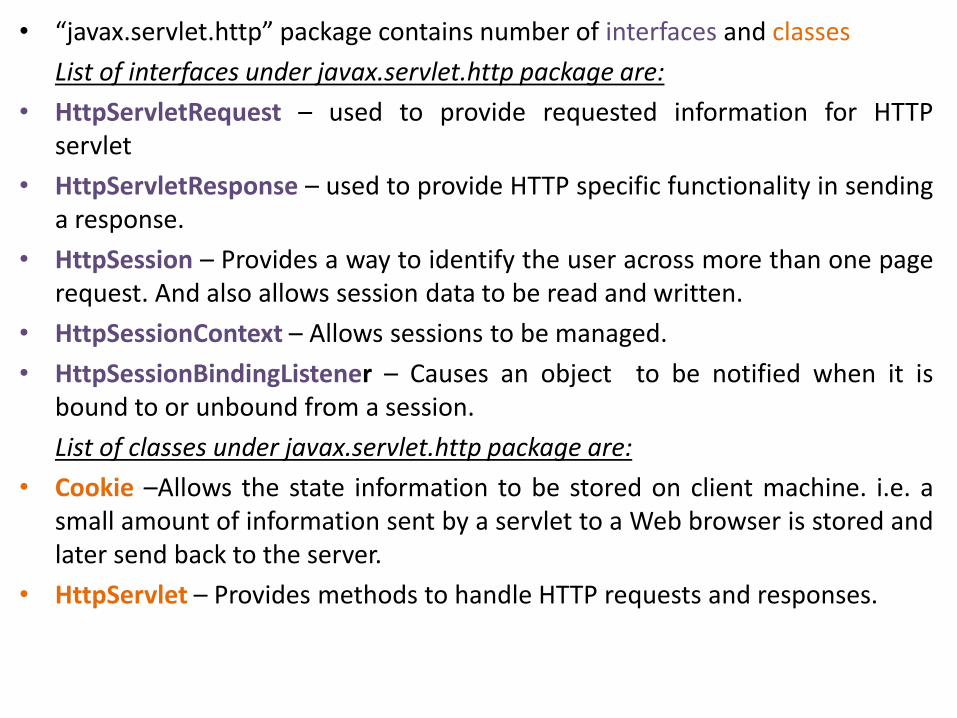
• “javax.servlet.http” package contains number of interfaces and classes
List of interfaces under javax.servlet.http package are:
• HttpServletRequest – used to provide requested information for HTTP servlet
• HttpServletResponse – used to provide HTTP specific functionality in sending a response.
• HttpSession – Provides a way to identify the user across more than one page request. And also allows session data to be read and written.
• HttpSessionContext – Allows sessions to be managed.
• HttpSessionBindingListener – Causes an object to be notified when it is bound to or unbound from a session.
List of classes under javax.servlet.http package are:
• Cookie –Allows the state information to be stored on client machine. i.e. a small amount of information sent by a servlet to a Web browser is stored and later send back to the server.
• HttpServlet – Provides methods to handle HTTP requests and responses.
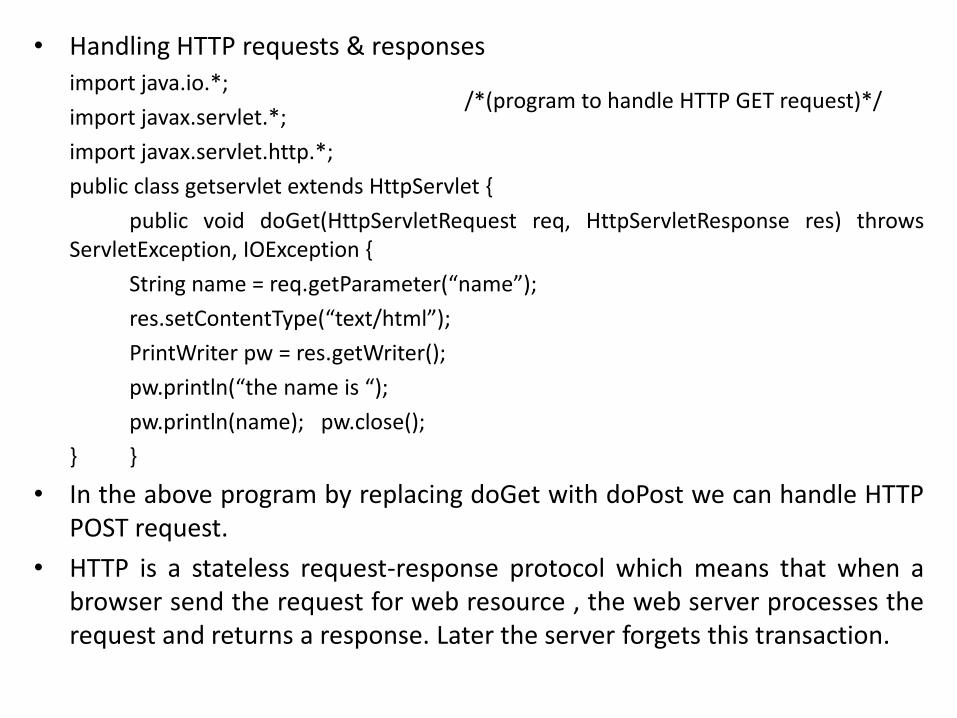
• Handling HTTP requests & responses
import java.io.*;
import javax.servlet.*;
import javax.servlet.http.*;
public class getservlet extends HttpServlet {
public void doGet(HttpServletRequest req, HttpServletResponse res) throws ServletException, IOException {
String name = req.getParameter(“name”);
res.setContentType(“text/html”);
PrintWriter pw = res.getWriter();
pw.println(“the name is “);
pw.println(name); pw.close();
} }
• In the above program by replacing doGet with doPost we can handle HTTP POST request.
• HTTP is a stateless request-response protocol which means that when a browser send the request for web resource , the web server processes the request and returns a response. Later the server forgets this transaction.
/*(program to handle HTTP GET request)*/

• Therefore keeping track of which request come from which user is not a easy task. There are two ways to solve this problem: – The server has to return all the information related to the current user along with each
response and let the browser send it back as part of next request. (or)
– The server have to save the state somewhere in it and send back only the identifier that the browser returns with the next request. Where the identifier is used to find the saved information on server.
• A new session can be started by requesting HttpSession object from HttpServletRequest in doGet() and doPost(),
HttpSession session = request.getSession(true);
Steps to install Apache
1. Download the binary build of Apache for Windows.
(named as “apache_1_3_#-win32-src.msi” if you are interested in the source code or simply “apache_1_3_#-win32-no_src.msi” if you don’t plan to do any thing with the source code)
2. Run the Apache “.msi” file you downloaded above. This will prompt for Whether or not you want to run Apache for all users(as a service).
Want it installed to run in a console window when you choose the Start Apache Shortcut.
Your server name, domain name, administrative email account.
Directory to install the Apache (Default is C:\Program Files\Apache Group\Apache).
Installation type i.e. complete installation or custom installation.
3. During the installation, Apache will configure the files in the conf directory for your chosen installation directory.
Note:- any of the files already exists in the directory will not overwritten instead a new copy of the corresponding file will be left with the extension .default.conf.
4. After installing Apache, you should edit the configuration files in the conf directory as required.
5. If you eventually uninstall Apache, your configuration and log files will not be removed.
Steps to install Apache:
6. One can run Apache in two ways As a service best option if you want apache to start automatically when machine
boots and stops when machine logoff
From console window best option if you want to manually start the Apache and close the console window to stop the Apache.
7. To run Apache from a console window, select the "Start Apache as console app" option from the Start menu.
8. To stop Apache running, either press select the "Shutdown Apache console app" icon option from the Start menu or press Ctrl + c or Ctrl + Break.
9. After starting Apache , to connect to the server and to access the default page, launch the browser and enter the URL (http://localhost/)
10. This should respond with a welcome page and a link to apache manual. If the host is not connected the you may have to use the URL (http://127.0.0.1).
11. To configure the apache you should edit the files in conf directory. Because Apache cannot share the same port with another TCP/IP application, you may need to stop or uninstall certain services first.
Steps to install XAMPP on windows
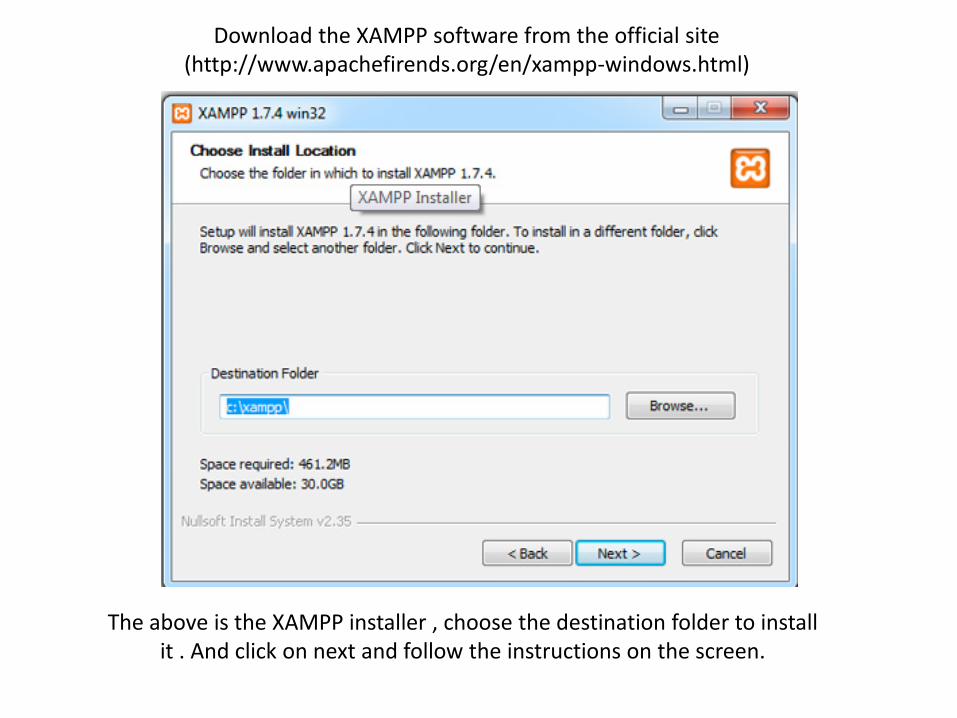
The above is the XAMPP installer , choose the destination folder to install it . And click on next and follow the instructions on the screen.
Download the XAMPP software from the official site (http://www.apachefirends.org/en/xampp-windows.html)
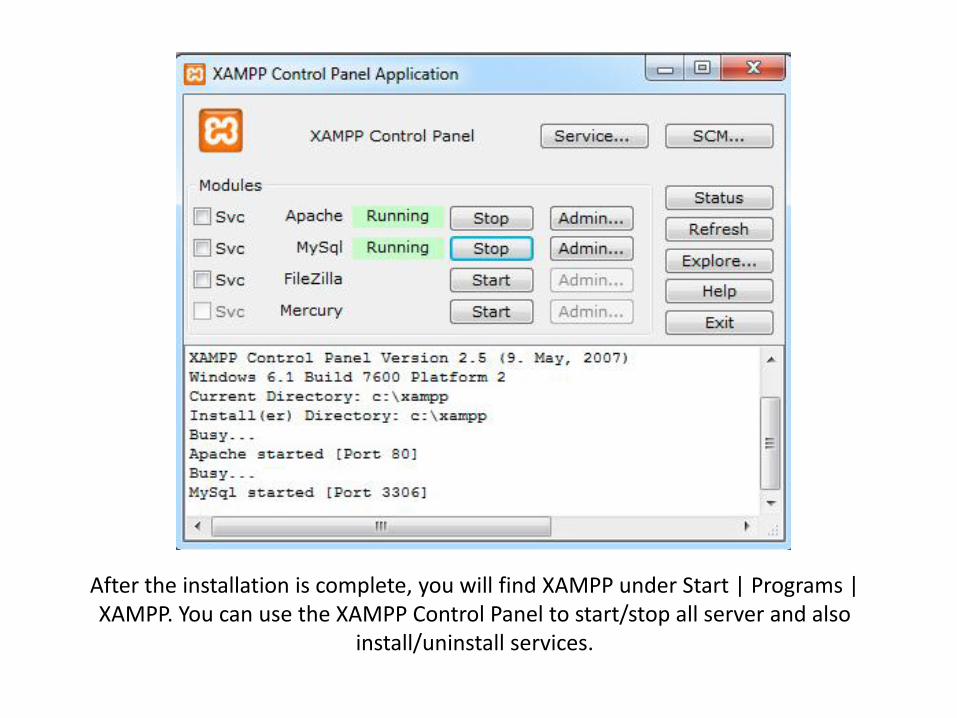
After the installation is complete, you will find XAMPP under Start | Programs | XAMPP. You can use the XAMPP Control Panel to start/stop all server and also
install/uninstall services.
Steps to install WAMP on windows

• Download the WAMP server software from the official website (http://www.wampserver.com/en/index.php).
• Once the software is downloaded from the website, you can find the icon as given below in the folder where you downloaded.
• Double click the icon to start the installation process.
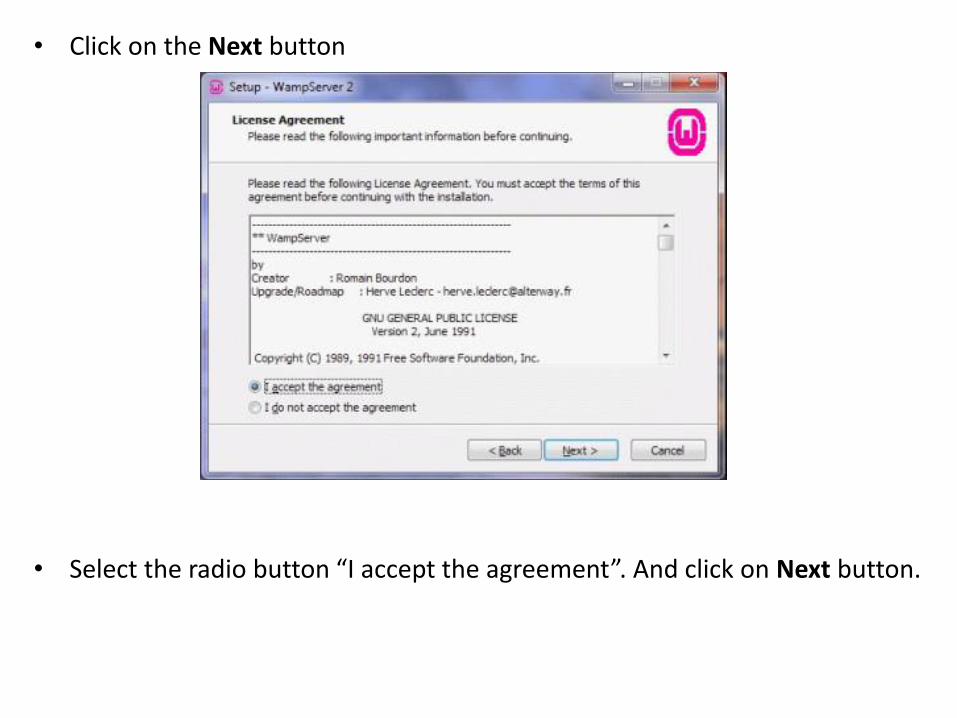
• Click on the Next button
• Select the radio button “I accept the agreement”. And click on Next button.

• Choose the directory where to install wamp server
• It is recommended to leave the default folder i.e. “C:\wamp” . Click on Next button.
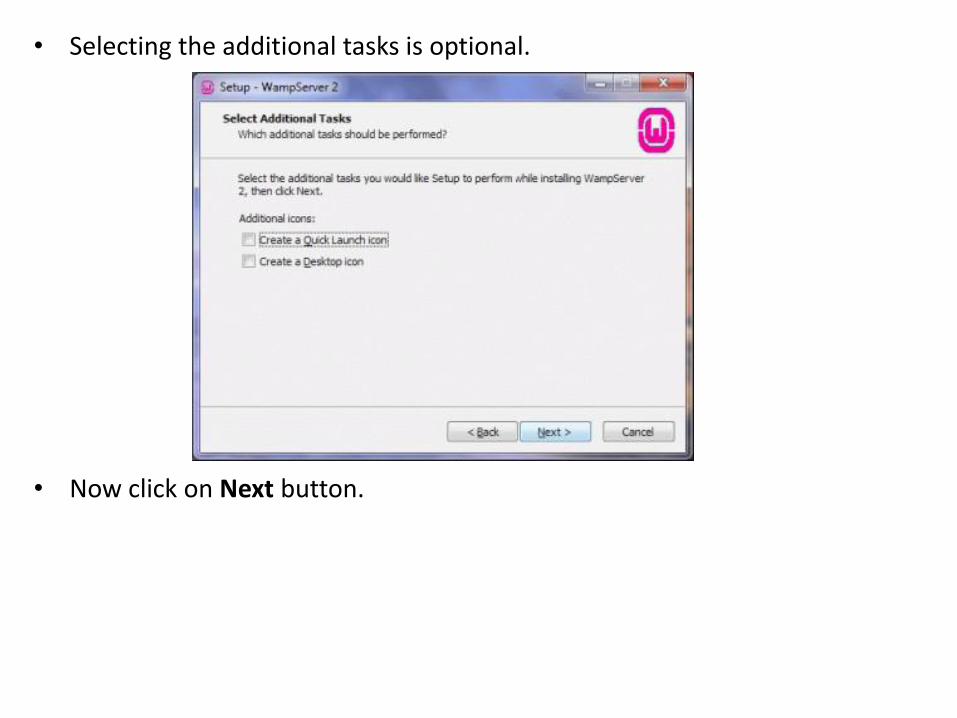
• Selecting the additional tasks is optional.
• Now click on Next button.
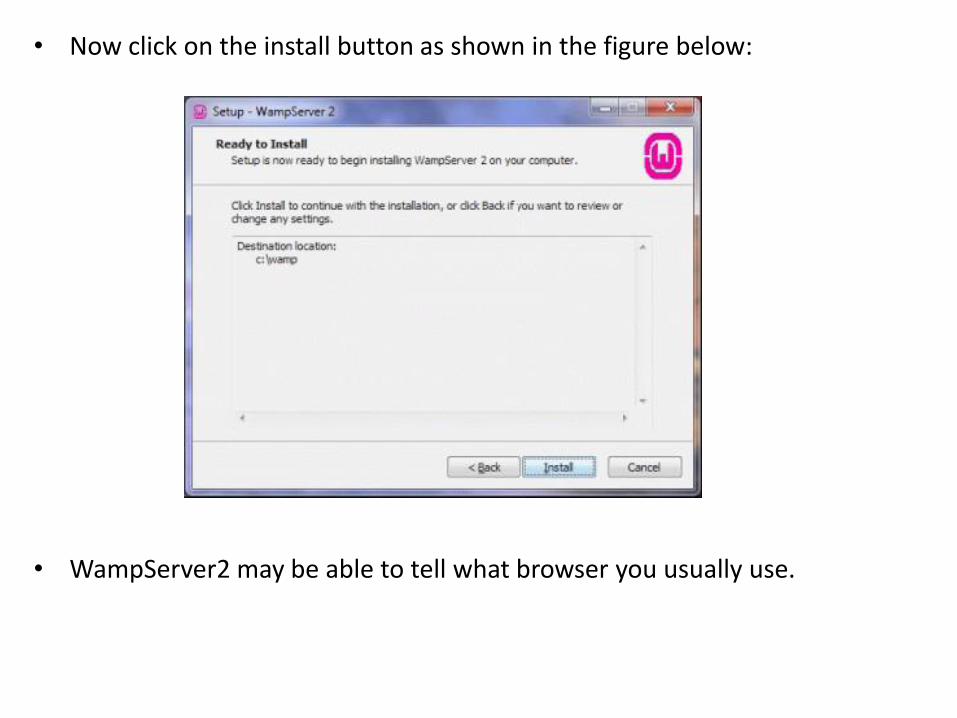
• Now click on the install button as shown in the figure below:
• WampServer2 may be able to tell what browser you usually use.
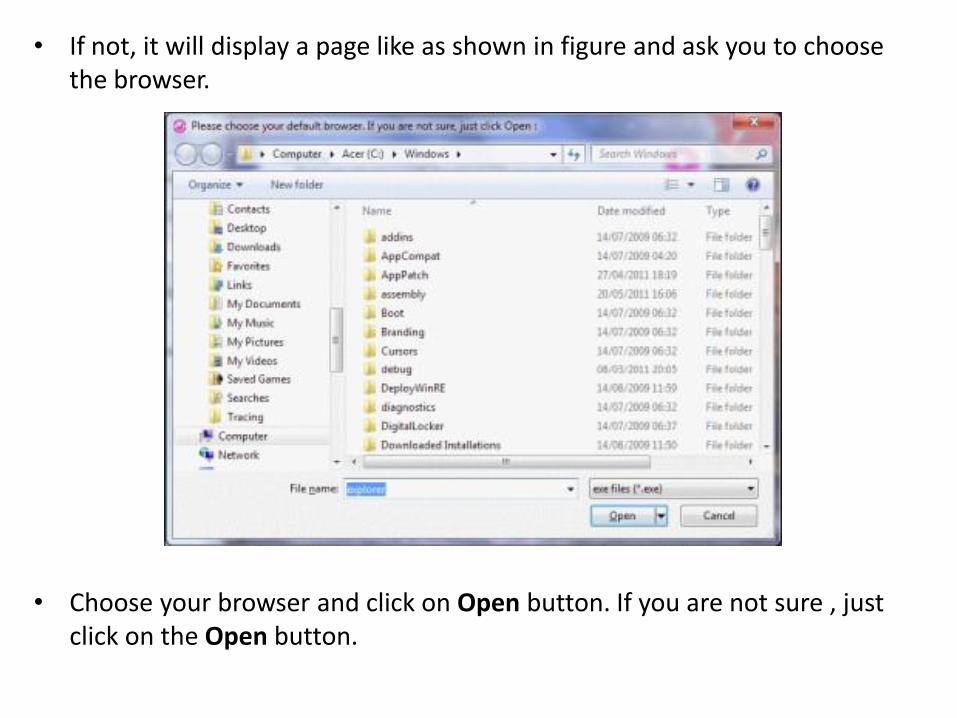
• If not, it will display a page like as shown in figure and ask you to choose the browser.
• Choose your browser and click on Open button. If you are not sure , just click on the Open button.

• Depending on your firewall settings you may be asked to allow the Apache server to access your networks as in the figure below:
• Click on Allow Access button.

• Leave the default values and click on Next button.
• Now you will get the window where you can check the check box to launch the wamp server 2 now option.
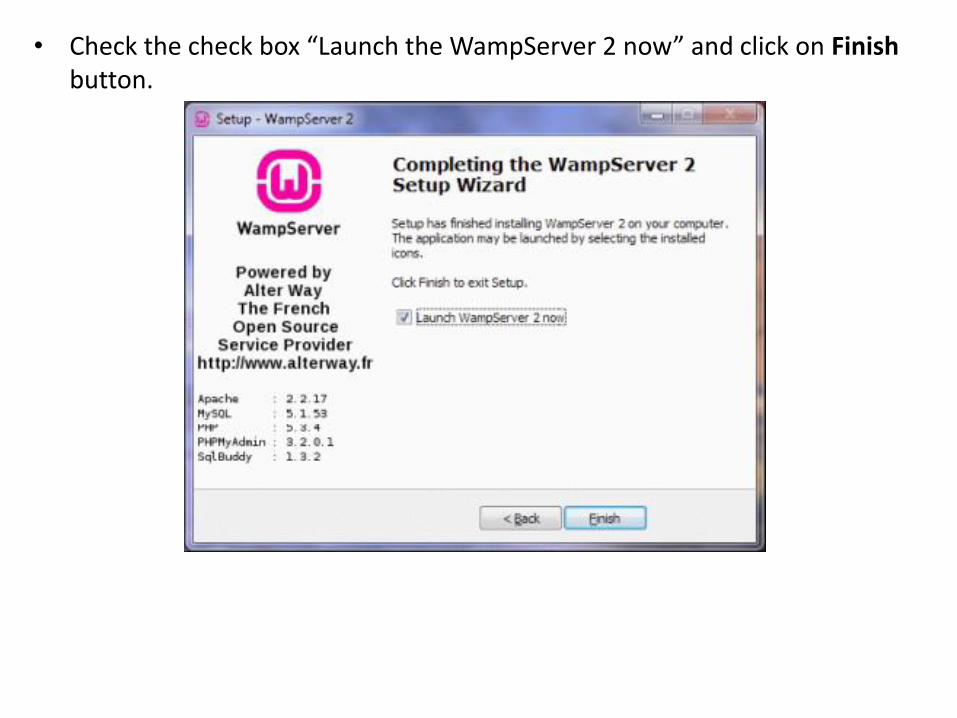
• Check the check box “Launch the WampServer 2 now” and click on Finish button.
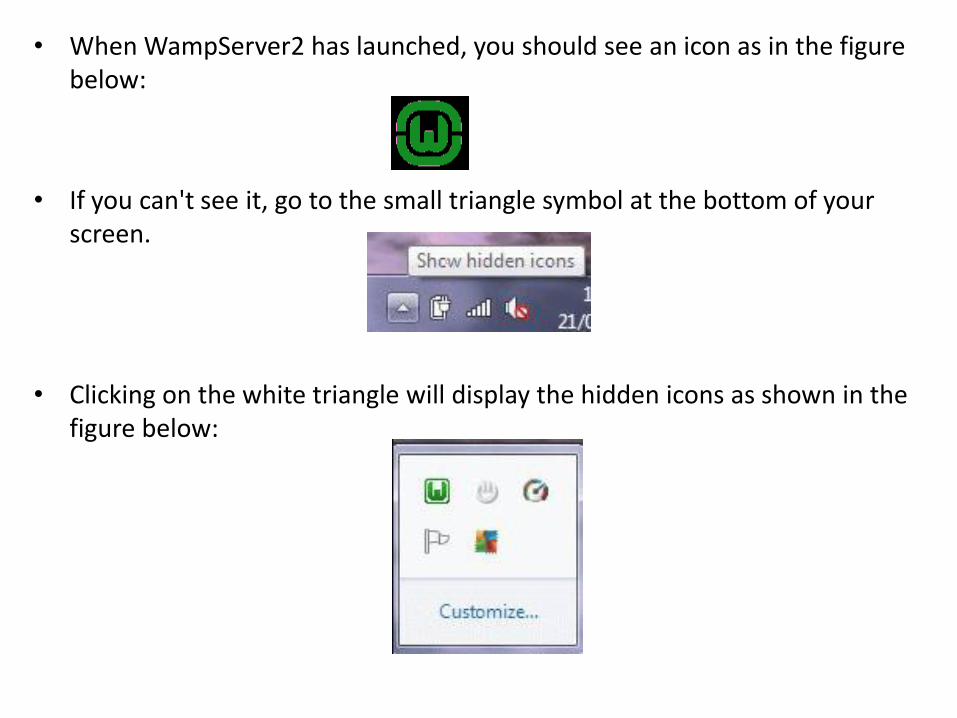
• When WampServer2 has launched, you should see an icon as in the figure below:
• If you can't see it, go to the small triangle symbol at the bottom of your screen.
• Clicking on the white triangle will display the hidden icons as shown in the figure below:
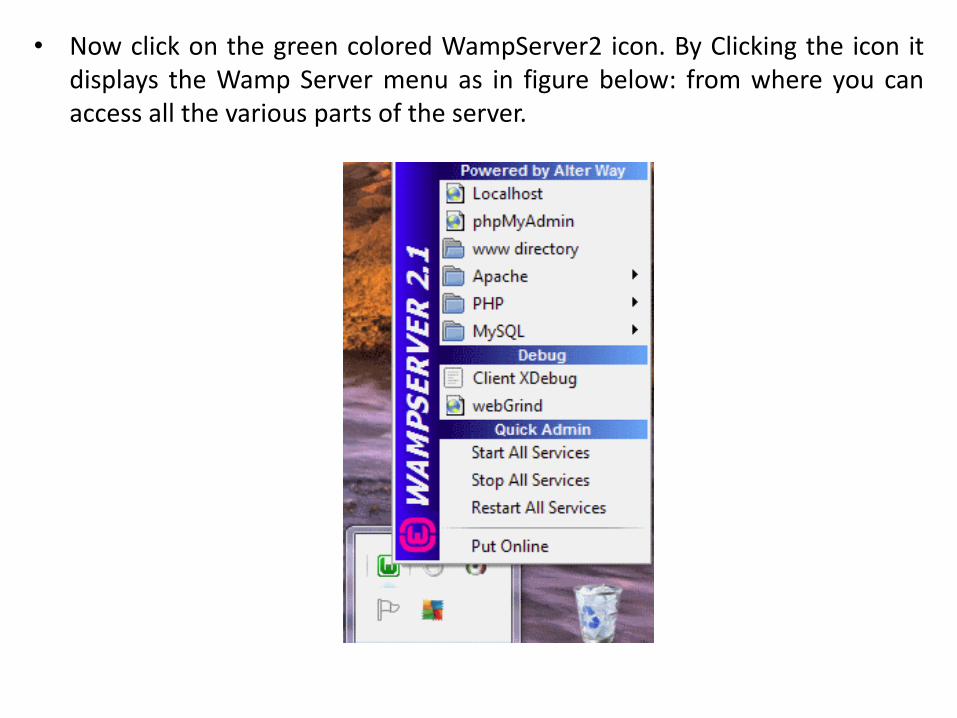
• Now click on the green colored WampServer2 icon. By Clicking the icon it displays the Wamp Server menu as in figure below: from where you can access all the various parts of the server.
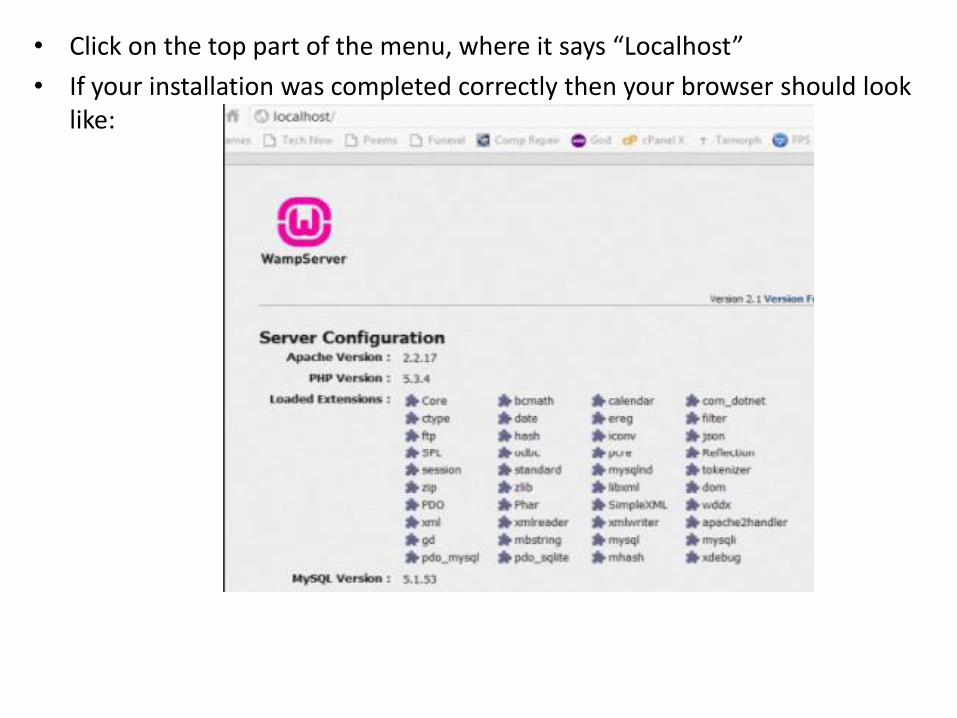
• Click on the top part of the menu, where it says “Localhost”
• If your installation was completed correctly then your browser should look like:
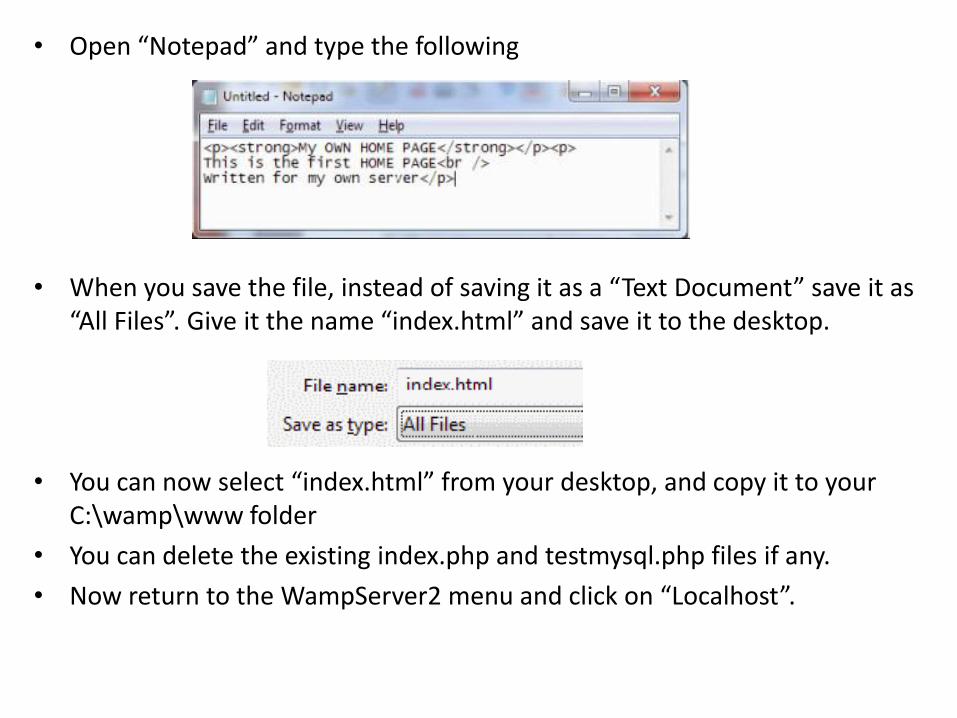
• Open “Notepad” and type the following
• When you save the file, instead of saving it as a “Text Document” save it as “All Files”. Give it the name “index.html” and save it to the desktop.
• You can now select “index.html” from your desktop, and copy it to your C:\wamp\www folder
• You can delete the existing index.php and testmysql.php files if any.
• Now return to the WampServer2 menu and click on “Localhost”.
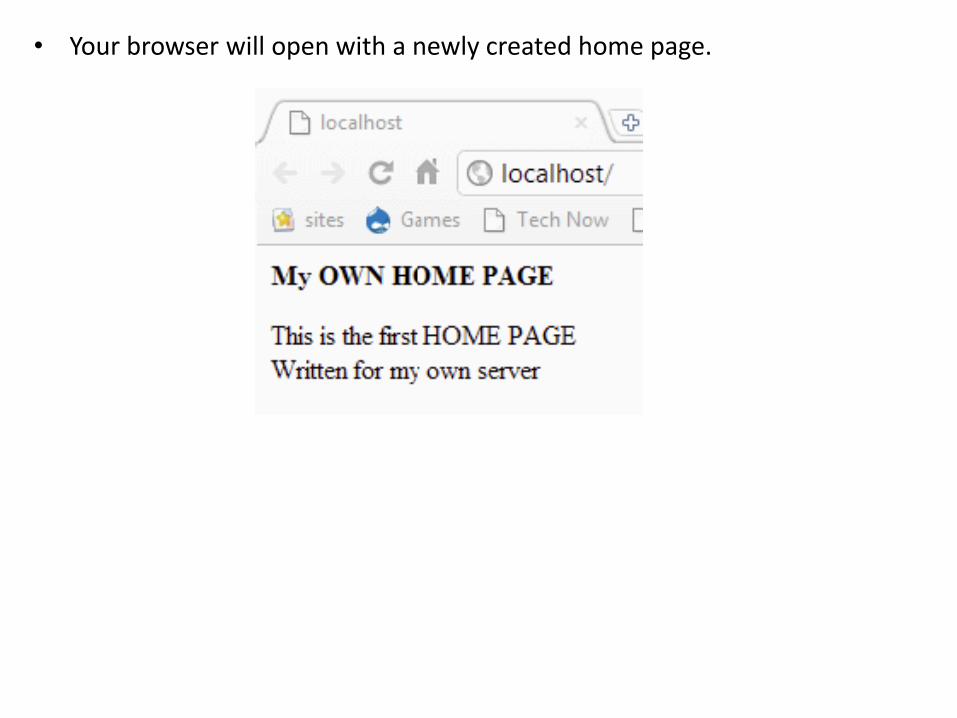
• Your browser will open with a newly created home page.