uniform accounting network accounting training
TRANSCRIPT

Revised April 2011
Payroll Training

Uniform Accounting Network – Payroll Training
Table of Contents
Payroll Setup
1. Department
2. Payee
3. Withholding
4. Frequency
5. Earning
6. Additional
7. Employee History #1
8. Employee History #2
9. Employee History #3
Using Payroll
10. Wages - Record
11. Wages - Edit
12. Wages - Post
13. Wages – 2nd Payroll
14. Withholdings
15. Payroll Utilities
16. EFTs
Payroll Reference Guides
17. UAN Payroll Software Quick Tips
18. 941 Quarterly Federal Tax Report Guide and Quick Tips
19. Ohio State Tax Guide
20. OPERS Guide, Quick Tips and ECS Reporting
21. OP&FPF Quick Tips
22. Quick Reference Phone List

Uniform Accounting Network – Payroll Training
Payroll Maintenance Entity File 1. Department
01: 1 of 2
***Load Training Exercise 01 Department*** ***Date is 01/01/2011***
***Enter Password Pilot***
Set the Processing Date
Enter the following information: Enter your Initials: X X X
Enter the Processing Date: 01/01/2011
The processing date entered above will be the date on each transaction completed during this session. The processing date is maintained by the UAN software and doesn’t automatically change on its own; it only changes when you change it on the User Login Screen. This date can only be moved forward, not backward.
Overview
Departments are created to organize the jobs of employees. A Department Id code must be established prior to setting up any employee information.
Steps to Access
Select Payroll. Select Maintenance. Select Entity File. Select Department. Select Record.
Remember to select Process after entering each record: Department Id ADMN Department Name: Administration Department Id CEMT Department Name: Cemetery Department Id ROAD Department Name: Road Maintenance Department Id
FIRE
Department Name: Fire
Exercise #1-1

Uniform Accounting Network – Payroll Training
Payroll Maintenance Entity File 1. Department
01: 2 of 2
Edit
This function allows the user to change or modify the Department Name. The Department Id Code cannot be modified.
Display
This function is used to view all the Department Id’s that were created and processed in the Record option.
Delete
This function is used to delete Department Id’s that are no longer needed. Deletion is not permitted if any employee jobs have been established that utilize that Department Id.
Reports
You have the choice of reviewing reports by displaying them on the screen or printing them. Click on your selection to make your choice. Select Payroll. Select Reports. Select Information and Status Reports. Select Entity. Select Department Listing.

Uniform Accounting Network – Payroll Training
Payroll Maintenance Entity File 2. Payee
***Load Training Exercise 02 Payee***
Overview
The system has five preset Payee Ids, one each for Federal Tax (includes Social Security and Medicare), State Tax, OPERS, OP&FPF and ODJFS. These payees should not be added again, as the system automatically associates the preset payees with their corresponding withholdings. This option is used to add payees that will correspond to any additional withholdings created by the user for remittance of local taxes, school taxes, union withholdings and for miscellaneous withholding payees (agencies) such as child support agencies, garnishments, health insurance and deferred compensation. The payee must be established prior to creating an additional withholding to those already established in the system. The OPERS and OP&FPF payees must have the Employer No/Tax Id 1 (Id 2 for OPERS-L) entered without any dashes since the program will automatically provide them in the printing of the reports. The OPERS ID # is a five digit code and the OP&FPF ID # is a four digit code. OP&FPF issues each employer an agreement code that identifies the employer and the payment frequency. Each employer has a unique agreement code depending on the number of frequencies they report. An example of an agreement number is 0928FB1. There are four elements that make up the agreement code. The first element is the four-digit employer code. This four-digit number is entered in the UAN software by going to Payroll, Maintenance, Entity File, and Payee. Select Edit and bring up the payee for OP&FPF. Enter the employer code in the field labeled Employer No/Tax Id 1. The ODJFS payee will need to be edited for reporting purposes. The ODJFS payee record defaults the current limit amount in the Wage Limit box. The Wage Limit information can be accessed in the ODJFS Edit Payee function if revisions are necessary. The Payee name and the Employer No/Tax Id 1 are required fields. The Payee Id cannot be edited after it has been recorded and processed. Other entries can be modified as necessary. For example, if your entity changes banks and you need to change the name of the bank, you can edit the payee, “Federal,” to reflect the changes.
Edit Payee
This function is used to change or modify the payee information. When initially setting up the payroll system, edit the preset payees to reflect actual remittance name and address information. The payee information for these payees is defaulted to print “X’s” in the place of letters and “9’s” in the place of numbers. Delete the X’s, the 9’s and enter the information on the following page.
02: 1 of 4

Uniform Accounting Network – Payroll Training
Payroll Maintenance Entity File 2. Payee
Steps to Access
Select Payroll. Select Maintenance. Select Entity File. Select Payee. Select Edit.
Verify the following information and select Process to save any changes:
Payee No: 1 2 Payee Id: FEDERAL OHIO Payee Name: First Bank of Ohio Ohio Department of Taxation Address 1: 110 Main Street 30 East Broad Street Address 2: PO Box 3 City: Anytown Columbus State: OH OH Zip: 43210-0114 43229 Phone: (555)222-2222 (888)405-4039 Fax: E-Mail Address:
(614)644-7313
Wage Limit: N/A N/A Employer No/Tax Id 1: 31-3456789 51-234567 Employer No/Tax Id 2: Print Y/N
(Optional: to print Tax Id;
Prints on top of warrant stub)
Payee No: 3 4 5 Payee Id: OPERS OP&FPF ODJFS Payee Name: Ohio Public
Employees Retirement System
Ohio Police and Fire Pension Fund
Ohio Department Of Job & Family Services
Address 1: 277 E. Town Street Dept. L-2521 PO Box 182404 City: Columbus Columbus Columbus State: OH OH OH Zip: 43215 43260-2521 43218-2404 Phone: Fax: E-Mail Address:
(800)222-7377 (614)228-2975 (877)644-6562
Wage Limit: N/A N/A 9000.00 Employer No/Tax Id 1: 88880 1064 0802295-00-9 Employer No/Tax Id 2: Print Y/N
(Only for OPERS-L) (Optional)
(Optional)
(Optional)
Exercise #2-1
02: 2 of 4

Uniform Accounting Network – Payroll Training
Payroll Maintenance Entity File 2. Payee
Record Payee
This option establishes payee files which will contain the payroll withholding payee remittance name and address information as well as phone, fax numbers and employer/tax Id numbers.
Steps to Access
Select Payroll. Select Maintenance. Select Entity File. Select Payee. Select Record.
Exercise #2-2
Record the following information and select Process after each Payee is entered: Payee No: 7 8 9 Payee Id: ANYTOWN DEF COMP SCHOOL Payee Name: Anytown Income
Tax Department Ohio Public Employees Deferred Comp.
Ohio School District Income Tax
Address 1: 535 High St. 172 East State St. 30 E. Broad St. Address 2: PO Box 2211 City: Anytown Columbus Columbus State: OH OH OH Zip: 43210-2211 43215 43215 Phone: (614)555-5555 (877)644-6457 (614)433-7711 Extension: Fax: E-Mail Address: Wage Limit:
Employer No/Tax Id 1: 42-9874578 55424-4433 51-234567 Employer No/Tax Id 2: Print Y/N
(Optional)
(Optional)
(Optional)
02: 3 of 4

Uniform Accounting Network – Payroll Training
Payroll Maintenance Entity File 2. Payee
Delete Payee
This function is used to delete a payee that has been added to the system. Payees cannot be deleted if a withholding has been established which utilizes the payee, or if withholding warrants have been issued to the payee during the current year. Unused payees can be deleted at the beginning of a new year. The preset payees cannot be deleted.
Reports
Select Payroll. Select Reports. Select General Payroll Reports. Select Payee. Select Payee Information.
02: 4 of 4

Uniform Accounting Network – Payroll Training
Payroll Maintenance Entity File 3. Withholding
03: 1 of 4
Overview
The preset withholdings are displayed in the following list:
1. Ohio Income Tax 11. OPERS-G Salary Reduction 2. Federal Income Tax 12. OPERS-L Regular 3. Medicare (only) 13. OPERS-L Fringe Benefit 4. Medicare Fringe Benefit 14. OPERS-L Salary Reduction 5. Medicare-FICA 15. OP&FPF – Regular 6. Medicare Fringe-FICA 16. OP&FPF – Fringe Benefit 7. Social Security-FICA 17. OP&FPF – Salary Reduction 8. Social Security Benefit 18. Supplemental State Withholding (edit) 9. OPERS-G Regular 19. Supplemental Federal Withholding (edit)
10. OPERS-G Fringe Benefit (20-29 Reserved for UAN) In the OPERS-G, G stands for government and in the OPERS-L, L stands for law enforcement. If Medicare and Social Security are withheld, then both Medicare-FICA and Social Security-FICA need to be added to the employee’s withholdings. If only Medicare is withheld, choose ‘Medicare’. If the appropriate preset withholdings listed above are not used and created through miscellaneous withholdings instead, the system will not be able to track information on the withholding reports properly, including W-2’s. Note: For Villages with OP&FPF employees, an additional field beside the OP&FPF Frequency field must be filled in. After the frequency is selected, the job must also be flagged as FIRE or POLICE. The entry will determine the correct OP&FPF withholding rate. The Processing Types that can be added are as follows:
AØ Cafeteria Plans (deductions not subject to Federal and State Taxes, Medicare, Social Security, School and Local Taxes)
BØ Deferred Deductions (not subject to Federal, State and School Taxes) FØ Local Tax GØ School Tax (based on Federal exemptions declared by employee) KØ Miscellaneous/Union Deduction
Important: The income tax tables are updated by a UAN install CD mailed at the end of each year or at the beginning of each year. You should install all new releases as soon as you receive them.

Uniform Accounting Network – Payroll Training
Payroll Maintenance Entity File 3. Withholding
03: 2 of 4
Edit Withholding
This function allows changes or modifications to a withholding established by the user. It also allows limited modifications to the preset withholding information. When initially setting up the payroll system, check the payment/deposit frequencies for the preset withholdings to ensure they agree with the frequency in which you make remittance to the corresponding withholding payees. If they do not agree, change the corresponding payment/deposit frequency. Processing Types cannot be changed once assigned to a withholding description.
Steps to Access
Select Payroll. Select Maintenance. Select Entity File. Select Withholding. Select Edit. Search: 9 OPERS-G Regular If you are billed by OPERS or OP&FPF for the employer’s share contribution, make sure that the “Billed” field is marked “Y” for yes. The check for the employer’s share contribution will be paid on the accounting side of the system. If “N” is indicated, the system will calculate the employer’s share contribution, and automatically include it with the employees’ withholdings on the appropriate remittance check.
Record Withholding
This function allows the user to add payroll withholdings in addition to the withholdings preset in the system. The Withholding Id field will print on the pay stub exactly as it is typed into that field. The Payee for this withholding must be established before the withholding can be created. If the wrong payee is selected, the withholding warrant will be generated to the wrong payee.
Steps to Access
Select Payroll. Select Maintenance. Select Entity File. Select Withholding. Select Record.

Uniform Accounting Network – Payroll Training
Payroll Maintenance Entity File 3. Withholding
03: 3 of 4
ecord the following information and select Process after each payroll withholding is entered:
0 e Tax
R
Withholding Id: 3 Anytown Incom Processing Type: FØ Local Tax W-2 Abbreviation: Payment/Deposit Frequency:
hly
Anytown 4 Mont
Wage Record Limit Amount: $ 0.00 Yearly Limit Amount: $ 0.00 Employee Share Value Type:
Value:
%
Rate 1.0
Payee Number: 7 Address: elect) (S
1 p 2Withholding Id: 3 Deferred Com 3 School
Processing Type: ithholdings
GØ School Tax BØ Deferred W
School District: 6789 Payment/Deposit Frequency: 4 Monthly terly 3 Quar Wage Record Limit Amount: $ 0.00 $ 0.00 Yearly Limit Amount: $ 0.00 $ 0.00 Employee Share Value Type:
Value: t
.00
5%
Amoun$0
Rate 0.7
Payee Number: 8 9 Address: elect) (S (Select)
Earned Income Only
ldings cannot be deleted. Only those withholdings dded by the user are eligible for deletion.
ll Reports.
This function is used to delete a payroll withholding. A payroll withholding cannot be deleted if it has current year-to-date withholdings, or if an employee record exists which utilizes the withholding. Also, preset system withho
Delete Withholding
a
Reports
Select Payroll. Select Reports. Select General Payro

Uniform Accounting Network – Payroll Training
Payroll Maintenance Entity File 3. Withholding
03: 4 of 4
elect Withholding Information Listing.
bles the employee’s share of withholdings to be pdated for multiple employees at one time.
ot available until employee’s information is entered.)
. Employee Goal must be allocated among the withholding field(s).
al is allocated, the Distributed Value will increase and the Undistributed alue will decrease.
lue must equal Employee Goal value before the Change Global Withholdings can e processed.
Select Withholding. S
The Change Global Withholdings area ena
Change Global Withholdings
u
Steps to Access
Select Payroll. Select Maintenance. Select Change Global Withholdings. (N
Data Entry
Required Fields 1. Withholding Id must be selected from the drop down menu. 2
As the Employee Go
Data Validation
V Distributed vab

Uniform Accounting Network – Payroll Training
Payroll Maintenance Entity File 4. Frequency
04: 1 of 2
Overview
Pay Frequency Id’s are maintained by UAN and cannot be added or deleted. The Edit function is used to set the Last Calendar Day of the Last Pay Period date, Start of Next Pay Period date and the End of Next Pay Period date to correspond with the entity’s actual pay period dates and withholding remittance periods. This function is required to set the internal day counter in the software.
Edit Frequency
The edit function only needs to be performed once during the payroll system setup phase but can be used to change pay period dates. Pay period dates may also be changed when recording wage transactions.
Optional fields: OP&FPF Police Agreement Number OP&FPF Fire Agreement Number Note: The optional fields above apply to those employers that must report to OP&FPF. The agreement number entered in this field can be located in the last digit of the OP&FPF Agreement Code assigned by OP&FPF.
Steps to Access
Select Payroll. Select Maintenance. Select Entity File. Select Frequency. Select Edit.
Uniform Accounting Network – Payroll Training
Payroll Maintenance Entity File 4. Frequency
04: 2 of 2
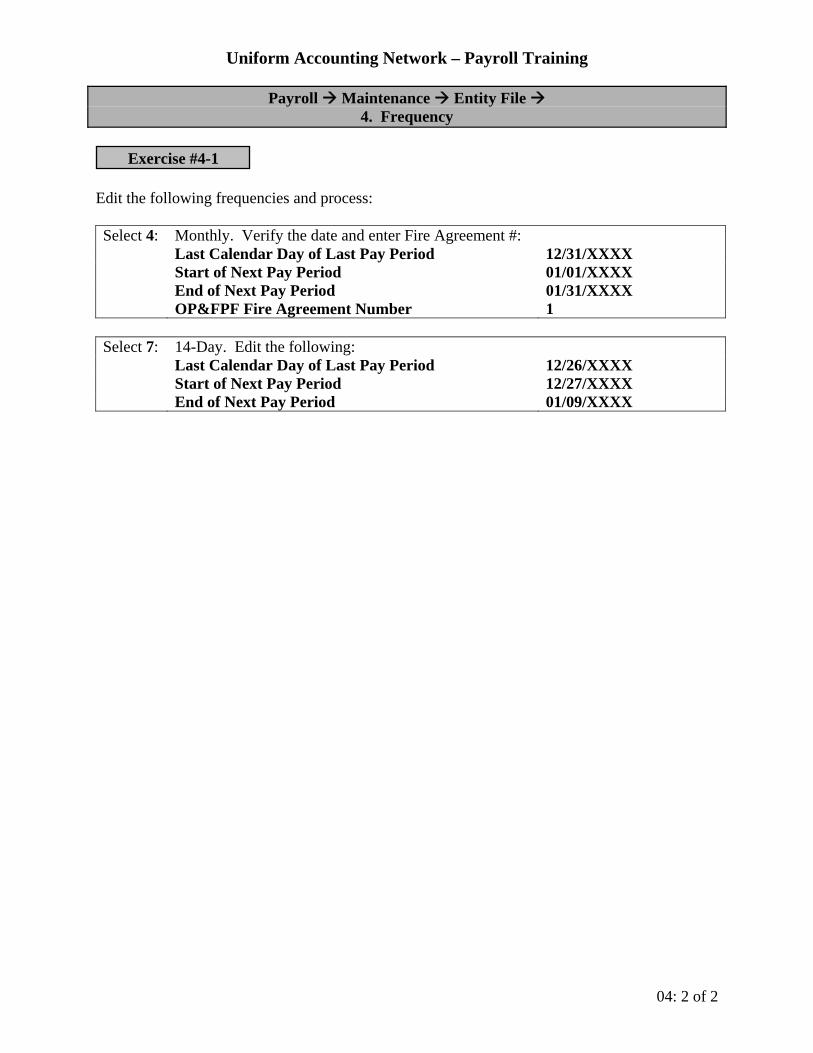
Exercise #4-1
Edit the following frequencies and process: Select 4: Monthly. Verify the date and enter Fire Agreement #: Last Calendar Day of Last Pay Period 12/31/XXXX Start of Next Pay Period 01/01/XXXX End of Next Pay Period
OP&FPF Fire Agreement Number 01/31/XXXX 1
Select 7: 14-Day. Edit the following: Last Calendar Day of Last Pay Period 12/26/XXXX Start of Next Pay Period 12/27/XXXX End of Next Pay Period 01/09/XXXX

Uniform Accounting Network – Payroll Training
Payroll Maintenance Entity File 5. Earning
05: 1 of 3
Overview
The Record Earning application is used to create additional earnings for employees. Additional earnings may be added if the earning does not exist in the preset earnings (i.e. Bereavement Leave, Jury Duty Leave), or if an additional earning of the same type is needed. An additional earning of the same type may be needed because once an earning is used by the employee job, that earning is no longer available to be used by the same employee job. The following table displays the earnings preset in the system (standard earnings) and the number of additional earning types available. Processing
Type Processing Type Name
Earning Type
Earning Description
Available Earnings Per Type that can be
Added 10 Taxable Earnings 100 Salary 101-199 10 Taxable Earnings 200 Hourly Wages 201-299 10 Taxable Earnings 300 Overtime Wages 301-399 10 Taxable Earnings 400 Per Item Wages 401-499 500 Comp Time 510 Holiday Leave 520 Personal Leave 530 Sick Leave 540 Vacation Leave
61 Leave-Comp Time Earned
600 Other Leave 601-699
10 Taxable Earnings 700 Tax Item 701-799 20 Non-Taxable Earnings 800 Non-Tax Item 801-899 30 Non-State Retirement
Earnings/3rd Party Sick Pay
900 Non-Retirement 901-979
80 Value of Non- Cash Benefit
980 Non-Cash Benefit
981-989
The shaded areas of the above table indicate earning types for which only one code can exist. No additional earnings of the same type can be added. For example, only one “Sick Leave” earning can exist. Other compensated leaves can be added if they do not exist in the earnings list. Such leaves can be added if necessary using processing type 61, Leave/Comp Time Earned. If the appropriate preset leave earning type is not used and another is created through an hourly or salary earning type, the system will not be able to track leave properly. This also applies to the overtime earning types. If overtime is set up using an hourly wage instead of an overtime wage, overtime wages will not be reflected accurately on the payroll reports.

Uniform Accounting Network – Payroll Training
Payroll Maintenance Entity File 5. Earning
05: 2 of 3
Steps to Access
Select Payroll. Select Maintenance. Select Entity File. Select Earning. Select Record. Processing
Type
Description
10 Taxable Earnings 20 Non-Taxable Earnings 30 Non-State Retirement Earnings/3rd Party Sick Pay 61 Leave/Comp Time Earned 80 Value of Non-Cash Benefit - used for W-2
Additional Earning Types Available:
Earning Type
Description
Earning Type Description
101-199 Salary 701-799 Tax Items 201-299 Hourly Wages 801-899 Non-Taxable 301-399 Overtime Wages 901-979 Non Retirement 401-499 Per Item Wages 980-989 Non Cash Benefit 601-699 Other Leave 990-999 (Reserved for UAN)
Note: Those employers that must file with OP&FPF must assign all OP&FPF earnings an earning type. Regular earnings will come up under the processing type of Taxable Earnings and leave earnings will come up under the processing type of Leave/Comp Time Earned. Selections are made from the Search option in the OP&FPF Earning Type box
Record the following information and select Process after each earning is entered: Processing Type: 10 Taxable Earnings Earning Type: 301 Overtime Wages Earning: Double Time Overtime Rate: 2.0 (No OP&FPF Earning Type)
Processing Type:
61 Leave/Comp Time Earned
Earning Type: 601 Leave Earning: Bereavement Leave (No OP&FPF Earning Type)
Exercise #5-1

Uniform Accounting Network – Payroll Training
Payroll Maintenance Entity File 5. Earning
05: 3 of 3
Processing Type: Earning Type: Earning:
10 Taxable Earnings 201 Hourly Wages Wages – Cemt
(No OP&FPF Earning Type)
Edit Earning
This function is used to change or modify the earning description for the standard earning types or for earning types that have been added. The description prints on the pay stub. The Processing Type and the Earning Type cannot be changed.
Exercise #5-2
Select Payroll. Select Maintenance. Select Entity File. Select Earning. Select Edit. Processing Type: 10 Taxable Earnings Earning Type: 400 Per Item Wages Earning: Grave Openings (No OP&FPF Earning Type)
Processing Type: 10 Taxable Earnings Earning Type: 100 Salary Earning: OP&FPF Earning Type:
Salary 0 Regular Pay
Delete Earning
This function is used to delete an earning established by the user. Standard earnings cannot be deleted. In addition, earnings cannot be deleted if an employee record exists which utilizes the earning.
Reports
Select Payroll. Select Reports. Select Information and Status Reports. Select Entity. Select Earning Information Listing.

Uniform Accounting Network – Payroll Training
Payroll Maintenance 6. Additional
06: 1 of 2
Overview
This optional utility can be used to record up to 24 fields of special employee information that may be established for each employee. Information such as emergency contact, an additional address, and certifications are some of the items which can be established. An Information Identification Code is automatically assigned by the system and cannot be changed. An entry for each Information Label and Information Description is entered with the record function. The label and the description fields each have a maximum of 17 characters per entry. These may be edited as necessary. Under Employee History (Payroll, Maintenance, Employee History), the information field allows for 18 characters.
Steps to Access
Select Payroll. Select Maintenance. Select Entity File. Select Additional. Select Record. Record the following information and select Process after entering each field : Information Identification Code: 1 (Defaulted by system) Information Label: Emergency Phone # Information Description: --- Information Identification Code: 2 (Defaulted by system) Information Label: Emergency Contact Information Description: Name of Contact Information Identification Code: 3 (Defaulted by system) Information Label: Safety Workshop Information Description: Attendance Date
Edit/Delete Additional
The label and description fields can be edited as necessary. The Information Identification Code cannot be changed. The delete function will delete the custom fields whether there is information entered for employees or not.

Uniform Accounting Network – Payroll Training
Payroll Maintenance 6. Additional
06: 2 of 2
Reports
This report is a list of the employee’s additional information. It can be viewed after the employees have been set up and information entered into the fields. Select Payroll. Select Reports. Select Information and Status Reports. Select Employee. Select Additional Information. Select Entity Additional Information.

Uniform Accounting Network – Payroll Training
Payroll Maintenance Employee History 7. Employee History - #1
Morton
07: 1 of 6
***Load Training Exercise 07 Employee History #1***
The Employee History application contains all of the maintenance functions for setting up an employee. These maintenance functions include the employee’s information, jobs, earnings, withholdings and additional employee information. The information can be added, edited, deleted or displayed in this application.
This function establishes basic information for employees which is required to process payroll. Included is the following information: the employee’s name, address, phone number, Social Security number, employment status, EFT information, OPERS Member Date, Federal and State Tax exemption information, as well as other pertinent employee information.
Select Payroll. Select Maintenance. Select Employee History. Select Record. Select Information. Record the following employee information and process: Employee Id: MORTONBC Combine Warrants: (checked) Employee Name: Bernie C. Morton Leave Balances: (checked) Address: 123 Main Street Salary Accounts: (checked) Anytown, OH 43210 Phone: (555)789-7777 Federal Status: Single SSN: 987-65-4321 Federal Exemptions: 1 Birth Date: 04/22/1964 State Exemptions: 1 Sex: M OPERS Member Date:
OP&FPF Member Date: 01/27/1989
N/A Ethnic Group: BØ Black/African OP&FPF Hours Base: 0.00 Status: ØØ Regular Employee Print SS#
Print Address: Active:
(unchecked) (checked) (checked)
Steps to Access
Information Overview
Employee History Overview

Uniform Accounting Network – Payroll Training
Payroll Maintenance Employee History 7. Employee History - #1
Morton
07: 2 of 6
Edit/Delete
These functions are used to change, modify or delete an employee record after it has been processed. An employee record cannot be deleted if time cards have been posted for that employee.
Job Overview
This function is used to assign a job(s) to each employee record.
Steps to Access
Select Payroll. Select Maintenance. Select Employee History. Select Record. Select Job. Record the following job information and process: Employee Id: MORTONBC Job Id: Ø1 (defaults) Employee Position: Worker Position Type: Ø5 – Other OP&FPF Frequency: (for OP&FPF employees) Class: Hired Unemployment: (checked) Department Id: Road Date Hired: 01/27/1989 Active: (checked)
Message: This employee was hired after March 31, 1986 and should be contributing to Medicare unless this employee is contributing to FICA (Medicare FICA and Social Security combined).

Uniform Accounting Network – Payroll Training
Payroll Maintenance Employee History 7. Employee History - #1
Morton
07: 3 of 6
Earning Overview
This function is used to add different types of earnings that an employee is eligible for to each of the employees jobs. The first earning added will display the following message:
This job does not have a main earning type. The record you are currently adding will be the main earning type for this job.
An appropriation account code must be assigned to each earning. Optional Fields: Prorate Leave: This checkbox selection is available for leave types 520, 530, 540 and all 600’s. This will allow the selected leave types to earn leave based on hours worked rather than pay period. Additional fields will be displayed on the screen when the Prorate Leave option is selected. Hours Earned, Per Hours Worked and Annual Maximum Leave fields will need to be entered when prorate leave is selected. Include Leave in Normal Hours: This checkbox selection can be utilized for all 500 and 600 leave types. This field is used to determine whether this type of leave is included or excluded from the hours worked calculation for prorated leave.
Steps to Access
Select Payroll. Select Maintenance. Select Employee History. Select Record. Select Earning.

Uniform Accounting Network – Payroll Training
Payroll Maintenance Employee History 7. Employee History - #1
Morton
07: 4 of 6
Record the following earning information and select Process: Employee Id: MORTONBC MORTONBC MORTONBC Job Id: MORTONBC 01 MORTONBC 01 MORTONBC 01 Earning Type: 200 Hourly Wages 201 Wages-Cemt 300 Overtime Wages Frequency: 7 - 14-Day 7 - 14-Day 7 - 14-Day Pay Period Hours/Items: 70 10 0 Pay Amount: 12.75 12.75 12.75 Overtime Rate 1.5 Account Code/Name: 2011-330-190-0000 1000-410-190-0000 2011-330-190-0000 Date of Last Raise: Active: (checked) (checked) (checked) Main Earning Type (checked) (unchecked) (unchecked)
Employee Id: MORTONBC MORTONBC MORTONBC Job Id: MORTONBC 01 MORTONBC 01 MORTONBC 01 Earning Type: 510 Holiday Leave 530 Sick Leave 540 Vacation Leave Frequency: 7 - 14-Day 7 - 14-Day 7 - 14-Day Pay Period Hours/Items: 0 4.6 Hrs Per Pay 0 Pay Amount: Establish Leave Hours:
12.75 0
12.75 0
12.75 0
Maximum Leave Balances: 0 350.00 0 Account Code/Name: 2011-330-190-0000 2011-330-190-0000 2011-330-190-0000 Date of Last Raise: Active: (checked) (checked) (checked) Main Earning Type: Included in normal hours
(unchecked) (unchecked)
(unchecked) (unchecked)
(unchecked) (unchecked)
Withholding Overview
This function associates payroll withholdings and employer share payments to the various earnings that have been established for each employee. Federal and State withholdings are automatically added to an employee job when the first withholding is recorded for that specific job.
Steps to Access
Select Payroll. Select Maintenance. Select Employee History. Select Record. Select Withholding.

Uniform Accounting Network – Payroll Training
Payroll Maintenance Employee History 7. Employee History - #1
Morton
07: 5 of 6
Record the following withholding information and select Process: Employee Id: MORTONBC MORTONBC MORTONBC Job Id: MORTONBC 01 MORTONBC 01 MORTONBC 01 W/H Id: 3 Medicare 9 OPERS-G Regular 31 Deferred Comp Select Edit. AA Code(Employee): Defaulted Defaulted Defaulted AA Code(Employer): 2011-330-213-0000 2011-330-211-0000 Value(Employee): 1.450% 10.00% $75.00 (Edit Amt.) Value(Employer): 1.450% 14.00% (See ‘Skip Select Save. Deductions’ below)
Message: When using Medicare you must also have a State Retirement to process unless all earnings for this job are non retirement earnings.
Skip Deductions (optional)
Select Yes. Select Select Dates. Click on the pay period end date for each of the pay periods that the withholding is to be deducted from the employee’s wages. (The selected dates will change from black to red when selected.) (For training purposes, do not select any dates and change Skip Deductions back to ‘No.’)
Additional (Special Information)
This optional utility is used to add the special employee information that has been established in the Entity File, Additional function. The information may be entered for any or all of the special fields that been created for the additional employee information for each employee. A maximum of 18 characters can be entered for each field.
Steps to Access
Select Payroll. Select Maintenance. Select Employee History. Select Record. Select Additional.

Uniform Accounting Network – Payroll Training
Payroll Maintenance Employee History 7. Employee History - #1
Morton
07: 6 of 6
Record the following additional information and process: Employee Id: MORTONBC Emergency Phone #: (419)777-7890 Emergency Contact/Name of Contact: Barbara Morton Safety Workshop /Attendance Date: Feb. 2, 2009
Edit/Delete Additional
The label and description fields can be edited as necessary. The Information Identification Code cannot be changed. The delete function will delete the custom fields whether there is information entered for employees or not.
Reports
Select Payroll. Select Reports. Select Information and Status Reports.
Select Employee. Select Additional Information.
Employee Additional Information. Entity Additional Information.
Select General Information. Select Information Sheets.
Employee. Blank.
Select Listing. Select Mailing Labels. Select Revision Due Date.

Uniform Accounting Network – Payroll Training
Payroll Maintenance Employee History 8. Employee History - #2
Thompson
08: 1 of 5
***Load Training Exercise 08 Employee History #2***
Overview
This exercise will follow the same steps as the previous exercise #7 (Employee History - #1). Each function is selected to complete the employee’s history.
Steps to Access: Information
Select Payroll. Select Maintenance. Select Employee History. Select Record. Select Information. Record the following employee information and process: Employee Id: THOMPSONGT Combine Warrants: (checked) Employee Name:
Greg T. Thompson Leave Balances: (checked)
Address: 55422 Westchester Dr. Salary Accounts: (checked) Anytown, OH 43210 Phone: (555)789-1234 Federal Status: Married SSN: 123-45-6789 Federal Exemptions: 2 Birth Date: 05/07/1961 State Exemptions: 2 Sex: M OPERS Member Date:
OP&FPF Member Date:
11/22/1996 01/08/1996
Ethnic Group: AØ White OP&FPF Hours Base: 160.00 Status: ØØ Regular Employee Print SS#
Print Address: Active:
(unchecked) (checked) (checked)
Note: The OP&FPF Hours Base is the amount of hours the member is scheduled to work in the earning periods. The hours base will usually not change from month to month with the exception of the months in which three bi-weekly or five weekly earning periods occur, and for fluctuating fire schedules.

Uniform Accounting Network – Payroll Training
Payroll Maintenance Employee History 8. Employee History - #2
Thompson
08: 2 of 5
Steps to Access: Job
Select Payroll. Select Maintenance. Select Employee History. Select Record. Select Job. Record each of the following jobs information and process each entry: Employee Id: THOMPSONGT Job Id: Ø1 (default) Employee Position: OP&FPF Pickup Type:
Fire A – Ed. Allowance
Position Type: Ø5 – Other OP&FPF Frequency: Monthly Class: Hired Unemployment: (checked) Department: Fire Date Hired: 01/08/1996 Active: (checked)
Note: The OP&FPF Pick-Up Type identifies the proper pick-up type for OP&FPF members. The pick-up type is a single letter (A, B, C or D) and is assigned by OP&FPF. For each OP&FPF member’s job, a pick-up type must be assigned. Employee Id: THOMPSONGT Job Id: Ø2 (default) Employee Position: OP&FPF Pickup Type:
Cemetery (none)
Position Type: Ø5 – Other OP&FPF Frequency: (none) Class: Hired Unemployment: (checked) Department: Cemetery Date Hired: 11/22/1996 Active: (checked)

Uniform Accounting Network – Payroll Training
Payroll Maintenance Employee History 8. Employee History - #2
Thompson
08: 3 of 5
Steps to Access: Earning Job 01
Select Payroll. Select Maintenance. Select Employee History. Select Record. Select Earning. Record the following earning information for Job 01 and process: Employee Id: THOMPSONGT Job Id: THOMPSONGT 01 Earning Type: 100 Salary Frequency: 4 - Monthly Pay Period Hours/Items: 1.0 Pay Amount: $800.00 Account Code/Name: 2191-220-190-0000 Date of Last Raise: 01/08/2007 Active: (checked)
Steps to Access: Withholding Job 01
Select Payroll. Select Maintenance. Select Employee History. Select Record. Select Withholding. Record the following withholding information for Job 01 and process: Employee Id: THOMPSONGT THOMPSONGT THOMPSONGT Job Id: THOMPSONGT 01 THOMPSONGT 01 THOMPSONGT 01 W/H Id: 3 Medicare 15 OP&FPF-Regular 30 Anytown Inc.Tax Select Edit. AA Code(Employee): Defaulted Defaulted Defaulted AA Code(Employer): 2191-220-213-0000 2191-220-215-0000 Value(Employee): 1.450% 10.000% 1.000% Value(Employer): 1.450% 24.000% Select Save.

Uniform Accounting Network – Payroll Training
Payroll Maintenance Employee History 8. Employee History - #2
Thompson
08: 4 of 5
Steps to Access: Earning Job 02
Select Payroll. Select Maintenance. Select Employee History. Select Record. Select Earning. Record the following earning information for Job 02 and process: Employee Id: THOMPSONGT Job Id: THOMPSONGT 02 Earning Type: 400 Grave Openings Frequency: 7 - 14-Day Pay Period Hours/Items: 0 Pay Amount: $125.00 Account Code/Name: 1000-410-190-0000 Date of Last Raise: Active: (checked)
Select Payroll. Select Maintenance. Select Employee History. Select Record. Select Withholding. Record the following withholding information for Job 02 and process: Employee Id: THOMPSONGT THOMPSONGT THOMPSONGT Job Id: THOMPSONGT 02 THOMPSONGT 02 THOMPSONGT 02 W/H Id: 3 Medicare 9 OPERS-G Reg. 30 Anytown Inc. Tax Select Edit. AA Code(Employee): Defaulted Defaulted Defaulted AA Code(Employer): 1000-410-213-0000 1000-410-211-0000 Value(Employee): 1.450% 10.00% 1.000% Value(Employer): 1.450% 14.00% Select Save.
Steps to Access: Withholding Job 02

Uniform Accounting Network – Payroll Training
Payroll Maintenance Employee History 8. Employee History - #2
Thompson
08: 5 of 5
Steps to Access: Additional
Select Payroll. Select Maintenance. Select Employee History. Select Record. Select Additional. Record the following additional information and select Process: Employee Id: THOMPSONGT Emergency Phone # (937)333-4567 Emergency Contact Emily Thompson Safety Workshop/Attendance Date 11/22/2008

Uniform Accounting Network – Payroll Training
Payroll Maintenance Employee History 9. Employee History - #3
Fiscal Officer
09: 1 of 3
***Load Training Exercise 09 Employee History #3***
Overview
This exercise will follow the same steps as previous exercise #7 (Employee History - #1). Each function is selected to complete the employee’s history. You may use your own information to set up the fiscal officer or use the information for Chris King in this exercise.
Steps to Access: Information
Select Payroll. Select Maintenance. Select Employee History. Select Record. Select Information. Record the following employee information and select Process: Employee Id: KINGCC Combine Warrants: (checked) Employee Name: Chris C. King Leave Balances: (checked) Address: 97 Maple Drive Salary Accounts: (checked) Anytown, OH 43210 Phone: (614)777-1234 Federal Status: Married SSN: 999-88-7777 Federal Exemptions: Ø Birth Date: (optional) State Exemptions: Ø Sex: M/F (your choice) OPERS Member Date:
OP&FPF Member Date:
11/07/1997 N/A
Ethnic Group: (Optional) OP&FPF Hours Base: 0.00 Status: ØØ Regular Employee Print SS#
Print Address: Active:
(unchecked) (checked) (checked)
Steps to Access: Job
Select Payroll. Select Maintenance. Select Employee History. Select Record. Select Job.

Uniform Accounting Network – Payroll Training
Payroll Maintenance Employee History 9. Employee History - #3
Fiscal Officer
09: 2 of 3
Record the following job information and select Process: Employee Id: KINGCC Job Id: Ø1 (default) Employee Position: Fisc. Officer Position Type: Ø2 Township Fiscal Officer OP&FPF Frequency: Class: Elected Unemployment: (unchecked) Department: Administration Date Hired: 11/07/1997 Active: (checked)
Steps to Access: Earning
Select Payroll. Select Maintenance. Select Employee History. Select Record. Select Earning. Record the following earning information and select Process: Employee Id: KINGCC Job Id: KINGCC 01 Earning Type: 100 Salary Frequency: 4 - Monthly Pay Period Hours/Items: 1.0 Pay Amount: $1,250.00 Account Code/Name: 1000-110-121-0000 Date of Last Raise: 01/01/2007 Active: (checked)
Steps to Access: Withholding
Select Payroll. Select Maintenance. Select Employee History. Select Record. Select Withholding.

Uniform Accounting Network – Payroll Training
Payroll Maintenance Employee History 9. Employee History - #3
Fiscal Officer
09: 3 of 3
Record the following withholding information and select Process: Employee Id: KINGCC KINGCC KINGCC Job Id: KINGCC 01 KINGCC 01 KINGCC 01 W/H Id: 3 Medicare 9 OPERS-G Reg. 32 School Tax Select Edit. AA Code(Employee): Defaulted Defaulted Defaulted AA Code(Employer): 1000-110-213-0000 1000-110-211-0000 Value(Employee): 1.450% 10.000% 0.750% Value(Employer): 1.450% 14.000% Select Save.
Steps to Access: Additional
Select Payroll. Select Maintenance. Select Employee History. Select Record. Select Additional. Record the following additional information and process: Employee Id: KINGCC Emergency Phone # (419)667-4321 Emergency Contact Pat King Safety Workshop/Attendance Date No

Uniform Accounting Network – Payroll Training
Payroll Transactions Wages 10. Wages - Record
10: 1 of 2
**Load Payroll Training Exercise “10 Wages - Record” ***Change Date to 01/14/2011
Overview
The wages transaction option is used to enter wage information for specific employee(s) job(s). Selections are made by wage type, departments and frequencies or by individual choice of departments and/or frequencies. The pay frequency can be edited if necessary to adjust start date or end date of the payroll period.
Set the Processing Date
Enter the following information: Enter your Initials: X X X
Verify the Processing Date: 01/14/2011
Steps to Access-Record
Select Payroll. Select Transactions. Select Wages. Select Record. Select Wage Type/Departments/Frequency. Enter wage information for all 14-Day employees and process. Select: Wage Type: Regular (Manual) (Conversion) Departments: Select All Frequencies: Start Date: End Date:
14-day 12/27/2010 01/09/2011
(Monthly – unchecked)
Select: Employees/Jobs Select All

Uniform Accounting Network – Payroll Training
Payroll Transactions Wages 10. Wages - Record
10: 2 of 2
Missing Information
If any necessary information is missing, wages cannot be recorded for those employees and a message is displayed to view a report of the missing information. Message: Do you want to record wage records for the selected employees/jobs? Select Yes. Message: There is 1 job that does not have all the information needed to record a wage record. Do you want a report of the missing information? Select Yes. Select Screen. Message: Do you want to continue recording wages without the job that has missing information? Select No. Close Preview Window (X)
Use Drop Down Menu
Select Payroll. Select Maintenance. Select Employee History. Select Edit, Information. Select Employe ID: BENNETTLS.
Enter 01/01/2000 for OPERS Member Date. Select Process. Select Cancel. Select Process. Message: Do you want to record wage records for the selected employees/jobs? Select Yes. Message: 5 wage records recorded

Uniform Accounting Network – Payroll Training
Payroll Transactions Wages Edit 11. Wages - Edit
11: 1 of 2
**Load Payroll Training Exercise “11 Wages - Edit” *** Date to 01/14/2011
Edit - Overview
The Edit function is used to edit wage information such as hours worked, leave time hours accrued and/or used and the appropriation account codes charged for a specific employee job. This function is used to makes changes to the default information contained in Employee History and processed in the Record function. By selecting the Wage Id/Record, all of the wage information for the specified employee Job Id will be displayed on the screen including the employee’s name, department and position, Social Security number, the pay period start and end dates, the gross and net payroll figures, and detailed wages and withholdings/credits descriptions. For hourly employees, only paid and earned leave and comp time records can be changed. Used leave and comp time records are not available for editing. When leave, comp time, vacation or holiday hours are entered during editing, the hours are deducted from the main earning type hours. For salary employees, only used and earned leave and comp time records are available to edit.
Steps to Access-Edit
Select Payroll. Select Transactions. Select Wages. Select Edit. Select Wage Type: Regular. Select Edit for each of the following wage entries: (The Rate – Hours/Items order can be switched by choice of button.) Select Save after Data Box entry. Then Process. Wage Id/Record Wage Description: Rate/Hours BennettLS - 01 FrostSP - 01
Hourly Wages Hourly Wages
32 Hrs. 30 hrs.
LucasDT - 01 MortonBC– 01
Hourly Wages Earned Vacation Leave
11 Hrs. 80 Hrs.
Paid Vacation Leave 8 Hrs. New Hours – 62.00 OK ThompsonGT -02 Grave Openings 5 Items
Note: An Asterisk (*) will be displayed in the box beside any earning types that have been edited. The asterisk will remain in the search box until new wages are recorded for the employee.

Uniform Accounting Network – Payroll Training
Payroll Transactions Wages Edit 11. Wages - Edit
11: 2 of 2
Note: If an employee has two different frequencies in the same job, taxes will be calculated on the shortest time frequency.
Batch Reports
Select Payroll. Select Reports. Select General Payroll Reports. Select Batch.
Select Earnings & Credits. Withholdings Leave Employer’s Share Appropriation Account Balances Detail Wages

Uniform Accounting Network – Payroll Training
Payroll Transactions Wages Post 12. Wages - Post
12: 1 of 2
**Load Payroll Training Exercise “12 Wages - Post”*** ***Date 01/14/2011***
Post - Overview
The post function is used to print the warrants. The warrants are earmarked until the processing date is equal to or greater than the transaction date and until you have Quit and re-entered the UAN Software.
Steps to Access - Post
Select Payroll. Select Transactions. Select Wages. Select Post. Select Regular. Post wages for the following: Departments: Select All Select Dept. Department Name
ADMN Administration CEMT Cemetery ROAD Road Maintenance
Wages: Select All Select Employee Job Id: WageR. Dept. Position Print
Lori Bennett BennettLS– 01 000001 ROAD Worker 1001 Steve Frost FrostSP - 01 000002 ROAD Worker 1002 Dave Lucas LucasDT - 01 000003 ADMN Assistant 1003 Bernie Morton MortonBC - 01 000004 ROAD Worker 1004 Greg Thompson ThompsonGT-02 000005 CEMT Cemetery 1005
Warrant Date: 1/16/2011.
Select: Process Message: Do you want to post the selected wage records? Select: Yes

Uniform Accounting Network – Payroll Training
Payroll Transactions Wages Post 12. Wages - Post
12: 2 of 2
Verify by printing the Earmarked report. (Accounting, Reports and Statements, Information & Status) Quit the UAN Software and re-enter changing the date to 01/31/2011. Message: Payroll warrants have transactions that will post to cash. OK.
Reports
Select Payroll. Select Reports. Select General Payroll Reports. Select Wages. Select Employee Detail/Adjustment. Payroll Register Detail Summary Summary by Income Wages and Overtime Wages and Overtime - Detailed Wages and Overtime - Summary

Uniform Accounting Network – Payroll Training
Payroll Transactions Wages 13. Wages – 2nd Payroll
13: 1 of 3
**Load Payroll Training Exercise “13 Wages – 2nd Payroll”*** ***Change Date 01/31/2011***
Overview
Entering the 2nd payroll of the month will include both biweekly and monthly frequencies. Edit the hourly and per item wages as outlined in this exercise.
Set the Processing Date
Enter the following information: Enter your Initials: X X X
Enter the Processing Date: 01/31/2011
Steps to Access - Record
Select Payroll. Select Transactions. Select Wages. Select Record. Select Wage Type/Departments/Frequency. Enter wage information for all frequencies and process: Select: Wage Type: Regular (Manual) (Conversion) Departments: Select All Frequencies: Edit: 14 Day 01/10/2011 01/23/2011 Select: Save Select All Select: Employees/Jobs Select All Select: Process
Message: Do you want to record wage records for the selected employees/jobs? Select Yes. Message: Wage information is not available to record. Select Ok

Uniform Accounting Network – Payroll Training
Payroll Transactions Wages 13. Wages – 2nd Payroll
13: 2 of 3
Steps to Access - Edit
Select Payroll. Select Transactions. Select Wages. Select Edit. Select Wage Type: Regular. Edit wages for the following time card information: (The Rate – Hours/Items order can be switched by choice of button.) Wage Id/Record Wage Description: Rate/Hours BennettLS – 01 Hourly Wages 15.0 Hrs. FrostSP – 01 Hourly Wages 35.5 Hrs. KingCC – 01 Salary (not necessary to edit) LucasDT – 01 Hourly Wages 42.0 Hrs. MortonBC - 01 Wages – Cemt. 5.0 Hrs. MortonBC - 01 Paid Sick Leave 4.0 Hrs. New Hours 66.0 Hrs. OK ThompsonGT – 01 Salary (not necessary to edit) ThompsonGT – 02 Grave Openings 2 Items
Steps to Access - Post
Select Payroll. Select Transactions. Select Wages. Select Post. Select Wage Type: Regular. Post wages for the following: Departments: Select All Select Dept. Department Name
ADMN Administration CEMT Cemetery FIRE Fire ROAD Road Maintenance
Wages: Select All

Uniform Accounting Network – Payroll Training
Payroll Transactions Wages 13. Wages – 2nd Payroll
13: 3 of 3
Select Employee Job Id: WageRec. Dept. Position Print
Lori Bennett BennettLS 01 000006 ROAD Worker 1006 Steve Frost Frost SP 01 000007 ROAD Worker 1007 Chris King King CC 01 000008 ADMN Fisc. Off. 1008 Dave Lucas LucasDT 01 000009 ROAD Assistant 1009 Bernie Morton MortonBC 01 000010 ROAD Worker 1010 Greg Thompson 000011 ThompsonGT 01 000011 FIRE Fire 1011 ThompsonGT 02 000011 CEMT Cemetery 1011
Warrant Date: 1/31/2011.
Select: Process Message: Do you want to post the selected wage records? Select: Yes Quit the UAN Software and re-enter to post to cash. Message: Payroll warrants have transactions that will post to cash. OK.
Select Payroll. Select Reports. Select General Payroll Reports.
Select Wages. Employee
Detail/Adjustment. Payroll Register Summary by Income Wages and Overtime Select Tax Reports. Federal Tax Ohio State Tax School Tax Local Tax 941 Schedule B
Reports
Select Monthly Reports. OPERS OP&FPF Select Quarterly Reports. 941 EIC ODJFS Select Yearly Reports. W-2 Report Print W-2 Forms 944

Uniform Accounting Network – Payroll Training
Payroll Transactions Withholdings 14. Withholdings
Overview
**View the following report before and after processing the withholding warrants. Select General Payroll Reports. Select Withholding. Select Unpaid. Select Withholding Monthly. Or Withholding Detail.
Steps to Access - Record
Select Payroll. Select Transactions. Select Withholdings. Select Record. Select Regular. Select Month. Select January. Record each of the following withholdings and process: Payee No: 1. First Bank of Ohio 8. Ohio Public Employees Deferred Comp.
Select Wage
No.Job Id Freq. Warrant
No.Warrant
DateStart End Amount
1 BennettLS 7 1001 01/16/11 12/27/10 01/09/11 43.59 2 FrostSP 01 7 1002 … … … 39.15 3 … … … … … … …
Select All. Enter Warrant Date: 01/31/2011. Note: Warrant/Voucher - select warrant to generate a withholding warrant to send for payment; select voucher to generate a withholding voucher for withholding payments taken directly out of the checking account.
14: 1 of 2

Uniform Accounting Network – Payroll Training
Payroll Transactions Withholdings 14. Withholdings
Steps to Access
Select Payroll. Select Transactions. Select Withholdings. Select Record. Select State Retirement. Select Month. Select January. Record withholdings for the following and process: Payee No: 3. Ohio Public Employees Retirement System 4. Ohio Police & Fire Pension Fund
Enter Warrant Date: 01/31/2011 Verify data in the Batch Reports.
Batch Reports
Select Payroll. Select Reports. Select General Payroll Reports. Select Batch. Select Withholding Payments. Post the withholdings for all Batch payments.
Steps to Access - Post
Select Payroll. Select Transactions. Select Withholdings. Select Post. Select All and Process. View the following report after posting the withholding warrants: Select General Payroll Reports. Select Withholding. Select Unpaid. Select Withholding Monthly.
14: 2 of 2

Uniform Accounting Network – Payroll Training
Payroll Transactions Payroll Utilities 15. Payroll Utilities
15: 1 of 6
Overview
The Payroll Utilities transaction area contains a submenu of eleven menu options. These options include the functions necessary to post adjustments, reallocate payments, reissue payments, reprint payments, void, over payments, electronic funds transfer options, ODJFS Transfer Data to Diskette, OPERS and OP&FPF data transfer options and W-2 utilities. Each of these options and the functions available within each are further explained in the UAN Payroll Manual.
ADJUST
Adjust Leave
The Adjust Leave option is used to adjust employee leave balances after wages have been recorded for an employee. Adjustments may be needed to correct prior entries, to correct accrual errors or to increase the balances at the beginning of a new year. The Leave screen displays the current leave balance that will be adjusted and what the leave balance will be after the adjustment is processed. CURRENT LEAVE BALANCE 72.00 NUMBER OF HOURS TO ADJUST (+/-) 40.00 LEAVE BALANCE AFTER ADJUSTMENT 112.00
The system will automatically display the following message each time the Adjust Leave option is selected: Documentation substantiating any Adjustment made should be retained for subsequent audits.
Adjust Pay Period
The Adjust Pay Period option is used to adjust pay period dates of wages that have been posted or wages that are still in batch. Corresponding payroll reports will be updated with the new information. Required fields include Pay Frequency, Pay Period Start Date (original), Pay Period End Date, select employee(s), new Start Date and new End Date. Only pay period dates for wages posted or in batch in the current year can be adjusted.

Uniform Accounting Network – Payroll Training
Payroll Transactions Payroll Utilities 15. Payroll Utilities
15: 2 of 6
Adjust Wages
The Adjust Wages option is used to issue a Special Warrant or Special Voucher to an employee (e.g. retroactive salary increase (special warrant) or a special voucher to update an employee’s records.) The adjustment wage record is used to pay an employee for wages that were not included in the original time card. It can also be used to adjust withholdings between withholdings. Note: The net amount of the withholdings may not be less than zero when using this option to adjust withholdings. The repayment wage record will allow the withholdings to be paid back to the employee in the scenario where withholdings were taken out by mistake. Note: Earnings will be zero for this option and may not be edited to reflect payment via an earning.
Adjust Withholding
The Adjust Withholdings option is used to clear and unencumber unpaid withholdings for the prior or current year that have been deducted from employees’ gross pay and have not been paid to the corresponding withholding payee (the withholding check has not yet been printed). When withholdings are adjusted, they are removed from the Unpaid Withholdings report. This option also unencumbers the appropriations in the appropriation account codes that were encumbered when the associated wages were posted. The system will automatically display the following message each time the Adjust Withholding option is selected: Documentation substantiating any Adjustment made should be retained for subsequent audits.
Withholding information can be adjusted for the current year or prior year. The system will automatically display the following message when the Prior Year selection is made: Clearing prior year withholding may impact 20XX W-2 information. Make appropriate W-2 adjustments if withholdings have changed for employees.
The system will automatically display the following message when the Current Year selection is made: We suggest the Unpaid Withholding Detail Report is printed prior to using this option if withholdings are going to be paid through the Accounting software. Do you want to print the report? It is recommended to print the report to assist in verification of the withholding adjustments.

Uniform Accounting Network – Payroll Training
Payroll Transactions Payroll Utilities 15. Payroll Utilities
15: 3 of 6
REALLOCATE PAYMENTS The Reallocate Payments option will change the charge distribution for any payment made on the payroll side of the software. Only current year payments that have cleared the bank may be reallocated with the exception of withholding vouchers. If the option ‘Reduce Entire Amount’ was not chosen then the existing account code(s) will need to be reduced first. This is done by clicking on the account code to be reduced and then selecting the ‘Edit’ button above the grid box. The amount to decrease the current allocation should be entered as a negative number. Then the account code(s) to be added may be done. To add the account code(s), use the ‘Add’ button above the grid box and enter the account code and amount to allocate to the code. Choosing the option ‘Reallocate Entire Amount’ will change all appropriation account distributions to zero.
REISSUE PAYMENTS The Reissue Payments option can be used to reissue a payment (regular or manual), EFT as a warrant, withholding warrant or a withholding voucher as a warrant. The system will allow more than one item (within each type) to be reissued at one time. The existing warrant number is reassigned to a new warrant number. The starting warrant number cannot be less than the next available warrant number in the system.
REPRINT PAYMENTS The Reprint Payments option can be used to reprint an EFT, a special voucher or a withholding voucher.
VOID The Void option can be used to void a payment, EFT, conversion, adjustment or withholding. The void transaction reverses all charges made on the warrant or EFT and updates the appropriate reports. This option should only be used when the warrant or EFT was issued for the wrong amount or should not have been issued. The system will allow more than one item (within each type) to be voided at one time.

Uniform Accounting Network – Payroll Training
Payroll Transactions Payroll Utilities 15. Payroll Utilities
15: 4 of 6
OVER PAYMENTS The Over Payment option is used to apply a refund or a credit issued by the withholding agency that was entered as a transaction in the accounting software. This utility will tie the receipts and reduction of expenditures (which are done as payment adjustments) posted on the accounting software to the payroll software. It is also used to tie credits made to the employer share of withholdings that are paid through the accounting software so that when the amount of the over payment is subtracted out of the warrant posted on the accounting software it will tie to the payroll software. If a refund is received for the amount overpaid, then the receipt of the refund that was posted in the accounting software will need to be applied using the Apply and Receipt function buttons. This will remove the over payment from payroll and tie the receipt posted in the accounting software to the payroll software. If the withholding payee issues a credit to the employer’s share of the withholding which is paid through the accounting software (like the employer’s share of OPERS) instead of a refund, then the credit will need to be applied using the Apply and Credit function buttons. This will remove the over payment from payroll and tie the credit that is subtracted from the withholding payment generated in the accounting software to the payroll software. A reverse function is also available to reverse and refunds or credits posted in error. Note: If a credit is received and the withholding is paid through payroll, the system will automatically deduct the over payment amount and submit the amount owed to the withholding payee. Nothing needs posted using the Over Payments Utility. Example: $1,000.00 gross payroll check; $755.00 net payroll check $1,000 Gross payroll check $100 Federal -245 755
Net payroll check
95
OPERS(employee) (138.50)
Employer
50 Ohio $245
1) The $755 net payroll check needs voided, and the three withholding checks have been
posted and printed. 2) The Withholding checks can then be redone. If you still have possession of the
withholding warrant(s) void the withholding warrant(s) before voiding the employee wages. This will prevent an overpayment from occurring.

Uniform Accounting Network – Payroll Training
Payroll Transactions Payroll Utilities 15. Payroll Utilities
15: 5 of 6
3) If you do not have the withholding checks, an over payment will be created. As a result, the withholding amounts become negative (-100, -95, -50). One of the following scenarios may apply: a) When the withholding is paid the next time, the over payment will automatically
be deducted from the next payment to the withholding payee. b) If a refund is received for the amount overpaid, then the receipt of the refund that
was posted in the accounting software will need to be applied using the Apply and Receipt function buttons. This will get remove the over payment and tie the receipt posted in the accounting software to the payroll software.
c) If the withholding payee issues a credit to the employer’s share of the withholding which is paid through the accounting software (like the employer’s share of OPERS) instead of a refund, then the credit will need to be applied using the Apply and Credit function buttons. This will remove the over payment and tie the credit that is subtracted from the withholding payment generated in the accounting software to the payroll software.
ELECTRONIC FUNDS TRANSFER – (EFT) The EFT utility is designed to create and transmit direct deposit information. Employee direct deposit information can be transmitted via modem, directly to the ACH institution or the direct deposit information can be created on diskette. Direct Deposit - Electronic Funds Transfer (EFT) will automatically instruct financial institutions to credit employees’ accounts for the amount of wages to be paid. The payroll information can be transmitted via modem or diskette into the Automated Clearing House (ACH) network which will transmit the payroll information to the employees’ financial institutions. The employees’ financial institutions will then deposit this money into employees’ accounts on pay day and charge the local government’s payroll account. Money will be available for employees the morning of pay day and is usually deposited before financial institutions open for business. Contact the UAN Support Line at 1-800-833-8261 to request EFT. The EFT protocol will need discussed with a UAN staff member and the ACH institution contacted to determine if the UAN EFT software is compatible with the bank’s system. Once it is determined that the UAN EFT software is compatible with the ACH institution, UAN will send a diskette to activate EFT.
ODJFS, OPERS, OP&FPF & W-2 These options explain transfers of the contribution information to a diskette or to transmit via the web. After clicking on the menu option, the system displays the series of system messages to complete the transfer processes.
Uniform Accounting Network – Payroll Training
Payroll Transactions Payroll Utilities 15. Payroll Utilities
15: 6 of 6
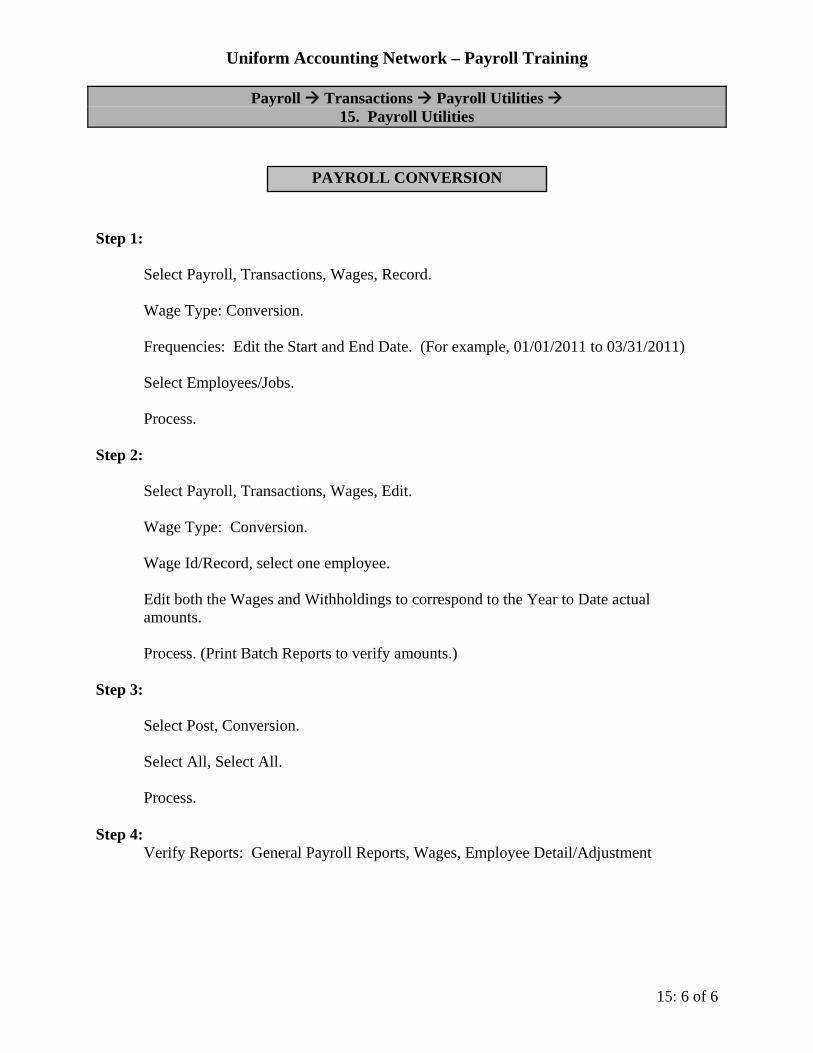
PAYROLL CONVERSION Step 1:
Select Payroll, Transactions, Wages, Record.
Wage Type: Conversion.
Frequencies: Edit the Start and End Date. (For example, 01/01/2011 to 03/31/2011)
Select Employees/Jobs. Process.
Step 2: Select Payroll, Transactions, Wages, Edit. Wage Type: Conversion. Wage Id/Record, select one employee. Edit both the Wages and Withholdings to correspond to the Year to Date actual
amounts. Process. (Print Batch Reports to verify amounts.)
Step 3: Select Post, Conversion. Select All, Select All. Process. Step 4:
Verify Reports: General Payroll Reports, Wages, Employee Detail/Adjustment

Uniform Accounting Network – Payroll Training
Payroll Transactions Payroll Utilities Electronic Funds Transfer 16. EFTs
16: 1 of 4
Overview
The EFT utility is designed to create and transmit direct deposit information. Employee direct deposit information can be transmitted via modem, directly to the ACH institution or the direct deposit information can be created on diskette. Direct Deposit - Electronic Funds Transfer (EFT) will automatically instruct financial institutions to credit employees’ accounts for the amount of wages to be paid. The payroll information can be transmitted via modem or diskette into the Automated Clearing House (ACH) network which will transmit the payroll information to the employees’ financial institutions. The employees’ financial institutions will then deposit this money into employees’ accounts on pay day and charge the local government’s payroll account. Money will be available for employees the morning of pay day and is usually deposited before financial institutions open for business. Contact the UAN Support Line at 1-800-833-8261 to request EFT. The EFT protocol will need discussed with a UAN staff member and the ACH institution contacted to determine if the

Uniform Accounting Network – Payroll Training
Payroll Transactions Payroll Utilities Electronic Funds Transfer 16. EFTs
16: 2 of 4
UAN EFT software is compatible with the bank’s system. Once it is determined that the UAN EFT software is compatible with the ACH institution, UAN will send a diskette to activate EFT. EFT (Electronic Funds Transfer) records must be established to allow EFT processing. The following steps will have to be completed to establish EFT records prior to using the EFT utility to transmit the EFT data:
1. Verify the Federal and State Tax ID numbers are correct under Accounting, Maintenance, Address Maintenance and Edit. Select the Entity Code (Township, Village, Library or Special).
2. Enter EFT Setup Information in the EFT Setup screen located under Payroll,
Transactions, Payroll Utilities, Electronic Funds Transfer. Telephone and modem information for use when transferring data via a modem should be entered (and when necessary edited) under the Transmission Information tab. Originating DFI, Immediate Destination and Immediate Origin information should be entered under File Structure tab. This information will be provided by the ACH banking institution. Two routing number fields are provided, the Originating DFI (Depository Financial Institution) field and the Immediate Destination field, because some ACH banking institutions require two routing numbers. The UAN EFT transfer routine uses both fields when transferring information. If only one routing number has been assigned, enter this number in both fields.
3. Enter the EFT information for each employee under Payroll, Maintenance, Employee
History, Edit and Information. Select the Employee Id to establish EFT.
a. EFT Authorized (Place a “ ” to select as “Yes.”) b. Routing Number (for the employee’s EFT institution) c. Account Number d. Account Type (Checking or Savings) e. Prenote Sent
Note: This field will remain unchecked until an EFT prenotification file is sent to the EFT Automated Clearing House (ACH) banking institution.
All employers are required to send the EFT Automated Clearing House (ACH) banking institution a prenotificaton file (new employee information) for pre-approval. All EFT information has to be verified and pre-approved before an EFT payment can take place. This information is required to be sent prior to using EFT for the first time and each time an employee is added to the EFT process or when changing existing employees’ EFT information. The option to send the EFT prenotification file, Send EFT Prenotification, is located within the EFT utility application and is explained further along with the other EFT functions in the information on the pages that follow. Once the prenote is sent, place a “ ” to select the Prenote Sent as “Yes”

Uniform Accounting Network – Payroll Training
Payroll Transactions Payroll Utilities Electronic Funds Transfer 16. EFTs
16: 3 of 4
under the employee’s information in Employee History. Be sure to select Process to save this change to each employee’s information. Note: EFT wage records will be recorded and edited the same as all other employees wage records. The difference will occur when the wage records are posted. EFT’s are chosen using the EFT function button instead of the Regular function button.
Steps to Access
Select Payroll. Select Transactions. Select Payroll Utilities. Select Electronic Funds Transfer. Select EFT. The EFT functions are as follows: Create EFT Batch - Assigns an EFT number to direct deposit information. Select the appropriate “Effective Date.” The Effective Date is the actual date the funds will be transferred to the employee accounts. The file is required to be submitted to the ACH banking institution two business days before the funds are transferred. Check with the bank for the appropriate EFT time frame.
Send EFT Batch -
Send file via modem: Click on process to transmit EFT file. The following status messages will be displayed during the transfer process:
a. Initializing modem b. Dialing ####### (the modem phone number) c. Waiting for remote response
Note: If the modem phone number or control record needs to be changed, this must be done in the EFT Setup screen located under Payroll, Transactions, Payroll Utilities, Electronic Funds Transfer.
Note: If the modem connection is not successful:
A “No response from the remote modem. Select “ok” to exit…” message will be displayed. Check the EFT ACH modem phone number and the modem line connection. If you cannot get the file to transfer, call the UAN Support Line for assistance.
If the modem connection is successful:

Uniform Accounting Network – Payroll Training
Payroll Transactions Payroll Utilities Electronic Funds Transfer 16. EFTs
16: 4 of 4
a. File Transfer Progress information will be displayed b. Disconnecting… (once transfer is complete) c. A report of employees in the EFT file is printed.
Resend EFT Batch - Will allow an EFT Batch file that was previously sent to be sent again. Send EFT Prenotification - Transmits or creates new or updated direct deposit information for
EFT ACH banking institution approval.
Reports
Report options available under the Electronic Funds Transfer utility: EFT Batch Report - Will print a single EFT Batch or all EFT Batches for the selected effective date. EFT Pre-Batch Report - Direct deposit information before an EFT number is assigned.

Revised 11/06
UUAANN PPaayyrroollll SSooffttwwaarree QQuuiicckk TTiippss
• How to Enter a Payroll • Under Payroll Transactions:
1. Select Wages to enter Employee Wage Record. Select Record.
2. Select Wage Type. If doing a regular payroll, select Regular Wages.
3. Select Departments to be paid. If paying all departments, click on Select All.
4. Select Frequencies to be paid. To edit the Pay Period dates, highlight the pay period to change and click on the Edit button just above the frequencies. Type in the correct dates. Click Save.
5. Click on the Employees/Jobs tab. Select the employees to pay. If an employee has multiple jobs, only check the jobs to pay.
6. Click on Process. A message will display at the bottom of the screen that wage records were recorded (and are now in the batch). *Reminder: Make sure frequency pay dates are correct before clicking on Process to record (create) the wage records.
7. After processing, click on Edit. Select Wage Type and then the Wage ID/Record to edit the employee wage record. If needed, edit the wage(s). Make sure to click on Process to save the change to the employee wage record.
8. Print the Batch Wage Reports to make sure the payroll is correctly located under Payroll/Reports/General Payroll Reports/ Batch.
9. To print payroll checks, select Post. Then select the Wage Type (Regular, EFT, Manual, or Conversion) and select the Departments and Employees to print checks. Verify the Warrant Date and Starting Warrant Number. Click on Process to print the warrants for the selected wage records.
• How to Print Withholdings • Under Payroll Transactions, Withholdings:
1. Select Record and Regular or State Retirement. Select a Period (Month, Quarter, Year, or Selected Date Period) for dates and the Payee No.
2. Select the Wage No. (or click on Select All) to select the withholding records and enter a Warrant Date. Click on Process to put the withholdings into the batch.
3. Print the Batch Withholdings Payments report located under Payroll/Reports/General Payroll Reports/Batch/Withholding Payments.
4. Edit if needed, and then select Post to print withholding warrants. Select the withholding warrants to be printed. Verify the Starting Warrant Number and click on Process to print the selected withholdings.
• How to Setup an Employee • Under Payroll Maintenance, Employee
History: 1. Select Record and Information to enter
an employee’s information. 2. After entering an employee’s
Information, click on Process. 3. Select Record and Job to enter an
employee’s job. 4. After entering each employee’s Job,
click on Process. 5. Select Record and Earnings to enter
each employee’s Earning Type. 6. After entering each employee’s Earning
Type, click on Process. 7. Select Record and Withholdings to
enter an employee’s withholdings. 8. After entering each employee’s
Withholding, click on Process.

Uniform Accounting Network – Payroll Training
Payroll Reports Quarterly 18A. Steps to Access 941
18A: 1 of 1
941: Report
Select Payroll. Select Reports. Select Quarterly. Select 941.
Note: To select a prior 941 report for the year, click on ‘Quarter to Date’ to active the Search box. Reminder: The warrant date determines the quarter wages are reported. For example an employee’s pay period is March 1st to March 31st and their pay check is dated April 1. Their wages will be reported on the 2nd quarter 941 report.
941: Withholding Warrant/Voucher
Select Payroll. Select Transactions. Select Withholdings. Select Regular.

Revised 03/11
994411 QQuuaarrtteerrllyy FFeeddeerraall TTaaxx RReeppoorrtt QQuuiicckk TTiippss
Explanation of each line item • Line 1: The system automatically pulls the number
of employees who had payrolls processed in the pay period that included the 12th day of the last month in the quarter specified.
• Line 2: The system automatically pulls in total gross wages processed during the quarter specified. This can be verified by looking at the Federal Tax report’s Wages Subject To Federal/State/School Tax column total.
• Line 3: The system automatically pulls in the total amount the system calculated and withheld in Federal withholdings plus any Supplemental Federal amounts withheld. This can be verified by looking at the 941 Schedule B’s Federal and Supplemental Withholdings.
• Line 4: Check this box if there are no wages, tips or other compensation subject to Social Security or Medicare tax. If this question does not apply to you, leave the box blank.
• Line 5a: The system automatically pulls in total taxable Social Security gross wages during the quarter specified. This can be verified by looking at the Federal Tax report’s Wages Subject To Social Security Tax. The system takes the total amount of wages subject to Social Security tax and multiplies it by the set percentage of 10.4% (employees’ share 4.2% and employer’s share 6.2%). The amount of Social Security tax that the system actually withheld can be verified by checking the 941 Schedule B’s Employee and Employer FICA Social Security.
• Line 5b: This line will be zero unless a figure was keyed in on the manual entry screen. The system takes the total amount of taxable Social Security tips and multiplies it by the set percentage of 10.4% (employees’ share 4.2% and employer’s share 6.2%).
• Line 5c: The system automatically pulls in total taxable Medicare wages and tips during the quarter specified. This can be verified by looking at the Federal Tax report’s Wages Subject To Combined FICA Medicare and Medicare Tax. The system takes the total amount of wages subject to Medicare tax and multiplies it by the percentage of 2.9% (employees’ share 1.45% and employer’s share 1.45%). The amount of Medicare tax that the
system actually withheld can be verified by checking the 941 Schedule B’s Employee and Employer FICA Medicare and Medicare.
• Line 5d: System adds Column 2 line 5a, Column 2 line 5b and Column 2 line 5c to calculate total Social Security and Medicare tax that should have been withheld. The total amount that the system actually withheld can be verified by looking at the 941 Schedule B’s Employee and Employer FICA Social Security, FICA Medicare and Medicare.
• Line 5e: This line is to enter tax due from a Section 3121(q) Notice and Demand. The IRS issues a Section 3121(q) Notice and Demand to advise an employer of the amount of tips received by employees who failed to report or under reported tips.
• Lines 6a - 6d: Lines reserved for future use. • Line 6e: This is the total taxes before any
adjustments. (line 3 + line 5d + line 5e = line 6e) • Line 7: This line contains any difference between
the total calculated amounts of Social Security and Medicare (line 5d) compared to what the system actually withheld. This usually will only contain fraction of cents due to the multiplication and rounding of the tax when computed separately for each wage record in the system.
• If there are more than fraction of cents in line 7, there are the following possibilities: 1. Medicare was not set up on one or more
employees for a period of time but should have been.
2. Withholding amounts for Federal, Medicare, and/or Social Security were edited to deduct a different amount than the system’s calculated amount.
3. A percentage was edited or modified from the set rate. For example, the percentage of Social Security and/or Medicare tax to be withheld was modified causing the system to withhold a larger or smaller amount of each.
4. Something was processed on the accounting side.
• Lines 8: Adjustment for sick pay for employee share of Social Security and Medicare taxes that were withheld by your third-party sick pay payer.

Revised 03/11
994411 QQuuaarrtteerrllyy FFeeddeerraall TTaaxx RReeppoorrtt QQuuiicckk TTiippss
• Line 9: Adjustment for tips and group-term life insurance any uncollected employee share of Social Security and Medicare taxes on tips and/or on group-term life insurance premiums paid for former employees.
• Line 10: The system totals lines 6e through 9 to calculate total taxes after adjustments.
• Line 11: The system pulls in total deposits for the quarter by adding the Federal withholding payments posted for each month of the quarter.
• If you have an unknown discrepancy between line 10 (total taxes) and line 11 (total deposits), below are some possible reasons: 1. The Federal withholding payment was not
processed in the same month as the employee’s payroll checks. For example, payroll was done in the month of March, but the Federal withholding payment was processed in the month of April. The system will not pull that Federal withholding payment amount into line 11 for the first quarter. It will pull it into the Second Quarter 941 report. Line 11 would then need to be edited. It is highly recommended, if possible, that the withholding payment be processed at the end of the month and quarter.
2. The Federal withholding payment was not processed for the correct amount. If the wrong months of withholding taxes were selected when the withholding payment was generated, the withholding payment amount would not have been correct. For example, the payroll was for a date earned in March, but the employees’ payroll check dates were in April. The Federal withholdings would have been reportable in April. When the March withholding payment was processed, the April payroll date paid should not have been selected. If it was, the Federal withholding payment would have been over.
3. The Federal withholding payment was processed through the accounting side of the software.
• Line 12a: For additional information please refer to the COBRA Premium Assistance Payments memo included in Version 13.2 and the following IRS links: http://www.irs.gov/newsroom/article/0,,id=204709,00.html
http://www.irs.gov/newsroom/article/0,,id=204708,00.html
• Line 12b: Enter total number of individuals that provided COBRA premium assistance payments reported on line 12a.
• Line 13: Add lines 11 and 12a • Line 14: Balance due - The system subtracts line 13
from line 10 to calculate the balance due. • Line 15: Overpayment - This line will have an
amount if total payments on line 13 are greater than total taxes on line 10.
• Line 16: The system automatically pulls in the 2-digit state abbreviation.
• Line 17: The system automatically pulls in the total amount of Federal, Supplemental Federal, Medicare (employees’ and employer’s share), and Social Security (employees’ and employer’s share) withheld for each month of the quarter being reported. These amounts can be verified using the Withholding Summary report or Withholding History report.
• Note: The system will only pull the tax liability into the boxes for each month of the quarter in line 17 if the monthly depositor selection box is checked. If either of the other two selection boxes is checked, the system will not pull the tax liability into the boxes for each month of the quarter in line 17.
• Line 18: Check this box if your business has closed and you do not have to file returns in the future. Also, enter the final date you paid wages.
• Line 19: Check this box if you are a seasonal employer and you do not have to file a return for every quarter of the year.
Note: The Reset Data button should be used when the 941 report has been previously processed. The reset option will recalculate the 941 with the latest information in the system.

Uniform Accounting Network – Payroll Training
Payroll Reports Tax Reports 19A. Ohio State Tax
19A: 1 of 2
Ohio State Tax: Report
Select Payroll Select Reports Select Tax Reports Select Ohio State Tax Report
Reminder: The warrant date determines when wages are reported. For example an employee’s pay period is March 1st to March 31st and their pay check is dated April 1st. Their wages will be reported in April.

Uniform Accounting Network – Payroll Training
Payroll Reports Tax Reports 19A. Ohio State Tax
19A: 2 of 2
Ohio State Tax: Withholding Warrant/Voucher
Select Payroll Select Transactions Select Withholdings Select Regular

Uniform Accounting Network – Payroll Training
Payroll Reports Monthly Reports 20A. Steps to Access OPERS
20A: 1 of 5
OPERS: Report
Select Payroll. Select Reports. Select Monthly Reports. Select OPERS. Select OPERS-G Gov’t/OPERS-L Law Enforcement
Note: To select a prior OPERS report for the year, click on ‘Month to Date’ to active the Search box.
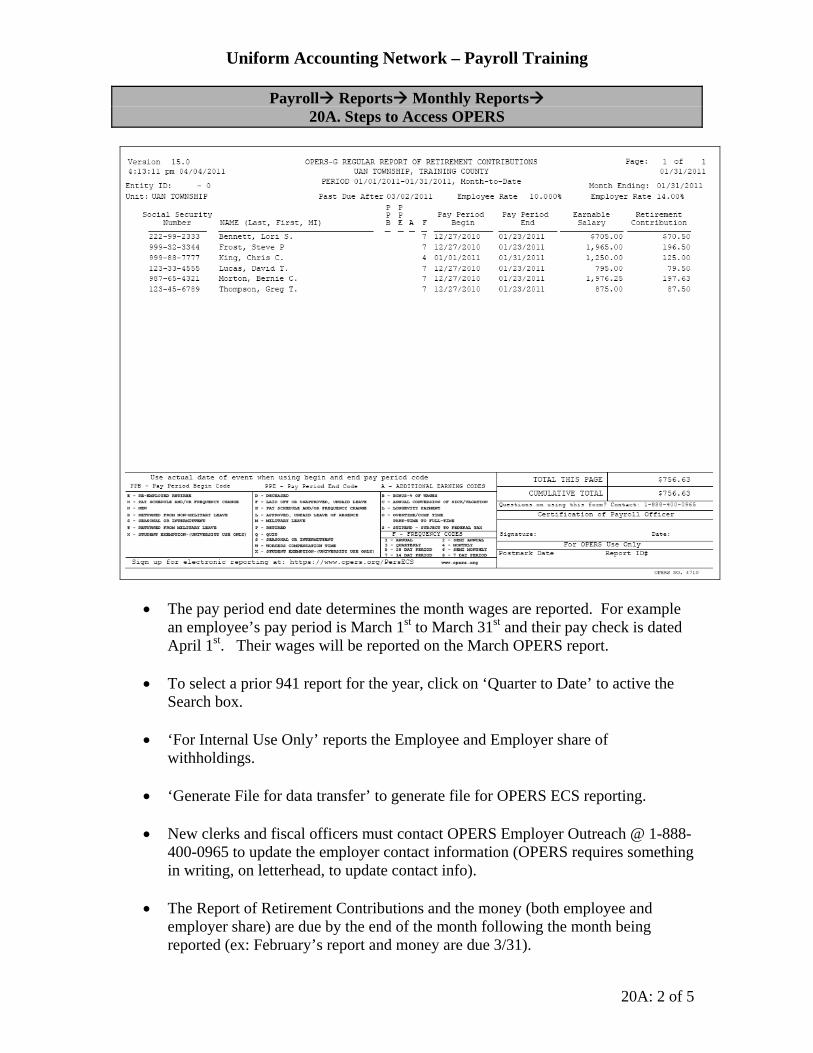
Uniform Accounting Network – Payroll Training
Payroll Reports Monthly Reports 20A. Steps to Access OPERS
20A: 2 of 5
• The pay period end date determines the month wages are reported. For example an employee’s pay period is March 1st to March 31st and their pay check is dated April 1st. Their wages will be reported on the March OPERS report.
• To select a prior 941 report for the year, click on ‘Quarter to Date’ to active the
Search box. • ‘For Internal Use Only’ reports the Employee and Employer share of
withholdings.
• ‘Generate File for data transfer’ to generate file for OPERS ECS reporting.
• New clerks and fiscal officers must contact OPERS Employer Outreach @ 1-888-400-0965 to update the employer contact information (OPERS requires something in writing, on letterhead, to update contact info).
• The Report of Retirement Contributions and the money (both employee and
employer share) are due by the end of the month following the month being reported (ex: February’s report and money are due 3/31).

Uniform Accounting Network – Payroll Training
Payroll Reports Monthly Reports 20A. Steps to Access OPERS
20A: 3 of 5
• Reporting is based on when the money is earned, not when it is paid. Each report
will contain earnable salary and contributions for any pay period that ended in that month (ex: March report will contain info for all pay periods that ended in March).
• Reports and/or money received after the due date will be assessed a 5% penalty.
• Reports and money can be mailed to OPERS, 277 E. Town St., Columbus, OH
43215.
• Many employers report electronically, using ECS (Employer Contribution System). If the employer is registered to report electronically, the new clerk or fiscal officer must contact Employer Outreach so they can be set up to have access to ECS.
• One-on-one training for ECS and retirement contribution reporting is available -
please contact Employer Outreach to schedule a site visit.
• Current version of forms and the Employer Manual can be found at www.opers.org
• Any employer-related questions can be directed to Employer Outreach at 1-888-
400-0965. Reps are available M-F, 7:30 AM - 4:30 PM. May also email questions to [email protected].
• OPERS will be offering sessions specifically for new clerks/fiscal officers at
LGOC.
OPERS: Withholding Warrant/Voucher
Select Payroll. Select Transactions. Select Withholdings. Select State Retirement.

Uniform Accounting Network – Payroll Training
Payroll Reports Monthly Reports 20A. Steps to Access OPERS
20A: 4 of 5
OPERS: Remittance Advice
Select Payroll. Select Reports. Select Monthly Reports. Select OPERS. Select OPERS Remittance Advice

Uniform Accounting Network – Payroll Training
Payroll Reports Monthly Reports 20A. Steps to Access OPERS
20A: 5 of 5

Revised 11/06
OOhhiioo PPuubblliicc EEmmppllooyyeeee RReettiirreemmeenntt SSyysstteemm QQuuiicckk TTiippss
What is required for OPERS retirement reporting? Entity Id – The Entity Id code required on the OPERS Report of Retirement Contributions is a six-digit number.
UAN Solution: Enter the first five digits of the number in the Employer No/Tax Id 1 field for the OPERS Payee under Payroll/Maintenance/Entity File/Payee/Edit. The last number will be pulled from the system based on the contribution type (regular or benefit) being reported.
Social Security Number – Verify that all employee Social Security Numbers are listed on the OPERS report and are correct.
UAN Solution: Enter or edit the Social Security Number (SSN) for an employee by editing the SSN field under Payroll/Maintenance/Employee History/Edit/Information.
Name – List the last name, first name then middle initial.
UAN Solution: Enter or edit an employee’s name by editing the Employee Name fields under Payroll/Maintenance/Employee History/Edit/Information.
Pay Period Begin (PPB) Codes - Required to explain why full pay periods are not being reported.
UAN Solution: PPB codes may be added to an OPERS report under Payroll/Reports/Monthly Reports/OPERS/OPERS-G Gov’t/OPERS-L Law Enforcement. Once the specified OPERS report has been selected, click on the employee line item that needs a PPB code added and select the Edit function button. A pink data entry box will appear, and the PPB code can be selected in the Pay Period Pay Begin Code field. Be sure to select Save when closing the pink data entry box.
Pay Period End (PPE) Codes - Required to explain why full pay periods are not being reported.
UAN Solution: PPE codes may be added to an OPERS report under Payroll/Reports/Monthly Reports/OPERS/OPERS-G Gov’t/OPERS-L Law Enforcement. Once the specified OPERS report has been selected, click on the employee line item that needs a PPE code added and select the Edit function button. A pink data entry box will appear, and the PPE code can be selected in the Pay Period Pay End Code field. Be sure to select Save when closing the pink data entry box.
Additional Earning (A) Codes – Used to explain larger than normal salaries.
UAN Solution: Additional Earning codes may be added to an OPERS report under Payroll/Reports/Monthly Reports/OPERS/OPERS-G Gov’t/OPERS-L Law Enforcement. Once the specified OPERS report has been selected, click on the employee line item that needs an Additional Earning code added and select the Edit function button. A pink data entry box will appear, and the Additional Earning code can be selected in the Additional Earning Code field. Be sure to select Save when closing the pink data entry box.

Revised 11/06
OOhhiioo PPuubblliicc EEmmppllooyyeeee RReettiirreemmeenntt SSyysstteemm QQuuiicckk TTiippss
Pay Period Begin – This is the pay cycle beginning date of when the salary is earned, not paid.
UAN Solution: The Pay Period Begin date will automatically be pulled into the OPERS report from existing employee wage records. The earliest pay period beginning date, with a pay period end date within the report month will be displayed for each employee. If the Pay Period Begin date is incorrect for an employee or all employees it may be fixed under Payroll/Transactions/Payroll Utilities/Adjust/Pay Period. The Pay Period Begin date may also be modified for an employee under Payroll/Reports/Monthly Reports/OPERS/OPERS-G Gov’t/OPERS-L Law Enforcement by selecting the employee line item that needs the Pay Period Begin date modified and selecting the Edit function button. A pink data entry box will appear, and the Pay Period Begin date can be modified in the Pay Period Start date field. Be sure to select Save when closing the pink data entry box. (Note: If you elect to use the second method to modify the Pay Period Begin date for an employee, this change will only be saved on that specified OPERS report and not throughout the UAN Payroll software.)
Pay Period End – This is the pay cycle ending date of when the salary is earned, not paid.
UAN Solution: Employee wage records are pulled into the monthly OPERS report based specifically on the pay period end date. The Pay Period End date itself will automatically be pulled into the OPERS report from the employee wage records. If employee wage records for a specific month are not pulling into the corresponding month’s OPERS report, verify that the correct pay period start and end dates were entered on the employee wage records. This information can be verified using the employees’ pay stubs or the Employee Detail/Adjustment report. If the pay period start and end dates are incorrect for an employee or all employees, they can be fixed under Payroll/Transactions/Payroll Utilities/Adjust/Pay Period. The Pay Period End date may also be modified for an employee on a selected OPERS report under Payroll/Reports/Monthly Reports/OPERS/OPERS-G Gov’t/OPERS-L Law Enforcement by selecting the employee line item that needs the Pay Period End date modified and selecting the Edit function button. A pink data entry box will appear, and the Pay Period End date can be modified in the Pay Period End date field. Be sure to select Save when closing the pink data entry box. (Note: If you elect to use the second method to modify the Pay Period End date for an employee, this change will only be saved on that specified OPERS report and not throughout the UAN Payroll software.)
Earnable Salary = Submit the gross wages of each employee.
UAN Solution: The Earnable Salary is pulled from the existing employee wage records. The Earnable Salary can be edited if necessary for a selected OPERS report under Payroll/Reports/Monthly Reports/OPERS/OPERS-G Gov’t/OPERS-L Law Enforcement by selecting the employee line item and then selecting the Edit function button. A pink data entry box will appear, and the Earnable Salary can be modified in the Gross Earnings field. Be sure to select Save when closing the pink data entry box. (Note: If you elect to use this method to modify the Earnable Salary (Gross Earnings) for an employee, this change will only be saved on that specified OPERS report and not throughout the UAN Payroll software.)

Revised 11/06
OOhhiioo PPuubblliicc EEmmppllooyyeeee RReettiirreemmeenntt SSyysstteemm QQuuiicckk TTiippss
Retirement Contribution = Submit the retirement contributions for each employee.
UAN Solution: The Retirement Contribution is pulled from the existing employee wage records. The Retirement Contribution may be edited if necessary for a selected OPERS report under Payroll/Reports/Monthly Reports/OPERS/OPERS-G Gov’t/OPERS-L Law Enforcement by selecting the employee line item and then selecting the Edit function button. A pink data entry box will appear, and the Retirement Contribution can be modified in the Retirement Contributions field. Be sure to select Save when closing the pink data entry box. (Note: If you elect to use this method to modify the Retirement Contributions for an employee, this change will only be saved on that specified OPERS report and not throughout the UAN Payroll software.)
Total This Page = All pages must have a subtotal of retirement contributions. UAN Solution: This is automatically calculated and reported based on the information contained within the report.
Cumulative Total = All pages must have a running total of retirement contributions.
UAN Solution: This is automatically calculated and reported based on the information contained within the report.
Signature = All pages must be signed by the person completing the report.

TO: ALL UAN CLIENTS
FROM: UAN STAFF
DATE: FEBRUARY 22, 2008
SUBJECT: OPERS ECS REPORTING, ONLINE WITHHOLDING PAYMENTS AND ROUNDING ISSUE
OPERS ECS REPORTING STEPS Below are the steps to generate and transfer a regular monthly OPERS data file: 1. Print/Screen the OPERS Report for the period of data to be transferred.
Select Payroll. Select Reports. Select Monthly Reports. Select OPERS. Select OPERS-G Gov’t/OPERS-L Law Enforcement. Select Month to Date to choose the month to report. Select OPERS-G or OPERS-L. Select the option to Generate file for data transfer (by placing a checkmark in the option box). Select the option for File. Select Process. Select to Print or Screen the report.
Steps to Access

Page 2 OPERS ECS Reporting, Online Withholding Payments and Rounding Issue After you Print or Screen the report, the following message box will be displayed saying that the file has been successfully transferred. Click on ‘OK’.
Exit the UAN Software and go to the UAN Software menu. Follow the additional steps below to send the file to OPERS through the web.
2. Connect to the Internet and click on the ‘OPERS ECS’ icon. Enter the OPERS ‘User ID and
Password’ that is provided by OPERS. Click on ‘Log-In to ECS’, ‘Create Reports’ and ‘Transfer a file’.
3. Enter File Location: C:\_UAN_Efiles\persdata.txt and click on ‘Submit Report for Verification’.
4. Verify that the OPERS screen report matches the report you generated in step 1 by clicking on the
‘View’ link. Then click on the ‘Submit to OPERS’ button.
5. Click on ‘Create Printer Friendly Version’ to print report(s).
6. Remit payment to OPERS. OPERS ONLINE WITHHOLDING PAYMENTS An option is available for employers to submit their OPERS withholding payments online. Employers must first be registered with OPERS to submit payments online. The OPERS ECS reporting option does not have to be used to be able to submit payments online. Below are the steps you would follow in the UAN software if OPERS payments are submitted online. If you issue your withholding payments through the accounting software (Accounting Only Users):
1. Record and Post a Charge for the withholding payment (located under Accounting → Transactions → Payments/Charges).
If you issue your withholding payments through the payroll software (Payroll Software Users) follow the steps below to Record and Post to print the OPERS withholding voucher:
Select Payroll. Select Transactions. Select Withholdings. Select Record. Select State Retirement. Select Month. Select Ohio Public Employees Retirement System (should be Payee No. 3). Select the Employee Wage Records to be included in the withholding payment (usually Select All). Enter the Warrant Date. Select the option for Voucher. Select Process.
Steps to Access

Page 3 OPERS ECS Reporting, Online Withholding Payments and Rounding Issue
After the withholding voucher has been recorded, it will need to be posted and printed. Select Post. Select Voucher. Select Ohio Employees Retirement System (should be Payee No. 3). Select Process.

Page 4 OPERS ECS Reporting, Online Withholding Payments and Rounding Issue OPERS ROUNDING ISSUE Due to the different methods in calculating the employer’s share of OPERS, a rounding issue may sometimes occur. UAN calculates the OPERS employer’s share of withholdings at the wage record level (i.e. each time a wage record is recorded both the employee’s and employer’s contributions are calculated). OPERS does not calculate the employer’s share at the wage record level. If OPERS calculates that you owe more money than the UAN Payroll software has calculated, you should still post and print the OPERS withholding warrant or voucher (if online payment) from the UAN system. You may then generate a second OPERS payment for the small difference from the UAN Accounting software by posting and printing a payment or charge (if online payment). If OPERS calculates that you owe less money than the UAN Payroll software has calculated, you should still post and print the OPERS withholding warrant or voucher (if online payment) from the UAN system. You will then have a ‘credit’ on your employer account with OPERS. This ‘credit’ may be offset the next time you pay OPERS or it may accumulate during the year. If you have a credit balance with OPERS that accumulates significantly during the year and you would like to adjust one of your next OPERS payments, then follow the steps below to adjust:
1) Print the Unpaid Withholding Detail Report (Payroll → Reports →General Payroll Reports → Withholding → Unpaid →Withholdings Detail). Select the OPERS withholding and then print the report to paper. This report will show the specific account codes for both the employees’ and employer’s share. Set this aside to use when creating the OPERS payment on the accounting side.
2) Clear the withholdings from the Payroll software (Payroll → Transactions → Payroll Utilities
→ Adjust → Withholding). Select Current Year from the top of the form and then select the month option from the top left (select the particular month to clear). Select all Time Frequencies, and all Wage Records. Next, select the OPERS withholding from the bottom left. You will notice the total amount of employees’ and employer’s shares match the Unpaid Withholding report you printed earlier. Click on Process if the totals match your report. If the totals do not match, check the report selection or the adjust selection to make sure all total are correct.
3) Generate the OPERS payment from the Accounting software (Accounting → Transactions →
Payment/Charges). Make a regular payment or charge (if online payment). Use the Unpaid Withholding Detail report to enter the specific amounts per account code. Since you have a ‘credit’ and need to decrease your OPERS payment, you will need to reduce the amount for the employer’s share and then make that distribution. If the Unpaid Withholding report indicated $1,000.00 for the employer’s share and you have a $0.02 credit then the amount of $999.98 should be distributed to that account code instead of the entire $1,000.00.

Uniform Accounting Network – Payroll Training
Payroll Reports Monthly Reports 21A. OP&FPF
21A: 1 of 2
Select Payroll. Select Reports. Select Monthly Reports. Select OP&FPF Select OP&FPF After December 31, 2005
Note: To select a prior OPERS report for the year, click on ‘Month to Date’ to active the Search box.
OP&FPF: Report

Uniform Accounting Network – Payroll Training
Payroll Reports Monthly Reports 21A. OP&FPF
21A: 2 of 2
Select Payroll. Select Transactions. Select Withholdings. Select State Retirement.
OP&FPF: Withholding Warrant/Voucher

Revised 11/06
OOhhiioo PPoolliiccee && FFiirree PPeennssiioonn FFuunndd QQuuiicckk TTiippss
What is required for OP&FPF retirement reporting? Employer Name & Employer Agreement Code – The employer code is a four-digit number, followed by F (fire) or P (police), your pay frequency code, and a single digit number. This code is seven digits in length and has been provided to you by OP&FPF. If you have misplaced the number, please contact OP&FPF.
UAN Solution: Enter the four-digit number by editing the Employer No/Tax Id 1 field for the OP&FPF Payee under Payroll/Maintenance/Entity File/Payee/Edit. Villages enter the Fire or Police reporting division information by editing the 2nd OP&FPF Frequency field under Payroll/Maintenance/Employee History/Edit/Job. Fire will be the reporting division default for Townships. Enter the pay frequency code by editing the OP&FPF Frequency field under Payroll/Maintenance/Employee History/Edit/Job. Enter the single digit frequency number for Monthly, Semi-Monthly, Fourteen Day, and Seven Day by editing the OP&FPF Police (Villages only) or Fire Agreement Number fields under Payroll/Maintenance/Entity File/Frequency/Edit.
Earning Period Beginning Date – This is the pay cycle beginning date of when the salary is earned, not paid.
UAN Solution: The Earning Period Beginning Date will be pulled from existing wage records. The earliest pay period beginning date for OP&FPF earning type 0 records, with an Earning Period Ending Date within the report month for each frequency selected, will be reported. The Earning Period Beginning Date may be edited for the selected OP&FPF report by selecting the Edit Report Header Dates button under Payroll/Reports/Monthly Reports/OP&FPF.
Earning Period Ending Date – This is the pay cycle ending date of when the salary is earned, not paid.
UAN Solution: The Earning Period Ending Date will be pulled from existing wage records. The latest pay period ending date for OP&FPF earning type 0 records, within the report month selected for each frequency, will be reported. The Earning Period Ending Date may be edited for the selected OP&FPF report by selecting the Edit Report Header Dates button under Payroll/Reports/Monthly Reports/OP&FPF.
Social Security Number – Verify that all Social Security Numbers are provided and are correct.
UAN Solution: Enter the Social Security Number (SSN) by editing the SSN field under Payroll/Maintenance/Employee History/Edit/Information.
Member Name – Report must be in alpha order by “Pick-Up Plan Code”. List the last name, then first name.
UAN Solution: Enter the Member Name by editing the Employee Name Fields under Payroll/Maintenance/Employee History/Edit/Information.

Revised 11/06
OOhhiioo PPoolliiccee && FFiirree PPeennssiioonn FFuunndd QQuuiicckk TTiippss
Enter the ‘Pick-Up Plan Code’ by editing the OP&FPF Pickup Type field under Payroll/Maintenance/Employee History/Edit/Job.
Hours Base (HRS BASE) – Hours base is the total amount of hours the member is scheduled to work in the earning period. The hours base will usually not change from month to month, with the exception of the months in which three bi-weekly, or five weekly earning periods occur, and for fluctuating fire schedules. The hours base is reported only for earning type 0 (regular hours) and should not appear on any other entries.
UAN Solution: Enter the standard Hours Base by editing the OP&FPF Hours Base field under Payroll/Maintenance/Employee History/Edit/Information. The Hours Base may be edited for the selected OP&FPF report by selecting the line item and editing the Hours Base field under the Payroll/Reports/Monthly Reports/OP&FPF.
Earning Type - Valid earning types are:
UAN Solution: Enter Earning Types by editing the OP&FPF Earning Type field under Payroll/Maintenance/Entity File/Earning. OP&FPF Earning Types must be assigned to each earning for OP&FPF employees. The OP&FPF Earning Types may be edited for the selected OP&FPF report by selecting the line item and editing the Pay Type field under the Payroll/Reports/Monthly Reports/OP&FPF.
0 Regular = Pay that keeps the member on payroll/makes up the hours base. Cash-outs are not pensionable.
1 Holiday = Pay for lump sum holiday pay. Report applicable hours and earning dates for the time in which the holidays are earned.
How do I report holiday pay if we pay our member as the holiday occurs?
If the Holiday is part of the base hours for that earning period, the holiday hours and all earnings connected to that holiday are reported under earning type 0. Do not report more hours than the scheduled holiday hours. Example: The member is entitled to be paid for Christmas Day, but also scheduled to work 8 hours that day. Report 8 hours under hours paid and all monies connected to that holiday under earning type 0. In this scenario, the employee is scheduled to work 8 hours and will be reported as working 8 hours, but will be compensated additional pay for working the holiday.
UAN Solution: The OP&FPF report will have to be edited. Earnings Setup: Regular Hours 8 @ 15.00 = 120.00 Earning Type 0 Holiday Hours 8 @ 15.00 = 120.00 Earning Type 0 UAN Report Defaults:
Earning Earning Earn Hours Gross Contributions Type Begin End Paid Wages Date Date 0 16.0 240.00 24.00 Correct reporting for OP&FPF: The OP&FPF report will have to be edited to correctly report this scenario.

Revised 11/06
OOhhiioo PPoolliiccee && FFiirree PPeennssiioonn FFuunndd QQuuiicckk TTiippss
Earning Earning Earn Hours Gross Contributions Type Begin End Paid Wages Date Date 0 8.0 240.00 24.00
How do I report holiday pay if we pay our members in a lump sum payment, for all of their holidays, either once a year or for another specific time frame?
If the Holiday is paid in a lump sum, you would report the amount of hours and money under an earning type 1 and provide the annual dates or the time frame dates in which the holidays cover. Example: The member is paid for eleven (11), eight (8) hour Holidays, @ $15.00 per hour, which is what he is entitled to for the entire year of 2006. It would be reported as follows:
Earning Earning Earn Hours Gross Contributions
Type Begin End Paid Wages Date Date 1 1-1-2006 12-31-2006 88.0 1320.00 132.00 UAN Solution: The OP&FPF report will be correct. Earnings Setup: Holiday Hours 88 @ 15.00 = 1320.00 Earning Type 1 UAN Report Defaults and Correct Reporting for OP&FPF:
Earning Earning Earn Hours Gross Contributions Type Begin End Paid Wages Date Date 1 1-1-2006 12-31-2006 88.0 1320.00 132.00
How do I report holiday pay if we pay our members, either as the holiday occurs or at any time they choose to be paid for them?
If the member’s hours base is 160, he earns $15.00 per hour and he was paid 152 regular hours and 48 hours for holiday, using 8 hours of his Holiday Pay to make up his hours base, it would be reported as follows:
Hours Earning Earn Earn Hours Gross Contributions Base Type Begin End Paid Wages Date Date 160 0 160 2,400.00 240.00 1 1-1-2006 12-31-2006 40 600.00 60.00
Always report the holiday portion that makes up the hours base under earning type 0 and lump sum payments under earning type 1. This will require holidays to be broken out by what makes up the hours base (earning type 0) and what does not make up the hours base (lump sum payment under earning type 1).
UAN Solution: The OP&FPF report will have to be edited. Earnings Setup: Regular Hours 152 @ 15.00 = 2280.00 Earning Type 0 Holiday Hours 48 @ 15.00 = 720.00 Earning Type 1

Revised 11/06
OOhhiioo PPoolliiccee && FFiirree PPeennssiioonn FFuunndd QQuuiicckk TTiippss
UAN Report Defaults:
Earning Earning Earn Hours Gross Contributions Type Begin End Paid Wages Date Date 0 152.0 2280.00 228.00 1 01-01-2006 12-31-2006 48.0 720.00 72.00 Correct reporting for OP&FPF:
Earning Earning Earn Hours Gross Contributions Type Begin End Paid Wages Date Date 0 160.0 2400.00 240.00 1 01-01-2006 12-31-2006 40.0 600.00 60.00
2 Overtime = Do not report hours paid. All overtime, including FLSA and Longevity Overtime should be reported under earning type 2. 3 Longevity = Report earning dates for the time frame in which the payment covers. Do not report hours paid. 4 Shift Differential = Use only if paid in lump sum outside the current pay earning dates. Do not report hours. Report earning dates for the time frame that the payment pertains to. If this payment is earned monthly, within the current earning cycle, the money rolls up and is reported under earning type 0. 5 Acting Pay = Use only if paid in lump sum outside the current pay earning dates. Do not report hours. Report earning dates for the time frame that the payment pertains to. If this payment is earned monthly, within the current earning cycle, the money rolls up and is reported under earning type 0. 6 Retro Pay = Must be reported within current payroll, using appropriate earning dates. Do not report hours paid. 7 Current Additional Allowable Salary = Do not report hours paid. These are funds that are in earned in the current earning period and are not included in the base pay (e.g., Resident pay, firearm proficiency, weapons allowance, court time, K-9 pay, paramedic pay, fire drills, training pay, etc.). 8 Lump Sum Additional Allowable Salary = Do not report hours paid. This entry is similar to earning type 7 with the exception that these are funds earned outside the current pay earning dates. Report applicable earning dates for the time frame that the payment pertains to. 9 Military Pay = Do not use this code. See information on “Frequently Asked Questions.” A Educational Allowance = Do not report hours paid. Tuition Reimbursements are not pensionable – do not report them. B Performance Bonus = Do not report hours paid. C Sick Leave Incentive = Do not report hours paid. Should only be reported if member’s sick bank is not reduced. D Stress/Hazard Pay = Do not report hours paid. E Special Duty = Do not report hours paid. Report only if the employer assumes responsibility for payment.

Revised 11/06
OOhhiioo PPoolliiccee && FFiirree PPeennssiioonn FFuunndd QQuuiicckk TTiippss
Earn Begin Date = This date is only reported if it differs from the date in the header entry at the top of the payroll report. UAN Solution: The Earning Period Beginning Date will be pulled from existing wage records with a Pay Period Ending Date within the reporting month. The Earning Period Beginning Date will only print if the Earning Period Begin or End Date are outside the header date range.
Earn End Date = This date is only reported if it differs from the date in the header entry at the top of the payroll report.
UAN Solution: The Earning Period Ending Date will be pulled from existing wage records. If wage records are not pulling into the report verify that the correct pay period start and end dates were entered on the wage records. This information can be verified using pay stubs or the Employee Detail/Adjustment report. If the pay period start and end dates are not correct they can be changed by editing the pay period under Payroll/Transactions/Payroll Utilities/Adjust/Pay Period. Wage records that have lump sum earning types (e.g. 1, 4, or 5) must be entered with a Pay Period Ending Date that falls within the reporting period. The reporting period is the month that the lump sum earning will be reported to OP&FPF. For example, lump sum earnings for pay period January 1st through June 30th that will be reported on the July OP&FPF report would need to be entered with a pay period ending date of July. Then the Pay Period Beginning and Ending Dates will need to be edited to reflect the correct earning period 01/01/06 through 06/30/06 for the selected OP&FPF report. Select the line item and edit the Pay Period Start and End fields under the Payroll/Reports/Monthly Reports/OP&FPF The Earning Period Ending Date will only print if the Earning Period Begin or End Date are outside the header date range.
Hours Paid (HRS PAID) = Only report the amount of hours paid for earning type 0 and earning type 1.
UAN Solution: The Hours Paid will be pulled from existing wage records. Hours Paid will only be reported for OP&FPF Earning Type 0 and Earning Type 1 records. Hours Paid will be replaced with Hours Base for salaried employees. The Hours Paid may be edited for the selected OP&FPF report by selecting the line item and editing the Hours Paid field under Payroll/Reports/Monthly Reports/OP&FPF.
Gross Salary = Submit the gross wages of each member by earning type.
UAN Solution: The Gross Salary will be pulled from existing wage records. The Gross Salary may be edited for the selected OP&FPF report by selecting the line item and editing the Gross Earnings field under Payroll/Reports/Monthly Reports/OP&FPF.

Revised 11/06
OOhhiioo PPoolliiccee && FFiirree PPeennssiioonn FFuunndd QQuuiicckk TTiippss
Member Taxed Deduction = Submit the “Taxed Contributions” for each earning type. UAN Solution: The Member Taxed Deduction will be pulled from existing wage records. The Member Taxed Deduction may be edited for the selected OP&FPF report by selecting the line item and editing the Retirement Regular field under Payroll/Reports/Monthly Reports/OP&FPF.
Member Salary Reduction = Submit the “Salary Reduction” contributions for each earning type.
UAN Solution: The Member Salary Reduction will be pulled from existing wage records. The Member Salary Reduction may be edited for the selected OP&FPF report by selecting the line item and editing the Retirement Reduction field under Payroll/Reports/Monthly Reports/OP&FPF.
Employer Paid Benefit Contribution = Submit the “Employer Paid” contributions for each earning type. UAN Solution: The Employer Paid Benefit Contribution will be pulled from existing wage records. The Employer Paid Benefit Contribution may be edited for the selected OP&FPF report by selecting the line item and editing the Retirement Benefit field under Payroll/Reports/Monthly Reports/OP&FPF.
Work Codes = Required if the member falls into one of the listed categories: N New Member T Terminated Member R Retired Member D Deceased Member S Suspended Member M Member on Military Leave L Member on Medical Leave Please include applicable dates pertaining to the work codes in the “Comments” field.
UAN Solution: Work Codes may be added for the selected OP&FPF report by selecting the line item and editing Work Codes field under Payroll/Reports/Monthly Reports/OP&FPF.
Comments = The comment section is provided for information pertaining to the member’s payroll (e.g., 3 day suspension, leave without pay, additional hours worked at straight pay, etc.). By supplying this information on the payroll, it could help eliminate 30-day letters and penalties.
UAN Solution: Comments may be added for the selected OP&FPF report by selecting the line item and editing Comments field under Payroll/Reports/Monthly Reports/OP&FPF.
Page Total = All pages must have a subtotal of gross salary and contributions by type (not a running total), and the total should balance the amount of detail reported per column (gross salary, taxed deductions, salary deductions, employer paid).
UAN Solution: This will be calculated and reported based on the information contained within the report.

Revised 11/06
OOhhiioo PPoolliiccee && FFiirree PPeennssiioonn FFuunndd QQuuiicckk TTiippss
Report Total = The grand total of the report contributions must be supplied on the report. This total must balance the amount of details reported per column. Do not add the gross and post 10 percent of that figure. Each column must be added individually and the totals must balance the amount of detail posted for each participating member.
UAN Solution: This will be calculated and reported based on the information contained within the report.
Signature = All pages must be signed by the person completing the report. Title = The title of the person completing the report must be provided.

88 E. Broad St. / Fifth Floor / Columbus, OH 43215‐3506 Telephone: (800) 833‐8261 Fax: (877) 727‐0088
TO: UAN CLIENTS
FROM: UAN STAFF
DATE: DECEMBER 22, 2009
SUBJECT: QUICK REFERENCE
This is a list of frequently used contact information for questions on accounting software, accounting procedures and payroll withholding questions. We combined them on one list for you to use as a quick reference. Auditor of State of Ohio, Mary Taylor CPA http://www.auditor.state.oh.us/ Audit Division ...........................................................................................................(800) 282-0370 Legal Division ...........................................................................................................(800) 282-0370 Open Government Unit & Public Records Training .................................................(800) 282-0370 http://www.auditor.state.oh.us/OGU/Default.htm AOS Publications ......................................................................................................(614) 466-6218 http://www.auditor.state.oh.us/Publications/Default.htm AOS Conference Information ...................................................................................(800) 282-0370 http://www.auditor.state.oh.us/ConferenceInformation/Default.htm Local Government Services (LGS) ...........................................................................(800) 345-2519 http://www.auditor.state.oh.us/LGS/Default.htm Special Investigations Unit (SIU) Fraud Hotline ......................................................(866) 372-8364 http://www.auditor.state.oh.us/SIU/Default.htm Link to Various Agencies Online Services: http://www.auditor.state.oh.us/OnlineServices/Default.htm Uniform Accounting Network (UAN) ......................................................................(800) 833-8261 Email: [email protected] http://uanlink.auditor.state.oh.us/

Page 2 Quick Reference
Federal Government Agencies Internal Revenue Service (IRS) Federal, State & Local Government Specialists Trudee L. Billo ..........................................................................................................(419) 522-2359 Email: [email protected] Ms. Billo is the Federal, State & Local Government Specialists for the following counties:
John Darr .................................................................................................................. (419) 526-2886 Email: [email protected] Mr. Darr is the Federal, State & Local Government Specialists for the following counties:
Wendy Speelman ......................................................................................................(419) 526-2607 Email: [email protected] Ms. Speelman is Federal, State & Local Government Specialists for the following counties:

Page 3 Quick Reference
Federal Government Agencies (Continued) Electronic Federal Tax Payment System (EFTPS) Hotline ..................................... (800) 555-4477 https://www.eftps.com/eftps/ Customer Service for Tax Exempt/Government Entities & Employee Plans ......... (877) 829-5500 General IRS Customer Service .............................................................................. (800) 829-1040 IRS Forms, Instructions, and Publications ................................................................(800) 829-3676 http://www.irs.gov/ Social Security Administration (SSA) SSA Employer Customer Service .............................................................................(800) 772-6270 SSA General Services ...............................................................................................(800) 772-1213 Email: [email protected] http://www.ssa.gov/ State of Ohio Government Agencies: http://www.ohio.gov/ Ohio Bureau of Workers’ Compensation (OBWC) ..................................................(800) 644-6292 http://www.ohiobwc.com/ Ohio Department of Taxation Tax Assistance Services ...........................................(888) 405-4039 http://tax.ohio.gov/channels/other/government.stm Ohio Police & Fire Pension Fund (OP&FPF)...........................................................(888) 864-8363 http://www.op-f.org/ Ohio Public Employees Retirement System (OPERS) .............................................(800) 222-7377 https://www.opers.org/ Public Employees Deferred Compensation (OPEDC) .............................................(877) 644-6457 http://www.ohio457.org/ Unemployment Compensation Division of the Ohio Department of Job & Family Services (ODJFS) Workers & Filings.....................................................................................................(877) 644-6562 Employers .................................................................................................................(866) 448-2829 http://jfs.ohio.gov/ouc/uctax/index.stm State of Ohio Legislative (Senate & House) Information .........................................(800) 282-0253 STAROHIO ..............................................................................................................(800) 648-7827 http://www.tos.ohio.gov/content/view/19/462/ Account: https://www.starohio.org/secure/login.asp State Library of Ohio ................................................................................................(800) 686-1532 http://www.winslo.state.oh.us/

Page 4 Quick Reference
Other Useful Links: Ohio Library Council (OLC) ....................................................................................(614) 416-2258 http://www.olc.org/index.asp Ohio Municipal League (OML) ................................................................................(800) 561-3597 http://www.omlohio.org/ Ohio Township Association (OTA) ......................................................................... (614) 863-0045 http://www.cpmra.muohio.edu/otaohio/

Uniform Accounting Network – Payroll Training
Table of Contents Miscellaneous
In UAN Training, practice exercises are used for learning purposes and are not available on a standard UAN system. However, all users have access to a training application. There are four options available. They are as follows:
1. Load Training Data - This option loads current Accounting and Payroll data into the training environment.
2. Run Training – This option opens up the training environment with the training data
that was loaded. 3. Save Training Data – This option saves the data that is in the training environment.
This allows saved training data to be reloaded. It will save only one training scenario at a time (multiple training sessions cannot be saved). This is a good idea for those users who wish to practice setting things up in the training environment.
4. Load Saved Training Data - This option loads saved training data (data saved using
option 3 above).
The default password is Pilot. The UAN system allows the password for any of the UAN programs to be changed. The password utility requires the password of the UAN Software (Accounting and Payroll) to be changed on a quarterly basis. For data security purposes, it is recommended to change the password for the UAN Software environment as frequently as needed. The program requires a minimum password length of five characters and a maximum password length of twenty four characters. Please refer to the Accounting Manual, Appendix E for further explanation of how to change passwords.
Mouse: When you see the word ‘select’ in an instruction in this training guide, you should move your mouse pointer to the required selection; then click or double-click the left button of the mouse. Keyboard: For menu selections and when you see the word ‘search’ in a screen, you can move the highlighted selection with the tab key or the up or down arrow keys until you have highlighted the required selection and then press enter.
General Instructions for Selecting Menu Options
Password
Training

Uniform Accounting Network – Payroll Training
Table of Contents Miscellaneous
Search Box: A field that has a down arrow key on the right hand side has a search box available. A function button must be selected first. Left clicking with the mouse on the down arrow key displays a listing of items. In some screens, pressing the space bar will activate the search box. F11 and F12: These additional keys at the top of the keyboard are used to make multiple selections from a grid. The F11 will select all choices up from the marked item. The F12 will select all choices down from the marked item. Shift F11 and Shift F12 will unselect the marked items
Spell check is available from the Windows option on the drop down menu at the top of the screen. Only characters and memo fields may be spell checked. Spell check cannot check fields that are read only. The hot key to activate ‘Spell Check’ in the system is accessed by pressing the ‘Ctrl’ key and the letter ‘S’ instead of using the ‘Alt’ key.
Hot keys allow the use of the keyboard to select menu items without using the mouse. The hot key letter designation can be identified as the letter in the button which is underlined. For example, if the menu item is Process, the ‘P’ would be the hot key. Hot keys are utilized by pressing the ‘Alt’ key and the underlined letter of the function button that is to be accessed.
Backups may be performed at anytime. A good procedure to follow is to periodically store a backup CD in a safe off-site location. Rotate the off-site CD on a monthly basis. A written log of backups should be documented to assist you in identifying the date of each backup, description of each backup, how many backups are on a CD-R and when the CD-R is full. You can reference Appendix E of the UAN Accounting Manual for a Backup Log copy and further information concerning backup procedures.
A UAN Help application is available in the Accounting, Payroll, Cemetery and Inventory software. It is accessible by pressing the F1 key anywhere in the software. When the F1 key is pressed, the Help application will bring up the section of the manual that applies to the area of the software that you are using. It also contains a Contents tab (to select another section of the manual), a Search utility, Back and Forward page buttons, and a Print option.
F1 - Help
Backups
Hot Keys
Spell Check