unidata - prismhr os/400, ibm informix®, ... chapter 22 performance monitoring and tuning ... tips...
TRANSCRIPT
UniData
Administering UniData on UNIX
Version 6.0September, 2002Part No. 000-9101
ii Administering UniDat
IBM Corporation555 Bailey AvenueSan Jose, CA 95141
Licensed Materials – Property of IBM
© Copyright International Business Machines Corporation 2002. All rights reserved.
AIX, DB2, DB2 Universal Database, Distributed Relational Database Architecture, NUMA-Q, OS/2, OS/390,
and OS/400, IBM Informix®, C-ISAM®, Foundation.2000 ™, IBM Informix® 4GL, IBM Informix®
DataBlade® module, Client SDK™, Cloudscape™, Cloudsync™, IBM Informix® Connect, IBM Informix®
Driver for JDBC, Dynamic Connect™, IBM Informix® Dynamic Scalable Architecture™ (DSA), IBM
Informix® Dynamic Server™, IBM Informix® Enterprise Gateway Manager (Enterprise Gateway Manager),
IBM Informix® Extended Parallel Server™, i.Financial Services™, J/Foundation™, MaxConnect™, Object
Translator™, Red Brick® Decision Server™, IBM Informix® SE, IBM Informix® SQL, InformiXML™,
RedBack®, SystemBuilder™, U2™, UniData®, UniVerse®, wIntegrate® are trademarks or registered
trademarks of International Business Machines Corporation.
Java and all Java-based trademarks and logos are trademarks or registered trademarks of Sun Microsystems,
Inc. in the United States and other countries.
Windows, Windows NT, and Excel are either registered trademarks or trademarks of Microsoft Corporation
in the United States and/or other countries.
UNIX is a registered trademark in the United States and other countries licensed exclusively through X/Open
Company Limited.
Other company, product, and service names used in this publication may be trademarks or service marks of
others.
This product includes cryptographic software written by Eric Young ([email protected]).
This product includes software written by Tim Hudson ([email protected]).
Documentation Team: Claire Gustafson
US GOVERNMENT USERS RESTRICTED RIGHTS
Use, duplication or disclosure restricted by GSA ADP Schedule Contract with IBM Corp.
a on UNIX
Table of Contents
Table ofContents
Chapter 1 IntroductionIntroduction . . . . . . . . . . . . . . . . . . . . 1-3
Audience . . . . . . . . . . . . . . . . . . . . 1-4
Chapter 2 UniData and UNIX SecurityUNIX File Permissions . . . . . . . . . . . . . . . 2-4
Additional UNIX Access Modes . . . . . . . . . . . . 2-6
UNIX umask . . . . . . . . . . . . . . . . . . 2-8
UniData Default Permissions . . . . . . . . . . . . . 2-10
UniData Processes and root . . . . . . . . . . . . . 2-11
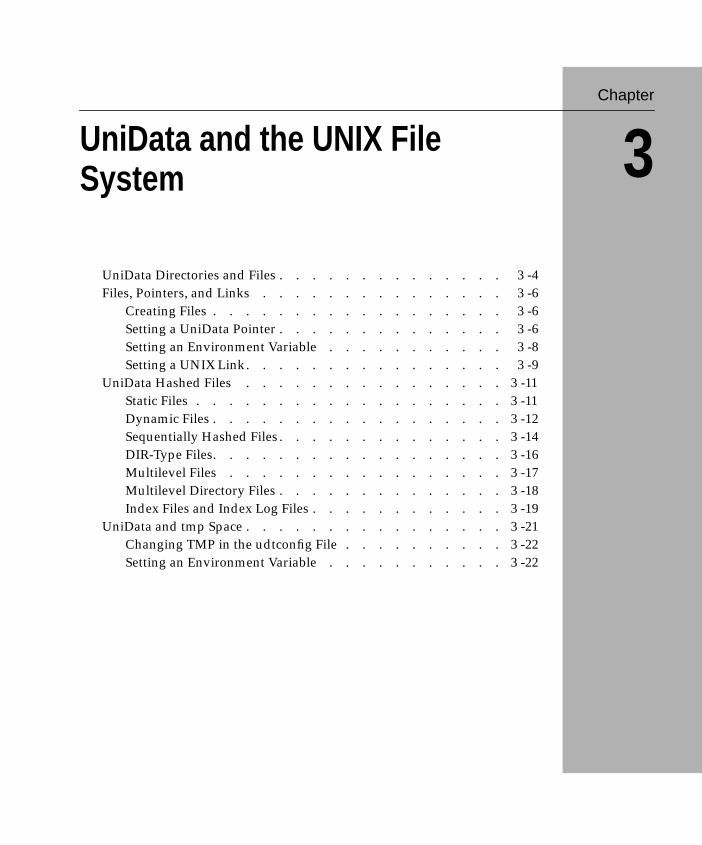
Chapter 3 UniData and the UNIX File SystemUniData Directories and Files . . . . . . . . . . . . . 3-4
Files, Pointers, and Links . . . . . . . . . . . . . . 3-6
Creating Files . . . . . . . . . . . . . . . . . . 3-6
Setting a UniData Pointer . . . . . . . . . . . . . . 3-6
Setting an Environment Variable . . . . . . . . . . . . 3-8
Setting a UNIX Link . . . . . . . . . . . . . . . . 3-9
UniData Hashed Files . . . . . . . . . . . . . . . 3-11
Static Files . . . . . . . . . . . . . . . . . . . 3-11
Dynamic Files . . . . . . . . . . . . . . . . . . 3-12
Sequentially Hashed Files . . . . . . . . . . . . . . 3-14
DIR-Type Files . . . . . . . . . . . . . . . . . . 3-16
Multilevel Files . . . . . . . . . . . . . . . . . . 3-17
Multilevel Directory Files . . . . . . . . . . . . . . 3-18
Index Files and Index Log Files . . . . . . . . . . . . 3-19
UniData and tmp Space . . . . . . . . . . . . . . . 3-21
Changing TMP in the udtconfig File . . . . . . . . . . 3-22
Setting an Environment Variable . . . . . . . . . . . . 3-22
iv Admin
Chapter 4 UniData and DaemonsWhat Is a Daemon? . . . . . . . . . . . . . . . . 4-4
Principal UniData Daemons . . . . . . . . . . . . . 4-5
Shared Basic Code Server (sbcs). . . . . . . . . . . . 4-5
Shared Memory Manager (smm) . . . . . . . . . . . 4-6
Clean Up (cleanupd) . . . . . . . . . . . . . . . 4-7
UniRPC Service (unirpcd). . . . . . . . . . . . . . 4-8
sync Daemon . . . . . . . . . . . . . . . . . . 4-8
Monitoring UniData Daemons . . . . . . . . . . . . 4-9
showud Command . . . . . . . . . . . . . . . . 4-9
Log Files. . . . . . . . . . . . . . . . . . . . 4-9
Chapter 5 UniData and MemoryUNIX and Shared Memory . . . . . . . . . . . . . 5-4
UniData and Shared Memory . . . . . . . . . . . . 5-5
smm and Shared Memory. . . . . . . . . . . . . . 5-5
sbcs and Shared Memory . . . . . . . . . . . . . . 5-13
Self-Created Segments . . . . . . . . . . . . . . . 5-13
UniData and the UNIX Kernel . . . . . . . . . . . . 5-14
Chapter 6 UniData and UNIX ipc FacilitiesMessage Queues . . . . . . . . . . . . . . . . . 6-4
UniData and Message Queues . . . . . . . . . . . . 6-4
Semaphores . . . . . . . . . . . . . . . . . . 6-6
Chapter 7 UniData and UNIX DevicesUNIX Devices: Overview . . . . . . . . . . . . . . 7-4
UniData and Terminal Devices . . . . . . . . . . . . 7-5
UniData and Tape Devices . . . . . . . . . . . . . 7-6
UniData and Printers . . . . . . . . . . . . . . . 7-7
UniData and Serial Devices . . . . . . . . . . . . . 7-8
Chapter 8 Configuring Your UniData SystemConfiguration Procedure . . . . . . . . . . . . . . 8-4
Chapter 9 Starting, Stopping, and Pausing UniDataStarting, Stopping, and Pausing UniData . . . . . . . . . . 9-3
Normal Operation . . . . . . . . . . . . . . . . 9-4
UniData Log Files . . . . . . . . . . . . . . . . 9-4
Start UniData with startud . . . . . . . . . . . . . 9-5
istering UniData on UNIX
Stop UniData with stopud . . . . . . . . . . . . . 9-6
Pausing UniData . . . . . . . . . . . . . . . . 9-7
The dbpause Command . . . . . . . . . . . . . . 9-7
The dbpause_status Command . . . . . . . . . . . 9-9
Resuming Processing . . . . . . . . . . . . . . . 9-9
Additional Commands . . . . . . . . . . . . . . 9-10
Listing Processes with showud . . . . . . . . . . . 9-11
Stopping a User Process with stopudt . . . . . . . . . 9-11
Stopping a User Process with deleteuser . . . . . . . . 9-12
Displaying ipc Facilities with ipcstat . . . . . . . . . 9-13
Removing ipc Structures with udipcrm . . . . . . . . 9-14
Stopping UniData with stopud -f. . . . . . . . . . . 9-15
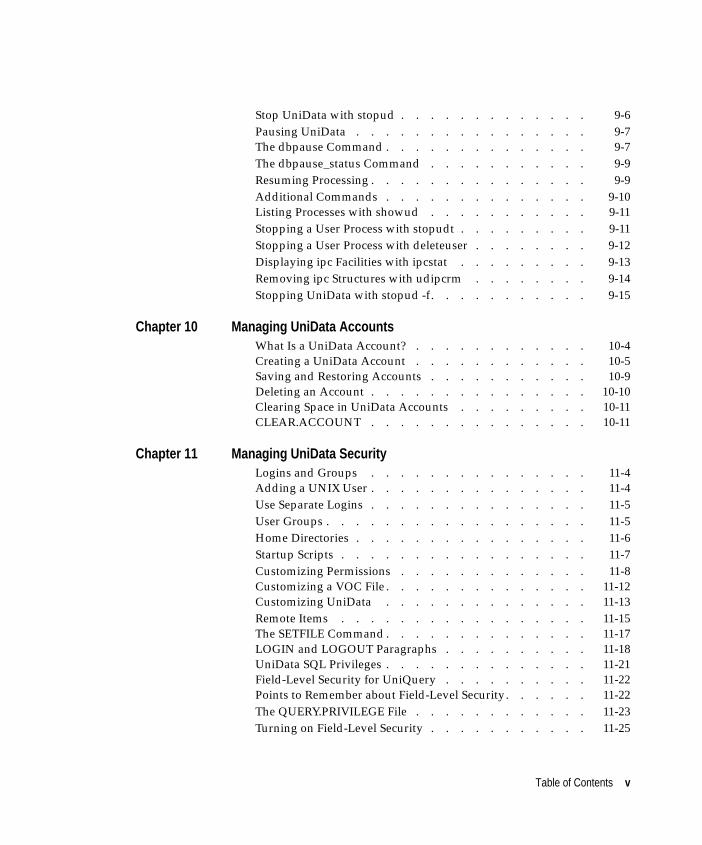
Chapter 10 Managing UniData AccountsWhat Is a UniData Account? . . . . . . . . . . . . 10-4
Creating a UniData Account . . . . . . . . . . . . 10-5
Saving and Restoring Accounts . . . . . . . . . . . 10-9
Deleting an Account . . . . . . . . . . . . . . . 10-10
Clearing Space in UniData Accounts . . . . . . . . . 10-11
CLEAR.ACCOUNT . . . . . . . . . . . . . . . 10-11
Chapter 11 Managing UniData SecurityLogins and Groups . . . . . . . . . . . . . . . 11-4
Adding a UNIX User . . . . . . . . . . . . . . . 11-4
Use Separate Logins . . . . . . . . . . . . . . . 11-5
User Groups . . . . . . . . . . . . . . . . . . 11-5
Home Directories . . . . . . . . . . . . . . . . 11-6
Startup Scripts . . . . . . . . . . . . . . . . . 11-7
Customizing Permissions . . . . . . . . . . . . . 11-8
Customizing a VOC File . . . . . . . . . . . . . . 11-12
Customizing UniData . . . . . . . . . . . . . . 11-13
Remote Items . . . . . . . . . . . . . . . . . 11-15
The SETFILE Command . . . . . . . . . . . . . . 11-17
LOGIN and LOGOUT Paragraphs . . . . . . . . . . 11-18
UniData SQL Privileges . . . . . . . . . . . . . . 11-21
Field-Level Security for UniQuery . . . . . . . . . . 11-22
Points to Remember about Field-Level Security. . . . . . 11-22
The QUERY.PRIVILEGE File . . . . . . . . . . . . 11-23
Turning on Field-Level Security . . . . . . . . . . . 11-25
Table of Contents v
vi Admin
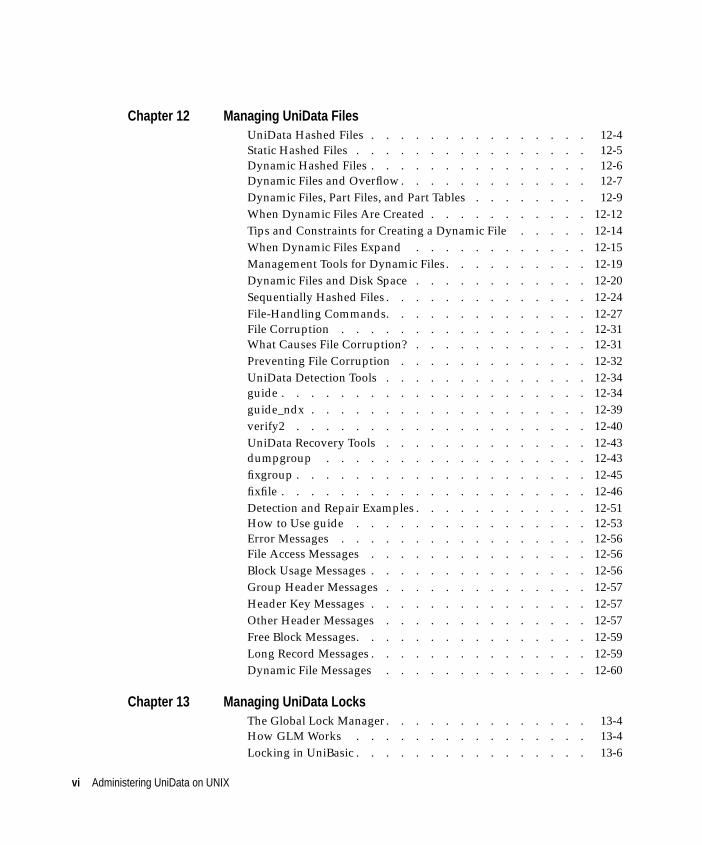
Chapter 12 Managing UniData FilesUniData Hashed Files . . . . . . . . . . . . . . . 12-4
Static Hashed Files . . . . . . . . . . . . . . . . 12-5
Dynamic Hashed Files . . . . . . . . . . . . . . . 12-6
Dynamic Files and Overflow. . . . . . . . . . . . . 12-7
Dynamic Files, Part Files, and Part Tables . . . . . . . . 12-9
When Dynamic Files Are Created . . . . . . . . . . . 12-12
Tips and Constraints for Creating a Dynamic File . . . . . 12-14
When Dynamic Files Expand . . . . . . . . . . . . 12-15
Management Tools for Dynamic Files. . . . . . . . . . 12-19
Dynamic Files and Disk Space . . . . . . . . . . . . 12-20
Sequentially Hashed Files . . . . . . . . . . . . . . 12-24
File-Handling Commands. . . . . . . . . . . . . . 12-27
File Corruption . . . . . . . . . . . . . . . . . 12-31
What Causes File Corruption? . . . . . . . . . . . . 12-31
Preventing File Corruption . . . . . . . . . . . . . 12-32
UniData Detection Tools . . . . . . . . . . . . . . 12-34
guide . . . . . . . . . . . . . . . . . . . . . 12-34
guide_ndx . . . . . . . . . . . . . . . . . . . 12-39
verify2 . . . . . . . . . . . . . . . . . . . . 12-40
UniData Recovery Tools . . . . . . . . . . . . . . 12-43
dumpgroup . . . . . . . . . . . . . . . . . . 12-43
fixgroup . . . . . . . . . . . . . . . . . . . . 12-45
fixfile . . . . . . . . . . . . . . . . . . . . . 12-46
Detection and Repair Examples . . . . . . . . . . . . 12-51
How to Use guide . . . . . . . . . . . . . . . . 12-53
Error Messages . . . . . . . . . . . . . . . . . 12-56
File Access Messages . . . . . . . . . . . . . . . 12-56
Block Usage Messages . . . . . . . . . . . . . . . 12-56
Group Header Messages . . . . . . . . . . . . . . 12-57
Header Key Messages . . . . . . . . . . . . . . . 12-57
Other Header Messages . . . . . . . . . . . . . . 12-57
Free Block Messages. . . . . . . . . . . . . . . . 12-59
Long Record Messages . . . . . . . . . . . . . . . 12-59
Dynamic File Messages . . . . . . . . . . . . . . 12-60
Chapter 13 Managing UniData LocksThe Global Lock Manager. . . . . . . . . . . . . . 13-4
How GLM Works . . . . . . . . . . . . . . . . 13-4
Locking in UniBasic . . . . . . . . . . . . . . . . 13-6
istering UniData on UNIX
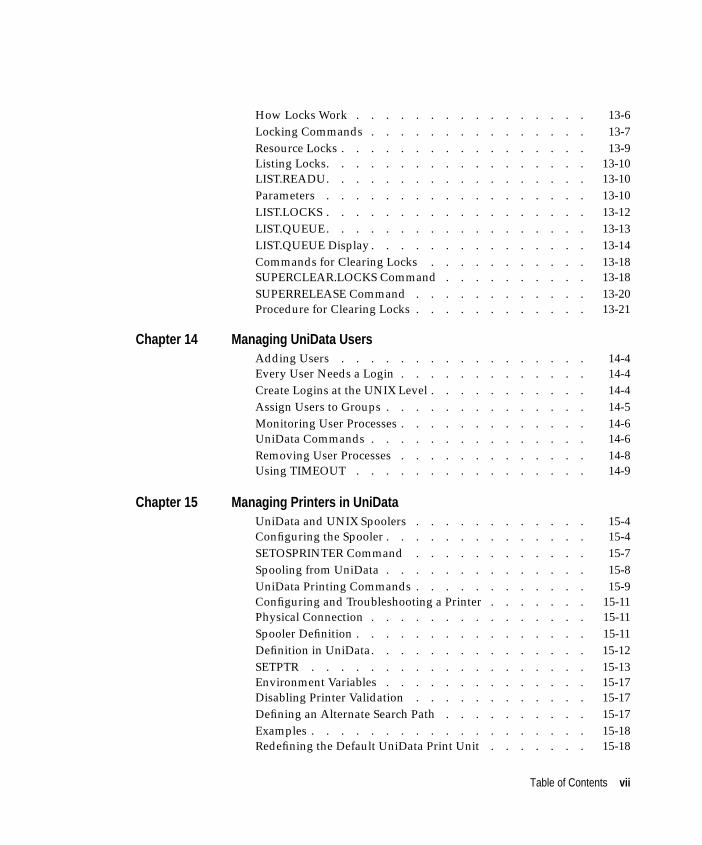
How Locks Work . . . . . . . . . . . . . . . . 13-6
Locking Commands . . . . . . . . . . . . . . . 13-7
Resource Locks . . . . . . . . . . . . . . . . . 13-9
Listing Locks. . . . . . . . . . . . . . . . . . 13-10
LIST.READU. . . . . . . . . . . . . . . . . . 13-10
Parameters . . . . . . . . . . . . . . . . . . 13-10
LIST.LOCKS . . . . . . . . . . . . . . . . . . 13-12
LIST.QUEUE. . . . . . . . . . . . . . . . . . 13-13
LIST.QUEUE Display . . . . . . . . . . . . . . . 13-14
Commands for Clearing Locks . . . . . . . . . . . 13-18
SUPERCLEAR.LOCKS Command . . . . . . . . . . 13-18
SUPERRELEASE Command . . . . . . . . . . . . 13-20
Procedure for Clearing Locks . . . . . . . . . . . . 13-21
Chapter 14 Managing UniData UsersAdding Users . . . . . . . . . . . . . . . . . 14-4
Every User Needs a Login . . . . . . . . . . . . . 14-4
Create Logins at the UNIX Level . . . . . . . . . . . 14-4
Assign Users to Groups . . . . . . . . . . . . . . 14-5
Monitoring User Processes . . . . . . . . . . . . . 14-6
UniData Commands . . . . . . . . . . . . . . . 14-6
Removing User Processes . . . . . . . . . . . . . 14-8
Using TIMEOUT . . . . . . . . . . . . . . . . 14-9
Chapter 15 Managing Printers in UniDataUniData and UNIX Spoolers . . . . . . . . . . . . 15-4
Configuring the Spooler . . . . . . . . . . . . . . 15-4
SETOSPRINTER Command . . . . . . . . . . . . 15-7
Spooling from UniData . . . . . . . . . . . . . . 15-8
UniData Printing Commands . . . . . . . . . . . . 15-9
Configuring and Troubleshooting a Printer . . . . . . . 15-11
Physical Connection . . . . . . . . . . . . . . . 15-11
Spooler Definition . . . . . . . . . . . . . . . . 15-11
Definition in UniData. . . . . . . . . . . . . . . 15-12
SETPTR . . . . . . . . . . . . . . . . . . . 15-13
Environment Variables . . . . . . . . . . . . . . 15-17
Disabling Printer Validation . . . . . . . . . . . . 15-17
Defining an Alternate Search Path . . . . . . . . . . 15-17
Examples . . . . . . . . . . . . . . . . . . . 15-18
Redefining the Default UniData Print Unit . . . . . . . 15-18
Table of Contents vii
viii Adm
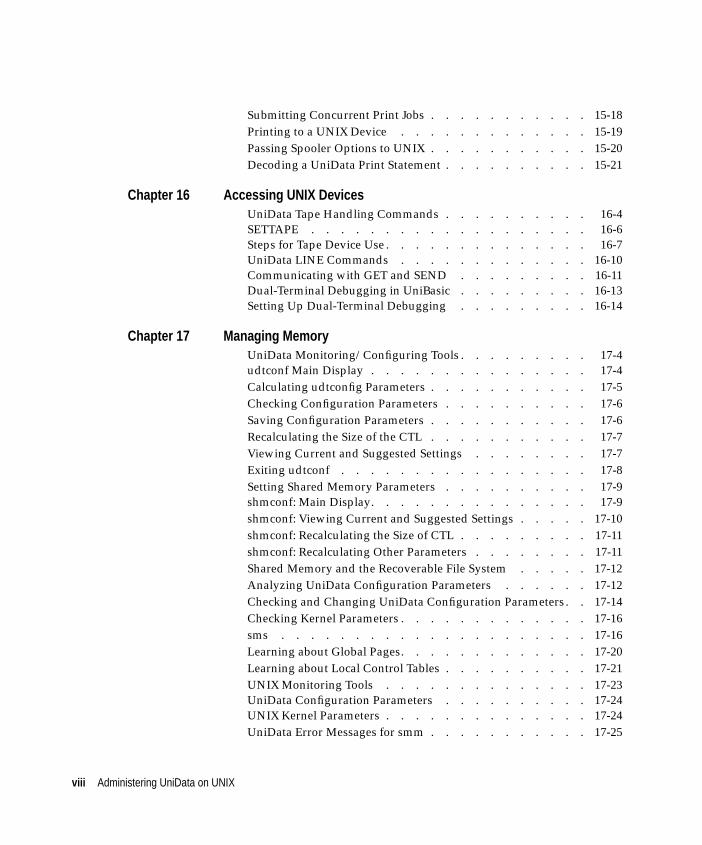
Submitting Concurrent Print Jobs . . . . . . . . . . . 15-18
Printing to a UNIX Device . . . . . . . . . . . . . 15-19
Passing Spooler Options to UNIX . . . . . . . . . . . 15-20
Decoding a UniData Print Statement . . . . . . . . . . 15-21
Chapter 16 Accessing UNIX DevicesUniData Tape Handling Commands . . . . . . . . . . 16-4
SETTAPE . . . . . . . . . . . . . . . . . . . 16-6
Steps for Tape Device Use . . . . . . . . . . . . . . 16-7
UniData LINE Commands . . . . . . . . . . . . . 16-10
Communicating with GET and SEND . . . . . . . . . 16-11
Dual-Terminal Debugging in UniBasic . . . . . . . . . 16-13
Setting Up Dual-Terminal Debugging . . . . . . . . . 16-14
Chapter 17 Managing MemoryUniData Monitoring/Configuring Tools . . . . . . . . . 17-4
udtconf Main Display . . . . . . . . . . . . . . . 17-4
Calculating udtconfig Parameters . . . . . . . . . . . 17-5
Checking Configuration Parameters . . . . . . . . . . 17-6
Saving Configuration Parameters . . . . . . . . . . . 17-6
Recalculating the Size of the CTL . . . . . . . . . . . 17-7
Viewing Current and Suggested Settings . . . . . . . . 17-7
Exiting udtconf . . . . . . . . . . . . . . . . . 17-8
Setting Shared Memory Parameters . . . . . . . . . . 17-9
shmconf: Main Display. . . . . . . . . . . . . . . 17-9
shmconf: Viewing Current and Suggested Settings . . . . . 17-10
shmconf: Recalculating the Size of CTL . . . . . . . . . 17-11
shmconf: Recalculating Other Parameters . . . . . . . . 17-11
Shared Memory and the Recoverable File System . . . . . 17-12
Analyzing UniData Configuration Parameters . . . . . . 17-12
Checking and Changing UniData Configuration Parameters . . 17-14
Checking Kernel Parameters . . . . . . . . . . . . . 17-16
sms . . . . . . . . . . . . . . . . . . . . . 17-16
Learning about Global Pages. . . . . . . . . . . . . 17-20
Learning about Local Control Tables . . . . . . . . . . 17-21
UNIX Monitoring Tools . . . . . . . . . . . . . . 17-23
UniData Configuration Parameters . . . . . . . . . . 17-24
UNIX Kernel Parameters . . . . . . . . . . . . . . 17-24
UniData Error Messages for smm . . . . . . . . . . . 17-25
inistering UniData on UNIX
Chapter 18 Managing ipc FacilitiesMessage Queues, Shared Memory, and Semaphores . . . . 18-4
UniData Log Files . . . . . . . . . . . . . . . . 18-7
Removing ipc Structures. . . . . . . . . . . . . . 18-8
Chapter 19 Managing Cataloged ProgramsUniBasic Source and Compiled Programs . . . . . . . . 19-4
UniBasic Compiled Programs . . . . . . . . . . . . 19-4
Cataloging UniBasic Programs . . . . . . . . . . . 19-5
Direct Cataloging . . . . . . . . . . . . . . . . 19-5
Local Cataloging . . . . . . . . . . . . . . . . 19-5
Global Cataloging . . . . . . . . . . . . . . . . 19-6
Managing Global Catalogs . . . . . . . . . . . . . 19-8
Contents of a Global Catalog . . . . . . . . . . . . 19-8
Verifying a Program Version . . . . . . . . . . . . 19-10
Listing Programs in Use . . . . . . . . . . . . . . 19-16
Creating an Alternate Global Catalog Space . . . . . . . 19-17
Files and Directories Created by newhome . . . . . . . 19-17
Procedure for Creating an Alternate Global Catalog Space . . 19-17
Chapter 20 CallBasic, CALLC, and makeudtLinking C Routines into UniData. . . . . . . . . . . 20-4
Overview . . . . . . . . . . . . . . . . . . . 20-4
Requirements . . . . . . . . . . . . . . . . . 20-4
Rebuilding for Troubleshooting . . . . . . . . . . . 20-5
makeudt . . . . . . . . . . . . . . . . . . . 20-6
File Examples . . . . . . . . . . . . . . . . . 20-7
Creating cfuncdef_user . . . . . . . . . . . . . . 20-10
Steps for Linking in C Functions . . . . . . . . . . . 20-11
Steps for Setting Up a Development Environment . . . . . 20-15
Accessing UniData from a C Program . . . . . . . . . 20-20
Requirements . . . . . . . . . . . . . . . . . 20-20
How CallBasic Works. . . . . . . . . . . . . . . 20-20
C Program Example . . . . . . . . . . . . . . . 20-22
UniBasic Subroutine Example . . . . . . . . . . . . 20-25
Steps for CallBasic . . . . . . . . . . . . . . . . 20-26
Chapter 21 General TroubleshootingCrashes and Restart Problems . . . . . . . . . . . . 21-4
UniData Crashes . . . . . . . . . . . . . . . . 21-4
Table of Contents ix
x Admin
UniData Cannot Start . . . . . . . . . . . . . . . 21-5
Response Problems in UniData . . . . . . . . . . . . 21-6
UniData Consistently Slow . . . . . . . . . . . . . 21-6
UniData is Hung . . . . . . . . . . . . . . . . . 21-6
Error Messages . . . . . . . . . . . . . . . . . 21-7
Common Error Messages . . . . . . . . . . . . . . 21-7
Chapter 22 Performance Monitoring and TuningPerformance Monitoring and Tuning . . . . . . . . . . . 22-3
UNIX Performance Considerations . . . . . . . . . . 22-4
UNIX Performance Monitoring . . . . . . . . . . . . 22-5
Tools . . . . . . . . . . . . . . . . . . . . . 22-5
Tips . . . . . . . . . . . . . . . . . . . . . 22-5
UniData Performance Factors . . . . . . . . . . . . 22-7
Database Design Considerations . . . . . . . . . . . 22-7
Using Alternate Key Indexes . . . . . . . . . . . . . 22-7
Sizing Static Hashed Files . . . . . . . . . . . . . . 22-7
Sizing Dynamic Hashed Files . . . . . . . . . . . . 22-8
UniBasic Coding Tips . . . . . . . . . . . . . . . 22-8
UniBasic Profiling . . . . . . . . . . . . . . . . 22-11
UniData Performance Monitoring: udtmon. . . . . . . . 22-15
udtmon: UniData User Statistics . . . . . . . . . . . 22-18
udtmon: File I/O Statistics . . . . . . . . . . . . . 22-19
udtmon: Program Control Statistics . . . . . . . . . . 22-21
udtmon: Dynamic Array Statistics . . . . . . . . . . . 22-24
udtmon: Lock Statistics . . . . . . . . . . . . . . 22-25
udtmon: Data Conversion Statistics . . . . . . . . . . 22-28
udtmon: Index Statistics . . . . . . . . . . . . . . 22-29
udtmon: Mglm Performance . . . . . . . . . . . . . 22-31
Appendix A UniData Configuration Parameters
Appendix B Environment Variables for UniData
Appendix C Configuring SSL for TelnetServer Side Configuration: . . . . . . . . . . . . . . . C-1
istering UniData on UNIX
1Chapter
Introduction
Audience . . . . . . . . . . . . . . . . . . . . . 1 -4

1-2 Adm
inistering UniData on UNIX
IntroductionThe purpose of this manual is to collect, in a single book, as much
information as possible about activities needed to administer a UniData
installation on UNIX. This manual repeats some information presented
elsewhere in the UniData documentation set. Certain command descriptions
and examples have been amplified or modified in this manual to increase
their usefulness to system administrators as opposed to end users.
Note: Before you try repeating the examples in this manual, make sure that you haveset the environment variables UDTHOME and UDTBIN, and make sure that yourPATH includes udtbin. See “Configuring Your UniData System,” for informationabout setting these variables.
Many of the administrative functions you can execute from the command
line are available through UniAdmi. For more information, see UsingUniAdmin.
1-3

AudienceAdministering UniData on UNIX is intended for people whose responsibilities
include the following:
■ Tasks performed at the host level
■ Reviewing and modifying kernel configuration
■ Modifying file protections
■ Adding UNIX users
■ Creating directories
■ Starting and stopping UniData
■ Backing up UniData files
■ Tasks performed within UniData
■ Creating and managing UniData accounts
■ Optimizing UniData configuration
■ Customizing security
■ Managing files
■ Monitoring and accessing files, peripherals, and system
resources
1-4 Administering UniData on UNIX
2Chapter
UniData and UNIX Security
UNIX File Permissions . . . . . . . . . . . . . . . . 2 -4
Additional UNIX Access Modes . . . . . . . . . . . . . 2 -6
UNIX umask . . . . . . . . . . . . . . . . . . . 2 -8
UniData Default Permissions . . . . . . . . . . . . . . 2 -10
UniData Processes and root . . . . . . . . . . . . . . 2 -11

2-2 Adm
inistering UniData on UNIX
This chapter describes UNIX security mechanisms and outlines how these
are used by UniData. It is important to understand UNIX security, because
UNIX file permissions form the basis of UniData security.
2-3
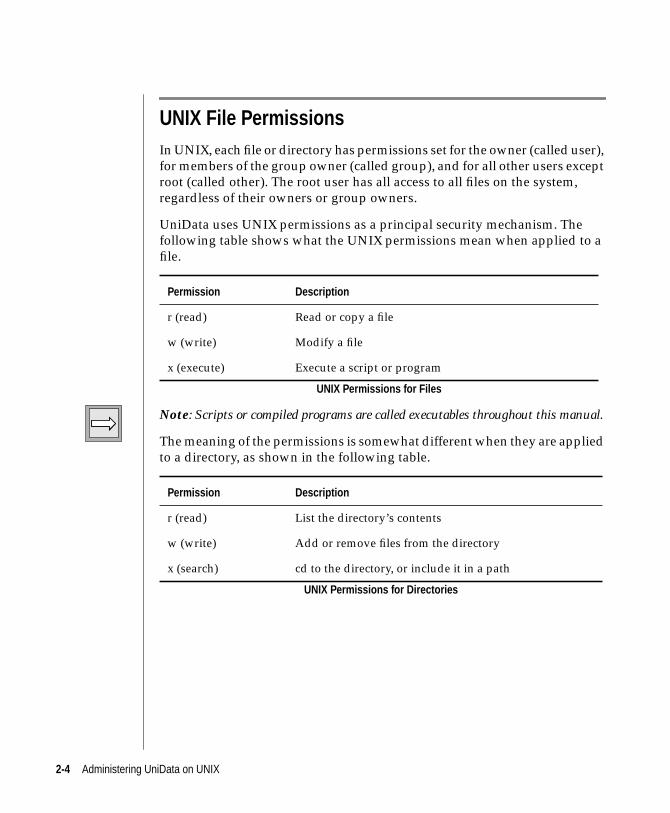
UNIX File PermissionsIn UNIX, each file or directory has permissions set for the owner (called user),
for members of the group owner (called group), and for all other users except
root (called other). The root user has all access to all files on the system,
regardless of their owners or group owners.
UniData uses UNIX permissions as a principal security mechanism. The
following table shows what the UNIX permissions mean when applied to a
file.
Note: Scripts or compiled programs are called executables throughout this manual.
The meaning of the permissions is somewhat different when they are applied
to a directory, as shown in the following table.
Permission Description
r (read) Read or copy a file
w (write) Modify a file
x (execute) Execute a script or program
UNIX Permissions for Files
Permission Description
r (read) List the directory’s contents
w (write) Add or remove files from the directory
x (search) cd to the directory, or include it in a path
UNIX Permissions for Directories
2-4 Administering UniData on UNIX
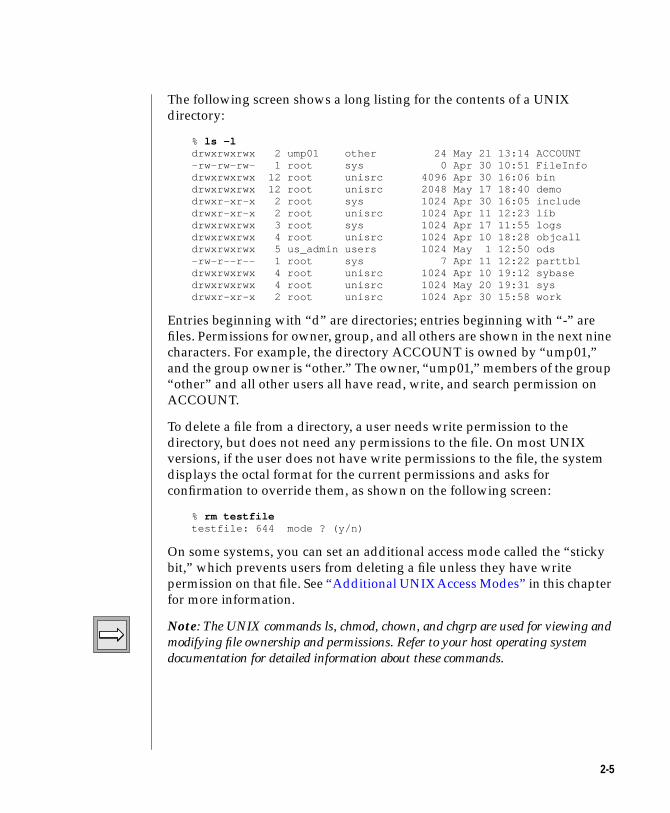
The following screen shows a long listing for the contents of a UNIX
directory:
% ls -ldrwxrwxrwx 2 ump01 other 24 May 21 13:14 ACCOUNT-rw-rw-rw- 1 root sys 0 Apr 30 10:51 FileInfodrwxrwxrwx 12 root unisrc 4096 Apr 30 16:06 bindrwxrwxrwx 12 root unisrc 2048 May 17 18:40 demodrwxr-xr-x 2 root sys 1024 Apr 30 16:05 includedrwxr-xr-x 2 root unisrc 1024 Apr 11 12:23 libdrwxrwxrwx 3 root sys 1024 Apr 17 11:55 logsdrwxrwxrwx 4 root unisrc 1024 Apr 10 18:28 objcalldrwxrwxrwx 5 us_admin users 1024 May 1 12:50 ods-rw-r--r-- 1 root sys 7 Apr 11 12:22 parttbldrwxrwxrwx 4 root unisrc 1024 Apr 10 19:12 sybasedrwxrwxrwx 4 root unisrc 1024 May 20 19:31 sysdrwxr-xr-x 2 root unisrc 1024 Apr 30 15:58 work
Entries beginning with “d” are directories; entries beginning with “-” are
files. Permissions for owner, group, and all others are shown in the next nine
characters. For example, the directory ACCOUNT is owned by “ump01,”
and the group owner is “other.” The owner, “ump01,” members of the group
“other” and all other users all have read, write, and search permission on
ACCOUNT.
To delete a file from a directory, a user needs write permission to the
directory, but does not need any permissions to the file. On most UNIX
versions, if the user does not have write permissions to the file, the system
displays the octal format for the current permissions and asks for
confirmation to override them, as shown on the following screen:
% rm testfiletestfile: 644 mode ? (y/n)
On some systems, you can set an additional access mode called the “sticky
bit,” which prevents users from deleting a file unless they have write
permission on that file. See “Additional UNIX Access Modes” in this chapter
for more information.
Note: The UNIX commands ls, chmod, chown, and chgrp are used for viewing andmodifying file ownership and permissions. Refer to your host operating systemdocumentation for detailed information about these commands.
2-5
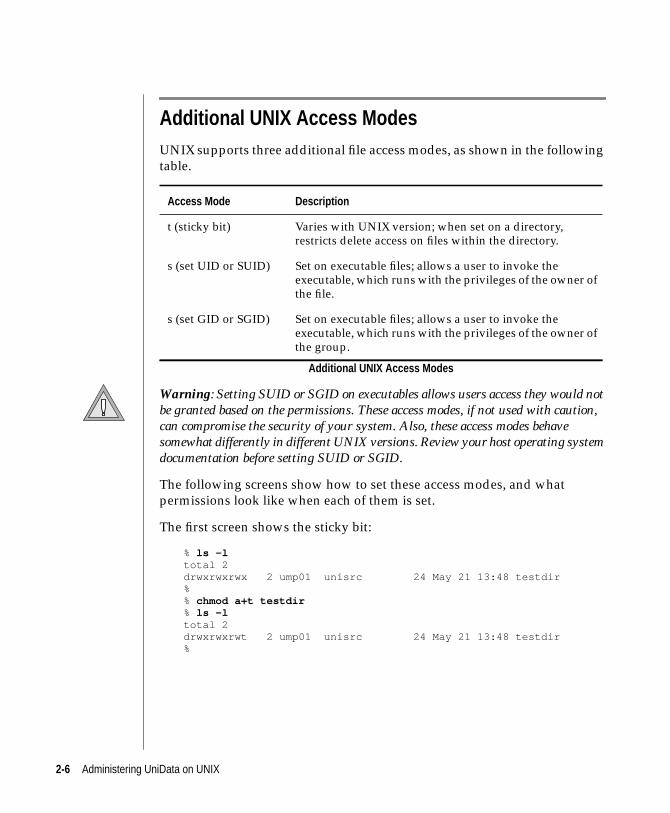
Additional UNIX Access ModesUNIX supports three additional file access modes, as shown in the following
table.
Warning: Setting SUID or SGID on executables allows users access they would notbe granted based on the permissions. These access modes, if not used with caution,can compromise the security of your system. Also, these access modes behavesomewhat differently in different UNIX versions. Review your host operating systemdocumentation before setting SUID or SGID.
The following screens show how to set these access modes, and what
permissions look like when each of them is set.
The first screen shows the sticky bit:
% ls -ltotal 2drwxrwxrwx 2 ump01 unisrc 24 May 21 13:48 testdir%% chmod a+t testdir% ls -ltotal 2drwxrwxrwt 2 ump01 unisrc 24 May 21 13:48 testdir%
Access Mode Description
t (sticky bit) Varies with UNIX version; when set on a directory,restricts delete access on files within the directory.
s (set UID or SUID) Set on executable files; allows a user to invoke theexecutable, which runs with the privileges of the owner ofthe file.
s (set GID or SGID) Set on executable files; allows a user to invoke theexecutable, which runs with the privileges of the owner ofthe group.
Additional UNIX Access Modes
2-6 Administering UniData on UNIX
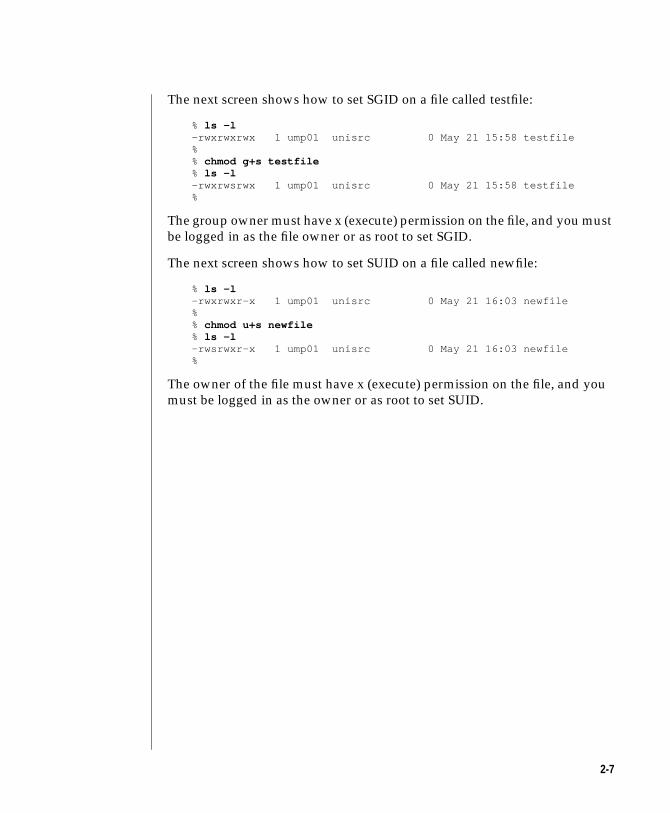
The next screen shows how to set SGID on a file called testfile:
% ls -l-rwxrwxrwx 1 ump01 unisrc 0 May 21 15:58 testfile%% chmod g+s testfile% ls -l-rwxrwsrwx 1 ump01 unisrc 0 May 21 15:58 testfile%
The group owner must have x (execute) permission on the file, and you must
be logged in as the file owner or as root to set SGID.
The next screen shows how to set SUID on a file called newfile:
% ls -l-rwxrwxr-x 1 ump01 unisrc 0 May 21 16:03 newfile%% chmod u+s newfile% ls -l-rwsrwxr-x 1 ump01 unisrc 0 May 21 16:03 newfile%
The owner of the file must have x (execute) permission on the file, and you
must be logged in as the owner or as root to set SUID.
2-7
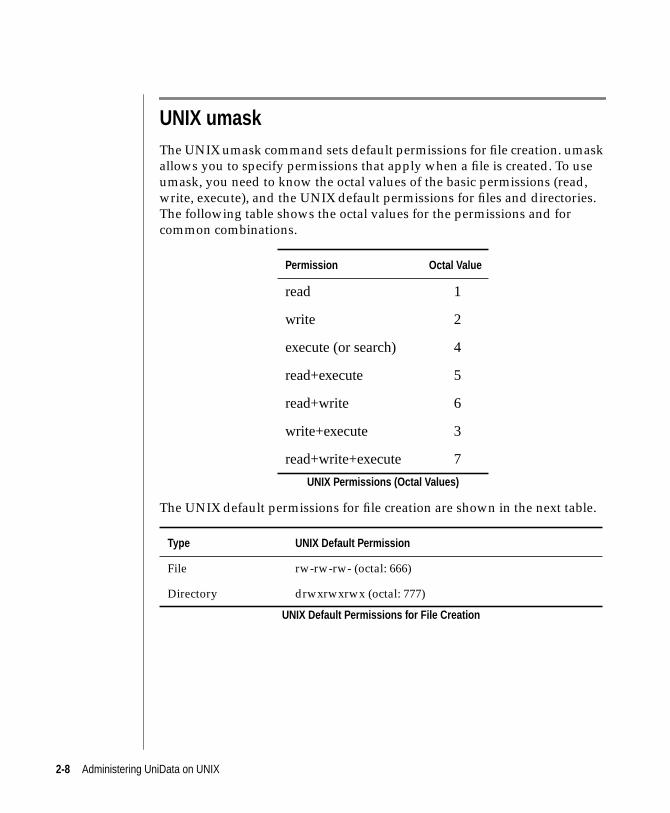
UNIX umaskThe UNIX umask command sets default permissions for file creation. umask
allows you to specify permissions that apply when a file is created. To use
umask, you need to know the octal values of the basic permissions (read,
write, execute), and the UNIX default permissions for files and directories.
The following table shows the octal values for the permissions and for
common combinations.
The UNIX default permissions for file creation are shown in the next table.
Permission Octal Value
read 1
write 2
execute (or search) 4
read+execute 5
read+write 6
write+execute 3
read+write+execute 7
UNIX Permissions (Octal Values)
Type UNIX Default Permission
File rw-rw-rw- (octal: 666)
Directory drwxrwxrwx (octal: 777)
UNIX Default Permissions for File Creation
2-8 Administering UniData on UNIX
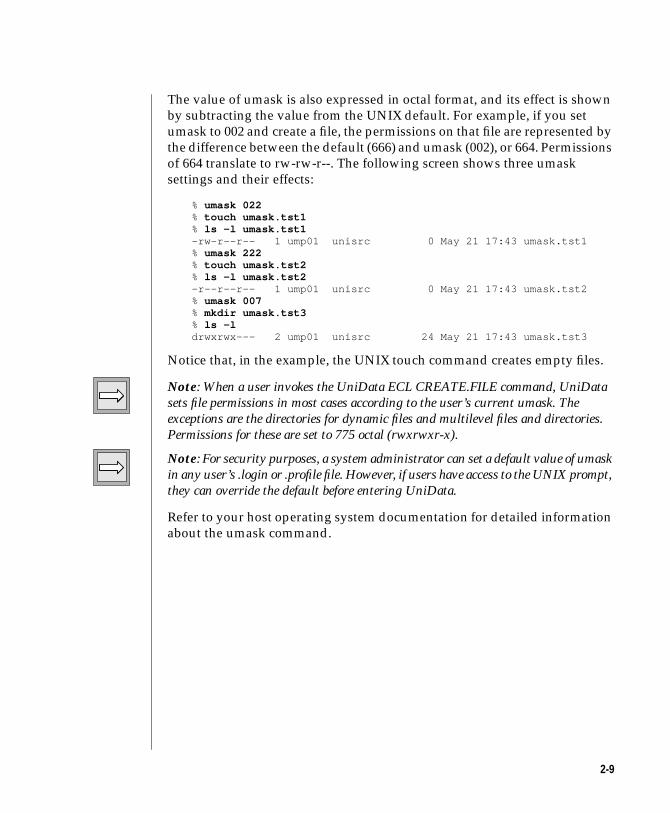
The value of umask is also expressed in octal format, and its effect is shown
by subtracting the value from the UNIX default. For example, if you set
umask to 002 and create a file, the permissions on that file are represented by
the difference between the default (666) and umask (002), or 664. Permissions
of 664 translate to rw-rw-r--. The following screen shows three umask
settings and their effects:
% umask 022% touch umask.tst1% ls -l umask.tst1-rw-r--r-- 1 ump01 unisrc 0 May 21 17:43 umask.tst1% umask 222% touch umask.tst2% ls -l umask.tst2-r--r--r-- 1 ump01 unisrc 0 May 21 17:43 umask.tst2% umask 007% mkdir umask.tst3% ls -ldrwxrwx--- 2 ump01 unisrc 24 May 21 17:43 umask.tst3
Notice that, in the example, the UNIX touch command creates empty files.
Note: When a user invokes the UniData ECL CREATE.FILE command, UniDatasets file permissions in most cases according to the user’s current umask. Theexceptions are the directories for dynamic files and multilevel files and directories.Permissions for these are set to 775 octal (rwxrwxr-x).
Note: For security purposes, a system administrator can set a default value of umaskin any user’s .login or .profile file. However, if users have access to the UNIX prompt,they can override the default before entering UniData.
Refer to your host operating system documentation for detailed information
about the umask command.
2-9
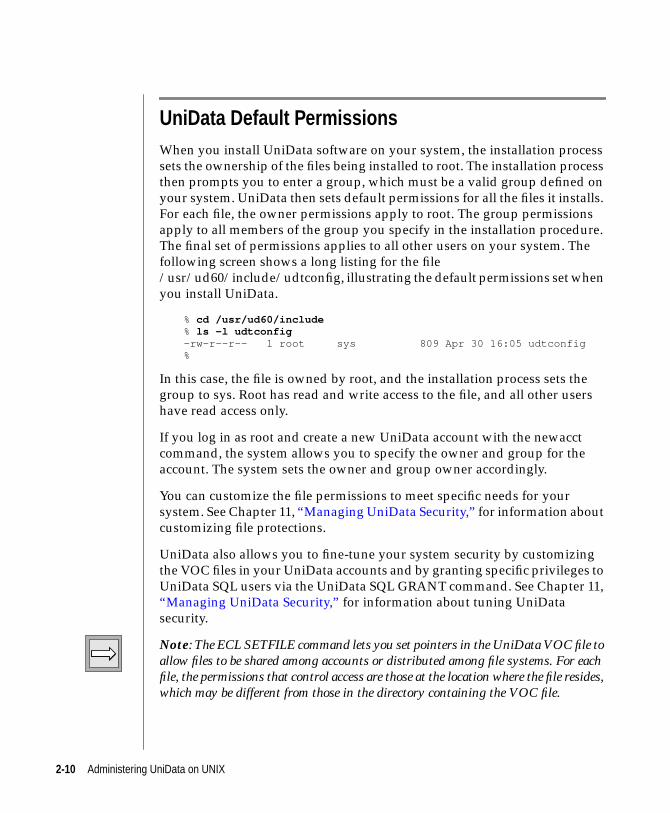
UniData Default PermissionsWhen you install UniData software on your system, the installation process
sets the ownership of the files being installed to root. The installation process
then prompts you to enter a group, which must be a valid group defined on
your system. UniData then sets default permissions for all the files it installs.
For each file, the owner permissions apply to root. The group permissions
apply to all members of the group you specify in the installation procedure.
The final set of permissions applies to all other users on your system. The
following screen shows a long listing for the file
/usr/ud60/include/udtconfig, illustrating the default permissions set when
you install UniData.
% cd /usr/ud60/include% ls -l udtconfig-rw-r--r-- 1 root sys 809 Apr 30 16:05 udtconfig%
In this case, the file is owned by root, and the installation process sets the
group to sys. Root has read and write access to the file, and all other users
have read access only.
If you log in as root and create a new UniData account with the newacct
command, the system allows you to specify the owner and group for the
account. The system sets the owner and group owner accordingly.
You can customize the file permissions to meet specific needs for your
system. See Chapter 11, “Managing UniData Security,” for information about
customizing file protections.
UniData also allows you to fine-tune your system security by customizing
the VOC files in your UniData accounts and by granting specific privileges to
UniData SQL users via the UniData SQL GRANT command. See Chapter 11,
“Managing UniData Security,” for information about tuning UniData
security.
Note: The ECL SETFILE command lets you set pointers in the UniData VOC file toallow files to be shared among accounts or distributed among file systems. For eachfile, the permissions that control access are those at the location where the file resides,which may be different from those in the directory containing the VOC file.
2-10 Administering UniData on UNIX
UniData Processes and rootSince the principal UniData daemons, smm, sbcs, unirpcd, and cleanupd
must run as root, UniData must be started by root. Those daemons have all
access to all files on your system. (If you are using the Recoverable File
System (RFS), the RFS daemons also run as root.) For security reasons,
UniData users should not have root privileges. When a user enters UniData,
the user process (called a udt) runs under the UID of the user. Since the udt
process drives all file access, users can perform only actions allowed to them
by your system’s security, which consists of UNIX file permissions, the local
VOC file, and SQL privileges.
2-11

2-12 Administering UniData on UNIX
3Chapter
UniData and the UNIX FileSystem
UniData Directories and Files . . . . . . . . . . . . . . 3 -4
Files, Pointers, and Links . . . . . . . . . . . . . . . 3 -6
Creating Files . . . . . . . . . . . . . . . . . . 3 -6
Setting a UniData Pointer . . . . . . . . . . . . . . 3 -6
Setting an Environment Variable . . . . . . . . . . . 3 -8
Setting a UNIX Link. . . . . . . . . . . . . . . . 3 -9
UniData Hashed Files . . . . . . . . . . . . . . . . 3 -11
Static Files . . . . . . . . . . . . . . . . . . . 3 -11
Dynamic Files . . . . . . . . . . . . . . . . . . 3 -12
Sequentially Hashed Files . . . . . . . . . . . . . . 3 -14
DIR-Type Files. . . . . . . . . . . . . . . . . . 3 -16
Multilevel Files . . . . . . . . . . . . . . . . . 3 -17
Multilevel Directory Files . . . . . . . . . . . . . . 3 -18
Index Files and Index Log Files . . . . . . . . . . . . 3 -19
UniData and tmp Space . . . . . . . . . . . . . . . . 3 -21
Changing TMP in the udtconfig File . . . . . . . . . . 3 -22
Setting an Environment Variable . . . . . . . . . . . 3 -22

3-2 Adm
inistering UniData on UNIX
This chapter describes relationships between UniData file types and UNIX
file types, and outlines the structures of various types of UniData files.
3-3
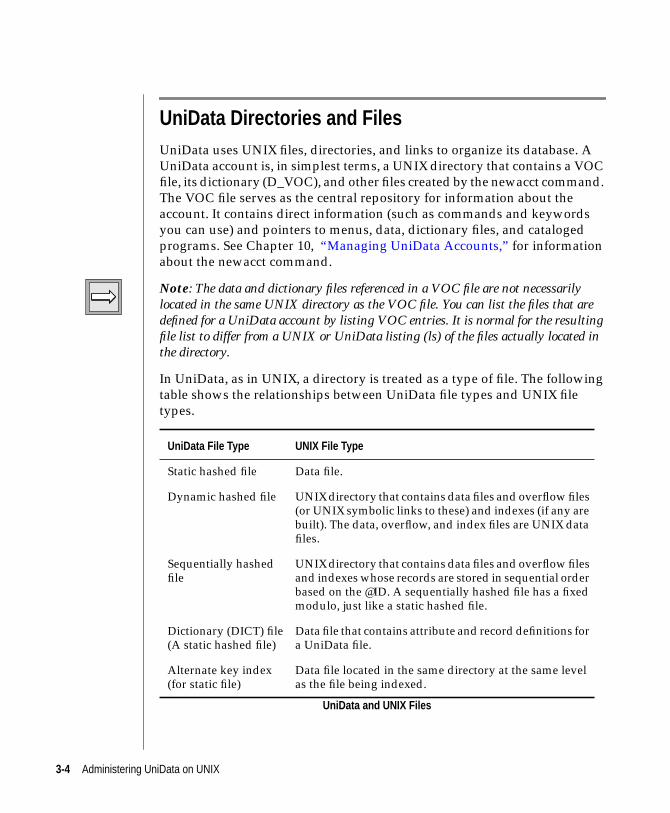
UniData Directories and FilesUniData uses UNIX files, directories, and links to organize its database. A
UniData account is, in simplest terms, a UNIX directory that contains a VOC
file, its dictionary (D_VOC), and other files created by the newacct command.
The VOC file serves as the central repository for information about the
account. It contains direct information (such as commands and keywords
you can use) and pointers to menus, data, dictionary files, and cataloged
programs. See Chapter 10, “Managing UniData Accounts,” for information
about the newacct command.
Note: The data and dictionary files referenced in a VOC file are not necessarilylocated in the same UNIX directory as the VOC file. You can list the files that aredefined for a UniData account by listing VOC entries. It is normal for the resultingfile list to differ from a UNIX or UniData listing (ls) of the files actually located inthe directory.
In UniData, as in UNIX, a directory is treated as a type of file. The following
table shows the relationships between UniData file types and UNIX file
types.
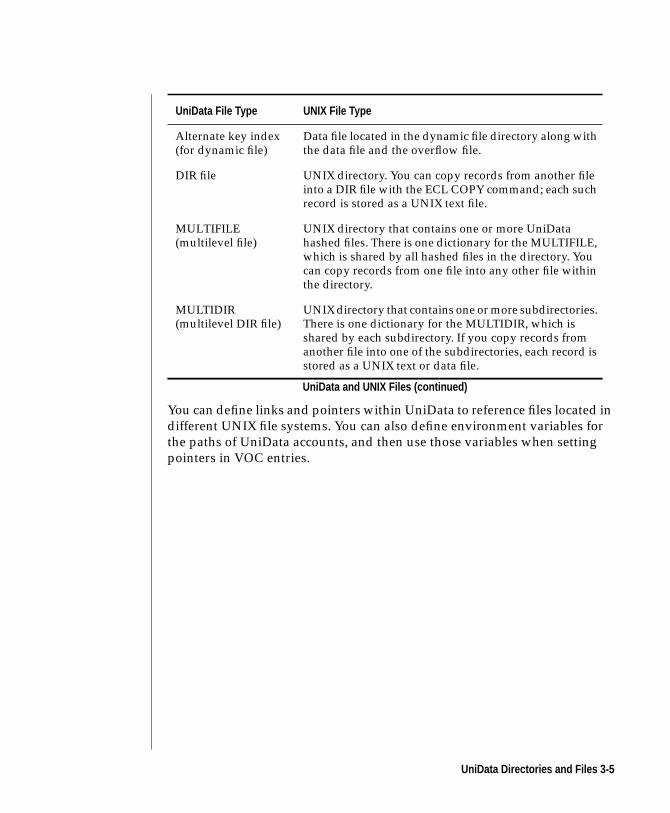
UniData File Type UNIX File Type
Static hashed file Data file.
Dynamic hashed file UNIX directory that contains data files and overflow files(or UNIX symbolic links to these) and indexes (if any arebuilt). The data, overflow, and index files are UNIX datafiles.
Sequentially hashedfile
UNIX directory that contains data files and overflow filesand indexes whose records are stored in sequential orderbased on the @ID. A sequentially hashed file has a fixedmodulo, just like a static hashed file.
Dictionary (DICT) file(A static hashed file)
Data file that contains attribute and record definitions fora UniData file.
Alternate key index(for static file)
Data file located in the same directory at the same levelas the file being indexed.
UniData and UNIX Files
3-4 Administering UniData on UNIX
You can define links and pointers within UniData to reference files located in
different UNIX file systems. You can also define environment variables for
the paths of UniData accounts, and then use those variables when setting
pointers in VOC entries.
Alternate key index(for dynamic file)
Data file located in the dynamic file directory along withthe data file and the overflow file.
DIR file UNIX directory. You can copy records from another fileinto a DIR file with the ECL COPY command; each suchrecord is stored as a UNIX text file.
MULTIFILE(multilevel file)
UNIX directory that contains one or more UniDatahashed files. There is one dictionary for the MULTIFILE,which is shared by all hashed files in the directory. Youcan copy records from one file into any other file withinthe directory.
MULTIDIR(multilevel DIR file)
UNIX directory that contains one or more subdirectories.There is one dictionary for the MULTIDIR, which isshared by each subdirectory. If you copy records fromanother file into one of the subdirectories, each record isstored as a UNIX text or data file.
UniData File Type UNIX File Type
UniData and UNIX Files (continued)
UniData Directories and Files 3-5
Files, Pointers, and Links
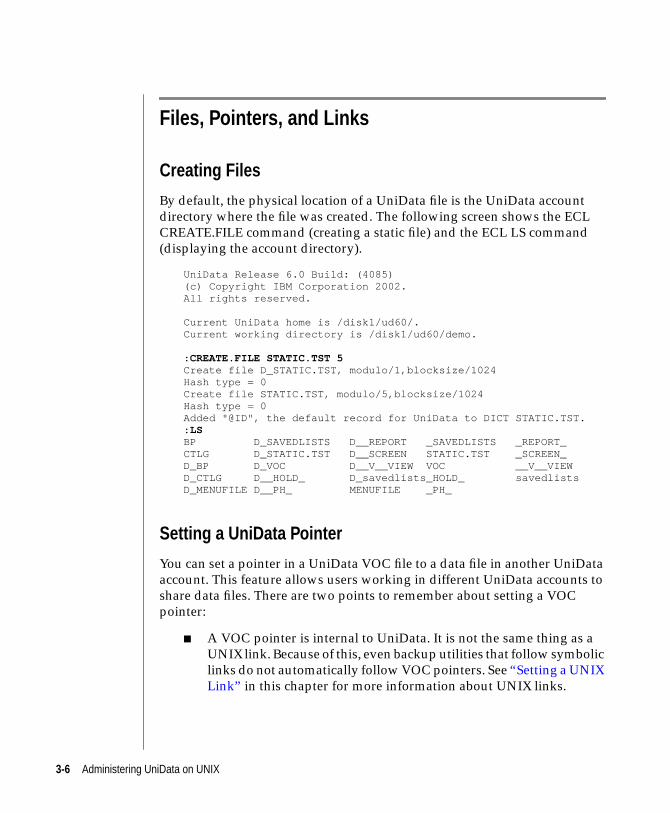
Creating Files
By default, the physical location of a UniData file is the UniData account
directory where the file was created. The following screen shows the ECL
CREATE.FILE command (creating a static file) and the ECL LS command
(displaying the account directory).
UniData Release 6.0 Build: (4085)(c) Copyright IBM Corporation 2002.All rights reserved.
Current UniData home is /disk1/ud60/.Current working directory is /disk1/ud60/demo.
: CREATE.FILE STATIC.TST 5Create file D_STATIC.TST, modulo/1,blocksize/1024Hash type = 0Create file STATIC.TST, modulo/5,blocksize/1024Hash type = 0Added "@ID", the default record for UniData to DICT STATIC.TST.: LSBP D_SAVEDLISTS D__REPORT _SAVEDLISTS _REPORT_CTLG D_STATIC.TST D__SCREEN STATIC.TST _SCREEN_D_BP D_VOC D__V__VIEW VOC __V__VIEWD_CTLG D__HOLD_ D_savedlists_HOLD_ savedlistsD_MENUFILE D__PH_ MENUFILE _PH_
Setting a UniData Pointer
You can set a pointer in a UniData VOC file to a data file in another UniData
account. This feature allows users working in different UniData accounts to
share data files. There are two points to remember about setting a VOC
pointer:
■ A VOC pointer is internal to UniData. It is not the same thing as a
UNIX link. Because of this, even backup utilities that follow symbolic
links do not automatically follow VOC pointers. See “Setting a UNIX
Link” in this chapter for more information about UNIX links.
3-6 Administering UniData on UNIX
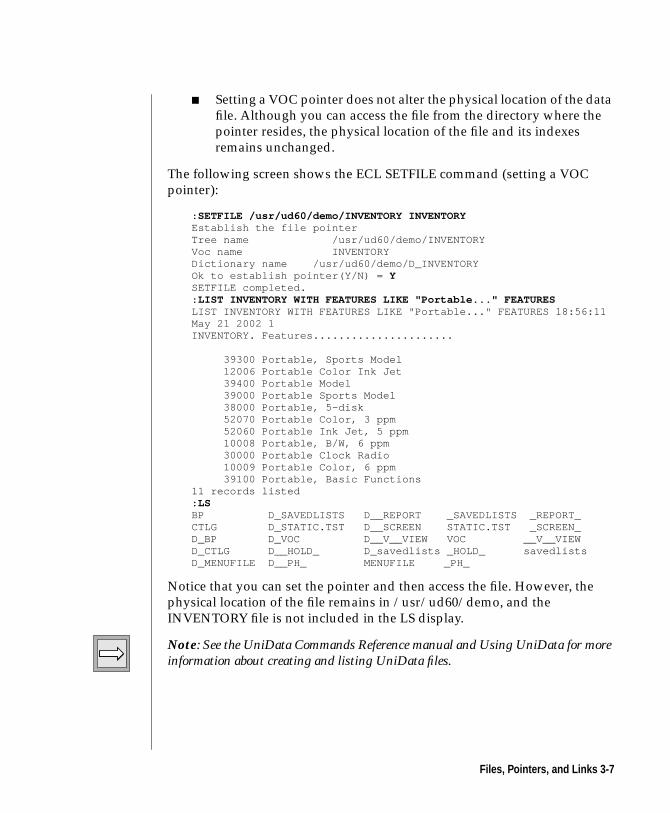
■ Setting a VOC pointer does not alter the physical location of the data
file. Although you can access the file from the directory where the
pointer resides, the physical location of the file and its indexes
remains unchanged.
The following screen shows the ECL SETFILE command (setting a VOC
pointer):
: SETFILE /usr/ud60/demo/INVENTORY INVENTORYEstablish the file pointerTree name /usr/ud60/demo/INVENTORYVoc name INVENTORYDictionary name /usr/ud60/demo/D_INVENTORYOk to establish pointer(Y/N) = YSETFILE completed.: LIST INVENTORY WITH FEATURES LIKE "Portable..." FEATURESLIST INVENTORY WITH FEATURES LIKE "Portable..." FEATURES 18:56:11May 21 2002 1INVENTORY. Features......................
39300 Portable, Sports Model 12006 Portable Color Ink Jet 39400 Portable Model 39000 Portable Sports Model 38000 Portable, 5-disk 52070 Portable Color, 3 ppm 52060 Portable Ink Jet, 5 ppm 10008 Portable, B/W, 6 ppm 30000 Portable Clock Radio 10009 Portable Color, 6 ppm 39100 Portable, Basic Functions11 records listed: LSBP D_SAVEDLISTS D__REPORT _SAVEDLISTS _REPORT_CTLG D_STATIC.TST D__SCREEN STATIC.TST _SCREEN_D_BP D_VOC D__V__VIEW VOC __V__VIEWD_CTLG D__HOLD_ D_savedlists _HOLD_ savedlistsD_MENUFILE D__PH_ MENUFILE _PH_
Notice that you can set the pointer and then access the file. However, the
physical location of the file remains in /usr/ud60/demo, and the
INVENTORY file is not included in the LS display.
Note: See the UniData Commands Reference manual and Using UniData for moreinformation about creating and listing UniData files.
Files, Pointers, and Links 3-7

Setting an Environment Variable
You can replace the “path” portion of a file reference in a VOC entry with a
UNIX environment variable. This makes it easy to move a file or files when
necessary without having to change each associated VOC entry. The
following screen shows how to set an environment variable for the UniData
demo account:
% setenv DEMO /usr/ud60/demo% printenv DEMO/usr/ud60/demo% cd $DEMO% pwd% /usr/ud60/demo%
Notice that you can use the environment variable to access the demo
database.
Note: The preceding example shows the C shell syntax for setting the environmentvariable. If you are using the Bourne or Korn shell, use the following syntax:
DEMO=/usr/ud60/demo; export DEMO
The following screen shows a VOC entry that uses the environment variable
to identify a file in the demo database:
: WHERE/users/testacct: !printenv DEMO/usr/ud60/demo: CT VOC INVENTORYVOC:
INVENTORY:F@DEMO/INVENTORY@DEMO/D_INVENTORY:
When users access the INVENTORY file, UniData uses the environment
variable to locate the file. If you move the entire demo database, you can
simply redefine the environment variable to the new path. Users can
continue to access the files.
Note: If you use an environment variable in a VOC entry, precede the environmentvariable with the @ character as shown in the previous example. The @ characterdirects UniData to handle the path reference with the environment variable.
3-8 Administering UniData on UNIX
Warning: You can use environment variables only in VOC entries for files. Youcannot use them in other types of entries that include file paths (for instance, catalogpointer items).
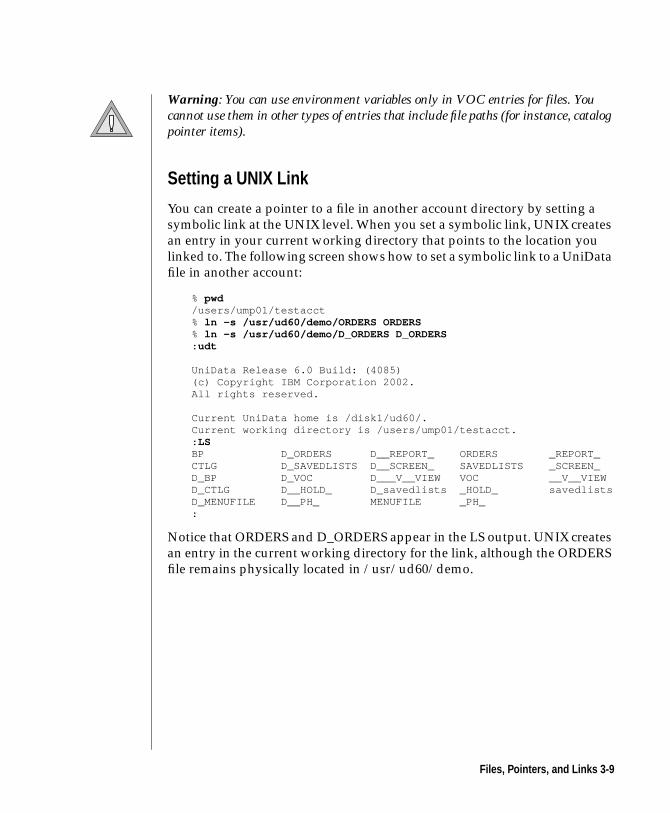
Setting a UNIX Link
You can create a pointer to a file in another account directory by setting a
symbolic link at the UNIX level. When you set a symbolic link, UNIX creates
an entry in your current working directory that points to the location you
linked to. The following screen shows how to set a symbolic link to a UniData
file in another account:
% pwd/users/ump01/testacct% ln -s /usr/ud60/demo/ORDERS ORDERS% ln -s /usr/ud60/demo/D_ORDERS D_ORDERS: udt
UniData Release 6.0 Build: (4085)(c) Copyright IBM Corporation 2002.All rights reserved.
Current UniData home is /disk1/ud60/.Current working directory is /users/ump01/testacct.: LSBP D_ORDERS D__REPORT_ ORDERS _REPORT_CTLG D_SAVEDLISTS D__SCREEN_ SAVEDLISTS _SCREEN_D_BP D_VOC D___V__VIEW VOC __V__VIEWD_CTLG D__HOLD_ D_savedlists _HOLD_ savedlistsD_MENUFILE D__PH_ MENUFILE _PH_:
Notice that ORDERS and D_ORDERS appear in the LS output. UNIX creates
an entry in the current working directory for the link, although the ORDERS
file remains physically located in /usr/ud60/demo.
Files, Pointers, and Links 3-9
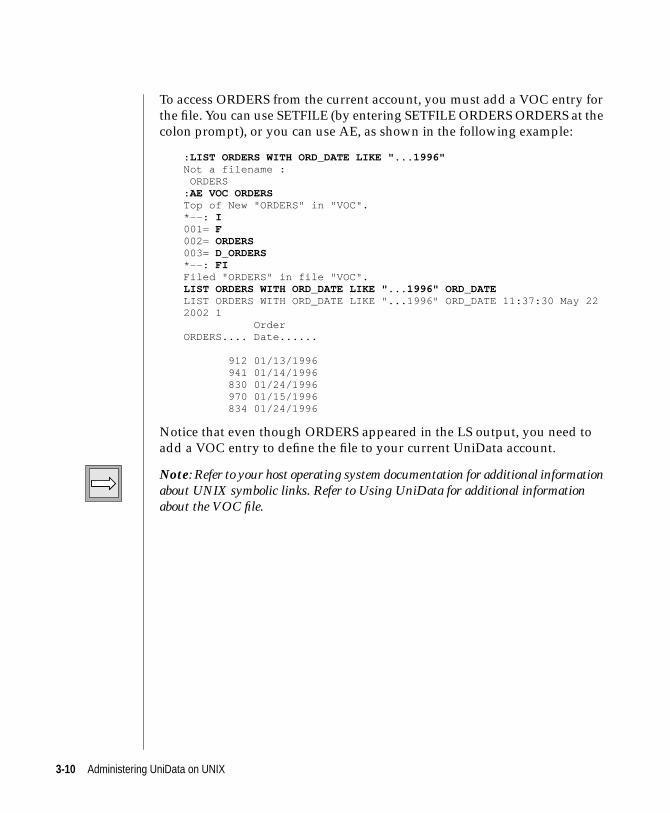
To access ORDERS from the current account, you must add a VOC entry for
the file. You can use SETFILE (by entering SETFILE ORDERS ORDERS at the
colon prompt), or you can use AE, as shown in the following example:
: LIST ORDERS WITH ORD_DATE LIKE "...1996"Not a filename : ORDERS: AE VOC ORDERSTop of New "ORDERS" in "VOC".*--: I001= F002= ORDERS003= D_ORDERS*--: FIFiled "ORDERS" in file "VOC".LIST ORDERS WITH ORD_DATE LIKE "...1996" ORD_DATELIST ORDERS WITH ORD_DATE LIKE "...1996" ORD_DATE 11:37:30 May 222002 1 OrderORDERS.... Date......
912 01/13/1996 941 01/14/1996 830 01/24/1996 970 01/15/1996 834 01/24/1996
Notice that even though ORDERS appeared in the LS output, you need to
add a VOC entry to define the file to your current UniData account.
Note: Refer to your host operating system documentation for additional informationabout UNIX symbolic links. Refer to Using UniData for additional informationabout the VOC file.
3-10 Administering UniData on UNIX
UniData Hashed Files
Static Files
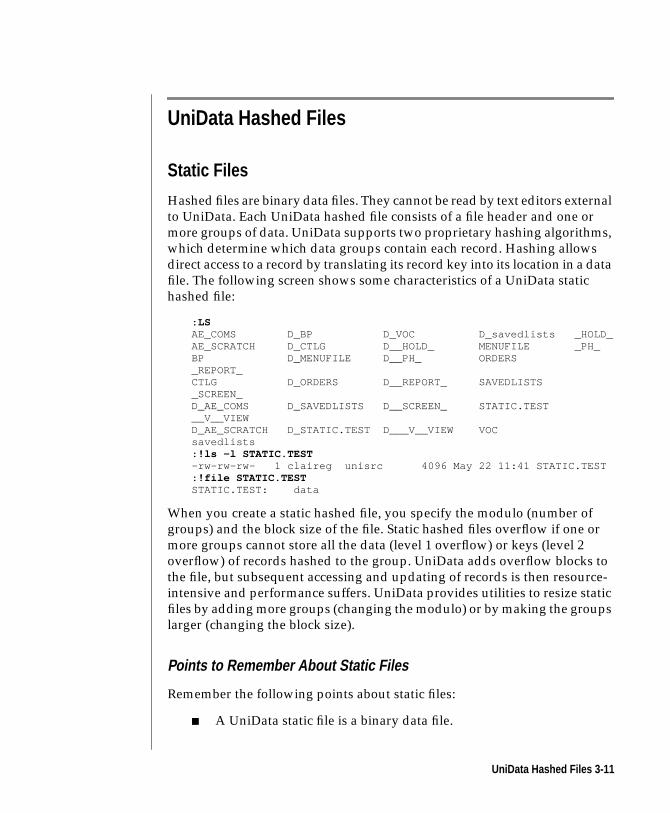
Hashed files are binary data files. They cannot be read by text editors external
to UniData. Each UniData hashed file consists of a file header and one or
more groups of data. UniData supports two proprietary hashing algorithms,
which determine which data groups contain each record. Hashing allows
direct access to a record by translating its record key into its location in a data
file. The following screen shows some characteristics of a UniData static
hashed file:
: LSAE_COMS D_BP D_VOC D_savedlists _HOLD_AE_SCRATCH D_CTLG D__HOLD_ MENUFILE _PH_BP D_MENUFILE D__PH_ ORDERS_REPORT_CTLG D_ORDERS D__REPORT_ SAVEDLISTS_SCREEN_D_AE_COMS D_SAVEDLISTS D__SCREEN_ STATIC.TEST__V__VIEWD_AE_SCRATCH D_STATIC.TEST D___V__VIEW VOCsavedlists: !ls -l STATIC.TEST-rw-rw-rw- 1 claireg unisrc 4096 May 22 11:41 STATIC.TEST: !file STATIC.TESTSTATIC.TEST: data
When you create a static hashed file, you specify the modulo (number of
groups) and the block size of the file. Static hashed files overflow if one or
more groups cannot store all the data (level 1 overflow) or keys (level 2
overflow) of records hashed to the group. UniData adds overflow blocks to
the file, but subsequent accessing and updating of records is then resource-
intensive and performance suffers. UniData provides utilities to resize static
files by adding more groups (changing the modulo) or by making the groups
larger (changing the block size).
Points to Remember About Static Files
Remember the following points about static files:
■ A UniData static file is a binary data file.
UniData Hashed Files 3-11
■ You define the size of a static file when you create the file, by
specifying the number and size of groups in the file.
■ When you add records to the file, each record is hashed to a group
using a proprietary hashing algorithm.
■ Static files can overflow, causing performance problems.
■ A static hashed file cannot be larger than 2 GB. If a file exceeds 2 GB,
you must make it a dynamic file.
See Chapter 12, “Managing UniData Files,” for more information about file
management commands.
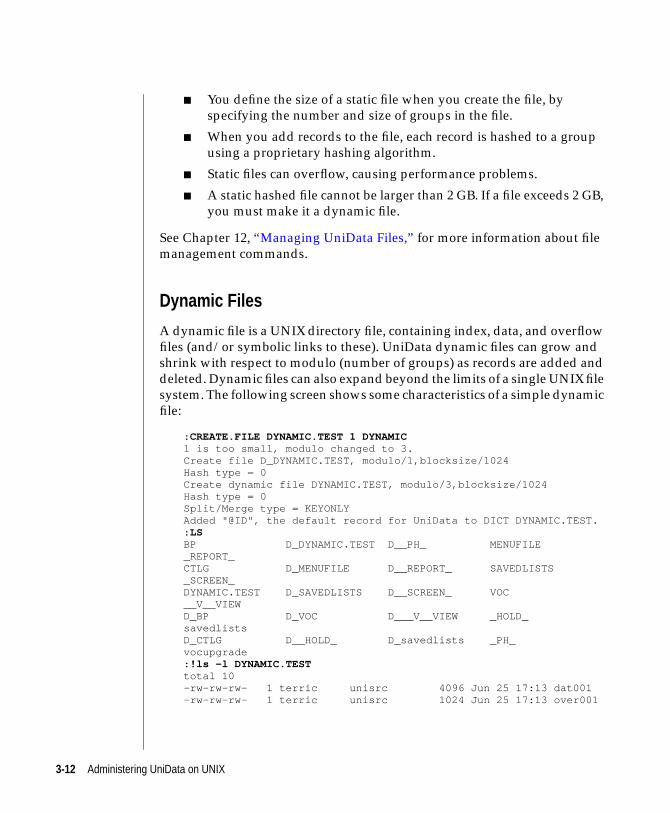
Dynamic Files
A dynamic file is a UNIX directory file, containing index, data, and overflow
files (and/or symbolic links to these). UniData dynamic files can grow and
shrink with respect to modulo (number of groups) as records are added and
deleted. Dynamic files can also expand beyond the limits of a single UNIX file
system. The following screen shows some characteristics of a simple dynamic
file:
: CREATE.FILE DYNAMIC.TEST 1 DYNAMIC1 is too small, modulo changed to 3.Create file D_DYNAMIC.TEST, modulo/1,blocksize/1024Hash type = 0Create dynamic file DYNAMIC.TEST, modulo/3,blocksize/1024Hash type = 0Split/Merge type = KEYONLYAdded "@ID", the default record for UniData to DICT DYNAMIC.TEST.: LSBP D_DYNAMIC.TEST D__PH_ MENUFILE_REPORT_CTLG D_MENUFILE D__REPORT_ SAVEDLISTS_SCREEN_DYNAMIC.TEST D_SAVEDLISTS D__SCREEN_ VOC__V__VIEWD_BP D_VOC D___V__VIEW _HOLD_savedlistsD_CTLG D__HOLD_ D_savedlists _PH_vocupgrade: !ls -l DYNAMIC.TESTtotal 10-rw-rw-rw- 1 terric unisrc 4096 Jun 25 17:13 dat001-rw-rw-rw- 1 terric unisrc 1024 Jun 25 17:13 over001
3-12 Administering UniData on UNIX
Notice that the UniData dynamic file is a UNIX directory, containing UNIX
files dat001 and over001. The dat001 file is a UniData hashed file, and the
blocks in over001 are linked to groups in the dat001 file.
The dat001 File
The dat001 file is also called the primary data file. As you add records to a
dynamic file, UniData hashes the keys to groups in dat001. As the file fills up,
UniData adds additional groups to the dat001 file. If the current file system
fills up or if dat001 grows larger than a UniData limit, UniData creates a
dat002 file. If dat002 is in another file system, UniData creates a UNIX link to
the dat002 file in the original dynamic file.
The over001 File
As you add records to a dynamic file, whenever the space reserved for data
in a group in the primary file gets too full, UniData writes the excess data into
blocks in over001. Registers within UniData track how blocks in over001 are
linked to groups in dat001. If over001 gets too large, UniData adds additional
blocks to it. If the current file system becomes full or over001 grows larger
than a UniData limit, UniData creates an over002 file. If the over002 file is in
a file system different from the current one, UniData creates a UNIX link to
over002 in the original dynamic file.
If you specify the OVERFLOW keyword with the CREATE.FILE command,
UniData creates a dynamic file with an overflow file for each dat file. For
example, over001 corresponds to dat001, over002 corresponds to dat002, and
so on. When the file is cleared, UniData maintains this overflow structure.
Points to Remember About Dynamic Files
Remember the following points about dynamic files:
■ A UniData dynamic file is a UNIX directory. The directory contains
files or UNIX links.
■ Dynamic files expand and shrink with respect to modulo. Expansion
and shrinking take place automatically during UniData processing.
■ Dynamic files can expand across UNIX file systems. The original
dynamic file contains UNIX links to any “part files” that are created
on other file systems.
UniData Hashed Files 3-13
■ Because the parts of a dynamic file are related by symbolic links, you
need a backup utility that follows symbolic links to guarantee
complete backups of dynamic files.
Note: Chapter 12, “Managing UniData Files,” includes detailed information aboutthe behavior of UniData dynamic files.
Sequentially Hashed Files
A sequentially hashed file has the same structure as a dynamic file, but
UniData stores all records sequentially based on the primary key. The
modulo (number of groups) for a sequentially hashed file is fixed, it does not
grow and shrink as records are added or deleted.
You create sequentially hashed files by converting from existing UniData
static or dynamic files. You specify a percentage of the file that you want to
remain empty to allow for growth. Although the structure for a sequentially
hashed file is the same as a dynamic file, the modulo is fixed.
Use sequentially hashed files for files where the majority of access is based on
the primary key.
The dat001 File
The dat001 file is also called the primary data file. As you add records to a
sequentially hashed file, UniData hashes the keys, based on information in
the gmekey file, to groups in dat001. If your data overflows the group (level
1 overflow), UniData writes the overflow data to the over001 file.
The over001 File
As you add records to a sequentially hashed file, whenever the space
reserved for data in a group in the primary file gets too full, UniData writes
the excess data into blocks in over001. Registers within UniData track how
blocks in over001 are linked to groups in dat001. If over001 gets too large,
UniData adds additional blocks to it. If the current file system becomes full,
or over001 grows larger than a UniData limit, UniData creates an over002 file.
If the over002 file resides in a different file system than the over001 file,
UniData creates a link to over002 in the original sequentially hashed file.
3-14 Administering UniData on UNIX
If the sequentially hashed file has level 2 overflow, the file should be rebuilt
using the shfbuild command.
The gmekey File
Each sequentially hashed file contains a static, read-only file called the
gmekey file. This file is read into memory when you open a sequentially
hashed file. The gmekey file contains information about the type of keys in
the file (alpha or numeric), and controls which group a record is hashed to
when it is written.
You create a sequentially hashed file by converting an existing dynamic or
static file with the shfbuild command:
Syntax:
shfbuild [-a |-k] [-n | -t] [-f] [-e empty percent] [-m modulo] [-b blocksize multiplier] [-i infile] outfile
To convert an existing file, execute the shfbuild command from the system
level prompt, as shown in the following example:
% shfbuild -m 59 SEQUENTIAL175 keys found from SEQUENTIAL.175 records appended to SEQUENTIAL; current modulo is 59.
After converting a file to a sequentially hashed file, you must manually enter
a file pointer in the VOC file in order to access the sequentially hashed file, as
shown in the following example:
: AE VOC SEQUENTIALTop of New "SEQUENTIAL" in "VOC".*--: I001= F002= SEQUENTIAL003= D_SEQUENTIAL*--: FIFiled "SEQUENTIAL" in file "VOC".
For more information about sequentially hashed files, see AdministeringUniData.
UniData Hashed Files 3-15
DIR-Type Files
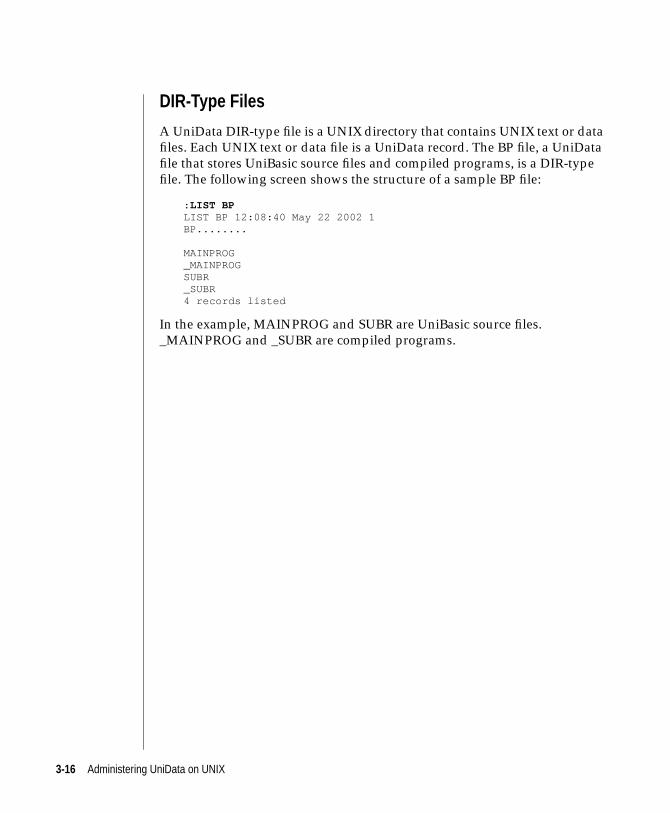
A UniData DIR-type file is a UNIX directory that contains UNIX text or data
files. Each UNIX text or data file is a UniData record. The BP file, a UniData
file that stores UniBasic source files and compiled programs, is a DIR-type
file. The following screen shows the structure of a sample BP file:
: LIST BPLIST BP 12:08:40 May 22 2002 1BP........
MAINPROG_MAINPROGSUBR_SUBR4 records listed
In the example, MAINPROG and SUBR are UniBasic source files.
_MAINPROG and _SUBR are compiled programs.
3-16 Administering UniData on UNIX
Multilevel Files
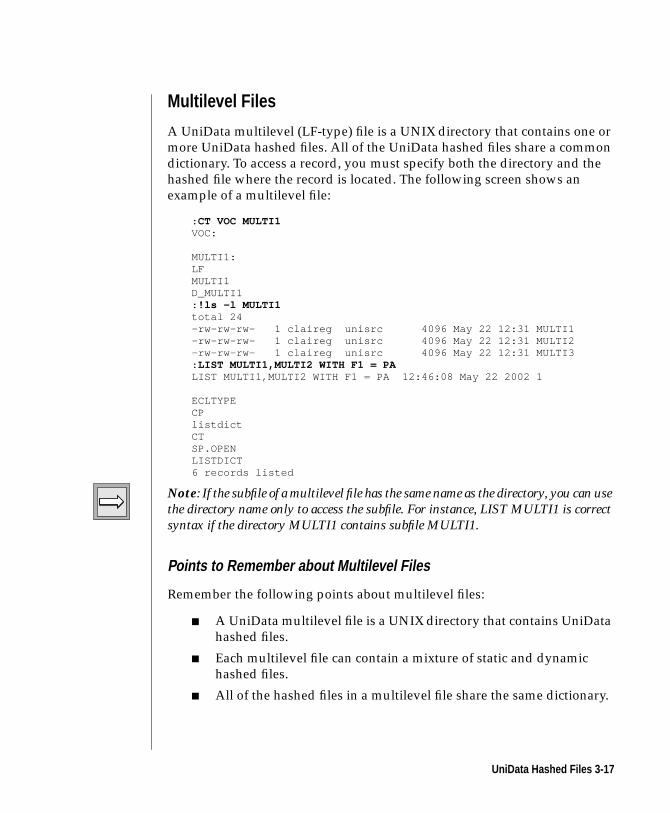
A UniData multilevel (LF-type) file is a UNIX directory that contains one or
more UniData hashed files. All of the UniData hashed files share a common
dictionary. To access a record, you must specify both the directory and the
hashed file where the record is located. The following screen shows an
example of a multilevel file:
: CT VOC MULTI1VOC:
MULTI1:LFMULTI1D_MULTI1: !ls -l MULTI1total 24-rw-rw-rw- 1 claireg unisrc 4096 May 22 12:31 MULTI1-rw-rw-rw- 1 claireg unisrc 4096 May 22 12:31 MULTI2-rw-rw-rw- 1 claireg unisrc 4096 May 22 12:31 MULTI3: LIST MULTI1,MULTI2 WITH F1 = PALIST MULTI1,MULTI2 WITH F1 = PA 12:46:08 May 22 2002 1
ECLTYPECPlistdictCTSP.OPENLISTDICT6 records listed
Note: If the subfile of a multilevel file has the same name as the directory, you can usethe directory name only to access the subfile. For instance, LIST MULTI1 is correctsyntax if the directory MULTI1 contains subfile MULTI1.
Points to Remember about Multilevel Files
Remember the following points about multilevel files:
■ A UniData multilevel file is a UNIX directory that contains UniData
hashed files.
■ Each multilevel file can contain a mixture of static and dynamic
hashed files.
■ All of the hashed files in a multilevel file share the same dictionary.
UniData Hashed Files 3-17

■ UniData supports multilevel files to simplify conversion for legacy
applications. However, accessing and maintaining multilevel files is
less efficient than accessing and maintaining ordinary static or
dynamic files. The leveled structure requires more system resources
to read and update these files. For this reason, we recommend using
ordinary static or dynamic hashed files rather than multilevel files
whenever possible. You can share a single dictionary among
UniData files by modifying the VOC entries for each file to reference
the same dictionary.
Multilevel Directory Files
A UniData multilevel directory (LD) file is a UNIX directory. The UNIX
directory contains one or more UNIX subdirectories (UniData DIR type files).
All of the DIR files share the same dictionary. To access a record, you must
specify both the multilevel directory file and the DIR file where the record
resides. The following screen shows some characteristics of a multilevel
directory file:
: LSAE_COMS D_CTLG D_VOC MULTI1 _REPORT_AE_SCRATCH D_DYNAMIC.TEST D__HOLD_ MULTID _SCREEN_BP D_MENUFILE D__PH_ ORDERS __V__VIEWCTLG D_MULTI1 D__REPORT_ SAVEDLISTS savedlistsDYNAMIC.TEST D_MULTID D__SCREEN_ STATIC.TESTD_AE_COMS D_ORDERS D___V__VIEW VOCD_AE_SCRATCH D_SAVEDLISTS D_savedlists _HOLD_D_BP D_STATIC.TEST MENUFILE _PH_: !ls -l MULTIDtotal 4drwxrwxr-x 2 claireg unisrc 24 May 22 12:49 TEST1drwxrwxr-x 2 claireg unisrc 24 May 22 12:49 TEST2: LIST MULTID,TEST1LIST MULTID,TEST1 12:51:57 May 22 2002 1MULTID....
MAINPROG_MAINPROGSUBR_SUBR4 records listed
Note: If a subdirectory of a multilevel directory file has the same name as the maindirectory, you can use the main directory name to access the subdirectory. Forinstance, LIST MULTID is correct syntax if the directory MULTID contains thesubdirectory MULTID.
3-18 Administering UniData on UNIX
Points to Remember about Multilevel Directory Files
Remember the following points about multilevel directory files:
■ A UniData multilevel directory file is a UNIX directory that contains
UniData DIR files (UNIX subdirectories).
■ All of the DIR files in a multilevel file share the same dictionary.
■ Each record in a multilevel directory is a UNIX file.
■ UniData supports multilevel directory files to simplify conversion of
legacy applications. However, accessing and maintaining multilevel
directory files is less efficient than ordinary DIR files. The leveled
structure means that more system resources are needed to read and
update these files. For this reason, IBM recommends using ordinary
DIR files rather than multilevel directory files whenever possible.
You can share a single dictionary among UniData DIR files by
modifying the VOC entries for each file to reference the same
dictionary.
Index Files and Index Log Files
UniData creates an index file whenever a user creates the first alternate key
index on a UniData hashed file. Index information is stored in B+ tree format.
UniData index files are UNIX data files.
Note: Regardless how many alternate key indexes users create for a data file,UniData creates a single index file.
The ECL CREATE.INDEX command creates the index file. The ECL
BUILD.INDEX command populates the index. DELETE.INDEX (with the
ALL option) removes the index file.
By default, each time a UniData data file is updated, its associated indexes are
updated. You can turn off automatic indexing on one or more data files (using
the ECL DISABLE.INDEX command) to speed performance during periods
of heavy activity on your system. If you turn off automatic indexing for a file,
UniData creates a log file and stores all updates to it. The ECL
UPDATE.INDEX command allows you to apply updates from index logs to
indexes in batch mode, and the ECL ENABLE.INDEX command turns
automatic updating back on. Either CLEAR.FILE or DELETE.INDEX (with
the ALL option) removes the index log file.
UniData Hashed Files 3-19
Note: See the UniData Commands Reference for additional information about indexhandling commands.
Index-Related Files for a Static Hashed File
For a static hashed file, UniData creates both the index file and the index log
file in the account directory with the data file. The following screen shows a
sample account where a static file named STATIC.TEST has been indexed:
: LSAE_COMS D_CTLG D_VOC MULTI1 _PH_AE_SCRATCH D_DYNAMIC.TEST D__HOLD_ MULTID _REPORT_BP D_MENUFILE D__PH_ ORDERS _SCREEN_CTLG D_MULTI1 D__REPORT_ SAVEDLISTS __V__VIEWDYNAMIC.TEST D_MULTID D__SCREEN_ STATIC.TEST savedlistsD_AE_COMS D_ORDERS D___V__VIEW VOCx_STATIC.TESTD_AE_SCRATCH D_SAVEDLISTS D_savedlists X_STATIC.TESTD_BP D_STATIC.TEST MENUFILE _HOLD_
X_STATIC.TEST is the index file for the data file STATIC.TEST, and
x_STATIC.TEST is the index log file.
Index-Related Files for a Dynamic Hashed or Sequentially Hashed File
For a dynamic hashed or sequentially hashed file, UniData creates both the
index file and the index log file in the dynamic file directory. The following
screen shows a sample account where a dynamic file named DYNAMIC.TST
has been indexed:
: LSAE_COMS D_CTLG D_VOC MULTI1 _REPORT_AE_SCRATCH D_DYNAMIC.TEST D__HOLD_ MULTID _SCREEN_BP D_MENUFILE D__PH_ ORDERS __V__VIEWCTLG D_MULTI1 D__REPORT_ SAVEDLISTS savedlistsDYNAMIC.TEST D_MULTID D__SCREEN_ STATIC.TESTD_AE_COMS D_ORDERS D___V__VIEW VOCD_AE_SCRATCH D_SAVEDLISTS D_savedlists _HOLD_D_BP D_STATIC.TEST MENUFILE _PH_: LS DYNAMIC.TESTdat001 idx001 over001 xlog001
Notice that the index and index log files are located in the dynamic file
directory rather than in the account. The file idx001 is the index file, and
xlog001 is the index log file.
3-20 Administering UniData on UNIX
UniData and tmp SpaceUniData uses temporary disk storage for a variety of purposes including:
■ Storing work files for UniQuery SORT and for sorting with the
ORDER BY option in UniData SQL
■ Building print files
■ Using DELETE.FILE to delete UniData files
■ Storing log and output files for layered products
■ Storing work files for commands such as LIST.READU, listuser,
BUILD.INDEX, UPDATE.INDEX, SP.EDIT
■ Storing work files for file repair tools
■ Storing work files for the UniBasic compiler
By default, UniData uses the UNIX partition /tmp for temporary disk
storage. You can define an alternate temporary disk storage location by
setting an environment variable called TMP, or by changing the TMP
parameter in the udtconfig file, located in /usr/ud60/include. If both are set,
the environment variable overrides the configuration parameter.
Note: You can override the default location for many UniData work files. However,there are some that cannot be overridden. Among these are working files used bySP.EDIT (copies of hold files you are editing), working files used by UniData SQLfor sorting with the ORDER BY clause, and working files for the UniBasic compiler.UniData creates these files in /tmp regardless of any other setting.
In most cases, UniData removes its temporary work files when they are no
longer needed. There are certain files that UniData does not remove,
including output files it generates from filetools. Because the default /tmp is
routinely cleared on many systems, you should consider defining alternate
temporary storage if you know you are going to be repairing files, for
example. Otherwise, you risk losing crucial data if the workfiles are removed
before you are finished.
UniData and tmp Space 3-21
Changing TMP in the udtconfig File
The following screen shows a sample udtconfig file with the TMP parameter
changed:
## Unidata Configuration Parameters## Section 1 Neutral parameters# These parameters are required by all Unidatainstallations.## 1.1 System dependent parameters, they should not be changed.LOCKFIFO=1SYS_PV=3
# 1.2 Changable parametersNFILES=60NUSERS=40WRITE_TO_CONSOLE=0TMP=/users/tmp/
.
.
.
Notice that the path name for TMP ends with the “/” character. This is
required.
Setting an Environment Variable
You can set the environment variable TMP in individual users’ .login or
.profile files to define alternate temporary disk storage for those users. A user
with access to a UNIX prompt can set the environment variable as well.
In the C shell, use the following commands to set and display the TMP
environment variable:
setenv TMP directory-name/
printenv TMP
In the Bourne or Korn shell, use the following commands to set and display
the TMP environment variable:
TMP=directory-name/;export TMP
printenv TMP
3-22 Administering UniData on UNIX
4Chapter
UniData and Daemons
What Is a Daemon? . . . . . . . . . . . . . . . . . 4 -4
Principal UniData Daemons . . . . . . . . . . . . . . 4 -5
Shared Basic Code Server (sbcs). . . . . . . . . . . . 4 -5
Shared Memory Manager (smm) . . . . . . . . . . . 4 -6
Clean Up (cleanupd) . . . . . . . . . . . . . . . 4 -7
UniRPC Service (unirpcd). . . . . . . . . . . . . . 4 -8
sync Daemon . . . . . . . . . . . . . . . . . . 4 -8
Monitoring UniData Daemons . . . . . . . . . . . . . 4 -9
showud Command . . . . . . . . . . . . . . . . 4 -9
Log Files. . . . . . . . . . . . . . . . . . . . 4 -9

4-2 Adm
inistering UniData on UNIX
This chapter explains what UNIX daemons are, and describes daemons
specific to UniData.
4-3
What Is a Daemon?A daemon is a background process that performs a specific task or set of
tasks. Daemons wait in the background until they receive a request for their
specific function. A number of standard UNIX daemons run on every UNIX
platform to control system processes, schedule commands, handle print
requests, and perform other similar functions. Refer to your host operating
system documentation for detailed information about the UNIX daemons
that run on your system.
4-4 Administering UniData on UNIX
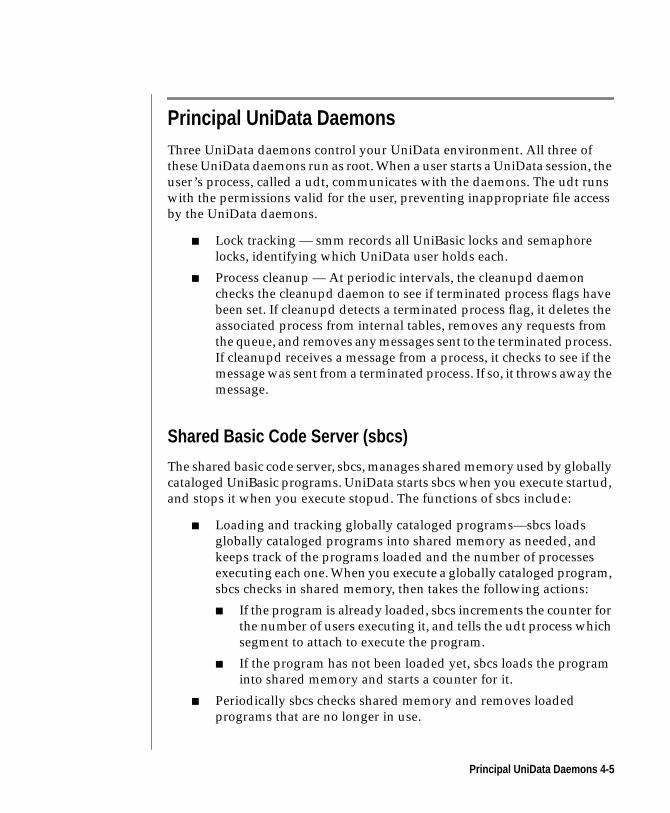
Principal UniData DaemonsThree UniData daemons control your UniData environment. All three of
these UniData daemons run as root. When a user starts a UniData session, the
user’s process, called a udt, communicates with the daemons. The udt runs
with the permissions valid for the user, preventing inappropriate file access
by the UniData daemons.
■ Lock tracking — smm records all UniBasic locks and semaphore
locks, identifying which UniData user holds each.
■ Process cleanup — At periodic intervals, the cleanupd daemon
checks the cleanupd daemon to see if terminated process flags have
been set. If cleanupd detects a terminated process flag, it deletes the
associated process from internal tables, removes any requests from
the queue, and removes any messages sent to the terminated process.
If cleanupd receives a message from a process, it checks to see if the
message was sent from a terminated process. If so, it throws away the
message.
Shared Basic Code Server (sbcs)
The shared basic code server, sbcs, manages shared memory used by globally
cataloged UniBasic programs. UniData starts sbcs when you execute startud,
and stops it when you execute stopud. The functions of sbcs include:
■ Loading and tracking globally cataloged programs—sbcs loads
globally cataloged programs into shared memory as needed, and
keeps track of the programs loaded and the number of processes
executing each one. When you execute a globally cataloged program,
sbcs checks in shared memory, then takes the following actions:
■ If the program is already loaded, sbcs increments the counter for
the number of users executing it, and tells the udt process which
segment to attach to execute the program.
■ If the program has not been loaded yet, sbcs loads the program
into shared memory and starts a counter for it.
■ Periodically sbcs checks shared memory and removes loaded
programs that are no longer in use.
Principal UniData Daemons 4-5
■ Controlling shared memory—The sbcs daemon can attach up to 20
shared memory segments. (On some platforms sbcs cannot attach 20
segments because the operating system imposes a lower limit. For
instance, AIX allows a process to attach only 10 shared memory
segments.)
■ The maximum size of each segment for sbcs is determined by the
UniData configuration parameter SBCS_SHM_SIZE. sbcs attaches
segments as it needs to load globally cataloged programs, and
releases memory back to UNIX when it no longer needs the memory.
■ Process cleanup — At periodic intervals, the sbcs process checks the
cleanupd daemon to see if terminated process flags have been set. If
sbcs detects a terminated process flag, it removes all messages sent
for the process. If the terminated process is the only process using a
program in shared memory, the program is removed from shared
memory. sbcs uses the process ID to determine if a message it
receives is from a terminated process. If so, sbcs discards the
message.
Note: See Chapter 19, “Managing Cataloged Programs,”, for additional informationabout sbcs.
Shared Memory Manager (smm)
The shared memory manager, smm, builds and manages structures and
tables within shared memory. UniData starts smm when you execute startud,
and stops it when you execute stopud.
UniData processes (udt processes) communicate with smm to request and
return shared memory. The UniData processes request shared memory from
smm for the following tasks:
■ License control—The smm process tracks the number of users for
which a site is licensed, and prevents more than that number of users
from logging in to UniData. smm also displays warning messages
when a license is about to expire.
■ User process tracking — When a user logs in to UniData, smm
assigns an internal tracking number to the user’s process and records
information about the process in tables within UniData.
■ Buffering program variables.
4-6 Administering UniData on UNIX

■ Storing query records and intermediate results.
■ Storing select lists.
■ Storing expression buffers.
■ Managing a current modulo table for dynamic files.
■ Process cleanup—At periodic intervals, the smm process checks the
cleanupd daemon to see if terminated process flags have been set. If
smm detects a terminated process flag, it checks all ipc IDs. If one of
the ipc IDs is invalid, smm exits, bringing down UniData. smm also
checks all process groups to see if a group leader terminated
abnormally. If so, smm removes all self-created shared memory
pieces and reclaims all global pages occupied by the terminated
group. smm also corrects any inconsistencies the global control
tables (GCT) may have. An inconsistency could exist if the process
was updating a GCT when it terminated.
The startud command starts smm, which creates a control table (CTL) in
shared memory. The CTL tracks all information about the shared memory
segments that smm manages. The size of the CTL is related to the number of
users on the system and to a series of configuration parameters. See Chapter
5, “UniData and Memory,”, and Chapter 7, “Managing Memory,” for more
information about smm.
Clean Up (cleanupd)
The clean up daemon, cleanupd, detects terminated user processes at check
time intervals. If cleanupd detects a terminated process, internal flags are set.
The smm and sbcs daemons periodically check to see if cleanupd has set
internal flags. If these daemons detect flags, each daemon performs the
necessary cleanup and resets its own flag to zero. The cleanupd daemon
performs clean up that is not handled by smm or sbcs. When the smm and
sbcs daemons have reset their flags to zero, the cleanupd daemon resets its
flag to zero, makes the user process id available, and frees the local control
table.
Principal UniData Daemons 4-7
UniRPC Service (unirpcd)
The UniRPC service is used by UniAdmin, UniObjects, UniObjects for Java,
UniData ODBC, UniOLEDB, and UCI to communicate with UniData on the
server.
sync Daemon
If you notice significant performance degradation during a checkpoint when
running the Recoverable File System (RFS), you can start sync daemons by
setting the udtconfig parameters N_SYNC and SYNC_TIME. Sync daemons
periodically flush updated pages from the system buffer to the log files,
reducing the amount of time it takes to complete a checkpoint.
N_SYNC determines the number of sync daemons UniData starts.
SYNC_TIME defines, in seconds, the amount of time the sync daemons wait
before scanning the system buffer for updated pages.
Note: The Recoverable File System creates and uses a group of additional UniDatadaemons. If you are using the Recoverable File System, refer to Administering theRecoverable File System for information about those daemons.
4-8 Administering UniData on UNIX
Monitoring UniData DaemonsUniData provides a command and several log files to monitor the status of
the daemons.
showud Command
The system-level command showud displays UniData daemons that are
currently running. The following screen shows output from showud:
# showud UID PID TIME COMMAND root 19503 0:00 /disk1/ud60/bin/aimglog 0 27543 root 19504 0:00 /disk1/ud60/bin/aimglog 1 27543 root 19505 0:00 /disk1/ud60/bin/bimglog 2 27543 root 19506 0:00 /disk1/ud60/bin/bimglog 3 27543 root 19494 0:06 /disk1/ud60/bin/cleanupd -m 10 -t 20 root 19500 1:14 /disk1/ud60/bin/cm 27543 root 19490 0:00 /disk1/ud60/bin/sbcs -r root 19499 0:01 /disk1/ud60/bin/sm 60 10705 root 19483 0:05 /disk1/ud60/bin/smm -t 60 root 19525 0:00 /disk1/unishared/unirpc/unirpcd#
Log Files
The sbcs, cleanupd, and smm daemons each record messages in a pair of logs
in the udtbin directory. In addition, the udt process writes messages to a log
file, called udt.errlog, if a UniData process encounters file corruption in a
data file. The following table lists these log files.
Daemon/Process Routine Messages Error Messages
lcp $UDTBIN/lcp.log $UDTBIN/lcp.errlog
smm $UDTBIN/smm.log $UDTBIN/smm.errlog
sbcs $UDTBIN/sbcs.log $UDTBIN/sbsc.errlog
cleanupd $UDTBIN/cleanupd.log $UDTBIN/cleanupd.errlog
udt N/A $UDTBIN/udt.errlog
Log Files for UniData Daemons and Processes
Monitoring UniData Daemons 4-9
See Chapter 9, “Starting, Stopping, and Pausing UniData,” for additional
information and examples.
The udt.errlog file
If a UniData process encounters file corruption in a data file during
processing, the process writes a message to the udt.errlog in udtbin. System
administrators can monitor this log and take corrective action for the
specified file.
The following example illustrates errors printed to the udt.errlog when a
SELECT statement is executed against a corrupt file:
udtno=1,pid=937,uid=1172,cwd=/home/claireg,Sep 12 12:44:461:grpno error in U_blkread for file 'TEST', key '', number=3
udtno=1,pid=937,uid=1172,cwd=/home/claireg,Sep 12 12:44:461:blkread error in U_read_group for file 'TEST', key '', number=3
udtno=1,pid=937,uid=1172,cwd=/home/claireg,Sep 12 12:44:461:read_all_block_in_group error in U_gen_read_group for file ' ',key ' ', number=0
4-10 Administering UniData on UNIX
5Chapter
UniData and Memory
UNIX and Shared Memory . . . . . . . . . . . . . . . 5 -4
UniData and Shared Memory . . . . . . . . . . . . . . 5 -5
smm and Shared Memory. . . . . . . . . . . . . . 5 -5
sbcs and Shared Memory . . . . . . . . . . . . . . 5 -13
Self-Created Segments . . . . . . . . . . . . . . . 5 -13
UniData and the UNIX Kernel . . . . . . . . . . . . 5 -14

5-2 Adm
inistering UniData on UNIX
This chapter describes how UniData interacts with the UNIX kernel to
configure, attach, and release shared memory.
5-3
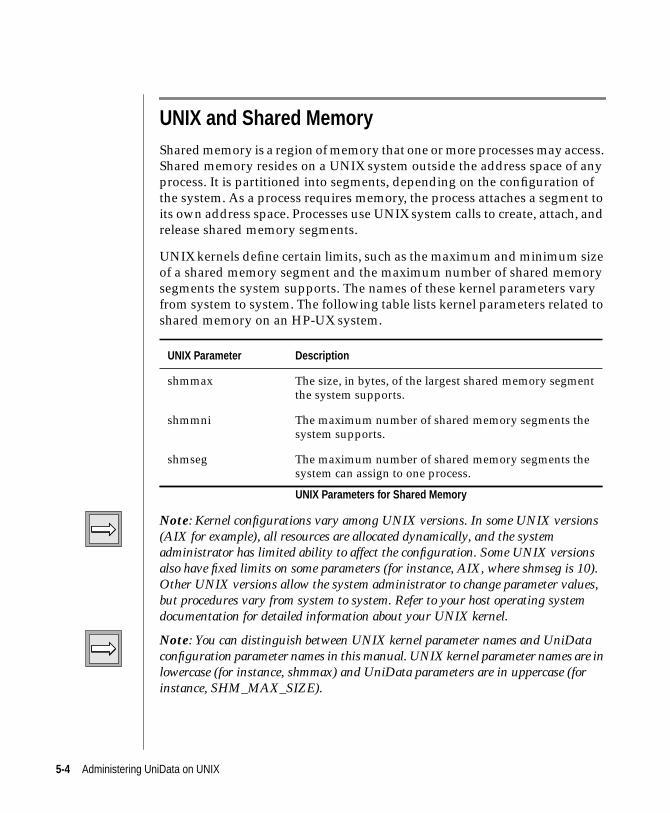
UNIX and Shared MemoryShared memory is a region of memory that one or more processes may access.
Shared memory resides on a UNIX system outside the address space of any
process. It is partitioned into segments, depending on the configuration of
the system. As a process requires memory, the process attaches a segment to
its own address space. Processes use UNIX system calls to create, attach, and
release shared memory segments.
UNIX kernels define certain limits, such as the maximum and minimum size
of a shared memory segment and the maximum number of shared memory
segments the system supports. The names of these kernel parameters vary
from system to system. The following table lists kernel parameters related to
shared memory on an HP-UX system.
Note: Kernel configurations vary among UNIX versions. In some UNIX versions(AIX for example), all resources are allocated dynamically, and the systemadministrator has limited ability to affect the configuration. Some UNIX versionsalso have fixed limits on some parameters (for instance, AIX, where shmseg is 10).Other UNIX versions allow the system administrator to change parameter values,but procedures vary from system to system. Refer to your host operating systemdocumentation for detailed information about your UNIX kernel.
Note: You can distinguish between UNIX kernel parameter names and UniDataconfiguration parameter names in this manual. UNIX kernel parameter names are inlowercase (for instance, shmmax) and UniData parameters are in uppercase (forinstance, SHM_MAX_SIZE).
UNIX Parameter Description
shmmax The size, in bytes, of the largest shared memory segmentthe system supports.
shmmni The maximum number of shared memory segments thesystem supports.
shmseg The maximum number of shared memory segments thesystem can assign to one process.
UNIX Parameters for Shared Memory
5-4 Administering UniData on UNIX
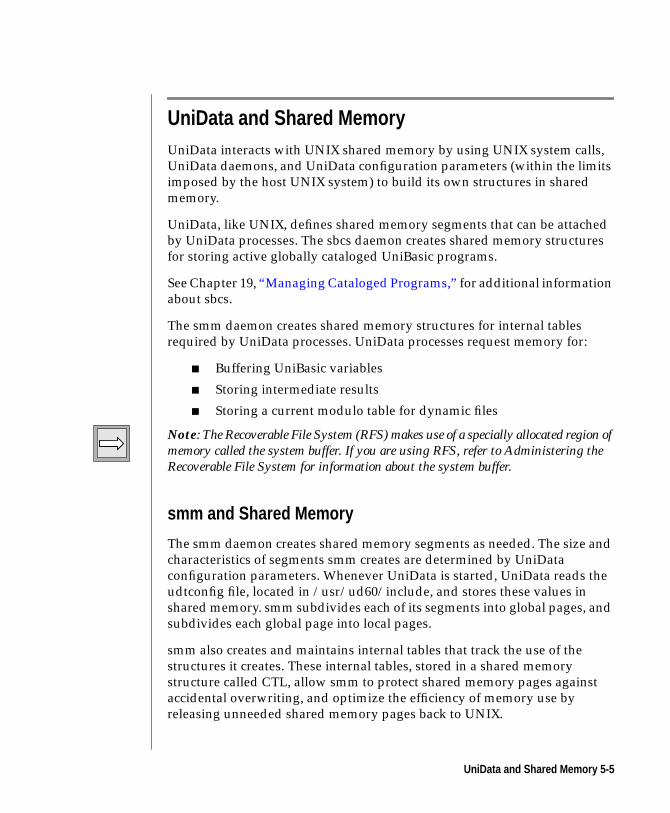
UniData and Shared MemoryUniData interacts with UNIX shared memory by using UNIX system calls,
UniData daemons, and UniData configuration parameters (within the limits
imposed by the host UNIX system) to build its own structures in shared
memory.
UniData, like UNIX, defines shared memory segments that can be attached
by UniData processes. The sbcs daemon creates shared memory structures
for storing active globally cataloged UniBasic programs.
See Chapter 19, “Managing Cataloged Programs,” for additional information
about sbcs.
The smm daemon creates shared memory structures for internal tables
required by UniData processes. UniData processes request memory for:
■ Buffering UniBasic variables
■ Storing intermediate results
■ Storing a current modulo table for dynamic files
Note: The Recoverable File System (RFS) makes use of a specially allocated region ofmemory called the system buffer. If you are using RFS, refer to Administering theRecoverable File System for information about the system buffer.
smm and Shared Memory
The smm daemon creates shared memory segments as needed. The size and
characteristics of segments smm creates are determined by UniData
configuration parameters. Whenever UniData is started, UniData reads the
udtconfig file, located in /usr/ud60/include, and stores these values in
shared memory. smm subdivides each of its segments into global pages, and
subdivides each global page into local pages.
smm also creates and maintains internal tables that track the use of the
structures it creates. These internal tables, stored in a shared memory
structure called CTL, allow smm to protect shared memory pages against
accidental overwriting, and optimize the efficiency of memory use by
releasing unneeded shared memory pages back to UNIX.
UniData and Shared Memory 5-5
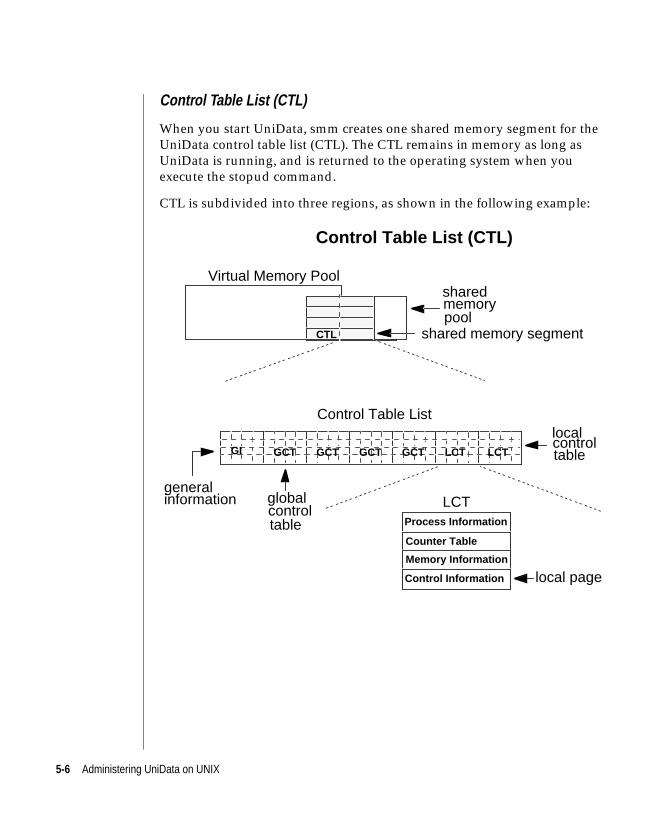
Control Table List (CTL)
When you start UniData, smm creates one shared memory segment for the
UniData control table list (CTL). The CTL remains in memory as long as
UniData is running, and is returned to the operating system when you
execute the stopud command.
CTL is subdivided into three regions, as shown in the following example:
Control Table List (CTL)
Virtual Memory Poolsharedmemorypool
Control Table List
shared memory segment
LCT
local page
CTL
GI GCT GCT GCT GCT LCT LCT
generalinformation global
controltable Process Information
Counter Table
Memory Information
Control Information
localcontroltable
5-6 Administering UniData on UNIX
The following table describes the structures in the CTL.
CTL Structure Description
GI Segment header; also called general information table.
GCTs (global controltables)
Each GCT records the use of global pages in a sharedmemory segment. UniData determines the number ofGCTs in the CTL by the configuration parameterSHM_GNTBLS. SHM_GNTBLS must not exceed thekernel parameter shmmni.
LCTs (local controltables)
Each LCT records the shared memory activity of aUniData process group. UniData determines the numberof LCTs in the CTL by the configuration parameterNUSERS. Each LCT comprises four subtables: PI, CT, MI,and CI. A process group is related to a process groupleader, which can be a udt or SQL session, or a userexecuting UniData system-level commands from a UNIXprompt.
PI (processinformation) table
Each PI table registers all processes within a processgroup.
CT (counter table) Each CT records information about the behavior of theprocess group.
MI (memoryinformation) table
Each MI table records all global pages or self-createdshared memory segments used by the process group.
CI (controlinformation) table
Each CI table records all blocks allocated from sharedmemory for temporary buffers.
Structures Within UniData’s CTL
UniData and Shared Memory 5-7
smm creates the CTL by using a series of configuration parameters. The
following table lists the parameters smm uses to compute the size of CTL.
The size of the CTL is the sum of the size required for the GI table, the GCTs,
and the LCTs. You can calculate these by following these steps:
1. The size of the GI table is fixed at 69 bytes.
2. Compute the space (in bytes) needed for GCTs:
((2+SHM_GNPAGES)*4)*SHM_GNTBLS
3. Compute the space (in bytes) needed for LCTs:
((96+(4*SHM_LPINENTS)+
(12*LMINENTS)+(8*SHM_LCINENTS))*NUSERS
4. Add the values from the first three steps.
You can also use the UniData command shmconf to calculate the size of CTL.
See Chapter 17, “Managing Memory,” for more information.
Parameter Description
SHM_GNTBLS The number of GCTs in the CTL, which is also themaximum number of shared memory segments thatUniData can attach at a time.
NUSERS The number of LCTs in the CTL, which is also themaximum number of UniData process groups that can runat the same time.
SHM_GNPAGES The number of global pages in a shared memory segment.
SHM_LPINENTS The number of entries in the PI table of each LCT, which isalso the number of processes that can be included in aUniData process group.
SHM_LCINENTS The number of entries available in the CI table of eachLCT; this is the maximum number of local memorysegments that a process group can use at one time. A localsegment is made up of one or more contiguous localpages.
SHM_LMINENTS The number of entries available in the MI table of eachLCT; this is the maximum number of global pages or self-created memory segments a process group can use at onetime.
Configuration Parameters for CTL Structures
5-8 Administering UniData on UNIX
Note: The size of the shared memory segment reserved for CTL does not need tomatch the size of the segments smm manages. All the segments smm manages are thesame size (computed by multiplying the number of global pages per segment by thesize of a global page by 512), but they are not necessarily the same size as CTL.
Creating and Assigning Memory Structures
When a UniData process requests memory, smm assigns one or more global
pages, as requested, and updates the GCT (or GCTs, if global pages are
assigned from more than one shared memory segment). smm also updates
the information in the requesting processes’ LCT. When the requesting
process has finished using the assigned memory, the process sends a message
to smm, which releases the global page or pages and updates the GCTs and
LCT.
The following figure illustrates smm’s shared memory structures:
UniData and Shared Memory 5-9
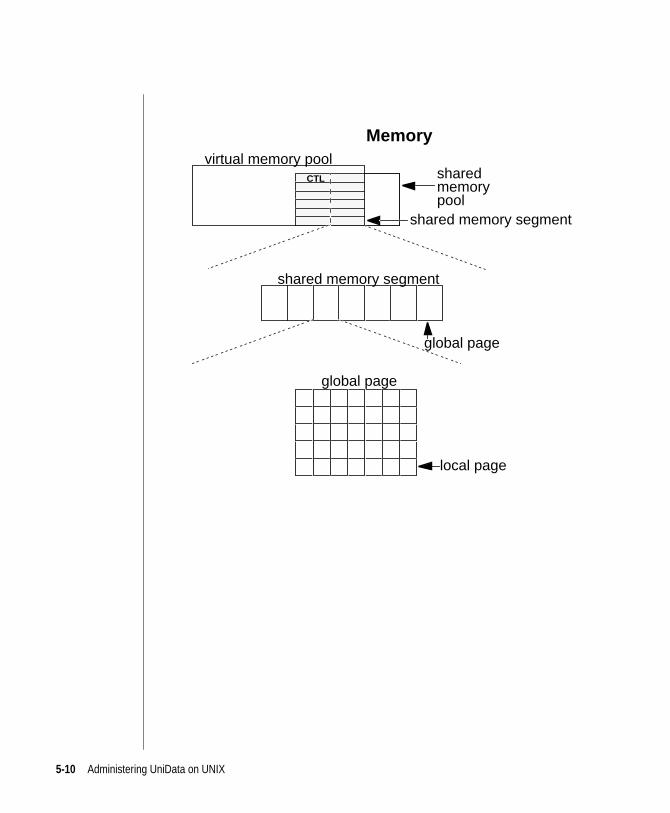
Memoryvirtual memory pool
sharedmemorypool
shared memory segment
shared memory segment
global page
global page
local page
CTL
5-10 Administering UniData on UNIX
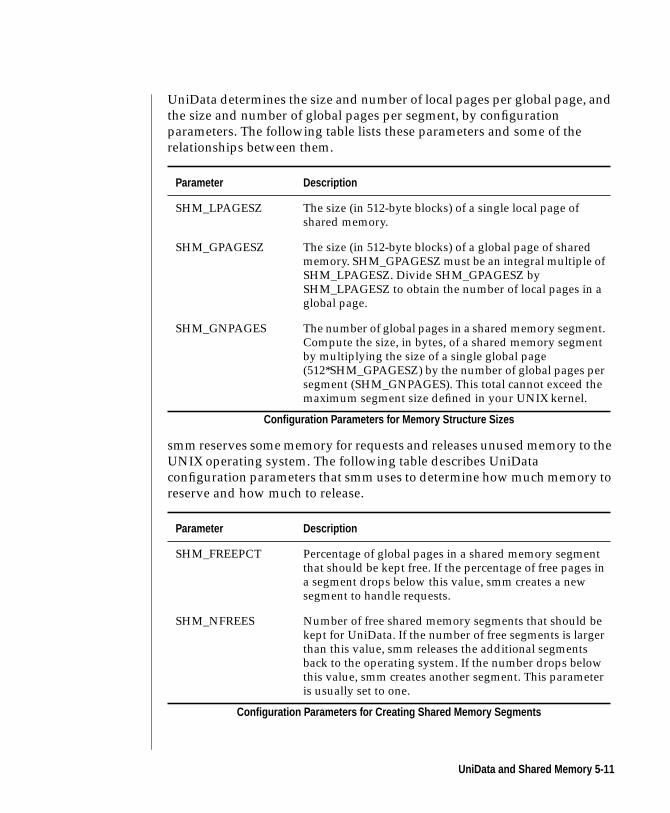
UniData determines the size and number of local pages per global page, and
the size and number of global pages per segment, by configuration
parameters. The following table lists these parameters and some of the
relationships between them.
smm reserves some memory for requests and releases unused memory to the
UNIX operating system. The following table describes UniData
configuration parameters that smm uses to determine how much memory to
reserve and how much to release.
Parameter Description
SHM_LPAGESZ The size (in 512-byte blocks) of a single local page ofshared memory.
SHM_GPAGESZ The size (in 512-byte blocks) of a global page of sharedmemory. SHM_GPAGESZ must be an integral multiple ofSHM_LPAGESZ. Divide SHM_GPAGESZ bySHM_LPAGESZ to obtain the number of local pages in aglobal page.
SHM_GNPAGES The number of global pages in a shared memory segment.Compute the size, in bytes, of a shared memory segmentby multiplying the size of a single global page(512*SHM_GPAGESZ) by the number of global pages persegment (SHM_GNPAGES). This total cannot exceed themaximum segment size defined in your UNIX kernel.
Configuration Parameters for Memory Structure Sizes
Parameter Description
SHM_FREEPCT Percentage of global pages in a shared memory segmentthat should be kept free. If the percentage of free pages ina segment drops below this value, smm creates a newsegment to handle requests.
SHM_NFREES Number of free shared memory segments that should bekept for UniData. If the number of free segments is largerthan this value, smm releases the additional segmentsback to the operating system. If the number drops belowthis value, smm creates another segment. This parameteris usually set to one.
Configuration Parameters for Creating Shared Memory Segments
UniData and Shared Memory 5-11
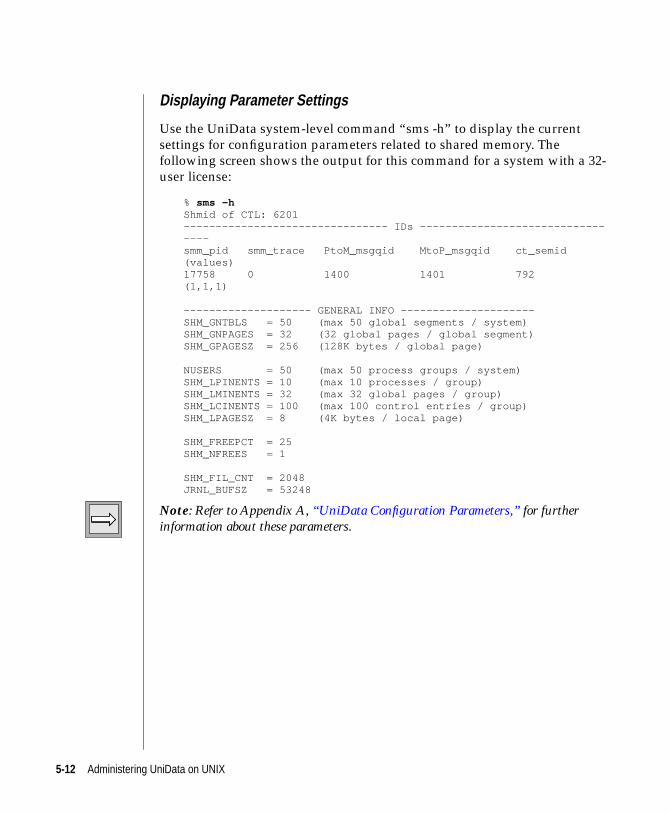
Displaying Parameter Settings
Use the UniData system-level command “sms -h” to display the current
settings for configuration parameters related to shared memory. The
following screen shows the output for this command for a system with a 32-
user license:
% sms -hShmid of CTL: 6201-------------------------------- IDs ---------------------------------smm_pid smm_trace PtoM_msgqid MtoP_msgqid ct_semid(values)17758 0 1400 1401 792(1,1,1)
-------------------- GENERAL INFO ---------------------SHM_GNTBLS = 50 (max 50 global segments / system)SHM_GNPAGES = 32 (32 global pages / global segment)SHM_GPAGESZ = 256 (128K bytes / global page)
NUSERS = 50 (max 50 process groups / system)SHM_LPINENTS = 10 (max 10 processes / group)SHM_LMINENTS = 32 (max 32 global pages / group)SHM_LCINENTS = 100 (max 100 control entries / group)SHM_LPAGESZ = 8 (4K bytes / local page)
SHM_FREEPCT = 25SHM_NFREES = 1
SHM_FIL_CNT = 2048JRNL_BUFSZ = 53248
Note: Refer to Appendix A, “UniData Configuration Parameters,” for furtherinformation about these parameters.
5-12 Administering UniData on UNIX
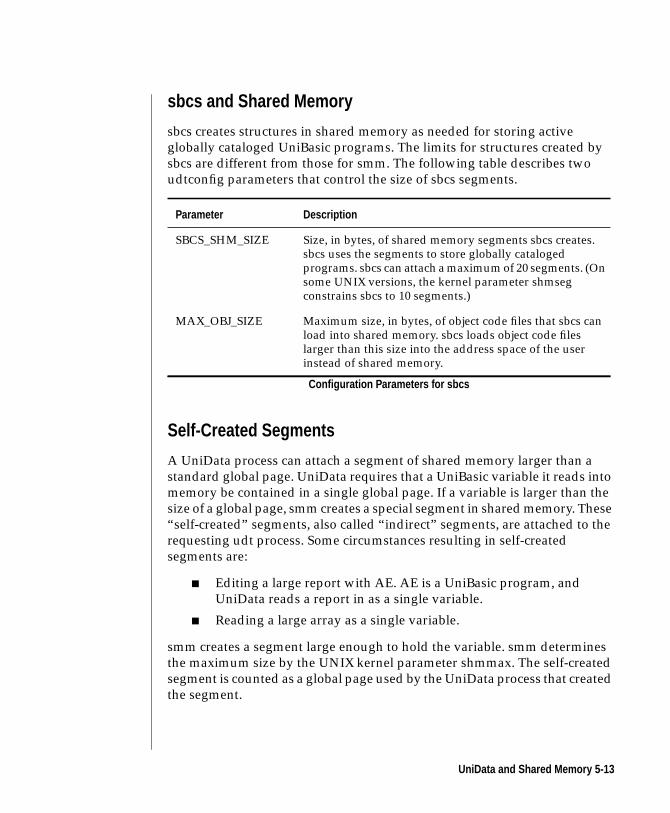
sbcs and Shared Memory
sbcs creates structures in shared memory as needed for storing active
globally cataloged UniBasic programs. The limits for structures created by
sbcs are different from those for smm. The following table describes two
udtconfig parameters that control the size of sbcs segments.
Self-Created Segments
A UniData process can attach a segment of shared memory larger than a
standard global page. UniData requires that a UniBasic variable it reads into
memory be contained in a single global page. If a variable is larger than the
size of a global page, smm creates a special segment in shared memory. These
“self-created” segments, also called “indirect” segments, are attached to the
requesting udt process. Some circumstances resulting in self-created
segments are:
■ Editing a large report with AE. AE is a UniBasic program, and
UniData reads a report in as a single variable.
■ Reading a large array as a single variable.
smm creates a segment large enough to hold the variable. smm determines
the maximum size by the UNIX kernel parameter shmmax. The self-created
segment is counted as a global page used by the UniData process that created
the segment.
Parameter Description
SBCS_SHM_SIZE Size, in bytes, of shared memory segments sbcs creates.sbcs uses the segments to store globally catalogedprograms. sbcs can attach a maximum of 20 segments. (Onsome UNIX versions, the kernel parameter shmsegconstrains sbcs to 10 segments.)
MAX_OBJ_SIZE Maximum size, in bytes, of object code files that sbcs canload into shared memory. sbcs loads object code fileslarger than this size into the address space of the userinstead of shared memory.
Configuration Parameters for sbcs
UniData and Shared Memory 5-13
Warning: Creating these segments of memory is not an efficient resource use, andmay result in poor performance or in thrashing. Use the system-level lstt commandor the ipcstat command to determine if your application is using self-createdsegments on a regular basis. If so, analyze the sizes of variables the application uses.Consider increasing the value of SHM_GPAGESZ (the size of a global page) tohandle the variables. Also, consider modifying the application to read arrays byelement rather than as a single variable.
UniData and the UNIX Kernel
When optimizing configuration parameters for shared memory, certain
changes may impact parameters in the UNIX kernel. Before implementing
configuration changes, you should explore the impact of these changes on
your kernel parameters, and determine if the kernel parameters should be
changed. The following table describes relationships between UNIX kernel
parameters and UniData.
Note: If you are using RFS, UniData allocates a portion of shared memory as asystem buffer for RFS processing. When you start UniData with RFS, UniDatareserves this buffer, and it is therefore not available to smm or sbcs. SeeAdministering the Recoverable File System for information about the system buffer.
UNIX Kernel Relationship to UniData
Maximum size ofshared memorysegment (shmmax)
Must be larger than CTL, and larger than a sharedmemory segment created by smm or sbcs. UniData maynot start if this kernel parameter is too low. If you changethe configuration parameters that control the size ofmemory structures, you may need to adjust this kernelparameter.
Maximum number ofshared memorysegments (shmmni)
Must be greater than SHM_GNTBLS, the number of GCTsin the control table. This parameter should be set highenough to accommodate all the GCTs, plus one segmentfor CTL, and one or more (up to 20) for sbcs.
Maximum number ofshared memorysegments per process(shmseg)
Must be greater than SHM_LMINENTS, the number ofentries available in the MI table for each LCT, which is thenumber of global pages that can be attached to a process.
UniData and the UNIX Kernel
5-14 Administering UniData on UNIX
6Chapter
UniData and UNIX ipc Facilities
Message Queues . . . . . . . . . . . . . . . . . . 6 -4
UniData and Message Queues . . . . . . . . . . . . 6 -4
Semaphores . . . . . . . . . . . . . . . . . . . . 6 -6

6-2 Adm
inistering UniData on UNIX
Interprocess communication (ipc) facilities consist of message queues, shared
memory segments, and semaphores. Chapter 5, “UniData and Memory,”describes shared memory handling. This chapter describes how UniData
uses message queues and semaphores.
Note: The UNIX ipcs and ipcrm commands, and the UniData system-level ipcstatand udipcrm commands, are useful for tracking and managing ipc resources. Referto your host operating system documentation for information about ipcs and ipcrm,and see Chapter 18, “Managing ipc Facilities,” for information about ipcstat andudipcrm.
6-3
Message QueuesA message queue is a system resource that can accept input from a number
of processes. Processes can then retrieve messages from the queue, with some
degree of selectivity. UNIX kernels generally include parameters that define
the number of message queues, their size, and the number of outstanding
messages the system can support.
The following table shows UNIX kernel parameters related to message
queues and messages.
Note: UNIX parameter names differ among versions of UNIX. These parameternames were read from a HP-UX kernel.
UniData and Message Queues
The smm and sbcs daemons use message queues for interprocess
communication. When you start UniData, UniData initializes log files for
each daemon, and lists the queues assigned to each daemon in its log.
Parameter Description
msgmni The number of message queues the system can support.
msgmax The maximum size of a message, in bytes, allowed on the system.
msgmnb The maximum length, in bytes, of a message queue. This is the sumof the length of all messages in the queue.
msgmap Maximum number of entries in an internal table that UNIX uses tomanage shared memory segments for holding messages.
msgseg Number of shared memory segments that UNIX reserves at kernelstartup time for holding messages.
UNIX Parameters for Message Queues
6-4 Administering UniData on UNIX

The following table describes the queues required for the UniData daemons.
Note: If you are using RFS, you need additional message queues to handlecommunications for the RFS daemons. See Administering the Recoverable FileSystem for information about RFS requirements for message queues.
Tip: If one or more of your UniData daemons will not start, check the error logs foreach daemon. Your UNIX kernel may not be configured with a sufficient number ofmessage queues. Often, kernels are configured for a minimal number of queues. Referto your host operating system documentation for information about kernelconfiguration.
UniData Daemon Queues
smm Two queues: one request queue and one reply queue.
sbcs Three queues: one request queue, one reply queue, and one “newversion” queue, used to replace a cataloged program with a newversion.
UniData Message Queue Requirements
Message Queues 6-5
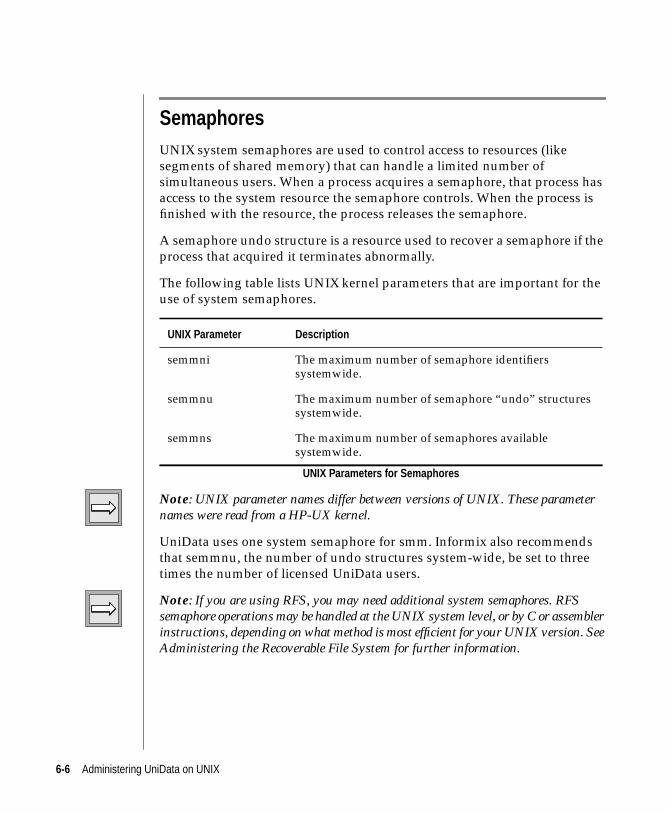
SemaphoresUNIX system semaphores are used to control access to resources (like
segments of shared memory) that can handle a limited number of
simultaneous users. When a process acquires a semaphore, that process has
access to the system resource the semaphore controls. When the process is
finished with the resource, the process releases the semaphore.
A semaphore undo structure is a resource used to recover a semaphore if the
process that acquired it terminates abnormally.
The following table lists UNIX kernel parameters that are important for the
use of system semaphores.
Note: UNIX parameter names differ between versions of UNIX. These parameternames were read from a HP-UX kernel.
UniData uses one system semaphore for smm. Informix also recommends
that semmnu, the number of undo structures system-wide, be set to three
times the number of licensed UniData users.
Note: If you are using RFS, you may need additional system semaphores. RFSsemaphore operations may be handled at the UNIX system level, or by C or assemblerinstructions, depending on what method is most efficient for your UNIX version. SeeAdministering the Recoverable File System for further information.
UNIX Parameter Description
semmni The maximum number of semaphore identifierssystemwide.
semmnu The maximum number of semaphore “undo” structuressystemwide.
semmns The maximum number of semaphores availablesystemwide.
UNIX Parameters for Semaphores
6-6 Administering UniData on UNIX
7Chapter
UniData and UNIX Devices
UNIX Devices: Overview . . . . . . . . . . . . . . . 7 -4
UniData and Terminal Devices . . . . . . . . . . . . . 7 -5
UniData and Tape Devices . . . . . . . . . . . . . . . 7 -6
UniData and Printers . . . . . . . . . . . . . . . . . 7 -7
UniData and Serial Devices . . . . . . . . . . . . . . 7 -8

7-2 Adm
inistering UniData on UNIX
This chapter briefly outlines how the UNIX operating system communicates
with devices such as terminals, disk drives, tape drives, and printers. The
chapter also outlines how UniData interacts with UNIX devices and device
handling.
7-3
UNIX Devices: OverviewThe UNIX operating system uses device drivers to communicate with disk
drives, tape drives, terminals, printers, and other hardware. Device drivers
are programs that know how to communicate with each type of hardware.
The UNIX kernel accesses these programs whenever a process requests
interaction with a device.
The UNIX communication interface is set up so that any device can be
viewed as a file. Data can be read from and written to a device file. The UNIX
kernel translates actions on the device file into requests from the appropriate
device driver program.
On most UNIX systems, device files reside in the /dev directory. This
directory contains special files for serial devices, terminals of various sorts,
disk devices, tape devices, and so forth. The names for these special device
files vary among UNIX versions.
Note: Refer to your host operating system documentation for additional informationabout device files and device drivers on your system.
7-4 Administering UniData on UNIX
UniData and Terminal DevicesFor virtually all terminal input/output, UniData relies on your host UNIX
operating system to perform terminal emulation. UniData does not maintain
its own terminal definition files. Different versions of UNIX handle terminal
definitions differently. Some store terminal definition information in a
termcap file while others use a terminfo database. Refer to your host
operating system documentation for information about terminal definitions
for your system.
Because terminal emulation in UniData happens at the UNIX level, terminal
emulation problems that occur within UniData must be resolved at the UNIX
level.
Note: There are a handful of UniData utilities that require a specific terminaldefinition file. For these utilities, your UniData product includes a file calledvvtermcap, which is a termcap-like file with extensions. This file is located in udtbin.To execute the utilities that require it (which include USAM, confprod, udtconf, andshmconf) you must define either the UDTBIN or the VVTERMCAP environmentvariable. See Appendix B, “Environment Variables for UniData,” for furtherinformation.
7-5
UniData and Tape DevicesNames for tape device files vary considerably between UNIX versions. The
name of a tape device file often identifies a tape drive and an access method
(such as rewind/no rewind).
UniData includes a number of commands that allow you to read data from
or write data to UNIX tape devices. To use these commands effectively, you
need to understand the tape device naming conventions on your system,
because you need to specify device names to define them in UniData. Refer
to your host operating system documentation for this information.
UniData uses a variety of proprietary methods, as well as some standard
UNIX commands, to read/write data to tape devices. Tape devices must be
defined in a UniData file before you can access them via UniData commands.
See Chapter 16, “Accessing UNIX Devices,” and the UniData CommandsReference for more information.
7-6 Administering UniData on UNIX
UniData and PrintersUniData uses the UNIX spooler on each system to perform all printing. In
order to print from within UniData to a UNIX printer, that printer must be
connected to your system and defined within your spooler software. UniData
provides commands and options that interface with your spooler and enable
you to direct output to a printer or a class of printers.
Many printer problems that appear within UniData must be resolved outside
of UniData, since the UniData commands do not interact directly with a
printer device. You need to understand the printer configuration and spooler
software on your system to troubleshoot UniData printing problems.
Since different UNIX versions use different spooler commands, UniData
enables you to define the translation between UniData printing options and
UNIX spooler options by defining a spooler configuration file. You can
determine your current spooler selection with the ECL LIMIT or SETPTR
command. For more information on defining spooler commands, refer to
Chapter 15, “Managing Printers in UniData.”
Note: IBM offers a spooler replacement product, called USAM/Print. This productis sold and licensed separately from the UniData RDBMS.
7-7
UniData and Serial DevicesUniData includes a group of commands that allow you to read data from or
write data to a UNIX serial device. Although you can use these commands to
access a terminal or printer device, they are most commonly used for
communicating between UniData and a device, such as a bar code reader or
scale. If such a device has a physical connection to your system, you can
define it within UniData and communicate with it through UniBasic
commands.
To make effective use of these UniData capabilities, you need to understand
your configuration and device naming conventions. Refer to your host
operating system documentation for this information. See Chapter 16,
“Accessing UNIX Devices,” and Developing UniBasic Applications for
information about communicating with serial devices.
7-8 Administering UniData on UNIX
8Chapter
Configuring Your UniDataSystem
Configuration Procedure . . . . . . . . . . . . . . . 8 -4

8-2 Adm
inistering UniData on UNIX
This chapter outlines configuration considerations that may be appropriate
when you first implement UniData or when you make major changes to your
system. (Major changes include adding or reconfiguring hardware, installing
a new software application, or upgrading or relicensing UniData.)
This chapter does not present detailed information, but outlines the
considerations and refers you to sources of additional information.
8-3
Configuration ProcedureIf you are installing or upgrading UniData, see Installing and LicensingUniData Products for estimates for initial disk and memory needs for your
system. These estimates should be sufficient to allow you to install and start
UniData with a minimal configuration.
1. Identify Disk Requirements
Disk space and disk configuration are key factors that determine system
performance. The initial estimates in Installing and Licensing UniData Productsshould allow you to install and run UniData. However, IBM recommends
that you evaluate your system, including your operating system, your
hardware configuration, and your application, to develop accurate disk
space requirements. IBM offers the following suggestions.
■ Disk Requirements—Use the largest expected size for your data files
to estimate how much disk space you need. In certain applications,
such as financial applications, the number of records varies in a
predictable way over time. Your system must have enough disk
space to handle the maximum number of records without difficulty.
■ Disk I/O—For best results, configure your disk system so that access
is balanced across all devices. IBM suggests the following:
■ /tmp directory—Locate your /tmp directory on a different
physical device from your data for improved performance.
■ UniData accounts—If your application uses more than one
UniData account, locate the account directories on separate
devices to distribute load.
■ Logical volume management—Consider implementing a logical
volume management protocol that includes disk striping.
Various products and utilities are available; consult with your
hardware vendor for recommendations. Striping, which allows
you to create logical volumes that span physical devices, can
provide significant performance improvements by balancing the
load on the system.
Tip: If your application frequently accesses data files that are larger than 300MB insize, IBM strongly recommends striping.
8-4 Administering UniData on UNIX
2. Identify Memory Requirements
The initial estimates in Installing and Licensing UniData Products should allow
you to install and run UniData with a minimal configuration. However,
memory requirements can be platform dependent as well as application
dependent. Estimate the memory required for the following components of
your application:
■ The control table list (CTL)
■ The memory segments controlled by smm
■ The memory segments for sbcs
■ If you use the Recoverable File System (RFS), the system buffer.
Refer to Chapter 5, “UniData and Memory,” for information about estimating
memory needs.
3. Verify Version Compatibilities
If you are considering major upgrades to your hardware or to your operating
system version, consult your IBM account representative early in your
planning process to determine if your current UniData version is supported
by the hardware or software you are considering.
4. Check/Reset UNIX Kernel Parameters
Depending on your version of UNIX, you may or may not be able to modify
kernel parameters directly. The following categories of parameters may need
adjustment when you first implement UniData:
■ Memory — Review parameters that limit the number of shared
memory segments systemwide, the maximum and minimum size of
a segment, and the maximum number of segments per process. See
Chapter 5, “UniData and Memory,” and Chapter 17, “ManagingMemory,” for additional information.
■ Files and Users — Review parameters that define the maximum
number of open files and file locks supported systemwide, the
maximum number of files per user process, and the maximum
number of user processes the system can support at one time.
Configuration Procedure 8-5
■ ipc Facilities — Review parameters that define the number and size
of message queues your system supports, the number of semaphore
sets and semaphores your system supports, and the number of
semaphore undo structures supported. Refer to Chapter 6, “UniData
and UNIX ipc Facilities,” and Chapter 18, “Managing ipc Facilities,”
for additional information.
Warning: The number of systemwide semaphores, normally semmns, should be aminimum of NUSERS + 10. The number of semaphore identifiers, normally semmni,must be at least NUSERS/NSEM_PSET + 1. If either of these kernel parameters arenot adequate for the number of licensed users, UniData displays an error messagesimilar to “Exit: smm: cannot allocate semaphore for udtno xx errno 28. Exit: SMMcan’t setup Control Table List,” and fails to start.
Note: If you discover that you need to change both UNIX kernel parameters andUniData configuration parameters, identify all your requirements and then plan torebuild the UNIX kernel first. If you attempt to start UniData with new parameters,and the UNIX kernel parameters are insufficient, UniData may not start.
5. Check/Reset UniData Configuration Parameters
The UniData udtconfig file, located in /usr/ud60/include, contains a set of
parameters that are given default values when you install UniData. When
you start a UniData session, UniData sets UNIX environment variables for
each value in the udtconfig file.
Note: The udtconfig file is always located in /usr/udnn/include, where nn is therelease number of UniData. For example, the udtconfig file for Release 6.0 is locatedin /usr/ud60/include, the udtconfig file for Release 5.2 is located in/usr/ud52/include, and so forth. Do not move the directory to another location, orUniData will not run.
The udtconfig file enables you to define values for each parameter that
applies to your UniData environment. Most udtconfig parameters can be
adjusted for your environment, but some should not be changed. Refer to
Appendix A, “UniData Configuration Parameters,” for detailed information
about each udtconfig parameter.
You must be logged in as root to modify udtconfig parameters.
8-6 Administering UniData on UNIX
The following screen displays a sample udtconfig file:
# Unidata Configuration Parameters## Section 1 Neutral parameters# These parameters are required by all Unidatainstallations.## 1.1 System dependent parameters, they should not be changed.LOCKFIFO=1SYS_PV=3
# 1.2 Changable parametersNFILES=55NUSERS=40WRITE_TO_CONSOLE=0TMP=/tmp/NVLMARK=FCNTL_ON=0TOGGLE_NAP_TIME=91NULL_FLAG=0N_FILESYS=200N_GLM_GLOBAL_BUCKET=101N_GLM_SELF_BUCKET=23GLM_MEM_SEGSZ=4194304
# 1.3 I18N related parameterUDT_LANGGRP=255/192/129ZERO_CHAR=131
## Section 2 Non-RFS related parameters## 2.1 Shared memory related parametersSBCS_SHM_SIZE=1048576SHM_MAX_SIZE=67108864SHM_ATT_ADD=0SHM_LBA=4096SHM_MIN_NATT=4SHM_GNTBLS=40SHM_GNPAGES=32SHM_GPAGESZ=256SHM_LPINENTS=10SHM_LMINENTS=32SHM_LCINENTS=100SHM_LPAGESZ=8SHM_FREEPCT=25SHM_NFREES=1
# 2.2 Size limitation parametersAVG_TUPLE_LEN=4EXPBLKSIZE=16MAX_OBJ_SIZE=307200MIN_MEMORY_TEMP=64
Configuration Procedure 8-7
# 2.3 Dynamic file related parametersGRP_FREE_BLK=5SHM_FIL_CNT=2048SPLIT_LOAD=60MERGE_LOAD=40KEYDATA_SPLIT_LOAD=95KEYDATA_MERGE_LOAD=40MAX_FLENGTH=1073741824PART_TBL=/liz1/ud60/parttbl
# 2.4 NFA/Telnet service related parameterEFS_LCKTIME=0TSTIMEOUT=60NFA_CONVERT_CHAR=0
# 2.5 Journal related parametersJRNL_MAX_PROCS=1JRNL_MAX_FILES=400
# 2.6 UniBasic file related parametersMAX_OPEN_FILE=500MAX_OPEN_SEQF=150MAX_OPEN_OSF=100MAX_DSFILES=1000
#2.7 UniBasic related parametersMAX_CAPT_LEVEL=2MAX_RETN_LEVEL=2COMPACTOR_POLICY=1VARMEM_PCT=50
# 2.8 Number of semaphores per semaphore setNSEM_PSET=8
# 2.9 Index related parametersSETINDEX_BUFFER_KEYS=0SETINDEX_VALIDATE_KEY=0
# 2.10 UPL/MGLM parameterMGLM_BUCKET_SIZE=50UPL_LOGGING=0
# 2.11 Printer _HOLD_ file related parametersMAX_NEXT_HOLD_DIGITS=4CHECK_HOLD_EXIST=0
## Section 3 RFS related parameters# These parameters are only used for RFS which is turned by# setting SB_FLAG to a positive value.## 3.1 RFS flagSB_FLAG=1
8-8 Administering UniData on UNIX
# 3.2 File related parametersBPF_NFILES=80N_PARTFILE=500
# 3.3 AFT related parametersN_AFT=200N_AFT_SECTION=1N_AFT_BUCKET=101N_AFT_MLF_BUCKET=23N_TMAFT_BUCKET=19
# 3.4 Archive related parametersARCH_FLAG=0N_ARCH=2ARCHIVE_TO_TAPE=0ARCH_WRITE_SZ=0
# 3.5 System buffer parametersN_BIG=233N_PUT=8192
# 3.6 TM message queue related parametersN_PGQ=10N_TMQ=10
# 3.7 After/before image related parametersN_AIMG=2N_BIMG=2AIMG_BUFSZ=102400BIMG_BUFSZ=102400AIMG_MIN_BLKS=10BIMG_MIN_BLKS=10AIMG_FLUSH_BLKS=2BIMG_FLUSH_BLKS=2
# 3.8 Flushing interval related parametersCHKPNT_TIME=300GRPCMT_TIME=5
# 3.9 Sync Daemon related parametersN_SYNC=0SYNC_TIME=0
## Section 6 Century Pivot Date#CENTURY_PIVOT=1930
## Section 7 Repliation parameters#REP_FLAG=1TCA_SIZE=128
Configuration Procedure 8-9
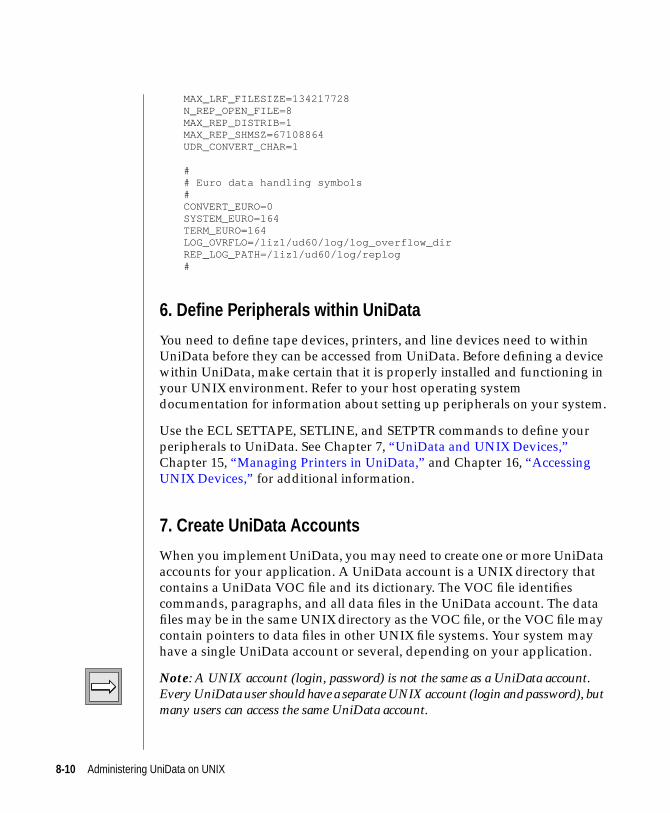
MAX_LRF_FILESIZE=134217728N_REP_OPEN_FILE=8MAX_REP_DISTRIB=1MAX_REP_SHMSZ=67108864UDR_CONVERT_CHAR=1
## Euro data handling symbols#CONVERT_EURO=0SYSTEM_EURO=164TERM_EURO=164LOG_OVRFLO=/liz1/ud60/log/log_overflow_dirREP_LOG_PATH=/liz1/ud60/log/replog#
6. Define Peripherals within UniData
You need to define tape devices, printers, and line devices need to within
UniData before they can be accessed from UniData. Before defining a device
within UniData, make certain that it is properly installed and functioning in
your UNIX environment. Refer to your host operating system
documentation for information about setting up peripherals on your system.
Use the ECL SETTAPE, SETLINE, and SETPTR commands to define your
peripherals to UniData. See Chapter 7, “UniData and UNIX Devices,”
Chapter 15, “Managing Printers in UniData,” and Chapter 16, “Accessing
UNIX Devices,” for additional information.
7. Create UniData Accounts
When you implement UniData, you may need to create one or more UniData
accounts for your application. A UniData account is a UNIX directory that
contains a UniData VOC file and its dictionary. The VOC file identifies
commands, paragraphs, and all data files in the UniData account. The data
files may be in the same UNIX directory as the VOC file, or the VOC file may
contain pointers to data files in other UNIX file systems. Your system may
have a single UniData account or several, depending on your application.
Note: A UNIX account (login, password) is not the same as a UniData account.Every UniData user should have a separate UNIX account (login and password), butmany users can access the same UniData account.
8-10 Administering UniData on UNIX
Use the UNIX mkdir command and the UniData system-level newacct
command to create UniData accounts. Refer to your host operating system
documentation for information about the mkdir command, and see Chapter
10, “Managing UniData Accounts,” for information about the newacct
command.
8. Add UNIX Users
Accessing UniData requires each user to have a login and password on your
UNIX system. IBM recommends you create a separate UNIX login (UNIX
account) for each UniData user. Refer to your host operating system
documentation for detailed information on creating UNIX accounts. See
Chapter 11, “Managing UniData Security,” for UniData-specific information.
9. Set Environment Variables
A user wishing to access UniData must have two environment variables set:
UDTHOME and UDTBIN. The settings you assign for these variables depend
on whether you performed a basic or an advanced UniData installation.
Note: See Installing and Licensing UniData Products for information aboutinstallation types.
UDTHOME — This variable identifies the absolute path of the
UniData “home” directory. The home directory contains
subdirectories UniData needs for processing.
UDTBIN — This variable identifies the path for the directory that
contains UniData executables. By default, udtbin is a subdirectory
under udthome.
Setting UDTHOME and UDTBIN
Each user needs UDTHOME and UDTBIN set to access UniData. You can
add commands to set these environment variables to each user’s .login or
.profile, or a user can set them at the UNIX prompt. If you are using the C
shell, use the following commands to set these variables:
setenv UDTHOME /directory-name
setenv UDTBIN /directory-name
Configuration Procedure 8-11
If you are using the Bourne or Korn shell, use these commands:
UDTHOME=/directory-name;export UDTHOME
UDTBIN=/directory-name;export UDTBIN
Setting PATH
Each user’s PATH should include the directory corresponding to UDTBIN. If
you are using the C shell, use the following command:
set path = ($path $UDTBIN)
Use the following command for Bourne or Korn shells:
PATH=$PATH:$UDTBIN;export PATH
Setting Additional Environment Variables
Appendix B, “Environment Variables for UniData,” lists an additional set of
variables that are significant for UniData users. These can be set in a user’s
login script or defined from a UNIX prompt before entering UniData.
Note: While you are in a UniData session, you cannot change environment variablesfor that session. Even if you execute setenv, for instance, from the ! prompt, the newsetting affects only processes started from the ! prompt. The new settings do not affectthe current UniData session.
10. Review UniData Security
Depending on your application, you may need to implement additional
measures to ensure data security and separation of duties. Review your
application and implement any or all of the following:
■ Default Permissions—Modify the default permissions for udthomeand its contents that were set when you installed UniData.
■ Users and groups—Assign UniData users to separate UNIX groups,
and set permissions on your database so that each group of users has
access to the data they need.
■ VOC file—Customize your VOC file to limit access to powerful
commands.
8-12 Administering UniData on UNIX
■ Remote entries—Use remote pointers to files and commands to
allow more fine-grained protection.
■ SQL Privileges—For SQL access, use the UniData SQL GRANT and
UniData SQL REVOKE commands to customize access to tables.
■ Query Privileges—For UniQuery access, use the
QUERY.PRIVILEGE file.
Refer to Chapter 11, “Managing UniData Security,” for additional
information.
11. Convert Data Files
Depending upon the nature of your system change, you may need to perform
some conversion of UniData hashed files. Consider the following:
■ Recoverable files—If you are implementing UniData’s Recoverable
File System, you need to create recoverable files and/or convert
existing hashed files to recoverable files. See Administering theRecoverable File System for detailed information.
■ Schema—If you are implementing UniData ODBC or UniOLEDB,
you may need to make UniData files accessible to UniData SQL, and
you may also need to utilize the Schema API to incorporate ODBC
compliance for field and attribute names. See Using VSG and theSchema API for detailed information.
■ File characteristics—UniData also offers you the capability to
convert files from static to dynamic, change file characteristics such
as block size and modulo, change hashing algorithm for a static file,
and change file format between high-byte and low-byte formats.
Refer to Chapter 12, “Managing UniData Files,” and to the UniDataCommands Reference for additional information.
12. Perform makeudt
UniData provides the capability to invoke C functions from within UniBasic
programs. It is necessary to rebuild the UniData executable (the binary file
udtbin/udt) whenever you wish to link in additional C functions.
Configuration Procedure 8-13
13. Review Backup Procedures
Special considerations are needed to back up UniData accounts. Make certain
your backup procedures have the following capabilities:
■ Subdirectories—Your backup procedure should be able to back up
at least three levels of subdirectories to support UniData MULTIDIR
and MULTIFILE files.
■ Symbolic links—Your backup procedure should be able to follow
UNIX symbolic links to support large dynamic files.
■ Backing up selected files—Your backup procedure should allow
you to input a list of files to back up to support full backups of
UniData accounts. Simply backing up the directory that contains the
VOC file may be insufficient, since data files may not be located in
the same UNIX directory as the VOC file. The ECL SETFILE
command creates VOC entries with pointers to files in other
locations. However, backup utilities do not follow these SETFILE
pointers like they do UNIX symbolic links. To create a complete
backup of an account, make sure you back up and verify each
physical file associated with the account.
8-14 Administering UniData on UNIX
9Chapter
Starting, Stopping, and PausingUniData
Normal Operation . . . . . . . . . . . . . . . . . . 9 -4
UniData Log Files . . . . . . . . . . . . . . . . 9 -4
Start UniData with startud . . . . . . . . . . . . . 9 -5
Stop UniData with stopud . . . . . . . . . . . . . 9 -6
Pausing UniData . . . . . . . . . . . . . . . . . . 9 -7
The dbpause Command . . . . . . . . . . . . . . 9 -7
The dbpause_status Command . . . . . . . . . . . . 9 -9
Resuming Processing . . . . . . . . . . . . . . . 9 -9
Additional Commands . . . . . . . . . . . . . . . . 9 -10
Listing Processes with showud . . . . . . . . . . . . 9 -11
Stopping a User Process with stopudt . . . . . . . . . 9 -11
Stopping a User Process with deleteuser. . . . . . . . . 9 -12
Displaying ipc Facilities with ipcstat . . . . . . . . . . 9 -13
Removing ipc Structures with udipcrm . . . . . . . . . 9 -14
Stopping UniData with stopud -f . . . . . . . . . . . 9 -15
9-2 Adm
inistering UniData on UNIX
Starting, Stopping, and Pausing UniDataThis chapter describes procedures for normal startup and shutdown of
UniData, and also describes commands used to log out users, stop processes,
and remove ipc facilities if needed. These commands are also documented in
the UniData Commands Reference.
9-3
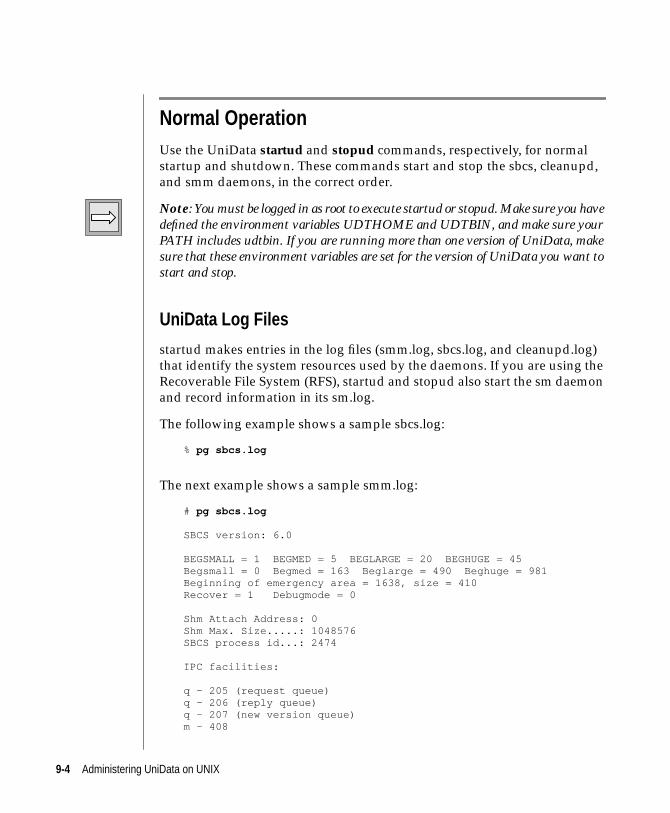
Normal OperationUse the UniData startud and stopud commands, respectively, for normal
startup and shutdown. These commands start and stop the sbcs, cleanupd,
and smm daemons, in the correct order.
Note: You must be logged in as root to execute startud or stopud. Make sure you havedefined the environment variables UDTHOME and UDTBIN, and make sure yourPATH includes udtbin. If you are running more than one version of UniData, makesure that these environment variables are set for the version of UniData you want tostart and stop.
UniData Log Files
startud makes entries in the log files (smm.log, sbcs.log, and cleanupd.log)
that identify the system resources used by the daemons. If you are using the
Recoverable File System (RFS), startud and stopud also start the sm daemon
and record information in its sm.log.
The following example shows a sample sbcs.log:
% pg sbcs.log
The next example shows a sample smm.log:
# pg sbcs.log
SBCS version: 6.0
BEGSMALL = 1 BEGMED = 5 BEGLARGE = 20 BEGHUGE = 45Begsmall = 0 Begmed = 163 Beglarge = 490 Beghuge = 981Beginning of emergency area = 1638, size = 410Recover = 1 Debugmode = 0
Shm Attach Address: 0Shm Max. Size.....: 1048576SBCS process id...: 2474
IPC facilities:
q - 205 (request queue)q - 206 (reply queue)q - 207 (new version queue)m - 408
9-4 Administering UniData on UNIX
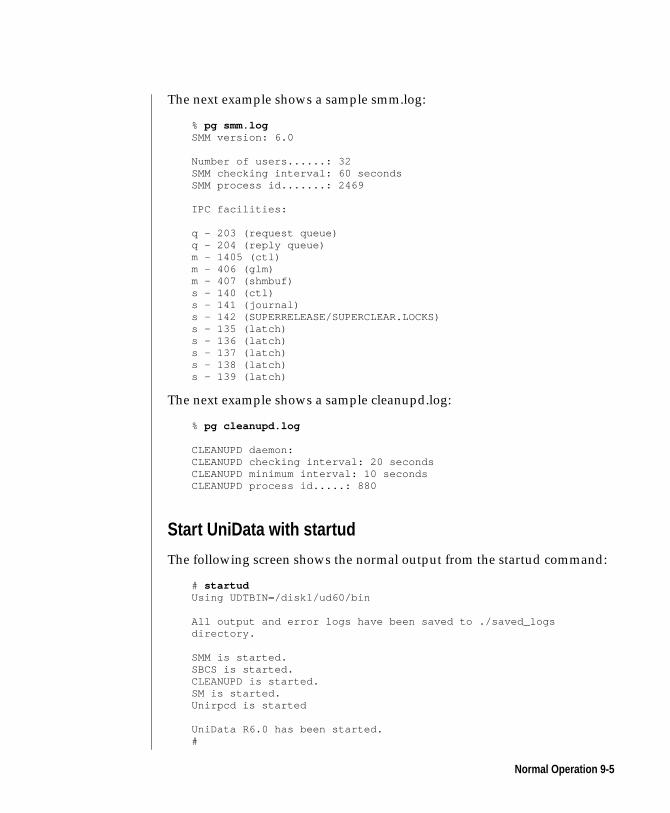
The next example shows a sample smm.log:
% pg smm.logSMM version: 6.0
Number of users......: 32SMM checking interval: 60 secondsSMM process id.......: 2469
IPC facilities:
q - 203 (request queue)q - 204 (reply queue)m - 1405 (ctl)m - 406 (glm)m - 407 (shmbuf)s - 140 (ctl)s - 141 (journal)s - 142 (SUPERRELEASE/SUPERCLEAR.LOCKS)s - 135 (latch)s - 136 (latch)s - 137 (latch)s - 138 (latch)s - 139 (latch)
The next example shows a sample cleanupd.log:
% pg cleanupd.log
CLEANUPD daemon:CLEANUPD checking interval: 20 secondsCLEANUPD minimum interval: 10 secondsCLEANUPD process id.....: 880
Start UniData with startud
The following screen shows the normal output from the startud command:
# startudUsing UDTBIN=/disk1/ud60/bin
All output and error logs have been saved to ./saved_logsdirectory.
SMM is started.SBCS is started.CLEANUPD is started.SM is started.Unirpcd is started
UniData R6.0 has been started.#
Normal Operation 9-5
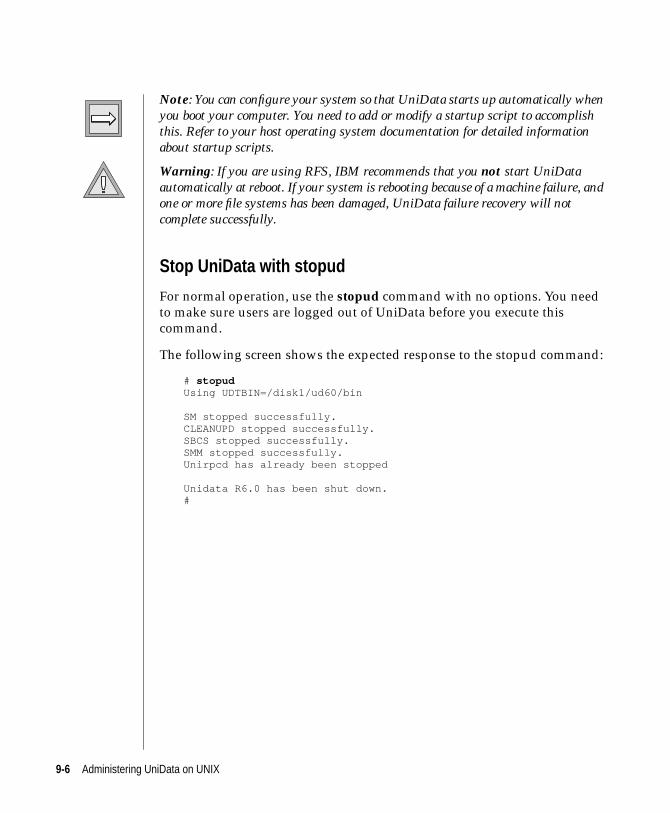
Note: You can configure your system so that UniData starts up automatically whenyou boot your computer. You need to add or modify a startup script to accomplishthis. Refer to your host operating system documentation for detailed informationabout startup scripts.
Warning: If you are using RFS, IBM recommends that you not start UniDataautomatically at reboot. If your system is rebooting because of a machine failure, andone or more file systems has been damaged, UniData failure recovery will notcomplete successfully.
Stop UniData with stopud
For normal operation, use the stopud command with no options. You need
to make sure users are logged out of UniData before you execute this
command.
The following screen shows the expected response to the stopud command:
# stopudUsing UDTBIN=/disk1/ud60/bin
SM stopped successfully.CLEANUPD stopped successfully.SBCS stopped successfully.SMM stopped successfully.Unirpcd has already been stopped
Unidata R6.0 has been shut down.#
9-6 Administering UniData on UNIX
Pausing UniData
The dbpause Command
UniData includes a system-level command that enables you to temporarily
block updates to the database. You can use this feature to perform some tasks
that require UniData to be stopped, such as backing up your data.
Syntax:
dbpause
UniData starts a new archive file when you resume processing.
Note: You must log in as root to issue the dbpause command.
dbpause blocks most updates to the database that are made within UniData.
UniData completes writes or transactions in process when you issue the
dbpause command before dbpause takes effect. Updates are blocked until the
system administrator executes the dbresume command.
UniData does not block UNIX commands, such as cp or mv. In addition,
UniData does not block updates to the _HOLD_ file and the _PH_ file, and
does not interrupt report printing. If you execute dbpause while running
RFS, UniData forces a checkpoint, flushes the after image logs to the archive
files (if archiving is enabled), and marks the next available logical sequence
number in the archive file for use after the backup. UniData displays this
information on the screen from which you execute dbpause, and writes it to
udtbin/sm.log.
Note: Some UniData system-level commands, such as cntl_install and verify2,require that UniData not be running. These commands do not execute successfullywith dbpause in effect. You cannot stop UniData with dbpause in effect.
The following ECL commands are not blocked when dbpause is in effect:
■ ACCT.SAVE, T.ATT, T.DUMP
■ BLOCK.PRINT, BLOCK.TERM
■ CHECKOVER, dumpgroup, fixfile, fixgroup, guide
■ CLEAR.ACCOUNT, CLEARDATA, CLR
Pausing UniData 9-7
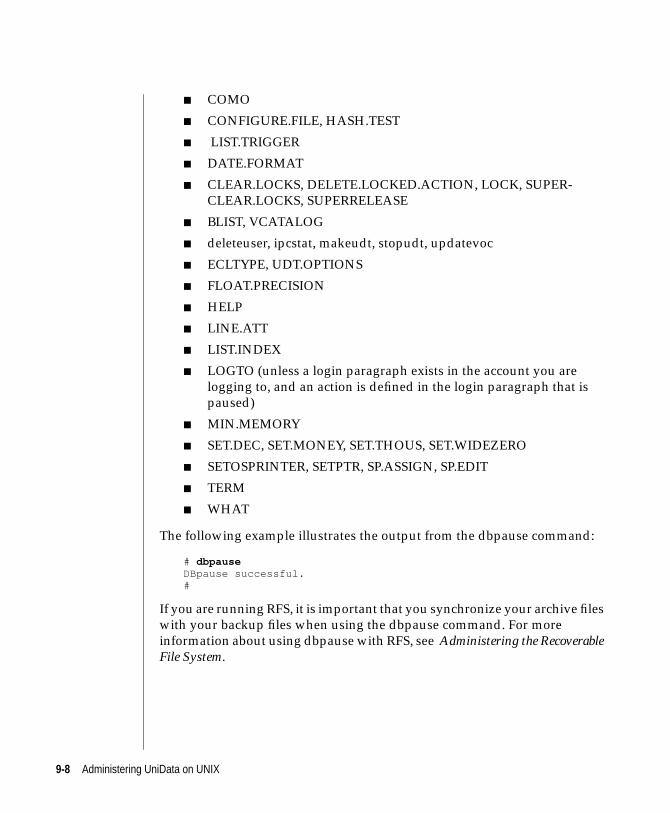
■ COMO
■ CONFIGURE.FILE, HASH.TEST
■ LIST.TRIGGER
■ DATE.FORMAT
■ CLEAR.LOCKS, DELETE.LOCKED.ACTION, LOCK, SUPER-
CLEAR.LOCKS, SUPERRELEASE
■ BLIST, VCATALOG
■ deleteuser, ipcstat, makeudt, stopudt, updatevoc
■ ECLTYPE, UDT.OPTIONS
■ FLOAT.PRECISION
■ HELP
■ LINE.ATT
■ LIST.INDEX
■ LOGTO (unless a login paragraph exists in the account you are
logging to, and an action is defined in the login paragraph that is
paused)
■ MIN.MEMORY
■ SET.DEC, SET.MONEY, SET.THOUS, SET.WIDEZERO
■ SETOSPRINTER, SETPTR, SP.ASSIGN, SP.EDIT
■ TERM
■ WHAT
The following example illustrates the output from the dbpause command:
# dbpauseDBpause successful.#
If you are running RFS, it is important that you synchronize your archive files
with your backup files when using the dbpause command. For more
information about using dbpause with RFS, see Administering the RecoverableFile System.
9-8 Administering UniData on UNIX
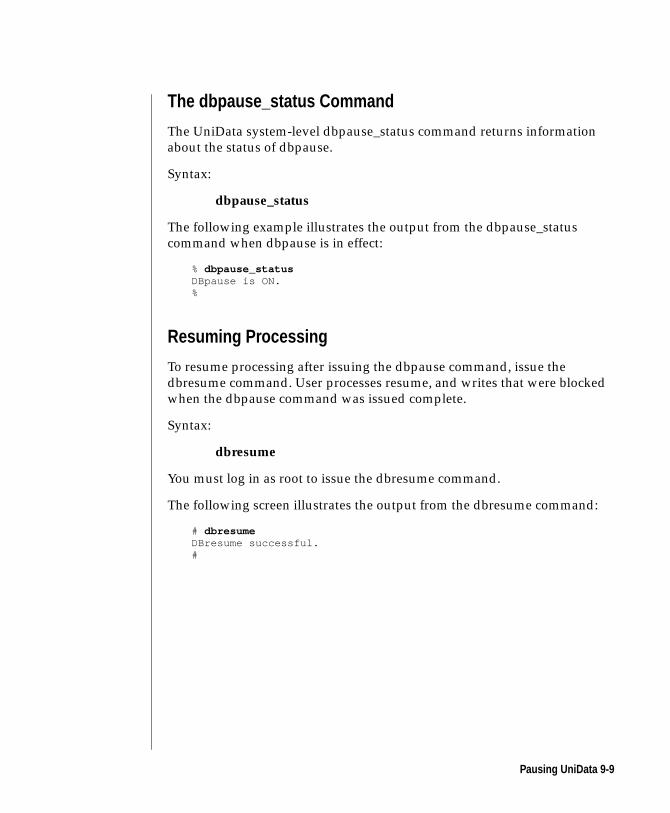
The dbpause_status Command
The UniData system-level dbpause_status command returns information
about the status of dbpause.
Syntax:
dbpause_status
The following example illustrates the output from the dbpause_status
command when dbpause is in effect:
% dbpause_statusDBpause is ON.%
Resuming Processing
To resume processing after issuing the dbpause command, issue the
dbresume command. User processes resume, and writes that were blocked
when the dbpause command was issued complete.
Syntax:
dbresume
You must log in as root to issue the dbresume command.
The following screen illustrates the output from the dbresume command:
# dbresumeDBresume successful.#
Pausing UniData 9-9
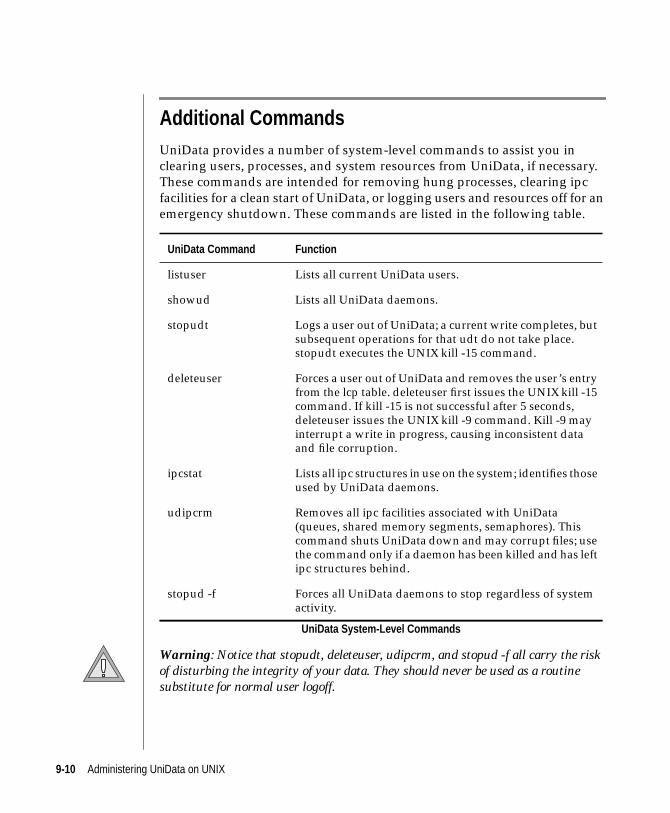
Additional CommandsUniData provides a number of system-level commands to assist you in
clearing users, processes, and system resources from UniData, if necessary.
These commands are intended for removing hung processes, clearing ipc
facilities for a clean start of UniData, or logging users and resources off for an
emergency shutdown. These commands are listed in the following table.
Warning: Notice that stopudt, deleteuser, udipcrm, and stopud -f all carry the riskof disturbing the integrity of your data. They should never be used as a routinesubstitute for normal user logoff.
UniData Command Function
listuser Lists all current UniData users.
showud Lists all UniData daemons.
stopudt Logs a user out of UniData; a current write completes, butsubsequent operations for that udt do not take place.stopudt executes the UNIX kill -15 command.
deleteuser Forces a user out of UniData and removes the user’s entryfrom the lcp table. deleteuser first issues the UNIX kill -15command. If kill -15 is not successful after 5 seconds,deleteuser issues the UNIX kill -9 command. Kill -9 mayinterrupt a write in progress, causing inconsistent dataand file corruption.
ipcstat Lists all ipc structures in use on the system; identifies thoseused by UniData daemons.
udipcrm Removes all ipc facilities associated with UniData(queues, shared memory segments, semaphores). Thiscommand shuts UniData down and may corrupt files; usethe command only if a daemon has been killed and has leftipc structures behind.
stopud -f Forces all UniData daemons to stop regardless of systemactivity.
UniData System-Level Commands
9-10 Administering UniData on UNIX
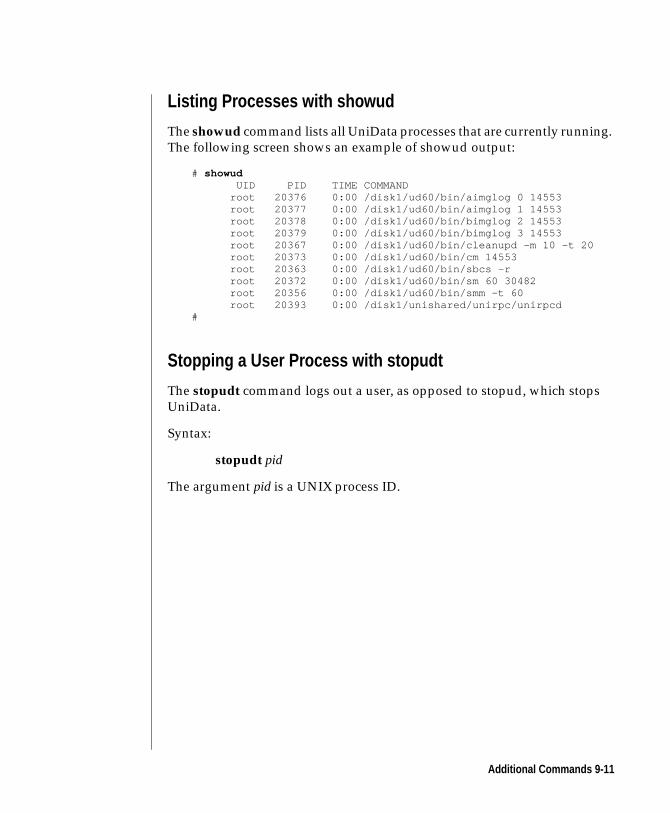
Listing Processes with showud
The showud command lists all UniData processes that are currently running.
The following screen shows an example of showud output:
# showud UID PID TIME COMMAND root 20376 0:00 /disk1/ud60/bin/aimglog 0 14553 root 20377 0:00 /disk1/ud60/bin/aimglog 1 14553 root 20378 0:00 /disk1/ud60/bin/bimglog 2 14553 root 20379 0:00 /disk1/ud60/bin/bimglog 3 14553 root 20367 0:00 /disk1/ud60/bin/cleanupd -m 10 -t 20 root 20373 0:00 /disk1/ud60/bin/cm 14553 root 20363 0:00 /disk1/ud60/bin/sbcs -r root 20372 0:00 /disk1/ud60/bin/sm 60 30482 root 20356 0:00 /disk1/ud60/bin/smm -t 60 root 20393 0:00 /disk1/unishared/unirpc/unirpcd#
Stopping a User Process with stopudt
The stopudt command logs out a user, as opposed to stopud, which stops
UniData.
Syntax:
stopudt pid
The argument pid is a UNIX process ID.
Additional Commands 9-11
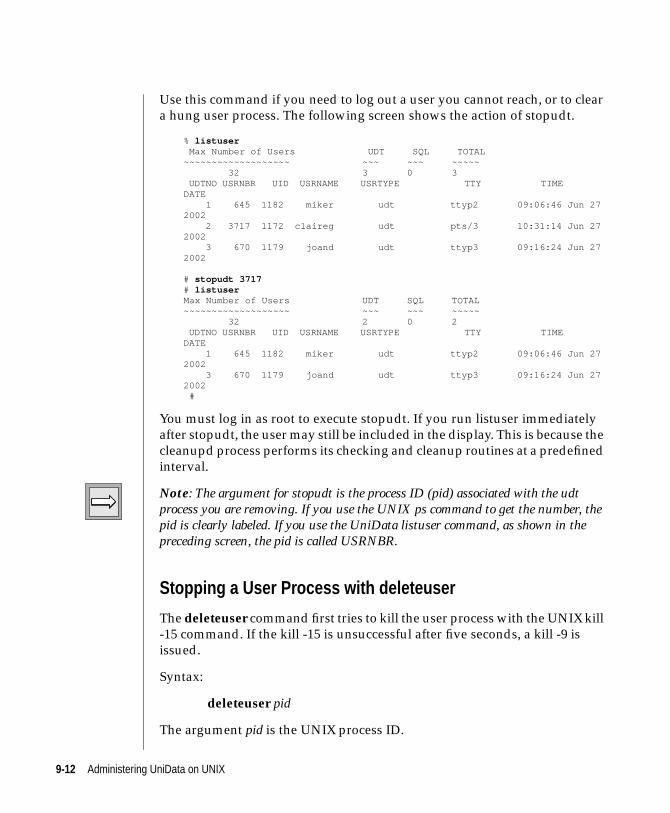
Use this command if you need to log out a user you cannot reach, or to clear
a hung user process. The following screen shows the action of stopudt.
% listuser Max Number of Users UDT SQL TOTAL~~~~~~~~~~~~~~~~~~~ ~~~ ~~~ ~~~~~ 32 3 0 3
UDTNO USRNBR UID USRNAME USRTYPE TTY TIMEDATE
1 645 1182 miker udt ttyp2 09:06:46 Jun 272002
2 3717 1172 claireg udt pts/3 10:31:14 Jun 272002
3 670 1179 joand udt ttyp3 09:16:24 Jun 272002
# stopudt 3717# listuserMax Number of Users UDT SQL TOTAL~~~~~~~~~~~~~~~~~~~ ~~~ ~~~ ~~~~~ 32 2 0 2
UDTNO USRNBR UID USRNAME USRTYPE TTY TIMEDATE
1 645 1182 miker udt ttyp2 09:06:46 Jun 272002
3 670 1179 joand udt ttyp3 09:16:24 Jun 272002 #
You must log in as root to execute stopudt. If you run listuser immediately
after stopudt, the user may still be included in the display. This is because the
cleanupd process performs its checking and cleanup routines at a predefined
interval.
Note: The argument for stopudt is the process ID (pid) associated with the udtprocess you are removing. If you use the UNIX ps command to get the number, thepid is clearly labeled. If you use the UniData listuser command, as shown in thepreceding screen, the pid is called USRNBR.
Stopping a User Process with deleteuser
The deleteuser command first tries to kill the user process with the UNIX kill
-15 command. If the kill -15 is unsuccessful after five seconds, a kill -9 is
issued.
Syntax:
deleteuser pid
The argument pid is the UNIX process ID.
9-12 Administering UniData on UNIX
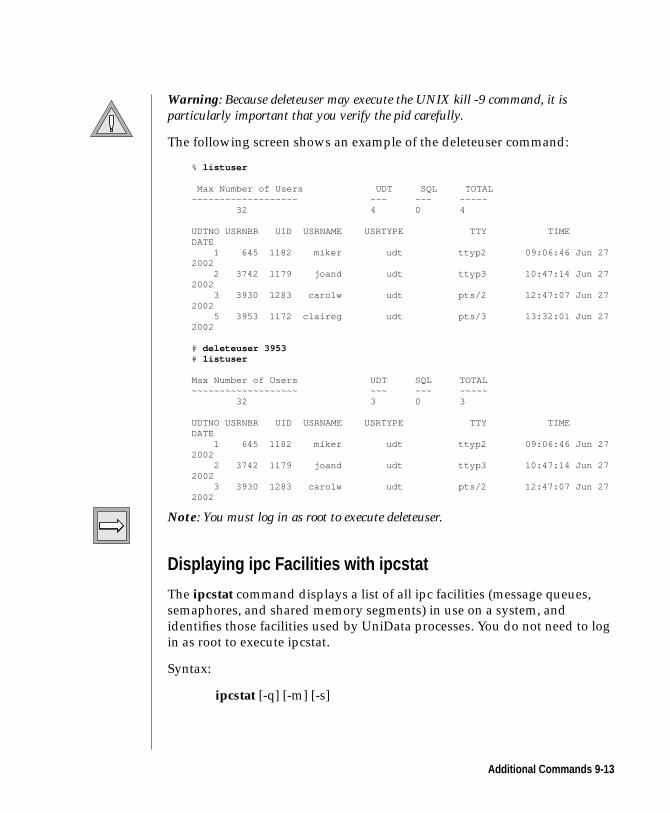
Warning: Because deleteuser may execute the UNIX kill -9 command, it isparticularly important that you verify the pid carefully.
The following screen shows an example of the deleteuser command:
% listuser
Max Number of Users UDT SQL TOTAL~~~~~~~~~~~~~~~~~~~ ~~~ ~~~ ~~~~~ 32 4 0 4
UDTNO USRNBR UID USRNAME USRTYPE TTY TIMEDATE
1 645 1182 miker udt ttyp2 09:06:46 Jun 272002
2 3742 1179 joand udt ttyp3 10:47:14 Jun 272002
3 3930 1283 carolw udt pts/2 12:47:07 Jun 272002
5 3953 1172 claireg udt pts/3 13:32:01 Jun 272002
# deleteuser 3953# listuser
Max Number of Users UDT SQL TOTAL~~~~~~~~~~~~~~~~~~~ ~~~ ~~~ ~~~~~ 32 3 0 3
UDTNO USRNBR UID USRNAME USRTYPE TTY TIMEDATE
1 645 1182 miker udt ttyp2 09:06:46 Jun 272002
2 3742 1179 joand udt ttyp3 10:47:14 Jun 272002
3 3930 1283 carolw udt pts/2 12:47:07 Jun 272002
Note: You must log in as root to execute deleteuser.
Displaying ipc Facilities with ipcstat
The ipcstat command displays a list of all ipc facilities (message queues,
semaphores, and shared memory segments) in use on a system, and
identifies those facilities used by UniData processes. You do not need to log
in as root to execute ipcstat.
Syntax:
ipcstat [-q] [-m] [-s]
Additional Commands 9-13
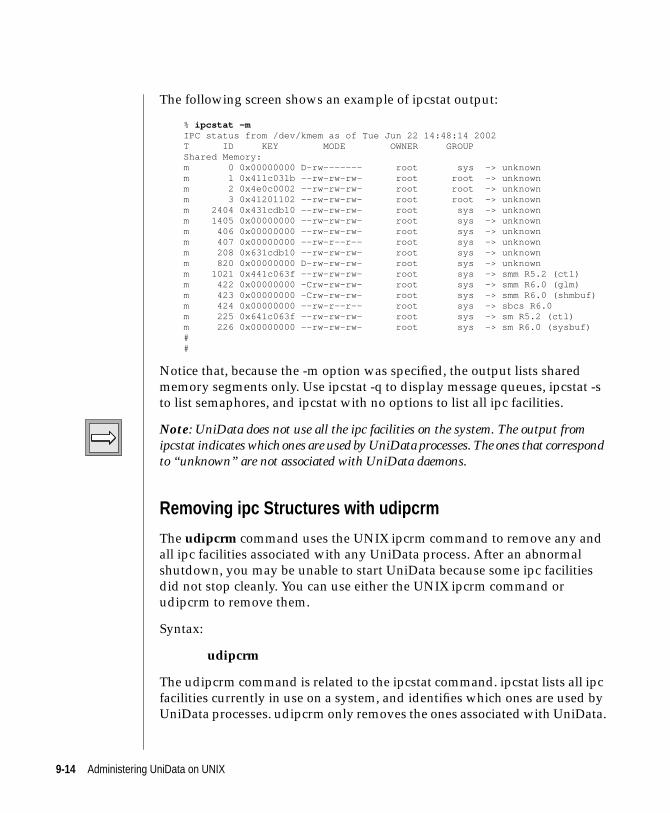
The following screen shows an example of ipcstat output:
% ipcstat -mIPC status from /dev/kmem as of Tue Jun 22 14:48:14 2002T ID KEY MODE OWNER GROUPShared Memory:m 0 0x00000000 D-rw------- root sys -> unknownm 1 0x411c031b --rw-rw-rw- root root -> unknownm 2 0x4e0c0002 --rw-rw-rw- root root -> unknownm 3 0x41201102 --rw-rw-rw- root root -> unknownm 2404 0x431cdb10 --rw-rw-rw- root sys -> unknownm 1405 0x00000000 --rw-rw-rw- root sys -> unknownm 406 0x00000000 --rw-rw-rw- root sys -> unknownm 407 0x00000000 --rw-r--r-- root sys -> unknownm 208 0x631cdb10 --rw-rw-rw- root sys -> unknownm 820 0x00000000 D-rw-rw-rw- root sys -> unknownm 1021 0x441c063f --rw-rw-rw- root sys -> smm R5.2 (ctl)m 422 0x00000000 -Crw-rw-rw- root sys -> smm R6.0 (glm)m 423 0x00000000 -Crw-rw-rw- root sys -> smm R6.0 (shmbuf)m 424 0x00000000 --rw-r--r-- root sys -> sbcs R6.0m 225 0x641c063f --rw-rw-rw- root sys -> sm R5.2 (ctl)m 226 0x00000000 --rw-rw-rw- root sys -> sm R6.0 (sysbuf)##
Notice that, because the -m option was specified, the output lists shared
memory segments only. Use ipcstat -q to display message queues, ipcstat -s
to list semaphores, and ipcstat with no options to list all ipc facilities.
Note: UniData does not use all the ipc facilities on the system. The output fromipcstat indicates which ones are used by UniData processes. The ones that correspondto “unknown” are not associated with UniData daemons.
Removing ipc Structures with udipcrm
The udipcrm command uses the UNIX ipcrm command to remove any and
all ipc facilities associated with any UniData process. After an abnormal
shutdown, you may be unable to start UniData because some ipc facilities
did not stop cleanly. You can use either the UNIX ipcrm command or
udipcrm to remove them.
Syntax:
udipcrm
The udipcrm command is related to the ipcstat command. ipcstat lists all ipc
facilities currently in use on a system, and identifies which ones are used by
UniData processes. udipcrm only removes the ones associated with UniData.
9-14 Administering UniData on UNIX
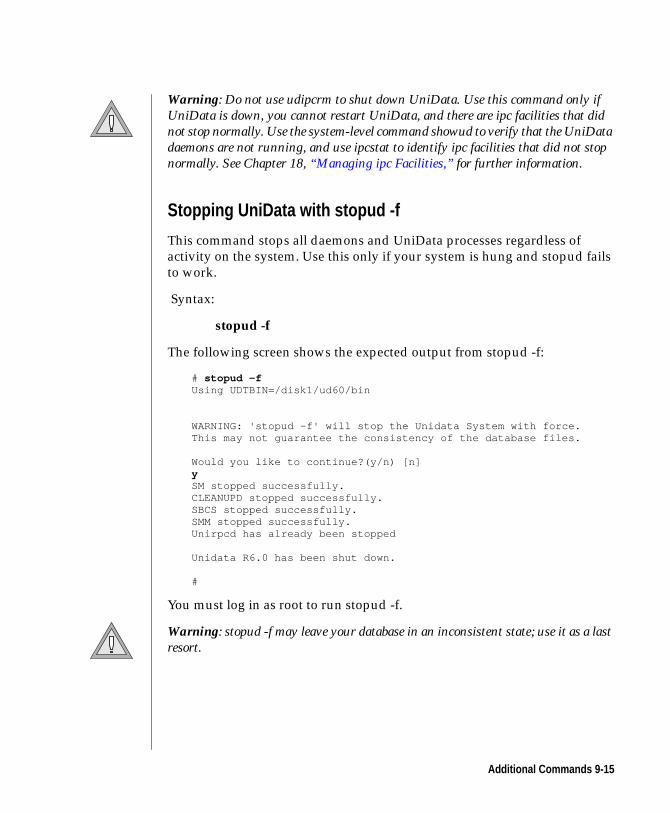
Warning: Do not use udipcrm to shut down UniData. Use this command only ifUniData is down, you cannot restart UniData, and there are ipc facilities that didnot stop normally. Use the system-level command showud to verify that the UniDatadaemons are not running, and use ipcstat to identify ipc facilities that did not stopnormally. See Chapter 18, “Managing ipc Facilities,” for further information.
Stopping UniData with stopud -f
This command stops all daemons and UniData processes regardless of
activity on the system. Use this only if your system is hung and stopud fails
to work.
Syntax:
stopud -f
The following screen shows the expected output from stopud -f:
# stopud -fUsing UDTBIN=/disk1/ud60/bin
WARNING: 'stopud -f' will stop the Unidata System with force.This may not guarantee the consistency of the database files.
Would you like to continue?(y/n) [n]ySM stopped successfully.CLEANUPD stopped successfully.SBCS stopped successfully.SMM stopped successfully.Unirpcd has already been stopped
Unidata R6.0 has been shut down.
#
You must log in as root to run stopud -f.
Warning: stopud -f may leave your database in an inconsistent state; use it as a lastresort.
Additional Commands 9-15
9-16 Administering UniData on UNIX

10Chapter
Managing UniData Accounts
What Is a UniData Account? . . . . . . . . . . . . . . 10-4
Creating a UniData Account . . . . . . . . . . . . . . 10-5
Saving and Restoring Accounts . . . . . . . . . . . . . 10-9
Deleting an Account . . . . . . . . . . . . . . . . . 10-10
Clearing Space in UniData Accounts . . . . . . . . . . . 10-11
CLEAR.ACCOUNT . . . . . . . . . . . . . . . . 10-11

10 -2 Ad
ministering UniData on UNIX
This chapter describes UniData accounts, and describes procedures used to
create, save, and clear the accounts.
10-3
What Is a UniData Account?A UniData account is a UNIX directory that contains a default set of UniData
files, including a VOC file and its dictionary.
Note: The default files UniData requires for an account are created by the UniDatasystem-level newacct command.
The VOC file identifies commands, paragraphs, and all data files that are
used in the UniData account. The data files may be in the same UNIX
directory as the VOC file, or the VOC file may contain pointers to data files
in other UNIX directories. Your system may have a single UniData account,
or several, depending on your application.
Note: A UNIX account typically means a login ID, its associated password, and itsdefault directory. There is no direct relationship between UniData accounts andUNIX accounts (logins). Many UNIX users may access any UniData account. AUNIX user’s default directory does not have to be (and usually is not) a UniDataaccount.
10-4 Administering UniData on UNIX
Creating a UniData AccountComplete the following four steps to create a UniData account:
1. Make sure the environment variable UDTHOME is set.
2. Use the UNIX mkdir command to create the directory that will house
the account. The name of the UniData account directory can be in
uppercase, lowercase, or mixed uppercase and lowercase.
3. Change to the directory with the UNIX cd command.
4. Use the UniData newacct command to create the VOC and other
UniData-specific files in the directory.
Note: You do not need to log in as root to create a UniData account. However, thenewacct command prompts you for a user and group for your account. If you arelogged in as root, UniData uses this information to set ownership and permissionsfor the account. If you are not logged in as root, UniData ignores your responses anduses your current login and group ID.
The following three screens illustrate how to create an account, how to enter
UniData in the new account, and how to use the UniData LS command to list
the contents of the account:
# mkdir ACCOUNT# cd ACCOUNT# newacct% newacctThe UDTHOME for this account is /disk1/ud60/.Do you want to continue(y/n)?
Please enter the account group name: users...
Notice that, in the example, UDTHOME was already set to the path of
/usr/ud60. When you execute newacct, UniData creates the new VOC file
using a standard VOC file located in udthome/sys.
Tip: If you want to tailor your standard VOC file before creating new accounts, youmay do so. IBM recommends that you save a copy of the standard VOC before makingchanges.
Creating a UniData Account 10-5
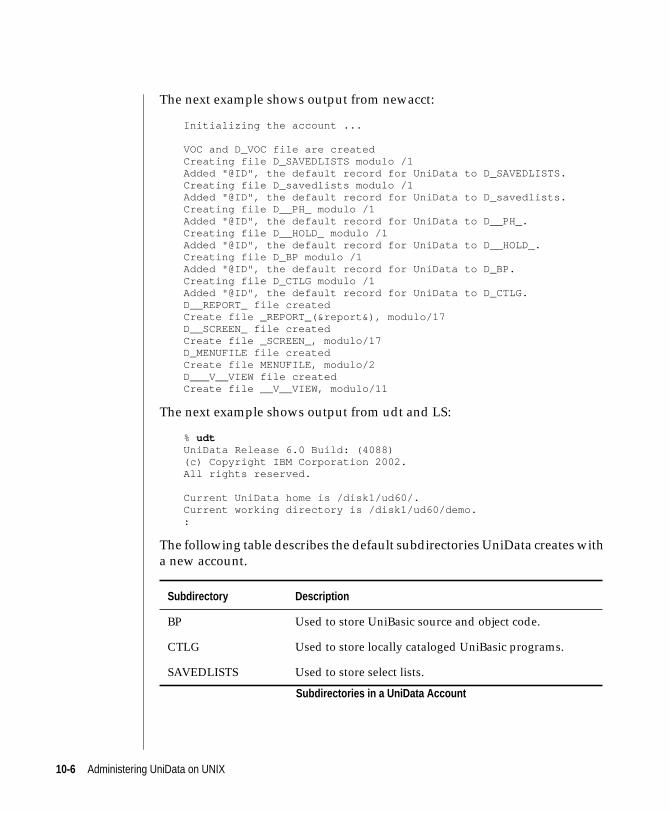
The next example shows output from newacct:
Initializing the account ...
VOC and D_VOC file are createdCreating file D_SAVEDLISTS modulo /1Added "@ID", the default record for UniData to D_SAVEDLISTS.Creating file D_savedlists modulo /1Added "@ID", the default record for UniData to D_savedlists.Creating file D__PH_ modulo /1Added "@ID", the default record for UniData to D__PH_.Creating file D__HOLD_ modulo /1Added "@ID", the default record for UniData to D__HOLD_.Creating file D_BP modulo /1Added "@ID", the default record for UniData to D_BP.Creating file D_CTLG modulo /1Added "@ID", the default record for UniData to D_CTLG.D__REPORT_ file createdCreate file _REPORT_(&report&), modulo/17D__SCREEN_ file createdCreate file _SCREEN_, modulo/17D_MENUFILE file createdCreate file MENUFILE, modulo/2D___V__VIEW file createdCreate file __V__VIEW, modulo/11
The next example shows output from udt and LS:
% udtUniData Release 6.0 Build: (4088)(c) Copyright IBM Corporation 2002.All rights reserved.
Current UniData home is /disk1/ud60/.Current working directory is /disk1/ud60/demo.:
The following table describes the default subdirectories UniData creates with
a new account.
Subdirectory Description
BP Used to store UniBasic source and object code.
CTLG Used to store locally cataloged UniBasic programs.
SAVEDLISTS Used to store select lists.
Subdirectories in a UniData Account
10-6 Administering UniData on UNIX
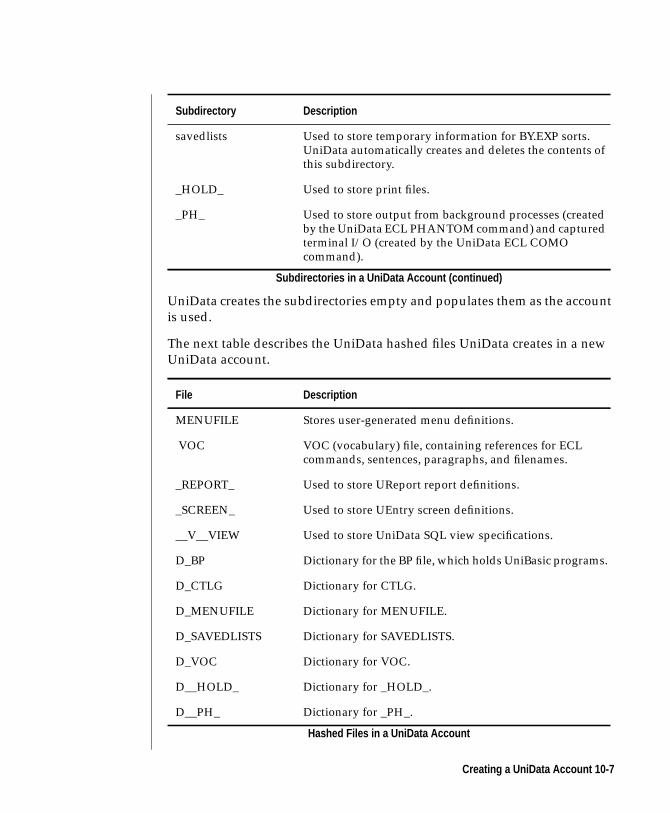
UniData creates the subdirectories empty and populates them as the account
is used.
The next table describes the UniData hashed files UniData creates in a new
UniData account.
savedlists Used to store temporary information for BY.EXP sorts.UniData automatically creates and deletes the contents ofthis subdirectory.
_HOLD_ Used to store print files.
_PH_ Used to store output from background processes (createdby the UniData ECL PHANTOM command) and capturedterminal I/O (created by the UniData ECL COMOcommand).
File Description
MENUFILE Stores user-generated menu definitions.
VOC VOC (vocabulary) file, containing references for ECLcommands, sentences, paragraphs, and filenames.
_REPORT_ Used to store UReport report definitions.
_SCREEN_ Used to store UEntry screen definitions.
__V__VIEW Used to store UniData SQL view specifications.
D_BP Dictionary for the BP file, which holds UniBasic programs.
D_CTLG Dictionary for CTLG.
D_MENUFILE Dictionary for MENUFILE.
D_SAVEDLISTS Dictionary for SAVEDLISTS.
D_VOC Dictionary for VOC.
D__HOLD_ Dictionary for _HOLD_.
D__PH_ Dictionary for _PH_.
Hashed Files in a UniData Account
Subdirectory Description
Subdirectories in a UniData Account (continued)
Creating a UniData Account 10-7
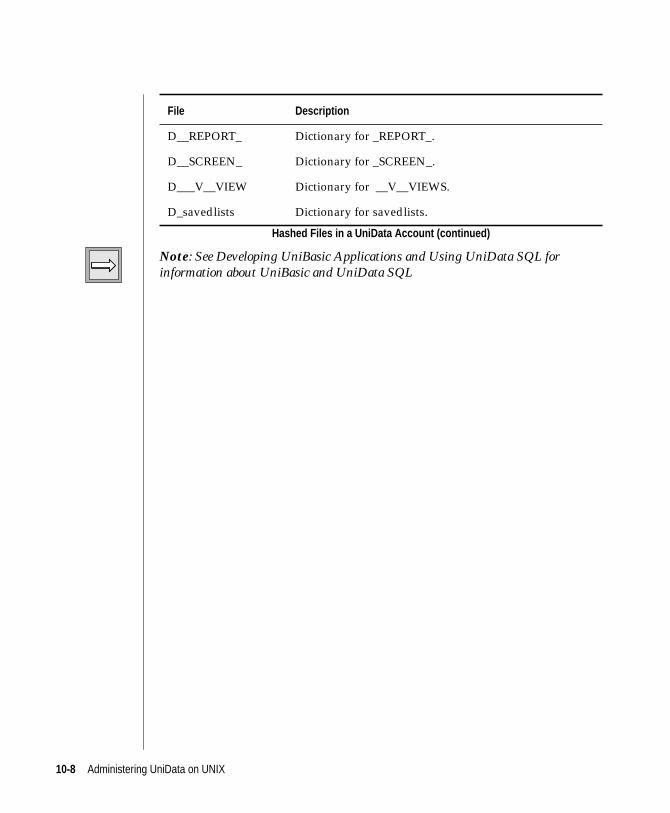
Note: See Developing UniBasic Applications and Using UniData SQL forinformation about UniBasic and UniData SQL
D__REPORT_ Dictionary for _REPORT_.
D__SCREEN_ Dictionary for _SCREEN_.
D___V__VIEW Dictionary for __V__VIEWS.
D_savedlists Dictionary for savedlists.
File Description
Hashed Files in a UniData Account (continued)
10-8 Administering UniData on UNIX
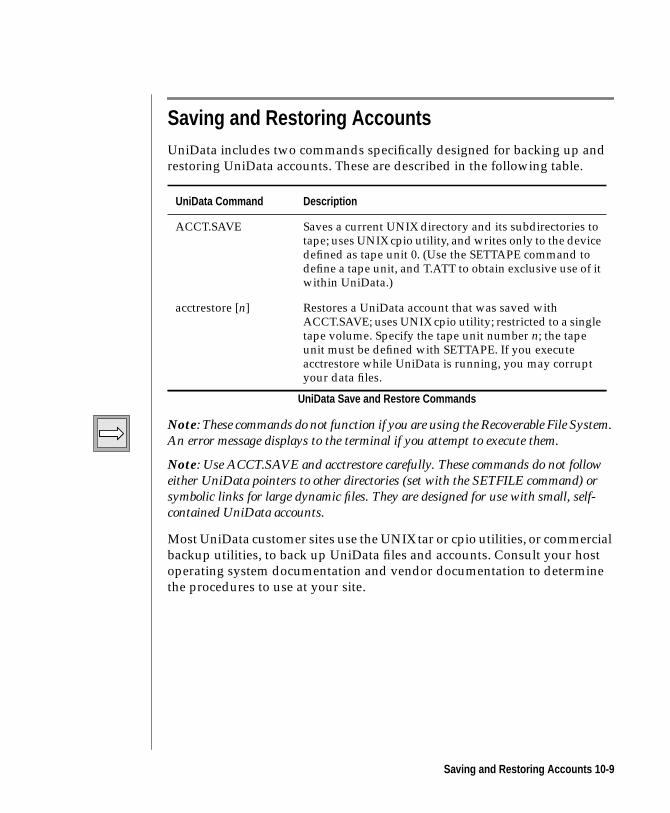
Saving and Restoring AccountsUniData includes two commands specifically designed for backing up and
restoring UniData accounts. These are described in the following table.
Note: These commands do not function if you are using the Recoverable File System.An error message displays to the terminal if you attempt to execute them.
Note: Use ACCT.SAVE and acctrestore carefully. These commands do not followeither UniData pointers to other directories (set with the SETFILE command) orsymbolic links for large dynamic files. They are designed for use with small, self-contained UniData accounts.
Most UniData customer sites use the UNIX tar or cpio utilities, or commercial
backup utilities, to back up UniData files and accounts. Consult your host
operating system documentation and vendor documentation to determine
the procedures to use at your site.
UniData Command Description
ACCT.SAVE Saves a current UNIX directory and its subdirectories totape; uses UNIX cpio utility, and writes only to the devicedefined as tape unit 0. (Use the SETTAPE command todefine a tape unit, and T.ATT to obtain exclusive use of itwithin UniData.)
acctrestore [n] Restores a UniData account that was saved withACCT.SAVE; uses UNIX cpio utility; restricted to a singletape volume. Specify the tape unit number n; the tapeunit must be defined with SETTAPE. If you executeacctrestore while UniData is running, you may corruptyour data files.
UniData Save and Restore Commands
Saving and Restoring Accounts 10-9
Deleting an AccountThere is no UniData command or utility that allows you to delete an entire
account. If you need to delete an account, complete the following steps:
1. Analyze the database and identify which files should be deleted.
Take care not to delete shared files that other UniData accounts may
need.
2. Create and verify a full backup of at least the account you are going
to delete.
3. Consider strategy. If the account is self-contained (that is, within one
file system), you can use the UNIX rm -r command to delete the
account directory. If the account has file pointers to other file
systems, or dynamic files with part files on other file systems, you
may wish to use the ECL DELETE.FILE command to delete the files
before removing the account directory. Use the ECL MAX.USER
command to prevent inadvertent access to the UniData account.
Warning: Be careful with rm -r. This command removes all files and subdirectoriesbelow the directory you specify. If you have nested accounts (a UniData accountwithin a UniData account) and you remove an account directory with rm -r, youcould remove more than one account.
10-10 Administering UniData on UNIX
Clearing Space in UniData AccountsThe _PH_ and _HOLD_ subdirectories of each UniData account store output
from background processes and temporary print files, respectively. These
subdirectories can become large, causing disk space problems. The UniData
ECL CLEAR.ACCOUNT command removes all files from either or both of
these subdirectories.
CLEAR.ACCOUNT
Syntax:
CLEAR.ACCOUNT
You must log in to the UniData account you are clearing. You do not need to
log in as root, however, you must have write permission for the _PH_ and
_HOLD_ directories. When you issue the command, UniData prompts you
for confirmation to clear each directory, as shown in the following example:
: WHERE/disk1/ud60/ACCOUNT: CLEAR.ACCOUNTClear _PH_ directory(Y/N)? YClear _HOLD_ directory(Y/N)? Y
Notice that the ECL WHERE command displays the current account.
Warning: CLEAR.ACCOUNT removes ALL files from the subdirectories. Use thiscommand only if you are certain none of the information is needed. Use the UniDataDELETE command or the UNIX rm command, if necessary, to remove only selectedfiles.
Clearing Space in UniData Accounts 10-11

10-12 Administering UniData on UNIX
11Chapter
Managing UniData Security
Logins and Groups . . . . . . . . . . . . . . . . . 11-4
Adding a UNIX User . . . . . . . . . . . . . . . . 11-4
Use Separate Logins . . . . . . . . . . . . . . . . 11-5
User Groups . . . . . . . . . . . . . . . . . . . 11-5
Home Directories . . . . . . . . . . . . . . . . . 11-6
Startup Scripts . . . . . . . . . . . . . . . . . . 11-7
Customizing Permissions . . . . . . . . . . . . . . . 11-8
Customizing a VOC File. . . . . . . . . . . . . . . . 11-12
Customizing UniData . . . . . . . . . . . . . . . 11-13
Remote Items . . . . . . . . . . . . . . . . . . . 11-15
The SETFILE Command. . . . . . . . . . . . . . . . 11-17
LOGIN and LOGOUT Paragraphs . . . . . . . . . . . . 11-18
UniData SQL Privileges . . . . . . . . . . . . . . . . 11-21
Field-Level Security for UniQuery . . . . . . . . . . . . 11-22
Points to Remember about Field-Level Security . . . . . . 11-22
The QUERY.PRIVILEGE File . . . . . . . . . . . . . 11-23
Turning on Field-Level Security . . . . . . . . . . . . 11-25

11 -2 Ad
ministering UniData on UNIX
While UniData uses UNIX permissions as its primary security mechanism,
there are a number of procedures you can use for customizing the security of
your UniData applications. This chapter describes how to use UNIX logins
and groups, how to modify default permissions, how to customize your VOC
file, and how to use remote pointers. The chapter also describes the
relationship between SQL privileges and other UniData security
mechanisms.
11-3
Logins and GroupsTo access UniData, users need a UNIX login (account).
Note: Utilities for adding and maintaining UNIX accounts are available on manysystems. Examples are sam or smit. They require root access, and automate therequired steps. For consistency, IBM recommends that you use your UNIX systemadministration utility to create and maintain UNIX accounts. Refer to your hostoperating system documentation and vendor documentation for information aboutprocedures available on your particular system.
UNIX typically stores user and group information in two files, as shown in
the following table.
Note: Some UNIX systems use additional files for security. For example, Solaris usesa file called /etc/shadow, and AIX uses one called /etc/security/passwd. Refer to yourhost operating system documentation for complete information about these files.
Adding a UNIX User
Adding a UNIX user, either manually or through your system administration
utility, involves the following steps:
1. Edit the /etc/passwd and /etc/group files (and /etc/shadow if
required).
2. Set a password for the user.
3. Create the home directory, and install startup scripts, if necessary.
UNIX Filename Description
/etc/group Contains a record for each group ID number (gid). Eachrecord includes a group name and defines the user IDnumbers (uid) associated with the group.
/etc/passwd Contains a record for each user ID. Each record includes alogin name, uid, gid, password, home directory, defaultshell identifier, and other optional information.
UNIX Security Files
11-4 Administering UniData on UNIX
Use Separate Logins
Although other database systems make use of group logins, which are shared
by a number of users, UniData allows you to define a separate login for each
user. IBM strongly recommends using separate logins for the following
reasons:
■ Most UNIX operating systems impose limits for system resources
(such as number of processes) that can be associated with one user.
Using separate logins makes your system utilize resources more
effectively.
■ It is easier to identify processes belonging to an individual user,
which facilitates troubleshooting.
■ Using separate logins allows you to define your users’
responsibilities for protecting their passwords and your data.
User Groups
Every UNIX user is assigned to a default group. The system recognizes the
user as a member of that default group at login. UNIX permissions allow you
to differentiate access among members of a group and users who are not
members of that group. You can use this feature to provide security in
UniData by defining applications (or accounts) that should be accessible to
certain users, defining groups to which those users belong, and setting the
group owners of the files and directories accordingly. For example, consider
the directory structure shown in the following example:
.
.
.drwxrwxr-- 2 root apusers 24 Jun 18 18:18 PAYABLESdrwxrwxr-- 2 root arusers 24 Jun 18 18:19 RECEIVABLES...
The example shows a long style listing for separate UniData accounts for two
applications: PAYABLES and RECEIVABLES. Notice the following:
Logins and Groups 11-5
■ Users in group apusers have read, write, and execute access to the
contents of PAYABLES, but only read access to RECEIVABLES. They
can list the contents of RECEIVABLES, but they cannot add or delete
files in RECEIVABLES, or cd to that directory, or access it with the
ECL LOGTO command.
■ Users in group arusers have read, write, and execute access to
RECEIVABLES, but only read access to PAYABLES. They can list the
contents of PAYABLES, but they cannot add or delete files in
PAYABLES, or cd to that directory, or access it with the ECL LOGTO
command.
You can assign users to more than one group. Refer to your host operating
system documentation for information about your system. The UNIX id
command enables root users to display the current uid and group
assignment for any login name. The UNIX newgrp command lets users
change between groups. A user can function as a member of only one group
at any time.
A user must be defined as a member of a group (in /etc/group) before using
newgrp to change to it. In the above example, a user who is a member of only
group arusers cannot use newgrp to change to apusers.
Home Directories
UNIX requires you to define a home directory for each login. This directory
is the working directory of the user at login time. You can define the same
home directory for a group of users, or create a separate one for each user.
The home directory does not need to be a UniData account.
Tip: A user’s home directory can contain startup scripts as well as output from non-UniData applications (such as UNIX text editors). The UniData command stack isalso saved here. If you use UniData accounts as home directories, and users generateother kinds of output there, you may encounter space or performance problems.
Note: The home directory you define for a user must exist. If you define a directoryand you do not create it or set appropriate permissions, the user may be unable to login to UNIX. Some administrative utilities create the directory and set permissionswhen you add a user. Check the documentation for your UNIX systemadministration utility to determine procedures at your site.
11-6 Administering UniData on UNIX
Startup Scripts
When a user logs in, the default shell (specified in /etc/passwd) executes a
startup script, if there is one, in the user’s home directory. The filename of the
startup script depends on the user’s default shell. If the shell is the Bourne or
Korn shell, the startup script is called “.profile”. If the shell is the C shell, the
startup script is called “.login”.
Tip: Many UNIX systems offer a default shell script that you can copy into a user’shome directory and then customize. Some systems also execute a system-wide scriptfor all logins. Refer to your host operating system documentation for specificinformation about your system. A sample .login file follows:
setenv TERM vt100stty erase ^Hset path=( $path /usr/ud60/bin)umask 002cd /usr/ud60/PAYABLESudt
This example shows how to use a startup script to ensure that a user logs into
a particular UniData account and receives an ECL prompt, rather than a
UNIX prompt. The example also defines the user’s terminal type, defines the
key sequence for erasing characters, modifies the user’s path to include the
UniData bin directory, and specifies the default permissions on files the user
creates.
Logins and Groups 11-7
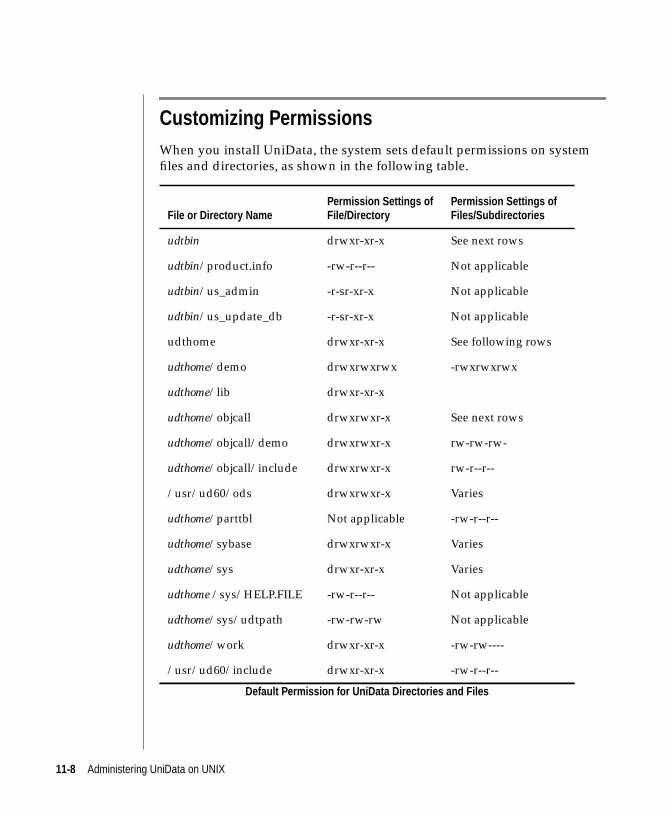
Customizing PermissionsWhen you install UniData, the system sets default permissions on system
files and directories, as shown in the following table.
File or Directory NamePermission Settings ofFile/Directory
Permission Settings ofFiles/Subdirectories
udtbin drwxr-xr-x See next rows
udtbin/product.info -rw-r--r-- Not applicable
udtbin/us_admin -r-sr-xr-x Not applicable
udtbin/us_update_db -r-sr-xr-x Not applicable
udthome drwxr-xr-x See following rows
udthome/demo drwxrwxrwx -rwxrwxrwx
udthome/lib drwxr-xr-x
udthome/objcall drwxrwxr-x See next rows
udthome/objcall/demo drwxrwxr-x rw-rw-rw-
udthome/objcall/include drwxrwxr-x rw-r--r--
/usr/ud60/ods drwxrwxr-x Varies
udthome/parttbl Not applicable -rw-r--r--
udthome/sybase drwxrwxr-x Varies
udthome/sys drwxr-xr-x Varies
udthome /sys/HELP.FILE -rw-r--r-- Not applicable
udthome/sys/udtpath -rw-rw-rw Not applicable
udthome/work drwxr-xr-x -rw-rw----
/usr/ud60/include drwxr-xr-x -rw-r--r--
Default Permission for UniData Directories and Files
11-8 Administering UniData on UNIX
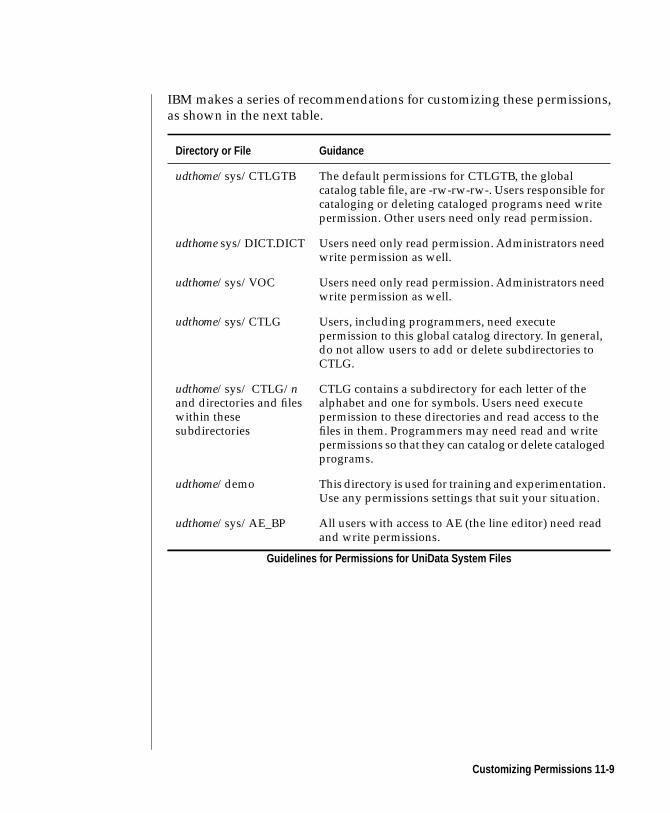
IBM makes a series of recommendations for customizing these permissions,
as shown in the next table.
Directory or File Guidance
udthome/sys/CTLGTB The default permissions for CTLGTB, the globalcatalog table file, are -rw-rw-rw-. Users responsible forcataloging or deleting cataloged programs need writepermission. Other users need only read permission.
udthome sys/DICT.DICT Users need only read permission. Administrators needwrite permission as well.
udthome/sys/VOC Users need only read permission. Administrators needwrite permission as well.
udthome/sys/CTLG Users, including programmers, need executepermission to this global catalog directory. In general,do not allow users to add or delete subdirectories toCTLG.
udthome/sys/ CTLG/nand directories and fileswithin thesesubdirectories
CTLG contains a subdirectory for each letter of thealphabet and one for symbols. Users need executepermission to these directories and read access to thefiles in them. Programmers may need read and writepermissions so that they can catalog or delete catalogedprograms.
udthome/demo This directory is used for training and experimentation.Use any permissions settings that suit your situation.
udthome/sys/AE_BP All users with access to AE (the line editor) need readand write permissions.
Guidelines for Permissions for UniData System Files
Customizing Permissions 11-9
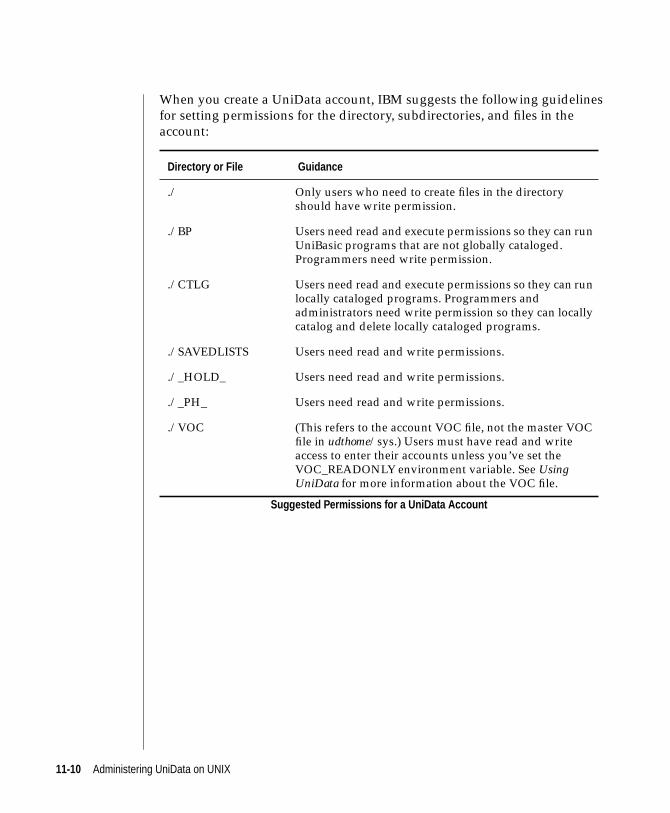
When you create a UniData account, IBM suggests the following guidelines
for setting permissions for the directory, subdirectories, and files in the
account:
Directory or File Guidance
./ Only users who need to create files in the directoryshould have write permission.
./BP Users need read and execute permissions so they can runUniBasic programs that are not globally cataloged.Programmers need write permission.
./CTLG Users need read and execute permissions so they can runlocally cataloged programs. Programmers andadministrators need write permission so they can locallycatalog and delete locally cataloged programs.
./SAVEDLISTS Users need read and write permissions.
./_HOLD_ Users need read and write permissions.
./_PH_ Users need read and write permissions.
./VOC (This refers to the account VOC file, not the master VOCfile in udthome/sys.) Users must have read and writeaccess to enter their accounts unless you’ve set theVOC_READONLY environment variable. See UsingUniData for more information about the VOC file.
Suggested Permissions for a UniData Account
11-10 Administering UniData on UNIX
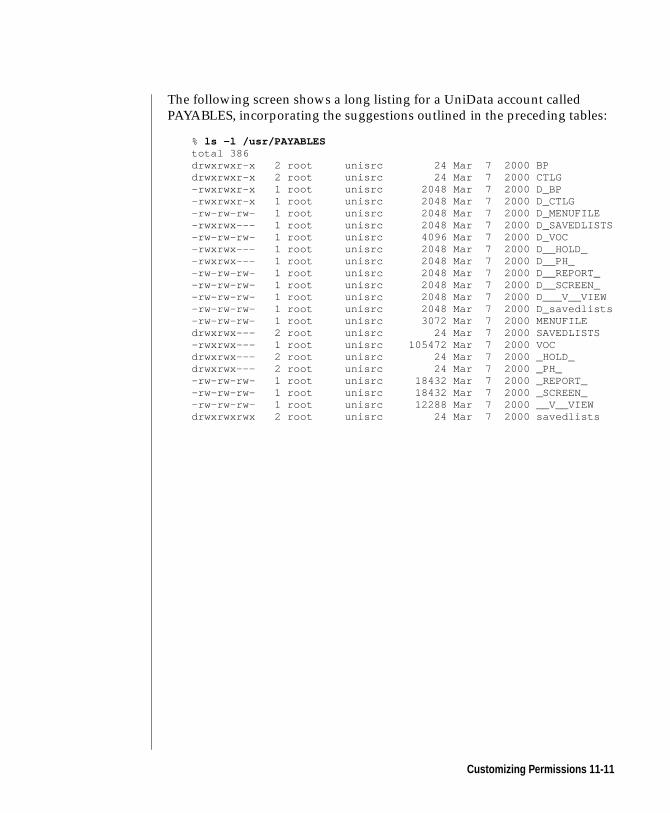
The following screen shows a long listing for a UniData account called
PAYABLES, incorporating the suggestions outlined in the preceding tables:
% ls -l /usr/PAYABLEStotal 386drwxrwxr-x 2 root unisrc 24 Mar 7 2000 BPdrwxrwxr-x 2 root unisrc 24 Mar 7 2000 CTLG-rwxrwxr-x 1 root unisrc 2048 Mar 7 2000 D_BP-rwxrwxr-x 1 root unisrc 2048 Mar 7 2000 D_CTLG-rw-rw-rw- 1 root unisrc 2048 Mar 7 2000 D_MENUFILE-rwxrwx--- 1 root unisrc 2048 Mar 7 2000 D_SAVEDLISTS-rw-rw-rw- 1 root unisrc 4096 Mar 7 2000 D_VOC-rwxrwx--- 1 root unisrc 2048 Mar 7 2000 D__HOLD_-rwxrwx--- 1 root unisrc 2048 Mar 7 2000 D__PH_-rw-rw-rw- 1 root unisrc 2048 Mar 7 2000 D__REPORT_-rw-rw-rw- 1 root unisrc 2048 Mar 7 2000 D__SCREEN_-rw-rw-rw- 1 root unisrc 2048 Mar 7 2000 D___V__VIEW-rw-rw-rw- 1 root unisrc 2048 Mar 7 2000 D_savedlists-rw-rw-rw- 1 root unisrc 3072 Mar 7 2000 MENUFILEdrwxrwx--- 2 root unisrc 24 Mar 7 2000 SAVEDLISTS-rwxrwx--- 1 root unisrc 105472 Mar 7 2000 VOCdrwxrwx--- 2 root unisrc 24 Mar 7 2000 _HOLD_drwxrwx--- 2 root unisrc 24 Mar 7 2000 _PH_-rw-rw-rw- 1 root unisrc 18432 Mar 7 2000 _REPORT_-rw-rw-rw- 1 root unisrc 18432 Mar 7 2000 _SCREEN_-rw-rw-rw- 1 root unisrc 12288 Mar 7 2000 __V__VIEWdrwxrwxrwx 2 root unisrc 24 Mar 7 2000 savedlists
Customizing Permissions 11-11
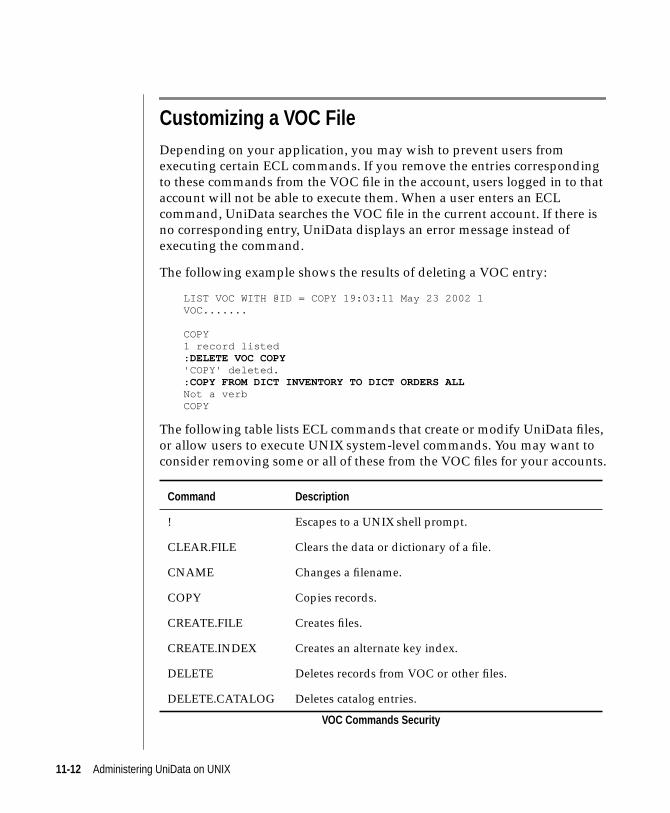
Customizing a VOC FileDepending on your application, you may wish to prevent users from
executing certain ECL commands. If you remove the entries corresponding
to these commands from the VOC file in the account, users logged in to that
account will not be able to execute them. When a user enters an ECL
command, UniData searches the VOC file in the current account. If there is
no corresponding entry, UniData displays an error message instead of
executing the command.
The following example shows the results of deleting a VOC entry:
LIST VOC WITH @ID = COPY 19:03:11 May 23 2002 1VOC.......
COPY1 record listed: DELETE VOC COPY'COPY' deleted.: COPY FROM DICT INVENTORY TO DICT ORDERS ALLNot a verbCOPY
The following table lists ECL commands that create or modify UniData files,
or allow users to execute UNIX system-level commands. You may want to
consider removing some or all of these from the VOC files for your accounts.
Command Description
! Escapes to a UNIX shell prompt.
CLEAR.FILE Clears the data or dictionary of a file.
CNAME Changes a filename.
COPY Copies records.
CREATE.FILE Creates files.
CREATE.INDEX Creates an alternate key index.
DELETE Deletes records from VOC or other files.
DELETE.CATALOG Deletes catalog entries.
VOC Commands Security
11-12 Administering UniData on UNIX

Note: You can remove entries from the UniData master VOC file (located inudthome/sys) or from the VOC files in one or more UniData accounts. The masterVOC is installed as part of the UniData installation, and is used to build VOC filesfor your accounts when you execute the newacct command. If you remove commandsfrom the master VOC file, and then create new UniData accounts, users in the newaccounts will not be able to execute the commands you removed.
Tip: If you choose to modify the master VOC file, make sure you save a copy of it andits dictionary before you begin your modifications.
Warning: When you remove a VOC command entry, UniData no longer recognizesthat command. UniData displays an error message if a user tries to execute thecommand, whether at the ECL prompt, or within a UniBasic program.
Customizing UniData
The UDT.OPTIONS command enables you to customize your UniData
environment. UDT.OPTIONS 19 allows you to choose whether superusers
(root access) can bypass security restrictions created by removing entries
from the VOC file. If UDT.OPTIONS 19 is on, UniData prevents even
superusers from executing commands after you remove the entries are from
the VOC file.
DELETE.FILE Deletes a file.
DELETE.INDEX Deletes an alternate key index.
DISABLE.INDEX Disables an alternate key index.
ED Invokes the ED editor.
ENABLE.INDEX Enables an alternate key index.
MODIFY Modifies records in a data or dictionary file.
PTRDISABLE Disables a printer or queue.
PTRENABLE Enables a printer or queue.
RESIZE Resizes a file.
UPDATE.INDEX Updates an alternate key index.
Command Description
VOC Commands Security (continued)
Customizing a VOC File 11-13
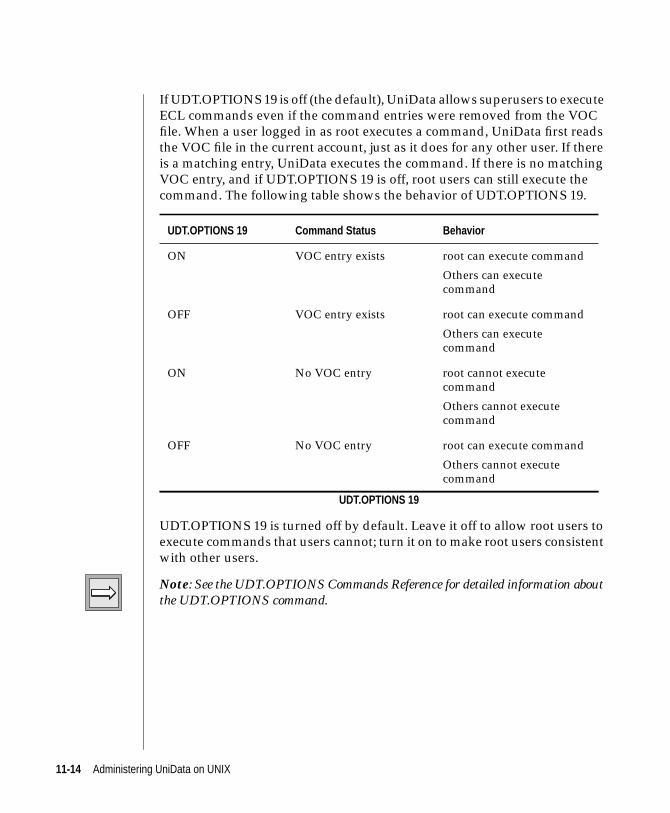
If UDT.OPTIONS 19 is off (the default), UniData allows superusers to execute
ECL commands even if the command entries were removed from the VOC
file. When a user logged in as root executes a command, UniData first reads
the VOC file in the current account, just as it does for any other user. If there
is a matching entry, UniData executes the command. If there is no matching
VOC entry, and if UDT.OPTIONS 19 is off, root users can still execute the
command. The following table shows the behavior of UDT.OPTIONS 19.
UDT.OPTIONS 19 is turned off by default. Leave it off to allow root users to
execute commands that users cannot; turn it on to make root users consistent
with other users.
Note: See the UDT.OPTIONS Commands Reference for detailed information aboutthe UDT.OPTIONS command.
UDT.OPTIONS 19 Command Status Behavior
ON VOC entry exists root can execute command
Others can executecommand
OFF VOC entry exists root can execute command
Others can executecommand
ON No VOC entry root cannot executecommand
Others cannot executecommand
OFF No VOC entry root can execute command
Others cannot executecommand
UDT.OPTIONS 19
11-14 Administering UniData on UNIX
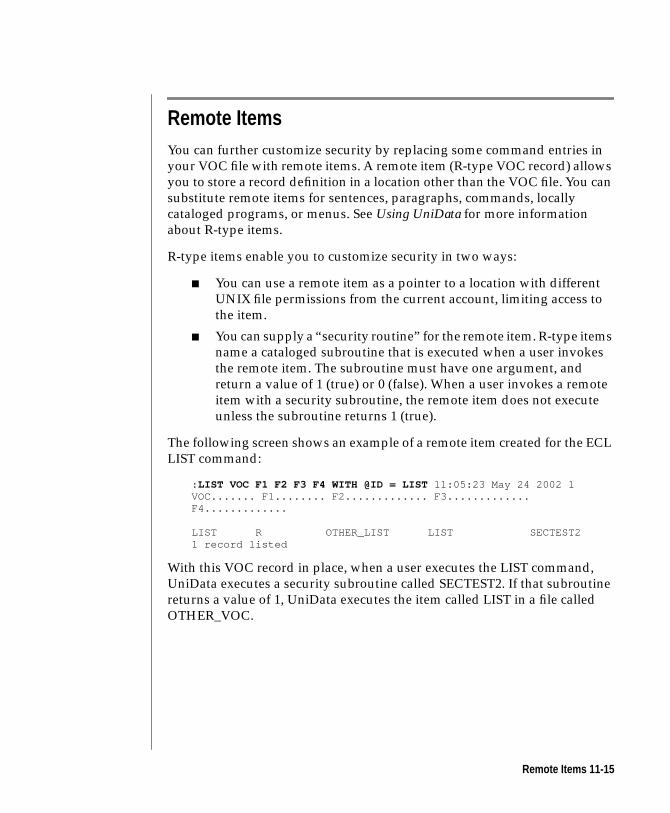
Remote ItemsYou can further customize security by replacing some command entries in
your VOC file with remote items. A remote item (R-type VOC record) allows
you to store a record definition in a location other than the VOC file. You can
substitute remote items for sentences, paragraphs, commands, locally
cataloged programs, or menus. See Using UniData for more information
about R-type items.
R-type items enable you to customize security in two ways:
■ You can use a remote item as a pointer to a location with different
UNIX file permissions from the current account, limiting access to
the item.
■ You can supply a “security routine” for the remote item. R-type items
name a cataloged subroutine that is executed when a user invokes
the remote item. The subroutine must have one argument, and
return a value of 1 (true) or 0 (false). When a user invokes a remote
item with a security subroutine, the remote item does not execute
unless the subroutine returns 1 (true).
The following screen shows an example of a remote item created for the ECL
LIST command:
: LIST VOC F1 F2 F3 F4 WITH @ID = LIST 11:05:23 May 24 2002 1VOC....... F1........ F2............. F3.............F4.............
LIST R OTHER_LIST LIST SECTEST21 record listed
With this VOC record in place, when a user executes the LIST command,
UniData executes a security subroutine called SECTEST2. If that subroutine
returns a value of 1, UniData executes the item called LIST in a file called
OTHER_VOC.
Remote Items 11-15

The next screen shows the security subroutine:
: AE BP SECTEST2Top of "SECTEST2" in "BP", 4 lines, 66 characters.*--: P001: SUBROUTINE SECTEST2(OKAY)002: COMMON /SECUR/ VALID003: OKAY = VALID004: RETURNBottom.
In this example, the subroutine obtains the value of VALID from named
COMMON. The value can be set by another subroutine or program. The
following example shows what happens if VALID is zero (false) and a user
executes the ECL LIST command:
: LIST VOC WITH F1 = PANot a verb LISTThe next screen shows what happens if VALID is 1 (true):: LIST VOC WITH F1 = PALIST VOC WITH F1 = PA 11:13:27 May 24 2002 1VOC.......
ECLTYPECPCTSP.OPENlistdictLISTDICT6 records listed
11-16 Administering UniData on UNIX
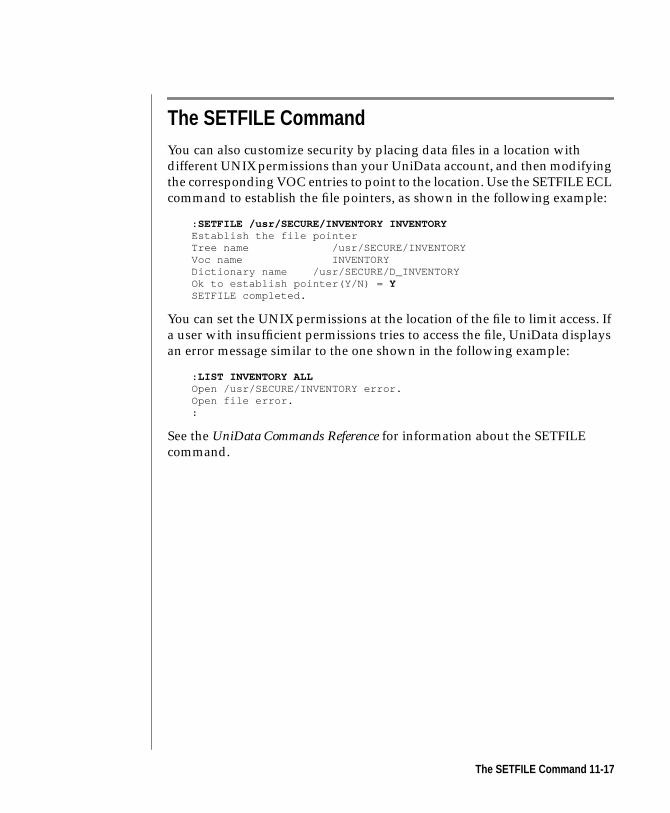
The SETFILE CommandYou can also customize security by placing data files in a location with
different UNIX permissions than your UniData account, and then modifying
the corresponding VOC entries to point to the location. Use the SETFILE ECL
command to establish the file pointers, as shown in the following example:
: SETFILE /usr/SECURE/INVENTORY INVENTORYEstablish the file pointerTree name /usr/SECURE/INVENTORYVoc name INVENTORYDictionary name /usr/SECURE/D_INVENTORYOk to establish pointer(Y/N) = YSETFILE completed.
You can set the UNIX permissions at the location of the file to limit access. If
a user with insufficient permissions tries to access the file, UniData displays
an error message similar to the one shown in the following example:
: LIST INVENTORY ALLOpen /usr/SECURE/INVENTORY error.Open file error.:
See the UniData Commands Reference for information about the SETFILE
command.
The SETFILE Command 11-17
LOGIN and LOGOUT ParagraphsYou can define LOGIN and LOGOUT paragraphs in the VOC files of your
accounts to provide further control of users’ environments. A typical LOGIN
paragraph sets UDT.OPTIONS and invokes an application menu. A typical
LOGOUT paragraph executes a routine that cleans up application files and
exits the application in an orderly manner. If a user’s .login or .profile sets
their working directory to a UniData account and executes the udt command,
and the LOGIN paragraph defines the UDT.OPTIONS and displays a menu,
the user does not see either the UNIX shell prompt or the ECL prompt.
The behavior of LOGIN and LOGOUT paragraphs are summarized as
follows:
■ When a user enters UniData, UniData checks the VOC file in the
account the user is entering for a LOGIN paragraph. If there is one,
UniData automatically executes it.
■ If the user changes accounts with the ECL LOGTO command,
UniData does NOT execute the LOGOUT paragraph in the account
the user is leaving. UniData looks in the VOC file of the account the
user is entering, and executes the LOGIN paragraph there, if there is
one.
■ When a user exits UniData, UniData checks the VOC file in the user’s
current account and executes the LOGOUT paragraph, if one is
there.
Note: You can also use the ECL ON.ABORT command to prevent users fromaccessing the ECL or UNIX prompt. ON.ABORT defines a paragraph that executeswhenever a UniBasic program aborts. See the UniData Commands Reference forinformation about ON.ABORT.
11-18 Administering UniData on UNIX
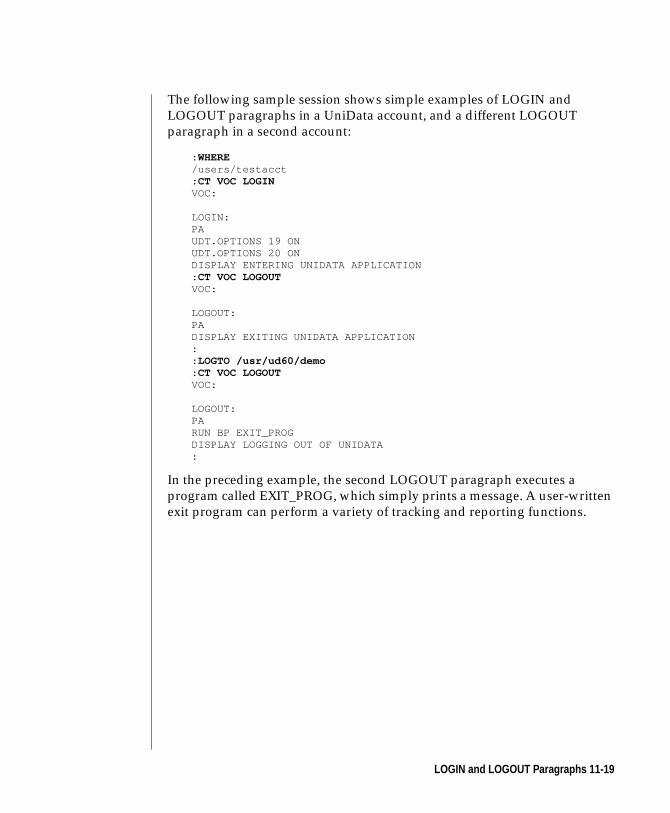
The following sample session shows simple examples of LOGIN and
LOGOUT paragraphs in a UniData account, and a different LOGOUT
paragraph in a second account:
: WHERE/users/testacct: CT VOC LOGINVOC:
LOGIN:PAUDT.OPTIONS 19 ONUDT.OPTIONS 20 ONDISPLAY ENTERING UNIDATA APPLICATION: CT VOC LOGOUTVOC:
LOGOUT:PADISPLAY EXITING UNIDATA APPLICATION:: LOGTO /usr/ud60/demo: CT VOC LOGOUTVOC:
LOGOUT:PARUN BP EXIT_PROGDISPLAY LOGGING OUT OF UNIDATA:
In the preceding example, the second LOGOUT paragraph executes a
program called EXIT_PROG, which simply prints a message. A user-written
exit program can perform a variety of tracking and reporting functions.
LOGIN and LOGOUT Paragraphs 11-19
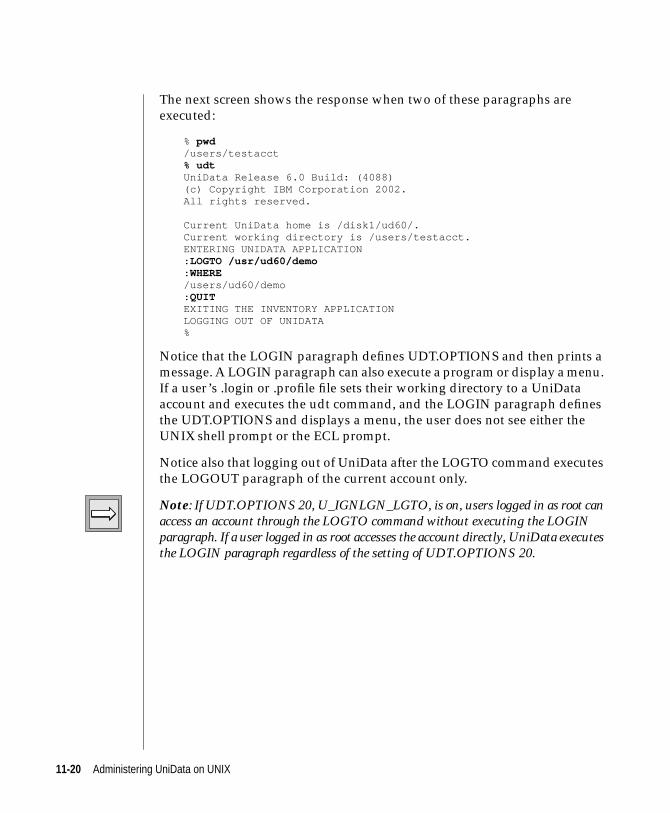
The next screen shows the response when two of these paragraphs are
executed:
% pwd/users/testacct% udtUniData Release 6.0 Build: (4088)(c) Copyright IBM Corporation 2002.All rights reserved.
Current UniData home is /disk1/ud60/.Current working directory is /users/testacct.ENTERING UNIDATA APPLICATION: LOGTO /usr/ud60/demo: WHERE/users/ud60/demo: QUITEXITING THE INVENTORY APPLICATIONLOGGING OUT OF UNIDATA%
Notice that the LOGIN paragraph defines UDT.OPTIONS and then prints a
message. A LOGIN paragraph can also execute a program or display a menu.
If a user’s .login or .profile file sets their working directory to a UniData
account and executes the udt command, and the LOGIN paragraph defines
the UDT.OPTIONS and displays a menu, the user does not see either the
UNIX shell prompt or the ECL prompt.
Notice also that logging out of UniData after the LOGTO command executes
the LOGOUT paragraph of the current account only.
Note: If UDT.OPTIONS 20, U_IGNLGN_LGTO, is on, users logged in as root canaccess an account through the LOGTO command without executing the LOGINparagraph. If a user logged in as root accesses the account directly, UniData executesthe LOGIN paragraph regardless of the setting of UDT.OPTIONS 20.
11-20 Administering UniData on UNIX
UniData SQL PrivilegesWhen a user creates a UniData SQL table or view, that user has exclusive
UniData SQL access to it. Regardless of file permissions set at the UNIX level,
no other user can execute UniData SQL operations against the table or view
until the owner grants privileges via the UniData SQL GRANT command.
The UniData SQL REVOKE command allows the owner (or any other user
with ALL privileges) to revoke privileges that were granted. UniData SQL
privileges can be granted or revoked for an entire table or for specified
commands.
Note: UniData and UniData SQL share data and dictionary files. Therefore,depending on the UNIX file permissions, tables you create in UniData SQL can beaccessed by other UniData tools, such as ECL or UniQuery. The GRANT andREVOKE commands affect UniData SQL operations only.
See the UniData SQL Commands Reference and Using UniData SQL for
additional information about UniData SQL privileges.
UniData SQL Privileges 11-21
Field-Level Security for UniQueryUniData includes functionality to determine UniQuery access on an
attribute-by-attribute basis.
System administrators can set privileges for UniQuery access at the file or
attribute level for a single user, or for all users in the UNIX group, by creating
a QUERY.PRIVILEGE table in a specified format and adding records to that
table.
You can also set a default for your system, defining all files as OPEN or
SECURE. In an OPEN system, the ability to access a file or a field with
UniQuery is a function of UNIX file permissions, other UniData security
implementations, and privileges granted using the QUERY.PRIVILEGE
table. In a SECURE system, unless privileges are granted in the
QUERY.PRIVILEGE table, users cannot access files via UniQuery, regardless
of UNIX permissions or other implementations.
Points to Remember about Field-Level Security
Remember the following points about field-level security:
■ Implementing and maintaining field-level security is a completely
manual process. You must create and populate the
QUERY.PRIVILEGE file manually.
■ ECL commands, such as CREATE.FILE, DELETE.FILE, and
CNAME, do not update the QUERY.PRIVILEGE table.
■ ECL commands are not affected by UniQuery security.
■ The UniQuery MODIFY command is not affected by the UniQuery
security feature. The security is imposed when a user attempts to
SELECT.
■ A default of OPEN or SECURE affects all UniData accounts that
share the same udthome. You cannot define some accounts as OPEN
and some as SECURE.
11-22 Administering UniData on UNIX
■ Privileges granted on a file are not automatically applied to its
dictionary. Therefore, if a user has ALL access to the INVENTORY
file and its dictionary, you must consider D_INVENTORY as well. If
the system default is OPEN, the user can access D_INVENTORY.
Otherwise, if you want the user to access D_INVENTORY, you need
a QUERY.PRIVILEGE record for D_INVENTORY as well.
The QUERY.PRIVILEGE File
UniQuery security depends on the existence of the QUERY.PRIVILEGE file,
which must be located in udthome/sys. If this file does not exist, UniQuery
functions as it has previously, with no field-level security.
Warning: If you create the QUERY.PRIVILEGE file, but do not populate the filewith any records, UniData does not allow any user to access any files on the systemthrough UniQuery.
When you install UniData, the UniQuery security is not implemented, and
there is no QUERY.PRIVILEGE file. If you wish to turn on this feature, you
must create QUERY.PRIVILEGE and D_QUERY.PRIVILEGE manually.
Records in the QUERY.PRIVILEGE file grant the SELECT privilege to users
or groups of users, at the file level or the attribute level. Each
QUERY.PRIVILEGE record has one attribute. The dictionary of the
QUERY.PRIVILEGE file contains four records.
Following is a sample of the dictionary of the QUERY.PRIVILEGE file:
: LIST DICT QUERY.PRIVILEGELIST DICT QUERY.PRIVILEGE BY TYP BY @ID TYP LOC CONV NAME FORMATSM ASSOC 15:20:26 Jun 02 2002 1@ID............ TYP LOC.......... CONV NAME........... FORMAT SMASSOC.....
@ID D 0 QUERY.PRIVILEGE 50L SPRIV D 1 PRIVILEGES 5R MFULLPATH V FIELD(@ID'*' File Path 25T S ,2)USERNAME V FIELD(@ID,'*' User Name 25T S ,1)4 records listed
Field-Level Security for UniQuery 11-23
The following table describes each QUERY.PRIVILEGE attribute:
Note: You can customize the length of the dictionary attributes in theQUERY.PRIVILEGE file. The length of @ID should be sufficient to contain thelongest UNIX user name and the longest absolute path for a UniData file on yoursystem. FULLPATH and USERNAME should be long enough to handle the longestabsolute path and longest UNIX user name, respectively.
The following table shows a very simple example of a QUERY.PRIVILEGE
file:
LIST QUERY.PRIVILEGE PRIV 15:28:31 Jun 02 2002 1QUERY.PRIVILEGE................................... PRIVILEGES
user01*/usr/ud60/demo/INVENTORY 1 2 3 4 5 11/user01*/usr/ud60/demo/CLIENTS ALLDEFAULT OPEN3 records listed
This QUERY.PRIVILEGE file means:
Attributes Description
@ID Defines the user or UNIX group and the file for which youare setting privileges. If you are setting up a systemdefault, @ID is DEFAULT. Otherwise, @ID must be of theformat username*path or PUBLIC*path.
PRIV Multivalued; lists the field(s) to which you are grantingaccess by location in the data file record. You can grantprivileges on all fields in a data file by setting PRIV toALL. If you are setting up a system default, set PRIV toeither OPEN or SECURE.
FULLPATH The absolute UNIX path of the file on which you aresetting UniQuery privileges.
USERNAME The UNIX ID of the user (or group) to which you aregranting privileges.
QUERY.PRIVILEGE Record Attributes
11-24 Administering UniData on UNIX
■ Except for INVENTORY and CLIENTS, which are in the demo
database, all users have privileges to query all files in all accounts
that share the same udthome.
■ user01 can query the fields in positions 1, 2, 3, 4, 5, and 11 only in the
INVENTORY file. No other user can query this file.
■ user01 can query any field in the CLIENTS file. No other user can
query the CLIENTS file.
UniQuery Processing
If you have turned on the security feature by creating and populating the
QUERY.PRIVILEGE file, every time a user logs in to UniData, their udt
process reads the contents of QUERY.PRIVILEGE and stores the information
for reference. Then, when a user attempts a UniQuery access, UniData checks
the stored information, following the following steps:
1. Check for privileges granted to the user’s UNIX group.
If the user’s UNIX group has sufficient privileges for the requested
access, allow the access. Otherwise, proceed to step 2.
2. Check for privileges granted specifically to the user.
If the user has sufficient privileges for the requested access, allow the
access. Otherwise, proceed to step 3.
3. Check for privileges granted to PUBLIC.
Privileges granted to PUBLIC apply to all system users. If PUBLIC
has sufficient privileges for the requested access, grant the access.
Otherwise, proceed to step 4.
4. Check for a DEFAULT entry.
If there is a DEFAULT record in QUERY.PRIVILEGE, and if the
default is set to OPEN, allow the requested access. If there is no
DEFAULT, or if the DEFAULT is SECURE, disallow the access,
displaying the following message:
No privilege on filename.
Turning on Field-Level Security
Complete the following steps to implement the UniQuery field-level security
feature:
Field-Level Security for UniQuery 11-25
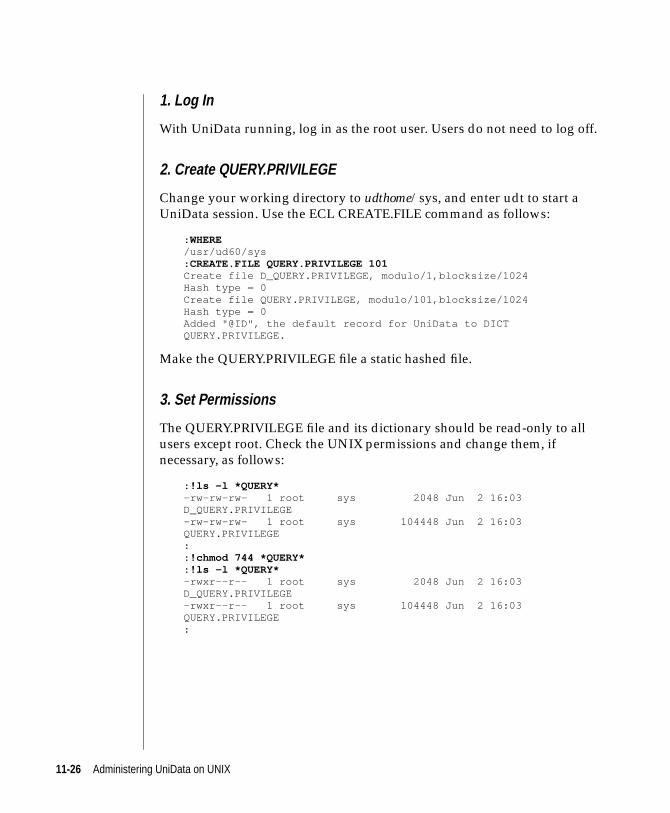
1. Log In
With UniData running, log in as the root user. Users do not need to log off.
2. Create QUERY.PRIVILEGE
Change your working directory to udthome/sys, and enter udt to start a
UniData session. Use the ECL CREATE.FILE command as follows:
: WHERE/usr/ud60/sys: CREATE.FILE QUERY.PRIVILEGE 101Create file D_QUERY.PRIVILEGE, modulo/1,blocksize/1024Hash type = 0Create file QUERY.PRIVILEGE, modulo/101,blocksize/1024Hash type = 0Added "@ID", the default record for UniData to DICTQUERY.PRIVILEGE.
Make the QUERY.PRIVILEGE file a static hashed file.
3. Set Permissions
The QUERY.PRIVILEGE file and its dictionary should be read-only to all
users except root. Check the UNIX permissions and change them, if
necessary, as follows:
: !ls -l *QUERY*-rw-rw-rw- 1 root sys 2048 Jun 2 16:03D_QUERY.PRIVILEGE-rw-rw-rw- 1 root sys 104448 Jun 2 16:03QUERY.PRIVILEGE:: !chmod 744 *QUERY*: !ls -l *QUERY*-rwxr--r-- 1 root sys 2048 Jun 2 16:03D_QUERY.PRIVILEGE-rwxr--r-- 1 root sys 104448 Jun 2 16:03QUERY.PRIVILEGE:
11-26 Administering UniData on UNIX
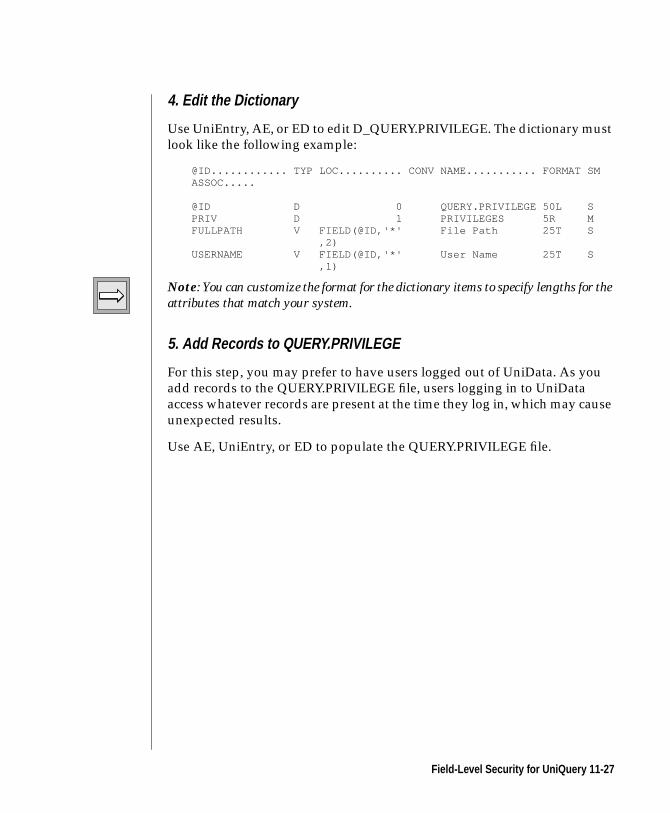
4. Edit the Dictionary
Use UniEntry, AE, or ED to edit D_QUERY.PRIVILEGE. The dictionary must
look like the following example:
@ID............ TYP LOC.......... CONV NAME........... FORMAT SMASSOC.....
@ID D 0 QUERY.PRIVILEGE 50L SPRIV D 1 PRIVILEGES 5R MFULLPATH V FIELD(@ID,'*' File Path 25T S ,2)USERNAME V FIELD(@ID,'*' User Name 25T S ,1)
Note: You can customize the format for the dictionary items to specify lengths for theattributes that match your system.
5. Add Records to QUERY.PRIVILEGE
For this step, you may prefer to have users logged out of UniData. As you
add records to the QUERY.PRIVILEGE file, users logging in to UniData
access whatever records are present at the time they log in, which may cause
unexpected results.
Use AE, UniEntry, or ED to populate the QUERY.PRIVILEGE file.
Field-Level Security for UniQuery 11-27

11-28 Administering UniData on UNIX
12Chapter
Managing UniData Files
UniData Hashed Files . . . . . . . . . . . . . . . . 12-4
Static Hashed Files . . . . . . . . . . . . . . . . . 12-5
Dynamic Hashed Files . . . . . . . . . . . . . . . . 12-6
Dynamic Files and Overflow . . . . . . . . . . . . . 12-7
Dynamic Files, Part Files, and Part Tables. . . . . . . . . 12-9
When Dynamic Files Are Created . . . . . . . . . . . 12-12
Tips and Constraints for Creating a Dynamic File . . . . . . 12-14
When Dynamic Files Expand . . . . . . . . . . . . . 12-15
Management Tools for Dynamic Files . . . . . . . . . . 12-19
Dynamic Files and Disk Space . . . . . . . . . . . . 12-20
Sequentially Hashed Files . . . . . . . . . . . . . . 12-24
File-Handling Commands . . . . . . . . . . . . . . . 12-27
File Corruption . . . . . . . . . . . . . . . . . . . 12-31
What Causes File Corruption? . . . . . . . . . . . . 12-31
Preventing File Corruption . . . . . . . . . . . . . . 12-32
UniData Detection Tools . . . . . . . . . . . . . . . 12-34
guide . . . . . . . . . . . . . . . . . . . . . 12-34
guide_ndx . . . . . . . . . . . . . . . . . . . 12-39
verify2 . . . . . . . . . . . . . . . . . . . . . 12-40
UniData Recovery Tools . . . . . . . . . . . . . . . . 12-43
dumpgroup . . . . . . . . . . . . . . . . . . . 12-43
fixgroup . . . . . . . . . . . . . . . . . . . . 12-45
fixfile . . . . . . . . . . . . . . . . . . . . . 12-46
Detection and Repair Examples . . . . . . . . . . . . . 12-51
How to Use guide . . . . . . . . . . . . . . . . . . 12-53
Error Messages . . . . . . . . . . . . . . . . . . . 12-56
File Access Messages . . . . . . . . . . . . . . . . 12-56
12 -2 Ad
Block Usage Messages . . . . . . . . . . . . . . . 12-56
Group Header Messages. . . . . . . . . . . . . . . 12-57
Header Key Messages . . . . . . . . . . . . . . . 12-57
Other Header Messages . . . . . . . . . . . . . . . 12-57
Free Block Messages . . . . . . . . . . . . . . . . 12-59
Long Record Messages . . . . . . . . . . . . . . . 12-59
Dynamic File Messages . . . . . . . . . . . . . . . 12-60
ministering UniData on UNIX
In a UniData stores your data database in UniData hashed files of several
different types in the database. UniData also supplies other types of files to
support your database, including index files, program files, and directory
files.
This chapter describes the types of UniData hashed files and explains the
commands used to manage them. See Chapter 3, “UniData and the UNIX
File System,” for information about other file types.
12-3
UniData Hashed FilesHashed files are binary files that cannot be viewed at the operating system
level or read by text editors external to UniData. Each UniData hashed file
consists of a file header and one or more groups of data. Each data group
contains the following structure:
■ A fixed-length group header
■ A pointer array
■ Record IDs
■ Data
A record key is assigned to a group in the file according to a hashing
algorithm. Then the precise location of the data is stored in the header of that
group. The goal of hashing is to make searching for data more efficient by
eliminating the need to search an entire file for a record. In a hashed file,
UniData searches only the group where the primary key of the record was
assigned. UniData supports two proprietary hashing algorithms (hash type
0 and hash type 1). The hash type determines the data group that contains
each record.
The most efficient hashing algorithm for a file is the one that provides the best
distribution of keys across the groups in the file. If the distribution is uneven,
heavily loaded groups are accessed more frequently, which results in
inefficient disk space use and increased contention for those groups. The
default hash type for both static and dynamic files is 0. You can specify hash
type 1 when you create a file, and you can switch between hash types with
the memresize command.
12-4 Administering UniData on UNIX
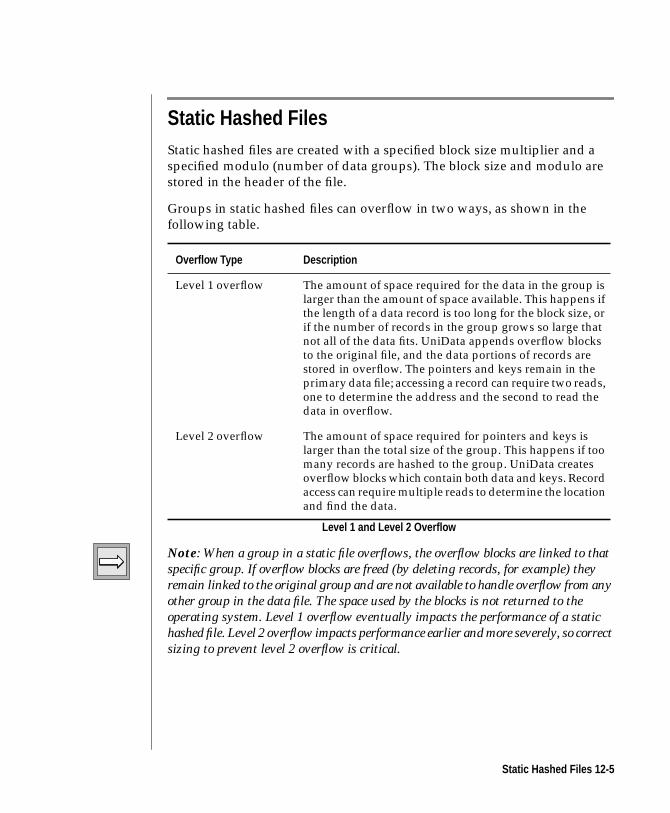
Static Hashed FilesStatic hashed files are created with a specified block size multiplier and a
specified modulo (number of data groups). The block size and modulo are
stored in the header of the file.
Groups in static hashed files can overflow in two ways, as shown in the
following table.
Note: When a group in a static file overflows, the overflow blocks are linked to thatspecific group. If overflow blocks are freed (by deleting records, for example) theyremain linked to the original group and are not available to handle overflow from anyother group in the data file. The space used by the blocks is not returned to theoperating system. Level 1 overflow eventually impacts the performance of a statichashed file. Level 2 overflow impacts performance earlier and more severely, so correctsizing to prevent level 2 overflow is critical.
Overflow Type Description
Level 1 overflow The amount of space required for the data in the group islarger than the amount of space available. This happens ifthe length of a data record is too long for the block size, orif the number of records in the group grows so large thatnot all of the data fits. UniData appends overflow blocksto the original file, and the data portions of records arestored in overflow. The pointers and keys remain in theprimary data file; accessing a record can require two reads,one to determine the address and the second to read thedata in overflow.
Level 2 overflow The amount of space required for pointers and keys islarger than the total size of the group. This happens if toomany records are hashed to the group. UniData createsoverflow blocks which contain both data and keys. Recordaccess can require multiple reads to determine the locationand find the data.
Level 1 and Level 2 Overflow
Static Hashed Files 12-5
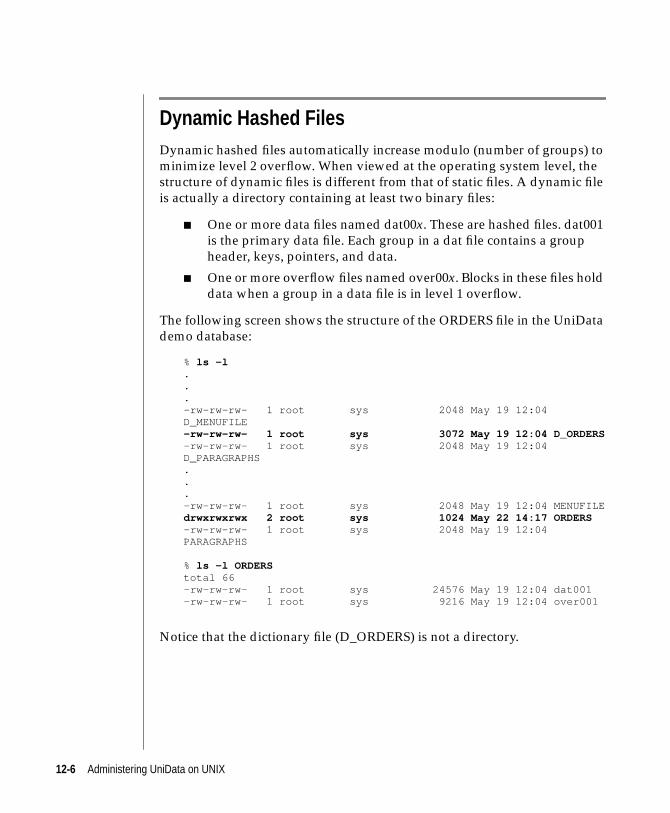
Dynamic Hashed FilesDynamic hashed files automatically increase modulo (number of groups) to
minimize level 2 overflow. When viewed at the operating system level, the
structure of dynamic files is different from that of static files. A dynamic file
is actually a directory containing at least two binary files:
■ One or more data files named dat00x. These are hashed files. dat001
is the primary data file. Each group in a dat file contains a group
header, keys, pointers, and data.
■ One or more overflow files named over00x. Blocks in these files hold
data when a group in a data file is in level 1 overflow.
The following screen shows the structure of the ORDERS file in the UniData
demo database:
% ls -l...-rw-rw-rw- 1 root sys 2048 May 19 12:04D_MENUFILE-rw-rw-rw- 1 root sys 3072 May 19 12:04 D_ORDERS-rw-rw-rw- 1 root sys 2048 May 19 12:04D_PARAGRAPHS...-rw-rw-rw- 1 root sys 2048 May 19 12:04 MENUFILEdrwxrwxrwx 2 root sys 1024 May 22 14:17 ORDERS-rw-rw-rw- 1 root sys 2048 May 19 12:04PARAGRAPHS
% ls -l ORDERStotal 66-rw-rw-rw- 1 root sys 24576 May 19 12:04 dat001-rw-rw-rw- 1 root sys 9216 May 19 12:04 over001
Notice that the dictionary file (D_ORDERS) is not a directory.
12-6 Administering UniData on UNIX
Dynamic Files and Overflow
Dynamic files automatically change size (both physical size and modulo) as
you add data to them. You create a dynamic file with a specified initial
modulo, which is the minimum modulo of the file. As records are added,
UniData adds groups to the data file (dat001) to prevent level 2 overflow and
adds blocks to the overflow file (over001) to contain level 1 overflow.
Splitting and Merging
When a group in the primary data file reaches level 1 overflow, UniData
stores the overflowed data in blocks in the overflow file. Blocks in over001 are
linked (internal to UniData) to groups in the primary data file dat001. When
the overflow file runs out of blocks, UniData adds blocks to it. To prevent
level 2 overflow, UniData splits groups (increasing the modulo of the
primary file) whenever the load factor of an existing group reaches a level
called the splitting threshold (or SPLIT.LOAD). The splitting process is
transparent to the user. When a group splits, the additional group is added to
the primary data file, increasing its modulo and physical size.
As records are removed from a dynamic file, groups that had been split can
merge back together if all the following conditions are true:
■ The current modulo of the file is greater than the minimum modulo
of the file.
■ The combined load factor of the two groups is less than a value called
merging threshold (or MERGE.LOAD).
■ One of the two groups is the last group in the file.
UniData provides two different split/merge types for dynamic files,
KEYONLY and KEYDATA. You can set the split/merge type when you create
a dynamic file, and you can change an existing split/merge type with the
CONFIGURE.FILE command or the memresize command. Use FILE.STAT,
ANALYZE.FILE, or GROUP.STAT to display the split/merge type.
Dynamic Hashed Files 12-7
KEYONLY Type
The KEYONLY split/merge type is the default for UniData dynamic files. For
KEYONLY dynamic files, the load factor of a group is the percentage of the
group space that is filled with keys and pointers. By default, the splitting
threshold for a group in a KEYONLY dynamic file is 60%, so the group can
split into two when the space occupied by keys and pointers reaches 60% of
the size of the group. By default, the merging threshold for a KEYONLY
dynamic file is 40%, so if the total load in a pair of groups that resulted from
a split is under 40% of the size of a single group, the pair are eligible to merge.
You can change the splitting threshold for a single KEYONLY file with the
CONFIGURE.FILE or memresize commands, and you can change the
defaults for all files by changing the SPLIT_LOAD and MERGE_LOAD
parameters in the UniData configuration file
(/usr/ud60/include/udtconfig).
KEYDATA Type
The KEYDATA split/merge type is also available for UniData dynamic files.
For KEYDATA dynamic files, the load factor of a group is the percentage of
the group space that is filled with keys, pointers, and data. By default, the
splitting threshold for a group in a KEYDATA dynamic file is 95 percent, so
the group can split into two when the space occupied by keys, pointers, and
data reaches 95 percent of the size of the group. By default, the merging
threshold for a KEYDATA dynamic file is 40 percent, so if the total load in a
pair of groups that resulted from a split is under 40 percent of the size of a
single group, the pair are eligible to merge.You can change the splitting
threshold for a single KEYDATA file with the CONFIGURE.FILE or
memresize commands, and you can change the defaults for all files by
changing the KEYDATA_SPLIT_LOAD and KEYDATA_MERGE_LOAD
parameters in the UniData configuration file
(/usr/ud60/include/udtconfig).
Selecting a Split/Merge Type
Use the KEYONLY split/merge type for files whose records differ widely in
length (standard deviation from average is large). When record lengths vary
widely, the KEYONLY split/merge type makes more efficient use of disk
space. Use the guide or FILE.STAT command to determine the record length
and standard deviation from average for an existing file.
12-8 Administering UniData on UNIX
Use KEYDATA for files whose record length is consistent and in which the
length of the data portion of each record is large with respect to the record ID.
For files with these characteristics, the KEYDATA split/merge type provides
a better distribution of records and less overflow than KEYONLY.
Dynamic Files and Hash Type
For both static and dynamic files, the default hash type is 0. This hash type
provides a more even distribution of keys in groups in dynamic files. If key
distribution in a file is uneven, you should consider tuning the modulo, block
size, and split/merge type of the file. If none of these methods is effective,
you should consider switching the hash type to 1.
Dynamic Files, Part Files, and Part Tables
UniData allows a dynamic file to have multiple dat, over, and idx files, so that
a dynamic file does not have the 2 gigabyte (GB) limit as does a static file.
These “part files” can reside in different file systems. Each part file can
approach 2 GB in size. The total number of part files in a dynamic file cannot
exceed 255. Part files are numbered sequentially by type (for instance, dat002,
over002, and idx002).
The UniData configuration parameter MAX_FLENGTH defines the
maximum size, in bytes, for a “part” of a dynamic file. UniData distributes
“part files” across file systems using ASCII files called “part tables.” A part
table:
■ Lists eligible file systems into which dynamic files are allowed to
expand.
■ Specifies the amount of reserved space on each file system. Reserved
space is not available for dynamic file expansion. Defining reserved
space reduces the probability of the disk becoming full.
The default value for MAX_FLENGTH, set when you install UniData, is 1GB
(1073741824 bytes). You can increase MAX_FLENGTH, but the maximum
value is (2 GB – 16 K).
Dynamic Hashed Files 12-9
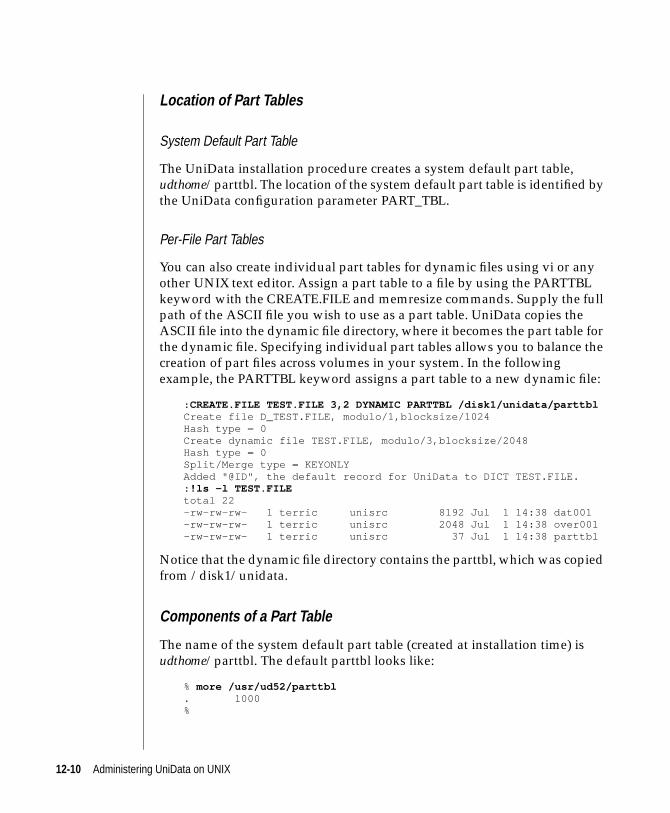
Location of Part Tables
System Default Part Table
The UniData installation procedure creates a system default part table,
udthome/parttbl. The location of the system default part table is identified by
the UniData configuration parameter PART_TBL.
Per-File Part Tables
You can also create individual part tables for dynamic files using vi or any
other UNIX text editor. Assign a part table to a file by using the PARTTBL
keyword with the CREATE.FILE and memresize commands. Supply the full
path of the ASCII file you wish to use as a part table. UniData copies the
ASCII file into the dynamic file directory, where it becomes the part table for
the dynamic file. Specifying individual part tables allows you to balance the
creation of part files across volumes in your system. In the following
example, the PARTTBL keyword assigns a part table to a new dynamic file:
: CREATE.FILE TEST.FILE 3,2 DYNAMIC PARTTBL /disk1/unidata/parttblCreate file D_TEST.FILE, modulo/1,blocksize/1024Hash type = 0Create dynamic file TEST.FILE, modulo/3,blocksize/2048Hash type = 0Split/Merge type = KEYONLYAdded "@ID", the default record for UniData to DICT TEST.FILE.: !ls -l TEST.FILEtotal 22-rw-rw-rw- 1 terric unisrc 8192 Jul 1 14:38 dat001-rw-rw-rw- 1 terric unisrc 2048 Jul 1 14:38 over001-rw-rw-rw- 1 terric unisrc 37 Jul 1 14:38 parttbl
Notice that the dynamic file directory contains the parttbl, which was copied
from /disk1/unidata.
Components of a Part Table
The name of the system default part table (created at installation time) is
udthome/parttbl. The default parttbl looks like:
% more /usr/ud52/parttbl. 1000%
12-10 Administering UniData on UNIX
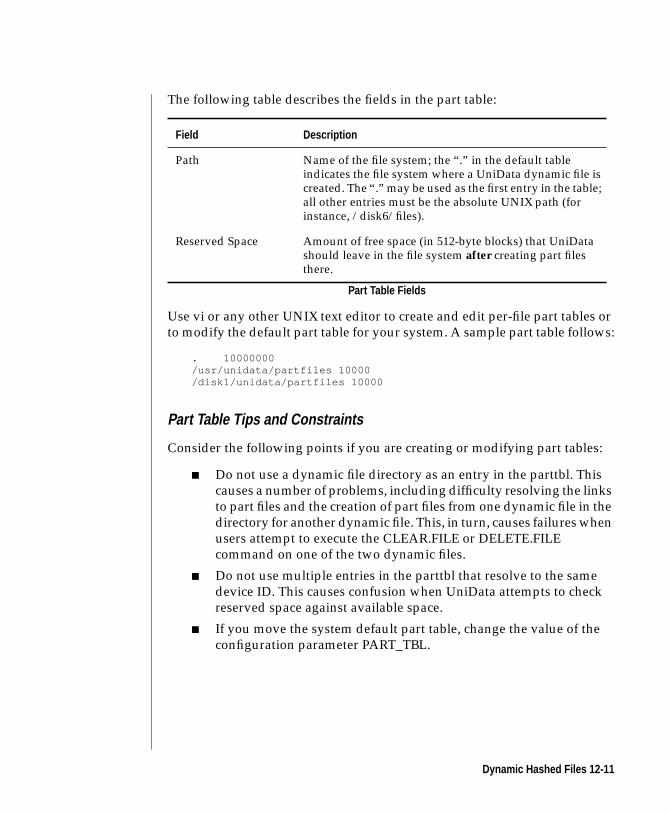
The following table describes the fields in the part table:
Use vi or any other UNIX text editor to create and edit per-file part tables or
to modify the default part table for your system. A sample part table follows:
. 10000000/usr/unidata/partfiles 10000/disk1/unidata/partfiles 10000
Part Table Tips and Constraints
Consider the following points if you are creating or modifying part tables:
■ Do not use a dynamic file directory as an entry in the parttbl. This
causes a number of problems, including difficulty resolving the links
to part files and the creation of part files from one dynamic file in the
directory for another dynamic file. This, in turn, causes failures when
users attempt to execute the CLEAR.FILE or DELETE.FILE
command on one of the two dynamic files.
■ Do not use multiple entries in the parttbl that resolve to the same
device ID. This causes confusion when UniData attempts to check
reserved space against available space.
■ If you move the system default part table, change the value of the
configuration parameter PART_TBL.
Field Description
Path Name of the file system; the “.” in the default tableindicates the file system where a UniData dynamic file iscreated. The “.” may be used as the first entry in the table;all other entries must be the absolute UNIX path (forinstance, /disk6/files).
Reserved Space Amount of free space (in 512-byte blocks) that UniDatashould leave in the file system after creating part filesthere.
Part Table Fields
Dynamic Hashed Files 12-11
■ When you create an ASCII file to use as a per-file part table,
remember that UniData places a copy of that file in a dynamic file
directory each time you specify it with the PARTTBL keyword
(CREATE.FILE or memresize). If you wish to add a partition or
otherwise edit the file, you need to edit the copy in each dynamic file
to which it is assigned, as well as at the location where you created
the file.
■ If you execute the memresize command to change the parameters of
a dynamic file, and you specify the PARTTBL keyword for a file that
already has a per-file part table, you will overwrite the existing per-
file part table.
When Dynamic Files Are Created
The following considerations determine where the parts of a newly created
dynamic file are located.
Estimating the Size of the File
The estimated space required for a new dynamic file is the smaller of the
following:
■ MAX_FLENGTH
■ minimum modulo * block size
If (minimum modulo * block size) is larger than MAX_FLENGTH, the new
file needs more than one data part file.
Locating the Dynamic File Directory
The dynamic file directory is located in the UniData account where
CREATE.FILE was executed.
Locating the Part Files
The part files (or UNIX links to them) are located in the dynamic file
directory. UniData reserves space for part files on the UNIX file system where
the dynamic file directory is located (the resident file system) by making the
following assessments:
12-12 Administering UniData on UNIX
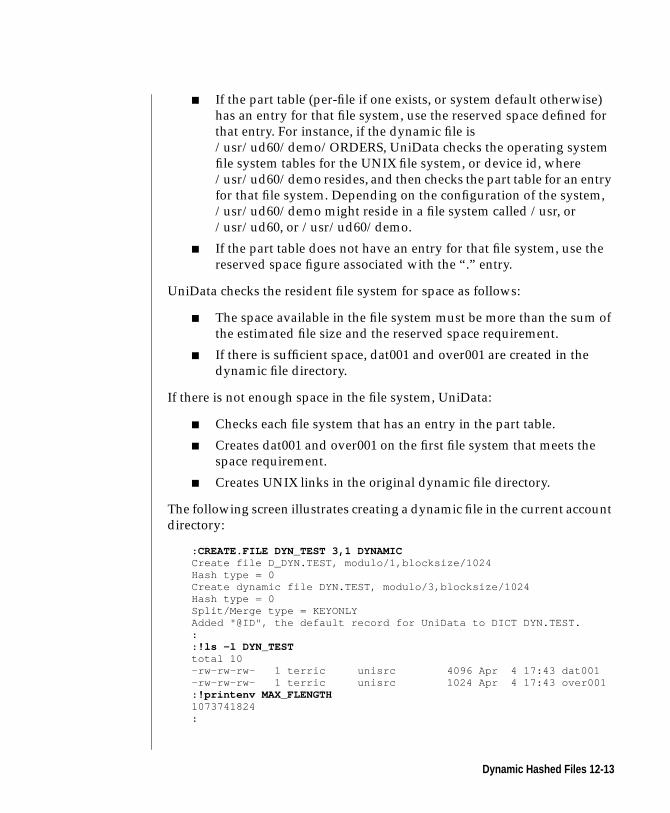
■ If the part table (per-file if one exists, or system default otherwise)
has an entry for that file system, use the reserved space defined for
that entry. For instance, if the dynamic file is
/usr/ud60/demo/ORDERS, UniData checks the operating system
file system tables for the UNIX file system, or device id, where
/usr/ud60/demo resides, and then checks the part table for an entry
for that file system. Depending on the configuration of the system,
/usr/ud60/demo might reside in a file system called /usr, or
/usr/ud60, or /usr/ud60/demo.
■ If the part table does not have an entry for that file system, use the
reserved space figure associated with the “.” entry.
UniData checks the resident file system for space as follows:
■ The space available in the file system must be more than the sum of
the estimated file size and the reserved space requirement.
■ If there is sufficient space, dat001 and over001 are created in the
dynamic file directory.
If there is not enough space in the file system, UniData:
■ Checks each file system that has an entry in the part table.
■ Creates dat001 and over001 on the first file system that meets the
space requirement.
■ Creates UNIX links in the original dynamic file directory.
The following screen illustrates creating a dynamic file in the current account
directory:
: CREATE.FILE DYN_TEST 3,1 DYNAMICCreate file D_DYN.TEST, modulo/1,blocksize/1024Hash type = 0Create dynamic file DYN.TEST, modulo/3,blocksize/1024Hash type = 0Split/Merge type = KEYONLYAdded "@ID", the default record for UniData to DICT DYN.TEST.:: !ls -l DYN_TESTtotal 10-rw-rw-rw- 1 terric unisrc 4096 Apr 4 17:43 dat001-rw-rw-rw- 1 terric unisrc 1024 Apr 4 17:43 over001: !printenv MAX_FLENGTH1073741824:
Dynamic Hashed Files 12-13
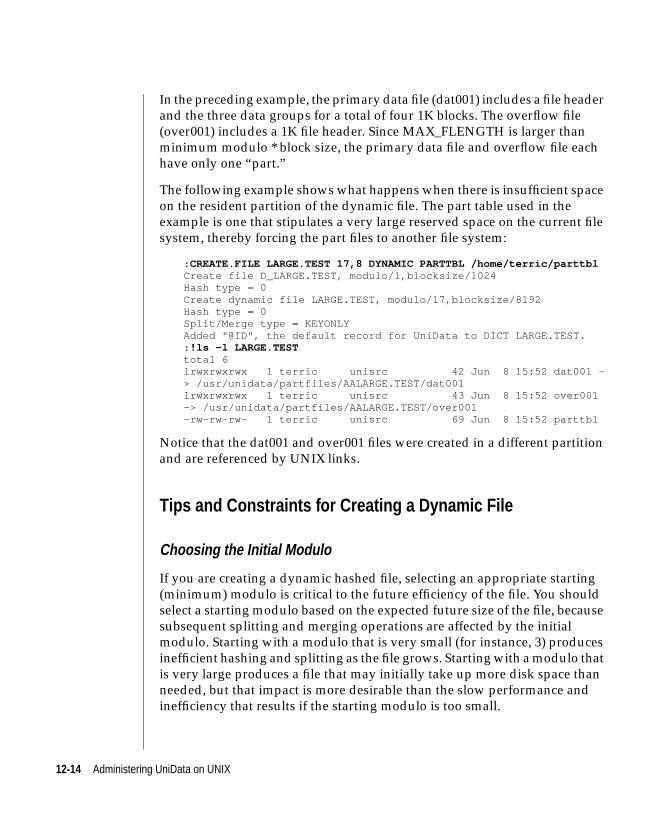
In the preceding example, the primary data file (dat001) includes a file header
and the three data groups for a total of four 1K blocks. The overflow file
(over001) includes a 1K file header. Since MAX_FLENGTH is larger than
minimum modulo * block size, the primary data file and overflow file each
have only one “part.”
The following example shows what happens when there is insufficient space
on the resident partition of the dynamic file. The part table used in the
example is one that stipulates a very large reserved space on the current file
system, thereby forcing the part files to another file system:
: CREATE.FILE LARGE.TEST 17,8 DYNAMIC PARTTBL /home/terric/parttblCreate file D_LARGE.TEST, modulo/1,blocksize/1024Hash type = 0Create dynamic file LARGE.TEST, modulo/17,blocksize/8192Hash type = 0Split/Merge type = KEYONLYAdded "@ID", the default record for UniData to DICT LARGE.TEST.: !ls -l LARGE.TESTtotal 6lrwxrwxrwx 1 terric unisrc 42 Jun 8 15:52 dat001 -> /usr/unidata/partfiles/AALARGE.TEST/dat001lrwxrwxrwx 1 terric unisrc 43 Jun 8 15:52 over001-> /usr/unidata/partfiles/AALARGE.TEST/over001-rw-rw-rw- 1 terric unisrc 69 Jun 8 15:52 parttbl
Notice that the dat001 and over001 files were created in a different partition
and are referenced by UNIX links.
Tips and Constraints for Creating a Dynamic File
Choosing the Initial Modulo
If you are creating a dynamic hashed file, selecting an appropriate starting
(minimum) modulo is critical to the future efficiency of the file. You should
select a starting modulo based on the expected future size of the file, because
subsequent splitting and merging operations are affected by the initial
modulo. Starting with a modulo that is very small (for instance, 3) produces
inefficient hashing and splitting as the file grows. Starting with a modulo that
is very large produces a file that may initially take up more disk space than
needed, but that impact is more desirable than the slow performance and
inefficiency that results if the starting modulo is too small.
12-14 Administering UniData on UNIX
When you create a dynamic file, estimate the initial modulo by using the
same procedure for estimating the modulo for a static file.
Choosing the Block Size
If you are creating a KEYDATA dynamic file, make sure the block size is large
with respect to the record length. IBM recommends that you choose a block
size that is at least 10 times the average record length. Load factor in a
KEYDATA file is based on the percentage of the space in each block that is
occupied by both keys and data. If the block size is not large with respect to
record size, the file will occupy a large amount of space and much of that
space will be unused.
If you are creating a KEYONLY dynamic file, make sure the block size is large
with respect to the average key length. IBM recommends that you choose a
block size that is at least ten times the average key length. Load factor in a
KEYONLY file is based on the percentage of the space in each block that is
occupied by keys and pointers. If the block size is not large with respect to the
average key length, and the hashing is not even, certain groups will be split
over and over, resulting in an inefficient distribution.
When Dynamic Files Expand
When records are added or updated in a dynamic file, a data part file,
overflow part file, or index part file may expand. Whenever a write operation
requires additional blocks, the following considerations determine whether
a new part file is needed, and if so, where it is located.
Determining Whether a New Part File Is Needed
UniData first checks to see if the part file can expand in its current location.
The part file can expand if the following two conditions are true:
■ The size of the part file is less than MAX_FLENGTH.
■ There is enough space in the file system where the part file resides to
complete the current write without expanding into reserved space.
For instance, if 10 blocks are needed, and the difference between
available and reserved space is more than 10 blocks, the part file can
expand.
Dynamic Hashed Files 12-15

Note: To check for space, UniData resolves the directory where the part file resides toits UNIX file system, and then checks the part table for an entry for that file system.For example, if the part file is /usr/ud60/demo/ORDERS/dat001, UniData locatesthe UNIX file system where /usr/ud60/demo/ORDERS resides, and checks the parttable for an entry for that file system. If there is an entry, UniData takes the reservedspace defined for that entry. If not, UniData uses the reserved space defined for the“.” entry.
If both conditions are true, UniData adds blocks to the part file and continues
processing. If either condition is not true, and the part file is an overflow part
file, UniData checks all the existing overflow part files. If one of those part
files meets the conditions, that part file is expanded. If no existing part file can
expand, UniData must create a new overflow part file. If the part file is a data
part file, UniData can expand only the last data part file created. For instance,
if the dynamic file directory contains dat001 and dat002, only dat002 can
expand.
Locating Space For a New Part File
The following table describes how UniData computes an estimated size for
the new part file, depending on its type.
Part File Type Estimated Size
Data part file The smaller of the following:
• The larger of (size of dat001) and (current modulo *block size)
• MAX_FLENGTH
Overflow part file The smaller of the following:
• The larger of (size of over001) and (current modulo *block size)
• MAX_FLENGTH
Index part file The smaller of the following:
• The larger of (size of dat001) and (current modulo *block size)
• MAX_FLENGTH
Estimating Size Requirements for Part Files
12-16 Administering UniData on UNIX

UniData searches the partitions listed in the part table for the dynamic file for
a partition that meets the requirement:
available space > (estimated size + reserved space)
UniData searches the part table in the following order:
1. The resident partition of the dynamic file, because locating the part
file in the dynamic file directory saves the overhead required by a
symbolic link.
2. All entries, in order from top to bottom.
Upon finding a partition that meets the space requirement, UniData:
■ Creates an appropriate directory, if needed.
■ Creates the new part file.
■ Creates a UNIX symbolic link in the dynamic file directory, if
needed.
If no partition meets the space requirement, UniData:
■ Checks to see which partition has the largest amount of free
space (available space - reserved space).
■ If the amount of free space is 20% or more of the estimated size,
creates the new part file at that location.
■ If no partition has sufficient free space (20% or more of the
estimated size of the part file), UniData prompts the user to
reclaim space or change the part table.
How Part Files Are Stored
When dynamic files expand into a different file system, UniData creates
directories in the new file system for the part files. To prevent duplicate
directory names, UniData assigns a prefix to each. The prefixes are assigned
based on an index in the target file system called .fil_prefix_tbl (a hidden
ASCII text file maintained by UniData). A sample .fil_prefix_tbl follows:
% more .fil_prefix_tblAA:/home/terric/SAMPLEAB:/home/terric/NEWACCTAC:/home/terric/NEWACCT/MULTI1
Dynamic Hashed Files 12-17
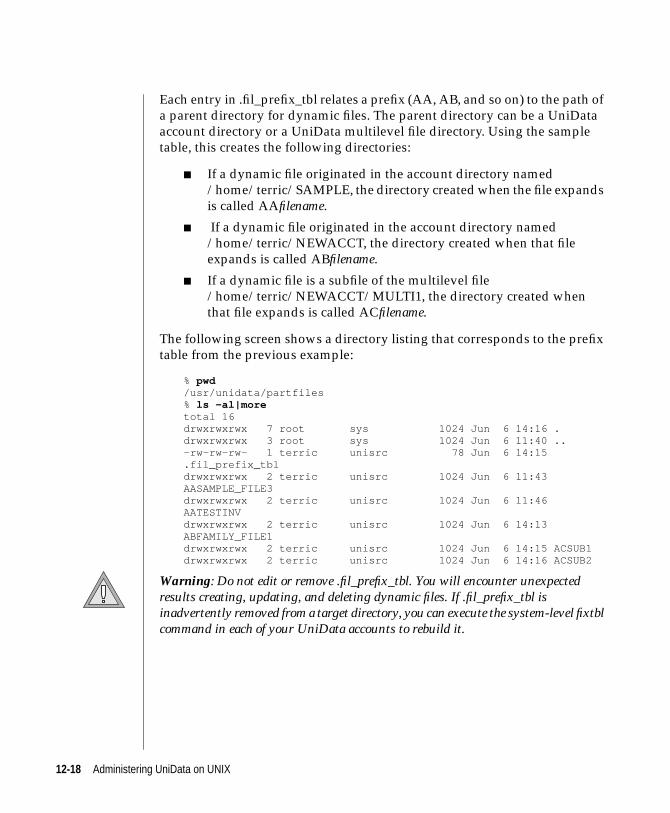
Each entry in .fil_prefix_tbl relates a prefix (AA, AB, and so on) to the path of
a parent directory for dynamic files. The parent directory can be a UniData
account directory or a UniData multilevel file directory. Using the sample
table, this creates the following directories:
■ If a dynamic file originated in the account directory named
/home/terric/SAMPLE, the directory created when the file expands
is called AAfilename.
■ If a dynamic file originated in the account directory named
/home/terric/NEWACCT, the directory created when that file
expands is called ABfilename.
■ If a dynamic file is a subfile of the multilevel file
/home/terric/NEWACCT/MULTI1, the directory created when
that file expands is called ACfilename.
The following screen shows a directory listing that corresponds to the prefix
table from the previous example:
% pwd/usr/unidata/partfiles% ls -al|moretotal 16drwxrwxrwx 7 root sys 1024 Jun 6 14:16 .drwxrwxrwx 3 root sys 1024 Jun 6 11:40 ..-rw-rw-rw- 1 terric unisrc 78 Jun 6 14:15.fil_prefix_tbldrwxrwxrwx 2 terric unisrc 1024 Jun 6 11:43AASAMPLE_FILE3drwxrwxrwx 2 terric unisrc 1024 Jun 6 11:46AATESTINVdrwxrwxrwx 2 terric unisrc 1024 Jun 6 14:13ABFAMILY_FILE1drwxrwxrwx 2 terric unisrc 1024 Jun 6 14:15 ACSUB1drwxrwxrwx 2 terric unisrc 1024 Jun 6 14:16 ACSUB2
Warning: Do not edit or remove .fil_prefix_tbl. You will encounter unexpectedresults creating, updating, and deleting dynamic files. If .fil_prefix_tbl isinadvertently removed from a target directory, you can execute the system-level fixtblcommand in each of your UniData accounts to rebuild it.
12-18 Administering UniData on UNIX
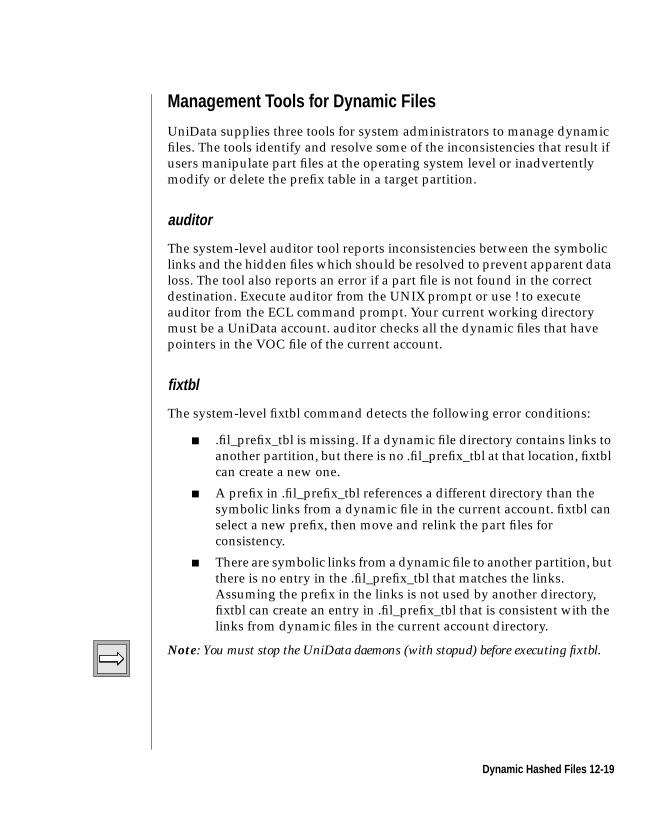
Management Tools for Dynamic Files
UniData supplies three tools for system administrators to manage dynamic
files. The tools identify and resolve some of the inconsistencies that result if
users manipulate part files at the operating system level or inadvertently
modify or delete the prefix table in a target partition.
auditor
The system-level auditor tool reports inconsistencies between the symbolic
links and the hidden files which should be resolved to prevent apparent data
loss. The tool also reports an error if a part file is not found in the correct
destination. Execute auditor from the UNIX prompt or use ! to execute
auditor from the ECL command prompt. Your current working directory
must be a UniData account. auditor checks all the dynamic files that have
pointers in the VOC file of the current account.
fixtbl
The system-level fixtbl command detects the following error conditions:
■ .fil_prefix_tbl is missing. If a dynamic file directory contains links to
another partition, but there is no .fil_prefix_tbl at that location, fixtbl
can create a new one.
■ A prefix in .fil_prefix_tbl references a different directory than the
symbolic links from a dynamic file in the current account. fixtbl can
select a new prefix, then move and relink the part files for
consistency.
■ There are symbolic links from a dynamic file to another partition, but
there is no entry in the .fil_prefix_tbl that matches the links.
Assuming the prefix in the links is not used by another directory,
fixtbl can create an entry in .fil_prefix_tbl that is consistent with the
links from dynamic files in the current account directory.
Note: You must stop the UniData daemons (with stopud) before executing fixtbl.
Dynamic Hashed Files 12-19

mvpart
The system-level mvpart command moves one or more part files of a
dynamic file to a different location. mvpart sets or resets symbolic links, if
needed, and creates or updates a prefix table (.fil_prefix_tbl) at the
destination location, if needed. Using mvpart ensures that the links, file
locations, and prefix tables remain synchronized.
Note: You must stop the UniData daemons (with stopud) before executing mvpart.
Dynamic Files and Disk Space
While it is possible for a dynamic file to shrink with respect to modulo, the
disk space “freed” by merging is not necessarily made available for other use.
When a group splits, the extra group added to the dynamic file is assigned to
the existing group that split. When a merge occurs, the “freed” group
remains allocated to the dynamic file, for use if the original group splits
again.
When data is removed from blocks in the overflow file, UniData keeps those
blocks for the dynamic file. A certain number are reserved for the groups they
were part of, and the remainder of the blocks are available for overflow from
any group in the file. The UniData configuration parameter GRP_FREE_BLK
defines the maximum number of free blocks that should be kept in the free
block list for a particular group. If more blocks are freed, they are kept in the
free block list at the file level.
Refer to Appendix A, “UniData Configuration Parameters,” for a list of the
configuration parameters.
If you remove all records from a dynamic file with either the ECL
CLEAR.FILE command or the ECL DELETE command with the ALL option,
the file returns to its minimum modulo, and the disk space is returned to
UNIX. However, if you remove all records from a dynamic file using a select
list, the file may not return to its minimum modulo. Depending on the order
in which records are removed, some groups resulting from earlier splits may
not become eligible for merging even though they do not contain any records.
12-20 Administering UniData on UNIX
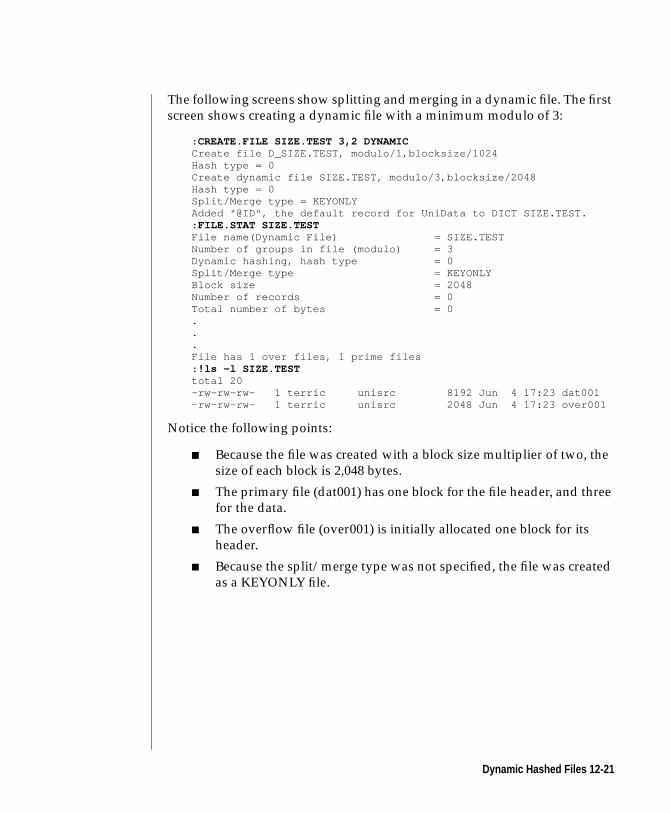
The following screens show splitting and merging in a dynamic file. The first
screen shows creating a dynamic file with a minimum modulo of 3:
: CREATE.FILE SIZE.TEST 3,2 DYNAMICCreate file D_SIZE.TEST, modulo/1,blocksize/1024Hash type = 0Create dynamic file SIZE.TEST, modulo/3,blocksize/2048Hash type = 0Split/Merge type = KEYONLYAdded "@ID", the default record for UniData to DICT SIZE.TEST.: FILE.STAT SIZE.TESTFile name(Dynamic File) = SIZE.TESTNumber of groups in file (modulo) = 3Dynamic hashing, hash type = 0Split/Merge type = KEYONLYBlock size = 2048Number of records = 0Total number of bytes = 0...File has 1 over files, 1 prime files: !ls -l SIZE.TESTtotal 20-rw-rw-rw- 1 terric unisrc 8192 Jun 4 17:23 dat001-rw-rw-rw- 1 terric unisrc 2048 Jun 4 17:23 over001
Notice the following points:
■ Because the file was created with a block size multiplier of two, the
size of each block is 2,048 bytes.
■ The primary file (dat001) has one block for the file header, and three
for the data.
■ The overflow file (over001) is initially allocated one block for its
header.
■ Because the split/merge type was not specified, the file was created
as a KEYONLY file.
Dynamic Hashed Files 12-21
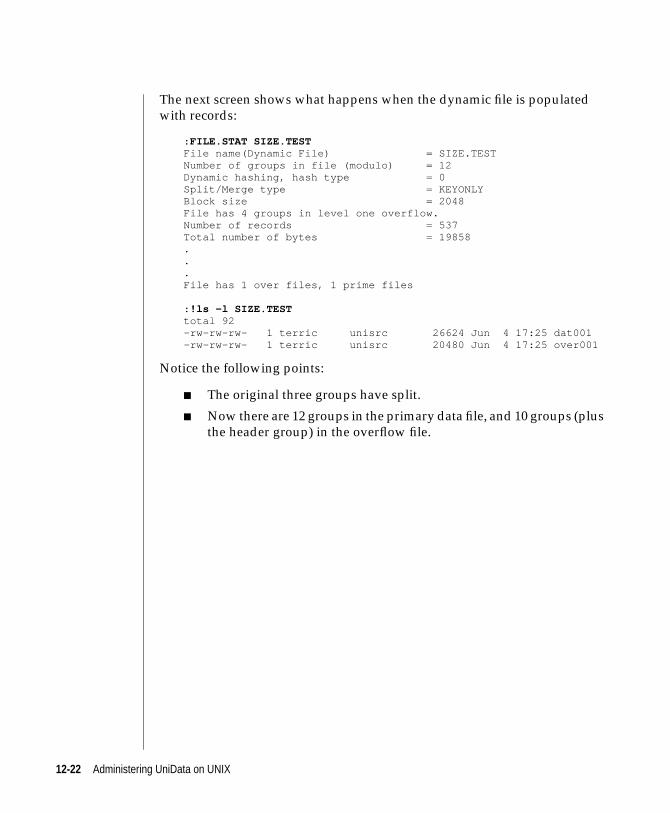
The next screen shows what happens when the dynamic file is populated
with records:
: FILE.STAT SIZE.TESTFile name(Dynamic File) = SIZE.TESTNumber of groups in file (modulo) = 12Dynamic hashing, hash type = 0Split/Merge type = KEYONLYBlock size = 2048File has 4 groups in level one overflow.Number of records = 537Total number of bytes = 19858...File has 1 over files, 1 prime files
: !ls -l SIZE.TESTtotal 92-rw-rw-rw- 1 terric unisrc 26624 Jun 4 17:25 dat001-rw-rw-rw- 1 terric unisrc 20480 Jun 4 17:25 over001
Notice the following points:
■ The original three groups have split.
■ Now there are 12 groups in the primary data file, and 10 groups (plus
the header group) in the overflow file.
12-22 Administering UniData on UNIX
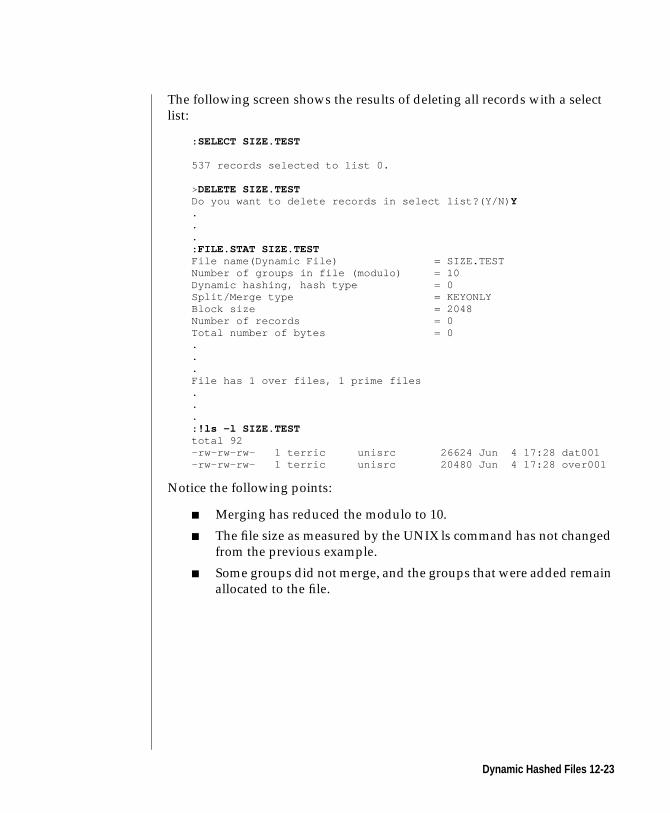
The following screen shows the results of deleting all records with a select
list:
: SELECT SIZE.TEST
537 records selected to list 0.
>DELETE SIZE.TESTDo you want to delete records in select list?(Y/N) Y...: FILE.STAT SIZE.TESTFile name(Dynamic File) = SIZE.TESTNumber of groups in file (modulo) = 10Dynamic hashing, hash type = 0Split/Merge type = KEYONLYBlock size = 2048Number of records = 0Total number of bytes = 0...File has 1 over files, 1 prime files...: !ls -l SIZE.TESTtotal 92-rw-rw-rw- 1 terric unisrc 26624 Jun 4 17:28 dat001-rw-rw-rw- 1 terric unisrc 20480 Jun 4 17:28 over001
Notice the following points:
■ Merging has reduced the modulo to 10.
■ The file size as measured by the UNIX ls command has not changed
from the previous example.
■ Some groups did not merge, and the groups that were added remain
allocated to the file.
Dynamic Hashed Files 12-23
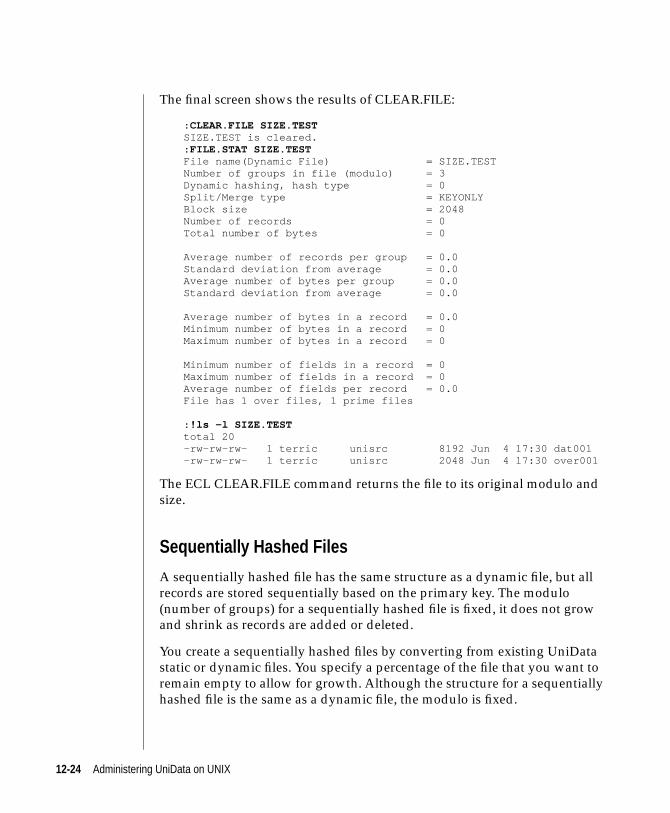
The final screen shows the results of CLEAR.FILE:
: CLEAR.FILE SIZE.TESTSIZE.TEST is cleared.: FILE.STAT SIZE.TESTFile name(Dynamic File) = SIZE.TESTNumber of groups in file (modulo) = 3Dynamic hashing, hash type = 0Split/Merge type = KEYONLYBlock size = 2048Number of records = 0Total number of bytes = 0
Average number of records per group = 0.0Standard deviation from average = 0.0Average number of bytes per group = 0.0Standard deviation from average = 0.0
Average number of bytes in a record = 0.0Minimum number of bytes in a record = 0Maximum number of bytes in a record = 0
Minimum number of fields in a record = 0Maximum number of fields in a record = 0Average number of fields per record = 0.0File has 1 over files, 1 prime files
: !ls -l SIZE.TESTtotal 20-rw-rw-rw- 1 terric unisrc 8192 Jun 4 17:30 dat001-rw-rw-rw- 1 terric unisrc 2048 Jun 4 17:30 over001
The ECL CLEAR.FILE command returns the file to its original modulo and
size.
Sequentially Hashed Files
A sequentially hashed file has the same structure as a dynamic file, but all
records are stored sequentially based on the primary key. The modulo
(number of groups) for a sequentially hashed file is fixed, it does not grow
and shrink as records are added or deleted.
You create a sequentially hashed files by converting from existing UniData
static or dynamic files. You specify a percentage of the file that you want to
remain empty to allow for growth. Although the structure for a sequentially
hashed file is the same as a dynamic file, the modulo is fixed.
12-24 Administering UniData on UNIX
A sequentially hashed file is used for files where the majority of access is
based on the primary key.
The dat001 File
The dat001 file is also called the primary data file. As you add records to a
sequentially hashed file, UniData hashes the keys, based on information in
the gmekey file, to groups in dat001. If your data overflows the group (level
1 overflow),UniData writes the overflow data to the over001 file.
The over001 File
As you add records to a sequentially hashed file, whenever the space
reserved for data in a group in the primary file gets too full, UniData writes
the excess data into blocks in over001. Registers within UniData track how
blocks in over001 are linked to groups in dat001. If over001 gets too large,
UniData adds additional blocks to it. If the current file system becomes full,
or over001 grows larger than a UniData limit, UniData creates an over002 file.
If the over002 file resides in a different file system than the over001 file,
UniData creates a link to over002 in the original sequentially hashed file.
If the sequentially hashed file has level 2 overflow, the file should be rebuilt
using the shfbuild command.
The gmekey File
Each sequentially hashed file contains a static, read-only file called the
gmekey file. This file is read into memory when you open a sequentially
hashed file. The gmekey file contains information about the type of keys in
the file (alpha or numeric), and controls which group a record is hashed to
when it is written.
You create a sequentially hashed file by converting an existing dynamic or
static file with the shfbuild command:
Syntax:
shfbuild [-a |-k] [-n | -t] [-f] [-e empty percent] [-m modulo] [-b blocksize multiplier] [-i infile] outfile
Dynamic Hashed Files 12-25
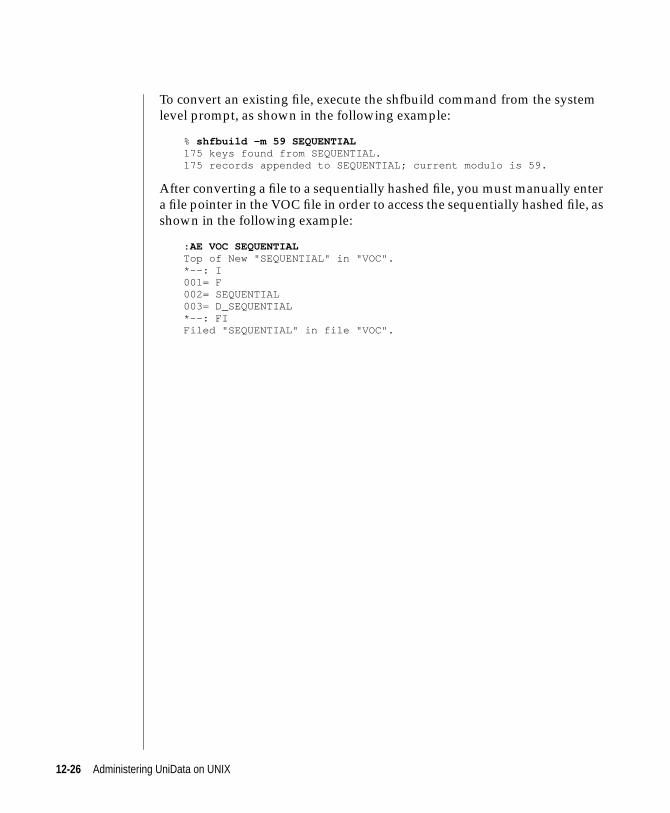
To convert an existing file, execute the shfbuild command from the system
level prompt, as shown in the following example:
% shfbuild -m 59 SEQUENTIAL175 keys found from SEQUENTIAL.175 records appended to SEQUENTIAL; current modulo is 59.
After converting a file to a sequentially hashed file, you must manually enter
a file pointer in the VOC file in order to access the sequentially hashed file, as
shown in the following example:
: AE VOC SEQUENTIALTop of New "SEQUENTIAL" in "VOC".*--: I001= F002= SEQUENTIAL003= D_SEQUENTIAL*--: FIFiled "SEQUENTIAL" in file "VOC".
12-26 Administering UniData on UNIX
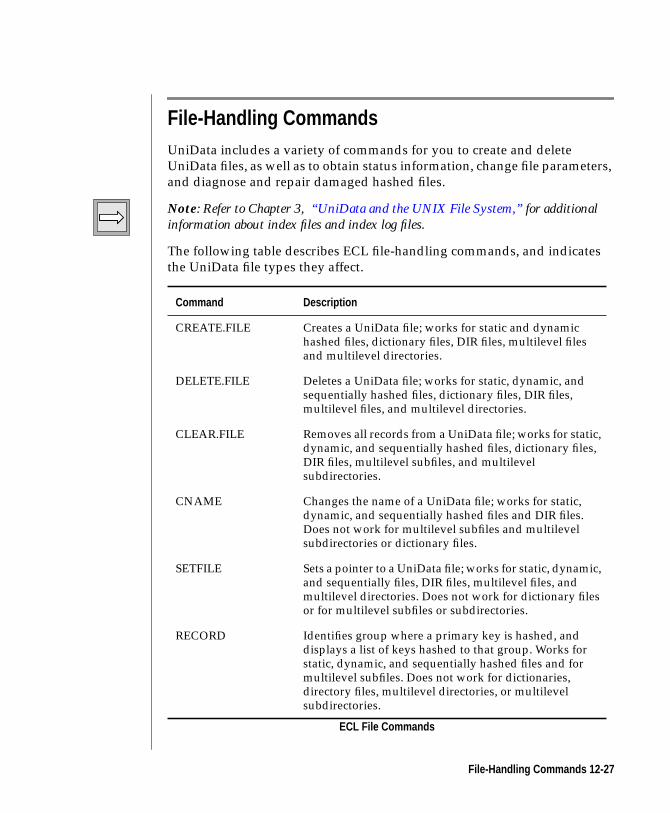
File-Handling CommandsUniData includes a variety of commands for you to create and delete
UniData files, as well as to obtain status information, change file parameters,
and diagnose and repair damaged hashed files.
Note: Refer to Chapter 3, “UniData and the UNIX File System,” for additionalinformation about index files and index log files.
The following table describes ECL file-handling commands, and indicates
the UniData file types they affect.
Command Description
CREATE.FILE Creates a UniData file; works for static and dynamichashed files, dictionary files, DIR files, multilevel filesand multilevel directories.
DELETE.FILE Deletes a UniData file; works for static, dynamic, andsequentially hashed files, dictionary files, DIR files,multilevel files, and multilevel directories.
CLEAR.FILE Removes all records from a UniData file; works for static,dynamic, and sequentially hashed files, dictionary files,DIR files, multilevel subfiles, and multilevelsubdirectories.
CNAME Changes the name of a UniData file; works for static,dynamic, and sequentially hashed files and DIR files.Does not work for multilevel subfiles and multilevelsubdirectories or dictionary files.
SETFILE Sets a pointer to a UniData file; works for static, dynamic,and sequentially files, DIR files, multilevel files, andmultilevel directories. Does not work for dictionary filesor for multilevel subfiles or subdirectories.
RECORD Identifies group where a primary key is hashed, anddisplays a list of keys hashed to that group. Works forstatic, dynamic, and sequentially hashed files and formultilevel subfiles. Does not work for dictionaries,directory files, multilevel directories, or multilevelsubdirectories.
ECL File Commands
File-Handling Commands 12-27
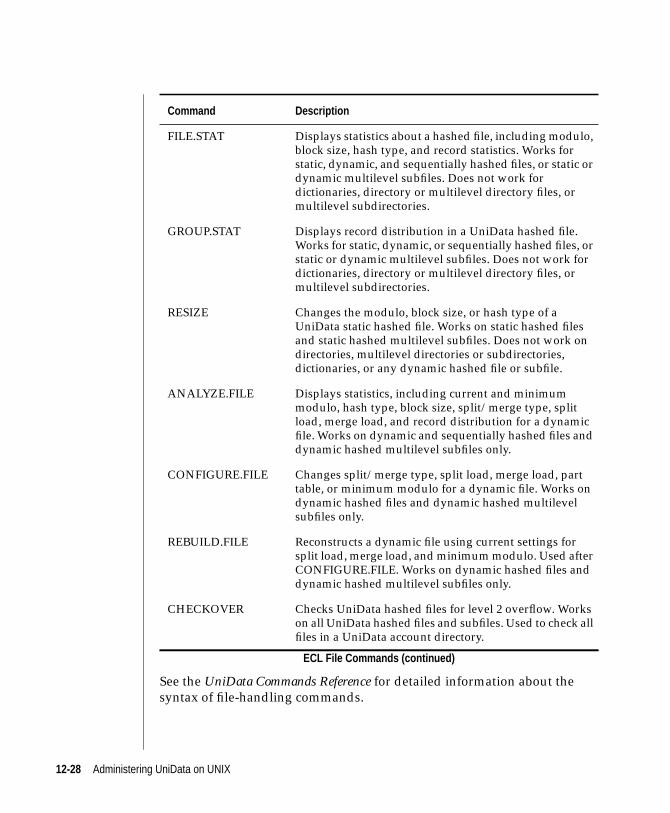
See the UniData Commands Reference for detailed information about the
syntax of file-handling commands.
FILE.STAT Displays statistics about a hashed file, including modulo,block size, hash type, and record statistics. Works forstatic, dynamic, and sequentially hashed files, or static ordynamic multilevel subfiles. Does not work fordictionaries, directory or multilevel directory files, ormultilevel subdirectories.
GROUP.STAT Displays record distribution in a UniData hashed file.Works for static, dynamic, or sequentially hashed files, orstatic or dynamic multilevel subfiles. Does not work fordictionaries, directory or multilevel directory files, ormultilevel subdirectories.
RESIZE Changes the modulo, block size, or hash type of aUniData static hashed file. Works on static hashed filesand static hashed multilevel subfiles. Does not work ondirectories, multilevel directories or subdirectories,dictionaries, or any dynamic hashed file or subfile.
ANALYZE.FILE Displays statistics, including current and minimummodulo, hash type, block size, split/merge type, splitload, merge load, and record distribution for a dynamicfile. Works on dynamic and sequentially hashed files anddynamic hashed multilevel subfiles only.
CONFIGURE.FILE Changes split/merge type, split load, merge load, parttable, or minimum modulo for a dynamic file. Works ondynamic hashed files and dynamic hashed multilevelsubfiles only.
REBUILD.FILE Reconstructs a dynamic file using current settings forsplit load, merge load, and minimum modulo. Used afterCONFIGURE.FILE. Works on dynamic hashed files anddynamic hashed multilevel subfiles only.
CHECKOVER Checks UniData hashed files for level 2 overflow. Workson all UniData hashed files and subfiles. Used to check allfiles in a UniData account directory.
Command Description
ECL File Commands (continued)
12-28 Administering UniData on UNIX
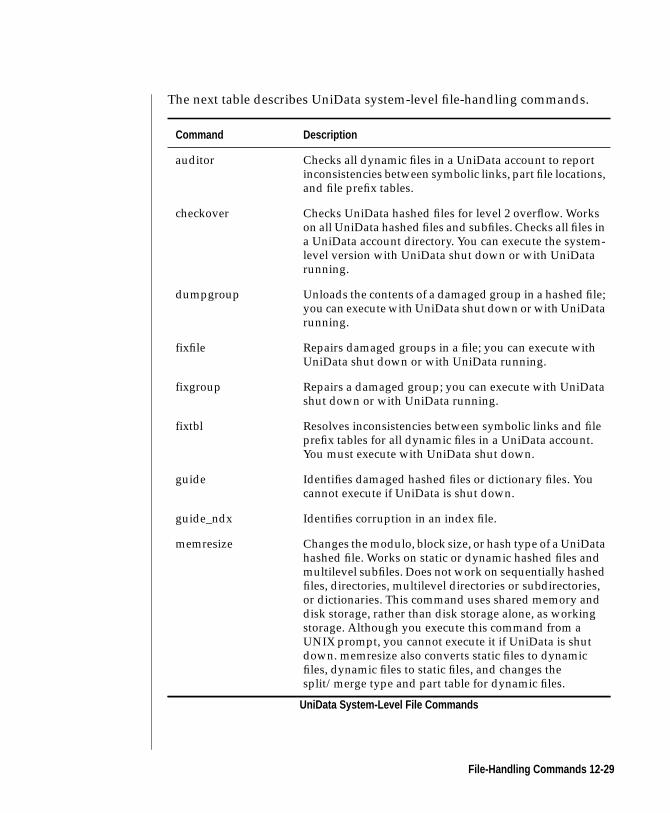
The next table describes UniData system-level file-handling commands.
Command Description
auditor Checks all dynamic files in a UniData account to reportinconsistencies between symbolic links, part file locations,and file prefix tables.
checkover Checks UniData hashed files for level 2 overflow. Workson all UniData hashed files and subfiles. Checks all files ina UniData account directory. You can execute the system-level version with UniData shut down or with UniDatarunning.
dumpgroup Unloads the contents of a damaged group in a hashed file;you can execute with UniData shut down or with UniDatarunning.
fixfile Repairs damaged groups in a file; you can execute withUniData shut down or with UniData running.
fixgroup Repairs a damaged group; you can execute with UniDatashut down or with UniData running.
fixtbl Resolves inconsistencies between symbolic links and fileprefix tables for all dynamic files in a UniData account.You must execute with UniData shut down.
guide Identifies damaged hashed files or dictionary files. Youcannot execute if UniData is shut down.
guide_ndx Identifies corruption in an index file.
memresize Changes the modulo, block size, or hash type of a UniDatahashed file. Works on static or dynamic hashed files andmultilevel subfiles. Does not work on sequentially hashedfiles, directories, multilevel directories or subdirectories,or dictionaries. This command uses shared memory anddisk storage, rather than disk storage alone, as workingstorage. Although you execute this command from aUNIX prompt, you cannot execute it if UniData is shutdown. memresize also converts static files to dynamicfiles, dynamic files to static files, and changes thesplit/merge type and part table for dynamic files.
UniData System-Level File Commands
File-Handling Commands 12-29
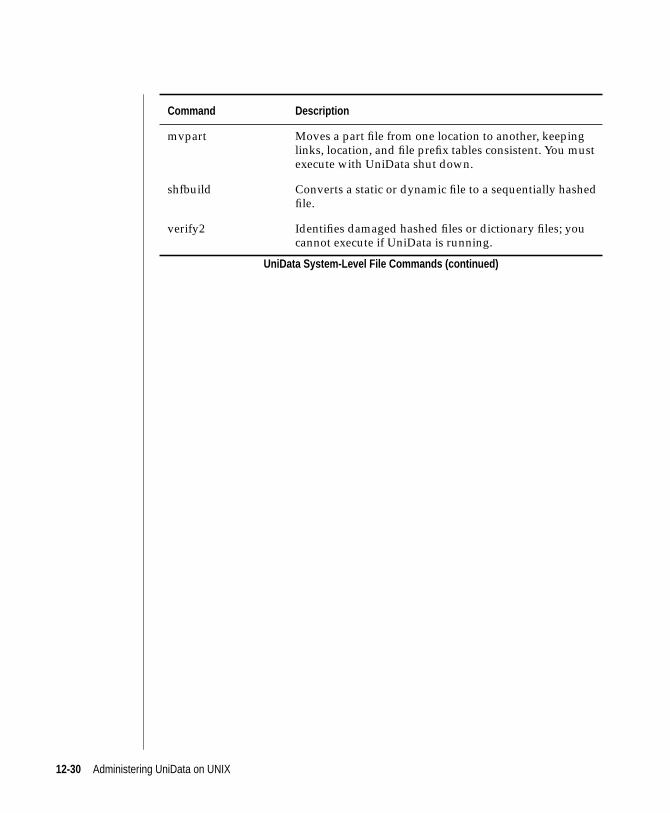
mvpart Moves a part file from one location to another, keepinglinks, location, and file prefix tables consistent. You mustexecute with UniData shut down.
shfbuild Converts a static or dynamic file to a sequentially hashedfile.
verify2 Identifies damaged hashed files or dictionary files; youcannot execute if UniData is running.
Command Description
UniData System-Level File Commands (continued)
12-30 Administering UniData on UNIX
File CorruptionFile corruption is damage to the structure of a file. UniData file management
tools diagnose and repair problems that occur if invalid, unreadable, or
inconsistent information is written to file or group headers. Such invalid
information can result in UniData being unable to access part or all of the
data in the file. UniData provides a series of utilities that allow you to detect
and repair damaged files.
Note: UniData file tools do not detect or repair invalid or inconsistent data in files.Detecting data inconsistencies should take place at the application level.
What Causes File Corruption?
File corruption can result from a variety of causes:
■ Hardware failures, including CPU crashes, media or memory failure,
controller failures, bad spots on a disk.
■ Interrupting a write in progress; for example, killing a UniData
process using a UNIX kill -9 command.
■ Incomplete writes; for example, a disk runs out of space before a
write is complete. This is a rare condition, since UniData prompts the
user to reclaim space when this occurs.
Note: Overflowed files are more likely to become corrupted, since multiple I/Ooperations can be required to accomplish a single read or write to an overflowed file.An interrupted write can result in a condition where a primary data block andcorresponding overflow blocks are out of synch. The increased chance of corruption isparticularly significant for files in level 2 overflow.
File Corruption 12-31
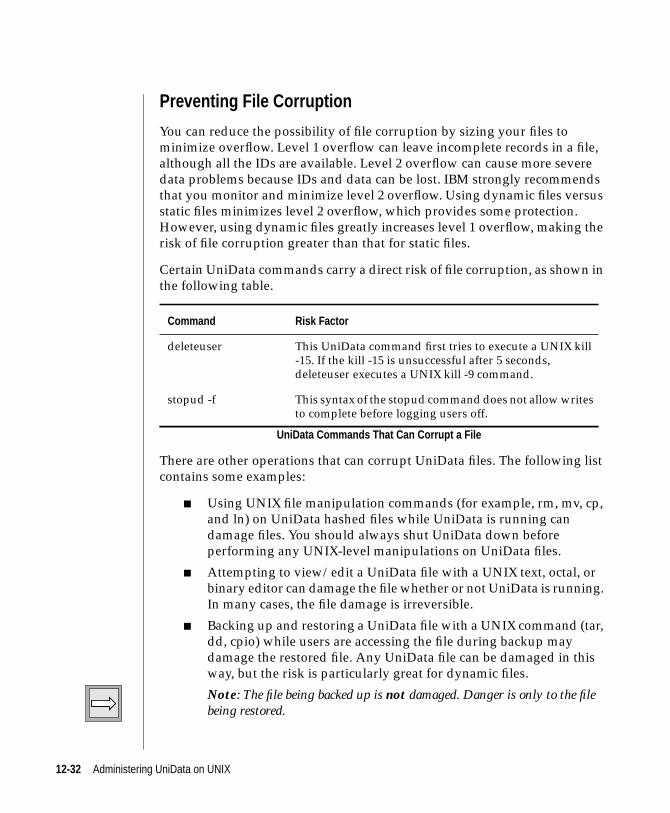
Preventing File Corruption
You can reduce the possibility of file corruption by sizing your files to
minimize overflow. Level 1 overflow can leave incomplete records in a file,
although all the IDs are available. Level 2 overflow can cause more severe
data problems because IDs and data can be lost. IBM strongly recommends
that you monitor and minimize level 2 overflow. Using dynamic files versus
static files minimizes level 2 overflow, which provides some protection.
However, using dynamic files greatly increases level 1 overflow, making the
risk of file corruption greater than that for static files.
Certain UniData commands carry a direct risk of file corruption, as shown in
the following table.
There are other operations that can corrupt UniData files. The following list
contains some examples:
■ Using UNIX file manipulation commands (for example, rm, mv, cp,
and ln) on UniData hashed files while UniData is running can
damage files. You should always shut UniData down before
performing any UNIX-level manipulations on UniData files.
■ Attempting to view/edit a UniData file with a UNIX text, octal, or
binary editor can damage the file whether or not UniData is running.
In many cases, the file damage is irreversible.
■ Backing up and restoring a UniData file with a UNIX command (tar,
dd, cpio) while users are accessing the file during backup may
damage the restored file. Any UniData file can be damaged in this
way, but the risk is particularly great for dynamic files.
Note: The file being backed up is not damaged. Danger is only to the filebeing restored.
Command Risk Factor
deleteuser This UniData command first tries to execute a UNIX kill-15. If the kill -15 is unsuccessful after 5 seconds,deleteuser executes a UNIX kill -9 command.
stopud -f This syntax of the stopud command does not allow writesto complete before logging users off.
UniData Commands That Can Corrupt a File
12-32 Administering UniData on UNIX
■ Using system-level maintenance tools (for example, online file
checking, which is supported under some UNIX versions) can
damage a file, although this is not a common cause of corruption.
File Corruption 12-33
UniData Detection ToolsUniData supplies the following tools for detecting damaged files:
■ guide — Use the guide command to detect file damage when
UniData is running.
■ verify2 — Use the verify2 command to detect file damage when
UniData is not running.
guide
Syntax:
guide [file1, file2,...][-options]
Note: You may supply guide with the name of a single UniData file or a series of filenames separated by commas or spaces. If you do not specify any files, guide processesall files in the current UniData account directory.
Description
guide is a system-level utility that provides detailed statistics and
suggestions for optimizing file size and ensuring data integrity.
12-34 Administering UniData on UNIX
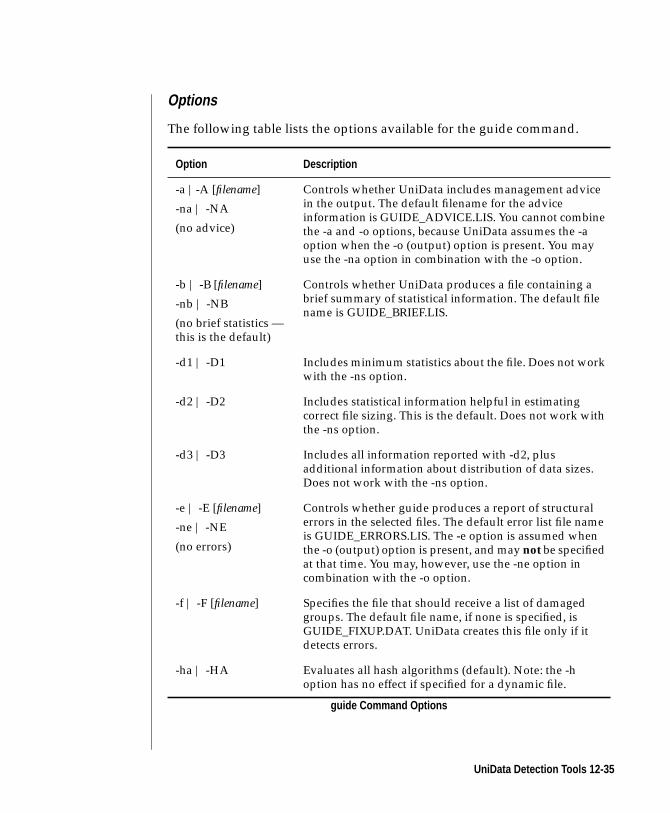
Options
The following table lists the options available for the guide command.
Option Description
-a |-A [filename]
-na | -NA
(no advice)
Controls whether UniData includes management advicein the output. The default filename for the adviceinformation is GUIDE_ADVICE.LIS. You cannot combinethe -a and -o options, because UniData assumes the -aoption when the -o (output) option is present. You mayuse the -na option in combination with the -o option.
-b | -B [filename]
-nb | -NB
(no brief statistics —this is the default)
Controls whether UniData produces a file containing abrief summary of statistical information. The default filename is GUIDE_BRIEF.LIS.
-d1 | -D1 Includes minimum statistics about the file. Does not workwith the -ns option.
-d2 | -D2 Includes statistical information helpful in estimatingcorrect file sizing. This is the default. Does not work withthe -ns option.
-d3 | -D3 Includes all information reported with -d2, plusadditional information about distribution of data sizes.Does not work with the -ns option.
-e | -E [filename]
-ne | -NE
(no errors)
Controls whether guide produces a report of structuralerrors in the selected files. The default error list file nameis GUIDE_ERRORS.LIS. The -e option is assumed whenthe -o (output) option is present, and may not be specifiedat that time. You may, however, use the -ne option incombination with the -o option.
-f | -F [filename] Specifies the file that should receive a list of damagedgroups. The default file name, if none is specified, isGUIDE_FIXUP.DAT. UniData creates this file only if itdetects errors.
-ha | -HA Evaluates all hash algorithms (default). Note: the -hoption has no effect if specified for a dynamic file.
guide Command Options
UniData Detection Tools 12-35
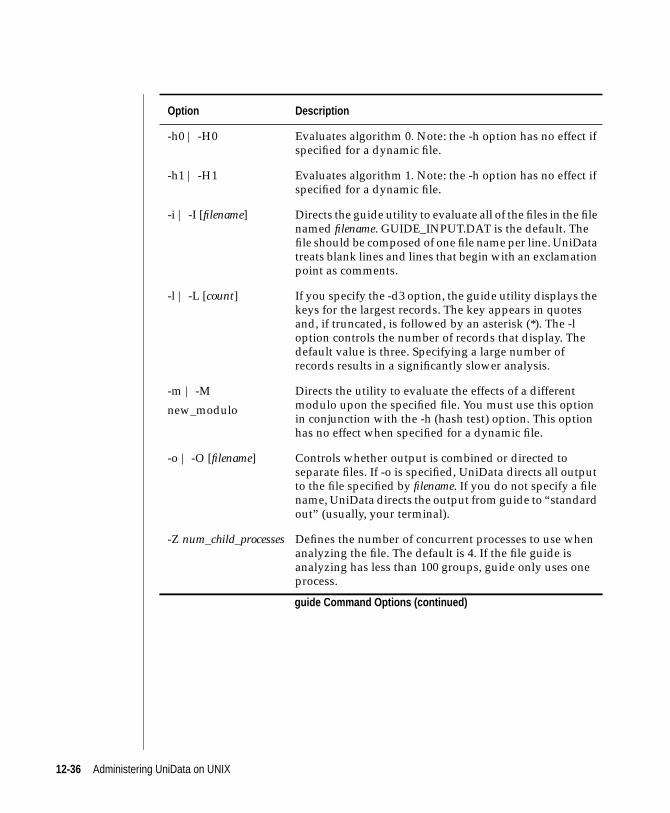
-h0 | -H0 Evaluates algorithm 0. Note: the -h option has no effect ifspecified for a dynamic file.
-h1 | -H1 Evaluates algorithm 1. Note: the -h option has no effect ifspecified for a dynamic file.
-i | -I [filename] Directs the guide utility to evaluate all of the files in the filenamed filename. GUIDE_INPUT.DAT is the default. Thefile should be composed of one file name per line. UniDatatreats blank lines and lines that begin with an exclamationpoint as comments.
-l | -L [count] If you specify the -d3 option, the guide utility displays thekeys for the largest records. The key appears in quotesand, if truncated, is followed by an asterisk (*). The -loption controls the number of records that display. Thedefault value is three. Specifying a large number ofrecords results in a significantly slower analysis.
-m | -M
new_modulo
Directs the utility to evaluate the effects of a differentmodulo upon the specified file. You must use this optionin conjunction with the -h (hash test) option. This optionhas no effect when specified for a dynamic file.
-o | -O [filename] Controls whether output is combined or directed toseparate files. If -o is specified, UniData directs all outputto the file specified by filename. If you do not specify a filename, UniData directs the output from guide to “standardout” (usually, your terminal).
-Z num_child_processes Defines the number of concurrent processes to use whenanalyzing the file. The default is 4. If the file guide isanalyzing has less than 100 groups, guide only uses oneprocess.
Option Description
guide Command Options (continued)
12-36 Administering UniData on UNIX
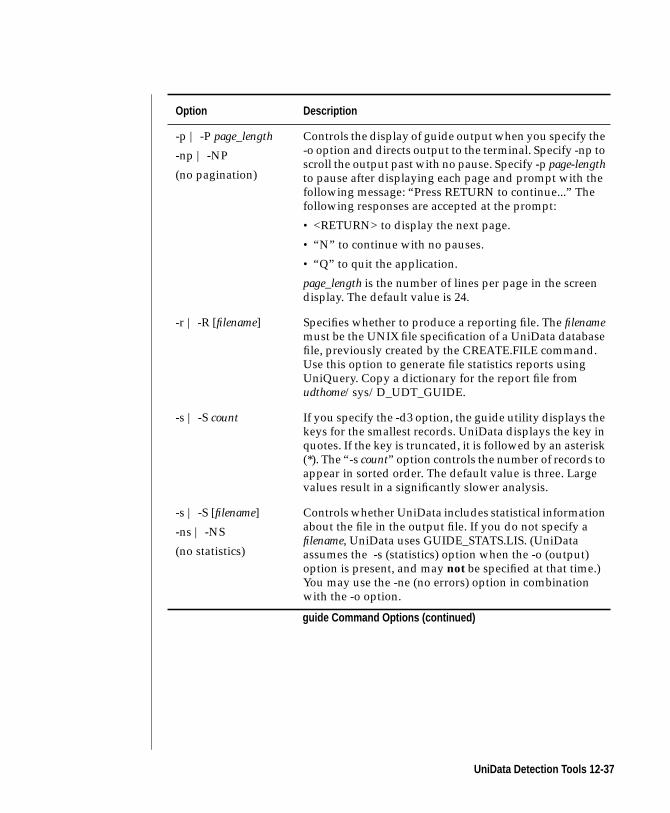
-p | -P page_length
-np | -NP
(no pagination)
Controls the display of guide output when you specify the-o option and directs output to the terminal. Specify -np toscroll the output past with no pause. Specify -p page-lengthto pause after displaying each page and prompt with thefollowing message: “Press RETURN to continue...” Thefollowing responses are accepted at the prompt:
• <RETURN> to display the next page.
• “N” to continue with no pauses.
• “Q” to quit the application.
page_length is the number of lines per page in the screendisplay. The default value is 24.
-r | -R [filename] Specifies whether to produce a reporting file. The filenamemust be the UNIX file specification of a UniData databasefile, previously created by the CREATE.FILE command.Use this option to generate file statistics reports usingUniQuery. Copy a dictionary for the report file fromudthome/sys/D_UDT_GUIDE.
-s | -S count If you specify the -d3 option, the guide utility displays thekeys for the smallest records. UniData displays the key inquotes. If the key is truncated, it is followed by an asterisk(*). The “-s count” option controls the number of records toappear in sorted order. The default value is three. Largevalues result in a significantly slower analysis.
-s | -S [filename]
-ns | -NS
(no statistics)
Controls whether UniData includes statistical informationabout the file in the output file. If you do not specify afilename, UniData uses GUIDE_STATS.LIS. (UniDataassumes the -s (statistics) option when the -o (output)option is present, and may not be specified at that time.)You may use the -ne (no errors) option in combinationwith the -o option.
Option Description
guide Command Options (continued)
UniData Detection Tools 12-37
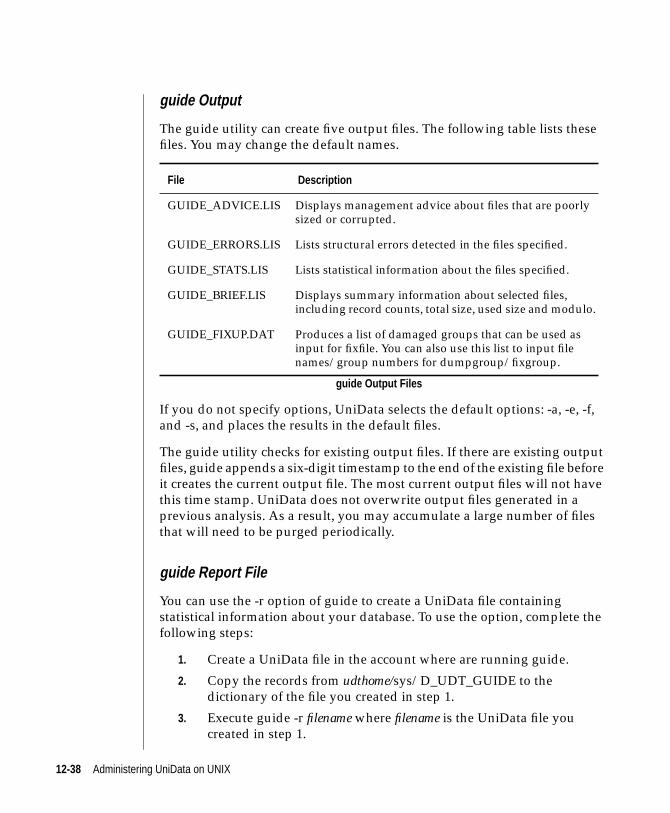
guide Output
The guide utility can create five output files. The following table lists these
files. You may change the default names.
If you do not specify options, UniData selects the default options: -a, -e, -f,
and -s, and places the results in the default files.
The guide utility checks for existing output files. If there are existing output
files, guide appends a six-digit timestamp to the end of the existing file before
it creates the current output file. The most current output files will not have
this time stamp. UniData does not overwrite output files generated in a
previous analysis. As a result, you may accumulate a large number of files
that will need to be purged periodically.
guide Report File
You can use the -r option of guide to create a UniData file containing
statistical information about your database. To use the option, complete the
following steps:
1. Create a UniData file in the account where are running guide.
2. Copy the records from udthome/sys/D_UDT_GUIDE to the
dictionary of the file you created in step 1.
3. Execute guide -r filename where filename is the UniData file you
created in step 1.
File Description
GUIDE_ADVICE.LIS Displays management advice about files that are poorlysized or corrupted.
GUIDE_ERRORS.LIS Lists structural errors detected in the files specified.
GUIDE_STATS.LIS Lists statistical information about the files specified.
GUIDE_BRIEF.LIS Displays summary information about selected files,including record counts, total size, used size and modulo.
GUIDE_FIXUP.DAT Produces a list of damaged groups that can be used asinput for fixfile. You can also use this list to input filenames/group numbers for dumpgroup/fixgroup.
guide Output Files
12-38 Administering UniData on UNIX
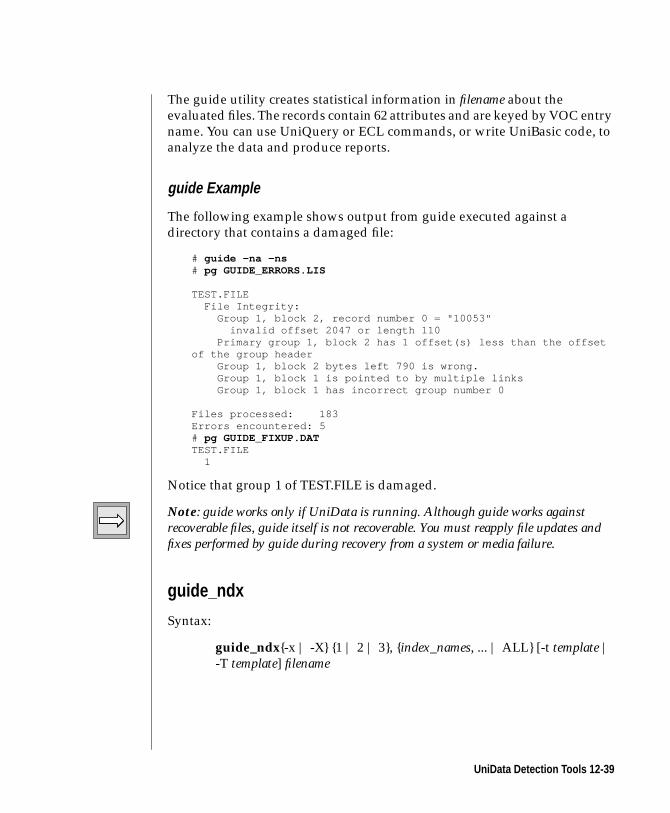
The guide utility creates statistical information in filename about the
evaluated files. The records contain 62 attributes and are keyed by VOC entry
name. You can use UniQuery or ECL commands, or write UniBasic code, to
analyze the data and produce reports.
guide Example
The following example shows output from guide executed against a
directory that contains a damaged file:
# guide -na -ns# pg GUIDE_ERRORS.LIS
TEST.FILE File Integrity: Group 1, block 2, record number 0 = "10053" invalid offset 2047 or length 110 Primary group 1, block 2 has 1 offset(s) less than the offsetof the group header Group 1, block 2 bytes left 790 is wrong. Group 1, block 1 is pointed to by multiple links Group 1, block 1 has incorrect group number 0
Files processed: 183Errors encountered: 5# pg GUIDE_FIXUP.DATTEST.FILE 1
Notice that group 1 of TEST.FILE is damaged.
Note: guide works only if UniData is running. Although guide works againstrecoverable files, guide itself is not recoverable. You must reapply file updates andfixes performed by guide during recovery from a system or media failure.
guide_ndx
Syntax:
guide_ndx{-x | -X} {1 | 2 | 3}, {index_names, ... | ALL} [-t template |
-T template] filename
UniData Detection Tools 12-39
Description
As with other UniData file types, an index file could become corrupt due to
hardware failures, the interruption of a write to the index file, or an
incomplete write. The guide_ndx utility checks for physical and logical
corruption of an index file.
If an index file is corrupt, UniData displays a run time error when a UniData
process tries to access the index. If the index file is associated with a
recoverable file, a message is written to the sm.log.
The guide_ndx command creates two files, the GUIDE_XERROR.LIS and the
GUIDE_STATS.LIS. GUIDE_ERROR.LIS lists any corruption found in the
index file, and GUIDE_STATS.LIS list statistics about the index. If you have a
corrupt index, you must rebuild it using the CREATE.INDEX and
BUILD.INDEX commands. For more information and creating and building
indexes, see Using UniData.
Note: IBM recommends deleting the index with the DELETE.INDEX ALLcommand. Using the ALL option deletes all alternate key indexes and the index fileitself.
verify2
Syntax:
verify2 [-Y | -y] [-H | -h block address] [-O | -o block address]
Description
The verify2 command, like guide, detects file corruption. Although verify2
does not produce as much information as guide, and does not produce the
damaged group list for repair, verify2 runs much more quickly, runs with
UniData down, and can be used for a rapid scan of files.
12-40 Administering UniData on UNIX

Parameters
The following table describes the parameters for verify2.
Parameter Description
[-Y | -y] Writes the file name and @ID of damaged records to a filecalled /tmp/vrfy2.pid, where pid is the UNIX process IDof the process that executed verify2.
[-H | -h block address] Bypasses checking the block whose hexadecimal addressis block address. This option enables you to bypass a singledamaged block, if you know its address, and examine therest of the file.
[-O | -o block address] Same as -h option, but -o allows you to bypass a block inthe overflow portion of a dynamic file.
verify2 Parameters
UniData Detection Tools 12-41
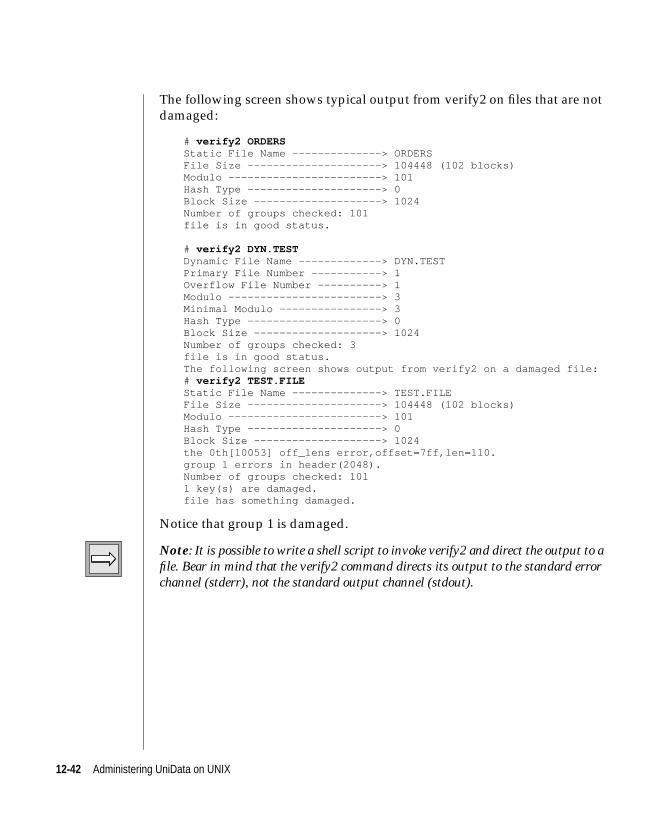
The following screen shows typical output from verify2 on files that are not
damaged:
# verify2 ORDERSStatic File Name --------------> ORDERSFile Size ---------------------> 104448 (102 blocks)Modulo ------------------------> 101Hash Type ---------------------> 0Block Size --------------------> 1024Number of groups checked: 101file is in good status.
# verify2 DYN.TESTDynamic File Name -------------> DYN.TESTPrimary File Number -----------> 1Overflow File Number ----------> 1Modulo ------------------------> 3Minimal Modulo ----------------> 3Hash Type ---------------------> 0Block Size --------------------> 1024Number of groups checked: 3file is in good status.The following screen shows output from verify2 on a damaged file:# verify2 TEST.FILEStatic File Name --------------> TEST.FILEFile Size ---------------------> 104448 (102 blocks)Modulo ------------------------> 101Hash Type ---------------------> 0Block Size --------------------> 1024the 0th[10053] off_lens error,offset=7ff,len=110.group 1 errors in header(2048).Number of groups checked: 1011 key(s) are damaged.file has something damaged.
Notice that group 1 is damaged.
Note: It is possible to write a shell script to invoke verify2 and direct the output to afile. Bear in mind that the verify2 command directs its output to the standard errorchannel (stderr), not the standard output channel (stdout).
12-42 Administering UniData on UNIX
UniData Recovery ToolsUniData includes the following commands to recover corrupted hashed files:
■ dumpgroup — Use this command to unload complete and valid
records from a damaged group, separating valid records from
damaged records.
■ fixgroup — Use this command to clear records from a damaged
group, and to reload and rebuild the group with the valid records
unloaded by dumpgroup.
■ fixfile — Use fixfile in conjunction with guide. guide provides a
FIXUP.DAT file that lists corrupt files and groups. fixfile uses
FIXUP.DAT to unload, clear, and rebuild the damaged groups.
Note: Although dumpgroup, fixgroup, and fixfile work against UniData recoverablefiles, their actions are not recoverable. If you are recovering from a system crash ormedia failure, any file repairs that took place since your last backup are not includedin logs or archives. You should check your files after recovery (using guide or verify2)and perform any needed repairs before users access them.
dumpgroup
Syntax:
dumpgroup filename group.no [-doutputfile] [-p]
Description
The system-level dumpgroup command unloads readable records from a
group you specify in a UniData file. If the file was corrupted, dumpgroup
unloads complete, valid records, leaving behind any information it cannot
read.
UniData Recovery Tools 12-43
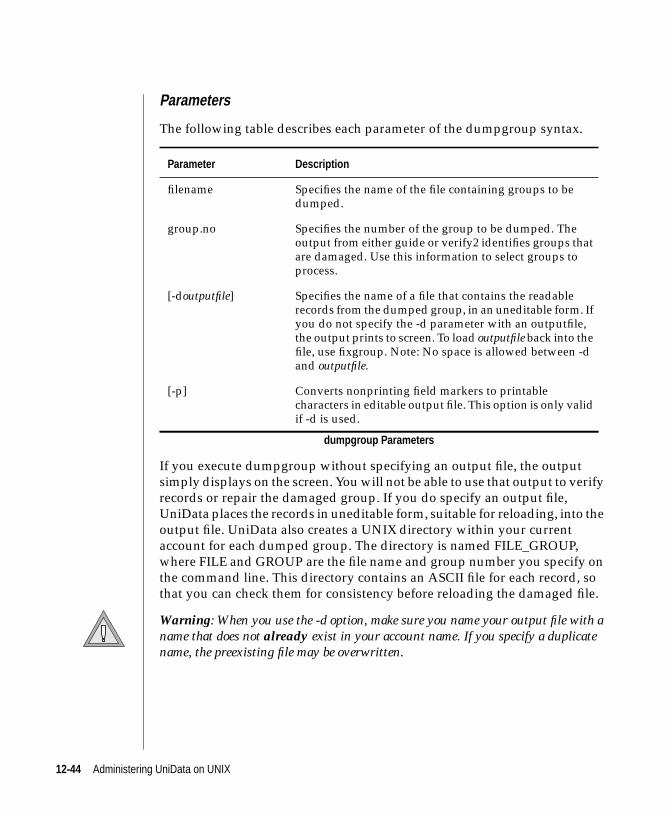
Parameters
The following table describes each parameter of the dumpgroup syntax.
If you execute dumpgroup without specifying an output file, the output
simply displays on the screen. You will not be able to use that output to verify
records or repair the damaged group. If you do specify an output file,
UniData places the records in uneditable form, suitable for reloading, into the
output file. UniData also creates a UNIX directory within your current
account for each dumped group. The directory is named FILE_GROUP,
where FILE and GROUP are the file name and group number you specify on
the command line. This directory contains an ASCII file for each record, so
that you can check them for consistency before reloading the damaged file.
Warning: When you use the -d option, make sure you name your output file with aname that does not already exist in your account name. If you specify a duplicatename, the preexisting file may be overwritten.
Parameter Description
filename Specifies the name of the file containing groups to bedumped.
group.no Specifies the number of the group to be dumped. Theoutput from either guide or verify2 identifies groups thatare damaged. Use this information to select groups toprocess.
[-doutputfile] Specifies the name of a file that contains the readablerecords from the dumped group, in an uneditable form. Ifyou do not specify the -d parameter with an outputfile,the output prints to screen. To load outputfile back into thefile, use fixgroup. Note: No space is allowed between -dand outputfile.
[-p] Converts nonprinting field markers to printablecharacters in editable output file. This option is only validif -d is used.
dumpgroup Parameters
12-44 Administering UniData on UNIX
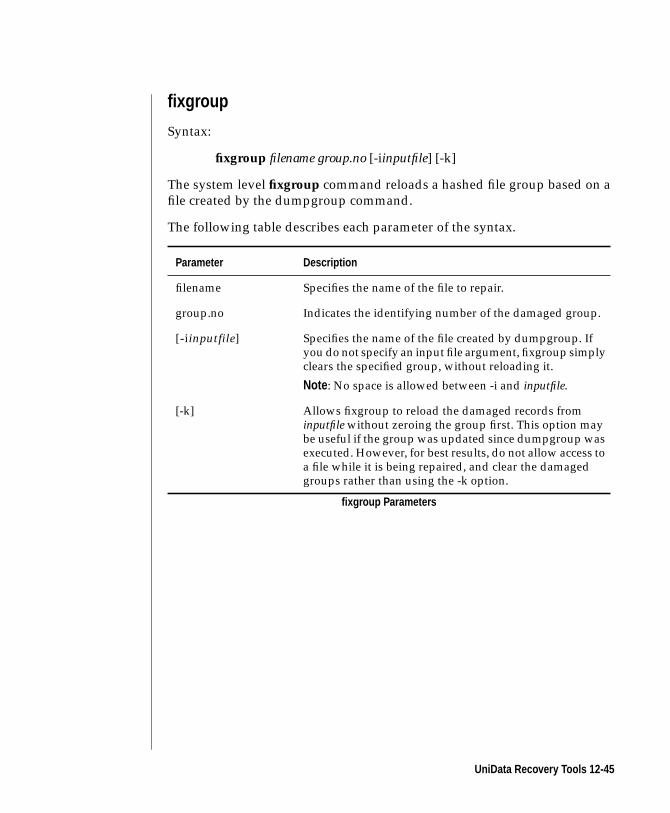
fixgroup
Syntax:
fixgroup filename group.no [-iinputfile] [-k]
The system level fixgroup command reloads a hashed file group based on a
file created by the dumpgroup command.
The following table describes each parameter of the syntax.
Parameter Description
filename Specifies the name of the file to repair.
group.no Indicates the identifying number of the damaged group.
[-iinputfile] Specifies the name of the file created by dumpgroup. Ifyou do not specify an input file argument, fixgroup simplyclears the specified group, without reloading it.
Note : No space is allowed between -i and inputfile.
[-k] Allows fixgroup to reload the damaged records frominputfile without zeroing the group first. This option maybe useful if the group was updated since dumpgroup wasexecuted. However, for best results, do not allow access toa file while it is being repaired, and clear the damagedgroups rather than using the -k option.
fixgroup Parameters
UniData Recovery Tools 12-45
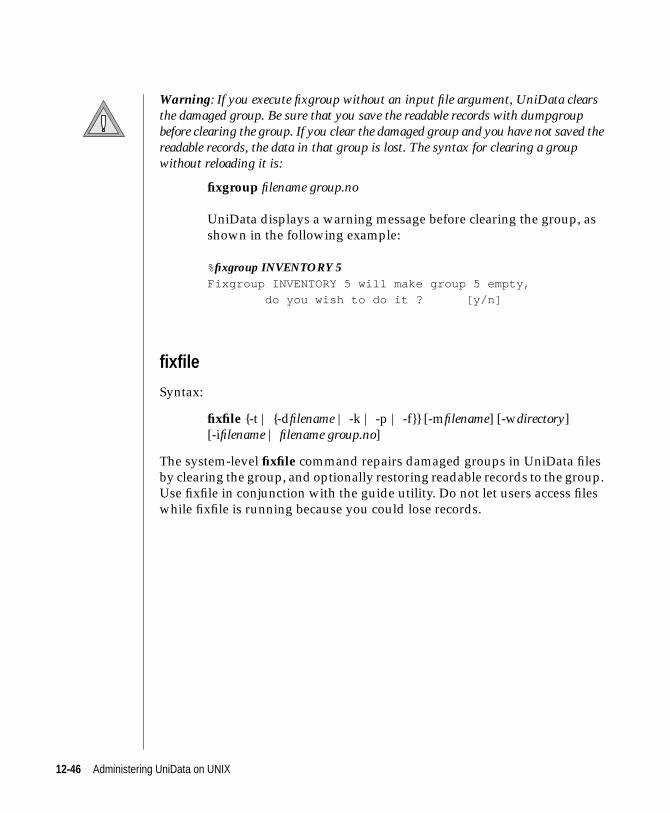
Warning: If you execute fixgroup without an input file argument, UniData clearsthe damaged group. Be sure that you save the readable records with dumpgroupbefore clearing the group. If you clear the damaged group and you have not saved thereadable records, the data in that group is lost. The syntax for clearing a groupwithout reloading it is:
fixgroup filename group.no
UniData displays a warning message before clearing the group, as
shown in the following example:
%fixgroup INVENTORY 5Fixgroup INVENTORY 5 will make group 5 empty,
do you wish to do it ? [y/n]
fixfile
Syntax:
fixfile {-t | {-dfilename | -k | -p | -f}} [-mfilename] [-wdirectory]
[-ifilename | filename group.no]
The system-level fixfile command repairs damaged groups in UniData files
by clearing the group, and optionally restoring readable records to the group.
Use fixfile in conjunction with the guide utility. Do not let users access files
while fixfile is running because you could lose records.
12-46 Administering UniData on UNIX
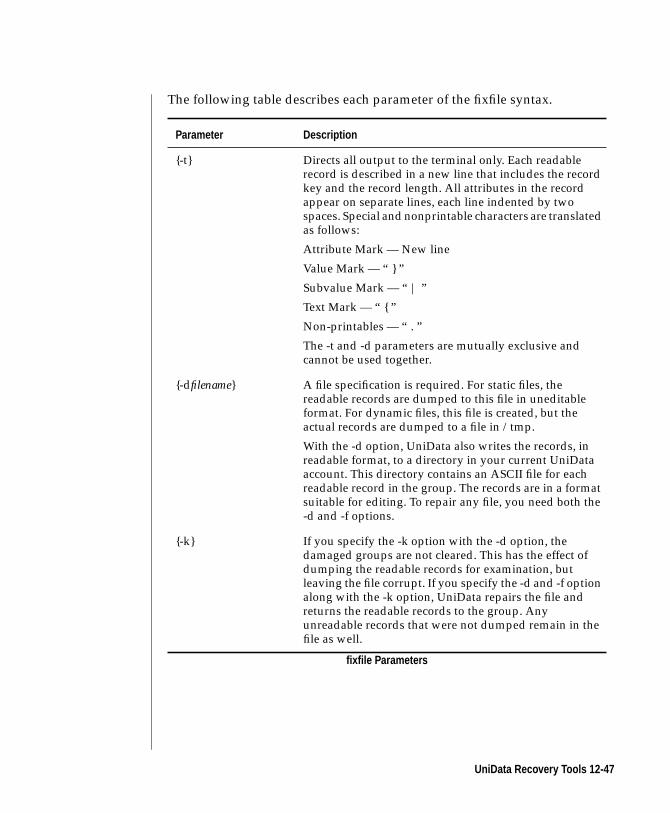
The following table describes each parameter of the fixfile syntax.
Parameter Description
{-t} Directs all output to the terminal only. Each readablerecord is described in a new line that includes the recordkey and the record length. All attributes in the recordappear on separate lines, each line indented by twospaces. Special and nonprintable characters are translatedas follows:
Attribute Mark — New line
Value Mark — “ } ”
Subvalue Mark — “ | ”
Text Mark — “ { ”
Non-printables — “ . ”
The -t and -d parameters are mutually exclusive andcannot be used together.
{-dfilename} A file specification is required. For static files, thereadable records are dumped to this file in uneditableformat. For dynamic files, this file is created, but theactual records are dumped to a file in /tmp.
With the -d option, UniData also writes the records, inreadable format, to a directory in your current UniDataaccount. This directory contains an ASCII file for eachreadable record in the group. The records are in a formatsuitable for editing. To repair any file, you need both the-d and -f options.
{-k} If you specify the -k option with the -d option, thedamaged groups are not cleared. This has the effect ofdumping the readable records for examination, butleaving the file corrupt. If you specify the -d and -f optionalong with the -k option, UniData repairs the file andreturns the readable records to the group. Anyunreadable records that were not dumped remain in thefile as well.
fixfile Parameters
UniData Recovery Tools 12-47
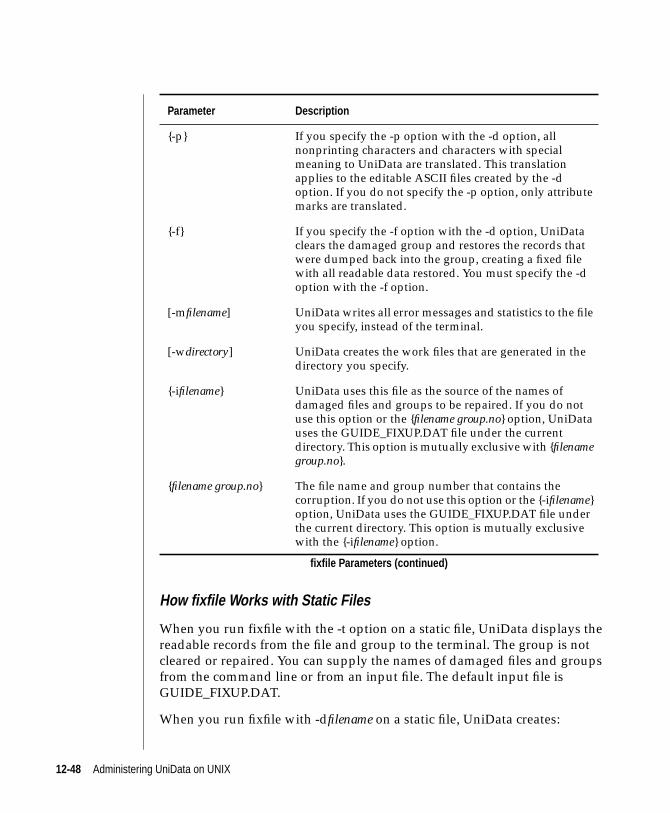
How fixfile Works with Static Files
When you run fixfile with the -t option on a static file, UniData displays the
readable records from the file and group to the terminal. The group is not
cleared or repaired. You can supply the names of damaged files and groups
from the command line or from an input file. The default input file is
GUIDE_FIXUP.DAT.
When you run fixfile with -dfilename on a static file, UniData creates:
{-p} If you specify the -p option with the -d option, allnonprinting characters and characters with specialmeaning to UniData are translated. This translationapplies to the editable ASCII files created by the -doption. If you do not specify the -p option, only attributemarks are translated.
{-f} If you specify the -f option with the -d option, UniDataclears the damaged group and restores the records thatwere dumped back into the group, creating a fixed filewith all readable data restored. You must specify the -doption with the -f option.
[-mfilename] UniData writes all error messages and statistics to the fileyou specify, instead of the terminal.
[-wdirectory] UniData creates the work files that are generated in thedirectory you specify.
{-ifilename} UniData uses this file as the source of the names ofdamaged files and groups to be repaired. If you do notuse this option or the {filename group.no} option, UniDatauses the GUIDE_FIXUP.DAT file under the currentdirectory. This option is mutually exclusive with {filenamegroup.no}.
{filename group.no} The file name and group number that contains thecorruption. If you do not use this option or the {-ifilename}option, UniData uses the GUIDE_FIXUP.DAT file underthe current directory. This option is mutually exclusivewith the {-ifilename} option.
Parameter Description
fixfile Parameters (continued)
12-48 Administering UniData on UNIX
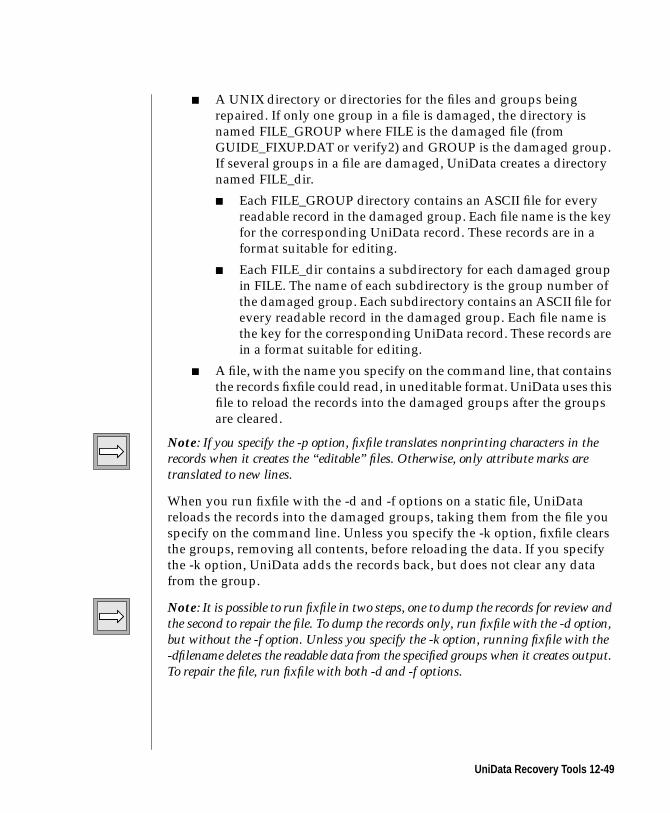
■ A UNIX directory or directories for the files and groups being
repaired. If only one group in a file is damaged, the directory is
named FILE_GROUP where FILE is the damaged file (from
GUIDE_FIXUP.DAT or verify2) and GROUP is the damaged group.
If several groups in a file are damaged, UniData creates a directory
named FILE_dir.
■ Each FILE_GROUP directory contains an ASCII file for every
readable record in the damaged group. Each file name is the key
for the corresponding UniData record. These records are in a
format suitable for editing.
■ Each FILE_dir contains a subdirectory for each damaged group
in FILE. The name of each subdirectory is the group number of
the damaged group. Each subdirectory contains an ASCII file for
every readable record in the damaged group. Each file name is
the key for the corresponding UniData record. These records are
in a format suitable for editing.
■ A file, with the name you specify on the command line, that contains
the records fixfile could read, in uneditable format. UniData uses this
file to reload the records into the damaged groups after the groups
are cleared.
Note: If you specify the -p option, fixfile translates nonprinting characters in therecords when it creates the “editable” files. Otherwise, only attribute marks aretranslated to new lines.
When you run fixfile with the -d and -f options on a static file, UniData
reloads the records into the damaged groups, taking them from the file you
specify on the command line. Unless you specify the -k option, fixfile clears
the groups, removing all contents, before reloading the data. If you specify
the -k option, UniData adds the records back, but does not clear any data
from the group.
Note: It is possible to run fixfile in two steps, one to dump the records for review andthe second to repair the file. To dump the records only, run fixfile with the -d option,but without the -f option. Unless you specify the -k option, running fixfile with the-dfilename deletes the readable data from the specified groups when it creates output.To repair the file, run fixfile with both -d and -f options.
UniData Recovery Tools 12-49
How fixfile Works with Dynamic Files
When you execute fixfile with the -d option on a dynamic file, UniData
creates the following:
■ A UNIX directory for each file-group combination being repaired.
The directories are named FILE_GROUP, where FILE is a damaged
file (from GUIDE_FIXUP.DAT or verify2) and GROUP is a damaged
group. If several groups in a file are damaged, UniData creates a
directory for each damaged group.
■ Each FILE_GROUP directory contains an ASCII file for every
readable record in the damaged group. Each record name is the key
for the corresponding UniData record. These records are in a format
suitable for editing.
■ A file containing the records fixfile could read, in uneditable format
suitable for reloading into the group after it has been cleared. This
file is located in /tmp (or in the directory identified by the TMP
environment variable) and is named ud_dp_pid, where pid is the
UNIX process id of the process that executed fixfile.
Note: If you specify the -p option, fixfile translates nonprinting characters in therecords when it creates the editable files. Otherwise, UniData only translatesattribute marks to new lines.
When you run fixfile with the -d and -f options on a dynamic file, UniData
reads the file you specify with the -d option on the command line, and also
reads the uneditable file of dumped records. UniData then reloads the
records from that file into the damaged groups. Unless you specify the -k
option, fixfile clears the groups, removing all contents, before reloading the
data. Otherwise, UniData adds the records back, but does not clear any data
from the group.
Note: You can run fixfile in two steps, one to dump the records for review and thesecond to repair the file. To dump the records for review, run fixfile with the -d option,but without the -f option. (You do not need to use -k for dynamic files. For dynamicfiles, running fixfile with -dfilename and not -f does not delete the readable data fromthe groups you specify when it creates output.) To repair the file, run fixfile with boththe -d and -f options. If you specify the same filename with -d in both the review andrepair steps, UniData will prompt whether or not to clear the damaged groups.
12-50 Administering UniData on UNIX
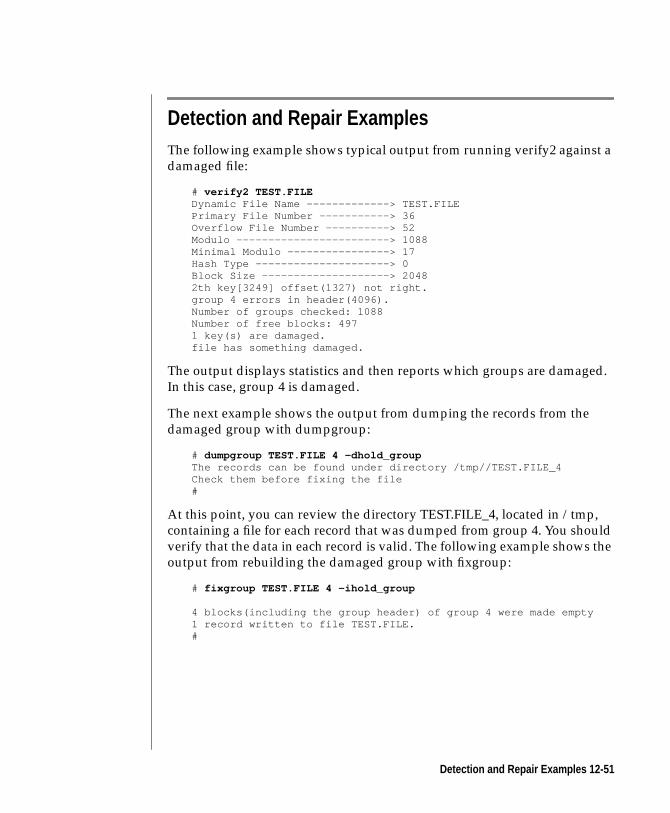
Detection and Repair ExamplesThe following example shows typical output from running verify2 against a
damaged file:
# verify2 TEST.FILEDynamic File Name -------------> TEST.FILEPrimary File Number -----------> 36Overflow File Number ----------> 52Modulo ------------------------> 1088Minimal Modulo ----------------> 17Hash Type ---------------------> 0Block Size --------------------> 20482th key[3249] offset(1327) not right.group 4 errors in header(4096).Number of groups checked: 1088Number of free blocks: 4971 key(s) are damaged.file has something damaged.
The output displays statistics and then reports which groups are damaged.
In this case, group 4 is damaged.
The next example shows the output from dumping the records from the
damaged group with dumpgroup:
# dumpgroup TEST.FILE 4 -dhold_groupThe records can be found under directory /tmp//TEST.FILE_4Check them before fixing the file#
At this point, you can review the directory TEST.FILE_4, located in /tmp,
containing a file for each record that was dumped from group 4. You should
verify that the data in each record is valid. The following example shows the
output from rebuilding the damaged group with fixgroup:
# fixgroup TEST.FILE 4 -ihold_group
4 blocks(including the group header) of group 4 were made empty1 record written to file TEST.FILE.#
Detection and Repair Examples 12-51
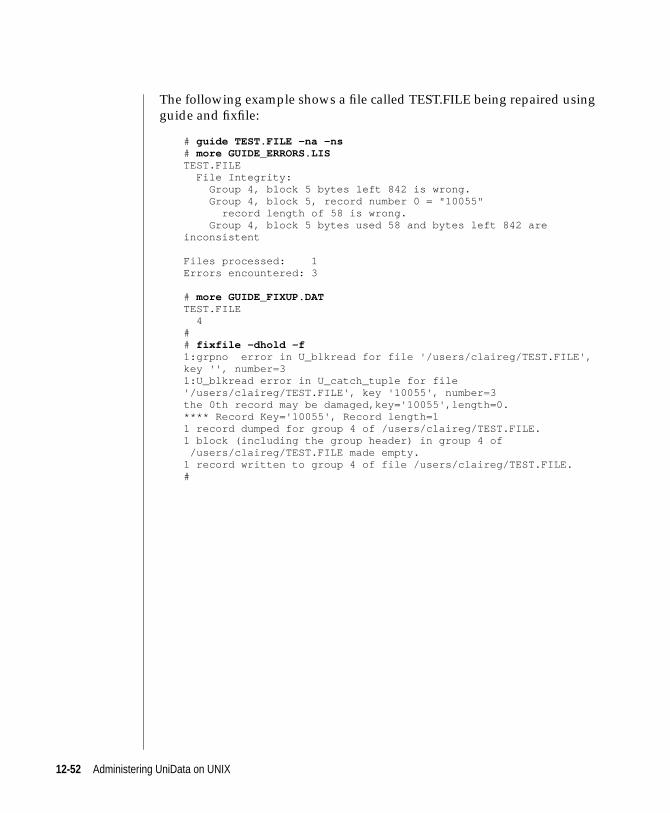
The following example shows a file called TEST.FILE being repaired using
guide and fixfile:
# guide TEST.FILE -na -ns# more GUIDE_ERRORS.LISTEST.FILE File Integrity: Group 4, block 5 bytes left 842 is wrong. Group 4, block 5, record number 0 = "10055" record length of 58 is wrong. Group 4, block 5 bytes used 58 and bytes left 842 areinconsistent
Files processed: 1Errors encountered: 3
# more GUIDE_FIXUP.DATTEST.FILE 4## fixfile -dhold -f1:grpno error in U_blkread for file '/users/claireg/TEST.FILE',key '', number=31:U_blkread error in U_catch_tuple for file'/users/claireg/TEST.FILE', key '10055', number=3the 0th record may be damaged,key='10055',length=0.**** Record Key='10055', Record length=11 record dumped for group 4 of /users/claireg/TEST.FILE.1 block (including the group header) in group 4 of /users/claireg/TEST.FILE made empty.1 record written to group 4 of file /users/claireg/TEST.FILE.#
12-52 Administering UniData on UNIX
How to Use guideComplete the following steps to effectively using the guide utility
1. Monitor File Integrity with guide
You should execute guide against your database at regular intervals, as well
as when you have had a system crash. You can set up shell scripts to run
guide at specified intervals on specified lists of files, or you can simply
execute the guide command in each UniData account.You can execute guide
against nonrecoverable static hashed files at any time, and schedule guide to
run on dynamic files and recoverable files at a time when the system is idle
or only lightly loaded.
2. Check Error Output (GUIDE_ERRORS.LIS)
Use the following information to determine what action to take depending
on the error output.
No Errors
If there are no errors, proceed to step 5.
Partially Allocated Block Messages
Partially allocated block messages are not false error reports; they indicate an
out-of-synch condition in a dynamic file, but they do not mean that the file
must be fixed immediately. Users can continue to access the file; this will not
cause damage. Complete the repair at a convenient time using the procedure
in step 3.
Partially allocated block messages look like:
free block xx partially allocated, xxx bytes remainingBlock xx of primary file not a member of any group
How to Use guide 12-53
Other guide Error Messages
guide produces many messages besides the one discussed above. If you see
error messages pertaining only to static files, or if you see other error
messages pertaining to dynamic files, proceed to step 3.
3. Repair Damaged Files
Complete the following steps:
1. Back up the damaged file(s)—If time and space permit, IBM
strongly recommends you back up (or simply make a copy of) the
damaged files before proceeding. In the event of a system failure
during the repair process, you will be able to restore from the backup
copies and repeat the procedures, rather than attempting to recover
a partially-completed repair. DO NOT ALLOW USERS TO ACCESS
YOUR FILES WHILE YOU ARE BACKING THEM UP!
2. Repair the damaged groups—Once you run guide, you can execute
either fixfile or dumpgroup/fixgroup to repair the damaged groups.
In either case, the process overview is: dump the readable records
from a damaged group, clear the group, and then reload all readable
records back into the group.
Tip: IBM recommends you not use the -k option with fixfile or withfixgroup. The -k option lets you reload the readable records withoutclearing the group. However, you may encounter additional errors if you donot clear the group. Use fixfile or fixgroup without -k; this procedureautomatically clears the group before reloading the readable records.
Warning: Be sure no users are accessing your files before repairing damagedgroups. The dumpgroup command does not obtain exclusive access, andfixfile/fixgroup only lock the file when the records are being written back toa group. Concurrent access to the file could make corruption worse.
3. Verify the repair—Rerun guide after the repair is complete to verify
that the errors are fixed. If they are not, or if additional groups are
damaged, repeat the previous step.
4. Back Up the Repaired Files
Back up any files you have just completed repairing.
12-54 Administering UniData on UNIX
5. Continue Processing
If you shut UniData down to repair files, start it again before allowing users
to log in.
How to Use guide 12-55
Error MessagesThis section lists error messages you may see, and provides information
about the meaning of them. UniData generates some of the messages from
the guide command, and others from the verify2 command.
File Access Messages
File access messages are similar to the following example:
can not obtain an exclusive lock on recoverable file 'filename'error opening 'filename' part filesUnable to lock dynamic file 'filename'
All of these messages indicate that guide or verify2 did not process the file
because it was unable to obtain an exclusive lock on the file.
Note: These messages display only at the terminal. They are not logged in any file.
Block Usage Messages
Block usage messages are similar to the following example:
Group xx, block xx is pointed at by multiple linksThe xxth block, grpoff=xx is pointed at by multiple linksIn file, 'filename', the xxth group, grpoff=xx, have hit by otherlinks.
These indicate that a block is found to be referenced by more than one link,
which should not occur. These messages indicate damage.
The xxth block of file (filename) has no link.the xxth block has no link
A block has been found that is not in the global free chain and is not used by
any group. This error can be reported when guide or verify2 encounters a
corrupt block, and is therefore unable to check blocks linked through the
corrupted one.
12-56 Administering UniData on UNIX
Group Header Messages
Group header messages are similar to the following example:
Group xx, block xx, invalid flags xx, should be an overflowheader block
Group xx, block xx, invalid flags xx, should be a normal headerblock
These messages indicate damage.
Header Key Messages
Header key messages are similar to the following example:
Group xx, block xx key area is corrupted, key size xx, number ofkeys xx
Group xx, block xx key area is corrupted, incorrect key size xxGroup xx, block xx key area is corrupted, data position xx, key
size xx number of keys xxGroup xx, block xx key area is corrupted, total key length xx,
key size xx, number of keys xxkeys xx in group header yy errorkeysize=xx,keys=xxBad keyarea: keysize=xx keys=xx datapos =xx
These errors indicate that key area size or number of keys have been
corrupted in a group header.
Other Header Messages
There are a number of types of other header messages, as shown in the
following example:
Group xx, block xx has incorrect group number
The group number recorded in the block header does not match the group
being checked.
Group xx, block xx has invalid offsetnext over (xx) error in group head
Error Messages 12-57
The offset (link to next disk block) is not a multiple of the block size, or, for a
dynamic file, the offset does not indicate an overflow file offset.
Group xx, block xx data area is corrupted, incorrect dataposition xx
wrong datapos=xx
A data position in a group header is damaged.
Group xx, block xx, y number xx = y invalid offset xx or lengthGroup xx, block xx, y number xx = y offset occurs in wrong orderGroup xx, block xx, y number xx = y offset errorPrimary group xx, block xx has xx offset(s) less than the offset
of the group headerthe bad length of the xxth key = xxThe xxth key='yy', keylen=yy, hashed to xx this group =xx,
modulo=xxtotalkeylen=xx,keysize=xx,keys=xx key area corruptedthe xxth key[] offset(yy) has wrong orderThe xxth[] off_lens error,offset=yy,len=xxThis isn’t an overflow group, but there is xx offset:are xx
offsets less than the offset of group header
Each group header has an area that stores offset-record length pairs, which
are sorted by offset. Each offset equals the offset of the previous record plus
its length. If these conditions are not met, corruption results, and some or all
of the previous messages display.
Group xx, block xx bytes used xx and bytes left xx areinconsistent
Group xx, block xx has wrong number of bytes remaininggroup header byteleft (xx) wrong*key[xx] (key) record length xx wrongfile no in xxth key[] offset() not rightbyteleft (xx) in blk(yy) wrongbyteused (xx) + byteleft (xx) in block (yy) error
The counter that records the number of bytes available in a block does not
agree with the actual number of bytes in the block.
Group xx, block xx, yy number xx=yy record length error xx&key[xx] (key) record length (xx) wrong
The actual record length does not match the offset-length pair of the record.
12-58 Administering UniData on UNIX
Free Block Messages
Free block messages are similar to the following example:
Group xx, free block count in group header (y) error, shouldbe xx
The actual count of free blocks for a group does not match the counter in the
group header.
Group xx, free block xx partially allocated, xx bytes remainingGroup xx, free block xx has invalid flags xx
A block is linked to the free block list but not correctly initialized. Blocks
linked to the free list should have no bytes used and should be “normal”
blocks (not header blocks).
Long Record Messages
“Long” records are records which span more than one block. Messages about
problems with long records look similar to the following example:
Group xx, block xx, y number xx =y invalid flags xxGroup xx, block xx, y number xx =y longrecord, nextoff(zz) errorGroup xx, block xx, y number xx =y longrec: file no in nextoff
(zz) errorGroup xx, block xx, y number xx =y invalid next offset xxGroup xx, block xx, y number xx =y record length errorblockflag for normal block(yy) error (xx)&key[xx] () blockflag (xx) for longrec errorlongrecord, byteleft(xx) errorlong record, last block (yy) flag (xx) error.
In UniData hashed files, a long record always starts from the beginning of a
level one overflow block, which is flagged as “STARTLONG.” Each
intermediate block is flagged as “MIDLONG,” and the last block is flagged
as “ENDLONG.” If the length of a long record does not match header
information, or if any flag in its data blocks is incorrect or the pointer in the
chain gets broken, guide and verify2 report messages like the preceding ones.
Error Messages 12-59
Dynamic File Messages
Dynamic file messages look similar to the following example:
Overflow file number too largePrimary file number too large
The part file number stored in a data block is invalid.
The next_block(xx) in overflow file header errorThe next_block(xx) in free block (xx) is over filesize.
The offset to the next global free block list is wrong.
The free block offset xx too large in header blockThe free block offset xx error in header blockBlock(xx) is not a index free blockFree blocks count in header of file error (should be xx)
Global free block information has been damaged.
level 2 overflow: file no in nextover (xx) erroropfile (xx) in group header(yy) error.
Header information for overflow part files has been damaged.
12-60 Administering UniData on UNIX
13Chapter
Managing UniData Locks
The Global Lock Manager . . . . . . . . . . . . . . . 13-4
How GLM Works . . . . . . . . . . . . . . . . . 13-4
Locking in UniBasic . . . . . . . . . . . . . . . . . 13-6
How Locks Work . . . . . . . . . . . . . . . . . 13-6
Locking Commands . . . . . . . . . . . . . . . . 13-7
Resource Locks . . . . . . . . . . . . . . . . . . . 13-9
Listing Locks . . . . . . . . . . . . . . . . . . . 13-10
LIST.READU . . . . . . . . . . . . . . . . . . 13-10
Parameters . . . . . . . . . . . . . . . . . . . 13-10
LIST.LOCKS . . . . . . . . . . . . . . . . . . . 13-12
LIST.QUEUE . . . . . . . . . . . . . . . . . . 13-13
LIST.QUEUE Display. . . . . . . . . . . . . . . . 13-14
Commands for Clearing Locks . . . . . . . . . . . . . 13-18
SUPERCLEAR.LOCKS Command . . . . . . . . . . . 13-18
SUPERRELEASE Command . . . . . . . . . . . . . . 13-20
Procedure for Clearing Locks . . . . . . . . . . . . . . 13-21

13 -2 Ad
ministering UniData on UNIX
This chapter outlines file, record, and system resource locking within
UniData, describes tools for listing locks and listing the contents of the wait
queue, and describes procedures for releasing locks that remain set when a
process exits UniData.
13-3
The Global Lock ManagerThe Global Lock Manager (GLM) is an internal software module that is
linked into each udt process to manage logical record locks. Prior toUniData
5.1, logical records locks were managed by the lock control process (lcp)
daemon.
How GLM Works
GLM manages local lock tables for each udt process and a shared global lock
table in shared memory, which can be accessed by multiple udt processes.
The lock tables are hashed tables containing linked lists, which contain lock
nodes. When a udt process locks a record, it writes the filename, record ID,
and lock mode to both the local lock table and the global lock table. When a
udt process requests a lock, UniData first searches the local lock table for that
udt to see if that process is holding the lock, then the global lock table to see
if another udt process is holding the lock.
GLM udtconfig Parameters
There are four udtconfig parameters which control the size of the shared lock
table and the memory UniData allocates for each memory request.
N_GLM_GLOBAL_BUCKET
This parameter defines the number of hash buckets system-wide, used to
hold the lock names in shared memory. This setting directly affects
performance. Normally, the default value of this parameter should not be
changed. However, if you notice significant degradation in performance, or
your application intensively accesses specific files, you should increase this
parameter. The value should be the closest prime number to NUSERS * 3.
13-4 Administering UniData on UNIX
N_GLM_SELF_BUCKET
This parameter determines the number of hash buckets for the local lock
table, and is highly application-dependent. If the application requires a large
number of locks in one transaction (more than 20), you should increase this
setting from the default of 23. The setting should be the closest prime number
to the maximum number of locks per transaction.
GLM_MEM_ALLOC
This parameter defines the number of lock nodes allocated for each memory
request, and is highly application-dependent. If your application requires a
large number of locks in one transaction, you should increase this value to the
maximum number of locks per transaction * 2.
GLM_MEM_SEGSZ
This parameter specifies the segment size for each shared memory segment
required for GLM. The maximum number of segments is 16. Large
application environments require a larger size. The default value is 10.
GLM_MEM_SEGSZ must be greater than 4096 and less than
SHM_MAX_SIZE. The formula for determining SHM_MAX_SIZE is
NUSERS * maximum number of locks per transaction * 512.
SHM_MAX_SIZE should be a multiple of 4096.
The Global Lock Manager 13-5
Locking in UniBasicA series of UniBasic commands allow you to set read-only and exclusive
locks on UniData files and their contents.
How Locks Work
UniBasic locks are advisory rather than physical, so they inform other users
of a file or record that the file or record is in use, rather than explicitly
preventing access. You can set exclusive locks or shared (read-only) locks.
Exclusive Locks (U Type)
Exclusive (U) locks are respected by all lock-checking commands except
those that write and delete. Exclusive locks are set by “U” commands, for
instance READU, MATREADU, and RECORDLOCKU.
Shared Locks (L Type)
Shared, or read-only, locks can be shared by more than one user. These locks
are set by “L” commands, for instance READL, MATREADL,
RECORDLOCKL. A record locked with an L lock can be accessed for reading
by another “L” command, but cannot be accessed by “U” commands.
Writing and Deleting
WRITE and DELETE commands execute regardless of lock status. WRITEU,
WRITEVU, MATWRITEU, and DELETEU retain locks set by previous
commands. To prevent multiple updates to records, you should precede all
WRITE and DELETE commands by a lock-setting command like READU.
13-6 Administering UniData on UNIX
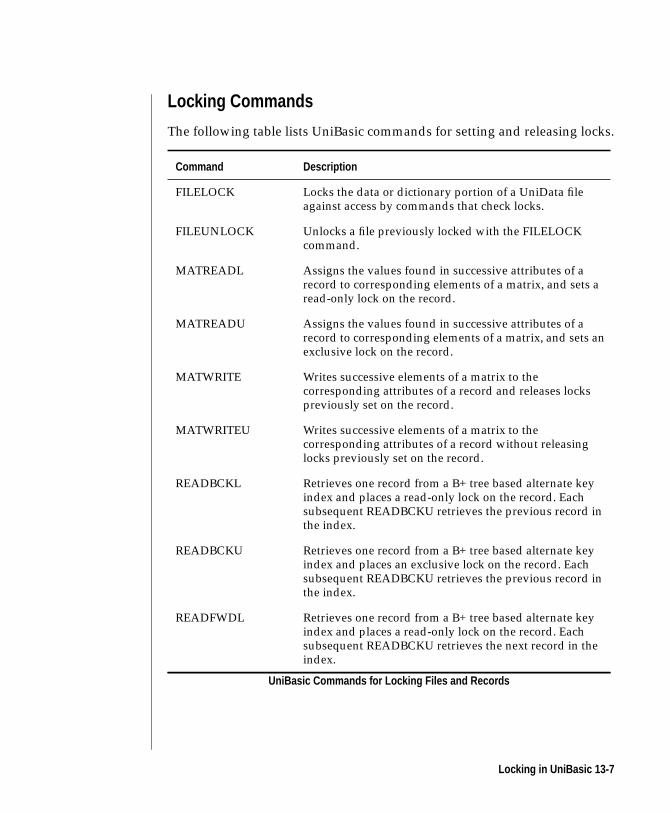
Locking Commands
The following table lists UniBasic commands for setting and releasing locks.
Command Description
FILELOCK Locks the data or dictionary portion of a UniData fileagainst access by commands that check locks.
FILEUNLOCK Unlocks a file previously locked with the FILELOCKcommand.
MATREADL Assigns the values found in successive attributes of arecord to corresponding elements of a matrix, and sets aread-only lock on the record.
MATREADU Assigns the values found in successive attributes of arecord to corresponding elements of a matrix, and sets anexclusive lock on the record.
MATWRITE Writes successive elements of a matrix to thecorresponding attributes of a record and releases lockspreviously set on the record.
MATWRITEU Writes successive elements of a matrix to thecorresponding attributes of a record without releasinglocks previously set on the record.
READBCKL Retrieves one record from a B+ tree based alternate keyindex and places a read-only lock on the record. Eachsubsequent READBCKU retrieves the previous record inthe index.
READBCKU Retrieves one record from a B+ tree based alternate keyindex and places an exclusive lock on the record. Eachsubsequent READBCKU retrieves the previous record inthe index.
READFWDL Retrieves one record from a B+ tree based alternate keyindex and places a read-only lock on the record. Eachsubsequent READBCKU retrieves the next record in theindex.
UniBasic Commands for Locking Files and Records
Locking in UniBasic 13-7
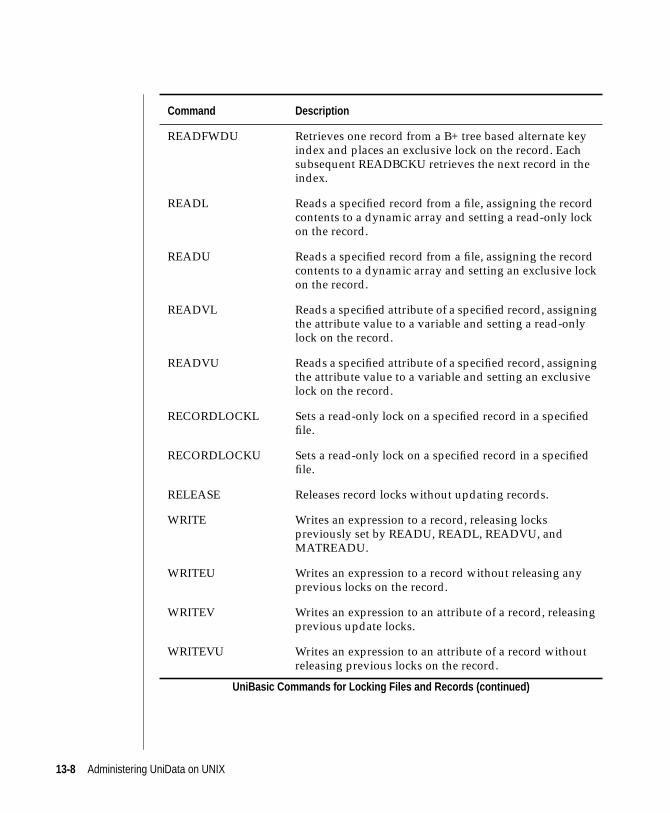
READFWDU Retrieves one record from a B+ tree based alternate keyindex and places an exclusive lock on the record. Eachsubsequent READBCKU retrieves the next record in theindex.
READL Reads a specified record from a file, assigning the recordcontents to a dynamic array and setting a read-only lockon the record.
READU Reads a specified record from a file, assigning the recordcontents to a dynamic array and setting an exclusive lockon the record.
READVL Reads a specified attribute of a specified record, assigningthe attribute value to a variable and setting a read-onlylock on the record.
READVU Reads a specified attribute of a specified record, assigningthe attribute value to a variable and setting an exclusivelock on the record.
RECORDLOCKL Sets a read-only lock on a specified record in a specifiedfile.
RECORDLOCKU Sets a read-only lock on a specified record in a specifiedfile.
RELEASE Releases record locks without updating records.
WRITE Writes an expression to a record, releasing lockspreviously set by READU, READL, READVU, andMATREADU.
WRITEU Writes an expression to a record without releasing anyprevious locks on the record.
WRITEV Writes an expression to an attribute of a record, releasingprevious update locks.
WRITEVU Writes an expression to an attribute of a record withoutreleasing previous locks on the record.
Command Description
UniBasic Commands for Locking Files and Records (continued)
13-8 Administering UniData on UNIX
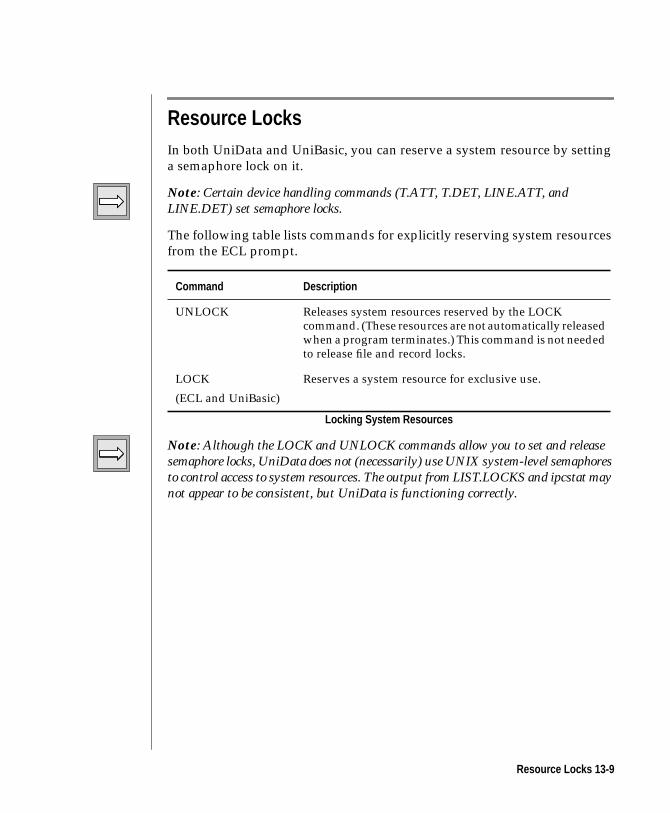
Resource LocksIn both UniData and UniBasic, you can reserve a system resource by setting
a semaphore lock on it.
Note: Certain device handling commands (T.ATT, T.DET, LINE.ATT, andLINE.DET) set semaphore locks.
The following table lists commands for explicitly reserving system resources
from the ECL prompt.
Note: Although the LOCK and UNLOCK commands allow you to set and releasesemaphore locks, UniData does not (necessarily) use UNIX system-level semaphoresto control access to system resources. The output from LIST.LOCKS and ipcstat maynot appear to be consistent, but UniData is functioning correctly.
Command Description
UNLOCK Releases system resources reserved by the LOCKcommand. (These resources are not automatically releasedwhen a program terminates.) This command is not neededto release file and record locks.
LOCK
(ECL and UniBasic)
Reserves a system resource for exclusive use.
Locking System Resources
Resource Locks 13-9
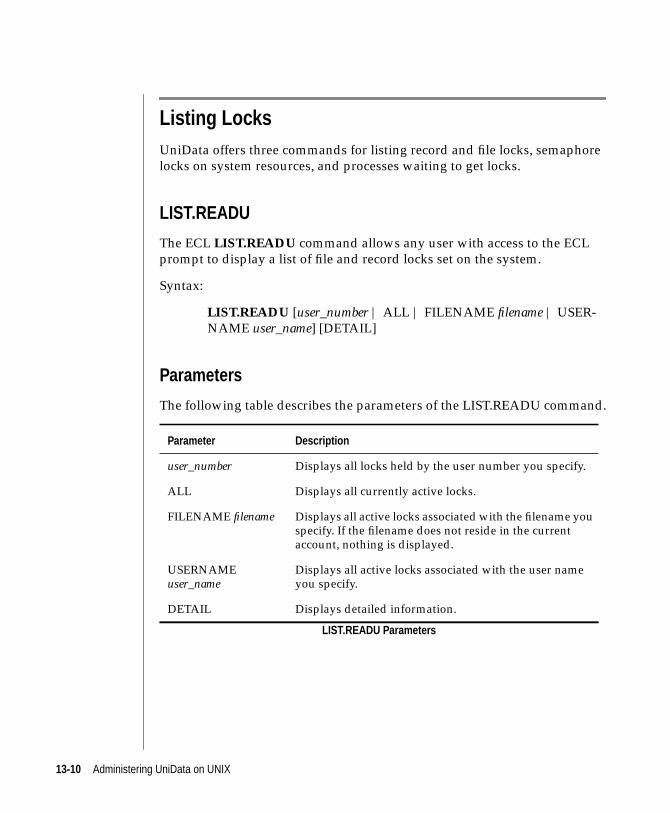
Listing LocksUniData offers three commands for listing record and file locks, semaphore
locks on system resources, and processes waiting to get locks.
LIST.READU
The ECL LIST.READU command allows any user with access to the ECL
prompt to display a list of file and record locks set on the system.
Syntax:
LIST.READU [user_number | ALL | FILENAME filename | USER-
NAME user_name] [DETAIL]
Parameters
The following table describes the parameters of the LIST.READU command.
Parameter Description
user_number Displays all locks held by the user number you specify.
ALL Displays all currently active locks.
FILENAME filename Displays all active locks associated with the filename youspecify. If the filename does not reside in the currentaccount, nothing is displayed.
USERNAMEuser_name
Displays all active locks associated with the user nameyou specify.
DETAIL Displays detailed information.
LIST.READU Parameters
13-10 Administering UniData on UNIX
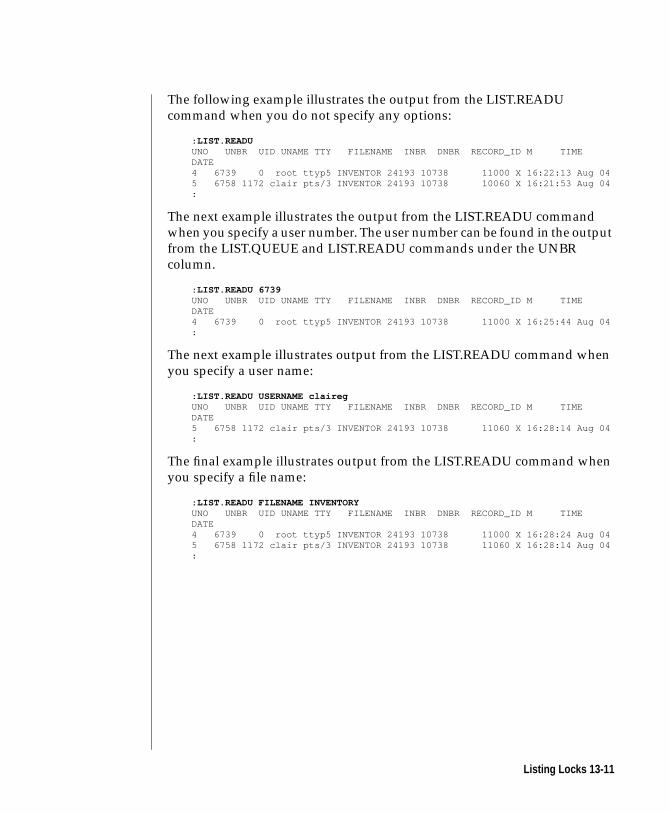
The following example illustrates the output from the LIST.READU
command when you do not specify any options:
: LIST.READUUNO UNBR UID UNAME TTY FILENAME INBR DNBR RECORD_ID M TIMEDATE4 6739 0 root ttyp5 INVENTOR 24193 10738 11000 X 16:22:13 Aug 045 6758 1172 clair pts/3 INVENTOR 24193 10738 10060 X 16:21:53 Aug 04:
The next example illustrates the output from the LIST.READU command
when you specify a user number. The user number can be found in the output
from the LIST.QUEUE and LIST.READU commands under the UNBR
column.
: LIST.READU 6739UNO UNBR UID UNAME TTY FILENAME INBR DNBR RECORD_ID M TIMEDATE4 6739 0 root ttyp5 INVENTOR 24193 10738 11000 X 16:25:44 Aug 04:
The next example illustrates output from the LIST.READU command when
you specify a user name:
: LIST.READU USERNAME clairegUNO UNBR UID UNAME TTY FILENAME INBR DNBR RECORD_ID M TIMEDATE5 6758 1172 clair pts/3 INVENTOR 24193 10738 11060 X 16:28:14 Aug 04:
The final example illustrates output from the LIST.READU command when
you specify a file name:
: LIST.READU FILENAME INVENTORYUNO UNBR UID UNAME TTY FILENAME INBR DNBR RECORD_ID M TIMEDATE4 6739 0 root ttyp5 INVENTOR 24193 10738 11000 X 16:28:24 Aug 045 6758 1172 clair pts/3 INVENTOR 24193 10738 11060 X 16:28:14 Aug 04:
Listing Locks 13-11
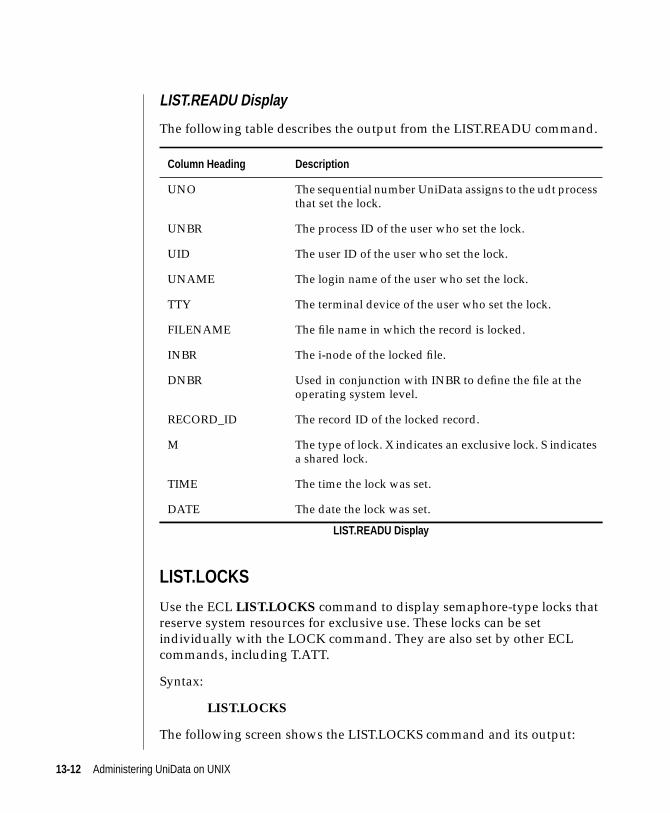
LIST.READU Display
The following table describes the output from the LIST.READU command.
LIST.LOCKS
Use the ECL LIST.LOCKS command to display semaphore-type locks that
reserve system resources for exclusive use. These locks can be set
individually with the LOCK command. They are also set by other ECL
commands, including T.ATT.
Syntax:
LIST.LOCKS
The following screen shows the LIST.LOCKS command and its output:
Column Heading Description
UNO The sequential number UniData assigns to the udt processthat set the lock.
UNBR The process ID of the user who set the lock.
UID The user ID of the user who set the lock.
UNAME The login name of the user who set the lock.
TTY The terminal device of the user who set the lock.
FILENAME The file name in which the record is locked.
INBR The i-node of the locked file.
DNBR Used in conjunction with INBR to define the file at theoperating system level.
RECORD_ID The record ID of the locked record.
M The type of lock. X indicates an exclusive lock. S indicatesa shared lock.
TIME The time the lock was set.
DATE The date the lock was set.
LIST.READU Display
13-12 Administering UniData on UNIX
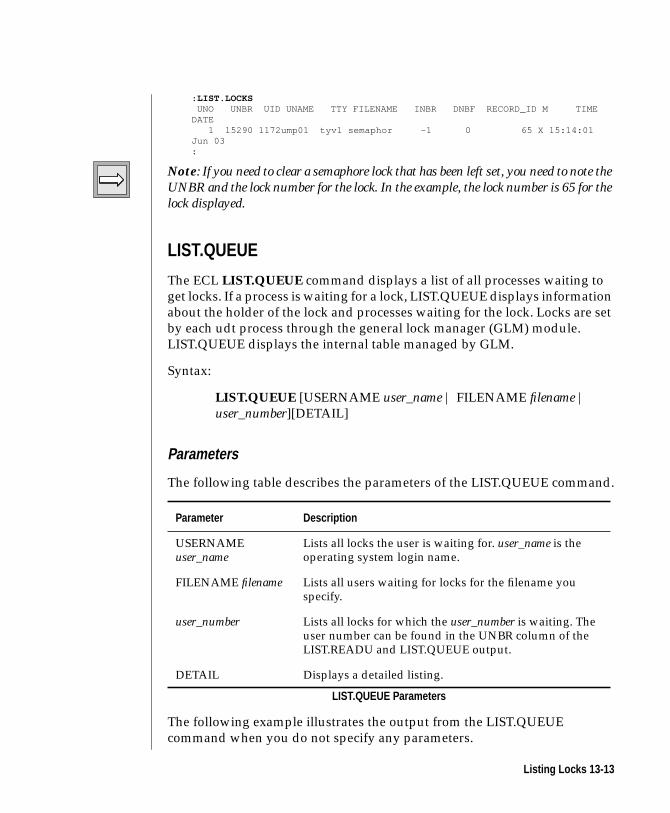
: LIST.LOCKSUNO UNBR UID UNAME TTY FILENAME INBR DNBF RECORD_ID M TIME
DATE 1 15290 1172ump01 tyv1 semaphor -1 0 65 X 15:14:01Jun 03:
Note: If you need to clear a semaphore lock that has been left set, you need to note theUNBR and the lock number for the lock. In the example, the lock number is 65 for thelock displayed.
LIST.QUEUE
The ECL LIST.QUEUE command displays a list of all processes waiting to
get locks. If a process is waiting for a lock, LIST.QUEUE displays information
about the holder of the lock and processes waiting for the lock. Locks are set
by each udt process through the general lock manager (GLM) module.
LIST.QUEUE displays the internal table managed by GLM.
Syntax:
LIST.QUEUE [USERNAME user_name | FILENAME filename |
user_number][DETAIL]
Parameters
The following table describes the parameters of the LIST.QUEUE command.
The following example illustrates the output from the LIST.QUEUE
command when you do not specify any parameters.
Parameter Description
USERNAMEuser_name
Lists all locks the user is waiting for. user_name is theoperating system login name.
FILENAME filename Lists all users waiting for locks for the filename youspecify.
user_number Lists all locks for which the user_number is waiting. Theuser number can be found in the UNBR column of theLIST.READU and LIST.QUEUE output.
DETAIL Displays a detailed listing.
LIST.QUEUE Parameters
Listing Locks 13-13
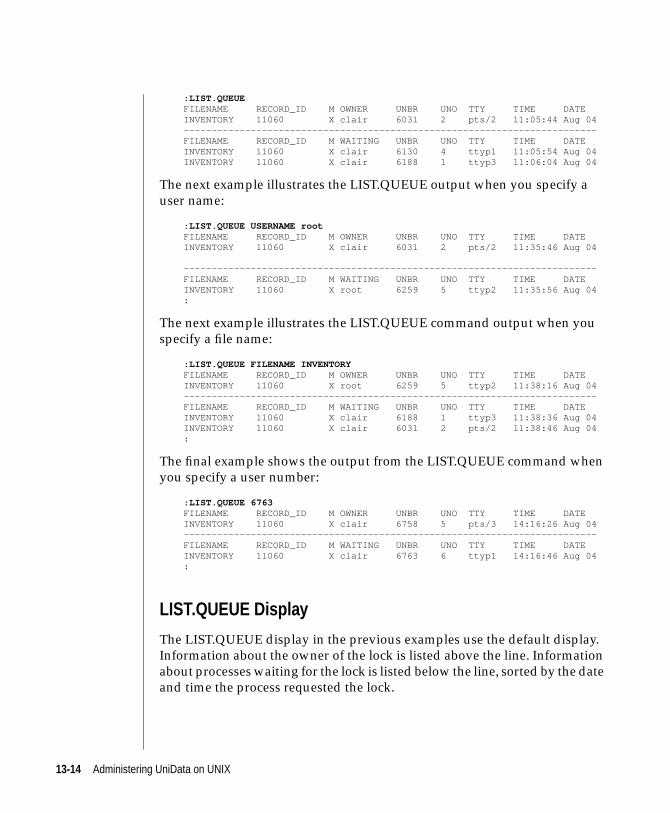
: LIST.QUEUEFILENAME RECORD_ID M OWNER UNBR UNO TTY TIME DATEINVENTORY 11060 X clair 6031 2 pts/2 11:05:44 Aug 04--------------------------------------------------------------------------FILENAME RECORD_ID M WAITING UNBR UNO TTY TIME DATEINVENTORY 11060 X clair 6130 4 ttyp1 11:05:54 Aug 04INVENTORY 11060 X clair 6188 1 ttyp3 11:06:04 Aug 04
The next example illustrates the LIST.QUEUE output when you specify a
user name:
: LIST.QUEUE USERNAME rootFILENAME RECORD_ID M OWNER UNBR UNO TTY TIME DATEINVENTORY 11060 X clair 6031 2 pts/2 11:35:46 Aug 04
--------------------------------------------------------------------------FILENAME RECORD_ID M WAITING UNBR UNO TTY TIME DATEINVENTORY 11060 X root 6259 5 ttyp2 11:35:56 Aug 04:
The next example illustrates the LIST.QUEUE command output when you
specify a file name:
: LIST.QUEUE FILENAME INVENTORYFILENAME RECORD_ID M OWNER UNBR UNO TTY TIME DATEINVENTORY 11060 X root 6259 5 ttyp2 11:38:16 Aug 04--------------------------------------------------------------------------FILENAME RECORD_ID M WAITING UNBR UNO TTY TIME DATEINVENTORY 11060 X clair 6188 1 ttyp3 11:38:36 Aug 04INVENTORY 11060 X clair 6031 2 pts/2 11:38:46 Aug 04:
The final example shows the output from the LIST.QUEUE command when
you specify a user number:
: LIST.QUEUE 6763FILENAME RECORD_ID M OWNER UNBR UNO TTY TIME DATEINVENTORY 11060 X clair 6758 5 pts/3 14:16:26 Aug 04--------------------------------------------------------------------------FILENAME RECORD_ID M WAITING UNBR UNO TTY TIME DATEINVENTORY 11060 X clair 6763 6 ttyp1 14:16:46 Aug 04:
LIST.QUEUE Display
The LIST.QUEUE display in the previous examples use the default display.
Information about the owner of the lock is listed above the line. Information
about processes waiting for the lock is listed below the line, sorted by the date
and time the process requested the lock.
13-14 Administering UniData on UNIX
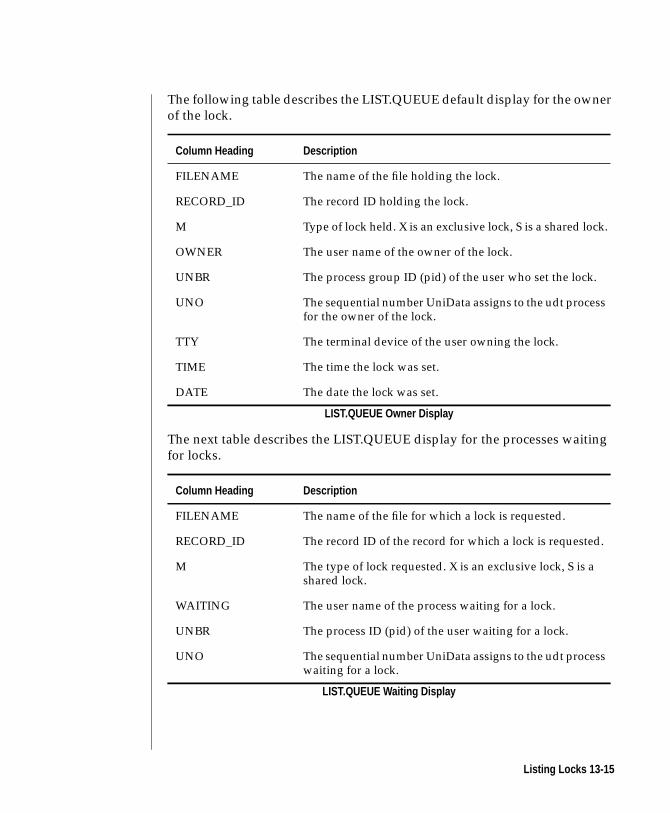
The following table describes the LIST.QUEUE default display for the owner
of the lock.
The next table describes the LIST.QUEUE display for the processes waiting
for locks.
Column Heading Description
FILENAME The name of the file holding the lock.
RECORD_ID The record ID holding the lock.
M Type of lock held. X is an exclusive lock, S is a shared lock.
OWNER The user name of the owner of the lock.
UNBR The process group ID (pid) of the user who set the lock.
UNO The sequential number UniData assigns to the udt processfor the owner of the lock.
TTY The terminal device of the user owning the lock.
TIME The time the lock was set.
DATE The date the lock was set.
LIST.QUEUE Owner Display
Column Heading Description
FILENAME The name of the file for which a lock is requested.
RECORD_ID The record ID of the record for which a lock is requested.
M The type of lock requested. X is an exclusive lock, S is ashared lock.
WAITING The user name of the process waiting for a lock.
UNBR The process ID (pid) of the user waiting for a lock.
UNO The sequential number UniData assigns to the udt processwaiting for a lock.
LIST.QUEUE Waiting Display
Listing Locks 13-15
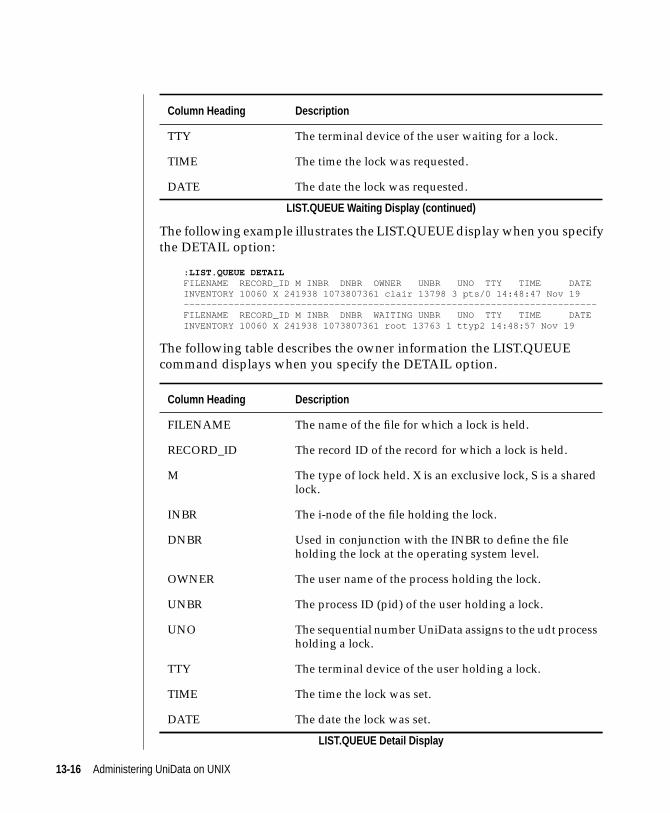
The following example illustrates the LIST.QUEUE display when you specify
the DETAIL option:
: LIST.QUEUE DETAILFILENAME RECORD_ID M INBR DNBR OWNER UNBR UNO TTY TIME DATEINVENTORY 10060 X 241938 1073807361 clair 13798 3 pts/0 14:48:47 Nov 19--------------------------------------------------------------------------FILENAME RECORD_ID M INBR DNBR WAITING UNBR UNO TTY TIME DATEINVENTORY 10060 X 241938 1073807361 root 13763 1 ttyp2 14:48:57 Nov 19
The following table describes the owner information the LIST.QUEUE
command displays when you specify the DETAIL option.
TTY The terminal device of the user waiting for a lock.
TIME The time the lock was requested.
DATE The date the lock was requested.
Column Heading Description
FILENAME The name of the file for which a lock is held.
RECORD_ID The record ID of the record for which a lock is held.
M The type of lock held. X is an exclusive lock, S is a sharedlock.
INBR The i-node of the file holding the lock.
DNBR Used in conjunction with the INBR to define the fileholding the lock at the operating system level.
OWNER The user name of the process holding the lock.
UNBR The process ID (pid) of the user holding a lock.
UNO The sequential number UniData assigns to the udt processholding a lock.
TTY The terminal device of the user holding a lock.
TIME The time the lock was set.
DATE The date the lock was set.
LIST.QUEUE Detail Display
Column Heading Description
LIST.QUEUE Waiting Display (continued)
13-16 Administering UniData on UNIX
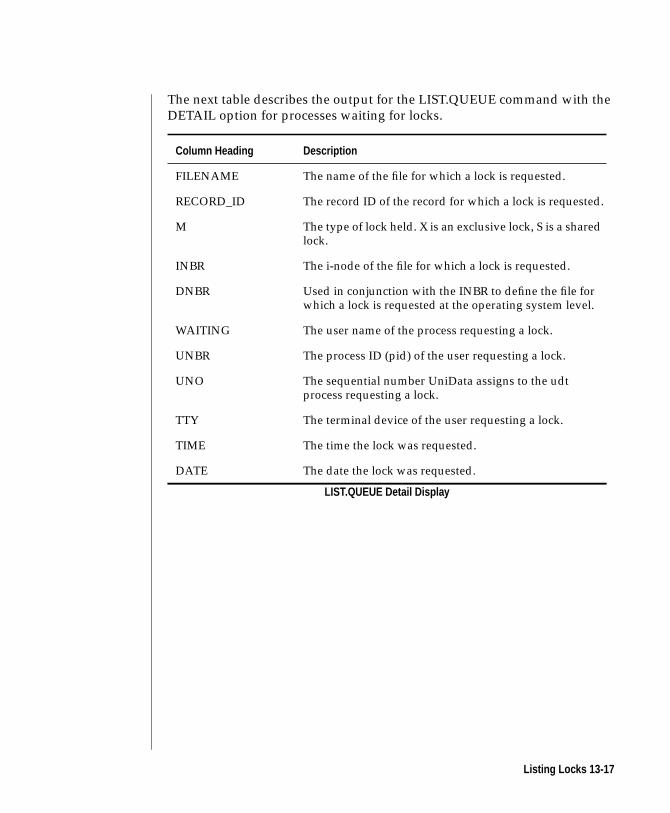
The next table describes the output for the LIST.QUEUE command with the
DETAIL option for processes waiting for locks.
Column Heading Description
FILENAME The name of the file for which a lock is requested.
RECORD_ID The record ID of the record for which a lock is requested.
M The type of lock held. X is an exclusive lock, S is a sharedlock.
INBR The i-node of the file for which a lock is requested.
DNBR Used in conjunction with the INBR to define the file forwhich a lock is requested at the operating system level.
WAITING The user name of the process requesting a lock.
UNBR The process ID (pid) of the user requesting a lock.
UNO The sequential number UniData assigns to the udtprocess requesting a lock.
TTY The terminal device of the user requesting a lock.
TIME The time the lock was requested.
DATE The date the lock was requested.
LIST.QUEUE Detail Display
Listing Locks 13-17
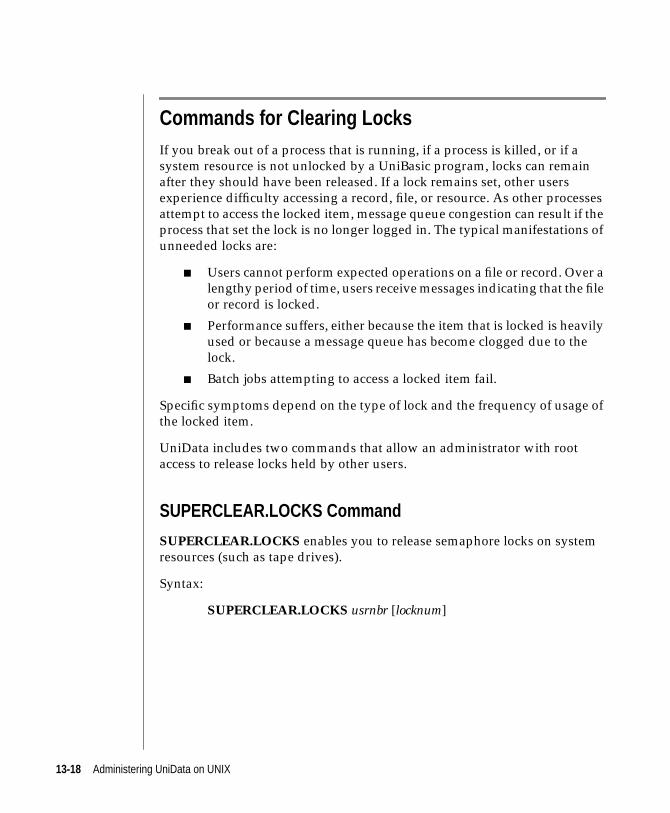
Commands for Clearing LocksIf you break out of a process that is running, if a process is killed, or if a
system resource is not unlocked by a UniBasic program, locks can remain
after they should have been released. If a lock remains set, other users
experience difficulty accessing a record, file, or resource. As other processes
attempt to access the locked item, message queue congestion can result if the
process that set the lock is no longer logged in. The typical manifestations of
unneeded locks are:
■ Users cannot perform expected operations on a file or record. Over a
lengthy period of time, users receive messages indicating that the file
or record is locked.
■ Performance suffers, either because the item that is locked is heavily
used or because a message queue has become clogged due to the
lock.
■ Batch jobs attempting to access a locked item fail.
Specific symptoms depend on the type of lock and the frequency of usage of
the locked item.
UniData includes two commands that allow an administrator with root
access to release locks held by other users.
SUPERCLEAR.LOCKS Command
SUPERCLEAR.LOCKS enables you to release semaphore locks on system
resources (such as tape drives).
Syntax:
SUPERCLEAR.LOCKS usrnbr [locknum]
13-18 Administering UniData on UNIX
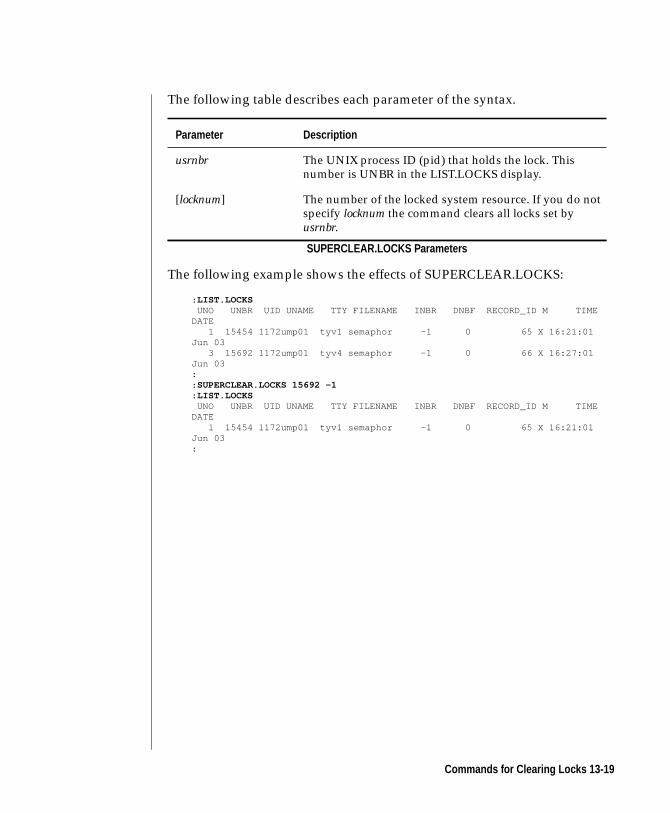
The following table describes each parameter of the syntax.
The following example shows the effects of SUPERCLEAR.LOCKS:
: LIST.LOCKSUNO UNBR UID UNAME TTY FILENAME INBR DNBF RECORD_ID M TIME
DATE 1 15454 1172ump01 tyv1 semaphor -1 0 65 X 16:21:01Jun 03 3 15692 1172ump01 tyv4 semaphor -1 0 66 X 16:27:01Jun 03:: SUPERCLEAR.LOCKS 15692 -1: LIST.LOCKS
UNO UNBR UID UNAME TTY FILENAME INBR DNBF RECORD_ID M TIMEDATE 1 15454 1172ump01 tyv1 semaphor -1 0 65 X 16:21:01Jun 03:
Parameter Description
usrnbr The UNIX process ID (pid) that holds the lock. Thisnumber is UNBR in the LIST.LOCKS display.
[locknum] The number of the locked system resource. If you do notspecify locknum the command clears all locks set byusrnbr.
SUPERCLEAR.LOCKS Parameters
Commands for Clearing Locks 13-19
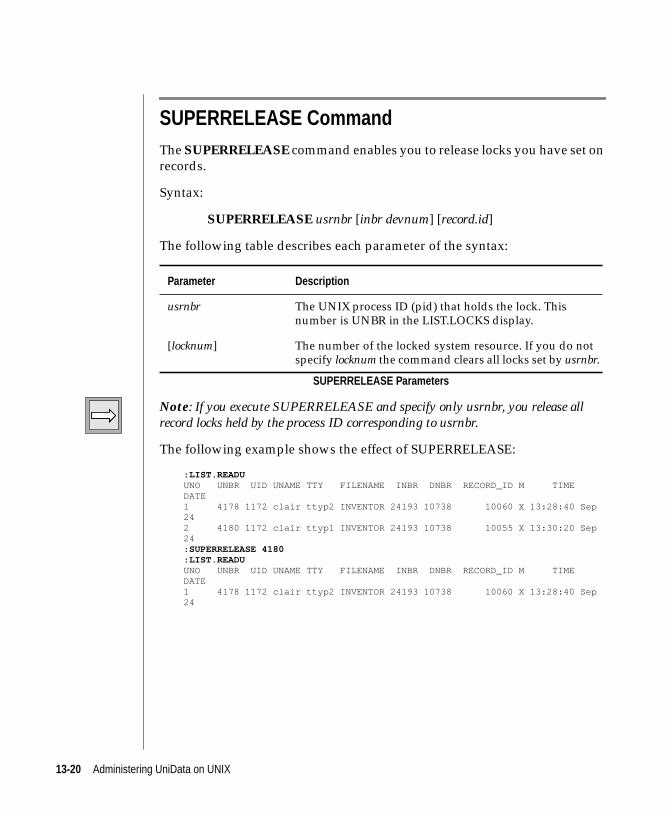
SUPERRELEASE CommandThe SUPERRELEASE command enables you to release locks you have set on
records.
Syntax:
SUPERRELEASE usrnbr [inbr devnum] [record.id]
The following table describes each parameter of the syntax:
Note: If you execute SUPERRELEASE and specify only usrnbr, you release allrecord locks held by the process ID corresponding to usrnbr.
The following example shows the effect of SUPERRELEASE:
: LIST.READUUNO UNBR UID UNAME TTY FILENAME INBR DNBR RECORD_ID M TIMEDATE1 4178 1172 clair ttyp2 INVENTOR 24193 10738 10060 X 13:28:40 Sep242 4180 1172 clair ttyp1 INVENTOR 24193 10738 10055 X 13:30:20 Sep24: SUPERRELEASE 4180: LIST.READUUNO UNBR UID UNAME TTY FILENAME INBR DNBR RECORD_ID M TIMEDATE1 4178 1172 clair ttyp2 INVENTOR 24193 10738 10060 X 13:28:40 Sep24
Parameter Description
usrnbr The UNIX process ID (pid) that holds the lock. Thisnumber is UNBR in the LIST.LOCKS display.
[locknum] The number of the locked system resource. If you do notspecify locknum the command clears all locks set by usrnbr.
SUPERRELEASE Parameters
13-20 Administering UniData on UNIX
Procedure for Clearing LocksComplete the following steps to identify and clear unneeded locks:
1. Check for Unneeded Locks
Use the UniData LIST.READU and LIST.LOCKS commands to display the
locks currently set on the system. Use LIST.QUEUE to identify locks for
which processes are waiting. Note locks that meet the following criteria:
■ They are set on files or records that users cannot currently access.
■ They have been set for a long period of time (shown by the time and
date on the list).
■ They were set by users who are not currently on the system (shown
by comparing the lists with the UniData LISTUSER command or the
UNIX who or ps commands).
2. Note Information for Clearing
For record locks, note UNBR, INBR, DNBR, RECORD NO. For semaphore
locks, note UNBR and lock number. To clear record locks, proceed to step 3.
To clear semaphore locks, proceed to step 4.
3. Release Record Locks
Login as root and use the UniData SUPERRELEASE command to clear record
locks. If possible, specify only a UNBR to clear all the locks belonging to a
process ID. If you have semaphore locks to clear, proceed to step 4.
Otherwise, proceed to step 5.
Warning: Some situations that retain locks can also cause file corruption (forexample, a udt process is inadvertently killed). Consider checking the file with guideto make certain it has not been corrupted.
Procedure for Clearing Locks 13-21
4. Clear Semaphore Locks
Log in as root and clear semaphore locks with the SUPERCLEAR.LOCKS
command.
5. Check for Message Queue Congestion
Some conditions that cause locks to remain set also cause message queue
congestion when other processes attempt to access the locked item. Refer to
Chapter 18, “Managing ipc Facilities,” for step-by-step instructions for
identifying and clearing congested message queues.
13-22 Administering UniData on UNIX
14Chapter
Managing UniData Users
Adding Users . . . . . . . . . . . . . . . . . . . 14-4
Every User Needs a Login . . . . . . . . . . . . . . 14-4
Create Logins at the UNIX Level . . . . . . . . . . . . 14-4
Assign Users to Groups . . . . . . . . . . . . . . . 14-5
Monitoring User Processes . . . . . . . . . . . . . . . 14-6
UniData Commands . . . . . . . . . . . . . . . . 14-6
Removing User Processes . . . . . . . . . . . . . . . 14-8
Using TIMEOUT . . . . . . . . . . . . . . . . . 14-9

14 -2 Ad
ministering UniData on UNIX
This chapter outlines considerations for adding users to your system and
assigning users to groups, and describes how to use UniData and UNIX
commands to view user processes for troubleshooting, and to remove user
processes when needed.
14-3
Adding Users
Every User Needs a Login
To access UniData on your system, you need a valid UNIX account, including
a UNIX login and password. In Pick® systems, where each login account
must be a Pick® account, shared logins and passwords are common. In
contrast, UniData allows multiple relationships between user logins and
UniData accounts. A user may have access to more than one UniData
account, and many users can access a single UniData account using separate
UNIX logins. Therefore, IBM strongly recommends you set up a separate
UNIX account for each user. IBM recommends separate logins for the
following reasons:
■ Since most operating systems impose limits on the number of
processes that can be associated with one user, using separate logins
allows your system to run more processes at one time.
■ It is easier to identify processes and locks belonging to an individual
user, which facilitates troubleshooting.
■ Using separate logins allows you to define your users’
responsibilities for protecting their passwords and your application
data.
Create Logins at the UNIX Level
There are no UniData commands or procedures for setting up UNIX user
accounts. Although the basic process for creating a UNIX account is similar
across UNIX versions, different system configurations may use different
utilities or third-party interfaces for the actual mechanics. Refer to your host
operating system and vendor documentation to determine the correct
procedure at your site.
Consider the following factors when setting up UNIX logins:
■ Each user should have a defined home directory. UNIX home
directories do not need to be unique; many users can share one if this
seems desirable on your system.
14-4 Administering UniData on UNIX

■ Home directories do not need to be UniData accounts, although they
may be.
■ Saved ECL command stacks are stored in the user’s home directory.
Note: IBM recommends that if some or all of your users require access to the UNIXshell prompt, or if they will be doing development or maintenance programming,their home directory should not be a UniData account that contains production dataor programs.
Warning: In some configurations, proprietary utilities are in use to automate manyof the steps for adding or deleting a user. Make sure that your utilities are clearlydocumented and understood. If you have a utility that deletes a user’s home directorywhen that user’s account is removed, for example, you could suffer data loss if youuse shared home directories.
Assign Users to Groups
UNIX allows you to define each user as a member of one or more UNIX
system groups. File permissions allow differentiation of access between
members of a group owner and users who are not members of that group.
Refer to Chapter 2, “ UniData and UNIX Security,” and Chapter 11, “
Managing UniData Security,” for more information about groups.
Note: The UNIX commands finger and groups display information about users.Refer to your host operating system documentation for information about thesecommands.
Adding Users 14-5
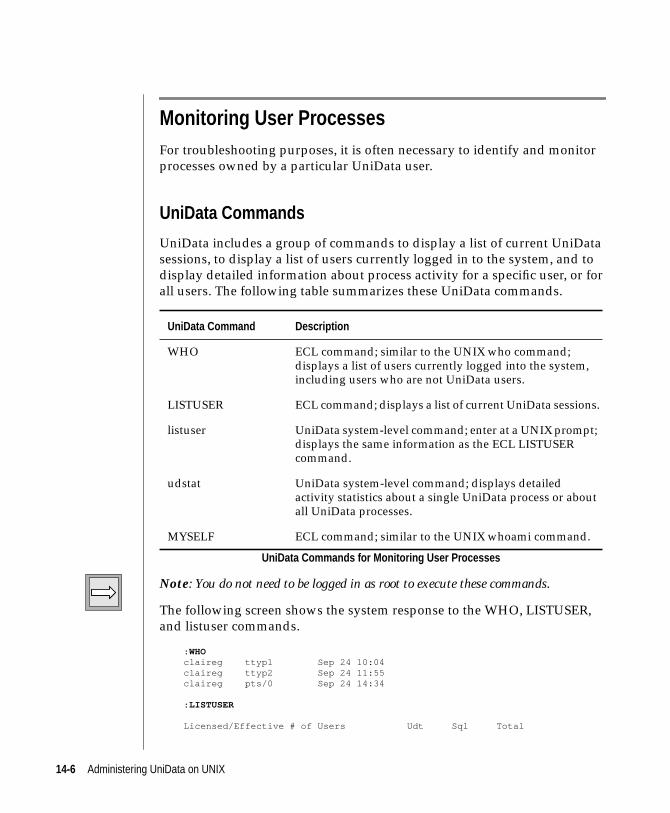
Monitoring User ProcessesFor troubleshooting purposes, it is often necessary to identify and monitor
processes owned by a particular UniData user.
UniData Commands
UniData includes a group of commands to display a list of current UniData
sessions, to display a list of users currently logged in to the system, and to
display detailed information about process activity for a specific user, or for
all users. The following table summarizes these UniData commands.
Note: You do not need to be logged in as root to execute these commands.
The following screen shows the system response to the WHO, LISTUSER,
and listuser commands.
: WHOclaireg ttyp1 Sep 24 10:04claireg ttyp2 Sep 24 11:55claireg pts/0 Sep 24 14:34
: LISTUSER
Licensed/Effective # of Users Udt Sql Total
UniData Command Description
WHO ECL command; similar to the UNIX who command;displays a list of users currently logged into the system,including users who are not UniData users.
LISTUSER ECL command; displays a list of current UniData sessions.
listuser UniData system-level command; enter at a UNIX prompt;displays the same information as the ECL LISTUSERcommand.
udstat UniData system-level command; displays detailedactivity statistics about a single UniData process or aboutall UniData processes.
MYSELF ECL command; similar to the UNIX whoami command.
UniData Commands for Monitoring User Processes
14-6 Administering UniData on UNIX
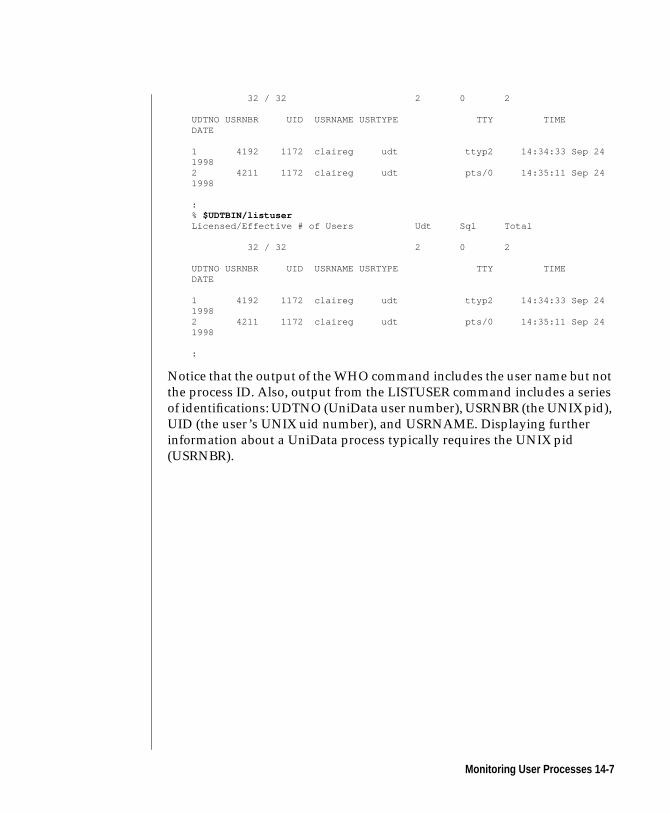
32 / 32 2 0 2
UDTNO USRNBR UID USRNAME USRTYPE TTY TIMEDATE
1 4192 1172 claireg udt ttyp2 14:34:33 Sep 2419982 4211 1172 claireg udt pts/0 14:35:11 Sep 241998
:% $UDTBIN/listuserLicensed/Effective # of Users Udt Sql Total
32 / 32 2 0 2
UDTNO USRNBR UID USRNAME USRTYPE TTY TIMEDATE
1 4192 1172 claireg udt ttyp2 14:34:33 Sep 2419982 4211 1172 claireg udt pts/0 14:35:11 Sep 241998
:
Notice that the output of the WHO command includes the user name but not
the process ID. Also, output from the LISTUSER command includes a series
of identifications: UDTNO (UniData user number), USRNBR (the UNIX pid),
UID (the user’s UNIX uid number), and USRNAME. Displaying further
information about a UniData process typically requires the UNIX pid
(USRNBR).
Monitoring User Processes 14-7
Removing User ProcessesUniData includes commands that enable you to stop a user’s udt process if
the process is hung, or if you need to stop UniData while a user is still logged
in. The following table summarizes these commands.
The UNIX kill command enables you to stop a process with a variety of
options. Use this command with caution, since it can cause data
inconsistency and file corruption. Refer to your host operating system
documentation for information about the kill command.
You can log yourself out using the stopudt command, but you must be
logged in as root to log out other users using stopudt. You must be logged in
as root to execute deleteuser.
Warning: Both of these commands can disrupt the consistency of your database, anddeleteuser can also corrupt data. These commands should not be used as a substitutefor normal user logout.
Tip: You can use the UniData system-level command udstat to check the activity ofa UniData process. If the process shows activity, stopping or deleting it could damagedata. See the UniData Commands Reference for examples of the udstat command.Communicate directly with the owner, if possible, before stopping a udt process,because even if the process seems to be idle, the terminal may be waiting for input andfiles may be open.
UniData Command Description
stopudt Logs a user out of UniData; a current write is allowed tocomplete, but subsequent operations for that udt do nottake place. stopudt uses the UNIX kill -15 command.
deleteuser First attempts to execute the UNIX kill -15 command. Ifthe command is not successful in five seconds, force logsa user out of UniData with the UNIX kill -9 command;may interrupt a write in progress, potentially causing filecorruption.
UniData Commands for Removing User Processes
14-8 Administering UniData on UNIX
Using TIMEOUT
You can execute the ECL TIMEOUT command at the ECL prompt, in a
LOGIN paragraph, or in a UniBasic program. TIMEOUT forces the current
udt process to log out after a specified number of seconds. If you include
TIMEOUT in the LOGIN paragraphs for your UniData accounts, you can
provide some improved security for terminals left idle.
Warning: Be careful with TIMEOUT. Because this command can cause a UniBasicprogram to terminate at an INPUT statement rather than concluding normally,using TIMEOUT can cause inconsistent data in your database.
Removing User Processes 14-9

14-10 Administering UniData on UNIX
15Chapter
Managing Printers in UniData
UniData and UNIX Spoolers . . . . . . . . . . . . . . 15-4
Configuring the Spooler . . . . . . . . . . . . . . . 15-4
SETOSPRINTER Command . . . . . . . . . . . . . 15-7
Spooling from UniData . . . . . . . . . . . . . . . 15-8
UniData Printing Commands . . . . . . . . . . . . . . 15-9
Configuring and Troubleshooting a Printer . . . . . . . . . 15-11
Physical Connection . . . . . . . . . . . . . . . . 15-11
Spooler Definition . . . . . . . . . . . . . . . . . 15-11
Definition in UniData . . . . . . . . . . . . . . . 15-12
SETPTR . . . . . . . . . . . . . . . . . . . . . 15-13
Environment Variables . . . . . . . . . . . . . . . . 15-17
Disabling Printer Validation . . . . . . . . . . . . . 15-17
Defining an Alternate Search Path . . . . . . . . . . . 15-17
Examples . . . . . . . . . . . . . . . . . . . . . 15-18
Redefining the Default UniData Print Unit . . . . . . . . 15-18
Submitting Concurrent Print Jobs . . . . . . . . . . . 15-18
Printing to a UNIX Device . . . . . . . . . . . . . . 15-19
Passing Spooler Options to UNIX . . . . . . . . . . . 15-20
Decoding a UniData Print Statement . . . . . . . . . . . 15-21

15 -2 Ad
ministering UniData on UNIX
This chapter explains how UniData interacts with UNIX spooler software
and describes how to configure and access printers from within UniData.
15-3
UniData and UNIX SpoolersAll printing from within UniData is actually performed by your UNIX
system spooler. UniData does not include its own spooler; the UniData
printing commands form an interface to UNIX spooler commands.
Different versions of UNIX include different spooling systems. There are two
major types: the BSD spooling system, which includes the lpd, lpc, and lpr
commands, and the ATT spooling system, which includes the lp command.
The spooling system for any UNIX is likely to be derived from one or the
other of these types, although each UNIX version may include platform-
specific features. Also, some UNIX versions include the user interfaces from
both spooling system types, although underlying processing is accomplished
by one or the other type. Refer to your host operating system documentation
for information about the spooler on your UNIX system.
Users can specify any UNIX spooler command supported on their system by
using the ECL command SETOSPRINTER, and defining the spooler
configuration file.
Configuring the Spooler
UniData includes a spooler configuration file, UDTSPOOL.CONFIG, located
in udthome/sys. This file contains information for the interface between the
UniData SETPTR command and the UNIX-level print commands. The
UDTSPOOL.CONFIG file contains interface information for the lp command
on each system. For some systems, UDTSPOOL.CONFIG also contains
information for the lpr command.
15-4 Administering UniData on UNIX
The following example illustrates the UDTSPOOL.CONFIG file:
% pg UDTSPOOL.CONFIG* Default $UDTHOME/sys/UDTSPOOL.CONFIG
* Beginning of the configuration file
* Beginning of entry for lp command.
lp DEFAULT * Default print command BANNER: -t DEST: -d COPIES: -n FORM: -f NHEAD: -o nobanner NOMESSAGE: -s DEFAULT: -c
* End of entry for lp command.
* Beginning of entry for lpr command.
lpr BANNER: -J DEST: -P COPIES: -# FORM: -P NHEAD: -h NOMESSAGE: * not available DEFAULT: * not available
* End of entry for lpr command.
* End of the configuration file(EOF):
Notice the following points about the UDTSPOOL.CONFIG file:
■ The file contains two entries, one for lp and one for lpr. Each entry
lists the spooler command options that correspond to typical
SETPTR options. Within each entry, the “DEFAULT” line indicates
options that the spooler should always include.
■ In the first entry for lp, the lp command is identified as DEFAULT.
This identification directs UniData to use lp as the spooler command
unless you specify another command.
You can modify the UDTSPOOL.CONFIG file using any UNIX text editor.
You can add spooler commands, modify the existing entries, and change the
command identified as the DEFAULT.
UniData and UNIX Spoolers 15-5
If a particular option is not available with your spooler command, and you
do not want UniData to display an error message each time you invoke your
spooler command, you can specify U_IGNORE next to the unsupported
option. In the following example, the NHEAD option in the lp command has
a value of U_IGNORE. Therefore, UniData ignores the NHEAD option, even
if you specify it with the SETPTR or SP.ASSIGN commands:
%pg UDTSPOOL.CONFIG* $UDTHOME/sys/UDTSPOOL.CONFIG for AIX 4.1.1
* Beginning of the configuration file
* Beginning of entry for lp command.
lp DEFAULT * Default print command BANNER: -t DEST: -d COPIES: -n FORM: -d NHEAD: U_IGNORE NOMESSAGE: * not available DEFAULT: -c
* End of entry for lp command.
* Beginning of entry for lpr command.
lpr BANNER: -J DEST: -P COPIES: -# FORM: -P NHEAD: -h NOMESSAGE: * not available DEFAULT: * not available
* End of entry for lpr command.
* End of the configuration file
15-6 Administering UniData on UNIX
Enabling and Disabling Printers
The PTRENABLE and PTRDISABLE commands issue platform-dependent
UNIX commands to enable and disable a printer, respectively. You may add
the appropriate UNIX commands to the UDTSPOOL.CONFIG file for your
platform, as shown in the following example:
# pg UDTSPOOL.CONFIG* $UDTHOME/sys/UDTSPOOL.CONFIG for HPUX10
* Beginning of the configuration file
* Beginning of entry for lp command.
lp DEFAULT * Default print command BANNER: -t DEST: -d COPIES: -n FORM: -d NHEAD: -o nb NOMESSAGE: -s DEFAULT: -c PTRENABLE: enable PTRDISABLE: disable -c
* End of entry for lp command.
* End of the configuration file
If you do not specify the PTRENABLE and PTRDISABLE commands in the
UDTSPOOL.CONFIG file, the defaults of enable and disable are used.
SETOSPRINTER Command
The ECL SETOSPRINTER command enables you to select a UNIX spooler
command.
Syntax:
SETOSPRINTER “spooler_command”
The spooler_command must have an entry in your UDTSPOOL.CONFIG file.
The following example illustrates the SETOSPRINTER command:
: SETOSPRINTER "lp": SETOSPRINTER "lpr"
UniData and UNIX Spoolers 15-7
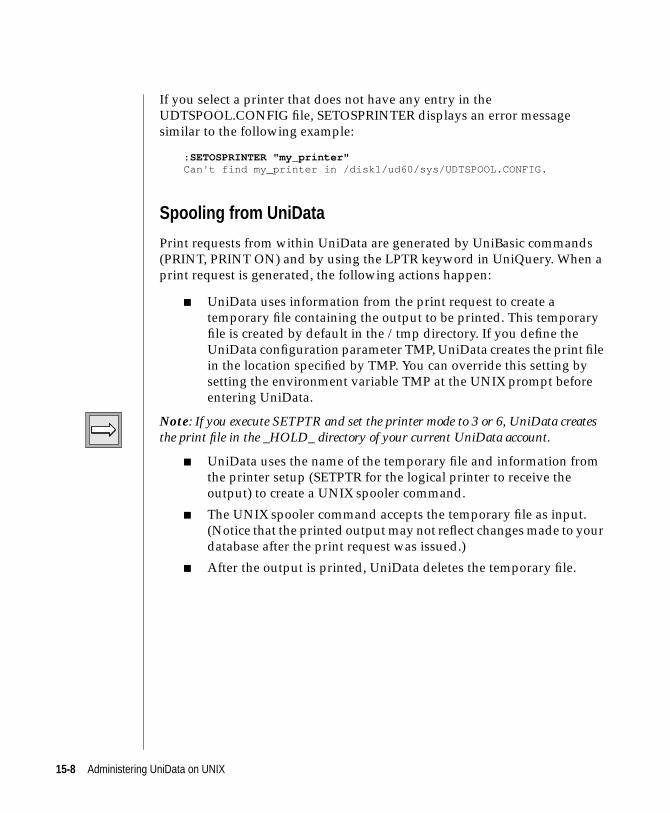
If you select a printer that does not have any entry in the
UDTSPOOL.CONFIG file, SETOSPRINTER displays an error message
similar to the following example:
: SETOSPRINTER "my_printer"Can't find my_printer in /disk1/ud60/sys/UDTSPOOL.CONFIG.
Spooling from UniData
Print requests from within UniData are generated by UniBasic commands
(PRINT, PRINT ON) and by using the LPTR keyword in UniQuery. When a
print request is generated, the following actions happen:
■ UniData uses information from the print request to create a
temporary file containing the output to be printed. This temporary
file is created by default in the /tmp directory. If you define the
UniData configuration parameter TMP, UniData creates the print file
in the location specified by TMP. You can override this setting by
setting the environment variable TMP at the UNIX prompt before
entering UniData.
Note: If you execute SETPTR and set the printer mode to 3 or 6, UniData createsthe print file in the _HOLD_ directory of your current UniData account.
■ UniData uses the name of the temporary file and information from
the printer setup (SETPTR for the logical printer to receive the
output) to create a UNIX spooler command.
■ The UNIX spooler command accepts the temporary file as input.
(Notice that the printed output may not reflect changes made to your
database after the print request was issued.)
■ After the output is printed, UniData deletes the temporary file.
15-8 Administering UniData on UNIX
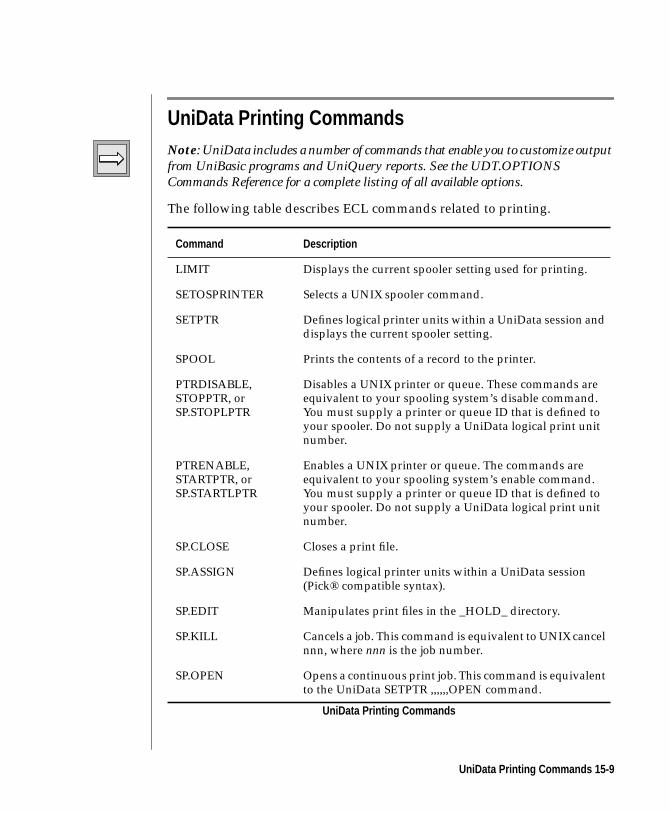
UniData Printing CommandsNote: UniData includes a number of commands that enable you to customize outputfrom UniBasic programs and UniQuery reports. See the UDT.OPTIONSCommands Reference for a complete listing of all available options.
The following table describes ECL commands related to printing.
Command Description
LIMIT Displays the current spooler setting used for printing.
SETOSPRINTER Selects a UNIX spooler command.
SETPTR Defines logical printer units within a UniData session anddisplays the current spooler setting.
SPOOL Prints the contents of a record to the printer.
PTRDISABLE,STOPPTR, orSP.STOPLPTR
Disables a UNIX printer or queue. These commands areequivalent to your spooling system’s disable command.You must supply a printer or queue ID that is defined toyour spooler. Do not supply a UniData logical print unitnumber.
PTRENABLE,STARTPTR, orSP.STARTLPTR
Enables a UNIX printer or queue. The commands areequivalent to your spooling system’s enable command.You must supply a printer or queue ID that is defined toyour spooler. Do not supply a UniData logical print unitnumber.
SP.CLOSE Closes a print file.
SP.ASSIGN Defines logical printer units within a UniData session(Pick® compatible syntax).
SP.EDIT Manipulates print files in the _HOLD_ directory.
SP.KILL Cancels a job. This command is equivalent to UNIX cancelnnn, where nnn is the job number.
SP.OPEN Opens a continuous print job. This command is equivalentto the UniData SETPTR ,,,,,,OPEN command.
UniData Printing Commands
UniData Printing Commands 15-9
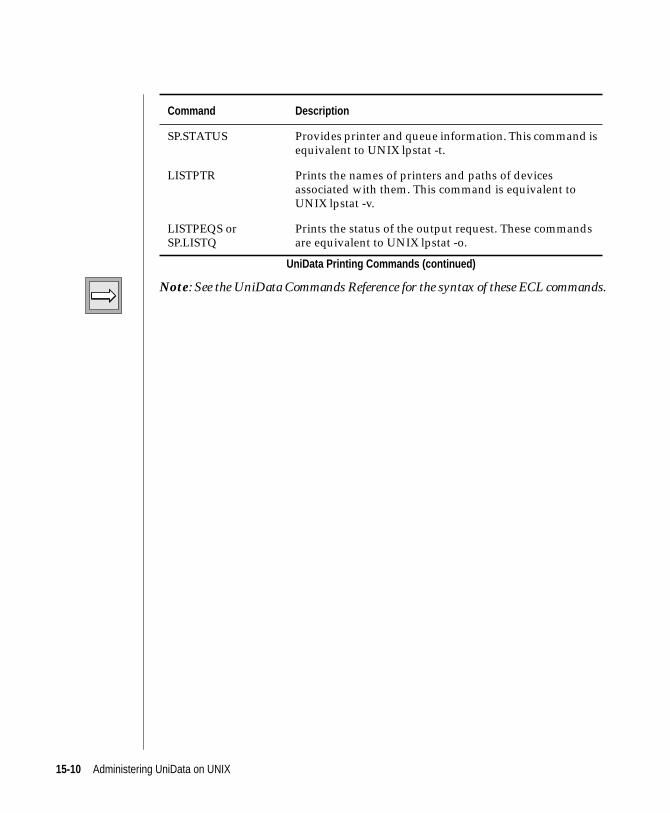
Note: See the UniData Commands Reference for the syntax of these ECL commands.
SP.STATUS Provides printer and queue information. This command isequivalent to UNIX lpstat -t.
LISTPTR Prints the names of printers and paths of devicesassociated with them. This command is equivalent toUNIX lpstat -v.
LISTPEQS orSP.LISTQ
Prints the status of the output request. These commandsare equivalent to UNIX lpstat -o.
Command Description
UniData Printing Commands (continued)
15-10 Administering UniData on UNIX
Configuring and Troubleshooting a PrinterIn order for any user to print to a printer from UniData, all the following
conditions must be true. Use these conditions as a guideline for setting up a
printer and for troubleshooting printer problems.
Physical Connection
The printer must be physically connected to your computer.
Troubleshooting
■ Check cables and connections.
■ Check power to the printer and check the printer for error
conditions.
■ Use the UNIX cat command to write a text file to the printer in serial
mode; verify that all contents of the file print successfully. For
example, assume you have a file called textfile and a printer attached
to /dev/tty01; enter cat textfile > /dev/tty01 at the UNIX prompt to
test the connection.
Refer to your host operating system documentation and your printer
documentation for information about connecting and troubleshooting a
printer.
Spooler Definition
You must define the printer to your UNIX spooler. Depending on your
spooling system, a printer can be a discrete destination or a member of a
device class.
Troubleshooting
■ Use the UNIX lpstat command to determine if the printer is defined.
Check your documentation to learn which option of lpstat to use.
Configuring and Troubleshooting a Printer 15-11
■ Attempt to spool a text file to the printer using the default print
command (for example, lp -c -dqueuename textfile). Remember that if
you added the printer as a member of a device class, spooling to the
device class sends the job to the first available member of that class,
which may not be the desired printer.
Note: Refer to your host operating system documentation for information about yourspooling system. Because different UNIX versions include different spoolingsystems, procedures for defining a printer to a spooler vary.
Definition in UniData
In order to access a specific printer (or queue) from a UniData session, you
need to link the printer, or queue, to an internal print unit in UniData. Use the
ECL SETPTR command for this. See “SETPTR” in this chapter.
Note: If you do not define a specific printer or queue with SETPTR, UniData directsoutput from UniBasic PRINT statements (following PRINTER ON statements), orfrom UniQuery statements with the LPTR option, to the default printer or queue onyour system.
15-12 Administering UniData on UNIX
SETPTRThe SETPTR command enables you to define “logical printer units” within a
UniData session. A logical printer unit is a combination of a printer
destination, a form type, page dimensions, and additional options. By
varying form type and options, you can define more than one logical printer
unit for a single physical printer.
With SETPTR, you can define up to 31 logical printer units in a single
UniData session. Throughout UniData, you can define up to 255, but you can
define only 31 in a single user session.
Syntax:
SETPTR unit [width,length,topmargin,bottommargin] [mode]
[“spooleroptions”] [options]
The following table lists the parameters of the SETPTR syntax.
Parameter Description
unit Logical printer unit number; internal to UniData; you canmap this to a UNIX printer or queue with the DEST andFORM options. Must range from 0 through 254; default is0.
[width] Number of characters per line; must be within the range0-256; default is 132.
[length] Number of lines per page; must be within the range1-32,767 lines; default is 60.
[topmargin] The number of lines to leave blank at the top of each page;must be within the range 0-25; default is 3.
[bottommargin] The number of lines to leave blank at the bottom of eachpage; must be within the range 0-25; default is 3.
SETPTR Parameters
SETPTR 15-13
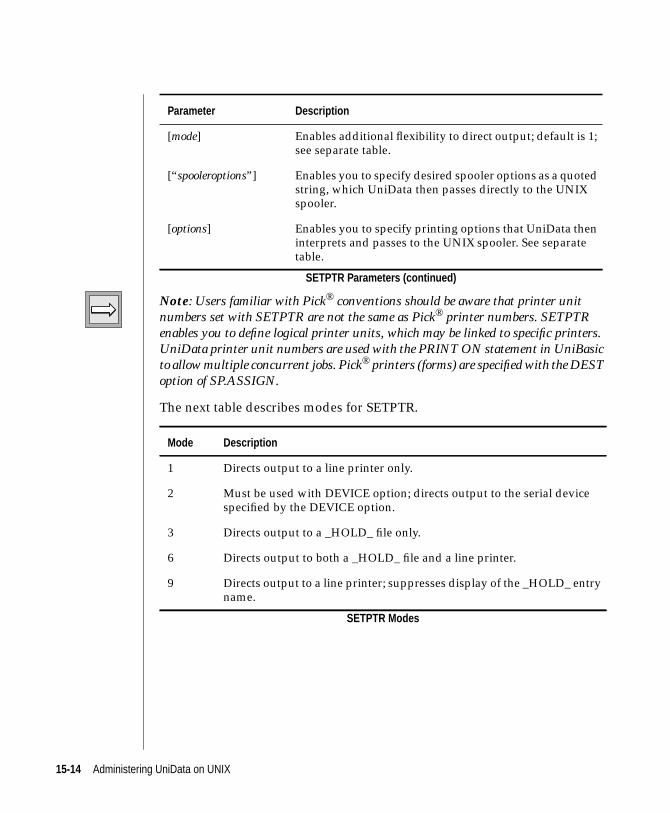
Note: Users familiar with Pick® conventions should be aware that printer unitnumbers set with SETPTR are not the same as Pick® printer numbers. SETPTRenables you to define logical printer units, which may be linked to specific printers.UniData printer unit numbers are used with the PRINT ON statement in UniBasicto allow multiple concurrent jobs. Pick® printers (forms) are specified with the DESToption of SP.ASSIGN.
The next table describes modes for SETPTR.
[mode] Enables additional flexibility to direct output; default is 1;see separate table.
[“spooleroptions”] Enables you to specify desired spooler options as a quotedstring, which UniData then passes directly to the UNIXspooler.
[options] Enables you to specify printing options that UniData theninterprets and passes to the UNIX spooler. See separatetable.
Mode Description
1 Directs output to a line printer only.
2 Must be used with DEVICE option; directs output to the serial devicespecified by the DEVICE option.
3 Directs output to a _HOLD_ file only.
6 Directs output to both a _HOLD_ file and a line printer.
9 Directs output to a line printer; suppresses display of the _HOLD_ entryname.
SETPTR Modes
Parameter Description
SETPTR Parameters (continued)
15-14 Administering UniData on UNIX
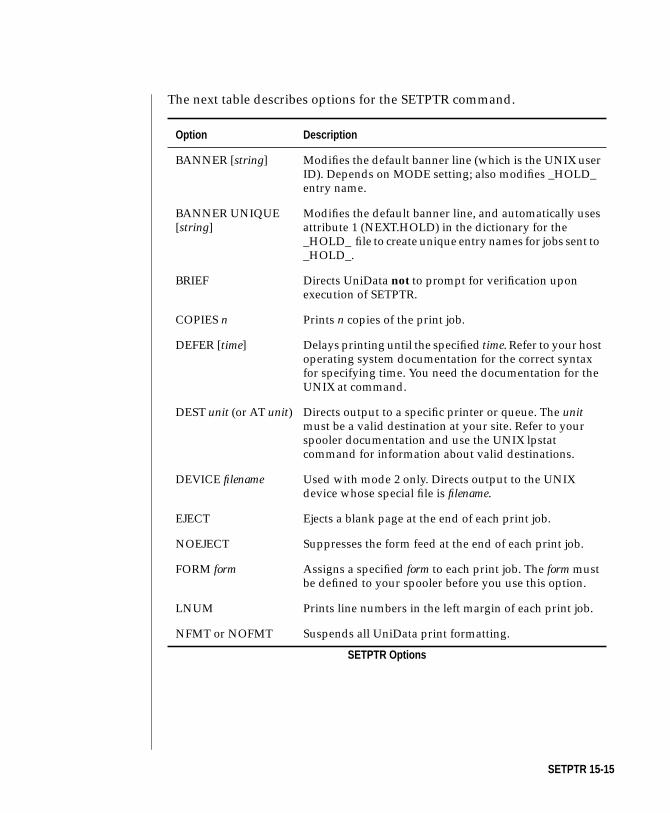
The next table describes options for the SETPTR command.
Option Description
BANNER [string] Modifies the default banner line (which is the UNIX userID). Depends on MODE setting; also modifies _HOLD_entry name.
BANNER UNIQUE[string]
Modifies the default banner line, and automatically usesattribute 1 (NEXT.HOLD) in the dictionary for the_HOLD_ file to create unique entry names for jobs sent to_HOLD_.
BRIEF Directs UniData not to prompt for verification uponexecution of SETPTR.
COPIES n Prints n copies of the print job.
DEFER [time] Delays printing until the specified time. Refer to your hostoperating system documentation for the correct syntaxfor specifying time. You need the documentation for theUNIX at command.
DEST unit (or AT unit) Directs output to a specific printer or queue. The unitmust be a valid destination at your site. Refer to yourspooler documentation and use the UNIX lpstatcommand for information about valid destinations.
DEVICE filename Used with mode 2 only. Directs output to the UNIXdevice whose special file is filename.
EJECT Ejects a blank page at the end of each print job.
NOEJECT Suppresses the form feed at the end of each print job.
FORM form Assigns a specified form to each print job. The form mustbe defined to your spooler before you use this option.
LNUM Prints line numbers in the left margin of each print job.
NFMT or NOFMT Suspends all UniData print formatting.
SETPTR Options
SETPTR 15-15
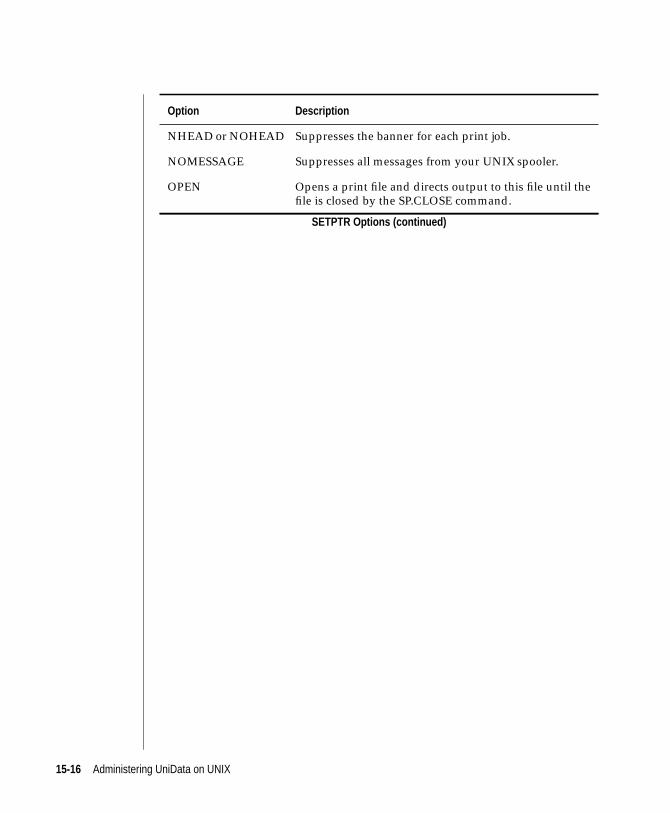
NHEAD or NOHEAD Suppresses the banner for each print job.
NOMESSAGE Suppresses all messages from your UNIX spooler.
OPEN Opens a print file and directs output to this file until thefile is closed by the SP.CLOSE command.
Option Description
SETPTR Options (continued)
15-16 Administering UniData on UNIX

Environment VariablesUniData provides two environment variables that affect printing.
Disabling Printer Validation
You can bypass validation of DEST and FORM in SETPTR against the UNIX
spooler’s list of logical printers by setting the NOCHKLPREQ environment
variable. (UniData concatenates DEST and FORM prior to validation, since
many logical printers can access a single physical printer or queue.) On
systems with hundreds of print units defined in the UNIX spooler, the
UniData validation can take so much time that it is a processing bottleneck.
In such cases, setting NOCHKLPREQ removes the bottleneck. Use the
following commands to set NOCHKLPREQ:
Bourne or Korn Shell:
NOCHKLPREQ=1;export NOCHKLPREQ
C shell:
setenv NOCHKLPREQ 1
Consider setting this variable in each user’s .login or .profile.
Warning: If you disable validation, you may encounter unexpected results,including lost print jobs, by specifying invalid DEST/FORM combinations. It issafest to disable checking if you execute your SETPTR commands in a paragraph ora UniBasic program rather than manually, and if you test all options beforeimplementing them in production.
Defining an Alternate Search Path
The LPREQ environment variable enables you to provide an alternate search
path for DEST/FORM validation. UniData automatically searches the
default directory for your UNIX environment (for instance, on an HP-UX
system, the directory /usr/spool/lp/request). If you wish to use a different
directory, use LPREQ.
Environment Variables 15-17
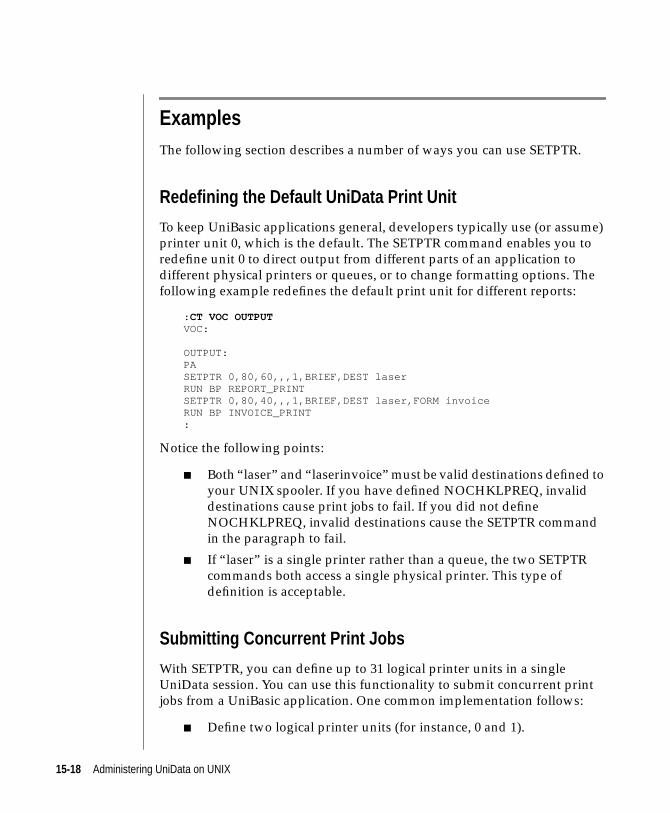
ExamplesThe following section describes a number of ways you can use SETPTR.
Redefining the Default UniData Print Unit
To keep UniBasic applications general, developers typically use (or assume)
printer unit 0, which is the default. The SETPTR command enables you to
redefine unit 0 to direct output from different parts of an application to
different physical printers or queues, or to change formatting options. The
following example redefines the default print unit for different reports:
: CT VOC OUTPUTVOC:
OUTPUT:PASETPTR 0,80,60,,,1,BRIEF,DEST laserRUN BP REPORT_PRINTSETPTR 0,80,40,,,1,BRIEF,DEST laser,FORM invoiceRUN BP INVOICE_PRINT:
Notice the following points:
■ Both “laser” and “laserinvoice” must be valid destinations defined to
your UNIX spooler. If you have defined NOCHKLPREQ, invalid
destinations cause print jobs to fail. If you did not define
NOCHKLPREQ, invalid destinations cause the SETPTR command
in the paragraph to fail.
■ If “laser” is a single printer rather than a queue, the two SETPTR
commands both access a single physical printer. This type of
definition is acceptable.
Submitting Concurrent Print Jobs
With SETPTR, you can define up to 31 logical printer units in a single
UniData session. You can use this functionality to submit concurrent print
jobs from a UniBasic application. One common implementation follows:
■ Define two logical printer units (for instance, 0 and 1).
15-18 Administering UniData on UNIX
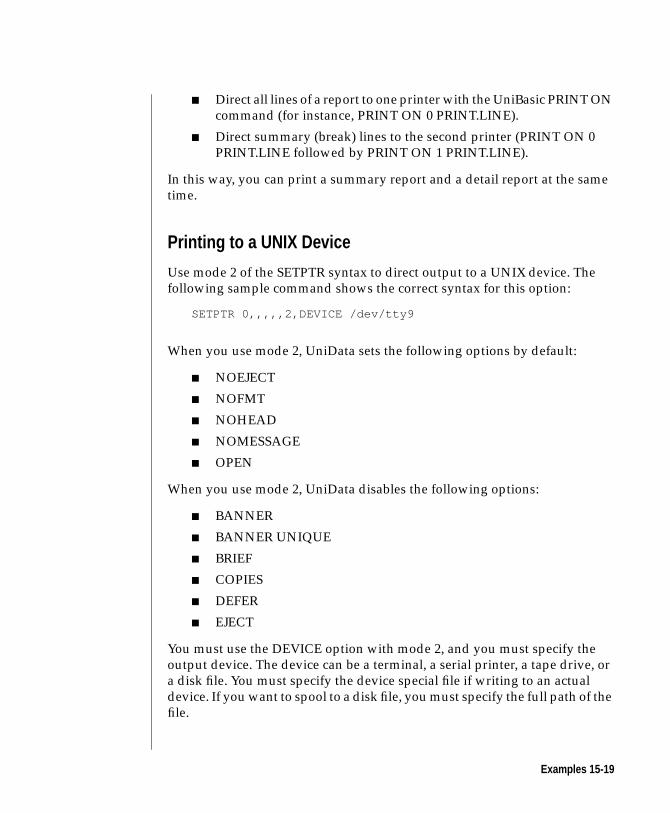
■ Direct all lines of a report to one printer with the UniBasic PRINT ON
command (for instance, PRINT ON 0 PRINT.LINE).
■ Direct summary (break) lines to the second printer (PRINT ON 0
PRINT.LINE followed by PRINT ON 1 PRINT.LINE).
In this way, you can print a summary report and a detail report at the same
time.
Printing to a UNIX Device
Use mode 2 of the SETPTR syntax to direct output to a UNIX device. The
following sample command shows the correct syntax for this option:
SETPTR 0,,,,,2,DEVICE /dev/tty9
When you use mode 2, UniData sets the following options by default:
■ NOEJECT
■ NOFMT
■ NOHEAD
■ NOMESSAGE
■ OPEN
When you use mode 2, UniData disables the following options:
■ BANNER
■ BANNER UNIQUE
■ BRIEF
■ COPIES
■ DEFER
■ EJECT
You must use the DEVICE option with mode 2, and you must specify the
output device. The device can be a terminal, a serial printer, a tape drive, or
a disk file. You must specify the device special file if writing to an actual
device. If you want to spool to a disk file, you must specify the full path of the
file.
Examples 15-19
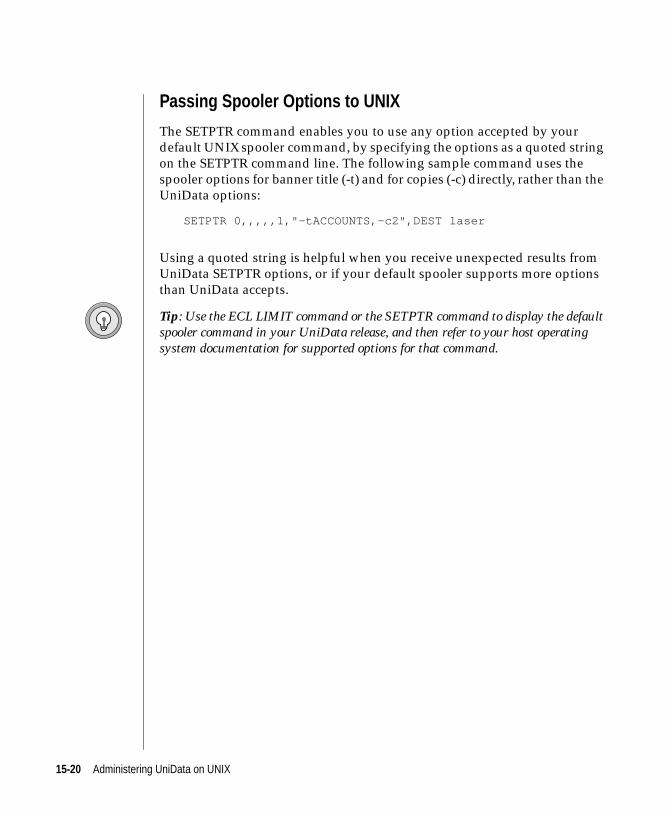
Passing Spooler Options to UNIX
The SETPTR command enables you to use any option accepted by your
default UNIX spooler command, by specifying the options as a quoted string
on the SETPTR command line. The following sample command uses the
spooler options for banner title (-t) and for copies (-c) directly, rather than the
UniData options:
SETPTR 0,,,,,1,"-tACCOUNTS,-c2",DEST laser
Using a quoted string is helpful when you receive unexpected results from
UniData SETPTR options, or if your default spooler supports more options
than UniData accepts.
Tip: Use the ECL LIMIT command or the SETPTR command to display the defaultspooler command in your UniData release, and then refer to your host operatingsystem documentation for supported options for that command.
15-20 Administering UniData on UNIX
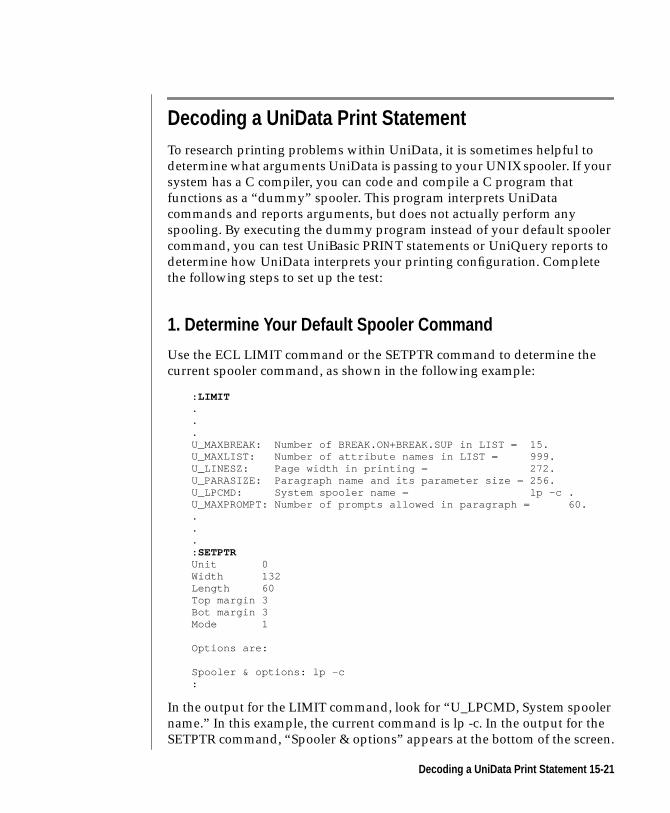
Decoding a UniData Print StatementTo research printing problems within UniData, it is sometimes helpful to
determine what arguments UniData is passing to your UNIX spooler. If your
system has a C compiler, you can code and compile a C program that
functions as a “dummy” spooler. This program interprets UniData
commands and reports arguments, but does not actually perform any
spooling. By executing the dummy program instead of your default spooler
command, you can test UniBasic PRINT statements or UniQuery reports to
determine how UniData interprets your printing configuration. Complete
the following steps to set up the test:
1. Determine Your Default Spooler Command
Use the ECL LIMIT command or the SETPTR command to determine the
current spooler command, as shown in the following example:
: LIMIT...U_MAXBREAK: Number of BREAK.ON+BREAK.SUP in LIST = 15.U_MAXLIST: Number of attribute names in LIST = 999.U_LINESZ: Page width in printing = 272.U_PARASIZE: Paragraph name and its parameter size = 256.U_LPCMD: System spooler name = lp -c .U_MAXPROMPT: Number of prompts allowed in paragraph = 60....: SETPTRUnit 0Width 132Length 60Top margin 3Bot margin 3Mode 1
Options are:
Spooler & options: lp -c:
In the output for the LIMIT command, look for “U_LPCMD, System spooler
name.” In this example, the current command is lp -c. In the output for the
SETPTR command, “Spooler & options” appears at the bottom of the screen.
Decoding a UniData Print Statement 15-21
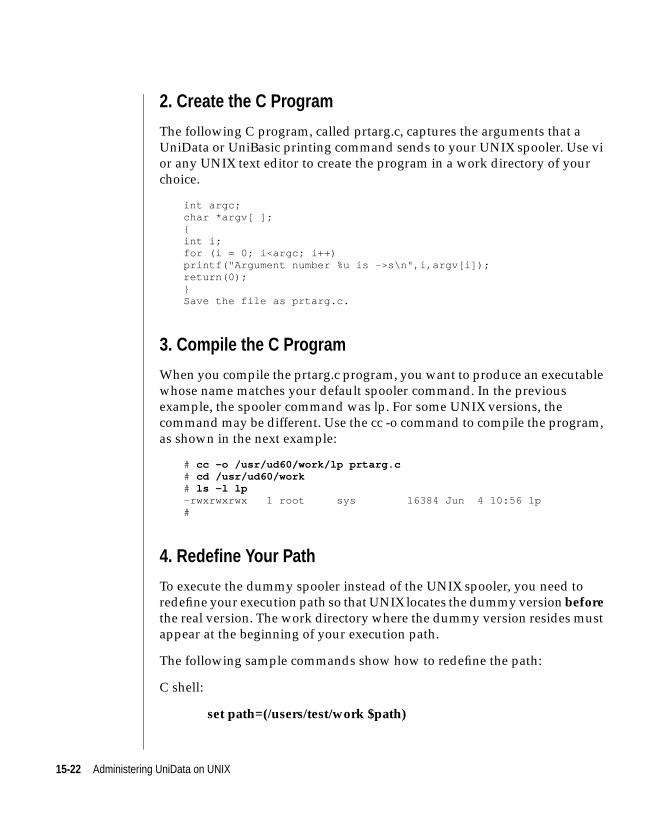
2. Create the C Program
The following C program, called prtarg.c, captures the arguments that a
UniData or UniBasic printing command sends to your UNIX spooler. Use vi
or any UNIX text editor to create the program in a work directory of your
choice.
int argc;char *argv[ ];{int i;for (i = 0; i<argc; i++)printf("Argument number %u is ->s\n",i,argv[i]);return(0);}Save the file as prtarg.c.
3. Compile the C Program
When you compile the prtarg.c program, you want to produce an executable
whose name matches your default spooler command. In the previous
example, the spooler command was lp. For some UNIX versions, the
command may be different. Use the cc -o command to compile the program,
as shown in the next example:
# cc -o /usr/ud60/work/lp prtarg.c# cd /usr/ud60/work# ls -l lp-rwxrwxrwx 1 root sys 16384 Jun 4 10:56 lp#
4. Redefine Your Path
To execute the dummy spooler instead of the UNIX spooler, you need to
redefine your execution path so that UNIX locates the dummy version beforethe real version. The work directory where the dummy version resides must
appear at the beginning of your execution path.
The following sample commands show how to redefine the path:
C shell:
set path=(/users/test/work $path)
15-22 Administering UniData on UNIX

Bourne or Korn shell:
PATH=/users/test/work:$PATH;export PATH
Once the path is redefined, your dummy spooler executes in place of the
default version.
5. Test UniData Printing
With your execution path redefined, log in to a UniData account and test
printing commands. The following screen shows sample output from the
dummy spooler for a UniQuery report statement that includes the LPTR
keyword, and from a UniBasic PRINT statement:
: SETPTR 0Unit 0Width 80Length 60Top margin 3Bot margin 3Mode 1
Options are:Destination laser
Spooler & options: lp -c -dlaser: LIST VOC WITH F1 = PA LPTRArgument number 0 is ->lpArgument number 1 is ->-cArgument number 2 is ->-dlaserArgument number 3 is ->/tmp/PRT2a18917:: CT BP PRINTONBP:
PRINTONPRINTER ONPRINT “HELLO WORLD”END: RUN BP PRINTONArgument number 0 is ->lpArgument number 1 is ->-cArgument number 2 is ->-dlaserArgument number 3 is ->/tmp/PRT4a18917:
Decoding a UniData Print Statement 15-23
6. Reset Your Execution Path
When you have completed a testing session, make sure you reset your
execution path so that the actual spooler command executes rather than the
dummy spooler program.
15-24 Administering UniData on UNIX
16Chapter
Accessing UNIX Devices
UniData Tape Handling Commands . . . . . . . . . . . 16-4
SETTAPE . . . . . . . . . . . . . . . . . . . . . 16-6
Steps for Tape Device Use . . . . . . . . . . . . . . . 16-7
UniData LINE Commands . . . . . . . . . . . . . . . 16-10
Communicating with GET and SEND . . . . . . . . . . . 16-11
Dual-Terminal Debugging in UniBasic . . . . . . . . . . . 16-13
Setting Up Dual-Terminal Debugging . . . . . . . . . . . 16-14

16 -2 Ad
ministering UniData on UNIX
This chapter describes UniData commands for identifying and accessing
UNIX tape devices. This chapter also describes commands for reading and
writing to other UNIX devices, which you can use for transferring data and
also for debugging UniBasic applications.
16-3
UniData Tape Handling CommandsUniData includes a number of ECL and UniBasic commands for reading data
from a tape and writing data to a tape. The following table summarizes these
ECL commands.
Note: See the UniData Commands Reference for information about ECL commands.
Command Description
SETTAPE Defines a logical tape unit in UniData; requires rootaccess; must precede all other tape commands.
T.ATT Links a logical tape unit to a UniData process; mustprecede any reads/writes involving the tape.
T.BAK Moves a tape backward a specified number of files.
T.CHK or T.CHECK Reads a tape created by T.DUMP and check for damage.
T.DET Releases a logical tape unit when a UniData process isfinished with it.
T.DUMP Copies the contents of a file or active select list to tape.
T.EOD Moves a tape to end of file.
T.FWD Moves a tape to the beginning of the next file.
T.LOAD Loads records from a tape created with T.DUMP.
T.RDLBL Reads and displays the first 80 characters of the tape labelon a tape created with T.DUMP.
T.READ Reads and displays the next record from tape.
T.REW Rewinds a tape.
T.SPACE Moves a tape forward a specified number of files.
T.STATUS Displays current tape device assignments.
T.UNLOAD Rewinds and unloads a tape.
T.WEOF Writes an end-of-file mark on a tape.
ECL Tape Handling Commands
16-4 Administering UniData on UNIX
The next table summarizes UniBasic commands for I/O on tape devices.
Note: See the UniBasic Commands Reference for information about these UniBasiccommands.
Command Description
READT Reads the next available record from tape.
RESIZET Changes the block size used by the WRITET statement.
REWIND Rewinds a tape.
WEOF Writes an end-of-file mark to a tape.
WRITET Writes the value of a specified expression as a record on atape.
UniBasic Tape Handling Commands
UniData Tape Handling Commands 16-5

SETTAPEThe ECL SETTAPE command enables you to define logical tape units in your
UniData environment. This command establishes a link between a UniData
internal tape unit number and a UNIX file. You can use SETTAPE to relate
unit numbers to tape devices or UNIX disk files.
Any user can execute SETTAPE unit.no to display the current settings for a
tape unit. However, you must log in as root to define a tape unit or modify
settings.
Once you define a tape unit using SETTAPE, users can access it in any
UniData account on your system. The tape unit definition remains the same
unless it is changed by root.
Syntax:
SETTAPE unit.no [dn.path.nr][dn.path.r][blocksize]
The following table describes the parameters of the SETTAPE syntax.
Parameter Description
unit.no Internal UniData tape unit number. Must be within therange 0-9.
[dn.path.nr] Full path for the no rewind device driver for unit.no.
[dn.path.r] Full path for the rewind device driver for unit.no.
[blocksize] Tape block size in bytes; must be a multiple of 512. Thedefault value is 4096.
SETTAPE Parameters
16-6 Administering UniData on UNIX
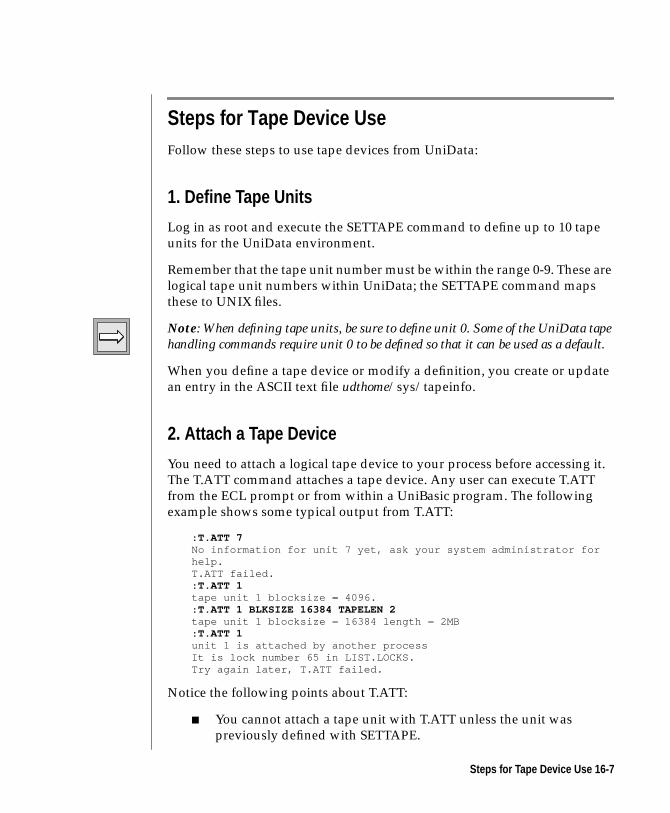
Steps for Tape Device UseFollow these steps to use tape devices from UniData:
1. Define Tape Units
Log in as root and execute the SETTAPE command to define up to 10 tape
units for the UniData environment.
Remember that the tape unit number must be within the range 0-9. These are
logical tape unit numbers within UniData; the SETTAPE command maps
these to UNIX files.
Note: When defining tape units, be sure to define unit 0. Some of the UniData tapehandling commands require unit 0 to be defined so that it can be used as a default.
When you define a tape device or modify a definition, you create or update
an entry in the ASCII text file udthome/sys/tapeinfo.
2. Attach a Tape Device
You need to attach a logical tape device to your process before accessing it.
The T.ATT command attaches a tape device. Any user can execute T.ATT
from the ECL prompt or from within a UniBasic program. The following
example shows some typical output from T.ATT:
: T.ATT 7No information for unit 7 yet, ask your system administrator forhelp.T.ATT failed.: T.ATT 1tape unit 1 blocksize = 4096.: T.ATT 1 BLKSIZE 16384 TAPELEN 2tape unit 1 blocksize = 16384 length = 2MB: T.ATT 1unit 1 is attached by another processIt is lock number 65 in LIST.LOCKS.Try again later, T.ATT failed.
Notice the following points about T.ATT:
■ You cannot attach a tape unit with T.ATT unless the unit was
previously defined with SETTAPE.
Steps for Tape Device Use 16-7
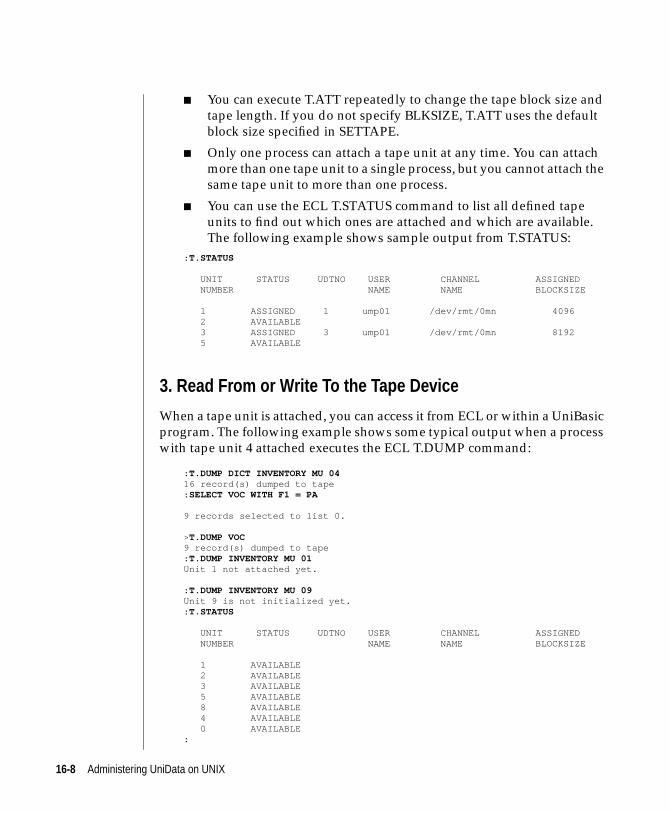
■ You can execute T.ATT repeatedly to change the tape block size and
tape length. If you do not specify BLKSIZE, T.ATT uses the default
block size specified in SETTAPE.
■ Only one process can attach a tape unit at any time. You can attach
more than one tape unit to a single process, but you cannot attach the
same tape unit to more than one process.
■ You can use the ECL T.STATUS command to list all defined tape
units to find out which ones are attached and which are available.
The following example shows sample output from T.STATUS:
: T.STATUS
UNIT STATUS UDTNO USER CHANNEL ASSIGNED NUMBER NAME NAME BLOCKSIZE
1 ASSIGNED 1 ump01 /dev/rmt/0mn 4096 2 AVAILABLE 3 ASSIGNED 3 ump01 /dev/rmt/0mn 8192 5 AVAILABLE
3. Read From or Write To the Tape Device
When a tape unit is attached, you can access it from ECL or within a UniBasic
program. The following example shows some typical output when a process
with tape unit 4 attached executes the ECL T.DUMP command:
: T.DUMP DICT INVENTORY MU 0416 record(s) dumped to tape: SELECT VOC WITH F1 = PA
9 records selected to list 0.
>T.DUMP VOC9 record(s) dumped to tape: T.DUMP INVENTORY MU 01Unit 1 not attached yet.
: T.DUMP INVENTORY MU 09Unit 9 is not initialized yet.: T.STATUS
UNIT STATUS UDTNO USER CHANNEL ASSIGNED NUMBER NAME NAME BLOCKSIZE
1 AVAILABLE 2 AVAILABLE 3 AVAILABLE 5 AVAILABLE 8 AVAILABLE 4 AVAILABLE 0 AVAILABLE:
16-8 Administering UniData on UNIX
Notice the following points about the example:
■ You cannot write to a tape device unless it is attached with T.ATT. If
you have attached more than one device, you need to specify the
device to write to or read from. If you have attached only one device,
UniData accesses the device you attached.
■ With T.DUMP, you can write from an active select list.
Note: When you access a tape device, the operation fails if the device is not properlyconnected or if no tape is mounted. The UniData T.ATT and SETTAPE commandsdo not detect device configuration problems, so you may be able to define and attacha device, but be unable to complete your access to it.
Tip: Due to the differences in Pick® operating systems and manufactured tapes, IBMsuggests you use the HDR.SUPP keyword when using the T.DUMP command, andwhen using the Pick® T-LOAD command, to avoid inconsistencies in tape labels.
4. Release the Tape Device
When you no longer need to access a tape device, use the T.DET command to
release it so another process can use it. If you have attached more than one
device, you need to release each one separately. If you have attached only
one, the T.DET command releases it. You can execute T.DET from ECL or
from within a UniBasic program.
Steps for Tape Device Use 16-9
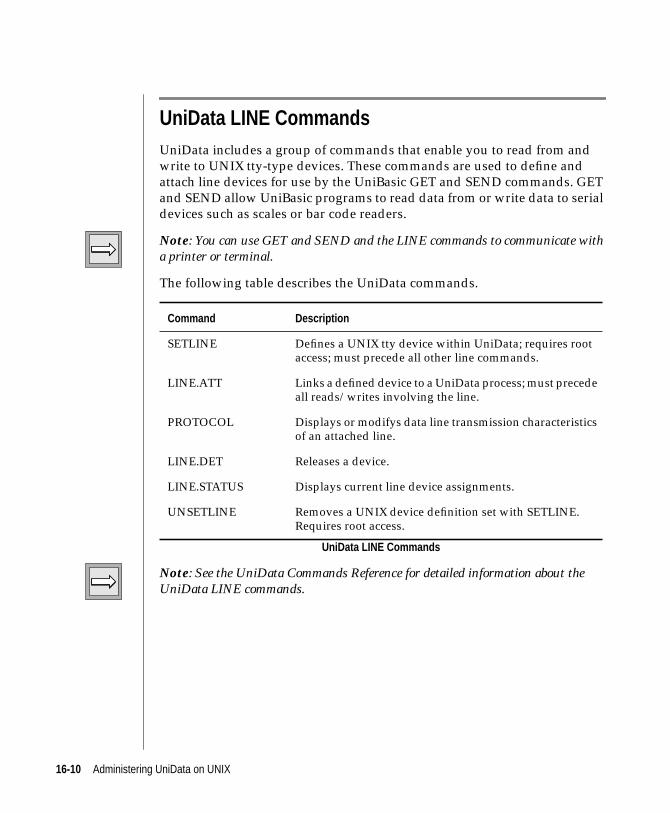
UniData LINE CommandsUniData includes a group of commands that enable you to read from and
write to UNIX tty-type devices. These commands are used to define and
attach line devices for use by the UniBasic GET and SEND commands. GET
and SEND allow UniBasic programs to read data from or write data to serial
devices such as scales or bar code readers.
Note: You can use GET and SEND and the LINE commands to communicate witha printer or terminal.
The following table describes the UniData commands.
Note: See the UniData Commands Reference for detailed information about theUniData LINE commands.
Command Description
SETLINE Defines a UNIX tty device within UniData; requires rootaccess; must precede all other line commands.
LINE.ATT Links a defined device to a UniData process; must precedeall reads/writes involving the line.
PROTOCOL Displays or modifys data line transmission characteristicsof an attached line.
LINE.DET Releases a device.
LINE.STATUS Displays current line device assignments.
UNSETLINE Removes a UNIX device definition set with SETLINE.Requires root access.
UniData LINE Commands
16-10 Administering UniData on UNIX
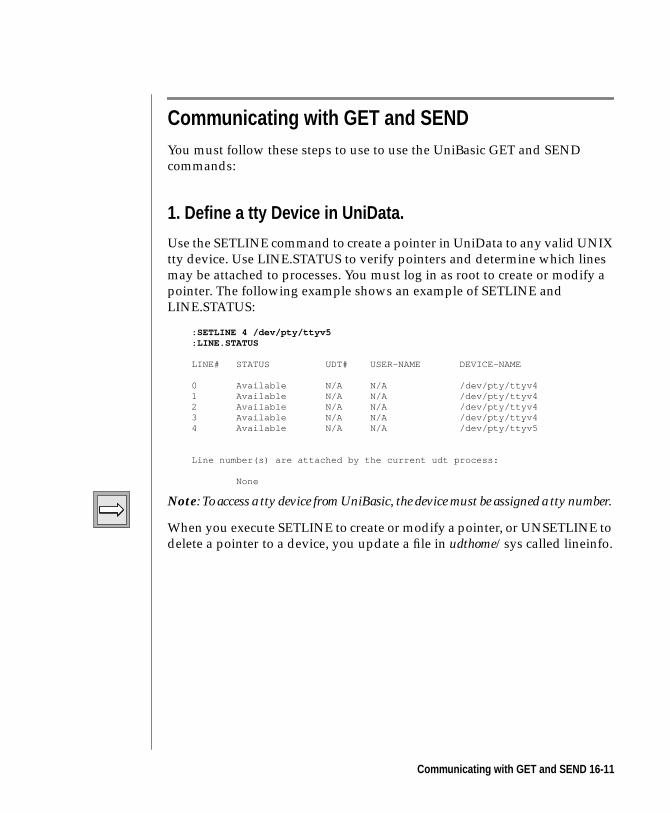
Communicating with GET and SENDYou must follow these steps to use to use the UniBasic GET and SEND
commands:
1. Define a tty Device in UniData.
Use the SETLINE command to create a pointer in UniData to any valid UNIX
tty device. Use LINE.STATUS to verify pointers and determine which lines
may be attached to processes. You must log in as root to create or modify a
pointer. The following example shows an example of SETLINE and
LINE.STATUS:
: SETLINE 4 /dev/pty/ttyv5: LINE.STATUS
LINE# STATUS UDT# USER-NAME DEVICE-NAME
0 Available N/A N/A /dev/pty/ttyv41 Available N/A N/A /dev/pty/ttyv42 Available N/A N/A /dev/pty/ttyv43 Available N/A N/A /dev/pty/ttyv44 Available N/A N/A /dev/pty/ttyv5
Line number(s) are attached by the current udt process:
None
Note: To access a tty device from UniBasic, the device must be assigned a tty number.
When you execute SETLINE to create or modify a pointer, or UNSETLINE to
delete a pointer to a device, you update a file in udthome/sys called lineinfo.
Communicating with GET and SEND 16-11
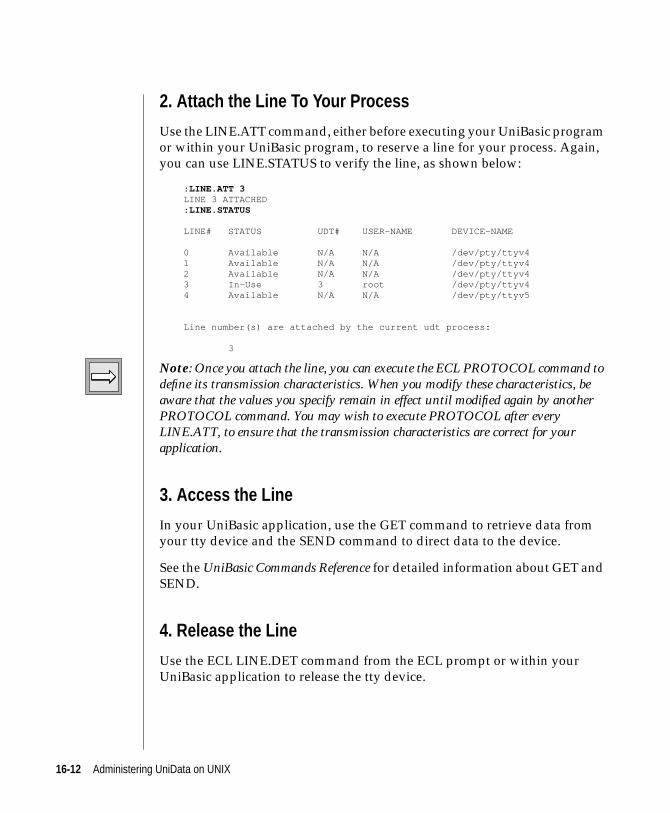
2. Attach the Line To Your Process
Use the LINE.ATT command, either before executing your UniBasic program
or within your UniBasic program, to reserve a line for your process. Again,
you can use LINE.STATUS to verify the line, as shown below:
: LINE.ATT 3LINE 3 ATTACHED: LINE.STATUS
LINE# STATUS UDT# USER-NAME DEVICE-NAME
0 Available N/A N/A /dev/pty/ttyv41 Available N/A N/A /dev/pty/ttyv42 Available N/A N/A /dev/pty/ttyv43 In-Use 3 root /dev/pty/ttyv44 Available N/A N/A /dev/pty/ttyv5
Line number(s) are attached by the current udt process:
3
Note: Once you attach the line, you can execute the ECL PROTOCOL command todefine its transmission characteristics. When you modify these characteristics, beaware that the values you specify remain in effect until modified again by anotherPROTOCOL command. You may wish to execute PROTOCOL after everyLINE.ATT, to ensure that the transmission characteristics are correct for yourapplication.
3. Access the Line
In your UniBasic application, use the GET command to retrieve data from
your tty device and the SEND command to direct data to the device.
See the UniBasic Commands Reference for detailed information about GET and
SEND.
4. Release the Line
Use the ECL LINE.DET command from the ECL prompt or within your
UniBasic application to release the tty device.
16-12 Administering UniData on UNIX
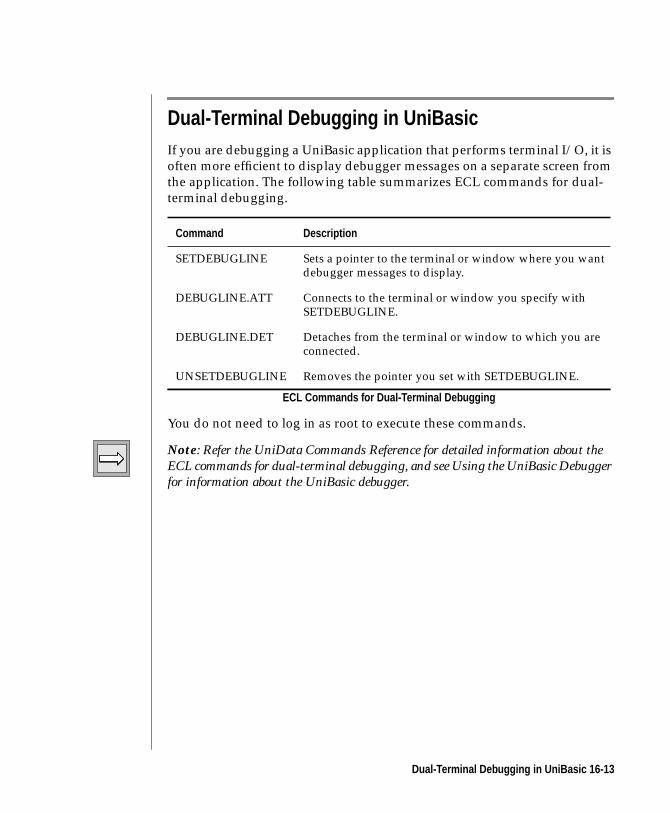
Dual-Terminal Debugging in UniBasicIf you are debugging a UniBasic application that performs terminal I/O, it is
often more efficient to display debugger messages on a separate screen from
the application. The following table summarizes ECL commands for dual-
terminal debugging.
You do not need to log in as root to execute these commands.
Note: Refer the UniData Commands Reference for detailed information about theECL commands for dual-terminal debugging, and see Using the UniBasic Debuggerfor information about the UniBasic debugger.
Command Description
SETDEBUGLINE Sets a pointer to the terminal or window where you wantdebugger messages to display.
DEBUGLINE.ATT Connects to the terminal or window you specify withSETDEBUGLINE.
DEBUGLINE.DET Detaches from the terminal or window to which you areconnected.
UNSETDEBUGLINE Removes the pointer you set with SETDEBUGLINE.
ECL Commands for Dual-Terminal Debugging
Dual-Terminal Debugging in UniBasic 16-13
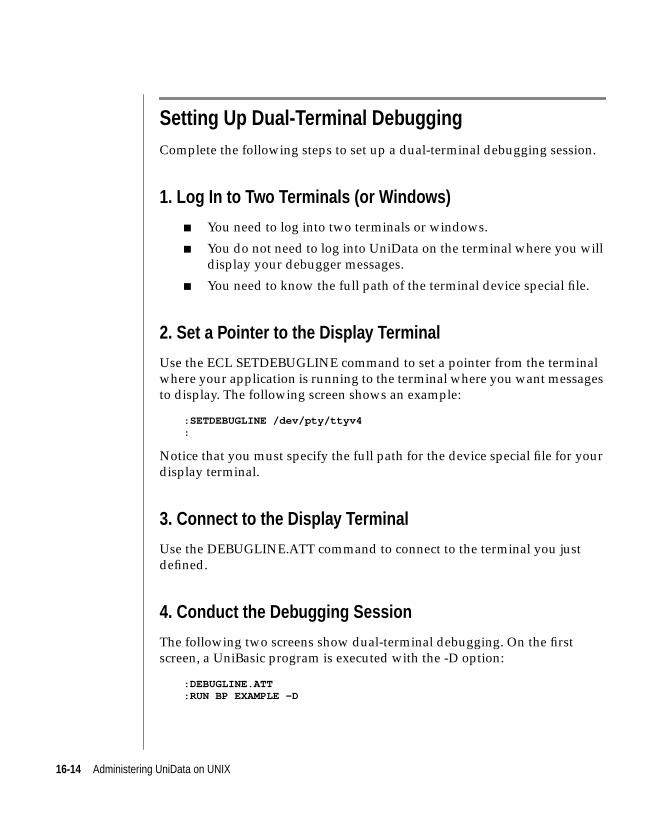
Setting Up Dual-Terminal DebuggingComplete the following steps to set up a dual-terminal debugging session.
1. Log In to Two Terminals (or Windows)
■ You need to log into two terminals or windows.
■ You do not need to log into UniData on the terminal where you will
display your debugger messages.
■ You need to know the full path of the terminal device special file.
2. Set a Pointer to the Display Terminal
Use the ECL SETDEBUGLINE command to set a pointer from the terminal
where your application is running to the terminal where you want messages
to display. The following screen shows an example:
: SETDEBUGLINE /dev/pty/ttyv4:
Notice that you must specify the full path for the device special file for your
display terminal.
3. Connect to the Display Terminal
Use the DEBUGLINE.ATT command to connect to the terminal you just
defined.
4. Conduct the Debugging Session
The following two screens show dual-terminal debugging. On the first
screen, a UniBasic program is executed with the -D option:
: DEBUGLINE.ATT: RUN BP EXAMPLE -D
16-14 Administering UniData on UNIX
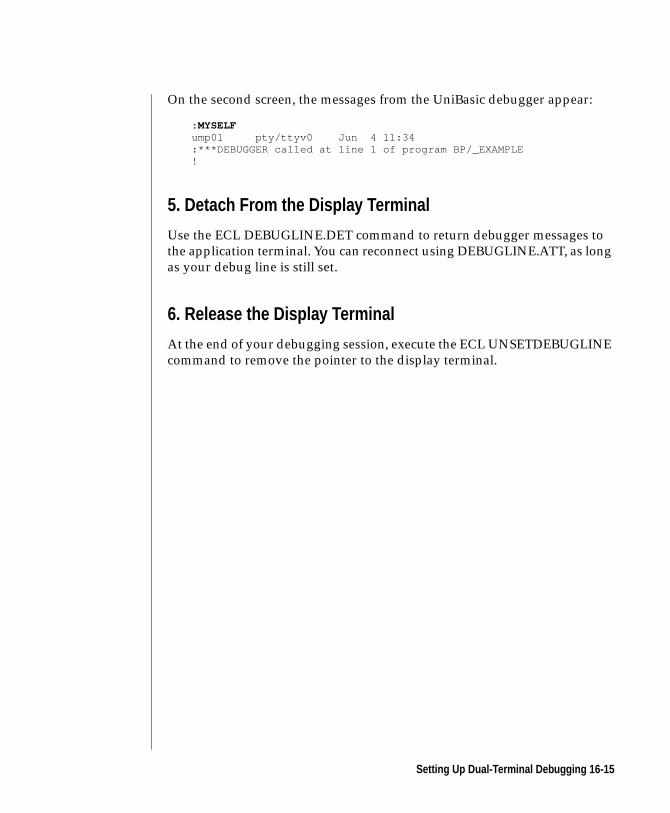
On the second screen, the messages from the UniBasic debugger appear:
: MYSELFump01 pty/ttyv0 Jun 4 11:34:***DEBUGGER called at line 1 of program BP/_EXAMPLE!
5. Detach From the Display Terminal
Use the ECL DEBUGLINE.DET command to return debugger messages to
the application terminal. You can reconnect using DEBUGLINE.ATT, as long
as your debug line is still set.
6. Release the Display Terminal
At the end of your debugging session, execute the ECL UNSETDEBUGLINE
command to remove the pointer to the display terminal.
Setting Up Dual-Terminal Debugging 16-15

16-16 Administering UniData on UNIX
17Chapter
Managing Memory
UniData Monitoring/Configuring Tools . . . . . . . . . . 17-4
udtconf Main Display . . . . . . . . . . . . . . . 17-4
Calculating udtconfig Parameters . . . . . . . . . . . 17-5
Checking Configuration Parameters . . . . . . . . . . 17-6
Saving Configuration Parameters . . . . . . . . . . . 17-6
Recalculating the Size of the CTL . . . . . . . . . . . 17-7
Viewing Current and Suggested Settings . . . . . . . . . 17-7
Exiting udtconf . . . . . . . . . . . . . . . . . . 17-8
Setting Shared Memory Parameters . . . . . . . . . . . . 17-9
shmconf: Main Display . . . . . . . . . . . . . . . 17-9
shmconf: Viewing Current and Suggested Settings . . . . . 17-10
shmconf: Recalculating the Size of CTL . . . . . . . . . 17-11
shmconf: Recalculating Other Parameters . . . . . . . . 17-11
Shared Memory and the Recoverable File System . . . . . . 17-12
Analyzing UniData Configuration Parameters . . . . . . . 17-12
Checking and Changing UniData Configuration Parameters . . 17-14
Checking Kernel Parameters . . . . . . . . . . . . . 17-16
sms . . . . . . . . . . . . . . . . . . . . . . 17-16
Learning about Global Pages . . . . . . . . . . . . . 17-20
Learning about Local Control Tables . . . . . . . . . . 17-21
UNIX Monitoring Tools . . . . . . . . . . . . . . . . 17-23
UniData Configuration Parameters . . . . . . . . . . . . 17-24
UNIX Kernel Parameters . . . . . . . . . . . . . . 17-24
UniData Error Messages for smm . . . . . . . . . . . . 17-25

17 -2 Ad
ministering UniData on UNIX
This chapter describes UniData commands and utilities for configuring,
monitoring, and troubleshooting shared memory. The chapter also lists
UniData error messages related to shared memory, and presents suggestions
for resolving the errors.
The following commands and utilities enable you to monitor the use of
shared memory on your system and provide suggestions for configuration
and tuning.
17-3
UniData Monitoring/Configuring ToolsThe udtconf utility enables you to automatically set all udtconfig parameters,
including those for shared memory. Although shared memory requirements
are highly application and platform dependent, udtconf can provide
suggestions for udtconfig parameters and provide information about the
actual state of your system.
Syntax:
udtconf
You do not have to log in as root to run udtconf, but the utility reads
information from the udtconfig file, located in /usr/ud60/include, and from
the UNIX kernel. If you do not log in as root, you may not have sufficient
access to the kernel, and the results will be unreliable.
You should run udtconf with UniData users logged off and UniData shut
down. The one exception is to assess the impact of the Recoverable File
System (RFS) system buffer. In this case, run udtconf from a UNIX prompt
while UniData is running.
udtconf Main Display
The following example shows the main screen of the udtconf utility:
17-4 Administering UniData on UNIX
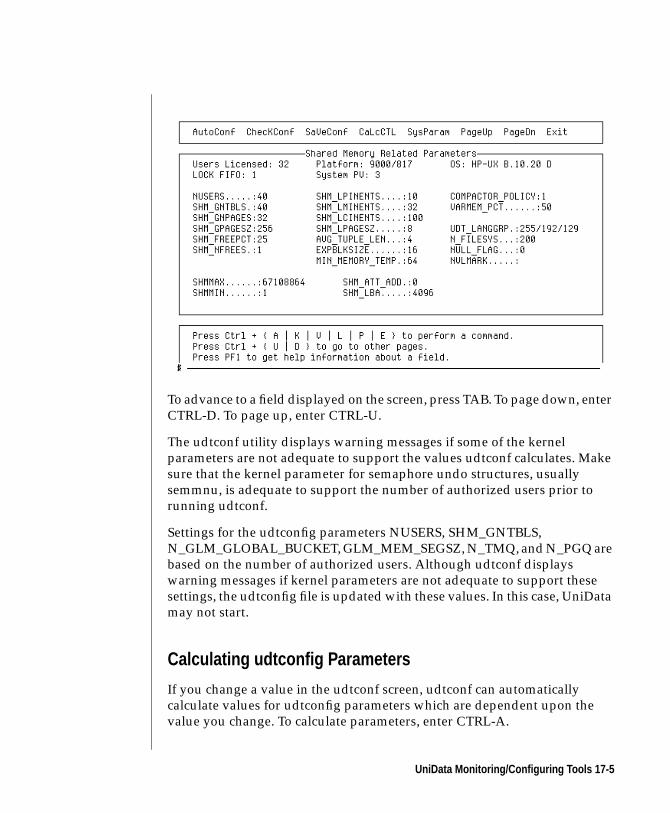
To advance to a field displayed on the screen, press TAB. To page down, enter
CTRL-D. To page up, enter CTRL-U.
The udtconf utility displays warning messages if some of the kernel
parameters are not adequate to support the values udtconf calculates. Make
sure that the kernel parameter for semaphore undo structures, usually
semmnu, is adequate to support the number of authorized users prior to
running udtconf.
Settings for the udtconfig parameters NUSERS, SHM_GNTBLS,
N_GLM_GLOBAL_BUCKET, GLM_MEM_SEGSZ, N_TMQ, and N_PGQ are
based on the number of authorized users. Although udtconf displays
warning messages if kernel parameters are not adequate to support these
settings, the udtconfig file is updated with these values. In this case, UniData
may not start.
Calculating udtconfig Parameters
If you change a value in the udtconf screen, udtconf can automatically
calculate values for udtconfig parameters which are dependent upon the
value you change. To calculate parameters, enter CTRL-A.
UniData Monitoring/Configuring Tools 17-5
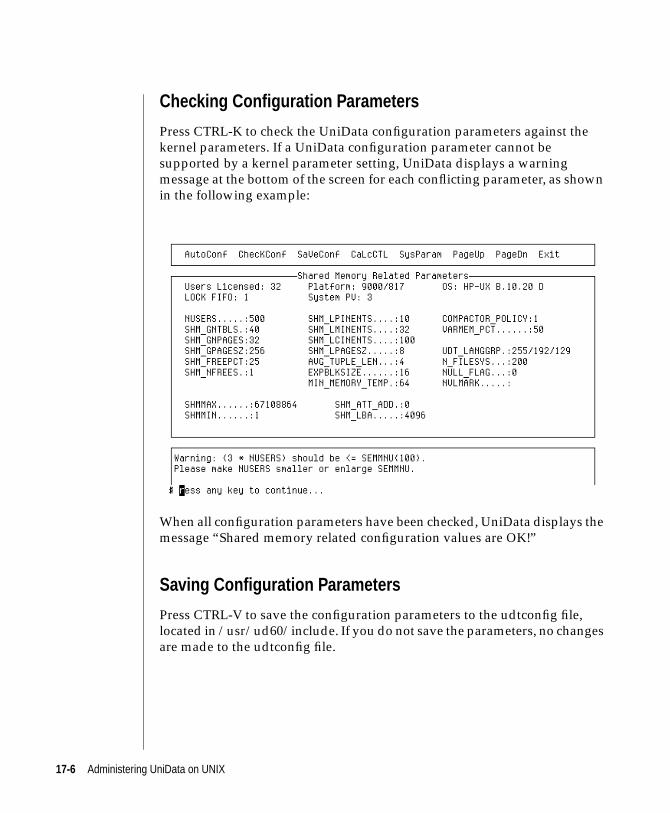
Checking Configuration Parameters
Press CTRL-K to check the UniData configuration parameters against the
kernel parameters. If a UniData configuration parameter cannot be
supported by a kernel parameter setting, UniData displays a warning
message at the bottom of the screen for each conflicting parameter, as shown
in the following example:
When all configuration parameters have been checked, UniData displays the
message “Shared memory related configuration values are OK!”
Saving Configuration Parameters
Press CTRL-V to save the configuration parameters to the udtconfig file,
located in /usr/ud60/include. If you do not save the parameters, no changes
are made to the udtconfig file.
17-6 Administering UniData on UNIX
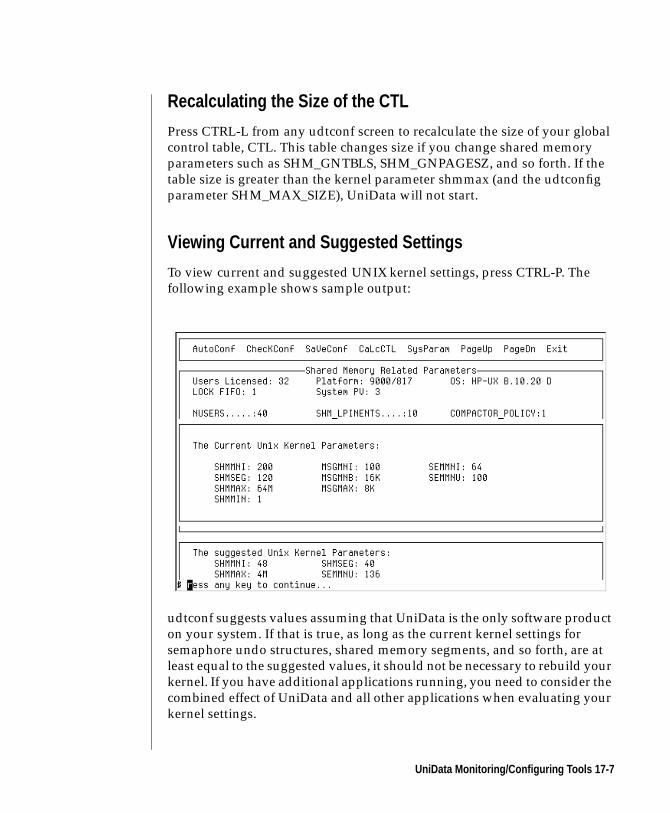
Recalculating the Size of the CTL
Press CTRL-L from any udtconf screen to recalculate the size of your global
control table, CTL. This table changes size if you change shared memory
parameters such as SHM_GNTBLS, SHM_GNPAGESZ, and so forth. If the
table size is greater than the kernel parameter shmmax (and the udtconfig
parameter SHM_MAX_SIZE), UniData will not start.
Viewing Current and Suggested Settings
To view current and suggested UNIX kernel settings, press CTRL-P. The
following example shows sample output:
udtconf suggests values assuming that UniData is the only software product
on your system. If that is true, as long as the current kernel settings for
semaphore undo structures, shared memory segments, and so forth, are at
least equal to the suggested values, it should not be necessary to rebuild your
kernel. If you have additional applications running, you need to consider the
combined effect of UniData and all other applications when evaluating your
kernel settings.
UniData Monitoring/Configuring Tools 17-7
Exiting udtconf
To exit the udtconf utility, enter CTRL-E. If you have made changes to
configuration parameters, make sure to save the changes by using CTRL-V
before exiting the program.
17-8 Administering UniData on UNIX
Setting Shared Memory ParametersThe shmconf utility enables you to set udtconfig parameters for shared
memory automatically. Unlike udtconf, you cannot set udtconfig parameters
that do not apply to shared memory through shmconf. Although its usability
for this purpose is platform-dependent and application-dependent, the
utility provides configuration suggestions and information about the actual
state of your system.
Syntax:
shmconf
You do not need to log in as root to execute shmconf, but the utility reads
information from udtconfig parameters and from the UNIX kernel. If you do
not log in as root, you may not have sufficient access to the kernel, and the
results will be unreliable.
In general, you should run shmconf with UniData users logged off and
UniData shut down. The one exception is to assess the impact of the RFS
system buffer. In this case, run shmconf from the UNIX prompt while
UniData is running.
Note: Only one user at a time may run shmconf.
shmconf: Main Display
The following screen shows a sample of the first output screen from shmconf:
Setting Shared Memory Parameters 17-9
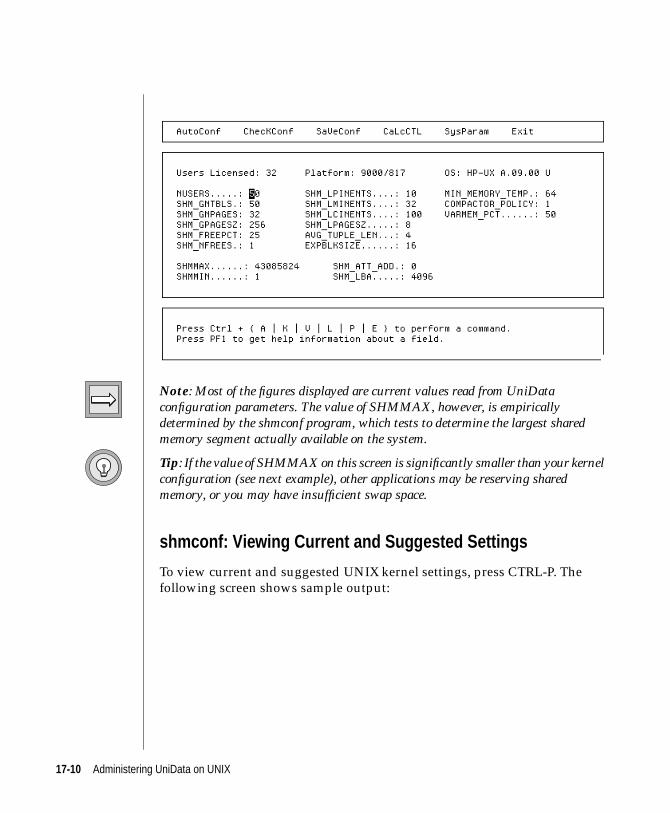
Note: Most of the figures displayed are current values read from UniDataconfiguration parameters. The value of SHMMAX, however, is empiricallydetermined by the shmconf program, which tests to determine the largest sharedmemory segment actually available on the system.
Tip: If the value of SHMMAX on this screen is significantly smaller than your kernelconfiguration (see next example), other applications may be reserving sharedmemory, or you may have insufficient swap space.
shmconf: Viewing Current and Suggested Settings
To view current and suggested UNIX kernel settings, press CTRL-P. The
following screen shows sample output:
17-10 Administering UniData on UNIX

Note: shmconf suggests values assuming that UniData is the only software producton your system. If that is true, as long as the current kernel settings for semaphoreundo structures, shared memory segments, and so forth, are at least equal to thesuggested values, it should not be necessary to rebuild your kernel. If you haveadditional applications running, you need to consider the combined effect of UniDataand all other applications when evaluating your kernel settings.
shmconf: Recalculating the Size of CTL
Press CTRL-L from any shmconf screen to recalculate the size of your global
control table, CTL. This table changes size if you change shared memory
parameters such as SHM_GNTBLS, SHM_GPAGESZ, and so on. If the table
size is greater than the kernel parameter shmmax (and the UniData
configuration parameter SHM_MAX_SIZE), UniData will not start.
shmconf: Recalculating Other Parameters
shmconf also enables you to recalculate parameters related to shared
memory. Press CTRL-A from any screen to do so.
Setting Shared Memory Parameters 17-11
Note: shmconf recalculates parameters, but does not update the udtconfig file unlessyou specify CTRL-V (saVe).
Shared Memory and the Recoverable File System
If you are using the Recoverable File System (RFS), UniData reserves the
amount of shared memory required for the system buffer. UniData reserves
this memory during startup, and it is not available to the smm or sbcs
daemons. If your system was running close to its limits in terms of memory
resources without RFS, allocating the system buffer can have a significant
impact. For instance, you may see an increase in error messages indicating
smm could not create or attach a shared memory segment.
Analyzing UniData Configuration Parameters
The system-level systest command checks all parameters in the udtconfig
file, located in /usr/ud60/include.
Syntax:
systest [-mn] [-sn] [-u] [-f filename] [-v] [c {n|r}]
The following table describes each parameter of the syntax:
Parameter Description
[-mn] Changes memory map display by about n MB. Highlyplatform dependent. Do not use this unless advised byIBM.
[-sn] Changes memory map display by about n MB. Highlyplatform dependent. Do not use this unless advised byIBM.
[-u] Creates or updates the UniData the configurationparameters NFILES and/or SHM_ATT_ADD. Use withextreme caution.
systest Command Parameters
17-12 Administering UniData on UNIX
Note: The -m and -s options of systest function differently on different platforms andalso function differently depending on machine activity. These options help youassess the effects of redefining memory addresses on your system. However, differentUNIX versions handle memory allocation so differently that these options may notproduce meaningful output. Do not use them unless advised by IBM TechnicalSupport.
You must log in as root to execute systest. Users do not need to log out of
UniData.
[-f filename] Creates a file name you specify containing the UniDataconfiguration parameters systest recommends for thenumber of authorized users and platform.
[-v] Displays detailed (verbose) output.
[-c {n|r}] Checks current kernel parameter settings againstUniData recommendations. Specify the -cr option tocompare against recommendations for the RecoverableFile System. Specify the -cn option if you will not be usingrecoverable files.
Parameter Description
systest Command Parameters (continued)
Setting Shared Memory Parameters 17-13
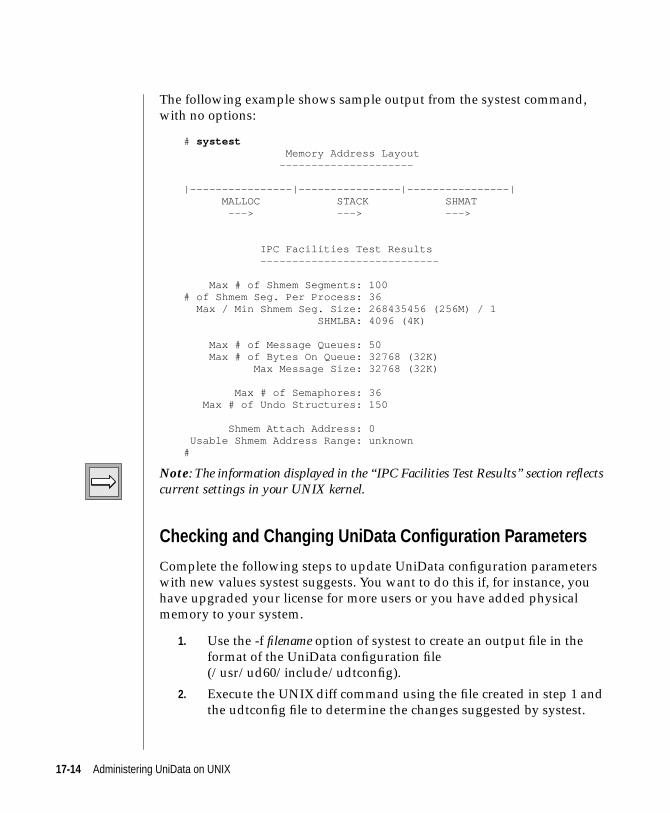
The following example shows sample output from the systest command,
with no options:
# systest Memory Address Layout ---------------------
|----------------|----------------|----------------| MALLOC STACK SHMAT ---> ---> --->
IPC Facilities Test Results ----------------------------
Max # of Shmem Segments: 100# of Shmem Seg. Per Process: 36 Max / Min Shmem Seg. Size: 268435456 (256M) / 1 SHMLBA: 4096 (4K)
Max # of Message Queues: 50 Max # of Bytes On Queue: 32768 (32K) Max Message Size: 32768 (32K)
Max # of Semaphores: 36 Max # of Undo Structures: 150
Shmem Attach Address: 0 Usable Shmem Address Range: unknown#
Note: The information displayed in the “IPC Facilities Test Results” section reflectscurrent settings in your UNIX kernel.
Checking and Changing UniData Configuration Parameters
Complete the following steps to update UniData configuration parameters
with new values systest suggests. You want to do this if, for instance, you
have upgraded your license for more users or you have added physical
memory to your system.
1. Use the -f filename option of systest to create an output file in the
format of the UniData configuration file
(/usr/ud60/include/udtconfig).
2. Execute the UNIX diff command using the file created in step 1 and
the udtconfig file to determine the changes suggested by systest.
17-14 Administering UniData on UNIX
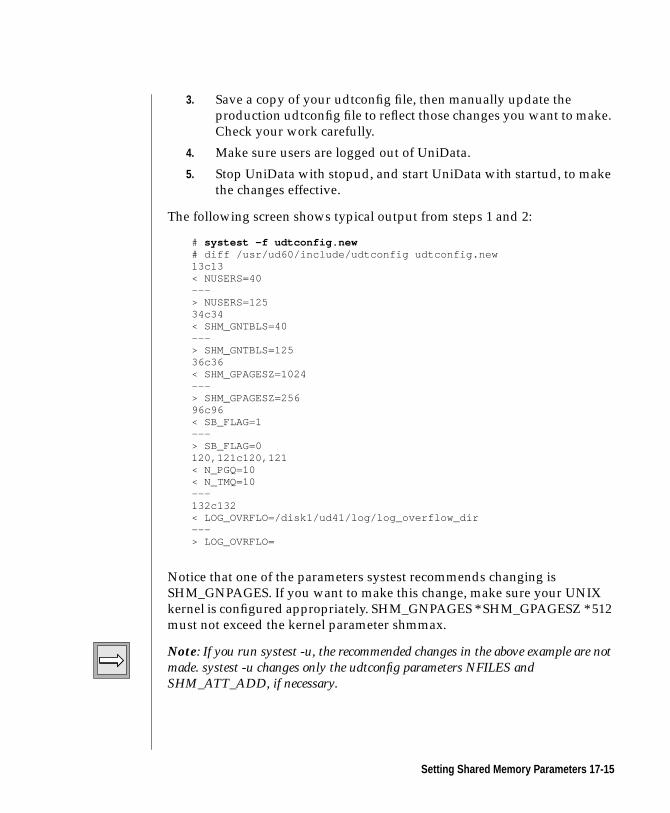
3. Save a copy of your udtconfig file, then manually update the
production udtconfig file to reflect those changes you want to make.
Check your work carefully.
4. Make sure users are logged out of UniData.
5. Stop UniData with stopud, and start UniData with startud, to make
the changes effective.
The following screen shows typical output from steps 1 and 2:
# systest -f udtconfig.new# diff /usr/ud60/include/udtconfig udtconfig.new13c13< NUSERS=40---> NUSERS=12534c34< SHM_GNTBLS=40---> SHM_GNTBLS=12536c36< SHM_GPAGESZ=1024---> SHM_GPAGESZ=25696c96< SB_FLAG=1---> SB_FLAG=0120,121c120,121< N_PGQ=10< N_TMQ=10---132c132< LOG_OVRFLO=/disk1/ud41/log/log_overflow_dir---> LOG_OVRFLO=
Notice that one of the parameters systest recommends changing is
SHM_GNPAGES. If you want to make this change, make sure your UNIX
kernel is configured appropriately. SHM_GNPAGES * SHM_GPAGESZ * 512
must not exceed the kernel parameter shmmax.
Note: If you run systest -u, the recommended changes in the above example are notmade. systest -u changes only the udtconfig parameters NFILES andSHM_ATT_ADD, if necessary.
Setting Shared Memory Parameters 17-15
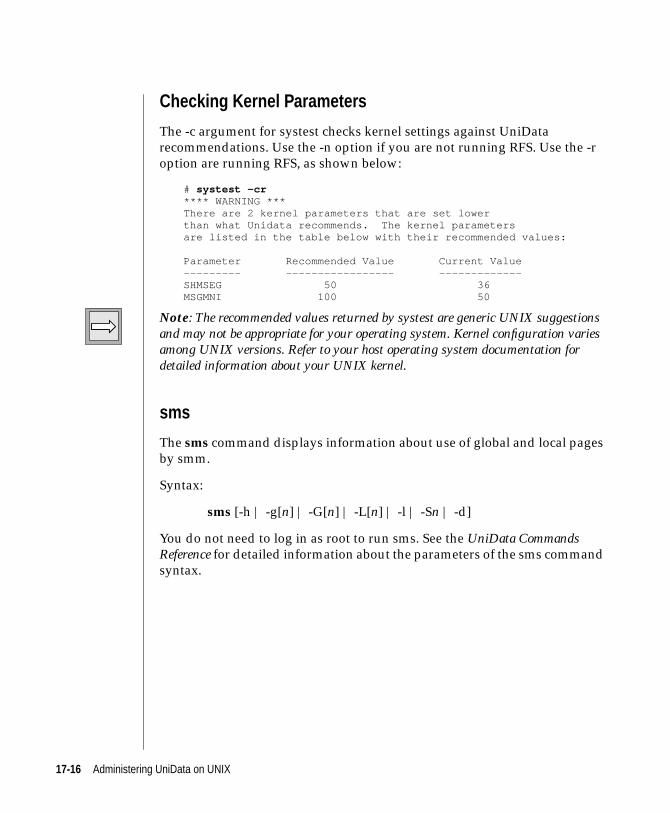
Checking Kernel Parameters
The -c argument for systest checks kernel settings against UniData
recommendations. Use the -n option if you are not running RFS. Use the -r
option are running RFS, as shown below:
# systest -cr**** WARNING ***There are 2 kernel parameters that are set lowerthan what Unidata recommends. The kernel parametersare listed in the table below with their recommended values:
Parameter Recommended Value Current Value--------- ----------------- -------------SHMSEG 50 36MSGMNI 100 50
Note: The recommended values returned by systest are generic UNIX suggestionsand may not be appropriate for your operating system. Kernel configuration variesamong UNIX versions. Refer to your host operating system documentation fordetailed information about your UNIX kernel.
sms
The sms command displays information about use of global and local pages
by smm.
Syntax:
sms [-h | -g[n] | -G[n] | -L[n] | -l | -Sn | -d]
You do not need to log in as root to run sms. See the UniData CommandsReference for detailed information about the parameters of the sms command
syntax.
17-16 Administering UniData on UNIX
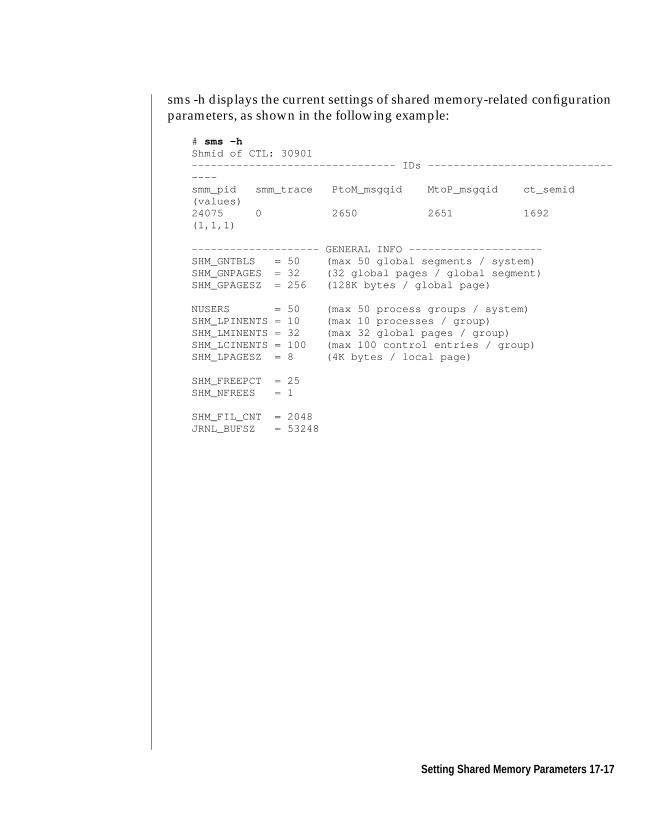
sms -h displays the current settings of shared memory-related configuration
parameters, as shown in the following example:
# sms -hShmid of CTL: 30901-------------------------------- IDs ---------------------------------smm_pid smm_trace PtoM_msgqid MtoP_msgqid ct_semid(values)24075 0 2650 2651 1692(1,1,1)
-------------------- GENERAL INFO ---------------------SHM_GNTBLS = 50 (max 50 global segments / system)SHM_GNPAGES = 32 (32 global pages / global segment)SHM_GPAGESZ = 256 (128K bytes / global page)
NUSERS = 50 (max 50 process groups / system)SHM_LPINENTS = 10 (max 10 processes / group)SHM_LMINENTS = 32 (max 32 global pages / group)SHM_LCINENTS = 100 (max 100 control entries / group)SHM_LPAGESZ = 8 (4K bytes / local page)
SHM_FREEPCT = 25SHM_NFREES = 1
SHM_FIL_CNT = 2048JRNL_BUFSZ = 53248
Setting Shared Memory Parameters 17-17
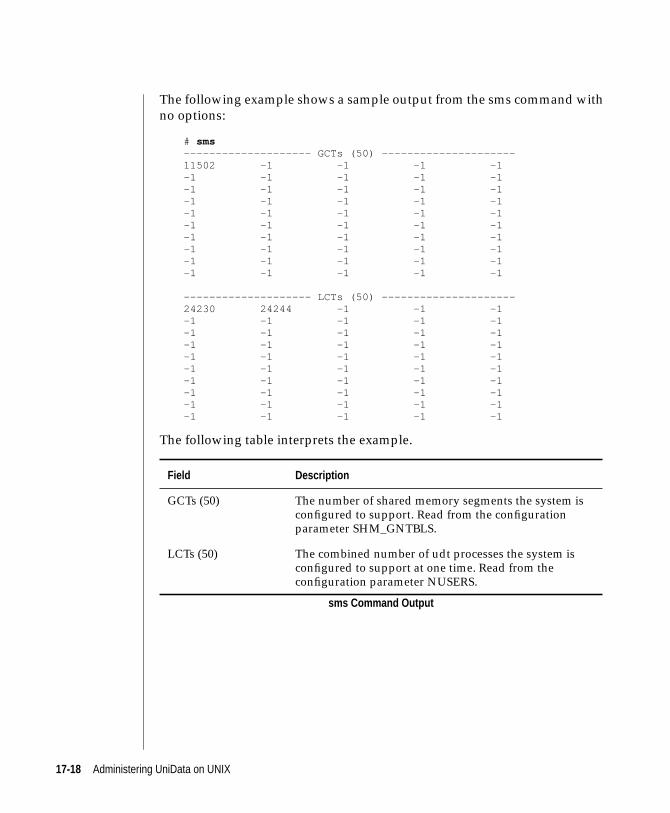
The following example shows a sample output from the sms command with
no options:
# sms-------------------- GCTs (50) ---------------------11502 -1 -1 -1 -1-1 -1 -1 -1 -1-1 -1 -1 -1 -1-1 -1 -1 -1 -1-1 -1 -1 -1 -1-1 -1 -1 -1 -1-1 -1 -1 -1 -1-1 -1 -1 -1 -1-1 -1 -1 -1 -1-1 -1 -1 -1 -1
-------------------- LCTs (50) ---------------------24230 24244 -1 -1 -1-1 -1 -1 -1 -1-1 -1 -1 -1 -1-1 -1 -1 -1 -1-1 -1 -1 -1 -1-1 -1 -1 -1 -1-1 -1 -1 -1 -1-1 -1 -1 -1 -1-1 -1 -1 -1 -1-1 -1 -1 -1 -1
The following table interprets the example.
Field Description
GCTs (50) The number of shared memory segments the system isconfigured to support. Read from the configurationparameter SHM_GNTBLS.
LCTs (50) The combined number of udt processes the system isconfigured to support at one time. Read from theconfiguration parameter NUSERS.
sms Command Output
17-18 Administering UniData on UNIX
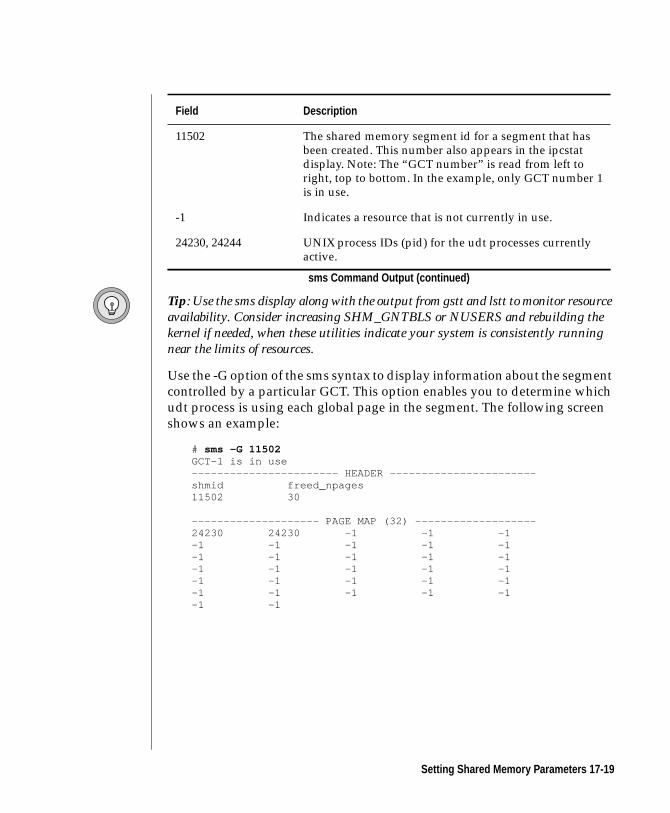
Tip: Use the sms display along with the output from gstt and lstt to monitor resourceavailability. Consider increasing SHM_GNTBLS or NUSERS and rebuilding thekernel if needed, when these utilities indicate your system is consistently runningnear the limits of resources.
Use the -G option of the sms syntax to display information about the segment
controlled by a particular GCT. This option enables you to determine which
udt process is using each global page in the segment. The following screen
shows an example:
# sms -G 11502GCT-1 is in use----------------------- HEADER -----------------------shmid freed_npages11502 30
-------------------- PAGE MAP (32) -------------------24230 24230 -1 -1 -1-1 -1 -1 -1 -1-1 -1 -1 -1 -1-1 -1 -1 -1 -1-1 -1 -1 -1 -1-1 -1 -1 -1 -1-1 -1
11502 The shared memory segment id for a segment that hasbeen created. This number also appears in the ipcstatdisplay. Note: The “GCT number” is read from left toright, top to bottom. In the example, only GCT number 1is in use.
-1 Indicates a resource that is not currently in use.
24230, 24244 UNIX process IDs (pid) for the udt processes currentlyactive.
Field Description
sms Command Output (continued)
Setting Shared Memory Parameters 17-19
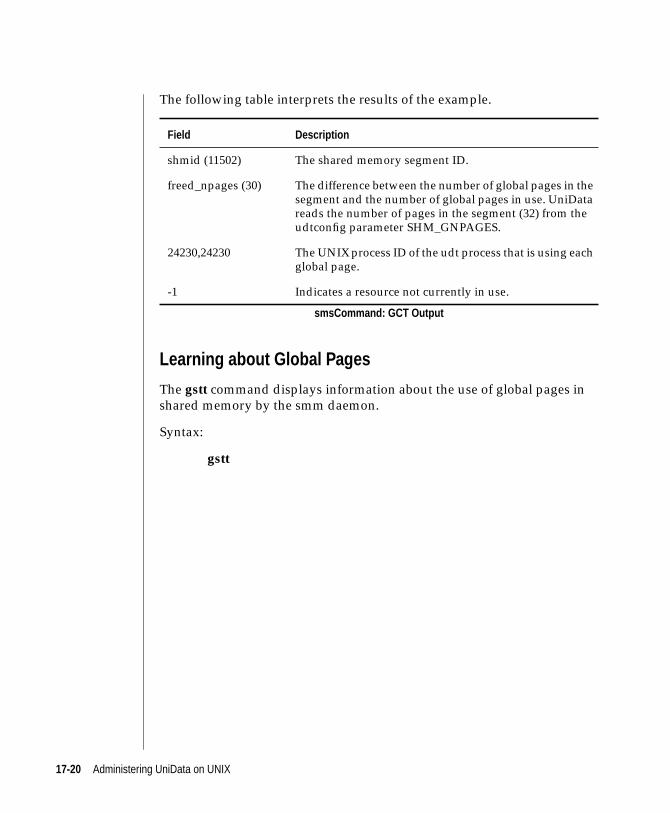
The following table interprets the results of the example.
Learning about Global Pages
The gstt command displays information about the use of global pages in
shared memory by the smm daemon.
Syntax:
gstt
Field Description
shmid (11502) The shared memory segment ID.
freed_npages (30) The difference between the number of global pages in thesegment and the number of global pages in use. UniDatareads the number of pages in the segment (32) from theudtconfig parameter SHM_GNPAGES.
24230,24230 The UNIX process ID of the udt process that is using eachglobal page.
-1 Indicates a resource not currently in use.
smsCommand: GCT Output
17-20 Administering UniData on UNIX
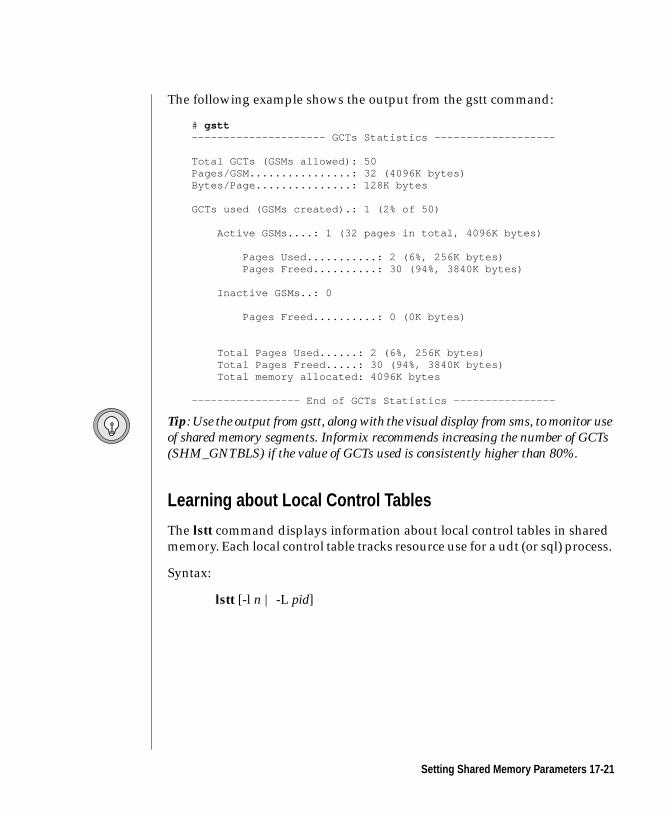
The following example shows the output from the gstt command:
# gstt--------------------- GCTs Statistics -------------------
Total GCTs (GSMs allowed): 50Pages/GSM................: 32 (4096K bytes)Bytes/Page...............: 128K bytes
GCTs used (GSMs created).: 1 (2% of 50)
Active GSMs....: 1 (32 pages in total, 4096K bytes)
Pages Used...........: 2 (6%, 256K bytes) Pages Freed..........: 30 (94%, 3840K bytes)
Inactive GSMs..: 0
Pages Freed..........: 0 (0K bytes)
Total Pages Used......: 2 (6%, 256K bytes) Total Pages Freed.....: 30 (94%, 3840K bytes) Total memory allocated: 4096K bytes
----------------- End of GCTs Statistics ----------------
Tip: Use the output from gstt, along with the visual display from sms, to monitor useof shared memory segments. Informix recommends increasing the number of GCTs(SHM_GNTBLS) if the value of GCTs used is consistently higher than 80%.
Learning about Local Control Tables
The lstt command displays information about local control tables in shared
memory. Each local control table tracks resource use for a udt (or sql) process.
Syntax:
lstt [-l n | -L pid]
Setting Shared Memory Parameters 17-21
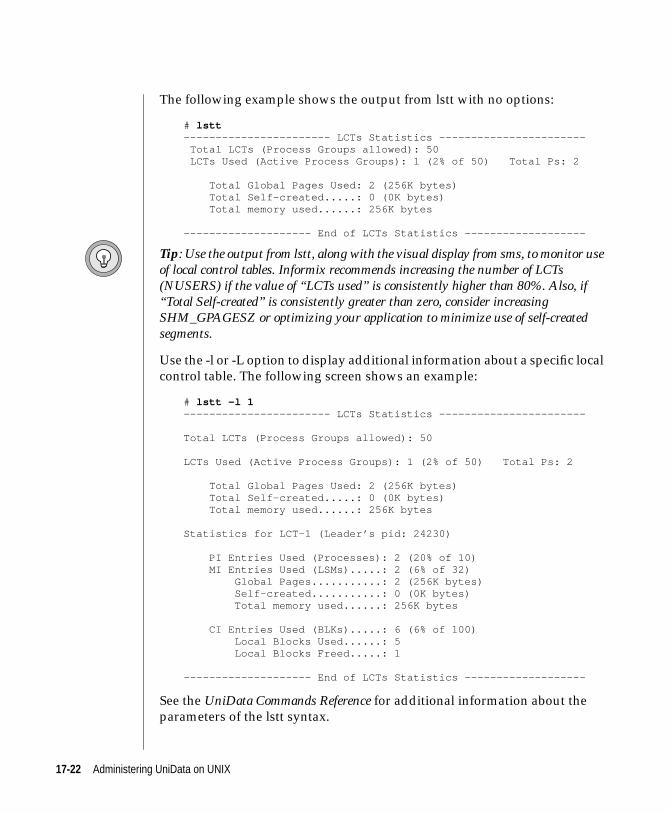
The following example shows the output from lstt with no options:
# lstt----------------------- LCTs Statistics ----------------------- Total LCTs (Process Groups allowed): 50 LCTs Used (Active Process Groups): 1 (2% of 50) Total Ps: 2
Total Global Pages Used: 2 (256K bytes) Total Self-created.....: 0 (0K bytes) Total memory used......: 256K bytes
-------------------- End of LCTs Statistics -------------------
Tip: Use the output from lstt, along with the visual display from sms, to monitor useof local control tables. Informix recommends increasing the number of LCTs(NUSERS) if the value of “LCTs used” is consistently higher than 80%. Also, if“Total Self-created” is consistently greater than zero, consider increasingSHM_GPAGESZ or optimizing your application to minimize use of self-createdsegments.
Use the -l or -L option to display additional information about a specific local
control table. The following screen shows an example:
# lstt -l 1----------------------- LCTs Statistics -----------------------
Total LCTs (Process Groups allowed): 50
LCTs Used (Active Process Groups): 1 (2% of 50) Total Ps: 2
Total Global Pages Used: 2 (256K bytes) Total Self-created.....: 0 (0K bytes) Total memory used......: 256K bytes
Statistics for LCT-1 (Leader’s pid: 24230)
PI Entries Used (Processes): 2 (20% of 10) MI Entries Used (LSMs).....: 2 (6% of 32) Global Pages...........: 2 (256K bytes) Self-created...........: 0 (0K bytes) Total memory used......: 256K bytes
CI Entries Used (BLKs).....: 6 (6% of 100) Local Blocks Used......: 5 Local Blocks Freed.....: 1
-------------------- End of LCTs Statistics -------------------
See the UniData Commands Reference for additional information about the
parameters of the lstt syntax.
17-22 Administering UniData on UNIX

UNIX Monitoring ToolsThe UNIX sar, vmstat, swap, and swapinfo commands provide useful
information for memory and swap space management. The availability and
syntax of these commands is platform-dependent. Refer to your host
operating system documentation for information about these commands.
UNIX Monitoring Tools 17-23
UniData Configuration ParametersChapter 5, “UniData and Memory,” lists the UniData configuration
parameters that control how smm creates and assigns memory structures.
These parameters are also listed in Appendix A, “UniData Configuration
Parameters.”
When designing your configuration for smm, account for sbcs, the system
buffer (if you are using RFS), and other applications on your system.
UNIX Kernel Parameters
Chapter 5, “UniData and Memory,” describes UNIX kernel parameters that
control creation and allocation of shared memory structures. An exhaustive
list of such parameters is beyond the scope of this manual, since the
parameters, their names, and the processes for adjusting them vary for
different UNIX versions. Refer to your host operating system and vendor
documentation for information specific to your system.
Note: Depending on the UNIX version, some kernel parameters can be defined eitheras fixed values or by internal calculations performed by the system. In some versions,you can tune the kernel while the system is running, while others require you toreboot to make the changes effective. Some UNIX versions (AIX, for example) handlekernel configuration dynamically and do not offer the capability to change theparameters directly.
17-24 Administering UniData on UNIX
UniData Error Messages for smmThis section lists error messages that are received when smm is unable to
respond to a request for memory resources. These messages are seen by the
requesting process, so there is no central location for them. They may appear
when you start UniData or at run time.
Consider the following guidelines when troubleshooting error messages:
■ Always note the full text of the error message, any error numbers
associated with the text, and when the error occurred.
■ Check the error logs (smm.errlog and sbcs.errlog) for additional
information.
■ When a message includes an error number (errno), check for the
corresponding UNIX message in /usr/include/sys/errno.h or the
UniData message in your UniData account’s ENGLISH.MSG file.
The message text is often necessary for distinguishing among
possible problems.
■ Consider the context in which the message appears.
■ If you are configuring UniData for the first time, the error
messages provide information you may need to reset
configuration parameters or rebuild the kernel.
■ If you have installed new application software (including C
routines for CALLC or CallBasic), and you begin to see error
messages, review the new additions before reconfiguring
UniData or rebuilding the UNIX kernel. Programming errors or
coding structure errors may masquerade as shared memory
errors; these should be corrected by correcting the software
rather than reconfiguring your system.
■ If your system has been running smoothly with no recent
changes, and you begin to see error messages, identify and
resolve external causes (such as swap space occupied by
temporary files) before reconfiguring UniData or rebuilding the
UNIX kernel.
■ Consider the resource needs of other applications running on your
system. Your system resources must support UniData and all other
applications.
UniData Error Messages for smm 17-25
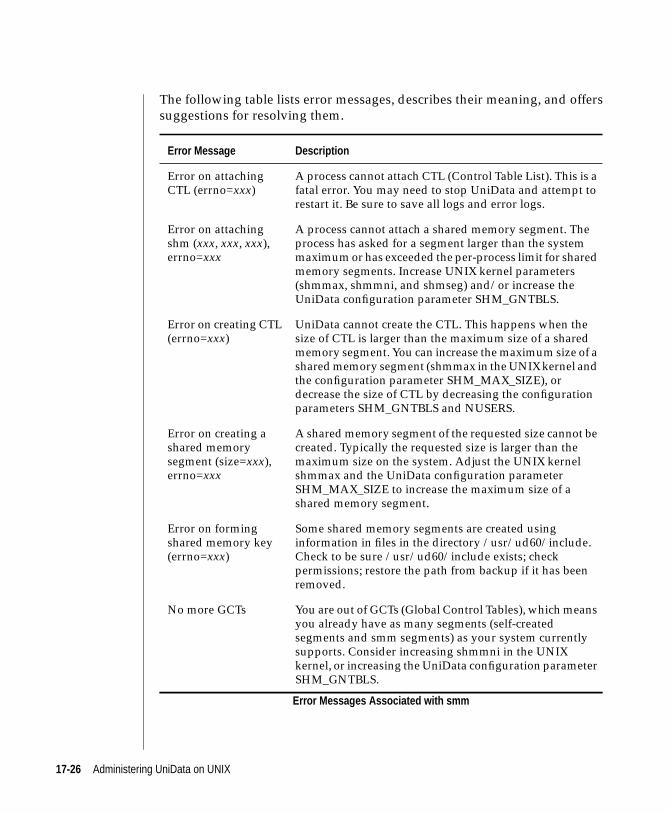
The following table lists error messages, describes their meaning, and offers
suggestions for resolving them.
Error Message Description
Error on attachingCTL (errno=xxx)
A process cannot attach CTL (Control Table List). This is afatal error. You may need to stop UniData and attempt torestart it. Be sure to save all logs and error logs.
Error on attachingshm (xxx, xxx, xxx),errno=xxx
A process cannot attach a shared memory segment. Theprocess has asked for a segment larger than the systemmaximum or has exceeded the per-process limit for sharedmemory segments. Increase UNIX kernel parameters(shmmax, shmmni, and shmseg) and/or increase theUniData configuration parameter SHM_GNTBLS.
Error on creating CTL(errno=xxx)
UniData cannot create the CTL. This happens when thesize of CTL is larger than the maximum size of a sharedmemory segment. You can increase the maximum size of ashared memory segment (shmmax in the UNIX kernel andthe configuration parameter SHM_MAX_SIZE), ordecrease the size of CTL by decreasing the configurationparameters SHM_GNTBLS and NUSERS.
Error on creating ashared memorysegment (size=xxx),errno=xxx
A shared memory segment of the requested size cannot becreated. Typically the requested size is larger than themaximum size on the system. Adjust the UNIX kernelshmmax and the UniData configuration parameterSHM_MAX_SIZE to increase the maximum size of ashared memory segment.
Error on formingshared memory key(errno=xxx)
Some shared memory segments are created usinginformation in files in the directory /usr/ud60/include.Check to be sure /usr/ud60/include exists; checkpermissions; restore the path from backup if it has beenremoved.
No more GCTs You are out of GCTs (Global Control Tables), which meansyou already have as many segments (self-createdsegments and smm segments) as your system currentlysupports. Consider increasing shmmni in the UNIXkernel, or increasing the UniData configuration parameterSHM_GNTBLS.
Error Messages Associated with smm
17-26 Administering UniData on UNIX
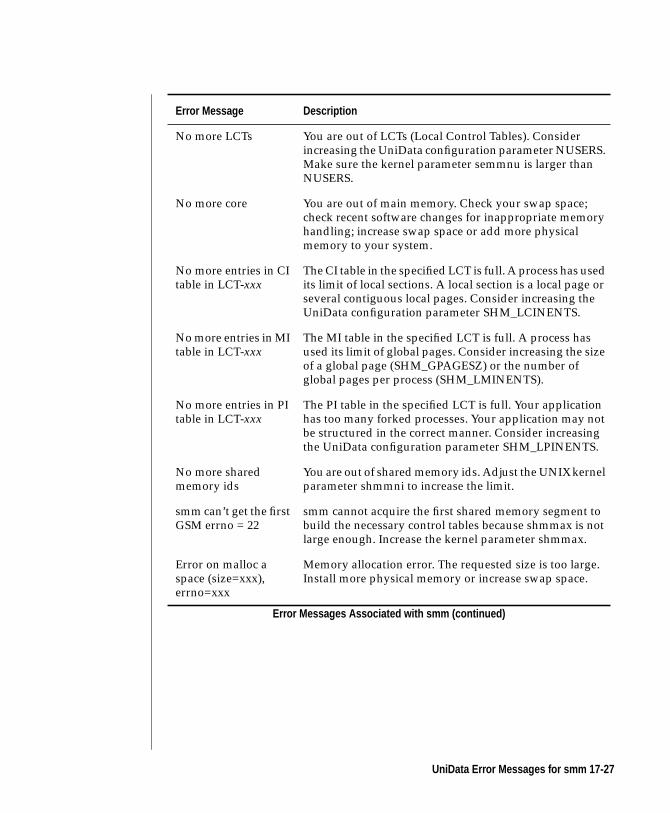
No more LCTs You are out of LCTs (Local Control Tables). Considerincreasing the UniData configuration parameter NUSERS.Make sure the kernel parameter semmnu is larger thanNUSERS.
No more core You are out of main memory. Check your swap space;check recent software changes for inappropriate memoryhandling; increase swap space or add more physicalmemory to your system.
No more entries in CItable in LCT-xxx
The CI table in the specified LCT is full. A process has usedits limit of local sections. A local section is a local page orseveral contiguous local pages. Consider increasing theUniData configuration parameter SHM_LCINENTS.
No more entries in MItable in LCT-xxx
The MI table in the specified LCT is full. A process hasused its limit of global pages. Consider increasing the sizeof a global page (SHM_GPAGESZ) or the number ofglobal pages per process (SHM_LMINENTS).
No more entries in PItable in LCT-xxx
The PI table in the specified LCT is full. Your applicationhas too many forked processes. Your application may notbe structured in the correct manner. Consider increasingthe UniData configuration parameter SHM_LPINENTS.
No more sharedmemory ids
You are out of shared memory ids. Adjust the UNIX kernelparameter shmmni to increase the limit.
smm can’t get the firstGSM errno = 22
smm cannot acquire the first shared memory segment tobuild the necessary control tables because shmmax is notlarge enough. Increase the kernel parameter shmmax.
Error on malloc aspace (size=xxx),errno=xxx
Memory allocation error. The requested size is too large.Install more physical memory or increase swap space.
Error Message Description
Error Messages Associated with smm (continued)
UniData Error Messages for smm 17-27

17-28 Administering UniData on UNIX
18Chapter
Managing ipc Facilities
Message Queues, Shared Memory, and Semaphores . . . . . . 18-4
UniData Log Files . . . . . . . . . . . . . . . . . 18-7
Removing ipc Structures . . . . . . . . . . . . . . . 18-8

18 -2 Ad
ministering UniData on UNIX
This chapter describes commands and procedures that monitor the use of
message queues and semaphores, and describes how to clear message
queues and remove queues when necessary to correct problems. This chapter
includes some instructions for monitoring shared memory use; however,
shared memory is described more fully in Chapter 17, “Managing Memory.”
18-3
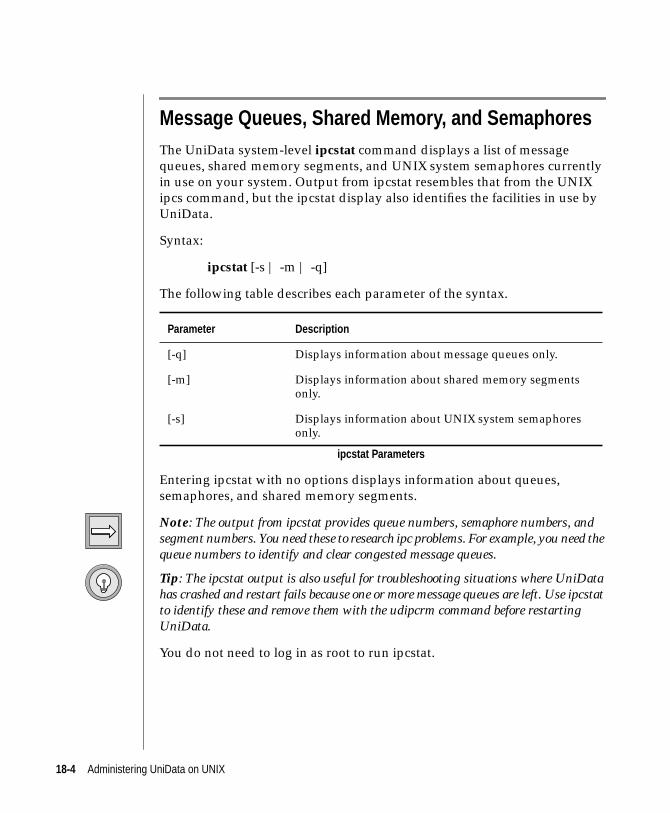
Message Queues, Shared Memory, and SemaphoresThe UniData system-level ipcstat command displays a list of message
queues, shared memory segments, and UNIX system semaphores currently
in use on your system. Output from ipcstat resembles that from the UNIX
ipcs command, but the ipcstat display also identifies the facilities in use by
UniData.
Syntax:
ipcstat [-s | -m | -q]
The following table describes each parameter of the syntax.
Entering ipcstat with no options displays information about queues,
semaphores, and shared memory segments.
Note: The output from ipcstat provides queue numbers, semaphore numbers, andsegment numbers. You need these to research ipc problems. For example, you need thequeue numbers to identify and clear congested message queues.
Tip: The ipcstat output is also useful for troubleshooting situations where UniDatahas crashed and restart fails because one or more message queues are left. Use ipcstatto identify these and remove them with the udipcrm command before restartingUniData.
You do not need to log in as root to run ipcstat.
Parameter Description
[-q] Displays information about message queues only.
[-m] Displays information about shared memory segmentsonly.
[-s] Displays information about UNIX system semaphoresonly.
ipcstat Parameters
18-4 Administering UniData on UNIX
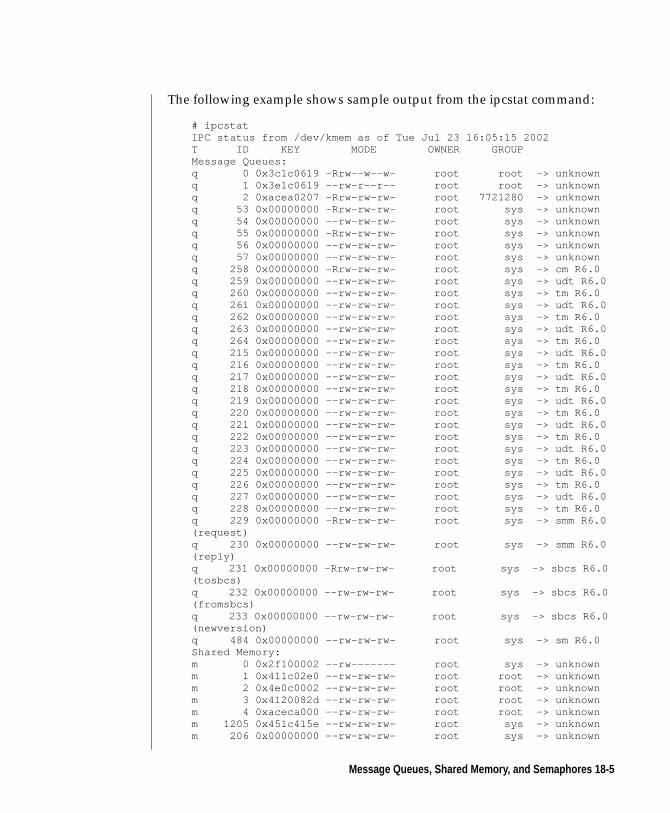
The following example shows sample output from the ipcstat command:
# ipcstatIPC status from /dev/kmem as of Tue Jul 23 16:05:15 2002T ID KEY MODE OWNER GROUPMessage Queues:q 0 0x3c1c0619 -Rrw--w--w- root root -> unknownq 1 0x3e1c0619 --rw-r--r-- root root -> unknownq 2 0xacea0207 -Rrw-rw-rw- root 7721280 -> unknownq 53 0x00000000 -Rrw-rw-rw- root sys -> unknownq 54 0x00000000 --rw-rw-rw- root sys -> unknownq 55 0x00000000 -Rrw-rw-rw- root sys -> unknownq 56 0x00000000 --rw-rw-rw- root sys -> unknownq 57 0x00000000 --rw-rw-rw- root sys -> unknownq 258 0x00000000 -Rrw-rw-rw- root sys -> cm R6.0q 259 0x00000000 --rw-rw-rw- root sys -> udt R6.0q 260 0x00000000 --rw-rw-rw- root sys -> tm R6.0q 261 0x00000000 --rw-rw-rw- root sys -> udt R6.0q 262 0x00000000 --rw-rw-rw- root sys -> tm R6.0q 263 0x00000000 --rw-rw-rw- root sys -> udt R6.0q 264 0x00000000 --rw-rw-rw- root sys -> tm R6.0q 215 0x00000000 --rw-rw-rw- root sys -> udt R6.0q 216 0x00000000 --rw-rw-rw- root sys -> tm R6.0q 217 0x00000000 --rw-rw-rw- root sys -> udt R6.0q 218 0x00000000 --rw-rw-rw- root sys -> tm R6.0q 219 0x00000000 --rw-rw-rw- root sys -> udt R6.0q 220 0x00000000 --rw-rw-rw- root sys -> tm R6.0q 221 0x00000000 --rw-rw-rw- root sys -> udt R6.0q 222 0x00000000 --rw-rw-rw- root sys -> tm R6.0q 223 0x00000000 --rw-rw-rw- root sys -> udt R6.0q 224 0x00000000 --rw-rw-rw- root sys -> tm R6.0q 225 0x00000000 --rw-rw-rw- root sys -> udt R6.0q 226 0x00000000 --rw-rw-rw- root sys -> tm R6.0q 227 0x00000000 --rw-rw-rw- root sys -> udt R6.0q 228 0x00000000 --rw-rw-rw- root sys -> tm R6.0q 229 0x00000000 -Rrw-rw-rw- root sys -> smm R6.0(request)q 230 0x00000000 --rw-rw-rw- root sys -> smm R6.0(reply)q 231 0x00000000 -Rrw-rw-rw- root sys -> sbcs R6.0(tosbcs)q 232 0x00000000 --rw-rw-rw- root sys -> sbcs R6.0(fromsbcs)q 233 0x00000000 --rw-rw-rw- root sys -> sbcs R6.0(newversion)q 484 0x00000000 --rw-rw-rw- root sys -> sm R6.0Shared Memory:m 0 0x2f100002 --rw------- root sys -> unknownm 1 0x411c02e0 --rw-rw-rw- root root -> unknownm 2 0x4e0c0002 --rw-rw-rw- root root -> unknownm 3 0x4120082d --rw-rw-rw- root root -> unknownm 4 0xaceca000 --rw-rw-rw- root root -> unknownm 1205 0x451c415e --rw-rw-rw- root sys -> unknownm 206 0x00000000 --rw-rw-rw- root sys -> unknown
Message Queues, Shared Memory, and Semaphores 18-5
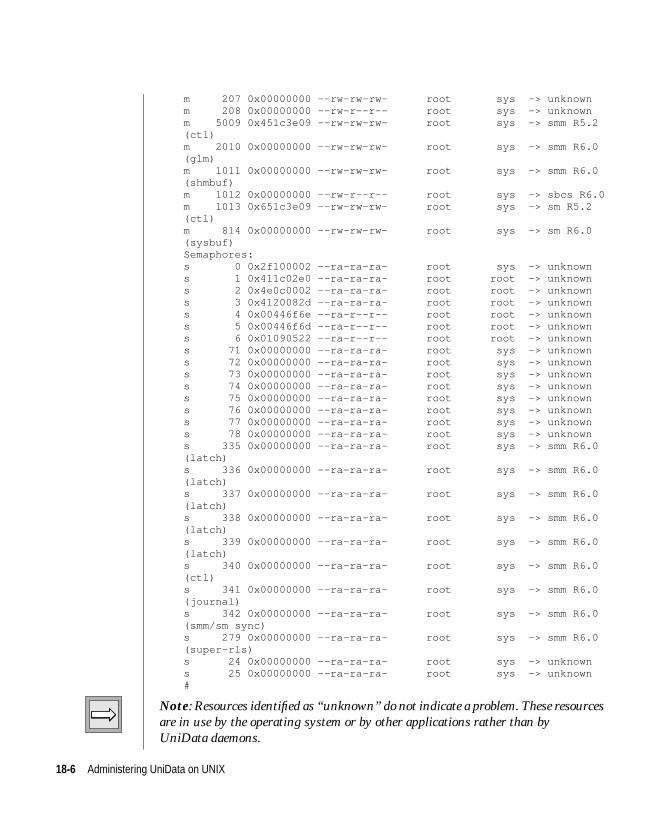
m 207 0x00000000 --rw-rw-rw- root sys -> unknownm 208 0x00000000 --rw-r--r-- root sys -> unknownm 5009 0x451c3e09 --rw-rw-rw- root sys -> smm R5.2(ctl)m 2010 0x00000000 --rw-rw-rw- root sys -> smm R6.0(glm)m 1011 0x00000000 --rw-rw-rw- root sys -> smm R6.0(shmbuf)m 1012 0x00000000 --rw-r--r-- root sys -> sbcs R6.0m 1013 0x651c3e09 --rw-rw-rw- root sys -> sm R5.2(ctl)m 814 0x00000000 --rw-rw-rw- root sys -> sm R6.0(sysbuf)Semaphores:s 0 0x2f100002 --ra-ra-ra- root sys -> unknowns 1 0x411c02e0 --ra-ra-ra- root root -> unknowns 2 0x4e0c0002 --ra-ra-ra- root root -> unknowns 3 0x4120082d --ra-ra-ra- root root -> unknowns 4 0x00446f6e --ra-r--r-- root root -> unknowns 5 0x00446f6d --ra-r--r-- root root -> unknowns 6 0x01090522 --ra-r--r-- root root -> unknowns 71 0x00000000 --ra-ra-ra- root sys -> unknowns 72 0x00000000 --ra-ra-ra- root sys -> unknowns 73 0x00000000 --ra-ra-ra- root sys -> unknowns 74 0x00000000 --ra-ra-ra- root sys -> unknowns 75 0x00000000 --ra-ra-ra- root sys -> unknowns 76 0x00000000 --ra-ra-ra- root sys -> unknowns 77 0x00000000 --ra-ra-ra- root sys -> unknowns 78 0x00000000 --ra-ra-ra- root sys -> unknowns 335 0x00000000 --ra-ra-ra- root sys -> smm R6.0(latch)s 336 0x00000000 --ra-ra-ra- root sys -> smm R6.0(latch)s 337 0x00000000 --ra-ra-ra- root sys -> smm R6.0(latch)s 338 0x00000000 --ra-ra-ra- root sys -> smm R6.0(latch)s 339 0x00000000 --ra-ra-ra- root sys -> smm R6.0(latch)s 340 0x00000000 --ra-ra-ra- root sys -> smm R6.0(ctl)s 341 0x00000000 --ra-ra-ra- root sys -> smm R6.0(journal)s 342 0x00000000 --ra-ra-ra- root sys -> smm R6.0(smm/sm sync)s 279 0x00000000 --ra-ra-ra- root sys -> smm R6.0(super-rls)s 24 0x00000000 --ra-ra-ra- root sys -> unknowns 25 0x00000000 --ra-ra-ra- root sys -> unknown#
Note: Resources identified as “unknown” do not indicate a problem. These resourcesare in use by the operating system or by other applications rather than byUniData daemons.
18-6 Administering UniData on UNIX
Notice that, because no options were specified, ipcstat displays information
about queues, semaphores, and memory segments.
UniData Log Files
When you start UniData, the smm and sbcs daemons record in their logs
(smm.log and sbcs.log) information about the ipc facilities they are using. See
Chapter 9, “Starting, Stopping, and Pausing UniData,” for examples of these
log files.
Note: Occasionally, UniData problems result from another process inadvertentlyremoving one of the UniData message queues. You can compare the log files withipcstat output to find out if this is the cause of a hang or crash. If a queue is removed,the initial list from the appropriate log includes the queue, but ipcstat does notinclude the queue.
Message Queues, Shared Memory, and Semaphores 18-7
Removing ipc StructuresCertain types of system failures cause ipc facilities associated with UniData
to be left after UniData has been shut down. This can occur if the system
crashes or if one of the daemons is inadvertently killed. In such cases,
restarting UniData fails because of the remaining ipc structures. You may see
symptoms like the following:
■ The startud command fails.
■ A message displays in the startud window indicating smm is still
running.
■ Executing showud indicates smm is not running.
If you encounter these symptoms, complete the following steps:
1. Check for Remaining Facilities
Enter the UniData ipcstat command at the UNIX prompt. If the output shows
structures associated with UniData processes, execute showud to see if any
UniData daemons are running.
■ If there are daemons running, proceed to step 2.
■ If there are ipc facilities, but no daemons, proceed to step 3.
■ If there are no UniData daemons running and no ipc facilities,
research other causes for the startup failure.
Tip: Occasionally icpstat fails to complete. You can obtain the information you needby executing the UNIX ipcs command and comparing the output with smm.log andsbcs.log to identify UniData structures.
2. Stop UniData
If showud indicates that none of the UniData daemons is running, proceed to
step 3. Otherwise, execute the stopud command. This command stops the
daemons appropriately. Then proceed to step 3.
18-8 Administering UniData on UNIX
3. Decide How to Proceed
Use the UniData udipcrm command (step 4) or the UNIX ipcrm command
(step 5).
4. Remove ipc Facilities with udipcrm
Log in as root, and enter the udipcrm command at a UNIX prompt. This
command removes all ipc facilities associated with UniData processes. The
following screen shows the output from udipcrm:
# $UDTBIN/udipcrmipcrm: msqid(1106): not foundipcrm: msqid(1107): not foundipcrm: msqid(1108): not foundipcrm: msqid(1109): not found...ipcrm: shmid(4308): not foundipcrm: shmid(2709): not foundipcrm: shmid(513): not foundipcrm: shmid(414): not foundipcrm: semid(708): not found#
The “not found” messages appear because resources forced out by udipcrm
try to send messages to ones that are already gone.
After successfully completing udipcrm, you should be able to restart
UniData. Proceed to step 6; you do not need to complete step 5.
5. Remove ipc Facilities with UNIX ipcrm
The UNIX ipcrm command removes specific ipc facilities by specifying their
identifiers. For this reason, ipcrm is easy to use if you are removing only a few
facilities.
Refer to your host operating system documentation for detailed information
about the ipcrm command. You must log in as root to execute it. You need the
output from ipcstat to identify the resources to remove. Note the type
(column 1 of ipcstat output; must be m, q, or s) and the ID (column 2 of ipcstat
output).
Removing ipc Structures 18-9
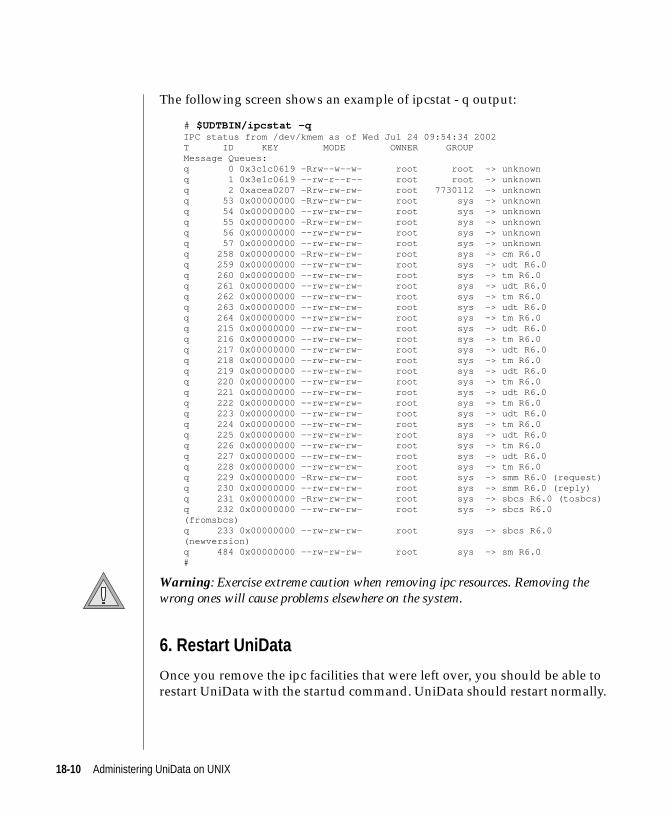
The following screen shows an example of ipcstat - q output:
# $UDTBIN/ipcstat -qIPC status from /dev/kmem as of Wed Jul 24 09:54:34 2002T ID KEY MODE OWNER GROUPMessage Queues:q 0 0x3c1c0619 -Rrw--w--w- root root -> unknownq 1 0x3e1c0619 --rw-r--r-- root root -> unknownq 2 0xacea0207 -Rrw-rw-rw- root 7730112 -> unknownq 53 0x00000000 -Rrw-rw-rw- root sys -> unknownq 54 0x00000000 --rw-rw-rw- root sys -> unknownq 55 0x00000000 -Rrw-rw-rw- root sys -> unknownq 56 0x00000000 --rw-rw-rw- root sys -> unknownq 57 0x00000000 --rw-rw-rw- root sys -> unknownq 258 0x00000000 -Rrw-rw-rw- root sys -> cm R6.0q 259 0x00000000 --rw-rw-rw- root sys -> udt R6.0q 260 0x00000000 --rw-rw-rw- root sys -> tm R6.0q 261 0x00000000 --rw-rw-rw- root sys -> udt R6.0q 262 0x00000000 --rw-rw-rw- root sys -> tm R6.0q 263 0x00000000 --rw-rw-rw- root sys -> udt R6.0q 264 0x00000000 --rw-rw-rw- root sys -> tm R6.0q 215 0x00000000 --rw-rw-rw- root sys -> udt R6.0q 216 0x00000000 --rw-rw-rw- root sys -> tm R6.0q 217 0x00000000 --rw-rw-rw- root sys -> udt R6.0q 218 0x00000000 --rw-rw-rw- root sys -> tm R6.0q 219 0x00000000 --rw-rw-rw- root sys -> udt R6.0q 220 0x00000000 --rw-rw-rw- root sys -> tm R6.0q 221 0x00000000 --rw-rw-rw- root sys -> udt R6.0q 222 0x00000000 --rw-rw-rw- root sys -> tm R6.0q 223 0x00000000 --rw-rw-rw- root sys -> udt R6.0q 224 0x00000000 --rw-rw-rw- root sys -> tm R6.0q 225 0x00000000 --rw-rw-rw- root sys -> udt R6.0q 226 0x00000000 --rw-rw-rw- root sys -> tm R6.0q 227 0x00000000 --rw-rw-rw- root sys -> udt R6.0q 228 0x00000000 --rw-rw-rw- root sys -> tm R6.0q 229 0x00000000 -Rrw-rw-rw- root sys -> smm R6.0 (request)q 230 0x00000000 --rw-rw-rw- root sys -> smm R6.0 (reply)q 231 0x00000000 -Rrw-rw-rw- root sys -> sbcs R6.0 (tosbcs)q 232 0x00000000 --rw-rw-rw- root sys -> sbcs R6.0(fromsbcs)q 233 0x00000000 --rw-rw-rw- root sys -> sbcs R6.0(newversion)q 484 0x00000000 --rw-rw-rw- root sys -> sm R6.0#
Warning: Exercise extreme caution when removing ipc resources. Removing thewrong ones will cause problems elsewhere on the system.
6. Restart UniData
Once you remove the ipc facilities that were left over, you should be able to
restart UniData with the startud command. UniData should restart normally.
18-10 Administering UniData on UNIX
Note: If UniData will not start, repeat steps 1 through 6. If UniData still will notstart, the problem is unrelated to ipc facilities. Examine the error logs in udtbin(smm.errlog and sbcs.errlog) and resolve all indicated error conditions.
Removing ipc Structures 18-11

18-12 Administering UniData on UNIX
19Chapter
Managing Cataloged Programs
UniBasic Source and Compiled Programs. . . . . . . . . . 19-4
UniBasic Compiled Programs . . . . . . . . . . . . . 19-4
Cataloging UniBasic Programs . . . . . . . . . . . . . 19-5
Direct Cataloging . . . . . . . . . . . . . . . . . 19-5
Local Cataloging . . . . . . . . . . . . . . . . . 19-5
Global Cataloging . . . . . . . . . . . . . . . . . 19-6
Managing Global Catalogs . . . . . . . . . . . . . . . 19-8
Contents of a Global Catalog . . . . . . . . . . . . . 19-8
Verifying a Program Version . . . . . . . . . . . . . 19-10
Listing Programs in Use . . . . . . . . . . . . . . . . 19-16
Creating an Alternate Global Catalog Space . . . . . . . . . 19-17
Files and Directories Created by newhome . . . . . . . . 19-17
Procedure for Creating an Alternate Global Catalog Space . . . 19-17

19 -2 Ad
ministering UniData on UNIX
This chapter describes the behavior of global, direct, and local cataloging for
UniBasic programs. It also describes how to create an alternate global catalog
space using the newhome command.
19-3
UniBasic Source and Compiled ProgramsUniData stores UniBasic source code in DIR-type files in the UniData account
where the source is developed. The default location for storing UniBasic
source code files is the BP file, which UniData creates as an empty file when
you create a UniData account. Developers store UniBasic source code files as
records in the BP file.
Note: In a UniData DIR-type file, like BP, each “record” is a UNIX file.
Each UniData account may contain numerous DIR files for UniBasic source.
UniBasic Compiled Programs
When you issue the BASIC command to compile a UniBasic program,
UniData stores the compiled code in the same DIR file where the source code
resides. The compiled code is a record whose name is the same as the source
record, prefixed with an underscore.
See the UniData Commands Reference and Developing UniBasic Applications for
information about the BASIC command.
The following example shows the contents of a program file:
: LIST BPTEST_TESTTEST2_TEST2EXAMPLE3_EXAMPLE3EXAMPLE5_EXAMPLE58 records listed
Records beginning with an underscore are compiled programs. Other
records are UniBasic source files.
Tip: Use the ECL RUN command to execute a compiled program. Refer to theUniData Commands Reference and Developing UniBasic Applications forinformation about the RUN command.
19-4 Administering UniData on UNIX

Cataloging UniBasic ProgramsCataloging UniBasic programs simplifies program execution and can
improve efficiency of system resource use by allowing multiple users to
access a single copy of a compiled program from shared memory. Use the
ECL CATALOG command to catalog one or more UniBasic programs.
Note: See the UniData Commands Reference and Developing UniBasicApplications for information about cataloging and the CATALOG command.
Compiled UniBasic programs can be cataloged directly, locally, or globally.
Direct Cataloging
Points to remember about direct cataloging are:
■ Compiled code is located in the program file in the UniData account
where the program was compiled and cataloged.
■ The VOC file in the account contains a pointer to the compiled code
in the program file. Users in the same account can execute the
program by entering the program name at the ECL prompt.
■ Because users access the compiled code in the program file,
developers do not need to recatalog the code if they recompile.
■ When a user executes a directly cataloged program, UniData loads a
copy of the program into the address space of the user.
Local Cataloging
Points to remember about local cataloging are:
■ Compiled code is located in the CTLG directory in the UniData
account where the program was cataloged, as well as in the program
file. CTLG is a DIR-type UniData file, and each record is a compiled
UniBasic program.
■ The VOC file in the account contains a pointer to the compiled
program in the CTLG. Users in the same account can execute the
program by entering the program name at the ECL prompt.
Cataloging UniBasic Programs 19-5
■ Developers must recatalog a program after recompiling to place a
new copy of the compiled code into the CTLG.
■ When a user executes a locally cataloged program, UniData loads a
copy of the program into the address space of the user.
Global Cataloging
Points to remember about global cataloging are:
■ If you execute the CATALOG command without specifying local or
direct cataloging, your program is globally cataloged.
■ Compiled code is located in a systemwide global catalog. The default
global catalog is udthome/sys/CTLG.
■ Developers must recatalog a program after recompiling it to place a
new copy of the compiled code into the global catalog.
Note: A UniData installation can have more than one global catalog space. Theenvironment variable UDTHOME determines which global catalog space aparticular UniData session accesses. See “Creating an Alternate Global CatalogSpace” in this chapter for more information about creating multiple global catalogspaces.
■ A systemwide global catalog is a DIR-type file, with 26
subdirectories named a through z. Compiled code is located in the
subdirectory corresponding to the first letter of the program name.
Compiled programs that begin with nonalphabetic characters are
stored in a subdirectory named X. The cataloged program name can
be the same as the source and object, or you can specify a different
name when you execute CATALOG.
Tip: Consider your program naming conventions if you are using global cataloging.Since the compiled code is placed in subdirectories according to name, you may havean unbalanced situation if a large number of your program names begin with thesame letter (for instance, a general ledger application where all the files begin with“gl”).
■ A globally cataloged program is available to users in all UniData
accounts.
19-6 Administering UniData on UNIX
■ When you execute a globally cataloged program, the shared basic
code server (sbcs) checks to see if a copy already exists in the shared
memory it controls.
■ If so, sbcs notifies the udt process which shared memory
segment to attach to access that copy.
■ If not, sbcs loads a copy into one of its shared memory segments
for the user to execute.
■ The sbcs daemon handles any object file located in the
udthome/sys/CTLG file system, regardless of how the program is
accessed.
■ The sbcs daemon can manage up to 20 shared memory segments for
globally cataloged programs. The size of each segment is determined
by the SBCS_SHM_SIZE parameter in the UniData configuration file
(/usr/ud60/include/udtconfig). The default value for
SBCS_SHM_SIZE is 1,048,576 bytes (1 MB), which is set when you
install UniData. Users encounter run-time errors if this size is
insufficient. You can increase the segment size as long as you do not
exceed the configuration parameter SHM_MAX_SIZE.
■ For operating systems which impose limits on the number of shared
memory segments (such as AIX, which allows only 10), users should
increase SBCS_SHM_SIZE. Typical values on AIX systems range
from 4 MB to 8 MB.
Tip: Refer to Appendix A, “UniData Configuration Parameters,” for additionalinformation about SBCS_SHM_SIZE and SHM_MAX_SIZE.
Cataloging UniBasic Programs 19-7
Managing Global CatalogsUniData provides a group of files and commands that manage global
catalogs. These files and commands accomplish the following:
■ Identify the contents of a global catalog space
■ Verify consistency between UniBasic source and a globally cataloged
program
■ Activate newly cataloged programs and subroutines
■ Display use of globally cataloged programs
Contents of a Global Catalog
UniData maintains two files that store contents of a global catalog. The global
catalog table, called CTLGTB, is a dynamically maintained file that shows the
current contents of the global catalog. You can list the catalog table from a
UniData account, as shown in the following example:
: LIST CTLGTB ALLLIST CTLGTB ALL 15:33:59 Jun 14 2002 1CATALOG NAME................ T ARG ORIGINATOR............ WHO....
SCHEMA_UPDATE_PRIVILEGES S 51 @UDTHOME/SYS_BP SCHEMA root _UPDATE_PRIVILEGESSCHEMA_LIST_USERS S 31 @UDTHOME/SYS_BP SCHEMA root _LIST_USERSSCHEMA_VIEW_CHECK S 71 @UDTHOME/SYS_BP SCHEMA root _VIEW_CHECKUS_EXECUTOR S 51 @UDTHOME/SYS_BP US_EXE root CUTORBUILD.CHARTBL S 01 @UDTHOME/DENAT_BP BUIL root D.CHARTBL508E S 41 @UDTHOME/SYS_BP 508E rootRPROG2_AE S 11 @UDTHOME/AE_BP RPROG2_ root AEJRNL_TEST M 0 @UDTHOME/SYS_BP JRNL_T root ESTSCHEMA_DELETE_MAP S 41 @UDTHOME/SYS_BP SCHEMA root _DELETE_MAPNFA.EXECSEL.U S 31 @UDTHOME/SYS_BP NFA.EX root ECSEL.U70E0 S 41 @UDTHOME/SYS_BP 70E0 root...
19-8 Administering UniData on UNIX
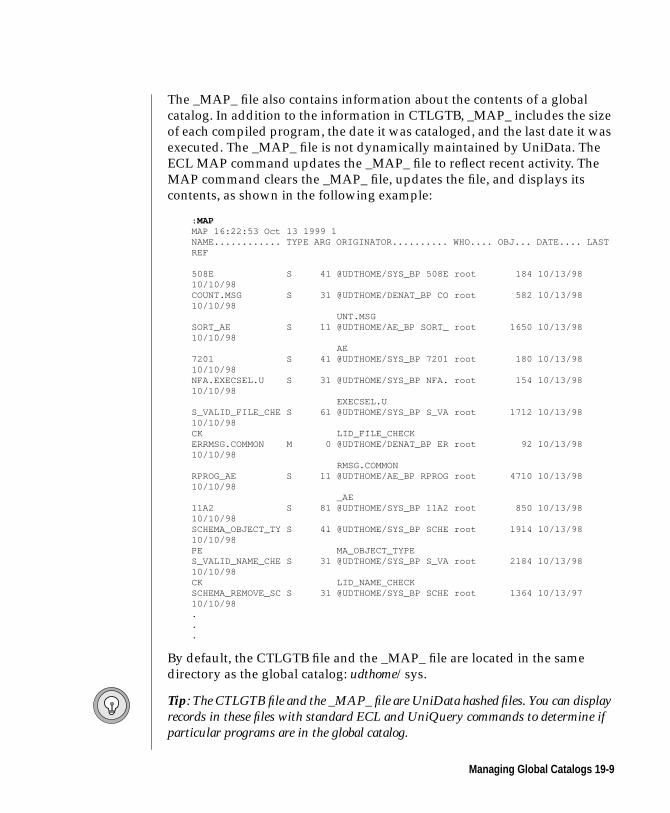
The _MAP_ file also contains information about the contents of a global
catalog. In addition to the information in CTLGTB, _MAP_ includes the size
of each compiled program, the date it was cataloged, and the last date it was
executed. The _MAP_ file is not dynamically maintained by UniData. The
ECL MAP command updates the _MAP_ file to reflect recent activity. The
MAP command clears the _MAP_ file, updates the file, and displays its
contents, as shown in the following example:
: MAPMAP 16:22:53 Oct 13 1999 1NAME............ TYPE ARG ORIGINATOR.......... WHO.... OBJ... DATE.... LASTREF
508E S 41 @UDTHOME/SYS_BP 508E root 184 10/13/9810/10/98COUNT.MSG S 31 @UDTHOME/DENAT_BP CO root 582 10/13/9810/10/98 UNT.MSGSORT_AE S 11 @UDTHOME/AE_BP SORT_ root 1650 10/13/9810/10/98 AE7201 S 41 @UDTHOME/SYS_BP 7201 root 180 10/13/9810/10/98NFA.EXECSEL.U S 31 @UDTHOME/SYS_BP NFA. root 154 10/13/9810/10/98 EXECSEL.US_VALID_FILE_CHE S 61 @UDTHOME/SYS_BP S_VA root 1712 10/13/9810/10/98CK LID_FILE_CHECKERRMSG.COMMON M 0 @UDTHOME/DENAT_BP ER root 92 10/13/9810/10/98 RMSG.COMMONRPROG_AE S 11 @UDTHOME/AE_BP RPROG root 4710 10/13/9810/10/98 _AE11A2 S 81 @UDTHOME/SYS_BP 11A2 root 850 10/13/9810/10/98SCHEMA_OBJECT_TY S 41 @UDTHOME/SYS_BP SCHE root 1914 10/13/9810/10/98PE MA_OBJECT_TYPES_VALID_NAME_CHE S 31 @UDTHOME/SYS_BP S_VA root 2184 10/13/9810/10/98CK LID_NAME_CHECKSCHEMA_REMOVE_SC S 31 @UDTHOME/SYS_BP SCHE root 1364 10/13/9710/10/98...
By default, the CTLGTB file and the _MAP_ file are located in the same
directory as the global catalog: udthome/sys.
Tip: The CTLGTB file and the _MAP_ file are UniData hashed files. You can displayrecords in these files with standard ECL and UniQuery commands to determine ifparticular programs are in the global catalog.
Managing Global Catalogs 19-9

Verifying a Program Version
The VCATALOG command checks the date/time stamp of a UniBasic source
file against the compiled program in the global catalog. If the UniBasic source
file was modified after the program was cataloged, the program does not
verify.
Syntax:
VCATALOG filename catalog.name program.name
The following table describes each parameter of the syntax.
Note: If catalog.name and program.name are the same, you need only supply thename once.
The following example shows output from VCATALOG:
: VCATALOG BP TESTProgram 'TEST' does not verify.: CATALOG BP TEST/usr/ud60/sys/CTLG/t/TEST has been cataloged, do you want tooverwrite?(Y/N) Y: VCATALOG BP TESTProgram 'TEST' does not verify.: BASIC BP TEST
Compiling Unibasic: BP/TEST in mode 'u'.compilation finished: CATALOG BP TEST/usr/ud60/sys/CTLG/t/TEST has been cataloged, do you want tooverwrite?(Y/N) Y: VCATALOG BP TESTProgram 'TEST' verifies.:
Parameter Description
filename Name of the file containing the program (BP, forinstance).
catalog.name Name given to the program when you executedCATALOG. For example, the command CATALOG BPTRIAL TEST creates a global catalog entry named TRIALfrom a program called TEST. So catalog.name is TRIAL.
program.name Name of the program source file. In the example in theprevious row of this table, program.name is TEST.
VCATALOG Parameters
19-10 Administering UniData on UNIX
In the example, notice that recataloging the program did not make the
program verify. This result indicates that the source code was changed, but
was not recompiled or recataloged. After the source code was recompiled
and recataloged, the program verified successfully.
Refer to the UniData Commands Reference for additional information about the
VCATALOG command.
Activating Newly Cataloged Programs and Subroutines
This section describes how to activate newly cataloged programs and
subroutines.
Main Programs
When you globally catalog a UniBasic main program, UniData:
■ Copies the new compiled code into the global catalog.
■ If there is a version of the program in shared memory, marks that
version as obsolete.
The users already executing the main program continue to execute the
previous version. Users that execute the program after the new version is
cataloged get the new version. Once all users exit the previous version,
UniData removes the copy of that version from shared memory.
Note: A user executing a main program continues to execute that version until itcompletes.
Subroutines
If a subroutine is recataloged while the main program is running, users will
not execute the newly-cataloged subroutine until the next time they execute
the main program. This prevents inconsistent execution of a subroutine
during one execution of the main program. Under certain circumstances,
however, a user or system administrator can override the default behavior.
Overrides are dangerous in a production environment, but may be useful in
a development or test environment.
Managing Global Catalogs 19-11
NEWVERSION Keyword
The NEWVERSION keyword for the CATALOG command enables a user
logged in as root to dynamically replace a globally cataloged subroutine. If a
subroutine is cataloged with NEWVERSION, any user executing the main
program accesses the new version of the subroutine with the next CALL or
EXECUTE of the subroutine, rather than waiting until the main program
completes. Consider the following sequence of events:
1. A user executes the main program MAIN.
2. MAIN calls a subroutine called SUBR, which completes and returns
to MAIN.
3. MAIN continues with other processing.
4. MAIN calls SUBR again. SUBR completes and returns to MAIN.
5. MAIN completes.
If SUBR is recataloged after step 1 without the NEWVERSION keyword, the
same version of SUBR is used for both calls (step 2 and step 4). With the next
execution of MAIN, the newly cataloged SUBR is used.
If SUBR is recataloged after step 1, with the NEWVERSION keyword, then
there are three possible results:
■ CATALOG happens after step 1 but before step 2. In this case, the
newly cataloged SUBR gets accessed in both step 2 and step 4.
■ CATALOG happens after step 2, but before step 4. In this case, the
prior version of SUBR gets accessed in step 2, and the newly
cataloged version gets accessed in step 4.
■ CATALOG happens after step 4. In this case, the prior version gets
accessed in both step 2 and step 4. With the next execution of MAIN,
the newly cataloged SUBR is accessed.
Warning: Using the NEWVERSION keyword to CATALOG a subroutine canproduce inconsistent results for users who are currently executing the main program.For example, the number of arguments could change.
19-12 Administering UniData on UNIX
The following sample CATALOG command shows the syntax including the
NEWVERSION keyword:
: CATALOG BP SUBR NEWVERSION/usr/ud60/sys/CTLG/s/SUBR has been cataloged, do you want tooverwrite?(Y/N) Y:
newversion System-Level Command
The UniData system-level command newversion enables a user logged in as
root to dynamically replace a cataloged subroutine (just as the
NEWVERSION keyword does), but limits the behavior to a selected user or
users.
Syntax:
newversion path userno...
The following table describes each parameter of the syntax.
Parameter Description
path Absolute path of the cataloged subroutine.
userno... UNIX process ID (pid) for a user who should access thenew subroutine dynamically. You can specify more thanone userno; separate the numbers with spaces.
newversion Parameters
Managing Global Catalogs 19-13
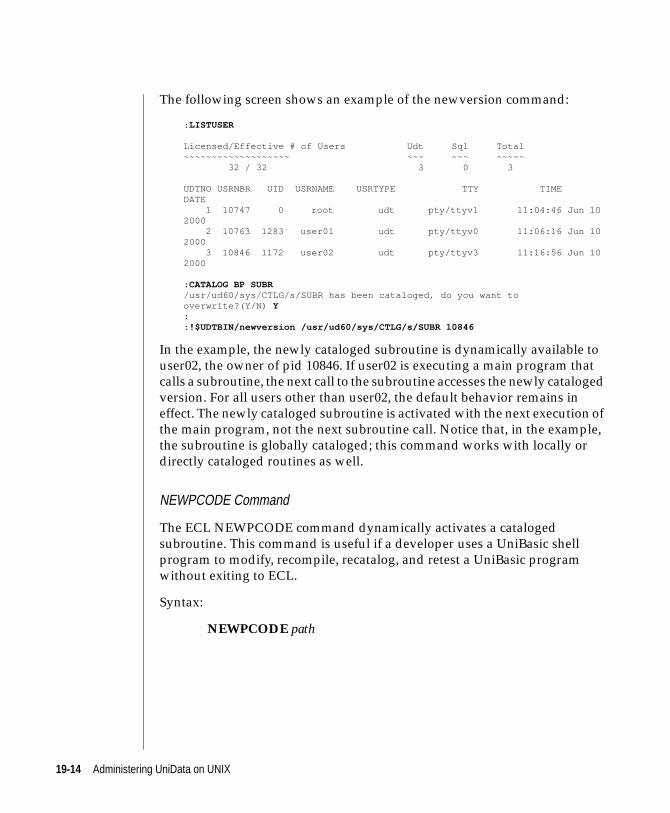
The following screen shows an example of the newversion command:
: LISTUSER
Licensed/Effective # of Users Udt Sql Total~~~~~~~~~~~~~~~~~~~ ~~~ ~~~ ~~~~~ 32 / 32 3 0 3
UDTNO USRNBR UID USRNAME USRTYPE TTY TIMEDATE
1 10747 0 root udt pty/ttyv1 11:04:46 Jun 102000
2 10763 1283 user01 udt pty/ttyv0 11:06:16 Jun 102000
3 10846 1172 user02 udt pty/ttyv3 11:16:56 Jun 102000
: CATALOG BP SUBR/usr/ud60/sys/CTLG/s/SUBR has been cataloged, do you want tooverwrite?(Y/N) Y:: !$UDTBIN/newversion /usr/ud60/sys/CTLG/s/SUBR 10846
In the example, the newly cataloged subroutine is dynamically available to
user02, the owner of pid 10846. If user02 is executing a main program that
calls a subroutine, the next call to the subroutine accesses the newly cataloged
version. For all users other than user02, the default behavior remains in
effect. The newly cataloged subroutine is activated with the next execution of
the main program, not the next subroutine call. Notice that, in the example,
the subroutine is globally cataloged; this command works with locally or
directly cataloged routines as well.
NEWPCODE Command
The ECL NEWPCODE command dynamically activates a cataloged
subroutine. This command is useful if a developer uses a UniBasic shell
program to modify, recompile, recatalog, and retest a UniBasic program
without exiting to ECL.
Syntax:
NEWPCODE path
19-14 Administering UniData on UNIX
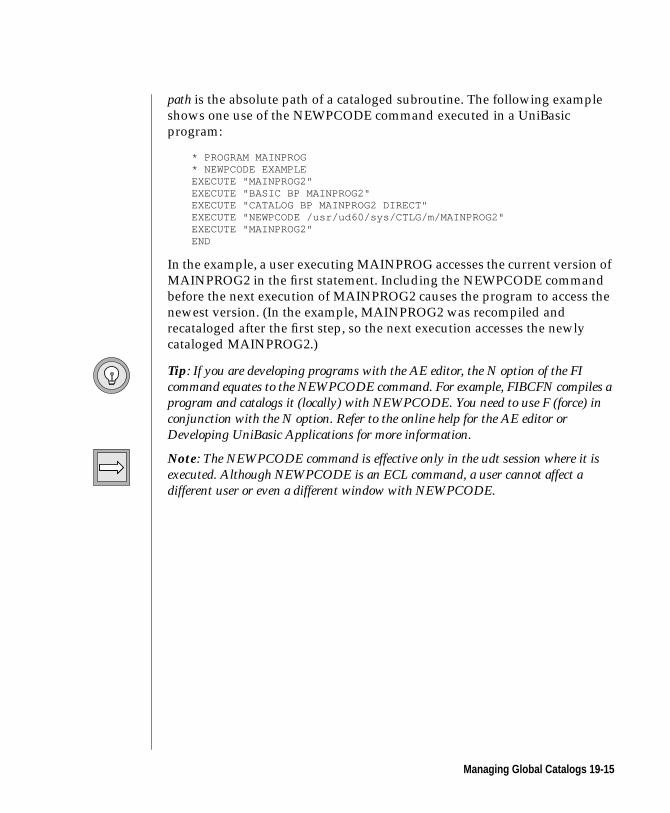
path is the absolute path of a cataloged subroutine. The following example
shows one use of the NEWPCODE command executed in a UniBasic
program:
* PROGRAM MAINPROG* NEWPCODE EXAMPLEEXECUTE "MAINPROG2"EXECUTE "BASIC BP MAINPROG2"EXECUTE "CATALOG BP MAINPROG2 DIRECT"EXECUTE "NEWPCODE /usr/ud60/sys/CTLG/m/MAINPROG2"EXECUTE "MAINPROG2"END
In the example, a user executing MAINPROG accesses the current version of
MAINPROG2 in the first statement. Including the NEWPCODE command
before the next execution of MAINPROG2 causes the program to access the
newest version. (In the example, MAINPROG2 was recompiled and
recataloged after the first step, so the next execution accesses the newly
cataloged MAINPROG2.)
Tip: If you are developing programs with the AE editor, the N option of the FIcommand equates to the NEWPCODE command. For example, FIBCFN compiles aprogram and catalogs it (locally) with NEWPCODE. You need to use F (force) inconjunction with the N option. Refer to the online help for the AE editor orDeveloping UniBasic Applications for more information.
Note: The NEWPCODE command is effective only in the udt session where it isexecuted. Although NEWPCODE is an ECL command, a user cannot affect adifferent user or even a different window with NEWPCODE.
Managing Global Catalogs 19-15
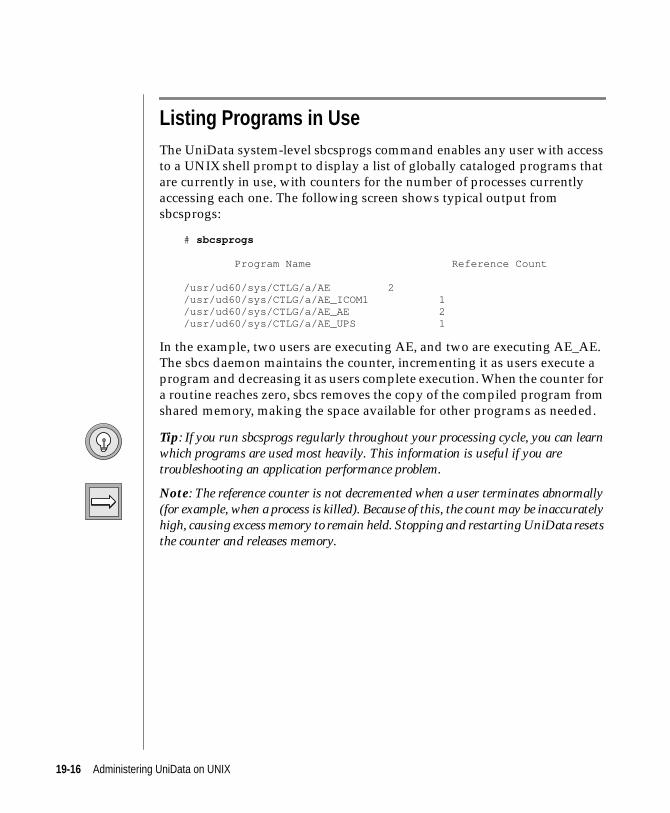
Listing Programs in UseThe UniData system-level sbcsprogs command enables any user with access
to a UNIX shell prompt to display a list of globally cataloged programs that
are currently in use, with counters for the number of processes currently
accessing each one. The following screen shows typical output from
sbcsprogs:
# sbcsprogs
Program Name Reference Count
/usr/ud60/sys/CTLG/a/AE 2/usr/ud60/sys/CTLG/a/AE_ICOM1 1/usr/ud60/sys/CTLG/a/AE_AE 2/usr/ud60/sys/CTLG/a/AE_UPS 1
In the example, two users are executing AE, and two are executing AE_AE.
The sbcs daemon maintains the counter, incrementing it as users execute a
program and decreasing it as users complete execution. When the counter for
a routine reaches zero, sbcs removes the copy of the compiled program from
shared memory, making the space available for other programs as needed.
Tip: If you run sbcsprogs regularly throughout your processing cycle, you can learnwhich programs are used most heavily. This information is useful if you aretroubleshooting an application performance problem.
Note: The reference counter is not decremented when a user terminates abnormally(for example, when a process is killed). Because of this, the count may be inaccuratelyhigh, causing excess memory to remain held. Stopping and restarting UniData resetsthe counter and releases memory.
19-16 Administering UniData on UNIX
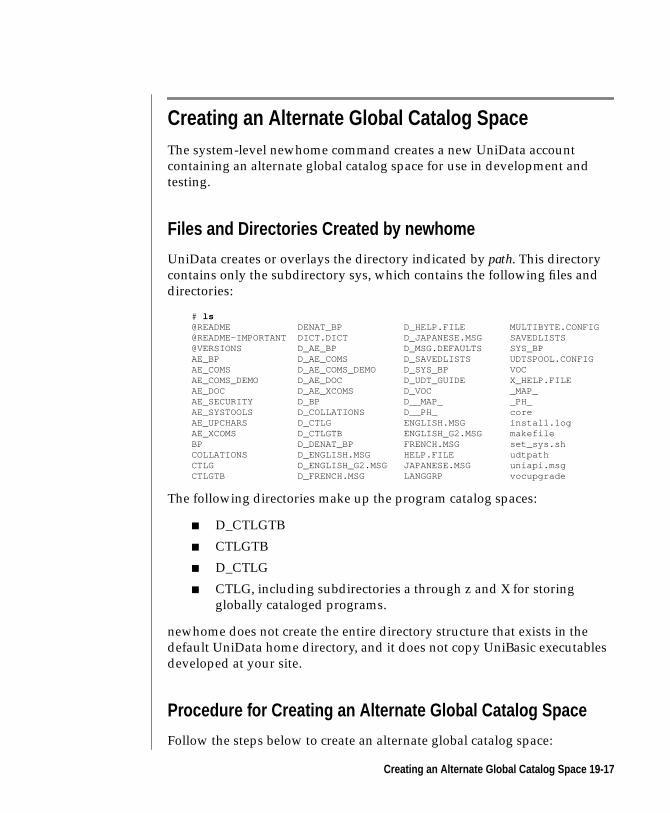
Creating an Alternate Global Catalog SpaceThe system-level newhome command creates a new UniData account
containing an alternate global catalog space for use in development and
testing.
Files and Directories Created by newhome
UniData creates or overlays the directory indicated by path. This directory
contains only the subdirectory sys, which contains the following files and
directories:
# ls@README DENAT_BP D_HELP.FILE MULTIBYTE.CONFIG@README-IMPORTANT DICT.DICT D_JAPANESE.MSG SAVEDLISTS@VERSIONS D_AE_BP D_MSG.DEFAULTS SYS_BPAE_BP D_AE_COMS D_SAVEDLISTS UDTSPOOL.CONFIGAE_COMS D_AE_COMS_DEMO D_SYS_BP VOCAE_COMS_DEMO D_AE_DOC D_UDT_GUIDE X_HELP.FILEAE_DOC D_AE_XCOMS D_VOC _MAP_AE_SECURITY D_BP D__MAP_ _PH_AE_SYSTOOLS D_COLLATIONS D__PH_ coreAE_UPCHARS D_CTLG ENGLISH.MSG install.logAE_XCOMS D_CTLGTB ENGLISH_G2.MSG makefileBP D_DENAT_BP FRENCH.MSG set_sys.shCOLLATIONS D_ENGLISH.MSG HELP.FILE udtpathCTLG D_ENGLISH_G2.MSG JAPANESE.MSG uniapi.msgCTLGTB D_FRENCH.MSG LANGGRP vocupgrade
The following directories make up the program catalog spaces:
■ D_CTLGTB
■ CTLGTB
■ D_CTLG
■ CTLG, including subdirectories a through z and X for storing
globally cataloged programs.
newhome does not create the entire directory structure that exists in the
default UniData home directory, and it does not copy UniBasic executables
developed at your site.
Procedure for Creating an Alternate Global Catalog Space
Follow the steps below to create an alternate global catalog space:
Creating an Alternate Global Catalog Space 19-17
1. Change to the New Account Directory
At the operating system prompt, change to the directory in which you intend
to locate the new UniData account, as in the following example:
# cd /home/claireg
2. Execute newhome
Execute the newhome command, indicating the path to the new account. In
this example, a new UNIX directory, testenv, will be created under
/home/claireg. (If the udtbin directory is in your path, you do not have to
precede the command with udtbin.)
Notice that the newhome command is executed from the ECL prompt, and
therefore is preceded by the ! ECL command:
: !$UDTBIN/newhome testenv
Creating new udt home /home/claireg/demo/testenv ...
The new UDTHOME is established, now only the sys directoryis there and it contains all the UniData system catalogedprograms, such as AE editor, NFA sever, etc.. To make it beeffective, the environment variable UDTHOME needs to be setto point to the new UDTHOME.
3. Modify VOC Entries for Users
Decide which UniData accounts should access the new global catalog space.
For each account, modify the VOC entry for CTLGTB. The entry should point
to the new global catalog space, as shown in the following example.
19-18 Administering UniData on UNIX
Notice that this example uses a soft pointer to @UDTHOME. This ensures
that the VOC always points to the correct catalog space. Refer to Chapter 3,
“UniData and the UNIX File System,” for information about setting soft
pointers in VOC entries.
: AE VOC CTLGTBTop of "CTLGTB" in "VOC", 3 lines, 45 characters.*--: P001: F002: @UDTHOME/sys/CTLGTB003: @UDTHOME/sys/D_CTLGTBBottom.*--:
You do not need to log in as root to edit the VOC entries; however, you need
write permissions on the VOC file in each account.
4. Modify UDTHOME for Users
You need to reset the UDTHOME environment variable for each user who
needs to access the alternate global catalog space. The value of UDTHOME
defined during a particular UniData session determines the global catalog
space a user accesses.
Note: Even if the VOC file of an account is set up to point to the alternate globalcatalog (CTLGTB), a user whose UDTHOME is set to the default value accesses thedefault global catalog space.
You can modify the UDTHOME variable in a user’s .login or .profile. Simply
use vi or any UNIX text editor to change the variable setting. The user must
then log out and log back in to make the change effective.
Users with access to a UNIX shell prompt can reset the UDTHOME
environment variable with the setenv command. The value set at the UNIX
prompt overrides the .login or .profile:
% printenv UDTHOME/disk1/ud60% setenv UDTHOME /home/carolw/demo/testenv% udtUniData Release 6.0 Build: (4088)Copyright (C) IBM Corporation 2002All rights reserved.
Current UniData home is /home/carolw/demo/testenv/.Current working directory is /home/carolw/demo.
Creating an Alternate Global Catalog Space 19-19
5. Copy Application Programs
After resetting UDTHOME to point to the new space, start UniData from an
account that has access to the site-specific programs that you want to access
from the new account, and recatalog those programs. Because you have reset
the UDTHOME environment variable, UniData places the recataloged
programs in the new space.
You can also use the following series of UNIX commands to copy all globally
cataloged programs to the new catalog space. Be sure to replace
original_udthome and new_udthome with the paths to your old and new
catalog spaces:
%cd original_udthome /sys/CTLGfind * -type f -print | cpio -pm new_udthome /sys/CTLG
6. Use the Alternate Global Catalog Space
The alternate global catalog space is now ready to use. The following
example shows the output of the sbcsprogs command when two global
catalog spaces are used:
% sbcsprogs
Program Name Reference Count
... 1/home/carolw/demo/testenv/sys/CTLG/a/AE/home/carolw/demo/testenv/sys/CTLG/a/AE_UPS 1/disk1/ud60/sys/CTLG/a/AE 1/disk1/ud60/sys/CTLG/a/AE_ICOM1 1/disk1/ud60/sys/CTLG/a/AE_UPS 1...%
Notice that AE is running twice, but that the two copies are cataloged in
different global catalog spaces.
19-20 Administering UniData on UNIX
20Chapter
CallBasic, CALLC, and makeudt
Linking C Routines into UniData . . . . . . . . . . . . 20-4
Overview . . . . . . . . . . . . . . . . . . . . 20-4
Requirements . . . . . . . . . . . . . . . . . . 20-4
Rebuilding for Troubleshooting . . . . . . . . . . . . 20-5
makeudt . . . . . . . . . . . . . . . . . . . . . 20-6
File Examples . . . . . . . . . . . . . . . . . . 20-7
Creating cfuncdef_user . . . . . . . . . . . . . . . 20-10
Steps for Linking in C Functions . . . . . . . . . . . . . 20-11
Steps for Setting Up a Development Environment . . . . . . . 20-15
Accessing UniData from a C Program . . . . . . . . . . . 20-20
Requirements . . . . . . . . . . . . . . . . . . 20-20
How CallBasic Works . . . . . . . . . . . . . . . 20-20
C Program Example . . . . . . . . . . . . . . . . . 20-22
UniBasic Subroutine Example . . . . . . . . . . . . . . 20-25
Steps for CallBasic . . . . . . . . . . . . . . . . . . 20-26

20 -2 Ad
ministering UniData on UNIX
UniData provides the makeudt tool and the UniBasic CALLC command for
linking C routines into UniData, and the CallBasic tool for linking UniData
into C programs. This chapter describes commands and procedures for using
these tools.
Note: See the UniBasic Commands Reference and Developing UniBasicApplications for information about the syntax and use of the CALLC command.
20-3
Linking C Routines into UniData
Overview
Many applications use C functions for purposes like environment definition,
security, or low-level data transfers (similar to the UniBasic GET and SEND
functions). UniData allows you to build a customized version of the UniData
“kernel” (the udt executable, located in udtbin) that includes C functions
developed at your site. Once you build the customized udt, you can access
the C functions from within a UniBasic application using CALLC commands.
You can also create a UniData executable with links to C programs so that
they are accessible through InterCall, UniObjects, or UniObjects for Java.
Note: When you use CALLC, your C functions are executed by a udt process. Theyare not visible to the end user at all.
Requirements
The components required to take advantage of this functionality are:
■ Development environment—Your system should have a full
software development kit. (A base compiler is not sufficient). You
need network libraries if you are using NFA.
■ C functions—You need to code and compile the C functions you are
linking into UniData.
■ Function definitions and make files—When you install UniData,
the files base.mk and cfuncdef are installed into the directory
udthome/work. You create a file called cfuncdef_user that contains
definitions for your site-specific C functions, and you may need to
customize the make file.
■ UniData commands—You use the UniData system-level commands
gencdef, genfunc, genefs, and makeudt, and makeudapi to build
your new UniData executable. If you execute the makeudt or
makeudapi commands, these commands are automatically
executed. If you use the make utility, you need to execute them
manually.
20-4 Administering UniData on UNIX
Note: Refer to your host operating system documentation and your hardware vendorif you have questions about your C development environment.
Rebuilding for Troubleshooting
You may consider rebuilding the UniData executable, even if you are not
linking in custom routines, to troubleshoot UniData problems on your
system. The udt executable shipped with your product is “stripped” for
maximum efficiency, which means that symbol tables used by system
debuggers have been removed. You can run makeudt to generate a
nonstripped binary to facilitate debugging.
Tip: Rebuilding udt is often unnecessary for researching problems. Do not undertakethis step unless you are advised to do so by IBM.
Rebuilding for Application Testing
Although the default behavior of makeudt overwrites the production version
of the udt executable, you can configure your system and use the make files
to create executables in a testing area separate from production. In this way,
you can conduct tests without disrupting user activity, and replace the
production udt only when you are satisfied with the functionality.
Linking C Routines into UniData 20-5
makeudtSyntax:
makeudt [-n nfa]
makeudt is a UniData system-level command that builds a new UniData
executable (udt). The command builds the executable using the following:
■ base.mk—This make file is located in udthome/work. This file is a
template that UniData uses to create a second make file called
new.mk. Then UniData uses new.mk to create the new udt
executable.
■ cfuncdef—This function definition file is also located in
udthome/work. It contains definitions for any C functions that
UniData has incorporated into your released udt. Do not modify this
file.
■ cfuncdef_user—This file contains definitions for site-specific C
functions that you want to link into UniData. You need to create this
file.
■ UniData Libraries—When you install UniData, you are prompted
for the path where you want to locate these.
The following table describes the option of the makeudt syntax.
Note: It is best to log in as root to execute makeudt. UniData may be up and running,and users may be logged in. If users are logged in, the makeudt command may or maynot allow you to overwrite the production udt, depending on your UNIX version.Some versions display an error message and exit, while others prompt whether youwish to overwrite the production udt.
Option Description
-n nfa Use this option only if you are not using UniDataOFS/NFA. This option allows makeudt to use “dummy”libraries rather than network libraries NFA requires.Software development environments may or may notinclude the network libraries; if yours does not includethese, and you do not use the -n nfa option, makeudt fails.
makeudt Options
20-6 Administering UniData on UNIX
File Examples
The base.mk file and the cfuncdef file are platform-specific.
base.mk Example
Warning: Do not copy the sample makefile onto your system. If you do, makeudt willlikely fail. Always start with the base.mk file released with your UniData release.
makeudt 20-7
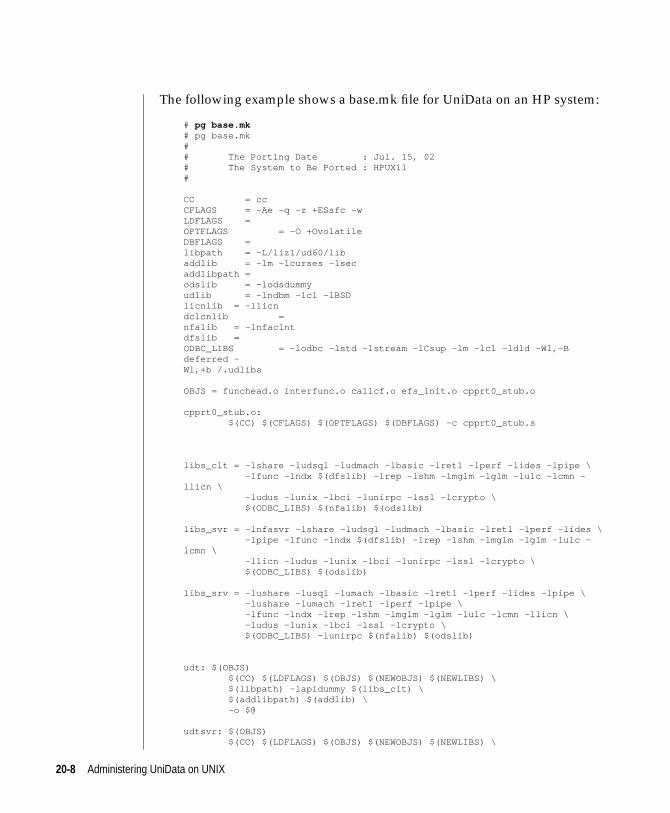
The following example shows a base.mk file for UniData on an HP system:
# pg base.mk# pg base.mk## The Porting Date : Jul. 15, 02# The System to Be Ported : HPUX11#
CC = ccCFLAGS = -Ae -q -z +ESsfc -wLDFLAGS =OPTFLAGS = -O +OvolatileDBFLAGS =libpath = -L/liz1/ud60/libaddlib = -lm -lcurses -lsecaddlibpath =odslib = -lodsdummyudlib = -lndbm -lcl -lBSDlicnlib = -llicndclcnlib =nfalib = -lnfaclntdfslib =ODBC_LIBS = -lodbc -lstd -lstream -lCsup -lm -lcl -ldld -Wl,-Bdeferred -Wl,+b /.udlibs
OBJS = funchead.o interfunc.o callcf.o efs_init.o cpprt0_stub.o
cpprt0_stub.o: $(CC) $(CFLAGS) $(OPTFLAGS) $(DBFLAGS) -c cpprt0_stub.s
libs_clt = -lshare -ludsql -ludmach -lbasic -lret1 -lperf -lides -lpipe \ -lfunc -lndx $(dfslib) -lrep -lshm -lmglm -lglm -lulc -lcmn -llicn \ -ludus -lunix -lbci -lunirpc -lssl -lcrypto \ $(ODBC_LIBS) $(nfalib) $(odslib)
libs_svr = -lnfasvr -lshare -ludsql -ludmach -lbasic -lret1 -lperf -lides \ -lpipe -lfunc -lndx $(dfslib) -lrep -lshm -lmglm -lglm -lulc -lcmn \ -llicn -ludus -lunix -lbci -lunirpc -lssl -lcrypto \ $(ODBC_LIBS) $(odslib)
libs_srv = -lushare -lusql -lumach -lbasic -lret1 -lperf -lides -lpipe \ -lushare -lumach -lret1 -lperf -lpipe \ -lfunc -lndx -lrep -lshm -lmglm -lglm -lulc -lcmn -llicn \ -ludus -lunix -lbci -lssl -lcrypto \ $(ODBC_LIBS) -lunirpc $(nfalib) $(odslib)
udt: $(OBJS) $(CC) $(LDFLAGS) $(OBJS) $(NEWOBJS) $(NEWLIBS) \ $(libpath) -lapidummy $(libs_clt) \ $(addlibpath) $(addlib) \ -o $@
udtsvr: $(OBJS) $(CC) $(LDFLAGS) $(OBJS) $(NEWOBJS) $(NEWLIBS) \
20-8 Administering UniData on UNIX
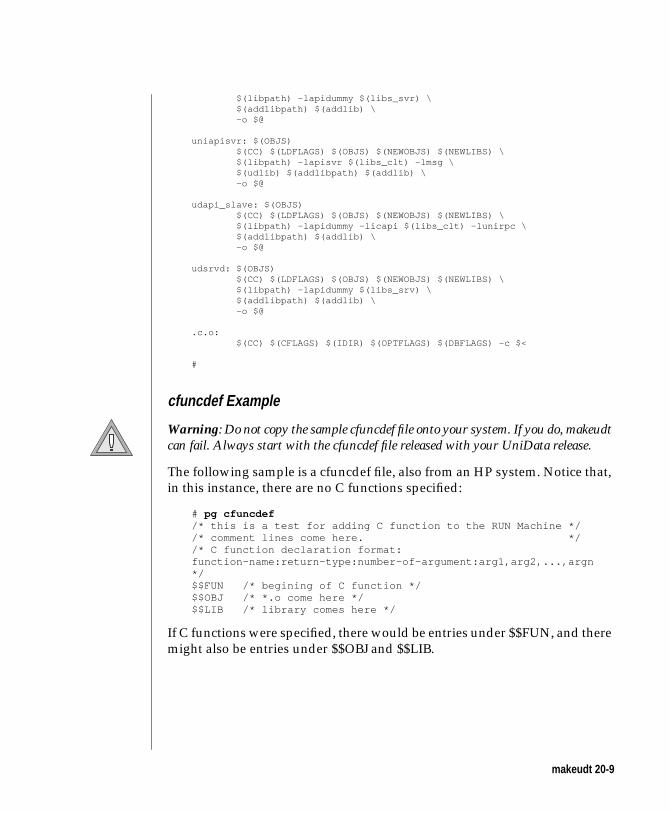
$(libpath) -lapidummy $(libs_svr) \ $(addlibpath) $(addlib) \ -o $@
uniapisvr: $(OBJS) $(CC) $(LDFLAGS) $(OBJS) $(NEWOBJS) $(NEWLIBS) \ $(libpath) -lapisvr $(libs_clt) -lmsg \ $(udlib) $(addlibpath) $(addlib) \ -o $@
udapi_slave: $(OBJS) $(CC) $(LDFLAGS) $(OBJS) $(NEWOBJS) $(NEWLIBS) \ $(libpath) -lapidummy -licapi $(libs_clt) -lunirpc \ $(addlibpath) $(addlib) \ -o $@
udsrvd: $(OBJS) $(CC) $(LDFLAGS) $(OBJS) $(NEWOBJS) $(NEWLIBS) \ $(libpath) -lapidummy $(libs_srv) \ $(addlibpath) $(addlib) \ -o $@
.c.o: $(CC) $(CFLAGS) $(IDIR) $(OPTFLAGS) $(DBFLAGS) -c $<
#
cfuncdef Example
Warning: Do not copy the sample cfuncdef file onto your system. If you do, makeudtcan fail. Always start with the cfuncdef file released with your UniData release.
The following sample is a cfuncdef file, also from an HP system. Notice that,
in this instance, there are no C functions specified:
# pg cfuncdef/* this is a test for adding C function to the RUN Machine *//* comment lines come here. *//* C function declaration format:function-name:return-type:number-of-argument:arg1,arg2,...,argn*/$$FUN /* begining of C function */$$OBJ /* *.o come here */$$LIB /* library comes here */
If C functions were specified, there would be entries under $$FUN, and there
might also be entries under $$OBJ and $$LIB.
makeudt 20-9
Cn
Creating cfuncdef_user
Although makeudt recognizes the cfuncdef_user file, UniData does not
include this file at installation. You can create this file from the cfuncdef file
by completing the following steps:
1. Copy the cfuncdef File
In the udthome/work directory, execute the command:
# cp cfuncdef cfuncdef_user
2. Edit cfuncdef_user
Use vi or any UNIX text editor to remove from your new
cfuncdef_user file any lines that appear under the lines beginning
with $$FUN, $$OBJ, and $$LIB. This step gives you a file that has the
format information included for the function definitions, but does
not contain references to any UniData routines.
3. Add Local C Functions to cfuncdef_user
Use vi or any UNIX text editor to add references to site-specific routines you are linking into UniData. Follow the format specified ithe file.
20-10 Administering UniData on UNIX
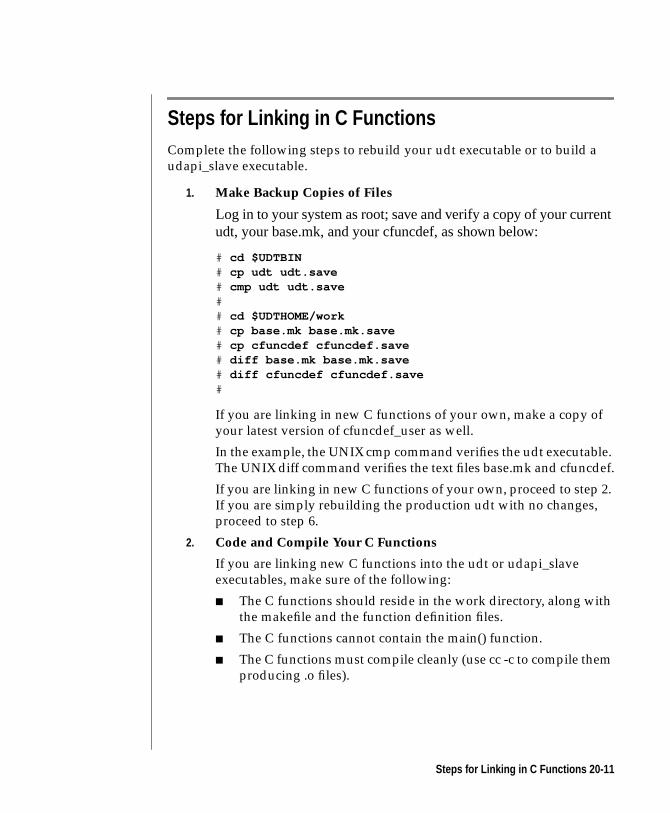
nt
Steps for Linking in C FunctionsComplete the following steps to rebuild your udt executable or to build a
udapi_slave executable.
1. Make Backup Copies of Files
Log in to your system as root; save and verify a copy of your curreudt, your base.mk, and your cfuncdef, as shown below:
# cd $UDTBIN# cp udt udt.save# cmp udt udt.save## cd $UDTHOME/work# cp base.mk base.mk.save# cp cfuncdef cfuncdef.save# diff base.mk base.mk.save# diff cfuncdef cfuncdef.save#
If you are linking in new C functions of your own, make a copy of
your latest version of cfuncdef_user as well.
In the example, the UNIX cmp command verifies the udt executable.
The UNIX diff command verifies the text files base.mk and cfuncdef.
If you are linking in new C functions of your own, proceed to step 2.
If you are simply rebuilding the production udt with no changes,
proceed to step 6.
2. Code and Compile Your C Functions
If you are linking new C functions into the udt or udapi_slave
executables, make sure of the following:
■ The C functions should reside in the work directory, along with
the makefile and the function definition files.
■ The C functions cannot contain the main() function.
■ The C functions must compile cleanly (use cc -c to compile them
producing .o files).
Steps for Linking in C Functions 20-11

3. Edit cfuncdef_user
Add information about your C functions to the cfuncdef_user text
file. Use vi or any other UNIX text editor to add the information.
Make sure the information for the function definitions (lines under
$$FUN) is added using the format described in the text file.
Make sure you define your C functions in cfuncdef_user rather than
cfuncdef.The cfuncdef file contains definitions for only UniData-
developed C functions that may be part of your UniData release.
UniData overwrites the cfuncdef file whenever you install a new
UniData version. If you placed your own function definitions there,
you will lose them with each new install. UniData does not overwrite
the cfuncdef_user file at installation, so your site specific definitions
are preserved.
The naming convention for UniData functions is U_funcname(). To
avoid errors, choose a different naming convention when naming
your C functions.
4. Ask Users to Log Out of UniData
Although you can create a new udt or udapi_slave executable while
users are logged into UniData, the makeudt command may fail
attempting to move this executable from udthome/work into your
udtbin directory. You can move the new udt manually at a later time
if you wish, but if you are ready to update production with makeudt
or makeudapi, users should be logged out of UniData.
If your changes are not fully tested, you may prefer not to overwrite
the production udt. See “Steps for Setting Up a Development Envi-
ronment” in this chapter.
20-12 Administering UniData on UNIX
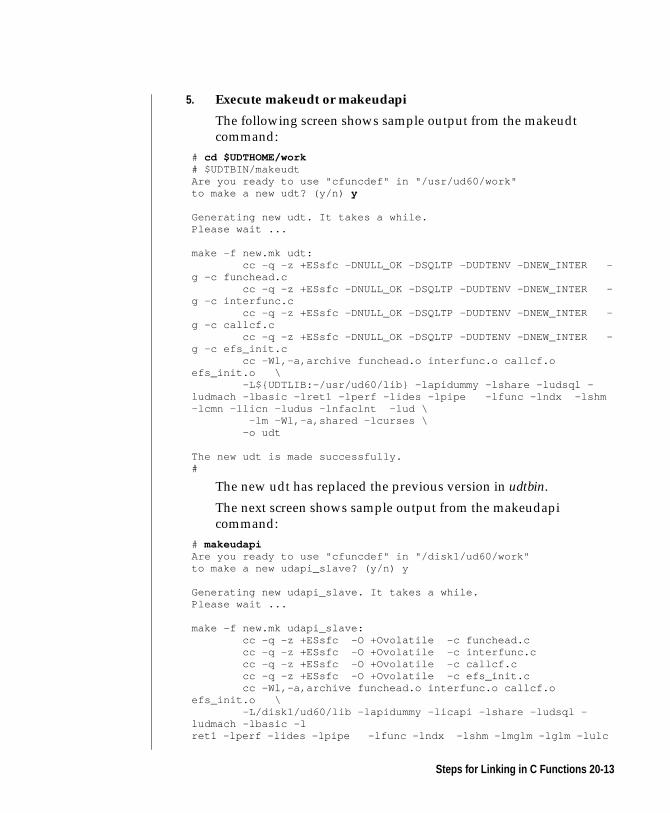
5. Execute makeudt or makeudapi
The following screen shows sample output from the makeudt
command:
# cd $UDTHOME/work# $UDTBIN/makeudtAre you ready to use "cfuncdef" in "/usr/ud60/work"to make a new udt? (y/n) y
Generating new udt. It takes a while.Please wait ...
make -f new.mk udt: cc -q -z +ESsfc -DNULL_OK -DSQLTP -DUDTENV -DNEW_INTER -g -c funchead.c cc -q -z +ESsfc -DNULL_OK -DSQLTP -DUDTENV -DNEW_INTER -g -c interfunc.c cc -q -z +ESsfc -DNULL_OK -DSQLTP -DUDTENV -DNEW_INTER -g -c callcf.c cc -q -z +ESsfc -DNULL_OK -DSQLTP -DUDTENV -DNEW_INTER -g -c efs_init.c cc -Wl,-a,archive funchead.o interfunc.o callcf.oefs_init.o \ -L${UDTLIB:-/usr/ud60/lib} -lapidummy -lshare -ludsql -ludmach -lbasic -lret1 -lperf -lides -lpipe -lfunc -lndx -lshm-lcmn -llicn -ludus -lnfaclnt -lud \ -lm -Wl,-a,shared -lcurses \ -o udt
The new udt is made successfully.#
The new udt has replaced the previous version in udtbin.
The next screen shows sample output from the makeudapi
command:
# makeudapiAre you ready to use "cfuncdef" in "/disk1/ud60/work"to make a new udapi_slave? (y/n) y
Generating new udapi_slave. It takes a while.Please wait ...
make -f new.mk udapi_slave: cc -q -z +ESsfc -O +Ovolatile -c funchead.c cc -q -z +ESsfc -O +Ovolatile -c interfunc.c cc -q -z +ESsfc -O +Ovolatile -c callcf.c cc -q -z +ESsfc -O +Ovolatile -c efs_init.c cc -Wl,-a,archive funchead.o interfunc.o callcf.oefs_init.o \ -L/disk1/ud60/lib -lapidummy -licapi -lshare -ludsql -ludmach -lbasic -lret1 -lperf -lides -lpipe -lfunc -lndx -lshm -lmglm -lglm -lulc
Steps for Linking in C Functions 20-13
-lcmn -llicn -ludus -lunix -lnfaclnt -lodsdummy -lunirpc\ -lm -Wl,-a,shared -lcurses -lsec \ -o udapi_slave
The new udapi_slave is made successfully.
The new udapi_slave has replaced the previous version in udtbin.
6. Make a Backup Copy of the New udt
If you experience a disk failure between the time you execute
makeudt or makeudapi and your next regularly-scheduled backup,
you need a copy of this new executable to restore your system to its
current state. If you do not make a backup copy, and you restore from
prior backups, you will replace the old version of udt or udapi_slave.
7. Produce a Stripped Executable (Optional)
The makeudt command produces an executable that contains
symbol table information that is helpful if you are using a debugging
tool to research a problem. However, including this information
increases the size of the executable, and may result in noticeably
slowed response for users. Consider using the UNIX strip command
to remove the symbol table information to decrease size and improve
performance. The following screen shows an example:
# ls -l udt-rwxrwxrwx 1 root unisrc 12671908 May 24 18:11 udt# strip udt# ls -l udt-rwxrwxrwx 1 root sys 4415488 Jun 10 15:20 udt
Consult your host operating system documentation for additional
information about stripping executables.
8. Allow Users to Login
All users who log in at this point will access the new version of the
udt or udapi_slave executable.
If you want to execute makeudt or makeudapi and not overwrite the
production udt, modify base.mk, replacing $@ in the very last line
with a new output file name, such as udt.test. Then complete steps 1
through 8. Users can access the new executable by entering that
name (for instance, udt.test) instead of udt.
20-14 Administering UniData on UNIX
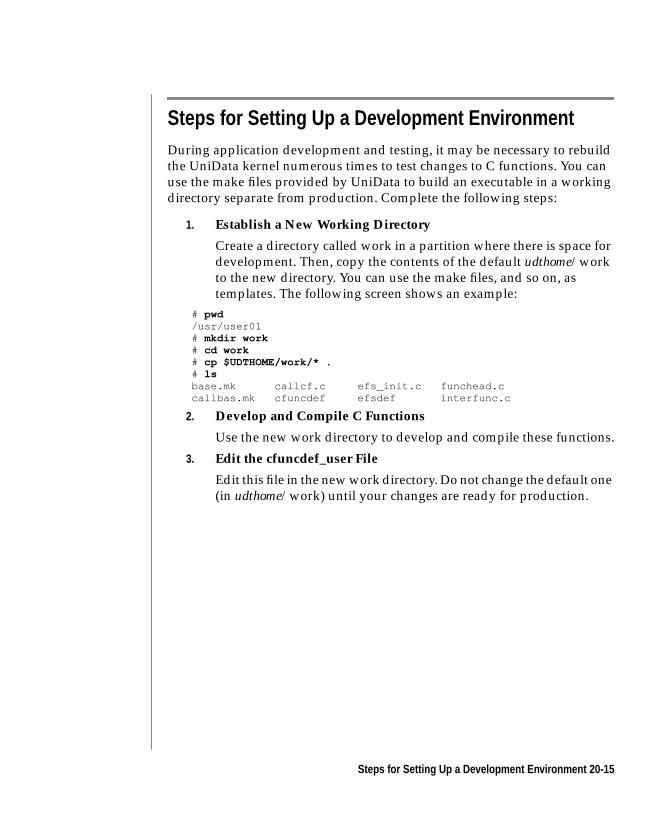
Steps for Setting Up a Development EnvironmentDuring application development and testing, it may be necessary to rebuild
the UniData kernel numerous times to test changes to C functions. You can
use the make files provided by UniData to build an executable in a working
directory separate from production. Complete the following steps:
1. Establish a New Working Directory
Create a directory called work in a partition where there is space for
development. Then, copy the contents of the default udthome/work
to the new directory. You can use the make files, and so on, as
templates. The following screen shows an example:
# pwd/usr/user01# mkdir work# cd work# cp $UDTHOME/work/* .# lsbase.mk callcf.c efs_init.c funchead.ccallbas.mk cfuncdef efsdef interfunc.c
2. Develop and Compile C Functions
Use the new work directory to develop and compile these functions.
3. Edit the cfuncdef_user File
Edit this file in the new work directory. Do not change the default one
(in udthome/work) until your changes are ready for production.
Steps for Setting Up a Development Environment 20-15
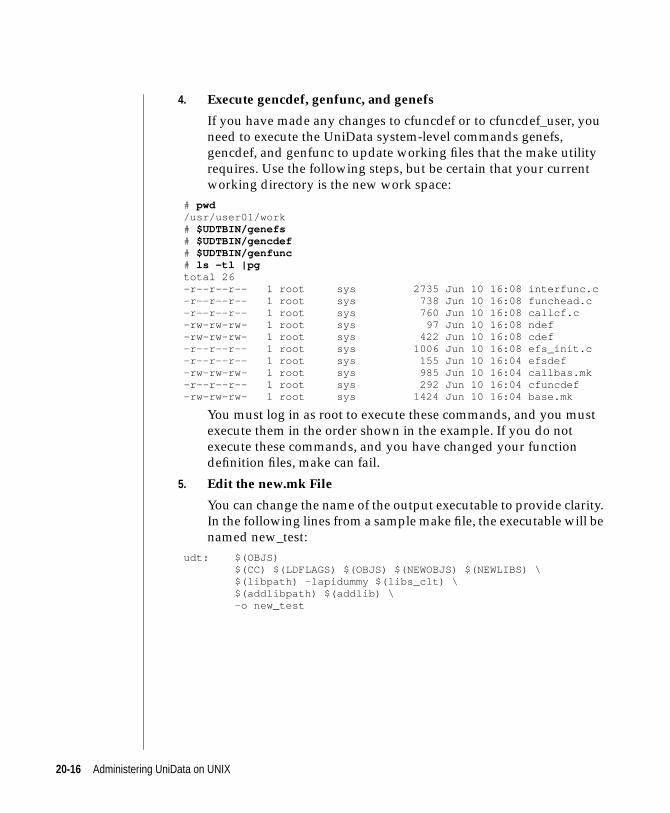
4. Execute gencdef, genfunc, and genefs
If you have made any changes to cfuncdef or to cfuncdef_user, you
need to execute the UniData system-level commands genefs,
gencdef, and genfunc to update working files that the make utility
requires. Use the following steps, but be certain that your current
working directory is the new work space:
# pwd/usr/user01/work# $UDTBIN/genefs# $UDTBIN/gencdef# $UDTBIN/genfunc# ls -tl |pgtotal 26-r--r--r-- 1 root sys 2735 Jun 10 16:08 interfunc.c-r--r--r-- 1 root sys 738 Jun 10 16:08 funchead.c-r--r--r-- 1 root sys 760 Jun 10 16:08 callcf.c-rw-rw-rw- 1 root sys 97 Jun 10 16:08 ndef-rw-rw-rw- 1 root sys 422 Jun 10 16:08 cdef-r--r--r-- 1 root sys 1006 Jun 10 16:08 efs_init.c-r--r--r-- 1 root sys 155 Jun 10 16:04 efsdef-rw-rw-rw- 1 root sys 985 Jun 10 16:04 callbas.mk-r--r--r-- 1 root sys 292 Jun 10 16:04 cfuncdef-rw-rw-rw- 1 root sys 1424 Jun 10 16:04 base.mk
You must log in as root to execute these commands, and you must
execute them in the order shown in the example. If you do not
execute these commands, and you have changed your function
definition files, make can fail.
5. Edit the new.mk File
You can change the name of the output executable to provide clarity.
In the following lines from a sample make file, the executable will be
named new_test:
udt: $(OBJS) $(CC) $(LDFLAGS) $(OBJS) $(NEWOBJS) $(NEWLIBS) \ $(libpath) -lapidummy $(libs_clt) \ $(addlibpath) $(addlib) \ -o new_test
20-16 Administering UniData on UNIX
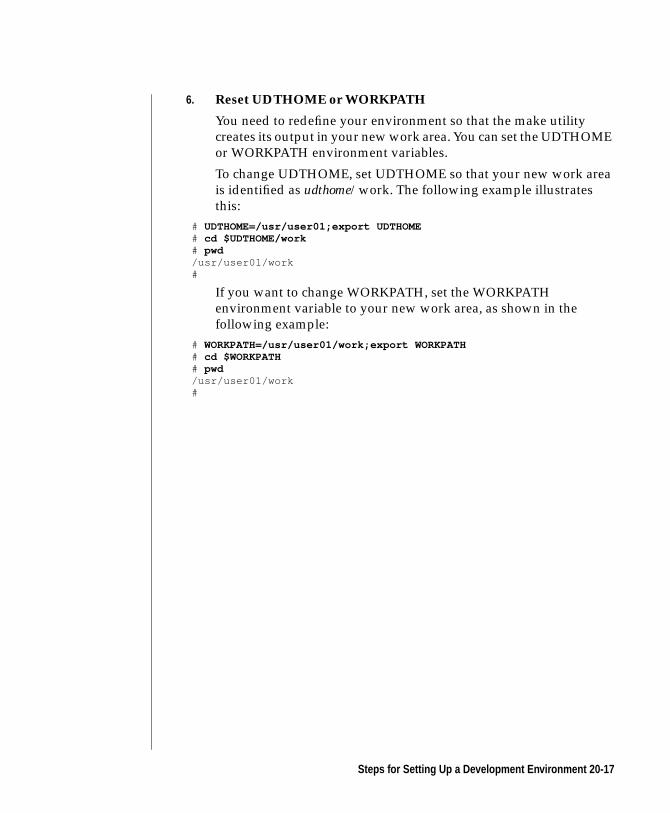
6. Reset UDTHOME or WORKPATH
You need to redefine your environment so that the make utility
creates its output in your new work area. You can set the UDTHOME
or WORKPATH environment variables.
To change UDTHOME, set UDTHOME so that your new work area
is identified as udthome/work. The following example illustrates
this:
# UDTHOME=/usr/user01;export UDTHOME# cd $UDTHOME/work# pwd/usr/user01/work#
If you want to change WORKPATH, set the WORKPATH
environment variable to your new work area, as shown in the
following example:
# WORKPATH=/usr/user01/work;export WORKPATH# cd $WORKPATH# pwd/usr/user01/work#
Steps for Setting Up a Development Environment 20-17
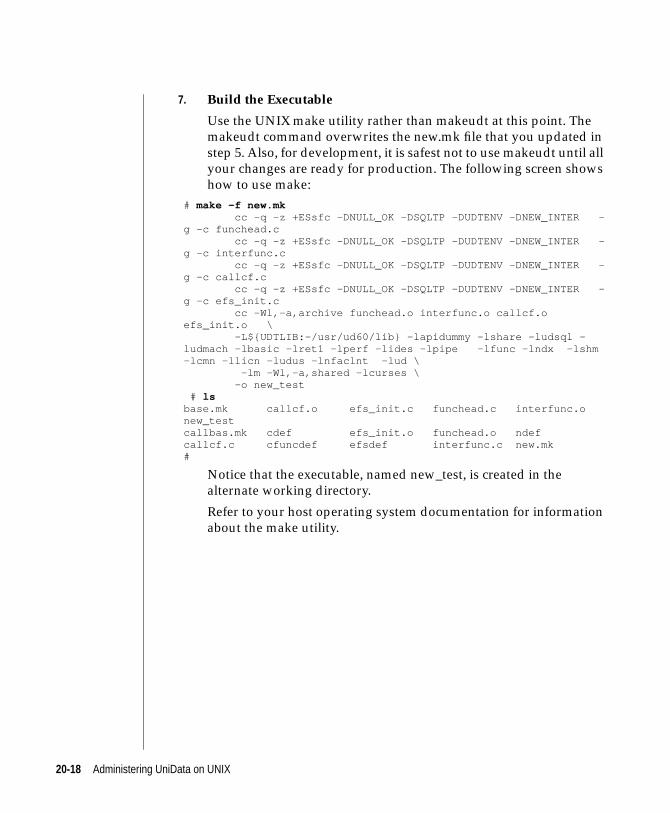
7. Build the Executable
Use the UNIX make utility rather than makeudt at this point. The
makeudt command overwrites the new.mk file that you updated in
step 5. Also, for development, it is safest not to use makeudt until all
your changes are ready for production. The following screen shows
how to use make:
# make -f new.mk cc -q -z +ESsfc -DNULL_OK -DSQLTP -DUDTENV -DNEW_INTER -g -c funchead.c cc -q -z +ESsfc -DNULL_OK -DSQLTP -DUDTENV -DNEW_INTER -g -c interfunc.c cc -q -z +ESsfc -DNULL_OK -DSQLTP -DUDTENV -DNEW_INTER -g -c callcf.c cc -q -z +ESsfc -DNULL_OK -DSQLTP -DUDTENV -DNEW_INTER -g -c efs_init.c cc -Wl,-a,archive funchead.o interfunc.o callcf.oefs_init.o \ -L${UDTLIB:-/usr/ud60/lib} -lapidummy -lshare -ludsql -ludmach -lbasic -lret1 -lperf -lides -lpipe -lfunc -lndx -lshm-lcmn -llicn -ludus -lnfaclnt -lud \ -lm -Wl,-a,shared -lcurses \ -o new_test # lsbase.mk callcf.o efs_init.c funchead.c interfunc.onew_testcallbas.mk cdef efs_init.o funchead.o ndefcallcf.c cfuncdef efsdef interfunc.c new.mk#
Notice that the executable, named new_test, is created in the
alternate working directory.
Refer to your host operating system documentation for information
about the make utility.
20-18 Administering UniData on UNIX
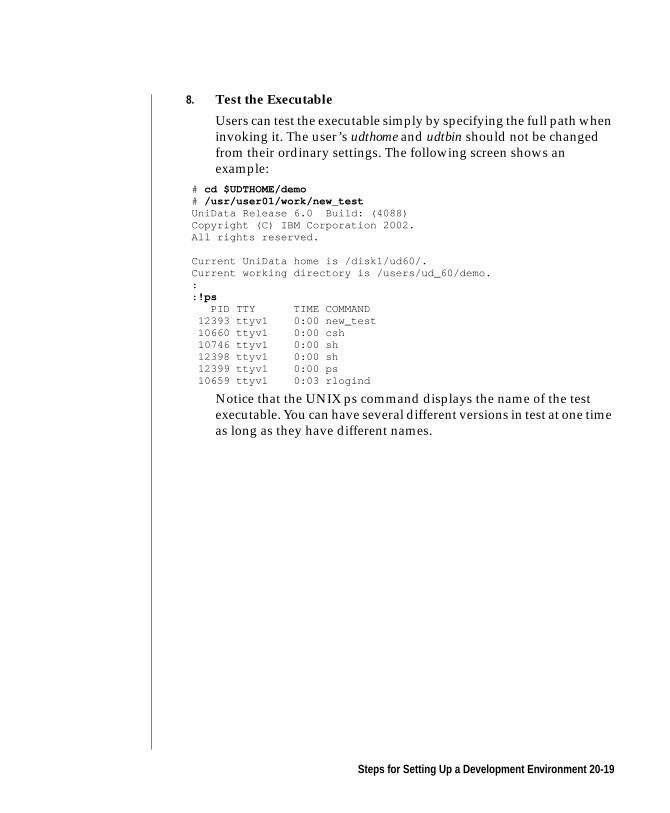
8. Test the Executable
Users can test the executable simply by specifying the full path when
invoking it. The user’s udthome and udtbin should not be changed
from their ordinary settings. The following screen shows an
example:
# cd $UDTHOME/demo# /usr/user01/work/new_testUniData Release 6.0 Build: (4088)Copyright (C) IBM Corporation 2002.All rights reserved.
Current UniData home is /disk1/ud60/.Current working directory is /users/ud_60/demo.:: !ps PID TTY TIME COMMAND 12393 ttyv1 0:00 new_test 10660 ttyv1 0:00 csh 10746 ttyv1 0:00 sh 12398 ttyv1 0:00 sh 12399 ttyv1 0:00 ps 10659 ttyv1 0:03 rlogind
Notice that the UNIX ps command displays the name of the test
executable. You can have several different versions in test at one time
as long as they have different names.
Steps for Setting Up a Development Environment 20-19
Accessing UniData from a C ProgramThe CallBasic application programming interface (API) allows you to access
a UniData database by calling UniBasic subroutines from a C program. The
CallBasic API is particularly useful for applications like automated processes
that gather data and then write the data into a UniData database. The main
body of the application may be written in C, and the application uses a
UniBasic subroutine, called through CallBasic, to write the data into UniData
hashed files in correct format.
Note: When you use CallBasic, your UniBasic routines are called from an externalprogram. UniBasic and UniData are invisible to the users of the external program.
Requirements
The components required to use the CallBasic API are:
■ Development environment—Your system should have a full
software development kit. (A base compiler is not sufficient). You
need network libraries if you are using NFA.
Consult your host operating system documentation and your
hardware vendor if you have questions about your C development
environment.
■ C programs—You need to code and compile the C application that
will call UniBasic.
■ Function definitions and make files—When you install UniData,
the file callbas.mk is installed into the directory udthome/work. Use
this makefile as a template to build your application, with UniData
linked into it.
The examples in this section are developed using udthome/work as a
workspace. You can create a separate workspace by creating a new directory
and copying all the files from udthome/work into it. Then complete the steps
in your own workspace.
How CallBasic Works
The CallBasic API includes three functions:
20-20 Administering UniData on UNIX
■ udtcallbasic_init( )—This function initializes UniData and
CallBasic. It serves the purpose of opening a “UniData session” for
your C application. Your C program must execute this function once
and only once.
■ U_callbas( )—This function calls a UniBasic subroutine, passing
arguments, and places the results in a pointer to the return value. You
may execute this function numerous times in your C application,
each time you want to call a UniBasic subroutine.
■ udtcallbasic_done( )—This function clears all UniData-related
temporary files and other resources, and ends the interface between
the C application and UniData. You must execute this function once
in your C application. You must also include this function in any
error exits in your application that may be taken after
udtcallbasic_init().
See Developing UniBasic Applications for a detailed description of the CallBasic
functions and their requirements.
Accessing UniData from a C Program 20-21
C Program ExampleThe following C program, called sample.c, illustrates the components
required for CallBasic:
#include <stdio.h>#include <setjmp.h>#include "/usr/ud60/include/share.h"
main(){ /* Declare variables */ char *rtn; char arg0[BUFSIZ]; char arg1[BUFSIZ]; char *args[2]; int sts;
/* Initialize the UniData environment */
/* Set up an error handler to shut down gracefully */
int jmpret, sat; U_SET_JMP(jmpret, sat); if (!jmpret) { udtcallbasic_done(1); exit(-1); } udtcallbasic_init(0, 0);
/* Assign arguments for the UniBasic routine */ strcopy(arg0, "Plants"); strcopy(arg1, "Animals"); args[0] = arg0; args[1] = arg1;
/* Call the subroutine */ sts = U_callbas(&rtn, "EXAMPLE", 2, args); if (sts == 0){ free(rtn); } printf("status: %d\n", sts); /* Close everything properly */ udtcallbasic_done(sts);}
Notice the following points about sample.c:
20-22 Administering UniData on UNIX
Header Files
You must include setjmp.h for the error handler, and you must include the
UniData header file /usr/ud60/include/share.h for linking UniData and your
C program.
Error Handler
Remember that the CallBasic exit routine, udtcallbas_done( ), must be the last
action taken before the C program exits, whether normally or abnormally.
Initializing CallBasic
This statement initializes CallBasic, effectively starting a udt session for your
C program:
udtcallbasic_init(0, 0);
Notice that it is executed once and only once in the C program.
If you initialize CallBasic more than one time, you will encounter errors and
your program may dump core.
Calling a UniBasic Subroutine
In this program, we call the subroutine and assign the return to a variable.
/* Call the subroutine */
sts = U_callbas(&rtn, "EXAMPLE", 2, args);
Remember that you can call more than one UniBasic subroutine, using the
U_callbas( ) function, as long as you do so between initializing and closing
CallBasic.
Freeing Resources
Each U_callbas( ) execution allocates memory; remember to free this after
conclusion of the subroutine:
if (sts == 0){ free(rtn);
C Program Example 20-23
Notice that we free the memory if the function completes successfully;
UniData frees the memory if the function fails.
Ending CallBasic
The last step in the C program is:
/* Close everything properly */ udtcallbasic_done(sts);
Remember that this function closes the UniData session for the C program,
closing all UniData temporary files and releasing all resources held by
UniData for this C program.
If you do not exit UniData cleanly, you may lose consistency of data, and you
may damage files.
20-24 Administering UniData on UNIX
UniBasic Subroutine ExampleThe following UniBasic subroutine, called EXAMPLE, is a very simplified
routine showing the requirements for CallBasic.
SUBROUTINE EXAMPLE(RETNVAL,ARG1,ARG2)PRINT "THE FIRST ARG IS ":ARG1PRINT "THE SECOND ARG IS ":ARG2RETNVAL="RETURN"RETURNEND
Notice the following points about the UniBasic subroutine.
Arguments
The arguments for the UniBasic subroutine match what is sent from the C
program. Here is the call to the subroutine:
sts = U_callbas(&rtn, "EXAMPLE", 2, args);
And here is the first line of the subroutine:
SUBROUTINE EXAMPLE(RETNVAL,ARG1,ARG2)
Additional Information
You must create, compile, and catalog the UniBasic subroutine in a UniData
account. The routine may be globally, directly, or locally cataloged. However,
if you catalog the routine directly or locally, you must execute the C program
from the UniData account where the subroutine is cataloged. Regardless how
you catalog the UniBasic subroutine, you must execute the C program from
a valid UniData account.
UniBasic Subroutine Example 20-25
Steps for CallBasicComplete the following steps to access UniData from a C program with
CallBasic:
1. Code and Compile the C Program
C compilers differ between UNIX versions. For instance, some C
compilers require ANSI-compliant syntax, and others do not.
Consult the documentation supplied with your C compiler for
specific coding requirements for your system.
The C program should be located in the same directory as the
makefile. By default, this is udthome/work. Use the cc -c command to
compile the C program in your workspace. cc -c produces a .o file in
the same directory. The following example shows how to compile the
sample program sample.c.# ls -l sample*-rw-rw-rw- 1 root sys 745 Jun 11 11:43 sample.c# cc -c sample.c# ls -l sample*-rw-rw-rw- 1 root sys 745 Jun 11 11:43 sample.c-rw-rw-rw- 1 root sys 1624 Jun 11 11:45 sample.o#
See “C Program Example” in this chapter for a listing of sample.c.
20-26 Administering UniData on UNIX
2. Code, Compile, and Catalog the UniBasic Subroutine
Remember that you can catalog the UniBasic subroutine globally,
locally, or directly. The following example shows compiling and
directly cataloging the sample subroutine EXAMPLE in the UniData
demo account:
: AE BP EXAMPLETop of "EXAMPLE" in "BP", 6 lines, 128 characters.*--: P001: SUBROUTINE EXAMPLE(RETNVAL,ARG1,ARG2)002: PRINT "THE FIRST ARG IS ":ARG1003: PRINT "THE SECOND ARG IS ":ARG2004: RETNVAL="RETURN"005: RETURN006: ENDBottom.*--: FIBCFiled "EXAMPLE" in file "BP" unchanged.
Compiling Unibasic: BP/EXAMPLE in mode 'u'.compilation finished:
Before proceeding further, be sure that both your C program and
your UniBasic subroutine are thoroughly tested.
3. Make a Copy of the Makefile Template
The template, released by default into udthome/work, is called
callbas.mk. When you copy it, name the copy in a way that relates it
to your C program, as shown below:
# ls callbas*callbas.mk# cp callbas.mk sample.mk#
The template for your makefile is platform and release dependent.
Always use callbas.mk on your system as a starting point; do not
attempt to use the examples in this document.
Steps for CallBasic 20-27
4. Edit Your Makefile
Use vi or any UNIX text editor to edit the copy you created in Step 3.
The purpose is to produce a makefile that will build your C program,
with udt linked into it, forming an executable whose name you
choose. There are additional steps required so that the make is
successful. Follow the sequence below:
a. Correct References for UniData Libraries
Locate a line in your make file that looks like this:
libpath = -L/disk3/srcman/alpha/ud_60_020715_4088/bin/lib
Notice that the path does nt match your production system. It con-
tains a UniData internal naming convention. You need to change this
to reflect the actual location of your UniData libraries. The following
example uses the default location:
libpath = -L/usr/ud60/lib
You also need to remove a redundant line. Look for a line that
resembles:
libpath = -L$$UDTLIB
Delete this line from your make file.
b. Enter the Name of Your Compiled C Routine
Look for a line that resembles:
NEWOBJS = callbas.o
callbas.o is a default object name released with the template. Change
this to match your C routine, as shown below for the sample
program:
NEWOBJS = sample.o
This change allows your C routine to be included in the make.
c. Enter the Name for Your New Executable
The UNIX make utility will build a new executable linking the
UniData kernel (udt) with your compiled C routine. You need to
modify the makefile to name the resulting executable. Look for a line
that resembles:
callbas: $(NEWOBJS) $(OBJS)
callbas is a default name released with the makefile. Substitute the
name you want as shown below:
20-28 Administering UniData on UNIX
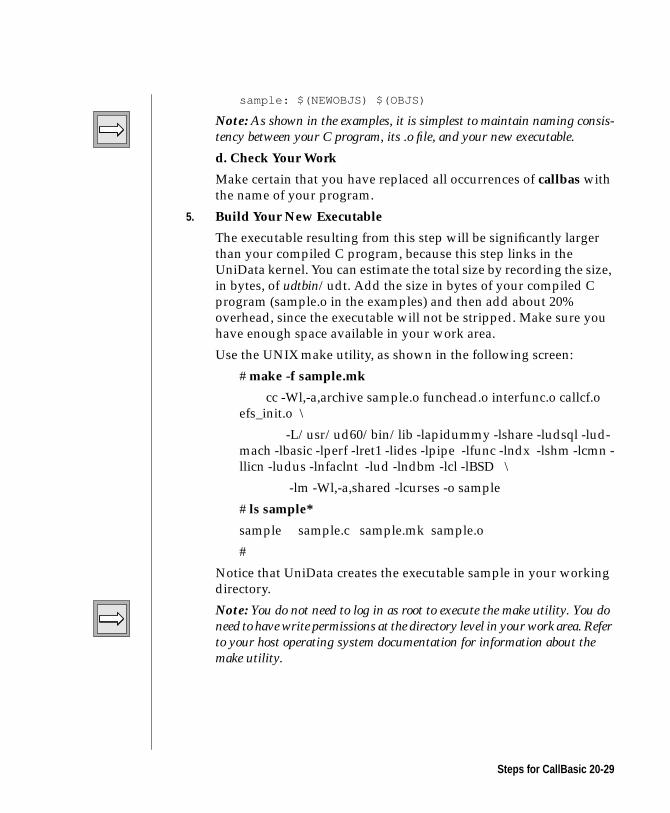
sample: $(NEWOBJS) $(OBJS)
Note: As shown in the examples, it is simplest to maintain naming consis-tency between your C program, its .o file, and your new executable.
d. Check Your Work
Make certain that you have replaced all occurrences of callbas with
the name of your program.
5. Build Your New Executable
The executable resulting from this step will be significantly larger
than your compiled C program, because this step links in the
UniData kernel. You can estimate the total size by recording the size,
in bytes, of udtbin/udt. Add the size in bytes of your compiled C
program (sample.o in the examples) and then add about 20%
overhead, since the executable will not be stripped. Make sure you
have enough space available in your work area.
Use the UNIX make utility, as shown in the following screen:
# make -f sample.mk
cc -Wl,-a,archive sample.o funchead.o interfunc.o callcf.o
efs_init.o \
-L/usr/ud60/bin/lib -lapidummy -lshare -ludsql -lud-
mach -lbasic -lperf -lret1 -lides -lpipe -lfunc -lndx -lshm -lcmn -
llicn -ludus -lnfaclnt -lud -lndbm -lcl -lBSD \
-lm -Wl,-a,shared -lcurses -o sample
# ls sample*
sample sample.c sample.mk sample.o
#
Notice that UniData creates the executable sample in your working
directory.
Note: You do not need to log in as root to execute the make utility. You doneed to have write permissions at the directory level in your work area. Referto your host operating system documentation for information about themake utility.
Steps for CallBasic 20-29

6. Produce a Stripped Executable (Optional)
The make utility produces an executable that contains symbol table
information that is helpful if you are using a debugging tool to
research a problem. However, including this information increases
the size of the executable, and may result in a noticeably slower
response for users. Consider using the UNIX strip command to
remove the symbol table information to decrease size and improve
performance. The following screen shows the results of stripping the
sample executable:
# ls -l sample
-rwxrwxrwx 1 root sys 12657828 Jun 12 12:18 sample
# strip sample
# ls -l sample
-rwxrwxrwx 1 root sys 4423680 Jun 12 12:57 sample
#
To save time, do not strip your executable until you finish testing and
debugging it. Consult your host operating system documentation for
information about debugging and symbol tables.
20-30 Administering UniData on UNIX
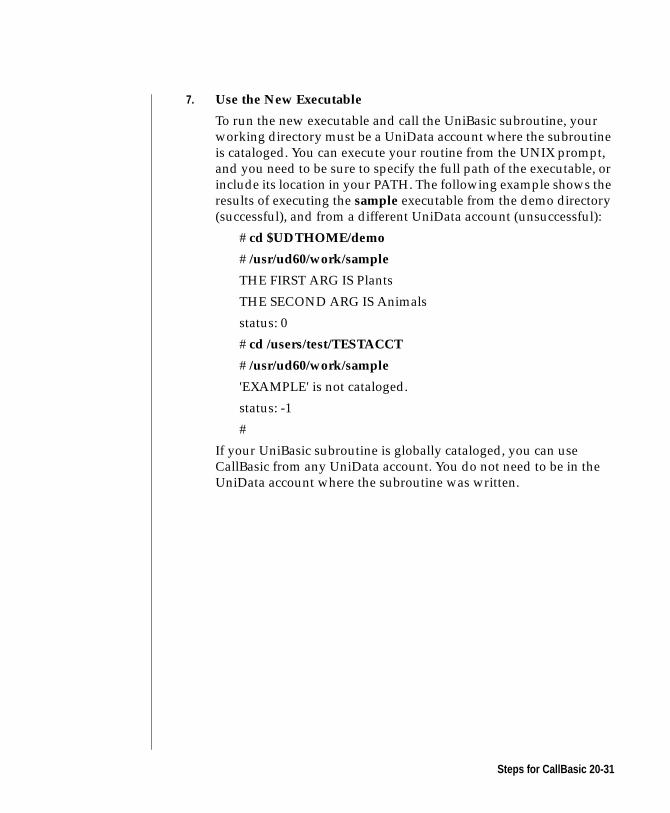
7. Use the New Executable
To run the new executable and call the UniBasic subroutine, your
working directory must be a UniData account where the subroutine
is cataloged. You can execute your routine from the UNIX prompt,
and you need to be sure to specify the full path of the executable, or
include its location in your PATH. The following example shows the
results of executing the sample executable from the demo directory
(successful), and from a different UniData account (unsuccessful):
# cd $UDTHOME/demo
# /usr/ud60/work/sample
THE FIRST ARG IS Plants
THE SECOND ARG IS Animals
status: 0
# cd /users/test/TESTACCT
# /usr/ud60/work/sample
'EXAMPLE' is not cataloged.
status: -1
#
If your UniBasic subroutine is globally cataloged, you can use
CallBasic from any UniData account. You do not need to be in the
UniData account where the subroutine was written.
Steps for CallBasic 20-31

20-32 Administering UniData on UNIX
21Chapter
General Troubleshooting
Crashes and Restart Problems. . . . . . . . . . . . . . 21-4
UniData Crashes . . . . . . . . . . . . . . . . . 21-4
UniData Cannot Start. . . . . . . . . . . . . . . . 21-5
Response Problems in UniData . . . . . . . . . . . . . 21-6
UniData Consistently Slow. . . . . . . . . . . . . . 21-6
UniData is Hung . . . . . . . . . . . . . . . . . 21-6
Error Messages . . . . . . . . . . . . . . . . . . . 21-7
Common Error Messages . . . . . . . . . . . . . . 21-7

21 -2 Ad
ministering UniData on UNIX
This chapter outlines several problems you may encounter running UniData,
and offers suggestions to research and resolve them. The chapter also
describes a number of UniData system messages, along with explanations of
their causes.
21-3
le
Crashes and Restart ProblemsThis section presents suggestions for handling situations where UniData
stops running entirely, or where you cannot start UniData.
UniData Crashes
Symptoms: System appears to be “hung”; one or more terminals may display
the message Killed or udt dead.
Suggestions:
1. Check to make sure your hardware and operating system is running.
Hardware or power problems may cause UniData to crash. If your
system is up and running, proceed to step 2. Otherwise, identify and
resolve system problems.
2. If you are running UniData on AIX, check swap space. The AIX
operating system kills processes when it runs out of swap space.
3. Check to see if UniData is still running. Execute the showud
command to check the status of the UniData daemons. If the UniData
daemons are still running, proceed to “UniData is Hung.”
Otherwise, proceed to step 4.
4. Check the UniData logs and error logs. These are located in udtbin.Consider printing them in case they are needed to research a crash.
5. Identify and resolve problems revealed in the logs. Chapter 12,
“Managing UniData Files,” Chapter 17, “Managing Memory,” and
Chapter 18, “Managing ipc Facilities” may be useful.
6. When all identified problems have been resolved, log in as root and
execute startud. If UniData does not start, proceed to “UniData
Cannot Start”. Otherwise, resume normal operations.
Note: UNIX system crashes may result in data inconsistencies or ficorruption, depending on the activity at the time of the crash.Examine your data files with verify2 before starting UniData, orwith guide after starting UniData.
21-4 Administering UniData on UNIX
er-Sys-
Additional factors must be considered if you are using the Recovable File System (RFS). See Administering the Recoverable Filetem for further information.
UniData Cannot Start
Symptoms: startud does not complete normally. Error messages may or may
not appear in the window where you run startud.
Suggestions:
1. Make sure your UNIX environment is running correctly. Check
UNIX system logs for error and warning conditions. Identify and
resolve external problems.
2. Check the UniData log files in udtbin. Consider printing them in case
they are needed to solve a problem.
3. Check for indications of shared memory problems. (For example, if
smm is unable to create the CTL segment, UniData will not start). If
there are messages in smm.errlog, review Chapter 17, “Managing
Memory,” for suggestions to solve the problem.
4. Check the status of UniData ipc facilities by logging in as root and
running ipcstat. If ipc structures were not properly cleaned up after
a crash, follow the procedures described in Chap[ter 18, “Managing
ipc Facilities,” to clear the structures.
If ipcstat hangs, use the UNIX ipcs command.
5. Log in as root and execute startud to restart UniData.
Additional factors must be considered if you are using RFS. SeeAdministering the Recoverable File Systemfor further information.
Crashes and Restart Problems 21-5
Response Problems in UniData
UniData Consistently Slow
Symptoms: The system is consistently sluggish whenever UniData is
running and users are logged in.
Suggestions: Refer to Chapter 22, “Performance Monitoring and Tuning.”
UniData is Hung
Symptoms: The system has been performing acceptably, but the response
slows. One to all terminals may appear hung.
Suggestions:
1. Execute the UNIX ps command. Look for processes with large and
rapidly growing cpu time. Explore these processes; kill them if
appropriate.
2. Execute showud at a UNIX prompt to make certain all UniData
daemons are running.
3. Check the UniData logs in udtbin for clues about the problem.
4. Check for file or semaphore lock problems with the ECL
LIST.LOCKS, LIST.QUEUE, and LIST.READU commands. See
Chapter 13, “Managing UniData Locks,” for procedures to identify
and clear unneeded locks.
5. Identify and resolve message queue problems using the procedures
described in Chapter 18, “Managing ipc Facilities.”
6. If the response is still slow, or if steps 1 through 3 did not reveal the
problem, check your system to identify and resolve unusual load
conditions. The UniData listuser, sbcsprogs, and udtmon programs,
and the UNIX uptime, vmstat, and ps commands may provide
helpful information.
21-6 Administering UniData on UNIX
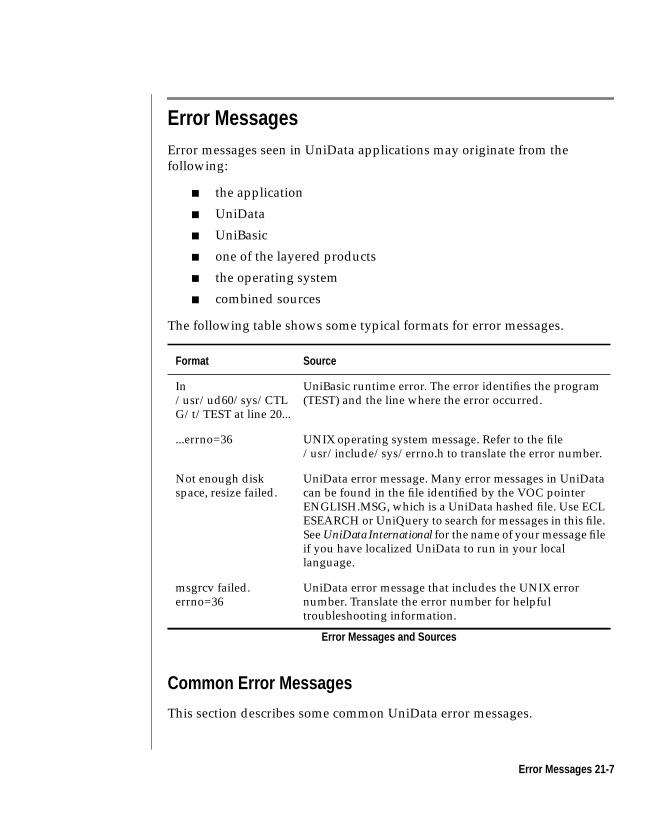
Error MessagesError messages seen in UniData applications may originate from the
following:
■ the application
■ UniData
■ UniBasic
■ one of the layered products
■ the operating system
■ combined sources
The following table shows some typical formats for error messages.
Common Error Messages
This section describes some common UniData error messages.
Format Source
In/usr/ud60/sys/CTLG/t/TEST at line 20...
UniBasic runtime error. The error identifies the program(TEST) and the line where the error occurred.
...errno=36 UNIX operating system message. Refer to the file/usr/include/sys/errno.h to translate the error number.
Not enough diskspace, resize failed.
UniData error message. Many error messages in UniDatacan be found in the file identified by the VOC pointerENGLISH.MSG, which is a UniData hashed file. Use ECLESEARCH or UniQuery to search for messages in this file.See UniData International for the name of your message fileif you have localized UniData to run in your locallanguage.
msgrcv failed.errno=36
UniData error message that includes the UNIX errornumber. Translate the error number for helpfultroubleshooting information.
Error Messages and Sources
Error Messages 21-7
Syntax error
■ Occurrence—This error appears when a user is attempting to run an
ECL command.
■ Causes—This error may result from the following:
■ Wrong syntax; refer to online help or to the UniData CommandsReference for the correct command syntax.
■ You entered a backspace or other control character; reenter the
command.
■ ECLTYPE is set to P when it should be U or vice versa; try
changing ECLTYPE and reenter the command.
■ BASICTYPE is set to P when it should be U or vice versa; try
changing BASICTYPE and reenter the command.
Not a verb command
■ Occurrence—This error appears when you are attempting to run an
ECL command.
■ Cause—command must be either a VOC entry or a globally cataloged
program.
■ You spelled the command incorrectly; try again.
■ You are in the wrong UniData account; command is not an entry
in the local VOC file; check the VOC file.
■ command is a UniBasic program that is not globally cataloged;
determine how it should be cataloged; make necessary
corrections; instruct users appropriately. See Chapter 19,
“Managing Cataloged Programs,” for further information.
cannot open abcdef
■ Occurrence—This is a UNIX-level error which occurs when a
process is attempting to open a file called abcdef.
■ Causes—This error can be caused by either of the following:
■ The file abcdef does not exist; check the filename and path and
try again.
21-8 Administering UniData on UNIX
Note: Some UNIX commands return the message “no such file or directory” for afile that does not exist, while others return “cannot open.”
■ The user receiving the error does not have sufficient permissions
to execute the file. See Chapter 2, “UniData and UNIX Security,”
and Chapter 11, “Managing UniData Security,” for additional
information.
Note: Some UNIX commands return the message cannot open filename:Permission denied and others simply return Permission denied.
[100004]
■ Occurrence—A number of users are logged into UniData. When an
additional user tries logging in, [100004] displays on the terminal.
■ Cause—You are out of semaphore undo structures in the UNIX
kernel. Use the UniData kp command to display kernel settings; the
parameter semmnu should be set to three times the number of users
licensed on your system. You need to rebuild your UNIX kernel.
[100000]
■ Occurrence—A number of users are logged into UniData. When an
additional user tries to log in, [100000] displays on their terminal.
■ Cause—The UniData configuration parameter NUSERS is too small.
This parameter, located in /usr/ud60/include/udtconfig,
determines the number of local control tables UniData uses. Each
local control table tracks information for a single UniData user
process. This parameter cannot exceed the kernel parameter
semmnu. Set NUSERS to the number of authorized UniData users +
number of authorized UniData users / 4.
Virtual field too big
■ Occurrence—This message displays after you execute a UniQuery
statement.
Error Messages 21-9
■ Cause—You have created a formula in a virtual attribute that, when
evaluated by UniQuery, creates a stack of C routines that is bigger
than the default. The limit that is exceeded is not the number of
characters in the formula itself, but an internal limit. Set the
environment variable VFIELDSIZE to a number greater than 300 (the
default) to resolve this problem. Try setting VFIELDSIZE to 400. The
larger VFIELDSIZE is, the more memory your process requires.
Record is too long. Please ask Unidata to extend the U_MAXEXTRA.
■ Occurrence—This message occurs while you are loading records
from tape into a UniData hashed file with T.LOAD. When the
message occurs, T.LOAD quits, leaving a partial restore.
■ Cause—T.LOAD has encountered a record that is too large to
process. You can remake the T.DUMP tape with a larger block size,
or you can load the tape into a DIR-type file rather than a UniData
hashed file. Once you have loaded it into the DIR file, you can use the
ECL COPY command to copy the records into a hashed file. If you
execute T.LOAD to load a file into a directory, make sure your UNIX
file system has enough inodes; you need one inode for every record
in the file you are loading.
Numra is maxed out in installshmid
■ Occurrence—This message displays while someone is trying to run
a globally cataloged UniBasic program.
■ Cause—The sbcs daemon is out of memory to store globally
cataloged programs. sbcs can manage up to 20 shared memory
segments, and the size of each is determined by the UniData
configuration parameter SBCS_SHM_SIZE (1 MB by default).
However, some UNIX versions (AIX, for example) limit the number
of shared memory segments to 10, thereby limiting the memory
available for sbcs. You can resolve this situation by resetting
SBCS_SHM_SIZE. Values from 4 MB to 8 MB are appropriate for AIX
systems.
21-10 Administering UniData on UNIX
22Chapter
Performance Monitoring andTuning
UNIX Performance Considerations . . . . . . . . . . . . 22-4
UNIX Performance Monitoring . . . . . . . . . . . . . 22-5
Tools . . . . . . . . . . . . . . . . . . . . . 22-5
Tips . . . . . . . . . . . . . . . . . . . . . . 22-5
UniData Performance Factors . . . . . . . . . . . . . . 22-7
Database Design Considerations . . . . . . . . . . . . 22-7
Using Alternate Key Indexes . . . . . . . . . . . . . 22-7
Sizing Static Hashed Files . . . . . . . . . . . . . . 22-7
Sizing Dynamic Hashed Files . . . . . . . . . . . . . 22-8
UniBasic Coding Tips . . . . . . . . . . . . . . . 22-8
UniBasic Profiling . . . . . . . . . . . . . . . . . . 22-11
1. Compile the Programs with -G . . . . . . . . . . . 22-11
2. Execute the Programs with -G . . . . . . . . . . . . 22-11
3. Review the Profile Output . . . . . . . . . . . . . 22-11
UniData Performance Monitoring: udtmon . . . . . . . . . 22-15
udtmon: UniData User Statistics . . . . . . . . . . . . 22-18
udtmon: File I/O Statistics . . . . . . . . . . . . . . 22-19
udtmon: Program Control Statistics . . . . . . . . . . . 22-21
udtmon: Dynamic Array Statistics . . . . . . . . . . . 22-24
udtmon: Lock Statistics . . . . . . . . . . . . . . . 22-25
udtmon: Data Conversion Statistics . . . . . . . . . . . 22-28
udtmon: Index Statistics . . . . . . . . . . . . . . . 22-29
udtmon: Mglm Performance . . . . . . . . . . . . . 22-31

22 -2 Ad
ministering UniData on UNIX
Performance Monitoring and TuningThis chapter outlines factors that can affect UniData performance on your
UNIX platform, lists generic UNIX tools for monitoring components of your
system, and describes UniData-specific procedures for monitoring
performance.
22-3
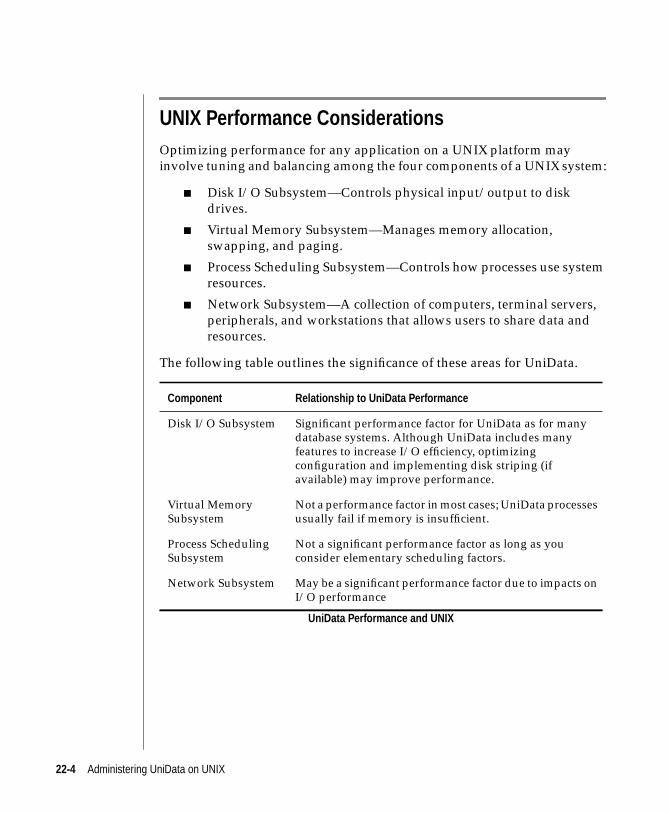
UNIX Performance ConsiderationsOptimizing performance for any application on a UNIX platform may
involve tuning and balancing among the four components of a UNIX system:
■ Disk I/O Subsystem—Controls physical input/output to disk
drives.
■ Virtual Memory Subsystem—Manages memory allocation,
swapping, and paging.
■ Process Scheduling Subsystem—Controls how processes use system
resources.
■ Network Subsystem—A collection of computers, terminal servers,
peripherals, and workstations that allows users to share data and
resources.
The following table outlines the significance of these areas for UniData.
Component Relationship to UniData Performance
Disk I/O Subsystem Significant performance factor for UniData as for manydatabase systems. Although UniData includes manyfeatures to increase I/O efficiency, optimizingconfiguration and implementing disk striping (ifavailable) may improve performance.
Virtual MemorySubsystem
Not a performance factor in most cases; UniData processesusually fail if memory is insufficient.
Process SchedulingSubsystem
Not a significant performance factor as long as youconsider elementary scheduling factors.
Network Subsystem May be a significant performance factor due to impacts onI/O performance
UniData Performance and UNIX
22-4 Administering UniData on UNIX
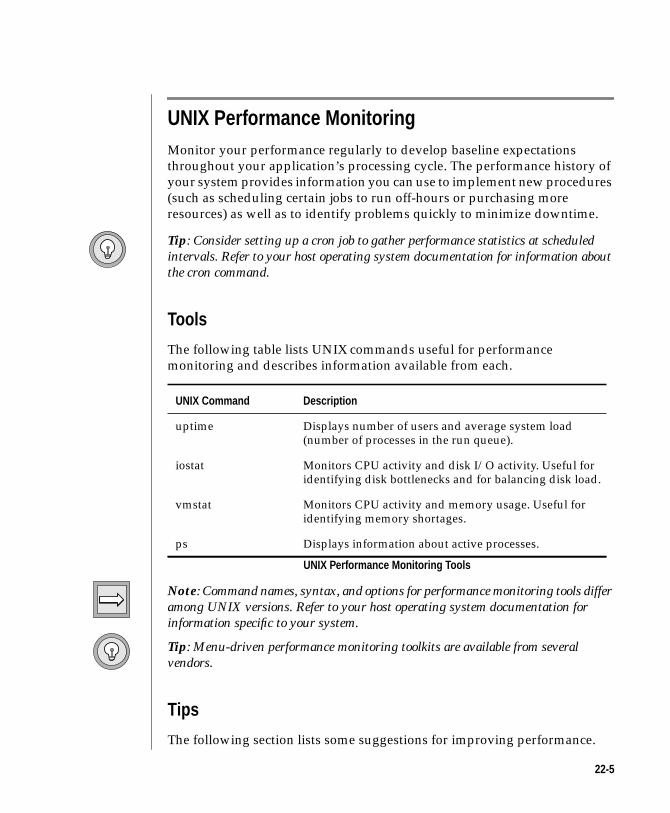
UNIX Performance MonitoringMonitor your performance regularly to develop baseline expectations
throughout your application’s processing cycle. The performance history of
your system provides information you can use to implement new procedures
(such as scheduling certain jobs to run off-hours or purchasing more
resources) as well as to identify problems quickly to minimize downtime.
Tip: Consider setting up a cron job to gather performance statistics at scheduledintervals. Refer to your host operating system documentation for information aboutthe cron command.
Tools
The following table lists UNIX commands useful for performance
monitoring and describes information available from each.
Note: Command names, syntax, and options for performance monitoring tools differamong UNIX versions. Refer to your host operating system documentation forinformation specific to your system.
Tip: Menu-driven performance monitoring toolkits are available from severalvendors.
Tips
The following section lists some suggestions for improving performance.
UNIX Command Description
uptime Displays number of users and average system load(number of processes in the run queue).
iostat Monitors CPU activity and disk I/O activity. Useful foridentifying disk bottlenecks and for balancing disk load.
vmstat Monitors CPU activity and memory usage. Useful foridentifying memory shortages.
ps Displays information about active processes.
UNIX Performance Monitoring Tools
22-5
uptime
If the load average shown by uptime is consistently greater than five, your
system is heavily loaded. Check your memory resources; check disk I/O.
ps, vmstat
Poor system performance associated with processes that are paging or
swapped may indicate memory shortages. Poor performance associated with
processes that are blocked for I/O may indicate disk I/O problems.
iostat
Results that may indicate I/O problems include: CPU in system state more
than 50% consistently; CPU has high idle time despite heavy system load;
CPU is never idle; disk activity is unbalanced.
22-6 Administering UniData on UNIX
UniData Performance FactorsWithin UniData applications, the major performance factors are: database
design, file sizing, and program coding efficiency.
Database Design Considerations
■ Structure your database so that records do not exceed a size limit of
4K.
■ When possible, avoid long, multivalued, variable-length records.
■ Locate the most frequently accessed attributes near the beginning of
a record.
■ As much as possible, make record keys numeric and short in length.
Using Alternate Key Indexes
Using alternate key indexes speeds query access in a hashed file, but can slow
file updates. Consider this factor when creating indexes. The more indexes
created for a file, the longer an update takes.
Index overflows occur when the maximum key length allocated is too small
to contain the attributes being indexed. Index overflows can degrade
performance for query as well as update access. The solution is to delete all
of the indexes for a file and rebuild them with a longer maximum length.
Tip: Use the UniData LIST.INDEX command to identify index overflow problems.Consider running LIST.INDEX periodically. See Using UniData for informationabout alternate key indexes.
Sizing Static Hashed Files
Performance suffers if UniData hashed files are allowed to overflow. Level 2
overflow, which occurs when primary keys outgrow the block, has a
particularly serious performance impact. Level 1 overflow, which occurs
when data overflows the block, eventually affects performance as well.
22-7
For information about file sizing commands, refer to Chapter 12, “Managing
UniData Files,” and to the UniData Commands Reference and Using UniData.
Tip: Consider using cron to execute the UniData system-level checkover commandin each of your UniData account directories at regular intervals. Use the output toresize files in level 2 overflow.
Sizing Dynamic Hashed Files
Dynamic hashed files differ from static hashed files in that they split and
merge with respect to a minimum modulo. Splitting prevents level 2
overflow conditions, because a group splits whenever the percentage
occupied by keys exceeds a preset value. Merging supports efficient access to
the file, because maintaining the file at a low modulo makes searches faster.
For information about dynamic file sizing commands, refer to Chapter 12,
“Managing UniData Files,” and to the UniData Commands Reference.
UniBasic Coding Tips
The efficiency of your UniBasic application has a significant impact on
UniData performance. Use the following guidelines when designing and
coding.
Use Modular Programming
■ Use inserts and include files consistently.
■ Open frequently used files to common areas to reduce physical file
opens.
Use Efficient Commands
■ Use the EQUATE command when possible.
■ Use CASE statements instead of IF, THEN, ELSE structure whenever
possible. Avoid nested IF, THEN, ELSE statements.
■ Use UniData @variables.
■ Minimize new assignment of variables.
■ Eliminate GOTO statements.
22-8 Administering UniData on UNIX
■ Use GOSUB instead of external CALLs when appropriate; use CALL
when multiple programs access the same code.
■ When using CALLs:
■ Avoid opening files; pass data through common areas or an
argument list.
■ Minimize the number of local variables in subroutines.
■ Use inserts, common areas, and argument lists whenever
possible.
■ Use A += B instead of A = A + B.
■ Use LOOP and REMOVE when extracting data sequentially from a
string.
■ Avoid unnecessary shell commands; minimize PERFORM,
EXECUTE, and MDPERFORM statements.
■ Use CALL to run another UniBasic program.
■ Avoid repeated ITYPE( ) function calls.
■ Minimize use of EXECUTE “SELECT.....” by:
■ Using UniBasic SETINDEX, READFWD, READBCK commands.
■ Using the UniBasic SELECT command.
Use Dynamic and Dimensioned Arrays Appropriately
■ Use dynamic arrays when you are accessing small strings and
variables.
■ Use dimensioned arrays when you are handling a large number of
attributes and delimited strings.
Use the Correct READ in Each Situation
■ Use READ when you are accessing small records, and the data you
want is near the beginning of each record.
■ Use READV if your intention is to get only one attribute.
22-9

■ Use MATREAD when:
■ You are handling records with a large number of attributes, and
you want to access more than one attribute.
■ You are handling large multivalued lists.
Manage Locks Carefully
■ Use the LOCKED clause with a loop.
■ Remember to release locks promptly.
See Developing UniBasic Applications for tips on using UniBasic locks
efficiently.
22-10 Administering UniData on UNIX
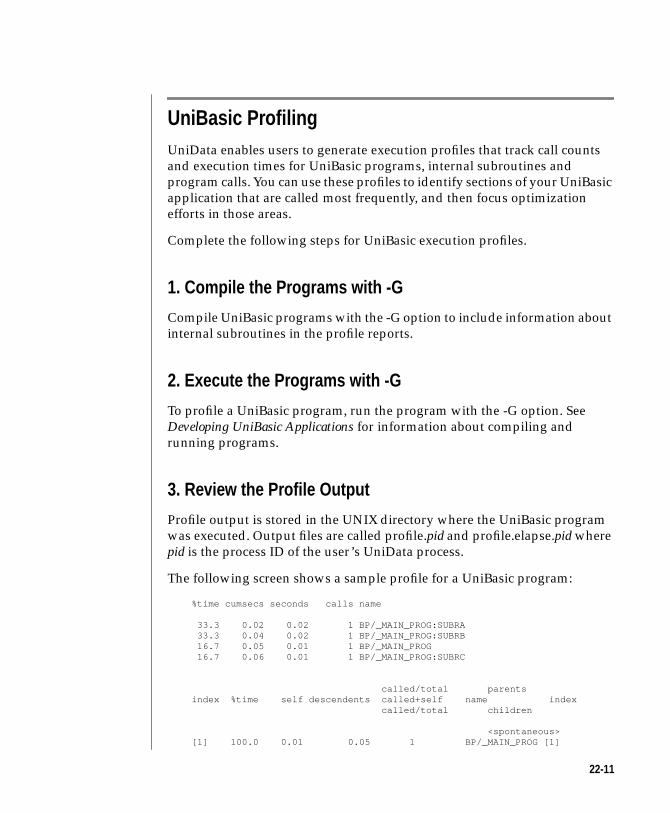
UniBasic ProfilingUniData enables users to generate execution profiles that track call counts
and execution times for UniBasic programs, internal subroutines and
program calls. You can use these profiles to identify sections of your UniBasic
application that are called most frequently, and then focus optimization
efforts in those areas.
Complete the following steps for UniBasic execution profiles.
1. Compile the Programs with -G
Compile UniBasic programs with the -G option to include information about
internal subroutines in the profile reports.
2. Execute the Programs with -G
To profile a UniBasic program, run the program with the -G option. See
Developing UniBasic Applications for information about compiling and
running programs.
3. Review the Profile Output
Profile output is stored in the UNIX directory where the UniBasic program
was executed. Output files are called profile.pid and profile.elapse.pid where
pid is the process ID of the user’s UniData process.
The following screen shows a sample profile for a UniBasic program:
%time cumsecs seconds calls name
33.3 0.02 0.02 1 BP/_MAIN_PROG:SUBRA 33.3 0.04 0.02 1 BP/_MAIN_PROG:SUBRB 16.7 0.05 0.01 1 BP/_MAIN_PROG 16.7 0.06 0.01 1 BP/_MAIN_PROG:SUBRC
called/total parentsindex %time self descendents called+self name index called/total children
<spontaneous>[1] 100.0 0.01 0.05 1 BP/_MAIN_PROG [1]
22-11
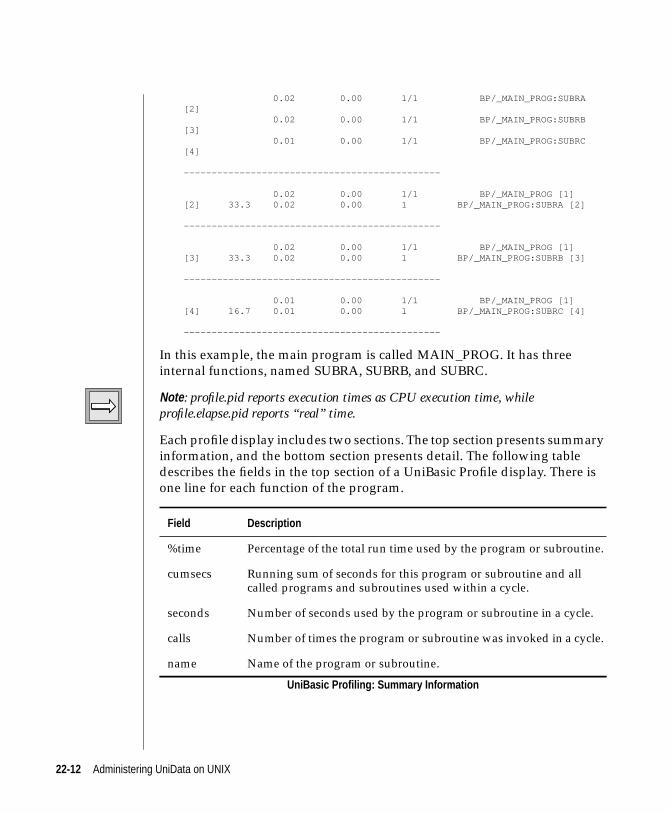
0.02 0.00 1/1 BP/_MAIN_PROG:SUBRA[2] 0.02 0.00 1/1 BP/_MAIN_PROG:SUBRB[3] 0.01 0.00 1/1 BP/_MAIN_PROG:SUBRC[4]
----------------------------------------------
0.02 0.00 1/1 BP/_MAIN_PROG [1][2] 33.3 0.02 0.00 1 BP/_MAIN_PROG:SUBRA [2]
----------------------------------------------
0.02 0.00 1/1 BP/_MAIN_PROG [1][3] 33.3 0.02 0.00 1 BP/_MAIN_PROG:SUBRB [3]
----------------------------------------------
0.01 0.00 1/1 BP/_MAIN_PROG [1][4] 16.7 0.01 0.00 1 BP/_MAIN_PROG:SUBRC [4]
----------------------------------------------
In this example, the main program is called MAIN_PROG. It has three
internal functions, named SUBRA, SUBRB, and SUBRC.
Note : profile.pid reports execution times as CPU execution time, whileprofile.elapse.pid reports “real” time.
Each profile display includes two sections. The top section presents summary
information, and the bottom section presents detail. The following table
describes the fields in the top section of a UniBasic Profile display. There is
one line for each function of the program.
Field Description
%time Percentage of the total run time used by the program or subroutine.
cumsecs Running sum of seconds for this program or subroutine and allcalled programs and subroutines used within a cycle.
seconds Number of seconds used by the program or subroutine in a cycle.
calls Number of times the program or subroutine was invoked in a cycle.
name Name of the program or subroutine.
UniBasic Profiling: Summary Information
22-12 Administering UniData on UNIX
UniData sorts program functions by execution time, and assigns an index to
each function for ease of reporting. For each index, UniData computes
information about functions that call, or are called by, the function
corresponding to the index. The detail section of a profile contains this
information, grouped by index. The next table describes the fields in the
detail section.
Field Description
index An identifying number assigned by UniData to theprogram or subroutine. UniData assigns the indexes indescending order of execution time. The index in column1 identifies the routine of interest for the group of data (thecurrent index function).
%time Percentage of the total program runtime used by theprogram or subroutine and its descendents.
self Time spent by the program or subroutine either calling, orbeing called by, the program or subroutine identified bythe current index.
descendents Execution time for descendents of this program orsubroutine.
called Line contents differ according to the line of the subsectionyou are reading:
called/total—lines above the index analyze parents; listsnumber of times this index is called by the parent listed inthe name field.
called+self—line containing the index; lists number oftimes the routine is called and the number of times it callsitself.
called/total—lines below the index number analyzechildren and descendents; lists number of times this indexcalls the child listed in the name field.
name Name of the program or subroutine analyzed in this rowof the report subsection.
index Index value assigned to the program or subroutine listedin the name field.
UniBasic Profiling: Detail Information
22-13
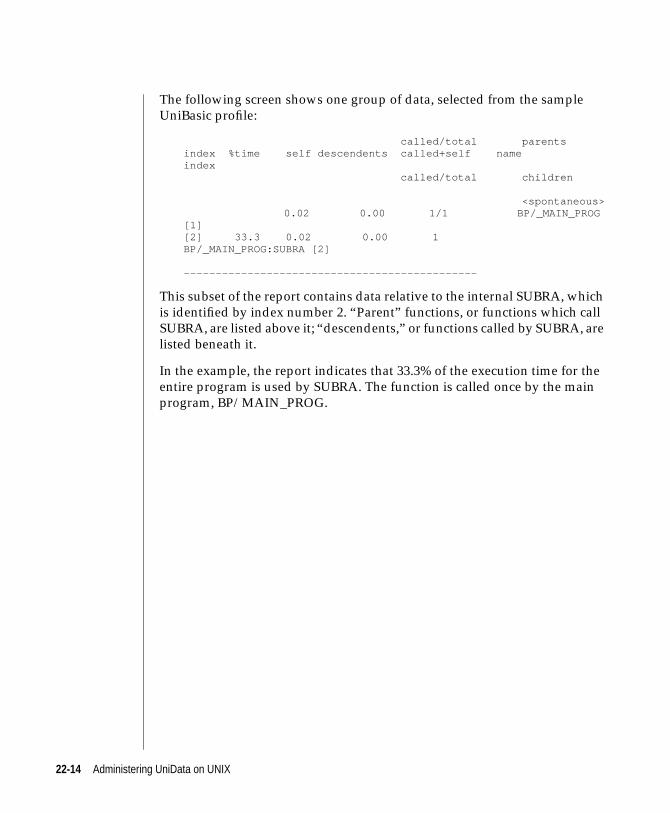
The following screen shows one group of data, selected from the sample
UniBasic profile:
called/total parentsindex %time self descendents called+self nameindex called/total children
<spontaneous>0.02 0.00 1/1 BP/_MAIN_PROG
[1][2] 33.3 0.02 0.00 1BP/_MAIN_PROG:SUBRA [2]
----------------------------------------------
This subset of the report contains data relative to the internal SUBRA, which
is identified by index number 2. “Parent” functions, or functions which call
SUBRA, are listed above it; “descendents,” or functions called by SUBRA, are
listed beneath it.
In the example, the report indicates that 33.3% of the execution time for the
entire program is used by SUBRA. The function is called once by the main
program, BP/MAIN_PROG.
22-14 Administering UniData on UNIX
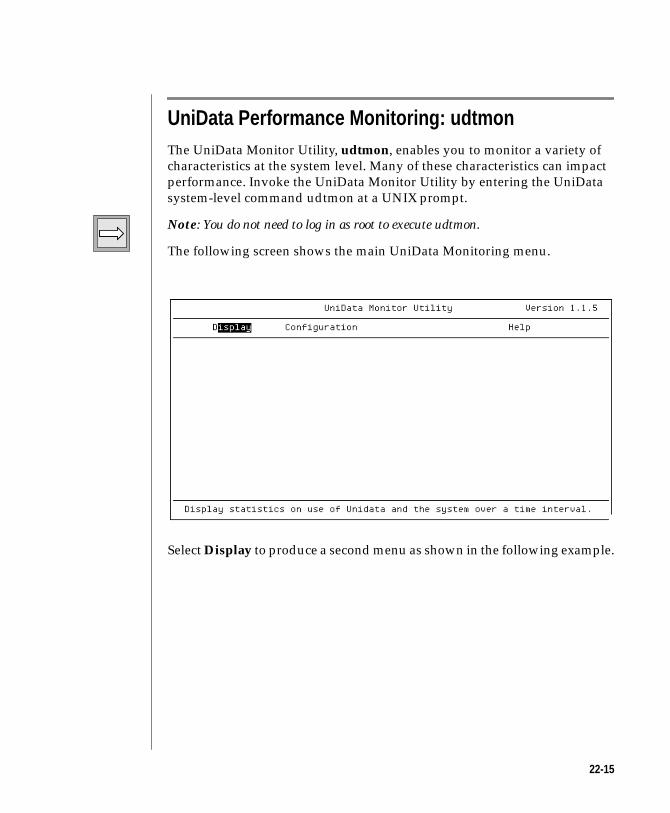
UniData Performance Monitoring: udtmonThe UniData Monitor Utility, udtmon, enables you to monitor a variety of
characteristics at the system level. Many of these characteristics can impact
performance. Invoke the UniData Monitor Utility by entering the UniData
system-level command udtmon at a UNIX prompt.
Note: You do not need to log in as root to execute udtmon.
The following screen shows the main UniData Monitoring menu.
Select Display to produce a second menu as shown in the following example.
22-15
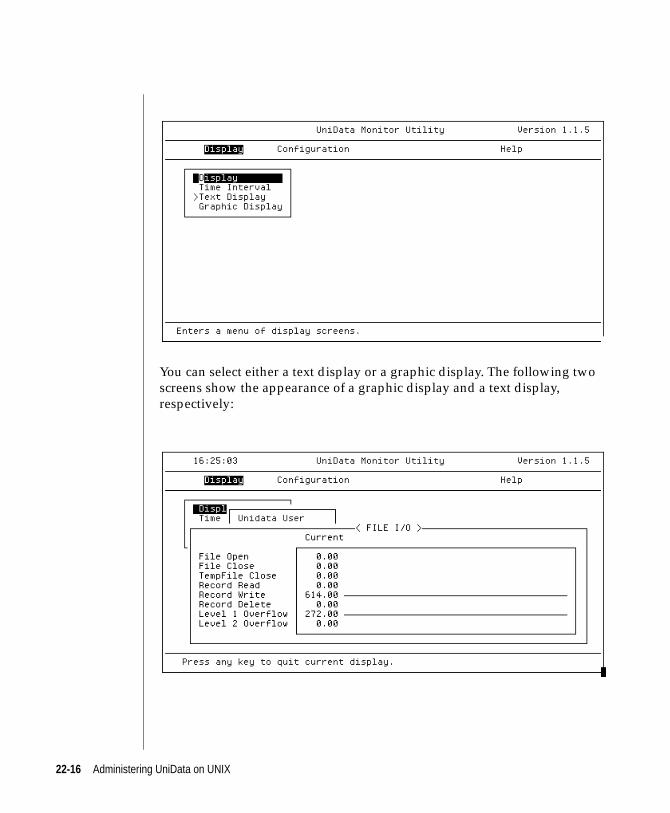
You can select either a text display or a graphic display. The following two
screens show the appearance of a graphic display and a text display,
respectively:
22-16 Administering UniData on UNIX
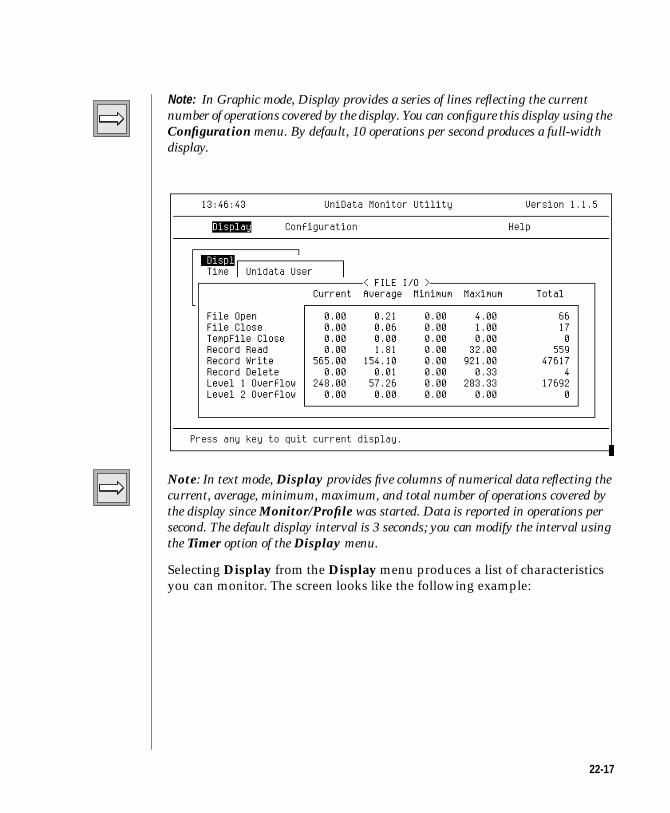
Note: In Graphic mode, Display provides a series of lines reflecting the currentnumber of operations covered by the display. You can configure this display using theConfiguration menu. By default, 10 operations per second produces a full-widthdisplay.
Note: In text mode, Display provides five columns of numerical data reflecting thecurrent, average, minimum, maximum, and total number of operations covered bythe display since Monitor/Profile was started. Data is reported in operations persecond. The default display interval is 3 seconds; you can modify the interval usingthe Timer option of the Display menu.
Selecting Display from the Display menu produces a list of characteristics
you can monitor. The screen looks like the following example:
22-17
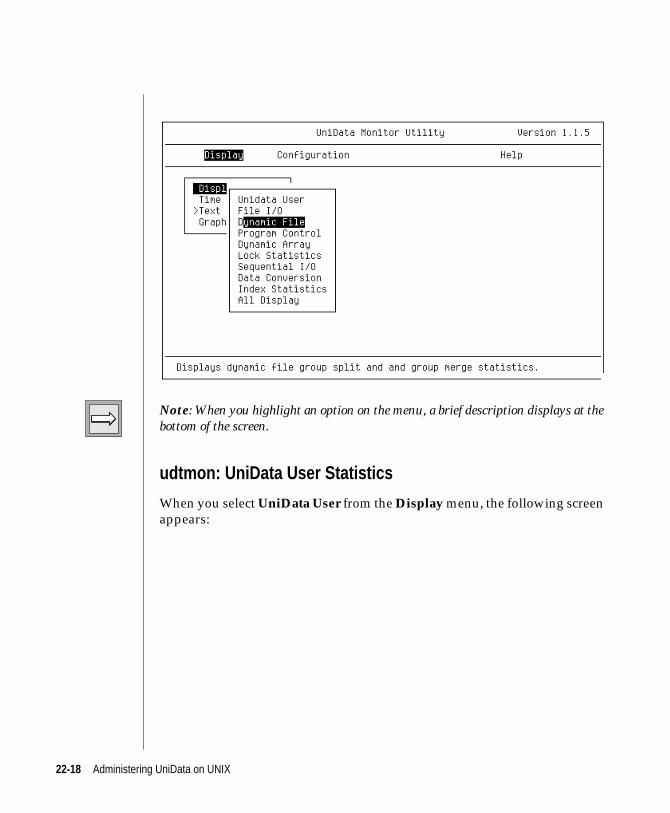
Note: When you highlight an option on the menu, a brief description displays at thebottom of the screen.
udtmon: UniData User Statistics
When you select UniData User from the Display menu, the following screen
appears:
22-18 Administering UniData on UNIX
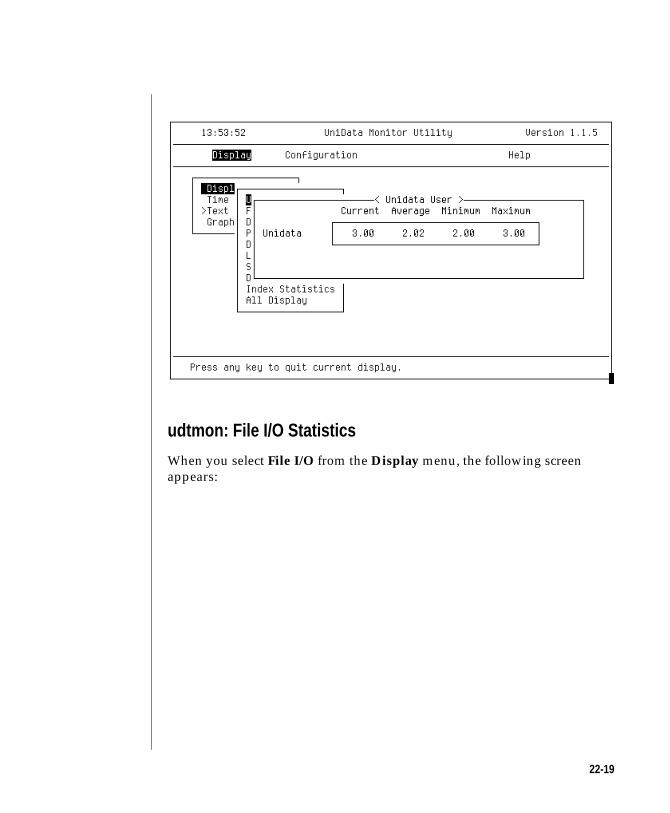
udtmon: File I/O Statistics
When you select File I/O from the Display menu, the following screen
appears:
22-19
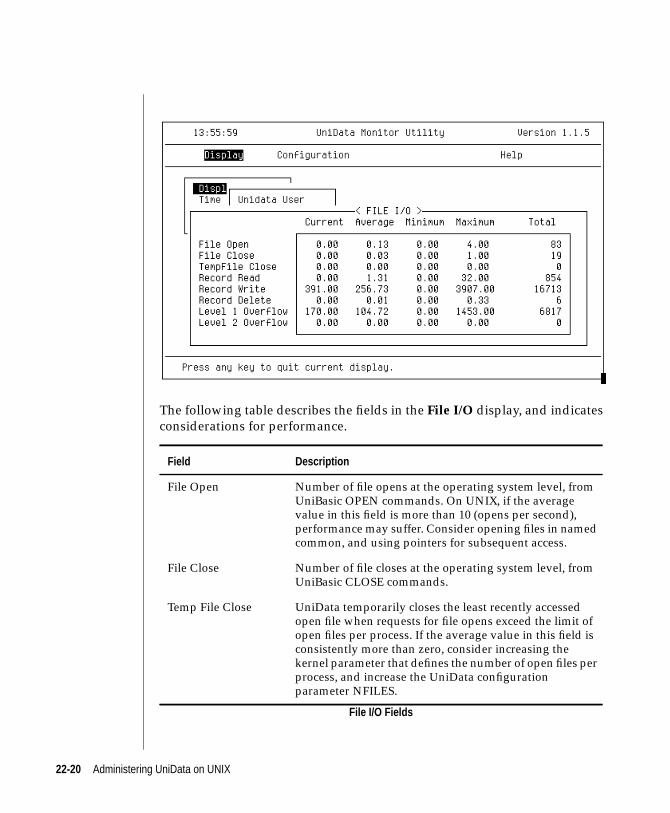
The following table describes the fields in the File I/O display, and indicates
considerations for performance.
Field Description
File Open Number of file opens at the operating system level, fromUniBasic OPEN commands. On UNIX, if the averagevalue in this field is more than 10 (opens per second),performance may suffer. Consider opening files in namedcommon, and using pointers for subsequent access.
File Close Number of file closes at the operating system level, fromUniBasic CLOSE commands.
Temp File Close UniData temporarily closes the least recently accessedopen file when requests for file opens exceed the limit ofopen files per process. If the average value in this field isconsistently more than zero, consider increasing thekernel parameter that defines the number of open files perprocess, and increase the UniData configurationparameter NFILES.
File I/O Fields
22-20 Administering UniData on UNIX
udtmon: Program Control Statistics
Selecting Program Control from the Display menu produces a screen similar
to the following example:
Record Read Number of records read by UniData commands (otherthan UniQuery). For most applications, Record Read isgreater than Record Write.
Record Write Number of records written by UniData commands (otherthan UniQuery).
Record Delete Number of records deleted by UniBasic commands (otherthan UniQuery).
Level 1 Overflow Number of operations (reads, writes, and deletes) torecords in level 1 overflow blocks. Compute the totalactivity by adding Record Read, Record Write, and RecordDelete. If you are using only static files and Level 1Overflow is more than 10% of the total activity, use guideto analyze your files and resize them appropriately.
Level 2 Overflow Number of operations (reads, writes, and deletes) torecords in level 2 overflow. If Level 2 Overflow is morethan 2% of total activity, use checkover or guide to identifyfiles in level 2 overflow and resize them appropriately.
Field Description
File I/O Fields (continued)
22-21
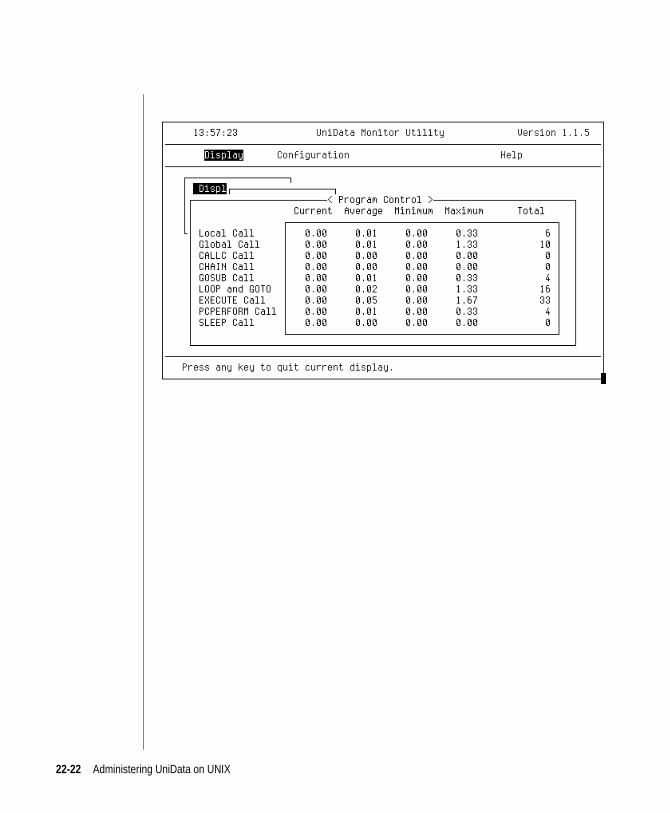
22-22 Administering UniData on UNIX
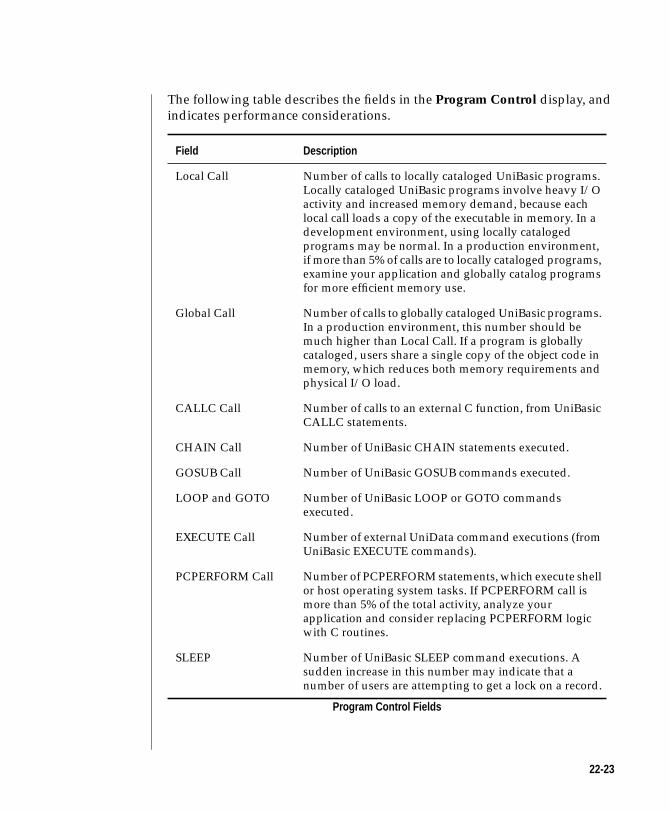
The following table describes the fields in the Program Control display, and
indicates performance considerations.
Field Description
Local Call Number of calls to locally cataloged UniBasic programs.Locally cataloged UniBasic programs involve heavy I/Oactivity and increased memory demand, because eachlocal call loads a copy of the executable in memory. In adevelopment environment, using locally catalogedprograms may be normal. In a production environment,if more than 5% of calls are to locally cataloged programs,examine your application and globally catalog programsfor more efficient memory use.
Global Call Number of calls to globally cataloged UniBasic programs.In a production environment, this number should bemuch higher than Local Call. If a program is globallycataloged, users share a single copy of the object code inmemory, which reduces both memory requirements andphysical I/O load.
CALLC Call Number of calls to an external C function, from UniBasicCALLC statements.
CHAIN Call Number of UniBasic CHAIN statements executed.
GOSUB Call Number of UniBasic GOSUB commands executed.
LOOP and GOTO Number of UniBasic LOOP or GOTO commandsexecuted.
EXECUTE Call Number of external UniData command executions (fromUniBasic EXECUTE commands).
PCPERFORM Call Number of PCPERFORM statements, which execute shellor host operating system tasks. If PCPERFORM call ismore than 5% of the total activity, analyze yourapplication and consider replacing PCPERFORM logicwith C routines.
SLEEP Number of UniBasic SLEEP command executions. Asudden increase in this number may indicate that anumber of users are attempting to get a lock on a record.
Program Control Fields
22-23
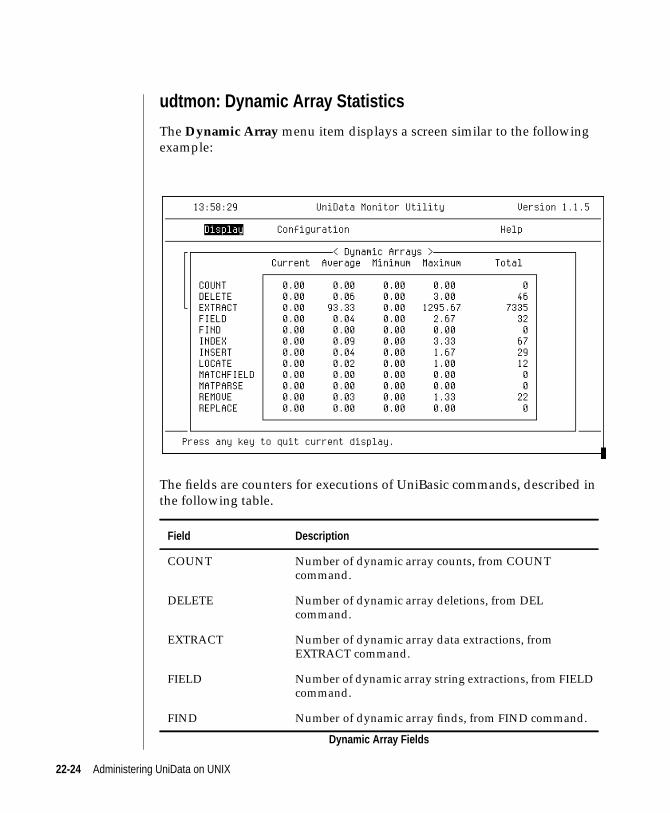
udtmon: Dynamic Array Statistics
The Dynamic Array menu item displays a screen similar to the following
example:
The fields are counters for executions of UniBasic commands, described in
the following table.
Field Description
COUNT Number of dynamic array counts, from COUNTcommand.
DELETE Number of dynamic array deletions, from DELcommand.
EXTRACT Number of dynamic array data extractions, fromEXTRACT command.
FIELD Number of dynamic array string extractions, from FIELDcommand.
FIND Number of dynamic array finds, from FIND command.
Dynamic Array Fields
22-24 Administering UniData on UNIX
udtmon: Lock Statistics
The following screen displays when you select Lock Statistics:
The following table describes the fields of the Lock Statistics display, and
indicates performance considerations:
INDEX Number of dynamic array substring indexes, fromINDEX command.
INSERT Number of dynamic array inserts, from INS command.
LOCATE Number of dynamic array locations, from LOCATEcommand.
MATCHFIELD Number of dynamic array substring matches, fromMATCHFIELD command.
MATPARSE Number of dynamic array matrix parses, fromMATPARSE command.
REMOVE Number of dynamic array element removals, fromREMOVE command.
REPLACE Number of dynamic array replacements, from REPLACEcommand.
Field Display
Record Lock Number of user-level record locks set by commands suchas READL and READU.
Record Unlock Number of user-level locks released by commands such asRELEASE.
Semaphore Lock Number of user-level resource locks set by commandssuch as LOCK and T.ATT.
Semaphore Unlock Number of user-level resource locks released bycommands such as T.DET or UNLOCK.
Lock Statistics Fields
Field Description
Dynamic Array Fields (continued)
22-25
Note: In some circumstances, this screen may indicate that more records are beingunlocked than are being locked. This is a function of how UniData gathers thestatistics and does not indicate a problem.
Shared Group Lock UniData-level shared lock on an entire group.
Excl. Group Lock UniData-level exclusive lock on an entire group. For mostapplications, the number of shared group locks exceedsthe number of exclusive group locks. If the number ofexclusive group locks is greater than the number of sharedgroup locks, one or more files may be overflowed. Identifythese with guide.
Shared Index Lock UniData-level shared lock on an index.
Excl. Index Lock UniData-level exclusive lock on an index. For mostapplications, the number of shared index locks exceeds thenumber of exclusive index locks. If the number ofexclusive index locks is larger than the number of sharedindex locks, one or more index files may be overflowed.Identify these with LIST.INDEX.
End-of-File Lock UniData-level lock that is required when UniData extendsa file by adding overflow groups or by splitting a dynamicfile. If this number is consistently greater than zero, andthe Dynamic File statistics do not show splitting andmerging, one or more files has overflowed. Identify theseand resize them for improved performance.
Lock Failure Number of times a process attempts to get a user-levellock and fails because the record is already locked. Ifperformance is suffering, analyze your application forimproper lock handling.
GLM Lock Request Number of times a udt process checks the global lockmanager to get a lock.
GLM Lock Failure Number of times a udt process attempts to get a lock fromthe global lock manager and fails because the record isalready locked.
Field Display
Lock Statistics Fields (continued)
22-26 Administering UniData on UNIX

udtmon: Sequential I/O StatisticsSelecting Sequential I/O displays statistics for I/O operations on sequential
files. The following screen shows the display.
The following table describes the fields of the Sequential I/O display.
Field Description
OPENSEQ Number of UniBasic OPENSEQ executions.
CLOSESEQ Number of UniBasic CLOSESEQ executions.
READSEQ Number of UniBasic READSEQ executions.
WRITESEQ Number of UniBasic WRITESEQ executions.
OSOPEN Number of UniBasic OSOPEN executions.
OSCLOSE Number of UniBasic OSCLOSE executions.
Sequential I/O Fields
22-27
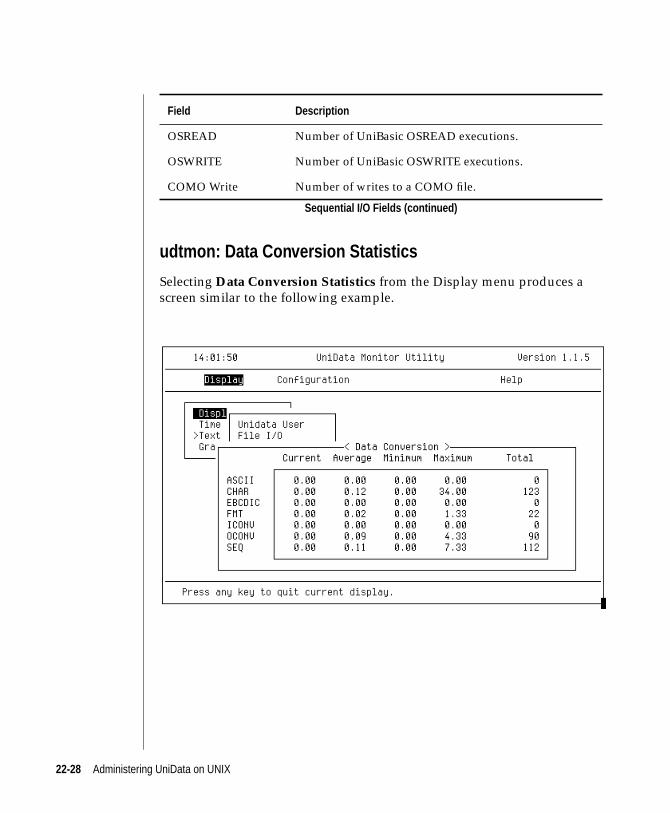
udtmon: Data Conversion Statistics
Selecting Data Conversion Statistics from the Display menu produces a
screen similar to the following example.
OSREAD Number of UniBasic OSREAD executions.
OSWRITE Number of UniBasic OSWRITE executions.
COMO Write Number of writes to a COMO file.
Field Description
Sequential I/O Fields (continued)
22-28 Administering UniData on UNIX
The information on the screen provides an overview of a UniBasic
application in terms of data handling. The following table describes the
actions counted in the Data Conversion Statistics display:
Note: There are no specific performance recommendations for this screen.
udtmon: Index Statistics
Selecting Index Statistics from the Display menu produces a screen similar
to the following example.
Field Description
ASCII Converting strings from EBCDIC to ASCII format.
CHAR Converting characters from numbers to ASCII characters.
EBCDIC Converting strings from ASCII to EBCDIC format.
FMT Formatting strings for output.
ICONV Converting strings from an external format to UniData to internalformat.
OCONV Converting strings from UniData internal format to an externalformat.
SEQ Determining the numeric value of an ASCII character.
Data Conversion Statistics Fields
22-29
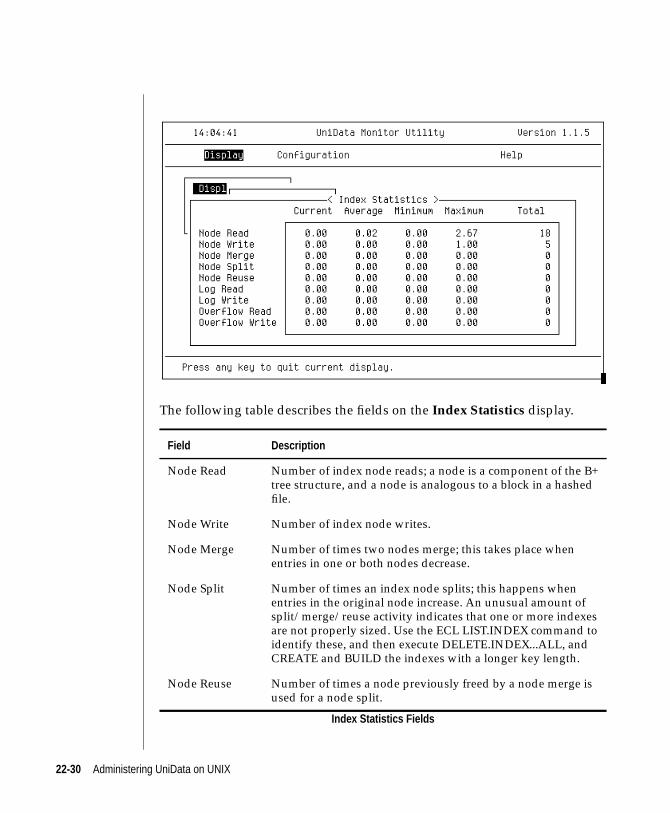
The following table describes the fields on the Index Statistics display.
Field Description
Node Read Number of index node reads; a node is a component of the B+tree structure, and a node is analogous to a block in a hashedfile.
Node Write Number of index node writes.
Node Merge Number of times two nodes merge; this takes place whenentries in one or both nodes decrease.
Node Split Number of times an index node splits; this happens whenentries in the original node increase. An unusual amount ofsplit/merge/reuse activity indicates that one or more indexesare not properly sized. Use the ECL LIST.INDEX command toidentify these, and then execute DELETE.INDEX...ALL, andCREATE and BUILD the indexes with a longer key length.
Node Reuse Number of times a node previously freed by a node merge isused for a node split.
Index Statistics Fields
22-30 Administering UniData on UNIX
Note: Notice in the sample Index Statistics display the number of Overflow Readsand Overflow Writes indicates that one or more index may be improperly sized.
udtmon: Mglm Performance
When you select Mglm Performance, the following screen displays.
Log Read Number of reads from an index log file; these occur when anindex which was disabled is reenabled and updated with thecontents of the index log.
Log Write Number of writes to an index log file. These occur while anindex is disabled, as UniData tracks changes by recording themin the index log.
Overflow Read Number of times UniData reads from an index overflow node.The system creates overflow nodes when the number of keys inan index exceeds a set limit. Reads to and writes from overflownodes slow system performance. If overflow activity (reads andwrites) exceeds 5% of system activity (node reads and nodewrites), use the ECL LIST.INDEX command to identify whichindexes are overflowed. Then execute DELETE.INDEX...ALL,and CREATE and BUILD the indexes with a longer key length.
Overflow Write Number of times UniData writes an overflow node.
Field Description
Index Statistics Fields (continued)
22-31
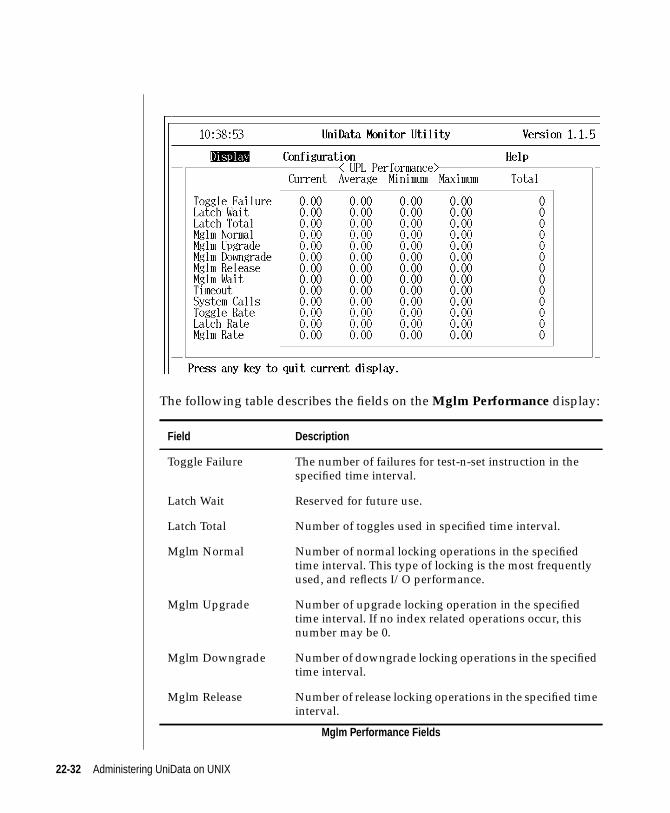
The following table describes the fields on the Mglm Performance display:
Field Description
Toggle Failure The number of failures for test-n-set instruction in thespecified time interval.
Latch Wait Reserved for future use.
Latch Total Number of toggles used in specified time interval.
Mglm Normal Number of normal locking operations in the specifiedtime interval. This type of locking is the most frequentlyused, and reflects I/O performance.
Mglm Upgrade Number of upgrade locking operation in the specifiedtime interval. If no index related operations occur, thisnumber may be 0.
Mglm Downgrade Number of downgrade locking operations in the specifiedtime interval.
Mglm Release Number of release locking operations in the specified timeinterval.
Mglm Performance Fields
22-32 Administering UniData on UNIX
Mglm Wait Number of times Mglm waits for a lock.
Timeout Reserved for future use.
System Calls Number of system calls used by the lock manager in thespecified time interval. This number should be low.
Toggle Rate Toggle Failure / Total Latch. This rate should be low. If thenumber is consistently greater than 5, increase theTOGGLE_NAP_TIME parameter in udtconfig.
Latch Rate Reserved for future use.
Mglm Rate (Mglm Wait) / (Mglm Normal + Mglm Release + MglmUpgrade + Mglm Downgrade). This number is used tocheck I/O performance and should be low.
Field Description
Mglm Performance Fields (continued)
22-33
22-34 Administering UniData on UNIX
AAppendix
UniData ConfigurationParameters
This appendix lists the names and descriptions for all UniData
configuration parameters as of Release 6.0. Refer to Chapter 8,
“Configuring Your UniData System,” for additional information
about modifying your udtconfig file.
The following tables describe the configuration parameters that
are placed in the udtconfig file located in udthome\include at the
time of installation. They are system-dependent and should not
be changed.
Parameter Description
LOCKFIFO The locking sequence of processes in the system. Thisparameter should not be changed.
SYS_PV Type of P/V operations used for the Recoverable FileSystem (RFS) only. Determined at installation; platformdependent. Don’t change unless instructed by IBM.
udtconfig Parameters That Should Not Be Changed
The following parameters may be changed to suit your environment:
Parameter Description
NFILES Number of physical files that can be opened at theoperating system level at one time in a UniDatasession. This limit is for both udt and tmprocesses; the name of the corresponding kernelparameter varies among UNIX versions.
NUSERS Limit for number of UniData user processes (suchas udt and PHANTOM) that can run at the sametime.
WRITE_TO_CONSOLE Switch for turning on and off messaging to yourconsole. Must be greater than zero for messages todisplay at console.
TMP Path of a UNIX directory for storing intermediatework files. Default is \IBM\ud60\temp onUniData for Windows Platforms or /tmp/ onUniData for UNIX. When changing thisparameter on UniData for UNIX, do not forget thetrailing “/.”
NVLMARK Specifies a character to print to represent the nullvalue. The ASCII character that represents thenull value is nonprinting.
FCNTL_ON Used with UniData Physical Lock Manager. If aUNIX platform supports test-n-set instruction,SYS_PV is set to 3 and FCNTL_ON is set to 0. If aUNIX platform does not support test-n-setinstruction, SYS_PV is set to 2 and FCNTL_ON isset to 1. Do not change this parameter unlessinstructed to do so by IBM.
TOGGLE_NAP_TIME If FCNTL_ON is set to 0, the length of time (inmilliseconds) that a process waits to access ashared memory address held by another process.This parameter has no effect if FCNTL_ON is setto 1. Do not change unless instructed to do so byIBM.
udtconfig Parameters That Can Be Changed
A-2 Administering UniData on UNIX
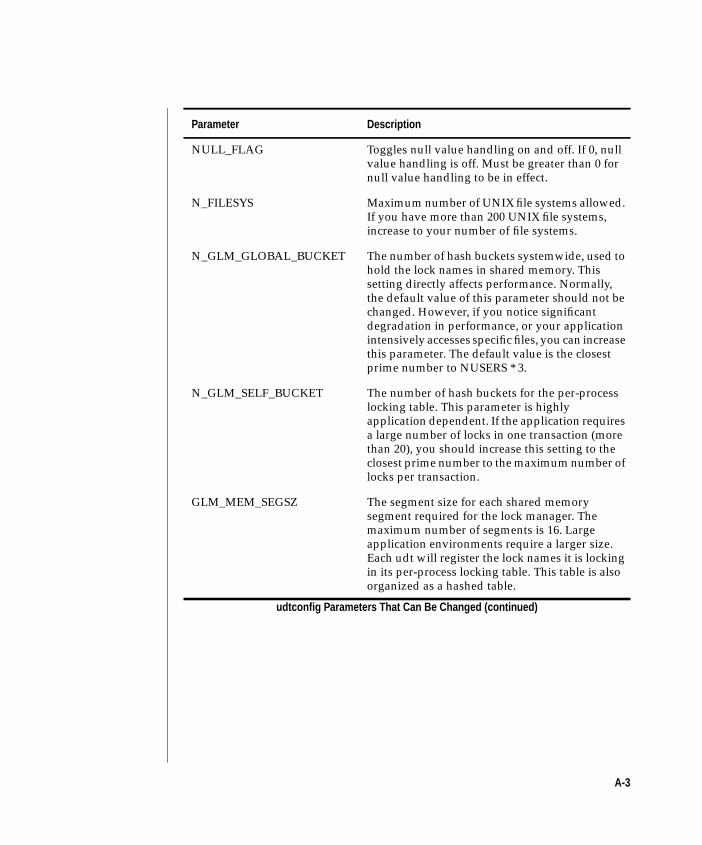
NULL_FLAG Toggles null value handling on and off. If 0, nullvalue handling is off. Must be greater than 0 fornull value handling to be in effect.
N_FILESYS Maximum number of UNIX file systems allowed.If you have more than 200 UNIX file systems,increase to your number of file systems.
N_GLM_GLOBAL_BUCKET The number of hash buckets systemwide, used tohold the lock names in shared memory. Thissetting directly affects performance. Normally,the default value of this parameter should not bechanged. However, if you notice significantdegradation in performance, or your applicationintensively accesses specific files, you can increasethis parameter. The default value is the closestprime number to NUSERS * 3.
N_GLM_SELF_BUCKET The number of hash buckets for the per-processlocking table. This parameter is highlyapplication dependent. If the application requiresa large number of locks in one transaction (morethan 20), you should increase this setting to theclosest prime number to the maximum number oflocks per transaction.
GLM_MEM_SEGSZ The segment size for each shared memorysegment required for the lock manager. Themaximum number of segments is 16. Largeapplication environments require a larger size.Each udt will register the lock names it is lockingin its per-process locking table. This table is alsoorganized as a hashed table.
Parameter Description
udtconfig Parameters That Can Be Changed (continued)
A-3
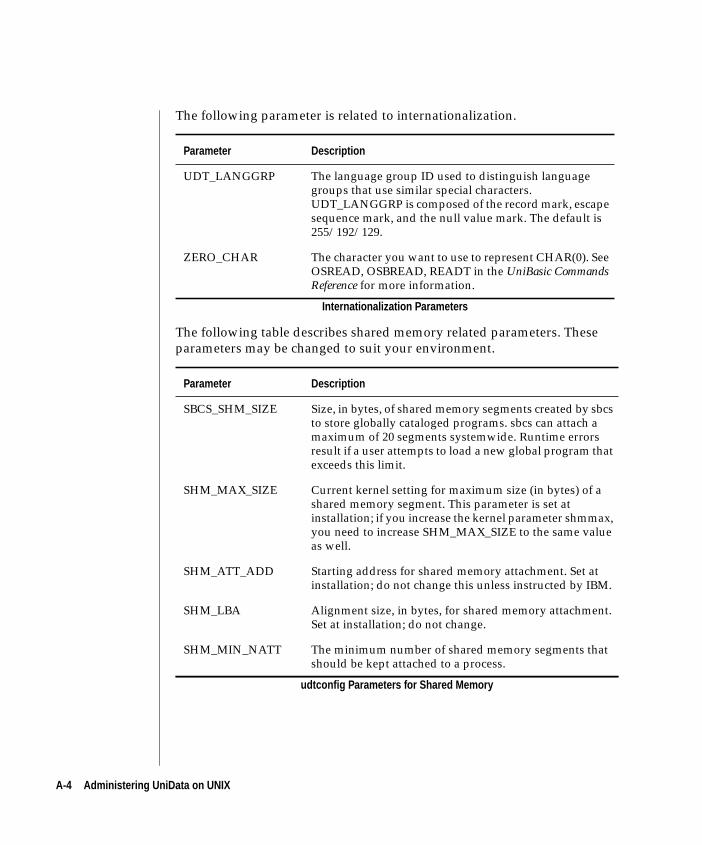
The following parameter is related to internationalization.
The following table describes shared memory related parameters. These
parameters may be changed to suit your environment.
Parameter Description
UDT_LANGGRP The language group ID used to distinguish languagegroups that use similar special characters.UDT_LANGGRP is composed of the record mark, escapesequence mark, and the null value mark. The default is255/192/129.
ZERO_CHAR The character you want to use to represent CHAR(0). SeeOSREAD, OSBREAD, READT in the UniBasic CommandsReference for more information.
Internationalization Parameters
Parameter Description
SBCS_SHM_SIZE Size, in bytes, of shared memory segments created by sbcsto store globally cataloged programs. sbcs can attach amaximum of 20 segments systemwide. Runtime errorsresult if a user attempts to load a new global program thatexceeds this limit.
SHM_MAX_SIZE Current kernel setting for maximum size (in bytes) of ashared memory segment. This parameter is set atinstallation; if you increase the kernel parameter shmmax,you need to increase SHM_MAX_SIZE to the same valueas well.
SHM_ATT_ADD Starting address for shared memory attachment. Set atinstallation; do not change this unless instructed by IBM.
SHM_LBA Alignment size, in bytes, for shared memory attachment.Set at installation; do not change.
SHM_MIN_NATT The minimum number of shared memory segments thatshould be kept attached to a process.
udtconfig Parameters for Shared Memory
A-4 Administering UniData on UNIX
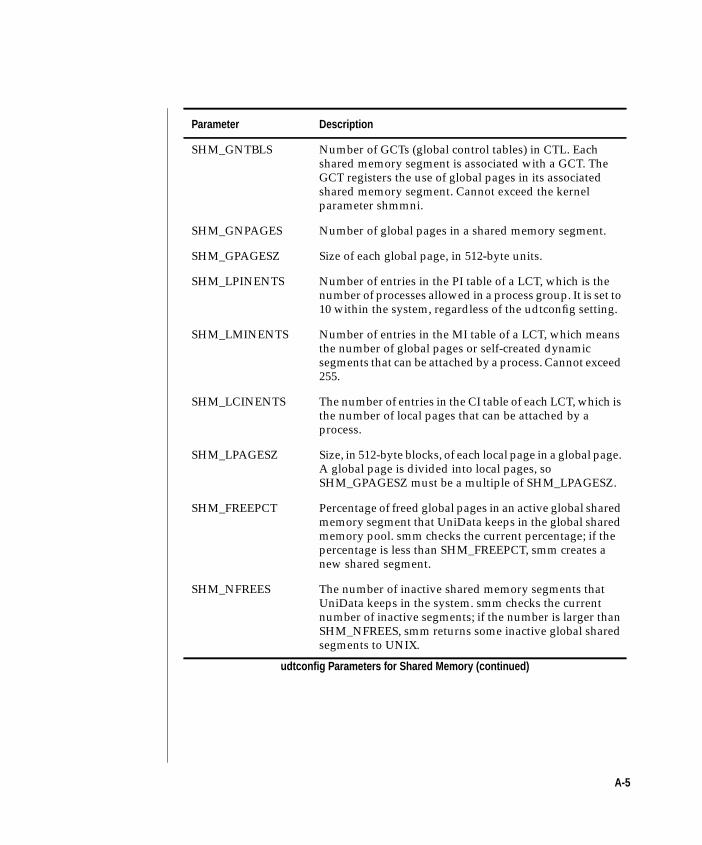
SHM_GNTBLS Number of GCTs (global control tables) in CTL. Eachshared memory segment is associated with a GCT. TheGCT registers the use of global pages in its associatedshared memory segment. Cannot exceed the kernelparameter shmmni.
SHM_GNPAGES Number of global pages in a shared memory segment.
SHM_GPAGESZ Size of each global page, in 512-byte units.
SHM_LPINENTS Number of entries in the PI table of a LCT, which is thenumber of processes allowed in a process group. It is set to10 within the system, regardless of the udtconfig setting.
SHM_LMINENTS Number of entries in the MI table of a LCT, which meansthe number of global pages or self-created dynamicsegments that can be attached by a process. Cannot exceed255.
SHM_LCINENTS The number of entries in the CI table of each LCT, which isthe number of local pages that can be attached by aprocess.
SHM_LPAGESZ Size, in 512-byte blocks, of each local page in a global page.A global page is divided into local pages, soSHM_GPAGESZ must be a multiple of SHM_LPAGESZ.
SHM_FREEPCT Percentage of freed global pages in an active global sharedmemory segment that UniData keeps in the global sharedmemory pool. smm checks the current percentage; if thepercentage is less than SHM_FREEPCT, smm creates anew shared segment.
SHM_NFREES The number of inactive shared memory segments thatUniData keeps in the system. smm checks the currentnumber of inactive segments; if the number is larger thanSHM_NFREES, smm returns some inactive global sharedsegments to UNIX.
Parameter Description
udtconfig Parameters for Shared Memory (continued)
A-5
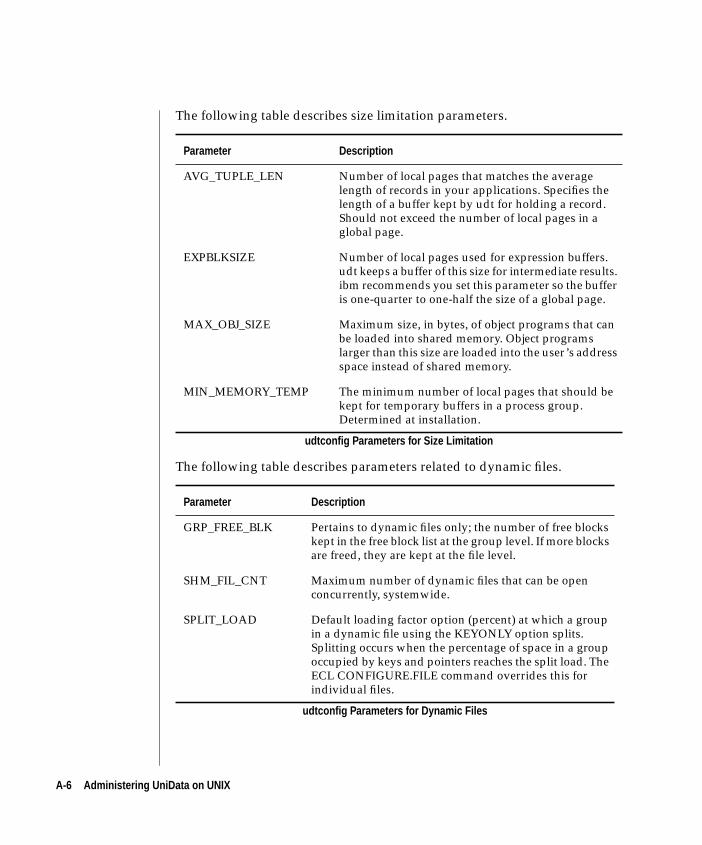
The following table describes size limitation parameters.
The following table describes parameters related to dynamic files.
Parameter Description
AVG_TUPLE_LEN Number of local pages that matches the averagelength of records in your applications. Specifies thelength of a buffer kept by udt for holding a record.Should not exceed the number of local pages in aglobal page.
EXPBLKSIZE Number of local pages used for expression buffers.udt keeps a buffer of this size for intermediate results.ibm recommends you set this parameter so the bufferis one-quarter to one-half the size of a global page.
MAX_OBJ_SIZE Maximum size, in bytes, of object programs that canbe loaded into shared memory. Object programslarger than this size are loaded into the user’s addressspace instead of shared memory.
MIN_MEMORY_TEMP The minimum number of local pages that should bekept for temporary buffers in a process group.Determined at installation.
udtconfig Parameters for Size Limitation
Parameter Description
GRP_FREE_BLK Pertains to dynamic files only; the number of free blockskept in the free block list at the group level. If more blocksare freed, they are kept at the file level.
SHM_FIL_CNT Maximum number of dynamic files that can be openconcurrently, systemwide.
SPLIT_LOAD Default loading factor option (percent) at which a groupin a dynamic file using the KEYONLY option splits.Splitting occurs when the percentage of space in a groupoccupied by keys and pointers reaches the split load. TheECL CONFIGURE.FILE command overrides this forindividual files.
udtconfig Parameters for Dynamic Files
A-6 Administering UniData on UNIX
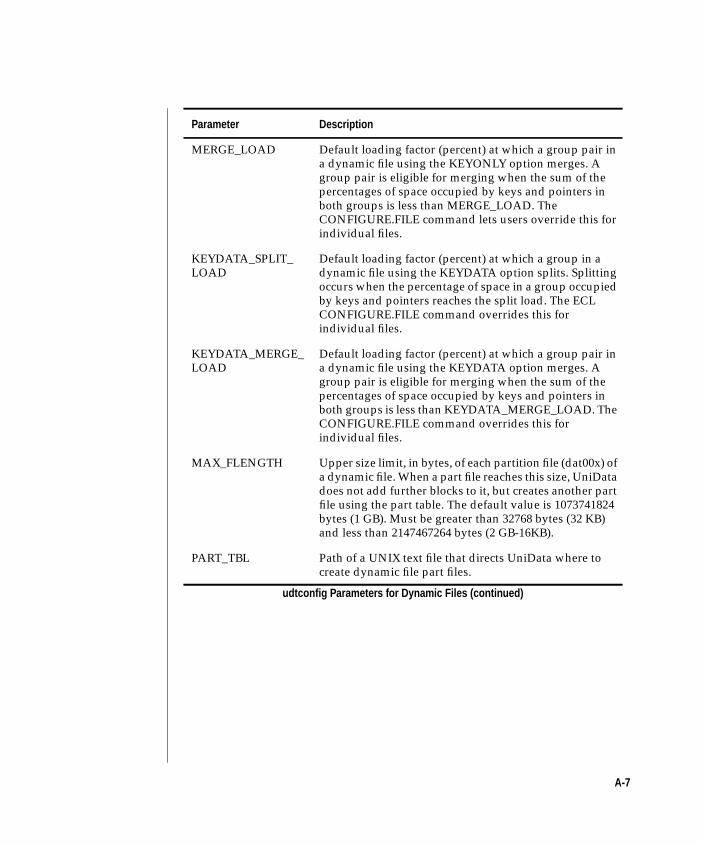
MERGE_LOAD Default loading factor (percent) at which a group pair ina dynamic file using the KEYONLY option merges. Agroup pair is eligible for merging when the sum of thepercentages of space occupied by keys and pointers inboth groups is less than MERGE_LOAD. TheCONFIGURE.FILE command lets users override this forindividual files.
KEYDATA_SPLIT_LOAD
Default loading factor (percent) at which a group in adynamic file using the KEYDATA option splits. Splittingoccurs when the percentage of space in a group occupiedby keys and pointers reaches the split load. The ECLCONFIGURE.FILE command overrides this forindividual files.
KEYDATA_MERGE_LOAD
Default loading factor (percent) at which a group pair ina dynamic file using the KEYDATA option merges. Agroup pair is eligible for merging when the sum of thepercentages of space occupied by keys and pointers inboth groups is less than KEYDATA_MERGE_LOAD. TheCONFIGURE.FILE command overrides this forindividual files.
MAX_FLENGTH Upper size limit, in bytes, of each partition file (dat00x) ofa dynamic file. When a part file reaches this size, UniDatadoes not add further blocks to it, but creates another partfile using the part table. The default value is 1073741824bytes (1 GB). Must be greater than 32768 bytes (32 KB)and less than 2147467264 bytes (2 GB-16KB).
PART_TBL Path of a UNIX text file that directs UniData where tocreate dynamic file part files.
Parameter Description
udtconfig Parameters for Dynamic Files (continued)
A-7
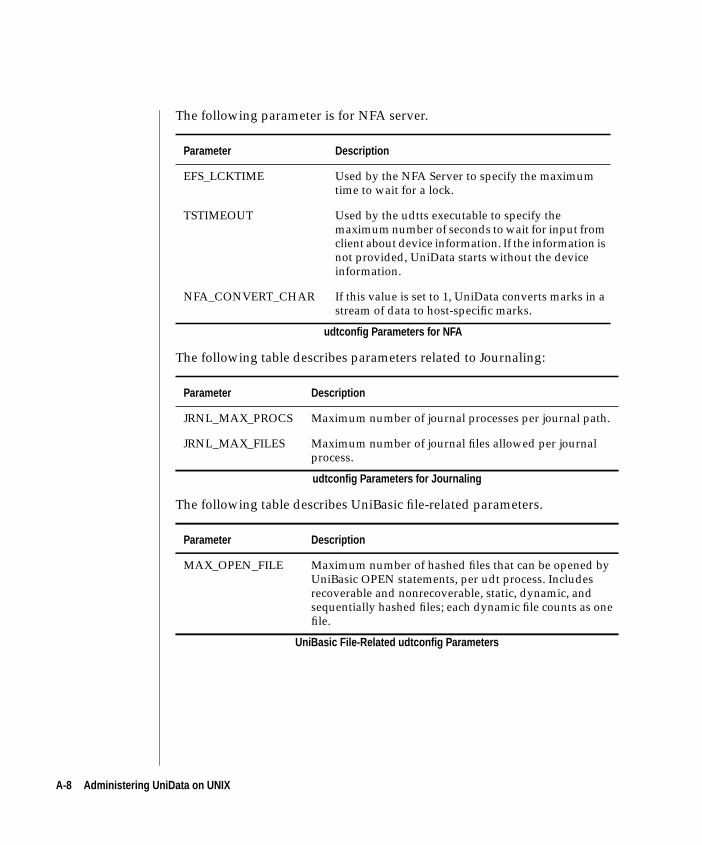
The following parameter is for NFA server.
The following table describes parameters related to Journaling:
The following table describes UniBasic file-related parameters.
Parameter Description
EFS_LCKTIME Used by the NFA Server to specify the maximumtime to wait for a lock.
TSTIMEOUT Used by the udtts executable to specify themaximum number of seconds to wait for input fromclient about device information. If the information isnot provided, UniData starts without the deviceinformation.
NFA_CONVERT_CHAR If this value is set to 1, UniData converts marks in astream of data to host-specific marks.
udtconfig Parameters for NFA
Parameter Description
JRNL_MAX_PROCS Maximum number of journal processes per journal path.
JRNL_MAX_FILES Maximum number of journal files allowed per journalprocess.
udtconfig Parameters for Journaling
Parameter Description
MAX_OPEN_FILE Maximum number of hashed files that can be opened byUniBasic OPEN statements, per udt process. Includesrecoverable and nonrecoverable, static, dynamic, andsequentially hashed files; each dynamic file counts as onefile.
UniBasic File-Related udtconfig Parameters
A-8 Administering UniData on UNIX

The following table describes parameters related to UniBasic.
MAX_OPEN_SEQF Maximum number of sequential files that can be opened atone time by UniBasic OPENSEQ statements, per udtprocess.
MAX_OPEN_OSF Maximum number of UNIX sequential files that can beopened at one time by UniBasic OSOPEN statements, perudt process.
MAX_DSFILES Maximum number of nonrecoverable dynamic part files(dat00x, over00x) a UniData process can open withUniBasic OPEN statements or ECL commands. Eachdynamic file has at least two part files.
Parameter Description
MAX_CAPT_LEVEL Number of levels allowed for nested UniBasicEXECUTE WITH CAPTURING or MDPERFORMWITH CAPTURING clauses. Individual users canset an environment variable that overrides theconfiguration parameter.
udtconfig Parameters for UniBasic
Parameter Description
UniBasic File-Related udtconfig Parameters (continued)
A-9
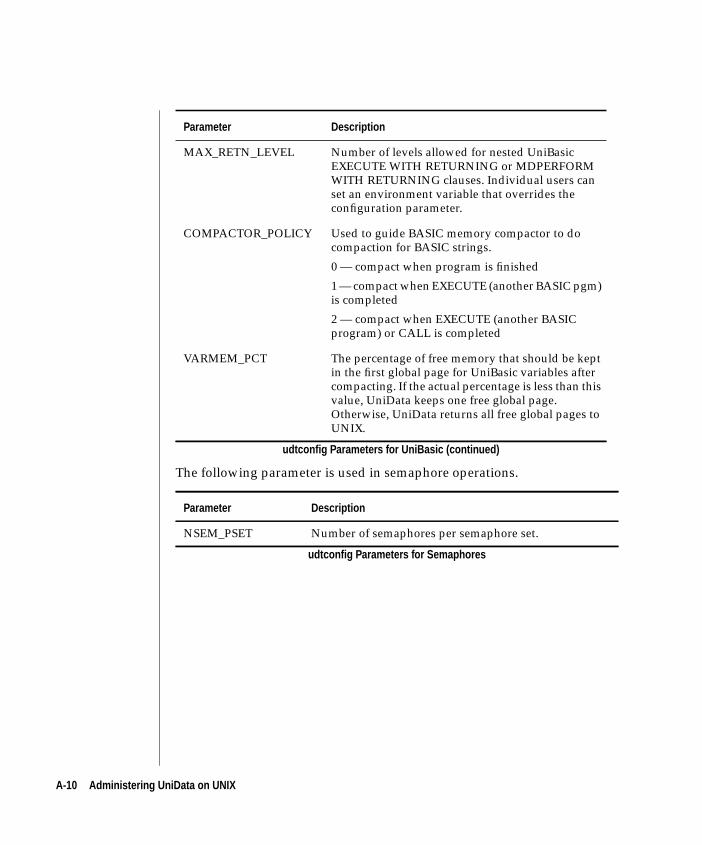
The following parameter is used in semaphore operations.
MAX_RETN_LEVEL Number of levels allowed for nested UniBasicEXECUTE WITH RETURNING or MDPERFORMWITH RETURNING clauses. Individual users canset an environment variable that overrides theconfiguration parameter.
COMPACTOR_POLICY Used to guide BASIC memory compactor to docompaction for BASIC strings.
0 — compact when program is finished
1 — compact when EXECUTE (another BASIC pgm)is completed
2 — compact when EXECUTE (another BASICprogram) or CALL is completed
VARMEM_PCT The percentage of free memory that should be keptin the first global page for UniBasic variables aftercompacting. If the actual percentage is less than thisvalue, UniData keeps one free global page.Otherwise, UniData returns all free global pages toUNIX.
Parameter Description
NSEM_PSET Number of semaphores per semaphore set.
udtconfig Parameters for Semaphores
Parameter Description
udtconfig Parameters for UniBasic (continued)
A-10 Administering UniData on UNIX
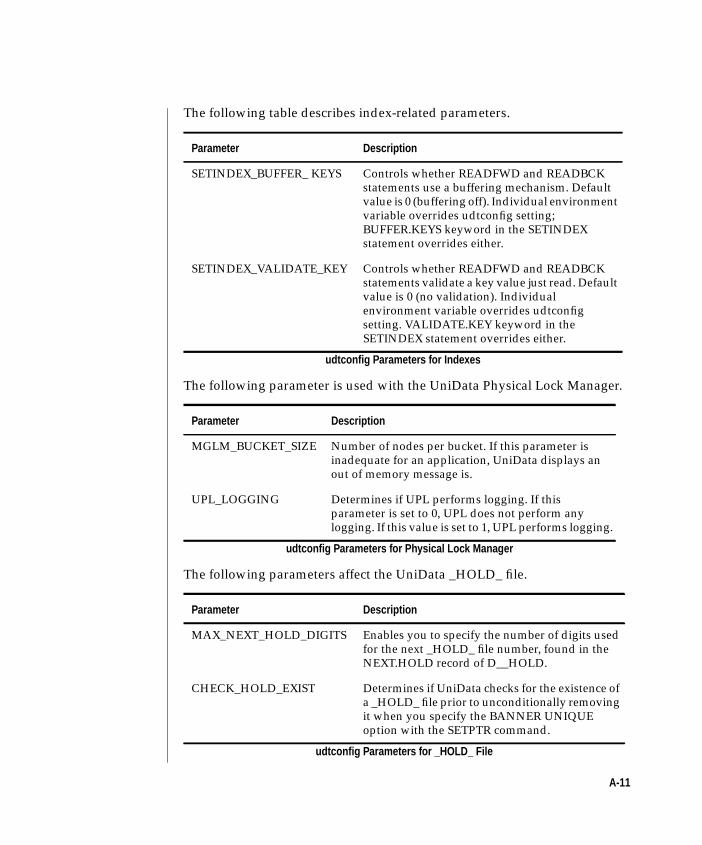
The following table describes index-related parameters.
The following parameter is used with the UniData Physical Lock Manager.
The following parameters affect the UniData _HOLD_ file.
Parameter Description
SETINDEX_BUFFER_ KEYS Controls whether READFWD and READBCKstatements use a buffering mechanism. Defaultvalue is 0 (buffering off). Individual environmentvariable overrides udtconfig setting;BUFFER.KEYS keyword in the SETINDEXstatement overrides either.
SETINDEX_VALIDATE_KEY Controls whether READFWD and READBCKstatements validate a key value just read. Defaultvalue is 0 (no validation). Individualenvironment variable overrides udtconfigsetting. VALIDATE.KEY keyword in theSETINDEX statement overrides either.
udtconfig Parameters for Indexes
Parameter Description
MGLM_BUCKET_SIZE Number of nodes per bucket. If this parameter isinadequate for an application, UniData displays anout of memory message is.
UPL_LOGGING Determines if UPL performs logging. If thisparameter is set to 0, UPL does not perform anylogging. If this value is set to 1, UPL performs logging.
udtconfig Parameters for Physical Lock Manager
Parameter Description
MAX_NEXT_HOLD_DIGITS Enables you to specify the number of digits usedfor the next _HOLD_ file number, found in theNEXT.HOLD record of D__HOLD.
CHECK_HOLD_EXIST Determines if UniData checks for the existence ofa _HOLD_ file prior to unconditionally removingit when you specify the BANNER UNIQUEoption with the SETPTR command.
udtconfig Parameters for _HOLD_ File
A-11
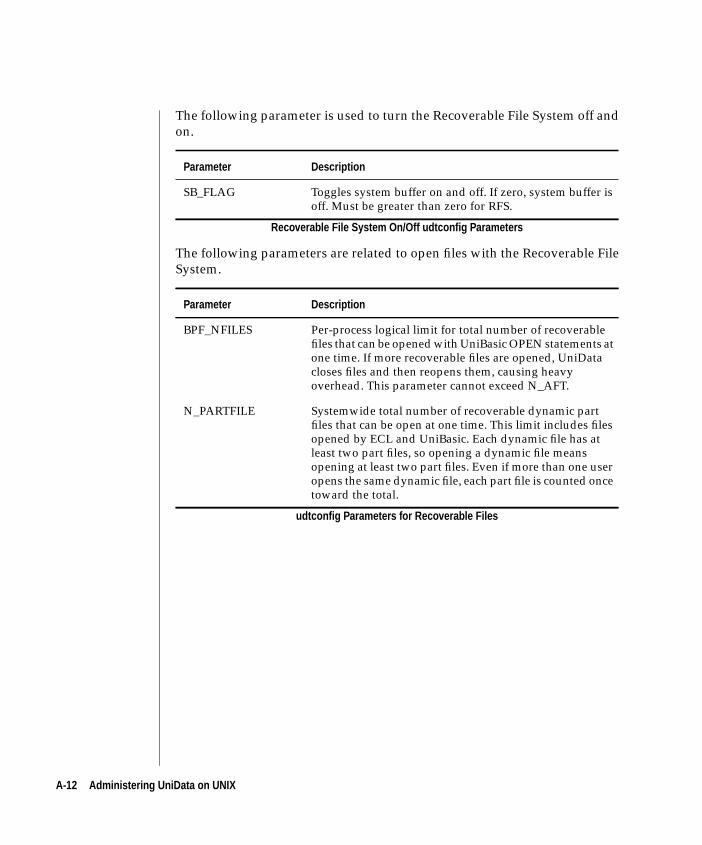
The following parameter is used to turn the Recoverable File System off and
on.
The following parameters are related to open files with the Recoverable File
System.
Parameter Description
SB_FLAG Toggles system buffer on and off. If zero, system buffer isoff. Must be greater than zero for RFS.
Recoverable File System On/Off udtconfig Parameters
Parameter Description
BPF_NFILES Per-process logical limit for total number of recoverablefiles that can be opened with UniBasic OPEN statements atone time. If more recoverable files are opened, UniDatacloses files and then reopens them, causing heavyoverhead. This parameter cannot exceed N_AFT.
N_PARTFILE Systemwide total number of recoverable dynamic partfiles that can be open at one time. This limit includes filesopened by ECL and UniBasic. Each dynamic file has atleast two part files, so opening a dynamic file meansopening at least two part files. Even if more than one useropens the same dynamic file, each part file is counted oncetoward the total.
udtconfig Parameters for Recoverable Files
A-12 Administering UniData on UNIX
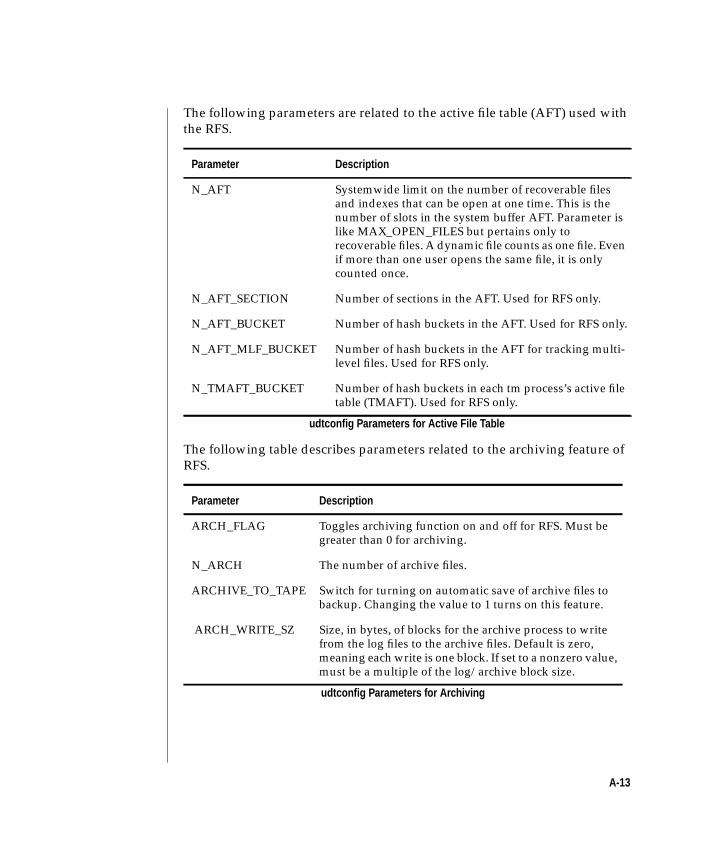
The following parameters are related to the active file table (AFT) used with
the RFS.
The following table describes parameters related to the archiving feature of
RFS.
Parameter Description
N_AFT Systemwide limit on the number of recoverable filesand indexes that can be open at one time. This is thenumber of slots in the system buffer AFT. Parameter islike MAX_OPEN_FILES but pertains only torecoverable files. A dynamic file counts as one file. Evenif more than one user opens the same file, it is onlycounted once.
N_AFT_SECTION Number of sections in the AFT. Used for RFS only.
N_AFT_BUCKET Number of hash buckets in the AFT. Used for RFS only.
N_AFT_MLF_BUCKET Number of hash buckets in the AFT for tracking multi-level files. Used for RFS only.
N_TMAFT_BUCKET Number of hash buckets in each tm process’s active filetable (TMAFT). Used for RFS only.
udtconfig Parameters for Active File Table
Parameter Description
ARCH_FLAG Toggles archiving function on and off for RFS. Must begreater than 0 for archiving.
N_ARCH The number of archive files.
ARCHIVE_TO_TAPE Switch for turning on automatic save of archive files tobackup. Changing the value to 1 turns on this feature.
ARCH_WRITE_SZ Size, in bytes, of blocks for the archive process to writefrom the log files to the archive files. Default is zero,meaning each write is one block. If set to a nonzero value,must be a multiple of the log/archive block size.
udtconfig Parameters for Archiving
A-13
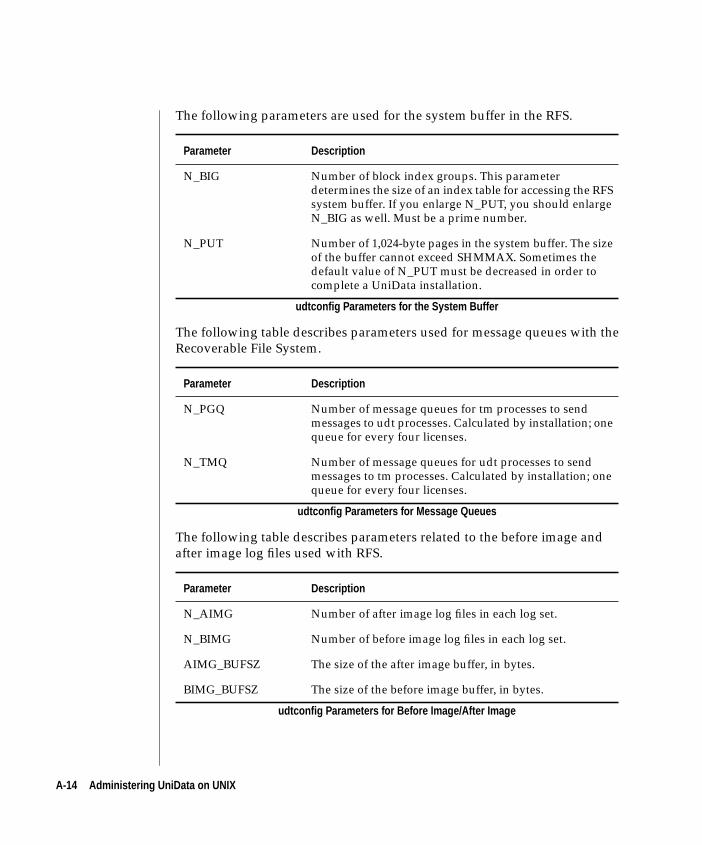
The following parameters are used for the system buffer in the RFS.
The following table describes parameters used for message queues with the
Recoverable File System.
The following table describes parameters related to the before image and
after image log files used with RFS.
Parameter Description
N_BIG Number of block index groups. This parameterdetermines the size of an index table for accessing the RFSsystem buffer. If you enlarge N_PUT, you should enlargeN_BIG as well. Must be a prime number.
N_PUT Number of 1,024-byte pages in the system buffer. The sizeof the buffer cannot exceed SHMMAX. Sometimes thedefault value of N_PUT must be decreased in order tocomplete a UniData installation.
udtconfig Parameters for the System Buffer
Parameter Description
N_PGQ Number of message queues for tm processes to sendmessages to udt processes. Calculated by installation; onequeue for every four licenses.
N_TMQ Number of message queues for udt processes to sendmessages to tm processes. Calculated by installation; onequeue for every four licenses.
udtconfig Parameters for Message Queues
Parameter Description
N_AIMG Number of after image log files in each log set.
N_BIMG Number of before image log files in each log set.
AIMG_BUFSZ The size of the after image buffer, in bytes.
BIMG_BUFSZ The size of the before image buffer, in bytes.
udtconfig Parameters for Before Image/After Image
A-14 Administering UniData on UNIX
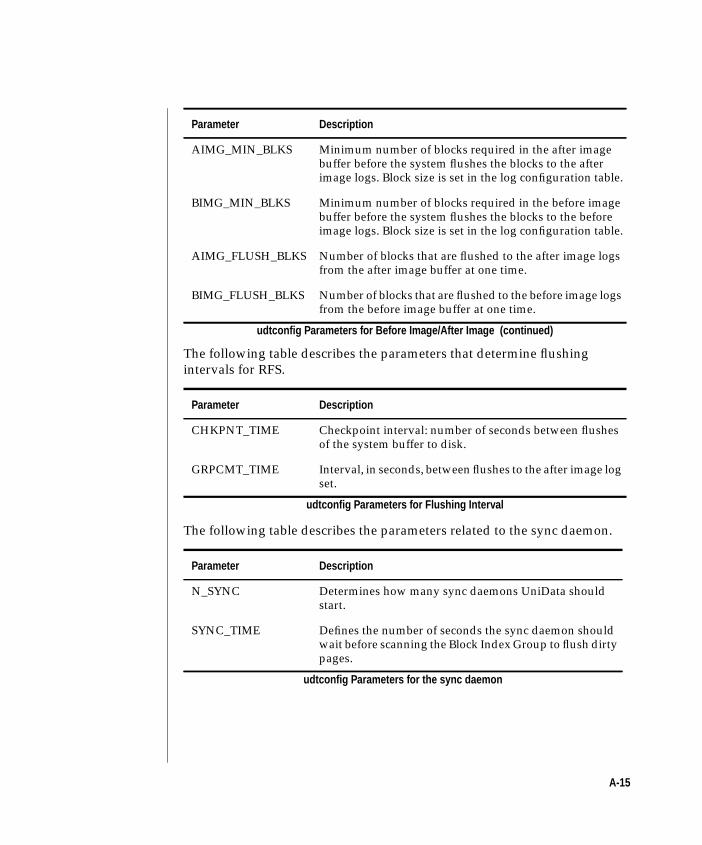
The following table describes the parameters that determine flushing
intervals for RFS.
The following table describes the parameters related to the sync daemon.
AIMG_MIN_BLKS Minimum number of blocks required in the after imagebuffer before the system flushes the blocks to the afterimage logs. Block size is set in the log configuration table.
BIMG_MIN_BLKS Minimum number of blocks required in the before imagebuffer before the system flushes the blocks to the beforeimage logs. Block size is set in the log configuration table.
AIMG_FLUSH_BLKS Number of blocks that are flushed to the after image logsfrom the after image buffer at one time.
BIMG_FLUSH_BLKS Number of blocks that are flushed to the before image logsfrom the before image buffer at one time.
Parameter Description
CHKPNT_TIME Checkpoint interval: number of seconds between flushesof the system buffer to disk.
GRPCMT_TIME Interval, in seconds, between flushes to the after image logset.
udtconfig Parameters for Flushing Interval
Parameter Description
N_SYNC Determines how many sync daemons UniData shouldstart.
SYNC_TIME Defines the number of seconds the sync daemon shouldwait before scanning the Block Index Group to flush dirtypages.
udtconfig Parameters for the sync daemon
Parameter Description
udtconfig Parameters for Before Image/After Image (continued)
A-15
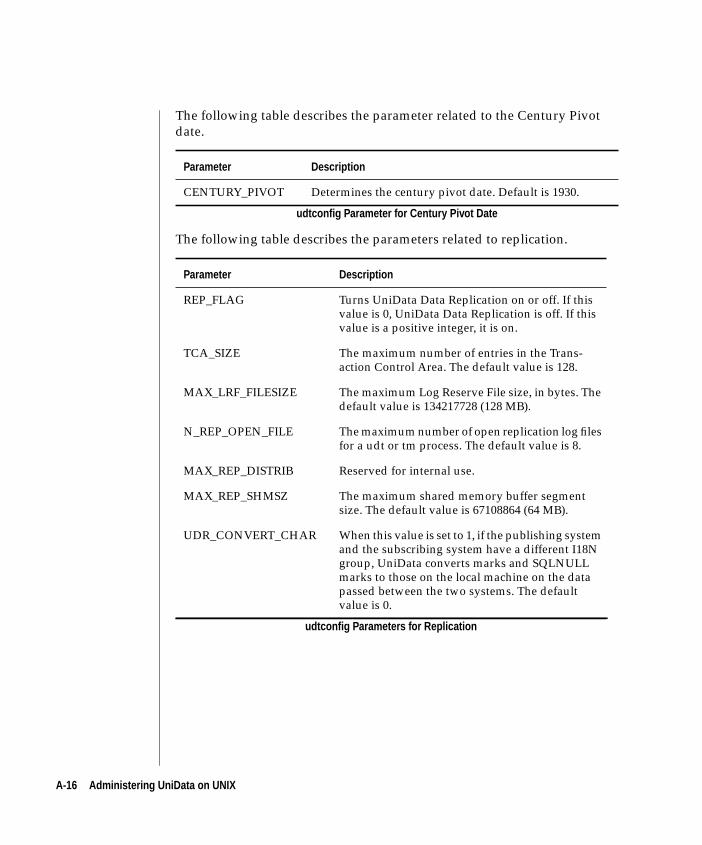
The following table describes the parameter related to the Century Pivot
date.
The following table describes the parameters related to replication.
Parameter Description
CENTURY_PIVOT Determines the century pivot date. Default is 1930.
udtconfig Parameter for Century Pivot Date
Parameter Description
REP_FLAG Turns UniData Data Replication on or off. If thisvalue is 0, UniData Data Replication is off. If thisvalue is a positive integer, it is on.
TCA_SIZE The maximum number of entries in the Trans-action Control Area. The default value is 128.
MAX_LRF_FILESIZE The maximum Log Reserve File size, in bytes. Thedefault value is 134217728 (128 MB).
N_REP_OPEN_FILE The maximum number of open replication log filesfor a udt or tm process. The default value is 8.
MAX_REP_DISTRIB Reserved for internal use.
MAX_REP_SHMSZ The maximum shared memory buffer segmentsize. The default value is 67108864 (64 MB).
UDR_CONVERT_CHAR When this value is set to 1, if the publishing systemand the subscribing system have a different I18Ngroup, UniData converts marks and SQLNULLmarks to those on the local machine on the datapassed between the two systems. The defaultvalue is 0.
udtconfig Parameters for Replication
A-16 Administering UniData on UNIX
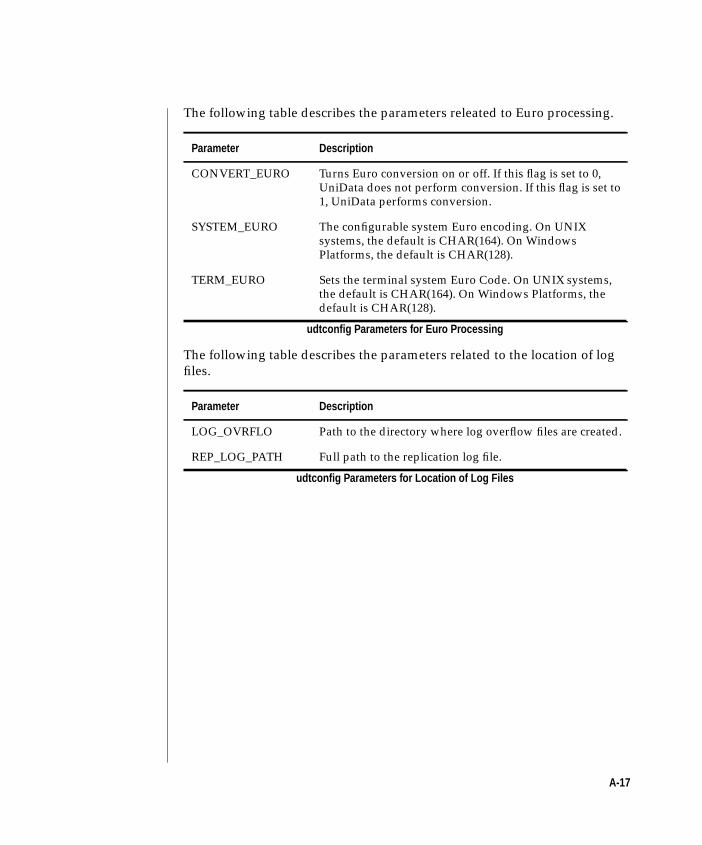
The following table describes the parameters releated to Euro processing.
The following table describes the parameters related to the location of log
files.
Parameter Description
CONVERT_EURO Turns Euro conversion on or off. If this flag is set to 0,UniData does not perform conversion. If this flag is set to1, UniData performs conversion.
SYSTEM_EURO The configurable system Euro encoding. On UNIXsystems, the default is CHAR(164). On WindowsPlatforms, the default is CHAR(128).
TERM_EURO Sets the terminal system Euro Code. On UNIX systems,the default is CHAR(164). On Windows Platforms, thedefault is CHAR(128).
udtconfig Parameters for Euro Processing
Parameter Description
LOG_OVRFLO Path to the directory where log overflow files are created.
REP_LOG_PATH Full path to the replication log file.
udtconfig Parameters for Location of Log Files
A-17
A-18 Administering UniData on UNIX
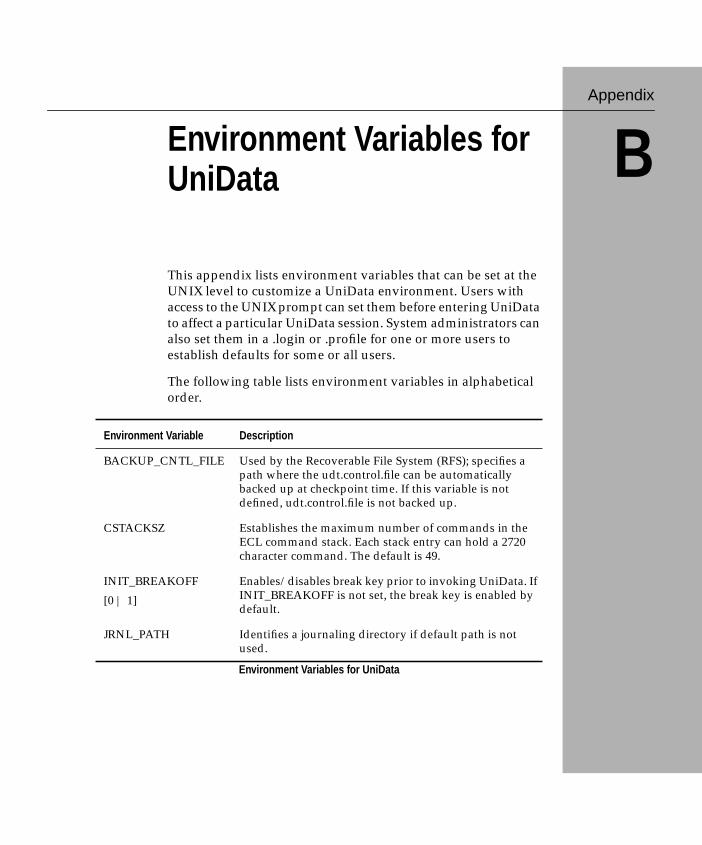
BAppendix
Environment Variables forUniData
This appendix lists environment variables that can be set at the
UNIX level to customize a UniData environment. Users with
access to the UNIX prompt can set them before entering UniData
to affect a particular UniData session. System administrators can
also set them in a .login or .profile for one or more users to
establish defaults for some or all users.
The following table lists environment variables in alphabetical
order.
Environment Variable Description
BACKUP_CNTL_FILE Used by the Recoverable File System (RFS); specifies apath where the udt.control.file can be automaticallybacked up at checkpoint time. If this variable is notdefined, udt.control.file is not backed up.
CSTACKSZ Establishes the maximum number of commands in theECL command stack. Each stack entry can hold a 2720character command. The default is 49.
INIT_BREAKOFF
[0 | 1]
Enables/disables break key prior to invoking UniData. IfINIT_BREAKOFF is not set, the break key is enabled bydefault.
JRNL_PATH Identifies a journaling directory if default path is notused.
Environment Variables for UniData
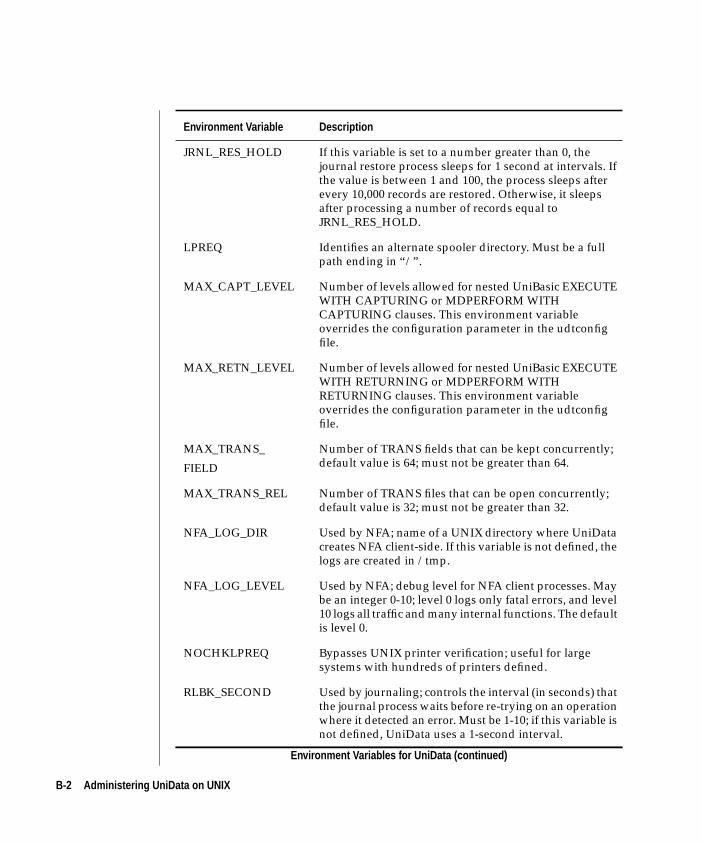
JRNL_RES_HOLD If this variable is set to a number greater than 0, thejournal restore process sleeps for 1 second at intervals. Ifthe value is between 1 and 100, the process sleeps afterevery 10,000 records are restored. Otherwise, it sleepsafter processing a number of records equal toJRNL_RES_HOLD.
LPREQ Identifies an alternate spooler directory. Must be a fullpath ending in “/”.
MAX_CAPT_LEVEL Number of levels allowed for nested UniBasic EXECUTEWITH CAPTURING or MDPERFORM WITHCAPTURING clauses. This environment variableoverrides the configuration parameter in the udtconfigfile.
MAX_RETN_LEVEL Number of levels allowed for nested UniBasic EXECUTEWITH RETURNING or MDPERFORM WITHRETURNING clauses. This environment variableoverrides the configuration parameter in the udtconfigfile.
MAX_TRANS_
FIELD
Number of TRANS fields that can be kept concurrently;default value is 64; must not be greater than 64.
MAX_TRANS_REL Number of TRANS files that can be open concurrently;default value is 32; must not be greater than 32.
NFA_LOG_DIR Used by NFA; name of a UNIX directory where UniDatacreates NFA client-side. If this variable is not defined, thelogs are created in /tmp.
NFA_LOG_LEVEL Used by NFA; debug level for NFA client processes. Maybe an integer 0-10; level 0 logs only fatal errors, and level10 logs all traffic and many internal functions. The defaultis level 0.
NOCHKLPREQ Bypasses UNIX printer verification; useful for largesystems with hundreds of printers defined.
RLBK_SECOND Used by journaling; controls the interval (in seconds) thatthe journal process waits before re-trying on an operationwhere it detected an error. Must be 1-10; if this variable isnot defined, UniData uses a 1-second interval.
Environment Variable Description
Environment Variables for UniData (continued)
B-2 Administering UniData on UNIX
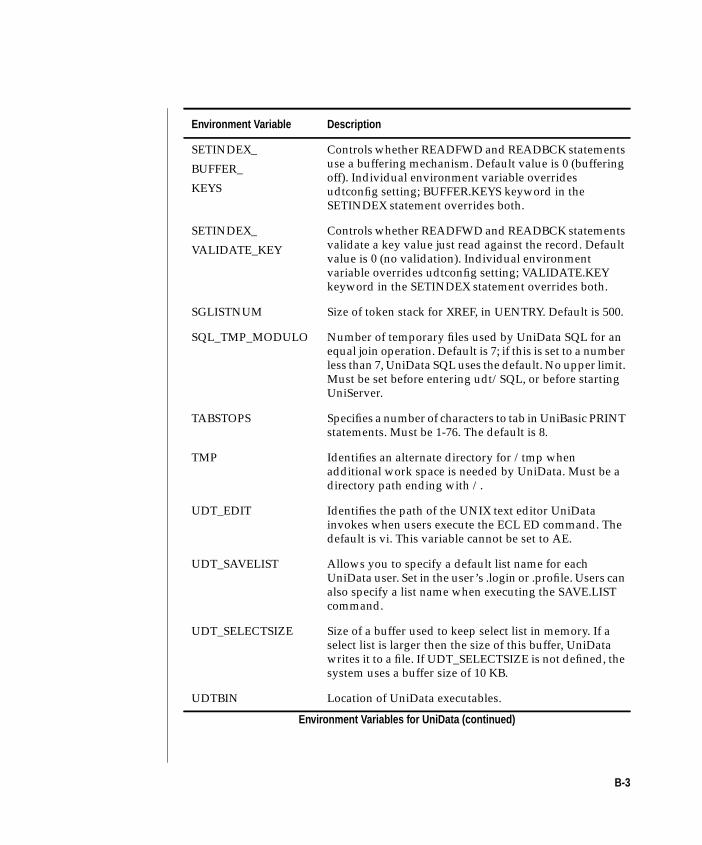
SETINDEX_
BUFFER_
KEYS
Controls whether READFWD and READBCK statementsuse a buffering mechanism. Default value is 0 (bufferingoff). Individual environment variable overridesudtconfig setting; BUFFER.KEYS keyword in theSETINDEX statement overrides both.
SETINDEX_
VALIDATE_KEY
Controls whether READFWD and READBCK statementsvalidate a key value just read against the record. Defaultvalue is 0 (no validation). Individual environmentvariable overrides udtconfig setting; VALIDATE.KEYkeyword in the SETINDEX statement overrides both.
SGLISTNUM Size of token stack for XREF, in UENTRY. Default is 500.
SQL_TMP_MODULO Number of temporary files used by UniData SQL for anequal join operation. Default is 7; if this is set to a numberless than 7, UniData SQL uses the default. No upper limit.Must be set before entering udt/SQL, or before startingUniServer.
TABSTOPS Specifies a number of characters to tab in UniBasic PRINTstatements. Must be 1-76. The default is 8.
TMP Identifies an alternate directory for /tmp whenadditional work space is needed by UniData. Must be adirectory path ending with /.
UDT_EDIT Identifies the path of the UNIX text editor UniDatainvokes when users execute the ECL ED command. Thedefault is vi. This variable cannot be set to AE.
UDT_SAVELIST Allows you to specify a default list name for eachUniData user. Set in the user’s .login or .profile. Users canalso specify a list name when executing the SAVE.LISTcommand.
UDT_SELECTSIZE Size of a buffer used to keep select list in memory. If aselect list is larger then the size of this buffer, UniDatawrites it to a file. If UDT_SELECTSIZE is not defined, thesystem uses a buffer size of 10 KB.
UDTBIN Location of UniData executables.
Environment Variable Description
Environment Variables for UniData (continued)
B-3
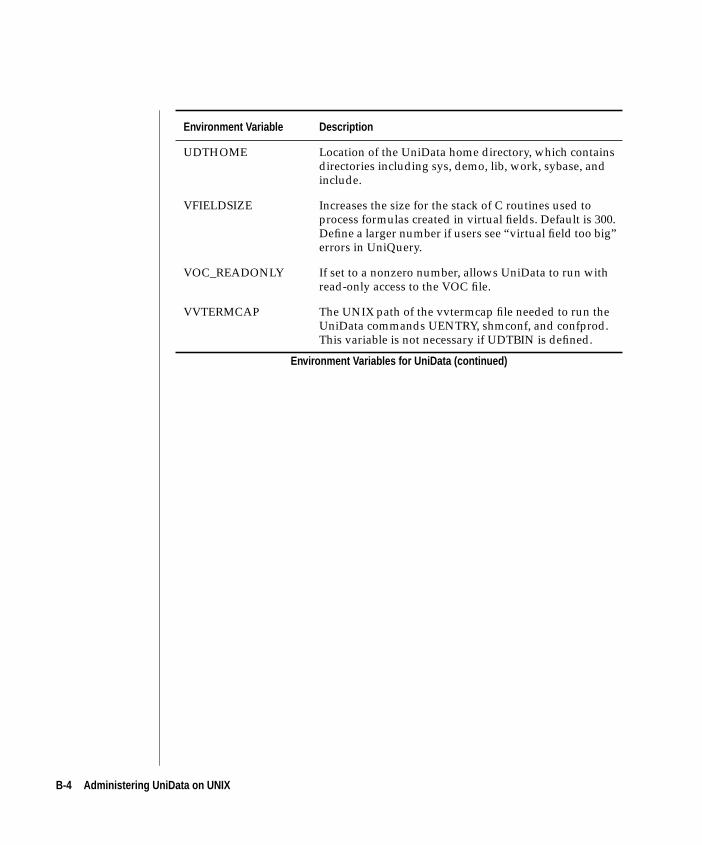
UDTHOME Location of the UniData home directory, which containsdirectories including sys, demo, lib, work, sybase, andinclude.
VFIELDSIZE Increases the size for the stack of C routines used toprocess formulas created in virtual fields. Default is 300.Define a larger number if users see “virtual field too big”errors in UniQuery.
VOC_READONLY If set to a nonzero number, allows UniData to run withread-only access to the VOC file.
VVTERMCAP The UNIX path of the vvtermcap file needed to run theUniData commands UENTRY, shmconf, and confprod.This variable is not necessary if UDTBIN is defined.
Environment Variable Description
Environment Variables for UniData (continued)
B-4 Administering UniData on UNIX

CAppendix
Configuring SSL forTelnet
/etc
rvers
esdns.
Server Side Configuration:To enable SSL for Telnet on UniData, you will need to edit fourdifferent files on the database server. The first two are system filesnamed services and inetd.conf. Both of these files reside under thedirectory on the unix server. Use vi or another suitable text editor tomake the changes described below.
Add the following line in /etc/services:
telnets 992/tcp
Where “telnets” is the service name. This can be any name of youchoosing. 992 is the standard port number used for secure telnet serand tcp is the protocol name for the service.
Add the following line in /etc/inetd.conf
telnets stream tcp nowait root UDTBIN_PATH/udtelnetdudtelnetd [-dN] [-o dir]
Where “telnets” is the telnet service name you specified in /etc/servicand UDTBIN_PATH is the path to the UniData bin directory. Udtelnetis the UniData secured telnet server and it takes the following optio
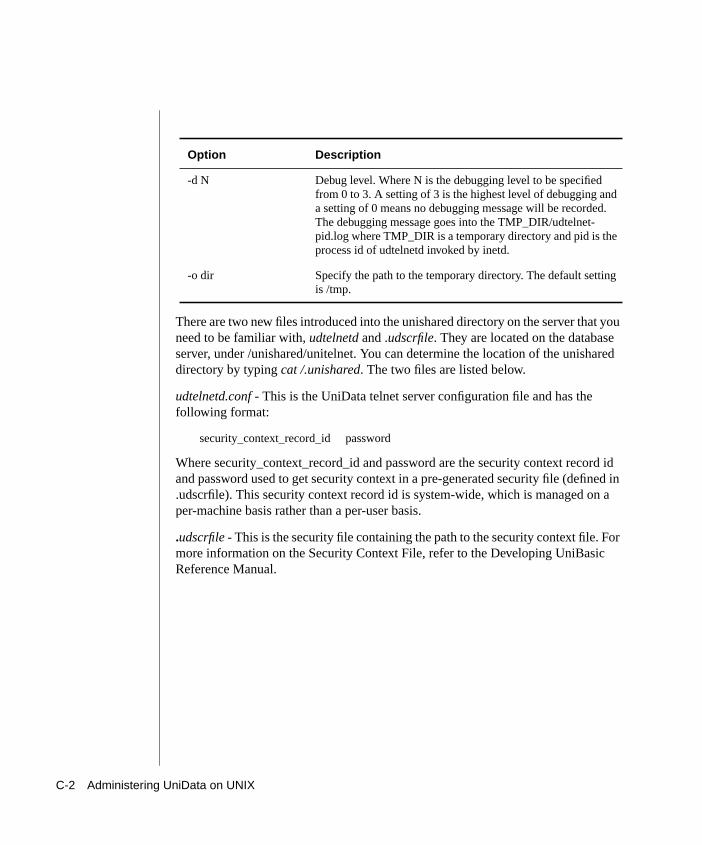
you
ared
d ided in a
or
.
g
There are two new files introduced into the unishared directory on the server thatneed to be familiar with,udtelnetd and .udscrfile. They are located on the databaseserver, under /unishared/unitelnet. You can determine the location of the unishdirectory by typingcat /.unishared. The two files are listed below.
udtelnetd.conf- This is the UniData telnet server configuration file and has thefollowing format:
security_context_record_id password
Where security_context_record_id and password are the security context recorand password used to get security context in a pre-generated security file (defin.udscrfile). This security context record id is system-wide, which is managed onper-machine basis rather than a per-user basis.
.udscrfile- This is the security file containing the path to the security context file. Fmore information on the Security Context File, refer to the Developing UniBasicReference Manual.
Option Description
-d N Debug level. Where N is the debugging level to be specifiedfrom 0 to 3. A setting of 3 is the highest level of debugging anda setting of 0 means no debugging message will be recordedThe debugging message goes into the TMP_DIR/udtelnet-pid.log where TMP_DIR is a temporary directory and pid is theprocess id of udtelnetd invoked by inetd.
-o dir Specify the path to the temporary directory. The default settinis /tmp.
C-2 Administering UniData on UNIX
@
Index
O QCA B D E F G H I J K L M N P R S T U V W X Y Z
Index
Aabnormal shutdown
removing ipc structure after 9-14
access modes, UNIX 2-6
accounts
displaying directory of 3-6
UniData
clearing space in 10-11
creating 8-10, 10-5
defined 3-4
deleting 10-10
described 10-4
files in 10-7
listing contents of 10-5
locating 8-4
permissions for 10-5
subdirectories in 10-6
UNIX
compared to UniData
account 8-10
creating 8-11, 11-4
relationship to UniData
account 10-4
acctrestore command
described 10-9
ACCT.SAVE command
described 10-9
not blocked by dbpause 9-7
adding
record to QUERY.PRIVILEGE
file 11-27
UNIX users 8-11, 11-4, 14-4
address space
attaching memory segment to 5-4
algorithms, hashing 3-11, 12-4
alternate key indexes
creating index file for 3-19
defined 3-4
performance 22-7
ANALYZE.FILE command
summarized 12-28
archive files
synchronizing with backup file 9-
8
ASCII files
as per-file part table 12-10, 12-12
assigning
part table to file 12-10
shared memory structure 5-9
attaching
shared memory segment 4-6, 5-4
auditor command
described 12-19
summarized 12-29
automatic indexing
disabling 3-19
enabling 3-19
automatic startup of UniData 9-6
Bbackground processes
daemon as 4-4
storing output from 10-7
backing up
file 8-14
UniData account 8-14, 10-9
backup files, synchronizing with
archive file 9-8
bar code readers, communicating
with 7-8
base.mk file 20-6
O QCA B D E F G H I J K L M N P R S T U V W X Y Z @
binary data files 3-11
BLIST command
not blocked by dbpause 9-8
block size
changing 8-13, 12-28
specifying
for dynamic file 12-15
for static files 3-11
block usage messages 12-56
blocking UniData processing 9-7
BLOCK.PRINT command
not blocked by dbpause 9-7
BLOCK.TERM command
not blocked by dbpause 9-7
BP directory
defined 10-6
described 3-16
dictionary for 10-7
buffering
UniBasic variables 5-5
building
shared memory structures and
tables 4-6
BUILD.INDEX command
populating index with 3-19
temporary disk storage and 3-21
BY.EXP sorts
storing temporary information
for 10-7
B+ tree format for indexes 3-19
CCallBasic
accessing UniData from C
program 20-20
building executable 20-29
C program example 20-22
callbas.mk file 20-27
requirements 20-20
steps for using 20-26
udtcallbasic_done( ) function 20-
21
udtcallbasic_init( ) function 20-20
UniBasic subroutine example 20-
25
using new executable 20-31
U_callbas( ) function 20-21
callbas.mk file 20-27
CALLC command
described 20-3
CATALOG command 19-5
cataloging
direct 19-5
global 19-6
local 19-5
programs 19-11
subroutines 19-11
cfuncdef file 20-6
cfuncdef_user file
creating 20-10
described 20-6
editing 20-12
changing
block size 8-13
file characteristics 8-13
file ownership 2-5
hashing algorithm 8-13
modulo 8-13
name of UniData file 12-27
permission 2-5
checking
UNIX ipc ID 4-7
CHECKOVER command
not blocked by dbpause 9-7
summarized 12-28
checkover command
summarized 12-29
checkpoints
forced by dppause command 9-7
chgrp UNIX command 2-5
chmod UNIX command 2-5
chown UNIX command 2-5
cleanupd daemon
described 4-7
lcp daemon and 4-5
log and error log for 4-9
sbcs daemon and 4-6
smm daemon and 4-7
cleanupd log file
entries made at UniData
startup 9-4
cleanupd.errlog file 4-9
cleanupd.log file 4-9
CLEARDATA command
not blocked by dbpause 9-7
clearing
hung processes 9-12
locks 13-18
semaphore lock 13-9
space in UniData account 10-11
system resources 9-10
UniData process 9-10
user 9-10, 9-12
_HOLD_ subdirectory 10-11
_PH_ subdirectory 10-11
CLEAR.ACCOUNT command
described 10-11
not blocked by dbpause 9-7
CLEAR.FILE command
failed due to dynamic file in part
table 12-11
removing records from dynamic
file with 12-20
security considerations for 11-12
summarized 12-27
CLEAR.LOCKS command
not blocked by dbpause 9-8
CLR command
not blocked by dbpause 9-7
CNAME command
security considerations for 11-12
summarized 12-27
commands
for clearing users and
processes 9-10
for dual-terminal debugging 16-
13
for file handling 12-27
not blocked by dbpause 9-7
reference for 10-7
UniBasic locking 13-7
UniBasic tape 16-5
UniData LINE 16-10
UniData printing 15-9
UniData tape 16-4
communicating
with hardware devices 7-4
COMO command
captured terminal input/output
and 10-7
not blocked by dbpause 9-8
computing
control table list (CTL) size 5-8
configuration file 12-8
configuration parameters
2 Administering UniData on UNIX
O QCA B D E F G H I J K L M N P R S T U V W X Y Z @
complete list of A-1
GRP_FREE_BLK 12-20
KEYDATA_MERGE_LOAD 12-8
KEYDATA_SPLIT_LOAD 12-8
MAX_FLENGTH 12-9, 12-12, 12-
15
MAX_OBJ_SIZE 5-13
NUSERS 5-8
PART_TBL 12-10
SBCS_SHM_SIZE 4-6, 5-13, 19-7
setting 8-6
shared memory 5-5, 5-12
SHM_FREEPCT 5-11
SHM_GNPAGES 5-8, 5-11
SHM_GNTBLS 5-7, 5-8, 5-14, 17-
18
SHM_GPAGESZ 5-11
SHM_LCINENTS 5-8
SHM_LMINENTS 5-14
SHM_LMINRNTS 5-8
SHM_LPAGESZ 5-11
SHM_LPINENTS 5-8
SHM_MAX_SIZE 19-7
SHM_NFREES 5-11
systest 17-14
TMP 3-22
CONFIGURE.FILE command
not blocked by dbpause 9-8
summarized 12-28
configuring
automatic startup of UniData 9-6
printer 15-3
UniData 8-4
UNIX kernel 5-4
control information (CI) table 5-7
control table list (CTL)
calculating size of 5-8
creating in shared memory 4-7
described 5-6
error message 17-26
memory requirements and 8-5
shmconf 17-11
controlling
access to ECL/UNIX prompt 11-
18
converting
between low-byte and high-byte
format 8-13
data files 8-13
legacy application 3-19
nonrecoverable file to
recoverable 8-13
static file to dynamic 8-13
COPY command
security considerations for 11-12
counter table (CT) 5-7
cpio UNIX utility 10-9
CREATE.FILE command
PARTTBL keyword with 12-10
security considerations for 11-12
static file 3-6
summarized 12-27
umask and 2-9
CREATE.INDEX command
alternate key index and 3-19
security considerations for 11-12
creating
alternate global catalog space 19-
3, 19-17
dat001 file 12-13
dynamic file 12-14
empty file 2-9
index file 3-19
over001 file 12-13
part table 12-11
pointer to file 8-14
prefix table 12-20
QUERY.PRIVILEGE file 11-26
recoverable file 8-13
schema 8-13
shared memory segment 5-9
shared memory structure
for globally cataloged
program 5-5
for internal table 5-5
UniData account 8-10, 10-5
UniData files 3-6
UNIX account 8-11, 14-4
UNIX directory 10-5
UNIX link 12-13
VOC records 8-14
VOC (vocabulary) file 10-5
cron UNIX command 22-5
CT (counter table) structures 5-7
CTL
See control table list (CTL)
CTLG directory 10-7
CTLGTB directory 19-9
customizing
default permissions 11-8
file permissions 2-10
length of dictionary attribute 11-
24
UniData security 11-3
VOC file 2-10, 10-5, 11-12
Ddaemons
cleanupd 4-7
defined 4-4
described 4-5
listing 9-10
log files for 4-9
monitoring 4-9
Recoverable File System (RFS) 2-
11, 4-8
sbcs (shared basic code server) 4-
5
smm (shared memory
manager) 4-6
UniData
running as root 2-11
damaged files
defined 12-31
detecting 12-34, 12-40
repairing 12-43
damaged groups
repairing 12-29, 12-46
unloading contents of 12-29
dat001 file 3-13, 12-6, 12-13
data files
converting 8-13
data integrity 12-34
data part files 12-16
databases
terminfo 7-5
DATE.FORMAT command
not blocked by dbpause 9-8
dbpause command
described 9-7
dbpause_status command
described 9-9
default files for UniData
account 10-4
default permissions
3 Administering UniData on UNIX
O QCA B D E F G H I J K L M N P R S T U V W X Y Z @
assigned at UniData
installation 2-10, 8-12
for file creation 2-8
UNIX 11-8
defining
peripheral device for UniData 8-
10
printer for UniData 15-12
tape unit for UniData 16-7
DELETE command
removing records from dynamic
file with 12-20
removing selected files with 10-
11
security considerations for 11-12
deleteuser command
described 9-12
not blocked by dbpause 9-8
removing user process with 14-8
summarized 9-10
DELETE.CATALOG command
security considerations for 11-12
DELETE.FILE command
failure due to dynamic file in part
table 12-11
security considerations for 11-13
summarized 12-27
temporary disk storage and 3-21
DELETE.INDEX command
removing index file with 3-19
security considerations for 11-13
DELETE.LOCKED.ACTION
command
not blocked by dbpause 9-8
deleting
file from UNIX directory 2-5
UniData account 10-10
detecting
file corruption 12-34, 12-40
device drivers 7-4
device files 7-4
device ID
in part table entry 12-11
dictionaries
sharing 3-17, 3-18
for UniData account files 10-7
for VOC file 8-10
dictionary attributes
customizing length of 11-24
dictionary (DICT) files
UNIX file type for 3-4
dictionary files 3-4
direct cataloging 19-5
directing output to printer 7-7
directories
default permissions for 11-8
displaying for account 3-6
dynamic file 12-12
home, UniData 8-11
directory (DIR) files 3-5, 3-16
directory permissions
described 2-4
octal values for 2-8
DISABLE.INDEX command
security considerations for 11-13
turning off automatic indexing 3-
19
disabling
automatic indexing 3-19
disk drives, communicating
with 7-4
disk input/output (I/O) 8-4
disk space use 12-4
disk storage, temporary 3-21
disk striping 8-4
displaying
account directory 3-6
globally cataloged program
use 19-16
ipc facility 9-13
list of file and record locks 13-10
list of processes waiting for
locks 13-13
list of semaphore locks 13-12
memory use 17-16, 17-20, 17-21
message queue information 18-4
shared memory configuration
parameters 5-12
shared memory segment
information 18-4
statistics for dynamic file 12-28
UNIX system semaphore
information 18-4
user and process activity 14-6
user ID and group 11-6
dual-terminal debugging
described 16-13
procedure 16-14
dumpgroup command
described 12-43
example 12-51
not blocked by dbpause 9-7
summarized 12-29
dynamic files
analyzing with auditor tool 12-19
checking for inconsistencies 12-
29
creating or modifying part
table 12-11
described 3-12, 12-6
disk space and 12-20
estimating required space for 12-
12
estimating size for part file 12-16
expanding part files for 12-15
expanding to new file system 12-
17
index file and index log file for 3-
20
KEYDATA split/merge type 12-8
KEYONLY split/merge type 12-8
locating directory and part
files 12-12
management tools for 12-19
merging 12-7
messages 12-60
modulo table for 5-5
moving part file 12-20
overflow block 3-13, 12-7
part file 12-9
part table 12-9
rebuilding .fil_prefix_tbl 12-18
repairing corruption in 12-50
resolving inconsistencies 12-29
selecting block size for 12-15
selecting minimum modulo 12-14
selecting split/merge type 12-8
splitting 12-7
symbolic link and 3-14
UNIX file type for 3-4
.fil_prefix_tbl file 12-17
D_BP file 10-7
D_CTLG file 10-7
D_MENUFILE file 10-7
D_QUERY.PRIVILEGE file
editing 11-27
D_SAVEDLISTS file 10-7
4 Administering UniData on UNIX
O QCA B D E F G H I J K L M N P R S T U V W X Y Z @
D_savedlists file 10-8
D_VOC file 10-7
D__HOLD_ file 10-7
D__PH_ file 10-7
D__REPORT_ file 10-8
D__SCREEN_ file 10-8
D___V__VIEW file 10-8
EECL commands
not blocked by dppause 9-7
ECLTYPE command
not blocked by dbpause 9-8
ED command
security considerations for 11-13
editing
dictionary for
QUERY.PRIVILEGE file 11-27
empty files, creating 2-9
ENABLE.INDEX command
security considerations for 11-13
turning on automatic updating 3-
19
enabling
automatic indexing 3-19
environment variables
complete list of B-1
LPREQ 15-17
NOCHKLPREQ 15-17
PATH 8-12
setting 1-3, 3-8, 8-11
UDTBIN 8-11
UDTHOME 8-11
WORKPATH 20-17
errno.h UNIX file 17-25
error messages
from guide command 12-56
common 21-7
shared memory 17-3
smm error messages 17-25
UniData error logs 17-25
UniData error messages 21-7
estimating
memory requirement 8-5
size for part file 12-16
space required for dynamic
file 12-12
/etc/group file 11-4
/etc/passwd file 11-4
/etc/security/passwd file 11-4
/etc/shadow file 11-4
exclusive locks 13-6
execute permissions 2-4
expanding part file 12-15
expression buffers, storing 4-7
extensions to termcap file 7-5
Ffield-level security
customizing security with 11-22
turning on 11-25
file access messages 12-56
file characteristics, changing 8-13
file corruption
after UniData crash 21-4
causes of 12-31
detecting 12-34, 12-40
repairing 12-43
udt.errlog file and 4-10
file locks
displaying list of 13-10
setting 13-6
file owner, permissions for 2-4
file permissions
described 2-4
octal values for 2-8
FILELOCK command
summarized 13-7
files
archive 9-8
backup 9-8
base.mk file 20-6
binary data 3-11
BP file 3-16
cfuncdef file 20-6
cfuncdef_user file 20-6, 20-10, 20-
12
changing name of 12-27
changing parameters of 12-28
checking for level 2 overflow 12-
28
converting data 8-13
corrupted 12-31
creating 3-6, 12-27
damaged 12-29
default permissions for 11-8
deleting 12-27
displaying statistics for a hashed
file 12-28
dynamic 12-6
etc/shadow file 11-4
GUIDE_ADVICE.LIS file 12-35,
12-38
GUIDE_BRIEF.LIS file 12-38
GUIDE_ERRORS.LIS file 12-35,
12-38
GUIDE_FIXUP.DAT file 12-35,
12-38
GUIDE_INPUT.DAT file 12-36
GUIDE_STATS.LIS file 12-38
hashed 10-7, 12-4
index file 3-20
index log file 3-20
log 9-4
name, reference for 10-7
new.mk file 20-16
over001 file 3-13, 12-6, 12-13
overflow 12-6
primary data 12-6
QUERY.PRIVILEGE file 11-22
removing record from 12-27
repairing damaged group 12-29
setting a pointer to UniData
file 12-27
spooler configuration 7-7
static 12-5
tape device 7-6
udtconfig file 3-21, 12-8
UDTSPOOL.CONFIG file 15-4
unloading contents of damaged
group 12-29
vvtermcap file 7-5
.login file 3-22, 11-7, B-1
.profile file 3-22, 11-7, B-1
/etc/group file 11-4
/etc/passwd file 11-4
/us_admin file 11-8
_HOLD_ file 10-7
_MAP_ file 19-9
_PH_ file 10-7
_REPORT_ file 10-8
_SCREEN_ file 10-7
FILEUNLOCK command
5 Administering UniData on UNIX

O QCA B D E F G H I J K L M N P R S T U V W X Y Z @
summarized 13-7
FILE.STAT command
summarized 12-28
.fil_prefix_tbl file 12-17
finger UNIX command 14-5
fixfile command
described 12-46
repairing dynamic file with 12-50
repairing static file with 12-48
summarized 12-29
fixfile group
not blocked by dbpause 9-7
fixgroup command
described 12-45
not blocked by dbpause 9-7
summarized 12-29
fixtbl command
described 12-19
rebuilding account with 12-18
summarized 12-29
FLOAT.PRECISION command
not blocked by dbpause 9-8
forcing logoffs 9-10
free block messages 12-59
FULLPATH parameter 11-24
function definition file 20-4
GGCT
See global control tables (GCT)
gencdef command 20-16
genefs command 20-16
general information (GI) table
defined 5-7
size of 5-8
genfunc command 20-16
GET command
communicating with GET and
SEND 16-11
GI
See general information (GI) table
gid
See group ID (gid)
global catalog
alternate 19-17
contents of 19-8
described 19-6
managing 19-8
global control tables (GCT)
described 5-7
process cleanup and 4-7
size of 5-8
smm daemon and 4-7
sms command and 17-18
global pages
determining size and number
of 5-11
dividing segment into 5-5
number to keep free 5-11
releasing 5-9
globally cataloged programs
loading and tracking 4-5
shared memory structure for 5-5
GRANT command
customizing permissions with 2-
10, 11-21
customizing table access with 8-
13
group header messages 12-57
group ID (gid)
displaying 11-6
record for 11-4
root access and 10-5
group logins 11-5
group members
file permissions for 2-4, 2-10
groups UNIX command 14-5
GROUP.STAT command
summarized 12-28
GRP_FREE_BLK parameter 12-20
gstt command
described 17-20
monitoring resource availability
with 17-19
guide command
creating UniData output file
with 12-38
described 12-34
error messages from 12-56
error output from 12-53
guidelines for using 12-53
not blocked by dbpause 9-7
output files from 12-38
purpose of 12-34
recoverable file and 12-39
summarized 12-29
GUIDE_ADVICE.LIS file 12-35, 12-
38
GUIDE_BRIEF.LIS file 12-35, 12-38
GUIDE_ERRORS.LIS file 12-35, 12-
38
GUIDE_FIXUP.DAT file 12-35, 12-
38
GUIDE_INPUT.DAT file 12-36
GUIDE_STATS.LIS file 12-38
Hhardware devices, communicating
with 7-4
hash groups
identifying 12-27
hash type
changing for static file 12-28
default 12-4
hashed files
checking for level 2 overflow 12-
28
default hash type 12-4
defined 3-11
dynamic 12-6
repairing corruption 12-43
static 12-5
structure of 12-4
in UniData account 10-7
hashing
dat001 file and 3-13
hashing algorithms 3-11, 12-4
HASH.TEST command
not blocked by dbpause 9-8
header key messages 12-57
HELP command
not blocked by dbpause 9-8
_HOLD_ file
clearing 10-11
defined 10-7
dictionary for 10-7
home directory
UniData 8-11
UNIX account and 11-6
hung processes, clearing 9-10
6 Administering UniData on UNIX
O QCA B D E F G H I J K L M N P R S T U V W X Y Z @
Iid UNIX command 11-6
identifying
damaged file 12-29
idx001 index file 3-20
index files
applying updates to 3-19
creating 3-19
dynamic file 3-20
idx001 file 3-20
populating 3-19
removing 3-19
static file 3-20
index log files 3-19, 3-20
index part files 12-16
indexes
alternate key 3-4
indirect segments 5-13
input/output (I/O)
disk 8-4
terminal 10-7
intermediate results, storing 5-5
internal flags, setting 4-7
internal tables, shared memory
structure for 5-5
interprocess communication (ipc)
facility
defined 6-3
removing 9-10
structure
displaying list of 9-10
removing 9-10, 9-14
UNIX kernel parameters and 6-4
iostat UNIX command 22-5
ipc
See interprocess communication
(ipc) 6-3
ipc IDs, checking 4-7
ipcrm UNIX command
managing ipc resources with 6-3
removing ipc facility with 9-14,
18-9
ipcs UNIX command
managing ipc resources with 6-3
ipcstat command
checking status of ipc facility 21-5
described 9-13
managing ipc resources with 6-3
not blocked by dbpause 9-8
output from 18-4
summarized 9-10
syntax for 18-4
I/O
See input/output (I/O)
Kkernel parameters
msgmap 6-4
msgmax 6-4
msgmnb 6-4
msgmni 6-4
msgseg 6-4
relationship to UniData 5-14
resetting 8-5
semmni 6-6
semmnu 6-6
shmmax 5-4
shmmni 5-4, 5-7
shmseg 5-4
KEYDATA split/merge type 12-8
KEYDATA_MERGE_LOAD
parameter 12-8
KEYDATA_SPLIT_LOAD
parameter 12-8
KEYONLY split/merge type 12-8
kill UNIX command 9-12, 12-32, 14-
8
killing
user process 9-12
Llcp daemon
log and error log for 4-9
running as root 2-11
lcp.errlog file 4-9
lcp.log file 4-9
LCT (local control table)
described 5-7
number of shared memory
segments 17-18
LD-type files 3-18
legacy applications, converting 3-
19
level 1 overflow
described 12-5
static file and 3-11
level 2 overflow
checking hashed file for 12-28
described 12-5
minimizing for dynamic file 12-6
static file and 3-11
LF-type files 3-17
LIMIT command
displaying default spooler
command with 15-20
displaying spooler options
with 7-7
summarized 15-9
line devices, defining for
UniData 8-10
LINE.ATT command
not blocked by dbpause 9-8
setting semaphore lock with 13-9
summarized 16-10
LINE.DET command
setting semaphore lock with 13-9
summarized 16-10
LINE.STATUS command
summarized 16-10
linking C routines into UniData 20-
4
links
symbolic
backup procedure and 3-14, 8-
14
creating 12-17
UNIX
creating 12-13
setting 3-9
used by UniData 3-4
list permissions, directory 2-4
listing
contents of UniData account 10-5
ipc structures 9-10
locks 13-10
LISTPEQS command
summarized 15-10
LISTPTR command
summarized 15-10
LISTUSER command
monitoring user processes 14-6
used in clearing locks 13-21
listuser command
7 Administering UniData on UNIX
O QCA B D E F G H I J K L M N P R S T U V W X Y Z @
displaying process ID with 9-12
summarized 9-10, 14-6
temporary disk storage and 3-21
LIST.INDEX command
not blocked by dbpause 9-8
LIST.LOCKS command
checking for lock problem
with 21-6
described 13-12
LIST.QUEUE command
checking for lock problem
with 21-6
described 13-13
displaying locks requested 13-21
LIST.READU command
checking lock problem with 21-6
described 13-10
displaying current locks with 13-
21
temporary disk storage and 3-21
LIST.TRIGGER command
not blocked by dbpause 9-8
load factor for splitting/merging
groups 12-7
local catalog 19-5
local control table (LCT)
described 5-7
number of shared memory
segments 17-18
size of 5-8
local pages
determining size and number
of 5-11
subdividing global page into 5-5
locally cataloged programs
storing 10-6
LOCK command
not blocked by dbpause 9-8
summarized 13-9
locking commands 13-7
locks
clearing 13-18
file
displaying list of 13-10
setting with UniBasic
command 13-6
record
clearing 13-20
displaying list of 13-10
setting 13-6
semaphore
clearing 13-22
displaying list of 13-12
setting 13-9
tracking 4-5
log files
described 9-4
identifying ipc facilities 18-7
temporary disk storage and 3-21
for UniData daemons 4-9
logical volume management
protocol 8-4
.login file 3-22, 11-7, B-1
LOGIN paragraphs
defining 11-18
logins
group 11-5
separate 11-5
UNIX 11-4
logoff, forced 9-10
LOGOUT paragraphs
defining 11-18
LOGTO command
dbpause and 9-8
effect on LOGOUT paragraph 11-
18
long record messages 12-59
LPREQ environment variable 15-
17
lpstat UNIX command 15-11
LPTR keyword
generating print request with 15-
8, 15-23
LS command
displaying account directory
with 3-6
listing contents of account
with 10-5
ls UNIX command 2-5
lstt command
described 17-21
sms command and 17-19
L-type locks 13-6
Mmake files 20-4, 20-16
make UNIX utility 20-18, 20-29
makeudt command
described 20-6
linking C function with 8-13
not blocked by dbpause 9-8
setting up development test
with 20-15
MAP command
example of 19-9
_MAP_ file 19-9
MATREADL command
summarized 13-7
MATREADU command
summarized 13-7
MATWRITE command
summarized 13-7
MATWRITEU command
summarized 13-7
MAX_FLENGTH parameter 12-9,
12-12, 12-15
MAX_OBJ_SIZE parameter 5-13
memory
troubleshooting 17-25
memory information (MI) table 5-7
memresize command
PARTTBL keyword with 12-10
per-file part table and 12-12
summarized 12-29
MENUFILE file
component of UniData
account 10-7
dictionary for 10-7
menus
definition, storing 10-7
MERGE_LOAD parameter 12-8
merging groups in dynamic file 12-
7
merging threshold 12-7
message queues
congestion in 13-22
displaying list of 9-13
Recoverable File System (RFS) 6-
5
UniData 6-4
UNIX 6-4
MI (memory information) table 5-7
MIN.MEMORY command
not blocked by dbpause 9-8
mkdir UNIX command
8 Administering UniData on UNIX

O QCA B D E F G H I J K L M N P R S T U V W X Y Z @
creating directory for UniData
account 8-11, 10-5
MODIFY command
security considerations for 11-13
modifying
part table 12-11
TMP configuration parameter 3-
22
modulo
automatic increase in dynamic
file 12-6
changing 12-28
dynamic file size and 3-12
selecting minimum 12-14
specifying for static file 3-11
table for dynamic file 4-7, 5-5
monitoring
file integrity with guide
command 12-53
globally cataloged program
use 19-16
interprocess communication (ipc)
facilities 18-4
memory 17-21
shared memory 17-4
UniData daemons 4-9
UniData performance 22-3, 22-15
user processes 14-6
moving
part file 12-20
msgmap kernel parameter 6-4
msgmax kernel parameter 6-4
msgmnb kernel parameter 6-4
msgmni kernel parameter 6-4
msgseg kernel parameter 6-4
MULTIDIR file type 3-5, 3-18, 8-14
MULTIFILE file type 3-5, 3-17, 8-14
multilevel directory files 3-18
multilevel files
described 3-17
UNIX file type for 3-5
mvpart command
described 12-20
summarized 12-30
MYSELF command
summarized 14-6
Nnewacct command
creating UniData account with 8-
11
described 10-5
files created by 3-4, 10-4
setting permissions with 2-10
newgrp UNIX command 11-6
newhome command
creating UniData account
with 19-17
NEWPCODE command
described 19-14
newversion command 19-13
NEWVERSION keyword 19-12
new.mk file 20-16
NOCHKLPREQ environment
variable 15-17
nonrecoverable file
converting to recoverable 8-13
NUSERS parameter 5-8
Oobject code, UniBasic 10-6
octal values 2-8
ON.ABORT command
preventing access to ECL/UNIX
prompts 11-18
OPEN security as system
default 11-22
other header messages 12-57
other users, file permissions for 2-4
output
from background process 10-7
directing to printer 7-7
file 3-21
from guide command 12-35, 12-
38
from verify2 command 12-42
over001 file 3-13, 12-6, 12-13
overflow
dynamic file 12-7
files 12-6, 12-16
static file in 3-11
owner
file permissions for 2-4, 2-10
Pparagraphs
LOGIN 11-18
LOGOUT 11-18
reference for 10-7
part files
data 12-16
defined 12-9
dynamic file and 12-9
estimating size for 12-16
index 12-16
locating 12-12
moving 12-20
overflow 12-16
part tables
components of 12-10
constraints for 12-11
creating dynamic file 12-13
dynamic files and 12-9
entries resolving to same device
ID 12-11
memresize command and 12-12
per-file 12-10
selecting location for new part
file 12-17
system default 12-10
partitioning shared memory 5-4
parttbl
See part tables, parttbl file
parttbl file
default permissions for 11-8
PARTTBL keyword
CREATE.FILE command
with 12-10
memresize command with 12-10
PART_TBL parameter 12-10
PATH environment variable 1-3, 8-
12, 9-4
pausing
UniData 9-7
per-file part tables 12-10
performance
alternate key index and 22-7, 22-
29
application design and 22-8, 22-
23
database design and 22-7
file and record locking and 22-25
9 Administering UniData on UNIX
O QCA B D E F G H I J K L M N P R S T U V W X Y Z @
file I/O and 22-20
file overflow and 12-5
file sizing and 22-7, 22-8
monitoring 22-3
tuning 22-3
UniData considerations 22-7
UNIX considerations 22-4
UNIX monitoring tool 22-5
using udtmon 22-15
peripheral devices, defining for
UniData 8-10
permissions
file and directory
described 2-4
octal values for 2-8
QUERY.PRIVILEGE file 11-26
recommended settings 11-9
setting for UniData account 10-5
UniData SQL 11-21
UNIX, customizing 11-8
PHANTOM command
background process and 10-7
_PH_ file
clearing 10-11
defined 10-7
dictionary for 10-7
PI (process information) tables 5-7
pid
See process ID (pid)
pointers
creating 8-14
to data file 10-4, 12-27
setting 3-6, 11-17
stored in VOC file 3-4, 8-10
populating
index file 3-19
subdirectory 10-7
prefix tables
inconsistencies with symbolic
link 12-29
mvpart command and 12-20
prefixes
related to path name 12-18
preventing
file corruption 12-32
primary data file 3-13, 12-6
PRINT command
spooling and 15-8
print files
storing in _HOLD_ directory 10-7
printers
communicating with 7-4
defining for UniData 8-10
printing
creating a dummy spooler 15-22
decoding a UniData print
command 15-21
example of 15-17, 15-18
overview of 15-4
to UNIX device 15-19
UNIX spooler and 7-7
using a quoted string 15-20
PRIV parameter of
QUERY.PRIVILEGE file 11-24
privileges
See permissions
process cleanup
role of lcp daemon in 4-5
role of sbcs daemon in 4-6
role of smm daemon in 4-7
process ID (pid)
stopping process with 9-12
process information (PI) tables 5-7
processes
clearing 9-10
UniData 2-11
waiting for lock 13-13
product.info file
default permissions for 11-8
.profile file 3-22, 11-7, B-1
profiling UniBasic applications 22-
11
program variables, buffering 4-6
PROTOCOL command
summarized 16-10
ps UNIX command
checking for unneeded locks
with 13-21
checking slow response time
with 21-6
getting process ID with 9-12
performance monitoring with 22-
5
PTRDISABLE command
security considerations for 11-13
PTRENABLE command
security considerations for 11-13
Qquery privileges 8-13
query records, storing 4-7
QUERY.PRIVILEGE file
adding record to 11-27
creating 11-26
described 11-23
editing dictionary for 11-27
Rread permissions 2-4
READBCKL command
summarized 13-7
READBCKU command
summarized 13-7
READFWDL command
summarized 13-7
READFWDU command
summarized 13-8
READL command
summarized 13-8
read-only locks 13-6
READU command
summarized 13-8
READVL command
summarized 13-8
READVU command
summarized 13-8
REBUILD.FILE command
summarized 12-28
RECORD command
summarized 12-27
record locks
clearing 13-20
displaying list of 13-10
setting 13-6
RECORDLOCKL command
summarized 13-8
RECORDLOCKU command
summarized 13-8
records
adding to QUERY.PRIVILEGE
file 11-27
deleting from file 12-27
identifying group where key is
hashed 12-27
10 Administering UniData on UNIX
O QCA B D E F G H I J K L M N P R S T U V W X Y Z @
Recoverable File System (RFS)
checkpoint 9-7
crash recovery 21-5
daemons 2-11, 4-8
message queue 6-5
saving and restoring UniData
account with 10-9
semaphore and 6-6
shared memory and 5-5
sm daemon 9-4
synchronizing archive with
backup 9-8
system buffer and 5-14, 8-5, 17-12
recoverable files
creating 8-13
guide command and 12-39
recovering
semaphore 6-6
RELEASE command
summarized 13-8
releasing
file lock 13-7
record lock 13-7, 13-20
semaphore lock 13-9
shared memory 5-5, 5-9
remote entries 8-13
remote items
security for 11-15
removing
index file 3-19
ipc structure 9-10, 9-14, 18-8
user process 14-8
repairing
corrupted file 12-43
damaged group 12-29, 12-46
dynamic file 12-50
static file 12-48
_REPORT_ file
component of UniData
account 10-7
RESIZE command
security considerations for 11-13
summarized 12-28
resizing
static file 12-28
resource locks 13-9
restoring
UniData account 10-9
resuming
UniData processing after
dbpause 9-9
reviewing
backup procedures 8-14
UniData security 8-12
REVOKE UniData SQL command
customizing permissions
with 11-21
customizing table access with 8-
13
RFS
See Recoverable File System (RFS)
rm UNIX command 10-11
root
determining VOC file privileges
for 11-13
file permissions for 2-4, 2-10
running UniData daemons as 2-
11
starting or stopping UniData
as 9-4
R-type VOC records
defined 11-15
Ssam UNIX utility 11-4
sar UNIX command 17-23
SAVEDLISTS file
dictionary for 10-7
savedlists file
dictionary for 10-8
SAVEDLISTS subdirectory 10-6
savedlists subdirectory 10-7
sbcs (shared basic code server)
daemon
creating shared memory
structure 5-5, 5-13
described 4-5
global cataloging 19-7
log and error log for 4-9
logging ipc facilities used 18-7
memory segment for 8-5
message queue for 6-5
running as root 2-11
sbcsprogs command
described 19-16
troubleshooting UniData
problems with 21-6
sbcs.log file 4-9
entries made at UniData
startup 9-4
SBCS_SHM_SIZ parameter 5-13
SBCS_SHM_SIZE parameter 4-6,
19-7
sbsc.errlog file 4-9
scales, communicating with 7-8
schemas, creating 8-13
screen definitions
for UEntry 10-7
_SCREEN_ file
component of UniData
account 10-7
scripts
startup 11-7
search permissions, directory 2-4
SECURE setting as system
default 11-22
security
checklist 8-12
customizing default
permissions 11-8
login and group 11-4
mechanism for 2-3
remote item 11-15
SETFILE command and 11-17
startup script 11-7
UniQuery 11-22
UNIX group 11-5
segment headers 5-7
segments of shared memory
attaching 4-6
described 5-4
divided into global pages 5-5
self-created 5-13
select lists
storing 4-7, 10-6
selecting
block size for dynamic file 12-15
minimum modulo for dynamic
file 12-14
split/merge type 12-8
semaphore
described 6-6
displaying list of 9-13
locks
11 Administering UniData on UNIX
O QCA B D E F G H I J K L M N P R S T U V W X Y Z @
clearing 13-9
displaying list of 13-12
setting 13-9
tracking 4-5
undo structures 6-6
semmni kernel parameter 6-6
semmnu kernel parameter 6-6
SEND
using GET and SEND 16-11
sentences
reference for 10-7
separate logins 11-5
serial devices, UNIX 7-8
set group ID (SGID) 2-6
set user ID (SUID) 2-6
SETFILE command
creating VOC entries with 8-14
customizing security 11-17
setting a VOC pointer with 3-7
setting VOC pointers 2-10
summarized 12-27
SETLINE command
defining peripheral with 8-10
summarized 16-10
SETOSPRINTER command
descrobed 15-7
not blocked by dbpause 9-8
summarized 15-9
SETPTR command
defining peripheral with 8-10
described 15-13
determining spooler selection
with 7-7
displaying default spooler
command with 15-20
modes 15-14
not blocked by dbpause 9-8
summarized 15-9
SETTAPE command
defining peripheral with 8-10
defining tape unit with 10-9, 16-7
described 16-6
summarized 16-4
setting
access mode on a file or
directory 2-6
configuration parameter 8-6
default file permissions 2-8
environment variable
PATH 8-11
path name 3-8
UDTBIN 8-11
UDTHOME 8-11
file and record locks 13-7
file pointer in UniData 2-10, 3-6
lock on record/file 13-6
permission for
QUERY.PRIVILEGE file 11-26
TMP environment variable 3-22
UniData configuration
parameter 17-9
UNIX kernel parameter 8-5
UNIX symbolic link 3-9
SET.DEC command
not blocked by dbpause 9-8
SET.MONEY command
not blocked by dbpause 9-8
SET.THOUS command
not blocked by dbpause 9-8
SET.WIDEZERO command
not blocked by dbpause 9-8
SGID (set group ID) 2-6
shared basic code server (sbcs)
daemon 4-5
shared locks 13-6
shared memory
CI table 5-7
creating CTL segment 5-6
error messages 17-25
loading globally cataloged
program into 4-5
Recoverable File System (RFS) 5-
14
releasing 5-5
sbcs (shared basic code server)
daemon and 5-13
segment
attaching 4-6
displaying list of 9-13
self-created segment 5-13
structure 4-6, 5-7
table 4-6
troubleshooting 17-25
tuning 17-19, 17-21, 17-22
UniData and 5-5
UNIX system and 5-4
shared memory manager
See smm (shared memory
manager) daemon
shared memory structures
assigning 5-9
shmconf command
control table (CTL) and 17-11
described 17-9
shmmax UNIX kernel parameter 5-
4, 5-14
shmmni UNIX kernel parameter 5-
4, 5-7, 5-14
shmseg UNIX kernel parameter 5-4
SHM_FREEPCT parameter 5-11
SHM_GNPAGES parameter 5-8, 5-
11
SHM_GNTBLS parameter 5-7, 5-8,
5-14, 17-18
SHM_GPAGESZ parameter 5-11
SHM_LCINENTS parameter 5-8
SHM_LMINENTS parameter 5-14
SHM_LMINRNTS parameter 5-8
SHM_LPAGESZ parameter 5-11
SHM_LPINENTS parameter 5-8
SHM_MAX_SIZE parameter 19-7
SHM_NFREES parameter 5-11
showud command
checking status of daemons
after crash 21-4
if slow response time 21-6
described 9-11
listing UniData processes with 9-
10
monitoring UniData daemons
with 4-9
proceeding if daemons not
running 18-8
shutdown operations
abnormal 9-14
normal 9-4
sm daemon 9-4
smit UNIX utility 11-4
smm (shared memory manager)
daemon
creating CTL segment 5-8
creating shared memory
segments 5-9
creating shared memory
structure 5-5
described 4-6
12 Administering UniData on UNIX
O QCA B D E F G H I J K L M N P R S T U V W X Y Z @
error messages 17-25
interprocess communication (ipc)
structure 18-7
log and error log for 4-9
managing size of segment 5-9
message queue for 6-5
running as root 2-11
shared memory and 5-5
unable to create CTL segment 21-
5
smm.errlog file 4-9
smm.log file
entries made at UniData
startup 9-4
showud command and 4-9
sms command
described 17-16
output from 17-18
sm.log file 9-4
source code, UniBasic 10-6
splitting
groups in dynamic file 12-7
splitting threshold 12-7
SPLIT.LOAD factor 12-7
split/merge types
changing for dynamic file 12-28
KEYDATA 12-8
KEYONLY 12-8
selecting 12-8
SPLIT_LOAD parameter 12-8
spooler configuration file 7-7
spooler, UNIX 7-7
SP.ASSIGN command
not blocked by dbpause 9-8
summarized 15-9
SP.CLOSE command
summarized 15-9
SP.EDIT command
not blocked by dbpause 9-8
overriding file location and 3-21
summarized 15-9
temporary disk storage and 3-21
SP.KILL command
summarized 15-9
SP.OPEN command
summarized 15-9
SP.STATUS command
summarized 15-10
starting
UniData 9-5
startud command
abnormal results 21-5
after system crash 21-4
expected response to 9-5
for normal startup 9-4
shared memory and 5-6
startup operations 9-4
startup scripts 11-7
startup, automatic 9-6
static files
converting to dynamic 8-13
described 3-11, 12-5
index file and index log file for 3-
20
repairing corruption in 12-48
UNIX file type for 3-4
sticky bit 2-5, 2-6
stopping
UniData
emergency shutdown 9-15
normal shutdown 9-6
user process 14-8
stopud command
control table (CTL) and 5-6
for emergency shutdown 9-10
-f option with 9-15
for normal shutdown 9-4, 9-6
stopudt command
described 9-11
not blocked by dbpause 9-8
removing process ID with 9-12
summarized 9-10, 14-8
storing
expression buffer 4-7
intermediate results 5-5
menu definition 10-7
modulo table for dynamic file 5-5
output from background
process 10-7
print file in _HOLD_
subdirectory 10-7
query record 4-7
select list 4-7, 10-6
temporary information for
BY.EXP sort 10-7
UEntry screen definition 10-7
UniBasic program 10-6
UniBasic source and object
code 10-6
UniData SQL view
specification 10-7
UReport definition 10-7
strip UNIX command 20-14, 20-30
SUID (set user ID) 2-6
SUPERCLEAR.LOCKS command
clearing semaphore lock with 13-
22
described 13-18
not blocked by dbpause 9-8
SUPERRELEASE command
described 13-20
not blocked by dbpause 9-8
releasing record lock with 13-21
superuser
See root
swap UNIX command 17-23
swapinfo UNIX command 17-23
symbolic links
backup procedure and 3-14, 8-14
creating 12-17
inconsistencies with prefix
table 12-29
setting 3-9
synchronizing
archive and backup files 9-8
system buffer
memory requirements and 8-5
Recoverable File System (RFS)
and 5-5
system performance
file overflow and 12-5
system resources, clearing 9-10
systest command
described 17-12
systest parameter 17-14
Ttape device files 7-6
tape devices, defining for
UniData 8-10
tape drives, communicating
with 7-4
tape use procedure 16-7
tar UNIX utility 10-9
13 Administering UniData on UNIX
O QCA B D E F G H I J K L M N P R S T U V W X Y Z @
temporary disk storage 3-21
TERM command
not blocked by dbpause 9-8
termcap file 7-5
terminal emulation 7-5
terminals
communicating with 7-4
terminated process cleanup
recovering semaphore for 6-6
role of cleanupd daemon in 4-7
role of lcp daemon in 4-5
role of sbcs daemon in 4-6
role of smm daemon in 4-7
terminfo database 7-5
testing
makeudt and 20-5, 20-19
text editors
creating part table with 12-10
hashed file and 3-11
threshold, splitting 12-7
TIMEOUT command
described 14-9
TMP configuration parameter 3-22
/tmp directory 8-4
TMP environment variable 3-21
TMP parameter 3-22
tmp space 3-21
touch UNIX command 2-9
troubleshooting
error messages 17-26, 21-7
makeudt 20-5
memory 17-3, 17-25
printer 15-11
response problem 21-6
UniData crash 21-4
tuning
memory 17-19, 17-21, 17-22
UniData performance 22-3
T.ATT command
attaching tape device with 16-7
not blocked by dbpause 9-7
obtaining exclusive use of tape
unit with 10-9
setting semaphore lock with 13-9
summarized 16-4
T.DET command
releasing tape device with 16-9
setting semaphore lock with 13-9
summarized 16-4
T.DUMP command
not blocked by dbpause 9-7
reading from or writing to tape
device 16-8
T.STATUS command
listing defined tape units with 16-
8
summarized 16-4
Uudapi_slave executable 20-11
udipcrm command
described 9-14
managing ipc resources with 6-3
removing ipc structure with 18-9
removing message queue
with 18-4
summarized 9-10
udstat command
checking activity of processes
with 14-8
summarized 14-6
udt daemon
error log for 4-9
udt executables
defined 20-4
rebuilding 20-11
udt user processes 2-11, 4-5
$UDTBIN directory
default permissions for 11-8
in PATH 1-3
UDTBIN environment variable 1-3,
8-11, 9-4
$UDTBIN/product.info file
default permissions for 11-8
$UDTBIN/us_admin file
default permissions for 11-8
$UDTBIN/us_update_db file 11-8
udtconfig file 12-8
changing TMP parameter in 3-21
location of 8-6
reading when UniData started 5-
5
UDTHOME environment variable
modifying 19-19, 20-17
setting 1-3, 8-11, 9-4
$UDTHOME/demo directory
default permissions for 11-8
$UDTHOME/objcall directory
default permissions for 11-8
$UDTHOME/objcall/demo
directory
default permissions for 11-8
$UDTHOME/parttbl file
creating 12-10
default permissions for 11-8
$UDTHOME/sys directory
default permissions for 11-8
$UDTHOME/sys/HELP.FILE file
default permissions for 11-8
$UDTHOME/sys/udtpath file
default permissions for 11-8
$UDTHOME/work directory
default permissions for 11-8
udtmon utililty
described 22-15
udtmon utility
display options 22-16
menu 22-17
monitoring slow response time
with 21-6
UDTSPOOL.CONFIG file 15-5
udt.errlog file 4-9
UDT.OPTIONS
setting in login paragraph 11-18
UDT.OPTIONS 19
customizing UniData
environment with 11-13
UDT.OPTIONS 20
effect on root access 11-20
UDT.OPTIONS command
not blocked by dbpause 9-8
UEntry screen definitions
storing 10-7
uid
See user ID (uid)
umask UNIX command 2-8
UniBasic
application overview 22-29
BP file and 19-4
cataloging programs 19-3
coding tips for performance 22-8
compiled programs 19-4
debugging 16-3, 16-13
locks, tracking 4-5
profiling 22-11
14 Administering UniData on UNIX
O QCA B D E F G H I J K L M N P R S T U V W X Y Z @
program
shared memory structure for 5-
5
stored in BP file 10-7
storing code in BP
subdirectory 10-6
storing in CTLG
subdirectory 10-6
setting lock on file or record 13-6
source code 19-4
variable
buffering 5-5
UniData
account
backing up 10-9
clearing space in 10-11
creating 10-5
deleting 10-10
described 10-4
files in 10-7
listing contents of 10-5
restoring 10-9
clearing process 9-10
configuration file 12-8
customizing default
permissions 11-8
default permissions 2-10
master VOC (vocabulary) file 11-
13
pausing 9-7
starting 9-5
stopping 9-6
system resources, clearing 9-10
UNIX spooler and 7-7, 15-3
UNIX tape device 16-3
UniData accounts
backing up 8-14
locating 8-4
UniData configuration parameters
complete list of A-1
GRP_FREE_BLK 12-20
KEYDATA_MERGE_LOAD 12-8
KEYDATA_SPLIT_LOAD 12-8
MAX_FLENGTH 12-9, 12-12, 12-
15
MAX_OBJ_SIZE 5-13
NUSERS 5-8
PART_TBL 12-10
SBCS_SHM_SIZE 4-6, 5-13, 19-7
shared memory and 5-5
SHM_FREEPCT 5-11
SHM_GNPAGES 5-8, 5-11
SHM_GNTBLS 5-7, 5-8, 5-14, 17-
18
SHM_GPAGESZ 5-11
SHM_LCINENTS 5-8
SHM_LMINENTS 5-8, 5-14
SHM_LPAGESZ 5-11
SHM_LPINENTS 5-8
SHM_MAX_SIZE 19-7
SHM_NFREES 5-11
systest 17-14
TMP 3-22
UniData files
creating 3-6
UniData pointers, setting 3-6
UniData security
customizing VOC file 11-12
recommended UNIX
permissions 11-10
remote items 11-15
SETFILE command 11-17
UDT.OPTIONS 19 and 11-13
UDT.OPTIONS 20 and 11-20
UNIX groups 14-5
UniData SQL
permissions 11-21
storing view specifications 10-7
UniQuery
field-level security 11-22
UNIX access modes 2-6
UNIX accounts
compared to UniData account 8-
10
creating 8-11, 11-4
UNIX devices 7-4
UNIX directories, UniData’s use
of 3-4
UNIX files, UniData’s use of 3-4
UNIX kernel parameters
controlling use of semaphore 6-6
msgmax 6-4
msgmnb 6-4
msgmni 6-4
msgseg 6-4
relationship to UniData 5-14
resetting 8-5
semmni 6-6
semmnu 6-6
shared memory 5-4
shmmax 5-14
shmmni 5-7, 5-14
systest 17-16
UNIX links
creating 12-13
distinguished from VOC
pointer 3-6
setting 3-9
UniData’s use of 3-4
UNIX login 11-4
UNIX permissions
customizing 2-10
execute 2-4
file 2-4
read 2-4
sticky bit 2-5
write 2-4
UNIX security
login and group 11-4
mechanisms for 2-3
startup script 11-7
UNIX serial devices 7-8
UNIX user groups 11-5
UNIX users, adding 11-4
unloading
contents of damaged group 12-29
UNLOCK command
summarized 13-9
UNSETLINE command
summarized 16-10
updatevoc command
not blocked by dbpause 9-8
UPDATE.INDEX command
applying updates from index
log 3-19
security considerations for 11-13
temporary disk storage and 3-21
uptime UNIX command 21-6, 22-5
UReport definitions
_REPORT_ subdirectory 10-7
user groups, UNIX 11-5
user ID (uid)
displaying 11-6
in group record 11-4
user processes (udt) 2-11, 4-5
USERNAME parameter of
QUERY.PRIVILEGE file 11-24
15 Administering UniData on UNIX
O QCA B D E F G H I J K L M N P R S T U V W X Y Z @
users
adding 8-11
clearing 9-10, 9-12
file permissions for 2-4
UNIX, adding 11-4
/usr/ud41/include directory
default permissions for 11-8
/usr/ud41/ods directory
default permissions for 11-8
us_admin file
default permissions for 11-8
us_update_db file 11-8
U-type locks 13-6
U_IGNLGN_LGTO option
effect on root access 11-20
U_VERIFY_VKEY option
customizing UniData
environment with 11-13
Vvalidating
DEST and FORM 15-17
variables, environment 1-3
VCATALOG command
not blocked by dbpause 9-8
verify2 command
described 12-40
error messages from 12-56
examining data file with 21-4
output from 12-42
purpose of 12-34
summarized 12-30
verifying
UniBasic program version 19-10
view specifications
for UniData SQL 10-7
virtual memory pool 5-6
vmstat UNIX command 17-23, 21-
6, 22-5
VOC (vocabulary) file
component of UniData
account 10-4, 10-7
creating 10-5
customizing 2-10, 10-5, 11-12
dictionary for 10-7
environment variables 3-8
F-type record 3-9
limiting access to commands 8-12
master 11-13
role in UniData account 3-4
R-type record 11-15
setting pointer to data file 3-6
UniData account and 8-10
VVTERMCAP environment
variable 7-5
vvtermcap file 7-5
__V__VIEW file
component of UniData
account 10-7
WWHAT command
not blocked by dbpause 9-8
WHERE command
displaying currrent account
with 10-11
WHO command
summarized 14-6
who UNIX command 13-21
WORKPATH environment
variable 20-17
WRITE command
summarized 13-8
write permissions 2-4
WRITEU command
summarized 13-8
WRITEV command
summarized 13-8
WRITEVU command
summarized 13-8
Xxlog001 file 3-20
Symbols$UDTBIN directory
default permissions for 11-8
in PATH 1-3
$UDTBIN/product.info file
default permissions for 11-8
$UDTBIN/us_admin file
default permissions for 11-8
$UDTBIN/us_update_db file 11-8
$UDTHOME/demo directory
default permissions for 11-8
$UDTHOME/objcall directory
default permissions for 11-8
$UDTHOME/objcall/demo
directory
default permissions for 11-8
$UDTHOME/objcall/include
directory
default permissions for 11-8
$UDTHOME/parttbl file
creating 12-10
default permissions for 11-8
$UDTHOME/sys directory
default permissions for 11-8
$UDTHOME/sys/HELP.FILE file
default permissions for 11-8
$UDTHOME/sys/udtpath file
default permissions for 11-8
$UDTHOME/work directory
default permissions for 11-8
.fil_prefix_tbl file 12-17
.login file 3-22, 11-7, B-1
.profile file 3-22, 11-7, B-1
/etc/group file 11-4
/etc/passwd file 11-4
/etc/security/passwd file 11-4
/etc/shadow file 11-4
/tmp directory 8-4
/usr/ud41/include directory
default permissions for 11-8
/usr/ud41/ods directory
default permissions for 11-8
@ID parameter of
QUERY.PRIVILEGE file 11-24
_HOLD_ file
dictionary for 10-7
_HOLD_ subdirectory
clearing 10-11
defined 10-7
_MAP_ file 19-9
_PH_ file
dictionary for 10-7
_PH_ subdirectory
clearing 10-11
defined 10-7
_REPORT_ file
16 Administering UniData on UNIX
O QCA B D E F G H I J K L M N P R S T U V W X Y Z @
component of UniData
account 10-7
dictionary for 10-8
_SCREEN_ file
component of UniData
account 10-7
dictionary for 10-8
__V__VIEW file
component of UniData
account 10-7
__V__VIEWS file
dictionary for 10-8
Index 17
@
/productinfo/alldoc/UNIDATA60/ADMINUNIX/
ADMINUNIXIX.fm
O QCA B D E F G H I J K L M N P R S T U V W X Y Z
18 Administering UniData on UNIX