umler component registry user guide - railinc … component registry user guide i revised september...
TRANSCRIPT
Umler™ Component Registry User Guide
7001 Weston Parkway, Suite 200 Cary, North Carolina 27513
© 2015 Railinc Incorporated. All Rights Reserved.
Last Updated: September 2015

Umler Component Registry User Guide Revised September 2015
Table of Contents Welcome to the Umler Component Registry ............................................................................... 1
Prerequisites ................................................................................................................................. 1 System Requirements ................................................................................................................... 1 What is New for This Release ...................................................................................................... 1 User Guide Structure .................................................................................................................... 2 Web Interface ............................................................................................................................... 3
Railinc Component Registry Web Page Layout ...................................................................... 3 Railinc Interface Elements ....................................................................................................... 5 Component Registry-Specific Interface Elements ................................................................... 5
Getting Started ............................................................................................................................... 6 Logging In .................................................................................................................................... 6 Logging Out ................................................................................................................................. 7
Registration .................................................................................................................................... 8 Search ........................................................................................................................................... 8
Viewing Component Details .................................................................................................. 10 Editing Components .............................................................................................................. 11 Deleting Components ............................................................................................................ 12
Add New Component ................................................................................................................ 13 Add Bolsters .......................................................................................................................... 16 Add Couplers ......................................................................................................................... 18 Add Brake Valve Control Emergency ................................................................................... 19 Add Brake Valve Control Service ......................................................................................... 20 Add Side Frames .................................................................................................................... 21 Add Slack Adjusters .............................................................................................................. 22 Add Wheelsets ....................................................................................................................... 23
Upload CSV ............................................................................................................................... 26 CSV Registration Upload File Preparation ............................................................................ 27 Uploading the CSV File ......................................................................................................... 28
Field Registration ....................................................................................................................... 30 Bolsters .................................................................................................................................. 31 Couplers ................................................................................................................................. 35 Brake Valve Control Emergency ........................................................................................... 38 Brake Valve Control Service ................................................................................................. 40 Slack Adjuster ........................................................................................................................ 42 Sideframe ............................................................................................................................... 44 Wheelsets ............................................................................................................................... 47
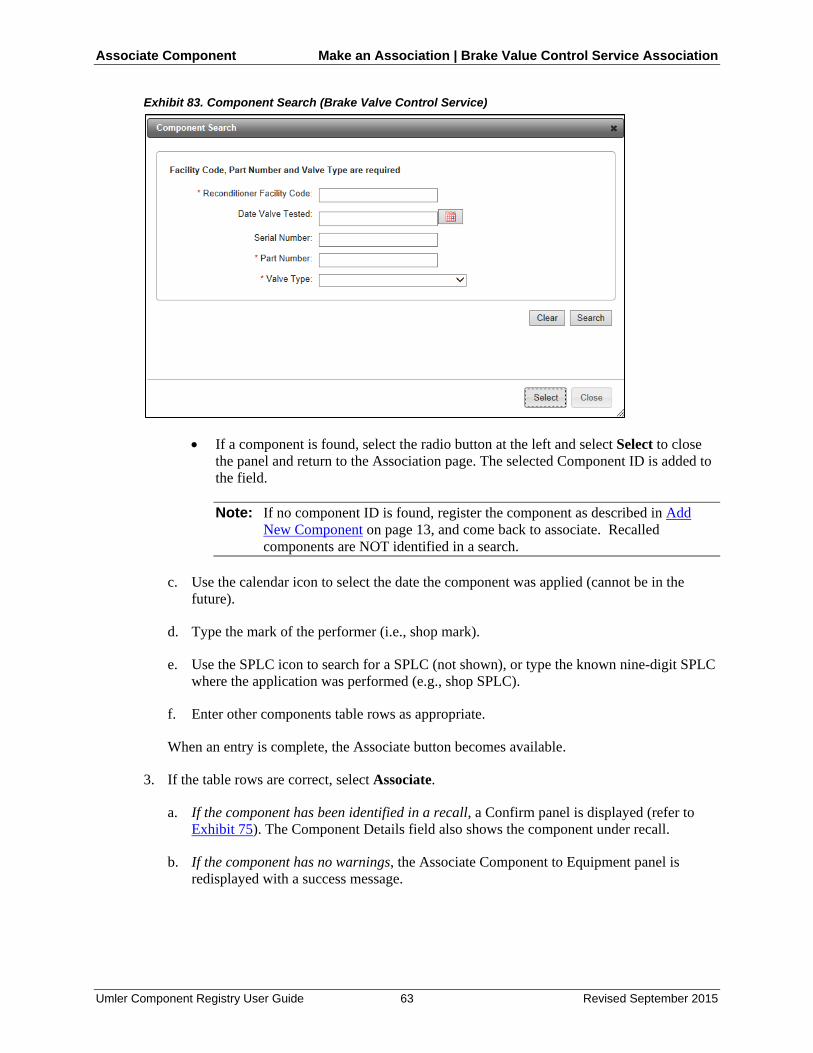
Associate Component................................................................................................................... 52 Make an Association .................................................................................................................. 52
Bolster Association ................................................................................................................ 54 Coupler Association ............................................................................................................... 57 Brake Value Control Emergency Association ....................................................................... 60 Brake Value Control Service Association ............................................................................. 62 Side Frame Association ......................................................................................................... 64 Slack Adjuster Association .................................................................................................... 66 Wheelset Association ............................................................................................................. 68 View All (Read Only) ............................................................................................................ 72
Nullify an Association ............................................................................................................... 73
Umler Component Registry User Guide i Revised September 2015

Upload Association CSV ........................................................................................................... 75 CSV Association Upload File Preparation ............................................................................ 76
Component Association Transaction History ............................................................................ 77 Query ............................................................................................................................................. 80
Pre-Defined Queries ................................................................................................................... 80 Glossary ........................................................................................................................................ 83 Index .............................................................................................................................................. 84
Umler Component Registry User Guide ii Revised September 2015
List of Exhibits Exhibit 1. Railinc Web Application Page Layout ............................................................................ 3 Exhibit 2. Launch Pad Link Drop-Down Menu ............................................................................... 4 Exhibit 3. Umler/ Component Registry Application Menu Bar (split for readability) .................... 5 Exhibit 4. Component Registry Menu ............................................................................................. 5 Exhibit 5. Component Registry-Specific Icons ................................................................................ 5 Exhibit 6. Component Registry-Specific Command Buttons .......................................................... 5 Exhibit 7. Select Your Company ..................................................................................................... 6 Exhibit 8. Umler Welcome .............................................................................................................. 7 Exhibit 9. Component Registry Application Menu Functions ......................................................... 7 Exhibit 10. Component Registry (with Registration) ...................................................................... 8 Exhibit 11. Registration Tabs and Descriptions ............................................................................... 8 Exhibit 12. Search Component Registry .......................................................................................... 8 Exhibit 13. Component Registry Search Results ............................................................................. 9 Exhibit 14. Component Registry Search Results with Component Details ................................... 10 Exhibit 15. Edit Component (top and bottom for Wheelsets) ........................................................ 11 Exhibit 16. Delete Component Confirmation ................................................................................ 12 Exhibit 17. Delete Component Success Message .......................................................................... 12 Exhibit 18. Add New Component to Registry ............................................................................... 13 Exhibit 19. Failed Add Component Transaction Message (bottom shows the error at right) ........ 14 Exhibit 20. Add New Component to Registry Success Message ................................................... 15 Exhibit 21. Add New Bolster ......................................................................................................... 16 Exhibit 22. Trademark Select ........................................................................................................ 17 Exhibit 23. Add New Coupler ....................................................................................................... 18 Exhibit 24. Add New Brake Valve Control Emergency ................................................................ 19 Exhibit 25. Add New Brake Valve Control Service ...................................................................... 20 Exhibit 26. Add New Side Frame .................................................................................................. 21 Exhibit 27. Add New Slack Adjusters ........................................................................................... 22 Exhibit 28. Add New Wheelset (1. Base Elements) ...................................................................... 23 Exhibit 29. Add New Wheelset (2. Axle) ...................................................................................... 23 Exhibit 30. Add New Wheelset (3. Wheel Group 1–Wheel 1) ...................................................... 24 Exhibit 31. Add New Component (3. Wheel Group 1–Roller Bearing 1) ..................................... 24 Exhibit 32. Add New Wheelset (4. Wheel Group 2–Wheel 2) ...................................................... 25 Exhibit 33. Add New Wheelset (4. Wheel Group 2–Roller Bearing 2) ......................................... 25 Exhibit 34. Browse Files to Find a Components CSV ................................................................... 26 Exhibit 35. Registration CSV Upload Template (in Excel) ........................................................... 27 Exhibit 36. Choose File (for Upload) ............................................................................................ 28 Exhibit 37. Browse Files to Find a Components CSV (after successful submission) ................... 28 Exhibit 38. E-Mail for Upload Submission Status ......................................................................... 29 Exhibit 39. Field Registration Select a Component Type .............................................................. 30 Exhibit 40. Search if Bolster is Registered .................................................................................... 31 Exhibit 41. Bolster Reference Diagram ......................................................................................... 31 Exhibit 42. Field Registration Search (Component found) ............................................................ 32 Exhibit 43. Field Registration Search (No Component found) ...................................................... 33 Exhibit 44. Field Registration Elements (Bolsters) ....................................................................... 33 Exhibit 45. Field Registration (with validation error) .................................................................... 34 Exhibit 46. Field Registration (Success message for Bolster) ....................................................... 34 Exhibit 47. Search if Coupler is Registered ................................................................................... 35 Exhibit 48. Coupler Reference Diagram ........................................................................................ 35
Umler Component Registry User Guide iii Revised September 2015
Exhibit 49. Field Registration Elements (Couplers) ...................................................................... 36 Exhibit 50. Field Registration (Success message for Couplers) .................................................... 36 Exhibit 51. Search if Brake Valve Control Emergency is Registered ........................................... 38 Exhibit 52. Field Registration Elements (Brake Valve Control Emergency) ................................ 39 Exhibit 53. Field Registration (Success message for Brake Valve Control Emergency) .............. 39 Exhibit 54. Search if Brake Valve Control Service is Registered .................................................. 40 Exhibit 55. Field Registration Elements (Brake Valve Control Service) ...................................... 41 Exhibit 56. Field Registration (Success message for Brake Valve Control Service) .................... 41 Exhibit 57. Search if Slack Adjuster is Registered ........................................................................ 42 Exhibit 58. Field Registration (Success message for Slack Adjuster) ........................................... 43 Exhibit 59. Search if Sideframe is Registered ............................................................................... 44 Exhibit 60. Side Frame Reference Diagram .................................................................................. 44 Exhibit 61. Field Registration Elements (Sideframes) ................................................................... 45 Exhibit 62. Field Registration (Success message for Sideframe) .................................................. 46 Exhibit 63. Search if Wheelset is Registered ................................................................................. 47 Exhibit 64. Field Registration for Wheelset (top) .......................................................................... 48 Exhibit 65. MID Search ................................................................................................................. 48 Exhibit 66. Field Registration for Wheelset (middle) .................................................................... 49 Exhibit 67. Field Registration for Wheelset (bottom) .................................................................... 50 Exhibit 68. Field Registration for Wheelset (with validation error) .............................................. 50 Exhibit 69. Field Registration (Success message for Wheelset) .................................................... 51 Exhibit 70. Component Registry (with Associate Component) ..................................................... 52 Exhibit 71. Associate Component to Equipment ........................................................................... 52 Exhibit 72. Associate Component to Equipment (search results) .................................................. 53 Exhibit 73. Associate Bolster to Equipment (ready for Association) ............................................ 54 Exhibit 74. Component Search (Bolsters) ...................................................................................... 55 Exhibit 75. Confirm Panel for Recalled Component ..................................................................... 56 Exhibit 76. Associate Bolster to Equipment (Success Message) ................................................... 56 Exhibit 77. Associate Coupler to Equipment (ready for Association) ........................................... 57 Exhibit 78. Component Search (Coupler) ...................................................................................... 58 Exhibit 79. Associate Coupler to Equipment (Success Message) .................................................. 59 Exhibit 80. Associate Brake Valve Control Emergency to Equipment (ready for Association) ... 60 Exhibit 81. Component Search (Brake Valve Control Emergency) .............................................. 60 Exhibit 82. Associate Brake Valve Control Service to Equipment (ready for Association) ......... 62 Exhibit 83. Component Search (Brake Valve Control Service) .................................................... 63 Exhibit 84. Associate Side Frame to Equipment (ready for Association) ..................................... 64 Exhibit 85. Associate Side Frame to Equipment (Success Message) ............................................ 65 Exhibit 86. Associate Slack Adjuster to Equipment (ready for Association) ................................ 66 Exhibit 87. Associate Slack Adjuster to Equipment (Success Message) ....................................... 67 Exhibit 88. Associate Wheelset to Equipment ............................................................................... 68 Exhibit 89. Component Search (Wheelsets) .................................................................................. 69 Exhibit 90. Associate Wheelset to Equipment (with success message) ......................................... 70 Exhibit 91. Component Details (read-only) ................................................................................... 71 Exhibit 92. Associate Component—View All (for Equipment ID) ............................................... 72 Exhibit 93. Associate Component to Equipment (with equipment result) ..................................... 73 Exhibit 94. Confirm Nullify ........................................................................................................... 73 Exhibit 95. Associate Component to Equipment (with nullification success message) ................ 74 Exhibit 96. Browse Files to Find an Association CSV .................................................................. 75 Exhibit 97. Association CSV Upload Template (in Excel)............................................................ 76 Exhibit 98. Transaction Log Search (with Element Value Criteria for Wheelset Components) ... 77 Exhibit 99. Transaction Log Search Results .................................................................................. 78
Umler Component Registry User Guide iv Revised September 2015

Exhibit 100. Transaction Details (for component association) ...................................................... 78 Exhibit 101. Transaction Details (for component nullification transaction) .................................. 79 Exhibit 102. Query Submenu ......................................................................................................... 80 Exhibit 103. Component Registry Query Menu Functions ............................................................ 80 Exhibit 104. Pre-Defined Query (default panel) ............................................................................ 81 Exhibit 105. Pre-Defined Query (with criteria set) ........................................................................ 81 Exhibit 106. Pre-Defined Query (with success message) .............................................................. 82 Exhibit 107. Pre-Defined Query E-Mail (with zipped CSV file attached). ................................... 82
Umler Component Registry User Guide v Revised September 2015
Welcome to the Umler Component Registry
Welcome to the Umler Component Registry Comprehensive Equipment Performance Monitoring (CEPM) is a web-based application that captures data for railcar equipment components. This data includes reporting on wheel repairs, validating railcar component existence, incorporating mileage information, and providing visibility into the current and past health status of rail equipment.
This first phase in the CEPM program focused on wheelsets (CEPM-Wheelsets). This included centralizing the registration of wheelset component details and identifying the application of wheelset components, including AAR and non-AAR repairs. The second phase added two additional components—bolsters and sideframes. Inventoried wheelsets without barcodes can be field registered. The third phase added couplers to the components. Another phase added brake valve control service and brake valve control emergency. This phase includes the addition of Slack Adjusters.
Users can:
• Register components in advance using Railinc’s Umler™ Component Registry • Report the application of components via Railinc’s Umler, Car Repair Billing (CRB),
and Equipment Health Maintenance System (EHMS) applications
Prerequisites The Component Registry operates as a part of Umler system. Each user must have an SSO ID and be authorized to use Umler. For more information on obtaining an SSO ID and requesting application access, see the Umler User Guide.
Each user must be familiar with:
• Logging In/Out • Railinc common interface component navigation
System Requirements The basic computer requirements for Component Registry are the same as for Umler. For more information on system requirements, see the Umler User Guide.
What is New for This Release • Added components for Slack Adjusters.
Umler Component Registry User Guide 1 Revised September 2015

Welcome to the Umler Component Registry
User Guide Structure This document has been organized to reflect the application menu order of the Component Registry. It describes use and interpretation of interface elements in the Component Registry.
The format of the Railinc user guide is in an “offset” style. Dictionary-like retrieval text is used in the header.
Railinc Single Sign On (SSO) information is included, and references to the Railinc Single Sign On User Guide added. SSO information for Umler administrators is also in the Railinc Single Sign On User Guide.
Whenever possible the term “select” is used to indicate making a choice using either the mouse or keyboard. Left-clicking generally activates a control or selects an item. Where a double-click is required, it is specified. Typical keyboard selection equivalents are described in Railinc Interface Elements starting on page 5.
Underlined blue links are functional links to go to another location in the user guide.
Umler Component Registry User Guide 2 Revised September 2015
Welcome to the Umler Component Registry Railinc Component Registry Web Page Layout
Web Interface The Component Registry interface provides the same navigational tools found in most Windows applications and Internet sites.
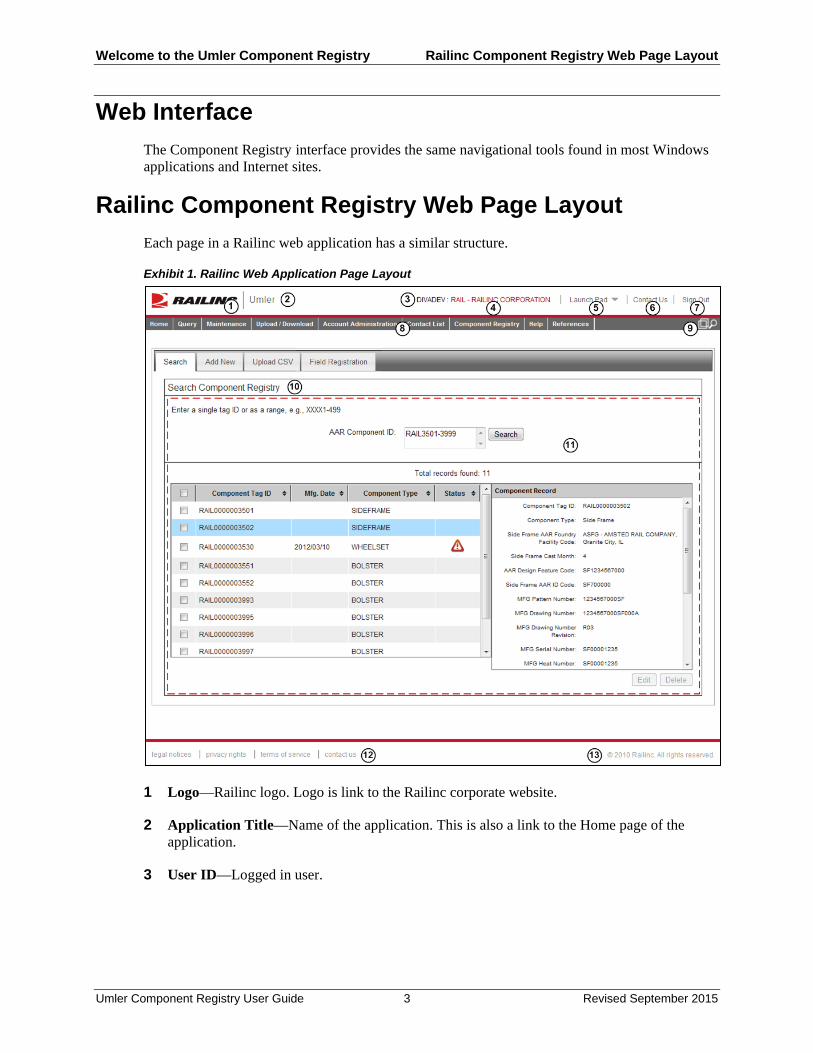
Railinc Component Registry Web Page Layout Each page in a Railinc web application has a similar structure.
Exhibit 1. Railinc Web Application Page Layout
1 Logo—Railinc logo. Logo is link to the Railinc corporate website.
2 Application Title—Name of the application. This is also a link to the Home page of the application.
3 User ID—Logged in user.
Umler Component Registry User Guide 3 Revised September 2015
Welcome to the Umler Component Registry Railinc Component Registry Web Page Layout
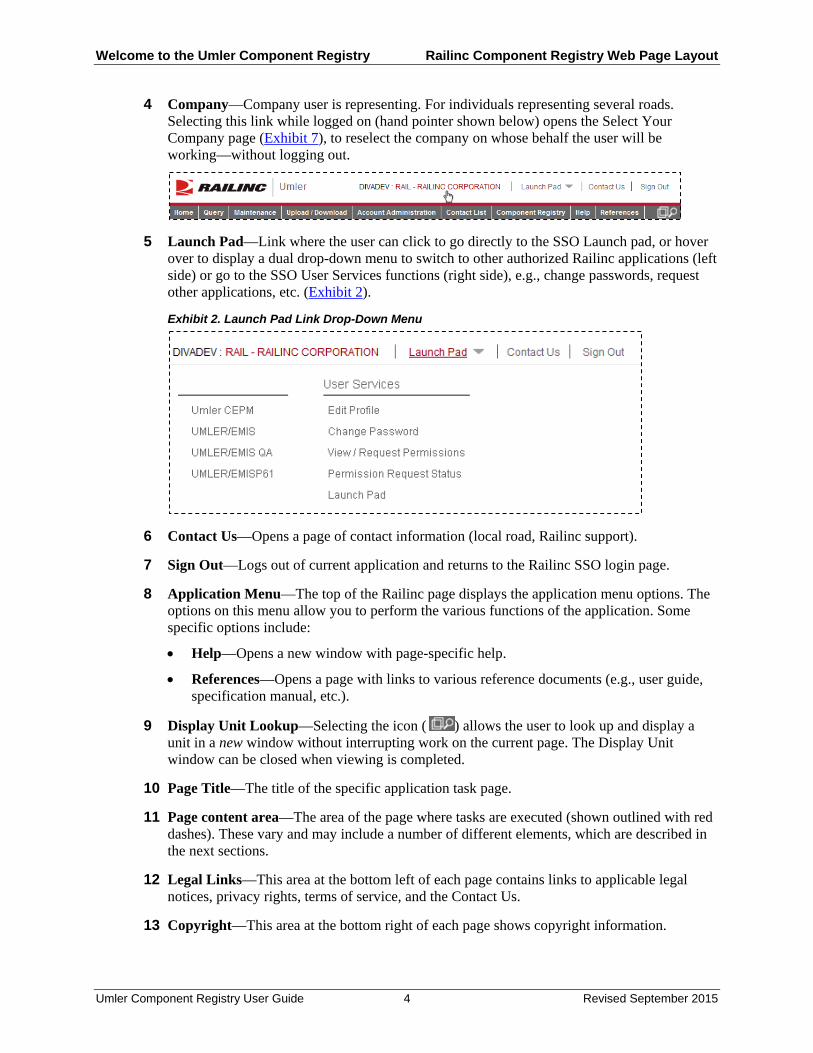
4 Company—Company user is representing. For individuals representing several roads. Selecting this link while logged on (hand pointer shown below) opens the Select Your Company page (Exhibit 7), to reselect the company on whose behalf the user will be working—without logging out.
5 Launch Pad—Link where the user can click to go directly to the SSO Launch pad, or hover over to display a dual drop-down menu to switch to other authorized Railinc applications (left side) or go to the SSO User Services functions (right side), e.g., change passwords, request other applications, etc. (Exhibit 2).
Exhibit 2. Launch Pad Link Drop-Down Menu
6 Contact Us—Opens a page of contact information (local road, Railinc support).
7 Sign Out—Logs out of current application and returns to the Railinc SSO login page.
8 Application Menu—The top of the Railinc page displays the application menu options. The options on this menu allow you to perform the various functions of the application. Some specific options include:
• Help—Opens a new window with page-specific help.
• References—Opens a page with links to various reference documents (e.g., user guide, specification manual, etc.).
9 Display Unit Lookup—Selecting the icon ( ) allows the user to look up and display a unit in a new window without interrupting work on the current page. The Display Unit window can be closed when viewing is completed.
10 Page Title—The title of the specific application task page.
11 Page content area—The area of the page where tasks are executed (shown outlined with red dashes). These vary and may include a number of different elements, which are described in the next sections.
12 Legal Links—This area at the bottom left of each page contains links to applicable legal notices, privacy rights, terms of service, and the Contact Us.
13 Copyright—This area at the bottom right of each page shows copyright information.
Umler Component Registry User Guide 4 Revised September 2015

Welcome to the Umler Component Registry Railinc Interface Elements
Railinc Interface Elements General interface elements are described in the Umler User Guide, which contains basic explanations of the elements and components that assist in moving through the various pages of the application to complete tasks. Mouse and keyboard equivalents are discussed for each element. Interface elements unique to the Component Registry are described in the next section.
Component Registry-Specific Interface Elements This section describes the Component Registry-specific interface elements.
Umler/ Component Registry Application Menu Exhibit 3 shows the Umler/ Component Registry application menu.
Exhibit 3. Umler/ Component Registry Application Menu Bar (split for readability)
The Component Registry application menu provides the functions described in Exhibit 9:
Component Registry Menu Exhibit 4. Component Registry Menu
Component Registry Icons and Indicators The Component Registry uses application-specific icons and indicators to assist the user:
Exhibit 5. Component Registry-Specific Icons
Icon Description CEPM-Specific Icons Indicates a component associated with more than one equipment ID Recall indicator icon (solid red with white exclamation point)
Component Registry Command Buttons The Component Registry uses some application-specific command buttons.
Exhibit 6. Component Registry-Specific Command Buttons
Name Function Associate Associate an entered component with an Equipment ID
Nullify Remove an association of a component from an equipment ID.
Mandatory Fields Mandatory fields are shown with red asterisks.
Umler Component Registry User Guide 5 Revised September 2015

Getting Started Logging In
Getting Started The Umler application is accessed using the Railinc Single Sign On (SSO), which can be accessed from the Railinc portal at http://www.railinc.com. The SSO log in is located at the upper right of the page.
Logging In To log into the Umler application:
1. Open the browser.
2. Open the Railinc portal at http://www.railinc.com.
3. Log in to SSO (at upper right).
4. On the Launch Pad panel, select Umler.
a. If the user represents two or more companies, the Select Your Company page is displayed (Exhibit 7).
Exhibit 7. Select Your Company
Select the link for the company wanted. The Umler Welcome page is displayed (Exhibit 8).
Note: To do work for a different company, select the Launch Pad link and reselect Umler and choose the other company. Alternatively, open a new browser window (File>New Window), select the Launch Pad link and reselect Umler and choose the other company. Toggle between the two company sessions using Alt+Tab. When finished working with multiple sessions, close the unwanted window using X, or Alt+F4. Do NOT select the sign out link—it ends the Single Sign On sessions (all of them).
Umler Component Registry User Guide 6 Revised September 2015
Getting Started Logging Out
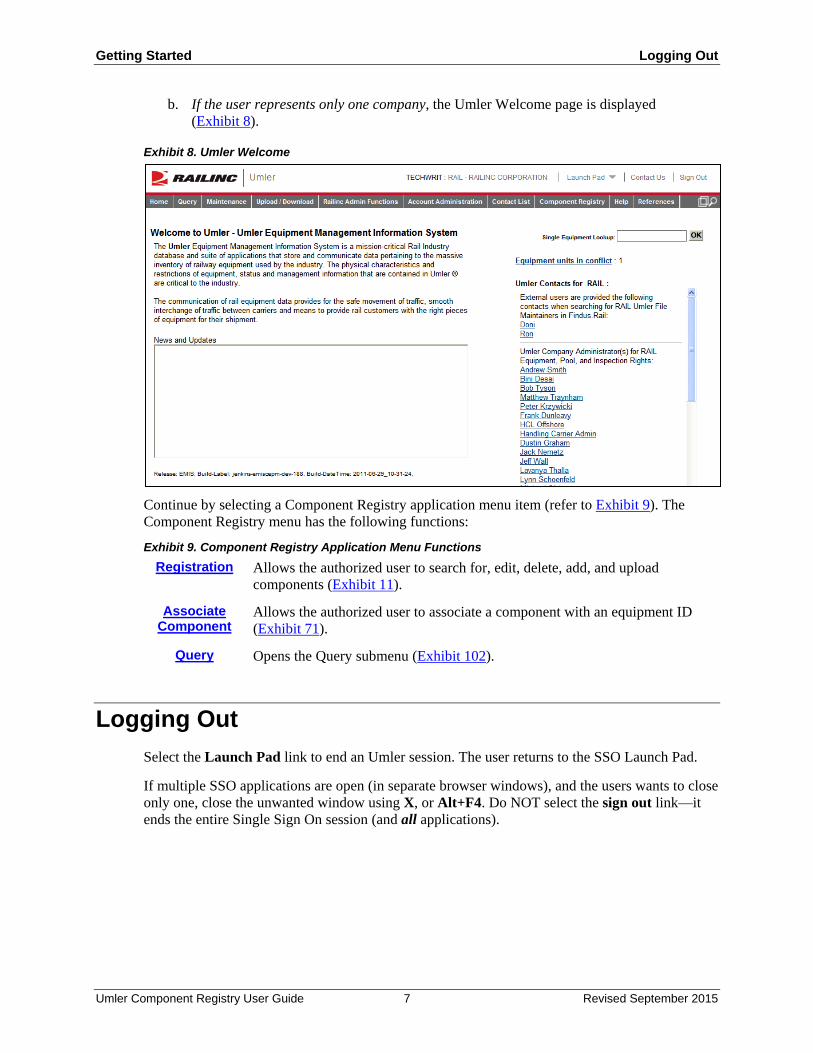
b. If the user represents only one company, the Umler Welcome page is displayed (Exhibit 8).
Exhibit 8. Umler Welcome
Continue by selecting a Component Registry application menu item (refer to Exhibit 9). The Component Registry menu has the following functions:
Exhibit 9. Component Registry Application Menu Functions Registration Allows the authorized user to search for, edit, delete, add, and upload
components (Exhibit 11).
Associate Component
Allows the authorized user to associate a component with an equipment ID (Exhibit 71).
Query Opens the Query submenu (Exhibit 102).
Logging Out Select the Launch Pad link to end an Umler session. The user returns to the SSO Launch Pad.
If multiple SSO applications are open (in separate browser windows), and the users wants to close only one, close the unwanted window using X, or Alt+F4. Do NOT select the sign out link—it ends the entire Single Sign On session (and all applications).
Umler Component Registry User Guide 7 Revised September 2015

Registration Search
Registration When the user selects Component Registry>Registration on an Umler page (Exhibit 10),
Exhibit 10. Component Registry (with Registration)
the Registry panel is displayed, defaulted to Search (Exhibit 12).
Exhibit 11 describes the tasks available on the panel.
Exhibit 11. Registration Tabs and Descriptions
Tab Item Description Search Allows the user to search for component IDs (default)
Add New Allows the authorized user to add a new component to the Registry Upload CSV Allows the authorized user to upload CSV records to the Registry
Field Registration Allows shops to register pre-CEPM components without barcodes (Exhibit 63)
Search To search for an existing Registry component:
1. Log onto Umler as described in Logging In on page 6. The Umler Welcome page is displayed (Exhibit 8).
2. Select Component Registry>Registration. The Search Component Registry tab page is displayed (Exhibit 12).
Exhibit 12. Search Component Registry
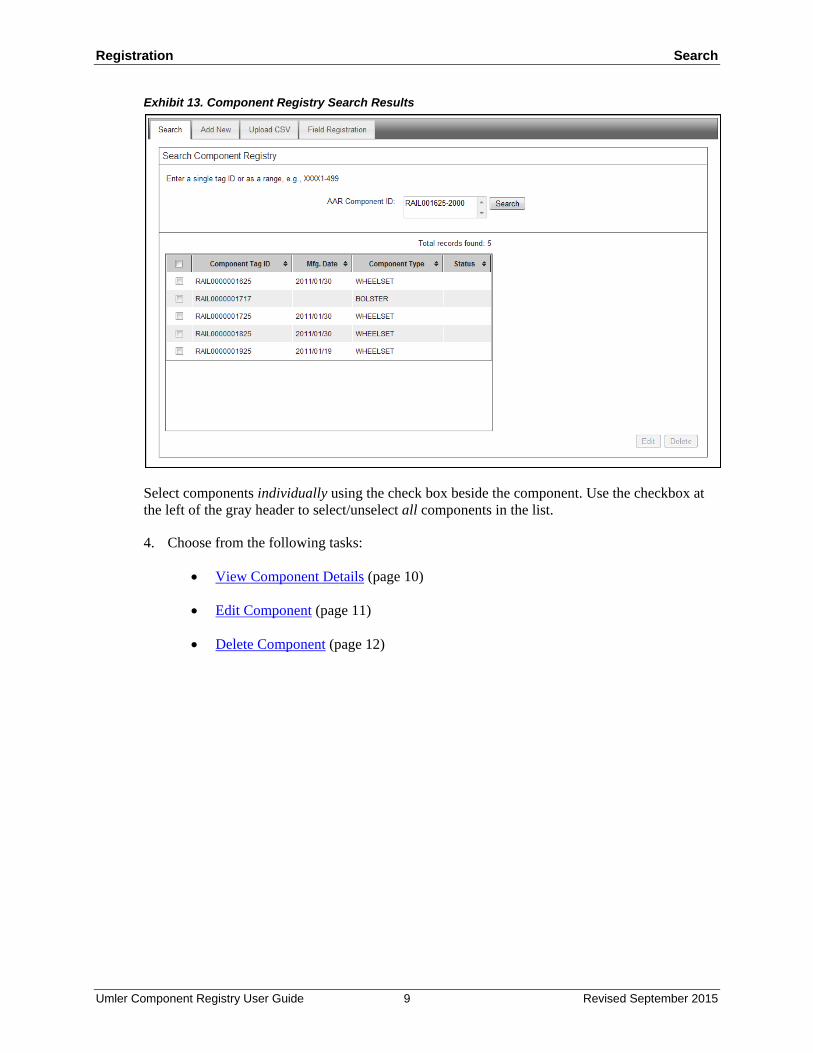
3. Type in a component ID. Ranges are supported up to 500 IDs. Format is XXXX (four alpha characters) plus up to ten digits. In this example (Exhibit 13) components from RAIL from 1625-2000 was entered.
Umler Component Registry User Guide 8 Revised September 2015
Registration Search
Exhibit 13. Component Registry Search Results
Select components individually using the check box beside the component. Use the checkbox at the left of the gray header to select/unselect all components in the list.
4. Choose from the following tasks:
• View Component Details (page 10)
• Edit Component (page 11)
• Delete Component (page 12)
Umler Component Registry User Guide 9 Revised September 2015
Registration Search | Viewing Component Details
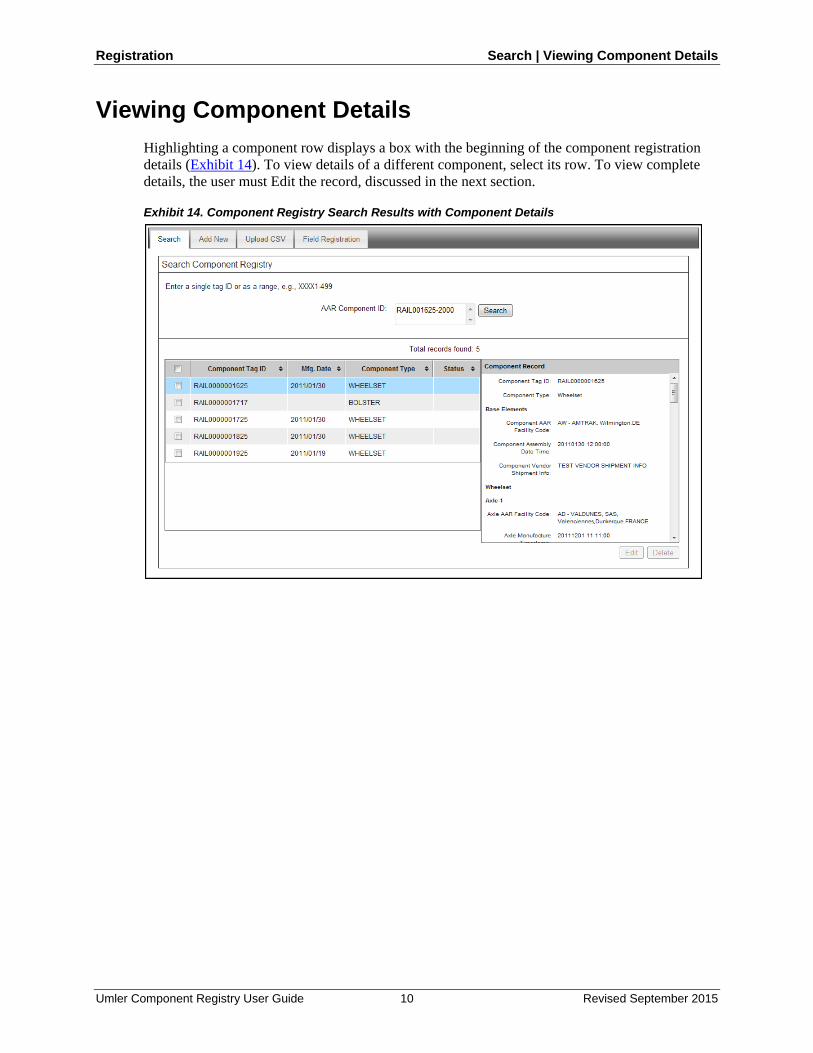
Viewing Component Details Highlighting a component row displays a box with the beginning of the component registration details (Exhibit 14). To view details of a different component, select its row. To view complete details, the user must Edit the record, discussed in the next section.
Exhibit 14. Component Registry Search Results with Component Details
Umler Component Registry User Guide 10 Revised September 2015
Registration Search | Editing Components
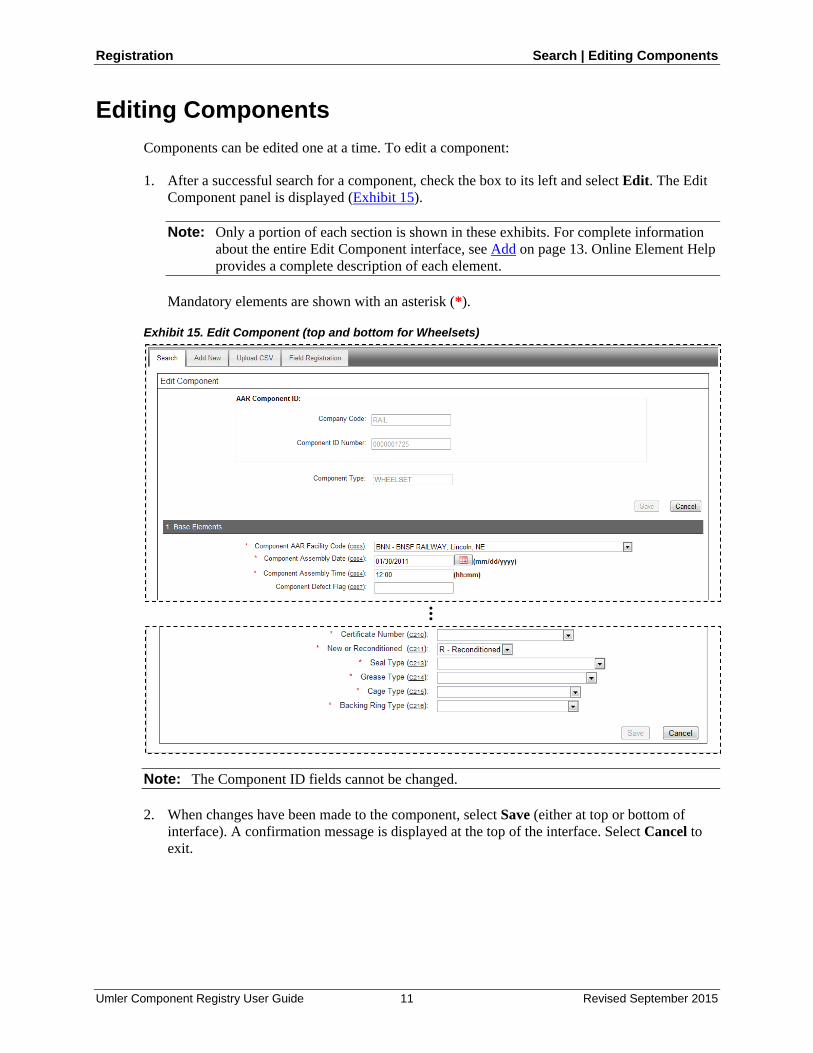
Editing Components Components can be edited one at a time. To edit a component:
1. After a successful search for a component, check the box to its left and select Edit. The Edit Component panel is displayed (Exhibit 15).
Note: Only a portion of each section is shown in these exhibits. For complete information about the entire Edit Component interface, see Add on page 13. Online Element Help provides a complete description of each element.
Mandatory elements are shown with an asterisk (*).
Exhibit 15. Edit Component (top and bottom for Wheelsets)
. . .
Note: The Component ID fields cannot be changed. 2. When changes have been made to the component, select Save (either at top or bottom of
interface). A confirmation message is displayed at the top of the interface. Select Cancel to exit.
Umler Component Registry User Guide 11 Revised September 2015
Registration Search | Deleting Components
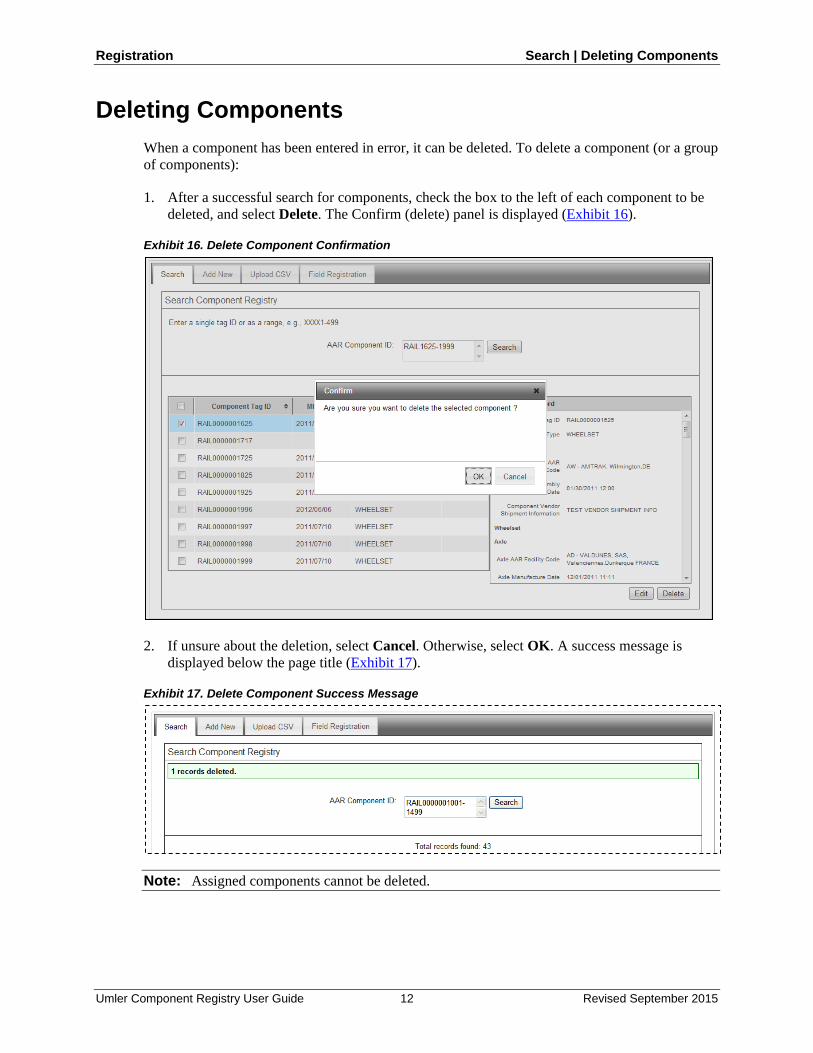
Deleting Components When a component has been entered in error, it can be deleted. To delete a component (or a group of components):
1. After a successful search for components, check the box to the left of each component to be deleted, and select Delete. The Confirm (delete) panel is displayed (Exhibit 16).
Exhibit 16. Delete Component Confirmation
2. If unsure about the deletion, select Cancel. Otherwise, select OK. A success message is displayed below the page title (Exhibit 17).
Exhibit 17. Delete Component Success Message
Note: Assigned components cannot be deleted.
Umler Component Registry User Guide 12 Revised September 2015

Registration Add New Component
Add New Component Components must be registered in the Component Registry to be associated with a piece of equipment. To add a new component registration:
1. Log onto Umler as described in Logging In on page 6. The Umler Welcome page is displayed (Exhibit 8).
2. Select Component Registry>Registration. The Search Component Registry tab page is displayed (Exhibit 12).
3. Select the Add New tab. The Add New Component to Registry panel is displayed (Exhibit 18).
Exhibit 18. Add New Component to Registry
4. The Company Code defaults to the user’s company.
5. Type the ID number to be assigned to the component. Up to 10 digits.
6. Select the Component Type from the drop-down.
7. Select Add. The number is validated and the Base Elements section of the information is displayed (These sections vary by Component Type).
• Select the Code link to view element help in a new window. Close the window when finished with the help. Elements with a red dot (●) are mandatory. Data Types: Text, Numeric, or Timestamp/Date.
• Mandatory elements have an asterisk. • Use calendar icons to select dates. • Use drop-down lists if provided. • Required formats are shown at the right of the field.
Umler Component Registry User Guide 13 Revised September 2015

Registration Add New Component
8. Complete the interface for the appropriate Component Type.
a. For Bolsters, go to Add Bolsters on page 16, before returning to Step 9.
b. For Couplers, go to Add Couplers on page 18 , before returning to Step 9.
c. For Brake Valve Control Emergency, go to Add Brake Valve Control Emergency on page 19, before returning to Step 9.
d. For Brake Valve Control Service, go to Add Brake Valve Control Service on page 20, before returning to Step 9.
e. For Side Frames, go to Add Side Frames on page 21, before returning to Step 9.
f. For Slack Adjusters, go to Add Slack Adjusters on page 22, before returning to Step 9.
g. For Wheelsets go to Add Wheelsets on page 23, before returning to Step 9.
9. When all mandatory elements are complete, select Save.
a. If any input errors have been made, a red error message is displayed at the top of the page (Exhibit 19).
Exhibit 19. Failed Add Component Transaction Message (bottom shows the error at right)
. . .
b. If input is validated, a green success message is displayed at the top of the page (Exhibit 20).
Umler Component Registry User Guide 14 Revised September 2015
Registration Add New Component
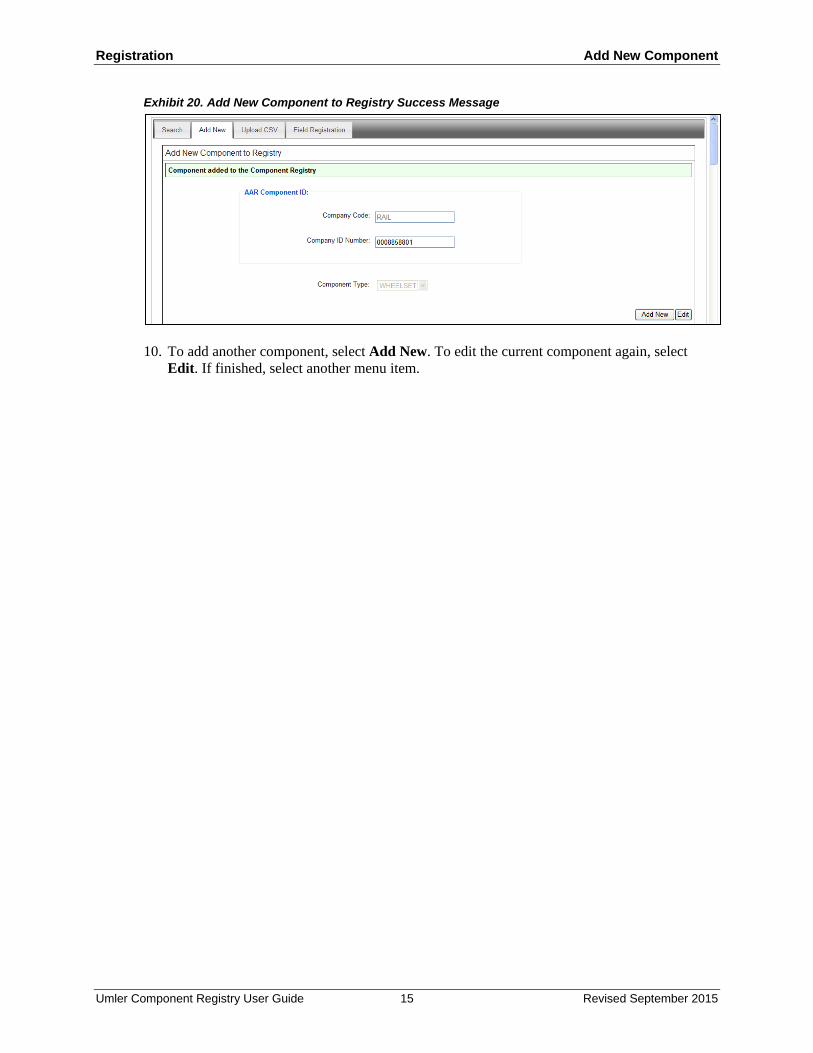
Exhibit 20. Add New Component to Registry Success Message
10. To add another component, select Add New. To edit the current component again, select Edit. If finished, select another menu item.
Umler Component Registry User Guide 15 Revised September 2015

Registration Add New Component | Add Bolsters
Add Bolsters
Exhibit 21. Add New Bolster
1. Complete the interface.
a. Select the trademark lookup icon ( ) to open the Trademark Select panel to select the Foundry Facility Code (Exhibit 22).
Umler Component Registry User Guide 16 Revised September 2015

Registration Add New Component | Add Bolsters
Exhibit 22. Trademark Select
Exhibit 22 shows the ASFG company radio button selected. Select Select to close the panel and return to the Add panel with the selected trademark.
b. The Component Defect Flag (C007) is for Railinc Administrators only.
2. Return to Step 9 on page 14 for Save instructions and troubleshooting.
Umler Component Registry User Guide 17 Revised September 2015

Registration Add New Component | Add Couplers
Add Couplers Exhibit 23. Add New Coupler
1. Complete the interface.
a. Use the trademark lookup ( ) to open the Trademark Select panel to select the Coupler AAR Facility Code. Refer to Exhibit 22.
b. The Component Defect Flag (C007) is for Railinc Administrators only.
2. Return to Step 9 on page 14 for Save instructions and troubleshooting.
Umler Component Registry User Guide 18 Revised September 2015

Registration Add New Component | Add Brake Valve Control Emergency
Add Brake Valve Control Emergency Exhibit 24. Add New Brake Valve Control Emergency
1. Complete the interface.
2. Return to Step 9 on page 14 for Save instructions and troubleshooting.
Umler Component Registry User Guide 19 Revised September 2015

Registration Add New Component | Add Brake Valve Control Service
Add Brake Valve Control Service Exhibit 25. Add New Brake Valve Control Service
1. Complete the interface.
2. Return to Step 9 on page 14 for Save instructions and troubleshooting.
Umler Component Registry User Guide 20 Revised September 2015
Registration Add New Component | Add Side Frames
Add Side Frames
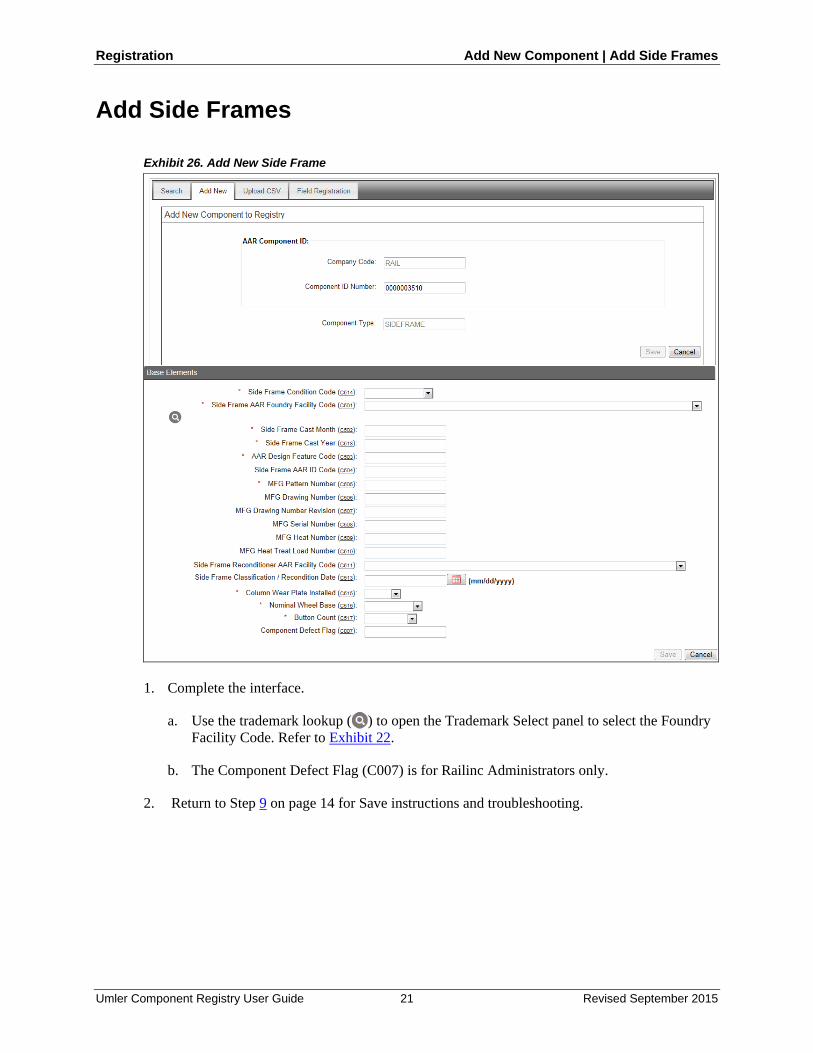
Exhibit 26. Add New Side Frame
1. Complete the interface.
a. Use the trademark lookup ( ) to open the Trademark Select panel to select the Foundry Facility Code. Refer to Exhibit 22.
b. The Component Defect Flag (C007) is for Railinc Administrators only.
2. Return to Step 9 on page 14 for Save instructions and troubleshooting.
Umler Component Registry User Guide 21 Revised September 2015

Registration Add New Component | Add Slack Adjusters
Add Slack Adjusters
Exhibit 27. Add New Slack Adjusters
1. Complete the interface.
2. Return to Step 9 on page 14 for Save instructions and troubleshooting.
Umler Component Registry User Guide 22 Revised September 2015

Registration Add New Component | Add Wheelsets
Add Wheelsets
Exhibit 28. Add New Wheelset (1. Base Elements)
1. Complete Section 1. Base Elements and scroll to the Section 2. Axle.
Exhibit 29. Add New Wheelset (2. Axle)
2. Complete Section 2. Axle and scroll to the Section 3.
Umler Component Registry User Guide 23 Revised September 2015
Registration Add New Component | Add Wheelsets
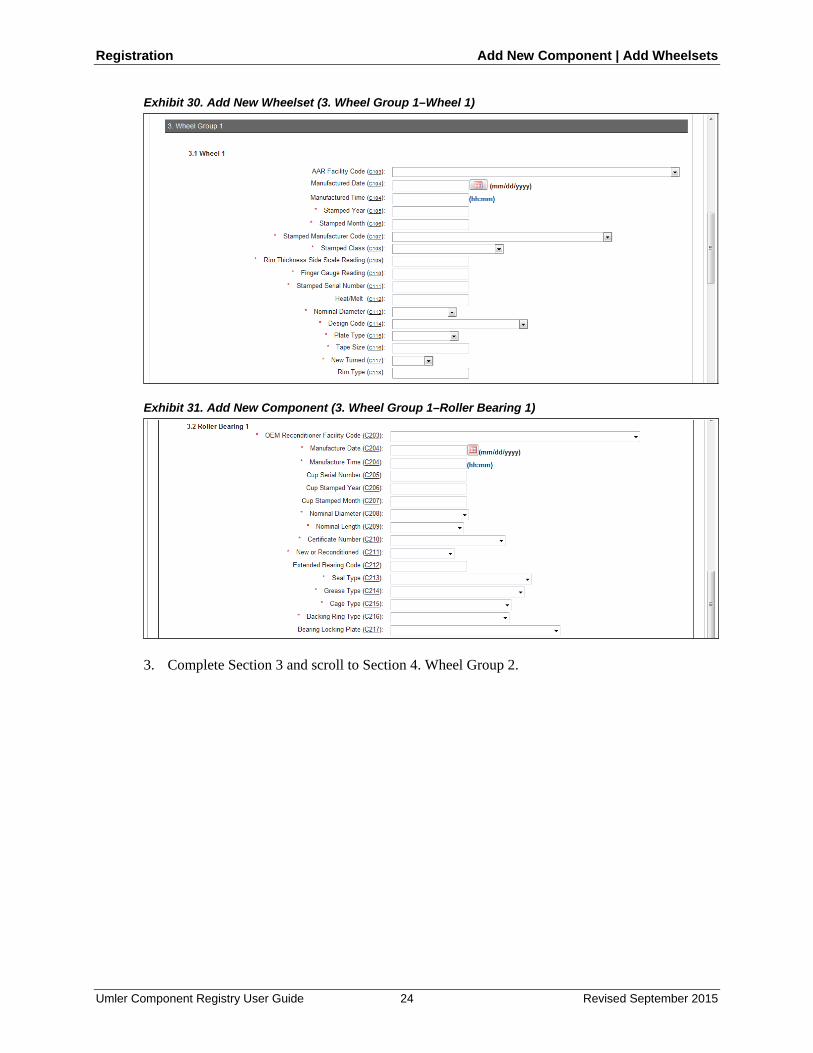
Exhibit 30. Add New Wheelset (3. Wheel Group 1–Wheel 1)
Exhibit 31. Add New Component (3. Wheel Group 1–Roller Bearing 1)
3. Complete Section 3 and scroll to Section 4. Wheel Group 2.
Umler Component Registry User Guide 24 Revised September 2015

Registration Add New Component | Add Wheelsets
Exhibit 32. Add New Wheelset (4. Wheel Group 2–Wheel 2)
Note: If Wheel 2 is the same as Wheel 1, check the box to automatically fill the fields. Exhibit 33. Add New Wheelset (4. Wheel Group 2–Roller Bearing 2)
Note: If Bearing 2 is the same as Bearing 1, check the box to automatically fill the fields. 4. Return to Step 9 on page 14 for Save instructions and troubleshooting.
Umler Component Registry User Guide 25 Revised September 2015

Registration Upload CSV
Upload CSV Uploads can be used to quickly submit many similar components (e.g., 100 wheelsets with no differences except serial numbers and component IDs), to correct fields throughout entire sets of components, or to delete large numbers of incorrectly or prematurely registered components. Users can upload component information from proprietary systems in an acceptable CSV format. To upload a component CSV file:
1. Log onto Umler as described in Logging In on page 6. The Umler Welcome page is displayed (Exhibit 8).
2. Select Component Registry>Registration. The Search Component Registry tab page is displayed (Exhibit 12).
3. Select the Upload CSV tab. The Browse files to find a components CSV panel is displayed (Exhibit 34).
Exhibit 34. Browse Files to Find a Components CSV
The link to the right of the Browse button opens a template of the format expected for component uploads. It can be opened or saved (Exhibit 35).
• For additional information about preparing upload files, see CSV Registration Upload File Preparation on page 27.
• If the CSV file has already been properly prepared, continue with Uploading the CSV File on page 28.
Umler Component Registry User Guide 26 Revised September 2015

Registration Upload CSV
CSV Registration Upload File Preparation Exhibit 35. Registration CSV Upload Template (in Excel)
The fields are as described in the online Element Help and in the Umler Component Registry Data Specification Manual accessed through Umler References. The Transaction Type indicates what action the user wants done for each row of information entered:
For component registrations: AC = Add Component CC = Change Component DC = Delete Component
Notes: • A single upload file can contain all three types of transactions.
• Large text entries should not contain commas (which are interpreted as field delimiters). Use dashes or other keyable characters.
• Changes require a Component ID and only those fields with changes (other fields are left untouched).
• Deletions require a Component ID only.
• Adds must contain all mandatory fields.
• For more information, see Umler Bulk Upload Transactions CSV File Specifications. Also available through Umler References.
Umler Component Registry User Guide 27 Revised September 2015

Registration Upload CSV
Uploading the CSV File 4. Select the Browse button to locate the file for upload. The Choose file panel is displayed
(Exhibit 36).
Exhibit 36. Choose File (for Upload)
5. Either double-click the file, or highlight it and select Open. The Browse Files to Find a Components CSV is redisplayed with the selected file (not shown).
6. Select Submit. A message is displayed (Exhibit 37).
Exhibit 37. Browse Files to Find a Components CSV (after successful submission)
7. Check user e-mail for a status message (Exhibit 38).
Umler Component Registry User Guide 28 Revised September 2015
Registration Upload CSV
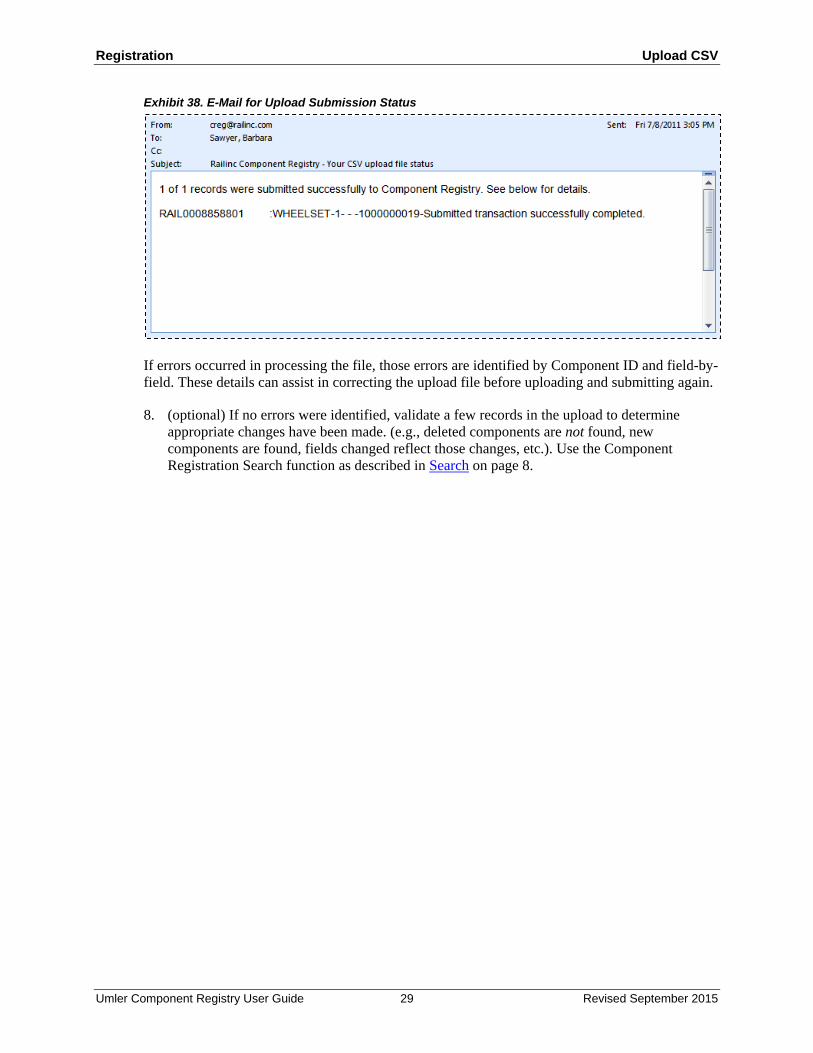
Exhibit 38. E-Mail for Upload Submission Status
If errors occurred in processing the file, those errors are identified by Component ID and field-by-field. These details can assist in correcting the upload file before uploading and submitting again.
8. (optional) If no errors were identified, validate a few records in the upload to determine appropriate changes have been made. (e.g., deleted components are not found, new components are found, fields changed reflect those changes, etc.). Use the Component Registration Search function as described in Search on page 8.
Umler Component Registry User Guide 29 Revised September 2015
Registration Field Registration
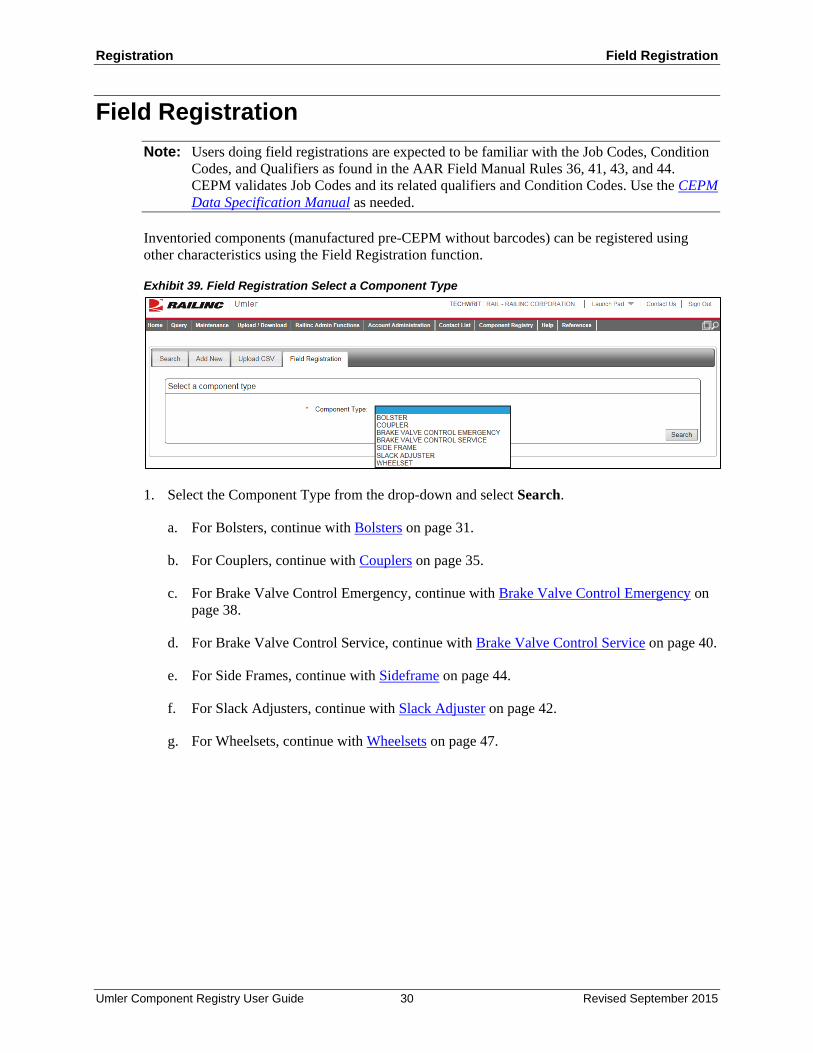
Field Registration Note: Users doing field registrations are expected to be familiar with the Job Codes, Condition
Codes, and Qualifiers as found in the AAR Field Manual Rules 36, 41, 43, and 44. CEPM validates Job Codes and its related qualifiers and Condition Codes. Use the CEPM Data Specification Manual as needed.
Inventoried components (manufactured pre-CEPM without barcodes) can be registered using other characteristics using the Field Registration function.
Exhibit 39. Field Registration Select a Component Type
1. Select the Component Type from the drop-down and select Search.
a. For Bolsters, continue with Bolsters on page 31.
b. For Couplers, continue with Couplers on page 35.
c. For Brake Valve Control Emergency, continue with Brake Valve Control Emergency on page 38.
d. For Brake Valve Control Service, continue with Brake Valve Control Service on page 40.
e. For Side Frames, continue with Sideframe on page 44.
f. For Slack Adjusters, continue with Slack Adjuster on page 42.
g. For Wheelsets, continue with Wheelsets on page 47.
Umler Component Registry User Guide 30 Revised September 2015
Registration Field Registration | Bolsters
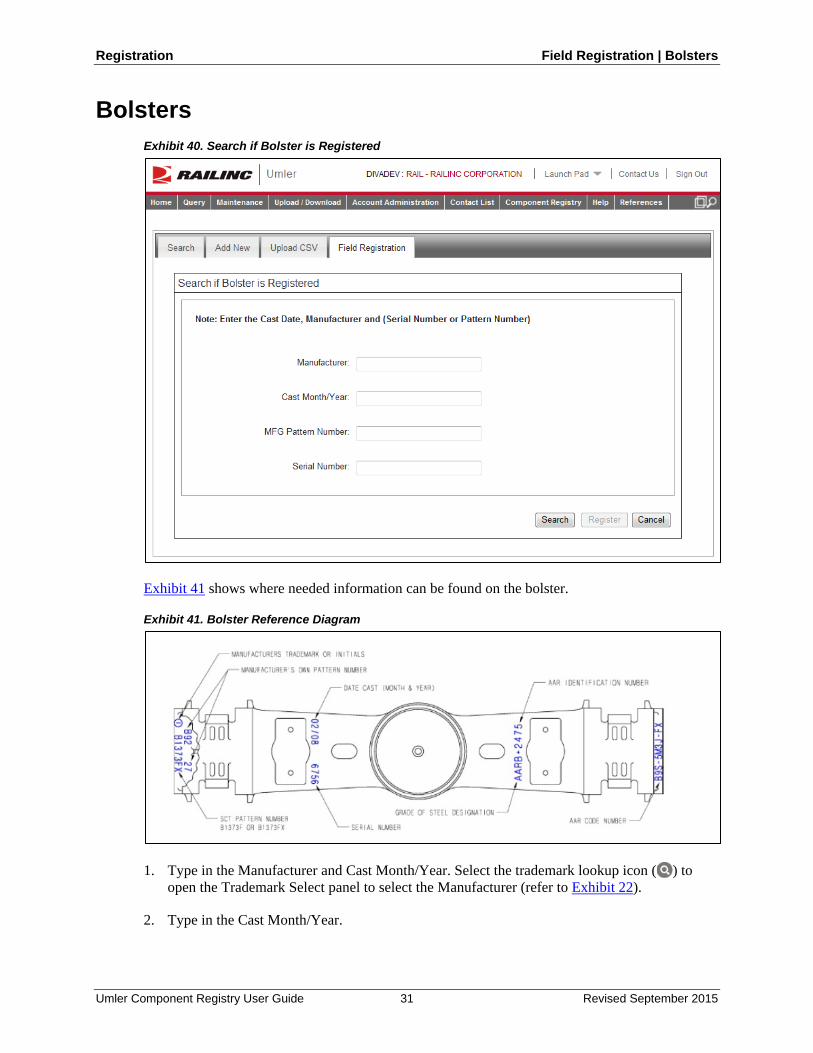
Bolsters Exhibit 40. Search if Bolster is Registered
Exhibit 41 shows where needed information can be found on the bolster.
Exhibit 41. Bolster Reference Diagram
1. Type in the Manufacturer and Cast Month/Year. Select the trademark lookup icon ( ) to open the Trademark Select panel to select the Manufacturer (refer to Exhibit 22).
2. Type in the Cast Month/Year.
Umler Component Registry User Guide 31 Revised September 2015

Registration Field Registration | Bolsters
3. Enter one of the following:
a. MFG Pattern Number, or
b. Serial Number
4. Select Search.
a. If a matching component is found (Exhibit 42), no field registration is necessary and the bolster can be associated with the Equipment ID as described in Bolster Association on page 54.
Exhibit 42. Field Registration Search (Component found)
b. If no matching component is found (Exhibit 43), select Register. The Field Registration Elements panel is displayed (Exhibit 44).
Umler Component Registry User Guide 32 Revised September 2015

Registration Field Registration | Bolsters
Exhibit 43. Field Registration Search (No Component found)
Exhibit 44. Field Registration Elements (Bolsters)
5. Complete all required elements for the bolster.
6. When all mandatory data is completed, select Save.
a. If validation fails, an error message is shown beside the invalid entry (Exhibit 45).
Umler Component Registry User Guide 33 Revised September 2015

Registration Field Registration | Bolsters
Exhibit 45. Field Registration (with validation error)
In Exhibit 45, a mandatory field was not completed.
b. If validation is successful, CEPM generates a unique bolster component ID (Exhibit 46).
Exhibit 46. Field Registration (Success message for Bolster)
In Exhibit 46, the new component ID shown is 8RIC0000475963. The bolster can now be associated with an Equipment ID as described in Bolster Association on page 54.
To add another bolster registration, select Add New. The Search if Bolster is Registered panel is displayed (Exhibit 40).
Umler Component Registry User Guide 34 Revised September 2015
Registration Field Registration | Couplers
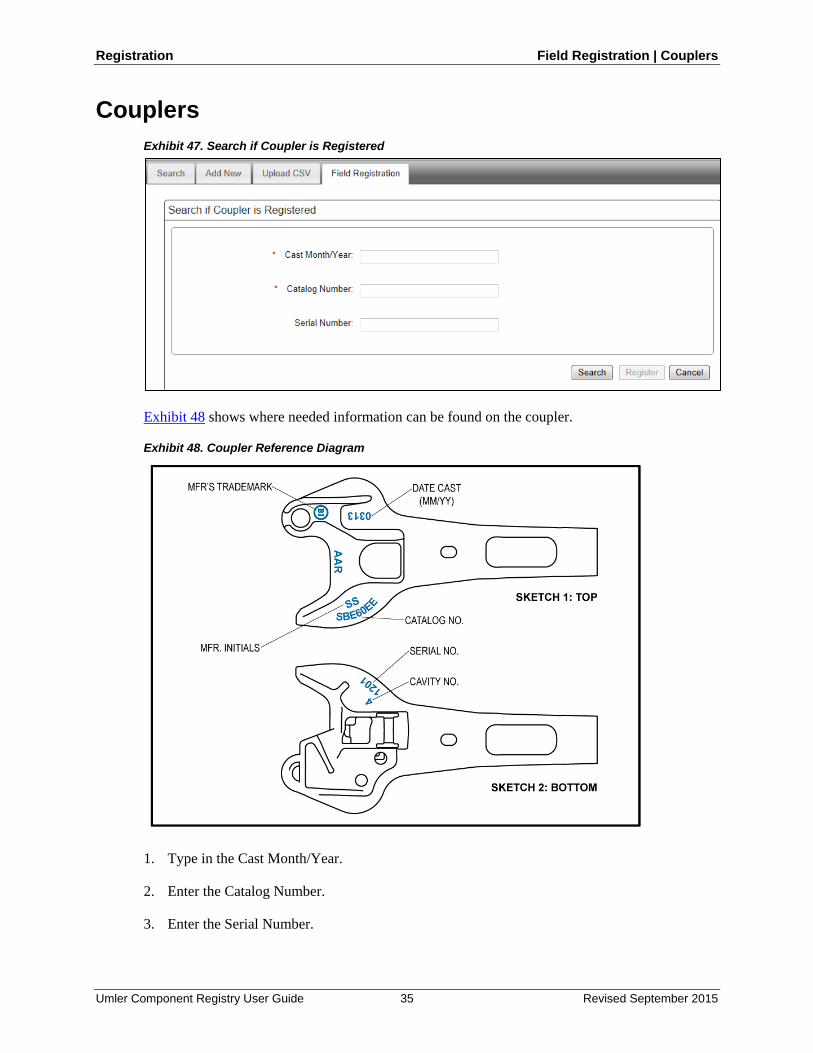
Couplers Exhibit 47. Search if Coupler is Registered
Exhibit 48 shows where needed information can be found on the coupler.
Exhibit 48. Coupler Reference Diagram
1. Type in the Cast Month/Year.
2. Enter the Catalog Number.
3. Enter the Serial Number.
Umler Component Registry User Guide 35 Revised September 2015

Registration Field Registration | Couplers
4. Select Search.
a. If a matching component is found (similar to Exhibit 42), no field registration is necessary and the coupler can be associated with the Equipment ID as described in Coupler Association on page 57.
b. If no matching component is found (similar to Exhibit 43), select Register. The Field Registration Elements panel is displayed (Exhibit 49).
Exhibit 49. Field Registration Elements (Couplers)
5. Complete all required elements for the coupler.
6. When all mandatory data is completed, select Save.
a. If validation fails, an error message is shown beside the invalid entry (similar to Exhibit 45).
b. If validation is successful, CEPM generates a unique coupler component ID (Exhibit 50).
Exhibit 50. Field Registration (Success message for Couplers)
Umler Component Registry User Guide 36 Revised September 2015

Registration Field Registration | Couplers
In Exhibit 50, the new component ID shown is 8RIC0000475964. The coupler can now be associated with an Equipment ID as described in Coupler Association on page 57.
To add another coupler registration, select Add New. The Search if Coupler is Registered panel is displayed (Exhibit 47).
Umler Component Registry User Guide 37 Revised September 2015
Registration Field Registration | Brake Valve Control Emergency
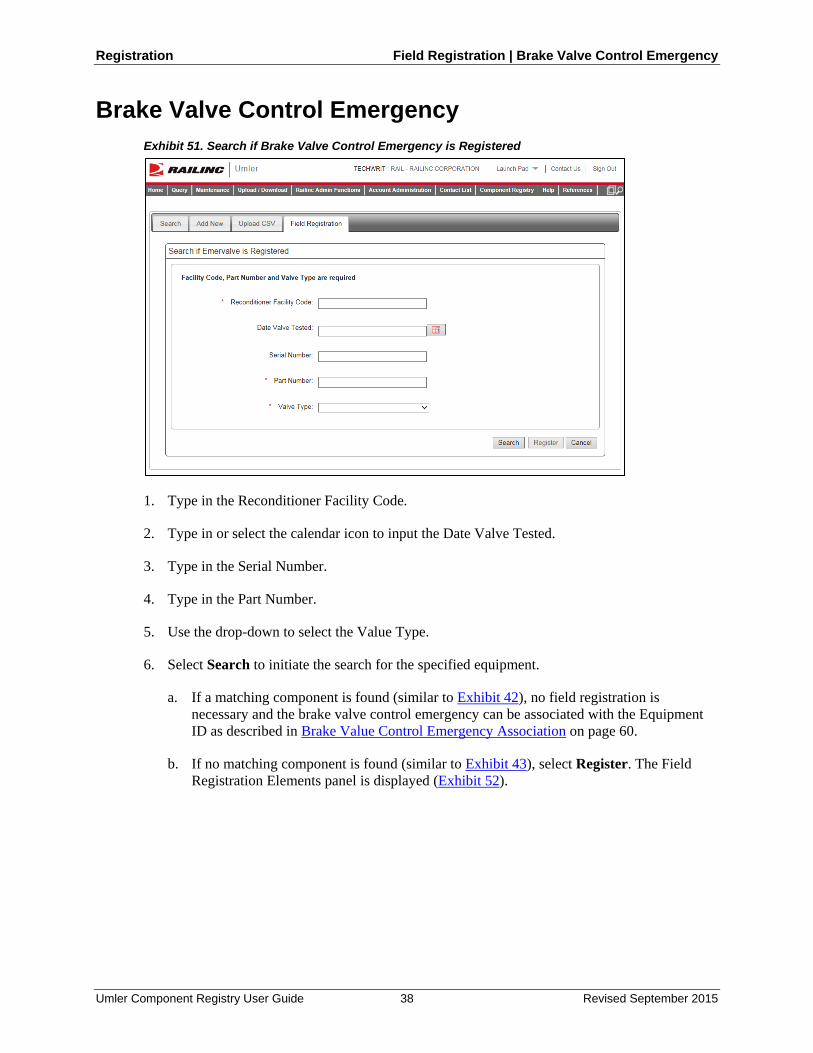
Brake Valve Control Emergency Exhibit 51. Search if Brake Valve Control Emergency is Registered
1. Type in the Reconditioner Facility Code.
2. Type in or select the calendar icon to input the Date Valve Tested.
3. Type in the Serial Number.
4. Type in the Part Number.
5. Use the drop-down to select the Value Type.
6. Select Search to initiate the search for the specified equipment.
a. If a matching component is found (similar to Exhibit 42), no field registration is necessary and the brake valve control emergency can be associated with the Equipment ID as described in Brake Value Control Emergency Association on page 60.
b. If no matching component is found (similar to Exhibit 43), select Register. The Field Registration Elements panel is displayed (Exhibit 52).
Umler Component Registry User Guide 38 Revised September 2015
Registration Field Registration | Brake Valve Control Emergency
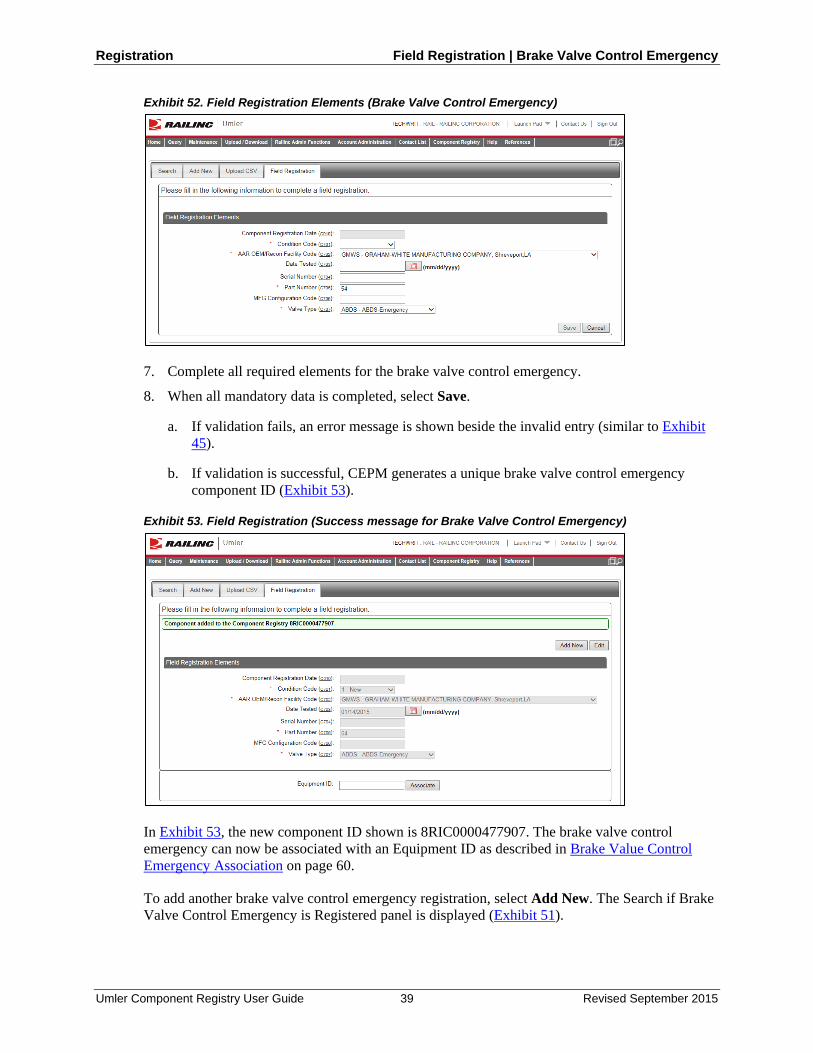
Exhibit 52. Field Registration Elements (Brake Valve Control Emergency)
7. Complete all required elements for the brake valve control emergency.
8. When all mandatory data is completed, select Save.
a. If validation fails, an error message is shown beside the invalid entry (similar to Exhibit 45).
b. If validation is successful, CEPM generates a unique brake valve control emergency component ID (Exhibit 53).
Exhibit 53. Field Registration (Success message for Brake Valve Control Emergency)
In Exhibit 53, the new component ID shown is 8RIC0000477907. The brake valve control emergency can now be associated with an Equipment ID as described in Brake Value Control Emergency Association on page 60.
To add another brake valve control emergency registration, select Add New. The Search if Brake Valve Control Emergency is Registered panel is displayed (Exhibit 51).
Umler Component Registry User Guide 39 Revised September 2015

Registration Field Registration | Brake Valve Control Service
Brake Valve Control Service Exhibit 54. Search if Brake Valve Control Service is Registered
1. Type in the Reconditioner Facility Code.
2. Type in or select the calendar icon to input the Date Valve Tested.
3. Type in the Serial Number.
4. Type in the Part Number.
5. Use the drop-down to select the Value Type.
6. Select Search to initiate the search for the specified equipment.
a. If a matching component is found (similar to Exhibit 42), no field registration is necessary and the brake valve control service can be associated with the Equipment ID as described in Brake Value Control Service Association on page 62.
b. If no matching component is found (similar to Exhibit 43), select Register. The Field Registration Elements panel is displayed (Exhibit 55).
Umler Component Registry User Guide 40 Revised September 2015
Registration Field Registration | Brake Valve Control Service
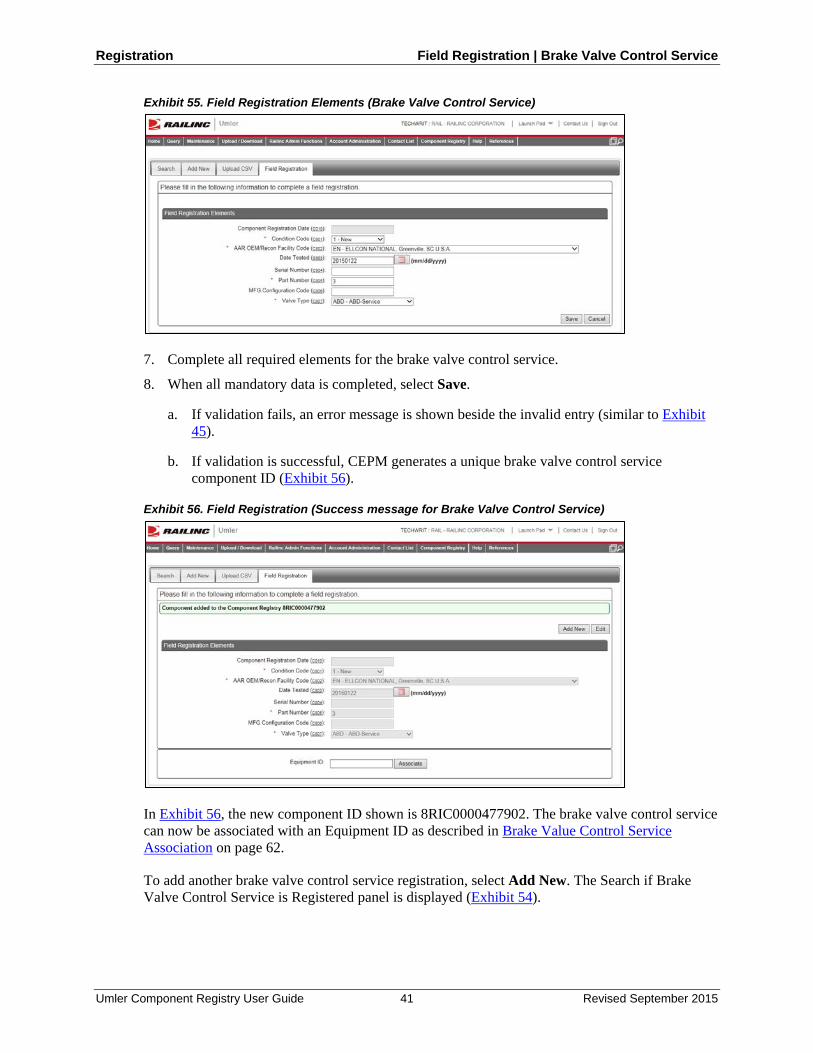
Exhibit 55. Field Registration Elements (Brake Valve Control Service)
7. Complete all required elements for the brake valve control service.
8. When all mandatory data is completed, select Save.
a. If validation fails, an error message is shown beside the invalid entry (similar to Exhibit 45).
b. If validation is successful, CEPM generates a unique brake valve control service component ID (Exhibit 56).
Exhibit 56. Field Registration (Success message for Brake Valve Control Service)
In Exhibit 56, the new component ID shown is 8RIC0000477902. The brake valve control service can now be associated with an Equipment ID as described in Brake Value Control Service Association on page 62.
To add another brake valve control service registration, select Add New. The Search if Brake Valve Control Service is Registered panel is displayed (Exhibit 54).
Umler Component Registry User Guide 41 Revised September 2015
Registration Field Registration | Slack Adjuster
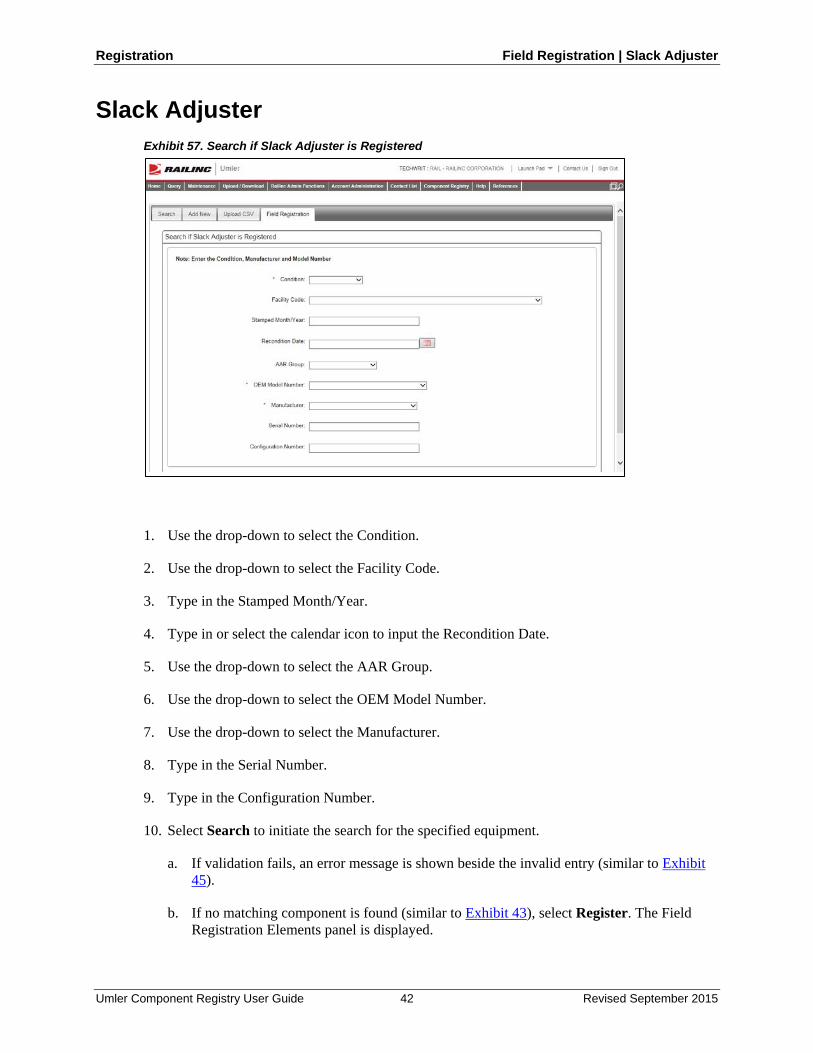
Slack Adjuster Exhibit 57. Search if Slack Adjuster is Registered
1. Use the drop-down to select the Condition.
2. Use the drop-down to select the Facility Code.
3. Type in the Stamped Month/Year.
4. Type in or select the calendar icon to input the Recondition Date.
5. Use the drop-down to select the AAR Group.
6. Use the drop-down to select the OEM Model Number.
7. Use the drop-down to select the Manufacturer.
8. Type in the Serial Number.
9. Type in the Configuration Number.
10. Select Search to initiate the search for the specified equipment.
a. If validation fails, an error message is shown beside the invalid entry (similar to Exhibit 45).
b. If no matching component is found (similar to Exhibit 43), select Register. The Field Registration Elements panel is displayed.
Umler Component Registry User Guide 42 Revised September 2015
Registration Field Registration | Slack Adjuster
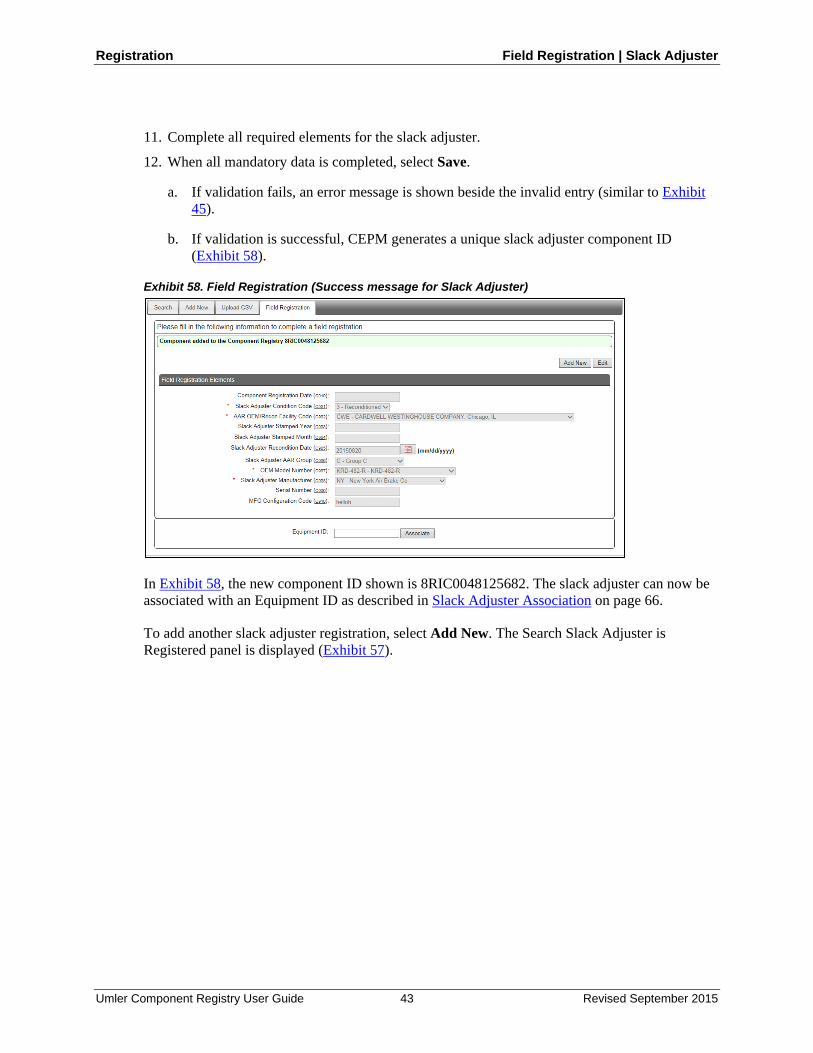
11. Complete all required elements for the slack adjuster.
12. When all mandatory data is completed, select Save.
a. If validation fails, an error message is shown beside the invalid entry (similar to Exhibit 45).
b. If validation is successful, CEPM generates a unique slack adjuster component ID (Exhibit 58).
Exhibit 58. Field Registration (Success message for Slack Adjuster)
In Exhibit 58, the new component ID shown is 8RIC0048125682. The slack adjuster can now be associated with an Equipment ID as described in Slack Adjuster Association on page 66.
To add another slack adjuster registration, select Add New. The Search Slack Adjuster is Registered panel is displayed (Exhibit 57).
Umler Component Registry User Guide 43 Revised September 2015
Registration Field Registration | Sideframe
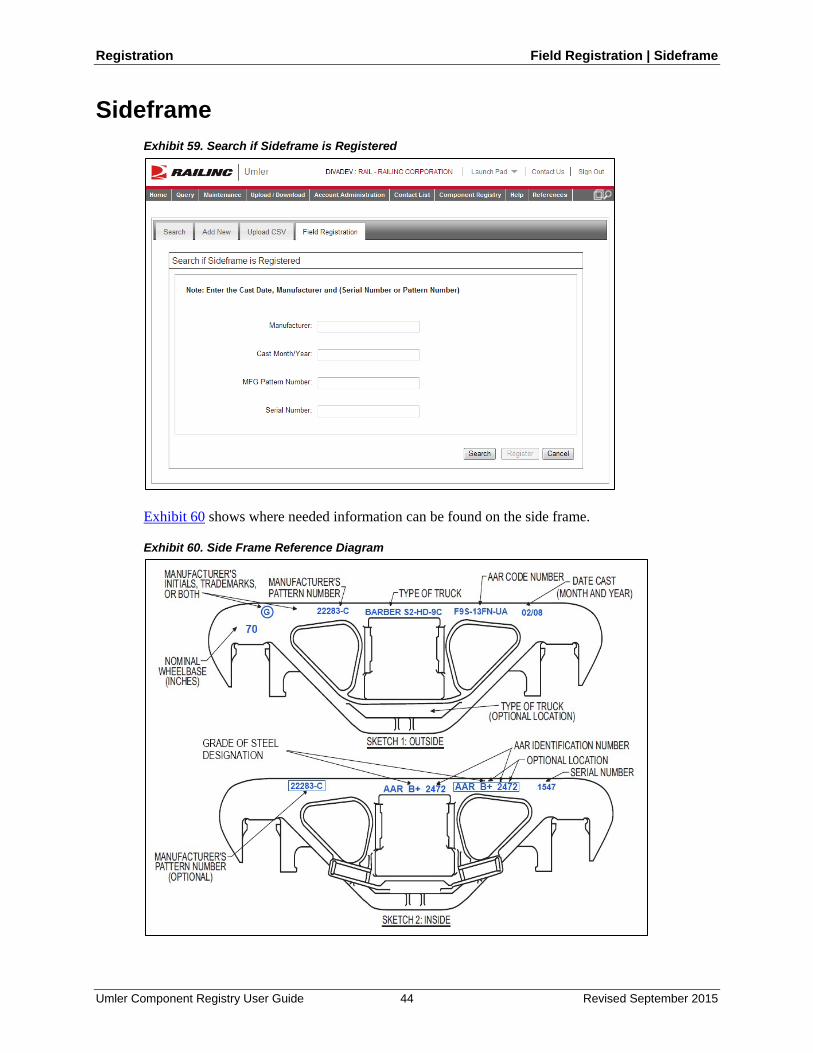
Sideframe Exhibit 59. Search if Sideframe is Registered
Exhibit 60 shows where needed information can be found on the side frame.
Exhibit 60. Side Frame Reference Diagram
Umler Component Registry User Guide 44 Revised September 2015

Registration Field Registration | Sideframe
1. Type in the Manufacturer.
2. Type in the Cast Month/Year.
3. Enter one of the following:
a. Enter the MFG Pattern Number.
b. Enter the Serial Number.
4. Select Search.
a. If a matching component is found (similar to Exhibit 42), no field registration is necessary and the side frame can be associated with the Equipment ID as described in Side Frame Association on page 64.
b. If no matching component is found (similar to Exhibit 43), select Register. The Field Registration Elements panel is displayed (Exhibit 61).
Exhibit 61. Field Registration Elements (Sideframes)
5. Complete all required elements for the sideframe. Select the trademark lookup icon ( ) to open the Trademark Select panel to select the Manufacturer (refer to Exhibit 22)
6. When all mandatory data is completed, select Save.
a. If validation fails, an error message is shown beside the invalid entry (similar to Exhibit 45).
b. If validation is successful, CEPM generates a unique sideframe component ID (Exhibit 62).
Umler Component Registry User Guide 45 Revised September 2015

Registration Field Registration | Sideframe
Exhibit 62. Field Registration (Success message for Sideframe)
In Exhibit 62, the new component ID shown is 8RIC0000474120. The sideframe can now be associated with an Equipment ID as described in Side Frame Association on page 64.
To add another sideframe registration, select Add New. The Search if Sideframe is Registered panel is displayed (Exhibit 59).
Umler Component Registry User Guide 46 Revised September 2015
Registration Field Registration | Wheelsets
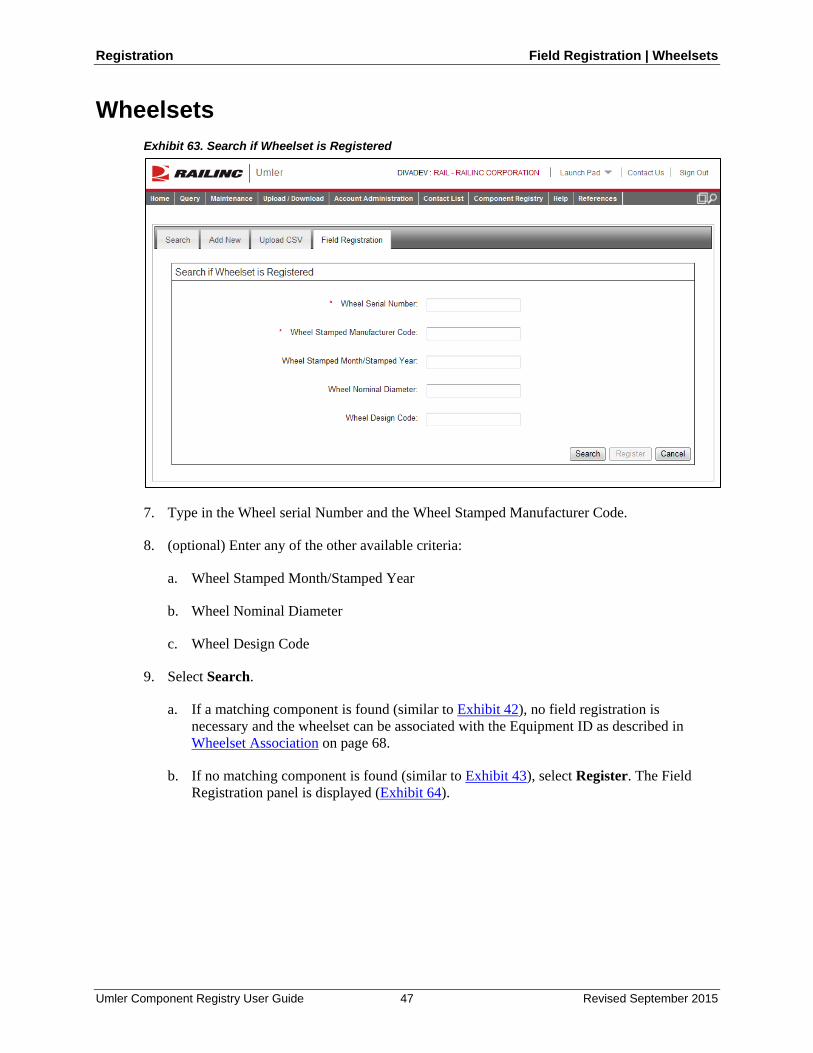
Wheelsets Exhibit 63. Search if Wheelset is Registered
7. Type in the Wheel serial Number and the Wheel Stamped Manufacturer Code.
8. (optional) Enter any of the other available criteria:
a. Wheel Stamped Month/Stamped Year
b. Wheel Nominal Diameter
c. Wheel Design Code
9. Select Search.
a. If a matching component is found (similar to Exhibit 42), no field registration is necessary and the wheelset can be associated with the Equipment ID as described in Wheelset Association on page 68.
b. If no matching component is found (similar to Exhibit 43), select Register. The Field Registration panel is displayed (Exhibit 64).
Umler Component Registry User Guide 47 Revised September 2015
Registration Field Registration | Wheelsets
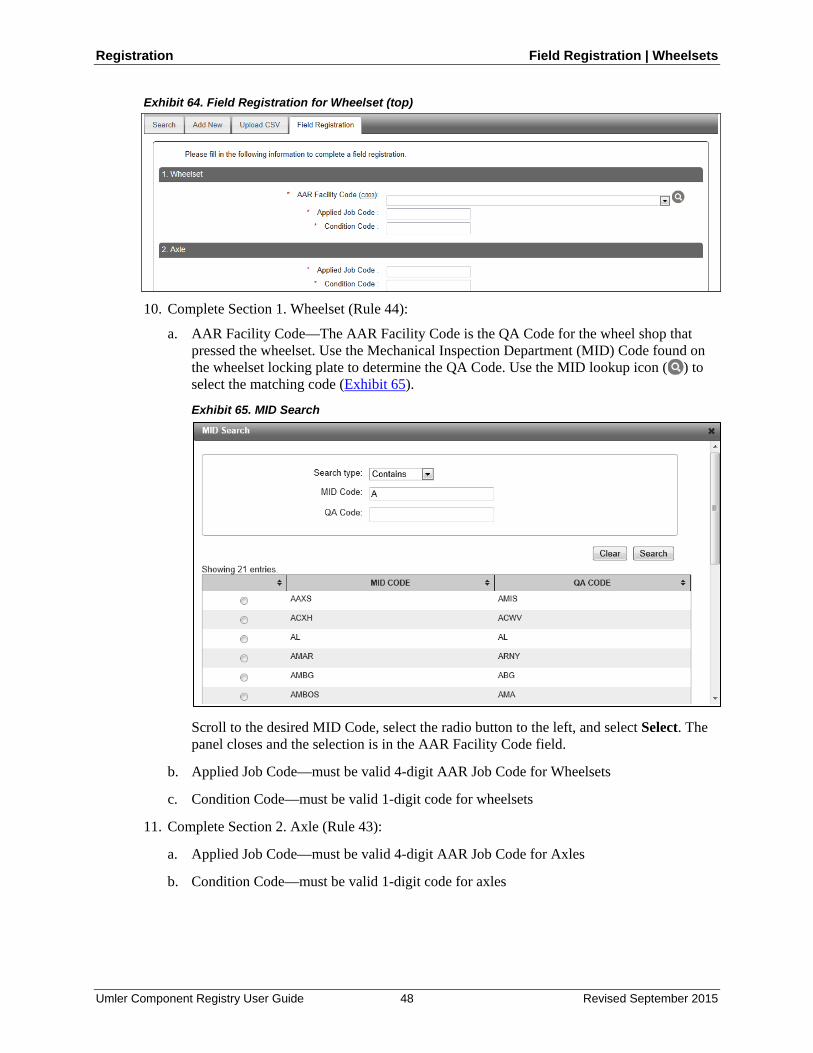
Exhibit 64. Field Registration for Wheelset (top)
10. Complete Section 1. Wheelset (Rule 44):
a. AAR Facility Code—The AAR Facility Code is the QA Code for the wheel shop that pressed the wheelset. Use the Mechanical Inspection Department (MID) Code found on the wheelset locking plate to determine the QA Code. Use the MID lookup icon ( ) to select the matching code (Exhibit 65).
Exhibit 65. MID Search
Scroll to the desired MID Code, select the radio button to the left, and select Select. The panel closes and the selection is in the AAR Facility Code field.
b. Applied Job Code—must be valid 4-digit AAR Job Code for Wheelsets
c. Condition Code—must be valid 1-digit code for wheelsets
11. Complete Section 2. Axle (Rule 43):
a. Applied Job Code—must be valid 4-digit AAR Job Code for Axles
b. Condition Code—must be valid 1-digit code for axles
Umler Component Registry User Guide 48 Revised September 2015

Registration Field Registration | Wheelsets
Exhibit 66. Field Registration for Wheelset (middle)
12. Complete Section 3.1 Wheel Group 1 (Wheel 1) [Rule 41]:
Note: Select the element link to view element help in a new window. Close the window when finished with the help. Elements with a red dot (●) are mandatory. Data Types: Text, Numeric, or Timestamp/Date.
a. Applied Job Code—must be valid 4-digit AAR Job Code for Wheels.
b. Applied Qualifier—must be valid 2-digit qualifier for the appropriate wheel group.
c. Condition Code—defaults to 7 (all wheels applied).
d. Stamped Year—Select the C105 link as needed for help.
e. Stamped Month—Select the C106 link as needed for help.
f. Stamped Manufacturer Code (filled from user search input)—Select the C107 link as needed for help.
g. Stamped Class—Select the C108 link as needed for help.
h. Rim Thickness Side Scale Reading—Select the C109 link as needed for help.
i. Finger Gauge Reading—Select the C110 link as needed for help.
j. Stamped Serial Number (filled from user search input) —Select the C111 link as needed for help.
13. Complete Section 3.2 Wheel Group 1 (Roller Bearing 1) [Rule 36]:
a. Applied Job Code—must be valid 4-digit AAR Job Code for Roller Bearings
b. Applied Qualifier—must be valid 2-digit qualifier for the appropriate bearing group
c. Condition Code—must be valid 1-digit code for bearings
14. Scroll to Section 4 Wheel Group 2 (Exhibit 67)
Umler Component Registry User Guide 49 Revised September 2015
Registration Field Registration | Wheelsets
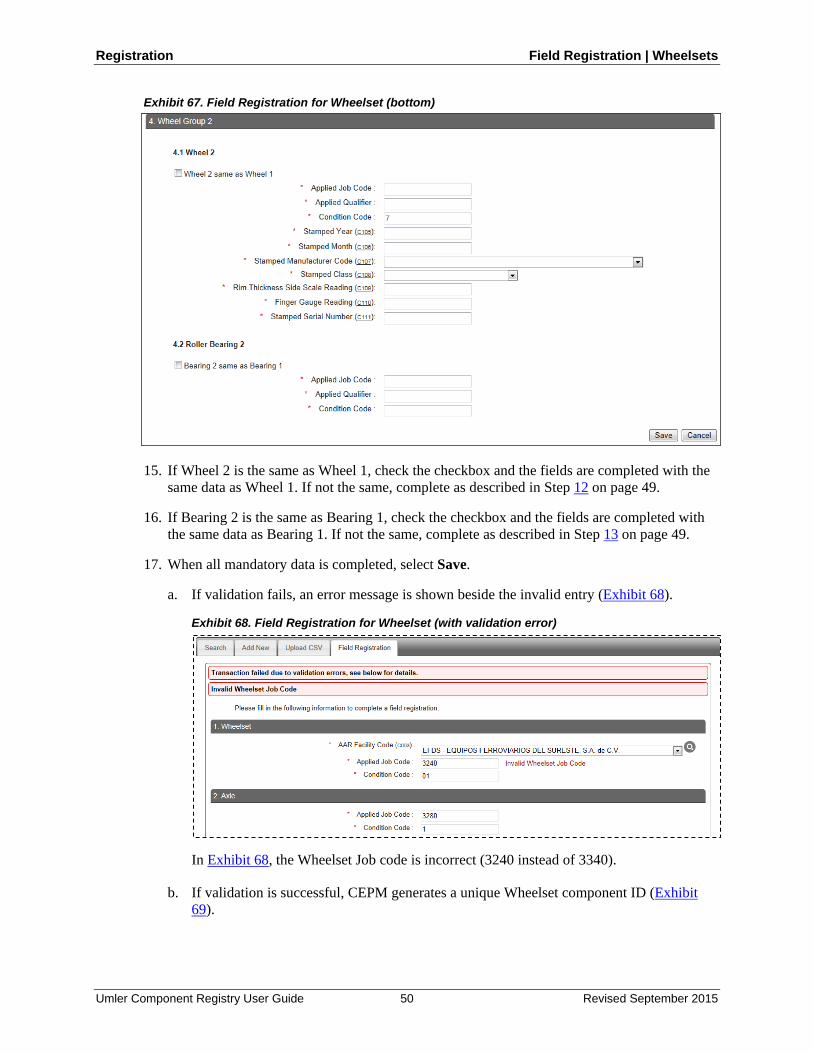
Exhibit 67. Field Registration for Wheelset (bottom)
15. If Wheel 2 is the same as Wheel 1, check the checkbox and the fields are completed with the same data as Wheel 1. If not the same, complete as described in Step 12 on page 49.
16. If Bearing 2 is the same as Bearing 1, check the checkbox and the fields are completed with the same data as Bearing 1. If not the same, complete as described in Step 13 on page 49.
17. When all mandatory data is completed, select Save.
a. If validation fails, an error message is shown beside the invalid entry (Exhibit 68).
Exhibit 68. Field Registration for Wheelset (with validation error)
In Exhibit 68, the Wheelset Job code is incorrect (3240 instead of 3340).
b. If validation is successful, CEPM generates a unique Wheelset component ID (Exhibit 69).
Umler Component Registry User Guide 50 Revised September 2015

Registration Field Registration | Wheelsets
Exhibit 69. Field Registration (Success message for Wheelset)
In Exhibit 69, the new component ID shown is 8RIC0000475973. The registered wheelset can now be associated with an Equipment ID as described in Wheelset Association on page 68.
18. To register another unbarcoded wheelset, select Register Another. The page resets for more input.
Note: It is usually best to search prior to starting a field registration to ensure there is no existing Component ID. Refer to Step 7 on page 47.
Umler Component Registry User Guide 51 Revised September 2015
Associate Component Make an Association
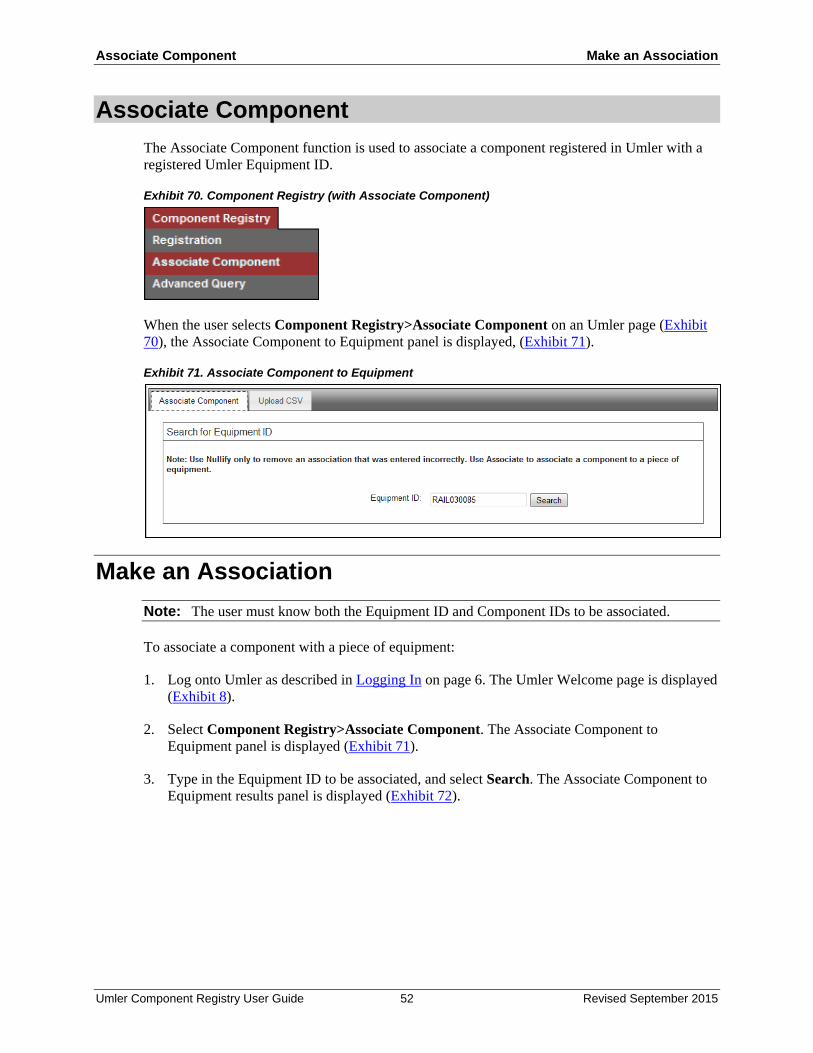
Associate Component The Associate Component function is used to associate a component registered in Umler with a registered Umler Equipment ID.
Exhibit 70. Component Registry (with Associate Component)
When the user selects Component Registry>Associate Component on an Umler page (Exhibit 70), the Associate Component to Equipment panel is displayed, (Exhibit 71).
Exhibit 71. Associate Component to Equipment
Make an Association Note: The user must know both the Equipment ID and Component IDs to be associated. To associate a component with a piece of equipment:
1. Log onto Umler as described in Logging In on page 6. The Umler Welcome page is displayed (Exhibit 8).
2. Select Component Registry>Associate Component. The Associate Component to Equipment panel is displayed (Exhibit 71).
3. Type in the Equipment ID to be associated, and select Search. The Associate Component to Equipment results panel is displayed (Exhibit 72).
Umler Component Registry User Guide 52 Revised September 2015

Associate Component Make an Association
Exhibit 72. Associate Component to Equipment (search results)
Information about the equipment is provided.
4. Select the Component Type from the drop-down.
a. For Bolsters, go to Bolster Association on page 54.
b. For Couplers, go to Coupler Association on page 57
c. For Brake Value Control Emergency, go to Brake Value Control Emergency Association on page 60.
d. For Brake Valve Control Service, go to Brake Value Control Service Association on page 62.
e. For Side Frames, go to Side Frame Association on page 64.
f. For Slack Adjusters, go to Slack Adjuster Association on page 66.
g. For Wheelsets, go to Wheelset Association on page 68.
h. To view ALL components associated with the equipment ID, select View All.
Umler Component Registry User Guide 53 Revised September 2015
Associate Component Make an Association | Bolster Association
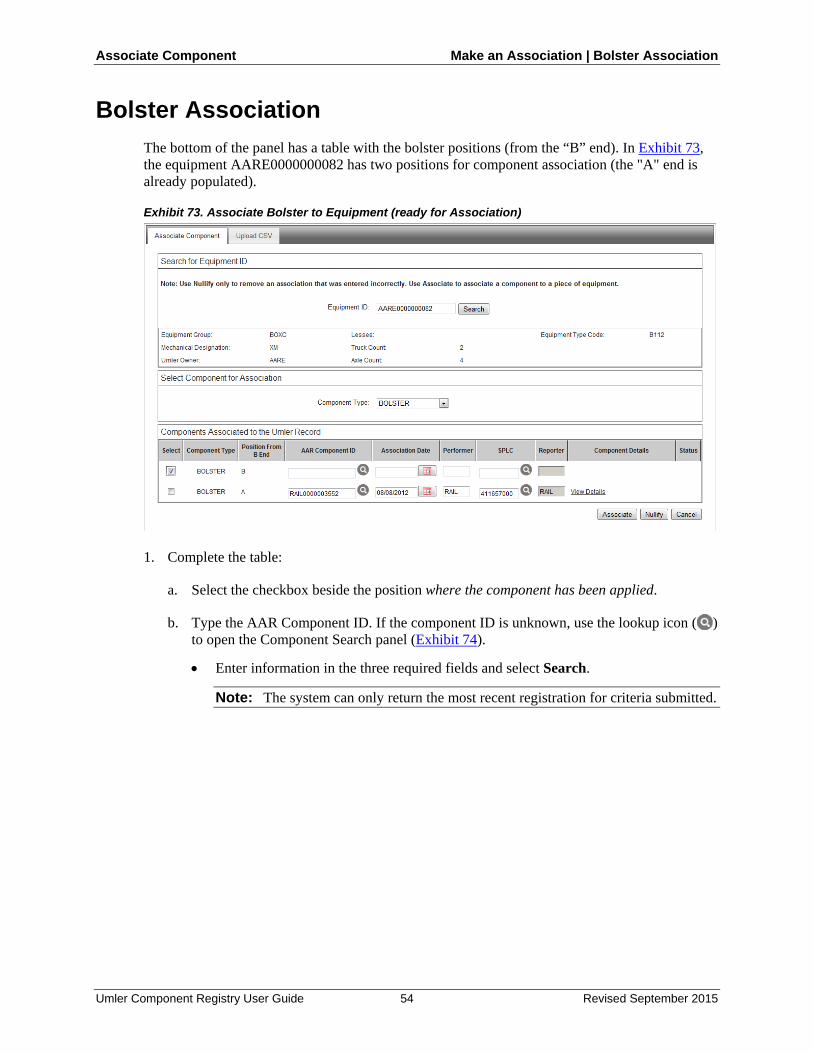
Bolster Association The bottom of the panel has a table with the bolster positions (from the “B” end). In Exhibit 73, the equipment AARE0000000082 has two positions for component association (the "A" end is already populated).
Exhibit 73. Associate Bolster to Equipment (ready for Association)
1. Complete the table:
a. Select the checkbox beside the position where the component has been applied.
b. Type the AAR Component ID. If the component ID is unknown, use the lookup icon ( ) to open the Component Search panel (Exhibit 74).
• Enter information in the three required fields and select Search.
Note: The system can only return the most recent registration for criteria submitted.
Umler Component Registry User Guide 54 Revised September 2015

Associate Component Make an Association | Bolster Association
Exhibit 74. Component Search (Bolsters)
• If a component is found, select the radio button at the left and select Select to close the panel and return to the Association page. The selected Component ID is added to the field.
Note: If no component ID is found, register the component as described in Add New Component on page 13, and come back to associate. Recalled components are NOT identified in a search.
c. Use the calendar icon to select the date the component was applied (cannot be in the
future).
d. Type the mark of the performer (i.e., shop mark).
e. Use the SPLC icon to search for a SPLC (not shown), or type the known nine-digit SPLC where the application was performed (e.g., shop SPLC).
f. Enter other components table rows as appropriate.
When an entry is complete, the Associate button becomes available.
2. If the table rows are correct, select Associate.
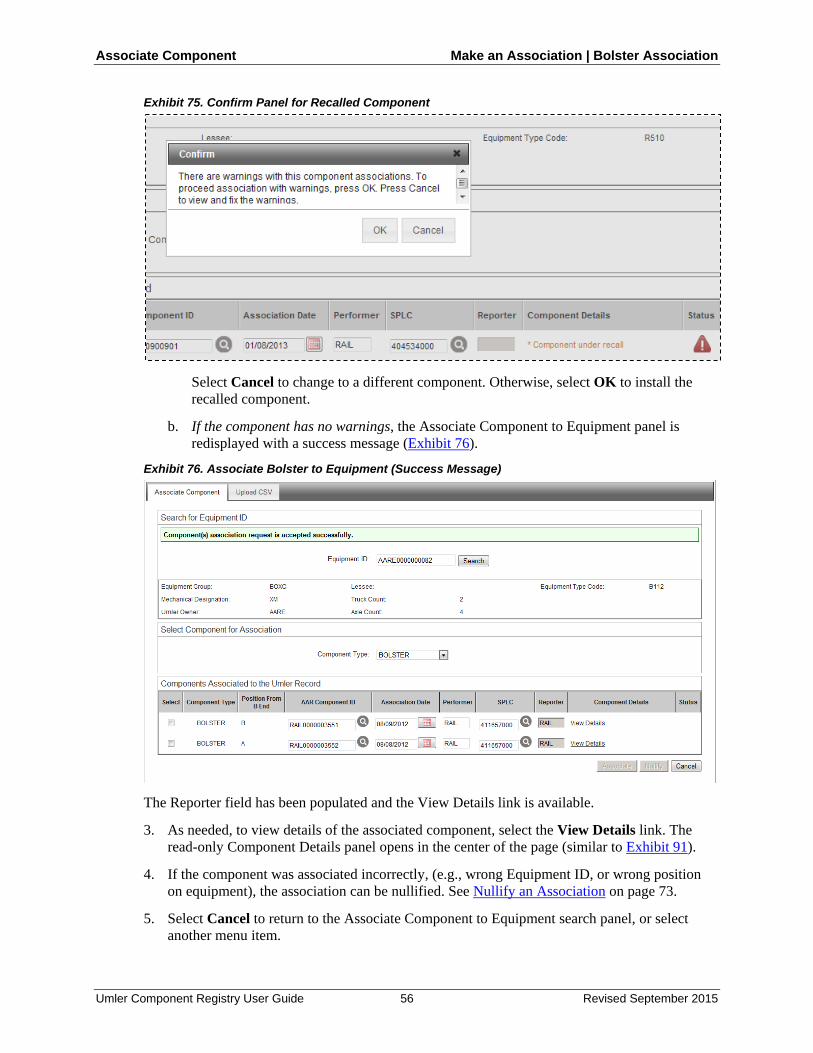
a. If the component has been identified in a recall, a Confirm panel is displayed (Exhibit 75). The Component Details field also shows the component under recall.
Umler Component Registry User Guide 55 Revised September 2015
Associate Component Make an Association | Bolster Association
Exhibit 75. Confirm Panel for Recalled Component
Select Cancel to change to a different component. Otherwise, select OK to install the recalled component.
b. If the component has no warnings, the Associate Component to Equipment panel is redisplayed with a success message (Exhibit 76).
Exhibit 76. Associate Bolster to Equipment (Success Message)
The Reporter field has been populated and the View Details link is available.
3. As needed, to view details of the associated component, select the View Details link. The read-only Component Details panel opens in the center of the page (similar to Exhibit 91).
4. If the component was associated incorrectly, (e.g., wrong Equipment ID, or wrong position on equipment), the association can be nullified. See Nullify an Association on page 73.
5. Select Cancel to return to the Associate Component to Equipment search panel, or select another menu item.
Umler Component Registry User Guide 56 Revised September 2015

Associate Component Make an Association | Coupler Association
Coupler Association The bottom of the panel has a table with the coupler positions (B and A). In Exhibit 77, the equipment RAIL0000000226 has two positions for component association (the "B" end is already completed, but not associated yet).
Exhibit 77. Associate Coupler to Equipment (ready for Association)
1. Complete the table:
a. Select the checkbox beside the position where the component has been applied.
b. Type the AAR Component ID. If the component ID is unknown, use the lookup icon ( ) to open the Component Search panel (Exhibit 78).
• Enter information in the three required fields and select Search.
Note: The system can only return the most recent registration for criteria submitted.
Umler Component Registry User Guide 57 Revised September 2015

Associate Component Make an Association | Coupler Association
Exhibit 78. Component Search (Coupler)
• If a component is found, select the radio button at the left and select Select to close the panel and return to the Association page. The selected Component ID is added to the field.
Note: If no component ID is found, register the component as described in Add New Component on page 13, and come back to associate. Recalled components are NOT identified in a search.
c. Use the calendar icon to select the date the component was applied (cannot be in the
future).
d. Type the mark of the performer (i.e., shop mark).
e. Use the SPLC icon to search for a SPLC (not shown), or type the known nine-digit SPLC where the application was performed (e.g., shop SPLC).
f. Enter other components table rows as appropriate.
When an entry is complete, the Associate button becomes available.
2. If the table rows are correct, select Associate.
a. If the component has been identified in a recall, a Confirm panel is displayed (refer to Exhibit 75). The Component Details field also shows the component under recall.
b. If the component has no warnings, the Associate Component to Equipment panel is redisplayed with a success message (Exhibit 79).
Umler Component Registry User Guide 58 Revised September 2015

Associate Component Make an Association | Coupler Association
Exhibit 79. Associate Coupler to Equipment (Success Message)
The Reporter field has been populated and the View Details link is available.
3. As needed, to view details of the associated component, select the View Details link. The read-only Component Details panel opens in the center of the page (similar to Exhibit 91).
4. If the component was associated incorrectly, (e.g., wrong Equipment ID, or wrong position on equipment), the association can be nullified. See Nullify an Association on page 73.
5. Select Cancel to return to the Associate Component to Equipment search panel, or select another menu item.
Umler Component Registry User Guide 59 Revised September 2015
Associate Component Make an Association | Brake Value Control Emergency Association
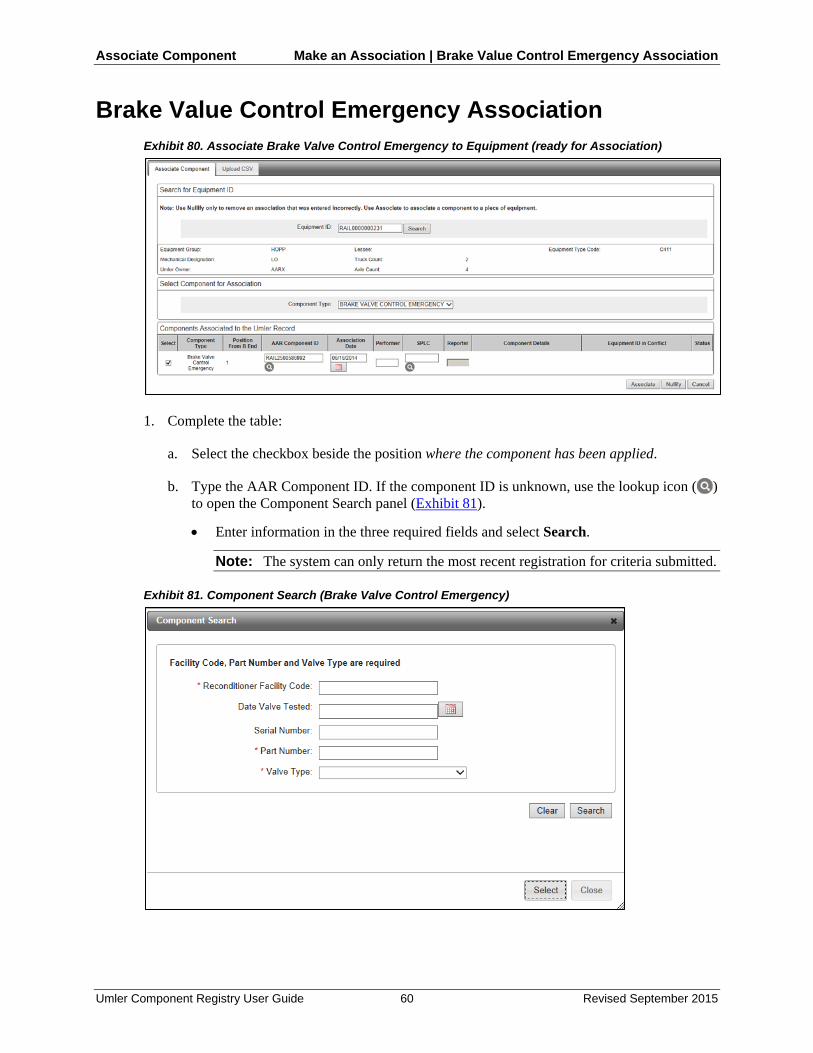
Brake Value Control Emergency Association Exhibit 80. Associate Brake Valve Control Emergency to Equipment (ready for Association)
1. Complete the table:
a. Select the checkbox beside the position where the component has been applied.
b. Type the AAR Component ID. If the component ID is unknown, use the lookup icon ( ) to open the Component Search panel (Exhibit 81).
• Enter information in the three required fields and select Search.
Note: The system can only return the most recent registration for criteria submitted. Exhibit 81. Component Search (Brake Valve Control Emergency)
Umler Component Registry User Guide 60 Revised September 2015

Associate Component Make an Association | Brake Value Control Emergency Association
• If a component is found, select the radio button at the left and select Select to close the panel and return to the Association page. The selected Component ID is added to the field.
Note: If no component ID is found, register the component as described in Add New Component on page 13, and come back to associate. Recalled components are NOT identified in a search.
c. Use the calendar icon to select the date the component was applied (cannot be in the
future).
d. Type the mark of the performer (i.e., shop mark).
e. Use the SPLC icon to search for a SPLC (not shown), or type the known nine-digit SPLC where the application was performed (e.g., shop SPLC).
f. Enter other components table rows as appropriate.
When an entry is complete, the Associate button becomes available.
2. If the table rows are correct, select Associate.
a. If the component has been identified in a recall, a Confirm panel is displayed (refer to Exhibit 75). The Component Details field also shows the component under recall.
b. If the component has no warnings, the Associate Component to Equipment panel is redisplayed with a success message.
Umler Component Registry User Guide 61 Revised September 2015

Associate Component Make an Association | Brake Value Control Service Association
Brake Value Control Service Association Exhibit 82. Associate Brake Valve Control Service to Equipment (ready for Association)
1. Complete the table:
a. Select the checkbox beside the position where the component has been applied.
b. Type the AAR Component ID. If the component ID is unknown, use the lookup icon ( ) to open the Component Search panel (Exhibit 81).
• Enter information in the three required fields and select Search.
Note: The system can only return the most recent registration for criteria submitted.
Umler Component Registry User Guide 62 Revised September 2015
Associate Component Make an Association | Brake Value Control Service Association
Exhibit 83. Component Search (Brake Valve Control Service)
• If a component is found, select the radio button at the left and select Select to close the panel and return to the Association page. The selected Component ID is added to the field.
Note: If no component ID is found, register the component as described in Add New Component on page 13, and come back to associate. Recalled components are NOT identified in a search.
c. Use the calendar icon to select the date the component was applied (cannot be in the
future).
d. Type the mark of the performer (i.e., shop mark).
e. Use the SPLC icon to search for a SPLC (not shown), or type the known nine-digit SPLC where the application was performed (e.g., shop SPLC).
f. Enter other components table rows as appropriate.
When an entry is complete, the Associate button becomes available.
3. If the table rows are correct, select Associate.
a. If the component has been identified in a recall, a Confirm panel is displayed (refer to Exhibit 75). The Component Details field also shows the component under recall.
b. If the component has no warnings, the Associate Component to Equipment panel is redisplayed with a success message.
Umler Component Registry User Guide 63 Revised September 2015
Associate Component Make an Association | Side Frame Association
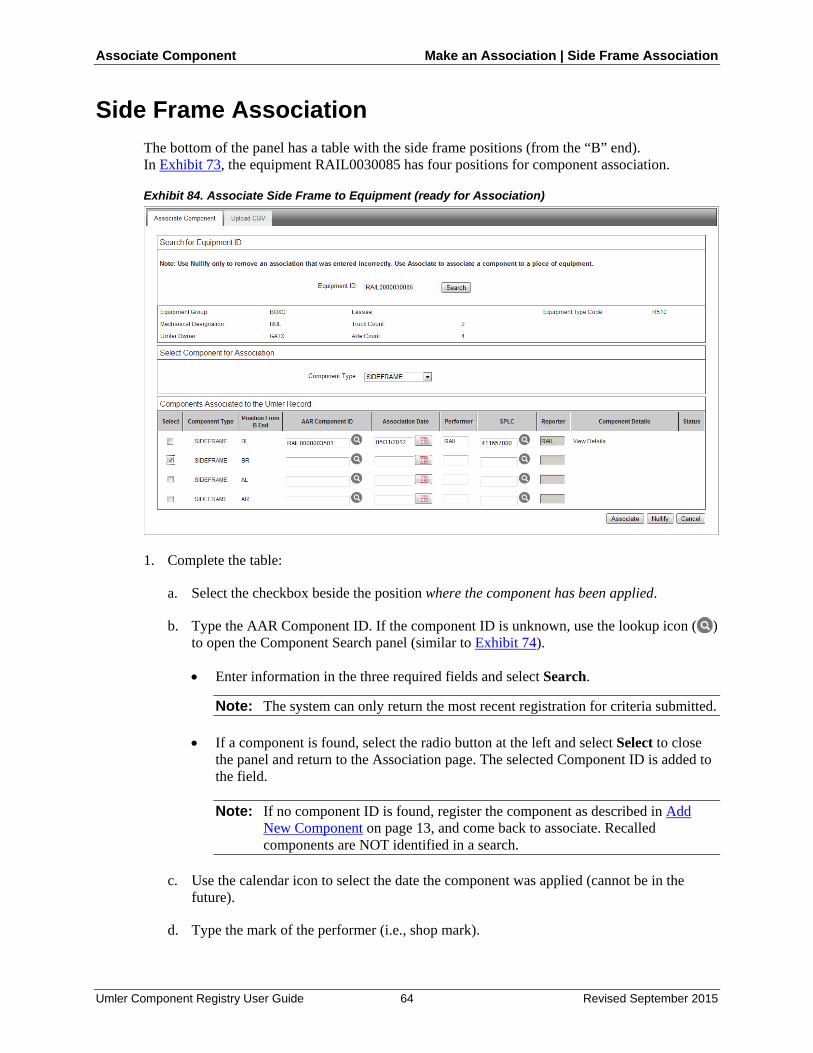
Side Frame Association The bottom of the panel has a table with the side frame positions (from the “B” end). In Exhibit 73, the equipment RAIL0030085 has four positions for component association.
Exhibit 84. Associate Side Frame to Equipment (ready for Association)
1. Complete the table:
a. Select the checkbox beside the position where the component has been applied.
b. Type the AAR Component ID. If the component ID is unknown, use the lookup icon ( ) to open the Component Search panel (similar to Exhibit 74).
• Enter information in the three required fields and select Search.
Note: The system can only return the most recent registration for criteria submitted.
• If a component is found, select the radio button at the left and select Select to close the panel and return to the Association page. The selected Component ID is added to the field.
Note: If no component ID is found, register the component as described in Add New Component on page 13, and come back to associate. Recalled components are NOT identified in a search.
c. Use the calendar icon to select the date the component was applied (cannot be in the
future).
d. Type the mark of the performer (i.e., shop mark).
Umler Component Registry User Guide 64 Revised September 2015

Associate Component Make an Association | Side Frame Association
e. Use the SPLC icon to search for a SPLC (not shown), or type the known nine-digit SPLC where the application was performed (e.g., shop SPLC).
f. Enter other components table rows as appropriate.
When an entry is complete, the Associate button becomes available.
2. If the table is correct, select Associate.
a. If the component has been identified in a recall, a Confirm panel is displayed (refer to Exhibit 75). The Component Details field also shows the component under recall.
b. If the component has no warnings, the Associate Component to Equipment panel is redisplayed with a success message (refer to Exhibit 85).
Exhibit 85. Associate Side Frame to Equipment (Success Message)
The Reporter field has been populated and the View Details link is available.
3. As needed, to view details of the associated component, select the View Details link. The read-only Component Details panel opens in the center of the page (similar to Exhibit 91).
4. If the component was associated incorrectly, (e.g., wrong Equipment ID, or wrong position on equipment), the association can be nullified. See Nullify an Association on page 73.
5. Select Cancel to return to the Associate Component to Equipment search panel, or select another menu item.
Umler Component Registry User Guide 65 Revised September 2015
Associate Component Make an Association | Slack Adjuster Association
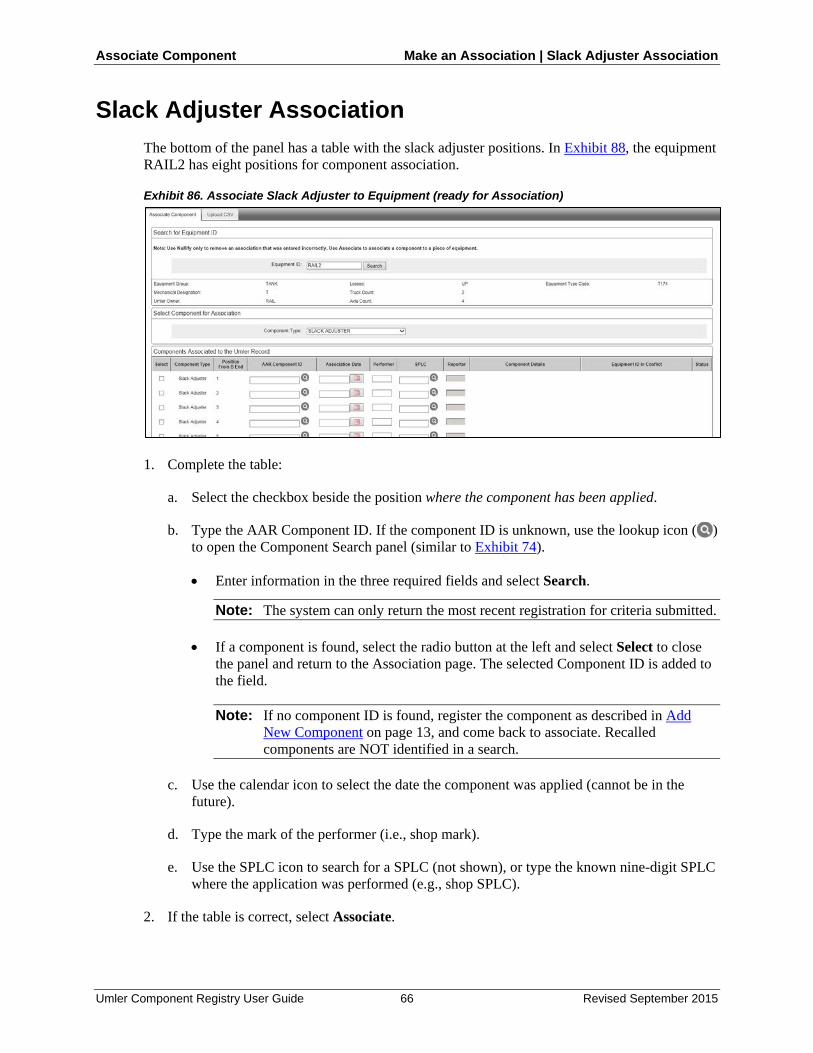
Slack Adjuster Association The bottom of the panel has a table with the slack adjuster positions. In Exhibit 88, the equipment RAIL2 has eight positions for component association.
Exhibit 86. Associate Slack Adjuster to Equipment (ready for Association)
1. Complete the table:
a. Select the checkbox beside the position where the component has been applied.
b. Type the AAR Component ID. If the component ID is unknown, use the lookup icon ( ) to open the Component Search panel (similar to Exhibit 74).
• Enter information in the three required fields and select Search.
Note: The system can only return the most recent registration for criteria submitted.
• If a component is found, select the radio button at the left and select Select to close the panel and return to the Association page. The selected Component ID is added to the field.
Note: If no component ID is found, register the component as described in Add New Component on page 13, and come back to associate. Recalled components are NOT identified in a search.
c. Use the calendar icon to select the date the component was applied (cannot be in the
future).
d. Type the mark of the performer (i.e., shop mark).
e. Use the SPLC icon to search for a SPLC (not shown), or type the known nine-digit SPLC where the application was performed (e.g., shop SPLC).
2. If the table is correct, select Associate.
Umler Component Registry User Guide 66 Revised September 2015
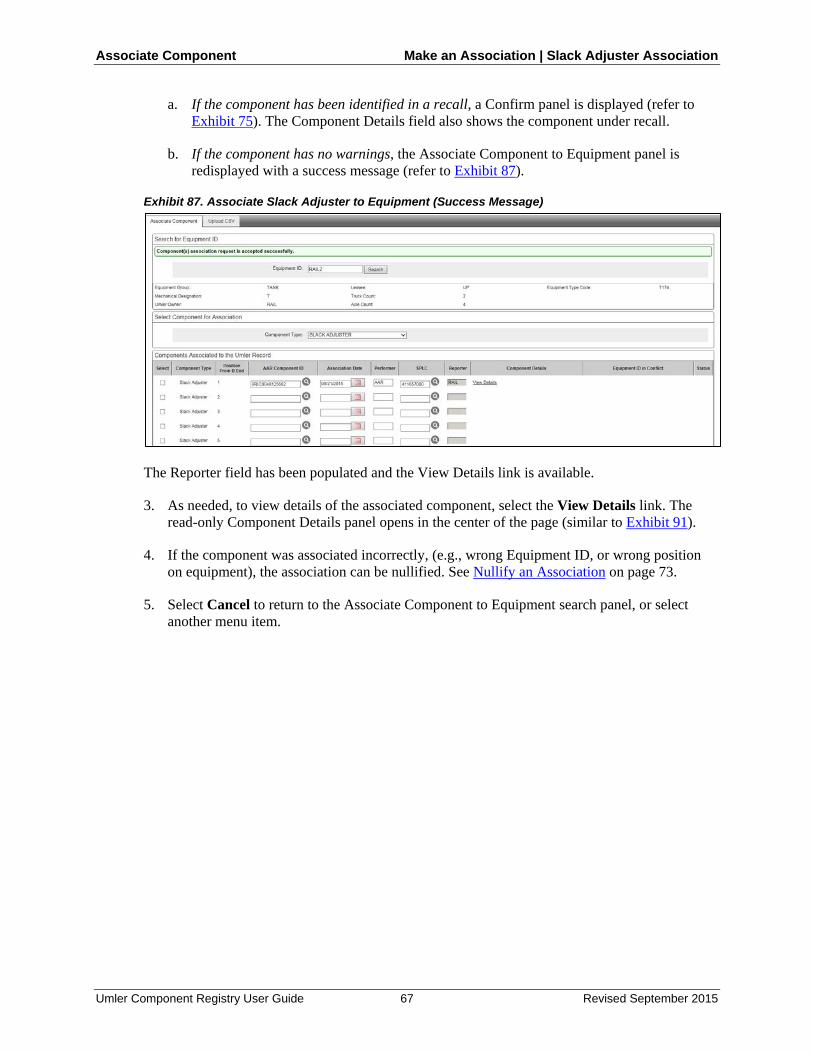
Associate Component Make an Association | Slack Adjuster Association
a. If the component has been identified in a recall, a Confirm panel is displayed (refer to Exhibit 75). The Component Details field also shows the component under recall.
b. If the component has no warnings, the Associate Component to Equipment panel is redisplayed with a success message (refer to Exhibit 87).
Exhibit 87. Associate Slack Adjuster to Equipment (Success Message)
The Reporter field has been populated and the View Details link is available.
3. As needed, to view details of the associated component, select the View Details link. The read-only Component Details panel opens in the center of the page (similar to Exhibit 91).
4. If the component was associated incorrectly, (e.g., wrong Equipment ID, or wrong position on equipment), the association can be nullified. See Nullify an Association on page 73.
5. Select Cancel to return to the Associate Component to Equipment search panel, or select another menu item.
Umler Component Registry User Guide 67 Revised September 2015

Associate Component Make an Association | Wheelset Association
Wheelset Association The bottom of the panel has a table with the wheelset positions (from the “B” end). In Exhibit 88, the equipment RAIL000000082 has four positions for component association.
Exhibit 88. Associate Wheelset to Equipment
1. Complete the table:
a. Select the checkbox beside the position where the component has been applied.
b. Type the AAR Component ID. If the component ID is unknown, use the lookup icon ( ) to open the Component Search panel (Exhibit 89).
• Enter information in both required fields (Wheel Serial Number and Wheel Stamped Manufacturer Code).
• (optional) Enter any of the other available criteria:
– Wheel Stamped Month/Stamped Year
– Wheel Nominal Diameter
– Wheel Design Code
• Select Search.
Umler Component Registry User Guide 68 Revised September 2015

Associate Component Make an Association | Wheelset Association
Exhibit 89. Component Search (Wheelsets)
• If a component is found, select the radio button at the left and select Select to close the panel and return to the Association page. The selected Component ID is added to the field.
Note: If no component ID is found, register a barcoded component as described in Add New Component on page 13, or for a nonbarcoded component, add the component as described in Field Registration on page 30. Recalled components are NOT identified in a search.
c. Use the calendar icon to select the date the component was applied (cannot be in the
future).
d. Type the mark of the performer (i.e., shop mark).
e. Use the SPLC icon to search for a SPLC (not shown), or type the known nine-digit SPLC where the application was performed (e.g., shop SPLC).
f. Enter other components table rows as appropriate.
When an entry is complete, the Associate button becomes available.
2. If the table is correct, select Associate.
a. If the component has been identified in a recall, a Confirm panel is displayed (refer to Exhibit 75). The Component Details field also shows the component under recall.
b. If the component has no warnings, the Associate Component to Equipment panel is redisplayed with a success message (Exhibit 90).
Umler Component Registry User Guide 69 Revised September 2015

Associate Component Make an Association | Wheelset Association
Exhibit 90. Associate Wheelset to Equipment (with success message)
The Reporter field has been populated and the View Details link is available.
3. As needed, to view details of the associated component, select the View Details link. The read-only Component Details panel opens in the center of the page (Exhibit 91).
Umler Component Registry User Guide 70 Revised September 2015

Associate Component Make an Association | Wheelset Association
Exhibit 91. Component Details (read-only)
4. When finished viewing component details, select OK (or ) to close the panel.
5. If the component was associated incorrectly, (e.g., wrong Equipment ID, or wrong position on equipment), the association can be nullified. See Nullify an Association on page 73.
6. Select Cancel to return to the Associate Component to Equipment search panel, or select another menu item.
Umler Component Registry User Guide 71 Revised September 2015
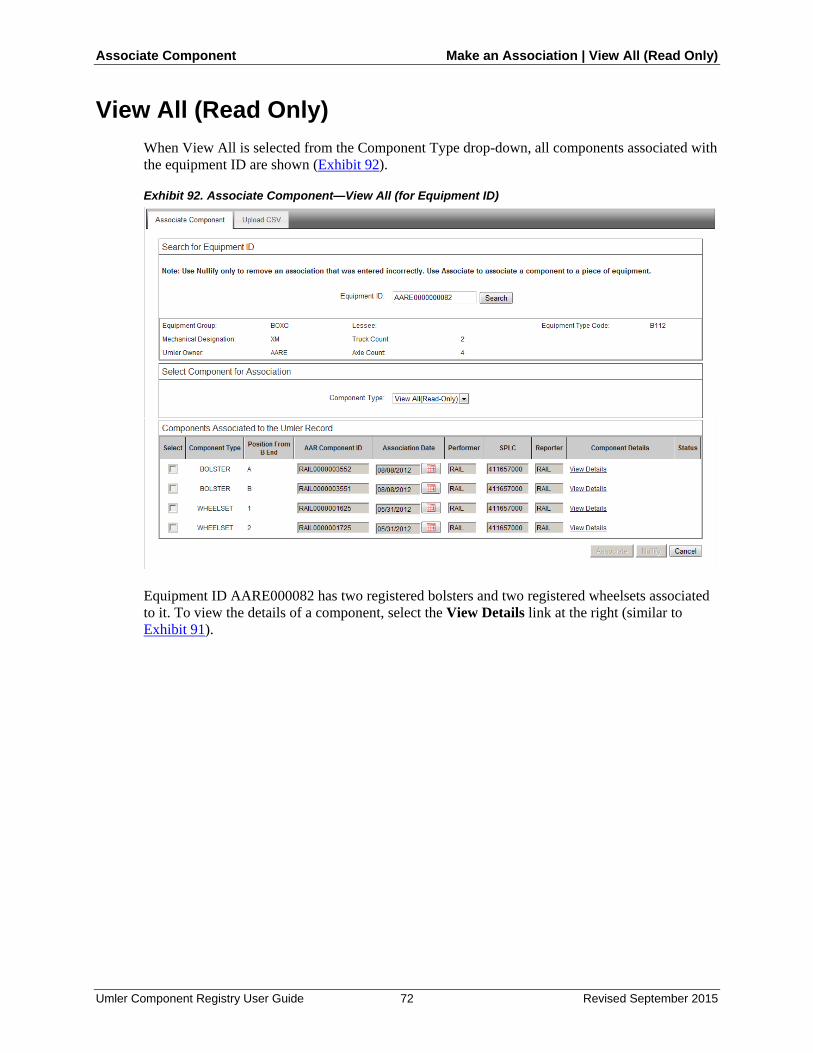
Associate Component Make an Association | View All (Read Only)
View All (Read Only) When View All is selected from the Component Type drop-down, all components associated with the equipment ID are shown (Exhibit 92).
Exhibit 92. Associate Component—View All (for Equipment ID)
Equipment ID AARE000082 has two registered bolsters and two registered wheelsets associated to it. To view the details of a component, select the View Details link at the right (similar to Exhibit 91).
Umler Component Registry User Guide 72 Revised September 2015
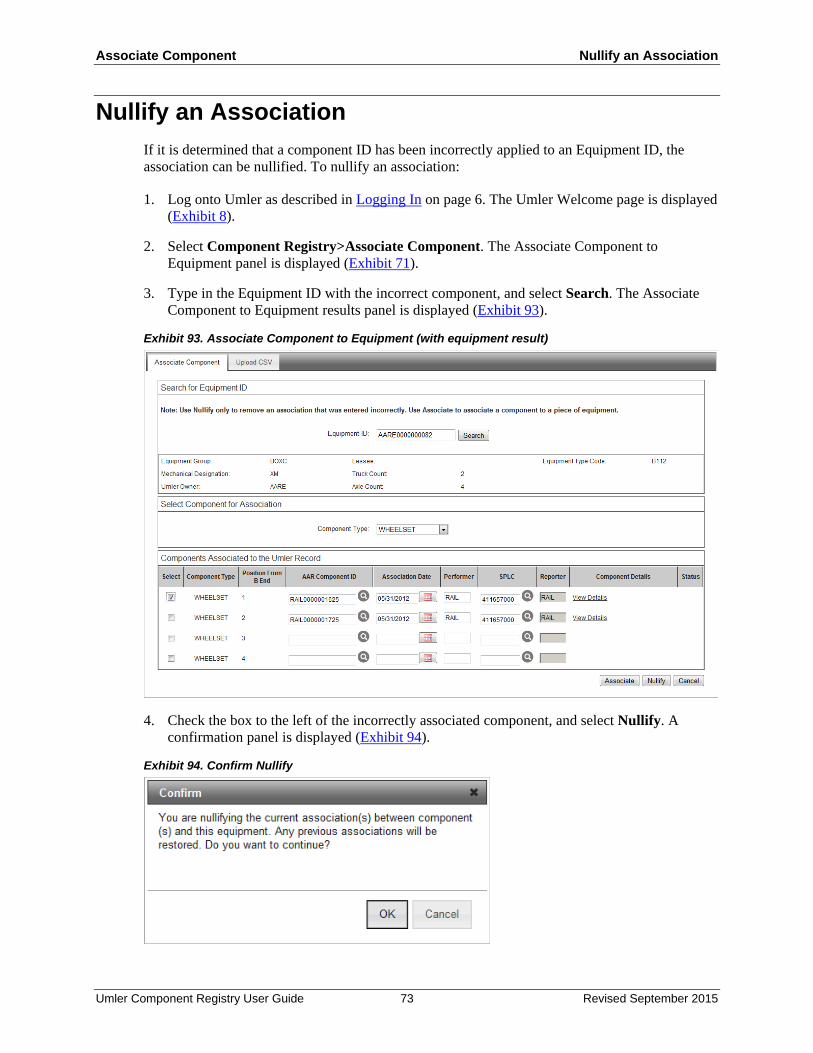
Associate Component Nullify an Association
Nullify an Association If it is determined that a component ID has been incorrectly applied to an Equipment ID, the association can be nullified. To nullify an association:
1. Log onto Umler as described in Logging In on page 6. The Umler Welcome page is displayed (Exhibit 8).
2. Select Component Registry>Associate Component. The Associate Component to Equipment panel is displayed (Exhibit 71).
3. Type in the Equipment ID with the incorrect component, and select Search. The Associate Component to Equipment results panel is displayed (Exhibit 93).
Exhibit 93. Associate Component to Equipment (with equipment result)
4. Check the box to the left of the incorrectly associated component, and select Nullify. A confirmation panel is displayed (Exhibit 94).
Exhibit 94. Confirm Nullify
Umler Component Registry User Guide 73 Revised September 2015

Associate Component Nullify an Association
5. If unsure about the nullification, select Cancel. Otherwise, select OK to nullify the association. The Associate Component to Equipment panel is redisplayed with a success message (Exhibit 95).
Exhibit 95. Associate Component to Equipment (with nullification success message)
Note: If the nullification was for an incorrect position, the component ID can be typed into the correct position and a correct association completed as described in Step 1 on page 68. Likewise, a different component ID can be entered and associated.
6. Select Cancel to return to the Associate Component to Equipment search panel, or select
another menu item.
Umler Component Registry User Guide 74 Revised September 2015

Associate Component Upload Association CSV
Upload Association CSV Uploads can be used to quickly submit many similar associations or to nullify large numbers of incorrectly or prematurely associated components. Users can upload association information from proprietary systems in an acceptable CSV format. To upload an association CSV file:
1. Log onto Umler as described in Logging In on page 6. The Umler Welcome page is displayed (Exhibit 8).
2. Select Component Registry>Associate Component. The Associate Component to Equipment panel is displayed, (Exhibit 71).
3. Select the Upload CSV tab. The Browse files to find an association CSV panel is displayed (Exhibit 96).
Exhibit 96. Browse Files to Find an Association CSV
The link to the right of the Browse button opens a template of the format expected for association uploads. It can be opened or saved (Exhibit 97).
• For additional information about preparing upload files, see CSV Association Upload File Preparation on page 76.
• If the CSV files has already been properly prepared, refer to Uploading the CSV File on page 28. This is similar to the process for registering components via CSV.
Umler Component Registry User Guide 75 Revised September 2015
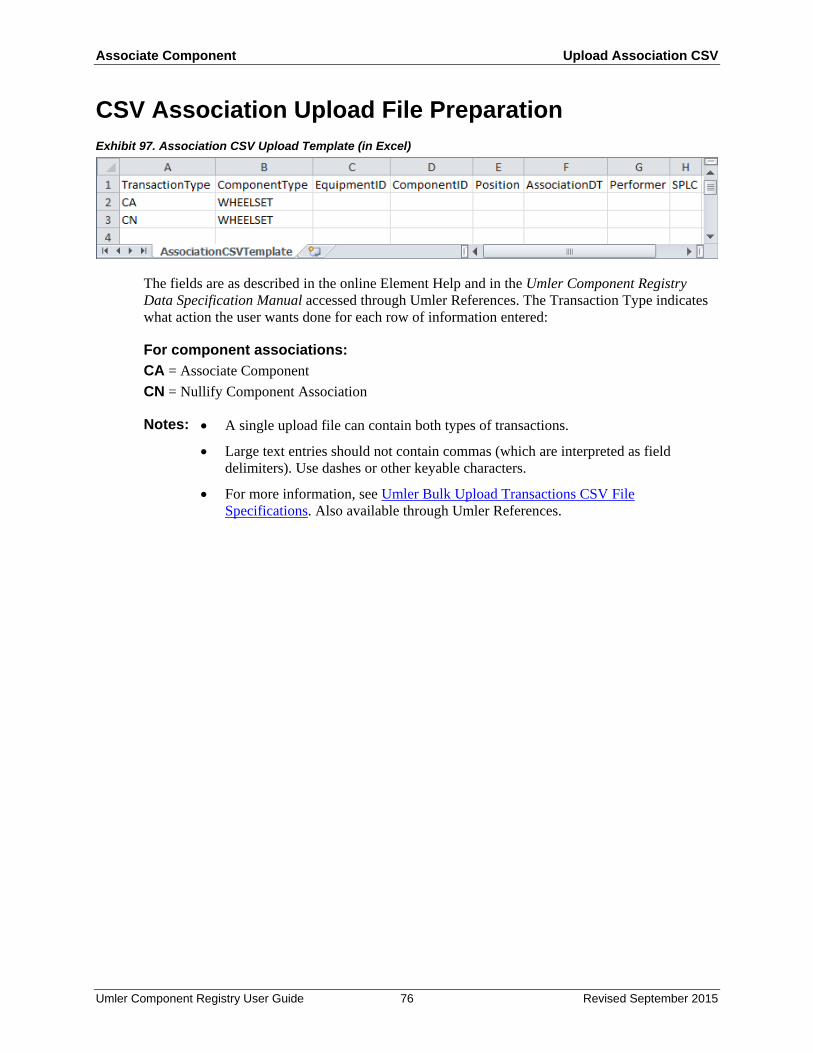
Associate Component Upload Association CSV
CSV Association Upload File Preparation Exhibit 97. Association CSV Upload Template (in Excel)
The fields are as described in the online Element Help and in the Umler Component Registry Data Specification Manual accessed through Umler References. The Transaction Type indicates what action the user wants done for each row of information entered:
For component associations: CA = Associate Component CN = Nullify Component Association
Notes: • A single upload file can contain both types of transactions.
• Large text entries should not contain commas (which are interpreted as field delimiters). Use dashes or other keyable characters.
• For more information, see Umler Bulk Upload Transactions CSV File Specifications. Also available through Umler References.
Umler Component Registry User Guide 76 Revised September 2015

Associate Component Component Association Transaction History
Component Association Transaction History The history of component association transactions can be accessed using the Umler Transaction Log task. To view historical component associations:
1. Log onto Umler as described in Logging In on page 6. The Umler Welcome page is displayed (Exhibit 8).
2. Select Query>Transaction Log. The Transaction Log Search panel is displayed (Exhibit 98).
Exhibit 98. Transaction Log Search (with Element Value Criteria for Wheelset Components)
3. Set general search criteria as described in the Umler User Guide.
Umler Component Registry User Guide 77 Revised September 2015
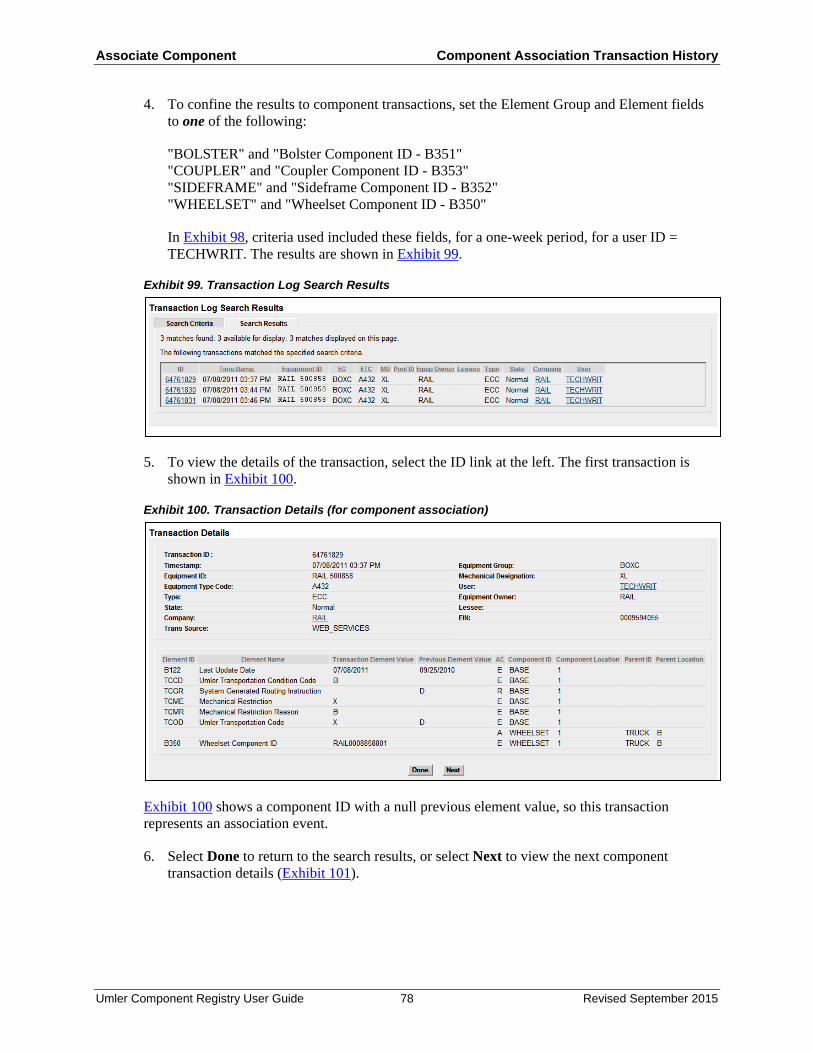
Associate Component Component Association Transaction History
4. To confine the results to component transactions, set the Element Group and Element fields to one of the following:
"BOLSTER" and "Bolster Component ID - B351" "COUPLER" and "Coupler Component ID - B353" "SIDEFRAME" and "Sideframe Component ID - B352" "WHEELSET" and "Wheelset Component ID - B350"
In Exhibit 98, criteria used included these fields, for a one-week period, for a user ID = TECHWRIT. The results are shown in Exhibit 99.
Exhibit 99. Transaction Log Search Results
5. To view the details of the transaction, select the ID link at the left. The first transaction is shown in Exhibit 100.
Exhibit 100. Transaction Details (for component association)
Exhibit 100 shows a component ID with a null previous element value, so this transaction represents an association event.
6. Select Done to return to the search results, or select Next to view the next component transaction details (Exhibit 101).
Umler Component Registry User Guide 78 Revised September 2015

Associate Component Component Association Transaction History
Exhibit 101. Transaction Details (for component nullification transaction)
In Exhibit 101, the Wheelset Component ID value is null, with a previous value of RAIL0008858801, which indicates that the association has been nullified.
7. Select Done to return to the search results or select another menu item.
Umler Component Registry User Guide 79 Revised September 2015

Query Pre-Defined Queries
Query When the user selects Query>, the Query submenu opens:
Exhibit 102. Query Submenu
The Component Registry Query menu has the following functions:
Exhibit 103. Component Registry Query Menu Functions Pre-Defined
Queries Allows the authorized user to execute standard queries (Exhibit 104).
Advanced Query
Allows the user to prepare a custom queries using multiple criteria with Boolean operators that can be saved, run, and edited. Refer to the Railinc Advanced Query User Guide accessed using the Advanced Query Documentation tab.
Pre-Defined Queries Pre-defined queries can be used to identify:
• Components the user's company has registered (Date range allowed) • Components Associated to user's Equipment (Date range allowed) • Components the user has associated in the past 90 days.
Results are always sent as a zipped CSV file attached to an e-mail.
To begin, select Component Registry>Pre-Defined Query. The Pre-Defined Query panel is displayed (Exhibit 104).
Umler Component Registry User Guide 80 Revised September 2015

Query Pre-Defined Queries
Exhibit 104. Pre-Defined Query (default panel)
Make criteria selections.
Note: Component Type can be set to Bolster, Coupler, Brake Valve Control Emergency, Brake Valve Control Service, Sideframe, Slack Adjuster or Wheelset.
Select Submit (Exhibit 105).
Exhibit 105. Pre-Defined Query (with criteria set)
A success message is displayed (Exhibit 106).
Umler Component Registry User Guide 81 Revised September 2015

Query Pre-Defined Queries
Exhibit 106. Pre-Defined Query (with success message)
The e-mail contains a zip CSV file (Exhibit 107).
Exhibit 107. Pre-Defined Query E-Mail (with zipped CSV file attached).
Double-clicking the file within the e-mail opens the zip file in a file list. Double-click again to extract in spreadsheet application (e.g., Excel).
Umler Component Registry User Guide 82 Revised September 2015
Glossary
Glossary AAR—American Association of Railroads
Car Hire—Car Hire is a usage charge paid to car owners by railroads for the use of freight cars and appurtenances.
CEPM—Comprehensive Equipment Performance Monitoring program. Components are registered in the Umler Component Registry, and associated to equipment using CEPM or through inputs from CRB and EHMS. First CEPM component is wheelsets. Subsequently added components include bolsters, couplers, and side frames.
Component ID—Uniquely identifiable information that includes 14 characters and is comprised of a company ID or Mark and up to 10-digit serial number. This component ID is the standard “AAR Component ID” that will be physically applied to the component during assembly.
CRB—Car Repair Billing.
EHMS—Equipment Health Maintenance System.
LCS—Liability Continuity System.
RAMP-ED—Rail Asset Management Process-Exception Disposition (RAMP-ED) system
SPLC—Standard Point Location Code.
Umler—Equipment Management Information System (formerly the Universal Machine Language Equipment Register [UMLER])
Umler Component Registry User Guide 83 Revised September 2015
Index
Index AAR Component ID, 83 AAR Field Manual, 30
overview, 30 Rule 16-18, 36 Rule 41, 49 Rule 43, 48 Rule 44, 48 Rule 47, 33 Rule 48, 45
AC (add component), 27 add, 13
bolster, 16 Brake Valve Control Emergency, 19 component registration, 13 Component Transaction Type (AC), 27 coupler, 18, 20 sideframe, 21 slack adjuster, 22 wheelset, 23
advanced query, 80 application title, 3 Applied Qualifier, 30
AAR Field Manual, 30 roller bearings, 49 wheels, 49
associate, 52 bolster, 54 component, 52 coupler, 57 sideframe, 64 slack adjuster, 66 Transaction Type (CA), 76 wheelset, 68
Associate button, 5 description, 5 used, 55, 58, 61, 63, 65, 66, 69
association, 52 component, 52 in Umler transaction log, 77 nullify, 73 query, 80 remove, 73 Upload CSV, 75
bolster, 16 associate, 54 associate View Details, 56, 59 association search, 54 diagram, 31 register, 16
brake value control emergency association search, 60, 62
Brake Valve Control Emergency register, 19
button, 5 Associate, 5 CEPM-specific, 5 Nullify, 5
CA (associate component), 76 CC (change component), 27 change, 4
company, 4 Component Transaction Type (CC), 27
checkbox (Same as), 25, 50 CN (nullify association), 76 company, 4
change, 4
select, 6 component, 8
add, 13 associate, 52 association in transaction log, 77 delete, 12 edit, 11 element help, 13 ID, 83 recalled, 55 register, 13 search, 8 view, 10
component ID, 83 AAR, 83 definition, 83 field registration, 30 for nonbarcoded wheelsets, 30
Component Registry, 1, 5 Associate Component, 52 computer requirements, 1 icons, 5 menu, 5 prerequisites, 1 Registration, 8
Component Search, 68 bolster, 54 brake value control emergency, 60, 62 coupler, 57 sideframe, 64 slack adjuster, 66 wheelset, 68
computer requirements, 1 Condition Code, 30
AAR Field Manual, 30 axles, 48 roller bearings, 49 wheels, 49 wheelsets, 48
contact us link, 4 content area, 4 copyright, 4 coupler, 18, 19, 20
associate, 57 association search, 57 diagram, 35 register, 18, 20
CSV, 26 advanced query, 82 CEPM association upload file preparation, 76 CEPM registration upload file preparation, 27 CEPM upload file submission, 28 CEPM upload validation, 29
DC (delete component), 27 delete, 12
component, 12 Component Transaction Type (DC), 27
diagram bolster, 31 coupler, 35 sideframe, 44
Display Unit icon, 4 edit component, 11 element help (component), 13 e-mail, 28
CSV upload status, 28
Umler Component Registry User Guide 84 Revised September 2015
Index
query results, 80 Field Registration, 30
bolster, 31 bolster component ID generation, 34 bolster input fields, 33 Brake Valve Control Emergency, 38 brake valve control emergency component ID generation, 39 Brake Valve Control Service, 40 brake valve control service component ID generation, 41 coupler, 35 coupler component ID generation, 36 coupler input fields, 35 prerequisites, 30 search for bolster, 31 search for Brake Valve Control Emergency, 38 search for Brake Valve Control Service, 40 search for coupler, 35 search for sideframe, 44 search for Slack Adjuster, 42 search for wheelset, 47 sideframe, 44 sideframe component ID generation, 45 sideframe input fields, 45 Slack Adjuster, 42 slack adjuster component ID generation, 43 start, 30 validation error, 33, 50 wheelset component ID generation, 50 wheelset input fields, 48
glossary, 83 help, 4
element, 13 page, 4
icon, 4 CEPM-specific, 5 Display Unit, 4
Job Code, 30 AAR Field Manual, 30 axles, 48 roller bearings, 49 wheels, 49 wheelsets, 48
Launch Pad, 4 legal, 4 legal notices, 4 link, 4
contact us, 4 Launch Pad, 4 navigational, 4 sign out, 4
locking plate, 48 log in, 6 log out, 7 logo (Railinc), 3 lookup icon (MID), 48 menu, 4
application, 4 Component Registry, 8 Help, 4 Query, 80 references, 4
MID Code, 48 multiple sessions, 6 navigational link, 4 nullify, 5
association, 73 confirmation, 73 success message, 74 Transaction Type (CN), 76
Nullify button, 5
description, 5 used, 73
page help, 4 page title, 4 pre-defined query, 80 privacy rights, 4 query, 80
advanced, 80 associated components, 80 pre-defined, 80 registered components, 80 results e-mail, 80
Query, 80 advanced query, 80 pre-defined query, 80 submenu, 80
Railinc logo, 3 recalled component, 55 references, 4 Registration, 8
Add New, 13 Field Registration, 30 Search, 8 Upload CSV, 26
Rule 16-18 (Couplers), 36 Rule 36 (Roller Bearings), 49 Rule 41 (Wheels), 49 Rule 43 (Axles), 48 Rule 44 (Wheelsets), 48 Rule 47 (Bolsters), 33 Rule 48 (Truck Side Frames), 45 Same As checkbox, 25, 50 search, 8
registry component, 8 tab, 8 unbarcoded bolster, 31 unbarcoded Brake Valve Control Emergency, 38 unbarcoded Brake Valve Control Service, 40 unbarcoded coupler, 35 unbarcoded sideframe, 44 unbarcoded Slack Adjuster, 42 unbarcoded wheelset, 47
sideframe, 21 associate, 64 associate View Details, 65 association search, 64 diagram, 44 register, 21
sign out link, 4 Sign-On Information, 3 slack adjuster
associate, 66 associate View Details, 67 association search, 66 register, 22
slack adjusters, 22 system requirements, 1 terminology, 2 terms of service, 4 title, 3
application, 3 page, 4
transaction log, 77 component association, 77 component association event, 78 component nullification event, 79
Transaction Type, 27 AC, 27 CA, 76 CC, 27
Umler Component Registry User Guide 85 Revised September 2015
Index
CN, 76 DC, 27 upload association, 76 upload registration, 27
Umler, 5 Component Registry menu, 5 log in, 6 log out, 7 multiple sessions, 6 Welcome, 7
Upload CSV, 26 CEPM association file preparation, 76 CEPM association template, 76 CEPM registration file preparation, 27 CEPM registration template, 27 e-mail status, 28 overview for CEPM, 26 upload submission, 28
validation, 29 validate CSV upload, 29 View Details, 70
bolster, 56, 59 sideframe, 65 slack adjuster, 67 wheelset, 70
web interface, 3 CEPM page layout, 3 CEPM-specific elements, 5
Welcome page, 7 wheelset, 23
associate, 68 associate View Details, 70 association search, 68 register, 23 register nonbarcorded, 30
Umler Component Registry User Guide 86 Revised September 2015