um_geopak_2_4_e
DESCRIPTION
Apostila geopak_2.4TRANSCRIPT

GEOPAK The geometric 3D software for co-ordinate measurement machines
User's Manual v 2.4

General Information
1 General Information GEOPAK
registers and calculates the geometric data of your parts records program runs for the following measurements provides, among others, all data (nominal-actual comparison) for
statistics (STATPAK) is the basic program for the 3D nominal-actual comparison of
surfaces (3D-TOL). Copyright (c) 2004 Mitutoyo Neuss, September 2004 Mitutoyo Messgeraete GmbH Borsigstrasse 8 - 10 D - 41469 Neuss Phone ++49 - 21 37-102-0 Fax ++49 - 21 37-86 85 E-mail:[email protected] International copyright laws protect the program itself as well as this online help. It is not allowed to copy or pass to third persons the total or part of it. The copyright is exclusively at Mitutoyo Messgeraete GmbH.
I-2 v 2.4 14.09.04

General Information
Overview The most important topics of the program GEOPAK I General Information and Contents II Learn Mode III Probe IV Workpiece Alignment V Elements: Basics VI Elements: Further Options VII Elements: Graphical Presentation VIII Variance Comparison IX Output of Data X Contours XI CMM Movement XII Appendix
14.09.04 v 2.4 I-3


Part Program Editor
14.09.04 v 2.4 II-1
II Learn Mode Contents 1 Part Program Editor ........................................................ 5
1.1 Introduction Part Program Editor............................................... 5 1.2 Part program window.................................................................. 6 1.3 Rights to write.............................................................................. 6 1.4 Insert / Overwrite ......................................................................... 7 1.5 Copy / Insert ................................................................................. 7 1.6 Undo ............................................................................................. 7
2 Learn Mode: Basics ........................................................ 8
2.1 Learn Mode: Introduction ........................................................... 8 2.2 Starting Learn Mode.................................................................... 9 2.3 Start up Wizard .......................................................................... 10
2.3.1 Definition ......................................................................................... 10 2.3.2 Procedure........................................................................................ 10 2.3.3 Hints ................................................................................................ 11 2.3.4 Configuration ................................................................................... 11
2.4 Temperature Compensation ..................................................... 12 2.4.1 Temperature Compensation: Manual CMM ..................................... 13
2.5 Reference Position .................................................................... 16 2.5.1 Compensation and Rotary Table ..................................................... 16 2.5.2 Define Reference Position ............................................................... 16 2.5.3 Procedure........................................................................................ 16
2.6 Volume Compensation.............................................................. 17 2.6.1 Probe Offset to Z-spindle................................................................. 17 2.6.2 Automatic Control ............................................................................ 17
3 Learn Mode Main Window ............................................ 18
3.1 PartManager and GEOPAK ....................................................... 18 3.2 The layout of the main window ................................................ 18 3.3 Windows and Tools................................................................... 20 3.4 Window Positions...................................................................... 21 3.5 Exit Single Measurement .......................................................... 22 3.6 Relearn from Repeat Mode ....................................................... 22 3.7 Measurement Window / Measurement Time ........................... 23
3.7.1 Measurement Window..................................................................... 23 3.7.2 Measurement time........................................................................... 23
3.8 Input Characteristics................................................................. 24 3.9 Reset System ............................................................................. 24 3.10 Printer Settings.......................................................................... 25 3.11 Reset Controller......................................................................... 25 3.12 Sound Output............................................................................. 25

Part Program Editor
II-2 v 2.4 14.09.04
3.13 Pallet Co-Ordinate System ....................................................... 26 3.13.1 Definitions ....................................................................................... 26 3.13.2 Connection to Manager Programs and Q-PAK................................ 26
4 Programming Help Contents........................................ 28
4.1 Programming help: Functions ................................................. 28 4.2 Measurement Graphic / Measurement Sequence .................. 29
5 Variables and Calculations........................................... 30
5.1 Definition of Variables .............................................................. 31 5.1.1 Decimal Places................................................................................ 31 5.1.2 Variables: Input of Formula ............................................................. 32 5.1.3 Include Element Characteristics ...................................................... 32
5.2 Input of Variables ...................................................................... 33 5.3 Yes/No Variable ......................................................................... 34 5.4 Save / Load Variables ............................................................... 34
5.4.1 Save ................................................................................................ 34 5.4.2 Load ................................................................................................ 34 5.4.3 Definition ......................................................................................... 34 5.4.4 Calling Variable from File ................................................................ 35
5.5 Transfer Actual CMM Position to Variable .............................. 35 5.6 Actual Temperature in Variable ............................................... 36 5.7 Settings for Temperature Compensation................................ 37 5.8 Settings in the dialogue............................................................ 38 5.9 Definition of String Variables ................................................... 39 5.10 Input of String Variables........................................................... 39 5.11 Store/Load String Variables ..................................................... 40 5.12 Wait for file with string variable ............................................... 41 5.13 System Variable in the Formula Calculation........................... 41
6 Operators and Functions.............................................. 42
6.1 Arithmetic Operators ................................................................ 42 6.2 Relational operators ................................................................. 42 6.3 Logical Operators ..................................................................... 43 6.4 Constants................................................................................... 43 6.5 Trigonometrical Functions ....................................................... 44 6.6 Arithmetic Functions ................................................................ 44 6.7 Operator Precedence................................................................ 45 6.8 Basic Geometry Elements ........................................................ 45 6.9 Element components................................................................ 46 6.10 GEOPAK Elements: Hole Shapes ............................................ 47 6.11 GEOPAK Probes........................................................................ 48 6.12 GEOPAK Rotary Table Data ..................................................... 49 6.13 Minimum Maximum................................................................... 49
6.13.1 Minimum maximum calculation........................................................ 49

Part Program Editor
14.09.04 v 2.4 II-3
6.13.2 Minimum maximum features............................................................ 49 6.13.3 Minimum maximum components ..................................................... 50 6.13.4 Example for minimum maximum access:......................................... 50
6.14 Best Fit ....................................................................................... 51 6.14.1 Best Fit Components ....................................................................... 51 6.14.2 Example for best fit access:............................................................. 51
6.15 Other GEOPAK Variables.......................................................... 52 6.16 Date and Time ............................................................................ 52 6.17 Week-days.................................................................................. 52 6.18 Week numbers ........................................................................... 52 6.19 System Time............................................................................... 53 6.20 Examples.................................................................................... 53 6.21 Result of Nominal-to-Actual Comparisons.............................. 54 6.22 Last Nominal-to-Actual Comparison........................................ 55 6.23 Nominal-to-Actual Comparison of Last Element .................... 56 6.24 Result of All Nominal-to-Actual Comparisons ........................ 57
7 Scale Factor................................................................... 59
7.1 Scale all elements (including element point) .......................... 59 7.2 Scale only element point........................................................... 59 7.3 Set scaling centre into origin ................................................... 60 7.4 Use scale factor for 3D-TOL ..................................................... 60
8 Sequence Control.......................................................... 61
8.1 Loops.......................................................................................... 61 8.1.1 Definition ......................................................................................... 61 8.1.2 Symbol or Special Character ........................................................... 61 8.1.3 Procedure........................................................................................ 61
8.2 Branches .................................................................................... 62 8.3 Subprograms ............................................................................. 62
8.3.1 Definition and Types........................................................................ 62 8.3.2 Create a Local Sub-Program........................................................... 62 8.3.3 Using an already existing Sub-Program........................................... 63
8.4 Delete Last Step......................................................................... 63 8.5 Error While Executing Command............................................. 64 8.6 Comment Line............................................................................ 64 8.7 Programmable Stop................................................................... 65 8.8 Show Picture.............................................................................. 65 8.9 Clear Picture .............................................................................. 65 8.10 Play Sound ................................................................................. 65 8.11 Send E-Mail ................................................................................ 66 8.12 Send SMS ................................................................................... 66 8.13 Create Directory......................................................................... 67 8.14 Input Head Data ......................................................................... 67

Part Program Editor
II-4 v 2.4 14.09.04
8.15 Set Head Data Field................................................................... 69 8.16 Sublot Input ............................................................................... 70 8.17 Set Sublot .................................................................................. 71 8.18 Program Call.............................................................................. 72 8.19 IO Condition (IO Communication)............................................ 73 8.20 Possibilities of Text Input/Data Name ..................................... 74 8.21 Single Selection ........................................................................ 75 8.22 Group Selection ........................................................................ 76

Part Program Editor
14.09.04 v 2.4 II-5
1 Part Program Editor 1.1 Introduction Part Program Editor
The part program editor allows you to
� view a part program,
� change a previously learnt part program,
� create new programs.
Select your part in the PartManager's part list, then activate the editor by a mouse click on the symbol shown above or via the menu bar "CMM / Part program editor". The main menu of the editor will be displayed.
Then you find a window (one for each part) in the centre of the screen (second window). With the <CTRL> key, you can call multiple part program windows from the parts list. The title line contains the name of the corresponding part program. It is possible to randomly move the part program windows as well as all the following dialog windows.
Activate Window If you work with several part program windows, you can activate the single windows as you want (Menu Bar / Window / Window …).
� In the list of the following window, you click on the title of the window you want and
� then on "Activate".

Part Program Editor
II-6 v 2.4 14.09.04
1.2 Part program window The part program window contains the following information (subdivided into five columns):
� Sequence number of the line (infinitely)
� Loop nesting
� Symbols of the function
� Text (name) of the function
� Parameter(s) of the function
To call the dialog from the learn mode, activate the corresponding line via mouse click. This line is shown now as a dark field. Now you have three possibilities to continue your work:
� Double click into the program line
� Click the symbol of the machine tools (e.g. "circle" if the element "circle" has been used in the single/learn mode for the measurement). The "Automatic Circle Measurement" dialog window is displayed.
� You can also use the way via the menu bar "Measurement"/"Automatic Element"/"Circle" (our example)
You can also click on a tool of your machine tools, which has not yet been measured. You get a dialog window to this tool (e.g. "Automatic Element Measurement Cylinder"). Depending on the mode you selected before – overwrite or insert – you overwrite the activated line or insert a new line.
1.3 Rights to write If you want to change a part program or create a new one, you need the
corresponding user right. The administrator assigns these rights (cf. also User Rights). You can see by the pen symbol in the status bar, lower left corner, whether you are actually allowed to change the program or not.

Part Program Editor
14.09.04 v 2.4 II-7
1.4 Insert / Overwrite You have two possibilities to toggle between Insert/Overwrite. You can see the mode in the status line on the right below.
� You toggle with the insert key of your keyboard.
� You can change via the menu bar "Edit / Overwrite". The "Overwrite" gets a tic, or the tic is removed.
1.5 Copy / Insert
You can also copy one or several command (program lines) by marking them with the mouse; if you want to mark several lines, keep - as usual - the <CTRL> key pressed when selecting. Thus the lines are put to the clipboard; from there they can be inserted into the same program at a different place, or even inserted into another part program. You deactivate the lines with the mouse or the <Shift> key.
1.6 Undo
If you want to copy lines, use the icon of the editor tool bar. If the tool bar is not displayed, you can undo all changes you have made, until the beginning of your editor session. Cancelling of any action can be achieved in two ways:
� Click on the backspace arrow of your editor tool bar, or …
� Choose the menu bar "Edit / Undo".

Learn Mode: Basics
II-8 v 2.4 14.09.04
2 Learn Mode: Basics 2.1 Learn Mode: Introduction
Using GEOPAK, you can obtain the geometrical data of your parts by a measurement procedure. To prepare the measurement program, you are automatically guided until all conditions for a smooth program run are fulfilled:
� Check of the connected devices
� Definition of the probe data
� Alignment of the part
Usually, you want to compare certain features of your parts against their nominal values shown on the drawing (e.g. diameter, straightness, and parallelism). GEOPAK offers elements (circle, plane etc.) that can be used to get these features.
Example: You want to measure a diameter (cf. drawing below) and to check whether its size is within the specified limits (here: 30mm diameter, the limits defined by a table value of H8).
In the main window of "Single / Learn", click the circle in the icon bar on top. Then you get a window to define how your circle must be constructed:
� the type of construction (measurement, intersection, etc.)
� the type of calculation, if made from single points or not (Gauss, minimum circumscribed, etc.)
� further measurement parameters (e.g. automatic measurement, graphic, tolerancing),
� for measured element, the number of points,
� give also a name and a number to each element,
After confirmation, you may only concentrate on the measurement.

Learn Mode: Basics
14.09.04 v 2.4 II-9
In the next step, - if you have activated tolerances via the symbol, you can input:
• the tolerance values, e.g.: +-0.100 or • e.g. with H8 the tolerance field according to DIN/ISO.
This measurement sequence is automatically stored. The data registered and stored in the learn mode is the prerequisite for any subsequent or later repeat mode.
2.2 Starting Learn Mode You have called learn mode of a part for which at least one part program already exists. Furthermore, there do exist measuring data of the last program run. Now you have the following possibilities:
� Relearn: You can extend the existing program, i.e. continue it. If you select this possibility, GEOPAK restores the data that resulted during the last program run. You can continue at the position, you e.g. stopped the day before. You do not have to execute the measurement again.
If you have changed the program in the meantime with the editor, it happens that the stored data do not correspond any more with the program run. The editor changes the part program but has no influence on the data!
� You can overwrite the existing part program if you do not use it any longer
� You can create a New Part Program if you want, e.g. determine a position program for a part and a separate CNC-operational sequence.
• Enter your new part program into the text field and confirm (OK).
• When starting the repeat mode, you can select from a part program table, which part programs you want to execute.

Learn Mode: Basics
II-10 v 2.4 14.09.04
2.3 Start up Wizard 2.3.1 Definition To control the program start for the learning mode, you can use the "Start up Wizard". This Start up Wizard is designed to give you the possibility to learn the part program start in a standardised form. It is basically possible to configure the Start up Wizard regarding its settings yourself. The Mitutoyo defaults are described under the topic "Procedure" below.
2.3.2 Procedure Start the part program like usual in the PartManager.
Following the two windows you know "Which probe tree is active?" and "Temperature coefficient", the dialogue "Start up Wizard" opens.
In the first window of the Start up Wizard you already define
� the probe to be used.
� Click on "Next" to get to the co-ordinate system,
� then click on "CNC-Parameter and CNC on",
� then on "Print format specification "
� and finally on the selection of the protocol.
As you can see, you have to work with five windows according to the default values, which is also indicated by the contents of the bracket in the title: (2/6). In this example, you are in the first of five windows. If you, however, decide in favour of the "Pattern alignment" in the subsequent window (ill. below), you need to go through one window more, i.e. six windows.
Otherwise, also your settings in the PartManager (Settings / Defaults for Programs / GEOPAK / Menus) are decisive for with how many windows you have to work with when using the Start up Wizard (see ill. below). If you have not requested the optional protocol, the Start up Wizard will not offer a respective option.

Learn Mode: Basics
14.09.04 v 2.4 II-11
2.3.3 Hints The symbols in the windows of the Start up Wizard are each complemented by a balloon.
However, the following symbols are particularly important:
You use this symbol to decide that you do not want your inputs to be learned.
You click on this symbol when you wish to make an input and you want this input to be learned.
2.3.4 Configuration If you want to change the configuration, go to GEOPAK and click on the menu "Settings" and the function "Start up Wizard: Configuration". In the following dialogue...
...you have the choice between these options: � Start up Wizard � Initialisation dialogues and � No "Start up Wizard" or "Init. Dialogues".
Only when you have activated the option "Start up Wizard", you have the choice between the "Standard settings" and the "CAT300 settings".
If you, for example, click on "Standard settings", you can subsequently work in nine to twelve windows. It starts with entering the decimals, the comment lines (up to 32,000 characters are possible), the temperature coefficient etc. By clicking once onto the buttons "Next", "Back" or "Done" you proceed as usual. The individual topics as well as the clearance height or subprogram are described in the GEOPAK-Help in detail. Another symbol
You use this symbol to decide that you want the part program automatically learnt as per your configuration definitions. That means that the system learns without queries. CAT300-Settings If you work with the program CAT300/3D-TOL, click on this button. The procedure is identical to the procedure for the "Standard settings". Further options The options "Initialisation dialogues" and "No Start up Wizard and no initialisation dialogues" are self-explanatory.

Learn Mode: Basics
II-12 v 2.4 14.09.04
2.4 Temperature Compensation This topic concerns the co-ordinate measuring instruments by means of which you can realise a temperature compensation.
What you should know � The program control automatically executes the compensation of
the machine.
� The compensation of the part is executed by GEOPAK.
� Depending on material, take the expansion coefficient from the tables for expansion coefficients of longitudinal.
� You must input the temperature coefficient.
� Activate the temperature compensation on the motherboard of the CMM.
� The machine control reads the values of the temperature sensors in minute steps again.
� The fact that the co-ordinate measuring instrument supports the temperature compensation is displayed through a thermometer in the "Machine Position" window.
Procedure � In learn mode, you can input the temperature coefficient via the
menu Settings/Temperature Coefficient. It has the unit K-1. The reference temperature is 20° C (68° F).
� In repeat mode, you can input the temperature coefficients into the start dialog.
� The input value is multiplied by 10*E-6.
� The software analyses the arithmetic mean value of the connected temperature sensors at the part.
� Each measured point is divided by the following factor:1,0 + temperature coefficient * (current temperature - 20°C)
� If you do not want a temperature compensation, you must input as temperature coefficient 0.000.
when proceeding this way, but if the CMM compensation is activated, a more important failure would occur as if you would not at all have activated the temperature compensation. Therefore, the input 0.000 is not allowed. Nevertheless, if you want this, it is necessary to enable it via an input in the INI file.
See also detailed in the topic "Reference Position ".

Learn Mode: Basics
14.09.04 v 2.4 II-13
2.4.1 Temperature Compensation: Manual CMM Except for CNC-operated machines which have the temperature compensation feature integrated also with regard to the hardware components, beginning from Version 2.2. the present option will be offered for manual CMMs, as well.
When you have installed MCOSMOS and wish to install the drivers, in the following dialogue window you get to the option "Temperature Sensor; Manual CMM" (see dialogue window below).
Clicking this option you get to the dialogue window "Temperature Sensor Settings" (see picture below).

Learn Mode: Basics
II-14 v 2.4 14.09.04
You are offered up to eight temperature probes (sensors). For your MCOSMOS installation you can get a "Thermal Compensation System" (Hardware Box) with up to eight sensors supplied from Mitutoyo. This is possible for CMMs beginning from EURO-M version. With your order you already decide whether you want to use "Workpiece" and/or "Scale" sensors.

Learn Mode: Basics
14.09.04 v 2.4 II-15
In the dialogue you then have to relate the sensor type to the sensor numbers (1-8). Theoretically, every combination is possible. As a rule, the situation will be similar to what is shown in the example dialogue above. Also in the picture below, you see, on the left, a sensor on the green workpiece. Three sensors are integrated within the axes.
Procedure
� At the beginning of the driver installation you insert the disk supplied with the sensor calibration data into drive A: and select the file with the ending ".dat".
� Then you select the serial communication port (Comport) to which you have connected the device (COM1 through COMn).
� The sensors to be set are shown in the dialogue as activated. Should you have ordered e.g. only five sensors, the buttons 6-8 are deactivated.
� The sensors are assigned their individual tasks by mouse-click into the check buttons.
� You click on the "Store" button to inform the MCOSMOS program of the settings. This also causes the program to be left.
For detailed information on this subject, see Temperature Compensation .

Learn Mode: Basics
II-16 v 2.4 14.09.04
2.5 Reference Position The compensation of the part temperature is carried out in machine co-ordinates. The part co-ordinates are not suited for a compensation because they can change in the course of a part program, e.g. through relocation of the origin. This could cause that the compensation would not be uniformly realised to the whole part and thus would be wrong.
2.5.1 Compensation and Rotary Table When using a rotary table, also the machine co-ordinates are not sufficient to realise the temperature compensation. Example: A rectangular part is placed on the rotary table and measurement is done from one side. Then, the part is rotated by 180° and you measure the other side. Since the measurements are carried out at the same machine position, indeed no compensation will be realised.
2.5.2 Define Reference Position For this reason, compensation is realised in the machine co-ordinates but it is also possible to enter a reference point for the compensation. If you work with a rotary table, the calibrated rotary table position is automatically taken as reference point for the compensation. But it is also possible to define a reference position. You can do that via the GEOWIN.INI file:
Section [TempCompRefPos]; in the variables TempCompRefX,TempCompRefY, TempCompRefZ
2.5.3 Procedure The temperature compensation will then be realised in the following steps:
� If a rotary table is defined respectively calibrated, you take the rotary swivel point as the reference point.
� If a reference point is given, you take this one as the reference point.
� If no case applies, take (0/0/0) as reference point.
The reference point will be subtracted from the co-ordinates proceeding from the machine. Then, calculation is realised with the factor described above followed by translation of the co-ordinates to the part system.

Learn Mode: Basics
14.09.04 v 2.4 II-17
2.6 Volume Compensation The volume compensation is realised for some of the CMM. At the first program start, after program installation, a window to input the necessary parameters for the volume compensation appears.
If you do not input the correct values (Z offset to Z-spindle will always be negative), this dialogue will appear with each new software initialisation of the machine. You must enter these values correctly; otherwise the measurement will not have the specified accuracy.
2.6.1 Probe Offset to Z-spindle
When producing our CMM, Mitutoyo does not know the probe systems used from customers during the measurement; therefore Mitutoyo has determined and stored the compensation values of the Z-spindle. In order to execute compensation at the actual measurement place, the program must know the offset from Z-spindle to stylus tip. You must enter these values.
The Z offset is always a negative value because the Z-axis of the machine co-ordinate system shows into the opposite direction.
2.6.2 Automatic Control Generally, it is possible to change the probe system. An automatic control of every change is programmed. The Z offset to the Z-spindle is calculated through calibration of probe no. 1. For calculation, a fixed reference is necessary.
As reference point, you can choose between two methods.
Method with table distance
To determine "Distance machine table / Z-spindle", you must move the Z-spindle to Z = 0. Normally, you have to remove your probe system to determine this distance. The distance machine table / masterball is defined from the table to the centre of the masterball.
Method with position of the masterball You only have to input the Z value. To determine this value, only calibrate probe no. 1 and press the button "Last measured masterball position". The X and Y values are only for information.
Attention If you change the probe configuration, you must at least calibrate probe no. 1 in order that the program automatically recalculates the Z offset. For details, refer to Probe Calibration.

Learn Mode Main Window
II-18 v 2.4 14.09.04
3 Learn Mode Main Window 3.1 PartManager and GEOPAK
You want to realise a measurement and have created a new part in the PartManager (see Create New Part). Activate the part and come to the main window of the GEOPAK learn mode, either via the pull-down menu or by a click on the symbol. Then you see...
� a series of symbols (icons) along the screen margins. These icons make possible a quick and easy access to the corresponding functions.
� an activated dialog window to the probe selection; you find details under "Probe Selection ".
When using an automatic probe tree changer system, some more items must be taken into consideration. Cf. details of these items under Change Probe Configuration .
3.2 The layout of the main window You activate the measurement process from the main window. Mitutoyo offers a series of menus, pull-down menus, and icons with functions, which make working as simple as possible.
� In the header of your screen, you see the title strip. Our example: shows the title strip "GEOPAK CMM Learn Mode" with the version number and the name of the part which you have enabled via the parts list.
� Below the title strip, you find the menu bar with the different menus from "Element" to "Help". If you activate one of these, pull-down menus appear. Most of the functions can be activated both ways, either by the icon or by the pull-down menus. The way you select is just a matter of personal preference.
� The leftmost position of the menu bar is the "Preferences" menu. If you click this menu, several general settings can be made for the program. Here you can choose if the program runs in metric or inch mode, whether an audio signal is made during measurement, or how the printer layout is made and other settings.
� Below the menu bar, you find, next to the "Quit" symbol a horizontal toolbar with icons:
• The left part contains the elements
from "Point" to "Angle". These elements are also listed in the pull-down menu "Elements".
• The right part contains (starting from right) the "trash"; this is used to delete the previous command, and the symbols

Learn Mode Main Window
14.09.04 v 2.4 II-19
for the modification of the part co-ordinate system.
� On the left margin, you find the tools for the machine movement beginning with the symbol for the probe change. Through these tools, you decide about measurement and driving strategy.
� In the lower part of the screen, you find a toolbar with, among other things, the different tolerances
Here, you can have a "Circularity Diagram".
� The status bar at the bottom of the main window gives information about the status of the program.
Here, you find e.g. information about the actually connected devices, and the unit of measurement (mm or inches).
� On the right margin, you find, among other things, the symbol for the calculator (define and calculate variables) as well as the toolbar with the programming tools. Via e.g. mouse click, you define the start of a loop (loop start, see symbol above, right side). Activate the "Programming Tools" bar via the pull-down menu "Window".

Learn Mode Main Window
II-20 v 2.4 14.09.04
3.3 Windows and Tools In the "Window" pull-down menu, you can find a number of options that can be activated/deactivated. In particular for the tools, by clicking with the mouse, you have a shorter way to access these functions.
Field for results In the field for results, you will find all information about your last operations, this means from the change of probe to the evaluation. Each action you have effected for the purpose of your task is represented in this field for results. Normally, you will find here more information as necessary to print out later (e.g. change of probe, etc.).
Position of Machine On principle, the position of machine is represented in co-ordinates. If you decided in the (menu bar "File / Settings / Input Characteristics") dialogue for another as the Cartesian co-ordinate system, of course this will be considered in the representation of the position of machine.
� If you have a CMM with temperature compensation, also a thermometer with the actual temperature will be shown.
� If you dispose of the functions with a rotary table, also the rotary table position will be indicated.
� The remaining running time can also be indicated in the repeat mode.
Display Axes When you display the axes, you can see the machine co-ordinate system (grey) and the co-ordinate system of the part (yellow).
Via the symbols (in the picture above in the upper line), you can select a view in the different planes.
List of Elements In the list of elements, you can see all geometric elements you have generated, that means the measured elements e.g. also the connection and intersection elements.

Learn Mode Main Window
14.09.04 v 2.4 II-21
Element Graphics For this subject, see details of Information of Element .
Tools for Machine You will find these tools in your GEOPAK main window, vertically on the left side. Each of the buttons corresponds to a menu item from the menu bar ("MMC" or "Probe").
Tools for Evaluation See details of Tolerances: Principles .
Program Tools By clicking on the program tools - in the main window, vertically on the right screen side -, you can e.g. call the dialogues of the variables or also determine the loop start or the loop end.
3.4 Window Positions You can select between two modes of window style, namely the
� normal mode and the � "Split Screen" mode. Hint: In the default, the windows are displayed in normal mode. Only if you activate in the pull-down menu the "Split Screen" function, all windows are displayed in the "Split Screen" mode.
This function can be reached via the "Menu Bar / Window". The store, load and default functions are valid for the normal mode as well as for the "Split Screen" mode. "Split Screen" mode. By the "Split Screen" function, a displaying on your screen of e.g. windows of GEOPAK and 3D-TOL or GEOPAK and CAT300 at the same time is possible. This function can be reached via the menu bar "Window". Saving You can store the window positions that you have selected at last according to your ideas. You will get this position again at each restart. Default Under "Default Window Positions", you will find a configuration that Mitutoyo considered to be useful. Wherever your window positions may be, via this function you return into a home position, with which you can, in each case, continue your work. Load You will choose the "Load Window Position" function if for example someone different worked on your computer, but you want to have your characteristic window constellation again.

Learn Mode Main Window
II-22 v 2.4 14.09.04
3.5 Exit Single Measurement This dialogue is shown when you have added commands in the part program. In this case you have the following possibilities:
� Store part program The additionally learned commands are stored with the part program and are available for the next execution of a part program.
� Delete part program Only the additionally learned part program commands are deleted. Already existing part program commands are not deleted.
� Store Data for Relearn If you don't use the recorded data for relearn, you should deactivate them by click on the option button. These data include all information you have recorded in the learn mode. Since there is considerable data, your fixed disk would be unnecessarily loaded.
3.6 Relearn from Repeat Mode Beginning from Version 2.2, the relearn function can be started immediately from the repeat mode (Menu bar / Repeat Mode / Start Relearn).
You can start this function also via this symbol.
The GEOPAK-Editor is called up using the part program processed last.
� The "Start Relearn" function, however, is not possible unless there is relearn data existing for the current part program.
� The repeat mode is closed.
� Relearn is automatically started without any dialogue at the beginning of the learn mode.

Learn Mode Main Window
14.09.04 v 2.4 II-23
3.7 Measurement Window / Measurement Time 3.7.1 Measurement Window You can close the meas. point display according to Windows conventions via the x-symbol. Then, the complete measurement process is deleted. This action corresponds to the repeated clicking on the dustbin symbol.
You must close the following safety question at exit.
3.7.2 Measurement time In the repeat mode, you can have displayed the remaining measurement time.
� In the PartManager, click via the menu bar "Settings / Defaults for Programs / CMM / GEOPAK" and come to the "Settings GEOPAK" window.
� In this window, click on the "Other" button and
� in the following window, click on "Display Remaining Measurement Time".
� In the first program run is indicated, how many time the measurement course has lasted till now.
� After the first program run, the remaining measurement time of the part program is indicated.
� This remaining measurement time is updated with each run.
� Since part programs can also contain commands as well as branches, text on screen etc. only an approximate remaining measurement time can be indicated.

Learn Mode Main Window
II-24 v 2.4 14.09.04
3.8 Input Characteristics In the Input characteristics dialogue box we distinguish between
� settings which will not be modified during the whole program (millimetres/inch) and
� settings, which are valid for one program line only (see GEOPAK editor). These settings can be changed at any time. The type of co-ordinate system can even be changed in several follow-up dialogue boxes (e.g. "CMM procedure", "Theoretical element circle" etc.). The default settings made at this time determine which suggestions are made in the dialogue boxes.
By means of these default settings you determine how e.g. angles, direction vectors etc.
� are entered in the dialogue boxes
� are described in the result field.
Normally, direction vectors are standardised (length=1). Their components are also called cosine because they include the cosine of the angle, which the vector has with the corresponding principal axis.
If you have selected the input of cosines, it is not necessary to care that the vectors have the length=1. It will do if the components accord in their proportion. For example (1/1/0) for a probing below 45 degrees in the X/Y plane.
The changes made in the program lines are stored. These changes are important for the repeat mode.
To open the Input characteristics dialogue box choose Settings / Input characteristics from the menu bar.
3.9 Reset System
To reset means to delete all actions made so far in the program run.
To open the Reset system window choose "Settings / System / Reset system" from the menu bar.

Learn Mode Main Window
14.09.04 v 2.4 II-25
3.10 Printer Settings It is possible to output graphic and text on different printers, e.g. if they do not fit in one document for layout reasons. Another reason to choose different printers may be the printer resolution or you simply wish to print graphic and text on different printers.
To open the Print dialogue box choose "Settings / System / Printer Settings / Graphic or Text" from the menu bar.
3.11 Reset Controller Do not use this function unless problems with the machine control occur. To use the function choose "Settings / System / Reset Controller" from the menu bar.
3.12 Sound Output To open the Sound output dialogue box choose Settings / System / Sound from the menu bar. Check the "Sound on" check box first and then check the following check boxes:
� Element begin
� Count points
� Element finished.

Learn Mode Main Window
II-26 v 2.4 14.09.04
3.13 Pallet Co-Ordinate System With the pallet co-ordinate system you can
� measure different parts
� on one or several pallets
� at different positions on the machine table
automatically or in CNC mode (see picture below).
3.13.1 Definitions The table co-ordinate system (table position) determines in which position the pallet is situated on the CMM table.
The pallet co-ordinate system determines, at which position the part is placed on the pallet.
As different types of pallets are possible, you must assign numbers to the pallets. The pallet co-ordinate systems are separately stored for each type of pallet. You may assign the same pallet co-ordinate system numbers for different types of pallets.
3.13.2 Connection to Manager Programs and Q-PAK As for each single part exists a part program, the same way exists for each pallet a manager program, which is calling the single part programs. This manager program
� includes information about which part program must be executed at which pallet position and ...
� gets the information from Q-PAK, on which table position the pallet is situated.
Condition First of all, you must have stored as table co-ordinate system the positions at which the pallets must be situated (refer to "Store/Load Co-Ordinate System").
Procedure

Learn Mode Main Window
14.09.04 v 2.4 II-27
� For each position on the pallet, you define a co-ordinate system.
� Store this co-ordinate system as a pallet co-ordinate system (menu bar "Co-Ordinate System / Store Pallet Co-Ordinate System").
Window "Store Co-Ordinate System"
� In this window, you enter the pallet co-ordinate system no. at the top. This number is used for the pallet co-ordinate system in the manager program.
� In the middle field, you enter for which type of pallet this co-ordinate system is valid.
� Below, you enter at which table position the pallet was situated when defining the co-ordinate system.
So, you have all information for using the pallet co-ordinate system in the manager program.
The "Load Pallet Co-Ordinate System" command is exclusively used for tests.

Programming Help Contents
II-28 v 2.4 14.09.04
4 Programming Help Contents 4.1 Programming help: Functions There are some functions designed to make easier for you generating an effective part program.
Automatic Measurement: If you need the automatic element measurement, just click on this icon (for example Circle). Then the automatic element measurement window appears, immediately after you confirm the element. Thus, it is not necessary to activate this function explicitly. The button remains pressed if you activate the element again.
Automatic element finished: As soon as the required number of measurement points has been taken,
• the element is considered to be ready and no more data points are expected,
• the element is calculated and stored.
This only makes sense if you know in advance how many points you need. If you want to keep measuring until you have reached the limits of your element, you should deactivate this function. In this case, you should use the icon "Automatic element finished" to tell GEOPAK that the measurement has been finished.
Measurement Graphic: After you have activated the function, the element you measure is continuously presented in the window "Measurement display".
Acoustic action: If you want, a voice can tell you what to do next; this is especially useful for manual machines, or during manual alignment.
Tolerate: this button activates the tolerance-input window immediately after you have confirmed the element window. In this case, you do not have to activate the function explicitly.
Loop counter: Within a loop, the element memory number can be automatically incremented for each execution by pressing this button. If you want to store the element into the same memory number, do not use this button.
No projection: If you do not want the element to be automatically projected into the plane it is nearest to, you should press this button.

Programming Help Contents
14.09.04 v 2.4 II-29
4.2 Measurement Graphic / Measurement Sequence You have four options for activating the measurement graphic:
� Click on both symbols: The element and the number of the measured and of the expected measurement points are displayed (see ill.).
� Click on the graphics symbol only: The element and the number of the measured measurement points are displayed.
� Click on none of the symbols: The number of the measured measurement points is displayed.
� Click only on the symbol "Aut. element finished": The number of the measured and of the expected measurement points are displayed.

Variables and Calculations
II-30 v 2.4 14.09.04
5 Variables and Calculations In addition to the possibilities GEOPAK offers in connection with the geometrical calculations, you can define – according to requirements - your own variables and perform calculations. You can use the variables wherever GEOPAK expects a numerical value. GEOPAK makes your work easier offering a list of the variables, which you have defined before.
� Activate the "Define Variable and Calculate" dialogue window via the symbol of the toolbar on the right of screen margin.
� By mouse-click, open the list box beside "Names of Variable".
� Click on "Your" Variable.
� GEOPAK accepts this variable as input value.
Variables generally have three major advantages:
� You can perform calculations, which are not programmed in GEOPAK, e.g. the calculation of a the area of circle out of the diameter, and ...
� You can use variables (without other calculations) to edit flexible part programs. This means that you only have to write a single part program for similar parts that only differ in some measurements For example, when calculating sealing rings having different diameters: here, only one part program for different diameters is sufficient if the diameter is defined as variable.
� Variables can also be read in a file or output into a file. This way, you can exchange data with other programs

Variables and Calculations
14.09.04 v 2.4 II-31
5.1 Definition of Variables In addition to the possibilities GEOPAK offers for the geometrical calculations, you can define – according to your requirements - your own variables and perform calculations. You can use the variables wherever GEOPAK expects a numerical value.
� Call the function "Formula Calculation" via the symbol or the menu "Calculate" and come to the "Define and Calculate Variables" dialogue window.
� Input the name you want for your variable (maximum 18 characters) into the line with names of variables.
� An expressive term makes easier finding the correct variable again and increases the readability of your part program. You should try to find a method which makes sense (also see topic Save/Load Variable)
5.1.1 Decimal Places As the next step, define in the dialogue window "Define Variable and Calculate" how many decimal places you need for this variable. The calculation will be done with the best possible accuracy, but for the
• protocol,
• tolerance and the
• comparison queries
only the number of decimal places you have defined is taken into account.
You should know
When calculating with decimal fractions, there is always a small truncation error. This truncation error makes it nearly impossible that a real number "exactly" accepts a value desired. If you perform a query of a calculated value for equation with a number, the computer will always inform you that the values are different because normally, to make an example, they differentiate around 10*E-18. However, this difference is not important for a normal application. The operator however, wants figures with such a small difference to be treated as "Equal".
You can find details in the topic Table of Operators and Functions .

Variables and Calculations
II-32 v 2.4 14.09.04
5.1.2 Variables: Input of Formula In the next description field, you can input just a number or a complete formula.
� In each case, GEOPAK immediately displays the result on the right (besides the text field) of the formula.
� If a calculation cannot be performed, the result is shown as "-".
� See which operandi and operators are allowed in a formula in detail under the topic Table of Operators and Functions.
� Upper and lower case letters are of no importance.
5.1.3 Include Element Characteristics � If you want to include the characteristic of a measured element into
the calculation (e.g. the diameter of a measured circle), first click on the list box "Elements" (at bottom left) with the elements already defined
� Then, click on the text field "Feature". Here, select the characteristic of the element.
� When clicking on the symbol, this element characteristic is accepted in the input field for the formula.
� If the calculation is making sense, the result is immediately displayed.
Hint
In this dialogue window (top on the right), you find the symbol. You can undo as many steps as you want.

Variables and Calculations
14.09.04 v 2.4 II-33
5.2 Input of Variables This function allows you to enter variables in the running part program by means of a dialogue box.
To open the "Input variable" dialogue box click on this icon or choose "Calculate / Input variable" from the menu bar.
In the "Input variable" dialogue box, proceed as follows:
� Simple input: Click on this icon if you wish to enter one variable only.
• In the Text for dialogue text box enter the dialogue text. The dialogue text describes the information to be entered in a part program dialogue.
• Make your entries in the Name of variable, Suggestion, Lower limit, Upper limit and Decimals text boxes. Make sure to use a significant name of variable.
� From dialogue file: Click on this icon if you wish to enter several variables in a dialogue box.
• In the Filename text box type the file name or...
• ... click on this icon to choose from the displayed .udl files that you have created before. You will find more detailed information in the file "Specifications for Layout Dialogue Boxes" (dia_lay_e.pdf) on the MCOSMOS CD-ROM.
• As it is possible to create several dialogues in one file enter the name of the dialogue in the "Name of dialogue" text box.

Variables and Calculations
II-34 v 2.4 14.09.04
5.3 Yes/No Variable This function is the simple version of the "Input variable" dialogue box. E.g. if you wish to determine before a measurement that the measuring results are to be printed, choose "Calculate / Yes/No variable" from the menu bar.
Make your entries in the Text for dialogue and Name of variable text boxes.
To choose Yes or No click on the corresponding icon or use the "Enter" or "ESC" key. If you choose "Yes" the value 1 will be written in the variable, if you choose "No" it is the value 0. With this variable you can control printing by means of the branch functionality.
5.4 Save / Load Variables 5.4.1 Save If you need the contents of the variables beyond the actual program run you should use the function "Save Variable" (menu bar "Calculation / Save Variables"). In the following window, you enter the file for the variables, so all defined variables at this moment are stored.
5.4.2 Load You can reload all variables as you have saved them before. Only enter the name of the file.
If you want to load only a single variable activate the symbol. Enter, for example the name of only one variable. Only the one you have selected is loaded (e.g. var1). Or you enter a wildcard (e.g. var*). In this case, all variables beginning with “var” are loaded.
5.4.3 Definition Before defining variables you should take care of giving names that make sense. Here an example:
� In a sub-program you want to load the jumping-off point via X, Y and Z out of a file without overwriting other variables when loading.
� If you have named these variables XCoor, YCoor and ZCoor, you would have to write three loading instructions.
� But if you have designated them CoorX, CoorY and CoorZ, you can load them with one instruction, namely Coor*.

Variables and Calculations
14.09.04 v 2.4 II-35
5.4.4 Calling Variable from File
You can wait for a variable file of another program.
Click this symbol to make sure that the next program run really waits for this current information. The file is then deleted after reading.
Click this symbol, if you want to select a variables file only while the program run takes place. Then during the execution of the part program the run of the part program is stopped and you can select a variables file in the file selection dialogue "Load Variables from File".
5.5 Transfer Actual CMM Position to Variable
Click on the symbol or use the menu bar with the functions“ Calculate / Actual Position in Variable".
In the following dialog window input the names of the variables into the text boxes.
Furthermore, you can read in this position either in the actual part co-ordinate system (de-activated symbol) or in the machine co-ordinate system (symbol activated).
Hint When entering the name of the variable, you can use either a name already existing, or a new one. If you use a new name, a new variable will be created.
Be careful when entering the name. Any typing mistake you make causes a new (wrong) variable to be created under this name and possibly you then use this variable.

Variables and Calculations
II-36 v 2.4 14.09.04
5.6 Actual Temperature in Variable To record the workpiece temperature it is possible to connect 1 - 8 temperature sensors to the control system.
In order for you to record and, if necessary, document temperature variations in the part program, these variations can be loaded into variables (refer also to the subject Formula Input). Make the following entries in the "Current Temperature into Variable" dialogue from the "Calculations" menu:
Name the variable and make your choice which temperature you want to take.
� The calculation temperature is recorded at every part program start. GEOPAK assumes that temperature remains unchanged while the program is running.
� The average value from all available sensors is shown in the "Machine Position" window. This allows the part program to check that the calculated temperature is still valid.
� You can also make your decision for the average temperature of selected sensors. In this case one button is active for each connected sensor.
If you want to know the CMM's current temperature values at the three axes, you will have to click, at your option, on one of the buttons in the lower section of this dialogue. The CMM will use these temperatures automatically to compensate for its own temperature dependence.
For information on this subject refer to Temperature Compensation and, if a manual CMM is of interest to you, to the subject Temperature Compensation: Manual CMM.

Variables and Calculations
14.09.04 v 2.4 II-37
5.7 Settings for Temperature Compensation
Introduction In cases where you wish to compensate for workpiece expansion or shrinkage, you have to pay special attention to a reference point. Our picture below is an example showing a workpiece held by a fixed stop (hatched). Expansions are possible only in the direction of the arrow. The reference point is marked with X.
The workpiece can also be bolted (see picture below).
As a general rule, the reference point is always the point whose position remains absolutely the same despite material expansion or shrinkage.
Make sure that the reference point of a rotary table that is required to be turned coincides with the centre of the table..

Variables and Calculations
II-38 v 2.4 14.09.04
5.8 Settings in the dialogue To access the dialogue, go to the "Calculate" menu and the "Settings for Temperature Compensation" functions. The dialogue is divided into for sections.
Temperature coefficient
You make your decision for or against a change. If your decision is positive, enter the coefficient or choose the workpiece material.
Calculation temperature You choose the average temperature of either all available sensors or selected sensors (for details refer to the subject Current Temperature into Variable).
Reference point for compensation To change the reference point, proceed as follows:
� Enter the workpiece co-ordinates, or ...
� Take the current CMM position by clicking on the symbol. Re-editing is possible.
� Where a rotary table is available, you can also choose the rotary table position.
Apply temperature compensation to movements If you should approach the same co-ordinates in spite of an expansion of the workpiece, e.g., you will get to results which possibly do not agree with the measurement job order (see picture below). To compensate for this fault, select the option "Apply Temperature Compensation to Movements".
In this example a circle is measured in XY - plane.
� Before the expansion the measuring height is about -4.999.
� After the expansion the measuring height lies with -5.000
In order to be able to activate this option, you must have indicated the reference point.

Variables and Calculations
14.09.04 v 2.4 II-39
5.9 Definition of String Variables This function allows you to change character strings or to "remember them for reuse", e.g. you can make use of this function if you wish to determine a file name.
� To open the "Define string variable" dialogue box click on this icon or choose "Calculate / Define string variable" from the menu bar.
� In the Name of string variable text box enter a name to define the variable (18 characters max.).
� A significant name makes it easy to find the correct string variable and improves the legibility of your part program (see also chapter Store variables to file/Load variables from file.
You will find further information in the file "UM_string_code_e.pdf". The file you find in the MCOSMOS directory "Documentation \ files \ geopak".
5.10 Input of String Variables This function allows you to enter string variables in the running part program by means of a dialogue box.
To open the "Input string variable" dialogue box click on this icon or choose "Calculate / Input string variable" from the menu bar.
In the "Input string variable" dialogue box, proceed as follows:
Simple input: Click on this icon if you wish to enter one variable only.
� In the Text for dialogue text box enter the dialogue text. The dialogue text describes the information to be entered in a part program dialogue.
� Make your entries in the Name of string variable, Input length and Suggestion text boxes. Make sure to use a significant name of string variable.
From dialogue file: Click on this icon if you wish to enter several string variables in a dialogue box.
� In the Filename text box type the file name or...
� ... click on this icon to choose from the displayed .udl files that you have to create before. For further information concerning the Specifications for Layout Dialogoe Boxes, please refer to your MCOSMOS CD-ROM under "Documents", folder "GEOPAK", file "dia_lay_e.pdf".
� As it is possible to create several dialogues in one file enter the name of the dialogue in the "Name of dialogue" text box.

Variables and Calculations
II-40 v 2.4 14.09.04
5.11 Store/Load String Variables
Store string variables You make use of this function if you need the contents of string variables for further purposes. To open the "Store string variables" dialogue box choose "Calculate / Store string variables" from the menu bar and enter the file for the string variables. All string variables defined at this time will be stored.
Load string variable To open the stored string variables simply enter the name of the file. Note that two different formats can be read:
�� Format with names of string variables
�� Format without names of string variables
The function of the Use load filter icon depends on the used format.
� The file to be read already contains the name of the string variable. Only the string variables, which correspond to the filter, are read.
� The file to be read does not contain the name of the string variable. In this case the filter represents the first part of the name to be defined for the string variable.
If you do not preset a filter, "STR" will be used as default string variable. The second part is an incremental counter (upwards) starting with zero.
Example for Use load filter with names of string variables A file of string variables with the following contents exists:
Text1=First Text
Text2=Second Text
Info1=First Information
Info2=Second Information
The "Text*" filter will be set.
The following string variables are read:
Text1=First Text
Text2=Second Text
Example for Use load filter without names of string variables A file of string variables with the following contents exists:
First Text
Second Text
Third Text
Fourth Text

Variables and Calculations
14.09.04 v 2.4 II-41
The "Text*" filter will be set.
The following string variables are read:
Text0= First Text
Text1= Second Text
Text2= Third Text
Text3= Fourth Text
5.12 Wait for file with string variable
Click on the Wait for file icon to wait for a file of string variables of another program.
Click this symbol to make sure that the next program run really waits for this current information. The file is then deleted after reading.
Click this symbol, if you want to select a variables file only while the program run takes place. Then during the execution of the part program the run of the part program is stopped and you can select a variables file in the file selection dialogue "Load Variables from File".
5.13 System Variable in the Formula Calculation
You come to the dialog "Define Variable and Calculate" via the symbol or the menu bar "Calculate / Formula Calculation".
� In the text box "System Parameters" of the dialog you determine the list selection for...
• Results of Min/Max Calculation • Results for Best Fit • Probe Data • CNC Parameters
� In the list box on the bottom right, you search for a corresponding component.
� For acceptance, click on the symbol.
� The component you selected appears on top of the text box.
� Over the symbol "Undo" you can make each action again annulled. That is especially then helpful if you deleted mistakenly formula entries.
Details about parameters can be taken from the topic "Table of Operators and Functions"

Operators and Functions
II-42 v 2.4 14.09.04
6 Operators and Functions 6.1 Arithmetic Operators Operator Description
+ Addition
- Subtraction
* Multiplication
/ Division
^ Exponential
6.2 Relational operators Operator Description
< Less than
<= Less than or equal to
> Greater than
>= Greater than or equal to
= Equal to
<> Not equal to
Result of logical operations (comparison)
Operator Relation between operand 1 and operand 2
Result
operand 1 is less than operand 2
1<
operand 1 is greater than or equal to operand 2
0
operand 1 is less than or equal to operand 2
1<=
operand 1 is greater than operand 2
0
operand 1 is equal to operand 2 1=
operand 1 is not equal to operand 2
0
operand 1 is greater than or equal to operand 2
1>=
operand 1 is less than operand 2
0

Operators and Functions
14.09.04 v 2.4 II-43
operand 1 is greater than operand 2
1>
operand 1 is less than or equal to operand 2
0
operand 1 is not equal to operand 2
1<>
operand 1 is equal to operand 2 0
6.3 Logical Operators Operator Description
AND Logical AND
OR Logical OR
NOT Logical NOT
Result of logical operations (Boolean operators)
Operator Operand 1 Operand 2 Result
0 0 0
0 <>0 0
<>0 0 0
AND
<>0 <>0 1
0 0 0
0 <>0 1
<>0 0 1
OR
<>0 <>0 1
0 - 1NOT
1 - 0
6.4 Constants Spelling Description
PI Pi (3,14159)
E Euler’s constant (2.71828...)

Operators and Functions
II-44 v 2.4 14.09.04
6.5 Trigonometrical Functions The trigonometrical functions expect the angles to be specified in degrees as parameters and produce them (inverse functions), in turn, in degrees.
Spelling Description
SIN Sine
COS Cosine
TAN Tangent
ASN Inverse sine
ACS Inverse cosine
ATN Inverse tangent
6.6 Arithmetic Functions Spelling Description
LG Logarithm (base 10)
LGN Natural logarithm (base e)
SQR Square
SQRT Square root
SGN Sign
ABS Absolute value
INT Truncation
FRC Fraction
RND Round
MIN Minimum
MAX Maximum
DEG Conversion from radiant to degree
RAD Conversion from degree to radiant
F2C Conversion from °F to °C
C2F Conversion from °C to °F
GAUSSRAND Gaussian distributed random value in range of ± argument
RAND Gaussian distributed random value in range of ± argument

Operators and Functions
14.09.04 v 2.4 II-45
6.7 Operator Precedence Operator precedence from the highest to lowest
Unary -, NOT
EXPONENT
SGN, ABS, INT, FRC, RND, MIN, MAX, DEG, RAD, SQR, SQRT, SIN, COS, TAN, ASN, ACS, ATN
*, /
+, -
AND
OR
<, <=, >, >=, =, <>
The operator precedence can be changed by ‘()’.
6.8 Basic Geometry Elements Spelling Description
PT Point
CR Circle
EL Ellipse
CO Cone
CY Cylinder
LN Line
PL Plane
SP Sphere
DI Distance
ANG Angle

Operators and Functions
II-46 v 2.4 14.09.04
6.9 Element components The values of the element features depend on the unit (inch or mm).
Spelling Description
X,Y,Z Location
I,J,K Direction (cosine format)
A,B,C Direction (α,β,γ)(angles in degrees)
RcylXY, RcylYZ, RCylZX
Cylindrical co-ordinate system, radius
RSph Spherical co-ordinate system, radius
PhiXY, PhiYZ, PhiZX
Cylindrical & spherical co-ordinate system, angle ϕ
ThetaX, ThetaY, ThetaZ
Spherical co-ordinate system, angle ϑ
H Only cylinder, height
L Length
R Radius of circle, etc. and large radius of ellipse
D Diameter (same as radius)
Di Distance from origin (plane & line)
R2 Big radius of ellipse
D2 Big diameter of ellipse
CA Cone angle (degree)
ChA Half cone angle (degree)
Rng Range (form of element)
Sig Sigma
Ang Only for angle, calculated angle
XY,YZ,ZX Only for angle, projected angle
Di Only for distance, calculated distance
MaxNo Highest used element number
Example for element access: � Access the diameter of the circle with the memory number 3
CR[3].D
� Access the X component (cosine angle) of the cylinder axis with the memory number 8 CY[8].I

Operators and Functions
14.09.04 v 2.4 II-47
6.10 GEOPAK Elements: Hole Shapes Elementtyp Component Size of the hole
SQ W Width of the square
RE W Width of the rectangle
RE L Length of the rectangle
SL W Width of the slot
SL L Length of the slot
DR W Width of the drop
DR L Length of the drop
DR R Large radius=W/2 of the drop
DR R2 small Radius of the drop
TR W Length of the triangle
TR H Height of the triangle
TZ W Width of the trapezoid
TZ H Height of the trapezoid
HX W Width of a hexagon
HX W2 Width 2 of a hexagon
Like for the Basic Geometry Elements you can also enter the following variable for the hole shapes.
Position
� Cartesian co-ordinates
� Cylinder co-ordinates
� Sphere co-ordinates
The same applies for the direction of the axis as an angle or in cosine format.

Operators and Functions
II-48 v 2.4 14.09.04
6.11 GEOPAK Probes Spelling Description
PRB Probe
Only the actual probe can be accessed
Probe components
Spelling Description
X,Y,Z Offsets
A,B Angles of rotary probe
R Radius of probe
D Diameter of probe
Rng Range (form)
Sig Sigma
Tree Number of probe tree
Num Number of actual probe
MaxNum Highest probe number used
NoOfDef Number of defined probes
MBall.D Master ball diameter
MBall.R Master ball radius
MBall.X Master ball X position
MBall.Y Master ball Y position
MBall.Z Master ball Z position
TreeOffs.X Offset of actual tree in X to tree 1
TreeOffs.Y Offset of actual tree in Y to tree 1
TreeOffs.Z Offset of actual tree in Z to tree 1
Example for probe access: Access the diameter of the actual probe PRB.D
Access the X offset PRB.X

Operators and Functions
14.09.04 v 2.4 II-49
6.12 GEOPAK Rotary Table Data Syntax Description
RT Rotary Table
Syntax Description
Ang Current angle in degree
X, Y, Z Alignment position in machine co-ordinates
A, B, C Alignment direction in degree
I, J, K Alignment direction (Cosine format)
6.13 Minimum Maximum These values are not available unless the minimum-maximum calculation function has been performed previously (Menu bar / Calculation / Minimum<->Maximum).
6.13.1 Minimum maximum calculation Spelling Description
MinMax Result of the minimum maximum calculation
6.13.2 Minimum maximum features Spelling Description
MinVal Minimum
MaxVal Maximum
Avg Average (mean)
Rng Range (form of element)
Sig Sigma
MemMinElm Element number of the element with the minimum value
MemMaxElm Element number of the element with the maximum value

Operators and Functions
II-50 v 2.4 14.09.04
6.13.3 Minimum maximum components Spelling Description
X,Y,Z Location
I,J,K Direction (cosine format)
ElI, ElJ, ElK Direction of ellipse axis (cosine format)
A,B,C Direction (α,β,γ)(angles in degrees)
ElA, ElB, ElC Direction of ellipse axis (α,β,γ)(angles in degrees)
RCylXY, RCylYZ, RCylZX
Cylindrical co-ordinate system, radius
RSph Spherical co-ordinate system, radius
PhiXY, PhiYZ, PhiZX
Cylindrical & spherical co-ordinate system, angle ϕ
ThetaX, ThetaY, ThetaZ
Spherical co-ordinate system, angle ϑ
R Radius of circle, etc. and large radius of ellipse
D Diameter (same as radius)
Di Distance from origin (plane & line)
R2 Small radius of ellipse
D2 Small diameter of ellipse
CA Cone angle (degree)
ChA Half cone angle (degree)
Rng Range (form of element)
Sig Sigma
Ang Only for angle, calculated angle
XY,YZ,ZX Only for angle, projected angle
AngXY,AngYZ,AngZX
Only for angle, projected angle, these terms only exist for compatibility with the distance terms
DiXYZ Only for distance, calculated distance
DiX, DiY, DiZ Components of the distance calculation
6.13.4 Example for minimum maximum access: � Access the range of the x co-ordinates
MinMax.Rng.X
� $$ access the maximum value of the diameter MinMax.MaxVal.D

Operators and Functions
14.09.04 v 2.4 II-51
� $$ access the element number with the maximum vector component in x direction MinMax.MemMaxElm.I
6.14 Best Fit These values are not available unless a best fit has been performed previously (Menu bar / Co-Ordinate System / Best Fit)
Spelling Description
BestFit Result of best fit
6.14.1 Best Fit Components Spelling Description
X,Y,Z Offsets (translation)
A,B,C Angles (rotation) (α,β,γ) (angles in degrees)
I,J,K Angles (rotation) (cosine format)
6.14.2 Example for best fit access: � Access the x component of the translation vector
BestFit.X
� Access the rotation angle βBestFit.B

Operators and Functions
II-52 v 2.4 14.09.04
6.15 Other GEOPAK Variables Spelling Description
SYS.UF Unit factor, 1.00 in mm mode, 25.4 in inch mode
SYS.RC Repeat counter
SYS.LC Loop counter
SYS.TC Temperature coefficient
SYS.SF Scale factor
CNC.SD Safety distance of CMMC
CS.Num Actual co-ordinate system number
Sys.IOBit[x] Status (0/1) of IO-Bit no x x from 0 to 99
6.16 Date and Time Spelling Description
Sys.Time.H current hour
Sys.Time.M current minutes
Sys.Time.S current seconds
Sys.Time.MS current milliseconds
Sys.Date.Y year
Sys.Date.M month
Sys.Date.D day
Sys.Date.DoY day of the year
6.17 Week-days Spelling Description
Sys.Date.DoW Week-day as per ISO 8601
Sys.Date.DoWu Week-day as per current user settings
Sys.Date.DoWs Week-day as per system settings
6.18 Week numbers Spelling Description
Sys.Date.W Week as per ISO 8601
Sys.Date.Wu Week as per current user settings
Sys.Date.Ws Week as per system settings

Operators and Functions
14.09.04 v 2.4 II-53
6.19 System Time Spelling Description
SYS.CT Current 'C' time, seconds from 1.01.1970 UTC.
Based on the ISO norm ISO 8601:1988 / EN 28601:1992 / before DIN 1355. In Europe, all three possibilities are identical but in the USA, we have to do with the following conditions:
� The first weekday is Sunday.
� The first week is the week of the 01.01 (according to ISO: the first weekday is: Monday; first week is: the week containing the 04.01).
Hint Should you wish to register the time required to run your part program, you are well advised to take the difference between two system time readings (SYS.CT).
6.20 Examples � Calculate the polar angle from circle centre to x axis and assign the
variable "Pangle" to it Pangll=ATN(CR[1].Y/CR[1].X)
� Calculate the area of the circle with the memory number 4 FL=Pi/4*SQR(CR[4].D)
� Assign a value to variable var2 var2=3.00
� Calculate double the amount of var2 var3=var2 * 2

Operators and Functions
II-54 v 2.4 14.09.04
6.21 Result of Nominal-to-Actual Comparisons The Version 2.2 offers you a variety of new variables which allow you, for instance, to obtain information on
� the last nominal-to-actual comparison, or on
� all nominal-to-actual comparisons of one measurement.
You can use the information about the last nominal-to-actual comparison as basis for your decision as to how to proceed with the part program.
You access the dialogue "Define Variable and Calculate" through "Menu bar / Calculate / Formula Calculation". This dialogue provides you the selection lists under the heading "System Parameters (see fig. below).
You should differentiate between
� a general statement as to whether or not the tolerance values have been exceeded. You obtain this general statement through
• the Last Feature (System Variable "Tol") ,
• the Last Element (System Variable "Tol.Cmd") or
• all Nominal-to-Actual Comparisons (System Variable "Tol.All").
� each single value of a feature (current position, diameter, etc.) However, to get these individual values, you should refer to a single nominal-to-actual comparison only. From the system variables, you should choose the option "Tol".
Hint When you use one of the tolerance variables for the "Formula Calculation" without having performed a nominal-to-actual comparison, the return value will always be = 0.

Operators and Functions
14.09.04 v 2.4 II-55
6.22 Last Nominal-to-Actual Comparison You can make use of all values calculated as a result of a nominal-to-actual comparison, using for this purpose the following table with the system variable "Tol".
Spelling Description Value type
Tol.Actual Actual value Numerical value
Tol.ActCrd1 Actual value of the first co-ordinate of position tolerance or concentricity depends on the projection plane
Numerical value
Tol.ActCrd2 Actual value of the second co-ordinate of position tolerance or concentricity depends on the projection plane
Numerical value
Tol.ActCrd3 Actual value of the third co-ordinate of position tolerance or concentricity depends on the projection plane
Numerical value
Tol.Deviation Deviation Numerical value
Tol.LowerTol Lower tolerance limit Numerical value
Tol.Nominal Actual value Numerical value
Tol.OutOfSpec Value out of specification
Numerical value
Tol.PosNo Position number Numerical value
Tol.RefCrd1 Reference value of the first co-ordinate of position tolerance or concentricity depends on the projection plane
Numerical value
Tol.RefCrd2 Reference value of the second co-ordinate of position tolerance or concentricity depends on the projection plane
Numerical value
Tol.RefCrd3 Reference value of the third co-ordinate of position tolerance or concentricity depends on the projection plane
Numerical value
Tol.UpperTol Upper tolerance limit Numerical value
Tol.NomTol Nominal tolerance Numerical value
Tol.LowerSpec Lower specification (nominal + lower tol) Numerical value
Tol.UpperSpec Upper specification (nominal + upper tol) Numerical value
You obtain the general statement in the variables "Tol.TolState", "Tol.TolUpperState" and "Tol.TolLowerState" as per the following table.

Operators and Functions
II-56 v 2.4 14.09.04
Tolerance state
TolStat TolUpperState TolLowerState
Actual value beyond upper tolerance 2 2 0
Actual value between upper tolerance and upper intervention limit
1 1 0
Actual value between upper and lower intervention limit
0 0 0
Actual value between lower intervention limit and lower tolerance
1 0 1
Actual value below lower tolerance 2 0 2
6.23 Nominal-to-Actual Comparison of Last Element Should you want to obtain a general statement on all features of the last, tolerance command you use for this purpose the system variable "Tol.Cmd.TolStae". In doing this, the results will be presented in accordance with the table "Tolerance state" (refer to Last Nominal-to-Actual Comparison). In this case, of all features of this element the worst result (highest number) will be taken.
You have the following possibilities:
Spelling Description Value type
Tol.Cmd.TolState Returns the state of the tolerance command.
Tolerance state
Tol.Cmd.TolUpperState Returns the state of the tolerance command as TolState , but only for the upper tolerance. See also table below.
Tolerance state
Tol.Cmd.TolLowerState Returns the state of the tolerance command as TolState, but only for the lower tolerance. See also table below..
Tolerance state

Operators and Functions
14.09.04 v 2.4 II-57
6.24 Result of All Nominal-to-Actual Comparisons You can use this variable at the end of a part program, if you want to know if all dimensions of the part are within the tolerance or intervention limits (System Variable "Tol.All."). In doing this, the results will be presented in accordance with the table "Tolerance state" (refer to Last Nominal-to-Actual Comparison). In this case, of all features of this element the worst result (highest number) will be taken.
In addition, you can request summary information in line with the following table.
Spelling Description Value type
Tol.All.TolState Returns the state of all tolerance commands
Three-State
Tol.All.TolUpperState Returns the state of all tolerance commands as TolState, but only for the upper tolerance. Cf. table below.
Three-State
Tol.All.TolLowerState Returns the state of all tolerance commands as TolState, but only for the lower tolerance. Cf. table below.
Three-State
Tol.Count.NoOfTol Number of tolerance comparisons
Numerical value
Tol.Count.InTol Number of the tolerance comparisons within the tolerance
Numerical value
Tol.Count.InCtrl Number of the tolerance comparisons within the intervention limits
Numerical value
Tol.Count.OOC Number of the tolerance comparisons out of the intervention limits (that is, between intervention limit and tolerance intervention limit)
Numerical value
Tol.Count.OOT Number of the tolerance comparisons out of the tolerance limits
Numerical value
Tol.Count.OOCUpper Number of the tolerance comparisons out of the upper intervention limits
Numerical value
Tol.Count.OOCLower Number of the tolerance comparisons out of the lower intervention limits
Numerical value
Tol.Count.OOTUpper Number of the tolerance comparisons out of the
Numerical value

Operators and Functions
II-58 v 2.4 14.09.04
upper tolerance limits
Tol.Count.OOTLower Number of the tolerance comparisons out of the lower tolerance limits
Numerical value
Remarks:
� Tol.Count.InTol + Tol.Count.OOT = Tol.Count.NoOfTol
� Tol.Count.InCtrl + Tol.Count.OOC + Tol.Count.OOT = Tol.Count.NoOfTol
� Tol.Count.InCtrl + Tol.Count.OOC = Tol.Count.InTol
� Tol.Count.OOCUpper + Tol.Count.OOCLower = Tol.Count.OOC
� Tol.Count.OOTUpper + Tol.Count.OOTLower = Tol.Count.OOT
� Every tolerance comparison is counted, that is, a part program command "Tolerance comparison" can include more than tolerance comparisons.

Scale Factor
14.09.04 v 2.4 II-59
7 Scale Factor If you know for example that a plastic part, after the injection moulding of duroplastic material, shrinks by a certain percentage, you should enlarge the form by this percentile. Use the "Scale Factor" function (menu bar "Calculate / Scale Factor").
Example When the part shrinks 5 per cent, enter 0.95.
Entering 1.00 means that the co-ordinates and dimensions remain unchanged.
In most of the cases the scale factor is identical for all co-ordinates, for many freeform surfaces, as well. Due to specific properties of workpieces produced e.g. by an injection moulding process, it is quite possible that material shrinkage or expansion is not identical in all directions.
In the following dialogue (with new functions being available as from Version 2.2) you are offered a total of four options.
7.1 Scale all elements (including element point) Clicking these option causes one scale factor to be entered for all three axes, including the element point. This option can be used in most of the cases.
7.2 Scale only element point Due to probe radius compensation, setting a different scale for each axis makes sense only for the element point. Other elements (freeform surfaces) would be

Scale Factor
II-60 v 2.4 14.09.04
calculated using the scale factor 1.0. In these cases, there would not even be a warning.
The option "Different scale factor for each axis" cannot be used in calculating formulae. The "Undo" command is not supported. In the case of an error occurring in the learn mode you would have to set the scale factor once more.
7.3 Set scaling centre into origin Clicking this option causes the scaling centre to be set into the origin of the workpiece. This is not advisable for offset-defined co-ordinate systems (RPS alignment, e.g. automotive parts).
In the present example showing any workpiece (2), the scaling centre (3) is not located in the origin of the co-ordinate system (1).
7.4 Use scale factor for 3D-TOL For the "Scale only element point" option the button is deactivated. The same is true in case you have not installed the dongle option for 3D-TOL.
� 3D-TOL can assume the scale factor and the scaling centre only in case it applies to all axes, i.e. when all elements are to be scaled.
� For points measured with different scale factors for each axis and required to be transferred to 3D-TOL, use Position Tolerance.
Please note that in this case it is your sole responsibility to define the nominal values.

Sequence Control
14.09.04 v 2.4 II-61
8 Sequence Control 8.1 Loops 8.1.1 Definition The loops are used to repeat the same or similar procedures several times in succession. It happens that your measurement task requires, e.g. to save measured elements in different element storage areas. For this purpose, we have installed a counter, which is increasing the number of the element storage by one at each loop flow.
All dialogues showing the symbol "Loop Counter" (on the left) provide you direct access to the function "Loops".
� When you want to access the same element at each time the loop is run, make sure that you de-activate the loop counter.
� When you want to access an additional element at each time the loop is run, make sure that you activate the loop counter
� If this is the case, the counter will increment by one at any flow in progress, beginning from the number entered from time to time.
8.1.2 Symbol or Special Character
Via the symbol, the loop indicator can be immediately used in the dialogues e.g. for tolerance comparisons, in the element storage or for storage of contours.
It is also possible to realise free inputs via the special characters "@LC", e.g. when
� entering file names,
� when entering formula calculation or even
� when you input a text.
When using the special character "@LC", you must pay attention to use capital characters without fail.
8.1.3 Procedure
� You come to the loop functions via the symbols or the menu bar "Program / Beginning of Loop (End of Loop)".
� In the window "Beginning of Loop", you determine the "Number of Executions". This can also be realised through variables (see details of the topic "Definition of Variables").

Sequence Control
II-62 v 2.4 14.09.04
8.2 Branches If, in an existing part program, you want to carry out individual instructions only in certain conditions, you can do that via install "Branches". The branches can only be created in the GEOPAK Editor.
Cf. details of topic "Branches" in the GEOPAK Editor.
8.3 Subprograms 8.3.1 Definition and Types There are two reasons to apply sub-programs:
� You want to divide up (structure) a long part program into blocks making sense and giving a clear overview.
� You want to hold self-repeating program runs in a sub-program in order to use it again. In these cases, especially variables are offered, with which you adapt an existing sub-program to the actual situation. Example: Sub-program for bore pictures with rims having four or five bores.
Sub-programs are separated into two program types.
� Sub-programs, which are related to a parts
� Sub-programs, which can be used from several parts (global)
The creation and administration of the global programs is realised in the sub-program management (see details in the PartManager under topic "Administration of Sub-Program").
8.3.2 Create a Local Sub-Program At the position where you want to create the sub-program activate the function via
� the menu bar "Program / Sub-Program" or via
� the symbol of the toolbar in the main window of the GEOPAK Editor.
� In the "Sub-Program Start" dialog window, click the "Learn" option and possibly enter a speaking name easy to recall.
� Immediately, all instructions in this sub-program are stored.
� Quit the sub-program via the symbol.

Sequence Control
14.09.04 v 2.4 II-63
8.3.3 Using an already existing Sub-Program
Activate the symbol and inform the program via the radio buttons where the sub-program is located (library etc.).
Hint The variables that are defined in the main program are also available in the sub-programs.
If you modify variables in the sub-programs you also modify them for the main program.
Hint To impede this, store the variables at the sub-program start. Before terminating the sub-program, again load the variables.
8.4 Delete Last Step With this function menu bar "Program (Delete Last Step"), you can remove the last command of the part program and in most cases undo it. The last command is displayed once again and you must confirm.
To undo also means:
� You have changed the co-ordinate system.
� You undo this change.
� You will get the co-ordinate system again as before the change.
Exception If you delete a probe change, it is not possible to directly undo this change. Proceed as follows:
� Make one more probe change for the probe you want and
� delete this one again. Then, you can continue measuring with the right probe
and the unnecessary probe change will not appear in your part program.

Sequence Control
II-64 v 2.4 14.09.04
8.5 Error While Executing Command
When this dialogue appears – usually unexpectedly - there are four options available:
� Repeat command: If you select this option, the last used dialogue opens. In this dialogue you can check again your last entries. The measurements you have performed up to this stage are still valid.
� Delete command: If you select this option, the command is neither executed nor stored.
� Store command: If you select this option, the command is stored despite a faulty execution in the part program.
� Repeat element measurement: If you select this option, e.g. in the case of a collision, the last dialogue is displayed again. However, the number of measurement points is completely reset to 0. Therefore, this option differs substantially from the option "Repeat command" (see above). This fourth option is particularly not recommendable for the scanning of contours because this would mean the loss of all points already measured.
8.6 Comment Line If you want to add information to your part program, which do not concern the measurement and will not appear in the test certificate, use the "Comment Line" (menu bar "Program / Comment Line"). In the following "Comment in Part Program" window, you can enter any text you want (80 characters max. per line).

Sequence Control
14.09.04 v 2.4 II-65
8.7 Programmable Stop With the "Programmable Stop" (menu bar "Program / Programmable Stop"), you can stop the part program run at a position and give some information or instructions to the user through
� a text,
� a picture or
� an audio file
Proceed according to Windows conventions.
8.8 Show Picture With this function (menu bar "Program / Show Picture"), you can have a picture for your actual measurement course.
Search for the picture via the symbol according to Windows conventions and confirm. The picture will appear in the "Measurement Display" window.
If, in the following, you call an element and confirm, the picture will be overwritten as a default setting in the "Measurement Display" window.
You can avoid this in the element window by clicking on the "Graphics of Meas." symbol.
8.9 Clear Picture With this function (menu bar "Program / Clear picture"), you can clear a picture that you have activated before (see details under "Show Picture"). By clicking on the function, the picture in the "Measurement Display" window will disappear.
8.10 Play Sound With this function (menu bar "Program / Play Sound"), you can play a sound during the actual measurement course.
You determine the file by clicking on the symbol according to Windows conventions.
Via the symbol above to the right ("Test") in the "Play Sound" window, you can hear the file to the test.

Sequence Control
II-66 v 2.4 14.09.04
8.11 Send E-Mail With this function (menu bar "Program / Send E-Mail"), you can send an e-mail directly out of GEOPAK. In addition, an e-mail program compatible with MAPI (for example Outlook-Express) must be installed.
You make the usual entries where
� for the address, the Cc details and the subject max. 80 signs are allowed.
� For the text, you can use 480 signs.
� You can attach one file each time.
8.12 Send SMS With this function (Menu Bar "Program / Send SMS"), you can directly send a SMS out of GEOPAK. Yet, before starting GEOPAK, the necessary settings must have been realised before in the PartManager. For details, see the following topics
� Configuration,
� Log Communication and
� Address Book
Hints You only can select one receiver from the address book.
For the text, you can use 160 characters. It is possible that the different providers accept not as much of characters.

Sequence Control
14.09.04 v 2.4 II-67
8.13 Create Directory With this function, you can create a new directory in a GEOPAK part program. This is useful, if e.g. tasks are repeated in weekly periods. Certainly, you wish to file the protocols of the results sorted by the week.
� In this case, first of all define a string variable, which you complete with the text and the "week" system variable (see example below).
Str1 = Woche_@week.
� Use this variable when entering the directory name in this function.
� Also use this variable in the "File Format Specification" function.
Hints If this path does not yet exit, it will be created. Otherwise, nothing happens.
With this command, you also can create sub-directories.
When selecting a name for the directories, you have all possibilities of the string coding at your disposal.
For further information concerning this subject, please refer to your MCOSMOS-CD-ROM under "Documents", folder "GENERAL", file "si_io_comm_g (e).pdf".
8.14 Input Head Data Some functions automatically ask for head data, when this data has been selected previously (e.g. "Beginning of File Format" or "Beginning of Print Protocol"). Other functions don't automatically ask for the head data, even if this information might be required (e.g. the "Flexible Protocol Output" or "Statistics Output into File"). Therefore, beginning from Version 2.2, the function "Input Head Data" will be available.
� You call this function (Menu bar / Program / Input Head Data) at the beginning of the part program and confirm in the following window.
� In this way the part program executed the functions you have entered in the dialog "HEAD Data Editor" earlier in the PartManager.
� If you proceed this way, no further action will be required later with a function asking for head data (e.g. Beginning of File Format). The head data dialogue will not appear again.
The head data required for input is the information defined in the PartManager with the option "Input Head Data before Printing" (for details, refer to the topic
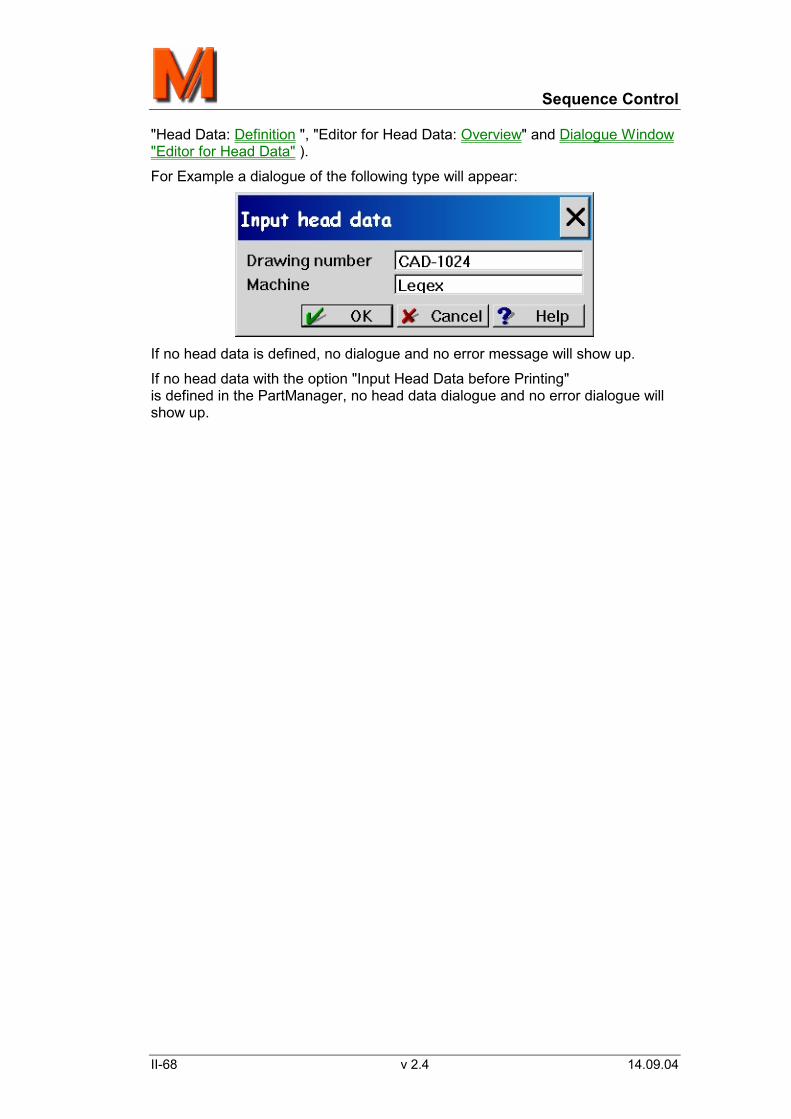
Sequence Control
II-68 v 2.4 14.09.04
"Head Data: Definition ", "Editor for Head Data: Overview" and Dialogue Window "Editor for Head Data" ).
For Example a dialogue of the following type will appear:
If no head data is defined, no dialogue and no error message will show up.
If no head data with the option "Input Head Data before Printing" is defined in the PartManager, no head data dialogue and no error dialogue will show up.

Sequence Control
14.09.04 v 2.4 II-69
8.15 Set Head Data Field This part program allows you to set a head data field (for details, refer to the topic "Editor for Head Data: Overview "). This is useful in case the head data is required to be set through a part program functionality, e.g. through a text variable.
To find out which head data field is to be set, the user has to enter the ID of the head data field which he has set already previously in the PartManager (fig. below; Menu bar / Settings / Head Data / New or Change).
You enter the ID and the new contents of the field.
You should know
� If there is no ID, an error message will appear ("Head Data Field not Existing").
� In case the data is entered in the learn mode with variables, the result will automatically be analysed and displayed under the input line.
� The existing ID's you have already set in the PartManager are

Sequence Control
II-70 v 2.4 14.09.04
suggestions for the ID list field.
� This command does not verify the "input type". If a number is defined as input type and a character string is set, no error will be displayed.
� Should the length of the input text be longer than the defined input length, the character string will automatically be reduced to the input length.
� If the "input type" reads "Extend list", the contents of this list will not be added (for details, refer to Extend List ).
� The new contents of the head data field is stored in the part's head data. This means: even if GEOPAK is finished, the new contents will be valid until it is replaced in the PartManager or changed by another command.
8.16 Sublot Input It may be necessary to specify sublot data already at the beginning of part programs (e.g. for the flexible protocol output or the statistics). Beginning from the Version 2.2, you can access this function through the "Menu bar / Program / Sublot Input" and confirm in the subsequent window.
Depending on the sublot already defined in the PartManager (for details, refer to General information on Sublot and the topics to follow), there will appear a dialogue where you input the sublot. When in the PartManager a "Structured Sublot" has been defined, a corresponding dialogue will be displayed (fig. below). Otherwise only the sublot input with an input field will be displayed.
The dialogue "Structured Sublot" performs a self-check of its input data. For the standard input, there is only a check for maximum length. If you enter less than 40 characters, the field will automatically be filled with blanks.
An error message will appear only in case the user has interrupted the input ("Sublot input was interrupted"). In the learn mode, there is no error message. The command is not learnt.
Refer also to "Set Sublot".

Sequence Control
14.09.04 v 2.4 II-71
8.17 Set Sublot This function (Menu bar / Program / Set Sublot) allows you to set the sublot as a whole or only a sublot field of a structured sublot.
Using the symbol ("Set Structured Sublot") you decide in the dialogue "Set Sublot" (see fig. below) as to whether you want to set the complete sublot or only a sublot field.
If data is entered in the learn mode with variables, the result will automatically be analysed and displayed under the input line. The remaining characters of every sublot are filled with blanks.
You should also know
� Structured sublot: In order to identify the sublot to be set, you enter the number of the sublot field and the new contents of the field. Should the sublot field to be set no exist, the screen shows an error message ("Sublot not existing").
� Set complete sublot: If the option "Set Structured Sublot" is disabled the whole sublot will be set.
� Default settings: If a structured sublot has been defined the default setting of the option "Set Structured Sublot" is enabled. Otherwise this function is disabled and can not be selected in learn mode.
Refer also to "Sublot Input".

Sequence Control
II-72 v 2.4 14.09.04
8.18 Program Call
Program Name With this function (menu bar "Program / Program Call"), you can call any external program, and this according to Windows conventions in the "Program Name" text field. Then, these programs will run in parallel to your part program.
If you only click on the clock symbol, the part program stops and only the external program is running. Only if you close the external program, your part program will start again.
Working Directory In this text box you enter the folders (directories) that are required for the running external program. Pay attention to the spelling of the directories and the rules of the way of writing of directories (e.g. \PROG\DATA).
Program Parameters If the external program requires further parameters, these are input, separated by empty signs, in this text field.

Sequence Control
14.09.04 v 2.4 II-73
8.19 IO Condition (IO Communication) Introduction
Frequently, the IO condition is also called IO communication (Input-Output). It makes possible that MCOSMOS may work together with other control systems. To do so, electronic signals are exchanged. The communication can take place in one or two directions.
Typical examples are
� Automatic process control,
� Pallet feeding device,
� Robot control.
IO Cards
IO cards, also called EA cards in German (Ein- oder Ausgangskarten), are Input / Output cards. In our case, we call them digital input or output cards. That means, per signal, there are only two conditions, logical "HIGH" (for the most part high tension) and logical "LOW" (for the most part low tension). To minimise the expenses when selecting IO cards, we offer some standard IO cards, e.g. the "ME-8100-A". Requirement The "IO_COND.INI" must be available in the "INI" directory of MCOSMOS. You find the file for the default setting on the MCOSMOS installation CD (\OPTIONS\IO_COND). In this file, you have to define the name of the control file (default setting "IO_COND.DAT"), and the type of card that you wish to use.
Furthermore, you will have to write a control file. This must also be available in the "INI" directory.
Without these files, MCOSMOS will not execute an IO communication. For further information concerning this subject, please refer to your
MCOSMOS-CD-ROM under "Documents", folder "GENERAL", file "si_io_comm_g (e).pdf".

Sequence Control
II-74 v 2.4 14.09.04
8.20 Possibilities of Text Input/Data Name It is also possible to enter defined variable information into all boxes in which you normally make text inputs: Protocol headlines, commentary lines, text lines (e.g. "Text to Printer"), as well as names of files, elements and variables.
Three important examples � If you want to output, for example the current time of day you can
do that over the output text by previously entering the text "Now it is @time o’ clock". That leads for example to the output: "Now it is 13:45:48 o’ clock".
� If you want to create your own ASCII-file with the results to each program run, you can input in the learn mode with the "File Format Beginning" function as file names for example "[email protected]". That leads after the first program run to "Result1.asc". Then to "Result 2.asc" etc. RC stands for Repeat Counter and begins with the number, that you input as an originally-protocol number namely in the dialogue window directly after start of the repeat mode.
� If you want to call variables within a loop via the loop indicator you input as a variable name, e.g. var@LC. This leads in the first loop flow to variable var1, in the second to var2 etc.
For further information about all possibilities of modifying the texts in the string coding, please refer to your MCOSMOS-CD-ROM under "Documents", file "UM_string_code_g(e).pdf".
Further possibilities of input:
Single Selection
Group Selection

Sequence Control
14.09.04 v 2.4 II-75
8.21 Single Selection In order to get, for instance, to a connection element, you first have to select the elements used to build the connection element. You can determine these elements via the single or group selection facility. Provided the elements are of one type of elements and arranged one behind each other in the memory, you are recommended to use the - undoubtedly faster - Group Selection.
In case of single selection, you have to
• proceed step by step, but it is up to you • determine the sequence and • to mix the types of elements.
There may, of course, occur situations where single selection is mandatory. This is the case, for instance, when you use a line and have to pay attention to its sense of direction.
Change selection When you change from single to group selection - and vice versa - the following two symbols are of utmost importance:
With mouse-click to group selection
With mouse-click to single selection
Our example In our following example, the line is the connection element.
� In the dialogue window "Connection Element Line", you are presented, on the left-hand side, all elements build up to now.
� Via the horizontal icon bar ("Available") you can decide by a mouse-click which types of elements you want to watch and use or not.
� You click the elements selected to the right-hand side and confirm.
With the connection element calculated using this method, you proceed in the same way as with any other element.
You should know
� In case of a measured element automatic projection into one plane is possible, due to the fact that the material side is known.
� In case of a connection element the material side is not known; hence automatic projection is not possible. So you have to define the projection plane.
For this purpose you have at the left border of the respective dialogue windows "Connection Element ..." the planes XY, YZ and ZX.

Sequence Control
II-76 v 2.4 14.09.04
8.22 Group Selection In order to get, for instance, to a connection element, you first have to select the elements used to build the connection element. You can determine these elements via the single or group selection facility. Provided the elements are of one type of elements and arranged one behind each other in the memory, you are recommended to use the - undoubtedly faster - group selection.
In case of Single Selection you have to
� Proceed step by step, but it is up to you
� to determine the sequence or
� to mix the types of elements.
There may, of course, occur situations where single selection is mandatory. This is the case, for instance, when you use a line and have to pay attention to its sense of direction.
Change Selection To change from single to group selection - and vice versa - you use the following two symbols:
With mouse-click to group selection
With mouse-click to single selection
Our example In our following example, the line is the connection element.
In the icon bar ("Available") you select, e.g., the element "Circle" and decide in the text box "Number" how many circles you want to use to build the connection element "Line".
Bear in mind that with the sequence of the circles you define the line's sense of direction.
With the connection element calculated using this method, you proceed in the same way as with any other element
You should know
� In case of a measured element automatic projection into one plane is possible, due to the fact that the material side is known.
� In case of a connection element the material side is not known; hence automatic projection is not possible. So you have to define the projection plane.
For this purpose you have at the left border of the respective dialogue windows "Connection Element ..." the planes XY, YZ and ZX.

Probe Data Management
III Probe Contents 1 Probe Data Management.................................................. 3
1.1 Probe Data Management: Introduction...................................... 3 1.2 New Input of Probe/Edit/Copy Probe Data ................................ 5 1.3 Save / Delete / Calibrate Probe Data .......................................... 6 1.4 Probe Selection............................................................................ 7 1.5 Confirm Probe Configuration ..................................................... 7 1.6 Change Probe Configuration...................................................... 8
1.6.1 Warnings ............................................................................................. 8 1.6.2 Numbering, e.g. for two racks ............................................................. 9 1.6.3 Counting.............................................................................................. 9
2 Probe Calibration ........................................................... 10
2.1 Probe Calibration: Options ....................................................... 10 2.2 PH9 Probe Clearance ................................................................ 11 2.3 Manual Calibration..................................................................... 12 2.4 Calibration of Scanning Probes ............................................... 12 2.5 Calibrate Scanning Probe Systems ......................................... 13 2.6 Define MPP/SP600 Factors ....................................................... 13
3 Define Master Ball .......................................................... 14
3.1 Define Master Ball: Example..................................................... 14 3.2 Z-Offset....................................................................................... 14 3.3 Maximum Difference.................................................................. 15
4 Archive Probes ............................................................... 16
4.1 Load Probe Data from Archive ................................................. 16 4.2 Single Probe Re-Calibration ..................................................... 17 4.3 Re-Calibrate from Memory........................................................ 17
4.3.1 Procedure.......................................................................................... 17 4.4 Calibrate Probe: Display ........................................................... 18
5 Several Masterballs........................................................ 19
5.1 Several Masterballs: Introduction ............................................ 19 5.2 Define Masterball Position........................................................ 19
6 Cancel Probe Change .................................................... 21
6.1 Cancel Probe Change: Sequence............................................. 21 6.2 Cancel Probe Change: Details and Tips .................................. 22 6.3 Rotary Table: Hints.................................................................... 22
7 Combination of Racks.................................................... 23
7.1 Combination of Racks / Introduction ....................................... 23
14.09.04 v 2.4 III-1

Probe Data Management
7.2 Combination of Racks / Definitions ......................................... 23 7.3 Sub-Racks.................................................................................. 24 7.4 Manual and Virtual Changer..................................................... 25 7.5 Manual Change.......................................................................... 25 7.6 Manual Change with Following Rack ...................................... 26 7.7 Definition of Sub-Racks............................................................ 26 7.8 Probe Extension Module "PEM" .............................................. 26 7.9 Rack Alignment ......................................................................... 27 7.10 Convert Rack Data .................................................................... 28 7.11 Set Advanced MPP100 Data ..................................................... 29 7.12 Calibrate ACR 3 ......................................................................... 30 7.13 Numbering Method of Probe Configurations.......................... 30 7.14 Rack Definition .......................................................................... 31 7.15 Options with the FCR25............................................................ 32 7.16 Configuration with the SCR200................................................ 33 7.17 Configuration with the ACR3 and Two Times FCR25 ............ 35 7.18 Rack Specific Parameters and Positions ................................ 36 7.19 Port Settings.............................................................................. 37
III-2 v 2.4 14.09.04

Probe Data Management
1 Probe Data Management 1.1 Probe Data Management: Introduction
You want to perform a single measurement. Your co-ordinate measuring machine is equipped with the probe suitable for your measuring job. You start your measuring program through the PartManager (for details refer to Single Measurement/Learn Mode). The GEOPAK main window opens and tells you that no probe is defined yet. Upon confirmation you are presented the dialogue window "Probe Data Management".
• For information about "ProbeBuilder" or "Define Probe" first click on the topic "ProbeBuilder".
• Further subjects are described under the topics "New Input of Probe/Edit/Copy Probe Data" and "Save/Delete/Calibrate Probe Data".
Hints You can input as many probes as you currently need. Make sure that the window is not unnecessarily overloaded. Keep in mind that probes can be archived and recalled again from there.
It is always the probe identified with an asterisk behind the probe number that is used for measurement.
About symbols:
The symbol (on the left) is activated, when you define a loop start prior to changing the probe. For details refer to the topic "Loops".
Click on the probe from where you want the loop to start.
Click on the symbol for OK.
It is possible to Load Probe from Archive.
The Archive probe function is possible, too.
Click the function "Select All" in case you want to calibrate all probes in succession.
As a rule, you print the current probe list. If a probe-tree changing system is used, the tree number will be asked for previously. The current tree number is suggested.
Provided you have manually set the angles of your probing system using the Renishaw Head Control Unit (HCU), you just click on the symbol to accept the angle values. The HCU is suitable for all rotary-type probing systems (PH9, PH10).
About columns The first column shows probe numbers.
The second column displays symbols.
14.09.04 v 2.4 III-3

Probe Data Management
The probe symbol represents a theoretical probe. There is a general rule: A changed or redefined probe is always given the symbol of a theoretical probe;
the pin symbolises an already calibrated probe.
Data regarding the Maximum Difference relative to the calculated calibration ball diameter is indicated after the diameter column. It is necessary that you have approached a minimum of 5 points for measurement. When the values are too high, then, for instance, you have touched the ball from the side (sliding-type probing).
Under "A" and "B" of the columns you find information on the probe angles (refer also to New Input of Probe/Edit/Copy Probe Data).
The probe offset relative to the reference probe is shown in the columns X,Y and Z (refer also to New Input of Probe/Edit/Copy Probe Data).
III-4 v 2.4 14.09.04

Probe Data Management
1.2 New Input of Probe/Edit/Copy Probe Data The dialogues "New Input of Probe", "Edit Probe Data" and "Copy Probe Data" are prompted up by clicking over the menu bar / Probe Data Management and the function required. The dialogues are almost identical.
New Input of Probe
The probes are consecutively numbered - necessarily starting from 1.
First enter a theoretical value for diameter, for example 2.000 (e.g. in mm). Whether to enter linear measures in millimetres or inches, is to be chosen in the following dialogue window via the menu bar / Settings / Input Characteristics.
If you have, for instance, a part program with offset values already defined for later recalibration (star-type probe) by another part program, then enter rough offset values. Otherwise leave the values set to 0.
In the lines for probe angles, use the arrow keys to select the values, upwards and downwards in steps of 7.5 degrees.
Edit Probe Data Click the respective line in the Probe Data Management window, click on Edit and perform the changes in the subsequent window. Upon OK, all changes are transferred to Probe Data Management.
In case data was saved previously and you have made changes, you will get a safety query.
Copy Probe Data Only the line "Copy to..." is active in the "Copy probe Data" dialogue. Click the line of the probe to be copied. Ignoring the number suggested, you can enter an
14.09.04 v 2.4 III-5

Probe Data Management
already occupied probe number. This probe is then overwritten. Otherwise the copied probe is placed to the end of the list.
Copying onto the reference probe is not possible.
In case data was saved previously and you have made changes, you will get a safety query.
As a rule of principle, any changed or redefined probe is always given the symbol of a theoretical probe.
Further topics:
Probe Data Management
Save/Delete/Calibrate Probe Data
1.3 Save / Delete / Calibrate Probe Data Save Saving causes all current data to be physically written on the hard disk.
In case data saving has been confirmed with OK and you want to change or recopy probe data in a subsequent step, you are requested to answer a safety query.
Hint If, however, you use the Probe Data Management window
• to save, • then to make changes or recopy data, and finally • to finish the window with Abort,
the "old", previously saved values will be displayed.
Delete Deletion is possible for any probe. The #1 probe (reference probe), however, can only be deleted if it is the last probe in the list, or if all subsequent probes are deleted at the same time together with the reference probe. Otherwise a fault message will show up.
Calibrate You always calibrate the active probe (for details refer to Probe Calibration).
Further topics:
Probe Data Management
New Input of Probe/Edit/Copy Probe Data
III-6 v 2.4 14.09.04

Probe Data Management
1.4 Probe Selection
If at least one probe is defined, you can see the window "change probe" with the data of the defined probe(s). Select one and confirm; then this becomes the actual probe used for measurement.
If there are no defined probes, you will see the window for probe management; here you can define your probe(s). For details, cf. (Probe Data Management and Probe Calibration ).
Even if there are probes defined, you can add new probes to the list. For this, you use the function "Probe / probe data management" in the pull-down menu. You can also access this function via the "probe" icon of the tool bar on the left margin of the screen.
Further Information
The active probe is marked by an <*>; this one is used for measurement.
The menu "probe" can access the windows for "select probe" and "probe data management".
You can easily change probe data by simply clicking any probe of the list twice. The window "change probe data" immediately appears.
The new data are directly passed to the probe data management window (for details, cf. Probe Data Management ).
After changing, the following question appears: "Data have been changed; store changes"?
1.5 Confirm Probe Configuration
This only refers to machines that are equipped with a probe changer system.
After starting learn or repeat mode, you get the window "Confirm Actual Probe Configuration". This dialog is a safety question at exit. Meanwhile, the probe configuration may have been manually changed. Therefore, you should examine the "real" probe tree and then confirm. If the probe configuration has been changed, you should enter the number of the configuration, which is active now.
If you do not enter the correct configuration, your measurement data will be wrong. Furthermore, while executing a part program, there are collisions when working with the wrong probe data. Last but not least, there will be problems as soon as you change the probe configuration; GEOPAK would try to record the probe configuration into an occupied port.
After confirmation, you get the "Change Probe" window. In the headline, you find the number of the probe configuration. Now, you continue as you did in Probe Selection .
14.09.04 v 2.4 III-7

Probe Data Management
1.6 Change Probe Configuration
The change of probe tree will be automatically realized. If you dispose of a manual tool changer, you must respect a series of special steps. Also see details of Manual Tool Changer .
The automatic change of probe tree will be realized from where the probe tree is situated at the moment you want to change it. The probe tree takes the direct way to the port. This direct way will only be selected if you have not indicated a security position in the "Rack Definition" program. To avoid collisions, take care that the access to the probe tree is free. Therefore, you should pay attention to warning messages.
You call the probe tree change via the menu probe / change configuration. Enter the number of the probe configuration and confirm.
In single / learn mode, you get the message "Attention: Probe Configuration has Changed". Now you have a chance to check whether the rack can be reached without collision; otherwise, you can correct the actual position by the joysticks. Do not forget to define these positions for the repeat mode by pressing the "GOTO button" of the joystick box. In repeat mode, you get the message only if the CNC can be manually moved, and you can use the joysticks to move the machine.
After the configuration has been changed, you get the window for the selection of the actual probe; the number of the configuration is written in the headline. Then, proceed as in Probe Selection .
If you have worked, before, with a swivelling probe, you get an additional message "Attention: Probe will move!". Make sure that the probe can be rotated without collision (see above).
1.6.1 Warnings If the probe configuration has not been calibrated yet, you get the error message "Probe # 1 not Defined". After you confirm it, you get the window for "Probe Data Management" (the number of the configuration appears in the headline).
As all the measurements can be made with different probe configurations, nevertheless can be combined no matter which configuration an element has been probed with, GEOPAK needs a common reference probe. This is probe #1 of configuration #1. This probe must be calibrated first; cf. also Probe Data Management .
The probe configuration number is the number of the port in the rack.
III-8 v 2.4 14.09.04

Probe Data Management
1.6.2 Numbering, e.g. for two racks If you have, for example two racks of the same type (see picture below with two SCR200), you must give an exact name to the ports in the corresponding rack. The numbering begins in your Rack with the number 01 and in the rack with the number 11.
1.6.3 Counting The following counting can still be used because of compatibility with GEOPAK 3 in connection with your part programs from this version:
If you use two SCR 200 with 6 ports, the numbering of the ports of the second rack starts from 7 and goes to 12; in case of an ACR, usually 8 ports are available, then counting for the second rack starts from 9. If, however, the number of assessable ports in the ACR has been reduced (e.g. to 7), counting for the second rack starts from 8.
If the rack position has not been determined yet, you get an error message.
14.09.04 v 2.4 III-9

Probe Calibration
2 Probe Calibration 2.1 Probe Calibration: Options Define Master Ball with Reference Probe
Before you calibrate one of the probes #2 to ..n, you must know the position of the master ball. This is achieved by measuring it using the probe #1; therefore, this probe is called the "reference probe". If you have not measured the master ball using probe #1, you will get the error message "Position of master ball not defined", if you try to calibrate some other probe. First, mount the master ball to a fixed position. Make sure that all probes you want to calibrate can freely access it.
Different methods GEOPAK offers different methods to calibrate probes.
Select the manual mode by clicking the symbol. You guide the CMM to the measuring points; you can decide which numbers of points must be taken. After at least five points, you can finish the measurement at any time.
Input the number of points for the calibration before measurement. Then measure the master ball manually. As soon as the defined number is reached, the program automatically calculates the probe data.
Only set the probe above the master ball; then select the "automatic probe calibration". If you have a CNC machine, the rest of the probe positions are automatically measured.
Procedure
Activate probe #1 in the window "Probe data management". Now click "calibrate" to get the dialogue for calibration. Select the manual calibration by a clicking the symbol.
Select the diameter of the master ball out of the list. If the actual diameter is not in the list, you can enter any other diameter via the text-input field.
Now specify the number of points you want to measure. At least five points must be used. Otherwise, you get a warning message.
You confirm und get the window "Calibrate Probe". In this window you get all information you need. You confirm.
Now probe the master ball with the probe you want to calibrate at least five times, and then confirm.
III-10 v 2.4 14.09.04

Probe Calibration
Note When using one of the other methods, continue accordingly.
If you want an automatic calibration of a probe configuration (activate by a click on the icon), and you have a rotary probe head; additionally input
With regard to the Swivel length you work with the ProbeBuilder (since version 2.3). By this program you can configure your probe system included the swivel length.
the safety distance (for more details, cf. Measurement Point). You should use a large distance first; this makes a calibration possible in spite of inaccurate probing of the pole.
the Z-Offset (for more details, see Z-Offset )
the number of calibration cycles; the subsequent measurements start from the data acquired by the previous cycle, thus making the calibration more accurate. Therefore, we recommend using at least two.
Cf. topic Recalibrate from Memory .
2.2 PH9 Probe Clearance With this command, you can move to a probe position, for which you must not especially define a probe. This makes sense for example if the probe should be moved alongside a part and has to be swivelled for this purpose.
After this function, you must again move to a defined probe if you want to continue the measurement.
The offset is made by the reference probe, i.e. the machine moves as if the reference probe would be active. The angle position is taken either from the probe number or correspondingly from the angle you entered.
14.09.04 v 2.4 III-11

Probe Calibration
2.3 Manual Calibration To get to this function and the dialogue, use the menu bar and the „Probe“ menu.
Prior to calibrating probes with numbers greater than 1, probe 1 needs to be calibrated.
When performing measurement on a ball, the "Element finished " is possible beginning from the fifth measurement point.
For "Element finished", the probe diameter is calculated.
In a volume-compensated machine, every single point with the probe offset is sent to the machine. As a reply, you get the volume-compensated points. These points are used to calculate the probe. For further details refer to the topic Volume Compensation
For the following functions and the dialogue related to them, make sure that you always enter the diameter of the masterball:
Manual calibration
Re-calibrate single probe
Re-calibrate from memory
In addition, beginning from Version 2.2, it is possible to also use an already defined masterball. If don't choose to do so, the masterball you use will have the number 1. The same applies also to an already existing part program.
Should you, however, choose to use this possibility, you will be able to enter the number of the masterball, but not the diameter. The diameter text box is deactivated, the diameter, however, is shown depending on the number of the masterball defined previously.
You will get an error message if the masterball is not defined.
2.4 Calibration of Scanning Probes When using one of the probing systems SP600, SP25 and SP80, special calibration routines are automatically used. For this, click on the option "Determine scale factors" in the window "Calibrate probe".
This option is only visible with an activated scanning probe system. When working with a newly defined probe, the text of this option in this window is greyed. However, the function itself is activated and can not be deactivated. That means: You have to determine the scale factors.
As a result (ill. above) you receive two different probe diameters, one for touching measurement and the other for scanning measurement. The values of the scanning probe are always the lower ones. Always only the offset of the touching measurement is used.
III-12 v 2.4 14.09.04

Probe Calibration
For the probe radius compensation of scanning commands (e.g. CNC scanning), always the diameter of the scanning probe is used. This also applies to the case that the measurement procedure was changed during the element measurement.
For more detailed information, refer to "Re-calibrate from Memory".
2.5 Calibrate Scanning Probe Systems The probe systems MPP of Mitutoyo and SPxx of Renishaw are scanning probe systems where scales are installed in the probe head. The position of these scales relative to the CMM scales must be additionally defined for the calibration.
Another feature of all the scanning probe systems is that the effective ball diameter is slightly different depending on whether the scanning probe systems will be operated in touch trigger or scanning mode. This is why the ball diameter must be determined twice.
Proceed as follows:
Measure the ball with the probe no. 1. From now on, the subsequent steps will be automatically realized. This is valid for all probes to be calibrated.
The ball will be measured in the touch trigger mode. This way, the offset of the current probe to probe no. 1 will be defined.
By means of this information, the MPP/SPxx factors will be determined by scanning the ball once again in a special mode.
Then, the ball will be measured once again in the touch trigger mode by using these factors in order to get the exact probe data.
2.6 Define MPP/SP600 Factors With measuring probes, for calibration purposes, you must define factors so that the measurement accuracy is guaranteed. The definition of the factors is always realized for the current probe. If you want to call this command in the part program ("Menu Bar / Probe / Define MPP Factors"), the following conditions must be fulfilled:
The probe must have been calibrated before.
In CNC operation, the probe must be moved over the masterball with the program.
In the manual mode, a dialogue is displayed prompting the operator to manually move the probe over the masterball.
This function is not applicable for a SP600 with star probe. Note For the scanning probe types (SP600, SP80 und SP25) the MPP factors and the relevant probe diameter are established automatically.
14.09.04 v 2.4 III-13

Define Master Ball
3 Define Master Ball 3.1 Define Master Ball: Example Situation
You have started GEOPAK in single / learn mode and want to calibrate a new probe in the probe data management window. When clicking the "calibrate" button, you get the warning "Position of master ball not defined; continue?"
Reason
The reference probe has not been calibrated yet, and you try to calibrate a probe with a number different from 1. This warning tries to prevent you from getting wrong results. If the position of the master ball has been changed in the meantime, or a different master ball is used. In these cases, the probe calibration would result in wrong probe data, because the differences to probe #1 would be wrong.
Solution
Calibrate probe #1 anew (cf. Probe Calibration ). However, if you are sure that the master ball position has not been changed since you have calibrated probe #1 the last time, you can opt for "continue" when you get the warning.
3.2 Z-Offset Usually during probe calibration, the master ball is probed using a circle along the equator, and a point on the pole. If you actually use a small tip, probing of equator may not be possible (cf. drawing below). In such a case, you can input an offset in Z; this means the height above the equator where the master ball is touched.
III-14 v 2.4 14.09.04

Define Master Ball
3.3 Maximum Difference The maximum difference is an information about the quality of an element or - if the element is close to perfect, e.g. as a master ball - the quality of the measurement or probe system.
It is calculated after the element data have been obtained from the measurement points. Then the distance of the individual points to the calculated surface is computed; in case of a sphere (the master ball) the following two points determine the value:
the point having the largest distance from the centre, and ...
the point that is nearest to the centre.
The difference between these two distances is the "maximum difference". The idea is the same for all the other elements as well; the maximum distances on one side and on the other give an indication about the measurement (cf. also
Probe Data Management ).
A = maximum distance
B = maximum distance
C = maximum difference
The value can only be obtained if an element is measured with more than the minimum number of points required for that element. If an element has been measured with only the minimum number of points, it is defined exactly through the points; there are no distances from the element to the points. For a sphere, you need at least 4+1=5 measurement points to get the value for the maximum difference.
Now the program calculates the "maximum difference". From this value, you can evaluate the quality of the measurement, the higher the value, the worse measurement.
Even in CNC mode, you may get a high value for the "maximum difference". This can be an indication that either your probe is defective, or has not been tightly screwed.
14.09.04 v 2.4 III-15

Archive Probes
4 Archive Probes You can archive any probe set; however, the probe #1 must also be archived. If you want to archive the complete list on the screen, click on probe #1 first, then press the <Shift> key and move the mouse up to the last probe. Then the whole block is marked and put in the archive.
Use the menu bar probes / archive or ...
Click in the "Probe Data Management" dialogue window on the symbol.
Note You can de-select single probes in a block by <Strg> and mouse
click.
A selected block is de-activated if you activate a single probe of this block. In this case, only the single probe is activated, the rest is de-activated.
You can get a list of archived probe sets if you select "Probes/from archive" from the menu bar, or click "Load from archive" in the probe data management window.
4.1 Load Probe Data from Archive You are in single / learn mode of GEOPAK and want to use a probe configuration, which has been defined (calibrated) and archived.
Select "Probes / Data from Archive" from the menu bar, or ...
Click in the "Probe Data Management" dialogue window on the symbol.
In either case you get the "Probe from Archive" window.
Select the probe set you need and confirm.
You can display the archived probe data before loading them.
• This means, in the "Probe from Archive" window, either with a click on the symbol ("View" bubble) or
• with a double click on the archive name. Then you find the loaded probe set in the probe data management
window. Next, activate the probe you need for the next measurement and click on "Change to" (cf. also Probe Data Management), and confirm.
Note As this implies a change of the actual probe, the new number and tip diameter indicate this change in the result field.
III-16 v 2.4 14.09.04

Archive Probes
4.2 Single Probe Re-Calibration Proceed as described in chapter "Re-calibrate from memory". A difference is that for single probe re-calibration only one probe will be determined. Gaps in the probe list are possible.
If you wish to calibrate a probe of any number of the list, the probe with the number 1 must be calibrated first (you will find more detailed information in chapter "Three possibilities for measurement").
4.3 Re-Calibrate from Memory To get to this function and the dialogue, use the menu bar and the „Probe“ menu.
This function gives you the possibility to re-calibrate probes via measured spheres.
The main advantage of this function is that even complex probe configurations can be calibrated using a CNC part program. This means that it can be done automatically.
However, a first set of probe data must already exist, e.g. as a set of theoretical values, or the previously defined probes.
4.3.1 Procedure You fix the master ball on the table of the machine at a position
where it can be accessed by all probes you want to calibrate.
You start with probe #1 and measure the ball as element "sphere" by all probes.
The spheres must be stored into subsequent memory numbers. However, the first number can be freely selected.
If you have measured the ball with all the probes, you select the pull down menu "probes / re-calibrate from memory".
In the following window you input the number of probes that have to be calibrated. In addition, you enter the memory number of the sphere which you have measured first with probe #1.
You confirm by "OK".
The probe data are calculated anew. These new data are stored to the disc immediately, if no error has occurred. The correlation between the probes and measured spheres must be exact.
The sequence number only does the correlation of the measured spheres and the probes. This means that the sequence numbers of the probes must not have interruptions, as otherwise a wrong correlation is done, and wrong probe data are stored.
14.09.04 v 2.4 III-17

Archive Probes
For the following functions and the dialogue related to them, make sure that you always enter the diameter of the masterball:
Manual calibration
Re-calibrate single probe
Re-calibrate from memory
In addition it is possible to also use an already defined masterball. If don't choose to do so, the masterball you use will have the number 1. The same applies also to an already existing part program.
Should you, however, choose to use this possibility, you will be able to enter the number of the masterball, but not the diameter. The diameter text box is deactivated, the diameter, however, is shown depending on the number of the masterball defined previously.
You will get an error message if the masterball is not defined.
For calibrating single probes and re-calibrating from memory it is possible to define the type of calibration (touching or scanning).
For the probe types SP600, SP80 and SP25, the scanning is already defined by determining the MPP Factors.
4.4 Calibrate Probe: Display In the display window for "Calibrate probe", you find all status information concerning the probe calibration. You find the current data in the upper field with the black background. The information there depend on the installed hardware.
Via the symbols (left) the functions "Delete" and "Element ready" can be selected.
In the centre of the window you find instructions as to which action is currently being performed (see example below).
In the lower table part of this window you see ...
...the results of former calibrations in case that you have calibrated more than just one probe,
the current probe calibration and
the calibrations still to be worked off.
Note To set the font type and size according to Windows conventions, click on the right mouse key – separately in both window parts.
III-18 v 2.4 14.09.04

Several Masterballs
5 Several Masterballs 5.1 Several Masterballs: Introduction This function enables you to calibrate the probes with one or more masterballs in different positions. The use of this function may be advisable where, e.g., it is impossible to calibrate all probes with one masterball only. Such a situation may occur, if it is impossible for all defined probes to approach the masterball. Another need for this function could arise also, when the probe tip used is so small that there is a potential risk of the probing action being performed with the shank of the probe. In all these cases you would get wrong measurement results.
Calibration of number 1 probe defines automatically the position of the first masterball.
In our example the probe designated X is the probe that cannot reach the first masterball. Probe Y is the probe that reached both masterballs. The sequence is performed in the following steps:
Calibrate probe 1 and define the position of the first master ball..
Calibrate probe Y against the first masterball.
Define the position of the second masterball using probe Y.
Calibrate probe X against the second masterball.
This method cannot be applied but for learnable part program commands used for calibration (for details refer to Define Masterball Position).
5.2 Define Masterball Position Recommendation For some fundamental information on the topic „Several Masterballs“ we recommend you first refer to the chapter Introduction
Procedure Use the „Menu bar / Probe / Define Masterball Position“ to get to the dialogue. Here the following inputs are possible:
Diameter of masterball (is stored)
Number of masterball
Use this symbol to activate the loop counter.
List to select the ball (position only is stored).
14.09.04 v 2.4 III-19

Several Masterballs
Further hints The maximum number allowed for the master ball is 100.
Gaps are permitted among these numbers.
Where the position of the reference masterball is not defined, the definition of other masterballs will not be possible. In this case you will get an error message.
A part program defining several masterball positions has to be written with the temperature coefficient 0.0. If this is not the case, the difference between the masterballs will be temperature-compensated. This should be avoided.
For details refer also to the topics
Re-Calibrate from Memory
Re-Calibrate Single Probe
Manual Calibration
III-20 v 2.4 14.09.04

Cancel Probe Change
6 Cancel Probe Change 6.1 Cancel Probe Change: Sequence If, for instance, an error occurs when a probe is being changed, you may need to cancel probe change. In this case it is ensured, beginning from version 2.2, that the subsequent measurements can be performed using the previous probe.
In cases where you have connected a swivel-type probing system, you first get a safety query.
Regarding the general sequence (cancel probe changes, probe tree changes, and rotate table)
You work with a probe (probe tree or rotary table) in the CNC mode and intend to make a probe change. Then you realise, however, that you do not want this change to happen.
Click on the "Delete Last Step" symbol in the learn mode.
Click on the "Step Back" symbol in the repeat mode.
Should you already have performed the change and the measurement as well, you need to delete the measurement results you have got by mistake, and then click on this symbol.
The CMM changes automatically to manual mode.
A warning comes up: e.g.: "Attention! Probe is being changed". This warning cannot be deleted.
In order to avoid collisions, move the CMM into a safe position and then click OK. The CMM will immediately resume the CNC operation.
The CMM changes to the previously used probe (probe tree; rotary table).
For further details refer to the topics
Cancel Probe Change: Details and Tips
Rotary Table: Hints.
14.09.04 v 2.4 III-21

Cancel Probe Change
6.2 Cancel Probe Change: Details and Tips For cancelling probes (cancelling probe tree) you should know that cancelling in a loop first deletes all repeats. Only then probe change is cancelled.
Tip: In the repeat mode, we recommend the use of the "Program Jump" function in cases where you want to skip more than one program line.
Cancelling a probe change, namely directly prior to changing a probe tree, causes the probe to lose its definition.
Output Going back in the part program causes ...
the data in the result box to be deleted.
Depending on the new settings, the CMM position is updated.
The status line is updated with the current, correct probe number (probe tree number).
Performance limits When you have deleted an intermediate position, the CMM is not moved back into the previous position.
6.3 Rotary Table: Hints In case the CMM has not been moved into a safe position, you will get the error message "CMM not in safe position relative to rotary table".
The "Cancel Table Rotation" command reverts the sense of rotation and turns the co-ordinate system back (if used).
Indexing rotary table Furthermore, this command reloads the previously used co-ordinate system, provided the table is of the indexing type. Indexing-type rotary tables are tables which rotate only by fixed degree increments (e.g. 90-degree increments). For each of the indexing table position, a fixed table co-ordinate system is loaded.
III-22 v 2.4 14.09.04

Combination of Racks
7 Combination of Racks 7.1 Combination of Racks / Introduction GEOPAK allows the combination of different racks. This serves to realise an automated and quick change of components as well as automated measurement tasks that have to be performed with different probes.
For more information, also refer to the topic "Change Probe Tree".
Combinations of probe change systems are configured via the definition program “Rack definition” and are subsequently measured in GEOPAK. MCOSMOS supports the following types of probe change systems:
FCR25
MCR20
SCR200
SCR600
SCR6
SCR80
Manual changer
Virtual changer
ACR3
ACR (with GPIB- or RS232-interface)
7.2 Combination of Racks / Definitions Master Rack These racks pick up components with the interface PAA, including:
• ACR (RS232C) • ACR (IEEE) • ACR3 • Manual changer • Virtual changer
Hint Master Racks always pick up complete probe trees.
Examples of probe trees with which the master rack can be fitted:
• TP20 with probe • SP25M with SM25-1 and SH25-1 • SP25M with TM25-20 and TP20-probe
14.09.04 v 2.4 III-23

Combination of Racks
Ports for parking Because the master racks always pick up complete probe trees, components must first be deposited in alternating cycles before new components can be picked up. Define the "Ports for parking" as places of deposit for ports. Leave those "Ports for parking" empty.
These allocations are required for each type of component.
Therefore, you need
• One port each for parking for TP20-probes. • One port each for parking for TP200-probes. • One joint port each for SM25-1, SM25-2, SM25-3 and TM25-20. • One joint port each for SH25-1, SH25-2 and SH25-3.
Hint The TP20-probe can be deposited both in the MCR20 and in the FCR 25.
7.3 Sub-Racks The racks MCR20, SCR200, SCR600 can also be defined and used as so-called "sub-racks" of either the ACR, the manual or the virtual changer.
On the other hand it is possible that two ports of the ACR access the same sub-rack. E.g. one ACR port may be equipped with a TP200 without extension and another ACR port with a TP200 with extension (e.g. PE1). Both TP200 exchange the styli in the same SCR200.
Hint A probe extension module (PEM), which can be accessed before any other probe tree is supported in the ACR (but not in the ACR3).
Further topics:
"Definition of Sub-Racks"
"Probe Extension Module "PEM"".
III-24 v 2.4 14.09.04

Combination of Racks
7.4 Manual and Virtual Changer A manual changer can be used if you wish to exchange the probe system and there is no ACR available.
Two examples:
TP200 and SP600 TP2 and QVP
A virtual changer is used if the probe system is to be changed but a physical exchange is not necessary, e.g. with the RMV camera system and the PH10, used at the same time. The virtual changer is also used for the offline creation of part programs.
7.5 Manual Change We must distinguish between an
exclusively manual change and a
tool changer with a following rack (e.g. SCR 200; see details of Manual Tool Changer with Following Rack).
Manual Change
Via the Probe/Change of Probe menu item, you call the change of probe. Enter the number of the probe tree you want and confirm.
You get a window with the information to the change of probe tree and the probe tree no.
Now, you must switch off the probe signal on the joystick box and change the tree.
After that, confirm in the "Manual Change of Probe Tree" window.
By confirming this, the machine control of the CMM registers the new probe system.
After the change of probe tree, you get the "Change Probe" window (probe tree no. in the title bar). Now, proceed as for the selection of probe.
14.09.04 v 2.4 III-25

Combination of Racks
7.6 Manual Change with Following Rack The sequence of operations for this configuration is described in an example.
Initially you have a "Master rack" (manual changer) and the following racks 1 (SCR 200) and 2 (SCR 600). The active tree is tree TP 200 with the probe tip of port 4 (following rack 1).
Its number is 14. The port for parking is port 1. The probe tree with its component has the number 11. You wish to change with the probe tip from port 3 (following rack 2) to the SP 600. The number of the new probe tree is 23. Also the SP 600 has set up the port for parking. The same applies to port 1. The probe tree with the component that will be deposited here has the number 21.
Proceed according to the following three steps:
In following rack 1 (SCR 200), the probe is automatically deposited in port 4 and the parked probe from port 1 is changed in.
Now you have to perform the probe tree change from number 11 to number 21 manually (for detailed information, refer to the topic "Manual Change".
In the following rack 2 (SCR 600), the probe is automatically deposited in the port for parking and the probe of port 3 is picked up (probe tree change from 21 to 23).
7.7 Definition of Sub-Racks If an ACR, a manual or a virtual changer is used, additional sub-racks to change the styli can be defined. Double-click on the port number to open the dialogue box "Port Settings".
If you select a TP200, TP20 or SP600 you can define the corresponding sub-rack.
Move the mouse to the port number and click the right mouse button. The "Insert" dialogue box will be opened.
The rack is added by a simple click on the icon. To change the rack-specific parameters, see Rack Definition.
7.8 Probe Extension Module "PEM" If an ACR, a manual or a virtual changer is used, you can also use the automatically changeable extension "PEM".
In the "Port Settings" select "PEM". Make sure to enter the offset by which the probe system is extended
in X, Y and Z direction. The figure in brackets indicates the number by which you can address
the probe including the extension.
III-26 v 2.4 14.09.04

Combination of Racks
7.9 Rack Alignment
ACR The alignment (measurement) of the ACR is achieved in the single/learn mode via the pull-down menu "Probe / ACR alignment". The operator is guided through the measurement by pictures independent of the language. The operator must have the user right to execute "Rack alignment" in GEOPAK.
The command "ACR alignment" is not learnable.
MCR20, SCR200, SCR600 The rack types MCR20, SCR200, SCR600 are measured by part programs. After the measurement the positions are converted by the learnable command "Convert rack data".
The part programs for the alignment of the racks and for the conversion of the data are available on the MCOSMOS CD under "AlignRacks". We recommend studying the Readme file in this directory carefully. The delivered part programs already contain the command "Convert rack data". Therefore no additional action is necessary after the execution of the part programs.
To execute the command "Convert rack data" in the learn or edit mode the operator must have the user right to execute "Rack alignment" in GEOPAK. In the repeat mode this command will be executed even if the operator does not have this right.
14.09.04 v 2.4 III-27

Combination of Racks
7.10 Convert Rack Data In order to automatically change the probe tip, GEOPAK must know the position of the probe change system. You determine this position by calibrating the probe change system by means of an example of a part program, which you will find on the MCOSMOS-CD under "AlignRacks". Through the "Convert Rack Data" command, the position data will be converted in a format meeting the requirements of the CMM.
"Convert Rack Data" Dialogue Window
Via the "Menu Bar / Probe", you come to the "Convert Rack Data" dialogue window.
"Convert Rack Data" List Box
In the "Convert Rack Data" dialogue window, you select in the "Rack Data File" list box the ASCII file, in which the rack position has been stored.
The format of this ASCII file and the order of the necessary positions in this ASCII file can be taken out of the examples of part programs you find on the MCOSMOS-CD under "AlignRacks".
"Length of Probe" List Box
Enter the length of the stylus (l) in the "Length of Probe" list box.
You determine the length (l) out of the tables of stylus and stylus extensions.
You can find more information to this subject under "Calibrate Probe Change System".
III-28 v 2.4 14.09.04

Combination of Racks
7.11 Set Advanced MPP100 Data Starting-situation: You use the MPP100 together with the probe change system SCR6.
After having changed the probe combination, the origin must be re-determined. This is necessary because different probe combinations have a different weight and thus the origin is different.
Set origin Continue as follows:
Measure the reference sphere with probe no. 1 of the current probe tree.
After that, set the origin in the "Set Advanced MPP100 Data" dialogue window.
For this, click on the "Set Origin after Probe Change" radio button.
Select the corresponding "Sphere" reference element in the list box and confirm.
Determine Reference Position Requirement: You only can set the origin after the probe change if the system knows the reference position.
To be able to determine the reference position, proceed as follows:
Measure the masterball with the reference probe (probe no. 1, probe tree no. 1).
For this, click on the "Determine Reference Position (Masterball)" radio button.
After that, select the corresponding "Sphere" reference element in the list box and confirm. By this, the reference position will be automatically stored.
Hint This determination of the reference position must always be repeated after the following cases:
• If the rack has been re-aligned or • the rack position has been changed or • if the reference probe has been changed.
Mitutoyo provides examples of part programs you can find on the MCOSMOS-CD under "AlignRacks". After the change of probe tree, you can call these part programs to automatically measure the masterball and to set the origin.
14.09.04 v 2.4 III-29

Combination of Racks
7.12 Calibrate ACR 3 You only can use the ACR 3 from version 2.1.
On principle, you proceed as already described in the topic Calibrate the Change Probe System . Certainly, there is an essential improvement with the ACR 3:
To calculate the position where the probe is situated we had to determine till now the distance of the stylus for the recording of the probe (PAA) at a "Masterball" on the rack. For the ACR 3, this distance will be entered at installation in the "Change Direction" window by the service-engineer. You don’t need any longer a controller incl. the expensive cabling.
Beginning from the Version 2.2 you can use two ACR-3 modules in order for you to have more than four different probing systems at your disposal. To this end you are required to make a change in the dialogue window designated "Position". You access this dialogue window through the "PartManager / Menu bar / Tools / Rack Definition / Movement Parameters". Enter the number 8 into the column "Number of Available Ports" and confirm.
7.13 Numbering Method of Probe Configurations
The numbering method described below is applicable up to MCOSMOS version 2.3, as starting with version 2.4, you always must define the probe tree numbers. It is, however, basically possible that each customer continues with the numbering method he has grown used to – also when working with version 2.4 or upwards. In this case he only needs to perform the definition himself but is free to select (also refer to the topic "Configuration with the SCR200 ").
The new numbering method of probe configurations (using the rack definition program) is carried out in steps of 10, i.e. the numbers are fixed for each rack, independent of the previous rack. The former numbering method was sequential without gaps.
Example (ACR, SCR200, SCR600):
New method 1..8, 11..16, 21..24 .
Former method 1..8, 9..14, 15..18 .
If the former numbering method is requested even when using the rack definition program, the following entry must be made in the MctrlWin.Ini:
[ToolChgMain] AskGeo3=1
Afterwards the former GEOPAK-3 numbering method can be selected in the rack definition program (File / GEO-3).
This selection is only possible if no configuration has been defined before.
When using a probe extension (PEM), the figure 100 is added to the configuration number, i.e. 11 becomes 111, 23 becomes 123.
For more information, see Change Probe Tree.
III-30 v 2.4 14.09.04

Combination of Racks
7.14 Rack Definition Start the definition program for the probe change system (Rack Definition) from the PartManager via the menu "Settings / Rack Definition". For this, the user must have already been assigned the user right "Tools" in the PartManager.
Define the combination in the definition program.
The measurement takes place in GEOPAK. Also read the topic "Calibrate Measurement Probe".
Before starting the probe change system, you have to define the configuration in the definition program.
Hint: The rack definition program is installed together with GEOPAK.
Procedure
Select all racks you intend to use from the program "Rack Definition" via the menu bar / "Changer" / "Add / Delete".
Then you can define the components of master racks or FCR 25 with a double click on the desired component. You get to the dialogue "Port settings".
If the component is from the master rack or the FCR 25, also define the "Port for parking" for the probe.
Before you can confirm the dialogue "Rack definition", you need to define the probe trees. Proceed as follows:
Highlight a component in the master rack.
Use the right mouse key to select the option "Define probe tree" from the context menu.
You get to the dialogue window "Define probe tree".
Define the probe tree number at the top right in the dialogue.
Combine the probe tree using the buttons "Add" and "Delete".
Hint If you want to change a probe tree configuration that has already been defined, click in the dialogue "Rack definition" on the required line at the bottom of the table".
Characteristic features of the FCR25
If no master rack has been defined, start the probe tree definition with one of these components: SM25-1, SM25-2, SM25-3 and TM25-20.
If a master rack has been defined, you have the option to change the components SM25-1, SM25-2, SM25-3 and TM25-20. In this case you need to define the "Port for parking".
Basically, also the probe tip can be changed. In this case, you have to define a "Port for parking" also for the probe tips.
14.09.04 v 2.4 III-31

Combination of Racks
7.15 Options with the FCR25 Starting with MCOSMOS version 2.4, the programme offers a range of additional options to structure the probe trees. You can, for example
select the probe tree numbers freely and
assign individual names to the components for recognition.
Particularly, the flexible fitting of the FCR25 is supported. Probe tips, modules and probe systems can be changed in this rack.
If you wish to perform a probe tree change in GEOPAK, you need no longer care about where the individual components have been parked (parking ports) after the learn mode or where from to get the individual components.
To guarantee a smooth operation, you only need to consider some factors when defining the probe trees:
To be at all able to perform a probe change, the relevant probe trees must have previously been defined with a probe tree number.
For defining your probe trees you must always start with the basic components from the masterrack (e.g. SP25M). As regards the window "Define probe tree", you should know that only those components are offered in this window that can actually be used.
III-32 v 2.4 14.09.04

Combination of Racks
7.16 Configuration with the SCR200 To clarify the processes, we use two examples: first, an example with a rack (SCR200) and second, an exemplary rack combination (ACR3 + two times FCR25). For information regarding the second example, go to the topic "Configuration with the ACR and Two Times FCR25 ".
Example 1 (SCR200): Proceed as follows:
In the window 'Rack definition', click in the menu "Changer" (Racks) on "Add/Delete".
In the following window "Add/Delete", click in the list "Available components" on the SCR200, then send it via the function "Add" to the page "Selected components" and confirm.
Back in the window "Rack definition" you see that the SCR200 has been defined as Rack1. The list underneath defines six ports that are each equipped with the probe TP200. With a click on the line "Rack1:SCR200", the right hand part of the window displays complete rack specific parameters, i.e. from rack direction to approach speed (see ill. below).
14.09.04 v 2.4 III-33

Combination of Racks
When clicking on one of the ports, the right hand part of the window displays information about
• the change speed in the port and • the probe tree component.
Rack Parameter A click with the right mouse key on the rack line, and three options appear with which you can change the parameters:
• Rack direction • PH10 angle • Movement parameters (for detailed information, refer to the topic
"Rack Specific Parameters and Positions " Probe Tree Number / Port Settings A click with the right mouse key on a port, and two options appear:
• Define probe tree number
Starting with version 2.4, the probe tree numbers must always be defined. Please note that in future you always have the free choice of these numbers. The probe tree numbers and the components are shown in a list in the window "Rack definition " (see ill. above). • Port Settings(for further information, click on the topic)
III-34 v 2.4 14.09.04

Combination of Racks
7.17 Configuration with the ACR3 and Two Times FCR25
To perform this configuration, always proceed as described for example 1 in the topic "Configuration with the SCR200", with the exception that in this case three racks are selected. For how to fit the racks, refer to the topic "Definition of Probe Change Systems (Rack Definition)".
In our example, the racks are fitted as shown in the illustration below.
14.09.04 v 2.4 III-35

Combination of Racks
7.18 Rack Specific Parameters and Positions The definition of your new change system configuration requires that you enter, among other things, several rack specific parameters.
To select a changer choose "File / New Configuration".
To change the parameters double-click on the corresponding icon (e.g. rack direction or safety position).
Rack direction: Defines the position of the rack on the CMM.
PH9/10 Angles: Defines the angle the probe head moves to before changing (accessing the rack).
Movement parameters:
• Safety position: Defines the position (in CMM coordinates), which is accessed before and after the change cycle.
• Distance to rack: Defines the distance of the CMM to the rack during the change cycle. The value is given relative to the rack.
• Distance to sensor: The distance to the sensor of the SCR200 can be corrected.
• Number of accessible ports: If not all ports are equipped with a probe or a stylus, pay attention not to change to an empty port.
Approach speed: Defines the speed of the CMM when approaching the rack.
Port01, speed during change cycle: Defines the speed of the CMM when entering a port. Sometimes this speed must be reduced (e.g. for long styli) to avoid a false triggering when opening a lid.
III-36 v 2.4 14.09.04

Combination of Racks
7.19 Port Settings In a first step you must perform some settings for the port. In the following window (see ill. below), it is important that you activate both options, i.e.
• module is subject to change and • stylus is subject to change. • If appropriate, you must change the number of the rack with
parking port or the number of the parking port. • Confirm.
With a further click (right mouse key) on Port01, you define in the following window the probe trees no. 1 and no. 2 (see also the topic "Definition of Probe Change Systems (Rack Definition)") and confirm.
14.09.04 v 2.4 III-37


Workpiece Alignment
IV Workpiece Alignment Contents 1 Workpiece Alignment....................................................... 2
1.1 Define Co-Ordinate System ........................................................ 2 1.1.1 Three Methods .................................................................................... 2 1.1.2 New co-ordinate system...................................................................... 3
1.2 Store/Load Co-Ordinate System................................................. 4 1.3 Store/Load Table Co-Ordinate System ...................................... 5 1.4 Patterns for Alignment ................................................................ 6 1.5 Alignment by Single Steps ......................................................... 7 1.6 Create Co-ordinate System through Best Fit ............................ 8
2 Alignment in Space .......................................................... 9
2.1 Three steps .................................................................................. 9 2.2 Measurement strategy................................................................. 9 2.3 Procedure................................................................................... 10 2.4 Alignment in Space by Plane.................................................... 12 2.5 Alignment in Space by Cylinder or Cone ................................ 12 2.6 Alignment in Space by Line...................................................... 13
3 Align Axis........................................................................ 15
3.1 Align Axis Parallel to Axis ........................................................ 15 3.2 Align Axis through Point........................................................... 16
4 Create Origin................................................................... 17
5 Workpiece alignment: Further options......................... 18
5.1 Move and Rotate Co-ordinate System ..................................... 18 5.2 Origin in Element ....................................................................... 18
6 RPS Alignment ............................................................... 20
6.1 RPS Alignment: Background.................................................... 20 6.2 General Rule .............................................................................. 20 6.3 Operation.................................................................................... 20
7 Workpiece Alignment: Further Options ....................... 22
7.1 Direction of a Plane ................................................................... 22 7.2 List of Elements......................................................................... 22
8 Types of Co-ordinate Systems...................................... 23
8.1 Polar Co-Ordinates: Change Planes ........................................ 25
14.09.04 v 2.4 IV-1

Workpiece Alignment
1 Workpiece Alignment 1.1 Define Co-Ordinate System
Before you start to measure the elements for alignment, you should make sure that the part is fixed to the machine in such a way that it cannot move.
You have selected the necessary probe and get the dialogue window "Define co-ordinate system".
1.1.1 Three Methods The upper part gives an option of three methods:
Alignment Patterns
Machine co-ordinate system
Co-ordinate system from archive
If you do not need exact alignment, or you have to use a more complex way of alignment not covered by the patterns, start with the machine co-ordinate system. Then, just click here and confirm.
If you need a co-ordinate system from the archive, just click the symbol shown above. Now you can either input the number directly, or get a list of all stored co-ordinate systems by a click on the arrow symbol of the input field. Then you can select from the list, too.
The third possibility is to use one of the alignment patterns to construct a co-ordinate system.
IV-2 v 2.4 14.09.04

Workpiece Alignment
1.1.2 New co-ordinate system In the dialogue window "define co-ordinate system", you find eight patterns frequently used for the initial alignment of a part. In the upper line, a plane determines the axis in space; in the lower line, axes in space (cylinder or cone) are used to create the direction in space.
If none of these patterns applies to your case, first measure single elements, and then align your part using them by the co-ordinate system functions of the menu bar (for more details, see Alignment by Single Steps).
Before you opt for the pattern, you should inform yourself about details of the possibilities regarding Patterns for Alignment .
Plane, Line, Line
Plane, Circle, Circle
Plane, Circle, Line (origin in centre of circle)
Plane, Circle, Line (origin on line)
Cylinder, Point, Point
Cylinder, Circle, Point
Cylinder, Line, Point (origin on axis of cylinder)
Cylinder, Line, Point (origin on line)
Circle or cylinder can be replaced by ellipse or cone. This is done in the window appearing after you have made the first decision on the pattern; this next window allows you to select (or change) the elements you are going to measure for alignment.
14.09.04 v 2.4 IV-3

Workpiece Alignment
In this window, GEOPAK suggests the elements and a way of measuring. The suggestion for the number of measurement points is always the minimum number required for the element plus one; this gives you an indication about the quality of the alignment. You can either accept the suggestions, or input your own data for...
the name of the element,
the memory number of the element,
the number of measurement points and...
the memory number of the co-ordinate system.
The co-ordinate system which is constructed this way can be immediately stored.
Just click the symbol, input the selected number, and confirm.
If you do not store at this point, you can do so later via the menu bar "Co-ordinate system / Store co-ordinate system".
The results, i.e. the measured elements, are listed in the result window. They can be used later for all types of further evaluation.
If you want to measure parts on one or more pallets, refer to details of "Pallet Co-Ordinate-System" and the following subjects.
1.2 Store/Load Co-Ordinate System When storing co-ordinate systems, we distinguish temporary and permanent co-ordinate systems.
Temporary co-ordinate systems are those created during the part program run, which are erased each time you start a new run.
Permanent (archive) co-ordinate systems correspond to fixed positions on the CMM table. Normally, they are used to enable a CNC run without manual alignment.
At "Load Co-Ordinate System", you proceed the same way.
For details to store or load a pallet co-ordinate system, see details of "Pallet Co-Ordinate System".
Beginning from Version 2.2, there will be separate functions with their own dialogues provided for the options "Save/Load Table Co-Ordinate System".
IV-4 v 2.4 14.09.04

Workpiece Alignment
1.3 Store/Load Table Co-Ordinate System Already in the default settings made in the PartManager you decide which options you take regarding the table co-ordinate system (menu bar / settings / default settings / programs / KMG / GEOPAK / settings GEOPAK / menu functions). Click the table co-ordinate system in this list.
A table co-ordinate system relates to the origin of the CMM. Thus it determines a position on the CMM table, which, for instance, may be provided with stops. Great importance is attached particularly to the table co-ordinate systems with the manager programs, e.g. where several workpieces are clamped at different positions on the CMM. In these cases, already in the manager program the workpieces can be related to a table co-ordinate system from the archive.
In a pallet-based operation, the table co-ordinate system determines the position of the pallet. The pallet co-ordinate system, in turn, determines the position of the (different) workpieces on the pallet. For further details see "Pallet Co-Ordinate System".
In GEOPAK, you access these functions through the "Menu bar / Co-Ordinate System/ Save / Load Table Co-Ordinate System".
Regarding this topic, refer also to Save/Load Co-Ordinate System .
14.09.04 v 2.4 IV-5

Workpiece Alignment
1.4 Patterns for Alignment In practical applications, most of the initial alignments are made using one of the following eight methods (patterns). Using these patterns makes easier and simpler set up of a co-ordinate system (cf. also Define Co-ordinate System ).
The pattern "Plane, Line, Line" defines the axis in space by the measured plane. The first line gives the direction of the x-axis; the origin is the intersection of the two lines.
The pattern "Plane, Circle, Circle" defines the axis in space by the measured plane. The line gives the direction of the x-axis from the first circle centre to the second; the origin is the centre of the first circle.
The pattern "Plane, Circle, Line (origin in circle)" defines the axis in space by the measured plane. The line gives the direction of the x-axis; the origin is the centre of the circle.
The pattern "Plane, Circle, Line (origin on line)" defines the axis in space by the measured plane. The line gives the direction of the x-axis; the origin is on the line; it is the centre of the circle projected to the line.
The pattern "Cylinder, Point, Point" defines the axis in space by the measured cylinder. The origin is on the axis of the cylinder; the first single point determines the Z-height of the origin. The direction of the x-axis is from the origin through the second measured point. If you use two probing points for the second point, and you probe on the right and left flank, you can use this to align a gear.
The pattern "Cylinder, Circle, Point" defines the axis in space by the measured cylinder. The origin is on the axis of the cylinder; the single point determines the Z-height of the origin. The direction of the x-axis is from the origin through the centre of the circle.
The pattern "Cylinder, Line, Point (origin on the cylinder axis)" defines the axis in space by the measured cylinder. The origin is on the axis of the cylinder; the single point determines the Z-height of the origin. The measured line gives the direction of the x-axis.
IV-6 v 2.4 14.09.04

Workpiece Alignment
The pattern "Cylinder, Line, Point (origin on the line)" defines the axis in space by the measured cylinder. The origin is on the axis of the cylinder; the single point determines the Z-height of the origin. The measured line gives the direction of the x-axis. The origin is projected to the line.
Circle or Cylinder can be replaced by ellipse or cone. You can switch between the element types by the icons of the following dialogue window.
Then, measure the elements; the measurements are recorded in the result window (cf. also Define Co-Ordinate System ).
1.5 Alignment by Single Steps In order to perform a complete alignment, the axis in space (in other words, the base plane), one axis within this plane, and the origin must be determined. This is done by the alignment patterns by using a single command. However, if your part does not suit for the use of one of these patterns, you must do it systematically. The following example shows these steps:
Select e.g. the machine co-ordinate system to start with.
Measure the F1 plane for the plane alignment.
To open the dialogue box click on this icon or choose "Co-ordinate system / Align plane" from the menu bar. In the "Align Plane" dialogue box choose OK to confirm.
Measure the F2 plane.
Create the intersection line between F1 and F2 for "Axis Alignment".
To open the dialogue box click on this icon or choose "Co-ordinate system / Align axis parallel to axis" from the menu bar.
Measure the F3 plane.
14.09.04 v 2.4 IV-7

Workpiece Alignment
Create the intersection point between F3 and the intersection line for the zero point determination.
To open the dialogue box click on this icon or choose "Co-ordinate system / Create origin" from the menu bar.
1.6 Create Co-ordinate System through Best Fit If you want to create a co-ordinate system via best fit, proceed as described under "Best fit with a fixed number of points " or "Best fit with a variable number of points ". However, in the first window "Best fit" you activate the check box "co-ordinate system".
If you want to store the co-ordinate system, you activate the symbol. Then you can input the number of the co-ordinate system in the field next to the symbol.
IV-8 v 2.4 14.09.04

Alignment in Space
2 Alignment in Space
For the most ordinary cases, GEOPAK proposes the Patterns for Alignment . However, there are cases that cannot be matched with one of these patterns; therefore GEOPAK has also the possibility to align by other means.
2.1 Three steps Basically, you proceed in three steps.
Alignment in space; you create the axis in space, or in other words a reference plane (usually XY plane).
Axis alignment; you need to determine an axis in the reference plane (mostly the x-axis).
Origin; you take a point in space and declare this the origin.
The determination of the origin can be independent of the two other steps, and made before these steps. In many cases, however, you use elements, which determine as well the rotation in space as one or two components of the origin.
2.2 Measurement strategy Now you can decide your procedure according to the actual measurement task (drawing, position of the part on the machine, etc.). Here you must define your measurement strategy.
For the alignment in space, you can use following elements:
Alignment in Space by Plane
Alignment in Space by Cylinder/Cone
Alignment in Space by Line
You should also know: The elements are stored in the Element List with a symbol, memory number, and the number of points each.
The simplest way is to use one of the Patterns for Alignment . However, if this is not sufficient, you can measure the elements for alignment manually, and then afterwards align your co-ordinate system by these.
You should start with the element necessary for the alignment in space, and then activate "alignment".
If the window for space alignment is displayed, and you measure the element then, the list of elements in the selection box is not yet updated. You must close the window and open it again.
14.09.04 v 2.4 IV-9

Alignment in Space
2.3 Procedure You come to the window for space alignment by the menu bar/co-
ordinate system and the function alignment in space.
You also can click on the symbol.
By the arrow key of the dialogue window, you open a list of elements. This is not the complete list as it only contains elements, which can be used for alignment in space, not e.g. circles or spheres.
Select the element (plane, cylinder, cone, or line).
Then you decide your co-ordinate plane (XY-, YZ-, or XZ-plane).
In most cases, you also select "Origin in Element" by clicking the symbol.
Z = 0
P = new origin (Z = minus)
IV-10 v 2.4 14.09.04

Alignment in Space
Example 1 The plane (cf. drawing above) determines the axis in space, here the XY plane. Then "Origin in Element" means that Z is set to zero for all points of the plane. If you do not want this, just click "Origin to Element" off; then the origin stays where it has been before.
After this, the origins in x and y direction are still unchanged; they must be determined by some other elements.
Example 2 The cylinder axis (cf. drawing above) is used for the axis in space, here the xy plane. In this case "Origin in Element" means that the origin in x and y is set to the cylinder axis; the z height of the origin is still open and has to be determined by some other element afterwards. Normally, the example for the cylinder axis is also valid for the axis of a cone. This is also true for the Patterns for Alignment.
The direction of a cylinder is determined by the sequence of probing; the positive direction runs from the first to the last measurement point. The positive direction of a cone always runs from the apex into the cone.
14.09.04 v 2.4 IV-11

Alignment in Space
2.4 Alignment in Space by Plane The Alignment in Space can be achieved by means of a plane, a cylinder, or cone. A line can only be used if it is a line in space, in other words a "Connection Element" (cf. also Alignment in Space by Cylinder/Cone and Alignment in Space by Line .
You measure - e.g. via the symbol - the plane; the result of the measurement is stored in the element list. Then you activate the alignment in space. In the dialogue window, select the measured plane. After you confirm, this plane is made the base plane of your co-ordinate system.
After the Alignment in Space by a plane, the axis in space always points out of the material; different from the alignment by a cylinder or a line, the sequence of measurement does not affect the result.
2.5 Alignment in Space by Cylinder or Cone The Alignment in Space can be achieved by a plane or the axis of a cylinder or cone (cf. also Alignment in Space by Plane and Alignment in Space by Line ).
By clicking the symbol or via the menu bar (elements / cylinder), you define the element as usual (measure or construct). The resulting element is stored in the element list.
IV-12 v 2.4 14.09.04

Alignment in Space
Then, click and select the cylinder as the axis in space. When applying the Alignment in Space, the axis of the cylinder becomes the z-axis of the co-ordinate system. The positive direction is determined by the probing sequence of the cylinder: from the first to the last measured point.
If a cone defines the axis, proceed accordingly. When applying the Alignment in Space for a cone, the positive direction is always the direction from the apex into the cone.
2.6 Alignment in Space by Line The Alignment in Space can be achieved by a plane, the axis of a cylinder or cone, or by a line (cf. also Alignment in Space by Plane and Alignment in Space by cylinder/cone).
By "Alignment in Space by Line" you will get a not projected line (Symbol ). Take care that the elements, you need for creating the line will be measured not projected.
Activate the element line by the icon. Then you get the element definition window. For the alignment in space, you can only use a line in space. Therefore you cannot use a measured line; a measured line is always projected.
Using the icon or the menu bar, you activate the element line. In the subsequent window, you can select
the connection element,
the intersection element, or
the symmetry element.
14.09.04 v 2.4 IV-13

Alignment in Space
You can use intersection lines of two planes (cf. example below); symmetry lines of lines in space, and lines connected from points in space, e.g. the centre points of two circles or ellipses.
1 = plane 1
2 = plane 2
3 = intersection line
IV-14 v 2.4 14.09.04

Align Axis
3 Align Axis 3.1 Align Axis Parallel to Axis The function "Align axis parallel to axis" is used if the co-ordinate system should be positioned horizontally to a certain axis. Before you execute this function carry out the plane alignment. The axis alignment determines one of the two axes to be positioned horizontally to the plane. In this example the Z axis is the plane axis.
First determine the alignment element, ellipse, line, cylinder or cone (measurement, theoretical etc.).
To open the dialogue box click on this icon or choose "Co-ordinate system / Align axis parallel to axis" from the menu bar.
You can choose between four alignment elements each of which with a defined axis.
To choose an element click on the corresponding icon.
In the "Co-or.-Plane-Axis" group box determine the axis (X or Y) you wish to align with the element at a click on the corresponding icon.
The selected element will be projected into the X/Y plane.
The co-ordinate system will be rotated around the Z axis until the X axis or Y axis is positioned parallel to the element.
Origin on axis
Click on this icon if the axis should not only be aligned parallel with the element but should be positioned exactly on the element. In this case the co-ordinate system is rotated and afterwards moved until the origin is positioned on the element.
14.09.04 v 2.4 IV-15

Align Axis
3.2 Align Axis through Point The function "Align axis through point" is used if a co-ordinate axis should pass a certain point. Before you execute this function carry out the plane alignment. The axis alignment determines one of the two axes to be positioned horizontally to the plane. In this example the Z axis is the plane axis.
First determine the alignment element, ellipse, line, cylinder or cone (measurement, theoretical etc.).
To open the dialogue box click on this icon or choose "Co-ordinate system / Align axis through point" from the menu bar.
You can choose between four alignment elements each of which with a defined point.
To choose an element click on the corresponding icon.
In the "Co-or.-Plane-Axis" group box determine the axis (X or Y) which should pass the point of the element at a click on the corresponding icon.
The selected element will be projected into the X/Y plane.
The co-ordinate system will be rotated around the Z axis until the X axis or Y axis passes this point.
Offset alignment
Click on this icon and enter a value if the axis should not pass the point but should be positioned in a certain distance to the point. The co-ordinate system will be rotated so that the point is positioned with the determined distance to the axis.
IV-16 v 2.4 14.09.04

Create Origin
4 Create Origin If your drawing has been measured from a certain origin, you can choose the "Create origin" function to align the co-ordinate system with the element, which contains this point.
Measure the element, which determines this origin first.
Click on this icon or choose "Co-ordinate system / Create origin" from the menu bar.
In the dialogue box choose the type of alignment element.
The text box indicates the element measured last.
If you wish to choose another element click on the arrow of the list box and make your selection from the elements listed.
With these icons you determine in which axis the element co-ordinate is set to zero. This can be done for each axis individually. For some elements (circle), however, two axes are available only.
GEOPAK sets all selected axes to zero. It may occur that the position of the origin may be changed accidentally. Example: You have selected all three axes and have determined the X/Y plane by a measured plane. The origin is positioned in this plane. If you measure a circle below this plane (Z=-3) the program would position this co-ordinate on the measuring height, i.e. Z=-3. In this case the Z axis should not have been selected.
14.09.04 v 2.4 IV-17

Workpiece alignment: Further options
5 Workpiece alignment: Further options 5.1 Move and Rotate Co-ordinate System
If you wish to move and rotate the co-ordinate system, proceed as follows:
Click on the icon shown above or choose "Co-ordinate system / Move and rotate co-ordinate system" from the menu bar.
In the dialogue box enter the values in the X, Y and Z text boxes.
In the text box enter the angle and click on the icon of the axis (axes) you wish to rotate.
If you wish to move and to rotate and you have entered the requested values in the dialogue box the co-ordinate system will always be moved first and then rotated. If you wish to rotate first and then move, proceed as follows:
Rotate first and confirm.
Open the dialogue box again, move and confirm.
The values differ from the ones obtained before.
5.2 Origin in Element When you measure an element to determine the axis in space, the orientation properties (direction in space) are evaluated. However, depending on the element, one or more co-ordinates of the origin can also be determined by this element.
This is achieved by clicking the icon. This means that the element is not only parallel to the axes of the co-ordinate system, but goes passes through the origin.
Z = 0
P = new origin (z = minus...)
Example 1: The plane (cf. above) determines the axis in space. If you select "Origin to Element", the z-value of the co-ordinate system is also set to zero on
IV-18 v 2.4 14.09.04

Workpiece alignment: Further options
the plane. In other words, the origin is shifted into the plane. The other co-ordinates (x and y) must be determined differently, e.g. by a circle.
Example 2: The axis of the cylinder (cf. above) determines the z-axis in space, in other words the xy plane. In this case, "origin to element" means that the x and y co-ordinates of the origin are set to the axis of the cylinder. The z-value of the origin must be defined distinctly.
14.09.04 v 2.4 IV-19

RPS Alignment
6 RPS Alignment 6.1 RPS Alignment: Background The RPS (Reference Point System) alignment is mainly used for sheet metal parts in a car, the origin of the co-ordinate system being in the centre of the front axle. The sheet metal parts do not have any features, which can be used for a conventional alignment. Therefore the designer usually designates specific points; these points have certain co-ordinates given. The RPS alignment consists of constructing the transformation in such a way that the actually measured points have these pre-defined co-ordinate values.
The values can be realised in different ways; two extreme are:
each point only determines one value; this means that 6 points are necessary, or...
one point (e.g. centre of a circle thanks to a created plane) determines 3 values, another 2, and the third determines one co-ordinate value. This means that only 3 elements are necessary.
GEOPAK can handle as well the two extreme cases as all the others in between. However, this makes the operation somewhat complicated.
6.2 General Rule For a proper alignment, the 6 degrees of freedom have to be removed; this means that normally 6 values must be given. The distribution is such that one co-ordinate has 3 known values, the second only 2, and the last only one value. As this can be any of the x, y, or z, this has to be transmitted to GEOPAK by buttons.
6.3 Operation In a practical application, you have to distinguish two cases:
Case 1: Drawing and known RPS Points Usually, the points are designated on the drawing, and the co-ordinates written in the lower right corner.
Furthermore, the drawing specifies which co-ordinate the point, e.g. Fxy for a point defining x and y, fixes. In addition, the tolerance for this co-ordinate is given as 0.0.
In this case, proceed as follows:
Measure the points on the part using the GEOPAK functions (compensated point, circle, intersection, etc.).
Select "Co-ordinate System"/"RPS Alignment" in the menu bar.
Select the first reference point, and enter the three nominal co-ordinates from the drawing.
Press the button(s) for those co-ordinates, which have to be exactly determined (the drawing states "Tolerance = 0.0"; usually, the label is something like 'Fz' for a z-value, etc.).
IV-20 v 2.4 14.09.04

RPS Alignment
Enter the other values as well, even if they are not relevant for the alignment, because they are needed internally.
Repeat the last 3 steps for the other references. For each reference, you must activate the input by the button on the upper part of the input field.
After all references have been input, check the input: the number of pressed co-ordinate keys must be exactly 6; 3 for one of x, y, or z; 2 for the next, and 1 for the last. Then press 'OK'.
Case 2: Only Data Set Given In this case - which happens frequently during demonstrations for customers - it is necessary to first determine the nominal co-ordinates.
For this, proceed as follows:
Load the drawing in 3D-TOL.
Use the function "Search Border Points" to find the nominal co-ordinates. Send these points to GEOPAK by pressing the corresponding button in the window.
Now measure close to your designated points in GEOPAK.
Then proceed as in the case of given RPS points (cf. above).
For the input of the co-ordinates, you can either take these values into variables (by the "formula calculation") or write them down and key them in.
14.09.04 v 2.4 IV-21

Workpiece Alignment: Further Options
7 Workpiece Alignment: Further Options 7.1 Direction of a Plane A vector perpendicular to the surface determines the direction of a plane. For a measured plane, this always points out the material, independent on the probing sequence (cf. also "Alignment in Space").
7.2 List of Elements The list of elements contains all measured or calculated elements. It consists of four columns with the following contents
the graphical symbol of the element (circle, point etc.)
a graphical symbol of the type of construction (measured, connection element, etc.). Here you can also find the number of points used to calculate the element (probing points for measured elements, or points of other elements for connection elements).
the name of the element.
the memory number of the element. The elements are separately stored for each type. The program automatically assigns the numbers 1 to...X, but you can also input the memory numbers you want in the dialogue window for the elements.
IV-22 v 2.4 14.09.04

Types of Co-ordinate Systems
8 Types of Co-ordinate Systems GEOPAK offers three types of co-ordinate system
Cartesian
Cylindrical
Spherical
You can always switch between these types.
For OUTPUT, select "Settings / Co-ordinate system mode" from the menu bar, and select the type in the following window.
For INPUT, switching is possible by clicking on the corresponding symbol in the input window. If you key-in an element, it is displayed using the co-ordinates you have input.
If you want to see the element in a different co-ordinate system type, switch the output (cf. above) to the required system type, then re-calculate the element from memory.
After program start, the Cartesian co-ordinate system is active.
Cartesian co-ordinates Here, the values of the X-, Y-, and Z-axes define the position of a point in space.
1 = X-co-ordinate
2 = Y-co-ordinate
3 = Z-co-ordinate
Cylindrical co-ordinates In this system a point in space is defined by
the projected distance from the origin,
the angle Phi with the first (x-) axis, and
the value of the z-axis.
If you have used an axis different from Z to make the alignment in space, the definitions are slightly different. The X-axis corresponds to the first axis of the
14.09.04 v 2.4 IV-23

Types of Co-ordinate Systems
selected plane. This means for the Y/Z-plane the Y-axis, for the Z/X-plane the Z-axis.
1 = angle Phi
2 = radius to origin
3 = Z-co-ordinate
Spherical co-ordinates In this system a point in space is defined by
the distance from the origin in space,
the angle Phi with the first axis, and
the angle Theta. In GEOPAK, the angle Theta is the angle between the z-axis and the vector to the point.
1 = angle Phi
2 = angle Theta
3 = (angle Theta)
4 = radius to origin
In literature, some take also the view that the angle Theta is the angle between the base plane and the vector.
IV-24 v 2.4 14.09.04

Types of Co-ordinate Systems
8.1 Polar Co-Ordinates: Change Planes In the dialogue windows where you can select one out of the three co-ordinate system types, we offer you another option.
As a rule, you select your polar co-ordinate system with a click on the middle or lower symbol (cylindrical or spherical, see picture below, left column). With a further click on one of these two polar co-ordinate systems you can additionally change the working plane. The changes are displayed to you.
14.09.04 v 2.4 IV-25


Measurement and Probe Radius Compensation
V Geometric Elements: Basics Contents 1 Measurement and Probe Radius Compensation........... 3
2 Elements ........................................................................... 4
2.1 Elements: Overview..................................................................... 4 2.2 Point.............................................................................................. 5
2.2.1 Symmetry-Element Point .................................................................... 6 2.2.2 Connection Element Point................................................................... 6 2.2.3 Intersection Element Point .................................................................. 6 2.2.4 Three Possibilities of Measurement .................................................... 6
2.3 Sphere .......................................................................................... 7 2.4 Circle............................................................................................. 7 2.5 Constructed Circles: Overview................................................... 9 2.6 Inclined Circle .............................................................................. 9 2.7 Ellipse ......................................................................................... 10 2.8 Cone............................................................................................ 11 2.9 Cylinder ...................................................................................... 12 2.10 Pre-Define Cylinder Direction................................................... 14 2.11 Probing Strategy Cylinder/Cone............................................... 15 2.12 Line ............................................................................................. 16 2.13 Constructed Lines ..................................................................... 17 2.14 Plane ........................................................................................... 18 2.15 Step Cylinder.............................................................................. 19 2.16 Contour....................................................................................... 19 2.17 Selection of Points Contour ..................................................... 20 2.18 Surfaces ..................................................................................... 21 2.19 Angle Calculation ...................................................................... 23
Furthermore, you can select between ................................. 23
2.20 Calculation of Distance ............................................................. 24 2.21 Distance along Probe Direction................................................ 26
3 Elements: Further Options ............................................ 27
3.1 Type of Construction................................................................. 27 3.2 Type of Calculation.................................................................... 28 3.3 Enveloping or Fitting-in Element.............................................. 30 3.4 Positive Direction by Vector ..................................................... 31 3.5 Re-calculate Elements............................................................... 34 3.6 Free Element Input .................................................................... 34
4 Calculation ...................................................................... 35
4.1 Calculation according to Gauss............................................... 35
14.09.04 v 2.4 V-1

Measurement and Probe Radius Compensation
4.2 Minimum Zone Element ............................................................ 35 4.3 Enveloping Element .................................................................. 36 4.4 Fitting-in Element ...................................................................... 36
5 Spread / Standard Deviation ......................................... 37
V-2 v 2.4 14.09.04

Measurement and Probe Radius Compensation
1 Measurement and Probe Radius Compensation
If you probe the part with a ball, you only know the co-ordinates of the ball centre. From these, we calculate the element. Then, it is compensated by the probe radius. GEOPAK must know on which side the material is situated so that the direction of the probe radius compensation is correct (inside or outside). This information comes from the probing direction. This is determined as follows:
CNC-CMM
• In manual mode, the control communicates the probing direction, which has been driven with the joystick.
• In the CNC mode, the probing direction is fixed with the driving command.
Manual CMM
• By probing from the first measurement point, the current position is continuously read so that the probing direction is determined. When you go beyond a determined distance (dummy distance), the position is taken over and will be converted in the probing direction together with the measurement point.
At CMMs with a fixed probe, you have to take into account that after the first measured point of an element you drive in the opposite direction of the material because otherwise the probing direction will not be correctly recognized and an incorrect compensation is realized.
14.09.04 v 2.4 V-3

Elements
2 Elements 2.1 Elements: Overview For your tasks you dispose of, among other things, the following elements: PointLine
Circle
Inclined Circle
Ellipse
Plane
Cone
Sphere
Cylinder
Step Cylinder
ContourCalculation of Angles
Calculation of Distance
Activate one of these elements either by a click on the icon or the pull down menu, and come to the corresponding dialog window.
Skipping of "Element Dialog" To carry out measurement the most quickly, you can skip the "Element Dialog". To do this, click on "Settings / Properties for Selection Dialog" in the menu. In the following window, click on the option "Skip Element Dialogue". Then, when calling up the element via the symbol, you immediately come to measurement.
When you call up your element using the menu bar and the function, you come to a dialogue window whose basic structure is identical for all elements (see example shown below "Element Circle").
The dialogue window consists of five areas.
Below the title bar, you find, horizontally arranged, the symbols for the Type of Construction.
V-4 v 2.4 14.09.04

Elements
The first four types of construction (from left) are identical for all elements.
• Measurement, • Connection element, • Re-calculate from memory, and • Theoretical element.
Note
Regarding the Constructed Elements like Fit in Element or Intersection Element, find information via the Table of Contents for this topic catalogue.
On the left side, you find the icons for Type of Calculation (Gauss, minimum zone element etc.)
On the right hand side, you can see the icons for the Programming Help (automatic measurement, tolerance etc.)
In the central area, you can input information about
• the name of the element; Mitutoyo makes a suggestion, e.g. circle, but you can input any name describing the actual element. If you click the arrow at the end of the input field, you will get a list of all names of this element type you have entered so far.
• the memory number: The program automatically stores and uses subsequent numbers. If it is necessary for you to store the element in a different memory number, you can overwrite the suggestion.
• the number of points: If you wish to have a statement about the form of the element, it is necessary to enter the minimum number of points.
the bottom area contains the usual buttons (Ok, cancel, etc.).
2.2 Point
Using this function, you create a new element of the type "Point".
You either click on the symbol or use the menu bar ("Element / Point").
In the subsequent dialogue window "Element Point", there are summarised all the types of construction of points allowed by GEOPAK (for further details, please also refer to Elements: Overview).
For details regarding the first four types of construction please refer to Type of Construction.
14.09.04 v 2.4 V-5

Elements
2.2.1 Symmetry-Element Point
Symmetry-Element: Using this symbol you can calculate the symmetry point from two elements. You confirm and get to the selection window Symmetrie-Element Punkt.
2.2.2 Connection Element Point
You can create the Connection Element Point using the
position co-ordinates of known elements or
the measurement points of these elements.
For detailed information refer also to the topics
Connection Elements General
Connection Element "From Meaured Points""
2.2.3 Intersection Element Point
Intersection Element: Using and confirming this symbol you can have the intersection of two elements calculated. For detailed informaton about this topic, refer to "Intersection Element Point".
2.2.4 Three Possibilities of Measurement For the measurement of points, you have three options:
Point (uncompensated): Here, you see the co-ordinates of the probe centre. Later on, e.g. during the distance calculation, GEOPAK will automatically perform the probe-radius compensation.
Compensated Point: When this option is selected, compensation is performed as follows:
• Manual mode: Compensation is performed along one of the co-ordinate system axes.
• CNC-mode: Compensation is along the probe direction.
CNC mode means that the “CNC ON” command was carried out. This means that also with a CNC CMM in joystick mode, the compensation is realized along the co-ordinate axis (as in manual mode) if the command has not yet been carried out.
Point Direction: With this option, only the co-ordinate in probe direction is indicated. This is the direction where probe radius compensation is performed, as well. In the polar co-ordinate system, probe radius compensation is carried out radially.
For details regarding the options available in the symbol block on the right-hand side of the dialogue window please refer to Programming Help.
V-6 v 2.4 14.09.04

Elements
Option Contour
If you want to carry out calculations with individual points of a contour, you can use the function (see symbol). Subsequently the dialogue "Min. max.of Contour" opens. To this regard, please refer extensively to Minimum and Maximum Point .
2.3 Sphere
Using this function, you create a new element of the type "Sphere". A sphere can be calculated only from a minimum of four measured points which must not all be located on a plane.
You either click on the symbol or use the menu bar ("Element / Sphere").
In the subsequent dialogue window "Element Sphere", there are summarised all the types of construction of spheres allowed by (for further details, please also refer to Elements: Overview).
For details regarding the first four types of construction please refer to Type of Construction.
If the sphere is calculated from measured points, several methods of calculation come into consideration (for further details, please refer to Type of Calculation).
For more information refer also to the topic "Fit in Element Sphere
For details regarding the options available in the symbol block on the right-hand side of the dialogue window please refer to Programming Help.
2.4 Circle
Using this function you create a new element of the type "Circle". A circle can be calculated only from a minimum of three measured points that must not be located on a line.
You either click on the symbol or use the menu bar ("Element / Circle").
In the dialogue window "Element Circle" there are summarised all the types of construction of circles allowed by GEOPAK (for further details, please refer to Elements: Overview).
For details regarding the first four types of construction please refer to Type of Construction.
If the circle is calculated from measured points, several methods of calculation come into consideration (for further details, please refer to Type of Calculation).
14.09.04 v 2.4 V-7

Elements
Normal case As a rule, the program calculates a plane from the measured points
• followed by checking, which base plane this plane comes closest to.
• This is the plane where the points are projected (Automatic projection).
• The circle is calculated.
Problem cases If the circle with its measured points is located diagonally in space,
• automatic projection could be carried out in the wrong plane. • In this case, you can predetermine the projection plane. • Regardless of the location of the measured points, projection
will then take place in this plane.
No projection
XY-Plane
YZ-Plane
ZX-Plane
Automatic projection plane
Set measuring level to zero: You activate this symbol in cases where you intend to measure the circles at different levels, without wanting to have any spatial components, e.g. for distance measurement.
Hint If you don't activate this symbol, the measuring level is maintained. Thus you can connect several circles to form an axis in space.
We recommend automatic projection. Caution is advisable in performing "forced projection" into a plane. When changing the plane, make sure that the changeover of the plane is made by this symbol. It is possible that you get the message that the circle cannot be calculated.
For details regarding the options available in the symbol block on the right-hand side of the dialogue window please refer to Programming Help.
V-8 v 2.4 14.09.04

Elements
2.5 Constructed Circles: Overview In the dialogue "Element circle" you have various possibilities to construct circles.
You can determine a "Connection Element Circle". We recommend, however, to consult also the topics Connection Elements General and Connection Element Point .
The function Fit in Element Circle you use when working with a circle with a pre-defined diameter or when you want to fit in this circle between two lines or a contour.
To create an Intersection Element Circle, there are three options available. If you want, for example, to measure a circle in a measured plane, you will apply the function via the cylinder symbol. If, instead, you want to know which diameter a cone or a sphere has at a certain position, you will click on one of these symbols.
2.6 Inclined Circle Usually the circles are projected to one of the basic coordinate planes. If problems occur due to the position of the circle (e.g. inclined position of a bore fit) it is possible to measure an "Inclined circle".
The element "inclined circle" consists of a plane and a circle. First you have to define the plane on which the circle is positioned. Proceed as follows:
measure the plane or
call a plane already measured from the memory. You will choose this alternative if more than one circle is to be measured in this plane.
To open the "Element Inclined circle" dialogue box choose
Element / Inclined circle from the menu bar or
click on the corresponding icon.
In this dialogue box make the requested settings.
You can only use the automatic circle measurement if the measurement plane has been defined in the co-ordinate system before.
Default setting of the icon
If this icon is not available in the toolbar, proceed as follows:
Make a default setting in the PartManager by choosing "Settings / Defaults for programs / CMM / GEOPAK" from the menu bar.
In the Settings for GEOPAK dialogue box choose the "Menus" button.
In the Menu-Functions dialogue box choose the "Inclined circle" radio button.
The icon appears in the GEOPAK window.
14.09.04 v 2.4 V-9

Elements
The inclined circle icon will replace the ellipse icon.
2.7 Ellipse
Using this function, you create an element of the type "Ellipse". An ellipse can be calculated only from a minimum of five measured points. You can also have the ellipse calculated as intersection of a plane with a cone or a cylinder.
You either click on the symbol or use the menu bar ("Element / Ellipse").
• It is possible that you do not see the symbol in the icon bar. • You can again reactivate the symbol function via the
"PartManager" program and the menu functions "Settings / Presetting Programs / CMM / GEOPAK".
In the dialogue window "Element Ellipse" there are summarised all the types of construction of ellipses allowed by GEOPAK (for further details, please refer to Elements: Overview).
For details regarding the first four types of construction please refer to Type of Construction.
Inform yourself in detail under the topic Intersection Element Ellipse .
For details regarding the options available in the symbol block on the right-hand side of the dialogue window please refer to Programming Help.
V-10 v 2.4 14.09.04

Elements
2.8 Cone
Using this function, you create an element of the type "Cone". A cone can only be calculated from a minimum of six measured points which must not all be located in one plane.
You either click on the symbol or use the menu bar ("Element / Cone").
In the dialogue window "Element Cone" there are summarised all the types of construction of cones allowed by GEOPAK (for further details, please refer to Elements: Overview).
For details regarding the first four types of construction please refer to Type of Construction.
If the cone is calculated from measured points, several methods of calculation come into consideration (for further details, please refer to Type of Calculation).
Hint There is no automatic cone measurement. Using the CNC measurement you can, however, generate the cone with several automatic circle measurements.
For details regarding the options available in the symbol block on the right-hand side of the dialogue window please refer to Programming Help.
If you need also the radius or the diameter of the cone for the protocol of your elements (cones), proceed as follows:
Use the symbol to the left to call up the dialogue "Define and calculate variable“.
Under "Variable name", enter in the text field opposite:
• For the radius: CO [x].R • For the diameter: CO [x].D
To have these values also in the protocol, click in the dialogue "Print Format Specification" on the option "formula calculation", if applicable also in "File Format Specification".
14.09.04 v 2.4 V-11

Elements
2.9 Cylinder
Using this function, you create an element of the type "Cylinder". A cylinder can only be calculated from a minimum of five measured points which must not all be located in one plane.
You either click on the symbol or use the menu bar ("Element / Cylinder").
In the dialogue window "Element Cylinder" there are summarised all the types of construction of cylinders allowed by GEOPAK (for further details, please refer to Elements: Overview).
For details regarding the first four types of construction please refer to Type of Construction.
If the cylinder is calculated from measured points, several methods of calculation come into consideration (for further details, please refer to Type of Calculation).
Hint Automatic measurement is possible. The strategy is, however, limited. Should this be not enough for you, we recommend that you carry out single automatic element measurements.
For details regarding the options available in the symbol block on the right-hand side of the dialogue window please refer to Programming Help.
Error message The occurrence of the error message "Cylinder not calculable" or the calculation of the cylinder in the wrong position can be caused by the algorithm not having the starting value for the calculation. This situation can be remedied by the function "Pre-Define Cylinder Direction".
Directional sense The directional sense for the cylinder is defined by the probing strategy in such a way that the direction of the axis runs from the first measurement point to the last one.
Should you want to define the directional sense independently of the probing strategy, GEOPAK enables you to do that using in the "Element Cylinder" dialogue the
- symbol (see also picture below).
V-12 v 2.4 14.09.04

Elements
If you do not see the symbol in this dialogue ...
Click in the PartManager menu bar on "SetPrograms / CMM / GEOPAK".
In the subsequent window "Settings for GE"Dialogues" ...
and then click the option "Dialogue Cylindein the "Dialogues" window.
14.09.04 v 2.4
tings / Default Settings
OPAK", click on
r - Pre-define direction"
V-13

Elements
2.10 Pre-Define Cylinder Direction
Using the symbol (picture on the left) in the "Element Cylinder" dialogue you can predefine the direction for cylinders (for details refer to "Cylinder ").
Click the symbol to get to the window designated "Pre-define direction". This window offers you two possibilities.
Input direction: The option used most frequently is the predefinition pf the direction by angles.
Use direction from element: Of course, you can define the cylinder direction also from measured elements which, e.g., are located parallel to each other or have a similar direction. All elements having a defined spatial axis are accepted.
An example to illustrate this would be a plane with several bores. First you have to establish the axes of the bores and use them for defining the cylinder's direction.
Upon confirmation you return to the "Element Cylinder" dialogue.
The symbol is depressed as a proof that you have predefined a direction.
V-14 v 2.4 14.09.04

Elements
2.11 Probing Strategy Cylinder/Cone The cylinder algorithm operates iteratively (recurring step by step). It starts with a first approximation and tries to improve it in a way to achieve the minimum. If this works out correctly, the improvements will continuously grow smaller very shortly. As soon as they are less than 10^-9 (i.e. numerically zero), the cylinder (cone) is calculated. In this case one would say that the itineration is converging.
Depending on the data, the number of steps is different; in most of the cases it is ranging between 6 and 15.
Maximum Number of Steps It happens that the first approximation does not come close enough to the final result. The improvements will then vary instead of continuously growing smaller, and they will never reach zero. The itineration does not converge. In order to avoid endless calculations in these cases, we have defined a maximum number of steps after which itineration will stops without result.
Circular Plane Hence it is the first approximation that is the critical issue in terms of iteration. The direction is essential. In a "normal case" we recommend to place the first three points on a circle which is approximately perpendicular to the cylinder. GEOPAK then assumes the direction of the first circular plane as the first approximation for the cylinder axis direction. As a result, itineration will start.
Surface of 2nd Order If iteration fails to converge, then GEOPAK tries another assumption for the first approximation, the calculation of a 2nd order surface. In this case the values are determined from the surface parameters. There is, however, a minimum of 9 points (an increased number is even better) required.
The calculation is the better the more irregularly the points are distributed on the surface. For that reason you should not position the points on two circles or along single surface lines.
So if you want to make use of the "2nd Order Surface" option, you should capture as many meas. points as possible and distribute them evenly over the whole cylinder surface.
Should both attempts come to no result, GEOPAK will try a third time. assuming, this time, that the two first points are located along a surface line. Should this attempt equally fail, the message "..not calculable" will be output.
Predefine Direction The fact that as from Version v2.3 the user is able to predefine the cylinder direction can be regarded as a further remedy to overcome the problems mentioned above. It is expected that this will distinctly increase reliability of the calculations. For details refer to the topic Pre-Define Cylinder Direction .
Hint Up to Version v2.2, the order for the 2nd and 3rd attempt was inverted. Starting from v2.3 it will conform to the present description.
14.09.04 v 2.4 V-15

Elements
2.12 Line
Using this function, you create an element of the type "Line". A line can be calculated only from a minimum of two measured points.
You either click on the symbol or use the menu bar ("Element / Line").
In the dialogue window "Element Line " there are summarised all the types of construction of lines allowed by GEOPAK (for further details please refer also to Elements: Overview).
For details regarding the first four types of construction please refer to Type of Construction.
If the line is calculated from measured points, several methods of calculation come into consideration (for further details refer also to Type of Calculation).
Recognising the projection plane As a rule, the program calculates a plane from the measured points and the probe directions.
• It is then checked which base plane this plane comes closest to. • This is the plane where the points are projected (Automatic
projection). • The line is calculated.
Problem cases If the line with its measured points is diagonal to space,
• automatic projection could take place in the wrong plane. • In this case you can predetermine the projection plane. • Regardless of the location of the measured points, projection
will then be realized in this plane.
No projection
XY-plane
YZ-plane
ZX-plane
Automatic projection plane Hint
We recommend automatic projection. Caution is advisable in performing "forced projection" into a plane. When changing the plane, make sure that the changeover of the plane is made by this symbol. It is possible that you get the message that the line cannot be calculated.
For details regarding the options available in the symbol block on the right-hand side of the dialogue window please refer to Programming Help.
V-16 v 2.4 14.09.04

Elements
2.13 Constructed Lines You have five different options to construct a line. You can find detailed information by clicking onto the relevant options.
Symmetry Element Line. The dialogue offers you for the 1st and 2nd element the elements line, cylinder and cone respectively.
Tangent. First, select the circle at which the tangent is to be placed. Then decide if the tangent is to be placed to the circle from a point or if you want the line to be a common tangent of two circles.
Shift-Element Line: Using this option, you create a line that runs parallel to the selected line and through the selected point.
Intersection Element Line: An intersection line can only be determined by two planes. The direction of the lines is defined by the direction vectors of the two planes using the "Right-hand rule".
Connection Element Line For additional information about the Connection Elements you should also consult the topic Connection Elements General .
14.09.04 v 2.4 V-17

Elements
2.14 Plane
Using this function, you create a new element of the type "Plane". A plane can be calculated only from a minimum of three measured points or defined as a symmetry plane.
You either click on the symbol or use the menu bar ("Element / Plane").
In the "Element Plane" dialogue window are summarised all the types of construction of planes allowed by GEOPAK (for further details refer also to Elements: Overview).
For details regarding the first four types of construction, see the topic Type of Construction.
Several methods of calculation are available in cases where the plane is calculated from measured points (for details see topic Type of Calculation).
Changing the type of calculation
You can have the element calculated in a way different from the originally set method.
Proceed as follows
Click on the symbol,
select the type of calculation,
confirm, and ...
select the original plane in the following window (e.g. "Plane, Recalculate / Copy from Memory").
Defining the direction vector
In a measured plane, the direction vector always points out of the material.
When you have the plane calculated as a connection element, the information of the material side is not available. In this case, the direction vector always points
from the origin
to the plane.
Hint For a connection plane located close to the origin, you are well advised to shift the origin prior to the calculation and reset it upon completion of the calculation, to make sure that you always get the same direction.
For details describing methods of creating the "Symmetry Element Plane", cf. Two Ways for Symmetry Element .
For details regarding the options available in the symbol block on the right-hand side of the dialogue window please refer to Programming Help.
V-18 v 2.4 14.09.04

Elements
2.15 Step Cylinder
With this function, you create two elements of the type "Cylinder", which have a common axis but different diameters. A step cylinder can be e.g. a graduated spindle.
In the same way you entered for all the other elements a name and a storage no., you can do that for each one of the two cylinders. If you confirm the "Element Step Cylinder", you will directly come to the measurement of the first step of the cylinder. You can also manually measure the first step of the cylinder or with the automatic elements you know.
If all points for the first step are recorded, click on the "Element Finished" icon. You come to the measure mode for the second step of the cylinder (see first step). Click again on the "Element Finished" icon and arrive at the calculation of the step cylinder.
The axes of the two cylinders are identical.
2.16 Contour
Using this function, you create a new element of the type "Contour". A contour comprises a number of points in an ordered array. The GEOPAK program can use the contour points for calculating an element (for details see the example shown under Selection of Points Contour).
You either click on the symbol (see above) or use the menu bar "Element / Contour".
In the dialogue window "Element Contour" there are summarised all the types of construction of planes allowed by GEOPAK (for further details please refer also to Elements: Overview).
For details concerning the first two types of construction see Type of Construction.
For further details see under
Contour Connection Element
Type of Construction
Load Contour.
Middle Contour .
Load Contour from External Systems . For details regarding the topic "Calculation of an Element on a Contour"
see topic Selection of Point Contour
14.09.04 v 2.4 V-19

Elements
2.17 Selection of Points Contour You have loaded a contour and want to calculate an element on this contour (or part of this contour). For this purpose you need, as a rule, only a part of the contour points. This is why you have to make a selection. For the selection of the points, you use the graphics. Make sure that this is activated.
Example for the calculation of a circle
Click on the element symbol,
in the following window and on the "Recalculate from Memory" symbol and confirm.
In the "Circle - Recalculate / Copy from Memory" window, you click on the symbol (contour).
Select a contour
• either from the list or ...
• by mouse-click (the mouse changes to a reticle) in a contour graphic on your screen. You confirm.
The "Selection of Point Contour" window appears. At the same time, the mouse pointer again changes to a reticle.
With the left-hand mouse button depressed, you select in the contour graphics all the areas you want to use for calculating, e.g. a circle. You can click single points, or you summarise points to form blocks (keep mouse button depressed). The areas selected are shown in colour (in "red" as shown in the picture below").
In the window "Selection of Points Contour", the co-ordinates of the
points or blocks are shown. You decide in which co-ordinate system you want to have them displayed.
Below the line "Selected Blocks" you decide via the symbols which blocks you want to use for the calculation.
Using this symbol you call up all contour points required for the
V-20 v 2.4 14.09.04

Elements
calculation of the element in question.
You delete all points (blocks).
2.18 Surfaces
Using this function, you create a new element of the type "Freeform Surface". This function generates the connection between GEOPAK and 3D-TOL.
You either click on the symbol or use the menu bar ("Element / Surface").
You come to the dialogue window "Element Surface".
In the text boxes, you enter your element name or the memory number in the usual manner.
In addition, using the symbols you can cause a sound output and a graphical assistance to be activated.
There are two ways to create a new element, i.e. by means of a
measurement or
by using a connection element.
If you opt for the measurement, click on the symbol and confirm with OK.
Important A "Connection element freeform surface" consists of measurement points of other elements whose measurement points have actually been measured before. So if you want to create a connection element, you can only use measured elements. Furthermore, the material side of the measured element must be known.
14.09.04 v 2.4 V-21
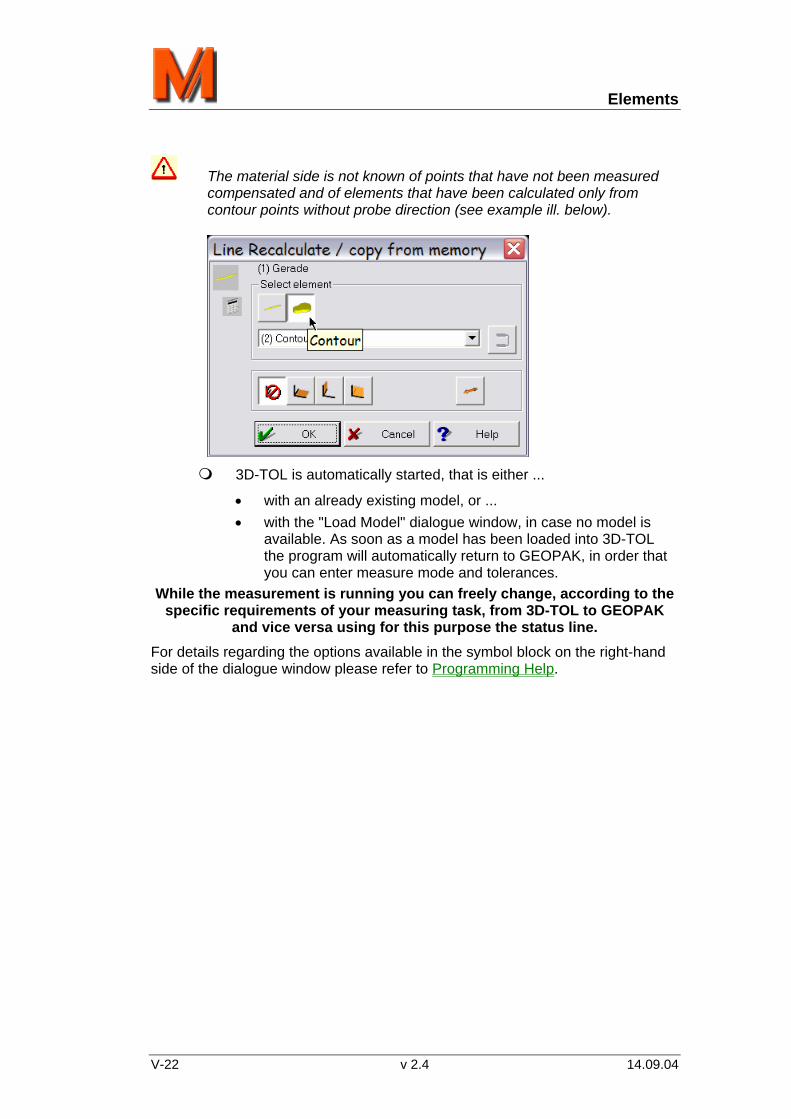
Elements
The material side is not known of points that have not been measured compensated and of elements that have been calculated only from contour points without probe direction (see example ill. below).
3D-TOL is automatically started, that is either ...
• with an already existing model, or ... • with the "Load Model" dialogue window, in case no model is
available. As soon as a model has been loaded into 3D-TOL the program will automatically return to GEOPAK, in order that you can enter measure mode and tolerances.
While the measurement is running you can freely change, according to the specific requirements of your measuring task, from 3D-TOL to GEOPAK
and vice versa using for this purpose the status line. For details regarding the options available in the symbol block on the right-hand side of the dialogue window please refer to Programming Help.
V-22 v 2.4 14.09.04

Elements
2.19 Angle Calculation By means of the function "Angle", you may calculate the angle between two elements. Activate the function (dialogue window) via the menu bar "Elements"
and the function "Angle", or choose a shorter way by clicking on the symbol in the toolbar.
GEOPAK calculates the angle in the plane and its 3 projections.
You Can Input The Following Addendum Conditions:
Calculation of the angle by probing the material sides
Calculation of the angles via the direction vector
This input only influences:
Measured planes
Measured straight lines. That is possible only if the straight lines were measured in the same driving plane. Otherwise, calculating is realised through the direction vectors.
Furthermore, you can select between
the calculated angle
its complementary angle of 180° ("Explementary Angle")
its complementary angle of 360°
Again, the result is a geometrical element of the type "Angle". Directly after this, you can make a nominal-actual comparison of values.
Pay Attention: The angle projections depend on the co-ordinate system.
For details regarding the options available in the symbol block on the right-hand side of the dialogue window please refer to Programming Help.
14.09.04 v 2.4 V-23

Elements
2.20 Calculation of Distance With the function "distance", you can calculate the distance between two elements. Activate the function (dialogue window) via the menu bar "Elements" and the function "Distance". You may also choose the shorter way via the symbol
displayed in the icon bar.
On principle, the result is a spatial distance.
GEOPAK Win calculates the distance as sum and as vector.
• The distance is always positive. • The distance vector is directed from the first towards the second
output element. Its vector components are signed.
You Can Input The Following Addendum Conditions:
Calculation of the radius of the output elements concerned. This input produces an effect not only on circles, cylinders and spheres involved, but also on not compensated measuring points. Here the respective probe radius is added or subtracted.
Projection plane, in which the calculated distance ought to be situated. This input is ineffective on planes concerned, i.e. are in no case projected.
• A projection is practical, e.g. if you calculate the distance between a circle and a straight line, which are situated in the same plane of drawing, but probed in another measurement position.
The result is a geometrical element of the type "distance". Directly after this, you can make a comparison of nominal and actual values.
Attention: The vectorial distance depends on the co-ordinate system.
For details regarding the options available in the symbol block on the right-hand side of the dialogue window please refer to Programming Help.
V-24 v 2.4 14.09.04

Elements
Distance comprising calculation of radii For circles, GEOPAK calculates the geometric distance between the circle centres and includes the radii in the calculation of this geographic distance. The resulting distance is decomposed into its components in a way that a2= ax2+ay2+az2.
Thus, the distance components (see sketch below) are defined by the points of intersection of the “straight line through the circle centres” with the circles. In the example of the sketch below, these are the components 1 and 2.
You do not get the component 1a. For the Y-value, this statement applies in exactly the same way.
1 = X-component
2 = Y-component
14.09.04 v 2.4 V-25

Elements
2.21 Distance along Probe Direction Basically, the function is used in cases where points from a CAD system are to be compared.
Example Nominal points exist, e.g. of a freeform surface from a CAD system. The normal line directions in the surface points directions are given, as well.
However, only the deviations arising perpendicular to the surface are to be determined.
Proceed as follows
You can activate the function via the menu "Element/Distance along Probing Direction" and come to the corresponding dialogue window.
You form a theoretical point and measure the corresponding point at the workpiece.
You enter the two points in the dialogue window.
The result is automatically displayed after the "Distance".
The distance along probing direction can be negative, as well. Material is lacking in such a case.
For details regarding the options available in the symbol block on the right-hand side of the dialogue window please refer to Programming Help.
V-26 v 2.4 14.09.04

Elements: Further Options
3 Elements: Further Options 3.1 Type of Construction In the GEOPAK way of thinking, select the element you want to get first, then select how this element must be built. Therefore, the dialogue windows for the elements contain icons describing the different construction methods (cf. also Elements). Some of these icons differ from one element type to the next; however, the first four icons are the same for all types.
Determine the element by measurement.
Calculate an element from the positions (locations) of other elements, e.g. the pitch circle diameter out of the centres of several circles.
"Re-calculate from memory" means:
The position of the element has been previously stored in a different co-ordinate system.
Now the element is recalled from memory and its position is calculated in the actual co-ordinate system.
You can also change the way of calculation: press e.g. the button for "minimum zone element", if the element originally has been calculated as a Gauss element.
You can also define any element as a "theoretical element"; this means that you input the nominal values by keyboard.
For different elements, further types of construction are possible; these are shown by different icons and separately explained for each element type.
14.09.04 v 2.4 V-27

Elements: Further Options
3.2 Type of Calculation For some types of elements you can select between four different methods of calculating the resulting element parameters, if more than the minimum number of points has been taken. Usually, these different ways of calculation are giving different results.
Gauss: The program calculates an "average" element; this element is situated within the points in such a way that the distances of the single points to both sides are roughly the same (or, more accurately: the sum of the squared distances is minimised).
Minimum Circumscribed Circle: the program calculates the smallest circle that contains all the points. This circle is always defined and unique; it is either a circle through two points, if these two points are opposite to each other, or a circle determined by three points. These three points form an acicular angle triangle.
Maximum Inscribed Element: the program calculates the largest circle that can be situated within the points. This is not always unique (e.g. in the case of an elliptical hole) which means that there may be more than one solution. Three points forming an acicular angle triangle always determine it.
Minimum Zone Element: the program calculates an element that is situated in the middle of two ideal elements. These two ideal elements contain all points in between them, and they are calculated in such a way that this zone is the smallest possible. The circle may have the same centre as the maximum
V-28 v 2.4 14.09.04

Elements: Further Options
inscribed or the minimum circumscribed circle, or may even be different from both. In this latter case, two points determine the inner, and two other points the outer circle. The radius or diameter output by GEOPAK is the average value of the two circles.
It depends on your measurement requirements which calculation to select. The most common calculation is according to Gauss criterion. When using this, all points have the same influence on the result, whereas for the other cases, only the outermost or innermost points determine the result.
Hint As to opt for which type of calculation, find detailed information in the topic Enveloping or Fitting-in Element.
14.09.04 v 2.4 V-29

Elements: Further Options
3.3 Enveloping or Fitting-in Element As regards lines and planes, a frequently asked question is which type of calculation is the most suitable.
From the illustration above you can see that for lines and planes, always the enveloping element is useful. With this method you receive the line (plane) represented by the blue line. If you opted for the fitting-in element, you would receive the line (plane) (red line) that lies in the material.
Hint This also applies to the case of two parallel edges forming a groove. Also in case that a feather key is to be fitted in this groove, you should use the enveloping element to limit the material free space (see ill. below).
V-30 v 2.4 14.09.04

Elements: Further Options
3.4 Positive Direction by Vector
Background In GEOPAK, all properties of the elements are automatically calculated. These properties are usually location, direction, and other features specific to the element. For the elements line, plane, cylinder, and cone the direction in space plays a significant role. Since calculation of angles between elements takes the so-called "positive direction" into account, and as alignment procedure also uses this positive direction to determine the axis in space or within a plane, this positive direction must be defined in such a way that reproducibility from one execution of the part program to the next is possible. Therefore, GEOPAK uses the following definitions of the positive direction for the elements.
Definition for the Elements For a measured line, the positive direction is the direction from the first to the last point. In the example below, the points have been taken as 1, 2, and 3; therefore, the positive direction is from 1 to 3.
If this line is used for an axis alignment of the x-axis, the axis gets the same direction as the line.
With the circle and the ellipse, the "Positive Direction" always is parallel to the direction vector of the projection plane. In our example below, the X/Y plane is the projection plane. The "Positive Direction" is indicated by Z+'.
14.09.04 v 2.4 V-31

Elements: Further Options
In case of a cylinder, the "positive direction" goes from the first to the last measured point, along the axis of the cylinder.
In the case of a cone, the "positive direction" runs from the apex into the opening of the cone (cf. picture below).
V-32 v 2.4 14.09.04

Elements: Further Options
In case of a plane, the vector pointing out of the plane gives the "positive direction". The vector of a measure plane always points away from the material; the order / sequence of measured points does not affect the direction (cf. picture below).
14.09.04 v 2.4 V-33

Elements: Further Options
3.5 Re-calculate Elements For the form tolerances straightness, flatness, and circularity you can blank measurement points and re-calculate the form tolerance after opening the graphic.
You proceed in the following way You activate the form tolerance required (see, e.g., under
Straightness). It is not necessary to activate the graphic symbol in the respective dialogue windows.
You confirm and get the graphics displayed.
You click on the symbol and come to the window "Re-calculate without Selected Points".
Using the symbol you mark in each case the point with the biggest distance towards the inside (Min.) or towards the outside (Max.).
The marked points appear on the graphics in red.
In case you have clicked one point or several points in excess, you can cancel the markings by this symbol.
When you delete the marked points with "OK", the element will be re-calculated. The results will be displayed to you immediately.
This command is not to learn.
3.6 Free Element Input When you want to open an element in the GEOPAK dialogues, you would open, as a rule, a list with all the elements available. Even in the part program editor, such a list is shown to you as dependant on context.
There are, however, cases where this is not sufficient. For example, when you are creating a subprogram. The elements of the main program to be called are then unknown.
In this case you can enter, via the function "Free Element Input", type, name and number of the element that you want to use.
This input is possible whenever you see this sign [..] in an element list. With a double click on this line, you open the "Free Element Input" window.
This window is self-explanatory.
V-34 v 2.4 14.09.04

Calculation
4 Calculation 4.1 Calculation according to Gauss In the "Elements (for example) Circle" windows, you optionally have four methods for the execution of your measurement tasks (see details of topic Type of Calculation ). The only method that is always clearly defined is the Gauss method. If no other method is specified, (the Chebychev, for example, is meant for the definitions of geometrical errors according to the ISO 1101) you select the Gauss method.
Gauss: The program is calculating an average element. The differences are largely cancelled out (compensation element).
In the graphics, you also get a value that is called standard deviation or spread.
4.2 Minimum Zone Element In the "Elements (for example) Circle" windows, you have four methods to execute your measurement tasks (see details of topic Type of Calculation ). One of it is the "Minimum Zone Element".
Minimum Zone Element: The program is calculating an average element, among a few features, which is geometrically perfect. This couple of features keeps the distance to a minimum but includes all measured points (Chebychev).
14.09.04 v 2.4 V-35

Calculation
4.3 Enveloping Element In the "Elements (for example) Circle" windows, there exist four methods to execute your measurement tasks (see details of topic Type of Calculation ). One of it is the "Enveloping Element Zone Element".
Enveloping Element: The program encloses the measured points by a smallest geometrically perfect feature (contact element at outside measurement).
4.4 Fitting-in Element In the "Elements (for example) Circle" windows, you have four methods to execute your measurement tasks (see details of topic Type of Calculation ). One of it is the "Fitting-In Element".
Fitting-in element: The program triggers the measured points by a biggest perfect feature (contact element at internal dimension).
V-36 v 2.4 14.09.04

Spread / Standard Deviation
5 Spread / Standard Deviation
Introduction In the circularity, straightness and flatness graphics, GEOPAK displays a value (standard deviation), which is designated by “Std. Dev. * 4“. The same value can be displayed in the graphics of elements as “4s”.
Degrees of Freedom: The degrees of freedom are important for the calculation of the standard deviation. This depends on the min. number of the necessary measurement points, i.e. from the type of element:
Type of element Min. number of
points Degrees of freedom
Line 2 Number of points - 2
Circle 3 Number of points - 3
Plane 3 Number of points - 3
Sphere 4 Number of points - 4
Cylinder 5 Number of points - 5
Cone 6 Number of points - 6
Calculation of standard deviation step-by-step: Sum up the square deviations: Measured point – calculated element
for all measured points.
Divide the “Sum of all deviation squares” through the degrees of freedom and
calculate out of it the square root.
The result is the standard deviation.
The graphics mentioned above display the quadruple value of it.
14.09.04 v 2.4 V-37


Constructed Elements: Connection Elements
VI Elements: Further Options Contents 1 Constructed Elements: Connection Elements .............. 3
1.1 Connection Elements, General................................................... 3 1.2 Connection Elements "From Measured Points" ....................... 5 1.3 Connection Element Point .......................................................... 7 1.4 Connection Element Line............................................................ 7 1.5 Connection Element Circle ......................................................... 8 1.6 Connection Element Ellipse ....................................................... 8 1.7 Connection Element Sphere....................................................... 8 1.8 Connection Element Cylinder..................................................... 9 1.9 Connection Element Cone .......................................................... 9 1.10 Connection Element Plane ....................................................... 10 1.11 Connection Element Freeform Surface ................................... 10
2 Intersection Elements .................................................... 12
2.1 Intersection Element Line ......................................................... 12 2.2 Intersection Element Point ....................................................... 14 2.3 Intersection: Extras ................................................................... 16 2.4 Intersection Element Circle ...................................................... 18 2.5 Intersection Element Ellipse..................................................... 19
3 Symmetry Elements ....................................................... 20
3.1 Symmetry Element Line ............................................................ 20 3.2 Symmetry Element Plane: Two Ways ...................................... 21 3.3 Symmetry Element Point .......................................................... 23
4 Fit in Elements................................................................ 24
4.1 Fit in Element Sphere ................................................................ 24 4.2 Fit in Element Circle .................................................................. 24
5 Further Constructed Elements...................................... 25
5.1 Shift-Element Line ..................................................................... 25 5.2 Tangent....................................................................................... 25
6 Automatic Element Recognition ................................... 26
6.1 Introduction................................................................................ 26 6.2 Further Options.......................................................................... 26 6.3 Activating the Function............................................................. 27 6.4 The Dialogue: Symbol and Information Boxes ....................... 27 6.5 The Dialogue: Important Functions ......................................... 28 6.6 Settings ...................................................................................... 29 6.7 Special Cases / Limitations ...................................................... 31
15.09.04 v 2.4 VI-1

Constructed Elements: Connection Elements
6.7.1 Special Cases with the Joystick........................................................ 31 6.7.2 Limitations......................................................................................... 31
7 Carbody Measurement: Hole Shapes........................... 32
7.1 Hole Shapes: Introduction........................................................ 32 7.2 Differences: Hole Shape – Inclined Circle............................... 33 7.3 Hole Shape: Symmetry Axis and Width .................................. 36 7.4 Hole Shape: How to Work......................................................... 37 7.5 Hole Shapes: Tolerance Comparison / Position..................... 38
8 Carbody Measurement: Introduction ........................... 40
8.1 Settings ...................................................................................... 41 8.2 Monitoring: Data Transfer ........................................................ 42 8.3 Start Part Program .................................................................... 42 8.4 Synchronisation of Part Program ............................................ 42 8.5 Synchronisation is nessecary.................................................. 43 8.6 Both Part Programs should be Finished................................. 43 8.7 Retrieve Element Data .............................................................. 44 8.8 Element Container..................................................................... 45 8.9 Joint Co-ordinate System......................................................... 45 8.10 Transfer Co-ordinate System ................................................... 46
VI-2 v 2.4 15.09.04

Constructed Elements: Connection Elements
1 Constructed Elements: Connection Elements
1.1 Connection Elements, General You use the Connection Elements option in cases where, e.g.,
you intend to create a hole pattern from centres of circles.
You can also draw a line through adjacent circles.
Or you wish to determine the straightness of a cylinder axis by
measuring several superimposed circles.
15.09.04 v 2.4 VI-3

Constructed Elements: Connection Elements
Special importance is attached to the option which allows you choose between single and group selection (for further details refer to "Single Selection" and "Group Selection".
The connection element is determined in the ...
current co-ordinate system and in
the selected projection plane.
Procedure To access the dialogue window of the connection element that you want to form, click ...
the corresponding symbol in the icon bar (see picture).
In the "Element Circle, etc." window, click on the symbol (see picture).
Or adopt a different method using the "Menu bar / Element / Circle, etc.".
In any case, for the present example you have to confirm "Element Circle" in the window.
Hint To see how to proceed in the dialogue windows "Connection Element Circle (Single and Group selection)", refer also to the subjects "Single Selection" and "Group Selection".
For details regarding the topic "From Measured Points" (left symbol) refer to Connection Element "From Measured Points"
VI-4 v 2.4 15.09.04

Constructed Elements: Connection Elements
1.2 Connection Elements "From Measured Points"
In the dialogue window "Connection Element Circle, etc.", you can use the symbol (left, above) for your decision to form the connection element from measured points. You can calculate a connection element also from the local co-ordinates, which have been established for the elements used. For the elements such as Circle, Sphere, and Ellipse, this is, in each case, the centre of the circle.
Hint These options are applicable to both Single selection and Group selection.
Option not active The topic "Connection Elements, General" shows examples where you do not activate the option "From measured points". The connection elements concerned pass through the centres of circles. A further example, used for the geometrical inspection of rotary tables, would be a "Connection Element Circle" through the centre of several spheres.
Option active You activate this option in cases where you wish to determine the connection element from measured points instead of using centres.
15.09.04 v 2.4 VI-5

Constructed Elements: Connection Elements
Example: On a cylinder, you have measured several circles at different heights (see picture below). Using these measurement points you can calculate a cylinder.
A connection element formed this way includes all features of a measured element (measurement points and material side).
Probe radius compensation The measured points are probe centres. From these, the new element is calculated against which – in the second step – the probe radius is compensated.
For this, GEOPAK uses the probe radius with which the first element was measured. The result is only valuable when the relevant elements where measured with the same probe radius.
In the learning mode you are therefore warned when two relevant probe radii differ by more than 0.01 mm.
VI-6 v 2.4 15.09.04

Constructed Elements: Connection Elements
1.3 Connection Element Point You can form the Connection Element Point from the
local co-ordinates of known elements, or
from the measurement points of these elements.
For further details, refer also to the topics
Connection Elements, General
Connection Element "From Measured Points"
1.4 Connection Element Line You can form the Connection Element Line from the...
local co-ordinates of known elements. Should you have to define, e.g., a line by the centres disposed adjacent or above each other, you form the Connection Element Line.
For this purpose, you are not allowed to activate the symbol "From Measured Points".
Measurement points of these elements.
If you want to connect two lines with each other (picture below, red Line), you will have to activate the symbol.
For further details, refer also to the topics
Connection Elements, General
Connection Element "From Measured Points"
15.09.04 v 2.4 VI-7

Constructed Elements: Connection Elements
1.5 Connection Element Circle
In the "Element Circle" dialogue you can decide for one out of four calculating methods ("Type of Calculation").
You can form the Connection Element Circle from the...
local co-ordinates of known elements. An application frequently used for the Connection Element Circle is a hole pattern.
In this case you are not allowed to activate the symbol "From Measured Points".
Measurement points of known elements.
For further details, refer also to the topics
Connection Elements, General
Connection Element "From Measured Points"
1.6 Connection Element Ellipse You can form the Connection Element Ellipse from the
local co-ordinates of known elements, or
from the measurement points of these elements.
For further details, refer also to the topics
Connection Elements, General
Connection Element "From Measured Points"
1.7 Connection Element Sphere You can form the Connection Element Sphere from the
local co-ordinates of known elements, or
from the measurement points of these elements.
For further details, refer also to the topics
Connection Elements, General
Connection Element "From Measured Points"
VI-8 v 2.4 15.09.04

Constructed Elements: Connection Elements
1.8 Connection Element Cylinder You can form the Connection Element Cylinder from the
local co-ordinates of known elements, or
from the measurement points of these elements. You can form a cylinder using, e.g., the measurement points of several superimposed circles.
For further details, refer also to the topics
Connection Elements, General
Connection Element "From Measured Points"
1.9 Connection Element Cone You can form the Connection Element Cone from the
local co-ordinates of known elements, or
from the measurement points of these elements. You can form a cone using, e.g., the measurement points of several superimposed circles.
For further details, refer also to the topics
Connection Elements, General
Connection Element "From Measured Points"
15.09.04 v 2.4 VI-9

Constructed Elements: Connection Elements
1.10 Connection Element Plane You can form the Connection Element Plane from the
local co-ordinates of known elements, or
from the measurement of these elements. You can form a plane using, e.g., the measurement points of two lines. This, however, is based on the understanding that the lines have been measured in one plane. (Picture below).
1 = Line in ZX plane 2 = Line in YZ plane
For further details, refer also to the topics
Connection Elements, General
Connection Element "From Measured Points"
1.11 Connection Element Freeform Surface The Connection Element Freeform surface is always formed from the measurement points of known elements. Example: You can form an Element Freeform Surface from the measurement points of two lines.
Prerequisites GEOPAK and 3D-TOL If you want to form the Connection Element Freeform Surface, you must use GEOPAK and 3D-TOL.
GEOPAK provides 3D-TOL with the required measurement points.
3D-TOL performs the actual evaluation.
Measurement points The elements used to form the new Connection Element Freeform Surface may only contain actually measured points.
By "actually measured points" we understand in this case: points determined by a probing of the work piece.
VI-10 v 2.4 15.09.04

Constructed Elements: Connection Elements
Do not use the following elements to form a Connection Element Freeform Surface:
Theoretical elements
Intersection elements (elements point, line, circle, ellipse)
Symmetry elements (elements point, line, surface)
Tangent
Move element (element line)
Fit in element circle or sphere
Minimum or maximum point of a contour (element point)
Connection elements not calculated from measurement points.
Do not use the following measurement points to form a Connection Element Freeform Surface:
Measurement points from the Element Point that was not measured as a "compensated point".
For a Connection Element calculated from measurement points, observe the following: The probe directions are defined from the calculated element.
Contours If you want to use contours for the Connection Element Freeform Surface, these may not be compensated contours, as the compensation is taken on from 3D-TOL.
For more details, refer to the topics
Connection Elements General
Connection Element "From Measured Points"
15.09.04 v 2.4 VI-11

Intersection Elements
2 Intersection Elements 2.1 Intersection Element Line
To crate an intersection line from two planes, use the menu "Element" and click on "Line" and in the subsequent dialogue onto the symbol (see above).
Alternatively, you can use the tool bar.
In the dialogue "Intersection Element Line"
select one plane each in the First and in the Second Element and click on Ok.
VI-12 v 2.4 15.09.04

Intersection Elements
The sense of direction of the determined line follows the "Right-hand rule" (see ill. below).
The right-hand rule as per the example above 1 Plane 1
2 Plane 2
NV1 Normal vector 1 (thumb)
NV2 Normal vector 2 (index finger)
1S Sense of direction of line after intersection of plane 1 with plane 2 (middle finger)
2S Sense of direction of line after intersection of plane 2 with plane 1 (the planes intersect in reverse sequence, therefore also the sense of direction of the intersection line is reversed).
If you click on the empty line (in the ill. above underlaid in blue), you get to the dialogue "Free Element Input ".
For information about the topic "Loops " click on the term.
15.09.04 v 2.4 VI-13

Intersection Elements
2.2 Intersection Element Point
To be able to construct an intersection element point, use the menu bar and click on "Elements / Point" and in the subsequent dialogue onto the symbol (see above).
Alternatively, you can use the tool bar.
The dialogue "Intersection Element Point" is basically similar to the other intersection elements. However, the Intersection Element Point offers substantially more options (see ill. below) than, for example, the line (only two planes).
If you click onto the empty line (...) you get to the dialogue "Free Element Input".
For information about the topic "Loops" click onto the term.
VI-14 v 2.4 15.09.04

Intersection Elements
Several intersection options at a glance Plane Line Circle Cone Cylinder Ellipse
Plane Error S S o L S mA S mA L
Line S S S/L S mA S mA S / M
Circle S o L S / L S/M L L L
Cone S mA S mA L S mA S mA L
Cylinder S mA S mA L S mA S mA L
Ellipse L S / M L L L Error
S = Intersection
L = Perpendicular
S / L = Intersection or perpendicular, if there is no intersection (ill. below)
The line does not intersect with the circle. The perpendicular is calculated.
S o L = Intersection or perpendicular can be selected
SmA = Intersection with axis
S / M = Intersection or middle, when there is no intersection (ill. below)
The circles do not intersect. The middle is calculated.
For more information refer to
Intersection: Extras (Contour; Point-Sphere; Circle-Plane).
15.09.04 v 2.4 VI-15

Intersection Elements
2.3 Intersection: Extras For the general statements you should first consult the topic Intersection Element Point.
Extra: Contour If an intersection element is a contour, the contour must be defined as the first element using the symbol.
Select your contour from the first list via the arrow symbol.
Select the second element from the second list.
You can only intersect contours with lines, circles or points. When projecting a point onto a contour, inform yourself thoroughly under the topic Intersection: Contour with Circle, Line, Point In all other cases you will receive an error message. Via the min./max.-symbols (ill. below), you select the intersection
points.
Hint In case of more than one intersection point (e.g. also in case of intersections of circle/line; circle/circle; circle/plane), you can select your desired point of intersection via the symbols (ill. above). You can decide on one point each with the biggest or smallest X-, Y- or Z-co-ordinate.
Extra: Point / Sphere Intersections are not possible for these elements. However, the perpendicular is offered as results.
VI-16 v 2.4 15.09.04

Intersection Elements
Extra: Intersection Circle / Plane Up to version 2.2, the centre of the circle was automatically projected onto the plane. As from v.2.3 you have the possibility to have the piercing points of the circle circumference line through the plane calculated as intersections (see ill. below).
For this, click on the symbol.
15.09.04 v 2.4 VI-17

Intersection Elements
2.4 Intersection Element Circle
You use the function "Intersection Element" via the cylinder symbol whenever you want to calculate a circle in a measured plane. The diameter of the circle is identical with the cylinder diameter (see picture below).
The information as to whether it is a bore or a shaft is taken over by the cylinder. This is of importance for the application of MMC.
Use the "Intersection Element" function via the cone symbol when you want to know
at which level the cone has a determined diameter
which diameter a cone has at a determined place.
Via the following symbols...
• Given diameter
• Distance from the apex of the cone
• Distance from the XY-plane
• Distance from the YZ-plane
• Distance from ZX-plane
You use the function "Intersection Element" via the sphere symbol when you want to know
at which level the sphere has a determined diameter, or ...
which diameter a sphere has at a determined place.
• Given diameter
• Distance from the pole of the sphere
• Distance from the base plane
VI-18 v 2.4 15.09.04

Intersection Elements
• Distance from the XY-plane
• Distance from the YZ-plane
• Distance from the ZX-plane
2.5 Intersection Element Ellipse
For an ellipse, the cylinder or the cone serves as an intersection element (2nd element). Click onto the symbol and confirm.
In the result field and in the protocol you find, apart from the data about the centre, the big and the small diameter, also the angles that include the big semi axis with the co-ordinate axes (see ill. below).
15.09.04 v 2.4 VI-19

Symmetry Elements
3 Symmetry Elements 3.1 Symmetry Element Line
The symmetry line of two lines is their median line. The smaller angle is bisected.
Often, the symmetry line is found between two parallel edges.
You can also use the axes of cones or cylinders as 1st or 2nd element.
VI-20 v 2.4 15.09.04

Symmetry Elements
3.2 Symmetry Element Plane: Two Ways You have possibilities to create symmetry elements in the "Element Plane" dialogue window.
Symmetry Element of two Planes
In the "Element Plane" dialogue window, click on the symbol and come to the corresponding "Symmetry Element Plane" dialogue window. Enter the planes under "First or Second Element" and confirm.
Hint The symmetry plane is in the joint material or the joint gap between the starting planes respectively.
In the above illustration, the symmetry planes are in the joint material.
In the above illustration, the symmetry plane is in the joint gap of the starting planes.
15.09.04 v 2.4 VI-21

Symmetry Elements
In the above illustration, the symmetry plane is in the opening angle between the starting planes.
In the above illustration, the symmetry plane is in the joint material of the starting planes.
Exception
The above illustration shows the symmetry plane in the gap of the joint material or in the joint material.
Possibly, both starting planes have been probed almost in parallel and from the same direction. In this case you should call up one of the starting planes from the memory and go the dialogue “Recalculate from memory” and click on the option
"Change direction“ (symbol left). This is how you will get again two planes with a joint mass or a joint gap respectively.
VI-22 v 2.4 15.09.04

Symmetry Elements
Symmetry Element of two Points
In the "Element Plane" dialogue window, click on the symbol and the corresponding "Symmetry Element Plane" dialogue window appears. Enter the points under "First or Second Element" and confirm.
Remember that a mouse-click on the area [..] allows you to change to "Free Element Input".
Hint The vector direction of the plane is defined by the direction from the first to the second point.
3.3 Symmetry Element Point
The symmetry point between two points is the mid-point between the two points.
You can also use the elements circle, ellipse and sphere as 1st and 2nd element. For the calculation of the symmetry point, GEOPAK uses the element mid-points.
The diameter of the elements has no influence on the result.
15.09.04 v 2.4 VI-23
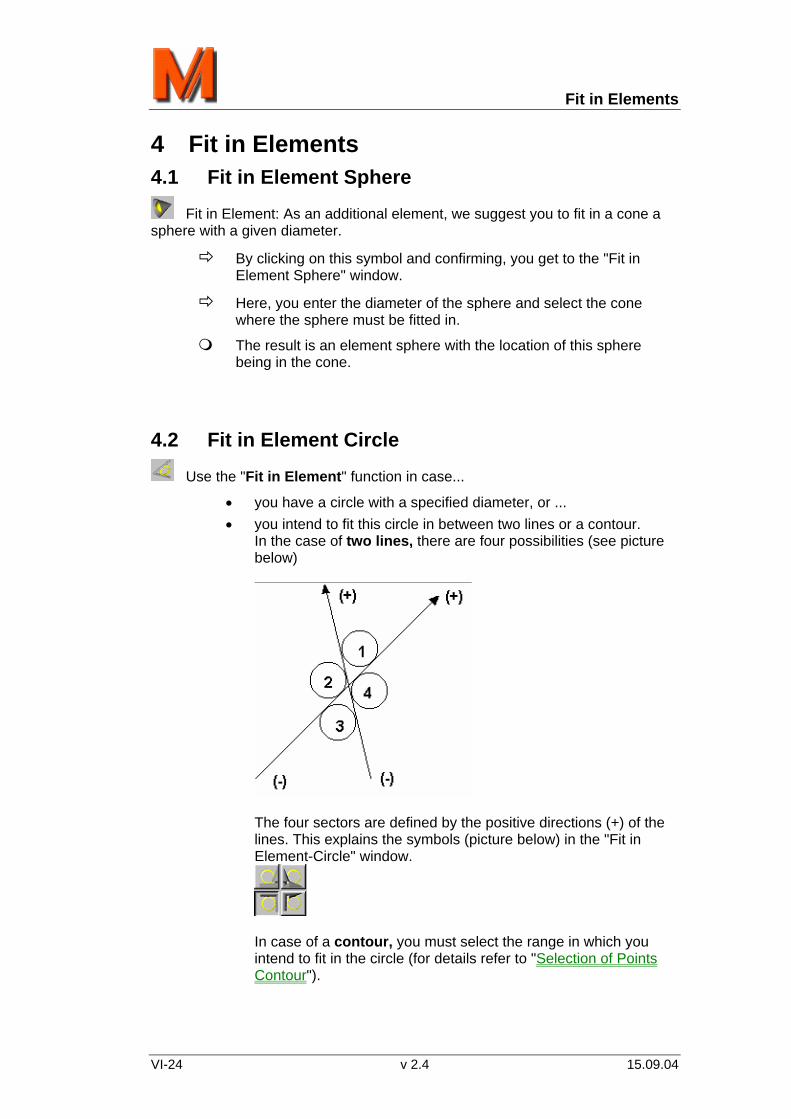
Fit in Elements
4 Fit in Elements 4.1 Fit in Element Sphere
Fit in Element: As an additional element, we suggest you to fit in a cone a sphere with a given diameter.
By clicking on this symbol and confirming, you get to the "Fit in Element Sphere" window.
Here, you enter the diameter of the sphere and select the cone where the sphere must be fitted in.
The result is an element sphere with the location of this sphere being in the cone.
4.2 Fit in Element Circle
Use the "Fit in Element" function in case...
• you have a circle with a specified diameter, or ... • you intend to fit this circle in between two lines or a contour.
In the case of two lines, there are four possibilities (see picture below)
The four sectors are defined by the positive directions (+) of the lines. This explains the symbols (picture below) in the "Fit in Element-Circle" window.
In case of a contour, you must select the range in which you intend to fit in the circle (for details refer to "Selection of Points Contour").
VI-24 v 2.4 15.09.04

Further Constructed Elements
5 Further Constructed Elements 5.1 Shift-Element Line
With this option you create a line that runs parallel to the selected line (1st element) and through the selected point (2nd element).
5.2 Tangent
Via the icon, you come to the “Tangent“ window. First, select the circle where the tangent must be placed. Then you decide …
whether the tangent must be placed at the circle from a point or whether …
the line must be a common tangent of two circles (see four icons on the left).
Since in the two cases, more tangents are possible, you have to select one via the icons (above). You can also imagine the small circle of the two circles as a point.
The designation of the tangents results of the contact point with the second circle out of direction of the first circle (see our example above): 1 Tangent inside right
2 Tangent outside left
3 Tangent outside right
4 Tangent inside left If you want the invert the direction of the tangent, you have to invert the order of the circles. You have to take into account that …
... tangent 2 becomes the tangent right outside and … ... tangent 3 becomes the tangent left outside.
15.09.04 v 2.4 VI-25

Automatic Element Recognition
6 Automatic Element Recognition 6.1 Introduction With this function it is for some of the elements no longer necessary to select an element to measure a workpiece. You measure a number of points and the element is automatically determined. The CMM records the individual measurement points with the probing direction. When the element has been found, it is graphically represented in the dialogue "Automatic element recognition" (in the ill. below, see the line after two measured points). Furthermore you get an acoustical message and a further representation in the window Element Graphic.
In case that a point has been measured that is positioned too far outside the element being measured, the element that has been previously detected in the part program is stored and this last point is disregarded (see ill. below) – this is done in the manual mode as a manual command and accordingly in the CNC-mode. You can either use this last point as your first point for the new element search or you can stop the measurement.
6.2 Further Options You can use the three elements first detected to initiate an automatic alignment (also refer to the topic Settings).
You can also automatically learn the clearance height, i.e. according to the surface alignment (see also the topic Settings).
You can also automatically call up the tolerance comparison for all stored elements (see also the topic Settings).
VI-26 v 2.4 15.09.04

Automatic Element Recognition
6.3 Activating the Function After you have activated the function in Settings and the CMM is idle, you can just start to measure in the manual mode. The function with all options and the dialogue gets active.
Alternatively you can use the menu "Elements / Automatic element recognition".
6.4 The Dialogue: Symbol and Information Boxes Toolbar In the toolbar of this dialogue (ill. below), you can opt for the default automatic element recognition (symbol left). Alternatively, you can pre-define an element which would mean a manual execution of all measurement processes up to the "Element finished", in order to be able to store an element (part program).
To switch off the automatic element recognition, you must do this in the PartManager in Settings.
In this toolbar, the symbols are activated or hidden. The symbols are operative when an element can be calculated from measurement points.
Information box An information box (ill. below) informs you what has happened or what needs to be done respectively.
Fields for results In other fields for results you find the latest relevant results of the element recognition (length, diameter, angle etc.).
15.09.04 v 2.4 VI-27

Automatic Element Recognition
6.5 The Dialogue: Important Functions With the automatic element recognition we provide you with a range of functions for a user-friendly control of the measurement process according to your individual requirements.
A click on this symbol deletes the last measurement point. This function also applies for the last element that has been automatically learnt/stored.
With a click on this symbol you accept and store the recognised element with all measurement points in the part program.
With a click on this symbol you store the recognised element with all points excluding the last one. The last point is used for the next element. With the automatic element recognition activated, this is also executed automatically.
A click on this button and the dialogue disappears. If there are already measurement points in the memory, a safety inquiry appears.
After recognition of the first three elements, you can initiate an automatic alignment using this symbol (for detailed information, refer to Patterns for Alignment ).
Following the surface alignment, a clearance height can be automatically set. This is always the Z-axis. The height can be put manually in the text box next to the symbol. You can also define the clearance height already in the Settings.
The automatic call-up of the tolerance comparison you can either determine in this dialogue or already in the Settings.
The symbols from left to right:
No tolerance comparison
Tolerance comparison directly after recognition of an element
Tolerance comparison of all elements after ending the functionality
VI-28 v 2.4 15.09.04

Automatic Element Recognition
6.6 Settings The special options of the Automatic Element Recognition include
the automatic alignment
the automatic setting of a clearance height and
the automatic call-up of the tolerance comparison.
You can use all three options via the settings. To get to the respective dialogue, use the PartManager via Settings / Defaults for programs / GEOPAK / GEOPAK configuration / Automatic element recognition (see ill. below).
Activate or finish the function in the dialogue top left.
15.09.04 v 2.4 VI-29

Automatic Element Recognition
Capture Range You use the capture range to determine the accuracy range within which points of an element shall be recognised. Points outside the range (red arrow in ill. below), initiate a new process for element recognition (for this, already refer to Automatic Element Recognition ).
Angular Range You use the angular range to determine the accuracy range of the probing direction. The probing direction of each measurement point is very important for determining an element. This is why points for which the probing direction is not within the defined angle (red arrow in ill. outside angle "α") are no longer used for determining the element. (see also already in Automatic Element Recognition ). These points initiate a new process for element recognition.
Use the options for the tolerance comparison to decide for either
• no or • a direct tolerance comparison (after storing an element) or • the tolerance comparison of all elements after finishing the
functionality.
VI-30 v 2.4 15.09.04

Automatic Element Recognition
6.7 Special Cases / Limitations 6.7.1 Special Cases with the Joystick With the joystick you have the possibility to perform two of the functions directly without the necessity to use the dialogue. The advantage of this is that you need not switch between joystick and keyboard.
Joystick Keyboard (dialogue)
CANCEL =
START =
Hint When the display in the dialogue shows 0 and you push the START button, the dialogue is closed and the functionality is finished.
This action corresponds to activating the symbol left.
You can use the GOTO-button to additionally learn interim positions that are also stored. You can activate this function only via the joystick.
6.7.2 Limitations The element point cannot be automatically learnt (if only one measurement point has been measured, this may always belong to another element). This applies in the same way for a line with only two measured points (with a third point, always a circle could be recognised).
The elements ellipse, inclined circle, sphere and step cylinder cannot be recognised with this function.
Cone and cylinder must be measured in circles.
All elements are only calculated acc. to Gauss.
The element names are given by GEOPAK.
During an automatic element recognition, no probe change is possible.
Hint For the SpinArm, certain driver settings are required (AutoDummy=1 und MouseModeAvailable=0)
15.09.04 v 2.4 VI-31

Carbody Measurement: Hole Shapes
7 Carbody Measurement: Hole Shapes 7.1 Hole Shapes: Introduction For the measurement of vehicle bodies – particularly in the automotive industry – a range of further elements is required in MCOSMOS. For these hole shapes, you find the following elements apart from the "Inclined circle":
Square
Rectangle
Slot
Triangle
Trapezoid
Hexagon
Drop
These elements are particularly used for measuring punched holes. First of all, the position and axis direction are important when working with these elements. Length values are not separately tolerated due to the high precision of the punching processes. However, they are also output in the protocols. As for the inclined circle, you first have to measure the surface (see example illustration below of measurement point display) and second, the element. You can also call up an already known surface from the memory.
For hole shapes you also have the option to measure the surface with any number of points. When measuring the actual element, however, you can only measure a defined number of points (for detailed information, refer to the topic Differences to Inclined Circle).
Further topics Symmetry Axis and Width
How to Work
Tolerance Comparison / Position Tolerance
VI-32 v 2.4 15.09.04

Carbody Measurement: Hole Shapes
7.2 Differences: Hole Shape – Inclined Circle To get to the dialogues, either use the symbol bar and click on the relevant symbol or use the menu "Elements / Hole shapes" and then on the Element.
15.09.04 v 2.4 VI-33

Carbody Measurement: Hole Shapes
For measuring the hole shapes (example dialogue, right), the system only uses the minimum required number of points
VI-34 v 2.4 15.09.04

Carbody Measurement: Hole Shapes
The elements and their respective number of measurement points:
Foursquare 4
Rectangle 5
Long hole 5
Triangle 5
Trapezium 6
Hexagon 6
Drop form 6
The elements are automatically finished after measuring these points. You cannot measure more points. Therefore, no form deviations are possible and no different modes of calculation.
There is no button "Autom. element finished".
There are no buttons for the calculation mode.
It is also not possible to enter a "Number of points".
Further topics Hole Shapes: Introduction
Symmetry Axis and Width
How to Work
Tolerance Comparison / Tolerance Position
15.09.04 v 2.4 VI-35

Carbody Measurement: Hole Shapes
7.3 Hole Shape: Symmetry Axis and Width The hole shapes all have at least one symmetry axis and one width perpendicular to the symmetry axis (see example illustrations below; from top left: trapezium, drop form and hexagon).
W 1, 2 or 3 = are each the widths or heights
Symmetry axis: The direction is defined as follows:
Triangle From the ground line to the opposite corner.
Trapezium Perpendicular to the parallel sides in direction from the bigger to the smaller side.
Drop form From the big to the small circle.
Other punched hole shapes
The sequence of the first two measurement points determines the direction of the symmetry axis.
Centre point: The centre point is positioned on the symmetry axis in the two hole ends.
VI-36 v 2.4 15.09.04

Carbody Measurement: Hole Shapes
Further topics Hole Shapes: Introduction
Differences to Inclined Circle
How to Work
Tolerance Comparison / Position Tolerance
7.4 Hole Shape: How to Work When working with hole shapes, you measure the points in a certain sequence and at given positions (see ill. below): The forms are composite forms. We have either to deal with angles, or lines changing into circle arcs. According to the requirements of the task, the angles are not included in the protocol.
When measuring long holes and drop forms, be careful not to interfere with the circle arcs when measuring the line with the measurement points as this would lead to wrong results. The same applies vice versa, i.e. do not get into the lines when measuring circle arcs.
15.09.04 v 2.4 VI-37

Carbody Measurement: Hole Shapes
In the learn mode, the representation in the display shows you where to probe (see example ill. below).
Further topics Hole Shapes: Introduction
Differences to Inclined Circle
Symmetry Axis and Width
Tolerance Comparison / Tolerance Position
7.5 Hole Shapes: Tolerance Comparison / Position Tolerance Comparison Element With any one of the hole shapes you can execute a "Tolerance comparison element" (ill. below; for detailed information also refer to the topic Dialogue Tolerance Comparison Elements).
You can only tolerate the position of the centre and the direction of the axis. To tolerate the measurement of a hole shape, you can use a variable (for detailed information, also refer to the topic GEOPAK Elements: Hole Shapes ).
Position Tolerance
You can execute a position tolerance with any one of the hole shapes (ill. below; for detailed information, also refer to the topic Position).
VI-38 v 2.4 15.09.04

Carbody Measurement: Hole Shapes
To apply the Maximum Material Condition (MMC), select a label in the text box next to the symbol.
Further topics Hole Shapes: Introduction
Differences to Inclined Circle
Symmetry Axis and Width
How to Work
15.09.04 v 2.4 VI-39

Carbody Measurement: Introduction
8 Carbody Measurement: Introduction For a carbody measurement, two identical systems measure the workpiece (ill. below).
Identical in this context means: Two CMMs are working with our software MCOSMOS, each CMM has an own PC, and the PCs are connected via a network.
The fact that the measurement is performed by two CMMs means a considerable saving of time for the body measurement.
The part programs can be learnt from either the Master CMM or from the Slave CMM. Analogous, one of the PCs is declared the Master PC and the second computer the "Slave PC". The programmes can be started either from the Master PC or from a third PC using the RemoteManager.
The measurement results are – like known from MCOSMOS – measured. If you wish to use the measurement results of both CMMs to create a joint protocol, the data can be transferred between the PCs (for detailed information, refer to Retrieve Element Data ). The protocol is output on the Master PC.
The part programs can be synchronised. The Synchronisation is partly automatic. The two machine controllers that are linked with each other via hardware components perform the collision control between the overlapping measurement ranges of the two CMMs.
But also the software contains features to exclude the occurence of a collision. After you have defined your probe system, a virtual cuboid is positioned around the probe to prevent collisions. Only after a probe has left an overlapping section, the second probe can move into this section.
Starting with version 2.4, we have furthermore established an "Element Container". In this container you can gather measurement points (applies
VI-40 v 2.4 15.09.04

Carbody Measurement: Introduction
principally for GEOPAK). As required, these measurement points can – e.g. for the carbody measurement – be transferred between the two PCs.
Further Topics Setup Parameters Monitoring: Data Transfer Start Part Program Synchronisation of Part Program Retrieve Element Data Element Container Joint Co-ordinate System Transfer Co-ordinate System
8.1 Settings Server or Client
To be able to work with a DualArm system, you must first adjust some defaults (PartManager / Settings / Defaults for programs / GEOPAK / DualArm).
After a new installation, the DualArm functionality is not available. To activate this functionality, use the option buttons of the dialogue and click on either "Server" for the Master PC or on "Client" for the Slave PC.
When clicking on "Server", a preset port is displayed. The port number must be the same on both PCs.
When clicking on "Client", you must additionally enter the network address of the other computer (Master PC).
Confirm and the "Transmission Control Protocol (TCP)" is initialised. This TCP enables the data transfer between Master and Slave PC.
Always start the Master PC first and then the Slave PC.
Hint In the dialogue "PartManager Configuration" make sure that you click on the GEOPAK repeat mode in the section "Autostart". In this case, the repeat mode is automatically started after starting the PartManager. No selected workpiece is required for this.
15.09.04 v 2.4 VI-41

Carbody Measurement: Introduction
8.2 Monitoring: Data Transfer After completion of the "Settings" GEOPAK offers the possibility to check the TCP with its functions (e.g. "Send"). In the learn mode, this function is always available, in the repeat mode only when the part program has not yet been started.
Start GEOPAK on the Master PC and click in the menu bar on Settings / DualArm Socket Monitor. A dialogue of the same name appears.
Then start the Slave PC,
start GEOPAK
and click in the menu bar on Settings / DualArm Socket Monitor.
If in the Socket Monitor of the Slave PC the button "Send" is activated like on the Master PC, you have performed the settings correctly.
Now you can carry out a test by sending measurement results from one PC to the other. The function "Element Container" is operative also without TCP.
8.3 Start Part Program Start the part program for the carbody measurement via the menu bar/Program and click on the function. Use this function on your Master PC to start a part program on the Slave PC. You can also use the function to check if the Transmission Control Protocol (TCP) is active or not (for the topic "TCP", also refer to the topic "Carbody Measurement: Introduction"). The part program on the Slave PC is then started without a further dialogue. The "Joint Co-ordinate System" is automatically loaded on both PCs.
What you need to know A part can have several part programs, i.e. separate for the two PCs. If there is only one part program, the part name is also the name of the part program.
To the end of a part program, a message with the content "Synchronisation" is sent to the other PC. If, for example, a part program on a Slave PC is finished, a confirmation of the end of the synchronisation is sent to the Master PC and vice versa.
In the text box "Timeout" which you can activate by clicking on this symbol, you can enter a timeout limit for the part program until synchronisation in seconds.
8.4 Synchronisation of Part Program The part programs on both PCs (Master and Slave PC) must be synchronised. This is achieved using the Transmission Control Protocol (TCP). To get to the function "Synchronisation of part program", go to the GEOPAK learn mode and use the menu bar / Program.
VI-42 v 2.4 15.09.04

Carbody Measurement: Introduction
8.5 Synchronisation is nessecary The synchronisation is mandatory. If, for example, in a certain section both CMMs measure only from different sides, useful results are only possible when using the synchronisation.
A synchronisation is also possible during an active part program. In this case, both PCs use the same synchronisation command in the active part program. To recognise the exact synchronisation point, a label must be set in the part program. In the dialogue "Synchronisation of part program" you enter a meaningful text (e.g. "Position XYZ reached"). This label must be used by the part program on both PCs.
8.6 Both Part Programs should be Finished The situation may occur that the part program on the Slave PC finishes earlier than on the Master PC. Therefore, an automatic synchronisation takes place at the end of each part program. This simply means that the part programs on the two PCs are not finished until also the final synchronisation is finished on both PCs.
Hints While a PC is waiting for a synchronisation, a window appears "Waiting for synchronisation". Additionally, the name of the label is displayed.
With a click on the button "Cancel" you can stop the synchronisation. A corresponding window appears for confirmation. A cancellation could, for example, be required when another part program is executed or the communication has been interrupted.
If you receive no feedback during the timeout limit, you receive the message "Command cancelled after timeout ".
15.09.04 v 2.4 VI-43

Carbody Measurement: Introduction
8.7 Retrieve Element Data The function "Retrieve element data" is used for transferring data between Master and Slave PC using the Transmission Control Protocol (TCP). The data refer to the "Joint Co-ordinate System". If this has not been defined, the workpiece co-ordinate system is used.
The Master PC retrieves the data, the Slave PC sends the data, if available. The Master PC waits until the data are available. In case of an error, the PC that has retrieved the data receives a message. Also the Slave PC can retrieve data.
Hints Use the text box for "Number of elements" to retrieve measurement results of more than one element. You would just need to enter a number bigger than 1.
The dialogue furthermore provides for defining a timeout in seconds. If you receive no feedback from the second PC during this timeout period, an error message appears.
VI-44 v 2.4 15.09.04

Carbody Measurement: Introduction
8.8 Element Container The element "Container" is only used to gather measurement points. It depends on the respective part program, for which calculation of an element the measurement points are needed at a later time. Apart from the carbody measurement, the element "Container" can also be used in the GEOPAK basic geometry.
Regarding the carbody measurement, find an example in the table below: The measurement points of an element have been determined on two CMMs, but have been gathered and calculated on one PC.
Master PC Slave PC
Element container 1 Element container 5
Meas. 5 points Meas. 5 points
Element finished Element finished
Request element (Container 5 as 2) No action
Send element (Container 5)
Connection element cylinder (container 1+2)
8.9 Joint Co-ordinate System The current co-ordinate system can be stored as a joint co-ordinate system not dependent on how the co-ordinate system has been defined. You must simply ensure that the alignment is the same on both CMMs.
Example Three spheres have been measured. The centres of the three spheres are used for this alignment as follows:
A plane through the three centres is used for the spatial alignment.
A line from the centre of the first sphere to the centre of the second sphere is used for the alignment of the X-axis.
The origin of the first sphere is the centre of the joint co-ordinate system.
Hints It is, however, a prerequisite that the spheres have been measured on both CMMs in the same way and at the same positions. Otherwise, the co-ordinate system would not be a "joint" co-ordinate system.
The co-ordinate system is stored in the GEOPAK learn mode, i.e. in the corresponding menu to which you get via the menu bar / co-ordinate system and with a click on the function "Send actual co-ord. system".
15.09.04 v 2.4 VI-45

Carbody Measurement: Introduction
8.10 Transfer Co-ordinate System You can transfer a co-ordinate system from one CMM to the other. A new alignment on the second CMM is not required.
For transferring the current co-ordinate system, there are two functions available together with the corresponding dialogues:
Send ... or
Retrieve co-ordinate system.
If there is no "Joint Co-ordinate System", you get an error message. To get to the dialogues, go in the GEOPAK learn mode to the menu bar / Program and click on the relevant function. The retrieved co-ordinate system is stored as the current co-ordinate system. The part program is not continued until this has been completed.
VI-46 v 2.4 15.09.04

Graphics of Elements
VII Geometric Elements: Graphical Presentation Contents
1 Graphics of Elements....................................................... 2
1.1 Graphics of Elements - Task ...................................................... 2 1.2 The "Graphics" Pull-Down Menu................................................ 2 1.3 Toolbar in the "Graphics of Elements" Window ....................... 2 1.4 Element Graphics Options.......................................................... 3 1.5 Further Components of the Graphics of Elements Window .... 3 1.6 Graphic Limits.............................................................................. 3 1.7 Changing the representation of the graphics of elements ...... 4 1.8 Select Element ............................................................................. 4 1.9 Element Information .................................................................... 5 1.10 Rotate ........................................................................................... 6 1.11 Contour View................................................................................ 6 1.12 Display Sub Elements of a Contour ........................................... 7 1.13 Circles as Partial Circle Display ................................................. 8 1.14 Contour Point Selection by Keyboard ..................................... 10 1.15 Multi-Colour Contour Display................................................... 11 1.16 Contour Display as Lines and / or Points................................ 12 1.17 Learnable Graphic Settings ...................................................... 12 1.18 Display of Graphic Windows .................................................... 13 1.19 Options of the "Graphics of Elements" ................................... 14 1.20 Recalculate Straightness, Flatness and Circularity................ 15
1.20.1 Toolbar in the "Straightness" Window............................................... 15 1.20.2 Delete Measurement Points and Recalculate ................................... 16
1.21 Print Graphics during Learn and Repeat Mode....................... 17 1.22 Store Section of Graphic Display in Learn Mode.................... 18 1.23 Learn Graphics of Elements Printing with "Autoscale" ......... 18 1.24 Learn Graphics of Elements Printing with a "Scale Factor".. 19 1.25 Define Scaling............................................................................ 19 1.26 Print Graphic in Repeat Mode................................................... 20 1.27 Define Label Layout................................................................... 20 1.28 Calculate New Elements out of Contour Points...................... 21 1.29 Compare Points ......................................................................... 22 1.30 Parallelism Graphics ................................................................. 24
14.09.04 v 2.4 VII-1

Graphics of Elements
1 Graphics of Elements 1.1 Graphics of Elements - Task The graphics of elements is used as a graphic support for your measurement tasks with GEOPAK. The window is available in the single and learn mode as well as in the repeat mode.
The components of the graphics of elements window are:
a toolbar
the range of the graphic representation in the window
the "Graphics" pull-down menu with its functions in the menu bar
1.2 The "Graphics" Pull-Down Menu You find the "Graphics" pull-down menu in the menu bar. In this menu, you can only activate functions if the graphics of elements window is also activated. In this case, all the other menus are deactivated.
1.3 Toolbar in the "Graphics of Elements" Window In the toolbar, you find the following buttons for functions you frequently use in the "Graphics" pull-down menu.
Zoom: Zoom graphics clip
Reset zoom
Moving: Move graphics clip
Graphical element or point selection(this function is only in the single or learn mode available)
Element information Display element information
Rotate: Rotate the graphic
Display Option
Top view (XY-plane, line of sight towards the Z-axis)
Side face (YZ-plane, line of sight towards the X-axis)
Front view (ZX-plane, line of sight towards the Y-axis)
3D- view
VII-2 v 2.4 14.09.04

Graphics of Elements
1.4 Element Graphics Options
With this function, you can change the representation of the graphics of elements through further options. (See "Element Graphics Options Window")
Learnable graphic commands: If you click this symbol, you can store in another window of the part program commands such as "Current View Settings", "Print Window" and "Close Window". However, the commands in the learn mode must not be imperatively carried out. This function is only in the single or learn mode available.
Print graphics: If you click this symbol, a printout of the current window contents with the usual log data is created.
Hint The "Reset Zoom" function is only possible if you’ve activated the auto scale (see " Element Graphic Options").
1.5 Further Components of the Graphics of Elements Window
Further components of the graphics of elements window are:
Further graphics status line in the lower window margin
Co-ordinate system view (in the window below, left side)
Origin of co-ordinate system
Auto grid with measures
You can activate/deactivate the display of these components in the "Element Graphic Options" window.
1.6 Graphic Limits
If you want to input the "Pan" and/or "Zoom" command numerically, use this function (menu bar "Graphics / Graphic Limits"). Contrariwise, you can read in this window, which changes you have made via the "Pan" and/or "Zoom" functions.
14.09.04 v 2.4 VII-3

Graphics of Elements
1.7 Changing the representation of the graphics of elements
Zoom
If you click on this symbol, you can select and zoom a clip of the graphics of elements through simple click.
Press the left mouse button.
Dragging the mouse you determine the increased area (red rectangle)
Reset Zoom
to reduce the element graphic to the original size back...
you click on the symbol or
with a double click into the graphics of elements.
Moving
When pressing the left mouse button, you can move the displayed graphics clip in the window.
1.8 Select Element
If you want to select geometric elements, the graphics of elements is in the selection mode.
That means, the mouse pointer changes to a cross-hair and you can click on the elements.
The function "select element" is only active, if you are in a function, which expected an element as input (e.g. recalculate from memory, intersection element, connection element, etc.).
Procedure In the graphics, click on one element or more.
The selected elements are displayed in red in the graphics.
As soon as you’ve selected and confirmed, the "Select Element" mode of the graphics of elements is automatically reset.
If you select two elements, you must note the following:
With the right mouse button, you determine whether the next element to select should be the first or the second element.
The current option number (1 or 2) is indicated in the mouse pointer.
VII-4 v 2.4 14.09.04

Graphics of Elements
1.9 Element Information
With this function, you get an information display for the elements.
Proceed as follows: Click on the "Element-Information" icon to change to the
"Element-Information" mode.
The mouse pointer changes to a cross-hair indicating the letter "i".
Click on the element you want to get an info about it.
The information-field contains information of the element. In the result field, you get further information to the corresponding element.
If you click on an info-field with the right mouse button, you can add further information in the information-field. Furthermore, you can delete the info-field or mask out the element.
You can have the hidden elements indicated again. To do so, click in the "Graphics" pull-down menu on "Display Hidden Elements".
Hint You can move the info-fields. Click on the info-field, keep pressed the left mouse button and move the info-field. The information-fields are only indicated for a moment. For example, the information-fields get lost after rotation of the co-ordinate system.
Hide elements
Click with the right mouse button into the info field of the element you wish to mask out.
The context menu is shown.
Click on the "Hide Element" function".
Show elements again Masked out elements will be shown again, if you click on "Graphics / Show Hidden Elements".
14.09.04 v 2.4 VII-5

Graphics of Elements
1.10 Rotate
In the 3D view, you can change to the "Rotate" mode.
Proceed as follows:
Click on the "3D-View" in the toolbar in the "Graphics of Elements" window.
Click on the "Rotate" icon. The mouse pointer is displayed as an arrow in this mode. Click on one of the three co-ordinate axes of the represented co-
ordinate systems that are displayed and move the mouse to the right or to the left.
The graphics is rotated in positive or negative direction around the selected axis.
Hint It is favourable to rotate in the normal (no zoom) graphics and with the "Auto Scale" setting in the "Elements Graphics Options" window because after the rotation, the graphics is automatically resized in the window.
1.11 Contour View This function allows different contour-related views to be adjusted in the graphics of elements. For instance, you can have displayed a single contour including all elements created within this contour (so-called sub elements).
This is how you get to the "Contour View" window:
Click on the "Contour View" symbol in the graphics of elements icon bar.
Or use the menu bar:
Click into the graphics of elements, in order to activate the "Graphic" function in the menu bar.
Click on "Graphic / View Contour" in the menu bar. This window offers you the following possibilities:
Contour Selection Display Subelements of a Contour Partial Circle Display ON and OFF Point Selection by Keyboard Multi-Colour Contour Display Display Contour as Lines and/or Points.
The settings you make in the " View Contour" window are for all or single contour. These settings enable you to suppress or show parts of contours in the graphics of elements.
VII-6 v 2.4 14.09.04

Graphics of Elements
1.12 Display Sub Elements of a Contour To change the display of contours, follow these fundamental steps:
First find out whether you want to view a specific contour or whether all contours are to be displayed.
Then adjust whether and which further geometrical elements are to be displayed.
Display contour and its sub elements Of a contour you wish to view, in the graphics of elements, only the contour itself and its sub elements, in other words, the elements which were created by means of this contour (fitted-in circle, etc.).
Activate the check box "Only Active Contour".
Choose a contour from the list box.
Above the contour selected, there appear the number of points the contour contains, the plane in which plane the contour was created and whether it is an open or closed contour.
Activate the check box "Only Contour Subelements" within the area "Geometric Elements".
Selecting "All" causes the contour and all geometric elements (circle, line, etc.) to be displayed, irrespective of whether or not these elements have been created by means of the selected contour. If "None" is selected, only the active contour will be displayed.
14.09.04 v 2.4 VII-7

Graphics of Elements
1.13 Circles as Partial Circle Display Larger part programs containing numerous elements may cause the graphics of elements to become unclear and complex. Moreover, sometimes you may require only partial information on elements (e.g. only on that part of the circle which runs through a contour) for the graphic view.
Hint To generate an inlaid circle, use the button "Fit in Element" in the "Circle Element" dialogue.
Using the "Partial Circle Display" function it is possible to display only that part of a circle which runs on the contour. The part beyond is masked out. This is based on the premise that the circle is a sub element of a contour.
VII-8 v 2.4 14.09.04

Graphics of Elements
Mask-out circle elements of contours Activate the "Partial Circle Display" function, in order to mask-out those parts of circles which do not run on the contour. This is generally based on the condition that the circle in question is a sub element of a contour.
You get the following graphics of elements:
14.09.04 v 2.4 VII-9

Graphics of Elements
1.14 Contour Point Selection by Keyboard A contour consisting of many points located close to each other makes it difficult for the mouse to catch the desired contour point. When selecting a point with the mouse, you always get the point located closed to the mouse pointer, when you have pressed the left mouse button.
Click on the "Contour View" symbol in the graphics of elements icon bar.
Or use the menu bar:
Click into the graphics of elements, in order to activate the "Graphic" function in the menu bar
Click on "Graphic / View Contour" in the menu bar.
Activate the function "Point Selection by Keyboard".
…To select contour points using the keyboard, it is necessary that the "Point Selection Contour" window is open.
To open the "Point Selection Contour" dialogue, you use, for instance, the "Element Circle" dialogue with "Fit in Element" activated. You confirm and the dialogue "Fit in element Circle" will be opened. After your inputs in the dialogue "Fit in element Circle" you confirm again.
Click with the mouse into the graphics of elements to make sure that the following keyboard inputs do not apply to the open dialogue, but to the graphics of elements.
This action has to be repeated, whenever you click with the mouse into the dialogue, for instance, to undo the last point area selection, as all subsequent keyboard inputs would again be related to the dialogue. At the beginning, the mouse pointer is always positioned onto the first contour point.
Use the arrow keys to move the mouse pointer to the desired contour point.
Operate the Enter key to define the selected contour point as the starting point of an area selection.
Use the arrow keys to move the mouse pointer to the contour point which you wish to define as the starting point of the point area to be selected.
Operate the Enter key to define the selected contour point as the starting point.
VII-10 v 2.4 14.09.04

Graphics of Elements
Key Mouse pointer movement
RH arrow key, Arrow key above
Moves mouse pointer to the next contour point
LH arrow key, Arrow key below
Moves mouse pointer to the previous contour point
Ctrl + arrow key, Page up, Page down
For fast mouse pointer movement on the contour
Pos 1 Moves mouse pointer to the first contour point
End Moves mouse pointer to the last contour point
Enter (first time) Start of selection Enter (second time) End of selection
In the "Point Selection by Keyboard" mode, you can use the mouse for an additional functionality, e.g. for zooming into the graphics. That would provide you a more detailed view while selecting points.
1.15 Multi-Colour Contour Display Within the graphics of elements, contours are always shown in white colour. If, for instance, a measured contour is required to be compared to its nominal contour, it might be difficult to distinguish these two contours in the graphics of elements. The "Multicolour Mode" enables several contours to be shown in different colours.
Click on the " View Contour" symbol in the graphics of elements icon bar.
Or use the menu bar:
Click into the graphics of elements to activate the "Graphic" function in the menu bar.
Click on "Graphic / Contour in the menu bar. Activate the "Multicolour Mode" function.
In the multi-colour mode, the contours are shown in five successive colours (white, green, blue, cyan and magenta). If more than five contours are displayed, the series of colours repeats cyclically in the specified order, beginning with white.
Deactivate the multi-colour mode for contours Deselect the "Multicolour Mode" in the "View Contour" using the check box. Then all contours will appear in the default colour white.
14.09.04 v 2.4 VII-11

Graphics of Elements
1.16 Contour Display as Lines and / or Points By default, contours are shown in the graphics of elements as a polygon. This is an array of lines connecting the individual point co-ordinates of the contour. The contour points co-ordinates themselves are not shown in this type of display.
Show Contour in Points Display Perform the following steps if only the points of a contour are to be shown in the graphics of elements:
Click on the "View Contour" symbol in the graphics of elements icon bar.
Or use the menu bar:
Click into the graphics of elements to activate the "Graphic" function in the menu bar.
Click on "Graphic / Contour View" in the menu bar. Activate the "View Points" function in the "Contour Display Mode"
area. This type of view is advisable in conjunction with the function "Point Selection by Keyboard".
The points - lines view is automatically activated during the selection of points, irrespective of the setting in the "View Contour" dialogue.
1.17 Learnable Graphic Settings
You can open the window "Learnable graphic settings" only in the GEOPAK part program editor, as the graphic settings are automatically stored in the learn mode.
Click on "Output" in the menu bar.
In the drop-down menu "Output", click on "Learnable graphic settings".
In the dialogue "Learnable graphic settings" you define the structure of the graphic evaluation.
Define graphic type Open the list box "Define type of graphic" and select a graphic type.
Select an element from the list box "Reference element".
The list box "Reference elements" only lists elements that are used in the part program and that can be used with the selected graphic type. In case that multiple reference elements are possible, always enter either the current or the nominal element.
Layout of the info windows You can use the function "Define label layout" to load the number, position and contents of the info windows of the graphic from a meta file. With this function,
VII-12 v 2.4 14.09.04

Graphics of Elements
the graphic is printed out in the repeat mode exactly according to the layout you have defined in the GEOPAK learn mode.
In the area "Define label layout", activate the function "Load layout #".
Enter the number of the layout to be loaded in the repeat mode into the list box.
To load" Define label layout" is only possible when working with the element graphic and the airfoil analysis graphic (MAFIS). If you select another graphic type (e.g. circular runout), this function is deactivated.
For more information about this topic, refer to "Define Layout of Info Windows" and "Display of Graphic Windows".
1.18 Display of Graphic Windows Element graphic options In the "Element graphic options" you determine which elements you wish to have displayed in the element graphic. For details as to the operation of the buttons, refer to the topic "Options of the "Graphics of Elements".
Display of the graphic windows
When deactivating the button "Auto scale", you can perform the settings for the co-ordinates of the visual range. For this, enter the desired values into the input fields of the areas "Minimum" and "Maximum".
Hint The graphic origin is positioned in the left bottom corner of the graphic window.
Setting of views You can use the view buttons for setting the views, i.e. top view, side view, front view or 3D view.
Co-ordinate mode With the buttons "Co-ordinate mode" you determine if the co-ordinates of the visual range are entered as cartesian co-ordinates, as cylinder co-ordinates or as spherical co-ordinates.
14.09.04 v 2.4 VII-13

Graphics of Elements
1.19 Options of the "Graphics of Elements"
You activate the "Element Graphic Options" window by clicking on the icon. Or click on "Options" in the "Graphic" pull-down menu.
In the "Element Graphic Options" window, you can change the display of the graphics of elements through further functions.
The window is divided in two parts:
Elements In the left part of the window, you find the symbols of the different element types. Here you determine, which elements must be displayed.
Further Functions You can activate or deactivate the functions through mouse click on the corresponding icon.
Auto scale: With the auto scale it is possible to view every inch of the graphics and in full size in the "Graphics of Elements" window. We suggest to always work with the activated auto scale.
Grid: With this function, you activate the automatic grid display with scale labelling.
Origin: With this function, you enable to display the origin.
Probe position: With this function, you enable the display of the position of the probe. The probe is only displayed in the graphics if it is located in the actual windowing of the "graphics of elements". The probe is represented as a red sphere in non varying size and is always well displayed.
Probe radius: With this function, you enable the display of the position of the probe radius. A thin red circumference around the probe shows the actual diameter of the probe. If the actual probe diameter in the graphic display is smaller than the symbolic representation of the probe, the actual probe radius is indicated as a thin black line within the symbolic representation of the probe.
Option Settings: With this function, you can opt for a graphic selection of elements. So you can click on elements in the "Graphics of Elements" window and measure for example the angle or the distance between elements. If a desired measurement task can’t be utilised appropriately, these elements are not displayed at graphic selection.
Symmetry axis: With this function, you display the symmetry axes for the elements such as circle, cylinder, cone and ellipse.
Co-ordinate system: With this function, you enable the display of the co-ordinate system.
Flags: With this function, you get an information display for the elements.
Info. for the actual element. With this function, you enable the display of the status line (operator indicator line).
VII-14 v 2.4 14.09.04

Graphics of Elements
1.20 Recalculate Straightness, Flatness and Circularity
Hints on beforehand: While this chapter exclusively treats the description of the dialogues and graphics of elements, we give detailed information to these subjects under straightness, flatness and circularity.
Task: You can mark and remove meas. points in the graphics for the straightness, flatness and circularity with the mouse pointer. After the corrections, you can recalculate the form deviation.
How to display the graphics window (e.g. straightness) Select the "Straightness" in the "Tolerance" pull-down menu under
"Form Tolerance" or
click on the "Straightness" tool for evaluation.
In the "Straightness" window, you click on "Show Straightness Diagram".
Elements of the Graphics Window:
Toolbar
Graphical display in the left part
Numerical evaluation in the right part
1.20.1 Toolbar in the "Straightness" Window
Zoom graphics clip
Reset zoom
Move graphics clip
Graphical element or point selection
Display element information
Recalculate without selected points
Learnable graphic commands: If you click on this icon, you can store, in another window, commands in the part program such as
"Actual Graphics Settings",
"Print Window" and
"Close Window".
Print graphics: If you click on this icon, a printout of the current window contents with the usual log data is created.
14.09.04 v 2.4 VII-15

Graphics of Elements
1.20.2 Delete Measurement Points and Recalculate Proceed as follows (two methods)
Graphical:
• Click on the "Recalculate without Selected Points" button.
• The mouse pointer changes to a cross-hair pointer. • In the graphics, you select by mouse click the points that are
not supposed to be included in the recalculation. After that, you confirm in the window "Recalculate without Selected Points".
Numerical:
• You can realize this selection also without graphic support in the "Recalculate without Selected Points" window. For that, click on the "Select Min. Point " and/or "Select Max. Point " buttons and confirm.
Hint Straightness, flatness and circularity over all meas. points are always accepted, namely
• in the field for results, • in the standard printout, • if necessary in the file output and • in the statistical analysis
Note that the function "Delete Measurement Points and Recalculate" is not learnable
VII-16 v 2.4 14.09.04

Graphics of Elements
1.21 Print Graphics during Learn and Repeat Mode This function enables you to print the displayed graphic windows directly from the learn and repeat modes. Furthermore you can define and store the layout of the labels.
Click on the "Print Graphics" symbol in the icon bar of the graphic window you want to print.
Or use the menu bar:
Click on the graphic window you want to print.
The drop-down menu "Graphic" is displayed as active.
Click on "Graphic / Print" in the menu bar.
Print graphic in learn mode
Activate the function "Print now".
Confirm your input.
The graphic is immediately printed.
Print graphic in repeat mode
Activate the function "Learn print command".
Confirm your input.
Now, the settings in the area "Define label layout for print command" are important.
Adapt graphic to the set paper format In the area "Magnification" you set the required scaling. For detailed information, refer to the topic "Autoscaling or Manual Scaling".
Label layout in the learn mode You can use the function "Define label layout for print command" to store the number, position and contents of the labels of the graphic in a meta file. Therefore, the graphic is printed in the repeat mode exactly like it has been learned in the learn mode. For detailed information, refer to the topic "Define label layout".
Close window Activate this function if you want to close the graphic window after completion of the part program command.
14.09.04 v 2.4 VII-17

Graphics of Elements
1.22 Store Section of Graphic Display in Learn Mode The graphics of elements shows, for instance, all elements. For your measurement protocol it may, however, be advisable to record only one element or a section clipped out from the graphics.
Use a zoom tool to enlarge the desired area of the graphics.
If the set blow-up of the graphic window is to remain
unchanged, you will have to turn the auto scale function in the "Elements Graphics Options" to OFF. An element added with auto scale switched ON causes the zoom to be reset.
Add the element information to your element.
Choose a view, e.g. "3D View".
Turn the graphics to the desired position.
Open the window "Learnable Graphic Commands".
Activate the option "Current View Settings" in the "Learnable Graphic Commands" window.
In cases where you also want the graphics to be printed out:
Activate the "Print Window" option.
Confirm your settings in the "Learnable Graphic Commands" window.
Activating the option "Current View Settings" causes the settings of the "Elements Graphic Options" to be stored as well.
1.23 Learn Graphics of Elements Printing with "Autoscale"
The auto scale function causes the current printout of the graphics for elements to be fitted into the paper size set by default.
Activate the "Print Window" option".
The "Auto scale" mode is shown as activated in the dialogue window.
Confirm your settings.
The command is then entered into your part program.
VII-18 v 2.4 14.09.04

Graphics of Elements
1.24 Learn Graphics of Elements Printing with a "Scale Factor"
This function allows surface and form comparisons between elements of different printouts to be made using the same scaling.
Activate the "Print Window" option.
The "auto scale" mode is shown as activated in the dialogue window.
Click on the symbol "Adjust Scaling".
The "Print Graphic" dialogue is opened as well.
Activate the "Define Scaling Factor" option in the "Print Graphic" dialogue.
Enter the scale factor into the input box.
Confirm your settings in the "Print Graphic" dialogue.
Your scale factor is shown in the "Learnable Graphic Commands" window.
Confirm your settings in the "Learnable Graphic Commands" dialogue.
The command is entered in your part program.
1.25 Define Scaling In the windows "Print graphic" and "Learnable graphic commands" you can:
Switch to the mode "Auto scale".
Adjust manual scaling.
Switch on auto scale When working with the auto scale function, the complete graphic is adjusted to the paper format settings, reduced or zoomed-in. The complete graphic is printed on the set paper format.
Activate the option "Auto scale".
All possibilities to a manual input of the scaling factor are inactive.
Enter scaling factor
Activate the option "Define scaling".
Enter the scaling factor into the input field.
To make sure that your graphic fits into the paper format you have set, you should enter a scaling factor that is smaller than the "recommended" maximum enlargement shown in the learn mode.
14.09.04 v 2.4 VII-19

Graphics of Elements
1.26 Print Graphic in Repeat Mode You can only use the print command of graphics in the repeat mode when you have deactivated the function "Close window". With this setting, the graphic windows in the completed part program remain open.
After completion of the part program, you can either
click on the printer symbol of the graphic window,
or click into the graphic window you wish to print.
The drop-down menu "Graphic" is displayed as active.
Click in the menu bar on "Graphic / Print"
In this dialogue you can enlarge or reduce the graphic for your print-out in the flexible protocol. For detailed information about this topic, refer to the topic "Define Scaling".
1.27 Define Label Layout You have the possibility to store the info windows of the graphic together with their number, position and contents. The settings of the learn mode are then at your disposal in the repeat mode.
Activate in the section "Print mode" the function "Learn print command".
Activate the function "Use current layout as #".
Confirm the proposed memory number.
Hint A memory number 1 indicates that no layout has been defined so far, as the memory numbers are incremented by 1 each.
Overwrite memory numbers Open the list box "Use current layout as #" and select one of the already existing memory numbers.
Loading of an label layout
Activate the function "Load layout #".
Enter into the input field the memory number of the layout you wish to load.
VII-20 v 2.4 14.09.04

Graphics of Elements
Not defining the label layout
Activate the function "Disregard labels".
The settings of the info windows of the learn mode are not taken on by the repeat mode.
Do not use memory number 0. The biggest memory number is 65535. The lable layout can only be defined for the element graphic and the airfoil analysis graphic.
Close graphic window Activate the option "Close window" if you want to have the graphic window closed after the part program command has been executed in the repeat mode.
1.28 Calculate New Elements out of Contour Points Via the "Recalculate Element from Memory" function it is possible to calculate new elements out of contour points. For that the "Select Points from Contour" function of the graphics of elements is available. By this, single points are not marked and selected, but rather blocks of points.
The "Select Points from Contour" Window is displayed:
Select an element.
Click on the "Memory Recall" icon and confirm.
In the "Recalculate / Copy From Memory" window, you select the contour out of whose contour points the element is supposed to be recalculated. In addition, you select the view and confirm.
The "Select Points from Contour" window appears.
In the "Select Points From Contour" mode, single points are not marked and selected. Now, you can mark and select blocks of points. A block always has a start and an end point. Start points and end points are labelled through little reticles. All points between the start and end mark are selected and represented in red in the graphics. If you move a label, the points are no longer displayed in red. The labels of the block are displayed in blue. In the status line of the graphics of elements, the actual data of the point are indicated under the moved label.
14.09.04 v 2.4 VII-21

Graphics of Elements
Proceed as follows Set a block
You set the labels by clicking on a point.
This point is the start label.
The end label is set where you release the mouse button again.
It is also possible to re-utilize and move a label that has already been set with the mouse.
Connect two blocks If you move a label (tag) of a block to the label of a second block, both blocks are connected.
Delete a block You click on a label with the right mouse button. The block is deleted.
Further Buttons in the "Select Points from Contour" Window
With the "Select All" button, the whole contour is marked.
If you want to delete all blocks, click on this button.
If you this click on this button, you only delete one block. You always delete at first the block that is next to the start point of the contour.
If you click on this button, an empty block is inserted. You can manually input for example co-ordinates if you already know the exact values. Or you can input e.g. variables. This function especially concerns a part program editor.
1.29 Compare Points Task: With the comparison of points, you get an overview of the position deviation of several elements. The elements can either be points, circles, ellipses or spheres.
Program run
The elements are designated as actual elements and must be completely filed in a sequence in the memory.
Input the nominal positions as theoretical nominal elements. These must also be completely filed in a sequence in the memory. Nominal elements must always be of the same type as the actual elements.
Click on "Compare Points" in the "Output" pull-down menu.
In the "Compare Points" dialogue window, you define the elements to be compared and the number of the elements. In this dialogue, you determine whether the actual points and the tolerance diameter must be displayed in the graphics. Furthermore, you select here a
• scale factor or the • auto scale.
VII-22 v 2.4 14.09.04

Graphics of Elements
The "Compare Points" graphics window appears.
• The graphics shows the largest and smallest distance of the actual element(s) to the nominal element(s).
• Furthermore, the text that you’ve input before in the dialogue window is displayed.
Elements of the "Compare Points" Graphics Window
Toolbar
Graphical display in the left part
Numerical evaluation in the right part
Toolbar in the "Compare Points" Graphics Window
Zoom graphics clip
Reset zoom
Move graphics clip
Display element information
Rotate the graphic
Display Option
Top view (XY-plane, line of sight towards the Z-axis)
Side face (YZ-plane, line of sight towards the X-axis)
Front view (ZX-plane, line of sight towards the Y-axis)
3D view
Learnable graphic commands: If you click on this icon, you can store in another window commands in the part program such as
• "Actual Graphics Settings", • "Print Window" and • "Close Window".
Print graphics: If you click this symbol, a printout of the current window contents with the usual log data is created.
14.09.04 v 2.4 VII-23

Graphics of Elements
1.30 Parallelism Graphics Task: For the parallelism of a projected line to a projected reference line, you can also have a graphics display.
How to get displayed a parallelism graphics
Select the "Parallelism" in the "Tolerance" pull-down menu under "Orientation" or
Click on the "Parallelism" tool for evaluation.
The "Parallelism" dialogue window appears. Here, you determine the actual line and the reference line. Furthermore, you enter the reference length, the projection plane and the width of tolerance.
A graphical display is not possible with a cylindrical width of tolerance.
You can realize further settings for the parallelism if you click the "Further Tolerance Options" button.
In the "Parallelism" window, you click on "Show Parallelism Diagram".
Now, you can click the "Parallelism Diagram Settings" button to realize further settings for the parallelism graphics. You can change the scale in the "Parallelism Diagram Settings" window. You determine whether the points in the graphic representation must be connected.
Confirm your settings in the "Parallelism" window to indicate the Parallelism Graphics.
Elements of the "Parallelism" Graphics Window
Toolbar
Graphical display in the left part
Numerical evaluation in the right part
Toolbar
Zoom graphics clip
Reset zoom
Move graphics clip
Display element information
Learnable graphic commands: If you click on this icon, you can store in another window commands in the part program such as
• "Actual Graphics Settings", • "Print Window" and • "Close Window".
VII-24 v 2.4 14.09.04

Graphics of Elements
Print graphics: If you click this symbol, a printout of the current window contents with the usual log data is created.
Hint
The parallelism is calculated out of the difference of the largest distance minus the smallest distance to the reference line.
If the reference length has been selected shorter than the measuring range of the line, only meas. points within the reference length are calculated.
Exception: If the reference length = 0.0 had been entered, the gauge length of the line is inserted.
14.09.04 v 2.4 VII-25


Tolerances
VIII Tolerances Contents 1 Tolerances ........................................................................ 3
1.1 Tolerances: General .................................................................... 3 1.2 Maximum Material Condition (MMC) .......................................... 4
1.2.1 Definition/Applicability ......................................................................... 4 1.2.2 The MMC in GEOPAK ........................................................................ 4
1.3 Tolerances in Detail..................................................................... 5 1.4 Straightness................................................................................. 7
1.4.1 Definition ............................................................................................. 7 1.4.2 Graphical Representation ................................................................... 7
1.5 Flatness ........................................................................................ 8 1.6 Roundness ................................................................................... 9
1.6.1 Definition ............................................................................................. 9 1.6.2 Graphical Representation ................................................................... 9
1.7 Scaling of Tolerance Graphics ................................................. 10 1.7.1 Roundness Scaling ........................................................................... 10 1.7.2 Straightness/Flatness Scaling........................................................... 11
1.8 Position ...................................................................................... 12 1.8.1 Definition ........................................................................................... 12 1.8.2 Examples .......................................................................................... 13 1.8.3 Position of Plane ............................................................................... 15 1.8.4 Position of Axis.................................................................................. 16 1.8.5 Calculate Absolute Position Tolerance ............................................. 19
1.9 Concentricity.............................................................................. 20 1.10 Coaxiality.................................................................................... 21 1.11 Parallelism.................................................................................. 22
1.11.1 Parallelism: Example......................................................................... 23 1.11.2 Parallelism of an Axis to a Reference Axis ....................................... 24 1.11.3 Parallelism of an Axis to a Reference Plane ..................................... 24 1.11.4 Parallelism of a Plane to a Reference Axis ....................................... 24 1.11.5 Parallelism of a Plane to a Reference Plane..................................... 24
1.12 Perpendicularity......................................................................... 25 1.12.1 Perpendicularity of an Axis to a Reference Axis ............................... 25 1.12.2 Perpendicularity of an Axis to a Reference Plane............................. 26 1.12.3 Perpendicularity of an Axis to a Reference axis................................ 26 1.12.4 Perpendicularity of a Plane to a Reference Plane ............................ 26
1.13 Angularity................................................................................... 27 1.14 Symmetry Tolerances ............................................................... 28
1.14.1 Symmetry Tolerance Point Element.................................................. 28 1.14.2 Symmetry Tolerance Axis Element ................................................... 29 1.14.3 Symmetry Tolerance Plane Element................................................. 30
1.15 Runout Tolerance ...................................................................... 32 1.15.1 Axial Runout...................................................................................... 33 1.15.2 Circular Runout ................................................................................. 35
1.16 Tolerance Variable..................................................................... 35
14.09.04 v 2.4 VIII-1

Tolerances
1.17 Tolerance Comparison "Last Element"................................... 36 1.18 Tolerance Comparison Element............................................... 36
1.18.1 "Tolerance Comparison Elements" Dialogue.................................... 36 1.18.2 Further Input Options ........................................................................ 37
1.19 Set Control Limits ..................................................................... 38 2 Contours ......................................................................... 39
2.1 Contours: General..................................................................... 39 2.2 Pitch ........................................................................................... 40 2.3 Comparison (Vector Direction) ................................................ 42 2.4 Best Fit Contour ........................................................................ 43
2.4.1 Best Fit Contour: Definition and Criteria ........................................... 43 2.4.2 Degrees of Freedom for Best Fit....................................................... 44
2.5 Width of Tolerance (Scale Factor) ........................................... 45 2.6 Form Tolerance Contour .......................................................... 47 2.7 Tolerance Band Editor .............................................................. 48 2.8 Define Tolerance Band of a Contour ....................................... 49 2.9 Edit Tolerance Band of a Contour ........................................... 50 2.10 Filter Contour ............................................................................ 51
3 Nominal-Actual Comparison: Further Options............ 53
3.1 Nominal-Actual Comparison, e.g. "Element Circle"............... 53 3.2 Further Options for Nominal Actual Comparison................... 54 3.3 Origin of Co-ordinate System .................................................. 55
VIII-2 v 2.4 14.09.04

Tolerances
1 Tolerances 1.1 Tolerances: General
Definition GEOPAK allows you to carry out tolerance comparisons to DIN ISO R 1101
and 7684, taking into account the "Maximum Material Condition" (MMC; see symbol above left).
The tolerance tables to DIN 16901, DIN 7168 and ISO R 286 are integrated within our program, as a standard feature, to be used as a basis for calculation. This means that, in addition to the nominal value, you have to enter the tolerance field (type). The actual limits are displayed to you immediately.
There are further trade-specific tables, e.g. for wood or plastic processing industries, you can create or use.
Furthermore, it is possible to stop the program run due to the results of the tolerance comparison (see below).
Two tolerance characteristics We differentiate between two tolerance characteristics.
Tolerances related to a single element only.
• You can activate this first group by clicking on the button "Tolerances" in the dialogues where these elements are defined.
• It is possible that you use the symbol disposed in the tolerance bar.
• Still a further option is via the menu "Tolerances" and the subsequent functions. "
Tolerances related to the position of two elements to each other. This second group can be activated only via the tolerance bar.
For the various tolerances see under "Tolerances in Details".
14.09.04 v 2.4 VIII-3

Tolerances
1.2 Maximum Material Condition (MMC) 1.2.1 Definition/Applicability The MMC allows to extend a given tolerance zone if
a shaft is out of its admissible maximum size, or
a bore is out of its admissible minimum size.
According to ISO 8015, the MMC is to be applied where the appears in the drawing. There exist, however, national standards (e.g. in the USA: ANSI Y 14.5M) that differ from this regulation.
If the stands on its own, the tolerance extension is taken only from the element itself.
A further means that an additional extension can be taken from a different element. This is shown, by the way, with an additional letter,
e.g. .
1.2.2 The MMC in GEOPAK Case 1: The MMC is allowed only for the element
Continue as follows
Measure element
Tolerance diameter
Call position tolerance
Activate
If the tolerated element has no own diameter, a reference mark must be selected in the following text box. This would be the case with a point but not with a circle.
VIII-4 v 2.4 14.09.04

Tolerances
Case 2: The MMC is allowed also for a reference element
Proceed as follows
Measure reference element
Tolerance diameter of reference element
Via the symbol in the "Further Tolerance -OptionsHTPC_MSGL_TOL_ELE_OPT" dialogue window, enter the respective datum label (in most cases a single letter, such as A, B, C ...).
Measure element
Tolerance diameter of element
Call position tolerance
Activate
Activate
In the subsequent text box you select, via the arrow, the datum label from the list.
1.3 Tolerances in Detail Following is a breakdown of all tolerances. By mouse click you get to every single topic.
Last Element: You tolerance directly the element that was last.
Element: You select the element in the dialogue window "Tolerance Comparison Element".
Straightness:
Flatness:
Roundness:
Position:
Concentricity:
Coaxiality:
Parallelism:
Perpendicularity:
14.09.04 v 2.4 VIII-5

Tolerances
Angularity:
Symmetry Tolerance Point Element:
Symmetry Tolerance Axis Element:
Symmetry Tolerance Plane Element:
Simple Runout Tolerance:
Tolerance Comparison Contours:
In case MMC is allowed with the individual tolerances, please see for details under "Maximum Material Condition".
VIII-6 v 2.4 14.09.04

Tolerances
1.4 Straightness 1.4.1 Definition
As far as straightness is concerned,
you can calculate it numerically, or
have its run shown graphically.
In any case, click on the symbol (left on top) and come to the "Straightness" window.
Select the desired line under "Element".
Enter the admissible geometrical deviation in the "Tolerance Width" text box.
The result is displayed in the result box.
Hint: For theoretical lines, intersection lines, symmetry lines and lines determined by two points only, geometrical deviation is not defined.
1.4.2 Graphical Representation
In the "Straightness" window, activate the symbol (on the left).
Via the symbol (on the left) the "Settings for the Straightness Graphics" window is displayed. Here, you can select any setting other than the default.
For details refer to the topic Scaling of Tolerance Graphics.
Further Options Via this symbol, you come to the dialogue window "Further Tolerance
Options".
Using this symbol you control the functionality "Loops" (see detailed information under this topic).
Connection of Points "Connection of Points", that's what you normally do. When probing manually, however, the connecting lines may cause confusion, particularly when the points have not been measured in correct order. It is recommended that you do away with the connections.
14.09.04 v 2.4 VIII-7

Tolerances
1.5 Flatness
Definition
As far as flatness is concerned...
you can calculate it numerically, or
have its run displayed in a graphic.
In any case, click on the symbol (left on top) and come to the "Flatness" window.
Select the desired plane under "Element".
Enter the admissible geometrical deviation in the "Tolerance Width" text box.
The result appears in the result box.
Hint: With theoretical planes, symmetry planes and planes determined by three points only, geometrical deviation is not defined.
Graphical Representation In the "Flatness" window, activate the symbol (on the left).
Via this symbol (on the left), you come to the window "Settings for the flatness graphics". Here you can select any setting other than the default.
For details refer to the topic Scaling of Tolerance Graphics.
Further Options Via this symbol, you come to the "Further Tolerance Options" dialogue
window.
Using this symbol, you control the functionality "Loops" (see details this topic).
Connection of Points "Connection of Points", that's what you normally do. When probing manually, however, the connecting lines may cause confusion, particularly when the points have not been measured in the correct order. It is recommended that you do away with the connections.
VIII-8 v 2.4 14.09.04

Tolerances
1.6 Roundness 1.6.1 Definition
As far as roundness is concerned,
you can calculate it numerically, or
have its run displayed graphically.
In any case, click on the symbol (top left) to get to the "Roundness" window".
Select the required circle under "Element".
Enter the permissible geometrical deviation into the "Tolerance Width" text box and click OK..
The result is displayed in the result box.
Hint: For theoretical circles, intersection circles, fitted-in circles and circles determined by three points only, geometrical deviation is not defined.
1.6.2 Graphical Representation
Activate the symbol (on the left) in the "Roundness" window.
The symbol (on the left) leads you the window "Settings for Roundness Graphics". Here you have three options to choose from:
Actual roundness scaling
Tolerance zone scaling
Nominal value with
• Upper tolerance • Lower tolerance
For details, refer to the topic Scaling of Tolerance Graphics.
Further Options This symbol leads you to the dialogue window "Further Tolerance Options".
Using this symbol you govern the "Loops" functionally (for details refer to detailed information regarding this subject).
Connection of Points "Connecting points" is the normal case for you. When probing manually, the connecting lines, however, may cause confusion, particularly when the points have not been measured in correct order. We recommend that you do away with the connections.
14.09.04 v 2.4 VIII-9

Tolerances
1.7 Scaling of Tolerance Graphics 1.7.1 Roundness Scaling
The symbols (on the left) of the "Roundness"-dialogue window enable graphical representation. As far as scaling is concerned, the "Settings for Roundness" windows allows you to choose from three options.
Actual Roundness Scaling (Default Setting) If you decide for this option, you can retrace the exact run of the circle in the graphics (see FIG. below).
In this graphics, however, you do not see whether the points are located within the tolerance width. This is caused in the present setup by the fact that the points with minimum and maximum distance define the green field.
Hint This is applicable accordingly to straightness, flatness, runout tolerances and parallelism, too.
Consequently, the points are always located within the green field, even if roundness does not comply with the specification. The roundness figures can be seen from the result box, the protocol or from data output.
By clicking on the symbol (on the left) in the "Further Tolerance Options" window = you can report the roundness figures to a statistics program. This applies equally to the following options.
Tolerance Zone Scaling Using this option you establish that the green field in fact agrees with the tolerance zone. The width of this tolerance zone is already entered in the "Roundness" window. In the graphics you can realise whether the circle is located within the roundness tolerance (see FIG. below. You can see that the P1 and P40 values are the same as in the figure above for "Actual Roundness Scaling".
Hint This is applicable accordingly to straightness, flatness, runout tolerances and parallelism, too.
VIII-10 v 2.4 14.09.04

Tolerances
With large or very small deviations, you may, under certain circumstances, not be able to retrace the run of the form. In this case, you should resort to the "Actual Roundness Scaling" function.
Nominal Value Scaling with Upper and Lower Tolerance To find out whether the circle with its geometrical deviation is still within the dimensional tolerance, you can perform the scaling operation using the nominal value and the tolerance limits (Upper / Lower Tolerance). As a result, you see here with this option, in addition to the figure above, a blue circle. This is the nominal diameter circle.
The green field is defined by the nominal value and the upper and lower tolerance you have entered.
It is possible (see FIG. above) that one or more points are located outside the green field, roundness, however, is in line with the specification. This can be seen from the result box, the protocol or from data output.
Hint This is applicable accordingly to straightness and flatness, but not to runout tolerances and parallelism.
1.7.2 Straightness/Flatness Scaling Contrary to "Roundness Scaling", these two cases do not allow to check for dimensional tolerance. You may, however, input an Upper and a Lower Tolerance. The upper limit is the one located prior to the material, the other one is located in the material.
14.09.04 v 2.4 VIII-11

Tolerances
1.8 Position 1.8.1 Definition Using the function "Position" you determine whether the positional deviation of a point is still within tolerance.
You click on the symbol in the tolerance bar
In the next step you select, via the symbols, the element type whose position must be tolerated. You need to know that for points (e.g. piercing point "Cylinder axis through plane") the material side is unknown and that therefore the "Maximum Material Condition (MMC) can not be applied directly.
The structure of the subsequent line is almost identical with the one for the drawing entries. In addition, help bubbles explain the individual symbols.
Your drawing tells you whether the tolerance zone is circular or flat. If circular, you activate the symbol.
In the next text box you enter the width of your tolerance zone or you make your last entries using the arrow.
If the use of MMCHTPC_MSGL_TOL_MMB is allowed, you activate the symbol.
If the use of MMCHTPC_MSGL_TOL_MMB with a reference is allowed , you activate the symbol.
For details about the principles of MMC, please refer to the topic Maximum Material Condition.
VIII-12 v 2.4 14.09.04

Tolerances
1.8.2 Examples Example 1 As an example we take the case of a "Point of intersection of cylinder axis and plane".
You tolerate the cylinder diameter.
You assign a datum label to the cylinder diameter via the dialogue window "Further Tolerance Options" .
Then you can apply the MMC in the dialogue window with respect to position, concentricity and symmetry of the point of intersection. You recognise this when the text field (Max. Material Condition Element) is active.
Example 2 For this example we take the case of a "Cutting circle of cylinder jacket and plane".
You tolerate the circle diameter.
Then you can apply the MMC in the dialogue window with respect to the position, the concentricity and the symmetry of the point of intersection, without necessity of an entry into a text field.
Example 3 For this example we take the case of a "Position of a symmetry line in a groove".
You tolerate the groove width as the distance.
You assign a datum label to the groove width via the dialogue window "Further Tolerance Options".
Then you can apply the MMC in the following dialogue window with regard to the "Position axis element", parallelism etc. of the symmetry line. You recognise this by an active text field (Max. Material Condition Element).
In case of a flat tolerance zone – the symbol is not activated - you can input only one co-ordinate.
In case of a circular tolerance zone (the symbol is activated)...
first select the plane where the tolerance zone is located, and ...
then the co-ordinates of the location.
In this case, you can enter the nominal position either in the cartesian or the polar system.
Choose the type of co-ordinate system using the known symbols.
14.09.04 v 2.4 VIII-13

Tolerances
Take over the actual value
In the left near the coordinate buttons you find an element button. By a click on this button you can take over the value of the element that you want to tolerate.
In case of a spatial tolerance zone (symbol on the left is activated), enter three co-ordinates. To determine the type of co-ordinate system, use the symbols (picture below, left-hand column).
In case of polar co-ordinates, you can, in addition, determine your working plane using the symbols (picture above, right-hand column). The help bubbles provide you with additional information.
Further Options
Via this symbol, you come to the dialogue window "Further Tolerance Options".
Using this symbol you control the functionality "Loops" (see detailed information under this topic).
Click on the symbol left to find detailed information about the topic "Determine Position Tolerance" with the option "Calculate absolute".
VIII-14 v 2.4 14.09.04

Tolerances
1.8.3 Position of Plane
You can only realize a tolerance of the position of a plane that is approximately parallel to one of the base planes.
You get the function via the “Tolerance” menu. In the following dialogue window
select the plane in which you want to realize a tolerance and
enter the width of tolerance.
Next, you decide in which tolerance direction (main direction and in parallel to which base plane) the tolerance range extends to. Enter the nominal position of the plane in the text field X, Y or Z.
Further proceeding depends on whether your tolerance zone is round or rectangular.
Rectangular Tolerance Zone
In this case, enter the co-ordinates of the left lower and the right upper edge.
Round Tolerance Zone
In this case, enter the co-ordinates of the centre and the diameter of the tolerance zone.
Via the icons (see left), it is possible to select whether you enter Cartesian or polar co-ordinates.
For more details, see also the topics "MMC" and
"Further Tolerance Options".
14.09.04 v 2.4 VIII-15

Tolerances
1.8.4 Position of Axis
You can only realize a tolerance of the position of an axis element that is approximately parallel to one of the principal axes.
You get the function via the tolerance menu. In the following dialogue window
first, you decide whether the actual element is a line, a cone or a cylinder.
You can display the elements in the list.
The further parameters depend on whether you have a round or plane tolerance zone.
Round Tolerance Zone: The example of a bore of which the axis runs approximately parallel to the Z-axis, you look on the axis from top (see picture below).
1 = Tolerance diameter
First, select the X/Y plane and then enter the X and Y co-ordinates.
VIII-16 v 2.4 14.09.04

Tolerances
Finally, enter the co-ordinates of start and end point (see picture below).
1 = start point 2 = end point
If you select another plane, proceed in a similar fashion.
Plane Tolerance Zone: By means of the example of a line in the X/Y plane that runs approximately parallel to the X-axis we explain, which parameters to enter (see picture below).
1 = start point 2 = end point
3 = Width of tolerance in error direction
The position of the axis is indicated through the Y value.
The error direction is the Y direction, too.
14.09.04 v 2.4 VIII-17

Tolerances
Therefore, for this example, select under “Print Preview“ (patch of a surface) as error direction the Y-axis in the X/Y plane.
In the text field, enter the nominal of the position of the line.
In our example, enter the X values for the start respectively the end point.
If you select another error direction, proceed in a similar fashion.
For more details, see also the topics "Max. Material Condition(MMC)" and "Further Tolerance Options".
Click on the symbol left to find detailed information about the topic "Determine Position Tolerance" with the option "Calculate absolute".
VIII-18 v 2.4 14.09.04

Tolerances
1.8.5 Calculate Absolute Position Tolerance
For the position tolerances you can use the option "Calculate absolute" in certain cases to simplify the input of the nominal co-ordinates.
The illustration below shows four bores (cylinders in top view and the points of intersection of the cylinder axes with the plane). The nominal co-ordinates differ only in the signs. This hole pattern has two symmetry axes (X- and Y-axis).
You can either tolerate
the position of the points or
the position of the cylinder axes.
In both cases you can enter the same nominal co-ordinates with the option "Calculate absolute" for all four bores, i.e. absolute (x = 6.0 and y = 4.0). This is useful for the loop repetitions.
For the position of an axis, as compared to the position of a circle, you additionally enter start and end point. When calculating the position tolerance, their signs remain valid also when carrying out an absolute calculation.
14.09.04 v 2.4 VIII-19

Tolerances
1.9 Concentricity Definition With the function "Concentricity" you check whether the location of the centre of a circle agrees with the location of a reference circle (centre of circle).
Proceed as follows:
In the first step, using the symbols, select the element of which position must be toleranced. Hint For points (e.g. piercing point "Cylinder Axis through Plane") the material side is unknown and therefore MMCHTPC_MSGL_TOL_MMB cannot be directly used.
Click in the tolerance bar on the symbol (on the left) and the "Concentricity" dialogue window appears. The structure of the top line (below the header) follows roughly the one for the drawing entries. In addition, help bubbles explain the individual symbols.
In the first text box, enter the diameter tolerance zone.
Example of a solution For this purpose, we take the case "Cylinder Axis through Plane".
You tolerance the diameter of the cylinder.
Via the "Further Tolerance Options" dialogue window, allocate a datum label to the cylinder diameter.
In the "Concentricity" dialogue window, you can then use MMC also with the "Point" element. This is shown by the fact that the centre text box in the top line is active.
With the elements circle, ellipse and sphere, the first relates to the element itself. This is why the input of a datum label is not required.
As for the rest, you proceed as described under the topic "Maximum Condition".
Further Options
Via this symbol, you come to the dialogue window "Further Tolerance Options".
Using this symbol you control the functionality "Loops" (see detailed information under this topic).
VIII-20 v 2.4 14.09.04

Tolerances
1.10 Coaxiality Definition With the "Coaxiality" function, check the position of two axes to each other. It is important for the input that the axes are approximately parallel to a main axis of the co-ordinate system.
Proceed as described in detail of the topic "Concentricity" and "Maximum Material Condition".
Click in the tolerance bar on the symbol (on the left) and come to the "Coaxiality" dialogue window. The structure of this line roughly follows the one for the drawing entries. In addition, help bubbles explain the individual symbols.
Hint As start or end point enter one co-ordinate, each of the range of which checking must be performed (see picture below).
This is what applies for our example (the reference axis shows as the Z axis upwards):
Start point = 0
End point = 5
The direction of the reference axis influences the signification of start and end point.
If the reference axis, opposite to the Z axis shows downwards, the following input is correct:
Start point = -5
End point = 0
Further Options
14.09.04 v 2.4 VIII-21

Tolerances
Via this symbol, you come to the "Further Tolerance Options" dialogue window.
Using this symbol, you control the functionality "Loops" (see details of this topic).
1.11 Parallelism With the function parallelism you check the location of two axes to each other. It is important for the input of the reference lengths that the axes or planes are approximately parallel relative to a main axis of the co-ordinate system.
In the tolerance bar you click on the symbol (on the left) and come to the "Parallelism" dialogue window.
First, you have to select your actual and your reference element. The subsequent inputs depend on these elements. Thus, we differentiate between four initial situations:
The parallelism of an axis relative to a reference axis
The parallelism of an axis relative to a reference plane
The parallelism of a plane relative to reference axis
The parallelism of a plane relative to a reference plane
For the four cases, proceed as follows:
First, select your actual or reference element in the window "Parallelism".
The next line is adapted to suit for the drawing entry. Here, in this line you enter the figures from your drawings.
If MMC is allowed, see details under "Maximum Material Condition".
By a mouse click on this topic, you obtain the latest information about each of the four initial situations.
Graphical Representation If the actual element is a measured line, you can have parallelism also graphically displayed. The procedure is similar to the one described in detail of topic Parallelism Graphics.
You inform yourself about this theme with click on Parallelism: Example .
Further Options
Via this symbol, you come to the "Further Tolerance Options" dialogue window.
Using this symbol you control the functionality "Loops" (see details of this topic).
VIII-22 v 2.4 14.09.04

Tolerances
1.11.1 Parallelism: Example For the parallelism of a line with a reference line, the system also provides a graphic.
The following example in the illustration below shows the parallelism of the line (3) to the reference line (2) as a reference. The graphic clarifies the way of calculation:
In addition to the measurement points P1 to P4 of the tolerated line (line 3), two additional points P5 and P6 are generated that have been calculated at the distance of the input reference length on the line (line 3).
The parallelism results from the difference between biggest and smallest distance to the reference line. If the selected value of the reference length is shorter than the measurement range of the line, only the measurement points positioned within the reference length are included in the calculation.
Exception: If the input for the reference length is 0.0, the reference length is inserted for the measurement length of the line.
These results are included in the graphic which is also available in form of a printout:
14.09.04 v 2.4 VIII-23

Tolerances
1.11.2 Parallelism of an Axis to a Reference Axis
The tolerance symbol (on the left) appearing on a drawing indicates that the tolerance zone concerned is a circular one. You click the symbol in the dialogue window.
In the following text box, there appears the width of the tolerance zone.
If MMC is allowed, details can be seen under "Maximum Material Condition".
If the tolerance zone is flat, you have to enter additionally the drawing level where it is defined.
Finally you must enter over which length parallelism has to be maintained (reference length).
1.11.3 Parallelism of an Axis to a Reference Plane Finally you must enter over which length parallelism has to be maintained (reference length).
1.11.4 Parallelism of a Plane to a Reference Axis Finally you must enter over which length parallelism has to be maintained (reference length).
1.11.5 Parallelism of a Plane to a Reference Plane Hint (applies to rectangular tolerance zone only) For the input of the reference lengths, it is important that the two planes are approximately parallel to any of the base planes, the reason for this being that the reference lengths can only be entered parallel to the co-ordinate axes.
To complete the previous steps (for details cf. "Parallelism" and MMC) additionally enter which length parallelism has to be maintained (reference length).
With the diameter symbol not activated (on the left), enter the diameter of the range which must be toleranced.
With the diameter symbol activated, select the axis along which parallelism must be maintained, and ... enter the reference lengths in the other two axes.
VIII-24 v 2.4 14.09.04

Tolerances
1.12 Perpendicularity With the perpendicularity function, check the location of two axes relative to each other. It is important for the input of the reference lengths that the axes or planes are approximately parallel relative to a main axis of the co-ordinate system.
In the tolerance bar, click on the symbol (on the left) and the "Perpendicularity" dialogue window is displayed.
First, you have to select your actual and your reference element. The subsequent inputs depend on these elements. Thus, we differentiate between four initial situations:
Perpendicularity of an axis to a reference axis
Perpendicularity of an axis to a reference plane
Perpendicularity of a plane to a reference axis
Perpendicularity of a plane to a reference plane
In the four cases, proceed as follows:
First, select your actual or reference element in the "Perpendicularity" window.
The next line is adapted to suit for drawing inputs. Here, you enter the figures of your drawings.
If MMC is allowed, refer to details of topic "Maximum Material Condition".
By a mouse click on this topic, you obtain the latest information about each of the four initial situations.
Further Options
Via this symbol, you come to the "Further Tolerance Options" dialogue window.
Using this symbol you control the functionality "Loops" (see details of this topic).
1.12.1 Perpendicularity of an Axis to a Reference Axis Since the tolerance zone is flat, you must show, in addition, in which
drawing level it is defined.
Finally, you must enter over which length perpendicularity has to be maintained (reference length).
14.09.04 v 2.4 VIII-25

Tolerances
1.12.2 Perpendicularity of an Axis to a Reference Plane
The presence of the diameter symbol (on the left) in the drawing indicates to a circular tolerance zone. Click the symbol in the dialogue window.
The next text box shows the width of the tolerance zone.
If MMC is allowed, refer to details of topic "Maximum Material Condition".
If the tolerance zone is flat, you must show, in addition, in which drawing level it is defined.
Finally, you must enter over which length perpendicularity has to be maintained (reference length).
1.12.3 Perpendicularity of an Axis to a Reference axis Hint (applies to rectangular tolerance zone only) For the input of the reference lengths it is important that the plane is more or less parallel to any of the base planes, the reason for this being that the reference lengths can only be entered parallel to the co-ordinate axes.
To complete the previous steps (for details cf. Perpendicularity) you additionally enter over which length perpendicularity has to be maintained (reference length).
In case the symbol (on the left) is activated, enter the diameter of the area to be toleranced.
In case the symbol is not activated, select the axis along which perpendicularity has to be maintained, and ... enter the reference lengths for the other two axes.
1.12.4 Perpendicularity of a Plane to a Reference Plane Finally, you must enter over which length perpendicularity has to be maintained (reference length).
VIII-26 v 2.4 14.09.04

Tolerances
1.13 Angularity Definition With the angularity function, check the location of an
Axis relative to an axis,
Axis relative to a plane,
Plane relative to an axis,
Plane relative to a plane.
Proceed as follows
In the tolerance bar, click on the symbol (on the left) and come to the "Angularity" dialogue window.
First, select your respective actual and reference element.
In the line below, enter the width of your tolerance zone.
If MMC is allowed, refer to "Maximum Material Condition" for more details.
In the bottom text boxes, enter nominal angle and reference lengths.
If your actual element features an axis (cylinder, cone or line) you have to click the drawing level where the angle must be maintained.
Further Options
Via this symbol, you come to the "Further Tolerance Options" dialogue window.
By using this symbol you control the functionality "Loops" (see details of this topic).
14.09.04 v 2.4 VIII-27

Tolerances
1.14 Symmetry Tolerances 1.14.1 Symmetry Tolerance Point Element With this function you check the location of an element relative to a symmetry element. Prior to realize the tolerance check itself, you must
measure the two elements and use them to calculate ...
the symmetry element. This, in turn, becomes the reference element.
Proceed as follows
In the tolerance bar, click on the symbol (on the left) and come to the "Symmetry Tolerance Point-Element" dialogue window.
By using the symbols in the top line of the dialogue window, select your actual and reference element.
If the reference element is only point-based – unlike a line or a plane - you still have to preselect the direction along which deviation must be calculated. (Symbols "Projection" de-activated, symbols "Tolerance Direction" activated).
If the symmetry location is given by an axis, the projection plane where deviation is must be calculated.
If the symmetry location is given by a plane, deviation will be automatically calculated perpendicularly to this plane.
The value determined is double the deviation from this location. According to your drawing, you also have to input, in addition to the above, the tolerance width. For details concerning MMC cf. Maximum Material Condition.
Further Options
Via this symbol, you come to the "Further Tolerance Options" dialogue window.
Using this symbol you control the functionality "Loops" (see details of this topic).
VIII-28 v 2.4 14.09.04

Tolerances
1.14.2 Symmetry Tolerance Axis Element With this function, check the location of an element relative to a symmetry element. Prior to performing the tolerance check itself, you must...
measure the two elements and use them to calculate ...
the symmetry element. This, in turn, becomes the reference element.
Proceed as follows
In the tolerance bar, click on the symbol (on the left) and come to the "Symmetry Tolerance Axis-Element" dialogue window.
By using the symbols in the top line of the dialogue window, select your actual and reference element.
If the reference element is point-based, deviation will be calculated only at this point. It is not necessary to enter start and end points.
If the reference element is an axis, the start and end point for the actual element must still be entered. If possible, the actual element should be parallel to one of the co-ordinate axes. Start and end point correspond to the co-ordinates in this axis. For comparison see also the topic Coaxiality.
According to your drawing, you also have to input, in addition to the above, the tolerance width. For details concerning MMC, refer to Maximum Material Condition .
Further Options
Via this symbol, the "Further Tolerance Options" dialogue window is displayed.
Using this symbol you control the functionality "Loops" (see details of this topic).
14.09.04 v 2.4 VIII-29

Tolerances
1.14.3 Symmetry Tolerance Plane Element With this function, check the location of an actual element relative to a symmetry element. Before realizing the tolerance check, you must ...
measure the two elements and use them ...
to calculate the symmetry element. This, in turn, becomes the reference element.
If possible, the planes should be paraxial in order to enter in a reasonable way the reference lengths and the toleranced direction.
Proceed as follows
In the tolerance bar, click on the symbol, and the "Symmetry Tolerance Plane-Element" dialogue window appears.
By using the symbols in the top line of the dialogue window you select your reference element.
If the reference element is a point, the position comparison is carried out only at this point. Therefore, no further data is required.
If the reference element is an axis, you must enter, in addition, the start and end point of the area to be measured (for details concerning this topic refer to Coaxiality).
If the reference element is a plane, you have to
• input the direction ... • and, for the other axes, the corner points of the area (see
picture below; the toleranced direction is the Z-axis).
VIII-30 v 2.4 14.09.04

Tolerances
X1 = Start X X2 = End X Y1 = Start Y Y2 = End Y
According to your drawing, you have to input, in addition to the above, the tolerance width. For details concerning MMC, refer to Maximum Material-Condition .
Further Options
Via this symbol, you come to the "Further Tolerance Options" dialogue window.
Using this symbol you control the functionality "Loops" (see details of this topic).
14.09.04 v 2.4 VIII-31

Tolerances
1.15 Runout Tolerance With the "Runout Tolerance" function, check both the radial and axial runout of your workpiece.
First, you have to define the axis of rotation. This can be the axis of a cone or a cylinder, or an axis that has been defined as a connection line through several circle centres.
In the tolerance bar, click on the symbol and come to the "Runout Tolerance" dialogue window.
Now, you must differentiate between a
axial runout – you measure a plane - or a
radial runout. This involves the measurement of a circle or a cylinder. Hint: For further details, refer to the subject Axial Runout.
If you have measured a cylinder your result will be equal to the total radial runout.
For this purpose, optionally click on one of these symbols. Depending on your selection, find the following elements in the list.
By a mouse-click on one of these elements (on the left), select as reference element the element that determines your axis of rotation.
Enter the admissible tolerance range in the bottom tolerance box. Hint: For the axial runout, you additionally need the diameter of the shaft (reference diameter) whose surface you have measured.
Using the symbols you can have the radial and axial runouts also in a graphics.
For details refer to the topics
"Roundness"Flatness"
"Scaling of Tolerance Graphics"
Further Options
Via this symbol, you come to the "Further Tolerance Options" dialogue window.
By using this symbol you control the functionality "Loops" (see details of this topic).
VIII-32 v 2.4 14.09.04

Tolerances
1.15.1 Axial Runout As far as axial runout is concerned, one distinguishes, as a rule of principle, between "Simple Axial Runout" and "Total Axial Runout". The reason for this is that for the limitation of a plane you have to enter a reference diameter in addition to the rotational axis.
Simple Axial Runout For Simple Axial Runout, a plane is defined by points located on a circular path (circle made up of red dots in the line drawing below). This circular path should be located centrally around the reference axis. Consequently, the reference diameter (in red) is the diameter of this circular path. It is not the cylinder diameter.
In the present case, the two points P13 and P14 are not measured points. Determined by GEOPAK, they define the axial runout since they represent the maximum deviations.
14.09.04 v 2.4 VIII-33

Tolerances
Total Axial Runout For Total Axial Runout, a plane is established by points which can be located on several circular paths. For example, the whole end face of a cylinder can be captured this way. To capture the edge of the end face as well, you have to enter the reference diameter which is, in our example below, the diameter of the cylinder.
In this case, the points P25 and P26 are not measured points. Determined by GEOPAK, they define the axial runout since they represent the maximum deviations.
Hint For axial runout calculation, all measurement points are used, no matter which reference diameter has been entered..
VIII-34 v 2.4 14.09.04

Tolerances
1.15.2 Circular Runout A circular runout calculation in GEOPAK does not only include the measurement points of a circle but also two additional points which are positioned on the circumference of the calculated circle, because a situation may occur in which the measurement points are all positioned inside a pre-defined tolerance zone, but not the whole circle. Although the example illustration below is not representative for a circular runout measurement, the number of measurement points = 4 is quite usual. The measurement points on the horizontal and on the vertical axis are still within the tolerance range. Nevertheless, the tolerated circle does not meet the required circular runout, because both points on the bisector of the angle are outside the tolerance range. Although they were not measured, they belong to the calculated circle.
Diameter and position of the calculated
circle also depend on the selected mode of calculation.
1.16 Tolerance Variable You can also realize a nominal-to-actual comparison of calculated values. You come to the function and the dialogue via the menu bar "Tolerance / Variable...".
In addition, by clicking on the symbol in the following dialogue, you have all other possibilities of the nominal-to-actual comparison e.g. the transmission to STATPAK, etc. (see details of Further Tolerance Options).
14.09.04 v 2.4 VIII-35

Tolerances
1.17 Tolerance Comparison "Last Element" This function usually deals with a nominal-to-actual comparison as in GEOPAK-3; but you can, in this case and independently to the type, access the last measured element.
To this subject, also see details under Tolerance Comparison Elements Dialogue".
1.18 Tolerance Comparison Element In this dialogue, you click on the element, of which you want to have a nominal-to-actual comparison. Confirm and the dialogue for example "Tolerance Comparison Element Cylinder" will appear. If you have measured several elements of one type, the proposal in the dialogue has always reference to the last measured element of the selected type.
To this subject, also see details under Tolerance Comparison Elements Dialogue".
1.18.1 "Tolerance Comparison Elements" Dialogue With this nominal-to-actual comparison, it is possible to check all element characteristics (position, direction, size, form) in only one dialogue. According to element type, the dialogue windows are, in part, differently constructed.
The dialogue will appear for example
via the menu bar "Tolerance / Tolerance Comparison Elements / Last Element or Element". Finally, if you click only on the "Element", you can choose in the following window the type of element, for which you want to realize a nominal-to-actual comparison (see in addition details under "Tolerance Comparison Element".
However, you can also click on the symbol in the element window. After the measurement, the dialogue automatically opens.
Via the symbol you select, which characteristic you want to check in this dialogue.
Absolute Values
If, for the co-ordinates, you are only interested in the absolute value and not in the sign, click on the symbol.
VIII-36 v 2.4 14.09.04

Tolerances
Tolerance Class
or some values, you have the possibility instead of entering upper and lower tolerance limits, to input a tolerance class. Then, GEOPAK calculates out of nominal value and tolerance class the corresponding limit values and displays them in the inactive text boxes.
In the tolerance classes, pay attention to the use of capitalization and small letters.
Instead of using the given tolerance classes, you can create your own characteristic tables. A helper program will be delivered during installation.
Polar Co-Ordinates
For the position of an element, you can select in the dialogue whether you want a Cartesian or a polar evaluation (see symbols in the dialogue, bottom left).
In the cylinder co-ordinates, at first, you get the radius in the XY plane. If you want the analysis in another plane, click several times on the symbol.
With the spherical co-ordinates, at first, you get the Phi angle in the XY plane and the Theta angle to the Z-axis. If you want the analysis in another plane, click several times on the symbol.
1.18.2 Further Input Options
For round elements you can, in addition, determine via the symbols whether you want to input the diameter or the radius.
During the learn mode of GEOPAK you can click on the respective icon of the element (e.g. line on the top left of the dialogue box) to accept the measured actual values in the "Nominal Value" column as proposal. The actual values are rounded up to one digit after the comma, for the unit "Inch" to two digits after the comma. In the GEOPAK editor the values are set to 0.00.
Options
For the form of some elements, you can also have a graphic chart. Settings for this graphic
By clicking on the symbol, you can realize different settings to the graphic in the following window.
Via the symbol, you get further options e.g. the transmission to STATPAK, the possibility to cancel etc. (also see details under Further Tolerance Options).
By using this symbol you control the functionality "Loops" (see details of this topic).
14.09.04 v 2.4 VIII-37

Tolerances
Position
If you click on one of the symbols you can currently switch over from
"Tolerance single co-ordinates" to
"Tolerance Position" and vice versa.
You can only use this option if the elements can be tolerated with "position tolerance" (e.g. you can't use the element line).
About "Tolerance Position" you inform yourself with a click on the topic.
1.19 Set Control Limits With this function (menu bar "Tolerances / Set Control Limits ..."), you can prompt a warning already before arriving at the tolerance limit. The control limit is a single value is and is indicated in percent of the tolerance zone. If an actual value is outside of the control limits - however within the tolerance – the following happens:
The value is represented in another colour as red or green in the result field as well as in the protocol.
With the corresponding setting of the format, the feature is printed out, respectively is written into the output file. Significant are the four dialogues "File Format Specification", "Change File Output Format", "Print Format Specification", "Change Print Format"). You come to these dialogues via the menu bar "Printout.
A definite IO-condition will be set (see details in the "io_con_e. pdf" respectively "io_con_g.pdf" document on our Homepage or on your MCOSMOS-CD).
VIII-38 v 2.4 14.09.04

Contours
2 Contours 2.1 Contours: General With the "Tolerance Comparison Contours" function, check the geometrical deviation of an actual contour from a nominal contour. Nominal and actual contour must be stored in the GEOPAK working memory before the comparison itself is realized. Moreover, the contours must be available in the same projection. As a rule, the nominal contour is provided by a CAD system.
Tolerance Comparison Contours
Clicking on the symbol in the icon bar, you come to the "Tolerance Comparison Contours" dialogue window.
In the text boxes, "Nominal" and "Actual", select from the lists your contours which are, in fact, already available. The nominal contour can already be a measured contour (for details cf. Load Contour). Or load your contour from an external CAD system (for further details regarding this topic cf. "Load Contour from CAD System").
Enter into the input field "Number of act/nom pairs" a "1", if not already proposed.
Tolerance comparison of multiple contour pairs If you want to execute tolerance comparisons with multiple contour pairs, enter into the input field "Number of act/nom pairs" a number bigger than "1".
If you want to compare, for example, three nominal contours with three actual contours, then enter into the input field "Number of nom/act pairs" a "3".
Similar to the loop mode, the memory numbers are counted upwards and the memory number of the selected contours is used as the start number
According to the input example, the following pairs are created.
Pair 1: (4)act1 / (1)nom1
Pair 2: (5)act2 / (2)nom2
Pair 3: (6)act3 / (3)nom3
In order that the tolerance comparison of multiple contour pairs can be executed, all contours must be existing with the relevant memory numbers. Furthermore, all used contours must be positioned in the same projection plane.
Your further action is divided into the following sections
14.09.04 v 2.4 VIII-39

Contours
Pitch
Comparison (Vector Direction)
Best Fit
Tolerance Width
By using this symbol you control the functionality "Loops" (see details of this topic).
2.2 Pitch By making inputs in "Pitch"...
you first of all define the points from where measurement must take place;
in the next step, by Vector Direction, enter the direction along which the distance from the opposite contour is measured.
The pitch specifies the distance where the individual comparisons are carried out. The points at which the nominal and actual comparison is carried out are, in most cases, not identical with the contour points of the actual respectively the nominal contour points. This is why they are interpolated (cubic curve). This means that even the areas between the points are calculated. According to your task, you will opt for one out of six "pitches".
Constant pitch: Uniform distance on the nominal contour.
Comparison only at nominal points: A comparison is realized at each point of the nominal contour.
Comparison only at actual points: A comparison is carried out at each point of the actual contour.
VIII-40 v 2.4 14.09.04

Contours
Hint This form is not recommended, as it takes a great deal of time. It is because of the vector direction that the program has to calculate the point through which the perpendicular goes to the actual point (see picture below).
1 = Actual contour 2 = Nominal contour
Constant angular pitch: The comparison takes place in a constant angular pitch relative to the co-ordinate system origin.
Constant pitch (1st co-ordinate): Here, use a uniform distance on the nominal contour, to be more exact, in the 1st co-ordinate Example In the ZX projection, you obtain a uniform distance in the Z-component with this setting.
Constant pitch (2nd co-ordinate): Here, use a uniform distance on the nominal contour, to be more exact, in the 2nd co-ordinate Example In the ZX projection, you obtain a uniform in the X component with this setting.
Except for nominal and actual points, enter a constant value in the respective text box below the symbols.
14.09.04 v 2.4 VIII-41

Contours
2.3 Comparison (Vector Direction) Between nominal and actual distance is calculated. Four possibilities are available (see below). The most frequent application is the "Comparison Perpendicular to Nominal Contour". This is the comparison that Mitutoyo offers in the default.
Comparison perpendicular to nominal contour: A perpendicular on the contour is formed using the comparison point.
Comparison through origin: A line through the origin of the co-ordinate system is using the comparison point.
Comparison along first axis: This comparison makes available the following possibilities:
• YZ-Contour parallel to Y-axis • ZX-Contour parallel to Z-axis • XY-Contour parallel to X-axis • RZ-Contour parallel to R-axis (radial plane of section) • Phi-Z-Contour parallel to Phi-axis (completed representation)
Comparison along first axis: This comparison makes available the following possibilities:
• YZ-Contour parallel to Z-axis • ZX-Contour parallel to X-axis • XY-Contour parallel to Y-axis • RZ-Contour parallel to Z-axis • Phi-Z-Contour parallel to Z-axis
Circles between nominal and actual contour: A perpendicular to the nominal contour is created through the reference point. Then, the biggest possible circle is created with its centre located on the perpendicular. The circle diameter is then limited by two contour points.
VIII-42 v 2.4 14.09.04

Contours
Hint In certain cases, the circle centre may leave the perpendicular in order to allow the creation of a bigger circle. In this case, three contour points limit the expansion of the circle (see ill. below).
2.4 Best Fit Contour 2.4.1 Best Fit Contour: Definition and Criteria The best fit function rotates and shifts a set of co-ordinate values (points of the actual contour) in such a way that it fits "best" into another group of given co-ordinates (points of the nominal contour).
The best fit follows the Gaussian criterion requiring that the sum of the distance squares is minimal.
This means that the distances of the actual points are calculated from their respective nominal values, and then are squared and summed. The "best" location is reached when this sum is as small as possible.
The best fit is based on the nominal-actual comparison. Should the latter not be possible, the best fit is possible neither.
For more information, refer to the topic Degree of Freedom for Best Fit.
14.09.04 v 2.4 VIII-43

Contours
2.4.2 Degrees of Freedom for Best Fit Generally, the actual values can be rotated and shifted as you want. Thus, you can achieve the best result. For this, operate the functions
"Horizontal",
"Vertical",
"Rotate".
Click either on one of the three symbols, or on two or even all three symbols. The best fit will be automatically made. The result can be seen from the graphical representation.
If only one rotation is allowed, said rotation is carried out around the origin of the actual co-ordinate system.
The results are graphically and numerically shown in the "Tolerance Comparison Contours" window. Here, you see the abbreviations where UD is Upper Difference; LD = Lower Difference; MD = Mean Difference). In addition to the above, via various symbols in this window, you have following possibility
In particular via the information symbol, you have the possibility to set information flags.
Click on the symbol
The mouse changes to a reticle.
Click on the position in the graphics where you want to set the information or flag.
With a further click on the flag (keep the mouse button pressed) you can drag the flag to a different position.
Clicking with the right mouse button on the flag, you can, among other things, delete the flag.
Using the "Learnable Graphic Commands" symbol, you can preset that the windows are printed out or applied in the repeat mode. You must activate this function already in the single mode, since, being in the repeat mode, you will have no more influence.
VIII-44 v 2.4 14.09.04

Contours
2.5 Width of Tolerance (Scale Factor) Definition An enlarged scale is used to visualize the deviations of the actual contour from the nominal one. Consequently, the deviations are displayed in a scale larger than the scale used for watching the nominal contour.
• The upper, the lower tolerance and the tolerance width determine the scale.
• The difference from upper and lower tolerance is related to the length of the nominal contour.
Three examples Example 1: The nominal contour is 1000mm and the difference from upper and lower tolerance is 0.1 mm. If, in this case, you take a tolerance width of 5 %, this will yield a scale factor of 500. On a DIN A 4-sized sheet of paper, this would be equal to about 10 mm.
Example 2: The nominal contour is 5mm and the difference from upper and lower tolerance is 0.1 mm. If you take in this case a tolerance width of 5 %, this will yield a scale factor of 25. On a DIN A 4-sized sheet of paper, this would also be equal to about 10 mm.
Example 3: The nominal contour is 5mm and the difference from upper and lower tolerance is 0.02 mm. If, in this case, you take a tolerance width of 2 %, this will yield a scale factor of 5. On a DIN A 4-sized sheet of paper, this would be equal to about 4mm.
With regard to tolerances the lower tolerance is, as a rule, in the material, the upper tolerance is outside.
Offset An overmeasure contour around the nominal contour is created with the offset. Then, the calculated deviations no longer refer to the nominal contour but to the overmeasure contour. The reference direction is not influenced by the offset.
14.09.04 v 2.4 VIII-45

Contours
Example: A slot is limited by inside and outside contour. The distance between the contours (i.e. the slot width) is 52 mm. The tolerance comparison shall be used to examine the deviation of the slot width from the nominal measurement 52 mm +-0.025 mm.
The inside contour serves as the nominal contour, the outside contour as the actual contour.
When carrying out the comparison with an offset (overmeasure) e.g. of 52 mm and a tolerance of +-0.025 mm, a significant deviation is visible.
Compared with that, no deviation is visible in the graphic when applying the onesided tolerance of 51.998 mm and 52.032 mm.
The result of the numerical evaluation shows no difference between the two processes.
VIII-46 v 2.4 14.09.04

Contours
2.6 Form Tolerance Contour The form tolerance of a measured contour to a reference contour is determined according to DIN 7184 in connection with DIN ISO 1101 as follows:
First, the maximum deviation between both contours is determined (see in the illustration below the radius of the red circle as a dotted line).
This radius amount is doubled (diameter of circle).
The value of the diameter includes all deviations when the centre of the circle is moved on the reference contour.
Reference contour (black)
Nominal contour (green)
Ideal circle (blue; part of the constructional drawing)
Circle with biggest deviation (red)
Use the function "Line form tolerance" to calculate this value.
Determine line form tolerance
A prerequisite for this function is that you are already using contours in your part program.
Load a measured contour (nominal contour).
Load an ideal contour (reference contour).
Use the symbol "Loop counter" to control the functionality "Loops" (for detailed information, refer to this topic).
The symbol "Further tolerance options" offers further possibilities, for example, how to perform transfers to STATPAK or how to abort a part program when the measurement results are outside the tolerance limits, etc. (for more details, also refer to the topic Further Tolerance Options).
If you activate this symbol you can have a form tolerance chart displayed.
Enter the value of the tolerance limit into the input field "Tolerance width".
Best fit The best fit is carried out prior to the evaluation of the line form tolerance. The best fit position of the contour is calculated only temporarily and is not stored. For details, refer to the topic Best Fit Contour.
14.09.04 v 2.4 VIII-47

Contours
2.7 Tolerance Band Editor The tolerance band editor makes it possible to specify various widths of tolerance ranges within a nominal contour.
Every contour point can be assigned a lower and upper tolerance limit, which can be stored in the GWS file. In case a contour nominal-to-actual comparison is performed, the measured contour can be compared to the nominal contour and its tolerance limits.
The tolerance band editor can be called only in the learn mode.
Define tolerance range of a nominal contour
Load a nominal contour.
Click in the menu bar on "Tolerance / Tolerance Comparison Elements / Tolerance Band Editor".
Select a nominal contour.
The Tolerance band dialogue is shown.
Define the contour tolerance range.
For details refer to the topic "Define Tolerance Band of a Contour" and "Edit Tolerance Band of a Contour".
VIII-48 v 2.4 14.09.04

Contours
2.8 Define Tolerance Band of a Contour Define uniform tolerance range
Your intention is to define a uniform tolerance range, i.e. all contour points have the same upper and lower tolerance limit.
Click on the "Constant Distribution" symbol.
Enter the "upper and lower limit" in the area "Start of Tolerance Range".
Now no entries are possible in the "End of Tolerance Range" area.
Mark tolerance range
Use the mouse cursor to mark the contour point where the tolerance range is to start.
Press the left mouse button.
A blue cross is shown.
Keep the left mouse button pressed and drag the mouse pointer to the contour point where the tolerance range is to end.
While dragging with the mouse, a second blue cross is shown.
Release the mouse button at the end of the tolerance range to be defined.
The defined tolerance range is shown marked with a red frame in the graphics of elements.
Define proportional tolerance range You wish to define a tolerance range having a tolerance range start width and a tolerance range end width. This means: the tolerance width continues changing from the tolerance range start to the tolerance range end.
Click on the "Proportional Distribution" symbol.
Now it is possible to make entries in the areas "Start of Tolerance Range" and "End of Tolerance Range".
Enter the "upper and lower limit" in the areas "Start of Tolerance Range" and "End of Tolerance Range".
Continue as described under "Mark Tolerance Range".
For further information on this topic refer to
Tolerance Band Editor and
Edit Tolerance Band of a Contour.
14.09.04 v 2.4 VIII-49

Contours
2.9 Edit Tolerance Band of a Contour Relate tolerance range to the whole contour
Click on the selection symbol in order to relate the entries from the areas "Start of Tolerance Range" and "End of Tolerance Range" to the whole contour.
Delete defined tolerance ranges of the whole contour
Click on the dust bin symbol to delete your tolerance ranges of the whole contour.
Enter tolerance limits using the mouse
Click on the pipette symbol to take the tolerance ranges by means of the mouse into the input boxes of the areas "Start of Tolerance Range" and "End of Tolerance Range".
Click with the mouse cursor on a contour point within a tolerance range.
Once the "Proportional Distribution" symbol is activated, the upper and lower tolerance limit of a contour point are entered into all input boxes.
Once the "Constant Distribution" symbol is activated, the upper and lower tolerance limit of a contour point are entered only into the input boxes of the area "Start of Tolerance Range".
Once you have entered the required values, press again the pipette symbol in order to switch this function off. Should you click, by mistake, into the graphics of elements, the values entered would be changed.
Show all elements in the graphics of elements
While defining a tolerance band of a contour, only the current contour is shown enlarged in the graphics of elements. If you wish to watch all elements, click on the symbol "Show Elements in Background".
For further information on this topic refer to
Tolerance Band Editor and
Define Tolerance Band of a Contour.
VIII-50 v 2.4 14.09.04

Contours
2.10 Filter Contour Regular Contours When filtering a contour (menu bar "Contour / Filter Contour") in GEOPAK, a smoothing effect is realized. We offer you a Gauss low-pass filter where the high frequency parts will be suppressed. Depending on application, you should distinguish:
For round contours, you should use the Gauss Filter / Circle, for oblong contours, the filter via the line.
When using the Gauss-filter, you must in any case enter the "Run in / run out"-value.
Select the filter via the list in the "Filter Contour" window.
Irregular Contours For contours to which it is almost impossible to assign a Gauss-filter due to their irregular forms, you will select the "Robust-Spline-Filter".
This option allows you filtering for contours and for
Automatic Circle Measurement
Automatic Line Measurement
When the Robust-Spline-filter is selected, the text field for the "Run in / run out"-entry is deactivated.
Automatic Circle Measurement For the automatic circle measurement a filter can be selected when the scanning symbol is active (see ill. below).
The critical wavelength is calculated with π, the circle diameter and on the basis of 50 UPR (undulations per revolution). It must be stated for every filter. The pre-set UPR-size is 50. The formula used internally by GEOPAK is then:
Critical wavelength = π * Circle diameter / UPR
14.09.04 v 2.4 VIII-51

Contours
Automatic line measurement For the automatic line measurement (ill. below) the critical wavelength must be entered.
Pre-set are the Gauss-filter and a critical wavelength of 1.0. The measurement unit is limited to millimetres.
VIII-52 v 2.4 14.09.04

Nominal-Actual Comparison: Further Options
3 Nominal-Actual Comparison: Further Options
3.1 Nominal-Actual Comparison, e.g. "Element Circle"
You have measured a circle and want to realize a nominal-actual comparison. To call this function, you have two possibilities:
Click into the menu bar "Nominal Actual Comparison Elements / Element and come to the "Nominal Actual Comparison" dialogue window.
Select via the evaluation tools (toolbar on the lower display margin).
Click into the icon and the "Nominal Actual Comparison" dialogue window appears.
By clicking on the characteristics (e.g. diameter), you can determine whether the displayed characteristic has to be tolerated or not. You notice that inputs are possible in one case, in the other case the cells are disabled. With one click, e.g. on the co-ordinate X, you activate or deactivate the cells.
If you want to tolerate the position in another mode of co-ordinate system, click on one of the symbols on the left (e.g. cylindrical co-ordinate mode). After that, the position of the element is directly converted. Normally, the polar representation is referred to the plane XY; i.e., third axis is the axis Z. If you want to relate the representation to another plane, click a second or third time on the corresponding type of co-ordinate system.
With "circular" elements, you can select whether you want the diameter or the radius for the comparison of nominal and actual values. The selection is carried out through two symbols below on the left side of the chart (for example diameter).
With tolerances of positions, it is possible that the sign of the position (e.g. value X) is important. On the other hand, it happens that the sign is troubling, since by the simply mathematical comparison an error is located that is twice as large as the value of the position.
Via the symbol in the heading of the dialogue window, you can determine whether the sign is enabled or not: If you click on the symbol, the sign is disabled.
Instead of numerical values, the tolerance limits can also be determined by table codes (e.g. H7). Activate each time the symbol before going to the "type" column. The cells of the numerical values (columns "Upper" and "Lower Tolerance Limit ") are deactivated. Input the so-called "Identifier" for the tolerance class into the text field.
14.09.04 v 2.4 VIII-53

Nominal-Actual Comparison: Further Options
Exit the text field either with a "TAB" or with one click into another box. Then the numerical values from the tolerance chart are entered into the boxes "Upper" and "Lower Tolerance".
If you want to carry out further actions after the nominal actual comparison, confirm via the symbol. A dialogue window appears "Further Options of Nominal Actual Comparison".
Here, the following options are at your disposal:
abort the part program if one value is excessive and/or too small;
transfer the suitable feature to STATPAK or 3D-TOL (for 3D-TOL, only position tolerances are possible)
define the feature as reference for a
ature a further identifier (e.g. drawing grid square) for
(positions) have be tolerated in the current or in the origin co-ordinate system.
ual n the "Comparison of Nominal and Actual Values Element”
on of Nominal and Actu
assign to the feature a position number for the continuous numbering and a sequence in the first sample test
assign to the feeasier finding.
Additionally, you can also determine whether values of positions to
3.2 Further Options for Nominal Actual Comparison If you want to execute further actions after the comparison of nominal and actvalues, click e.g. idialogue window
If you want further actions after the comparison of nominal and actual values, click e.g. in the "Compari al Values: "Element Circle"
dialogue window on the
s
symbol. Below the headline "Further Options in the Nominal Actual Comparison" you can then
abort the part program if the lower tolerance limit remained under.
abort the part program if the upper tolerance limit is exceeded; or ...
T alid for bilateral tolerance, not for form and position
his is only vtolerances.
transfer the feature to STATPAK. For this, first of all a name must be assigned to the feature. As soon as at least one characis input for a name, the symbol "Report to Statistic Program" is activated.
ter
In addition, the feature name can be only input for the
alues are recorded ere and can be consulted for calculations (e.g. Best Fit).
protocol.
You may also transmit position tolerances to 3D-TOL. The vth
VIII-54 v 2.4 14.09.04

Nominal-Actual Comparison: Further Options
Additional Information:
the position number; you can use it if you, e.g. execute the measurement for an initial sample. In the program of initial sample report of Mitutoyo, the features are classified according to this number, before printing. This allows you to carry out the measurement in another order than the features are required in the report
a further designation; this can be, e.g. the grid square of a larger drawing, so that the feature can be easily found.
a reference identification; this is used if the MMC may be applied. Here, it is sometimes specified in the drawing that the MMC can also be applied for a reference element (e.g. ' A '). Where it is possible, in GEOPAK, to use the MMC you also can input this reference identification. During the input, you get a list of the references already defined.
3.3 Origin of Co-ordinate System Normally, GEOPAK always converts the positions and directions into the current co-ordinate system. With the development of a new function, we want to keep at your disposal, at the end of a long part program, the possibility to tolerate the positions in the original co-ordinate system.
The Situation
You have a long part program and change the co-ordinate system several times.
You want to execute all nominal-actual comparisons only at the end.
You want to tolerate the positions in your original co-ordinate system that actually is no longer at your disposal.
Tolerance of the positions
In the "Further Options for Nominal Actual Comparison" dialogue window, click on the symbol on the right and activate for tolerance of the positions the "Origin of Co-ordinate System". The symbol on the left side always signifies the actual (last) co-ordinate system.
This is only valid for positions. Diameter or radius are independent from the co-ordinate system.
14.09.04 v 2.4 VIII-55


Output
IX Output of Data Contents 1 Output................................................................................ 2
1.1 Output of Data.............................................................................. 2 1.2 File Format Specification ............................................................ 3 1.3 Standard or Special File Format................................................. 4 1.4 Change File Output Format ........................................................ 5 1.5 File Format End............................................................................ 5 1.6 Print Format Specification .......................................................... 5 1.7 Change Print Format ................................................................... 6 1.8 Print Format End.......................................................................... 6 1.9 Form Feed .................................................................................... 7 1.10 Printing according to Layout Head Start ................................... 7 1.11 Protocol Archive .......................................................................... 8 1.12 External Printing.......................................................................... 8 1.13 External Print Format Change .................................................... 8 1.14 External Print Format End .......................................................... 8 1.15 Output Text .................................................................................. 9 1.16 Layout for Surface ..................................................................... 10 1.17 Save Contour in ASCII File ....................................................... 11 1.18 Open Protocol ............................................................................ 11 1.19 Change Protocol ........................................................................ 12 1.20 Close Protocol ........................................................................... 12 1.21 Protocol Output ......................................................................... 12 1.22 Types of Output ......................................................................... 13 1.23 Print Preview (Page View)......................................................... 15
2 Flexible Graphic Protocols............................................ 16
2.1 Flexible Graphic Protocols and Graphic ................................. 17 2.2 Flexible Graphic Protocols in the GEOPAK Editor ................. 18 2.3 Tolerance Graphics in the Flexible Protocol ........................... 19 2.4 Templates of Graphic Windows ............................................... 20
3 Protocol Output .............................................................. 21
3.1 Dialogue for Protocol Output.................................................... 21 3.2 Scale and Print Graphics .......................................................... 21
14.09.04 v 2.4 IX-1

Output
1 Output 1.1 Output of Data For the "Output" of measured data, GEOPAK always proposes two ways. You can output the data on a printer, and/or store the measurement results in a file. In GEOPAK, these functions are accessible with the menu bar and the "Output" menu.
If you need a printed report, you are going to opt for the printer as output media e.g. if you need documents for the archives. GEOPAK uses the printer having been determined as default printer in your Windows system (see details under "Printer Settings").
• If you want to use a different printer, you first must select this printer as default in Windows.
• Printing is done page by page. • The format of the data can either be the one predefined by
GEOPAK or your own format. For further details, refer to Print Layout".
The output of data in a file (storing) is always in ASCII. You will prefer this solution if you need the data for further processing, e.g. in some other programs. To do so, use the "File Format Specification" function. However, you can change the output format via the "Change File Output Format" function. It is also possible to print the ASCII-file; however, there is no formatting information.
You can use both ways, printer output and storage as ASCII file, independently during the learn mode of the part program. These parallel functions will meet all your requirements.
Please consider in advance which data you need to be printed or stored before starting the learn mode. The data are recorded from the moment you switch the corresponding format on (e.g. "Print Format Start").
IX-2 v 2.4 14.09.04

Output
1.2 File Format Specification In this dialogue (menu bar "Output / File Format Specification") you determine, e.g. the name of the output file, where to store it and which information it must include (head data, formula calculation, etc.).
Output File
In the "Output File" text field, you can enter a complete file name including drive and path (according to Windows conventions a max. of 255 signs).
• If possible, select "signifying" file names. It will be easier to find them again. If you enter only one file name, this file will be automatically stored. You will find the file in the MCOSMOS/exe directory having been created at the installation of MCOSMOS.
• If you enter one fixed file name, the output file will be overwritten each time you execute the part program.
• If you want to store all files, you must change the file name each time you execute the program. For further information concerning this subject, please refer to your MCOSMOS-CD-ROM under "Documents", folder "GENERAL", file "UM_string_code_g(e).pdf.
If you have already created one or more output files, you can use a list of suggestions; this list appears when you click the arrow symbol. From this list, you can choose a file by clicking with the mouse.
If you click on the icon, you get a dialogue window (Windows conventions) so that you can easily find files in the different directories.
Append
Also click on the "Append" check box. In this case, the new data are always appended to the existing file. Otherwise, the file is simply overwritten.
Output You can click as many boxes as you want, with the corresponding options. Thus, you meet all requirements for your output file.
For information on whether and how to choose "Standard" or any special formats refer to the topic Standard or Special File Format.
14.09.04 v 2.4 IX-3

Output
1.3 Standard or Special File Format File format Beginning from Version 2.2, the "Start of File Format" dialogue includes as an extension the section "File Format". Here you can make your choice using one of the radio buttons for "Standard" or any other formats. This enables you to create ASCII files in several formats for a variety of part programs without having to change the default setting.
Standard Clicking "Standard" causes the default setting made in the "Settings GEOPAK" dialogue of the PartManager to remain unchanged. To get to this dialogue, use the "Menu bar / Settings / Default Settings Programs / CMM / GEOPAK". The format file name's length is limited to 40 characters.
Special format In order to get a special format, click the second button. Use the arrow key to select your format from the list.
This is what you should know:
• The list is derived from already existing format files. • The last preceding input is suggested. • After reinstallation the GEOPAK-3 format is suggested. • The "Mitutoyo GEOPAK-3" and "Mitutoyo GEOPAK" formats are
always shown. They refer to the file GEOASCII.INI and the sections [GEOPAK-3] and [Geopak-Win] respectively.
The other optional formats are derived from files with the extension GAF = GEOPAK-ASCII format. The file name without this extension is in each case the name that is shown in the list. The format has to be described in this file. In order for this to be implemented, we recommend that you contact the Mitutoyo Service.
The GAF file has to be stored in the MCOSMOS-INI directory.
IX-4 v 2.4 14.09.04

Output
1.4 Change File Output Format Before starting the output, you must have specified under "File Format Specification " what you want to output in the file.
During the execution of the part program, you can change the items that must be in the file by the "Change Output Format" function. Thus, you can add other items to your file or delete.
Activate the "Change Output Format" function via the menu bar and the "Output" pull-down menu.
1.5 File Format End Via this function (menu bar "Output"), you finish the data output to file. Now, you can either use this file for other purposes, or even start a new file (cf. under File Format Specification). Thus, it will be possible to place in order the data – sorted according to "Geometrical Elements", "Tolerances", etc. – in different files and to store it.
You do not have to finish the output explicitly; when you leave the program, the output file will be automatically closed. The data are stored.
1.6 Print Format Specification Activate these functions in GEOPAK via the menu bar and the "Output" menu. Select the "Print Format Specification" function.
When using this function and the following dialogue window, you define which items (measured results) will be printed.
In the description fields, you can define the text for the headlines and footers. The printed protocol has a headline and a footer printed on every page. Font and size of type is defined for the whole protocol.
Notice that GEOPAK writes, in any case, the version number and the part program term into the headline. The footer includes the current page number.
Texts that have once been input are automatically stored. Via the arrow key, you can activate and use later again the texts that have once been input. In the protocol, the texts are right justified. To realize your protocols, cf. under Print Layout.
In the logo file description field, input the path and file name of the bitmap of your logo.
Instead of typing the file name, you can also click the icon. If you click on the icon, you get a dialogue window (Windows conventions) so that you can easily find and activate your file in the different directories. It is supposed that you have stored your logo as a bitmap (*.BMP) file in a directory.
If you choose a logo, it automatically appears in the dialogue. In the protocol, you can see how your logo appears above the protocol head. The file can be in JPG or BMP format.
14.09.04 v 2.4 IX-5

Output
By clicking in the "Head Data" check box, you can have the head data of the part printed on the first page of the protocol. You can define the head data in the PartManager via the menu bar "Settings / Head data". These data may be the drawing number, the part name, the customer information, and others.
When using the other check boxes, you can select which information will be printed on your protocol.
You will always get the
• name of the operator and the • date and time of start printing.
You must know
Recording starts as soon as you confirm the input of the "Print Format Specification" by "Ok".
The selected data are recorded until you finish the part program or stop the output with the "Print Format End" function via the menu bar "Output".
A page is printed as soon as it will be full.
If a page is full, it will be automatically printed. You can watch the percentage in the status bar besides the user name (at the bottom of the page).
Via the "Form Feed" function (menu bar "Output") you can get the printout even if the page is not yet full.
Via the "Change Print Output Format" function, you can change print options without stipulating a new printout format.
You can only use one printout format until activating the "Print Format End" function.
1.7 Change Print Format This function is same as "Change File Output Format".
1.8 Print Format End Via this function (menu bar "Output"), you finish the data output to file. Now, you can either use this file for other purposes, or even start a new file (cf. under File Format Specification). Thus, it will be possible to create different protocols – sorted e.g. according to "Geometrical Elements", "Tolerances", etc. –.
You do not have to finish the output explicitly; when you leave the program, the protocol output will be finished and the current page printed (even if the page is not complete).
IX-6 v 2.4 14.09.04

Output
1.9 Form Feed Via the "Form Feed" function (menu bar "Output") you can get the printout even if the page is not yet full.
1.10 Printing according to Layout Head Start MCOSMOS proposes a default layout for your print report. If this format is not satisfactory, you can create your own report. The layout is realized in another program (see details under "The Mitutoyo Layout"). The structure of the log heading is stipulated in the layout file and cannot be changed on your own. If you want, you can have an adjusted layout from the Mitutoyo service.
If you want to use the layout file, you must tell it GEOPAK, this means via the "Print Layout" (menu bar "Output") function. This function also allows printing out several reports in only one operation.
Hint The "Print Layout" function is utilised appropriately at the end of the part program because all nominal-to-actual comparisons will be listed in the report.
As a standard, Mitutoyo delivers several possibilities for the layout, e.g. the initial sample report according to VDA guidelines.
Proceed as follows
If you have, for example created several layout files and activated them already once, you will find these in a list. To do so, click on the arrow key on the right of the text field.
If you want to make the selection that MCOSMOS offers, click on the symbol in the following "Open" dialogue window, first search - according to Windows conventions - the directory in which MCOSMOS is installed on your computer.
Under "*/MCOSMOS/Layout" you will find the files proposed from Mitutoyo and those you have created.
Hint For further information about the layout, please refer to your MCOSMOS-CD-ROM under "Documents", folder "GEOPAK", files "dia_lay_g(e).pdf" and "UM_user_def_g(e).pdf" and folder "GENERAL", file "print_lay_2_0_g(e).pdf".
14.09.04 v 2.4 IX-7

Output
1.11 Protocol Archive In this window (menu bar "Output / Protocol Archive"), you enter the folder in which MCOSMOS stores all the files relevant for a subsequent protocol. The data can be administrated or printed via the Protocol-Manager. See details under "Protocol-Manager".
1.12 External Printing If you activate this function, proceed in the following dialogue the same way as explained under "Print Format Specification".
1.13 External Print Format Change If you activate this function, proceed in the following dialogue the same way as explained under "Change Print Format".
1.14 External Print Format End If you activate this function, proceed in the following dialogue the same way as explained under "Print Format End".
IX-8 v 2.4 14.09.04

Output
1.15 Output Text
Activate the "Text Output" function via the symbol or via the menu bar and the "Output" menu.
If you want to output additional information in your protocol (see icon on the left), click on the printer symbol.
This is also valid for the ASCII file.
You may enter
a defined text, which, each time, is the same when you print it or
another text at each part program execution. Then, GEOPAK will stop at each execution and asks you to enter your text.
You can enter a variable in the text (date etc.). For further information concerning this subject, please refer to your MCOSMOS-CD-ROM under "Documents", folder "GEOPAK", file UM_string_code_g(e).pdf.
The input text will be analysed and prepared. In the line under the description field is shown, which text will be written into the protocol respectively into the file after the "Preparation of Data".
Assign position number to a text You can assign a number to entered texts (attributive features) using the input field "Position number". In output protocols (e.g. initial sample report), you can use position numbers to define the sequence of the output data. This is how you can directly position input text in the protocol.
In the case of identical position numbers, first the input text and then the relevant tolerance comparison are output.
14.09.04 v 2.4 IX-9

Output
1.16 Layout for Surface The "Layout for Surface" window (menu bar "Output" and then the function) has to do with the dialogue you originally know from 3D-TOL Win. In 3D-TOL, the different views of the parts or the models will be provided with a name in the "Labelling" line. In GEOPAK, you can’t edit in this line, although it is the same dialogue. You only can call the layout commands having been generated in 3D-TOL and change with some options.
If you have opened the dialogue, you will see in the "Labelling" line the names of the views, which you have already allocated in 3D-TOL.
You can ask for a list of the different views of the part, you actually work with in GEOPAK, via the arrow symbol (see picture below).
Click on the view you want (in our example "top view").
You can rotate the part and
print out the view.
With the different options, you can
print the graphics,
print the list of the measured points,
Stop 3D-TOL after having printed and,
if you have opened the info. windows in the selected view, you may automatically "Re-sort" these.
In the following description fields
drawing no. and
the two comment lines
you can display the default of 3D-TOL via the arrow symbol. It is possible to edit in these lines in contrast to the "Labelling" (see above).
IX-10 v 2.4 14.09.04

Output
1.17 Save Contour in ASCII File With the "Contour Save" function, you can store contours as ASCII file that means as a text. Activate this function via the menu bar and the "Output" pull-down menu.
In the "Contour Save" dialogue window in the list field under "Select Element", you will find the contours you have measured so far. It is a part of the List of Elements . Here, the number of contours is not limited.
Click the contour you want to store. If you do not see it in the displayed zone, you can use the scroll bar to view the whole list.
Now enter the name of the file in the "Contour File" field together with the path where you want to store the contour.
You can also click on the icon and store the file in the following dialogue window (Windows conventions).
The file names must get the extension <.gws>. Otherwise, the program does not recognise the special information contained in the file. The three letters g, w and s come from "GEOPAK-Win Scanning".
Once you have stored the contour in such a file, you can use e.g. Word- or Notepad to read, print, or modify the data. It is also possible to edit in these text files (according to Windows conventions).
1.18 Open Protocol To access this function and the corresponding dialogue, go to the menu bar and the "Output" menu.
This function and the subsequent options "Change Protocol Format" and "Close Protocol" enable you to control the output of tolerance comparisons and elements. For initial detailed information refer to "Protocol Output" .
Hint Remember right from the beginning that for the control of the print output you have always to follow this order:
Close protocol
Change protocol format
Close protocol
Printing, however, is also performed automatically at the end of the part program.
The "Open Protocol" dialogue offers you four options under the heading "Output Options". It is your decision as a user what print-out option you take:
all tolerance comparisons,
the tolerance comparisons outside the control limits,
tolerance comparisons outside the tolerance limits, or
all elements.
Using this dialogue you also make your decision for one of the "Output Types".
14.09.04 v 2.4 IX-11

Output
In contrast to the function File Format Spezifikation the option "head data" does not stand to the decree in this dialogue. So that you can input the head data, you must use the option Inout Head Data or Set Head Data Field.
1.19 Change Protocol This dialogue (Menu bar / Output / Change Protocol Format) allows you to make changes to the output format previously selected in the dialogue "Open Protocol".
You have four options. It is your decision as a user what print-out option you take:
all tolerance comparisons,
the tolerance comparisons outside the control limits,
tolerance comparisons outside the tolerance limits, or
all elements.
1.20 Close Protocol Using this function (Menu bar / Output) you finish the current print output. After finishing you can, of course, open a new protocol (for details refer to "Open Protocol"). Thus it is possible to generate various protocols - designated e.g., by "Geometric Elements", "Tolerances", etc.
When you leave the program, the protocol output is closed and the protocol printed out.
1.21 Protocol Output By means of the "Protocol Output", you can create protocols. Here, you can select a layout and the type of output.
Hint
The template is a layout or a manuscript for your protocol.
"Layout" List Box
On the left side of the dialogue window, you find the "Layout" list box.
In the "Layout" list box, you will see all layouts situated in the ..\MCOSMOS\Layout directory. After the MCOSMOS installation, you find some examples of layouts in this folder you can use.
If you select a layout, a preliminary drawing of the layout is automatically displayed.
IX-12 v 2.4 14.09.04

Output
Number of Copies
In the "Number of Copies" list box, you define how many copies you want to output.
In the list box, you see how many protocols have been requested at last.
In which form the protocols are printed or stored is explained in the "Types of Output".
1.22 Types of Output By means of the radio buttons, which are listed under "Output" on the right side of the dialogue window, you determine the output format. The following radio buttons are available:
Printer If not set before, output is done on the current printer. If, in the ProtocolDesigner, you have selected another printer for a layout, this will be used to print the protocol. For this topic, see details under "ProtocolDesigner". On your MCOSMOS-CD-ROM you will find also a complete user’s manual under "protocolldesigner_g(e).pdf". Click on "Documents" and "GENERAL".
open this file in a text-processing program and if necessary adapt
ocuments will
irectory, you can select layouts that have been optimised for Word.
), you should use the Multi-Mime-HTML format.
e of charge "Acrobat Reader" of Adobe.
This format is qualified for sending measurement protocols. With
Print to File If you select this option, a PRN file (preprint process) will be created. The condition for this is a postscript printer driver able to create graphics for a device-independent printing.
Rich Text Format If you make this option, a file will be created in RTF format. Then, you canit.
Hint
The RTF documents will be created according to the Microsoft specification "Version 1.5". Not all software makers comply with this specification. So it may happen that the created RTF dbe badly displayed by the text-processing programs. But, out of the ..\MCOSMOS\Layout d
HTML Format If you output a protocol in HTML format (without Muli-Mime), several files will be created by default. For example, the pictures are stored in a separate file. If you want to send your measurement protocols (e.g. as email or on CD rom
Adobe PDF-Format A PDF document will be created that you can read, print and edit (but editing is limited) with the fre
Multi-Mime-HTML-Format
14.09.04 v 2.4 IX-13

Output
Multi-Mime-HTML format in contrast to simple HTML, only one file will be created.
XML-Format This format is partially still in the making. XML is meant to offer you multitudinous possibilities for processing your measurement data.
Output in Formats of Graphic Data File
• Bitmap If you make this option, you get one or several bitmap files, independently to the size of your protocol.
• JPEG graphics If you make this option, you get one or several JPEG files, independently to the size of your protocol.
• Metafile (EMF) If the output must be in the Metafile format, you get one or several Metafile files, independently to the size of your protocol.
Hint These graphic data files are suitable for a problem-free integration of your measurement data in presentations.
List Box for File Names In the list box bottom right, you enter the file name of the protocol.
IX-14 v 2.4 14.09.04

Output
1.23 Print Preview (Page View) This preview option is a "Real Data Print Preview". This means that there are no global values displayed such as those shown, e.g., in the ProtocolDesigner. What is displayed are the values obtained from the measurements you have just performed.
You access the dialogue (picture below) in the GEOPAK learn mode through the "Menu bar / Output / Protocol Preview".
So it is possible for you to verify your protocol once more before printing. If your protocol is alright, you will not have to leave the print preview again. You select your template from the list and confirm. As a result, you obtain a screen-filling preview from where you can print directly.
In addition to the above, it is possible to store the print preview or to email it to your customer. For this purpose, you customer needs only a small program that he can get from you without paying license fees. You find this "invoice.ll" program on your MCOSMOS – CD.
All other symbols in this preview window are ballooned, so you can see right on the spot what function is concerned.
14.09.04 v 2.4 IX-15

Flexible Graphic Protocols
2 Flexible Graphic Protocols To open the dialogue window "Store graphic for template" click on the
symbol (left) of an opened graphic window, e.g. "Graphics of elements".
Alternatively you can use the menu bar "Graphic / Store graphic for template".
With this function you can prepare graphics in the learn mode for the printout in the flexible protocol.
Background It is not possible to print graphic windows directly out of the GEOPAK learn mode into the flexible protocols. For this, you need to store the graphic windows temporarily as a file. The definition as to which files are printed out, you find in the templates.
In the input field "Names" of the dialogue "Store graphic for template" you enter a name of the graphic that is as "telling" as possible. You can also dispose of nine view numbers. Depending on the template with which you want to print, you have to select the view number. You know these view numbers (picture on the right) from the ProtocolDesigner. For detailed information on this program and further directions for use and Online Help refer to ProtocolDesigner.
The inputs in the input fields "Name" and "Comment" are, subject to a relevant template, included in the flexible protocol.
Hint In contrast to the GEOPAK edit mode, you need not select a graphic type, because in the learn mode, the function "Store graphic for template" is linked to the graphic. For more information, refer to "Flexible Graphic Protocols in the GEOPAK Editor"" and "Flexible Graphic Protocols and Graphic".
IX-16 v 2.4 14.09.04

Flexible Graphic Protocols
2.1 Flexible Graphic Protocols and Graphic Print Graphic
Activate the function "View number".
The function "For table" is deactivated.
Select view number 1, as the protocol output of Mitutoyo templates is performed via "view number" 1 as a standard.
Activate the function "Print graphic" if you wish to print out the graphic immediately after having confirmed the dialogue with "OK".
After clicking the option "Print graphic", the dialogue "Protocol Output" opens.
In this case, you select in the dialogue "Protocol output" the template you require for your flexible protocol.
To avoid problems with graphics of older measurements, these view numbers and the connected data are deleted upon each program start.
Print graphic as a table in the flexible protocol
Activate the function "For table".
The function "View number" is deactivated.
Thus, the graphic is not printed in a single frame but is included in a table in the flexible protocol. The advantage of printing graphics within a table is that any number of graphics can be printed, i.e. irrespective of whether you wish to print out 1 or 100 graphics, you can always use the same template.
Positioning the graphic in the flexible protocol If you enter a number in the input field "Position number", you can position the graphic in the flexible protocol. We recommend that you reserve position numbers for this purpose in your part program in order to avoid a doubling of position numbers in the flexible protocol.
Change size of graphic in the flexible protocol If you activate the function "Define scaling", you can enlarge or reduce the display size of the graphic in the flexible protocol to scale.
You can use this function to fit the graphic into the frame of the template. In case that the graphic is bigger than the frame, only that part of the graphic is displayed that fits into the frame.
Values below zero reduce the graphic size.
Values bigger than zero enlarge the graphic size.
Edit graphic The function "Store graphic for template" automatically stores all graphics as a meta file. To edit the graphic with the graphic programs Corel Draw, Micrografx Designer or AutoCAD, click on the button "Edit graphic".
The button "Edit graphic" is only active when a graphic editor has been set in the PartManager under "Settings / Defaults for programs / button PartManager / Editor Tab".
14.09.04 v 2.4 IX-17

Flexible Graphic Protocols
Layout of info windows in the learn mode You can use the function "Define layout of info windows for print command" to store the number, position and contents of the info windows in a meta file. Therefore, the graphic is printed in the repeat mode exactly the same way as it has been learned in the learn mode. For detailed information, refer to the topic "Define Layout of Info Windows".
Info windows can only be defined for the element graphics and the airfoil analysis (MAFIS).
For detailed information refer to "Protocol Output" and "Types or Output".
2.2 Flexible Graphic Protocols in the GEOPAK Editor In order to print-out graphic windows like, for example, "Graphics of elements” in the repeat mode, the function "Store Graphic for template” is required.
Background It is not possible to print graphic windows directly out of the GEOPAK learn mode into the flexible protocols. For this, you need to store the graphic windows temporarily as a file. The definition as to which files are printed out, you find in the templates.
To get to the function and the corresponding dialogue use the menu bar and the menu "Output".
In the part program, this function should always be between the commands "Open protocol” and "Close protocol”.
In the command "Open protocol”, always ensure that you have selected the correct template. For detailed information, refer to the topic Templates of Graphic Windows.
For further information, also read the topic
Tolerance Graphics in the Flexible Protocol.
IX-18 v 2.4 14.09.04

Flexible Graphic Protocols
2.3 Tolerance Graphics in the Flexible Protocol Positioning the graphic in the flexible protocol You can position the graphic in the flexible protocol when you enter a number into the input field "Position number". We recommend to reserve position numbers for this purpose to avoid a doubling of position numbers in the flexible protocol.
Change size of graphic in the flexible protocol If you activate the function "Define scaling", you can enlarge or reduce the display size of the graphic in the flexible protocol to scale.
Values below zero reduce the graphic,
values bigger than zero enlarge the graphic.
Example: Print-out tolerance graphic "Flatness" in the flexible protocol.
In the dialogue window "Open protocol" you select for example the template "Flatness".
Select from the list box "Define graphic type" the type "Flatness".
Select from the list box "Reference element" an element that shall be represented in the tolerance graphic.
Confirm the "Loop counter", when you want an output of elements with a tolerance graphic within a loop.
In the input fields "Name" and "Comment" you enter the text that you want to be output in the flexible protocol.
Activate the function "View number".
The function "For table" is deactivated.
Select view number 1, because the Mitutoyo templates regularly output the protocols via the "View number 1".
Activate the function "Close window" when you want to close the graphic window in the repeat mode.
Example: Print tolerance graphic "Flatness" as a table in the flexible protocol
Select in the dialogue window "Open protocol" the template "Mitutoyo Graphic output in a table.mte".
Follow the steps 2 to 5 of the above example.
Activate the function "For table".
The function "View number" is deactivated.
For details, refer to the topic Templates of Graphic Windows.
14.09.04 v 2.4 IX-19

Flexible Graphic Protocols
2.4 Templates of Graphic Windows For information about which graphic window requires which template, see the table below:
Graphic window Template
Graphics of elements ELEMGRAPHIC
Tolerance graphic
Straightness STRAIGHTNESS
Flatness FLATNESS
Roundness CIRCULARITY
Parallelism PARALLELISM
Circular Runout CIRCULARRUNOUT
Axial Runout AXIALRUNOUT
Compare Points COMPAREPNTS
Tolerance Comparison Contour TOLCOMPCONTOUR
IX-20 v 2.4 14.09.04

Protocol Output
3 Protocol Output 3.1 Dialogue for Protocol Output With the dialogue for the protocol output, it is possible to enter additional data in the protocol. These can be e.g.
data concerning the part,
data concerning the user or
data concerning the customer.
Via the "Template" list box, you select the layout you want.
Hint The template is a layout or a manuscript for your protocol.
The selected ProtocolDesigner template must have been related to a user-defined input dialogue (edl file). You can relate a user-defined input dialogue only in the ProtocolManager program. For further information on this subject refer to "Relate User-Defined Input Dialogue to a ProtocolDesigner Template".
An example for a layout with a dialogue is the "Initial Sample Report of 1998" that you can find in the list box.
Hint For a better orientation, a preliminary drawing of the selected layout is automatically displayed.
3.2 Scale and Print Graphics The function "Learnable Graphic Commands" enables the settings for the graphic evaluations of the below items to be stored in the GEOPAK Part Program Editor.
Element Graphics
Tolerance Graphics
• Straightness • Flatness • Circularity
Parallelism
Airfoil analysis
Circular Runout
Compare Points
Tolerance Comparison Contours
You decide whether the print graphics is printed out with an automatic or adjustable scale factor.
14.09.04 v 2.4 IX-21

Protocol Output
Add learnable graphic command to part program
Click in the menu bar on "Output / Learnable Graphic Commands".
Select a graphic type from the list box "Define graphic type".
In the list box "Reference element", select an element that shall be displayed and evaluated in the selected graphic.
Hint When several reference elements are possible, always select the current or the nominal element as the reference element.
All elements are displayed in the element graphics. Therefore the Element Selection list box is disabled in case you select the element graphics.
Activate the "Print Window" option, when the graphics is to be printed in the repeat mode.
Only open graphic windows can be printed. In order for the element graphics to be printed, it is necessary that in the repeat mode the function "Window / Element Graphics" in the menu bar is activated.
To print the rest of the graphic windows it is necessary that the diagram symbol is activated in the corresponding nominal-to-actual-comparison.
Adjust the way your graphics is to be scaled in the printout.
Activate the "Close Window" option, when the graphic window which was followed in performing the part program command in the repeat mode, has to be closed.
Upon confirmation of your settings the part program command "Learnable Graphic Commands" will be transferred into your part program.
IX-22 v 2.4 14.09.04

Contours
X Contours Contents 1 Contours ........................................................................... 3
1.1 Principles ..................................................................................... 3 1.2 Contour Import............................................................................. 3 1.3 Export Contour ............................................................................ 4 1.4 Technical Specification............................................................... 5 1.5 DXF Format .................................................................................. 5 1.6 VDAFS Format ............................................................................. 6 1.7 VDAIS (IGES) Format................................................................... 7 1.8 NC Formats .................................................................................. 8 1.9 Special formats............................................................................ 9 1.10 Error Message.............................................................................. 9
2 Manipulate Contour........................................................ 10
2.1 Manipulate Contour ................................................................... 10 2.2 Scale Contour ............................................................................ 10 2.3 Edit Contour Point ..................................................................... 11 2.4 Mirror Contour ........................................................................... 11 2.5 Move / Rotate Contour .............................................................. 12 2.6 Create Offset-Contour ............................................................... 12 2.7 Idealize Contour......................................................................... 14 2.8 Change Point Sequence............................................................ 15 2.9 Sort Sequence of Contour Points ............................................ 16 2.10 Middle Contour .......................................................................... 17 2.11 Fit in Circle with fixed Diameter ............................................... 18 2.12 Prepare Leading Contour.......................................................... 18 2.13 Activate Leading Contour ......................................................... 19 2.14 Scanning with Guiding Contour ............................................... 20 2.15 Loop Counter ............................................................................. 22 2.16 Scanning of a Nominal Contour ............................................... 22 2.17 Define Approach Direction ....................................................... 24 2.18 Recalculate Contour from Memory / Copy .............................. 24 2.19 Intersection Point (Contour with Line / Circle / Point)............ 25 2.20 Contour Connection Element ................................................... 26
3 Delete Contour Points.................................................... 27
3.1 Delete Points of a Contour........................................................ 27 3.2 Delete via "Single Selection".................................................... 28 3.3 Delete with the Co-Ordinates.................................................... 29 3.4 Delete with Radius..................................................................... 30
14.09.04 v 2.4 X-1

Contours
3.5 Delete via an Angle Area .......................................................... 31 3.6 Reduce Number of Points ........................................................ 31 3.7 Delete Linear Parts of a Contour.............................................. 32 3.8 Reduce Neighboured Points .................................................... 33 3.9 Delete Point Intervals from Contour ........................................ 34 3.10 Clean Contour ........................................................................... 34 3.11 Delete Contour Loops............................................................... 35 3.12 Delete Reversing Paths from Contour..................................... 36 3.13 Delete Double Contour Points.................................................. 36 3.14 Min. and Max. Point................................................................... 37
X-2 v 2.4 14.09.04

Contours
1 Contours 1.1 Principles The following texts describes a function - meanwhile integrated in GEOPAK - which was known before as program "TRANSPAK".
With this function it is possible to take over contours from external CAD systems to GEOPAK. It's primary task is to read in contours for tolerance comparisons.
Condition for the measuring procedures in GEOPAK is that only the required contour data (e.g. of any two dimensional contour) are included in the CAD files. In general, it is only possible to read in formats which correspond to the technical specifications determined in GEOPAK (for further information please refer to Technical Specification).
No surface data and no dimensioning lines must be included in the data file. The dimensioning lines are considered as lines to be measured by the program.
Precondition The function "Import contour" must be activated by an entry in the dongle.
1.2 Contour Import Procedure
Click on this icon or choose "Element / Contour" from the menu bar.
Enter the contour name and the memory number in the dialogue window "Element Contour".
Click on the icon "Import contour" and confirm.
Dialogue window In the dialogue window "Import contour" choose the following settings:
The Type of format, e.g. VDAFS or IGES,
The Contour file (CAD file) by choosing this icon.
The pitch: If you do not insert additional points, the initial and end points of a line or of a sector of circle will be transferred only. The distance between these two points is normally too large. Use the function "Pitch" to insert additional points.
The unit of measurement of the file (default, millimetres or inch). We recommend to use the default setting. If, however, the determined unit in the CAD file is not correct you have to change it.
In order to obtain exact results for the tolerance comparisons always activate the option "Set end point". If this option is activated, two additional contour points are inserted at the beginning and the
14.09.04 v 2.4 X-3

Contours
end of a line or of a sector of circle. The points are inserted with a distance of 0,01 millimetres.
If a contour contains many small elements, this option is not necessary. The maximum number of points to be generated is 32 000. If this number is exceeded, GEOPAK displays the error message "Too many points".
Sort order of points: It may occur that the elements in a CAD file are not mutually connected. In this case the position of the elements is not correct (see picture below).
First of all sort the elements in the correct order.
Confirm.
The contour is read. This process will take some time.
The result is shown in the element graphic, in the element list and in the result field.
If you wish to sort, a maximum number of 7000 elements can be read.
1.3 Export Contour The specifications of chapter "Import contour" are valid for this chapter except for the following descriptions.
Procedure How to export the measured contour data to an external CAD system:
Click on menu "Output" and choose function "Export contour".
Choose your settings for "Select contour", "Type of format" and "Contour file" in the displayed dialogue window.
Choose the "unit of measurement" of the file.
Choose the desired contour (2D contour or 3D contour) by clicking on the corresponding icon.
Confirm. The output of the contour is protocoled in the result field.
After you have scanned a contour, the data can be output to CAD systems via different common interfaces e.g. VDAFS or IGES.
X-4 v 2.4 14.09.04

Contours
1.4 Technical Specification General conditions for data exchange Attention must be paid during the design with the CAD system that the end positions of successive design elements coincide with the start position of the next element (e.g. in AUTOCAD set OFANG to END).
The maximum sequence of polynomial curves is 22.
Only the contour lines may be used in the data output.
If the option "Sort order of points" is activated, the maximum number of geometric elements to be read is 7000. If this option is deactivated, up to 31999 elements can be read in. It is possible to create contours with a maximum number of 31999 points.
This specification is only valid for the exchange of contours between CAD systems and GEOPAK
1.5 DXF Format DXF format : ASCII, based on AutoCad V10.0 Autodesk
Convert DXF into GEOPAK The contours are output as elements.
Blocks must be resolved before the output.
The following elements and group codes are supported:
LINE 10, 20, 30 (starting position) 11, 21, 31 (end position)
POINT 10, 20, 30 (point) (when using the DXF 'POINT' element no intermediate points are generated in GEOPAK)
CIRCLE 10, 20, 30 (centre), 40 (radius)
ARC 10, 20, 30 (centre), 40 (radius), 50, 60 (angle)
POLYLINE 66
VERTEX 10, 20, 30 (location), 42 (bulge)
SEQEND
3DLINE 10, 20, 30 (starting position) 11, 21, 31 (end position)
Group codes not listed here are ignored. In particular, the use of 210, 220, 230 and with POLYLINE 10, 20, 30 with values not equal to 0 leads to errors.
Convert GEOPAK into DXF Contours are output as DXF element POLYLINE. When interpolation is activated each point corresponds to a VERTEX element.
14.09.04 v 2.4 X-5

Contours
1.6 VDAFS Format VDAFS format : ASCII, V 2.0 according to DIN 66301.
Convert VDAFS into GEOPAK The contours are output as "sets".
The following VDAFS elements are supported:
HEADER Start identifier of the file
BEGINSET Start of a set
ENDSET End of a set
$$ Comment
POINT Point co-ordinates (when using this element, no intermediate points are generated in GEOPAK.)
PSET Point sequence
MDI Point vector sequence; the direction vectors are not evaluated
CURVE Curve from segments; the polynomial sequence may not exceed 22
CIRCLE Circle
Using language elements not listed above may lead to errors.
Convert GEOPAK into VDAFS Contours are output as the VDAFS element PSET.
X-6 v 2.4 14.09.04

Contours
1.7 VDAIS (IGES) Format VDAIS is a subset of IGES V3.0.
Convert VDAIS into GEOPAK
Element Typ Form Subord Sw
PD ptr. Matrix ptr.
Geometric elements
Circular arc 100 0 X X X
2D-point 106 1 X X X
3D-point 106 2 X X X
Straight line 110 0 X X X
Par. Spline curve 112 0 X X X
Types: linear, quadratic, cubic *
Point (--> composite curve)
116 0 X X X
Transformation matrix
124 0 - X !0
Structuring element
Composite curve 102 0 !00 X !0
Group 402 1,7,14,15 !00 X -
PD pointer only on geometric elements *
* General restriction compared to IGES. Convert GEOPAK into VDAIS Contours are output as the VDAIS element 110 (straight line).
14.09.04 v 2.4 X-7

Contours
1.8 NC Formats NC programs are generated and read according to DIN 66025.
Reading NC data into GEOPAK The following G commands are interpreted:
G1 straight line interpolation
G2 circle interpolation in clockwise direction
G3 circle interpolation in counter-clockwise direction
G17 XY plane selection
G18 ZX plane selection
G19 YZ plane selection
Note
the circle in commands G2 and G3 must be defined via the midpoint (I, J, K);
the co-ordinates can be specified both incrementally and absolutely;
the commands G1, G2, G3 can also be programmed permanently.
Output of GEOPAK in NC formats
The data are output via G1 commands.
Initial and end sequences can be defined specifically for each control system.
X-8 v 2.4 14.09.04

Contours
1.9 Special formats In addition to the above-mentioned formats several special formats for programs such as PC-DRAFT, PERSONAL DESIGNER, etc. are available.
In these formats it is possible to transfer point data only. To a large extent the formats may be freely defined using control files.
In all cases these formats are ASCII formats. Internal (binary) CAD formats are generally not supported.
1.10 Error Message If an error Message is displayed, proceed as follows:
Check the format in the dialogue window "Import contour".
If necessary enlarge the distance of points.
Deactivate the option "Set end point".
As described above it may happen that e.g. an IGES file contains elements which can not be read by GEOPAK.
14.09.04 v 2.4 X-9

Manipulate Contour
2 Manipulate Contour 2.1 Manipulate Contour A mouse-click on the menu topic "Contour" provides you with various possibilities to manipulate your contour (position, shape, etc.). The manipulation is done to the original contours, that is, no new contours are created. You can cancel any changes made. All functions are of the teach-in type to be used for the repeat mode.
For details as to whether and how to use the loop counter, please refer to the title "Loop Counter".
All contours are processed in the actual co-ordinate system, that is, not necessarily in the system where they were measured.
This is what you can do with the contour:
Scale
Mirror
Move
Create Offset-Contour
You can also "Cancel Points". You activate this function, however, using the menu "Elements".
2.2 Scale Contour For details regarding general principles see under "Manipulate Contour".
You proceed in the following way: You click in the menu bar on Contour/Scale and come to the
dialogue window "Scale Contour".
Using the arrow, you select an already existing contour.
You enter the scale factors into the text boxes X, Y and Z and confirm.
All points of the contour are multiplied - relative to the origin of the actual co-ordinate system - by these factors.
X-10 v 2.4 14.09.04

Manipulate Contour
2.3 Edit Contour Point You can use this function to change the co-ordinates of an already existing contour point.
Proceed as follows:
In the menu bar click on "Contour / Edit contour point" and the dialogue window "Edit contour point " opens.
Use this arrow to select an already existing contour.
Confirm.
The dialogue window "Select points from contour" is opened.
Set the co-ordinates mode.
Enter the contour point you want to change.
In the GEOPAK learning mode you can select the contour point to be changed in the element graphic using the mouse.
Confirm your selection.
The dialogue window "Edit contour point " is opened.
In the dialogue window "Edit contour point" you enter the new co-ordinates of the contour point to be changed.
2.4 Mirror Contour For details regarding general principles see under "Manipulate Contour".
You proceed in the following way:
You click in the menu bar on Contour/Mirror and come to the dialogue window "Mirror Contour".
Using the arrow, you select an already existing contour.
Using the symbols, you select one of the planes relative to which you want to mirror the contour, and then you confirm.
The order of points is inverted. The object is, in particular, to establish from the original and the mirrored contour one common contour (in one sense of rotation) (for details see under the topic "Connection Element Contour").
14.09.04 v 2.4 X-11

Manipulate Contour
2.5 Move / Rotate Contour All points of the contour are first moved and then rotated - relative to the origin of the actual co-ordinate system.
For details regarding general principles see under "Manipulate Contour".
You proceed in the following way:
You click in the menu bar on "Move/Rotate Contour" and come to the dialogue window "Move/Rotate Contour".
Using the arrow, you select an already existing contour.
You enter the "move" figures into the text boxes X, Y and Z, and then you confirm.
If you then still want to rotate the contour around an axis, you use the symbols to select one of the three axes (X, Y or Z).
Furthermore, you enter the figure for the angle in the adjacent text box.
"Rotate" first If you want to rotate first and move after,
you rotate (as described above), leave the "move" figures at 0 and confirm. Then ...
call up the dialogue again and move (as described above). Now the angle of rotation remains at 0.
2.6 Create Offset-Contour For details regarding general principles concerning the topic contour see under "Manipulate Contour".
Introduction You have scanned a contour in order to generate a CNC part program (e.g. for wire spark-erosion machines (for details see under the topic Transfer Contour into External System). What you need for such a transfer is a contour whose tool radius is increased or decreased. Such a contour is also called an Offset Contour or an Equidistant. The perpendicular (normal line is formed at each point of the contour. The point is moved by the "offset" along the perpendicular.
You proceed in the following way:
You click in the menu bar on "Contour/Contour with Offset" and come to the appropriate dialogue window.
In this dialogue window, you select the contour via the list functions, and then ...
you enter the offset figure.
Use the option buttons to define in which direction the contour shall be offset.
X-12 v 2.4 14.09.04

Manipulate Contour
Increase/Decrease Contour To define the direction in which the contour shall be increased or decreased, imagine a closed contour between start and end point. The option "Increase contour" moves the contour outwards. For this, the material side of the contour is of no importance.
Left / Right The offset orientates at the sort sequence of the contour points. The command "Left" effects the stated offset to the left side of the contour seen in point sequence.
The calculation of the offset contour makes it possible to clip off parts of the contour (see picture below. Upon completion of the calculation, these constrictions are automatically deleted. This is the reason why the calculated contour may possibly provide less points than the initial contour. These points are recovered by the "Back function".
On the left (above) the original contour, on the right (below) the contour after the offset.
The "Offset Contour" is shown in the element graphics and recorded in the result box.
14.09.04 v 2.4 X-13

Manipulate Contour
2.7 Idealize Contour The possibility to change a measured contour is important for the creation of a machine tool part program. A point selection of a contour can be put in relation to a defined geometric element (point, circle, line, angle). Then, the contour equals the element in this specific range. This contour range is idealized to the element.
The operation of the function consists of three parts:
Selection of a contour to be changed.
Selection of an element to be taken as the ideal element.
Selection of the contour sections to be idealized.
Proceed as follows:
In the menu bar, click on "Contour/Idealize contour".
The dialogue "Idealize contour" opens.
Select contour In order to be able to work with contours, you must load at least one contour. For information about how to load a contour, go to the topic Load Contour.
In the list box "Select contour", click on the contour you wish to idealize.
For information about if and how to apply the loop counter, go to "Loop Counter".
Select element In order to be able to select an element, the required element must be part of your part program. For further information, refer to the topic Elements: Overview.Use the buttons
Point
Line
Circle
Angle
to select an element type with which you wish to idealize the contour.
In the list box "Select element", click on the element with which you wish to idealize the contour.
For information about if and how to use the loop counter, refer to the topic "Loop Counter".
Select contour range Use the buttons "Selected range" to select:
X-14 v 2.4 14.09.04

Manipulate Contour
Point selection contour. You wish to idealize a contour section with a manual input. For details, go to "Select Points from Contour".
Defined by element. The contour section is defined by the selected element.
Complete contour. The complete contour is idealized after the selected element.
2.8 Change Point Sequence The function changes the sequence of the points within a contour. The co-ordinates of the points and the number of the contour points are not influenced. The function can be applied to a selected range or to the complete contour.
Proceed as follows:
Click in the menu bar on "Contour/Change point sequence".
The dialogue "Change point sequence" opens.
Select contour To be able to work with contours you need to load at least one contour. For information about how to load a contour, refer to the topic Load Contour.
In the list box "Select contour", click on the contour for which you wish to change the point sequence.
For information about if and how to apply the loop counter, refer to the topic "Loop Counter".
Select contour range
Click on the button "Point selection contour" and you can define a contour range.
When confirming the dialogue "Change point sequence", the dialogue "Point selection contour" opens.
Select a contour range. For more information, refer to "Point Selection Contour".
Select complete contour
To select the complete contour, click on the symbol "Complete contour".
For more information about this topic, refer to Sort Sequence of the Contour Points beschrieben.
14.09.04 v 2.4 X-15

Manipulate Contour
2.9 Sort Sequence of Contour Points A correct sort sequence of the contour points is important for many types of calculations. The sequence can be wrong when, for example, a contour has been imported by an external system. Also the GEOPAK-function "Connection element contour" can lead to the connection of points to a disordered contour. The decision as to which of the following functions is the most suitable must be taken from case to case.
Smallest projected distance
Smallest distance in the space
The points are sorted depending on the distance between adjoining points. The algorithm starts with the start point (ascending) or the end point (descending) of the selected range. Then, the next contour point to the previous one is continuously searched and sorted anew. This is repeated until the sorting of all contour points is completed. The point co-ordinates are, depending on the selection, viewed as a projected point (projected distance) or as a XYZ-point (in the space).
Reverse sort sequence for points The sequence of the points is reversed. Thus, the start point of a contour becomes the end point of the contour and vice versa.
X-co-ordinate
Y-co-ordinate
Z-co-ordinate
The points are sorted depending on the selected co-ordinate. The start and the end point of the contour may change.
Radius projected
Radius 3D
The points are sorted against the origin of the co-ordinate system depending on the radius of each point. The start and end point of the contour will usually change. The radius is calculated, depending on the selection, either from the projected point (radius projected) or the XYZ-point (Radius 3D).
Angle range The points are sorted against the first axis of the contour projection depending on the angle of each individual point. The angle is always calculated on the projection plane of the contour. The start point does not change, the end point may change.
Ascending / Descending The sort sequence of the previous settings (except "Reverse sort sequence for points") can be reversed using these option buttons.
X-16 v 2.4 14.09.04

Manipulate Contour
Examples:
• Contour points of a gear are sorted with the option "Angle range". • A contour parallel to the X-axis could be sorted easily with the
option "X-co-ordinate". • In most cases, the option "Smallest distance in space" is
sufficient.
2.10 Middle Contour A Middle Contour is calculated, for instance, in cases where the mean for correction is to be calculated from a variety of workpieces (nests or forms). A situation where a new contour with a defined pitch or defined pitches is to be produced from a single contour is regarded as a special case. Thus, the Middle Contour becomes necessary in case of a tool correction where the nominal, the actual and also the tool contour must each have the same number of points. Only if this is the case, a correction can be performed.
You proceed in the following way:
You either click on the symbol or use the menu bar with the functions "Element/Contour".
Using the dialogue window "Element Contour", you allocate a name and a memory location to the contour you still want to calculate.
You click on the symbol and confirm.
In the window "Middle Contour" under "Avail.", you select the contours you want to use for the calculation.
Clicking on the double arrow you move the contours under the heading "Selected" (or also back).
Additionally, you enter the pitch (the spacing between the points) to be used for calculating the new contour, and then you confirm..
For details as to whether and how to use the loop counter, please refer to the title "Loop Counter".
The new contour is displayed in the element graphics and recorded in the result box..
Hint In the window "Middle Contour" you can, of course, select just one contour with a different pitch.
For details regarding general principles see under "Manipulate Contour".
14.09.04 v 2.4 X-17

Manipulate Contour
2.11 Fit in Circle with fixed Diameter You can fit in a circle with given diameter in a contour with two touching points. The result is the circle shown in the element graphics below.
You proceed in the following way
In the toolbar, click on the symbol on the left.
In the following "Element Circle" window, click under "Type of Construction" on the "Fit in Element" symbol.
Via the "Fit in Element Circle" and "Select Points from Contour" windows, you create your circle. See further details to this in the topics Constructed Circles and Select Points from Contour .
This function can only be used on contours with a point sequence. The "Inserted Circle“ is a simulation of the customary methods in order to evaluate spindle and screw parameters. The starting points must exist shaped as a contour.
2.12 Prepare Leading Contour A leading contour can be provided, e.g. by a CAD system. Upon completion of the measurement, an actual / nominal comparison can be made with the scanned contour.
You proceed in the following way Scanning following a leading contour requires the following actions to be done previously:
You click on "CNC On" and on the functions "CMM/CNC On" disposed at the menu bar.
You see in the GEOPAK status line a yellow dot next to the CMM symbol.
You click on the symbol in the symbol bar, and...
de-activate in the following dialogue window "Element Contour" the function "Automatic Measurement".
For details as to whether and how to use the loop counter, please refer to the title "Loop Counter".
X-18 v 2.4 14.09.04

Manipulate Contour
You click on the symbol and confirm.
Upon completion of the above, the function " Scanning following a leading contour" in the menu CMM is activated.
For details regarding general principles see under "Manipulate Contour".
2.13 Activate Leading Contour Before the function "Scanning following Leading Contour" is activated, you must perform a series of steps. For details see under the topic Prepare Leading Contour.
This is what you must know
• The points are established by probing. • For this purpose, every single point of the leading contour is
probed. • Moreover, it is necessary that a probe is defined.
You proceed in the following way:
In the menu "CCM" you click on the function "Scanning following Leading Contour".
You select the leading contour in the window " Scanning following Leading Contour".
For details as to whether and how to use the loop counter, please refer to the topic "Loop Counter".
Using the known symbols you specify the plane along which scanning is to take place.
In addition to the selection of the plane you choose a probing direction.
A graphical sign in the dialogue window on the right shows you the plane where and the direction from which probing takes place.
Clicking on the symbol you specify that traversing will take place using "Probing Direction of the Leading Contour".
You enter the safety distance and measurement length.
The probe radius compensation, if necessary, will be carried out by you at a later time, requiring a separate step.
14.09.04 v 2.4 X-19

Manipulate Contour
2.14 Scanning with Guiding Contour Basis If you want to scan according to a guiding contour, you must consider the following items:
The points of the guiding contour and the measured points are treated as probe centre points. The probe radius cannot be compensated because when working e.g. on vaulted surface, the exact point on work piece (P) is not known (see picture below).
In order to avoid a crash, enter the required safety distance.
The measured nominal length limits the search in the probing direction. This way, you avoid a crash with the probe shaft (see also the related subject Enter Z Offset).
In the first scanning with guiding contour, you should reduce the movement speed of the CMM.
Default: Specify measurement direction (fixed measurement direction)
If you have selected e.g. the X/Y plane, you measure in the +Z or—Z direction. In order to get a short measurement time, the (dash-lined) Z co-ordinate adapts itself in our example with the X/Y plane (swung line below) of the workpiece contour.
If you selected, like above, the X/Y-plain, the probing direction in the
X/Y plane is automatically calculated. It passes vertically to the contour, namely to the inner or outer side. (see picture below [outer side]).
X-20 v 2.4 14.09.04

Manipulate Contour
Measuring Direction specified through Guiding Contour If the contour of 3D-TOL has been generated, also a probing direction exists that you can use (see picture below).
14.09.04 v 2.4 X-21

Manipulate Contour
2.15 Loop Counter For saving and exporting contours, you also can use "Loop Counters".
The procedure for "Saving".
Via the symbol, click in the list field on the contour, with which you want to begin in the loop, respectively you want to save as first contour.
Activate the loop counter via the symbol.
When saving, the loop counter is not automatically registered.
Click on the symbol.
In the window "Save Contour as" you must enter the special characters "@LC" at an independent place (see example below).
[email protected] each m loop flow, a file is (example above) created:
contour1.gws, contour2.gws, .., contourN.gws Notice For the export of contours with the loop counter the above mentioned steps are analogously valid.
2.16 Scanning of a Nominal Contour This function is used to scan
flat surfaces, e.g. sealing surfaces of cylinder heads, in the surface mode.
In the edge mode you can scan a nominal contour at high speed.
For this, you can only use scan probes, like for example
MPP100
SP25
SP80
SP600
The scanning of single points, e.g. with a TP200, is not possible.
The scanning of a nominal contour in the surface mode works like the Phi-Z-scanning. However, a contour is used as leading geometry instead of a circle.
Proceed as follows
In the menu "CMM" click on the function "Scanning of a nominal contour"
Select the leading contour in the window "Scanning of a nominal
X-22 v 2.4 14.09.04

Manipulate Contour
contour".
For information about if and how to apply the loop counter, refer to the topic "Loop Counter".
Add probe radius offset to leading contour
The loaded leading contour is positioned either on the workpiece surface or in the probe centre. When using a contour positioned on the workpiece surface, activate the button.
Add probe radius offset to measured contour
The measured contour can be compensated by the probe radius. This is how you get a contour on the workpiece surface. This button is only active in the edge mode.
Tolerance Limits The nominal contour is used to calculate geometrical elements like circles (red) and lines (blue). The maximum deviation between the nominal contour and the calculated elements is defined by the tolerance limits of the line and circle elements.
Enter these tolerance limits into the input fields "Line" and "Circle".
During the scanning process the probe may not loose contact to the workpiece. Therefore, the offset of the nominal contour is included in the calculation. This offset is the excursion that is added to the approach direction. For detailed information, refer to Define Approach Direction.
14.09.04 v 2.4 X-23

Manipulate Contour
2.17 Define Approach Direction Define the scan mode or the movement strategy.
When probing a surface and using the Phi-Z-strategy, click on the symbol "Start point on the surface".
When probing at an edge in one of the three planes XY, XZ and YZ from the side, click on the symbol "Start point on the edge". This scan mode is quicker than the scan mode for an unknown contour. As this is a 2D-scan, the third co-ordinate remains almost constant.
You can define the angles of the direction vectors of the approach direction in the input fields X, Y and Z. The entered values are automatically adapted so that the sum of the cosine four squares is 1. The approach direction is used to determine on which side of the nominal contour the material is.
If you click on the symbol "Change direction vector", the respective angle of the direction vector is reversed.
Accept CMM-position
When clicking on the symbol "Machine position", the approach direction to the first contour point is defined. With this function you can assert that no collisions occur before starting the contour measurement.
Point distance and scan speed
In the input field "Pitch", enter the point distance of the individual contour points.
In the input field "Scan speed", enter the speed with which you wish to scan your workpiece.
2.18 Recalculate Contour from Memory / Copy For your measurement task it can be necessary that an already saved contour must be recalculated (e.g. in a new co-ordinate system). This can be useful if two contours must be calculated being of two different co-ordinate systems.
Procedure
In the toolbar, click on the symbol ...
and in the following window "Element Contour" on the keypad.
You can also select via the "Menu Bar / Element / Contour".
A window "Recalculate from Memory / Copy: Contour" is displayed.
In the list field "Select Contour", click the contour, which must be recalculated (copied).
In the "Storage" list box, you enter a no. already existing or a new no. for your contour.
On principle, you can select
X-24 v 2.4 14.09.04

Manipulate Contour
• a whole contour or a • section of it (also selectable with the mouse).
If and how to use the loop counter, is fully shown in the topic "Loop CounterHTPC_SCN_CONT_SAVE_LOP".
Via one of the symbols (here the Phi Z plane), you decide in which plane the contour must be projected.
Via the symbol, you determine whether the contour must be recalculated as an open or closed contour.
2.19 Intersection Point (Contour with Line / Circle / Point)
You can calculate intersections also by using the element combinations "Contour / Circle", "Contour / Line" and "Contour / Point". If, in case of the combination "Contour / Point", the point is not positioned on the contour, the point projected onto the contour is calculated as the intersection.
Note The projection of a point onto a contour is defined as the shortest distance between the point and the contour.
You proceed in the following way
Click on "Element Point" in the toolbar, confirm and the "Element Point" window is displayed.
In this window, click on the "Intersection" symbol in "Type of Construction" and confirm.
The "Intersection Element Point" window is displayed.
Insert intersection points as contour points into a contour
In the tool bar "First element", click on the contour symbol when this button is not yet active.
You select a contour in the list box "First element".
In the tool bar "Second element", you click on the element symbol that you want to intersect with the contour (e.g. line, circle and point).
Select an element in the list box "Second element".
You either click on "Insert element point as contour point" or on "Insert all of the intersection points".
For further details, see the topic Intersection Element Point.
14.09.04 v 2.4 X-25

Manipulate Contour
2.20 Contour Connection Element Using the function "Connection Element Contour" you can connect single contours to form a common contour. This function is suitable also for copying a contour. You can use this function to your advantage, e.g., in cases where you create a "Contour with Offset". You would then have the original together with the "new contour" for comparison purposes. You can also overwrite and existing contour.
Of great importance is the option which allows you to choose between the Single or Group Selection (for details please refer to the topics "Single Selection" and "Group Selection").
The general contour is located in the ...
actual co-ordinate system and in the
selected projection plane.
Procedure You come to the dialogue window "Contour Connection Element" by
clicking on the symbol in the toolbar.
In the window "Element Contour", click on the symbol (picture left).
Or select via the "Menu Bar / Element / Contour".
In any case, you must confirm in the "Element Contour" window.
Opened / closed contour: Change status
You can use this function to connect the first and the last contour point of a contour. The contour is assigned the status "closed contour". In this case, the button is displayed as pushed.
If the connection between the first and the last contour point is interrupted, the contour is assigned the status "opened contour".
Hint For details as how to proceed in the dialogue windows "Contour Connection Element (Single or Group Selection)", please refer to the "Single Selection" and "Group Selection".
X-26 v 2.4 14.09.04

Delete Contour Points
3 Delete Contour Points Working with contours makes it necessary to change (delete, move) contour measurement points. The explanations provided for the following functions show how geometrical elements can be calculated from contour points and, e.g., how you evaluate only parts of a contour.
Click on "Contour / Delete Points" in the menu bar in order to open the "Delete Points" dialogue.
Select contour In order for you to work with contours, you have to load, at least, one contour. For information on how to load a contour refer to the topic Load Contour.
Decide whether you want to use the loop counter.
The topic "Loop Counter" provides information as to whether and how to use the loop counter.
Use contours For details regarding the practical use of contours refer to the following items:
Delete Points of a Contour
Reduce Number of Points
Clean Contour
3.1 Delete Points of a Contour If, for instance, you wish to evaluate only parts of a contour, or to delete not desired contour points, the "Delete Points" window gives you four options with regard to the "Delete Points" function.
Delete via Single Selection
Delete with the Co-Ordinates
Delete with Radius
Delete via an Angle Area
Notice For the following actions, you must know that the reference point is always the origin of the actual co-ordinate system.
14.09.04 v 2.4 X-27

Delete Contour Points
3.2 Delete via "Single Selection" In cases where you have to delete single points from a contour, you will use this function.
Click on the symbol.
Confirm the "Delete Points" dialogue.
The "Selection of Point Contour" window opens.
With the mouse cursor (reticule), you mark in the element graphics the points you want to delete.
The area is marked in another colour (see Fig. below marked in red).
The number of the selected groups and their co-ordinates are transferred to the "Selection of Point Contour" window.
X-28 v 2.4 14.09.04

Delete Contour Points
3.3 Delete with the Co-Ordinates For cases where you have to delete contour areas from the contour, you will use this function.
You decide whether you want to use the X, Y or Z co-ordinate for the selection of the contour points.
Click on the symbol "X-Y-Z Co-Ordinates".
Use the check buttons to determine whether you wish to delete the points above or below the co-ordinate or between two co-ordinates.
The area where you wish to delete the contour points is to be entered into the text box adjacent to the co-ordinate symbols. You can input negative values.
For the example shown in the picture below, we activated the option "X Co-Ordinate" and "above".
The result is shown in a graphics and in the "Select Points from Contour" window.
14.09.04 v 2.4 X-29

Delete Contour Points
3.4 Delete with Radius For cases where you have to delete contour areas from the contour, you will use this function.
Click on the symbol "Radius - 3D"
or on the symbol "Radius - projected".
Use the check buttons to determine whether you wish to delete the points above or below the radius or between two radii.
Enter the radius or the radii (in the present case 10) into the text box.
For our example (see picture below), we activated the "below" option.
X-30 v 2.4 14.09.04

Delete Contour Points
3.5 Delete via an Angle Area For cases where you have to delete contour areas from the contour, you will use this function.
Click on the "Angle Range" symbol.
Enter the "from" angle (e.g.. 50°) into the first input box, and, into the second box, the "to" angle (e.g. 50°).
"From" angle 1, "to" angle 2
Upon confirmation of your entries you get the following contour in the element graphics, Fig. 2.
Contour with deleted points
3.6 Reduce Number of Points You will reduce the number of points of a contour if you intend to...
speed up calculation,
clean the contour,
process contour data to suit a CAD system or a machine tool.
To this end, there are the following functions available for you:
Delete Linear Parts of a Contour
Reduce Neighboured Points
Delete Point Intervals from Contour
14.09.04 v 2.4 X-31

Delete Contour Points
3.7 Delete Linear Parts of a Contour This function ensures that contour points located inside the run of the contour are kept within the contour; points, however, located in areas where the contour is linear, are deleted.
Example In the contour shown here (Fig. 1), points not required are to be deleted from the linear run of the contour. Points deviating less than 0.01 mm from the ideal contour run are deleted.
Contour with not deleted contour points.
Perform the following steps:
Click on the symbol "Deviation from Chord".
Indicate in the "Maximum Deviation" input box the width of the gap determining which points are deleted, Fig. 2.
The points shown in red are deleted from the contour.
X-32 v 2.4 14.09.04

Delete Contour Points
Enter e.g. 0.01mm into the input box designated "Maximum Deviation".
The element graphics has shown you that the linear portion of the contour run is 3 mm.
Enter the value 3 mm into the "Max. Pitch" input box.
Upon confirmation of your entries you get the following contour in the element graphics, see Fig. 3.
Contour with deleted points.
3.8 Reduce Neighboured Points This function enables you to delete contour points located close to each other. This is the case mostly with runs of curves or small radii.
Perform the following steps:
Click on the button "Reduce Neighboured Points".
Enter a figure, e.g. 1 mm, into the input box "Lowest Pitch".
Points located within this distance are deleted.
Points shown in red are deleted from the contour.
The distance is calculated from every point which was not deleted.
14.09.04 v 2.4 X-33

Delete Contour Points
3.9 Delete Point Intervals from Contour This function enables you to delete point intervals from contours. By entering a figure of your choice into the input box "Take every xth Point" you determine the points which are not to be deleted.
Click on the button "Keep Points by Interval".
Enter a figure, e.g. 3, into the input box "Step of Points to save".
The first contour point and every third contour points will not be deleted, see Fig. 1.
Points shown in red are deleted from the contour.
Upon confirmation of your entries you get the following contour in the element graphics, see Fig. 2.
Contour with every third point.
Supposing the contour consisted of 1000 contour points and you entered 1001, the contour would be deleted, except the first point.
3.10 Clean Contour A contour consists of measurement points arranged in the order of measurement. The contour should include no points of the same position (double points), no loops and no reversing paths.
Using the following functions you can:
Delete Contour Loops
Delete Reversing Paths
Delete Double Points
X-34 v 2.4 14.09.04

Delete Contour Points
3.11 Delete Contour Loops The reason for contour loops can be the functions "Contour with Offset" and "Probe Radius Compensation" in the scanning dialogue. Performing the function "Delete Contour Loops" causes the crossing point of the loop to replace the contour points of the loop, see Fig. 1.
The crossing point is shown in green and the loop points in red.
Click on the symbol "Delete Contour Loops".
Enter the max. number of points into the input box "Biggest Loop".
The time required for calculating this function depends on the number of loop points which you have entered.
Upon confirmation of your entries you get the following contour in the element graphics, se Fig. 2.
Contour with no loop
If a contour contains several loops, all these loops will be deleted.
14.09.04 v 2.4 X-35

Delete Contour Points
3.12 Delete Reversing Paths from Contour Reversing paths are formed as a result of the connection of two contours with each other and the superposition of contour points.
Contour with reversing paths.
Click on the symbol "Delete Reversing Point Sequences".
Enter an angle, e.g. 10°, which covers the reversing paths, into the input box "Reversing Angle".
The origin of the angle is, in this case, the point 5.
The function recognises reversing paths, provided they are located within the entered angle. This function recognises also the end of the reversing paths and deletes the points not required (shown in red).
Upon confirmation of your entries to get the following contour in the element graphics, see Fig. 2.
Contour with no reversing paths
3.13 Delete Double Contour Points
In order to delete double contour points, click on the symbol. Double contour points (same position of single meas. points) cannot be used for contour calculation.
Neighboured points whose distance is less than 0.0001 mm are regarded as double contour points.
X-36 v 2.4 14.09.04

Delete Contour Points
3.14 Min. and Max. Point If, e.g. for fabrication of eyeglasses, you want to know which size must have the blank, you can use the min-max function in GEOPAK. The function is used, among other things, to evaluate the greatest extension of a contour in the minus and plus values of X, Y and Z. With this function, you also can – for alignment of a co-ordinate system – set the part on "0" (origin) at an extreme value. All subsequent positions are relative to this extreme value.
Notice The extreme values are even evaluated (interpolated) if the point itself has not been measured.
You proceed in the following way
Click on the point symbol in the toolbar because the extreme values will be stored as point elements.
In the following "Element Point" window, click on the "Min/Max of Contour" symbol in the "Type of Construction" line and confirm.
In the "Min/Max of Contour" window, select at first a contour.
In the symbol boxes of the adapted contour, you see that it is also possible to evaluate the extreme values outside the contour (see red points).
With this function, you determine the point on the contour, which is the nearest to the origin.
With this function, you determine the point on the contour, which is the farthest to the origin.
If you will choose specifically the first or the last point of a contour you click one of the symbols.
Click on one of the symbols (optionally) and confirm.
The point is displayed in another colour on the graphics.
Position of the Point In the picture below, we have evaluated e.g. the extreme value outside a gearwheel (above right side). To locate the co-ordinates already shown in the picture, you continue as follows:
14.09.04 v 2.4 X-37

Delete Contour Points
Click in the element graphics on the symbol (left side).
Via click on the green point, you first get the point no. in a rectangular box.
Through click on the right mouse button on this rectangular box, you get a list from which you can, e.g. call your information (picture below).
Through click e.g. on the Y co-ordinate, you get the requested value (picture below).
X-38 v 2.4 14.09.04

CMM Movement
XI CMM Movement Contents 1 CMM Movement ................................................................ 3
1.1 Move CMM.................................................................................... 3 1.2 Move CMM along an Axis............................................................ 4 1.3 Circular Movement ...................................................................... 4 1.4 Drive Manually to Point ............................................................... 6 1.5 Manual Measurement Point ........................................................ 6 1.6 Define Clearance Height ............................................................. 7
1.6.1 Definition ............................................................................................. 7 1.6.2 Procedure............................................................................................ 7 1.6.3 Move Clearance Height....................................................................... 7
1.7 Error Height.................................................................................. 7 1.7.1 Definition ............................................................................................. 7 1.7.2 Procedure and Options ....................................................................... 8 1.7.3 Co-Ordinate System............................................................................ 8 1.7.4 Change of Probe ................................................................................. 8
1.8 Measurement Point...................................................................... 8 1.8.1 Measurement Point: Two Options....................................................... 8 1.8.2 Option 1............................................................................................... 9 1.8.3 Option 2............................................................................................... 9 1.8.4 Details ............................................................................................... 10
1.9 Measurement Point (Laser)....................................................... 12 1.10 Measurement Point with Direction ........................................... 12 1.11 Direction Entry via Variables .................................................... 13 1.12 Groove Point .............................................................................. 14 1.13 Measurement Point with Imaginary Point................................ 15
1.13.1 Three Options ................................................................................... 15 1.13.2 Procedure.......................................................................................... 15
1.14 Probing of Edge Point ............................................................... 16 1.15 Automatic Line Measurement................................................... 18 1.16 Automatic Plane Measurement................................................. 20 1.17 Automatic Circle Measurement ................................................ 21 1.18 Automatic Inclined Circle Measurement.................................. 23 1.19 Automatic Inclined Circle Measurement: Dialogue ................ 24 1.20 Automatic Cylinder Measurement............................................ 26 1.21 Scanning .................................................................................... 27
1.21.1 Scanning of Known Elements ........................................................... 28 1.21.2 Scanning in the YZ, ZX, RZ and Phi Z Planes .................................. 29
1.22 Element finished........................................................................ 30 1.23 Delete Last Meas. Point............................................................. 30 1.24 Stop............................................................................................. 30 1.25 Turn Rotary Table ...................................................................... 31
14.09.04 v 2.4 XI-1

CMM Movement
1.26 Deflection................................................................................... 32 1.27 Trigger-Automatic ..................................................................... 32 1.28 Installation of CNC Mode.......................................................... 32 1.29 Measuring Speed....................................................................... 34 1.30 Movement Speed....................................................................... 34 1.31 Safety Distance.......................................................................... 34 1.32 Measured Nominal Length ....................................................... 34 1.33 Positioning Accuracy................................................................ 35 1.34 Change CNC Parameters.......................................................... 35 1.35 Best Fit: Definition and Criteria................................................ 36
1.35.1 Two Purposes ................................................................................... 37 1.35.2 Program Run..................................................................................... 37 1.35.3 Best Fit with Fixed Number of Points................................................ 37 1.35.4 Best Fit with a Variable Number of Points ........................................ 38 1.35.5 Degrees of Freedom for Best Fit....................................................... 38 1.35.6 Tolerance and MMC for Best Fit ....................................................... 39 1.35.7 Graphics for Best Fit ......................................................................... 39
1.36 Calculation of Minimum-/Maximum ......................................... 39
XI-2 v 2.4 14.09.04

CMM Movement
1 CMM Movement 1.1 Move CMM Procedure
You can either click the icon, which is located in the tool bar for the machine (left margin) or select via the menu bar "Measurement / Move Machine". In both cases you get the dialogue window "Move CMM".
On the left side, you see the icon. If you want to move the machine to a specific position, click here and input the co-ordinates of this position. By a click on the arrow on the right end of the input fields, you can recall the last inputs. Furthermore you can define variables (e.g. store Z) in the "Formula Calculation"; then you can use these variables for the input.
Now you can select which Types of Co-ordinate Systems you want to use; at any time, you can click on the corresponding symbol.
A click on the icon enables you to move the machine according to the actual position.
The in-home position depends on the construction of the machine; it is the position where it goes after power up.
Depending on the actual position of the machine, these movements can lead to a collision.
For the in-home movement, the machine moves along the spindle axis first, then the two other axes together.
If you need the actual position of the machine in your input window (e.g. because you only want to change one of the values), click on the icon; then you get the actual position in the selected mode.
14.09.04 v 2.4 XI-3

CMM Movement
1.2 Move CMM along an Axis Through this function, it is possible to proceed the probe in an axis. Enable the function via the menu bar "CMM / Move Along Axis".
Just enter the value of the target co-ordinate in the axis. The input is only possible in Cartesian.
If you want to display the data of the point where the probe is now situated, click on the symbol.
Normally, the program supposes moving along an axis in the part co-ordinate system, but shifting to the machine co-ordinate system is possible. Proceed as follows:
Keep the dialogue window "Move Along an Axis".
Click on "Co-ordinate System" in the menu bar and in the pull-down menu on "Determine Co-ordinate System".
In the following dialogue window, choose in the upper icon bar the symbol "CMM Co-ordinates" and confirm through "Ok".
This way, you overwrite the co-ordinate system.
1.3 Circular Movement The "Circular Movement" function serves the purpose of getting the probe on the quickest way from the start to the end point. You access the dialogue through the "Menu bar / CMM / Circular Movement". This function can be used in the CNC mode only.
There are two methods offered for the "Circular Movement" function.
Method 1
This method (Default Setting) is used to approach three points.
Perform the following steps:
First determine in the "Circular Movement" window which co-ordinate mode you want to use.
Enter the co-ordinates of start, pass through and end point, and then click OK.
It is also possible, however, that you use the CMM symbol to enter the current CMM position.
XI-4 v 2.4 14.09.04

CMM Movement
In any case, the CMM with the probe first moves from the current position to the start position.
1 = Start point
2 = Pass through point
3 = End point
Movement commands issued by CAT300 as "Circular Movement" within an element measurement cycle will be stored automatically in the part program.
The centre of the circle must be located within the CMM volume.
Use this symbol to change to "Method 2".
Method 2 This method allows you to determine the movement path by
driving plane,
radius,
start and end angle,
sense of movement (using the clock symbols clockwise and anticlockwise), and
centre of circle.
For the centre of circle you select (see above) the co-ordinate mode or the CMM's current position. This is, of course, based on the assumption that you (can) move the probe precisely to the position which is to become the centre of circle.
This "Method 2" is not for use in space, but only in the driving planes XY, YZ and ZX.
14.09.04 v 2.4 XI-5

CMM Movement
The angles refer to the first axis of the base plane. he CMM volume. The centre of the circle must be located within t
Use this symbol to change to "Method 1".
nual CMM you "Drive manually to point". To open the dialogue box
choose "Machine / Drive manually
Make the following entries:
desired position
1.4 Drive Manually to Point Drive to a certain position If you wish to measure at a certain position of the part with a macan make use of the function
to point" from the menu bar.
the coordinates of the
the precision to reach the position (in the "Capture range" text box of the dialogue box).
In the Cartesian mode simply click on the icon to determine the axes to be considered. This option is available in the Cartesian mode only. In the polar mode
individual axes is extremely high so that it is useless to select
After confirmwill be displa
inal
wo axes each and to drive in one axis only.
n. The window disappears as soon as the numbers for every selected
ual Measurement Point” function in the part program and in the “CMM” m tically ended. This m
a manual CMM, and at a CNC-CMM for elements that are measured in manual mode
anual measurement point function in an element. For example if you want to realize a change of probe between the measurement points.
the influence of thea single value.
Display window ation a window indicating the determined coordinates on the right yed.
The numbers in blue on the left indicate the distances of the nompositions along the machine axes. It is possible to jam t
If the "Capture range" of the axes has been reached the digits are displayed in gree
axis are green.
1.5 Manual Measurement Point You can see the “Man
enu of the editor. In learn mode, this command is automaeans,
for each element that you record at
(before the “CNC ON” command). Hint It is possible to reuse the m
XI-6 v 2.4 14.09.04

CMM Movement
1.6 Define Clearance Height 1.6.1 Definition The clearance height is a height, which is automatically driven before element measurement. After each measurement, the machine returns to clearance height position. In many cases, this avoids entering intermediate positions between the elements. Thus, a hole mounting pattern can, e.g. be measured without an intermediate position.
1.6.2 Procedure Activate "CMM / Clearance Height" via the menu bar.
In the following dialog, click the symbol (left) to define the clearance height in the text box (right).
You define the axis in which axis to move via the axis symbols (in the picture it is the X axis) The selected axis is displayed.
To get help, you can call the actual machine position via the symbol.
Deactivate the clearance height by clicking once more on the symbol.
1.6.3 Move Clearance Height The clearance height is always automatically driven between two elements. But you can also drive the machine to the actual clearance height whenever you want. This can be useful, e.g. for tests. Then, click on the function “Move Clearance Height” in the “CMM” menu. This procedure has the same effect as Move CMM in an Axis.
1.7 Error Height 1.7.1 Definition The error height is meant to be the height that you drive in case of a machine error, for example at a collision. In opposition with the clearance height, several error heights can exist. This function is mostly used in part programs for palette operation or for shifts without any attendance. The error height ensures that, for example in case of a collision at a part, the measurement passes on to the next part.
That is why you must define the error height in a way that the CMM is able to
• duly terminate the "Collision Measurement" and • the next part can unobstructedly be driven
To ensure this, it may be useful to define several clearance heights. In these cases, the error heights are driven in opposite to the definition made.
14.09.04 v 2.4 XI-7

CMM Movement
1.7.2 Procedure and Options Activate the function via the "CMM / Error Height“ menu bar.
You can define the error heights at the symbol. The numbers are automatically counted (upwards) and displayed.
You can change the last defined error height.
You can delete the last defined error height.
For security, you should reduce the Movement Speed (in the dialog below on the left).
1.7.3 Co-Ordinate System During the measuring process different co-ordinate systems are possible. Therefore GEOPAK must know to which co-ordinate system the axis and the error height refer.
1.7.4 Change of Probe You always drive the error height with the actual probe. For a problem free movement it can become useful to change the probe between the error heights. When the error height has been reached the program changes to the probe you have indicated in the dialog.
1.8 Measurement Point 1.8.1 Measurement Point: Two Options
You can make the machine probe a point either by the joystick box; for this, press the "MEAS"-button, then move the machine to the part. The other way is via the keyboard, either the icon on the left margin, or via the menu bar "Measurement / Probing Point" as soon as you have activated an element. Then you get the corresponding dialog window.
Normally, there are two possibilities to define a measurement point.
XI-8 v 2.4 14.09.04

CMM Movement
1.8.2 Option 1 1. Point on the surface: Here, the theoretical touch point on the surface of the part is given, and the travelling direction. This works in nearly all cases, even if you use a probe with a different diameter, as the probe size is taken into account when measuring.
1 = stylus ball radius
2 = theoretical touch point
3 = travelling direction
4 = safety distance
1.8.3 Option 2 2. Probe centre: Here, you specify the location of the probe centre a certain distance away from the surface point. In addition, the probing direction is also required.
1 = start position
2 = travelling direction
3 = change over point
14.09.04 v 2.4 XI-9

CMM Movement
1.8.4 Details
Point on the surface:
Enter the co-ordinates for the theoretical touching point, or
Select the data from the list box, where the last ten inputs are stored and offered to you when clicking on the arrow or
take the actual position of the machine by clicking the icon.
The program knows the Safety Distance and the probe diameter and uses them to calculate the movement.
1 = movement speed
2 = measurement speed
During the input of the co-ordinates, you can select between three Types of Co-ordinate Systems . Just click on the icon for the type of co-ordinate system you want. GEOPAK always starts with the Cartesian co-ordinate system.
Cartesian co-ordinate system
Cylindrical co-ordinate system
Spherical co-ordinate system
After input of the probing point, GEOPAK needs the direction of probing. For this, you have two possibilities:
I Input of angles; this input is done in the prompt fields besides the symbol . Here, you enter the angles of the probing direction with the axes X, Y, and Z.
The angles can be input through one of the following three methods:
key the values in, or
select a value out of the list boxes, which appear after a click on the arrow besides the input box, or
click on the icon; this makes the direction of the probing vector pointing into the opposite direction, e.g.: X=90° becomes X=270°.
XI-10 v 2.4 14.09.04

CMM Movement
II Input of a Target: Here, a target point, which can even be situated in the part, gives the direction. It is not necessary that the probe can reach the target; this target is only taken to calculate the direction.
1 = measurement point
2 = imaginary point
The co-ordinates of the target are entered in the lower input boxes. If you select the input by target, the icons and the corresponding input fields are inactive. For the input of the targets, you can also select the Types of Co-ordinate Systems (cf. above).
Note
A click on the icon shows the actual position of the probe; this position means the co-ordinates in the part co-ordinate system, and it is immediately transformed to the selected co-ordinate system type.
Centre of Probe: In this case, you do not input the theoretical touch point, but the point in front of the material where the machine switches from movement speed into measurement speed.
For the input of this point, you can also select one of the three Types of Co-ordinate Systems (cf. above).
Laser probe For working with a laser probe, refer to the topic Measurement Point (Laser).
14.09.04 v 2.4 XI-11

CMM Movement
1.9 Measurement Point (Laser) For the topic "Measurement point (probing point)" you must always differentiate between point measurement and scanning measurement. For point measurement, proceed as described by the topic Measurement Point. When working with a laser probe, this dialogue is extended by the functions
"Surface mode" or
"Edge mode" respectively.
To switch between the surface and the edge mode, use the tool bar (see ill. below). However, a change between a surface and an edge measurement must in any case be announced to the machine control before starting a new measurement.
You can also use a joystick for probing.
For detailed information about measuring with a laser probe, refer to the topic group Laser Probe "WIZprobe" .
1.10 Measurement Point with Direction Define the measurement point (probing point) via the menu bar "Measurement" and the "Measurement Point (Probing Point)" function. You can also click on the
symbol in the tools for machine. You come to the corresponding dialogue window.
In order to determine the measurement point, you have three options (see details of topic Measurement Point ). One of the possibilities is the following.
Measurement point with direction: At this procedure, you do not have a theoretic workpiece. Select a centre of probe with direction in which the probe must move.
Enter the data for a centre of probe with direction in the upper three input fields, or
From the list boxes, select the data which has been recorded here over the last ten measurements, or
select the data of position of machine via the symbol
XI-12 v 2.4 14.09.04

CMM Movement
1 = start position
2 = movement direction
3 = centre of probe with direction
You can choose one of three Types of Co-ordinate Systems hereafter.
Cartesian Co-ordinate System
Cylinder Co-ordinate System
Sphere Co-ordinate System
You still must enter the direction in which the system of probe has to move. You can do that in the input fields beside the symbols. Here, you determine the angle of the probing direction to the axes X, Y and Z.
You have three possibilities:
Enter the values you want, or
Select a value from the pull-down list fields, or
Click on the symbols and change the direction vectors of the X, Y or Z components if you want probing into the opposite direction. Example: X=0° is becoming X=180°.
1.11 Direction Entry via Variables Apart from the possibility to enter fixed angles or components of the direction vector, you can also enter values via variables. In this case please observe that
all components of the direction value are defined via variables and
the sum of the squared components is 1.
14.09.04 v 2.4 XI-13

CMM Movement
1.12 Groove Point Differently from the touch trigger system, which records a measurement point at the first contact with the part, you can drive with a scanning probe e.g. in a v-formed slot so that the ball is fitting at the same time to the two flanks (see pictures below).
Start of probing
Contact and change of direction
Groove point
The probing must always be vertically realized to the Z-axis. It is always the centre of probe that is output.
You get this function via the "Menu Bar / CMM / Measurement Point (Probing Point)". Click on the icon on the left in the following dialogue. Cf. the topic Measurement Point with Direction
XI-14 v 2.4 14.09.04

CMM Movement
1.13 Measurement Point with Imaginary Point You determine the measurement point (probing point) via the menu bar "CMM" and the function "Measurement Point (Probing Point)".
You also can click on the symbol in the tools for machine. You obtain the corresponding dialogue window.
In order to determine the measurement point, you have three options (refer to detailed information Measurement Point). One of the three possibilities is the following.
1.13.1 Three Options Measurement point with imaginary point: When proceeding this way, you
determine the direction by means of a centre of probe with direction and an imaginary point. Normally, you measure the origin of the element.
1 = Measurement Point
2 = Imaginative Point
1.13.2 Procedure Enter the data for a centre of probe with direction in the upper three
input fields, or
Choose data from the list fields which have been recorded over the last ten measurements or
Choose data of position of machine (symbol).
Enter the data for the imaginary point in the lower three input fields.
When applying this procedure, the symbols (direction vectors) are inactive.
In the basic configuration, you see the co-ordinate initials X, Y and Z.
Even now, you can select one of the three Types of Co-Ordinate Systems .
Cartesian Co-ordinate System
Cylinder Co-ordinate System
14.09.04 v 2.4 XI-15

CMM Movement
Sphere Co-ordinate System
Start position as a proposal
You can also select the start position that you have already entered by clicking on the symbol. In this case the co-ordinates of the start position for travelling to the imaginary destination are taken over. You will use this option when you intend to change only one co-ordinate, for example. As, however, GEOPAK calculates the probing direction from the difference of the co-ordinates, at least one co-ordinate needs to be changed.
1.14 Probing of Edge Point If you want to probe an edge point at a thin sheet, you can realize this in GEOPAK with a special probing strategy. This strategy can also be applied if the sheet you want to measure is bent compared with the model or the learnt part. Near the edge point on the sheet, one or several probing processes will be executed. The height of the real edge probing will be calculated out of these preceding probing processes (surface points). It is possible to independently adapt the safety distance from the general setting, separately according to your required edge and surface point(s).
Select the element "Point".
In the CMM pull-down menu, click on the "Edge Measurement" function.
The following dialogue is divided in "Edge Point" and "Surface Point".
Representation for all Options of the Edge Measurement
1 = Edge point; 2 = Measurement Deepness; 3 = Edge Point Probing Direction
Representation for the "1 Surface Point" Option
1 = Distance Edge/Surface Point; 2 = Surface Point Probing Direction
XI-16 v 2.4 14.09.04

CMM Movement
At the “1 Surface Point” option, the height will be adjusted.
Representation from top 1 Surface Point
Red Point = Preceding Probing Point
2 Surface Point
1 = Distance Edge/Surface Point; 2 = Min. Edge Distance
If there exist two surface points, not only the height but also the direction of the edge probing will be adjusted.
3 Surface Point
1 = Distance Edge/Surface Point; 2 = Min. Edge Distance
If there are three surface points, also a lateral bending of the sheet will be compensated.
14.09.04 v 2.4 XI-17

CMM Movement
1.15 Automatic Line Measurement To open the dialogue box
click on this icon in the "Element Line" dialogue box or
choose "Machine / Autom. element measurement / Line" from the menu bar or
click on this icon in the tool bar on the left margin of the GEOPAK main window.
Start point In the "Automatic line measurement" dialogue box enter the coordinates of the start point (depends on the type of coordinate system).
Angle This is the angle between the line in measuring direction and the first axis of the direction plane, i.e. if you enter an angle of 0 or 180 degrees you will achieve the opposite measuring direction (see following picture).
XI-18 v 2.4 14.09.04

CMM Movement
Probing
Choose the "Probing" icons if you wish to probe
in the driving plane
along the driving direction
to the right or to the left.
On the right side of the dialogue box the selected probing mode will be displayed (see example in the picture below).
See also information on the subject "Scanning of Known Elements ".
See also "Filter Contour".
14.09.04 v 2.4 XI-19

CMM Movement
1.16 Automatic Plane Measurement At the automatic plane measurement, the driving strategy is the same as in the automatic circle measurement. That means the measurement points will be distributed on a circle. The probing is done vertically to the driving plane.
You get the function via
the symbol in the CMM tools, or via
the menu bar "CMM / Autom. Element Measurement / Plane", or via
the symbol out of the "Element Plane" dialogue.
With the symbols, you determine whether you probe by moving up or down (in positive or negative plane direction).
Circular
If you can make a rotation with your CMM, you should activate this (see symbol) if you measure the base of a circumferential groove. You avoid intermediate positions that would be necessary if you would drive on straight lines. If you can move from a meas. point to the next one without a collision, the straight way is the fastest and shortest. Slot Width
If your CMM is not able to make a rotation, you should input, in case of a circumferential groove, a slot width (see symbol). This slot width indicates how much place is available for moving around. GEOPAK then calculates the driving ways between the probing positions, this means
out of this slot width,
out of the actual ball diameter and
out of the safety distance.
The number of the calculated intermediate positions is always the smallest possible. It depends essentially on the number of meas. points and the slot width.
See also information on the subject "Scanning of Known Elements ".
XI-20 v 2.4 14.09.04

CMM Movement
1.17 Automatic Circle Measurement You can use the "Automatic Circle Measurement" if you measure a circle or an ellipse. As part measurement, you can use the "Automatic Circle Measurement" also for a cylinder, a cone or a sphere.
You get the function via
the symbol in the CMM tools, or via
the menu bar "CMM / Autom. Element Measurement / Circle", or via
the symbol out of the "Element Circle" dialogue.
Input the circle parameter that means the nominal diameter for the diameter. The ball diameter and safety distance are automatically calculated by GEOPAK.
The option "In Clockwise Direction or Anticlockwise" is only relevant if you only measure the part of a circle.
Circular If it is possible with your CMM to make a rotation, you should activate this
(see symbol) if you measure an outer circle (bolt). You avoid intermediate positions that would be necessary if you would drive on straight lines.
At an inner circle (bore hole), the straight way is the fastest and shortest.
Slot Width If your CMM is not able to make a rotation, you should input, in case of an
outer circle, a slot width. This slot width indicates how much place is available for moving around. GEOPAK then calculates the driving ways between the probing positions, this means
out of this slot width,
out of the actual ball diameter and
out of the safety distance.
The number of the calculated intermediate positions is always the smallest possible. It essentially depends on the number of meas. points and the slot width.
Thread Pitch
If you want to measure the position of a thread hole, click on the symbol and input the thread pitch.
If the symbol is not activated, the CMM will drive on the same height. That would falsify the position (see pictures below). If you have input the thread pitch, the probing always takes place under the same conditions. This way, a good position determination is possible.
14.09.04 v 2.4 XI-21

CMM Movement
Without thread pitch
With thread pitch
See also information on the subject "Scanning of Known Elements ".
See also "Filter Contour".
XI-22 v 2.4 14.09.04

CMM Movement
1.18 Automatic Inclined Circle Measurement With this function and the relevant dialogues we provide you with the advantages of the Automatic Circle Measurement also for the measurement of inclined circles: The part program is shorter, easier to change and learn.
In particular, you can use this function to measure the surface and within the surface the inclined circle with only one part program command.
Furthermore it is easier to distribute the measurement points on the circle more evenly.
Graphical presentation The illustration below (lateral cross-section) gives you an overview of the graphical presentation of the surface and circle measurement.
The numbers 1 to 6 show the sequence of actions.
At position 2, the surface measurement is finished.
Position 3: Start into the hole.
Circle measurement at positions 4 and 5.
Position 6: From here you can move to clearance height.
a: Circle diameter
b: Circle centre
c: Approach height
d: Approach depth
e: Edge distance
f: Surface normal
g: Diameter for surface measurement
h: Safety distance
For how to proceed further, find detailed information in Automatic Inclined Circle Measurement: Dialogue .
14.09.04 v 2.4 XI-23

CMM Movement
1.19 Automatic Inclined Circle Measurement: Dialogue Surface and Circle
In our example for the topic Automatic Inclined Circle Measurement we assume that both surface and circle are measured. You have taken this decision already in the dialogue "Element inclined circle" (Menu bar/elements/inclined circle) using the symbols for "Measurement" and "Automatic measurement" (see above).
In the following dialogue (excerpt in ill. below), you perform the settings that are already known to you from the automatic circle measurement.
Additionally required are details about approach height and approach depth.
Inner and outer circle
As opposed to the automatic circle measurement, you must use vectors in this dialogue to define the starting position of the circle measurement on the surface. The origin for this vector is the circle centre. With the end angle you define where the last measurement point is taken (end angle 0 = end angle 360 degrees).
These data are not required for the inner full circle.
Edge distance and plane vector For the plane measurement you additionally require the distance to the edge and the vector for the angularity of the plane (see dialogue excerpt below). This vector is perpendicular to the plane.
XI-24 v 2.4 14.09.04

CMM Movement
Further elements possible The option buttons in this dialogue (dialogue excerpt below) are deactivated in learn mode. In the edit mode you must decide between:
Not connected with a plane Select this option when measuring
anything other than an inclined circle (e.g. cylinder, sphere, cone).
Plane still to be measured (see above under "Plane and circle").
Plane is complete. In this case, a plane exists and only the circle must be measured.
Hint When editing a part program, it may become necessary to change one of these options, e.g. switching from "Plane is complete" to "Plane still to be measured".
14.09.04 v 2.4 XI-25

CMM Movement
1.20 Automatic Cylinder Measurement You get the function via
the symbol in the CMM tools, or via
the menu bar "CMM / Automatic Cylinder Measurement / Cylinder ", or via
the symbol out of the "Element Cylinder " dialogue.
For the automatic cylinder measurement, GEOPAK presets the following strategy:
Measurement is made - parallel to the driving plane – of the circles you preset by the "Number of Steps" (minimum 2).
If you want to determine the number of points for each single circle, you must divide the total number of points (see in the dialogue window leftover) through the "Number of Steps".
The measurement of the cylinder begins on the height of the co-ordinate (first step) you entered. The last step will be measured by the variation in elevation higher or deeper.
If higher or deeper will be indicated by the driving direction.
Since the direction of axis of the cylinder always corresponds to the direction of the first up to the last meas. point, you also determine the direction of axis of the cylinder through this driving direction.
If this given probing strategy is not sufficient, don’t use the "Automatic Cylinder Measurement" function but rather use for example the "Automatic Circle or Line Measurement".
Problem
The driving strategy in GEOPAK differs from that in GEOPAK-3 to the extent that the last position is situated at another place. This can lead to – with GEOPAK-3 part programs converted to GEOPAK - a collision of the following driving command.
Problem Solving
You can select a GEOPAK-3 compatible driving strategy by activating the symbol in the dialogue. You activate the symbol via the "PartManager / Settings / Defaults for Programs / CMM / GEOPAK / Dialogues" and to the end the "Display Button for GEOPAK-3" function.
See also information on the subject "Scanning of Known Elements ".
XI-26 v 2.4 14.09.04

CMM Movement
1.21 Scanning For the scanning, you have further options via the menus "Measurement Point: Two Possibilities“ and "Measurement Point with Direction". Meantime, you should be sufficiently familiarized with these two topics.
Open or closed
For scanning, it is important if you have an open or closed contour. If the contour is closed, click the symbol. Then, scanning is terminated as soon as the CMM has reached the starting point.
With an open contour, deactivate the symbol and determine via the target point the zone you want to record. In this case, you have multiple possibilities to finish a scanning (the following example with a scanning in the X/Y plane.
Enter the X as well as the Y values of the target point. The scanning is only terminated if the X as well as the Y co-ordinates have been reached.
Enter the X value and activate the symbol "Ignore Second Axis". The scanning is terminated as soon as the value of the X co-ordinate has been reached.
Enter the Y value and activate the symbol "Ignore First Axis". The scanning is terminated as soon as the Y co-ordinate has been reached independently from the X value.
If you want get information about scanning in the YZ, ZX, RZ and Phi Z planes, click the symbol on the left.
It is also important to know if you operate with a measuring or a switching probe system. If you work with a measuring probe system, you must input the scanning speed (1-20 mm/sec) and the Deflection of the probe.
14.09.04 v 2.4 XI-27

CMM Movement
1.21.1 Scanning of Known Elements Scanning with a "Measuring Probe" is possible for the four elements
Line,
Circle,
Cylinder and
Plane.
Provided your CMM has a controller capable of measuring known elements, it is possible to perform measurement at a scanning speed of up to 100mm/sec. Known elements are elements that you can find in your drawings by their properties (diameter, position etc.).
On principle, the scanning of the above mentioned elements is subject to the same conditions as described in the following chapters
Automatic Line Measurement ,
Automatic Circle Measurement ,
Automatic Cylinder Measurement ,
Automatic Plane Measurement .
Click on the scan symbol in the respective "Automatic Element Measurement" dialogues. Enter the scanning speed in the adjacent text box. For the optimum scanning speed refer to your records regarding the probing system and the CMM.
In order to obtain an optimum result, enter a minimum of 50 points into the text box designated "Number of Points".
Scanning of cylinders For the scanning of cylinder it is assumed that you know that only solid cylinders can be measured.
Provided your controller has the "Scanning of Known Elements" option, measurement will take place in spiral form. Otherwise, superimposed circles will be measured.
XI-28 v 2.4 14.09.04

CMM Movement
1.21.2 Scanning in the YZ, ZX, RZ and Phi Z Planes If you scan with an open contour in the other planes and want to "Ignore Axis" (see details of topic "Scanning" for the target point, you should respect the following axis co-ordinations:
1st axis 2nd axis
YZ Y Z
ZX Z X
RZ R Z
Phi Z Phi Z
You select the RZ scanning if you work with rotating and symmetrical profiles. This can be, e.g. bottles or mouthpieces of trumpets. The driving plane is determined through the Z axis and the starting point (picture below).
You decide for Phi Z scanning if you move a circle on the one hand, but at the same time must record different heights (see picture below). The circle is lies symmetrically around the Z axis. The radius is indicated through the starting point.
14.09.04 v 2.4 XI-29

CMM Movement
1.22 Element finished With this function (menu bar "CMM / Element Finished"), you tell GEOPAK that the actual element is finished and no other measurement points are expected. At this moment, the calculation of the elements will be realized.
If, after calculation, you notice that the element had incorrect points or if you still want to measure other points, you can delete the command via the symbol. Then, you automatically return to the element measurement.
If you know in advance how many points you want to measure, you can already activate this in the element dialogue with the "Aut. Element Finished" symbol. This way, after having reached the number of points to be measured, the measurement is terminated and the calculation is automatically executed.
1.23 Delete Last Meas. Point With this function, you can delete the respective last measured point in single/learn mode as well as in repeat mode. This can only be done if the CNC mode is deactivated.
You can start this function via the symbol or the menu bar "CMM / Delete Last Measured Point".
1.24 Stop
Via this function that you can activate either via the symbol or the menu bar "CMM / Stop", it is possible to stop the CMM in case of a crash.
This is the same function that you have on your joystick ("R.STOP").
XI-30 v 2.4 14.09.04

CMM Movement
1.25 Turn Rotary Table
In case you have a rotary table, the corresponding dialogue gives you several possibilities. You access the dialogue through the "Menu bar / CMM/ Turn Rotary Table".
It is your decision to choose either an
absolute angle of rotation, or
a relative angle of rotation.
Click on the symbol "Absolute Rotary Angle" and enter into the text box below an angle the table rotates to. Using the hand symbols you determine the sense of rotation.
Click on the symbol "Relative Rotary Angle" and enter into the text box below an angle by which the table is to rotate. Entering a positive angle causes the table to go round clockwise, entering a negative angle causes it to go anticlockwise.
In any case, when the table rotates watch whether there are workpieces on the table and where precisely they are located..
For measurement the symbol "Co-Ordinate System" should always be activated (depressed) in order to make sure that the co-ordinate system of the workpiece automatically rotates, as well. This function is usually not switched off unless the rotary table is set up.
Manual mode using the joystick box Mitutoyo rotary tables can also be turned manually using the joystick box. The controller transmits the end position to GEOPAK. In the learn mode this table rotation is stored in the part program as "Turn Rotary Table Absolute".
The controller does, however, not transmit the sense of rotation. Therefore GEOPAK determines the shortest travel. In cases where this method should not practicable (due to fouling conditions with the workpiece), the rotary table has to be turned under software control.
See also information on the subject "Scanning with the Rotary Table:Introduction".
14.09.04 v 2.4 XI-31

CMM Movement
1.26 Deflection To be sure having a contact with the workpiece, the measuring probe works with a so-called deflection. The control minds that the deflection does, at each point of the part, not go beyond the limits of the defined values in a dialog. As for a spring, a better deflection corresponds to a better probing of the part.
On principle is valid: The deflection must be the same as the probe calibrated one.
Notice According to the actual status of development, a deflection between 0,25 and 1 mm, depending on the connected probe system, is possible.
Feature for SP 600 When you have swivelled the SP 600, this is influencing the own weight of the probe pin so that going backwards to 0 is not possible any more. Here, we have a "Pre-Guiding". By this means, the maximum deflection is reduced.
1.27 Trigger-Automatic You use the trigger automatic with optical systems that give a signal when running over a border. For exact measurement it is important that the measurement recording is always realized in the same direction (clear - dark or dark -clear). This is why every second signal is ignored.
Enable / disable the trigger automatic by clicking on the symbol in the “CMM” menu.
This function is only activated if you have input it into the INI.file.
1.28 Installation of CNC Mode You have determined the probe and the co-ordinate system. Via the menu bar "Measurement" and the function "CNC Parameters and CNC Enabled", you come to the corresponding dialog window. Here, you are prompted to input the required values for the measurement task.
For CNC mode you need information to the following items (also see the dialog window):
Movement Speed
Measuring Speed
Safety Distance
In the following dialogue window, you can change all settings at the same time.
Enter values
If you want to enter values for the single positions, click on the CMM symbol.
Characteristic features
XI-32 v 2.4 14.09.04

CMM Movement
For the movement and the measurement speed, you have two specific values. You can select between the
max. value or the
default.
The default value for the measurement speed (probing speed) is the value able to realize the max. accuracy. If your part program is determined to function on different CMMs with different properties, you should select the default setting.
Continue with values
But if you want to continue single parameters, click on the symbol.
In addition to "CNC Parameters...", you can read in the headline of this dialog window "... and CNC ON". If you confirm your inputs, the part program is stored according to your specification. In repeat mode, CNC mode is enabled.
In the pull-down menu "Machine", you also find the "CNC Parameter" functions. With this dialog, you can change one or several parameters in the actual program. The "CNC Parameters" dialog window compared with the "CNC Parameters and CNC ON" dialog window is extended by two parameters:
Measuring Length The measuring length is the max. length of a CMM’s moving speed to probe a part.
Positioning Accuracy The positioning accuracy describes the distance between probe and intermediate position. If the probe came to the intermediate position with this distance, the CMM continues to the next position.
In the status line of the GEOPAK main window you see, next to the symbol for the CMM, the status of operation.
• Green: CNC-mode off • Yellow: CNC-mode on
Further Options We inform you about further options for the CNC mode with the following terms "Clearance Height" and "Error Height".
14.09.04 v 2.4 XI-33

CMM Movement
1.29 Measuring Speed The measuring speed is the speed with which the CMM is moving to probe the part.
The "Minimal" or "Maximal Measuring Speed" depends on the CMM and the probing system.
On principle is valid: The lower is the measuring speed, the more exact is the measurement. Yet, steady measurement could unnecessarily prolong the measurement time. For an optimal measurement speed respecting both "Accuracy " and "Measurement Time" refer to documentation of CMM. The optimal speed is 3 mm/sec.
1.30 Movement Speed With the movement speed, the co-ordinate measuring machine (CMM) moves between the measurement points. Normally, the movement speed is specified. But, if you work with a heavy probing system it may happen that you must reduce the speed.
You have to pay special attention to new machines with a movement speed between 600 and 1000 mm/sec. These movement speeds require a much higher braking distance, otherwise the probe can be damaged.
1.31 Safety Distance The safety distance is the distance between the theoretical probe point on the surface of the piece and the point where the CMM changes from movement speed to measurement speed.
If the measurement points are directly probed (Scanning,) and you have a too small safety distance, you risk collisions if the contour shows and distinct irregularities.
1.32 Measured Nominal Length The measured nominal length is the maximal length of a CMM moving in measurement speed in order to probe a part. This avoids that wrong measurement results are possible.
Example: The parts to be measured are located on a palette. If there are missing one or more parts, the CMM would measure the next part on the palette and you would get wrong measurement results. You can avoid this by entering a determined measured nominal length.
XI-34 v 2.4 14.09.04

CMM Movement
1.33 Positioning Accuracy The positioning accuracy is used when there are several movement commands in the buffer of the machine. It defines the point of movement of the machine where the controller considers the target as "reached" and starts moving towards the next target. It does not affect the accuracy of the measurement.
1 = destination A
2 = intermediate position B
3 = destination C
4 = positioning accuracy
5 = work piece
You should know:
If you select a high value, the part program executes faster than with a small value.
The value is used in all cases when there are subsequent movements of the machine.
1.34 Change CNC Parameters In case you want to change, during CNC run, the parameters e.g. measurement speed or movement speed, click on this function (menu bar "CMM / CNC Parameters"). In the following dialogue window, you can change all settings at the same time.
Enter values
If you want to enter values for the single positions, click on the CMM symbol.
Characteristic features For the movement and the measurement speed, you have two specific values. You can select between the
max. value or the
default. The default value for the measurement speed (probing speed) is the value able to realize the max. accuracy. If your part program will be determined to function on different CMMs with different properties, you should select the default setting.
14.09.04 v 2.4 XI-35

CMM Movement
Continue with values
But if you want to continue with single parameters, click on the symbol.
Enter two further Parameters The "CNC-Parameter" dialogue window has been upgraded with two further parameters compared with the "CNC Parameters and CNC on"
Measuring Length The measurement length is the max. length of a CMM’s measurement speed to probe a part.
Positioning Distance The positioning distance describes the distance between probe and intermediate position. If the probe came to the intermediate position with this distance, the CMM continues to the next position.
In the status line of the GEOPAK main window (bottom left) you see, next to the symbol for the CMM, the status of operation.
Green: CNC mode off
Yellow: CNC mode on
Further Options We inform you about further options for the CNC mode with the following terms "Clearance Height" and "Safety Plane".
1.35 Best Fit: Definition and Criteria At best fit, a group of co-ordinate values (points) is rotated and shifted in a way that it suits "best" into another group of specified co-ordinates.
These specified co-ordinates are nominal values; the others are designated as "Real Value" or "Actual Values".
Always one actual and one nominal value build a couple of points.
The best fit is based on the analogy of the Gauss criterion. This criterion requires that the sum of the squares distances is small.
This means that the distances of the actual values are calculated from their corresponding nominal values, and then they are squared and summed up. The "best" fit can be reached, if the sum is minute.
For a best fit, you need at least two couples of points.
Notice You can access the results of best fit (rotation and movement) as described in formula calculation under the topic "Table of Operands".
XI-36 v 2.4 14.09.04

CMM Movement
1.35.1 Two Purposes A best fit can do duty for two different purposes:
for evaluation if an alignment of points are together within a tolerance (see also "Tolerance and MMB at Best Fit", "Graphic at Best Fit"), or
You can determine a co-ordinate system (see "Create Co-Ordinate System with Best Fit ").
1.35.2 Program Run The process is different according to
whether you have a fixed number of actual points (see "Best Fit with Fixed Number of Points" to which are assigned nominal values or
whether the number of the couple of points is variable (see "Best Fit with Variable Number of Points").
1.35.3 Best Fit with Fixed Number of Points Program Run:
You measure the elements representing their actual values. In the pull-down menu, you select "Co-Ordinate System / Best Fit". In the "Best Fit" window, activate the "Single Selection-Criterion"
and select the degrees of freedom (see "Degrees of Freedom for Best Fit").
Confirm with "OK" and come to the "Best Fit Elements" window of the elements you have measured. These elements have a fixed point.
In this window you select an element and press the symbol. The element you have selected is transferred to the window "Expected Values" which only contains the selected elements.
When the element is transferred, GEOPAK prompts you under "co-ordinates" to input the nominal values for the element. The element and the nominal value are indicated in the window "Best Fit Elements".
If you have, by mistake, transferred an element into the "Selection" window, you can remove it again with the symbol.
Notice Even if you have measured lots of elements you can make a clear and short element list for selection. You only display the type you need, the others are filtered. To do so, you disable the element symbols above the element list.
Immediately after your "OK"
the calculation is realized, and
in the protocol there are data about how much mm you have moved respectively rotated your elements.
14.09.04 v 2.4 XI-37

CMM Movement
1.35.4 Best Fit with a Variable Number of Points With a variable number of couples of points it is not possible to enter the nominal values before. Example: A sub-program for rims with 4 or 5 fixing holes. In this case, the nominal values are not entered for each element but the allocation is realized via other elements that are input as "Theoretical Elements".
Program Run
You define the theoretical elements to which you have assigned nominal values.
These theoretical elements must have sequenced storage numbers and must be of the same type.
You measure the actual elements in the same order and completely store them.
You select in the pull-down menu “Co-ordinate System / Best Fit ".
In the "Best Fit" window, activate the "Group Selection". For the remaining preference possibilities refer to "Degrees of Freedom for Best Fit".
Now, a selection window in which you can
• select the first nominal and respectively actual element as well as • the number of your couples of points, is displayed.
With "OK", you start the calculation and
the result is recorded.
1.35.5 Degrees of Freedom for Best Fit Definition Generally, the actual and nominal values can be moved and rotated as you like it. Thus, you get the best result. To do so, activate the "Rotate & Shift" function.
In some cases, you optionally can only rotate or shift (see "Only Rotate" or " Only Shift ").
Details With the buttons below this selection you can modify once again the degrees of freedom. Thus, if for example a movement is only possible in one direction or if a rotation can only be carried out around one determined axis.
The selection in the top row facilitates the input.
If only one rotation is allowed, you can also enter the rotation point around which rotation shall be realized. If there is no input, rotation is effected around the origin of the actual co-ordinate system.
XI-38 v 2.4 14.09.04

CMM Movement
1.35.6 Tolerance and MMC for Best Fit For a judgement "OK / NOK" a tolerance is necessary. You can input this tolerance in the first window "Best fit". The position of the single actual values is checked after the best fit against this tolerance limit.
Only for single selection In case that not points, but circles are taken for the best fit calculation, it is also possible to apply the MMC, if allowed. Then the individual tolerance limits are expanded by the difference to the maximum material size. You inform the program about this by clicking the check box "MMC".
In the window for the nominal values you must additionally input the maximum material size of the diameter, which is:
The smallest allowable size of a hole;
The largest allowable size of a boss.
1.35.7 Graphics for Best Fit
For an evaluation of the result of the best fit calculation, a graphical comparison can be activated by the symbol.
In the graphics, you can see the nominal points and the actual points, either before or after the calculation.
The distances between the nominal and actual positions are enlarged; you can either input or automatically set the scale factor.
The tolerance for each position is also displayed.
If an actual value is further away from its nominal than twice the tolerance, it is not displayed. Only an arrow shows the direction where the actual value lies. This is to avoid long lines crossing the whole of the drawing.
1.36 Calculation of Minimum-/Maximum On principle, you can calculate all defined element features with this function. This function allows, for example to determine from a number of circles the biggest or the smallest diameter. You have two possibilities: Single- or Group Selection.
Activate the function via the menu bar "Calculation / Minimum <-> Maximum".
After termination of the calculations you have different values at your disposal.
You can access these values in the formula calculation (see details in topic "System Variable in Formula Calculation").
14.09.04 v 2.4 XI-39


Further Options
XII Appendix Contents 1 Further Options ................................................................ 2
2 Delivery ............................................................................. 3
2.1 Form and Scope........................................................................... 3 2.2 Installation.................................................................................... 3
3 Prerequisites..................................................................... 4
3.1 Minimum Configuration .............................................................. 4 3.2 Required Knowledge ................................................................... 4
4 Support and Service......................................................... 5
5 Hotline ............................................................................... 6
14.09.04 v 2.4 XII-1

Further Options
1 Further Options A series of further options add to the capabilities offered by GEOPAK.
You have alignment programs for probe changing systems
The external program call-up is programmable and, as such, can be integrated with the part program.
A virtual machine supports you in machine-remote programming.
The PartManager offers another series of options for GEOPAK:
• There are, e.g., the Manager Programs capable of combining several part programs to one Manager Program.
• The Remote-Manager enables part programs to be started under remote control via a file-supported port in GEOPAK, that is from other computers within a network.
• Q-PAK causes part programs to be executed automatically in a wait loop. A graphic user prompting system supports the user.
Also the Q-PAK dialogue shows the pictures of those workpieces which were entered by the user already in the PartManager.
Communication with other control systems is ensured by our "IO-Conditions".
Use the "string coding" function to insert all sorts of information of a part program into a text line. It is also possible to output the value of a variable or the contents of a text variable.
The scope of delivery comprises:
• A part program converter from GEOPAK-3 (DOS) to GEOPAK • A port to import external part programs in the GEOPAK-ASCII
format Another function allows an output of the measured elements in the
formats DMIS, DXF and IGES.
XII-2 v 2.4 14.09.04

Delivery
2 Delivery 2.1 Form and Scope The GEOPAK program is executable under the Windows 2000 / XP operating systems.
GEOPAK is supplied on CD-ROM.
Being the basis of the MCOSMOS system and responsible for the part management, the PartManager is always comprised with our delivery.
The program is copy.-protected by means of a so-called "Dongle".
Online Help and User's Manual are part of our delivery.
GEOPAK is available in most of the European languages and also in some Asian languages as well.
2.2 Installation GEOPAK uses the Mitutoyo Installation Program (picture below) for its installation.
The user will be guided through the complete installation by clear, action orientated dialogues, which enable the user to carry out the installation by himself.
14.09.04 v 2.4 XII-3

Prerequisites
3 Prerequisites 3.1 Minimum Configuration The requirement for running GEOPAK is an IBM-compatible PC with minimum Pentium 4 processor (min. 1 GHz, recommended 2 GHz). The program requires a minimum of 256 MB RAM and 30 GB HD memory capacity (not including the capacity requirements for the temporary files and part program files). In connection with 3D-TOL, 1.5 MHZ (recommended 3 MHZ) and 512 MB main memory are required, provided that the CAD models do not exceed the free main memory capacity. The graphics card must be unlimited open-GL-capable and must have a minimum of 128 MB capacity (recommended 256 MB).
Sufficient memory is an essential prerequisite for flawless running of the measuring programs.
3.2 Required Knowledge The user of GEOPAK should have basic knowledge of geometry, basic knowledge of form and position tolerances as well as basic PC-knowledge (able to use Windows).
XII-4 v 2.4 14.09.04

Support and Service
4 Support and Service Maintenance is performed by way of software updates to adapt to new requirements.
For application problems, we support 3D-TOL-users with a hotline service (see chapter 12: Hotline).
For information about other software products, please visit our CTL homepage: www.mitutoyo-ctl.de.
For information about our hardware products, please first visit our homepage: www.mitutoyo.de.
Being a leading supplier, Mitutoyo is of course represented on all relevant trade fairs. Furthermore, highly qualified Mitutoyo experts offer training courses for customers.
The statements in this description are not binding. We reserve the right to changes in the course of the technological progress.
The program itself and this product information are protected by copyright and may neither in part nor in whole be copied and/or distributed. Copyright Mitutoyo Messgeräte GmbH (all rights reserved).
Neuss, September 2004
Mitutoyo Messgeräte GmbH
Borsigstr. 8 - 10
D - 41469 Neuss
Phone: 0 21 37 / 1 02-0
Fax: 0 21 37 / 86 85
E-Mail: [email protected]
14.09.04 v 2.4 XII-5

Hotline
5 Hotline Should you have any topical questions in spite of the documentation provided by us, you are kindly requested to contact us at the following telephone numbers.
01805 / 102-333 is the number for our hardware service (0.12 €/min). Depending on whether you ring us from Northern or Southern Germany, you will be connected with Neuss or Leonberg.
At the number 01805 / 102-343 (0,12 €/min) you reach our software experts. Your call is directed to a branch office located in your vicinity. If the number there is engaged, your call will be directed to Neuss. There is an info voice installed for each branch office.
You can reach us on the phone on weekdays from 7.30 a.m. to 8.00 p.m., and on Saturdays from 8.00 a.m. to 2.00 p.m.
XII-6 v 2.4 14.09.04