ultra low power dac for portable audio applicationspdf.dzsc.com/99999/201085103024178.pdfcompared to...
TRANSCRIPT

w WM8910
Ultra Low Power DAC for Portable Audio Applications
WOLFSON MICROELECTRONICS plc
To receive regular email updates, sign up at http://www.wolfsonmicro.com/enews
Pre-Production, April 2010, Rev 3.0
Copyright ©2010 Wolfson Microelectronics plc
DESCRIPTION
The WM8910 is a high performance ultra-low power stereo DAC optimised for portable audio applications.
The device features stereo ground-referenced headphone amplifiers using the Wolfson ‘Class-W’ amplifier techniques - incorporating an innovative dual-mode charge pump architecture - to optimise efficiency and power consumption during playback. The ground-referenced outputs eliminate headphone coupling capacitors. Both headphone and line outputs include common mode feedback paths to reject ground noise.
Control sequences for audio path setup can be pre-loaded and executed by an integrated sequencer to reduce software driver development and eliminate pops and clicks via Wolfson’s SilentSwitch™ technology.
The analogue input stage can be configured for single ended or differential inputs. Up to 2 stereo microphone or line inputs may be connected. The input impedance is constant with PGA gain setting.
A stereo digital microphone interface is provided, which can also be mixed with the mic/line signals at the output mixers.
A dynamic range controller provides compression and level control to support a wide range of portable recording applications. Anti-clip and quick release features offer good performance in the presence of loud impulsive noises.
Common audio sampling frequencies are supported from a range of external clocks, either directly or generated via the FLL.
The WM8910 can operate directly from a single 1.8V switched supply. For optimal power consumption, the digital core can be operated from a 1.0V supply.
FEATURES • 4.5mW power consumption for DAC to headphone
playback
• DAC SNR 96dB typical, THD -86dB typical
• Control sequencer for pop minimised start-up and shut-down
• Single register write for default start-up sequence
• Integrated FLL provides all necessary clocks
- Self-clocking modes allow processor to sleep
- All standard sample rates from 8kHz to 96kHz
• Stereo digital microphone input
• 2 single ended inputs per stereo channel
• 1 fully differential mic / line input per stereo channel
• Digital Dynamic Range Controller (compressor / limiter)
• Digital sidetone mixing
• Ground-referenced headphone driver
• Ground-referenced line outputs
• Stereo differential line driver for direct interface to WM9001 speaker driver
• 40-pin QFN package (5x5mm)
APPLICATIONS • Portable multimedia players
• Multimedia handsets
• Handheld gaming

WM8910 Pre-Production
w PP, Rev 3.0 April 2010
2
BLOCK DIAGRAM

Pre-Production WM8910
w PP, Rev 3.0, April 2010
3
TABLE OF CONTENTS
DESCRIPTION ....................................................................................................... 1 FEATURES............................................................................................................. 1 APPLICATIONS ..................................................................................................... 1 BLOCK DIAGRAM ................................................................................................. 2 TABLE OF CONTENTS ......................................................................................... 3 PIN CONFIGURATION ........................................................................................... 6 ORDERING INFORMATION .................................................................................. 6 PIN DESCRIPTION ................................................................................................ 7 ABSOLUTE MAXIMUM RATINGS ......................................................................... 8 RECOMMENDED OPERATING CONDITIONS ..................................................... 8 ELECTRICAL CHARACTERISTICS ...................................................................... 9
TERMINOLOGY ............................................................................................................. 9 COMMON TEST CONDITIONS ..................................................................................... 9 INPUT SIGNAL PATH .................................................................................................. 10 OUTPUT SIGNAL PATH .............................................................................................. 10 BYPASS PATH ............................................................................................................ 12 CHARGE PUMP ........................................................................................................... 13 FLL ............................................................................................................................... 13 OTHER PARAMETERS ............................................................................................... 13
POWER CONSUMPTION .................................................................................... 14 COMMON TEST CONDITIONS ................................................................................... 14 POWER CONSUMPTION MEASUREMENTS ............................................................. 14
SIGNAL TIMING REQUIREMENTS ..................................................................... 16 COMMON TEST CONDITIONS ................................................................................... 16 MASTER CLOCK ......................................................................................................... 16 AUDIO INTERFACE TIMING ....................................................................................... 17
MASTER MODE .......................................................................................................................................................... 17 SLAVE MODE ............................................................................................................................................................. 18 TDM MODE ................................................................................................................................................................. 19
CONTROL INTERFACE TIMING ................................................................................. 20 DIGITAL FILTER CHARACTERISTICS ............................................................... 21
DAC FILTER RESPONSES ......................................................................................... 22 DE-EMPHASIS FILTER RESPONSES ........................................................................ 24
DEVICE DESCRIPTION ....................................................................................... 25 INTRODUCTION .......................................................................................................... 25 ANALOGUE INPUT SIGNAL PATH ............................................................................. 26
INPUT PGA ENABLE .................................................................................................................................................. 27 INPUT PGA CONFIGURATION ................................................................................................................................... 27 SINGLE-ENDED INPUT .............................................................................................................................................. 29 DIFFERENTIAL LINE INPUT ....................................................................................................................................... 29 DIFFERENTIAL MICROPHONE INPUT ...................................................................................................................... 30 INPUT PGA GAIN CONTROL ..................................................................................................................................... 30 INPUT PGA COMMON MODE AMPLIFIER ................................................................................................................. 32
DIGITAL MICROPHONE INTERFACE ......................................................................... 32 DIGITAL MICROPHONE VOLUME CONTROL ........................................................................................................... 34
DYNAMIC RANGE CONTROL (DRC) .......................................................................... 37 COMPRESSION/LIMITING CAPABILITIES ................................................................................................................. 37 GAIN LIMITS ............................................................................................................................................................... 38

WM8910 Pre-Production
w PP, Rev 3.0 April 2010
4
DYNAMIC CHARACTERISTICS .................................................................................................................................. 39 ANTI-CLIP CONTROL ................................................................................................................................................. 40 QUICK RELEASE CONTROL ...................................................................................................................................... 40 GAIN SMOOTHING ..................................................................................................................................................... 41 INITIALISATION .......................................................................................................................................................... 41
DIGITAL MIXING ......................................................................................................... 42 DIGITAL MIXING PATHS ............................................................................................................................................ 42 DAC INTERFACE VOLUME BOOST ........................................................................................................................... 43 DIGITAL SIDETONE ................................................................................................................................................... 44
DIGITAL-TO-ANALOGUE CONVERTER (DAC) .......................................................... 45 DAC DIGITAL VOLUME CONTROL ............................................................................................................................ 45 DAC SOFT MUTE AND SOFT UN-MUTE ................................................................................................................... 48 DAC MONO MIX .......................................................................................................................................................... 49 DAC DE-EMPHASIS.................................................................................................................................................... 49 DAC SLOPING STOPBAND FILTER ........................................................................................................................... 50 DAC BIAS CONTROL .................................................................................................................................................. 50 DAC OVERSAMPLING RATIO (OSR) ......................................................................................................................... 51
OUTPUT SIGNAL PATH .............................................................................................. 52 OUTPUT SIGNAL PATHS ENABLE ............................................................................................................................ 53 HEADPHONE / LINE OUTPUT SIGNAL PATHS ENABLE .......................................................................................... 54 OUTPUT PGA BIAS CONTROL .................................................................................................................................. 57 OUTPUT DRIVERS BIAS CONTROL .......................................................................................................................... 57 OUTPUT MIXER CONTROL ........................................................................................................................................ 58 OUTPUT VOLUME CONTROL .................................................................................................................................... 60
ANALOGUE OUTPUTS ............................................................................................... 64 HEADPHONE OUTPUTS – HPOUTL AND HPOUTR .................................................................................................. 64 LINE OUTPUTS – LINEOUTL AND LINEOUTR .......................................................................................................... 64 DIFFERENTIAL LINE OUTPUTS – LON/LOP AND RON/ROP ................................................................................... 64 EXTERNAL COMPONENTS FOR GROUND-REFERENCED OUTPUTS ................................................................... 65
REFERENCE VOLTAGES AND MASTER BIAS .......................................................... 66 POP SUPPRESSION CONTROL................................................................................. 68
DISABLED INPUT / OUTPUT CONTROL .................................................................................................................... 68 DIFFERENTIAL LINE OUTPUT DISCHARGE CONTROL ........................................................................................... 68
CHARGE PUMP ........................................................................................................... 69 DC SERVO .................................................................................................................. 70 DIGITAL AUDIO INTERFACE ...................................................................................... 73
MASTER AND SLAVE MODE OPERATION ............................................................................................................... 73 OPERATION WITH TDM ............................................................................................................................................. 74 BCLK FREQUENCY .................................................................................................................................................... 75 AUDIO DATA FORMATS (NORMAL MODE) ............................................................................................................... 75 AUDIO DATA FORMATS (TDM MODE) ...................................................................................................................... 77
DIGITAL AUDIO INTERFACE CONTROL ................................................................... 79 BCLK AND LRCLK CONTROL .................................................................................................................................... 80 COMPANDING ............................................................................................................................................................ 82 LOOPBACK ................................................................................................................................................................. 84
CLOCKING AND SAMPLE RATES .............................................................................. 84 CLK_SYS CONTROL .................................................................................................................................................. 86 CONTROL INTERFACE CLOCKING ........................................................................................................................... 87 AUTOMATIC CLOCKING CONFIGURATION .............................................................................................................. 87 USB CLOCKING MODE .............................................................................................................................................. 89 DAC OPERATION AT 88.2K / 96K .............................................................................................................................. 89 DIGITAL MICROPHONE (DMIC) OPERATION ........................................................................................................... 89
FREQUENCY LOCKED LOOP (FLL) ........................................................................... 90 FREE-RUNNING FLL CLOCK ..................................................................................................................................... 93

Pre-Production WM8910
w PP, Rev 3.0, April 2010
5
GPIO OUTPUTS FROM FLL ....................................................................................................................................... 94 EXAMPLE FLL CALCULATION ................................................................................................................................... 94 EXAMPLE FLL SETTINGS .......................................................................................................................................... 95
GENERAL PURPOSE INPUT/OUTPUT (GPIO) .......................................................... 96 INTERRUPTS ............................................................................................................ 100 CONTROL INTERFACE ............................................................................................ 103 CONTROL WRITE SEQUENCER .............................................................................. 106
INITIATING A SEQUENCE ........................................................................................................................................ 106 PROGRAMMING A SEQUENCE ............................................................................................................................... 107 DEFAULT SEQUENCES ........................................................................................................................................... 109 START-UP SEQUENCE ............................................................................................................................................ 110 SHUTDOWN SEQUENCE ......................................................................................................................................... 112
POWER-ON RESET .................................................................................................. 114 QUICK START-UP AND SHUTDOWN ...................................................................... 116
QUICK START-UP (DEFAULT SEQUENCE) ............................................................................................................ 116 QUICK SHUTDOWN (DEFAULT SEQUENCE) ......................................................................................................... 116
SOFTWARE RESET AND CHIP ID ........................................................................... 117 REGISTER MAP ................................................................................................. 118
REGISTER BITS BY ADDRESS ................................................................................ 121 APPLICATIONS INFORMATION ....................................................................... 158
RECOMMENDED EXTERNAL COMPONENTS ......................................................... 158 PACKAGE DIMENSIONS .................................................................................. 159 IMPORTANT NOTICE ........................................................................................ 160
ADDRESS .................................................................................................................. 160

WM8910 Pre-Production
w PP, Rev 3.0 April 2010
6
PIN CONFIGURATION
ORDERING INFORMATION
DEVICE TEMPERATURE
RANGE PACKAGE
MOISTURE SENSITIVITY LEVEL
PEAK SOLDERING TEMPERATURE
WM8910LGEFK/V -40°C to +85°C 40-lead QFN
(5x5x0.55mm, lead-free)
MSL3 260°C
WM8910LGEFK/RV -40°C to +85°C 40-lead QFN
(5x5x0.55mm, lead-free, tape and reel)
MSL3 260°C
Note:
Tube quantity = 95
Reel quantity = 3,500

Pre-Production WM8910
w PP, Rev 3.0, April 2010
7
PIN DESCRIPTION
NAME PIN TYPE DESCRIPTION
DGND 1 Supply Digital ground (return path for DCVDD and DBVDD)
MCLK 2 Digital Input Master clock for DAC
GPIO2 3 Digital Input/Output GPIO2 / Digital microphone input
GPIO1 4 Digital Input/Output GPIO1 / Digital microphone input
INTERRUPT / GPIO4
5 Digital Output Interrupt output / GPIO4
BCLK / GPIO5 6 Digital Input/Output Audio interface bit clock / GPIO5
DACDAT 7 Digital Input DAC digital audio data
LRC 8 Digital Input/Output Audio interface left / right clock
AIFTXDAT 9 Digital Output Digital Microphone audio data
CPVDD 10 Supply Charge pump power supply
CPCA 11 Analogue Output Charge pump flyback capacitor pin
CPGND 12 Supply Charge pump ground
CPCB 13 Analogue Output Charge pump flyback capacitor pin
CPVOUTP 14 Analogue Output Charge pump positive decoupling (powers HPOUTL/R, LINEOUTL/R)
CPVOUTN 15 Analogue Output Charge pump negative decoupling (powers HPOUTL/R, LINEOUTL/R)
HPOUTR 16 Analogue Output Right headphone output (line or headphone)
HPOUTFB 17 Analogue Input Headphone ground
HPOUTL 18 Analogue Output Left headphone output (line or headphone)
LINEOUTR 19 Analogue Output Right line output 1 (line output)
LINEOUTFB 20 Analogue Input Line-out ground
LINEOUTL 21 Analogue Output Left line output 1 (line output)
LOP 22 Analogue Output Left differential output positive side
LON 23 Analogue Output Left differential output negative side
AVDD 24 Supply Analogue power supply (powers analogue, LOP, LON, ROP, RON)
VMID 25 Analogue Output Midrail voltage decoupling capacitor
AGND 26 Supply Analogue power return
RON 27 Analogue Output Right differential output negative side
ROP 28 Analogue Output Right differential output positive side
DNC 29 n/a Unused - Do Not Connect
DNC 30 n/a Unused - Do Not Connect
IN2R 31 Analogue Input Right channel input 2
IN1R 32 Analogue Input Right channel input 1 / Digital microphone input
DNC 33 n/a Unused - Do Not Connect
IN2L 34 Analogue Input Left channel input 2
IN1L 35 Analogue Input Left channel input 1 / Digital microphone input
SDIN 36 Digital Input/Output Control interface data input / 2-wire acknowledge output
SCLK 37 Digital Input Control interface clock Input
GPIO3 / ADDR 38 Digital Input/Output GPIO3 / control interface address selection
DCVDD 39 Supply Digital core supply
DBVDD 40 Supply Digital buffer supply (powers audio interface and control interface)

WM8910 Pre-Production
w PP, Rev 3.0 April 2010
8
ABSOLUTE MAXIMUM RATINGS
Absolute Maximum Ratings are stress ratings only. Permanent damage to the device may be caused by continuously operating at or beyond these limits. Device functional operating limits and guaranteed performance specifications are given under Electrical Characteristics at the test conditions specified.
ESD Sensitive Device. This device is manufactured on a CMOS process. It is therefore generically susceptible to damage from excessive static voltages. Proper ESD precautions must be taken during handling and storage of this device.
Wolfson tests its package types according to IPC/JEDEC J-STD-020B for Moisture Sensitivity to determine acceptable storage conditions prior to surface mount assembly. These levels are:
MSL1 = unlimited floor life at <30°C / 85% Relative Humidity. Not normally stored in moisture barrier bag. MSL2 = out of bag storage for 1 year at <30°C / 60% Relative Humidity. Supplied in moisture barrier bag. MSL3 = out of bag storage for 168 hours at <30°C / 60% Relative Humidity. Supplied in moisture barrier bag.
The Moisture Sensitivity Level for each package type is specified in Ordering Information.
CONDITION MIN MAX
AVDD, DCVDD -0.3V +2.5V
DBVDD, -0.3V +4.5V
CPVDD -0.3V +2.2V
HPOUTL, HPOUTR, LINEOUTL, LINEOUTR (CPVDD + 0.3V) * -1 CPVDD + 0.3
Voltage range digital inputs DGND -0.3V DBVDD +0.3V
Voltage range analogue inputs AGND -0.3V AVDD +0.3V
Temperature range, TA -40°C +85°C
Storage temperature after soldering -65°C +150°C
Notes:
1. Analogue and digital grounds must always be within 0.3V of each other.
2. All digital and analogue supplies are completely independent from each other; there is no restriction on power supply sequencing.
3. HPOUTL, HPOUTR, LINEOUTL, LINEOUTR are outputs, and should not normally become connected to DC levels. However, if the limits above are exceeded, then damage to the WM8910 may occur.
RECOMMENDED OPERATING CONDITIONS
PARAMETER SYMBOL MIN TYP MAX UNIT
Digital supply range (Core) DCVDD 0.95 1.0 1.89 V
Digital supply range (Buffer) DBVDD 1.42 1.8 3.6 V
Analogue supplies range AVDD 1.71 1.8 2.0 V
Charge pump supply range CPVDD 1.71 1.8 2.0 V
Ground DGND, AGND, CPGND 0 V
Operating Temperature (ambient) TA -40 +25 +85 °C

Pre-Production WM8910
w PP, Rev 3.0, April 2010
9
ELECTRICAL CHARACTERISTICS
TERMINOLOGY
1. Signal-to-Noise Ratio (dB) – SNR is the difference in level between a full scale output signal and the device output noise with no signal applied, measured over a bandwidth of 20Hz to 20kHz. This ratio is also called idle channel noise. (No Auto-zero or Automute function is employed).
2. Total Harmonic Distortion (dB) – THD is the difference in level between a 1kHz full scale sinewave output signal and the first seven harmonics of the output signal. The amplitude of the fundamental frequency of the output signal is compared to the RMS value of the next seven harmonics and expressed as a ratio.
3. Total Harmonic Distortion + Noise (dB) – THD+N is the difference in level between a 1kHz full scale sine wave output signal and all noise and distortion products in the audio band. The amplitude of the fundamental reference frequency of the output signal is compared to the RMS value of all other noise and distortion products and expressed as a ratio.
4. Channel Separation (dB) – is a measure of the coupling between left and right channels. A full scale signal is applied to the left channel only, the right channel amplitude is measured. Then a full scale signal is applied to the right channel only and the left channel amplitude is measured. The worst case channel separation is quoted as a ratio.
5. Channel Level Matching (dB) – measures the difference in gain between the left and the right channels.
6. Power Supply Rejection Ratio (dB) – PSRR is a measure of ripple attenuation between the power supply pin and an output path. With the signal path idle, a small signal sine wave is summed onto the power supply rail, The amplitude of the sine wave is measured at the output port and expressed as a ratio.
7. All performance measurements carried out with 20kHz AES17 low pass filter for distortion measurements, and an A-weighted filter for noise measurement. Failure to use such a filter will result in higher THD and lower SNR and Dynamic Range readings than are found in the Electrical Characteristics. The low pass filter removes out of band noise; although it is not audible it may affect dynamic specification values.
COMMON TEST CONDITIONS
Unless otherwise stated, the following test conditions apply throughout the following sections:
• DCVDD = 1.0V
• DBVDD = 1.8V
• AVDD = CPVDD =1.8V
• Ambient temperature = +25°C
• Audio signal: 1kHz sine wave, sampled at 48kHz with 24-bit data resolution
Additional, specific test conditions are given within the relevant sections below.

WM8910 Pre-Production
w PP, Rev 3.0 April 2010
10
INPUT SIGNAL PATH
PGA and microphone boost
PARAMETER TEST CONDITIONS MIN TYP MAX UNIT
Minimum PGA gain setting L_MODE/R_MODE= 00b or 01b -1.55 dB
L_MODE/R_MODE= 10b +12
Maximum PGA gain setting L_MODE/R_MODE= 00b or 01b +28.28 dB
L_MODE/R_MODE= 10b +30
Single-ended to differential conversion gain
L_MODE/R_MODE= 00b +6 dB
PGA gain accuracy L_MODE/R_MODE= 00b
Gain -1.5 to +6.7dB
-1 +1 dB
L_MODE/R_MODE= 00b
Gain +7.5 to +28.3dB
-1.5 +1.5
L_MODE/R_MODE= 1X
Gain +12 to +24dB
-1 +1
L_MODE/R_MODE= 1X
Gain +27 to +30dB
-1.5 +1.5
Mute attenuation all modes of operation 88 dB
Equivalent input noise L_MODE/R_MODE= 00b or 01b 114
828
μVrms
nV/√Hz
OUTPUT SIGNAL PATH
Stereo Playback to Headphones - DAC input to HPOUTL+HPOUTR pins with 15Ω load
Test conditions: HPOUTL_VOL = HPOUTR_VOL = 111001b (0dB)
PARAMETER SYMBOL TEST CONDITIONS MIN TYP MAX UNIT
Output Power (per Channel) Po 1% THD
RLoad= 30Ω
28
0.91
-0.76
mW
Vrms
dBV
1% THD
RLoad= 15Ω
30
0.67
-3.47
mW
Vrms
dBV
DC Offset DC servo enabled, calibration complete.
0 +/-1.5 mV
Signal to Noise Ratio SNR A-weighted 90 96 dB
Total Harmonic Distortion THD RL=30Ω; Po=2mW -93
dB RL=30Ω; Po=20mW -82
RL=15Ω; Po=2mW -83 -72
RL=15Ω; Po=20mW -83
Total Harmonic Distortion + Noise THD+N RL=30Ω; Po=2mW -90
dB RL=30Ω; Po=20mW -82
RL=15Ω; Po=2mW -81 -70
RL=15Ω; Po=20mW -81
Channel Separation 1kHz signal, 0dBFS 100 dB
10kHz signal, 0dBFS 85
Channel Level Matching 1kHz signal, 0dBFS +/-1 dB
Power Supply Rejection Ratio PSRR 1kHz, 100mV pk-pk 60 dB
20kHz, 100mV pk-pk 40

Pre-Production WM8910
w PP, Rev 3.0, April 2010
11
Stereo Playback to Line-out - DAC input to LINEOUTL+LINEOUTR pins with 3.01kΩ / 50pF load
Test conditions: LINEOUTL_VOL = LINEOUTR_VOL = 111001b (0dB)
PARAMETER SYMBOL TEST CONDITIONS MIN TYP MAX UNIT
Full Scale Output Signal Level DAC 0dBFS output at 0dB volume
0.95
-0.446
2.69
1.0
0
2.83
1.05
0.424
2.97
Vrms
dBV
Vpk-pk
DC offset DC servo enabled.
Calibration complete.
0 +/-1.5 mV
Signal to Noise Ratio SNR A-weighted 90 95 dB
Total Harmonic Distortion THD 3.01kΩ load -86 -77 dB
Total Harmonic Distortion + Noise THD+N 3.01kΩ load -84 -75 dB
Channel Separation 1kHz signal, 0dBFS 100 dB
10kHz signal, 0dBFS 85
Channel Level Matching 1kHz signal, 0dBFS +/-1dB dB
Power Supply Rejection Ratio PSRR 1kHz, 100mVpk-pk 60 dB
20kHz, 100mV pk-pk 40
Stereo Playback to Differential Line-out - DAC input to LOP+LON or ROP+RON pins with 10kΩ / 50pF load
Test conditions: SPKR_LVOL = SPKR_RVOL = 111001b (0dB)
PARAMETER SYMBOL TEST CONDITIONS MIN TYP MAX
Full Scale Output Signal Level 0dBFS
Measured Differentially
0.95
-0.446
2.69
1.0
0
2.83
1.05
0.424
2.97
Vrms
dBV
Vpk-pk
Common mode output level AVDD/2
Common mode output error +/-7 mV
Signal to Noise Ratio SNR A-weighted 90 95 dB
Total Harmonic Distortion THD -92 -82 dB
Total Harmonic Distortion + Noise THD+N -88 -80 dB
Channel Separation 1kHz signal, 0dBFS 100 dB
10kHz signal, 0dBFS 85
Channel Level Matching 1kHz signal +/-1dB dB
Power Supply Rejection Ratio PSRR 1kHz, 100mVpk-pk 60 dB
20kHz, 100mV pk-pk 40
Output PGAs (HP, LINE and Differential LINE)
PARAMETER TEST CONDITIONS MIN TYP MAX UNIT
Minimum PGA gain setting -57 dB
Maximum PGA gain setting 6 dB
PGA Gain Step Size 1 dB
PGA gain accuracy +6dB to 0dB -1.5 +1.5 dB
PGA gain accuracy 0dB to -57dB -1 +1 dB
Mute attenuation
HPOUTL/R 77 dB
LINEOUTL/R 79
Differential LINE
(LOP-LOR/ROP-RON)
105 dB

WM8910 Pre-Production
w PP, Rev 3.0 April 2010
12
BYPASS PATH
Differential stereo line input to stereo line output- IN1L-IN2L / IN1R-IN2R pins to LINEOUTL+LINEOUTR pins with 3.01kΩ / 50pF load
Test conditions:
L_MODE = R_MODE = 01b (Differential Line)
LIN_VOL = RIN_VOL = 01111b (+4.2dB)
LINEOUTL_VOL = LINEOUTR_VOL = 111001b (0dB) Total signal path gain = +4.20dB
PARAMETER SYMBOL TEST CONDITIONS MIN TYP MAX UNIT
Line Input Full Scale Signal Level applied to IN2L or IN2R
0.617
-4.20
1.745
Vrms
dBV
Vpk-pk
Full Scale Output Signal Level 1.0
0
2.83
Vrms
dBV
Vpk-pk
Signal to Noise Ratio SNR A-weighted 99 dBV
Total Harmonic Distortion THD -5.2dBV input -92 dBV
Total Harmonic Distortion + Noise THD+N -5.2dBV input -90 dBV
Channel Separation 1kHz signal, -5.2dBV 85 dB
10kHz signal, -5.2dBV 80
Channel Level Matching 1kHz signal, -5.2dBV +/-1 dB
Power Supply Rejection Ratio PSRR 1kHz, 100mVpk-pk 56 dB
20kHz, 100mV pk-pk 40
Differential stereo line input to stereo line output- IN1L-IN2L / IN1R-IN2R pins to LINEOUTL+LINEOUTR pins with 3.01kΩ / 50pF load
Test conditions:
L_MODE = R_MODE = 01b (Differential Line)
LIN_VOL = RIN_VOL = 00101b (0dB)
LINEOUTL_VOL = LINEOUTR_VOL = 111001b (0dB)
Total signal path gain = 0dB
PARAMETER SYMBOL TEST CONDITIONS MIN TYP MAX UNIT
Line Input Full Scale Signal Level applied to IN2L or IN2R
1.0
0
2.83
Vrms
dBV
Vpk-pk
Full Scale Output Signal Level 0.95
-0.446
2.69
1.0
0
2.83
1.05
0.424
2.97
Vrms
dBV
Vpk-pk
Signal to Noise Ratio SNR A-weighted 85 97 dBV
Total Harmonic Distortion THD -1.0dBV input -92 -82 dBV
Total Harmonic Distortion + Noise THD+N -1.0dBV input -89 -80 dBV

Pre-Production WM8910
w PP, Rev 3.0, April 2010
13
CHARGE PUMP
PARAMETER SYMBOL TEST CONDITIONS MIN TYP MAX UNIT
Charge pump start-up time 40 μs
External component requirements
To achieve specified headphone output power and performance
Flyback capacitor (between CPCA and CPCB pins)
CFB at 2V 1 μF
CPVOUTP capacitor at 2V 2 μF
CPVOUTN capacitor at 2V 2 μF
FLL
PARAMETER SYMBOL TEST CONDITIONS MIN TYP MAX UNIT
Input Frequency FREF FLL_CLK_REF_DIV = 00 0.032 13.5 MHz
FLL_CLK_REF_DIV = 01 0.032 27 MHz
Lock time 2 ms
Free-running mode start-up time VMID enabled 100 μs
Free-running mode frequency accuracy Reference supplied initially +/-10 %
No reference provided +/-30 %
OTHER PARAMETERS
VMID Reference
PARAMETER TEST CONDITIONS MIN TYP MAX UNIT
Midrail Reference Voltage (VMID pin) –3% AVDD/2 +3% V
Digital Inputs / Outputs
PARAMETER SYMBOL TEST CONDITIONS MIN TYP MAX UNIT
Input HIGH Level VIH 0.7×DBVDD V
Input LOW Level VIL 0.3×DBVDD V
Output HIGH Level VOH IOH = +1mA 0.9×DBVDD V
Output LOW Level VOL IOL = -1mA 0.1×DBVDD V

WM8910 Pre-Production
w PP, Rev 3.0 April 2010
14
POWER CONSUMPTION
The WM8910 power consumption is dependent on many parameters. Most significantly, it depends on supply voltages, sample rates, mode of operation, and output loading.
The power consumption on each supply rail varies approximately with the square of the voltage. Power consumption is greater at fast sample rates than at slower ones. When the digital audio interface is operating in Master mode, the DBVDD current is significantly greater than in Slave mode. (Note also that power savings can be made by using MCLK as the BCLK source in Slave mode.) The output load conditions (impedance, capacitance and inductance) can also impact significantly on the device power consumption.
COMMON TEST CONDITIONS
Unless otherwise stated, the following test conditions apply throughout the following sections:
• Ambient temperature = +25°C
• Audio signal = quiescent (zero amplitude)
• Sample rate = 44.1kHz
• MCLK = 12MHz
• Audio interface mode = Master (LRCLK_DIR=1, BCLK_DIR=1)
• CLK_SRC_SEL = 0 (System clock comes direct from MCLK, not from FLL)
Additional, variant test conditions are quoted within the relevant sections below. Where applicable, power dissipated in the headphone or line loads is included.
POWER CONSUMPTION MEASUREMENTS
Stereo Playback to Headphones - DAC input to HPOUTL+HPOUTR pins with 30Ω load.
Test conditions DACBIAS_SEL = 01b (Normal bias x 0.5) DACVMID_BIAS_SEL = 11b (Normal bias x 0.75) PGA_BIAS = 011b (Normal bias x 0.5) CP_DYN_PWR = 1b (Charge pump controlled by real-time audio level) Variant test conditions AVDD DCVDD DBVDD CPVDD TOTAL
V mA V mA V mA V mA mW Slave mode, 44.1kHz sample rate, quiescent 1.8 1.60 1.2 0.76 1.8 0.00 1.8 0.41 4.5 Master mode, 44.1kHz sample rate, quiescent 1.8 1.60 1.2 0.76 1.8 0.09 1.8 0.41 4.7 Master mode, 44.1kHz, Po = 0.1mW/channel 1.8 1.60 1.2 0.90 1.8 0.09 1.8 1.85 7.5 Master mode, 44.1kHz, Po = 1mW/channel 1.8 1.60 1.2 0.92 1.8 0.09 1.8 5.77 14.5 Master mode, 8kHz sample rate, quiescent 1.8 1.60 1.2 0.65 1.8 0.03 1.8 0.41 4.4 Master mode, 8kHz, Po = 0.1mW/channel 1.8 1.60 1.2 0.71 1.8 0.03 1.8 1.85 7.1

Pre-Production WM8910
w PP, Rev 3.0, April 2010
15
Stereo Playback to Line-out - DAC input to LINEOUTL+LINEOUTR or HPOUTL+HPOUTR pins with 3.01kΩ / 50pF load
Test conditions: CP_DYN_PWR = 1b (Charge pump controlled by real-time audio level) Variant test conditions AVDD DCVDD DBVDD CPVDD TOTAL
V mA V mA V mA V mA mW 44.1kHz sample rate 1.8 1.95 1.2 0.76 1.8 0.09 1.8 0.32 5.2 8kHz sample rate 1.8 1.95 1.2 0.68 1.8 0.03 1.8 0.32 4.9
Stereo analogue bypass to headphones - IN1L/R or IN2L/R pins to HPOUTL+HPOUTR pins with 30Ω load.
Test conditions: Audio interface disabled Note that the Analogue bypass configuration does not benefit from the Class W dynamic control, and the power consumption is greater in this case than the DAC to Line-Out case. See “Charge Pump” section. Variant test conditions AVDD DCVDD DBVDD CPVDD TOTAL
V mA V mA V mA V mA mW Quiescent 1.8 1.46 1.2 0.12 1.8 0.00 1.8 1.54 5.5 Po = 0.1mW/channel 1.8 1.46 1.2 0.12 1.8 0.00 1.8 4.54 11.0
Off Test conditions: No Clocks applied Variant test conditions AVDD DCVDD DBVDD CPVDD TOTAL
V mA V mA V mA V mA mW None 1.8 0.01 1.0 0.012 1.8 0.003 1.8 0.005 0.047

WM8910 Pre-Production
w PP, Rev 3.0 April 2010
16
SIGNAL TIMING REQUIREMENTS
COMMON TEST CONDITIONS
Unless otherwise stated, the following test conditions apply throughout the following sections:
• Ambient temperature = +25°C
• DCVDD = 1.0V
• DBVDD = AVDD = CPVDD = 1.8V
• DGND = AGND = CPGND = 0V
Additional, specific test conditions are given within the relevant sections below.
MASTER CLOCK
MCLK
tMCLKL tMCLKH
tMCLKY
Figure 1 Master Clock Timing
Master Clock Timing
PARAMETER SYMBOL TEST CONDITIONS MIN TYP MAX UNIT
MCLK cycle time TMCLKY MCLKDIV2=1 40 ns
MCLKDIV2=0 80 ns
MCLK cycle time TMCLKY DCVDD ≥ 1.62V
MCLKDIV2=0
54.25 ns
MCLK duty cycle TMCLKDS 60:40 40:60

Pre-Production WM8910
w PP, Rev 3.0, April 2010
17
AUDIO INTERFACE TIMING
MASTER MODE
Figure 2 Audio Interface Timing – Master Mode
Audio Interface Timing – Master Mode
PARAMETER SYMBOL MIN TYP MAX UNIT
LRC propagation delay from BCLK falling edge tDL 10 ns
AIFTXDAT propagation delay from BCLK falling edge tDDA 10 ns
DACDAT setup time to BCLK rising edge tDST 10 ns
DACDAT hold time from BCLK rising edge tDHT 10 ns

WM8910 Pre-Production
w PP, Rev 3.0 April 2010
18
SLAVE MODE
Figure 3 Audio Interface Timing – Slave Mode
Audio Interface Timing – Slave Mode
PARAMETER SYMBOL MIN TYP MAX UNIT
BCLK cycle time tBCY 50 ns
BCLK pulse width high tBCH 20 ns
BCLK pulse width low tBCL 20 ns
LRC set-up time to BCLK rising edge tLRSU 10 ns
LRC hold time from BCLK rising edge tLRH 10 ns
DACDAT hold time from BCLK rising edge tDH 10 ns
AIFTXDAT propagation delay from BCLK falling edge tDD 10 ns
DACDAT set-up time to BCLK rising edge tDS 40 ns
Note: BCLK period must always be greater than or equal to MCLK period.

Pre-Production WM8910
w PP, Rev 3.0, April 2010
19
TDM MODE
In TDM mode, it is important that two devices to not attempt to drive the AIFTXDAT pin simultaneously. The timing of the WM8910 AIFTXDAT pin tri-stating at the start and end of the data transmission is described below.
Figure 4 Audio Interface Timing – TDM Mode
Audio Interface Timing – TDM Mode
PARAMETER SYMBOL MIN TYP MAX UNIT
AIFTXDAT setup time from BCLK falling edge 4 ns
AIFTXDAT release time from BCLK falling edge 25 ns

WM8910 Pre-Production
w PP, Rev 3.0 April 2010
20
CONTROL INTERFACE TIMING
SCLK(input)
SDIN
t4 t3
START
t8
STOP
t5
t2 t1
t9
t7t6
Figure 5 Control Interface Timing
Control Interface Timing
PARAMETER SYMBOL MIN TYP MAX UNIT
SCLK Frequency 526 kHz
SCLK Low Pulse-Width t1 1.3 μs
SCLK High Pulse-Width t2 600 ns
Hold Time (Start Condition) t3 600 ns
Setup Time (Start Condition) t4 600 ns
Data Setup Time t5 100 ns
SDIN, SCLK Rise Time t6 300 ns
SDIN, SCLK Fall Time t7 300 ns
Setup Time (Stop Condition) t8 600 ns
Data Hold Time t9 900 ns
Pulse width of spikes that will be suppressed tps 0 5 ns

Pre-Production WM8910
w PP, Rev 3.0, April 2010
21
DIGITAL FILTER CHARACTERISTICS
PARAMETER TEST CONDITIONS MIN TYP MAX UNIT
DAC Normal Filter
Passband +/- 0.05dB 0 0.454 fs
-6dB 0.5 fs
Passband Ripple 0.454 fs +/- 0.03 dB
Stopband 0.546 fs
Stopband Attenuation F > 0.546 fs -50 dB
DAC Sloping Stopband Filter
Passband +/- 0.03dB 0 0.25 fs
+/- 1dB 0.25 fs 0.454 fs
-6dB 0.5 fs
Passband Ripple 0.25 fs +/- 0.03 dB
Stopband 1 0.546 fs 0.7 fs
Stopband 1 Attenuation f > 0.546 fs -60 dB
Stopband 2 0.7 fs 1.4 fs
Stopband 2 Attenuation f > 0.7 fs -85 dB
Stopband 3 1.4 fs
Stopband 3 Attenuation F > 1.4 fs -55 dB
DAC FILTERS
Mode Group Delay
Normal 16.5 / fs
Sloping Stopband 18 / fs
TERMINOLOGY
1. Stop Band Attenuation (dB) – the degree to which the frequency spectrum is attenuated (outside audio band)
2. Pass-band Ripple – any variation of the frequency response in the pass-band region

WM8910 Pre-Production
w PP, Rev 3.0 April 2010
22
DAC FILTER RESPONSES
Figure 6 DAC Filter Response for
CLK_SYS_MODE = 10b (Clock is 250 x fs related)
DAC_SB_FILT = 1b (Sloping StopBand Filter)
Sample Rate ≤ 24kHz
Figure 7 DAC Filter Response for
CLK_SYS_MODE = 00b or 01b
DAC_SB_FILT = 1b (Sloping StopBand Filter)
Sample Rate ≤ 24kHz
Figure 8 DAC Filter Response for
CLK_SYS_MODE = 10b (Clock is 250 x fs related)
DAC_SB_FILT = 0b (Normal Filter)
Sample Rate > 24kHz (except 88.2kHz)
Figure 9 DAC Filter Response for
CLK_SYS_MODE = 00b or 01b
DAC_SB_FILT = 0b (Normal Filter)
Sample Rate > 24kHz

Pre-Production WM8910
w PP, Rev 3.0, April 2010
23
Figure 10 DAC Filter Response for
CLK_SYS_MODE = 01b (Clock is 272 x fs related)
DAC_SB_FILT = 0b (Normal Filter)
Sample Rate = 88.2kHz

WM8910 Pre-Production
w PP, Rev 3.0 April 2010
24
DE-EMPHASIS FILTER RESPONSES
MAGNITUDE(dB)
-10
-9
-8
-7
-6
-5
-4
-3
-2
-1
0
0 5000 10000 15000 20000
Frequency (Hz)
MAGNITUDE(dB)
-0.15
-0.1
-0.05
0
0.05
0.1
0.15
0.2
0.25
0.3
0 2000 4000 6000 8000 10000 12000 14000 16000 18000
Frequency (Hz)
Figure 11 De-Emphasis Digital Filter Response (32kHz) Figure 12 De-Emphasis Error (32kHz)
MAGNITUDE(dB)
-10
-9
-8
-7
-6
-5
-4
-3
-2
-1
0
0 5000 10000 15000 20000 25000
Frequency (Hz)
MAGNITUDE(dB)
-0.1
-0.05
0
0.05
0.1
0.15
0.2
0 5000 10000 15000 20000 25000
Frequency (Hz)
Figure 13 De-Emphasis Digital Filter Response (44.1kHz) Figure 14 De-Emphasis Error (44.1kHz)
MAGNITUDE(dB)
-12
-10
-8
-6
-4
-2
0
0 5000 10000 15000 20000 25000 30000
Frequency (Hz)
MAGNITUDE(dB)
-0.15
-0.1
-0.05
0
0.05
0.1
0.15
0 5000 10000 15000 20000 25000 30000
Frequency (Hz)
Figure 15 De-Emphasis Digital Filter Response (48kHz) Figure 16 De-Emphasis Error (48kHz)

Pre-Production WM8910
w PP, Rev 3.0, April 2010
25
DEVICE DESCRIPTION
INTRODUCTION
The WM8910 is a high performance ultra-low power stereo DAC optimised for portable audio applications. Flexible analogue interfaces and powerful digital signal processing (DSP) make it ideal for small portable devices.
The WM8910 supports up to 4 analogue audio inputs. One pair of single-ended or differential microphone/line inputs is selected as the analogue input source.
A two-channel digital microphone interface is also supported, with direct input to the DSP core.
Two pairs of ground-referenced Class-W headphone / line outputs are provided; these are powered from an integrated Charge Pump, enabling high quality, power efficient headphone playback without any requirement for DC blocking capacitors. A DC Servo circuit is available for DC offset correction, thereby suppressing pops and reducing power consumption. Two differential line outputs are also provided; these are also capable of driving external speaker drivers. Ground loop feedback is available on the ground-referenced headphone and line outputs, providing rejection of noise on the ground connections. All outputs use Wolfson SilentSwitch™ technology for pop and click suppression.
The stereo DACs are of hi-fi quality, using a 24-bit low-order oversampling architecture to deliver optimum performance. A digital mixing path from the Digital Microphone input to the DAC provides a sidetone of enhanced quality during voice calls. DAC soft mute and un-mute is available for pop-free music playback.
The integrated Dynamic Range Controller (DRC) provides further processing capability of the digital audio paths. The DRC provides compression and signal level control to improve the handling of unpredictable signal levels. ‘Anti-clip’ and ‘quick release’ algorithms improve intelligibility in the presence of transients and impulsive noises.
The WM8910 has a highly flexible digital audio interface, supporting a number of protocols, including I2S, DSP, MSB-first left/right justified, and can operate in master or slave modes. PCM operation is supported in the DSP mode. A-law and μ-law companding are also supported. Time division multiplexing (TDM) is available to allow multiple devices to stream data simultaneously on the same bus, saving space and power.
The system clock CLK_SYS provides clocking for the Digital Microphone, DACs, DSP core, digital audio interface and other circuits. CLK_SYS can be derived directly from the MCLK pin or via an integrated FLL, providing flexibility to support a wide range of clocking schemes. Typical portable system MCLK frequencies, and sample rates from 8kHz to 48kHz are all supported. DAC operation at 88.2kHz and 96kHz is also possible. The clocking circuits are configured automatically from the sample rate (fs) and from the CLK_SYS / fs ratio.
The integrated FLL can be used to generate CLK_SYS from a wide variety of different reference sources and frequencies. The FLL can accept a wide range of reference frequencies, which may be high frequency (e.g. 13MHz) or low frequency (eg. 32.768kHz). The FLL is tolerant of jitter and may be used to generate a stable CLK_SYS from a less stable input signal. The integrated FLL can be used as a free-running oscillator, enabling autonomous clocking of the Charge Pump and DC Servo if required.
The WM8910 uses a standard 2-wire control interface, providing full software control of all features, together with device register readback. An integrated Control Write Sequencer enables automatic scheduling of control sequences; commonly-used signal configurations may be selected using ready-programmed sequences, including time-optimised control of the WM8910 pop suppression features. It is an ideal partner for a wide range of industry standard microprocessors, controllers and DSPs. Unused circuitry can be disabled under software control, in order to save power; low leakage currents enable extended standby/off time in portable battery-powered applications.
Up to 5 GPIO pins may be configured for miscellaneous input/output functions such as button/accessory detect inputs, or for clock, system status, or programmable logic level output for control of additional external circuitry. Interrupt logic, status readback and de-bouncing options are supported within this functionality.

WM8910 Pre-Production
w PP, Rev 3.0 April 2010
26
ANALOGUE INPUT SIGNAL PATH
The WM8910 has four analogue input pins, which may be used to support connections to multiple microphone or line input sources. The input multiplexer on the Left and Right channels can be used to select different configurations for each of the input sources. The analogue input paths can support line and microphone inputs, in single-ended and differential modes. The input stage can also provide common mode noise rejection in some configurations.
The Left and Right analogue input channels are routed directly to the output mixers.
The WM8910 input signal paths and control registers are illustrated in Figure 17.
Single-Ended (inverting) Mode: Gain -1.57dB to +28.5dB, non-linear stepsDifferential Line Mode: Gain -1.57dB to +28.5dB, non-linear stepsDifferential Microphone Mode: Gain +12dB to +30dB, 3dB steps
MUX
IN1L
IN2L-+
L_MODEL_IP_SEL_NL_IP_SEL_P
INL_ENAINL_CM_ENALIN_MUTELIN_VOLVMID
BYPASSL
MUX-+
R_MODER_IP_SEL_NR_IP_SEL_P
INR_ENAINR_CM_ENARIN_MUTERIN_VOL
BYPASSR
Single-Ended (inverting) Mode: Gain -1.57dB to +28.5dB, non-linear stepsDifferential Line Mode: Gain -1.57dB to +28.5dB, non-linear stepsDifferential Microphone Mode: Gain +12dB to +30dB, 3dB steps
IN1R
IN2R
VMID
Figure 17 Block Diagram for Input Signal Path

Pre-Production WM8910
w PP, Rev 3.0, April 2010
27
INPUT PGA ENABLE
The input PGAs (Programmable Gain Amplifiers) and Multiplexers are enabled using register bits INL_ENA and INR_ENA, as shown in Table 1.
REGISTER ADDRESS
BIT LABEL DEFAULT DESCRIPTION
R12 (0Ch)
Power Management 0
1 INL_ENA 0 Left Input PGA Enable
0 = disabled
1 = enabled
0 INR_ENA 0 Right Input PGA Enable
0 = disabled
1 = enabled
Table 1 Input PGA Enable
To enable the input PGAs, the reference voltage VMID and the bias current must also be enabled. See “Reference Voltages and Master Bias” for details of the associated controls VMID_RES and BIAS_ENA.
INPUT PGA CONFIGURATION
The analogue input channels can each be configured in three different modes, which are as follows:
Single-Ended Mode (Inverting)
Differential Line Mode
Differential Mic Mode
The mode is selected by the L_MODE and R_MODE fields for the Left and Right channels respectively. The input pins are selected using the L_IP_SEL_N and L_IP_SEL_P fields for the Left channel and the R_IP_SEL_N and R_IP_SEL_P for the Right channel. In Single-Ended mode, L_IP_SEL_N alone determines the Left Input pin, and the R_IP_SEL_N determines the Right Input pin.
The three modes are illustrated in Figure 18, Figure 19 and Figure 20. It should be noted that the available gain and input impedance varies between configurations (see also “Electrical Characteristics”). The input impedance is constant with PGA gain setting.
The Input PGA modes are selected and configured using the register fields described in Table 2.

WM8910 Pre-Production
w PP, Rev 3.0 April 2010
28
REGISTER ADDRESS
BIT LABEL DEFAULT DESCRIPTION
R46 (2Eh)
Analogue Left Input 1
5:4 L_IP_SEL_N [1:0]
00 In Single-Ended or Differential Line Modes, this field selects the input pin for the inverting side of the left input path.
In Differential Mic Mode, this field selects the input pin for the non-inverting side of the left input path.:
00 = IN1L
01 = IN2L
1X = Reserved
3:2 L_IP_SEL_P [1:0]
01 In Single-Ended or Differential Line Modes, this field selects the input pin for the non-inverting side of the left input path.
In Differential Mic Mode, this field selects the input pin for the inverting side of the left input path.
00 = IN1L
01 = IN2L
1X = Reserved
1:0 L_MODE [1:0] 00 Sets the mode for the left analogue input:
00 = Single-Ended
01 = Differential Line
10 = Differential MIC
11 = Reserved
R47 (2Fh)
Analogue Right Input 1
5:4 R_IP_SEL_N [1:0]
00 In Single-Ended or Differential Line Modes, this field selects the input pin for the inverting side of the right input path.
In Differential Mic Mode, this field selects the input pin for the non-inverting side of the right input path.
00 = IN1R
01 = IN2R
1X = Reserved
3:2 R_IP_SEL_P [1:0]
01 In Single-Ended or Differential Line Modes, this field selects the input pin for the non-inverting side of the right input path.
In Differential Mic Mode, this field selects the input pin for the inverting side of the right input path.
00 = IN1R
01 = IN2R
1X = Reserved
1:0 R_MODE [1:0] 00 Sets the mode for the right analogue input:
00 = Single-Ended
01 = Differential Line
10 = Differential MIC
11 = Reserved
Table 2 Input PGA Mode Selection

Pre-Production WM8910
w PP, Rev 3.0, April 2010
29
SINGLE-ENDED INPUT
The Single-Ended PGA configuration is illustrated in Figure 18 for the Left channel. The available gain in this mode is from -1.57dB to +28.5dB in non-linear steps. The input impedance is 12kΩ. The PGA output is phase inverted with respect to the selected input pin. Different input pins can be selected in the same mode by altering the L_IP_SEL_N field.
The equivalent configuration is also available on the Right channel; this can be selected independently of the Left channel mode.
Figure 18 Single Ended Mode
DIFFERENTIAL LINE INPUT
The Differential Line PGA configuration is illustrated in Figure 19 for the Left channel. The available gain in this mode is from -1.57dB to +28.5dB in non-linear steps. The input impedance is 12kΩ. The PGA output is in phase with the input pin selected by L_IP_SEL_P. The PGA output is phase inverted with respect to the input pin selected by L_IP_SEL_N.
As an option, common mode noise rejection can be provided in this PGA configuration, as illustrated in Figure 19. This is enabled using the register bits defined in Table 5.
The equivalent configuration is also available on the Right channel; this can be selected independently of the Left channel mode.
Figure 19 Differential Line Mode

WM8910 Pre-Production
w PP, Rev 3.0 April 2010
30
DIFFERENTIAL MICROPHONE INPUT
The Differential Mic PGA configuration is illustrated in Figure 20 for the Left channel. The available gain in this mode is from +12dB to +30dB in 3dB linear steps. The input impedance is 120kΩ. The PGA output is in phase with the input pin selected by L_IP_SEL_N. The PGA output is phase inverted with respect to the input pin selected by L_IP_SEL_P.
Note that the inverting input pin is selected using L_IP_SEL_P and the non-inverting input pin is selected using L_IP_SEL_N. This is not the same as for the Differential Line mode.
The equivalent configuration is also available on the Right channel; this can be selected independently of the Left channel mode.
Figure 20 Differential Microphone Mode
INPUT PGA GAIN CONTROL
The volume control gain for the Left and Right channels be independently controlled using the LIN_VOL and RIN_VOL register fields as described in Table 3. The available gain range varies according to the selected PGA Mode as detailed in Table 4. Note that the value ‘00000’ must not be used in Differential Mic Mode, as the PGA will not function correctly under this setting. In single-ended mode (L_MODE / R_MODE = 00b), the conversion from single-ended to differential within the WM8910 adds a further 6dB of gain to the signal path.
Each input channel can be independently muted using LINMUTE and RINMUTE.
It is recommended to not adjust the gain dynamically whilst the signal path is enabled; the signal should be muted at the input or output stage prior to adjusting the volume control.
REGISTER ADDRESS
BIT LABEL DEFAULT DESCRIPTION
R44 (2Ch)
Analogue Left Input 0
7 LINMUTE 1 Left Input PGA Mute
0 = not muted
1 = muted
4:0 LIN_VOL [4:0] 00101 Left Input PGA Volume
(See Table 4 for volume range)
R45 (2Dh)
Analogue Right Input 0
7 RINMUTE 1 Right Input PGA Mute
0 = not muted
1 = muted
4:0 RIN_VOL [4:0] 00101 Right Input PGA Volume
(See Table 4 for volume range)
Table 3 Input PGA Volume Control

Pre-Production WM8910
w PP, Rev 3.0, April 2010
31
LIN_VOL [4:0], RIN_VOL [4:0]
GAIN –
SINGLE-ENDED MODE /
DIFFERENTIAL LINE MODE
GAIN –
DIFFERENTIAL MIC MODE
00000 -1.5 dB Not valid
00001 -1.3 dB +12 dB
00010 -1.0 dB +15 dB
00011 -0.7 dB +18 dB
00100 -0.3 dB +21 dB
00101 0.0 dB +24 dB
00110 +0.3 dB +27 dB
00111 +0.7 dB +30 dB
01000 +1.0 dB +30 dB
01001 +1.4 dB +30 dB
01010 +1.8 dB +30 dB
01011 +2.3 dB +30 dB
01100 +2.7 dB +30 dB
01101 +3.2 dB +30 dB
01110 +3.7 dB +30 dB
01111 +4.2 dB +30 dB
10000 +4.8 dB +30 dB
10001 +5.4 dB +30 dB
10010 +6.0 dB +30 dB
10011 +6.7 dB +30 dB
10100 +7.5 dB +30 dB
10101 +8.3 dB +30 dB
10110 +9.2 dB +30 dB
10111 +10.2 dB +30 dB
11000 +11.4 dB +30 dB
11001 +12.7 dB +30 dB
11010 +14.3 dB +30 dB
11011 +16.2 dB +30 dB
11100 +19.2 dB +30 dB
11101 +22.3 dB +30 dB
11110 +25.2 dB +30 dB
11111 +28.3 dB +30 dB
Table 4 Input PGA Volume Range

WM8910 Pre-Production
w PP, Rev 3.0 April 2010
32
INPUT PGA COMMON MODE AMPLIFIER
In Differential Line Mode only, a Common Mode amplifier can be enabled as part of the input PGA circuit. This feature provides approximately 20dB reduction in common mode noise on the differential input, which can reduce problematic interference. The presence of Common Mode noise can limit the usable signal range of the device; enabling the Common Mode amplifier can solve this issue.
It should be noted that the Common Mode amplifier consumes additional power and can also add its own noise to the input signal. For these reasons, it is recommended that the Common Mode Amplifier is only enabled if there is a known source of Common Mode interference.
The Common Mode amplifier is controlled by the INL_CM_ENA and INR_CM_ENA fields as described in Table 5. Although the Common Mode amplifier may be enabled regardless of the input PGA mode, its function is only effective in the Differential Line Mode configuration.
REGISTER ADDRESS
BIT LABEL DEFAULT DESCRIPTION
R46 (2Eh)
Analogue Left Input 1
6 INL_CM_ENA 1 Left Input PGA Common Mode Rejection enable
0 = Disabled
1 = Enabled
(only available for L_MODE=01 – Differential Line)
R47 (2Fh)
Analogue Right Input 1
6 INR_CM_ENA 1 Right Input PGA Common Mode Rejection enable
0 = Disabled
1 = Enabled
(only available for R_MODE=01 – Differential Line)
Table 5 Common Mode Amplifier Enable
DIGITAL MICROPHONE INTERFACE
The WM8910 supports a two-channel digital microphone interface. The two-channel audio data is multiplexed on the DMIC_DAT input and clocked by the DMIC_LR output.
The Digital Microphone Input, DMIC_DAT, can be enabled on GPIO2, GPIO3, IN1L or IN1R, using the DIGMIC_SEL register field. The Digital Microphone Clock, DMIC_LR, can be enabled on any of the 5 GPIO pins.
The Digital Microphone Input is selected by setting the DMIC_SEL bit. The Digital Microphone DSP functions are enabled by setting DMICL_ENA and DMICR_ENA for the left and right channels respectively.
The Digital Microphone Interface configuration is illustrated in Figure 21.
Note that that care must be taken to ensure that the respective digital logic levels of the microphone are compatible with the digital input thresholds of the WM8910. The digital input thresholds are referenced to DBVDD, as defined in “Electrical Characteristics”. It is recommended to power the digital microphones from the same DBVDD supply as WM8910.

Pre-Production WM8910
w PP, Rev 3.0, April 2010
33
Figure 21 Digital Microphone Interface Control
When a GPIO pin is configured as DMIC_LR Clock output, the WM8910 outputs a clock which supports Digital Mic operation at a multiple of the DAC sampling rate, in the range 1-3MHz. The Digital Microphone DSP must be enabled (see Table 6) and the DAC sampling rate must be set in order to ensure correct operation of all DSP functions associated with the digital microphone. Volume control for the Digital Microphone Interface signals is provided using the registers described in Table 7.
See “General Purpose Input/Output (GPIO)” for details of configuring the DMIC_LR and DMIC_DAT functions. See “Clocking and Sample Rates” for the details of the supported clocking configurations.
When GPIO2, GPIO3, IN1L or IN1R is configured as DMIC_DAT input, this pin is the digital microphone input. Up to two microphones can share this pin; the two microphones are interleaved as illustrated in Figure 22.
The digital microphone interface requires that MIC1 transmits a data bit each time that DMIC_LR is high, and MIC2 transmits when DMIC_LR is low. The WM8910 samples the digital microphone data in the middle of each DMIC_LR clock phase. Each microphone must tri-state its data output when the other microphone is transmitting.
Figure 22 Digital Microphone Interface Timing
The digital microphone interface control fields are described in Table 6.

WM8910 Pre-Production
w PP, Rev 3.0 April 2010
34
REGISTER ADDRESS
BIT LABEL DEFAULT DESCRIPTION
R18 (12h)
Power Management 6
1 DMICL_ENA 0 Digital Microphone DSP Enable
0 = disabled
1 = enabled
0 DMICR_ENA 0 Digital Microphone DSP Enable
0 = disabled
1 = enabled
R39 (27h)
Digital Microphone 0
10:9 DIGMIC_SRC_SEL [1:0]
00 Digital Microphone Data Select
00 = GPIO2
01 = GPIO3
10 = IN1L
11 = IN2R
R164 (A4h)
Clock Rate Test 4
9 DMIC_SEL 0 Digital Microphone mode.
0 = Disabled
1 = Audio DSP input is from digital microphone interface
Table 6 Digital Microphone Interface Control
Note that, in addition to setting the registers described in Table 6, the selected GPIO pins (GPIO1, GPIO2 or GPIO3) must also be configured to provide the digital microphone interface function. See “General Purpose Input/Output (GPIO)” for details. Note that selecting DMIC_DAT on the IN1L or IN1R pin causes that pin to be disconnected from the analogue input PGA circuits.
Note that all the GPIO pins are referenced to the DBVDD power domain; the IN1L and IN1R pins are referenced to the AVDD power domain. Care must be taken to ensure the microphone logic levels are compatible with the applicable power domain.
DIGITAL MICROPHONE VOLUME CONTROL
The output of the Digital Microphone DSP can be digitally amplified or attenuated over a range from -71.625dB to +17.625dB in 0.375dB steps. The volume of each channel can be controlled separately. The gain for a given eight-bit code is detailed in Table 8.
The DMICVU bit controls the loading of digital volume control data. When DMICVU is set to 0, the DMICL_VOL or DMICR_VOL control data is loaded into the respective control register, but does not actually change the digital gain setting. Both left and right gain settings are updated when a 1 is written to DMICVU. This makes it possible to update the gain of both channels simultaneously.

Pre-Production WM8910
w PP, Rev 3.0, April 2010
35
REGISTER ADDRESS
BIT LABEL DEFAULT DESCRIPTION
R36 (24h)
DMIC Digital Volume Left
8 DMICVU N/A Digital Microphone Volume Update
Writing a 1 to this bit causes left and right DMIC volume to be updated simultaneously
7:0 DMICL_VOL [7:0]
1100_0000
(0dB)
Left Digital Microphone Volume
00h = Mute
01h = -71.625dB
02h = -71.250dB
… (0.375dB steps)
C0h = 0dB
… (0.375dB steps)
EFh to FFh = +17.625dB
(See Table 8 for volume range)
R37 (25h)
DMIC Digital Volume Right
8 DMICVU N/A Digital Microphone Volume Update
Writing a 1 to this bit causes left and right DMIC volume to be updated simultaneously
7:0 DMICR_VOL [7:0]
1100_0000
(0dB)
Right Digital Microphone Volume
00h = Mute
01h = -71.625dB
02h = -71.250dB
… (0.375dB steps)
C0h = 0dB
… (0.375dB steps)
EFh to FFh = +17.625dB
(See Table 8 for volume range)
Table 7 Digital Microphone Volume Control

WM8910 Pre-Production
w PP, Rev 3.0 April 2010
36
ADCL_VOL or ADCR_VOL Volume (dB)
ADCL_VOL or ADCR_VOL Volume (dB)
ADCL_VOL or ADCR_VOL Volume (dB)
ADCL_VOL or ADCR_VOL Volume (dB)
0h MUTE 40h -48.000 80h -24.000 C0h 0.000
1h -71.625 41h -47.625 81h -23.625 C1h 0.375
2h -71.250 42h -47.250 82h -23.250 C2h 0.750
3h -70.875 43h -46.875 83h -22.875 C3h 1.125
4h -70.500 44h -46.500 84h -22.500 C4h 1.500
5h -70.125 45h -46.125 85h -22.125 C5h 1.875
6h -69.750 46h -45.750 86h -21.750 C6h 2.250
7h -69.375 47h -45.375 87h -21.375 C7h 2.625
8h -69.000 48h -45.000 88h -21.000 C8h 3.000
9h -68.625 49h -44.625 89h -20.625 C9h 3.375
Ah -68.250 4Ah -44.250 8Ah -20.250 CAh 3.750
Bh -67.875 4Bh -43.875 8Bh -19.875 CBh 4.125
Ch -67.500 4Ch -43.500 8Ch -19.500 CCh 4.500
Dh -67.125 4Dh -43.125 8Dh -19.125 CDh 4.875
Eh -66.750 4Eh -42.750 8Eh -18.750 CEh 5.250
Fh -66.375 4Fh -42.375 8Fh -18.375 CFh 5.625
10h -66.000 50h -42.000 90h -18.000 D0h 6.000
11h -65.625 51h -41.625 91h -17.625 D1h 6.375
12h -65.250 52h -41.250 92h -17.250 D2h 6.750
13h -64.875 53h -40.875 93h -16.875 D3h 7.125
14h -64.500 54h -40.500 94h -16.500 D4h 7.500
15h -64.125 55h -40.125 95h -16.125 D5h 7.875
16h -63.750 56h -39.750 96h -15.750 D6h 8.250
17h -63.375 57h -39.375 97h -15.375 D7h 8.625
18h -63.000 58h -39.000 98h -15.000 D8h 9.000
19h -62.625 59h -38.625 99h -14.625 D9h 9.375
1Ah -62.250 5Ah -38.250 9Ah -14.250 DAh 9.750
1Bh -61.875 5Bh -37.875 9Bh -13.875 DBh 10.125
1Ch -61.500 5Ch -37.500 9Ch -13.500 DCh 10.500
1Dh -61.125 5Dh -37.125 9Dh -13.125 DDh 10.875
1Eh -60.750 5Eh -36.750 9Eh -12.750 DEh 11.250
1Fh -60.375 5Fh -36.375 9Fh -12.375 DFh 11.625
20h -60.000 60h -36.000 A0h -12.000 E0h 12.000
21h -59.625 61h -35.625 A1h -11.625 E1h 12.375
22h -59.250 62h -35.250 A2h -11.250 E2h 12.750
23h -58.875 63h -34.875 A3h -10.875 E3h 13.125
24h -58.500 64h -34.500 A4h -10.500 E4h 13.500
25h -58.125 65h -34.125 A5h -10.125 E5h 13.875
26h -57.750 66h -33.750 A6h -9.750 E6h 14.250
27h -57.375 67h -33.375 A7h -9.375 E7h 14.625
28h -57.000 68h -33.000 A8h -9.000 E8h 15.000
29h -56.625 69h -32.625 A9h -8.625 E9h 15.375
2Ah -56.250 6Ah -32.250 AAh -8.250 EAh 15.750
2Bh -55.875 6Bh -31.875 ABh -7.875 EBh 16.125
2Ch -55.500 6Ch -31.500 ACh -7.500 ECh 16.500
2Dh -55.125 6Dh -31.125 ADh -7.125 EDh 16.875
2Eh -54.750 6Eh -30.750 AEh -6.750 EEh 17.250
2Fh -54.375 6Fh -30.375 AFh -6.375 EFh 17.625
30h -54.000 70h -30.000 B0h -6.000 F0h 17.625
31h -53.625 71h -29.625 B1h -5.625 F1h 17.625
32h -53.250 72h -29.250 B2h -5.250 F2h 17.625
33h -52.875 73h -28.875 B3h -4.875 F3h 17.625
34h -52.500 74h -28.500 B4h -4.500 F4h 17.625
35h -52.125 75h -28.125 B5h -4.125 F5h 17.625
36h -51.750 76h -27.750 B6h -3.750 F6h 17.625
37h -51.375 77h -27.375 B7h -3.375 F7h 17.625
38h -51.000 78h -27.000 B8h -3.000 F8h 17.625
39h -50.625 79h -26.625 B9h -2.625 F9h 17.625
3Ah -50.250 7Ah -26.250 BAh -2.250 FAh 17.625
3Bh -49.875 7Bh -25.875 BBh -1.875 FBh 17.625
3Ch -49.500 7Ch -25.500 BCh -1.500 FCh 17.625
3Dh -49.125 7Dh -25.125 BDh -1.125 FDh 17.625
3Eh -48.750 7Eh -24.750 BEh -0.750 FEh 17.625
3Fh -48.375 7Fh -24.375 BFh -0.375 FFh 17.625
Table 8 Digital Microphone Volume Range

Pre-Production WM8910
w PP, Rev 3.0, April 2010
37
DYNAMIC RANGE CONTROL (DRC)
The dynamic range controller (DRC) is a circuit which can be enabled in the Digital Microphone input path. Its function is to adjust the signal gain in conditions where the input amplitude is unknown or varies over a wide range, e.g. when recording from microphones built into a handheld system. The DRC can apply Compression and Automatic Level Control to the signal path. It incorporates ‘anti-clip’ and ‘quick release’ features for handling transients in order to improve intelligibility in the presence of loud impulsive noises.
The DRC is enabled as shown in Table 9.
REGISTER ADDRESS
BIT LABEL DEFAULT DESCRIPTION
R40 (28h)
DRC 0
15 DRC_ENA 0 DRC enable
1 = enabled
0 = disabled
Table 9 DRC Enable
COMPRESSION/LIMITING CAPABILITIES
The DRC supports two different compression regions, specified by R0 and R1, separated by a “knee” at input amplitude T. For signals above the knee, the compression slope R0 applies; for signals below the knee, the compression slope R1 applies.
The overall DRC compression characteristic in “steady state” (i.e. where the input amplitude is near-constant) is illustrated in Figure 23.
DR
C O
utpu
t Am
plitu
de (
dB
)
Figure 23 DRC Compression Characteristic
The slope of R0 and R1 are determined by register fields DRC_R0_SLOPE_COMP and DRC_R1_SLOPE_COMP respectively. A slope of 1 indicates constant gain in this region. A slope less than 1 represents compression (i.e. a change in input amplitude produces only a smaller change in output amplitude). A slope of 0 indicates that the target output amplitude is the same across a range of input amplitudes; this is infinite compression.
The “knee” in Figure 23 is represented by T and Y, which are determined by register fields DRC_THRESH_COMP and DRC_AMP_COMP respectively.

WM8910 Pre-Production
w PP, Rev 3.0 April 2010
38
Parameter Y0, the output level for a 0dB input, is not specified directly, but can be calculated from the other parameters, using the equation
The DRC Compression parameters are defined in Table 10.
REGISTER ADDRESS
BIT LABEL DEFAULT DESCRIPTION
R42 (2Ah)
DRC 2
5:3 DRC_R0_SLOPE_COMP [2:0]
100 Compressor slope R0
000 = 1 (no compression)
001 = 1/2
010 = 1/4
011 = 1/8
100 = 1/16
101 = 0
110 = Reserved
111 = Reserved
2:0 DRC_R1_SLOPE_COMP [2:0]
000 Compressor slope R1
000 = 1 (no compression)
001 = 1/2
010 = 1/4
011 = 1/8
100 = 0
101 = Reserved
11X = Reserved
R43 (2Bh)
DRC 3
10:5 DRC_THRESH_COMP [5:0]
000000 Compressor threshold T (dB)
000000 = 0dB
000001 = -0.75dB
000010 = -1.5dB
… (-0.75dB steps)
111100 = -45dB
111101 = Reserved
11111X = Reserved
4:0 DRC_AMP_COMP [4:0]
00000 Compressor amplitude at threshold YT (dB)
00000 = 0dB
00001 = -0.75dB
00010 = -1.5dB
… (-0.75dB steps)
11110 = -22.5dB
11111 = Reserved
Table 10 DRC Compression Control
GAIN LIMITS
The minimum and maximum gain applied by the DRC is set by register fields DRC_MINGAIN and DRC_MAXGAIN. These limits can be used to alter the DRC response from that illustrated in Figure 23. If the range between maximum and minimum gain is reduced, then the extent of the dynamic range control is reduced. The maximum gain prevents quiet signals (or silence) from being excessively amplified.

Pre-Production WM8910
w PP, Rev 3.0, April 2010
39
REGISTER ADDRESS
BIT LABEL DEFAULT DESCRIPTION
R41(29h)
DRC 1
3:2 DRC_MINGAIN [1:0]
00 Minimum gain the DRC can use to attenuate audio signals
00 = 0dB (default)
01 = -6dB
10 = -12dB
11 = -18dB
1:0 DRC_MAXGAIN [1:0]
01 Maximum gain the DRC can use to boost audio signals
00 = 12dB
01 = 18dB (default)
10 = 24dB
11 = 36dB
Table 11 DRC Gain Limits
DYNAMIC CHARACTERISTICS
The dynamic behaviour determines how quickly the DRC responds to changing signal levels. Note that the DRC responds to the average (RMS) signal amplitude over a period of time.
The DRC_ATTACK_RATE determines how quickly the DRC gain decreases when the signal amplitude is high. The DRC_DECAY_RATE determines how quickly the DRC gain increases when the signal amplitude is low.
These register fields are described in Table 12. Note that the register defaults are suitable for general purpose microphone use.
REGISTER ADDRESS
BIT LABEL DEFAULT DESCRIPTION
R41 (29h)
DRC 1
15:12 DRC_ATTACK_RATE [3:0]
0011 Gain attack rate (seconds/6dB)
0000 = instantaneous
0001 = 363us
0010 = 726us
0011 = 1.45ms (default)
0100 = 2.9ms
0101 = 5.8ms
0110 = 11.6ms
0111 = 23.2ms
1000 = 46.4ms
1001 = 92.8ms
1010 = 185.6ms
1011-1111 = Reserved
11:8 DRC_DECAY_RATE [3:0]
0010 Gain decay rate (seconds/6dB)
0000 = 186ms
0001 = 372ms
0010 = 743ms (default)
0011 = 1.49s
0100 = 2.97s
0101 = 5.94s
0110 = 11.89s
0111 = 23.78s
1000 = 47.56s
1001-1111 = Reserved
Table 12 DRC Time Constants

WM8910 Pre-Production
w PP, Rev 3.0 April 2010
40
ANTI-CLIP CONTROL
The DRC includes an Anti-Clip feature to avoid signal clipping when the input amplitude rises very quickly. This feature uses a feed-forward technique for early detection of a rising signal level. Signal clipping is avoided by dynamically increasing the gain attack rate when required. The Anti-Clip feature is enabled using the DRC_ANTICLIP_ENA bit.
Note that the feed-forward processing increases the latency in the input signal path. For low-latency applications (e.g. telephony), it may be desirable to reduce the delay, although this will also reduce the effectiveness of the anti-clip feature. The latency is determined by the DRC_FF_DELAY bit. If necessary, the latency can be minimised by disabling the anti-clip feature altogether.
The DRC Anti-Clip control bits are described in Table 13.
REGISTER ADDRESS
BIT LABEL DEFAULT DESCRIPTION
R40 (28h) DRC 0
5 DRC_FF_DELAY 1 Feed-forward delay for anti-clip feature
0 = 5 samples
1 = 9 samples
Time delay can be calculated as 5/fs or 9/ fs, where fs is the sample rate.
1 DRC_ANTICLIP_ENA
1 Anti-clip enable
0 = disabled
1 = enabled
Table 13 DRC Anti-Clip Control
QUICK RELEASE CONTROL
The DRC includes a Quick-Release feature to handle short transient peaks that are not related to the intended source signal. For example, in handheld microphone recording, transient signal peaks sometimes occur due to user handling, key presses or accidental tapping against the microphone. The Quick Release feature ensures that these transients do not cause the intended signal to be masked by the longer time constants of DRC_DECAY_RATE.
The Quick-Release feature is enabled by setting the DRC_QR_ENA bit. When this bit is enabled, the DRC measures the crest factor (peak to RMS ratio) of the input signal. A high crest factor is indicative of a transient peak that may not be related to the intended source signal. If the crest factor exceeds the level set by DRC_THRESH_QR, then the normal decay rate (DRC_DECAY_RATE) is ignored and a faster decay rate (DRC_RATE_QR) is used instead.
The DRC Quick-Release control bits are described in Table 14.
REGISTER ADDRESS
BIT LABEL DEFAULT DESCRIPTION
R40 (28h)
DRC 0
2 DRC_QR_ENA 1 Quick release enable
0 = disabled
1 = enabled
R41 (29h)
DRC 1
7:6 DRC_THRESH_QR [1:0]
01 Quick release crest factor threshold
00 = 12dB
01 = 18dB (default)
10 = 24dB
11 = 30dB
5:4 DRC_RATE_QR [1:0]
00 Quick release decay rate (seconds/6dB)
00 = 0.725ms (default)
01 = 1.45ms
10 = 5.8ms
11 = Reserved
Table 14 DRC Quick-Release Control

Pre-Production WM8910
w PP, Rev 3.0, April 2010
41
GAIN SMOOTHING
The DRC includes a gain smoothing filter in order to prevent gain ripples. A programmable level of hysteresis is also used to control the DRC gain. This improves the handling of very low frequency input signals whose period is close to the DRC attack/decay time. DRC Gain Smoothing is enabled by default and it is recommended to use the default register settings.
The extent of the gain smoothing filter may be adjusted or disabled using the control fields described in Table 15.
REGISTER ADDRESS
BIT LABEL DEFAULT DESCRIPTION
R40 (28h)
DRC 0
12:11 DRC_THRESH_HYST [1:0]
01 Gain smoothing hysteresis threshold
00 = Low
01 = Medium (recommended)
10 = High
11 = Reserved
3 DRC_SMOOTH_ENA
1 Gain smoothing enable
0 = disabled
1 = enabled
0 DRC_HYST_ENA
1 Gain smoothing hysteresis enable
0 = disabled
1 = enabled
Table 15 DRC Gain Smoothing
INITIALISATION
When the DRC is initialised, the gain is set to the level determined by the DRC_STARTUP_GAIN register field. The default setting is 0dB, but values from -18dB to +36dB are available, as described in Table 16.
REGISTER ADDRESS
BIT LABEL DEFAULT DESCRIPTION
R40 (28h)
DRC 0
10:6 DRC_STARTUP_GAIN [4:0]
00110 Initial gain at DRC startup
00000 = -18dB
00001 = -15dB
00010 = -12dB
00011 = -9dB
00100 = -6dB
00101 = -3dB
00110 = 0dB (default)
00111 = 3dB
01000 = 6dB
01001 = 9dB
01010 = 12dB
01011 = 15dB
01100 = 18dB
01101 = 21dB
01110 = 24dB
01111 = 27dB
10000 = 30dB
10001 = 33dB
10010 = 36dB
10011 to 11111 = Reserved
Table 16 DRC Initialisation

WM8910 Pre-Production
w PP, Rev 3.0 April 2010
42
DIGITAL MIXING
The Digital Microphone and DAC data can be combined in various ways to support a range of different usage modes.
Data from either of the two Digital Microphone channels can be routed to either the left or the right channel of the digital audio interface. In addition, data from either of the digital audio interface channels can be routed to either the left or the right DAC. See “Digital Audio Interface” for more information on the audio interface.
The WM8910 provides a Dynamic Range Control (DRC) feature, which can apply compression and gain adjustment in the digital microphone signal path. This is effective in controlling signal levels under conditions where input amplitude is unknown or varies over a wide range.
The DACs can be configured as a mono mix of the two audio channels. Digital sidetone from the Digital Microphones can also be selectively mixed into the DAC output path.
DIGITAL MIXING PATHS
Figure 24 shows the digital mixing paths available in the WM8910 digital core.
Figure 24 Digital Mixing Paths

Pre-Production WM8910
w PP, Rev 3.0, April 2010
43
The polarity of each Digital Microphone channel can be changed under software control using the TXL_DATINV and TXR_DATINV register bits. The AIFTXL_SRC and AIFTXR_SRC register bits may be used to select which Digital Microphone channel is used for the left and right digital audio interface data. These register bits are described in Table 17.
REGISTER ADDRESS
BIT LABEL DEFAULT DESCRIPTION
R24 (18h)
Audio Interface 0
7 AIFTXL_SRC 0 Left Digital Audio channel source
0 = Left DMIC data is output on left channel
1 = Right DMIC data is output on left channel
6 AIFTXR_SRC 1 Right Digital Audio channel source
0 = Left DMIC data is output on right channel
1 = Right DMIC data is output on right channel
R38 (26h)
DMIC Digital 0
1 TXL_DATINV 0 Left Digital Microphone Invert
0 = Left DMIC output not inverted
1 = Left DMIC output inverted
0 TXR_DATINV 0 Right Digital Microphone Invert
0 = Right DMIC output not inverted
1 = Right DMIC output inverted
Table 17 DMIC Routing and Control
The input data source for each DAC can be changed under software control using register bits DACL_SRC and DACR_SRC. The polarity of each DAC input may also be modified using register bits DACL_DATINV and DACR_DATINV. These register bits are described in Table 18.
REGISTER ADDRESS
BIT LABEL DEFAULT DESCRIPTION
R24 (18h)
Audio Interface 0
12 DACL_DATINV 0 Left DAC Invert
0 = Left DAC output not inverted
1 = Left DAC output inverted
11 DACR_DATINV 0 Right DAC Invert
0 = Right DAC output not inverted
1 = Right DAC output inverted
5 AIFDACL_SRC 0 Left DAC Data Source Select
0 = Left DAC outputs left channel data
1 = Left DAC outputs right channel data
4 AIFDACR_SRC 1 Right DAC Data Source Select
0 = Right DAC outputs left channel data
1 = Right DAC outputs right channel data
Table 18 DAC Routing and Control
DAC INTERFACE VOLUME BOOST
A digital gain function is available at the audio interface to boost the DAC volume when a small signal is received on DACDAT. This is controlled using register bits DAC_BOOST [1:0]. To prevent clipping at the DAC input, this function should not be used when the boosted DAC data is expected to be greater than 0dBFS.

WM8910 Pre-Production
w PP, Rev 3.0 April 2010
44
The digital interface volume is controlled as shown in Table 19.
REGISTER ADDRESS
BIT LABEL DEFAULT DESCRIPTION
R24 (18h)
Audio Interface 0
10:9 DAC_BOOST [1:0]
00 DAC Input Volume Boost
00 = 0dB
01 = +6dB (Input data must not exceed -6dBFS)
10 = +12dB (Input data must not exceed -12dBFS)
11 = +18dB (Input data must not exceed -18dBFS)
Table 19 DAC Interface Volume Boost
DIGITAL SIDETONE
Digital sidetone mixing (from Digital Microphone output into DAC input) is available when Digital Microphones and DACs are operating at the same sample rate. Digital data from either left or right DMIC can be mixed with the audio interface data on the left and right DAC channels.
When using the digital sidetone, it is recommended that the Digital Microphones are enabled before un-muting the DACs to prevent pop noise. The DAC volumes and sidetone volumes should be set to an appropriate level to avoid clipping at the DAC input.
When digital sidetone is used, it is recommended that the Charge Pump operates in Register Control mode only (CP_DYN_PWR = 0). See “Charge Pump” for details.
The digital sidetone is controlled as shown in Table 20.
REGISTER ADDRESS
BIT LABEL DEFAULT DESCRIPTION
R32 (20h)
DAC Digital 0
11:8 DMICL_DAC_SVOL [3:0]
0000 Left Digital Sidetone Volume
0000 = -36dB
0001 = -33dB
(… 3dB steps)
1011 = -3dB
11XX = 0dB
(See Table 21 for volume range)
7:4 DMICR_DAC_SVOL [3:0]
0000 Right Digital Sidetone Volume
0000 = -36dB
0001 = -33dB
(… 3dB steps)
1011 = -3dB
11XX = 0dB
(See Table 21 for volume range)
3:2 DMIC_TO_DACL [1:0]
00 Left DAC Digital Sidetone Source
00 = No sidetone
01 = Left Digital Microphone
10 = Right Digital Microphone
11 = Reserved
1:0 DMIC_TO_DACR [1:0]
00 Right DAC Digital Sidetone Source
00 = No sidetone
01 = Left Digital Microphone
10 = Right Digital Microphone
11 = Reserved
Table 20 Digital Sidetone Control

Pre-Production WM8910
w PP, Rev 3.0, April 2010
45
The digital sidetone volume settings are shown in Table 21.
DMICL_DAC_SVOL
OR
DMICR_DAC_SVOL
SIDETONE VOLUME
0000 -36
0001 -33
0010 -30
0011 -27
0100 -24
0101 -21
0110 -18
0111 -15
1000 -12
1001 -9
1010 -6
1011 -3
1100 0
1101 0
1110 0
1111 0
Table 21 Digital Sidetone Volume
DIGITAL-TO-ANALOGUE CONVERTER (DAC)
The WM8910 DACs receive digital input data from the DACDAT pin and via the digital sidetone path (see “Digital Mixing” section). The digital audio data is converted to oversampled bit streams in the on-chip, true 24-bit digital interpolation filters. The bitstream data enters two multi-bit, sigma-delta DACs, which convert them to high quality analogue audio signals. The Wolfson SmartDAC™ architecture offers reduced power consumption, whilst also delivering a reduction in high frequency noise and sensitivity to clock jitter. It also uses a Dynamic Element Matching technique for high linearity and low distortion.
The analogue outputs from the DACs can then be mixed with other analogue inputs before being sent to the analogue output pins (see “Output Signal Path”).
The DACs are enabled by the DACL_ENA and DACR_ENA register bits.
REGISTER ADDRESS
BIT LABEL DEFAULT DESCRIPTION
R18 (12h)
Power Management 6
3 DACL_ENA 0 Left DAC Enable
0 = DAC disabled
1 = DAC enabled
2 DACR_ENA 0 Right DAC Enable
0 = DAC disabled
1 = DAC enabled
Table 22 DAC Enable Control
DAC DIGITAL VOLUME CONTROL
The output level of each DAC can be controlled digitally over a range from -71.625dB to 0dB in 0.375dB steps. The level of attenuation for an eight-bit code is detailed in Table 24.
The DAC_VU bit controls the loading of digital volume control data. When DAC_VU is set to 0, the DACL_VOL or DACR_VOL control data is loaded into the respective control register, but does not actually change the digital gain setting. Both left and right gain settings are updated when a 1 is written to DAC_VU. This makes it possible to update the gain of both channels simultaneously.

WM8910 Pre-Production
w PP, Rev 3.0 April 2010
46
REGISTER ADDRESS
BIT LABEL DEFAULT DESCRIPTION
R30 (1Eh)
DAC Digital Volume Left
8 DACVU N/A DAC Volume Update
Writing a 1 to this bit causes left and right DAC volume to be updated simultaneously
7:0 DACL_VOL [7:0] 1100_0000
(0dB)
Left DAC Digital Volume
00h = Mute
01h = -71.625dB
02h = -71.250dB
… (0.375dB steps)
C0h = 0dB
… (0.375dB steps)
EFh to FFh = +17.625dB
(See Table 24 for volume range)
R31 (1Fh)
DAC Digital Volume Right
8 DACVU N/A DAC Volume Update
Writing a 1 to this bit causes left and right DAC volume to be updated simultaneously
7:0 DACR_VOL [7:0] 1100_0000
(0dB)
Right DAC Digital Volume
00h = Mute
01h = -71.625dB
02h = -71.250dB
… (0.375dB steps)
C0h = 0dB
… (0.375dB steps)
EFh to FFh = +17.625dB
(See Table 24 for volume range)
Table 23 DAC Digital Volume Control

Pre-Production WM8910
w PP, Rev 3.0, April 2010
47
DACL_VOL or DACR_VOL Volume (dB)
DACL_VOL or DACR_VOL Volume (dB)
DACL_VOL or DACR_VOL Volume (dB)
DACL_VOL or DACR_VOL Volume (dB)
0h MUTE 40h -48.000 80h -24.000 C0h 0.0001h -71.625 41h -47.625 81h -23.625 C1h 0.0002h -71.250 42h -47.250 82h -23.250 C2h 0.0003h -70.875 43h -46.875 83h -22.875 C3h 0.0004h -70.500 44h -46.500 84h -22.500 C4h 0.0005h -70.125 45h -46.125 85h -22.125 C5h 0.0006h -69.750 46h -45.750 86h -21.750 C6h 0.0007h -69.375 47h -45.375 87h -21.375 C7h 0.0008h -69.000 48h -45.000 88h -21.000 C8h 0.0009h -68.625 49h -44.625 89h -20.625 C9h 0.000Ah -68.250 4Ah -44.250 8Ah -20.250 CAh 0.000Bh -67.875 4Bh -43.875 8Bh -19.875 CBh 0.000Ch -67.500 4Ch -43.500 8Ch -19.500 CCh 0.000Dh -67.125 4Dh -43.125 8Dh -19.125 CDh 0.000Eh -66.750 4Eh -42.750 8Eh -18.750 CEh 0.000Fh -66.375 4Fh -42.375 8Fh -18.375 CFh 0.00010h -66.000 50h -42.000 90h -18.000 D0h 0.00011h -65.625 51h -41.625 91h -17.625 D1h 0.00012h -65.250 52h -41.250 92h -17.250 D2h 0.00013h -64.875 53h -40.875 93h -16.875 D3h 0.00014h -64.500 54h -40.500 94h -16.500 D4h 0.00015h -64.125 55h -40.125 95h -16.125 D5h 0.00016h -63.750 56h -39.750 96h -15.750 D6h 0.00017h -63.375 57h -39.375 97h -15.375 D7h 0.00018h -63.000 58h -39.000 98h -15.000 D8h 0.00019h -62.625 59h -38.625 99h -14.625 D9h 0.0001Ah -62.250 5Ah -38.250 9Ah -14.250 DAh 0.0001Bh -61.875 5Bh -37.875 9Bh -13.875 DBh 0.0001Ch -61.500 5Ch -37.500 9Ch -13.500 DCh 0.0001Dh -61.125 5Dh -37.125 9Dh -13.125 DDh 0.0001Eh -60.750 5Eh -36.750 9Eh -12.750 DEh 0.0001Fh -60.375 5Fh -36.375 9Fh -12.375 DFh 0.00020h -60.000 60h -36.000 A0h -12.000 E0h 0.00021h -59.625 61h -35.625 A1h -11.625 E1h 0.00022h -59.250 62h -35.250 A2h -11.250 E2h 0.00023h -58.875 63h -34.875 A3h -10.875 E3h 0.00024h -58.500 64h -34.500 A4h -10.500 E4h 0.00025h -58.125 65h -34.125 A5h -10.125 E5h 0.00026h -57.750 66h -33.750 A6h -9.750 E6h 0.00027h -57.375 67h -33.375 A7h -9.375 E7h 0.00028h -57.000 68h -33.000 A8h -9.000 E8h 0.00029h -56.625 69h -32.625 A9h -8.625 E9h 0.0002Ah -56.250 6Ah -32.250 AAh -8.250 EAh 0.0002Bh -55.875 6Bh -31.875 ABh -7.875 EBh 0.0002Ch -55.500 6Ch -31.500 ACh -7.500 ECh 0.0002Dh -55.125 6Dh -31.125 ADh -7.125 EDh 0.0002Eh -54.750 6Eh -30.750 AEh -6.750 EEh 0.0002Fh -54.375 6Fh -30.375 AFh -6.375 EFh 0.00030h -54.000 70h -30.000 B0h -6.000 F0h 0.00031h -53.625 71h -29.625 B1h -5.625 F1h 0.00032h -53.250 72h -29.250 B2h -5.250 F2h 0.00033h -52.875 73h -28.875 B3h -4.875 F3h 0.00034h -52.500 74h -28.500 B4h -4.500 F4h 0.00035h -52.125 75h -28.125 B5h -4.125 F5h 0.00036h -51.750 76h -27.750 B6h -3.750 F6h 0.00037h -51.375 77h -27.375 B7h -3.375 F7h 0.00038h -51.000 78h -27.000 B8h -3.000 F8h 0.00039h -50.625 79h -26.625 B9h -2.625 F9h 0.0003Ah -50.250 7Ah -26.250 BAh -2.250 FAh 0.0003Bh -49.875 7Bh -25.875 BBh -1.875 FBh 0.0003Ch -49.500 7Ch -25.500 BCh -1.500 FCh 0.0003Dh -49.125 7Dh -25.125 BDh -1.125 FDh 0.0003Eh -48.750 7Eh -24.750 BEh -0.750 FEh 0.0003Fh -48.375 7Fh -24.375 BFh -0.375 FFh 0.000
Table 24 DAC Digital Volume Range

WM8910 Pre-Production
w PP, Rev 3.0 April 2010
48
DAC SOFT MUTE AND SOFT UN-MUTE
The WM8910 has a soft mute function. When enabled, this gradually attenuates the volume of the DAC output. When soft mute is disabled, the gain will either gradually ramp back up to the digital gain setting, or return instantly to the digital gain setting, depending on the DAC_MUTEMODE register bit.
The DAC is not muted by default (DAC_MUTE = 0). To mute the DAC, this function must be enabled by setting DAC_MUTE to 1.
Soft Mute Mode would typically be enabled (DAC_MUTEMODE = 1) when using DAC_MUTE during playback of audio data so that when DAC_MUTE is subsequently disabled, the sudden volume increase will not create pop noise by jumping immediately to the previous volume level (e.g. resuming playback after pausing during a track).
Soft Mute Mode would typically be disabled (DAC_MUTEMODE = 0) when un-muting at the start of a music file, in order that the first part of the track is not attenuated (e.g. when starting playback of a new track, or resuming playback after pausing between tracks).
DAC muting and un-muting using volume control bits DACL_VOL and DACR_VOL.
DAC muting and un-muting using the DAC_MUTE bit.
If soft Mute Mode is not enabled (DAC_MUTEMODE = 0):
Setting the DAC_MUTE bit causes the volume to ramp down at a rate controlled by DAC_MUTERATE.
Clearing the DAC_MUTE bit causes the volume to return to the un-muted level immediately.
DAC muting and un-muting using the DAC_MUTE bit.
If soft Mute Mode is enabled (DAC_MUTEMODE = 1):
Setting the DAC_MUTE bit causes the volume to ramp down.
Clearing the DAC_MUTE bit causes the volume to ramp up to the un-muted level at a rate controlled by DAC_MUTERATE.
Figure 25 DAC Mute Control

Pre-Production WM8910
w PP, Rev 3.0, April 2010
49
The volume ramp rate during soft mute and un-mute is controlled by the DAC_MUTERATE bit. Ramp rates of fs/32 and fs/2 can be selected, as shown in Table 25. The ramp rate determines the rate at which the volume is increased or decreased. The actual ramp time depends on the extent of the difference between the muted and un-muted volume settings.
REGISTER ADDRESS
BIT LABEL DEFAULT DESCRIPTION
R33 (21h)
DAC Digital 1
10 DAC_MUTERATE
0 DAC Soft Mute Ramp Rate
0 = Fast ramp (fs/2, maximum ramp time is 10.7ms at fs=48k)
1 = Slow ramp (fs/32, maximum ramp time is 171ms at fs=48k)
9 DAC_MUTEMODE
0 DAC Soft Mute Mode
0 = Disabling soft-mute (DAC_MUTE=0) will cause the DAC volume to change immediately to DACL_VOL and DACR_VOL settings
1 = Disabling soft-mute (DAC_MUTE=0) will cause the DAC volume to ramp up gradually to the DACL_VOL and DACR_VOL settings
3 DAC_MUTE 0 DAC Soft Mute Control
0 = DAC Un-mute
1 = DAC Mute
Table 25 DAC Soft-Mute Control
DAC MONO MIX
A DAC digital mono-mix mode can be enabled using the DAC_MONO register bit. This mono mix will be output on whichever DAC is enabled. To prevent clipping, a -6dB attenuation is automatically applied to the mono mix.
The mono mix is only supported when one or other DAC is disabled. When the mono mix is selected, then the mono mix is output on the enabled DAC only; there is no output from the disabled DAC. If DACL_ENA and DACR_ENA are both set, then stereo operation applies.
REGISTER ADDRESS
BIT LABEL DEFAULT DESCRIPTION
R33 (21h)
DAC Digital 1
12 DAC_MONO 0 DAC Mono Mix
0 = Stereo
1 = Mono (Mono mix output on enabled DAC)
Table 26 DAC Mono Mix
DAC DE-EMPHASIS
Digital de-emphasis can be applied to the DAC playback data (e.g. when the data comes from a CD with pre-emphasis used in the recording). De-emphasis filtering is available for sample rates of 48kHz, 44.1kHz and 32kHz. See “Digital Filter Characteristics” for details of de-emphasis filter characteristics.
REGISTER ADDRESS
BIT LABEL DEFAULT DESCRIPTION
R33 (21h) DAC Digital 1
2:1 DEEMPH [1:0] 00 DAC De-Emphasis Control
00 = No de-emphasis
01 = 32kHz sample rate
10 = 44.1kHz sample rate
11 = 48kHz sample rate
Table 27 DAC De-Emphasis Control

WM8910 Pre-Production
w PP, Rev 3.0 April 2010
50
DAC SLOPING STOPBAND FILTER
Two DAC filter types are available, selected by the register bit DAC_SB_FILT. When operating at sample rates <= 24kHz (e.g. during voice communication) it is recommended that the sloping stopband filter type is selected (DAC_SB_FILT=1) to reduce out-of-band noise which can be audible at low DAC sample rates. See “Digital Filter Characteristics” for details of DAC filter characteristics.
REGISTER ADDRESS
BIT LABEL DEFAULT DESCRIPTION
R33 (21h) DAC Digital 1
11 DAC_SB_FILT 0 Selects DAC filter characteristics
0 = Normal mode
1 = Sloping stopband mode (recommended when fs <= 24kHz)
Table 28 DAC Sloping Stopband Filter
DAC BIAS CONTROL
The analogue circuits within the DAC use the Master bias current (see “Reference Voltages and Master Bias”). The DAC bias currents can also be reduced using the DACBIAS_SEL and DACVMID_SEL fields as described in Table 29. These can be used to reduce power consumption, but may have a marginal impact on audio performance in some usage modes.
The DAC bias currents can be increased using the DAC_BIAS_BOOST field. Setting this bit doubles the bias level of DACBIAS_SEL and DACVMID_BIAS_SEL. This offers a performance improvement, but also an increase in power consumption.
Note that the increased DAC VMID buffer bias is unlikely to give better performance; when DAC_BIAS_BOOST is set, it is recommended to set DACVMID_BIAS_SEL = 01 in order to restore the Normal DAC VMID buffer bias level.
REGISTER ADDRESS
BIT LABEL DEFAULT DESCRIPTION
R8 (08h)
Analogue DAC 0
5 DAC_BIAS_BOOST
0 DAC Bias boost
0 = Disable
1 = Enable
When DAC Bias boost is enabled, the bias selected by DACBIAS_SEL and DACVMID_BIAS_SEL are both doubled.
4:3 DACBIAS_SEL 00 DAC bias current select
00 = Normal bias
01 = Normal bias x 0.5
10 = Normal bias x 0.66
11 = Normal bias x 0.75
2:1 DACVMID_BIAS_SEL
00 DAC VMID buffer bias select
00 = Normal bias
01 = Normal bias x 0.5
10 = Normal bias x 0.66
11 = Normal bias x 0.75
Table 29 DAC Bias Control

Pre-Production WM8910
w PP, Rev 3.0, April 2010
51
DAC OVERSAMPLING RATIO (OSR)
The DAC oversampling rate is programmable to allow power consumption versus audio performance trade-offs. The default oversampling rate is low for reduced power consumption; using the higher OSR setting improves the DAC signal-to-noise performance.
REGISTER
ADDRESS
BIT LABEL DEFAULT DESCRIPTION
R33 (21h)
DAC Digital 1
0 DAC_OSR 0 DAC Oversampling Control
0 = Low power (normal oversample)
1 = High performance (double rate)
Table 30 DAC Oversampling Control

WM8910 Pre-Production
w PP, Rev 3.0 April 2010
52
OUTPUT SIGNAL PATH
The outputs HPOUTL and LINEOUTL are derived from the Left Mixer, whilst the HPOUTR and LINEOUTR are derived from the Right Mixer. These mixers allow the stereo DAC and stereo bypass (analogue input) signals to be mixed together for the Headphone and Line outputs.
A feedback path for common mode noise rejection is provided at HPOUTFB and LINEOUTFB for the Headphone and Line outputs respectively. This pin must be connected to ground for normal operation.
The outputs LOP/LON and ROP/RON are differential line outputs derived from the Left Speaker mixer and Right Speaker mixer respectively.
Each analogue output can be separately enabled; independent volume control is also provided for each output. The output signal paths and associated control registers are illustrated in Figure 26. See “Analogue Outputs” for details of the external connections to these outputs.
Figure 26 Output Signal Path and Control Registers

Pre-Production WM8910
w PP, Rev 3.0, April 2010
53
OUTPUT SIGNAL PATHS ENABLE
The output mixers and drivers can be independently enabled and disabled using the register bits described in Table 31.
Note that the Headphone Outputs and Line Outputs are also controlled by fields located within Register R90 and R94, which provide suppression of pops & clicks when enabling and disabling these signal paths. These registers are described in the following “Headphone / Line Output Signal Paths Enable” section.
Under recommended usage conditions, the pop suppression control bits will be configured by scheduling the default Start-Up and Shut-Down sequences as described in the “Control Write Sequencer” section. In these cases, the user does not need to set the register fields in R13, R14, R15, R90 and R94 directly.
REGISTER ADDRESS
BIT LABEL DEFAULT DESCRIPTION
R13 (0Dh)
Power Management 1
1 MIXOUTL_ENA 0 Left Output Mixer Enable
0 = disabled
1 = enabled
0 MIXOUTR_ENA 0 Right Output Mixer Enable
0 = disabled
1 = enabled
R14 (0Eh)
Power Management 2
1 HPL_PGA_ENA 0 Left Headphone Output Enable
0 = disabled
1 = enabled
0 HPR_PGA_ENA 0 Right Headphone Output Enable
0 = disabled
1 = enabled
R15 (0Fh)
Power Management 3
1 LINEOUTL_PGA_ENA
0 Left Line Output Enable
0 = disabled
1 = enabled
0 LINEOUTR_PGA_ENA
0 Right Line Output Enable
0 = disabled
1 = enabled
R16 (10h)
Power Management 4
1 MIXSPKL_ENA 0 Left Speaker Mixer Enable
0 = disabled
1 = enabled
0 MIXSPKR_ENA 0 Right Speaker Mixer Enable
0 = disabled
1 = enabled
R17 (11h)
Power Management 5
1 SPKL_ENA 0 Left Speaker Output Enable
0 = disabled
1 = enabled
0 SPKR_ENA 0 Right Speaker Output Enable
0 = disabled
1 = enabled
Table 31 Output Signal Paths Enable
To enable the output PGAs and mixers, the reference voltage VMID and the bias current must also be enabled. See “Reference Voltages and Master Bias” for details of the associated controls VMID_RES and BIAS_ENA.

WM8910 Pre-Production
w PP, Rev 3.0 April 2010
54
HEADPHONE / LINE OUTPUT SIGNAL PATHS ENABLE
The Headphone / Line output paths can be actively discharged to AGND through internal resistors if desired. This is desirable at start-up in order to achieve a known output stage condition prior to enabling the VMID reference voltage. This is also desirable in shutdown to prevent the external connections from being affected by the internal circuits. The ground-referenced Headphone outputs and Line outputs are shorted to AGND by default; the short circuit is removed on each of these paths by setting the applicable fields HPL_RMV_SHORT, HPR_RMV_SHORT, LINEOUTL_RMV_SHORT or LINEOUTR_RMV_SHORT.
The ground-referenced Headphone output and Line output drivers are designed to suppress pops and clicks when enabled or disabled. However, it is necessary to control the drivers in accordance with a defined sequence in start-up and shut-down to achieve the pop suppression. It is also necessary to schedule the DC Servo offset correction at the appropriate point in the sequence (see “DC Servo”). Table 32 and Table 33 describe the recommended sequences for enabling and disabling these output drivers.
SEQUENCE HEADPHONE ENABLE LINEOUT ENABLE
Step 1 HPL_ENA = 1
HPR_ENA = 1
LINEOUTL_ENA = 1
LINEOUTR_ENA = 1
Step 2 HPL_ENA_DLY = 1
HPR_ENA_DLY = 1
LINEOUTL_ENA_DLY = 1
LINEOUTR_ENA_DLY = 1
Step 3 DC offset correction DC offset correction
Step 4 HPL_ENA_OUTP = 1
HPR_ENA_OUTP = 1
LINEOUTL_ENA_OUTP = 1
LINEOUTR_ENA_OUTP = 1
Step 5 HPL_RMV_SHORT = 1
HPR_RMV_SHORT = 1
LINEOUTL_RMV_SHORT = 1
LINEOUTR_RMV_SHORT = 1
Table 32 Headphone / Line Output Enable Sequence
SEQUENCE HEADPHONE DISABLE LINEOUT DISABLE
Step 1 HPL_RMV_SHORT = 0
HPR_RMV_SHORT = 0
LINEOUTL_RMV_SHORT = 0
LINEOUTR_RMV_SHORT = 0
Step 2 HPL_ENA = 0
HPL_ENA_DLY = 0
HPL_ENA_OUTP = 0
HPR_ENA = 0
HPR_ENA_DLY = 0
HPR_ENA_OUTP = 0
LINEOUTL_ENA = 0
LINEOUTL_ENA_DLY = 0
LINEOUTL_ENA_OUTP = 0
LINEOUTR_ENA = 0
LINEOUTR_ENA_DLY = 0
LINEOUTR_ENA_OUTP = 0
Table 33 Headphone / Line Output Disable Sequence
The registers relating to Headphone / Line Output pop suppression control are defined in Table 34.
REGISTER ADDRESS
BIT LABEL DEFAULT DESCRIPTION
R90 (5Ah)
Analogue HP 0
7 HPL_RMV_SHORT
0 Removes HPL short
0 = HPL short enabled
1 = HPL short removed
For normal operation, this bit should be set as the final step of the HPL Enable sequence.
6 HPL_ENA_OUTP 0 Enables HPL output stage
0 = Disabled
1 = Enabled
For normal operation, this bit should be set to 1 after the DC offset cancellation has been scheduled.

Pre-Production WM8910
w PP, Rev 3.0, April 2010
55
REGISTER ADDRESS
BIT LABEL DEFAULT DESCRIPTION
5 HPL_ENA_DLY 0 Enables HPL intermediate stage
0 = Disabled
1 = Enabled
For normal operation, this bit should be set to 1 after the output signal path has been configured, and before DC offset cancellation is scheduled. This bit should be set with at least 20us delay after HPL_ENA.
4 HPL_ENA 0 Enables HPL input stage
0 = Disabled
1 = Enabled
For normal operation, this bit should be set as the first step of the HPL Enable sequence.
3 HPR_RMV_SHORT
0 Removes HPR short
0 = HPR short enabled
1 = HPR short removed
For normal operation, this bit should be set as the final step of the HPR Enable sequence.
2 HPR_ENA_OUTP 0 Enables HPR output stage
0 = Disabled
1 = Enabled
For normal operation, this bit should be set to 1 after the DC offset cancellation has been scheduled.
1 HPR_ENA_DLY 0 Enables HPR intermediate stage
0 = Disabled
1 = Enabled
For normal operation, this bit should be set to 1 after the output signal path has been configured, and before DC offset cancellation is scheduled. This bit should be set with at least 20us delay after HPR_ENA.
0 HPR_ENA 0 Enables HPR input stage
0 = Disabled
1 = Enabled
For normal operation, this bit should be set as the first step of the HPR Enable sequence.

WM8910 Pre-Production
w PP, Rev 3.0 April 2010
56
REGISTER ADDRESS
BIT LABEL DEFAULT DESCRIPTION
R94 (5Eh)
Analogue Lineout 0
7 LINEOUTL_RMV_SHORT
0 Removes LINEOUTL short
0 = LINEOUTL short enabled
1 = LINEOUTL short removed
For normal operation, this bit should be set as the final step of the LINEOUTL Enable sequence.
6 LINEOUTL_ENA_OUTP
0 Enables LINEOUTL output stage
0 = Disabled
1 = Enabled
For normal operation, this bit should be set to 1 after the DC offset cancellation has been scheduled.
5 LINEOUTL_ENA_DLY
0 Enables LINEOUTL intermediate stage
0 = Disabled
1 = Enabled
For normal operation, this bit should be set to 1 after the output signal path has been configured, and before DC offset cancellation is scheduled. This bit should be set with at least 20us delay after LINEOUTL_ENA.
4 LINEOUTL_ENA 0 Enables LINEOUTL input stage
0 = Disabled
1 = Enabled
For normal operation, this bit should be set as the first step of the LINEOUTL Enable sequence.
3 LINEOUTR_RMV_SHORT
0 Removes LINEOUTR short
0 = LINEOUTR short enabled
1 = LINEOUTR short removed
For normal operation, this bit should be set as the final step of the LINEOUTR Enable sequence.
2 LINEOUTR_ENA_OUTP
0 Enables LINEOUTR output stage
0 = Disabled
1 = Enabled
For normal operation, this bit should be set to 1 after the DC offset cancellation has been scheduled.
1 LINEOUTR_ENA_DLY
0 Enables LINEOUTR intermediate stage
0 = Disabled
1 = Enabled
For normal operation, this bit should be set to 1 after the output signal path has been configured, and before DC offset cancellation is scheduled. This bit should be set with at least 20us delay after LINEOUTR_ENA.
0 LINEOUTR_ENA 0 Enables LINEOUTR input stage
0 = Disabled
1 = Enabled
For normal operation, this bit should be set as the first step of the LINEOUTR Enable sequence.
Table 34 Headphone / Line Output Pop Suppression Control

Pre-Production WM8910
w PP, Rev 3.0, April 2010
57
OUTPUT PGA BIAS CONTROL
The output PGA circuits use the Master bias current (see “Reference Voltages and Master Bias”). The output PGA bias currents can also be controlled using the PGA_BIAS field as described in Table 35. Selecting a lower bias can be used to reduce power consumption, but may have a marginal impact on audio performance in some usage modes. Selecting a higher bias offers a performance improvement, but also an increase in power consumption.
REGISTER ADDRESS
BIT LABEL DEFAULT DESCRIPTION
R172 (ACh)
Analogue Output Bias 0
6:4 PGA_BIAS [2:0] 000 Headphone and Lineout PGA bias control
000 = Normal bias
001 = Normal bias x 1.5
010 = Normal bias x 0.75
011 = Normal bias x 0.5
100 = Normal bias x 0.33
101 = Normal bias
110 = Normal bias
111 = Normal bias x 2
Table 35 Output PGA Bias Control
OUTPUT DRIVERS BIAS CONTROL
The bias of the Headphone and Lineout drivers can be controlled independently of the PGA bias. These may be increased or decreased using the OUTPUTS_BIAS field as described in Table 36. This can be used to reduce power consumption or improve performance.
If it is desired to improve the performance of the outputs with the minimum increase in power consumption, then it is recommended to increase the OUTPUTS_BIAS level and to use the default setting of PGA_BIAS.
REGISTER ADDRESS
BIT LABEL DEFAULT DESCRIPTION
R187 (BBh)
Analogue Output Bias 2
2:0 OUTPUTS_BIAS [2:0]
000 Headphone and Lineout Output Drivers bias control
000 = Normal bias
001 = Normal bias x 1.5
010 = Normal bias x 0.75
011 = Normal bias x 0.5
100 = Normal bias x 0.33
101 = Normal bias
110 = Normal bias
111 = Normal bias x 2
Table 36 Output Drivers Bias Control

WM8910 Pre-Production
w PP, Rev 3.0 April 2010
58
OUTPUT MIXER CONTROL
Each of the four output mixers has the same four inputs:
• DAC Left
• DAC Right
• Bypass Left (Analogue input)
• Bypass Right (Analogue input)
The input signals to the left and right mixers (feeding HPOUTL/R and LINEOUTL/R) are enabled using the register fields described in Table 37. These mixers do not provide volume controls on the inputs or outputs. However, input signals can be attenuated at source using the control fields LIN_VOL, RIN_VOL, DACL_VOL and DACR_VOL.
REGISTER ADDRESS
BIT LABEL DEFAULT DESCRIPTION
R50 (32h)
Analogue Left Mix 0
3 DACL_TO_MIXOUTL
1 Left DAC to Left Output Mixer Enable
0 = disabled
1 = enabled
2 DACR_TO_MIXOUTL
0 Right DAC to Left Output Mixer Enable
0 = disabled
1 = enabled
1 BYPASSL_TO_MIXOUTL
0 Left Analogue Input to Left Output Mixer Enable
0 = disabled
1 = enabled
0 BYPASSR_TO_MIXOUTL
0 Right Analogue Input to Left Output Mixer Enable
0 = disabled
1 = enabled
R51 (33h)
Analogue Right Mix 0
3 DACL_TO_MIXOUTR
0 Left DAC to Right Output Mixer Enable
0 = disabled
1 = enabled
2 DACR_TO_MIXOUTR
1 Right DAC to Right Output Mixer Enable
0 = disabled
1 = enabled
1 BYPASSL_TO_MIXOUTR
0 Left Analogue Input to Right Output Mixer Enable
0 = disabled
1 = enabled
0 BYPASSR_TO_MIXOUTR
0 Right Analogue Input to Right Output Mixer Enable
0 = disabled
1 = enabled
Table 37 Headphone and Line Output Mixer Control

Pre-Production WM8910
w PP, Rev 3.0, April 2010
59
The input signals to the speaker mixers are enabled and controlled using the register fields described in Table 38.
These mixers provide a selectable 0dB or -6dB volume control on each input. The input signals may also be controlled at source using the control fields LIN_VOL, RIN_VOL, DACL_VOL and DACR_VOL, but it should be noted that adjusting these fields would also affect the other output mixers.
REGISTER ADDRESS
BIT LABEL DEFAULT DESCRIPTION
R52 (34h)
Analogue Spk Mix Left 0
3 DACL_TO_MIXSPKL
0 Left DAC to Left Spkr Mixer Enable
0 = disabled
1 = enabled
2 DACR_TO_MIXSPKL
0 Right DAC to Left Spkr Mixer Enable
0 = disabled
1 = enabled
1 BYPASSL_TO_MIXSPKL
0 Left Analogue Input to Left Spkr Mixer Enable
0 = disabled
1 = enabled
0 BYPASSR_TO_MIXSPKL
0 Right Analogue Input to Left Spkr Mixer Enable
0 = disabled
1 = enabled
R53 (35h)
Analogue Spk Mix Left 1
3 DACL_MIXSPKL_VOL
0 Left DAC to Left Spkr Mixer volume control
0 = 0dB
1 = -6dB
2 DACR_MIXSPKL_VOL
0 Right DAC to Left Spkr Mixer volume control
0 = 0dB
1 = -6dB
1 BYPASSL_MIXSPKL_VOL
0 Left Analogue Input to Left Spkr Mixer volume control
0 = 0dB
1 = -6dB
0 BYPASSR_MIXSPKL_VOL
0 Right Analogue Input to Left Spkr Mixer volume control
0 = 0dB
1 = -6dB
R54 (36h)
Analogue Spk Mix Right 0
3 DACL_TO_MIXSPKR
0 Left DAC to Right Spkr Mixer Enable
0 = disabled
1 = enabled
2 DACR_TO_MIXSPKR
0 Right DAC to Right Spkr Mixer Enable
0 = disabled
1 = enabled
1 BYPASSL_TO_MIXSPKR
0 Left Analogue Input to Right Spkr Mixer Enable
0 = disabled
1 = enabled
0 BYPASSR_TO_MIXSPKR
0 Right Analogue Input to Right Spkr Mixer Enable
0 = disabled
1 = enabled

WM8910 Pre-Production
w PP, Rev 3.0 April 2010
60
REGISTER ADDRESS
BIT LABEL DEFAULT DESCRIPTION
R55 (37h)
Analogue Spk Mix Right 1
3 DACL_MIXSPKR_VOL
0 Left DAC to Right Spkr Mixer volume control
0 = 0dB
1 = -6dB
2 DACR_MIXSPKR_VOL
0 Right DAC to Right Spkr Mixer volume control
0 = 0dB
1 = -6dB
1 BYPASSL_MIXSPKR_VOL
0 Left Analogue Input to Right Spkr Mixer volume control
0 = 0dB
1 = -6dB
0 BYPASSR_MIXSPKR_VOL
0 Right Analogue Input to Right Spkr Mixer volume control
0 = 0dB
1 = -6dB
Table 38 Speaker Mixer Control
OUTPUT VOLUME CONTROL
Each analogue output can be independently controlled. The headphone output control fields are described in Table 39. The line output control fields are described in Table 40. The differential line output control fields are described in Table 41. The output pins are described in more detail in “Analogue Outputs”.
The volume and mute status of each output can be controlled individually using the bit fields shown in Table 39, Table 40 and Table 41.
To prevent “zipper noise” when a volume adjustment is made, a zero-cross function is provided on all output paths. When this function is enabled, volume updates will not take place until a zero-crossing is detected. In the event of a long period without zero-crossings, a timeout will apply. The timeout must be enabled by setting the TO_ENA bit, as defined in “Clocking and Sample Rates”.
The volume update bits control the loading of the output driver volume data. For example, when HPOUTVU is set to 0, the headphone volume data can be loaded into the respective control register, but will not actually change the gain setting. The Left and Right headphone volume settings are updated when a 1 is written to HPOUTVU. This makes it possible to update the gain of a Left/Right pair of output paths simultaneously.

Pre-Production WM8910
w PP, Rev 3.0, April 2010
61
REGISTER ADDRESS
BIT LABEL DEFAULT DESCRIPTION
R57 (39h)
Analogue OUT1 Left
8 HPL_MUTE 0 Left Headphone Output Mute
0 = Un-mute
1 = Mute
7 HPOUTVU 0 Headphone Output Volume Update
Writing a 1 to this bit will update HPOUTL and HPOUTR volumes simultaneously.
6 HPOUTLZC 0 Left Headphone Output Zero Cross Enable
0 = disabled
1 = enabled
5:0 HPOUTL_VOL [5:0]
10_1101 Left Headphone Output Volume
000000 = -57dB
000001 = -56dB
(… 1dB steps)
111001 = 0dB
(… 1dB steps)
111110 = +5dB
111111 = +6dB
R58 (3Ah)
Analogue OUT1 Right
8 HPR_MUTE 0 Right Headphone Output Mute
0 = Un-mute
1 = Mute
7 HPOUTVU 0 Headphone Output Volume Update
Writing a 1 to this bit will update HPOUTL and HPOUTR volumes simultaneously.
6 HPOUTRZC 0 Right Headphone Output Zero Cross Enable
0 = disabled
1 = enabled
5:0 HPOUTR_VOL [5:0]
10_1101 Right Headphone Output Volume
000000 = -57dB
000001 = -56dB
(… 1dB steps)
111001 = 0dB
(… 1dB steps)
111110 = +5dB
111111 = +6dB
Table 39 Volume Control for HPOUTL and HPOUTR

WM8910 Pre-Production
w PP, Rev 3.0 April 2010
62
REGISTER ADDRESS
BIT LABEL DEFAULT DESCRIPTION
R59 (3Bh)
Analogue OUT2 Left
8 LINEOUTL_MUTE 0 Left Line Output Mute
0 = Un-mute
1 = Mute
7 LINEOUTVU 0 Line Output Volume Update
Writing a 1 to this bit will update LINEOUTL and LINEOUTR volumes simultaneously.
6 LINEOUTLZC 0 Left Line Output Zero Cross Enable
0 = disabled
1 = enabled
5:0 LINEOUTL_VOL [5:0]
11_1001 Left Line Output Volume
000000 = -57dB
000001 = -56dB
(… 1dB steps)
111001 = 0dB
(… 1dB steps)
111110 = +5dB
111111 = +6dB
R60 (3Ch)
Analogue OUT2 Right
8 LINEOUTR_MUTE
0 Right Line Output Mute
0 = Un-mute
1 = Mute
7 LINEOUTVU 0 Line Output Volume Update
Writing a 1 to this bit will update LINEOUTL and LINEOUTR volumes simultaneously.
6 LINEOUTRZC 0 Right Line Output Zero Cross Enable
0 = disabled
1 = enabled
5:0 LINEOUTR_VOL [5:0]
11_1001 Right Line Output Volume
000000 = -57dB
000001 = -56dB
(… 1dB steps)
111001 = 0dB
(… 1dB steps)
111110 = +5dB
111111 = +6dB
Table 40 Volume Control for LINEOUTL and LINEOUTR

Pre-Production WM8910
w PP, Rev 3.0, April 2010
63
REGISTER ADDRESS
BIT LABEL DEFAULT DESCRIPTION
R62 (3Eh)
Analogue OUT3 Left
8 SPKL_MUTE 1 Left Speaker Output Mute
0 = Un-mute
1 = Mute
7 SPKVU 0 Speaker Output Volume Update
Writing a 1 to this bit will update LON/LOP and RON/ROP volumes simultaneously.
6 SPKLZC 0 Left Speaker Output Zero Cross Enable
0 = disabled
1 = enabled
5:0 SPKL_VOL [5:0] 11_1001 Left Speaker Output Volume
000000 = -57dB
000001 = -56dB
(… 1dB steps)
111001 = 0dB
(… 1dB steps)
111110 = +5dB
111111 = +6dB
R63 (3Fh)
Analogue OUT3 Right
8 SPKR_MUTE 1 Right Speaker Output Mute
0 = Un-mute
1 = Mute
7 SPKVU 0 Speaker Output Volume Update
Writing a 1 to this bit will update LON/LOP and RON/ROP volumes simultaneously.
6 SPKRZC 0 Right Speaker Output Zero Cross Enable
0 = disabled
1 = enabled
5:0 SPKR_VOL [5:0] 11_1001 Right Speaker Output Volume
000000 = -57dB
000001 = -56dB
(… 1dB steps)
111001 = 0dB
(… 1dB steps)
111110 = +5dB
111111 = +6dB
Table 41 Volume Control for LON/LOP and RON/ROP

WM8910 Pre-Production
w PP, Rev 3.0 April 2010
64
ANALOGUE OUTPUTS
The WM8910 has eight analogue output pins:
• Headphone outputs, HPOUTL and HPOUTR
• Line outputs, LINEOUTL and LINEOUTR
• Differential line outputs, LON/LOP and RON/ROP
The output signal paths and associated control registers are illustrated in Figure 26.
HEADPHONE OUTPUTS – HPOUTL AND HPOUTR
The headphone outputs are designed to drive 16Ω or 32Ω headphones. These outputs are ground-referenced, i.e. no series capacitor is required between the pins and the headphone load. They are powered by an on-chip charge pump (see “Charge Pump” section). Signal volume at the headphone outputs is controlled as shown in Table 39.
The ground-referenced outputs incorporates a common mode, or ground loop, feedback path which provides rejection of system-related ground noise. The return path for the HPOUTL and HPOUTR outputs is via HPOUTFB. This pin must be connected to ground for normal operation of the headphone output. No register configuration is required.
LINE OUTPUTS – LINEOUTL AND LINEOUTR
The line outputs are identical to the headphone outputs in design. They are ground-referenced and power by the on-chip charge pump. Signal volume at the headphone outputs is controlled as shown in Table 40.
Note that these outputs are intended for driving line loads, as the charge pump powering both the Headphone and Line outputs can only provide sufficient power to drive one set of headphones at any given time.
The ground-referenced outputs incorporates a common mode, or ground loop, feedback path which provides rejection of system-related ground noise. The return path for the LINEOUTL and LINEOUTR outputs is via LINEOUTFB. This pin must be connected to ground for normal operation of the line output. No register configuration is required.
DIFFERENTIAL LINE OUTPUTS – LON/LOP AND RON/ROP
The differential line outputs are designed to differential line loads, including external loudspeaker drivers. The WM9001 is an ideal component for driving loudspeakers from these outputs. These pins are referenced to VMID (AVDD/2) and are powered directly from the AVDD supply.
Signal volume at the differential line outputs is controlled as shown in Table 41.

Pre-Production WM8910
w PP, Rev 3.0, April 2010
65
EXTERNAL COMPONENTS FOR GROUND-REFERENCED OUTPUTS
In the case of the ground referenced outputs HPOUTL, HPOUTR, LINEOUTL and LINEOUTR, it is recommended to connect a zobel network to the audio output pins for best audio performance in all applications. The components of the zobel network have the effect of dampening high frequency oscillations or instabilities that can arise outside the audio band under certain conditions. Possible sources of these instabilities include the inductive load of a headphone coil or an active load in the form of an external line amplifier. The capacitance of lengthy cables or PCB tracks can also lead to amplifier instability. The zobel network should comprise a 20Ω resistor and 100nF capacitor in series with each other, as illustrated in Figure 27.
Note that the zobel network is recommended for best audio quality and amplifier stability in all cases.
Figure 27 Zobel Network Components for HPOUTL, HPOUTR, LINEOUTL and LINEOUTR
The differential line outputs LOP/LON and ROP/RON would, typically, be connected to differential line drivers such as the WM9001 speaker driver. In such applications, a zobel network is not required on these differential line outputs.

WM8910 Pre-Production
w PP, Rev 3.0 April 2010
66
REFERENCE VOLTAGES AND MASTER BIAS
This section describes the analogue reference voltage and bias current controls. It also describes the VMID soft-start circuit for pop-free start-up and shut-down. Note that, under the recommended usage conditions of the WM8910, these features will be configured by running the default Start-Up and Shut-Down sequences as described in the “Control Write Sequencer” section. In these cases, the user does not need to set these register fields directly.
The analogue circuits in the WM8910 require a mid-rail analogue reference voltage, VMID. This reference is generated from AVDD via a programmable resistor chain. Together with the external VMID decoupling capacitor, the programmable resistor chain results in a slow, normal or fast charging characteristic on VMID. This is controlled by VMID_RES [1:0], and can be used to optimise the reference for normal operation, low power standby or for fast start-up as described in Table 42. For normal operation, the VMID_RES field should be set to 01.
The analogue circuits in the WM8910 require a bias current. The normal bias current is enabled by setting BIAS_ENA. Note that the normal bias current source requires VMID to be enabled also. The normal bias current can also be controlled using the ISEL field as described in Table 42. This can be used to reduce power consumption, but may have a detrimental impact on audio performance in some usage modes. The default setting is recommended.
Note that the DAC and Output PGA bias circuits may also be adjusted in order to reduce power consumption. For details, see “Digital-to-Analogue Converter (DAC)“ or “Output Signal Path”.
An alternate bias current source (Start-Up Bias) is provided for pop-free start-up; this is selected using POBCTRL (see Table 43). Note that the default setting of POBCTRL selects the Start-Up Bias. The normal bias is only selected when POBCTRL is set to logic 0.
REGISTER ADDRESS
BIT LABEL DEFAULT DESCRIPTION
R4 (04h)
Bias Control 0
3:2 ISEL [1:0] 10 Master Bias control
00 = Normal bias x 0.5
01 = Normal bias x 0.75
10 = Normal bias
11 = Normal bias x 1.5
0 BIAS_ENA 0 Enables the Normal bias current generator (for all analogue functions)
0 = Disabled
1 = Enabled
R5 (05h)
VMID Control 0
2:1 VMID_RES [1:0] 00 VMID Divider Enable and Select
00 = VMID disabled (for OFF mode)
01 = 2 x 50kΩ divider (for normal operation)
10 = 2 x 250kΩ divider (for low power standby)
11 = 2 x 5kΩ divider (for fast start-up)
Table 42 Reference Voltages and Master Bias Enable

Pre-Production WM8910
w PP, Rev 3.0, April 2010
67
A pop-suppressed start-up requires VMID to be enabled smoothly, without the step change normally associated with the initial stage of the VMID capacitor charging. A pop-suppressed start-up also requires the analogue bias current to be enabled throughout the signal path prior to the VMID reference voltage being applied. The WM8910 incorporates pop-suppression circuits which address these requirements.
The alternate current source (Start-Up Bias) is enabled by STARTUP_BIAS_ENA. The start-up bias is selected (in place of the normal bias) by POBCTRL. It is recommended that the start-up bias is used during start-up, before switching back to the higher quality, normal bias.
VMID_IO_ENA has the same functionality as STARTUP_BIAS_ENA. The start-up bias is enabled by setting either of these bits.
A soft-start circuit is provided in order to control the switch-on of the VMID reference. The soft-start control circuit is enabled by setting VMID_SOFT. Three slew rates are provided, under control of the VMID_SOFT field. When the soft-start circuit is enabled prior to enabling VMID_RES, the reference voltage rises smoothly, without the step change that would otherwise occur. It is recommended that the soft-start circuit and the output signal path be enabled before VMID is enabled by VMID_RES.
A soft shut-down is provided, using the soft-start control circuit and the start-up bias current generator. The soft shut-down of VMID is achieved by setting VMID_SOFT, STARTUP_BIAS_ENA and POBCTRL to select the start-up bias current and soft-start circuit prior to setting VMID_RES=00.
REGISTER ADDRESS
BIT LABEL DEFAULT DESCRIPTION
R4 (04h)
Bias Control 0
4 POBCTRL 1 Selects the bias current source
0 = Normal bias
1 = Start-Up bias
1 STARTUP_BIAS_ENA
0 Enables the Start-Up bias current generator
0 = Disabled
1 = Enabled
R5 (05h)
VMID Control 0
5 VMID_IO_ENA 0 Enables the Start-Up bias current generator
0 = Disabled
1 = Enabled
(same functionality as STARTUP_BIAS_ENA)
4:3 VMID_SOFT [1:0] 10 VMID soft start enable / slew rate control
00 = Disabled
01 = Fast soft start
10 = Nominal soft start
11 = Slow soft start
Table 43 Soft Start Control

WM8910 Pre-Production
w PP, Rev 3.0 April 2010
68
POP SUPPRESSION CONTROL
The WM8910 incorporates Wolfson’s SilentSwitch™ technology which enables pops normally associated with Start-Up, Shut-Down or signal path control to be suppressed. To achieve maximum benefit from these features, careful attention is required to the sequence and timing of these controls. Note that, under the recommended usage conditions of the WM8910, these features will be configured by running the default Start-Up and Shut-Down sequences as described in the “Control Write Sequencer” section. In these cases, the user does not need to set these register fields directly.
The Pop Suppression controls relating to the Headphone / Line Output drivers are described in the “Output Signal Path” section.
DISABLED INPUT / OUTPUT CONTROL
The analogue inputs to the WM8910 and the Differential Line (Speaker) outputs are biased to VMID in normal operation. In order to avoid audible pops caused by a disabled signal path dropping to AGND, the WM8910 can maintain these connections at VMID when the relevant input or output stage is disabled. This is achieved by connecting a buffered VMID reference to the input or output. The buffered VMID reference is enabled by setting VMID_BUF_ENA.
When the buffered VMID reference is enabled, it is connected to any unused input pins by setting the BUFIO_ENA register bit. When buffered VMID is enabled, it is connected to any disabled Differential Line outputs (speaker driver outputs) by setting VMID_TIE_ENA. The resistance associated with VMID_TIE_ENA can be either 500Ω or 20kΩ, depending on the VROI register bit.
REGISTER ADDRESS
BIT LABEL DEFAULT DESCRIPTION
R5 (05h)
VMID Control 0
7 VMID_TIE_ENA 0 VMID buffer to Differential Lineouts
0 = Disabled
1 = Enabled
(only applies when relevant outputs are disabled, ie. SPLK=0 or SPKR=0. Resistance is controlled by VROI.)
6 BUFIO_ENA 0 VMID buffer to unused Inputs/Outputs
0 = Disabled
1 = Enabled
0 VMID_BUF_ENA 0 VMID Buffer Enable
0 = Disabled
1 = Enabled
R65 (41h) 0 VROI 0 Select VMID_TIE_ENA resistance for disabled Differential Lineouts
0 = 20k ohm
1 = 500 ohm
Table 44 Disabled Input / Output Control
DIFFERENTIAL LINE OUTPUT DISCHARGE CONTROL
The differential line output paths can be actively discharged to AGND through internal resistors if desired. This is desirable at start-up in order to achieve a known output stage condition prior to enabling the soft-start VMID reference voltage. This is also desirable in shut-down to prevent the external connections from being affected by the internal circuits. The Differential Line outputs (speaker driver outputs) can be discharged to AGND by setting SPK_DISCHARGE.
REGISTER ADDRESS
BIT LABEL DEFAULT DESCRIPTION
R65 (41h) 1 SPK_DISCHARGE
0 Speaker Discharge Enable
0 = Disabled
1 = Enable
Table 45 Differential Line Output Discharge Control

Pre-Production WM8910
w PP, Rev 3.0, April 2010
69
CHARGE PUMP
The WM8910 incorporates a dual-mode Charge Pump which generates the supply rails for the headphone and line output drivers, HPOUTL, HPOUTR, and LINEOUTL and LINEOUTR. The Charge Pump has a single supply input, CPVDD, and generates split rails CPVOUTP and CPVOUTN according to the selected mode of operation. The Charge Pump connections are illustrated in Figure 28 (see the “Electrical Characteristics” section for external component values). An input decoupling capacitor may also be required at CPVDD, depending upon the system configuration.
Figure 28 Charge Pump External Connections
The Charge Pump is enabled by setting the CP_ENA bit. When enabled, the charge pump adjusts the output voltages (CPVOUTP and CPVOUTN) as well as the switching frequency in order to optimise the power consumption according to the operating conditions. This can take two forms, which are selected using the CP_DYN_PWR register bit.
• Register Control (CP_DYN_PWR = 0)
• Dynamic Control (CP_DYN_PWR = 1)
Under Register Control, the HPOUTL_VOL, HPOUTR_VOL, LINEOUTL_VOL and LINEOUTR_VOL register settings are used to control the charge pump mode of operation.
Under Dynamic Control, the audio signal level in the DAC is used to control the charge pump mode of operation. This is the Wolfson ‘Class W’ mode, which allows the power consumption to be optimised in real time, but can only be used if the DAC is the only signal source. This mode should not be used if any of the bypass paths are used to mix analogue inputs into the output signal path.
Under the recommended usage conditions of the WM8910, the Charge Pump will be enabled by running the default Start-Up sequence as described in the “Control Write Sequencer” section. (Similarly, it will be disabled by running the Shut-Down sequence.) In these cases, the user does not need to write to the CP_ENA bit. The Charge Pump operating mode defaults to Register Control; Dynamic Control may be selected by setting the CP_DYN_PWR register bit, if appropriate.
When digital sidetone is used (see “Digital Mixing”), it is recommended that the Charge Pump operates in Register Control mode only (CP_DYN_PWR = 0). This is because the Dynamic Control mode (Class W) does not measure the sidetone signal level and hence the Charge Pump configuration cannot be optimised for all signal conditions when digital sidetone is enabled; this could lead to signal clipping.
The MCLK signal must be present for the charge pump to function. The clock division from MCLK is handled transparently by the WM8910 without user intervention, as long as MCLK and sample rates are set correctly (see “Clocking and Sample Rates” section). The clock divider ratio depends on the SAMPLE_RATE [3:0], CLK_SYS_MODE [1:0], and CLK_SYS_RATE [3:0] register settings.
The charge pump requires a minimum CLK_SYS frequency of 2.8224MHz.
The Charge Pump control fields are described in Table 46.

WM8910 Pre-Production
w PP, Rev 3.0 April 2010
70
REGISTER ADDRESS
BIT LABEL DEFAULT DESCRIPTION
R98 (62h)
Charge Pump 0
0 CP_ENA 0 Enable charge-pump digits
0 = disable
1 = enable
R104 (68h)
Class W 0
0 CP_DYN_PWR 0 Enable dynamic charge pump power control
0 = charge pump controlled by volume register settings
1 = charge pump controlled by real-time audio level
Table 46 Charge Pump Control
DC SERVO
The WM8910 provides a DC servo circuit on the headphone and line outputs in order to remove DC offset from these ground-referenced outputs. When enabled, the DC servo ensures that the DC level of these outputs remains within 1.5mV of ground. Removal of the DC offset is important because any deviation from GND at the output pin will cause current to flow through the load under quiescent conditions, resulting in increased power consumption. Additionally, the presence of DC offsets can result in audible pops and clicks at power up and power down.
The recommended usage of the DC Servo is initialised by running the default Start-Up sequence as described in the “Control Write Sequencer” section. The default Start-Up sequence selects START_STOP servo mode, which causes a one-off correction to be performed, after which the measured DC offset is then maintained on the headphone and line outputs.
If a different usage is required, e.g. if one or more of the outputs is not in use, or if periodic DC offset correction is required, then the default Start-Up sequence may be modified according to specific requirements. The relevant control fields are defined in Table 47 .
If DC offset correction is not required on any output, then DCS_MASTER_ENA should be set to 0. Setting this field to 0 before running the Start-Up sequence will disable the DC Servo on all outputs.
If DC offset correction is only required on selected channels, then DCS_ENA should be set accordingly. Setting this field to 1111b enables the DC Servo on all outputs. Setting any bit to 0 disables the DC Servo on the corresponding output. Disabling the DC Servo on unused outputs reduces power consumption in the device. To modify this within the Start-Up sequence, the data in WSEQ Address 23 and WSEQ Address 24 should be updated (see “Control Write Sequencer”) before running the sequence.
If periodic updates to the DC offset correction is required, then DCS_MODE should be modified. Setting this field to 11b selects START_UPDATE servo mode, which causes the DC offset to be measured and corrected on a periodic basis. The default time between updates is approximately 10 minutes. Scheduling periodic updates enables the WM8910 to compensate for any change in DC offsets which might have occurred due to power supply drift or other factors. To modify this within the Start-Up sequence, the data in WSEQ Address 22 should be updated (see “Control Write Sequencer”) before running the sequence.

Pre-Production WM8910
w PP, Rev 3.0, April 2010
71
REGISTER ADDRESS
BIT LABEL DEFAULT DESCRIPTION
R67 (43h)
DC Servo 0
4 DCS_MASTER_ENA
1 DC Servo Master Control
0 = DC Servo Reset
1 = DC Servo Enabled
3:0 DCS_ENA [3:0] 0000 DC Servo Enable
[3] - HPOUTL enable
[2] - HPOUTR enable
[1] - LOUTL enable
[0] - LOUTR enable
R69 (45h)
DC Servo 2
1:0 DCS_MODE [1:0] 00 DC Servo Mode
00 = WRITE_STOP
01 = WRITE_UPDATE
10 = START_STOP
11 = START_UPDATE
Table 47 DC Servo Control
To reduce power consumption when unused audio outputs are disabled, the DC Servo correction should also be disabled. The WM8910 provides the capability to quickly resume the necessary DC Servo correction when the outputs are re-enabled, without the time delay associated with the START_STOP mode of DC Servo operation.
If the DC Servo correction is disabled using the DCS_ENA bits, but the DCS_MASTER_ENA bit is maintained at 1, then the DC Servo will retain the latest correction values in its memory. These values will be re-applied when the DC Servo is later enabled via the DCS_ENA bits.
An alternative method to apply known correction settings is to read the correction values from the WM8910 register map and to store these for later use. After DC offset correction has been performed, the applicable correction values can be read from the fields in the Servo Readback registers R81 to R84 described in Table 48.
Setting DCS_MODE to 00b or 01b selects WRITE_STOP mode and WRITE_UPDATE mode respectively. WRITE_STOP mode is similar to START_STOP mode, except that the DC Servo correction factors are read from internal registers, instead of being calculated from the measured output conditions. In the same way, WRITE_UPDATE mode is similar to START_UPDATE mode. When the DC Servo is commanded to one of these modes, the initial DC offset correction values are read from the _WRITE_VAL field in registers R71 to R74 described in Table 48.
Selecting WRITE_STOP or WRITE_UPDATE mode applies initial settings which should be written to registers R71 to R74 before the DC Servo is enabled. In WRITE_STOP mode, no further DC correction is applied. In WRITE_UPDATE mode, the DC Servo will periodically measure and adjust the DC offset correction. Similar to START_UPDATE mode, the default time between updates is approximately 10 minutes.

WM8910 Pre-Production
w PP, Rev 3.0 April 2010
72
REGISTER ADDRESS
BIT LABEL DEFAULT DESCRIPTION
R71 (47h) DC Servo 4
7:0 DCS_HPOUTL_WRITE_VAL [7:0]
0000_0000 Value to send to Left Headphone Output Servo in a WRITE mode
Two’s complement format.LSB is 0.25mV. Range is +/-32mV
R72 (48h) DC Servo 5
7:0 DCS_HPOUTR_WRITE_VAL [7:0]
0000_0000 Value to send to Right Headphone Output Servo in a WRITE mode
Two’s complement format.LSB is 0.25mV. Range is +/-32mV
R73 (49h) DC Servo 6
7:0 DCS_LOUTL_WRITE_VAL [7:0]
0000_0000 Value to send to Left Line Output Servo in a WRITE mode
Two’s complement format.LSB is 0.25mV. Range is +/-32mV
R74 (4Ah) DC Servo 7
7:0 DCS_LOUTR_WRITE_VAL [7:0]
0000_0000 Value to send to Right Line Output Servo in a WRITE mode
Two’s complement format.LSB is 0.25mV. Range is +/-32mV
R81 (51h) DC Servo Readback 1
7:0 DCS_HPOUTL_INTEG [7:0] 0000_0000 Readback value on Left Headphone Output Servo.
Two’s complement format.LSB is 0.25mV. Range is +/-32mV
R82 (52h) DC Servo Readback 2
7:0 DCS_HPOUTR_INTEG [7:0] 0000_0000 Readback value on Headphone Right Output Servo.
Two’s complement format.LSB is 0.25mV. Range is +/-32mV
R83 (53h) DC Servo Readback 3
7:0 DCS_LOUTL_INTEG [7:0] 0000_0000 Readback value on Left Line Output Servo.
Two’s complement format.LSB is 0.25mV. Range is +/-32mV
R84 (54h) DC Servo Readback 4
7:0 DCS_LOUTR_INTEG [7:0] 0000_0000 Readback value on Right Line Output Servo.
Two’s complement format.LSB is 0.25mV. Range is +/-32mV
Table 48 DC Servo Initial Settings and Readback

Pre-Production WM8910
w PP, Rev 3.0, April 2010
73
DIGITAL AUDIO INTERFACE
The digital audio interface is used for inputting DAC data into the WM8910 and outputting Digital Microphone data from it. The digital audio interface uses four pins:
• AIFTXDAT: Digital Microphone (DMIC) data output
• DACDAT: DAC data input
• LRC: DAC and DMIC data alignment clock
• BCLK: Bit clock, for synchronisation
The clock signals BCLK and LRCLK can be outputs when the WM8910 operates as a master, or inputs when it is a slave (see “Master And Slave Mode Operation” below).
Note that the BCLK pin can also support other functions, as described under “General Purpose Input/Output (GPIO)”. BCLK is the default function on this pin (GP5_FN = 1h). Under default conditions, the other GPIO control fields for this pin have no effect.
Four different audio data formats are supported:
• Left justified
• Right justified
• I2S
• DSP mode
All four of these modes are MSB first. They are described in “Audio Data Formats (Normal Mode)” below. Refer to the “Signal Timing Requirements” section for timing information.
Time Division Multiplexing (TDM) is available in all four data format modes. The WM8910 can be programmed to send and receive data in one of two time slots.
PCM operation is supported using the DSP mode.
MASTER AND SLAVE MODE OPERATION
The WM8910 digital audio interface can operate in master or slave mode, as shown in Figure 29 and Figure 30.
Figure 29 Master Mode Figure 30 Slave Mode
In master mode, BCLK is derived from CLK_SYS via a programmable division set by BCLK_DIV.
In master mode, LRC is derived from BCLK via a programmable division set by LRCLK_RATE. The BCLK input to this divider may be internal or external, allowing mixed master and slave modes.

WM8910 Pre-Production
w PP, Rev 3.0 April 2010
74
The direction of these signals and the clock frequencies are controlled as described in the “Digital Audio Interface Control” section.
BCLK and LRC can be enabled as outputs in Slave mode, allowing mixed Master/Slave operation - see “Digital Audio Interface Control”.
OPERATION WITH TDM
Time division multiplexing (TDM) allows multiple devices to transfer data simultaneously on the same bus. The WM8910 DMICs and DACs support TDM in master and slave modes for all data formats and word lengths. TDM is enabled and configured using register bits defined in the “Digital Audio Interface Control” section.
Figure 31 TDM with WM8910 as Master Figure 32 TDM with Other CODEC as Master
Figure 33 TDM with Processor as Master
Note: The WM8910 is a 24-bit device. If the user operates the WM8910 in 32-bit mode then the 8 LSBs will be ignored on the receiving side and not driven on the transmitting side. It is therefore recommended to add a pull-down resistor if necessary to the DACDAT line and the AIFTXDAT line in TDM mode.

Pre-Production WM8910
w PP, Rev 3.0, April 2010
75
BCLK FREQUENCY
The BCLK frequency is controlled relative to CLK_SYS by the BCLK_DIV divider. Internal clock divide and phase control mechanisms ensure that the BCLK and LRC edges will occur in a predictable and repeatable position relative to each other and relative to the data for a given combination of DAC/DMIC sample rate and BCLK_DIV settings.
BCLK_DIV is defined in the “Digital Audio Interface Control” section. See also the “Clocking and Sample Rates” section for more information.
AUDIO DATA FORMATS (NORMAL MODE)
In Right Justified mode, the LSB is available on the last rising edge of BCLK before a LRC transition. All other bits are transmitted before (MSB first). Depending on word length, BCLK frequency and sample rate, there may be unused BCLK cycles after each LRC transition.
Figure 34 Right Justified Audio Interface (assuming n-bit word length)
In Left Justified mode, the MSB is available on the first rising edge of BCLK following a LRC transition. The other bits up to the LSB are then transmitted in order. Depending on word length, BCLK frequency and sample rate, there may be unused BCLK cycles before each LRC transition.
Figure 35 Left Justified Audio Interface (assuming n-bit word length)
In I2S mode, the MSB is available on the second rising edge of BCLK following a LRC transition. The other bits up to the LSB are then transmitted in order. Depending on word length, BCLK frequency and sample rate, there may be unused BCLK cycles between the LSB of one sample and the MSB of the next.

WM8910 Pre-Production
w PP, Rev 3.0 April 2010
76
nn-1n-2321 nn-1n-2321
LEFT CHANNEL RIGHT CHANNEL
MSB LSBInput Word Length (WL)
1/fs
LRC
BCLK
DACDAT/AIFTXDAT
1 BCLK 1 BCLK
Figure 36 I2S Justified Audio Interface (assuming n-bit word length)
In DSP mode, the left channel MSB is available on either the 1st (mode B) or 2nd (mode A) rising edge of BCLK (selectable by AIF_LRCLK_INV) following a rising edge of LRC. Right channel data immediately follows left channel data. Depending on word length, BCLK frequency and sample rate, there may be unused BCLK cycles between the LSB of the right channel data and the next sample.
In device master mode, the LRC output will resemble the frame pulse shown in Figure 37 and Figure 38. In device slave mode, Figure 39 and Figure 40, it is possible to use any length of frame pulse less than 1/fs, providing the falling edge of the frame pulse occurs greater than one BCLK period before the rising edge of the next frame pulse.
Figure 37 DSP Mode Audio Interface (mode A, AIF_LRCLK_INV=0, Master)
Figure 38 DSP Mode Audio Interface (mode B, AIF_LRCLK_INV=1, Master)

Pre-Production WM8910
w PP, Rev 3.0, April 2010
77
Figure 39 DSP Mode Audio Interface (mode A, AIF_LRCLK_INV=0, Slave)
Figure 40 DSP Mode Audio Interface (mode B, AIF_LRCLK_INV=1, Slave)
PCM operation is supported in DSP interface mode. WM8910 Digital Microphone data that is output on the Left Channel will be read as mono PCM data by the receiving equipment. Mono PCM data received by the WM8910 will be treated as Left Channel data. This data may be routed to the Left/Right DACs as described in the “Digital Mixing” section.
AUDIO DATA FORMATS (TDM MODE)
TDM is supported in master and slave mode and is enabled by register bits AIFTX_TDM and AIFDAC_TDM. All audio interface data formats support time division multiplexing (TDM) for Digital Microphone (DMIC) and DAC data.
Two time slots are available (Slot 0 and Slot 1), selected by register bits AIFTX_TDM_CHAN and AIFDAC_TDM_CHAN which control time slots for the DMIC data and the DAC data.
When TDM is enabled, the AIFTXDAT pin will be tri-stated immediately before and immediately after data transmission, to allow another audio device to drive this signal line for the remainder of the sample period. It is important that two audio devices do not attempt to drive the data pin simultaneously, as this could result in a short circuit. See “Audio Interface Timing” for details of the AIFTXDAT output relative to BCLK signal. Note that it is possible to ensure a gap exists between transmissions by setting the transmitted word length to a value higher than the actual length of the data. For example, if 32-bit word length is selected where only 24-bit data is available, then the WM8910 interface will tri-state after transmission of the 24-bit data; this creates an 8-bit gap after the WM8910’s TDM transmission slot.
When TDM is enabled, BCLK frequency must be high enough to allow data from both time slots to be transferred. The relative timing of Slot 0 and Slot 1 depends upon the selected data format as shown in Figure 41 to Figure 45.

WM8910 Pre-Production
w PP, Rev 3.0 April 2010
78
Figure 41 TDM in Right-Justified Mode
Figure 42 TDM in Left-Justified Mode
Figure 43 TDM in I2S Mode
1/fs
LRC
BCLK
DACDAT/AIFTXDAT
1 BCLK
SLOT 0 LEFT SLOT 0 RIGHT SLOT 1 LEFT SLOT 1 RIGHT
Falling edge can occur anywhere in this area
1 BCLK
Figure 44 TDM in DSP Mode A

Pre-Production WM8910
w PP, Rev 3.0, April 2010
79
Figure 45 TDM in DSP Mode B
DIGITAL AUDIO INTERFACE CONTROL
The register bits controlling audio data format, word length left/right channel data source and TDM are summarised in Table 49.
REGISTER ADDRESS
BIT LABEL DEFAULT DESCRIPTION
R24 (18h)
Audio Interface 0
12 DACL_DATINV 0 Left DAC Invert
0 = Left DAC output not inverted
1 = Left DAC output inverted
11 DACR_DATINV 0 Right DAC Invert
0 = Right DAC output not inverted
1 = Right DAC output inverted
7 AIFTXL_SRC 0 Left Digital Audio channel source
0 = Left DMIC data is output on left channel
1 = Right DMIC data is output on left channel
6 AIFTXR_SRC 1 Right Digital Audio channel source
0 = Left DMIC data is output on right channel
1 = Right DMIC data is output on right channel
5 AIFDACL_SRC 0 Left DAC Data Source Select
0 = Left DAC outputs left channel data
1 = Left DAC outputs right channel data
4 AIFDACR_SRC 1 Right DAC Data Source Select
0 = Right DAC outputs left channel data
1 = Right DAC outputs right channel data
R25 (19h)
Audio Interface 1
13 AIFDAC_TDM 0 DAC TDM Enable
0 = Normal DACDAT operation
1 = TDM enabled on DACDAT
12 AIFDAC_TDM_CHAN
0 DACDAT TDM Channel Select
0 = DACDAT data input on slot 0
1 = DACDAT data input on slot 1
11 AIFTX_TDM 0 Digital Microphone TDM Enable
0 = Normal AIFTXDAT operation
1 = TDM enabled on AIFTXDAT

WM8910 Pre-Production
w PP, Rev 3.0 April 2010
80
REGISTER ADDRESS
BIT LABEL DEFAULT DESCRIPTION
10 AIFTX_TDM_CHAN
0 AIFTXDAT TDM Channel Select
0 = AIFTXDAT outputs data on slot 0
1 = AIFTXDAT output data on slot 1
7 AIF_BCLK_INV 0 BCLK Invert
0 = BCLK not inverted
1 = BCLK inverted
4 AIF_LRCLK_INV 0 LRC Polarity / DSP Mode A-B select.
Right, left and I2S modes – LRC polarity
0 = Not Inverted
1 = Inverted
DSP Mode – Mode A-B select
0 = MSB is available on 2nd BCLK rising edge after LRC rising edge (mode A)
1 = MSB is available on 1st BCLK rising edge after LRC rising edge (mode B)
3:2 AIF_WL [1:0] 00 Digital Audio Interface Word Length
00 = 16 bits
01 = 20 bits
10 = 24 bits
11 = 32 bits
1:0 AIF_FMT [1:0] 10 Digital Audio Interface Format
00 = Right Justified
01 = Left Justified
10 = I2S
11 = DSP
R38 (26h)
DMIC Digital 0
1 TXL_DATINV 0 Left Digital Microphone Invert
0 = Left DMIC output not inverted
1 = Left DMIC output inverted
0 TXR_DATINV 0 Right Digital Microphone Invert
0 = Right DMIC output not inverted
1 = Right DMIC output inverted
Table 49 Digital Audio Interface Data Control
Note that the WM8910 is a 24-bit device. In 32-bit mode (AIF_WL=11), the 8 LSBs are ignored on the receiving side and not driven on the transmitting side.
BCLK AND LRCLK CONTROL
The audio interface can be programmed to operate in master mode or slave mode using the BCLK_DIR and LRCLK_DIR register bits. In master mode, the BCLK and LRCLK signals are generated by the WM8910 when the Digital Microphone DSP or either of the DACs is enabled. In slave mode, the BCLK and LRCLK clock outputs are disabled by default to allow another digital audio interface to drive these pins.
It is also possible to force the BCLK or LRCLK signals to be output using BCLK_DIR and LRCLK_DIR, allowing mixed master and slave modes. The BCLK_DIR and LRCLK_DIR fields are defined in Table 50.

Pre-Production WM8910
w PP, Rev 3.0, April 2010
81
When BCLK is not selected (GP5_FN ≠ 1), the WM8910 uses the MCLK input as the Bit Clock, provided that BCLK_DIR is set to 0 to configure BCLK as an input, ie. BCLK slave mode. This configuration can offer power consumption benefits in addition to flexibility of GPIO functionality,
When the BCLK pin is an output (BCLK_DIR=1), BCLK is derived from the internal CLK_SYS signal (see “Clocking and Sample Rates”). In this case, the BCLK frequency is controlled in relation to CLK_SYS by the BCLK_DIV register field. When BCLK is an input, BCLK_DIV has no effect.
When the LRC pin is an output (LRCLK_DIR=1), LRC is derived from BCLK (irrespective of whether BCLK is an input or output). In this case, the LRC frequency is controlled in relation to BCLK by the LRCLK_RATE register field. When LRC is an input, LRCLK_RATE has no effect.
BCLK_DIV and LRCLK_RATE are defined in Table 50. The clocking scheme is illustrated in the “Clocking and Sample Rates” section - see Figure 48.
REGISTER ADDRESS
BIT LABEL DEFAULT DESCRIPTION
R25 (19h)
Audio Interface 1
9 LRCLK_DIR 0 Audio Interface LRC Direction
0 = LRC is input
1 = LRC is output
6 BCLK_DIR 0 Audio Interface BCLK Direction
0 = BCLK is input
1 = BCLK is output
R26 (1Ah)
Audio Interface 2
4:0 BCLK_DIV [4:0] 0_1000 BCLK Frequency (Master Mode)
00000 = CLK_SYS
00001 = Reserved
00010 = CLK_SYS / 2
00011 = CLK_SYS / 3
00100 = CLK_SYS / 4
00101 = CLK_SYS / 5
00110 = Reserved
00111 = CLK_SYS / 6
01000 = CLK_SYS / 8 (default)
01001 = CLK_SYS / 10
01010 = Reserved
01011 = CLK_SYS / 12
01100 = CLK_SYS / 16
01101 = CLK_SYS / 20
01110 = CLK_SYS / 22
01111 = CLK_SYS / 24
10000 = Reserved
10001 = CLK_SYS / 30
10010 = CLK_SYS / 32
10011 = CLK_SYS / 44
10100 = CLK_SYS / 48
R27 (1Bh)
Audio Interface 3
10:0 LRCLK_RATE [10:0]
000_0010_0010
LRC Rate (Master Mode)
LRC clock output = BCLK / LRCLK_RATE
Integer (LSB = 1)
Valid range: 8 to 2047
50:50 LRCLK duty cycle is only guaranteed with even values (8, 10, … 2046).
Table 50 Digital Audio Interface Clock Control

WM8910 Pre-Production
w PP, Rev 3.0 April 2010
82
COMPANDING
The WM8910 supports A-law and μ-law companding on both transmit (Digital Microphone) and receive (DAC) sides as shown in Table 51.
REGISTER ADDRESS
BIT LABEL DEFAULT DESCRIPTION
R24 (18h)
Audio Interface 0
3 DMIC_COMP 0 DMIC Companding Enable
0 = disabled
1 = enabled
2 DMIC_COMPMODE
0 DMIC Companding Type
0 = μ-law
1 = A-law
1 DAC_COMP 0 DAC Companding Enable
0 = disabled
1 = enabled
0 DAC_COMPMODE
0 DAC Companding Type
0 = μ-law
1 = A-law
Table 51 Companding Control
Companding uses a piecewise linear approximation of the following equations (as set out by ITU-T G.711 standard) for data compression:
μ-law (where μ=255 for the U.S. and Japan):
F(x) = ln( 1 + μ|x|) / ln( 1 + μ) -1 ≤ x ≤ 1
A-law (where A=87.6 for Europe):
F(x) = A|x| / ( 1 + lnA) x ≤ 1/A
F(x) = ( 1 + lnA|x|) / (1 + lnA) 1/A ≤ x ≤ 1
The companded data is also inverted as recommended by the G.711 standard (all 8 bits are inverted for μ-law, all even data bits are inverted for A-law). The data will be transmitted as the first 8 MSBs of data.
Companding converts 13 bits (μ-law) or 12 bits (A-law) to 8 bits using non-linear quantization. This provides greater precision for low amplitude signals than for high amplitude signals, resulting in a greater usable dynamic range than 8 bit linear quantization. The companded signal is an 8-bit word comprising sign (1 bit), exponent (3 bits) and mantissa (4 bits).
8-bit mode is selected whenever DAC_COMP=1 or DMIC_COMP=1. The use of 8-bit data allows samples to be passed using as few as 8 BCLK cycles per LRC frame. When using DSP mode B, 8-bit data words may be transferred consecutively every 8 BCLK cycles.
8-bit mode (without Companding) may be enabled by setting DAC_COMPMODE=1 or DMIC_COMPMODE=1, when DAC_COMP=0 and DMIC_COMP=0.
BIT7 BIT [6:4] BIT [3:0]
SIGN EXPONENT MANTISSA
Table 52 8-bit Companded Word Composition

Pre-Production WM8910
w PP, Rev 3.0, April 2010
83
u-law Companding
0
20
40
60
80
100
120
0 0.1 0.2 0.3 0.4 0.5 0.6 0.7 0.8 0.9 1
Normalised Input
Co
mp
and
ed O
utp
ut
0
0.1
0.2
0.3
0.4
0.5
0.6
0.7
0.8
0.9
1
No
rmal
ised
Ou
tpu
t
Figure 46 μ-Law Companding
A-law Companding
0
20
40
60
80
100
120
0 0.2 0.4 0.6 0.8 1
Normalised Input
Co
mp
and
ed O
utp
ut
0
0.1
0.2
0.3
0.4
0.5
0.6
0.7
0.8
0.9
1
No
rmal
ised
Ou
tpu
t
Figure 47 A-Law Companding

WM8910 Pre-Production
w PP, Rev 3.0 April 2010
84
LOOPBACK
Setting the LOOPBACK register bit enables digital loopback. When this bit is set, the Digital Microphone data output is routed to the DAC digital data input path. The digital audio interface input (DACDAT) is not used when LOOPBACK is enabled.
REGISTER ADDRESS
BIT LABEL DEFAULT DESCRIPTION
R24 (18h)
Audio Interface 0
8 LOOPBACK 0 Digital Loopback Function
0 = No loopback
1 = Loopback enabled (Digital Microphone data output is directly input to DAC data input)
Table 53 Loopback Control
Note: When the digital sidetone is enabled, Digital Microphone data will continue to be added to DAC data when loopback is enabled.
CLOCKING AND SAMPLE RATES
The WM8910 DAC supports a wide range of standard audio sample rates from 8kHz to 96kHz. DAC oversample rates of 64fs or 128fs are supported (based on a 48kHz sample rate).
The Digital Microphone interface supports audio sample rates from 8kHz to 48kHz. When the DAC and the Digital Microphone interface are both enabled, they operate at the same sample rate, fs.
The internal clocks for the WM8910 are all derived from a common internal clock source, CLK_SYS. This clock is the reference for the DMIC, DACs, DSP core functions, digital audio interface, DC servo control and other internal functions.
CLK_SYS can either be derived directly from MCLK, or may be generated from a Frequency Locked Loop (FLL) using MCLK, BCLK or LRC as a reference. Many commonly-used audio sample rates can be derived directly from typical MCLK frequencies; the FLL provides additional flexibility for a wide range of MCLK frequencies. To avoid audible glitches, all clock configurations must be set up before enabling playback. The FLL can be used to generate a free-running clock in the absence of an external reference source; see “Frequency Locked Loop (FLL)” for further details.
The WM8910 supports automatic clocking configuration. The programmable dividers associated with the Digital Microphone, DACs, DSP core functions and DC servo are configured automatically, with values determined from the SAMPLE_RATE, CLK_SYS_RATE and CLK_SYS_MODE fields. Note that the user must also configure the Digital Audio Interface.
A 256kHz clock, supporting the Control Write Sequencer and other internal functions is derived from CLK_SYS. This clock is enabled by WSMD_CLK_ENA.
A slow clock, TOCLK, is used to de-bounce the button/accessory detect inputs, and to set the timeout period for volume updates when zero-cross detect is used. This clock is enabled by TO_ENA.
The Charge Pump and DC servo control functions are clocked from CLK_SYS.
In master mode, BCLK is derived from CLK_SYS via a programmable divider set by BCLK_DIV. In master mode, the LRC is derived from BCLK via a programmable divider LRCLK_RATE. The LRC can be derived from an internal or external BCLK source, allowing mixed master/slave operation.
The overall clocking scheme for the WM8910 is illustrated in Figure 48. Note that BCLK and LRC are described in the “Digital Audio Interface” section.

Pre-Production WM8910
w PP, Rev 3.0, April 2010
85
MC
LKf/N
FL
LF
LL_
CLK
_S
RC
sel
ects
the
inpu
t re
fere
nce
for
FLL
osc
illat
or.
FLL
Clo
ck o
utpu
t may
be
se
lect
ed o
n a
ny G
PIO
pin
.
CL
K_S
YS
Inte
rnal
clo
cks
are
deriv
ed
from
CLK
_S
YS
, wh
ich
can
be
deri
ved
from
MC
LK o
r fr
om t
he F
LL o
utp
ut. T
he C
LK_
SY
S s
ourc
e is
sel
ecte
d by
CLK
_SR
C_S
EL.
A
sele
cta
ble
div
ide
by 2
opt
ion
is p
rovi
ded
usi
ng M
CLK
DIV
2. T
he in
tern
al c
lock
s a
re
ena
ble
d by
CLK
_SY
S_E
NA
.
CL
K_D
SP
DS
P c
lock
s a
re d
eriv
ed fr
om
CLK
_SY
S. T
hese
are
ena
ble
d b
y C
LK_
DS
P_E
NA
.
DA
C C
loc
ksD
AC
DS
P c
lock
is d
eriv
ed fr
om D
SP
_C
LK a
utom
atic
ally
. Alte
rna
te s
ettin
gs a
re
avai
lab
le u
sing
DA
CO
SR
.
Dig
ital
Mic
rop
ho
ne
Clo
cks
Clo
ckin
g fo
r th
e D
igita
l Mic
roph
one
is d
eriv
ed fr
om D
SP
_CLK
aut
omat
ical
ly.
Oth
er C
lock
sT
he c
lock
ing
for
the
DC
Ser
vo, C
harg
e P
ump
and
oth
er in
tern
al fu
nctio
ns is
der
ived
fr
om C
LK_
SY
S a
uto
ma
tical
ly.
256
kHz
Clo
ckT
he 2
56kH
z cl
ock
for
the
Con
trol
Writ
e S
eque
ncer
is d
eriv
ed fr
om C
LK_S
YS
au
tom
atic
ally
. T
his
is e
nab
led
by
WS
MD
_CLK
_EN
A.
TO
CL
K C
on
tro
lT
he s
low
clo
ck f
or v
olu
me
upda
te t
ime
out a
nd G
PIO
/ a
cces
sory
det
ect d
e-bo
unce
is e
nab
led
by
TO
_EN
A.
LR
C R
ate
LRC
rat
e is
set
by
LRC
LK_
RA
TE
in m
aste
r m
ode.
The
BC
LK in
put t
o th
is d
ivid
er
ma
y be
inte
rnal
or
exte
rnal
.
BC
LK
Ra
teB
CLK
rat
e is
set
by
BC
LK_
DIV
in m
aste
r m
ode
.
CL
K_
SY
S_
EN
AC
LK
_D
SP
_E
NA C
LK
_D
SP
f/N
DA
Cf/N
Au
tom
atic
DS
P
Clo
ckin
g C
ontr
ol
SA
MP
LE
_RA
TE
[2:
0]
CLK
_S
YS
_RA
TE
[3:
0]
The
DA
C, D
MIC
, 256
kHz,
and
DC
S
ervo
clo
cks
are
conf
igur
ed
auto
mat
ical
ly a
ccor
ding
to
SA
MP
LE_R
AT
E, C
LK_S
YS
_RA
TE
an
d C
LK_S
YS
_MO
DE
.
CL
K_S
YS
f/NC
lock
ing
for
DC
Se
rvo,
C
harg
e P
ump
and
othe
r ci
rcu
its
256k
Hz
clo
ck to
Con
trol
Writ
e S
eque
nce
r an
d M
ICB
IAS
C
urre
nt D
etec
t filt
erin
gT
O_
EN
A
Bu
tton/
acc
esso
ry
dete
ct d
e-bo
unc
e,
Vo
lum
e up
date
tim
eou
t
R1
Ah[
4:0
] B
CL
K_D
IV[4
:0]
(Mas
ter
Mo
de)
000
00
= S
YS
CL
K00
00
1 =
SY
SC
LK
/ 1
.500
01
0 =
SY
SC
LK
/ 2
000
11
= S
YS
CL
K /
300
10
0 =
SY
SC
LK
/ 4
001
01
= S
YS
CL
K /
500
11
0 =
SY
SC
LK
/ 5
.500
11
1 =
SY
SC
LK
/ 6
010
00
= S
YS
CL
K /
8
010
01
= S
YS
CL
K /
10
010
10
= S
YS
CL
K /
11
010
11
= S
YS
CL
K /
12
011
00
= S
YS
CL
K /
16
011
01
= S
YS
CL
K /
20
011
10
= S
YS
CL
K /
22
BC
LK
_D
IV[3
:0]
LR
CL
K_R
AT
E[1
0:0
]
LRC
BC
LK
f/N
CL
K_
SY
S_M
OD
E [
1:0
]
f/N
BC
LK
_D
IRL
RC
LK
_D
IR
f/N
MA
ST
ER
M
OD
E
CL
OC
K
OU
TP
UT
Sf/N
MC
LK
DIV
2
DA
C_O
SR
WS
MD
_C
LK
_E
NA
f/N
Clo
ckin
g fo
r D
igita
l M
icro
phon
e In
terf
ace
FLL
f RE
Ff O
UT
CL
K_
SR
C_
SE
L
BC
LKL
RC
FL
L_C
LK
_S
RC
GP
IO
Figure 48 Clocking Overview

WM8910 Pre-Production
w PP, Rev 3.0 April 2010
86
CLK_SYS CONTROL
The CLK_SRC_SEL bit is used to select the source for CLK_SYS. The source may be either the MCLK input or the FLL output. The selected source may be adjusted by the MCLKDIV2 divider to generate CLK_SYS. These register fields are described in Table 54. See “Frequency Locked Loop (FLL)” for more details of the Frequency Locked Loop clock generator.
The CLK_SYS signal is enabled by register bit CLK_SYS_ENA. This bit should be set to 1 for normal operation with MCLK applied. This bit should be set to 0 when reconfiguring clock sources. It is not recommended to change CLK_SRC_SEL while the CLK_SYS_ENA bit is set.
The following operating frequency limits must be observed when configuring CLK_SYS. Failure to observe these limits will result in degraded noise performance and/or incorrect DMIC/DAC functionality.
If DAC_OSR = 0 then CLK_SYS ≥ 3MHz
If DAC_OSR = 1 then CLK_SYS ≥ 6MHz
For DAC operation up to 48kHz sample rate, the following CLK_SYS limits are applicable. These conditions are applicable whenever DACL_ENA = 1 or DACR_ENA = 1.
Note that the Digital Microphone operation limits must also be observed if either of the Digital Microphone DSP functions is enabled. See “Digital-to-Analogue Converter (DAC)” for definitions of DAC_MONO and DAC_OSR.
If DAC_MONO = 0 and DAC_OSR = 0, then CLK_SYS ≥ 128 x fs
If DAC_MONO = 0 and DAC_OSR = 1, then CLK_SYS ≥ 256 x fs
If DAC_MONO = 1 and DAC_OSR = 0, then CLK_SYS ≥ 64 x fs
If DAC_MONO = 1 and DAC_OSR = 1, then CLK_SYS ≥ 128 x fs
For Digital Microphone operation up to 48kHz sample rate, the following CLK_SYS limit is applicable. This condition is applicable whenever DMICL_ENA = 1 or DMICR_ENA = 1.
Note that the DAC operation limits must also be observed if either DAC is enabled.
CLK_SYS ≥ 256 x fs
Further requirements for 88.2kHz and 96kHz DAC operation are provided later in this section. Note that Digital Microphone operation at 88.2kHz or 96kHz is not possible.
The clocking of the Digital Microphone and DAC circuits is derived from CLK_DSP, which is enabled by CLK_DSP_ENA. (Note that CLK_SYS must also be enabled.)
A 256kHz clock required for the Control Write Sequencer is derived from CLK_SYS. The 256kHz clock is enabled by WSMD_CLK_ENA.
The slow clock (TOCLK) required for input signal de-bouncing and volume update timeout functions is derived from the 256kHz clock. The TOCLK clock is enabled by TO_ENA.
The CLK_SYS control register fields are defined in Table 54.

Pre-Production WM8910
w PP, Rev 3.0, April 2010
87
REGISTER ADDRESS
BIT LABEL DEFAULT DESCRIPTION
R20 (14h)
Clock Rates 0
0 MCLKDIV2 0 Enables divide by 2 on MCLK
0 = CLK_SYS = MCLK
1 = CLK_SYS = MCLK / 2
R21 (15h)
Clock Rates 1
15 CLK_SRC_SEL 0 SYSCLK Source Select
0 = MCLK
1 = FLL output
R22 (16h)
Clock Rates 2
2 CLK_SYS_ENA 0 System Clock enable
0 = Disabled
1 = Enabled
1 CLK_DSP_ENA 0 DSP Clock enable
0 = Disabled
1 = Enabled
0 TO_ENA 0 Zero Cross timeout enable
0 = Disabled
1 = Enabled
R108 (6Ch)
Write Sequencer 0
8 WSMD_CLK_ENA
0 Write Sequencer Clock Enable
0 = Disabled
1 = Enabled
Table 54 MCLK and CLK_SYS Control
CONTROL INTERFACE CLOCKING
Register map access is possible with or without a Master Clock (MCLK). However, if CLK_SYS_ENA has been set to 1, then a Master Clock must be present for control register Read/Write operations. If CLK_SYS_ENA = 1 and MCLK is not present, then register access will be unsuccessful. (Note that read/write access to register R22, containing CLK_SYS_ENA, is always possible.)
If it cannot be assured that MCLK is present when accessing the register map, then it is required to set CLK_SYS_ENA = 0 to ensure correct operation.
It is possible to use the WM8910 analogue bypass paths to the differential line outputs (LON/LOP and RON/ROP) without MCLK. Note that MCLK is always required when using HPOUTL, HPOUTR, LINEOUTL or LINEOUTR.
AUTOMATIC CLOCKING CONFIGURATION
The WM8910 supports a wide range of standard audio sample rates from 8kHz to 96kHz. The Automatic Clocking Configuration mode simplifies the configuration of the clock dividers in the WM8910 by deriving most of the necessary parameters from a minimum number of user registers.
The SAMPLE_RATE field selects the sample rate, fs, of the Digital Microphone and DAC. Note that the same sample rate always applies to the Digital Microphone and DAC.
The CLK_SYS_RATE and CLK_SYS_MODE fields must be set according to the ratio of CLK_SYS to fs. (Note that the internal clock CLK_SYS is derived from MCLK as controlled by MCLKDIV2). When these fields are set correctly, the Sample Rate Decoder circuit automatically determines the clocking configuration for all other circuits within the WM8910.
The DSP clocking is enabled by CLK_DSP_ENA; see Table 54 for details of this register.

WM8910 Pre-Production
w PP, Rev 3.0 April 2010
88
REGISTER ADDRESS
BIT LABEL DEFAULT DESCRIPTION
R21 (15h)
Clock Rates 1
13:10 CLK_SYS_RATE [3:0]
0011 CLK_SYS_RATE and CLK_SYS_MODE together determine the clock division ratio (CLK_SYS / fs); see Table 56
9:8 CLK_SYS_MODE [1:0]
00
3:0 SAMPLE_RATE [3:0]
1000 Selects the Sample Rate (fs)
0000 = 8kHz
0001 = 11.025kHz
0010 = 12kHz
0011 = 16kHz
0100 = 22.05kHz
0101 = 24kHz
0110 = 32kHz
0111 = 44.1kHz
1000 = 48kHz
1001 = 88.2kHz (Not available for Digital Microphone.)
1010 = 96kHz (Not available for Digital Microphone.)
1011 to 1111 = Reserved
If the desired sample rate is not listed in this table, then the closest alternative should be chosen.
Table 55 Automatic Clocking Configuration Control
00 01 10(default)
0000 64 68 1250001 128 136 1250010 192 204 2500011 256 272 2500100 384 408 3750101 512 544 5000110 768 816 7500111 1024 1088 10001000 1408 1496 10001001 1536 1632 1500
1010 to 1111
CLK_SYS_MODE
CLK
_SY
S_R
AT
E
Available CLK_SYS / fs ratios
Reserved
(USB modes)
Table 56 Sample Rate Decoder Control
The clock division ratios available with CLK_SYS_MODE = 00 are suitable for use with standard audio master clocks. For example, with a 12.288MHz CLK_SYS and 48kHz sample rate, the CLK_SYS to fs ratio is 256. In this case, the required setting for CLK_SYS_RATE is 0011, as shown above.

Pre-Production WM8910
w PP, Rev 3.0, April 2010
89
USB CLOCKING MODE
The clock division ratios with CLK_SYS_MODE = 01 or CLK_SYS_MODE = 10 allow compatibility with a 12MHz USB clock, at sample rates up to 48kHz. For example, with a 12MHz (USB) clock and 8kHz sample rate, the CLK_SYS to fs ratio is 1500. In this case, the required setting for CLK_SYS_RATE is 1001.
Note that 44.1kHz and related sample rates are approximate when derived from a USB clock. For example, with a 12MHz MCLK and a division ratio of 272, the exact sample rate obtained is 44.118kHz rather than 44.1kHz. This 0.04% offset is inaudible and can be ignored. 48kHz and related sample rates are exact in all modes of operation, provided that MCLK itself is exact.
DAC OPERATION AT 88.2K / 96K
The WM8910 supports DAC operation at 88.2kHz and 96kHz sample rates. This section details specific conditions applicable to these operating modes. Note that Digital Microphone operation at 88.2kHz or 96kHz is not possible.
For DAC operation at 88.2kHz or 96kHz sample rates, the available clocking configurations are detailed in Table 57.
Note that, for DAC operation at 88.2kHz or 96kHz sample rates, the Digital Microphone DSP functions must both be disabled (DMICL_ENA = 0 and DMICR_ENA = 0). Also, the DAC_OSR register should be set to 0.
The CLK_SYS frequency is derived from MCLK. Note that the maximum MCLK frequency is defined in the “Signal Timing Requirements” section.
SAMPLE RATE REGISTER CONFIGURATION CLK_SYS / fs RATIO
88.2kHz SAMPLE_RATE = 1001 CLK_SYS_RATE = 0001
CLK_SYS_MODE = 00 128 x fs
CLK_SYS_MODE = 01 136 x fs
CLK_SYS_MODE = 10 125 x fs
96kHz SAMPLE_RATE = 1010 CLK_SYS_RATE = 0001
CLK_SYS_MODE = 00 128 x fs
CLK_SYS_MODE = 10 125 x fs
Table 57 DAC Operation at 88.2kHz and 96kHz Sample Rates
DIGITAL MICROPHONE (DMIC) OPERATION
When a GPIO1 pin is configured as DMIC_LR Clock output, the WM8910 outputs a clock which supports Digital Microphone operation at a multiple of the SAMPLE_RATE (see Table 55). The precise clock frequency varies according to the MCLK frequency, the SAMPLE_RATE field and other settings. The clock frequency is always within the range 1MHz - 3MHz, and some examples are shown in Table 58.
SAMPLE RATE
CLK_SYS CLK_SYS RATIO
DMIC_LR FREQUENCY
DMIC_LR RATIO
8kHz 12.288MHz 1536fs 1.024MHz 128fs
8kHz 12MHz 1500fs 1.200MHz 150fs
16kHz 12.288MHz 768fs 2.048MHz 128fs
16kHz 12MHz 750fs 2.400MHz 150fs
48kHz 12.288MHz 256fs 1.536MHz 32fs
48kHz 12MHz 250fs 2.400MHz 50fs
44.1kHz 11.2896MHz 256fs 2.822MHz 64fs
44.1kHz 12MHz 272fs 3.000MHz 68fs
32kHz 12MHz 375fs 2.400MHz 75fs
24kHz 12MHz 500fs 2.400MHz 100fs
12kHz 12MHz 1000fs 1.500MHz 125fs
Table 58 Digital Microphone Clock
Note that the 88.2kHz and 96kHz sample rate settings are not valid for Digital Microphone operation.

WM8910 Pre-Production
w PP, Rev 3.0 April 2010
90
FREQUENCY LOCKED LOOP (FLL)
The integrated FLL can be used to generate CLK_SYS from a wide variety of different reference sources and frequencies. The FLL can use either MCLK, BCLK or LRC as its reference, which may be a high frequency (eg. 12.288MHz) or low frequency (eg. 32.768kHz) reference. The FLL is tolerant of jitter and may be used to generate a stable CLK_SYS from a less stable input signal. The FLL characteristics are summarised in “Electrical Characteristics”.
Note that the FLL can be used to generate a free-running clock in the absence of an external reference source. This is described in the “Free-Running FLL Clock” section below.
The FLL is enabled using the FLL_ENA register bit. Note that, when changing FLL settings, it is recommended that the digital circuit be disabled via FLL_ENA and then re-enabled after the other register settings have been updated. When changing the input reference frequency FREF, it is recommended the FLL be reset by setting FLL_ENA to 0.
The FLL_CLK_SRC field allows MCLK, BCLK or LRC to be selected as the input reference clock.
The field FLL_CLK_REF_DIV provides the option to divide the input reference (MCLK, BCLK or LRC) by 1, 2, 4 or 8. This field should be set to bring the reference down to 13.5MHz or below. For best performance, it is recommended that the highest possible frequency - within the 13.5MHz limit - should be selected.
The field FLL_CTRL_RATE controls internal functions within the FLL; it is recommended that only the default setting be used for this parameter. FLL_GAIN controls the internal loop gain and should be set to the recommended value quoted in Table 61.
The FLL output frequency is directly determined from FLL_FRATIO, FLL_OUTDIV and the real number represented by FLL_N and FLL_K. The field FLL_N is an integer (LSB = 1); FLL_K is the fractional portion of the number (MSB = 0.5). The fractional portion is only valid in Fractional Mode when enabled by the field FLL_FRAC.
It is recommended that fractional Mode (FLL_FRAC = 1) is selected at all times. Power consumption in the FLL is reduced in integer mode; however, the performance may also be reduced, with increased noise or jitter on the output.
If low power consumption is required, then FLL settings must be chosen when N.K is an integer (ie. FLL_K = 0). In this case, the fractional mode can be disabled by setting FLL_FRAC = 0.
For best FLL performance, a non-integer value of N.K is required. In this case, the fractional mode must be enabled by setting FLL_FRAC = 1. The FLL settings must be adjusted, if necessary, to produce a non-integer value of N.K.
The FLL output frequency is generated according to the following equation:
FOUT = (FVCO / FLL_OUTDIV)
The FLL operating frequency, FVCO is set according to the following equation:
FVCO = (FREF x N.K x FLL_FRATIO)
See Table 61 for the coding of the FLL_OUTDIV and FLL_FRATIO fields.
FREF is the input frequency, as determined by FLL_CLK_REF_DIV.
FVCO must be in the range 90-100 MHz. Frequencies outside this range cannot be supported.
Note that the output frequencies that do not lie within the ranges quoted above cannot be guaranteed across the full range of device operating temperatures.

Pre-Production WM8910
w PP, Rev 3.0, April 2010
91
In order to follow the above requirements for FVCO, the value of FLL_OUTDIV should be selected according to the desired output FOUT, as described in Table 59. The divider, FLL_OUTDIV, must be set so that FVCO is in the range 90-100MHz.
OUTPUT FREQUENCY FOUT FLL_OUTDIV
2.8125 MHz - 3.125 MHz 4h (divide by 32)
5.625 MHz - 6.25 MHz 3h (divide by 16)
11.25 MHz - 12.5 MHz 2h (divide by 8)
22.5 MHz - 25 MHz 1h (divide by 4)
Table 59 Selection of FLL_OUTDIV
The value of FLL_FRATIO should be selected as described in Table 60.
REFERENCE FREQUENCY FREF FLL_FRATIO
1MHz - 13.5MHz 0h (divide by 1)
256kHz - 1MHz 1h (divide by 2)
128kHz - 256kHz 2h (divide by 4)
64kHz - 128kHz 3h (divide by 8)
Less than 64kHz 4h (divide by 16)
Table 60 Selection of FLL_FRATIO
In order to determine the remaining FLL parameters, the FLL operating frequency, FVCO, must be calculated, as given by the following equation:
FVCO = (FOUT x FLL_OUTDIV)
The value of FLL_N and FLL_K can then be determined as follows:
N.K = FVCO / (FLL_FRATIO x FREF)
See Table 61 for the coding of the FLL_OUTDIV and FLL_FRATIO fields.
Note that FREF is the input frequency, after division by FLL_CLK_REF_DIV, where applicable.
In FLL Fractional Mode, the fractional portion of the N.K multiplier is held in the FLL_K register field. This field is coded as a fixed point quantity, where the MSB has a weighting of 0.5. Note that, if desired, the value of this field may be calculated by multiplying K by 216 and treating FLL_K as an integer value, as illustrated in the following example:
If N.K = 8.192, then K = 0.192
Multiplying K by 216 gives 0.192 x 65536 = 12582.912 (decimal)
Apply rounding to the nearest integer = 12583 (decimal) = 3127 (hex)
For best performance, FLL Fractional Mode should always be used. Therefore, if the calculations yield an integer value of N.K, then it is recommended to adjust FLL_FRATIO in order to obtain a non-integer value of N.K. Care must always be taken to ensure that the FLL operating frequency, FVCO, is within its recommended limits of 90-100 MHz.
The register fields that control the FLL are described in Table 61. Example settings for a variety of reference frequencies and output frequencies are shown in Table 62.

WM8910 Pre-Production
w PP, Rev 3.0 April 2010
92
REGISTER ADDRESS
BIT LABEL DEFAULT DESCRIPTION
R128 (80h)
FLL Control 1
7:4 FLL_GAIN [3:0] 0h Gain applied to error
0000 = x 1 (Recommended value)
0001 = x 2
0010 = x 4
0011 = x 8
0100 = x 16
0101 = x 32
0110 = x 64
0111 = x 128
1000 = x 256
Recommended that this register is not changed from default.
3 FLL_HOLD 0 FLL Hold Select
0 = Disabled
1 = Enabled
This feature enables free-running mode in FLL when reference clock is removed
2 FLL_FRAC 0 Fractional enable
0 = Integer Mode
1 = Fractional Mode
Fractional Mode is recommended in all cases
0 FLL_ENA 0 FLL Enable
0 = Disabled
1 = Enabled
R129 (81h)
FLL Control 2
12:11
FLL_CLK_SRC [1:0]
00 FLL Clock source
00 = MCLK
01 = BCLK
10 = LRC
11 = Reserved
10:9 FLL_CLK_REF_DIV [1:0]
00 FLL Clock Reference Divider
00 = MCLK / 1
01 = MCLK / 2
10 = MCLK / 4
11 = MCLK / 8
MCLK (or other input reference) must be divided down to <=13.5MHz.
For lower power operation, the reference clock can be divided down further if desired.

Pre-Production WM8910
w PP, Rev 3.0, April 2010
93
REGISTER ADDRESS
BIT LABEL DEFAULT DESCRIPTION
8:6 FLL_CTRL_RATE [2:0]
000 Frequency of the FLL control block
000 = FVCO / 1 (Recommended value)
001 = FVCO / 2
010 = FVCO / 3
011 = FVCO / 4
100 = FVCO / 5
101 = FVCO / 6
110 = FVCO / 7
111 = FVCO / 8
Recommended that this register is not changed from default.
5:3 FLL_OUTDIV [2:0]
000 FOUT clock divider
000 = 2
001 = 4
010 = 8
011 = 16
100 = 32
101 = 64
110 = 128
111 = 256
(FOUT = FVCO / FLL_OUTDIV)
2:0 FLL_FRATIO [2:0]
000 FVCO clock divider
000 = divide by 1
001 = divide by 2
010 = divide by 4
011 = divide by 8
1XX = divide by 16
000 recommended for FREF > 1MHz
100 recommended for FREF < 64kHz
R130 (82h)
FLL Control 3
15:0 FLL_K [15:0] 0000h Fractional multiply for FREF
(MSB = 0.5)
R131 (83h)
FLL Control 4
9:0 FLL_N [9:0] 000h Integer multiply for FREF
(LSB = 1)
Table 61 FLL Register Map
FREE-RUNNING FLL CLOCK
The FLL can generate a clock signal even when the external reference is removed. It should be noted that the accuracy of this clock is reduced, and a reference source should always be used where possible. In free-running modes, the FLL is not sufficiently accurate for hi-fi audio applications. The free-running modes are suitable for clocking other functions, including the Write Sequencer and DC servo control. The free-running mode can be used to support the analogue input (bypass) audio paths.
A clock reference is required for initial configuration of the FLL as described above. For free-running operation, the FLL_HOLD bit should be set, as described in Table 61. When FLL_HOLD is set, the FLL will continue to generate a stable output clock after the reference input is stopped or disconnected.
Note that the FLL must be selected as the CLK_SYS source by setting CLK_SRC_SEL (see Table 54). Note that, in the absence of any reference clock, the FLL output is subject to a very wide tolerance. See “Electrical Characteristics” for details of the FLL accuracy.

WM8910 Pre-Production
w PP, Rev 3.0 April 2010
94
GPIO OUTPUTS FROM FLL
The WM8910 has an internal signal which indicates whether the FLL Lock has been achieved. The FLL Lock status is an input to the Interrupt control circuit and can be used to trigger an Interrupt event - see “Interrupts”.
The FLL Lock signal can be output directly on a GPIO pin as an external indication of FLL Lock. See “General Purpose Input/Output (GPIO)” for details of how to configure a GPIO pin to output the FLL Lock signal.
The FLL Clock can be output directly on a GPIO pin as a clock signal for other circuits. Note that the FLL Clock may be output even if the FLL is not selected as the WM8910 CLK_SYS source. The clocking configuration is illustrated in Figure 48. See “General Purpose Input/Output (GPIO)” for details of how to configure a GPIO pin to output the FLL Clock.
EXAMPLE FLL CALCULATION
To generate 12.288 MHz output (FOUT) from a 12.000 MHz reference clock (FREF):
• Set FLL_CLK_REF_DIV in order to generate FREF <=13.5MHz: FLL_CLK_REF_DIV = 00 (divide by 1)
• Set FLL_CTRL_RATE to the recommended setting: FLL_CTRL_RATE = 000 (divide by 1)
• Set FLL_GAIN to the recommended setting: FLL_GAIN = 0000 (multiply by 1)
• Set FLL_OUTDIV for the required output frequency as shown in Table 59:- FOUT = 12.288 MHz, therefore FLL_OUTDIV = 2h (divide by 8)
• Set FLL_FRATIO for the given reference frequency as shown in Table 60: FREF = 12MHz, therefore FLL_FRATIO = 0h (divide by 1)
• Calculate FVCO as given by FVCO = FOUT x FLL_OUTDIV:- FVCO = 12.288 x 8 = 98.304MHz
• Calculate N.K as given by N.K = FVCO / (FLL_FRATIO x FREF): N.K = 98.304 / (1 x 12) = 8.192
• Determine FLL_N and FLL_K from the integer and fractional portions of N.K:- FLL_N is 8. FLL_K is 0.192
• Confirm that N.K is a fractional quantity and set FLL_FRAC: N.K is fractional. Set FLL_FRAC = 1. Note that, if N.K is an integer, then an alternative value of FLL_FRATIO should be selected in order to produce a fractional value of N.K.

Pre-Production WM8910
w PP, Rev 3.0, April 2010
95
EXAMPLE FLL SETTINGS
Table 62 provides example FLL settings for generating common CLK_SYS frequencies from a variety of low and high frequency reference inputs.
FREF FOUT FLL_CLK_ REF_DIV
FVCO FLL_N FLL_K FLL_ FRATIO
FLL_ OUTDIV
FLL_ FRAC
32.000
kHz
12.288
MHz
Divide by 1
(0h)
98.304
MHz
192
(0C0h)
0
(0000h)
16
(4h)
8
(2h)
0
32.000
kHz
11.2896
MHz
Divide by 1
(0h)
90.3168
MHz
176
(0B0h)
0.4
(6666h)
16
(4h)
8
(2h)
1
32.768
kHz
12.288
MHz
Divide by 1
(0h)
98.304
MHz
187
(0BBh)
0.5
(8000h)
16
(4h)
8
(2h)
1
32.768
kHz
11.288576
MHz
Divide by 1
(0h)
90.3086
MHz
172
(0ACh)
0.25
(4000h)
16
(4h)
8
(2h)
1
32.768
kHz
11.2896
MHz
Divide by 1
(0h)
90.3168
MHz
172
(0ACh)
0.2656
(4400h)
16
(4h)
8
(2h)
1
48
kHz
12.288
MHz
Divide by 1
(0h)
98.304
MHz
128
(080h)
0
(0000h)
16
(4h)
8
(2h)
0
11.3636
MHz
12.368544
MHz
Divide by 1
(0h)
98.9484
MHz
8
(008h)
0.707483
(B51Eh)
1
(0h)
8
(2h)
1
12.000
MHz
12.288
MHz
Divide by 1
(0h)
98.304
MHz
8
(008h)
0.192
(3127h)
1
(0h)
8
(2h)
1
12.000
MHz
11.289597
MHz
Divide by 1
(0h)
90.3168
MHz
7
(007h)
0.526398
(86C2h)
1
(0h)
8
(2h)
1
12.288
MHz
12.288
MHz
Divide by 1
(0h)
98.304
MHz
8
(008h)
0
(0000h)
1
(0h)
8
(2h)
0
12.288
MHz
11.2896
MHz
Divide by 1
(0h)
90.3168
MHz
7
(007h)
0.35
(599Ah)
1
(0h)
8
(2h)
1
13.000
MHz
12.287990
MHz
Divide by 1
(0h)
98.3039
MHz
7
(007h)
0.56184
(8FD5h)
1
(0h)
8
(2h)
1
13.000
MHz
11.289606
MHz
Divide by 1
(0h)
90.3168
MHz
6
(006h)
0.94745
(F28Ch)
1
(0h)
8
(2h)
1
19.200
MHz
12.287988
MHz
Divide by 2
(1h)
98.3039
MHz
10
(00Ah)
0.23999
(3D70h)
1
(0h)
8
(2h)
1
19.200
MHz
11.289588
MHz
Divide by 2
(1h)
90.3167
MHz
9
(009h)
0.40799
(6872h)
1
(0h)
8
(2h)
1
Table 62 Example FLL Settings

WM8910 Pre-Production
w PP, Rev 3.0 April 2010
96
GENERAL PURPOSE INPUT/OUTPUT (GPIO)
The WM8910 provides five multi-function pins which can be configured to provide a number of different functions. These are digital input/output pins on the DBVDD power domain. The GPIO pins are:
• GPIO1
• GPIO2
• GPIO3 / ADDR
• INTERRUPT / GPIO4
• BCLK / GPIO5
Each general purpose I/O pin can be configured to be a GPIO input or configured as one of a number of output functions. Signal de-bouncing can be selected on GPIO input pins for use with jack/button detect applications. Table 63 lists the functions that are available on each of these pins. The default function is highlighted for each pin.
GPIO PINS
GPIO Pin Function GPIO1 GPIO2 GPIO3/ ADDR
INTERRUPT/ GPIO4
BCLK/GPIO5
GPIO output Yes Yes Yes Yes Yes
BCLK input/output No No No No Yes
Interrupt output (IRQ) Yes Yes Yes Yes Yes
Digital Microphone Clock (DMIC_LR) Yes Yes Yes Yes No
Digital Microphone Data (DMIC_DAT) No Yes Yes No No
GPIO input
(including jack/button detect)
Yes Yes Yes Yes Yes
MICBIAS Current detect output Yes Yes Yes Yes Yes
MICBIAS Short Circuit detect output Yes Yes Yes Yes Yes
FLL Lock output Yes Yes Yes Yes Yes
FLL Clock output Yes Yes Yes Yes Yes
Table 63 GPIO Functions Available
The register fields that control the functionality of these pins are described in Table 64. For each pin, the selected function is determined by the GPn_FN field, where n identifies the GPIO pin (1 to 5). Note that the INTERRUPT pin is also referred to as GPIO4; the BCLK pin is also referred to as GPIO5.
The pin direction, set by GPn_DIR, must be set according to the function selected by GPn_FN.
The characteristics of any pin selected as an output may be controlled by setting GPn_OP_CFG - an output pin may be either CMOS or Open-Drain. When a pin is configured as a GPIO output, its level can be set to logic 0 or logic 1 using the GPn_LVL field.
A pin configured as a GPIO input can be used to trigger an Interrupt event. This input may be configured as active high or active low using the GPn_IP_CFG field. De-bouncing of this input may be enabled using the GPn_DB field. Internal pull-up and pull-down resistors may be enabled using the GPn_PU and GPn_PD fields. (Note that if GPn_PU and GPn_PD are both set for any GPIO pin, then the pull-up and pull-down will be disabled.)
Each of the GPIO pins is an input to the Interrupt control circuit and can be used to trigger an Interrupt event. The register field GPn_INTMODE selects edge detect or level detect Interrupt functionality. Edge detect raises an interrupt on rising and falling transitions. Level detect asserts the interrupt for as long as the GPIO status is asserted. See “Interrupts”.
The Digital Microphone Interface and MICBIAS Current Detect functions are described in the “Analogue Input Signal Path” section.

Pre-Production WM8910
w PP, Rev 3.0, April 2010
97
Interrupt Output is the default function of GPIO4. See “Interrupts” for further details.
BCLK is the default function of GPIO5. This may be input or output. Note that, when BCLK is enabled on this pin (GP5_FN = 1h), the other GPIO control fields for this pin have no effect. When BCLK is not enabled on this pin (GP5_FN ≠ 1h), the WM8910 uses the MCLK input as the Bit Clock. See “Digital Audio Interface Control” for further details.
REGISTER ADDRESS
BIT LABEL DEFAULT DESCRIPTION
R116 (74h)
GPIO Control 1
13:8 GP1_FN [5:0] 00_0000 GPIO 1 Pin Function select
00h = GPIO output
01h = Reserved
02h = IRQ output
03h = GPIO input
04h = Reserved
05h = Reserved
06h = DMIC_LR Clock output
07h = Reserved
08h = FLL Lock output
09h = FLL Clock output 0Ah to 3Fh = Reserved
7 GP1_DIR 1 GPIO Pin Direction
0 = Output
1 = Input
6 GP1_OP_CFG 0 Output pin configuration
0 = CMOS
1 = Open-drain
5 GP1_IP_CFG 1 Input pin configuration
0 = Active low
1 = Active high
4 GP1_LVL 0 GPIO Output Level
(when GP1_FN = 00000)
0 = Logic 0
1 = Logic 1
3 GP1_PD 1 GPIO Pull-Down Enable
0 = Pull-down disabled
1 = Pull-down enabled (Approx 100kΩ)
2 GP1_PU 0 GPIO Pull-Up Enable
0 = Pull-up disabled
1 = Pull-up enabled (Approx 100kΩ)
1 GP1_INTMODE 0 GPIO Interrupt Mode
0 = Level triggered
1 = Edge triggered
0 GP1_DB 0 GPIO de-bounce
0 = GPIO is not debounced
1 = GPIO is debounced

WM8910 Pre-Production
w PP, Rev 3.0 April 2010
98
REGISTER ADDRESS
BIT LABEL DEFAULT DESCRIPTION
R117 (75h) GPIO Control 2
13:8 GP2_FN [5:0] 00_0000 GPIO 2 Pin Function select
00h = GPIO output
01h = Reserved
02h = IRQ output
03h = GPIO input
04h = Reserved
05h = Reserved
06h = DMIC_DAT Data input
07h = DMIC_LR Clock output
08h = FLL Lock output
09h = FLL Clock output 0Ah to 3Fh = Reserved
7 GP2_DIR 1 GPIO Pin Direction
0 = Output
1 = Input
6 GP2_OP_CFG 0 Output pin configuration
0 = CMOS
1 = Open-drain
5 GP2_IP_CFG 1 Input pin configuration
0 = Active low
1 = Active high
4 GP2_LVL 0 GPIO Output Level
(when GP2_FN = 00000)
0 = Logic 0
1 = Logic 1
3 GP2_PD 1 GPIO Pull-Down Enable
0 = Pull-down disabled
1 = Pull-down enabled (Approx 100kΩ)
2 GP2_PU 0 GPIO Pull-Up Enable
0 = Pull-up disabled
1 = Pull-up enabled (Approx 100kΩ)
1 GP2_INTMODE 0 GPIO Interrupt Mode
0 = Level triggered
1 = Edge triggered
0 GP2_DB 0 GPIO de-bounce
0 = GPIO is not debounced
1 = GPIO is debounced
R118 (76h) GPIO Control 3
13:8 GP3_FN [5:0] 00_0000 GPIO 3 Pin Function select
00h = GPIO output
01h = Reserved
02h = IRQ output
03h = GPIO input
04h = Reserved
05h = Reserved
06h = DMIC_DAT Data input
07h = DMIC_LR Clock output
08h = FLL Lock output
09h = FLL Clock output 0Ah to 3Fh = Reserved
7 GP3_DIR 1 GPIO Pin Direction
0 = Output
1 = Input

Pre-Production WM8910
w PP, Rev 3.0, April 2010
99
REGISTER ADDRESS
BIT LABEL DEFAULT DESCRIPTION
6 GP3_OP_CFG 0 Output pin configuration
0 = CMOS
1 = Open-drain
5 GP3_IP_CFG 1 Input pin configuration
0 = Active low
1 = Active high
4 GP3_LVL 0 GPIO Output Level
(when GP3_FN = 00000)
0 = Logic 0
1 = Logic 1
3 GP3_PD 1 GPIO Pull-Down Enable
0 = Pull-down disabled
1 = Pull-down enabled (Approx 100kΩ)
2 GP3_PU 0 GPIO Pull-Up Enable
0 = Pull-up disabled
1 = Pull-up enabled (Approx 100kΩ)
1 GP3_INTMODE 0 GPIO Interrupt Mode
0 = Level triggered
1 = Edge triggered
0 GP3_DB 0 GPIO de-bounce
0 = GPIO is not debounced
1 = GPIO is debounced
R119 (77h) GPIO Control 4
13:8 GP4_FN [5:0] 00_0010 GPIO 4 Pin Function select
00h = GPIO output
01h = Reserved
02h = IRQ output
03h = GPIO input
04h = Reserved
05h = Reserved
06h = Reserved
07h = DMIC_LR Clock output
08h = FLL Lock output
09h = FLL Clock output 0Ah to 3Fh = Reserved
7 GP4_DIR 0 GPIO Pin Direction
0 = Output
1 = Input
6 GP4_OP_CFG 0 Output pin configuration
0 = CMOS
1 = Open-drain
5 GP4_IP_CFG 1 Input pin configuration
0 = Active low
1 = Active high
4 GP4_LVL 0 GPIO Output Level
(when GP4_FN = 00000)
0 = Logic 0
1 = Logic 1
3 GP4_PD 0 GPIO Pull-Down Enable
0 = Pull-down disabled
1 = Pull-down enabled (Approx 100kΩ)
2 GP4_PU 0 GPIO Pull-Up Enable
0 = Pull-up disabled
1 = Pull-up enabled (Approx 100kΩ)

WM8910 Pre-Production
w PP, Rev 3.0 April 2010
100
REGISTER ADDRESS
BIT LABEL DEFAULT DESCRIPTION
1 GP4_INTMODE 0 GPIO Interrupt Mode
0 = Level triggered
1 = Edge triggered
0 GP4_DB 0 GPIO de-bounce
0 = GPIO is not debounced
1 = GPIO is debounced
R120 (78h) GPIO Control 5
13:8 GP5_FN [5:0] 00_0001 GPIO 5 Pin Function select
00h = GPIO output
01h = BCLK
02h = IRQ output
03h = GPIO input
04h = Reserved
05h = Reserved
06h = Reserved
07h = DMIC_LR Clock output
08h = FLL Lock output
09h = FLL Clock output 0Ah to 3Fh = Reserved
7 GP5_DIR 1 GPIO Pin Direction
0 = Output
1 = Input
6 GP5_OP_CFG 0 Output pin configuration
0 = CMOS
1 = Open-drain
5 GP5_IP_CFG 1 Input pin configuration
0 = Active low
1 = Active high
4 GP5_LVL 0 GPIO Output Level
(when GP5_FN = 00000)
0 = Logic 0
1 = Logic 1
3 GP5_PD 0 GPIO Pull-Down Enable
0 = Pull-down disabled
1 = Pull-down enabled (Approx 100kΩ)
2 GP5_PU 0 GPIO Pull-Up Enable
0 = Pull-up disabled
1 = Pull-up enabled (Approx 100kΩ)
1 GP5_INTMODE 0 GPIO Interrupt Mode
0 = Level triggered
1 = Edge triggered
0 GP5_DB 0 GPIO de-bounce
0 = GPIO is not debounced
1 = GPIO is debounced
Table 64 GPIO Control

Pre-Production WM8910
w PP, Rev 3.0, April 2010
101
INTERRUPTS
The Interrupt Controller has multiple inputs. These include the GPIO input pins and the Write Sequencer Status. Any combination of these inputs can be used to trigger an Interrupt (IRQ) event.
There is an Interrupt Status field associated with each of the IRQ inputs. These are contained in the Interrupt Status Register (R121), as described in Table 65. The status of the IRQ inputs can be read from this register at any time, or else in response to the Interrupt Output being signalled via a GPIO pin.
The Interrupt Output represents the logical ‘OR’ of all the unmasked IRQ inputs. The bits within the Interrupt Status register (R121) are latching fields and, once they are set, they are not reset until the Status Register is read. Accordingly, the Interrupt Output is not reset until each of the unmasked IRQ inputs has been read. Note that, if the condition that caused the IRQ input to be asserted is still valid, then the Interrupt Output will remain set even after the Status register has been read.
Each of the IRQ inputs can be individually masked or enabled as an input to the Interrupt function, using the bits contained in the Interrupt Status Mask register (R122). Note that the interrupt status fields remain valid, even when masked, but the masked bits will not cause the Interrupt Output to be asserted.
When a GPIO input is used as Interrupt event, the polarity can be set using GP_IP_CFG as described in Table 64. The polarity of the FLL Lock indication can be set using FLL_LOCK_INV as described in Table 65; this allows the IRQ event to be used to indicate either the assertion or the de-assertion of the FLL Lock signal.
By default, the Interrupt Output is Active High. The polarity can be inverted using IRQ_POL.
The Interrupt Output may be configured the INTERRUPT/GPIO4 pin or on the GPIO1/DMIC_LR, GPIO2/DMIC_DAT, GPIO3/ADDR or BCLK/GPIO5 pins. Interrupt Output is the default function on the INTERRUPT pin (GP4_FN = 2h), but the INTERRUPT pin can also be used to support other functions. See “General Purpose Input/Output (GPIO)” for details of how to configure GPIO pins for Interrupt (IRQ) output.
The WM8910 Interrupt Controller circuit is illustrated in Figure 54. The associated control fields are described in Table 65.
Figure 49 Interrupt Controller

WM8910 Pre-Production
w PP, Rev 3.0 April 2010
102
REGISTER ADDRESS
BIT LABEL DEFAULT DESCRIPTION
R121 (79h)
Interrupt Status 1
13 WSEQ_BUSY_EINT
0 Write Sequencer Busy IRQ status 0 = WSEQ IRQ not set 1 = WSEQ IRQ set The Write Sequencer asserts this flag when it has completed a programmed sequence - ie it indicates that the Write Sequencer is NOT Busy.
5 FLL_LOCK_EINT
0 FLL Lock IRQ status 0 = FLL Lock IRQ not set 1 = FLL Lock IRQ set
4 GP5_EINT 0 GPIO5 IRQ status 0 = GPIO5 IRQ not set 1 = GPIO5 IRQ set
3 GP4_EINT 0 GPIO4 IRQ status 0 = GPIO4 IRQ not set 1 = GPIO4 IRQ set
2 GP3_EINT 0 GPIO3/ADDR IRQ status 0 = GPIO3 IRQ not set 1 = GPIO3 IRQ set
1 GP2_EINT 0 GPIO2/DMIC_DAT IRQ status 0 = GPIO2 IRQ not set 1 = GPIO2 IRQ set
0 GP1_EINT 0 GPIO1/DMIC_LR IRQ status 0 = GPIO1 IRQ not set 1 = GPIO1 IRQ set
R122 (7Ah)
Interrupt Status 1 Mask
13 IM_WSEQ_BUSY_EINT
1 Interrupt mask for WSEQ Busy indication 0 = Not masked 1 = Masked
5 IM_FLL_LOCK_EINT
1 Interrupt mask for FLL Lock 0 = Not masked 1 = Masked
4 IM_GP5_EINT 1 Interrupt mask for GPIO5 0 = Not masked 1 = Masked
3 IM_GP4_EINT 1 Interrupt mask for GPIO4 0 = Not masked 1 = Masked
2 IM_GP3_EINT 1 Interrupt mask for GPIO3/ADDR 0 = Not masked 1 = Masked
1 IM_GP2_EINT 1 Interrupt mask for GPIO2/DMIC_DAT 0 = Not masked 1 = Masked
0 IM_GP1_EINT 1 Interrupt mask for GPIO1/DMIC_LR 0 = Not masked 1 = Masked
R123 (7Bh)
Interrupt Polarity 1
5 FLL_LOCK_INV 0 FLL Lock polarity
0 = Non-inverted
1 = Inverted
R126 (7Eh) Interrupt Control
0 IRQ_POL 0 Interrupt Output polarity
0 = Active high
1 = Active low
Table 65 Interrupt Control

Pre-Production WM8910
w PP, Rev 3.0, April 2010
103
CONTROL INTERFACE
The WM8910 is controlled by writing to registers through a 2-wire serial control interface. Readback is available for all registers, including Chip ID, power management status and GPIO status.
Note that, if it cannot be assured that MCLK is present when accessing the register map, then it is required to set CLK_SYS_ENA = 0 to ensure correct operation. See “Clocking and Sample Rates” for further details and for the definition of CLK_SYS_ENA.
The WM8910 is a slave device on the control interface; SCLK is a clock input, while SDIN is a bi-directional data pin. To allow arbitration of multiple slaves (and/or multiple masters) on the same interface, the WM8910 transmits logic 1 by tri-stating the SDIN pin, rather than pulling it high. An external pull-up resistor is required to pull the SDIN line high so that the logic 1 can be recognised by the master.
In order to allow many devices to share a single 2-wire control bus, every device on the bus has a unique 8-bit device ID (this is not the same as the 8-bit address of each register in the WM8910). The default device ID for the WM8910 is 0011 0100 (34h). The LSB of the device ID is the Read/Write bit; this bit is set to logic 1 for “Read” and logic 0 for “Write”.
Alternatively, the device ID can be set to 0011 0110 (0x36) by pulling the GPIO3/ADDR pin high during device start-up, when the internal power-on reset signal PORB (see “Power-on Reset”) is released. The setup and hold times for device ID selection are shown in Table 66. After the device ID has been selected, the GPIO3/ADDR pin can be used as a GPIO.
SYMBOL MIN TYP MAX UNIT
Tpusetup 100 μs
Tpuhold 100 μs
Table 66 GPIO3/ADDR Latch on Power-up Timing
The WM8910 operates as a slave device only. The controller indicates the start of data transfer with a high to low transition on SDIN while SCLK remains high. This indicates that a device ID, register address and data will follow. The WM8910 responds to the start condition and shifts in the next eight bits on SDIN (8-bit device ID, including Read/Write bit, MSB first). If the device ID received matches the device ID of the WM8910, then the WM8910 responds by pulling SDIN low on the next clock pulse (ACK). If the device ID is not recognised or the R/W bit is ‘1’ when operating in write only mode, the WM8910 returns to the idle condition and waits for a new start condition and valid address.
If the device ID matches the device ID of the WM8910, the data transfer continues as described below. The controller indicates the end of data transfer with a low to high transition on SDIN while SCLK remains high. After receiving a complete address and data sequence the WM8910 returns to the idle state and waits for another start condition. If a start or stop condition is detected out of sequence at any point during data transfer (i.e. SDIN changes while SCLK is high), the device returns to the idle condition.
The WM8910 supports the following read and write operations:
• Single write
• Single read
• Multiple write using auto-increment
• Multiple read using auto-increment
The sequence of signals associated with a single register write operation is illustrated in Figure 50.

WM8910 Pre-Production
w PP, Rev 3.0 April 2010
104
A1D7 D1 A7SDIN
SCLK
device ID data bits B15 – B8
A0 B15 B8 B1 B0
Note: The SDIN pin is used as input for the control register address and data; SDIN is pulled low by the receiving device to provide the acknowledge (ACK) response
R/W B9 B7
register address data bits B7 – B0START (Write) ACK ACK ACK STOPACK
Figure 50 Control Interface Register Write
The sequence of signals associated with a single register read operation is illustrated in Figure 51.
Figure 51 Control Interface Register Read
The Control Interface also supports other register operations, as listed above. The interface protocol for these operations is summarised below. The terminology used in the following figures is detailed in Table 67.
Note that multiple write and multiple read operations are supported using the auto-increment mode. This feature enables the host processor to access sequential blocks of the data in the WM8910 register map faster than is possible with single register operations.
TERMINOLOGY DESCRIPTION
S Start Condition
Sr Repeated start
A Acknowledge (SDIN Low)
A Not Acknowledge (SDIN High)
P Stop Condition
R/W ReadNotWrite 0 = Write
1 = Read
[White field] Data flow from bus master to WM8910
[Grey field] Data flow from WM8910 to bus master
Table 67 Control Interface Terminology
Figure 52 Single Register Write to Specified Address

Pre-Production WM8910
w PP, Rev 3.0, April 2010
105
Figure 53 Single Register Read from Specified Address
Figure 54 Multiple Register Write to Specified Address using Auto-increment
Figure 55 Multiple Register Read from Specified Address using Auto-increment
Figure 56 Multiple Register Read from Last Address using Auto-increment

WM8910 Pre-Production
w PP, Rev 3.0 April 2010
106
CONTROL WRITE SEQUENCER
The Control Write Sequencer is a programmable unit that forms part of the WM8910 control interface logic. It provides the ability to perform a sequence of register write operations with the minimum of demands on the host processor - the sequence may be initiated by a single operation from the host processor and then left to execute independently.
Default sequences for Start-Up and Shut-Down are provided (see “Default Sequences” section). It is recommended that these default sequences are used unless changes become necessary.
When a sequence is initiated, the sequencer performs a series of pre-defined register writes. The host processor informs the sequencer of the start index of the required sequence within the sequencer’s memory. At each step of the sequence, the contents of the selected register fields are read from the sequencer’s memory and copied into the WM8910 control registers. This continues sequentially through the sequencer’s memory until an “End of Sequence” bit is encountered; at this point, the sequencer stops and an Interrupt status flag is asserted. For cases where the timing of the write sequence is important, a programmable delay can be set for specific steps within the sequence.
Note that the Control Write Sequencer’s internal clock is derived from the internal clock CLK_SYS. An external MCLK signal must be present when using the Control Write Sequencer, and CLK_SYS must be enabled by setting CLK_SYS_ENA (see “Clocking and Sample Rates”). The clock division from MCLK is handled transparently by the WM8910 without user intervention, as long as MCLK and sample rates are set correctly.
INITIATING A SEQUENCE
The Register fields associated with running the Control Write Sequencer are described in Table 68.
The Write Sequencer Clock is enabled by setting the WSMD_CLK_ENA bit. Note that the operation of the Control Write Sequencer also requires the internal clock CLK_SYS to be enabled via the CLK_SYS_ENA (see “Clocking and Sample Rates”).
The start index of the required sequence must be written to the WSEQ_START_INDEX field. Setting the WSEQ_START bit initiates the sequencer at the given start index.
The Write Sequencer can be interrupted by writing a logic 1 to the WSEQ_ABORT bit.
The current status of the Write Sequencer can be read using two further register fields - when the WSEQ_BUSY bit is asserted, this indicates that the Write Sequencer is busy. Note that, whilst the Control Write Sequencer is running a sequence (indicated by the WSEQ_BUSY bit), normal read/write operations to the Control Registers cannot be supported. (The Write Sequencer registers and the Software Reset register can still be accessed when the Sequencer is busy.) The index of the current step in the Write Sequencer can be read from the WSEQ_CURRENT_INDEX field; this is an indicator of the sequencer’s progress. On completion of a sequence, this field holds the index of the last step within the last commanded sequence.
When the Write Sequencer reaches the end of a sequence, it asserts the WSEQ_BUSY_EINT flag in Register R121 (see Table 65 within the “Interrupts” section). This flag can be used to generate an Interrupt Event on completion of the sequence. Note that the WSEQ_BUSY_EINT flag is asserted to indicate that the WSEQ is NOT Busy.

Pre-Production WM8910
w PP, Rev 3.0, April 2010
107
REGISTER ADDRESS
BIT LABEL DEFAULT DESCRIPTION
R108 (6Ch)
Write Sequencer 0
8 WSMD_CLK_ENA
0 Write Sequencer Clock Enable
0 = Disabled
1 = Enabled
R111 (6Fh)
Write Sequencer 3
9 WSEQ_ABORT 0 Writing a 1 to this bit aborts the current sequence and returns control of the device back to the serial control interface.
8 WSEQ_START 0 Writing a 1 to this bit starts the write sequencer at the memory location indicated by the WSEQ_START_INDEX field. The sequence continues until it reaches an “End of sequence” flag. At the end of the sequence, this bit will be reset by the Write Sequencer.
5:0 WSEQ_START_INDEX [5:0]
00_0000 Sequence Start Index. This is the memory location of the first command in the selected sequence.
0 to 31 = RAM addresses
32 to 48 = ROM addresses
49 to 63 = Reserved
R112 (70h)
Write Sequencer 4
9:4 WSEQ_CURRENT_INDEX [5:0]
00_0000 Sequence Current Index. This is the location of the most recently accessed command in the write sequencer memory.
0 WSEQ_BUSY 0 Sequencer Busy flag (Read Only).
0 = Sequencer idle
1 = Sequencer busy
Note: it is not possible to write to control registers via the control interface while the Sequencer is Busy.
Table 68 Write Sequencer Control – Initiating a Sequence
PROGRAMMING A SEQUENCE
A sequence consists of write operations to data bits (or groups of bits) within the control registers. The Register fields associated with programming the Control Write Sequencer are described in Table 69.
For each step of the sequence being programmed, the Sequencer Index must be written to the WSEQ_WRITE_INDEX field. The values 0 to 31 correspond to all the available RAM addresses within the Write Sequencer memory. (Note that memory addresses 32 to 48 also exist, but these are ROM addresses, which are not programmable.)
Having set the Index as described above, Register R109 must be written to (containing the Control Register Address, the Start Bit Position and the Field Width applicable to this step of the sequence). Also, Register R110 must be written to (containing the Register Data, the End of Sequence flag and the Delay time required after this step is executed). After writing to these two registers, the next step in the sequence may be programmed by updating WSEQ_WRITE_INDEX and repeating the procedure.
WSEQ_ADDR is an 8-bit field containing the Control Register Address in which the data should be written.
WSEQ_DATA_START is a 4-bit field which identifies the LSB position within the selected Control Register to which the data should be written. Setting WSEQ_DATA_START = 0100 will cause 1-bit data to be written to bit 4. With this setting, 4-bit data would be written to bits 7:4 and so on.

WM8910 Pre-Production
w PP, Rev 3.0 April 2010
108
WSEQ_DATA_WIDTH is a 3-bit field which identifies the width of the data block to be written. This enables selected portions of a Control Register to be updated without any concern for other bits within the same register, eliminating the need for read-modify-write procedures. Values of 0 to 7 correspond to data widths of 1 to 8 respectively. For example, setting WSEQ_DATA_WIDTH = 010 will cause a 3-bit data block to be written. Note that the maximum value of this field corresponds to an 8-bit data block; writing to register fields greater than 8 bits wide must be performed using two separate operations of the Control Write Sequencer.
WSEQ_DATA is an 8-bit field which contains the data to be written to the selected Control Register. The WSEQ_DATA_WIDTH field determines how many of these bits are written to the selected register; the most significant bits (above the number indicated by WSEQ_DATA_WIDTH) are ignored.
WSEQ_DELAY is a 4-bit field which controls the waiting time between the current step and the next step in the sequence. The total delay time per step (including execution) is given by:
T = k × (2 WSEQ_DELAY + 8)
where k = 62.5μs (under recommended operating conditions)
This gives a useful range of execution/delay times from 562μs up to 2.048s per step.
WSEQ_EOS is a 1-bit field which indicates the End of Sequence. If this bit is set, then the Control Write Sequencer will automatically stop after this step has been executed.
REGISTER ADDRESS
BIT LABEL DEFAULT DESCRIPTION
R108 (6Ch) Write Sequencer 0
4:0 WSEQ_WRITE_INDEX [4:0]
0_0000 Sequence Write Index. This is the memory location to which any updates to R109 and R110 will be copied.
0 to 31 = RAM addresses
R109 (6Dh) Write Sequencer 1
14:12 WSEQ_DATA_WIDTH [2:0]
000 Width of the data block written in this sequence step.
000 = 1 bit
001 = 2 bits
010 = 3 bits
011 = 4 bits
100 = 5 bits
101 = 6 bits
110 = 7 bits
111 = 8 bits
11:8 WSEQ_DATA_START [3:0]
0000 Bit position of the LSB of the data block written in this sequence step.
0000 = Bit 0
…
1111 = Bit 15
7:0 WSEQ_ADDR [7:0]
0000_0000 Control Register Address to be written to in this sequence step.
R110 (6Eh) Write Sequencer 2
14 WSEQ_EOS 0 End of Sequence flag. This bit indicates whether the Control Write Sequencer should stop after executing this step.
0 = Not end of sequence
1 = End of sequence (Stop the sequencer after this step).
11:8 WSEQ_DELAY [3:0]
0000 Time delay after executing this step.
Total time per step (including execution) = 62.5μs × (2WSEQ_DELAY + 8)
7:0 WSEQ_DATA [7:0]
0000_0000 Data to be written in this sequence step. When the data width is less than 8 bits, then one or more of the MSBs of WSEQ_DATA are ignored. It is recommended that unused bits be set to 0.
Table 69 Write Sequencer Control - Programming a Sequence

Pre-Production WM8910
w PP, Rev 3.0, April 2010
109
Note that a ‘Dummy’ write can be inserted into a control sequence by commanding the sequencer to write a value of 0 to bit 0 of Register R255 (FFh). This is effectively a write to a non-existent register location. This can be used in order to create placeholders ready for easy adaptation of the sequence. For example, a sequence could be defined to power-up a mono signal path from DACL to headphone, with a ‘dummy’ write included to leave space for easy modification to a stereo signal path configuration. Dummy writes can also be used in order to implement additional time delays between register writes. Dummy writes are included in the default start-up sequence – see Table 71.
In summary, the Control Register to be written is set by the WSEQ_ADDR field. The data bits that are written are determined by a combination of WSEQ_DATA_START, WSEQ_DATA_WIDTH and WSEQ_DATA. This is illustrated below for an example case of writing to the VMID_RES field within Register R5 (05h).
In this example, the Start Position is bit 01 (WSEQ_DATA_START = 0001b) and the Data width is 2 bits (WSEQ_DATA_WIDTH = 0001b). With these settings, the Control Write Sequencer would updated the Control Register R5 [2:1] with the contents of WSEQ_DATA [1:0].
Figure 57 Control Write Sequencer Example
DEFAULT SEQUENCES
When the WM8910 is powered up, two Control Write Sequences are available through default settings in both RAM and ROM memory locations. The purpose of these sequences, and the register write required to initiate them, is summarised in Table 70. In both cases, a single register write will initiate the sequence.
WSEQ START
INDEX
WSEQ FINISH
INDEX
PURPOSE TO INITIATE
0 (00h) 29 (1Dh) Start-Up sequence Write 0100h to
Register R111 (6Fh)
32 (20h) 48 (30h) Shutdown sequence Write 0120h to
Register R111 (6Fh)
Table 70 Write Sequencer Default Sequences
Note on Shut-Down sequence: The instruction at Index Address 32 (20h) shorts the outputs LINEOUTL and LINEOUTR. If the Line outputs are not in use at the time the sequence is run, then the sequence could, instead, be started at Index Address 33.

WM8910 Pre-Production
w PP, Rev 3.0 April 2010
110
Index addresses 0 to 31 may be programmed to users’ own settings at any time, as described in “Programming a Sequence” Users’ own settings remain in memory and are not affected by software resets (i.e. writing to Register R0). However, any non-default sequences are lost when the device is powered down.
START-UP SEQUENCE
The Start-up sequence is initiated by writing 0100h to Register R111 (6Fh). This single operation starts the Control Write Sequencer at Index Address 0 (00h) and executes the sequence defined in Table 71.
For typical clocking configurations with MCLK=12.288MHz, this sequence takes approximately 425ms to run.
WSEQ INDEX
REGISTER ADDRESS
WIDTH START DATA DELAY EOS DESCRIPTION
0 (00h) R4 (04h) 5 bits Bit 0 1Ah 0h 0b POBCTRL = 1
ISEL [1:0] = 10b
STARTUP_BIAS_ENA = 1
BIAS_ENA = 0
(delay = 0.5625ms)
1 (01h) R65 (41h) 1 bit Bit 1 01h 9h 0b SPK_DISCHARGE = 1
(delay = 32.5ms)
2 (02h) R17 (11h) 2 bits Bit 0 03h 0h 0b SPKL_ENA = 1
SPKR_ENA = 1
(delay = 0.5625ms)
3 (03h) R65 (41h) 1 bit Bit 1 00h 0h 0b SPK_DISCHARGE = 0
(delay = 0.5625ms)
4 (04h) R5 (5h) 8 bits Bit 0 F7h Bh 0b VMID_TIE_ENA = 1
BUFIO_ENA = 1
VMID_IO_ENA = 1
VMID_SOFT = 10
VMID_RES = 11
VMID_BUF_ENA = 1
(delay = 128.5ms)
5 (05h) R17 (11h) 2 bits Bit 0 00h 0h 0b SPKL_ENA = 0
SPKR_ENA = 0
(delay = 0.5625ms)
6 (06h) R5 (5h) 2 bits Bit 3 00h 0h 0b VMID_SOFT = 00
(delay = 0.5625ms)
7 (07h) R5 (05h) 2 bits Bit 1 01h 0h 0b VMID_RES [1:0] = 01b
(delay = 0.5625ms)
8 (08h) R4 (04h) 1 bit Bit 0 01h 0h 0b BIAS_ENA = 1
(delay = 0.5625ms)
9 (09h) R14 (0Eh) 2 bits Bit 0 03h 0h 0b HPL_PGA_ENA = 1
HPR_PGA_ENA = 1
(delay = 0.5625ms)
10 (0Ah) R13 (Dh) 2 bits Bit 0 03h 0h 0b MIXOUTL = 1
MIXOUTR = 1
(delay = 0.5625ms)
11 (0Bh) R15 (0Fh) 2 bits Bit 0 03h 0h 0b LINEOUTL_PGA_ENA = 1
LINEOUTR_PGA_ENA = 1
(delay = 0.5625ms)
12 (0Ch) R22 (16h) 1 bit Bit 1 01h 0h 0b CLK_DSP_ENA = 1
(delay = 0.5625ms)
13 (0Dh) R18 (12h) 2 bits Bit 2 03h 5h 0b DACL_ENA = 1
DACR_ENA = 1

Pre-Production WM8910
w PP, Rev 3.0, April 2010
111
WSEQ INDEX
REGISTER ADDRESS
WIDTH START DATA DELAY EOS DESCRIPTION
(delay = 2.5ms)
14 (0Eh) R255 (FFh) 1 bit Bit 0 00h 0h 0b Dummy Write for expansion
(delay = 0.5625ms)
15 (0Fh) R4 (04h) 1 bit Bit 4 00h 0h 0b POBCTRL = 0
(delay = 0.5625ms)
16 (10h) R98 (62h) 1 bit Bit 0 01h 6h 0b CP_ENA = 1
(delay = 4.5ms)
17 (11h) R255 (FFh) 1 bit Bit 0 00h 0h 0b Dummy Write for expansion
(delay = 0.5625ms)
18 (12h) R90 (5Ah) 8 bits Bit 0 11h 0h 0b HPL_ENA = 1
HPR_ENA = 1
(delay = 0.5625ms)
19 (13h) R94 (5Eh) 8 bits Bit 0 11h 0h 0b LINEOUTL_ENA = 1
LINEOUTR_ENA = 1
(delay = 0.5625ms)
20 (14h) R90 (5Ah) 8 bits Bit 0 33h 0h 0b HPL_ENA_DLY = 1
HPR_ENA_DLY = 1
(delay = 0.5625ms)
21 (15h) R94 (5Eh) 8 bits Bit 0 33h 0h 0b LINEOUTL_ENA_DLY = 1
LINEOUTR_ENA_DLY = 1
(delay = 0.5625ms)
22 (16h) R69 (45h) 2 bits Bit 0 02h 0h 0b DCS_MODE = 10
(delay = 0.5625ms)
23 (17h) R67 (43h) 4 bits Bit 0 0Fh Ch 0b DCS_ENA = 1111
(delay = 256.5ms)
24 (18h) R67 (43h) 4 bits Bit 0 0Fh 7h 0b DCS_ENA = 1111
(delay = 8.5ms)
25 (19h) R255 (FFh) 1 bit Bit 0 00h 0h 0b Dummy Write for expansion
(delay = 0.5625ms)
26 (1Ah) R90 (5Ah) 8 bits Bit 0 77h 0h 0b HPL_ENA_OUTP = 1
HPR_ENA_OUTP = 1
(delay = 0.5625ms)
27 (1Bh) R94 (5Eh) 8 bits Bit 0 77h 0h 0b LINEOUTL_ENA_OUTP = 1
LINEOUTR_ENA_OUTP = 1
(delay = 0.5625ms)
28 (1Ch) R90 (5Ah) 8 bits Bit 0 FFh 0h 0b HPL_RMV_SHORT = 1
HPR_RMV_SHORT = 1
(delay = 0.5625ms)
29 (1Dh) R94 (5Eh) 8 bits Bit 0 FFh 0h 1b LINEOUTL_RMV_SHORT = 1
LINEOUTR_RMV_SHORT = 1
End of Sequence
30 (1Eh) R255 (FFh) 1 bit Bit 0 00h 0h 0b Spare
31 (1Fh) R255 (FFh) 1 bit Bit 0 00h 0h 0b Spare
Table 71 Start-up Sequence

WM8910 Pre-Production
w PP, Rev 3.0 April 2010
112
SHUTDOWN SEQUENCE
The Shutdown sequence is initiated by writing 0120h to Register R111 (6Fh). This single operation starts the Control Write Sequencer at Index Address 32 (20h) and executes the sequence defined in Table 72.
For typical clocking configurations with MCLK=12.288MHz, this sequence takes approximately 325ms to run.
WSEQ INDEX
REGISTER ADDRESS
WIDTH START DATA DELAY EOS DESCRIPTION
32 (20h) R94 (5Eh) 8 bits Bit 0 77h 0h 0b LINEOUTL_RMV_SHORT = 0
LINEOUTR_RMV_SHORT = 0
(delay = 0.5625ms)
33 (21h) R90 (5Ah) 8 bits Bit 0 77h 0h 0b HPL_RMV_SHORT = 0
HPR_RMV_SHORT = 0
(delay = 0.5625ms)
34 (22h) R90 (5Ah) 8 bits Bit 0 00h 0h 0b HPL_ENA_OUTP = 0
HPL_ENA_DLY = 0
HPL_ENA = 0
HPR_ENA_OUTP = 0
HPR_ENA_DLY = 0
HPR_ENA = 0
(delay = 0.5625ms)
35 (23h) R94 (5Eh) 8 bits Bit 0 00h 0h 0b LINEOUTL_ENA_OUTP = 0
LINEOUTL_ENA_DLY = 0
LINEOUTL_ENA = 0
LINEOUTR_ENA_OUTP = 0
LINEOUTR_ENA_DLY = 0
LINEOUTR_ENA = 0
(delay = 0.5625ms)
36 (24h) R67 (43h) 4 bits Bit 0 00h 0h 0b DCS_ENA = 0000
(delay = 0.5625ms)
37 (25h) R98 (62h) 1 bit Bit 0 00h 0h 0b CP_ENA = 0
(delay = 0.5625ms)
38 (26h) R18 (12h) 2 bits Bit 2 00h 0h 0b DACL_ENA = 0
DACR_ENA = 0
(delay = 0.5625ms)
39 (27h) R22 (16h) 1 bit Bit 1 00h 0h 0b CLK_DSP_ENA = 0
(delay = 0.5625ms)
40 (28h) R14 (0Eh) 2 bits Bit 0 00h 0h 0b HPL_PGA_ENA = 0
HPR_PGA_ENA = 0
(delay = 0.5625ms)
41 (29h) R15 (0Fh) 2 bits Bit 0 00h 0h 0b LINEOUTL_PGA_ENA = 0
LINEOUTR_PGA_ENA = 0
(delay = 0.5625ms)
42 (2Ah) R13 (0Dh) 2 bits Bit 0 00h 0h 0b MIXOUTL_ENA = 0
MIXOUTR_ENA = 0
(delay = 0.5625ms)
43 (2Bh) R4 (04h) 1 bit Bit 0 00h 0h 0b BIAS_ENA = 0
(delay = 0.5625ms)
44 (2Ch) R5 (05h) 2 bits Bit 3 02h 0h 0b VMID_SOFT = 10
(delay = 0.5625ms)
45 (2Dh) R5 (05h) 1 bit Bit 0 00h Ch 0b VMID_BUF_ENA = 0
(delay = 256.5ms)
46 (2Eh) R5 (05h) 1 bit Bit 0 00h 9h 0b VMID_BUF_ENA = 0
(delay = 32.5ms)

Pre-Production WM8910
w PP, Rev 3.0, April 2010
113
WSEQ INDEX
REGISTER ADDRESS
WIDTH START DATA DELAY EOS DESCRIPTION
47 (2Fh) R5 (05h) 8 bits Bit 0 00h 0h 0b VMID_TIE_ENA = 0
BUFIO_ENA = 0
VMID_IO_ENA = 0
VMID_SOFT = 00
VMID_RES = 00
VMID_BUF_ENA = 0
(delay = 0.5625ms)
48 (30h) R4 (04h) 2 bits Bit 0 00h 0h 1b STARTUP_BIAS_ENA = 0
BIAS_ENA = 0
End of Sequence
Table 72 Shutdown Sequence

WM8910 Pre-Production
w PP, Rev 3.0 April 2010
114
POWER-ON RESET
The WM8910 includes an internal Power-On-Reset (POR) circuit, which is used to reset the digital logic into a default state after power up. The POR circuit is powered from AVDD and monitors DCVDD. The internal POR¯ ¯ ¯ signal is asserted low when AVDD or DCVDD are below minimum thresholds.
The specific behaviour of the circuit will vary, depending on the relative timing of the supply voltages. Typical scenarios are illustrated in Figure 58 and Figure 59.
Figure 58 Power On Reset Timing - AVDD enabled first
Figure 59 Power On Reset Timing - DCVDD enabled first
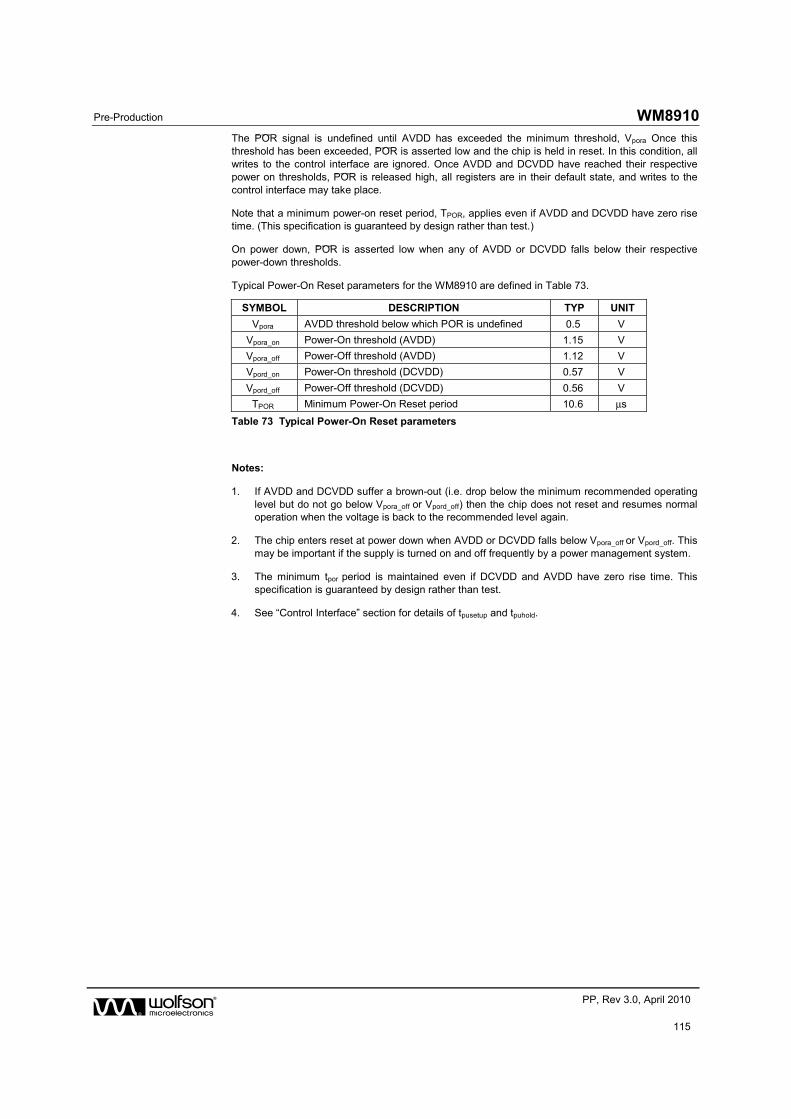
Pre-Production WM8910
w PP, Rev 3.0, April 2010
115
The POR¯ ¯ ¯ signal is undefined until AVDD has exceeded the minimum threshold, Vpora Once this threshold has been exceeded, POR¯ ¯ ¯ is asserted low and the chip is held in reset. In this condition, all writes to the control interface are ignored. Once AVDD and DCVDD have reached their respective power on thresholds, POR¯ ¯ ¯ is released high, all registers are in their default state, and writes to the control interface may take place.
Note that a minimum power-on reset period, TPOR, applies even if AVDD and DCVDD have zero rise time. (This specification is guaranteed by design rather than test.)
On power down, POR¯ ¯ ¯ is asserted low when any of AVDD or DCVDD falls below their respective power-down thresholds.
Typical Power-On Reset parameters for the WM8910 are defined in Table 73.
SYMBOL DESCRIPTION TYP UNIT
Vpora AVDD threshold below which POR is undefined 0.5 V
Vpora_on Power-On threshold (AVDD) 1.15 V
Vpora_off Power-Off threshold (AVDD) 1.12 V
Vpord_on Power-On threshold (DCVDD) 0.57 V
Vpord_off Power-Off threshold (DCVDD) 0.56 V
TPOR Minimum Power-On Reset period 10.6 μs
Table 73 Typical Power-On Reset parameters
Notes:
1. If AVDD and DCVDD suffer a brown-out (i.e. drop below the minimum recommended operating level but do not go below Vpora_off or Vpord_off) then the chip does not reset and resumes normal operation when the voltage is back to the recommended level again.
2. The chip enters reset at power down when AVDD or DCVDD falls below Vpora_off or Vpord_off. This may be important if the supply is turned on and off frequently by a power management system.
3. The minimum tpor period is maintained even if DCVDD and AVDD have zero rise time. This specification is guaranteed by design rather than test.
4. See “Control Interface” section for details of tpusetup and tpuhold.

WM8910 Pre-Production
w PP, Rev 3.0 April 2010
116
QUICK START-UP AND SHUTDOWN
The WM8910 has the capability to perform a quick start-up and shut-down with a minimum number of register operations. This is achieved using the Control Write Sequencer, which is configured with default start-up settings that set up the device for DAC playback via Headphone and Line Output. Assuming a 12.288MHz external clock, the start-up sequence configures the device for 48kHz playback mode.
The default start-up sequence requires three register write operations. The default shutdown sequence requires just a single register write. The minimum procedure for executing the quick start-up and shutdown sequences is described below. See “Control Write Sequencer” for more details.
QUICK START-UP (DEFAULT SEQUENCE)
An external clock must be applied to MCLK. Assuming 12.288MHz input clock, the start-up sequence will take approximately 425ms to complete.
The following register operations will initiate the quick start-up sequence.
REGISTER ADDRESS
VALUE DESCRIPTION
R108 (6Ch)
Write Sequencer 0
0100h WSMD_CLK_ENA = 1
This enables the Write Sequencer Clock
R22 (16h)
Clock Rates 2
0004h CLK_SYS_ENA = 1
This enables the System Clock
R111 (6Fh)
Write Sequencer 3
0100h WSEQ_START_INDEX = 00h
WSEQ_START = 1
WSEQ_ABORT = 0
This starts the Write Sequencer at Index address 0 (00h)
Table 74 Quick Start-Up Control
The WSEQ_BUSY bit (in Register R112, see Table 68) will be set to 1 while the sequence runs. When this bit returns to 0, the device has been set up and is ready for DAC playback operation.
QUICK SHUTDOWN (DEFAULT SEQUENCE)
The default shutdown sequence assumes the initial device conditions are as configured by the default start-up sequence. Assuming 12.288MHz input clock, the shutdown sequence will take approximately 325ms to complete.
The following register operation will initiate the default shut-down sequence.
REGISTER ADDRESS
VALUE DESCRIPTION
R111 (6Fh)
Write Sequencer 3
0120h WSEQ_START_INDEX = 20h
WSEQ_START = 1
WSEQ_ABORT = 0
This starts the Write Sequencer at Index address 32 (20h)
Table 75 Quick Shutdown Control
The WSEQ_BUSY bit (in Register R112, see Table 68) will be set to 1 while the sequence runs. When this bit returns to 0, the system clock can be disabled (CLK_SYS_ENA=0) and MCLK can be stopped.

Pre-Production WM8910
w PP, Rev 3.0, April 2010
117
SOFTWARE RESET AND CHIP ID
A Software Reset can be commanded by writing to Register R0. This is a read-only register field and the contents will not be affected by writing to this Register.
The Chip ID can be read back from Register R0. The Chip Revision ID can be read back from Register 1, as described in Table 76.
REGISTER ADDRESS
BIT LABEL DEFAULT DESCRIPTION
R0 (00h)
SW Reset and ID
15:0 SW_RST_DEC_ID1 [15:0]
8903h Writing to this register resets all registers to their default state.
Reading from this register will indicate Device ID 8903h.
R1 (01h)
Revision Number
3:0 CHIP_REV [3:0]
0010b Reading from this register will indicate the Revision ID.
Table 76 Software Reset and Chip ID

WM8910 Pre-Production
w PP, Rev 3.0 April 2010
118
REGISTER MAP
Dec
Ad
dr
Hex
Ad
dr
Nam
e15
14
131
21
110
98
76
54
32
10
Bin
Def
ault
00
0S
W R
ese
t and
ID
100
0_10
01_
0000
_00
11
10
1R
evis
ion
Nu
mb
er0
00
00
00
00
00
000
00_
0000
_00
00_
0000
40
4B
ias
Co
ntro
l 00
00
00
00
00
00
PO
BC
TR
LS
TA
RT
UP
_BIA
S_
EN
AB
IAS
_E
NA
000
0_00
00_
0001
_10
00
50
5V
MID
Co
ntr
ol 0
00
00
00
00
VMID
_TIE
_ENA
BUFI
O_E
NA
VM
ID_I
O_
EN
AV
MID
_B
UF
_E
NA
000
0_00
00_
0000
_00
00
80
8A
nalo
gu
e D
AC
00
00
00
00
00
0D
AC
_B
IAS
_BO
OS
T1
000
0_00
00_
0000
_00
01
120C
Pow
er
Man
age
men
t 0
00
00
00
00
00
00
00
INL_
EN
AIN
R_
EN
A00
00_
0000
_00
00_
0000
130D
Pow
er
Man
age
men
t 1
00
00
00
00
00
00
00
MIX
OU
TL
_EN
AM
IXO
UT
R_
EN
A00
00_
0000
_00
00_
0000
140
EP
owe
r M
anag
em
ent
20
00
00
00
00
00
00
0H
PL
_PG
A_E
NA
HP
R_
PG
A_
EN
A00
00_
0000
_00
00_
0000
150F
Pow
er
Man
age
men
t 3
00
00
00
00
00
00
00
LIN
EO
UT
L_P
GA
_E
NA
LIN
EO
UT
R_P
GA
_E
NA
000
0_00
00_
0000
_00
00
161
0P
owe
r M
anag
em
ent
40
00
00
00
00
00
00
0M
IXS
PK
L_E
NA
MIX
SP
KR
_E
NA
000
0_00
00_
0000
_00
00
171
1P
owe
r M
anag
em
ent
50
00
00
00
00
00
00
0S
PK
L_E
NA
SP
KR
_E
NA
000
0_00
00_
0000
_00
00
181
2P
owe
r M
anag
em
ent
60
00
00
00
00
00
0D
AC
L_E
NA
DA
CR
_E
NA
DM
ICL
_EN
AD
MIC
R_
EN
A00
00_
0000
_00
00_
0000
201
4C
lock
Rat
es 0
00
00
01
00
00
00
00
0M
CLK
DIV
20
000
_010
0_0
000_
000
0
211
5C
lock
Rat
es 1
CLK
_S
RC
_SE
L0
00
00
000
0_11
00_
0000
_10
00
221
6C
lock
Rat
es 2
00
00
00
00
00
00
0C
LK
_S
YS
_EN
AC
LK
_D
SP
_EN
AT
O_E
NA
000
0_00
00_
0000
_00
00
241
8A
udio
In
terf
ace
00
00
DA
CL
_DA
TIN
VD
AC
R_D
AT
INV
LOO
PB
AC
KA
IFT
XL
_SR
CA
IFT
XR
_S
RC
AIF
DA
CL_
SR
CA
IFD
AC
R_S
RC
DM
IC_
CO
MP
DM
IC_
CO
MP
MO
DE
DA
C_
CO
MP
DA
C_
CO
MP
MO
DE
000
0_00
00_
0101
_00
00
251
9A
udio
In
terf
ace
10
0AI
FDAC
_TDM
AIFD
AC_T
DM
_CH
ANAI
FTX_
TDM
AIFT
X_TD
M_C
HAN
LR
CLK
_DIR
0A
IF_
BC
LK
_IN
VB
CLK
_D
IR0
AIF
_LR
CL
K_
INV
000
0_00
00_
0000
_00
10
261
AA
udio
In
terf
ace
20
00
00
00
00
00
000
0_00
00_
0000
_10
00
271
BA
udio
In
terf
ace
30
00
00
000
0_00
00_
0010
_00
10
301
ED
AC
Dig
ital V
olu
me
Le
ft0
00
00
00
DA
CV
U0
000
_000
P_
110
0_00
00
311F
DA
C D
igita
l Vo
lum
e R
ight
00
00
00
0D
AC
VU
000
0_0
00P
_11
00_
000
0
322
0D
AC
Dig
ital 0
00
00
000
0_00
00_
0000
_00
00
332
1D
AC
Dig
ital 1
00
0D
AC
_M
ON
OD
AC
_S
B_
FIL
TD
AC
_MU
TE
RA
TE
DA
C_M
UT
EM
OD
E0
00
00
DA
C_
MU
TE
DA
C_
OS
R00
00_
0000
_00
00_
0000
342
2R
ES
ER
VE
D0
00
00
00
00
00
00
00
000
00_
0000
_00
00_
0000
352
3R
ES
ER
VE
D0
00
00
00
00
00
00
00
000
00_
0000
_00
00_
0000
362
4D
MIC
Dig
ital V
olu
me
Le
ft0
00
00
00
DM
ICV
U0
000
_000
P_
110
0_00
00
372
5D
MIC
Dig
ital V
olu
me
Rig
ht
00
00
00
0D
MIC
VU
000
0_0
00P
_11
00_
000
0
382
6D
MIC
Dig
ital 0
00
00
00
00
00
01
00
TX
L_D
AT
INV
TX
R_
DA
TIN
V00
00_
0000
_00
01_
0000
392
7D
igita
l Mic
roph
one
00
00
00
00
11
10
01
100
00_
0000
_01
11_
0011
DIG
MIC
_S
RC
_S
EL[
1:0
]
DA
C_B
OO
ST
[1:0
]
DM
IC_
TO
_DA
CL[
1:0
]DM
ICL_
DAC
_SVO
L[3:
0]
DM
ICR
_V
OL
[7:0
]
DA
CR
_V
OL
[7:0
]
DM
IC_T
O_
DA
CR
[1:0
]
DA
CL
_V
OL[
7:0
]
SW
_R
ST
_D
EV
_ID
1[1
5:0
]
CH
IP_
RE
V[3
:0]
VM
ID_R
ES
[1:0
]
ISE
L[1
:0]
VM
ID_S
OF
T[1
:0]
DA
CB
IAS
_S
EL
[1:0
]
DM
ICL_
VO
L[7
:0]
DE
EM
PH
[1:0
]
DA
CV
MID
_BIA
S_
SE
L[1
:0]
AIF
_W
L[1
:0]
LRC
LK
_R
AT
E[1
0:0
]
CL
K_
SY
S_
RA
TE
[3:0
]
BC
LK
_D
IV[4
:0]
AIF
_F
MT
[1:0
]
DM
ICR
_DAC
_SVO
L[3:
0]
CL
K_
SY
S_M
OD
E[1
:0]
SA
MP
LE
_R
AT
E[3
:0]

Pre-Production WM8910
w PP, Rev 3.0, April 2010
119
Dec
Ad
dr
He
x A
dd
rN
am
e15
1413
1211
109
87
65
43
21
0B
in D
efa
ult
40
28
DR
C 0
DR
C_
EN
A0
DR
C_F
F_
DE
LAY
0D
RC
_SM
OO
TH
_E
NA
DR
C_
QR
_E
NA
DR
C_A
NT
ICLI
P_
EN
AD
RC
_H
YS
T_E
NA
000
0_1
001_
101
1_11
11
41
29
DR
C 1
001
1_0
010_
010
0_00
01
42
2A
DR
C 2
00
00
00
00
00
000
0_0
000_
001
0_00
00
43
2B
DR
C 3
00
00
00
000_
000
0_00
00_
0000
44
2CA
nalo
gue
Le
ft In
put
00
00
00
00
0L
INM
UT
E0
00
000_
000
0_10
00_
0101
45
2DA
nalo
gue
Rig
ht I
nput
00
00
00
00
0R
INM
UT
E0
00
000_
000
0_10
00_
0101
46
2E
Ana
log
ue L
eft
Inp
ut 1
00
00
00
00
0IN
L_C
M_E
NA
000
0_0
000_
010
0_01
00
47
2FA
nalo
gue
Rig
ht I
nput
10
00
00
00
00
INR
_CM
_EN
A0
000_
000
0_01
00_
0100
50
32
Ana
log
ue L
eft
Mix
00
00
00
00
00
00
0D
AC
L_T
O_
MIX
OU
TL
DA
CR
_T
O_M
IXO
UT
LB
YP
AS
SL_
TO
_MIX
OU
TL
BY
PA
SS
R_T
O_
MIX
OU
TL
000
0_0
000_
000
0_10
00
51
33
Ana
log
ue R
ight
Mix
00
00
00
00
00
00
0D
AC
L_T
O_
MIX
OU
TR
DA
CR
_T
O_M
IXO
UT
RB
YP
AS
SL_
TO
_MIX
OU
TR
BY
PA
SS
R_T
O_
MIX
OU
TR
000
0_0
000_
000
0_01
00
52
34
Ana
log
ue S
pk M
ix L
eft
00
00
00
00
00
00
0D
AC
L_T
O_
MIX
SP
KL
DA
CR
_TO
_M
IXS
PK
LB
YP
AS
SL_
TO
_MIX
SP
KL
BY
PA
SS
R_T
O_
MIX
SP
KL
000
0_0
000_
000
0_00
00
53
35
Ana
log
ue S
pk M
ix L
eft
10
00
00
00
00
00
0D
AC
L_M
IXS
PK
L_
VO
LD
AC
R_M
IXS
PK
L_V
OL
BY
PA
SS
L_M
IXS
PK
L_V
OL
BY
PA
SS
R_M
IXS
PK
L_V
OL
000
0_0
000_
000
0_00
00
54
36
Ana
log
ue S
pk M
ix R
igh
t 00
00
00
00
00
00
0D
AC
L_T
O_
MIX
SP
KR
DA
CR
_TO
_M
IXS
PK
RB
YP
AS
SL_
TO
_MIX
SP
KR
BY
PA
SS
R_T
O_
MIX
SP
KR
000
0_0
000_
000
0_00
00
55
37
Ana
log
ue S
pk M
ix R
igh
t 10
00
00
00
00
00
0D
AC
L_M
IXS
PK
R_V
OL
DA
CR
_MIX
SP
KR
_VO
LB
YP
AS
SL_
MIX
SP
KR
_V
OL
BY
PA
SS
R_M
IXS
PK
R_
VO
L0
000_
000
0_00
00_
0000
57
39
Ana
log
ue O
UT
1 L
eft
00
00
00
0H
PL_M
UTE
HP
OU
TV
UH
PO
UT
LZC
0000
_00
00_P
010_
1101
58
3A
Ana
log
ue O
UT
1 R
igh
t0
00
00
00
HPR
_MUT
EH
PO
UT
VU
HP
OU
TR
ZC
0000
_00
00_P
010_
1101
59
3B
Ana
log
ue O
UT
2 L
eft
00
00
00
0LI
NEO
UTL
_MU
TELI
NE
OU
TV
ULI
NE
OU
TL
ZC
0000
_00
00_P
011_
1001
60
3CA
nalo
gue
OU
T2
Rig
ht
00
00
00
0LI
NEO
UTR
_MU
TELI
NE
OU
TV
UL
INE
OU
TR
ZC
0000
_00
00_P
011_
1001
62
3E
Ana
log
ue O
UT
3 L
eft
00
00
00
0SP
KL_M
UTE
SP
KV
US
PK
LZ
C00
00_0
001
_P01
1_10
01
63
3FA
nalo
gue
OU
T3
Rig
ht
00
00
00
0SP
KR_M
UTE
SP
KV
US
PK
RZ
C00
00_0
001
_P01
1_10
01
65
41
Ana
log
ue S
PK
Ou
tpu
t C
on
trol
00
00
00
00
00
00
00
0SP
K_D
ISC
HAR
GE
VR
OI
000
0_0
000_
000
0_00
00
66
42
RE
SE
RV
ED
00
00
00
00
00
00
00
00
000
0_0
000_
000
0_00
00
67
43
DC
Ser
vo 0
00
00
00
00
00
0D
CS
_MA
ST
ER
_E
NA
000
0_0
000_
000
1_00
00
69
45
DC
Ser
vo 2
00
00
00
00
10
10
01
000
0_0
000_
101
0_01
00
71
47
DC
Ser
vo 4
00
00
00
00
000
0_0
000_
000
0_00
00
72
48
DC
Ser
vo 5
00
00
00
00
000
0_0
000_
000
0_00
00
73
49
DC
Ser
vo 6
00
00
00
00
000
0_0
000_
000
0_00
00
74
4A
DC
Ser
vo 7
00
00
00
00
000
0_0
000_
000
0_00
00
81
51
DC
Ser
vo R
eadb
ack
10
00
00
00
00
000_
000
0_00
00_
0000
82
52
DC
Ser
vo R
eadb
ack
20
00
00
00
00
000_
000
0_00
00_
0000
83
53
DC
Ser
vo R
eadb
ack
30
00
00
00
00
000_
000
0_00
00_
0000
84
54
DC
Ser
vo R
eadb
ack
40
00
00
00
00
000_
000
0_00
00_
0000
DR
C_A
TT
AC
K_R
AT
E[3
:0]
DR
C_D
EC
AY
_R
AT
E[3
:0]
DR
C_T
HR
ES
H_
CO
MP
[5:0
]
DC
S_L
OU
TR
_IN
TE
G[7
:0]
DC
S_L
OU
TL_
INT
EG
[7:0
]
DC
S_
EN
A[3
:0]
HP
OU
TR
_V
OL[
5:0
]
DC
S_M
OD
E[1
:0]
SP
KL
_VO
L[5
:0]
SP
KR
_VO
L[5:
0]
DR
C_
TH
RE
SH
_HY
ST
[1:0
]
DR
C_
TH
RE
SH
_QR
[1:0
]
L_IP
_S
EL
_N[1
:0]
DR
C_
AM
P_
CO
MP
[4:0
]
HP
OU
TL
_VO
L[5
:0]
RIN
_V
OL[
4:0
]
L_I
P_
SE
L_P
[1:0
]
R_
IP_S
EL
_P[1
:0]
LIN
EO
UT
R_V
OL
[5:0
]
R_
IP_
SE
L_
N[1
:0]
R_M
OD
E[1
:0]
LIN
EO
UT
L_V
OL
[5:0
]
DR
C_M
AX
GA
IN[1
:0]
DR
C_
MIN
GA
IN[1
:0]
DR
C_
RA
TE
_QR
[1:0
]
DR
C_S
TA
RT
UP
_GA
IN[4
:0]
DC
S_
HP
OU
TL
_WR
ITE
_VA
L[7
:0]
DC
S_
HP
OU
TR
_IN
TE
G[7
:0]
DC
S_
HP
OU
TR
_W
RIT
E_V
AL
[7:0
]
DC
S_
LOU
TL
_WR
ITE
_V
AL[
7:0
]
DC
S_H
PO
UT
L_IN
TE
G[7
:0]
DR
C_
R1_
SL
OP
E_
CO
MP
[2:0
]
LIN
_V
OL[
4:0
]
DC
S_L
OU
TR
_WR
ITE
_VA
L[7
:0]
DR
C_
R0_
SL
OP
E_
CO
MP
[2:0
]
L_M
OD
E[1
:0]

WM8910 Pre-Production
w PP, Rev 3.0 April 2010
120
Dec
Ad
dr
He
x A
dd
rN
am
e15
1413
1211
109
87
65
43
21
0B
in D
efa
ult
90
5A
Ana
log
ue H
P 0
00
00
00
00
HP
L_R
MV
_SH
OR
TH
PL
_EN
A_
OU
TP
HP
L_E
NA
_DL
YH
PL
_EN
AH
PR
_R
MV
_SH
OR
TH
PR
_EN
A_
OU
TP
HP
R_E
NA
_DL
YH
PR
_E
NA
000
0_0
000_
000
0_00
00
94
5E
Ana
log
ue L
ine
out
00
00
00
00
0LI
NE
OU
TL
_RM
V_S
HO
RT
LIN
EO
UT
L_E
NA
_O
UT
PL
INE
OU
TL_
EN
A_
DL
YLI
NE
OU
TL
_E
NA
LIN
EO
UT
R_R
MV
_SH
OR
TL
INE
OU
TR
_E
NA
_OU
TP
LIN
EO
UT
R_
EN
A_
DLY
LIN
EO
UT
R_
EN
A0
000_
000
0_00
00_
0000
98
62
Ch
arg
e P
um
p 0
00
00
00
00
00
00
00
0C
P_
EN
A0
000_
000
0_00
00_
0000
104
68
Cla
ss W
00
00
00
00
00
00
10
00
CP_D
YN_P
WR
0000
_000
0_00
01_0
000
108
6CW
rite
Seq
uen
cer
00
00
00
00
WS
MD
_C
LK_E
NA
00
00
000_
000
0_00
00_
0000
109
6DW
rite
Seq
uen
cer
10
000
0_0
000_
000
0_00
00
110
6E
Wri
te S
eque
nce
r 2
0W
SE
Q_E
OS
00
000
0_0
000_
000
0_00
00
111
6FW
rite
Seq
uen
cer
30
00
00
0W
SE
Q_A
BO
RT
WS
EQ
_ST
AR
T0
00
000_
000
0_00
00_
0000
112
70
Wri
te S
eque
nce
r 4
00
00
00
00
0W
SE
Q_B
US
Y0
000_
000
0_00
00_
0000
116
74
GP
IO C
ontr
ol 1
00
GP
1_D
IRG
P1
_O
P_C
FG
GP
1_I
P_
CF
GG
P1_
LVL
GP
1_P
DG
P1
_PU
GP
1_IN
TM
OD
EG
P1
_DB
000
0_0
000_
101
0_10
00
117
75
GP
IO C
ontr
ol 2
00
GP
2_D
IRG
P2
_O
P_C
FG
GP
2_I
P_
CF
GG
P2_
LVL
GP
2_P
DG
P2
_PU
GP
2_IN
TM
OD
EG
P2
_DB
000
0_0
000_
101
0_10
00
118
76
GP
IO C
ontr
ol 3
00
GP
3_D
IRG
P3
_O
P_C
FG
GP
3_I
P_
CF
GG
P3_
LVL
GP
3_P
DG
P3
_PU
GP
3_IN
TM
OD
EG
P3
_DB
000
0_0
000_
101
0_10
00
119
77
GP
IO C
ontr
ol 4
00
GP
4_D
IRG
P4
_O
P_C
FG
GP
4_I
P_
CF
GG
P4_
LVL
GP
4_P
DG
P4
_PU
GP
4_IN
TM
OD
EG
P4
_DB
000
0_0
010_
001
0_00
00
120
78
GP
IO C
ontr
ol 5
00
GP
5_D
IRG
P5
_O
P_C
FG
GP
5_I
P_
CF
GG
P5_
LVL
GP
5_P
DG
P5
_PU
GP
5_IN
TM
OD
EG
P5
_DB
000
0_0
001_
101
0_00
00
121
79
Inte
rru
pt S
tatu
s 1
00
WS
EQ
_B
US
Y_E
IN
T0
00
00
00
FL
L_LO
CK
_E
INT
GP
5_E
INT
GP
4_E
INT
GP
3_E
INT
GP
2_E
INT
GP
1_E
INT
000
0_0
000_
000
0_00
00
122
7A
Inte
rru
pt S
tatu
s 1
Mas
k1
1IM
_W
SE
Q_
BU
SY
_E
INT
11
11
11
1IM
_FLL
_LO
CK
_EIN
TIM
_G
P5_
EIN
TIM
_G
P4_
EIN
TIM
_G
P3_
EIN
TIM
_G
P2_
EIN
TIM
_G
P1_
EIN
T1
111_
111
1_11
11_
1111
123
7B
Inte
rru
pt P
ola
rity
10
00
00
00
00
0F
LL_
LOC
K_
INV
00
00
00
000_
000
0_00
00_
0000
126
7E
Inte
rru
pt C
ontr
ol
00
00
00
00
00
00
00
0IR
Q_
PO
L0
000_
000
0_00
00_
0000
128
80
FLL
Con
trol
10
00
00
00
0F
LL_
HO
LD
FL
L_F
RA
C0
FLL
_E
NA
000
0_0
000_
000
0_00
00
129
81
FLL
Con
trol
20
00
000
0_0
000_
000
0_00
00
130
82
FLL
Con
trol
30
000_
000
0_00
00_
0000
131
83
FLL
Con
trol
40
00
00
00
000_
000
0_00
00_
0000
164
A4
Clo
ck R
ate
Te
st 4
00
10
10
DM
IC_
SE
L0
00
11
10
00
001
0_1
000_
001
1_10
00
172
AC
Ana
log
ue O
utp
ut B
ias
00
00
00
00
00
00
00
000
0_0
000_
000
0_00
00
187
BB
Ana
log
ue O
utp
ut B
ias
20
00
00
00
00
00
00
000
0_0
000_
000
0_00
00
PG
A_
BIA
S[2
:0]
GP
4_F
N[5
:0]W
SE
Q_D
AT
A_
ST
AR
T[3
:0]
WS
EQ
_AD
DR
[7:0
]
WS
EQ
_ST
AR
T_
IND
EX
[5:0
]
WS
EQ
_CU
RR
EN
T_I
ND
EX
[5:0
]
GP
1_F
N[5
:0]
GP
2_F
N[5
:0]
GP
3_F
N[5
:0]
WS
EQ
_W
RIT
E_
IND
EX
[4:0
]
FL
L_G
AIN
[3:0
]
FLL
_F
RA
TIO
[2:0
]F
LL_
CT
RL_
RA
TE
[2:0
]F
LL_
CLK
_RE
F_D
IV[1
:0]
WS
EQ
_D
AT
A_W
IDT
H[2
:0]
FLL
_CL
K_
SR
C[1
:0]
FLL
_OU
TD
IV[2
:0]
GP
5_F
N[5
:0]
WS
EQ
_DE
LAY
[3:0
]W
SE
Q_
DA
TA
[7:0
]
FL
L_K
[15:
0]
FL
L_N
[9:0
]
OU
TP
UT
S_
BIA
S[2
:0]

Pre-Production WM8910
w PP, Rev 3.0, April 2010
121
REGISTER BITS BY ADDRESS
REGISTER
ADDRESS
BIT LABEL DEFAULT DESCRIPTION REFER TO
R0 (00h) SW Reset and ID
15:0 SW_RST_DEV_ID1 [15:0]
1000_1001_0000_001
1
Writing to this register resets all registers to their default state.
Reading from this register will indicate Device ID 8903h.
Register 00h SW Reset and ID
REGISTER
ADDRESS
BIT LABEL DEFAULT DESCRIPTION REFER TO
R1 (01h) Revision Number
3:0 CHIP_REV [3:0]
0000 Reading from this register will indicate the Revision ID.
Register 01h Revision Number
REGISTER
ADDRESS
BIT LABEL DEFAULT DESCRIPTION REFER TO
R4 (04h) Bias Control 0
4 POBCTRL 1 Selects the bias current source
0 = Normal bias
1 = Start-Up bias
3:2 ISEL [1:0] 10 Master Bias control
00 = Normal bias x 0.5
01 = Normal bias x 0.75
10 = Normal bias
11 = Normal bias x 1.5
1 STARTUP_BIAS_ENA
0 Enables the Start-Up bias current generator
0 = Disabled
1 = Enabled
0 BIAS_ENA 0 Enables the Normal bias current generator (for all analogue functions)
0 = Disabled
1 = Enabled
Register 04h Bias Control 0
REGISTER
ADDRESS
BIT LABEL DEFAULT DESCRIPTION REFER TO
R5 (05h) VMID Control 0
7 VMID_TIE_ENA
0 VMID buffer to Differential Lineouts
0 = Disabled
1 = Enabled
(only applies when relevant outputs are disabled, ie. SPLK=0 or SPKR=0. Resistance is controlled by VROI.)
6 BUFIO_ENA 0 VMID buffer to unused input and output pins.
0 = Disabled
1 = Enabled
5 VMID_IO_ENA 0 Enables the Start-Up bias current generator
0 = Disabled
1 = Enabled
(same functionality as STARTUP_BIAS_ENA)

WM8910 Pre-Production
w PP, Rev 3.0 April 2010
122
REGISTER
ADDRESS
BIT LABEL DEFAULT DESCRIPTION REFER TO
4:3 VMID_SOFT [1:0]
00 VMID soft start enable / slew rate control
00 = Disabled
01 = Fast soft start
10 = Nominal soft start
11 = Slow soft start
2:1 VMID_RES [1:0]
00 VMID Divider Enable and Select
00 = VMID disabled (for OFF mode)
01 = 2 x 50k divider (for normal operation)
10 = 2 x 250k divider (for low power standby)
11 = 2 x 5k divider (for fast start-up)
0 VMID_BUF_ENA
0 VMID Buffer Enable
0 = Disabled
1 = Enabled
Register 05h VMID Control 0
REGISTER
ADDRESS
BIT LABEL DEFAULT DESCRIPTION REFER TO
R8 (08h) Analogue DAC 0
5 DAC_BIAS_BOOST
0 DAC Bias boost
0 = Disable
1 = Enable
When DAC Bias boost is enabled, the bias selected by DACBIAS_SEL and DACVMID_BIAS_SEL are both doubled.
4:3 DACBIAS_SEL [1:0]
00 DAC bias current select
00 = Normal bias
01 = Normal bias x 0.5
10 = Normal bias x 0.66
11 = Normal bias x 0.75
2:1 DACVMID_BIAS_SEL [1:0]
00 DAC VMID buffer bias select
00 = Normal bias
01 = Normal bias x 0.5
10 = Normal bias x 0.66
11 = Normal bias x 0.75
Register 08h Analogue DAC 0
REGISTER
ADDRESS
BIT LABEL DEFAULT DESCRIPTION REFER TO
R12 (0Ch) Power Management 0
1 INL_ENA 0 Left Input PGA Enable
0 = disabled
1 = enabled
0 INR_ENA 0 Right Input PGA Enable
0 = disabled
1 = enabled
Register 0Ch Power Management 0

Pre-Production WM8910
w PP, Rev 3.0, April 2010
123
REGISTER
ADDRESS
BIT LABEL DEFAULT DESCRIPTION REFER TO
R13 (0Dh) Power Management 1
1 MIXOUTL_ENA
0 Left Output Mixer Enable
0 = disabled
1 = enabled
0 MIXOUTR_ENA
0 Right Output Mixer Enable
0 = disabled
1 = enabled
Register 0Dh Power Management 1
REGISTER
ADDRESS
BIT LABEL DEFAULT DESCRIPTION REFER TO
R14 (0Eh) Power Management 2
1 HPL_PGA_ENA
0 Left Headphone Output Enable
0 = disabled
1 = enabled
0 HPR_PGA_ENA
0 Right Headphone Output Enable
0 = disabled
1 = enabled
Register 0Eh Power Management 2
REGISTER
ADDRESS
BIT LABEL DEFAULT DESCRIPTION REFER TO
R15 (0Fh) Power Management 3
1 LINEOUTL_PGA_ENA
0 Left Line Output Enable
0 = disabled
1 = enabled
0 LINEOUTR_PGA_ENA
0 Right Line Output Enable
0 = disabled
1 = enabled
Register 0Fh Power Management 3
REGISTER
ADDRESS
BIT LABEL DEFAULT DESCRIPTION REFER TO
R16 (10h) Power Management 4
1 MIXSPKL_ENA 0 Left Speaker Mixer Enable
0 = disabled
1 = enabled
0 MIXSPKR_ENA
0 Right Speaker Mixer Enable
0 = disabled
1 = enabled
Register 10h Power Management 4
REGISTER
ADDRESS
BIT LABEL DEFAULT DESCRIPTION REFER TO
R17 (11h) Power Management 5
1 SPKL_ENA 0 Left Speaker Output Enable
0 = disabled
1 = enabled
0 SPKR_ENA 0 Right Speaker Output Enable
0 = disabled
1 = enabled
Register 11h Power Management 5

WM8910 Pre-Production
w PP, Rev 3.0 April 2010
124
REGISTER
ADDRESS
BIT LABEL DEFAULT DESCRIPTION REFER TO
R18 (12h) Power Management 6
3 DACL_ENA 0 Left DAC Enable
0 = DAC disabled
1 = DAC enabled
2 DACR_ENA 0 Right DAC Enable
0 = DAC disabled
1 = DAC enabled
1 DMICL_ENA 0 Digital Microphone DSP Enable
0 = disabled
1 = enabled
0 DMICR_ENA 0 Digital Microphone DSP Enable
0 = disabled
1 = enabled
Register 12h Power Management 6
REGISTER
ADDRESS
BIT LABEL DEFAULT DESCRIPTION REFER TO
R20 (14h) Clock Rates 0
0 MCLKDIV2 0 Enables divide by 2 on MCLK
0 = CLK_SYS = MCLK
1 = CLK_SYS = MCLK / 2
Register 14h Clock Rates 0
REGISTER
ADDRESS
BIT LABEL DEFAULT DESCRIPTION REFER TO
R21 (15h) Clock Rates 1
15 CLK_SRC_SEL
0 SYSCLK Source Select
0 = MCLK
1 = FLL output
13:10 CLK_SYS_RATE [3:0]
0011 CLK_SYS / Sample rate (fs) ratio
if CLK_SYS_MODE = 00 (256*fs related clocks)
0000 = 64*fs
0001 = 128*fs
0010 = 192*fs
0011 = 256*fs
0100 = 384*fs
0101 = 512*fs
0110 = 768*fs
0111 = 1024 *fs
1000 = 1408*fs
1001 = 1536*fs
1010 to 1111 = Reserved
if CLK_SYS_MODE = 01 (272*fs related clocks)
0000 = 68*fs
0001 = 136*fs
0010 = 204*fs
0011 = 272*fs
0100 = 408*fs
0101 = 544*fs
0110 = 816*fs

Pre-Production WM8910
w PP, Rev 3.0, April 2010
125
REGISTER
ADDRESS
BIT LABEL DEFAULT DESCRIPTION REFER TO
0111 = 1088 *fs
1000 = 1496*fs
1001 = 1632*fs
1010 to 1111 = Reserved if CLK_SYS_MODE = 10 (250*fs related clocks)
0000 = 125*fs
0001 = 125*fs
0010 = 250*fs
0011 = 250*fs
0100 = 375*fs
0101 = 500*fs
0110 = 750*fs
0111 = 1000 *fs
1000 = 1000*fs
1001 = 1500*fs
1010 to 1111 = Reserved
9:8 CLK_SYS_MODE [1:0]
00 CLK_SYS mode
00 = 256*fs related
01 = 272*fs related
10 = 250*fs related
11 = Reserved
3:0 SAMPLE_RATE [3:0]
1000 Selects the Sample Rate (fs)
0000 = 8kHz
0001 = 11.025kHz
0010 = 12kHz
0011 = 16kHz
0100 = 22.05kHz
0101 = 24kHz
0110 = 32kHz
0111 = 44.1kHz
1000 = 48kHz
1001 = 88.2kHz (Not available for Digital Microphone.)
1010 = 96kHz (Not available for Digital Microphone.)
1011 to 1111 = Reserved
If the desired sample rate is not listed in this table, then the closest alternative should be chosen.
Register 15h Clock Rates 1
REGISTER
ADDRESS
BIT LABEL DEFAULT DESCRIPTION REFER TO
R22 (16h) Clock Rates 2
2 CLK_SYS_ENA
0 System Clock enable
0 = Disabled
1 = Enabled
1 CLK_DSP_ENA
0 DSP Clock enable
0 = Disabled
1 = Enabled
0 TO_ENA 0 Zero Cross timeout enable
0 = Disabled
1 = Enabled
Register 16h Clock Rates 2

WM8910 Pre-Production
w PP, Rev 3.0 April 2010
126
REGISTER
ADDRESS
BIT LABEL DEFAULT DESCRIPTION REFER TO
R24 (18h) Audio Interface 0
12 DACL_DATINV 0 Left DAC Invert
0 = Left DAC output not inverted
1 = Left DAC output inverted
11 DACR_DATINV
0 Right DAC Invert
0 = Right DAC output not inverted
1 = Right DAC output inverted
10:9 DAC_BOOST [1:0]
00 DAC Digital Input Volume Boost
00 = 0dB
01 = +6dB (Input data must not exceed -6dBFS)
10 = +12dB (Input data must not exceed -12dBFS)
11 = +18dB (Input data must not exceed -18dBFS)
8 LOOPBACK 0 Digital Loopback Function
0 = No loopback
1 = Loopback enabled (Digital Microphone data output is directly input to DAC data input)
7 AIFTXL_SRC 0 Left Digital Audio channel source
0 = Left DMIC data is output on left channel
1 = Right DMIC data is output on left channel
6 AIFTXR_SRC 1 Right Digital Audio channel source
0 = Left DMIC data is output on right channel
1 = Right DMIC data is output on right channel
5 AIFDACL_SRC 0 Left DAC Data Source Select
0 = Left DAC outputs left channel data
1 = Left DAC outputs right channel data
4 AIFDACR_SRC
1 Right DAC Data Source Select
0 = Right DAC outputs left channel data
1 = Right DAC outputs right channel data
3 DMIC_COMP 0 DMIC Companding Enable
0 = disabled
1 = enabled
2 DMIC_COMPMODE
0 DMIC Companding Type
0 = μ-law
1 = A-law
1 DAC_COMP 0 DAC Companding Enable
0 = disabled
1 = enabled
0 DAC_COMPMODE
0 DAC Companding Type
0 = μ-law
1 = A-law
Register 18h Audio Interface 0

Pre-Production WM8910
w PP, Rev 3.0, April 2010
127
REGISTER
ADDRESS
BIT LABEL DEFAULT DESCRIPTION REFER TO
R25 (19h) Audio Interface 1
13 AIFDAC_TDM 0 DAC TDM Enable
0 = Normal DACDAT operation
1 = TDM enabled on DACDAT
12 AIFDAC_TDM_CHAN
0 DACDAT TDM Channel Select
0 = DACDAT data input on slot 0
1 = DACDAT data input on slot 1
11 AIFTX_TDM 0 Digital Microphone TDM Enable
0 = Normal AIFTXDAT operation
1 = TDM enabled on AIFTXDAT
10 AIFTX_TDM_CHAN
0 AIFTXDAT TDM Channel Select
0 = AIFTXDAT outputs data on slot 0
1 = AIFTXDAT output data on slot 1
9 LRCLK_DIR 0 Audio Interface LRC Direction
0 = LRC is input
1 = LRC is output
7 AIF_BCLK_INV 0 BCLK Invert
0 = BCLK not inverted
1 = BCLK inverted
6 BCLK_DIR 0 Audio Interface BCLK Direction
0 = BCLK is input
1 = BCLK is output
4 AIF_LRCLK_INV
0 LRC Polarity / DSP Mode A-B select.
Right, left and I2S modes – LRC polarity
0 = Not Inverted
1 = Inverted
DSP Mode – Mode A-B select
0 = MSB is available on 2nd BCLK rising edge after LRC rising edge (mode A)
1 = MSB is available on 1st BCLK rising edge after LRC rising edge (mode B)
3:2 AIF_WL [1:0] 00 Digital Audio Interface Word Length
00 = 16 bits
01 = 20 bits
10 = 24 bits
11 = 32 bits
1:0 AIF_FMT [1:0] 10 Digital Audio Interface Format
00 = Right Justified
01 = Left Justified
10 = I2S
11 = DSP
Register 19h Audio Interface 1

WM8910 Pre-Production
w PP, Rev 3.0 April 2010
128
REGISTER
ADDRESS
BIT LABEL DEFAULT DESCRIPTION REFER TO
R26 (1Ah) Audio Interface 2
4:0 BCLK_DIV [4:0]
0_1000 BCLK Frequency (Master Mode)
00000 = CLK_SYS
00001 = CLK_SYS / 1.5
00010 = CLK_SYS / 2
00011 = CLK_SYS / 3
00100 = CLK_SYS / 4
00101 = CLK_SYS / 5
00110 = Reserved
00111 = CLK_SYS / 6
01000 = CLK_SYS / 8 (default)
01001 = CLK_SYS / 10
01010 = Reserved
01011 = CLK_SYS / 12
01100 = CLK_SYS / 16
01101 = CLK_SYS / 20
01110 = CLK_SYS / 22
01111 = CLK_SYS / 24
10000 = Reserved
10001 = CLK_SYS / 30
10010 = CLK_SYS / 32
10011 = CLK_SYS / 44
10100 = CLK_SYS / 48
Register 1Ah Audio Interface 2
REGISTER
ADDRESS
BIT LABEL DEFAULT DESCRIPTION REFER TO
R27 (1Bh) Audio Interface 3
10:0 LRCLK_RATE [10:0]
000_0010_0010
LRC Rate (Master Mode)
LRC clock output = BCLK / LRCLK_RATE
Integer (LSB = 1)
Valid range: 8 to 2047
50:50 LRCLK duty cycle is only guaranteed with even values (8, 10, … 2046).
Register 1Bh Audio Interface 3
REGISTER
ADDRESS
BIT LABEL DEFAULT DESCRIPTION REFER TO
R30 (1Eh) DAC Digital Volume Left
8 DACVU 0 DAC Volume Update
Writing a 1 to this bit causes left and right DAC volume to be updated simultaneously
7:0 DACL_VOL [7:0]
1100_0000 Left DAC Digital Volume
00h = Mute
01h = -71.625dB
02h = -71.250dB
… (0.375dB steps)
C0h to FFh = 0dB
Register 1Eh DAC Digital Volume Left

Pre-Production WM8910
w PP, Rev 3.0, April 2010
129
REGISTER
ADDRESS
BIT LABEL DEFAULT DESCRIPTION REFER TO
R31 (1Fh) DAC Digital Volume Right
8 DACVU 0 DAC Volume Update
Writing a 1 to this bit causes left and right DAC volume to be updated simultaneously
7:0 DACR_VOL [7:0]
1100_0000 Right DAC Digital Volume
00h = Mute
01h = -71.625dB
02h = -71.250dB
… (0.375dB steps)
C0h to FFh = 0dB
Register 1Fh DAC Digital Volume Right
REGISTER
ADDRESS
BIT LABEL DEFAULT DESCRIPTION REFER TO
R32 (20h) DAC Digital 0
11:8 DMICL_DAC_SVOL [3:0]
0000 Left Digital Sidetone Volume
0000 = -36dB
0001 = -33dB
(… 3dB steps)
1011 = -3dB
11XX = 0dB
7:4 DMICR_DAC_SVOL [3:0]
0000 Right Digital Sidetone Volume
0000 = -36dB
0001 = -33dB
(… 3dB steps)
1011 = -3dB
11XX = 0dB
3:2 DMIC_TO_DACL [1:0]
00 Left DAC Digital Sidetone Source
00 = No sidetone
01 = Left Digital Microphone
10 = Right Digital Microphone
11 = Reserved
1:0 DMIC_TO_DACR [1:0]
00 Right DAC Digital Sidetone Source
00 = No sidetone
01 = Left Digital Microphone
10 = Right Digital Microphone
11 = Reserved
Register 20h DAC Digital 0

WM8910 Pre-Production
w PP, Rev 3.0 April 2010
130
REGISTER
ADDRESS
BIT LABEL DEFAULT DESCRIPTION REFER TO
R33 (21h) DAC Digital 1
12 DAC_MONO 0 DAC Mono Mix
0 = Stereo
1 = Mono (Mono mix output on enabled DAC)
11 DAC_SB_FILT 0 Selects DAC filter characteristics
0 = Normal mode
1 = Sloping stopband mode
(recommended when fs <= 24kHz
10 DAC_MUTERATE
0 DAC Soft Mute Ramp Rate
0 = Fast ramp (fs/2, maximum ramp time is 10.7ms at fs=48k)
1 = Slow ramp (fs/32, maximum ramp time is 171ms at fs=48k)
9 DAC_MUTEMODE
0 DAC Soft Mute Mode
0 = Disabling soft-mute (DAC_MUTE=0) will cause the DAC volume to change immediately to DACL_VOL and DACR_VOL settings
1 = Disabling soft-mute (DAC_MUTE=0) will cause the DAC volume to ramp up gradually to the DACL_VOL and DACR_VOL settings
3 DAC_MUTE 0 DAC Soft Mute Control
0 = DAC Un-mute
1 = DAC Mute
2:1 DEEMPH [1:0] 00 DAC De-Emphasis Control
00 = No de-emphasis
01 = 32kHz sample rate
10 = 44.1kHz sample rate
11 = 48kHz sample rate
0 DAC_OSR 0 DAC Oversampling Control
0 = Low power (normal oversample)
1 = High performance (double rate)
Register 21h DAC Digital 1
REGISTER
ADDRESS
BIT LABEL DEFAULT DESCRIPTION REFER TO
R36 (24h) DMIC Digital Volume Left
8 DMICVU 0 Digital Microphone Volume Update
Writing a 1 to this bit causes left and right DMIC volume to be updated simultaneously
7:0 DMICL_VOL [7:0]
1100_0000 Left Digital Microphone Volume
00h = Mute
01h = -71.625dB
02h = -71.250dB
… (0.375dB steps)
C0h = 0dB
… (0.375dB steps)
EFh = +17.625dB
F0h to FFh = +17.625dB
Register 24h DMIC Digital Volume Left

Pre-Production WM8910
w PP, Rev 3.0, April 2010
131
REGISTER
ADDRESS
BIT LABEL DEFAULT DESCRIPTION REFER TO
R37 (25h) DMIC Digital Volume Right
8 DMICVU 0 Digital Microphone Volume Update
Writing a 1 to this bit causes left and right DMIC volume to be updated simultaneously
7:0 DMICR_VOL [7:0]
1100_0000 Right Digital Microphone Volume
00h = Mute
01h = -71.625dB
02h = -71.250dB
… (0.375dB steps)
C0h = 0dB
… (0.375dB steps)
EFh = +17.625dB
F0h to FFh = +17.625dB
Register 25h DMIC Digital Volume Right
REGISTER
ADDRESS
BIT LABEL DEFAULT DESCRIPTION REFER TO
R38 (26h) DMIC Digital 0
1 TXL_DATINV 0 Left Digital Microphone Invert
0 = Left DMIC output not inverted
1 = Left DMIC output inverted
0 TXR_DATINV 0 Right Digital Microphone Invert
0 = Right DMIC output not inverted
1 = Right DMIC output inverted
Register 26h DMIC Digital 0
REGISTER
ADDRESS
BIT LABEL DEFAULT DESCRIPTION REFER TO
R39 (27h) Digital Microphone 0
10:9 DIGMIC_SRC_SEL [1:0]
00 Digital Microphone Data Select
00 = GPIO2
01 = GPIO3
10 = IN1L
11 = IN2R
Register 27h Digital Microphone 0

WM8910 Pre-Production
w PP, Rev 3.0 April 2010
132
REGISTER
ADDRESS
BIT LABEL DEFAULT DESCRIPTION REFER TO
R40 (28h) DRC 0
15 DRC_ENA 0 DRC enable
1 = enabled
0 = disabled
12:11 DRC_THRESH_HYST [1:0]
01 Gain smoothing hysteresis threshold
00 = Low
01 = Medium (recommended)
10 = High
11 = Reserved
10:6 DRC_STARTUP_GAIN [4:0]
0_0110 Initial gain at DRC startup
00000 = -18dB
00001 = -15dB
00010 = -12dB
00011 = -9dB
00100 = -6dB
00101 = -3dB
00110 = 0dB (default)
00111 = 3dB
01000 = 6dB
01001 = 9dB
01010 = 12dB
01011 = 15dB
01100 = 18dB
01101 = 21dB
01110 = 24dB
01111 = 27dB
10000 = 30dB
10001 = 33dB
10010 = 36dB
10011 to 11111 = Reserved
5 DRC_FF_DELAY
1 Feed-forward delay for anti-clip feature
0 = 5 samples
1 = 9 samples
Time delay can be calculated as 5/fs or 9/ fs, where fs is the sample rate.
3 DRC_SMOOTH_ENA
1 Gain smoothing enable
0 = disabled
1 = enabled
2 DRC_QR_ENA 1 Quick release enable
0 = disabled
1 = enabled
1 DRC_ANTICLIP_ENA
1 Anti-clip enable
0 = disabled
1 = enabled
0 DRC_HYST_ENA
1 Gain smoothing hysteresis enable
0 = disabled
1 = enabled
Register 28h DRC 0

Pre-Production WM8910
w PP, Rev 3.0, April 2010
133
REGISTER
ADDRESS
BIT LABEL DEFAULT DESCRIPTION REFER TO
R41 (29h) DRC 1
15:12 DRC_ATTACK_RATE [3:0]
0011 Gain attack rate (seconds/6dB)
0000 = instantaneous
0001 = 363us
0010 = 726us
0011 = 1.45ms (default)
0100 = 2.9ms
0101 = 5.8ms
0110 = 11.6ms
0111 = 23.2ms
1000 = 46.4ms
1001 = 92.8ms
1010 = 185.6ms
1011-1111 = Reserved
11:8 DRC_DECAY_RATE [3:0]
0010 Gain decay rate (seconds/6dB)
0000 = 186ms
0001 = 372ms
0010 = 743ms (default)
0011 = 1.49s
0100 = 2.97s
0101 = 5.94s
0110 = 11.89s
0111 = 23.78s
1000 = 47.56s
1001-1111 = Reserved
7:6 DRC_THRESH_QR [1:0]
01 Quick release crest factor threshold
00 = 12dB
01 = 18dB (default)
10 = 24dB
11 = 30dB
5:4 DRC_RATE_QR [1:0]
00 Quick release decay rate (seconds/6dB)
00 = 0.725ms (default)
01 = 1.45ms
10 = 5.8ms
11 = Reserved
3:2 DRC_MINGAIN [1:0]
00 Minimum gain the DRC can use to attenuate audio signals
00 = 0dB (default)
01 = -6dB
10 = -12dB
11 = -18dB
1:0 DRC_MAXGAIN [1:0]
01 Maximum gain the DRC can use to boost audio signals
00 = 12dB
01 = 18dB (default)
10 = 24dB
11 = 36dB
Register 29h DRC 1

WM8910 Pre-Production
w PP, Rev 3.0 April 2010
134
REGISTER
ADDRESS
BIT LABEL DEFAULT DESCRIPTION REFER TO
R42 (2Ah) DRC 2
5:3 DRC_R0_SLOPE_COMP [2:0]
100 Compressor slope R0
000 = 1 (no compression)
001 = 1/2
010 = 1/4
011 = 1/8
100 = 1/16
101 = 0
110 = Reserved
111 = Reserved
2:0 DRC_R1_SLOPE_COMP [2:0]
000 Compressor slope R1
000 = 1 (no compression)
001 = 1/2
010 = 1/4
011 = 1/8
100 = 0
101 = Reserved
11X = Reserved
Register 2Ah DRC 2
REGISTER
ADDRESS
BIT LABEL DEFAULT DESCRIPTION REFER TO
R43 (2Bh) DRC 3
10:5 DRC_THRESH_COMP [5:0]
00_0000 Compressor threshold T (dB)
000000 = 0dB
000001 = -0.75dB
000010 = -1.5dB
… (-0.75dB steps)
111100 = -45dB
111101 = Reserved
11111X = Reserved
4:0 DRC_AMP_COMP [4:0]
0_0000 Compressor amplitude at threshold YT (dB)
00000 = 0dB
00001 = -0.75dB
00010 = -1.5dB
… (-0.75dB steps)
11110 = -22.5dB
11111 = Reserved
Register 2Bh DRC 3

Pre-Production WM8910
w PP, Rev 3.0, April 2010
135
REGISTER
ADDRESS
BIT LABEL DEFAULT DESCRIPTION REFER TO
R44 (2Ch) Analogue Left Input 0
7 LINMUTE 1 Left Input PGA Mute
0 = not muted
1 = muted
4:0 LIN_VOL [4:0] 0_0101 Left Input PGA Volume
If L_MODE = 00 (Single ended)
OR L_MODE = 01 (Differential Line)
00000 -1.5
00001 -1.3
00010 -1.0
00011 -0.7
00100 -0.3
00101 +0.0 (default)
00110 +0.3
00111 +0.7
01000 +1.0
01001 +1.4
01010 +1.8
01011 +2.3
01100 +2.7
01101 +3.2
01110 +3.7
01111 +4.2
10000 +4.8
10001 +5.4
10010 +6.0
10011 +6.7
10100 +7.5
10101 +8.3
10110 +9.2
10111 +10.2
11000 +11.4
11001 +12.7
11010 +14.3
11011 +16.2
11100 +19.2
11101 +22.3
11110 +25.2
11111 +28.3
If L_MODE = 1X (Differential MIC)
00000 Not valid
00001 +12
00010 +15
00011 +18
00100 +21
00101 (default) +24
00110 +27
00111 +30
01XXX +30
1XXXX +30
Register 2Ch Analogue Left Input 0

WM8910 Pre-Production
w PP, Rev 3.0 April 2010
136
REGISTER
ADDRESS
BIT LABEL DEFAULT DESCRIPTION REFER TO
R45 (2Dh) Analogue Right Input 0
7 RINMUTE 1 Right Input PGA Mute
0 = not muted
1 = muted
4:0 RIN_VOL [4:0] 0_0101 Right Input PGA Volume
If R_MODE = 00 (Single ended)
OR R_MODE = 01 (Differential Line)
00000 -1.5
00001 -1.3
00010 -1.0
00011 -0.7
00100 -0.3
00101 +0.0 (default)
00110 +0.3
00111 +0.7
01000 +1.0
01001 +1.4
01010 +1.8
01011 +2.3
01100 +2.7
01101 +3.2
01110 +3.7
01111 +4.2
10000 +4.8
10001 +5.4
10010 +6.0
10011 +6.7
10100 +7.5
10101 +8.3
10110 +9.2
10111 +10.2
11000 +11.4
11001 +12.7
11010 +14.3
11011 +16.2
11100 +19.2
11101 +22.3
11110 +25.2
11111 +28.3
If R_MODE = 1X (Differential MIC)
00000 Not valid
00001 +12
00010 +15
00011 +18
00100 +21
00101 (default) +24
00110 +27
00111 +30
01XXX +30
1XXXX +30
Register 2Dh Analogue Right Input 0

Pre-Production WM8910
w PP, Rev 3.0, April 2010
137
REGISTER
ADDRESS
BIT LABEL DEFAULT DESCRIPTION REFER TO
R46 (2Eh) Analogue Left Input 1
6 INL_CM_ENA 1 Left Input PGA Common Mode Rejection enable
0 = Disabled
1 = Enabled
(only available for L_MODE=01 – Differential Line)
5:4 L_IP_SEL_N [1:0]
00 In Single-Ended or Differential Line Modes, this field selects the input pin for the inverting side of the left input path.
In Differential Mic Mode, this field selects the input pin for the non-inverting side of the left input path.
00 = IN1L
01 = IN2L
1X = Reserved
3:2 L_IP_SEL_P [1:0]
01 In Single-Ended or Differential Line Modes, this field selects the input pin for the non-inverting side of the left input path.
In Differential Mic Mode, this field selects the input pin for the inverting side of the left input path.
00 = IN1L
01 = IN2L
1X = Reserved
1:0 L_MODE [1:0] 00 Sets the mode for the left analogue input:
00 = Single-Ended
01 = Differential Line
10 = Differential MIC
11 = Reserved
Register 2Eh Analogue Left Input 1
REGISTER
ADDRESS
BIT LABEL DEFAULT DESCRIPTION REFER TO
R47 (2Fh) Analogue Right Input 1
6 INR_CM_ENA 1 Right Input PGA Common Mode Rejection enable
0 = Disabled
1 = Enabled
(only available for R_MODE=01 – Differential Line)
5:4 R_IP_SEL_N [1:0]
00 In Single-Ended or Differential Line Modes, this field selects the input pin for the inverting side of the right input path.
In Differential Mic Mode, this field selects the input pin for the non-inverting side of the right input path.
00 = IN1R
01 = IN2R
1X = Reserved
3:2 R_IP_SEL_P [1:0]
01 In Single-Ended or Differential Line Modes, this field selects the input pin for the non-inverting side of the right input path.
In Differential Mic Mode, this field selects the input pin for the inverting side of the right input path.
00 = IN1R
01 = IN2R
1X = Reserved
1:0 R_MODE [1:0] 00 Sets the mode for the right analogue input:
00 = Single-Ended
01 = Differential Line

WM8910 Pre-Production
w PP, Rev 3.0 April 2010
138
REGISTER
ADDRESS
BIT LABEL DEFAULT DESCRIPTION REFER TO
10 = Differential MIC
11 = Reserved
Register 2Fh Analogue Right Input 1
REGISTER
ADDRESS
BIT LABEL DEFAULT DESCRIPTION REFER TO
R50 (32h) Analogue Left Mix 0
3 DACL_TO_MIXOUTL
1 Left DAC to Left Output Mixer Enable
0 = disabled
1 = enabled
2 DACR_TO_MIXOUTL
0 Right DAC to Left Output Mixer Enable
0 = disabled
1 = enabled
1 BYPASSL_TO_MIXOUTL
0 Left Analogue Input to Left Output Mixer Enable
0 = disabled
1 = enabled
0 BYPASSR_TO_MIXOUTL
0 Right Analogue Input to Left Output Mixer Enable
0 = disabled
1 = enabled
Register 32h Analogue Left Mix 0
REGISTER
ADDRESS
BIT LABEL DEFAULT DESCRIPTION REFER TO
R51 (33h) Analogue Right Mix 0
3 DACL_TO_MIXOUTR
0 Left DAC to Right Output Mixer Enable
0 = disabled
1 = enabled
2 DACR_TO_MIXOUTR
1 Right DAC to Right Output Mixer Enable
0 = disabled
1 = enabled
1 BYPASSL_TO_MIXOUTR
0 Left Analogue Input to Right Output Mixer Enable
0 = disabled
1 = enabled
0 BYPASSR_TO_MIXOUTR
0 Right Analogue Input to Right Output Mixer Enable
0 = disabled
1 = enabled
Register 33h Analogue Right Mix 0
REGISTER
ADDRESS
BIT LABEL DEFAULT DESCRIPTION REFER TO
R52 (34h) Analogue Spk Mix Left 0
3 DACL_TO_MIXSPKL
0 Left DAC to Left Spkr Mixer Enable
0 = disabled
1 = enabled
2 DACR_TO_MIXSPKL
0 Right DAC to Left Spkr Mixer Enable
0 = disabled
1 = enabled
1 BYPASSL_TO_MIXSPKL
0 Left Analogue Input to Left Spkr Mixer Enable
0 = disabled
1 = enabled
0 BYPASSR_TO_MIXSPKL
0 Right Analogue Input to Left Spkr Mixer Enable
0 = disabled
1 = enabled
Register 34h Analogue Spk Mix Left 0

Pre-Production WM8910
w PP, Rev 3.0, April 2010
139
REGISTER
ADDRESS
BIT LABEL DEFAULT DESCRIPTION REFER TO
R53 (35h) Analogue Spk Mix Left 1
3 DACL_MIXSPKL_VOL
0 Left DAC to Left Spkr Mixer volume control
0 = 0dB
1 = -6dB
2 DACR_MIXSPKL_VOL
0 Right DAC to Left Spkr Mixer volume control
0 = 0dB
1 = -6dB
1 BYPASSL_MIXSPKL_VOL
0 Left Analogue Input to Left Spkr Mixer volume control
0 = 0dB
1 = -6dB
0 BYPASSR_MIXSPKL_VOL
0 Right Analogue Input to Left Spkr Mixer volume control
0 = 0dB
1 = -6dB
Register 35h Analogue Spk Mix Left 1
REGISTER
ADDRESS
BIT LABEL DEFAULT DESCRIPTION REFER TO
R54 (36h) Analogue Spk Mix Right 0
3 DACL_TO_MIXSPKR
0 Left DAC to Right Spkr Mixer Enable
0 = disabled
1 = enabled
2 DACR_TO_MIXSPKR
0 Right DAC to Right Spkr Mixer Enable
0 = disabled
1 = enabled
1 BYPASSL_TO_MIXSPKR
0 Left Analogue Input to Right Spkr Mixer Enable
0 = disabled
1 = enabled
0 BYPASSR_TO_MIXSPKR
0 Right Analogue Input to Right Spkr Mixer Enable
0 = disabled
1 = enabled
Register 36h Analogue Spk Mix Right 0
REGISTER
ADDRESS
BIT LABEL DEFAULT DESCRIPTION REFER TO
R55 (37h) Analogue Spk Mix Right 1
3 DACL_MIXSPKR_VOL
0 Left DAC to Right Spkr Mixer volume control
0 = 0dB
1 = -6dB
2 DACR_MIXSPKR_VOL
0 Right DAC to Right Spkr Mixer volume control
0 = 0dB
1 = -6dB
1 BYPASSL_MIXSPKR_VOL
0 Left Analogue Input to Right Spkr Mixer volume control
0 = 0dB
1 = -6dB
0 BYPASSR_MIXSPKR_VOL
0 Right Analogue Input to Right Spkr Mixer volume control
0 = 0dB
1 = -6dB
Register 37h Analogue Spk Mix Right 1

WM8910 Pre-Production
w PP, Rev 3.0 April 2010
140
REGISTER
ADDRESS
BIT LABEL DEFAULT DESCRIPTION REFER TO
R57 (39h) Analogue OUT1 Left
8 HPL_MUTE 0 Left Headphone Output Mute
0 = Un-mute
1 = Mute
7 HPOUTVU 0 Headphone Output Volume Update
Writing a 1 to this bit will update HPOUTL and HPOUTR volumes simultaneously.
6 HPOUTLZC 0 Left Headphone Output Zero Cross Enable
0 = disabled
1 = enabled
5:0 HPOUTL_VOL [5:0]
10_1101 Left Headphone Output Volume
000000 = -57dB
000001 = -56dB
(… 1dB steps)
111001 = 0dB
(… 1dB steps)
111110 = +5dB
111111 = +6dB
Register 39h Analogue OUT1 Left
REGISTER
ADDRESS
BIT LABEL DEFAULT DESCRIPTION REFER TO
R58 (3Ah) Analogue OUT1 Right
8 HPR_MUTE 0 Right Headphone Output Mute
0 = Un-mute
1 = Mute
7 HPOUTVU 0 Headphone Output Volume Update
Writing a 1 to this bit will update HPOUTL and HPOUTR volumes simultaneously.
6 HPOUTRZC 0 Right Headphone Output Zero Cross Enable
0 = disabled
1 = enabled
5:0 HPOUTR_VOL [5:0]
10_1101 Right Headphone Output Volume
000000 = -57dB
000001 = -56dB
(… 1dB steps)
111001 = 0dB
(… 1dB steps)
111110 = +5dB
111111 = +6dB
Register 3Ah Analogue OUT1 Right

Pre-Production WM8910
w PP, Rev 3.0, April 2010
141
REGISTER
ADDRESS
BIT LABEL DEFAULT DESCRIPTION REFER TO
R59 (3Bh) Analogue OUT2 Left
8 LINEOUTL_MUTE
0 Left Line Output Mute
0 = Un-mute
1 = Mute
7 LINEOUTVU 0 Line Output Volume Update
Writing a 1 to this bit will update LINEOUTL and LINEOUTR volumes simultaneously.
6 LINEOUTLZC 0 Left Line Output Zero Cross Enable
0 = disabled
1 = enabled
5:0 LINEOUTL_VOL [5:0]
11_1001 Left Line Output Volume
000000 = -57dB
000001 = -56dB
(… 1dB steps)
111001 = 0dB
(… 1dB steps)
111110 = +5dB
111111 = +6dB
Register 3Bh Analogue OUT2 Left
REGISTER
ADDRESS
BIT LABEL DEFAULT DESCRIPTION REFER TO
R60 (3Ch) Analogue OUT2 Right
8 LINEOUTR_MUTE
0 Right Line Output Mute
0 = Un-mute
1 = Mute
7 LINEOUTVU 0 Line Output Volume Update
Writing a 1 to this bit will update LINEOUTL and LINEOUTR volumes simultaneously.
6 LINEOUTRZC 0 Right Line Output Zero Cross Enable
0 = disabled
1 = enabled
5:0 LINEOUTR_VOL [5:0]
11_1001 Right Line Output Volume
000000 = -57dB
000001 = -56dB
(… 1dB steps)
111001 = 0dB
(… 1dB steps)
111110 = +5dB
111111 = +6dB
Register 3Ch Analogue OUT2 Right

WM8910 Pre-Production
w PP, Rev 3.0 April 2010
142
REGISTER
ADDRESS
BIT LABEL DEFAULT DESCRIPTION REFER TO
R62 (3Eh) Analogue OUT3 Left
8 SPKL_MUTE 1 Left Speaker Output Mute
0 = Un-mute
1 = Mute
7 SPKVU 0 Speaker Output Volume Update
Writing a 1 to this bit will update LON/LOP and RON/ROP volumes simultaneously.
6 SPKLZC 0 Left Speaker Output Zero Cross Enable
0 = disabled
1 = enabled
5:0 SPKL_VOL [5:0]
11_1001 Left Speaker Output Volume
000000 = -57dB
000001 = -56dB
(… 1dB steps)
111001 = 0dB
(… 1dB steps)
111110 = +5dB
111111 = +6dB
Register 3Eh Analogue OUT3 Left
REGISTER
ADDRESS
BIT LABEL DEFAULT DESCRIPTION REFER TO
R63 (3Fh) Analogue OUT3 Right
8 SPKR_MUTE 1 Right Speaker Output Mute
0 = Un-mute
1 = Mute
7 SPKVU 0 Speaker Output Volume Update
Writing a 1 to this bit will update LON/LOP and RON/ROP volumes simultaneously.
6 SPKRZC 0 Right Speaker Output Zero Cross Enable
0 = disabled
1 = enabled
5:0 SPKR_VOL [5:0]
11_1001 Right Speaker Output Volume
000000 = -57dB
000001 = -56dB
(… 1dB steps)
111001 = 0dB
(… 1dB steps)
111110 = +5dB
111111 = +6dB
Register 3Fh Analogue OUT3 Right
REGISTER
ADDRESS
BIT LABEL DEFAULT DESCRIPTION REFER TO
R65 (41h) Analogue SPK Output Control 0
1 SPK_DISCHARGE
0 Speaker Discharge Enable
0 = Disabled
1 = Enable
0 VROI 0 Select VMID_TIE_ENA resistance for disabled Differential Lineouts
0 = 20k ohm
1 = 500 ohm
Register 41h Analogue SPK Output Control 0

Pre-Production WM8910
w PP, Rev 3.0, April 2010
143
REGISTER
ADDRESS
BIT LABEL DEFAULT DESCRIPTION REFER TO
R67 (43h) DC Servo 0
4 DCS_MASTER_ENA
1 DC Servo Master Control
0 = DC Servo Reset
1 = DC Servo Enabled
3:0 DCS_ENA [3:0] 0000 DC Servo Enable
[3] - HPOUTL enable
[2] - HPOUTR enable
[1] - LINEOUTL enable
[0] - LINEOUTR enable
Register 43h DC Servo 0
REGISTER
ADDRESS
BIT LABEL DEFAULT DESCRIPTION REFER TO
R69 (45h) DC Servo 2
1:0 DCS_MODE [1:0]
00 DC Servo Mode
00 = WRITE_STOP
01 = WRITE_UPDATE
10 = START_STOP
11 = START_UPDATE
Register 45h DC Servo 2
REGISTER
ADDRESS
BIT LABEL DEFAULT DESCRIPTION REFER TO
R71 (47h) DC Servo 4
7:0 DCS_HPOUTL_WRITE_VAL [7:0]
0000_0000 Value to send to Left Headphone Output Servo in a WRITE mode
Two’s complement format.
LSB is 0.25mV.
Range is +/-32mV
Register 47h DC Servo 4
REGISTER
ADDRESS
BIT LABEL DEFAULT DESCRIPTION REFER TO
R72 (48h) DC Servo 5
7:0 DCS_HPOUTR_WRITE_VAL [7:0]
0000_0000 Value to send to Right Headphone Output Servo in a WRITE mode
Two’s complement format.
LSB is 0.25mV.
Range is +/-32mV
Register 48h DC Servo 5
REGISTER
ADDRESS
BIT LABEL DEFAULT DESCRIPTION REFER TO
R73 (49h) DC Servo 6
7:0 DCS_LOUTL_WRITE_VAL [7:0]
0000_0000 Value to send to Left Line Output Servo in a WRITE mode
Two’s complement format.
LSB is 0.25mV.
Range is +/-32mV
Register 49h DC Servo 6

WM8910 Pre-Production
w PP, Rev 3.0 April 2010
144
REGISTER
ADDRESS
BIT LABEL DEFAULT DESCRIPTION REFER TO
R74 (4Ah) DC Servo 7
7:0 DCS_LOUTR_WRITE_VAL [7:0]
0000_0000 Value to send to Right Line Output Servo in a WRITE mode
Two’s complement format.
LSB is 0.25mV.
Range is +/-32mV
Register 4Ah DC Servo 7
REGISTER
ADDRESS
BIT LABEL DEFAULT DESCRIPTION REFER TO
R81 (51h) DC Servo Readback 1
7:0 DCS_HPOUTL_INTEG [7:0]
0000_0000 Readback value on Left Headphone Output Servo.
Two’s complement format.
LSB is 0.25mV.
Range is +/-32mV
Register 51h DC Servo Readback 1
REGISTER
ADDRESS
BIT LABEL DEFAULT DESCRIPTION REFER TO
R82 (52h) DC Servo Readback 2
7:0 DCS_HPOUTR_INTEG [7:0]
0000_0000 Readback value on Headphone Right Output Servo.
Two’s complement format.
LSB is 0.25mV.
Range is +/-32mV
Register 52h DC Servo Readback 2
REGISTER
ADDRESS
BIT LABEL DEFAULT DESCRIPTION REFER TO
R83 (53h) DC Servo Readback 3
7:0 DCS_LOUTL_INTEG [7:0]
0000_0000 Readback value on Left Line Output Servo.
Two’s complement format.
LSB is 0.25mV.
Range is +/-32mV
Register 53h DC Servo Readback 3
REGISTER
ADDRESS
BIT LABEL DEFAULT DESCRIPTION REFER TO
R84 (54h) DC Servo Readback 4
7:0 DCS_LOUTR_INTEG [7:0]
0000_0000 Readback value on Right Line Output Servo.
Two’s complement format.
LSB is 0.25mV.
Range is +/-32mV
Register 54h DC Servo Readback 4

Pre-Production WM8910
w PP, Rev 3.0, April 2010
145
REGISTER
ADDRESS
BIT LABEL DEFAULT DESCRIPTION REFER TO
R90 (5Ah) Analogue HP 0
7 HPL_RMV_SHORT
0 Removes HPL short
0 = HPL short enabled
1 = HPL short removed
For normal operation, this bit should be set as the final step of the HPL Enable sequence.
6 HPL_ENA_OUTP
0 Enables HPL output stage
0 = Disabled
1 = Enabled
For normal operation, this bit should be set to 1 after the DC offset cancellation has been scheduled.
5 HPL_ENA_DLY
0 Enables HPL intermediate stage
0 = Disabled
1 = Enabled
For normal operation, this bit should be set to 1 after the output signal path has been configured, and before DC offset cancellation is scheduled. This bit should be set with at least 20us delay after HPL_ENA.
4 HPL_ENA 0 Enables HPL input stage
0 = Disabled
1 = Enabled
For normal operation, this bit should be set as the first step of the HPL Enable sequence.
3 HPR_RMV_SHORT
0 Removes HPR short
0 = HPR short enabled
1 = HPR short removed
For normal operation, this bit should be set as the final step of the HPR Enable sequence.
2 HPR_ENA_OUTP
0 Enables HPR output stage
0 = Disabled
1 = Enabled
For normal operation, this bit should be set to 1 after the DC offset cancellation has been scheduled.
1 HPR_ENA_DLY
0 Enables HPR intermediate stage
0 = Disabled
1 = Enabled
For normal operation, this bit should be set to 1 after the output signal path has been configured, and before DC offset cancellation is scheduled. This bit should be set with at least 20us delay after HPR_ENA.
0 HPR_ENA 0 Enables HPR input stage
0 = Disabled
1 = Enabled
For normal operation, this bit should be set as the first step of the HPR Enable sequence.
Register 5Ah Analogue HP 0

WM8910 Pre-Production
w PP, Rev 3.0 April 2010
146
REGISTER
ADDRESS
BIT LABEL DEFAULT DESCRIPTION REFER TO
R94 (5Eh) Analogue Lineout 0
7 LINEOUTL_RMV_SHORT
0 Removes LINEOUTL short
0 = LINEOUTL short enabled
1 = LINEOUTL short removed
For normal operation, this bit should be set as the final step of the LINEOUTL Enable sequence.
6 LINEOUTL_ENA_OUTP
0 Enables LINEOUTL output stage
0 = Disabled
1 = Enabled
For normal operation, this bit should be set to 1 after the DC offset cancellation has been scheduled.
5 LINEOUTL_ENA_DLY
0 Enables LINEOUTL intermediate stage
0 = Disabled
1 = Enabled
For normal operation, this bit should be set to 1 after the output signal path has been configured, and before DC offset cancellation is scheduled. This bit should be set with at least 20us delay after LINEOUTL_ENA.
4 LINEOUTL_ENA
0 Enables LINEOUTL input stage
0 = Disabled
1 = Enabled
For normal operation, this bit should be set as the first step of the LINEOUTL Enable sequence.
3 LINEOUTR_RMV_SHORT
0 Removes LINEOUTR short
0 = LINEOUTR short enabled
1 = LINEOUTR short removed
For normal operation, this bit should be set as the final step of the LINEOUTR Enable sequence.
2 LINEOUTR_ENA_OUTP
0 Enables LINEOUTR output stage
0 = Disabled
1 = Enabled
For normal operation, this bit should be set to 1 after the DC offset cancellation has been scheduled.
1 LINEOUTR_ENA_DLY
0 Enables LINEOUTR intermediate stage
0 = Disabled
1 = Enabled
For normal operation, this bit should be set to 1 after the output signal path has been configured, and before DC offset cancellation is scheduled. This bit should be set with at least 20us delay after LINEOUTR_ENA.
0 LINEOUTR_ENA
0 Enables LINEOUTR input stage
0 = Disabled
1 = Enabled
For normal operation, this bit should be set as the first step of the LINEOUTR Enable sequence.
Register 5Eh Analogue Lineout 0
REGISTER
ADDRESS
BIT LABEL DEFAULT DESCRIPTION REFER TO
R98 (62h) Charge Pump 0
0 CP_ENA 0 Enable charge-pump digits
0 = disable
1 = enable
Register 62h Charge Pump 0

Pre-Production WM8910
w PP, Rev 3.0, April 2010
147
REGISTER
ADDRESS
BIT LABEL DEFAULT DESCRIPTION REFER TO
R104 (68h) Class W 0
0 CP_DYN_PWR 0 Enable dynamic charge pump power control
0 = charge pump controlled by volume register settings
1 = charge pump controlled by real-time audio level
Register 68h Class W 0
REGISTER
ADDRESS
BIT LABEL DEFAULT DESCRIPTION REFER TO
R108 (6Ch) Write Sequencer 0
8 WSMD_CLK_ENA
0 Write Sequencer Clock Enable
0 = Disabled
1 = Enabled
4:0 WSEQ_WRITE_INDEX [4:0]
0_0000 Sequence Write Index. This is the memory location to which any updates to R109 and R110 will be copied.
0 to 31 = RAM addresses
Register 6Ch Write Sequencer 0
REGISTER
ADDRESS
BIT LABEL DEFAULT DESCRIPTION REFER TO
R109 (6Dh) Write Sequencer 1
14:12 WSEQ_DATA_WIDTH [2:0]
000 Width of the data block written in this sequence step.
000 = 1 bit
001 = 2 bits
010 = 3 bits
011 = 4 bits
100 = 5 bits
101 = 6 bits
110 = 7 bits
111 = 8 bits
11:8 WSEQ_DATA_START [3:0]
0000 Bit position of the LSB of the data block written in this sequence step.
0000 = Bit 0
…
1111 = Bit 15
7:0 WSEQ_ADDR [7:0]
0000_0000 Control Register Address to be written to in this sequence step.
Register 6Dh Write Sequencer 1

WM8910 Pre-Production
w PP, Rev 3.0 April 2010
148
REGISTER
ADDRESS
BIT LABEL DEFAULT DESCRIPTION REFER TO
R110 (6Eh) Write Sequencer 2
14 WSEQ_EOS 0 End of Sequence flag. This bit indicates whether the Control Write Sequencer should stop after executing this step.
0 = Not end of sequence
1 = End of sequence (Stop the sequencer after this step).
11:8 WSEQ_DELAY [3:0]
0000 Time delay after executing this step.
Total delay time per step (including execution)=
62.5μs × (2^WSEQ_DELAY + 8)
7:0 WSEQ_DATA [7:0]
0000_0000 Data to be written in this sequence step. When the data width is less than 8 bits, then one or more of the MSBs of WSEQ_DATA are ignored. It is recommended that unused bits be set to 0.
Register 6Eh Write Sequencer 2
REGISTER
ADDRESS
BIT LABEL DEFAULT DESCRIPTION REFER TO
R111 (6Fh) Write Sequencer 3
9 WSEQ_ABORT
0 Writing a 1 to this bit aborts the current sequence and returns control of the device back to the serial control interface.
8 WSEQ_START 0 Writing a 1 to this bit starts the write sequencer at the memory location indicated by the WSEQ_START_INDEX field. The sequence continues until it reaches an “End of sequence” flag. At the end of the sequence, this bit will be reset by the Write Sequencer.
5:0 WSEQ_START_INDEX [5:0]
00_0000 Sequence Start Index. This is the memory location of the first command in the selected sequence.
0 to 31 = RAM addresses
32 to 48 = ROM addresses
49 to 63 = Reserved
Register 6Fh Write Sequencer 3
REGISTER
ADDRESS
BIT LABEL DEFAULT DESCRIPTION REFER TO
R112 (70h) Write Sequencer 4
9:4 WSEQ_CURRENT_INDEX [5:0]
00_0000 Sequence Current Index. This is the location of the most recently accessed command in the write sequencer memory.
0 WSEQ_BUSY 0 Sequencer Busy flag (Read Only).
0 = Sequencer idle
1 = Sequencer busy
Note: it is not possible to write to control registers via the control interface while the Sequencer is Busy.
Register 70h Write Sequencer 4

Pre-Production WM8910
w PP, Rev 3.0, April 2010
149
REGISTER
ADDRESS
BIT LABEL DEFAULT DESCRIPTION REFER TO
R116 (74h) GPIO Control 1
13:8 GP1_FN [5:0] 00_0000 GPIO 1 Pin Function select
00h = GPIO output
01h = Reserved
02h = IRQ output
03h = GPIO input
04h = Reserved
05h = Reserved
06h = DMIC_LR Clock output
07h = Reserved
08h = FLL Lock output
09h = FLL Clock output 0Ah to 3Fh = Reserved
7 GP1_DIR 1 GPIO Pin Direction
0 = Output
1 = Input
6 GP1_OP_CFG 0 Output pin configuration
0 = CMOS
1 = Open-drain
5 GP1_IP_CFG 1 Input pin configuration
0 = Active low
1 = Active high
4 GP1_LVL 0 GPIO Output Level
(when GP1_FN = 00000)
0 = Logic 0
1 = Logic 1
3 GP1_PD 1 GPIO Pull-Down Enable
0 = Pull-down disabled
1 = Pull-down enabled (Approx 100kΩ)
2 GP1_PU 0 GPIO Pull-Up Enable
0 = Pull-up disabled
1 = Pull-up enabled (Approx 100kΩ)
1 GP1_INTMODE
0 GPIO Interrupt Mode
0 = Level triggered
1 = Edge triggered
0 GP1_DB 0 GPIO de-bounce
0 = GPIO is not debounced
1 = GPIO is debounced
Register 74h GPIO Control 1

WM8910 Pre-Production
w PP, Rev 3.0 April 2010
150
REGISTER
ADDRESS
BIT LABEL DEFAULT DESCRIPTION REFER TO
R117 (75h) GPIO Control 2
13:8 GP2_FN [5:0] 00_0000 GPIO 2 Pin Function select
00h = GPIO output
01h = Reserved
02h = IRQ output
03h = GPIO input
04h = Reserved
05h = Reserved
06h = DMIC_DAT Data input
07h = DMIC_LR Clock output
08h = FLL Lock output
09h = FLL Clock output 0Ah to 3Fh = Reserved
7 GP2_DIR 1 GPIO Pin Direction
0 = Output
1 = Input
6 GP2_OP_CFG 0 Output pin configuration
0 = CMOS
1 = Open-drain
5 GP2_IP_CFG 1 Input pin configuration
0 = Active low
1 = Active high
4 GP2_LVL 0 GPIO Output Level
(when GP2_FN = 00000)
0 = Logic 0
1 = Logic 1
3 GP2_PD 1 GPIO Pull-Down Enable
0 = Pull-down disabled
1 = Pull-down enabled (Approx 100kΩ)
2 GP2_PU 0 GPIO Pull-Up Enable
0 = Pull-up disabled
1 = Pull-up enabled (Approx 100kΩ)
1 GP2_INTMODE
0 GPIO Interrupt Mode
0 = Level triggered
1 = Edge triggered
0 GP2_DB 0 GPIO de-bounce
0 = GPIO is not debounced
1 = GPIO is debounced
Register 75h GPIO Control 2

Pre-Production WM8910
w PP, Rev 3.0, April 2010
151
REGISTER
ADDRESS
BIT LABEL DEFAULT DESCRIPTION REFER TO
R118 (76h) GPIO Control 3
13:8 GP3_FN [5:0] 00_0000 GPIO 3 Pin Function select
00h = GPIO output
01h = Reserved
02h = IRQ output
03h = GPIO input
04h = Reserved
05h = Reserved
06h = DMIC_DAT Data input
07h = DMIC_LR Clock output
08h = FLL Lock output
09h = FLL Clock output 0Ah to 3Fh = Reserved
7 GP3_DIR 1 GPIO Pin Direction
0 = Output
1 = Input
6 GP3_OP_CFG 0 Output pin configuration
0 = CMOS
1 = Open-drain
5 GP3_IP_CFG 1 Input pin configuration
0 = Active low
1 = Active high
4 GP3_LVL 0 GPIO Output Level
(when GP3_FN = 00000)
0 = Logic 0
1 = Logic 1
3 GP3_PD 1 GPIO Pull-Down Enable
0 = Pull-down disabled
1 = Pull-down enabled (Approx 100kΩ)
2 GP3_PU 0 GPIO Pull-Up Enable
0 = Pull-up disabled
1 = Pull-up enabled (Approx 100kΩ)
1 GP3_INTMODE
0 GPIO Interrupt Mode
0 = Level triggered
1 = Edge triggered
0 GP3_DB 0 GPIO de-bounce
0 = GPIO is not debounced
1 = GPIO is debounced
Register 76h GPIO Control 3

WM8910 Pre-Production
w PP, Rev 3.0 April 2010
152
REGISTER
ADDRESS
BIT LABEL DEFAULT DESCRIPTION REFER TO
R119 (77h) GPIO Control 4
13:8 GP4_FN [5:0] 00_0010 GPIO 4 Pin Function select
00h = GPIO output
01h = Reserved
02h = IRQ output
03h = GPIO input
04h = Reserved
05h = Reserved
06h = Reserved
07h = DMIC_LR Clock output
08h = FLL Lock output
09h = FLL Clock output 0Ah to 3Fh = Reserved
7 GP4_DIR 0 GPIO Pin Direction
0 = Output
1 = Input
6 GP4_OP_CFG 0 Output pin configuration
0 = CMOS
1 = Open-drain
5 GP4_IP_CFG 1 Input pin configuration
0 = Active low
1 = Active high
4 GP4_LVL 0 GPIO Output Level
(when GP4_FN = 00000)
0 = Logic 0
1 = Logic 1
3 GP4_PD 0 GPIO Pull-Down Enable
0 = Pull-down disabled
1 = Pull-down enabled (Approx 100kΩ)
2 GP4_PU 0 GPIO Pull-Up Enable
0 = Pull-up disabled
1 = Pull-up enabled (Approx 100kΩ)
1 GP4_INTMODE
0 GPIO Interrupt Mode
0 = Level triggered
1 = Edge triggered
0 GP4_DB 0 GPIO de-bounce
0 = GPIO is not debounced
1 = GPIO is debounced
Register 77h GPIO Control 4

Pre-Production WM8910
w PP, Rev 3.0, April 2010
153
REGISTER
ADDRESS
BIT LABEL DEFAULT DESCRIPTION REFER TO
R120 (78h) GPIO Control 5
13:8 GP5_FN [5:0] 00_0001 GPIO 5 Pin Function select
00h = GPIO output
01h = BCLK
02h = IRQ output
03h = GPIO input
04h = Reserved
05h = Reserved
06h = Reserved
07h = DMIC_LR Clock output
08h = FLL Lock output
09h = FLL Clock output 0Ah to 3Fh = Reserved
7 GP5_DIR 1 GPIO Pin Direction
0 = Output
1 = Input
6 GP5_OP_CFG 0 Output pin configuration
0 = CMOS
1 = Open-drain
5 GP5_IP_CFG 1 Input pin configuration
0 = Active low
1 = Active high
4 GP5_LVL 0 GPIO Output Level
(when GP5_FN = 00000)
0 = Logic 0
1 = Logic 1
3 GP5_PD 0 GPIO Pull-Down Enable
0 = Pull-down disabled
1 = Pull-down enabled (Approx 100kΩ)
2 GP5_PU 0 GPIO Pull-Up Enable
0 = Pull-up disabled
1 = Pull-up enabled (Approx 100kΩ)
1 GP5_INTMODE
0 GPIO Interrupt Mode
0 = Level triggered
1 = Edge triggered
0 GP5_DB 0 GPIO de-bounce
0 = GPIO is not debounced
1 = GPIO is debounced
Register 78h GPIO Control 5

WM8910 Pre-Production
w PP, Rev 3.0 April 2010
154
REGISTER
ADDRESS
BIT LABEL DEFAULT DESCRIPTION REFER TO
R121 (79h) Interrupt Status 1
13 WSEQ_BUSY_EINT
0 Write Sequencer Busy IRQ status
0 = WSEQ IRQ not set
1 = WSEQ IRQ set
The Write Sequencer asserts this flag when it has completed a programmed sequence - ie it indicates that the Write Sequencer is NOT Busy.
5 FLL_LOCK_EINT
0 FLL Lock IRQ status
0 = FLL Lock IRQ not set
1 = FLL Lock IRQ set
4 GP5_EINT 0 GPIO5 IRQ status
0 = GPIO5 IRQ not set
1 = GPIO5 IRQ set
3 GP4_EINT 0 GPIO4 IRQ status
0 = GPIO4 IRQ not set
1 = GPIO4 IRQ set
2 GP3_EINT 0 GPIO3 IRQ status
0 = GPIO3 IRQ not set
1 = GPIO3 IRQ set
1 GP2_EINT 0 GPIO2 IRQ status
0 = GPIO2 IRQ not set
1 = GPIO2 IRQ set
0 GP1_EINT 0 GPIO1 IRQ status
0 = GPIO1 IRQ not set
1 = GPIO1 IRQ set
Register 79h Interrupt Status 1
REGISTER
ADDRESS
BIT LABEL DEFAULT DESCRIPTION REFER TO
R122 (7Ah) Interrupt Status 1 Mask
13 IM_WSEQ_BUSY_EINT
1 Interrupt mask for WSEQ Busy indication
0 = Not masked
1 = Masked
5 IM_FLL_LOCK_EINT
1 Interrupt mask for FLL Lock
0 = Not masked
1 = Masked
4 IM_GP5_EINT 1 Interrupt mask for GPIO5
0 = Not masked
1 = Masked
3 IM_GP4_EINT 1 Interrupt mask for GPIO4
0 = Not masked
1 = Masked
2 IM_GP3_EINT 1 Interrupt mask for GPIO3
0 = Not masked
1 = Masked
1 IM_GP2_EINT 1 Interrupt mask for GPIO2
0 = Not masked
1 = Masked
0 IM_GP1_EINT 1 Interrupt mask for GPIO1
0 = Not masked
1 = Masked
Register 7Ah Interrupt Status 1 Mask

Pre-Production WM8910
w PP, Rev 3.0, April 2010
155
REGISTER
ADDRESS
BIT LABEL DEFAULT DESCRIPTION REFER TO
R123 (7Bh) Interrupt Polarity 1
5 FLL_LOCK_INV
0 FLL Lock polarity
0 = Non-inverted
1 = Inverted
Register 7Bh Interrupt Polarity 1
REGISTER
ADDRESS
BIT LABEL DEFAULT DESCRIPTION REFER TO
R126 (7Eh) Interrupt Control
0 IRQ_POL 0 Interrupt Output polarity
0 = Active high
1 = Active low
Register 7Eh Interrupt Control
REGISTER
ADDRESS
BIT LABEL DEFAULT DESCRIPTION REFER TO
R128 (80h) FLL Control 1
7:4 FLL_GAIN [3:0] 0000 Gain applied to error
0000 = x 1 (Recommended value)
0001 = x 2
0010 = x 4
0011 = x 8
0100 = x 16
0101 = x 32
0110 = x 64
0111 = x 128
1000 = x 256
Recommended that this register is not changed from default.
3 FLL_HOLD 0 FLL Hold Select
0 = Disabled
1 = Enabled
This feature enables free-running mode in FLL when reference clock is removed
2 FLL_FRAC 0 Fractional enable
0 = Integer Mode
1 = Fractional Mode
Fractional Mode is recommended in all cases
0 FLL_ENA 0 FLL Enable
0 = Disabled
1 = Enabled
Register 80h FLL Control 1

WM8910 Pre-Production
w PP, Rev 3.0 April 2010
156
REGISTER
ADDRESS
BIT LABEL DEFAULT DESCRIPTION REFER TO
R129 (81h) FLL Control 2
12:11 FLL_CLK_SRC [1:0]
00 FLL Clock source
00 = MCLK
01 = BCLK
10 = LRC
11 = Reserved
10:9 FLL_CLK_REF_DIV [1:0]
00 FLL Clock Reference Divider
00 = MCLK / 1
01 = MCLK / 2
10 = MCLK / 4
11 = MCLK / 8
MCLK (or other input reference) must be divided down to <=13.5MHz.
For lower power operation, the reference clock can be divided down further if desired.
8:6 FLL_CTRL_RATE [2:0]
000 Frequency of the FLL control block
000 = FVCO / 1 (Recommended value)
001 = FVCO / 2
010 = FVCO / 3
011 = FVCO / 4
100 = FVCO / 5
101 = FVCO / 6
110 = FVCO / 7
111 = FVCO / 8
Recommended that this register is not changed from default.
5:3 FLL_OUTDIV [2:0]
000 FOUT clock divider
000 = 2
001 = 4
010 = 8
011 = 16
100 = 32
101 = 64
110 = 128
111 = 256
(FOUT = FVCO / FLL_OUTDIV)
2:0 FLL_FRATIO [2:0]
000 FVCO clock divider
000 = divide by 1
001 = divide by 2
010 = divide by 4
011 = divide by 8
1XX = divide by 16
000 recommended for FREF > 1MHz
100 recommended for FREF < 64kHz
Register 81h FLL Control 2

Pre-Production WM8910
w PP, Rev 3.0, April 2010
157
REGISTER
ADDRESS
BIT LABEL DEFAULT DESCRIPTION REFER TO
R130 (82h) FLL Control 3
15:0 FLL_K [15:0] 0000_0000_0000_000
0
Fractional multiply for FREF
(MSB = 0.5)
Register 82h FLL Control 3
REGISTER
ADDRESS
BIT LABEL DEFAULT DESCRIPTION REFER TO
R131 (83h) FLL Control 4
9:0 FLL_N [9:0] 00_0000_0000
Integer multiply for FREF
(LSB = 1)
Register 83h FLL Control 4
REGISTER
ADDRESS
BIT LABEL DEFAULT DESCRIPTION REFER TO
R164 (A4h) Clock Rate Test 4
9 DMIC_SEL 0 Digital Microphone mode.
0 = Disabled
1 = Audio DSP input is from digital microphone interface
Register A4h Clock Rate Test 4
REGISTER
ADDRESS
BIT LABEL DEFAULT DESCRIPTION REFER TO
R172 (ACh) Analogue Output Bias 0
6:4 PGA_BIAS [2:0]
000 Headphone and Lineout PGA bias control
000 = Normal bias
001 = Normal bias x 1.5
010 = Normal bias x 0.75
011 = Normal bias x 0.5
100 = Normal bias x 0.33
101 = Normal bias
110 = Normal bias
111 = Normal bias x2
Register ACh Analogue Output Bias 0
REGISTER
ADDRESS
BIT LABEL DEFAULT DESCRIPTION REFER TO
R187 (BBh) Analogue Output Bias 2
2:0 OUTPUTS_BIAS [2:0]
000 Headphone and Lineout Output Drivers bias control
000 = Normal bias
001 = Normal bias x 1.5
010 = Normal bias x 0.75
011 = Normal bias x 0.5
100 = Normal bias x 0.33
101 = Normal bias
110 = Normal bias
111 = Normal bias x 2
Register BBh Analogue Output Bias 2

WM8910 Pre-Production
w PP, Rev 3.0 April 2010
158
APPLICATIONS INFORMATION
RECOMMENDED EXTERNAL COMPONENTS
Figure 60 Recommended External Components
Notes:
1. Decoupling Capacitors X5R ceramic capacitor is recommended for capacitors C1, C2, C3, C4, C5, C6 and C7.
All decoupling capacitors should be positioned as close to the WM8910 as possible.
The positioning of C12 is particularly important - this should be as close to the WM8910 as possible.
2. Charge Pump Capacitors Specific recommendations for C5, C6 and C7 are provided in Table 77. Note that two different recommendations are provided for these components; either of these components is suitable, depending upon size requirements and availability.
The positioning of C5 is very important - this should be as close to the WM8910 as possible.
It is important to select a suitable capacitor type for the Charge Pump. Note that the capacitance may vary with DC voltage; care is required to ensure that required capacitance is achieved at the applicable operating voltage, as specified in Table 77. The capacitor datasheet should be consulted for this information.
COMPONENT REQUIRED CAPACITANCE
VALUE PART NUMBER VOLTAGE TYPE SIZE
C5 (CPCA-CPCB) ≥ 1μF at 2VDC 2.2μF Kemet C0402C225M9PAC 6.3v X5R 0402
2.2μF MuRata GRM155R60J225ME15_EIA 6.3v X5R 0402
C6 (CPVOUTN)
C7 (CPVOUTP) ≥ 2μF at 2VDC
2.2μF MuRata GRM188R61A225KE34D 10v X5R 0603
4.7μF MuRata GRM155R60J475M_EIA 6.3v X5R 0402
Table 77 Charge Pump Capacitors
3. Zobel Networks The Zobel network shown in Figure 60 is required on HPOUTL, HPOUTR, LINEOUTL and LINEOUTR whenever that output is enabled. Stability of these ground-referenced outputs across all process corners cannot be guaranteed without the Zobel network components. (Note that, if any ground-referenced output pin is not required, the zobel network components can be omitted from the output pin, and the pin can be left floating.) The Zobel network requirement is detailed further in the applications note WAN_0212 “Class W Headphone Impedance Compensation”.
Zobel networks (C13, C14, C15, C16, R1, R2, R3, R4) should be positioned reasonably close to the WM8910.

Pre-Production WM8910
w PP, Rev 3.0, April 2010
159
PACKAGE DIMENSIONS
NOTES:1. DIMENSION b APPLIED TO METALLIZED TERMINAL AND IS MEASURED BETWEEN 0.25 mm AND 0.30 mm FROM TERMINAL TIP. 2. FALLS WITHIN JEDEC, MO-220.3. ALL DIMENSIONS ARE IN MILLIMETRES4. THIS DRAWING IS SUBJECT TO CHANGE WITHOUT NOTICE.5. REFER TO APPLICATIONS NOTE WAN_0118 FOR FURTHER INFORMATION.
DM051.AFL: 40 PIN QFN PLASTIC PACKAGE 5 X 5 X 0.55 mm BODY, 0.40 mm LEAD PITCH
Caaa
INDEX AREA(D/2 X E/2)
Caaa2 X
2 X
TOP VIEW
D
E
C0.08
Cccc
A
A1C
(A3)
SEATING PLANE
1
18 17
b
21
L
D2/2
D2
E2
E2/2
SEE DETAIL B
BCccc M A
B
B
A A
39 40
1
2
10
11
30
31
e
DETAIL A
BCbbb M A40x b
L
R
1
1
DETAIL B
TE
RM
INA
L T
IP
R
DA
TU
M
ee/
21
SEE DETAIL A
SymbolsDimensions (mm)
MIN NOM MAX NOTE
A
A1
A3
b
D
D2
E
E2
e
L
0.50 0.55 0.60
0.050.020
0.203 REF
0.250.200.15
5.00 BSC
3.653.63.55
5.00 BSC
0.4 BSC
3.6 3.653.55
0.35 0.4 0.45
1
2
2
aaa
bbbccc
REF:
0.15
0.100.10
JEDEC, MO-220
Tolerances of Form and Position
EXPOSED GND PADDLE
EXPOSEDGND PADDLE
6
PIN #1 IDENTIFICATION CHAMFER R0.300 X 45o

WM8910 Pre-Production
w PP, Rev 3.0 April 2010
160
IMPORTANT NOTICE
Wolfson Microelectronics plc (“Wolfson”) products and services are sold subject to Wolfson’s terms and conditions of sale, delivery and payment supplied at the time of order acknowledgement.
Wolfson warrants performance of its products to the specifications in effect at the date of shipment. Wolfson reserves the right to make changes to its products and specifications or to discontinue any product or service without notice. Customers should therefore obtain the latest version of relevant information from Wolfson to verify that the information is current.
Testing and other quality control techniques are utilised to the extent Wolfson deems necessary to support its warranty. Specific testing of all parameters of each device is not necessarily performed unless required by law or regulation.
In order to minimise risks associated with customer applications, the customer must use adequate design and operating safeguards to minimise inherent or procedural hazards. Wolfson is not liable for applications assistance or customer product design. The customer is solely responsible for its selection and use of Wolfson products. Wolfson is not liable for such selection or use nor for use of any circuitry other than circuitry entirely embodied in a Wolfson product.
Wolfson’s products are not intended for use in life support systems, appliances, nuclear systems or systems where malfunction can reasonably be expected to result in personal injury, death or severe property or environmental damage. Any use of products by the customer for such purposes is at the customer’s own risk.
Wolfson does not grant any licence (express or implied) under any patent right, copyright, mask work right or other intellectual property right of Wolfson covering or relating to any combination, machine, or process in which its products or services might be or are used. Any provision or publication of any third party’s products or services does not constitute Wolfson’s approval, licence, warranty or endorsement thereof. Any third party trade marks contained in this document belong to the respective third party owner.
Reproduction of information from Wolfson datasheets is permissible only if reproduction is without alteration and is accompanied by all associated copyright, proprietary and other notices (including this notice) and conditions. Wolfson is not liable for any unauthorised alteration of such information or for any reliance placed thereon.
Any representations made, warranties given, and/or liabilities accepted by any person which differ from those contained in this datasheet or in Wolfson’s standard terms and conditions of sale, delivery and payment are made, given and/or accepted at that person’s own risk. Wolfson is not liable for any such representations, warranties or liabilities or for any reliance placed thereon by any person.
ADDRESS
Wolfson Microelectronics plc
Westfield House
26 Westfield Road
Edinburgh
EH11 2QB
Tel :: +44 (0)131 272 7000
Fax :: +44 (0)131 272 7001
Email :: [email protected]