ug173 emis web miquest - hampshiredocuments.hants.gov.uk/...01-27ug173emiswebmiquest.pdf · page 6...
TRANSCRIPT

EMIS Web
MIQUEST
This document relates to the following version(s) of EMIS Web 3.0.1

EMIS Web MIQUEST
Page 2 Saved as: UG173 EMIS Web MIQUEST.doc
© Copyright Egton Medical Information Systems Ltd 2010 þ Controlled Document Version 1: 15 June 2010 Title: UG173 EMIS Web MIQUEST Saved as: UG173 EMIS Web MIQUEST.doc
Published by EMIS Documentation
No part of this document may be sold, hired, reproduced or transmitted in any form or by any means, electronic or mechanical, including photocopying, recording and information storage and retrieval systems for any other purpose than the purchaser’s use without the express written permission of EMIS.
Every effort is made to ensure that your EMIS documentation is up to date, but our commitment to constantly improve our software and systems means that there may have been changes since this document was produced.
Associated documentation
None

EMIS Web MIQUEST
Saved as: UG173 EMIS Web MIQUEST.doc Page 3
Contents 1 Introduction to MIQUEST ............................................................................................................ 4
1.1 Access MIQUEST ............................................................................................................................. 4 2 Configuring MIQUEST ................................................................................................................ 5
2.1 Locate the required information ........................................................................................................ 5 2.2 Configure Practice Settings............................................................................................................... 7 2.3 Configure Enquirer/Agreement Settings ............................................................................................ 7 2.4 Set a scheduled query run time ........................................................................................................ 9
3 Import a MIQUEST query ......................................................................................................... 11 4 Running a MIQUEST query ...................................................................................................... 12
4.1 Run a MIQUEST query immediately ............................................................................................... 12 5 Export a MIQUEST query ......................................................................................................... 13 6 Troubleshooting ........................................................................................................................ 14 7 Glossary ................................................................................................................................... 15 8 Index ......................................................................................................................................... 16

EMIS Web MIQUEST
Page 4 Saved as: UG173 EMIS Web MIQUEST.doc
1 Introduction to MIQUEST MIQUEST, an acronym for Morbidity Query Information Export SynTax, is a module that enables you to create and run the same queries (searches) on computer systems produced by different manufacturers to extract search information from practice systems irrespective of which computer system they use.
When you run the queries they extract information from the EMIS system and collect information in the form of reports. The reports are in the file format CSV that means they can be opened, viewed and saved in a spreadsheet application such as Microsoft Excel.
MIQUEST queries are written using HQL (Health Query Language). Using MIQUEST you can run, save and export queries. For example you can run a query, export the results to a folder on your hard drive and then email the results to your PCT.
In this document you will learn how to:
n Configure MIQUEST for remote and local queries; see section 2 Configuring MIQUEST on page 5.
n Import queries; see section 3 Import a MIQUEST query on page 3.
n Run queries; see section 4 Running a MIQUEST query on page 12.
n Export queries; see section 5 Export a MIQUEST query on page 13.
n Troubleshoot; see section 6 Troubleshooting on page 14.
1.1 Access MIQUEST To access MIQUEST, do one of the following:
n Click , point to Reporting, and then select MIQUEST.
n If you have customised the quick access toolbar, click .
n On the home page, click the link if configured.
The MIQUEST screen is displayed.

EMIS Web MIQUEST
Saved as: UG173 EMIS Web MIQUEST.doc Page 5
2 Configuring MIQUEST You can configure MIQUEST for both remote and local queries.
Note: For a description of remote and local queries; see section 7 Glossary on page 15 for a description of remote and local queries.
In this section you will learn how to:
n Locate the required information; see section 2.1 Locate the required information on page 5.
n Configure the practice settings; see section 2.2 Configure Practice Settings on page 7.
n Configure the enquirer and agreement settings; see section 2.3 Configure Enquirer/Agreement Settings on page 7.
n Set a scheduled start time; see section 2.4 Set a scheduled query run time on page 9.
2.1 Locate the required information 1. On your PC, locate and open the folder containing the MIQUEST query or queries.
2. Right-click the required query and select Open With.
3. The Open with screen is displayed.
Open screen with Note Pad highlighted
4. Select Notepad, and then click OK.
The query is displayed using Notepad.
EMIS Web MIQUEST
Page 6 Saved as: UG173 EMIS Web MIQUEST.doc
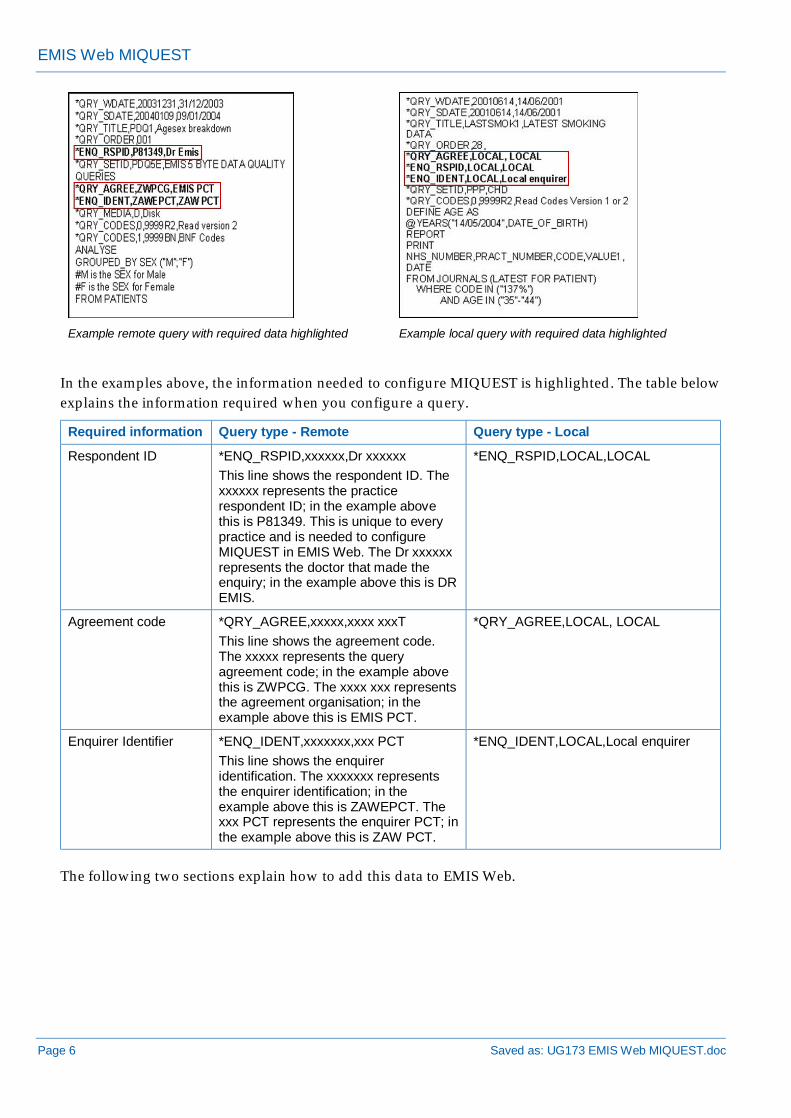
Example remote query with required data highlighted Example local query with required data highlighted
In the examples above, the information needed to configure MIQUEST is highlighted. The table below explains the information required when you configure a query.
Required information Query type - Remote Query type - Local
Respondent ID *ENQ_RSPID,xxxxxx,Dr xxxxxx This line shows the respondent ID. The xxxxxx represents the practice respondent ID; in the example above this is P81349. This is unique to every practice and is needed to configure MIQUEST in EMIS Web. The Dr xxxxxx represents the doctor that made the enquiry; in the example above this is DR EMIS.
*ENQ_RSPID,LOCAL,LOCAL
Agreement code *QRY_AGREE,xxxxx,xxxx xxxT This line shows the agreement code. The xxxxx represents the query agreement code; in the example above this is ZWPCG. The xxxx xxx represents the agreement organisation; in the example above this is EMIS PCT.
*QRY_AGREE,LOCAL, LOCAL
Enquirer Identifier *ENQ_IDENT,xxxxxxx,xxx PCT This line shows the enquirer identification. The xxxxxxx represents the enquirer identification; in the example above this is ZAWEPCT. The xxx PCT represents the enquirer PCT; in the example above this is ZAW PCT.
*ENQ_IDENT,LOCAL,Local enquirer
The following two sections explain how to add this data to EMIS Web.
EMIS Web MIQUEST
Saved as: UG173 EMIS Web MIQUEST.doc Page 7
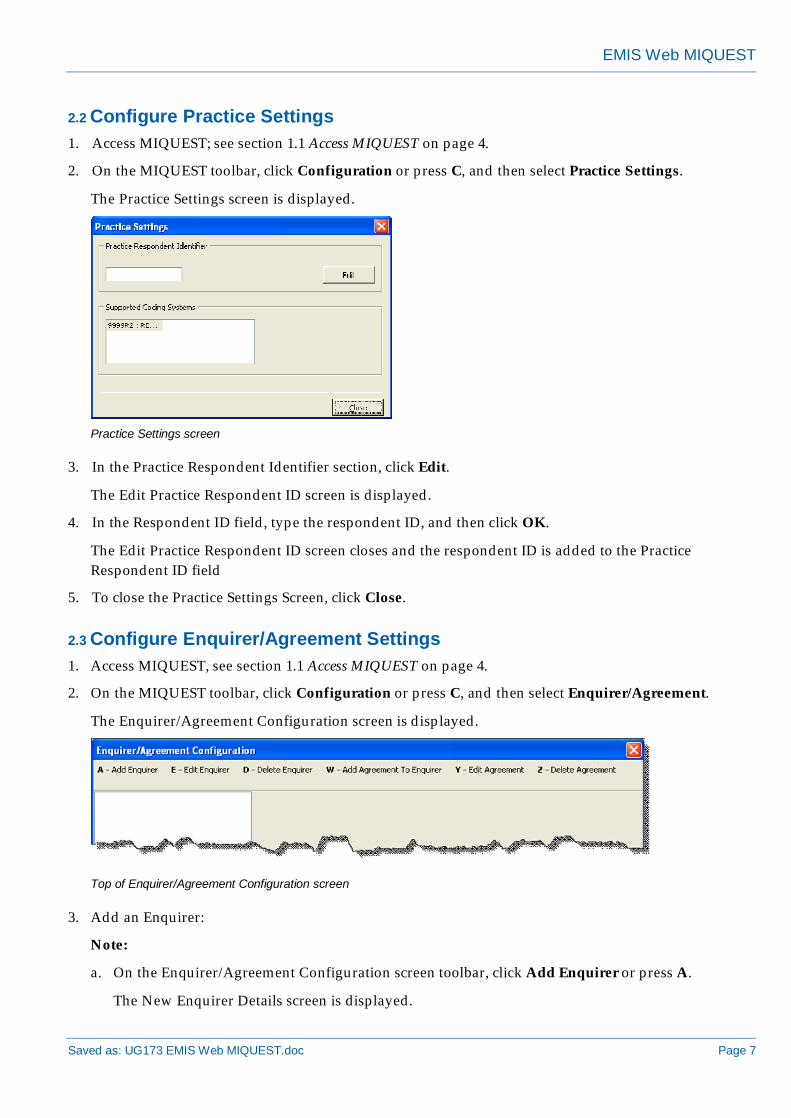
2.2 Configure Practice Settings 1. Access MIQUEST; see section 1.1 Access MIQUEST on page 4.
2. On the MIQUEST toolbar, click Configuration or press C, and then select Practice Settings.
The Practice Settings screen is displayed.
Practice Settings screen
3. In the Practice Respondent Identifier section, click Edit.
The Edit Practice Respondent ID screen is displayed.
4. In the Respondent ID field, type the respondent ID, and then click OK.
The Edit Practice Respondent ID screen closes and the respondent ID is added to the Practice Respondent ID field
5. To close the Practice Settings Screen, click Close.
2.3 Configure Enquirer/Agreement Settings 1. Access MIQUEST, see section 1.1 Access MIQUEST on page 4.
2. On the MIQUEST toolbar, click Configuration or press C, and then select Enquirer/Agreement.
The Enquirer/Agreement Configuration screen is displayed.
Top of Enquirer/Agreement Configuration screen
3. Add an Enquirer:
Note:
a. On the Enquirer/Agreement Configuration screen toolbar, click Add Enquirer or press A.
The New Enquirer Details screen is displayed.

EMIS Web MIQUEST
Page 8 Saved as: UG173 EMIS Web MIQUEST.doc
New Enquirer Details screen
b. In the Enquirer Identifier field, type the enquiry code shown in the enquirer identifier line.
Note: This is the ENQ_IDENT line. In the example on page 6, this is ZAWEPCT for the remote query and LOCAL for a local query.
c. Complete the Name and Address boxes.
Tip: If you do not want to type the name and address, copy the Enquirer Identifier in each box. You cannot leave the name and address boxes blank.
d. To close the New Enquirer Details screen, click OK.
A new enquirer folder is displayed in the left-hand pane.
4. Add an Agreement code to the Enquirer:
Note:
a. If required, select the required folder.
b. On the Enquirer/Agreement Configuration screen toolbar, click Add Agreement to Enquirer or press A.
The New Agreement Details screen is displayed.
New Agreement Details screen

EMIS Web MIQUEST
Saved as: UG173 EMIS Web MIQUEST.doc Page 9
c. In the Agreement Code field, type the agreement code shown in the MIQUEST query line.
Note: This is the QRY_AGREE line. In the example on page 5, this is ZWPCG for the remote query and LOCAL for a local query.
d. Complete the Title field.
Tip: If you do not want to type the title, copy the agreement code. You cannot leave the title field blank.
e. In the Agreement Period field, click and use the calendar to select the agreement period dates.
Note: Ensure that the date you select is in the future. EMIS recommends that you select a date up to three years ahead to avoid having to reset details.
f. In the Transfer Method field, click and select Disk.
Note: The transfer methods Network and Both are not supported in EMIS Web.
5. To close the New Agreement Details screen, click OK.
The Agreement Folder is displayed below the enquirer folder in the left-hand pane of the Enquirer/Agreement Configuration screen.
Example enquirer folder showing child agreement folder
6. To close the Enquirer/Agreement Configuration screen, click Close.
2.4 Set a scheduled query run time 1. Access MIQUEST, see section 1.1 Access MIQUEST on page 4.
2. On the MIQUEST toolbar, click Configuration or press C, and then select Set Scheduled Query Run Time.
The Set Scheduler Start Time screen is displayed.
Set Scheduler Start Time screen
3. Click and use the calendar to select the date that you want the queries to run.
EMIS Web MIQUEST
Page 10 Saved as: UG173 EMIS Web MIQUEST.doc
Tip: Remember to mark the next day’s date for queries that you want to run in the early hours of the morning.
4. Do one of the following:
n Type the required time, using 24-hour clock format.
n Click and select the required time.
5. To set the scheduled start time, select Enabled, and then click OK.
The selected query is scheduled to run at the time and on the date that you have chosen.
Note: When a query has run, it is displayed in the Completed, Awaiting Authorisation section of the Responses (pending) folder in the left-hand pane.

EMIS Web MIQUEST
Saved as: UG173 EMIS Web MIQUEST.doc Page 11
3 Import a MIQUEST query 1. Access MIQUEST, see section 1.1 Access MIQUEST on page 4.
2. On the MIQUEST toolbar, click Transfer or press T.
The Transfer drop list is displayed.
3. Select one of the following:
n Remote Location and Files to Import.
Note: Use this option if you are importing a remote query.
n Local Location and Files to Import.
Note: Use this option if you are importing a local query.
The Open screen is displayed.
4. Navigate to the location of the required query, select it, and then click Open.
Tip: To select more than one query, press and hold the CTRL key, and then click each required query.
Note: The time it takes to import a query can vary depending on the number and size of the imported files. There is an indicator at the bottom of the right-hand pane that shows the import progress.
A confirmation message is displayed when the import is complete.
5. Click OK.
The number of imported queries is displayed in the unauthorised option of the Inbox section in the navigation pane.
6. In the navigation pane, select Query, Unauthorised.
The query details are displayed in the right-hand pane.
MIQUEST screen with the Query, Unauthorised navigation pane option selected
7. In the right-hand pane, right-click the required query, and then select Authorise Set or press A.
A confirmation message is displayed.
8. To confirm, click Yes.
The query is moved to the Waiting to Run option of the Queue section in the navigation pane.

EMIS Web MIQUEST
Page 12 Saved as: UG173 EMIS Web MIQUEST.doc
4 Running a MIQUEST query You can run MIQUEST queries straight away or you can schedule them to run at a time that is convenient to the practice, for example overnight. Some queries can take a long time to run. The following variables can effect the time it takes to run a query:
n The number of patients on the practice list.
Note: EMIS recommends that practices with over 4000 patients schedule queries to run at approximately between 01:30 to 02:00, see section 2.4 Set a scheduled query run time on page 9.
n The number of client PCs in use.
n The type of query that is being run.
n The speed of your server.
4.1 Run a MIQUEST query immediately 1. Access MIQUEST, see section 1.1 Access MIQUEST on page 4.
2. In the navigation pane Queue section, select Waiting to Run.
All of the queries in this section are displayed in the right-hand pane.
MIQUEST screen with the Waiting to Run navigation pane option selected
3. Select the required query from the right-hand pane, and then on the toolbar, select Queue Set Now or press Q.
The selected queries are moved to the Running section of the Queue folder in the navigation pane.
Note: The server checks the Running section of the Queue folder every 15 minutes to check for queries that are waiting to run.
When a query has run, it is displayed in the Completed, Awaiting Authorisation option of the Responses (Pending) folder in the navigation pane.
4. Right-click the query and select Unauthorise Set or press H.
When a query is authorised it is displayed in the Completed, Authorised option of the Responses (pending) section in the navigation pane.
EMIS Web MIQUEST
Saved as: UG173 EMIS Web MIQUEST.doc Page 13
5 Export a MIQUEST query 1. Access MIQUEST, see section 1.1 Access MIQUEST on page 4.
2. In the navigation pane Responses (pending) section, select Completed, Awaiting Authorisation.
All of the queries in this section are displayed in the right-hand pane.
3. Select the required query from the right-hand pane, and then on the toolbar, select Authorise Set or press A.
The query is now displayed in the Completed, Authorised option of the Responses (pending) section in the navigation pane.
4. Select the Completed, Authorised option of the Responses (pending) section in the navigation pane.
The queries in this section are displayed in the right-hand pane.
5. Select the required query, and then select Export Set or press P.
A confirmation message is displayed.
6. To confirm, click Yes.
An information message is displayed, to display the number and details of the exported queries.
7. Click OK.
The query is displayed in the Response, Exported option of the Outbox folder section in the navigation pane.

EMIS Web MIQUEST
Page 14 Saved as: UG173 EMIS Web MIQUEST.doc
6 Troubleshooting Use the following procedure to deal with rejected queries.
If you have a MIQUEST query that does not import correctly, it is displayed in the Query, Auto Rejected, Pending section of the Inbox.
To find out why a query has been rejected:
1. In the navigation pane, select the Query, Auto Rejected, Pending option of the inbox section.
The queries are displayed in the right-hand pane.
2. Right-click the required query, and then select View.
The HQL Query Editor screen is displayed.
HQL Query Editor
Tip: To change the order of the panes, On the HQL Query Editor screen toolbar, click Toggle View or press T. For example, you can toggle the Response pane to move to the right-hand side.
Tip: On the HQL Query Editor screen toolbar, to remove the left-hand pane, click Toggle Menu or press M.
The reason the query is rejected is displayed in the response pane. In the example above you can see that the enquirer ID does not match a stored system enquirer.
3. Amend the required details in the practice settings, save to file, and then import the query.

EMIS Web MIQUEST
Saved as: UG173 EMIS Web MIQUEST.doc Page 15
7 Glossary Enquirer: A party that formulates enquiries about health data and submits them to a Respondent (usually a general practice) and receives and analyses the results of these enquiries.
Respondent: A general practice (or another healthcare provider) that receives and deals with MIQUEST enquiries and dispatches the results of these enquiries.
Agreement code: An agreement under which a Respondent participates in a Data Collection Scheme run by an Enquirer.
Remote query: A remote query is a query run by practice staff to serve the objectives of the external Enquirer. The query is supplied by an Enquirer, and the responses to a remote query are forwarded to the Enquirer.
Local query: A local query is a query run by practice staff to serve the objectives of the practice. The practice may have written the query or it may have been supplied by an Enquirer, another practice or system developer. The responses to a local query are for use within the practice and are not to be forwarded to external Enquirers.
EMIS Web MIQUEST
Page 16 Saved as: UG173 EMIS Web MIQUEST.doc
8 Index A agreement settings
configuring ...................................................................................... 7
auto rejected........................................................... 14
E enquirer
adding ............................................................................................ 7
adding agreements ...................................................................... 8
enquirer settings configuring ...................................................................................... 7
G glossary .................................................................. 15
H HQL
health query language ................................................................... 4
M MIQUEST
accessing ........................................................................................ 4
configuring ...................................................................................... 5
introduction ..................................................................................... 4
MIQUEST information locating............................................................................................ 5
MIQUEST queries exporting ....................................................................................... 13
importing ....................................................................................... 11
running .......................................................................................... 12
running, immediately .................................................................... 12
P practice settings
configuring ...................................................................................... 7
Q queries
local ................................................................................................. 5
remote ............................................................................................. 5
setting scheduled run time ............................................................. 9