uem migrations v3 - vmware blogsmigrations!!!! technicalwhitepaper ......
TRANSCRIPT

UEM Migrations Persona Management and ProfileUnity to UEM
TECH N I CA L W H I T E P A P E R

UEM Migrations
T E CHN I C A L WH I T E P A P ER / 2
Contents
1. Persona Management to UEM, Preparation ...................................... 5 2. Persona Management to UEM, Migration ......................................... 6
2.1 Disable DirectFlex ......................................................................................................... 7 2.2 Configure folder redirection ........................................................................................... 8 2.3 Run PM and UEM side-by-side to migrate the user profile ......................................... 12 2.1 Disable Persona Management .................................................................................... 12
3. ProfileUnity to UEM, Preparation ..................................................... 13 4. ProfileUnity to UEM, Migration ........................................................ 14
4.1 ProfileUnity Configuration Report ................................................................................ 15 4.2 Disable DirectFlex ....................................................................................................... 16 4.3 Run ProfileUnity and UEM side-by-side to migrate the user profile ............................ 17 4.4 ProfileUnity, Configure folder redirection ..................................................................... 18 4.5 Disable ProfileUnity ..................................................................................................... 22 4.1 Extra Configurations .................................................................................................... 22
5. About the Authors and Contributions ............................................... 22

T E CHN I C A L WH I T E P A P ER / 3
List of Figures
Figure 1. UEM Preparation Overview ........................................................................................................... 5 Figure 2. Persona to UEM Migration Overview ............................................................................................ 6 Figure 3. Not the correct policy as mentioned above. .................................................................................. 7 Figure 4. Advanced policy setting to disable DirectFlex. .............................................................................. 7 Figure 5. Editing UEM Policy for Redirection ............................................................................................... 8 Figure 6. Folders for redirect ........................................................................................................................ 8 Figure 7. User accounts example ................................................................................................................. 8 Figure 8. Folder redirection path .................................................................................................................. 9 Figure 9. Folder redirection properties ......................................................................................................... 9 Figure 10. Folder redirection properties warning ........................................................................................ 10 Figure 11. Folder redirection confirmation .................................................................................................. 10 Figure 12. Create Config ............................................................................................................................ 11 Figure 13. Custom Config .......................................................................................................................... 11 Figure 14. Config Name ............................................................................................................................. 11 Figure 15. Insert registry settings ............................................................................................................... 11 Figure 16. Save Config ............................................................................................................................... 11 Figure 17. GPOs linked to same OU .......................................................................................................... 12 Figure 18. Horizon View Pool pointing to shared OU ................................................................................. 12 Figure 19. Disable Persona Management Policy ....................................................................................... 12 Figure 20. UEM Preparation Overview ....................................................................................................... 13 Figure 21. ProfileUnity to UEM Migration Overview ................................................................................... 14 Figure 22. ProfileUnity Management Console ............................................................................................ 15 Figure 23. Download ProfileUnity PDF/Configuration file ........................................................................... 15 Figure 24. Example ProfileUnity Configuration Page ................................................................................. 15 Figure 25. Not the correct policy as mentioned above. .............................................................................. 16 Figure 26. Advanced policy setting to disable DirectFlex. .......................................................................... 16 Figure 27. UEM GPO linked ....................................................................................................................... 17 Figure 28. Horizon View Pool pointing to shared OU ................................................................................. 17 Figure 29. Editing UEM Policy for Redirection ........................................................................................... 18 Figure 30. Folders for redirect .................................................................................................................... 18 Figure 31. ProfileUnity Config folder redirection (Inside the PDF Report) .................................................. 19 Figure 32. Folder redirection path .............................................................................................................. 19 Figure 33. Folder redirection properties ..................................................................................................... 19 Figure 34. Folder redirection properties warning ........................................................................................ 20

T E CHN I C A L WH I T E P A P ER / 4
Figure 35. Folder redirection confirmation .................................................................................................. 20 Figure 36. Create Config ............................................................................................................................ 21 Figure 37. Custom Config .......................................................................................................................... 21 Figure 38. Config Name ............................................................................................................................. 21 Figure 39. Insert registry settings ............................................................................................................... 21 Figure 40. Save Config ............................................................................................................................... 21

T E CHN I C A L WH I T E P A P ER / 5
1. Persona Management to UEM, Preparation Figure 1. UEM Preparation Overview
Follow the UEM Easy Start Guide to setup UEM. In short, installation of UEM is done through the following actions:
1. Install the FlexEngine on all machines 2. Create two file shares. One share will store the UEM configuration files. The other share will store
application customizations per user profile. 3. Configure the UEM GPO and link it to all users. 4. Create UEM Config Files for all applications that are used in the environment. Read the
‘Application Profiler - Admin Guide’ to learn the easiest way to create Config Files. o Application Profiling should be done for only those applications your organization needs
to manage or enforce. If no configuration file is created for an application the application will run like normal but any personalization done to the application will not be saved once the user logs-off.
Note: It is critical that UEM is fully configured and applications are profiled prior to Migration. We have had customers who did not profile their applications such as Internet Explorer, which might have saved passwords etc. If you go through the migration process and disable Persona Management, any settings from Internet Explorer that were previously customized will be lost.
RDSH or VDI
Create Central Config Share& User profile folder share
2
Active Directory
VMware UEM GPOLink UEM GPO to the
existing Persona Management GPO.
3
Install FlexEngine on Gold Images
App Profiler
4
Create config filesfor all applications
1
UEM Preparation Workflow

T E CHN I C A L WH I T E P A P ER / 6
2. Persona Management to UEM, Migration Figure 2. Persona to UEM Migration Overview
The following are high-level steps that need to be executed for a successful migration:
1. Disable DirectFlex using the unique GPO obtained from VMware support. Only during the migration DirectFlex needs to be disabled in order to save all application settings at log off. Use the ‘VMware UEM FlexEngine Advanced DirectFlex Settings.admx’ template to configure DirectFlex to be disabled and to process DirectFlex Config Files at logon and log off.
2. Configure folder redirection for user’s data (My Documents, Pictures, etc.)
3. Create Desktop redirect configuration through UEM Management console (only if applicable)
4. Have user’s login/logoff at least once. This will allow UEM to pick-up current registry settings from Persona Management.
5. Disable Persona Management by changing the View pools to point at a different OU or remove the linked Persona Management GPO in the OU.
6. Enable DirectFlex
Disable DirectFlex by importing: VMware UEM FlexEngineAdvanced DirectFlex Settings.admx template and selecting ‘Enable’
Configure folder redirection pointing toexisting “%username%.V2” profiles.
1
Create Desktop redirectUEM configuration
Management Console
3
2
4
5
6
Enable DirectFlex (Set to Disable)
Disable Persona Management
Have users login/logoff at least once
Persona to UEM Migration
T E CHN I C A L WH I T E P A P ER / 7
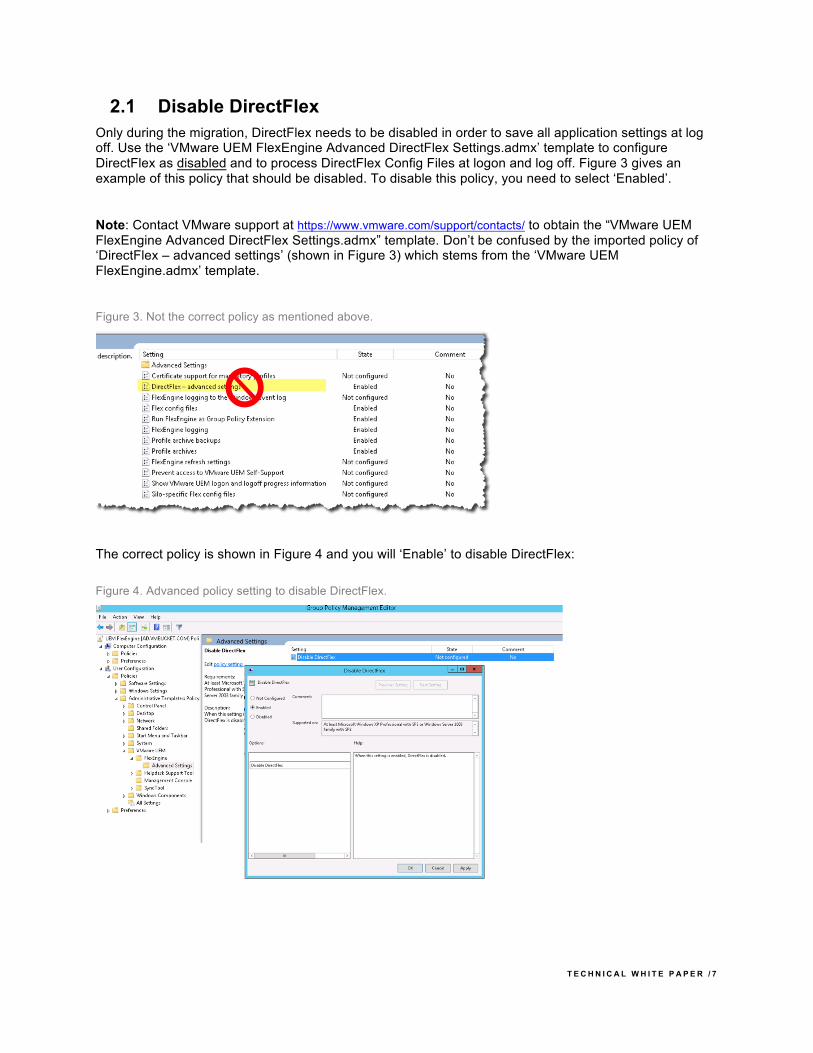
2.1 Disable DirectFlex Only during the migration, DirectFlex needs to be disabled in order to save all application settings at log off. Use the ‘VMware UEM FlexEngine Advanced DirectFlex Settings.admx’ template to configure DirectFlex as disabled and to process DirectFlex Config Files at logon and log off. Figure 3 gives an example of this policy that should be disabled. To disable this policy, you need to select ‘Enabled’.
Note: Contact VMware support at https://www.vmware.com/support/contacts/ to obtain the “VMware UEM FlexEngine Advanced DirectFlex Settings.admx” template. Don’t be confused by the imported policy of ‘DirectFlex – advanced settings’ (shown in Figure 3) which stems from the ‘VMware UEM FlexEngine.admx’ template.
Figure 3. Not the correct policy as mentioned above.
The correct policy is shown in Figure 4 and you will ‘Enable’ to disable DirectFlex:
Figure 4. Advanced policy setting to disable DirectFlex.

T E CHN I C A L WH I T E P A P ER / 8
2.2 Configure folder redirection Figure 5. Editing UEM Policy for Redirection Figure 6. Folders for redirect
Move the Persona Management GPO Folder Redirection settings to a Folder Redirection GPO using the standard Windows policy settings as shown in Figure 5 and Figure 6. That way the PM GPO can be removed completely. So verify your user profile naming format.
Figure 7. User accounts example
If your naming format ends with “.V2” you need to consider this when setting the SMB paths for the UEM GPO so take account for this extra “.V2” after the %username%. To do this, create a new GPO or utilize the existing UEM GPO that contains Folder Redirection settings for all folders that are currently redirected with the ProfileUnity.
Note: Just the folders that contain User Data (Documents, Desktop, Downloads, Music, Pictures and Videos) should be redirected. All the other folders (like AppData) should NOT be redirected, because Flex+ managed those folders.

T E CHN I C A L WH I T E P A P ER / 9
Figure 8 shows an example of folder redirection for the My Documents folder using the PM GPO. In this example, the My Documents folder is redirected to \\dfs1\persona$\%username%.V2\Documents. (\\server\share\%username%.V2\Documents).
Figure 8. Folder redirection path Figure 9. Folder redirection properties
You will want to uncheck the "Grant the user exclusive" option. The problem is that by default, the Grant the user exclusive rights to My Documents check box is selected, with the following consequence (quote from the Technet library article about folder redirection):
If you select this check box, the user and the local system have full control over the folder, and no one else, not even the administrator, has any rights to it. If you clear this check box, no changes are made to the permissions on the folder. Whatever permissions are in effect by default remain in effect.
Source: https://technet.microsoft.com/en-us/library/cc781907.aspx
• Do not select the ‘Move the content of Documents to the new location’ (Figure 9) • Repeat these steps for all folders that contain Personal Data (Documents, Desktop, Downloads,
Music, Pictures and Videos).
Note: In some cases we have observed folders in the Folder Redirection GPO should specified in this exact format per share: \servername\share\%username%.V2 excluding the share name such as \Documents or \Desktop.

T E CHN I C A L WH I T E P A P ER / 1 0
After selecting ‘OK’ and you have chose not to apply the redirection policy to older platforms such as Windows 2000, XP, 2003 you will be presented with the following dialog box (Figure 10):
Figure 10. Folder redirection properties warning
Select ‘Yes’ to continue.
Note: After you select ‘OK’ on the dialog box if you re-open the properties of a folder you will see a similar screen as in Figure 11:
Figure 11. Folder redirection confirmation
Take note of the yellow highlight section that it matches the naming format you were looking for.

T E CHN I C A L WH I T E P A P ER / 1 1
2.2.1 Desktop redirected (only if applicable) If the Desktop folder is redirected and UEM is configured to start though the Group Policy Extension (GPE) a timing issue might occur, because the UEM GPE runs before the Folder Redirection GPE.
The following scenario could happen: UEM creates a shortcut on the Desktop, which is not yet redirected so it's created in C:\Users\%username%\Desktop. After that, Folder Redirection redirect the Desktop to \\server\share\%username%.V2\Desktop and the user does not see the created shortcut.
To solve this timing issue, UEM should remember and restore the redirected folder location of the Desktop. Create a Config File within UEM to do this. The steps to execute this is as follows:
Figure 12. Create Config Figure 13. Custom Config Figure 14. Config Name
1. Select ‘Create Config File’ 2. Select ‘Create a custom config file’ 3. Name this Config File ‘Desktop Folder Redirection settings’
Figure 15. Insert registry settings Figure 16. Save Config
4. Copy the following two lines to the Import/Export section of the Config File: [IncludeIndividualRegistryValues] HKCU\Software\Microsoft\Windows\CurrentVersion\Explorer\User Shell Folders\Desktop
5. Select ‘Save Config File’

T E CHN I C A L WH I T E P A P ER / 1 2
2.3 Run PM and UEM side-by-side to migrate the user profile Run Persona Management and UEM side by side during a specific period to allow all users to log in/log off at least once. To do this make sure you have both UEM and Personal Management GPO’s linked to the same OU where your View Pools will be pointing to.
Figure 17. GPOs linked to same OU Figure 18. Horizon View Pool pointing to shared OU
Once both GPO’s are in-place log in and log off with a test user to make sure the settings are migrated successfully. After all the Persona Management profiles are successfully migrated to UEM, continue with section 3.1 and disable Persona Management.
2.1 Disable Persona Management
This last step involves disabling Persona Management by changing the Persona Management GPO. Change the ‘Manage user persona’ policy setting to Disabled.
Figure 19. Disable Persona Management Policy
Enable DirectFlex again, this speeds up the log in time. To do this, change the ‘Disable DirectFlex’ policy setting to Disabled. See Figure 19.
Optional: If users have a User Profile Path configured on their Active Directory user account, remove that path when switching to UEM. This applies both to the User Profile Path and to the Remote Desktop Services User Profile Path. UEM provides users with one profile that can roam between any Windows version.

T E CHN I C A L WH I T E P A P ER / 1 3
3. ProfileUnity to UEM, Preparation Figure 20. UEM Preparation Overview
Follow the UEM Easy Start Guide to setup UEM. In short, installation of UEM is done through the following actions:
1. Install the FlexEngine on all machines 2. Create two file shares. One share will store the UEM configuration files. The other share will store
application customizations per user profile. 3. Configure the UEM GPO and link it to all users. 4. Create UEM Config Files for all applications that are used in the environment. Read the
‘Application Profiler - Admin Guide’ to learn the easiest way to create Config Files. o Application Profiling should be done for only those applications your organization needs
to manage or enforce. If no configuration file is created for an application the application will run like normal but any personalization done to the application will not be saved once the user logs-off.
Note: It is critical that UEM is fully configured and applications are profiled prior to Migration. We have had customers who did not profile their applications such as Internet Explorer, which might have saved passwords etc. If you go through the migration process and disable ProfileUnity, any settings from Internet Explorer that were previously customized will be lost.
RDSH or VDI
Create Central Config Share& User profile folder share
2
Active Directory
VMware UEM GPOLink UEM GPO to the
existing Persona Management GPO.
3
Install FlexEngine on Gold Images
App Profiler
4
Create config filesfor all applications
1
UEM Preparation Workflow

T E CHN I C A L WH I T E P A P ER / 1 4
4. ProfileUnity to UEM, Migration Figure 21. ProfileUnity to UEM Migration Overview
The following are high-level steps that need to be executed for a successful ProfileUnity migration:
1. Get ProfileUnity Configuration report and review for information that will be needed to configure UEM
2. Disable DirectFlex using the unique GPO obtained from VMware support. Only during the migration DirectFlex needs to be disabled in order to save all application settings at log off. Use the ‘VMware UEM FlexEngine Advanced DirectFlex Settings.admx’ template to configure DirectFlex to be disabled and to process DirectFlex Config Files at logon and log off.
3. Configure folder redirection for user data
4. Configure folder redirection for the users desktop (optional)
5. Have user’s login/logoff at least once. This will allow UEM to pick-up current registry settings from ProfileUnity
6. Remove .INI file from the ProfileUnity Client Files Directory
a. This is normally in \\domain\netlogon\ProfileUnity Directory
b. Client may have put this file in a different location.
c. By removing this file you will stop ProfileUnity from running for clients.
7. Enable DirectFlex
8. Configure printer, drive mappings and any other functions that ProfileUnity may have been performing. This may require the creation of other GPOs for users or machines to inject registry settings.
Create Desktop redirectUEM configuration “Save Only” Mode
Management Console
4
Configure folder redirection pointing toexisting path found in the ProU report
3
5
Have users login/logoffat least once
Liquidware Labs Profile Unity to UEM Migration
6
Remove&.INI&FromProfileUnity&ClientFiles&Directory
Disable DirectFlex by importing:VMware UEM FlexEngine Advanced DirectFlex Settings.admx
template and selecting ‘Enable’
2
Run ProfileUnity ConfigReport and Review
1
7
Enable DirectFlex (Set to Disable)
8
Configure printer/drivemappings, etc.

T E CHN I C A L WH I T E P A P ER / 1 5
4.1 ProfileUnity Configuration Report
ProfileUnity uses “Filters” to determine what function needs to be applied to what user. These filters can be complex but must be reviewed to determine any special uses cases for delivery of functions. Examples would be like PCoIP remote machine IP being used for printer mappings.
It is recommended to get the ProfileUnity Configuration PDF from the client prior to any SOW being written. The PDF holds the complete configuration of ProfileUnity. This can be used to determine everything that ProfileUnity is doing for the client. Drive Mapping, Folder Redirection, Printer Mapping and all functions are shows in this PDF.
A full understanding of what ProfileUnity is doing for the client is required before transition to VMware UEM. ProfileUnity has the ability to move certain parts of the profile between OS’ and different profile types. Like Windows XP (v1 Profile) to Windows 8.1 (v2.1 Profile). ProfileUnity Filters may be in use to detect these OS and save different parts of the Persona to different locations. To export the ProfileUnity Configuration PDF you will need to load the ProfileUnity Management Console (Web Interface) and select the magnifying glass icon.
Figure 22. ProfileUnity Management Console
Figure 23. Download ProfileUnity PDF/Configuration file
Figure 24. Example ProfileUnity Configuration Page
Notice icons with RED numbers. These are the features that are active for your client. Modules that use Elevation: Privilege Elevation, Application Restrictions, Portability (If needed for HKLM), User Defined Scripts, Application Launcher, Registry. FlexApp is the Application Packaging Technology. Examine what advance features have been configured and make note of them. Configured mapped printers or drive mappings will need to be re-setup in UEM once your migration is completed.

T E CHN I C A L WH I T E P A P ER / 1 6
4.2 Disable DirectFlex
Only during the migration, DirectFlex needs to be disabled in order to save all application settings at log off. Use the ‘VMware UEM FlexEngine Advanced DirectFlex Settings.admx’ template to configure DirectFlex as disabled and to process DirectFlex Config Files at logon and log off. Figure 25 gives an example of this policy that should be disabled. To disable this policy, you need to select ‘Enabled’.
Note: Contact VMware support at https://www.vmware.com/support/contacts/ to obtain the “VMware UEM FlexEngine Advanced DirectFlex Settings.admx” template. Don’t be confused by the imported policy of ‘DirectFlex – advanced settings’ (shown in Figure 25) which stems from the ‘VMware UEM FlexEngine.admx’ template.
Figure 25. Not the correct policy as mentioned above.
The correct policy is shown in Figure 26 and you will ‘Enable’ to disable DirectFlex:
Figure 26. Advanced policy setting to disable DirectFlex.

T E CHN I C A L WH I T E P A P ER / 1 7
4.3 Run ProfileUnity and UEM side-by-side to migrate the user profile
Run ProfileUnity and UEM side by side during a specific period to allow all users to log in/log off at least once. To do this make sure you have the UEM GPO linked where your View Pools will be pointing to. Additionally, the ProfileUnity service should be running and the .INI should be in-place.
Figure 27. UEM GPO linked Figure 28. Horizon View Pool pointing to shared OU
Once UEM GPO is in-place log in and log off with a test user to make sure the settings are migrated successfully. After all the ProfileUnity profiles are successfully migrated to UEM, continue with the next section and disable ProfileUnity.

T E CHN I C A L WH I T E P A P ER / 1 8
4.4 ProfileUnity, Configure folder redirection Figure 29. Editing UEM Policy for Redirection Figure 30. Folders for redirect
ProfileUnity handles folder redirection. Review the ProU PDF to see what folders have been redirected. There will be no “.v2” with ProfileUnity. That is only if they were using roaming profiles or maybe View Persona Manager.
ProfileUnity can handle AppData and AppData Local in several ways.
• Folder Redirection to a UNC Path • Folder Redirection to a Drive that is mapped to a UNC Path – Helps with Compatibility of App • Portability – ZIP/Unzip technology
Configure Folder Redirection GPO using the standard Windows policy settings as shown in Figure 29 and Figure 30. To do this, create a new GPO or utilize the existing UEM GPO that contains Folder Redirection settings for all folders that are currently redirected with the ProfileUnity.
Note: Just the folders that contain User Data (Documents, Desktop, Downloads, Music, Pictures and Videos) should be redirected. All the other folders (like AppData) should NOT be redirected, because UEM manages those folders.
T E CHN I C A L WH I T E P A P ER / 1 9
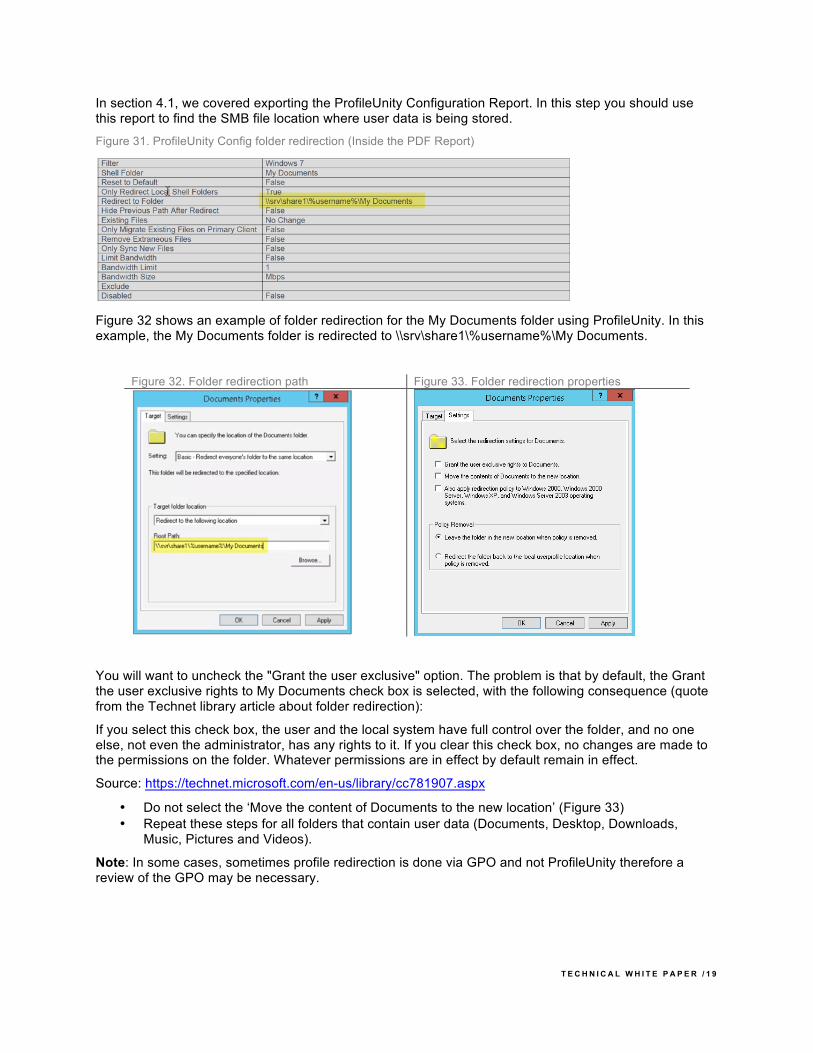
In section 4.1, we covered exporting the ProfileUnity Configuration Report. In this step you should use this report to find the SMB file location where user data is being stored.
Figure 31. ProfileUnity Config folder redirection (Inside the PDF Report)
Figure 32 shows an example of folder redirection for the My Documents folder using ProfileUnity. In this example, the My Documents folder is redirected to \\srv\share1\%username%\My Documents.
Figure 32. Folder redirection path Figure 33. Folder redirection properties
You will want to uncheck the "Grant the user exclusive" option. The problem is that by default, the Grant the user exclusive rights to My Documents check box is selected, with the following consequence (quote from the Technet library article about folder redirection):
If you select this check box, the user and the local system have full control over the folder, and no one else, not even the administrator, has any rights to it. If you clear this check box, no changes are made to the permissions on the folder. Whatever permissions are in effect by default remain in effect.
Source: https://technet.microsoft.com/en-us/library/cc781907.aspx
• Do not select the ‘Move the content of Documents to the new location’ (Figure 33) • Repeat these steps for all folders that contain user data (Documents, Desktop, Downloads,
Music, Pictures and Videos).
Note: In some cases, sometimes profile redirection is done via GPO and not ProfileUnity therefore a review of the GPO may be necessary.

T E CHN I C A L WH I T E P A P ER / 2 0
After selecting ‘OK’ and you have chose not to apply the redirection policy to older platforms such as Windows 2000, XP, 2003 you will be presented with the following dialog box (Figure 34):
Figure 34. Folder redirection properties warning
Select ‘Yes’ to continue.
Note: After you select ‘OK’ on the dialog box if you re-open the properties of a folder you will see a similar image as shown in Figure 35:
Figure 35. Folder redirection confirmation
Take note of the yellow highlight section that it matches the naming format you were looking for.
T E CHN I C A L WH I T E P A P ER / 2 1
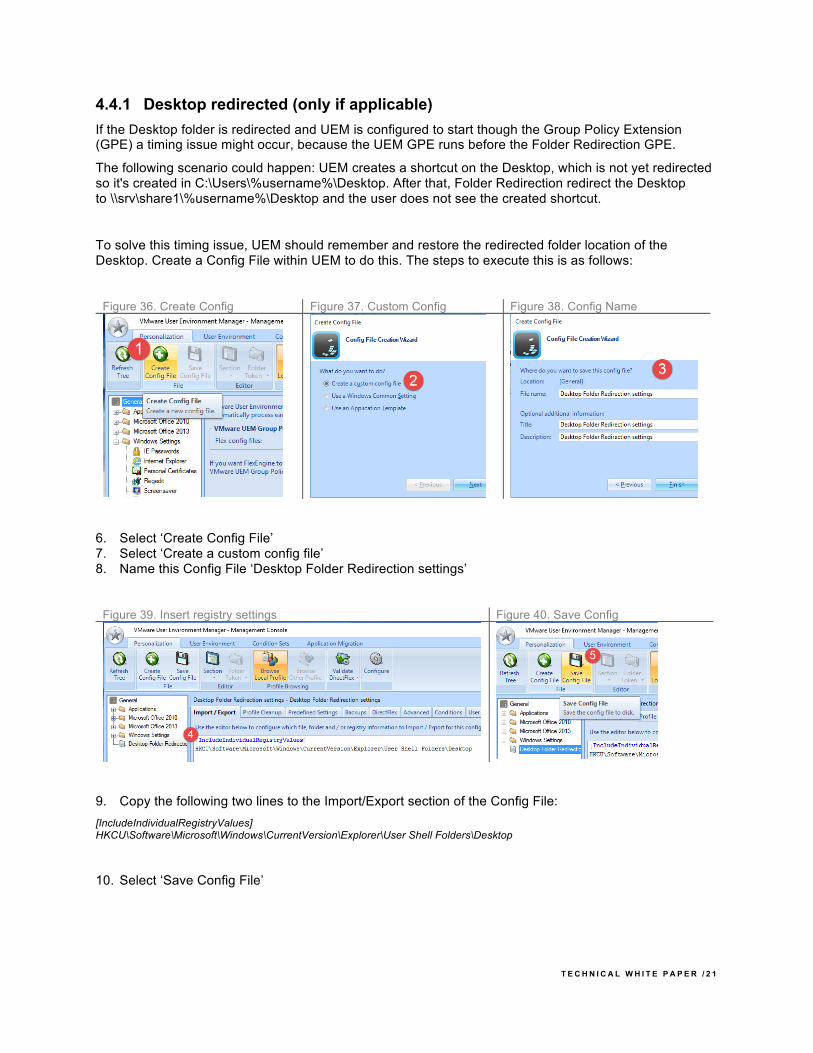
4.4.1 Desktop redirected (only if applicable) If the Desktop folder is redirected and UEM is configured to start though the Group Policy Extension (GPE) a timing issue might occur, because the UEM GPE runs before the Folder Redirection GPE.
The following scenario could happen: UEM creates a shortcut on the Desktop, which is not yet redirected so it's created in C:\Users\%username%\Desktop. After that, Folder Redirection redirect the Desktop to \\srv\share1\%username%\Desktop and the user does not see the created shortcut.
To solve this timing issue, UEM should remember and restore the redirected folder location of the Desktop. Create a Config File within UEM to do this. The steps to execute this is as follows:
Figure 36. Create Config Figure 37. Custom Config Figure 38. Config Name
6. Select ‘Create Config File’ 7. Select ‘Create a custom config file’ 8. Name this Config File ‘Desktop Folder Redirection settings’
Figure 39. Insert registry settings Figure 40. Save Config
9. Copy the following two lines to the Import/Export section of the Config File: [IncludeIndividualRegistryValues] HKCU\Software\Microsoft\Windows\CurrentVersion\Explorer\User Shell Folders\Desktop
10. Select ‘Save Config File’

T E CHN I C A L WH I T E P A P ER / 2 2
4.5 Disable ProfileUnity
This last step involves disabling/removing ProfileUnity.
Step 1. If applies remove ProfileUnity from master image or Physical system: Option A.
• Run uninstall.vbs from netlogon\profileunity folder
• If this does not work. Run CMD elevated (Administrator) and this command:
• c:\windows\system32\wscript.exe \\server\netlogon\uninstall.vbs
Option B.
• Remove Profile Unity files on the desktop:
• Replace userinit.exe in the registry:
1. HKEY_LOCAL_MACHINE\SOFTWARE\Microsoft\Windows NT\CurrentVersion\Winlogon
2. Replace: C:\Program Files\ProfileUnity\userinit.exe
3. With: C:\Windows\System32\userinit.exe
Note: Please verify, the userinit.exe is still in C:\Windows\System32 and hasn’t been removed.
Delete profile Unity folder - C:\Program Files\ProfileUnity
Step 2. Delete the GPO Step 3. Delete Profile Unity Folder (usually in netlogon share) Step 4. Restart
4.1 Extra Configurations The last step needed to be executed is to re-create any custom printer/drive mappings that ProfileUnity was managing. In some cases, you may have an enforced policy with ProfileUnity to elevate privileges. These special use-cases can be discovered in the exported PDF report. For example, an elevation use-case means an application such as Quick Books only runs as a local admin. Another example is if an application needed adjustments the registry values under HKLM.
5. About the Authors and Contributions Jeremy Wheeler, Consulting Architect with the VMware End-User Computing Professional Services team, created this paper.
VMware would like to acknowledge the following people for their contributions to this document:
• Devon Cassidy, Technical Support Engineer End User Computing, Global Tech Lead, VMware
• Pim van de Vis, Technical, IT Infrastructure Architect, VMware