u s in g az u r e + ai to d e t e c t e m ot io n · u s in g az u r e + ai to d e t e c t e m ot...
TRANSCRIPT

USING AZURE + AI TO DETECT EMOTIONUSING AZURE + AI TO DETECT EMOTIONBERND VERST (@BERNDVERST)BERND VERST (@BERNDVERST)
DEVELOPER ADVOCATE, MICROSOFTDEVELOPER ADVOCATE, MICROSOFT
In this workshop we will build a Pythonapp that uses Cognitive Services APIs todetect emotions in faces and then store
the emotions detected.

RESOURCESRESOURCESEverything covered here is available at
AKA.MS/HACKCBSWORKSHOPAKA.MS/HACKCBSWORKSHOP

WHAT ARE WE BUILDING?WHAT ARE WE BUILDING?Client
Takes a photo from our webcamSends the photo to our Backend API
Server
Receives the photo, detects faces andemotionsStores the emotions in a database

AZURE TECHNOLOGIESAZURE TECHNOLOGIESAzure App ServiceCognitive ServicesCosmosDB

OPEN SOURCE TECHNOLOGIESOPEN SOURCE TECHNOLOGIESPython 3.7FlaskOpenCV

PREREQUISITESPREREQUISITESPython 3.7Microsoft Azure AccountVisual Studio CodePython Extension for Visual Studio CodeAzure App Service Extension for Visual StudioCodeAzure Cosmos DB Extension for Visual StudioCode

LET'S GET STARTEDLET'S GET STARTED

BUILD AN APP TO TAKE A PHOTOBUILD AN APP TO TAKE A PHOTO
Create picturetaker.py with code:
pip3 install opencv-python
import cv2 cam = cv2.VideoCapture(0) cv2.namedWindow('Press space to take a photo') while True: ret, frame = cam.read() cv2.imshow('Press space to take a photo', frame) key = cv2.waitKey(1) if key%256 == 32: break cam.release() cv2.destroyAllWindows()
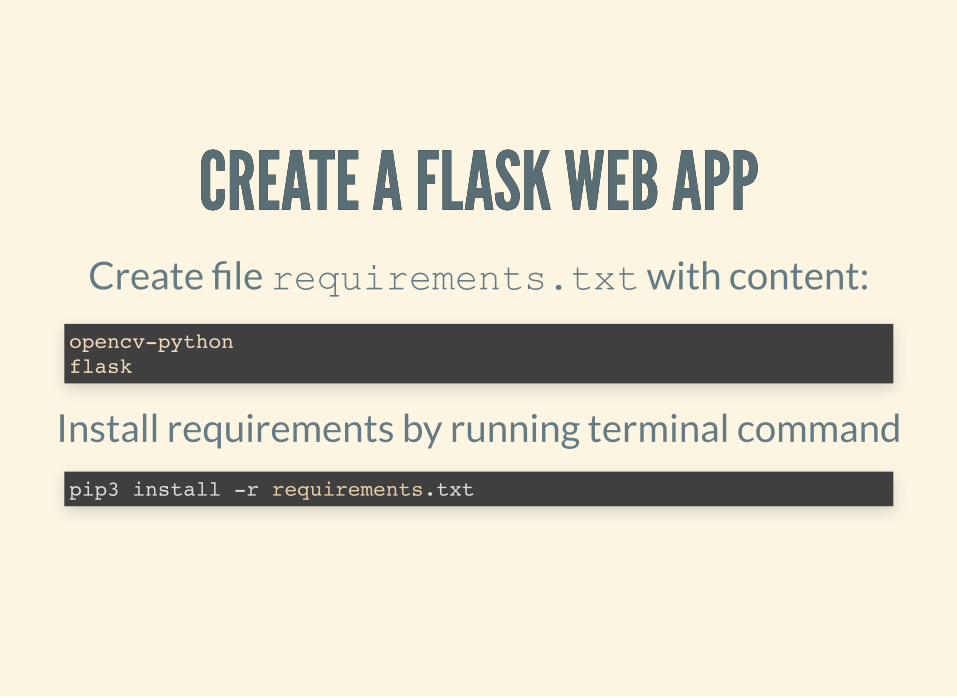
CREATE A FLASK WEB APPCREATE A FLASK WEB APPCreate �le requirements.txt with content:
Install requirements by running terminal command
opencv-python flask
pip3 install -r requirements.txt

CREATE A FLASK WEB APP (CONTINUED)CREATE A FLASK WEB APP (CONTINUED)Create a �le called app.py with code:
from flask import Flask app = Flask(__name__) @app.route('/')def home(): return 'Hello World'

DEPLOYING TO AN APP SERVICEDEPLOYING TO AN APP SERVICEUsing Visual Code and the App Service extension we
are deploying our web app to the cloud.
Detailed steps

ADD A REST (WEB) API ROUTE TO THEADD A REST (WEB) API ROUTE TO THEFLASK APPFLASK APP
We want to be able to receive image data
In app.py add imports:
Add code
from flask import Flask, request import base64
@app.route('/image', methods=['POST'])def upload_image(): json = request.get_json() base64_image = base64.b64decode(json['image']) return 'OK'

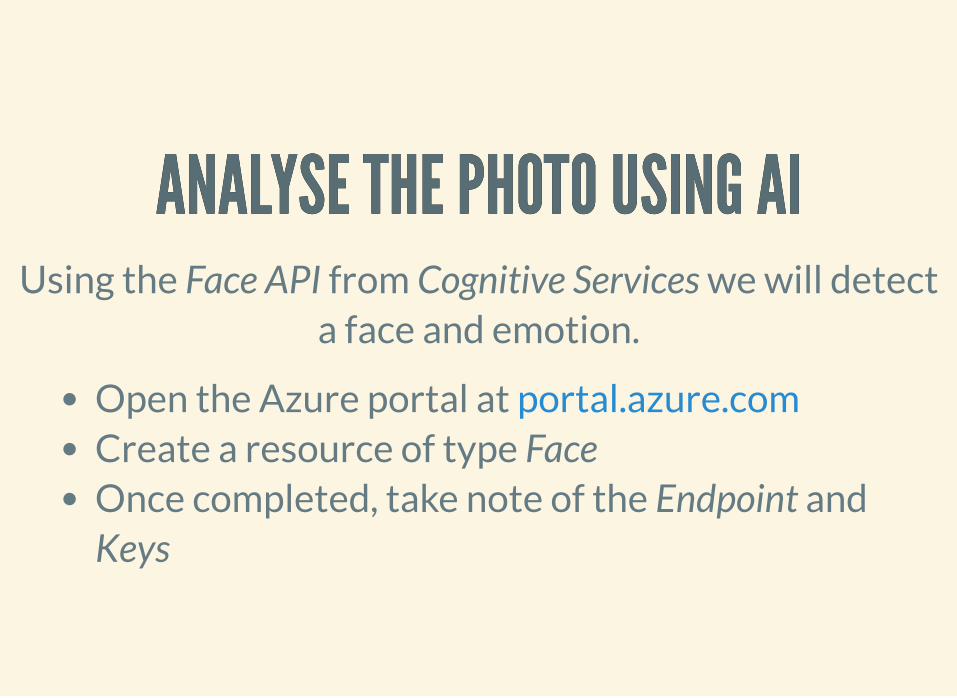
ANALYSE THE PHOTO USING AIANALYSE THE PHOTO USING AIUsing the Face API from Cognitive Services we will detect
a face and emotion.
Open the Azure portal at Create a resource of type FaceOnce completed, take note of the Endpoint andKeys
portal.azure.com

ANALYSE THE PHOTO USING AIANALYSE THE PHOTO USING AI(CONTINUED)(CONTINUED)
Add the Face API SDK to requirements.txt by
adding the line
Install the requirements with
azure-cognitiveservices-vision-face
pip3 install -r requirements.txt

ANALYSE THE PHOTO USING AIANALYSE THE PHOTO USING AI(CONTINUED)(CONTINUED)
Add imports to app.py
Add two variables:
from azure.cognitiveservices.vision.face import FaceClient from msrest.authentication import CognitiveServicesCredentials import io import uuid
face_api_endpoint = 'https://centralus.api.cognitive.microsoft.comface_api_key = '<key>'
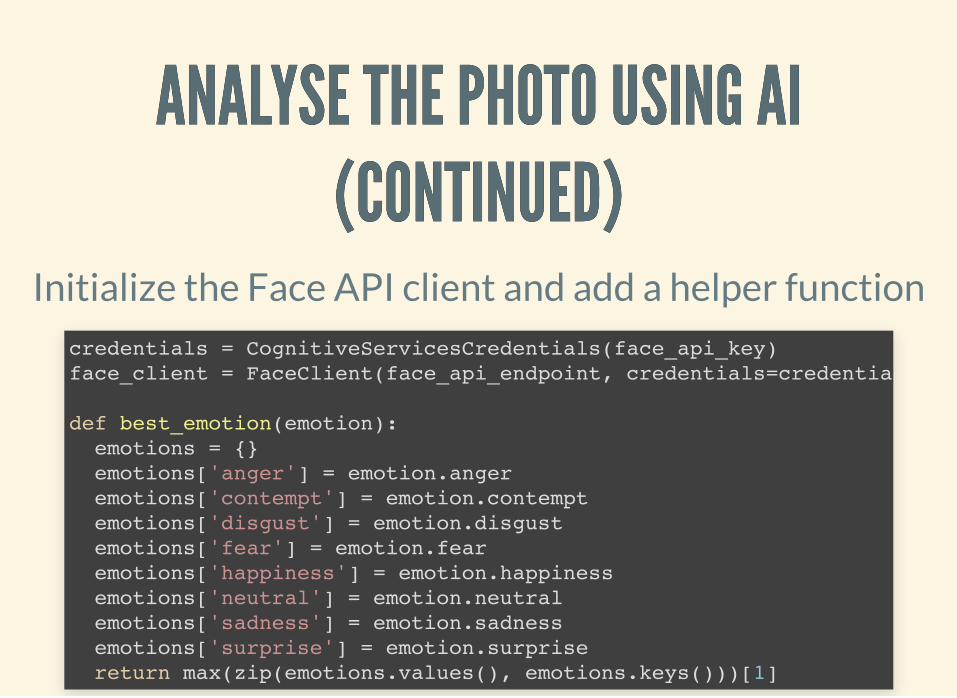
ANALYSE THE PHOTO USING AIANALYSE THE PHOTO USING AI(CONTINUED)(CONTINUED)
Initialize the Face API client and add a helper function
credentials = CognitiveServicesCredentials(face_api_key) face_client = FaceClient(face_api_endpoint, credentials=credentia def best_emotion(emotion): emotions = {} emotions['anger'] = emotion.anger emotions['contempt'] = emotion.contempt emotions['disgust'] = emotion.disgust emotions['fear'] = emotion.fear emotions['happiness'] = emotion.happiness emotions['neutral'] = emotion.neutral emotions['sadness'] = emotion.sadness emotions['surprise'] = emotion.surprise return max(zip(emotions.values(), emotions.keys()))[1]

ANALYSE THE PHOTO USING AIANALYSE THE PHOTO USING AI(CONTINUED)(CONTINUED)
Update the upload_image function by adding this
code snippet before the return statement.
image = io.BytesIO(base64_image) faces = face_client.face.detect_with_stream(image, return_face_attributes=['emotion']) for face in faces: doc = { 'id' : str(uuid.uuid4()), 'emotion': best_emotion(face.face_attributes.emotion) }

SAVE THE FACE DETAILS TO A DATABASESAVE THE FACE DETAILS TO A DATABASEWe will store data in a Cosmos DB database. Let's
create one.
Database workshopCollection facesPartition key blankInitial Throughput 400
Detailed instructions

SAVE THE FACE DETAILS TO A DATABASESAVE THE FACE DETAILS TO A DATABASE(CONTINUED)(CONTINUED)
Add the Cosmos SDK to the requirements.txt
Install the requirements
azure.cosmos
pip3 install -r requirements.txt

SAVE THE FACE DETAILS TO A DATABASESAVE THE FACE DETAILS TO A DATABASE(CONTINUED)(CONTINUED)Import the SDKs
Initialize the Cosmos DB client
Using the Cosmos DB extension, get the connectionstring and replace the variable values.
import azure.cosmos.cosmos_client as cosmos_client
cosmos_url = '' cosmos_primary_key = '' cosmos_collection_link = 'dbs/workshop/colls/faces' client = cosmos_client.CosmosClient(url_connection=cosmos_url, auth = {'masterKey': cosmos_p


SAVE THE FACE DETAILS TO A DATABASESAVE THE FACE DETAILS TO A DATABASE(CONTINUED)(CONTINUED)
Now use the Cosmos DB SDK
In the upload_image function, inside the loop after
the doc is created update the code:
Deploy the code using the App Service extension.
...for face in faces: ... client.CreateItem(cosmos_collection_link, doc) ...

CALL THE WEB API FROM THE PHOTOCALL THE WEB API FROM THE PHOTOTAKING APPTAKING APP
Add requests to requirements.txt and install via
Add these imports to picturetaker.py
pip3 install -r requirements.txt
import requests import base64
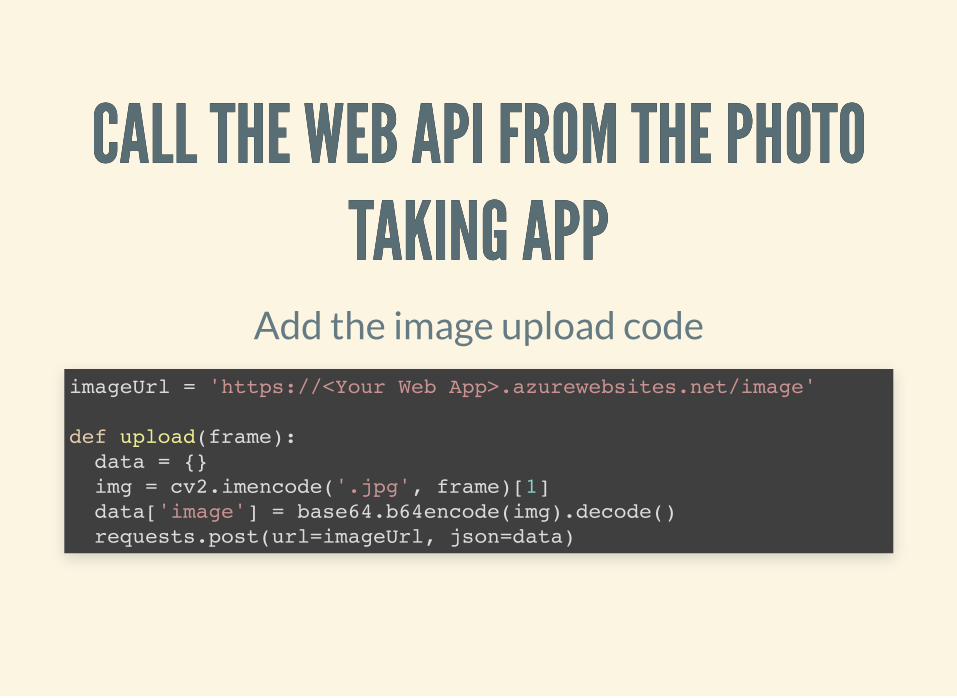
CALL THE WEB API FROM THE PHOTOCALL THE WEB API FROM THE PHOTOTAKING APPTAKING APP
Add the image upload code
imageUrl = 'https://<Your Web App>.azurewebsites.net/image' def upload(frame): data = {} img = cv2.imencode('.jpg', frame)[1] data['image'] = base64.b64encode(img).decode() requests.post(url=imageUrl, json=data)

CALL THE WEB API FROM THE PHOTOCALL THE WEB API FROM THE PHOTOTAKING APPTAKING APP
Add a call to the upload function.
Start the Debugger
... if k%256 == 32: upload(frame) break ...

CREATE A WEB PAGE TO VIEW THE RESULTSCREATE A WEB PAGE TO VIEW THE RESULTSCreate a template to display the emotions stored in the
DB
Create a folder templates and �le home.htmlwithin that folder.
<!doctype html><html> <body> <table border = 1> <tr> <td>Emotion</td> </tr> {% for row in result %} <tr> <td> {{ row.emotion }} </td> </tr> {% endfor %}

</table> </body></html>
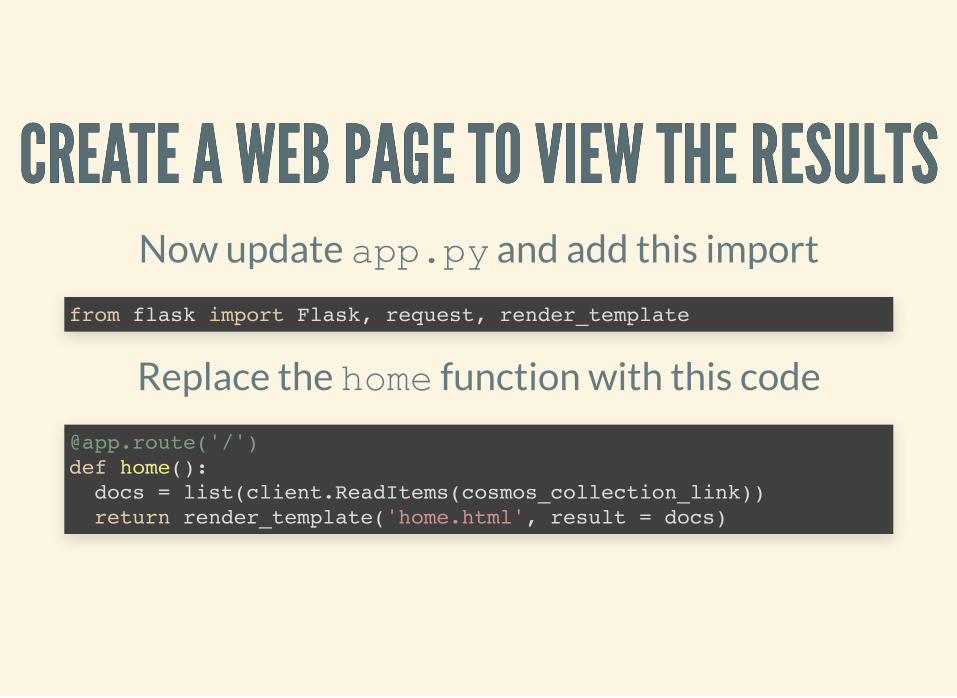
CREATE A WEB PAGE TO VIEW THE RESULTSCREATE A WEB PAGE TO VIEW THE RESULTSNow update app.py and add this import
Replace the home function with this code
from flask import Flask, request, render_template
@app.route('/')def home(): docs = list(client.ReadItems(cosmos_collection_link)) return render_template('home.html', result = docs)

CLEANING UPCLEANING UPDelete the resource group we created by visiting the
.Azure Portal

THANK YOU!THANK YOU!Everything covered here is available at
You can follow me on social media at @berndverst
AKA.MS/HACKCBSWORKSHOPAKA.MS/HACKCBSWORKSHOP