u p u g ser uide - retro-kit
TRANSCRIPT

High Speed serial data transfer for the BBC B and Master Series |by Martin B
USER
PORT
UTILITIES
ROM
SOFTWARE
V5.1R
USER GUIDE

2
Contents Introduction ...................................................................................................................................... 5
What you need .............................................................................................................................. 5
The custom BBC Micro “User Port” to RS-232 cable ....................................................................... 6
9-pin RS-232 UPURS cable.......................................................................................................... 6
Parts list..................................................................................................................................... 6
The serial port ............................................................................................................................... 7
Legacy RS-232 serial ports.......................................................................................................... 7
A USB to RS-232 serial cable ...................................................................................................... 7
Serial Port assignments .............................................................................................................. 7
Installing the UPURS suite in the BBC Micro ....................................................................................... 8
Notes on using UPURS from disc .................................................................................................... 8
Installing UPURS to Sideways RAM ................................................................................................ 8
Installing UPURS into a spare Sideways ROM socket ...................................................................... 8
Getting up and running with UPURS and an FTDI USB to RS232 cable ................................................ 9
Installing the FTDI drivers in Windows ........................................................................................... 9
Uninstalling older FTDI drivers ................................................................................................... 9
Installing the latest FTDI drivers for Windows .......................................................................... 12
Installing the FTDI drivers in Linux................................................................................................ 13
PC side software .............................................................................................................................. 14
Software for Windows ................................................................................................................. 14
Configuring the settings ........................................................................................................... 15
Software for Linux ....................................................................................................................... 16
Configuring the settings ........................................................................................................... 17
Using UPURS ................................................................................................................................... 18
Known Incompatibilities .............................................................................................................. 18
Overview ..................................................................................................................................... 18
Creating a physical floppy disc on the BBC Micro from a received disc image ............................... 19
Creating a disc image from a physical floppy disc ......................................................................... 21
For Windows ........................................................................................................................... 21
For Linux .................................................................................................................................. 22
Advanced options .................................................................................................................... 24
UPXSSD Error codes ................................................................................................................. 25
Using *UPLOAD ........................................................................................................................... 26

3
*UPLOAD <addr> ..................................................................................................................... 27
*UPLOAD @............................................................................................................................. 28
*UPLOAD R<id> ....................................................................................................................... 28
Extracting ROM images using *UPXROM...................................................................................... 29
Usage ...................................................................................................................................... 29
Listing current ROMs ............................................................................................................... 29
Exporting a single ROM ............................................................................................................ 30
Exporting multiple ROMs (Advanced users).............................................................................. 30
UPCFS.............................................................................................................................................. 32
About UEF files ............................................................................................................................ 32
Decompressing a UEF file ......................................................................................................... 32
UPCFS Compatibility .................................................................................................................... 32
Using *UPCFS .............................................................................................................................. 33
Supported commands with UPCFS ........................................................................................... 33
Loading a program from UEF on a BBC Micro ............................................................................... 34
Loading Frogger from Superior Software.................................................................................. 34
Loading Psycastria 2 ................................................................................................................. 34
Reporting issues with UEF files .................................................................................................... 34
Troubleshooting .............................................................................................................................. 35
General connectivity issues.......................................................................................................... 35
Resolution ............................................................................................................................... 35
Clear to Send responds but data will not transfer correctly .......................................................... 35
Resolution ............................................................................................................................... 35
BBC Micro reports “No Rx Data!” ................................................................................................. 35
Resolution ............................................................................................................................... 35
When receiving data, the screen went blank and now the computer says “BBC Computer 16K”
even when I press CTRL+BREAK. .................................................................................................. 36
Resolution ............................................................................................................................... 36
After receiving data, I press BREAK and see a “Bad Sum” error. ................................................... 36
Resolution ............................................................................................................................... 36
When listing the ROMs in my BBC Micro with UPXROM, I see duplicate entries and the listing
differs from *ROMS ..................................................................................................................... 36
Resolution ............................................................................................................................... 36
When writing to a floppy I see a “Write error” message............................................................... 36

4
Resolution ............................................................................................................................... 36
When using UPDSD I see a “Write error” but UPSSD works just fine with the same disc. .............. 37
Resolution ............................................................................................................................... 37
When using any of the UPURS disc tools to create a disc, I still see a “Write error”. ..................... 37
Resolution ............................................................................................................................... 37
UPURS reports “Track No. >79” when I try to write an image to my floppy disc. .......................... 37
Resolution ............................................................................................................................... 37
My disc image transfers are losing bytes when transferring using UPXSSD or UPXDSD ................. 37
Resolution ............................................................................................................................... 38
My disc image transfers are gaining bytes when transferring using UPXSSD or UPXDSD ............... 38
Resolution ............................................................................................................................... 38
UPCFS reports “Chunk Type? XXYY” when attempting to load a program. .................................... 38
Resolution ............................................................................................................................... 38
UPCFS appears to work but then the cassette motor relay clicks and its light comes on ............... 39
Resolution ............................................................................................................................... 39
Special Thanks ................................................................................................................................. 40

5
Introduction The UPURS suite provides a set of tools for the transfer of data to and from the BBC Micro series of
computers using a high speed serial link.
The high speed serial link is implemented using a custom cable designed to connect to the BBC Micro
computers’ User Port, presenting a standard 9-pin serial plug to the external system.
Transfer speeds of 115k baud can be achieved to and from the BBC Micro using the user port cable,
reliably operating at speeds far in excess of the on board RS-423 serial port.
The accompanying software is designed to import and export single sided disc (ssd) and double sided
disc (dsd) images that are used to archive software for the BBC Micro computer systems. Advanced
features of UPURS allow data to be loaded directly into the memory of the BBC Micro and for ROM
banks to be exported out to a connected computer.
The sections of the guide referring to the Linux operating system were created whilst testing UPURS
using the Ubuntu 11.04 distribution (Kernel Version: 2.6.38-8), installed on an x36 (32-bit) PC. This
specific Linux distribution and kernel version is not a prerequisite – it simply happens to be the
version that the tests were conducted with for the transfer utilities. Other versions of Linux are
likely to work just as well.
What you need To operate the UPURS suite, you need the following items:
1. A copy of the UPURS software on disc or an EPROM with the UPURS ROM image on it.
2. The custom BBC Micro User Port to RS-232 Serial cable.
3. A PC with a spare Serial port OR a suitable USB to RS-232 serial cable (FTDI chipset based
cables are recommended)
4. A computer with Windows, OS X, Linux or any other suitable operating system supporting
legacy serial port speeds up to 115200 baud OR the use of the USB to RS-232 serial cable.
5. Suitable PC side software to operate the serial interface.

6
The custom BBC Micro “User Port” to RS-232 cable The custom cable can be sourced from the UPURS suite author or can be made up by a competent
electronics enthusiast relatively quickly.
9-pin RS-232 UPURS cable
Fig. 1 - The custom 9-pin UPURS serial cable
Parts list
The component list for the 9-pin UPURS cable can be made up from the suggested RS Components
stock numbers is as follows:
1. 2 x 0.25W 4.7k ohm resistors (RS 386-919)
2. 2 x 1N4148 diode (or similar) (RS 670-8858)
3. 1 x D-Sub connector solder 9-pin F (RS 692-7790)
4. 1 x 20way bump polarised skt w/strain relief (RS 192-7388)
5. 1x Connector, unshielded cable clamp, size 1 (RS 680-9213)
6. A length of 20 way IDC ribbon cable* (RS 289-9896)
* The made up cable has been successfully tested up to a maximum length of 2m. The suggested RS
order code for the IDC ribbon cable is for a roll of 5m.

7
The serial port If you have a computer with legacy RS-232 serial ports capable of communicating at 115200 baud
then version 4 of UPURS can be used by plugging the UPURS cable directly into one of the spare
ports on the computer. For more modern computers that do not have serial ports as standard or you
are using UPURS version 3, a USB to RS-232 serial cable is required.
Legacy RS-232 serial ports
Legacy RS-232 ports can either be 9-pin or 25-pin male connectors. To use a 25-pin serial port, add a
9-pin male to 25-pin female serial adapter (suggested RS part: RS 218-289) which will convert the
port to a 9-pin type.
A USB to RS-232 serial cable
When using a USB to RS-232 serial cable, the author only recommends cables that use the FTDI USB
RS-232 chipset.
Drivers for an FTDI chipset based USB to RS-232 cable supporting Windows, Linux and Mac OS X can
be found on the FTDI website at the following address: http://www.ftdichip.com/Drivers/VCP.htm.
As of the 25th of August 2011, there are two versions available on the site. 2.08.14 has been
superseded by a beta release from FTDI of version 2.08.17 which addresses a timing related “data
leak” on the Windows drivers.
Suitable cables are currently available from Tronisoft Ltd and USBnow at the following address:
0.9m cable from Tronisoft Ltd
1.8m cable from USBnow
Serial Port assignments
When using legacy RS-232 serial ports, under Windows, they will always be referenced as COM1 and
COM2. If your Windows computer does not have legacy ports, COM1 and COM2 will be unavailable.
Linux generally refers to legacy serial ports as /dev/ttyS0 and /dev/ttyS1 where available.
With a USB to RS-232 serial adapter, the serial port “COM port” assignments are set at the time of
installation by the operating system which assigns the first available “COM port” number to the
adapter. This could be COM3, COM4, COM5 etc. On Linux, these USB RS232 serial ports are assigned
slightly differently and as such, they can be assigned from 0 onwards as the device name differs from
legacy serial ports e.g. /dev/ttyUSB0 as opposed to /dev/ttyS0 for a legacy port.
8
Installing the UPURS suite in the BBC Micro The UPURS suite can be used in three different ways on the BBC Micro. Either as tools directly from
disc, as a ROM image loaded into Sideways RAM or thirdly as a permanent EPROM installed within
the BBC Micro in an available Sideways ROM socket.
Notes on using UPURS from disc When using the UPURS utilities from disc, please check that the disc is “Write protected” to ensure
that you do not overwrite the utilities whilst transferring data from the connected computer.
Installing UPURS to Sideways RAM To install the UPURS image from the UPURS utility disc into a suitable SRAM bank differs depending
on the SRAM utilities each BBC Micro has. Using the UPURS suite itself is an option using the
*UPLOAD command to load the UPURS ROM image into Sideways RAM from a connected computer.
With the UPURS disc in the currently active drive, simply enter *UPLOAD R<id> where id is the value
of the Sideways ROM bank you wish to use and initiate the transfer of the ROM from the connected
computer. For more information on this, see the section covering the use of *UPLOAD.
Alternatively, with the UPURS disc in the currently active drive, and a DFS ROM that contains
suitable SRAM tools (e.g. DFS 2.26), the command to load the UPURS ROM image into SRAM would
look like this:
*SRLOAD UPURS 8000 <id>
The value of id in both examples must be between 0 and 15 (or F depending on which tool is being
used) and be a valid bank of Sideways RAM. Please refer to the documentation for your SRAM tools
for further information.
Installing UPURS into a spare Sideways ROM socket Creating an EPROM with the UPURS ROM image is outside of the scope of this user guide and it is
assumed that users who are interested in this method of using UPURS are capable of creating an
EPROM using a suitable EPROM programmer and therefore need no instruction.
For users who have obtained a UPURS EPROM to fit into their BBC Micro, suitable instructions for
fitting an EPROM to the BBC B and B+ are available for download from 8-bit Software.

9
Getting up and running with UPURS and an FTDI USB to RS232 cable If you’re using a computer with legacy serial ports, you can skip directly to the section of the manual
covering the use of PC side software.
Installing the FTDI drivers in Windows If the FTDI drivers for MS Windows noted above are being used and their version number is 2.08.14
or earlier, it is worth noting that whilst they will work (with a minor issue1) using UPURSv3, they will
not work with UPURS v4.
At the time of writing, a full set of 32-bit and 64-bit beta drivers have been released by FTDI to fix
the issues with previous versions and they are identified as version 2.08.17. These drivers are
currently only available as BETA version drivers from FTDI and are required for correct use of UPURS
v4 with a USB to serial adapter.
The following instructions cover removing any existing FTDI drivers from a Windows PC and then
installing version 2.08.17.
Uninstalling older FTDI drivers
Windows Vista and Windows 7
Due to the introduction of “Windows Resource Protection” with Windows Vista, the un-installation
of the FTDI drivers must be done manually. The easiest method of un-installing the drivers is with
the USB-RS232 cable plugged into the PC at the time and these instructions will cover that method
of uninstalling the FTDI drivers.
To uninstall the drivers from Windows, they must be removed using the “Device Manager”. To
access the Device Manager, open the Start Menu and right click on the “My Computer” or
“Computer” entry and choose the “Manage” option.
Fig.2. Opening the Computer Management console in Windows Vista and 7
1 There is a minor bug in 2.08.14 and earlier drivers that causes data to “leak” when sending data to the BBC
Micro if the BBC Micro does not initiate the process of receiving the data within the first 5 seconds of the connecting computer initiating the send.

10
The “Computer Management” console should open and the Device Manager can be found under the
“System Tools” section.
Navigate through the device manager and expand the section covering “Ports (COM & LPT)”. If the
USB-RS232 cable is plugged in, an entry should be listed as “USB Serial Port (COMx)” where x is the
virtual COM port that has been created on the machine when the drivers were originally installed.
Fig.3 - Navigating through the device manager
To then uninstall the drivers, right click on the “USB Serial Port (COMx)” entry and choose “Uninstall”
ensuring that the “Delete the driver software for this device” has been “checked” in the
confirmation popup. Once uninstalled, unplug the USB-RS232 cable.

11
Windows XP
Uninstalling any previous versions of the FTDI drivers under Windows XP is relatively straight
forward. A small utility called FTClean is available from FTDI can be used to uninstall the drivers and
clean the related registry entries, thereby ensuring a clean install of the latest drivers.
FTClean can be downloaded from FTDI at the following address:
http://www.ftdichip.com/Resources/Utilities/FTClean.zip
Once downloaded, the contents of the zip file should be extracted to the desktop. The software once
used need not be kept and as such can be deleted after the successful installation of the new drivers.
Once the software is extracted, there should be a new folder on the desktop called FTClean. Open
the folder and double click on the file listed as FTClean or FTClean.exe.
Fig.4 - The Windows XP FTDI driver clean up tool
By clicking on the “Clean System” button, the utility will search for and uninstall the FTDI drivers and
remove all related registry entries.

12
Installing the latest FTDI drivers for Windows
Windows Vista and 7 installation procedure
1. Download the drivers.
2. Unzip the driver distribution to "C:\UPURSdrivers\" for example.
3. Open device manager as detailed in the “Uninstall” procedure for Windows Vista and 7
4. Plug in the USB-RS232 cable.
5. Choose “Skip obtaining driver software from Windows Update” in the Driver Software
installation popup. (If this does not appear, check the installer icon near the clock in the task
bar).
6. In “Device Manager” locate the “USB Serial Port” listed in “Other devices”.
7. Right click on the “USB Serial Port” entry and choose “Update Driver Software”
8. Choose to “Browse” for driver software and locate the driver folder “C:\UPURSdrivers\”
before clicking “Next”
9. The driver install should then proceed, please choose to accept any changes that the driver
installation may require.
10. Once completed, the device “USB Serial Port (COMx)” will be listed in the “Ports (COM &
LPT)” section of the device manager and be ready to use. Make a note of the COM port
listed as you will require this information later.
Windows XP installation procedure
1. Download the drivers. 2. Unzip the driver distribution to “C:\UPURSdrivers\” for example. 3. Plug in the USB-RS232 cable. 4. In the “Found new Hardware Wizard” choose “No, not this time” when telling Windows to
use “Windows Update” and click “Next”. 5. At the next screen, choose “Install from a list or a specific location” and click “Next”. 6. Choose “Don’t search. I will choose the driver to install.” and click “Next”. 7. In the “Common hardware types” selection, scroll down and choose “Ports (COM &LPT)”
and click “Next”. 8. Choose “Have Disk” and navigate to where the drivers were unzipped e.g.
“C:\UPURSdrivers\” 9. The device to be installed should be listed. Click “Next” followed by “Continue Anyway”. 10. Once installed, a second device should be found, to install this second driver repeat the
process from Step 4 onwards after which the driver installation should be complete.
13
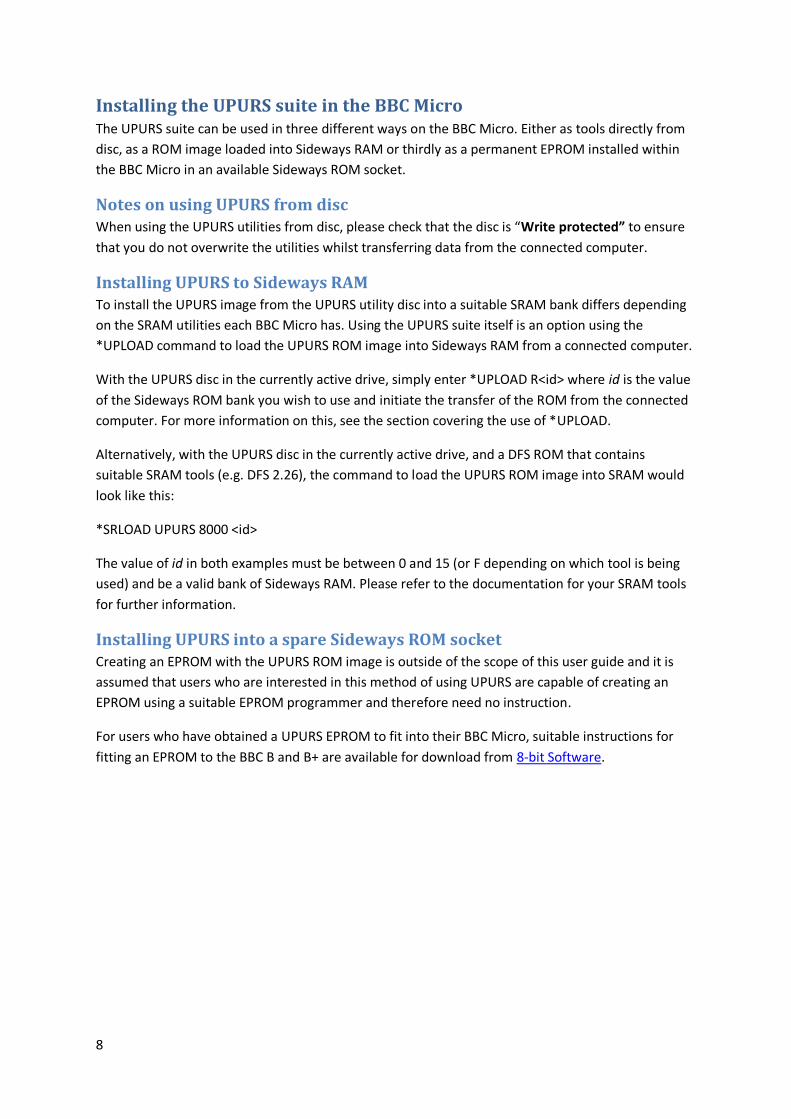
Installing the FTDI drivers in Linux From Kernel version 2.6.31 and later, the FTDI driver is already pre-installed in Linux distributions. If
you are using a Linux kernel that predates this version, you will need to install the FTDI driver as a
prerequisite step. The driver is available from the Future Technologies Devices International Ltd.
website, which is listed at the beginning of this guide.
With the FTDI driver properly installed, connect the USB to Serial adaptor cable to a spare USB port
on your Linux system. It should be automatically recognised and attached to a Virtual COM port
within the operating system.
To confirm the FTDI cable is recognised by your system, type the following command in a Terminal
window:
$ dmesg | grep FTDI
The system should respond with an output similar to figure 5.
Fig. 5 - The output from this example confirms that the operating system has detected the FTDI USB
Serial adaptor and has assigned it to the Virtual Com Port ttyUSB0.
14
PC side software Any suitable communications software capable of communicating over an RS-232 connection and
logging received data to a file should be suitable for use with the UPURS suite.
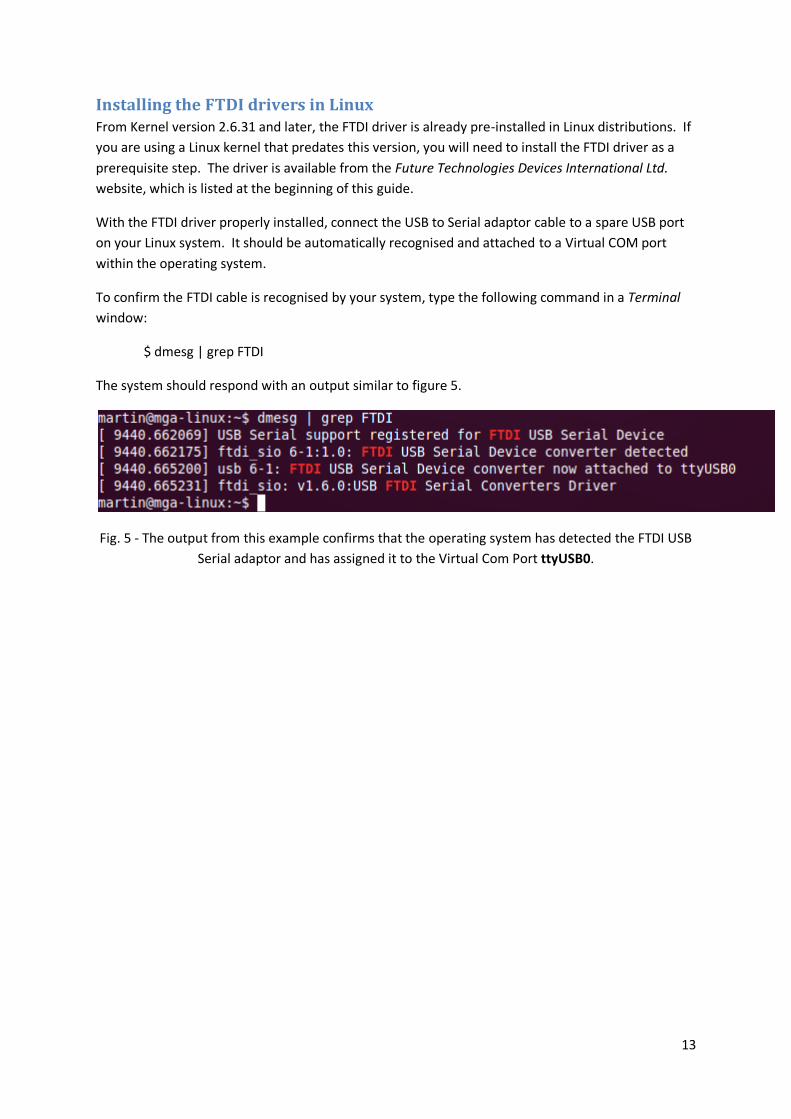
Software for Windows The author currently recommends the Hercules SETUP Utility which is available for free from HW
group at the following address.
http://www.hw-group.com/products/hercules/index_en.html
Fig. 6 - The Hercules Serial tab
The Serial tab of the Hercules utility can be used as a simple serial port terminal for the RS-232
standard. It's similar to the Hyperterminal application but with some extended functions.
Parameters :
Set the parameters of the connection (speed, parity, handshake)
Set the mode of operation (Free, PortStore test, Data, Setup)
Set and display the value of the signal on each modem line (i.e. on each RS-232 pin)
Send and display messages or commands to and from remote device
Firmware update of device (N/A)

15
Other parameters (in Right-click menu)
Display special characters (in ASCII, HEX or DEC)
Log the communication to a file
Create and send a test file...
Configuring the settings
Name – Choose the appropriate RS-232 COM port (e.g. COM4)
Baud – Set this to 115200 Baud
Data size – Set this to 8 (bits)
Parity – Set this to “none”
Handshake – Set this to RTS/CTS
Mode – Set this to “Free”.
Open|Close button
Open and Close the serial connection to the BBC Micro using the currently active parameters.
When all the correct settings have been selected, click the Open button to establish communications
between the virtual COM port and the BBC Micro.

16
Software for Linux For the purposes of testing the suite with Linux, Cutecom was selected as it offers a Graphical User
Interface and is very easy to configure. It may not be installed by default as part of your Linux
distribution but can be obtained from the usual sources. (If using a Ubuntu distribution for example,
the Ubuntu Software Center application can be used to locate, download and install it with a few
mouse clicks).
Once Cutecom is installed, launch the application with the following command from a Terminal
window:
$ sudo cutecom
You will be prompted for your password for authentication and once entered correctly, the Cutecom
application will be opened with “Super User” privileges. A screen similar to figure 3 should appear:
Fig. 7 – The Cutecom GUI

17
Configuring the settings
Confirm the parameters are as shown in the above screenshot, specifically:
Device: Type the appropriate Virtual Com port name (e.g. /dev/ttyUSB0)2
Baud : Set this to 115200 Baud
Data bits: Set this to 8 (bits)
Stop bits: Set this to 1
Parity: Set this to “none”
Handshaking: Tick the Hardware checkbox
Open for: Tick the Reading and Writing checkboxes
Tick the checkbox: Apply settings when opening
You should also:
Uncheck the Hex Output box
Ensure the file type for Send File is set to Plain
Select No Line End
Set Char Delay to 0ms.
When all the correct settings have been selected, click the Open Device button to establish
communications between the virtual COM port and the BBC Micro.
2 This is the device name assigned by the operating system and should match the device name returned by the
dmesg command previously issued. (You will need to precede the device name assigned with “/dev/”. You may have to type the device name as the drop-down list may only contain physical RS232 ports found on your system.

18
Using UPURS
Known Incompatibilities Before we start using UPURS, it’s worth noting that there is a known incompatibility with UPURS and
certain other modern storage solutions that use the User Port for their connectivity. Specifically,
storage solutions based on MMC and SD card technologies that use the User Port may clash with the
UPURS disc utilities where UPCFS may continue to work correctly.
Overview The UPURS suite has six commands allowing a user to image and create floppy discs and to load data
received directly from the User Port into memory or Sideways RAM (SRAM) and also to extract
images of Sideways ROM or RAM banks.
In addition to the disc based utilities, UPURS also provides a way of accessing UEF images of data
cassettes to load and run programs and data directly from a PC into a BBC Micro. UPURS
accomplishes this feature by providing a pseudo file system that mimics the BBC Micro’s native
Cassette File System (CFS).
*UPSSD <drv> Creates a floppy disc with the contents of the SSD image being sent.
*UPDSD <drv> Creates a floppy disc with the contents of the DSD image being sent.
*UPXSSD <drv> [F] [I] Exports the image of a physical SSD to the connecting computer.
*UPXSSD <drv> [I4|I8] Exports the image of a physical SSD to the connecting computer.
*UPXDSD <drv> [F] [I] Exports the image of a physical DSD to the connecting computer.
*UPXDSD <drv> [I4|I8] Exports the image of a physical DSD to the connecting computer.
*UPLOAD <addr> Receives data and places it into the BBC Micros memory at addr.
*UPLOAD @ Receives data and places it into the BBC Micros memory at &1900.
*UPLOAD R<id> Receives data and places it directly into the chosen SRAM bank id.
*UPXROM ? Lists all currently installed ROMs
*UPXROM <rom_id> [\] Exports the ROM located in the specified ROM bank.
*UPXROM <low> <high> Exports an inclusive range of ROM banks from low to high.
*UPCFS Prepares the BBC Micro to accept UEF files by intercepting the CFS
Using the suite should involve a similar process on all connected operating systems, the main
differences between interacting with different operating systems will be briefly described, in
particular in how this relates to receiving and sending files using the *UPxSD and *UPXxSD utilities.

19
Creating a physical floppy disc on the BBC Micro from a received disc image *UPSSD <drv>
*UPDSD <drv>
There are two commands within the UPURS suite that are designed to create a floppy disc image
from the data received over the RS-232 link called UPSSD and UPDSD. The process to send a disc
image to the BBC Micro is the same for both ssd and dsd disc images with the exception of the
choice of command on the BBC Micro.
This manual will only cover the commands used to create a Single Sided floppy disc. To create a
double sided floppy disc, simply replace UPSSD with UPDSD in the command below.
To create a floppy disc from the contents of an SSD image on the connected computer, the following
command must be issued at the BBC Micro command line:
*UPSSD <drv> where drv can be a value between 0 and 3.3
NOTE: When issuing this command, be careful to ensure that the floppy disc to be written to is pre-
formatted. The disc maybe either blank or contain data, however any data on the disc will be
overwritten.
Fig. 8 - *UPSSD awaiting data from the connected computer.
Ensure that a floppy is inserted into the correct floppy drive on the BBC Micro and then move across
to the connected computer system.
On the connected computer, using the RS-232 terminal software, the serial connection must be
“OPENed” if it hasn’t been already before choosing the option “Send a File...” or “Send File”.
3 Where UPDSD is used, the value of drv must be between 0 and 1.

20
When choosing to send a file, a dialogue box will appear, similar to those in figure 4 below, allowing
you to select a file to send to the BBC micro. Navigate to the disk image file that you wish to send
and click the Open button.
Fig.9 – The File selection screens for both Windows and Linux
Once a file has been selected, the transfer will begin immediately and the progress of the transfer
can be seen on the connecting computer. When the transfer is completed, press a key on the BBC
Micro to complete the transfer process which will flush any remaining data in the buffer to the
floppy disc and complete the transfer.
When the entire file is transferred, it will be signalled on the BBC Micro with the message “Transfer
OK”. The disc should now be ready to use.
If the transfer is interrupted prematurely by pressing a key on the BBC Micro before the transfer is
complete, the BBC Micro will report an error of “Incomplete!”.
A status of “Incomplete!” indicates that the user pressed a key on the BBC Micro before all of the
data had been sent to the BBC Micro successfully. When a user presses a key, the current buffer is
flushed to disc and is then checked to see if it is still empty. Where the buffer has data in it after
being flushed, this means that the sending computer sent data to the BBC Micro after the BBC Micro
began the transfer finalisation process thereby causing the transfer to be incomplete.

21
Creating a disc image from a physical floppy disc *UPXSSD <drv> [F]|[I[4|8]]
*UPXDSD <drv> [F]|[I[4|8]]
Creating a disc image of a physical floppy disc on the BBC Micro is achieved using one of two
commands, UPXSSD and UPXDSD. The syntax is the same for UPXSSD and UPXDSD and the examples
below will work for both commands.
To create a contiguous image of the used area of the source disc, at the command prompt on the
BBC Micro type the following command.
*UPXSSD <drv> where drv can be a value between 0 and 3.4
The BBC Micro will start the process of sending data to the connected computer but will wait for the
user to signal that the connected computer is ready to receive. At this point, do not press the [SPACE
BAR].
For Windows
Moving to the connected computer, using the data settings for the Hercules software outlined
above, choose the “Log to File...” feature from the context menu available on the right click of your
mouse. Choose a suitable name for the disc image e.g. test.ssd and click open.
Fig. 10 - Configuring the Log to file options using the Hercules menu
Next, use the key combination of CTRL+L or the context menu option of “Log Enable” to begin
logging any data received by the connected computer to the file ‘test.ssd’ then Open the Serial
connection to the BBC Micro before finally, moving back to the BBC Micro, press the [SPACE BAR] to
commence sending data to the connected computer.
4 Where UPXDSD is used, the value of drv must be between 0 and 1.

22
When the BBC Micro completes the sending process, it is important to check that the number of
bytes transmitted by the BBC Micro is the same as the number received by the destination PC.
Where the number of bytes are different, please refer to the troubleshooting guide for further
information.
If the byte counts are the same, use CTRL+L key combination or the “Turn off Logging” option in the
context menu to close the received file.
For Linux
On your Linux system, click the Cutecom Open File button (labelled “…”) and a file selection dialogue
box will appear similar to figure 5 below. (You may need to uncheck the “Log to:” button to enable
this selection).
Fig. 11 - Selecting a destination for the transferred data to be stored
Navigate to where you want to store your received file and enter a suitable filename and click
“Save”. Ensure “Log to:” is selected in the drop-down box and tick the box to the left of it. Press
the [SPACE BAR] on your BBC Micro to initiate the transfer.
When the BBC Micro has completed transferring the entire disk image, it will be signalled with the
message “Image Complete”.
When the transfer is complete, double check the number of bytes sent reported by the BBC Micro
with the number of bytes received by the destination PC by checking the file size. If the byte counts
are different, please refer to the trouble shooting section for more assistance.
23
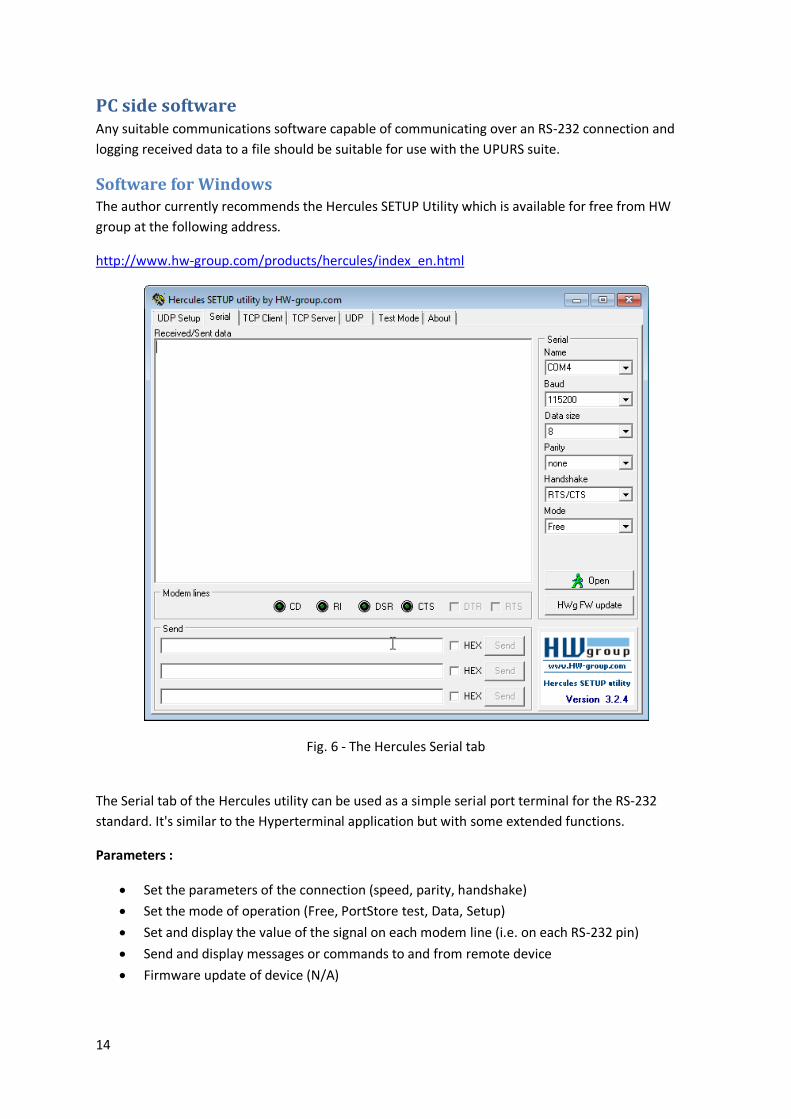
Note: If you are to receive multiple files from the BBC, you will need to uncheck the “Log to:” box
and specify a new name for each file you receive using the process described immediately above.
Fig 12 - Showing the process of imaging a single sided floppy disc using the F parameter.

24
Advanced options
UPXSSD and UPXDSD both have several advanced command line options allowing for greater control
over how a disc image is created including the recovery of data from corrupt or copy protected discs.
Parameters
No Parameters
Using UPXSSD with no parameters with create a contiguous image of the used area of the source
disc as determined by the analysis of the DFS directory held in Track 0. Any read errors will
immediately abort the process reporting ‘Fatal error’ for Track 0 errors or ‘Read error’ for any other
track.
F - Creating a full disc image
The optional parameter “F” is used to force UPXSSD and UPXDSD to create a (F)ull image of the disc
in the designated drive. This option may be useful where the directory structure on the disc may not
reflect the true contents of the disc. Any read errors will immediately abort the process reporting
‘Fatal error’ for Track 0 errors or ‘Read error’ for any other track.
NOTE: The use of “F” is recommended when archiving original software unless you are confident
that the disc has no ‘hidden’ data and the directory listing is a true reflection of the contents of the
original disc.
I, I4 and I8 - Creating a full disc image from a corrupt or irregular floppy disc
The parameters “I”, “I4” and “I8” are used to perform disc imaging, (I)gnoring any errors that may be
encountered during the read process. This allows a disc with missing, out of sequence or invalid
tracks to be imaged.
The use of “I” is the equivalent of using UPXSSD without any parameters producing a contiguous
image of the used area of the floppy disc as determined by the inspection of a valid Track 0 directory
list, “I4” and “I8” implicitly uses the “F” parameter thereby imaging an entire 40 or 80 track disc
respectively.
If a read error is encountered when attempting to read Track 0 with option “I”, the imaging process
will fail whereas, “I4” and “I8” will image the entire disc regardless of the presence of a corrupt track
0.
Where a track cannot be read, valid track data will be sent to the receiving PC but will contain a
contiguous block of bytes of the value &FA.

25
Fig. 13 - Four screenshots show the use of the I8 parameter on a floppy disc with 7 faulty tracks.
When UPXSSD encounters a fault on the floppy disc it is reading, if the “I”, “I4” or “I8” parameter are
used, the error is reported but the imaging process continues regardless in an effort to recover as
much data from the disc as is possible. Errors are reported to the user in the format of “Track?Error”
so “02?C” is reporting that track 2 has the error code “C” which represents “Sector Not Found”.
When using UPXDSD, the errors are colour coded to provide a distinction between the two sides of
the disc. Errors in red indicate an error in the primary disc surface (i.e. 0 or 1), errors in yellow
indicate an error in the secondary surface (i.e. 2 or 3)
UPXSSD Error codes
UPXSSD returns the actual floppy disc controller error code extracted from the fault byte. These
codes differ from the Acorn DFS error codes and are as follows:
4 - Clock Error
6 - Sector ID CRC Error
7 - Data CRC Error
8 - Drive Not Ready
C - Sector Not Found

26
Using *UPLOAD *UPLOAD <addr>
*UPLOAD @
*UPLOAD R<id>
The *UPLOAD function is an advanced feature of the UPURS suite allowing the direct placing of data
received from the User Port at any point in the BBC Micro’s memory map or the direct loading of a
ROM image directly into a Sideways RAM bank.
The usage of *UPLOAD is identical for both Windows and Linux and only the file selection process
differs between platforms both of which have been described in the section covering the use of the
*UPxSD commands.
The process for *UPLOAD is similar to that of the *UPxSD commands except, where those
commands write the received data directly to a floppy disc, *UPLOAD writes data to an area of RAM.
As with UPSSD and UPDSD, to finalise the transfer process, all uses of *UPLOAD require that the user
presses a key after the connected computer has completed sending data. Where the transfer is
aborted by the user pressing a key on the BBC Micro before the transfer of data is complete, the BBC
Micro will flush the buffer to memory before rechecking the buffer. If the buffer has more data in, a
transfer status message of “Incomplete!” will be reported confirming that the transfer was indeed
interrupted prematurely.
*UPLOAD <addr> and *UPLOAD @ do not support the writing of data across the TUBE to the Second
Processor memory space.
NOTE: When using *UPLOAD, please make a careful note of the size of the file that is being sent to
the BBC Micro. If the file is too large to fit into the BBC Micro’s memory, the data may overwrite
critical areas of the BBC Micro’s memory map and possibly even wrap around to &0000 causing
system settings to be overwritten resulting in significant data corruption and requiring the BBC
Micro to be powered off and on again in order to restore normal function.
The maximum size of file that can be safely received is therefore dependent on the values of PAGE
and HIMEM or if writing data directly to the screen, the values of PAGE and &7FFF.

27
*UPLOAD <addr>
To load an image or file directly into an address within the BBC Micro’s memory, you can issue the
*UPLOAD command with a hexadecimal address of the beginning of the memory space you wish to
upload the data to.
For example to *UPLOAD a data file into MODE 2 screen memory, you can issue the commands:
MODE 2
*UPLOAD 3000
NB: The example screenshots below use MODE 2 with a graphics and text window defined in order
to show the data loading process without overwriting the image data with output from *UPLOAD.
Fig. 14 - *UPLOAD 3000 command issued, waiting for data.
Fig. 15 - Data received and loaded between the values of &3000 and &6BFF.
NOTE: The address value passed to *UPLOAD must always be the address of a page boundary
within the BBC Micro’s memory so must always be of the format &xx00. For example &1900 and
&3000 are both okay but &1920 and &3040 cannot be used.

28
*UPLOAD @
*UPLOAD @ is similar to *UPLOAD <addr> except it is fixed to the address of &1900, allowing images
of programs to be uploaded into memory on BBC Micro’s with a page of &1900 which is common for
DFS based file systems.
*UPLOAD R<id>
To load a ROM image directly into Sideways RAM begins by issuing the command:
*UPLOAD R<id>
The value of id must be between the hexadecimal values of 0 and &F and be a valid bank of
Sideways RAM.
Fig. 16 - *UPLOAD awaiting data from the connected computer.
When you see the “Buffer open...” message, move to the connected computer and ensure that the
Serial Port has been OPENed before then choosing the “Send a File...” option and browse to the
ROM image file that you wish to load into Sideways RAM on the BBC Micro.
Following the selection of the file, the transfer will begin immediately and the sending PC should
indicate the progress with the software’s “progress bar”. When the sending PC indicates that the
transfer is complete, press any key on the BBC Micro to flush any remaining data from the transfer
buffer thereby completing and verifying the transfer process. On success, the BBC should state
“Transfer OK” and return to a prompt.
Once the transfer into a sideways RAM bank has been completed, use CTRL-BREAK to reset the BBC
Micro and initialise the newly loaded ROM image and type *HELP at the prompt to confirm that the
ROM image has been loaded successfully.
NOTE: Uploading a ROM image to any other SRAM bank where it is already in use will result in the
original ROM image in the designated bank being overwritten. *UPLOAD does not check to see if
you are overwriting the SRAM bank that UPURS is currently occupying. If you attempt to *UPLOAD
an alternate ROM image to the same bank that UPURS currently occupies, the transfer will hang
and the SRAM bank will be corrupted.

29
Extracting ROM images using *UPXROM
Usage
*UPXROM ?
*UPXROM <rom_id> [\]5
*UPXROM <rom_id_low> <rom_id_high>
*UPXROM supports the export of ROM images from designated ROM banks or sideways RAM banks.
Individual ROMs can be exported as 8K or 16K files by use of the attribute “\” which signifies that the
image should be written out as an 8K file. The banks to be exported are indicated by the rom_id
which must be a hexadecimal numeric value between 0 and F.
Listing current ROMs
To list the current ROM images that are installed in the BBC Micro, issue the command *UPXROM
with the ‘?’ switch. The resulting list will identify the ROM/RAM banks in use and the name of the
ROM image that is occupying each bank as shown in the listing below.
Banks that are empty are indicated by the use of the ‘?’, banks that are in use have the name of the
ROM image listed, SRAM banks are indicated by the use of ‘w’ rather than ‘:’.
0 w ?
1 w ?
2 w ?
3 w ?
4 : ?
5 : ?
6 : EXMON II 1.03
7 : DFS,NET
8 : ADT 2.00
9 : RamFS 1.00
A : DFS 2.26
B : Acorn ADFS 1.33
C : UPURS 5.1R
D : ?
E : ?
F : BASIC
This listing shows that there are ROMs available in banks 6 through to B and E and that HiBASIC is
loaded into SRAM located in bank F.
5 ‘\’ appears as ‘½’ in MODE 7

30
Exporting a single ROM
When using *UPXROM, the process is similar to that when using the *UPXSSD and *UPXDSD and the
same procedure should be used when choosing the file to which the ROM images should be saved
on the connecting computer when preparing to receive the data from the BBC Micro.
To export an 8K ROM (e.g. NFS 3.60) which resides in the sideways ROM bank 7 would use the
following command:
*UPXROM 7 \
Which would appear in MODE 7 as:
*UPXROM 7 ½
To export a 16K ROM (e.g. DNFS 1.20) which resides in the sideways ROM bank 11 would use the
following command:
*UPXROM B
Once the connecting computer is ready to receive the ROM image(s), press the [SPACE BAR] to
commence sending the ROM images.
Exporting multiple ROMs (Advanced users)
*UPXROM can be used to export multiple ROMs to a single file where all ROMs are exported out as
16K images regardless of their actual size and the use of “\” is ignored. The resulting exported file
will be 16K * <number of roms exported> in size.
A file should be created on the connecting computer to which all the data sent from the BBC Micro
should be saved and the instructions for this can be found in the section covering *UPXSSD and
*UPXDSD.
To export multiple ROMs, the following command line is used:
*UPXROM <rom_id_low> <rom_id_high>
The low and high ROM ids form a range signifying the beginning and end ROM banks to export.
Example: *UPXROM 1 A
This command will export ALL ROM banks from bank 1 to &A inclusive. Including those ROM banks
that are currently unoccupied.
After issuing the command on the BBC Micro, ensure that the connecting computer is ready to
receive the data and logging is enabled before finally pressing the [SPACE BAR] on the BBC Micro to
initiate the send function.
A set of ROM banks exported in this way will require manual extraction of individual ROM images
from the single contiguous file using a Hex editor such as HxD which has a file splitting tool built in or
XVI32 which allows a selected block of data to be written directly to a file.

31
When extracting ROMs from a contiguous file in this way, each exported ROM bank starts at an
offset of &4000 from the beginning of the file i.e. The first bank exported will be at address &0000,
the second bank in the exported file will be at &4000, the third at &8000, fourth at &B000 etc.
REMEMBER: All ROMs are exported as 16K (&4000 byte) blocks regardless of their size which could
be 8K (&2000 bytes) or 16K (&4000 bytes).

32
UPCFS The use of UEF files with UPURS is intended to allow users to send UEF encapsulated data as
contained on the original audio data cassettes that were produced in their thousands during the
1980’s and 90’s to the BBC Micro for the purposes of “direct play”.
The speeds at which UPCFS operate are far in excess of the original Acorn Cassette Filing System
which allows users to read data as it was stored on cassette but at the speeds of a modern day
system.
No more waiting 15 minutes for a cassette based game to load!
About UEF files UEF stands for “Unified Emulator Format” and was originally developed to provide a way of
emulating the original data storage formats for use with Emulator applications that recreate Acorn
computer environments such as the Electron and BBC Micro on more modern PC technology.
The UEF format is a container format for the compressed storage of audio tapes, ROMs and floppy
discs. The format can also be used to store machine state snapshots and the intention of the UEF
format is to provide an accurate archive of the original media from which a program or data is taken.
When creating UEF files they are traditionally compressed using the gzip file compression algorithms
before being packaged for download on the Internet as a Zip file.
UPCFS does not support compressed UEF files and they must be de-compressed before transferring
them to a BBC Micro.
Decompressing a UEF file
UEF files that can be found on the Internet are usually packaged as a Zip file. The UEF is then
extracted and used with an emulator as it is. For use with UPCFS, a second decompression stage
must be carried out. Tools such as Winzip can be used to accomplish this second decompression
stage.
The process of preparing a UEF file for use with UPCFS is as follows.
1. Download the UEF zip file package from the Internet.
2. Extract the UEF filename.uef from the zip package.
3. Rename the extracted UEF file to filename.uef.gz by adding the .gz file extension.
4. Extract the gzip’d uef filename.uef from the .gz file.
Once the file is extracted and decompressed, it is ready for use with UPCFS.
UPCFS Compatibility UPCFS aims to be as compatible as possible with the original Acorn CFS system however there are
several programs that employ copy protection schemes or use particular techniques that can
interfere with the UPCFS system rendering them incompatible.
At the time of writing, UPCFS has been tested with 279 UEF files from the Stairway to Hell - BBC
Model B UEF archive and achieves a compatibility rate of over 86%.

33
Many of the failures are experienced when UPCFS is overridden by custom software loaders that re-
engage the Acorn CFS and then attempt to load the next stage of the program. Typically this
behaviour results in the Cassette Motor relay being enabled and the Cassette Motor light
illuminating.
Using *UPCFS *UPCFS is different in operation to the other commands in the UPURS suite in that it is not in itself a
command used to transfer data from the PC to the BBC Micro. Instead, issuing the command *UPCFS
configures the BBC Micro in such a way that the traditional Cassette Filing System (CFS) commands
are intercepted by UPURS and the BBC Micro believes it is accepting data directly from the build in
CFS.
When the *UPCFS command is issued, the BBC Micro will initialise it’s memory settings and then
pass control back to the user at the prompt.
The *UPCFS system will then recognise and intercept the standard suite of commands that are used
by the CFS to load and run programs and data.
NOTE: UPCFS requires that a suitable USB to RS-232 cable is used and the use of legacy serial ports is
not supported.
Supported commands with UPCFS
With version 5.1 of UPURS, the UPCFS system is read only and supports the following commands.
*RUN
*LOAD
*/
*CAT
*OPT
CHAIN
LOAD
OPENIN
OPENUP (read only)
BGET#
CLOSE#
INPUT#
EOF#

34
Loading a program from UEF on a BBC Micro The loading of any particular program from a UEF is entirely dependent on the type of program that
is contained by that UEF and often, the UEF filename may give a hint as to which command you
should use to load the application.
e.g.
Frogger-Superior_RUN_B.uef uses *RUN to load the game Frogger
Psycastria2_B.uef uses CHAIN”” to load the game Psycastria 2
The initial setup for transferring files from the PC to the BBC Micro is the same as for other
commands within the UPURS suite
Loading Frogger from Superior Software
1. On the BBC Micro type *UPCFS to configure the UPURS suite.
2. On the PC, open the correct Serial Port to prepare to send the UEF file.
3. Select your decompressed UEF for Frogger - Frogger-Superior_RUN_B.uef.
4. The PC should then wait before sending the UEF file to the BBC Micro.
5. On the BBC Micro type *RUN followed by RETURN to initiate the loading sequence for
Frogger.
6. Play Frogger.
Interestingly, Frogger is one of the slowest loading UEF files as it has a custom loader that
implements a comparatively long pause between loading each block of data. Using the real CFS with
the Frogger data cassette, this can be seen by the Motor Control circuit flipping on and off
throughout the load process.
Loading Psycastria 2
1. On the BBC Micro type *UPCFS to configure the UPURS suite.
2. On the PC, open the correct Serial Port to prepare to send the UEF file.
3. Select your decompressed UEF for Psycastria 2 - Psycastria2_B.uef.
4. The PC should then wait before sending the UEF file to the BBC Micro.
5. On the BBC Micro type CHAIN”” followed by RETURN to initiate the loading sequence for
Psycastria 2.
6. Play Psycastria 2.
Reporting issues with UEF files If you encounter repeatable, issues with a UEF file, you can submit your findings at the following
address: http://www.retro-kit.co.uk/UPURS/Report/.
Each report is logged and imported into our tracking facilities for investigation so the more
information you can provide, the easier it will be to answer your query.

35
Troubleshooting
General connectivity issues Using Hercules on a Windows PC, open the COM port and then move to the BBC Micro. Press the
<BREAK> key then at the prompt enter:
?&FE62=&7D <RETURN>
?&FE60=&40 <RETURN>
The Clear to Send (CTS) indicator in Hercules should turn Green. Continue the diagnosis by entering:
?&FE60=0 <RETURN>
The CTS indicator should go off again.
Resolution
If the CTS indicator does not respond as described, power off the BBC Micro, re-check all
connections, power on and try again.
If the CTS indicator responds correctly, the cable and connection should be operational so try to
transfer data using one of the UPURS commands. If the CTS indicator continues not to respond after
several attempts, please contact the author via http://www.stardot.org.uk/forums.
Clear to Send responds but data will not transfer correctly If after carrying out the troubleshooting steps above, the CTS indicator responds correctly but data
does not transfer correctly, this may indicate that the connecting computers serial port strictly
implements the DTR/DSR part of the RS-232 communications protocol.
Resolution
Check the DTR box in Hercules. The Data Set Ready (DSR) indicator should “light up”. Attempt
carrying out a data transfer using one of the UPURS commands.
BBC Micro reports “No Rx Data!” This is the BBC Micro reporting that after issuing a Clear To Send (CTS) signal to the connecting
computer, it did not receive a start bit for the first byte of data. If the connecting computer were to
become disconnected from the BBC Micro or the send was not initiated on the connecting computer
before pressing the [SPACE BAR] on the BBC Micro this error would be thrown.
Resolution
Power off the BBC Micro and re-check all of the connections before powering on again, ensuring that
all connections are good.
Ensure that the transfer procedure is done in the correct order. For more details, see the section
covering *UPSSD and *UPDSD.

36
When receiving data, the screen went blank and now the computer says
“BBC Computer 16K” even when I press CTRL+BREAK. This can occur when a buffer overrun occurs where the BBC’s memory is overwritten with NULL data
thereby setting the system flags to indicate that the machine only has 16KB of RAM. The buffer
overrun can be triggered if the software on the connecting computer does not reset the RS-232 Tx
Data line and it is left “high” rather than the correct idle state of “low”.
Resolution
Power off the BBC Micro and wait for a few seconds before turning it back on again; when power is
restored, the BBC Micro should report “BBC Computer 32K”.
After receiving data, I press BREAK and see a “Bad Sum” error. This can occur to the BBC Micro when the value of PAGE on the computer is higher than &1900.
UPURS uses memory above &1900 and this can be allocated as filing system workspace on some
computers so when the BREAK key is pressed and the ROMs are initialised, they can report this error
due to the fact that UPURS has corrupted their workspace.
Resolution
If you cannot lower the value of PAGE to &1900 or below by disabling some ROMs, when you see
the “Bad Sum” error, press CTRL+BREAK to hard reset your BBC Micro.
When listing the ROMs in my BBC Micro with UPXROM, I see duplicate
entries and the listing differs from *ROMS This occurs in BBC Micros that do not have ROM expansion boards fitted and the ROM inspection
code sees “ghosts” of ROMs it has previously encountered due to the way in which the BBC manages
the ROM select lines in hardware. The *ROMS command has to deal with the same underlying
behaviour from the BBC Micro and simply masks the existence of subsequent ROMs it has
encountered before, assuming that further instances are ghosts thereby reporting the banks as
empty.
Resolution
In general, the highest priority version of any particular ROM that is listed more than once is the
actual ROM and the subsequent listings are ghosts and can be ignored.
When writing to a floppy I see a “Write error” message. This occurs when a disc has not been formatted or there are corruptions on the disc.
Resolution
Format and verify the disc ensuring that both sides of the disc have been formatted. If the disc does
not verify, try to write the same image using a known good disc. If writing the image to a known
good disc fails, attempt to write a different image. If this fails, contact the author for further support.

37
When using UPDSD I see a “Write error” but UPSSD works just fine with the
same disc. This occurs when the second side of the disc has not been formatted. The double sided disc images
are interleaved and as such, tracks are alternately written to the floppy disc 3 tracks at a time. When
UPDSD attempts to write the first 3 tracks to the second side of the disc, it cannot and throws this
error.
Resolution
Ensure both sides of the floppy disc to be written to have been correctly formatted before
attempting to transfer data to the disc again.
When using any of the UPURS disc tools to create a disc, I still see a “Write
error”. This issue can occur for many reasons but is always triggered by a call to OSWORD &7F which is the
generic Acorn multi-purpose DFS disc-handling routine.
Resolution
Common errors that can be the cause of this error are write-protect being applied or faulty and/or
unformatted discs. Less common causes of this error can be due to software clashes due to another
ROM being present such as an MMC driver which might be “hijacking” OSWORD &7F and
interrupting the writes to the floppy disc. Using a ROM such as Advanced Toolkit (ADT) that has a
*UNPLUG command to virtually unplug the MMC ROM whilst using UPURS.
UPURS reports “Track No. >79” when I try to write an image to my floppy
disc. This error occurs when the track count of an ssd or dsd image exceeds 80 tracks (0 to 79).
Resolution
Check that the SSD or DSD does not exceed 200KB or 400KB. If the image is larger than these
maximum file sizes, the image is invalid and cannot be imported by UPURS.
My disc image transfers are losing bytes when transferring using UPXSSD
or UPXDSD There are two different scenarios where this can take place.
The first situation where this error can occur is if the transfer procedure is carried out out-of-
sequence. For instance, pressing the space bar to initiate a send from the BBC Micro before the PC
has been configured to receive data and then subsequently opening the PC’s COM port. When the
COM port is opened, any data on the COM port already will be flushed before the PC then issues an
RTS command to receive data from the BBC Micro. Typically, the data loss it at the beginning of the
disc image file that is created.
The other situation where this error can occur when the receiving PC is running a version of the MS
Windows operating system AND using an Intel chipset based motherboard running a variant of the
82801 Southbridge I/O controller hub AND the machine is under a high I/O or CPU load. Data loss
can occur at any point through the transfer and appears random.

38
Resolution
To avoid data loss in the first situation, simply follow the correct procedure as this manual sets out.
In the second situation, when using UPURS with an Intel 82801 Southbridge I/O controller hub, it is
essential that your PC is under as little load as possible. Perfect transfers are achievable if the I/O
and CPU load are reduced to a minimum. To do this, simply close as many applications as possible
and limit network and disk usage whilst transferring data to the PC.
My disc image transfers are gaining bytes when transferring using UPXSSD
or UPXDSD This issue can occur when using any terminal programs to either send or receive data with file
logging enabled. In send mode, the terminal won't differentiate between typed characters and a
spooled file and in receive or log mode, the log will capture all communications activity between the
two devices whether sent or received and whether typed or via a file.
Resolution
When performing send or receive with terminal communications it is important to do nothing other
than the required actions whilst a log (at either side) is in progress.
UPCFS reports “Chunk Type? XXYY” when attempting to load a program. This issue can occur of a several different reasons. When using Serial Terminal software such as
Hercules on the PC, every key press that is made whilst data is being transferred is incorporated into
the data transfer process. This means you can intentionally cause a “Chunk Type?” error simply by
pressing keys on the PC keyboard whilst a transfer is in progress.
The second reason for a “Chunk Type?” error is when UPCFS encounters a UEF chunk of a type that it
was not expecting. The byte value in the error response from UPCFS indicates the value of the two
bytes that describe the UEF Chunk type.
The third reason for the “Chunk Type?” error is usually due to the software that is being loaded
using a cassette format that is encoded into the UEF. These custom encodings are usually down to
copy protection methods that have been employed.
Resolution
Attempt to re-load the UEF in question. If the UEF loads without issue then it’s likely that there was
extraneous data on the serial port when the transfer began or a key was pressed on the keyboard
during transfer.
Some software titles fail on the same block with the same “Chunk Type?” error and byte value. It’s
likely that the UEF is of a custom format or has copy protection techniques that are incompatible
with the current version of UPCFS. Please report these errors using the online error reporting form:
http://www.retro-kit.co.uk/UPCFS/Report/

39
UPCFS appears to work but then the cassette motor relay clicks and its light
comes on Some software titles reset the system vectors that UPCFS intercepts to enable loading UEFs over the
User Port causing the system to revert to the true Cassette Filing System. When a custom loader
does this, and attempts to load the next section of the title, it engages the BBC Micro’s internal
systems and the Cassette Motor relay engages.
Resolution
Titles that do this are currently incompatible with UPCFS. Please report the titles using the online
error reporting form:
http://www.retro-kit.co.uk/UPCFS/Report/

40
Special Thanks I would like to especially thank 'A' Martin, Paulv, Samwise, BigEd, 1024MAK, n0mArch, Hugh, Pugh,
Barney McGrew, Cuthbert, Dibble and Grub from the Stairway to Hell forums for their contributions
to the project.