u-bass kit assembly instructions - · pdf file(3 1/3” (~84,7 mm~) for 5 string bass)...
TRANSCRIPT

!!U-bass Kit
Assembly Instructions Compiled by playubass.com
��� av ���1 30
!This guide is built from the instructions found here: http://kalabrand.com/ubass-kit/index.html
Tools Needed • 5/8” (16 mm) Wrench • 7/16” (~11 mm) Socket wrench • 12 mm Socket wrench • 5/64th” (~2 mm) Allen Wrench • 1/6” (4 mm) Drill bit • 3/32th” (~2,5 mm) Drill bit • 7/64th” (~2,8 mm) Drill Bit • Philips Drill Bit • Drill • Philips Screw Driver • An Awl Or Sharp Point to make marks • A Small File With a dull Bottom Edge • Wood Glue • Tape • Super Glue • Steel Wool • 320 Grit Sandpaper • Paper Towel • Water • Shim Material • Shrink Wrap • Zip-Tie • Shim Material • Removable Lock-Tite !Optional Tools • Crowning File (photo) • 5/32” (~4 mm) Round file • 13/64th” (~5 mm) Round File • 1/8” (~3 mm) File • 7/64th” (~2,8 mm) File
Additional tool

U-bass Kit Assembly Instructions compiled by playubass.com
!!PART ONE – strap buttons
��� av ���2 30
01. With Ruler find center point on bottom of body. Mark with an awl. (FIG. 1)
FIG. 1
Part One Completed

U-bass Kit Assembly Instructions compiled by playubass.com
��� av ���3 30
02. Repeat Step 1 on the horn of the body. (FIG. 2) !!!!!!!!!!!!
FIG. 2
FIG. 3
FIG. 4
03. With a 3/32th” (~2,4 mm) Drill bit, drill the holes that you marked 6/8th of an inch deep. (~19 mm) (FIG. 3) !!!!!!!!!!!!!!!04. Use Philips Screw driver to install Strap Buttons. (FIG. 4) !!!!!!!!!!!

U-bass Kit Assembly Instructions compiled by playubass.com
!!
PART TWO – bridge posts
��� av ���4 30
05. Prep a paper towel soaked with a decent amount of water! Apply a small amount of wood clue to the metal bushing.. (FIG. 5)
FIG. 5
Part Two Completed

U-bass Kit Assembly Instructions compiled by playubass.com
��� av ���5 30
06. Press down on post. (FIG. 6) !!!!!!!!!!!!!07. Remove the thumbwheel and wipe the excess glue with wet paper towel (FIG. 7) • Press down one more time to allow
anymore glue to come out, re-wipe with paper towel.
• Make sure the post is sitting flush with the body.
• Repeat steps 05 through 07 with the other post. !!!!!!!!!!!
08. Adjust both posts to 2 mm above the body. (FIG. 8) !!
FIG. 6
FIG. 7
FIG. 8

U-bass Kit Assembly Instructions compiled by playubass.com
!PART THREE – EQ install
��� av ���6 30
FIG. 9
09. Place 3” (about 7,5 cm) of shrink wrap on the pickup wire (DO NOT SHRINK IT WITH HEAT GUN) this is to protect the pickup wire from making unnecessary contact. (FIG. 9)
Part Three Completed

U-bass Kit Assembly Instructions compiled by playubass.com
��� av ���7 30
10. Feed a portion of the pickup wire through the pickup hole until a portion of the wire is sticking out the top side (CAREFUL NOT TO BEND THE WIRE) (FIG. 10a, FIG. 10b)
FIG. 10a
FIG. 10b

U-bass Kit Assembly Instructions compiled by playubass.com
��� av ���8 30
FIG. 11
FIG. 12
FIG. 13
11. Install the EQ/PREAMP with the battery leads facing towards the left backside of the body. (FIG. 11) !!!!!!!!!!!!12. Tighten the washers and nuts to the posts with a 7/16th” (11 mm) socket wrench (DO NOT OVER TIGHTEN, THIS WILL CAUSE THE EQ/PREAMP BOARD TO BEND) (FIG. 12) !!!!!!!!!!!!!!13. Feed the jack through the jack hole. Adjust the inside washer so 5mm of the jack extends out from the body.

U-bass Kit Assembly Instructions compiled by playubass.com
��� av ���9 30
14. Tighten the Jack with a 12mm socket wrench. (FIG. 14) !!!!!!!!!!!!!!!!!!!!!15. Apply clip where pictured. (FIG. 15) !!
FIG. 14
FIG. 15

U-bass Kit Assembly Instructions compiled by playubass.com
��� av ���10 30
16. Clip the Zip-Tie to 3 (76 mm) inches (3 1/3” (~84,7 mm~) for 5 String Bass) Place in the channel of the Bridge. (FIG. 16) !!!!!!!!17. Carefully Pull pick up wire out approximately 3 ½” (~89 mm) (4” (101,6 mm) for 5 String Bass) (FIG. 17) !!!!!!!!!!!!!!!!!!!!18. Feed pickup through the bridge and place the bridge on the posts. (FIG. 18a) Prep a 2” (50,8 mm) piece of tape so it is quickly available. (FIG. 18b)
FIG. 16
FIG. 17
FIG. 18a FIG. 18b
U-bass Kit Assembly Instructions compiled by playubass.com
��� av ���11 30
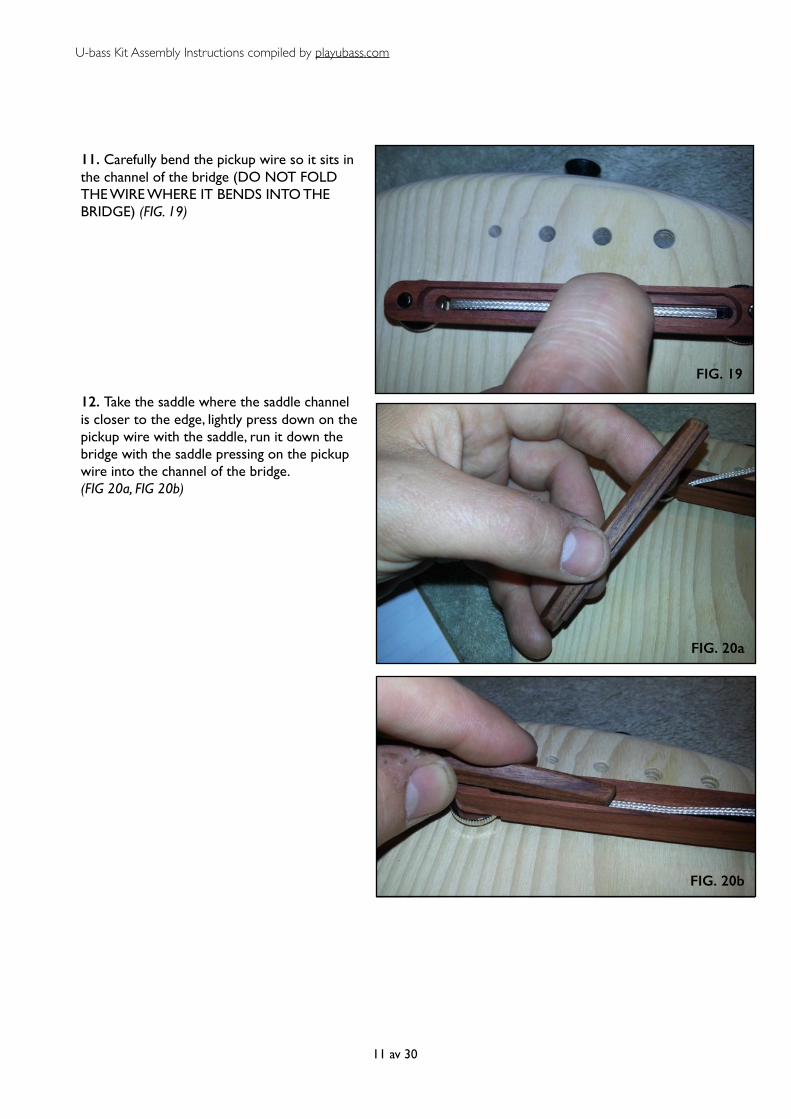
11. Carefully bend the pickup wire so it sits in the channel of the bridge (DO NOT FOLD THE WIRE WHERE IT BENDS INTO THE BRIDGE) (FIG. 19) !!!!!!!!!!12. Take the saddle where the saddle channel is closer to the edge, lightly press down on the pickup wire with the saddle, run it down the bridge with the saddle pressing on the pickup wire into the channel of the bridge. (FIG 20a, FIG 20b) !!!!!!!!! FIG. 20a
FIG. 20b
FIG. 19

U-bass Kit Assembly Instructions compiled by playubass.com
��� av ���12 30
FIG. 23
FIG. 21
FIG. 22
13. Place the tape on the saddle and bridge to prevent it from popping off. (FIG. 21) !!!!!!!!!!14. Now secure the wires with the clip and install a 9v Battery. (FIG. 22) !!!!!!!!!!!!!15. Hold the back plate so the flat side site flush with the cavity wall. (FIG. 23)

U-bass Kit Assembly Instructions compiled by playubass.com
��� av ���13 30
16. Securing the back plate flush, Drill with the 1/16th” (~1,6 mm) drill bit through the middle of the three holes on the back plate. (FIG. 24) !!!!!!!!!!!!!!!!!!!!!17. Screw the three back plate screws with a Phillips screw driver. (FIG. 25)
FIG. 24
FIG. 25

U-bass Kit Assembly Instructions compiled by playubass.com
��� av ���14 30
18. Align the pots on the EQ/PREAMP so that the flat parts are in a straight line. (FIG. 26) !!!!!!!!!!!!!!!19. With the 5/64th” (2 mm) Allen wrench remove the tightening screw from the knob, and apply a small amount of Removable Lock-Tite. (FIG. 27)
FIG. 26
FIG. 27
20. Place a folded piece of paper under the knob. While tightening the knob this will prevent it from rubbing against the body. (FIG. 28) !21. Repeat Steps 13 through 21 for the remaining knobs.
FIG. 28

U-bass Kit Assembly Instructions compiled by playubass.com
��� av ���15 30
PART FOUR – Dressing the frets
22. With the File, File down the fret ends at these three angles. (FIG. 29a, 29b, 29c)
FIG. 29a
Part Four-Six Completed
FIG. 29b
FIG. 29c

U-bass Kit Assembly Instructions compiled by playubass.com
��� av ���16 30
23. File until the ends of the frets look like this. (FIG. 30) !!!!!!!!!!!!!!!!!!!!!!!!24. With 320 Grit Sandpaper, slightly cure it around the fret ends and sand the fret ends by going up and down the neck. (FIG. 31) (DON’T PUT TO MUCH OF A CURVE OR YOU MIGHT RISK THE STRINGS SLIDING OFF THE FRET ENDS).
FIG. 30
FIG. 31

U-bass Kit Assembly Instructions compiled by playubass.com
��� av ���17 30
FIG. 32
25. Sand until the fret ends becomes smooth. (FIG. 32) !!!!!!!!!!!!!!!!!!!!26. With the Steel wool repeat what you did with the sandpaper. (FIG. 33)
FIG. 33

U-bass Kit Assembly Instructions compiled by playubass.com
��� av ���18 30
PART FIVE – Installing the nut
Part Four-Six Completed
27. Set the nut in the nut slot and measure the height from the middle of the nut. Ideally for a fretted neck you want the nut to be 5mm from the fret board. For a fretless neck you want the nut to be 3 mm from the fret board. (FIG. 34) !28. Sand down the nut until you have achieved the proper height. !!!!!!!!!!!29. Check your height before gluing it into place. (FIG. 35)
FIG. 34
FIG. 35
U-bass Kit Assembly Instructions compiled by playubass.com
��� av ���19 30
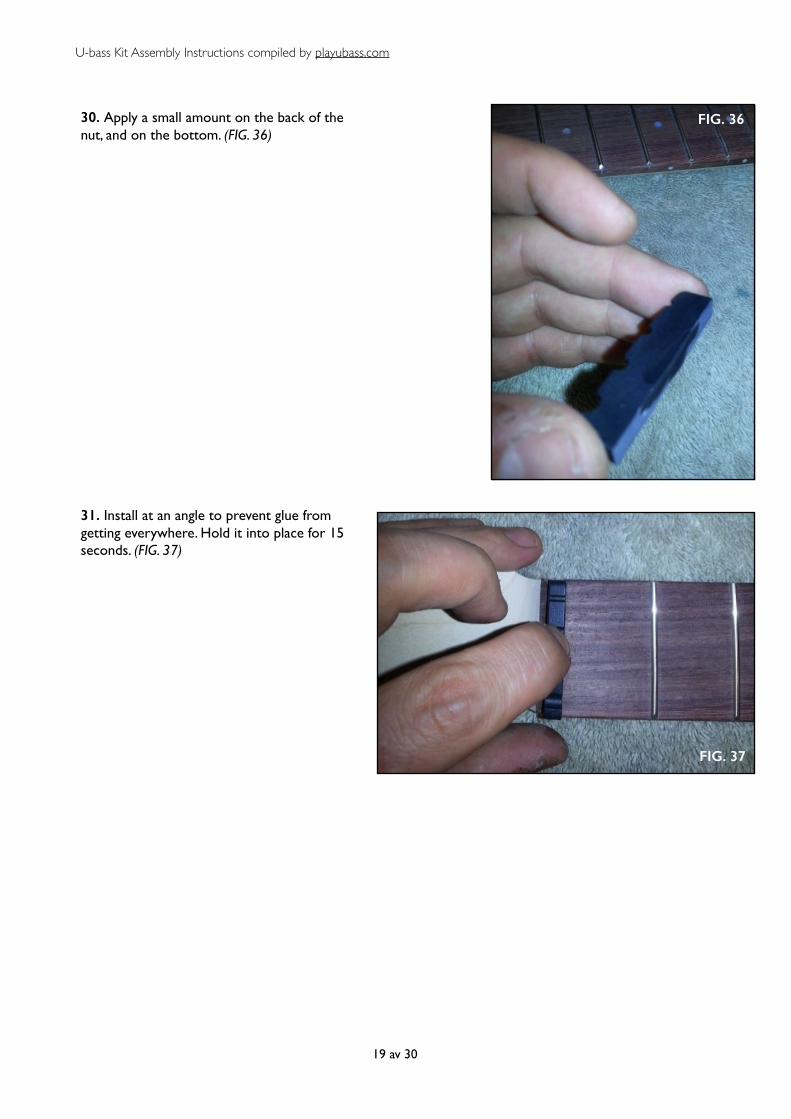
30. Apply a small amount on the back of the nut, and on the bottom. (FIG. 36) !!!!!!!!!!!!!!!!!!!!!31. Install at an angle to prevent glue from getting everywhere. Hold it into place for 15 seconds. (FIG. 37) !!!!!!!!!!!!!!!
FIG. 36
FIG. 37

U-bass Kit Assembly Instructions compiled by playubass.com
��� av ���20 30
32. Install the tuner bodies (FIG. 38) !!!!!!!!!!!!!!!!33. Insert the metal washers (FIG. 39)
Part Four-Six Completed
PART SIX – Tuners
FIG. 38
FIG. 39

U-bass Kit Assembly Instructions compiled by playubass.com
��� av ���21 30
34. Insert the plastic washers. (Fig. 40) !!!!!!!!!!!!!!!35. Hand tighten the nut and the washers, with these snug you are able to position the tuners into place. (FIG. 41a, FIG. 41b) !36. When they are in place flip the neck over. Wrap some tape around the 3/32” (~2,4 mm) drill bit so 7 mm of the drill bit end is exposed. !!!!!!!!
FIG. 40
FIG. 41a
FIG. 41b

U-bass Kit Assembly Instructions compiled by playubass.com
��� av ���22 30
37. Drill the screw holes. (FIG.42) !!!!!!!!!!!!!!!!!!!!!!!38. Install the screws with a Philips screw driver (DO NOT OVER TIGHTEN; THIS WILL CAUSE THE SCREW TO STRIP OUT THE HOLE.) (FIG. 43) !!!!!!!!!!
FIG. 42
FIG. 43

U-bass Kit Assembly Instructions compiled by playubass.com
��� av ���23 30
39. Tighten the tuner nuts with a 5/8th” (16 mm) wrench (FIG. 44) !!!!!!!!!!!!!!!!!40. Place the gear with the gears facing up. (FIG. 45) !!!!!!!!!!!!!!41. Fit the tuner post through the gears (FIG. 46) !42. Screw it down. !43. Repeat steps 8 through 11 for the reaming tuner posts.
FIG. 44
FIG. 45
FIG. 46

U-bass Kit Assembly Instructions compiled by playubass.com
��� av ���24 30
44. Put a piece of tape on the string retainer positioning it so it sits at the bottom of the neck slope. (FIG. 47a, FIG. 47b)
PART SEVEN – String retainer (This step only applies for a 5 String kit)
Part Four-Six Completed
FIG. 47a FIG. 47b

U-bass Kit Assembly Instructions compiled by playubass.com
��� av ���25 30
45. With a 3/32” (~2,5 mm) drill bit, drill the screw holes. (FIG. 48) !46. Screw the screws in with a Philips screw driver. !!!!!!!!!!!!!!!!47. You’ll be able to adjust the proper height when you string it up. The Height should be so the “B” string is about 2-3 mm from touching the neck. (FIG. 49)
FIG. 48
FIG. 49

U-bass Kit Assembly Instructions compiled by playubass.com
��� av ���26 30
48. To achieve proper string height you will need to shim the neck. For a fretted neck you will need a shim approximately 2.25 mm tall. A fretless you will need a shim approximately 2.80 mm tall. Anything can be used for a shim. Plastic, wood, paper, pictured is an example. (FIG. 50) !!!!!!!!!49. Cut the ends of your shim at an angle so it fits snug at the back of the neck pocket. (FIG. 51) !!
PART EIGHT – Attaching the Neck to the Body
PART EIGHT - Completed
FIG. 50
FIG. 51

U-bass Kit Assembly Instructions compiled by playubass.com
��� av ���27 30
50. With a 7/64” (~2,8 mm) bit in your drill hold the neck in the neck pocket of the body like so. (FIG. 52) !51. Keep the neck flush with the top part of the neck pocket. Drill the holes for the neck pocket like so. (KEEP YOUR HOLD ON THE NECK AND BODY SECURE AS YOU DRILL, THIS WILL PREVENT THE SCREW HOLES FROM BECOMING CROOKED) !52. Now holding it secure again so the neck is flush with the top of the neck pocket, use a Phillips drill bit and drill the neck screws in. (FIG. 53)
FIG. 52
FIG. 53

U-bass Kit Assembly Instructions compiled by playubass.com
��� av ���28 30
53. First string up the A string. (FIG. 54) !54. You’ll notice the saddle rocks forward. Lift the A string above the saddle and carefully rock the saddle back. Place the A string back down. (FIG. 55) !55. When you string up the E string, repeat the same step by lifting the E and the A string and carefully rock the saddle back !56. Now you can string up the rest of the strings. (DO NOT CUT THE EXCESS ENDS OF THE STRINGS YET)
PART NINE – Strings
FIG. 54
FIG. 55

U-bass Kit Assembly Instructions compiled by playubass.com
��� av ���29 30
PART TEN – Nut filing
57. When you press down on the string behind the 2nd fret, the optimal string height should be 2 mm from the first fret. (FIG. 56) !58. When filing you can hold the string out of the way by slightly pulling it, and filling with the other hand (FIG. 57) !59. File a little at a time, and check the height periodically to prevent from filing to deep. !60. Once you’ve finished filing you can check your string height at the 12th fret. String height should be between 3.5 mm to 5 mm for fretted and 3 mm to 5 mm for fretless. !61. To adjust the Height at the 12th fret you can turn the thumbwheels at the bridge. (FIG. 58) !62. Once you’ve reached your preferred string height you can plug it in and tune it up! When you feel you are set up you can now clip the excess string ends so there is ¾” (19 mm) excess still on them. !Enjoy your new U-BASS!
FIG. 56
FIG. 57
FIG. 58
The Files used in production for filling the nuts are 4 String: E: 5/32” (4 mm) round file A: 5/32” (4 mm) round file D: 1/8th” (3 mm) file, G: 7/64th” (~2,78 mm) File 5 String: B: 13/64th” ~5,16 mm) round file E: 5/32” (4 mm) round file A: 5/32” (4 mm) round file D: 1/8th” (3 mm) file G: 7/64th” (~2,78 mm) File If you find yourself without these file options, you can use any sized file the you can properly file to the appropriate string size.

U-bass Kit Assembly Instructions compiled by playubass.com
��� av ���30 30
Complete Setup