tv5 digital player user’s manualstatic.highspeedbackbone.net/pdf/machspeed_tv5_manual.pdf · tv5...
TRANSCRIPT

TV5 Digital Player
User’s Manual
Note: Screen shots taken in this manual may appear different on the player itself.
Table of Content:
Computer System requirements ............................................................ 1
Notes ............................................................................................... 2
Product Introduction ............................................................................. 2
Buttons & Interface .............................................................................. 3
Basic Operation.................................................................................... 3
Video Playback ................................................................................... 5
Audio Playback..................................................................................... 6
Photo Playback .................................................................................... 7
Program Recording ............................................................................... 7
Accessories ......................................................................................... 9
Settings .............................................................................................11
Troubleshooting .................................................................................14
Specification & Accessory ....................................................................15
Computer System Requirements:
a. The minimum PC system requirements: WIN98SE/ME/2K/XP
CPU: Pentium 200MHz or above processor, USB (Universal Serial Bus) port, 32M or above
system memory (For Windows2K, it is recommended to use 128M). 20MB of unoccupied hard
disk space. DVD/VCD-ROM, Sound card (optional), an internet connection (recommended)
b. Connecting the MP4 to your PC:
Connect the small end of the provided USB cable to the TV1. With this end attached, plug the
other end of the USB cable to any USB port on your Computer
Note: Do not turn on the power before inserting the USB cable. Doing so may damage the player.
Do not use any other USB cables except the one we’ve provided. If you need a
replacement cable, please contact the manufacturer.

Notes:
Thank you for purchasing our product! Before operating this unit, please read the following
precautions carefully:
1. Avoid environments with high temperatures, high humidity, the normal operating
temperature for this unit is
0C-40C
2. Avoid direct sunlight.
3. When removing or putting in an SD Card, make sure that the player is turned off. Doing so
while on may cause damage to the player.
5. Do not disassemble this unit. Doing so may cause damage and void your warranty.
6. Do not try replacing the battery.
Product introduction:
1) Movie play function: This is used for playing movies; MPEG4 supports ASF format or any file
with ASF format converted by software. The playback resolution is 320x240@30f/s.
2) Audio play function: Used for playing various files with audio formats that includes MP3, WMA
and WAV etc.
3) Photo browsing function: This is used for browsing various photos taken by digital camera.
Built-in microphone recording function supports Line-in recording.
4) Supports video recording, AV IN
5) Supports video output , AV OUT ( NTSC/PAL )
6) Game, Calendar, clock for time display.
7) Multi-language setting.
8) Expansion slot for inserting SD/MMC card for larger capacity storage.
9) Built-in lithium cell
10) Built-in speakers

Buttons and interface:
To exit from your current operation, press “ESC” button
The LED on the player can have two states. If the light is green, the unit is on. If the light is red,
it means the unit is charging.
Basic operation:
1). Power on operation:
Press the “power” button for 2 seconds. The first screen you see is the main menu.
2). Power off operation:
Press and hold the power button for 3 seconds to turn the unit off.
3). Charging the unit:
Connect the charger to a wall socket and then plug it into the unit. The LED light should turn
red and the player will be charging at this point.
Note: You can charge the player even if it is on!
4). Connecting the unit to your computer:
Turn the player on; connect USB cable’s smaller port with mini USB port and the bigger one
with the USB port on your computer. Your Computer should now recognize the player. Open
“My Computer” and you will find one/two removable disks. If you have an SD Card inserted
in the player you should see two removable disks.
5 Ejecting your player from the computer:
Make sure that you take the time to eject your player from your computer after each session.
This is important because not doing so can potentially harm the player and/or cause
data corruption/loss. When you plug the player in, your computer puts an icon in the lower
right hand corner of your desktop as show here:
When you’re ready to eject the player, roll over this icon and click once. It’ll display an option
that says “safely remove hardware” Click that, and it’ll eject the player so you can remove it from
your computer.
Tip: It’s usually a good idea to rename your removable drives to minimize confusion. To do
this, start by plugging just the player into your computer. When your PC recognizes it, open
My Computer and right-click on the removable disk. Select the Rename option and give it a
name. Once you’ve done this, eject the mp3 as described above and put the SD Card in if you
have one. At this point, you’ll see two drives. One of them you’ve already named, the other
one is your SD Card.
Video Playback:
a. Press button to select the video function, and then press “Menu” to confirm the
selection.
b. After choosing the video option, press to select the video and then press “Menu”
again to confirm your selection.
c. Before playing the video, you can press “Menu” to enter into the video settings. Use the
up and down buttons to select the operations such as EQ mode, Playing mode, File
Protection and Delete File.
d. Press the 4D button rightward to enter into the pre-selection submenu using the
“up” and “down” buttons. Press “Menu” to confirm the selection and exit from the
present screen. (Shown in the figure below)

Select Video Playing Video playback submenu
EQ Mode: You can choose to switch the EQ settings in this menu.
Play mode: Repeat present, Repeat all, Random Playing, Normal Playing
Delete options: Delete all the video files without write-protection in the file folder
Audio Settings: 8 KHz, 16 KHz, 24 KHz, 32 KHz, 48 KHz
Note: While playing the recorded (TV, DVD, VCD) ASF files or other ASF files, pay attention
to your original selected sample rate of the file. (If the sample rate was 8 KHz when
you recorded it, the file needs to be 8 KHz when you play it back.)
Audio Playback:
1. Select the Audio option on the main screen by using the buttons. Once it’s
highlighted press the “Menu” button to confirm the selection.
2. Once you’re in the Audio playback, move the up and down button to select the songs
you want to hear and press the “Play” button to begin playback.
Operation details:
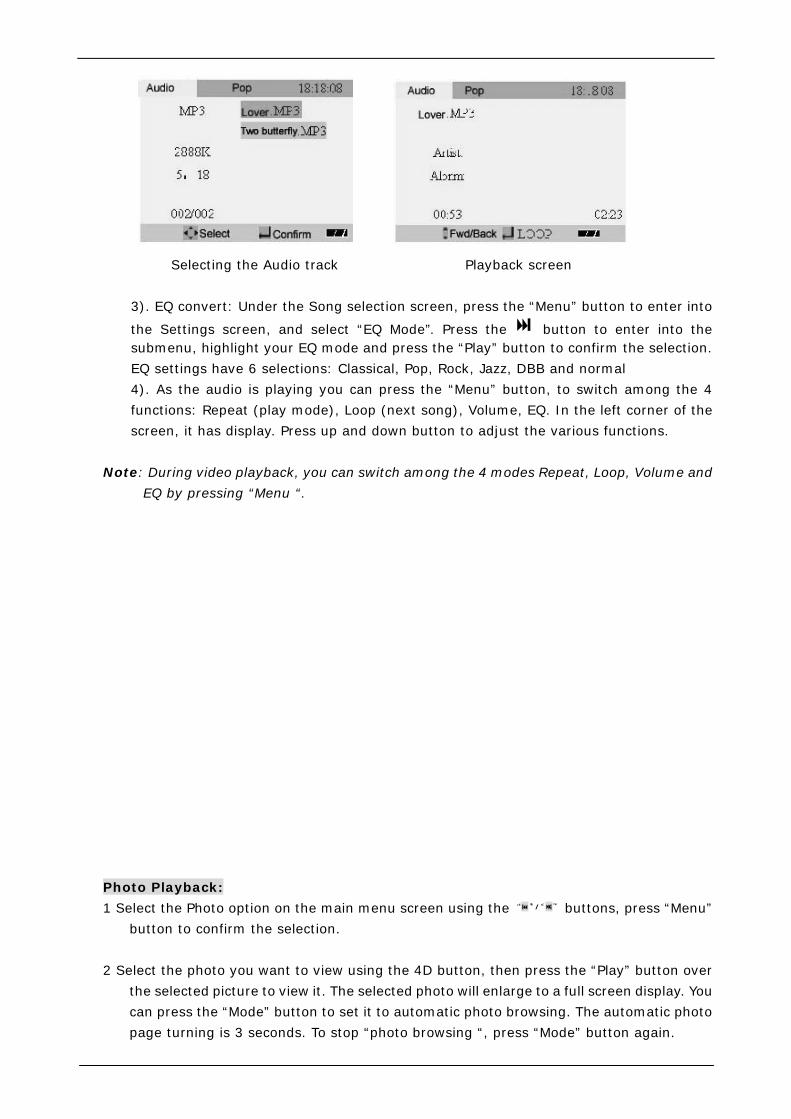
Selecting the Audio track Playback screen
3). EQ convert: Under the Song selection screen, press the “Menu” button to enter into
the Settings screen, and select “EQ Mode”. Press the button to enter into the submenu, highlight your EQ mode and press the “Play” button to confirm the selection.
EQ settings have 6 selections: Classical, Pop, Rock, Jazz, DBB and normal
4). As the audio is playing you can press the “Menu” button, to switch among the 4
functions: Repeat (play mode), Loop (next song), Volume, EQ. In the left corner of the
screen, it has display. Press up and down button to adjust the various functions.
Note: During video playback, you can switch among the 4 modes Repeat, Loop, Volume and
EQ by pressing “Menu “.
Photo Playback:
1 Select the Photo option on the main menu screen using the buttons, press “Menu”
button to confirm the selection.
2 Select the photo you want to view using the 4D button, then press the “Play” button over
the selected picture to view it. The selected photo will enlarge to a full screen display. You
can press the “Mode” button to set it to automatic photo browsing. The automatic photo
page turning is 3 seconds. To stop “photo browsing “, press “Mode” button again.

Photo browsing
3 If you want to lock a photo from being deleted, you can press “Menu” button to enter into
the settings menu, then select “ File protect “ to lock it. If you want to unlock it, you can
select “Unprotect” and press the “Menu” key to confirm the selection.
4 If you want to delete some photos, you can enter into the delete sub-menu to execute this
operation. You can also “delete one photo”, you can also delete the files without
write-protecting under the present file folder.
5 If the photos downloaded from the computer can’t be displayed, you must convert the
image to a lower resolution. The screen resolution of this unit is 240x160.
Tip: Microsoft has an add-on to Windows XP ONLY that will let you resize photos while
retaining the image quality. You can find this utility and others here:
http://www.microsoft.com/windowsxp/downloads/powertoys/xppowertoys.mspx
Note: This add-in is not supported by Microsoft or Mach Speed Technologies.
Tip: While browsing through your photos, pressing and holding the “Menu” button will set
the photo you currently have on the screen as the default. This means every time you
turn the unit on, you’ll see this photo.
Program Recording:
1 Turn on MP4 player and enter into standby interface. Select “Recording” menu through
button. Press “Menu” to enter into record interface:

2 Recording has 3 modes: Line-In recording, Mic recording and Video recording
3 By default the mode is set to Video recording. At this moment if there is video frequency
signal input, then it will be shown after being turned on; if there isn’t any video frequency
signals input, it will be black screen. Press “Play” button when there is video frequency
signal, it will start to record the signal. Meanwhile, “Camera” icon changes from “yellow”
to “red” and flickers constantly. Press “Play” button again, recording will be stopped,
“Camera” icon will change from “red” to “yellow” and stop flickering.
4 Under the standby state of video frequency recording, press “Menu” button, you can
choose the other 2 recording modes: Mic recording or Line In recording.
5 After selecting the right recording mode, press “Play” button to start recording, if you want
to stop recording, you only need pressing “Play” button again.
Note : Under “Mic recording” or “Line In recording” mode, you must set the screen saver
time under “ audio frequency ”as long as possible, otherwise, the unit will
automatically turn off when the previous set time is up.
Accessories:
Games:
Snake:
1 Select Accessories through , press “Menu” to enter into the submenu. Select “Snake”
and press “Menu” button to start the game.

2 The game won’t start until you press the “Menu” button. When you press that button, the
snake will start to move in the direction it’s facing.
3 Pressing “Up”, “Down”, “Left” and “Right” button controls the snake’s rotation in the
corresponding direction. The object of the game is to collect the small apples without
touching another part the wall or another part of the snake.
4 Press “Menu” button to pause/resume game operation during play.
Tip: You can accelerate by holding down the direction the snake is heading in. I.E. if the
snake going left, continue to hold the left button to speed it up.
Russian:
1 Turn on MP4 player, select “accessory” through , press “Menu” to enter into the
submenu, select “Russian”, and press “Menu” button to start the game.
Operation details:
Accessory Screenshot Russian
2 When you start the game, the first block is on the screen. You press “up” or “down” to
select the speed of the blocks starting out. After you’ve selected the difficulty, press the
“Menu” key to start the game. Use the “Left” and “Right” buttons to move the block, and
“up” to rotate the block 90° degrees. Pressing the “Down” button accelerates the fall to
place the block faster. The object of the game is to create whole horizontal lines. See how
many lines you can get in one turn!
3 During the game, press “Menu” button to pause or resume it
4 Pressing “ESC” brings you back to the Accessories page.
Storage Information:
This function is used for checking the storage status to see how much space is left.
1 Under “Accessory”, highlight “Storage Information” then press the “Menu” button to
confirm the selection. Highlight “memory information” and then press “Menu” to display
the how much space you have. If there is a SD/MMC card, the system will check the

external memory card first. To check the internal memory, power the unit off and take
out the SD card. Then turn it back on and get back to this screen.
Accessory Screen Memory checking
Calendar:
This unit supports a Calendar function.
1. Turn on MP4 player, select “Accessory” through button , press “Menu” button to
enter, select “ Calendar “ and then press “Menu” to display Calendar.
2. Press “Menu” to open the “Calendar”, by default, the position that the cursor is at when
it comes up should be the present date.
Calendar interface:
3. Press “Menu” or “Esc” to confirm and exit
4. The time and date can be set through the “Time” menu under “Settings”.

Settings:
The “Settings” menu has many different options.
Time:
Changing the time is as simple as using the directional pad to select which parameter
you would like to change. Once you’ve selected what you would like to change, press the
“up” or “down” key to make the change.
Speaker:
This option allows you to turn the sound on and off.
Language:
There are two languages for choice: English and Simple Chinese. Pressing “Menu”
confirms the selection.
TV output:
Using the Video cable we supplied with the unit, plug the mini jack end into the unit
where the hole is labeled TV OUT. The other end of the plug has three colored ends. The
yellow input is for the video, and the white and red inputs are for left and right audio,
respectively. Connect these inputs to your TV. Select the proper input channel for the
corresponding input jacks. (If you aren’t sure how to do this, please consult your
television manufacturers’ instruction manual.)
On the player itself under the “Setup” submenu, you’ll see a selection called “TV_out”.
Upon selecting this you’ll get three choices:
TV PAL: This is mainly for use in other countries.
TV NTSC: If you’re living in The United States, this is most likely the option you’ll
want to choose when you want to display a signal on your television. Almost all TV’s in
the USA operate through the NTSC standard.
LCD: This option switches the display of the TV5 back to the built in LCD.
Default Settings:
This switches the player back to the factor settings. Basically like when you first got it
out of the box.
Automatic Power off timer:
This unit has an Auto-Off feature for when it sits idle for too long, it powers itself off to
save battery life. Your options are 3 minutes.
Storage:
The options listed under this submenu designate where the TV1 saves the data. You
have three options under this menu.
Nandflash: Saves the data on the TV1 internal memory
Card: Saves the data on an external SD Card.
Appendix:

5 Select “Program file”
6 After selecting the path (or keeping it as the default path) the program will start copy into that
directory.
Appendix:
At this point you’ve successfully installed the Transcoding software.
1 You can find the installation file on the cd that came with the TV1 on this directory. If you’re
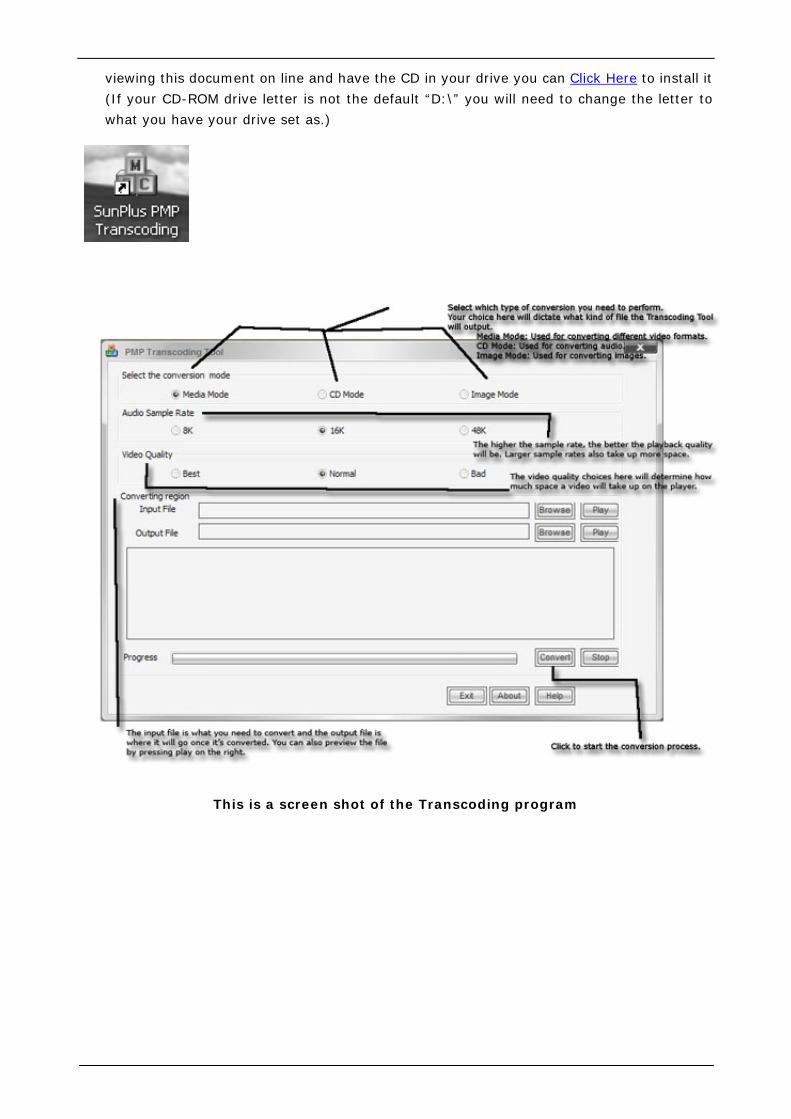
viewing this document on line and have the CD in your drive you can Click Here to install it
(If your CD-ROM drive letter is not the default “D:\” you will need to change the letter to
what you have your drive set as.)
This is a screen shot of the Transcoding program

A) Troubleshooting:
Problem: Possible Resolution:
I turn the unit on, but I get no display. Start by charging the battery for approximately 2 hours. If
that doesn’t work, try clearing the unit by holding in the
reset button on the back of the player.
The unit comes on very briefly and then turns back off
immediately.
It’s possible that the unit doesn’t have enough of a charge.
Try charging it for approximately 2 hours. Keep in mind
that this unit has a feature where it turns itself off after a
period of no operation.
The buttons have no response. Make sure that the Lock button isn’t switched to the
“Locked” position.
My computer isn’t recognizing the device. (Windows XP) Make sure you have completed all of your Windows
Updates. In some instances the generic USB driver that
this device uses only works properly after at least Service
Pack 1.q
My computer isn’t recognizing the device. (Windows 98SE) Install the driver included with the disk.
I can’t hear any audio/see any video on my recordings. Make sure that the RCA cables are inserted ALL the way
into the jacks.
If you have any other questions, please feel free to visit our website at
http://www.machspeed.com for updates, changes to this manual, and contact/support
information.

Product Specification & Accessory :
Storage Memory 128/256/512Mb SNR 90dB
Battery Built-in Lithium
Battery
Earphone Output Power 5mW+5mW
Display Screen 2.5” TFT Screen Output Frequency Range 20Hz-20KHz
Product Size
( L*W*H )
90*60*17.5mm Recording Rate 8Hz-48KHz
USB Interface USB1.0 Support Compressed bit
rate
MP3 8Kbps to 320Kbps
WMA 24Kbps to
128Kbps
Please check whether the following accessories are included in your color box:
User Manual ------------------1 pc Stereo Earphone ------------------- 1 pair
Installation CD----------------1 pc USB cable ---------------------------1 pc
Record Convert Cable --------1 pc Video cable ------------------------- 1pc
Charger ------------------------1 pc MP4 Unit -------------------------- 1pc