tv connector user guide - unitron.comunitron.com/content/dam/unitron-2014/documents/english/tv...
TRANSCRIPT
TV Connectoruser guide
Thank youThank you for choosing the TV Connector. The intended use of the TV Connector is to connect your hearing aids directly to your TV or audio source.
Your TV Connector
Hearing healthcare professional: _______________
___________________________________________
Telephone: _________________________________
Serial number of TV Connector: ________________
Warranty: __________________________________
Date of purchase: ____________________________
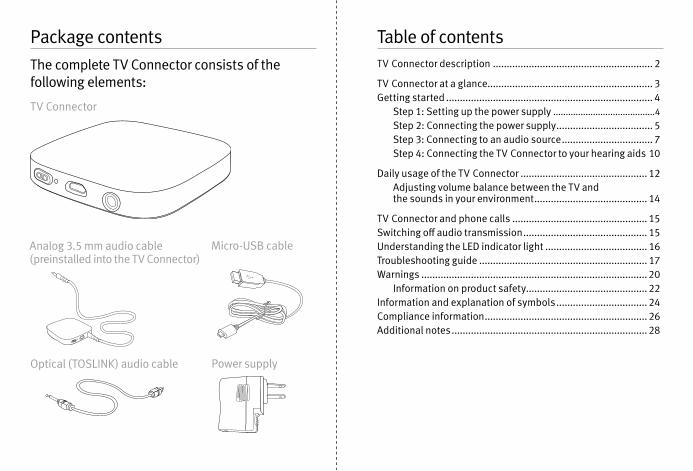
Table of contentsTV Connector description .......................................................... 2
TV Connector at a glance ............................................................ 3Getting started ........................................................................... 4
Step 1: Setting up the power supply .........................................4Step 2: Connecting the power supply ................................... 5Step 3: Connecting to an audio source ................................. 7Step 4: Connecting the TV Connector to your hearing aids 10
Daily usage of the TV Connector .............................................. 12Adjusting volume balance between the TV and the sounds in your environment ......................................... 14
TV Connector and phone calls ................................................. 15Switching off audio transmission ............................................. 15Understanding the LED indicator light ..................................... 16Troubleshooting guide ............................................................. 17Warnings ..................................................................................20
Information on product safety ............................................22Information and explanation of symbols .................................24Compliance information ...........................................................26Additional notes .......................................................................28
Package contentsThe complete TV Connector consists of the following elements:
Analog 3.5 mm audio cable (preinstalled into the TV Connector)
Power supply
TV Connector
Optical (TOSLINK) audio cable
Micro-USB cable
2 3
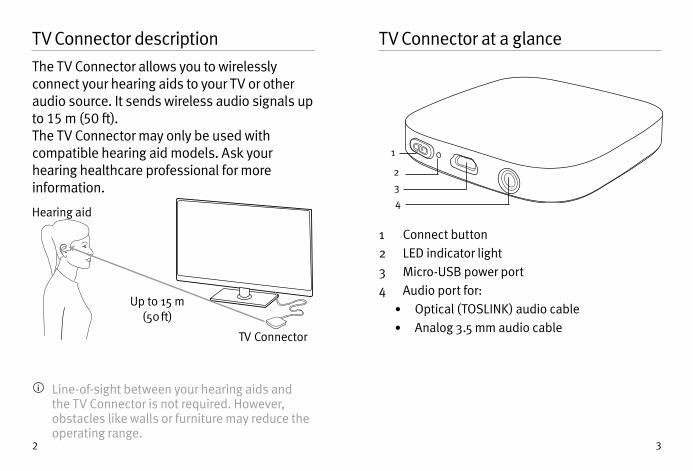
TV Connector description The TV Connector allows you to wirelessly connect your hearing aids to your TV or other audio source. It sends wireless audio signals up to 15 m (50 ft). The TV Connector may only be used with compatible hearing aid models. Ask your hearing healthcare professional for more information.
TV Connector
Hearing aid
Up to 15 m(50 ft)
Line-of-sight between your hearing aids and the TV Connector is not required. However, obstacles like walls or furniture may reduce the operating range.
TV Connector at a glance
1 Connect button2 LED indicator light3 Micro-USB power port4 Audio port for:
• Optical (TOSLINK) audio cable• Analog 3.5 mm audio cable
1
234

4 5
Getting started
Step 1: Setting up the power supplyTo attach the country adapter:1. Select the adapter that corresponds to your
country. (Included country adapters may vary by country.)
2. Insert the round corner of
the adapter to the round corner of the universal power supply until it is completely inserted.
3. Click the tail of the adapter in to lock it into place. Make sure the adapter is securely locked.
US EU UK AUS
2.
3.
To remove the country adapter:1. Pull back the tab on the
universal power supply and hold.
2. Gently pull the adapter upwards to remove it from the receptacle.
Step 2: Connecting the power supply1. Insert the larger end of the USB
cable into the power supply.
2. Plug the power supply into the wall outlet.
2.1.

6 7
3. Insert the smaller end of the USB cable into the micro-USB power port of the TV Connector.
Alternatively, the TV Connector can be powered via USB cable on the TV by inserting the larger end of the USB cable into the USB port of the TV.
When the TV Connector is plugged into a power source for the first time, the connection to the hearing aids will be automatic. The hearing aids will play a confirmation melody when the connection is successful.
Step 3: Connecting to an audio sourceThe TV Connector can be connected to any audio source such as a TV, PC or stereo system. It supports two different audio cable inputs: optical (TOSLINK) or analog. Either of these audio cables must be plugged into the dedicated audio port on the TV Connector.
Select the audio cable that is compatible with your audio source.
Ensure the chosen audio cable is firmly inserted into both the TV Connector and the audio source.
Optical (TOSLINK)Digital signal fiber optic cable (optional)
Analog3.5 mm audio cable (preinstalled in the TV Connector)
8 9
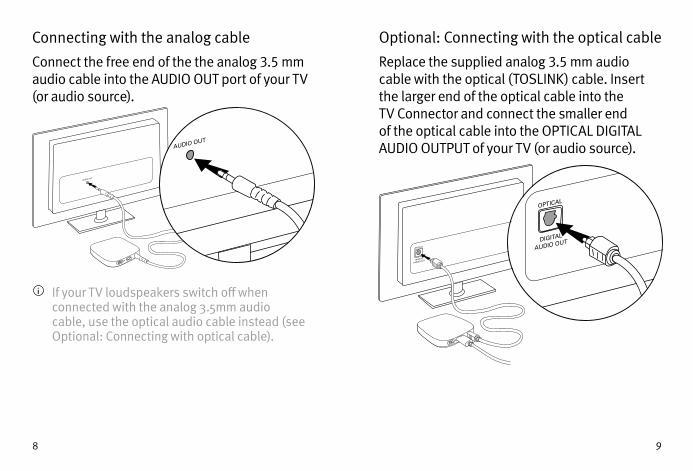
Connecting with the analog cableConnect the free end of the the analog 3.5 mm audio cable into the AUDIO OUT port of your TV (or audio source).
If your TV loudspeakers switch off when connected with the analog 3.5mm audio cable, use the optical audio cable instead (see Optional: Connecting with optical cable).
Optional: Connecting with the optical cableReplace the supplied analog 3.5 mm audio cable with the optical (TOSLINK) cable. Insert the larger end of the optical cable into the TV Connector and connect the smaller end of the optical cable into the OPTICAL DIGITAL AUDIO OUTPUT of your TV (or audio source).
10 11
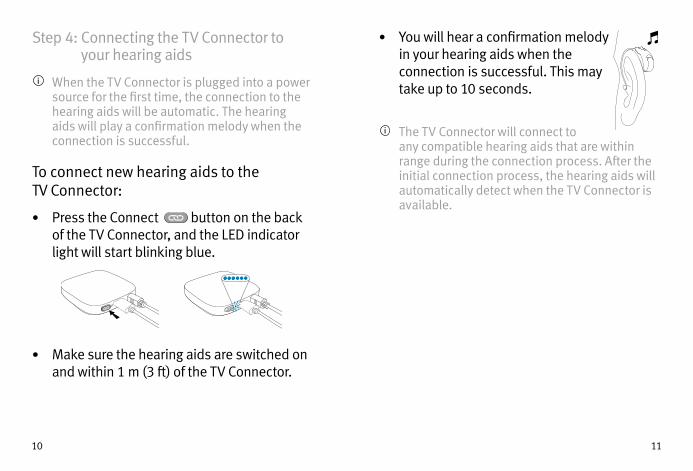
Step 4: Connecting the TV Connector to your hearing aids
When the TV Connector is plugged into a power source for the first time, the connection to the hearing aids will be automatic. The hearing aids will play a confirmation melody when the connection is successful.
To connect new hearing aids to the TV Connector:
• Press the Connect button on the back of the TV Connector, and the LED indicator light will start blinking blue.
• Make sure the hearing aids are switched on and within 1 m (3 ft) of the TV Connector.
• You will hear a confirmation melody in your hearing aids when the connection is successful. This may take up to 10 seconds.
The TV Connector will connect to any compatible hearing aids that are within range during the connection process. After the initial connection process, the hearing aids will automatically detect when the TV Connector is available.
12 13
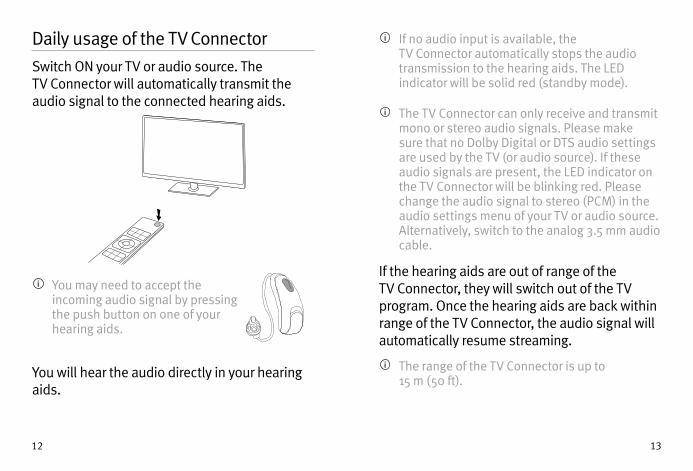
Daily usage of the TV ConnectorSwitch ON your TV or audio source. The TV Connector will automatically transmit the audio signal to the connected hearing aids.
You may need to accept the incoming audio signal by pressing the push button on one of your hearing aids.
You will hear the audio directly in your hearing aids.
If no audio input is available, the TV Connector automatically stops the audio transmission to the hearing aids. The LED indicator will be solid red (standby mode).
The TV Connector can only receive and transmit mono or stereo audio signals. Please make sure that no Dolby Digital or DTS audio settings are used by the TV (or audio source). If these audio signals are present, the LED indicator on the TV Connector will be blinking red. Please change the audio signal to stereo (PCM) in the audio settings menu of your TV or audio source. Alternatively, switch to the analog 3.5 mm audio cable.
If the hearing aids are out of range of the TV Connector, they will switch out of the TV program. Once the hearing aids are back within range of the TV Connector, the audio signal will automatically resume streaming.
The range of the TV Connector is up to 15 m (50 ft).
14 15
TV Connector and phone callsIf your hearing aids are connected to your mobile phone, you can still receive phone calls, even when using the TV Connector. In the case of an incoming call, the hearing aids will automatically stop the audio signal from the TV Connector and the incoming call alert will be played through the hearing aids. After the call, the hearing aids will switch back to the TV Connector audio signal automatically.
Switching off audio transmissionTo end the transmission of the audio signal from the TV Connector, simply switch off the TV or audio source. The TV Connector will go into standby mode automatically and the hearing aids will switch out of the TV program.
If someone else is still watching the TV (or listening to the audio source), use the hearing aid push buttons to switch back to your automatic program. This option may need to be programmed by your hearing healthcare professional.
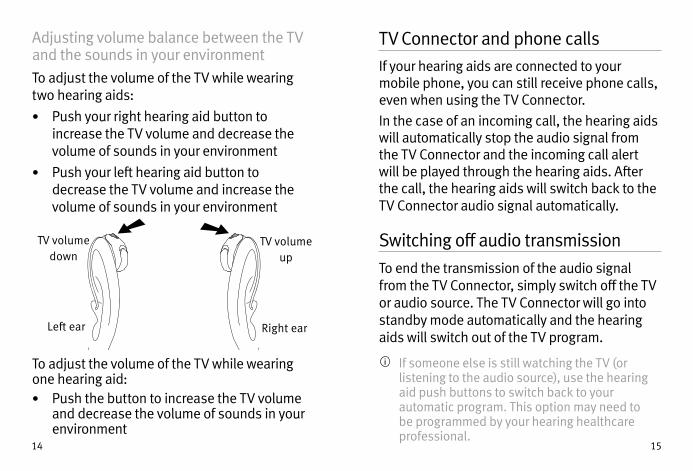
Adjusting volume balance between the TV and the sounds in your environmentTo adjust the volume of the TV while wearing two hearing aids: • Push your right hearing aid button to
increase the TV volume and decrease the volume of sounds in your environment
• Push your left hearing aid button to decrease the TV volume and increase the volume of sounds in your environment
To adjust the volume of the TV while wearing one hearing aid:• Push the button to increase the TV volume
and decrease the volume of sounds in your environment
Left ear Right ear
TV volume down
TV volume up
16 17
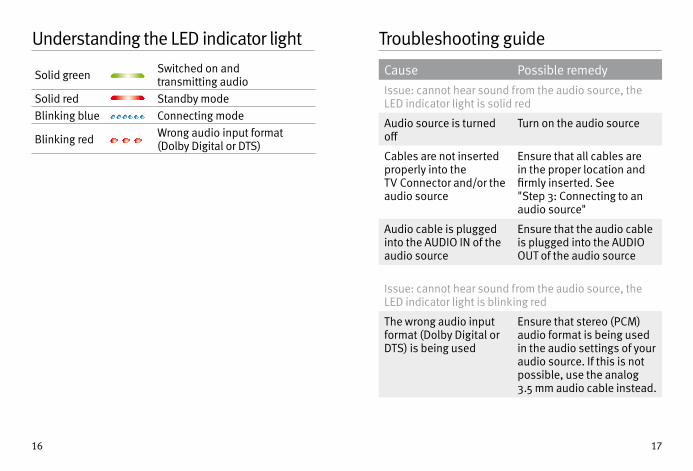
Understanding the LED indicator light
Solid green Switched on and transmitting audio
Solid red Standby modeBlinking blue Connecting mode
Blinking red Wrong audio input format (Dolby Digital or DTS)
Troubleshooting guide
Cause Possible remedyIssue: cannot hear sound from the audio source, the LED indicator light is solid red
Audio source is turned off
Turn on the audio source
Cables are not inserted properly into the TV Connector and/or the audio source
Ensure that all cables are in the proper location and firmly inserted. See "Step 3: Connecting to an audio source"
Audio cable is plugged into the AUDIO IN of the audio source
Ensure that the audio cable is plugged into the AUDIO OUT of the audio source
Issue: cannot hear sound from the audio source, the LED indicator light is blinking red
The wrong audio input format (Dolby Digital or DTS) is being used
Ensure that stereo (PCM) audio format is being used in the audio settings of your audio source. If this is not possible, use the analog 3.5 mm audio cable instead.
18 19
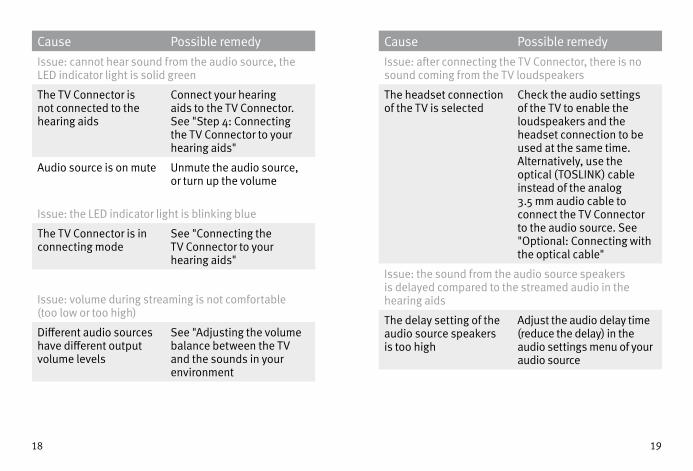
Cause Possible remedyIssue: cannot hear sound from the audio source, the LED indicator light is solid green
The TV Connector is not connected to the hearing aids
Connect your hearing aids to the TV Connector. See "Step 4: Connecting the TV Connector to your hearing aids"
Audio source is on mute Unmute the audio source, or turn up the volume
Issue: the LED indicator light is blinking blue
The TV Connector is in connecting mode
See "Connecting the TV Connector to your hearing aids"
Issue: volume during streaming is not comfortable (too low or too high)
Different audio sources have different output volume levels
See "Adjusting the volume balance between the TV and the sounds in your environment
Cause Possible remedyIssue: after connecting the TV Connector, there is no sound coming from the TV loudspeakers
The headset connection of the TV is selected
Check the audio settings of the TV to enable the loudspeakers and the headset connection to be used at the same time.Alternatively, use the optical (TOSLINK) cable instead of the analog 3.5 mm audio cable to connect the TV Connector to the audio source. See "Optional: Connecting with the optical cable"
Issue: the sound from the audio source speakers is delayed compared to the streamed audio in the hearing aids
The delay setting of the audio source speakers is too high
Adjust the audio delay time (reduce the delay) in the audio settings menu of your audio source
20 21
Warnings This device is not for children under 36 months. It contains small parts that can cause choking, if swallowed by children. Keep out of reach of children, individuals with cognitive impairment, and pets. If swallowed, consult a physician or hospital immediately. Only use hearing aids that have been specially programmed for you by your hearing healthcare professional. Changes or modifications to this device that were not explicitly approved by Sonova AG are not permitted. The TV Connector may generate magnetic fields. If any influence of the TV Connector on the implantable device (e.g. pacemakers, defibrillators, etc.) is experienced, stop using the TV Connector and contact your doctor and/or the manufacturer of the implantable device for advice.
Opening the device might damage it. If problems occur which cannot be resolved by following the remedy guidelines in the troubleshooting section of this user guide, consult your hearing healthcare professional. Dispose of electrical components in accordance with your local regulations. Do not use the device in explosive areas (mines or industrial areas with danger of explosions, oxygen rich environments or areas where flammable anesthetics are handled) or where electronic equipment is prohibited. External devices may only be connected if they have been tested in accordance with corresponding IECXXXXX standards. Only use accessories approved by Sonova AG.

22 23
Caution: electric shock. Do not insert plug alone into electrical outlets.
For safety reasons, only use chargers supplied by Sonova AG, or stabilized chargers with a rating of 5VDC, min. 500 mA.
Information on product safety Protect the device cables, ports and power supply from dirt and debris.
Do not use excessive force when connecting your device to its different cables.
Protect the device from excessive moisture (bathing or swimming areas) and heat sources (radiator, TV top). Protect the device from excessive shock and vibration.
Clean the device using a damp cloth. Never use household cleaning products (washing
powder, soap, etc.) or alcohol to clean them. Never use a microwave or other heating devices to dry the device.
X-ray radiation, CT or MRI scans may destroy or adversely affect the correct functioning of the device.
If the device has been dropped or damaged, if it overheats, has a damaged cord or plug, or has been dropped into liquid, stop using your device and contact your hearing healthcare professional.
High-powered electronic equipment, larger electronic installations and metallic structures may impair and significantly reduce the operating range.
Protect your eyes from the optical light from the optical TOSLINK cable when plugging the cable into the TV or audio source and the TV Connector.
24 25
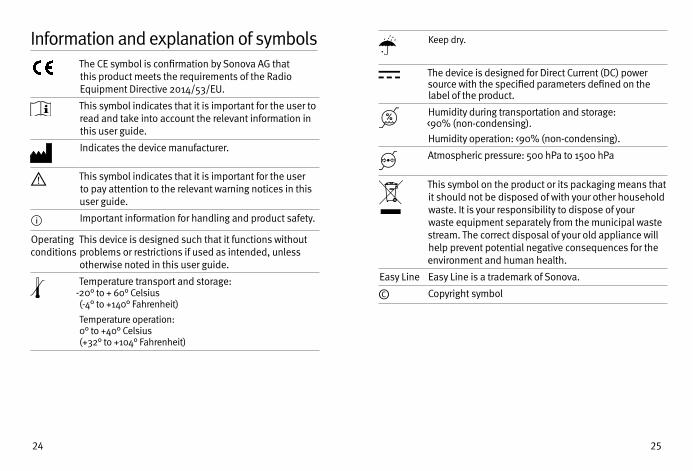
Information and explanation of symbolsThe CE symbol is confirmation by Sonova AG that this product meets the requirements of the Radio Equipment Directive 2014/53/EU.
This symbol indicates that it is important for the user to read and take into account the relevant information in this user guide.
Indicates the device manufacturer.
This symbol indicates that it is important for the user to pay attention to the relevant warning notices in this user guide.
Important information for handling and product safety.
Operating conditions
This device is designed such that it functions without problems or restrictions if used as intended, unless otherwise noted in this user guide.
Temperature transport and storage: -20° to + 60° Celsius (-4° to +140° Fahrenheit)Temperature operation: 0° to +40° Celsius (+32° to +104° Fahrenheit)
Keep dry.
The device is designed for Direct Current (DC) power source with the specified parameters defined on the label of the product.
Humidity during transportation and storage: <90% (non-condensing).Humidity operation: <90% (non-condensing).
Atmospheric pressure: 500 hPa to 1500 hPa
This symbol on the product or its packaging means that it should not be disposed of with your other household waste. It is your responsibility to dispose of your waste equipment separately from the municipal waste stream. The correct disposal of your old appliance will help prevent potential negative consequences for the environment and human health.
Easy Line Easy Line is a trademark of Sonova.
© Copyright symbol
26 27
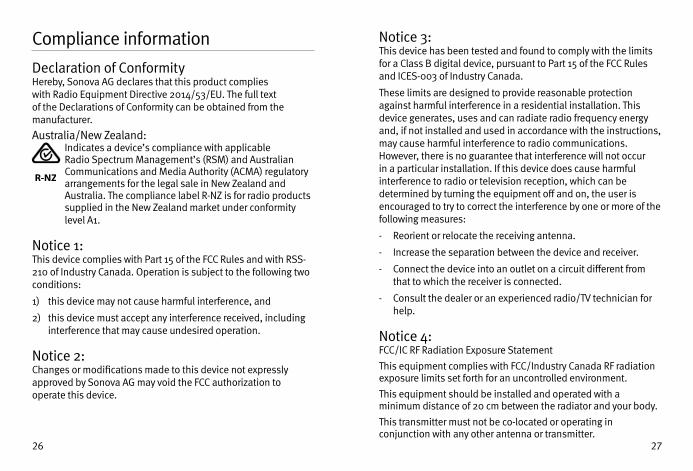
Compliance informationDeclaration of Conformity Hereby, Sonova AG declares that this product complies with Radio Equipment Directive 2014/53/EU. The full text of the Declarations of Conformity can be obtained from the manufacturer.Australia/New Zealand:
Indicates a device’s compliance with applicable Radio Spectrum Management’s (RSM) and Australian Communications and Media Authority (ACMA) regulatory arrangements for the legal sale in New Zealand and Australia. The compliance label R-NZ is for radio products supplied in the New Zealand market under conformity level A1.
Notice 1:This device complies with Part 15 of the FCC Rules and with RSS-210 of Industry Canada. Operation is subject to the following two conditions:
1) this device may not cause harmful interference, and
2) this device must accept any interference received, including interference that may cause undesired operation.
Notice 2:Changes or modifications made to this device not expressly approved by Sonova AG may void the FCC authorization to operate this device.
Notice 3:This device has been tested and found to comply with the limits for a Class B digital device, pursuant to Part 15 of the FCC Rules and ICES-003 of Industry Canada.
These limits are designed to provide reasonable protection against harmful interference in a residential installation. This device generates, uses and can radiate radio frequency energy and, if not installed and used in accordance with the instructions, may cause harmful interference to radio communications. However, there is no guarantee that interference will not occur in a particular installation. If this device does cause harmful interference to radio or television reception, which can be determined by turning the equipment off and on, the user is encouraged to try to correct the interference by one or more of the following measures:
- Reorient or relocate the receiving antenna.
- Increase the separation between the device and receiver.
- Connect the device into an outlet on a circuit different from that to which the receiver is connected.
- Consult the dealer or an experienced radio/TV technician for help.
Notice 4: FCC/IC RF Radiation Exposure StatementThis equipment complies with FCC/Industry Canada RF radiation exposure limits set forth for an uncontrolled environment.This equipment should be installed and operated with a minimum distance of 20 cm between the radiator and your body.This transmitter must not be co-located or operating in conjunction with any other antenna or transmitter.

Additional notes
___________________________________________
___________________________________________
___________________________________________
___________________________________________
___________________________________________
___________________________________________
___________________________________________
___________________________________________
___________________________________________
___________________________________________
___________________________________________

Sonova AG Laubisrütistrasse 28 CH-8712 Stäfa, Switzerland
2017
-10
029-
6194
-02
©
201
7 S
onov
a AG
. Al
l rig
hts
rese
rved
.
7 6 1 3 3 8 9 0 0 3 9 3 2