tutorial gimp open source image-editing gimp gimp:...
TRANSCRIPT
Tutorial Gimp
82 LXF124 November 2009 www.linuxformat.com
Gimp Tutorial
Michael J Hammelis a contributor to the Gimp project and the author of three books on the subject, including his latest, The Artist’s Guide to Gimp Effects.
Our expert
Gimp: Summer Gimp Open source image-editing software you can get your teeth into
Gimp wizard Michael J Hammel lets you ride the retro rave of sunbeams and silhouettes in this month’s tutorial be-in.
I’m a tail-end baby boomer, which means I was too young for Woodstock while my parents were too old. They rocked to Jerry Lee Lewis while I prefer the ‘soft’ melodies
of Pink Floyd or AC/DC. None of us are flower children.So, in a fond retrospective, my sunbeam tutorial this
month is based on what everyone else has been telling me the 60s were all about: the sun, beams of light, love and grassy fields. Somehow I think it was more complex than that. But not for us. Not this month at least.
Last month Gimp specialist Michael J Hammel went planetary intergalactic.
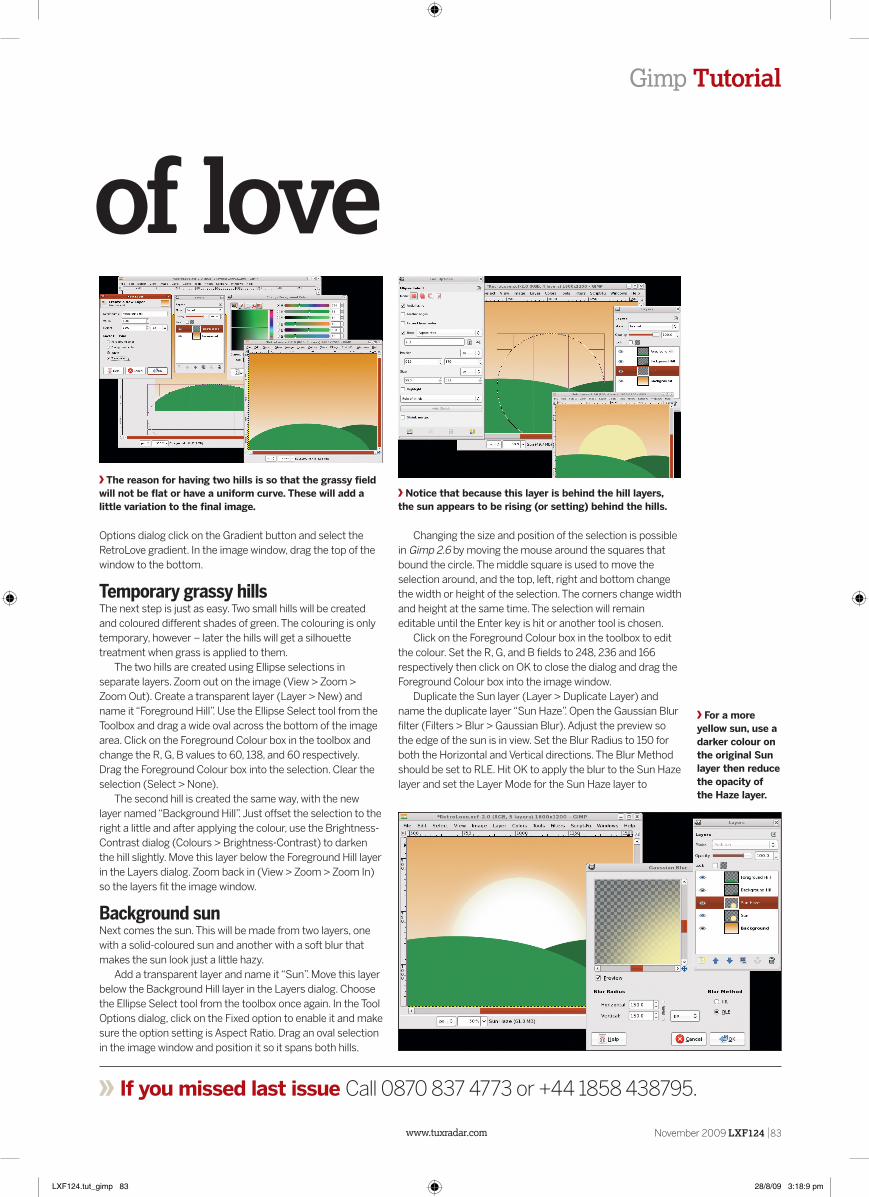
Love in the 60s was black and white, with just a splash of colour. Or maybe that’s just the rose-tinted specs…
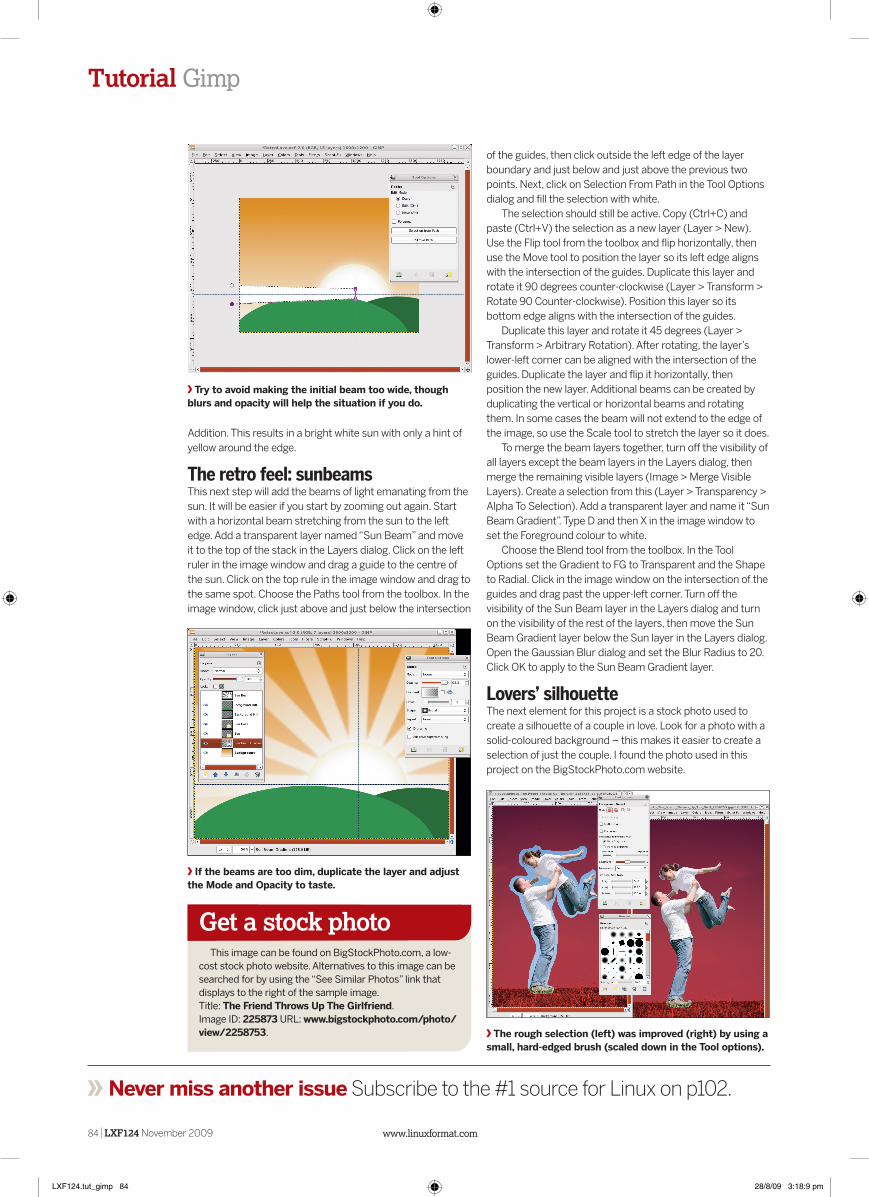
Gradients are easy to create and can be used for a background colour, textured patterns or 3D-like effects.
This will be one of the easiest tutorials I’ve presented in some time – there are no special talents needed here. But you will need to find some extra brushes to add to Gimp’s stock collection. I’ll show you were to get these and how to use them. A stock photo is also required; I’ll point you to the one I’m using here. Let’s step back in time!
Creating a custom gradientThe project starts with a splash of colour on the background applied as a gradient. The easy way to do this is to just set the foreground and background colours and use the Blend tool from the toolbox, dragging from top to bottom in the canvas. Instead, let’s review how to create a custom gradient.
Open a new image (File > New) that’s 1600x1200 pixels. Type D in the image window to reset the foreground and background colours to their defaults of black and white, respectively. At the bottom of the Gradients dialog (Windows > Dockable Dialogs > Gradients) are icons for managing gradients. Click on the icon second from the left to create a new gradient, which will open the Gradient Editor dialog, with the initial gradient shown using the foreground colour on the left and background colour on the right. Click and hold the right mouse button on the gradient to open a menu, then choose Left Endpoint’s Colour. In the dialog that opens, set the R, G and B values to 219, 122, and 2 respectively. Click on OK to set the left endpoint colour.
Creating a custom gradient is all about using that menu to add new segments, setting the colours on either end of the segment and adjusting the size of segments. In the Gradient Editor, change the name from Untitled to “RetroLove”. Then click on the Save icon in the dialog, close the Gradient Editor dialog and choose the Blend tool from the Toolbox. In the Tool
LXF124.tut_gimp 82 28/8/09 3:18:8 pm
Tutorial Gimp Gimp Tutorial
www.tuxradar.com November 2009 LXF124 83
If you missed last issue Call 0870 837 4773 or +44 1858 438795.
Options dialog click on the Gradient button and select the RetroLove gradient. In the image window, drag the top of the window to the bottom.
Temporary grassy hillsThe next step is just as easy. Two small hills will be created and coloured different shades of green. The colouring is only temporary, however – later the hills will get a silhouette treatment when grass is applied to them.
The two hills are created using Ellipse selections in separate layers. Zoom out on the image (View > Zoom > Zoom Out). Create a transparent layer (Layer > New) and name it “Foreground Hill”. Use the Ellipse Select tool from the Toolbox and drag a wide oval across the bottom of the image area. Click on the Foreground Colour box in the toolbox and change the R, G, B values to 60, 138, and 60 respectively. Drag the Foreground Colour box into the selection. Clear the selection (Select > None).
The second hill is created the same way, with the new layer named “Background Hill”. Just offset the selection to the right a little and after applying the colour, use the Brightness-Contrast dialog (Colours > Brightness-Contrast) to darken the hill slightly. Move this layer below the Foreground Hill layer in the Layers dialog. Zoom back in (View > Zoom > Zoom In) so the layers fit the image window.
Background sunNext comes the sun. This will be made from two layers, one with a solid-coloured sun and another with a soft blur that makes the sun look just a little hazy.
Add a transparent layer and name it “Sun”. Move this layer below the Background Hill layer in the Layers dialog. Choose the Ellipse Select tool from the toolbox once again. In the Tool Options dialog, click on the Fixed option to enable it and make sure the option setting is Aspect Ratio. Drag an oval selection in the image window and position it so it spans both hills.
Changing the size and position of the selection is possible in Gimp 2.6 by moving the mouse around the squares that bound the circle. The middle square is used to move the selection around, and the top, left, right and bottom change the width or height of the selection. The corners change width and height at the same time. The selection will remain editable until the Enter key is hit or another tool is chosen.
Click on the Foreground Colour box in the toolbox to edit the colour. Set the R, G, and B fields to 248, 236 and 166 respectively then click on OK to close the dialog and drag the Foreground Colour box into the image window.
Duplicate the Sun layer (Layer > Duplicate Layer) and name the duplicate layer “Sun Haze”. Open the Gaussian Blur filter (Filters > Blur > Gaussian Blur). Adjust the preview so the edge of the sun is in view. Set the Blur Radius to 150 for both the Horizontal and Vertical directions. The Blur Method should be set to RLE. Hit OK to apply the blur to the Sun Haze layer and set the Layer Mode for the Sun Haze layer to
Gimp: Summer Gimp Open source image-editing software you can get your teeth into
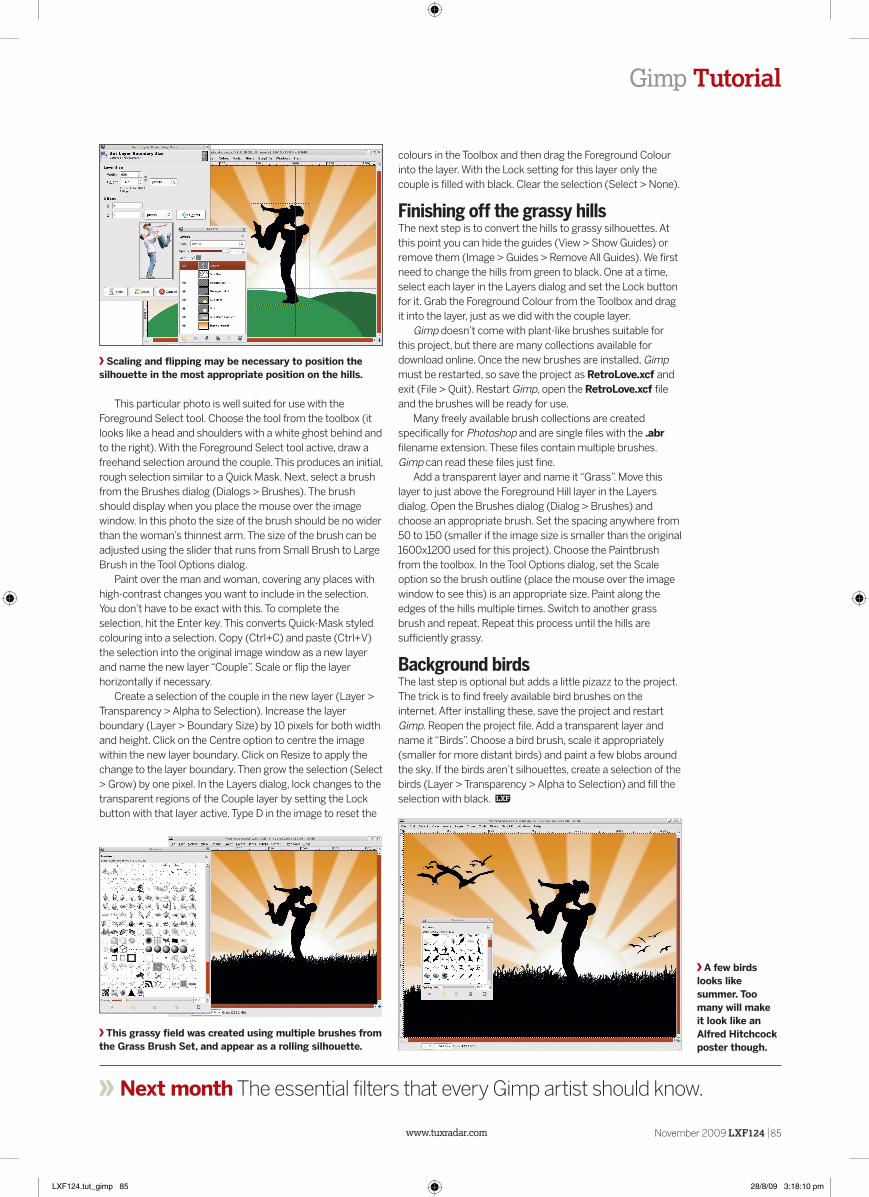
The reason for having two hills is so that the grassy field will not be flat or have a uniform curve. These will add a little variation to the final image.
Notice that because this layer is behind the hill layers, the sun appears to be rising (or setting) behind the hills.
For a more yellow sun, use a darker colour on the original Sun layer then reduce the opacity of the Haze layer.
of love
LXF124.tut_gimp 83 28/8/09 3:18:9 pm
Tutorial Gimp
84 LXF124 November 2009 www.linuxformat.com
Gimp Tutorial
of the guides, then click outside the left edge of the layer boundary and just below and just above the previous two points. Next, click on Selection From Path in the Tool Options dialog and fill the selection with white.
The selection should still be active. Copy (Ctrl+C) and paste (Ctrl+V) the selection as a new layer (Layer > New). Use the Flip tool from the toolbox and flip horizontally, then use the Move tool to position the layer so its left edge aligns with the intersection of the guides. Duplicate this layer and rotate it 90 degrees counter-clockwise (Layer > Transform > Rotate 90 Counter-clockwise). Position this layer so its bottom edge aligns with the intersection of the guides.
Duplicate this layer and rotate it 45 degrees (Layer > Transform > Arbitrary Rotation). After rotating, the layer’s lower-left corner can be aligned with the intersection of the guides. Duplicate the layer and flip it horizontally, then position the new layer. Additional beams can be created by duplicating the vertical or horizontal beams and rotating them. In some cases the beam will not extend to the edge of the image, so use the Scale tool to stretch the layer so it does.
To merge the beam layers together, turn off the visibility of all layers except the beam layers in the Layers dialog, then merge the remaining visible layers (Image > Merge Visible Layers). Create a selection from this (Layer > Transparency > Alpha To Selection). Add a transparent layer and name it “Sun Beam Gradient”. Type D and then X in the image window to set the Foreground colour to white.
Choose the Blend tool from the toolbox. In the Tool Options set the Gradient to FG to Transparent and the Shape to Radial. Click in the image window on the intersection of the guides and drag past the upper-left corner. Turn off the visibility of the Sun Beam layer in the Layers dialog and turn on the visibility of the rest of the layers, then move the Sun Beam Gradient layer below the Sun layer in the Layers dialog. Open the Gaussian Blur dialog and set the Blur Radius to 20. Click OK to apply to the Sun Beam Gradient layer.
Lovers’ silhouetteThe next element for this project is a stock photo used to create a silhouette of a couple in love. Look for a photo with a solid-coloured background – this makes it easier to create a selection of just the couple. I found the photo used in this project on the BigStockPhoto.com website.
Never miss another issue Subscribe to the #1 source for Linux on p102.
Try to avoid making the initial beam too wide, though blurs and opacity will help the situation if you do.
Addition. This results in a bright white sun with only a hint of yellow around the edge.
The retro feel: sunbeamsThis next step will add the beams of light emanating from the sun. It will be easier if you start by zooming out again. Start with a horizontal beam stretching from the sun to the left edge. Add a transparent layer named “Sun Beam” and move it to the top of the stack in the Layers dialog. Click on the left ruler in the image window and drag a guide to the centre of the sun. Click on the top rule in the image window and drag to the same spot. Choose the Paths tool from the toolbox. In the image window, click just above and just below the intersection
If the beams are too dim, duplicate the layer and adjust the Mode and Opacity to taste.
The rough selection (left) was improved (right) by using a small, hard-edged brush (scaled down in the Tool options).
Get a stock photoThis image can be found on BigStockPhoto.com, a low-
cost stock photo website. Alternatives to this image can be searched for by using the “See Similar Photos” link that displays to the right of the sample image.Title: The Friend Throws Up The Girlfriend. Image ID: 225873 URL: www.bigstockphoto.com/photo/view/2258753.
LXF124.tut_gimp 84 28/8/09 3:18:9 pm
Tutorial Gimp Gimp Tutorial
www.tuxradar.com November 2009 LXF124 85
This particular photo is well suited for use with the Foreground Select tool. Choose the tool from the toolbox (it looks like a head and shoulders with a white ghost behind and to the right). With the Foreground Select tool active, draw a freehand selection around the couple. This produces an initial, rough selection similar to a Quick Mask. Next, select a brush from the Brushes dialog (Dialogs > Brushes). The brush should display when you place the mouse over the image window. In this photo the size of the brush should be no wider than the woman’s thinnest arm. The size of the brush can be adjusted using the slider that runs from Small Brush to Large Brush in the Tool Options dialog.
Paint over the man and woman, covering any places with high-contrast changes you want to include in the selection. You don’t have to be exact with this. To complete the selection, hit the Enter key. This converts Quick-Mask styled colouring into a selection. Copy (Ctrl+C) and paste (Ctrl+V) the selection into the original image window as a new layer and name the new layer “Couple”. Scale or flip the layer horizontally if necessary.
Create a selection of the couple in the new layer (Layer > Transparency > Alpha to Selection). Increase the layer boundary (Layer > Boundary Size) by 10 pixels for both width and height. Click on the Centre option to centre the image within the new layer boundary. Click on Resize to apply the change to the layer boundary. Then grow the selection (Select > Grow) by one pixel. In the Layers dialog, lock changes to the transparent regions of the Couple layer by setting the Lock button with that layer active. Type D in the image to reset the
Next month The essential filters that every Gimp artist should know.
This grassy field was created using multiple brushes from the Grass Brush Set, and appear as a rolling silhouette.
A few birds looks like summer. Too many will make it look like an Alfred Hitchcock poster though.
Scaling and flipping may be necessary to position the silhouette in the most appropriate position on the hills.
colours in the Toolbox and then drag the Foreground Colour into the layer. With the Lock setting for this layer only the couple is filled with black. Clear the selection (Select > None).
Finishing off the grassy hillsThe next step is to convert the hills to grassy silhouettes. At this point you can hide the guides (View > Show Guides) or remove them (Image > Guides > Remove All Guides). We first need to change the hills from green to black. One at a time, select each layer in the Layers dialog and set the Lock button for it. Grab the Foreground Colour from the Toolbox and drag it into the layer, just as we did with the couple layer.
Gimp doesn’t come with plant-like brushes suitable for this project, but there are many collections available for download online. Once the new brushes are installed, Gimp must be restarted, so save the project as RetroLove.xcf and exit (File > Quit). Restart Gimp, open the RetroLove.xcf file and the brushes will be ready for use.
Many freely available brush collections are created specifically for Photoshop and are single files with the .abr filename extension. These files contain multiple brushes. Gimp can read these files just fine.
Add a transparent layer and name it “Grass”. Move this layer to just above the Foreground Hill layer in the Layers dialog. Open the Brushes dialog (Dialog > Brushes) and choose an appropriate brush. Set the spacing anywhere from 50 to 150 (smaller if the image size is smaller than the original 1600x1200 used for this project). Choose the Paintbrush from the toolbox. In the Tool Options dialog, set the Scale option so the brush outline (place the mouse over the image window to see this) is an appropriate size. Paint along the edges of the hills multiple times. Switch to another grass brush and repeat. Repeat this process until the hills are sufficiently grassy.
Background birds The last step is optional but adds a little pizazz to the project. The trick is to find freely available bird brushes on the internet. After installing these, save the project and restart Gimp. Reopen the project file. Add a transparent layer and name it “Birds”. Choose a bird brush, scale it appropriately (smaller for more distant birds) and paint a few blobs around the sky. If the birds aren’t silhouettes, create a selection of the birds (Layer > Transparency > Alpha to Selection) and fill the selection with black. LXF
LXF124.tut_gimp 85 28/8/09 3:18:10 pm