tutorial for minecraft
DESCRIPTION
How to build an awesome spaceship in Minecraft , complete guideTRANSCRIPT

Ragnur Le Barbare’s
MEGABUILD tutorial

CHAPTER ONE: PREPARATION
Step 1 : what to build ?
So you wish to build a truly huge spaceship? Well, the first step is – of course – to decide
what you are going to build. Three criteria matter for me: how much I like the ship/the series
it appeared in, how difficult it looks like to build, and how good I think it will look like in
Minecraft. Why?
- How much I like the ship: of course, trying to build a ship you like will greatly help
to keep you motivated throughout the project: don’t forget that it will take
weeks, even months to build, so you’ll never have the motivation to finish a ship
you don’t like!
- How difficult: I don’t feel like a pro builder, and I know I won’t be able to build
some of the more complex structures that can be found; it seems obvious, but
don’t try too complex builds for your first time, unless you are very, very
motivated (see previous point).
- How good it looks like: Minecraft is by essence a very “blocky” game (I know,
Captain Obvious strikes again!), but for your spaceship to look good, you will
need to add details, such as pipes, guns, antennas, airlocks, everything that will
differentiate it from a flying brick. That’s why I won’t try to build a life-sife TIE
fighter in Minecraft: too small, no room for details, except if it is scaled up. That’s
also why I won’t try the Death Star: far too big, the scaling down required will
make every little detail disappear (it would be like building a sphere, the only
details you could add being a trench and a superlaser).
To conclude this part, I’ll choose my ship for this tutorial: the Omega Destroyer from the
Babylon 5 universe, which satisfies all my criteria:
- It is one of the flagships of my favorite sci-fi show, so of course I love it!
- Not a lot of curves, so relatively easy to build; I can build more complicated, but
this time I have a deadline to respect, so I’ll keep it more simple.
- Enough room for details: big pipes running through the structure, complicated
engines, antennas, etc. (of course, it will depend on the scale of the ship in
Minecraft).

Step 2: reference images
The most important part of the preparation: finding good reference images! The most useful
thing you can find is the kind of picture that shows you the 4 views of the ship (side, top,
front, back). Fortunately, with a quick Google search, I was able to find such a picture for the
Omega Destroyer.
If you can’t find this “4-views picture”, don’t despair! You’ll “only” need a side view, and
every other picture of the ship you can find, under every angle you can find: it will help you
with the proportions, and allow you to extrapolate the top, front and back views of the ship.
From experience (the Scarran Dreadnaught of one of my projects, for which I only had the
silhouette of the side, and a couple of views from a 3d model), it’s much more difficult to do,
but still possible.

This brings me to a very important point of megabuilds: you are not trying to recreate the
exact same ship, it is an adaptation! So it is not the end of the world if the proportions are a
bit skewed, if you can’t add some details or if you have to invent your own. Just as the Game
Of Thrones tv-show cannot be a carbon copy of the books doesn’t mean it’s bad: for your
spaceship, it’s exactly the same!
Now, even if you have the “4-views picture” (if someone in the comments knows the real
English name of this kind of picture, you’ll get a shout out!), I strongly advise you to find a lot
of other views, preferably in high quality, so you can figure out details, things you missed,
etc…
Here are some reference images for the Omega Destroyer for this tutorial, a mix of episodes
screenshots and 3d models realized by fans:
http://www.foundation3d.com/plugins/p13_download_manager/images/697.jpg
http://tonygardner.com/blog/category/w-i-p/omega-class-destroyer/
http://en.academic.ru/pictures/enwiki/98/b5tech.jpg
http://www.fernhoo.com/picture/gallery/omega_destroyer.jpg
http://suptg.thisisnotatrueending.com/archive/9228209/images/1271430619501.jpg
http://www.starshipmodeler.com/b5/td_OmegaFrontDet.jpg
http://www.gian-cursio.net/wp-content/uploads/2012/01/001a_shot.jpg

Step 3: scaling down
The goal of this step is to find the dimensions of our ship. For this, I copy-pasted the side
view of the ship on a new paint.net file, selecting the ship from the tip of the top and bottom
antennas. You’ll notice that a part of the ship is cut: it is the rotating part, showed in the
other views at an angle of 45°. In order to try and respect the deadline for the contest, I’ll
make this part horizontal, which also allows me to gain more height for the ship.
Speaking of height, you know that Minecraft is currently limited to 256 blocks. This selection
is 323 pixels high (meaning 323 blocks), therefore we will have to shrink the ship a bit.
256/323 = 0.79, so we shrink the “4-views picture” to approximately 79% of its original size,
and ta-daa! We have ourselves a ship that will fit in a Minecraft world!
According to these calculations, the Omega Destroyer will be 256 blocks high, 885 blocks
long and 236 blocks wide. In other words: BIG.
BEWARE: check each view of the ship to ensure that the dimensions are the same, or it will
be a pain in the backside later! For instance, the Front and Back views of my reference
picture are not to scale with the Side and Top views, I had to tweak them.

CHAPTER TWO: LET’S BUILD: FIRST STEPS
Step 1: creating the world
Open Minecraft, select singleplayer, and create a new world (Game mode: creative, No
structures, world type: Superflat). Once it is done, walk (or fly) in a straight line for 30s-1min,
in order to create more chunks, which will help us with McEdit.
Now, open McEdit, and load your world.

You can see a lot of unwanted chunks on the left side, delete them for more clarity in your
world. We’ll also delete all the blocks (grass, bedrock, dirt) present in the world, so the ship
isn’t standing on grass.
The world is ready to host the Omega Destroyer, don’t forget to save it!

Step 2: first blocks
So, we’ll start with the front section, more specifically the outer armor. I typically build the
outline in 2 dimensions, and then shape it with McEdit. It is very simple: head to your
paint.net ship plans, zoom in on the section of interest, and draw a line that follows the
shape of the hull (1px, antialiasing DEactivated)
Now, select your line, and read its length on the bottom of the screen: 64 blocks, that are
roughly 115 blocks above ground. Next step: build this line in Minecraft (either with McEdit
or ingame)!
Now, do the same for the rest of the outer hull.

(this is a 3d render with Minetographer)
And it’s done! Now, we need to fill this hollow plane, either by hand in Minecraft, or with
McEdit (I am lazy, so guess what I do!).

Step 3: shaping the armor
Let’s add some details: the front view shows us that the part we are building seems to be 2
blocks wide, and the reference pictures show that the 2nd block corresponds to a darker
armor, forming the edge of our the outer hull. Let’s build it!
90° angles are far too sharp in my opinion, adding just one block makes them more pleasing
to the eye .

Now, if you look at the front and top views, you can see that this outer shell isn’t flat at all.
What we just built is correct in the side view, but needs to be shaped to fit the top/front
view. Once again, it’s extremely easy!
First, we need to draw the outline of the hull in the front view. Remember the first line, 64
blocks high? It should be the same in the front view, be sure to verify it (red line on the
following picture). Now, we can draw the other lines of the outer hull (yellow), which show
the final shape of this part.
Yes, I know, this is the right side of the ship, and we started to build the left side, but the
ship being symmetrical, this issue is easy to resolve...
To shape the outer hull, we’ll go to McEdit, and select the top part. The goal is then to nudge
your selection, resize it, nudge again, resize again, etc. Keep doing this until your McEdit
structure follows the yellow Paint.net line.


Do the same with the bottom part, and the outer hull of the front section is complete! It
doesn’t look like much for now, but the inner hull and the details will improve it a lot.

Step 4: Inner hull
We’ll start with the docking bay, one of the most recognizable features of the ship. We begin
with the “ceiling” of this subsection, as you can see on this picture.
A quick look at the front view to determine the height of this ceiling, another quick look at
the HD render to guess its position compared to the edge of the outer hull, and we’re ready
to build.
Note that I am only building one half of the ship. With the miracle of the “Mirror” tool, we’ll
save an enormous amount of time to build the other half!
For the “floor” of the docking subsection, simply clone the ceiling at the appropriate height.

Using the same method, we can build the entrance of the hangar.
Next, some general details on the hangar (again, looking at the reference pictures is
mandatory ). Try to vary the materials used for the best effect! I use stone for the ship, but
a lot of grey variations are available, from clay to cobble to wool.

In the next two pictures, I’ve made the wall of the subsection, and detailed it a bit. I’ll stop
here for this subsection, and add more details if needed later.

Step 5: the magic of cloning
As I said before, we will clone and mirror the structure to make the other side of the ship.
This is very simple: open McEdit, select the structure, hit “clone”, then “mirror”, and put the
clone in the right position, before hitting “clone” again. Done!
Looks like some kind of weird TIE fighter…
As a bonus, I also added the “Earth Alliance” logo, still with the same method, the one we
will use at almost every step of this tutorial: outlining in paint.net, counting pixels/blocks,
building.


CHAPTER THREE: Front section
Step 1: fine details: an example
Reference images say: 3 more ceilings for this subsection, let’s build them! Beware, they are
not of the same length, check with your paint.net top view and other pictures!
As you can see on the next picture, the top subsection isn’t symmetrical, so be careful NOT
to include it when you use the mirror tool later. The front view is a bit too blurry to make a
lot of details, in my opinion, so we’ll use another picture to build them.
as opposed to

My advice in general for making details: try to stay close to the picture, but don’t hesitate to
deviate if you think it looks better! And don’t forget, stone is good, but using other blocks
and other shades of grey is better .
A concrete example with the part circled in blue: if I build exactly what is on the picture, the
result will look a bit dull.
So, it’s time to get creative! First, I’ll smoothe the angles of the top part to get more depth.
It’s still a bit strange, so I’ll add a column of blocks in front of those pillars.
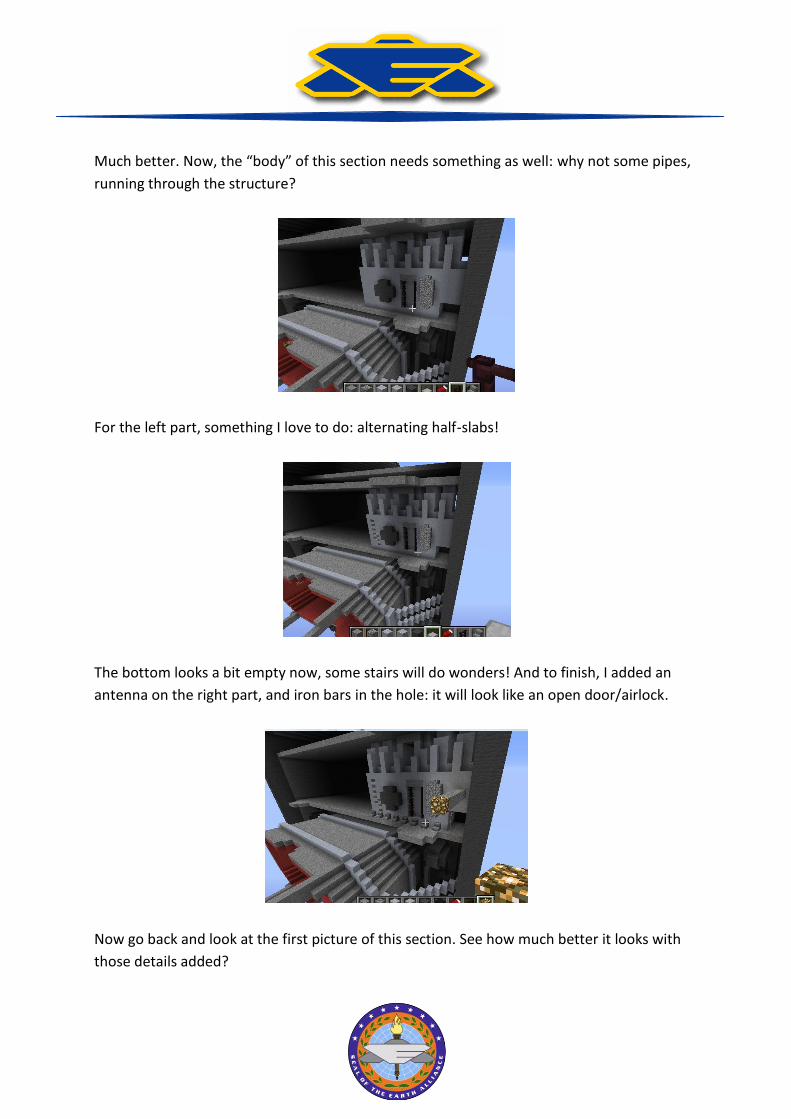
Much better. Now, the “body” of this section needs something as well: why not some pipes,
running through the structure?
For the left part, something I love to do: alternating half-slabs!
The bottom looks a bit empty now, some stairs will do wonders! And to finish, I added an
antenna on the right part, and iron bars in the hole: it will look like an open door/airlock.
Now go back and look at the first picture of this section. See how much better it looks with
those details added?

Step 2: front section – top levels
Now that I have explained my main construction methods, both for large structures and for
details, I’ll go a little faster in the tutorial, focusing on the important points.
Let’s start this step by building the rest of the level we built earlier. Just like I’ve explained
before, it is a mix of the reference pictures and my own ideas. You’ll notice that I added
yellow/black warning lines on the hangar: just a random thought, I gave it a try, and I think it
looks good .
Now, let’s build the upper level. Once again, to stress how important details are, and why
you should spend some time to make them, here is a before/after picture (“before” meaning
“just like the reference picture looks like”):

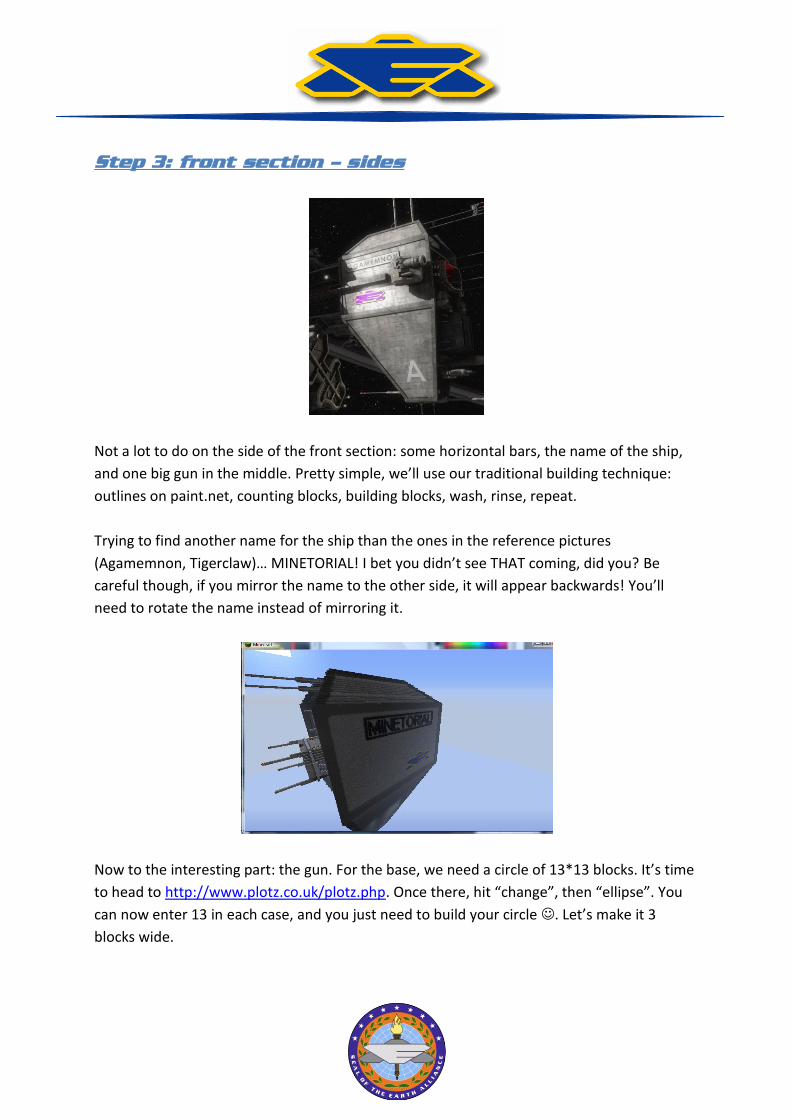
Step 3: front section – sides
Not a lot to do on the side of the front section: some horizontal bars, the name of the ship,
and one big gun in the middle. Pretty simple, we’ll use our traditional building technique:
outlines on paint.net, counting blocks, building blocks, wash, rinse, repeat.
Trying to find another name for the ship than the ones in the reference pictures
(Agamemnon, Tigerclaw)… MINETORIAL! I bet you didn’t see THAT coming, did you? Be
careful though, if you mirror the name to the other side, it will appear backwards! You’ll
need to rotate the name instead of mirroring it.
Now to the interesting part: the gun. For the base, we need a circle of 13*13 blocks. It’s time
to head to http://www.plotz.co.uk/plotz.php. Once there, hit “change”, then “ellipse”. You
can now enter 13 in each case, and you just need to build your circle . Let’s make it 3
blocks wide.
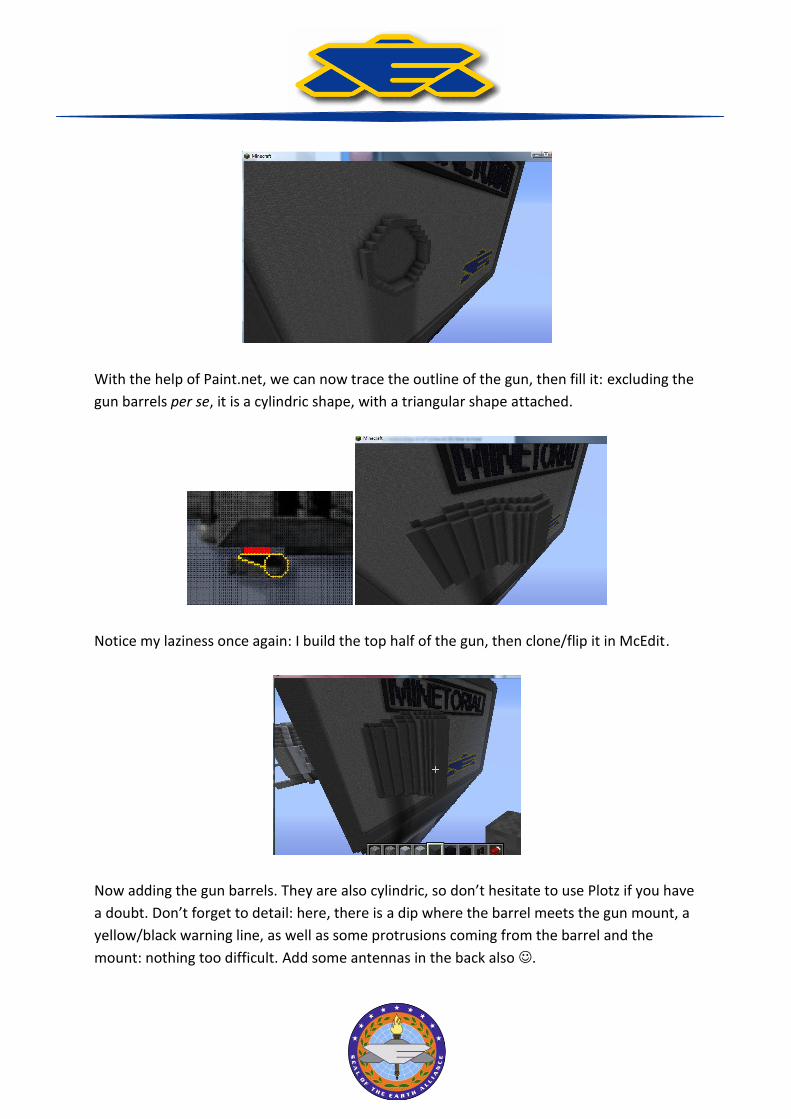
With the help of Paint.net, we can now trace the outline of the gun, then fill it: excluding the
gun barrels per se, it is a cylindric shape, with a triangular shape attached.
Notice my laziness once again: I build the top half of the gun, then clone/flip it in McEdit.
Now adding the gun barrels. They are also cylindric, so don’t hesitate to use Plotz if you have
a doubt. Don’t forget to detail: here, there is a dip where the barrel meets the gun mount, a
yellow/black warning line, as well as some protrusions coming from the barrel and the
mount: nothing too difficult. Add some antennas in the back also .


Step 4: mirror fail!
I said at the beginning that the left and right side of the ship are the same. Wrong! The gun is
in this position on the right side, but upside down on the left! To fix this mistake, I’ll mirror
the gun to the other side (so we’ll have the gun of the right side in the right position), and
flip the left-side gun so it takes the right position as well.
When clone/flipping in McEdit, don’t forget to check the “copy air” option, so the clone will
completely replace –and not merge with– the original.
It’s done! You should check the stairs (detail of the small gun), because mirroring/flipping
sometimes places them randomly. If needed, rebuild them in the right position.

Step 5: bottom levels
It should be routine by now: look at the reference pictures, look at the front view, build the
floor of the level, build a black wall behind.
Add details. First, three cylinders topped by a half-sphere (with the help from Plotz once
again).
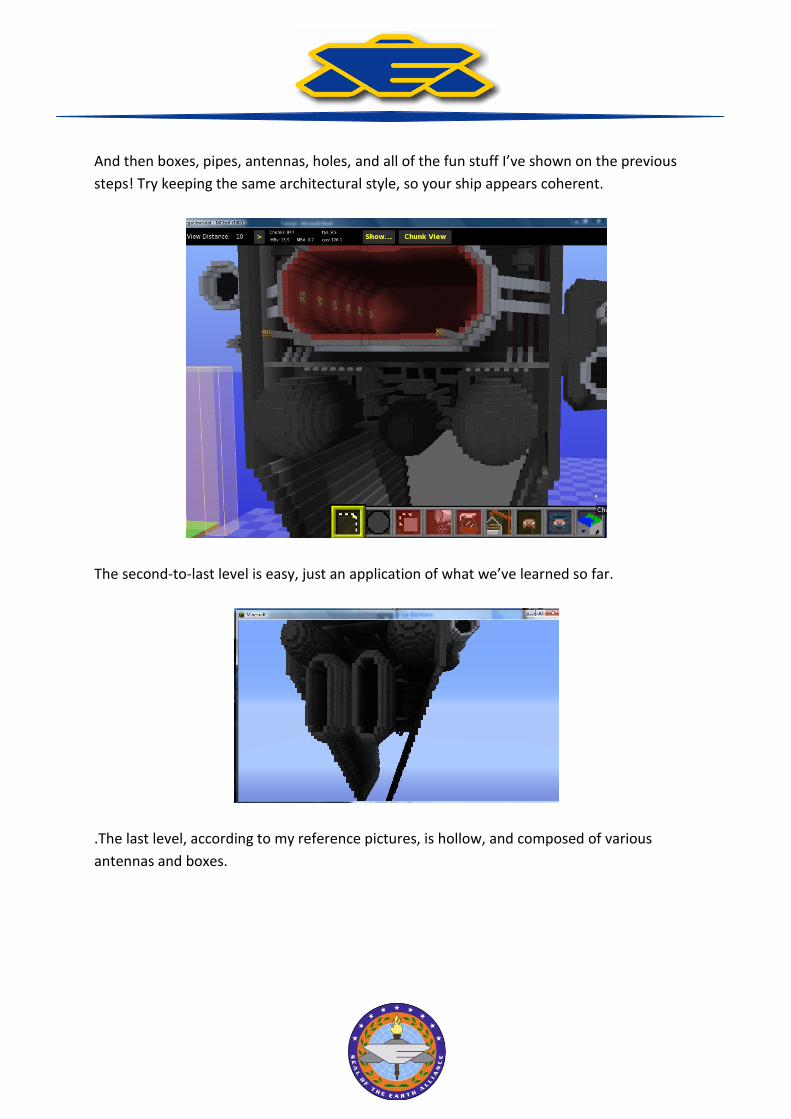
And then boxes, pipes, antennas, holes, and all of the fun stuff I’ve shown on the previous
steps! Try keeping the same architectural style, so your ship appears coherent.
The second-to-last level is easy, just an application of what we’ve learned so far.
.The last level, according to my reference pictures, is hollow, and composed of various
antennas and boxes.

Now building the big antenna:

Then the details behind:
And we’re done! The front section of the ship is complete, but notice that I haven’t done
anything on the top or on the back of this section. I’ll complete it once the central section is
underway.

CHAPTER FOUR: Central section.
Step 1: laying the foundations
The central section of the ship looks square-shaped, but a look at the reference pictures
shows us a lot of details and tweaks in this shape. Therefore, we’ll start simple, by building
the cylinder that separates the central section from the rotating part. At its largest, it has an
81 blocks diameter (red line). At its edges, the diameter shrinks to 79 (yellow lines), then 77-
75 (green lines), 73-71 (blue), and 69 (purple).
Just as you’ve learnt during this tutorial, the goal is to use Plotz to build the circles, then
McEdit to adjust the position of the cylinder. We’ll add details later.

Careful looks at the reference pictures show that the central section is composed of a
superstructure, vaguely square-shaped, inside which there is a mass of pipes, boxes and
guns. So, the first thing to do is to build the superstructure. The side and top views are a
little too blurry for my taste, so I had to extrapolate a bit using our other reference pictures.
Once the basic shape is done, I just follow it to complete the side superstructure.

Notice that I haven’t built it until the front section; the transition between the two sections
will be dealt with later.
Here’s the top:
Just add some smoothing for a better effect:
Now, clone/flip the top to the bottom, and clone/mirror the whole section to build the other
side.


Step 2: link with the front section – top level -
This is the only reference picture I have that shows (not so clearly) what’s going on in this
part, so expect a lot of improvisation!
First, clone the other end of the section so it’s close to the front one.

Then, a new ceiling in the back of the front section.
Now, black walls. Black walls are good, because we can use them to build details with a color
contrast, and because we don’t need to build anything behind them. As you know, I’m lazy,
and therefore aiming for the best possible effect with the least amount of time.
Here’s the top part of a “tower”, with some details.

The bottom of the tower. You can see that the tower will be slightly more inclined than the
ref picture, but hey, adaptation, not literal translation!
For a little bit of variety, I used nether brick instead of black/grey wool.
A situation that can arise during these megabuilds is that you just don’t like what you just
built. For instance, I am not particularly fond of this tower: the shape is correct, but
something is amiss. If it’s late in the evening, don’t hesitate to leave the project, and maybe
tomorrow you’ll get a better idea for your problematic part!

…And I finally found the solution in the morning: the tower was too light in my opinion, so I
darkened it a bit by replacing the nether brick with black wool, and the stone slabs with
cobblestone slabs. It looks better now, so let’s clone/mirror it to the other side.
Now, what remains to be done is a couple of antennas on the top of the ship, and details
between the towers. Written, it doesn’t look like a lot, but it still took me three hours to
build…
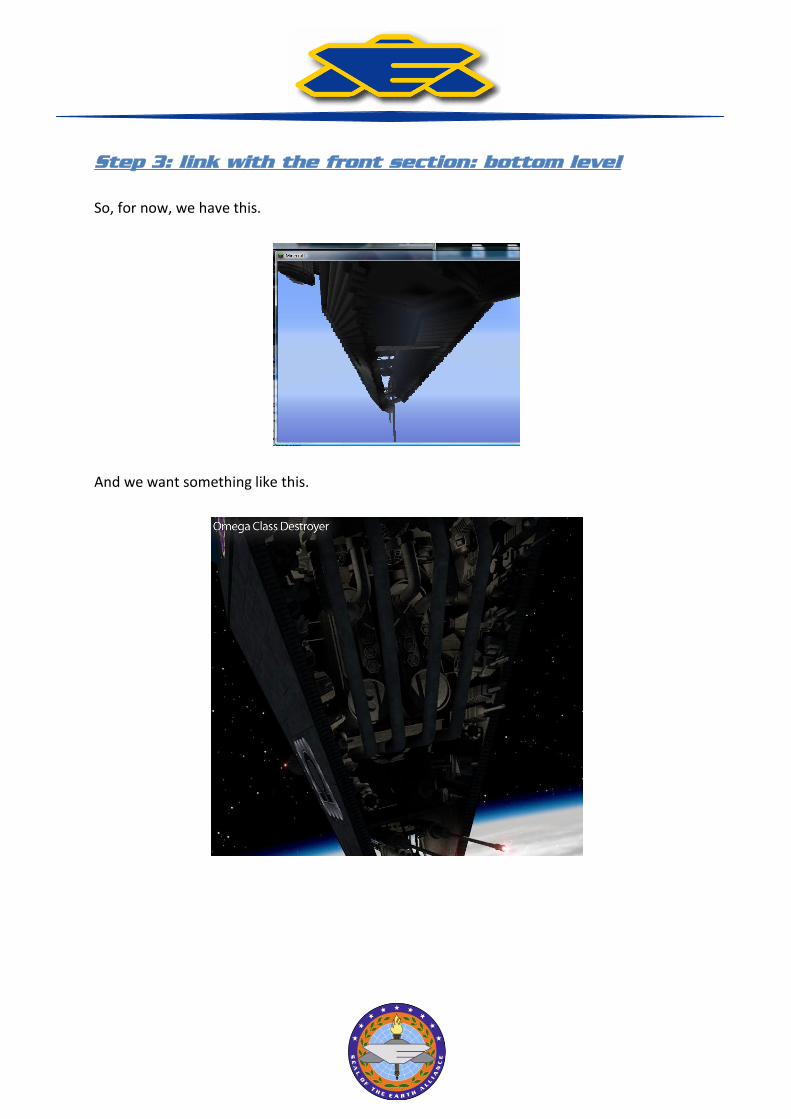
Step 3: link with the front section: bottom level
So, for now, we have this.
And we want something like this.

So, let’s get to work!
Boxes! Pipes! Spheres! Guns! A couple of hours! Boom.
Well, the screenshot’s a bit ugly, but it’s the downside of building in the shade…

Step 4: Side and top details
Let’s flesh out the central section! The first thing to see is a thick horizontal bar, starting
from the front section.
Next are some red circles, either missile silos of fighter launching bays.
Next step: a ceiling, and our usual mass of pipes, boxes, antennas, guns: fun stuff, I say!

Here’s for the side. According to the ref pictures, there’s not a lot of details on the top of this
section, so I’ll improvise a bit, to try and keep the same level of details throughout the whole
ship.
And finally, the guns and details of the rear cylinder.

CHAPTER 5 : back section
Step 1: cloning around.
You can’t miss the rotating section of the ship, but I won’t build it yet, for a couple of
reasons. Firstly, the back section is almost identical to the central section I just built, so it
seems logical to me to build it right after the first. Secondly, I said at the beginning that I’d
build the rotating section horizontally, and not at a 45° angle like almost every reference
picture. However, if enough time is left in the contest, I might still build it “properly”;
therefore, I’ll build the rest of the ship, and see how much time I have left for this rotating
part, before deciding how I’ll build it.
That being said, let’s start on the back section (this is the one between the rotating section
and the engines). As I said, it is very similar to the central section, but longer. We have the
same superstructure, the same horizontal bar, the same red cylinders at the center, the
same details on the top, but the side details look different.
So, the first steps are easy: clone/mirror the cylinder (and the beginning of the
superstructure) at the end of the central section, and place it *looks at paint.net* 147 blocks
away.

Now, strip the superstructure of its details, take a slice of it, and clone it an appropriate
amount of times. Don’t forget to close the superstructure by clone/mirroring the beginning!
And don’t forget to also cut the horizontal bar, as it doesn’t cover the whole section. The
ceilings can stay.
The ships looks a bit miserable, cut in two without its rotating section, so I’ll just build a
cylinder to link the front/central and back sections.

Step 2: detailing (alt.title: “I have already seen
this…”)
Ref pictures show that the red cylinders in the middle are the same between the central and
back sections, so guess what I do (hint: it starts with “c”, and ends with “lone”).
For the other details, it’s the usual, so I’ll just post some screenshots instead of providing the
exact same description than in the previous chapter.

Don’t forget: when you clone/flip or mirror, double check the stairs!

Step 3: Engines superstructure
Creating the engine section will be a little more complicated: the basic shape is an irregular
octagon, but its size increases throughout the section; therefore, we’ll have to build in 3
dimensions, yaaaay!
Let’s start simple: basic shape.
Now, the sloped line of the octagon can be built easily: use McEdit to work out the
dimensions, select an appropriate rectangle in paint.net, and draw the line!

We will now build this line: it is 3d, so I usually do it in two steps.
First, the “horizontal” part: just like before, take the dimensions in McEdit, transfer them to
paint.net, build the line. Here, we have a line of 74x6: Not very complicated .

Now, all that remains is to create the vertical slope. With our McEdit measurements, we
know that it is a 74x24 line. Once drawn in paint.net, we’ll use the same process as in
chapter 2, step 3: select the line in McEdit, nudge, shrink the selection, nudge again, and so
on. Follow the line you just drew in paint.net, and you’re done!
Do the same with the other line:
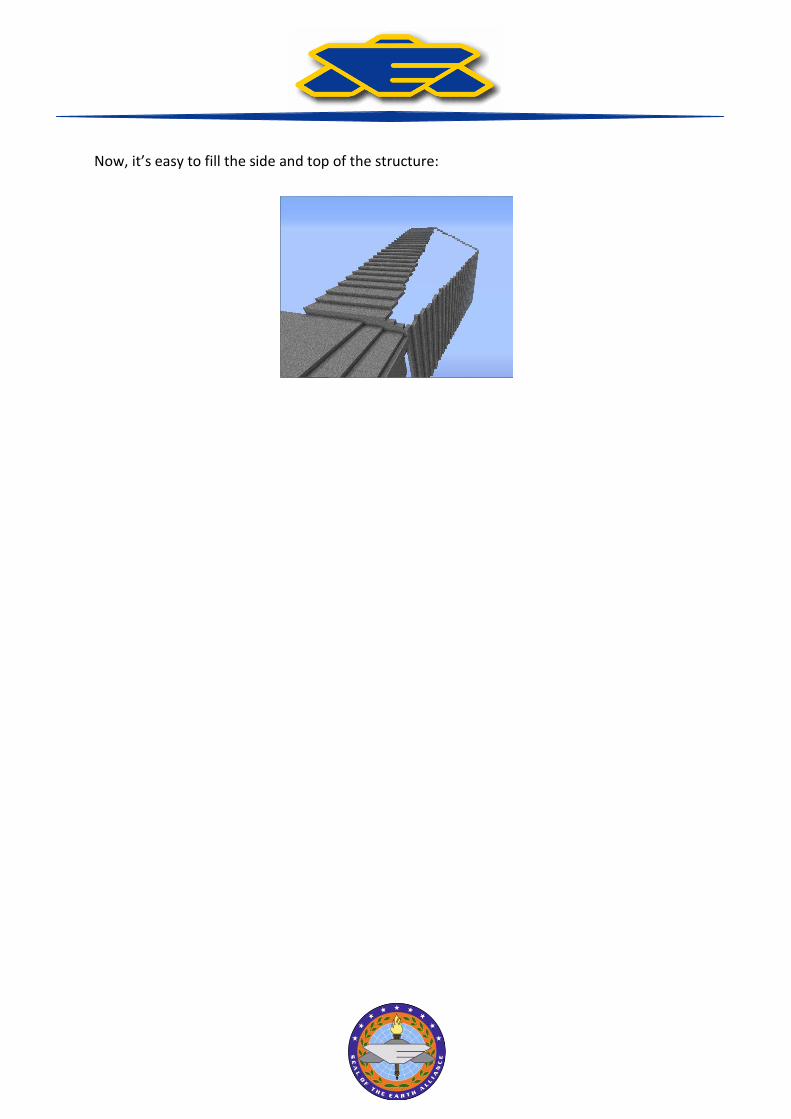
Now, it’s easy to fill the side and top of the structure:

Step 4: Engines superstructure -part 2
Here’s the complicated part: building the diagonal, which of course, isn’t regular. Once
again, I use a method based on paint.net; I don’t think it is the best method, particularly
regarding smoothing, but it’s the only one I know (yet…), so let’s go!
The goal is to draw the largest line (which we have already built in Minecraft) in paint.net
(red line on the next screenshot), and the “edges” of the rest of the structure (black dots on
the next screenshot).
Now, you can see that if we want to build the next row of blocks, we can’t build the same
line, because the left edge isn’t at the same level! Therefore, we have to draw a new line in
paint.net, respecting the change in position of the edges. This is the yellow line on the next
screenshot.
I find it a bit difficult to explain, so I hope it is understandable for everyone. Let’s build the
next row, for another example. This time, the left edge hasn’t moved, it is still in the position

corresponding to the yellow line. However, the right edge has moved, and is now 1 block
down and 1 block left compared to its original position.
Therefore, we can draw our new paint.net line (green), and build it. Don’t worry about the
holes in the structure, we’ll fill them later.
Using the same method (and hoping you have understood the principle), I can now build the
rest of the structure.

I hate this kind of building; it’s so slow, and you can’t clone anything! But finally, after a
couple of hours, the structure is complete! Now, just fill the holes by placing a block in front
of them, and you’re done. Of course, clone/mirror and clone/flip it to build the rest!
Now that the basic (but overly long and complicated to build) shape is done, let’s finish the
superstructure and add details. Believe me, when you’ve struggled for hours trying to build
those 3d slopes, building “normally” is so much more pleasant . If you’ve read this tutorial
since the beginning, you already know how to create the details. If not, GO READ IT!!! ;-).

Step 5: thrusters
The thrusters are basically big cylinders with decreasing diameters, so I’ll build them with the
method shown in chapter 4, step 1: a cylinder of diameter X for Y rows, then a cylinder of
diameter X2 for Z rows, and so on. Plotz is our friend! Note: I’m building outside of the ship
so you can see the details.
Adding the details isn’t very hard if you’ve managed to build such a massive project.
Now, place the thruster at the appropriate position, and clone/mirror/flip it until you have
the 4.

It looks good, doesn’t it?
Oh, and don’t forget to build the inside of the thrusters ;-)
And finally, some details will end our engines section!
CHAPTER SIX: rotating section
Step 1: I lied!
I said at the beginning of the tutorial that I would build the rotating part horizontally, to save
time before the deadline of the contest. Well, surprise, I have several days left! Therefore, I’ll
try and build my rotating section at the 45° angle shown in every reference picture!
So! Smells like the end, doesn’t it? For those who have had the patience of reading this
tutorial, thanks a lot . Now, for this last chapter, I don’t think I have anything more to
teach you: you know how I work, both for superstructures and details, and from now, it’s
only up to your imagination and reference pictures!
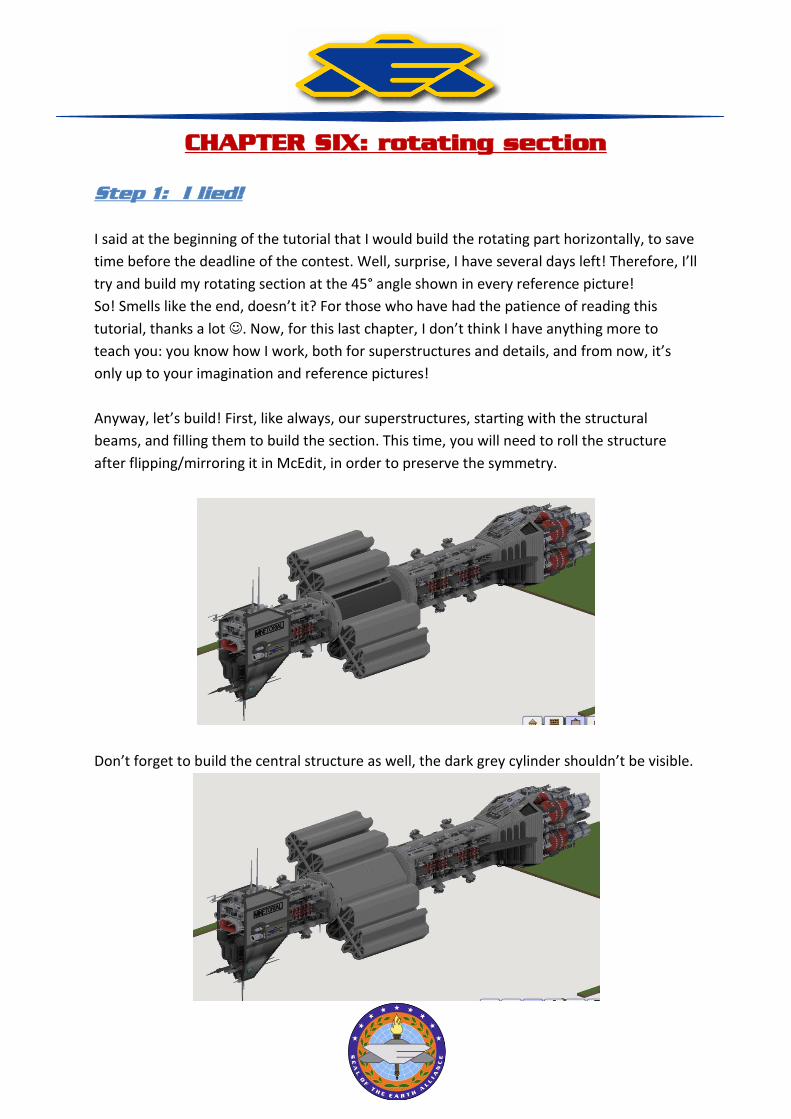
Anyway, let’s build! First, like always, our superstructures, starting with the structural
beams, and filling them to build the section. This time, you will need to roll the structure
after flipping/mirroring it in McEdit, in order to preserve the symmetry.
Don’t forget to build the central structure as well, the dark grey cylinder shouldn’t be visible.

Step 2: details
This section is based on repeated structures, so the details are easy to build and clone.
However, you MUST be careful when you flip/rotate the section, because in these sloped
builds, it’s very easy to miss your target by just one block, which screws up the entire
structure. I had this problem thrice while building for the next screenshot. Maybe I’m just
dumb :-P.
When you’re near the end of the project, the temptation to hurry up is huge, and the quality
of your build can suffer a lot from it. So, try and keep a little patience when you build the last
details (but I admit that I often go too fast as well).

Aaaaaand that’s it! In just six easy chapters (though a bit long), we’ve gone from this:
To this!

And for the final step, just head to McEdit, and remove the grass/bedrock of the new chunks
created during the construction.
Conclusion:
Well, that certainly was a long tutorial! I estimate the amount of work needed to build this
ship at about 30+ hours, but you’ll need a lot more if you’re not experimented. Don’t lose
faith though, you can do it!
Anyway, I hope you’ve enjoyed reading this tutorial (and that I was understandable enough).
Now for the mandatory part of any PMC blog, I’d love to qualify for the finals of the contest,
so please feel free to diamond and favorite this tutorial, but ONLY if you think it deserves it.
To do this, just head to http://www.planetminecraft.com/blog/megabuild-tutorial-how-to-
build-a-massive-spaceship-1-complete/
And as always, constructive criticism and feedback is most appreciated! If you manage to
build your own spaceship thanks to this tutorial, please send me the link .
Ragnur le Barbare