tutorial – build a simple ibm rational® publishing … · course materials may not be reproduced...
TRANSCRIPT

© Copyright IBM Corp. 2013 1
Course materials may not be reproduced in whole or in part without the prior written permission of IBM.
Tutorial – Build a simple IBM Rational® Publishing Engine™ (RPE) template for IBM Rational DOORS®
Length: 1 hour
Pre-requisites:
Understand the terms document template and document specification, and what RPE Document Studio and RPE Launcher do.
o RPE 1.2 Infocenter: http://pic.dhe.ibm.com/infocenter/rpehelp/v1r2/index.jsp
o Youtube
Objectives: In this tutorial, you will build and generate a simple RPE template for DOORS. Specifically, you will:
Add the DOORS schema
Add a query to a template
Add attributes to the template.
Preview the template
Continue adding attributes
Preview the template
Optional: Add conditional output , preview the template and verify the results
Requirements:
Installed IBM Rational Publishing Engine v1.2
Java 6 Runtime Environment or later; IBM and Sun JREs are supported
Microsoft Word 2003 or later
DOORS 9.1 or later
Any DOORS project containing data OR Avionics Test System sample for DOORS OR Cars sample for DOORS

Steps:
Create and Save a new Document Template, and add the DOORS schema
__1. Start RPE Document Studio. If the Template Selection window opens, click Cancel. If the Welcome window opens, click X to close it. Make sure you are in the RPE Studio perspective.
__2. Go to File->New->New Template Wizard. You will use the New Template Wizard to create a new template and add the DOORS schema. If you wanted, you could have used New->Document Template, saved the template, and then added the data source separately in the Data Source Schema area. However, using the wizard will allow you to do it all at once.
2 © Copyright IBM Corp. 2013
Course materials may not be reproduced in whole or in part without the prior written permission of IBM.

__3. In the New Template Wizard, click Next.
__4. In the next wizard screen called Select Starting Template. Leave the radio button next to “Create a New Template” selected. Type “simple DOORS” as the Name, and “simple template for DOORS” as the Description.
© Copyright IBM Corp. 2013 3
Course materials may not be reproduced in whole or in part without the prior written permission of IBM.

__5. Click Next.
__6. In the next wizard window called New Title Page, leave the radio button next to No Title Page checked. You could have defined a title page to use here.
__7. Click Next. In the next wizard window called Data Sources, click the Add button to add the data source schema.
__a. In the New Data Source window that opens, click DOORS to select it.
__b. Leave the Data Source file as is since it already points to the default DOORS schema deployed with RPE.
__c. Type “DOORS 1” as the Data Source ID. Type “DOORS data source” as the Data Source Description. This gives a name and ID to your data source as it is used in this template.
__8. Click OK. The data source schema is now added, with an ID, Type, Schema File, and Description. Note that the data source schema is used to build the queries in the template. You configure a real data source later, when you use the template in a document specification, and when you are ready to run and generate a report document.
4 © Copyright IBM Corp. 2013
Course materials may not be reproduced in whole or in part without the prior written permission of IBM.

__9. Click Next. In the next wizard window called Master Pages Structure, you will not add anything. You could, in the future, use this to edit the template master pages structure.
__10. Click Next. In the next wizard window called Variables, you will not add anything. You could, in the future, use this to add variables to your template.
© Copyright IBM Corp. 2013 5
Course materials may not be reproduced in whole or in part without the prior written permission of IBM.
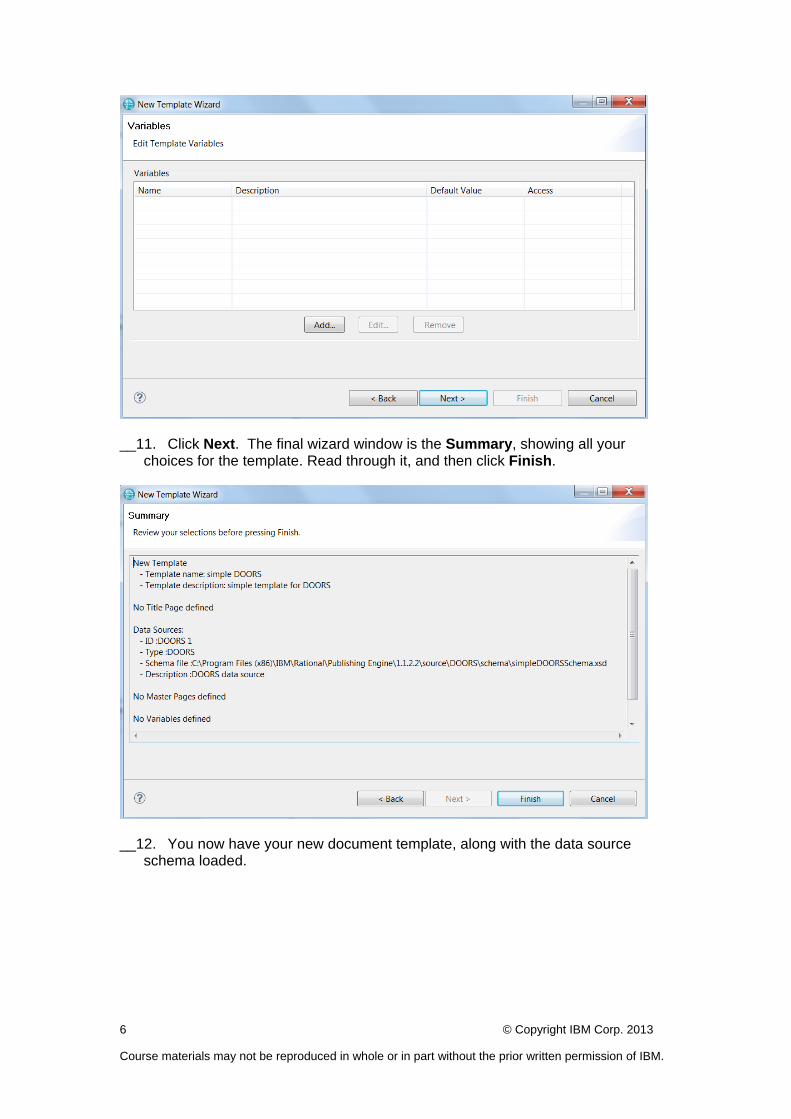
__11. Click Next. The final wizard window is the Summary, showing all your choices for the template. Read through it, and then click Finish.
__12. You now have your new document template, along with the data source schema loaded.
6 © Copyright IBM Corp. 2013
Course materials may not be reproduced in whole or in part without the prior written permission of IBM.

__13. Go to File->Save As, and save your new document template as simple_template_doors.dta in your location of choice.
__14. Go to the Data Source Schema view, and expand and look at the DOORS schema structure.
© Copyright IBM Corp. 2013 7
Course materials may not be reproduced in whole or in part without the prior written permission of IBM.

Add the first query
You will follow these steps to use the palette view to add a container in the edit area. The container is where you will put your query later.
__1. Click the “container” tool in the palette to select it. Then keep your left mouse button pressed, and drag it to the template edit area. This will create a container in the edit area
8 © Copyright IBM Corp. 2013
Course materials may not be reproduced in whole or in part without the prior written permission of IBM.

Note: You can also click a Palette element, then click in the edit area to create it. But your arrow (or your mouse) will remain active and will continue to add containers if you continue to click. So go to the Palette and click Select. This will deactivate the arrow so that it does not continue to add containers.
__2. Now click the “Object (DOORSObject)” element in the Data Source Schemas view.
__3. Drag the “Object (DOORSObject)” element onto the container in the edit area. You have now created a query. The container now contains a query.
© Copyright IBM Corp. 2013 9
Course materials may not be reproduced in whole or in part without the prior written permission of IBM.

Note:
The Data Source Handle is $1. This can also be considered the query ID. The Query is called Module/Object.
Information about the query is displayed in the edit area and in the Properties window below the template edit area. To see the Properties window, click the container.
Add Attributes
See the screenshot below.
This query by itself displays no information. To get data into the output, you need to use the query’s attributes. The attributes are the child nodes marked with the
icon with an “a” in a circle.
In a template element, you can only use the attributes of the query defined for that template element or any of its direct ancestors. In the context of the current example, only the elements in the box can be used inside the container
10 © Copyright IBM Corp. 2013
Course materials may not be reproduced in whole or in part without the prior written permission of IBM.

__1. If it is not already expanded, then expand “Object (DOORSObject)” in the Data Source Schemas window.
__2. Click the “Object Heading (string)” attribute of the “Object” element
__3. Drag the attribute onto the container in the edit area. RPE will automatically create a text element in the container and set its content to be the “Object Heading” attribute
© Copyright IBM Corp. 2013 11
Course materials may not be reproduced in whole or in part without the prior written permission of IBM.

__4. Your query output will now show data when it is finally run through the document specification. Save the document template
__5. Double click the Text element in the edit area. Its Properties will open below the edit area. Also a Data Expression editor dialog will open, and it will display the content that will be used for the text. Click Cancel to close this window.
12 © Copyright IBM Corp. 2013
Course materials may not be reproduced in whole or in part without the prior written permission of IBM.

Test the template
You will use the RPE Launcher perspective (in RPE Document Studio) to generate and preview the template.
__1. Click the Open Perspective button in the upper left of the user interface.
__2. Click Other. Click RPE Launcher to select it. Then click OK.
__3. This will open the RPE Launcher perspective. You will now be working with the Document Specification, as opposed to the Document Template.
© Copyright IBM Corp. 2013 13
Course materials may not be reproduced in whole or in part without the prior written permission of IBM.

__4. Make sure an authenticated DOORS Client is running on your machine.
__5. Return to the RPE Launcher perspective.
__6. Right click on Data source: DOORS 1 – DOORS*. Click Configure Data Source to start the “DOORS Data Source Selection” wizard.
14 © Copyright IBM Corp. 2013
Course materials may not be reproduced in whole or in part without the prior written permission of IBM.

__7. In the first welcome window of the wizard, click Next.
__8. In the second wizard window called DOORS Connection Options, leave the radio button checked next to “Use running DOORS instance”. Also, leave the radio button checked next to “Database view”.
© Copyright IBM Corp. 2013 15
Course materials may not be reproduced in whole or in part without the prior written permission of IBM.

__9. Click Next. If a compatible DOORS Client instance is running on your machine, RPE will display the database structure. Select the module, version and view you want to test your template on. In this example, we will select System Requirements for our project.
__10. Click Finish.
__11. Once the DOORS Data Source Selection” wizard is finished, the information about the selected module-version-view is written in the document specification. To check this, in the document specification, click Data source: DOORS 1 – DOORS to select it, and look at the Properties below it.
16 © Copyright IBM Corp. 2013
Course materials may not be reproduced in whole or in part without the prior written permission of IBM.

__12. The document generation can now proceed. In the main toolbar, go to Document Specification->Generate current document.
© Copyright IBM Corp. 2013 17
Course materials may not be reproduced in whole or in part without the prior written permission of IBM.

__13. A “Document Specification configuration” window appears. This is where you will configure the information to generate a report containing real data. The first window is a summary of details for review. You will limit the output to HTML and Word later.
Note: Instead of going to Launcher and using Document Specification->Generate current document, you can also go to Publish->Generate Document to generate and preview. You can use this option from both Launcher and RPE Studio. This option launches the same “Document Specification configuration” wizard that you will use now.
__14. Click Next. This window shows the data sources used in the template(s) contained in this Document Specification.
18 © Copyright IBM Corp. 2013
Course materials may not be reproduced in whole or in part without the prior written permission of IBM.

__15. Click Next. This window is where you configure your output format and location.
__a. Use the backward < and forward > arrows to select output formats. In this example, you will save HTML and Word output.
__b. Use the Browse… button to specify the location where you want your output to be saved. You will use absolute path to the location of your choice. You will save the reports under the names simple_doors.html and simple_doors.doc.
__16. Click Next. This window allows you to configure style sheets for your output formats. Since you will not be using style sheets for the HTML or Word output, you will leave this blank.
__17. Click Next. This window allows you to review details.
© Copyright IBM Corp. 2013 19
Course materials may not be reproduced in whole or in part without the prior written permission of IBM.

__18. Leave the radio button selected next to “Run the document generation”. Click OK. A progress window showing the document generation will appear, and if there are no errors, a results window with links to your output will appear. Your output is now generated and saved to the location you specified. You can also:
__a. Click on any link to open the document
__b. Right click on any link to save it into a different location
20 © Copyright IBM Corp. 2013
Course materials may not be reproduced in whole or in part without the prior written permission of IBM.

__19. Click on the Word output and open it. Why isn’t the Object text displayed? You will now fix that.
__20. Close your Word document. Click Close on your RPE Results window to close it. Return to RPE.
Continue Adding Attributes
__1. Switch to the “RPE Studio” perspective using the toolbar
__2. You will now add a paragraph to the container from the edit area. Click the paragraph element in the palette, and then keep your left mouse button pressed to drag it below the text object inside the container in the edit area. The paragraph is added as the last child of the container.
© Copyright IBM Corp. 2013 21
Course materials may not be reproduced in whole or in part without the prior written permission of IBM.

Note: If you used the click-click method, rather than the click-and-drag method, you may need to click Select in the palette to de-activate the Paragraph tool so that further clicking will not continue to add paragraphs.
__3. You will now create a query by dragging and dropping an element from the schema into your new paragraph. Click the “Object Text (string)” attribute of the “Object (DOORSObject)” element in the schema view. Drag the attribute onto your new paragraph in the edit area.
22 © Copyright IBM Corp. 2013
Course materials may not be reproduced in whole or in part without the prior written permission of IBM.

__4. RPE will automatically create a text element in the paragraph to hold the “Object Text (string)”.
__5. Save the document template
Test the template
__1. This time, you will not switch to the RPE Launcher perspective. Instead, in RPE Studio, go to Document Specification->Generate Current Document.
© Copyright IBM Corp. 2013 23
Course materials may not be reproduced in whole or in part without the prior written permission of IBM.

Note: You can also use Publish->Generate Document.
__2. Go through the same configuration wizard steps as before. A progress window showing the document generation will appear, and if there are no errors, a results window with links to your output will appear.
__3. Open the word output.
24 © Copyright IBM Corp. 2013
Course materials may not be reproduced in whole or in part without the prior written permission of IBM.

Your Object text is now displayed.
You are now finished with the core activities in this tutorial. If you would like to complete the optional activity “Conditional Output”, please continue.
© Copyright IBM Corp. 2013 25
Course materials may not be reproduced in whole or in part without the prior written permission of IBM.

Conditional Output
In some cases, there may be empty lines in the output as shown in the screenshot below. The empty lines appear because RPE will generate a paragraph for all DOORS objects in the module, including objects that do not have object text. To eliminate the empty lines, conditions can be defined on elements.
__1. Right click on the paragraph and select “Data\Edit Condition …” from the context menu to bring up the condition editor
26 © Copyright IBM Corp. 2013
Course materials may not be reproduced in whole or in part without the prior written permission of IBM.

__1. Select “Object text” as the left operand
__2. Select “not equal to” as operator
__3. Leave the “right operand” empty
__4. Click “Add”
__5. The appropriate attributes are selected in the left hand side tree*. RPE generates the condition
Object_Text != “”
__6. Save the document template
© Copyright IBM Corp. 2013 27
Course materials may not be reproduced in whole or in part without the prior written permission of IBM.

__7. A small icon is now shown in the editor area, on top of the paragraph, to mark that the template element has a condition applied
a. The condition is visible in the tooltip
b. The condition can be changed invoking the using the condition editor again
Test the template and verify the results
__1. In the main toolbar, go to Document Specification->Generate Current Document. Generate the document again
__2. Open the Word output. The empty lines are gone
28 © Copyright IBM Corp. 2013
Course materials may not be reproduced in whole or in part without the prior written permission of IBM.

END
© Copyright IBM Corp. 2013 29
Course materials may not be reproduced in whole or in part without the prior written permission of IBM.