tutor bikin buku tahunan
DESCRIPTION
tutor bikin buku tahunanTRANSCRIPT

SPC Page Creator/Yearbook Creator User GuideVersion 2.5 - October 2011
Copyright © SPC Yearbooks 2011Yearbook Creator is a software program supplied by SPC Yearbooks (an imprint of The School Planner Company Limited)SPC Yearbooks, Units 1-3, The Ermine Centre, Hurricane Close, Huntingdon, Cambridgeshire PE29 6XXTel: 0845 838 61 61 Email: [email protected]

New features ................................................................................................................................................3
Introduction & installation About this user guide .......................................................................................................................................4 An introduction to SPC Page Creator .................................................................................................................4 Hardware requirements ....................................................................................................................................4 Other requirements ..........................................................................................................................................4 Installing SPC Page Creator ...............................................................................................................................4 Support & FAQs .................................................................................................................................................4
Getting started Important advice before you begin your Yearbook project ................................................................................5 Using Yearbook Creator for the first time ..........................................................................................................5 Create a new project from a product template .................................................................................................5 Give your new Yearbook a name .......................................................................................................................5 You are ready to work on your Yearbook project ...............................................................................................5 Layout of the panels .........................................................................................................................................6
Adding pictures & text Adding pictures ................................................................................................................................................7 Adding text ......................................................................................................................................................7 Choosing Fonts .................................................................................................................................................7
Managing pages in your project Viewing pages in your project ..........................................................................................................................8 Inserting, duplicating, adding, deleting and rearranging pages .......................................................................8 New Features: Rulers, Grids and Guides ............................................................................................................8
Using Page Styles in your project Using existing Page Styles ................................................................................................................................9 Creating New Page Styles .................................................................................................................................9 Renaming and Deleting Page Styles .................................................................................................................9
Checking your project (proofing) Using “Create Proofs” to check your project .......................................................................................................9
Creating your order Creating your order .........................................................................................................................................10 Completing your order and sending your files Upload Finished Pages ....................................................................................................................................12 Save Finished Pages ........................................................................................................................................12 Creating a cover for your Yearbook Choosing the right cover design .....................................................................................................................13 Choosing a different Page Style for the cover ..................................................................................................13 Using a custom colour for your cover ..............................................................................................................13 Adding your own text and font .......................................................................................................................13
Proofing and ordering your Yearbook cover Using “Create Proofs” to check your cover........................................................................................................14 Creating your Yearbook cover order ................................................................................................................14
Returning your order to us Getting your order back to us for printing .......................................................................................................15 Making a backup copy of your Yearbook project .............................................................................................15 Removing SPC Page Creator from your computer ...........................................................................................15
Main menu functions The main menu ..............................................................................................................................................16
Panels The Inspector Control Panel ............................................................................................................................17 The Inspector Control Panel (continued) .........................................................................................................18
Contents
2

The a
ppea
ranc
e of t
he Li
brar
y has
been
upda
ted s
o tha
t it n
ow us
es ta
bs
to ch
ange
betw
een s
ectio
ns.
The p
ictur
e thu
mbn
ails s
how
the n
umbe
r of
times
a pic
ture
has b
een u
sed i
n you
r yea
rboo
k.
Feat
ures
Each
pictu
re ca
n be r
ated
by rig
ht-c
lickin
g on
its t
hum
bnail
and s
electi
ng th
e rele
vant
ite
m fr
om th
e set
tings
drop
-dow
n men
u. Th
e ra
ting w
ill ap
pear
unde
rnea
th ea
ch pi
cture
th
umbn
ail if
it is
enab
led.
Add y
our p
hoto
s to t
his pa
nel b
y bro
wsing
to
your
folde
r of im
ages
and s
elect
ok. D
o not
mov
e or
rena
me t
he im
ages
in th
is fo
lder, k
eep t
hem
in
their
origi
nal lo
catio
n on y
our c
ompu
ter.
The p
ictur
e list
can b
e sor
ted b
y file
nam
e, da
te cr
eate
d, da
te m
odifi
ed, p
ictur
e or
ienta
tion,
usag
e and
ratin
g.
Chec
k whe
re ea
ch pi
cture
has b
een u
sed b
y righ
t-cli
cking
its t
hum
bnail
. Fro
m th
e dro
p-do
wn m
enu
choo
se ‘P
ictur
e Usa
ge’ to
disp
lay w
hich p
ages
the
pictu
re ap
pear
s on.
Click
on a
page
num
ber t
o jum
p to
that
page
.
3
Year
book
Crea
tor n
ow ha
s a pr
eview
optio
n. Th
e pr
eview
optio
n can
be ac
cesse
d via
the V
iew m
enu
or vi
a the
Prev
iew ic
on on
the t
oolba
r and
allow
s a
large
r pre
view
of th
e pag
e lay
out t
o be v
iewed
. The
pr
eview
will
not s
how
empt
y pict
ure o
r tex
t box
es.
Doub
le cli
ck or
click
and d
rag t
o res
ize
the “
Pictu
res”
pane
l.
The ‘
Cate
gory
’ men
u and
the ‘A
dd’ o
ption
s are
now
locat
ed w
ithin
th
e acti
on bu
tton o
n the
right
-han
d side
of th
e libr
ary.

About this user guide This user guide describes how to operate the Yearbook Creator software program published by SPC Yearbooks, an imprint of The School Planner Company Ltd.
SPC Page Creator and Yearbook Creator refer to the software program and the product used to create Yearbooks. SPC Page Creator is the name of the actual application that is installed on a computer. Yearbook Creator is the name of the product within the application that is used to create Yearbooks. Both terms will be used interchangeably, depending on what is being described.
Yearbook Creator and this user guide are subject to continuous development, and reviews will be made accordingly in subsequent versions and editions. We are happy to receive your views on both the development of the software and user guide on how you think they can be improved.
As a licensed user of the software program, we will keep you up to date with new releases and product developments.
If you wish to contact us about the software or this user guide please use this information:
SPC Yearbooks, Units 1-3, The Ermine Centre, Hurricane CloseHuntingdon, Cambridgeshire PE29 6XX
Tel: 0845 838 61 61Email: [email protected]: http://www.spc-yearbooks.co.uk
An introduction to SPC Page Creator
SPC Page Creator is a desktop publishing software program that enables you to design documents such as Yearbooks (using Yearbook Creator), planners (etc).
The main difference between SPC Page Creator and other desktop publishing programs is that it contains a specific set of products that we have created.
The SPC Page Creator program is simple to use and has familiar ways of working such as ‘drag and drop’, where you can drag a picture from a picture panel into a picture box on the page. Text can also be easily added using the Text Box feature. Our Yearbook Templates give you the freedom to simply add pictures and text to predefined page styles. However, you can if you wish create your own layouts and use them as the basis of your Yearbook design (refer to “Creating New Page Styles” on page 9 if you wish to do this).
Hardware requirements
The minimum specification for each platform is included below:
PC Minimum specification• Windows XP (Service Pack 2 or 3) or Vista• 1GB hard disk space• Minimum 512MB of RAM (1GB preferred)
Apple Mac Minimum specification• Mac OS 10.3.9• 2GB hard disk space• Minimum 1GB of RAM (2GB recommended
Other requirements
As well as complying with the minimum specifications for your chosen platform, your computer will also need to have the following:• A DVD drive (writer) for burning files to a DVD disc (the requirement is for
a DVD drive that can create DVD discs because your files may be more than the capacity of a CD drive. If you do not have access to a DVD writer on your machine you may still use a CD writer, but you will need to split the files between multiple CDs.
• Ability to install software on the chosen machine (Administrator rights)• Ability to save files to the computer*Optional• Access to your local network (for future network versions)
* Project files are saved in the My Documents folder on PC or Users folder on Mac
Installing SPC Page Creator on a PC
Simply insert the CD into your computer’s CD drive. The software should automatically run the CD and begin the installation process.
If your CD does not autorun or you have switched autorun off, you can install the software manually by using the following steps:
• Double click the My Computer icon on your desktop• Locate the CD icon• Right click and select ‘Explore’• In the Explore window, double click the SPC Page Creator icon• The software should now install
Installing SPC Page Creator on an Apple Mac
• Double-click on the installer (A DMG file)• Select the language you would like to use and then follow the wizard steps to install the software.• When the installation is complete, the program can be accessed from within the Applications folder.
If you have any problem please contact your IT administrator or IT departmentor refer to our FAQs page on our website (http://www.spc-yearbooks.co.uk)
We have made the installation of the SPC Page Creator software program as easy as possible. If you do experience problems installing the software, you can refer to our FAQs page where you will be able to find information about specific errors if they occur. If the issue you’re experiencing is not listed here contact your account manager by calling 0845 838 61 61.
IMPORTANT NOTEWhen you open the software program the first time after installation it may take a short while for the first screen to appear. Each time you open the software after the first time the first screen should appear after a very short period of time.
Support & FAQs
To access the Support & FAQs, please visit our SPC Yearbooks website (www.spc-yearbooks.co.uk) and follow the link for the FAQs from the main navigation. Once you are at the FAQs page, you will see a list of questions, navigate to your specific query and click the green cross to reveal the solution. If you cannot see your issue listed here contact your account manager.
Introduction & installation
4

Important advice before you begin working on your Yearbook project!1) When you first start to use the program, “Maximise” the window so that you can clearly see all of the panels
(to Maximise, click the middle button of the three buttons located in the top right of the screen).2) We recommend that you do not have any other software applications open while you are using SPC Page Creator. If you have
several software applications open you may find SPC Page Creator is slower to operate.3) Organise your pictures into folders on your computer in a location that will be easy to find when using Yearbook Creator.
Ideally, you will have each class in their own folder - this makes pictures easier to manage. Do not place your pictures on a USB pen drive or other removable device as this may corrupt your yearbook project. Do not move or rename images used in your project.
4) Your Yearbook project cannot be shared to other machines using “Save As”. Projects are stored automatically in the “My Documents” folder on the machine on which they are created.5) You CAN install the software on as many computers as you wish but you will not be able at present to work on the same
project from multiple computers. Each computer will create a separate project. You could split your Yearbook into sections and have different people working on different sections - we can glue it all back together for you!
Using Yearbook Creator for the first timeOnce you have successfully installed the SPC Page Creator software (which contains Yearbook Creator) an icon should appear on your desktop called ‘SPC Page Creator’.
To start the program, double click the icon. After a few moments you will see the screen below. To create a new demo project, click the “Create a New Project” button.
Create a new project from a product templateTo create a new project, click the Yearbook Template Designs Product Type and then select the template that you wish to use for your Yearbook project button (click it once so it has a blue outline) and then click the “Next” button
Give your new Yearbook project a nameOn the next screen you will be able to give your new project a name. Simply enter the name into the Project Name text box and then click the “Create” button. Any existing projects will be listed in the main window. If you wish to add folders for your separate projects you can do that by using the “New Folder” button.
Getting started...
You are ready to work on your Yearbook projectOnce you have created your new project the next screen you will see is the main software program window. Each part of the window is split into panels. Each panel has a specific function.
To get an overview of the functions, see the window layout (overleaf)
2
31
4
!
5

Page preview panel
This panel shows you a thumbnail of each page in the docum
ent. To go to a page, simply click on the thum
bnail and the page will appear in the Full Page Preview panel. The page with a blue outline is the page currently being viewed.
Library page previews panel
This panel shows you a thumbnail of each page in the Library. Library sections can
be accessed by using the buttons in the panel to the left (Library selector panel). In this exam
ple the ‘Page Styles’ preview thumbnails are shown as this is the Library
section selected in the Library Selector panel to the left.
Full page preview panel
This panel shows the currently selected page in full page view. Add pictures and text and m
ake changes to your pages in this panel.
Library selector panel This panel allows you to
select the Library that you wish to use
Pictures panel This panel shows you a thum
bnail of photographs that you can im
port into your project. To add som
e photos, simply click
the ‘Add’ button. Browse to the directory where your photographs are. Click OK
to insert them. They will appear in this
window. From here you can drag them
into picture boxes on the page.
You can also rotate them by right clicking
on them and selecting one of the rotation
options from the pop-up m
enu.
Inspector panel This panel gives you all of the tools that you need to m
anipulate your photo and text boxes. There are various tools that you can use to enhance the look and feel of your project including Stroke (border), Drop Shadow, Brightness and Contrast, am
ong many others.
Maxim
ise your window
We recom
mend that when you first start
to use the program that you “M
aximise”
the window so that you can clearly see all of the panels (to M
aximise, click the
middle button of the three buttons located
in the top right of the screen). We also
recomm
end that you do not run any other software applications while you are using SPC Page Creator.
Main m
enu This is the m
ain menu panel. To see what
each menu does take a look at page 14
ColoursTo create your own background colour, use the colour palette. To access this, click the page icon in the inspector panel and click the background colour button.
Layout of the panels
6
Toolbar panel Gives you quick access to key functions of
Yearbook Creator

Adding pictures Using the “Pictures Panel” it is easy to import and use pictures in your Yearbook project. To import pictures, click the Add button in the Pictures Panel. Browse to the folder of images that you wish to use. Once selected, click OK. All of the images contained in the folder will be imported into the Pictures Panel. Yearbook Creator will accept JPEG, TIF and PNG image formats.
Pictures in the Pictures Panel can be rotated by 90,180, and 270 degrees. To do this, right click on the desired picture and select an option from the pop-up menu. This sets the default orientation when the image is used in the document. This menu also gives you the option to remove a picture from the Pictures Panel (note that this does not delete the picture from the folder, it simply removes it from the Pictures Panel).
Once your images have been imported they can be dragged and dropped into picture boxes in your Yearbook project. To do this, hover over an image so that the cursor turns into a hand. Hold down the left mouse button and then drag the picture to a picture box on the current page. The picture box border will turn blue when the image is in the correct position to be dropped in. If you drop the image while the entire page border is blue, the image will appear as an object on the page but will not be inside a picture box.
Once an image is placed inside a picture box it can be moved around by holding down the ALT key on the keyboard (so that the cursor turns to a hand) and then pressing the left mouse button so that the image is ‘grabbed’. With the left mouse button pressed down, you can move the image within the box.Once pictures are added to your project they can be modified in various ways using the Inspector panel (see page 15 for a detailed description of the tools in the Inspector)
Adding pictures & text
Figure 1: The Pictures Panel Add pictures from a folder on your machine and then drag and drop them into your Yearbook
Adding Text Adding text to your project is easy using the built-in text editor. To add text to a text box simply double click on the text in the box you wish to work on. The text editor will appear in a pop-up window. Type (or paste) your text into the text editor and then click OK to save the text to the text box.
Text pasted from Word will retain its formatting BUT text pasted from a web page will default to Times New Roman, so you will need to change the format of the text manually. If you wish to clear all formatting from your text, place the text in Notepad first before cutting and pasting into your project.
If the border of a text box on the page turns red, it means that there is too much text inside the box. To rectify this, double click the text box and either remove some text or reduce the size of the font. To reduce the size of the font, place the cursor anywhere inside the body of the text and then hold down the CTRL key and press the A key to select all of the text. Next, click the ‘Size’ drop-down box and select a smaller size for the text. Alternatively, resize the text box itself.
Choosing Fonts
Yearbook Creator has been designed to allow you to use any font installed on your computer within your Yearbook project. To change the font used in a text box, double-click on the text that you wish to change. The text editor will appear in a pop-up window. Select the text that you wish to change and then select a font from the Font drop-down selector located to the top left of the text editor window. The text should now display in your chosen font. Once you are happy with the changes, click OK to change the font in your project.
* We recommend that you create your text in a word processing application such as Microsoft Word and spellcheck it prior to inserting into your project!
Figure 2: The Text Editor Add text into your project using the text editor. Double click a text box to open the text editor
7

Viewing pages in your project
The Pages Panel allows you to view thumbnails of all pages in your project at a glance. Pages can be selected for viewing in the “Full Page Preview Panel” by clicking the desired page thumbnail once. This page will then have a blue line around it, denoting that it has been selected.
Pages within your project can be managed in several ways. Below is a list of options available when working with pages (to access these options, use the Page main menu item to the top left of the program window):
Inserting, duplicating, adding, deleting and rearranging pages
Page > InsertInserts a blank page AFTER the currently selected page (identified as the page with a blue line around it in the Page Previews panel)
Page > DuplicateCreates a copy of the currently selected page in the Page Previews panel
Page > AddAdds a blank page to the end of the project
Page > DeleteDeletes the currently selected page
Page > Rearrange Pages...Selecting this option opens a pop-up window showing the document pages. Using this tool you can rearrange the order of the pages in your project. Pages can be moved by using the mouse to drag and drop a page in a new location. Pages can also be moved by using the arrow buttons to the left of the pop-up window. Selected pages have a blue line around them. To select a page click it once.
Page > FirstSelects the first page in the project
Page > LastSelects the last page in the project
Page > PreviousMoves the selection to the previous page in the project
Page > NextMoves the selection to the next page in the project
Managing pages in your project
Figure 3: The Pages Panel & Rearrange Pages pop-up View all of the pages within your project using this window. Click a thumbnail to view the full page.Use the Page Rearrange tool to move pages within your project allowing you the flexibility to design pages anywhere in your project and then move them when you are ready to create an order of your finished Yearbook.
Figure 4: The Full Page Preview Panel This panel allows you to make edits to individual pages within your project.
8
! New Features: Yearbook Creator now includes some new features including Rulers, Grids and Guides.
RulersRulers can be switched on or off via the View menu option. Ruler unit measurement can be either millimetres or inches. The unit of measurement can be modified in Preferences (File > Preferences).
GuidesGuides are useful for positioning objects on the page. The Guides option can be accessed via the View menu option. Settings include Show/Hide, Snap Position, Clear Guides, Clear All Guides and Guide Settings where the colour of the guides can be modified. We have included a 15mm margin as a guide on each blank page of the Yearbook, we strongly recommend that you keep all photos and comments within these guides to avoid any content being trimmed or lost in the binding.
GridsGrids are also useful for positioning objects on the page. The Guides option can be accessed via the View menu option. Settings include Show/Hide, Show When Dragging, Snap Position and Grid Settings where the colour, size and subdivisions of the grid can be modified.

Using existing Page Styles
Each Yearbook product has a set of templates called ‘Page Styles’. These styles can be used to quickly create new pages in the existing design style of the product.
To use a Page Style, insert a new page in your project (see the previous page on inserting new pages). Select the Page Styles panel window in the Library window. Now simply drag and drop a template onto the blank page. The template will position itself automatically to fit on the page in the best way.
Now you can insert pictures and text on your new page!
Creating New Page Styles
You may want to create your own page layouts and reuse them in your project. The easiest way to do this is to save your page layout as a Page Style.
• Create your page (using picture boxes, shapes and text boxes)• In the Library window, select the Page Styles button• Underneath the category selector drop-down box there is a small arrow.
Click it to reveal an option to ‘Save Page As Page Style’ and click this option• Give your page a name and a category name if you wish to use categories• Your page design has now been saved as a Page Style template
Renaming and Deleting Page Styles
To rename or delete a Page Style, right click the Page Style thumbnail in the library window. A pop-up menu appears with the option to delete or rename.
Using “Page Styles” in your project
Figure 5: The Page Styles panelUse Page Styles to create a new page with an existing style. You can also create new page designs andsave these as custom Page Styles. Page Styles can simply be dragged on to a new blank page.
Using “Create Proofs” to check your project
When you are ready to check your project, you can use the “Create Proofs” option to save it as a set of images that can be printed to hard copy and checked (proofed).
To Create Proofs do the following:
• First save your project• Select File > Create Proofs from the main menu• In the pop-up, choose your desired options (see Figure 7 below)• Click the OK button• Allow the program to output the image files• When done, the folder containing the images will automatically popup
Once you have created the proofs, you can view them on screen or print them out onto A4 paper for everyone to look at.
You can have as many proofreaders as you like or nominate one person with the task of proofreading*. Once you have proofread your project you can then make any changes to your Yearbook before placing your order and sending us the finished files.
* Please note that we DO NOT proofread Yearbook Creator projects. It is your responsibility to make sure that all pictures and text are correct before submitting your order!
Checking your project (proofing)
Figure 6: Using “Create Proofs” to check your projectOutput Proofs is a great way to check your project in printed format. Output Proofs lets you specify the image output format type and destination of the files.
Figure 7: “Create Proofs” pop-up
9
Destination Click the Select button to choose a
destination for your proof files. Each page will be output as an image, so, if you have 50 pages in your project, you will output 50 images
Output format Choose between JPEG and TIF formats
(we recommend JPG for proofing)
Pages Choose which pages you would like to proof. Use the select button
to select pages or select all to export all pages as proofs

Creating your order
Once you are happy with your Yearbook, you will need to create the order files for us to print. Yearbook Creator uses an encryption system to create a high- resolution encrypted version of your Yearbook.
To create your order, do the following:
• Select File > Order... from the main menu or click the green shopping trolley icon.• The program checks the Yearbook (Flight Check) for any potential issues such as
empty picture boxes and/or empty text boxes.• The Flight Check Results window advises of any potential issues. If any of the issues
are marked with a red symbol, they will need to be fixed before the order can be placed. Yellow symbols are advisory only - these should be reviewed by you before proceeding.
• Click OK to proceed with the order• The Order pop-up will appear. • Read the Disclaimer message and then tick the box to activate the Order button. • Click the Order button• A browser window will now open containing a login screen for ‘SPC Yearbooks
Online Ordering’.
Creating a new account The ordering website will now open in a new browser window (see figure 15). To create a new account, click the “New Customer? Create An Account” button. You will now see a form where you can create your account by adding your school information. Once you have entered all of the required information, click the “Create” button to create your account. If you have entered all of the required information, you will be taken to the “Order Details” page.
Creating your order
Figure 11: Creating a new account Enter your information on this page to create a new account - please note that this account information relates to your online yearbook order only and does not affect any of your customer details held with us.
Figure 8: Creating your orderYour project is Flight Checked to make sure it is ready for printing. The Flight Check Results window advises you of any potential issues in your Yearbook
Figure 9: The Order pop-upClick the Disclaimer agreement tick box and you are ready to go!
Figure 10: Login screen This is where you create a new account and login to upload your yearbook.
10
10

Order Details You will now see your yearbook or yearbook cover name. Please note that you do not need to change the quantity - please leave the quantity as one. To proceed, click the “Continue” button.
Shipping & BillingThe Shipping & Billing page shows the delivery and billing address. This will be the same address that you used when you created your account. The shipping and billing address should be the address of your school.
Payment PageThe Payment page gives you a summary of your order.
PLEASE NOTE THAT THE ORDER TOTAL WILL ALWAYS EQUAL ZERO AS PAYMENT FOR YOUR YEARBOOKS WILL BE COMPLETED OFFLINE BETWEEN SPC YEARBOOKS AND YOUR SCHOOL. YOU DO NOT NEED TO PAY ONLINE FOR YOUR ORDER.
To proceed, click the “Confirm Order” button.
Completing your order You will now see a confirmation page. Follow the instructions on the page and close the browser window to return to the Yearbook Creator software to either upload your files or save them to your computer to send to us on disc.
Creating your order
Figure 15: Completing your order Once you have completed the ordering process you will see this screen. To proceed, close the browser window and return to the software to upload your files or save them to your computer to send to us on a DVD or CD.
Figure 12: Order details pageThis screen contains the information about your yearbook. You do not need to edit the information on this page - leave the quantity as one.
Figure 13: Shipping & Billing PageThis page will show the address details you entered when you created your account. Please make sure the shipping address is the school address.
Figure 14: Payment page All yearbook payments will be made offline so the order Total will always equal zero. Simply click the ‘Confirm Order’ button.
10
11
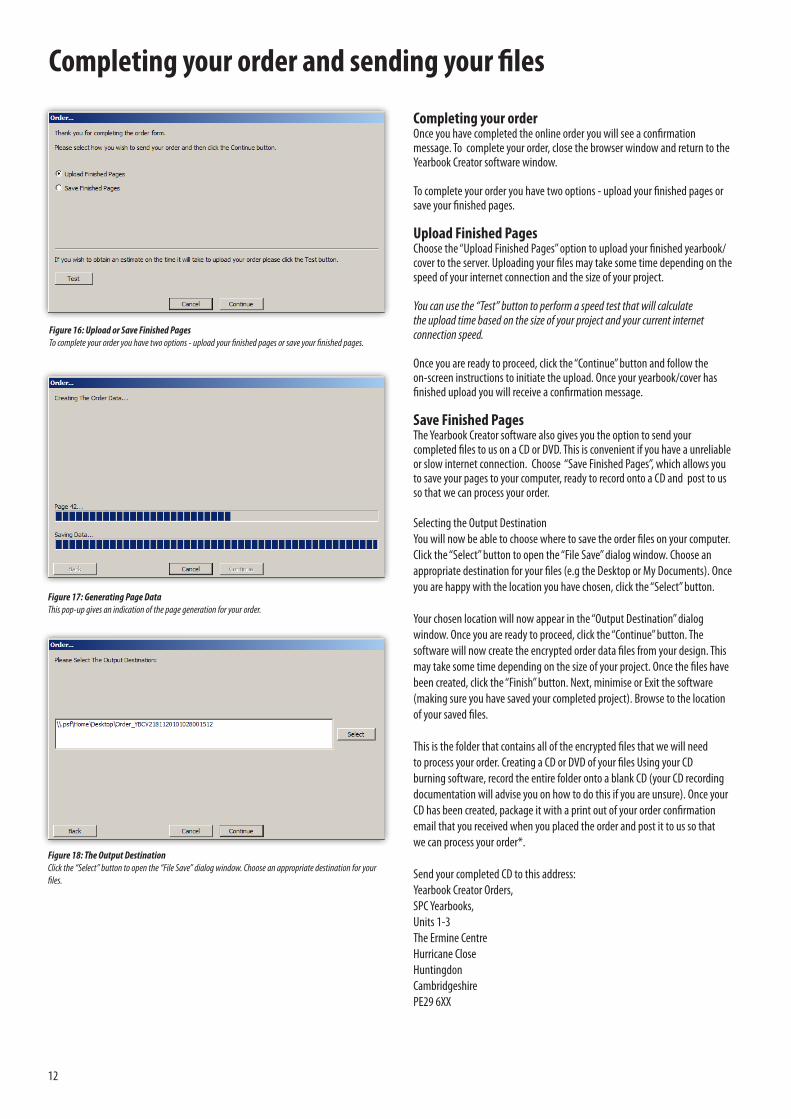
Completing your order Once you have completed the online order you will see a confirmation message. To complete your order, close the browser window and return to the Yearbook Creator software window.
To complete your order you have two options - upload your finished pages or save your finished pages.
Upload Finished PagesChoose the “Upload Finished Pages” option to upload your finished yearbook/cover to the server. Uploading your files may take some time depending on the speed of your internet connection and the size of your project.
You can use the “Test” button to perform a speed test that will calculate the upload time based on the size of your project and your current internet connection speed.
Once you are ready to proceed, click the “Continue” button and follow the on-screen instructions to initiate the upload. Once your yearbook/cover has finished upload you will receive a confirmation message.
Save Finished PagesThe Yearbook Creator software also gives you the option to send your completed files to us on a CD or DVD. This is convenient if you have a unreliable or slow internet connection. Choose “Save Finished Pages”, which allows you to save your pages to your computer, ready to record onto a CD and post to us so that we can process your order.
Selecting the Output Destination You will now be able to choose where to save the order files on your computer. Click the “Select” button to open the “File Save” dialog window. Choose an appropriate destination for your files (e.g the Desktop or My Documents). Once you are happy with the location you have chosen, click the “Select” button.
Your chosen location will now appear in the “Output Destination” dialog window. Once you are ready to proceed, click the “Continue” button. The software will now create the encrypted order data files from your design. This may take some time depending on the size of your project. Once the files have been created, click the “Finish” button. Next, minimise or Exit the software (making sure you have saved your completed project). Browse to the location of your saved files.
This is the folder that contains all of the encrypted files that we will need to process your order. Creating a CD or DVD of your files Using your CD burning software, record the entire folder onto a blank CD (your CD recording documentation will advise you on how to do this if you are unsure). Once your CD has been created, package it with a print out of your order confirmation email that you received when you placed the order and post it to us so that we can process your order*.
Send your completed CD to this address: Yearbook Creator Orders, SPC Yearbooks, Units 1-3The Ermine CentreHurricane CloseHuntingdonCambridgeshirePE29 6XX
Completing your order and sending your files
Figure 16: Upload or Save Finished Pages To complete your order you have two options - upload your finished pages or save your finished pages.
Figure 18: The Output DestinationClick the “Select” button to open the “File Save” dialog window. Choose an appropriate destination for your files.
Figure 17: Generating Page DataThis pop-up gives an indication of the page generation for your order.
12
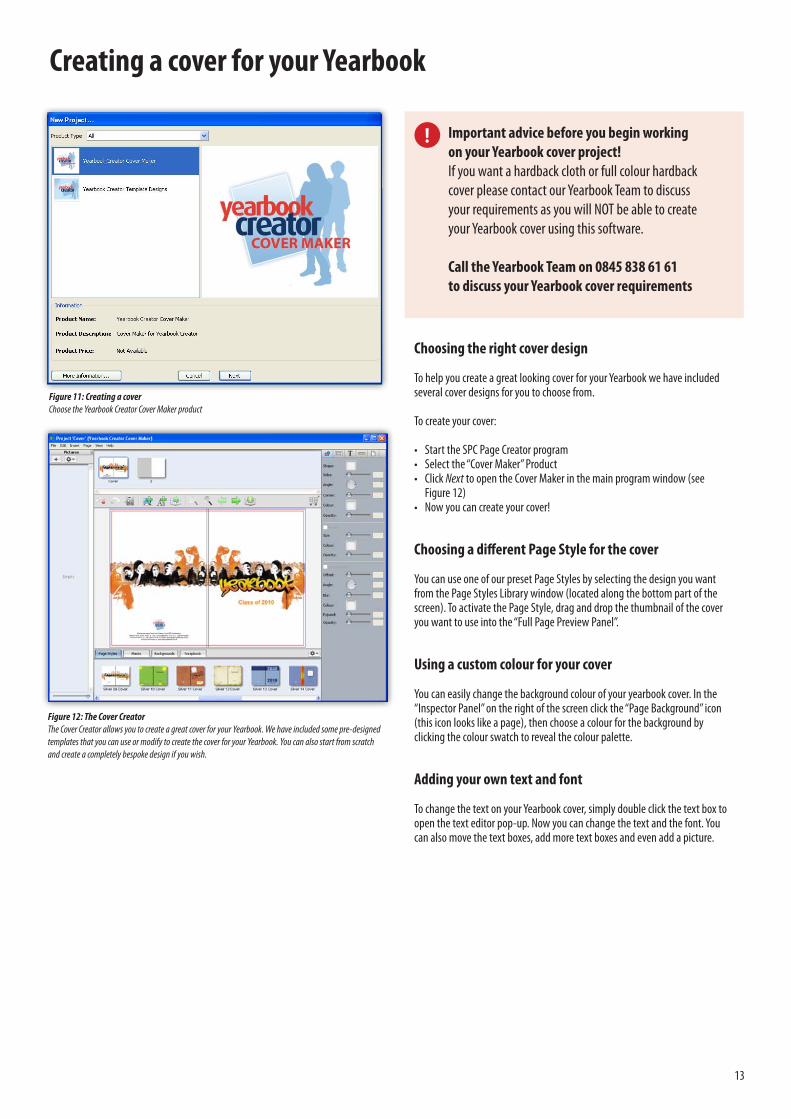
Choosing the right cover design
To help you create a great looking cover for your Yearbook we have included several cover designs for you to choose from.
To create your cover:
• Start the SPC Page Creator program• Select the “Cover Maker” Product• Click Next to open the Cover Maker in the main program window (see Figure 12)• Now you can create your cover!
Choosing a different Page Style for the cover
You can use one of our preset Page Styles by selecting the design you want from the Page Styles Library window (located along the bottom part of the screen). To activate the Page Style, drag and drop the thumbnail of the cover you want to use into the “Full Page Preview Panel”.
Using a custom colour for your cover
You can easily change the background colour of your yearbook cover. In the “Inspector Panel” on the right of the screen click the “Page Background” icon (this icon looks like a page), then choose a colour for the background by clicking the colour swatch to reveal the colour palette.
Adding your own text and font
To change the text on your Yearbook cover, simply double click the text box to open the text editor pop-up. Now you can change the text and the font. You can also move the text boxes, add more text boxes and even add a picture.
Creating a cover for your Yearbook
Figure 11: Creating a coverChoose the Yearbook Creator Cover Maker product
Figure 12: The Cover CreatorThe Cover Creator allows you to create a great cover for your Yearbook. We have included some pre-designed templates that you can use or modify to create the cover for your Yearbook. You can also start from scratch and create a completely bespoke design if you wish.
13
Important advice before you begin working on your Yearbook cover project!If you want a hardback cloth or full colour hardback cover please contact our Yearbook Team to discuss your requirements as you will NOT be able to create your Yearbook cover using this software.
Call the Yearbook Team on 0845 838 61 61 to discuss your Yearbook cover requirements
!

Proofing and ordering your Yearbook cover
Figure 15: Creating a coverChoose from the selection of cover designs in the “Page Styles” library.
Using “Create Proofs” to check your cover
When you are ready to check your cover design, you can use the “Create Proofs” option to save it as an image that can be printed to hard copy and checked (proofed).
To Create Proofs do the following:
• First save your cover design by selecting File > Save• Select File > Create Proofs from the main menu• In the pop-up, choose your desired options (see Figure 16 below)• Click the OK button• Allow the program to output the image file(s)• When done, the folder containing the image will automatically popup
Once you have created the cover proof, you can view it on screen or print it out onto an A4 paper for everyone to look at.
You can have as many proofreaders as you like or nominate one person with the task of proofreading*. Once you have proofread your project you can then make any changes to your Yearbook before placing your order and sending us the finished files.
* Please note that we DO NOT proofread Yearbook Creator cover designs. It is your responsibility to make sure that all pictures and text are correct before submitting your order!
Figure 16: “Create Proofs” pop-up
Creating your Yearbook cover order
Once you are happy with your Yearbook cover, you will need to create the order file for us to print. Yearbook Creator uses an encryption system to create a high-resolution encrypted version of your Yearbook cover.*
To create your order, do the following:
• Select File > Order... from the main menu• The program checks the Yearbook (Flight Check) for any potential issues
such as empty picture boxes and/or empty text boxes.• The Flight Check Results window advises of any potential issues. If any of
the issues are marked with a red symbol, they will need to be fixed before the order can be placed. Yellow symbols are advisory only - these should be reviewed by you before proceeding.
• Click OK to proceed with the order• The Order pop-up will appear. • Read the Disclaimer message and then tick the box to activate the Order
button. • Click the Order button• A browser window will now open containing a login screen for ‘SPC
Yearbooks Online Ordering’.
For guidance on ordering your yearbook cover please see Page 10
Getting your order back to us for printingFor details about how to return your order to us please see the next page
Figure 17: The Order pop-upThe Order pop-up lets you specify a quantity, add your Order Number (shown on your software CD) and any special instructions to us. Click the Disclaimer agreement tick box and you are ready to go!
14
Destination Click the Select button to choose a
destination for your proof files. Each page will be output as an image; so, if you have 50 pages in
your project, you will output 50 images
Output format Choose between JPEG and TIF formats
(we recommend JPG for proofing)
Pages Choose which pages you would like to proof. Use the select but-
ton to select pages or select all to export all pages as proofs

15
Returning your order to us
Getting your order back to us for printing
NOTE! If you chose to send your files to us using the “Upload Finished Pages” option during the ordering process you do not need to take any further action (unless you make changes to your yearbook and we request that you re-upload your files to us).
Once you have created the order files for your Yearbook and Yearbook Cover you will need to copy all files contained within the order folders onto a CD, DVD or USB memory stick. Once you have copied all of the files onto your chosen medium, return the CD, DVD or USB memory stick in a padded envelope to the following address:
Yearbook Creator OrdersSPC YearbooksUnits 1-3The Ermine CentreHurricane CloseHuntingdonCambridgeshirePE29 6XX
Please note: SPC Yearbooks will not be held responsible for items lost in the post. Once we receive and process your order, we will produce a printed proof that we will send to you before we commit to printing your Yearbooks.
PLEASE SEND YOUR CD, DVD OR USB MEMORY STICK BY FIRST CLASS RECORDED POST FOR SAFETY AND SECURITY.
If your project does become lost in the post, there is no need to worry about your privacy or the privacy of your students being compromised as the files you are sending to us are encrypted and they cannot be decrypted by anyone other than SPC Yearbooks - not even by someone else with a copy of the software.
Making a backup copy of your Yearbook Project
To make a backup copy of your Yearbook and Yearbook Cover browse to your “My Documents” folder on PC or your “Users” folder on Mac . Here you will find a folder called “SPC Page Creator Projects”. Inside this folder you will find folders that relate to your projects.
Locate the folder of your Yearbook project and make a copy of it to another location on your computer (e.g. CD/DVD or other backup device).
Locate the folder of your Yearbook cover and make a copy of it to another location on your computer (e.g. CD/DVD or other backup device).
Removing SPC Page Creator from your computer
If you wish to remove the software program from your computer once your project is finished, please follow these instructions:
PC• Click the Start button (on your Windows desktop)• Hover over “All Programs”• Find menu item “SPC Page Creator”• Hover over it and then select “Uninstall SPC Page Creator” from the fly out
menu
Mac• Navigate to “Applications” and locate the “SPC Page Creator” folder• Right-click on the folder and select “Move to Trash”, then empty your trash
The software will now be removed from your computer

Main menu functions
The main menuThe main menu consists of six options:
FileEditInsertPageViewHelp
Each option has sub-options which can be accessed by clicking the menu option once. The sub- options are as follows:
FileFile > SaveSaves the project that is currently open.
File > CloseCloses the project that is currently open.
File > Check ProjectCheck Project allows you to check your project for potential errors and issues (such as empty picture boxes). Any warnings will appear in a pop-up window with a description of the issue.
File > Create ProofsCreate Proofs allows you to make some proofs of your project. A proof is like a ‘preview’ of how your project will look when it is printed. When you select this option a small pop-up dialogue box appears. You have the option to use JPEG or TIFF format (we recommend JPEG for proofs). You can then select the destination for the proof files by clicking the “Select” button. Choose your location and then click “Save”. The software will then begin saving your proofs (this may take some time depending on the size of your project and images). Once the proofs have been created, the folder containing them will automatically be opened up on the desktop and you will be able to view your proofs. Proofs are low resolution and have watermarks, but they can be printed.
File > PreferencesChoosing preferences opens a small pop-up dialogue box which contains the following options:
Measurements - you can choose to have measurements in Millimetres or Inches Constrain proportions on new picture/shape boxes - when this is ticked any new picture and shape boxes will remain square shaped when you enlarge or reduce them in size.
File > OrderWhen your yearbook is completed choose this option to order it. Order files will be created which you then send to us for printing.
File > ExitExit the software
EditEdit > UndoUndo the most recent actions that you have taken
Edit > RedoRedo any steps you may have undone
Edit > CutCut a selected object from the page
Edit > CopyCopy a selected object from the page
Edit > PastePaste a cut or copied object onto the page
Edit > ClearRemove a selected object from the page (you can also use the Delete key or Backspace key on the keyboard)
Edit > Select AllSelect all objects on the page (that are selectable)
InsertInsert > Picture BoxInserts a picture box onto the page with the following shape options - Rectangle, Oval or Polygon
Insert > ShapeInserts a shape onto the page with the following options - Rectangle, Oval, Polygon or Line
Insert > Text BoxInserts a text box onto the page
PagePage > InsertInserts a blank page AFTER the currently selected page (identified as the page with a blue line around it in the Page Previews panel)
Page > DuplicateCreates a copy of the currently selected page in the Page Previews panel
Page > AddAdds a blank page to the end of the project
Page > DeleteDeletes the currently selected page
Page > Rearrange Pages...Selecting this option opens a pop-up window showing the document pages. Using this tool you can rearrange the order of the pages in your project. Pages can be moved by using the mouse to drag and drop a page in a new location. Pages can also be moved by using the arrow buttons to the left of the pop-up window. Selected pages have a blue line around them. To select a page click it once.
Page > FirstSelects the first page in the project
Page > LastSelects the last page in the project
Page > PreviousMoves the selection to the previous page in the project
Page > NextMoves the selection to the next page in the project
ViewView > Hide InspectorHides the Inspector control panel from view. Toggles (switches on and off when clicked) to “Show Inspector” when hidden
View > Hide LibraryHides the Library panel from view. Toggles to “Show Library” when hidden
View > Hide Page PreviewsHides the Page Previews panel from view. Toggles to “Show Page Previews” when hidden
View > Hide PicturesHides the Pictures panel from view. Toggles to “Show Pictures” when hidden
View > Hide ToolbarHides the Toolbar panel from view. Toggles to “Show Toolbar” when hidden
View > Show RulersShows the Rulers. Toggles to “Hide Rulers” when hidden
View > GuidesGives access to the Guides menu including Show/Hide, Snap Position, Clear Guides, Clear All Guides and Guide Settings where the colour of the guides can be modified.
View > GridGives access to the Grids menu including Show/Hide, Show When Dragging, Snap Position and Grid Settings where the colour, size and subdivisions of the grid can be modified.
View > Snap Position To Page ItemsAllows picture and text boxes to snap to existing page items.
View > Minimum ZoomSets zoom so that the entire page can be viewed.
View > Zoom OutZooms out from the page (decreases size of the page objects)
View > Zoom InZooms into the page (increases size of the page objects)
View > Maximum ZoomSets zoom to maximum so objects can be viewed close-up
View > Hide Box GuidesHides dashed border around picture, shape and text boxes. Toggles to “Show Box Guides” when they are hidden
View > PreviewAllows you to preview your yearbook full screen.
HelpHelp > HelpGives you access to the Help & Support pages on the SPC Yearbooks website.
16
Panels
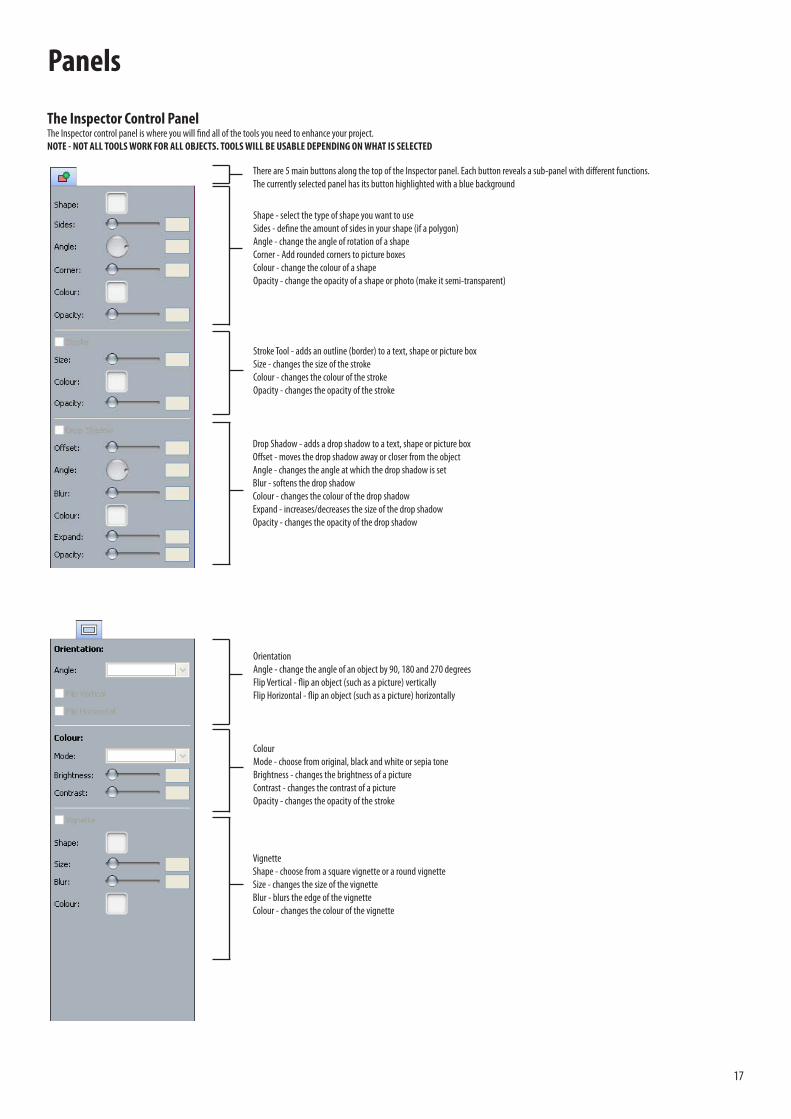
There are 5 main buttons along the top of the Inspector panel. Each button reveals a sub-panel with different functions.The currently selected panel has its button highlighted with a blue background
The Inspector Control PanelThe Inspector control panel is where you will find all of the tools you need to enhance your project. NOTE - NOT ALL TOOLS WORK FOR ALL OBJECTS. TOOLS WILL BE USABLE DEPENDING ON WHAT IS SELECTED
Shape - select the type of shape you want to useSides - define the amount of sides in your shape (if a polygon)Angle - change the angle of rotation of a shapeCorner - Add rounded corners to picture boxesColour - change the colour of a shapeOpacity - change the opacity of a shape or photo (make it semi-transparent)
Stroke Tool - adds an outline (border) to a text, shape or picture boxSize - changes the size of the strokeColour - changes the colour of the strokeOpacity - changes the opacity of the stroke
Drop Shadow - adds a drop shadow to a text, shape or picture boxOffset - moves the drop shadow away or closer from the objectAngle - changes the angle at which the drop shadow is setBlur - softens the drop shadowColour - changes the colour of the drop shadowExpand - increases/decreases the size of the drop shadowOpacity - changes the opacity of the drop shadow
OrientationAngle - change the angle of an object by 90, 180 and 270 degreesFlip Vertical - flip an object (such as a picture) verticallyFlip Horizontal - flip an object (such as a picture) horizontally
ColourMode - choose from original, black and white or sepia toneBrightness - changes the brightness of a pictureContrast - changes the contrast of a pictureOpacity - changes the opacity of the stroke
VignetteShape - choose from a square vignette or a round vignetteSize - changes the size of the vignetteBlur - blurs the edge of the vignetteColour - changes the colour of the vignette
17

This panel allows you to modify text boxes and their contentsAlignment - align the text to the Top, Centre or Bottom of the text boxMargin Size - increase the invisible margin around the inside edge of the text boxLine Spacing - increase the spacing between lines of text (leading)
The Inspector Control Panel - continuedThe Inspector control panel is where you will find all of the tools you need to enhance your project. NOTE - NOT ALL TOOLS WORK FOR ALL OBJECTS. TOOLS WILL BE USABLE DEPENDING ON WHAT IS SELECTED
Position - shows you the position of a selected object
Size - shows the width and height of a selected objectConstrain Proportions - when ticked, maintains the image proportions
Offset - change the position of the picture within the picture box
Scale - changes the scale of the picture within the picture box(If Zoom Lock is selected, the picture automatically resizes when the picturebox is increased or decreased in size)Angle - changes the angle of the picture box (useful for collages)
Page Background Colour - change the colour of the background
18