turbo & turbo elite 2008 im - barbeques galore
TRANSCRIPT

REV 0608a
America's Barbecue Grill Superstores
DANGER
If you smell gas:
1. Shut off gas to the appliance.2. Extinguish any open flame.3. Open lid.4. If odor continues, keep away from the appli-
ance and immediately call your gas supplieror your fire department.
WARNING
1. Do not store or use gasoline or other flam-mable liquids or vapors in the vicinity of thisor any other appliance.
2. An LP cylinder not connected for use shallnot be stored in the vicinity of this or anyother appliance.
Note: We highly recommend you always cover this barbecue when it isnot in use which will prolong the life of the barbecue and protect it fromthe elements.
Read this Owner’s Manual carefully andbe sure your gas grill is properly assem-bled, installed and maintained. Failureto follow these instructions could resultin serious bodily injury and/or propertydamage.
Note to Installer: Leave this Owner’sManual with the consumer after deliveryand/or installation.
Note to Consumer: Leave this Owner’sManual in a convenient place for futurereference.
Design Certified Unit approved byCSA Laboratories under standardANSI Z21.58-2007 / CSA 1.6-2007Outdoor Gas Cooking Equipment
Turbo & Turbo EliteInstruction Manual
Customer Service Helpline: If you have questions about assembly or grill operation, or if there are damaged ormissing parts when you unpack this unit from the shipping box, call us Monday through Friday at 1-800-752-3085
Barbeques Galore 800-752-3085 2173 Salk Avenue, Suite 200 Carlsbad, CA 92008
Model No. SKU# Model NameCG3TCBN 353938 Turbo 3 Burner NGCG4TCBN 353953 Turbo 4 Burner NGCG4TCBRN 353979 Turbo 4 Burner + RB NGCG4TDBRN 354001 Turbo Elite 4 Burner + RB NGCG5TDBRN 354050 Turbo Elite 5 Burner + RB NGCG3TCBP 353920 Turbo 3 Burner LPCG4TCBP 353946 Turbo 4 Burner LPCG4TCBRP 353961 Turbo 4 Burner + RB LPCG4TDBRP 354043 Turbo Elite 4 Burner + RB LPCG5TDBRP 354068 Turbo Elite 5 Burner + RB LP


Table Of Contents
Safety Information . . . . . . . . . . . . . . . . . . . . . . . . . . . . . . . . . . . . . . . . . . . . . . . . . . . . . . . . . .Pg. 2,3Refilling The Propane Gas Cylinder . . . . . . . . . . . . . . . . . . . . . . . . . . . . . . . . . .Pg. 4Assembly Instructions . . . . . . . . . . . . . . . . . . . . . . . . . . . . . . . . . . . . . . . . . . . . . . . . . . . . . . .Pg. 4Stainless Steel Hood Installation . . . . . . . . . . . . . . . . . . . . . . . . . . . . . . . . . . . . . . . . . . . . . . .Pg. 5Installing Components . . . . . . . . . . . . . . . . . . . . . . . . . . . . . . . . . . . . . . . . . . . . . . . . . . . . . . .Pg. 6Using Your Gas Grill . . . . . . . . . . . . . . . . . . . . . . . . . . . . . . . . . . . . . . . . . . . . . . . . . . . . . . . .Pg. 7,8Location . . . . . . . . . . . . . . . . . . . . . . . . . . . . . . . . . . . . . . . . . . . . . . . . . . . . . . . . . . . . . . . . . .Pg. 7Lighting Instructions . . . . . . . . . . . . . . . . . . . . . . . . . . . . . . . . . . . . . . . . . . . . . . . . . . . . . . . .Pg. 7Rotisserie Burner Lighting Instructions . . . . . . . . . . . . . . . . . . . . . . . . . . . . . . . . . . . . . . . . . .Pg. 7Cooking Tips & Care Of Your Gas Grill . . . . . . . . . . . . . . . . . . . . . . . . . . . . . . . . . . . . . . . . . .Pg. 9,10Maintenance Guide . . . . . . . . . . . . . . . . . . . . . . . . . . . . . . . . . . . . . . . . . . . . . . . . . . . . . . . . .Pg. 10,11Do’s & Dont’s . . . . . . . . . . . . . . . . . . . . . . . . . . . . . . . . . . . . . . . . . . . . . . . . . . . . . . . . . . . . . .Pg. 12Outdoor Propane Built-in Installation Specifications . . . . . . . . . . . . . . . . . . . . . . . . . . . . . . . .Pg. 13-15Outdoor Natural Gas Built-in Installation Specifications . . . . . . . . . . . . . . . . . . . . . . . . . . . . .Pg. 16Parts List . . . . . . . . . . . . . . . . . . . . . . . . . . . . . . . . . . . . . . . . . . . . . . . . . . . . . . . . . . . . . . . . .Pg. 18,19Parts Diagram . . . . . . . . . . . . . . . . . . . . . . . . . . . . . . . . . . . . . . . . . . . . . . . . . . . . . . . . . . . . .Pg. 20Warranty Information . . . . . . . . . . . . . . . . . . . . . . . . . . . . . . . . . . . . . . . . . . . . . . . . . . . . . . . .Pg.21
- 1 -

- 2 -
WARNING : All barbecues and carts are designed for outdoor use only andcannot be installed in or on boats.This barbecue is not intended to be installed in or on recreationalvehicles.All barbecues are not intended for commercial use.
WARNINGFuels used in gas or oil-fired appliances and the products ofcombustion of such fuels, contain chemicals known to theState of California to cause cancer, birth defects and/ orother reproductive harm.
This warning is issued pursuant to California Health &Safety Code Sec. 25249.6.
WARNINGFailure to comply with these instructions could result ina fire or explosion that could cause serious bodilyinjury, death, or property damage.
WARNINGYour grill will get very hot. Never lean over the cookingarea while using your grill. Do not touch cooking surfaces,grill housing, grill lid or any other grill parts while the grill is inoperation, or until the grill has cooled down after use.Failure to comply with these instructions may result inserious bodily injury.
You have bought a quality gas product from BarbequesGalore. All gas products require careful installation and or assem-bly and pre-operational testing. We recommend that our trainedstaff assemble, test and if necessary install your new purchase foryou.
Barbeques Galore cannot be held responsible for anydamages to persons or property resulting from improper assemblyor installation.
If you chose to assemble, test and install your own unit, pleasefollow the manufacturer’s instructions explicitly.
FOR OUTDOOR USE ONLYThis outdoor cooking gas appliance shall be used only outdoorsand shall not be used in a building, garage or any other enclosedarea.
This Outdoor Cooking Gas Appliance is not intended tobe installed in or on recreational vehicles and/or boats.
GAS PRESSUREThe Natural Gas Grill is designed to operate on Natural
Gas at a gas pressure regulated at 4" water column (W.C.)when equipped with the correct Natural Gas Orifice on thevalves and a Natural Gas Regulator on the supply line.
The Propane Gas Grill is designed to operate on propane at agas pressure regulated at 11" water column (W.C.) when equippedwith the correct Propane Orifices on the valves and a PropaneRegulator on the supply line.
GENERAL INFORMATIONThis installation must conform with local codes or, in the absenceof local codes, with either the National Fuel Gas Code, ANSIZ223.1/NFPA 54, Natural Gas and Propane Installation Code, CSAB149.1, or Propane Storage and Handling Code, B149.2
CAUTION: LEAK CHECKINGCheck all gas connections with a soap solution to be sure they
are tight and leakproof. To make soap solution, mix one part waterwith one part liquid detergent. With heat control knobs at "OFFposition, turn gas supply on. Apply the mixture to all gas pipe con-nections. Soap bubbles will appear if connections are not properlysealed; repair as necessary. Never test for gas leaks with a lightedmatch or open flame.
PROPANE MODELS:Correct LP Gas Tank Use
LP gas side burner models are designed for use with a stan-dard 20 lb. Liquid Propane Gas (LP gas) tank, not included withbarbecue box. Never connect your side burner to an LP gas tankthat exceeds this capacity. A tank of approximately 12 inches indiameter by 18-1/2 inches high is the maximum size LP gas tank touse. A Propane tank with an OPD (Overfill Prevention Device) mustbe used. This safety feature prevents the tank from being over-filled which can cause malfunction of the LP gas tank, regulatorand/or side burner.
The LP gas tank must be constructed and marked in accor-dance with the Specifications for LP-Gas Cylinders of the U.S.Department of Transportation (D.O.T.) or the National Standard ofCanada, CAN/CSA-B339, Cylinders, Spheres and Tubes forTransportation of Dangerous Goods; and Commission, as applica-ble. The LP gas tank must have a listed overfilling preventiondevice and a cylinder connection device compatible with the con-nection for outdoor cooking appliances.
Also, be sure to read and follow all LP instructions on the fol-lowing page.
NOTE: If the outdoor cooking gas appliance is not in use, the gasmust be turned off at the supply cylinder.
(a) Do not store a spare LP-gas cylinder under or near thisappliance;
(b) Never fill the cylinder beyond 80 percent full; and
(c) If the information in (a) and (b) is not followed exactly, afire causing death or serious injury may occur.
1. The LP gas tank has a shutoff valve, terminating in an LP gassupply tank valve outlet, that is compatible with a Type 1 tankconnection device. The LP gas tank must also have a safetyrelief device that has a direct communication with the vaporspace of the tank.
2. The tank supply system must be arranged for vapor withdraw-al.
3. The LP gas tank used must have a collar to protect the tankvalve.
! Never connect an unregulated LP gas tank to your gas grill.The gas regulator assembly supplied with your gas grill isadjusted to have an outlet pressure of 11" water column (W.C.)for connection to an LP gas tank.
! Only use the regulator and hose assembly supplied with yourgas grill. Replacement regulators and hose assemblies must bethose specified by manufacture.
! Have your LP gas tank filled by a reputable propane gas dealerand visually inspected and re-qualified at each filling.
! Never fill the gas tank beyond 80% full. Have your propane gas
Safety Information

- 3 -
dealer check the release valve after every filling to ensure that itremains free of defects.
! Always keep LP gas tanks in an upright position.
! Do not store (or use) gasoline or other flammable vapors andliquids in the vicinity of this gas grill.
! An LP gas tank that is not connected for use must NOT bestored on bottom shelf or in the vicinity of this or any other gasgrill.
! Do not subject the LP gas tank to excessive heat.
! Never store an LP gas tank indoors. If you store your gas grill inthe garage or other indoor location, always disconnect the LPgas tank first and store it safely outside and out of reach of chil-dren.
! LP gas tanks must be stored outdoors in a well-ventilated area.Disconnected LP gas tanks must not be stored in a building,garage or any other enclosed area.
! When your gas grill is not in use the gas must be turned off at theLP gas tank.
! The regulator and hose assembly must be inspected before eachuse of the grill.
! Keep the gas regulator hose away from hot grill surfaces anddripping grease. Avoid unnecessary twisting of hose. Visuallyinspect hose prior to each use for cuts, cracks, excessive wearor other damage. If it is evident there is excessive abrasion orwear, or the hose is cut, it must be replaced prior to the outdoorcooking gas appliance being put into operation. The replacementhose assembly shall be obtained from a Barbeques Galore store.
! Never light your gas grill with the lid closed or before checking toinsure the burner tubes are fully seated over the gas valve ori-fices.
! Never allow children to operate your grill. Do not allow childrento play near your grill.
WARNINGA strong gas smell, or the hissing sound of gas indicates aserious problem with your gas grill or the LP gas tank. Failureto immediately follow the steps listed below could result in afire or explosion that could cause serious bodily injury, death,or property damage.
If you smell gas;! Shut off gas supply to the side burner.
! Turn the Control Knobs to the OFF position.
! Open lid.
! Get away from the LP gas tank.
! Do not try to fix the problem yourself..! If odor continues or you have a fire you cannot extinguish, call
your fire department.
Do not call near the LP gas tank because your telephone is an elec-trical device and could create a spark resulting in fire and/or explo-sion.
The LP gas pressure regulator and hose assembly supplied
with this unit must be used without alteration. If this assembly needsto be replaced, use only the type specified by Barbeques Galore forthis appliance.
When connecting the LP gas regulator to the supply cylinder,please remember that the threaded fittings on the QCC-1 valvetightens clockwise (Figure 1). This connection must be tightenedfully to prevent leakage.
If your Propane tank should ever require repainting use a lightcolored paint to allow heat reflection. Never use a dark color torepaint the Propane tank.
This appliance is for outdoor use in a well-ventilated area only.This unit must not be used in a building, garage or any otherenclosed area.
BUILT-IN UNITS UTILIZING NATURAL GASWhen connecting a built-in unit to the natural gas supply
in your home, please ensure the pipe joint compound is resis-tant to the action of natural gas. In addition, please observethe following:
The barbecue and its individual shut-off valve must bedisconnected from the gas supply piping system during anypressure testing of that system at test pressures in excess of½ psi (3.5 kPa).
The barbecue must be isolated from the gas supplypiping system by closing its individual manual shut-off valveduring any pressure testing of the gas supply piping systemat test pressures equal to or less than ½ psi (3.5 kPa)
The units are supplied from the factory equipped for usewith natural gas and includes a natural gas regulator. If oper-ation with propane gas is desired, simply follow the instruc-tions found on page 4 of this manual. In addition, a propanegas regulator MUST be installed in the gas supply line fromthe propane gas tank.
Please remember to check all gas connections for leaksafter the piping is completed. Follow the procedure found onpage 2, under the heading "CAUTION: LEAK CHECKING."

Assembly Instructions1. Remove unit from carton carefully, ensuring drip tray does not fall out.2. Check barbecue for damage.3. Check that proper orifices are installed in the valves.
IMPORTANT: The Turbo barbecue is supplied from the factory setup for NaturalGas and fitted with Natural Gas orifices stamped 1.75 (Figure 2).
Rear burner units are supplied from the factory setup for Natural Gas and fitted withNatural Gas Orifices (see Figure 3) stamped as follows:
3 Burner: 1.68mm (rear burner)4 & 5 Burner: 1.80mm (rear burner)
NOTE: Ensure barbecue is connected to a regulated gas supply. Failureto use the appropriate gas regulator voids all warranties.
Should it be necessary, your Barbeques Galore Store can convert your bar-becue from Natural Gas to Propane.
ALL NEW CYLINDERS MUST BE PURGED BEFORE THE FIRST FILLING.A) Turn heat control knobs and Gas Cylinder valve to
"OFF" position.B) Propane cylinder equipped with QCC-1 valve (Figure
1) is equipped with a right-handed thread. Turn blackplastic nut counter-clockwise to loosen.
C) Remove cylinder from Grill. Have cylinder filled byyour local Propane gas dealer.
D) Some Propane Cylinders have a bleed-off valve (Fig.1). This bleed-off valve should be inspected for leaksafter each refilling of the tank. Turn clockwise toreseal.
E) Fasten full Propane tank to Grill and connect QCC-1fitting to tank valve (Figure 1) by turning clockwise.
F) With heat control knobs still at "OFF" position, turn on Cylinder valve.
USING SOAP SOLUTION, TEST THE GAS CONNECTION FOR LEAKS. (See Page 1 for information on mixing andapplying soap solution) if bubbles appear, there is a leak. The connection must be tightened to close the leak or immedi-ately turn off the gas supply and contact a qualified customer service agent for replacement parts or for further instruction.
The pressure regulator and hose assembly supplied with this barbecue MUST be used. Replacement pressure reg-ulators and hose assemblies must be those supplied by Barbeques Galore for this barbecue.
This Gas Grill must be connected to an appropriate REGULATED gas supply - refer to Safety Information.
REFILLING THE PROPANE GAS CYLINDER
- 4 -
LP Gas: stamped 1.13
Natural Gas: stamped 1.75
1 1 351
7
Figure 2 Main Burner
Figure 3
Rotis Burner
Orifice
Rear Burner Models Only
Important Note: This grill is manufactured to exact specifications. LP models are certified for use with LP gas and NGmodels are certified for use with Natural Gas. You cannot convert this grill from one fuel type to the other. For your safety,conversion kits are available but can only be installed by a BBQ Galore technician. Any attempt to convert your grill will voidyour warranty.
IMPORTANT: This barbecue is intended for use with LP cylinders equipped with a QCC-1 / OPD valve (QuickConnect Coupling Type 1 with Overfill Prevention Device) .
WARNING! Purging and filling of LP-Gas cylinders must be performed by personnel who have been thoroughlytrained in accepted LP-Gas industry procedures. Failure to follow this instruction may result in explosion, fire, severe per-sonal injury, or death.
Figure 1
REGULATOR
PRESSURERELIEF VALVE
Turn Clockwiseto Reseal
BLACK COUPLING NUT(Turn Clockwise to connect)
CGA791 connection valve
BLEED-OFFVALVE
Dust Cap
- 5 -
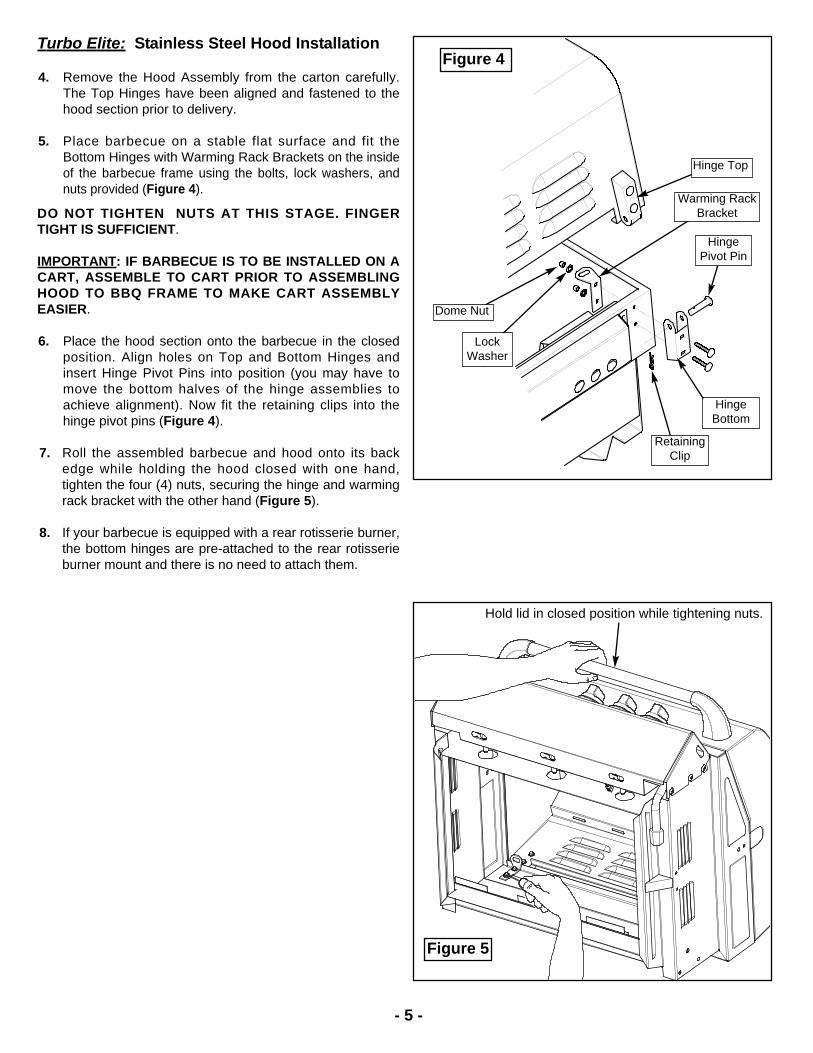
Turbo Elite: Stainless Steel Hood Installation
4. Remove the Hood Assembly from the carton carefully.The Top Hinges have been aligned and fastened to thehood section prior to delivery.
5. Place barbecue on a stable flat surface and fit theBottom Hinges with Warming Rack Brackets on the insideof the barbecue frame using the bolts, lock washers, andnuts provided (Figure 4).
DO NOT TIGHTEN NUTS AT THIS STAGE. FINGERTIGHT IS SUFFICIENT.
IMPORTANT: IF BARBECUE IS TO BE INSTALLED ON ACART, ASSEMBLE TO CART PRIOR TO ASSEMBLINGHOOD TO BBQ FRAME TO MAKE CART ASSEMBLYEASIER.
6. Place the hood section onto the barbecue in the closedposition. Align holes on Top and Bottom Hinges andinsert Hinge Pivot Pins into position (you may have tomove the bottom halves of the hinge assemblies toachieve alignment). Now fit the retaining clips into thehinge pivot pins (Figure 4).
7. Roll the assembled barbecue and hood onto its backedge while holding the hood closed with one hand,tighten the four (4) nuts, securing the hinge and warmingrack bracket with the other hand (Figure 5).
8. If your barbecue is equipped with a rear rotisserie burner,the bottom hinges are pre-attached to the rear rotisserieburner mount and there is no need to attach them.
Warming RackBracket
Figure 4
HingeBottom
HingePivot Pin
Dome Nut
Hinge Top
LockWasher
RetainingClip
Hold lid in closed position while tightening nuts.
Figure 5
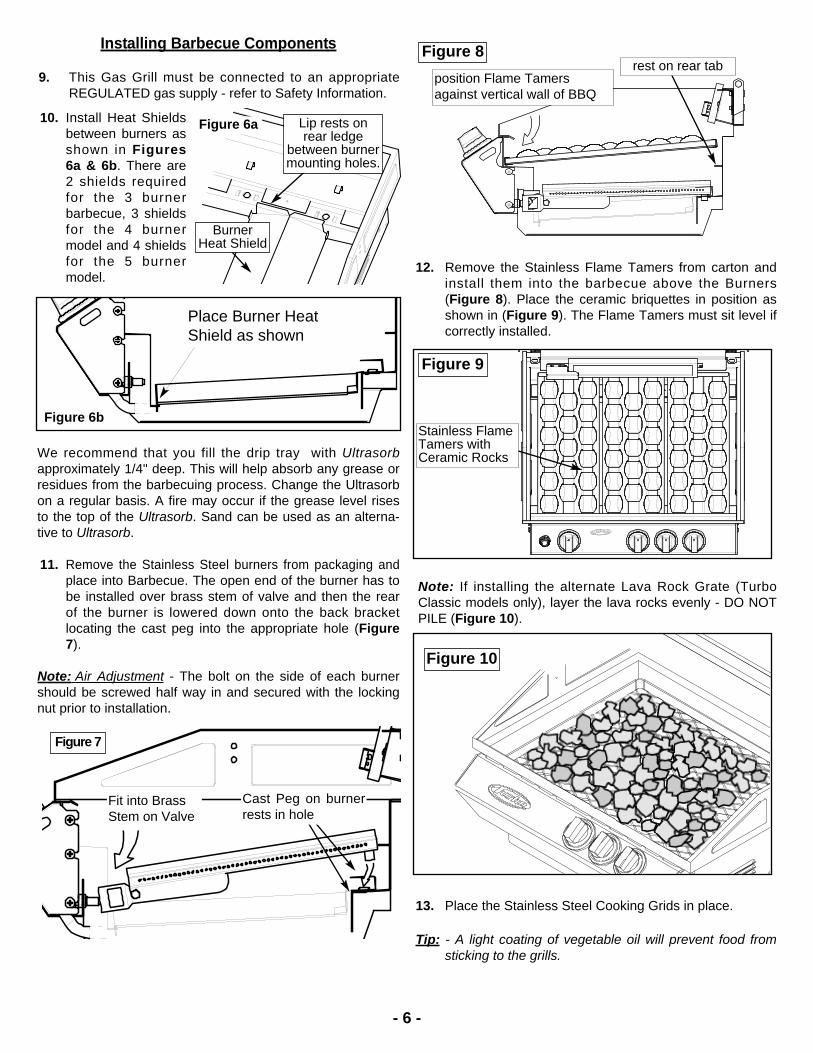
Installing Barbecue Components
9. This Gas Grill must be connected to an appropriateREGULATED gas supply - refer to Safety Information.
10. Install Heat Shieldsbetween burners asshown in Figures6a & 6b. There are2 shields requiredfor the 3 burnerbarbecue, 3 shieldsfor the 4 burnermodel and 4 shieldsfor the 5 burnermodel.
We recommend that you fill the drip tray with Ultrasorbapproximately 1/4" deep. This will help absorb any grease orresidues from the barbecuing process. Change the Ultrasorbon a regular basis. A fire may occur if the grease level risesto the top of the Ultrasorb. Sand can be used as an alterna-tive to Ultrasorb.
11. Remove the Stainless Steel burners from packaging andplace into Barbecue. The open end of the burner has tobe installed over brass stem of valve and then the rearof the burner is lowered down onto the back bracketlocating the cast peg into the appropriate hole (Figure7).
Note: Air Adjustment - The bolt on the side of each burnershould be screwed half way in and secured with the lockingnut prior to installation.
Figure 6a Lip rests onrear ledge
between burnermounting holes.
BurnerHeat Shield
Fit into BrassStem on Valve
Cast Peg on burnerrests in hole
Figure 7
12. Remove the Stainless Flame Tamers from carton andinstall them into the barbecue above the Burners(Figure 8). Place the ceramic briquettes in position asshown in (Figure 9). The Flame Tamers must sit level ifcorrectly installed.
Note: If installing the alternate Lava Rock Grate (TurboClassic models only), layer the lava rocks evenly - DO NOTPILE (Figure 10).
13. Place the Stainless Steel Cooking Grids in place.
Tip: - A light coating of vegetable oil will prevent food fromsticking to the grills.
Figure 8position Flame Tamersagainst vertical wall of BBQ
rest on rear tab
Figure 9
Stainless FlameTamers withCeramic Rocks
Figure 10
- 6 -
Place Burner HeatShield as shown
Figure 6b
LocationTHE GAS GRILL IS DESIGNED FOR OUTDOORINSTALLATION ONLY.
It may be installed on a covered or open patio providedthe sides and bottom are at least 14" away and the back atleast 16" away from any combustible construction. Thegrill must not be located under any overhead unprotectedcombustible construction.
Before each use, carefully and thoroughly checkregulator hose. If it is evident there is excessive abrasion orwear, or the hose is cut, it must be replaced prior to the appli-ance being put into operation. Contact your BBQ Galore retaileror by calling BBQ’s Galore at (800) 474-5587.
Lighting InstructionsImportant: Do not bend directly over grill when lighting theburner. Lid must be in open position before lighting.
The gas controls are fitted with a pilot flame ignitionsystem. Push any knob in and turn slowly (counterclock-wise) to HIGH (see Figure 11).
If you have difficulty lighting the burner it may be neces-sary to turn and hold the knob for 1 (one) second at the pointprior to the Ignitor “clicking”. If the burner does not light, turnthe control knob to OFF, wait 5 minutes for gas to clear, thenretry.
If the knob is turned fully counterclockwise the lowestflame setting will occur. To visually check that the burner isoperating look between the frame and tray at the flame.
NOTE: If grill does not light with a valve, try an adjacentvalve, once ignition is achieved, the other burners will lightoff the lit burner or the Flash Tube may be used (Figure 12).
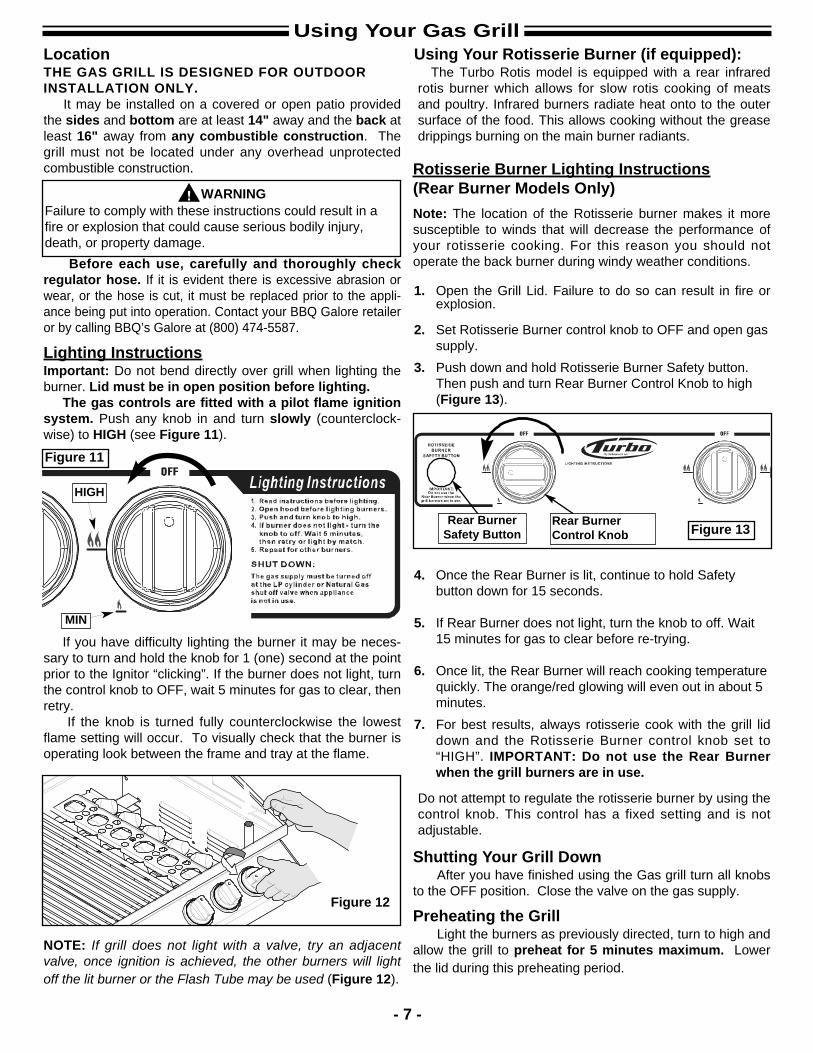
Using Your Rotisserie Burner (if equipped):The Turbo Rotis model is equipped with a rear infrared
rotis burner which allows for slow rotis cooking of meatsand poultry. Infrared burners radiate heat onto to the outersurface of the food. This allows cooking without the greasedrippings burning on the main burner radiants.
Rotisserie Burner Lighting Instructions(Rear Burner Models Only)Note: The location of the Rotisserie burner makes it moresusceptible to winds that will decrease the performance ofyour rotisserie cooking. For this reason you should notoperate the back burner during windy weather conditions.
1. Open the Grill Lid. Failure to do so can result in fire orexplosion.
2. Set Rotisserie Burner control knob to OFF and open gassupply.
3. Push down and hold Rotisserie Burner Safety button.Then push and turn Rear Burner Control Knob to high(Figure 13).
4. Once the Rear Burner is lit, continue to hold Safetybutton down for 15 seconds.
5. If Rear Burner does not light, turn the knob to off. Wait15 minutes for gas to clear before re-trying.
6. Once lit, the Rear Burner will reach cooking temperaturequickly. The orange/red glowing will even out in about 5minutes.
7. For best results, always rotisserie cook with the grill liddown and the Rotisserie Burner control knob set to“HIGH”. IMPORTANT: Do not use the Rear Burnerwhen the grill burners are in use.
Do not attempt to regulate the rotisserie burner by using thecontrol knob. This control has a fixed setting and is notadjustable.
Shutting Your Grill DownAfter you have finished using the Gas grill turn all knobs
to the OFF position. Close the valve on the gas supply.
Preheating the GrillLight the burners as previously directed, turn to high and
allow the grill to preheat for 5 minutes maximum. Lowerthe lid during this preheating period.
Using Your Gas Grill
- 7 -
Rear BurnerControl Knob
Rear BurnerSafety Button Figure 13
Figure 12
WARNINGFailure to comply with these instructions could result in afire or explosion that could cause serious bodily injury,death, or property damage.
Figure 11
HIGH
MIN

Heat ControlIMPORTANT: When cooking with hood closed, neverexceed temperatures of 480°F (250°C).Direct Cooking: Your Gas grill is equipped with a number ofburners which can be regulated easily. This feature givesyou the flexibility to cook enough hamburgers to feed thewhole gang with all the burners at the same setting, or slowcook a casserole over low heat on one side of the grill whileyou sear a steak over a high flame on the other side, or justlight one or two of the burners for a small meal.Indirect Cooking: Cook large cuts of meat to golden perfec-tion with indirect heat (Hood must be closed for indirectcooking). By using indirect heat, your food doesn't come indirect contact with flame, instead, the heat from the lightedside of the grill gently circulates throughout the grill (seeFigure 14).
Closed Hood Saves MoneyWhen the smoker hood is closed you have a more con-
stant temperature. Your food will cook faster, with fewer flare-ups, and you will use less energy. Make sure basting pan isin place at all times especially when cooking roasts, wholefish, chickens and ALL rotisserie cooking. Use of a bastingpan eliminates manual basting, since the juices drop into thepan, vaporize, rise and self-baste. Water, beer, wine, fruitjuices or herbs in the basting pan adds flavor. Gravy or saucecan be made from the drippings. Disposable basting pansprevent flare-ups.
Flare-up ControlAnytime you cook meat above an open flame you will
have flare-ups, since flare-ups are caused when the naturaljuices from the meat fall on the hot Ceramic Rock. Flare-ups,and the resulting smoke, are what give meat cooked over anopen flame the delicious outdoor flavor, so expect andencourage some flare-up. However, excessive flare-ups canbe caused by cooking extra fatty foods directly on the grill, orby cooking with too high a temperature. These types of flare-ups should be controlled or your food will burn.
To prevent excessive flare-ups, trim off excess fat frommeat and poultry before putting it on the grill, or cook particu-larly fatty meat such as duck, in a basting pan (or put thebasting pan on the ceramic rocks directly under the meat). Tocontrol excessive flare-ups caused by too high a heat setting,turn the heat control knob to a lower setting.
NOTE: When installing Warming Rack, make sure back legsfit into Warming Rack Bracket holes and rest against theback of the barbecue frame (Figure 15).
Cleaning Up After Using Your GrillTo keep your grill ready for the next time you want to use
it, turn the grill off, then take a long handled soft brass bristlebrush and brush off the cooking grills. Be careful, they're hot!Protect your hand from the heat by using an oven mitt to holdthe brush.
The Turbo Barbecue (Figure 16) has a black controlpanel. Turbo Elite has a stainless steel Control Panel. Bothcome with a stainless steel Smoker Hood for long life.
- 8 -
Figure 14Basting Pan
Warming RackBracket
back of barbecue
WarmingRack
Figure 15
Figure 16Turbo Elite
shown
Match Light Rod NG Regulatorshown
TemperatureGauge
Stainless Hood

The Turbo Elite Barbecue (Figure 17) has beendesigned and manufactured from heavy gauge porcelainsteel for long life. Daily weathering and high heat associat-ed with grill cooking can cause the hood’s exterior stainlesssurfaces to ”tan”.
To clean the stainless steel surfaces of your grill, followthese directions;
1. NEVER clean a grill while hot.
2. Shut off gas supply at source and disconnect fuel linefrom gas valve manifold. Protect fuel line fitting.
3. Remove dirt or grease using a soft cloth, then polishstainless surfaces with a Foam Spray cleaner designedfor stainless steel. Never use an abrasive cleaner orscrubber that may scratch your stainless surfaces.
4. Dry with a soft cloth and let air dry before restarting grill.
Cooking Tips & Care Of Your Gas Grill
Food Preparation
Preparing food to be cooked on your gas grill requiresno more effort than if you were preparing it to be cooked onyour indoor range. The following tips will help you get thebest results right from the start.
1. Trim off excess fat from meat, leaving a thin stripround the edges. To prevent meat from curling up while itcooks, slash the remaining fat at two-inch intervals, takingcare not to cut into the meat. Trim off all excess fat frompoultry before cooking.
2. Use tongs instead of a fork when turning meat orpoultry. The prongs of a fork pierce the meat or poultry,causing it to lose it's natural juices.
3. If you use a tomato or sugar base sauce for basting,do not apply until the last five or ten minutes of cookingperiod. Use over a longer period of time will result in over-browning or charring.
4. Poultry, fish and natural lean meats should be brushedwith cooking oil, butter, or margarine several times duringthe cooking period to avoid their drying out.
5. Meats and poultry should be brought to room tempera-ture before cooking. Frozen foods such as fish and vegeta-bles should be put on the grill without thawing.
6. Salt meat, fish or poultry after cooking, not before orduring cooking periods. Other spices including pepper andgarlic may be freely applied.
SMOKE COOKING
Smoke cooking is an exceptionally slow method ofcooking in which a flavoring source is added to the barbe-cue in order to impart its own delectable flavor to the mealfor a deep smoke flavor.
Soak a flavoring source such as hickory chips, greentwigs of apple-wood or wild cherry, garlic cloves or bayleaves in water for 30 minutes prior to use. Loosely wrap ina single layer of aluminum foil, leaving one end slightly openand place on top of the Flame Tamer assembly at thebeginning of the cooking period.
For a lighter smoke flavor, add the pre-moistenedwrapped flavor source during the last half hour of thecooking period. Remember, smoke cooking is slow cooking.You can't hurry it along without unsatisfactory results. Keepthe heat control knobs set at LOW and the lid closed.
- 9 -
Warming Rack
Figure 17

Rotisserie Cooking (rear burner models)Rotisserie cooking produces foods that are moist, flavorful
and attractive. The optional rotisserie system is most com-monly used for cooking meat or poultry and is designed tocook food from the back burner using infrared heat. The loca-tion of the burner allows the placement of a cooking panbeneath the food to collect juices for basting and gravy(Figure 18).
To flavor the contents of the cooking pan you may addherbs, onions, or other spices of your choice. The backburner is an infrared type, which provides intense searingradiant heat. The intense heat sears in the natural juices andnutrients found in quality cuts of meat.
The cooking times on a rotisserie will be approximately thesame as for oven cooking.
Tips for Using The Back Burner
For back burner lighting instructions refer to page 6 of thisOwner’s Manual. The location of the back burner makes it more susceptible towinds that will decrease the performance of your rotisseriecooking. For this reason you should not operate the backburner during windy weather conditions. For best results, always rotisserie cook with the grill lid downand the Back Burner control knob set to HIGH. Do not usethe main grill burners when the Back Burner is in opera-tion.
Energy Conservation
You'll be pleased to know that by cooking outdoors onyour Gas grill you'll be using no more of our nation's pre-cious energy than if you were cooking indoors. And, on hotsummer days, cooking outdoors takes the heat out of thekitchen and cuts down on the energy needed to air conditionyour home.
MAINTENANCE GUIDE
On at least a monthly basis during times when the BBQ isin use, and at least every other week during high usageperiods, the following items must be inspected:
1. Clear the area surrounding the BBQ of ALL combustiblematerials, gasoline and other flammable vapors andliquids.
2. Ensure that the free flow of combustion and ventilating airis not obstructed.
Stainless Steel Cooking Grills
Use a brass bristle brush to clean off the excess build-up onboth sides of the grill.
To thoroughly clean the grills:
1. Lightly brush off excess build-up with brass brush on bothsides.
2. Remove grills from BBQ.
3. Wash grills in warm water.
4. With grills still wet, sprinkle baking soda very liberallyover surfaces on both sides.
5. Take a wet sponge and vigorously rub and clean off sur-faces. NOTE: Tough spots may need second applicationof baking soda and rubbing.
6. Rinse well and dry. Oil lightly.
- 10 -
Figure 18
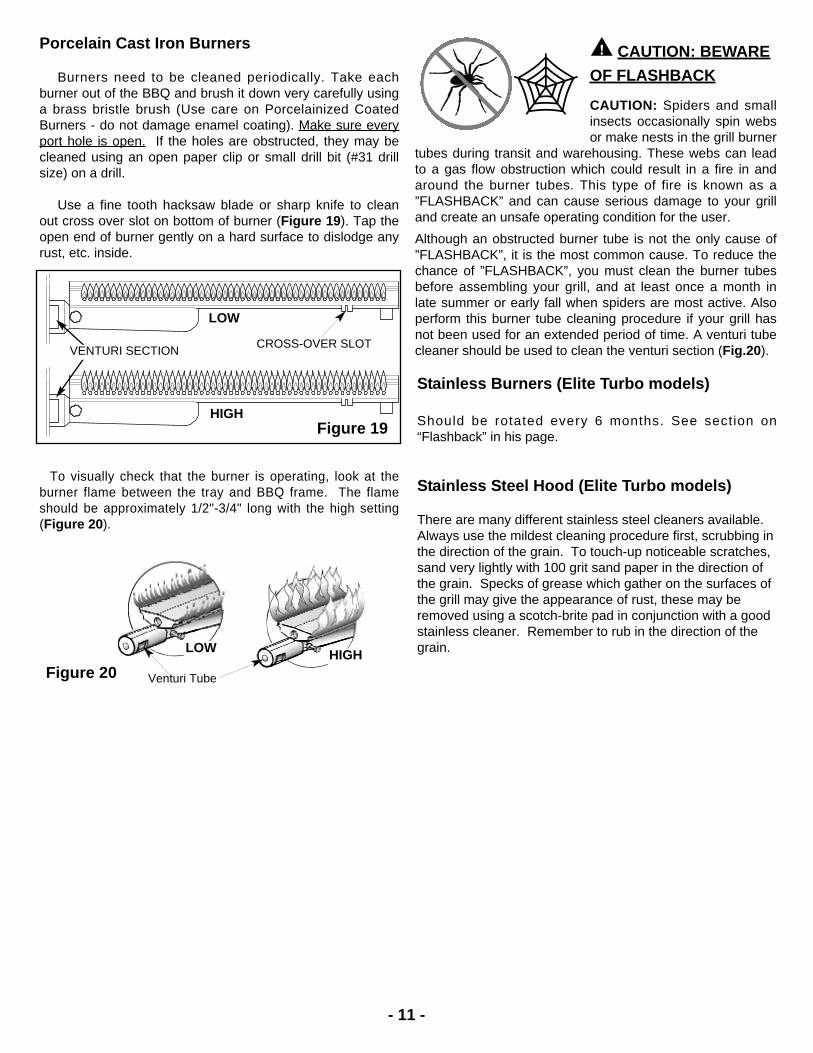
Porcelain Cast Iron Burners
Burners need to be cleaned periodically. Take eachburner out of the BBQ and brush it down very carefully usinga brass bristle brush (Use care on Porcelainized CoatedBurners - do not damage enamel coating). Make sure everyport hole is open. If the holes are obstructed, they may becleaned using an open paper clip or small drill bit (#31 drillsize) on a drill.
Use a fine tooth hacksaw blade or sharp knife to cleanout cross over slot on bottom of burner (Figure 19). Tap theopen end of burner gently on a hard surface to dislodge anyrust, etc. inside.
To visually check that the burner is operating, look at theburner flame between the tray and BBQ frame. The flameshould be approximately 1/2"-3/4" long with the high setting(Figure 20).
CAUTION: BEWAREOF FLASHBACK
CAUTION: Spiders and smallinsects occasionally spin websor make nests in the grill burner
tubes during transit and warehousing. These webs can leadto a gas flow obstruction which could result in a fire in andaround the burner tubes. This type of fire is known as a”FLASHBACK” and can cause serious damage to your grilland create an unsafe operating condition for the user.Although an obstructed burner tube is not the only cause of”FLASHBACK”, it is the most common cause. To reduce thechance of ”FLASHBACK”, you must clean the burner tubesbefore assembling your grill, and at least once a month inlate summer or early fall when spiders are most active. Alsoperform this burner tube cleaning procedure if your grill hasnot been used for an extended period of time. A venturi tubecleaner should be used to clean the venturi section (Fig.20).
Stainless Burners (Elite Turbo models)
Should be rotated every 6 months. See section on“Flashback” in his page.
Stainless Steel Hood (Elite Turbo models)
There are many different stainless steel cleaners available.Always use the mildest cleaning procedure first, scrubbing inthe direction of the grain. To touch-up noticeable scratches,sand very lightly with 100 grit sand paper in the direction ofthe grain. Specks of grease which gather on the surfaces ofthe grill may give the appearance of rust, these may beremoved using a scotch-brite pad in conjunction with a goodstainless cleaner. Remember to rub in the direction of thegrain.
Figure 19HIGH
LOW
- 11 -
CROSS-OVER SLOTVENTURI SECTION
Figure 20HIGHLOW
Venturi Tube
- 12 -
DO’S & DON’TS
DO..Have propane cylinder (LP units) filled by authorizedLP supplier.
Record your grill model number on your instructions andkeep the instructions and parts list in a convenientplace.Check all gas line connections for leaks with soapysolution prior to lighting, tighten until bubbles disap-pear.Raise the hood before lighting the burner.Preheat the grill 5 minutes maximum before cooking.After cooking, turn the grill off, then take a long handledsoft brass bristle brush and brush off the cooking grills.Then turn off gas at the Propane tank or main valve.
Use a mitt to turn off tank valve, it can get hot. Cookwith hood down when possible. It is generally faster andmore efficient. Trapped smoke adds to the flavor.Turn the gas off promptly should you be unable to lightthe grill immediately. Wait a full 5 minutes beforeattempting to light grill again.Have proper tools, tongs, mittens and hot pads readyprior to removing foods.Trim excess fats from meats to minimize flare-ups.Let the grill cool before removing any parts for cleaning.Be careful of the control valve setting. LP gas is hotterand the lower setting may be generally preferred.Cover the barbecue when not in use.Use a mitt or glove when opening BBQ lid or turning offPropane tank valve after use.
DON’T..Install grill closer than 14" on the sides or 16" on theback to any combustible construction.Attempt any adjustment of the regulator, it has beenpreset and tested.Allow the LP tank to lie on its side. Keep in an uprightposition.Turn a control knob on until a lighted match is insertedin the lighting hole.Use plastics or untempered glass utensils on the grill.Attempt to move an aluminum foil pan while it is hot.Let it cool first before moving it.Cover or block any air openings in the bottom of thegrill with foil.
Wear long, loose flowing clothing around the grill. Longflowing hair is also easily ignited especially by unexpect-ed flare-ups. Tie hair back or wear a hat or a scarf.Put food on the gri l l and leave it unattended orunwatched for long periods. Most fats can catch fireeven on the lower setting.Use caustic materials, i.e., lye , to clean grill parts.Store any additional Propane gas tanks under barbecueWooden Carts not intended for commercial use.
When cooking with hood closed NEVER exceed tem-peratures of 480°F (250°C).
Wood Chips In A Gas GrillWood chips should be soaked for a minimum of 30
minutes. Presoaked chips or chunks may be thrown directlyonto a charcoal fire, but they must be in a container orwrapped in foil, log fashion, for use in gas grills.
If smoking is expected to last for a long period of time,you should keep chips soaking in the event you need tothrow more on the fire or to add to the container or makeanother foil log.
INFORMATION REGARDINGREPLACEMENT PARTS
Replacement parts for this barbecue unit are availablefrom your Barbeques Galore retailer or if you have anyquestions call your friends at Barbeques Galore:phone #(800) GRILL UP (1-800-474-5587).

Questions? Call our Grill Information Center: 1-800-752-3085 Monday thru Friday 8am-4:30pm PST
- 13 -
NOTE: When choosing a location for your Gas grill, keep in mind that it should not be located under any overhead com-bustible construction. The side and bottom of the grill should not be any closer than 14 inches to combustible construction,and the back of the grill should not be any closer than 16 inches to combustible construction.Barbecues must be installed in accordance with CSA specifications and all local building codes.
Outdoor Propane BBQ Built-in Installation SpecificationsWARNING: When using Propane, EXTREME CAUTION should be used to provide ample ventilation of vapor from theenclosure. LP Gas vapor is heavier than air and SERIOUS INJURY from a DANGEROUS EXPLOSION could occur if LPGas is allowed to accumulate in an enclosure and then ignited. Both the Barbecue enclosure and LP cylinder enclosurerequire venting that must be provided at the floor level of the enclosure to allow any leaking LP Gas vapor to escape.
Vapors from products containing Chlorine and other caustic chemicals can cause Stainless Steel flexibleconnectors to corrode. THESE PRODUCTS SHOULD NOT BE STORED IN AN ISLAND OR NEAR THE
connector. Cleaning solutions, Household Chemicals and Solder fluxes can also cause pinholes if they come in contact withthese connectors and MUST be washed off immediately with water.
NOTE: When installing a barbecue equipped for liquidpropane in an island, the propane tank must be in a sepa-rate enclosure that is completely isolated from the barbecue.It must be cross-ventilated in accordance with the currentstandard. The propane tank MUST NEVER be installeddirectly under the barbecue.
NOTE: Upper & lower ground-level vents (20 sq. in.minimum each) MUST BE PROVIDED for combustion air onboth sides of built-in construction. Please ask a BarbequesGalore associate for full details.
Barbecues must be installed in accordance with CSAspecifications and all local building codes.
Figure 26
Outer l ips ofbarbecue reston edges.
StainlessFlexline
Non-combustibleConstruction
Vented onBOTH SIDES
of Island
CSA ApprovedRubber Gas
Hose
QCC-1/OPDTank
CSA ApprovedPropaneRegulator
VentedAccessDoor
CSA ApprovedPropane Regulator
(not supplied)
Secure Stainless Flexline with Plumber’sTape to prevent shifting during tank installa-tion. An approved rubber gas hose is thenconnected to the LPG tank.
QCC-1 & OPDrequired(not included)
Propane InstallationFigure 27
WARNINGFailure to comply with these instructions may result in a fire orexplosion that could cause property damage, serious bodily injuryor death. This gas grill is intended for outdoor use only and is notintended to be installed in or on recreational vehicles or boats.
WARNING
Clamp downflexline

1. Construct metal framing using barbecue dimensions "W1", "D" & "H" found in the following page. Observe clearanceto combustible dimensions “R” & “S” also obtained from your specific barbecue Instruction Manual. The followinginstructions accommodate the minimum requirements for an LP Gas barbecue in a built-in island installation. ForNatural Gas Installations, refer to your Instruction Manual. Island construction designs may vary as long as theymaintain these minimum requirements.
2. When designing your island, take into careful consideration the island's surroundings, i.e., accessibility, clearances,overhead obstructions and clearance to combustibles, shrubbery that may potentially block ventilation air for theenclosure, nearby windows where smoke may enter and places where too much draft may be encountered, etc.
3. If utilizing the space directly underneath the barbecue for storage, the area allowed MUST NOT permit the storage ofany spare LP tank! A shelf may be designed-in to prevent a spare tank from being stored. Construction must be builtin such a manner as to prevent storage of any LP spare tank in any position.
W1
*36”H
* nominal dimension not includinghardiboard or leveling feet.
*36”
Allow forvent open-
ings
Allow space for ONE LPTank as primary fuel
source ONLY!
Figure 1
Outdoor Propane BBQ Built-in Island Specifications
- 14 -

** minimum clearance required to combustibleadjacent walls or structure.
4” x 6” Ventsshown with
screens. Mustremain unob-
structed.
Tank Retainer Kit
LP regulator suppliedwith barbecue must
be used
A plenum wall is required to create a sepa-rate compartment for LP Tank source.
Heat Shield requiredunderneath BBQ
DO NOT store any spare LPTanks within the enclosure.
Upper and lowervent openings
required.Locate whereunobstructed.
6” MIN**RD
**S
Hardiboard asrequired
4” MIN
Figure 2
Figure 3
!
- 15 -

- 16 -
Outdoor Natural Gas BBQ Built-in Installation SpecificationsFigure 28
CSA ApprovedNatural GasRegulator
GasSupply
Outer lips ofb a r b e c u erests onedges.
Louvers on BBQ must remainunobstructed to allow forcombustion air.
Access to1/2”-1/2” NPTS h u t - O f fValve mustbe provided.
1/2” Stainless Flexline
Non-combustibleConstruction
1/2” Male pipefitting to Tee
IMPORTANT: Regulator must be on the Turbo Barbecueor your warranty is voided.
IN
OUT
Natural Gas supply
Close Nipple
Shut-off Valveis required
(not supplied)
CSA approved Natural GasRegulator (included)
Figure 29
StainlessSteel Flex-line(not included)
Teflon Pipe Thread Sealant isrecommended for use on allthreaded connections.
Gas Inlet
Natural Gas Built-In Gas Line Installation(shown with optional WOK installation)
11” MIN.Non-combustibleConstruction
Figure 30
D1
W1
D3
H
D2
HOOD CLEARANCECombustibleConstruction
BUILT-IN CUTOUT DIMENSIONS TO NON-COMBUSTIBLE CONSTRUCTION
MODEL W1 D1 D2 D3 H
CG3TCB (N/P) 24-1/2”
19-3/4” 16” 14” 9-1/2”
CG4TCB (N/P) 30-1/2”
CG4TCBR (N/P) 30-1/2”
CG4TDBR (N/P) 30-1/2”
CG5TDBR (N/P) 38-1/2”

18-1/2"
9-1/2"
Figure 33
W1*
DIM “W2”
Turbo & Turbo Elite Models
NG Regulator shownNG Regulatorshown
- 17 -
Model No. SKU# Model Name W1* W2CG3TCBN 353938 Turbo 3 Burner NG 24-1/2" 25-5/8"CG4TCBN 353953 Turbo 4 Burner NG 30-1/2" 31-5/8"CG4TCBRN 353979 Turbo 4 Burner + RB NG 30-1/2" 31-5/8"CG4TDBRN 354001 Turbo Elite 4 Burner + RB NG 30-1/2" 31-3/4"CG5TDBRN 354050 Turbo Elite 5 Burner + RB NG 38-1/2" 39-1/2"CG3TCBP 353920 Turbo 3 Burner LP 24-1/2" 25-5/8"CG4TCBP 353946 Turbo 4 Burner LP 30-1/2" 31-5/8"CG4TCBRP 353961 Turbo 4 Burner + RB LP 30-1/2" 31-5/8"CG4TDBRP 354043 Turbo Elite 4 Burner + RB LP 30-1/2" 31-3/4"CG5TDBRP 354068 Turbo Elite 5 Burner + RB LP 38-1/2" 39-1/2"
* includes clearance for screws
Turbo BBQ Replacement Parts List
Description1 1 G Frame - 3 Burner Black
1 1 G Frame - 4 Burner Black1 1 1 1 G Frame - 4 Burner Black - Rear Burner
1 1 G Frame - 5 Burner Black - Rear Burner2 1 1 1 1 1 1 1 1 1 1 Baffle for Turbo Control Panel
1 1 Control Panel - 3 Burner Black Turbo Classic1 1 Control Panel - 4 Burner Black Turbo Classic
1 1 4 Bnr Elite RB Ctrl Panel#21 1 5 Bnr Elite RB Ctrl Panel#2
4 3 3 4 4 4 4 4 4 5 5 Control Knob Large Plated -Turbo Elite 1 1 Drip Tray S/S 26" - No Holes
1 1 1 1 1 1 Drip Tray S/S 31" - No Holes 1 1 Drip Tray S/S 39" - No Holes
6 3 3 4 4 4 4 4 4 5 5 Flame Thrower Bracket w/Electrode 1 Manifold Assembly 3 Burner Turbo NG
1 Manifold Assembly 3 Burner Turbo LP1 Manifold Assembly 4 Burner Turbo NG
1 Manifold Assembly 4 Burner Turbo LP1 1 Manifold Assembly 4 Burner Turbo NG-R/Bnr
1 1 Manifold Assembly 4 Burner Turbo LP-R/Bnr1 Manifold Assembly 5 Burner Turbo NG-R/Bnr
1 Manifold Assembly 5 Burner Turbo LP-R/Bnr 1 1 1 1 1 Manifold Tube,Turbo,#1 NG 1 1 1 1 1 Manifold Tube,Turbo,#2 NG 1 1 1 1 1 Manifold Tube,Turbo,#3 NG
1 1 1 1 Manifold Tube,Turbo,#4 NG 1 Manifold Tube,Turbo,#5 NG
1 1 1 1 1 Manifold Tube,Turbo,#1 LP 1 1 1 1 1 Manifold Tube,Turbo,#2 LP1 1 1 1 1 Manifold Tube,Turbo,#3 LP
1 1 1 1 Manifold Tube,Turbo,#4 LP1 Manifold Tube,Turbo,#5 LP
1 1 1 Flame Thrower Tube, Turbo, 150mm 1 1 1 Flame Thrower Tube, Turbo, 210mm 1 1 1 Flame Thrower Tube, Turbo, 310mm
1 1 Flame Thrower Tube, Turbo, 410mm 1 Flame Thrower Tube, Turbo, 510mm
10 3 3 4 4 4 4 4 4 5 5 Orifice Holder with Nut 3 4 4 4 5 Orifice - Natural Gas
3 4 4 4 5 Orifice - Propane Gas 12 2 2 2 2 2 2 2 2 2 2 Hinge Top 13 2 2 2 2 2 2 2 2 2 2 Hinge Bottom 14 2 2 2 2 2 2 2 2 2 2 Warming Rack Bracket 15 2 2 2 2 2 2 2 2 2 2 Hinge Pivot Pin (Style 3) 16 2 2 2 2 2 2 2 2 2 2 Retaining Clip (Style 3) 17 8 8 8 8 8 8 8 8 8 8 S/Steel Bolts for S/Steel Hinge 18 4 4 4 4 4 4 4 4 4 4 Stainless Steel Flat Washer 19 8 8 8 8 8 8 8 8 8 8 Lock Washer #10 - Zinc 20 8 8 8 8 8 8 8 8 8 8 Dome Nut 21 3 3 4 4 4 4 4 4 5 5 S/S Flame Tamer (New) W/Ceramics
1 1 Rock Grate - 3 Burner (Alternate) - *(not shown)1 1 1 1 1 1 Rock Grate - 4 Burner (Alternate) - *(not shown)
1 1 Rock Grate - 5 Burner (Alternate) - *(not shown)23* 2 2 2 2 2 2 2 2 3 3 Lava Rock (Alternate) - *(not shown)
1 1 1 1 3 Bnr Stainless Burner Pack 2 2 2 2 2 2 1 1 2 Bnr Stainless Burner Pack
CG
4TC
BR
N
QTY
CG
5TD
BR
P
CG
3TC
BP
CG
4TC
BP
CG
4TC
BR
P
CG
3TC
BN
CG
4TD
BR
N
CG
5TD
BR
N
CG
4TC
BN
CG
4TD
BR
P
ITEM
9
11
8
22*
24
1
5
3
7
- 18 -

Turbo BBQ Replacement Parts List
DescriptionCG
4TC
BR
N
QTY
CG
5TD
BR
P
CG
3TC
BP
CG
4TC
BP
CG
4TC
BR
P
CG
3TC
BN
CG
4TD
BR
N
CG
5TD
BR
N
CG
4TC
BN
CG
4TD
BR
P
ITEM
Cooking Grill 13" Stainless Steel 4 4 5 5 Cooking Grill 8" Stainless Steel
2 2 Cooking Grill 13" (W style) M/Enml., *(not shown)4 4 4 4 Cooking Grill 8" (W style) M/Enml., *(not shown)
1 1 Stainless Hood 3 Burner - Turbo Elite 1 1 1 1 1 1 Stainless Hood 4 Burner - Turbo Elite
1 1 Stainless Hood 5 Burner - Turbo Elite 28 1 1 1 1 1 1 1 1 1 1 Turbo Badge 29 1 1 1 1 1 1 1 1 1 1 Hood Thermometer - Turbo Elite
1 1 Crossfire-Stainless Steel 3 Burner 1 1 1 1 1 1 Crossfire-Stainless Steel 4 Burner
1 1 Crossfire-Stainless Steel 5 Burner 31 2 2 2 2 2 2 2 2 2 2 Clip for Crossfire 32 1 1 1 1 1 1 1 1 1 1 Lighting Instruction Decal 33 2 2 2 2 2 2 2 2 2 2 Hood Buffer
1 1 26" Warming Rack - Stainless Steel 1 1 1 1 1 1 31" Warming Rack - Stainless Steel
1 1 39" Warming Rack - Stainless Steel 35 2 2 2 2 2 2 2 2 2 2 Handle Brackets for S/Steel Hood
1 1 Handle 3 Bnr S/Steel Hood 1 1 1 1 1 1 Handle 4 Bnr S/Steel Hood
1 1 Handle 5 Bnr S/Steel Hood 37 3 3 4 4 4 4 4 4 5 5 Valve- Turbo Flame Thrower 38 2 2 3 3 3 3 3 3 4 4 Heat Shield S/Steel
1 1 1 1 Rear Burner Small - Black1 1 Rear Burner Large - Black
1 1 1 1 Rear Burner Surround-4Bnr - black1 1 Rear Burner Surround-5Bnr - black
1 1 1 1 Rear Burner Cover-4 Bnr - black1 1 Rear Burner Cover-5 bnr - black
42 1 1 1 1 1 1 Rear Burner Valve43 1 1 1 1 1 1 Rear Burner Collector Box - black44 1 1 1 1 1 1 Rear Burner S/S Flexline45 1 1 1 1 1 1 Safety Thermocouple Tube46 1 1 1 1 1 1 Safety Button Nut47 1 1 1 1 1 1 Safety Valve Rear Burner48 1 1 1 1 1 1 Gas Supply Tube - Safety Valve
1 1 1 1 Rear Trim f/Turbo 4B w/RB1 1 Rear Trim f/Turbo 5B w/RB
1 1 1 1 1 1 1 1 3 & 4 R/Bnr F/Thrower Gas Line1 1 5 R/Bnr F/Thrower Gas Line
51 1 1 1 1 1 1 1 1 1 1 Lighting Tube
34
36
30
25
26*
27
50
39
40
41
49
- 19 -
ExplodedParts Diagram
1215
13
18
19
20
16
1417
1
30
31
33
51
24
538
28
47
8
10
225
21
3635 32
27
29
39
40
34
41
49
4
11
379
6
Valve/IgniterAssembly
ElectrodeLead
ChromeControl Knob
- 20 -
3
59
42
44
4843
45
47
46
50
Safety Valve Detail
10
or26

- 21 -
Barbeques Galore Limited Warranty
Barbeques Galore hereby warrants to the ORIGINAL PURCHASER of this Barbeques Galore Gas Barbecue that itwill be free of defects in material and workmanship from the date of purchase as follows:Solid Cast Stainless Steel Burners................................................................................................................3 yearsAll Stainless Steel exterior parts....................................................................................................................2 yearsPainted BBQ Frames, Igniter Assemblies and All Remaining Parts .............................................................limited war-ranty...when assembled and operated in accordance with the printed instructions that accompany it.
High cooking temperatures, excessive humidity, chlorine, fertilizers, lawn pesticides and salt can affect theStainless Steel components and for these reasons, the limited warranties DO NOT COVER DISCOLORATION ORRUST, unless there is a loss of structural integrity on the grill component.
Barbeques Galore shall not be liable under this or any implied warranty for incidental or consequential damagesand Barbeques Galore’s liability is limited to the purchase price of this barbecue. This warranty gives you specificlegal rights, and you may also have other rights which vary from state to state. This warranty is applicable in theUnited States and Canada. No one else is authorized to perform any obligations under this warranty.
Barbeques Galore requires reasonable proof of your date of purchase. THEREFORE YOU SHOULD RETAINYOUR SALES SLIP OR INVOICE AND RETURN THE BARBEQUES GALORE PRODUCT REGISTRATION CARDIMMEDIATELY.
This limited warranty shall be limited to the repair or replacement of parts which prove defective under normal use and serviceand which on examination shall indicate to Barbeques Galore’s satisfaction they are defective. Before returning any parts toBarbeques Galore, contact our Customer Service Center at (800) 752-3085 or email us at [email protected]
If Barbeques Galore confirms the defect and approves the claim, Barbeques Galore will elect to repair or replace such partwithout charge. Parts returned to Barbeques Galore must be sent freight prepaid to:
Barbeques Galore, Inc., Customer Service Center, 3001 E. Pioneer Pkwy, Arlington, TX 76011or to the nearest Barbeques Galore Store. Barbeques Galore will return parts to the purchaser freight or postage prepaid.
The LP tank manufacturer is solely responsible for the materials, workmanship and performance of the tank. If the tank has adefect, malfunctions, or you have questions regarding the tank, call the tank manufacturer’s customer service center. The phonenumber is on the warning decal which is permanently attached to the tank. If the tank manufacturer has not resolved the issue toyour satisfaction, then call the Barbeques Galore store nearest you.
Model Number _______________________ Serial Number _________________________
Date of Purchase______________________Purchase From__________________________
Warranty Restrictions
This warranty applies only when the grill is used in the United States, Canada & Australia.This warranty gives you specific legal rights, and you may also have other rights which vary from state to state.

Customer Service Helpline: If you have questions about assembly or grill operation, or if there are damaged ormissing parts when you unpack this unit from the shipping box, call us Monday through Friday at 1-800-752-3085
Barbeques Galore 800-752-3085 2173 Salk Avenue, Suite 200 Carlsbad, CA 92008