tungsten network web form invoice submission guide
TRANSCRIPT

Tungsten Network Web Form
Invoice Submission Guide
Creating an Invoice/Credit Note Page 2
Useful Features When Creating an Invoice/Credit Note Page 13
Creating Invoice Templates Page 16
Purchasing more invoices Page 17
Administration Menu Page 19

Creating an Invoice/Credit Note
1. Log in to your Tungsten Network account at www.tungsten-network.com and
click on „Login‟. Enter your login credentials including your password.
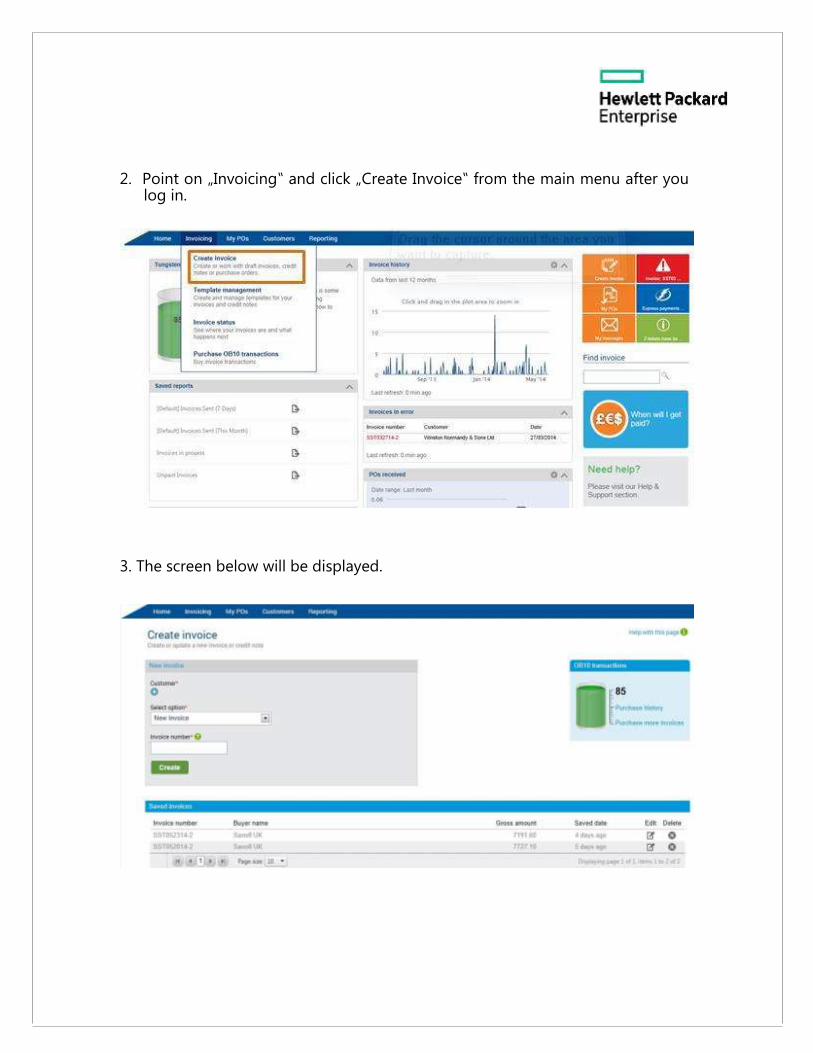
2. Point on „Invoicing‟ and click „Create Invoice‟ from the main menu after you
log in.
3. The screen below will be displayed.
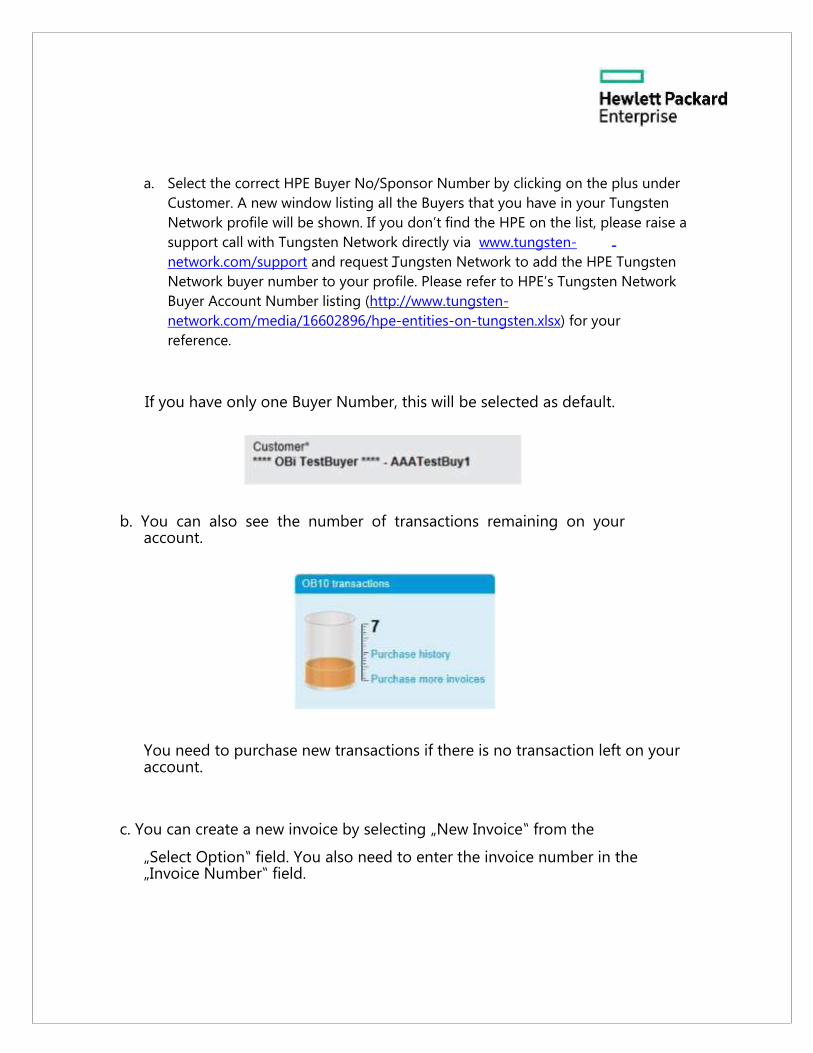
a. Select the correct HPE Buyer No/Sponsor Number by clicking on the plus under
Customer. A new window listing all the Buyers that you have in your Tungsten
Network profile will be shown. If you don’t find the HPE on the list, please raise a
support call with Tungsten Network directly via www.tungsten-
network.com/support and request Tungsten Network to add the HPE Tungsten
Network buyer number to your profile. Please refer to HPE’s Tungsten Network
Buyer Account Number listing (http://www.tungsten-
network.com/media/16602896/hpe-entities-on-tungsten.xlsx) for your
reference.
If you have only one Buyer Number, this will be selected as default.
b. You can also see the number of transactions remaining on your
account.
You need to purchase new transactions if there is no transaction left on your account.
c. You can create a new invoice by selecting „New Invoice‟ from the
„Select Option‟ field. You also need to enter the invoice number in the „Invoice Number‟ field.
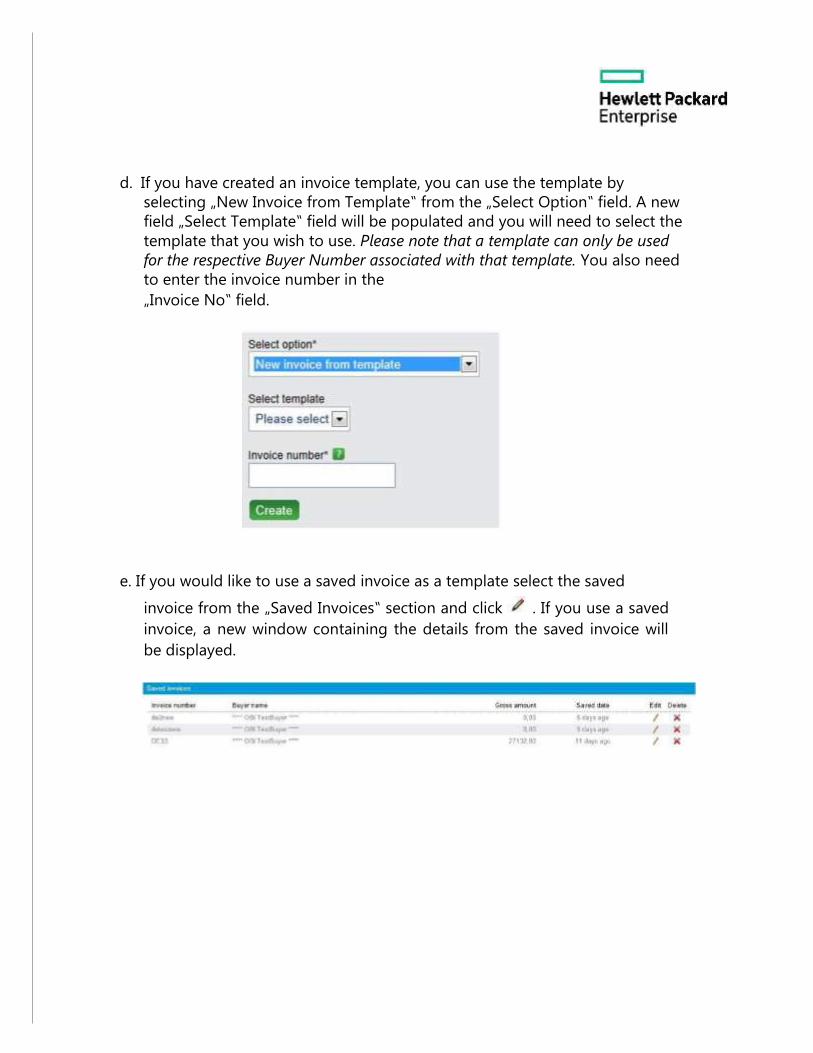
d. If you have created an invoice template, you can use the template by
selecting „New Invoice from Template‟ from the „Select Option‟ field. A new
field „Select Template‟ field will be populated and you will need to select the
template that you wish to use. Please note that a template can only be used
for the respective Buyer Number associated with that template. You also need
to enter the invoice number in the „Invoice No‟ field.
e. If you would like to use a saved invoice as a template select the saved
invoice from the „Saved Invoices‟ section and click . If you use a saved
invoice, a new window containing the details from the saved invoice will
be displayed.

4. Enter or update invoice data.
a. Your details and Who you are invoicing
Some parts of the “Your Details” and “Who you are invoicing” sections
will be defaulted from your Tungsten Network profile and from HPE Tungsten Network profile. You cannot modify these sections. It is
important that you choose the correct Buyer account number from the previous step.
Incorrect use of HPE account number may result in your invoices being returned to you and you have to resubmit to the correct HPE account.
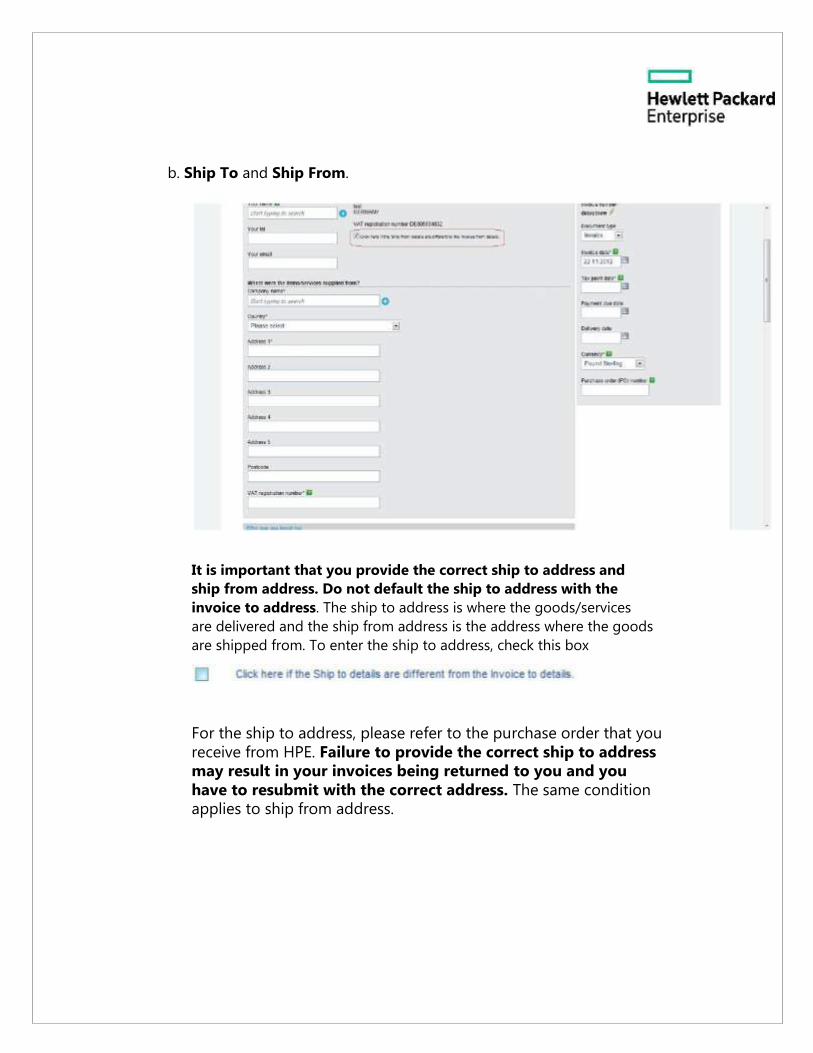
b. Ship To and Ship From.
It is important that you provide the correct ship to address and
ship from address. Do not default the ship to address with the
invoice to address. The ship to address is where the goods/services
are delivered and the ship from address is the address where the goods
are shipped from. To enter the ship to address, check this box
For the ship to address, please refer to the purchase order that you
receive from HPE. Failure to provide the correct ship to address
may result in your invoices being returned to you and you
have to resubmit with the correct address. The same condition
applies to ship from address.
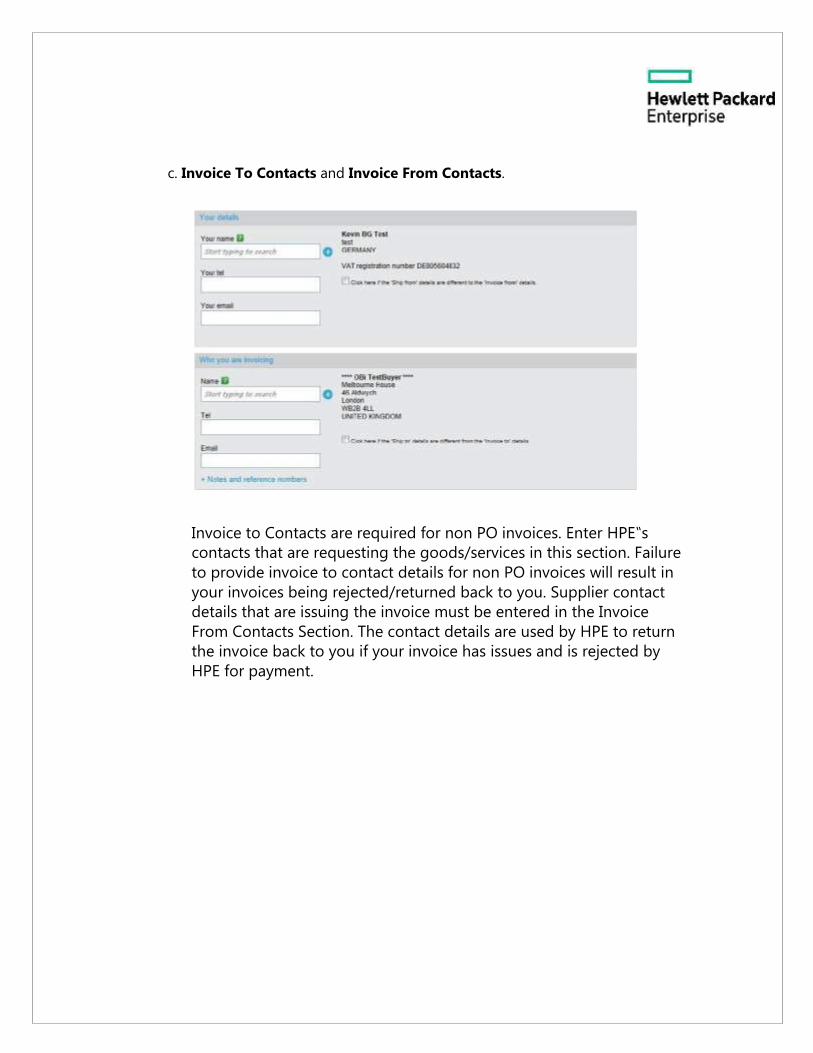
c. Invoice To Contacts and Invoice From Contacts.
Invoice to Contacts are required for non PO invoices. Enter HPE‟s
contacts that are requesting the goods/services in this section. Failure
to provide invoice to contact details for non PO invoices will result in
your invoices being rejected/returned back to you. Supplier contact
details that are issuing the invoice must be entered in the Invoice
From Contacts Section. The contact details are used by HPE to return
the invoice back to you if your invoice has issues and is rejected by
HPE for payment.

d. Invoice/Credit Note Details
Select Invoice/Credit Note from the Document type drop down list.
o If credit note is selected, ‘Original Invoice No’ field will be populated automatically and the original invoice number associated with the credit note must be entered.
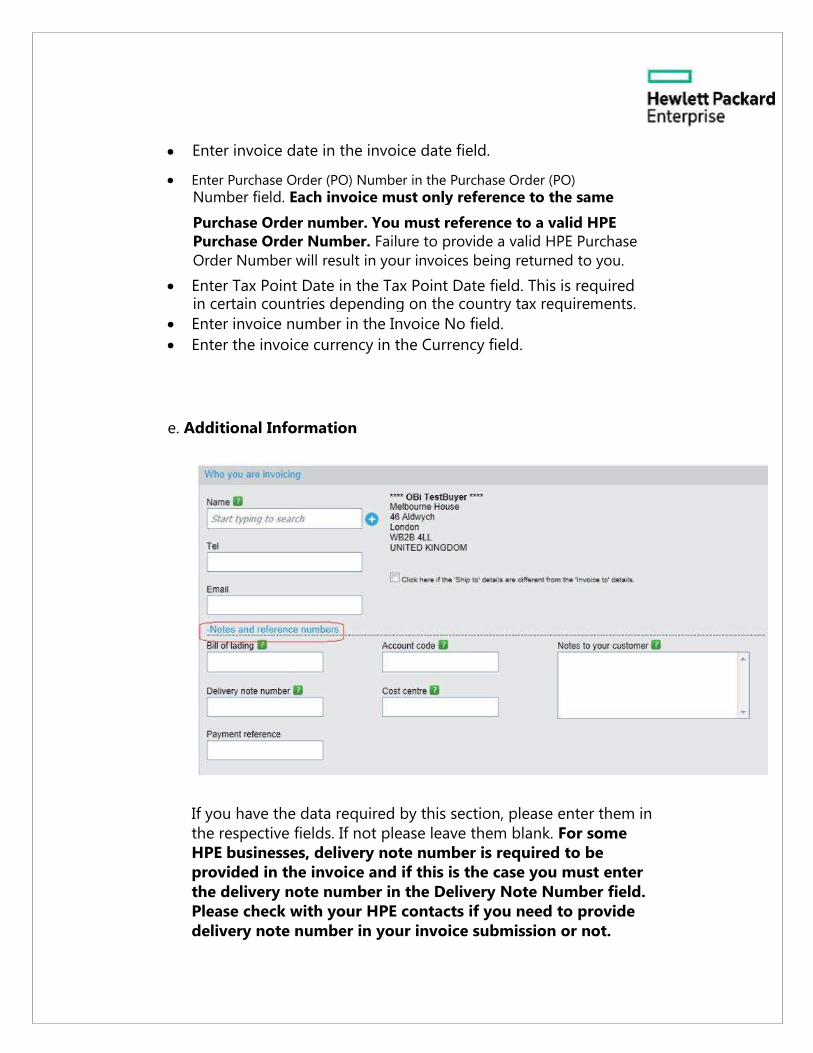
Enter invoice date in the invoice date field.
Enter Purchase Order (PO) Number in the Purchase Order (PO)
Number field. Each invoice must only reference to the same
Purchase Order number. You must reference to a valid HPE
Purchase Order Number. Failure to provide a valid HPE Purchase
Order Number will result in your invoices being returned to you.
Enter Tax Point Date in the Tax Point Date field. This is required
in certain countries depending on the country tax requirements.
Enter invoice number in the Invoice No field.
Enter the invoice currency in the Currency field.
e. Additional Information
If you have the data required by this section, please enter them in
the respective fields. If not please leave them blank. For some
HPE businesses, delivery note number is required to be
provided in the invoice and if this is the case you must enter
the delivery note number in the Delivery Note Number field.
Please check with your HPE contacts if you need to provide
delivery note number in your invoice submission or not.

f. Invoice Detail Line
Enter Quantity, Unit, Price in the respective fields
If you have entered PO number in Invoice/Credit Note Details Section then you can leave the PO number field in this section blank. If you enter the PO number again in this section then you must ensure that the PO number is the same as the PO
number in Invoice/Credit Note Details section. Enter the PO line number from HPE Purchase Order in the
PO Line Number field.
You can enter HPE Part Number in the Product Code field and the part number description in the Product Description field. If you don‟t have the HPE Part Number, you can leave the Product Code field blank and you only need to enter the
description of the line item in the Product Description field. If your invoice has more than 1 line item, click Save Line
Item and then Add to add another line item.
To edit the line item after you save it, click on .
To delete the line item after you save it, click on .
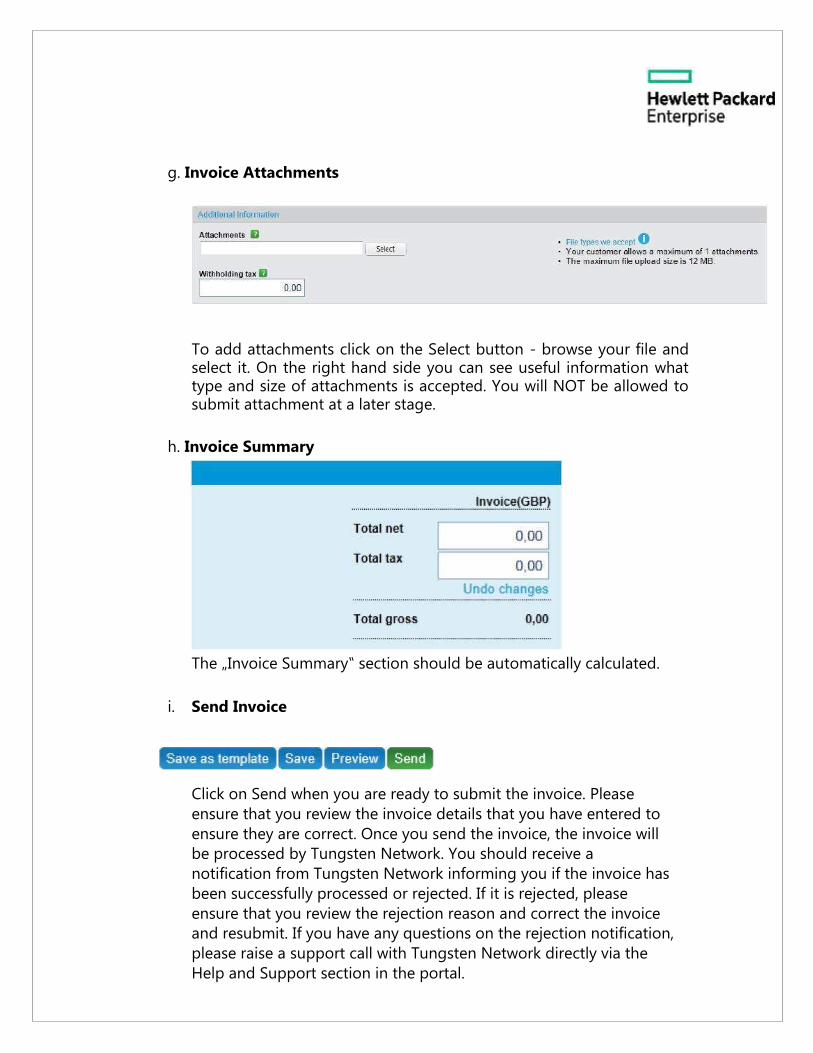
g. Invoice Attachments
To add attachments click on the Select button - browse your file and select it. On the right hand side you can see useful information what type and size of attachments is accepted. You will NOT be allowed to submit attachment at a later stage.
h. Invoice Summary
The „Invoice Summary‟ section should be automatically calculated.
i. Send Invoice
Click on Send when you are ready to submit the invoice. Please
ensure that you review the invoice details that you have entered to
ensure they are correct. Once you send the invoice, the invoice will
be processed by Tungsten Network. You should receive a
notification from Tungsten Network informing you if the invoice has
been successfully processed or rejected. If it is rejected, please
ensure that you review the rejection reason and correct the invoice
and resubmit. If you have any questions on the rejection notification,
please raise a support call with Tungsten Network directly via the
Help and Support section in the portal.
Useful Features When Creating an Invoice/Credit Note
1. Save Invoice
If for some reasons, you don’t have the time to complete the invoice
submission, you can save the invoice. Click on . The data that you have
entered will also be saved. You can open the saved invoice when you want to
continue.
To open a saved invoice, click „Invoicing‟ from the menu bar and select „Create invoice/use saved invoice‟ and follow step 3e as explained above.
2. Save As Template
This option is useful if you are using the same invoice data again and again for every invoice submission. For example, if you invoice the same purchase order number with the same description for the same HPE Buyer Account Number.
You can enter the same data and leave the variable data such as invoice number, invoice date and other relevant fields blank. You can save the invoice as template and you can use this template and you only need to enter the
variable data and click when you are ready to submit the
invoice. You can use the template again for future invoice submission.
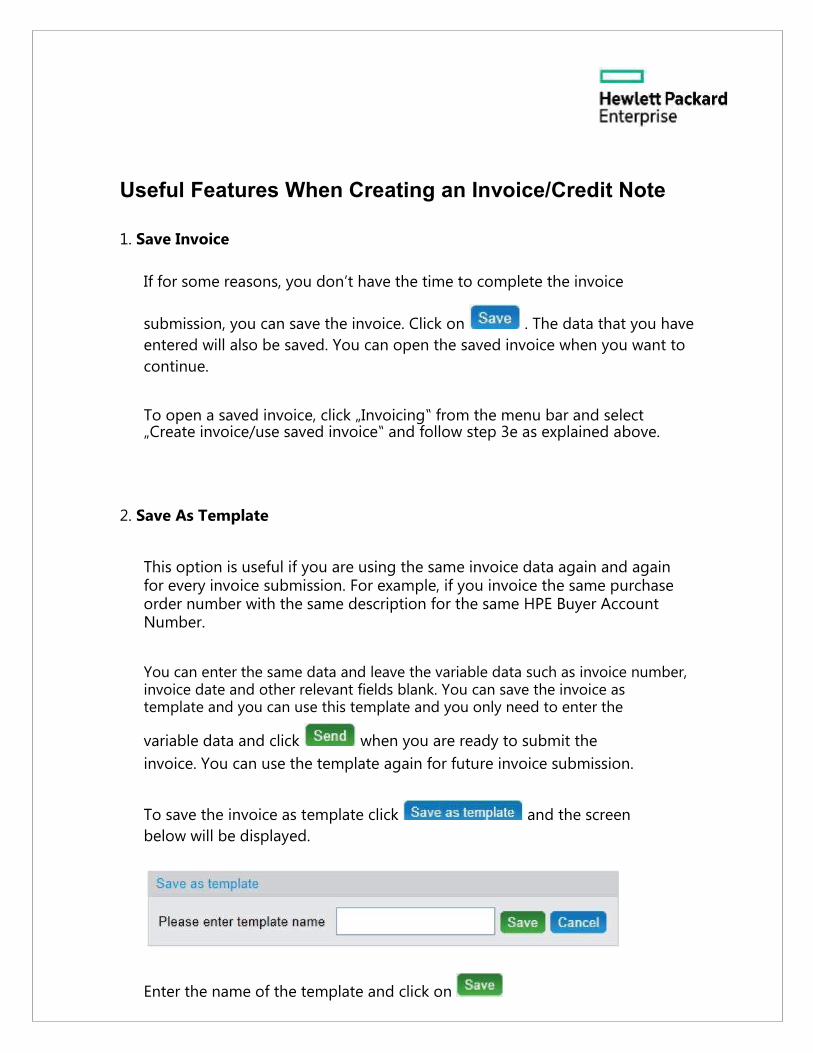
To save the invoice as template click and the screen
below will be displayed.
Enter the name of the template and click on
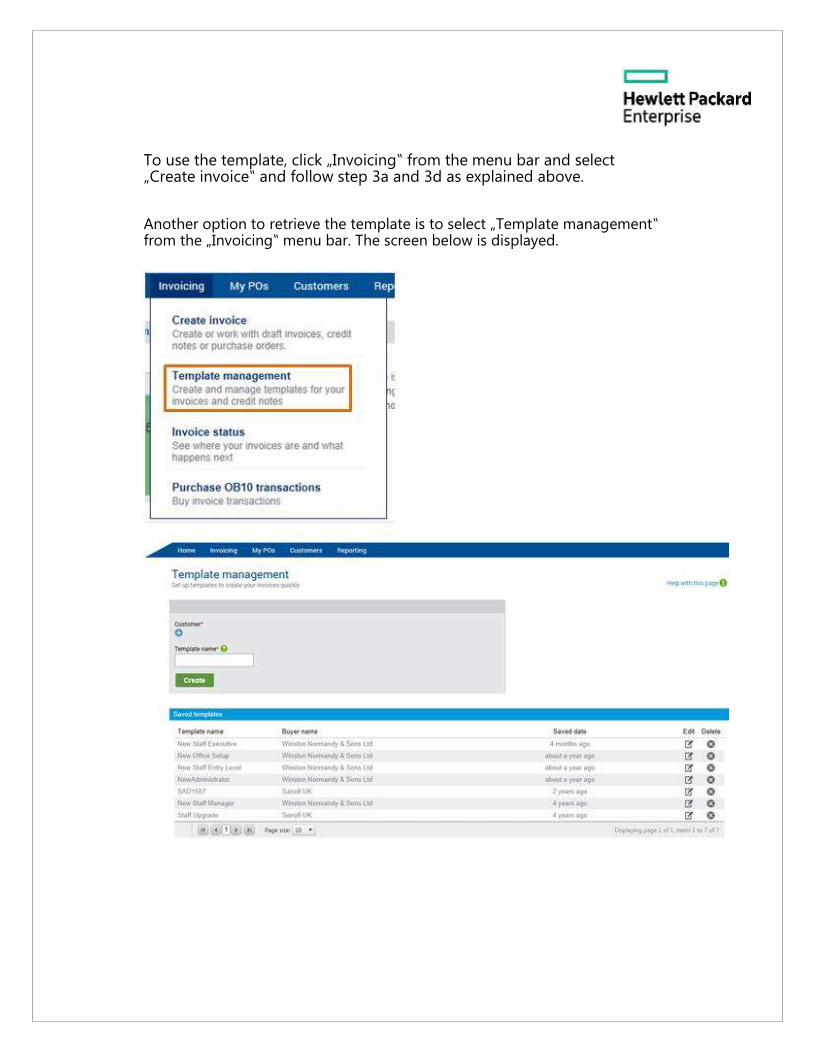
To use the template, click „Invoicing‟ from the menu bar and select „Create invoice‟ and follow step 3a and 3d as explained above. Another option to retrieve the template is to select „Template management‟ from the „Invoicing‟ menu bar. The screen below is displayed.

The template that you have created should be listed in the „Saved Templates‟ Section. Select the template to be used by clicking on the edit button. The invoice template is opened. You can enter the variable data in the relevant
fields. When finished, click on
You will be asked to enter the invoice number.
Click on Create an invoice. Review the invoice data one more time and if you are satisfied, click on Send to submit the invoice.
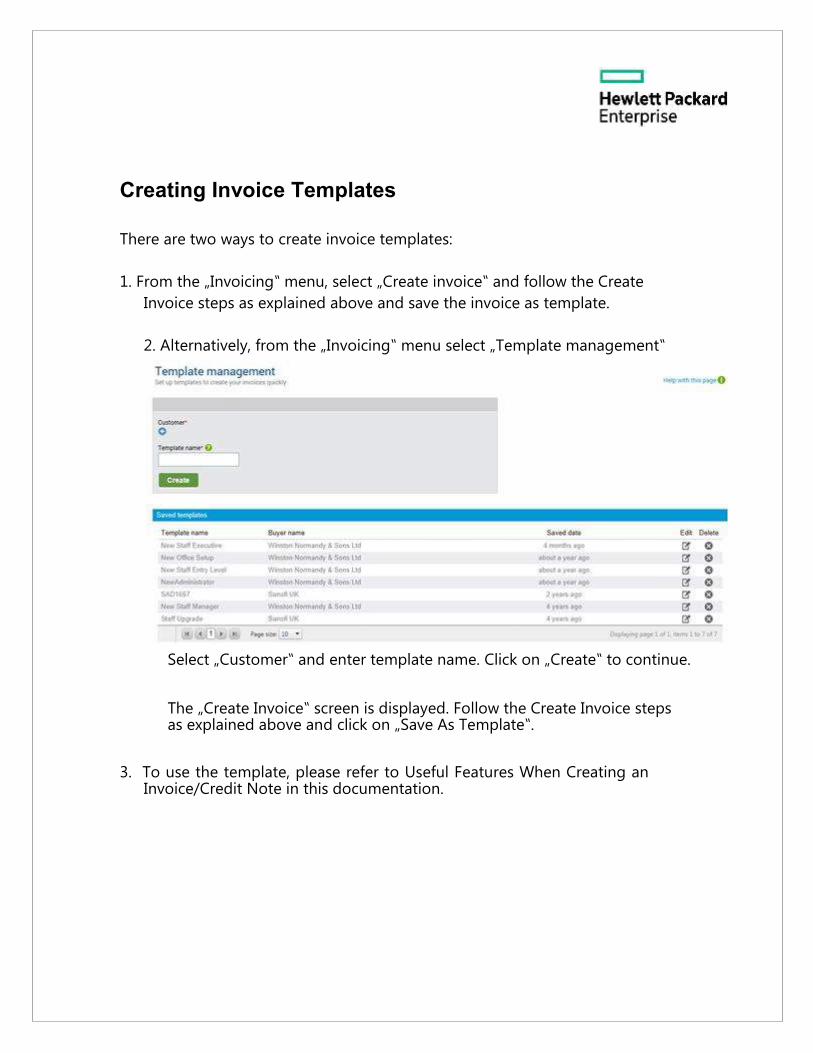
Creating Invoice Templates
There are two ways to create invoice templates:
1. From the „Invoicing‟ menu, select „Create invoice‟ and follow the Create Invoice steps as explained above and save the invoice as template.
2. Alternatively, from the „Invoicing‟ menu select „Template management‟
Select „Customer‟ and enter template name. Click on „Create‟ to continue.
The „Create Invoice‟ screen is displayed. Follow the Create Invoice steps as explained above and click on „Save As Template‟.
3. To use the template, please refer to Useful Features When Creating an
Invoice/Credit Note in this documentation.
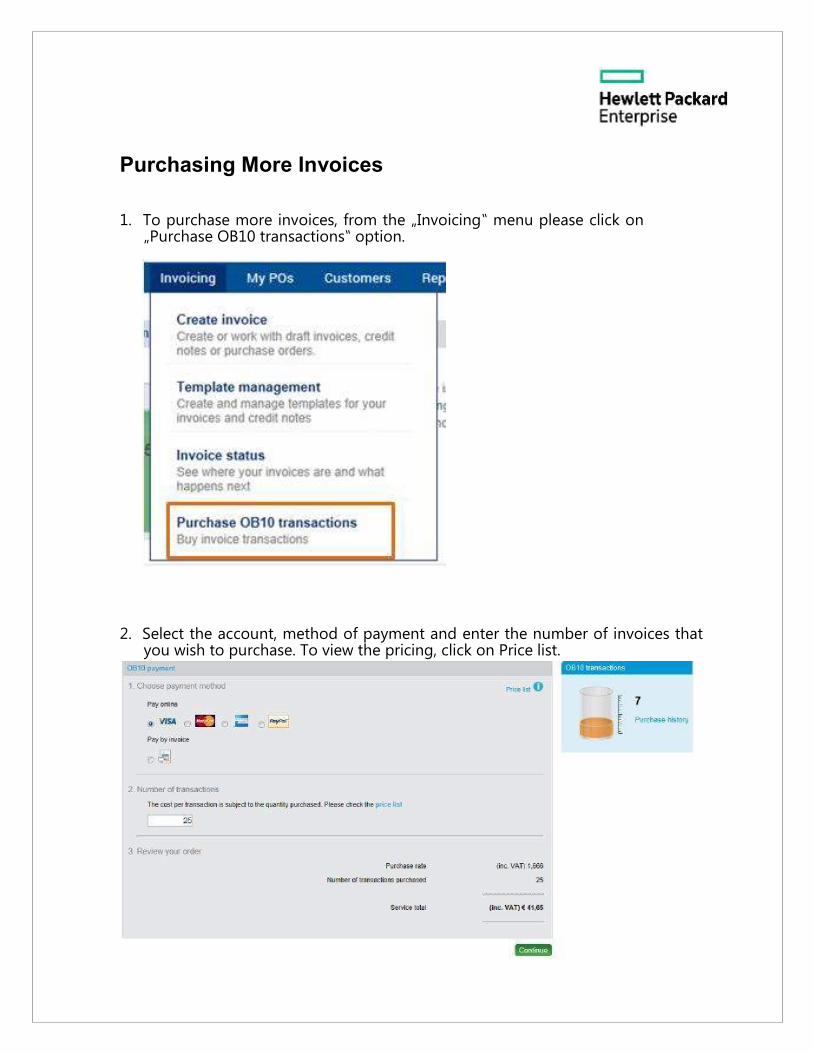
Purchasing More Invoices
1. To purchase more invoices, from the „Invoicing‟ menu please click on
„Purchase OB10 transactions‟ option.
2. Select the account, method of payment and enter the number of invoices that
you wish to purchase. To view the pricing, click on Price list.
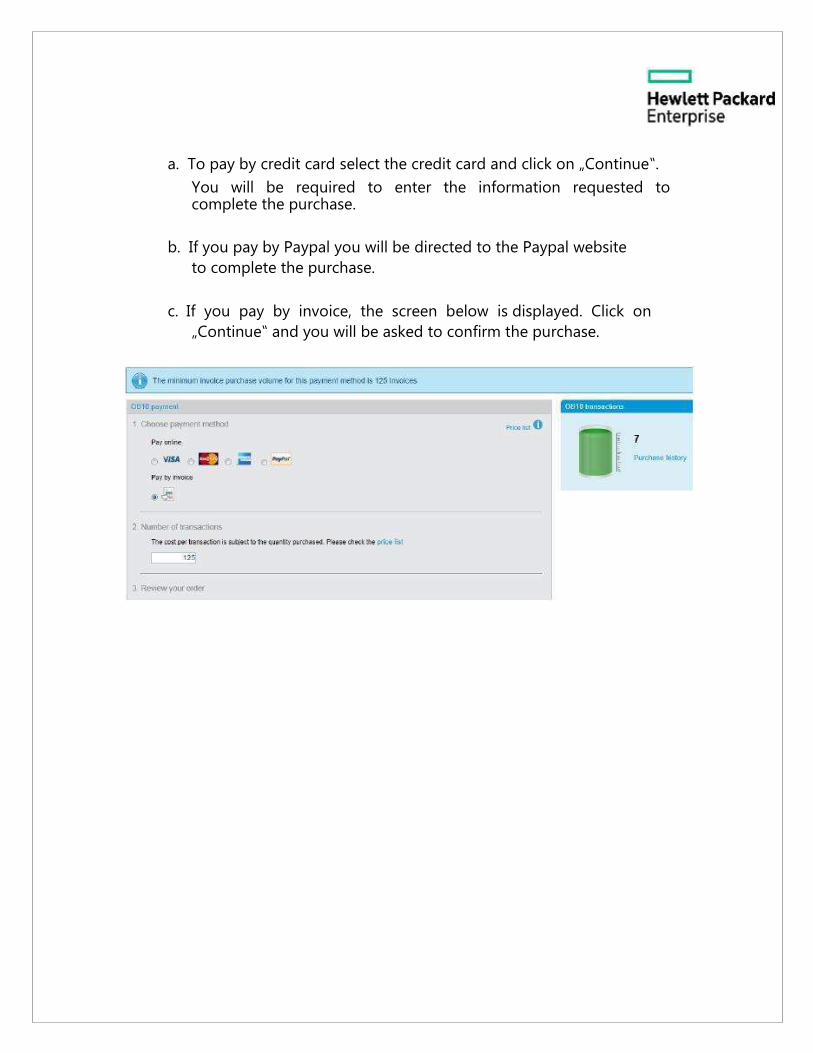
a. To pay by credit card select the credit card and click on „Continue‟.
You will be required to enter the information requested to complete the purchase.
b. If you pay by Paypal you will be directed to the Paypal website
to complete the purchase.
c. If you pay by invoice, the screen below is displayed. Click on
„Continue‟ and you will be asked to confirm the purchase.

My Account Menu
If you need to make changes to your Tungsten Network profile such as changing the address, adding additional users, updating remit to details you can do so using the „My Account‟ menu
1. My profile
To update your details information, select „My profile‟ option. Make the changes as required and click on „Save‟.
2. My Company
From the „My Company‟ menu you can change company details, add/change users, add/change contacts, and manage ticket alerts.