ts_72_admin_en
DESCRIPTION
Teamsite 7.2 admin guideTRANSCRIPT

TeamSiteAdministration Guide
Version 7.2Document Revision 0
August 2010

Notice
This documentation is a proprietary product of Autonomy and is protected by copyright laws and international treaty. Information in this documentation is subject to change without notice and does not represent a commitment on the part of Autonomy. While reasonable efforts have been made to ensure the accuracy of the information contained herein, Autonomy assumes no liability for errors or omissions. No liability is assumed for direct, incidental, or consequential damages resulting from the use of the information contained in this documentation.
The copyrighted software that accompanies this documentation is licensed to the End User for use only in strict accordance with the End User License Agreement, which the Licensee should read carefully before commencing use of the software. No part of this publication may be reproduced, transmitted, stored in a retrieval system, nor translated into any human or computer language, in any form or by any means, electronic, mechanical, magnetic, optical, chemical, manual or otherwise, without the prior written permission of the copyright owner.
This documentation may use fictitious names for purposes of demonstration; references to actual persons, companies, or organizations are strictly coincidental.
Trademarks and Copyrights
Copyright © 2010 Autonomy Corporation plc and its affiliates. All rights reserved. Advise, AudioLogger, Autonomy etalk, ContentServices, ControlHub, DataDeploy, etalk PRO, etalk, e-talk, Expert, Explore, Interwoven, LiveSite, MediaBin, MetaTagger, Observe, OpenDeploy, Optimost, Qfiniti Enterprise 3, Qfiniti, Recorder, SoftSound , SoftSound Analysis Plug-in, Survey, TeamSite, Virage ControlCenter, Virage Encoder, Virage SmartEncode, Virage VideoLogger, Virage, VisualAnnotate, VS Archive, VS Broadcast Monitoring, and all related titles and logos are trademarks of Autonomy Corporation plc and its affiliates.
Microsoft is a registered trademark, and MS-DOS, Windows, Windows 95, Windows NT, SharePoint, and other Microsoft products referenced herein are trademarks of Microsoft Corporation.
UNIX is a registered trademark of The Open Group.
AvantGo is a trademark of AvantGo, Inc.
Epicentric Foundation Server is a trademark of Epicentric, Inc.
Documentum and eRoom are trademarks of Documentum, a division of EMC Corp.
FileNet is a trademark of FileNet Corporation.
Lotus Notes is a trademark of Lotus Development Corporation.
mySAP Enterprise Portal is a trademark of SAP AG.
Oracle is a trademark of Oracle Corporation.
Adobe is a trademark of Adobe Systems Incorporated.
Novell is a trademark of Novell, Inc.
Stellent is a trademark of Stellent, Inc.
All other trademarks are the property of their respective owners.
Notice to Government End Users
If this product is acquired under the terms of a DoD contract: Use, duplication, or disclosure by the Government is subject to restrictions as set forth in subparagraph (c)(1)(ii) of 252.227-7013. Civilian agency contract: Use, reproduction or disclosure is subject to 52.227-19 (a) through (d) and restrictions set forth in the accompanying end user agreement. Unpublished-rights reserved under the copyright laws of the United States. Autonomy, Inc., One Market Plaza, Spear Tower, Suite 1900, San Francisco, CA. 94105, US.
August 10, 2010
Copyright Notice

•
Contents
About This Book 15Intended Audience . . . . . . . . . . . . . . . . . . . . . . . . . . . . . . . . . . . . . . . . . . . .15Notation Conventions . . . . . . . . . . . . . . . . . . . . . . . . . . . . . . . . . . . . . . . . . .16Product Documentation . . . . . . . . . . . . . . . . . . . . . . . . . . . . . . . . . . . . . . . .17
Documentation Updates. . . . . . . . . . . . . . . . . . . . . . . . . . . . . . . . . . . . . .17
Chapter 1: TeamSite Overview 19TeamSite Elements. . . . . . . . . . . . . . . . . . . . . . . . . . . . . . . . . . . . . . . . . . . .19
Content Stores . . . . . . . . . . . . . . . . . . . . . . . . . . . . . . . . . . . . . . . . . . . . .19Branches . . . . . . . . . . . . . . . . . . . . . . . . . . . . . . . . . . . . . . . . . . . . . . . . .20Workareas . . . . . . . . . . . . . . . . . . . . . . . . . . . . . . . . . . . . . . . . . . . . . . . .20Staging Areas. . . . . . . . . . . . . . . . . . . . . . . . . . . . . . . . . . . . . . . . . . . . . .20Editions . . . . . . . . . . . . . . . . . . . . . . . . . . . . . . . . . . . . . . . . . . . . . . . . . .21
User Roles . . . . . . . . . . . . . . . . . . . . . . . . . . . . . . . . . . . . . . . . . . . . . . . . . .22Reviewer . . . . . . . . . . . . . . . . . . . . . . . . . . . . . . . . . . . . . . . . . . . . . . . . .23Author . . . . . . . . . . . . . . . . . . . . . . . . . . . . . . . . . . . . . . . . . . . . . . . . . . .23Editor . . . . . . . . . . . . . . . . . . . . . . . . . . . . . . . . . . . . . . . . . . . . . . . . . . . .23Administrator . . . . . . . . . . . . . . . . . . . . . . . . . . . . . . . . . . . . . . . . . . . . . .24Master . . . . . . . . . . . . . . . . . . . . . . . . . . . . . . . . . . . . . . . . . . . . . . . . . . .24WorkflowUser. . . . . . . . . . . . . . . . . . . . . . . . . . . . . . . . . . . . . . . . . . . . . .24WorkflowAdmin . . . . . . . . . . . . . . . . . . . . . . . . . . . . . . . . . . . . . . . . . . . .24
TeamSite Workflow . . . . . . . . . . . . . . . . . . . . . . . . . . . . . . . . . . . . . . . . . . . .25Jobs . . . . . . . . . . . . . . . . . . . . . . . . . . . . . . . . . . . . . . . . . . . . . . . . . . . . .25Tasks . . . . . . . . . . . . . . . . . . . . . . . . . . . . . . . . . . . . . . . . . . . . . . . . . . . .26
TeamSite Architecture. . . . . . . . . . . . . . . . . . . . . . . . . . . . . . . . . . . . . . . . . .26Understanding the TeamSite File System . . . . . . . . . . . . . . . . . . . . . . . .28NFS Exports. . . . . . . . . . . . . . . . . . . . . . . . . . . . . . . . . . . . . . . . . . . . . . .30Specify VPaths. . . . . . . . . . . . . . . . . . . . . . . . . . . . . . . . . . . . . . . . . . . . .31Related Documentation . . . . . . . . . . . . . . . . . . . . . . . . . . . . . . . . . . . . . .32
Chapter 2: Configuration File Overview 33The iw.cfg File. . . . . . . . . . . . . . . . . . . . . . . . . . . . . . . . . . . . . . . . . . . . . . . .33
Location of iw.cfg . . . . . . . . . . . . . . . . . . . . . . . . . . . . . . . . . . . . . . . . . . .34The iw.cfg File Options. . . . . . . . . . . . . . . . . . . . . . . . . . . . . . . . . . . . . . .35
Additional Configuration Files . . . . . . . . . . . . . . . . . . . . . . . . . . . . . . . . . . . .38
TeamSite Administration Guide 3• • •••

Contents
4
Chapter 3: Configure the TeamSite Server 41Configure User Interface Functionality . . . . . . . . . . . . . . . . . . . . . . . . . . . . .41
Enable and Disable VisualPreview. . . . . . . . . . . . . . . . . . . . . . . . . . . . . .41Configure Domain Lists in the Login Screen . . . . . . . . . . . . . . . . . . . . . .42Configure Email Settings . . . . . . . . . . . . . . . . . . . . . . . . . . . . . . . . . . . . .43Specify Valid Domains . . . . . . . . . . . . . . . . . . . . . . . . . . . . . . . . . . . . . . .43
Configure Server Functionality . . . . . . . . . . . . . . . . . . . . . . . . . . . . . . . . . . .44Control Modification Times. . . . . . . . . . . . . . . . . . . . . . . . . . . . . . . . . . . .44Modify Extended Attributes . . . . . . . . . . . . . . . . . . . . . . . . . . . . . . . . . . .45Specify the Encoding of the iw.cfg File . . . . . . . . . . . . . . . . . . . . . . . . . . .45Configure the Web Daemon . . . . . . . . . . . . . . . . . . . . . . . . . . . . . . . . . . .46Change the Servlet Engine . . . . . . . . . . . . . . . . . . . . . . . . . . . . . . . . . . .46Set Locking Models . . . . . . . . . . . . . . . . . . . . . . . . . . . . . . . . . . . . . . . . .46Compare Files . . . . . . . . . . . . . . . . . . . . . . . . . . . . . . . . . . . . . . . . . . . . .48Submit and Update Logs . . . . . . . . . . . . . . . . . . . . . . . . . . . . . . . . . . . . .49Autoprivate Feature . . . . . . . . . . . . . . . . . . . . . . . . . . . . . . . . . . . . . . . . .49
Working with the Utility Service. . . . . . . . . . . . . . . . . . . . . . . . . . . . . . . . . . .52Run as Non-Root User . . . . . . . . . . . . . . . . . . . . . . . . . . . . . . . . . . . . . . .54Start/Stop the iwutild Server . . . . . . . . . . . . . . . . . . . . . . . . . . . . . . . . . . .55
Enable the Event Subsystem . . . . . . . . . . . . . . . . . . . . . . . . . . . . . . . . . . . .55Verify that the Event Subsystem is Enabled. . . . . . . . . . . . . . . . . . . . . . .57Modify Database Information . . . . . . . . . . . . . . . . . . . . . . . . . . . . . . . . . .57Ensure that the Event Subsystem Servlet is Started . . . . . . . . . . . . . . . .58Enable DAS Publishing . . . . . . . . . . . . . . . . . . . . . . . . . . . . . . . . . . . . . .58
Configure Server Performance . . . . . . . . . . . . . . . . . . . . . . . . . . . . . . . . . . .59Cache Size. . . . . . . . . . . . . . . . . . . . . . . . . . . . . . . . . . . . . . . . . . . . . . . .59External Task Impersonation . . . . . . . . . . . . . . . . . . . . . . . . . . . . . . . . . .60Throughput Monitors . . . . . . . . . . . . . . . . . . . . . . . . . . . . . . . . . . . . . . . .60Detect Low Disk Space and Inode Count . . . . . . . . . . . . . . . . . . . . . . . . .61
Configure the TeamSite Server Locale . . . . . . . . . . . . . . . . . . . . . . . . . . . . .62Configure FormsPublisher . . . . . . . . . . . . . . . . . . . . . . . . . . . . . . . . . . . . . .63
Set up the Example Environment . . . . . . . . . . . . . . . . . . . . . . . . . . . . . . .63FormsPublisher Settings in iw.cfg . . . . . . . . . . . . . . . . . . . . . . . . . . . . . .64
TeamSite Embedded Failsafe . . . . . . . . . . . . . . . . . . . . . . . . . . . . . . . . . . . .65
Chapter 4: Manage the TeamSite Server 67Verify Server Operation . . . . . . . . . . . . . . . . . . . . . . . . . . . . . . . . . . . . . . . .68Start and Stop the TeamSite Server . . . . . . . . . . . . . . . . . . . . . . . . . . . . . . .69Check for Multiple Servers . . . . . . . . . . . . . . . . . . . . . . . . . . . . . . . . . . . . . .70Check Request Handling . . . . . . . . . . . . . . . . . . . . . . . . . . . . . . . . . . . . . . .70Verify the Server Mount . . . . . . . . . . . . . . . . . . . . . . . . . . . . . . . . . . . . . . . .71Locate the Installation Directory . . . . . . . . . . . . . . . . . . . . . . . . . . . . . . . . . .71Review TeamSite Log Files . . . . . . . . . . . . . . . . . . . . . . . . . . . . . . . . . . . . .72
WFS Log . . . . . . . . . . . . . . . . . . . . . . . . . . . . . . . . . . . . . . . . . . . . . . . . .72Installation Log. . . . . . . . . . . . . . . . . . . . . . . . . . . . . . . . . . . . . . . . . . . . .73Server Log . . . . . . . . . . . . . . . . . . . . . . . . . . . . . . . . . . . . . . . . . . . . . . . .73
TeamSite Administration Guide
• • • •••

Contents
•
Trace Log . . . . . . . . . . . . . . . . . . . . . . . . . . . . . . . . . . . . . . . . . . . . . . . . .73Events Log . . . . . . . . . . . . . . . . . . . . . . . . . . . . . . . . . . . . . . . . . . . . . . . .73Workflow Log . . . . . . . . . . . . . . . . . . . . . . . . . . . . . . . . . . . . . . . . . . . . . .74Windows Event Viewer. . . . . . . . . . . . . . . . . . . . . . . . . . . . . . . . . . . . . . .75
Monitor the Server Load . . . . . . . . . . . . . . . . . . . . . . . . . . . . . . . . . . . . . . . .75Reconfigure iwwebd to Recognize a New IP Address . . . . . . . . . . . . . . . . .76Manage Disk Space . . . . . . . . . . . . . . . . . . . . . . . . . . . . . . . . . . . . . . . . . . .77
File Locations. . . . . . . . . . . . . . . . . . . . . . . . . . . . . . . . . . . . . . . . . . . . . .77Enhance File System Performance on the TeamSite Server . . . . . . . . . .79
Monitor Disk Space Usage . . . . . . . . . . . . . . . . . . . . . . . . . . . . . . . . . . . . . .80Delete Editions. . . . . . . . . . . . . . . . . . . . . . . . . . . . . . . . . . . . . . . . . . . . .81Metadata Forking . . . . . . . . . . . . . . . . . . . . . . . . . . . . . . . . . . . . . . . . . . .82Move the Content Store and Removing Old Versions. . . . . . . . . . . . . . . .83
Chapter 5: Working with Branches 85Control Branch Ownership and Administration. . . . . . . . . . . . . . . . . . . . .86Create Branches . . . . . . . . . . . . . . . . . . . . . . . . . . . . . . . . . . . . . . . . . . .87Integrate Content From Different Branches . . . . . . . . . . . . . . . . . . . . . . .88Manage Branches . . . . . . . . . . . . . . . . . . . . . . . . . . . . . . . . . . . . . . . . . .89Working with Branch Properties . . . . . . . . . . . . . . . . . . . . . . . . . . . . . . . .90View Branch Users and Roles . . . . . . . . . . . . . . . . . . . . . . . . . . . . . . . . .91
Chapter 6: Manage TeamSite Access 93Access Considerations . . . . . . . . . . . . . . . . . . . . . . . . . . . . . . . . . . . . . . . . .93Working with Permissions. . . . . . . . . . . . . . . . . . . . . . . . . . . . . . . . . . . . . . .94
Workarea Access . . . . . . . . . . . . . . . . . . . . . . . . . . . . . . . . . . . . . . . . . .100Branch and Workarea Security . . . . . . . . . . . . . . . . . . . . . . . . . . . . . . .101Default Permissions . . . . . . . . . . . . . . . . . . . . . . . . . . . . . . . . . . . . . . . .101View File Permissions . . . . . . . . . . . . . . . . . . . . . . . . . . . . . . . . . . . . . .102View File Permissions . . . . . . . . . . . . . . . . . . . . . . . . . . . . . . . . . . . . . .103
Share TeamSite Assets using Windows Groups . . . . . . . . . . . . . . . . . . . . .103Group Usage with Native Mode Active Directory . . . . . . . . . . . . . . . . . .104Group Usage for Larger AD Networks . . . . . . . . . . . . . . . . . . . . . . . . . .105Manage Windows Groups for Best Performance . . . . . . . . . . . . . . . . . .106
Enable the User/Group/Role Disk Cache . . . . . . . . . . . . . . . . . . . . . . . . . .107Disable Group Nesting . . . . . . . . . . . . . . . . . . . . . . . . . . . . . . . . . . . . . .108Enable the ADSI Debug Flag . . . . . . . . . . . . . . . . . . . . . . . . . . . . . . . . .108Additional Tools for Debugging. . . . . . . . . . . . . . . . . . . . . . . . . . . . . . . .108
Operate System Group Membership . . . . . . . . . . . . . . . . . . . . . . . . . . . . .109Change Group Ownership of Workareas . . . . . . . . . . . . . . . . . . . . . . . .110Web Server Group/UID . . . . . . . . . . . . . . . . . . . . . . . . . . . . . . . . . . . . . 111Group Remapping . . . . . . . . . . . . . . . . . . . . . . . . . . . . . . . . . . . . . . . . . 111Maintain the GID . . . . . . . . . . . . . . . . . . . . . . . . . . . . . . . . . . . . . . . . . .112
Authentication. . . . . . . . . . . . . . . . . . . . . . . . . . . . . . . . . . . . . . . . . . . . . . .112Store TeamSite Users . . . . . . . . . . . . . . . . . . . . . . . . . . . . . . . . . . . . . .113The user_databases.xml File . . . . . . . . . . . . . . . . . . . . . . . . . . . . . . . . .113
TeamSite Administration Guide 5• • •••

Contents
6
Create a Certificate Authority Database in the cert7.db Format . . . . . . .116Synchronize LDAP Users. . . . . . . . . . . . . . . . . . . . . . . . . . . . . . . . . . . .118Configure TeamSite to Work Without an Anonymous Bind. . . . . . . . . . .120LDAP Synchronization . . . . . . . . . . . . . . . . . . . . . . . . . . . . . . . . . . . . . .120Impact of Using Non-OS Users in TeamSite. . . . . . . . . . . . . . . . . . . . . .121User Authentication . . . . . . . . . . . . . . . . . . . . . . . . . . . . . . . . . . . . . . . .122TeamSite and PAM Configuration File Interaction . . . . . . . . . . . . . . . . .123The Authentication Daemon. . . . . . . . . . . . . . . . . . . . . . . . . . . . . . . . . .125Domains to Use for Group Authentication . . . . . . . . . . . . . . . . . . . . . . .125Log Users and Groups . . . . . . . . . . . . . . . . . . . . . . . . . . . . . . . . . . . . . .126
Configure Submit Filtering . . . . . . . . . . . . . . . . . . . . . . . . . . . . . . . . . . . . .126The submit.cfg File. . . . . . . . . . . . . . . . . . . . . . . . . . . . . . . . . . . . . . . . .127Submit Filtering Sequence . . . . . . . . . . . . . . . . . . . . . . . . . . . . . . . . . . .129Sample submit.cfg file . . . . . . . . . . . . . . . . . . . . . . . . . . . . . . . . . . . . . .130Test and Debug Submit Filtering . . . . . . . . . . . . . . . . . . . . . . . . . . . . . .132 RCS Macro Expansion . . . . . . . . . . . . . . . . . . . . . . . . . . . . . . . . . . . . .133
Chapter 7: Set Up TagUI 137TagUI Features . . . . . . . . . . . . . . . . . . . . . . . . . . . . . . . . . . . . . . . . . . . . . .138Using TagUI Rulesets . . . . . . . . . . . . . . . . . . . . . . . . . . . . . . . . . . . . . . . . .139TagUI Form Design. . . . . . . . . . . . . . . . . . . . . . . . . . . . . . . . . . . . . . . . . . .139Configure TagUI . . . . . . . . . . . . . . . . . . . . . . . . . . . . . . . . . . . . . . . . . . . . .141
Map to Rulesets . . . . . . . . . . . . . . . . . . . . . . . . . . . . . . . . . . . . . . . . . . .141Adjust Server Timeout . . . . . . . . . . . . . . . . . . . . . . . . . . . . . . . . . . . . . .144Tag Large Numbers of Files . . . . . . . . . . . . . . . . . . . . . . . . . . . . . . . . . .144Control the Search Function. . . . . . . . . . . . . . . . . . . . . . . . . . . . . . . . . .145Revert to MetaData Capture Tagging . . . . . . . . . . . . . . . . . . . . . . . . . . .145
Create Rulesets . . . . . . . . . . . . . . . . . . . . . . . . . . . . . . . . . . . . . . . . . . . . .145Merge Rulesets . . . . . . . . . . . . . . . . . . . . . . . . . . . . . . . . . . . . . . . . . . . . .153
Dynamic Addition of Select Box Entries . . . . . . . . . . . . . . . . . . . . . . . . .155Using FormAPI . . . . . . . . . . . . . . . . . . . . . . . . . . . . . . . . . . . . . . . . . . . . . .156Integrate MetaTagger . . . . . . . . . . . . . . . . . . . . . . . . . . . . . . . . . . . . . . . . .157
Create a Ruleset . . . . . . . . . . . . . . . . . . . . . . . . . . . . . . . . . . . . . . . . . .157Create a Mapping File . . . . . . . . . . . . . . . . . . . . . . . . . . . . . . . . . . . . . .160
Migrate from Metadata Capture Tagging. . . . . . . . . . . . . . . . . . . . . . . . . . .161Compatibility and Default Behavior . . . . . . . . . . . . . . . . . . . . . . . . . . . .162Sequence of Events . . . . . . . . . . . . . . . . . . . . . . . . . . . . . . . . . . . . . . . .164Update Your Tagging Structure . . . . . . . . . . . . . . . . . . . . . . . . . . . . . . .165Update Rulesets. . . . . . . . . . . . . . . . . . . . . . . . . . . . . . . . . . . . . . . . . . .165Replicant Processing . . . . . . . . . . . . . . . . . . . . . . . . . . . . . . . . . . . . . . .165The CGI Environment . . . . . . . . . . . . . . . . . . . . . . . . . . . . . . . . . . . . . .167Merge Previous and Next Generation Rulesets . . . . . . . . . . . . . . . . . . .170Compare Merged Rulesets . . . . . . . . . . . . . . . . . . . . . . . . . . . . . . . . . .171
TeamSite Administration Guide
• • • •••

Contents
•
Chapter 8: Configure the TeamSite Web Daemon and Proxy Server 173About the TeamSite Web Daemon . . . . . . . . . . . . . . . . . . . . . . . . . . . . . . .174About the Proxy Server. . . . . . . . . . . . . . . . . . . . . . . . . . . . . . . . . . . . . . . .174
Apply Changes to Proxy Configuration. . . . . . . . . . . . . . . . . . . . . . . . . .176Configure TeamSite Web Daemon and Proxy Server Operation. . . . . . . . .176
Resolve Relative and Absolute Paths . . . . . . . . . . . . . . . . . . . . . . . . . .177Document Roots . . . . . . . . . . . . . . . . . . . . . . . . . . . . . . . . . . . . . . . . . .178
Resolve Fully Qualified URLs . . . . . . . . . . . . . . . . . . . . . . . . . . . . . . . . . . .180Redirect Fully Qualified URLs. . . . . . . . . . . . . . . . . . . . . . . . . . . . . . . . . . .181
Configure the Proxy Server to Redirect Fully Qualified URLs . . . . . . . .181Configure your Web browsers to Use the TeamSite Web Daemon . . . .182
Redirect TeamSite Views to Different Areas . . . . . . . . . . . . . . . . . . . . . . . .183Using iwproxy_preconnect_remap . . . . . . . . . . . . . . . . . . . . . . . . . . . .184Using iwproxy_preconnect_redirect . . . . . . . . . . . . . . . . . . . . . . . . . . .185
Configure TeamSite to Use Different Web Servers . . . . . . . . . . . . . . . . . . .185Configure External Remappings . . . . . . . . . . . . . . . . . . . . . . . . . . . . . . . . .186
Using iwproxy_preconnect_remap . . . . . . . . . . . . . . . . . . . . . . . . . . . . .186Using iwproxy_external_remap . . . . . . . . . . . . . . . . . . . . . . . . . . . . . . .187
Host Header Remappings. . . . . . . . . . . . . . . . . . . . . . . . . . . . . . . . . . . . . .187Enable iwproxy Access Control . . . . . . . . . . . . . . . . . . . . . . . . . . . . . . . . .188Configure SSI Remapping . . . . . . . . . . . . . . . . . . . . . . . . . . . . . . . . . . . . .188Configure Proxy Failover . . . . . . . . . . . . . . . . . . . . . . . . . . . . . . . . . . . . . .189Debug Your Proxy Server Configuration . . . . . . . . . . . . . . . . . . . . . . . . . . .191
Chapter 9: Back Up TeamSite 193Integrate with Third-Party Backup Solutions . . . . . . . . . . . . . . . . . . . . . . . .193Suggested Strategies for Incremental Backups . . . . . . . . . . . . . . . . . . . . .195
Appendix A: MediaBin Connector 197Configure the MediaBin Connector . . . . . . . . . . . . . . . . . . . . . . . . . . . . . . .197
Display the MediaBin Properties Screen . . . . . . . . . . . . . . . . . . . . . . . .198Edit the MediaBin Connector Properties . . . . . . . . . . . . . . . . . . . . . . . .199
FormsPublisher Configuration Files . . . . . . . . . . . . . . . . . . . . . . . . . . . . . .202datacapture.cfg . . . . . . . . . . . . . . . . . . . . . . . . . . . . . . . . . . . . . . . . . . .202Presentation Template Files . . . . . . . . . . . . . . . . . . . . . . . . . . . . . . . . . .205
MetaData XML Record . . . . . . . . . . . . . . . . . . . . . . . . . . . . . . . . . . . . . . . .205attribute Metadata Elements . . . . . . . . . . . . . . . . . . . . . . . . . . . . . . . . .206Representation of Data Types . . . . . . . . . . . . . . . . . . . . . . . . . . . . . . . .207Dublin Core Metadata Elements. . . . . . . . . . . . . . . . . . . . . . . . . . . . . . .207Custom Metadata . . . . . . . . . . . . . . . . . . . . . . . . . . . . . . . . . . . . . . . . . .209
MediaBin Configuration . . . . . . . . . . . . . . . . . . . . . . . . . . . . . . . . . . . . . . .209Setting Anonymous Access . . . . . . . . . . . . . . . . . . . . . . . . . . . . . . . . . .209Configuring MediaBin Trusted Client and LDAP Authentication . . . . . . .210
Troubleshooting . . . . . . . . . . . . . . . . . . . . . . . . . . . . . . . . . . . . . . . . . . . . .210Running MediaBin Connector 1.1 and 2.0 Toolkits Simultaneously . . . .210Import from MediaBin Requires Anonymous Access to the Transfer Directory211
TeamSite Administration Guide 7• • •••

Contents
8
Update Required When Using Microsoft Internet Explorer 6.0 SP1 . . . .211
Appendix B: Internationalization 213Overview . . . . . . . . . . . . . . . . . . . . . . . . . . . . . . . . . . . . . . . . . . . . . . . . . .213Supported Client and Server Platforms. . . . . . . . . . . . . . . . . . . . . . . . . . . .214Supported Content . . . . . . . . . . . . . . . . . . . . . . . . . . . . . . . . . . . . . . . . . . .214Limitations and Assumptions . . . . . . . . . . . . . . . . . . . . . . . . . . . . . . . . . . .215Content Stores and Character Encoding. . . . . . . . . . . . . . . . . . . . . . . . . . .216About UTF-8 . . . . . . . . . . . . . . . . . . . . . . . . . . . . . . . . . . . . . . . . . . . . . . . .216URL Commands with Multibyte Characters . . . . . . . . . . . . . . . . . . . . . . . .216Interface with Localized Operating Systems . . . . . . . . . . . . . . . . . . . . . . . .217Access the Localized Interface . . . . . . . . . . . . . . . . . . . . . . . . . . . . . . . . . .217Language of the VisualPreview Tool Bar . . . . . . . . . . . . . . . . . . . . . . . . . .217Run TeamSite CLTs in DOS Console Mode . . . . . . . . . . . . . . . . . . . . . . . .218Specify File Encoding of Text Files . . . . . . . . . . . . . . . . . . . . . . . . . . . . . . .219
Text Editor Encodings . . . . . . . . . . . . . . . . . . . . . . . . . . . . . . . . . . . . . .220Behavior of Netscape Navigator. . . . . . . . . . . . . . . . . . . . . . . . . . . . . . .220Configure Netscape for Multibyte Characters. . . . . . . . . . . . . . . . . . . . .221
Usage Scenarios . . . . . . . . . . . . . . . . . . . . . . . . . . . . . . . . . . . . . . . . . . . .222
Appendix C: Specify Content Encoding 225regex_map Defined . . . . . . . . . . . . . . . . . . . . . . . . . . . . . . . . . . . . . . . . . .226
Simple regex_map Example . . . . . . . . . . . . . . . . . . . . . . . . . . . . . . . . .226The regex_map Format . . . . . . . . . . . . . . . . . . . . . . . . . . . . . . . . . . . . . . .227
Rule Syntax . . . . . . . . . . . . . . . . . . . . . . . . . . . . . . . . . . . . . . . . . . . . . .228Regular Expression Syntax . . . . . . . . . . . . . . . . . . . . . . . . . . . . . . . . . .228Variables . . . . . . . . . . . . . . . . . . . . . . . . . . . . . . . . . . . . . . . . . . . . . . . .229Application Variables . . . . . . . . . . . . . . . . . . . . . . . . . . . . . . . . . . . . . . .229Intermediate Variables . . . . . . . . . . . . . . . . . . . . . . . . . . . . . . . . . . . . . .229Interpolation of Variables and Captured Subexpressions . . . . . . . . . . . .230Quoting . . . . . . . . . . . . . . . . . . . . . . . . . . . . . . . . . . . . . . . . . . . . . . . . .232
Strategies for Effective regex_maps . . . . . . . . . . . . . . . . . . . . . . . . . . . . . .234Internationalization and regex_maps . . . . . . . . . . . . . . . . . . . . . . . . . . . . .235VisualPreview and file_encoding.cfg . . . . . . . . . . . . . . . . . . . . . . . . . . . . .236Source Differencing and Merging and file_encoding.cfg . . . . . . . . . . . . . . .236
Sample file_encoding.cfg . . . . . . . . . . . . . . . . . . . . . . . . . . . . . . . . . . . .237
Appendix D: Single Sign-On 239Overview . . . . . . . . . . . . . . . . . . . . . . . . . . . . . . . . . . . . . . . . . . . . . . . . . .239Integrate SiteMinder and TeamSite with an Active Response. . . . . . . . . . .240
Prerequisites . . . . . . . . . . . . . . . . . . . . . . . . . . . . . . . . . . . . . . . . . . . . .240Overview . . . . . . . . . . . . . . . . . . . . . . . . . . . . . . . . . . . . . . . . . . . . . . . .241Integration Procedure. . . . . . . . . . . . . . . . . . . . . . . . . . . . . . . . . . . . . . .243
Integrate SiteMinder and TeamSite Without an Active Response . . . . . . . .247Prerequisites . . . . . . . . . . . . . . . . . . . . . . . . . . . . . . . . . . . . . . . . . . . . .247Overview . . . . . . . . . . . . . . . . . . . . . . . . . . . . . . . . . . . . . . . . . . . . . . . .247Integration Procedure. . . . . . . . . . . . . . . . . . . . . . . . . . . . . . . . . . . . . . .249
TeamSite Administration Guide
• • • •••

Contents
•
Integrate an SSO Product Other than SiteMinder with TeamSite . . . . . . . .255Prerequisites . . . . . . . . . . . . . . . . . . . . . . . . . . . . . . . . . . . . . . . . . . . . .255Overview . . . . . . . . . . . . . . . . . . . . . . . . . . . . . . . . . . . . . . . . . . . . . . . .255Integration Procedure. . . . . . . . . . . . . . . . . . . . . . . . . . . . . . . . . . . . . . .257
Troubleshooting . . . . . . . . . . . . . . . . . . . . . . . . . . . . . . . . . . . . . . . . . . . . .258Troubleshooting the SiteMinder Web Agent . . . . . . . . . . . . . . . . . . . . . .258Troubleshooting the Active Response . . . . . . . . . . . . . . . . . . . . . . . . . .260
Appendix E: TeamSite Service Monitor 261Service Monitor Overview. . . . . . . . . . . . . . . . . . . . . . . . . . . . . . . . . . . . . .261TeamSiteService Monitor Components and Processes . . . . . . . . . . . . . . .262Install TeamSite Service Monitor. . . . . . . . . . . . . . . . . . . . . . . . . . . . . . . . .264Configure TeamSite Service Monitor . . . . . . . . . . . . . . . . . . . . . . . . . . . . .265
iw.powerfail . . . . . . . . . . . . . . . . . . . . . . . . . . . . . . . . . . . . . . . . . . . . . .265iw.processfail . . . . . . . . . . . . . . . . . . . . . . . . . . . . . . . . . . . . . . . . . . . . .266Start and Stop iwserver Under Service Monitor . . . . . . . . . . . . . . . . . . .267Uninstall TeamSite Service Monitor . . . . . . . . . . . . . . . . . . . . . . . . . . . .267Related Documentation . . . . . . . . . . . . . . . . . . . . . . . . . . . . . . . . . . . . .268
Appendix F: Troubleshooting 269
Glossary 273
Index 285
TeamSite Administration Guide 9• • •••

Contents
10
TeamSite Administration Guide• • • •••

•
Figures
Figure 1 Using TeamSite for Web site development................................................................. 22Figure 2 Assign-edit-approve workflow model .......................................................................... 25Figure 3 Example of a workflow for a job .................................................................................. 26Figure 4 Connections from client computer to TeamSite server ............................................... 27Figure 5 Connections from client computer to TeamSite server ............................................... 28Figure 6 TeamSite file system structure.................................................................................... 29Figure 7 How the Event Subsystem Works............................................................................... 56Figure 8 Registry Editor window ............................................................................................... 79Figure 9 Expanding the directory tree of the TeamSite server.................................................. 79Figure 10 Viewing a shared access drive ................................................................................... 80Figure 11 Viewing the size of the iw-store .................................................................................. 81Figure 12 New Branch screen..................................................................................................... 87Figure 13 Manage Branches screen from the Actions menu ...................................................... 89Figure 14 Branch Properties screen ........................................................................................... 90Figure 15 TagUI screens for single file tagging......................................................................... 140Figure 16 TagUI screen for multiple file tagging with Description tab ....................................... 141Figure 17 Tagging multiple MetaTagger-enabled files ............................................................. 161Figure 18 Error message in TagUI when items do not match................................................... 172Figure 19 Metadata capture tagging for multiple files ............................................................... 172Figure 20 Browser access to iwwebd........................................................................................ 174Figure 21 Processing proxy requests through the iw.cfg file..................................................... 175Figure 22 Local Area Network settings dialog box.................................................................... 182Figure 23 Proxy failover remap diagram ................................................................................... 190Figure 24 MediaBin Properties Screen ..................................................................................... 199Figure 25 Edit MediaBin Connector window ............................................................................. 200Figure 26 SiteMinder integrated with TeamSite and Active Response ..................................... 242Figure 27 SiteMinder integrated with TeamSite without Active Response................................ 248Figure 28 SSO product integrated with TeamSite without Active Response ............................ 256Figure 29 TeamSite Service Monitor components and processes............................................ 263
TeamSite Administration Guide 11• • •••

Figures
12
•
TeamSite Administration Guide• • •••

•
Tables
Table 1 Notation Conventions............................................................................................... 16Table 2 TeamSite options configurable in the iw.cfg File...................................................... 35Table 3 Functions of Configuration Files .............................................................................. 38Table 4 Autoprivate Encodings ............................................................................................. 50Table 5 server_locale Settings in iw.cfg................................................................................ 62Table 6 server_locale Settings in iw.cfg................................................................................ 63Table 7 Other files and directories controlled by [location] ................................................... 78Table 8 Role operations and permission checking ............................................................... 95Table 9 Attributes for user_databases.xml file.................................................................... 114Table 10 Vpaths and corresponding rulesets ....................................................................... 143Table 11 TagUI DTD support................................................................................................ 162Table 12 TagUI and Metadata Capture Tagging differences................................................ 162Table 13 MediaBin metadata elements ................................................................................ 209Table 14 Language Encodings ............................................................................................. 218Table 15 Code Pages for CLTs ............................................................................................ 218Table 16 Default Encodings for Text Editors ........................................................................ 220Table 17 XML Special Characters ........................................................................................ 233Table 18 Realms................................................................................................................... 244Table 19 Rules...................................................................................................................... 244Table 20 Response............................................................................................................... 244Table 21 Realm..................................................................................................................... 250Table 22 Rules...................................................................................................................... 250Table 23 Rules...................................................................................................................... 250Table 24 Response............................................................................................................... 251Table 25 Response............................................................................................................... 251Table 26 Response............................................................................................................... 252Table 27 Response............................................................................................................... 252Table 28 Policy ..................................................................................................................... 253Table 29 Troubleshooting options......................................................................................... 269
TeamSite Administration Guide 13• • •••

Tables
14
TeamSite Administration Guide• • • •••

About This Book
The TeamSite Administration Guide is a guide for configuring, customizing, and maintaining TeamSite.
Intended AudienceIt is primarily intended for TeamSite Administrators and Master users, web server administrators, and system administrators. Users of this manual should be familiar with basic UNIX commands and be able to use an editor such as emacs or vi.
Users should be familiar with IIS and with basic Windows operating system operations such as adding users and modifying ACLs.
It is also very helpful to be familiar with regular expression syntax. If you are not familiar with regular expressions, it is recommended that you consult a reference manual such as Mastering Regular Expressions, by Jeffrey Friedl.
Some TeamSite configuration files make use of XML. For more information about XML, consult a reference manual or the online specification at http://www.xml.com/axml/testaxml.htm.
TeamSite Administration Guide 15
• • • •••

About This Book
16
Notation ConventionsThis manual uses the following notation conventions:
This guide also uses the following conventions:
The term “Windows” indicates any supported version of the Microsoft Windows operating system, such as Windows® 2003.
Table 1 Notation Conventions
Convention Definition and Usage
Bold Text that appears in a GUI element such as, a menu item, button, or element of a dialog box, and command names are shown in bold. For example:
Click Edit File in the Button Bar.
Italic Book titles appear in italics.
Terms are italicized the first time they are introduced.
Important information may be italicized for emphasis.
Monospace Commands, command-line output, and file names are in monospace type. For example:
The iwextattr command-line tool allows you to set and look up extended attributes on a file.
Monospaced italic
Monospaced italics are used for command-line variables.For example:
iwckrole role user
This means that you must replace role and user with your values.
Monospaced bold Monospaced bold represents information you enter in response to system prompts. The character that appears before a line of user input represents the command prompt, and should not be typed. For example:
iwextattr -s project=proj1 //IWSERVER/default/main/dev/WORKAREA/andre/products/index.html
Monospaced bold italic
Monospaced bold italic text is used to indicate a variable in user input. For example:
iwextattr -s project=projectname workareavpath
means that you must insert the values of projectname and workareavpath when you enter this command.
[] Square brackets surrounding a command-line argument mean that the argument is optional.
| Vertical bars separating command-line arguments mean that only one of the arguments can be used.
TeamSite Administration Guide
• • • •••

Product Documentation
Directory paths use Windows conventions in this guide. These conventions mandate using backward slashes (\) in path names. (Unix systems use backward slashes.) The Unix convention is used when referring to a Unix-specific directory. For example: UNIX: docroot/news/front.html
Windows: docroot\news\front.html
Product DocumentationRefer to the TeamSite Release Notes for information on the documentation set available for TeamSite.
Documentation Updates
Additions and corrections to this document (when available) can be downloaded in PDF format from the following Web site: https://customers.autonomy.com.
TeamSite Administration Guide 17
• • • •••

About This Book
18
TeamSite Administration Guide• • • •••

Chapter 1
TeamSite Overview
This chapter introduces three major TeamSite concepts and concludes with a description of the TeamSite system architecture:
TeamSite Elements
User Roles
TeamSite Workflow
TeamSite Architecture
TeamSite ElementsThe following sections describe some common TeamSite concepts that you should be familiar with before beginning to configure TeamSite.
Content Stores
The Content Store is a large directory created by the TeamSite installation program that contains TeamSite files and metadata. By default, the Content Store is located in Unix:/iw-store; Windows:C:\iw-store.
TeamSite supports as many as eight Content Stores per TeamSite server (the first is created automatically by the installation program, and the others are created as needed by the TeamSite system administrator.
TeamSite Administration Guide 19
• • • •••

Chapter 1: TeamSite Overview
20
Branches
TeamSite provides branches for different paths of development for content. Branches can be related to each other (for example, alternate language versions of the same Web site) or they may be completely independent. Typically, each branch contains all the content for a Web site or a major section of it (such as a department), or a collection of related content (such as the program files for a software application or the image and text files for a book). Branches can be indexed and searched.
A single branch contains archived copies of its content as editions, a staging area for content integration, and individual workareas where users may develop content without disturbing one another. Branches can also contain subbranches, so that teams may keep alternate paths of development separate from each other. Content can be easily shared and synchronized across branches and subbranches. Users may work on one branch or on several, and the number of branches on a system is not limited.
Branches facilitate distributed workflow because they allow separate teams to work independently on different projects. Because all branches are located on the same TeamSite server, it is easy for one team to incorporate the work of another into their project.
Workareas
Each workarea contains a virtual copy of all related content, which may be modified in any way without affecting the work of other contributors. Users who have access to a workarea may modify files within that workarea and view their changes within the context of all related content before integrating their work with that of other contributors. Users can lock files in each workarea, eliminating the possibility of conflicting edits.
All changes made to files in a workarea are kept completely separate from other workareas and the staging area until the user chooses to submit his changes to the staging area. Within a workarea, users may add, edit, or delete files, or revert to older versions of files without affecting other users.
Staging Areas
Each branch contains one staging area where contributors incorporate their changes with the work of others. Users submit files from their workareas to the staging area to integrate their work with other contributions, and test the integrity of the resulting content. Because the staging area is an integrated component of the system, conflicts
TeamSite Administration Guide
• • • •••

TeamSite Elements
are easily identified and different versions of the same file can be merged, rather than overwritten.
Editions
Editions are read-only snapshots of a branch, taken at sequential points in its development. Contributors with appropriate permissions can create new editions any time they feel their work is well integrated, or any time they want to create an updated snapshot of all content for reference or deployment to a production server. For Web site content development, each edition is a fully functional version of the Web site, so that users can see the development of the Web site over time and compare it with current work.
TeamSite branches contain private workareas, which contain complete virtual copies of the Web site; staging areas, where contributors integrate their work; and editions, which are read-only snapshots of the Web site at various points in its development. Each area contains a virtual copy of the entire Web site. Content is submitted from workareas to the staging area, and the staging area is then published as an edition. Older editions are available for reference. The following diagram illustrates the use of TeamSite for Web site development.
TeamSite Administration Guide 21
• • • •••

Chapter 1: TeamSite Overview
22
Figure 1 Using TeamSite for Web site development
User RolesTeamSite ships with out-of-the-box user types, each with specific access permissions and optimized user interfaces. These user types are known as roles. The roles are:
Administrator
Author
Editor
Master
Reviewer
TeamSite Administration Guide
• • • •••

User Roles
Site Manager
WorkflowUser
WorkflowAdmin
These default roles are summarized in the following sections. Each installation can create or modify roles to meet the needs of your organization.
Reviewer
Reviewers generally review work done by others. They may have approval authority. They can browse workareas and review files and forms, search for content, and work with tasks. Reviewers usually access TeamSite from the browser-based ContentCenter Standard interface.
Author
Authors are primary content creators. All work done by Authors goes through an explicit approval step. They can receive assignments from Editors, which are displayed in task lists when Authors log in to TeamSite. Authors usually access TeamSite from the browser-based ContentCenter Standard interface and do not need to be sophisticated computer users.
In order to test their work, Authors have full access to the content in their Editors’ workareas, but do not need to concern themselves with the larger structure and functionality of TeamSite. The Author role is appropriate for non-technical users or for more technical contributors who do not need access to extended TeamSite functionality, such as advanced version management features.
Editor
Editors own workareas. They create and edit content, just as Authors do, but they are primarily responsible for managing the development taking place within their workareas. This includes assigning files to Authors and submitting completed content to the staging area, and it may include creating editions.
Editors have access to specialized TeamSite content and workflow management functions. Editors are generally “managerial” users, who primarily supervise the work of
TeamSite Administration Guide 23
• • • •••

Chapter 1: TeamSite Overview
24
Authors, or self-managing “power” users, who need extended TeamSite functionality to manage their own content.
Administrator
Administrators own branches. They have all the abilities of Editors, but they are primarily responsible for the content and functioning of their branch. Administrators can manage project workflow by creating new workareas for Editors and groups and by creating subbranches of their own branch to explore separate paths of development. They can assign TeamSite users to groups and assign users to roles on the branch.
An Administrator is the supervisor of the project being developed on his branch.
Master
Master users own the entire TeamSite Content Server. They can create new stores and perform all the functions of Editors and Administrators on any branch. They can create or modify roles. The Master user is generally involved in the installation of TeamSite and can reconfigure TeamSite on a system-wide basis.
Users with the Master role have access to the Administration Console within ContentCenter Professional. This allows them to add operating system users to TeamSite, assign groups, create and edit roles, and perform other TeamSite tasks. Most installations only have a few Master users.
WorkflowUser
By default, all TeamSite users should be able to use workflow models. To achieve this, the workflowModels branch of the iwadmin store is shared for iwEveryone with role as WorkflowUser. This role has the minimum privileges required to instantiate a workflow.
WorkflowAdmin
The WorkflowAdmin role has privileges to design workflows using Interwoven Workflow Modeler and upload them to TeamSite. They have privileges to manage, configure, and debug the workflow models. Users who can perform these operations include workflow developers or TeamSite administrators.
TeamSite Administration Guide
• • • •••

TeamSite Workflow
TeamSite WorkflowA workflow model is a general workflow configuration that can be used repeatedly. Each workflow model describes a process that may include user tasks and a wide variety of automated tasks. Workflow models are configured by the system administrator or by the Client Services organization.
For more information about configuring different workflow models, consult the TeamSite Workflow Developer’s Guide.
Figure 2 is a diagram of a very simple assign-edit-approve workflow model. Email is sent to the participants at every stage of the process, and some automated tasks are performed at the end.
Figure 2 Assign-edit-approve workflow model
Jobs
A job is a set of interdependent tasks. One example of a TeamSite job would be the set of tasks needed to prepare a new section in a marketing Web site to support a new product launch.
Each job is a specific instance of a workflow model. When a job is created, the job creator must supply all the specific information for that job. For example, the workflow model in Figure 2 might be used to create the job in Figure 3.
submitted
Editorinitiates job
Task:Email sentto Author
Task:Editor
reviews
ApproveReject
Task:Automateddeployment
Task:Author
edits files
Task:Email sentto Author
Task:Email sentto Editor
Task:Email sentto Author
Task:Content
to thestaging area
Author’swork
TeamSite Administration Guide 25
• • • •••

Chapter 1: TeamSite Overview
26
Figure 3 Example of a workflow for a job
Because jobs follow predefined workflow models, tasks cannot be added to or removed from individual jobs, although not every possible task may actually take place for a given job.
Tasks
A task is a unit of work performed by a single user or process. Each task in a job is associated with a particular TeamSite workarea and carries a set of files with it. The user or process owning a task can modify, add files to, or remove files from the task.
Tasks have two possible states: active and inactive. A task becomes active when its predecessor task signals it to do so (predecessor tasks and conditions for activation are all configured as part of the workflow model). Once the task has been activated, users or external programs can work on it. For example, once a user task has been activated, the user can work on the files contained in the task. Once an external task has been activated, the appropriate external program can run on the files contained in the task. Inactive tasks are tasks that have been completed or that have not been activated yet.
TeamSite ArchitectureThe TeamSite file system is composed of the TeamSite Content Server and device driverkernel module, the TeamSite Content Store of files and metadata, a suite of command-line tools, TeamSite CGI, proxy servers for access through the TeamSite
submitted
Andreinitiates job
Task:Email sent
to Pat
Task:Andre
reviews
ApproveReject
Task:Automateddeployment
Task:Email sent
to Pat
Task:Email sentto Andre
Task:Email sent
to Pat
Task:Content
to thestaging area
Pat’swork
Task:Pat edits
index.htmland
banner.gif
TeamSite Administration Guide
• • • •••

TeamSite Architecture
browser-based user interfaces (ContentCenter), and file system mounts for access through the file system interface.
The TeamSite file system is the core of the TeamSite system, where detailed information about the Web site, the Web assets, Web asset metadata, the production process and the users is stored. The TeamSite file system collects and maintains metadata on TeamSite files, directories, and areas, and allows TeamSite to process and present information according to who is asking for the information, and under what conditions. By using an object-oriented design within a file system architecture, TeamSite combines extensive metadata tagging with open access and file system performance for Web content.
The client computer connects to the TeamSite server in several ways. Requests from the browser interfaces or Local File Manager are routed through the TeamSite Web daemon, which allows consistent views of TeamSite areas. The double proxy server redirects hard-coded links within the Web site. Requests through the file system interface (TeamSite shared drive)(NFS mount/Samba) and command-line tools, which do not go through the web server, are not routed through a proxy server.
Figure 4 Connections from client computer to TeamSite server
RPC
Browser
iwproxy
Local File
command
CSSDK
TeamSiteContent
Store
Client ComputerTeamSite Content Server
Workarea
Web
CommandLine Tools
Server(port 81)
Virtualization(port 1080)
TeamSite File System
line
Local FileManager
ContentServices
Web
Content
Daemon(port 80)
SMB
Share Network
TeamSiteServer
(iwserver)
DeviceDriver
TeamSiteShared Drive
ServletEngine
CSSDK
Manager
Applications
InterfacesSoapServer
TeamSite Administration Guide 27
• • • •••

Chapter 1: TeamSite Overview
28
Figure 5 Connections from client computer to TeamSite server
Understanding the TeamSite File System
The TeamSite file system mount contains a file system view of all the Content Stores, branches, workareas, staging areas, and editions on the TeamSite server. TeamSite areas do not contain physical copies of the collection of content, but rather pointers to the files contained in the collection of content. The only physical files contained within TeamSite areas are the files that have actually been modified in those areas. That is, the only files actually contained in a workarea are those files that have been modified in that workarea but not yet submitted to the staging area. The only files contained in the staging area are the files that have been submitted since it was last published. The only files in an edition are the files that have changed since the previous edition was published.
A simple TeamSite file system structure is shown in the following graphic:
RPC
NFS
Browser
iwproxy
NFS mount
Local File
command
Samba
/.iwmnt
/iwmnt
TeamSite
TeamSite
TeamSiteContentStores
ContentServer
kernelfile system
File systemmount
File systemmount
Client ComputerTeamSite Content Server
Workarea
Web
CommandLine Tools
Server(port 81)
Virtualization(port 1080)
TeamSite File System
line
Local FileManager
Web
Content
ServletEngine
Daemon
(port 80)(iwserver)
Manager
Interfaces
ContentServices
Applications
CSSDKSoapServer
CSSDK
driver
TeamSite Administration Guide
• • • •••

TeamSite Architecture
Figure 6 TeamSite file system structure
Each branch contains three system-generated directories:
WORKAREA—Contains an individual workarea for each contributor on the branch.
STAGING—Staging area common to all workareas on the branch.
EDITION—All published editions on the branch.
It may also contain directories that hold subbranches. In the example above, the main branch (main) contains one workarea (admin), a staging area, an initial edition, and a subbranch (development). The subbranch contains three user-defined workareas (andre, pat, and chris), a staging area, and two editions, one of which is user-generated (ed_0001).
Although many of the files contained within this file system structure are virtual, they can be treated as if they were real. They appear to exist even when you run link checkers and scripts against them. However, staging areas, editions, and container directories (for example, WORKAREA, EDITION, main, or development) are all read-only. Only workareas can be written to.
store name*
STAGING
chrispat
WORKAREA STAGING EDITION
INITIAL
WORKAREA EDITION
INITIAL
development
main
ed_0001andre pat chris
admin
Legend:
System-created
User-created
default or
* Store name is user-assigned in MultiStore implementations
TeamSite Administration Guide 29
• • • •••

Chapter 1: TeamSite Overview
30
NFS Exports
Linux only
Exporting the TeamSite file system for NFS clients requires two steps:
1. The TeamSite file system entry in /etc/exports must use the fsid export option.
2. The TeamSite file system must be unexported prior to stopping TeamSite.
Failure to specify the fsid option in /etc/exports causes NFS client mount requests to fail with “Permission denied” errors. Failure to unexport the TeamSite file system prevents the TeamSite file system from unmounting, which in turn prevents a clean shutdown of TeamSite. An alternative to unexporting the TeamSite file system is to stop the NFS services.
The following is an example entry in the /etc/exports file for the TeamSite file system (see the UNIX man exports page for more information):/iwmnt/default *(rw,fsid=1000)
The following command shows how to unexport just the TeamSite file system (see the UNIX man exportfs page for more information):# exportfs -u *:/iwmnt/default
The following command can be used to stop NFS services:# /etc/init.d/nfs stop
TeamSite Administration Guide
• • • •••

TeamSite Architecture
Specify VPaths
The path describing a workarea is its workarea VPath. The path describing a file’s location within an area is its area relative path. Combined together, a file’s full VPath describes its precise location in the file system.
A vpath (“version path”) is a path within the TeamSite content repository, specified as one of the following:\store\branch+\EDITION\edition
\store\branch+\WORKAREA\area\directory*\file
\store\branch+\STAGING\directory*\file
where “+” indicates 1 or more; * indicates 0 or more, and a path may omit the elements below it in order to specify just a directory, area, branch, or store.
A branch may not be named EDITION, WORKAREA, or STAGING.
STAGING is a special area that every branch has. Thus, an area is either a workarea, specified as WORKAREA\area, or STAGING.
The following are all valid vpath specifications:
\default, a store.
\default\main, the branch main.
\default\main\pubs, the (sub)branch pubs.
\default\main\pubs\EDITION\initial, the edition initial.
\default\main\pubs\STAGING, the staging area for the pubs branch.
\default\main\pubs\WORKAREA\uitk, the workarea uitk.
\default\main\pubs\WORKAREA\uitk\guide\examples, a directory.
\default\main\pubs\WORKAREA\uitk\guide\examples/example1, a file.
\default\main\pubs\WORKAREA\uitk\README, a file directly under a workarea.
The path delimiter can be either “/” or “\” when specifying a TeamSite path, but will be output as: “/” (Unix) or “\” (Windows).
Optionally, a vpath can include the server name by prepending //servername to it, though doing so is generally not needed.
The maximum length of a vpath (including host name, branch, workarea, and folders) is currently limited to about 600 bytes.The limitation is imposed by the maximum length of a GET URL command supported by a browser. The 600-byte requirement provides 30 folder levels with average 20-byte folder names.
TeamSite Administration Guide 31
• • • •••

Chapter 1: TeamSite Overview
32
For multi-byte languages (Chinese, Japanese, Korean), the maximum length is reduced by a factor of 9 to about 67 bytes. Each CJK character, when used as part of an URL, must be encoded. The encoding for UTF-8 expands each character to a 9-byte sequence of the form “%xx%xx%xx” where xx is the hexadecimal UTF-8 code.
Related Documentation
For information and preliminary configuration information, consult the TeamSite Installation Guide.
For more information about configuring different workflow models, consult the TeamSite Workflow Developer’s Guide.
For more information on specifying a vpath, see the TeamSite Command-Line Tools manual.
TeamSite Administration Guide
• • • •••

Chapter 2
Configuration File Overview
Most of the settings for the TeamSite server are configured in the main configuration file, iw-home\etc\iw.cfg (default location).
Additional settings are configured in a variety of additional files.
Configuration and customization of the ContentCenter interfaces is done through the UI Toolkit; refer to the TeamSite User Interface Customization Guide for details.
This chapter addresses the following:
The iw.cfg File
Additional Configuration Files
The iw.cfg FileThe TeamSite iw.cfg configuration file is divided into sections that display in square brackets (the iwwebd section is shown in the following example). The configurable parameter (http_port) is to the left of the equal sign, and the current setting (80) is to the right; for example:
[iwwebd]http_port=80
To edit any of the settings:
1. Open the configuration file in a text editor.
2. Change the current setting.
You cannot have a space before or after the equal sign.
3. Save and close the file.
TeamSite Administration Guide 33
• • • •••

Chapter 2: Configuration File Overview
34
Changes to most of these configuration settings take effect within a few minutes (although for options that affect a user interface, users may need to clear their browser cache in order to see the changes). For these settings to take immediate effect, use the iwreset.exe command-line tool (CLT). Configuration options that require TeamSite to be restarted in order to take effect are noted where appropriate.
NOTE
If section headings are duplicated in the iw.cfg file, some or all of the values given for the parameters in one copy of the section will be ignored. Verify that a section heading only appears once in your iw.cfg file.
You can also edit the iw.cfg file using the Configuration tab in the Administration Console. Refer to the TeamSite User Interface Administration Guide for information on editing this file.
Location of iw.cfg
If iw.cfg does not exist in the default location, TeamSite looks for it in the following locations, in the following order:
Windows:
iw-home\local\etc\iw.cfg
iw-home\etc\iw.cfg
HKEY_LOCAL_MACHINE\Software\Interwoven\TeamSite\iw-config (registry key)
Unix:
/etc/iw.cfg
iw-home/config/iw.cfg
iw-home/local/etc/iw.cfg
iw-home/etc/iw.cfg
If iw.cfg is not found in any of these places, TeamSite assumes the default values for iw.cfg settings.
TeamSite Administration Guide
• • • •••

The iw.cfg File
The iw.cfg File Options
Table 2 describes the configurable options in iw.cfg, lists the option or section name, and identifies the page from the manual that describes the option.
Table 2 TeamSite options configurable in the iw.cfg File
Function iw.cfg option Page
Configuring UI functionality
Enabling/disabling VisualPreview [iwproxy_smartcontextedit_allowed] page 41
Windows: Configuring domain lists in the login screen
domain_list page 42
Configuring email settings maildomain, mailserver, use_mapping_file, email_mapping_file, debug_output
page 43
Specifying valid domains to redirect ContentCenter users from a public URL
valid_domains page 43
Configuring server functionality
Controlling modification time old_mod_times page 44
Modifying extended attributes force_EA_mod_times page 45
Setting the encoding of iw.cfg encoding page 45
Configuring the Web daemon host, http_port, https_port, default_protocol
page 46
Configuring the servlet engine servlet_port page 46
Setting the main branch locking model main_lock_model page 46
Controlling locked file submission only_lock_owner_creator_submits page 48
Controlling behavior of Mandatory Write and Optional Write locking
lockmodel_compatibility page 48
Specifying the number of versions to check for the common ancestor of compared files.
compare_search_limit page 48
Specifying the number of events logged in the submit and update logs
event_log_size page 49
Setting the port number for the iwutild service
utild_ext_tasks_portnum page 52
Unix: Running iwutild as non-root user iwutild_runas_root page 54
Enabling the Event Subsystem ew_enable page 55
Setting the default size of the event log file
ew_rollover_threshhold page 55
TeamSite Administration Guide 35
• • • •••

Chapter 2: Configuration File Overview
36
Configuring server performance
Setting cache size cachesize page 59
Windows: Controlling impersonation disable_ext_task_impersonation, impersonate_without_password
page 60
Setting throughput monitors thruputmonitoring, thruputmonitorx page 60
Detecting low disk space and inodes disklow_mybtes, disklowpercent, disklow_knodes (Unix)
page 61
Configuring the TeamSite server locale server_locale page 62
Setting TeamSite file locations [locations] page 77
Configuring FormsPublisher
Setting FormsPublisher default directory
data_root page 64
Setting number of previews preview_history_limit page 64
Specifying directory for preview files preview_system_directory page 64
Formatting data record printing pretty_print_dcrs page 65
Configuring TeamSite access
Identifying default OS group iwglobal_group
Specifying the default role for the owner of a branch
branch_owner_role page 86
Specifying the role or roles that can administer branches
admin_roles page 86
Windows: Specifying a secondary master user
secondary_admin_account page 86
Changing branch owner and group main_owner, main_group page 86
Setting branch and workarea security branch_security, workarea_security page 101
Setting default permissions branch_default_perm, Unix: workarea_default_perm, file_default_perm, directory_default_perm
page 101
Windows: Using Domain Local Groups to share workareas
domain_local_groups page 103
Windows: Using the Active Directory System Interface
use_adsi, debug_adsi page 103
Windows: Enabling user/group/role disk cache
enable_user_group_disk_cache page 107
Windows: Specifying groups for Active Directories
windows_groups_for_users, windows_groups_for_sharing, include_nested_groups
page 105
Table 2 TeamSite options configurable in the iw.cfg File (Continued)
Function iw.cfg option Page
TeamSite Administration Guide
• • • •••

The iw.cfg File
Setting the webserver (Windows)group/(Unix)UID
(Unix)webserver_uid/(Windows)webserver_group
page 111
Managing permissions on the workarea
mask_workarea_access page 112
Unix: Configuring group remapping map_secondary_to_primary_gid page 111
Unix: Maintain gid honor_setgid, honor_setgid_on_rename
page 112
Unix: Specifying information for iwldapsync updates.
ldapcache_thread_delay, log_ldap_sync, ldap_sync_retry
page 118
Unix: Specifying the frequency of updating the operating system users cache
enumerate_os_users_thread_delay page 120
Unix: Check credentials in an external source.
password_file page 122
Unix: User authentication authenticate_by page 122
Unix: PAM Configuration pam_service, pam_do_acct_mgmt page 123
Windows: Configuring which domains to use for group authentication
domain_list page 125
Windows: Configuring user and group logging
show_user_list page 126
Configuring submit filtering
Specifying debug submit handling debug_event_handler page 132
Configuring the TeamSite proxy server
Configuring proxy server operation [iwproxy] page 176
Setting document roots [iwproxy_remap] page 178
Resolving fully-qualified URLs [iwproxy_fullproxy_redirect] page 180
Redirecting TeamSite views to different areas
[iwproxy_preconnect_remap]
[iwproxy_preconnect_redirect]
page 183
Configuring TeamSite to use different Web servers
[iwproxy_preconect_remap]
[iwproxy_external_remap]
page 185
Configuring external remappings [iwproxy_external_remap] page 186
Setting host header remappings [iwproxy_hostheader_remap] page 187
Enabling iwproxy Access Control [iwproxy_access_control_enabled] page 188
Configuring SSI remappings [iwproxy_plugin_remap] page 188
Configuring proxy failover [iwproxy_failover_remap] page 189
Table 2 TeamSite options configurable in the iw.cfg File (Continued)
Function iw.cfg option Page
TeamSite Administration Guide 37
• • • •••

Chapter 2: Configuration File Overview
38
Additional Configuration FilesThe following files contain information about your TeamSite server configuration:
Identifying Content Stores
Defining content stores store_directory_store-name, store_comment_store-name
*
Configuring workflows
Enabling query on workflow events delete_jobs_on_completion page 216
Controlling adding files to command line of external task command callouts
external_task_add_filelist **
Controlling nesting depth wftask_nesting_depth_allowed **
Controlling external task retries external_task_retry_wait **
Checking for locking and others conflicts before submit
presubmit_check **
Unix: Preventing external tasks from being owned by the root user
external_task_root_allowed **
Controlling jobs being assigned to users without access to files
task_areavpath_file_access_check **
Controlling whether files are locked when creating jobs and tasks
permit_add_locked_files_to_locking_tasks
**
* Refer to the TeamSite Installation Guide for information.
** Refer to the TeamSite Workflow Developer’s Guide for information.
Table 3 Functions of Configuration Files
Configuration File Function
Unix: /etc/defaultiwhome Describes the location of the TeamSite application software. The default location is /usr/iw-home.
Unix: /etc/defaultiwstore Describes the location of the TeamSite Content Store directory. The default location is /usr/iw-store.
Unix: /etc/defaultiwmount Describes the location of the TeamSite virtual mount point. The default location is /iwmnt.
Table 2 TeamSite options configurable in the iw.cfg File (Continued)
Function iw.cfg option Page
TeamSite Administration Guide
• • • •••

Additional Configuration Files
Unix: /etc/defaultiwlog Describes the location of the iwserver.log file. The default location is /var/adm/iwserver.log.
Unix: /etc/defaultiwelog Describes the location of the iwevents.log file. The default location is /var/adm/iwevents.log.
Unix: /etc/defaultiwtrace Describes the location of the iwtrace.log file. The default location is /var/adm/iwtrace.log.
iw-home\local\config\submit.cfg Specifies all file permissions that are automatically changed at submit time.
iw-home\local\config\autoprivate.cfg Specifies what types of files are automatically marked private.
iw-home\local\config\file_encoding.cfg Contains rules that determine the character encoding of the contents of files that do not specify their encoding. See page 225 for information about creating these rules.
iw-home\local\config\templating.cfg Specifies the forms that are used in which TeamSite areas and how the forms map to presentation templates as well as setting form display options.
iw-home\conf\roles\tsusers.xml Contains information on all TeamSite users.
iw-home\conf\roles\user_databases.xml Identifies the databases that contain user information.
iw-home\conf\roles\roles.xml Contains information on operations performed by each role, as set through the Edit Roles screen.
iw-home\conf\tsgroups.xml Contains information on TeamSite groups.
iwsearch-home\etc\search.properties Configures the index server and search server.
iwsearch-home\etc\branches.cfg Lists the branches to be indexed by the index server.
iwsearch-home\etc\FieldMapping.xml Defines extended attributes and templating attributes to be indexed.
iw-home\tsreport\conf\spring-config.xml Configures the EAs to be used by TeamSite ReportCenter.
iw-home\httpd\webapps\eventsubsystem\WEB-INF\iw_bridge_cfg.xml
Provides additional Event Subsystem configuration.
iw-home\etc\iwutild.cfg Configures commands for the utility service.
Table 3 Functions of Configuration Files (Continued)
Configuration File Function
TeamSite Administration Guide 39
• • • •••

Chapter 2: Configuration File Overview
40
iw-home\local\config\datacapture.cfg Defines rule sets for capturing metadata or forms.
iw-home\local\config\metadata-rules.cfg Provides information on mapping vpaths to data capture rules.
Table 3 Functions of Configuration Files (Continued)
Configuration File Function
TeamSite Administration Guide
• • • •••

Chapter 3
Configure the TeamSite Server
This chapter contains the following information on configuring the TeamSite server:
Configure User Interface Functionality
Configure Server Functionality
Working with the Utility Service
Enable the Event Subsystem
Configure Server Performance
Configure the TeamSite Server Locale
Configure FormsPublisher
TeamSite Embedded Failsafe
Configure User Interface FunctionalityThe following sections describe the configuration settings that enable you to customize the functionality displayed in the user interfaces.
Enable and Disable VisualPreview
You can selectively enable or disable VisualPreview for different workareas or files by adding lines to the [iwproxy_smartcontextedit_allowed] section of iw.cfg. If this section does not exist or contains no entries, VisualPreview is enabled by default.
The [iwproxy_smartcontextedit_allowed] section begins with one _default line, which specifies whether VisualPreview is turned on or off in any area or for any file not otherwise specified. This line is then followed by any number of _regex lines. Each _regex line uses a case-insensitive regular expression to specify areas or files, and then
TeamSite Administration Guide 41
• • • •••

Chapter 3: Configure the TeamSite Server
42
specifies whether VisualPreview is enabled or disabled for the specified items. A _regex line has the following case-insensitive syntax:_regex=regular-expression=yes|no
Lines in the [iwproxy_smartcontextedit_allowed] section are order-dependent. In the following example, the _default=yes line turns VisualPreview on for all files managed in TeamSite. The first regex line explicitly turns it on for all files in all of Andre’s workareas on all branches. The second regex line turns VisualPreview off for all CGI files. But because the line turning VisualPreview on for Andre’s workareas comes first, he can use VisualPreview for CGI files in his workarea.[iwproxy_smartcontextedit_allowed]
_default=yes
_regex=(.*)/WORKAREA/andre/.*=yes
_regex=\.cgi(\?.*)?$=no
Configure Domain Lists in the Login Screen
Windows:
The domain_list parameter is a comma-separated list of domains that defines the options that display in the Domain field of the TeamSite login screen. It is located in the [iwcgi] section of iw.cfg.
If the [iwcgi] section of iw.cfg does not contain this line, add it as follows:
[iwcgi]domain_list=This Domain,That Domain,The Other Domain
NOTES
You can include any number of domains in this list. If your [iwcgi] section does not contain a domain_list, domains are automatically
detected and displayed. Domains are listed in alphabetical order, not the order listed in iw.cfg. Do not confuse this line with the domain_list line in the [iwserver] section of
iw.cfg.
TeamSite Administration Guide
• • • •••
Configure User Interface Functionality
Configure Email Settings
The TeamSite Assign feature sends email to the recipient of a task. The following settings in the [iwsend_mail] section of iw.cfg enable you to configure how this email is sent:
maildomain=domain.topleveldomain
Specifies the domain (for example, maildomain=Autonomy.com)
mailserver=<your mail server domain>
Specifies the mail server to use (for example, mailserver=mailbg01).
use_mapping_file=false|true
Optional entry that specifies whether or not to use a mapping file to configure individual email addresses or aliases.
email_mapping_file=path_to_file
Optional entry that specifies the location of the mapping file to use (a sample file is located in <iw-home>/local/config/wft/email_map.cfg).
debug_output=path_to_file
An optional entry that specifies that debug output will be sent to the file location indicated.
Specify Valid Domains
When ContentCenter users go to a public URL and then return through a done_page parameter, you can specify the valid domains to which users can be redirected. This prevents users from being maliciously directed to a harmful domain.
Use the valid_domains setting to provide a comma-separated list of valid domains for URLs in TeamSite ContentCenter. By default, the TeamSite server host name, domain and IP address are automatically included and do not have to be specified here.[teamsite_servlet_ui]
valid_domains=domain,domain,domain
TeamSite Administration Guide 43
• • • •••

Chapter 3: Configure the TeamSite Server
44
Configure Server FunctionalityThe following sections describe the configuration settings that determine the TeamSite server functionality.
Control Modification Times
The old_mod_times setting controls what value is returned for the modification time of a file through the file system interface. [iwserver]
old_mod_times=true
By default, old_mod_times is set to true, and the modification time of a file is the time a user last changed the file's contents. Submitting a file to the staging area or updating it into your workarea through Get Latest does not affect the modification time; the modification time will be the same as the modification time of the source file. If old_mod_times=false, the modification time of a file is the later of the time (1) a user last changed its contents and (2) the time the file was updated into the workarea (with get-latest, copy-to-area, or iwupdate operations) or submitted if it is a file in the staging area or an edition.
This distinction is important when you are using TeamSite for SCM. A lot of build tools, such as UNIX make, rely on timestamps to determine whether it needs to regenerate object files. They typically compare the modification time of the source file with the modification time of the corresponding object file and decide to rebuild the object file only if the source file has a later modification date. If you use such a build tool out of a TeamSite workarea with old_mod_times=true (the default), you could have problems if your workarea is updated before a build.
For example: You run make to recompile file1.c in your workarea. This generates object file file1.o, with the current time as its modification time. However, yesterday another user submitted another version of file1.c, but you did not update your workarea before running make. This newer version of file.c has a modification time from yesterday (when it was modified before being submitted). If you now update your workarea, you will get the new version of file1.c, but its modification time would still be the time from yesterday. By default, with old_mod_times=yes, the modification time of a file has no correlation to the time you update your workarea. If you run make again, it would fail to recompile the new version of file1.c, because the modification time of file1.o is later than the modification time of the newer file1.c. This can be resolved by setting old_mod_times=false. The modification time of file1.c would then show in your workarea with the time when you did the get-latest procedure, and make would know to regenerate the object file.
TeamSite Administration Guide
• • • •••

Configure Server Functionality
The old_mod_times setting only affects the modification time displayed through the file system interface and not through ContentCenter. The modification time of a file in a user interface is always the time the contents changed.
Modify Extended Attributes
Normally when extended attributes (EAs) are modified, the content modification timestamp of the file is not updated (although there is an attribute modification timestamp that is updated). This is the default and is equivalent to setting false for this option.
You can set up TeamSite so that the content modification timestamp is updated whenever the EAs are modified using the force_EA_mod_times option in the iw.cfg file.[iwserver]
force_EA_mod_times=true
Specify the Encoding of the iw.cfg File
To facilitate the internationalization of TeamSite, you have the ability to use text editors that save the iw.cfg file in various encodings. The encoding setting in the first section of the iw.cfg file declares the encoding of the iw.cfg file itself. The default setting is ascii.
To change the encoding of the iw.cfg file, add the following lines to the beginning of the file:[iwcfg]
encoding=encoding_type
where encoding_type is one of the following:
ascii (default setting)
cp1252
euc-jp
ISO-8859-1
shift_jis
utf-8
NOTE
This must be the first section in the iw.cfg file—no other entry can precede it.
TeamSite Administration Guide 45
• • • •••

Chapter 3: Configure the TeamSite Server
46
Configure the Web Daemon
To set Web daemon defaults, edit the [iwwebd] values in the iw.cfg file: [iwwebd]
host=hostname.domain
http_port=80
https_port=443
default_protocol=http
The default_protocol setting is used by the following scripts when TeamSite generates URLs:
iwsend_servlet_mail.ipl script—uses it to embed URLs into the email messages it sends. Set this to default_protocol=https to have the email with the https prefix for the task URL after running a workflow.
<iwov_webdesk_url> presentation template tag—uses it when generating hyperlinks to the TeamSite server.
Set this to default_protocol=https for email messages
For more settings in [iwwebd], refer to Chapter 8, “Configure the TeamSite Web Daemon and Proxy Server.”
Change the Servlet Engine
By default, the servlet port is set to 8080. To change this setting, edit the servlet_port value in the [teamsite_servlet_ui] section of the iw.cfg file.[teamsite_servlet_ui]
servlet_port=8080
Set Locking Models
Locking prevents users in other workareas on the branch from editing or submitting a file that is locked. TeamSite supports three types of file locking:
Submit. Enables users to ensure that their changes are submitted before others can submit theirs. When a file is locked, users in different workareas can edit their version of the file, but cannot submit it until the owner of the lock submits his work or manually releases the lock. This option is selected by default and is well-suited for environments where parallel development is desired.
TeamSite Administration Guide
• • • •••

Configure Server Functionality
Mandatory Write. Ensures that only one user can edit a file at a given time. Users must lock files while editing them. While files are locked, no other users in any workarea on the branch can edit their version of those files. This option is suitable for environments where serial development is required.
Optional Write. Enables users to choose whether or not to lock a file. While files are locked, no other users in any workarea on the branch can edit their version of those files. This option is suitable for environments where serial development is desired, but optional.
A branch’s locking model is set when the branch is created. Different branches on one TeamSite server may use different types of locking. All workareas on a branch use the same type of locking. The type of locking a branch uses cannot be changed after the branch has been created.
You can also set these locking models, plus the option None, when creating roles. Since a branch and a role can have separate file locking, TeamSite uses the more restrictive of the role locking and branch locking when determining what locking model is in place for a particular user on that branch. TeamSite also evaluates whether a user has multiple roles on the branch and uses the least restrictive locking specified in a role. It then compares locking for the role with the branch locking model and applies the most restrictive model.
Role locking is useful if you wanted to have a different locking model for users having different roles on a given branch. For example, the author role may have mandatory write locking, implying that users who are authors in a branch that has submit locking should have the lock on the file and lock the file in their workarea before editing the file. This lowers the need for authors to deal with conflict resolution and merging while other roles enjoy a more lenient model.
Submit Locking is the least restrictive followed by Optional Write Lock and Mandatory Write Lock.
ContentCenter configurations may impose additional restrictions on whether a user needs to lock a file before being able to edit it.
Set a Locking Model on a Branch
TeamSite enables you to specify the locking model of each branch at the time that it is created. However, the main branch is created automatically by the TeamSite installation program and it uses the default option of Submit locking.
TeamSite Administration Guide 47
• • • •••

Chapter 3: Configure the TeamSite Server
48
Creating a new Content Store also creates a new main branch. You can specify which locking model to use for the main branch of a new Content Store by completing the following procedure:
1. Edit the main_lock_model line in the [iwserver] section of iw.cfg as follows:
[iwserver]main_lock_model=locking_model
where locking_model is either of the non-default models:
optional_write_lock (or o)
mandatory_write_lock (or m)
2. Save and close the iw.cfg file.
3. Run the iwreset CLT to ensure the edit is recognized.
4. Create a new Content Store as described in the TeamSite Installation Guide.
The new Content Store uses the setting specified by the main_lock_model option when it is created.
Locked File Submission
You can configure TeamSite to allow only the owner or creator of the lock to submit a locked file to the staging area (as opposed to allowing any member of the workarea where the file is locked). To configure this option, add the following line to the [iwserver] section of iw.cfg:[iwserver]
only_lock_owner_creator_submits=yes
Locking Behavior
The lockmodel_compatibility option in the iw.cfg file controls behavior of Mandatory Write and Optional Write locking. When the option is set to true, all users who have access to the same workarea can edit the locked file. When the option is set to false, the file can be edited only by the lock owner in the workarea where it was locked.[iwserver]
lockmodel_compatibility=true|false
Compare Files
When TeamSite is comparing two versions of a file, it checks the version history chain to determine a common ancestor for the two versions. You can specify the number of
TeamSite Administration Guide
• • • •••

Configure Server Functionality
versions to check using the compare_search_limit option in iw.cfg, as follows (the default is 20):[iwserver]
compare_search_limit=20
Submit and Update Logs
By default, the Submit and Update logs contain the 64 most recent Submit or Get Latest operations for a workarea (as opposed to the 64 most recent files that were submitted or updated). You can change this number, by editing the event_log_size line in the [iwserver] section of iw.cfg.[iwserver]
event_log_size=64
Autoprivate Feature
TeamSite’s Autoprivate feature enables you to prevent certain file types and directories from being submitted to the staging area or copied during a Copy To operation. Examples of these files may include temporary files, backup files and Macintosh resource forks. File types specified in the Autoprivate configuration file automatically get marked Private.
NOTE
Changes to Autoprivate only apply to files or directories that are created or renamed after the changes are made. Changes do not apply to existing files.
Files and directories may also be specified Private by turning on the Do not submit check box in the Properties screen in ContentCenter.
To activate Autoprivate, create a text file named autoprivate.cfg in your iw-home\local\config\ directory. The Autoprivate file consists of two sections:
files (or directories) matched by pattern
files (or directories) matched by name
Each section is set off by parentheses on their own lines, and the file begins with a “ ( ” (open parenthesis) on its own line and ends with a “ ) ” (close parenthesis) on its own line.
Individual entries in the first section are in the following format:
TeamSite Administration Guide 49
• • • •••

Chapter 3: Configure the TeamSite Server
50
((filenamepattern)(#_characters_to_match_at_beginning)(#_characters to match_at_end))
where both #_characters_to_match_at_beginning and #_characters_to_match_at_end are in hexadecimal.
For example, to have Autoprivate detect any file or directory that ends with .frk, add the following entry:((x.frk)(0)(4))
meaning to match zero characters at the beginning of the name and the four characters (.frk) specified at the end of the name.
To set Autoprivate to detect any filename that ends in .backup.fm, add the following entry:
((x.backup.fm)(0)(a))
where 0 specifies not to match any characters at the beginning, and a (hexidecimal 10) specifies to match ten characters at the end of the filename.
Entries in the second section specify exact filename matches, set off by double parentheses. These filename matches apply across all directories in all workareas on the TeamSite server. For example, if autoprivate.cfg includes:
((test))
then all files and directories named test that are created after this line is added, in all directories in all workareas in TeamSite, will be marked private.
The autoprivate.cfg file recognizes the following six special characters: ( ) [ ] # and a space (spacebar). If your file names contain any of these characters, you must encode these values when specifying them as a pattern. For example, to have Autoprivate detect a file name that includes spaces, encode the spaces with a \20, for example, to match “Network Trash Folder” include:
((Network\20Trash\20Folder))
Encodings are represented as \xx where xx is the hex value of the corresponding ASCII character. The following table shows the mappings for the six special characters.
Table 4 Autoprivate Encodings
Special Character Autoprivate Encoding
# \23
[ \5b
] \5d
( \28
TeamSite Administration Guide
• • • •••

Configure Server Functionality
Encoding examples:
The following sample autoprivate.cfg file includes a few common entries:(
(
((x.o)(0)(2))
((x.a)(0)(2))
((x~)(0)(1))
((.nfsXXX)(4)(0))
((x.bak)(0)(4))
((x.tmp)(0)(4))
)
(
((network\20trash\20folder))
((Network\20Trash\20Folder))
((.HSAncillary))
((.HSResource))
((.hsancillary))
((.hsresource))
((.tnatr:intf))
((.tnatr:reso-fork))
((resource.frk))
((trash))
)
)
For changes to autoprivate.cfg to take effect, restart the TeamSite server or use the iwreset command-line tool.
) \29
space (spacebar) \20
((\23x\23)(1)(1)) matches file names of the form: #*#
((\23bbaax)(2)(0)) matches: #b*
((\28ab\29)(2)(2)) #(ab) matches the file name: (ab), the #(ab) is a comment
((a\5b\5db)(2)(2)) matches: a[]b
Table 4 Autoprivate Encodings
Special Character Autoprivate Encoding
TeamSite Administration Guide 51
• • • •••

Chapter 3: Configure the TeamSite Server
52
Working with the Utility ServiceThe utility service or daemon named iwutild performs various tasks including executing commands on behalf of trusted clients with impersonation, reading and writing configuration files, and reading log files. Programs executed on behalf of trusted clients are restricted to those explicitly specified in the iw-home\etc\iwutild.cfg file.
All iwat triggers and workflow external tasks are executed by iwutild. However, the programs executed by iwat triggers and workflow external tasks need not be specified in iwutild.cfg. The iwutild daemon replaces iwprocessd (Unix).
The iwutild.cfg file can be edited to modify error logging, executed commands, and file locations. The following code shows the default iwutild.cfg file.<?xml version="1.0" encoding="UTF-8"?>
<iwutild>
<!-- Logging options for the Teamsite utility daemon. -->
<!-- utild log level can be either "quiet", "error" or "debug" -->
<!-- hopi log level can be either "quiet", "panic", "error",
"warn", "info" or "debug" -->
<log
level="error"
path="/var/adm/iwutild.log"
cmdoutputpath="/var/adm/iwutild_cmdout.log"/>
<!-- optional -->
<!-- ipc tunables -->
<hopi
port-http="6688"
port-ssl="6689"
ssl-cert-dir="/usr/iw-home/local/config/ssl/iwutild"
log-level="error"/>
<!-- The list of commands executed by the utility daemon. -->
<!-- The servletd start up depends on iwstat. -->
<command-list>
<command
name="iwpt_compile"
path="/usr/iw-home/bin/iwpt_compile.ipl"/>
<command
name="iwstat"
impersonate="false"
path="/usr/iw-home/bin/iwstat"/>
TeamSite Administration Guide
• • • •••

Working with the Utility Service
</command-list>
<file-list>
<file
name="iwcfg"
path="/etc/iw.cfg"/>
<file
name="iwutildcfg"
path="/usr/iw-home/etc/iwutild.cfg"/>
<file
name="iwlicense"
path="/usr/iw-home/etc/TS.lic"/>
<file
name="useropsxml"
path="/usr/iw-home/private/etc/userops.xml"/>
<file
name="useropsuixml"
path="/usr/iw-home/private/etc/userops_ui.xml"/>
<file
name="iwutildclientcfg"
path="/usr/iw-home/servletd/conf/iwutild_client.cfg"/>
<file
name="cssdkcfg"
path="/usr/iw-home/cssdk/cssdk.cfg"/>
<file
name="iwserverlog"
path="/var/adm/iwserver.log"/>
<file
name="iwtracelog"
path="/var/adm/iwtrace.log"/>
<file
name="iweventslog"
path="/var/adm/iwevents.log"/>
<file
name="iwutildlog"
path="/var/adm/iwutild.log"/>
<file
name="transformcfg"
path="/usr/iw-home/local/config/transform.cfg"/>
<file
name="datasourceconfigxml"
path="/usr/iw-home/local/config/DataSourceConfig.xml"/>
<file
name="metadatarulescfg"
path="/usr/iw-home/local/config/metadata-rules.cfg"/>
<file
TeamSite Administration Guide 53
• • • •••

Chapter 3: Configure the TeamSite Server
54
name="templatingcfg"
path="/usr/iw-home/local/config/templating.cfg"/>
<file
name="fileencodingcfg"
path="/usr/iw-home/local/config/file_encoding.cfg"/>
<file
name="availabletemplatescfg"
path="/usr/iw-home/local/config/wft/available_templates.cfg"/>
</file-list>
</iwutild>
The iwutild.cfg file uses the port-ssl option to set the port number to be used for the iwutild service. The default value is 6689. This value can be changed during the TeamSite installation.
If you change the port number in iwutild.cfg after installation, you need to update the cssdk.cfg file and set the following option in iw.cfg so that iwserver can find the iwutild service. [iwserver]
utild_ext_tasks_portnum=portnumber
The iwutild.cfg file allows you to select which commands or scripts use impersonation and which are to run as System. The iwptcompiler is one of these commands. Disable impersonation for a command by specifying impersonate="false" for the command.
The iwutildreset CLT can force iwutild to re-read the iwutild.cfg file. The iwutildstat CLT provides status information for the iwutild server. Refer to the TeamSite Command-Line Tools for information on these CLTs.
Run as Non-Root User
Unix:
The iwutild process can also be run as the non-root user iwts. This is achieved through a setting in the iw.cfg file, which defaults to true:[iwserver]
iwutild_runas_root=true|false
You should be aware of the following areas that are impacted when iwutild is invoked as a non-root user:
Files and directories created by customer scripts through the file system interface (/iwmnt) may not have the correct ownership and permissions. They will be owned by iwts.
TeamSite Administration Guide
• • • •••

Enable the Event Subsystem
Creation of assets outside of the Teamsite environment may not be possible without the appropriate directory and file permissions. The files created will be owned by iwts.
The iwat triggers will not run as the user root; instead they run as the non-root user iwts. If the triggers invoke scripts that create or delete files and directories through the file system interface, ownership and permissions will be for user iwts.
The existing external workflow task scripts will have to be re-written by the customer to use the URL-based workflow feature.
If you are running the utility daemon as non-root and invoke any workflow external tasks by mistake, the behavior of the task is not determined. The task might end up creating files with incorrect ownership since the external tasks will be run as the user iwts.
The templating scripts will have to be re-written using XLST, instead of the current PT compiler implementation.
The TeamSite server (that is, iwserver) running on UNIX systems is run by the process iwts rather than by root. As a result, after TeamSite is installed, permissions on all Content Store files are reset to enable iwts, and all TeamSite processes except iwauthend run as iwts or iwui. This conversion cannot be undone, and the installer cannot opt out of it.
NOTE
You must still log in as the user root to run the TeamSite installation script and to perform administration tasks.
Start/Stop the iwutild Server
Unix: The iwutild daemon is started and stopped with iwserver.
Windows: The iwutild service is a separate service that is automatically started and stopped.
Enable the Event SubsystemThe Event Subsystem is packaged and installed with TeamSite and can be used to deliver messages (events) to and from Search or ReportCenter with TeamSite as an
TeamSite Administration Guide 55
• • • •••

Chapter 3: Configure the TeamSite Server
56
event publisher and Search and ReportCenter as subscribers. To do this, the Event Subsystem stores and queues events.
NOTE
In addition to Search and Report center, other subscribers include Workflow Modeler and OpenDeploy DAS module. DAS is enabled for DataDeploy. For more information about the DataDeploy module, see the OpenDeploy documentation.
The Event Subsystem uses a JMS (Java Message Service)-compliant model of message delivery, which is based on three concepts:
Events – Synonymous with message. Events are the result of changes, end-user actions, or occurrences in a Publisher program. For example, TeamSite server events include (but are not limited to):
CreateBranch
Submit
TaskActivate
Events have names and properties, such as user, role, and timestamp, that are represented in the Event Subsystem as attribute/value pairs.
A subscriber can be set up to perform functions after a TeamSite event occurs. For example, an index can be updated after files are submitted.
Publishers. Applications that send events to the Event Subsystem. The Event Subsystem then passes the events to Subscribers that have registered to receive them.
Subscribers. Applications that register with the Event Subsystem to receive events. Subscribers can filter events so that they receive only the ones they need.
Figure 7 illustrates how the Event Subsystem works.
Figure 7 How the Event Subsystem Works
Message Service
Message Service Interface
TeamSite
Publishers
Server
SubscribersEvent Subsystem
Proxy Servlet
Implementation
Search
ReportCenter
OpenDeploy
WorkflowModeler
DAS
TeamSite Administration Guide
• • • •••

Enable the Event Subsystem
The Event Subsystem is configured by the TeamSite installer. Refer to the TeamSite Installation Guide for information.
Verify that the Event Subsystem is Enabled
The Event Subsystem is normally enabled during the TeamSite installation. You can verify that the Event Subsystem was enabled by checking the iw-home\etc\iw.cfg file. Look for the following line in the [event_subsystem] section: [event_subsystem]
ew_enable=true
If the line is not included, add it to the iw.cfg file. Save and close the file; issue the iwreset CLT.
The default size of each default_log_location/iwevents/TeamsiteEvents.x log file (before it rolls over) is 100 MB. This is specified in iw.cfg under the [event_subsystem] section. [event_subsystem]
ew_rollover_threshold=104587600
NOTE
The iw.cfg file may contain other commented-out settings in the [event_subsystem] section; ignore these settings.
Modify Database Information
If you need to modify database information, you can do so in the ApplicationContainer/server/default/deploy/activemq-ear-5.3.0.ear/activemq-ra.rar/broker-config.xml file’s ess-ds bean ID. <bean xmlns="" id="ess-ds" class="org.apache.commons.dbcp.BasicDataSource" destroy-method="close">
<property name="driverClassName" value=""/>
<property name="url" value=""/>
<property name="username" value=""/>
<property name="password" value="${password}"/>
<property name="initialSize" value="10"/>
<property name="poolPreparedStatements" value="true"/>
</bean>
The password will be encrypted in the ess.properties file.
TeamSite Administration Guide 57
• • • •••

Chapter 3: Configure the TeamSite Server
58
NOTE
A script is required in order to change the database password. Please contact Customer Support for more information.
Ensure that the Event Subsystem Servlet is Started
On Windows, use the Services control panel to start the Event Subsystem service. On Unix, execute /etc/init.d/iw.server start to start the Event Subsystem daemon.
To ensure that the Event Subsystem servlet is started, restart the servlet engine by issuing an iwreset -ui command. This will also ensure that the application container and Event System webapps are started. You can verify that the Event System webapps are started by looking at <iwhome>/local/logs/iwui/iweventproxy.log.
Enable DAS Publishing
OpenDeploy and DataDeploy subscribe to a deprecated message topic called TeamSite_User. Publishing to this topic is disabled by default. To enable this, perform the following steps. Future releases of OpenDeploy use the new message topic Interwoven.
If you are using DataDeploy, enable DAS by performing the following steps:
1. Stop the TeamSite services.
2. Make the following changes to the iw-home\httpd\webapps\eventsubsystem\WEB-INF\iw_bridge_cfg.xml file.
Add dasTopic="TeamSite_User" property to the iwovJMS tag.
For example:<iwovJMS classpath="_IW_HOME_/eventsubsystem/lib/openjms-client-0.7.6.1.jar" initialContextFactory="org.exolab.jms.jndi.InitialContextFactory" url="tcp://localhost:3035/" factoryName="JmsTopicConnectionFactory" topic="Interwoven" dasTopic="TeamSite_User" expiryTimeInDays="4" waitTime="300000"></iwovJMS>
Uncomment logFile tags with the name property value of "TeamSiteDASLog" and "TeamSiteClientDASLog".
TeamSite Administration Guide
• • • •••

Configure Server Performance
For example:<logFile name="TeamSiteClientDASLog" baseLogName="_IW_LOG_DIR_/iwui/iwevents/TeamSiteClientEvents" stateFileName="_IW_HOME_/servletd/logs/iwclientDASproxy.properties" waitTime="30000" isDAS="true" />
<logFile name="TeamSiteDASLog" baseLogName="_IW_LOG_DIR_/iwevents/TeamsiteEvents" stateFileName="_IW_HOME_/servletd/logs/iwDASproxy.properties" waitTime="30000" isDAS="true" />
3. Restart the TeamSite services.
4. The DAS enabling can be verified by looking into the messages_handles database table for the messages published for the DAS. example: Pseudo Query:
Select * from message_handles where destinationId in
(Select destinationId from destinations where name ='TeamSite_User')
Configure Server PerformanceThe following sections describe the configuration settings that enable you to maximize the performance of TeamSite relative to your unique environment.
Cache Size
To set the TeamSite cache size, edit the cachesize line in the [iwserver] section of iw.cfg. If a comment symbol (#) begins the line, remove it. If this line does not appear in your iw.cfg file, add it as shown below. The initial cache size setting should be approximately three times the number of files and directories on the largest branch.
For example, if the largest branch contains 15,000 files and directories, you should set cache size to 45000 as follows:[iwserver]
cachesize=45000
Minimum cache size is 1000; maximum is 400,000 entries. Each cache line takes a maximum of 1KB of physical memory. Recommended physical memory is cache size times 1KB plus an additional 25% as a safety margin. In the example shown below, physical memory would be (45,000 * 1KB) + 11MB = 56MB. If you encounter a great
TeamSite Administration Guide 59
• • • •••

Chapter 3: Configure the TeamSite Server
60
deal of memory swapping, you should either reduce the cache size or install more memory.
NOTE
The value of cachesize is not the amount of memory that is used, but the number of objects kept in the cache.
You must restart the TeamSite server for this change to take effect.
External Task Impersonation
Windows:
When the disable_ext_task_impersonation option in the iw.cfg file is set to true, workflow external tasks run without impersonation (that is, as System). [authentication]
disable_ext_task_impersonation=true|false
External tasks run as the task owner and are restricted to the permissions associated with the task owner. If the impersonate_without_password option in the iw.cfg file is set to false, the behavior from earlier TeamSite versions in which the iwauth cookie carries the password is in effect. This applies only to iwptcompile and CGIs and has no effect if impersonation is turned off for a given command in the iwutild.cfg file.[authentication]
impersonate_without_password=true|false
Throughput Monitors
Throughput monitors can be used in conjunction with the iwstat CLT to monitor system status and performance. By default, the throughput monitoring is set to off. To turn on throughput monitoring edit the thruputmonitoring line in the [iwserver] section of iw.cfg as follows:[iwserver]
thruputmonitoring=on
After turning monitoring on, the five default throughput monitors are activated. They return system statistics over the previous minute, 15 minutes, hour, eight hours, 24 hours, and for the entire time that the system has been running.
TeamSite Administration Guide
• • • •••

Configure Server Performance
You can deactivate any of the default monitors by adding a comment mark (#) to the beginning of the line. The last two throughput monitors can be configured with custom time intervals.[iwserver]
thruputmonitoring=on
thruputmonitor1=1 # 1 minute
thruputmonitor2=15 # 15 minutes
thruputmonitor3=60 # 1 hour
thruputmonitor4=480 # 8 hours
thruputmonitor5=1440 # 24 hours
thruputmonitor6=-1 # forever
thruputmonitor7
thruputmonitor8
Detect Low Disk Space and Inode Count
TeamSite is configured to freeze the Content Store when it detects that free disk space or inode count (on Unix) is low. The Content Store remains frozen until sufficient disk space or inode count (on Unix) is restored, at which point the server returns to its normal running state. This feature helps prevent possible corruption of the Content Store. While the Content Store is frozen, users cannot write to the TeamSite Content Store. Users can still perform read-only operations. The CLT iwfreeze can be used to manually freeze the Content Store.
The disklow lines in the [iwserver] section of iw.cfg control the behavior of disk/inode (on Unix) low detection. They are shown here with their default settings:[iwserver]
disklow_mbytes=50
disklowpercent=10
(Unix)disklow_knodes=50
disklow_mbytes—Defines the freeze threshold in MB for the TeamSite server. The TeamSite server does not allow any write operations if the disk space falls below this setting.
disklowpercent—Defines the percentage of free disk space that is considered low.
(Unix)disklow_knodes—Defines a freeze threshold in thousands of inodes for the TeamSite server.
NOTE
If the server detects a low-disk state based on the threshold set in iw.cfg, it does not allow you to manually unfreeze the Content Store with the iwfreeze command. The
TeamSite Administration Guide 61
• • • •••

Chapter 3: Configure the TeamSite Server
62
TeamSite server does not allow disklowpercent to go below 2 percent. To change these settings, edit the setting on any of these lines.
Configure the TeamSite Server LocaleThe iw.cfg file contains a server_locale entry in the [iwserver] section. The entry specifies the locale in which current execution of the TeamSite server (iwserver) runs. For example:[iwserver]
server_locale=English_UnitedStates.MS1252 (Windows)US-ASCII (Unix)@Binary;
This setting is automatically created in the iw.cfg file when iwserver is started. The native/system locale is determined by reading the LANG environment variable (Unix)/System Locale setting in the Regional Settings control (Windows). Once the server_locale setting exists in the iw.cfg file, it is used to determine the TeamSite server’s native/system locale at every invocation of iwserver. If this setting is not present, iwserver determines its locale from the LANG environment variable (Unix)/System Locale setting in the Regional Settings control panel (Windows).
NOTE
While this setting can be user-modified, it is designed to serve as reference as to the locale in which iwserver is currently running. If you have a situation where you want to force iwserver to run in a particular locale (independent of the LANG environment variable (Unix)/System Locale setting (Windows) you can stop the TeamSite server, manually edit the server_locale line, then restart the TeamSite server.
The locale in which the server operates (as defined by the server_locale entry), effectively determines the locale of the TeamSite IFS. For example, if iwserver runs under the Japanese_Japan.Shift_JIS@Binary locale, all file and directory names are encoded in Shift_JIS encoding.
The server_locale setting in the iw.cfg file can contain any of the locales listed in the following table (note that these settings are Autonomy naming conventions—the operating system locales to which they map are also contained in the table):
Table 5 server_locale Settings in iw.cfg
iw.cfg server_locale Setting (Unix) Solaris
SimplifiedChinese_China.MS936@Binary zh/
Korean_Korea.MS949@Binary ko
TeamSite Administration Guide
• • • •••

Configure FormsPublisher
Configure FormsPublisherThe following sections describe how to configure FormsPublisher to provide an example templating environment. After the initial setup is complete, you can:
Use the example templating environment to become familiar with the FormsPublisher end-user features.
Customize the example environment to create your site-specific configuration.
Set up the Example Environment
Perform the following steps to set up the example FormsPublisher environment. You must copy these files and directories to locations that are specific to your site.
1. Decide which workarea you will use for the initial FormsPublisher setup.
Ideally, this workarea should be on a temporary test branch where you can submit and publish without affecting the rest of your TeamSite installation. After FormsPublisher is configured in a workarea on this test branch, you can copy the workarea to a permanent branch. You can then submit the workarea to the staging area and use Get Latest to propagate the setup to other workareas on the branch.
2. Read the iw-home\examples\Templating\README file for details about directory contents and last-minute information that might not be documented elsewhere.
Japanese_Japan.Shift_JIS@Binary ja_JP.PCK
Japanese_Japan.JapanEUC@Binary ja
German_Germany.Latin1@Default de
English_UnitedStates.US-ASCII@Binary C (“C” locale)
Table 6 server_locale Settings in iw.cfg
iw.cfg server_locale Setting Windows Locale
SimplifiedChinese_China.MS936@Binary Simplified Chinese
Korean_Korea.MS949@Binary Korean
Japanese_Japan.MS932@Binary Japanese
German_Germany.MS1252@Default German
English_UnitedStates.MS1252@Binary U.S. English
Table 5 server_locale Settings in iw.cfg
iw.cfg server_locale Setting (Unix) Solaris
TeamSite Administration Guide 63
• • • •••

Chapter 3: Configure the TeamSite Server
64
3. Copy the contents of iw-home\examples\Templating\templatedata (including the templatedata directory itself) to the workarea determined in step 1.
Ensure all users have read and write permission for each file.
Do not change any directory or file names.
The end result should be workarea_name/templatedata/...
4. Edit the templating.cfg file to specify the branches where FormsPublisher is used.
5. Optionally, edit the available_templates.cfg file as described in the Workflow Developer’s Guide.
FormsPublisher Settings in iw.cfg
You may need to configure the following FormsPublisher settings in your TeamSite iw.cfg file:
Identify the Templating Directory
To change the directory in your workareas where templating content will reside, modify the /etc/iw.cfg file. The default directory is templatedata.[teamsite_templating]
data_root=directory
Maintain Preview Files
A manifest file is created at the top of the user’s workarea when a preview is performed. Included in the manifest file is a list of files created during a preview. When a new preview is requested, the manifest file is checked and the temporary files listed in it are deleted. The manifest file is also deleted. The preview is then generated and a new manifest file is created.
The preview_history_limit parameter in the iw.cfg file lets a user do multiple previews and compare the results of previews without the preview files being deleted. For example, if preview_history_limit=2, two temporary preview files would be maintained. When the user does a third preview in the same workarea, the oldest set of preview and manifest files are deleted and replaced with preview files that are created by the current preview. As a result, a user's workarea always contains two manifest files and the corresponding preview files. These files are marked private so they will not be submitted to the staging area or shown in a TeamSite directory listing.[teamsite_templating]
TeamSite Administration Guide
• • • •••

TeamSite Embedded Failsafe
preview_history_limit=value
The preview_system_directory parameter in the iw.cfg file puts preview system files, such as manifest files, in a directory other than data_root (templatedata).[teamsite_templating]
preview_system_directory=directory
Control Printing of Data Records
Data records are normally written so that all content appears on a single line. You have the option to print so that each new XML element in a data record starts on a new line, indented. To enable this type of printing, include the following line in the /etc/iw.cfg file.[teamsite_templating]
pretty_print_dcrs=true
TeamSite Embedded FailsafeThe TeamSite Failsafe functionality has been automated to improve the ability to protect your assets against unexpected server outages. Unlike previous versions of TeamSite, there is no need to modify your iw.cfg file to benefit from what is now known as Embedded Failsafe.
Embedded Failsafe improves reliability by automatically flushing the cache at clean flush points, thereby reducing the possibility of on-disc metadata inconsistencies caused by abnormal server termination.
TeamSite Administration Guide 65
• • • •••

Chapter 3: Configure the TeamSite Server
66
TeamSite Administration Guide• • • •••

Chapter 4
Manage the TeamSite Server
This chapter describes configuration settings and procedures that can be used to manage and enhance your server performance. While there are many variables that contribute to your TeamSite server performance, the information contained in this section should prove useful to most TeamSite administrators. The following topics are discussed:
Verify Server Operation
Start and Stop the TeamSite Server
Check for Multiple Servers
Check Request Handling
Verify the Server Mount
Locate the Installation Directory
Review TeamSite Log Files
Monitor the Server Load
Reconfigure iwwebd to Recognize a New IP Address
Manage Disk Space
Monitor Disk Space Usage
TeamSite Administration Guide 67
• • • •••

Chapter 4: Manage the TeamSite Server
68
Verify Server OperationTo verify that the TeamSite server is running, complete the following procedure:
Windows:
1. Press Alt + Ctrl + Delete and select Task Manager to open the Windows Task Manager.
2. Click the Processes tab.
3. Ensure that one iwserver.exe is running.
If there is no iwserver.exe listed:
a. Open the Control Panel (Start > Settings > Control Panel) and select Administrative Tools.
b. Double-click Services.
c. Ensure that TeamSite is listed in the Name column, and that it is listed as Started in the Status column (TeamSite in the Services window is the equivalent of iwserver.exe in the Task Manager).
4. Optionally, check the Mem Usage column of the Task Manager to see how much memory iwserver.exe is using.
For details about analyzing and changing the amount of memory it is using, and the relationship between cache size and memory usage, see “Cache Size” on page 59.
Unix:
1. Type the following command:
% /bin/ps -ef | grep iwserver | grep -v grep
If the iwserver process (that is, the TeamSite server) is running, you will see a response similar to this:
iwts 643 638 0 Feb 08 ? 7:22 iwserver.sol -e /Interwoven/TeamSite/local/logs/iwevents.log /iw-store
If you do not see a similar response, iwserver is not running. To troubleshoot your installation:
Solaris—Check the iwtrace.log file to see if TeamSite stopped abnormally producing an EXITED: message.
AIX—Check the var/admin/iwserver.log file for ERROR: and WARNING: messages.
2. If you determine that the TeamSite server stopped abnormally, stop the TeamSite services with the following command:
% /etc/init.d/iw.server stop
TeamSite Administration Guide
• • • •••

Start and Stop the TeamSite Server
3. Start TeamSite by running the following command:
% /etc/init.d/iw.server start
Start and Stop the TeamSite ServerWindows:
To manually stop the TeamSite server:
1. Log in to Windows with Administrator permissions.
2. Select Start > Settings > Control Panel.
3. Double-click Administrative Tools.
4. Double-click Component Services.
The Component Services Control Panel opens.
5. Select TeamSite from the list of services, and click Stop.
6. Select Proxy from the list of services, and click Stop.
7. If you are using OpenDeploy, select OpenDeploy from the list of services, and click Stop.
8. To restart TeamSite, you must reboot the server host machine.
Do not attempt to restart the TeamSite service from the Services control panel. By default, TeamSite is configured to start automatically on reboot.
NOTE
If you stop the TeamSite server while there are open handles (for example, someone has a file from the Content Store open, or is exploring it, or it is remotely mounted), either of the following entries may be written to iwtrace.log:ERROR: DrvUnMountDevice - Lock volume failed Access Denied or:Trying to delete non-existent vnode 0xXXXXXXXXThese messages can be ignored.
Unix:
To stop the TeamSite server:
% /etc/init.d/iw.server stop
TeamSite Administration Guide 69
• • • •••

Chapter 4: Manage the TeamSite Server
70
To restart the TeamSite server:
% /etc/init.d/iw.server start
Check for Multiple ServersUnix:
One server process should be running at any given time. If there are no processes running, then the server is not running. If more than one server process is running, there is a problem with the server and it should be stopped and restarted.
To reset the server to ensure that only one server process is running:
1. Issue the following command to stop the server:
% /etc/init.d/iw.server stop
2. Verify that all server processes have stopped. If not, manually kill any remaining processes. For more information on the kill command, consult a UNIX reference manual.
3. Restart the server with the following command:
% /etc/init.d/iw.server start
Check Request HandlingTo ensure that the TeamSite server is answering requests correctly, type the following command:
% >iw-home\bin\iwversion
If the TeamSite server is responding, you will see a response similar to this:
iwserver: 7.1.2 Build 61235 Interwoven 20101031
If the server does not respond or stops, then the server is not handling requests correctly. Restart the server as described in “Check for Multiple Servers” on page 70 for Unix and as described on page 69 for Windows.
TeamSite Administration Guide
• • • •••

Verify the Server Mount
Verify the Server MountWindows:
Use Windows Explorer to verify that the Y: (default) drive is mounted as a file system volume.
If you did not use the default installation location, check the iwmount line in the [locations] section of iw-home\etc\iw.cfg to find out what drive letter was used. Use Windows Explorer to verify that the drive is mounted as an IFS volume. If it is not, reboot the server.
NOTE
If you are using IIS, the Microsoft Management Console may show an error flag next to the IFS volume when you reboot the Windows server. This does not necessarily indicate an error. Because IIS starts before TeamSite, it cannot find the IFS volume when it first starts, and it does not remove the error even after TeamSite starts and the IFS volume appears. Once the TeamSite server does start, you can navigate to the IFS volume and see your content files in your backing store.
Unix:
Verify the server is mounted to the correct drive partition with the following command:
% df -k | grep iwserver
The output should contain two lines similar to this:Filesystem kbytes used avail capacity Mounted on
server:/iwserver/default 3141968 1542472 1285336 55% /iwmnt/default
server:/iwserver/default 3141968 1542472 1285336 55% /.iwmnt/default
If the server does not respond properly, stop and restart it with:/etc/init.d/iw.server stop then /etc/init.d/iw.server start.
Locate the Installation DirectoryOn Windows, to locate the TeamSite installation directory, use the iwgethome.exe CLT:
1. Select Start > Run.
2. Type cmd in the Open field and click OK.
TeamSite Administration Guide 71
• • • •••

Chapter 4: Manage the TeamSite Server
72
The command window opens.
3. Type iwgethome at the command prompt and press Enter.
TeamSite displays the installation directory:
>iwgethomeC:Program Files\Interwoven\TeamSite
On Unix, to locate the TeamSite installation directory, type iwgethome at a command prompt. TeamSite displays the installation directory:
% iwgethome/local/iw-home
For detailed information about iwgethome and all TeamSite CLTs, refer to the TeamSite Command-Line Tools manual for your platform.
Review TeamSite Log FilesTeamSite records events in various TeamSite log files and also in the Windows Event Viewer. These files, their contents, and default locations are described in the following sections.
NOTE
The default locations of files is iw-home\local\logs.
WFS Log
Unix:
On system startup, the TeamSite kernel device driver (iwovwfs) is installed. This occurs before most other services are up. Messages from this installation are logged into /var/adm/iwwfs.log, and an error message is printed to the console instructing you to look at this log file. The location of this file cannot be changed.
TeamSite Administration Guide
• • • •••

Review TeamSite Log Files
Installation Log
Unix:
The TeamSite installation log records the prompts and your replies to them during the execution of the TeamSite installation program. The file is called installer.log and, by default, is located in <iw-home>/iwinstall/logs.
Server Log
The server log records the state of TeamSite over time—including, but not limited to—when the TeamSite server is started, stopped, and mounted. The file is called iwserver.log and, by default, is located in iw-home\local\logs. If the file is not in the default location, you can locate it using the CLT iwgetelog.
Master users can also view the server log from the Logs tab in the Administration Console.
Trace Log
The trace log records any irregularities on the TeamSite server. It is primarily used by Consulting Services to diagnose system performance issues. The file is called iwtrace.log and, by default, is located in iw-home\local\logs. If the file is not in the default location, you can locate it using the CLT iwgettrace.exe.
Master users can also view the trace log from the Logs tab in the Administration Console.
Events Log
The iwevents.log records TeamSite activities—including, but not limited to—file submits, edition, branch and workarea creation, and DiskLow, Freeze, ShutDown, StartUp and Thaw events. It is used with certain TeamSite triggering scripts. By default, the file is located in iw-home\local\logs. On Unix, if the file is not in the default location, you can locate it by checking the /etc/defaultiwelog file or by using the CLT iwgetelog. On Windows, if the file is not in the default location, you can locate it using the CLT iwgetelog.exe. The entries in your iwevents.log file will be similar to these:
TeamSite Administration Guide 73
• • • •••
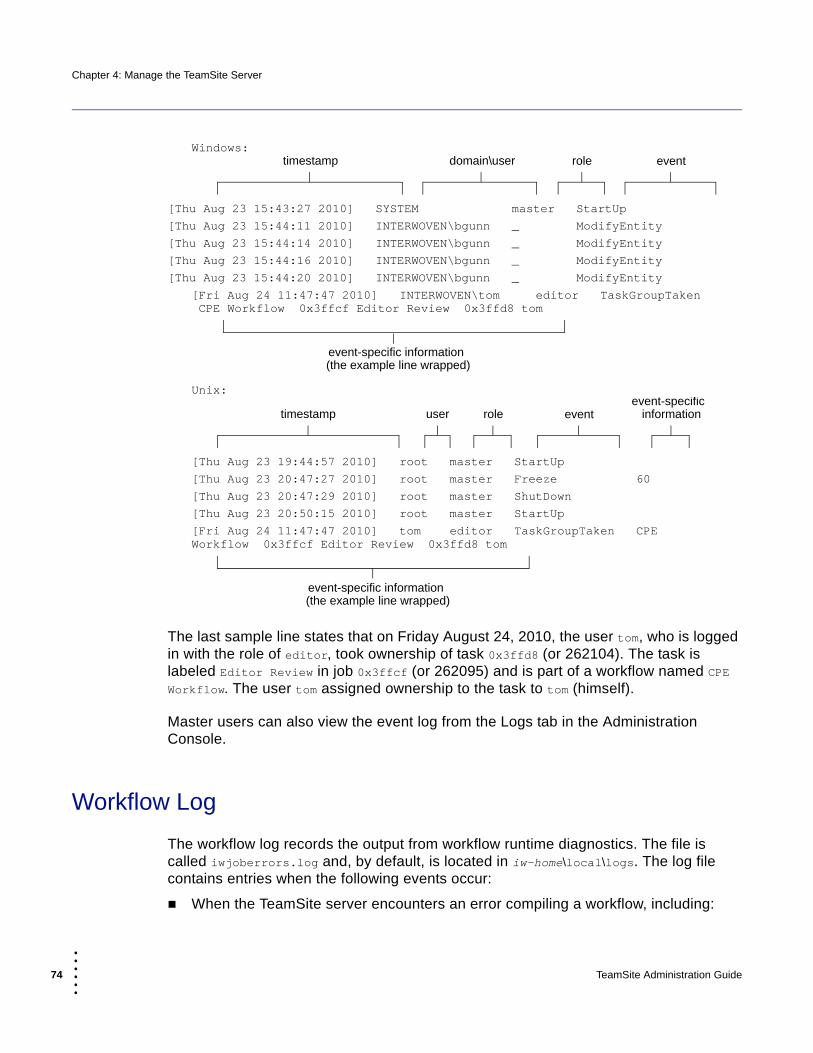
Chapter 4: Manage the TeamSite Server
74
Windows:
[Thu Aug 23 15:43:27 2010] SYSTEM master StartUp
[Thu Aug 23 15:44:11 2010] INTERWOVEN\bgunn _ ModifyEntity
[Thu Aug 23 15:44:14 2010] INTERWOVEN\bgunn _ ModifyEntity
[Thu Aug 23 15:44:16 2010] INTERWOVEN\bgunn _ ModifyEntity
[Thu Aug 23 15:44:20 2010] INTERWOVEN\bgunn _ ModifyEntity
[Fri Aug 24 11:47:47 2010] INTERWOVEN\tom editor TaskGroupTaken CPE Workflow 0x3ffcf Editor Review 0x3ffd8 tom
Unix:
[Thu Aug 23 19:44:57 2010] root master StartUp
[Thu Aug 23 20:47:27 2010] root master Freeze 60
[Thu Aug 23 20:47:29 2010] root master ShutDown
[Thu Aug 23 20:50:15 2010] root master StartUp
[Fri Aug 24 11:47:47 2010] tom editor TaskGroupTaken CPE Workflow 0x3ffcf Editor Review 0x3ffd8 tom
The last sample line states that on Friday August 24, 2010, the user tom, who is logged in with the role of editor, took ownership of task 0x3ffd8 (or 262104). The task is labeled Editor Review in job 0x3ffcf (or 262095) and is part of a workflow named CPE Workflow. The user tom assigned ownership to the task to tom (himself).
Master users can also view the event log from the Logs tab in the Administration Console.
Workflow Log
The workflow log records the output from workflow runtime diagnostics. The file is called iwjoberrors.log and, by default, is located in iw-home\local\logs. The log file contains entries when the following events occur:
When the TeamSite server encounters an error compiling a workflow, including:
timestamp domain\user eventrole
event-specific information(the example line wrapped)
timestamp user role eventevent-specific
information
event-specific information(the example line wrapped)
TeamSite Administration Guide
• • • •••

Monitor the Server Load
a task’s named owner has insufficient privileges to its areavpath
an areavpath does not exist
This does not include every workflow specification that has errors—some errors occur on the client.
When externaltasks have trouble forking on Windows.
When the workflow engine has problems while running tasks in a job, including:
attempting to create a task variable that already exists.
attempting to add a file to a task that is already in its file list.
Windows Event Viewer
You can configure TeamSite to log and display any of the following events in the Windows Event Viewer:
DiskLow
Freeze
ShutDown
StartUp
Thaw
Configuration is controlled by the [iwserver] section in the iw.cfg file. See the Windows Event Viewer documentation provided by its manufacturer for usage details.
Monitor the Server LoadThe TeamSite CLT iwstat.exe returns a list of all current TeamSite processes, for example:
While the TeamSite server is not running (as the result of iwfreeze), iwstat returns:
*** SERVER FROZEN: 55 SECONDS REMAINING ***
ID Thread User Duration Operation
0x9d 0xf root 0.000 GetArchiveStatus
While the TeamSite server is running, iwstat returns:Store Status
iwadmin Running
TeamSite Administration Guide 75
• • • •••

Chapter 4: Manage the TeamSite Server
76
dev Running
ThirdParty Running
pubs Running
bugdb Running
dropzone Running
integrations Running
products Running
scratch Running
CIE Running
workflow Running
ID Thread User Duration Store Operation
0x28e33f4 0x1a75 dvallabh 0.000 - GetServerStatus
0x28543a1 0x1e - 2529.446 dev BatchJobs
Store: dev
Batch Jobs (running):
Queued User Job Object ID
[Fri Jul 9 15:27:19 2010] root RemoveDuplicateData (Phase 1)
Minutes Thruput Avg op Load
1 13 0.0000 0.00
5 17 0.0003 0.00
15 233 0.0041 0.95
60 1792 0.0004 0.71
See TeamSite Command-Line Tools for details about iwstat.exe usage and output.
Reconfigure iwwebd to Recognize a New IP Address
If you change the IP address of the server hosting TeamSite, complete the following procedure to reconfigure iwwebd to recognize the new address.
1. Go to the iwwebd.bin directory/folder.
2. Run iwwebd_conf.ipl from the command line.
3. Restart iwwebd.
TeamSite Administration Guide
• • • •••

Manage Disk Space
Manage Disk SpaceThe following sections describe procedures you can use to manage disk space on the TeamSite server.
File Locations
The [locations] section of iw.cfg must be updated if you change the locations of certain TeamSite files and directories from their default locations. By default, iw.cfg includes the following entries:#[locations]
#iwhome=/usr/iw-home
#iwmount=/iwmnt
#iwcgimount=/.iwmnt
#iwstore=/local/iw-store
#iweventlog=/var/adm/iwevents.log
#iwtracelog=/var/adm/iwtrace.log
#iwserverlog=/var/adm/iwserver.log
To change the location of one of the entries, remove the comment (#) marks from its line and edit the line to point to the new location. (Ensure that the [locations] line is not also commented out). For example: [locations]
iwbin=C:\Program Files\Interwoven\TeamSite\(Unix:usr/iw-home/)bin
iwmount=Y:/iwmnt
iwcgimount=Y:/.iwmnt
iwroles=C:\Program Files\Interwoven\TeamSite\(Unix:usr/iw-home/)local\/config\roles
iwstore=Window:C:\iw-store;Unix:local\iw-store
iwsubmitconfig=C:\Program Files\Interwoven\TeamSite\(Unix:usr/iw-home/)local\config\submit.cfg
iwautoprivate=C:\Program Files\Interwoven\TeamSite\(Unix:usr/iw-home/)local\config\autoprivate.cfg
iwlogs=C:\Program Files\Interwoven\TeamSite\(Unix:usr/iw-home/)local\logs
iwconfigs=C:\Program Files\Interwoven\TeamSite\(Unix:usr/iw-home/)local\config
iweventlog=C:\Program Files\Interwoven\TeamSite\local\logs\(Unix:var/adm/)iwevents.log
iwtracelog=C:\Program Files\Interwoven\TeamSite\local\logs\(Unix:var/adm/)iwtrace.log
iwserverlog=/var/adm/iwserver.log
iwdeploylog=C:\Program Files\Interwoven\TeamSite\Unix:usr/iw-home/)local\logs\iwdeploy.log
After restarting, TeamSite looks for the specified file or directory in the new location.
TeamSite Administration Guide 77
• • • •••

Chapter 4: Manage the TeamSite Server
78
The default iw.cfg does not contain all applicable files. The following table lists other files and directories controlled by [location] in iw.cfg, some of which are included in the preceding example.
On Unix, if you change the location of iwmount, you must edit its webserver alias to point to the new location. Also make sure the values in /etc/defaultiw* match these settings.
NOTES
On Windows, the TeamSite shared drive location can be configured to any drive letter (for example, to change the shared drive to X:, edit the [locations] section to contain the line iwmount=X:). If you change the shared drive location, you must update the webserver alias (iw-mount) accordingly. After changing shared drive locations, you must reboot the server for the changes to take effect.
If you change the location of one of the logs and no file with the specified name is present in the new location, a new file is created.
On Windows, to change the location of the TeamSite Content Store, you must edit the Registry.
Table 7 Other files and directories controlled by [location]
iwbin Specifies the location of TeamSite binaries (by default Unix:/Interwoven/TeamSite/bin;Windows: iw-home\bin).
iwmount Specifies the location of the TeamSite mount point.
iwcgimount Specifies the location of the non-attribute caching TeamSite mount point.
iwroles Specifies the directory containing the TeamSite roles files.
iwstore Specifies the location of the TeamSite Content Store (this setting can be overridden by the Registry key on Windows).
iwsubmitconfig Specifies the location of the Submit Filtering configuration file.
iwautoprivate Specifies the location of the Autoprivate configuration file.
iwlogs Specifies the directory containing TeamSite logs.
iwconfigs Specifies the default configuration file directory.
iweventlog Specifies the location of the TeamSite event log.
iwtracelog Specifies the location of the TeamSite trace log.
Unix: iwserverlog
Specifies the location of the TeamSite server log.
iwdeploylog Specifies the location of the deployment log.
TeamSite Administration Guide
• • • •••

Manage Disk Space
Figure 8 Registry Editor window
Enhance File System Performance on the TeamSite Server
On Windows, on the TeamSite server, browsing the TeamSite shared drive using Windows Explorer can be slow. If you are working on the system that hosts the TeamSite server, you can improve performance by completing the following procedure:
1. Open Windows Explorer or My Computer.
2. Select Tools > Map Network Drive.
The Map Network Drive window opens.
3. Click Browse.
The Browse For Folder window opens.
4. Locate the system that hosts the TeamSite server.
5. Click the plus sign (+) to expand the directory tree of your TeamSite server.
The following graphic shows this for a TeamSite server called Bgunn.
Figure 9 Expanding the directory tree of the TeamSite server
6. Select IWServer, then click OK.
TeamSite Administration Guide 79
• • • •••
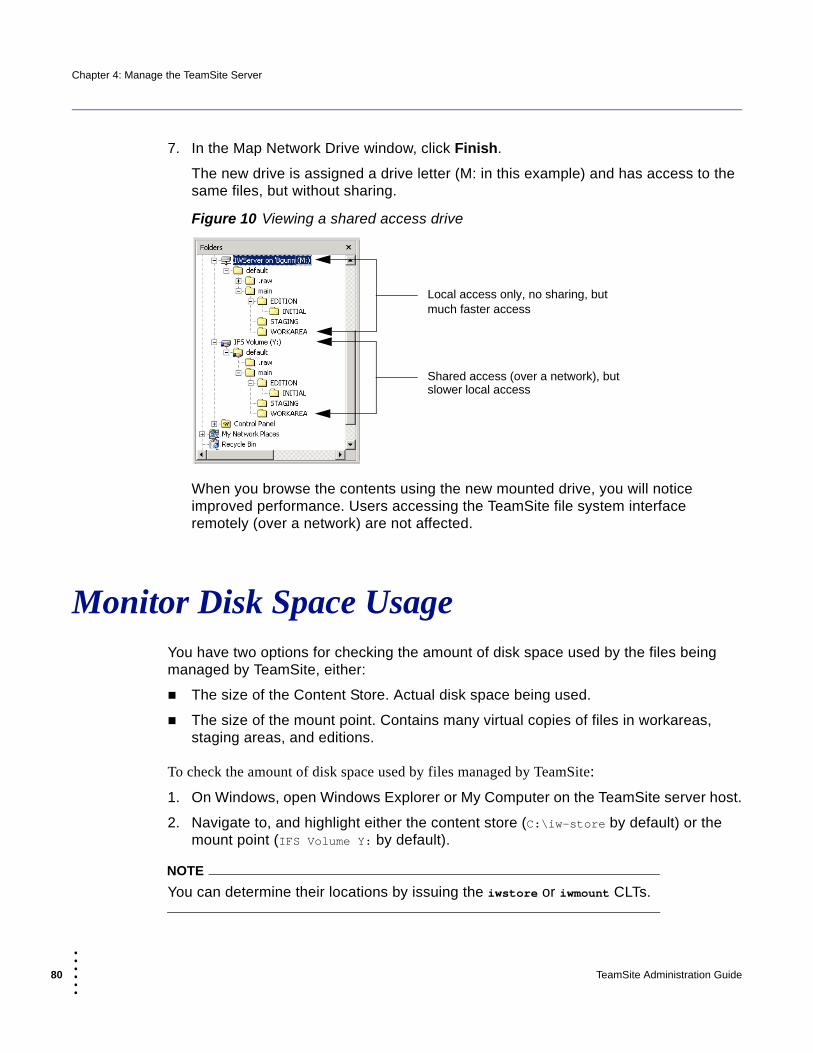
Chapter 4: Manage the TeamSite Server
80
7. In the Map Network Drive window, click Finish.
The new drive is assigned a drive letter (M: in this example) and has access to the same files, but without sharing.
Figure 10 Viewing a shared access drive
When you browse the contents using the new mounted drive, you will notice improved performance. Users accessing the TeamSite file system interface remotely (over a network) are not affected.
Monitor Disk Space UsageYou have two options for checking the amount of disk space used by the files being managed by TeamSite, either:
The size of the Content Store. Actual disk space being used.
The size of the mount point. Contains many virtual copies of files in workareas, staging areas, and editions.
To check the amount of disk space used by files managed by TeamSite:
1. On Windows, open Windows Explorer or My Computer on the TeamSite server host.
2. Navigate to, and highlight either the content store (C:\iw-store by default) or the mount point (IFS Volume Y: by default).
NOTE
You can determine their locations by issuing the iwstore or iwmount CLTs.
Local access only, no sharing, but
Shared access (over a network), but
much faster access
slower local access
TeamSite Administration Guide
• • • •••

Monitor Disk Space Usage
The amount of disk usage for your selection is shown in the bottom of the window:
Figure 11 Viewing the size of the iw-store
On Unix, issue the following command:
% df -k `cat /etc/defaultiwstore`
The system will return something similar to the following:Filesystem kbytes used avail capacity Mounted on
/dev/dsk/c0t2d0s2 17637068 9613319 7847379 56% /local
Although the mount point contains many virtual copies of files in workareas, staging areas, and editions, df -k only checks the actual disk space used.
Delete Editions
To reclaim some disk space, you can delete old editions, which also deletes all files contained in that edition and all intermediate submissions between publication of editions. You should be aware that if a file is contained in more than one edition and not all of these editions are deleted, the file is not deleted; only the pointer to the file in the deleted edition is deleted. Therefore, you may not save as much space as you anticipate.
To delete an edition using the ContentCenter Professional interface:
1. In the branch view, click the check box next to the edition you want to delete.
2. Select File > Delete.
A confirmation window is displayed.
3. Type YES in the confirmation field and then click Delete.
Size of C:\iw-store
TeamSite Administration Guide 81
• • • •••

Chapter 4: Manage the TeamSite Server
82
The edition and all versions of the files contained within that edition are deleted. Additionally, all Submit Log entries are transferred to the next most recent edition. If the edition you have deleted is the newest one, the Submit Log entries are transferred to the staging area.
NOTE
You can also delete editions using the iwrmed CLT as described in the TeamSite Command-Line Tools.
Metadata Forking
Metadata forking conserves disk space by reducing the number of files whose content is duplicated throughout the TeamSite Content Store. That is, if you have an old version of a file in one branch, and an identical version on another branch, the same data may appear twice in the Content Store. Metadata forking is accomplished by running the iwfsshrink CLT and results in no user-visible changes to the TeamSite virtual file system (for example, file histories are not changed).
The iwfsshrink utility must be run while the TeamSite server is running; however, TeamSite may experience some performance degradation while it is running. Also, iwfsshrink may not remove all duplicates (for example, it does not remove any duplicates created by TeamSite users while the utility is running). The iwfsshrink utility should be run every few months.
1. Start the iwfsshrink utility from the command line:
% >iwfsshrink run storename
The utility may take several hours to run.
2. Issue the command again using the status option to view the current status:
% >iwfsshrink status storename
when iwfsshrink finishes running, it returns a message similar to:
Not currently running.Last started Mon Jun 26 15:47:53 2002Last completed Tue Jun 27 00:40:04 2002Files examined: 317974Bytes examined: 75936814830Files found to be duplicates: 233430Files converted: 198352Bytes removed: 23455046531
3. Optionally, you can pause the operation with the pause option, then restart it with the run option.
For more details about the iwfsshrink utility, see the TeamSite Command-Line Tools.
TeamSite Administration Guide
• • • •••

Monitor Disk Space Usage
Move the Content Store and Removing Old Versions
If you are running out of disk space and iwfsshrink does not recover enough extra space, you may need to move the TeamSite Content Store. The TeamSite Content Store must reside on a single logical volume, for example, a single disk or an array of disks.
Alternatively, if you have unused branches in TeamSite, you can delete these branches to recover disk space. Over time, individual branches take up an increasing amount disk space, as the number of versions and files on the branch grows. If you do not need any of your old version history, you can create a new (empty) branch, create a workarea, copy all the old content into the workarea, then delete the old branch. Exercise extreme caution when doing this, as all version and metadata information will be irrevocably lost.
TeamSite Administration Guide 83
• • • •••

Chapter 4: Manage the TeamSite Server
84
TeamSite Administration Guide• • • •••

Chapter 5
Working with Branches
Branches represent paths of content development. Branches contain exactly one staging area, one or more editions, and one or more workareas. Newly created branches are based on an edition of the parent branch. A staging area and an INITIAL edition are created automatically when a new branch is added; workareas must be created manually.
Content can be shared among branches. See “Integrate Content From Different Branches” on page 88.
A locking model is one of the properties set when a branch is created. Locking models specify locking behavior for all workareas on the branch and determine whether users can edit files in different workareas at the same time. The role the user has on a branch also sets locking behavior. The locking behavior for both the branch and the role are combined to determine the locking behavior for a user in a branch. See “Set Locking Models” on page 46.
All users can view public branches and their properties, but only users with a role on the branch can view private branches. Only users in roles who have authorization can reassign a branch to a new owner and update the branch properties. Only some properties are editable after the branch is created.
Deleting branches removes them and their contents, including the version history, from the system. Use caution when deleting branches.
To access branches:
1. Select the Content tab.
2. Navigate to the store that contains the branches you want.
3. Open the main branch. If subbranches exist, navigate through them to the branch you want.
TeamSite Administration Guide 85
• • • •••

Chapter 5: Working with Branches
86
Control Branch Ownership and Administration
You can specify the owner and group of the main branch of a new Content Store by editing the main_owner and main_group lines in the [iwserver] section of iw.cfg. When TeamSite is first installed, it uses the default option of root/Administrator for main branch ownership as follows. [iwserver]
main_owner=root/Administrator
main_group=root/Administrators
To change this setting on an existing main branch, you must use the Windows File Properties to take ownership, or the command-line tool iwchgrp to change the group on Windows and chown and chgrp commands to change the ownership on Unix of the root directory of the main branch. However, if you edit the main_owner and main_group lines and then create a new Content Store, the new settings take effect on the new Content Store. For information about creating a new Content Store, see the TeamSite Installation Guide.
You can specify the role that the owner of a branch has in the iw.cfg file. This role will be added for the person who is the branch owner. This will be in effect whenever a new branch is created. If nothing is specified, the Administrator role is used.[iwserver]
branch_owner_role=role_name
You can specify the role or roles that can administer branches (have access to the Actions > Manage Branches menu item) with the following iw.cfg option:[iwserver]
admin_roles=role_name, role_name
If a user has one of the roles specified in the admin_roles setting in the branch being viewed, the Manage Branches menu item is enabled. This setting controls whether the user sees the menu item; it does not give users in the roles any additional privileges, such as adding users to a role on a branch. For that, you still need to modify the role to have Delegate permission.
(Windows) You can specify a secondary master user other the local administrator with the following iw.cfg option:[iwserver]
secondary_admin_account=domain\user
TeamSite Administration Guide
• • • •••

Create Branches
Users with appropriate permissions can create subbranches within branches.
Figure 12 New Branch screen
To create a branch:
1. Select the Content tab.
2. Navigate to the branch under which you want to create the new branch.
3. Click New Branch in the view pane title bar.
4. Enter a name for the branch.
5. Enter a general description of the branch (for example, if content for a product catalog is to be developed on the branch, you might enter “Branch established for the development of product catalog content.”).
6. Your user name is displayed in the Owner field by default. Enter a different user name if you want to assign the branch to another person. By default, this user will have the Administrator role on the branch (unless a different role has been configured using the branch_owner_role option in the iw.cfg file).
7. Select a locking option. See “Set Locking Models” on page 46 for information about those options.
8. Enter the name of the edition you want to use as a starting point. The edition must be from the parent branch.
TeamSite Administration Guide 87
• • • •••

Chapter 5: Working with Branches
88
9. Specify whether you want to you want the branch to inherit access from the parent branch.Turn on Inherit from Parent to indicate that the users and their roles should initially be identical to those on the parent branch. You can add additional users later. This is the recommended setting. If this setting is not turned on, you select the users and groups for this branch separate from the parent branch. It is recommended that individual users be added to a TeamSite group rather than being added individually to a branch.
10. Select Restrict Access to set up this branch so it is only displayed for users or the groups that have permission to work in the branch. By default, a restricted branch is shown in general listings of all branches, but users without a role on that branch cannot go into that branch. (The branch_security option in iw.cfg controls whether the name of restricted branches can be seen.)
11. Click OK.
The branch is created and contains no workareas, one edition named INITIAL, and a staging area. The staging area and INITIAL edition contain a copy of the content from the edition you chose as a starting point.
After a branch is created you can create workareas and base them on the branch’s INITIAL edition, or any other editions you create on the branch.
Integrate Content From Different Branches
You can integrate content from different branches manually, or through automated workflow processes. This section describes the manual process; see the TeamSite Workflow Developer’s Guide for information about automated workflow processes.
The staging area and INTIAL edition in newly created branches contain a copy of the content in the parent branch’s edition on which they are based. Newly created workareas contain a copy of the content in the branch’s edition on which they are based. Therefore, if you want to create subbranches with workareas that contain content similar to that in the parent branch, create an edition for the parent branch that contains the content you want, and base your subbranches on that edition. You can then base the workareas on the INITIAL edition in each subbranch.
To manually integrate content from one branch to another:
1. Select the Content tab.
2. Navigate to the branch that contains an edition of the content that you want to propagate.
3. Click Editions.
TeamSite Administration Guide
• • • •••

The view pane displays the Editions view. The Editions view lists the staging area (top) and editions (most recent first).
4. Select the edition that contains the content you want, or navigate into the edition and select the items you want to propagate if only a subset of the edition’s content is desired.
5. Select a workarea.
6. Select an overwrite option.
7. Click OK.
The content is copied to the selected workarea.
After the content is copied to the workarea on the target branch, you can submit the content and create new editions to meet your needs.
Manage Branches
If your role allows you to manage branches, you can use the Actions > Manage Branches menu item from the Content tab to display the Manage Branches screen. This screen lists the branches you can manage. From this screen, you can delete or rename the branch. Each branch also has a Properties link so you can modify the branch properties.
Figure 13 Manage Branches screen from the Actions menu
TeamSite Administration Guide 89
• • • •••

Chapter 5: Working with Branches
90
Working with Branch Properties
In the Manage Branches screen, click a branch’s Properties link to display its Branch Properties screen.
Figure 14 Branch Properties screen
It contains the following information:
Name. The name of the branch.
Location. The path to the branch.
Description. The text entered to describe the branch. You can modify this field if you have permission to manage branches.
Created on. The date the branch was originally created.
Locking. The locking model that was selected when the branch was created.
Based on. The edition that was used to provide content for this branch.
Owner. The owner of the branch. You can modify this field if you have permission to manage branches. You can use the Find link to search for the user who will own the branch.
Private. The Restrict access check box determines whether the branch is visible only for users with access to this branch or whether it can be viewed by all TeamSite users.
Inherit from Parent. The Users and Roles check box controls whether users and their roles should initially be identical to those on the parent branch. Additional
TeamSite Administration Guide
• • • •••

users can be added later. If this setting is not turned on, the users and groups for this branch are selected separate from the parent branch.
If you make changes to the branch properties, click Save to save and close the Branch Properties screen.
View Branch Users and Roles
The Users and Roles screen shows a list of users and groups who can work on the selected branch or store.
As the following users or groups are always permitted to work on the specific branch or store, they cannot be removed or their roles cannot be altered from this screen.
Owner of the branch.
Inherited users or groups, if any. An inherited user or group can be identified by a green arrow mark in the icon that represents the user or group.
At times, you may come across the same user or group being listed multiple times with various roles. In such cases, the user or group will have cumulative permissions from all the roles.
To access the Users and Roles screen:
1. Navigate to the branch or store where you want to assign users or groups.
2. Click Configuration.
3. Click Users and Roles.
The roles that have been assigned to a user or group are listed next to the user and are comma-separated. If there are too many roles such that they cannot be displayed in a single line next to the user, mouse over the Roles column next to the user to see the entire list of roles as a tooltip.
Options from this screen enable you to:
Assign Users and Roles. Assign a user or group to the branch.
Edit Roles. Modify the role that a user or group has in that branch.
Remove. Remove a user or group from working on that branch.
Download List. Download a list of users and roles who have permission to work on this branch.
For more information about working with users and roles, see the ContentCenter Professional User Guide.
TeamSite Administration Guide 91
• • • •••

Chapter 5: Working with Branches
92
TeamSite Administration Guide• • • •••

Chapter 6
Manage TeamSite Access
This chapter discusses various procedures for managing access to TeamSite, including assigning user roles, user authentication, and filtering user submissions, as follows:
Access Considerations
Working with Permissions
Share TeamSite Assets using Windows Groups
Enable the User/Group/Role Disk Cache
Operate System Group Membership
Authentication
Configure Submit Filtering
Access ConsiderationsAccess to TeamSite is governed by the following two factors:
Windows/UNIX-related authentication permissions
TeamSite role-based access
Windows/UNIX file permissions control who has access to individual files and directories. Windows/UNIX password authentication is used when logging in to TeamSite. However, TeamSite access privileges govern the role a user has in various branches and workareas. For example, to edit a file in a workarea, a user must both be able to access that workarea (through TeamSite access privileges), and have permissions for that file and its parent directory (through Windows/UNIX permissions).
When adding a new user, you need to consider the following factors:
Whether the user will have access to the server.
TeamSite Administration Guide 93
• • • •••

Chapter 6: Manage TeamSite Access
94
The role the user will play in your TeamSite operations.
The content the user will be editing.
To decide what groups new users need to belong to and which workareas they need to access, consider your existing groups and the content and workareas they can access. Add new users to the groups that work on the same content that they need to edit, and they will automatically have access to their workareas and to their content files. If the new users need their own workarea, create a private or shared workarea, but make sure that they own or have group-level (Unix) access to the files that they will be editing. To change ownership or group (Unix) access to files, see page 110.
When creating a new workarea, you need to decide:
What the name of the workarea should be.
Who will need to access the workarea (On Unix, this can be one person or one person and a group).
What content the workarea’s owner and group should and should not have access to.
Set permissions on your files according to the latter consideration. Remember that a file cannot have different permissions in different workareas.If a file’s permissions differs across workareas, you will encounter conflicts when you submit files to the staging area.
NOTE
The TeamSite log-in screen accepts passwords of virtually any length. If you are using multi-byte characters, the maximum length is 64 characters. On Unix, other underlying authentication operating system mechanisms (including /etc/passwd, PAM, LDAP, and SecureID) may have different policies.
Working with PermissionsWhen users try to perform any action in TeamSite, the TeamSite server automatically checks to see whether or not they have permission to perform that action. TeamSite checks the following factors:
User roles. If you are attempting to perform any of these actions through ContentCenter, you must be a user or member of a group associated with a role authorized to perform the action on the branch.
TeamSite Administration Guide
• • • •••

Working with Permissions
Workarea permissions. A user has workarea permissions if he is either the primary owner of a workarea or if he belongs to the group that has access to the workarea.
File permissions. File permissions are Windows: Modify, UNIX: read-write-execute permissions (unless otherwise specified) to a file.
Directory permissions. Directory permissions are Windows: Change, UNIX: read-write permissions (unless otherwise specified) to a directory.
Permission overrides. Standard permissions are overridden for that role.
Not all of these factors apply to every action. TeamSite checks only the factors that apply to the action being attempted. Generally, it checks as follows:
All the roles a user has on the branch are calculated. If any of these roles allow the operation, permission is granted; otherwise the operation is not allowed for the user on that object.
For operations on files in workareas:
The user must be the owner or a member of the owning group of the workarea.
The user must have the appropriate Windows/UNIX file directory permissions.
The file must meet the appropriate locking constraints.
The user must be the owner of the job or task (if applicable).
If the user has a role on the branch that has permission overrides set, these restrictions may not apply.
Table 8 lists all of the operations that can be specified when roles are being created or edited. It also shows the scope of each of the operations and the permissions that are checked before a user can perform the function.
NOTE
TeamSite workflow tasks may require users to perform actions such as editing a file, submitting it to the staging area, or taking ownership of a group task. To perform the task, the user must have the ability to perform the action as specified in the table. For example, if you assign a task that requires an Author to edit a file, the Author must have workarea permissions, parent directory permissions, and file permissions for that file in addition to the Edit operation in the role.
Table 8 Role operations and permission checking
Operation Object Affected Permissions Checked
Branch Administration
Create Branch branch
Delete Branch branch
TeamSite Administration Guide 95
• • • •••

Chapter 6: Manage TeamSite Access
96
Delete Edition edition
Modify Branch Properties
branch
Rename Branch branch
Rename Edition edition
ContentCenter Professional Operations
Show Reporting UI
Content Management
Compare workarea, staging area, edition, file, folder, deleted file, symlink (Unix)
• User/group has file read permission on source and destination areas.
• Workarea is readable.
Publish Edition branch
Submit workarea, file, folder, deleted file, symlink
• User/group is member of workarea.
Update Workarea workarea, file, folder, deleted file, symlink
• User/group is member of workarea.
External Triggers
Create or Delete External Triggers
Files, Forms, and Folders
Copy Files and Folders
file, folder, symlink • User/group has file read permission on source area.
• User/group is member of workarea.
• User/group has file write permission on destination area.
Delete Files and Folders
file, folder, symlink • Has operating system permission to delete files.
• User/group is member of workarea.
• Satisfies branch and role locking constraints.
• User is owner of task or job requesting deletion.
Download file, folder • User/group has file read permission.
• Workarea is readable.
Table 8 Role operations and permission checking (Continued)
Operation Object Affected Permissions Checked
TeamSite Administration Guide
• • • •••

Working with Permissions
Edit file, folder • User/group has file write permission.
• User/group is member of workarea.
• Satisfies branch and role locking constraints.
• User is owner of task or job requesting edit.
Generate Form file, folder, symlink • User/group has file write permission.
• User/group is member of workarea.
• Satisfies branch and role locking constraints.
• User is owner of task or job requiring the form generation.
Lock File file, deleted file, symlink • File is not locked.
• User/group is member of workarea.
Mark Private file, folder, symlink • User/group is member of workarea.
Merge File file, symlink • User/group is member of workarea.
• User/group has file write permission.
Modify File and Folder Permissions
file, folder, symlink • User/group is member of workarea.
• Has operating system permission to change files.
• Satisfies branch and role locking constraints.
• User is owner of task or job requesting edit.
Modify File Extended Attributes
file, symlink • User/group is member of workarea.
• User/group has file write permission.
• Satisfies branch and role locking constraints.
• User is owner of task or job requesting modification.
Move Files and Folders
file, folder, symlink • User/group has file write permission.
• User/group is member of workarea.
• Has operating system permission to rename files.
• Satisfies branch and role locking constraints.
• User is owner of task or job requiring the rename.
Table 8 Role operations and permission checking (Continued)
Operation Object Affected Permissions Checked
TeamSite Administration Guide 97
• • • •••

Chapter 6: Manage TeamSite Access
98
Preview File file, folder, branch, edition, workarea, staging area, symlink
• User/group has file read permission.
• Workarea is readable.
Preview Form file, folder, workarea, symlink
• User/group has file read permission.
• Workarea is readable. Rename Files and Folders
file, folder, symlink • User/group has file write permission.
• User/group is member of workarea.
• Has operating system permission to rename files.
• Satisfies branch and role locking constraints.
• User is owner of task or job requiring the rename.
Revert File file, deleted file, symlink • User/group is member of workarea.
Search content store, branch, workarea, staging area, edition, file, folder, deleted file, symlink
• User/group has file read permission.
• Workarea is readable.
Undo Changes file, workarea, symlink • User/group has file write permission.
• User/group is member of workarea.
• Satisfies branch and role locking constraints.
• User is owner of task or job requesting change.
Unlock File file, deleted file, symlink • File is locked.
• User/group is workarea owner or locked the file.
Unmark Private file, folder, symlink • User/group is member of workarea.
View File History file, deleted file, symlink • User/group has file read permission.
• Workarea is readable.
New and Imported Content
Create File folder • User/group has file write permission.
• User/group is member of workarea.
• Satisfies branch and role locking constraints.
• User is owner of task or job requesting file creation.
Table 8 Role operations and permission checking (Continued)
Operation Object Affected Permissions Checked
TeamSite Administration Guide
• • • •••

Working with Permissions
Create Folder folder • User/group has file write permission.
• User/group is member of workarea.
• Satisfies branch and role locking constraints.
• User is owner of task or job requesting file creation.
Create Form file, folder • User/group is member of workarea.
• User is owner of task or job requesting form creation.
Import file, folder • User/group has file write permission.
• User/group is member of workarea.
• Satisfies branch and role locking constraints.
• User is owner of task or job requesting file import.
Store Administration
Freeze Store content store
Modify Store Properties
content store
Thaw Store content store
User Administration
Create TS Group
Create TS User
Delete TS User
Workarea Administration
Create Workarea branch
Delete Workarea workarea
Modify Workarea Properties
workarea User/role is member of workarea.
Rename Workarea workarea
Workflow
Add Task Comment task User is owner of task or job.
Assign file, folder, deleted file, symlink
Attach to Task task User is owner of task or job.
Change Task Owner task User is owner of task or job.
Table 8 Role operations and permission checking (Continued)
Operation Object Affected Permissions Checked
TeamSite Administration Guide 99
• • • •••

Chapter 6: Manage TeamSite Access
10
Workarea Access
By default, the workarea root file system permissions restrict any subdirectory access. For example, the permissions on a subdirectory or a file specify that a user can modify the subdirectory or file. However, permissions on the root directory do not grant write permissions to the user. Therefore, TeamSite does not allow the user to modify the file or subdirectory. To disable this check, set this option to no.[iwserver]
mask_workarea_access=no
Configure Workflow Models
workflow
Detach From Task task User is owner of task or job.
End Job job User/group is owner of job.
Manage Workflow Models
workflow
Modify Job Properties job User/group is owner of job.
Modify Task Properties
task User is owner of job.
Publish Workflow Models
workflow
New Job
Read Job Properties job
Read Task Properties task
Retry Task task User is owner of task or job.
Return Group Task task User is owner of task or job.
Take Back Task task User is owner of task or job.
Take Group Task task
View All Jobs
View All Tasks
View Job Details job
View My Jobs
View My Tasks
Webview Workflow Models
workflow
Table 8 Role operations and permission checking (Continued)
Operation Object Affected Permissions Checked
0 TeamSite Administration Guide
• • • •••

Working with Permissions
When set to no, permissions on the workarea root directory affect only this directory rather than the entire tree.
Branch and Workarea Security
Branch and workarea security determines whether or not users can see (in ContentCenter) the names of branches and workareas they do not have access to. By default, the branch_security and workarea_security lines in the [iwserver] section of iw.cfg are set to off. This means that all branch and workarea names are displayed to users even if they do not have permission to access them (they see the name of the branch or workarea, but they cannot click on it and [N/A] is displayed next to it).
You can configure TeamSite to not display the names of branches and workareas in the ContentCenter if the user does not have read permissions by editing the branch_security and workarea_security lines in the section of iw.cfg as follows:[iwserver]
branch_security=on
workarea_security=on
Default Permissions
Unix:
You can configure the default permissions for branches, workareas, directories, and files created using ContentCenter. Permissions on files created through the file system interface are determined by your file system interface configuration (for example, the Samba configuration).
To change the permissions, edit any or all of the four permission lines in the [iwserver] section of iw.cfg to specify the octal values of the default permission bits for newly created branches, workareas, directories, and files. The default settings are as follows:[iwserver]
branch_default_perm=775
workarea_default_perm=775
file_default_perm=664
directory_default_perm=775
The new settings only apply to branches, workareas, directories, and files created after you have edited these lines and run iwreset.
Windows:
TeamSite Administration Guide 101
• • • •••

Chapter 6: Manage TeamSite Access
10
You can control branch permissions on Windows by adding the branch_default_perm parameter to the [iwserver] section of the iw.cfg file as follows:[iwserver]
branch_default_perm=0
The default behavior creates all branches with read access for the group Everyone. If you add branch_default_perm=0 as shown, the group Everyone is not added to the ACL for new branches created after this configuration setting is added.
View File Permissions
Windows:
When you click the Permissions link on a File Properties screen, the Permissions screen is displayed. It shows the permissions set for the file and the inherited permissions.
From this screen, you can perform the following operations:
Add Permissions. Click Add Permissions to display the Users and Groups dialog box with the Permission field. Select the type of permission you are granting (Read only, Full Control, Modify). Then search for and select users and groups. Click Add or Add and Close when you finish.
NOTE
Permissions can only be changed in ContentCenter or with the iwaccess CLT and not through a browser window. Use add-windows-permission option of the iwaccess CLT to set permissions recursively for a folder and the files or folders below that folder.
Edit. Click Edit opposite a user to display the Edit Permissions screen. The Name and User display. Select a Permission option and save the change.
Delete. Click Delete to remove the user from the permissions. You are prompted to verify the deletion.
Remove Inherited Permissions. When you click Remove Inherited Permissions, you are asked if you want to make a local copy of the inherited permissions.
2 TeamSite Administration Guide
• • • •••

Share TeamSite Assets using Windows Groups
View File Permissions
Unix:
When you click the Permissions link on a File Properties screen, the Permissions screen is displayed. It shows the permissions set for the file.
From this screen, you can perform the following operations:
Change the permissions for the file owner.
Change permissions for the group.
Change permissions for others.
The permissions you can set are:
Read Only
Read and Write
Write Only
No Access
You cannot change the Execute permission.
Share TeamSite Assets using Windows GroupsWindows groups can be used to group users and to share TeamSite assets such as branches and workareas. They may also be used, in conjunction with Windows Access Control Lists (ACLs) to provide finer-grained access control for individual directories and files. Over time, Windows has evolved, and the use of Windows groups has evolved with it. Best practice for using groups with TeamSite depends on the Windows Operating System version, and on the size and complexity of the network in which it works. There are two basic scenarios:
A small-scale Windows 2003 network using Native Mode Active Directory.
A large-scale Windows 2003 network using Native Mode Active Directory.
NOTE
TeamSite groups are an alternative to Windows groups. The advantage of TeamSite groups is that they are managed entirely within TeamSite whereas Windows groups
TeamSite Administration Guide 103
• • • •••

Chapter 6: Manage TeamSite Access
10
require management through the Windows operating system. The advantage of Windows groups is that they interoperate with Windows and AD.
The following sections explain how Windows groups are typically used in each of these environments, and describe in what circumstances the new Active Directory System Interface (ADSI) and disk-caching code can be used to improve performance.
Group Usage with Native Mode Active Directory
When a Mixed Mode Active Directory installation is converted to Native Mode operation, the local groups on the Primary Domain Controller become domain local groups. This type of group is not available in an NTLM or Mixed Mode AD environment.
The advantage of domain local groups is that they are known to all machines in the domain in which they are defined. If domain local groups are used to share TeamSite resources, the TeamSite server may run on any machine in the domain, and moving the TeamSite server software to a different machine in the domain does not require any changes to the group structure. In a Mixed Mode environment, where the groups for sharing are tied to a particular machine rather than to the domain, it is more difficult to swap out failed hardware or to move the TeamSite server to a different machine.
In this environment, use domain local groups for sharing rather than traditional local groups. To enable the use of domain local groups as groups for sharing, use the following setting in iw.cfg: [iwserver]
domain_local_groups=yes
TeamSite may be configured to use traditional Windows APIs to collect group information, or it may be configured to use the Active Directory System Interface (ADSI) supported by Windows. Use of the newer ADSI code may improve performance if users and groups come from multiple domains and there are larger numbers of users and groups. The groups for sharing must be domain local groups rather than (machine) local groups. To select the ADSI code, specify the following two lines in the iw.cfg file:[iwserver]
use_adsi=yes
domain_local_groups=yes
For larger installations, TeamSite may be configured to use cached user and group information to significantly reduce the server's startup time. This feature may be used with or without enabling the ADSI code. See “Enable the User/Group/Role Disk Cache” on page 107.
4 TeamSite Administration Guide
• • • •••

Share TeamSite Assets using Windows Groups
Group Usage for Larger AD Networks
TeamSite is often installed on a machine that is part of a large, complex Windows network. Such a network may contain many different domains, and each domain may contain resources that must be shared across domains. In this scenario, recommended practice is to use universal groups rather than global groups to group users. Universal groups are known across all domains, and they may contain users from any domain. (Global groups, by contrast, may only contain users from their own domain). Like domain local groups, universal groups are only available in domains that have been promoted to run Native Mode Active Directory.
In this environment, where users are grouped in universal groups, and resources are shared using domain local groups, the new ADSI code must be enabled in iw.cfg:[iwserver]
use_adsi=yes
domain_local_groups=yes
When TeamSite users are in tsusers.xml, the TeamSite server may take several minutes to start up as it collects user and group information. This startup time can be significantly reduced when the server is configured to use cached user and group information at startup time (this is on by default). See “Enabling the User/Group/Role Disk Cache” and information later in this section.
In networks that are spread over large geographic areas and where TeamSite users are spread among different domains, network response times may encounter unusual delays when the TeamSite service is first started. The TeamSite service is usually configured to start automatically after a Windows reboot. At startup, TeamSite reads a variety of user and group information from the Active Directory. This process may take several minutes. In extreme cases, the time required to start the server may result in a system timeout, which occurs when the server requires more than 10 minutes to start. These are possible solutions for this problem:
Increase the timeout period from the default value of 600, which denotes 600 seconds (10 minutes), to a larger value. The timeout period may be set to a different value by changing a parameter in the Windows Registry. The key to be changed is found in the Registry at HKEY_LOCAL_MACHINE\SYSTEM\ CurrentControlSet\Services\iwserver\Parameters\Start Timeout. Its value is the number of seconds that Windows should wait for the server to start.
If the server startup time is unacceptably long, consider limiting the number of inquiries that TeamSite must make to remote AD controllers. This is done by limiting the number of domains that TeamSite is required to search using the domain_list parameter in the iwserver section of iw.cfg. If it is not practical to limit the number of domains, the need to query remote AD controllers for group membership information can be reduced or eliminated completely by careful choice of Windows group type for various uses. These possible changes may improve performance:
TeamSite Administration Guide 105
• • • •••

Chapter 6: Manage TeamSite Access
10
Use universal groups exclusively to group users. This is recommended practice from Microsoft (although other group types may be used). To instruct TeamSite to restrict its user search to universal groups, set the following parameter in iw.cfg:[iwserver]
windows_groups_for_users=UNIVERSAL
If the groups used to share TeamSite resources are domain local groups only, limit the TeamSite search for nested groups to groups nested in domain local groups. This is done with the following iw.cfg setting:[iwserver]
windows_groups_for_sharing=LOCAL
Use universal groups exclusively to share TeamSite resources. Recommended practice is usually to share resources using domain local groups, but in larger systems, significant performance gains may be made if universal groups are used instead. If universal groups only are used to share TeamSite resources, then the TeamSite server can use the Active Directory Global Catalog for all its inquiries about groups for sharing. To configure the server to restrict its groups for sharing to universal groups, include the following settings in the iw.cfg file:[iwserver]
windows_groups_for_sharing=UNIVERSAL
Manage Windows Groups for Best Performance
System response times are dependent on several factors:
The number of groups in the system.
The extent of group nesting.
The size of groups.
The number of TeamSite users.
The number of domains to be searched for users and groups.
The performance of the corporate network.
While some of these factors may be outside your control, response times can usually be improved by trying some of the following:
Where practical, limit the number and size of groups used for sharing TeamSite assets. Create dedicated groups, composed solely of TeamSite users, instead of using large existing groups. This is especially helpful if the existing operating system groups contain many members that are not TeamSite users.
Limit the number of domains that contain TeamSite users and Windows groups used for sharing. The domain_list parameter in the [iwserver] section of iw.cfg
6 TeamSite Administration Guide
• • • •••

Enable the User/Group/Role Disk Cache
should be set to include only domains that contain TeamSite users and groups; see “Domains to Use for Group Authentication” on page 125. A short list of domains can be searched faster than a long one.
If possible, use universal groups exclusively to group TeamSite users. Set windows_groups_for_users=UNIVERSAL in iw.cfg. This is recommended for most TeamSite installations.
Consider using universal groups instead of domain local or global groups to share TeamSite resources. Set windows_groups_for_sharing=UNIVERSAL in iw.cfg. This restriction is not necessary for most TeamSite installations.
Where TeamSite users are in tsusers.xml and there are a lot of users, groups or domains, leave the user/group/role disk cache enabled (the default setting). This is a good practice for most large TeamSite installations.
In installations that do not include nested groups in the groups used for sharing TeamSite assets, disable the nested group handling functions (see “Disable Group Nesting” on page 108). This option is not frequently used, but is sometimes chosen to improve response times where there are very large numbers of TeamSite users.
Enable the User/Group/Role Disk CacheInstallations with large numbers of users and group memberships may benefit from the use of a disk cache for users, groups, and roles. When the user/group/role disk caching code is enabled, TeamSite saves a copy of the in-memory user, group, and role cache to disk every time the in-memory cache is refreshed. This disk image of the cache is used the next time the TeamSite server is started to improve the server startup performance. Server startup time is faster.In the case of Windows, particularly where TeamSite must search multiple domains and process large amounts of user and group information, this feature also improves the usability of the server during its first few minutes of operation. This improved usability is due to the fact that the server does not have to wait until all of the access information is collected from Windows before it allows access to particular TeamSite resources.
The disk cache is enabled by default. To disable this feature in iw.cfg, set:[iwserver]
enable_user_group_disk_cache=false
TeamSite Administration Guide 107
• • • •••

Chapter 6: Manage TeamSite Access
10
Disable Group Nesting
In some TeamSite installations, the Windows groups used for sharing TeamSite assets do not contain any nested groups. In this case, server operation can be sped up by disabling the code within TeamSite that handles nested groups.
Group nesting is enabled by default. To disable TeamSite's handling of nested groups in iw.cfg, set:[iwserver]
include_nested_groups=false
Enable the ADSI Debug Flag
On Windows, to examine the TeamSite group information in detail, use the debugging flag to examine the cache of nested groups that TeamSite builds on startup. Enabling this flag causes TeamSite to write the contents of the ADSI group cache to the iwtrace log.
This flag is disabled by default. To enable the group debugging flag in iw.cfg, set:[iwserver]
debug_adsi=true
Additional Tools for Debugging
Several software tools can be used to examine the group memberships of TeamSite users on Windows.
The iwdebug command-line tool can be used to display the contents of the TeamSite internal cache at any time the server is running. The output from iwdebug commands is written to the iwtrace log. The -g option lists group information, and the -u option lists each user in the cache and the groups of which that user is a member. The two options can be used together, if desired: iwdebug -g -u.
The iwldapsearch command-line tool can be used to search an Active Directory or an LDAP directory for user or group information. It uses syntax similar to the ldap search utilities that accompany most LDAP server installations. However, unlike the generic LDAP search tools, it knows about any LDAP configuration information found in iw.cfg. For example, if TeamSite roles are kept in an LDAP attribute called description, the following command can be used to retrieve the names of all the TeamSite Authors in the system: iwldapsearch "description=author" dn.
8 TeamSite Administration Guide
• • • •••

Operate System Group Membership
The iwldapsearch utility may be used even if there is no LDAP or Active Directory configuration information in iw.cfg. In this case, the server (host) name and search base need to be specified. The following command lists all of the Windows groups on an Active Directory server called qa.qadomain.com: ldapsearch -h qa.qadomain.com -b "cn=users,dc=qadomain,dc=com" "objectclass=group" name
Operate System Group MembershipTeamSite supports two types of groups for user management: those managed through standard Windows functions/UNIX commands (referred to as operating system groups) and those managed through TeamSite (referred to as TeamSite groups). Workareas can be shared by either type of group. For users to have access to a particular workarea, they must either be the owner of the workarea or a member of the workarea’s group. TeamSite uses Windows/UNIX groups for access control; it also uses TeamSite groups.The UNIX groups can be managed with standard UNIX commands.
To create a UNIX operating system group:
1. Open the /etc/group file in a text editor.
2. Add a new line to the file using the following format:
groupname:*:gid:username1,username2,username3
For example, the entry for the group allauthors might look like this:
allauthors:*:2000:pat,andre,chris
3. Save and close the file.
To add a user to a Windows/UNIX group:
Windows:
1. Select Start > Programs > Administrative Tools > Computer Management. The Computer Manager is displayed.
2. In the Computer Manager, select Local Users and Groups > Groups.
3. Double-click the group that has access to the workarea to which you want to add the user.
The Properties window for the selected group opens.
4. Click Add.
5. Select the user you want to add from the list or type the user name, then click OK.
TeamSite Administration Guide 109
• • • •••

Chapter 6: Manage TeamSite Access
11
Unix:
1. Open the /etc/group file.
2. Locate the group that has access to the workarea to which you want to add the user.
3. Add the name to the list of usernames that follows it. Usernames must be separated by commas.
If the user is an Administrator and you want that user to have Administrator privileges for a branch, add the user to the group of Administrators for that branch.
You can add any number of users to a group.
Change Group Ownership of Workareas
To change which group has access to a workarea:
1. From the Command Prompt, navigate into the directory containing the workarea.
2. Use the iwchgrp.exe command (Windows) (see TeamSite Command-Line Tools) or the chgrp command (Unix) to change the workarea’s group. You can change either the OS group or the TeamSite group. The chgrp command can only be used to change the OS group.
TeamSite only checks the primary group owner of a workarea and does not rely on ACLs to determine workarea ownership.
You can also change ownership of workareas through ContentCenter Professional in the Workarea Properties screen.
Example
Unix:
In this example, user Chris changes the group for one of the workareas on the sales subbranch. First, he navigates into the directory containing the workareas. Then, he looks at the existing workareas and learns that Andre has two workareas, one private (andre1) and one shared with the group demoauthor (andre2). Chris has one private workarea (wa1). He uses the chgrp command to change the group on his workarea, then checks the results. After this change, all members of the group demoauthor can access all files and directories in the andre2 and wa1 workareas.
% cd /.iwmnt/default/main/sales/WORKAREA
% ls -la
total 3
0 TeamSite Administration Guide
• • • •••

Operate System Group Membership
drwxrwxr-x 27 andre nobody 512 Apr 23 17:07 andre1
drwxrwxr-x 3 andre demoauthor 512 Apr 17 11:52 andre2
drwxrwxr-x 2 chris nobody 512 Apr 17 11:37 wa1
% chgrp demoauthor wa1
% ls -la
total 3
drwxrwxr-x 27 andre nobody 512 Apr 23 17:07 andre1
drwxrwxr-x 3 andre demoauthor 512 Apr 17 11:52 andre2
drwxrwxr-x 2 chris demoauthor 512 Apr 17 11:37 wa1
Web Server Group/UID
The web server group/uid setting should be set to any group/uid that allows the web server to see the web content as an outside viewer would see it, in order for users to be able to preview the Web site like any external user would. On Unix, specify a single user ID. Because many external browsers access the web server as nobody, this is used as the default.To improve security, you are encouraged to change your web server to another user other than nobody and change the value of webserver_uid. To change the web server group/uid setting, edit the webserver_groupuid line in the [iwserver] section of iw.cfg. If iw.cfg does not contain this line, add it as shown:[iwserver]
webserver_uid=web_uid (Unix)
webserver_group=IWGROUP (Windows)
On Windows, this sets a group of users, all of whom have full file system access. If this line does not exist, the group Everyone is used.
Group Remapping
Unix:
This option provides a workaround for a limitation of NFS. When NFS checks the operating system group that can access a file against the groups that a user belongs to, it only checks the first sixteen groups that the user belongs to. Therefore, if the group on the file is the seventeenth (or higher) group that the user belongs to, NFS will incorrectly deny the user access to the file (this applies only to operations performed through the file system).
The map_secondary_to_primary option in iw.cfg works around this problem. Because TeamSite does not have NFS’s sixteen-group limitation, it first determines whether a user should have group-level access to the file. Then, if the map_secondary_to_primary
TeamSite Administration Guide 111
• • • •••

Chapter 6: Manage TeamSite Access
11
option is turned on, it maps the file’s group to the user’s primary group. Therefore, if you check the gid on a file using the file system, it could return a gid different from the true gid of the file. To find the file’s true gid, use the File > File Properties menu item in TeamSite or the iwattrib CLT.
By default, map_secondary_to_primary_gid=no, to turn group remapping on, edit the line in the [iwserver] section of iw.cfg to read as follows:[iwserver]
map_secondary_to_primary_gid=yes
Recommendation: Use TeamSite groups.
Maintain the GID
Unix:
To disable all setgid behavior through ContentCenter, set honor_setgid to false. [iwserver]
honor_setgid=true|false
When a file is imported or renamed, the group for the target directory is applied to the file. By default, this is set to true. If you do not wish the gid to be applied to import and rename operations, set this option to false.[iwserver]
honor_setgid_on_rename=true|false
To turn off all setgid functionality during a ContentCenter Import, you must set honor_setgid_on_rename=false and honor_setgid=false.
AuthenticationAuthentication involves determining whether users can access TeamSite resources. The tsusers.xml file maintains information on TeamSite users. Operating system users are usually identified as TeamSite users and added to this file through the Manage Users option in the ContentCenter Professional Administration Console that is available to Master users.
OS and non-OS users can be identified in LDAP or an external source.
The LDAP files can be set up in one of two ways:
2 TeamSite Administration Guide
• • • •••
Authentication
Users in the LDAP file display in the Administration Console and can be added through the Manage Users screen or with the iwuseradm CLT.
Users in the LDAP file are added as TeamSite users through a synchronization process that reads the LDAP files; they cannot be added through the Administration Console or using the CLT (refer to “Synchronize LDAP Users” on page 118).
Store TeamSite Users
Potential TeamSite users must be identified in a database or must have operating system access. This database may be an LDAP file or an external database. These databases are identified in the user_databases.xml file. An LDAP database can contain either OS users or non-OS users; they cannot be mixed.
The user_databases.xml File
TeamSite reads information on user databases from the user_databases.xml file. You must edit this file manually. The file is stored in iw-home/conf\roles directory; and example file ships with TeamSite. Databases identified in the file are used to authenticate TeamSite users. Only configurations for LDAP databases and external databases are supported. Define as many LDAP or external databases as are required for your site.
NOTE
LDAP files that contain users that are to be added through synchronization include the attr_sync attribute described in “Synchronize LDAP Users” on page 118.
The following code is an example of the user_databases.xml file that defines two LDAP databases and two external databases. Databases set up using these formats are used to add TeamSite users through the iwuseradm CLT or the Administration Console.<iwuser_databases>
<iwldap id="ldap_1" display_name="my ldap_1" os="t">
<server value="ishuffle-sol.amer.interwoven.com" />
<port value="389" />
<search_key value="uid" />
<ssl_port value="0" />
<CAFile value="" />
<dnBase value="marketing.interwoven.com" />
<account value="admin" />
TeamSite Administration Guide 113
• • • •••

Chapter 6: Manage TeamSite Access
11
<password value="52616e646f6d4956c82bafa0f007 0585907d439c34792e66c55ade1fd1e21fc4" />
<attr_email value="mail" />
<attr_display_name value="cn" />
</iwldap>
<iwldap id="ldap_2" display_name="my ldap_2" os="f">
<server value="ishuffle-sol.amer.interwoven.com" />
<port value="389" />
<search_key value="uid" />
<ssl_port value="0" />
<CAFile value="" />
<dnBase value="sales.interwoven.com" />
<account value="admin" />
<password value="52616e646f6d4956c82bafa0f007 0585907d439c34792e66c55ade1fd1e21fc4" />
</iwldap>
<external-source id="ext_src_1" display_name="my ext_src_1">
<authentication_source value="http://localhost/iw/my_prog1"/>
<param_username value="username"/>
<param_password value="password"/>
<timeout value="500"/>
</external-source>
<external-source id="ext_src_2" display_name="my ext_src_2">
<authentication_source value="https://host:443/iw-bin/sample_extsrc.cgi"/>
<CAFile value="c:\iw-home\iw-webd\conf\client\cacert.pem"/>
<timeout value="500"/>
</external-source>
</iwuser_databases>
Table 9 describes each of the attributes in the user_databases.xml file.
Table 9 Attributes for user_databases.xml file
Attribute or Element Description
id Unique id that identifies a particular LDAP server or external source.
display_name Identifies the LDAP server or external source in the ContentCenter Professional Administration Console. If it is not defined, the id attribute is used.
os Boolean value that indicates whether the users from this LDAP server are OS users (t) or non-OS users (f). The default value is f. Each LDAP configuration can contain either OS users or non-OS users, but not both.
4 TeamSite Administration Guide
• • • •••

Authentication
server Name or IP address of the LDAP server.
port Port for the LDAP server (default is 389).
search_key Name of the LDAP attribute that holds the user account names (default is uid).
ssl_port Port that the LDAP server uses to communicate when SSL is in use. This is assumed to be port 636.
CAFile The location of your CA certificate database file. This entry must be in the Netscape “cert7” format.
An example default “cert7.db file” that contains the certifications for a variety of Certification Authorities is found in the TeamSite installation in the directory iw-home\tools\db\netscape\cert7.db.
dnBase Specification of the DN base location according to LDAP search syntax.
account Specifies the Distinguished Name of the LDAP/Active Directory user account to be used for LDAP/Active Directory searches. This is not a simple account name, but a complete Distinguished Name (DN) for a user.
password Encrypted version of the password (refer to “The Password Attribute” on page 116).
attr_email Used to query the LDAP server for email addresses. The default is mail. If the value is specified with an empty string, LDAP will not be queried for this attribute.
attr_display_name Used to query the LDAP server for user display names or common names. The default is cn. If the value is specified with an empty string, LDAP will not be queried for this attribute.
authentication_url A URL that TeamSite uses to authenticate a user from the external source. Username and password are included as URL parameters and the command is posted to the external source server. Both HTTP and HTTPS protocols are supported. If HTTPS protocol is used, the filepath for the Certificate Authority file must be specified using the CAFile attribute.
param_username Used with param_password to construct the URL for authentication. The default is username.
param_password Used with param_username to construct the URL for authentication. The default is password.
timeout_value Specifies how long (in ms) to wait for the HTTP response; default is 500 ms.
Table 9 Attributes for user_databases.xml file (Continued)
Attribute or Element Description
TeamSite Administration Guide 115
• • • •••

Chapter 6: Manage TeamSite Access
11
The Password Attribute
The password value stored in user_databases.xml is an encrypted version of the password. Blowfish encryption software is used to encrypt/decrypt the password.
Since the user_databases.xml file has to be maintained manually, you need to manually encrypt the password and save the encrypted password in user_databases.xml.
To encrypt a LDAP login password:
1. Define IWCLT_PASSWORD environment variable as the actual password.
2. Run the following CLT to generate the encrypted password:iwuseradm encrypt-userdatabase-pwd
The CLT outputs a 64-bit password like the one shown below:52616e646f6d4956c82bafa0f0070585907d439c34792e66c55ade1fd1e21fc4
3. Copy the 64-bit encrypted password to the corresponding LDAP server configuration in user_databases.xml file.
To verify whether an encryption is correct:
1. Define IWCLT_PASSWORD environment variable as the actual password.
2. Run the following CLT to verify an encryption:iwuseradm encrypt-userdatabase-pwd -v 52616e646f6d4956c82bafa0f0070585907d439c34792e66c55ade1fd1e21fc4
The CLT outputs YES if the encrypted password matches the original password.
When you use the ContentCenter Professional Administration Console to manage users, you can search for users in these databases.
Create a Certificate Authority Database in the cert7.db Format
Certificate Authority (CA) Certificates used by the TeamSite server for SSL must be in the “cert7” format. This section describes how to create a new CA database in the cert7 format and how to add a CA Certificate to the database. The Sun/Netscape utilities “keyutil” and “certutil” are used for this procedure. Please contact Customer Support for information about where you can obtain these utilities.
1. Create a new (empty) key3 database file.
This step is a requirement of the old Sun/Netscape “keyutil” and “certutil” utilities. The key database must exist even though CA certificates do not require keys. Since it will be empty, we will not create a password to protect its contents when we create it. The “keyutil” program is used for this step:
6 TeamSite Administration Guide
• • • •••

Authentication
keyutil -C
2. Create a new cert7 database containing your CA certificate.
The following command creates a new cert7.db file and adds a single new CA certificate file to the database. The “certutil” program is used for this step:
certutil -A -i certicicateToAdd -n nickName -t "C,C,C"
Replace “certificateToAdd” in this command with the name of the file that holds the CA certificate you want to put into the database.
Replace “nickName” in this command with the name that the certificate will be known by in the database. The value for “nickName” is normally the same as the CN of the issuer for your certificate.
For example:
certutil -A -i CA.crt -n "Acme Manufacturing, Inc. CA" -t "C,C,C"
You will now have three new files in your directory: cert7.db, key3.db, and secmodule.db. These files should all be copied to the same directory. They should also match what is specified in the authentication section of iw.cfg and, if used, in the XML files that specify user databases.
3. Verify that the new database exists and contains the CA certificate.
List all of the certificates in the database. Look for the name of the one you just added. The utility adds a variety of standard CA’s, so there will be other certificates included with the one you added.
On the line that contains the name of the certificate you just added, you should see C,C,C. (“C” is the code for a Certificate Authority; the three C’s indicate that this authority can issue certificates for any purpose). The command to list all of the certs is:
certutil -L
Next, verify that the certificate you added is valid. The command to show detailed information about the new certificate is:
certutil -L -n "Acme Manufacturing, Inc. CA"
Replace “Acme Manufacturing, Inc.” with the value you used for “nickName” in step 2. This command should result in the display of about a page of information with the details of the certificate.
Check that the CN field for “Issuer” is the same as the one you typed when you created the database.
Check the dates under “Validity”.
• The “Not before” date should be no later than today’s date.
• The “Not after” date should be some date in the future, preferably a few years into the future. (The “Not after” date is the expiry date for the certificate.)
TeamSite Administration Guide 117
• • • •••

Chapter 6: Manage TeamSite Access
11
4. Create a java truststore (used by the Interwoven Application Container to support LDAP search and browse functions):
keytool -keystore truststore -import -alias myCA -file myCA.crt -trustcacerts
“keytool” is available in the java SDK that ships with TeamSite.
5. Copy the files to the destination you specified in your iw.xml file (and user_databases.xml file, if used).
Note that the “CAFile” tag in user_databases.xml expects a directory name where the CA files exist, not the name of the cert7.db file. These files should all be copied to a single directory. They should also match what is specified in the authentication section of iw.cfg and, if used, in the XML files that specify user databases. Be sure that the .db file(s), certificate file(s) and truststore are readable by iwts and iwui (chmod 644 is recommended for most installations).
Create a Certificate Authority Database in the cert7.db Format for Linux
For Linux, the process is the same except for the following:
The version of “certutil” which ships with most Linux distributions creates a cert8.db file which is not compatible with TeamSite. To create a cert7.db file, download an older version of NSS from
ftp://ftp.mozilla.org/pub/mozilla.org/security/nss/releases/NSS_3_2_2_RTM/Linux2.2_x86_glibc_PTH_OPT.OBJ/nss-3.2.2.tar.gz
Use the certutil included in that download.
Synchronize LDAP Users
The LDAP synchronization process (iwldapsync) reads the LDAP databases to synchronize the users contained in the databases with TeamSite users. It adds new users, deletes obsolete users, and updates user attributes, such as email addresses, based on changes made to the LDAP databases.
Identify LDAP Synchronization Files
The description of a LDAP file in user_databases.xml must contain the attr_sync attribute to allow users in that LDAP file to be automatically created as TeamSite users. The synchronization process updates attributes of LDAP users in TeamSite or removes TeamSite users that are no longer in LDAP.
8 TeamSite Administration Guide
• • • •••
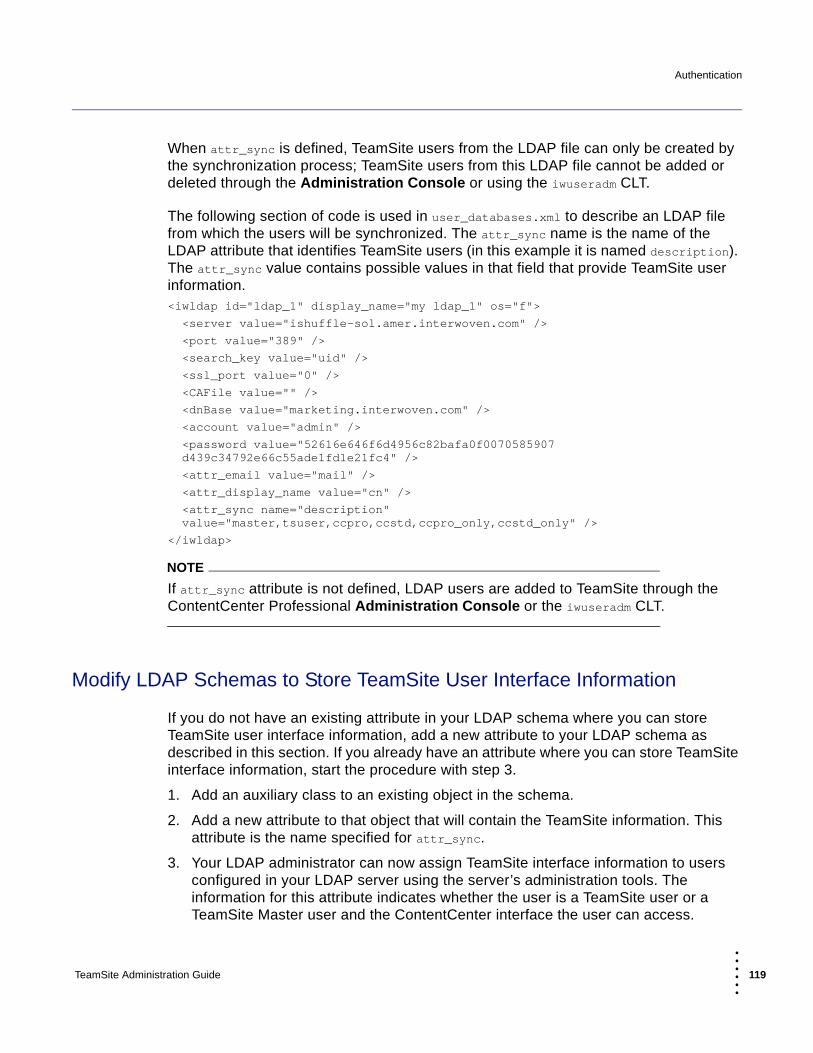
Authentication
When attr_sync is defined, TeamSite users from the LDAP file can only be created by the synchronization process; TeamSite users from this LDAP file cannot be added or deleted through the Administration Console or using the iwuseradm CLT.
The following section of code is used in user_databases.xml to describe an LDAP file from which the users will be synchronized. The attr_sync name is the name of the LDAP attribute that identifies TeamSite users (in this example it is named description). The attr_sync value contains possible values in that field that provide TeamSite user information.<iwldap id="ldap_1" display_name="my ldap_1" os="f">
<server value="ishuffle-sol.amer.interwoven.com" />
<port value="389" />
<search_key value="uid" />
<ssl_port value="0" />
<CAFile value="" />
<dnBase value="marketing.interwoven.com" />
<account value="admin" />
<password value="52616e646f6d4956c82bafa0f0070585907 d439c34792e66c55ade1fd1e21fc4" />
<attr_email value="mail" />
<attr_display_name value="cn" />
<attr_sync name="description" value="master,tsuser,ccpro,ccstd,ccpro_only,ccstd_only" />
</iwldap>
NOTE
If attr_sync attribute is not defined, LDAP users are added to TeamSite through the ContentCenter Professional Administration Console or the iwuseradm CLT.
Modify LDAP Schemas to Store TeamSite User Interface Information
If you do not have an existing attribute in your LDAP schema where you can store TeamSite user interface information, add a new attribute to your LDAP schema as described in this section. If you already have an attribute where you can store TeamSite interface information, start the procedure with step 3.
1. Add an auxiliary class to an existing object in the schema.
2. Add a new attribute to that object that will contain the TeamSite information. This attribute is the name specified for attr_sync.
3. Your LDAP administrator can now assign TeamSite interface information to users configured in your LDAP server using the server’s administration tools. The information for this attribute indicates whether the user is a TeamSite user or a TeamSite Master user and the ContentCenter interface the user can access.
TeamSite Administration Guide 119
• • • •••

Chapter 6: Manage TeamSite Access
12
The following are the valid values (they are case-sensitive):
master. This user is a TeamSite Master user.
tsuser. This user is a TeamSite user.
ccpro. ContentCenter Professional is displayed when the user logs in. A link at the top of the screen allows them to move between ContentCenter Professional and ContentCenter Standard. When logging in later, the user returns to the interface they were using when they logged out.
ccpro-only. ContentCenter Professional is displayed. The user cannot switch to ContentCenter Standard.
ccstd. ContentCenter Standard is displayed when the user logs in. A link at the top of the screen allows them to move between ContentCenter Standard and ContentCenter Professional. When logging in later, the user returns to the interface they were using when they logged out.
ccstd-only. ContentCenter Standard is displayed. The user cannot switch to ContentCenter Professional.
Configure TeamSite to Work Without an Anonymous Bind
In some installations, anonymous binds to LDAP/Active Directory are not permitted for security reasons. If you cannot use an anonymous bind to LDAP/Active Directory to read user names, you can establish a dedicated LDAP/Active Directory user account to use for user authentication. All searches for users’ Distinguished Names are done using this account instead of an anonymous bind.
DistinguishedName specifies the Distinguished Name of the LDAP/Active Directory user account to be used for LDAP/Active Directory searches. This is not a simple account name, but a complete Distinguished Name (DN) for a user. For example:account=cn=TeamSite,cn=Users,ou/dc=myCompany,c=us/dc=com.
The password specifies the encrypted password of the LDAP/Active Directory user account that matches account.
This information is included in the user_databases.xml file using the account and password attributes.
LDAP Synchronization
Synchronization is done with the iwldapsync CLT (refer to the TeamSite Command-Line Tools for options on this CLT). This CLT is normally launched when TeamSite starts up
0 TeamSite Administration Guide
• • • •••

Authentication
and is run periodically as defined by ldapcache_thread_delay in the iw.cfg file. The default is every 24 hours. The CLT can also be run manually.
You can enable logging of the LDAP synchronization process using the log_ldap_sync option in the iw.cfg file; logging is on by default. The ldap_sync_retry_count is used to specify the number of retries to connect to the TeamSite server when the LDAP synchronization process runs. By default, the retry count is 12, which means that TeamSite waits about 60 seconds to start responding to client requests.
Set these options in the [authentication] section as:[authentication]
ldapcache_thread_delay=1440
log_ldap_sync=yes
ldap_sync_retry=12
TeamSite automatically synchronizes TeamSite users up to the search limit set by the LDAP server for each LDAP configuration. If the LDAP server is configured to limit the number of records returned by a search query to a number that is less than the number of TeamSite users in the LDAP database, no LDAP users will be found during the synchronization. Try the following options to address the issue when using LDAP synchronization:
Divide the users under different LDAP subtrees (under different base DNs) and define multiple LDAP databases in TeamSite such that the number of TeamSite users under each LDAP database configuration is no more than the LDAP search limit.
Increase you LDAP search limit to the number of TeamSite users configured in LDAP.
The other option is to add LDAP users to TeamSite using either the Administration Console or the iwuseradm CLT instead of using the LDAP synchronization procedure.
Impact of Using Non-OS Users in TeamSite
Enabling non-OS users in TeamSite impacts the way TeamSite operates in some areas. You should be aware of the following:
The file system interface is not available for contents that belong to non-OS users. An OS user, with the exception of the TeamSite global OS user (iwguser), will not be able to view TeamSite content properties that belong to a non-OS user through the file system interface.
File permissions cannot be set for multiple non-OS users or non-OS groups on a single asset because non-OS users or groups are mapped to a single OS user or group.
TeamSite Administration Guide 121
• • • •••

Chapter 6: Manage TeamSite Access
12
Non-OS user functionality is only available from sciface, CSSDK, and the ContentCenter interfaces. There is no file system support for Non-OS users. From the file system, all non-OS users appear as iwguser.
Non-OS users can only be added to non-OS groups.
While LaunchPad works for non-OS users, the Direct Edit feature that uses the file system interface will not be available on content belonging to non-OS users.
Non-OS users cannot use the Perl compiler to compile presentation templates. The XSLT PT compiler must be used.
Non-OS users cannot be the owners of external tasks since OS impersonation is not possible; use an URL external task. If a non-OS user attempts to execute an external task, the task is not launched and an error is displayed in the iwjoberrors.log file.
TeamSite does not manage LDAP user passwords (such as expiration information). You need to manage LDAP user passwords.
User Authentication
Unix:
TeamSite can be configured to authenticate users by the following methods:
External source. Users’ credentials are checked against a customer-specified file that is in the same format as /etc/passwd or a shadow password file. The file name is specified in the [authentication] section of iw.cfg using the password_file=fileName parameter.
Local. Users’ credentials are passed to the UNIX user authentication. If there is a shadow password file, it is used to verify the credentials. If no shadow password file is available, use the /etc/passwd file (this is the default method).
Pluggable authentication modules (PAM). Users’ credentials are passed to a PAM for verification.
Single Sign-On. If all authentication is performed by an SSO product such as SiteMinder, you should specify only sso in authenticate_by. If authentication is done by an SSO product and by other means as well, you can use the sso setting together with other authenticate_by settings such as pam, local, and file.
Complete the following procedure to specify the type of authentication used by TeamSite:
1. Add the following line to the [authentication] section of iw.cfg:
authenticate_by=mode
2 TeamSite Administration Guide
• • • •••

Authentication
where mode specifies one or more of file, local, sso, or pam.
You can separate multiple entries by commas or spaces, and you can specify precedence. For example, if you specify authenticate_by=file pam, the file is checked first. If this check fails, pam is checked next.
2. If file is specified as one of the possible authentication modes (that is the [authentication] section contains the line authenticate_by=file), add the following line:
password_file=absolute-path-to-file
where absolute-path-to-file is the absolute path to a file containing encrypted user passwords using the same format found in /etc/shadow. The section should look like this:[authenticate]
authenticate_by=file,pam
password_file=absolute-path-to-file
If pam is specified as one of the authentication modes (as shown), TeamSite communicates with pam to perform account management functions on the authenticated user. Account management functions include—but are not limited to—controlling expired passwords and login time restrictions.
3. To configure TeamSite not to perform account management functions, add the following line to the [authentication] section of iw.cfg:
pam_do_acct_mgmt=no
Every LDAP directory has a schema that describes the objects and attributes that are found in the directory. For example, you could have an object called user and an attribute postaladdress. To configure TeamSite to perform user authentication, you can either modify an existing attribute to represent TeamSite users or create a new one; this procedure is described in “Modify LDAP Schemas to Store TeamSite User Interface Information” on page 119.
TeamSite and PAM Configuration File Interaction
For Solaris:
By default, on TeamSite for UNIX, PAM controls authentication by using entries tagged with the teamsite service name stored in the /etc/pam.conf file. You can specify that PAM use /etc/pam.conf entries tagged with something other than teamsite by changing the pam_service line in the [authentication] section of iw.cfg.
TeamSite Administration Guide 123
• • • •••

Chapter 6: Manage TeamSite Access
12
For example, to specify that TeamSite instead use the lines in /etc/pam.conf that also control the telnet program, edit the pam_service line in iw.cfg so that it reads as follows:[authentication]
pam_service=telnet
The format of /etc/pam.conf is described in detail in the pam.conf(4) man page. You should configure TeamSite with its own entries in /etc/pam.conf using the service name teamsite (or whatever service name you specify for pam_service in iw.cfg). Only the auth and account modules in /etc/pam.conf are used for TeamSite authentication. If no entries are present for TeamSite in /etc/pam.conf, PAM uses whatever settings are specified for the other service. Note that this scenario is not recommended.
The following lines in /etc/pam.conf produce behavior equivalent to the traditional TeamSite authentication method:teamsite auth required /usr/lib/security/pam_unix.so.1
teamsite account required /usr/lib/security/pam_unix.so.1
To use a third-party PAM module, specify its path instead of /usr/lib/security/pam_unix.so.1. For more information about PAM, see http://www.sun.com/software/solaris/pam/.
NOTE
TeamSite is tested with the pam_ldap and pam_unix modules that ship with Solaris. No other testing or certification of any vendor's PAM modules is performed. If you want to use PAM with TeamSite, you should do a proof-of-concept to verify that the particular PAM module will work satisfactorily with TeamSite in your environment.
For Linux:
Linux systems do not contain the file /etc/pam.conf. Instead, Linux systems use individual PAM configuration files in the directory /etc/pam.d.
The following entry is required in the iw.cfg file to enable PAM on Linux:[authentication]
pam_service=filename
The filename should be the name of a PAM configuration file located in /etc/pam.d. For example, you would use the following entry to specify that TeamSite use the PAM settings for sudo located in /etc/pam.d (assuming that a configuration file named sudo already exists in /etc/pam.d):pam_service=sudo
4 TeamSite Administration Guide
• • • •••

Authentication
If this entry does not exist in the iw.cfg file, PAM does not default to any other settings, and therefore is not enabled.
In many installations, the content of the sudo file is an acceptable starting point for PAM configuration. The sudo file typically contains the following:#%PAM-1.0
auth required pam_stack.so service=system-auth
account required pam_stack.so service=system-auth
password required pam_stack.so service=system-auth
session required pam_stack.so service=system-auth
The file named in the pam_service entry must be located in /etc/pam.d and must be owned by root.
The Authentication Daemon
TeamSite for UNIX includes a daemon called iwauthend that processes PAM login requests on behalf of the TeamSite server.
The iwauthend daemon is automatically installed by the TeamSite installation program and is started with TeamSite. It requires no configuration and logs its internal issues to the iwauthend.log file, which is located in iw-home/local/logs.
Domains to Use for Group Authentication
Windows:
To configure which domains are used for group authentication, configure the domain_list line in the [iwserver] section of iw.cfg. This setting can be used to reduce the startup time for TeamSite, by limiting the number of domains it tries to authenticate against.
By default, TeamSite authenticates against all domains. To limit the number of domains used for group authentication, add the following line to the [iwserver] section of iw.cfg:[iwserver]
domain_list=domain1,domain2,domain3
You can include any number of domains in this list.
You can explicitly specify the domain controller that should be used for a particular domain. This option should not be used if the use_adsi parameter is enabled.[iwserver]
TeamSite Administration Guide 125
• • • •••

Chapter 6: Manage TeamSite Access
12
domain_list=domain1, domain2:domain_controllerA, domain3
In this example, the primary domain controller would be used for first and third domains, while domain_controllerA would be used for the second domain.
NOTE
Do not confuse this line with the domain_list line in the [iwcgi] section.
Log Users and Groups
Windows:
TeamSite can be configured to record in its log files every authenticated user and all groups with which each user is associated. To activate this feature, add the following line to the [iwserver] section of iw.cfg:[iwserver]
show_user_list=true
Once this feature is activated, each time TeamSite is restarted, it logs all users in the roles files and their associated groups in iw-home\local\logs\iwtrace.log. Log files use the following format:
user: username [associated groups]
NOTE
If this feature is left on for too long, your log files will grow extremely large.
Configure Submit FilteringThe TeamSite server enables you to automatically change file attributes, including uid/owner, gid/group, and permissions/ACLs, at the time that you submit a file. This functionality enables you to automate the task of defining the permissions associated with each file stored in TeamSite. The submit filter performs the specified operation on files immediately before they are submitted, so that changes are made to the files in the workarea, which are then submitted.
6 TeamSite Administration Guide
• • • •••

Configure Submit Filtering
The submit.cfg File
On startup, the TeamSite server reads a configuration file named submit.cfg in the iw-home\local\config\ directory (unless the location of this file is otherwise specified in the [locations] section of iw.cfg). The submit.cfg file contains rules to match file and workarea patterns to specific actions to perform when files and directories are submitted.
NOTE
This file is not present by default; you need to create the file in the location specified.
The submit.cfg file uses the following format: case-sensitive = [yes|no]
rules
{
workarea1_pattern
{
file_pattern1 { action1 action2 ... }
file_pattern2 { action3 action4 ...
...
}
workarea2_pattern
{
file_pattern3 { action5 action6 ... }
file_pattern4 { action7 action8 ... }
...
}
...
}
where:
The case-sensitive statement specifies whether or not the rules matching should ignore the case of the path names. If case-sensitive is not specified, the value is assumed to be no on Windows, and yes on Unix, so that rules matching does not ignore the case of the path names.
workarea#_pattern is used to match a workarea to the set of file rules to apply when a submit is done from that workarea. Each pattern can only be specified once, and the first match is used. For Solaris, and Windows, the syntax of the pattern is regex(5) (extended syntax). For AIX, use the POSIX 1003.2 extended regular expression syntax. For more information on regular expressions, consult a reference manual such as Mastering Regular Expressions, by Jeffrey Friedl., or read the man page (Solaris only):
% man -s 5 regex
TeamSite Administration Guide 127
• • • •••

Chapter 6: Manage TeamSite Access
12
The match is done against the path name of the workarea, starting with \default\main.
file_pattern# is used to match a file or directory to the set of actions to perform on it when it is submitted. Each file or directory pattern can only be specified once, and the first match is used. The syntax of the pattern is regex(5) (extended syntax) for Solaris, or the POSIX 1003.2 extended regular expression syntax for AIX.
The match is done against the path name of the file or directory relative to the workarea.
action# is one of:
Unix:
uid=namegid=nameperm=octal numberamask=octal numberomask=octal numberexpand_rcs_macros=[yes|no] (see page 134)
and specifies the operation to perform on the file or directory being submitted. uid=, gid=, and perm= specify new values for these attributes. amask= specifies a bit mask to “and” to the existing mode of the file or directory. omask= specifies a bit mask to “or” with the existing mode of the file or directory.
Windows:
owner = name (changes the owner of the file or directory)group = name (changes the group of the file or directory)setaccess = ACL (replaces the access control list for the file or directory)changeaccess = ACL (modifies the access control list so that the specified users have only the specified rights)
where name is one of:
usernamegroupnamedomainname\usernamedomainname\groupname
and where ACL (Access Control List) contains one or more Access Control Entries (ACE), as follows:
name:perms (a single ACE, to specify a single user or group)
{ name:perms, name:perms, ... } (multiple ACEs, to specify multiple users or groups)
where perms specifies the permissions granted to the specified user or group and is either any sequence made of the characters:
R (read) W (write)X (execute)
8 TeamSite Administration Guide
• • • •••

Configure Submit Filtering
D (delete)P (change permissions)O (take ownership)
or one of the preset combinations:
ALL (RWXDPO)NONE (none)READ (RX)WRITE (W)CHANGE (RWXD)
For example:
setaccess={ andre:ALL, marketing\pat:RX }
would remove the existing ACL and grant andre full access and pat (in the marketing domain) read and execute access to the specified files.
changeaccess={ chris:CHANGE, everyone:RX }
would remove any existing ACEs for the user chris and the group everyone, and grant chris change access and the group everyone read access to the specified files. Any other existing ACEs would remain unchanged.
Submit Filtering Sequence
When you submit files or directories, the following sequence is initiated:
1. The server determines what files and directories have changed and need to be submitted. It also verifies that none of them are in conflict with the staging area or locked in other workareas.
2. The path name of the workarea from which the submit is being done is matched against the workarea patterns in the submit.cfg file.
3. If the workarea matches one of the workarea patterns, then, for each file and directory that needs to be submitted (as determined in step 1), the file’s path name is matched against the file patterns in the matching workarea’s section.
4. If a match is found, the server performs the specified set of actions (defined in submit.cfg) to the file or directory in the workarea.
5. The server submits the transformed files and directories to the staging area.
TeamSite Administration Guide 129
• • • •••

Chapter 6: Manage TeamSite Access
13
Sample submit.cfg fileWindows:
CASE-SENSITIVE = NORULES
{
. # any workarea
{
/a/b/.*\.html$ # files ending in .html under /a/b
{
owner=DOMAIN\andre
group="DOMAIN\\web editors"
setaccess = {everyone:Read, domain\andre:ALL}
}
[^/]$ # all other files
{
group="DOMAIN\\web editors"
setaccess = {users:rx, "domain\\webeditors:change"}
}
/$ # all directories
{
group="DOMAIN\\web editors"
setaccess = {everyone:rwx/rx, "domain\\webeditors:change"}
}
}
}
Unix:
CASE-SENSITIVE = YES
RULES
{
# SECTION 1
^/default/main/WORKAREA/.*$ # any workarea in the main branch
{
^/index\.html$ { gid=test perm=0664 uid=andre }
# attributes fixed for /index.html
.*\.sh$ { omask=0111 } # execute bits on all .sh files
/$ { uid=andre } # andre owns all the directories
.* { amask=0775 } # don't allow world write access
}
# SECTION 2
^/default/main/TeamSite/WORKAREA/chris$ # just for chris
{
^/html/chris/.*$ { uid=chris gid=iw } # under /html/chris/
.* { amask=0775 } # don't allow world write access
}
0 TeamSite Administration Guide
• • • •••

Configure Submit Filtering
# SECTION 3
.* # any other workarea on any other branch
{
.* { amask=0775 gid=test } # no world write access
}
}
NOTES
Only the first match is applied. That is, the first match is used if multiple rules match the file or directory. The submit.cfg file should be ordered so that the most specific workarea patterns are closer to the top and the most specific file patterns are earlier in each section. You may need to duplicate some actions for them to apply to multiple rules.
For purposes of matching, the path name of a directory must end in a slash (/). Single or double quotes around patterns are optional, but they must be used around workarea
and file patterns that contain spaces or the following special characters: #, {, }, =, or ,.
Backslashes (\) are special characters when used within patterns surrounded by quotes; a backslash followed by any character is replaced by the single character. For example, to embed a single quote, double quote, or backslash in a pattern, precede the character with a backslash (\', \", or \\). Backslashes are not special characters in patterns that are not quoted.
Windows:
For example, the following three specifications are equivalent:
owner = DOMAIN\andreowner = 'DOMAIN\\andre'owner = "DOMAIN\\andre"
You can use backslashes (\) or forward slashes (/) as the path delimiter in regular expressions, but using forward slashes is more readable. This is because the backslash is treated as a special character in regex(5) syntax, and it is also treated as a special character by the configuration file parser when the expression is enclosed in quotes or double quotes. Therefore, when an expression using backslashes is contained in quotes or double quotes, the backslashes must be escaped twice, for a total of four backslashes.
For example, the following are equivalent expressions for matching any file whose name ends in .html in the \a\b directory: ^/a/b/.*\.html$'^/a/b/.*\\.html$'"^/a/b/.*\\.html$"^\\a\\b\\.*\.html$'^\\\\a\\\\b\\\\.*\\.html$'"^\\\\a\\\\b\\\\.*\\.html$"
TeamSite Administration Guide 131
• • • •••

Chapter 6: Manage TeamSite Access
13
Do not specify duplicate workarea patterns multiple times, duplicate file patterns multiple times within a workarea section, or the same action multiple times within a file rule.
(Unix) Because of client-side attribute caching, the modes, uid, and gid may not reflect the changes in the workarea immediately after a submit. The correct attributes are displayed after a sufficient time-out interval (usually about 30 seconds).
(Unix) You cannot change the permissions for a symbolic link. The perm, amask, and omask actions are not performed on a submitted symbolic link. The uid and gid actions are performed on a submitted link, not on the actual file.
(Unix) The permission values must be specified as an octal number (using the digits 0 to 7) and taking the structure “XXXX”.
Changes to submit.cfg do not take effect until the server is restarted or until you use iwreset.
File permissions could be overwritten with submit.cfg options. If submit.cfg and file permissions are not designed properly, the end user could be confused.
Test and Debug Submit Filtering
The iwtestcfg CLT can be used to determine which workarea and file patterns are applied to a file at the time of submission. For example:%/>iwtestcfg /default/main/WORKAREA/andre/cgi/test.sh
would return:Matched area pattern "^/default/main/WORKAREA/.*$"
Matched file pattern ".*\.sh$"
Actions to do are:
owner = andre/omask=0111
Matched area pattern and Matched file pattern are the case-insensitive regular expressions found in submit.cfg that match the workarea and file. Actions to do are the actions (specified in submit.cfg) that will be applied to the file.
Refer to the TeamSite Command-Line Tools manual for more information about this CLT.
You can also get debugging information on the submit handling configuration printed to iwtrace.log by adding the following line to the [iwserver] section of iw.cfg:[iwserver]
debug_event_handler=yes
This configures the TeamSite server to print:
2 TeamSite Administration Guide
• • • •••

Configure Submit Filtering
A configuration map of submit.cfg.
Which actions are performed as files are submitted.
RCS Macro Expansion
Unix:
TeamSite provides RCS-style macro substitution at submit time. These macros enable you to embed version information into files, including:
File name
Revision string
Last modifier
Last modified
Submit comments
To use the macro facility, you must add new rules to the submit.cfg configuration file (see page 130), then manually insert the macros into files in your workarea. When the files are submitted, the TeamSite server replaces the macros with the appropriate information, and rewrites the file in your workarea and the staging area.
Available Macros
The macros are a subset of those used in RCS (called keywords in the RCS documentation). The following description is taken from the UNIX co(1) man page, modified for TeamSite semantics.
Strings of the form $keyword$ and $keyword:...$ embedded in the text are replaced with strings of the form $keyword:value$ where keyword and value are pairs listed below. Keywords can be embedded in literal strings or comments to identify a revision.
Initially, the user enters strings of the form $keyword$. On submit, the server replaces these strings with strings of the form $keyword:value$. On subsequent submits, the value fields will be replaced automatically with updated values.
The following keywords (macros) and their corresponding values are recognized by TeamSite:
$Author$. The login name of the user who last modified the file. This is a standard RCS keyword and does not refer to the TeamSite Author role.
$Date$, The date and time the file was last modified.
TeamSite Administration Guide 133
• • • •••

Chapter 6: Manage TeamSite Access
13
$Header$. A standard header containing the path name of the file, the revision string, the date and time, the author. The path is relative to the area root.
$Id$. Same as $Header$, except that the filename does not include the path.
$Log$. The comment supplied during submit, preceded by a header containing the filename, the revision string, the date and time when the file was last modified, and the author. The comment is either the submit comment supplied for the individual file or, if this is empty, the comment supplied for the all the files associated with the submit. Existing log messages are not replaced. Instead, the new log message is inserted after $Log:...$. This is useful for accumulating a complete change log in a file.
Each inserted line is prefixed by the string that prefixes the $Log$ line. For example, if the $Log$ line is // $Log:tan.cc $, RCS prefixes each line of the log with //. This is useful for languages with comments that go to the end of the line. The convention for other languages is to use a * prefix inside a multiline comment. For example, the initial log comment of a C program is conventionally of the following form:/** $Log$*/
$Revision$. The revision string.
$Source$. The pathname of the file, relative to the root directory of the area.
The following RCS keywords (macros) are ignored by TeamSite:
$Locker$
$Name$
$RCSfile$
$State$
The following characters in keyword values are represented by escape sequences:
Enable Macro Expansion
To enable RCS macro expansion for a particular set of files, you must include the following action in the submit.cfg rules that apply to those files:expand_rcs_macros=yes
Here is a sample submit.cfg file:
Character Escape Sequence
end-of-line \n
$ \044
\ \\
4 TeamSite Administration Guide
• • • •••

Configure Submit Filtering
CASE-SENSITIVE = YES
RULES
{
"." # any workarea
{
".*\.[ch]$" { gid=iw, expand_rcs_macros=yes }
# files ending in .c or .h
".*" { gid=iw } # all other files/directories
}
}
TeamSite Administration Guide 135
• • • •••

Chapter 6: Manage TeamSite Access
13
6 TeamSite Administration Guide• • • •••

Chapter 7
Set Up TagUI
TagUI provides a method for tagging files (that is, assigning metadata to files). TagUI can be used to add metadata to a single file or to multiple files at one time. The purpose of tagging is to add extended attributes to your content that can be used later to generate more informative web sites. For example, an expiration date can be used to specify when content is to be removed. You can also add tags that are used to search for content.
When end-users set metadata on files (that is, tag them), the metadata is added to files as TeamSite extended attributes and stored in the TeamSite Content Store. Adding metadata is a file-specific feature. That is, users must explicitly select the files on which to set metadata. Metadata cannot be set globally for an entire area or branch. For example, to set metadata on all files in a workarea, the user must select each file in that workarea (by clicking Select All or by clicking the check box next to each file) and then initiate a TagUI session. If the data meets all necessary criteria, TagUI adds the new metadata (in the form of TeamSite extended attributes) to the specified files.
When a user selects the tagging option from ContentCenter or within a workflow, a form displays to obtain the metadata values. This form is designed using the data capture framework described in the TeamSite FormsPublisher Developer’s Guide. This chapter describes specific TagUI-form design issues.
Tagging has been accomplished in previous TeamSite releases through different methods:
In TeamSite 6.7.1 and earlier releases, Metadata Capture Tagging (sometimes referred to as Tagger GUI) was used. This method is supported for backward compatibility.
In TeamSite 6.7.1 SP1, the next-generation tagging system was introduced. However, it could only be used to tag one file at a time.
TeamSite 6.7.2 provides TagUI, which is the single-file and multi-file next-generation tagging system. This method is the default for all tagging activities.
TeamSite Administration Guide 137
• • • •••

Chapter 7: Set Up TagUI
13
This chapter describes how to set up and use TagUI. It then discusses how to move Metadata Capture Tagging configuration files to TagUI.
This chapter discusses the following topics:
TagUI Features
Using TagUI Rulesets
TagUI Form Design
Configure TagUI
Create Rulesets
Merge Rulesets
Using FormAPI
Integrate MetaTagger
Migrate from Metadata Capture Tagging
TagUI Features TagUI differs from the Metadata Capture Tagging in several key areas. Tagging features provided by TagUI include:
Scripting through FormAPI. You can use FormAPI and the <script> element to create dynamic TagUI input forms. See the TeamSite FormsPublisher: FormAPI Developer’s Guide for details about using FormAPI.
Rich text editor support. You can configure data forms to use rich text editors such as TinyMCE and VisualFormat for data entry. Values stored for these text fields will include rich text formatting information.
Tab Support. You can use the <tab> element when defining the form to divide content input onto multiple pages.
Additional replicant and container support. You can configure data forms using combination=”or” for item replicants and containers. The <replicant> element is no longer supported.
Additional <browser> attribute support. You can use attributes such as ceiling-dir with the <browser> element.
Support for MetaTagger integration. If MetaTagger is installed, you can map individual data form items to specific MetaTagger projects so that MetaTagger is invoked when a user tags a file through those data form items.
8 TeamSite Administration Guide
• • • •••

Using TagUI Rulesets
Using TagUI RulesetsWhen a user selects a file or files to tag in ContentCenter Standard or Professional:
1. The TagUI process is invoked.
2. The TagUI processor reads the file iw-home/local/config/metadata-rules.cfg to determine which ruleset or rulesets to use for the files selected for tagging. (The ruleset is specified by name in the <ruleset> element.) A ruleset is a data capture template (DCT) that contains one ruleset and has a file name with a .cfg extension.
3. TagUI searches for the ruleset or rulesets in the files located in the iw-home/local/config/tagui/rulesets60 directory. If multiple files have been selected for tagging, it searches for rulesets for all the files. All of the rulesets in this directory must conform to the DTD for the TagUI as defined by iw-home/local/config/datacapture6.0.dtd.
4. If TagUI does not find rulesets for all of the files, it looks in iw-home/local/config/datacapture.cfg. If it finds rulesets in the datacapture.cfg file, it dynamically migrates the rulesets to conform to the datacapture6.0.dtd so they can be merged with other rulesets.
5. The rules defining the TagUI appearance and behavior are executed. The TagUI form displays using the same rendering engine used by FormsPublisher and Workflow Modeler. The user can complete the process of tagging the file or files originally selected. If multiple rulesets are found, they are merged.
TagUI Form DesignThis section shows a possible form for collecting metadata for a single file. The form uses tabs so the information is divided between screens.
TeamSite Administration Guide 139
• • • •••
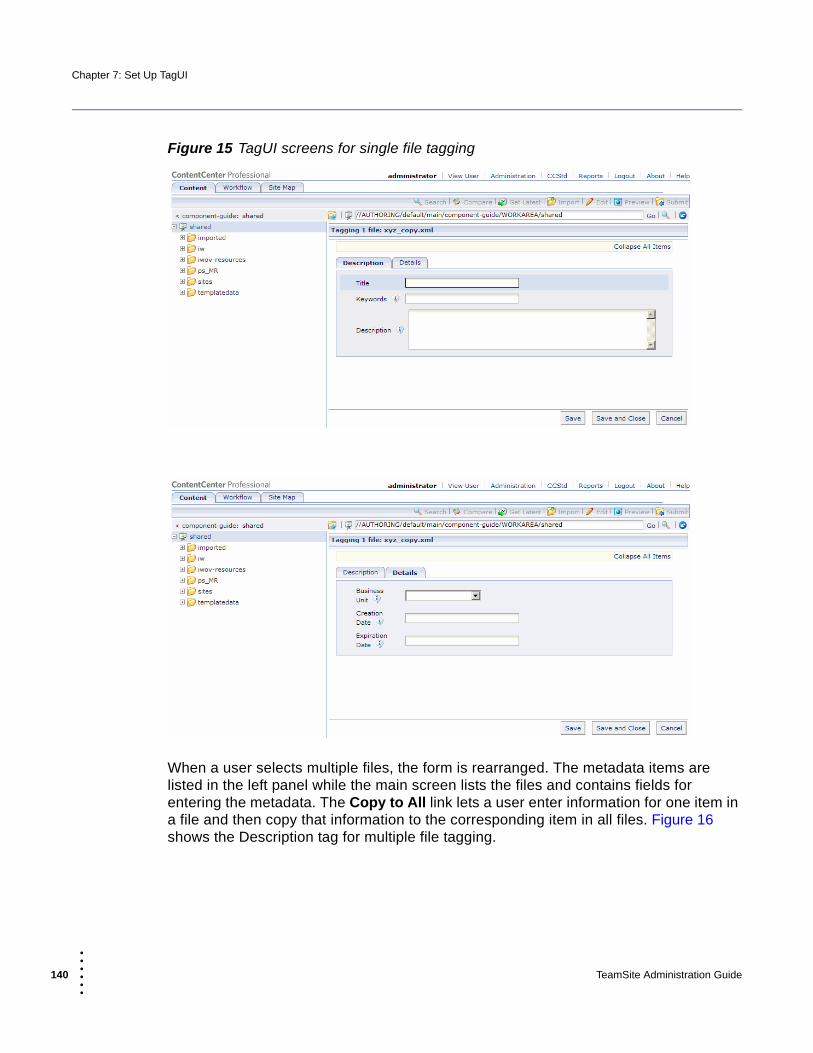
Chapter 7: Set Up TagUI
14
Figure 15 TagUI screens for single file tagging
When a user selects multiple files, the form is rearranged. The metadata items are listed in the left panel while the main screen lists the files and contains fields for entering the metadata. The Copy to All link lets a user enter information for one item in a file and then copy that information to the corresponding item in all files. Figure 16 shows the Description tag for multiple file tagging.
0 TeamSite Administration Guide
• • • •••

Configure TagUI
Figure 16 TagUI screen for multiple file tagging with Description tab
Configure TagUITo configure TagUI, you need to:
1. Create one or more ruleset files in the iw-home/local/config/tagui/rulesets60 directory. Ruleset file names must end in .cfg, and the files must conform to the DTD defined in iw-home/local/config/datacapture6.0.dtd. Each ruleset file can contain only one ruleset. See “Create Rulesets” on page 145.
2. Specify the name of the ruleset you created in the iw-home/local/config/tagui/ rulesets60 directory to the iw-home/local/config/metadata-rules.cfg file. See “Map to Rulesets” on page 141.
Map to Rulesets
The metadata-rules.cfg file maps vpaths to data capture rules that are defined in the iw-home/local/config/tagui/rulesets60 directory. The metadata-rules.cfg file consists of a series of <cond> (conditional) elements. A <cond> element can contain <rule>
TeamSite Administration Guide 141
• • • •••

Chapter 7: Set Up TagUI
14
elements and other <cond> elements. Each vpath is run through metadata-rules.cfg, possibly resulting in a one-to-many mapping from vpaths to named rules. Whenever a list of <cond> elements is found, the first to match the current vpath takes effect, and the rest of the elements in the list are discarded. Therefore, entries in this file should have broader regex expressions at the bottom and more specific expressions at the top.
The TeamSite installation program installs the metadata-rules.cfg in the iw-home/local/config/ directory. The metadata-rules.cfg file uses the following DTD: <!ELEMENT metadata-rules (cond)*>
<!ELEMENT cond (cond|rule)*>
<!ATTLIST cond
vpath-regex CDATA #REQUIRED
>
<!ELEMENT rule EMPTY>
<!ATTLIST rule
name CDATA #REQUIRED
>
The contents of the metadata-rules.cfg file are as follows:
Notes:
International Encoding—UTF-8 is an encoding of Unicode, a standard for encoding the character sets of international languages. All of your content should specify their encoding as UTF-8.
Vpath Regular Expression—Names the vpath (in this case, all files in all directories) to which the rules named in the following subelements are applied.
Rule Identifier—Names the rule that applies to the preceding vpath. The rule itself is defined in the <ruleset> element of a file contained in the iw-home/local/config/tagui/rulesets60 directory. In this example, the Default Rule rule always applies to all files in all directories.
The following metadata-rules.cfg file illustrates a more detailed example. When multiple rule names are specified under a single cond expression, these rulesets are merged as described on page 153.
<?xml version="1.0" encoding="UTF-8" ?>
<metadata-rules>
<cond vpath-regex=".">
<rule name="Default Rule" />
</cond>
</metadata-rules>
International Encoding
Vpath Expression Rule Identifier
2 TeamSite Administration Guide
• • • •••

Configure TagUI
Table 10 shows the results of the vpath expressions identified in the example code. It also identifies the rulesets that will be applied to each category of files. For example, any file in the /default/main/syndication directory has the Default and Syndicate rulesets because it is in the /default/main/syndication directory. Additionally, files with a .pdf file extension in the /default/main/syndication directory also have the PDF Files ruleset applied while files with a .doc extension in the /default/main/syndication directory also have the MS Word Files ruleset applied. The number in brackets (such as [1]) shows the corresponding identifier in the example code.
Table 10 Vpaths and corresponding rulesets
Result of vpath Expression Rulesets Applied to Files
[1] any file in the /default/main/syndication directory
[2] Default, Syndicate
[3] any file in the /default/main/syndication directory with .pdf extension
[2] Default, Syndicate, [4] PDF Files
<metadata-rules>
<cond vpath-regex="^/default/main/syndication">
<rule name="Default" />
<rule name="Syndication" />
<cond vpath-regex="\.pdf$">
<rule name="PDF Files" />
</cond>
<cond vpath-regex="\.doc$">
<rule name="MS Word Files" />
</cond>
</cond>
<cond vpath-regex="^/default/main/www">
<rule name="Default" />
<rule name="Web Content" />
<cond vpath-regex="\.html$">
<rule name="HTML Files" />
<cond vpath-regex="/pr/">
<rule name="PR" />
</cond>
<cond vpath-regex="/corp/">
<rule name="Corporate" />
</cond>
</cond>
</cond>
</metadata-rules>
Vpath Expression1
Rule Identifiers2
Vpath Expression3
Rule Identifier4
Vpath Expression5
Rule Identifier6
Vpath Expression7
Rule Identifiers8
Vpath Expression9
Rule Identifier10
Vpath Expression11
Rule Identifier12
Vpath Expression13
Rule Identifier14
TeamSite Administration Guide 143
• • • •••

Chapter 7: Set Up TagUI
14
Adjust Server Timeout
If a user receives a Request Timed Out message after clicking Save or Save and Close when tagging multiple files, this indicates a slow response time and you may need to increase the timeout value. To adjust the timeout value, modify the following entry in the application_custom.xml file:<default-param id="iw.tagui.ajax-timeout" value="60000"/>
The default is 60000, which is the connection timeout value in milliseconds (and equivalent to 60 seconds).
Tag Large Numbers of Files
Attempting to tag a large number of files at one time may impact system performance. You can specify the number of files that can be tagged in one screen to improve the tagging response times. After the user tags the first group of files, the next group of files displays for tagging. To adjust the number of files to be tagged in each group, modify the following entry in the application_custom.xml file:<default-param id="iw.tagui.taggingGroupSize"
value="500"
public="true"/>
Set value to unlimited to disable grouping.
[5] any file in the /default/main/syndication directory with a .doc extension
[2] Default, Syndicate, [6] MS Word Files
[7] any file in the /default/main/www directory [8] Default, Web Content
[9] any file in the /default/main/www directory with a .html extension
[8] Default, Web Content, [10] HTML Files
[11] any file in the /default/main/www/pr directory with a .html extension
[8] Default, Web Content, [12] PR
[13] any file in /default/main/www/corp with a .html extension
[8] Default, Web Content, [14] Corporate
Table 10 Vpaths and corresponding rulesets
Result of vpath Expression Rulesets Applied to Files
4 TeamSite Administration Guide
• • • •••

Create Rulesets
Control the Search Function
By default, users can search for data in forms. This feature has little meaning for TagUI and is automatically turned off when a user is tagging multiple files. It can be disabled for tagging single files with the following entry in the application_custom.xml file: <param id="iw.tagui.searchdcr.enabled"
value="false"
public="true"/>
Revert to MetaData Capture Tagging
To revert to the original Metadata Capture Tagging (Tagger GUI) for either single files or multiple files, set the following separately for ContentCenter Professional and ContentCenter Standard in application_custom.xml:<default-param id="iw.tagui.singleFilelUI"
value="old"
public="true"/>
<default-param id="iw.tagui.multiFilelUI"
value="old"
public="true"/>
Create RulesetsA ruleset defines the form that is used for collecting metadata for a particular type of file. You may have rulesets created especially for files with certain extensions (such as .pdf, .html, .doc, .txt). The metadata collected for each of these types may be different. A ruleset is actually a data capture template (DCT) similar to those used for FormsPublisher. A .cfg file defines a ruleset for capturing data; you specify the file name. Rules are referred to by name in metadata-rules.cfg. You may create as many rulesets as you need.
Rules contain items, where each item is a single set of data that is to be captured from the end user. An item consists of one instances. Each instance encapsulates how to capture the data for the item. You can specify access control elements that determine whether a field is applicable to a particular user.
The TeamSite installation program installs a sample file called datacaptureExamplewithValidation.cfg in the iw-home/local/config/tagui/rulesets60 directory. You can copy, rename, and edit the example file to create your actual rules
TeamSite Administration Guide 145
• • • •••

Chapter 7: Set Up TagUI
14
file. Use the datacapture6.0.dtd and annotated examples described in the TeamSite FormsPublisher Developer’s Guide as a reference to create your own site-specific configuration.
The contents of the datacaptureExamplewithValidation.cfg file used to create the form in Figure 15 are shown here; the section immediately following the file explains the callouts.
<?xml version="1.0" encoding="UTF-8"?>
<!DOCTYPE data-capture-requirements SYSTEM "datacapture6.0.dtd">
<data-capture-requirements>
<ruleset name="Default Rule with Validation"> <root-container name="Asset_metadata" location="Asset_metadata">
<tab name="Description">
<label>Description </label>
<description>
Metadata that describes the topic of the asset.
</description>
<item name="Title" pathid="Title">
<label>Title</label>
<description>Title description</description>
<text required="f" size="32" maxlength="60"/>
</item>
<item name="Keywords" pathid="Keywords">
<label>Keywords</label>
<description>
Keywords can include terms that are not in the asset itself.
</description>
<text required="f" size="32" maxlength="60"/>
</item>
<item name="Description" pathid="Description">
<label>Description</label>
<description>
A brief summary of 250 characters or less.
</description>
<textarea required="f" rows="5" cols="72" wrap="virtual" maxlength="250"/>
</item>
</tab>
International Encoding
Rule Identifier
root-container Element
Tab Element
Item Elements
Text Instance
Textarea Instance
6 TeamSite Administration Guide
• • • •••

Create Rulesets
<tab name="Details">
<item name="Business_Unit" pathid="Business_Unit">
<label>Business Unit</label>
<description>
Unit that is responsible for the asset.
</description>
<select>
<option label="Administration" value="Admin"/>
<option label="Facilities" value="Facilities"/>
<option label="Finance" value="Finance"/>
<option label="Human Resources" value="HR"/>
<option label="Legal" value="Legal"/>
<option label="Marketing" value="Marketing"/>
<option label="Sales" value="Sales"/>
<option label="Systems" value="Systems"/>
</select>
</item>
<item name="Creation_Date" pathid="Creation_Date">
<label>Creation Date</label>
<description>
The date the asset was created, in the YYYY-MM-DD format.
</description>
<text required="f" maxlength="10" size="32" validation-regex= "^[0-9][0-9][0-9][0-9]-[0-1][0-9]-[0-3][0-9]$"/>
</item>
<item name="Expiration_Date" pathid="Expiration_Date">
<label>Expiration Date</label>
<description>
The date the asset should be retired, in the YYYY-MM-DD format.
</description>
<text required="f" maxlength="10" size="32" validation-regex= "^[0-9][0-9][0-9][0-9]-[0-1][0-9]-[0-3][0-9]$"/>
</item>
</tab>
</root-container>
Tab Element
Select instance
item element
validation-regex
TeamSite Administration Guide 147
• • • •••

Chapter 7: Set Up TagUI
14
Creation_Date","onItemChange",testCDate);
IWEventRegistry.addItemHandler("/Asset_metadata/Details/Expiration_Date","onItemChange",testEDate);
IWEventRegistry.addFormHandler("onSave",testCombinedData);
// event handler for copyToAll
IWEventRegistry.addItemHandler("/Asset_metadata/Details/Creation_Date","onAfterItemReplace",testCDate);
IWEventRegistry.addItemHandler("/Asset_metadata/Details/Expiration_Date","onAfterItemReplace",testEDate);
function testCDate(itemCDate) {
// check build-in validations
itemCDate.setValid(null);
var itemEDate = IWDatacapture. getItem("/Asset_metadata/Details/Expiration_Date");
itemEDate.setValid(null);
if (itemCDate.isValid() && itemEDate.isValid()) {
if (!compareDates(itemCDate.getValue(), itemEDate.getValue())) {
//use item-specific messages instead of alert()
itemCDate.addErrorMessage("Creation Date must be before the Expiration Date");
itemEDate.addErrorMessage("Expiration Date must be after the Creation Date");
itemCDate.setValid(false);
itemEDate.setValid(false);
// alert("Expiration Date must be after the Creation Date");
return false;
} else {
itemCDate.clearErrorMessages();
itemCDate.setValid(true);
itemEDate.clearErrorMessages();
itemEDate.setValid(true);
return true;
}
}
itemCDate.setValid(false);
itemEDate.setValid(false);
return false;
}
function testEDate(itemEDate) {
//check build-in validations
itemEDate.setValid(null);
var itemCDate = IWDatacapture. getItem("/Asset_metadata/Details/Creation_Date");
itemCDate.setValid(null);
if (itemEDate.isValid() && itemCDate.isValid()) {
if (!compareDates(itemCDate.getValue(), itemEDate.getValue())) {
// use item-specific messages messages instead of alert()
itemCDate.addErrorMessage("Creation Date must be before the Expiration Date");
itemEDate.addErrorMessage("Expiration Date must be after the Creation Date");
script Element
8 TeamSite Administration Guide
• • • •••

Create Rulesets
Te
itemCDate.setValid(false);
itemEDate.setValid(false);
// alert("Expiration Date must be after the Creation Date");
return false;
} else {
itemEDate.clearErrorMessages();
itemEDate.setValid(true);
itemCDate.clearErrorMessages();
itemCDate.setValid(true);
return true;
}
}
itemCDate.setValid(false);
itemEDate.setValid(false);
return false;
}
function compareDates(creationDateStr, expirationDateStr) {
if ((creationDateStr.length==0) || (expirationDateStr.length==0))
return true;
var creationYear = creationDateStr.substring(0,4);
var creationMonth = creationDateStr.substring(5,7);
var creationDay = creationDateStr.substring(8,10);
var creationDate = (new Date()).setFullYear(creationYear, creationMonth,creationDay);
var expirationYear = expirationDateStr.substring(0,4);
var expirationMonth = expirationDateStr.substring(5,7);
var expirationDay = expirationDateStr.substring(8,10);
var expirationDate = (new Date()).setFullYear(expirationYear, expirationMonth,expirationDay);
return (creationDate < expirationDate);
}
amSite Administration Guide 149
• • • •••

Chapter 7: Set Up TagUI
15
Notes:
International Encoding. UTF-8 is an encoding of Unicode, a standard for encoding the character sets of international languages. All web assets should specify their encoding as UTF-8.
Rule Identifier. The <ruleset> element contains all of the items define the appearance and behavior of the TagUI form. The name attribute is required.
Root-container Element. This is a required element to provide the first path of the extended attribute name. The name and location attributes are required.
Tab Element. Each <tab> element groups the fields that are on that screen of the form. It also provides the text on the tabs. In this form, there are two tabs: the first is named Description and contains the Title, Keyword, and Description fields, and the second is named Details and contains the Business Unit, Creation Date, and Expiration Date fields.
Item Element. An item is a single set of data (that is, a single field on the form) that is to be captured from a content contributor. Item names must be unique within any given nesting level. An item does not require a label; the field shows up without a caption. However, if you are tagging multiple files, the label on the left will be the value specified with the name attribute.
//only allow SAVE if either "Keywords" or "Title" has value
function testCombinedData(button) {
var canSave = true;
if (IWDatacapture.SAVE_BUTTON == button) {
var itemKeywords = IWDatacapture. getItem("/Asset_ metadata/Description/Keywords");
var itemTitle = IWDatacapture. getItem("/Asset_metadata/Description/Title");
IWDatacapture.clearFormInfoMessage();
if (itemKeywords.getValue() == "" && itemTitle.getValue() == "" ) {
IWDatacapture.postFormInfoMessage("At least one of Keywords or Title must have a value");
canSave = false;
}
}
return canSave;
}
]]>
</script>
</ruleset>
</data-capture-requirements>
0 TeamSite Administration Guide
• • • •••

Create Rulesets
Item Element. Specifies that data will be entered and captured using an unformatted single-line text field. The optional <text> element controls the length of text entry fields in metadata capture and search forms. It also controls whether an end-user is required to enter text in a field. If the data field is used to hold a date or time with a specific format, it is best to include a validation-regex to force users to input data in the correct format (see the validation-regex description that follows). In this example the user is required to enter a string between one and 60 characters in the text field.
Textarea Instance. Specifies that data will be entered and captured in a textarea field of a specified size. You can specify the number of rows and columns and how text will wrap.
Description Element. The <description> element is used to provide the information that displays when a user clicks on the question mark next to a field on a form.
Select Field. Specifies that data will be captured using a drop-down or multi-select list.
Item Element with a specific format (date). If a value for date or time is needed, specify a format and include a validation. Because there are many formats for date and time, specifying a format forces the user to enter data in that format and reduces the chance of user error.
Validation-regex. The user can be forced to enter a date or time in the format you specify by including a validation regex. The value for the validation-regex attribute must match the format specified. The regex in this example specifies the range of digits that can be entered for yyyy-mm-dd and that dashes must separate year, month and day.
Script Element. Indicates that FormAPI calls are being used. This example shows validation checking of the information the user entered in the form. It uses the postMessage API call instead of alerts that were used in earlier versions. This is preferred if the ruleset is used for tagging multiple files because it eliminates the need for the user to click through an alert dialog box once for every file.
Requirements for Designing Rulesets
Only one <ruleset> element can be used in a .cfg file. The file must have a .cfg extension.
All ruleset .cfg files must conform to the datacapture6.0.dtd as described in the TeamSite FormsPublisher Developer’s Guide.
The <replicant> attribute is not supported when designing forms for TagUI. Use the <container> or <item> elements with the min and max attributes.
If at least one ruleset uses tabs, all rulesets that will be merged must also contain tabs; otherwise a merge conflict error will occur.
TeamSite Administration Guide 151
• • • •••

Chapter 7: Set Up TagUI
15
The location attribute is required for <container> elements, and the pathid attribute is required for <item> elements. Use relative locations and pathids; for example: <container name="A" location="X">. One recommendation is to use a unique location or pathid across all rulesets. Another suggestion is to use the same value for location/pathid as you use for name; however, replace any special characters with an underscore for the location/pathid. The following are examples of unsupported location/pathid formats in TagUI:
non-located locations/pathids: <container name="A"> or <container name="A" location="">
absolute locations/pathids: <container name="A" location="/X">
attribute locations/pathids: <container name="A" location="@X">
PCDATA locations/pathids: <item name="A" pathid="#PCDATA">
The <dialog> element is not supported.
Use the same root-container name, such as root, for rulesets that will be merged. Otherwise, a FormAPI script that registers handlers in one root-container will not work when scripts are merged. For example: Ruleset A contains a root container named A, which contains item A1. Ruleset B contains a root container named B, which contains item A1 and a FormAPI script. The merged ruleset will contain root container A, with item A1 merged with item A1 from container B; it will not include the script because it did not get merged since it belongs to root container A.
Do not use a slash (/) in an item or tab name; the Copy to All link and FormAPI will not work.
Best Practices for Designing Rulesets
Items in different rulesets should be uniquely defined. If you want to merge rulesets, items with the same name must be defined identically in different rulesets. For example, if a field with a particular name is identified as a text field in one ruleset and as a drop-down menu in another ruleset, an error will occur when the rulesets are merged. This is different from the Metadata Capture Tagging previously used in TeamSite.
Do not name a TagUI ruleset datacapture.cfg.
2 TeamSite Administration Guide
• • • •••

Merge Rulesets
Merge RulesetsWhen a user selects a file or files to tag, multiple rulesets may need to be combined before the form displays in a process known as ruleset merging.
When a single file is tagged, rulesets may need to be merged to find rules for all the fields in the TagUI form.
When multiple files are being tagged, the rulesets for all files are merged to include all fields from all rules. Depending on the files being tagged, there may be fields that are identified as “Not Applicable” in the TagUI form for a particular file. These are fields that would not appear if a file is tagged alone.
The following files illustrate a very simple example of how rulesets are merged. The rulesets files RS1.cfg and RS2.cfg define the items being displayed in the tagging form. The metadata-rules.cfg file defines the files that use each ruleset.
RS1.cfg<?xml version="1.0" encoding="UTF-8"?>
<data-capture-requirements>
<ruleset name="RS1">
<root-container name="root" location="root">
<item name="itemA" pathid="itemA" >
<label>Item A</label>
<textarea >
<default>Item A default value</default>
</textarea>
</item>
<item name="itemB" pathid="itemB" >
<label>Item B</label>
<textarea >
<default>Item B default value</default>
</textarea>
</item>
</root-container>
</ruleset>
</data-capture-requirements>
RS2.cfg<?xml version="1.0" encoding="UTF-8"?>
<data-capture-requirements>
<ruleset name="RS2">
<root-container name="root" location="root">
<item name="itemA" pathid="itemA" >
TeamSite Administration Guide 153
• • • •••

Chapter 7: Set Up TagUI
15
<label>Item A</label>
<textarea >
<default>Item A default value</default>
</textarea>
</item>
<item name="itemC" pathid="itemC" >
<label>Item C</label>
<textarea >
<default>Item C default value</default>
</textarea>
</item>
</root-container>
</ruleset>
</data-capture-requirements>
metadata-rules.cfg<?xml version="1.0" encoding="UTF-8" ?>
<metadata-rules>
<cond vpath-regex=".*file1\.txt">
<rule name="RS1" />
</cond>
<cond vpath-regex=".*file2\.txt">
<rule name="RS2" />
</cond>
<cond vpath-regex=".*file12\.txt">
<rule name="RS1" />
<rule name="RS2" />
</cond>
</metadata-rules>
The file RS1.cfg defines Item A and Item B. The file RS2.cfg defines Item A and Item C. The metadata-rules.cfg indicates files with names or vpaths containing the string file1.txt are to be tagged as defined in RS1.cfg while files containing the string file2.txt are to be tagged as defined in RS2.cfg and file with names or vpaths containing the string file12.txt are to be tagged as defined in both RS1.cfg and RS2.cfg.
When the user selects Item A, all files will have fields for entering metadata for that value. When the user selects Item B, file2 will be marked as not applicable and the field will not display. Similarly, when the user selects Item C, file1 is marked as not applicable. The user can view and add metadata in all values for file12 since it uses both rulesets RS1 and RS2.
An example that would be used to tag one file would be if the user selected a file that satisfied the condition for *file12.txt shown as the third condition in
4 TeamSite Administration Guide
• • • •••

Merge Rulesets
metadata-rules.cfg. Rulesets RS1 and RS2 would be merged to create the tagging form for the selected file.
Troubleshooting Merged Files
If ruleset merging fails, the merged data capture template is printed into the servlet_out.log debug log.
Dynamic Addition of Select Box Entries
TagUI supports dynamic changes to select box entries. TagUI must interpret saved select box values from another source as dynamic entries from a previous session, and allow those values into the drop-down list. Dynamic changes may occur because:
Extended attributes from an old data capture template are not consistent with what was specified in the new data capture template.
The values for the extended attribute are not valid. When a file that was previously tagged has a value that is no longer an option, the value will be added to the select box; however, the label for that value is not shown.
Multiple select drop-down values (have multi="t") are saved in a single string (for example, "value1, value2, value3"). On changing a multi-valued list into a single-valued list, TagUI renders "value1, value2, value3" as a legal option in the select list. Metadata Capture Tagging would have arbitrarily chosen one of the values.
If you anticipate the meaning of a saved value could change, it is recommended that you migrate the extended attribute data to the new format to achieve the result your organization desires.
The list changes through a CGI callout, a CLT, or by FormAPI. For example, if value4 is added as a select value through a CGI callout, a CLT, or by FormAPI, the select box will contain this additional value, even though it was not included in the original ruleset definition.
If you anticipate the meaning of a saved value could change, it is recommended that you migrate the extended attribute data to the new format to achieve the result your organization desires.
TeamSite Administration Guide 155
• • • •••

Chapter 7: Set Up TagUI
15
Using FormAPIEvent handlers can be specified in JavaScript in the ruleset through the use of the FormAPI <script> element. This can specify form-level or item-level event handlers and perform tasks such as custom validation.
When rulesets with a <script> element are merged, the content of the <script> elements are also merged.
A custom handler doing item validation can use IWItem.addErrorMessage to provide an explanation. This message remains displayed next to the item until the item value has been fixed and revalidated through another invocation of a handler. The custom handler is responsible in clearing any previous messages using IWItem.clearErrorMessages.
In releases prior to TeamSite 6.7.2, a JavaScript alert() function was often used to display a message in a dialog box that the user needed to acknowledge. This alert was used by the event handler author when an event handler prevented further processing by returning a value of false. An example for item-level events is onCallout to explain why a callout was cancelled; an example for form-level events is onSave to explain why the save process could not proceed. The JavaScript alert function will continue to work. However in multi-file tagging this method may require a user to click through a large number of pop-up dialog boxes.
A custom handler can replace the use of JavaScript alert() function with a FormAPI postMesage call. This message can be posted at the item level using IWItem.postMessage or at the form level using IWDatacapture.postFormInfoMessage. These messages are transient and are cleared automatically when the form is redrawn when the user switches tabs or selects a different item in multi-file tagging. Use item.setValid(null) to clear old messages. You can also use item.clearErrorMessages; however if you miss entering this for a message, the message may appear multiple times. See the <script> example in the datacaptureExamplewithValidation.cfg file (page 148).
Best Practices for using JavaScript
Unique function names across rulesets are recommended; you may want to prepend the ruleset name to a function name. For example, a ruleset named validateMyData in ruleset1 could be renamed ruleset1_validateMyData.
Avoid the use of the JavaScript function alert in TagUI rulesets. When rulesets are merged, multiple alerts may occur, requiring the user to click each one.
The JavaScript code in each <script> element should only contain the function declaration and the event handler registration. Any other executable code could be
6 TeamSite Administration Guide
• • • •••

Integrate MetaTagger
executed before FormAPI finishes initialization and the results would be unpredictable and unrepeatable.
By default, IWEventRegistry registrations from different <script> tags may overwrite previous registrations so only the last registered handler is processed. For IWEventRegistry.addFormHandler and IWEventRegistry.addItemHandler API calls, specify replace=false for TagUI so the event handler is added and not overwritten.
Troubleshooting JavaScript
You can insert debugger statements inside a <script> tag to debug and trace execution of the code.
Integrate MetaTaggerIf MetaTagger is installed on your system, you can configure TagUI items to use Metatagger whenever TagUI is invoked. Configuration involves two activities that are described in the following sections:
Creating a ruleset for the data form from which Metatagger will be invoked.
Creating a file that maps MetaTagger projects to data form items defined in the ruleset. Without this mapping file, TagUI does not attempt to search for MetaTagger-provided metadata.
The process of displaying a MetaTagger-enabled form is:
Using ContentCenter, the user selects the file or files for tagging.
TagUI displays the form.
TagUI obtains the metadata for MetaTagger-enabled items and populates the form.
If this is the first time a file is being tagged, the metadata displays automatically.
If the file has already been tagged, the user clicks Suggest to request metadata from MetaTagger, which overwrites existing metadata.
Create a Ruleset
Use the example ruleset shown in this section as the basis for creating your own ruleset for a data form that will invoke MetaTagger. The file defining the ruleset must:
Reside in the iw-home/local/config/tagui/rulesets60 directory.
Have a file name ending in .cfg.
TeamSite Administration Guide 157
• • • •••

Chapter 7: Set Up TagUI
15
Contain the tagEngineConfig attribute, which points to the MetaTagger mapping file that you will create as described in the next section.
Conform to the TagUI DTD defined in datacapture6.0.dtd. Do not use <select>, <radio>, and <check box> attributes in MetaTagger-enabled items; instead use <textarea>.
All MetaTagger-enabled items become <select> items. The original item type is not relevant. However, the drop-down list does not behave like a normal drop-down list, and the user does not need to select any of the items.
The following example shows an example ruleset file named PDF_Files.cfg. It defines a data form named “Asset_metadata.” Code to enable MetaTagger is shown in bold. This data form:
Has two tabs—New Default and Details.
Collects input from a user in five data entry areas (Title, Keywords, Description, Creation Date, and Expiration Date); the first two are MetaTagger-enabled items.
Invokes Metatagger when the user chooses to add metadata, using the Metatagger projects defined in MT_PDFTitle (explained in “Create a Mapping File”).
<?xml version="1.0" encoding="UTF-8"?>
<data-capture-requirements>
<ruleset name="PDF_Files">
<root-container name="Asset_metadata" location="Asset_metadata">
<tab name="New Default">
<item name="PDF_title" pathid="PDF_title" tagEngineConfig="metatagger://MT_PDFTitle">
<label>Title</label>
<description>Title description</description>
<textarea required="f" size="32" maxlength="60"/>
</item>
<item name="PDF_Keywords" pathid="PDF_Keywords" tagEngineConfig="metatagger://MT_PDFTitle">
<label>Keywords</label>
<description>
Keywords can include terms that are not in the asset itself.
</description>
<textarea required="f" size="32" maxlength="60"/>
</item>
<item name="PDF_Description" pathid="PDF_Description">
<label>Description</label>
<description>
A brief summary of 250 characters or less.
</description>
<textarea required="f" rows="5" cols="72" wrap="virtual" maxlength="250"/>
</item>
8 TeamSite Administration Guide
• • • •••

Integrate MetaTagger
</tab>
<tab name="Details">
<item name="Creation_Date" pathid="Creation_Date">
<label>Creation Date</label>
<description>
The date the asset was created, in the YYYY-MM-DD format.
</description>
<text required="f" maxlength="10" size="32" validation-regex= "^[0-9][0-9][0-9][0-9]-[0-1][0-9]-[0-3][0-9]$"/>
</item>
<item name="Expiration_Date" pathid="Expiration_Date">
<label>Expiration Date</label>
<description>
The date the asset should be retired, in the YYYY-MM-DD format.
</description>
<text required="f" maxlength="10" size="32" validation-regex= "^[0-9][0-9][0-9][0-9]-[0-1][0-9]-[0-3][0-9]$"/>
</item>
</tab>
</root-container>
</ruleset>
</data-capture-requirements>
NOTES
Be sure that the maxlength attribute is set to a value that is high enough to display all results for metadata suggestions returned by MetaTagger. If maxlength is too low, the display field truncates the returned result, and users may lose some of the data that was suggested or be unable to edit the information.
Use caution if you are considering specifying the textarea required attribute as true. Every MetaTagger-enabled field must have at least one value generated using the Suggest button when true is specified. If a value is not available, the user cannot save the entire set of files they are attempting to tag.
Requirements for Designing Rulesets for MetaTagger-Enabled Items
The <choice> element is not supported for MetaTagger-enabled items.
The or container is not supported if a <choice> element has a MetaTagger-enabled item as a child.
The container/item replicant is not supported if the item or items inside the replicant container are MetaTagger-enabled items.
An itemRef is not supported.
TeamSite Administration Guide 159
• • • •••

Chapter 7: Set Up TagUI
16
Create a Mapping File
Perform the following steps to create a file that maps MetaTagger projects to data capture template items.
1. Create a metataggerMappings directory in iw-home/local/config/tagui. All MetaTagger mapping files must reside in this directory.
2. In iw-home/local/config/metataggerMappings, create a file with a name of your choice (referred to in this example as MT_PDFTitle).
3. Edit MT_PDFTitle file so that it contains just the <tagUIConfig> element and its associated subelements. The <tagUIConfig> element can contain multiple items (one for each data entry area that will use MetaTagger). Each item also contains one or more parameter subelements mapping the data entry area for that item to a MetaTagger project. The metataggerProjectName is required. For example:<?xml version="1.0"?><tagUIConfig> <item name="/Asset_metadata/New Default/PDF_title"> <parameter name="metataggerProjectName" value="title"/> <parameter name="suggestButton" value="f"/>
<!-- default is "t" (true) --> </item> <item name="/Asset_metadata/New Default/PDF_Keywords"> <parameter name="metataggerProjectName" value="WEB-thesaurus"/> </item></tagUIConfig>
NOTE
All item references are rooted in the node specified in the <root-container> element in PDF_Files.cfg. The syntax for item references is the same as the base FormAPI path syntax.
The data entry areas of the “Asset_metadata” form are mapped to Metatagger projects as follows:
PDF_title (mapped to the title Metatagger project)
PDF_Keywords (mapped to the WEB-thesaurus Metatagger project)
Because "suggestButton" for the first item (PDF_title) is set to "f", the form does not render a Suggest button next to that field. The metadata from the Suggest All button will not overwrite the value in the field for that item. This is useful if you want to disable the Suggest button for a browse-only project.
0 TeamSite Administration Guide
• • • •••

Migrate from Metadata Capture Tagging
Using MetaTagger-Enabled TagUI
When MetaTagger is enabled for tagging multiple files, each file displays with a field for the metadata for the file type. An example of tagging multiple files in ContentCenter Standard is shown in Figure 17.
Figure 17 Tagging multiple MetaTagger-enabled files
If you ask MetaTagger to suggest values using Suggest All during multi-file tagging and then you click Cancel in the pop-up, the values that were already suggested remain but the process terminates. The status shows you how many files were processed with suggestions.
Migrate from Metadata Capture TaggingMetadata Capture Tagging (Tagger GUI) that has been provided with TeamSite for earlier releases is still supported. While you can currently use it, converting to TagUI is needed because Metadata Capture Tagging support will not continue. This section describes considerations when migrating your tagging configuration.
TeamSite Administration Guide 161
• • • •••

Chapter 7: Set Up TagUI
16
Compatibility and Default Behavior
The following table shows which tagging DTDs are supported by Metadata Capture Tagging and TagUI options.
NOTE
While TagUI supports the Metadata Capture Tagging DTD (datacapture.cfg that conforms to metadatacapture6.0.dtd), the opposite is not true. That is, Metadata Capture Tagging does not support the TagUI DTD (ruleset60/*.cfg that conforms to datacapture6.0.dtd). It is not recommended that any new tagging be set up using the Metadata Capture Tagging DTD; instead use the TagUI DTD.
Table 12 summarizes the differences between Metadata Capture Tagging and TagUI.
Table 11 TagUI DTD support
Tagging DTD Metadata Capture Tagging TagUI
Original (metadatacapture6.0.dtd)
Supported Supported
Next generation (datacapture6.0.dtd)
Not supported Supported
Table 12 TagUI and Metadata Capture Tagging differences
Feature Metadata Capture Tagging TagUI
Rendering engine and CGI environment
Rendering engine is unique to Metadata Capture Tagging.
Same rendering engine is shared by FormsPublisher, TagUI, and Workflow Modeler. This new CGI environment is enabled by default, but the original CGI environment can be re-enabled separately from TagUI for backward compatibility (that is, a system can run the original CGI environment and TagUI at the same time).
See “The CGI Environment” on page 167 for more information.
Ruleset configuration files
iw-home/local/config/datacapture.cfg
iw-home/local/config/tagui/rulesets60/anyfilename.cfg
iw-home/local/config/datacapture.cfg (for backward compatibility)
2 TeamSite Administration Guide
• • • •••

Migrate from Metadata Capture Tagging
DTD iw-home/local/config/metadatacapture6.0.dtd (to validate overall Metadata Capture Tagging configuration file datacapture.cfg)
iw-home/local/config/datacapture6.0.dtd applicable to TagUI configuration files in iw-home/local/config/tagui/rulesets60. This is the same format used by FormsPublisher for XML-style (but not Interwoven-style) templates and data forms.
iw-home/local/config/metadatacapture6.0.dtd applicable to iw-home/local/config/datacapture.cfg (for backward compatibility)
Tagging configuration file to specify rulesets
iw-home/local/config/metadata-rules.cfg
iw-home/local/config/metadata-rules.cfg (same file)
Data capture template directory location
iw-home/local/config iw-home/local/config/tagui/rulesets60
iw-home/local/config (backward compatibility)
Interaction with MetaTagger (if installed)
Original MetaTagger dialog window.
TagUI MetaTagger dialog window.
<ruleset> element Any number of <ruleset> elements allowed in iw-home/local/config/datacapture.cfg configuration file.
Only one <ruleset> element allowed per iw-home/local/config/tagui/rulesets60/anyfilename.cfg configuration file; any number of configuration files allowed.
Any number of <ruleset> elements allowed in iw-home/local/config/datacapture.cfg configuration file (backward compatibility).
<root-container> element
Not supported. Required if using TagUI ruleset DTD (datacapture6.0.dtd).
Not supported if using Metadata Capture Tagging ruleset DTD (metadatacapture6.0.dtd).
<replicant> element Supported. Not supported if using TagUI ruleset DTD (datacapture6.0.dtd). Instead use (for example):
<container min="1" max="3" default="1">
or
<item min="1" max="3" default="1">
Supported if using Metadata Capture Tagging ruleset DTD (metadatacapture6.0.dtd).
<item> element No pathid attribute. Required pathid attribute if using TagUI ruleset DTD (datacapture6.0.dtd). pathid must be simple). See the discussion of location/pathid on page 151.
No pathid attribute if using Metadata Capture Tagging ruleset DTD (metadatacapture6.0.dtd).
Table 12 TagUI and Metadata Capture Tagging differences (Continued)
Feature Metadata Capture Tagging TagUI
TeamSite Administration Guide 163
• • • •••

Chapter 7: Set Up TagUI
16
Sequence of Events
When a user selects a file or files to tag in ContentCenter Standard or Professional:
1. The TagUI processor checks application.xml to determine whether to use TagUI or Metadata Capture Tagging for tagging.
2. If using TagUI, the TagUI engine is invoked.
3. The TagUI engines reads the file iw-home/local/config/metadata-rules.cfg to determine which rulesets to use.
4. The TagUI engine searches for the specified rulesets.
a. First the TagUI searches for the ruleset in the iw-home/local/config/tagui/rulesets60 directory.
b. If the specified ruleset is not found, TagUI searches for the ruleset in the iw-home/local/config/datacapture.cfg file. Any rulesets found are converted to conform to datacapture6.0.dtd.
5. When all the rulesets are found, the rules are merged, the TagUI form is displayed, and the user can complete the process of tagging the selected file or files.
<container> element No location attribute. Use location attribute if using TagUI ruleset DTD (datacapture6.0.dtd). Conforms to the same rules as pathid. See the TeamSite FormsPublisher Developer’s Guide for information on using the pathid attribute. The location attribute is required if <container> is a child of a <tab> element.
No location attribute if using Metadata Capture Tagging ruleset DTD (metadatacapture6.0.dtd).
<view-container> <view> element
Supported. Not supported if using TagUI ruleset DTD (datacapture6.0.dtd). Replaced with <root-container><tab>.
Supported if using Metadata Capture Tagging ruleset DTD (metadatacapture6.0.dtd).
<cgi-callout> element Supported. Not supported if using TagUI ruleset DTD (datacapture6.0.dtd). Replaced with <callout>.
Supported if using Metadata Capture Tagging ruleset DTD (metadatacapture6.0.dtd).
Dynamic addition of select box entries.
Not supported. Supported; may require migrating extended attribute data to TagUI format. See “Merge Previous and Next Generation Rulesets” on page 170 for more information.
Table 12 TagUI and Metadata Capture Tagging differences (Continued)
Feature Metadata Capture Tagging TagUI
4 TeamSite Administration Guide
• • • •••

Migrate from Metadata Capture Tagging
Update Your Tagging Structure
NOTE
You should back up the iw-home/local/config/metadata-rules.cfg file before performing these steps.
To configure TagUI to use the new rulesets, you need to:
1. Create one or more configuration files in the iw-home/local/config/tagui/rulesets60 directory. Configuration file names must end in .cfg, and the files must conform to the DTD defined in iw-home/local/config/datacapture6.0.dtd. Each configuration file can contain only one ruleset.
2. In iw-home/local/config/metadata-rules.cfg, change the ruleset name specified for use to the name of the new ruleset you created in the iw-home/local/config/tagui/rulesets60 directory.
Update Rulesets
To see an example of the differences in ruleset/DCT definitions for TagUI as opposed to Metadata Capture Tagging, compare the datacapture_ruleset60.cfg DCT (beginning on page 146) for TagUI with the datacapture.cfg.example file described in the “Configuring Metadata Capture” chapter of the TeamSite Administration Guide. Specifically, note the following differences:
Use of the <tab> element instead of the <view-container> and <view> elements.
Addition of the <root-container> element.
Removal of the <replicant> element.
Replicant Processing
Unlike the Metadata Capture Tagging DTD, the TagUI DTD does not support the <replicant> element with min and max attributes. Instead, it provides equivalent support through the <container> and <item> elements. The TagUI <container> element supports the same max, min, and default semantics of the <replicant> element.
TeamSite Administration Guide 165
• • • •••

Chapter 7: Set Up TagUI
16
NOTE
The <replicant> element is still supported for backward compatibility in rulesets conforming to the old DTD, but the old DTD does not provide support for new features such as FormAPI script.
The Metadata Capture Tagging DTD distinguished between replicants and containers, and whether an item used the <replicant> or <container> tag had an impact on the format for the item when it was saved in the Content Store. This format may be important for your downstream systems. In TagUI’s new DTD, the replicant save format is preserved for backward compatibility for containers that can be instantiated multiple times (those where neither min and max are not 1). To properly support containers or replicants that implicitly or explicitly have both min and max equal to 1, a new attribute eaSaveFormat for <container> elements allows you to explicitly define whether you want to use the container or replicant save format in this otherwise ambiguous case (see Table 12).
To migrate templates to use TagUI, replace <replicant> elements with <container> elements. Since <container> elements support the same attributes in the TagUI DTD as <replicant> supported, you should be able to keep all attributes the same, unless the replicant explicitly or implicitly uses min and max of 1.
A new eaSaveFormat attribute in the <container> element is provided to allow this case:
min CDATA "1"
max CDATA "1"
default CDATA "1"
location CDATA #IMPLIED
refid CDATA #IMPLIED
eaSaveFormat (withInstanceNums | withoutInstanceNums) "withInstanceNums"
<!-- @eaSaveFormat: Tag UI specific for EA compatibility. withoutInstanceNums only applies when min==max==1. -->
In Metadata Capture Tagging, <replicant> elements were always saved in the Content Store using instance numbers, and <container> elements were always saved in the Content Store without instance numbers.
The following datacapture.cfg entry creates an extended attribute with container/item=user_input_value in the Content Store:<container name="container"> <item name="item"> <text>
The following datacapture.cfg entry:<replicant name="replicant" min="1" max="1"> <item name="item"> <text>
creates an extended attribute such as replicant/0/item=user_input_value_for_instance_0 in the Content Store. If max was changed to
6 TeamSite Administration Guide
• • • •••

Migrate from Metadata Capture Tagging
allow two instances, a second instance would use /1/ in the extended attribute name.
In TagUI, you can specify eaSaveFormat=”withInstanceNums” on a <container> element to mimic the save format of a <replicant> element in Metadata Capture Tagging. You can specify eaSaveFormat=”withoutInstanceNums” to save <container> elements without instance numbers.
The default for the eaSaveFormat in the TagUI is “withInstanceNums”, so unless otherwise specified, containers in TagUI configurations would save using instance numbers (to support the min and max elements allowed by TagUI <container> elements).
To migrate replicants and containers in which min==max==1, the eaSaveForm attribute lets you specify whether the /#/ format should be included when saving (or attempting to load) the data form. Setting eaSaveForm="withInstanceNums" retains the instance numbers. Setting eaSaveForm="withoutInstanceNums" does not.
NOTES
When min and max are not both 1, this is automatically a replicant type and instance numbers must be used in the Content Store. If they are not, replicant instances 2 through N would overwrite the first instance in the Content Store. FormsPublisher recognizes this case automatically, which is why withoutInstanceNums only applies when min==max==1.
The withoutInstanceNums setting only applies when min and max are both equal to 1, since having an instantiable container would result in a save format that includes instance numbers in Metadata Capture Tagging.
Even though the eaSaveFormat attribute only exists in the TagUI DTD, the Metadata Capture Tagging DTD files are transformed dynamically at runtime into TagUI DTD files when TagUI renders them. Therefore, the dynamic migration code automatically adds eaSaveFormat=withoutInstanceNums whenever migrating an original format container into a TagUI format container so that TagUI automatically works with the original DTD and is backwards compatible with any pre-existing data.
The CGI Environment
Since TagUI shares a common rendering framework with FormsPublisher and Workflow Modeler, the CGI environment variables passed by the Metadata Capture Tagging, as inputs to the CGI itself, are not compatible when using TagUI. Customers should migrate their callout code to use the CGI environment passed to callouts common to FormsPublisher, Workflow Modeler, and TagUI.
TeamSite Administration Guide 167
• • • •••

Chapter 7: Set Up TagUI
16
The CGI environment can be enabled separately from TagUI. Because migrating TagUI CGIs to use the FormsPublisher/Data Capture Framework environment may pose challenges for Metadata Capture Tagging customers who have pre-existing CGI callout implementations, Interwoven has implemented an option in TagUI to enable the Metadata Capture Tagging CGI environment. This option is available to help customers who cannot immediately migrate to the Form Publisher-like CGI environment, but the old CGI environment will not be supported in the future. So customers who need to use this option should plan a migration to the FormsPublisher/Data Capture Framework CGI environment.
As such, if you are using <cgi-callout/> in your Metadata Capture Tagging datacapture.cfg and you are experiencing errors in your cgi callout, you may need to revert to passing the old cgi environment variables to your callout. This can be accomplished by setting the following parameter in your application_custom.xml in two places, under both the ccpro and ccstd sections:<application id="ccpro">
<!--
public-comment:
This property is used to determine whether to use old cgi-callout environment which is the same as old tagui variable or new CGI callout
enviroment which is the same as formspub.
-->
<param id="iw.tagui.CGIEnv"
value="old”/>
</application>
<application id="ccstd">
<param id="iw.tagui.CGIEnv"
value=”old” />
</application>
To change back to the new CGI environment, set the value for iw.tagui.CGIEnv to "new".
Because the frame structure differs between the Metadata Capture Tagging and TagUI, your existing CGI scripts may receive JavaScript errors when trying to set the value from the CGI onto the TagUI form. If you encounter this case, changes may be required in your CGI code that writes values back into the TagUI form.
TeamSite ships with two example files showing CGI callouts. The file iw-home/httpd/iw-bin/example_metadata_callout.ipl can only be used if you set the CGIEnv variable to old.
8 TeamSite Administration Guide
• • • •••

Migrate from Metadata Capture Tagging
The following function call from this file shows how the form is called. Compare the line in bold type with the similar line in the example below.function set_datacapture_item_value( selectedValue )
{
if ((window.opener == null) ||
(window.opener.closed))
{
return false;
}
var calloutForm = eval(’opener.document.$form_name’);
//var calloutForm = ’$form_name’;
if (!calloutForm)
{
return false;
}
var calloutElementFound = false;
for ( i = 0 ; i < calloutForm.elements.length ; i++ )
{
if (calloutForm.elements[i].name == ’$element_name’)
{
calloutForm.elements[i].value = selectedValue;
calloutElementFound = true;
break;
}
}
if (!calloutElementFound)
{
return false;
}
return true;
}
To take advantage of the new CGI functionality, refer to the example file iw-home/httpd/iw-bin/example_datacapture_callout.ipl. This example can only be used if you set the CGIEnv variable to new. Again, compare the bold lines in the two file to see the difference in how forms are called.
function set_datacapture_item_value( selectedValue )
{
if ((window.opener == null) ||
(window.opener.closed))
{
return false;
TeamSite Administration Guide 169
• • • •••

Chapter 7: Set Up TagUI
17
}
var calloutForm = eval($form_name);
if (!calloutForm)
{
return false;
}
var calloutElementFound = false;
for ( i = 0 ; i < calloutForm.elements.length ; i++ )
{
if (calloutForm.elements[i].name == ’$element_name’)
{
calloutForm.elements[i].value = selectedValue;
calloutElementFound = true;
break;
}
}
if (!calloutElementFound)
{
return false;
}
return true;
}
When working with cgi-callouts in TagUI alongside FormAPI script, you should follow the guidelines for callouts outlined in the TeamSite FormsPublisher Developer’s Guide in the section titled “Using Callouts.” Most notably, look at the call for datacapture.refreshItem(), which is used to synchronize the form field and the FormAPI item object that enables the usage of FormAPI with callout-populated fields.
Merge Previous and Next Generation Rulesets
When TagUI checks for rulesets, it first looks in the iw-home/local/config/tagui/rulesets60 directory. If it does not find all the rulesets it needs for a form (as defined in metadata-rules.cfg), it looks for the rulesets in iw-home/local/config/datacapture.cfg. If it finds the necessary rulesets defined in datacapture.cfg, they are used after they are converted to the new format.
For example, tagging a file requires Rule1 and Rule2. TagUI finds Rule1.cfg in the rulesets60 directory. It finds a ruleset named Rule2 in the datacapture.cfg file and uses
0 TeamSite Administration Guide
• • • •••

Migrate from Metadata Capture Tagging
that information. Rule1 and Rule2 are then combined to create the form necessary to tag the file.
Any items that have the same name in different rulesets must be identical in all attributes. Otherwise, an error is issued.
Compare Merged Rulesets
The following code defines items in two rulesets—one named txt and one named doc. They define the title item differently; the txt rule defines it as a text field while the doc rule defines it as a select box.
txt rule <ruleset name="txt">
...
<item name="title">
<database data-type="VARCHAR(100)" />
<text required="f" size="32" maxlength="60" />
</item>
...
</ruleset>
Doc rule <ruleset name="doc">
...
<item name="title">
<description>select title from drop-down options</description>
<database data-type="VARCHAR(100)" />
<select>
<option label="Video Games" value="Video Games" />
<option label="Movies" value="Movies" />
<option label="Shopping" value="Shopping" />
<option label="Sports" value="Sports" />
</select>
</item>
...
</ruleset>
Because TagUI requires that items in merged rulesets be identical, merging rulesets with items defined differently as shown results in an error message (Figure 18):
TeamSite Administration Guide 171
• • • •••

Chapter 7: Set Up TagUI
17
Figure 18 Error message in TagUI when items do not match
Using Metadata Capture Tagging, the results are unpredictable when multiple files were selected. In this example the form displays a select box for all Title fields (Figure 19). If a different rule was encountered first, the title might display as text fields instead of drop-down options.
Figure 19 Metadata capture tagging for multiple files
2 TeamSite Administration Guide
• • • •••

Chapter 8
Configure the TeamSite Web Daemon and Proxy Server
The following sections describe the configuration settings for the TeamSite web daemon and the TeamSite proxy server. They begin with an overview of each of these features, and then are followed by sections on specific configuration settings.
About the TeamSite Web Daemon
About the Proxy Server
Configure TeamSite Web Daemon and Proxy Server Operation
Resolve Fully Qualified URLs
Redirect Fully Qualified URLs
Redirect TeamSite Views to Different Areas
Configure TeamSite to Use Different Web Servers
Configure External Remappings
Host Header Remappings
Enable iwproxy Access Control
Configure SSI Remapping
Configure Proxy Failover
Debug Your Proxy Server Configuration
TeamSite Administration Guide 173
• • • •••

Chapter 8: Configure the TeamSite Web Daemon and Proxy Server
17
About the TeamSite Web DaemonTeamSite uses a web daemon, iwwebd.exe, to provide a single HTTP interface to the TeamSite ContentCenter interfaces.
Figure 20 Browser access to iwwebd
Remote contributors can use TeamSite securely without having to establish a Virtual Private Network (VPN). The iwwebd web daemon also serves the non-servlet-based parts of TeamSite ContentCenter. For an illustration of how requests are processed, see Figure 4 on page 27.
About the Proxy ServerTeamSite uses a proxy server to perform the following functions:
Resolve relative and absolute URL names in TeamSite areas in order to present users with a virtualized view of the Web site contained within an area (see page 177).
Redirect fully qualified URLs into TeamSite areas (see page 181).
Redirect browsing in one branch or workarea into another area (see page 183).
Redirect individual workareas to use different Web servers (see page 185).
Remap links to external Web servers (see page 186).
Modify Host: headers (see page 187).
TeamSiteFile System
CustomerWeb server
iwproxy servletd
iwwebdBrowser
optionalfire wall
4 TeamSite Administration Guide
• • • •••

About the Proxy Server
Remap SSI requests (see page 188).
Each time a request is made through the TeamSite proxy server, the following sections of iw.cfg are processed as shown in the following graphic. More than one rule may be applied to a request. When a rule matches a URL—depending on the section in which the rule was specified—either an HTTP redirect is sent back to the browser to indicate the new location or the URL is rewritten and passed to the new section. The first rule that matches in any section prevails; no other rules in that section are applied.
Figure 21 Processing proxy requests through the iw.cfg file
See Configure the Proxy Server to Redirect Fully Qualified URLs. Applies only if the browser’s proxy has been set to the TeamSite proxy server.
See Document Roots.
See Configure External Remappings. Applies only if none of the preceding rules has matched.
See Redirect TeamSite Views to Different Areas.
See Host Header Remappings.
See Enable and Disable VisualPreview.
See Configure Proxy Failover. Sends the rewritten path to be reprocessed.
iwproxy_fullproxy_redirect
iwproxy_remap
iwproxy_external_remap
iwproxy_preconnect_redirect
iwproxy_hostheader_remap
iwproxy_smartcontextedit_allowed
iwproxy_failover_remapCan the rewritten pathbe found?
Yes
No
The specified page is returned.
iwproxy_preconnect_remap
TeamSite Administration Guide 175
• • • •••

Chapter 8: Configure the TeamSite Web Daemon and Proxy Server
17
Apply Changes to Proxy Configuration
If you change any of the iwproxy mappings in iw.cfg, you must use the iwreset -a CLT to ensure that TeamSite recognizes the changes.
NOTE
iwreset -a does not apply changes to the [iwproxy_remap] or [iwproxy_plugin_remap] sections of iw.cfg if you are using Web server plug-ins. If you make changes to these sections and you are using Web server plug-ins, you must restart the Apache Web server (not the Apache Tomcat, IBM WebSphere, or BEA WebLogic web application server) to apply the changes.
Configure TeamSite Web Daemon and Proxy Server Operation
The [iwproxy] section of iw.cfg is used to configure the operation of the TeamSite proxy server. By default, your [iwproxy] section reads as follows:
[iwproxy]customer_webserver_host=hostname or IP_addressiwproxy_host=proxy_hostnameiwproxy_port=1080customer_webserver_port=81
where:
customer_webserver_host is the host name of the content Web server. The value must be set to the host name of the Web server that serves the content of your Web sites.
iwproxy_host specifies the host where the TeamSite proxy daemon runs. Usually this is the TeamSite server.
iwproxy_port is the port on which the TeamSite proxy server operates. It should be set to an open port value. This port need only be open to the TeamSite proxy server. It may be blocked from end-user clients for added security.
customer_webserver_port is the port through which the TeamSite proxy server communicates with the Web server. It must be set to the value of the port used by the Web server.
6 TeamSite Administration Guide
• • • •••

Configure TeamSite Web Daemon and Proxy Server Operation
The settings in the [iwproxy] section are set during the TeamSite installation. They can be manually edited if necessary.
Resolve Relative and Absolute Paths
Relative paths specify file locations relative to the referencing file’s directory location. Absolute paths specify file locations relative to the Web site’s document root directory.
For example, the file whose directory path (rooted in a TeamSite area) is /main/index.html might contain a link to the file /images/banner.gif. This link can be specified as either a relative or an absolute path as follows:
As a relative path:
../images/banner.gif
As an absolute path:
/images/banner.gif
NOTE
The proxy server does not allow you to remap the document root directory for Content Store branches other than the default Content Store.
Links in HTML documents are often specified with relative or absolute path names. For example, in a link to an image, the file name might appear as:
/images/miles.gif
On a typical Web server, this link reference would be mapped by the Web server to its document root, for example:
/images/miles.gif D:\inetpub\wwwroot\(Unix:usr\httpd/)images\miles.gif
All users that attempt to access the file using the absolute path name are mapped to the same file location on the Web server.
However, TeamSite supports a system of private workareas, giving each user access to the Web site’s files from within their own personal, virtual version of the Web site. TeamSite uses a proxy server to manage mapping of files to workareas with relative and absolute path references. Using the previous example, the TeamSite proxy server enables all users attempting to access /images/miles.gif from within TeamSite to be mapped to the copy of miles.gif in their own workareas. The redirected mapping would look like:
TeamSite Administration Guide 177
• • • •••

Chapter 8: Configure the TeamSite Web Daemon and Proxy Server
17
/images/pic.gif Y:\(Unix:iw-mount)default\main\branchpath\WORKAREA\workareaname\images\miles.gif
Document Roots
TeamSite maps the initial Web server directory structure (the document root) of workareas to the top level of the workarea directory by default. You may, however, want to move the document root, or group types of files together for improved clarity, convenience, or efficiency. On a branch-by-branch basis, the TeamSite proxy server allows you to remap the document root anywhere within the workarea directory. It also allows you to define mappings directly to subdirectories within workareas.
NOTE
The proxy server does not allow you to remap the document root directory for Content Store branches other than the default Content Store.
Document roots are defined in the [iwproxy_remap] section of iw.cfg. The default setting is as follows:
[iwproxy_remap]global_default_map=/
NOTE
The iw.cfg file also contains a section called [global_default_map]. There must be a corresponding section for each parameter defined in the [iwproxy_remap] section.
To configure document roots for individual branches:
1. For each branch that you want to configure, add a line to the [iwproxy_remap] section of iw.cfg as follows:
[iwproxy_remap]configSectionName=vpath
where configSectionName is the name of the section of the configuration file that defines the branch remappings, and vpath is the vpath to the branch you are configuring.
2. For each line that you added to [iwproxy_remap] section, create a section in iw.cfg named [configSectionName].
3. Add a line to this new section that defines the document root:
_docroot=dirpath
where dirpath is a directory path rooted in a workarea.
8 TeamSite Administration Guide
• • • •••

Configure TeamSite Web Daemon and Proxy Server Operation
You can also add lines that bypass the document root, as follows:
path=path
For example, if you added the following lines to [iwproxy_remap]:[iwproxy_remap]
branchrewrite_1=/main
branchrewrite_2=/main/training
The first line tells TeamSite to use the section [branchrewrite_1] to set the document root configuration for the /main branch. The second line tells TeamSite to use the [branchrewrite_2] section to set the document root configuration for the /main/training branch.
You would then create two new sections in iw.cfg corresponding to the lines in [iwproxy_remap]:
[branchrewrite_1]
_docroot=/htdocs
/pictures/=/pictures/
/html/=/html/
[branchrewrite_2]
_docroot=/htdocs
/images/=/images/
Note that the first line of both the new sections contains _docroot=/htdocs. This defines a special directive that sets the mapping of the document root. Any requests from workareas on the main branch or the main/training branch to the root level directory (/) now start at:
.../workareaname/htdocs/
Thus, the request for file /miles.gif will now be mapped to:
The two docroot configuration sections also contain lines similar to the following:
/pictures/=/pictures/
This line maps file requests directly to the listed directory /pictures/, bypassing the document root defined in the first line. Thus, a request for the file /pictures/mingus.gif gets mapped to:
.../workareaname/pictures/mingus.gif
.../workareaname/htdocs/miles.gif
newly defined docroot file
TeamSite Administration Guide 179
• • • •••

Chapter 8: Configure the TeamSite Web Daemon and Proxy Server
18
not:
.../workareaname/htdocs/pictures/mingus.gif
The TeamSite proxy server operates using literal string matches and substitutions in path names. To avoid inadvertently rewriting names, always use trailing slashes in your remap definitions.
NOTE
Do not use trailing slashes in your remap definitions for _docroot directories.
Resolve Fully Qualified URLsThe proxy server can also be configured to resolve fully qualified paths. For example, a link to the main page of a Web site might appear as: http://www.name.com.
If such a link appears in an HTML file in a TeamSite workarea, and you follow that link while performing in-context QA, you will be taken out of the workarea and to the actual referenced Web site.
Therefore, if you use fully qualified URLs to reference pages within your own Web site, clicking on these links will take you out of the in-context view of the current workarea, staging area, or edition and into your own currently deployed Web site. To solve this problem, TeamSite enables you to configure your proxy server to redirect fully qualified links within your Web site, then pass them to the regular proxy server to ensure the integrity of the in-context view in a workarea, staging area, or edition.
NOTE
Only configure this setting if your Web site uses fully qualified URLs that you need to view in-context. This setting requires you to manually configure your browser, so that you cannot view the actual Web site without reconfiguring your browser. This also slows the TeamSite server by sending every request through iwwebd and iwproxy.
0 TeamSite Administration Guide
• • • •••

Redirect Fully Qualified URLs
Redirect Fully Qualified URLsThere are two major steps you must complete to configure TeamSite to redirect fully qualified URLs:
Configure your proxy server by editing the [iwproxy_fullproxy_redirect] section of iw.cfg.
Configure your Web browser’s proxy to use the TeamSite Web daemon (iwwebd).
These procedures are described in detail in the next two sections.
Configure the Proxy Server to Redirect Fully Qualified URLs
This feature allows fully qualified URLs in a Web page to be redirected back into workarea-virtualized paths if users set their browser’s proxy to iwproxy. This feature must be specifically enabled (enabled=yes) to prevent it from being abused. If you enable this feature, be sure you understand the security implications and properly secure the HTTP and HTTPS ports of your TeamSite server using a firewall and VPN where needed.
Edit the [iwproxy_fullproxy_redirect] section of iw.cfg. to include any number of _regex lines as follows:
_regex=source_regex=dest_ex
where source_regex is a case-insensitive regular expression specifying a fully qualified URL that might appear in a page, and dest_ex is an expression specifying the path that the link will be redirected to. This expression should always be the path to the file specified in source_regex, but rooted in a TeamSite area. For example:
[iwproxy_fullproxy_redirect]
enabled=yes
_regex=http://www(\.example\.com)?/(.*)=/$2
enables the feature and redirects links that specify http://www.example.com in the URL and sends them to the corresponding location in the current TeamSite area.
NOTE
If your iw.cfg file’s [iwwebd] section defines the host as host=hostname.domain, and your browser's proxy server is set to hostname.domain:port, when you start TeamSite, you must enter http://hostname.domain/iw/ in your browser rather than http://hostname/iw/.
TeamSite Administration Guide 181
• • • •••

Chapter 8: Configure the TeamSite Web Daemon and Proxy Server
18
Continue the configuration by completing the procedures described in the next sections.
The TeamSite web daemon can be used as a proxy server to connect to any outside address and access content. You can create a regex in the [iwproxy_fullproxy_redirect] section of iw.cfg to disable this functionality. Refer to the [iwproxy_fullproxy_redirect] section of iw.cfg.example for details.
Configure your Web browsers to Use the TeamSite Web Daemon
You must modify your Web browser to use the TeamSite proxy server as described here for Internet Explorer.
1. In Internet Explorer, select Tools > Internet Options.
The Internet Options window is displayed.
2. Select the Connections tab.
3. Click LAN Settings.
The Local Area Network (LAN) Settings window is displayed.
Figure 22 Local Area Network settings dialog box
4. Click the Use a proxy server check box.
5. Type the name of your TeamSite server (for example, teamsite1.example.com) in the Address section.
6. Type the http-port specified in the [iwwebd] section of iw.cfg (for example, 80) in the Port section.
7. Click OK.
2 TeamSite Administration Guide
• • • •••

Redirect TeamSite Views to Different Areas
To configure Internet Explorer to not use the TeamSite proxy server:
1. In Internet Explorer, select Tools > Internet Options.
The Internet Options window is displayed.
2. Select the Connections tab.
3. Click LAN Settings.
The Local Area Network (LAN) Settings window is displayed.
4. Either:
Clear the Use a proxy server check box, and click OK.
Click Advanced. The Proxy Settings window is displayed. Continue with step 5.
5. In the Exceptions field, enter the URLs that you want to access without using the proxy server.
6. Click OK.
Redirect TeamSite Views to Different AreasThe proxy server enables web teams to work on branches of development that are populated only with the portion of the content that they are developing, but still maintain a full in-context view of the entire content collection by referencing the staging area or a known edition on another branch of development.
This feature is very flexible in that it can be configured on a per-branch or per-workarea basis, and the redirected view can be configured to take the user to any TeamSite area on any branch. Redirection can occur in one of two ways:
Through [iwproxy_preconnect_remap], which retains your original area as the current working area and directs files there from another area. In this scenario, docroot is based on the original area’s parent branch.
Through [iwproxy_preconnect_redirect], which causes the area you redirect into to become the current working area (and that area’s parent branch becomes the basis of docroot).
TeamSite Administration Guide 183
• • • •••

Chapter 8: Configure the TeamSite Web Daemon and Proxy Server
18
Using iwproxy_preconnect_remap
To configure TeamSite to redirect workarea views and retain your original area as the current working area (as described in the first bullet), edit the [iwproxy_preconnect_remap] section of iw.cfg as follows:[iwproxy_preconnect_remap]
_regex=source_regex=dest_ex
where source_regex is a case-insensitive regular expression describing the area to be mapped from, and dest_ex is an expression describing the area to be mapped to. These areas are most commonly workareas or staging areas, but you can map to and from any workarea, staging area, or edition. You can add any number of _regex lines to this section.
For example:_regex=(.*)/branch1/WORKAREA/[^/]+/products/(.*)=$1/branch2/STAGING/products/$2
tells the proxy server to remap the products directory of any workarea on any branch named branch1 to the products directory of the staging area on its sister branch, branch2.
In the source regular expression, (.*) is used to specify an arbitrary path, and $1 in the destination expression means that it must follow the same path (and therefore branch1 can be anywhere in the branch structure, but branch2 is a sister branch of branch1). Also in the source regular expression, [^/]+ is used to specify a single directory level, of any name (which in this case would be the workarea name, and therefore all workareas on branch1 are specified). Finally, the source regular expression uses (.*) to specify another arbitrary path, and $2 in the destination expression tells it to follow the same path.
You can also specify the exact location of the areas you want to remap:_regex=^/iw-mount/default/main/branch1/WORKAREA/[^/]+/products/(.*)=/iw-mount/default/main/branch2/STAGING/products/$1
Or, you can specify an individual workarea to remap:_regex=^/iw-mount/default/main/dev/branch1/WORKAREA/andre/coolstuff/(.*)=/iw-mount/default/main/branch2/STAGING/coolstuff/$1
The TeamSite proxy server applies the first match it finds, so you can exclude a particular area from a more general rule by creating a separate rule for that area and placing it before the more general rule. For example:
_regex=(.*)/branch1/WORKAREA/chris/products/(.*)=$1/branch1/STAGING/products/$2
4 TeamSite Administration Guide
• • • •••

Configure TeamSite to Use Different Web Servers
_regex=(.*)/branch1/WORKAREA/[^/]+/products/(.*)=$1/branch2/STAGING/products/$2
remaps the products directory in all workareas on branch1 except for Chris’s to the staging area of branch2.
See “Configure Proxy Failover” on page 189 for more details about configuration rule precedence.
Using iwproxy_preconnect_redirect
To configure TeamSite to redirect workarea views and cause the area you redirect into to become the current working area (as described in the second bullet on page 183), edit the [iwproxy_preconnect_redirect] section of iw.cfg:[iwproxy_preconnect_redirect]
_regex=source_regex=dest_ex
where source_regex and dest_ex are as described in “Using iwproxy_preconnect_remap” on page 186. If you set [iwproxy_preconnect_redirect] and then click on a link defined by an absolute path name, the docroot of that link is based on the branch you redirected into (as opposed to the branch of the area you redirected from, which would be the behavior if you had set [iwproxy_preconnect_remap]). See “Configure Proxy Failover” on page 189 for a details about configuration rule precedence.
Configure TeamSite to Use Different Web Servers
You can configure TeamSite to use different Web servers for different workareas or different types of content. For example, Andre might want to make all under-development CGIs in his workarea on branch1 be served by test1.example.com:1234. This would let Andre test different Web server configurations for his CGIs on branch1 without disturbing anyone else.
To configure TeamSite to use different Web servers, edit the [iwproxy_preconnect_remap] section of iw.cfg:[iwproxy_preconnect_remap]
_regex=source_regex=dest_ex
TeamSite Administration Guide 185
• • • •••

Chapter 8: Configure the TeamSite Web Daemon and Proxy Server
18
where source_regex is a case-insensitive regular expression describing the area and files to be served by the other Web server, and dest_ex is an expression describing the area and files on the other Web server. This expression must include the port number.
For this to work properly, the other Web server must have the appropriate NFS TeamSite directory mounts and privileges. The Web server alias used by httpd on port 1234 of test1.example.com must be configured with the TeamSite alias as well (/iw-mount/).
The following example would allow Andre to test all CGIs in his workarea on test1.example.com, as previously described:
[iwproxy_preconnect_remap]
_regex=^/iw-mount/default/main/branch1/WORKAREA/andre/(.*)\.cgi(\?.*)?$=http://test1.example.com:1234/iw-mount/default/main/branch1/WORKAREA/andre/$1.cgi$2
Configure External RemappingsThe TeamSite proxy server enables you to define mappings to directories outside of the TeamSite system or on different computers altogether. You can define these mappings using either of the following methods:
[iwproxy_preconnect_remap]
[iwproxy_external_remap]
If you use [iwproxy_preconnect_remap], the mappings follow normal [iwproxy_preconnect_remap] precedence rules. However, [iwproxy_external_remap] mappings apply only if no other remapping rule has been applied.
Using iwproxy_preconnect_remap
To configure TeamSite to redirect workarea views to external Web servers, edit the [iwproxy_preconnect_remap] section of iw.cfg as follows:[iwproxy_preconnect_remap]
_regex=source_regex=dest_ex
where source_regex is a case-insensitive regular expression describing the area to be mapped from, and dest_ex is an expression describing the area to be mapped to. These areas are most commonly workareas or staging areas, but you can map to and from any workarea, staging area, or edition. For example:
6 TeamSite Administration Guide
• • • •••

Host Header Remappings
_regex=(.*)/branch1/WORKAREA/[^/]+/logos/(.*)=http://corporateidserver.example.com/logos/$2
sends all requests for files in the /logos directory in all workareas on branch1 to another server, corporateidserver.example.com.
Using iwproxy_external_remap
You can also use [iwproxy_external_remap] rules for external remappings, although [iwproxy_preconnect_remap] is the preferred methodology.
For example, if all your corporate logo files reside on a separate server, you can use [iwproxy_external_remap] to create a mapping to the directory where they reside:
[iwproxy_external_remap]
/logos/=http://corporateidserver.example.com/logos/
This remapping sends all requests for /logos/ to a directory on another server, corporateidserver.example.com/logos/. You can also create associations using case-insensitive regular expression mapping.
The [iwproxy_external_remap] section is read after the [iwproxy_remap] section, and is only applied if none of the [iwproxy_remap] rules were invoked. For example, if you create a mapping for /logos/ in one of the [branchrewrite] sections, all requests on that branch for files in the /logos/ directory will use that mapping instead of the external mapping. Requests on other branches will still be sent to the corporateidserver.
Host Header RemappingsIf your Web server manipulates Host: headers (for example, virtual domains), you can configure TeamSite to replicate that behavior. To configure Host: header remapping, edit the [iwproxy_hostheader_remap] section of iw.cfg.[iwproxy_hostheader_remap]
_regex=source_regex=dest_ex
where source_regex is a case-insensitive regular expression describing the area to be mapped from, and dest_ex is an expression describing the new Host: header. For example:
_regex=^/iw-mount/default/main/branch1/WORKAREA/.*=example.com:1234
TeamSite Administration Guide 187
• • • •••

Chapter 8: Configure the TeamSite Web Daemon and Proxy Server
18
will change the Host: header that the source server gets from the TeamSite proxy server to read:
Host: example.com:1234
whenever content in a workarea on branch1 is accessed.
Enable iwproxy Access ControlBy default, iwproxy allows any authenticated TeamSite user to view any file in TeamSite. To configure iwproxy to verify the users’ ability to read certain files in the file system, add an [iwproxy_access_control_enabled] section to your iw.cfg file based on the example that follows.
This example implements the following policy:
All users should be able to read any document on the intranet, except for files in the /hr/ directory, which require specific read access.
All users should be able to read any document on the internet site.
For all other branches, iwproxy should check to ensure the current user has read access.
[iwproxy_access_control_enabled]
_default=yes
_regex=^/iw-mount/dc/main/intranet/(((WORKAREA|EDITION)/[^/)]+)|STAGING)/hr/=yes
_regex=^/iw-mount/dc/main/intranet/(((WORKAREA|EDITION)/[^/]+)|STAGING)/=no
_regex=^/iw-mount/dc/main/www%20external/(((WORKAREA|EDITION)/[^/]+)|STAGING)/=no
Configure SSI RemappingThe TeamSite Web server plug-in supports the ability to both remap and virtualize SSI requests. To enable SSI request virtualization, you must install the necessary redirector module (iwproxy_nsapi.solaris.sodll or iwproxy_isapi.dll) in addition to the Web server plug-in.
After installing the necessary redirector module as described on as described in the TeamSite Installation Guide, you can configure TeamSite to remap SSI requests by
8 TeamSite Administration Guide
• • • •••

Configure Proxy Failover
adding or modifying the [iwproxy_plugin_remap] section of iw.cfg. In the following example, any SSI request containing the string /forms/ is mapped to /iw-mount/default/main/Branch2/STAGING/forms instead of being referred to the root of the user’s workarea:
[iwproxy_plugin_remap]
_regex=(.*)/forms/(.*)=/iw-mount/default/main/Branch2/STAGING/forms/$2
If you want to debug regular expressions, set the value for _debug in the [iwproxy_plugin_remap] section to true. On NES and Apache, debugging information is stored in the Web server error log file. On IIS, this information is stored in C:\temp\iw_isapi.log. This log file can grow extremely large over time.
Configure Proxy FailoverIf a requested page does not exist, the [iwproxy_failover_remap] section of iw.cfg can be used to specify an alternate location. This section enables you to specify both alternate locations and the number of times to process an URL in an attempt to find a valid location. The figure below illustrates the process by which proxy failover remaps URLs.
TeamSite Administration Guide 189
• • • •••

Chapter 8: Configure the TeamSite Web Daemon and Proxy Server
19
Figure 23 Proxy failover remap diagram
The [iwproxy_failover_remap] section has the following structure:[iwproxy_failover_remap]
_maxfail=#
_regex=source_regex=dest_ex
_regex=source_regex=dest_ex
To specify the number of times to try to remap a URL, edit the _maxfail line of the [iwproxy_failover_remap] section of iw.cfg. The default value of this line is _maxfail=0, which turns off proxy failover. Note that proxy failover is seldom needed because files
iwproxy_remap, iwproxy_external_remapiwproxy_preconnect_redirect
iwproxy_preconnect_remap
iwproxy_hostheader_remap
iwproxy_smartcontextedit_allowed
iwproxy_failover_remapremaps the rewritten URL and
Can the rewrittenpath be found?
Yes
No
The specified page is returned, if found.
The proxy server rewrites the URL according to rules specified in iwproxy_fullproxy_redirect,
Has maxfail beenreached?
increments maxfail.
If it is not found, the proxy server returns a File not found message.
Can the rewrittenpath be found?
No
Yes
0 TeamSite Administration Guide
• • • •••

Debug Your Proxy Server Configuration
are almost always in locations that can be specified using static, case-insensitive regular expressions during configuration. If you need to enable proxy failover, it is recommended that you do not set _maxfail to more than 1 or 2 due to the impact on system performance.
To specify expressions to remap, add _regex lines to [iwproxy_failover_remap]. These lines specify an incoming pattern to match, and an expression that they should be mapped to. The proxy server will take the first match it finds, remap it as specified, then try to locate the page. If it cannot find the new location, it will try to match the remapped expression to a regular expression specified in [iwproxy_failover_remap]. This process will continue until a match is found or the number of iterations specified by the _maxfail line is reached.
_regex lines in the [iwproxy_failover_remap] section follow the same syntax as _regex lines specified in the [iwproxy_preconnect_remap] section of iw.cfg, where source_regex is a case-insensitive regular expression describing the area to be mapped from, and dest_ex is an expression describing the area to be mapped to. For examples of _regex syntax, see “Resolve Relative and Absolute Paths” on page 177.
Debug Your Proxy Server ConfigurationIf your proxy server does not seem to be configured correctly, use the iwproxy.exe CLT’s debug option to list all the translations being made by the proxy server:
iwproxy [-d|-x]
iwproxy returns debug output which you can redirect to a file. Note that the iwproxy debug mode is single-threaded; it therefore slows the TeamSite server down significantly. Use the debug mode for diagnostic purposes only.
One common source of proxy configuration problems is the inclusion of any character or blank space past the end of a branch name in any line in any [iwproxy*] section in iw.cfg. For example, the following line in the [iwproxy_remap] section is illegal because it contains blank spaces and characters after the branch name:[iwproxy_remap]
tag_engspecs=/main/engspecs #This is the engineering spec site
-d Debug mode (outputs client & server headers)
-x Extended (verbose) debug mode (outputs client body text as well)
TeamSite Administration Guide 191
• • • •••

Chapter 8: Configure the TeamSite Web Daemon and Proxy Server
19
NOTE
iwproxy.exe needs to run as root/local Administrator or a user with the following access privileges: Act as Part of Operating System, Log on Locally, Increase Quotas, and Replace a Process Level Token.
2 TeamSite Administration Guide
• • • •••

Chapter 9
Back Up TeamSite
Your TeamSite Content Stores represent a tremendous investment in resources and are a valuable corporate asset. As such, they should be backed up daily, or even more frequently, to minimize the possibility of damaged or lost data. Any third-party backup solution that can guarantee exact time and state directory content recovery can be used.
This chapter discusses:
Integrate with Third-Party Backup Solutions
Suggested Strategies for Incremental Backups
Integrate with Third-Party Backup SolutionsIt is recommended that you use a high-quality third-party backup solution for protecting the Content Store data. When evaluating a backup solution, the following criteria are essential:
The backup method must provide a way to perform an iwfreeze operation prior to performing the backup. This must be done to assure that the Content Store does not change during the backup. The backup method must then perform an iwfreeze -- operation to allow writes to the Content Store when the backup is finished.
The backup method must be fast enough to perform a full or incremental backup of the Content Store within a reasonable length of time. The maximum allowable length of time depends on the requirements of the particular installation, but should probably be less than 12 hours.
The restore method must provide a way to do a complete state-restore of a directory as of a given time. This means that when a directory is recovered, the contents must match exactly what was in the directory at the time the backup was performed. Only files that were present at the time of the backup must be present in the restore. That is, if a file was deleted from the original directory between backups, it should
TeamSite Administration Guide 193
• • • •••

Chapter 9: Back Up TeamSite
19
not be present in the restore. For example, take a backup, delete a file, take another backup; a restore from the second backup should not contain the deleted file. Some backup and restore products regard all backed-up files to be “sticky,” that is, as long as a file ever existed, it is present in the restoration regardless of whether it was deleted prior to the last backup.
Additional criteria to consider are:
An automated backup execution facility capable of performing full backups followed by level (preferred) or incremental backups to provide a customizable backup strategy.
Automated backup media management and manipulation (for example, a tape jukebox or silo).
The ability to make copies of completed backups for off-site storage.
If the available backup method is efficient and inexpensive (compared to the value of the data being protected), the TeamSite workareas can also be backed up to allow users to recover individual files or directories from their workareas, rather than having to recover the entire Content Store. This is a very convenient feature for users, but can come at a relatively high price in terms of extra time and space needed for these redundant backups. Although the virtual files which comprise much of theTeamSite file system mount (Y:/iwmnt) take up no extra space on the TeamSite server, if the actual TeamSite workareas are backed up, the virtual files in the workareas will be treated as actual files and will take up space in the backup media.
NOTE
Workarea backup must be done through the Y: drive.
You must freeze the TeamSite Content Store (with the iwfreeze command) while you are backing up your Content Store or workareas. Failure to freeze the Content Store while you are backing up can result in possible data loss and corruption. For details about the iwfreeze CLT, refer to TeamSite Command-Line Tools for your platform.
NOTE
If you are using multiple Content Stores, you can back up each store independently. The iw-store directory should be backed up if you have in-progress workflows or batch jobs that you do not want to lose. Because workflows can span all stores, a full frozen backup of all stores and the workflow store is needed. You can freeze and unfreeze the workflow store just like any other store, but you cannot move it outside of iw-store.
Backing up workareas alone is not a substitute for backing up the TeamSite Content Store. If you only back up the files that appear in the TeamSite file system mount, you
4 TeamSite Administration Guide
• • • •••

Suggested Strategies for Incremental Backups
will lose important metadata such as version histories and file status. Always back up the actual TeamSite Content Store whether or not you back up individual workareas.
Suggested Strategies for Incremental BackupsIt is possible to implement a “level-oriented” backup if a sufficiently sophisticated backup solution is available. For example, a full backup can be performed on the first Saturday of the month, then incremental backups that build on each other can be performed for the rest of the week. On the second Saturday of the month, a “super-incremental” backup based on the original full backup done on the first Saturday is performed. The super-incremental backup supersedes all of the previous incremental backups. Only the first full backup and super-incremental are needed to completely recover the Content Store. For the subsequent week, incremental backups are again performed based on the super-incremental backup done on the second Saturday. The following Saturday, another super-incremental backup based on the previous super-incremental file is performed, again eliminating the need for the previous week’s incrementals to recreate the Content Store. To perform a recovery at this point, restore the original full backup, then each super-incremental in sequence, and finally the balance (if any) of the current week’s incrementals.
This tiered, or level-oriented backup can be repeated on a monthly basis to produce a week-by-week record of the Content Store. To reproduce the Content Store as of any particular Saturday, recover the full backup from the beginning of the month, then apply each Saturday backup in turn until the desired Saturday is reached.
To determine your optimal backup strategy, you must analyze the trade-offs of convenience and speed in backing up versus simplicity and speed of restoration, and decide what best suits your needs. A strategy using a single full backup and an indefinite string of incrementals is optimized for backup speed, but the amount of time required to perform a full recover of the Content Store grows with each passing day as a new incremental is added to the list. Every backup must be preserved to be able to recover the Content Store. One benefit of this method is that a complete daily record of the Content Store will be preserved.
The opposite extreme is to perform a full backup every day. Each backup will take the maximum amount of time to perform, but only one recover needs to be done to completely recreate the Content Store. If you only preserve the previous day’s backup, no history of the Content Store will be retained, but the amount of storage space used by the backups is minimized.
TeamSite Administration Guide 195
• • • •••

Chapter 9: Back Up TeamSite
19
6 TeamSite Administration Guide• • • •••

Appendix A
MediaBin Connector
This chapter describes the configuration of the MediaBin Connector. MediaBin Connector provides Web content developers seamless access to the business and creative content managed in MediaBin repositories when using TeamSite for performing Web content management tasks.
The following topics are described in this chapter:
Configure the MediaBin Connector
FormsPublisher Configuration Files
MetaData XML Record
MediaBin Configuration
Troubleshooting
NOTE
For information on importing MediaBin assets, refer to the ControlCenter Professional User Guide.
Configure the MediaBin ConnectorConfiguration of MediaBin Connector involves establishing connectors between the TeamSite server and the MediaBin servers. Connectors can be established using one of the following methods:
Trusted login. Connection is attempted using the TeamSite user’s personal TeamSite login information. MediaBin trusted login is accomplished using LDAP authentication. An entry matching the TeamSite user name must be present in the LDAP.
TeamSite Administration Guide 197
• • • •••

Appendix A: MediaBin Connector
19
Trusted login is not supported for root (UNIX) or Administrator (Windows) accounts. It is intended only for end users.
See “MediaBin Configuration” on page 209 for more information.
Guest login. Connection is attempted using a “Guest” account established on the MediaBin server for use with TeamSite. This account information must be configured in TeamSite prior to the connection being attempted. This single account applies to all TeamSite users. This method is also known as “proxy login.”
When TeamSite connects to MediaBin, it does not use the identity of the current TeamSite user. Instead, it impersonates a MediaBin user. The credentials of these “proxy users” are stored in the TeamSite system and are used by all TeamSite users. It is recommended that you not use the credentials of a real person, but instead create dedicated user accounts in MediaBin for use as TeamSite proxy users. The proxy users should be given read access to those assets that are to be made available to TeamSite; they do not need any write privileges.
Fail through. The initial connection is made using the TeamSite user’s personal information. If that attempt fails, then the connection is reattempted using the Guest account information.
Each server connector exists independently of the other. For example, you can configure a guest login connector between your TeamSite and MediaBin servers.
Configuration of the connection to DigitalSafe, MediaBin and Optimost servers is performed through the Connectors tab in the Administration Console.
Display the MediaBin Properties Screen
To display the MediaBin Properties screen:
1. In TeamSite, go to ContentCenter Professional.
2. Click Administration to display the Administration Console.
3. Click the Connectors tab.
4. In the left pane, select MediaBin. The MediaBin Properties screen (Figure 24) is displayed.
8 TeamSite Administration Guide
• • • •••
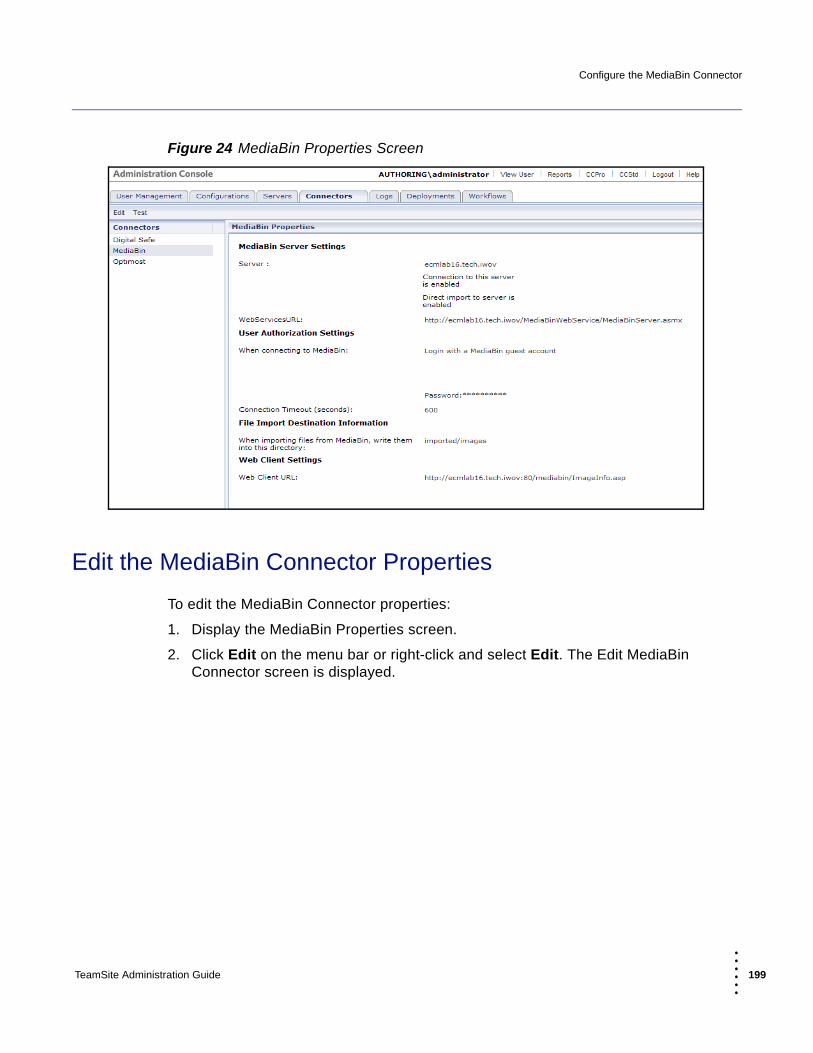
Configure the MediaBin Connector
Figure 24 MediaBin Properties Screen
Edit the MediaBin Connector Properties
To edit the MediaBin Connector properties:
1. Display the MediaBin Properties screen.
2. Click Edit on the menu bar or right-click and select Edit. The Edit MediaBin Connector screen is displayed.
TeamSite Administration Guide 199
• • • •••

Appendix A: MediaBin Connector
20
Figure 25 Edit MediaBin Connector window
3. Complete the following attributes in each of the following sections to configure your MediaBin connector:
MediaBin Server Settings:
• Enter the name of the MediaBin server hosting the Web services.
• Check the associated box to enable a connection to the MediaBin server you specified.
• Check the associated box to enable direct import.
• Enter the appropriate URL to point to the MediaBin web services in the Web Services URL field. In most cases you can simply change the host name in the default value.
User Authorization Settings:
Select one of the following authorization options:
• Login as the TeamSite user. Login to the MediaBin server will be done using the same user name that was used to login to the TeamSite server. An entry for this TeamSite user must be present in the LDAP used by MediaBin.
• Login with a MediaBin guest account. Login with the guest user account you set up on the MediaBin server for use with your TeamSite server.
• Try to login as the TeamSite user, but use the MediaBin guest account if unsuccessful. This option uses your TeamSite user login information first, but if it is not successful, then it will try the MediaBin guest account automatically.
0 TeamSite Administration Guide
• • • •••

Configure the MediaBin Connector
Trusted Client:
Complete the following attribute if either the Login as the TeamSite user or Try to login as the TeamSite user, but use the MediaBin guest account if unsuccessful option was selected as your User Authorization Settings option.
• Enter the hint required for trusted client access in the Hint field. This is the same value as is used in the MediaBin web.config file’s TrustedClientHint value.
Guest User:
Complete the following attributes if either the Login with a MediaBin guest account or Try to login as the TeamSite user, but use the MediaBin guest account if unsuccessful option was selected as your User Authorization Settings option:
• Enter the MediaBin user name of the account in the Name field.
• Enter the MediaBin domain (if necessary) in the Domain field.
• Enter the password associated with the user name in the Password field.
Connection Timeout Setting: Enter the time in seconds before which the MediaBin connection times out.
File Import Destination Information:
• Enter the directory within your TeamSite workarea in which any files imported from the MediaBin server when using FormsPublisher are written. Note that when you are importing MediaBin assets using the Import command, files are stored in your current working directory.
Web Client Setting:
• Enter the appropriate URL to point to the MediaBin server on which you can edit assets selected within TeamSite. In most cases you can simply change the host name in the default value.
4. After you have entered the appropriate attributes, click one of the following:
Save and Test to save the MediaBin connector properties and to test the connection to the MediaBin server.
Save and Close to save the MediaBin connector properties and close the window.
Cancel to cancel the changes.
TeamSite Administration Guide 201
• • • •••

Appendix A: MediaBin Connector
20
FormsPublisher Configuration FilesThe following FormsPublisher configuration files must be modified to use MediaBin Connector:
datacapture.cfg. Defines rule sets for capturing data.
Presentation templates (.tpl files). Contains HTML code and FormsPublisher tags to describe the output files.
Samples of these files are included in the following location:
iw-home/examples/Templating/templatedata/MediaBin/press-release
iw-home/examples/Templating/templatedata/MediaBin/press-release-immediate
iw-home/examples/Templating/templatedata/MediaBin/press-release-iwov
Refer to the README file residing at the following location for descriptions of each of these samples:iw-home/examples/Templating/templatedata
This chapter assumes the reader is familiar with creating FormsPublisher datacapture.cfg files and presentation templates. Refer to the TeamSite FormsPublisher Developer’s Guide for more information.
datacapture.cfg
You can incorporate MediaBin functionality in your FormsPublisher form by including a dialog for either or both remote servers in your associated datacapture.cfg file. In the datacapture.cfg file, dialogs are configured using the dialog element. Each dialog has a set of named parameters that are used to connect the FormsPublisher form fields to the dialog’s inputs and outputs.
Each parameter can have an input, an output, or both. An input parameter can have an actual value, or it can reference an item whose value will be obtained when the dialog is activated. An output parameter can only reference an item whose value will be set by the dialog. The set of output parameters can be different depending on whether the form is configured to import files from the remote server immediately upon selection, or whether to wait until the Web page is actually generated.
Dialog parameters reference items by name, not by path. When a dialog references an item, it first looks for an item with that name in the same container as the dialog itself. If it is not found, then it looks in the enclosing (parent) container, and so on up the hierarchy.
2 TeamSite Administration Guide
• • • •••

FormsPublisher Configuration Files
You can configure the dialog element anywhere that an item element can appear. The dialog element has the following attributes:
type. Specify one of the following values to indicate what type of remote server is being represented:
mediabin
You must specify a value. There is no default value.
label. Specify the text that appears on the button, for example MediaBin.
The following configuration inserts a MediaBin field into the form, and gives the associated button the label “MediaBin”:<dialog type="mediabin" label="MediaBin">
...
</dialog>
The dialog element can also include the optional rowcontinue and window-features attributes, which are used elsewhere in the datacapture.cfg file. Refer to the FormsPublisher documentation for more information.
Each parameter associated with the dialog is configured within the dialog element as a separate dialog-param element. The type of parameter is specified by the dialog-param element’s name attribute. For example:<dialog type="mediabin" label="MediaBin">
<dialog-param name="path">
...
</dialog-param>
...
</dialog>
Inputs and outputs are configured within each dialog-param element using the dialog-input and dialog-output elements, respectively. Both these types of elements include the field-ref sub-element, which associates the item reference to the input or output.
In the following example, the parameter “path” includes both an input and an output, while the parameter “label” includes only an output.<dialog type="mediabin" label="MediaBin">
<dialog-param name="path">
<dialog-input><field-ref name="path"/></dialog-input>
<dialog-output><field-ref name="path"/></dialog-output>
</dialog-param>
<dialog-param name="label">
<dialog-output><field-ref name="label"/></dialog-output>
</dialog-param>
TeamSite Administration Guide 203
• • • •••

Appendix A: MediaBin Connector
20
Here is a list of parameters used by MediaBin:
immediate. Indicate whether (true) or not (false) the selected MediaBin asset file is to be imported into TeamSite at the time it is selected within FormsPublisher, or whether it will exist as a reference pointer until the Web page is actually generated. Default value is false.
asset-id. The MediaBin ID value for the selected digital asset. The value can later be used by the presentation template import tags to import the selected asset. When you specify an input value, it indicates a previously-selected asset that allows the browser to open up in the context of that asset.
label. The default file name of the MediaBin asset you selected, or a user-defined label value. The value you use will appear as the hyperlink text to the MediaBin asset in the generated Web page.
path. Displays a path on the MediaBin server where the document file can be accessed.
arearelpath. Indicates the path to the imported MediaBin document relative to the TeamSite workarea. This value only applies if immediate="true".
format. The desired format for the asset rendition. Use of the following values:
GIF
JPG
JPEG
task. The name of the desired retrieval task.
width (optional). The width in pixels of the asset.
height (optional). The heght in pixels of the asset.
ceilingDirectory (optional). The MediaBin container path that the user can browse. The user can only browse assets and containers under this directory.The leading slash is required; do not include a trailing slash. Example: /Media Database/TestFolder
destinationDirectory (optional). The path relative to the TeamSite workarea where the selected MediaBin asset should be imported. This value only applies if immediate=”true”. The MediaBin asset’s path in the MediaBin repository is not re-created under this TeamSite directory.Example: pressRelease/images
Use of the format parameter is not compatible with the task, width, and height parameters. If you do not specify any of these parameters, then the asset is imported in its existing state.
The original proportions of the asset will be maintained even if the specified width and height do not conform to those original proportions. If you specify the width and height parameter values as each being “0”, then the original dimensions of the asset are used.
4 TeamSite Administration Guide
• • • •••

MetaData XML Record
Presentation Template Files
MediaBin Connector makes the following tags available to the presentation templates:
iwov_import_mediabin. Creates a TeamSite file that is a copy or derivative of an asset in MediaBin. It then emits a URL that points to the imported file. The URL will be relative to the workarea of the data capture record.
Refer to your sample presentation templates that were installed with MediaBin Connector to get additional usage information.
These tags require the IW_AUTH environment variable to be set to a valid value. This variable will be set when the presentation template is invoked from the user interface or a workflow external task. If you want to test the presentation template from the command line, you must set this variable before calling the iwpt_compile CLT.
When these tags are used in a presentation template, the template may not function if it is applied from the command line (for example, using iwgen or iwregen) or in a nonstandard execution environment. These tags require access to a valid TeamSite session string. The session string is provided by ContentCenter when the Preview or Generate commands are performed and is provided by the workflow engine if the template is applied in an external task.This IW_AUTH environment variable can be set to a valid session string if one is not already available
You can also run the perldoc program to get more information on these tags. To run this program, navigate to the following location:iw-home/iw-perl/bin
and enter the following command at the prompt:
Windows. perldoc.bat tagname
UNIX. perldoc tagname
where tagname is one of the MediaBin Connector tags listed at the beginning of this section, for example:perdoc.bat TeamSite::PT::iwov_import_mediabin
MetaData XML RecordMediaBin assets have associated metadata. This metadata contains information about an asset such as the creation date, author name, and description. It can also contain
TeamSite Administration Guide 205
• • • •••

Appendix A: MediaBin Connector
20
product-specific information such as a MediaBin repository path. For a full list of metadata for MediaBin assets, refer to the documentation for these products.
In MediaBin Connector, the metadata associated with an imported MediaBin asset is also imported into TeamSite. The imported metadata is represented as an XML record, and this XML record is written to a TeamSite extended attribute (EA) of the imported asset. The EA names is:
MediaBin/Metadata. Metadata EA name for a MediaBin imported asset;
The basic structure of the metadata XML record is a document-level metadata element that contains namespace attributes, and zero or more attribute metadata child elements and Dublin Core metadata elements. The following is an example of a partial metadata XML record for a MediaBin file.<metadata xmlns:dc="http://purl.org/dc/elements/1.1/"
xmlns:xs="http://www.w3.org/2001/XMLSchema">
<dc:type>JPEG</dc:type>
<attribute>
<name>Asset Type</name>
<value type="xs:string">JPEG</value>
</attribute>
<attribute>
<name>Dimensions (pixels)</name>
<value type="xs:int">300</value>
<value type="xs:int">300</value>
</attribute>
<dc:date.created>2004-10-19T09:50:00</dc:date.created>
...
</metadata>
attribute Metadata Elements
MediaBin metadata is represented in the XML record within attribute elements. The metadata name and value is unaltered from the original asset’s metadata. An attribute element contains one name child element and zero or more child elements. The following shows a MediaBin attribute element with a single value.<attribute>
<name>Asset Type</name>
<value type="xs:string">JPEG</value>
</attribute>
6 TeamSite Administration Guide
• • • •••

MetaData XML Record
This example shows a MediaBin attribute element with multiple values.<attribute>
<name>Dimensions (pixels)</name>
<value type="xs:int">300</value>
<value type="xs:int">300</value>
</attribute>
MediaBin metadata comprises both system metadata, such as insertion time, modified time, and dimensions, and file format specific metadata for formats such as JPEG, PhotoShop, and MS Office. All this metadata is represented for a single asset. For an imported MediaBin asset, the metadata concerns the asset in MediaBin, not the rendition. For example, if a TIFF file is retrieved as a GIF, the attributes regarding the format, size and dimensions of the asset will be appropriate for the TIFF file.
Representation of Data Types
The metadata value element contains a type attribute. This attribute gives the data type of the metadata value. The W3 standard namespace for data types is used with the namespace prefix xs. The namespace URI is an attribute of the metadata element. It is located at the following URL:http://www.w3.org/2001/XMLSchema
The following data types are represented:
boolean
dateTime
double
float
int
long
string
Dublin Core Metadata Elements
The standard Dublin Core metadata element set is used to represent corresponding MediaBin metadata. Dublin Core metadata elements are qualified by the Dublin Core namespace with the namespace prefix dc. The namespace URI is an attribute of the metadata element. It is located at the following URL:http://purl.org/dc/elements/1.1/
TeamSite Administration Guide 207
• • • •••

Appendix A: MediaBin Connector
20
The Dublin Core standard permits omitted or repeated metadata elements. The Dublin Core element set comprises the following elements:
Title
Creator
Subject
Description
Publisher
Contributor
Content
Date
Type
Format
Identifier
Source
Language
Relation
Coverage
Rights
For the Dublin Core Date metadata element there are two qualifiers applied:
Created
Modified
MediaBin metadata elements that correspond to Dublin Core metadata elements are represented in the metadata XML record as the following:
A Dublin Core metadata element
A proprietary metadata element
This example shows the two elements representing MediaBin’s “Asset Type” metadata: a Dublin Core dc:type element and an attribute element.<dc:type>JPEG</dc:type>
<attribute>
<name>Asset Type</name>
<value type="xs:string">JPEG</value>
</attribute>
8 TeamSite Administration Guide
• • • •••

MediaBin Configuration
The following table lists MediaBin metadata elements that correspond to Dublin Core metadata elements:
Custom Metadata
MediaBin supports the generation of custom metadata. MediaBin custom metadata associated with an asset is captured along with the system and file format specific metadata.
MediaBin ConfigurationThis section contains instructions for configuring your MediaBin server for use with the MediaBin Connector. The instructions here are supplemental to the MediaBin product documentation.
The MediaBin Web Service README file contains information on configuring MediaBin. This file is named readme.txt and resides in the following location:c:\InetPub\www\MediaBinWebService
Setting Anonymous Access
The MediaBin Web Service depends on anonymous access. To configure this correctly, follow these steps:
1. For the MediaBinWebService virtual directory, go to the Authentication Methods screen and turn on the Enable anonymous access check box.
2. For the folder in the MediaBinWebService directory that is used for transferring files, verify that the Enable anonymous access check box is turned on.
Table 13 MediaBin metadata elements
MediaBin Dublin Core
Name Title
Asset Type Type
Check In User Creator
Insertion Time Date Created
Modified Time Date Modified
TeamSite Administration Guide 209
• • • •••

Appendix A: MediaBin Connector
21
3. Verify that the anonymous user has read and write access to the temporary directory specified in the TempPath setting in the MediaBin web.config file.
Configuring MediaBin Trusted Client and LDAP Authentication
Refer to the LDAP Support and Trusted Client Support sections in the README file for the appropriate information.
Additional information is available in the section on configuring the MediaBin Web service for LDAP support in the MediaBin Asset Server Administration Guide.
TroubleshootingThis information may provide information on issues related to MediaBin Connector.
Running MediaBin Connector 1.1 and 2.0 Toolkits Simultaneously
The MediaBin Connector 1.1 and 2.0 toolkits have not been tested together in the same ContentCenter Web application. If you are upgrading from a system that uses MediaBin Connector 1.x, the recommended best practice is to remove the MediaBin Connector 1.x toolkit from ContentCenter and migrate existing datacapture templates and presentation templates to the MediaBin Connector 2.0 solution.
If you want to run both the MediaBin Connector 1.1 and 2.0 toolkits in the same ContentCenter instance, follow these steps:
1. Back up the following files:
k3.jar
MediaBinServer.jar
from their home location:iw-home/local/config/lib/content_center/sample_connector_src/lib
into a backup directory.
2. Extract the following files (using tools such as WinZip or Gnu Zip):
wom.jar
MediaBinServer.jar
0 TeamSite Administration Guide
• • • •••

Troubleshooting
from the MediaBinconnector.tk.war file, which resides in the following location:
iw-home/private/lib/content_center
3. Copy the wom.jar and MediaBinServer.jar files to the location referenced in step 1.
4. Rebuild the MediaBin Connector 1.1 toolkit. Refer to the instructions included with the toolkit for more information.
Import from MediaBin Requires Anonymous Access to the Transfer Directory
The ability to import digital assets from the MediaBin server requires that IIS be configured to allow anonymous access to the MediaBin transfer directory. By default, anonymous access to the transfer directory is not enabled. Refer to your MediaBin documentation for more information on configuring anonymous access.
Update Required When Using Microsoft Internet Explorer 6.0 SP1
If you are using Microsoft Internet Explorer 6.0 SP1 as your browser, you must install the following update:Cumulative Security Update for Internet Explorer 6 Service Pack 1 for
Corporations - Windows XP and Windows 2000 (873377)
You can obtain this update from the following Microsoft Web site:http://www.microsoft.com/downloads/details.aspx?amp;amp;amp;amp;displaylang=en&familyid=8C6560FC-297C-4982-8BA5-DE7949043B17&displaylang=en
NOTE
This link could change at any time.
TeamSite Administration Guide 211
• • • •••

Appendix A: MediaBin Connector
21
2 TeamSite Administration Guide• • • •••

Appendix B
Internationalization
The following topics are specifically addressed in this chapter:
Overview
Supported Client and Server Platforms
Supported Content
Limitations and Assumptions
Content Stores and Character Encoding
About UTF-8
URL Commands with Multibyte Characters
Interface with Localized Operating Systems
Access the Localized Interface
Language of the VisualPreview Tool Bar
Run TeamSite CLTs in DOS Console Mode
Specify File Encoding of Text Files
Usage Scenarios
OverviewTeamSite is engineered with your global enterprise in mind. This includes internationalizing the TeamSite server to support multibyte languages and locales at the operating system, and localizing the ContentCenter user interface and documentation. Internationalized TeamSite supports the following needs:
International user data. Enables users to enter data, content, and field values in English, Korean, Traditional Chinese, Simplified Chinese, French, German, and Japanese.
TeamSite Administration Guide 213
• • • •••

Appendix B: Internationalization
21
Localized operating system. The TeamSite server runs on any one of the following localized operating systems: English, French, German, Korean, Simplified Chinese, Traditional Chinese, and Japanese (one locale per instance of iwserver).
Localized user interfaces. The ContentCenter Professional and ContentCenter Standard interfaces have been localized into French, German, Japanese, Korean, Traditional Chinese, and Simplified Chinese.
Localized file names. You are no longer restricted to having file and directory names in ASCII character encoding. For example, file, directory, branch, workarea, and edition names can have Japanese names on Japanese servers, German names on German servers, Simplified Chinese names on Simplified Chinese servers, and so forth.
Continued support for processing of non-English metadata and FormsPublisher content.
NOTE
Information on localized servers contained in this chapter is only valid with localized TeamSite versions. Check the Release Notes to determine whether localized servers are supported in your TeamSite version.
Supported Client and Server PlatformsThe client connecting to the TeamSite server must use the same language as the server (they can be different locales of the same language). For example, running ContentCenter on German Windows connected to a Solaris TeamSite server running in the German Latin 1 locale (de) is supported. However, if that same German Windows client logged into a Windows Japanese TeamSite server and added files with names containing German High ASCII characters, those files would not be supported by the TeamSite server due to limitations with the native file system and handling of characters outside of its code pages.
Supported ContentTeamSite supports non-ASCII characters in branch, area, directory, vpath, and file names in addition to the contents of a file.
4 TeamSite Administration Guide
• • • •••
Limitations and Assumptions
Limitations and Assumptions An internationalized TeamSite server does not mean that your TeamSite server can
be run in multiple locales concurrently. The TeamSite server can run in any supported locale, but one locale at a time.
It is expected that the locale in which the TeamSite server runs is the same locale as the rest of file system and server operating systems. Consider the following scenario:
a. You have a file server which runs in ja (Japanese Extended UNIX Code) locale, with a hierarchy of file and directory structures with names encoded in Japanese EUC.
b. You install and run your TeamSite server on this file server.
c. You use the file system interface to migrate your existing hierarchy of files and directories into the TeamSite File System (/iwmnt).
d. The TeamSite server must run in the ja locale for these file and directory names to be processed correctly. If you change the locale to ja_JP.PCK (Japanese Shift-JIS) before TeamSite server is started, the TeamSite server would incorrectly interpret the imported file and directory names as ja_JP.PCK encoded. This is not a supported scenario.
Mixed-locale file systems are not supported. For example, a scenario where a parent directory has directory names encoded in ja_JP.PCK (Japanese Shift-JIS, and child directories have file names encoded in ja is not supported.
If TeamSite server is running on a German operating system using a German Latin1 locale, it is possible to create a branch or workarea on the TeamSite File System with Japanese names using ContentCenter. However, when viewed with the file system interface, these Japanese names would appear as illegible characters because the server is running in a Latin1 locale and does not include the Japanese character set. This is not a supported scenario.
This scenario is supported for Metadata because Metadata entered using the ContentCenter does not interact with server operating system. Any data that is interchanged with the server operating system (including VPATHs) are only meaningful if they are within the server locale’s encoding.
If the TeamSite File System is functioning as a networked file server, it is expected that all other networked file system clients (for example, NFS clients) are operating in the same locale as the TeamSite File System file server.
Currently, NFS does not enforce this restriction and therefore enables NFS clients to be in a different locale than the NFS server. However, NFS protocol does not do encoding conversion. Therefore, file and directory attributes (including names) are passed through in binary format. This would not work for TeamSite File System
TeamSite Administration Guide 215
• • • •••

Appendix B: Internationalization
21
functioning as a file server because it does encoding conversion from and into UTF-8 based on the server file system’s locale.
Content Stores and Character EncodingUser-defined Content Stores that are named using multibyte characters must have a corresponding entry in the iw.cfg file. Refer to the TeamSite Installation Guide for detailed information on creating Content Stores.
About UTF-8UTF-8 is the 8-bit encoding format for Unicode. Unicode is a system for exchanging, processing, and displaying diverse written languages. Unicode supports the principal written languages of the world as well as many classical languages.
URL Commands with Multibyte CharactersWhen constructing URL commands when parameters contain multibyte characters, make sure that these parameters are URL- and UTF-8--encoded. Multibyte characters should be URL-encoded based on their Unicode representation in UTF-8.
For example, the URL to edit the file:
/archive/main/WORKAREA/area/ .html
would be:
/iw/iw-cc/edit?vpath=/archive/main/WORKAREA/area/%e5%ba%9c.html
since the Japanese character is Unicode character U+30D5, which is encoded as the bytes 0xe5 0xba 0x9c in the UTF-8 format.
6 TeamSite Administration Guide
• • • •••

Interface with Localized Operating Systems
Interface with Localized Operating SystemsThe internationalized TeamSite server’s virtualized Intelligent File System (IFS) functions the same way a regular file system does on localized operating systems. For example, if TeamSite runs on a server that is running in the EUC-JP locale, the TeamSite IFS is displayed and functions as an EUC-JP encoded file system.
To achieve this, TeamSite system calls to the operating system are converted from UTF-8 encoded textual data (for example, VPATH information) into the locale of iwserver (as defined by the server_locale setting in iw.cfg). In most cases, this is the same as the operating system’s native locale. The conversion is also required when operating system information is returned to TeamSite.
NOTE
If the TeamSite server is run in a different locale than the host operating system’s locale, the TeamSite virtual file system would use a different encoding locale compared to the rest of host server’s file systems. By default, the TeamSite server locale uses the native locale of the host operating system.
Access the Localized InterfaceTo display the localized (French, German, Japanese, Korean, Traditional Chinese, or Simplified Chinese) ContentCenter interface, you must change your browser’s language settings to the appropriate language.
To display the localized (French, German, Japanese, Korean, Traditional Chinese, or Simplified Chinese) Local File Manager interface, your client operating system must be in the same language as the interface you want to display.
Language of the VisualPreview Tool BarThe language of the VisualPreview tool bar normally follows the browser's language settings, as does the rest of ContentCenter user interface. The exception is when the character encoding of the document being worked on through VisualPreview conflicts with the chosen user interface language (browser's settings).
TeamSite Administration Guide 217
• • • •••

Appendix B: Internationalization
21
For example, an HTML document being worked on through VisualPreview has a specified charset of “Shift_JIS”, but the chosen user interface language is “German”. In this case, the VisualPreview tool bar cannot appear in German. Instead, the tool bar appears in English. If the document being worked on through VisualPreview is in ISO-8859-1 encoding, then the Visual Preview tool bar appears in German. Whenever there is a conflict, the tool bar appears in English. The following table lists the encodings that are allowed for specific browser's language settings.
Run TeamSite CLTs in DOS Console ModeBy default, the TeamSite Server (like most Windows applications) uses code page 1252 on Single Byte Character Set (SBCS) systems in English and German. However, the DOS command window uses different OEM code pages for SBCS English systems and German systems. This difference can cause CLT output to be displayed incorrectly.
To avoid this issue, complete the following procedure before running any CLT on SBCS systems.
1. Open the DOS command window.
Table 14 Language Encodings
Encoding of document (charsets) Allowed Languages (browser's settings)
shift_jis, shift-jis, x-ms-cp932, x-sjis, ms-Kanji, cp932, euc-jp, x-euc-jp, x-euc
Japanese or English
gb2312, chinese, GB2312-80, GB231280, GBK, euc-cn, x-euc-cn, cp936
Simplified Chinese (PRC) or English
ks_c_5601-1987, euc-kr, korean, KSC5601, KSC_5601, cp949
Korean or English
iso-8859-1, Windows-1252, Latin1, latin1, iso_8859-1
German, French, or English
us-ascii, us, x-ansi, ISO646-US, ascii English only
utf-8, utf-16be,utf-16le Japanese, Simplified Chinese, Korean, German, French, or English
Table 15 Code Pages for CLTs
Single Byte Character Set System Language Default Code Page DOS Command Window
OEM Code Page
English 1252 437
German 1252 850
8 TeamSite Administration Guide
• • • •••

Specify File Encoding of Text Files
2. Right-click on the command window’s title bar and choose Properties from the menu.
The Properties dialog box is displayed.
3. Click the Font tab.
4. Select Lucida Console font from the Font list, and click OK.
The Apply Properties dialog box is displayed.
5. Select Save properties for future windows with same title, and click OK.
6. At the DOS prompt, type chcp and press Enter.
The system returns the active code page number: 437 for English systems, or 850 for German systems. Record the code page number so you can revert to the default code page for commands that require it.
7. Type chcp 1252 and press Enter to change the code page to 1252.
The system confirms the active code page is set to 1252. All command window input and output will use this code page.
Specify File Encoding of Text FilesAll browsers rely on default settings to “guess” the encoding of web pages whose encoding is not explicitly declared. If the browser’s default setting is different than that of the actual encoding of the page passed to the browser, the browser may render the page incorrectly. Therefore, the best practice is for your web pages to always declare their encoding. This prevents your browser from guessing incorrectly when you use TeamSite, and ensures that your web site viewers’ browsers will not have to guess which encoding they should use.
For HTML documents, VisualPreview honors the encoding specified by the charset parameter in either a Content-Type HTTP header or in an HTML META tag. For example:
Content-Type: text/plain; charset=UTF-8
<META HTTP-EQUIV="Content-type" CONTENT="text/html; charset=UTF-8">
To display multibyte characters in non-HTML text documents in VisualPreview with the desired character encoding, the content webserver must be configured to return a Content-Type HTTP header that specifies the encoding, for example:Content-Type: text/plain; charset=UTF-8
If the charset is not specified—either by the content webserver’s Content-type HTTP header, or by the charset tag within the file—VisualPreview assumes that the document
TeamSite Administration Guide 219
• • • •••

Appendix B: Internationalization
22
is encoded in ISO-8859-1, which may cause the document to be displayed with “garbage” characters.
NOTE
To solve the issue of text files that do not specify their encoding, use the file_encoding.cfg configuration file. Refer to Appendix C, “,” for detailed information about creating configuring settings in file_encoding.cfg.
Text Editor Encodings
The following table shows the default settings for various text editors and how to modify them to use UTF-8 encoding.
Behavior of Netscape Navigator
If a Netscape browser finds a UTF-8 page, it uses UTF-8 as its default encoding for pages that do not specify their encoding. This may cause the browser to display pages incorrectly if the user browses pages that do not specify their encoding, or creates pages without specifying the encoding.
Table 16 Default Encodings for Text Editors
Text Editor Platform Default Encoding To Save as UTF-8 Encoding:
Notepad Windows ANSI (relative to the localized operating system)
• Select File > Save As.
• Select UTF-8 in the Encoding drop down menu.
Wordpad Windows Rich Text Format (RTF) (relative to the localized operating system)
• Select File > Save As.
• Select Unicode Text Document in the Save as type drop down menu.
vi Solaris Depends on the locale of vi’s active process.
Cannot save or render text as UTF-8.
emacs Solaris Depends on the locale of emac’s active process.
Cannot save or render text as UTF-8.
0 TeamSite Administration Guide
• • • •••

Appendix B: Internationalization
22
Scenario 1
1. A Japanese user goes to a Japanese site which does not specify its encoding. Netscape defaults to Japanese (Auto-Detect).
2. The Japanese user logs into TeamSite (UTF-8 pages). Netscape switches to UTF-8.
3. The Japanese user opens a new window and returns to the Japanese site which does not specify its encoding. Now Netscape defaults to UTF-8.
This would not happen if the site specified the encoding of its web pages.
Scenario 2
1. A Japanese user logs into TeamSite (UTF-8 pages). Netscape switches to UTF-8.
2. The Japanese user’s content in TeamSite does not include the ‘Content-type’ META tag.
3. Upon entering SmartContext QA, Netscape tries to render the content as UTF-8, which is probably wrong. The solution to this problem is to always specify the encoding for all HTML content.
Configure Netscape for Multibyte Characters
Complete the following procedure if you are using a Netscape browser to display multibyte characters:
1. Open your Netscape browser.
2. Select Edit > Preferences to display the Preferences dialog box.
3. Click Appearance > Fonts to display the Fonts settings.
4. Set the For the Encoding field to Unicode.
5. Set the Variable Width Font field to a font which supports the language you want to use.
6. Set the Fixed Width Font field to a font which supports the language you want to use.
7. Click the Use my default fonts, overriding document-specified fonts option.
8. Click OK.
If this procedure does not deliver the expected results (that is, certain characters are not displayed properly), try the following procedure:
1. Select View > Character Set > Set Default Character Set.
1 TeamSite Administration Guide
• • • •••

Appendix B: Internationalization
22
2. Select View > Character Set > Unicode (UTF-8).
Usage ScenariosThe following examples illustrate some of the advantages of using TeamSite in a global enterprise. Note that a branch scenario could also apply to a workarea, directory, or file operation (for example, New Branch, New Workarea, and Import File). Scenarios can also be applied to other locales.
Scenario 1
1. The TeamSite server is running in the Windows Japanese /ja_JP.PCK (Shift-JIS)locale on Solaris.
2. You create a branch with a Japanese name using ContentCenter running on Japanese Windows. This branch is created in the TeamSite File System with Windows Japanese/Shift-JIS encoding.
3. You can navigate this branch with the Japanese name using ContentCenter.
4. You can also log on to the server machine and access this branch with Japanese name using the file system interface (Windows Explorer).
Scenario 2
1. The TeamSite server is running in the Windows Japanese /ja_JP.PCK (Shift-JIS)locale on Solaris.
2. Your TeamSite Administrator copies a directory from the Windows Explorer file system into the TeamSite File System. This directory contains file and directory names with Japanese encoded names.
3. Your TeamSite Administrator creates a file in the TeamSite File System with a Japanese (Shift-JIS) encoded name.
4. ContentCenter users (on any client platform) can view and access this directory (and corresponding files) with a Japanese name.
2 TeamSite Administration Guide
• • • •••

Usage Scenarios
Scenario 3
1. You install and run TeamSite on a Japanese Solaris system in the ja_JP.PCK locale. The file server for this system operates in the Shift-JIS locale (ja_JP.PCK locale on Solaris is a Shift-JIS locale.
2. You create a branch with a Japanese name using ContentCenter.
This branch is displayed in /iwmnt as a directory with a Shift-JIS encoded directory name and is displayed in all typical file system operations with a Shift-JIS encoded directory name just like the other files and directories in the file system.
Scenario 4
1. You install and run TeamSite on a Japanese Solaris system in a ja_JP.PCK locale. The file server for this system operates in the Shift-JIS locale.
2. You copy an existing hierarchy of files and directory structures into a workarea called isuzuki within /iwmnt.
3. You use ContentCenter to access the isuzuki workarea.
The file and directory hierarchy display with Japanese directory and file names and is correctly referenced in ContentCenter.
Scenario 3
1. Type an iwsubmit command in a shell window running on a Japanese system.
2. Create submit comments in Japanese.
3. Execute the iwsubmit command. In ContentCenter, the Japanese submit comments are displayed correctly with the corresponding entity submitted.
Scenario 5
1. You install and run TeamSite on a Japanese Solaris system in a ja_JP.PCK locale.
2. Using ContentCenter, you submit a file and comments in Japanese.
3. You use the iwsubmit CLT to view the extended attributes of the file.
The Japanese submit comments are displayed correctly on the command-line. After executing the submit, the same submit comments are displayed correctly in history log of the file submitted.
TeamSite Administration Guide 223
• • • •••

Appendix B: Internationalization
22
4 TeamSite Administration Guide• • • •••

Appendix C
Specify Content Encoding
TeamSite includes a configuration file called file_encoding.cfg that enables you to create rules to determine the character encoding of the contents of files that do not specify their encoding. The file_encoding.cfg file (located by default in iw-home\local\config) uses an XML-based language called regex_map. The regex_map format is designed to be structured enough for maintainability, and extensible so that the same format may be used in future configuration files. This file contains a <regex_map> element, which contains rules to map vpaths (directory paths) to the character encoding specification of file contents.
For TeamSite to correctly interpret a text document, it is necessary to know the character encoding in which its contents are represented. Unlike an HTML document that can declare the encoding of its contents using an <HTTP META="Content-Type"
CONTENT="text/html; charset=charsetname"> tag, a plain text file has no mechanism for storing this information. The encoding is required for certain TeamSite functionality including VisualPreview and the Source Differencing and Merge tools.
In previous releases, VisualPreview relied on the Content-Type header from the content Web server to specify the encoding of plain text files. This required you to configure the encoding at your content Web server which may limit flexibility and scalability. By default, the Source Differencing and Merge tools assumed that text files are encoded in ISO-8859-1, which is not suitable for content in eastern Asian languages.
The following sections describe the regex_map language, and how it is used to specify the character encodings of text files used by TeamSite:
regex_map Defined
The regex_map Format
Strategies for Effective regex_maps
Internationalization and regex_maps
VisualPreview and file_encoding.cfg
Source Differencing and Merging and file_encoding.cfg
TeamSite Administration Guide 225
• • • •••

Appendix C: Specify Content Encoding
22
regex_map DefinedA regex_map is a filter that transforms a set of input variable values into a set of output variable values through a set of rules written in XML using the following form:
Simple regex_map Example
The following regex_map determines the character encoding of TeamSite files. Each reg_vpath means that a match is to be performed on the vpath variable, and each val_encoding assigns a result if the match succeeded.
Input Variables
Output Variables
regex_map
var1 = "transformed value1"var2 = "transformed value2"var3 = "new value3"
var1 = "original value1"var2 = "original value2"
<regex_map><match .../><subst .../><subst .../><match .../>
</regex_map>
6 TeamSite Administration Guide
• • • •••

The regex_map Format
In the preceding regex_map example:
If the input vpath variable is "/x/y/z.txt", the resulting encoding variable is set to "8859_1" because "/x/y/z.txt" ends with ".txt".
All files in the /web/techsupport/jp branch are encoded in Shift-JIS, because their vpath begins with "/web/techsupport/jp/".
If the input vpath variable does not contain "/web/techsupport/jp/", the output encoding variable is set to "UTF8" because ".*" matches any string.
Each rule within <regex_map> is evaluated in order, the first <match> tag with a regular expression that matches the input variable vpath is used, and subsequent rules are ignored. Therefore, it is important for the <match reg_vpath= ".*" val_encoding= "UTF8"/> rule to appear last.
The regex_map FormatA regex_map consists of a <regex_map> element that contains substitution and match rules expressed by using <subst> and <match> tags. Substitution and match rules are consulted in the order in which they are listed within the <regex_map> element. Each rule may assign values to variables.
Input Variable
Output Variable
regex_map
encoding = character encodingfor the given vpath
<regex_map><match reg_vpath= "/web/techsupport/jp/" val_encoding= "Shift_JIS"/><match reg_vpath= "\.txt$" val_encoding= "8859_1"/><match reg_vpath= ".*" val_encoding= "UTF8"/>
</regex_map>
vpath = path of a TeamSite file
TeamSite Administration Guide 227
• • • •••

Appendix C: Specify Content Encoding
22
Rule Syntax
Every <subst> or <match> rule expresses the following logical operation:
If all the regular expressions within this rule match, then perform all of this rule’s variable assignments; otherwise, ignore this rule and consult the next rule.
Execution terminates when the first <match> rule has been applied, or when there are no more rules. A <subst> rule that has been satisfied does not terminate execution (unless it is the last rule).
All attributes of rules use the form reg_varname or val_varname.
reg_varname attributevApplies a regular expression to varname.
val_varname attribute. Assigns a value to varname if all of the regular expressions in the current rule are satisfied.
The following are some simple examples of rules.
If vpath starts with /default/main/ set the encoding to 8859_1 and continue processing:
<subst reg_vpath="^/default/main/" val_encoding="8859_1"/>
The encoding of all files named index_zh_TW.html anywhere in the /web branch is Big5. There are no exceptions to this rule, so stop processing if it applies.
<match reg_vpath= "^/web/(STAGING|WORKAREA|EDITION).*/index_zh_TW.html" val_encoding= "Big5"/>
Note that the “or” capability of regular expressions, expressed by the pipe character ( | ), enables this single rule handle three cases at once (STAGING or WORKAREA or EDITION).
The encoding is always "Shift_JIS".
<match val_encoding="Shift_JIS"/>
When there are no reg_ conditions, the assignment always executes if the rule is encountered. Any rules that occur after this statement are unused.
Regular Expression Syntax
The regex_map interpreter uses Perl-Compatible Regular Expressions (PCRE) as its regular expression engine. The PCRE is similar to the Perl regular expression engine and includes advanced features such as “lookahead” assertions.
8 TeamSite Administration Guide
• • • •••

The regex_map Format
Regular expressions in regex_map are case-sensitive by default. If a variable is listed in the opt_case_insensitive attribute of <regex_map>, all regular expressions applied to that variable in the regex_map are case-insensitive.
For example, because filenames and URLs are case-insensitive on Microsoft Windows, the following declaration would be recommended when writing a regex_map for a TeamSite server on Microsoft Windows:<regex_map opt_case_insensitive="vpath url">
<subst reg_vpath="..." .../>
<match reg_url="..." .../>
</regex_map>
Variables
Variables store strings to be passed in the following ways:
As input to a regex_map from an application.
From rule to rule within a regex_map.
As results from a regex_map to the application.
Variable names are case-sensitive and must begin with a letter and may contain any sequence of alphanumeric characters and the underscore character ( “ _ ” ). References to any variable whose value is not set by the application or by rules in the regex_map evaluates to an empty string.
Application Variables
Any application that uses a regex_map gives it a set of inputs before execution and inspects a set of output variables when the regex_map processing completes. These input and output variables are known as application variables.
Intermediate Variables
You may find it helpful to assign intermediate results to your variables in regex_map rules before arriving at final output values. These intermediate variables can help make a complex set of rules more manageable by factoring out several separate conditions into one condensed case. You can then write one rule to act on the condensed case, instead of repetitively writing the same actions for the individual initial conditions. “Strategies for Effective regex_maps” on page 234 contains an example of factoring.
TeamSite Administration Guide 229
• • • •••

Appendix C: Specify Content Encoding
23
Intermediate variables should have names that begin with x_ to avoid conflicts with application variables that may be created in the future.
Interpolation of Variables and Captured Subexpressions
When assigning a value to a variable, the values of other variables can be included. In val_attributes, each occurrence of ${varname} or $varname causes the value of varname to be inserted instead, as shown in the following example:
In the preceding example:
In the <subst> rule, curly braces ({ }) are required to separate the variable name good from the literal string jour that immediately follows.
In the <match> rule, there is no need to disambiguate the three variables because the variable names french, my, and friend are followed by a comma, a space, and an exclamation point, none of which can be confused as being part of a variable name.
In the second rule, the values of friend and french are taken from the time at which the rule was encountered. All assignments in a rule appear to occur simultaneously and do not affect each other.
Output Variables
regex_map
good = "Bon"my = "mon"
<regex_map><subst val_french="${good}jour"/><match val_friend="copain"
</regex_map>
friend = "copain"french = "Bonjour, mon ami"
Input Variables
good = "Bon"my = "mon"
friend = "ami"
val_french="$french, $my $friend!"/>
0 TeamSite Administration Guide
• • • •••

The regex_map Format
It is also possible to include just portions of variables. Placing parentheses around portions of a regular expression applied to varname creates a captured subexpression variable that can be used when assigning values. The longhand form of a captured subexpression variable is ${varname:n}, which refers to the string captured by the nth pair of parentheses in reg_varname.
NOTE
Pairs of parentheses are numbered according to the order in which their left parenthesis occurs within the regular expression. Parentheses of the form (?:some_expression) are used solely for grouping characters in the regular expression, not for capturing text during matching, and are excluded from the count.
The shorthand version of a captured subexpression variables is $n. Note that the shorthand notation can only be used when the variable being modified is the same as the variable from which the subexpression was captured.
Unlike application and intermediate variables, captured subexpression variables are scoped to the <subst> or <match> rule that created them. If a captured subexpression variable needs to be used in a subsequent rule, it should be stored in an intermediate variable.
For example, the pair of rules in the following regex_map makes the assignment message="regex_maps are awesome maps!" in an inefficient way:
Input Variables
regex_map
<regex_map><subst reg_text="This regular expression match fails"
reg_message="some (m[aeiou]ps)"val_text="so this assignment never occurs..."
</regex_map>
text = "My, how large your eyes are!"message = "regards some maps with awe"
Output Variables
text = "My, how large your eyes are"message = "regex_maps are awesome maps!"
val_message="... and the $1 capture is wasted."/>
<subst reg_text="(?:(bloop)|([a-z]+)(!))"reg_message="(...)ards ((.{4}) (.{4})) with (.*)"val_message="$1ex_${4} ${text:2} ${message:5}$2${text:3}"/>
TeamSite Administration Guide 231
• • • •••

Appendix C: Specify Content Encoding
23
In the previous example:
The first rule does not apply because the value of the text variable does not match the regular expression in reg_text.
While performing the regular expression match for message, the special variable ${message:1} (the $1 variable associated with message) takes on the value maps within the scope of the rule. However, since the entire rule is inapplicable, it has no effect. Neither of the two val_assignments happens, and the temporary ${message:1}="maps" binding is discarded.
The second rule does apply, since both of the reg_text and reg_message matches succeed. The parentheses also capture the text in the strings, resulting in the following temporary bindings:
${text:1} = empty string${text:2} = are
${text:3} = !
${message:1} = reg
${message:2} = some maps
${message:3} = some
${message:4} = maps
${message:5} = awe
Finally, variable interpolation occurs for the val_message assignment. Since the $1, ${4}, and $2 occur in a val_message context, they are treated as shorthand for ${message:1}, ${message:4}, and ${message:2}, respectively. The curly braces for ${4} are optional in this case, and could be used in other situations to clarify where the variable name ends and literal text begins.
Quoting
Inside a val_ attribute, dollar signs ($) have special meaning—they mark the start of captured subexpression names. To force a dollar sign to lose this special meaning (and be treated as a literal dollar sign), it must be escaped by preceding it with a backslash. Similarly, a backslash is treated as a special quoting character unless it is escaped by a preceding backslash.
2 TeamSite Administration Guide
• • • •••

The regex_map Format
In the preceding example, hello is assigned the value "Hi! Parking costs $1\hr." (with the deliberately “wrong” backslash used instead of a forward slash for demonstration purposes).
Also, because regex_map is written in XML, characters with special meaning in XML need to be represented using XML entities. These special characters are described in the following table.
For example,
<subst val_statement="Programmers think "1 & 1 is 1.quot;"/>
assigns the following value to the statement variable:
Programmers think “1 & 1 is 1.”
Table 17 XML Special Characters
Special XML Character Visual Representation XML Entry
Double quote ” "
Apostrophe ’ '
Ampersand & &
Greater than > >
Less than < <
Input Variable
Output Variable
regex_map
<regex_map><subst reg_hello="(.*)"
val_hello="$1! Parking costs \$1\\hr."</regex_map>
hello = "Hi"
hello = "Hi Parking costs $1\hr."
TeamSite Administration Guide 233
• • • •••

Appendix C: Specify Content Encoding
23
Strategies for Effective regex_mapsThe regex_map grammar is a powerful string manipulation language yet still allows simple configurations to be expressed simply. This is due to:
the ability to work with multiple variables
the use of regular expressions with the capability to reference captured subexpressions
the option to chain rules with <subst> or stop processing with <match>
By taking advantage of these features, you can write configuration files that are compact and manageable.
The following example demonstrates how factoring and intermediate variables can make a regex_map configuration scale to handle complex situations. Suppose that a system-wide reorganization forced you to rename all files named README to README.TXT and relocate all files under the /a/b branch to the /c/d branch. You could list all of the possibilities as follows:<regex_map>
<!- Handle both branch move and file extension addition ->
<match reg_vpath= "/a/b/((WORKAREA|EDITION|STAGING).*)README$"
val_vpath= "/c/d/$1README.TXT"/>
<!- Handle branch move only ->
<match reg_vpath= "/a/b/((WORKAREA|EDITION|STAGING).*)"
val_vpath= "/c/d/$1"/>
<!- Handle file extension addition only ->
<match reg_vpath= "(.*)/README$"
val_vpath= "$1/README.TXT"/>
</regex_map>
But this strategy could become extremely complicated if there were more combinations. A factored set of rules can handle each change independently:<regex_map>
<!- Handle a possible branch move ->
<subst reg_vpath= "/a/b/((WORKAREA|EDITION|STAGING).*)"
val_vpath= "/c/d/$1"/>
<!- Handle a possible file extension addition ->
<subst reg_vpath= "(.*)/README$"
val_vpath= "$1/README.TXT"/>
</regex_map>
4 TeamSite Administration Guide
• • • •••

Internationalization and regex_maps
A complicated set of rules could be clarified with intermediate variables, for example:<regex_map>
<!-- Decompose vpath into branch, area, directory, filename -->
<!-- Decomposition could be done in just one rule, -->
<!-- but we choose to break it up with the help of x_rest. -->
<subst reg_vpath="^(.*?)/((?:WORKAREA|EDITION|STAGING).*)"
val_x_branch="${vpath:1}"
val_x_rest="${vpath:2}"/>
<subst reg_x_rest="((?:WORKAREA|EDITION)/[^/]+|STAGING)(.*)"
val_x_area="${x_rest:1}"
val_x_rest="${x_rest:2}/>
<subst reg_x_rest="(.*)(/.*)"
val_x_dir="${x_rest:1}"
val_x_file="${x_rest:2}"/>
<!-- End decomposition -->
<!-- Do the transformations -->
<subst reg_x_branch="^/a/b$"
val_x_branch="/c/d"/>
<subst reg_x_file="^/README$"
val_x_file="/README.TXT"/>
<!-- End transformations -->
<!-- Put vpath back together. -->
<subst val_vpath="$x_branch$x_area$x_dir$x_file"/>
</regex_map>
In the preceding example, factoring out the vpath decomposition logic simplifies the actual transformation rules. In a complex situation with many transformation rules, adding a few standardized rules at the beginning and end of the regex_map is worthwhile.
Internationalization and regex_mapsTeamSite regex_maps should be written in UTF-8 and should provide UTF-8 input values and expect UTF-8 output values for all variables. The regular expression engine is UTF-8-aware. For example, a period (.) in a regular expression matches a single character, regardless of the number of bytes needed to represent that character.
TeamSite Administration Guide 235
• • • •••

Appendix C: Specify Content Encoding
23
If you need to specify non-ASCII literal characters in your regex_maps, ensure the text editor you are using can edit and save the file_encoding.cfg in UTF-8 encoding. Refer to page 219 for details about text editor encodings.
VisualPreview and file_encoding.cfgTo determine the encoding of a text file, VisualPreview mimics the behavior of your web browser by performing the following series of checks:
First, VisualPreview checks the Content-Type header from the content webserver. If the MIME type (text/html or text/plain) is followed by a character encoding declaration (for example, Content-Type: text/plain; charset=UTF-8), it uses the specified encoding.
If the file is an HTML document, VisualPreview searches for a character encoding declaration in an HTML META tag (for example, <META HTTP-EQUIV="Content-Type" CONTENT="text/html; charset=Big5">), which it uses if found.
If the aforementioned methods do not return the encoding, VisualPreview computes the encoding using the regex_map configuration in the file_encoding.cfg file. It uses the vpath as the input variable and the encoding as the expected output.
Source Differencing and Merging and file_encoding.cfg
Unlike VisualPreview, the Source Differencing and Merge tools do not mimic your web browser. Instead, they rely entirely on the file_encoding.cfg file to determine the character encoding of text documents. The Source Differencing and Merge tools assume that the “other” file and the “common ancestor” file share the character encoding of the workarea file.
The following list of encodings are the IANA preferred charset names (http://www.iana.org/assignments/character-sets) and are valid entries for the file_encoding.cfg file:
English, German:
ISO-8859-1
ISO-8859-15
6 TeamSite Administration Guide
• • • •••

Source Differencing and Merging and file_encoding.cfg
windows-1252
Japanese:
Shift_JIS
EUC-JP
Korean:
EUC-KR
Simplified Chinese:
EUC-CN
GB2312
Unicode:
UTF-8
NOTE
file_encoding.cfg has no effect on the file encoding seen in visual differencing. This is so that what is seen in the visual differencing tool most closely approximates what will be seen in the production environment.
Sample file_encoding.cfg<?xml version="1.0" encoding="UTF-8"?>
<!-- Input variable: vpath -->
<!-- Output variable: encoding -->
<vpath_to_encoding_map>
<!-- Ignore upper and lower case when
evaluating reg_vpath and reg_encoding conditions. -->
<regex_map opt_case_insensitive="vpath encoding">
<!-- Set the default result. A default like this is highly
recommended. -->
<subst val_encoding="8859_1"/>
<!-- Make a note of Japanese files scattered about. -->
<subst reg_vpath="(?:_ja|_jp|_jpn)\." val_x_lang="Asian:Japanese"/>
<!-- Likewise with Chinese files. -->
TeamSite Administration Guide 237
• • • •••

Appendix C: Specify Content Encoding
23
<subst reg_vpath=".*\.zh\.txt$" val_x_lang="Asian:Chinese"/>
<!-- As site policy, our Japanese files are Shift-JIS -->
<subst reg_x_lang="Asian:Japanese" val_encoding="Shift-JIS"/>
<!-- As site policy, our Chinese files are Big5 -->
<subst reg_x_lang="Asian:Chinese" val_encoding="Big5"/>
<!-- Otherwise, the directory name at the top of the area is the
result. -->
<subst reg_vpath="(?:(?:WORKAREA|EDITION)/[^/]+|STAGING)/([^/]+)/" val_encoding="${vpath:1}"/>
<!-- Canonicalize encoding names. Try Shift_JIS, then SJIS. -->
<match reg_encoding="(sjis|shift[_-]jis)" val_encoding="Shift_JIS"/> </regex_map>
</vpath_to_encoding_map>
8 TeamSite Administration Guide
• • • •••

Appendix D
Single Sign-On
This chapter describes the procedure for configuring TeamSite to integrate with single sign-on (SSO) authentication products. These products include SiteMinder from Computer Associates as well as authentication software from other vendors. The integration enables:
The TeamSite server to act as another web server in a portal environment controlled by the SSO product.
A single sign-on where TeamSite users log in once against the SSO authentication engine and are authorized to access all of its resources (TeamSite and the other web servers in the portal) without having to log in to TeamSite explicitly.
The following topics are described in this chapter:
Overview
Integrate SiteMinder and TeamSite with an Active Response
Integrate SiteMinder and TeamSite Without an Active Response
Integrate an SSO Product Other than SiteMinder with TeamSite
Troubleshooting
OverviewTeamSite provides a framework providing integration with SiteMinder. You can also use this framework to integrate SSO products from other vendors. See theTeamSite Release Notes for details about which SSO products are currently supported.
After completing the integration described in this chapter, the SSO product controls access to TeamSite by authenticating the user against its user database and placing an authentication cookie in the browser. Three different integration scenarios are described in detail:
TeamSite Administration Guide 239
• • • •••

Appendix D: Single Sign-On
24
Integrating CA SiteMinder with TeamSite together with the Active Response module. This is the same integration that was supported in previous versions of TeamSite and is the recommended configuration. No SiteMinder Policy Server configuration changes are necessary when an existing system is upgraded to TeamSite 6.7.1 or later from TeamSite 6.5 or 6.7. However, if you are using an older Web Agent that does not support Apache 2, you will need to upgrade to a version that supports Apache 2. See “Install and Configure the SiteMinder Web Agent on the TeamSite System” on page 243 for more information.
Integrating CA SiteMinder with TeamSite without employing the Active Response module. This integration is recommended when it is not practical to install an Active Response module for TeamSite in the SiteMinder Policy Server.
Integrating an SSO product other than SiteMinder with TeamSite without employing an active response.
The following sections describe these integrations in detail.
Integrate SiteMinder and TeamSite with an Active Response
This section describes how to integrate CA SiteMinder and TeamSite using the Active Response module. This configuration is the one most widely used in existing TeamSite/SiteMinder installations. It is a good choice when maximum security is desired and where it is possible to install an Active Response on the Policy Server that communicates with the TeamSite authentication system.
Prerequisites
The following conditions must already be met before you start this procedure:
TeamSite 6.7.1 or above is installed on one computer.
SiteMinder Policy Server 5.5 or 6.0 is installed on another computer.
You have an SSL certificate for the TeamSite system.
TeamSite and SiteMinder share the same user database.
0 TeamSite Administration Guide
• • • •••

Integrate SiteMinder and TeamSite with an Active Response
Overview
With this configuration, two credential verifications are performed when a user signs on through the SiteMinder system. First, SiteMinder authenticates the user and sets an SMSESSION authentication cookie. Upon successful authentication by SiteMinder, the SiteMinder Policy Server opens an encrypted channel to the TeamSite authentication service, and the user is authenticated by TeamSite. Following successful authentication by TeamSite, a TeamSite IWAUTH authentication cookie is set, and the user is able to access TeamSite.
Advantages to this configuration include the following:
It makes it possible set up a system that has some users that authenticate using the SSO system and some that use standard TeamSite authentication.
Both authentications are controlled by SiteMinder, and are done in the context of a secure SiteMinder server.
It can be used with various older TeamSite servers, as well as with current products.
A disadvantage of this approach is that it requires the installation of proprietary authentication code in the SiteMinder Policy Server and requires a communication channel between the SiteMinder Policy Server and the authentication service.
The typical sequence of data and operation flow following integration is depicted in the following figure and described in the legend that follows.
TeamSite Administration Guide 241
• • • •••

Appendix D: Single Sign-On
24
Figure 26 SiteMinder integrated with TeamSite and Active Response
1. A TeamSite user accesses the TeamSite server by entering hostname/iw-cc/ in a browser.
2. The web agent intercepts the request and prompts for a user name and password.
3. The user enters a user name and password.
4. The CA Web agent passes the login information to the SiteMinder Policy Server, which authenticates the user. The Policy Server then calls the Active Response function in the iwtssmar.so file.
5. The Active Response module makes an SSL connection to the TeamSite Access Service and sends the user’s login credentials.
6. The TeamSite Access Service authenticates the user and returns a session string that the Active Response module uses to create an IWAUTH cookie.
7. The Active Response module then writes the IWAUTH persistent cookie to the web agent.
8. The web agent passes the cookie to the user’s browser.
9. The cookie is checked each time the user visits a page served by TeamSite.
10. Upon verification, the page is served from TeamSite and displayed in the user’s browser.
SiteMinder Policy Server
TeamSite servletd
(Content Services)
Active Response Module
iw-w
ebd
with
Site
Min
der
web
age
nt
Bro
wse
r
1
2
3
4
5
68
9 9
1010
7
2 TeamSite Administration Guide
• • • •••

Integrate SiteMinder and TeamSite with an Active Response
Integration Procedure
Performing this integration involves the following main steps:
Install and Configure the SiteMinder Web Agent on the TeamSite System.
Set Realms, Rules, and Responses on the SiteMinder Policy Server.
Set Environment Variables on the SiteMinder Policy Server.
Copying the Active Response Module to the SiteMinder Policy Server.
Details are in the following sections.
Install and Configure the SiteMinder Web Agent on the TeamSite System
1. Ensure that the host and agent configuration objects that you plan to use are created prior to running the SiteMinder Web Agent installation script. This is necessary because the SiteMinder Web Agent installation script prompts you for the IP address of the SiteMinder Policy Server, the name of the agent configuration object, and the name of the host configuration object.
2. Run the SiteMinder Web Agent installation script supplied by CA. Refer to the documentation provided with that product for more installation details. On Windows systems, SiteMinder Web Agent V5QMR8 is supported. On UNIX systems, SiteMinder Web Agent V5QMR7 is supported.
3. On UNIX systems, the SiteMinder Web Agent software is usually installed in a different location from the web server it services. To find the various libraries and executables it needs, the Web Agent uses the following environment variables:
$LD_LIBRARY_PATH
$NETE_WA_ROOT
$NETE_WA_PATH.
SiteMinder provides a script called nete_wa_env.sh with the Web Agent software that sets these environment variables.
In a typical TeamSite installation, TeamSite is configured to start automatically whenever its host computer is booted. For the SiteMinder Web Agent to start, values for $LD_LIBRARY_PATH, $NETE_WA_ROOT, and $NETE_WA_PATH must be known to the TeamSite startup script iwuiboot at boot time. The recommended configuration is to execute the nete_wa_env.sh script every time iwuiboot is run. To do this, add the following line to the script iw-home/private/bin/iwuiboot as the first executable command following the block of comments at the top of the file:
. pathToWebAgentRoot/nete_wa_env.sh
TeamSite Administration Guide 243
• • • •••

Appendix D: Single Sign-On
24
The “.” followed by a space at the beginning of the command is required. It tells the shell to execute the script in the current shell environment without forking another shell.
4. On Windows systems, copy the WebAgent.conf and LocalConfig.conf files from $NETE_WA_ROOT\BIN\IIS to $IW_HOME\iw-webd\conf. This step is necessary because the Windows Web installation script for Web Agents does not recognize the iwwebd Apache server. This step is not necessary on UNIX systems.
Set Realms, Rules, and Responses on the SiteMinder Policy Server
1. Open the SiteMinder Policy Server user interface where you will create Realms and Rules to protect TeamSite resources.
2. Create the following SiteMinder Realms:
3. Under the protected_iw Realm, create the following Rules:
The other Realm does not require any rules.
4. Create a SiteMinder Response with the name IWResponse and the following details:
NOTE
Leave the Parameters field empty.
Table 18 Realms
Realm Name Realm Type Resource Filter
protected_iw Protected /iw
unprotected_iw Unprotected /iw/services/cm/2.0/accessservice
Table 19 Rules
Rule Name Description
Authenticate_iw - iw* Configured for authenticating event actions.
Protected_iw - iw* Configured for GET, PUT, POST actions.
Table 20 Response
Field Entry
Attribute of the Response WebAgent-OnAccept-Redirect
Attribute Kind Active Response
Library Name UNIX: full_path/iwtssmar.so
Windows: full_path\iwtssmar.dll
Function Name activeResponse
4 TeamSite Administration Guide
• • • •••

Integrate SiteMinder and TeamSite with an Active Response
5. Create a SiteMinder Policy with the following label:
Add TeamSite users
6. In the Rules tab, add the following Rules:
Authenticate_iw
Protect_iw
For the Authenticate_iw Rule, set the Response to IWResponse.
Set Environment Variables on the SiteMinder Policy Server
The Active Response module uses two environment variables. One of these specifies the host computer and port that is used to talk to the TeamSite Access Service. The other specifies the location of a text file that is used to seed the pseudo-random number generated used by the SSL encryption libraries. This may be any file, preferably one that changes randomly.
Perform the following procedure on the system where the SiteMinder Policy Server is running.
On a UNIX system:
1. Change to the home directory for smuser.
2. Open the .profile file in your text editor.
3. Create an environment variable called INTERWOVEN_AUTH_HOST, for example:
export INTERWOVEN_AUTH_HOST=server.interwoven.com:443
This environment variable provides the name of the TeamSite server and optional port. If no port number is specified, the default port number 443 is used.
4. Create an environment variable called INTERWOVEN_RAND_FILE. This variable specifies the complete path of a file containing random text. For example:
export INTERWOVEN_RAND_FILE=/var/adm/random.txt
5. If you are using an LDAP system and the UNIX account name is not a component of the Distinguished Name (DN) of the system’s users, you must tell the Active Response module where to find a user’s UNIX account name. To do this, set an additional environment variable called INTERWOVEN_USER_ATTR to the LDAP attribute that holds the UNIX account names. This is typically “uid”. For example:
export INTERWOVEN_USER_ATTR=uid
6. Save and close the .profile file.
TeamSite Administration Guide 245
• • • •••

Appendix D: Single Sign-On
24
On a Windows system:
1. Right-click on the My Computer icon on your desktop and select Properties from the menu. The System Properties window is displayed.
2. Click the Advanced tab.
3. Click Environment Variables. The Environment Variables dialog box is displayed.
4. In the System variables section, click New. The New System Variable dialog box is displayed.
5. Enter INTERWOVEN_AUTH_HOST in the Variable Name field.
6. Enter the name of the server and optional port in the Variable Value field, for example: server.interwoven.com:443.
This environment variable provides the name of the TeamSite server and optional port. If no port number is specified, the default port number 443 is used.
7. Click OK to close the New System Variable dialog box.
8. Again, select New from the System variables section to display the New System Variable dialog box.
9. Enter INTERWOVEN_RAND_FILE in the Variable Name field.
10. In the Variable Value field, enter the complete path of a file containing random text, for example: c:\iw\random.txt.
11. If you are using an LDAP system and the Windows account name is not part of the Distinguished Name (DN) of the system’s users, you must tell the Active Response module where to find a user’s Windows account name. To do this, set an additional environment variable called INTERWOVEN_USER_ATTR as follows. (The Windows account name is typically already part of the DN. If that is the case with your system, skip to step 12.)
a. Select New from the System variables section to display the New System Variable dialog box.
b. Enter INTERWOVEN_USER_ATTR in the Variable Name field.
c. In the Variable Value field, enter the name of the LDAP attribute that contains your system’s users’ Windows account name. This name is typically “uid” or “SAMAccountName.”
12. Click OK to close the New System Variable, Environment Variables, and System Properties windows.
13. Reboot your system.
6 TeamSite Administration Guide
• • • •••
Integrate SiteMinder and TeamSite Without an Active Response
Copying the Active Response Module to the SiteMinder Policy Server
The installation program automatically places the Active Response module needed to integrate TeamSite and SiteMinder in the iw-home/lib directory on your TeamSite server. The module is in a file is called iwtssmar.so (on UNIX systems) or iwtssmar.dll (on Windows systems) and must be copied to your SiteMinder Policy Server.
1. Stop all SiteMinder Policy Server daemons (UNIX) or services (Windows). Refer to the SiteMinder Operations Guide for detailed instructions.
2. Copy the iwtssmar.so (UNIX) or iwtssmar.dll (Windows) file from iw-home/lib to where the policyserver_home/bin/smservauth executable can find it.
For example (UNIX):
%cp iw-home/lib/iwtssmar.so /var/siteminder/bin/
Integrate SiteMinder and TeamSite Without an Active Response
This section describes how to integrate CA SiteMinder and TeamSite without using the Active Response module.
Prerequisites
The following conditions must already be met before you start this procedure:
TeamSite release 6.7.1 or above is installed on one computer.
SiteMinder Policy Server 5.5 or 6.0 is installed on another computer.
TeamSite and SiteMinder share the same user database.
Overview
This configuration does not require the installation of any proprietary software on the SiteMinder Policy Server, and requires no connection between the Policy Server and the TeamSite authentication service. With this approach, users are authenticated solely by SiteMinder, and there is no additional TeamSite authentication step. SiteMinder verifies the user’s password, sets an SMSESSION authentication cookie, and passes the
TeamSite Administration Guide 247
• • • •••

Appendix D: Single Sign-On
24
user’s identity to TeamSite through a session cookie or HTML header parameter. TeamSite prepares an IWAUTH access cookie based on the user’s identity, and does not perform any further credential check.
The advantages of this approach are that there is no requirement to install an authentication plug-in in the SiteMinder Policy Server, and there is no need to open a communication channel between the Policy Server and the TeamSite authentication service.
The typical sequence of data and operation flow following integration is depicted in the following figure and described in the legend that follows.
Figure 27 SiteMinder integrated with TeamSite without Active Response
1. A TeamSite user accesses the TeamSite server by entering hostname/iw-cc/ in a browser.
2. The web agent intercepts the request and prompts for a user name and password.
3. A user enters a user name and password.
4. The SiteMinder web agent passes the login information to the SiteMinder Policy Server, which authenticates the user.
5. TeamSite sees the SMSESSION cookie that SiteMinder has set, looks up the user name, and sets an IWAUTH cookie that TeamSite will use for access control.
SiteMinder Policy Server
TeamSite servletd
(Content Services)
iw-w
ebd
with
Site
Min
der
web
age
nt
Bro
wse
r
1
2
3
4
6
7 7
88
5
8 TeamSite Administration Guide
• • • •••

Integrate SiteMinder and TeamSite Without an Active Response
6. The web agent passes the cookie to the user’s browser.
7. The cookie is checked each time the user visits a page served by TeamSite.
8. Upon verification, the page is served from TeamSite and displayed in the user’s browser.
Integration Procedure
Performing this integration involves the following main steps:
Install and Configure the SiteMinder Web Agent.
Configure the SiteMinder Policy Server.
Configure TeamSite.
Details are in the following sections.
Install and Configure the SiteMinder Web Agent
1. Ensure that the host and agent configuration objects that you plan to use are created prior to running the SiteMinder Web Agent installation script. This is necessary because the SiteMinder Web Agent installation script prompts you for the IP address of the SiteMinder Policy Server, the name of the agent configuration object, and the name of the host configuration object.
2. Run the SiteMinder Web Agent installation script supplied by CA. Refer to the documentation provided with that product for more installation details. On Windows systems, SiteMinder Web Agent V5QMR8 is supported. On UNIX systems, SiteMinder Web Agent V5QMR7 is supported.
3. On UNIX systems, the SiteMinder Web Agent software is usually installed in a different location from the web server it services. To find the various libraries and executables it needs, the Web Agent uses the following environment variables:
$LD_LIBRARY_PATH
$NETE_WA_ROOT
$NETE_WA_PATH.
SiteMinder provides a script called nete_wa_env.sh with the Web Agent software that sets these environment variables.
In a typical TeamSite installation, TeamSite is configured to start automatically whenever its host computer is booted. For the SiteMinder Web Agent to start, values for $LD_LIBRARY_PATH, $NETE_WA_ROOT, and $NETE_WA_PATH must be known to the TeamSite startup script iwuiboot at boot time. The recommended configuration is to execute the nete_wa_env.sh script every time iwuiboot is run. To do this, add
TeamSite Administration Guide 249
• • • •••

Appendix D: Single Sign-On
25
the following line to the script iw-home/private/bin/iwuiboot as the first executable command following the block of comments at the top of the file:
. pathToWebAgentRoot/nete_wa_env.sh
The “.” followed by a space at the beginning of the command is required. It tells the shell to execute the script in the current shell environment without forking another shell.
4. On Windows systems, copy the WebAgent.conf and LocalConfig.conf files from $NETE_WA_ROOT\BIN\IIS to $IW_HOME\iw-webd\conf. This step is necessary because the Windows Web installation script for Web Agents does not recognize the iwwebd Apache server. This step is not necessary on UNIX systems.
Configure the SiteMinder Policy Server
1. Open the SiteMinder Policy Server user interface where you will create Realms and Rules to protect TeamSite resources.
2. Create the following SiteMinder realm:
3. Create a rule under the protected_iw Realm.
If you are using a session cookie, use the following rule:
If you are using an HTTP header parameter instead of a session cookie, use the following rule:
Table 21 Realm
Realm Name Realm Type Resource Filter
protected_iw Protected /iw
Table 22 Rules
Rule Name Description Action
iwCookieRule Sets a session cookie upon successful authentication.
Authentication event onAuthAccept.
Table 23 Rules
Rule Name Description Action
iwHeaderVarRule Sets a header parameter upon successful authentication.
Authentication event onAuthAccept.
0 TeamSite Administration Guide
• • • •••

Integrate SiteMinder and TeamSite Without an Active Response
4. Create a SiteMinder Response.
If you are using a session cookie:
Use the name iwCookieResponse and set the attributes as shown in following table. The purpose of this response is to set a session cookie to the user’s TeamSite account name after the user is successfully authenticated by SiteMinder. The implementation shown here assumes that the SiteMinder user database is in an LDAP directory and that the uid attribute in the directory contains the user’s TeamSite account name. The variable name you choose can be any name, but it must match what is specified in the TeamSite configuration file for iw.common.authentication.ssoUserCookie. For UNIX account names, the values are case sensitive, and must match the user names in the tsusers.xml file.
If the SiteMinder Policy Server is on a UNIX system, go to Step 6.
If you are using an HTML header parameter (rather than a session cookie):
Use the name iwHeaderVarResponse and set the attributes as shown in following table. The purpose of this response is to set a session cookie to the user’s TeamSite account name after the user is successfully authenticated by SiteMinder. The implementation shown here assumes that the SiteMinder user database is in an LDAP directory and that the uid attribute in the directory contains the user’s TeamSite account name. The variable name you choose can be any name, but it must match what is specified in the TeamSite configuration file for iw.common.authentication.ssoUserParam. For UNIX account names, the values are case sensitive, and must match the user names in the tsusers.xml file.
Table 24 Response
Field Entry
Name iwCookieResponse
Description Set user name in session cookie
Agent Type SiteMinder Web Agent
Attribute of the Response WebAgent-HTTP-Cookie-Variable
Attribute Kind User Attribute
Attribute Name uid
Variable Name IW_UNAME
Table 25 Response
Field Entry
Name iwHeaderVarResponse
Description Set user name in header parameter
Agent Type SiteMinder Web Agent
Attribute of the Response WebAgent-HTTP-Header-Variable
TeamSite Administration Guide 251
• • • •••

Appendix D: Single Sign-On
25
If the SiteMinder Policy Server is on a UNIX system, go to step 6.
5. If the SiteMinder Policy Server is on a Windows system, TeamSite requires both a user name and a domain name for authentication. You can choose whether the user account name and the domain name are passed to TeamSite together or separately. If your user directory contains an attribute for each TeamSite user in the form domain\user, domain/user, or [email protected], you may pass this value to TeamSite in the session cookie or parameter you specified for ssoUserCookie or ssoUserParameter. Otherwise, if you store domain information separately in a different attribute in your user database, you may send the user name in ssoUserCookie or ssoUserParameter, and send the domain name in a different cookie or parameter.
If the ssoUserCookie or ssoUserParameter does not contain a domain name, create an additional SiteMinder cookie response or header response as shown in the following tables to set the domain name.
If you are using a session cookie for the domain name:.
If you are using an HTML header parameter for the domain name:
Attribute Kind User Attribute
Attribute Name uid
Variable Name HTTP_IW_UNAME
Table 26 Response
Field Entry
Name iwDomainResponse
Description Set user domain in session cookie
Agent Type SiteMinder Web Agent
Attribute of the Response WebAgent-HTTP-Cookie-Variable
Attribute Kind User Attribute
Attribute Name domain
Variable Name IW_UDOMAIN
Table 27 Response
Field Entry
Name iwDomainResponse
Description Set user domain in header parameter
Agent Type SiteMinder Web Agent
Attribute of the Response WebAgent-HTTP-Header-Variable
Table 25 Response
Field Entry
2 TeamSite Administration Guide
• • • •••

Integrate SiteMinder and TeamSite Without an Active Response
6. If the protected_iw realm does not already have a policy, create one with the following settings:.
If you configured the system to pass user information in the session cookie, in the Rules tab select Add/Remove Rules. Select iwCookieVarRule that you created earlier and add it to the policy. After you add the rule, select Select Response to tie iwCookieVarResponse to the rule.
If you configured the system to pass user information in an HTML header parameter (rather than in the session cookie), in the Rules tab select Add/Remove Rules. Select iwHeaderVarRule that you created earlier and add it to the policy. After you add the rule, select Select Response to tie iwHeaderVarResponse to the rule.
If TeamSite is running on a Windows computer, and you have chosen to pass the user’s domain name separately from his account name, create another rule under the protected_iw domain called iwDomainRule, and add it to iw-policy. After you add the rule, select select Response to tie iwDomainResponse to the rule.
Configure TeamSite
The TeamSite configuration described here is performed through the UI toolkit. All of these Java parameters are customized by entering their values as default-param subelements in the applications element of the application_custom.xml file. See the TeamSite User Interface Customization Guide for details about setting parameters in application_custom.xml.
NOTE
You can perform this configuration before or after you install and configure the SiteMinder Policy Server.
Set Java parameters as follows:
1. To enable SSO authentication in TeamSite, set:
Attribute Kind User Attribute
Attribute Name domain
Variable Name HTTP_IW_UDOMAIN
Table 28 Policy
Policy Name Enabled
iw-policy Yes
Table 27 Response
Field Entry
TeamSite Administration Guide 253
• • • •••

Appendix D: Single Sign-On
25
iw.common.authentication.ssoEnabled=true
The default value for this parameter is false; to enable SSO, it must be set to true.
2. Verify that the name of the SSO cookie set by the SSO package is already set to SiteMinder’s default of SMSESSION. The setting should appear as shown here. If it does not, reset it accordingly:
iw.common.authentication.ssoCookieName=SMSESSION
3. TeamSite requires either an HTTP header parameter or a session cookie that contains the TeamSite user’s account name. You can choose to use either alternative.
If you choose to set a header parameter, set ssoUserParam to the following:
iw.common.authentication.ssoUserParam=header_parameter_name
If you choose to set a cookie, set ssoUserCookie to the variable name that you specified in step 5 in the preceding section:
iw.common.authentication.ssoUserCookie=session_cookie_name
4. On Windows systems, if your user directory does not contain an attribute for each TeamSite user in the form domain\user, domain/user, or [email protected], you may need to send the domain information separately in a different session cookie or HTTP header parameter.
If you choose to set a header parameter, set it as follows:
iw_common.authentication.ssoDomainParam=header_parameter_name
The default value is HTTP_IW_DOMAIN.
If you choose to set a session cookie, set it as follows:
iw.common.authentication.ssoDomainCookie=session_cookie_name
The default value is IW_DOMAIN.
4 TeamSite Administration Guide
• • • •••

Integrate an SSO Product Other than SiteMinder with TeamSite
Integrate an SSO Product Other than SiteMinder with TeamSite
This section describes how to integrate TeamSite with an SSO product from any vendor. This integration does not use the Active Response module.
Prerequisites
The following conditions must already be met before you start this procedure:
TeamSite release 6.7.1 or above is installed on one computer.
An SSO product is installed on another computer.
You have an SSL certificate for the TeamSite system.
TeamSite and the SSO product share the same user database.
Overview
This configuration does not require the installation of any proprietary software in the SSO system. Authentication is delegated completely to the SSO system, without TeamSite playing a role. This approach accommodates a variety of different SSO products from different vendors. To use an SSO system with TeamSite, it must be able to pass the authenticated user’s account name to TeamSite upon completion of authentication. This may be done using an HTTL header parameter or a browser session cookie.
The typical sequence of data and operation flow following integration is depicted in the following figure and described in the legend that follows.
TeamSite Administration Guide 255
• • • •••
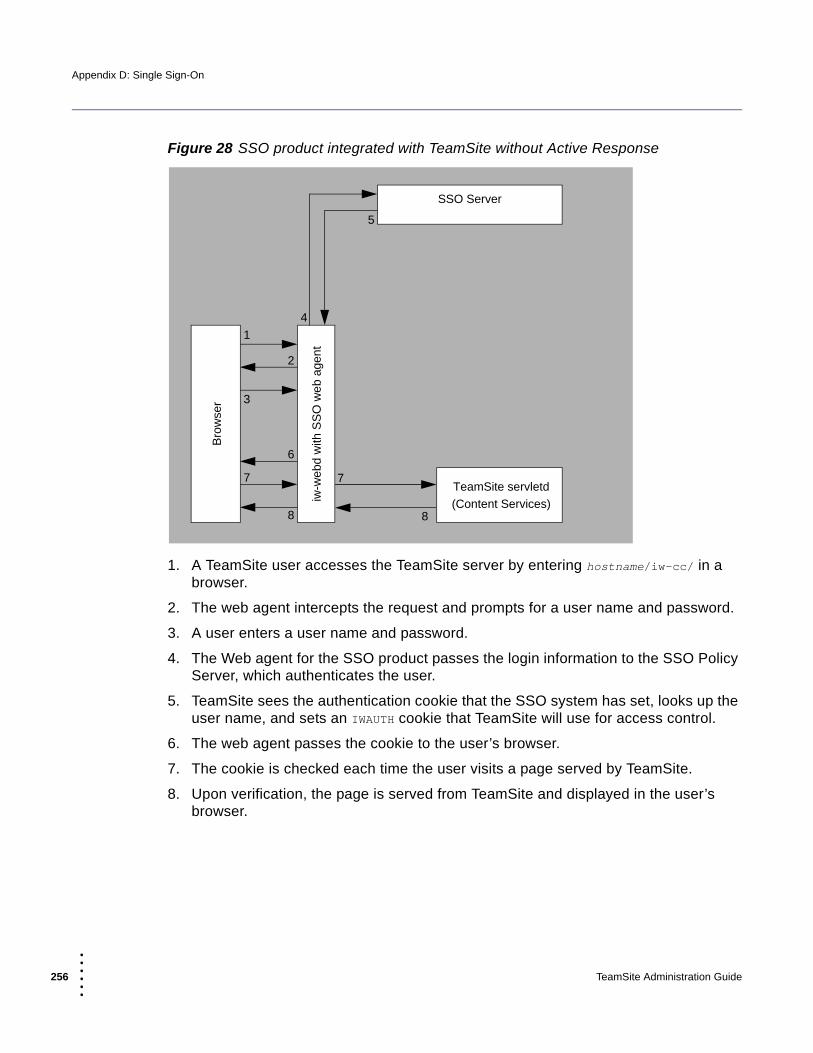
Appendix D: Single Sign-On
25
Figure 28 SSO product integrated with TeamSite without Active Response
1. A TeamSite user accesses the TeamSite server by entering hostname/iw-cc/ in a browser.
2. The web agent intercepts the request and prompts for a user name and password.
3. A user enters a user name and password.
4. The Web agent for the SSO product passes the login information to the SSO Policy Server, which authenticates the user.
5. TeamSite sees the authentication cookie that the SSO system has set, looks up the user name, and sets an IWAUTH cookie that TeamSite will use for access control.
6. The web agent passes the cookie to the user’s browser.
7. The cookie is checked each time the user visits a page served by TeamSite.
8. Upon verification, the page is served from TeamSite and displayed in the user’s browser.
SSO Server
TeamSite servletd
(Content Services)iw-w
ebd
with
SS
O w
eb
agen
t
Bro
wse
r
1
2
3
4
6
7 7
88
5
6 TeamSite Administration Guide
• • • •••

Integrate an SSO Product Other than SiteMinder with TeamSite
Integration Procedure
Performing this integration involves three main steps:
Install and Configuring the SSO Web Agent
Configure the SSO Server
Configure TeamSite
Details are in the following sections.
Install and Configuring the SSO Web Agent
The web agent must be compatible with Apache 2 web servers. See the SSO vendor’s documentation for the recommended version and installation instructions.
Configure the SSO Server
The SSO server needs to generate either a session cookie or an HTML header parameter that contains a TeamSite user account name. For Windows account names, the domain may be sent in the same cookie or parameter, or it may be sent in a different cookie or parameter. When the domain and user name are sent together, any of the following forms is acceptable:
domain\user
domain/user
Configure TeamSite
TeamSite configuration is performed through the UI toolkit. All of the parameters are located in the application_custom.xml file. See the TeamSite User Interface Customization Guide for details about setting parameters in application_custom.xml.
NOTE
You can perform this configuration before or after you install and configure the SSO Server.
Set Java parameters as follows:
1. To enable SSO authentication in TeamSite, set:
TeamSite Administration Guide 257
• • • •••

Appendix D: Single Sign-On
25
iw.common.authentication.ssoEnabled=true
The default value for this parameter is false; to enable SSO, it must be set to true.
2. Verify that the name of the SSO cookie set by the SSO package is already set to SiteMinder’s default of SMSESSION. The setting should appear as shown here. If it does not, reset it accordingly:
iw.common.authentication.ssoCookieName=SMSESSION
3. TeamSite requires either an HTTP header parameter or a session cookie that contains the TeamSite user’s account name. You can choose to use either alternative.
If you choose to set a header parameter, set ssoUserParam to the following:
iw.common.authentication.ssoUserParam=header_parameter_name
If you choose to set a cookie, set ssoUserCookie to the following:
iw.common.authentication.ssoUserCookie=session_cookie_name
4. On Windows systems, if your user directory does not contain an attribute for each TeamSite user in the form domain\user, domain/user, or [email protected], you may need to send the domain information separately in a different session cookie or HTTP header parameter.
If you choose to set a header parameter, set it as follows:
iw_common.authentication.ssoDomainParam=header_parameter_name
The default value is HTTP_IW_DOMAIN.
If you choose to set a session cookie, set it as follows:
iw.common.authentication.ssoDomainCookie=session_cookie_name
The default value is IW_DOMAIN.
Troubleshooting
Troubleshooting the SiteMinder Web Agent
If the Web Agent is configured correctly, you should see the SiteMinder login dialog when you attempt to visit a TeamSite web page. If the SiteMinder dialog does not appear, it may be due to one of the following errors:
8 TeamSite Administration Guide
• • • •••

Troubleshooting
“Failed to start the LLAWP process. Execlp failed: No such file or directory.”
These and similar messages may result if the NETE_WA_* environment variables are not correctly set. See SiteMinder Knowledge Base article 222207 for additional details.
“child pid 1234 exit signal Abort (6)”
If the ServerPath parameter is missing from the Web Agent configuration, you may get messages of the form child pid 1234 exit signal Abort (6). The solution is to add a value for ServerPath to the WebAgent.conf configuration file.
“Server already running. Duplicate LLAWP processes not allowed, exiting.”
If the SiteMinder LLAWP process does not shut down correctly when iwweb is stopped, it may be because the SiteMinder ServerPath parameter was specified in the Agent Configuration Object instead of in WebAgent.conf. The solution is to move ServerPath to the WebAgent.conf file, and to remove any associated semaphores. You can do this using the OS commands ipcs and ipcrm, or by rebooting the system. See SiteMinder Knowledge Base article 222318 and Tech Note 1027 for additional details.
If the problem persists after applying the ServerPath resolution, a workaround is to issue the following command before running any script or command that stops and restarts the TeamSite iwweb web server:
LLAPW /pathToConfigDirectory/webagent.conf -APACHE20 -shutdown
If the SiteMinder dialog appears correctly, then after entering the user name and password for a valid TeamSite user, you should see the TeamSite page you requested. If, instead, you see a TeamSite login page, then TeamSite did not detect an IWAUTH session cookie, either because one was not created, or because it was created in the wrong domain.
If the IWAUTH cookie is not present, it may be because the user is present in the SiteMinder user database, but he is not a valid TeamSite user. Make sure that the user is present in the tsusers.xml file.
Netscape and Mozilla Firefox web browsers provide a “cookie manager” option that displays the value of all cookies, including session cookies. If an IWAUTH cookie is present, but its domain does not match the path you typed for the TeamSite web page, you may need to make changes to your Web Agent configuration file, or to your system’s DNS settings to correct this. If the IWAUTH cookie is absent completely, and the user is a valid TeamSite user, then the problem is probably due to a SiteMinder Policy Server configuration error. If you are using a session cookie to pass the user name to
TeamSite Administration Guide 259
• • • •••

Appendix D: Single Sign-On
26
TeamSite, make sure that the cookie is set as expected, and that its name matches the name you have selected in the TeamSite application.xml configuration file.
Troubleshooting the Active Response
Normally, if SiteMinder successfully authenticates a user, the Active Response module also authenticates the user successfully. If SiteMinder successfully authenticates a user and the authentication fails, one of the following messages is logged to the SiteMinder access log file:
Failed to read INTERWOVEN_AUTH_HOST value.
This message is logged if the INTERWOVEN_AUTH_HOST environment variable has not been set.
Failed to read random seed data.
This message is logged if the INTERWOVEN_RAND_FILE environment variable is missing or does not point to a file that can be read by SiteMinder.
TCP socket connection error.
This message is written to the log file if the SiteMinder computer is unable to open a TCP/IP socket connection to the TeamSite server. A possible reason for this might be that the TeamSite server is unreachable or that the INTERWOVEN_AUTH_HOST environment variable contains an incorrect host name or port number.
SSL Connection error.
This message is written to the log file if SiteMinder is able to open a socket connection to the TeamSite server but is unable to establish an SSL session over the channel. Possible reasons include a misconfigured TeamSite server whose X.509 certificate is missing or corrupt.
Failed to send query to server.
This message is written to the log file if the SSL channel to the TeamSite server fails.
Failed to get session string from server.
This message appears if the supplied user name and password are valid, but no TeamSite role is associated with the user. This message does not necessarily denote an error if there are some SiteMinder users that are intentionally not given access to TeamSite.
0 TeamSite Administration Guide
• • • •••

Appendix E
TeamSite Service Monitor
The TeamSite Service Monitor is a “watchdog” daemon/service that monitors the TeamSite server (iwserver). You must purchase TeamSite Service Monitor in addition to the base version of TeamSite to use the features described in this appendix. This appendix describes the TeamSite Service Monitor:
Service Monitor Overview
TeamSiteService Monitor Components and Processes
Install TeamSite Service Monitor
Configure TeamSite Service Monitor
Service Monitor OverviewThe TeamSite Service Monitor uses a daemon/service known as the watchdog and a set of associated tools and scripts to monitor the TeamSite server, detect process and power failures, log failure events, and optionally take corrective action. After TeamSite Service Monitor is installed and configured, it is transparent to end users, performing all user-visible operations identically to the base version of TeamSite.
NOTE
The Service Monitor only monitors iwserver; it does not monitor any other services. Additionally, it does not monitor TeamSite in a cluster environment.
You can configure the Service Monitor in several ways. For example, you can instruct it to:
Shut down the TeamSite server and notify a specified system user that a power or process failure was detected.
TeamSite Administration Guide 261
• • • •••

Appendix E: TeamSite Service Monitor
26
Stop the TeamSite server after detecting a failure even if all post-failure system checks are normal.
Perform a different action depending on whether a power failure or a process failure was detected.
Perform any other Perl script-defined action automatically upon failure detection.
For any failure, you must execute a file system check (use the iwfsck CLT described in the TeamSite Command-Line Tools) to ensure that data inconsistencies have not been introduced.
You can also turn off the Service Monitor completely, in which case the base version of TeamSite continues to run.
TeamSiteService Monitor Components and Processes
The following flowchart shows the TeamSite Service Monitor components and processes. See the section immediately following the flowchart for an explanation of each item.
2 TeamSite Administration Guide
• • • •••

TeamSiteService Monitor Components and Processes
Figure 29 TeamSite Service Monitor components and processes
The main TeamSite Service Monitor component is the iwtock watchdog daemonservice, which starts the iwserver process and tracks iwserver execution for as long as the TeamSite server is running. When iwtock first starts, it determines whether the previous TeamSite shutdown was abnormal or normal. If it detects an abnormal shutdown, iwtock runs the iw-home\ha\conf\iw.powerfail script, which can be configured either to stop iwtock or to perform a variety of system checks or other actions as described in “Configure TeamSite Service Monitor” on page 265. If the system meets the passing criteria defined in iw.powerfail, iwtock starts iwserver. If the system does not meet the passing criteria, iwtock stops and iwserver is not started. All output from iw.powerfail is logged in iwserver.log.
If iwtock determines that the previous TeamSite shutdown was normal, it starts iwserver. From this point on, iwtock continues to monitor iwserver. If at any time iwtock detects that iwserver is not running and there is no evidence of an explicit shutdown, it
Start iwtock
Previous shutdown normal?
Continue monitoring iwserver
Run iw.powerfail
Diagnostics OK?
Stop iwtock
Stop iwtock
Diagnostics OK?
Run iw.processfail
No
Yes
No
Yes
No No
Yes
Yes (Solaris)
Yes (Windows)
iwserverrunning?
Start iwserver
TeamSite Administration Guide 263
• • • •••

Appendix E: TeamSite Service Monitor
26
assumes that an unexpected shutdown or system interruption has occurred. In this situation, iwtock runs the iw-home\ha\conf\iw.processfail script, which can be configured either to stop iwtock or to perform a variety of system checks or other actions as described in “Configure TeamSite Service Monitor” on page 265. If the system meets the passing criteria defined in iw.processfail, iwtock starts on Unix and iwserver/iwtock exits (it cannot start iwserver due to Windows architecture characteristics). If the system does not meet one or more passing criteria, iwtock stops and iwserver is not restarted.
All output from iwtock, iw.powerfail, and iw.processfail is logged in iwserver.log.
NOTE
If iwserver attempts to spawn more than once within 30 seconds of initial startup or a restart, iwtock will exit.
On Windows, on any list of active system processes, iwtock appears as iwperl (you will not see a list entry called iwtock).
Install TeamSite Service MonitorComplete the following steps to install the TeamSite Service Monitor:
Unix:
1. Log in as root.
2. Stop iwserver:
% /etc/init.d/iwserver stop
3. Copy the TeamSite Service Monitor installation file ha.x.x.x.BuildXXXX.tar.gz from the distribution media into iw-home.
4. Uncompress the installation file:
% gunzip -c IWOVha-sol.x.x.x.BuildXXXX.tar.gz | (tar xvpf -)
This creates several HA-specific subdirectories in iw-home.
5. Go to iw-home/ha/install and run the iwinstallha command:
% iwinstallha
6. Restart iwserver:
% /etc/init.d/iw.server start
4 TeamSite Administration Guide
• • • •••

Configure TeamSite Service Monitor
Windows:
1. Log in as Administrator.
2. In the TeamSite Service Monitor distribution media window, double-click TeamSiteHAbuild#.exe.
3. After the program executes, reboot the system.
Configure TeamSite Service MonitorConfiguring TeamSite Service Monitor requires that you edit the iw.powerfail and iw.processfail scripts to execute tasks that are relevant and specific to your installation. The configuration procedures are described in the following sections.
iw.powerfail
The default iw.powerfail script shown here is shipped with TeamSite. In its current form, it only logs its own name (iw.powerfail) when executed. It also contains a commented example of how you could configure the script to run the iwsi program to send email to a system administrator when the script executes. You can configure this script to perform any action upon execution; the only requirement is that you use Perl syntax compatible with Perl Release 5.00503. All results returned by iw.powerfail are logged in iwserver.log.
NOTE
For any failure, you must execute a file system check (use the iwfsck CLT described in the TeamSite Command-Line Tools) to ensure that data inconsistencies have not been introduced.To force iwtock to exit rather than start the TeamSite server after iw.powerfail executes, specify an iw.powerfail exit value of 127. This feature is included for scenarios in which TeamSite should not restart automatically following a power failure.
use File::Basename;
print( basename( $0 ) . "\n" );
#
# Use this script to execute processes that can clean up after a powerfail
# crash.
#
# This script is executed when the Watchdog daemon determines that the
TeamSite Administration Guide 265
• • • •••

Appendix E: TeamSite Service Monitor
26
# system was not taken down cleanly, and the daemon is itself beginning
# execution.
# Some of the things that might be tried:
# Run the iwfsck CLT
#
# You may also want to mail your system administrator at this point:
#
#use Mail::Send;
#$msg = new Mail::Send Subject=>'TeamSite problem', To=>'admin,root';
#$mfh = $msg->open;
#print $mfh "Please address TeamSite issues at your earliest convenience";
#$mfh->close;
#
# If you do not wish to continue bringing up the system, then exit this
# script with a 127.
# 127 indicates to the daemon that it is not to continue with the bringup.
#
#exit 127
iw.processfail
The default iw.processfail script shown here is shipped with TeamSite. In its current form, it only logs its own name (iw.processfail) when executed. It also contains a commented example of how you could configure the script to run the iwsi program to send email to a system administrator when the script executes. You can configure this script to perform any action upon execution; the only requirement is that you use Perl syntax compatible with Perl Release 5.00503. All results returned by iw.processfail are logged in iwserver.log.
NOTE
On Unix, to force iwtock to exit rather than restart the TeamSite server after iw.processfail executes, specify an iw.processfail exit value of 127. This feature is included for scenarios in which TeamSite should not restart automatically following a process failure. On Windows, because of the way in which TeamSite and Windows interact, it is not possible for iw.processfail to restart the TeamSite server. Instead, the iwtock service exits whenever iw.processfail finishes executing. At that point, you must reboot the system to restart the TeamSite server.
use File::Basename;
6 TeamSite Administration Guide
• • • •••

Configure TeamSite Service Monitor
print( basename( $0 ) . "\n" );
#
# Use this script to execute processes that can clean up after a TeamSite
# crash after the system has begun processing data.
#
# This script is executed when the Service Monitor daemon determines that
# the system was not taken down cleanly, and the daemon has already begun
# observing the execution of TeamSite. Some of the things that might be
# tried:
#
#
# You may also want to mail your system administrator at this point:
#
#use Mail::Send;
#$msg = new Mail::Send Subject=>'TeamSite problem', To=>'admin,root';
#$mfh = $msg->open;
#print $mfh "Please address TeamSite issues at your earliest convenience";
#$mfh->close;
#
# If you do not wish to restart the system, then exit this script
# with a 127. 127 indicates to the daemon that it is not to restart
# the server. The server will not restart at all.
#
#exit 127
Start and Stop iwserver Under Service Monitor
You can manually start and stop iwserver under the TeamSite Service Monitor just as you would under the base version of TeamSite. See Chapter 4, “Manage the TeamSite Server,” for more information. On any list of active system processes, iwtock appears as iwperl (you will not see a list entry called iwtock).
Uninstall TeamSite Service Monitor
Complete the following procedure to uninstall the TeamSite Service Monitor and revert to the base version of TeamSite.
TeamSite Administration Guide 267
• • • •••

Appendix E: TeamSite Service Monitor
26
NOTE
On Unix, the following procedure deletes the entire ha subdirectory. If you plan to restart TeamSite Service Monitor later, you should back up the contents of ha to a different location before you start this procedure.
1. Log in as root.
2. Stop iwserver:
% /etc/init.d/iwserver stop
3. Go to iw-home/ha/install and run the iwuninstallha command:
% iwuninstallha
You will be prompted to confirm that you want to uninstall TeamSite Service Monitor. Answer yes to continue uninstalling.
4. Restart iwserver after iwuninstallha finishes executing:
% /etc/init.d/iw.server start
Windows:
1. Log in as Administrator.
2. Open the Control Panel (Start > Settings > Control Panel).
3. Select the Add/Remove Programs control panel.
4. Select TeamSiteHA, and click Add/Remove.
5. When the uninstall completes, reboot the system.
Related Documentation
See the iwsi documentation in TeamSite Command-Line Tools for more information about the TeamSite Service Monitor.
8 TeamSite Administration Guide
• • • •••

Appendix F
Troubleshooting
This appendix contains miscellaneous information regarding a variety of troubleshooting issues. In addition to the suggestions that follow, Consulting Services and Technical Support can assist you with any configuration issues you might encounter.
NOTE
Several features have troubleshooting sections in the chapters describing those features.
Table 29 Troubleshooting options
Unexpected Server ShutdownAfter an unexpected server shutdown (such as a power outage or system failure), if the server does not start properly when the system is brought back up, immediately contact Technical Support.
Do not attempt to restart the server by manually modifying or deleting system files. Doing so may cause irreparable damage to the Content Store.
Only run the iwfsfix CLT under the supervision of Technical Support. Conducting any of the suggested repairs without first confirming the action with Technical Support is not recommended because it could result in inadvertent damage to the Content Store.
Other Server IssuesOn Unix:
NTCSFsdClaimASharedMemoryChannel: No shared memory communication channel available message appears in Windows System Log.
The code is trying to get a buffer and is not successful. However, it retries and succeeds. The workaround is to add the following registry setting HKLM \SYSTEM \CurrentControlSet \Services \iwfsd \Parameters Value:
CoreCommRetryCount REG_DWORD 0x100
TeamSite Administration Guide 269
• • • •••

Appendix F: Troubleshooting
27
File operations on task files may not return clear warnings if the store in which the task files reside is deactivated. If you attempt to perform an operation on a file whose store is deactivated, one of the following messages may appear:
Internal Server Error
TeamSite FileEdit
Error:Call to sciLocateObjectWithVersionPath()returned an error
SCI Error
No archive found
TeamSite iwdirnav.cgi
Error:iwdirnav.cgi could not open path "/s1/main/WORKAREA/w1"
You should not disable stores if users are actively working on those stores.
Install/Remove ProgramsVisualFormat on client machines may not appear in the Add/Remove Programs on Windows client machines. (You should be aware that it may be listed as eWebEditPro.) If you install VisualFormat on a Windows computer by running visualformatclient.exe, you can uninstall the product from the Add/Remove Programs window in the Control Panel. However, if you installed it from a Web page, no listing for VisualFormat will be present in the Add/Remove Programs window. Instructions on how to uninstall the software under these conditions can be found at the following Web site: www.ektron.com//support/ewebeditprokb.cfm?doc_id=1628.
On Unix:
When the TeamSite installation is started, the following warning is displayed: “Cannot convert string ‘monotype-arial-regular-normal--*-140-*-*-p-*-iso8859-1’ to type FontStruct”. The installation program substitutes a font; therefore, this warning can be ignored.
EmailHTML format email notifications do not display correctly with Eudora 6.01 on a Macintosh client; however, the email is still usable. The user can choose Open in browser to see the email properly.
The Exchange 2000 server may corrupt the workflow emails. Use Exchange 2003.
Windows XPThe VisualAnnotate toolbar does not automatically display on Windows XP. Select View > Toolbars> Visual Annotate to turn on the toolbar.
JVMWhen editing a file in ContentCenter Professional, the editor goes to the background and the Local File Manager is displayed. This applies when using a Sun JVM plug-in instead of the browser’s built-in JVM in Windows.
Table 29 Troubleshooting options (Continued)
0 TeamSite Administration Guide
• • • •••

IIS (Windows)Content may not refresh after an edit. The solution is to turn off caching in IIS, as follows:
1. Run the Internet Services Manager (Start > Programs > Administrative Tools > Internet Services Manager) and expand the icon for my computer.
2. Click Default Web Site.
3. Right-click on the iw-mount icon and select Properties.
4. In the properties dialog, select the HTTP Header tab.
5. Turn on the Enable Content Expiration check box and made sure that the expiration setting is Expire Immediately.
VisualPreview/Local File Manager: When used with some editors, you may see the “accessed by another process” message (does allow save). When you edit a file using these editors through the VisualPreview tab, you may get the message “The document name is in use by another application and cannot be accessed.” This does not happen with NotePad. This a known IIS problem, which occurs because IIS keeps a file open for a while after it is requested in an http transaction. Workarounds are waiting for a while (20-30 seconds), not using IIS in combination with VisualPreview (since normally VisualPreview accesses the file just before it is being edited), or using a different Web server.
If a branch, directory, or filename contains .com or .exe, navigating to that location results in 404 page not found error. This applies when using IIS on Windows and is an IIS mechanism to prevent worms and viruses.
IIS caching can cause cached versions of files to be displayed during a preview operation. If users do not see recent modifications when previewing documents from My Local Files, turn off global caching from the IIS control panel. Select the machine name, then select Action > Properties. In the Server Extensions tab of the Properties dialog box, select Use Custom Settings from the Performance drop-down menu. Then, click the corresponding Settings button. Set In-memory document cache, Include file cache and Image file cache each to 0.
Virus Scanning and TeamSite (Windows)Virus scanning software can be used on both the TeamSite server and TeamSite clients, but it should not scan the files on the TeamSite server’s IFS drive (Y:\) or any TeamSite share to which a client is connected (\\ServerName\iwserver\path_to_workarea).
If you scan these areas, you may see file properties changed or General Protection Fault errors (GPFs). You can scan the iw-store directory.
Refer to Knowledge Base articles 51697 and 52911.
Flexible RolesIf a logged-in user is assigned a new role in a branch, the user should refresh the ContentCenter screen before attempting to open a workarea in the branch.
Table 29 Troubleshooting options (Continued)
TeamSite Administration Guide 271
• • • •••

Appendix F: Troubleshooting
27
PermissionsIn a situation where an administrator has override privileges on a workarea where he is not part of the group for sharing, attempting to generate a form causes an error. The iwpt_compile CLT does not have permission to access the workarea from ContentCenter or from the file system. Other commands may have similar results. The purpose of the override feature is to allow a user to do certain work in the workarea without being in a workarea group, but it does not change file permissions.
The number of permission entries on any given node (server/store/branch) is restricted to 4000.
Table 29 Troubleshooting options (Continued)
2 TeamSite Administration Guide
• • • •••

Glossary
Administrator
An out-of-the box role configured for the owner of a branch, responsible for the project being developed on it. An Administrator can perform all the functions that an Author or an Editor can, and can also create and delete new subbranches and workareas on his branch. Administrators exercise control over workflow by giving workareas to editors and subbranches to other administrators.
Advanced File Merging
TeamSite can automatically merge two separately modified versions of a file, producing a new file containing the changes made by both users. Advanced File Merging is completely automatic if the edits were made to different parts of the file (non-conflicting edits).
approve
When an Editor approves a file returned by an Author, the file is submitted to the staging area. Approving a file automatically unlocks it and removes it from the Author’s Task list.
assign
To lock a file for the use of a specific Author and attach comments. A list of assigned files is displayed in the Author’s Task list. Editors can also view a list of files that they have assigned.
attribute search
A basic parametric search that involves single-level value-pairs AND/OR search criteria. The supported operators for parametric search are: equal (=), less than (<), less than or equal (<=), greater than (>), greater than or equal (>=), not equal (<>).
Author
An out-of-the box role configured for a primary web content contributor with limited access to the TeamSite system, usually using ContentCenter Standard. Authors can access, create, and modify web content through their Editors’ workareas. An Editor can assign specific files to an Author, which will appear in the Author’s Task list.
TeamSite Administration Guide 273
• • • •••

:
27
Autoprivate
The Autoprivate feature helps minimize clutter on the development server. Autoprivate automatically identifies file types that should not be submitted to the staging area and marks them as Private. These files typically include Microsoft temporary files (.TMP), various backup files (.BAK), and Macintosh resource forks (.FRK).
branch
A path of development for a body of content developed and maintained by a team. Each branch contains one or more workareas, a staging area, and a published edition and may contain subbranches and previous editions.
casual contributor
A person who modifies or creates content using TeamSite, usually on an infrequent or sporadic basis. “Contributor” is a generic term that does not designate a specific TeamSite role.
category
In FormsPublisher, a category is a grouping of types of templates. Category directories are the first division of the templatedata directory. Each category has its own directory, which contains subdirectories for each type within it. An example of a category would be beverages, which may contain tea, coffee, milk, and soda types.
When editing roles, categories are groupings of operations that users can perform within a role.
collection
The metadata for a set of documents with optimized architecture for searching.
command-line tool (CLT)
TeamSite has many command-line tools that make TeamSite functionality available from the command line. Consult the TeamSite Command-Line Tools.
command trigger
A type of command-line tool that can trigger scripts when specific TeamSite events occur. An example is the use the iwatsub command trigger to trigger an event when files are submitted.
comment
A note attached to a file, directory, workarea, branch, edition, job, or task. Comments can be attached to workareas, branches and editions when they are created. Comments can be attached to files and directories when they are
4 TeamSite Administration Guide
• • • •••

:
assigned, returned, rejected, locked or submitted. Global comments can be set when these functions involve multiple files.
Compare
A function that displays a list of the differences between any two TeamSite objects. Objects that can be compared include workareas, staging areas, or editions.
Composite search
An advanced search feature that allows multiple search criteria to be specified. These criteria can be a mixture of full text, form entry, and metadata parameters.
conflict
Occurs when multiple users make changes to the same file in multiple locations, for example, when a file has been changed in two different workareas.
conflicting edits
Occur when multiple users make changes to the same parts of the same file, producing two versions of the file that cannot be automatically merged. Conflicting edits require users to specify which individual changes will go into the merged version.
content
A set of information contained within a text document, vocabulary, file, or database record. See also data record.
ContentCenter Professional
A user interface for experienced TeamSite users, technical users, or users who have some familiarity with content management systems. It is intended for “power users,” and users who must administer content development projects. It includes integrated administrative functions for easy, contextual TeamSite administration and fully customizable menus, tabs, and more.
ContentCenter Standard
A user interface for business users—that is, non-technical subject matter experts and infrequent users of a content management system. It includes an initial customizable “home page” containing module UI components displaying areas for a user's tasks, favorites, work in progress, and forms, wizards for common functions, and out-of-box email messages for workflow task notification.
contributor
A person who modifies or creates content using TeamSite. “Contributor” is a generic term that does not designate a specific TeamSite role.
TeamSite Administration Guide 275
• • • •••

:
27
convert
The process of changing a Microsoft Word file to PDF or HTML format.
data capture template
An XML file, datacapture.cfg, that defines the form used to capture data from content contributors. A data capture template is associated with a category and type. The category and type define the type of data required by the data capture template. The data that a content contributor enters in a data capture template is saved on the TeamSite file system as an XML file in the form of a data record.
data record
An XML file containing formatting information interspersed with data captured from a contributor or through other means. A data record is named when a content contributor saves the record. Content contributors can edit a data record by reopening it in the form that created it. Several different data records can also be matched to a single presentation template to create one or many output files. Data records can also be deployed to a database by DataDeploy.
delegated administration
Users in specific roles may be allowed to delegate administrative activities to users in other roles. This is set up in the Edit Roles screen. This allows administrative activities to be performed by users who are most involved with that content.
edition
A frozen, read-only snapshot of a branch of development. An edition contains a copy of all the files in the staging area at the time it was published. New editions can be released to production servers as complete, functional Web sites. Editions also serve as rollback points for projects in development, and they provide permanent archives of the Web site for Site Rollback.
Editor
An out-of-the box role configured for the owner of a workarea or workareas. Editors assign files to Authors, manage files, and edit and create files, submit content to the staging area, and may create editions. Editors may have access to workareas that they do not own, but they cannot assign files in these workareas.
form
The form generated by a data capture template. A contributor fills out a form to create a data record. A form is displayed in the FormsPublisher window so that a user can enter and format data, select options, and access menu items.
6 TeamSite Administration Guide
• • • •••

:
form entry
The information a user enters in a blank form. Form entry files are stored in locations selected within the templatedata/form_category/form_type/data folder in the user’s workarea, and are available to recall and use as necessary.
Form Entry Search
Ability to search on specified fields within a form entry.
form item
An element in a data capture template that defines a form field, such as a text field, text area, check box, combo box, or option button.
FormsPublisher
A TeamSite module that allows you to configure the look and feel of your web pages. Use it to generate forms used within ContentCenter for capturing data. For more information, consult TeamSite FormsPublisher Developer’s Guide.
Full-text search
Ability to search by entering one or more keywords from any document and applying AND/OR operators on the keywords.
Get Latest
A command that brings staging area content that is different from the workarea content into the workarea.
groups
TeamSite groups are a collection of users who can access branches and share workareas. TeamSite groups complement the operating system groups that may exist.
history
A complete record of all changes that have been made to a file through time. A user can see the complete history of a file by selecting it and selecting History from the View menu.
initial edition
The first edition on a newly created branch. The initial edition serves as the original source of content for all workareas on a new branch. This edition may be empty, or it may be a copy of an edition from another branch.
TeamSite Administration Guide 277
• • • •••

:
27
job
A set of interdependent tasks assigned to one or more people. All jobs are based on predefined workflows, and each job is a specific instance of a workflow model. When a user starts a job based on a workflow, the user specifies who should perform each task, and then initiates the job. The person who is to perform each task is notified through the Tasks section of the ContentCenter interface (and optionally through email) that there is a task to perform. After a task is completed, the job proceeds to the next task in its sequence that was defined by the workflow. When all of the tasks in a job are done, the job is complete.
locking
Restricting file access within a branch. Locking a file reduces the possibility of conflicting edits but also reduces the team’s ability to work on files simultaneously. Every time a file is locked, the version in the workarea is compared with the version in the staging area and the latest is taken (although this behavior can be overridden). TeamSite supports three types of locking, or locking models: Submit Locking, Optional Write Locking, and Mandatory Write locking. The locking model is defined at the branch level by the Administrator or for a specific role when the role is created.
main branch
The first branch created when TeamSite is installed. The Main Branch is owned by the Master user. All branches in the TeamSite system are subordinate to the main branch.
Mandatory Write locking
A type of locking where users are required to lock a file in order to edit it. Until a user locks a file, all files in his workarea are read-only. Taking the write lock allows only a single person to modify the file at a given time, ensuring serial development and eliminating conflicting edits.
Master
An out-of-the box role configured for the owner of the main branch. The Master user is responsible for the entire Web site. The Master organizes the structure of the TeamSite system and coordinates the activities of all users, creates roles, assigns operating system users, and can also perform all functions on all branches. Master users have access to the ContentCenter Professional Administration Console.
merge
The process of reconciling conflicts between versions of a file that have been edited by two people. The two versions can be merged in the staging area to produce a new version of the file, incorporating changes made by both users. Merging can be automated with TeamSite’s Advanced File Merging.
8 TeamSite Administration Guide
• • • •••

:
metadata
There are four types of metadata: file properties, user-specified metadata, system-provided metadata (such as FormsPublisher extended attributes), and derived metadata from Metatagger operations.
Navigation Window
The left-hand side of the TeamSite window, which allows you to navigate through TeamSite by clicking on the underlined names of branches, workareas, staging areas, editions, or directories.
Optional Write Locking
A type of locking in which users can choose to lock a file to ensure no other users edit the file, even within their own workareas. When a user locks a file, it becomes read-only to all other users. Under the Optional Write Lock model, locking files ensures serial development of those files and reduces the risk of conflicting edits.
output file
A file that a user generates by combining form entries with a presentation template. The output file is typically in HTML format for use as a Web page, although it can be other file types. The user can generate output pages using any combination of form entries and presentation templates that the ContentCenter developer has made available. Multiple output files can optionally be generated using different presentation templates.
presentation template
A template that defines how form entries will appear when displayed. For example, a presentation template could specify the size, color, and layout of a Web page.
A presentation template is populated with data from one or more of the following sources:
Data record
Queries to databases
FormsPublisher can be configured to populate any presentation template with any data record plus additional information as required from a relational database.
A contributor can match a single data record with several presentation templates to create multiple output files containing the same or similar information, each suitable for a different Web site, each with a different look and feel.
Presentation templates can be used with component templates. A component template is a presentation template nested within another presentation template. Multiple data records of the same type can use a single presentation template to create multiple output files in the same format.
TeamSite Administration Guide 279
• • • •••
:
28
preview
Viewing content prior to submitting, deploying, or generating an output file from it. Previewing typically pertains to Web sites that being working on. For example, before beginning work on a Web site, a user may preview it to assess its current look and feel. Previewing is also useful after you have finished working on a Web site to ensure that your changes appear as you intended prior to making the Web site publicly available. Previewing within FormsPublisher is limited to displaying the output of the form being worked on using a specific presentation template.
private
Within a workarea, a user can mark a file as Private, which prevents the file from being submitted to the staging area if the file is a part of a workarea or directory that is submitted. It also prevents the file from being copied to another workarea during a Copy To operation.
public
The opposite of Private, the Public function removes the private marking on a file. All files are public by default.
publish
The publishing of finished content to environments beyond the one where it was created. For example, a user could create a press release from within ContentCenter, submit the final version for approval and inclusion in the staging area, and then publish the finished version to a production system that lets the general population access it. Not all ContentCenter users have the ability to deploy content; permission to do so is controlled by the ContentCenter administrator.
publisher
An application that sends events to the Event subsystem.
Reviewer
An out-of-the box role configured for users who are responsible for reviewing content prepared by other users.
role
A collection of operations that are assigned to users. These are stored in the roles.xml file. Master users configure roles to meet the needs of their installation.
search field type
Available, indexed fields within the search project dictate the possible values for the user to search. For example, a date field would provide a calendar for the use to select a date to be searched.
0 TeamSite Administration Guide
• • • •••

:
Search index
Search is enabled by building an index of searchable content and metadata.
Search results
The returned set of assets that adhere to the specified criteria.
Site Rollback
The process of deploying a previous edition in place of the current Web site. Because TeamSite editions are complete copies of the entire Web site at the time of publication, they can be referenced to revert to prior versions of files, directories, or the entire Web site.
staging area
The area where users integrate the contents of their workareas. Users submit read-only copies of files from their workareas to the staging area to integrate with other contributions, and test the integrity of the resulting Web site.
subbranch
A branch subordinate to a major branch. To separate development efforts among teams or team members, an Administrator can create subbranches. The subbranch receives its own unique staging area and workareas and generates its own editions. Editions published on a subbranch can be integrated back into work on the higher branch, or released as stand-alone Web sites.
submit
The act of transferring Web site content from a workarea to the staging area. After a user performs an action on a file, the user must submit the file so that it can be approved and integrated into the staging area. For example, if a user edits a file in a workarea, the file must be submitted so that the changes can be reviewed and promoted to the staging area when approved. When a user’s work reaches the staging area it is integrated with the work of other contributors into publishable, deployable content.
Submit Locking
A type of locking in which users can choose to lock a file to insure that their changes are submitted to the staging area. While a file is locked, other users can edit their own version of the locked file within their workarea, but they cannot submit to the staging area. Once the lock holder has released the file lock, other users can merge their modifications with the new file version.
subscriber
An application that registers with the Event Subsystem to receive events.
TeamSite Administration Guide 281
• • • •••

:
28
tag
When users tag a file, they specify additional descriptive information that remains with the file indefinitely (this information is also called metadata). For example, a user could tag a press release file by adding a title such as “Press Release,” key words such as “July” and “Acquisition,” a region such as “California,” and so on. These tags do not appear in the text of the file, so they are not displayed when the file is viewed through a browser or editing application. Instead, they appear when you view the file’s tags, use search functionality, or use a product such as MetaTagger.
task
A unit of work performed by a single user or process that is part of a job. Each task in a job is associated with a particular TeamSite workarea and carries a set of files with it. There are two types of tasks: individual and group.
Individual tasks are assigned to a specific person. When an individual task is assigned to a user, it appears under Tasks > My Tasks view in the Workflow tab. From there the user can take whatever action is necessary to complete the task.
Group tasks are assigned to a group of people, any one of whom can perform the task. (Groups are defined and maintained by ContentCenter administrators and other maintainers of your ContentCenter system.) If a group task is assigned to your group, it appears under the Workflow tab > Tasks > Unassigned Group Tasks view. From there a user can take ownership of the task and complete it.
After you perform a task, the job proceeds to the next task in its predefined sequence. When all of the tasks in a job are done, the job is complete.
task list
The Task list shows the user which tasks and jobs he is responsible for and allows the user to do the necessary work to complete the tasks.
task transition
Selecting a task transition moves the job along the workflow process by activating successor task(s).
template
A file that specifies attributes of another file, such as look and feel. When you create a file, you can choose to base that file on a template.
templating.cfg
A configuration file that controls what presentation templates are available to TeamSite users, and in what category they appear. It is located in the <iw-home>/local/config/ directory.
2 TeamSite Administration Guide
• • • •••

:
28
type
A division within a category in FormsPublisher. Each type has a corresponding data capture template so that users can enter information for that type. Examples of types could be tea, coffee, milk, and soda, which are part of the beverages category.
unlock
To remove a lock from a file. If an Editor has locked a file, the branch Administrator or Master user can also remove the lock. The Master user can remove any lock from any file.
user
A person who has been set up to be a TeamSite user and is assigned specific roles in various TeamSite branches. A Master user has additional responsibilities for maintaining TeamSite and adding users, creating roles, and so forth.
version
A numbered iteration of a content file. Whenever users submit a file and it is approved, ContentCenter saves the new version of the file containing the changes and retains the original, pre-edited version. Because previous versions are not deleted, users can view all previous versions of the file, see when and by whom each version was modified, and if necessary revert the current file back to an earlier version. Note that versioning only occurs when a file is submitted to the staging area. If a user just edits a file and saves the changes, a new version is not created until the file enters the staging area.
VisualPreview
A tab that is displayed on an output page that allows you to perform various TeamSite functions.
Web site
A generic term, meaning a set of interrelated files viewed through a browser. In TeamSite, the term “Web site” generally refers to all the contents on a branch of development, though these may be a superset or a subset of an organization’s actual Web site.
workarea
A virtual copy of a Web site, which may be worked on independently without affecting the actual site or the work of other contributors. A workarea can be owned by a single user or a number of users together. Editors and Administrators can own workareas, but Authors cannot.
3 TeamSite Administration Guide
• • • •••
:
28
workflow
A sequence of tasks that can be assigned to one or more people. For example, a workflow could define three tasks: to edit some text, to add an image, and to review the work. Whenever users start a job, it must be based on a predefined workflow. Workflows are defined by ContentCenter administrators and other maintainers of the ContentCenter system. See also “workflow model,” “job,” and “task.”
workflow model
A general workflow configuration that can be used repeatedly. Each workflow model describes a process which may include user tasks and a wide variety of automated tasks.
4 TeamSite Administration Guide
• • • •••

Index
A
absolute paths 177
access 123
branch 91
inherit 88
privileges, to TeamSite 93
restricting 88
to files 94
ACEs
about 128
changing at submit time 129
ACLs
about 128
changing at submit time 126
Active Directory 120
Active Response Module 247
adding
users to TeamSite 93
admin_roles 86
administration
creating branches 87
integrating content 88
Administrators
defined 24, 273
Advanced File Merging
defined 273
anonymous binds 120
application variables 229
approve
defined 273
area relative path 31
assign
defined 273
assigning files 23
attribute search
defined 273
attributes
filtering 126
in LDAP schemas 119
authenticate_by 122
authentication 125
external file 112, 122
LDAP 112, 122
local 122
modes 123
PAMs 122
password 93
setting type 112
users 122, 239
Authors
defined 23, 273
Autoprivate
defined 49, 274
matching
filenames 50
patterns 49
autoprivate.cfg
encoding 51
format 49
location 49
sample 51
special characters 50
available_templates.cfg 64
B
backups
Content Stores 193
multiple stores 194
of workareas 194
strategies 195
branch_default_perm 101, 102
TeamSite Administration Guide 285
• • • •••

Index
28
branch_owner_role 86
branch_security 101
branches 85
administrator 86
creating 87
defined 20, 274
inherit access 88
locking models on 47, 85
managing 89
owner 86
private 85
properties 90
read access 101
remappings, configuring 178
restricting access 88
security 101
sharing content among 88
structure 29
browsers
clearing cache 34
C
cache size
configuring 59
cachesize 59
caching 271
captured subexpression 231
casual contributor
defined 274
changing
file attributes, on submission 126
group ownership of workareas 110
permissions, on directories 95
TeamSite file locations 77
TeamSite mount 78
characters
non-ASCII 214
charset parameter, content encoding 219
checking
disk space usage 80
for multiple servers 70
request handling 70
server status 68
chgrp command 110
CLTs
code page requirements 218
defined 274
iwchgrp 110
iwfsshrink 82
iwgetelog 73
iwgettrace 73
iwldapsync 120
iwstat 75
iwtestcfg 132
iwutildreset 54
iwutildstat 54
code pages 218
collection
defined 274
command trigger
defined 274
command-line tool
defined 274
comments
defined 274
compare_search_limit 49
comparing
defined 275
Composite search
defined 275
configuration files
available_templates.cfg 64
iw.cfg 33
list of 38
locations 77
configuring
Autoprivate 49
branch and workarea security 101
branch remappings 178
cache size 59
Content Store freezes 61
default permissions
on files 101
different web servers 185
domain lists in the login screen 42
domains for group authentication 125
encoding of text files 220
6 TeamSite Administration Guide
• • • •••

•
external remappings 186
file locations 77
group remapping 111
IP addresses 76
iw.cfg 33
locking behavior 48
main branch 47
options in iw.cfg 34
PAMs 123
proxy server 176
restarting after changes 34
rule sets for metadata capture 145
Submit and Update logs 49
submit filtering 126
throughput monitors 60
user interface 41
web server uid 111
conflicting edits
defined 275
conflicts
defined 275
conserving disk space 82
content
defined 275
Content Store
backing up 193, 194
deactivated 270
defined 19
freezing 61
moving 83
ContentCenter
localized interface 217
user interface 119
ContentCenter Professional
defined 275
ContentCenter Standard
defined 275
control panel, Regional Setting 62
conventions 16
notation 15
convert
defined 276
creating
branches 87
editions 23
workareas 94
customer_webserver_host 176
customer_webserver_port 176
D
DAS Publishing 58
data record
defined 276
printing 65
data_root 64
datacapture.cfg 146, 202
annotated example
rule identifier 150
UTF-8 encoding 150
validation-regex 151
configuring 145
datacapture6.0.dtd 162
DataDeploy
enabling DAS publishing 58
debug_adsi 108
debug_event_handler 132
debug_output 43
debugging
proxy server configuration 191
submit filtering 132
default
code pages 218
drive (Y:) 71
file permissions 101
user authentication 122
default_protocol 46
iwov_webdesk_url tag 46
iwsend_servlet_mail.ipl script 46
delegated administration
defined 276
deleting
branches 83
editions 81
device drivers
kernel 72
directories
permissions 95
TeamSite Administration Guide 287• • •••

Index
28
directory structure
copying 64
directory_default_perm 101
disable_ext_task_impersonation 60
disabling
VisualPreview 41
disk cache
users/group/role 107
disk space
checking usage 80
compression 81
conserving 82
file system mount 28
low 61
managing 80
moving the Content Store 83
recovery 81
removing old versions 83
removing unused branches 83
usage 81
disklow_knodes 61
disklow_mbytes 61
disklowpercent 61
document root
configuring 178
defined 178
mapping 178
domain local groups 106
domain_list 42, 126
domain_local_groups 104
domains
configuring, in the login screen 42
for group authentication 125
DTD
datacapture6.0.dtd 162
metadatacapture6.0.dtd 162
metadata-rules.cfg 142
E
editions
creating 23
defined 21, 276
deleting 81
initial, defined 277
see also publishing editions
Submit logs 82
Editors
defined 23, 276
corrupted 270
domains 43
incorrect display 270
mapping files 43
servers 43
settings, for workflow 43
tasks 43
email_mapping_file 43
Embedded Failsafe 65
enable_user_group_disk_cache 107
enabling
VisualPreview 41
encoding 45
charset parameter 219
file_encoding.cfg 220, 237
html files 225
IANA preferred names 236
Merge tool 236
META tag 219
setting in iw.cfg 45
Single Byte Character Sets 218
Source Differencing tool 236
specifying 219
text editors 220, 236
text files 225
Unicode 216
UTF-8 216, 236
valid charsets 236
visual differencing 237
vpaths 225
environment variables
LANG 62
SiteMinder 245
errata 17
event subsystem 55
events 56
publishers 56
subscribers 56
8 TeamSite Administration Guide
• • • •••

•
event_log_size 49
events log 73
locating 73
example templating environment 63
copying 64
extended attributes 137
migrating 155
modifying 45
external remappings, configuring 186
F
failover see proxy server
file system
mount 28
performance, improving 79
structure 28
file_default_perm 101
file_encoding.cfg
content encoding 220
defined 225
Merge tool 236
sample file 237
Source Differencing tool 236
UTF-8 236
valid encodings 236
visual differencing 237
VisualPreview 236
files
access to 94
assigning 23
autoprivate.cfg 51
available_templates.cfg 64
changing attributes of 126
comparing 49
configuration 225
datacapture 6.0.dtd 162
datacapture.cfg 146, 202
default permissions 101
editing 271
encoding 225
file_encoding.cfg 220, 225, 237
histories, defined 277
iw.cfg 33
iwauthend.log 125
iw-bridge_cfg 39
iwevents.log 73
iwinstall.log 73
iwjoberrors.log 74
iwserver.log 73
iwtrace.log 69, 73, 126
iwutild.cfg 52
log 126
metadatacaptue6.0.dtd 162
metadata-rules.cfg 141, 142
modification time 44
pam.conf 123
permissions 95, 102, 103
private 49
sample metadata-rules.cfg 142
sample submit.cfg 134
setting permissions on 94
sharing among branches 88
submit.cfg 127
submitting locked 48
tagging 139, 164
timestamp 45
user_databases.xml 113
virtual 29
filtering, on file submission 126
finding the installation directory 71
font message 270
force_EA_mod_times 45
form entry
defined 277
form item
defined 277
FormsPublisher
configuring 63
freezing the Content Store 61
full-text search
defined 277
fully qualified paths
see proxy server
TeamSite Administration Guide 289• • •••

Index
29
G
Get Latest
defined 277
global_default_map 178
groups
adding user 109
authenticating domains 125
creating 109
defined 277
domain local 106
global 105
improving performance 106
membership 109
nested 108
NFS limitations 111
operating system 109
remapping 111
TeamSite 87
universal 105
UNIX 109
Windows 103
H
histories
defined 277
honor_setgid 112
honor_setgid_on_rename 112
host 46
host headers, remapping
see proxy server
http_port 46
https_port 46
I
IANA charset names 236
IFS volume 71
IIS
and the server mount 71
impersonate_without_password 60
include_nested_groups 108
inherit from parent 88
inode count 61
installation directory, locating 71
intermediate variables 229
internationalization
browser behavior 220
client and server 214
encoding setting in iw.cfg 45
file_encoding.cfg 225
IANA charset names 236
iw.cfg settings 62
recommendations 219
regex_map 235
server_locale setting 62
text editor encoding 220
Unicode 216
UTF-8 216, 235
VisualPreview 225
vpath encoding 225
Interwoven Merge tool 225
IP addresses, changing 76
iw.cfg 33, 61, 65, 123
about 33
access 36, 86, 100, 101, 104, 106, 107, 108, 112, 121
admin_roles 86
and the proxy server 178
authenticate_by 122
authentication section 122
branch_default_perm 101, 102
branch_owner_role 86
branch_security 101
cachesize 59
changing the templating directory 64
compare_search_limit 49
configuration options 34
Content Stores 38
customer_webserver_host 176
customer_webserver_port 176, 178
data_root 64
debug_adsi 108
debug_event_handler 132
debug_output 43
default_protocol 46
directory_default_perm 101
disable_ext_task_impersonation 60
0 TeamSite Administration Guide
• • • •••

•
disklow_knodes 61
disklow_mbytes 61
domain_list 42, 126
domain_local_groups 104
email_mapping_file 43
enable_user_group_disk_cache 107
encoding 45
event_log_size 49
file_default_perm 101
force_EA_mod_times 45
format 33
FormsPublisher 36, 64, 65
honor_setgid 112
honor_setgid_on_rename 112
host 46
http_port 46
https_port 46
impersonate_without_password 60
include_nested_groups 108
iwproxy_host 176
iwproxy_port 176
iwproxy_smartcontextedit_allowed 41
iwutild_runas_root 54
ldap_sync_retry 121
ldapcache_thread_delay 121
list of options 35
locating 34
lockmodel_compatibility 48
log_ldap_sync 121
maildomain 43
mailserver 43
main_group 86
main_lock_model 48
main_owner 86
maintaining preview files 64
map_secondary_to_primary_gid 112
mask_workarea_access 100
old_mod_times 44
only_lock_owner_creator_submits 48
pam_do_acct_mgmt 123
pam_service 124
password_file 122
pretty_print_dcrs 65
preview_history_limit 65
printing data records 65
proxy server 37
secondary_admin_account 86
server functionality 35, 44, 45, 46, 48, 49, 54
server performance 36, 59, 60, 61, 62
server_locale 62
servlet_port 46
setting ports 46
show_user_list 126
specifying preview directory 65
submit filtering 37
thruputmonitoring 60
UI functionality 35, 41, 42, 43
use_adsi 104
use_mapping_file 43
utild_ext_tasks_portnum 54
valid_domains 43
webserver_group 111
webserver_uid 111
windows_groups_for_sharing 106
windows_groups_for_users 106
workarea_default_perm 101
workarea_security 101
workflow 38
iw_bridge_cfg.xml 39
iwauthend 125
iwauthend.log 125
iwchgrp 110
iwevents.log 73
iwfsshrink 82
iwgetelog 73
iwgettrace 73
iwinstall.log 73
iwjoberrors
log file 74
iwjoberrors.log 74
iwldapsync 118, 120
iwovwfs.log 72
iwproxy
configuring 176
debug option 191
iwwebd 174
performance considerations 180
SSL support 174
TeamSite Administration Guide 291• • •••
Index
29
iwproxy_host 176
iwproxy_port 176
iwproxy_smartcontextedit_allowed 41
iwserver
checking 68
locating 71, 72
log file 73
memory usage 68
monitoring 261
starting 69
stopping 69
iwserver.log 73
iwstat 75
iwtestcfg 132
iwtrace.log 69, 73, 126
iwtssmar file
SiteMinder 247
iwutild 52
iwutild.cfg 52
iwutild_runas_root 54
iwutildreset CLT 54
iwutildstat CLT 54
iwwebd 174, 180
J
Java servlet engine 46
jobs
defined 25, 278
K
kernel device driver 72
L
LANG environment variable 62
languages, browser behavior 220
LDAP
anonymous binds 120
authentication 122
login password 116
modifying schemas 119
schemas 123
search, troubleshooting 121
setting up 112
synchronization 118, 121
TeamSite user interface 119
user authentication 112
users adding automatically 118
LDAP synchronization 118
ldap_sync_retry 121
ldapcache_thread_delay 121
Local File Manager
localized GUI 217
locales
native 62
TeamSite server setting 62
locations
installation directory 71
iw.cfg 34
TeamSite files, changing 77
locking
branch 85
branches 47
configuring submits 48
defined 278
in workareas 48
on the main branch 47
role and branch 47
types of 46
lockmodel_compatibility 48
log files
event 73
installation 73
iwauthend 125
iwevents.log 73
iwinstall.log 73
iwjoberrors.log 74
iwserver.log 73
iwtrace 126
iwtrace.log 73
reviewing 72
server 73
submit 49, 82
trace 73
update 49
workflow 74
log size 49
2 TeamSite Administration Guide
• • • •••

•
log_ldap_sync 121
logging
users and groups 126
logging in
authentication 93
login
screen, configuring domain lists 42
low disk space 61
low inode count, detecting 61
M
macro expansion 133, 134
macros 133
expansion 134
maildomain 43
mailserver 43
main branch
defined 278
locking model 47
ownership 86
main_group 86
main_lock_model 48
main_owner 86
Manage Branches screen 89
mandatory write locking 47
defined 278
map_secondary_to_primary_gid 112
mask_workarea_access 100
Master
defined 24, 278
secondary 86
MediaBin
anonymous access 209
connecting to 197
MediaBin Connector properties 198
MediaBin Connector
configuration 197
modifying FormsPublisher 202
modifying presentation templates 205
troubleshooting 210
memory
shared 269
Merge tool 225, 236
merging files
defined 278
META tag 219
metadata
attribute 206
custom 209
data types 207
defined 279
Dublin Core 207
MediaBin Connector 205
metadata capture
DTD 142, 146
rule sets 145
metadatacapture6.0.dtd 162
metadata-rules.cfg
configuring 141, 142
DTD 142
examples 142
rule identifier 142
sample file 142
UTF-8 encoding 142
vpath identifier 142
Microsoft Management Console, mount errors 71
modification time 44
monitoring
iwserver 261
system status 60
mount errors, Microsoft Management Console 71
mounting the TeamSite server 71
multibyte characters
browser behavior when interpreting encoding 220
multiple servers 70
MultiStore
backing up 194
N
Native Mode Active Directory 104
Navigation Window
defined 279
nested groups
disabling 108
Netegrity 239
New Branch screen 87
TeamSite Administration Guide 293• • •••

Index
29
new users
adding 93
NFS exports 30
NFS, group limitations 111
non-ASCII characters 214
non-OS users 112
impact 121
notation conventions 15
Notepad, saving documents as UTF-8 220
O
old_mod_times 44
only_lock_owner_creator_submits 48
operating system groups 109
optional write locking 47
defined 279
OS groups 109
output file
defined 279
override permissions 95
ownership
branch 86
workareas, changing 110
P
PAM
account management 123
and TeamSite 123
authentication 125
configuring 123
defined 122
third-party modules 124
pam.conf 123
pam_do_acct_mgmt 123
pam_service 124
password_file 122
passwords 93
encrypting 116
length 94
paths
absolute 177
relative 177
resolving see also proxy server
vpath 31
performance
monitoring 60
using groups 106
permissions
checking 95
default 101
directory 95
file 93, 94, 95, 102, 103
override 95, 272
required for actions 94
role-based 93
types of 94
workarea 95
port number
proxy server 176
servletiw.cfg
servlet_port 46
web server 176
presentation templates
for MediaBin Connector 205
pretty_print_dcrs 65
preview
defined 280
maintaining files 64
specifying directory for 65
preview_history_limit 65
preview_system_directory 65
private
branches 85
defined 280
files 49
properties
branch 90
proxy server
about 174
configuring
applying changes 176
basic operation 176
overview 173
to use different webservers 185
debugging 191
document roots 180
4 TeamSite Administration Guide
• • • •••

•
external remappings 186
failover 189
fully qualified paths
Internet Explorer 182
resolving 180
server configuration 181
host header remappings 187
host name 176
port number 176
redirecting TeamSite views 183, 184, 185
relative and absolute paths 177
remapping document roots
rules of precedence 175
SSI remapping 188
public
defined 280
public URL protection 43
publisher
defined 280
publishing
defined 280
publishing editions 23
R
RCS macro expansion
about 133
enabling 134
reconfiguring IP address 76
recovering disk space 81
redirecting TeamSite views see proxy server
regex_map
element 225, 227
illustrated 226
internationalization 235
introduced 225
regular expression syntax 229
strategies 234
UTF-8 235
variables 229
Regional Settings control panel 62
regular expressions
about 15, 127
case-sensitivity 229
expression engine 228
file encoding 225
in regex_maps 229
in Submit filters 127
relative paths 177
see also proxy server
remote contributors 174
replicant
eliminating 166
request handling 70
resolving path names see proxy server
restart server 269
restrict access 88
reverse proxy
SiteMinder 244, 250
Reviewers
defined 23, 280
reviewing TeamSite logs
overview 72
with Windows Event Viewer 75
roles
defined 22, 280
operations 95
rule sets, configuring 145
rule syntax 228
S
SCE
see VisualPreview
schemas
LDAP 123
search
composite 275
full-text 277
secondary_admin_account 86
server
load, monitoring 75
locales 62
mount errors 71
mount, verifying 71
multiple 70
operations
verifying 68
TeamSite Administration Guide 295• • •••

Index
29
resources
disk space 80
managing 77, 79
starting 69
status, checking 68
stopping 69
server log
location 73
server mount
verifying 71
server performance
configuring 59
server shut down
unexpected 269
server_locale 62
Service Monitor
about 261
components 262
configuring 261, 265
installing 264
iw.powerfail 263, 265
iw.processfail 264, 266
iwtock 263
logging 265, 266
starting and stopping the server 267
uninstalling 267
servlet
engine 46
port 46
servlet_port 46
setgid behavior 112
settings
email, for workflow 43
encoding 45
server_locale 62
show_user_list 126
Single Byte Character Set (SBCS) 218
single sign-on 239
Site Rollback
defined 281
SiteMinder Policy Server 239, 260
configuring 244, 250
environment variables 245
Source Differencing tool 225, 236
SSIs, remapping see proxy server
SSL support 174
staging area
defined 20, 281
starting TeamSite
server 69
startup time
reducing 105, 125
stopping TeamSite server 69
subbranches
defined 281
submit
changing file attributes 126
filtering
debugging 132
introduced 126
RCS macro expansion 133, 134
sequence of events 129
locked files 48
log file 49, 82
submit locking 46
defined 281
submit.cfg
about 127
format of 127
sample 130, 134
submitting
defined 281
subscriber
defined 281
synchronization
LDAP 118, 121
system information
monitoring 60
T
tag
defined 282
Tagger GUI
reverting to original 145
TagUI
configuring 141, 165
features 138
6 TeamSite Administration Guide
• • • •••

•
next generation 139, 164
select box entries 155
task list
defined 282
tasks
defined 26, 282
email 43
ownership 95
states 26
transitions
defined 282
TeamSite
architecture 27
configuration files 38
disk space usage 80
file locations, changing 77
groups 87
internationalized 213
mount, changing 78
proxy server
iwwebd 173
overview 174
see also proxy server
server
answering requests 70
enhancing performance 79
mounting 71
process 70
resetting 70
restarting 69, 70
starting 69
stopping 69
Service Monitor 261
UNIX permissions 95
web daemon 173
templatedata directory
copying to workarea 64
templates
defined 282
templating directory
changing 64
templating environment
example 63
templating.cfg
defined 282
text editor encodings 220, 236
throughput monitors 60
thruputmonitoring 60
timestamps 44
trace log
debugging information 132
location 73
troubleshooting 260, 269
Content Store 270
email 270
flexible roles 271
IIS 271
JVM 270
MediaBin Connector 210
navigating 271
permissions 272
removing VisualFormat 270
server shut down 269
shared memory 269
SiteMinder Policy Server 260
Unix installation 270
virus scanning 271
trusted clients 52
U
Unicode 216
universal groups 105
UNIX permissions 95
unlock
defined 283
URL commands
multibyte characters 216
use_adsi 104
use_mapping_file 43
user interface
configuration 41
stored in LDAP 119
user_databases.xml 113
attributes 114
example 113
TeamSite Administration Guide 297• • •••

Index
29
users
authenticating 113
authentication
types of 122
defined 283
identifying 113
logging 126
non-OS 112, 121
roles
permitted actions 94
UTF-8
about 216
file_encoding.cfg 236
recommendations 219
regex_map 235
utild_ext_tasks_portnum 54
utility service
iwutild 52
V
valid_domains 43
variables
application 229
captured subexpression 231
intermediate 229
naming convention 230
regex_map 229
verifying server mount 71
version path 31
versions 49
defined 283
viewing
branches and workareas 101
virtual files 29
virus scanning 271
VisualFormat
removing software 270
VisualPreview
defined 283
disabling 41
enabling 41
encoding of text files 225
file_encoding.cfg 236
localizing 217
tool bar 41
vpath 31
defined 31
vpaths, encoding mappings 225
W
watchdog 261
web browsers, interpreting encoding 220
web content, specifying encoding 219
web daemon
about 174
configuring 173, 176
setting defaults 46
web servers
configuring 185
group 111
host name 176
plugins 176
port number 176
starting and stopping 176
uid 111
Web site
defined 283
development 21
webserver_group 111
webserver_uid 111
Windows
Event Viewer 75
permissions and TeamSite 95
Task Manager 68
Windows groups 103
Windows network 105
windows_groups_for_sharing 106
windows_groups_for_users 106
Wordpad, saving documents as UTF-8 220
workarea_default_perm 101
workarea_security 101
workareas
changing group ownership 110
creating 94
defined 20, 283
locking files in 48
8 TeamSite Administration Guide
• • • •••

•
ownership changes 110
permissions 95
permissions on directory 100
read access 101
security 101
workflow
defined 284
jobs
defined 25
tasks
defined 26
workflow log
locating 74
workflow models
and jobs 26
assign-edit-approve 25
defined 25, 284
WorkflowAdmin
defined 24
WorkflowUser
defined 24
Write locking
see also Optional Write locking, Mandatory Write locking
X
XML
about 15
datacapture.cfg 146
metadata-rules.cfg 142
regex_map language 225
special characters 233
Y
Y: drive (default TeamSite drive) 71
TeamSite Administration Guide 299• • •••

Index
30
0 TeamSite Administration Guide• • • •••

