trisoft to livecontent the review process -...
TRANSCRIPT

Presenter Name Presenter Title
Date
Phyllis Croce Information Developer
23 March 2012
Trisoft to LiveContent The Review Process
How LiveContent has improved the review workflow

• About me:
• I am currently the Information Developer for the Trisoft product.
• I wrote documentation and course development for the SDL Contenta CMS for
14 years prior to joining the Trisoft team.
• I also developed and taught a course for SDL XPP system administrators.
• I developed preliminary training materials for LiveContent.
• I am assisting with SDL AuthorAssistant documentation.
• I use DITA and Trisoft to create, manage, and publish documentation to CHM,
PDF, WebHelp, and LiveContent.
Introduction
2
• SDL Trisoft and SDL LiveContent products are in SDL’s Structured
Content Technologies
• SDL Trisoft is developed in Mechelen, Belgium
• SDL LiveContent is developed in Wakefield, Massachusetts

Before: The Age of Reviewing PDF
3
Send the PDF in an email to each reviewer
Post to an internal web
site then send email to let reviewers know where to
find it
Publish to PDF and distribute for review
Reviewers review and comment
Print PDF and write on hard copy and return
Add sticky notes in the PDF
(reviewers needed PDF edit
software to do this) and return in an email
Snap a section, add to an
email, add comments

4
Before: The Age of Reviewing PDF
Collect individual pieces of review and make edits
Resolve differences or inconsistencies in the
information
Make Modifications
Send the PDF in an email to each reviewer
Post to an internal web
site then send email to let reviewers know where to
find it
Publish to PDF and distribute for final
review

Now: Publish to LiveContent
5
Publish to LiveContent
Provides everyone access to the publication at the
same time.
• Reviewers can make comments that others can
see so they don’t make the same comment.
• This also helps to reduce inconsistencies in reviews
and comments.

How its done
6
I added an output format for LiveContent to my SDL Trisoft publication
With one click, it automatically publishes to LiveContent

SDL LiveContent
7
These are all publications that were
published to this instance of LiveContent.
Click on a title to display the publication.

These are all publications that were
published to this instance of LiveContent.
Click on a title to display the publication. Click on a topic to display its contents
SDL LiveContent
8

9
SDL LiveContent
To add a comment, click
Add Comment

To add a comment, click
Add Comment
10
SDL LiveContent
change title in toc
Topic reads “Can I hide…” TOC reads: “Can I hid…”
Change TOC to: “Can I hide…”

change title in toc
Topic reads “Can I hide…” TOC reads: “Can I hid…”
Change TOC to: “Can I hide…”
11
SDL LiveContent
The comment is added to the topic

The comment is added to the topic
12
SDL LiveContent
Click to open and view the comment

RSS Feed Notification
13
Click to access in LiveContent
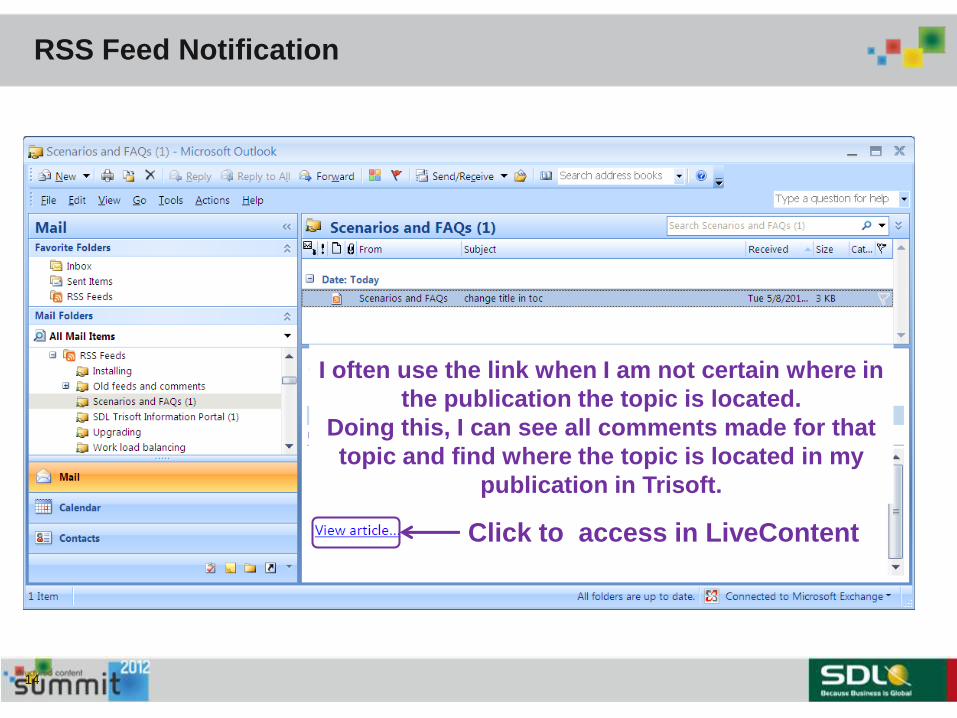
RSS Feed Notification
14
Click to access in LiveContent
I often use the link when I am not certain where in
the publication the topic is located.
Doing this, I can see all comments made for that
topic and find where the topic is located in my
publication in Trisoft.

RSS Feed Notification
15
Click to access in LiveContent
I often use the link when I am not certain where in
the publication the topic is located.
Doing this, I can see all comments made for that
topic and find where the topic is located in my
publication in Trisoft.
The comment is also added to the topic in Trisoft

Demo
16
SDL Trisoft – publish
SDL LiveContent - comment
Email – notification

1. Login to the SDL Trisoft Web Client as an administrator user.
2. Click Settings --> Output Formats.
3. Click Add.
4. In the Add Output Format window, do the following:
a. Type SDL LiveContent. This is the name that users see in Trisoft Publication Manager when they publish.
b. Select the Resolutions of the graphics that you want to appear in SDL LiveContent publications from the select list.
c. In the EDT of the output (Electronic Output Type) field, select ZIP from the select list.
d. Uncheck Single file.
e. Leave the DITA-OT transformation type field empty.
f. In the Style processor field, select SDL LiveContent from the select list.
g. In the SDL LiveContent server URL text box, type the URL and port number for the SDL LiveContent server.
The URL must include http:// or https:// and the port number for SDL LiveContent.
Omit a final forward slash at the end of the URL. For example, http://LCserver:4444/LiveContent
h. In the SDL LiveContent user name text box, type the LiveContent user through whom the publication is handled.
This user must belong to a group that has the Manage Publication permission in SDL LiveContent.
i. In the SDL LiveContent password text box, type the password for the user in the previous step.
j. In the SDL LiveContent skin text box, type the name of the skin with which the publication is to be styled.
k. Decide if you want to Clean up after publishing. If you check this option, after publishing, Trisoft deletes temporary files from
<Trisoft_home>\DataDita\PublishingService\Data\DataExports
l. Check Alter DTD System ID location.
m. Click OK.
5. On the Trisoft server computer, restart IIS.
Adding the LiveContent Publish Format Option
17

In LiveContent:
Note: RSS feeds only work if anonymous users are allowed to access the system - in LiveContent as a user with
administrative permissions:
1. Select Manage Application > Manage Groups
2. For anonymous (users) under Use > Use application is checked.
Under XForms > Use XForms is checked.
To add the RSS feed:
1. Select List Publications then select the publication.
2. When the pub is displayed, click the icon in the upper right (orange and white icon).
3. In the resulting window, right-click on the name of the publication (top left).
4. Select Properties.
5. Copy the Address (URL) to your clipboard.
Adding an RSS Feed for email notification
18
In Outlook: 1. Create a folder for the RSS feeds.
2. Right-click on the new RSS feeds folder.
3. Select Add a New RSS Feed.
4. Paste the address in the field then click Add.
5. When prompted to verify adding, click OK.
6. A new folder bearing the name of the publication is added under the folder you created.
Click on this folder to view any comments made in LC for that publication.
Note: The steps must be done in Outlook and not in a web email interface.

Copyright © 2008-2012 SDL plc. All rights reserved.. All company names, brand names, trademarks,
service marks, images and logos are the property of their respective owners.
This presentation and its content are SDL confidential unless otherwise specified, and may not be
copied, used or distributed except as authorised by SDL.