trio par led rg specifications: modelcdb.s3.amazonaws.com/itemrelatedfiles/11199/trio par...
TRANSCRIPT

TRIO PAR LED RG SPECIFICATIONS: Model: Trio Par LED RGVoltage: 100V-240V 50/60HzLEDs: 6 x 9W RGBW LEDs 72 SMD White LEDs Red/Green LaserWeight: 2lbs./ 0.9kgs.Size: 9.8”(L) x 3.5”(W) x 9.8”(H) Working Position: Any Safe positionDuty Cycle: None DMX Channels: 4 DMX Channel Modes: 6/10/26/30 ChannelsColors: RGBWWarranty: 1 Year
CAUTION! Please read and under-stand these instructions before installing or operating this unit.Operating Instructions:The Trio Par LED RG has been tested at the factory, there is no assembly required. The unit is ready to be plugged into a power outlet. This unit has 4 DMX channel modes; 6/10/26/30 channels. It has 6 operating modes; RGBW Dimmer mode, color change mode, fade mode, pulse mode, sound active mode, or DMX mode. Fuse Replacement: Disconnect the unit from its power source. Remove the power cord from the unit. Once the cord has been removed, you will find that the fuse holder is located inside the power socket. Insert a flat-head screw driver into the power socket and gently pry out the fuse holder. Remove the bad fuse and replace with a new one. The fuse holder also has a holder for a spare fuse.
©Eliminator® Los Angeles, CA. - www.EliminatorLighting.com
Caution! Never open unit when in use. Always disconnect main power before replacing fuse. Remember to always replace with the exact same type fuse.
1 Year Limited Warranty: Eliminator Lighting warranty is valid from the date of purchase. Our 1 year limited warranty covers manufacturing defects only. Serial number, place of purchase with dated valid receipt must be submitted at time of service. Eliminator Lighting warranty does not cover items or parts prone to wear and tear: lamps, fuses, brushes and belts. Eliminator Lighting warranty is only valid with-in the United States.

DMX Mode:Operating through a DMX controller gives the user the freedom to create their own programs tailored to their own individual needs. The Trio Par LED RG has 4 DMX channel modes; 6/10/26/30 channels. See the chart below for the DMX traits and values.1. This function will allow you to control each individual fixture’s traits with a standard DMX 512 controller.2. To run your fixture in DMX mode plug the fixture in and press the MENU or UP and DOWN buttons until “Addr” is displayed and press ENTER. “A.XXX” will now be displayed. “XXX” represents the current displayed address. Use the UP or DOWN buttons to select your desired DMX address.3. Press ENTER again to select your desired DMX channel mode. Use the UP and DOWN buttons to find your desired DMX channel mode.4. After you have chosen your desired DMX address and DMX channel mode, press ENTER and plug in the fixture via the XLR connections to any standard DMX controller.
Jump Change Mode:1. Plug the fixture in and press the MENU or UP and DOWN buttons until “ASC -” is displayed. 2. Press the ENTER button to adjust the Jump speed. Use the UP and DOWN buttons to adjust the speed. The speed can be adjusted between “AS.00” (slowest) to “AS.12” (fastest).3. After you have adjusted the program speed you can activate strobing by pressing the MENU button until “FLAS” is displayed and press ENTER. The Flash can be adjusted between “FL.00” (flash off) to “FL.12” (fastest flash).
©Eliminator® Los Angeles, CA. - www.EliminatorLighting.com
Menu Submenu Channels Operating Mode Addr A.001-512 6/10/26/30-Ch DMX address/channel
mode ASC- AS.00-12 Jump change
mode/speed ACC- AC.00-12 Pulse change
mode/speed FAde FA.00-12 Fade
change/speed SOUF SF.00-12 Pulse change sound
control/sensitiveness rL-- rL.00-12 Red brightness
adjustable gL-- gL.00-12 green brightness
adjustable bL-- bL.00-12 Blue brightness
adjustable uL-- uL.00-12 white brightness
adjustable L1-- ON/OFF Laser R on-o� L2-- ON/OFF Laser G on-o� FLAS FL.00-12 Strobe speed

Pulse Change Mode:1. Plug the fixture in and press the MENU or UP and DOWN buttons until “ACC -” is displayed. 2. Press the ENTER button to adjust the Pulse speed. Use the UP and DOWN buttons to adjust the speed. The speed can be adjusted between “AC.00” (slowest) to “AC.12” (fastest).3. After you have adjusted the pulse speed you can activate strobing by pressing the MENU button until “FLAS” is displayed and press ENTER. The Flash can be adjusted between “FL.00” (flash off) to “FL.12” (fastest flash). Fade Mode:1. Plug the fixture in and press the MENU or UP and DOWN buttons until “FAde” is displayed. 2. Press the ENTER button to adjust the Fade speed. Use the UP and DOWN buttons to adjust the speed. The speed can be adjusted between “FA.00” (slowest) to “FA.12” (fastest).3. After you have adjusted the program speed you can activate strobing by pressing the MENU button until “FLAS” is displayed and press ENTER. The Flash can be adjusted between “FL.00” (flash off) to “FL.12” (fastest flash).
Sound Active Pulse Mode:1. Plug the fixture in and press the MENU or UP and DOWN buttons until “SOUF” is displayed. 2. Press the ENTER button to adjust the sound sensitivity. Use the UP and DOWN buttons to adjust the sensitivity. The sensitivity can be adjusted between “SF.00” (least sensitive) to “SF.12” (most sensitive).3. After you have adjusted the sensitivity you can activate strobing by pressing the MENU button until “FLAS” is displayed and press ENTER. The Flash can be adjusted between “FL.00” (flash off) to “FL.12” (fastest flash).
RGBW Dimmer Mode:1. Plug the fixture in and press the MENU or UP and DOWN buttons until either “rL” (Red), “gL” (Green), “bL” (Blue), or “uL” (White) is displayed. These are the dimmer modes for each color. When your find your desired color you would like to adjust press ENTER.2. Use the UP and DOWN buttons to adjust the output intensity. When you are finished adjjusting press ENTER.3. See the System Menu located on the previous page for the various dimmer settings.4. You can activate strobing by pressing the MENU button until “FLAS” is displayed and press ENTER. The Flash can be adjusted between “FL.00” (flash off) to “FL.12” (fastest flash).
Red or Green Laser On/OFF:1. Plug the fixture in and press the MENU or UP and DOWN buttons until either “L1” (Red Laser), or “L2” (Green Laser) is displayed. 2. Press the ENTER button to enter the On/Off submenu, and use the UP or DOWN buttons to to turn the lasers either “ON” or OF”. Press ENTER after you have made your desired choice.3. You can activate strobing by pressing the MENU button until “FLAS” is displayed and press ENTER. The Flash can be adjusted between “FL.00” (flash off) to “FL.12” (fastest flash).
©Eliminator® Los Angeles, CA. - www.EliminatorLighting.com
©Eliminator® Los Angeles, CA. - www.EliminatorLighting.com
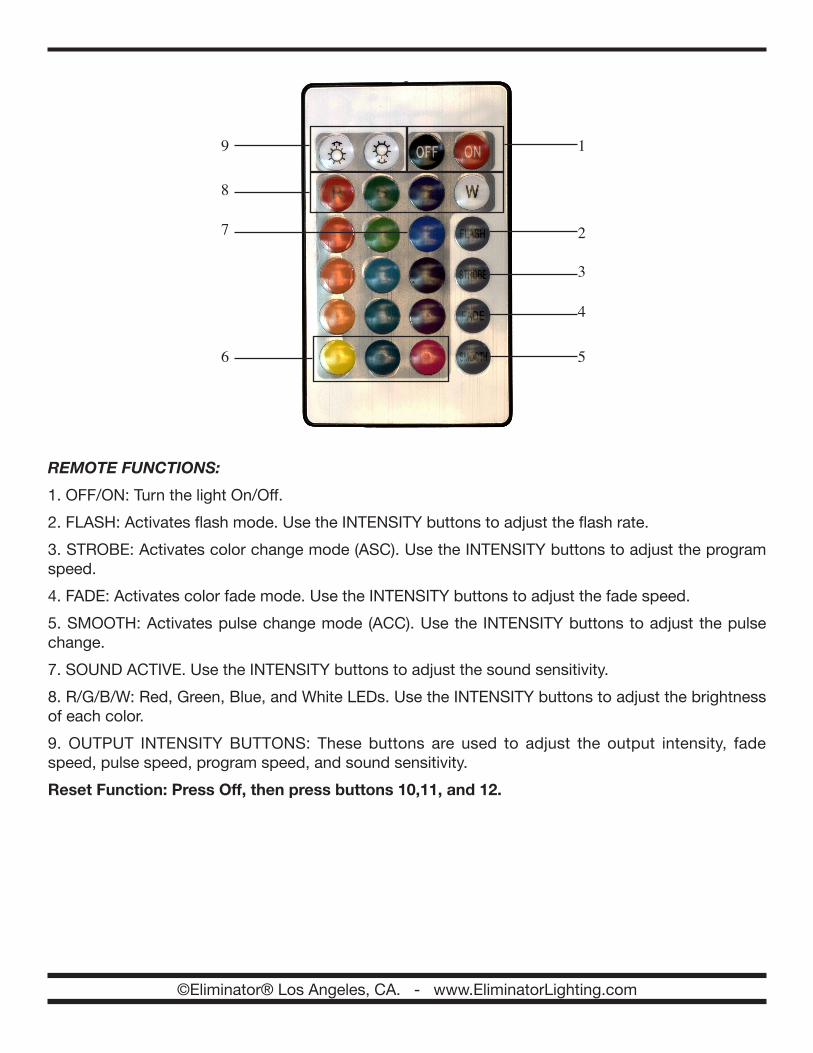
REMOTE FUNCTIONS:1. OFF/ON: Turn the light On/Off.2. FLASH: Activates flash mode. Use the INTENSITY buttons to adjust the flash rate.3. STROBE: Activates color change mode (ASC). Use the INTENSITY buttons to adjust the program speed.4. FADE: Activates color fade mode. Use the INTENSITY buttons to adjust the fade speed.5. SMOOTH: Activates pulse change mode (ACC). Use the INTENSITY buttons to adjust the pulse change.7. SOUND ACTIVE. Use the INTENSITY buttons to adjust the sound sensitivity.8. R/G/B/W: Red, Green, Blue, and White LEDs. Use the INTENSITY buttons to adjust the brightness of each color.9. OUTPUT INTENSITY BUTTONS: These buttons are used to adjust the output intensity, fade speed, pulse speed, program speed, and sound sensitivity.Reset Function: Press Off, then press buttons 10,11, and 12.
1
2
3
4
5
9
8
7
6

©Eliminator® Los Angeles, CA. - www.EliminatorLighting.com
DMX TRAITS: 26 CHANNELSCHANNEL 1: RED LED 1 0% - 100%CHANNEL 2: GREEN LED 1 0% - 100%CHANNEL 3: BLUE LED 1 0% - 100%CHANNEL 4: WHITE LED 1 0% - 100%CHANNEL 5: RED LED 2 0% - 100%CHANNEL 6: GREEN LED 2 0% - 100%CHANNEL 7: BLUE LED 2 0% - 100%CHANNEL 8: WHITE LED 2 0% - 100%CHANNEL 9: RED LED 3 0% - 100%CHANNEL 10: GREEN LED 3 0% - 100%CHANNEL 11: BLUE LED 3 0% - 100%CHANNEL 12: WHITE LED 3 0% - 100%CHANNEL 13: RED LED 4 0% - 100%CHANNEL 14: GREEN LED 4 0% - 100%CHANNEL 15: BLUE LED 4 0% - 100%CHANNEL 16: WHITE LED 4 0% - 100%CHANNEL 17: RED LED 5 0% - 100%CHANNEL 18: GREEN LED 5 0% - 100%CHANNEL 19: BLUE LED 5 0% - 100%CHANNEL 20: WHITE LED 5 0% - 100%CHANNEL 21: RED LED 6 0% - 100%CHANNEL 22: GREEN LED 6 0% - 100%CHANNEL 23: BLUE LED 6 0% - 100%CHANNEL 24: WHITE LED 6 0% - 100%CHANNEL 25: RED LASER 0 - 127 = RED LASER OFF128 - 255 = RED LASER ONCHANNEL 26: GREEN LASER0 - 127 = GREEN LASER OFF128 - 255 = GREEN LASER ON
DMX TRAITS: 10 CHANNELSCHANNEL 1: MASTER DIMMER 0% - 100%CHANNEL 2: RED LED 0% - 100%CHANNEL 3: GREEN LED 0% - 100%CHANNEL 4: BLUE LED 0% - 100%CHANNEL 5: WHITE LED 0% - 100%CHANNEL 6: RED LASER 0 - 127 = RED LASER OFF128 - 255 = RED LASER ONCHANNEL 7: GREEN LASER0 - 127 = GREEN LASER OFF128 - 255 = GREEN LASER ONCHANNEL 8: PROGRAMS0 - 15 = NO FUNCTION16 - 75 = JUMP CHANGE MODE (ASC)76 - 135 = PULSE CHANGE MODE (ACC)136 - 195 = FADE CHANGE MODE (FAde)196 - 255 = SOUND ACTIVE PULSE (SOUF)CHANNEL 9: PROGRAM SPEED/SOUND SENSITIVITY0 - 255 = PROGRAM SPEED SLOW - FAST0 - 255 = SENSITIVITY LEAST-MOST (SOUF)CHANNEL 10: STROBING 0 - 5 = NO FUNCTION6 - 255 = STROBING SLOW - FAST
DMX TRAITS: 6 CHANNELSCHANNEL 1: RED LED 0% - 100%CHANNEL 2: GREEN LED 0% - 100%CHANNEL 3: BLUE LED 0% - 100%CHANNEL 4: WHITE LED 0% - 100%CHANNEL 5: RED LASER 0 - 127 = RED LASER OFF128 - 255 = RED LASER ONCHANNEL 6: GREEN LASER0 - 127 = GREEN LASER OFF128 - 255 = GREEN LASER ON

©Eliminator® Los Angeles, CA. - www.EliminatorLighting.com
DMX TRAITS: 30 CHANNELSCHANNEL 1: MASTER DIMMER 0% - 100%CHANNEL 2: RED LED 1 0% - 100%CHANNEL 3: GREEN LED 1 0% - 100%CHANNEL 4: BLUE LED 1 0% - 100%CHANNEL 5: WHITE LED 1 0% - 100%CHANNEL 6: RED LED 2 0% - 100%CHANNEL 7: GREEN LED 2 0% - 100%CHANNEL 8: BLUE LED 2 0% - 100%CHANNEL 9: WHITE LED 2 0% - 100%CHANNEL 10: RED LED 3 0% - 100%CHANNEL 11: GREEN LED 3 0% - 100%CHANNEL 12: BLUE LED 3 0% - 100%CHANNEL 13: WHITE LED 3 0% - 100%CHANNEL 14: RED LED 4 0% - 100%CHANNEL 15: GREEN LED 4 0% - 100%CHANNEL 16: BLUE LED 4 0% - 100%CHANNEL 17: WHITE LED 4 0% - 100%CHANNEL 18: RED LED 5 0% - 100%CHANNEL 19: GREEN LED 5 0% - 100%CHANNEL 20: BLUE LED 5 0% - 100%CHANNEL 21: WHITE LED 5 0% - 100%CHANNEL 22: RED LED 6 0% - 100%CHANNEL 23: GREEN LED 6 0% - 100%CHANNEL 24: BLUE LED 6 0% - 100%CHANNEL 25: WHITE LED 6 0% - 100%CHANNEL 26: RED LASER 0 - 127 = RED LASER OFF128 - 255 = RED LASER ONCHANNEL 27: GREEN LASER0 - 127 = GREEN LASER OFF128 - 255 = GREEN LASER ON
DMX TRAITS: 30 CHANNELSCHANNEL 28: PROGRAMS0 - 15 = NO FUNCTION16 - 75 = JUMP CHANGE MODE (ASC)76 - 135 = PULSE CHANGE MODE (ACC)136 - 195 = FADE CHANGE MODE (FAde)196 - 255 = SOUND ACTIVE PULSE (SOUF)CHANNEL 29: PROGRAM SPEED/SOUND SENSITIVITY0 - 255 = PROGRAM SPEED SLOW - FAST0 - 255 = SENSITIVITY LEAST-MOST (SOUF)CHANNEL 30: STROBING 0 - 5 = NO FUNCTION6 - 255 = STROBING SLOW - FAST