trial frame refraction - cybersight.org · means i want to add plus over the refraction i have to...
TRANSCRIPT

This presentation has been created for Orbis International trainees by
New England College of Optometry Volunteer Faculty.
This presentation is property of the New England College of Optometry and any attempt to reproduce material will be in violation of US copyright law.
TRIAL FRAME REFRACTION:
MORE THAN JUST “1 OR 2?”
Sarah Wassnig, B.Optom, MPH
May 09 2018
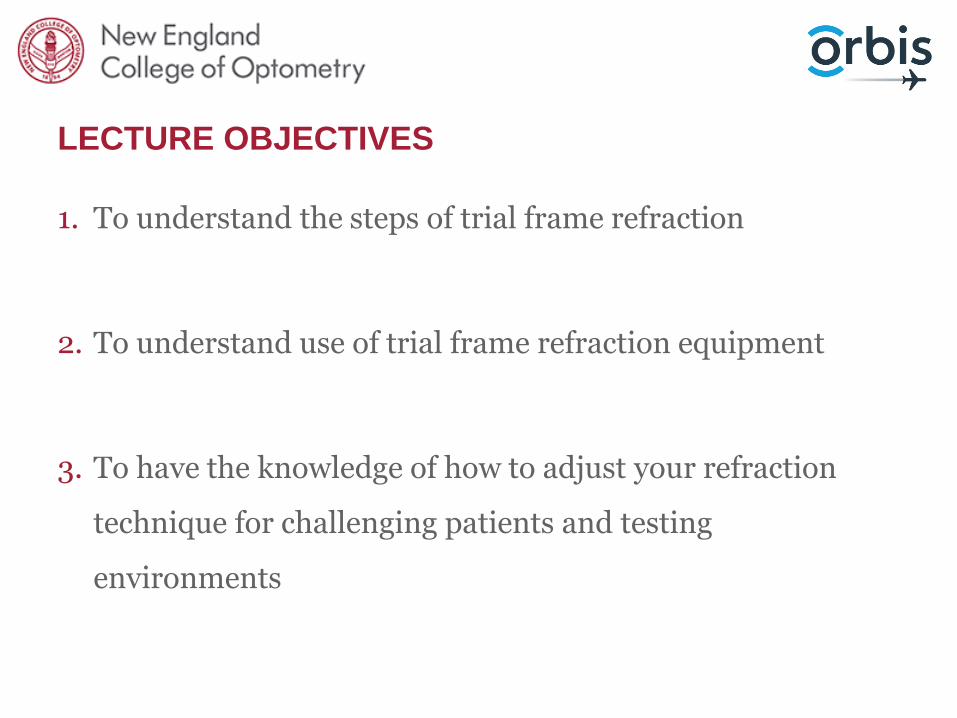
LECTURE OBJECTIVES
1. To understand the steps of trial frame refraction
2. To understand use of trial frame refraction equipment
3. To have the knowledge of how to adjust your refraction
technique for challenging patients and testing
environments

www.cybersight.org


www.cybersight.org

QUESTION?
HOW MANY PEOPLE TRIAL FRAME REFRACT?
A. Never
B. I trial frame refract only low vision patients
C. I sometimes trial frame refract
D. I only trial frame refract

QUESTION?
HOW MANY PEOPLE LEARNED TO DO A FULL TRIAL FRAME REFRACT IN THEIR DEGREE?
A. No, I was only taught phoropter refraction
B. I was only taught trial frame refraction
C. I was trained equally in phoropter and trial frame refraction
D. I was only trained in trial frame refraction in the context of a low vision patient

QUESTION?
HOW MANY PEOPLE REFRACT IN ENVIRONMENTS OUTSIDE OF CLINIC?
A. Never, I only refract in the clinic
B. I do school and/or community screenings
C. I visit remote towns and/or nursing homes to do full eye examinations

HOW IS TRIAL FRAME
DIFFERENT TO PHOROPTER
REFRACTION?

REFRACTION – THE PHOROPTER
CONTRAINDICATIONS:
• Young children• Older adults• People with disabilities• Deaf or hard of hearing patients

REFRACTION – THE TRIAL FRAME
INDICATIONS AND BENEFITS
1. Children
2. Persons with disabilities
3. Persons with low vision
4. Illiterate people
5. Those speaking a different language
6. Elderly
7. High prescriptions

THE EQUIPMENT NEEDED FOR
TRIAL FRAME REFRACTION

THE EQUIPMENT
THE TRIAL FRAME

THE EQUIPMENT
THE TRIAL FRAME

THE EQUIPMENT
THE TRIAL FRAME
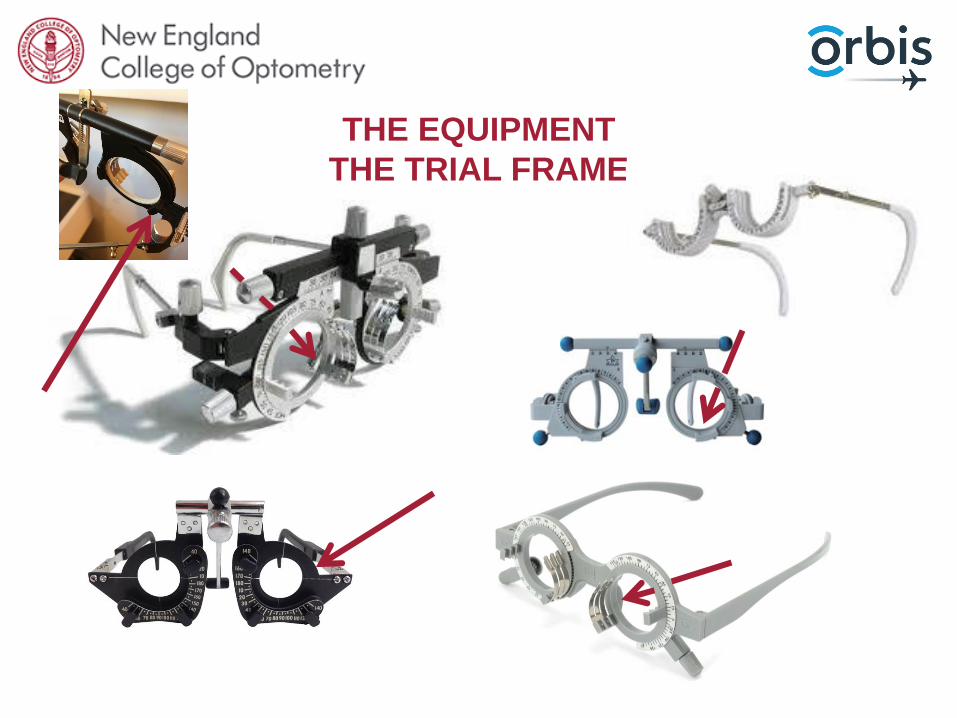
THE EQUIPMENT
THE TRIAL FRAME

THE EQUIPMENT
THE TRIAL FRAME

THE EQUIPMENT
THE TRIAL FRAME

THE EQUIPMENT
THE TRIAL FRAME

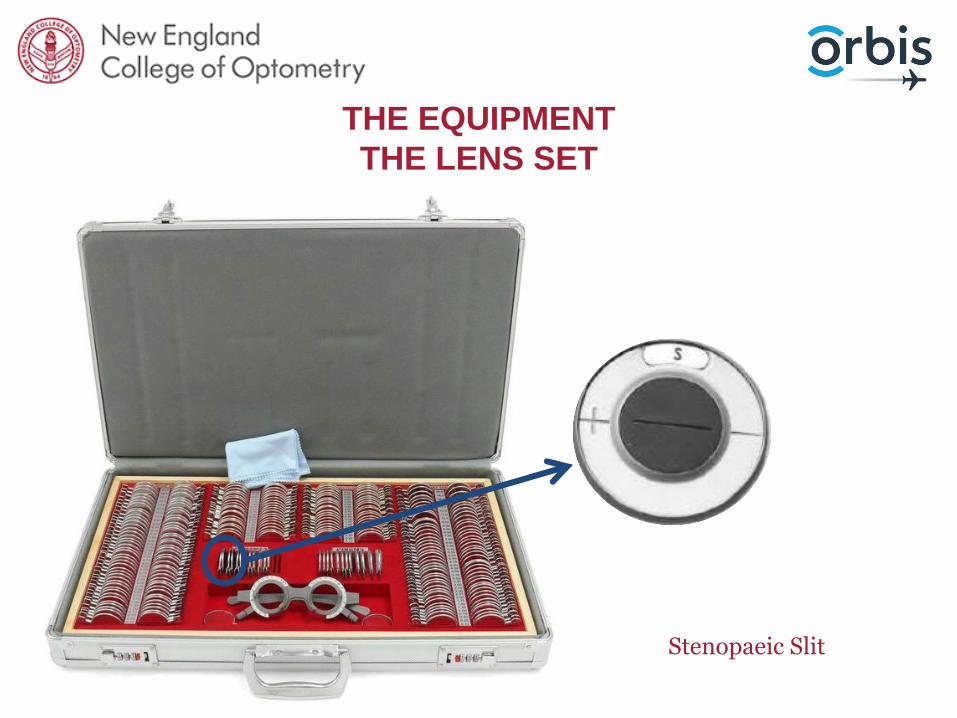
THE EQUIPMENT
THE LENS SET

THE EQUIPMENT
THE LENS SET
Jackson Cross Cylinder Lenses“JCC”

THE EQUIPMENT
THE LENS SET
red and green lenses

THE EQUIPMENT
THE LENS SET
Occluder
THE EQUIPMENT
THE LENS SET
Stenopaeic Slit

THE EQUIPMENT
THE LENS SET
Pinhole

THE EQUIPMENT
THE LENS SET
Maddox Rod

THE EQUIPMENT
THE LENS SET
Prisms

THE EQUIPMENT
Risley Prisms and handheld prism equipment

THE EQUIPMENT
THE LENS SET

THE EQUIPMENT
THE LENS SET

THE EQUIPMENT
THE LENS SET
HOW DO I WORK WITH A
LOOSE LENS SET?

WORKING WITH A LENS SET
KEEP IT TIDY!
KEEP YOUR FINGER PRINTS OFF THE LENSES

WORKING WITH A LENS SET
But what if I want to “reserve” a lens?
Put the lens back
but turn the hand to the inside

WORKING WITH A LENS SET
Right hand takes from the right side, left hand takes
from the left side.

WORKING WITH A LENS SET
Use the gaps in the lens set to put the lenses away faster

TRIAL FRAME REFRACTION
WHAT ARE THE STEPS?

REFRACTION – PROCEDURE
Always push the patient to the best acuity
1. Test the patient’s vision with current glasses or no glasses if they do not have a pair. – Test both eyes individually and
binocularly.
Hrynchak, P. (2013). Clinical Optometric Procedures. Brien Holden Institute Academy
Show the full chart
“Great! Can you read any of letters
on the next line below?”

REFRACTION – SET UP
PATIENT POSITION
• Sitting comfortable, not forward
TRIAL FRAME POSITION
• Trial frame adjusted for vertex distance
• Trial frame adjusted for inter-pupillary distance
• Trial frame straight
• Trial frame adjusted behind the ears
ILLUMINATION
• Depends on the chart
EXAMINER POSITION
• To the side of the patient
• Need to be able to manipulate lenses and, possibly, chart
• Don’t block the patient’s view

ADJUSTING THE TRIAL FRAME PROPERLY
Make sure your temple is straight!
Adjust your temple to fit snuggly behind the ear!

ADJUSTING THE TRIAL FRAME PROPERLY
Make sure the frame is straight!
Make sure the pupillary distance of the trial frame matches thepupillary distance of the patient!
Make sure the nose rest is up on the nose!
Make sure the patient is looking through the center of the lens!
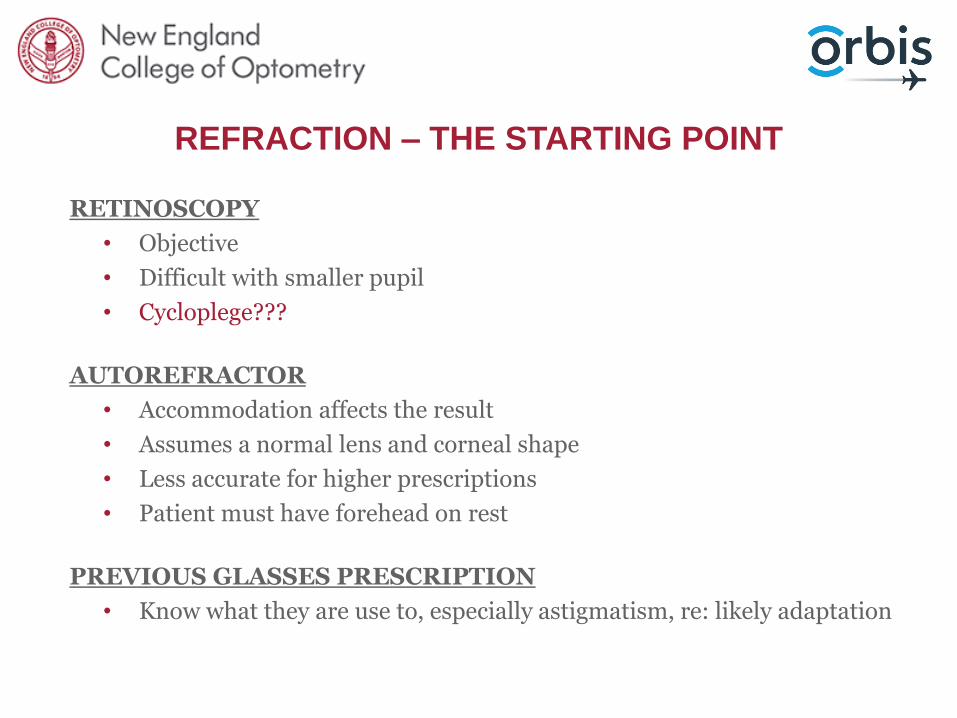
REFRACTION – THE STARTING POINT
RETINOSCOPY
• Objective
• Difficult with smaller pupil
• Cycloplege???
AUTOREFRACTOR
• Accommodation affects the result
• Assumes a normal lens and corneal shape
• Less accurate for higher prescriptions
• Patient must have forehead on rest
PREVIOUS GLASSES PRESCRIPTION
• Know what they are use to, especially astigmatism, re: likely adaptation
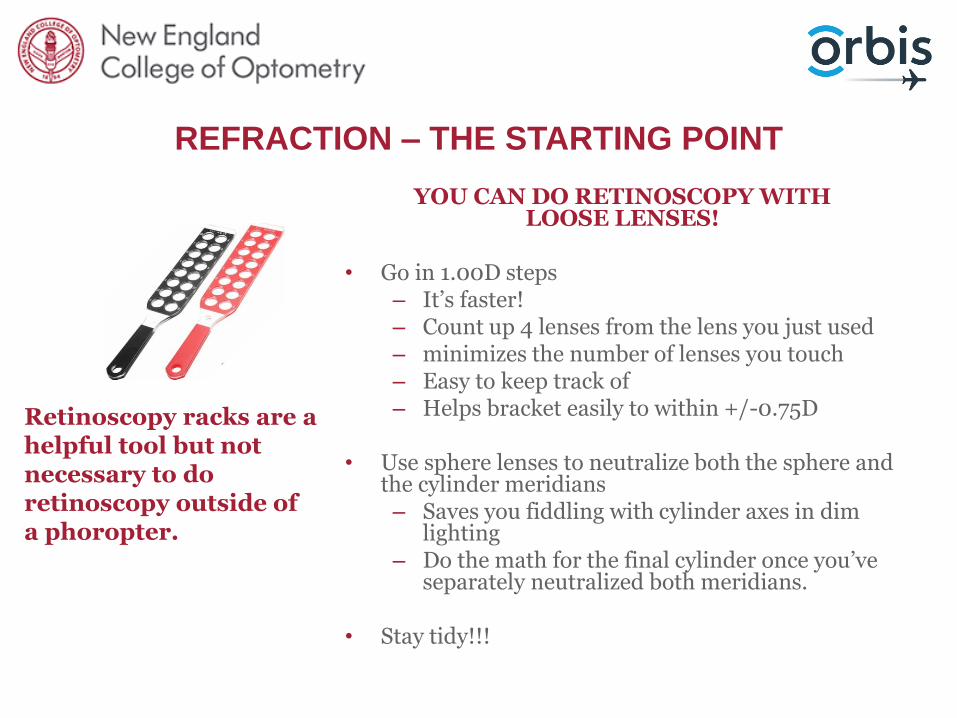
YOU CAN DO RETINOSCOPY WITH LOOSE LENSES!
• Go in 1.00D steps – It’s faster!– Count up 4 lenses from the lens you just used– minimizes the number of lenses you touch– Easy to keep track of– Helps bracket easily to within +/-0.75D
• Use sphere lenses to neutralize both the sphere and the cylinder meridians – Saves you fiddling with cylinder axes in dim
lighting– Do the math for the final cylinder once you’ve
separately neutralized both meridians.
• Stay tidy!!!
Retinoscopy racks are a helpful tool but not necessary to do retinoscopy outside ofa phoropter.
REFRACTION – THE STARTING POINT

WHEN DO I CYCLOPLEGE?
• Vergence of light is altered by accommodation
• We want to suspend a patient’s accommodation to ensure the distance refractive error is accurate
• We can minimize accommodation in other ways that are less permanent and give us a more realistic idea of how much prescription the patient will take.
BUT is cycloplegic always necessary?
• Don’t cycloplege if:
1. the patient’s age suggests the accommodation system is not at it’s peak,
2. the clinical setting does not allow for checking of anterior chamber angles, and/or
3. if you plan to refract and binocular test the patient after completing retinoscopy.
• Cyloplegic refractions are not always well accepted by patients with active accommodation
• When thinking of prescribing a full cycloplegic refraction in a patient without strabismus or amblyopia, prescriptions should be trialed on the patient in a trial frame without cyclopegia before prescribing.

HOW DO WE MINIMIZE ACCOMMODATION
Misconception: we have the perfect refraction when we have fully relaxed accommodation.
We accidently stimulate accommodation when we over minus the refraction.
1. “Fogging” – through out this lecture I will refer to “fogging the eye”, this means I want to add plus over the refraction I have to blur the vision and therefore fully relax accommodation. You will hear me tell you to slowly reduce the fog until the patient can read their best visual acuity – the reason we are doing this is to find the point at which the patient can see their best visual acuity with the most plus refraction.
2. Binocular Balance – at the end of a refraction we binocular balance in patients who have active accommodation and who have equal vision between both eyes.
3. Duochrome – throughout the refraction we can use duochrome to check the patient has not been over minused.

QUESTIONS BEFORE WE MOVE ON?

REFRACTION – PROCEDURE
3. Measure best visual acuity with your starting point
– Retinoscopy, auto-refraction or previous refraction.
Cylinder lensis in the front Lens well
Sphere lensis in the lens wellbehind
Show the full chart
2. Occlude the left eye
– Refract the right eye first

MY STARTING VISUAL ACUITY IS BAD!?!?
• Not everyone sees 20/20 (6/6, 1.o) – and that’s okay!
• Trust your retinoscopy
➢ if you get a few lines worse than 20/20 (6/6, 1.0) then that means you’re most likely only a few steps away from the true refraction.

REFRACTION – PROCEDURE
4. Refine the sphere
– Take a +0.25D lens and a -0.25D lens in one hand
– Show the patient the two lens options asking which makes their lowest visual acuity clearer.
– Add the lens that makes it clearer –careful not to over minus here, they need to READ more letter if they want more minus!
– Keep repeating until the patient reports “same” or cannot read more with the preferred lens.
Show the full chartDirect the patient's attention to the line
of their best acuity.

REFRACTION – PROCEDURE
5. Duochrome– Clearer in the red, add minus (-0.25D)
the myopia is under-corrected or the hyperopia is over-corrected.
– Clearer in the green, add plus (+0.25D) the hyperopia is under-corrected or the myopia is over-corrected.
– Stop when equal or 1 step on green for accommodating patients
– This test does not always work – if the patient continues to say red then, they most likely have a red preference so go back to your original prescription and skip this test.
– Cannot be preformed on patients with vision worse than 20/30 (6/9, 0.63)
“Equal”
“Red”
“Green”

WANT TO DO DUOCHROME BUT HAVE NO
COMPUTERIZED CHART?
YOU HAVE THESE LENSES!

WANT TO DO DUOCHROME BUT HAVE NO
COMPUTERIZED CHART?

Clearer in the red
Add +0.25D Sphere
WANT TO DO DUOCHROME BUT HAVE NO
COMPUTERIZED CHART?

WANT TO DO DUOCHROME BUT HAVE NO
COMPUTERIZED CHART?

Clearer in the green now!
WANT TO DO DUOCHROME BUT HAVE NO
COMPUTERIZED CHART?
How do I choose which lens!?!?!
Leave the patient 1 step in the green.

WANT TO DO DUOCHROME BUT HAVE NO
COMPUTERIZED CHART?

Same = leave the power
WANT TO DO DUOCHROME BUT HAVE NO
COMPUTERIZED CHART?

QUESTIONS BEFORE WE MOVE ON?

REFRACTION – PROCEDURE
6. Astigmatism/cylinder:
• Isolate the line 1 step larger than current VA
Hrynchak, P. (2013). Clinical Optometric Procedures. Brien Holden Institute Academy

REFRACTION – PROCEDURE
AXIS REFINEMENT
• Align the HANDLE of the Jackson Cross Cylinder (JCC) with the lens axis (so the dots are straddling the axis)
• If the tentative or starting astigmatism is more -0.50DC = refine your axis first as being off axis will alter your power.

-1.25
AXIS
CHECK
• Flip the JCC one side being “lens or option 1” and the other side being “lens or option 2”
• Advise the patient that neither lens will be completely clear, but ask which option is best.

REFRACTION – PROCEDURE
– If the two lenses are equal, move straight on to power determination.
– If not, rotate the cylinder LENS axis toward the minus axis (red dot) of the JCC.
–Repeat this question
• If the response is in the opposite direction move the axis back by half the amount changed the first time.
• If the response was in same direction as last, make another change of axis towards the red, until the response is in the opposite direction.
–Continue with this bracketing until the patient notices no difference between the two lens positions.
Hrynchak, P. (2013). Clinical Optometric Procedures. Brien Holden Institute Academy

REFRACTION – PROCEDURE
POWER REFINEMENT
• Align the POWER dots of the Jackson Cross Cylinder (JCC) with the lens axis.
• If tentative or starting astigmatism is -0.50DC or -0.25DC it is best to refine power first – it may not even be a real astigmatism!

-1.25
POWER CHECK
• Advise the patient that neither of the lens will be completely clear, but ask which option is best
• Flip the JCC lens to give the two power options

REFRACTION – PROCEDURE
– If the two lenses are equal, you are finished!
– If the patient prefers the red (minus) axis dots, add -0.25DC.
– If the patient prefers the white (plus) axis dots, remove -0.25DC.
–Repeat until both views are clearer
– If you change cylinder power by more than -0.75DC, check axis again.
MAINTAIN SPHERICAL EQUIVALENT
For every -0.50DC you increase add +0.25D Sphere
For every -0.50DC you decrease remove +0.25D Sphere
Hrynchak, P. (2013). Clinical Optometric Procedures. Brien Holden Institute Academy

REFRACTION – PROCEDURE
NO INITIAL ASTIGMATISM??
• Align the JCC so the axes are at 135/45, flip lens and take note of which axis is red preferred
• Align the JCC so the axes are at 180/90, flip lens and take note of which axis is red preferred
• Add – 0.50 DC between the two preferred red axes Add +0.25DS for spherical equivalent
• Refine the power and then the axis
• If prefers white, there is no cylinder in the prescription. Remember to remove the +0.25D from the sphere to maintain spherical
equivalent.
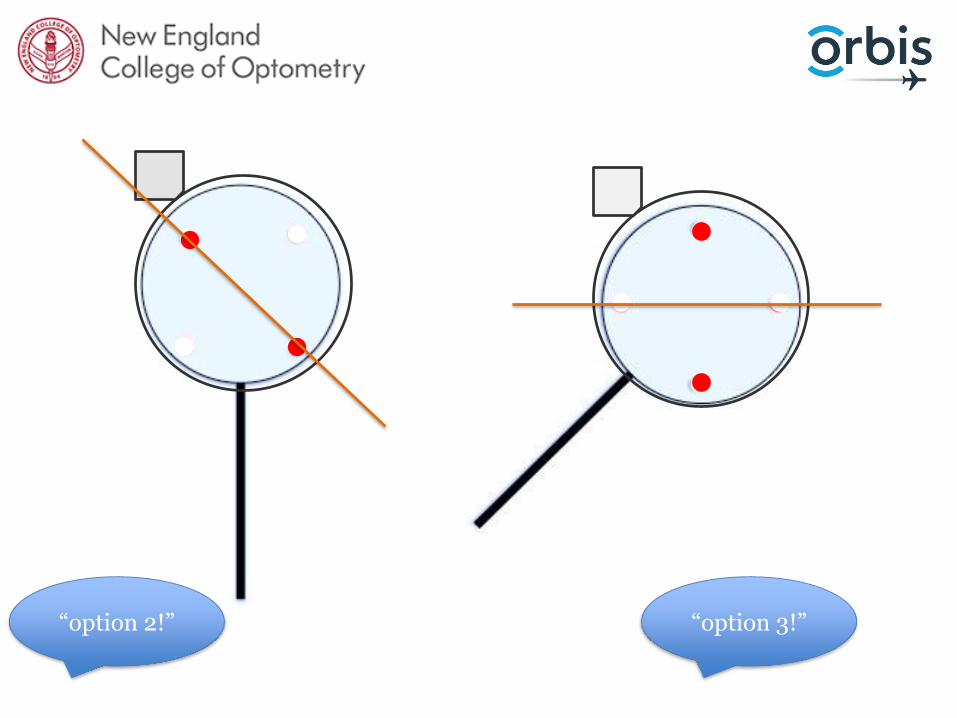
“option 2!” “option 3!”

If there is any astigmatism the axis must be between 135 degrees and 180 degrees!
-0.50

QUESTIONS BEFORE WE MOVE ON?

REFRACTION – PROCEDURE
7. Refine best sphere
– Fog the vision
• Add ≈+0.75DS to bring 2-4 lines worse than current VA).
** warn the patient it will be blurry **
– Slowly reduce the plus by 0.25D steps, each time checking visual acuity.
• Stop when VA does not improve
NO MORE THAN -0.25DS OVER
Show the full chartDirect the patient's attention to the line of best acuity as their vision clears up.

REFRACTION - PROCEDURE
• Occlude the right eye and move onto the left eye
• REPEAT THE PROCESS!

REFRACTION - PROCEDURE
Hrynchak, P. (2013). Clinical Optometric Procedures. Brien Holden Institute Academy
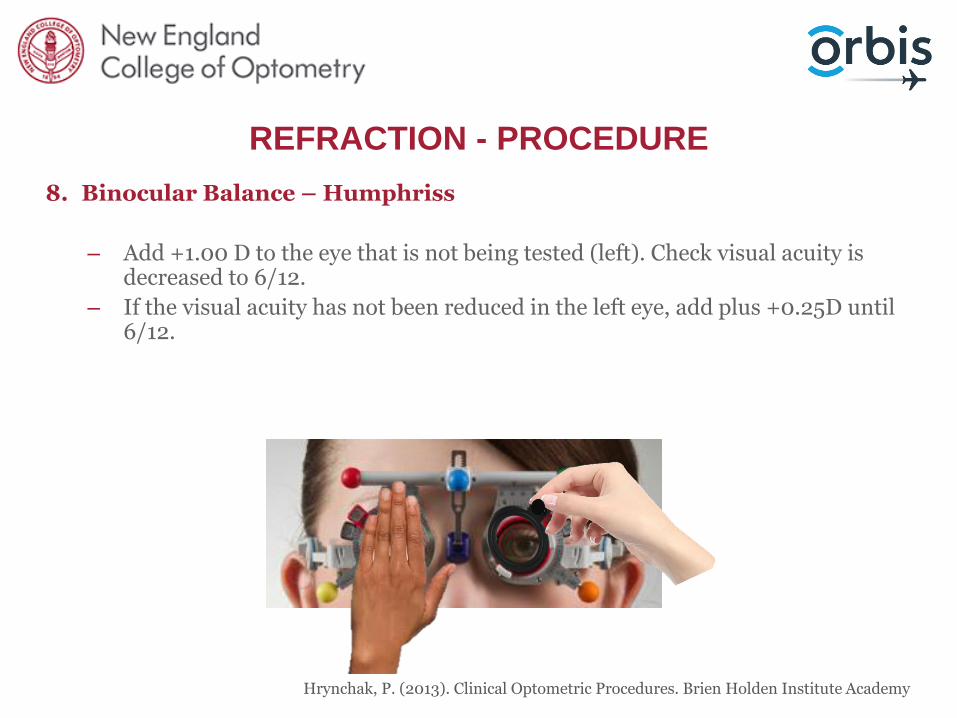
8. Binocular Balance - Humphriss
• INDICATIONS: patients who are old enough to participate, equal visual acuity,patients with peripheral.
• CONTRAINDICATIONS: strabismus, unstable or decompensating heterophoria
REFRACTION - PROCEDURE
Hrynchak, P. (2013). Clinical Optometric Procedures. Brien Holden Institute Academy
8. Binocular Balance – Humphriss
– Add +1.00 D to the eye that is not being tested (left). Check visual acuity is decreased to 6/12.
– If the visual acuity has not been reduced in the left eye, add plus +0.25D until 6/12.

REFRACTION - PROCEDURE
Hrynchak, P. (2013). Clinical Optometric Procedures. Brien Holden Institute Academy
8. Binocular Balance – Humphriss
– Compare +0.25 to -0.25, ask the patient which lens is clearer
– If one lens is clearer adjust the sphere in that direction.
– Repeat the comparison until equal

REFRACTION - PROCEDURE
Hrynchak, P. (2013). Clinical Optometric Procedures. Brien Holden Institute Academy
8. Binocular Balance – Humphriss
*** Only minor adjustments are made this way.
If more than 0.50D change, check the fog on the eye not being tested ***
– Fog this eye and unfog other eye
– Repeat for the left eye

REFRACTION - PROCEDURE
Hrynchak, P. (2013). Clinical Optometric Procedures. Brien Holden Institute Academy
8. Binocular Balance – Humphriss
– Compare +0.25 to -0.25, ask the patient which lens is clearer
– If one lens is clearer adjust the sphere in that direction.
– Repeat the comparison until equal, remove the right fogging lens.

QUESTIONS BEFORE WE MOVE ON?

CLINICAL PEARLS FOR
REFRACTING WITH A TRIAL
FRAME

ADDITIONAL BINOCULAR BALANCE METHOD
- SUCCESSIVE ALTERNATE OCCLUSION
Successive alternate occlusion
Only works with equal best corrected VA
• Add +1.00 sphere power OU
• Target: isolate the line 20/50 (6/15, 0.4) or 20/60 (6/18, 0.32)
• Directions:
– “Can you see the line with your right eye? And now your left eye?”
– “I’m going to cover one eye at a time. Both views will be blurry, but I want you to tell me which view is clearer or if they look the same.”

• Add +1.00D Sphere over each eye
• Direct the patient’s gaze to the 20/40 (6/12, 0.5) line, but show the whole chart.
ADDITIONAL BINOCULAR BALANCE METHOD
- SUCCESSIVE ALTERNATE OCCLUSION

• Continue to switch between the two eyes to give the patient a chance to compare views.
• Open the VA chart to show multiple lines.
• Reduce the plus power binocularly, checking the VA after each +0.25 step.
ADDITIONAL BINOCULAR BALANCE METHOD
- SUCCESSIVE ALTERNATE OCCLUSION

• Continue to switch between the two eyes to give the patient a chance to compare views.
• Open the VA chart to show multiple lines.
• Reduce the plus power binocularly, checking the VA after each +0.25 step.
ADDITIONAL BINOCULAR BALANCE METHOD
- SUCCESSIVE ALTERNATE OCCLUSION
• Continue to switch between the two eyes to give the patient a chance to compare views.
– If the patient says “Right” add +0.25D sphere to the left eye
– If the patient says “Left” add +0.25D sphere to the right eye
– If the patient keeps switching between right and left, leave the dominant eye slightly clearer.
– If the patient says “the same” leave.
• Open the VA chart to show multiple lines.
• Reduce the plus power binocularly, checking the VA after each +0.25 step.
ADDITIONAL BINOCULAR BALANCE METHOD
- SUCCESSIVE ALTERNATE OCCLUSION

CHECKING FOR EYE DOMINANCE
Which eye does the body visually prefer and use to line up with objects in visual space?
EE E
Both eyes openClose right eye
= no change
Close left eye = image no longer lined
up
Which is the dominant eye?LEFT EYE!
The image didn’t move when the left eye was open because binocularly it was responsible for lining up with the visual target “E”

STEADY YOUR JJC LENS
Use your other hand to steady the JCC lens!
It’s essential that you remain on axis!

WHAT IF I CANNOT ISOLATE A LINE OR AN “O” FOR
JACKSON CROSS CYLINDER?
Point to a “D”
Ask the patient “which lens looks more like the letter “D” and which lens makes the letter look more like a letter “O”?”
The round dots are a great target for Jackson Cross Cylinder!
Ask the patient “which side of the lens make the dots rounder and darker?”

WHAT IF MY PATIENT ALWAYS THINKS “2” IS
ALWAYS THE ANSWER?
“I am going to show you two lenses and each time I want
you to tell me which lens makes the line of letters look
clearer” Lens 1 or 2?”
“These are the first pair – Which is clearer, lens
1 or 2?”“Great. Now
between lens 3 or 4?”
“Now 5 or 6?”
“Again, 1 or 2?”

I HAVE THIS CHART BUT NO JCC LENS
FAN AND BLOCK!
After getting the best vision SPHERE
1. Ask the patient which lines on the fan are the clearest and darkest
2. Move the arrow so it is 90 degrees to where the patient reports clearest (the two limbs of the arrow will be equally clear).
3. Add positive sphere equal to half of the estimated astigmatism.
4. Ask the patient to look at the blocks and ask which block is clearest – add negative cylinder lenses -0.25DC at a time with the axis aligned with the clearer block lines.
5. Continue until both blocks are equally clear.
6. Refine spherical lens power by decreasing the power by 0.25DS at a time

I HAVE THIS CHART BUT NO JCC LENS
FAN AND BLOCK!
1. Ask the patient which lines on the fan are the clearest and darkest
1. Move the arrow so it is 90 degrees to where the patient reports clearest (the two limbs of the arrow will be equally clear).

I HAVE THIS CHART BUT NO JCC LENS
What if I don’t know the estimated astigmatism?
20/20 (6/6, 1.0) 0.00 to 0.75DC
20/32 (6/9.5, 0.63) 1.00DC to 1.25DC
20/40 (6/12, 0.5) 1.50DC to 1.75DC
20/63 (6/18, 0.32) 2.00DC to 2.25DC
20/80 (6/24, 0.25) 2.50DC to 3.00DC
20/100 (6/30, 0.20) 3.25DC to 4.00DC
3. Add positive sphere equal to half of the estimated astigmatism.

I HAVE THIS CHART BUT NO JCC LENS
FAN AND BLOCK!
4. Ask the patient to look at the blocks and ask which block is clearest – add negative cylinder lenses -0.25DC at a time with the axis aligned with the clearer block lines.
5. Continue until both blocks are equally clear.

I HAVE THIS CHART BUT NO JCC LENS
CLOCK CHART!
• Add a +1.00DS lens in front of best vision sphere.
• Ask the patient “which clock position has the darkest, sharpest lines?”
• Multiply the smaller “o’clock” position by 30 – E.g.: 30x2 = 60degrees
• Place a -0.25DC lens at that axis
• Ask again “which line is darkest/sharpest?”
• Continue adding -0.25DC until all lines are the same.
• KEEP ADJUSTING SPHERICAL EQUIVALENT!

CAN I USE THIS TO FIND ASTIGMATISM?
Thorington Method and the Stenopaeic Slit
• Not as accurate as other methods discussed.
• No choosing between “1 or 2”
• Low visual acuity because of high astigmatism. Retinoscopy reflex is difficult to see.
• After best spherical visual acuity is achieved, add +0.50DS.
• Put stenopaeic slit into the trial frame and the patient is instructed to rotate slit, whilst looking at the full chart, until best visual acuity is achieved.
• The slit is now aligned with the minus cylinder axis.
• Refract the two principle meridians separately with the stenopaeic slit in place.

I AM WORRIED ABOUT VERTEX DISTANCE!
• If you have a sphere high prescription then you are correct to be worried about vertex distance. – Place the sphere lens in the back lens well of the trial frame.– There is a ruler to the side for you to measure the vertex distance of the trial
frame on the patient.
Back lens well

REFRACTION – OVER CURRENT GLASSES

LOW VISION PATIENTS
Just Noticeable Difference!
• Hand held Jackson Cross Cylinder (JCC) lenses come in different steps!
– Usually we would use +/0.25 OR +/-0.50
BUT we can also buy +/- 0.75 AND +/- 1.00
• This allows us to have bigger differences between lenses when acuity is more impaired
• 20/100 = JND of 1.00 or +/- 0.50
• 20/200 = JND of 2.00 or +/- 1.00

CHART CONDITIONS
• Mark where your chart distance is on the floor.
• Have a clean chart with white background and distinct black letters for good contrast
• Place the chart at eye level
• Test in good lighting with minimal shadows around the chart
• In a screening situation where you have estimated the distance of the chart, the patient may not be reading the 20/20 (6/6, 1.0) line because the chart is incorrectly positioned – that’s okay.
➢ You can refract to the “best visual acuity” as long as you don’t shift the chart during refraction.

NEEDING TO ADJUST YOUR CHART TO FIT INTO
YOUR TESTING ENVIRONMENT?
• LogMAR charts have uniform size progression!
• Can be used easily at different test distances
– At half the distance, expect 3 lines better
– At twice the distance, expect 3 lines worse
Letters Tumbling E LEA symbols Landolt C

WHAT IF I AM NOT SURE IF THE PATIENT WILL BE
COMFORTABLE WITH THIS CHANGE IN
REFRACTION?
• Large changes in cylinder axis/power or sphere power can make the patient uncomfortable.
• Always get the patient to walk around and see how they feel with the trial frame on with the prescription.
• Alter the prescription so the patient feels more comfortable.

FINDING A NEAR PRESCRIPTION
FOR PRESBYOPES
• Ask the patient to hold the chart at their reading distance
We all read at different distances
• What prescription would you expect at each age if distance vision is corrected?
– Age 45 = +0.75D add
– Age 50 = +1.00D add
– Age 55 = +1.50D add
– Age 60 = +2.00D add
– Age 65 = +2.50D add
Add +0.25D sphere over both eyes if you want to bring the working distance closer
Add -0.25D sphere over both eyes if you want to bring the working distance away

IT IS AWKWARD ADDING +0.25D/-0.25D LENSES
OVER BOTH EYES TO ASSESS READING!
Yes it is!
I LOVE my +/-0.25D flippers!
I ask the patient to look at their reading target at a
distance comfortable for them and the I place the +0.25D
lenses over saying “does this improve your vision?”. If no, I revmove the flipper, flip it and
place the -0.25D lenses over both eyes asking again “ does
this improve your vision?”

CONFIRMING REFRACTION IN KIDS
WITH BLUR FUNCTION
1. Add +1.50 over ret finding, binocularly. Warn child of blur and you will slowly make it clearer.
2. Ask the best line they can see and each time they start making errors reduce plus by 0.25D.
3. Keep going until they plateau or get to 6/6.
*** Do this monocularly if there is a large difference between visual acuity ***

LECTURE OBJECTIVES
1. To understand the steps of trial frame refraction
2. To understand use of trial frame refraction equipment
3. To have the knowledge of how to adjust your refraction
technique for challenging patients and testing
environments

THANK YOU
QUESTIONS?