trex stateless support - cisco · trex stateless support iii contents ... trex has limited...
TRANSCRIPT

TRex Stateless support i
TRex Stateless support

TRex Stateless support ii
REVISION HISTORY
NUMBER DATE DESCRIPTION NAME

TRex Stateless support iii
Contents
1 Audience 1
2 Stateless support 2
2.1 High level functionality . . . . . . . . . . . . . . . . . . . . . . . . . . . . . . . . . . . . . . . . . . . . . . . . 2
2.1.1 Traffic profile example . . . . . . . . . . . . . . . . . . . . . . . . . . . . . . . . . . . . . . . . . . . . 3
2.1.2 High level functionality - Roadmap for future development . . . . . . . . . . . . . . . . . . . . . . . . . 3
2.2 IXIA IXExplorer vs TRex . . . . . . . . . . . . . . . . . . . . . . . . . . . . . . . . . . . . . . . . . . . . . . 3
2.3 RPC Architecture . . . . . . . . . . . . . . . . . . . . . . . . . . . . . . . . . . . . . . . . . . . . . . . . . . . 4
2.3.1 RPC architecture highlights . . . . . . . . . . . . . . . . . . . . . . . . . . . . . . . . . . . . . . . . . 6
2.4 TRex Objects . . . . . . . . . . . . . . . . . . . . . . . . . . . . . . . . . . . . . . . . . . . . . . . . . . . . . 7
2.5 Stateful vs Stateless . . . . . . . . . . . . . . . . . . . . . . . . . . . . . . . . . . . . . . . . . . . . . . . . . . 8
2.5.1 Using Stateless mode to mimic Stateful mode . . . . . . . . . . . . . . . . . . . . . . . . . . . . . . . . 8
2.6 TRex package folders . . . . . . . . . . . . . . . . . . . . . . . . . . . . . . . . . . . . . . . . . . . . . . . . . 8
2.7 Getting Started Tutorials . . . . . . . . . . . . . . . . . . . . . . . . . . . . . . . . . . . . . . . . . . . . . . . 9
2.7.1 Tutorial: Prepare TRex configuration file . . . . . . . . . . . . . . . . . . . . . . . . . . . . . . . . . . 9
2.7.2 Tutorial: Load TRex server, Simple IPv4 UDP . . . . . . . . . . . . . . . . . . . . . . . . . . . . . . . 9
2.7.3 Tutorial: Connect from a remote server . . . . . . . . . . . . . . . . . . . . . . . . . . . . . . . . . . . 13
2.7.4 Tutorial: Source and Destination MAC addresses . . . . . . . . . . . . . . . . . . . . . . . . . . . . . . 14
2.7.5 Tutorial: Python automation . . . . . . . . . . . . . . . . . . . . . . . . . . . . . . . . . . . . . . . . . 16
2.7.6 Tutorial: HLT Python API . . . . . . . . . . . . . . . . . . . . . . . . . . . . . . . . . . . . . . . . . . 19
2.7.7 Tutorial: Simple IPv4/UDP packet simulator . . . . . . . . . . . . . . . . . . . . . . . . . . . . . . . . 21
2.7.8 Tutorial: Port layer mode configuration . . . . . . . . . . . . . . . . . . . . . . . . . . . . . . . . . . . 26
2.8 Port service mode . . . . . . . . . . . . . . . . . . . . . . . . . . . . . . . . . . . . . . . . . . . . . . . . . . . 28
2.8.1 ARP / ICMP response . . . . . . . . . . . . . . . . . . . . . . . . . . . . . . . . . . . . . . . . . . . . 29
2.9 Packet capturing . . . . . . . . . . . . . . . . . . . . . . . . . . . . . . . . . . . . . . . . . . . . . . . . . . . . 29
2.9.1 BPF Filtering . . . . . . . . . . . . . . . . . . . . . . . . . . . . . . . . . . . . . . . . . . . . . . . . . 30
2.9.2 BPFJIT . . . . . . . . . . . . . . . . . . . . . . . . . . . . . . . . . . . . . . . . . . . . . . . . . . . . 31
2.9.3 API usage . . . . . . . . . . . . . . . . . . . . . . . . . . . . . . . . . . . . . . . . . . . . . . . . . . . 31
2.9.4 Console usage . . . . . . . . . . . . . . . . . . . . . . . . . . . . . . . . . . . . . . . . . . . . . . . . 32
2.9.4.1 Capture monitoring . . . . . . . . . . . . . . . . . . . . . . . . . . . . . . . . . . . . . . . . 32

TRex Stateless support iv
2.9.4.2 Capture recording . . . . . . . . . . . . . . . . . . . . . . . . . . . . . . . . . . . . . . . . . 34
2.9.5 Using capture as a counter . . . . . . . . . . . . . . . . . . . . . . . . . . . . . . . . . . . . . . . . . . 35
2.9.6 Video tutorials . . . . . . . . . . . . . . . . . . . . . . . . . . . . . . . . . . . . . . . . . . . . . . . . 36
2.10 Neighboring protocols . . . . . . . . . . . . . . . . . . . . . . . . . . . . . . . . . . . . . . . . . . . . . . . . 36
2.10.1 ARP . . . . . . . . . . . . . . . . . . . . . . . . . . . . . . . . . . . . . . . . . . . . . . . . . . . . . . 36
2.10.2 ICMP . . . . . . . . . . . . . . . . . . . . . . . . . . . . . . . . . . . . . . . . . . . . . . . . . . . . . 38
2.10.3 IPv6 ND client . . . . . . . . . . . . . . . . . . . . . . . . . . . . . . . . . . . . . . . . . . . . . . . . 39
2.11 Traffic profile tutorials . . . . . . . . . . . . . . . . . . . . . . . . . . . . . . . . . . . . . . . . . . . . . . . . 40
2.11.1 Tutorial: Simple interleaving streams . . . . . . . . . . . . . . . . . . . . . . . . . . . . . . . . . . . . 40
2.11.2 Tutorial: Multi burst streams - action next stream . . . . . . . . . . . . . . . . . . . . . . . . . . . . . . 42
2.11.3 Tutorial: Multi-burst mode . . . . . . . . . . . . . . . . . . . . . . . . . . . . . . . . . . . . . . . . . . 43
2.11.4 Tutorial: Loops of streams . . . . . . . . . . . . . . . . . . . . . . . . . . . . . . . . . . . . . . . . . . 44
2.11.5 Tutorial: IMIX with UDP packets, bi-directional . . . . . . . . . . . . . . . . . . . . . . . . . . . . . . 45
2.11.6 Tutorial: Field Engine, syn attack . . . . . . . . . . . . . . . . . . . . . . . . . . . . . . . . . . . . . . 46
2.11.7 Tutorial: Field Engine, tuple generator . . . . . . . . . . . . . . . . . . . . . . . . . . . . . . . . . . . . 48
2.11.8 Tutorial: Field Engine, write to a bit-field packet . . . . . . . . . . . . . . . . . . . . . . . . . . . . . . 49
2.11.9 Tutorial: Field Engine, random packet size . . . . . . . . . . . . . . . . . . . . . . . . . . . . . . . . . 49
2.11.10 Tutorial: Field Engine: Pre-caching to improve performance . . . . . . . . . . . . . . . . . . . . . . . . 50
2.11.11 Tutorial: New Scapy header . . . . . . . . . . . . . . . . . . . . . . . . . . . . . . . . . . . . . . . . . 51
2.11.12 Tutorial: Field Engine, Multiple Clients . . . . . . . . . . . . . . . . . . . . . . . . . . . . . . . . . . . 52
2.11.13 Tutorial: Field Engine, many clients with ARP . . . . . . . . . . . . . . . . . . . . . . . . . . . . . . . 54
2.11.14 Tutorial: Field Engine, split to core . . . . . . . . . . . . . . . . . . . . . . . . . . . . . . . . . . . . . 56
2.11.15 Tutorial: Field Engine, null stream . . . . . . . . . . . . . . . . . . . . . . . . . . . . . . . . . . . . . . 57
2.11.16 Tutorial: Field Engine, stream barrier (split) . . . . . . . . . . . . . . . . . . . . . . . . . . . . . . . . . 57
2.11.17 Tutorial: PCAP file to one stream . . . . . . . . . . . . . . . . . . . . . . . . . . . . . . . . . . . . . . 58
2.11.18 Tutorial: Teredo tunnel (IPv6 over IPv4) . . . . . . . . . . . . . . . . . . . . . . . . . . . . . . . . . . . 59
2.11.19 Tutorial: Mask instruction . . . . . . . . . . . . . . . . . . . . . . . . . . . . . . . . . . . . . . . . . . 59
2.11.20 Tutorial: Advanced traffic profile . . . . . . . . . . . . . . . . . . . . . . . . . . . . . . . . . . . . . . 61
2.11.21 Tutorial: Per stream statistics . . . . . . . . . . . . . . . . . . . . . . . . . . . . . . . . . . . . . . . . . 64
2.11.22 Tutorial: flow_stats object structure . . . . . . . . . . . . . . . . . . . . . . . . . . . . . . . . . . . . . 67
2.11.23 Tutorial: Per stream latency/jitter/packet errors . . . . . . . . . . . . . . . . . . . . . . . . . . . . . . . 68
2.11.24 Tutorial: HLT profiles . . . . . . . . . . . . . . . . . . . . . . . . . . . . . . . . . . . . . . . . . . . . 71
2.12 Functional Tutorials . . . . . . . . . . . . . . . . . . . . . . . . . . . . . . . . . . . . . . . . . . . . . . . . . . 73
2.12.1 Tutorial: Testing Dot1Q VLAN tagging . . . . . . . . . . . . . . . . . . . . . . . . . . . . . . . . . . . 73
2.12.2 Tutorial: Testing IPv4 ping - echo request / echo reply . . . . . . . . . . . . . . . . . . . . . . . . . . . 74
2.13 Services . . . . . . . . . . . . . . . . . . . . . . . . . . . . . . . . . . . . . . . . . . . . . . . . . . . . . . . . 75
2.13.1 Overview . . . . . . . . . . . . . . . . . . . . . . . . . . . . . . . . . . . . . . . . . . . . . . . . . . . 75
2.13.2 Customizing Tests . . . . . . . . . . . . . . . . . . . . . . . . . . . . . . . . . . . . . . . . . . . . . . 76
2.13.3 Control Plane Stress Tests . . . . . . . . . . . . . . . . . . . . . . . . . . . . . . . . . . . . . . . . . . 79

TRex Stateless support v
2.13.4 Currently Provided Services . . . . . . . . . . . . . . . . . . . . . . . . . . . . . . . . . . . . . . . . . 80
2.13.5 A Detailed DHCP Example . . . . . . . . . . . . . . . . . . . . . . . . . . . . . . . . . . . . . . . . . 80
2.13.6 Limitations . . . . . . . . . . . . . . . . . . . . . . . . . . . . . . . . . . . . . . . . . . . . . . . . . . 80
2.13.7 Console plugins . . . . . . . . . . . . . . . . . . . . . . . . . . . . . . . . . . . . . . . . . . . . . . . . 80
2.14 PCAP Based Traffic Tutorials . . . . . . . . . . . . . . . . . . . . . . . . . . . . . . . . . . . . . . . . . . . . . 84
2.14.1 PCAP Based Traffic . . . . . . . . . . . . . . . . . . . . . . . . . . . . . . . . . . . . . . . . . . . . . 84
2.14.1.1 Local PCAP push . . . . . . . . . . . . . . . . . . . . . . . . . . . . . . . . . . . . . . . . . 84
2.14.1.2 Server-based push . . . . . . . . . . . . . . . . . . . . . . . . . . . . . . . . . . . . . . . . . 85
2.14.2 Tutorial: Simple PCAP file - Profile . . . . . . . . . . . . . . . . . . . . . . . . . . . . . . . . . . . . . 85
2.14.3 Tutorial: Simple PCAP file - API . . . . . . . . . . . . . . . . . . . . . . . . . . . . . . . . . . . . . . 88
2.14.4 Tutorial: PCAP file iterating over dest IP . . . . . . . . . . . . . . . . . . . . . . . . . . . . . . . . . . 88
2.14.5 Tutorial: PCAP file with VLAN . . . . . . . . . . . . . . . . . . . . . . . . . . . . . . . . . . . . . . . 89
2.14.6 Tutorial: PCAP file and Field Engine - Profile . . . . . . . . . . . . . . . . . . . . . . . . . . . . . . . . 90
2.14.7 Tutorial: Server-side method with large PCAP file . . . . . . . . . . . . . . . . . . . . . . . . . . . . . 91
2.14.8 Tutorial: A long list of PCAP files of varied sizes . . . . . . . . . . . . . . . . . . . . . . . . . . . . . . 92
2.15 Performance Tweaking . . . . . . . . . . . . . . . . . . . . . . . . . . . . . . . . . . . . . . . . . . . . . . . . 92
2.15.1 Caching MBUFs . . . . . . . . . . . . . . . . . . . . . . . . . . . . . . . . . . . . . . . . . . . . . . . 92
2.15.2 Core masking per interface . . . . . . . . . . . . . . . . . . . . . . . . . . . . . . . . . . . . . . . . . . 93
2.15.3 Predefind modes . . . . . . . . . . . . . . . . . . . . . . . . . . . . . . . . . . . . . . . . . . . . . . . 94
2.15.4 Manual mask . . . . . . . . . . . . . . . . . . . . . . . . . . . . . . . . . . . . . . . . . . . . . . . . . 96
2.16 Reference . . . . . . . . . . . . . . . . . . . . . . . . . . . . . . . . . . . . . . . . . . . . . . . . . . . . . . . 97
2.17 Console commands . . . . . . . . . . . . . . . . . . . . . . . . . . . . . . . . . . . . . . . . . . . . . . . . . . 97
2.17.1 Overview . . . . . . . . . . . . . . . . . . . . . . . . . . . . . . . . . . . . . . . . . . . . . . . . . . . 97
2.17.2 Ports State . . . . . . . . . . . . . . . . . . . . . . . . . . . . . . . . . . . . . . . . . . . . . . . . . . 97
2.17.3 Common Arguments . . . . . . . . . . . . . . . . . . . . . . . . . . . . . . . . . . . . . . . . . . . . . 98
2.17.3.1 Help . . . . . . . . . . . . . . . . . . . . . . . . . . . . . . . . . . . . . . . . . . . . . . . . 98
2.17.3.2 Port mask . . . . . . . . . . . . . . . . . . . . . . . . . . . . . . . . . . . . . . . . . . . . . 98
2.17.3.3 Duration . . . . . . . . . . . . . . . . . . . . . . . . . . . . . . . . . . . . . . . . . . . . . . 98
2.17.3.4 Multiplier . . . . . . . . . . . . . . . . . . . . . . . . . . . . . . . . . . . . . . . . . . . . . 98
2.17.4 Commands . . . . . . . . . . . . . . . . . . . . . . . . . . . . . . . . . . . . . . . . . . . . . . . . . . 99
2.17.4.1 connect . . . . . . . . . . . . . . . . . . . . . . . . . . . . . . . . . . . . . . . . . . . . . . . 99
2.17.4.2 reset . . . . . . . . . . . . . . . . . . . . . . . . . . . . . . . . . . . . . . . . . . . . . . . . 99
2.17.4.3 portattr . . . . . . . . . . . . . . . . . . . . . . . . . . . . . . . . . . . . . . . . . . . . . . . 99
2.17.4.4 clear . . . . . . . . . . . . . . . . . . . . . . . . . . . . . . . . . . . . . . . . . . . . . . . . 100
2.17.4.5 stats . . . . . . . . . . . . . . . . . . . . . . . . . . . . . . . . . . . . . . . . . . . . . . . . 100
2.17.4.6 streams . . . . . . . . . . . . . . . . . . . . . . . . . . . . . . . . . . . . . . . . . . . . . . . 101
2.17.4.7 start . . . . . . . . . . . . . . . . . . . . . . . . . . . . . . . . . . . . . . . . . . . . . . . . 103
2.17.4.8 stop . . . . . . . . . . . . . . . . . . . . . . . . . . . . . . . . . . . . . . . . . . . . . . . . 104
2.17.4.9 pause . . . . . . . . . . . . . . . . . . . . . . . . . . . . . . . . . . . . . . . . . . . . . . . . 104

TRex Stateless support vi
2.17.4.10 resume . . . . . . . . . . . . . . . . . . . . . . . . . . . . . . . . . . . . . . . . . . . . . . . 104
2.17.4.11 update . . . . . . . . . . . . . . . . . . . . . . . . . . . . . . . . . . . . . . . . . . . . . . . 104
2.17.4.12 per stream operations . . . . . . . . . . . . . . . . . . . . . . . . . . . . . . . . . . . . . . . 105
2.17.4.13 TUI . . . . . . . . . . . . . . . . . . . . . . . . . . . . . . . . . . . . . . . . . . . . . . . . 105
2.18 Benchmarks of 40G NICs . . . . . . . . . . . . . . . . . . . . . . . . . . . . . . . . . . . . . . . . . . . . . . . 106
2.19 Appendix . . . . . . . . . . . . . . . . . . . . . . . . . . . . . . . . . . . . . . . . . . . . . . . . . . . . . . . 106
2.19.1 Scapy packet examples . . . . . . . . . . . . . . . . . . . . . . . . . . . . . . . . . . . . . . . . . . . . 106
2.19.2 HLT supported Arguments . . . . . . . . . . . . . . . . . . . . . . . . . . . . . . . . . . . . . . . . . . 106
2.19.2.1 connect . . . . . . . . . . . . . . . . . . . . . . . . . . . . . . . . . . . . . . . . . . . . . . . 106
2.19.2.2 cleanup_session . . . . . . . . . . . . . . . . . . . . . . . . . . . . . . . . . . . . . . . . . . 106
2.19.2.3 traffic_config . . . . . . . . . . . . . . . . . . . . . . . . . . . . . . . . . . . . . . . . . . . . 107
2.19.2.4 traffic_control . . . . . . . . . . . . . . . . . . . . . . . . . . . . . . . . . . . . . . . . . . . 109
2.19.2.5 traffic_stats . . . . . . . . . . . . . . . . . . . . . . . . . . . . . . . . . . . . . . . . . . . . . 109
2.19.3 FD.IO open source project using TRex . . . . . . . . . . . . . . . . . . . . . . . . . . . . . . . . . . . 109
2.19.4 Using Stateless client via JSON-RPC . . . . . . . . . . . . . . . . . . . . . . . . . . . . . . . . . . . . 110
2.19.4.1 How to run TRex side: . . . . . . . . . . . . . . . . . . . . . . . . . . . . . . . . . . . . . . . 110
2.19.4.2 Native Stateless API functions: . . . . . . . . . . . . . . . . . . . . . . . . . . . . . . . . . . 110
2.19.4.3 HLTAPI Methods can be called here as well: . . . . . . . . . . . . . . . . . . . . . . . . . . . 111
2.19.4.4 Example of running from Java: . . . . . . . . . . . . . . . . . . . . . . . . . . . . . . . . . . 111

TRex Stateless support 1 / 112
Chapter 1
Audience
This document assumes basic knowledge of TRex, and assumes that TRex is installed and configured. For information, see themanual, especially the material up to the Basic Usage section.

TRex Stateless support 2 / 112
Chapter 2
Stateless support
2.1 High level functionality
• Large scale - Supports about 10-22 million packets per second (mpps) per core, scalable with the number of cores
• Support for 1, 10, 25, 40, and 100 Gb/sec interfaces
• Support for multiple traffic profiles per interface
• Profile can support multiple streams, scalable to 10K parallel streams
• Supported for each stream:
– Packet template - ability to build any packet (including malformed) using Scapy (example: MPLS/IPv4/Ipv6/GRE/VXLAN/NSH)
– Field Engine program
* Ability to change any field inside the packet (example: src_ip = 10.0.0.1-10.0.0.255)
* Ability to change the packet size (example: random packet size 64-9K)
– Mode - Continuous/Burst/Multi-burst support
– Rate can be specified as:
* Packets per second (example: 14MPPS)
* L1 bandwidth (example: 500Mb/sec)
* L2 bandwidth (example: 500Mb/sec)
* Interface link percentage (example: 10%)
– Support for HLTAPI-like profile definition
– Action - stream can trigger a stream
• Interactive support - Fast Console, GUI
• Statistics per interface
• Statistics per stream done in hardware
• Latency and jitter per stream
• Blazingly fast automation support
– Python 2.7/3.0 Client API
– Python HLTAPI Client API
• Multi-user support - multiple users can interact with the same TRex instance simultaneously

TRex Stateless support 3 / 112
2.1.1 Traffic profile example
The following example shows three streams configured for Continuous, Burst, and Multi-burst traffic.
Figure 2.1: Example of multiple streams
2.1.2 High level functionality - Roadmap for future development
• Routing protocol support — RIP/BGP/ISIS/SPF (no current plan to extend supported protocols)
2.2 IXIA IXExplorer vs TRex
TRex has limited functionality compared to IXIA, but has some advantages. The following table summarizes the differences:
Table 2.1: TRex vs IXExplorer
Feature IXExplorer TRex DescriptionLine rate Yes 10-24MPPS/core, depends
on the use caseMultistream
255 Software limited to ~20K
Packetbuild
flexibil-ity
Limited Scapy - Unlimited Example: GRE/VXLAN/NSH is supported.Can be extended to future protocols.
PacketField
Engine
Limited Unlimited
TxMode
Continuous/Burst/Multi-burst
Continuous/Burst/Multi-burst
ARP/IPv6ND Em-ulation
Yes Yes
DHCPClientEmula-
tion
Yes Yes
TRex Stateless support 4 / 112
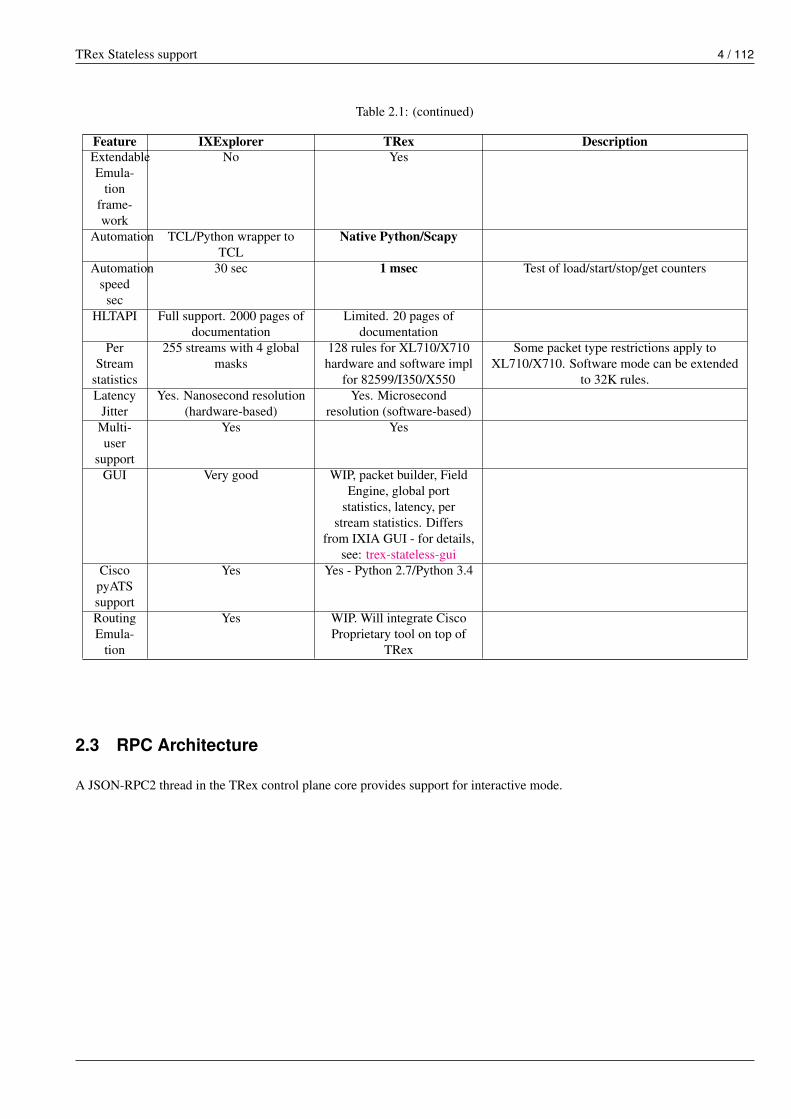
Table 2.1: (continued)
Feature IXExplorer TRex DescriptionExtendableEmula-
tionframe-work
No Yes
Automation TCL/Python wrapper toTCL
Native Python/Scapy
Automationspeed
sec
30 sec 1 msec Test of load/start/stop/get counters
HLTAPI Full support. 2000 pages ofdocumentation
Limited. 20 pages ofdocumentation
PerStream
statistics
255 streams with 4 globalmasks
128 rules for XL710/X710hardware and software impl
for 82599/I350/X550
Some packet type restrictions apply toXL710/X710. Software mode can be extended
to 32K rules.Latency
JitterYes. Nanosecond resolution
(hardware-based)Yes. Microsecond
resolution (software-based)Multi-user
support
Yes Yes
GUI Very good WIP, packet builder, FieldEngine, global port
statistics, latency, perstream statistics. Differs
from IXIA GUI - for details,see: trex-stateless-gui
CiscopyATSsupport
Yes Yes - Python 2.7/Python 3.4
RoutingEmula-
tion
Yes WIP. Will integrate CiscoProprietary tool on top of
TRex
2.3 RPC Architecture
A JSON-RPC2 thread in the TRex control plane core provides support for interactive mode.

TRex Stateless support 5 / 112
Figure 2.2: RPC server components
Layers
• Control transport protocol: ZMQ working in REQ/RES mode.
• RPC protocol on top of the control transport protocol: JSON-RPC2.
• Asynchronous transport: ZMQ working in SUB/PUB mode (used for asynchronous events such as interface changemode, counters, and so on).
Interfaces
• Automation API: Python is the first client to implement the Python automation API.
• User interface: The console uses the Python API to implement a user interface for TRex.
• GUI : The GUI works on top of the JSON-RPC2 layer.
Control of TRex interfaces
• Numerous users can control a single TRex server together, from different interfaces.
• Users acquire individual TRex interfaces exclusively. Example: Two users control a 4-port TRex server. User A acquiresinterfaces 0 and 1; User B acquires interfaces 3 and 4.
• Only one user interface (console or GUI) can have read/write control of a specific interface. This enables caching theTRex server interface information in the client core. Example: User A, with two acquired interfaces, can have only oneread/write control session at a time.
• A user can set up numerous read-only clients on a single interface - for example, for monitoring traffic statistics on theinterface.
• A client in read-write mode can acquire a statistic in real time (with ASYNC ZMQ). This enables viewing statisticsthrough numerous user interfaces (console and GUI) simultaneously.
Synchronization
• A client syncs with the TRex server to get the state in connection time, and caches the server information locally afterthe state has changed.
• If a client crashes or exits, it syncs again after reconnecting.

TRex Stateless support 6 / 112
Figure 2.3: Multiple users, per interface
For details about the TRex RPC server, see the RPC specification.
2.3.1 RPC architecture highlights
The RPC architecture provides the following advantages:
• Fast interaction with TRex server. Loading, starting, and stopping a profile for an interface is very fast - about 2000 cycles/sec.
• Leverages Python/Scapy for building a packet/Field Engine.
• HLTAPI compiler complexity is handled in Python.
TRex Stateless support 7 / 112
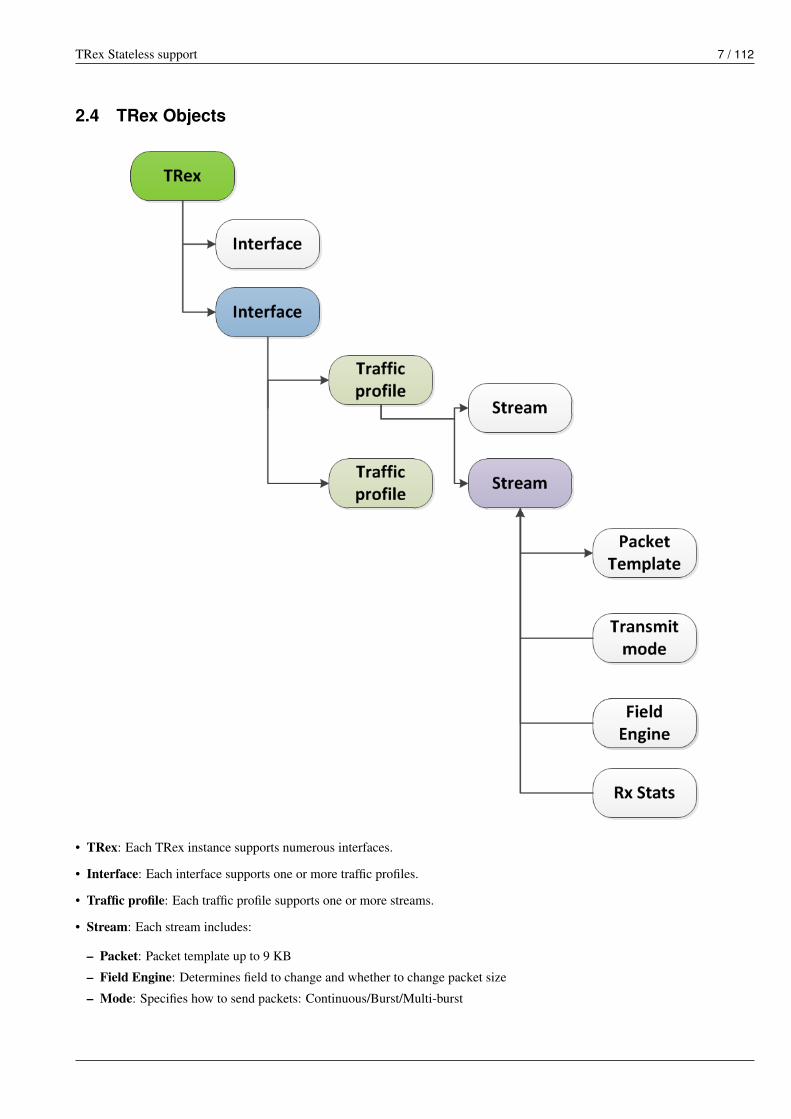
2.4 TRex Objects
• TRex: Each TRex instance supports numerous interfaces.
• Interface: Each interface supports one or more traffic profiles.
• Traffic profile: Each traffic profile supports one or more streams.
• Stream: Each stream includes:
– Packet: Packet template up to 9 KB
– Field Engine: Determines field to change and whether to change packet size
– Mode: Specifies how to send packets: Continuous/Burst/Multi-burst

TRex Stateless support 8 / 112
– Rx Stats: Statistics to collect for each stream
– Rate: Rate (packets per second or bandwidth)
– Action: Specifies stream to follow when the current stream is complete (valid for Continuous or Burst modes)
2.5 Stateful vs Stateless
TRex Stateless support enables basic L2/L3 testing, relevant mostly for a switch or router. In Stateless mode it is possible todefine a stream with a one packet template, define a program to change any fields in the packet, and run the stream in one of thefollowing modes:
• Continuous
• Burst
• Multi-burst
Stateless mode does not support learning NAT translation, as there is no context of flow/client/server.
• In Stateful mode, the basic building block is a flow/application (composed of many packets).
• Stateless mode is much more flexible, enabling you to define any type of packet, and build a simple program.
Table 2.2: Features: Stateful vs Stateless
Feature Stateful StatelessPer flow state Yes No
NAT Yes NoTunnel Some are supported YesL7 App
emulationYes No
Any type ofpacket
No Yes
Latency Jitter Global/Per flow Per Stream
2.5.1 Using Stateless mode to mimic Stateful mode
Stateless mode can mimic some, but not all functionality of Stateful mode. For example, you can load a PCAP with the numberof packets as a link of streams:a→b→c→d→ back to aYou can then create a program for each stream to change:src_ip=10.0.0.1-10.0.0.254This creates traffic similar to that of Stateful mode, but with a completely different basis.
If you are confused you probably need Stateless. :-)
2.6 TRex package folders
Location Description/ t-rex-64/dpdk_set_ports/stl-sim

TRex Stateless support 9 / 112
Location Description/stl Stateless native (py) profiles/stl/hlt Stateless HLT profiles/ko Kernel modules for DPDK/external_libs Python external libs used by server/clients/exp Golden PCAP file for unit-tests/cfg Examples of config files/cap2 Stateful profiles/avl Stateful profiles - SFR profile/automation Python client/server code for both Stateful and Stateless/automation/regression Regression for Stateless and Stateful/automation/config Regression setups config files/automation/trex_control_plane/stl Stateless lib and Console/automation/trex_control_plane/stl/trex_stl_lib Stateless lib/automation/trex_control_plane/stl/examples Stateless examples
2.7 Getting Started Tutorials
The tutorials in this section demonstrate basic TRex stateless use cases. Examples include common and moderately advancedTRex concepts.
2.7.1 Tutorial: Prepare TRex configuration file
GoalDefine the TRex physical or virtual ports and create configuration file.
Follow this chapter first time configuration
2.7.2 Tutorial: Load TRex server, Simple IPv4 UDP
GoalSend simple UDP packets from all ports of a TRex server.
Traffic profileThe following profile defines one stream, with an IP/UDP packet template with 10 bytes of x(0x78) of payload. For moreexamples of defining packets using Scapy, see the Scapy documentation.
Filestl/udp_1pkt_simple.py
from trex_stl_lib.api import *
class STLS1(object):
def create_stream (self):
return STLStream(packet =
STLPktBuilder(pkt = Ether()/IP(src="16.0.0.1",dst="48.0.0.1")/
UDP(dport=12,sport=1025)/(10*’x’)v1
),mode = STLTXCont()) v2

TRex Stateless support 10 / 112
def get_streams (self, direction = 0, **kwargs):v3
# create 1 streamreturn [ self.create_stream() ]
# dynamic load - used for TRex console or simulatordef register(): v4
return STLS1()
v1 Defines the packet. In this case, the packet is IP/UDP with 10 bytes of x. For more information, see the Scapy documen-tation.v2 Mode: Continuous. Rate: 1 PPS (default rate is 1 PPS)v3 The get_streams function is mandatory.v4 Each traffic profile module requires a register function.
NoteThe SRC/DST MAC addresses are taken from /etc/trex_cfg.yaml. To change them, add Ether(dst="00:00:dd:dd:00:01") withthe desired destination.
Start TRex as a server
NoteThe TRex package includes all required packages. It is not necessary to install any Python packages (including Scapy).
[bash]>sudo ./t-rex-64 -i
• Wait until the server is up and running.
• (Optional) Use -c to add more cores.
• (Optional) Use --cfg to specify a different configuration file. The default is /etc/trex_cfg.yaml.
Connect with consoleOn the same machine, in a new terminal window (open a new window using xterm, or ssh again), connect to TRex usingtrex-console.
[bash]>trex-console # v1Connecting to RPC server on localhost:4501 [SUCCESS]connecting to publisher server on localhost:4500 [SUCCESS]Acquiring ports [0, 1, 2, 3]: [SUCCESS]
125.69 [ms]
trex>start -f stl/udp_1pkt_simple.py -m 10mbps -a # v2Removing all streams from port(s) [0, 1, 2, 3]: [SUCCESS]Attaching 1 streams to port(s) [0, 1, 2, 3]: [SUCCESS]

TRex Stateless support 11 / 112
Starting traffic on port(s) [0, 1, 2, 3]: [SUCCESS]
# pause the traffic on all port>pause -a # v3# resume the traffic on all port>resume -a # v4# stop traffic on all port>stop -a # v5# show dynamic statistic>tui
v1 Connects to the TRex server from the local machine.v2 Start the traffic on all ports at 10 mbps. Can also specify as MPPS. Example: 14 MPPS (-m 14mpps).v3 Pauses the traffic.v4 Resumes.v5 Stops traffic on all ports.
NoteIf you have a connection error, open the /etc/trex_cfg.yaml file and remove keywords such as enable_zmq_pub :trueand zmq_pub_port :4501 from the file.
Viewing streamsTo display stream data for all ports, use streams -a.
Streams
trex>streams -aPort 0:
ID | packet type | length | mode | rate | next stream-----------------------------------------------------------------------------------1 | Ethernet:IP:UDP:Raw | 56 | Continuous | 1.00 pps | -1
Port 1:
ID | packet type | length | mode | rate | next stream-----------------------------------------------------------------------------------1 | Ethernet:IP:UDP:Raw | 56 | Continuous | 1.00 pps | -1
Port 2:
ID | packet type | length | mode | rate | next stream-----------------------------------------------------------------------------------1 | Ethernet:IP:UDP:Raw | 56 | Continuous | 1.00 pps | -1
Port 3:
ID | packet type | length | mode | rate | next stream-----------------------------------------------------------------------------------1 | Ethernet:IP:UDP:Raw | 56 | Continuous | 1.00 pps | -1

TRex Stateless support 12 / 112
Viewing command helpTo view help for a command, use <command> --help.
Viewing general statisticsTo view general statistics, open a "textual user interface" with tui.
TRex >tuiGlobal Statistics
Connection : localhost, Port 4501Version : v1.93, UUID: N/ACpu Util : 0.2%
:Total Tx L2 : 40.01 Mb/secTotal Tx L1 : 52.51 Mb/secTotal Rx : 40.01 Mb/secTotal Pps : 78.14 Kpkt/sec
:Drop Rate : 0.00 b/secQueue Full : 0 pkts
Port Statistics
port | 0 | 1 |--------------------------------------------------------owner | hhaim | hhaim |state | ACTIVE | ACTIVE |-- | | |Tx bps L2 | 10.00 Mbps | 10.00 Mbps |Tx bps L1 | 13.13 Mbps | 13.13 Mbps |Tx pps | 19.54 Kpps | 19.54 Kpps |Line Util. | 0.13 % | 0.13 % |--- | | |Rx bps | 10.00 Mbps | 10.00 Mbps |Rx pps | 19.54 Kpps | 19.54 Kpps |---- | | |opackets | 1725794 | 1725794 |ipackets | 1725794 | 1725794 |obytes | 110450816 | 110450816 |ibytes | 110450816 | 110450816 |tx-bytes | 110.45 MB | 110.45 MB |rx-bytes | 110.45 MB | 110.45 MB |tx-pkts | 1.73 Mpkts | 1.73 Mpkts |rx-pkts | 1.73 Mpkts | 1.73 Mpkts |----- | | |oerrors | 0 | 0 |ierrors | 0 | 0 |
status: /
browse: ’q’ - quit, ’g’ - dashboard, ’0-3’ - port displaydashboard: ’p’ - pause, ’c’ - clear, ’-’ - low 5%, ’+’ - up 5%,
DiscussionIn this example TRex sends the same packet from all ports. If your setup is connected with loopback, you will see Txpackets from port 0 in Rx port 1 and vice versa. If you have DUT with static route, you might see all packets going to aspecific port.
Static route
TRex Stateless support 13 / 112
interface TenGigabitEthernet0/0/0mtu 9000ip address 1.1.9.1 255.255.255.0
!interface TenGigabitEthernet0/1/0mtu 9000ip address 1.1.10.1 255.255.255.0
!
ip route 16.0.0.0 255.0.0.0 1.1.9.2ip route 48.0.0.0 255.0.0.0 1.1.10.2
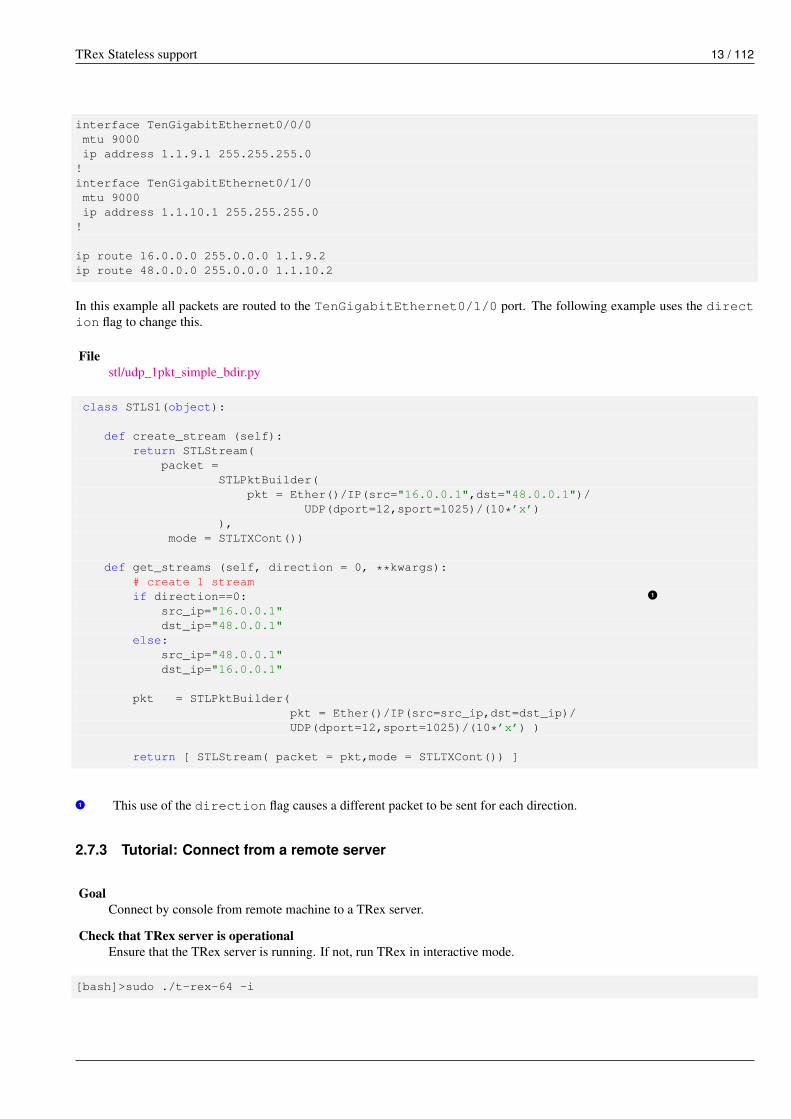
In this example all packets are routed to the TenGigabitEthernet0/1/0 port. The following example uses the direction flag to change this.
Filestl/udp_1pkt_simple_bdir.py
class STLS1(object):
def create_stream (self):return STLStream(
packet =STLPktBuilder(
pkt = Ether()/IP(src="16.0.0.1",dst="48.0.0.1")/UDP(dport=12,sport=1025)/(10*’x’)
),mode = STLTXCont())
def get_streams (self, direction = 0, **kwargs):# create 1 streamif direction==0: v1
src_ip="16.0.0.1"dst_ip="48.0.0.1"
else:src_ip="48.0.0.1"dst_ip="16.0.0.1"
pkt = STLPktBuilder(pkt = Ether()/IP(src=src_ip,dst=dst_ip)/UDP(dport=12,sport=1025)/(10*’x’) )
return [ STLStream( packet = pkt,mode = STLTXCont()) ]
v1 This use of the direction flag causes a different packet to be sent for each direction.
2.7.3 Tutorial: Connect from a remote server
GoalConnect by console from remote machine to a TRex server.
Check that TRex server is operationalEnsure that the TRex server is running. If not, run TRex in interactive mode.
[bash]>sudo ./t-rex-64 -i
TRex Stateless support 14 / 112
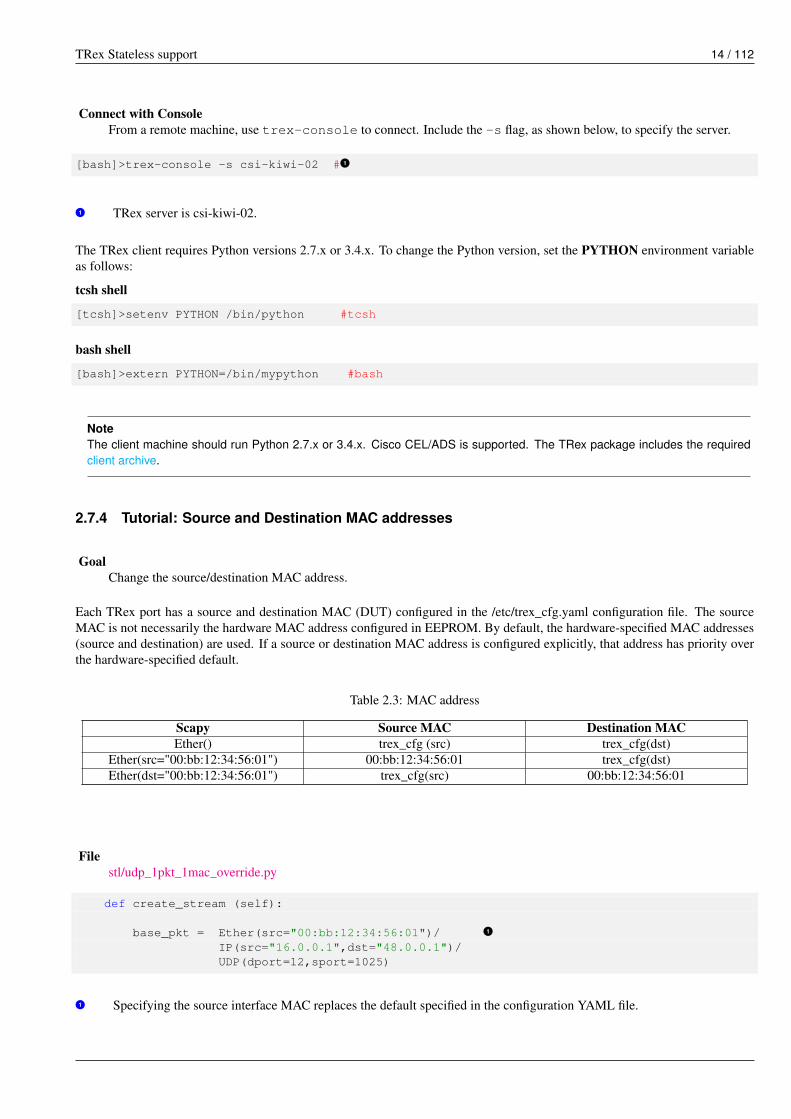
Connect with ConsoleFrom a remote machine, use trex-console to connect. Include the -s flag, as shown below, to specify the server.
[bash]>trex-console -s csi-kiwi-02 # v1v1 TRex server is csi-kiwi-02.
The TRex client requires Python versions 2.7.x or 3.4.x. To change the Python version, set the PYTHON environment variableas follows:
tcsh shell
[tcsh]>setenv PYTHON /bin/python #tcsh
bash shell
[bash]>extern PYTHON=/bin/mypython #bash
NoteThe client machine should run Python 2.7.x or 3.4.x. Cisco CEL/ADS is supported. The TRex package includes the requiredclient archive.
2.7.4 Tutorial: Source and Destination MAC addresses
GoalChange the source/destination MAC address.
Each TRex port has a source and destination MAC (DUT) configured in the /etc/trex_cfg.yaml configuration file. The sourceMAC is not necessarily the hardware MAC address configured in EEPROM. By default, the hardware-specified MAC addresses(source and destination) are used. If a source or destination MAC address is configured explicitly, that address has priority overthe hardware-specified default.
Table 2.3: MAC address
Scapy Source MAC Destination MACEther() trex_cfg (src) trex_cfg(dst)
Ether(src="00:bb:12:34:56:01") 00:bb:12:34:56:01 trex_cfg(dst)Ether(dst="00:bb:12:34:56:01") trex_cfg(src) 00:bb:12:34:56:01
Filestl/udp_1pkt_1mac_override.py
def create_stream (self):
base_pkt = Ether(src="00:bb:12:34:56:01")/ v1IP(src="16.0.0.1",dst="48.0.0.1")/UDP(dport=12,sport=1025)
v1 Specifying the source interface MAC replaces the default specified in the configuration YAML file.

TRex Stateless support 15 / 112
ImportantA TRex port receives a packet only if the packet’s destination MAC matches the HW Src MAC defined for that port inthe /etc/trex_cfg.yaml configuration file. Alternatively, a port can be put into promiscuous mode, allowing theport to receive all packets on the line. The port can be configured to promiscuous mode by API or by the followingcommand at the console: portattr -a --prom.
To set ports to promiscuous mode and show the port status:
trex>portattr -a --prom on # v1trex>stats --ps # v2Port Status
port | 0 | 1 |---------------------------------------------------------------
driver | rte_ixgbe_pmd | rte_ixgbe_pmd |maximum | 10 Gb/s | 10 Gb/s |status | IDLE | IDLE |promiscuous | on | on | # v3
-- | | |HW src mac | 90:e2:ba:36:33:c0 | 90:e2:ba:36:33:c1 |SW src mac | 00:00:00:01:00:00 | 00:00:00:01:00:00 |SW dst mac | 00:00:00:01:00:00 | 00:00:00:01:00:00 |
--- | | |PCI Address | 0000:03:00.0 | 0000:03:00.1 |NUMA Node | 0 | 0 |
v1 Configures all ports to promiscuous mode.v2 Show port status.v3 "on" indicates port promiscuous mode.
To change ports to promiscuous mode by Python API:
Python API to change ports to promiscuous mode
c = STLClient(verbose_level = LoggerApi.VERBOSE_REGULAR)
c.connect()
my_ports=[0,1]
# prepare our portsc.reset(ports = my_ports)
# port info, mac-addr info, speedprint c.get_port_info(my_ports) v1c.set_port_attr(my_ports, promiscuous = True) v2
v1 Get port info for all ports.v2 Change the port attribute to promiscuous =True.
For more information see the Python Client API.
NoteInterfaces are not set to promiscuous mode by default. Typically, after changing the port to promiscuous mode for a specifictest, it is advisable to change it back to non-promiscuous mode.
TRex Stateless support 16 / 112
2.7.5 Tutorial: Python automation
GoalSimple automation test using Python from a local or remote machine.
Directories
Python API examples: automation/trex_control_plane/stl/examples
Python API library: automation/trex_control_plane/stl/trex_stl_lib
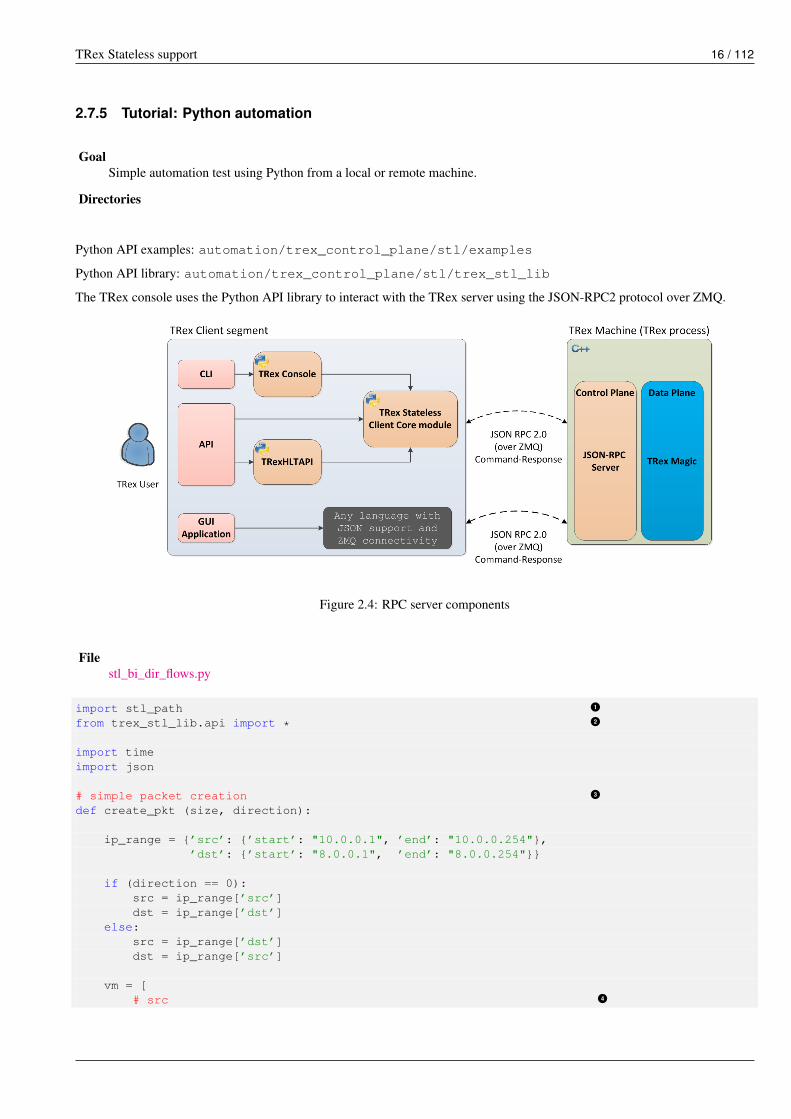
The TRex console uses the Python API library to interact with the TRex server using the JSON-RPC2 protocol over ZMQ.
Figure 2.4: RPC server components
Filestl_bi_dir_flows.py
import stl_path v1from trex_stl_lib.api import *
v2import timeimport json
# simple packet creation v3def create_pkt (size, direction):
ip_range = {’src’: {’start’: "10.0.0.1", ’end’: "10.0.0.254"},’dst’: {’start’: "8.0.0.1", ’end’: "8.0.0.254"}}
if (direction == 0):src = ip_range[’src’]dst = ip_range[’dst’]
else:src = ip_range[’dst’]dst = ip_range[’src’]
vm = [# src v4

TRex Stateless support 17 / 112
STLVmFlowVar(name="src",min_value=src[’start’],max_value=src[’end’],size=4,op="inc"),
STLVmWrFlowVar(fv_name="src",pkt_offset= "IP.src"),
# dstSTLVmFlowVar(name="dst",
min_value=dst[’start’],max_value=dst[’end’],size=4,op="inc"),
STLVmWrFlowVar(fv_name="dst",pkt_offset= "IP.dst"),
# checksumSTLVmFixIpv4(offset = "IP")]
base = Ether()/IP()/UDP()pad = max(0, len(base)) * ’x’
return STLPktBuilder(pkt = base/pad,vm = vm)
def simple_burst ():
# create clientc = STLClient()
# username/server can be changed those are the default# username = common.get_current_user(),# server = "localhost"# STLClient(server = "my_server",username ="trex_client") for example
passed = True
try:# turn this on for some information#c.set_verbose("high")
# create two streamss1 = STLStream(packet = create_pkt(200, 0),
mode = STLTXCont(pps = 100))
# second stream with a phase of 1ms (inter stream gap)s2 = STLStream(packet = create_pkt(200, 1),
isg = 1000,mode = STLTXCont(pps = 100))
# connect to serverc.connect() v5# prepare our ports (my machine has 0 <--> 1 with static route)c.reset(ports = [0, 1]) # Acquire port 0,1 for $USER v6# add both streams to portsc.add_streams(s1, ports = [0])c.add_streams(s2, ports = [1])
# clear the stats before injectingc.clear_stats()
TRex Stateless support 18 / 112
# choose rate and start traffic for 10 seconds on 5 mppsprint "Running 5 Mpps on ports 0, 1 for 10 seconds..."c.start(ports = [0, 1], mult = "5mpps", duration = 10) v7# block until donec.wait_on_traffic(ports = [0, 1]) v8# read the stats after the teststats = c.get_stats() v9print json.dumps(stats[0], indent = 4, separators=(’,’, ’: ’), sort_keys = True)print json.dumps(stats[1], indent = 4, separators=(’,’, ’: ’), sort_keys = True)
lost_a = stats[0]["opackets"] - stats[1]["ipackets"]lost_b = stats[1]["opackets"] - stats[0]["ipackets"]
print "\npackets lost from 0 --> 1: {0} pkts".format(lost_a)print "packets lost from 1 --> 0: {0} pkts".format(lost_b)
if (lost_a == 0) and (lost_b == 0):passed = True
else:passed = False
except STLError as e:passed = Falseprint e
finally:c.disconnect() v10
if passed:print "\nTest has passed :-)\n"
else:print "\nTest has failed :-(\n"
# run the testssimple_burst()
v1 Imports the stl_path. The path here is specific to this example. When configuring, provide the path to your stl_trex library.v2 Imports TRex Stateless library. When configuring, provide the path to your TRex Stateless library.v3 Creates packet per direction using Scapy.v4 See the Field Engine section for information.v5 Connects to the local TRex. Username and server can be added.v6 Acquires the ports.v7 Loads the traffic profile and start generating traffic.v8 Waits for the traffic to be finished. There is a polling function so you can test do something while waiting.v9 Get port statistics.v10 Disconnects.
See TRex Stateless Python API for details about using the Python APIs.

TRex Stateless support 19 / 112
2.7.6 Tutorial: HLT Python API
HLT Python API is a layer on top of the native layer. It supports the standard Cisco traffic generator API. For more information,see Cisco/IXIA/Spirent documentation.TRex supports a limited number of HLTAPI arguments. It is recommended to use the native API for simplicity and flexibility.
Supported HLT Python API classes:
• Device Control
– connect
– cleanup_session
– device_info
– info
• Interface
– interface_config
– interface_stats
• Traffic
– traffic_config - not all arguments are supported
– traffic_control
– traffic_stats
For details, see: Appendix
Filehlt_udp_simple.py
import sysimport argparseimport stl_pathfrom trex_stl_lib.api import *
v1from trex_stl_lib.trex_stl_hltapi import *
v2if __name__ == "__main__":
parser = argparse.ArgumentParser(usage="""Connect to TRex and send burst of packets
examples
hlt_udp_simple.py -s 9000 -d 30
hlt_udp_simple.py -s 9000 -d 30 -rate_percent 10
hlt_udp_simple.py -s 300 -d 30 -rate_pps 5000000
hlt_udp_simple.py -s 800 -d 30 -rate_bps 500000000 --debug
then run the simulator on the output./stl-sim -f example.py -o a.pcap ==> a.pcap include the packet
""",description="Example for TRex HLTAPI",epilog=" based on hhaim’s stl_run_udp_simple example")
TRex Stateless support 20 / 112
parser.add_argument("--ip",dest="ip",help=’Remote trex ip’,default="127.0.0.1",type = str)
parser.add_argument("-s", "--frame-size",dest="frame_size",help=’L2 frame size in bytes without FCS’,default=60,type = int,)
parser.add_argument(’-d’,’--duration’,dest=’duration’,help=’duration in second ’,default=10,type = int,)
parser.add_argument(’--rate-pps’,dest=’rate_pps’,help=’speed in pps’,default="100")
parser.add_argument(’--src’,dest=’src_mac’,help=’src MAC’,default=’00:50:56:b9:de:75’)
parser.add_argument(’--dst’,dest=’dst_mac’,help=’dst MAC’,default=’00:50:56:b9:34:f3’)
args = parser.parse_args()
hltapi = CTRexHltApi()print ’Connecting to TRex’res = hltapi.connect(device = args.ip, port_list = [0, 1], reset = True, break_locks = ←↩
True)check_res(res)ports = res[’port_handle’]if len(ports) < 2:
error(’Should have at least 2 ports for this test’)print ’Connected, acquired ports: %s’ % ports
print ’Creating traffic’
res = hltapi.traffic_config(mode = ’create’, bidirectional = True,port_handle = ports[0], port_handle2 = ports[1],frame_size = args.frame_size,mac_src = args.src_mac, mac_dst = args.dst_mac,mac_src2 = args.dst_mac, mac_dst2 = args.src_mac,l3_protocol = ’ipv4’,ip_src_addr = ’10.0.0.1’, ip_src_mode = ’increment’, ←↩
ip_src_count = 254,ip_dst_addr = ’8.0.0.1’, ip_dst_mode = ’increment’, ←↩
ip_dst_count = 254,l4_protocol = ’udp’,udp_dst_port = 12, udp_src_port = 1025,stream_id = 1, # temporary workaround, add_stream does not ←↩
return stream_id

TRex Stateless support 21 / 112
rate_pps = args.rate_pps,)
check_res(res)
print ’Starting traffic’res = hltapi.traffic_control(action = ’run’, port_handle = ports[:2])check_res(res)wait_with_progress(args.duration)
print ’Stopping traffic’res = hltapi.traffic_control(action = ’stop’, port_handle = ports[:2])check_res(res)
res = hltapi.traffic_stats(mode = ’aggregate’, port_handle = ports[:2])check_res(res)print_brief_stats(res)
res = hltapi.cleanup_session(port_handle = ’all’)check_res(res)
print ’Done’
v1 Imports the native TRex API.v2 Imports the HLT API.
2.7.7 Tutorial: Simple IPv4/UDP packet simulator
GoalUse the TRex Stateless simulator.
Demonstrates the most basic use case for the TRex simulator.
The TRex package includes a simulator tool, stl-sim. The simulator operates as a Python script that calls an executable. Theplatform requirements for the simulator tool are the same as for TRex.
The TRex simulator can:
• Test your traffic profiles before running them on TRex.
• Generate an output PCAP file.
• Simulate a number of threads.
• Convert from one type of profile to another.
• Convert any profile to JSON (API). See: TRex stream specification
Example traffic profile:
Filestl/udp_1pkt_simple.py
from trex_stl_lib.api import *
class STLS1(object):
def create_stream (self):

TRex Stateless support 22 / 112
return STLStream(packet =
STLPktBuilder(pkt = Ether()/IP(src="16.0.0.1",dst="48.0.0.1")/
UDP(dport=12,sport=1025)/(10*’x’)v1
),mode = STLTXCont()) v2
def get_streams (self, direction = 0, **kwargs):# create 1 streamreturn [ self.create_stream() ]
# dynamic load - used for TRex console or simulatordef register(): v3
return STLS1()
v1 Defines the packet - in this case, IP/UDP with 10 bytes of x.v2 Mode is Continuous, with a rate of 1 PPS. (Default rate: 1 PPS)v3 Each traffic profile module requires a register function.
The following runs the traffic profile through the TRex simulator, limiting the number of packets to 10, and storing the output ina PCAP file.
[bash]>./stl-sim -f stl/udp_1pkt_simple.py -o b.pcap -l 10executing command: ’bp-sim-64-debug --pcap --sl --cores 1 --limit 5000 -f /tmp/tmpq94Tfx ←↩
-o b.pcap’
General info:------------
image type: debugI/O output: b.pcappacket limit: 10core recording: merge all
Configuration info:-------------------
ports: 2cores: 1
Port Config:------------
stream count: 1max PPS : 1.00 ppsmax BPS L1 : 672.00 bpsmax BPS L2 : 512.00 bpsline util. : 0.00 %
Starting simulation...
Simulation summary:-------------------
TRex Stateless support 23 / 112
simulated 10 packetswritten 10 packets to ’b.pcap’
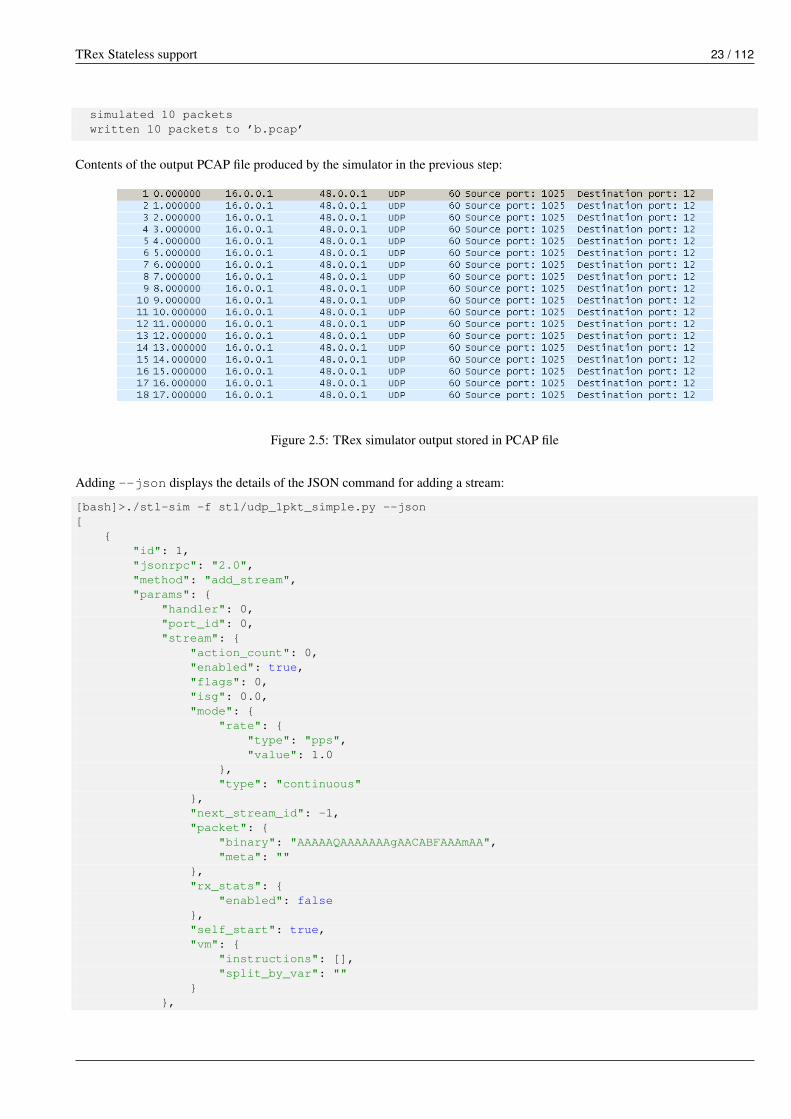
Contents of the output PCAP file produced by the simulator in the previous step:
Figure 2.5: TRex simulator output stored in PCAP file
Adding --json displays the details of the JSON command for adding a stream:
[bash]>./stl-sim -f stl/udp_1pkt_simple.py --json[
{"id": 1,"jsonrpc": "2.0","method": "add_stream","params": {
"handler": 0,"port_id": 0,"stream": {
"action_count": 0,"enabled": true,"flags": 0,"isg": 0.0,"mode": {
"rate": {"type": "pps","value": 1.0
},"type": "continuous"
},"next_stream_id": -1,"packet": {
"binary": "AAAAAQAAAAAAAgAACABFAAAmAA","meta": ""
},"rx_stats": {
"enabled": false},"self_start": true,"vm": {
"instructions": [],"split_by_var": ""
}},

TRex Stateless support 24 / 112
"stream_id": 1}
},{
"id": 1,"jsonrpc": "2.0","method": "start_traffic","params": {
"duration": -1,"force": true,"handler": 0,"mul": {
"op": "abs","type": "raw","value": 1.0
},"port_id": 0
}}
]
For more information about stream definition, see the RPC specification.
To convert the profile to YAML format:
$./stl-sim -f stl/udp_1pkt_simple.py --yaml- stream:
action_count: 0enabled: trueflags: 0isg: 0.0mode:
pps: 1.0type: continuous
packet:binary: AAAAAQAAAAAAAgAACABFAAAmAAEAAEAROmeta: ’’
rx_stats:enabled: false
self_start: truevm:
instructions: []split_by_var: ’’
To display packet details, use the --pkt option (using Scapy).
[bash]>./stl-sim -f stl/udp_1pkt_simple.py --pkt=======================Stream 0=======================
###[ Ethernet ]###dst = 00:00:00:01:00:00src = 00:00:00:02:00:00type = IPv4
###[ IP ]###version = 4Lihl = 5Ltos = 0x0len = 38id = 1flags =frag = 0L

TRex Stateless support 25 / 112
ttl = 64proto = udpchksum = 0x3ac5src = 16.0.0.1dst = 48.0.0.1\options \
###[ UDP ]###sport = blackjackdport = 12len = 18chksum = 0x6161
###[ Raw ]###load = ’xxxxxxxxxx’
0000 00 00 00 01 00 00 00 00 00 02 00 00 08 00 45 00 ..............E.0010 00 26 00 01 00 00 40 11 3A C5 10 00 00 01 30 00 .&....@.:.....0.0020 00 01 04 01 00 0C 00 12 61 61 78 78 78 78 78 78 ........aaxxxxxx0030 78 78 78 78 xxxx
To convert any profile type to native again, use the --native option, as shown in the following example, which includes theinput file, the command to convert it to native, and the output:
Input YAML format
- name: udp_64Bstream:self_start: Truepacket:
binary: ←↩AAAAAAAAAAAAAAAACABFAAAuBNIAAH8R9usQAAABMAAAAQQBBAEAEgAAAAAAAAAAAAAAAAAAAAAAAAAA
mode:type: continuouspps: 100
Command to convert to native:
[bash]>./stl-sim -f my_yaml.yaml --native
The output:
Output Native
# !!! Auto-generated code !!!from trex_stl_lib.api import *
class STLS1(object):def get_streams(self):
streams = []
packet = (Ether(src=’00:de:01:0a:01:00’, dst=’00:50:56:80:0d:28’, type=2048) /IP(src=’101.0.0.1’, proto=17, dst=’102.0.0.1’, chksum=28605, len=46, ←↩
flags=2L, ihl=5L, id=0) /UDP(dport=2001, sport=2001, len=26, chksum=1176) /Raw(load=’\xde\xad\xbe\xef\x00\x01\x06\x07\x08\x09\x0a\x0b\x00\x9b\xe7\ ←↩
xdb\x82M’))vm = STLScVmRaw([], split_by_field = ’’)stream = STLStream(packet = CScapyTRexPktBuilder(pkt = packet, vm = vm),
name = ’udp_64B’,mac_src_override_by_pkt = 0,mac_dst_override_mode = 0,mode = STLTXCont(pps = 100))
streams.append(stream)
return streams

TRex Stateless support 26 / 112
def register():return STLS1()
DiscussionThe following are the main traffic profile formats. Native is the preferred format. There is a separation between how thetraffic is defined and how to control/activate it. The API/Console/GUI can load a traffic profile and start/stop/get a statistic.Due to this separation it is possible to share traffic profiles.
Table 2.4: Traffic profile formats
Profile Type Format DescriptionNative Python Most flexible. Any format can be converted to native using the stl-
sim command with the --native option.HLT Python Uses HLT arguments.YAML/JSON YAML/JSON The common denominator traffic profile. Information is shared
between console, GUI, and simulator in YAML format. This formatis difficult to use for defining packets; primarily for machine use.YAML can be converted to native using the stl-sim commandwith the --native option.
2.7.8 Tutorial: Port layer mode configuration
GoalConfigure TRex port with either IPv4 or MAC address.
TRex ports can operate in two different mutually exclusive modes:
• Layer 2 mode - MAC level configuration
• Layer 3 mode - IPv4/IPv6 configuration
Table 2.5: Port layer modes
Mode Port configuration requirements NotesLayer 2 mode When configuring a port for L2 mode, must
provide the destination MAC address for the port(Legacy mode previous to v2.12 version).
-
Layer 3 mode When configuring a port for L3, must provideboth source IPv4/IPv6 address and a IPv4/IPv6destination address.
As an intergral part of configuring L3, the clientwill try to ARP resolve the destination addressand automatically configure the correctdestination MAC, instead of sending an ARPrequest when starting traffic.
Note: While in L3 mode, TRex server willgenerate gratuitous ARP packets to make surethat no ARP timeout on the DUT/router willresult in a faliure of the test.

TRex Stateless support 27 / 112
Example of configuring L2 mode Console
trex>service
trex>l2 --helpusage: port [-h] --port PORT --dst DST_MAC
Configures a port in L2 mode
optional arguments:-h, --help show this help message and exit--port PORT, -p PORT source port for the action--dst DST_MAC Configure destination MAC address
trex(service)>l2 -p 0 --dst 6A:A7:B5:3A:4E:FF
Setting port 0 in L2 mode: [SUCCESS]
trex>service --off
Example of configuring L2 mode- Python API
client.set_service_mode(port = 0, enabled = True)
client.set_l2_mode(port = 0, dst_mac = "6A:A7:B5:3A:4E:FF")
client.set_service_mode(port = 0, enabled = False)
Example of configuring L3 mode- Console
trex>service
trex(service)>l3 --helpusage: port [-h] --port PORT --src SRC_IPV4 --dst DST_IPV4
Configures a port in L3 mode
optional arguments:-h, --help show this help message and exit--port PORT, -p PORT source port for the action--src SRC_IPV4 Configure source IPv4 address--dst DST_IPV4 Configure destination IPv4 address
trex(service)>l3 -p 0 --src 1.1.1.2 --dst 1.1.1.1
Setting port 0 in L3 mode: [SUCCESS]
ARP resolving address ’1.1.1.1’: [SUCCESS]
trex>service --off
Example of configuring L3 mode - Python API
client.set_service_mode(port = 0, enabled = True)
client.set_l3_mode(port = 0, src_ipv4 = ’1.1.1.2’, dst_ipv4 = ’1.1.1.1’)
client.set_service_mode(port = 0, enabled = False)

TRex Stateless support 28 / 112
2.8 Port service mode
In normal operation mode, to preserve high speed processing of packets, TRex ignores most of the Rx traffic, with the exceptionof counting/statistic and handling latency flows.
The following illustrates how Rx packets are handled. Only a portion are forwarded to the Rx handling module and none areforwarded back to the Python client.
Figure 2.6: Port Under Normal Mode
In service mode, a port responds to ping and ARP requests, and also enables forwarding packets to the Python control plane forapplying full duplex protocols (DCHP, IPv6 neighboring, and so on).
The following illustrates how packets can be forwarded back to the Python client.
Figure 2.7: Port Under Service Mode
TRex Stateless support 29 / 112
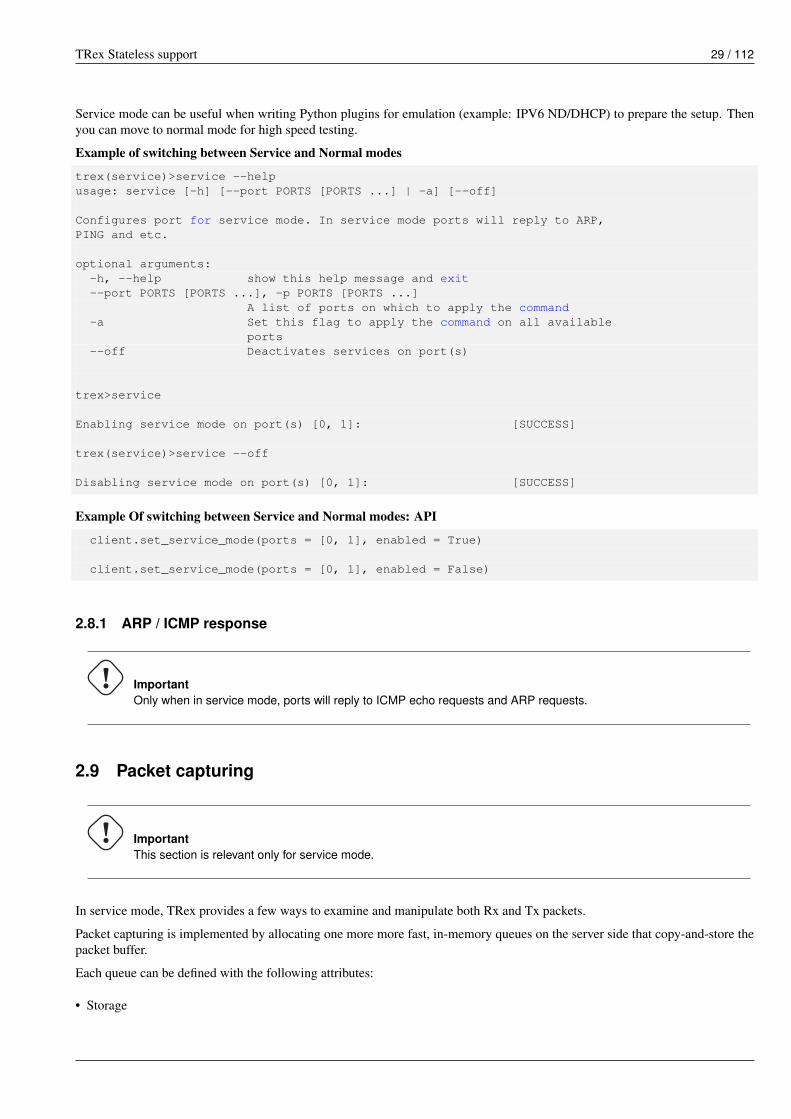
Service mode can be useful when writing Python plugins for emulation (example: IPV6 ND/DHCP) to prepare the setup. Thenyou can move to normal mode for high speed testing.
Example of switching between Service and Normal modes
trex(service)>service --helpusage: service [-h] [--port PORTS [PORTS ...] | -a] [--off]
Configures port for service mode. In service mode ports will reply to ARP,PING and etc.
optional arguments:-h, --help show this help message and exit--port PORTS [PORTS ...], -p PORTS [PORTS ...]
A list of ports on which to apply the command-a Set this flag to apply the command on all available
ports--off Deactivates services on port(s)
trex>service
Enabling service mode on port(s) [0, 1]: [SUCCESS]
trex(service)>service --off
Disabling service mode on port(s) [0, 1]: [SUCCESS]
Example Of switching between Service and Normal modes: API
client.set_service_mode(ports = [0, 1], enabled = True)
client.set_service_mode(ports = [0, 1], enabled = False)
2.8.1 ARP / ICMP response
ImportantOnly when in service mode, ports will reply to ICMP echo requests and ARP requests.
2.9 Packet capturing
ImportantThis section is relevant only for service mode.
In service mode, TRex provides a few ways to examine and manipulate both Rx and Tx packets.
Packet capturing is implemented by allocating one more more fast, in-memory queues on the server side that copy-and-store thepacket buffer.
Each queue can be defined with the following attributes:
• Storage
TRex Stateless support 30 / 112
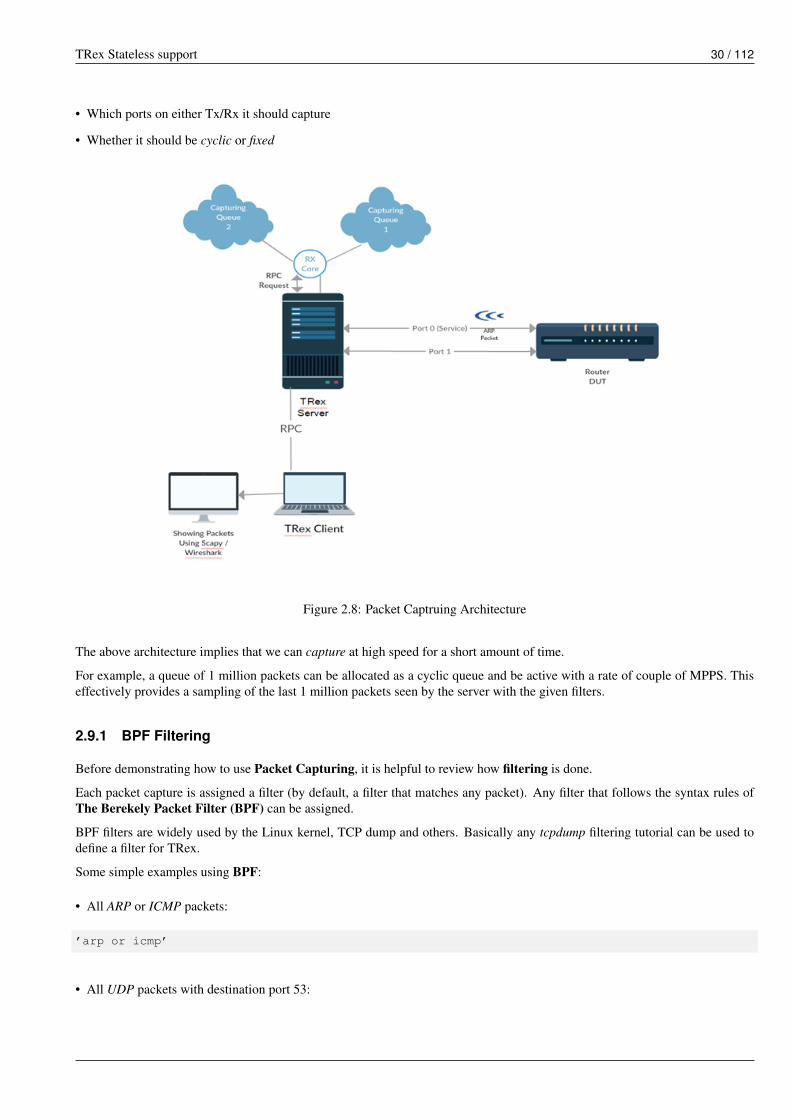
• Which ports on either Tx/Rx it should capture
• Whether it should be cyclic or fixed
Figure 2.8: Packet Captruing Architecture
The above architecture implies that we can capture at high speed for a short amount of time.
For example, a queue of 1 million packets can be allocated as a cyclic queue and be active with a rate of couple of MPPS. Thiseffectively provides a sampling of the last 1 million packets seen by the server with the given filters.
2.9.1 BPF Filtering
Before demonstrating how to use Packet Capturing, it is helpful to review how filtering is done.
Each packet capture is assigned a filter (by default, a filter that matches any packet). Any filter that follows the syntax rules ofThe Berekely Packet Filter (BPF) can be assigned.
BPF filters are widely used by the Linux kernel, TCP dump and others. Basically any tcpdump filtering tutorial can be used todefine a filter for TRex.
Some simple examples using BPF:
• All ARP or ICMP packets:
’arp or icmp’
• All UDP packets with destination port 53:

TRex Stateless support 31 / 112
’udp and dst 53’
• All packets VLAN tagged 200 and TCP SYN:
’vlan 200 and tcp[tcpflags] == tcp-syn’
For more examples, refer to BPF and tcpdump examples available online.
2.9.2 BPFJIT
TRex server uses BPF JIT, a compiled version of BPF to native code, to allow very fast filtering. So high speed filtering is verymuch possible in TRex.
Before
The following is a snapshot of a XL710 with Intel® Xeon® CPU E5-2667 v3 @ 3.20GHz handling 15.72 mpps before applyinga BPF filter.
Global Statistics
connection : localhost, Port 4501 total_tx_L2 : 8.18 Gb/secversion : v2.28 total_tx_L1 : 10.73 Gb/seccpu_util. : 3.31% @ 14 cores (7 per port) total_rx : 8.18 Gb/secrx_cpu_util. : 82.0% / 15.72 Mpkt/sec v1 total_pps : 15.97 Mpkt/secasync_util. : 0.19% / 1.76 KB/sec drop_rate : 0.00 b/sec
queue_full : 0 pkts
After
With a non-hitting filter to measure the effect of using the BPF filter:
Global Statistics
connection : localhost, Port 4501 total_tx_L2 : 8.21 Gb/secversion : v2.28 total_tx_L1 : 10.77 Gb/seccpu_util. : 3.37% @ 14 cores (7 per port) total_rx : 8.21 Gb/secrx_cpu_util. : 86.4% / 15.63 Mpkt/sec v1 total_pps : 16.03 Mpkt/secasync_util. : 0.21% / 1.64 KB/sec drop_rate : 0.00 b/sec
queue_full : 0 pkts
There is almost zero impact (<5%) on CPU utilization for negative filtering.
Of course, a hitting filter will have impact but usually on a very small portion of the traffic.
2.9.3 API usage
Using the Python API is fairly simple:
Python API:
# move port 1 to service mode as we want to capture traffic on itclient.set_service_mode(ports = 1)
# start a capture on port 1 Rx side with a limit, a mode and a *BPF* filter for any UDP ←↩with dst port 53
capture = client.start_capture(rx_ports = 1, limit = 100, mode = ’fixed’, bpf_filter = ’udp ←↩and dst 53’)

TRex Stateless support 32 / 112
# execute your code here
# save the packets to a file or to a list (see the Python API docs)client.stop_capture(capture[’id’], ’/home/mydir/port_0_rx.pcap’)
# exit service mode on port 1client.set_service_mode(ports = 1, enabled = False)
2.9.4 Console usage
The console provides couple of flexible ways to handle packet capturing
• Capture Monitoring
• Capture Recording
2.9.4.1 Capture monitoring
Capture monitoring is a non-persistent method for capturing and showing packets from either Tx / Rx of one or more ports.
Monitoring has 3 modes:
• Low Verbose - A short line per packet will be displayed
• High Verbose - Full Scapy show will be displayed per packet
• Wireshark Pipe - Launches Wireshark with a pipe connected to the traffic being captured
The first two options display packet information on the console. This is ideal if a moderate amount of traffic is being monitored.However, if a large amount of traffic is being monitored, consider Wireshark Pipe or the Capture Recording method.
Example of capturing traffic using the console with verbose on
trex>service v1Enabling service mode on port(s) [0, 1, 2, 3]: [SUCCESS]
trex(service)>capture monitor start --rx 3 -v v2Starting stdout capture monitor - verbose: ’high’ [SUCCESS]
*** use ’capture monitor stop’ to abort capturing... ***
trex(service)>arp -p 3 v3Resolving destination on port(s) [3]: [SUCCESS]
Port 3 - Recieved ARP reply from: 1.1.1.1, hw: 90:e2:ba:ae:88:b8 v438.14 [ms]
trex(service)>
#1 Port: 3 -- Rx
Type: ARP, Size: 60 B, TS: 16.98 [sec]
###[ Ethernet ]###dst = 90:e2:ba:af:13:89src = 90:e2:ba:ae:88:b8
TRex Stateless support 33 / 112
type = 0x806###[ ARP ]###
hwtype = 0x1ptype = 0x800hwlen = 6plen = 4op = is-at v5hwsrc = 90:e2:ba:ae:88:b8psrc = 1.1.1.1hwdst = 90:e2:ba:af:13:89pdst = 4.4.4.4
###[ Padding ]###load = ’\x00\x00\x00\x00\x00\x00\x00\x00\x00\x00\x00\x00\x00\x00\x00\x00\ ←↩
x00\x00’
trex(service)>
v1 , v1 , v1 Move to service mode to allow capturing.v2 Activate a capture monitor on port 3 Rx side with verbose on.v3 Send an ARP request on port 3.v4 The console shows the returning packet.v5 is-at ARP response was captured.
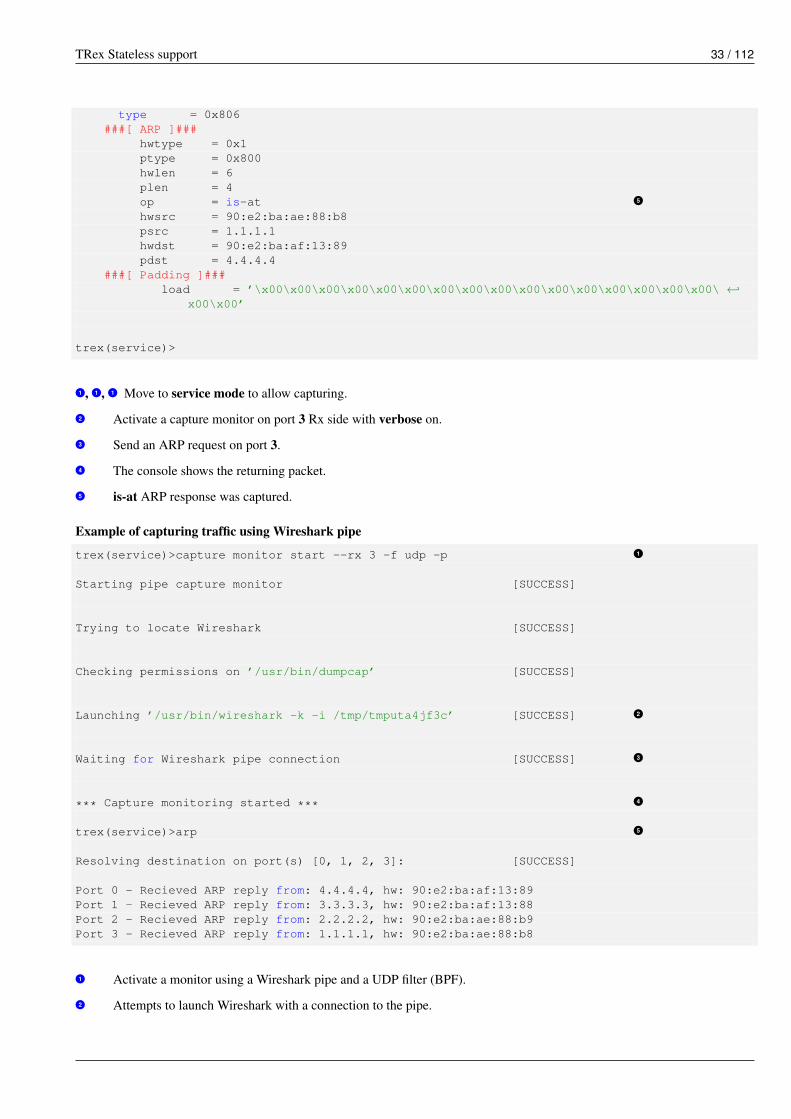
Example of capturing traffic using Wireshark pipe
trex(service)>capture monitor start --rx 3 -f udp -p v1Starting pipe capture monitor [SUCCESS]
Trying to locate Wireshark [SUCCESS]
Checking permissions on ’/usr/bin/dumpcap’ [SUCCESS]
Launching ’/usr/bin/wireshark -k -i /tmp/tmputa4jf3c’ [SUCCESS] v2Waiting for Wireshark pipe connection [SUCCESS] v3*** Capture monitoring started ***
v4trex(service)>arp v5Resolving destination on port(s) [0, 1, 2, 3]: [SUCCESS]
Port 0 - Recieved ARP reply from: 4.4.4.4, hw: 90:e2:ba:af:13:89Port 1 - Recieved ARP reply from: 3.3.3.3, hw: 90:e2:ba:af:13:88Port 2 - Recieved ARP reply from: 2.2.2.2, hw: 90:e2:ba:ae:88:b9Port 3 - Recieved ARP reply from: 1.1.1.1, hw: 90:e2:ba:ae:88:b8
v1 Activate a monitor using a Wireshark pipe and a UDP filter (BPF).v2 Attempts to launch Wireshark with a connection to the pipe.

TRex Stateless support 34 / 112
v3 Console is blocked until connection is established.v4 Monitor is active.v5 Sends ARP request.
Figure 2.9: Wireshark Pipe
2.9.4.2 Capture recording
In addition to monitoring, the console allows a simple recording as well. Recording enables you to define a fixed-size queuewhich then can be saved to a PCAP file.
Example of capturing a traffic to a fixed size queue
trex(service)>capture record start --rx 3 --limit 200 v1Starting packet capturing up to 200 packets [SUCCESS]
*** Capturing ID is set to ’4’ ***v2
*** Please call ’capture record stop --id 4 -o <out.pcap>’ when done ***
trex(service)>capture v3Active Recorders
ID | Status | Packets | Bytes | TX Ports | ←↩RX Ports
------------------------------------------------------------------------------------------------------ ←↩
4 | ACTIVE | [0/200] | 0 B | - | ←↩3
trex(service)>start -f stl/imix.py -m 1kpps -p 0 --force v4Removing all streams from port(s) [0]: [SUCCESS]
Attaching 3 streams to port(s) [0]: [SUCCESS]

TRex Stateless support 35 / 112
Starting traffic on port(s) [0]: [SUCCESS]
20.42 [ms]
trex(service)>capture v5Active Recorders
ID | Status | Packets | Bytes | TX Ports | ←↩RX Ports
------------------------------------------------------------------------------------------------------ ←↩
4 | ACTIVE | [200/200] | 74.62 KB | - | ←↩3
trex(service)>capture record stop --id 4 -o /tmp/rx_3.pcap v6Stopping packet capture 4 [SUCCESS]
Writing 200 packets to ’/tmp/rx_3.pcap’ [SUCCESS]
Removing PCAP capture 4 from server [SUCCESS]
trex(service)>
v1 Start a packet record on port 3 Rx side with a limit of 200 packets.v2 A new capture is created with an ID 4.v3 Show the capture status - currently empty.v4 Start traffic on port 0, which is connected to port 3.v5 Show the capture status - full.v6 Save 200 packets to an output file: /tmp/rx_3.pcap
2.9.5 Using capture as a counter
Another use of packet capturing is counting. Instead of fetching the packets, you can simply count packets that hit the BPF filter.
For example, to count any packet that is UDP with source port of 5000, you can simply attach an empty capture with the correctBPF filter and examine the matched field:
trex(service)>capture record start --rx 3 --limit 0 -f udp and src 5000
Starting packet capturing up to 0 packets [SUCCESS]
*** Capturing ID is set to ’14’ ****** Please call ’capture record stop --id 14 -o <out.pcap>’ when done ***
trex(service)>capture
Active Recorders
ID | Status | Matched | Packets | Bytes | RX Ports | ←↩BPF Filter

TRex Stateless support 36 / 112
------------------------------------------------------------------------------------------------------- ←↩
14 | ACTIVE | 0 | [0/0] | 0 B | 3 | udp ←↩and src 5000
trex(service)>
The Matched field indicates how many packets matched the filter.
2.9.6 Video tutorials
This tutorial demonstrates the new packet capture ability.
2.10 Neighboring protocols
To preserve high speed traffic generation, TRex handles neighboring protocols in the pre-test phase.
A test that requires running a neighboring protocol should first move to service mode, execute the required steps in Python,switch back to normal mode, and start the actual test.
2.10.1 ARP
A basic neighboring protocol that is provided as part of TRex is ARP.
Example setup:
Figure 2.10: Router ARP
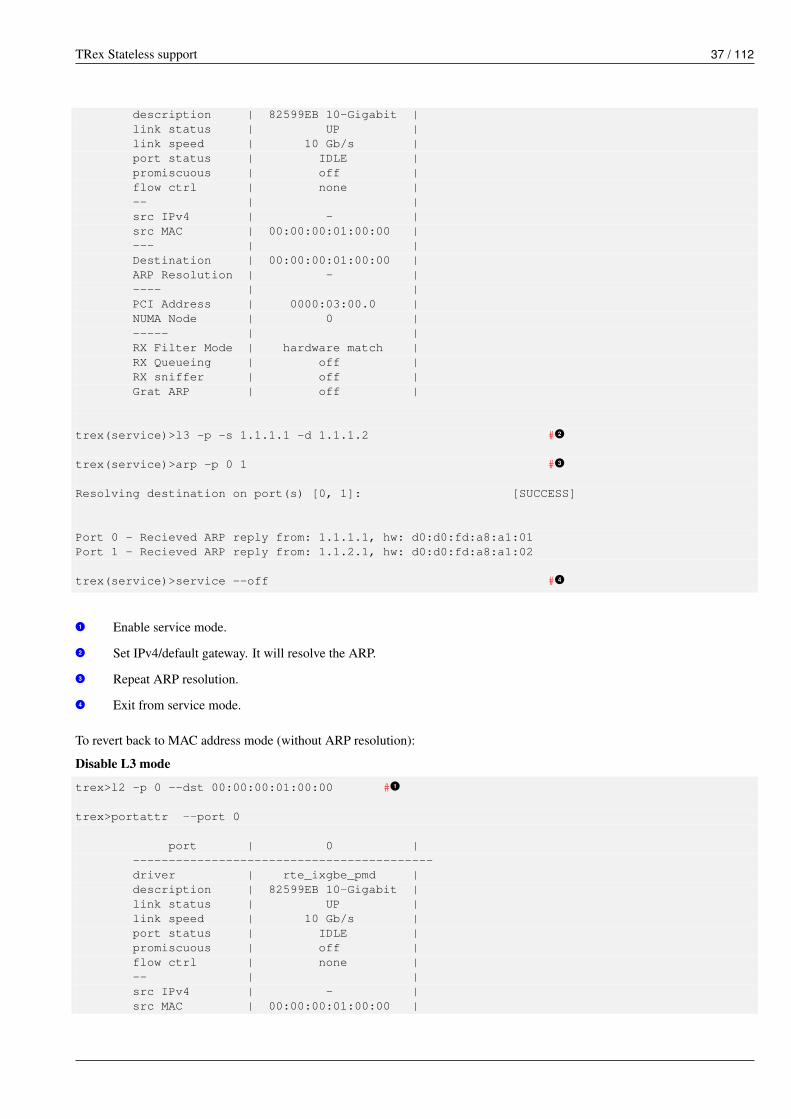
trex>service # v1Enabling service mode on port(s) [0, 1]: [SUCCESS]
trex(service)>portattr --port 0
port | 0 |------------------------------------------driver | rte_ixgbe_pmd |
TRex Stateless support 37 / 112
description | 82599EB 10-Gigabit |link status | UP |link speed | 10 Gb/s |port status | IDLE |promiscuous | off |flow ctrl | none |-- | |src IPv4 | - |src MAC | 00:00:00:01:00:00 |--- | |Destination | 00:00:00:01:00:00 |ARP Resolution | - |---- | |PCI Address | 0000:03:00.0 |NUMA Node | 0 |----- | |RX Filter Mode | hardware match |RX Queueing | off |RX sniffer | off |Grat ARP | off |
trex(service)>l3 -p -s 1.1.1.1 -d 1.1.1.2 # v2trex(service)>arp -p 0 1 # v3Resolving destination on port(s) [0, 1]: [SUCCESS]
Port 0 - Recieved ARP reply from: 1.1.1.1, hw: d0:d0:fd:a8:a1:01Port 1 - Recieved ARP reply from: 1.1.2.1, hw: d0:d0:fd:a8:a1:02
trex(service)>service --off # v4v1 Enable service mode.v2 Set IPv4/default gateway. It will resolve the ARP.v3 Repeat ARP resolution.v4 Exit from service mode.
To revert back to MAC address mode (without ARP resolution):
Disable L3 mode
trex>l2 -p 0 --dst 00:00:00:01:00:00 # v1trex>portattr --port 0
port | 0 |------------------------------------------driver | rte_ixgbe_pmd |description | 82599EB 10-Gigabit |link status | UP |link speed | 10 Gb/s |port status | IDLE |promiscuous | off |flow ctrl | none |-- | |src IPv4 | - |src MAC | 00:00:00:01:00:00 |

TRex Stateless support 38 / 112
--- | |Destination | 00:00:00:01:00:00 |ARP Resolution | - |---- | |PCI Address | 0000:03:00.0 |NUMA Node | 0 |----- | |RX Filter Mode | hardware match |RX Queueing | off |RX sniffer | off |Grat ARP | off |
v1 Disable service mode.
Python API:
client.set_service_mode(ports = [0, 1], enabled = True) v1# configure port 0, 1 to Layer 3 modeclient.set_l3_mode(port = 0, src_ipv4 = ’1.1.1.2’, dst_ipv4 = ’1.1.1.2’) v2client.set_l3_mode(port = 1, src_ipv4 = ’1.1.2.2’, dst_ipv4 = ’1.1.2.1’)
# ARP resolve ports 0, 1c.resolve(ports = [0, 1])
client.set_service_mode(ports = [0, 1], enabled = False) v3v1 Enable service mode.v2 Configure IPv4 and default gateway.v3 Disable service mode.
2.10.2 ICMP
Another basic protocol provided with TRex is ICMP. It is possible, under service mode, to ping the DUT or even a TRex portfrom the console / API.
TRex Console
trex(service)>ping --helpusage: ping [-h] --port PORT -d PING_IPV4 [-s PKT_SIZE] [-n COUNT]
pings the server / specific IP
optional arguments:-h, --help show this help message and exit--port PORT, -p PORT source port for the action-d PING_IPV4 which IPv4 to ping-s PKT_SIZE packet size to use-n COUNT, --count COUNT
How many times to ping [default is 5]
trex(service)>ping -p 0 -d 1.1.2.2
Pinging 1.1.2.2 from port 0 with 64 bytes of data:Reply from 1.1.2.2: bytes=64, time=27.72ms, TTL=127Reply from 1.1.2.2: bytes=64, time=1.40ms, TTL=127Reply from 1.1.2.2: bytes=64, time=1.31ms, TTL=127Reply from 1.1.2.2: bytes=64, time=1.78ms, TTL=127Reply from 1.1.2.2: bytes=64, time=1.95ms, TTL=127
TRex Stateless support 39 / 112
Python API
# move to service modeclient.set_service_mode(ports = ports, enabled = True)
# configure port 0, 1 to Layer 3 modeclient.set_l3_mode(port = 0, src_ipv4 = ’1.1.1.2’, dst_ipv4 = ’1.1.1.1’)client.set_l3_mode(port = 1, src_ipv4 = ’1.1.2.2’, dst_ipv4 = ’1.1.2.1’)
# ping port 1 from port 0 through the routerclient.ping_ip(src_port = 0, dst_ipv4 = ’1.1.2.2’, pkt_size = 64) v1# disable service modeclient.set_service_mode(enabled = False)
v1 Check connectivity.
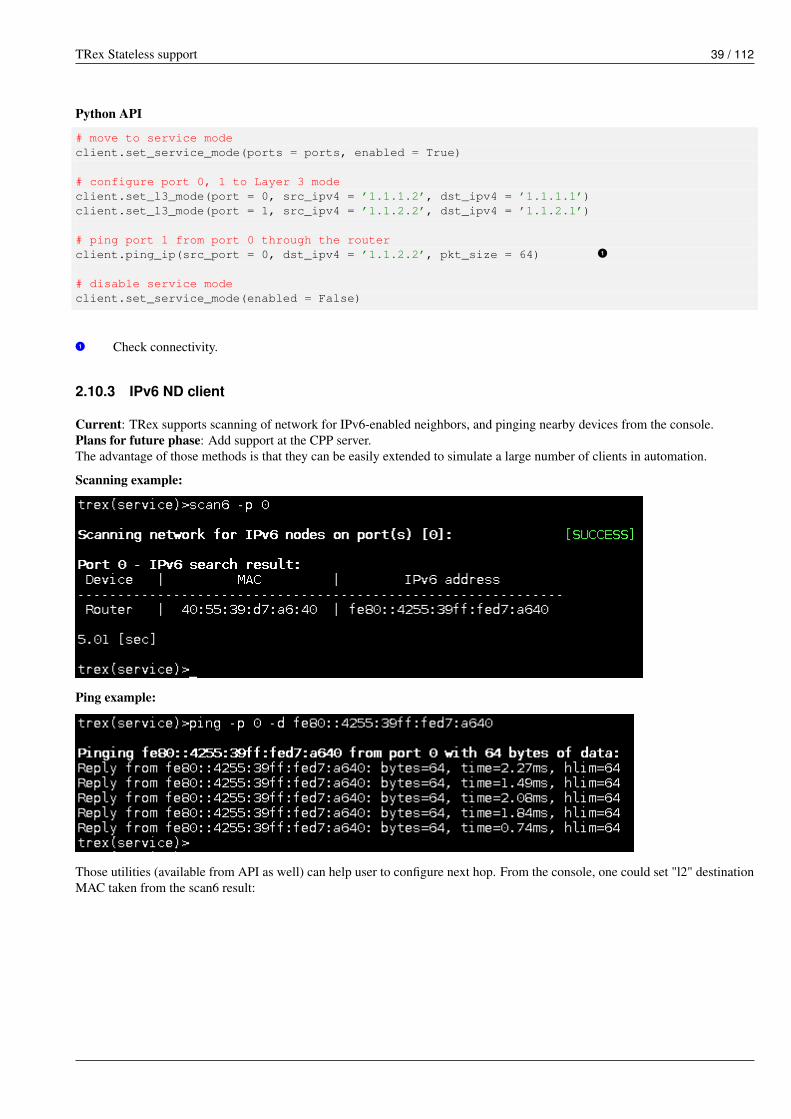
2.10.3 IPv6 ND client
Current: TRex supports scanning of network for IPv6-enabled neighbors, and pinging nearby devices from the console.Plans for future phase: Add support at the CPP server.The advantage of those methods is that they can be easily extended to simulate a large number of clients in automation.
Scanning example:
Ping example:
Those utilities (available from API as well) can help user to configure next hop. From the console, one could set "l2" destinationMAC taken from the scan6 result:

TRex Stateless support 40 / 112
For setting own IPv6, we use local address as described in RFC 3513.For scanning of network, we ping the multicast address ff02::1 and establish connection via NS/ND conversations.
Additional links on scanning network:
• RFC draft of scanning
• Scanning of network in Ubuntu: scan6
Example of using IPv6 methods in automation:
• stl_ipv6_tools.py
2.11 Traffic profile tutorials
2.11.1 Tutorial: Simple interleaving streams
GoalDemonstrate interleaving of multiple streams.
The following example demonstrates 3 streams with different rates (10, 20, 40 PPS) and different start times, based on aninter-stream gap (ISG) of 0, 25 msec, or 50 msec.

TRex Stateless support 41 / 112
Filestl/simple_3pkt.py
Interleaving multiple streamsdef create_stream (self):
# create a base packet and pad it to sizesize = self.fsize - 4 # no FCSbase_pkt = Ether()/IP(src="16.0.0.1",dst="48.0.0.1")/UDP(dport=12,sport=1025) v1base_pkt1 = Ether()/IP(src="16.0.0.2",dst="48.0.0.1")/UDP(dport=12,sport=1025)base_pkt2 = Ether()/IP(src="16.0.0.3",dst="48.0.0.1")/UDP(dport=12,sport=1025)pad = max(0, size - len(base_pkt)) * ’x’
return STLProfile( [ STLStream( isg = 0.0,packet = STLPktBuilder(pkt = base_pkt/pad),mode = STLTXCont( pps = 10), v2),
STLStream( isg = 25000.0, #defined in usec, 25 msecpacket = STLPktBuilder(pkt = base_pkt1/pad),mode = STLTXCont( pps = 20), v3),
STLStream( isg = 50000.0,#defined in usec, 50 msecpacket = STLPktBuilder(pkt = base_pkt2/pad),mode = STLTXCont( pps = 40) v4
)]).get_streams()
v1 Defines template packets using Scapy.v2 Defines streams with rate of 10 PPS.v3 Defines streams with rate of 20 PPS.v4 Defines streams with rate of 40 PPS.
OutputThe folowing figure presents the output.
Figure 2.11: Interleaving of streams

TRex Stateless support 42 / 112
Discussion
• Stream #1
– Schedules a packet each 100 msec
• Stream #2
– Schedules a packet each 50 msec– Starts 25 msec after stream #1
• Stream #3
– Schedules a packet each 25 msec– Starts 50 msec after stream #1
You can run the traffic profile in the TRex simulator and view the details in the PCAP file containing the simulation output.
[bash]>./stl-sim -f stl/simple_3pkt.py -o b.pcap -l 200
To run the traffic profile from console in TRex, use the following command.
trex>start -f stl/simple_3pkt.py -m 10mbps -a
2.11.2 Tutorial: Multi burst streams - action next stream
GoalCreate a profile with a stream that trigger another stream
The following example demonstrates:
1. More than one stream
2. Burst of 10 packets
3. One stream activating another stream (see self_start=False in the traffic profile)
Filestl/burst_3pkt_60pkt.py
def create_stream (self):
# create a base packet and pad it to sizesize = self.fsize - 4 # no FCSbase_pkt = Ether()/IP(src="16.0.0.1",dst="48.0.0.1")/UDP(dport=12,sport=1025)base_pkt1 = Ether()/IP(src="16.0.0.2",dst="48.0.0.1")/UDP(dport=12,sport=1025)base_pkt2 = Ether()/IP(src="16.0.0.3",dst="48.0.0.1")/UDP(dport=12,sport=1025)pad = max(0, size - len(base_pkt)) * ’x’
return STLProfile( [ STLStream( isg = 10.0, # star in delayname =’S0’,packet = STLPktBuilder(pkt = base_pkt/pad),mode = STLTXSingleBurst( pps = 10, total_pkts = 10) ←↩
, v1next = ’S1’), # point to next stream
STLStream( self_start = False, # stream is disabled enable ←↩trow S0 v2
name =’S1’,packet = STLPktBuilder(pkt = base_pkt1/pad),
TRex Stateless support 43 / 112
mode = STLTXSingleBurst( pps = 10, total_pkts = ←↩20),
next = ’S2’ ),
STLStream( self_start = False, # stream is disabled enable ←↩trow S0 v3
name =’S2’,packet = STLPktBuilder(pkt = base_pkt2/pad),mode = STLTXSingleBurst( pps = 10, total_pkts = 30 ←↩
))
]).get_streams()
v1 Stream S0 is configured to self_start=True, starts after 10 sec.v2 S1 is configured to self_start=False, activated by stream S0.v3 S2 is activated by S1.
To run the simulation, use this command.
[bash]>./stl-sim -f stl/stl/burst_3pkt_60pkt.py -o b.pcap
The generated PCAP file has 60 packets. The first 10 packets have src_ip=16.0.0.1. The next 20 packets has src_ip=16.0.0.2.The next 30 packets has src_ip=16.0.0.3.
This run the profile from console use this command.
TRex>start -f stl/stl/burst_3pkt_60pkt.py --port 0
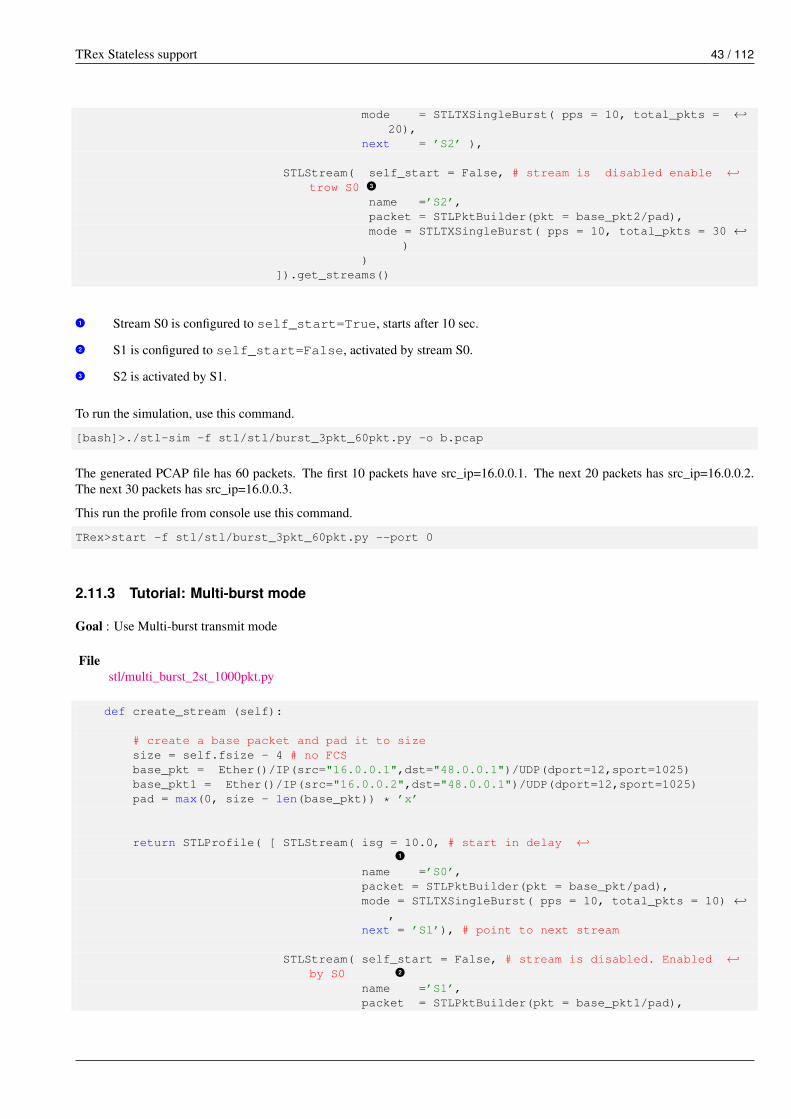
2.11.3 Tutorial: Multi-burst mode
Goal : Use Multi-burst transmit mode
Filestl/multi_burst_2st_1000pkt.py
def create_stream (self):
# create a base packet and pad it to sizesize = self.fsize - 4 # no FCSbase_pkt = Ether()/IP(src="16.0.0.1",dst="48.0.0.1")/UDP(dport=12,sport=1025)base_pkt1 = Ether()/IP(src="16.0.0.2",dst="48.0.0.1")/UDP(dport=12,sport=1025)pad = max(0, size - len(base_pkt)) * ’x’
return STLProfile( [ STLStream( isg = 10.0, # start in delay ←↩v1name =’S0’,packet = STLPktBuilder(pkt = base_pkt/pad),mode = STLTXSingleBurst( pps = 10, total_pkts = 10) ←↩
,next = ’S1’), # point to next stream
STLStream( self_start = False, # stream is disabled. Enabled ←↩by S0 v2
name =’S1’,packet = STLPktBuilder(pkt = base_pkt1/pad),
TRex Stateless support 44 / 112
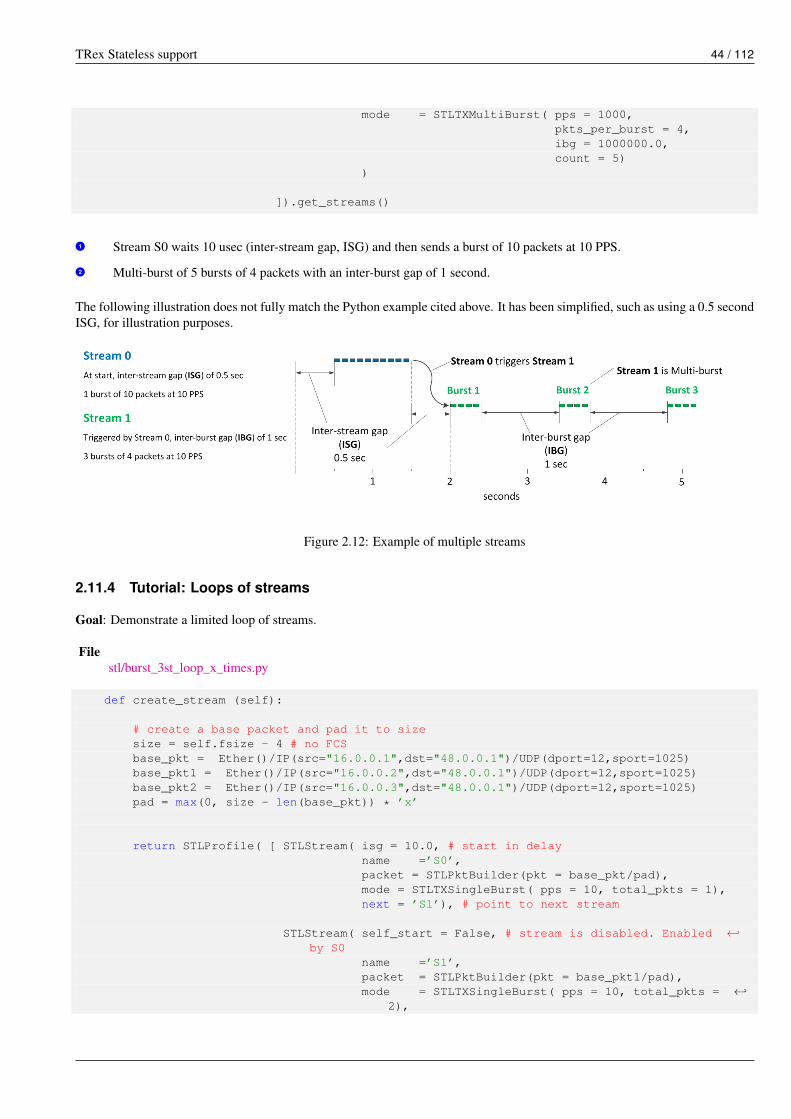
mode = STLTXMultiBurst( pps = 1000,pkts_per_burst = 4,ibg = 1000000.0,count = 5)
)
]).get_streams()
v1 Stream S0 waits 10 usec (inter-stream gap, ISG) and then sends a burst of 10 packets at 10 PPS.v2 Multi-burst of 5 bursts of 4 packets with an inter-burst gap of 1 second.
The following illustration does not fully match the Python example cited above. It has been simplified, such as using a 0.5 secondISG, for illustration purposes.
Figure 2.12: Example of multiple streams
2.11.4 Tutorial: Loops of streams
Goal: Demonstrate a limited loop of streams.
Filestl/burst_3st_loop_x_times.py
def create_stream (self):
# create a base packet and pad it to sizesize = self.fsize - 4 # no FCSbase_pkt = Ether()/IP(src="16.0.0.1",dst="48.0.0.1")/UDP(dport=12,sport=1025)base_pkt1 = Ether()/IP(src="16.0.0.2",dst="48.0.0.1")/UDP(dport=12,sport=1025)base_pkt2 = Ether()/IP(src="16.0.0.3",dst="48.0.0.1")/UDP(dport=12,sport=1025)pad = max(0, size - len(base_pkt)) * ’x’
return STLProfile( [ STLStream( isg = 10.0, # start in delayname =’S0’,packet = STLPktBuilder(pkt = base_pkt/pad),mode = STLTXSingleBurst( pps = 10, total_pkts = 1),next = ’S1’), # point to next stream
STLStream( self_start = False, # stream is disabled. Enabled ←↩by S0
name =’S1’,packet = STLPktBuilder(pkt = base_pkt1/pad),mode = STLTXSingleBurst( pps = 10, total_pkts = ←↩
2),
TRex Stateless support 45 / 112
next = ’S2’ ),
STLStream( self_start = False, # stream is disabled. Enabled ←↩by S1
name =’S2’,packet = STLPktBuilder(pkt = base_pkt2/pad),mode = STLTXSingleBurst( pps = 10, total_pkts = 3 ←↩
),action_count = 2, # loop 2 times ←↩v1next = ’S0’ # loop back to S0
)]).get_streams()
v1 Go back to S0, but limit it to 2 loops.
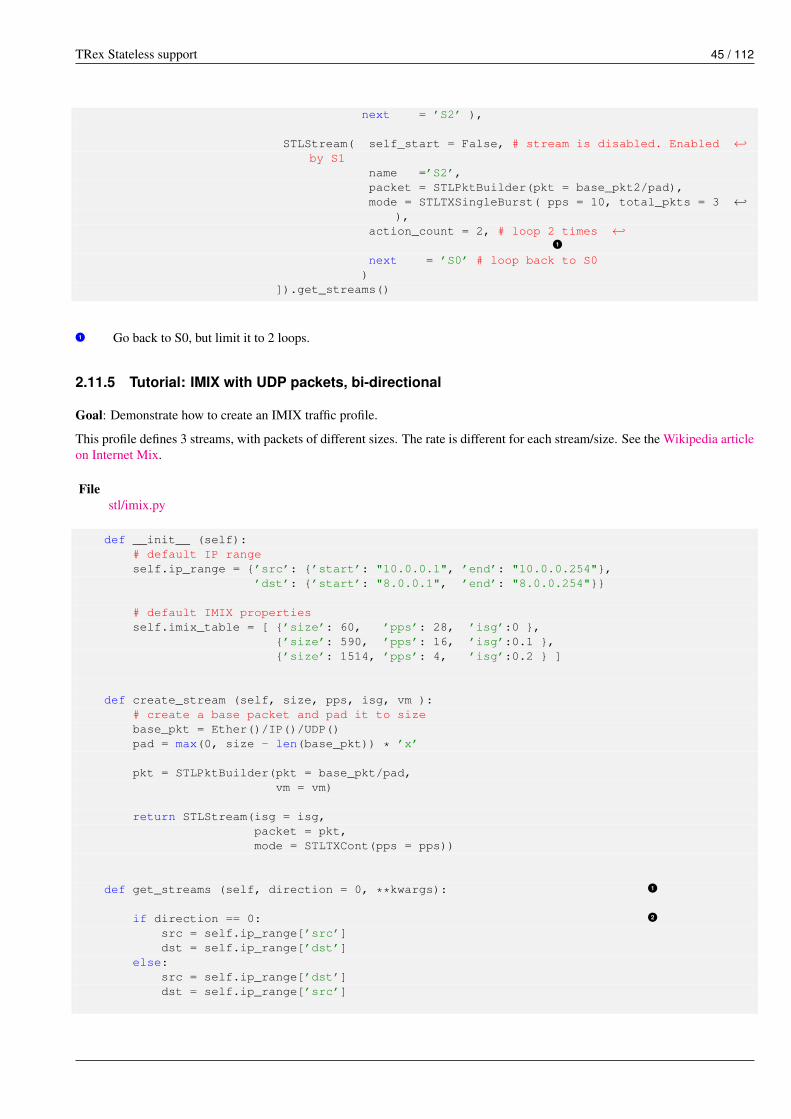
2.11.5 Tutorial: IMIX with UDP packets, bi-directional
Goal: Demonstrate how to create an IMIX traffic profile.
This profile defines 3 streams, with packets of different sizes. The rate is different for each stream/size. See the Wikipedia articleon Internet Mix.
Filestl/imix.py
def __init__ (self):# default IP rangeself.ip_range = {’src’: {’start’: "10.0.0.1", ’end’: "10.0.0.254"},
’dst’: {’start’: "8.0.0.1", ’end’: "8.0.0.254"}}
# default IMIX propertiesself.imix_table = [ {’size’: 60, ’pps’: 28, ’isg’:0 },
{’size’: 590, ’pps’: 16, ’isg’:0.1 },{’size’: 1514, ’pps’: 4, ’isg’:0.2 } ]
def create_stream (self, size, pps, isg, vm ):# create a base packet and pad it to sizebase_pkt = Ether()/IP()/UDP()pad = max(0, size - len(base_pkt)) * ’x’
pkt = STLPktBuilder(pkt = base_pkt/pad,vm = vm)
return STLStream(isg = isg,packet = pkt,mode = STLTXCont(pps = pps))
def get_streams (self, direction = 0, **kwargs):v1
if direction == 0: v2src = self.ip_range[’src’]dst = self.ip_range[’dst’]
else:src = self.ip_range[’dst’]dst = self.ip_range[’src’]
TRex Stateless support 46 / 112
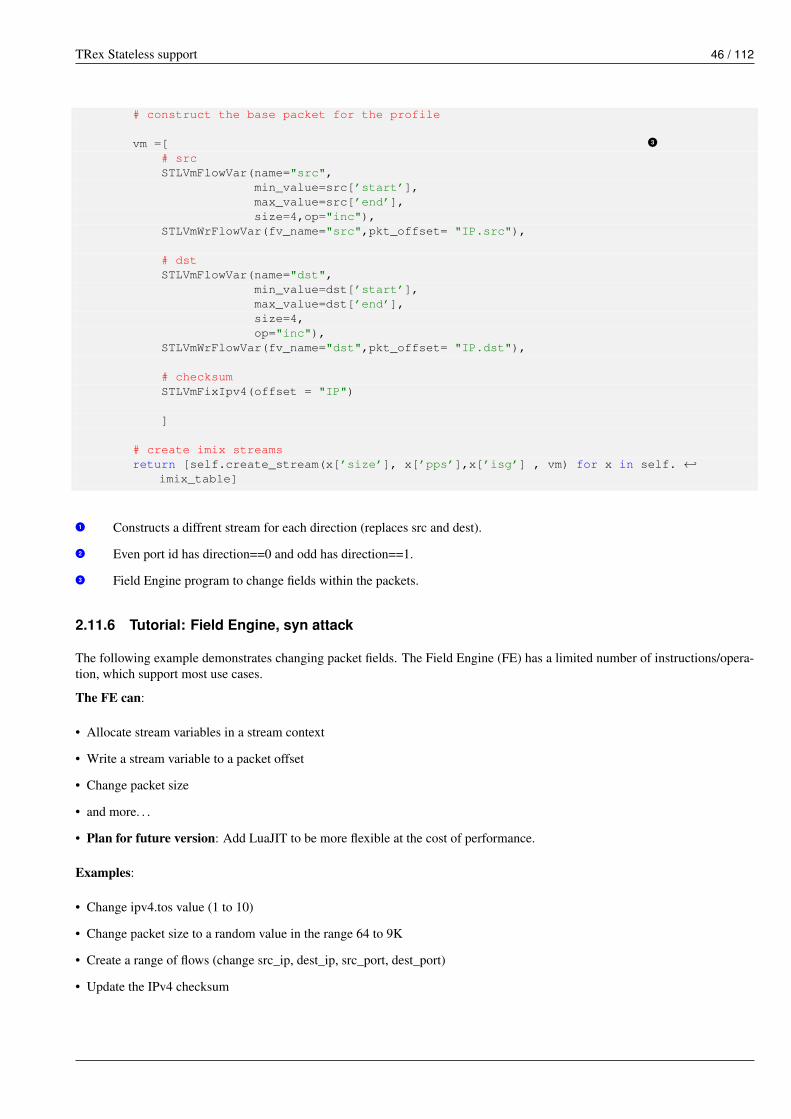
# construct the base packet for the profile
vm =[ v3# srcSTLVmFlowVar(name="src",
min_value=src[’start’],max_value=src[’end’],size=4,op="inc"),
STLVmWrFlowVar(fv_name="src",pkt_offset= "IP.src"),
# dstSTLVmFlowVar(name="dst",
min_value=dst[’start’],max_value=dst[’end’],size=4,op="inc"),
STLVmWrFlowVar(fv_name="dst",pkt_offset= "IP.dst"),
# checksumSTLVmFixIpv4(offset = "IP")
]
# create imix streamsreturn [self.create_stream(x[’size’], x[’pps’],x[’isg’] , vm) for x in self. ←↩
imix_table]
v1 Constructs a diffrent stream for each direction (replaces src and dest).v2 Even port id has direction==0 and odd has direction==1.v3 Field Engine program to change fields within the packets.
2.11.6 Tutorial: Field Engine, syn attack
The following example demonstrates changing packet fields. The Field Engine (FE) has a limited number of instructions/opera-tion, which support most use cases.
The FE can:
• Allocate stream variables in a stream context
• Write a stream variable to a packet offset
• Change packet size
• and more. . .
• Plan for future version: Add LuaJIT to be more flexible at the cost of performance.
Examples:
• Change ipv4.tos value (1 to 10)
• Change packet size to a random value in the range 64 to 9K
• Create a range of flows (change src_ip, dest_ip, src_port, dest_port)
• Update the IPv4 checksum

TRex Stateless support 47 / 112
For more information, see: TRex RPC Server
The following example demonstrates creating a SYN attack from many src addresses to one server.
Filestl/syn_attack.py
def create_stream (self):
# TCP SYNbase_pkt = Ether()/IP(dst="48.0.0.1")/TCP(dport=80,flags="S") v1# vmvm = STLScVmRaw( [ STLVmFlowVar(name="ip_src",
min_value="16.0.0.0",max_value="18.0.0.254",size=4, op="random"), v2
STLVmFlowVar(name="src_port",min_value=1025,max_value=65000,size=2, op="random"), v3
STLVmWrFlowVar(fv_name="ip_src", pkt_offset= "IP.src" ), v4STLVmFixIpv4(offset = "IP"), # fix checksum v5STLVmWrFlowVar(fv_name="src_port", v6
pkt_offset= "TCP.sport") # U
])
pkt = STLPktBuilder(pkt = base_pkt,vm = vm)
return STLStream(packet = pkt,random_seed = 0x1234,# can be removed. will give the same random ←↩
value any runmode = STLTXCont())
v1 Creates SYN packet using Scapy .v2 Defines a stream variable name=ip_src, size 4 bytes, for IPv4.v3 Defines a stream variable name=src_port, size 2 bytes, for port.v4 Writes ip_src stream var into IP.src packet offset. Scapy calculates the offset. Can specify IP:1.src for a secondIP header in the packet.v5 Fixes IPv4 checksum. Provides the header name IP. Can specify IP:1 for a second IP.v6 Writes src_port stream var into TCP.sport packet offset. TCP checksum is not updated here.
WarningOriginal Scapy cannot calculate offset for a header/field by name. This offset capability will not work for all cases. Insome complex cases, Scapy may rebuild the header. In such cases, specify the offset as a number.
Output PCAP file:

TRex Stateless support 48 / 112
Table 2.6: Output - PCAP file
pkt Client IPv4 Client Port1 17.152.71.218 58142 17.7.6.30 268103 17.3.32.200 18104 17.135.236.168 558105 17.46.240.12 10786 16.133.91.247 2323
2.11.7 Tutorial: Field Engine, tuple generator
The following example creates multiple flows from the same packet template. The Tuple Generator instructions are used to createtwo stream variables for IP and port. See: TRex RPC Server
Filestl/udp_1pkt_tuple_gen.py
base_pkt = Ether()/IP(src="16.0.0.1",dst="48.0.0.1")/UDP(dport=12,sport=1025)
pad = max(0, size - len(base_pkt)) * ’x’
vm = STLScVmRaw( [ STLVmTupleGen ( ip_min="16.0.0.1", v1ip_max="16.0.0.2",port_min=1025,port_max=65535,name="tuple"), # define tuple gen
STLVmWrFlowVar (fv_name="tuple.ip", pkt_offset= "IP.src" ), v2STLVmFixIpv4(offset = "IP"),STLVmWrFlowVar (fv_name="tuple.port", pkt_offset= "UDP.sport" ←↩
) v3]
)
pkt = STLPktBuilder(pkt = base_pkt/pad,vm = vm)
v1 Defines a struct with two dependent variables: tuple.ip, tuple.portv2 Writes the tuple.ip variable to IPv4.src field offset.v3 Writes the tuple.port variable to UDP.sport field offset. Set UDP.checksum to 0.
Table 2.7: Output - PCAP file
pkt Client IPv4 ClientPort
1 16.0.0.1 10252 16.0.0.2 10253 16.0.0.1 10264 16.0.0.2 10265 16.0.0.1 10276 16.0.0.2 1027

TRex Stateless support 49 / 112
• Number of clients: 2: 16.0.0.1 and 16.0.0.2
• Number of flows is limited to 129020: (2 * (65535-1025))
• The stream variable size should match the size of the FlowVarWr instruction.
2.11.8 Tutorial: Field Engine, write to a bit-field packet
The following example writes a stream variable to a bit field packet variable. In this example, an MPLS label field is changed.
Table 2.8: MPLS header
Label TC S TTL0 1 2 3 4 5 6 7 8 9 0 1 2 3 4 5 6 7 8 9 0 1 2 3 4 5 6 7 8 9 0 1
Filestl/udp_1pkt_mpls_vm.py
def create_stream (self):# 2 MPLS label the internal with s=1 (last one)pkt = Ether()/
MPLS(label=17,cos=1,s=0,ttl=255)/MPLS(label=0,cos=1,s=1,ttl=12)/IP(src="16.0.0.1",dst="48.0.0.1")/UDP(dport=12,sport=1025)/(’x’*20)
vm = STLScVmRaw( [ STLVmFlowVar(name="mlabel", v1min_value=1,max_value=2000,size=2, op="inc"), # 2 bytes var v2
STLVmWrMaskFlowVar(fv_name="mlabel",pkt_offset= "MPLS:1.label", v3pkt_cast_size=4,mask=0xFFFFF000,shift=12) # write to 20bit ←↩
MSB]
)
# burst of 100 packetsreturn STLStream(packet = STLPktBuilder(pkt = pkt ,vm = vm),
mode = STLTXSingleBurst( pps = 1, total_pkts = 100) )
v1 Defines a variable size of 2 bytes.v2 Writes the stream variable label with a shift of 12 bits, with a 20-bit MSB mask. Cast the stream variables of 2 bytes to 4bytes.v3 Change the second MPLS header.
2.11.9 Tutorial: Field Engine, random packet size
The following example demonstrates varies the packet size randomly, as follows:
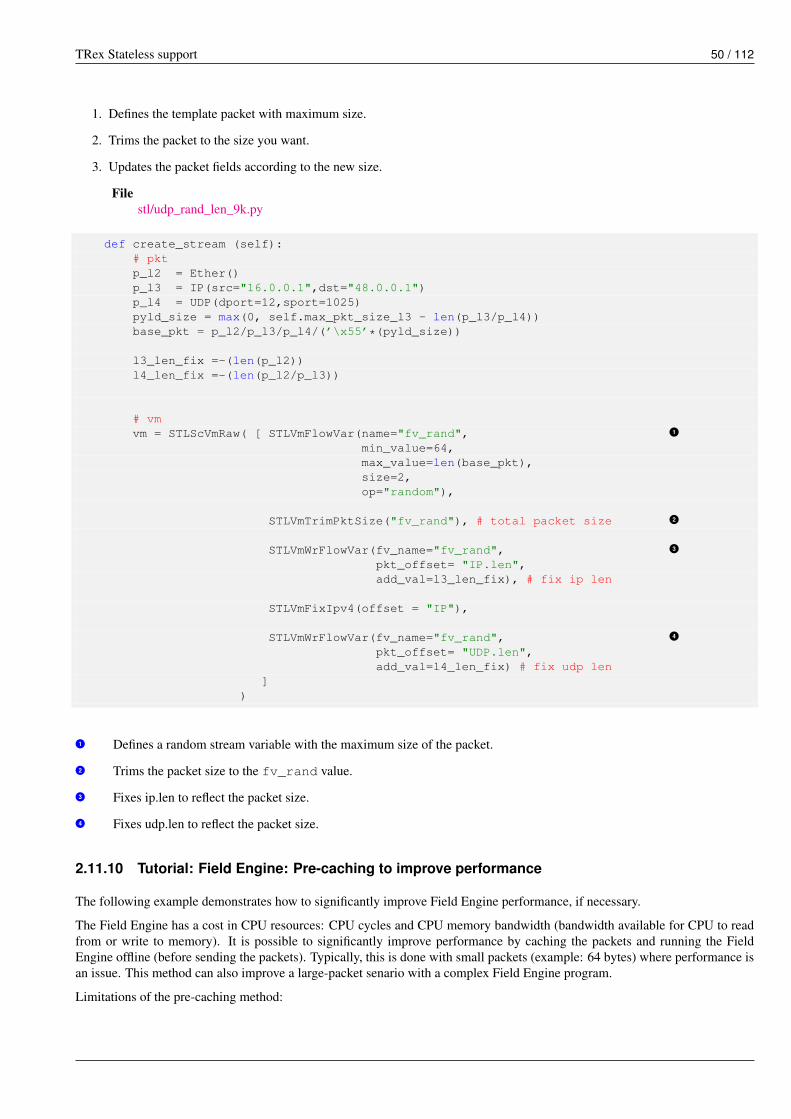
TRex Stateless support 50 / 112
1. Defines the template packet with maximum size.
2. Trims the packet to the size you want.
3. Updates the packet fields according to the new size.
Filestl/udp_rand_len_9k.py
def create_stream (self):# pktp_l2 = Ether()p_l3 = IP(src="16.0.0.1",dst="48.0.0.1")p_l4 = UDP(dport=12,sport=1025)pyld_size = max(0, self.max_pkt_size_l3 - len(p_l3/p_l4))base_pkt = p_l2/p_l3/p_l4/(’\x55’*(pyld_size))
l3_len_fix =-(len(p_l2))l4_len_fix =-(len(p_l2/p_l3))
# vmvm = STLScVmRaw( [ STLVmFlowVar(name="fv_rand", v1
min_value=64,max_value=len(base_pkt),size=2,op="random"),
STLVmTrimPktSize("fv_rand"), # total packet size v2STLVmWrFlowVar(fv_name="fv_rand", v3
pkt_offset= "IP.len",add_val=l3_len_fix), # fix ip len
STLVmFixIpv4(offset = "IP"),
STLVmWrFlowVar(fv_name="fv_rand", v4pkt_offset= "UDP.len",add_val=l4_len_fix) # fix udp len
])
v1 Defines a random stream variable with the maximum size of the packet.v2 Trims the packet size to the fv_rand value.v3 Fixes ip.len to reflect the packet size.v4 Fixes udp.len to reflect the packet size.
2.11.10 Tutorial: Field Engine: Pre-caching to improve performance
The following example demonstrates how to significantly improve Field Engine performance, if necessary.
The Field Engine has a cost in CPU resources: CPU cycles and CPU memory bandwidth (bandwidth available for CPU to readfrom or write to memory). It is possible to significantly improve performance by caching the packets and running the FieldEngine offline (before sending the packets). Typically, this is done with small packets (example: 64 bytes) where performance isan issue. This method can also improve a large-packet senario with a complex Field Engine program.
Limitations of the pre-caching method:

TRex Stateless support 51 / 112
1. Only a limited number of packets can be cached. The total number of cached packets for all the streams on all ports islimited by the memory pool (range: approximately 10 - 40K).
2. Pre-caching packets is not appropriate for some traffic requirements. Examples: A program that steps in prime numbers oruses a random variable.
An example of a scenario that cannot use this method, due to the packet limitation, is a program that changes the src_ip randomly.Pre-caching a limited number of packets would not be compatible with continuously varying the src_ip randomly.
Filestl/udp_1pkt_src_ip_split.py
def create_stream (self):# create a base packet and pad it to sizesize = self.fsize - 4; # no FCS
base_pkt = Ether()/IP(src="16.0.0.1",dst="48.0.0.1")/UDP(dport=12,sport=1025)
pad = max(0, size - len(base_pkt)) * ’x’
vm = STLScVmRaw( [ STLVmFlowVar ( "ip_src",min_value="10.0.0.1",max_value="10.0.0.255",size=4, step=1,op="inc"),
STLVmWrFlowVar (fv_name="ip_src",pkt_offset= "IP.src" ),
STLVmFixIpv4(offset = "IP")],split_by_field = "ip_src",cache_size =255 # the cache size v1
);
pkt = STLPktBuilder(pkt = base_pkt/pad,vm = vm)
stream = STLStream(packet = pkt,mode = STLTXCont())
return stream
v1 Cache 255 packets. The range is the same as the ip_src stream variable.
This example FE program is fully compatible with pre-caching - the traffic output is exactly the same as when running withoutpre-caching. Caching the packets enables the program to run 2 to 5 times faster.
2.11.11 Tutorial: New Scapy header
The following example uses a header that is not supported by Scapy by default. The example demonstrates VXLAN support.
Filestl/udp_1pkt_vxlan.py
# Adding header that does not exists yet in Scapy# This was taken from pull request of Scapy#

TRex Stateless support 52 / 112
# RFC 7348 - Virtual eXtensible Local Area Network (VXLAN): ←↩v1# A Framework for Overlaying Virtualized Layer 2 Networks over Layer 3 Networks# http://tools.ietf.org/html/rfc7348_VXLAN_FLAGS = [’R’ for i in range(0, 24)] + [’R’, ’R’, ’R’, ’I’, ’R’, ’R’, ’R’, ’R’, ’R’]
class VXLAN(Packet):name = "VXLAN"fields_desc = [FlagsField("flags", 0x08000000, 32, _VXLAN_FLAGS),
ThreeBytesField("vni", 0),XByteField("reserved", 0x00)]
def mysummary(self):return self.sprintf("VXLAN (vni=%VXLAN.vni%)")
bind_layers(UDP, VXLAN, dport=4789)bind_layers(VXLAN, Ether)
class STLS1(object):
def __init__ (self):pass
def create_stream (self):pkt = Ether()/IP()/UDP(sport=1337,dport=4789)/VXLAN(vni=42)/Ether()/IP()/(’x’*20) ←↩v2#pkt.show2()#hexdump(pkt)
# burst of 17 packetsreturn STLStream(packet = STLPktBuilder(pkt = pkt ,vm = []),
mode = STLTXSingleBurst( pps = 1, total_pkts = 17) )
v1 Downloads and adds a Scapy header from the specified location. An alternative is to write a Scapy header.v2 Apply the header.
For more information how to define headers see Adding new protocols in the Scapy documentation.
2.11.12 Tutorial: Field Engine, Multiple Clients
The following example generates traffic from many clients with different IP/MAC addresses to one server.

TRex Stateless support 53 / 112
Figure 2.13: Multiple clients, single server
1. Send a gratuitous ARP from B→D with server IP/MAC (58.55.1.1).
2. DUT learns the ARP of server IP/MAC (58.55.1.1).
3. Send traffic from A→C with many client IP/MAC addresses.
Example:
• Base source IPv4: 55.55.1.1
• Destination IPv4: 58.55.1.1
Increment src ipt portion starting at 55.55.1.1 for n number of clients (55.55.1.1, 55.55.1.2)Src MAC: Start with 0000.dddd.0001, increment MAC in steps of 1Dst MAC: Fixed 58.55.1.1
The following sends a gratuitous ARP from the TRex server port for this server (58.0.0.1).
def create_stream (self):# create a base packet and pad it to sizebase_pkt = Ether(src="00:00:dd:dd:01:01",
dst="ff:ff:ff:ff:ff:ff")/ARP(psrc="58.55.1.1",
hwsrc="00:00:dd:dd:01:01",hwdst="00:00:dd:dd:01:01",pdst="58.55.1.1")
Then traffic can be sent from client side: A→C
Filestl/udp_1pkt_range_clients_split.py
class STLS1(object):
def __init__ (self):self.num_clients =30000 # max is 16bitself.fsize =64
def create_stream (self):

TRex Stateless support 54 / 112
# create a base packet and pad it to sizesize = self.fsize - 4 # no FCSbase_pkt = Ether(src="00:00:dd:dd:00:01")/
IP(src="55.55.1.1",dst="58.55.1.1")/UDP(dport=12,sport=1025)pad = max(0, size - len(base_pkt)) * ’x’
vm = STLScVmRaw( [ STLVmFlowVar(name="mac_src",min_value=1,max_value=self.num_clients,size=2, op="inc"), # 1 byte varible, range 1-10
STLVmWrFlowVar(fv_name="mac_src", pkt_offset= 10), v1STLVmWrFlowVar(fv_name="mac_src" ,
pkt_offset="IP.src",offset_fixup=2), v2
STLVmFixIpv4(offset = "IP")]
,split_by_field = "mac_src" # split)
return STLStream(packet = STLPktBuilder(pkt = base_pkt/pad,vm = vm),mode = STLTXCont( pps=10 ))
v1 Writes the stream variable mac_srcwith an offset of 10 (last 2 bytes of src_mac field). The offset is specified explicitlyas 10 bytes from the beginning of the packet.v2 Writes the stream variable mac_src with an offset determined by the offset of IP.src plus the offset_fixup of 2.
2.11.13 Tutorial: Field Engine, many clients with ARP
In the following example, there are two switches: SW1 and SW2. TRex port 0 is connected to SW1 and TRex port 1 is connectedto SW2. There are 253 hosts connected to SW1 and SW2 with two network ports.
Table 2.9: Client side the network of the hosts
Name DescriptionTRex port 0 MAC 00:00:01:00:00:01TRex port 0 IPv4 16.0.0.1IPv4 host client side range 16.0.0.2-16.0.0.254MAC host client side range 00:00:01:00:00:02-
00:00:01:00:00:FE
Table 2.10: Server side the network of the hosts
Name DescriptionTRex port 1 MAC 00:00:02:00:00:01TRex port 1 IPv4 48.0.0.1IPv4 host server side range 48.0.0.2-48.0.0.254MAC host server siderange
00:00:02:00:00:02-00:00:02:00:00:FE

TRex Stateless support 55 / 112
Figure 2.14: arp/nd
In the following example, there are two switches: SW1 and SW2. TRex port 0 is connected to SW1 and TRex port 1 is connectedto SW2. In this example, because there are many hosts connected to the same network using SW1 and not as a next hop, wewould like to teach SW1 the MAC addresses of the hosts and not to send the traffic directly to the hosts MAC (as it is unknown).For that we would send an ARP to all the hosts (16.0.0.2-16.0.0.254) from TRex port 0 and gratuitous ARP from server side(48.0.0.1) TRex port 1 as the first stage of the test.
Procedure:
1. Send a gratuitous ARP from TRex port 1 with server IP/MAC (48.0.0.1). Now SW2 will know that 48.0.0.1 is locatedafter this port of SW2.
2. Send ARP request for all hosts from port 0 with a range of 16.0.0.2-16.0.0.254. Now all switch ports will learn thePORT/MAC locations. Without this stage, the first packets from TRex port 0 would be flooded to all switch ports.
3. Send traffic from TRex0→clients, port 1→servers.
ARP traffic profile
base_pkt = Ether(dst="ff:ff:ff:ff:ff:ff")/ARP(psrc="16.0.0.1",hwsrc="00:00:01:00:00:01", pdst="16.0.0.2") ←↩v1
vm = STLScVmRaw( [ STLVmFlowVar(name="mac_src", min_value=2, max_value=254, size=2, op=" ←↩inc"), v2
STLVmWrFlowVar(fv_name="mac_src" ,pkt_offset="ARP.pdst",offset_fixup=2) ←↩,

TRex Stateless support 56 / 112
],split_by_field = "mac_src" # split
)
v1 ARP packet with TRex port 0 MAC and IP and pdst as variable.v2 Write it to ARP.pdst.
Gratuitous ARP traffic profile
base_pkt = Ether(src="00:00:02:00:00:01",dst="ff:ff:ff:ff:ff:ff")/ARP(psrc="48.0.0.1",hwsrc="00:00:02:00:00:01",
hwdst="00:00:02:00:00:01", pdst="48.0.0.1") v1v1 Gratuitous ARP packet with TRex port 1 MAC and IP. No VM is needed.
NoteThis can be also be done for IPv6. ARP could be replaced with Neighbor Solicitation IPv6 packet.
2.11.14 Tutorial: Field Engine, split to core
Following TRex version 2.08, "split to core" functionality was deprecated, and remains only for backward compatibility. Thenew implementation is always to split as if the profile were sent from one core. It is not necessary for users to consider the actualnumber of cores.
def create_stream (self):
# TCP SYNbase_pkt = Ether()/IP(dst="48.0.0.1")/TCP(dport=80,flags="S")
# vmvm = STLScVmRaw( [ STLVmFlowVar(name="ip_src",
min_value="16.0.0.0",max_value="16.0.0.254",size=4, op="inc"),
STLVmWrFlowVar(fv_name="ip_src", pkt_offset= "IP.src" ),
STLVmFixIpv4(offset = "IP"), # fix checksum]
,split_by_field = "ip_src" v1)
v1 Deprecated split by field - not in use (post v2.08).
Some rules regarding split stream variables and burst/multi-burst
• When using burst/multi-burst, the packets are split to the default number of threads specified in the YAML configurationfile. It is not necessary to split the threads explicitly.
• When the number of packets in a burst is smaller than the number of threads, one thread handles the burst.
• In the case of a stream with a burst of 1 packet, only the first DP thread handles the stream.

TRex Stateless support 57 / 112
2.11.15 Tutorial: Field Engine, null stream
The following example creates a stream with no packets. The example uses the inter-stream gap (ISG) of the null stream, andthen starts a new stream. Essentially, this uses one property of the stream (ISG) without actually including packets in the stream.
This method can create loops like the following:
Figure 2.15: Null stream
1. S1 - Sends a burst of packets, then proceed to stream NULL.
2. NULL - Waits the inter-stream gap (ISG) time, then proceeds to S1.
Null stream configuration:
1. Mode: Burst
2. Number of packets: 0
2.11.16 Tutorial: Field Engine, stream barrier (split)
(Future feature - not yet implemented)
In some situations, it is necessary to split streams into threads in such a way that specific streams will continue only after all thethreads have passed the same path. In the figure below, a barrier ensures that stream S3 starts only after all threads of S2 arecomplete.
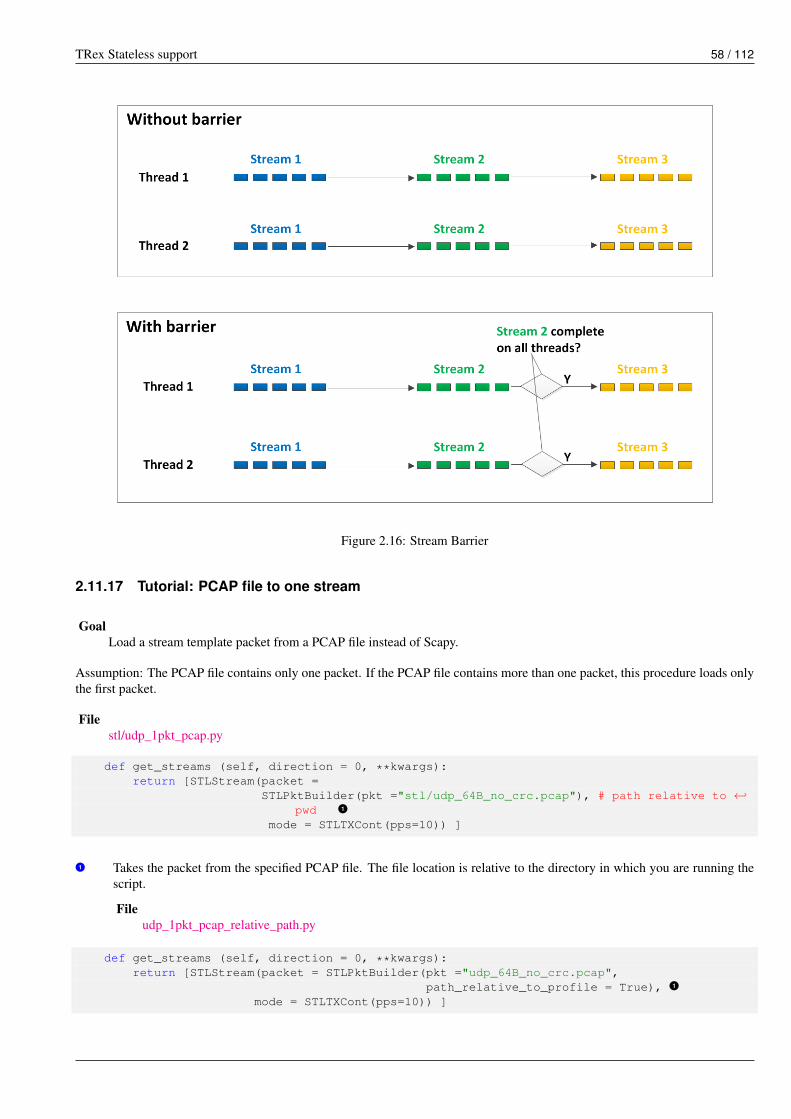
TRex Stateless support 58 / 112
Figure 2.16: Stream Barrier
2.11.17 Tutorial: PCAP file to one stream
GoalLoad a stream template packet from a PCAP file instead of Scapy.
Assumption: The PCAP file contains only one packet. If the PCAP file contains more than one packet, this procedure loads onlythe first packet.
Filestl/udp_1pkt_pcap.py
def get_streams (self, direction = 0, **kwargs):return [STLStream(packet =
STLPktBuilder(pkt ="stl/udp_64B_no_crc.pcap"), # path relative to ←↩pwd v1
mode = STLTXCont(pps=10)) ]
v1 Takes the packet from the specified PCAP file. The file location is relative to the directory in which you are running thescript.
Fileudp_1pkt_pcap_relative_path.py
def get_streams (self, direction = 0, **kwargs):return [STLStream(packet = STLPktBuilder(pkt ="udp_64B_no_crc.pcap",
path_relative_to_profile = True), v1mode = STLTXCont(pps=10)) ]

TRex Stateless support 59 / 112
v1 Takes the packet from the PCAP file, relative to the directory of the profile file location.
2.11.18 Tutorial: Teredo tunnel (IPv6 over IPv4)
The following example demonstrates creating an IPv6 packet within an IPv4 packet, and creating a range of IP addresses.
Filestl/udp_1pkt_ipv6_in_ipv4.py
def create_stream (self):# Teredo Ipv6 over Ipv4pkt = Ether()/IP(src="16.0.0.1",dst="48.0.0.1")/
UDP(dport=3797,sport=3544)/IPv6(dst="2001:0:4137:9350:8000:f12a:b9c8:2815",
src="2001:4860:0:2001::68")/UDP(dport=12,sport=1025)/ICMPv6Unknown()
vm = STLScVmRaw( [# tuple gen for inner Ipv6STLVmTupleGen ( ip_min="16.0.0.1", ip_max="16.0.0.2",
port_min=1025, port_max=65535,name="tuple"), v1
STLVmWrFlowVar (fv_name="tuple.ip",pkt_offset= "IPv6.src",offset_fixup=12 ), v2
STLVmWrFlowVar (fv_name="tuple.port",pkt_offset= "UDP:1.sport" ) v3
])
v1 Defines a stream struct called tuple with the following variables: tuple.ip, tuple.portv2 Writes a stream tuple.ip variable with an offset determined by the IPv6.src offset plus the offset_fixup of 12bytes (only 4 LSB).v3 Writes a stream tuple.port variable into the second UDP header.
2.11.19 Tutorial: Mask instruction
STLVmWrMaskFlowVar is single-instruction-multiple-data Field Engine instruction. The pseudocode is as follows:
Pseudocode
uint32_t val=(cast_to_size)rd_from_variable("name") # read flow-varval+=m_add_value # add value
if (m_shift>0) { # shiftval=val<<m_shift
}else{if (m_shift<0) {
val=val>>(-m_shift)}
}
pkt_val=rd_from_pkt(pkt_offset) # RMWpkt_val = (pkt_val & ~m_mask) | (val & m_mask)wr_to_pkt(pkt_offset,pkt_val)
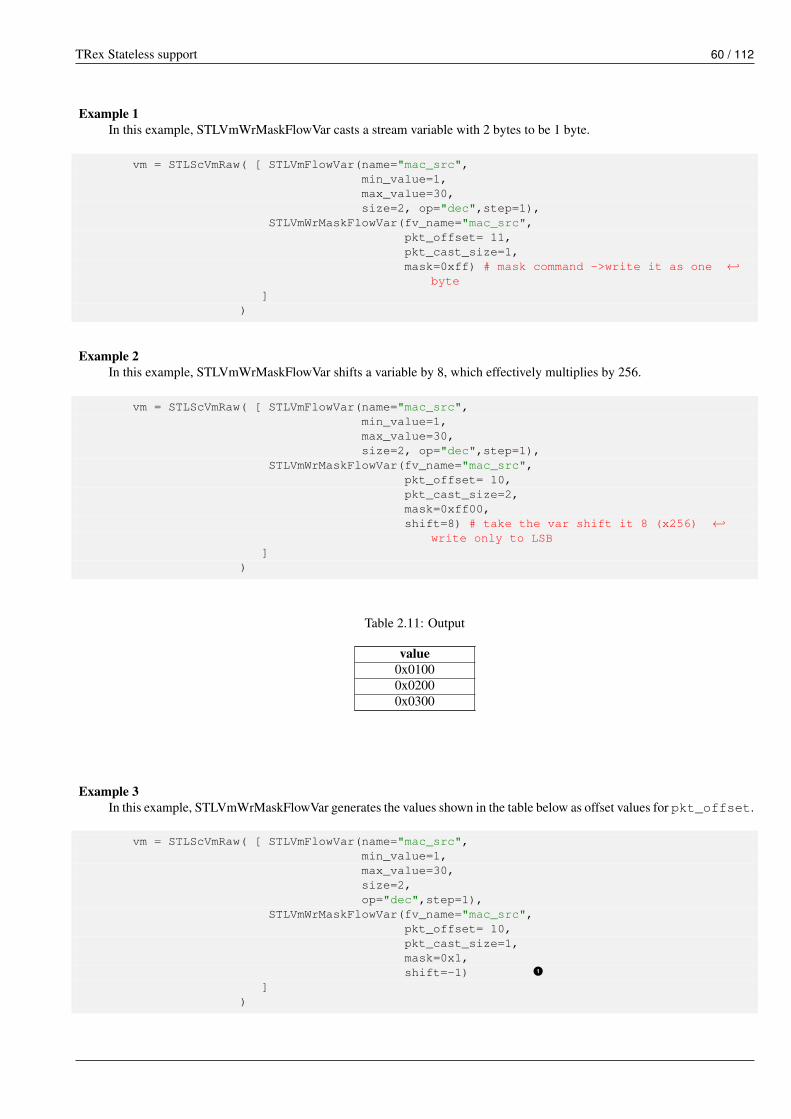
TRex Stateless support 60 / 112
Example 1In this example, STLVmWrMaskFlowVar casts a stream variable with 2 bytes to be 1 byte.
vm = STLScVmRaw( [ STLVmFlowVar(name="mac_src",min_value=1,max_value=30,size=2, op="dec",step=1),
STLVmWrMaskFlowVar(fv_name="mac_src",pkt_offset= 11,pkt_cast_size=1,mask=0xff) # mask command ->write it as one ←↩
byte]
)
Example 2In this example, STLVmWrMaskFlowVar shifts a variable by 8, which effectively multiplies by 256.
vm = STLScVmRaw( [ STLVmFlowVar(name="mac_src",min_value=1,max_value=30,size=2, op="dec",step=1),
STLVmWrMaskFlowVar(fv_name="mac_src",pkt_offset= 10,pkt_cast_size=2,mask=0xff00,shift=8) # take the var shift it 8 (x256) ←↩
write only to LSB]
)
Table 2.11: Output
value0x01000x02000x0300
Example 3In this example, STLVmWrMaskFlowVar generates the values shown in the table below as offset values for pkt_offset.
vm = STLScVmRaw( [ STLVmFlowVar(name="mac_src",min_value=1,max_value=30,size=2,op="dec",step=1),
STLVmWrMaskFlowVar(fv_name="mac_src",pkt_offset= 10,pkt_cast_size=1,mask=0x1,shift=-1) v1
])

TRex Stateless support 61 / 112
v1 Divides the value of mac_src by 2, and writes the LSB. For every two packets, the value written is changed.
Table 2.12: Output
value0x000x000x010x010x000x000x010x01
2.11.20 Tutorial: Advanced traffic profile
Goal
• Define a different profile to operate in each traffic direction.
• Define a different profile for each port.
• Tune a profile tune by the arguments of tunables.
Every traffic profile must define the following function:
def get_streams (self, direction = 0, **kwargs)
direction is a mandatory field, required for any profile being loaded.
A profile can have any key-value pairs. Key-value pairs are called "tunables" and can be used to customize the profile.
The profile defines which tunables can be input to customize output.
Usage notes for defining parameters
• All parameters require default values.
• A profile must be loadable with no parameters specified.
• Every tunable must be expressed as key-value pair with a default value.
• All automatically provided values that are not tunables are defined by kwargs (Python keyword arguments).
For example, for the profile below, pcap_with_vm.py:
• The profile receives direction as a tunable and mandatory field.
• The profile defines 4 additional tunables.
• Automatic values such as port_id, which are not tunables, will be provided on kwargs.
Filestl/pcap_with_vm.py
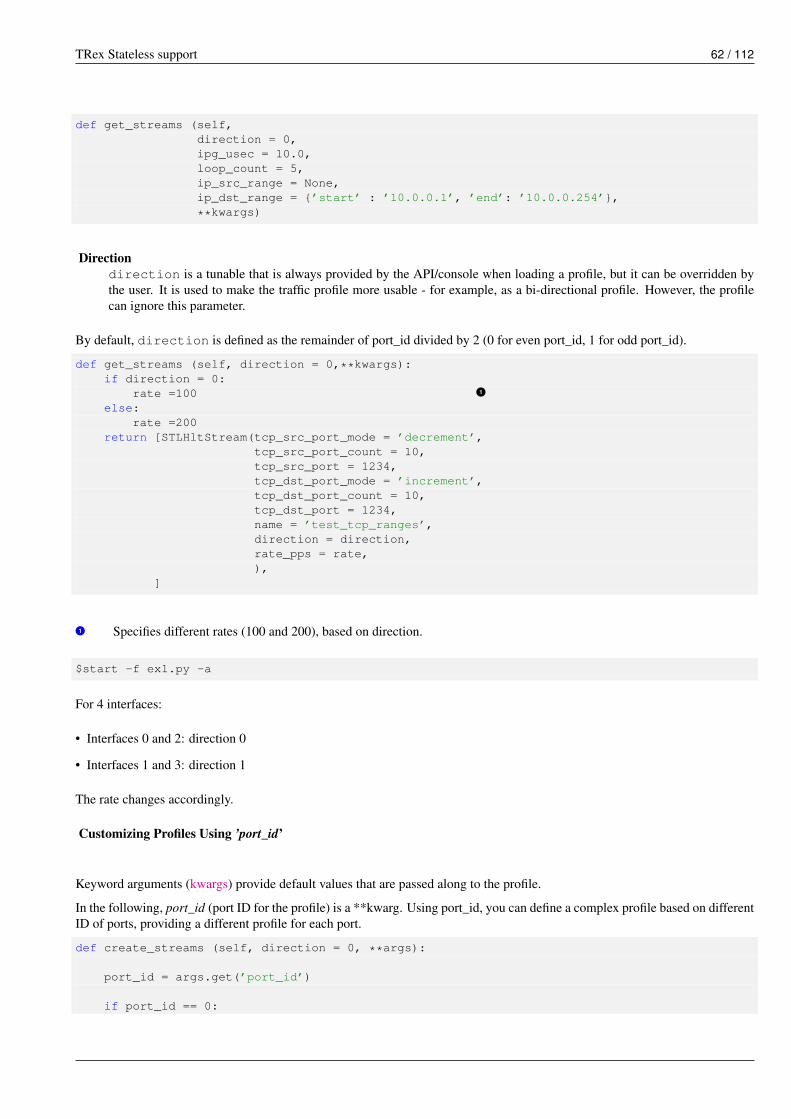
TRex Stateless support 62 / 112
def get_streams (self,direction = 0,ipg_usec = 10.0,loop_count = 5,ip_src_range = None,ip_dst_range = {’start’ : ’10.0.0.1’, ’end’: ’10.0.0.254’},
**kwargs)
Directiondirection is a tunable that is always provided by the API/console when loading a profile, but it can be overridden bythe user. It is used to make the traffic profile more usable - for example, as a bi-directional profile. However, the profilecan ignore this parameter.
By default, direction is defined as the remainder of port_id divided by 2 (0 for even port_id, 1 for odd port_id).
def get_streams (self, direction = 0,**kwargs):if direction = 0:
rate =100 v1else:
rate =200return [STLHltStream(tcp_src_port_mode = ’decrement’,
tcp_src_port_count = 10,tcp_src_port = 1234,tcp_dst_port_mode = ’increment’,tcp_dst_port_count = 10,tcp_dst_port = 1234,name = ’test_tcp_ranges’,direction = direction,rate_pps = rate,),
]
v1 Specifies different rates (100 and 200), based on direction.
$start -f ex1.py -a
For 4 interfaces:
• Interfaces 0 and 2: direction 0
• Interfaces 1 and 3: direction 1
The rate changes accordingly.
Customizing Profiles Using ’port_id’
Keyword arguments (kwargs) provide default values that are passed along to the profile.
In the following, port_id (port ID for the profile) is a **kwarg. Using port_id, you can define a complex profile based on differentID of ports, providing a different profile for each port.
def create_streams (self, direction = 0, **args):
port_id = args.get(’port_id’)
if port_id == 0:

TRex Stateless support 63 / 112
return [STLHltStream(tcp_src_port_mode = ’decrement’,tcp_src_port_count = 10,tcp_src_port = 1234,tcp_dst_port_mode = ’increment’,tcp_dst_port_count = 10,tcp_dst_port = 1234,name = ’test_tcp_ranges’,direction = direction,rate_pps = rate,),
]
if port_id == 1:return STLHltStream(
#enable_auto_detect_instrumentation = ’1’, # not supported yetip_dst_addr = ’192.168.1.3’,ip_dst_count = ’1’,ip_dst_mode = ’increment’,ip_dst_step = ’0.0.0.1’,ip_src_addr = ’192.168.0.3’,ip_src_count = ’1’,ip_src_mode = ’increment’,ip_src_step = ’0.0.0.1’,l3_imix1_ratio = 7,l3_imix1_size = 70,l3_imix2_ratio = 4,l3_imix2_size = 570,l3_imix3_ratio = 1,l3_imix3_size = 1518,l3_protocol = ’ipv4’,length_mode = ’imix’,#mac_dst_mode = ’discovery’, # not supported yetmac_src = ’00.00.c0.a8.00.03’,mac_src2 = ’00.00.c0.a8.01.03’,pkts_per_burst = ’200000’,rate_percent = ’0.4’,transmit_mode = ’continuous’,vlan_id = ’1’,direction = direction,)
if port_id = 3:..
Full example using the TRex Console
The following command displays information about tunables for the pcap_with_vm.py traffic profile.
-=TRex Console v1.1=-
Type ’help’ or ’?’ for supported actions
trex>profile -f stl/pcap_with_vm.py
Profile Information:
General Information:Filename: stl/pcap_with_vm.pyStream count: 5
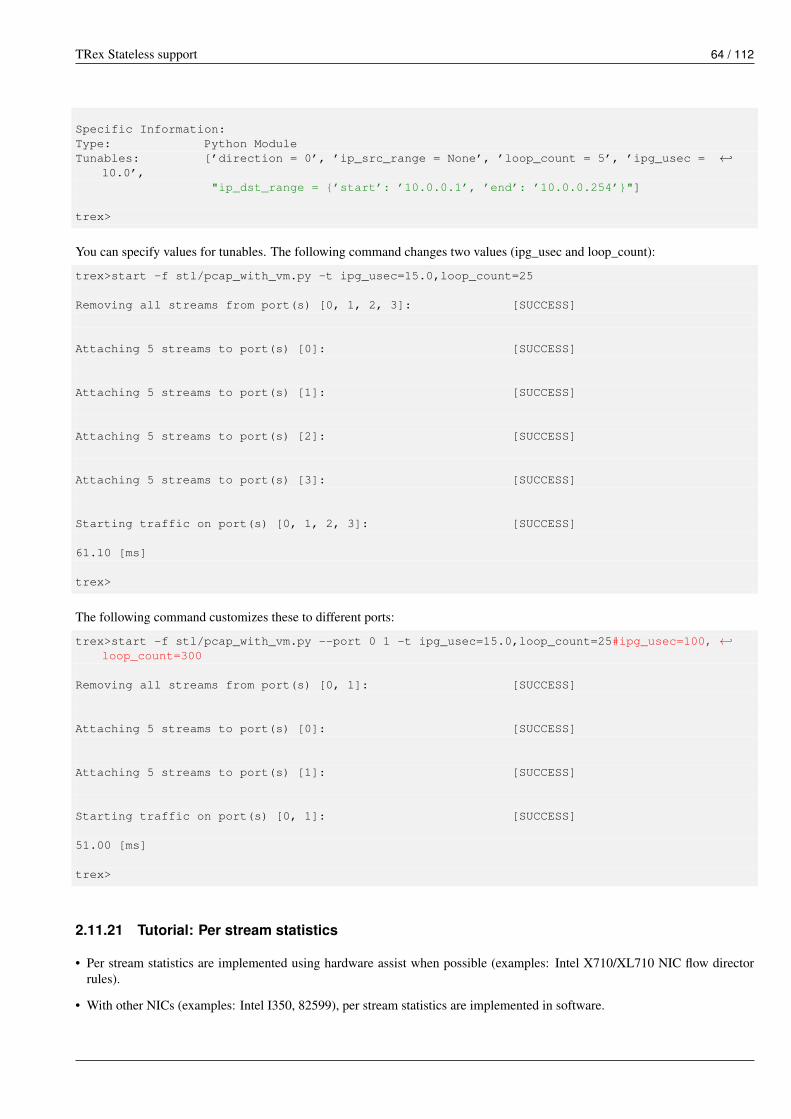
TRex Stateless support 64 / 112
Specific Information:Type: Python ModuleTunables: [’direction = 0’, ’ip_src_range = None’, ’loop_count = 5’, ’ipg_usec = ←↩
10.0’,"ip_dst_range = {’start’: ’10.0.0.1’, ’end’: ’10.0.0.254’}"]
trex>
You can specify values for tunables. The following command changes two values (ipg_usec and loop_count):
trex>start -f stl/pcap_with_vm.py -t ipg_usec=15.0,loop_count=25
Removing all streams from port(s) [0, 1, 2, 3]: [SUCCESS]
Attaching 5 streams to port(s) [0]: [SUCCESS]
Attaching 5 streams to port(s) [1]: [SUCCESS]
Attaching 5 streams to port(s) [2]: [SUCCESS]
Attaching 5 streams to port(s) [3]: [SUCCESS]
Starting traffic on port(s) [0, 1, 2, 3]: [SUCCESS]
61.10 [ms]
trex>
The following command customizes these to different ports:
trex>start -f stl/pcap_with_vm.py --port 0 1 -t ipg_usec=15.0,loop_count=25#ipg_usec=100, ←↩loop_count=300
Removing all streams from port(s) [0, 1]: [SUCCESS]
Attaching 5 streams to port(s) [0]: [SUCCESS]
Attaching 5 streams to port(s) [1]: [SUCCESS]
Starting traffic on port(s) [0, 1]: [SUCCESS]
51.00 [ms]
trex>
2.11.21 Tutorial: Per stream statistics
• Per stream statistics are implemented using hardware assist when possible (examples: Intel X710/XL710 NIC flow directorrules).
• With other NICs (examples: Intel I350, 82599), per stream statistics are implemented in software.
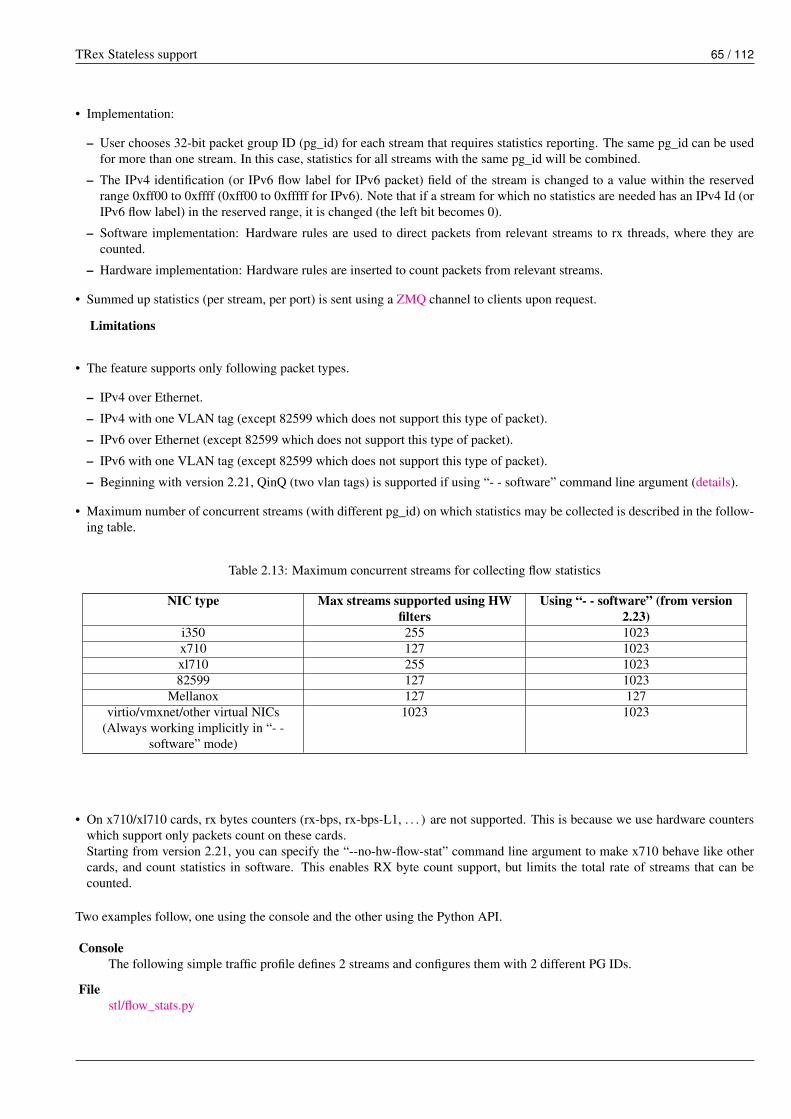
TRex Stateless support 65 / 112
• Implementation:
– User chooses 32-bit packet group ID (pg_id) for each stream that requires statistics reporting. The same pg_id can be usedfor more than one stream. In this case, statistics for all streams with the same pg_id will be combined.
– The IPv4 identification (or IPv6 flow label for IPv6 packet) field of the stream is changed to a value within the reservedrange 0xff00 to 0xffff (0xff00 to 0xfffff for IPv6). Note that if a stream for which no statistics are needed has an IPv4 Id (orIPv6 flow label) in the reserved range, it is changed (the left bit becomes 0).
– Software implementation: Hardware rules are used to direct packets from relevant streams to rx threads, where they arecounted.
– Hardware implementation: Hardware rules are inserted to count packets from relevant streams.
• Summed up statistics (per stream, per port) is sent using a ZMQ channel to clients upon request.
Limitations
• The feature supports only following packet types.
– IPv4 over Ethernet.
– IPv4 with one VLAN tag (except 82599 which does not support this type of packet).
– IPv6 over Ethernet (except 82599 which does not support this type of packet).
– IPv6 with one VLAN tag (except 82599 which does not support this type of packet).
– Beginning with version 2.21, QinQ (two vlan tags) is supported if using “- - software” command line argument (details).
• Maximum number of concurrent streams (with different pg_id) on which statistics may be collected is described in the follow-ing table.
Table 2.13: Maximum concurrent streams for collecting flow statistics
NIC type Max streams supported using HWfilters
Using “- - software” (from version2.23)
i350 255 1023x710 127 1023xl710 255 102382599 127 1023
Mellanox 127 127virtio/vmxnet/other virtual NICs
(Always working implicitly in “- -software” mode)
1023 1023
• On x710/xl710 cards, rx bytes counters (rx-bps, rx-bps-L1, . . . ) are not supported. This is because we use hardware counterswhich support only packets count on these cards.Starting from version 2.21, you can specify the “--no-hw-flow-stat” command line argument to make x710 behave like othercards, and count statistics in software. This enables RX byte count support, but limits the total rate of streams that can becounted.
Two examples follow, one using the console and the other using the Python API.
ConsoleThe following simple traffic profile defines 2 streams and configures them with 2 different PG IDs.
Filestl/flow_stats.py

TRex Stateless support 66 / 112
class STLS1(object):
def get_streams (self, direction = 0):return [STLStream(packet = STLPktBuilder(pkt ="stl/udp_64B_no_crc.pcap"),
mode = STLTXCont(pps = 1000),flow_stats = STLFlowStats(pg_id = 7)), v1
STLStream(packet = STLPktBuilder(pkt ="stl/udp_594B_no_crc.pcap"),mode = STLTXCont(pps = 5000),flow_stats = STLFlowStats(pg_id = 12)) v2
]
v1 Assigned to PG ID 7.v2 Assigned to PG ID 12.
The following command injects this to the console and uses the textual user interface (TUI) to display the TRex activity:
trex>start -f stl/flow_stats.py --port 0
Removing all streams from port(s) [0]: [SUCCESS]
Attaching 2 streams to port(s) [0]: [SUCCESS]
Starting traffic on port(s) [0]: [SUCCESS]
155.81 [ms]
trex>tui
Streams Statistics
PG ID | 12 | 7--------------------------------------------------Tx pps | 5.00 Kpps | 999.29 pps # v1Tx bps L2 | 23.60 Mbps | 479.66 KbpsTx bps L1 | 24.40 Mbps | 639.55 Kbps--- | |Rx pps | 5.00 Kpps | 999.29 pps # v2Rx bps | N/A | N/A # v3---- | |opackets | 222496 | 44500 # v4ipackets | 222496 | 44500obytes | 131272640 | 2670000ibytes | N/A | N/A # v5----- | |opackets | 222.50 Kpkts | 44.50 Kpktsipackets | 222.50 Kpkts | 44.50 Kpktsobytes | 131.27 MB | 2.67 MBibytes | N/A | N/A # v6v1 Tx bandwidth of the streams matches the configured values.v2 Rx bandwidth (999.29 pps) matches the Tx bandwidth (999.29 pps), indicating that there were no drops.v3 , v5 , v6 RX byte count is not supported on this platform (no hardware support for byte count), so TRex displays N/A. You
can add “--no-hw-flow-stat” command line argument to count everything in software, but max rate of streams that can betracked will be lower.
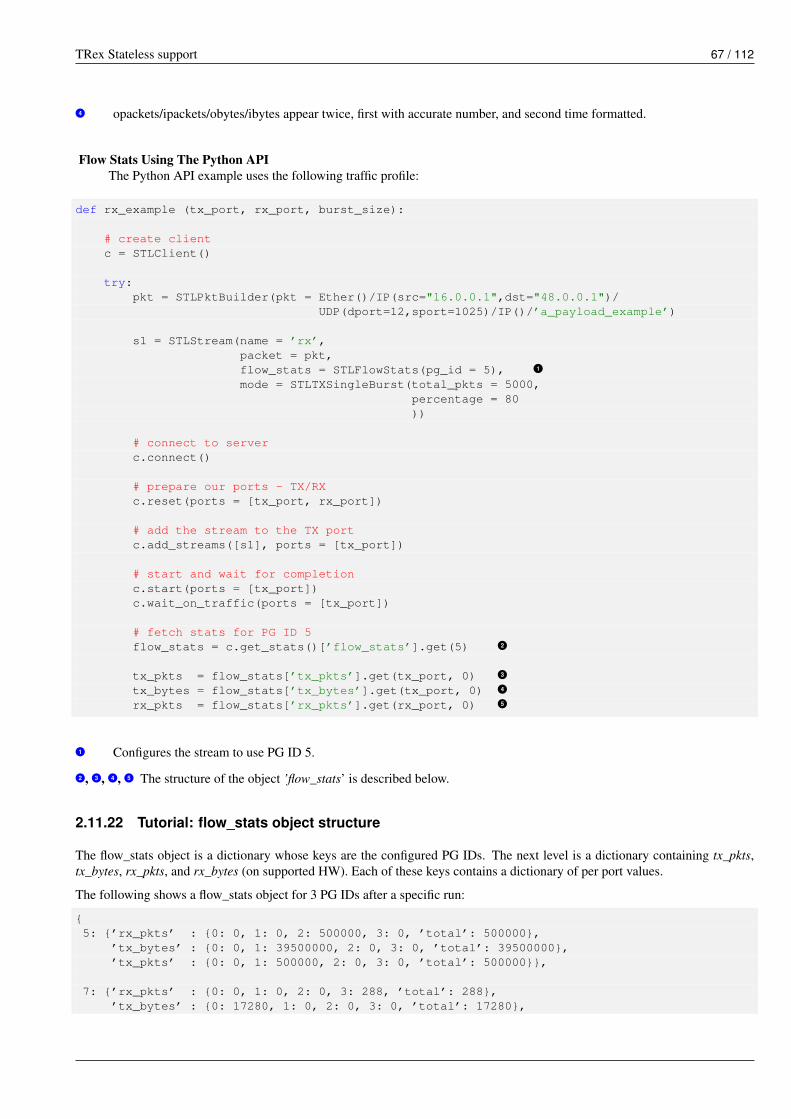
TRex Stateless support 67 / 112
v4 opackets/ipackets/obytes/ibytes appear twice, first with accurate number, and second time formatted.
Flow Stats Using The Python APIThe Python API example uses the following traffic profile:
def rx_example (tx_port, rx_port, burst_size):
# create clientc = STLClient()
try:pkt = STLPktBuilder(pkt = Ether()/IP(src="16.0.0.1",dst="48.0.0.1")/
UDP(dport=12,sport=1025)/IP()/’a_payload_example’)
s1 = STLStream(name = ’rx’,packet = pkt,flow_stats = STLFlowStats(pg_id = 5), v1mode = STLTXSingleBurst(total_pkts = 5000,
percentage = 80))
# connect to serverc.connect()
# prepare our ports - TX/RXc.reset(ports = [tx_port, rx_port])
# add the stream to the TX portc.add_streams([s1], ports = [tx_port])
# start and wait for completionc.start(ports = [tx_port])c.wait_on_traffic(ports = [tx_port])
# fetch stats for PG ID 5flow_stats = c.get_stats()[’flow_stats’].get(5) v2tx_pkts = flow_stats[’tx_pkts’].get(tx_port, 0) v3tx_bytes = flow_stats[’tx_bytes’].get(tx_port, 0) v4rx_pkts = flow_stats[’rx_pkts’].get(rx_port, 0) v5
v1 Configures the stream to use PG ID 5.v2 , v3 , v4 , v5 The structure of the object ’flow_stats’ is described below.
2.11.22 Tutorial: flow_stats object structure
The flow_stats object is a dictionary whose keys are the configured PG IDs. The next level is a dictionary containing tx_pkts,tx_bytes, rx_pkts, and rx_bytes (on supported HW). Each of these keys contains a dictionary of per port values.
The following shows a flow_stats object for 3 PG IDs after a specific run:
{5: {’rx_pkts’ : {0: 0, 1: 0, 2: 500000, 3: 0, ’total’: 500000},
’tx_bytes’ : {0: 0, 1: 39500000, 2: 0, 3: 0, ’total’: 39500000},’tx_pkts’ : {0: 0, 1: 500000, 2: 0, 3: 0, ’total’: 500000}},
7: {’rx_pkts’ : {0: 0, 1: 0, 2: 0, 3: 288, ’total’: 288},’tx_bytes’ : {0: 17280, 1: 0, 2: 0, 3: 0, ’total’: 17280},
TRex Stateless support 68 / 112
’tx_pkts’ : {0: 288, 1: 0, 2: 0, 3: 0, ’total’: 288}},
12: {’rx_pkts’ : {0: 0, 1: 0, 2: 0, 3: 1439, ’total’: 1439},’tx_bytes’: {0: 849600, 1: 0, 2: 0, 3: 0, ’total’: 849600},’tx_pkts’ : {0: 1440, 1: 0, 2: 0, 3: 0, ’total’: 1440}}
}
2.11.23 Tutorial: Per stream latency/jitter/packet errors
• Per stream latency/jitter is implemented by software. This is an extension of the per stream statistics. Whenever you choose todisplay latency info for a stream, the statistics described in the "Per stream statistics" section are also available.
• Implementation:
– Select a 32-bit packet group ID (pg_id) for each stream that requires latency reporting. The pg_id should be unique perstream.
– The IPv4 identification field (or IPv6 flow label in case of IPv6 packet) of the stream is changed to a defined constant value(in the reserved range described in the "per stream statistics" section), to signal to the hardware to pass the stream to thesoftware.
– The last 16 bytes of the packet payload are used to pass needed information: ID of the stream, packet sequence number (perstream), timestamp of packet transmission.
• Gathered info (per stream) is sent to clients over a ZeroMQ messaging channel upon request.
Limitations
• The feature supports only the following packet types. (Exception: When using the “--software” command line arg, all packettypes are supported.)
– IPv4 over Ethernet– IPv4 with one VLAN tag (except 82599 which does not support this type of packet)
– IPv6 over Ethernet (except 82599 which does not support this type of packet)
– IPv6 with one VLAN tag (except 82599 which does not support this type of packet)
• Packets must contain at least 16 bytes of payload.
• Each stream must have unique pg_id number. This also means that a given "latency collecting" stream can’t be transmittedfrom two interfaces in parallel (internally it means that there are two streams).
• Maximum number of concurrent streams (with different pg_id) on which latency info may be collected: 128 (in addition to thestreams which collect per stream statistics)
• Global multiplier does not apply to this type of stream. Latency streams are processed by software, so multiplying them mightinadvertently overwhelm the RX core. Consequently, if you have profile with 1 latency stream and 1 non-latency stream, andyou change the traffic multipler, the latency stream keeps the same rate. To change the rate of a latency stream, manually editthe profile file. Usually this is not necessary because normally you stress the system using non latency stream, and (in parallel)measure latency using a constant-rate latency stream.
ImportantLatency streams (transmit or receive) are not supported at full line rate like normal streams. This is a design featureintended to keep latency measurement accurate while preserving CPU resources. Typically, it is sufficient to have alow-rate latency stream. For example, if the required latency resolution is 10 usec, it is not necessary to send a latencystream at a speed higher than 100 KPPS. Typically, queues are built over time, so it is not possible that one packet willhave latency and another packet in the same path will not have the same latency. The non-latency streams can be atfull line rate, to load the DUT, while the low speed latency streams measure the latency of this path. Do not make thetotal rate of latency streams higher than 5 MPPS.
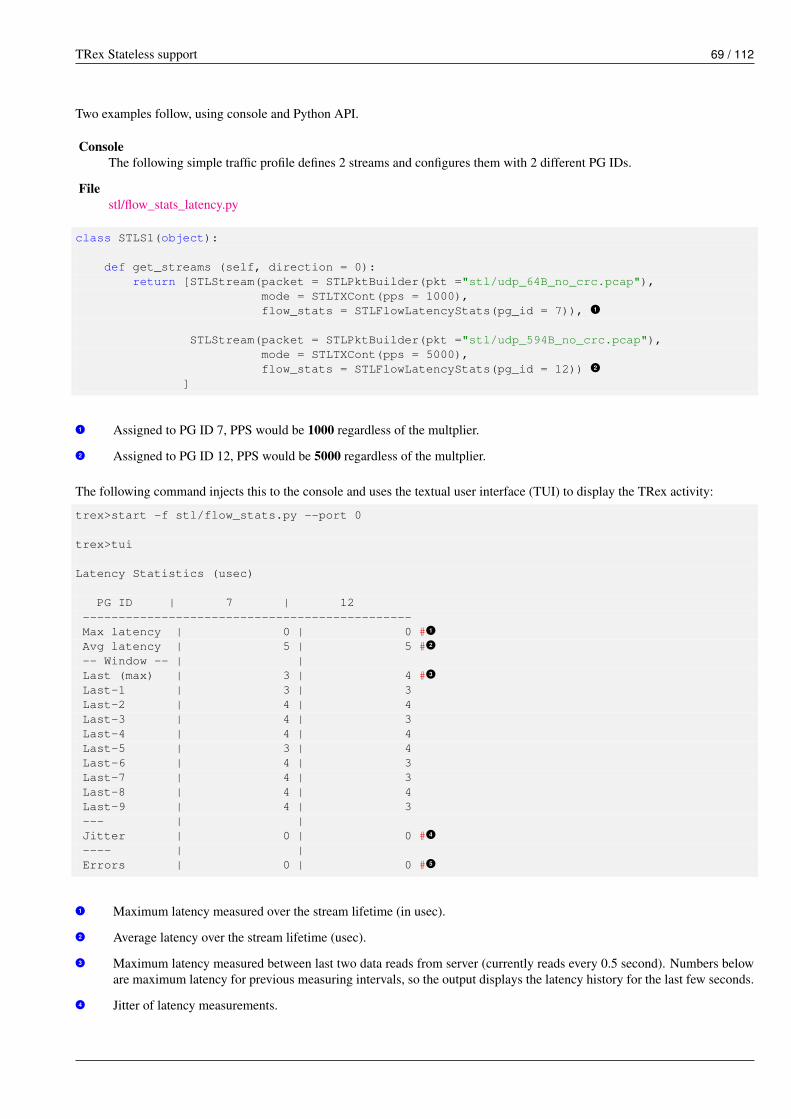
TRex Stateless support 69 / 112
Two examples follow, using console and Python API.
ConsoleThe following simple traffic profile defines 2 streams and configures them with 2 different PG IDs.
Filestl/flow_stats_latency.py
class STLS1(object):
def get_streams (self, direction = 0):return [STLStream(packet = STLPktBuilder(pkt ="stl/udp_64B_no_crc.pcap"),
mode = STLTXCont(pps = 1000),flow_stats = STLFlowLatencyStats(pg_id = 7)), v1
STLStream(packet = STLPktBuilder(pkt ="stl/udp_594B_no_crc.pcap"),mode = STLTXCont(pps = 5000),flow_stats = STLFlowLatencyStats(pg_id = 12)) v2
]
v1 Assigned to PG ID 7, PPS would be 1000 regardless of the multplier.v2 Assigned to PG ID 12, PPS would be 5000 regardless of the multplier.
The following command injects this to the console and uses the textual user interface (TUI) to display the TRex activity:
trex>start -f stl/flow_stats.py --port 0
trex>tui
Latency Statistics (usec)
PG ID | 7 | 12----------------------------------------------Max latency | 0 | 0 # v1Avg latency | 5 | 5 # v2-- Window -- | |Last (max) | 3 | 4 # v3Last-1 | 3 | 3Last-2 | 4 | 4Last-3 | 4 | 3Last-4 | 4 | 4Last-5 | 3 | 4Last-6 | 4 | 3Last-7 | 4 | 3Last-8 | 4 | 4Last-9 | 4 | 3--- | |Jitter | 0 | 0 # v4---- | |Errors | 0 | 0 # v5v1 Maximum latency measured over the stream lifetime (in usec).v2 Average latency over the stream lifetime (usec).v3 Maximum latency measured between last two data reads from server (currently reads every 0.5 second). Numbers below
are maximum latency for previous measuring intervals, so the output displays the latency history for the last few seconds.v4 Jitter of latency measurements.

TRex Stateless support 70 / 112
v5 Indication of number of errors (sum of seq_too_high and seq_too_low). You can see description in Python API docbelow). In the future it will be possible to zoom in to see specific counters. For now, if you need to see specific counters,use the Python API.
Example using Python API:
Example Filestl_flow_latency_stats.py
stats = c.get_stats()
flow_stats = stats[’flow_stats’].get(5)lat_stats = stats[’latency’].get(5) v1tx_pkts = flow_stats[’tx_pkts’].get(tx_port, 0)tx_bytes = flow_stats[’tx_bytes’].get(tx_port, 0)rx_pkts = flow_stats[’rx_pkts’].get(rx_port, 0)drops = lat_stats[’err_cntrs’][’dropped’]ooo = lat_stats[’err_cntrs’][’out_of_order’]dup = lat_stats[’err_cntrs’][’dup’]sth = lat_stats[’err_cntrs’][’seq_too_high’]stl = lat_stats[’err_cntrs’][’seq_too_low’]lat = lat_stats[’latency’]jitter = lat[’jitter’]avg = lat[’average’]tot_max = lat[’total_max’]last_max = lat[’last_max’]hist = lat [’histogram’]
# lat_stats will be in this format
latency_stats == {’err_cntrs’:{ # error counters v2
u’dup’:0, # Same sequence number was received twice in a rowu’out_of_order’:0, # Packets received with sequence number too low (We ←↩
assume it is reorder)u’dropped’:0 # Estimate of number of packets that were dropped ( ←↩
using seq number)u’seq_too_high’:0, # seq number too high eventsu’seq_too_low’:0, # seq number too low events
},’latency’:{
’jitter’:0, # in usec’average’:15.2, # average latency (usec)’last_max’:0, # last 0.5 sec window maximum latency (usec)’total_max’:44, # maximum latency (usec)’histogram’:[ # histogram of latency
{u’key’:20, # bucket counting packets with latency in the range ←↩
20 to 30 usecu’val’:489342 # number of samples that hit this bucket’s range
},{
u’key’:30,u’val’:10512
},{
u’key’:40,u’val’:143
},

TRex Stateless support 71 / 112
{’key’:0, # bucket counting packets with latency in the range ←↩
0 to 10 usec’val’:3
}]
}},
v1 Get the Latency dictionary.v2 For calculating packet error events, we add sequence number to each packet’s payload. We decide what went wrong onlyaccording to sequence number of last packet received and that of the previous packet. seq_too_low and seq_too_highcount events we see. dup, out_of_order and dropped are heuristics we apply to try and understand what happened. Theywill be accurate in common error scenarios. We describe few scenarios below to help understand this.
Error counters scenarios
• Scenario 1: Receive a packet with seq num 10, and another packet with seq num 10. We increment dup and seq_too_lowby 1.
• Scenario 2: Receive a packet with seq num 10 and then a packet with seq num 15. We assume 4 packets were dropped,and increment dropped by 4, and seq_too_high by 1. We expect next packet to arrive with sequence number 16.
• Continuation of Scenario 2: Receive a packet with seq num 11. We increment seq_too_low by 1. We incrementout_of_order by 1. We decrement dropped by 1. (The assumption is that one of the packets that was considered asdropped before has actually arrived out of order.)
2.11.24 Tutorial: HLT profiles
HLTAPI traffic_config() function has a set of arguments for creating streams.It is possible to define TRex traffic profile using those arguments, which are converted under the hood to native Scapy/FieldEngine instructions.For limitations see here [altapi-support].
Filestl/hlt/hlt_udp_inc_dec_len_9k.py
class STLS1(object):’’’Create 2 Eth/IP/UDP streams with different packet size:First stream will start from 64 bytes (default) and will increase until max_size ←↩
(9,216)Seconds stream will decrease the packet size in reverse way’’’
def create_streams (self):max_size = 9*1024return [STLHltStream(length_mode = ’increment’,
frame_size_max = max_size,l3_protocol = ’ipv4’,ip_src_addr = ’16.0.0.1’,ip_dst_addr = ’48.0.0.1’,l4_protocol = ’udp’,udp_src_port = 1025,udp_dst_port = 12,rate_pps = 1,
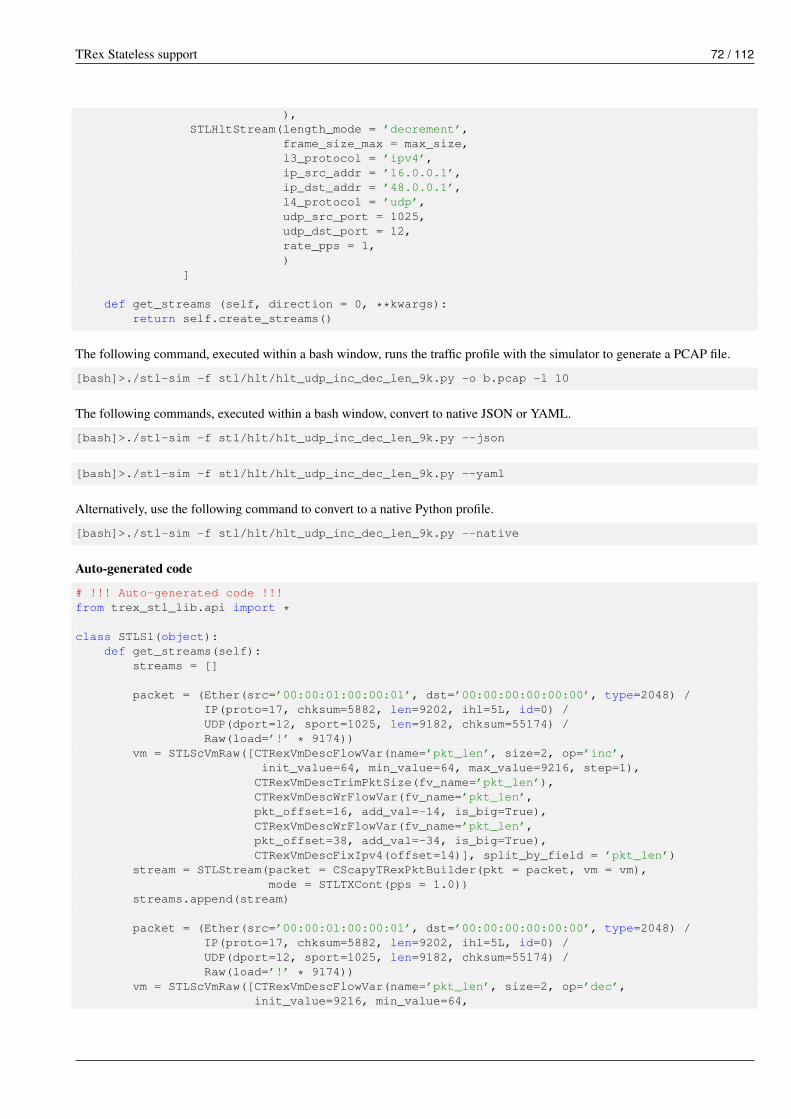
TRex Stateless support 72 / 112
),STLHltStream(length_mode = ’decrement’,
frame_size_max = max_size,l3_protocol = ’ipv4’,ip_src_addr = ’16.0.0.1’,ip_dst_addr = ’48.0.0.1’,l4_protocol = ’udp’,udp_src_port = 1025,udp_dst_port = 12,rate_pps = 1,)
]
def get_streams (self, direction = 0, **kwargs):return self.create_streams()
The following command, executed within a bash window, runs the traffic profile with the simulator to generate a PCAP file.
[bash]>./stl-sim -f stl/hlt/hlt_udp_inc_dec_len_9k.py -o b.pcap -l 10
The following commands, executed within a bash window, convert to native JSON or YAML.
[bash]>./stl-sim -f stl/hlt/hlt_udp_inc_dec_len_9k.py --json
[bash]>./stl-sim -f stl/hlt/hlt_udp_inc_dec_len_9k.py --yaml
Alternatively, use the following command to convert to a native Python profile.
[bash]>./stl-sim -f stl/hlt/hlt_udp_inc_dec_len_9k.py --native
Auto-generated code
# !!! Auto-generated code !!!from trex_stl_lib.api import *
class STLS1(object):def get_streams(self):
streams = []
packet = (Ether(src=’00:00:01:00:00:01’, dst=’00:00:00:00:00:00’, type=2048) /IP(proto=17, chksum=5882, len=9202, ihl=5L, id=0) /UDP(dport=12, sport=1025, len=9182, chksum=55174) /Raw(load=’!’ * 9174))
vm = STLScVmRaw([CTRexVmDescFlowVar(name=’pkt_len’, size=2, op=’inc’,init_value=64, min_value=64, max_value=9216, step=1),
CTRexVmDescTrimPktSize(fv_name=’pkt_len’),CTRexVmDescWrFlowVar(fv_name=’pkt_len’,pkt_offset=16, add_val=-14, is_big=True),CTRexVmDescWrFlowVar(fv_name=’pkt_len’,pkt_offset=38, add_val=-34, is_big=True),CTRexVmDescFixIpv4(offset=14)], split_by_field = ’pkt_len’)
stream = STLStream(packet = CScapyTRexPktBuilder(pkt = packet, vm = vm),mode = STLTXCont(pps = 1.0))
streams.append(stream)
packet = (Ether(src=’00:00:01:00:00:01’, dst=’00:00:00:00:00:00’, type=2048) /IP(proto=17, chksum=5882, len=9202, ihl=5L, id=0) /UDP(dport=12, sport=1025, len=9182, chksum=55174) /Raw(load=’!’ * 9174))
vm = STLScVmRaw([CTRexVmDescFlowVar(name=’pkt_len’, size=2, op=’dec’,init_value=9216, min_value=64,

TRex Stateless support 73 / 112
max_value=9216, step=1),CTRexVmDescTrimPktSize(fv_name=’pkt_len’),CTRexVmDescWrFlowVar(fv_name=’pkt_len’, pkt_offset=16,add_val=-14, is_big=True),CTRexVmDescWrFlowVar(fv_name=’pkt_len’,pkt_offset=38, add_val=-34, is_big=True),CTRexVmDescFixIpv4(offset=14)], split_by_field = ’pkt_len’)
stream = STLStream(packet = CScapyTRexPktBuilder(pkt = packet, vm = vm),mode = STLTXCont(pps = 1.0))
streams.append(stream)
return streams
def register():return STLS1()
Use the following command within the TRex console to run the profile.
TRex>start -f stl/hlt/hlt_udp_inc_dec_len_9k.py -m 10mbps -a
2.12 Functional Tutorials
On functional tests we demonstrate a way to test certain cases which does not require high bandwidth but instead require moreflexibility such as fetching all the packets on the RX side.
2.12.1 Tutorial: Testing Dot1Q VLAN tagging
GoalGenerate a Dot1Q packet with a vlan tag and verify the returned packet is on the same vlan.
Filestl_functional.py
The following example is presented here in a simplified form. See the file above for the full working example.
#passed a connected client object and two portsdef test_dot1q (c, rx_port, tx_port):
# activate service mode on RX codec.set_service_mode(ports = rx_port)
# generate a simple Dot1Qpkt = Ether() / Dot1Q(vlan = 100) / IP()
# start a capturecapture = c.start_capture(rx_ports = rx_port)
# push the Dot1Q packet to TX port... we need ’force’ because this is under service ←↩mode
print(’\nSending 1 Dot1Q packet(s) on port {}’.format(tx_port))
c.push_packets(ports = tx_port, pkts = pkt, force = True)c.wait_on_traffic(ports = tx_port)
rx_pkts = []c.stop_capture(capture_id = capture[’id’], output = rx_pkts)

TRex Stateless support 74 / 112
print(’\nRecived {} packets on port {}:\n’.format(len(rx_pkts), rx_port))
c.set_service_mode(ports = rx_port, enabled = False)
# got back one packetassert(len(rx_pkts) == 1)rx_scapy_pkt = Ether(rx_pkts[0][’binary’])
# it’s a Dot1Q with the same VLANassert(’Dot1Q’ in rx_scapy_pkt)assert(rx_scapy_pkt.vlan == 100)
rx_scapy_pkt.show2()
2.12.2 Tutorial: Testing IPv4 ping - echo request / echo reply
GoalGenerate a ICMP echo request from one interface to another one and validate the response.
Filestl_functional.py
# test a echo request / echo replydef test_ping (c, tx_port, rx_port):
# activate service mode on RX codec.set_service_mode(ports = [tx_port, rx_port])
# fetch the configtx_port_attr = c.get_port_attr(port = tx_port)rx_port_attr = c.get_port_attr(port = rx_port)
assert(tx_port_attr[’layer_mode’] == ’IPv4’)assert(rx_port_attr[’layer_mode’] == ’IPv4’)
pkt = Ether() / IP(src = tx_port_attr[’src_ipv4’], dst = rx_port_attr[’src_ipv4’]) / ←↩ICMP(type = 8)
# start a capture on the sending portcapture = c.start_capture(rx_ports = tx_port)
print(’\nSending ping request on port {}’.format(tx_port))
# send the ping packetc.push_packets(ports = tx_port, pkts = pkt, force = True)c.wait_on_traffic(ports = tx_port)
# fetch the packetrx_pkts = []c.stop_capture(capture_id = capture[’id’], output = rx_pkts)
print(’\nRecived {} packets on port {}:\n’.format(len(rx_pkts), tx_port))
c.set_service_mode(ports = rx_port, enabled = False)
# got back one packetassert(len(rx_pkts) == 1)rx_scapy_pkt = Ether(rx_pkts[0][’binary’])

TRex Stateless support 75 / 112
# check for ICMP replyassert(’ICMP’ in rx_scapy_pkt)assert(rx_scapy_pkt[’ICMP’].type == 0)
rx_scapy_pkt.show2()
2.13 Services
ImportantThe following section relies on service mode - please refer to service mode section for more details
2.13.1 Overview
While under service mode, TRex provides the ability to run services.
A service is an instance of a service type that has a certain request / response state machine.
Figure 2.17: Services Instances
For example, the ARP service type provides a way to create ARP request instances that can be then executed by TRex in aparallel way supporting up to ~1000 requests in parallel.

TRex Stateless support 76 / 112
The following diagram illustrates how services fit in the general flow:
Figure 2.18: Services Execution Flow
NoteA simple example
The simplest example of a service execution:
# import the ARP servicefrom trex_stl_lib.services.trex_stl_service_arp import STLServiceARP
# create a service context on port 0ctx = client.create_service_ctx(port = 0)
# generate single ARP request from 1.1.1.5 to 1.1.1.1arp = STLServiceARP(ctx, src_ip = ’1.1.1.5’, dst_ip = ’1.1.1.1’)
# move to service mode and execute serviceclient.set_service_mode(ports = 0)try:
ctx.run(arp)finally:
client.set_service_mode(ports = 0, enabled = False)
# show the ARP resultprint(arp.get_record())
Recieved ARP reply from: 1.1.1.1, hw: b8:46:dd:63:21:e4"
There are two main usages for services:
• Customizing Tests
• Control Plane Stress
2.13.2 Customizing Tests
Services provides an easy way to customize tests:
executing services can be used to dynamically acquire data prior to the test and then generate a test based on the results.
NoteAn example of using DHCP service to cutomize a test
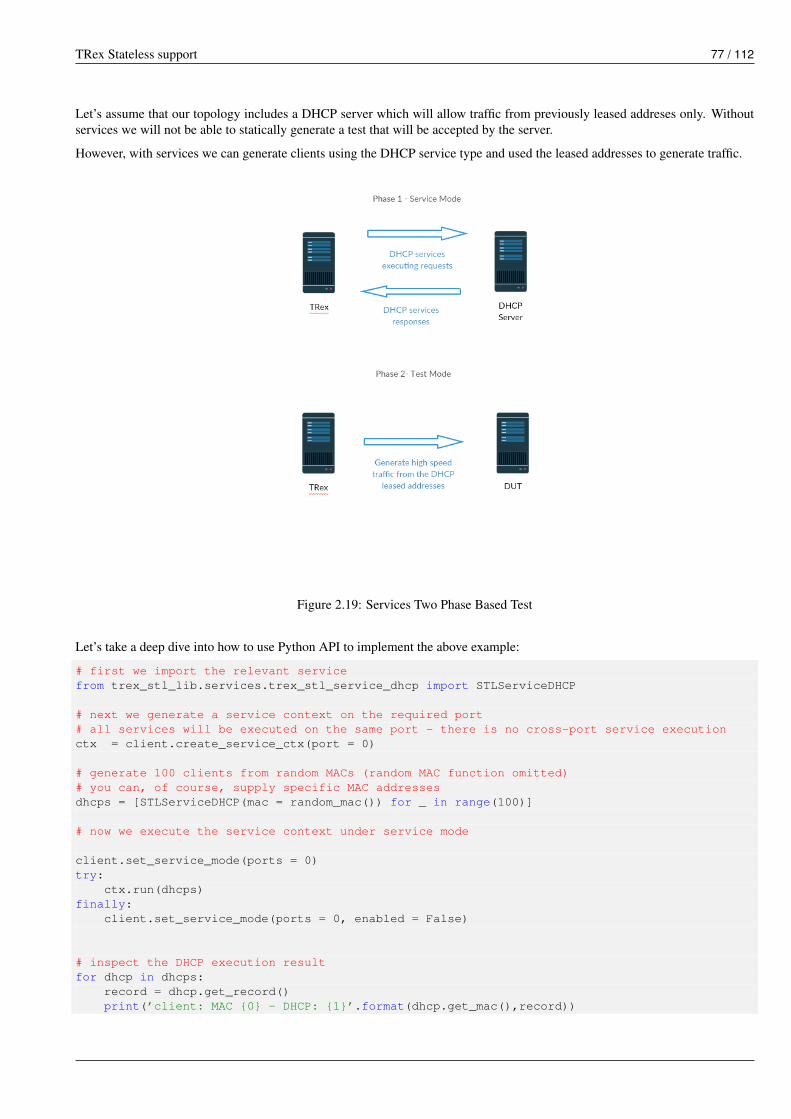
TRex Stateless support 77 / 112
Let’s assume that our topology includes a DHCP server which will allow traffic from previously leased addreses only. Withoutservices we will not be able to statically generate a test that will be accepted by the server.
However, with services we can generate clients using the DHCP service type and used the leased addresses to generate traffic.
Figure 2.19: Services Two Phase Based Test
Let’s take a deep dive into how to use Python API to implement the above example:
# first we import the relevant servicefrom trex_stl_lib.services.trex_stl_service_dhcp import STLServiceDHCP
# next we generate a service context on the required port# all services will be executed on the same port - there is no cross-port service executionctx = client.create_service_ctx(port = 0)
# generate 100 clients from random MACs (random MAC function omitted)# you can, of course, supply specific MAC addressesdhcps = [STLServiceDHCP(mac = random_mac()) for _ in range(100)]
# now we execute the service context under service mode
client.set_service_mode(ports = 0)try:
ctx.run(dhcps)finally:
client.set_service_mode(ports = 0, enabled = False)
# inspect the DHCP execution resultfor dhcp in dhcps:
record = dhcp.get_record()print(’client: MAC {0} - DHCP: {1}’.format(dhcp.get_mac(),record))

TRex Stateless support 78 / 112
# let’s filter all the DHCPs that successfuly moved to ’BOUND’ state# refer to the DHCP code reference to see all the available statesbounded_dhcps = [dhcp for dhcp in dhcps if dhcp.state == ’BOUND’]
# we can use the above results to generate traffic from the leased addresses
streams = []for bound_dhcp in bounded_dhcps:
record = bound_dhcp.get_record()
pkt = STLPktBuilder(pkt = Ether(src=record.client_mac)/IP(src=record.client_ip,dst=record.server_ip)/UDP)
streams.append(STLStream(packet = pkt, mode = STLTXSingleBurst(total_pkts = 1000)))
# add streams and generate trafficclient.add_streams(ports = 0, streams = streams)client.start(ports = 0, mult = ’100%’)client.wait_on_traffic()
And here is how the output (partial) looks like:
client: MAC 3c:1d:08:91:7f:34 - DHCP: ip: 1.1.1.8, server_ip: 1.1.1.1, subnet: ←↩255.255.255.0
client: MAC 21:3c:a3:3f:cb:a7 - DHCP: ip: 1.1.1.5, server_ip: 1.1.1.1, subnet: ←↩255.255.255.0
client: MAC f9:ba:11:51:91:8b - DHCP: ip: 1.1.1.7, server_ip: 1.1.1.1, subnet: ←↩255.255.255.0
client: MAC b8:46:dd:63:21:e4 - DHCP: ip: 1.1.1.11, server_ip: 1.1.1.1, subnet: ←↩255.255.255.0
client: MAC b8:38:f9:c7:1c:6e - DHCP: ip: 1.1.1.9, server_ip: 1.1.1.1, subnet: ←↩255.255.255.0
client: MAC 44:27:f1:f3:9a:bd - DHCP: ip: 1.1.1.10, server_ip: 1.1.1.1, subnet: ←↩255.255.255.0
client: MAC cd:8d:c6:c9:5c:6a - DHCP: ip: 1.1.1.2, server_ip: 1.1.1.1, subnet: ←↩255.255.255.0
client: MAC 51:ee:33:d9:d8:9f - DHCP: ip: 1.1.1.3, server_ip: 1.1.1.1, subnet: ←↩255.255.255.0
client: MAC 75:f2:22:ce:86:47 - DHCP: ip: 1.1.1.4, server_ip: 1.1.1.1, subnet: ←↩255.255.255.0
client: MAC 19:bb:56:20:52:3b - DHCP: ip: 1.1.1.6, server_ip: 1.1.1.1, subnet: ←↩255.255.255.0
NoteAn example of using IPv6 ND to establish IPv6 neighborships before running DP tests.
The IPv6 ND service has many options, most of them are not mandatory: mandatory parameters:
• ctx: the service context object
• dst_ip: the IPv6 neighbor address to be resolved
• src_ip: the IPv6 source address to be used
optional parameters:
• retries: number of retries in case of timeouts (default=1)

TRex Stateless support 79 / 112
• src_mac: source mac address to be used in Ethernet packets (default taken from port in use)
• timeout: timeout in seconds to wait for neighbor advertisements in response to our neighbor solicitation packets (default 2)
• verify_timeout: timeout in seconds to wait for neighbor soliciation messages from a neighbor, after our NS was answered(Neighbor verification is not always performed, but depends on our state in the neighbors ND cache).
• vlan: vlan identifiers used for dot1q/dot1ad vlan headers (e.g. [200,2] uses outer vlan 200, inner vlan 2)
• fmt: encapsulation format used for vlan tagging (Q: dot1q, D: dot1ad). Double tagging can be formatted with "QQ" (double-dot1q) or "DQ" (dot1q in dot1ad), or DD or QD . . . .
• verbose_level: increase logging of IPv6 service instances (e.g service_level = STLServiceIPv6ND.ERROR)
#!/usr/bin/python
from stl_path import *from trex_stl_lib.api import *from trex_stl_lib.services.trex_stl_service_IPv6ND import STLServiceIPv6ND
c = STLClient()c.connect()c.acquire(force = True)c.set_service_mode(ports = 0)
# create service contextctx = c.create_service_ctx(port = 0)
nd_service = STLServiceIPv6ND( ctx,src_ip = "2001:db8:10:22::15",dst_ip = "2001:db8:10:22::1",vlan = [ 500, 22],timeout=2,verify_timeout=6,fmt = "QQ",verbose_level = STLServiceIPv6ND.INFO
)ctx.run(nd_service)print nd_service.get_record()
2.13.3 Control Plane Stress Tests
Another practical use-case of services is to simply use the first phase as the main phase and focus on generating many controlplane requests.
For example, the same DHCP example can be used to stress out a DHCP server by generating many requests.
Now, even though service mode is slower that regular mode, and service context execution is even slower as we wait for responsefrom the server there are still two major benefits:
• Parallelism - When generating many service instances, there will be minimum impact on the total run time as we executeservices in parallel
• Flexibility - Putting aside performance, TRex services are written in Python and uses Scapy to generate traffic and thus arevery easy to manipulate and custom fit

TRex Stateless support 80 / 112
2.13.4 Currently Provided Services
Currently, the implemented services provided with TRex package are:
• ARP - provides an ARP resolution for an IPv4 address
• ICMPv4 - provides Ping IPv4 for an IPv4 address
• DHCP - provides a DHCP bound/release lease address
• IPv6ND - provides IPv6 neighbor discovery
We are planning to add more and hope for contribution in this area
2.13.5 A Detailed DHCP Example
Full DHCP example can be found under the following GitHub link:
• stl_dhcp_example.py
2.13.6 Limitations
There is no limitation on the types of services that are being executed. It is possible to run ARP and DHCP in parallel if it isneeded.
The only limitation is that services run under context which is bounded to a single port.
There is no way to forward response from another port to the context.
Also, the number of service instances per execution is currently limited to 1000.
2.13.7 Console plugins
Another usage of services (or even mix of them) is plugins infrastructure in trex-console.Plugins system is a way to dynamically import and run some code.
trex>plugins -husage: plugins [-h] ...
Show / load / use plugins
optional arguments:-h, --help show this help message and exit
command:
show Show / search for pluginsload Load (or implicitly reload) plugin by nameunload Unload plugin by name
Plugins are located in console/plugins directory, and their filename begins with "plugin_".They can be searched via "show" command and loaded via "load" command:
trex>plugins load wlc
Loading plugin: wlc [SUCCESS]
trex>plugins show+----------------------+-----------------+

TRex Stateless support 81 / 112
| Plugin name | Loaded |+======================+=================+| IPv6ND | No |+----------------------+-----------------+| hello | No |+----------------------+-----------------+| wlc | Yes |+----------------------+-----------------+
Now, loaded plugin can be seen in menu of plugins and used:
trex>plugins -husage: plugins [-h] ...
Show / load / use plugins
optional arguments:-h, --help show this help message and exit
command:
show Show / search for pluginsload Load (or implicitly reload) plugin by nameunload Unload plugin by namewlc WLC testing related functionality
trex>plugins wlc -husage: plugins wlc [-h]
{add_client,base,close,create_ap,reconnect,show,start} ...
optional arguments:-h, --help show this help message and exit
commands:{add_client,base,close,create_ap,reconnect,show,start}add_client Add client(s) to AP(s)base Set base values of MAC, IP etc. for created AP/Client.
Will be increased for each new device.close Closes all wlc-related stuffcreate_ap Create AP(s) on portreconnect Reconnect disconnected AP(s) or Client(s).show Show status of APsstart Start traffic on behalf on client(s).
trex>plugins wlc create_ap -p 0
Enabling service mode on port(s) [0]: [SUCCESS]
Discovering WLC [SUCCESS]
Establishing DTLS connection [SUCCESS]
Join WLC and get SSID [SUCCESS]
Example of plugin (file console/plugins/plugin_hello.py):
#!/usr/bin/python
from console.plugins import *

TRex Stateless support 82 / 112
’’’Example plugin’’’
class Hello_Plugin(ConsolePlugin):def plugin_description(self):
return ’Simple example’
# used to init stuffdef plugin_load(self):
# Adding arguments to be used at do_* functionsself.add_argument(type = str,
dest = ’username’, # <----- variable name to be usedhelp = ’Username to greet’)
# We build argparser from do_* functions, stripping the "do_" from namedef do_greet(self, username): # <------ username was registered in plugin_load
’’’Greet some username’’’self.trex_client.logger.log(’Hello, %s!’ % bold(username.capitalize())) # <--- ←↩
trex_client is set implicitly
NoteAn plugin that uses the IPv6 service, that allows experimenting with IPv6 from the console.
trex(service)>plugins load IPv6ND
Loading plugin: IPv6ND [SUCCESS]
trex(service)>plugins IPv6ND -husage: plugins IPv6ND [-h] {clear,resolve,status} ...
optional arguments:-h, --help show this help message and exit
commands:{clear,resolve,status}clear clear IPv6 ND requests/entriesresolve perform IPv6 neighbor discoverystatus show status of generated ND requests
trex(service)>plugins IPv6ND resolve -husage: IPv6ND resolve [-h] -p PORT -s SRC_IP [-m SRC_MAC] -d DST_IP [-v VLAN]
[-f FMT] [-t TIMEOUT] [-T VERIFY_TIMEOUT] [-c COUNT][-r RATE] [-R RETRIES] [-V]
perform IPv6 neighbor discovery
optional arguments:-h, --help show this help message and exit-p PORT, --port PORT trex port to use-s SRC_IP, --src-ip SRC_IP
src ip to use-m SRC_MAC, --src-mac SRC_MAC
src mac to use-d DST_IP, --dst-ip DST_IP
IPv6 dst ip to discover
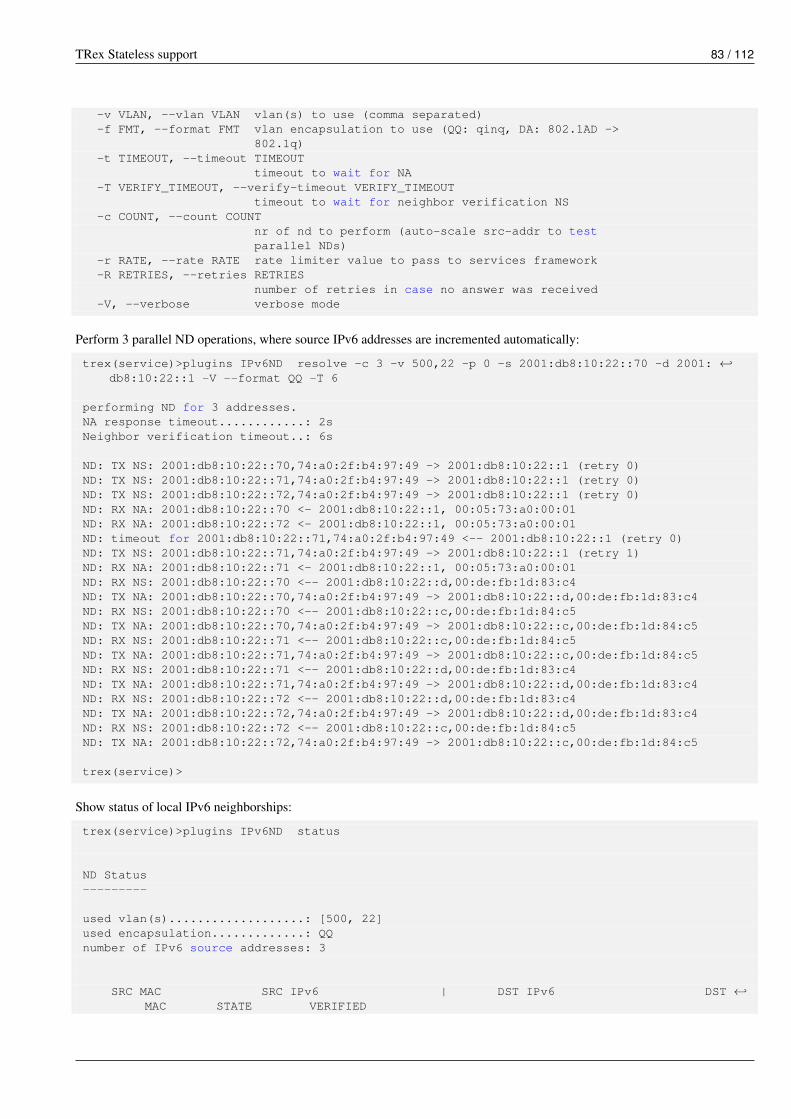
TRex Stateless support 83 / 112
-v VLAN, --vlan VLAN vlan(s) to use (comma separated)-f FMT, --format FMT vlan encapsulation to use (QQ: qinq, DA: 802.1AD ->
802.1q)-t TIMEOUT, --timeout TIMEOUT
timeout to wait for NA-T VERIFY_TIMEOUT, --verify-timeout VERIFY_TIMEOUT
timeout to wait for neighbor verification NS-c COUNT, --count COUNT
nr of nd to perform (auto-scale src-addr to testparallel NDs)
-r RATE, --rate RATE rate limiter value to pass to services framework-R RETRIES, --retries RETRIES
number of retries in case no answer was received-V, --verbose verbose mode
Perform 3 parallel ND operations, where source IPv6 addresses are incremented automatically:
trex(service)>plugins IPv6ND resolve -c 3 -v 500,22 -p 0 -s 2001:db8:10:22::70 -d 2001: ←↩db8:10:22::1 -V --format QQ -T 6
performing ND for 3 addresses.NA response timeout............: 2sNeighbor verification timeout..: 6s
ND: TX NS: 2001:db8:10:22::70,74:a0:2f:b4:97:49 -> 2001:db8:10:22::1 (retry 0)ND: TX NS: 2001:db8:10:22::71,74:a0:2f:b4:97:49 -> 2001:db8:10:22::1 (retry 0)ND: TX NS: 2001:db8:10:22::72,74:a0:2f:b4:97:49 -> 2001:db8:10:22::1 (retry 0)ND: RX NA: 2001:db8:10:22::70 <- 2001:db8:10:22::1, 00:05:73:a0:00:01ND: RX NA: 2001:db8:10:22::72 <- 2001:db8:10:22::1, 00:05:73:a0:00:01ND: timeout for 2001:db8:10:22::71,74:a0:2f:b4:97:49 <-- 2001:db8:10:22::1 (retry 0)ND: TX NS: 2001:db8:10:22::71,74:a0:2f:b4:97:49 -> 2001:db8:10:22::1 (retry 1)ND: RX NA: 2001:db8:10:22::71 <- 2001:db8:10:22::1, 00:05:73:a0:00:01ND: RX NS: 2001:db8:10:22::70 <-- 2001:db8:10:22::d,00:de:fb:1d:83:c4ND: TX NA: 2001:db8:10:22::70,74:a0:2f:b4:97:49 -> 2001:db8:10:22::d,00:de:fb:1d:83:c4ND: RX NS: 2001:db8:10:22::70 <-- 2001:db8:10:22::c,00:de:fb:1d:84:c5ND: TX NA: 2001:db8:10:22::70,74:a0:2f:b4:97:49 -> 2001:db8:10:22::c,00:de:fb:1d:84:c5ND: RX NS: 2001:db8:10:22::71 <-- 2001:db8:10:22::c,00:de:fb:1d:84:c5ND: TX NA: 2001:db8:10:22::71,74:a0:2f:b4:97:49 -> 2001:db8:10:22::c,00:de:fb:1d:84:c5ND: RX NS: 2001:db8:10:22::71 <-- 2001:db8:10:22::d,00:de:fb:1d:83:c4ND: TX NA: 2001:db8:10:22::71,74:a0:2f:b4:97:49 -> 2001:db8:10:22::d,00:de:fb:1d:83:c4ND: RX NS: 2001:db8:10:22::72 <-- 2001:db8:10:22::d,00:de:fb:1d:83:c4ND: TX NA: 2001:db8:10:22::72,74:a0:2f:b4:97:49 -> 2001:db8:10:22::d,00:de:fb:1d:83:c4ND: RX NS: 2001:db8:10:22::72 <-- 2001:db8:10:22::c,00:de:fb:1d:84:c5ND: TX NA: 2001:db8:10:22::72,74:a0:2f:b4:97:49 -> 2001:db8:10:22::c,00:de:fb:1d:84:c5
trex(service)>
Show status of local IPv6 neighborships:
trex(service)>plugins IPv6ND status
ND Status---------
used vlan(s)...................: [500, 22]used encapsulation.............: QQnumber of IPv6 source addresses: 3
SRC MAC SRC IPv6 | DST IPv6 DST ←↩MAC STATE VERIFIED
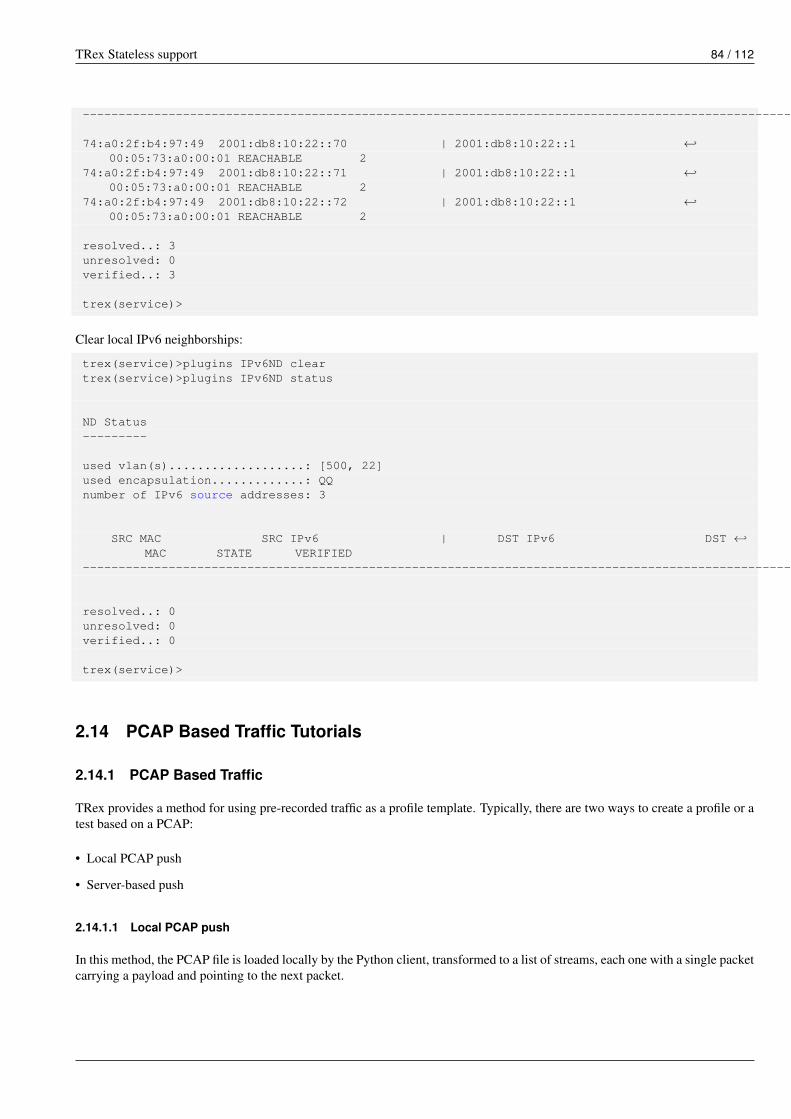
TRex Stateless support 84 / 112
-------------------------------------------------------------------------------------------------------------------------- ←↩
74:a0:2f:b4:97:49 2001:db8:10:22::70 | 2001:db8:10:22::1 ←↩00:05:73:a0:00:01 REACHABLE 2
74:a0:2f:b4:97:49 2001:db8:10:22::71 | 2001:db8:10:22::1 ←↩00:05:73:a0:00:01 REACHABLE 2
74:a0:2f:b4:97:49 2001:db8:10:22::72 | 2001:db8:10:22::1 ←↩00:05:73:a0:00:01 REACHABLE 2
resolved..: 3unresolved: 0verified..: 3
trex(service)>
Clear local IPv6 neighborships:
trex(service)>plugins IPv6ND cleartrex(service)>plugins IPv6ND status
ND Status---------
used vlan(s)...................: [500, 22]used encapsulation.............: QQnumber of IPv6 source addresses: 3
SRC MAC SRC IPv6 | DST IPv6 DST ←↩MAC STATE VERIFIED
------------------------------------------------------------------------------------------------------------------------ ←↩
resolved..: 0unresolved: 0verified..: 0
trex(service)>
2.14 PCAP Based Traffic Tutorials
2.14.1 PCAP Based Traffic
TRex provides a method for using pre-recorded traffic as a profile template. Typically, there are two ways to create a profile or atest based on a PCAP:
• Local PCAP push
• Server-based push
2.14.1.1 Local PCAP push
In this method, the PCAP file is loaded locally by the Python client, transformed to a list of streams, each one with a single packetcarrying a payload and pointing to the next packet.
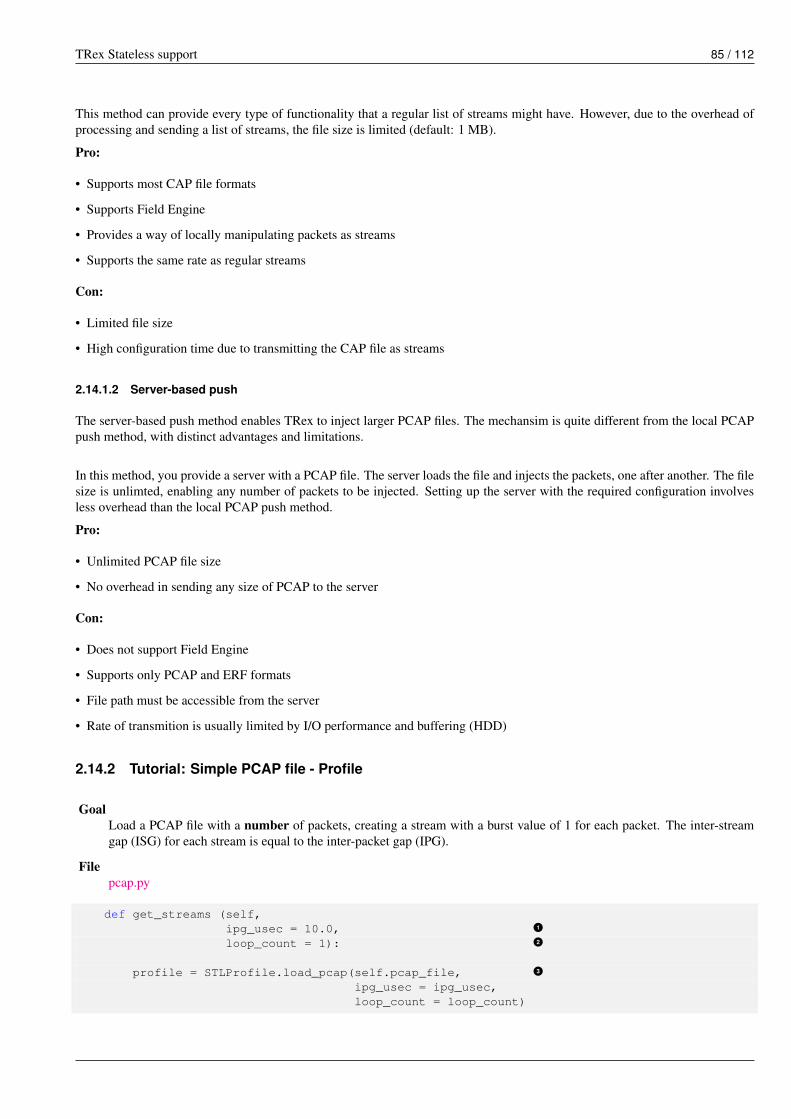
TRex Stateless support 85 / 112
This method can provide every type of functionality that a regular list of streams might have. However, due to the overhead ofprocessing and sending a list of streams, the file size is limited (default: 1 MB).
Pro:
• Supports most CAP file formats
• Supports Field Engine
• Provides a way of locally manipulating packets as streams
• Supports the same rate as regular streams
Con:
• Limited file size
• High configuration time due to transmitting the CAP file as streams
2.14.1.2 Server-based push
The server-based push method enables TRex to inject larger PCAP files. The mechansim is quite different from the local PCAPpush method, with distinct advantages and limitations.
In this method, you provide a server with a PCAP file. The server loads the file and injects the packets, one after another. The filesize is unlimted, enabling any number of packets to be injected. Setting up the server with the required configuration involvesless overhead than the local PCAP push method.
Pro:
• Unlimited PCAP file size
• No overhead in sending any size of PCAP to the server
Con:
• Does not support Field Engine
• Supports only PCAP and ERF formats
• File path must be accessible from the server
• Rate of transmition is usually limited by I/O performance and buffering (HDD)
2.14.2 Tutorial: Simple PCAP file - Profile
GoalLoad a PCAP file with a number of packets, creating a stream with a burst value of 1 for each packet. The inter-streamgap (ISG) for each stream is equal to the inter-packet gap (IPG).
Filepcap.py
def get_streams (self,ipg_usec = 10.0, v1loop_count = 1): v2
profile = STLProfile.load_pcap(self.pcap_file, v3ipg_usec = ipg_usec,loop_count = loop_count)

TRex Stateless support 86 / 112
v1 The inter-stream gap in microseconds.v2 Loop count.v3 Input PCAP file.
Figure 2.20: Example of multiple streams
The figure shows the streams for a PCAP file with 3 packets, with a loop configured.
• Each stream is configured to Burst mode with 1 packet.
• Each stream triggers the next stream.
• The last stream triggers the first with action_loop=loop_count if loop_count > 1.
The profile runs on one DP thread because it has a burst with 1 packet. (Cannot split in this case.)
To run this example, enter:
[bash]>./stl-sim -f stl/pcap.py --yaml
The following output appears:
$./stl-sim -f stl/pcap.py --yaml- name: 1
next: 2 v1stream:action_count: 0enabled: trueflags: 0isg: 10.0mode:
percentage: 100total_pkts: 1type: single_burst
packet:meta: ’’
rx_stats:enabled: false
self_start: truevm:
instructions: []split_by_var: ’’
- name: 2next: 3stream:action_count: 0enabled: trueflags: 0isg: 10.0mode:
percentage: 100

TRex Stateless support 87 / 112
total_pkts: 1type: single_burst
packet:meta: ’’
rx_stats:enabled: false
self_start: falsevm:
instructions: []split_by_var: ’’
- name: 3next: 4stream:action_count: 0enabled: trueflags: 0isg: 10.0mode:
percentage: 100total_pkts: 1type: single_burst
packet:meta: ’’
rx_stats:enabled: false
self_start: falsevm:
instructions: []split_by_var: ’’
- name: 4next: 5stream:action_count: 0enabled: trueflags: 0isg: 10.0mode:
percentage: 100total_pkts: 1type: single_burst
packet:meta: ’’
rx_stats:enabled: false
self_start: falsevm:
instructions: []split_by_var: ’’
- name: 5next: 1 v2stream:action_count: 1 v3enabled: trueflags: 0isg: 10.0mode:
percentage: 100total_pkts: 1type: single_burst
packet:meta: ’’
rx_stats:

TRex Stateless support 88 / 112
enabled: falseself_start: false v4vm:
instructions: []split_by_var: ’’
v1 Each stream triggers the next stream.v2 The last stream triggers the first.v3 The current loop count is given in: action_count:1v4 Self_start is enabled for the first stream, disabled for all other streams.
2.14.3 Tutorial: Simple PCAP file - API
For this case we can use the local push method:
c = STLClient(server = "localhost")
try:
c.connect()c.reset(ports = [0])
d = c.push_pcap(pcap_file = "my_file.pcap", # our local PCAP fileports = 0, # use port 0ipg_usec = 100, # IPGcount = 1) # inject only once
c.wait_on_traffic()
stats = c.get_stats()opackets = stats[port][’opackets’]print("{0} packets were Tx on port {1}\n".format(opackets, port))
except STLError as e:print(e)sys.exit(1)
finally:c.disconnect()
2.14.4 Tutorial: PCAP file iterating over dest IP
For this case we can use the local push method:
c = STLClient(server = "localhost")
try:
c.connect()port = 0c.reset(ports = [port])
vm = STLIPRange(dst = {’start’: ’10.0.0.1’, ’end’: ’10.0.0.254’, ’step’ : 1})
c.push_pcap(pcap_file = "my_file.pcap", # our local PCAP file

TRex Stateless support 89 / 112
ports = port, # use ’port’ipg_usec = 100, # IPGcount = 1, # inject only oncevm = vm # provide VM object)
c.wait_on_traffic()
stats = c.get_stats()opackets = stats[port][’opackets’]print("{0} packets were Tx on port {1}\n".format(opackets, port))
except STLError as e:print(e)sys.exit(1)
finally:c.disconnect()
2.14.5 Tutorial: PCAP file with VLAN
This is an interesting case where we can provide the push API with a function hook. The hook is called for each packet that isloaded from the PCAP file.
# generate a packet hook function with a VLAN IDdef packet_hook_generator (vlan_id):
# this function will be called for each packet and will expect# the new packet as a return valuedef packet_hook (packet):
packet = Ether(packet)
if vlan_id >= 0 and vlan_id <= 4096:packet_l3 = packet.payloadpacket = Ether() / Dot1Q(vlan = vlan_id) / packet_l3
return str(packet)
return packet_hook
c = STLClient(server = "localhost")
try:
c.connect()port = 0c.reset(ports = [port])
vm = STLIPRange(dst = {’start’: ’10.0.0.1’, ’end’: ’10.0.0.254’, ’step’ : 1})
d = c.push_pcap(pcap_file = "my_file.pcap",ports = port,ipg_usec = 100,count = 1,packet_hook = packet_hook_generator(vlan_id = 1))
c.wait_on_traffic()
stats = c.get_stats()

TRex Stateless support 90 / 112
opackets = stats[port][’opackets’]print("{0} packets were Tx on port {1}\n".format(opackets, port))
except STLError as e:print(e)sys.exit(1)
finally:c.disconnect()
2.14.6 Tutorial: PCAP file and Field Engine - Profile
The following example loads a PCAP file to many streams, and attaches the Field Engine program to each stream. For example,the Field Engine can change the IP.src of all the streams to a random IP address.
Filestl/pcap_with_vm.py
def create_vm (self, ip_src_range, ip_dst_range):if not ip_src_range and not ip_dst_range:
return None
# until the feature of offsets will be fixed for PCAP use hard coded offsets
vm = []
if ip_src_range:vm += [STLVmFlowVar(name="src",
min_value = ip_src_range[’start’],max_value = ip_src_range[’end’],size = 4, op = "inc"),
#STLVmWrFlowVar(fv_name="src",pkt_offset= "IP.src")STLVmWrFlowVar(fv_name="src",pkt_offset = 26)
]
if ip_dst_range:vm += [STLVmFlowVar(name="dst",
min_value = ip_dst_range[’start’],max_value = ip_dst_range[’end’],size = 4, op = "inc"),
#STLVmWrFlowVar(fv_name="dst",pkt_offset= "IP.dst")STLVmWrFlowVar(fv_name="dst",pkt_offset = 30)]
vm += [#STLVmFixIpv4(offset = "IP")STLVmFixIpv4(offset = 14)]
return vm
def get_streams (self,ipg_usec = 10.0,loop_count = 5,ip_src_range = None,ip_dst_range = {’start’ : ’10.0.0.1’,
’end’: ’10.0.0.254’}):

TRex Stateless support 91 / 112
vm = self.create_vm(ip_src_range, ip_dst_range) v1profile = STLProfile.load_pcap(self.pcap_file,
ipg_usec = ipg_usec,loop_count = loop_count,vm = vm) v2
return profile.get_streams()
v1 Creates Field Engine program.v2 Applies the Field Engine to all packets→ converts to streams.
Table 2.14: Output
pkt IPv4 flow1 10.0.0.1 12 10.0.0.1 13 10.0.0.1 14 10.0.0.1 15 10.0.0.1 16 10.0.0.1 17 10.0.0.2 28 10.0.0.2 29 10.0.0.2 2
10 10.0.0.2 211 10.0.0.2 212 10.0.0.2 2
2.14.7 Tutorial: Server-side method with large PCAP file
The example below uses the remote push API method, providing a PCAP file to a remote server. Note: The file path to the PCAPfile must be visible to the server.
c = STLClient(server = "localhost")
try:
c.connect()c.reset(ports = [0])
# use an absolute path so the server can reach thispcap_file = os.path.abspath(pcap_file)
c.push_remote(pcap_file = pcap_file,ports = 0,ipg_usec = 100,count = 1)
c.wait_on_traffic()
stats = c.get_stats()opackets = stats[port][’opackets’]print("{0} packets were Tx on port {1}\n".format(opackets, port))

TRex Stateless support 92 / 112
except STLError as e:print(e)sys.exit(1)
finally:c.disconnect()
2.14.8 Tutorial: A long list of PCAP files of varied sizes
A scenario with several PCAP files is a good candidate for the remote push API. The total overhead for sending the PCAP fileswill be high if there is a long list of separate PCAP files. So in this case, it is preferable to inject them with a remote API and tosave the transmission of the packets.
c = STLClient(server = "localhost")
try:
c.connect()c.reset(ports = [0])
# iterate over the list and send each file to the serverfor pcap_file in pcap_file_list:
pcap_file = os.path.abspath(pcap_file)
c.push_remote(pcap_file = pcap_file,ports = 0,ipg_usec = 100,count = 1)
c.wait_on_traffic()
stats = c.get_stats()opackets = stats[port][’opackets’]print("{0} packets were Tx on port {1}\n".format(opackets, port))
except STLError as e:print(e)sys.exit(1)
finally:c.disconnect()
2.15 Performance Tweaking
This section describes some advanced features that can help to optimize TRex performance. These features are not active "outof the box" because they might have some impact on other functionality, and in general, might sacrafice one or more properties.Users can decide on any trade-offs individually before employing these optimizations.
2.15.1 Caching MBUFs
see here [trex_cache_mbuf]
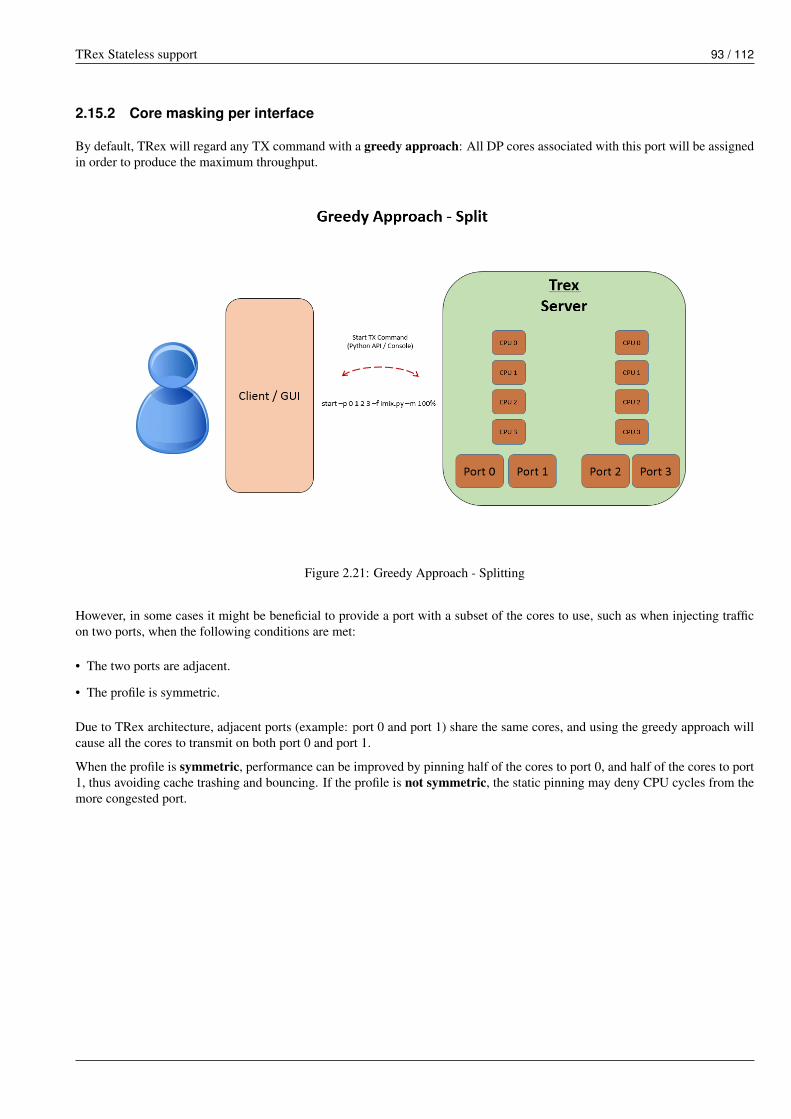
TRex Stateless support 93 / 112
2.15.2 Core masking per interface
By default, TRex will regard any TX command with a greedy approach: All DP cores associated with this port will be assignedin order to produce the maximum throughput.
Figure 2.21: Greedy Approach - Splitting
However, in some cases it might be beneficial to provide a port with a subset of the cores to use, such as when injecting trafficon two ports, when the following conditions are met:
• The two ports are adjacent.
• The profile is symmetric.
Due to TRex architecture, adjacent ports (example: port 0 and port 1) share the same cores, and using the greedy approach willcause all the cores to transmit on both port 0 and port 1.
When the profile is symmetric, performance can be improved by pinning half of the cores to port 0, and half of the cores to port1, thus avoiding cache trashing and bouncing. If the profile is not symmetric, the static pinning may deny CPU cycles from themore congested port.

TRex Stateless support 94 / 112
Figure 2.22: Pinning Cores To Ports
TRex provides this in two ways, described below.
2.15.3 Predefind modes
As described above, the default mode is split mode, but you can configure a predefined mode called pin. This can be done byAPI or from the console.
trex>start -f stl/syn_attack.py -m 40mpps --total -p 0 1 --pin <-- provide ’--pin’ ←↩to the command
Removing all streams from port(s) [0, 1]: [SUCCESS]
Attaching 1 streams to port(s) [0]: [SUCCESS]
Attaching 1 streams to port(s) [1]: [SUCCESS]
Starting traffic on port(s) [0, 1]: [SUCCESS]
60.20 [ms]
trex>
API example to PIN cores
c.start(ports = [port_a, port_b], mult = rate,core_mask=STLClient.CORE_MASK_PIN) v1v1 core_mask = STLClient.CORE_MASK_PIN
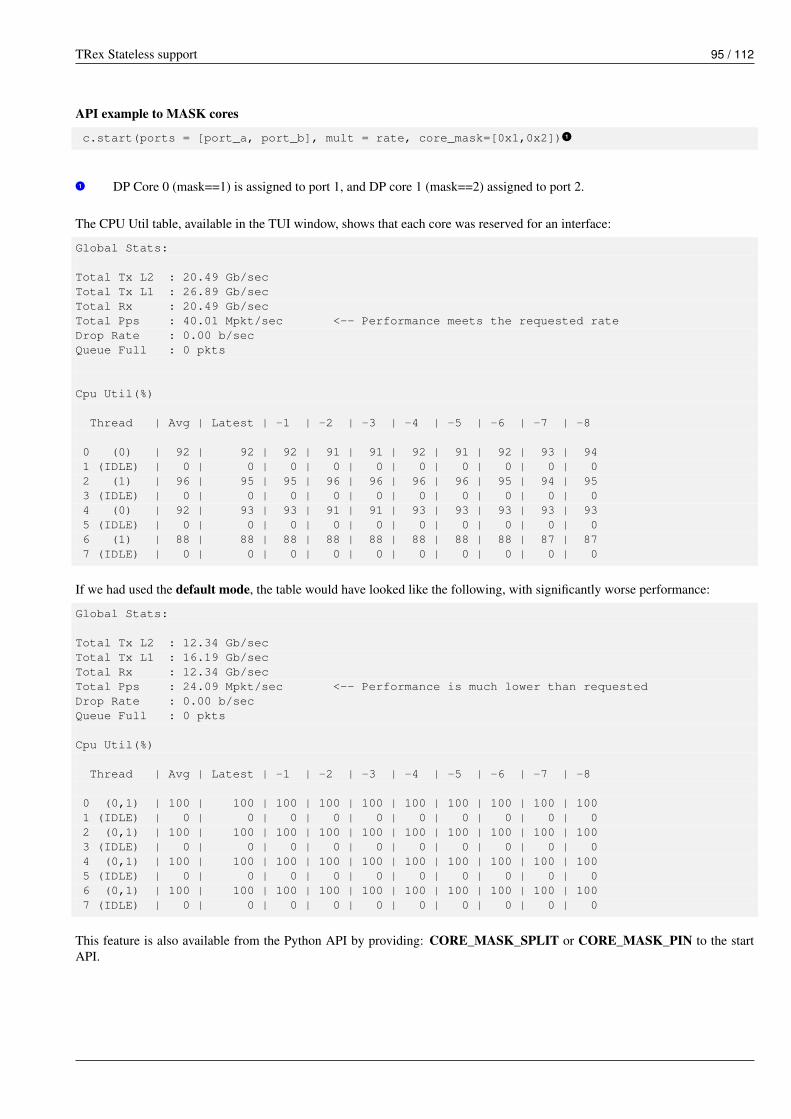
TRex Stateless support 95 / 112
API example to MASK cores
c.start(ports = [port_a, port_b], mult = rate, core_mask=[0x1,0x2]) v1v1 DP Core 0 (mask==1) is assigned to port 1, and DP core 1 (mask==2) assigned to port 2.
The CPU Util table, available in the TUI window, shows that each core was reserved for an interface:
Global Stats:
Total Tx L2 : 20.49 Gb/secTotal Tx L1 : 26.89 Gb/secTotal Rx : 20.49 Gb/secTotal Pps : 40.01 Mpkt/sec <-- Performance meets the requested rateDrop Rate : 0.00 b/secQueue Full : 0 pkts
Cpu Util(%)
Thread | Avg | Latest | -1 | -2 | -3 | -4 | -5 | -6 | -7 | -8
0 (0) | 92 | 92 | 92 | 91 | 91 | 92 | 91 | 92 | 93 | 941 (IDLE) | 0 | 0 | 0 | 0 | 0 | 0 | 0 | 0 | 0 | 02 (1) | 96 | 95 | 95 | 96 | 96 | 96 | 96 | 95 | 94 | 953 (IDLE) | 0 | 0 | 0 | 0 | 0 | 0 | 0 | 0 | 0 | 04 (0) | 92 | 93 | 93 | 91 | 91 | 93 | 93 | 93 | 93 | 935 (IDLE) | 0 | 0 | 0 | 0 | 0 | 0 | 0 | 0 | 0 | 06 (1) | 88 | 88 | 88 | 88 | 88 | 88 | 88 | 88 | 87 | 877 (IDLE) | 0 | 0 | 0 | 0 | 0 | 0 | 0 | 0 | 0 | 0
If we had used the default mode, the table would have looked like the following, with significantly worse performance:
Global Stats:
Total Tx L2 : 12.34 Gb/secTotal Tx L1 : 16.19 Gb/secTotal Rx : 12.34 Gb/secTotal Pps : 24.09 Mpkt/sec <-- Performance is much lower than requestedDrop Rate : 0.00 b/secQueue Full : 0 pkts
Cpu Util(%)
Thread | Avg | Latest | -1 | -2 | -3 | -4 | -5 | -6 | -7 | -8
0 (0,1) | 100 | 100 | 100 | 100 | 100 | 100 | 100 | 100 | 100 | 1001 (IDLE) | 0 | 0 | 0 | 0 | 0 | 0 | 0 | 0 | 0 | 02 (0,1) | 100 | 100 | 100 | 100 | 100 | 100 | 100 | 100 | 100 | 1003 (IDLE) | 0 | 0 | 0 | 0 | 0 | 0 | 0 | 0 | 0 | 04 (0,1) | 100 | 100 | 100 | 100 | 100 | 100 | 100 | 100 | 100 | 1005 (IDLE) | 0 | 0 | 0 | 0 | 0 | 0 | 0 | 0 | 0 | 06 (0,1) | 100 | 100 | 100 | 100 | 100 | 100 | 100 | 100 | 100 | 1007 (IDLE) | 0 | 0 | 0 | 0 | 0 | 0 | 0 | 0 | 0 | 0
This feature is also available from the Python API by providing: CORE_MASK_SPLIT or CORE_MASK_PIN to the startAPI.

TRex Stateless support 96 / 112
2.15.4 Manual mask
For debugging or advanced core scheduling you might choose to provide a manual masking to specify to the server which coresto use.
Example:
• 2 interfaces: interface 0 and interface 1
• A profile that utilizes 95% of the traffic on one side, and provides 5% of the traffic in the other direction.
• 8 cores assigned to the two interfaces.
To assign 3 cores to interface 0 and 1 core to interface 1, execute the following in the console (or if using the API, provide a listof masks to the start command):
trex>start -f stl/syn_attack.py -m 10mpps --total -p 0 1 --core_mask 0xE 0x1
Removing all streams from port(s) [0, 1]: [SUCCESS]
Attaching 1 streams to port(s) [0]: [SUCCESS]
Attaching 1 streams to port(s) [1]: [SUCCESS]
Starting traffic on port(s) [0, 1]: [SUCCESS]
37.19 [ms]
trex>
c.start(ports = [port_a, port_b], mult = rate,core_mask=[0x0xe,0x1]) v1v1 Mask of cores per port.
The following output is appears in the TUI CPU Util window:
Total Tx L2 : 5.12 Gb/secTotal Tx L1 : 6.72 Gb/secTotal Rx : 5.12 Gb/secTotal Pps : 10.00 Mpkt/secDrop Rate : 0.00 b/secQueue Full : 0 pkts
Cpu Util(%)
Thread | Avg | Latest | -1 | -2 | -3 | -4 | -5 | -6 | -7 | -8
0 (1) | 45 | 45 | 45 | 45 | 45 | 45 | 46 | 45 | 46 | 451 (IDLE) | 0 | 0 | 0 | 0 | 0 | 0 | 0 | 0 | 0 | 02 (0) | 15 | 15 | 14 | 15 | 15 | 14 | 14 | 14 | 14 | 143 (IDLE) | 0 | 0 | 0 | 0 | 0 | 0 | 0 | 0 | 0 | 04 (0) | 14 | 14 | 14 | 14 | 14 | 14 | 14 | 14 | 15 | 145 (IDLE) | 0 | 0 | 0 | 0 | 0 | 0 | 0 | 0 | 0 | 06 (0) | 15 | 15 | 15 | 15 | 15 | 15 | 15 | 15 | 15 | 157 (IDLE) | 0 | 0 | 0 | 0 | 0 | 0 | 0 | 0 | 0 | 0

TRex Stateless support 97 / 112
2.16 Reference
Additional profiles and examples are available in the stl/hlt folder.
For information about the Python client API, see the Python Client API documentation.
2.17 Console commands
2.17.1 Overview
The console uses the TRex client API to control TRex.
Important information about console usage:
• The console does not save its own state. It caches the server state. It is assumed that there is only one console with R/Wpermission at any given time, so once connected as R/W console (per user/interface), it can read the server state and then cacheall operations.
• Many read-only clients can exist for the same user interface.
• The console syncs with the server to get the state during connection stage, and caches the server information locally.
• In case of crash or exit of the console, it will sync again at startup.
• The order of command line parameters is not important.
• The console can display TRex stats in real time. You can open two consoles simultaneously - one for commands (R/W) andone for displaying statistics (read only).
2.17.2 Ports State
State MeaningIDLE
No streams
STREAMS
Has streams. Not transmitting (did not start transmission, or ←↩transmission was stopped).
WORK
Has streams. Transmitting.
PAUSE
Has streams. Transmission paused.
IDLE -> (add streams) -> STREAMS (start) -> WORK (stop) -> STREAMS (start)| WORK (pause) -> PAUSE (resume)----| || |-------------------------------------
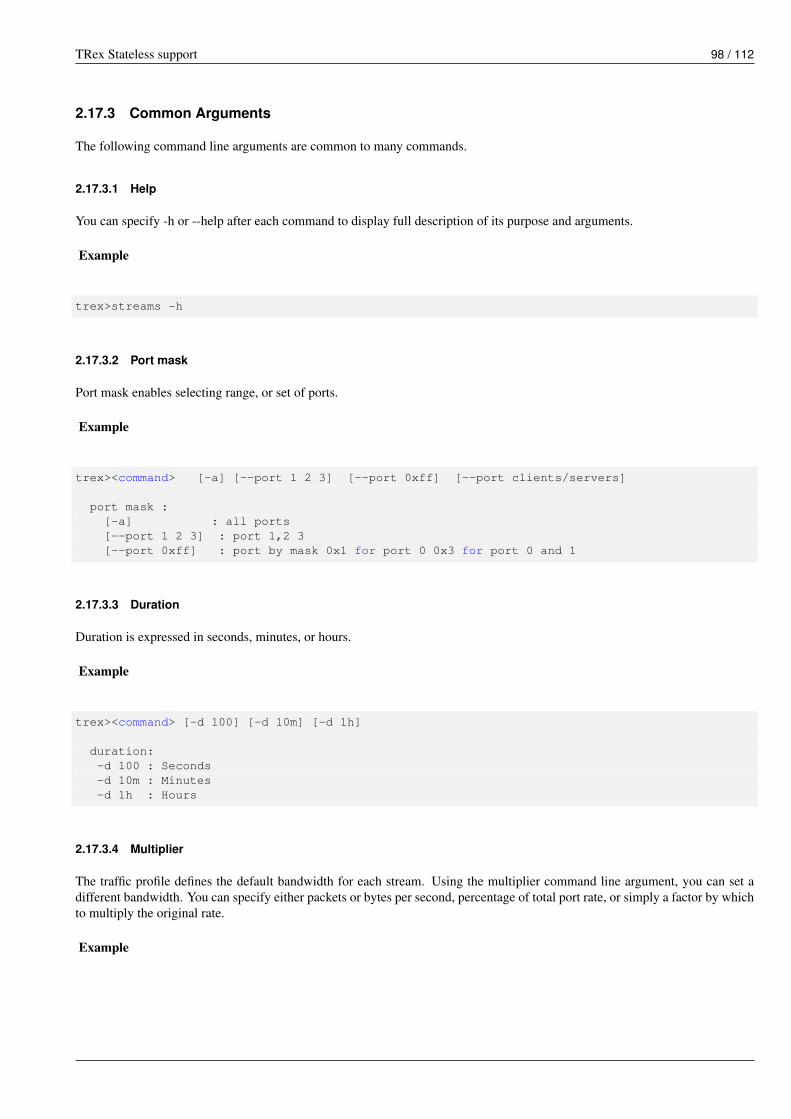
TRex Stateless support 98 / 112
2.17.3 Common Arguments
The following command line arguments are common to many commands.
2.17.3.1 Help
You can specify -h or --help after each command to display full description of its purpose and arguments.
Example
trex>streams -h
2.17.3.2 Port mask
Port mask enables selecting range, or set of ports.
Example
trex><command> [-a] [--port 1 2 3] [--port 0xff] [--port clients/servers]
port mask :[-a] : all ports[--port 1 2 3] : port 1,2 3[--port 0xff] : port by mask 0x1 for port 0 0x3 for port 0 and 1
2.17.3.3 Duration
Duration is expressed in seconds, minutes, or hours.
Example
trex><command> [-d 100] [-d 10m] [-d 1h]
duration:-d 100 : Seconds-d 10m : Minutes-d 1h : Hours
2.17.3.4 Multiplier
The traffic profile defines the default bandwidth for each stream. Using the multiplier command line argument, you can set adifferent bandwidth. You can specify either packets or bytes per second, percentage of total port rate, or simply a factor by whichto multiply the original rate.
Example

TRex Stateless support 99 / 112
trex><command> [-m 100] [-m 10gb] [-m 10kpps] [-m 40%]
multiplier :
-m 100 : Multiply original rate by given factor.-m 10gbps : From graph calculate the maximum rate as this bandwidth for all streams (for ←↩
each port)-m 10kpps : From graph calculate the maximum rate as this pps for all streams (for each ←↩
port)-m 40% : From graph calculate the maximum rate as this precent from total port rate ( ←↩
for each port)
2.17.4 Commands
2.17.4.1 connect
Attempts to connect to the server you were connected to. Can be used after a server restart. Cannot be used to connect to adifferent server.
Also:
• Syncs the port info and stream info state.
• Reads all counter statistics for reference.
Example
$connect
2.17.4.2 reset
Resets the server and client to a known state. Not used in normal scenarios.
• Forces acquire on all ports.
• Stops all traffic on all ports.
• Removes all streams from all ports.
Example
trex>reset
2.17.4.3 portattr
Configures port attributes.
Example

TRex Stateless support 100 / 112
trex>portattr --helpusage: port_attr [-h] [--port PORTS [PORTS ...] | -a] [--prom {on,off}]
[--link {up,down}] [--led {on,off}] [--fc {none,tx,rx,full}][--supp]
Sets port attributes
optional arguments:-h, --help show this help message and exit--port PORTS [PORTS ...], -p PORTS [PORTS ...]
A list of ports on which to apply the command-a Set this flag to apply the command on all available
ports--prom {on,off} Set port promiscuous on/off--link {up,down} Set link status up/down--led {on,off} Set LED status on/off--fc {none,tx,rx,full}
Set Flow Control type--supp Show which attributes are supported by current NICs
Figure 2.23: Setting link down on port 0 affects port 1 at loopback
2.17.4.4 clear
Clears all port stats counters.
Example
trex>clear -a
2.17.4.5 stats
Can be used to show global/port/stream statistics. Can also be used to retrieve extended stats from port (xstats).
Example

TRex Stateless support 101 / 112
trex>stats --port 0 -ptrex>stats -s
Xstats error example
trex>stats -x --port 0 2Xstats:
Name: | Port 0: | Port 2:\------------------------------------------------------------------rx_good_packets | 154612905 | 153744994tx_good_packets | 154612819 | 153745136rx_good_bytes | 9895225920 | 9839679168tx_good_bytes | 9276768500 | 9224707392rx_unicast_packets | 154611873 | 153743952rx_unknown_protocol_packets | 154611896 | 153743991tx_unicast_packets | 154612229 | 153744562mac_remote_errors | 1 | 0 # v1rx_size_64_packets | 154612170 | 153744295tx_size_64_packets | 154612595 | 153744902
v1 Error that can be seen only with this command.
2.17.4.6 streams
Shows info about loaded streams on TRex port(s). By default, streams are displayed in a brief summary table:
trex>streams
Port 0:
ID | packet type | length | mode | rate | next ←↩stream
1 | Ethernet:IP:UDP:Raw | 64 | continuous | 1 pps | -12 | Ethernet:IP:UDP:Raw | 64 | continuous | 1.00 Kpps | -1
Port 1:
ID | packet type | length | mode | rate | next ←↩stream
1 | Ethernet:IP:UDP:Raw | 64 | continuous | 1 pps | -12 | Ethernet:IP:UDP:Raw | 64 | continuous | 1.00 Kpps | -1
Streams can be filtered by port ID(s) and/or stream ID(s).
trex>streams --port 0 1 --id 0
..
..
The --code argument is used as follows:
• --code can be used without argument to display generated Python code that produces the streams.
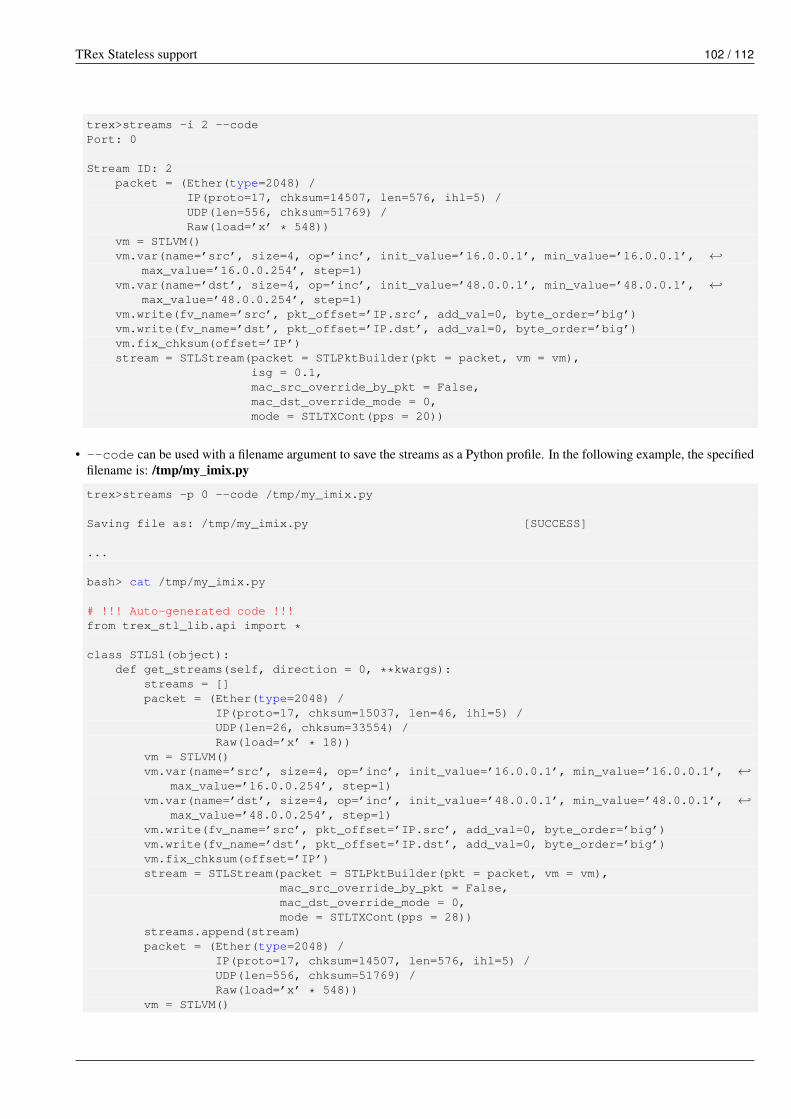
TRex Stateless support 102 / 112
trex>streams -i 2 --codePort: 0
Stream ID: 2packet = (Ether(type=2048) /
IP(proto=17, chksum=14507, len=576, ihl=5) /UDP(len=556, chksum=51769) /Raw(load=’x’ * 548))
vm = STLVM()vm.var(name=’src’, size=4, op=’inc’, init_value=’16.0.0.1’, min_value=’16.0.0.1’, ←↩
max_value=’16.0.0.254’, step=1)vm.var(name=’dst’, size=4, op=’inc’, init_value=’48.0.0.1’, min_value=’48.0.0.1’, ←↩
max_value=’48.0.0.254’, step=1)vm.write(fv_name=’src’, pkt_offset=’IP.src’, add_val=0, byte_order=’big’)vm.write(fv_name=’dst’, pkt_offset=’IP.dst’, add_val=0, byte_order=’big’)vm.fix_chksum(offset=’IP’)stream = STLStream(packet = STLPktBuilder(pkt = packet, vm = vm),
isg = 0.1,mac_src_override_by_pkt = False,mac_dst_override_mode = 0,mode = STLTXCont(pps = 20))
• --code can be used with a filename argument to save the streams as a Python profile. In the following example, the specifiedfilename is: /tmp/my_imix.py
trex>streams -p 0 --code /tmp/my_imix.py
Saving file as: /tmp/my_imix.py [SUCCESS]
...
bash> cat /tmp/my_imix.py
# !!! Auto-generated code !!!from trex_stl_lib.api import *
class STLS1(object):def get_streams(self, direction = 0, **kwargs):
streams = []packet = (Ether(type=2048) /
IP(proto=17, chksum=15037, len=46, ihl=5) /UDP(len=26, chksum=33554) /Raw(load=’x’ * 18))
vm = STLVM()vm.var(name=’src’, size=4, op=’inc’, init_value=’16.0.0.1’, min_value=’16.0.0.1’, ←↩
max_value=’16.0.0.254’, step=1)vm.var(name=’dst’, size=4, op=’inc’, init_value=’48.0.0.1’, min_value=’48.0.0.1’, ←↩
max_value=’48.0.0.254’, step=1)vm.write(fv_name=’src’, pkt_offset=’IP.src’, add_val=0, byte_order=’big’)vm.write(fv_name=’dst’, pkt_offset=’IP.dst’, add_val=0, byte_order=’big’)vm.fix_chksum(offset=’IP’)stream = STLStream(packet = STLPktBuilder(pkt = packet, vm = vm),
mac_src_override_by_pkt = False,mac_dst_override_mode = 0,mode = STLTXCont(pps = 28))
streams.append(stream)packet = (Ether(type=2048) /
IP(proto=17, chksum=14507, len=576, ihl=5) /UDP(len=556, chksum=51769) /Raw(load=’x’ * 548))
vm = STLVM()

TRex Stateless support 103 / 112
vm.var(name=’src’, size=4, op=’inc’, init_value=’16.0.0.1’, min_value=’16.0.0.1’, ←↩max_value=’16.0.0.254’, step=1)
vm.var(name=’dst’, size=4, op=’inc’, init_value=’48.0.0.1’, min_value=’48.0.0.1’, ←↩max_value=’48.0.0.254’, step=1)
vm.write(fv_name=’src’, pkt_offset=’IP.src’, add_val=0, byte_order=’big’)vm.write(fv_name=’dst’, pkt_offset=’IP.dst’, add_val=0, byte_order=’big’)vm.fix_chksum(offset=’IP’)stream = STLStream(packet = STLPktBuilder(pkt = packet, vm = vm),
isg = 0.1,mac_src_override_by_pkt = False,mac_dst_override_mode = 0,mode = STLTXCont(pps = 20))
streams.append(stream)packet = (Ether(type=2048) /
IP(proto=17, chksum=13583, len=1500, ihl=5) /UDP(len=1480, chksum=22936) /Raw(load=’x’ * 1472))
vm = STLVM()vm.var(name=’src’, size=4, op=’inc’, init_value=’16.0.0.1’, min_value=’16.0.0.1’, ←↩
max_value=’16.0.0.254’, step=1)vm.var(name=’dst’, size=4, op=’inc’, init_value=’48.0.0.1’, min_value=’48.0.0.1’, ←↩
max_value=’48.0.0.254’, step=1)vm.write(fv_name=’src’, pkt_offset=’IP.src’, add_val=0, byte_order=’big’)vm.write(fv_name=’dst’, pkt_offset=’IP.dst’, add_val=0, byte_order=’big’)vm.fix_chksum(offset=’IP’)stream = STLStream(packet = STLPktBuilder(pkt = packet, vm = vm),
isg = 0.2,mac_src_override_by_pkt = False,mac_dst_override_mode = 0,mode = STLTXCont(pps = 4))
streams.append(stream)
return streams
def register():return STLS1()
2.17.4.7 start
Start transmitting traffic on set of ports.
• Removes all streams.
• Loads new streams.
• Starts traffic (can set multiplier, duration, and other parameters).
• Acts only on ports in "stopped: mode. If --force is specified, port(s) are first stopped.
• Note: If any ports are not in "stopped" mode, and --force is not used, the command fails.
ExampleStart a profile on all ports, with a maximum bandwidth of 10 GB.
trex>start -a -f stl/imix.py -m 10gb
ExampleStart a profile on ports 1 and 2, and multiply the bandwidth specified in the traffic profile by 100.
trex>start -port 1 2 -f stl/imix.py -m 100

TRex Stateless support 104 / 112
2.17.4.8 stop
• Operates on a set of ports.
• Changes the mode of the port(s) to "stopped".
• Does not remove streams.
ExampleUse this command to stop the specified ports.
trex>stop --port 0
2.17.4.9 pause
• Operates on a set of ports.
• Changes a working set of ports to "pause" (no traffic transmission) state.
Example
trex>pause --port 0
2.17.4.10 resume
• Operates on a set of ports.
• Changes a working set of port(s) to "resume" state (transmitting traffic again).
• All ports should be in "paused" status. If any of the ports is not paused, the command fails.
Example
trex>resume --port 0
2.17.4.11 update
Update the bandwidth multiplier for a set of ports.
• All ports must be in "work" state. If any ports are not in "work" state, the command fails.
ExampleMultiply traffic on all ports by a factor of 5.
trex>update -a -m 5

TRex Stateless support 105 / 112
2.17.4.12 per stream operations
In version v2.34 was added option to pause/resume/update specific stream(s).In future this functionality might be altered/removed.Internally uses API commands:
• pause_streams
• resume_streams
• update_streams
In the console, stream ids can be specified via --id argument.(Stream IDs are shown in output of "streams" command)For example, one could use following:
> start -f stl/imix.py -p 0> pause -p 0 --id 1 2> resume -p 0 --id 1> update -p 0 --id 1 -m 1kpps
Warning
• Pausing/resuming specific stream(s) does not change state of port.
• Changing rates of specific streams causes out of sync between CP and DP regarding streams rate.Prior to updating rate of whole port, need to revert changes made to rates of specific streams.
2.17.4.13 TUI
The textual user interface (TUI) displays constantly updated TRex statistics in a text window.
Example
trex>tui
Enters a Stats mode and displays three types of TRex statistics:
• Global/port stats/version/connected, etc.
• Per port
• Per port stream
Keyboard commands in the TUI window:
Command Descriptionq Quit the TUI window (return to console)c Clear all countersd, s, l Change display between dashboard (d), streams (s) and l
(latency) info

TRex Stateless support 106 / 112
2.18 Benchmarks of 40G NICs
TRex stateless benchmarks
2.19 Appendix
2.19.1 Scapy packet examples
# UDP headerEther()/IP(src="16.0.0.1",dst="48.0.0.1")/UDP(dport=12,sport=1025)
# UDP over one vlanEther()/Dot1Q(vlan=12)/IP(src="16.0.0.1",dst="48.0.0.1")/UDP(dport=12,sport=1025)
# UDP QinQEther()/Dot1Q(vlan=12)/Dot1Q(vlan=12)/IP(src="16.0.0.1",dst="48.0.0.1")/UDP(dport=12,sport ←↩
=1025)
#TCP over IP over VLANEther()/Dot1Q(vlan=12)/IP(src="16.0.0.1",dst="48.0.0.1")/TCP(dport=12,sport=1025)
# IPv6 over vlanEther()/Dot1Q(vlan=12)/IPv6(src="::5")/TCP(dport=12,sport=1025)
#Ipv6 over UDP over IPEther()/IP()/UDP()/IPv6(src="::5")/TCP(dport=12,sport=1025)
#DNS packetEther()/IP()/UDP()/DNS()
#HTTP packetEther()/IP()/TCP()/"GET / HTTP/1.1\r\nHost: www.google.com\r\n\r\n"
2.19.2 HLT supported Arguments
2.19.2.1 connect
Argument Default Commentdevice localhost ip or hostname of TRextrex_rpc_port None TRex extention: RPC port of TRex server (for several TRexes under same OS)trex_pub_port None TRex extention: Publisher port of TRex server (for several TRexes under same OS)port_list None list of portsusername TRexUserreset Truebreak_locks False
2.19.2.2 cleanup_session
Argument Default Commentmaintain_lock False release ports at the end or notport_list Noneport_handle None

TRex Stateless support 107 / 112
2.19.2.3 traffic_config
Argument Default Commentmode None ( create | modify | remove | reset )
split_by_cores split ( split | duplicate | single ) TRex extention: split = split traffic by cores, duplicate = duplicatetraffic for all cores, single = run only with sinle core (not implemented yet)
load_profile None TRex extention: path to filename with stream profile (stream builder parameters will beignored, limitation: modify)
consistent_randomFalse TRex extention: False (default) = random sequence will be different every run, True = randomsequence will be same every run
ignore_macs False TRex extention: True = use MACs from server configuration, no MAC VM (workaround onlack of ARP)
disable_flow_statsFalse TRex extention: True = don’t use flow stats for this stream, (workaround for limitation on typeof packet for flow_stats)
flow_stats_id None TRex extention: uint, for use of STLHltStream, specifies id for flow stats (see stateless manualfor flow_stats details)
port_handle Noneport_handle2 Nonebidirectional False
stream builder parameterstransmit_modecontinuous ( continuous | multi_burst | single_burst )rate_pps Nonerate_bps Nonerate_percent 10stream_id Nonename Nonedirection 0 TRex extention: 1 = exchange sources and destinations, 0 = do nothingpkts_per_burst 1burst_loop_count 1inter_burst_gap 12length_mode fixed ( auto | fixed | increment | decrement | random | imix )l3_imix1_size 64l3_imix1_ratio 7l3_imix2_size 570l3_imix2_ratio 4l3_imix3_size 1518l3_imix3_ratio 1l3_imix4_size 9230l3_imix4_ratio 0
L2frame_size 64frame_size_min 64frame_size_max 64frame_size_step 1l2_encap ethernet_ii ( ethernet_ii | ethernet_ii_vlan )mac_src 00:00:01:00:00:01mac_dst 00:00:00:00:00:00mac_src2 00:00:01:00:00:01mac_dst2 00:00:00:00:00:00mac_src_mode fixed ( fixed | increment | decrement | random )mac_src_step 1 we are changing only 32 lowest bitsmac_src_count 1mac_dst_mode fixed ( fixed | increment | decrement | random )mac_dst_step 1 we are changing only 32 lowest bitsmac_dst_count 1mac_src2_modefixed ( fixed | increment | decrement | random )
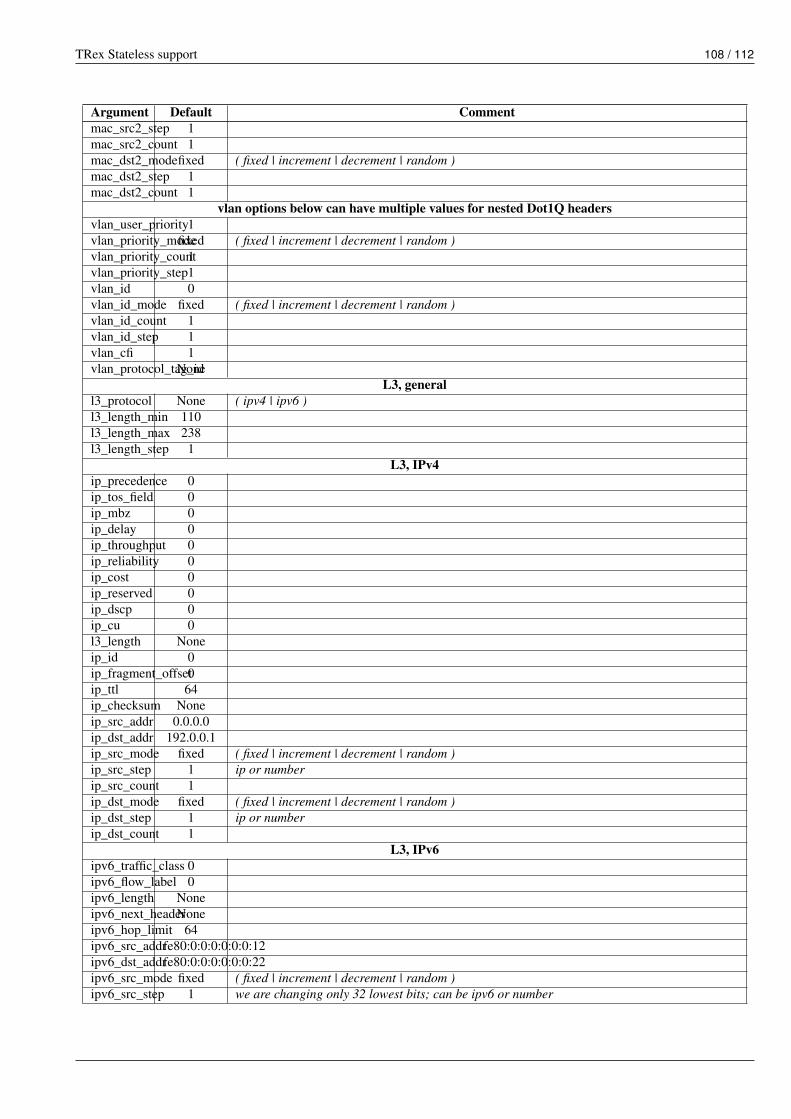
TRex Stateless support 108 / 112
Argument Default Commentmac_src2_step 1mac_src2_count 1mac_dst2_modefixed ( fixed | increment | decrement | random )mac_dst2_step 1mac_dst2_count 1
vlan options below can have multiple values for nested Dot1Q headersvlan_user_priority1vlan_priority_modefixed ( fixed | increment | decrement | random )vlan_priority_count1vlan_priority_step1vlan_id 0vlan_id_mode fixed ( fixed | increment | decrement | random )vlan_id_count 1vlan_id_step 1vlan_cfi 1vlan_protocol_tag_idNone
L3, generall3_protocol None ( ipv4 | ipv6 )l3_length_min 110l3_length_max 238l3_length_step 1
L3, IPv4ip_precedence 0ip_tos_field 0ip_mbz 0ip_delay 0ip_throughput 0ip_reliability 0ip_cost 0ip_reserved 0ip_dscp 0ip_cu 0l3_length Noneip_id 0ip_fragment_offset0ip_ttl 64ip_checksum Noneip_src_addr 0.0.0.0ip_dst_addr 192.0.0.1ip_src_mode fixed ( fixed | increment | decrement | random )ip_src_step 1 ip or numberip_src_count 1ip_dst_mode fixed ( fixed | increment | decrement | random )ip_dst_step 1 ip or numberip_dst_count 1
L3, IPv6ipv6_traffic_class 0ipv6_flow_label 0ipv6_length Noneipv6_next_headerNoneipv6_hop_limit 64ipv6_src_addrfe80:0:0:0:0:0:0:12ipv6_dst_addrfe80:0:0:0:0:0:0:22ipv6_src_mode fixed ( fixed | increment | decrement | random )ipv6_src_step 1 we are changing only 32 lowest bits; can be ipv6 or number

TRex Stateless support 109 / 112
Argument Default Commentipv6_src_count 1ipv6_dst_mode fixed ( fixed | increment | decrement | random )ipv6_dst_step 1 we are changing only 32 lowest bits; can be ipv6 or numberipv6_dst_count 1
L4, TCPl4_protocol None ( tcp | udp )tcp_src_port 1024tcp_dst_port 80tcp_seq_num 1tcp_ack_num 1tcp_data_offset 5tcp_fin_flag 0tcp_syn_flag 0tcp_rst_flag 0tcp_psh_flag 0tcp_ack_flag 0tcp_urg_flag 0tcp_window 4069tcp_checksum Nonetcp_urgent_ptr 0tcp_src_port_modeincrement ( increment | decrement | random )tcp_src_port_step 1tcp_src_port_count1tcp_dst_port_modeincrement ( increment | decrement | random )tcp_dst_port_step 1tcp_dst_port_count1
L4, UDPudp_src_port 1024udp_dst_port 80udp_length Noneudp_dst_port_modeincrement ( increment | decrement | random )udp_src_port_step1udp_src_port_count1udp_src_port_modeincrement ( increment | decrement | random )udp_dst_port_step1udp_dst_port_count1
2.19.2.4 traffic_control
Argument Default Commentaction None ( clear_stats | run | stop | sync_run | poll | reset )port_handle None
2.19.2.5 traffic_stats
Argument Default Commentmode aggregate ( all | aggregate | streams )port_handle None
2.19.3 FD.IO open source project using TRex
here

TRex Stateless support 110 / 112
2.19.4 Using Stateless client via JSON-RPC
For functions that do not require complex objects and can use JSON-serializable input/output, you can use Stateless API viaJSON-RPC proxy server.Thus, you can use Stateless TRex from any language supporting JSON-RPC.
2.19.4.1 How to run TRex side:
• Run the Stateless TRex server in one of 2 ways:
– Run TRex directly in shell:
[bash]>sudo ./t-rex-64 -i
– Run TRex via JSON-RPC command to trex_daemon_server:
start_trex(trex_cmd_options, user, block_to_success = True, timeout = 40, stateless = ←↩True)
• Run the RPC "proxy" to stateless in one of 2 ways:
– Run directly:
cd automation/trex_control_plane/stl/examplespython rpc_proxy_server.py
– Send JSON-RPC command to master_daemon:
if not master_daemon.is_stl_rpc_proxy_running():master_daemon.start_stl_rpc_proxy()
Done :)
Now you can send requests to the rpc_proxy_server and get results as an array of 2 values:
• If fail, result will be: [False, <traceback log with error>]
• If success, result will be: [True, <return value of called function>]
In the same directory of rpc_proxy_server.py, there is Python example of usage: using_rpc_proxy.py
2.19.4.2 Native Stateless API functions:
• acquire
• connect
• disconnect
• get_stats
• get_warnings
• push_remote
• reset
• wait_on_traffic
These functions can be called directly as server.push_remote(’udp_traffic.pcap’). If you need any other function of a statelessclient, you can either add it to rpc_proxy_server.py, or use this method:server.native_method(<string of function name>, <args of the function>)
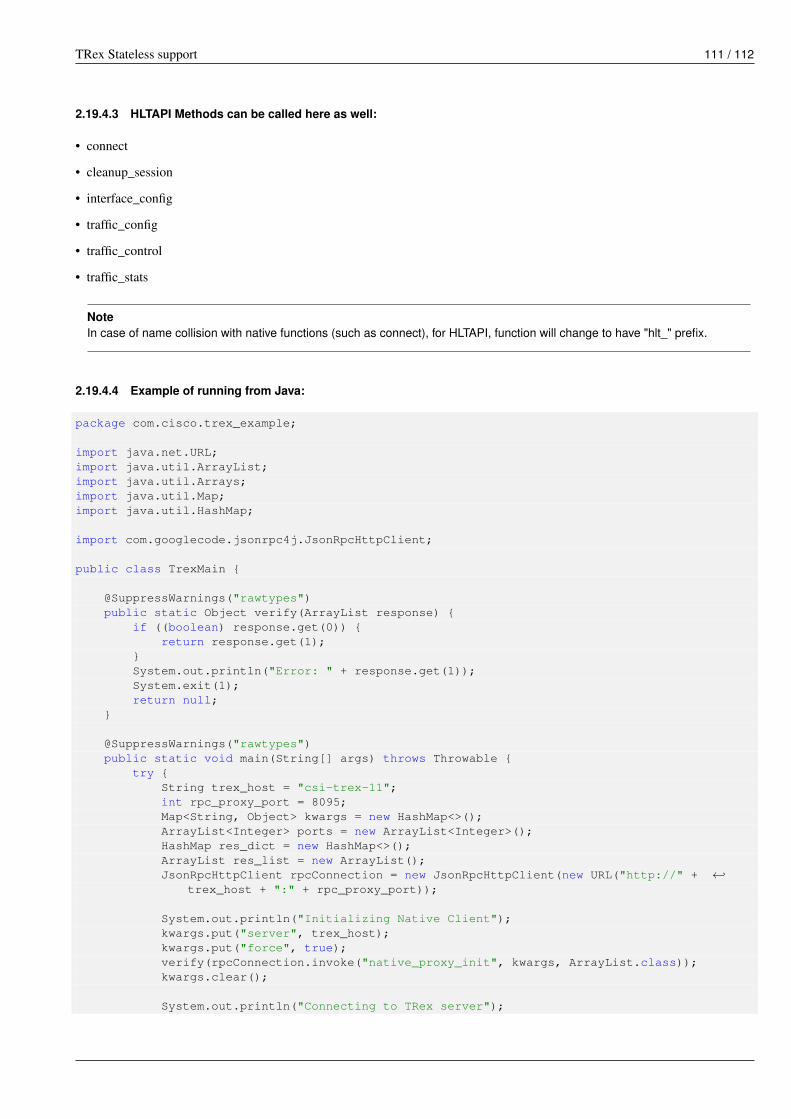
TRex Stateless support 111 / 112
2.19.4.3 HLTAPI Methods can be called here as well:
• connect
• cleanup_session
• interface_config
• traffic_config
• traffic_control
• traffic_stats
NoteIn case of name collision with native functions (such as connect), for HLTAPI, function will change to have "hlt_" prefix.
2.19.4.4 Example of running from Java:
package com.cisco.trex_example;
import java.net.URL;import java.util.ArrayList;import java.util.Arrays;import java.util.Map;import java.util.HashMap;
import com.googlecode.jsonrpc4j.JsonRpcHttpClient;
public class TrexMain {
@SuppressWarnings("rawtypes")public static Object verify(ArrayList response) {
if ((boolean) response.get(0)) {return response.get(1);
}System.out.println("Error: " + response.get(1));System.exit(1);return null;
}
@SuppressWarnings("rawtypes")public static void main(String[] args) throws Throwable {
try {String trex_host = "csi-trex-11";int rpc_proxy_port = 8095;Map<String, Object> kwargs = new HashMap<>();ArrayList<Integer> ports = new ArrayList<Integer>();HashMap res_dict = new HashMap<>();ArrayList res_list = new ArrayList();JsonRpcHttpClient rpcConnection = new JsonRpcHttpClient(new URL("http://" + ←↩
trex_host + ":" + rpc_proxy_port));
System.out.println("Initializing Native Client");kwargs.put("server", trex_host);kwargs.put("force", true);verify(rpcConnection.invoke("native_proxy_init", kwargs, ArrayList.class));kwargs.clear();
System.out.println("Connecting to TRex server");

TRex Stateless support 112 / 112
verify(rpcConnection.invoke("connect", kwargs, ArrayList.class));
System.out.println("Resetting all ports");verify(rpcConnection.invoke("reset", kwargs, ArrayList.class));
System.out.println("Getting ports info");kwargs.put("func_name", "get_port_info"); // some "custom" functionres_list = (ArrayList) verify(rpcConnection.invoke("native_method", kwargs, ←↩
ArrayList.class));System.out.println("Ports info is: " + Arrays.toString(res_list.toArray()));kwargs.clear();for (int i = 0; i < res_list.size(); i++) {
Map port = (Map) res_list.get(i);ports.add((int)port.get("index"));}
System.out.println("Sending pcap to ports: " + Arrays.toString(ports.toArray()) ←↩);
kwargs.put("pcap_filename", "stl/sample.pcap");verify(rpcConnection.invoke("push_remote", kwargs, ArrayList.class));kwargs.clear();verify(rpcConnection.invoke("wait_on_traffic", kwargs, ArrayList.class));
System.out.println("Getting stats");res_dict = (HashMap) verify(rpcConnection.invoke("get_stats", kwargs, ArrayList ←↩
.class));System.out.println("Stats: " + res_dict.toString());
System.out.println("Deleting Native Client instance");verify(rpcConnection.invoke("native_proxy_del", kwargs, ArrayList.class));
} catch (Throwable e) {e.printStackTrace();
}}
}