travel portal user guide: traveller arrangermams.rmit.edu.au/ig628pmk11m.pdftravel portal user guide...
TRANSCRIPT
Travel Portal User Guide: Traveller A guide for RMIT Travellers applying for their own travel approval
—

Contents —
1 Travel Portal User Guide: Traveller
Attach quote & documents 15
Purpose of Travel Screen 16 Attach Quote & Supporting Documents 17
Fill-in Flight and Cost Estimates 18
Flights Screen 19 High Risk Assessment Rating 20 Skip Accommodation & Car Hire 21 Cost Estimates Screen 22 Cost Estimates – Definitions 23 Per Diem Calculator 24
Submit for Approval 25
Confirmation Screen 26 Approval Workflow 27 Hints & Tips 28
Book 29 Forward Approved Email to Consultant 30 Approved but can’t find email? 31
Overview 2
Plan 3 Before you Go 4 Get a Quote 5 Travel Risks and Visas 6
Approval 7
Create a requisition 8
Log into Travel Portal 9 Turning off Pop-Up Blocker 10 Portal Home Screen 11 International/Domestic Requisition 12 Traveller Details Screen 13 Navigating in the Travel Portal 14
Overview
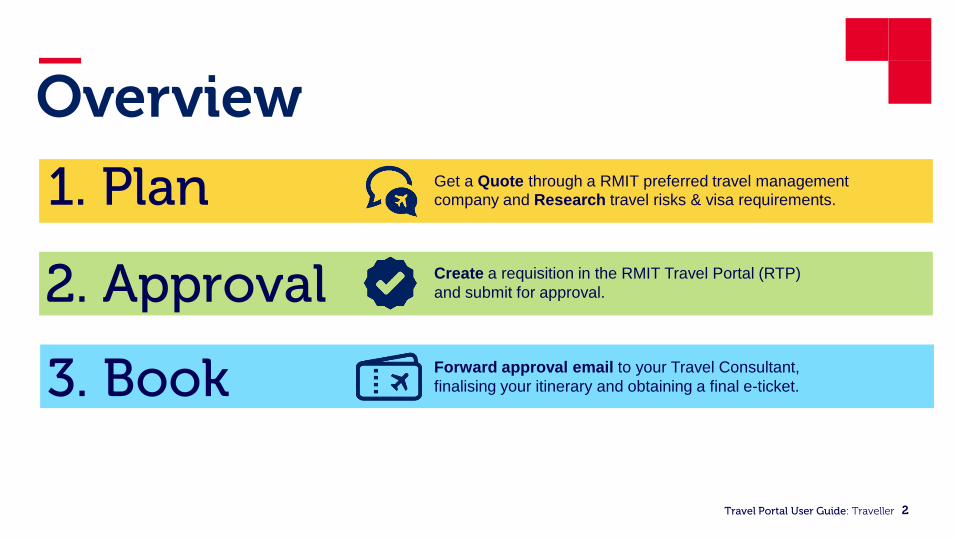
1. Plan Get a Quote through a RMIT preferred travel management company and Research travel risks & visa requirements.
2. Approval Create a requisition in the RMIT Travel Portal (RTP) and submit for approval.
3. Book Forward approval email to your Travel Consultant, finalising your itinerary and obtaining a final e-ticket.
—
2 Travel Portal User Guide: Traveller

Plan
• Before you Go
• Get a Quote
• Travel Risks and Visas
—
Research Your Trip & Get Advice
1 3 Travel Portal User Guide: Traveller

Plan: Before you Go —
Before you apply for travel approval…
APPROVAL
Discuss your potential travel with your supervisor. Establish if you need to arrange an out-of-office plan to ensure your absence will not impact your department
Check IO/Cost Centres to ensure you have enough to cover your travel costs
Taking private travel days while away? Make sure you apply for leave through ESS
Check with International SOS the status of your destination country for any travel risk warnings & recommendations
Check the validity of your passport and visa requirements for your destination/s if you are travelling overseas
Read the RMIT Travel Policy
RISK & INSURANCES
Read the RMIT Corporate Travel Insurance Overview Go to the International SOS website and print the RMIT
membership card Download the International SOS App to your smart phone
to access instant travel warnings, updates and country information
FIT TO TRAVEL
Complete vaccinations for your destination/s. Unsure what is required? Contact International SOS
Have clearance to travel from your GP if you have pre-existing health conditions
4 Travel Portal User Guide: Traveller

Plan: Get a Quote —
Contact an approved RMIT Travel Management Company (TMC)
CT Connections
P 03 8527 4040 / 1300 068 107 E [email protected] W www.ctconnections.com.au
ATPI Voyager
P 1300 082 504 (toll free) E [email protected] W www.atpi.com/voyager/au-en
Reho Travel (Study Tours)
P (03) 9823 5288 E [email protected] W www.reho.com
For more information: www.rmit.edu.au/travel/providers
The university travel policy requires all travellers funded by RMIT to book via the approved travel management companies to ensure duty of care requirements are met.
5 Travel Portal User Guide: Traveller

Plan: Travel Risks and Visas —
Your International SOS RMIT membership number is 12ACPA000012. For more information please visit www.rmit.edu.au/travel/risk&safety
All RMIT travellers have 24/7 access to the International SOS Global Assistance Program for travel advice and assistance.
Reach out to International SOS if you need a routine referral, lose your medication, or have a medical or security crisis. BEFORE YOU LEAVE
- Access pre-travel information including vaccinations, real-time information on country guides, online medical and security reports
- Download the International SOS App through your App or Play Store by searching “International SOS”
DURING TRAVEL
- Seek health, safety and security advice - Need to speak with an experienced,
Western-trained doctor or security specialist - Need a local doctor or medical attention
including supplies of medical equipment - Need travel advice on loss of travel documents
or legal assistance
6 Travel Portal User Guide: Traveller

Approval —
• Create a requisition
• Attach quote & documents
• Fill in flight & cost estimates
• Submit for approval
Create & Submit Your Requisition Through the Travel Portal
2 7 Travel Portal User Guide: Traveller

• Logging into Travel Portal
• Turning off your browser pop-up blocker
• Portal Home Screen
• International/Domestic Requisition
• Traveller Details Screen
• Navigating in the Travel Portal
Each traveller must be on a separate requisition number in order to be properly covered by the RMIT business insurance. Only staff members with valid e-numbers are able to access the Travel Portal.
Helpful Topics:
8 Travel Portal User Guide: Traveller
Approval: Create a Requisition —

Head to: www.rmit.edu.au/travel
Click on this button, located on the right side of the screen
You will be prompted to login on this screen. Only staff with a valid e-number can access the travel portal.
9 Travel Portal User Guide: Traveller
— Approval Logging into the Travel Portal
Create a Requisition
Google Chrome Windows Internet Explorer
Mozilla Firefox
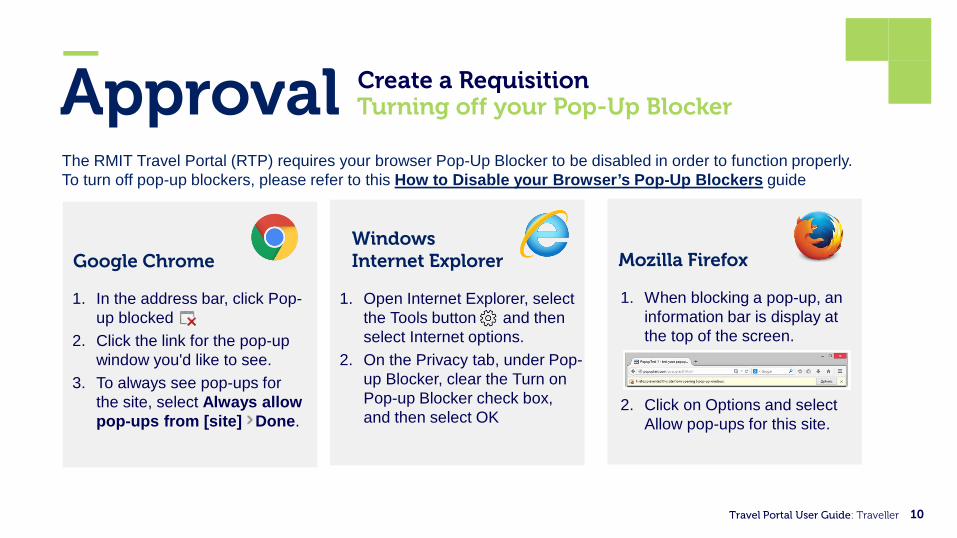
1. In the address bar, click Pop-up blocked
2. Click the link for the pop-up window you'd like to see.
3. To always see pop-ups for the site, select Always allow pop-ups from [site] Done.
1. Open Internet Explorer, select the Tools button and then select Internet options.
2. On the Privacy tab, under Pop-up Blocker, clear the Turn on Pop-up Blocker check box, and then select OK
1. When blocking a pop-up, an information bar is display at the top of the screen.
2. Click on Options and select Allow pop-ups for this site.
10 Travel Portal User Guide: Traveller
The RMIT Travel Portal (RTP) requires your browser Pop-Up Blocker to be disabled in order to function properly. To turn off pop-up blockers, please refer to this How to Disable your Browser’s Pop-Up Blockers guide
— Approval Turning off your Pop-Up Blocker
Create a Requisition
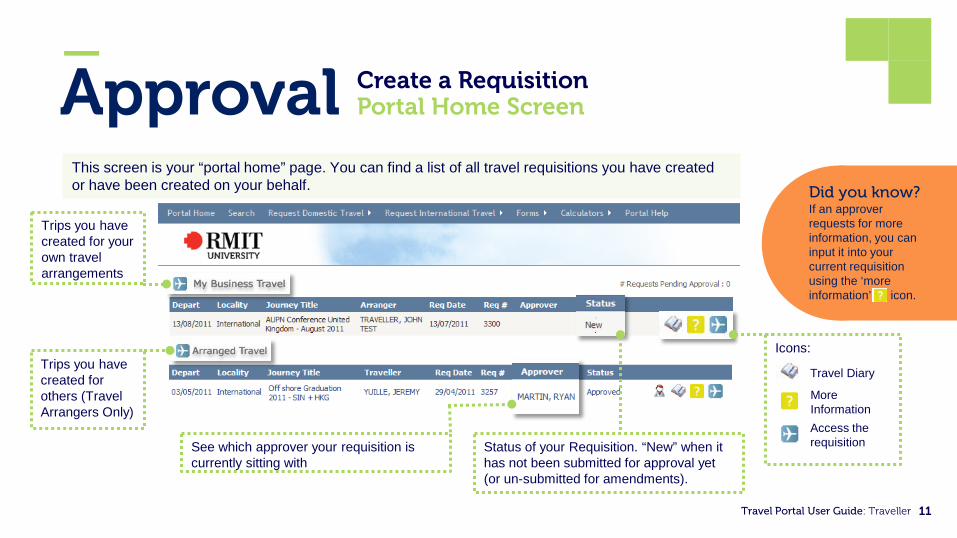
This screen is your “portal home” page. You can find a list of all travel requisitions you have created or have been created on your behalf.
Trips you have created for your own travel arrangements
Trips you have created for others (Travel Arrangers Only)
Status of your Requisition. “New” when it has not been submitted for approval yet (or un-submitted for amendments).
See which approver your requisition is currently sitting with
Icons: Travel Diary
More Information Access the requisition
Did you know? If an approver requests for more information, you can input it into your current requisition using the ‘more information’ icon.
11 Travel Portal User Guide: Traveller
— Approval Portal Home Screen
Create a Requisition

—
On the home screen: Your requisition type will always appear on the top left of your requisition.
Domestic Requisition
Click ‘Full Request’ on the drop down menu
International Requisition
Click ‘Complex Request’ on the drop down menu
12 Travel Portal User Guide: Traveller
Approval Domestic / International Create a Requisition

—
Requisition number generated once “Create Requisition” is clicked
! Important
You must open individual requisition numbers for each RMIT traveller, even if travelling together.
Only for secondary externally-funded travellers eg. Spouse and/or child
DO NOT change the email address as any override made will corrupt the requisition!
Blue box will highlight what screen you are currently on
13 Travel Portal User Guide: Traveller
Approval Traveller Detail Screen Create a Requisition

—
Icons:
Email trip to traveller Cancel the requisition completely Cancel, but requisition will remain on Portal Home
View Approval Workflow and approval audit trail Print trip plan
Save Requisition Attach files to requisition
Tool bar to indicate what page of the requisition you are currently on. Page is highlighted in blue box
Click to go to your Portal Home page at any time
Jump back…
into a created requisition, click the “blue aeroplane” icon located on your Portal Home screen.
14 Travel Portal User Guide: Traveller
Approval Navigating through the Portal Create a Requisition
Approval: Attach Quote & Documents —
Helpful Topics:
Attach any travel cost estimates (quote) from your preferred RMIT travel agent, along with any supporting documentation for your trip. Use the free text field to inform your approver of documents attached and where you have obtained cost estimates from.
• Purpose of Travel Screen • Attach Quote & Supporting Documentation
15 Travel Portal User Guide: Traveller

—
Select your Trip Reason
Fill in your travel reason and specify any private days planned during your itinerary.
Attach any supporting documentation to assist your approver.
Specify any private travel days and complete your leave form in ESS.
16 Travel Portal User Guide: Traveller
Approval Purpose of Travel Screen Attach Quotes & Documents

—
! Important
Turn off your browser pop-up blocker to avoid system errors
Use free text box to list attached documents or any further information to support your travel request
Use the ‘paperclip’ icon to attach quote for your travel arrangements and any other supporting documents.
17 Travel Portal User Guide: Traveller
Attach Quote & Supporting Docs Travel documents Approval

Approval: Fill-In Flight & Cost Estimates —
Helpful Topics:
The Flights screen is essentially your trip plan and allows your approvers to view which destinations you are travelling to. This screen will also detect if travel is going to high risk destinations.
The Cost Estimates screen is where you input your budget against relevant internal order numbers. This is also where you fill in your own per diem claim.
• Flights Screen • High Risk Assessment Form • Skip Accommodation & Car Hire Details Screen • Cost Estimates Screens • Per Diem Calculator
18 Travel Portal User Guide: Traveller

Approval —
This is a trip plan to notify your approvers of destinations that you will be travelling to.
Destinations in transit are not required to be entered in the flights section as this information will be included on the itinerary you will attach to your requisition
Risk rating will appear once you enter destinations.
Risk ratings are refreshed daily and are inputted from International SOS.
Use “Flight Comments” box to state how you sourced your cost estimate and itinerary.
NOTE: For travel where you are not flying, still complete the “Flight From” and “Flight To” fields and enter your comments. Eg. Driving to destination
19
Flights Screen Flights & Cost Estimates
Travel Portal User Guide: Traveller

High Risk Assessment Form —
If the country you are proposing travel to is deemed to be a high or extreme risk destination you’ll need to complete a High Risk Travel Assessment Form prior to submitting your travel request. This is easily identified and accessible by the symbol
located within your travel request.
20 Travel Portal User Guide: Traveller
Tick correct box that relates to your travel plans
Column 1: Enter in identified risk in the country you are travelling to.
Column 2: Enter in what preventative measures you will be taking to avoid the identified risks
Important This form must be completed saved and closed before submitting your request for approval
!
Approval —
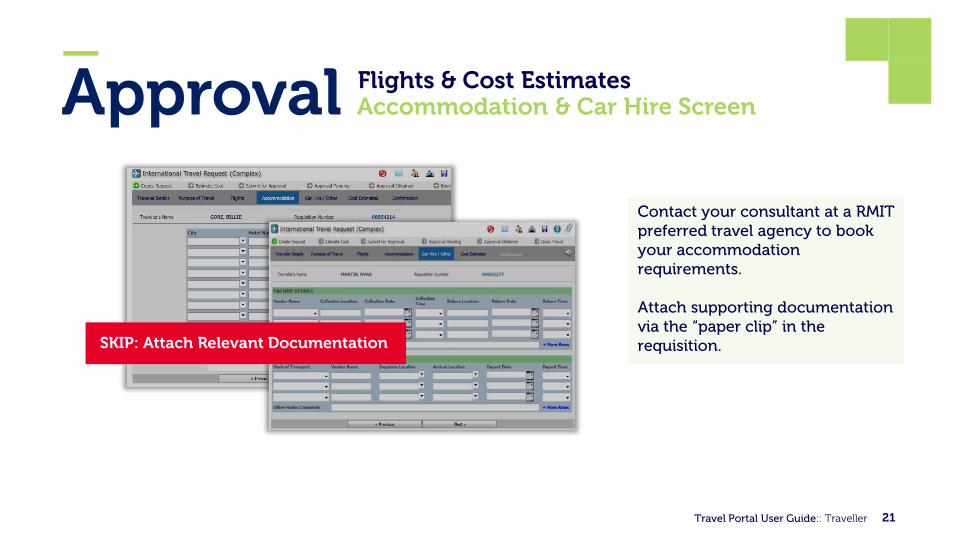
Contact your consultant at a RMIT preferred travel agency to book your accommodation requirements. Attach supporting documentation via the “paper clip” in the requisition.
21 Travel Portal User Guide:: Traveller
Accommodation & Car Hire Screen Flights & Cost Estimates
SKIP: Attach Relevant Documentation
Approval —
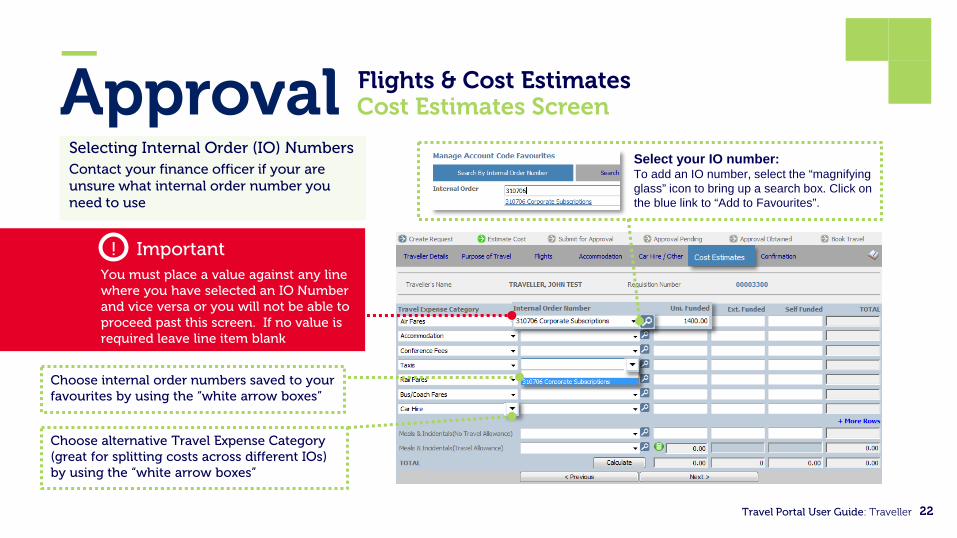
Selecting Internal Order (IO) Numbers Contact your finance officer if your are unsure what internal order number you need to use
Select your IO number: To add an IO number, select the “magnifying glass” icon to bring up a search box. Click on the blue link to “Add to Favourites”.
! Important
You must place a value against any line where you have selected an IO Number and vice versa or you will not be able to proceed past this screen. If no value is required leave line item blank
Choose internal order numbers saved to your favourites by using the “white arrow boxes”
Choose alternative Travel Expense Category (great for splitting costs across different IOs) by using the “white arrow boxes”
22 Travel Portal User Guide: Traveller
Cost Estimates Screen Flights & Cost Estimates

Approval: —
Fill-In Flight and Cost Estimates Cost Estimates Screen - Definitions
Travel Portal User Guide: Traveller 23
A B C D
Internal Order Number > ‘Not Required’
Allocation of ‘Not Required’ is used for external or self funded travel. Uni. Funded
Selected if RMIT are paying for the travel or an external company pays money into an RMIT IO & WBS Account, and RMIT is billed by the travel agent.
Externally Funded
External company arranges all travel requirements and payments. Self Funded
Traveller pays for their own travel without seeking reimbursement from RMIT.
B
A C
D
Approval —
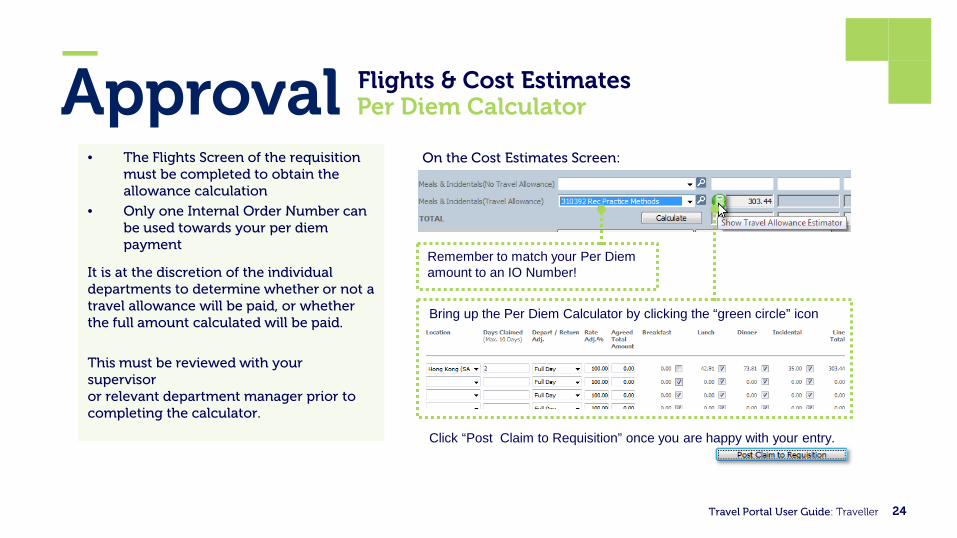
• The Flights Screen of the requisition must be completed to obtain the allowance calculation
• Only one Internal Order Number can be used towards your per diem payment
It is at the discretion of the individual departments to determine whether or not a travel allowance will be paid, or whether the full amount calculated will be paid.
This must be reviewed with your supervisor or relevant department manager prior to completing the calculator.
On the Cost Estimates Screen:
Bring up the Per Diem Calculator by clicking the “green circle” icon
Remember to match your Per Diem amount to an IO Number!
Click “Post Claim to Requisition” once you are happy with your entry.
24 Travel Portal User Guide: Traveller
Per Diem Calculator Flights & Cost Estimates
Approval: Submit for Approval —
Helpful Topics:
The Confirmation screen consists a list of Terms & Conditions. It is a requirement for you to accept these policy conditions prior to submitting your requisition. Approval of your requisition is based on financial delegation. You can track your travel requisition’s workflow and view its status at anytime.
• Confirmation Screen • Approval Workflow • Hints and Tips
25 Travel Portal User Guide: Traveller

Approval —
Tick all the terms & conditions boxes and click “Accept Policy Conditions”
Select appropriate Level 1 Approver from the drop down menu on “Confirmation” Screen
Submit for Approval
Travel Portal User Guide: Traveller
NOTE: If your Level 1 approver is not listed, please contact [email protected]
Confirmation Screen Submit for Approval
26

Approval —
To view the approval workflow at any time click the “man woman” icon located within the requisition
Travel requisitions will now follow financial delegation along the travellers‘ approval line. This means that requisitions will be approved based on value.
Please note that requisitions: • Created by travel arrangers will still require
traveller terms & conditions acceptance (via current email arrangement)
• Will still flow through your financial officers for budgetary checks
• That fall in the “High/Extreme" risk category will escalate to COO for review and final approval
You can also track where your requisition is sitting on your Portal Home Screen.
27 Travel Portal User Guide: Traveller
Approval Workflow Submit for Approval
Should the approval workflow be incorrect, to investigate contact: [email protected]

Approval —
Hints & Tips
28 Travel Portal User Guide: Traveller
My approver has not received my requisition.
If your requisition has been submitted but your approver has not received notification to review and/or action, it could be: • With your finance manager for their approval
(this appears as “Level 0 – (GRP) [finance group]” in the approval workflow audit trail)
• With an incorrect approver
You can access the approval workflow audit trail by going into your requisition via the icon and clicking the icon.
How do I amend a requisition once it’s been submitted?
A submitted requisition is greyed out and locked for editing. To amend a submitted requisition: 1. Log onto the RTP and click the icon on your “Portal
Home” screen 2. Go to the “Confirmation” tab 3. At the bottom of this screen, you will see an “Unsubmit
Approval” button. Click to Unsubmit. 4. This will bring you back to your Portal Home screen,
where you can now access your editable requisition via the icon again.
Once you are done with your edits, simply go back to the “Confirmation” tab and “Submit for Approval”. Your requisition will then re-enter your approval workflow from level 0.
Submit for Approval

Book —
• Forward Approved Email to your consultant
• Approved but can’t find email?
Requisition Approved? Proceed to Book Your Travel
3 29 Travel Portal User Guide: Traveller
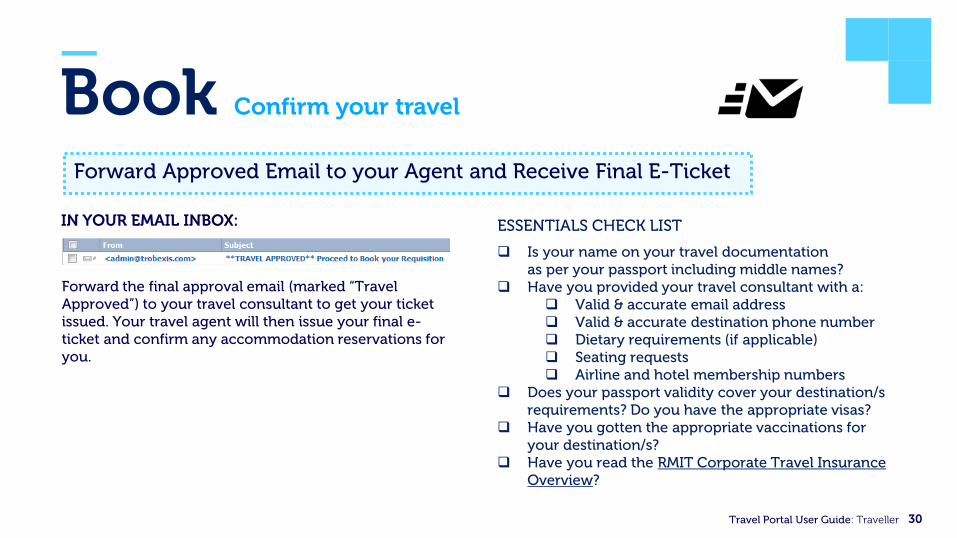
Book —
Forward Approved Email to your Agent and Receive Final E-Ticket
IN YOUR EMAIL INBOX:
Forward the final approval email (marked “Travel Approved”) to your travel consultant to get your ticket issued. Your travel agent will then issue your final e-ticket and confirm any accommodation reservations for you.
ESSENTIALS CHECK LIST
Is your name on your travel documentation as per your passport including middle names?
Have you provided your travel consultant with a: Valid & accurate email address Valid & accurate destination phone number Dietary requirements (if applicable) Seating requests Airline and hotel membership numbers
Does your passport validity cover your destination/s requirements? Do you have the appropriate visas?
Have you gotten the appropriate vaccinations for your destination/s?
Have you read the RMIT Corporate Travel Insurance Overview?
30 Travel Portal User Guide: Traveller
Confirm your travel
—
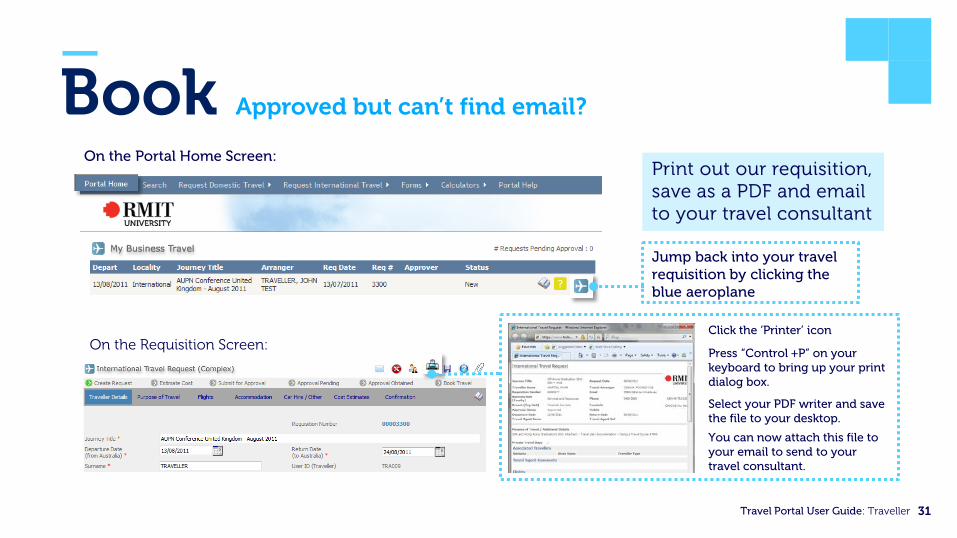
Print out our requisition, save as a PDF and email to your travel consultant
On the Portal Home Screen:
Jump back into your travel requisition by clicking the blue aeroplane
On the Requisition Screen: Click the ‘Printer’ icon
Press “Control +P” on your keyboard to bring up your print dialog box.
Select your PDF writer and save the file to your desktop.
You can now attach this file to your email to send to your travel consultant.
31 Travel Portal User Guide: Traveller
Book Approved but can’t find email?