transitional shades -...
TRANSCRIPT

Transitional Shades
Installation Instructions Traditional, 2-On-1 Headrail & Sundown Shades
Couplitaire
Modernaire
Visionaire
*Click BACK on any page to return to the Table of Contents*
Allure Installation Instructions 2 BACK
Allure Transitional, Two-on-One & Sundown Shades
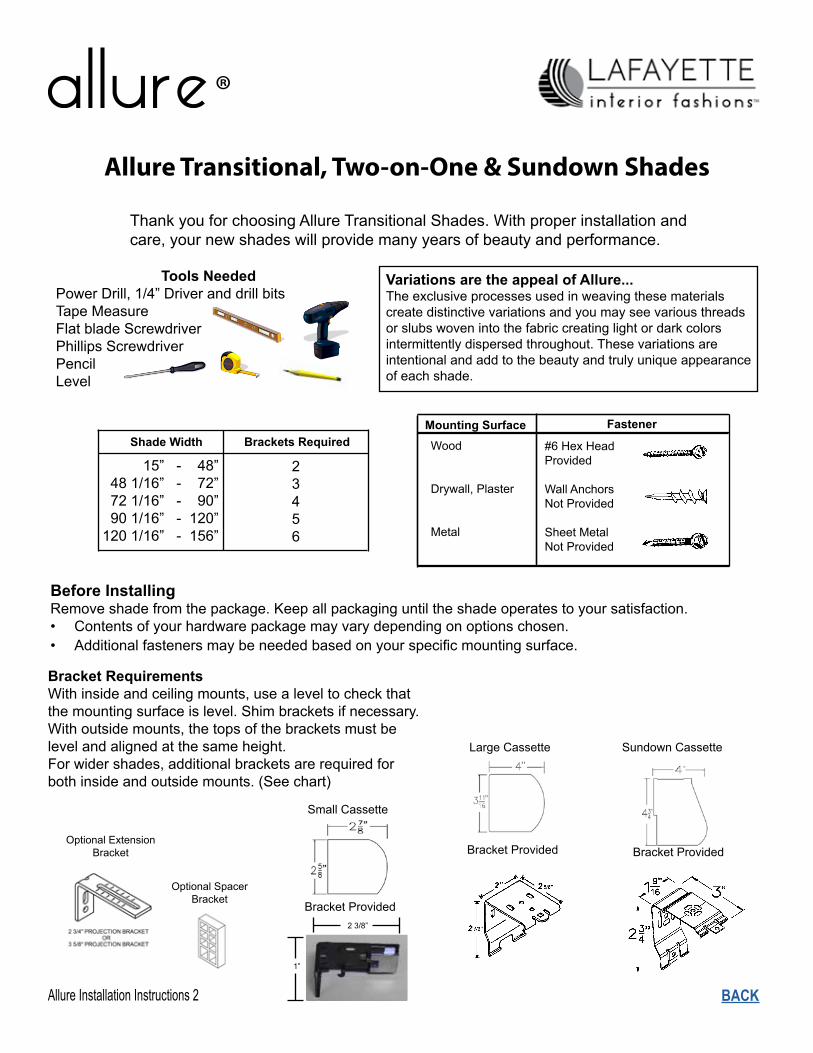
Thank you for choosing Allure Transitional Shades. With proper installation and care, your new shades will provide many years of beauty and performance.
Before InstallingRemove shade from the package. Keep all packaging until the shade operates to your satisfaction.• Contents of your hardware package may vary depending on options chosen.• Additional fasteners may be needed based on your specific mounting surface.
Bracket RequirementsWith inside and ceiling mounts, use a level to check that the mounting surface is level. Shim brackets if necessary. With outside mounts, the tops of the brackets must be level and aligned at the same height. For wider shades, additional brackets are required for both inside and outside mounts. (See chart)
Mounting Surface Fastener
Wood
Drywall, Plaster
Metal
#6 Hex HeadProvided
Wall AnchorsNot Provided
Sheet Metal Not Provided
Tools NeededPower Drill, 1/4” Driver and drill bitsTape MeasureFlat blade ScrewdriverPhillips ScrewdriverPencilLevel
Bracket Provided
Large Cassette
Bracket Provided
Sundown Cassette
15” - 48”48 1/16” - 72”72 1/16” - 90”90 1/16” - 120”
120 1/16” - 156”
Shade Width Brackets Required
2 3 4 5 6
Optional Extension Bracket
Optional Spacer Bracket
Small Cassette
Bracket Provided2 3/8”
1”
Variations are the appeal of Allure...The exclusive processes used in weaving these materials create distinctive variations and you may see various threads or slubs woven into the fabric creating light or dark colors intermittently dispersed throughout. These variations are intentional and add to the beauty and truly unique appearance of each shade.
Allure Installation Instructions 3BACK
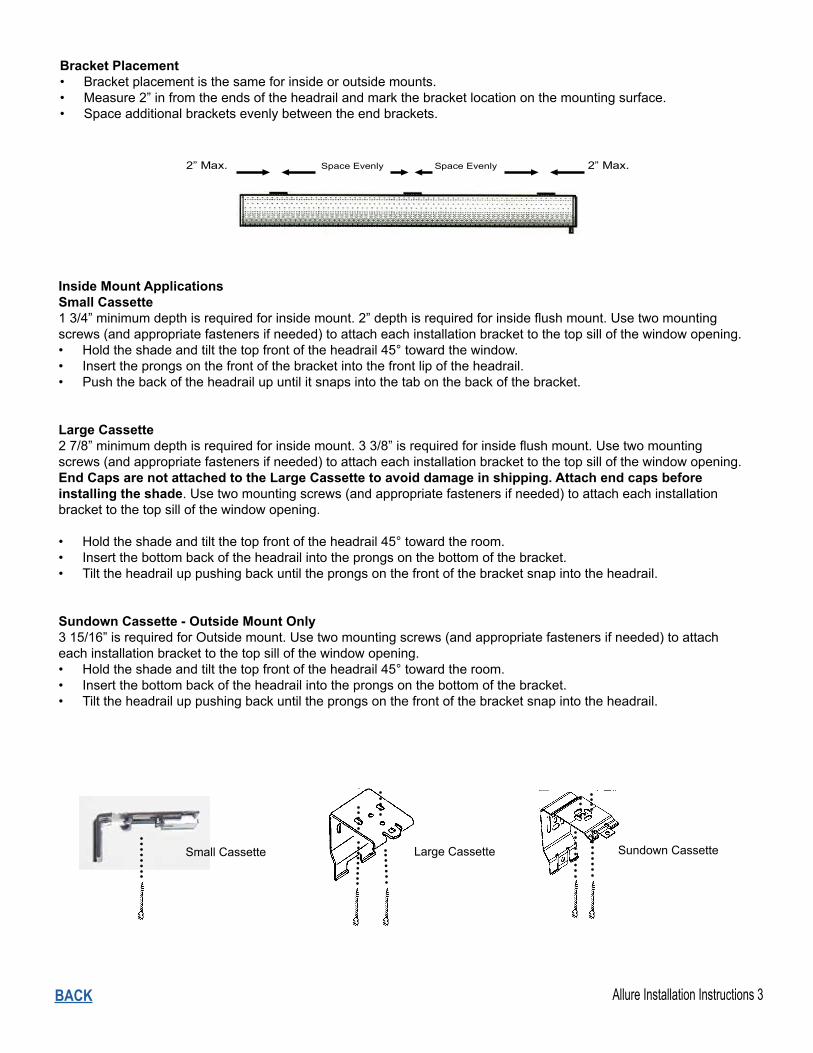
Bracket Placement• Bracket placement is the same for inside or outside mounts.• Measure 2” in from the ends of the headrail and mark the bracket location on the mounting surface.• Space additional brackets evenly between the end brackets.
2” Max. Space Evenly Space Evenly 2” Max.
Inside Mount ApplicationsSmall Cassette1 3/4” minimum depth is required for inside mount. 2” depth is required for inside flush mount. Use two mounting screws (and appropriate fasteners if needed) to attach each installation bracket to the top sill of the window opening.• Hold the shade and tilt the top front of the headrail 45° toward the window. • Insert the prongs on the front of the bracket into the front lip of the headrail. • Push the back of the headrail up until it snaps into the tab on the back of the bracket.
Large Cassette2 7/8” minimum depth is required for inside mount. 3 3/8” is required for inside flush mount. Use two mounting screws (and appropriate fasteners if needed) to attach each installation bracket to the top sill of the window opening.End Caps are not attached to the Large Cassette to avoid damage in shipping. Attach end caps before installing the shade. Use two mounting screws (and appropriate fasteners if needed) to attach each installation bracket to the top sill of the window opening.
• Hold the shade and tilt the top front of the headrail 45° toward the room. • Insert the bottom back of the headrail into the prongs on the bottom of the bracket. • Tilt the headrail up pushing back until the prongs on the front of the bracket snap into the headrail.
Sundown Cassette - Outside Mount Only3 15/16” is required for Outside mount. Use two mounting screws (and appropriate fasteners if needed) to attach each installation bracket to the top sill of the window opening.• Hold the shade and tilt the top front of the headrail 45° toward the room. • Insert the bottom back of the headrail into the prongs on the bottom of the bracket. • Tilt the headrail up pushing back until the prongs on the front of the bracket snap into the headrail.
Large Cassette Sundown CassetteSmall Cassette
Allure Installation Instructions 4 BACK
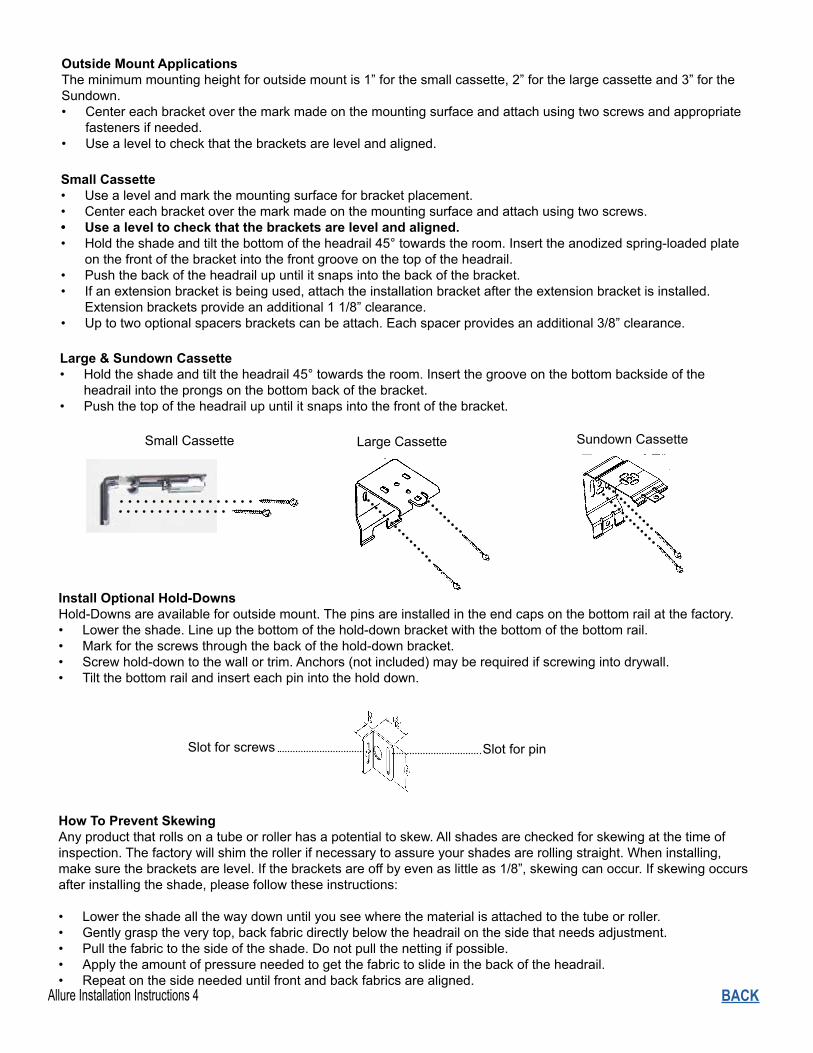
Outside Mount ApplicationsThe minimum mounting height for outside mount is 1” for the small cassette, 2” for the large cassette and 3” for the Sundown.• Center each bracket over the mark made on the mounting surface and attach using two screws and appropriate
fasteners if needed.• Use a level to check that the brackets are level and aligned.
Slot for pinSlot for screws
Install Optional Hold-DownsHold-Downs are available for outside mount. The pins are installed in the end caps on the bottom rail at the factory.• Lower the shade. Line up the bottom of the hold-down bracket with the bottom of the bottom rail.• Mark for the screws through the back of the hold-down bracket.• Screw hold-down to the wall or trim. Anchors (not included) may be required if screwing into drywall.• Tilt the bottom rail and insert each pin into the hold down.
Small Cassette• Use a level and mark the mounting surface for bracket placement.• Center each bracket over the mark made on the mounting surface and attach using two screws. • Use a level to check that the brackets are level and aligned. • Hold the shade and tilt the bottom of the headrail 45° towards the room. Insert the anodized spring-loaded plate
on the front of the bracket into the front groove on the top of the headrail. • Push the back of the headrail up until it snaps into the back of the bracket.• If an extension bracket is being used, attach the installation bracket after the extension bracket is installed.
Extension brackets provide an additional 1 1/8” clearance. • Up to two optional spacers brackets can be attach. Each spacer provides an additional 3/8” clearance.
Large & Sundown Cassette• Hold the shade and tilt the headrail 45° towards the room. Insert the groove on the bottom backside of the
headrail into the prongs on the bottom back of the bracket.• Push the top of the headrail up until it snaps into the front of the bracket.
Large Cassette Sundown CassetteSmall Cassette
How To Prevent SkewingAny product that rolls on a tube or roller has a potential to skew. All shades are checked for skewing at the time of inspection. The factory will shim the roller if necessary to assure your shades are rolling straight. When installing, make sure the brackets are level. If the brackets are off by even as little as 1/8”, skewing can occur. If skewing occurs after installing the shade, please follow these instructions:
• Lower the shade all the way down until you see where the material is attached to the tube or roller. • Gently grasp the very top, back fabric directly below the headrail on the side that needs adjustment. • Pull the fabric to the side of the shade. Do not pull the netting if possible. • Apply the amount of pressure needed to get the fabric to slide in the back of the headrail. • Repeat on the side needed until front and back fabrics are aligned.
Allure Installation Instructions 5BACK 18-8004-CASS November 2014
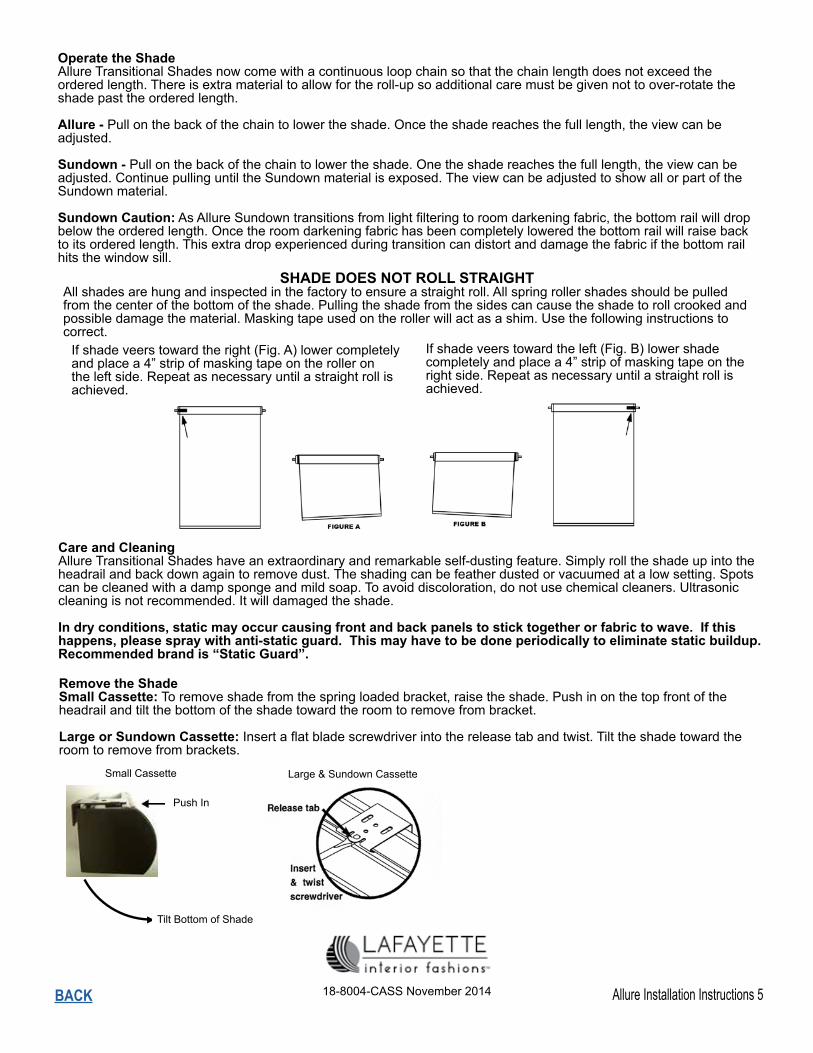
Remove the ShadeSmall Cassette: To remove shade from the spring loaded bracket, raise the shade. Push in on the top front of the headrail and tilt the bottom of the shade toward the room to remove from bracket.
Large or Sundown Cassette: Insert a flat blade screwdriver into the release tab and twist. Tilt the shade toward the room to remove from brackets.
Care and CleaningAllure Transitional Shades have an extraordinary and remarkable self-dusting feature. Simply roll the shade up into the headrail and back down again to remove dust. The shading can be feather dusted or vacuumed at a low setting. Spots can be cleaned with a damp sponge and mild soap. To avoid discoloration, do not use chemical cleaners. Ultrasonic cleaning is not recommended. It will damaged the shade.
In dry conditions, static may occur causing front and back panels to stick together or fabric to wave. If this happens, please spray with anti-static guard. This may have to be done periodically to eliminate static buildup.Recommended brand is “Static Guard”.
Operate the ShadeAllure Transitional Shades now come with a continuous loop chain so that the chain length does not exceed the ordered length. There is extra material to allow for the roll-up so additional care must be given not to over-rotate the shade past the ordered length.
Allure - Pull on the back of the chain to lower the shade. Once the shade reaches the full length, the view can be adjusted.
Sundown - Pull on the back of the chain to lower the shade. One the shade reaches the full length, the view can be adjusted. Continue pulling until the Sundown material is exposed. The view can be adjusted to show all or part of the Sundown material.
Sundown Caution: As Allure Sundown transitions from light filtering to room darkening fabric, the bottom rail will drop below the ordered length. Once the room darkening fabric has been completely lowered the bottom rail will raise back to its ordered length. This extra drop experienced during transition can distort and damage the fabric if the bottom rail hits the window sill.
Large & Sundown CassetteSmall Cassette
Push In
Tilt Bottom of Shade
SHADE DOES NOT ROLL STRAIGHTAll shades are hung and inspected in the factory to ensure a straight roll. All spring roller shades should be pulled from the center of the bottom of the shade. Pulling the shade from the sides can cause the shade to roll crooked and possible damage the material. Masking tape used on the roller will act as a shim. Use the following instructions to correct.
If shade veers toward the right (Fig. A) lower completely and place a 4” strip of masking tape on the roller on the left side. Repeat as necessary until a straight roll is achieved.
If shade veers toward the left (Fig. B) lower shade completely and place a 4” strip of masking tape on the right side. Repeat as necessary until a straight roll is achieved.
Allure Installation Instructions 6 BACK
Thank you for choosing an Allure Transitional Shade. With proper installation and care, your new shade will provide many years of beauty and performance.
Mounting Surface FastenerWood
Drywall, Plaster
Metal
#6 Hex HeadProvided
Wall AnchorsNot Provided
Sheet Metal Not Provided
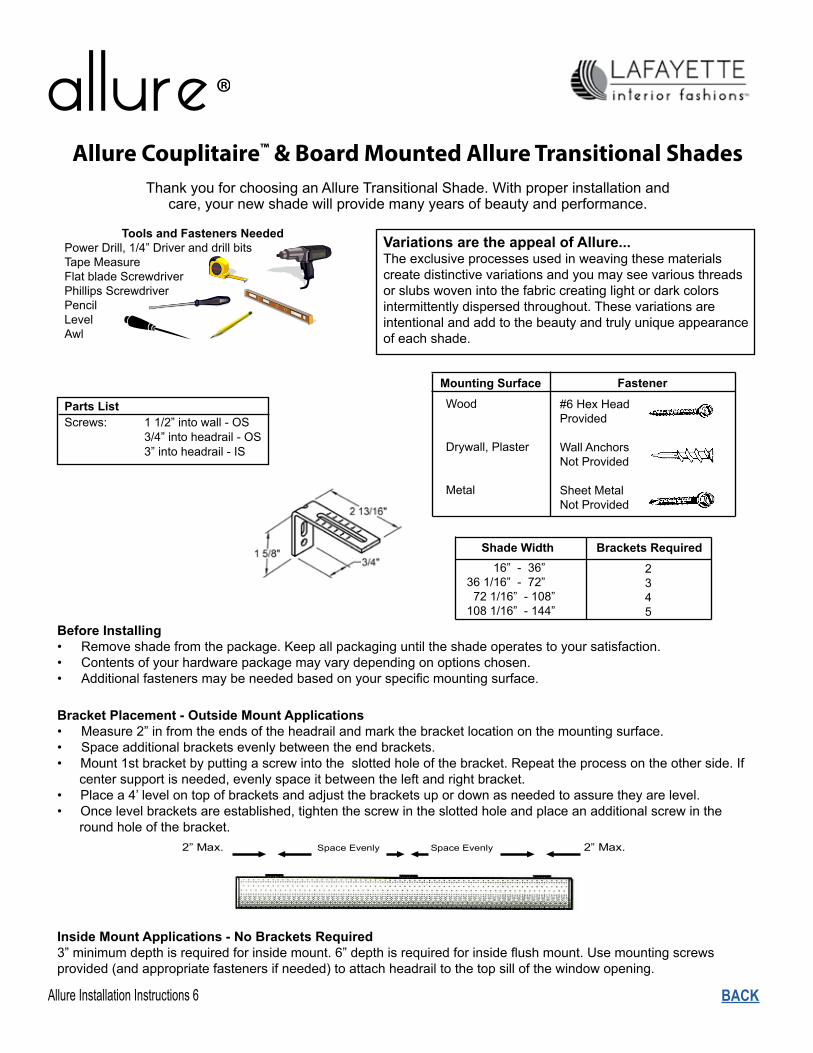
Tools and Fasteners NeededPower Drill, 1/4” Driver and drill bitsTape MeasureFlat blade ScrewdriverPhillips ScrewdriverPencilLevelAwl
16” - 36” 36 1/16” - 72” 72 1/16” - 108” 108 1/16” - 144”
Shade Width Brackets Required
2 3 4 5
Before Installing• Remove shade from the package. Keep all packaging until the shade operates to your satisfaction.• Contents of your hardware package may vary depending on options chosen.• Additional fasteners may be needed based on your specific mounting surface.
Parts ListScrews: 1 1/2” into wall - OS 3/4” into headrail - OS 3” into headrail - IS
Bracket Placement - Outside Mount Applications• Measure 2” in from the ends of the headrail and mark the bracket location on the mounting surface.• Space additional brackets evenly between the end brackets. • Mount 1st bracket by putting a screw into the slotted hole of the bracket. Repeat the process on the other side. If center support is needed, evenly space it between the left and right bracket. • Place a 4’ level on top of brackets and adjust the brackets up or down as needed to assure they are level.• Once level brackets are established, tighten the screw in the slotted hole and place an additional screw in the round hole of the bracket.
2” Max. Space Evenly Space Evenly 2” Max.
Inside Mount Applications - No Brackets Required3” minimum depth is required for inside mount. 6” depth is required for inside flush mount. Use mounting screws provided (and appropriate fasteners if needed) to attach headrail to the top sill of the window opening.
Allure Couplitaire™ & Board Mounted Allure Transitional Shades
Variations are the appeal of Allure...The exclusive processes used in weaving these materials create distinctive variations and you may see various threads or slubs woven into the fabric creating light or dark colors intermittently dispersed throughout. These variations are intentional and add to the beauty and truly unique appearance of each shade.
Allure Installation Instructions 7BACK
Operate the ShadeAllure Transitional Shades now come with a continuous loop chain so that the chain length does not exceed the ordered length. There is extra material to allow for the roll-up so additional care must be given not to over-rotate the shade past the ordered length.Pull on the back of the chain to lower the shade. Once the shade reaches the full length, the view can be adjusted.
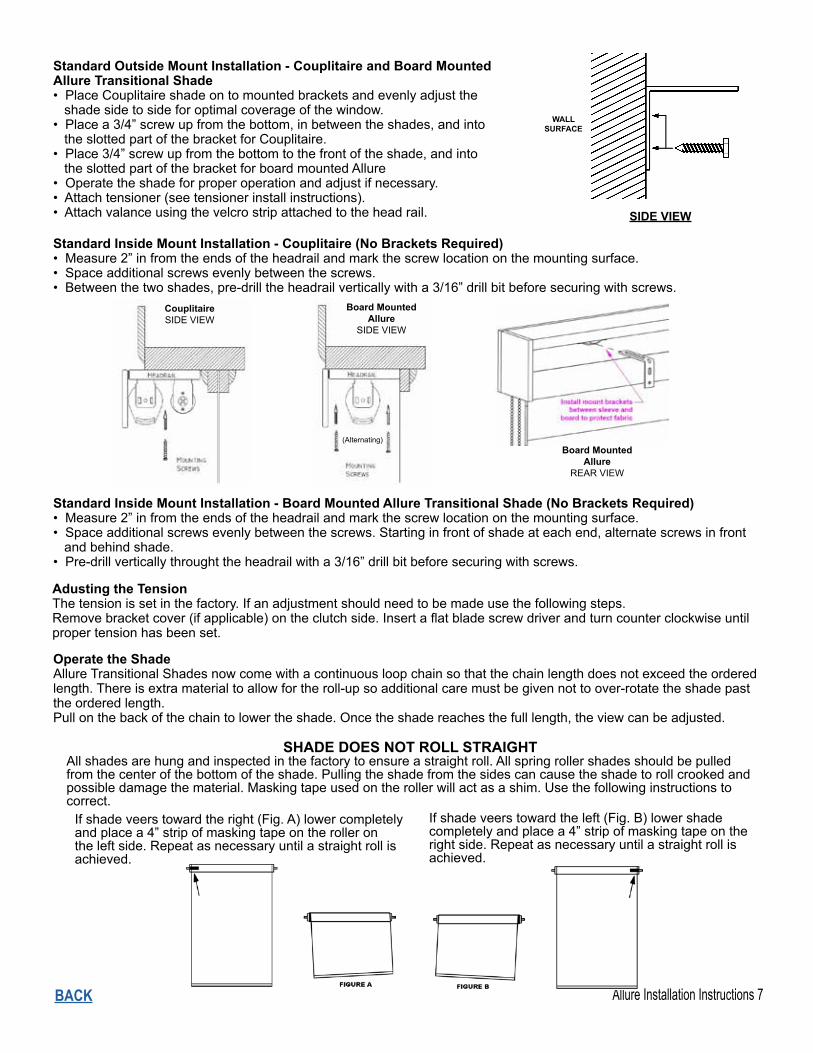
Standard Outside Mount Installation - Couplitaire and Board Mounted Allure Transitional Shade• Place Couplitaire shade on to mounted brackets and evenly adjust the shade side to side for optimal coverage of the window.• Place a 3/4” screw up from the bottom, in between the shades, and into the slotted part of the bracket for Couplitaire.• Place 3/4” screw up from the bottom to the front of the shade, and into the slotted part of the bracket for board mounted Allure• Operate the shade for proper operation and adjust if necessary.• Attach tensioner (see tensioner install instructions).• Attach valance using the velcro strip attached to the head rail.
WALLSURFACE
SIDE VIEW
CouplitaireSIDE VIEW
Standard Inside Mount Installation - Couplitaire (No Brackets Required)• Measure 2” in from the ends of the headrail and mark the screw location on the mounting surface.• Space additional screws evenly between the screws.• Between the two shades, pre-drill the headrail vertically with a 3/16” drill bit before securing with screws.
Standard Inside Mount Installation - Board Mounted Allure Transitional Shade (No Brackets Required)• Measure 2” in from the ends of the headrail and mark the screw location on the mounting surface.• Space additional screws evenly between the screws. Starting in front of shade at each end, alternate screws in front and behind shade.• Pre-drill vertically throught the headrail with a 3/16” drill bit before securing with screws.
Board MountedAllure
REAR VIEW
(Alternating)
Board MountedAllure
SIDE VIEW
Adusting the TensionThe tension is set in the factory. If an adjustment should need to be made use the following steps. Remove bracket cover (if applicable) on the clutch side. Insert a flat blade screw driver and turn counter clockwise until proper tension has been set.
SHADE DOES NOT ROLL STRAIGHTAll shades are hung and inspected in the factory to ensure a straight roll. All spring roller shades should be pulled from the center of the bottom of the shade. Pulling the shade from the sides can cause the shade to roll crooked and possible damage the material. Masking tape used on the roller will act as a shim. Use the following instructions to correct.
If shade veers toward the right (Fig. A) lower completely and place a 4” strip of masking tape on the roller on the left side. Repeat as necessary until a straight roll is achieved.
If shade veers toward the left (Fig. B) lower shade completely and place a 4” strip of masking tape on the right side. Repeat as necessary until a straight roll is achieved.

Allure Installation Instructions 8 BACK
Care and CleaningAllure Transitional Shades have an extraordinary and remarkable self-dusting feature. Simply roll the shade up into the headrail and back down again to remove dust. The shading can be feather dusted or vacuumed at a low setting. Spots can be cleaned with a damp sponge and mild soap. To avoid discoloration, do not use chemical cleaners. Ultrasonic cleaning is not recommended. It will damage the shade.
In dry conditions, static may occur causing front and back panels to stick together or fabric to wave. If this happens, please spray with anti-static guard. This may have to be done periodically to eliminate static buildup.Recommended brand is “Static Guard”.
18-8004-COUP November 2014
Allure Installation Instructions 9BACK
Thank you for choosing an Allure Modernaire Shade. With proper installation and care, your new shade will provide many years of beauty and performance.
Mounting Surface FastenerWood
Drywall, Plaster
Metal
#6 Hex HeadProvided
Wall AnchorsNot Provided
Sheet Metal Not Provided
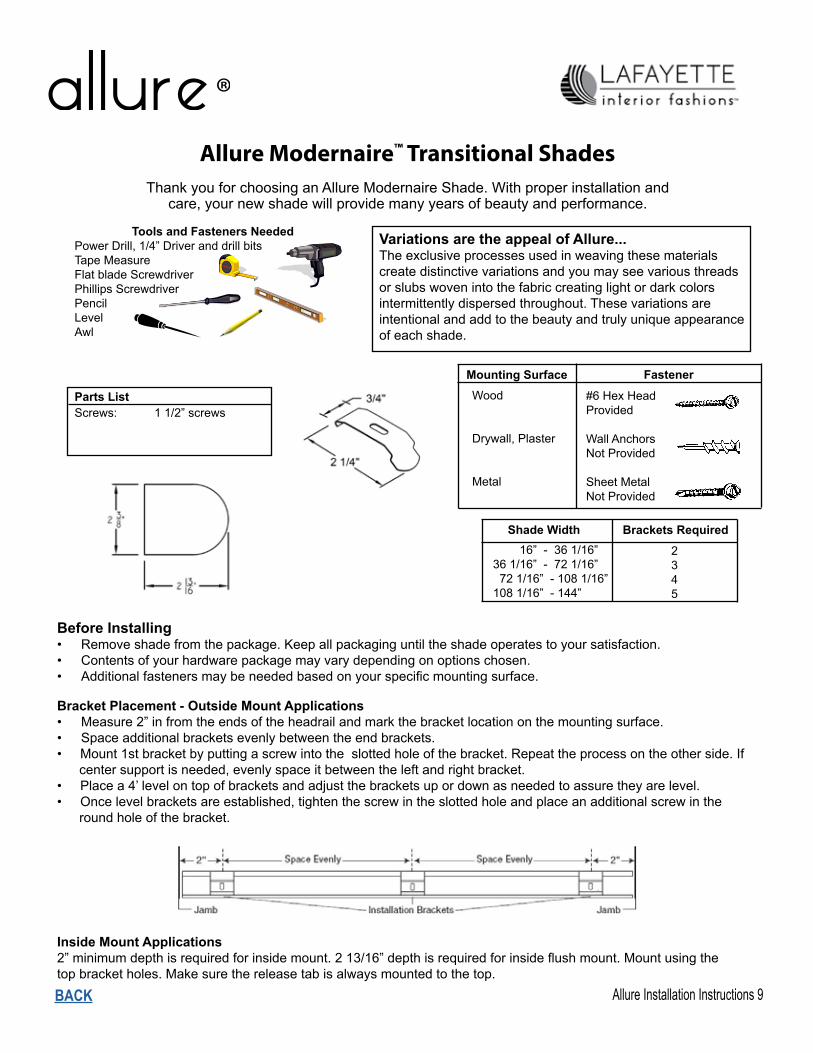
Tools and Fasteners NeededPower Drill, 1/4” Driver and drill bitsTape MeasureFlat blade ScrewdriverPhillips ScrewdriverPencilLevelAwl
16” - 36 1/16” 36 1/16” - 72 1/16” 72 1/16” - 108 1/16” 108 1/16” - 144”
Shade Width Brackets Required
2 3 4 5
Before Installing• Remove shade from the package. Keep all packaging until the shade operates to your satisfaction.• Contents of your hardware package may vary depending on options chosen.• Additional fasteners may be needed based on your specific mounting surface.
Parts ListScrews: 1 1/2” screws
Bracket Placement - Outside Mount Applications• Measure 2” in from the ends of the headrail and mark the bracket location on the mounting surface.• Space additional brackets evenly between the end brackets. • Mount 1st bracket by putting a screw into the slotted hole of the bracket. Repeat the process on the other side. If center support is needed, evenly space it between the left and right bracket. • Place a 4’ level on top of brackets and adjust the brackets up or down as needed to assure they are level.• Once level brackets are established, tighten the screw in the slotted hole and place an additional screw in the round hole of the bracket.
Inside Mount Applications 2” minimum depth is required for inside mount. 2 13/16” depth is required for inside flush mount. Mount using thetop bracket holes. Make sure the release tab is always mounted to the top.
Allure Modernaire™ Transitional Shades
Variations are the appeal of Allure...The exclusive processes used in weaving these materials create distinctive variations and you may see various threads or slubs woven into the fabric creating light or dark colors intermittently dispersed throughout. These variations are intentional and add to the beauty and truly unique appearance of each shade.
Allure Installation Instructions 10 BACK
Care and CleaningAllure Transitional Shades have an extraordinary and remarkable self-dusting feature. Simply roll the shade up into the headrail and back down again to remove dust. The shading can be feather dusted or vacuumed at a low setting. Spots can be cleaned with a damp sponge and mild soap. To avoid discoloration, do not use chemical cleaners. Ultrasonic cleaning is not recommended. It will damaged the shade.
In dry conditions, static may occur causing front and back panels to stick together or fabric to wave. If this happens, please spray with anti-static guard. This may have to be done periodically to eliminate static buildup.Recommended brand is “Static Guard”.
Operate the ShadeAllure Transitional Shades now come with a continuous loop chain so that the chain length does not exceed the ordered length. There is extra material to allow for the roll-up so additional care must be given not to over-rotate the shade past the ordered length.
Allure - Pull on the back of the chain to lower the shade..or front of chain to raise. Once the shade reaches the full length, the view can be adjusted.
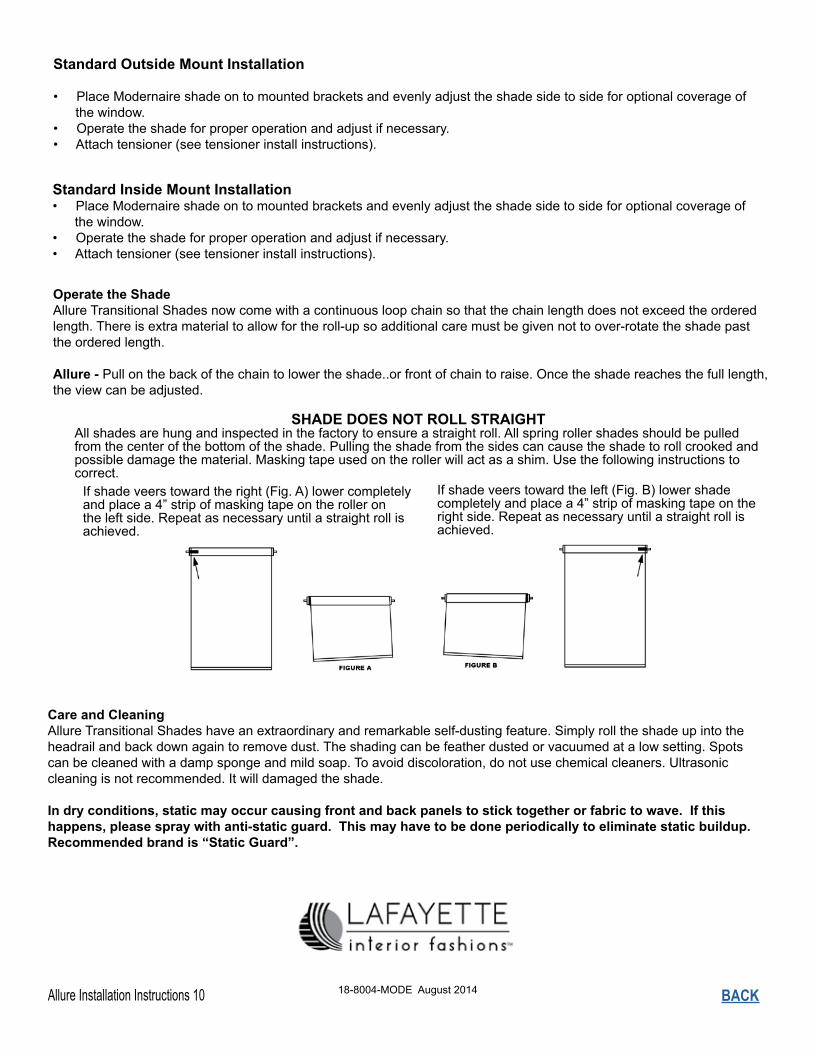
Standard Outside Mount Installation
• Place Modernaire shade on to mounted brackets and evenly adjust the shade side to side for optional coverage of the window.• Operate the shade for proper operation and adjust if necessary.• Attach tensioner (see tensioner install instructions).
18-8004-MODE August 2014
Standard Inside Mount Installation• Place Modernaire shade on to mounted brackets and evenly adjust the shade side to side for optional coverage of the window.• Operate the shade for proper operation and adjust if necessary.• Attach tensioner (see tensioner install instructions).
SHADE DOES NOT ROLL STRAIGHTAll shades are hung and inspected in the factory to ensure a straight roll. All spring roller shades should be pulled from the center of the bottom of the shade. Pulling the shade from the sides can cause the shade to roll crooked and possible damage the material. Masking tape used on the roller will act as a shim. Use the following instructions to correct.
If shade veers toward the right (Fig. A) lower completely and place a 4” strip of masking tape on the roller on the left side. Repeat as necessary until a straight roll is achieved.
If shade veers toward the left (Fig. B) lower shade completely and place a 4” strip of masking tape on the right side. Repeat as necessary until a straight roll is achieved.
Allure Installation Instructions 11BACK
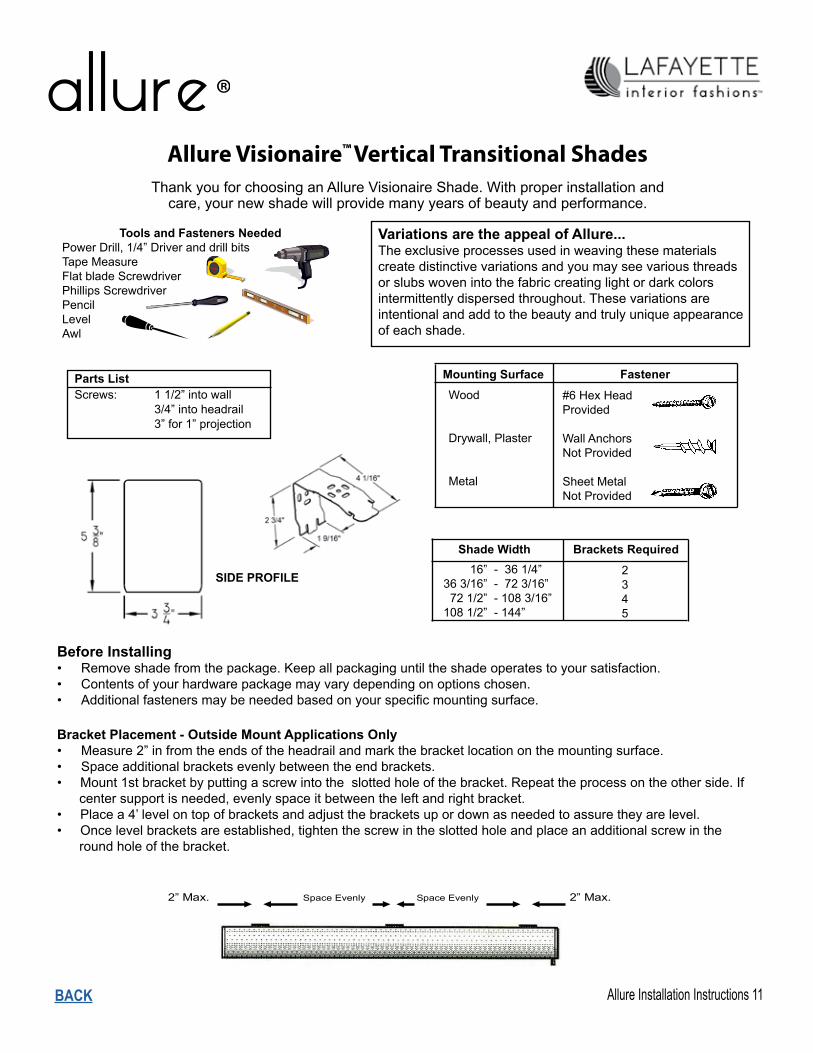
Thank you for choosing an Allure Visionaire Shade. With proper installation and care, your new shade will provide many years of beauty and performance.
Mounting Surface FastenerWood
Drywall, Plaster
Metal
#6 Hex HeadProvided
Wall AnchorsNot Provided
Sheet Metal Not Provided
Tools and Fasteners NeededPower Drill, 1/4” Driver and drill bitsTape MeasureFlat blade ScrewdriverPhillips ScrewdriverPencilLevelAwl
16” - 36 1/4” 36 3/16” - 72 3/16” 72 1/2” - 108 3/16” 108 1/2” - 144”
Shade Width Brackets Required
2 3 4 5
Before Installing• Remove shade from the package. Keep all packaging until the shade operates to your satisfaction.• Contents of your hardware package may vary depending on options chosen.• Additional fasteners may be needed based on your specific mounting surface.
Parts ListScrews: 1 1/2” into wall 3/4” into headrail 3” for 1” projection
Bracket Placement - Outside Mount Applications Only• Measure 2” in from the ends of the headrail and mark the bracket location on the mounting surface.• Space additional brackets evenly between the end brackets. • Mount 1st bracket by putting a screw into the slotted hole of the bracket. Repeat the process on the other side. If center support is needed, evenly space it between the left and right bracket. • Place a 4’ level on top of brackets and adjust the brackets up or down as needed to assure they are level.• Once level brackets are established, tighten the screw in the slotted hole and place an additional screw in the round hole of the bracket.
2” Max. Space Evenly Space Evenly 2” Max.
SIDE PROFILE
Allure Visionaire™ Vertical Transitional Shades
Variations are the appeal of Allure...The exclusive processes used in weaving these materials create distinctive variations and you may see various threads or slubs woven into the fabric creating light or dark colors intermittently dispersed throughout. These variations are intentional and add to the beauty and truly unique appearance of each shade.
Allure Installation Instructions 12 BACK
Care and CleaningAllure Transitional Shades have an extraordinary and remarkable self-dusting feature. Simply roll the shade up into the headrail and back down again to remove dust. The shading can be feather dusted or vacuumed at a low setting. Spots can be cleaned with a damp sponge and mild soap. To avoid discoloration, do not use chemical cleaners. Ultrasonic cleaning is not recommended. It will damaged the shade.
In dry conditions, static may occur causing front and back panels to stick together or fabric to wave. If this happens, please spray with anti-static guard. This may have to be done periodically to eliminate static buildup.Recommended brand is “Static Guard”.
Operate the ShadeAllure Visionaire Vertical Transitional Shades come with a metal bead chain loop. There is extra material to allow for the roll-up so additional care must be given not to over-rotate the shade past the ordered length.
Pull on the back of the chain to lower the shade..front of chain to raise. The view can be adjusted by pulling the tilt cords to slide back vanes side to side. (Can be adjusted at any shade height)
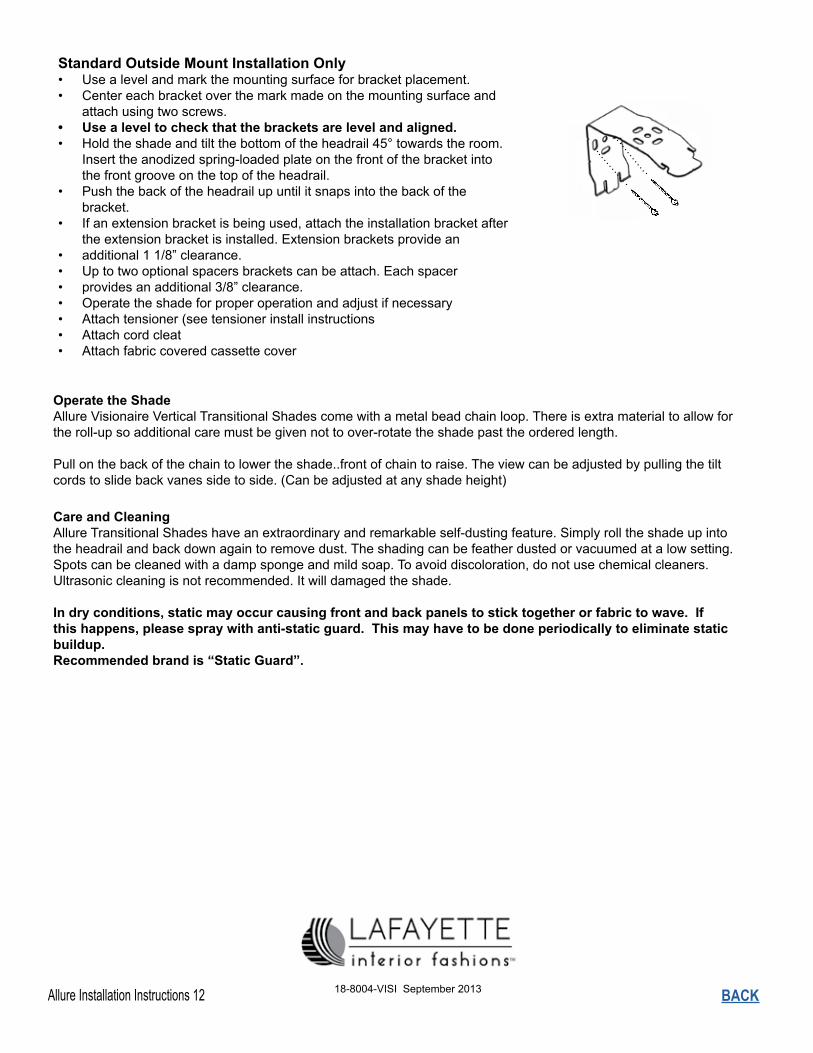
Standard Outside Mount Installation Only• Use a level and mark the mounting surface for bracket placement.• Center each bracket over the mark made on the mounting surface and
attach using two screws. • Use a level to check that the brackets are level and aligned. • Hold the shade and tilt the bottom of the headrail 45° towards the room.
Insert the anodized spring-loaded plate on the front of the bracket into the front groove on the top of the headrail.
• Push the back of the headrail up until it snaps into the back of the bracket.
• If an extension bracket is being used, attach the installation bracket after the extension bracket is installed. Extension brackets provide an
• additional 1 1/8” clearance. • Up to two optional spacers brackets can be attach. Each spacer • provides an additional 3/8” clearance.• Operate the shade for proper operation and adjust if necessary• Attach tensioner (see tensioner install instructions• Attach cord cleat• Attach fabric covered cassette cover
18-8004-VISI September 2013