training manual - abbott nutrition · 4 10. insert plug into wall socket 11. switch on the power...
TRANSCRIPT

Abbott FreeGo® pump
Training Manual
Freedom for life

2

Contents
FOR ENTERAL FEEDING ONLY
Section Page
1 Set-up What you need
Set up the Abbott FreeGo® table drip stand
1
2
2 Preparation Prepare the Abbott FreeGo® pump
Plug in and turn on
3
4
3 The giving set Familiarise yourself with the giving set 5–6
4 Attaching feed Attach giving set to the Ready to Hang (RTH) container
Insert giving set cassette into pump and prime the giving set
7
8–9
5 Rates & dosages
Summary of controls and functions
SET RATE and SET DOSE functions
Connect to the feeding tube and start feeding
10
11
12
6 Feed volume VOL FED and CLEAR VOL settings 13
7 Cleaning & controls
Everyday care of your pump 14
8 Alarms & alerts
OCCL
FEED EMPTY
DOSE and BATTERY
15
16
17
9 Problems? Troubleshooting guide 18–20
10 Pump accessories
Abbott FreeGo® portable backpack
Abbott FreeGo® accessories
22–23
24
Appendix Feed details
Important contact numbers
25–26

1
Abbott FreeGo® pump with power lead
Giving set provided in a plastic bag
Pole clamp to attach the pump to the stand
Feed
What you need
Stand to hold the feed

2
1. The stand is in two parts
2. Depress the locking button and slide the parts together
3. Stand is correctly assembled when the locking button pops through the hole
Feed container hangs from the hook at the top of the stand
Feed may be different from the one shown here
4. Correct position of pump, feed and stand when assembled
Set up the Abbott FreeGo® table drip stand
1

3
Prepare the Abbott FreeGo® pump
5. Attach power cord to pump 6. Attach the pole clamp to the back of the pump by screwing it into the pole clamp
9. Ensure stand is secured to the pole clamp and that the pump cannot move up or down
8. Hold the pump in place and tighten the clamp onto the pole by turning the black knob
7. Align the green dot on the stand pole with the pole clamp screw

4
10. Insert plug into wall socket 11. Switch on the power supply
12. When the pump is powered by the AC/mains a plug icon shows on the LCD and an LED light above the pump dial illuminates. These icons indicate the pump’s integral battery is being recharged. During recharging the LCD battery icon will scroll. It may take up to 2 minutes for the green LED light to illuminate if the battery is depleted.
Fully-charged, the battery will allow the pump to work in the event of power failure or voluntary disconnection from the mains power supply. Please see page 17 for further details on how long the battery can power the pump
Plug in and turn on
2
5
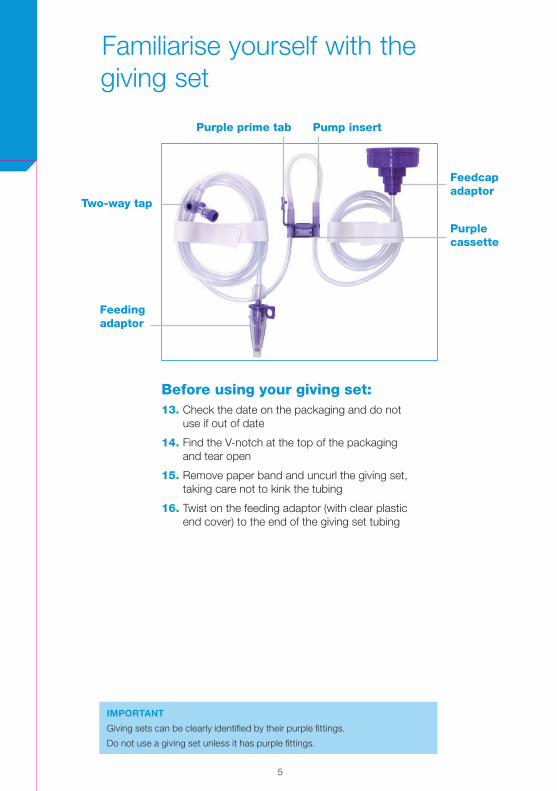
Before using your giving set: 13. Check the date on the packaging and do not
use if out of date
14. Find the V-notch at the top of the packaging and tear open
15. Remove paper band and uncurl the giving set, taking care not to kink the tubing
16. Twist on the feeding adaptor (with clear plastic end cover) to the end of the giving set tubing
IMPORTANT
Giving sets can be clearly identified by their purple fittings.
Do not use a giving set unless it has purple fittings.
Familiarise yourself with the giving set
Two-way tap
Pump insertPurple prime tab
Feedcap adaptor
Purple cassette
Feeding adaptor

6
Pump insert Purple prime tabFeedcap adaptor
Two-way tap (also known as medicines port or flushing port)
Feeding adaptorPurple cassette
3

7
17. Check the date on the feed (do not use if out of date)
18. Shake the container gently
19. Unscrew the protective white cap, taking care not to touch the foil lid
20. Do not touch foil with your fingers and do not pierce it with scissors
21. Screw on the feedcap adaptor tightly. The built-in foil cutter will pierce the foil automatically
22. Hang the container upside down from the hook on the drip stand
* RTH is an abbreviation for ‘Ready to Hang’ (the rigid pre-filled plastic bottles containing your feed)
Attach giving set to the Ready to Hang (RTH) container*

8
Insert giving set cassette into pump and prime the giving set
423. Open the
pump door24. Grasp the purple
cassette body25. Loop pump insert
around wheel, stretching lightly
27. Seat purple cassette into pump. Gently press the tubing to ensure it is fully seated in slots below the cassette
28. Close pump door. You will hear a click when the door has been closed properly
29. Turn pump dial to SET RATE or SET DOSE
30. Press and hold the PRIME button for 2 seconds, then release
The giving set can be primed (filled) using:
(A) THE AUTOPRIME FUNCTION
26. Gently pull down on the loop
‘PRIMING’ will be displayed. Autopriming will stop when the priming volume has been reached.
To stop the process, press and release the PRIME button
NOTE: The end cover of the feeding adapter needs to be removed prior to priming the set.

9
23. Gently push the purple prime tab on the feeding set cassette against the tubing
24. Steadily apply pressure until the feed begins to flow (there is no need to use a pumping action)
25. Completely fill the set by allowing the feed to expel air from the tubing
26. Open the door on the pump
27. Grasp the purple cassette body
28. Loop the pump insert around the wheel, stretching lightly
29. Gently pull down on the loop
30. Seat the purple cassette into the pump. Gently press the tubing to ensure it is fully seated in slots below the cassette
31. Close the pump door. You will hear a click when it has been closed properly
(B) MANUAL PRIMING
NOTE: The end cover needs to be removed prior to priming the set.

10
5
Summary of controls and functions
OFF/CHRGTurns pump off (and will charge the battery if plugged in)
SET RATESets the amount of feed needed per hour
ARROW KEYS
Used to increase or decrease dosage and rate of feed.
They are also used to switch between settings on the LCD display
PRIME BUTTONUsed to auto prime the system
OPTIONS BUTTONUsed to adjust alarm volume and back light intensity
SET DOSEAmount to be fed. Set to INF DOSE if a specific dose is not required
RUNOperates pump and delivers feed
VOL FEDShows the amount of feed administered
CLEAR VOLClears the accumulated volume that has been delivered and been stored in pump’s memory
HOLDPauses pump for 5 minutes. Use HOLD if you want to cancel an alarm or pause feeding

11
32. Turn pump dial to SET RATE
33. Select flow rate by pressing the Up or Down arrows. Keeping an arrow depressed will cause the scroll rate to increase
34. Turn dial to SET DOSE
35. Set the desired dose by using the Up or Down arrows
If your healthcare professional tells you not to set a dose, depress the Down arrow until INF DOSE is displayed (pump will feed until the container is empty)
SET RATE and SET DOSE functions

12
Connect to the feeding tube and start feeding
36. Flush your feeding tube as directed, then remove end-cover from giving set
38. Turn the dial to RUN to start feeding. Four drop icons will scroll in the lower right hand corner of the display while feed is running
37. Connect giving set to your feeding tube. Use the feeding adaptor if required
6
NOTE: The end cover needs to be removed prior to priming the set.

13
39. Turn the dial to VOL FED and the display will indicate how much feed you have delivered
VOL FEDLets you check how much accumulated feed you have delivered
40. To continue feeding, turn the dial back to RUN
VOL FED and CLEAR VOL settings
41. To reset the VOL FED counter to zero, turn the dial to CLEAR VOL (the volume will clear after a 5 second count down on display)
42. To continue feeding, turn the dial back to RUN
CLEAR VOLResets VOL FED display to zero

14
43. Before cleaning make sure the pump is off. Switch off mains power and unplug from the wall socket
44. Wipe carefully and thoroughly with a soft damp cloth and warm soapy water
45. The pump is water resistant and can be rinsed under running water. Make sure that you dry the pump properly
The pump should be cleaned every day after use and immediately after spills occur
46. When you have finished cleaning the pump, it should be reconnected so that the battery can continue charging
Everyday care of your pump
WARNING – CLEAN THE OUTSIDE OF THE PUMP ONLY
Do not submerge the pump or spray water or cleaning solution into the pump. For general disinfecting, use 10% solution of 5.25% sodium hypochlorite (household bleach), or 40% solution of ethyl alcohol, or 10% solution of phosphoric acid.
7

15
If the display shows OCCL INTO PUMP and an audio alarm sounds, the feed cannot be delivered due to a blockage between the feed container and the pump
If the display shows OCCL OUT OF PUMP and an audio alarm sounds there is a blockage between the pump and the patient
Alarms/Alerts: OCCL
Silencing the alarm
Turn dial to HOLD to silence the alarm
OCCL
Remove the giving set from the pump and check the following• Is the giving set tubing bent or trapped anywhere?
• Is the two-way tap in the feeding position?
• Is the clamp open on your feeding tube (e.g. nasogastric/gastrostomy tube)?
• Is your feeding tube blocked? To check, set the pump up ready to feed, disconnect the giving set from the feeding tube and RUN the pump into a suitable container. If feed comes out and there is no alarm,it means the pump and giving set are working normally, indicating that your feeding tube may be blocked (contact your healthcare professional)
• If you still experience problems, telephone the Hospital2Home Freephone Helpline: 0800 0183 799

16
Bottle empty
Replace bottle if required (it may be the end of the
feeding period)
Bottle not empty
• Turn dial to HOLD to stop the audio alarm
• Remove feeding set adapter from your enteral feeding tube
• Prime any air out of the feeding set
• Securely re-attach the feeding set to your enteral feeding tube
• Turn dial to RUN to begin feeding
Or… If you are done feeding:
• Turn dial to OFF/CHRG. This message is displayed because pump was programmed to feed until container is empty (SET DOSE at INF DOSE).
FEED EMPTY
The FEED EMPTY alarm occurs if air is detected in the feeding set
Is the bottle empty?
Alarms/alerts: FEED EMPTY
8

17
Alarms/alerts: DOSE and BATTERY
• DOSE DONE means that the dose you entered in SET DOSE is finished. This is normal
• If you wish to feed until the container is empty, set the dose to INF DOSE by selecting SET DOSE and depressing the Down arrow until INF DOSE is displayed
• If dose is set to INF DOSE this alarm will not alert
• BATT LOW BATTERY means that the pump’s internal battery needs recharging
• Approximately 30 minutes of battery operation remain
• Connect to mains power and continue feeding
• If CHRG PLEASE WAIT is displayed, please wait until PUMP READY TO USE is displayed
• A fully charged battery will power the pump for about 24 hours at a feed rate of 84ml/h. The battery charges fully in about 6 hours
• BATT BATT EMPTY means that the battery is depleted and the pump has stopped feeding
• Connect to mains power
• The display will indicate CHRG PLEASE WAIT until the pump is ready to use
DOSE DONE
BATTERY

18
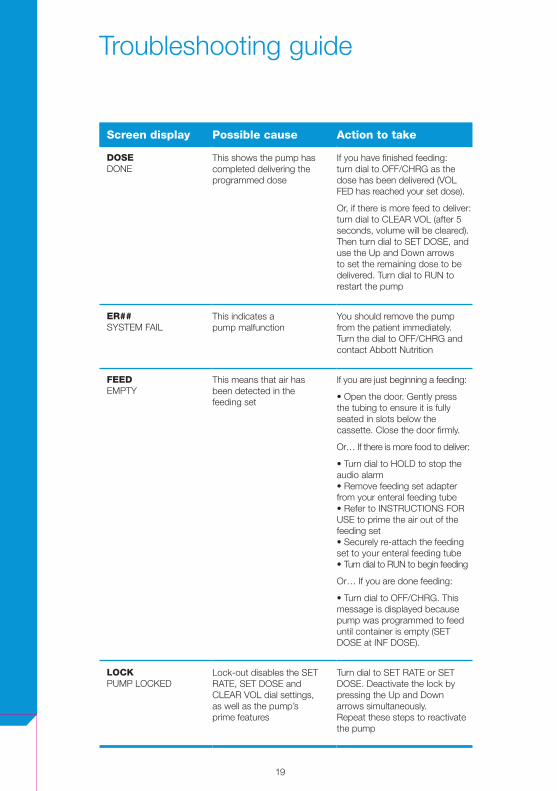
Troubleshooting guide
Screen display Possible cause Action to take
ATTN PUMP ON HOLD
This means that hold time has elapsed
Turn dial to RUN to restart the pump
BATT BATT EMPTY
This means the pump battery is depleted and the pump has stopped working
Plug the power cord into a mains outlet and make sure the power is turned on. The display will indicate CHRG PLEASE WAIT until pump is ready to use
BATT LOW BATTERY
This means the pump battery is nearly empty and approximately 30 minutes of battery operation remain
Plug the power cord into a mains outlet and make sure the power is turned on
CHRG PLEASE WAIT
The battery charge is below the minimum level to operate and the pump cannot be used until minimum charge level is reached
No action to be taken. Pump is available for use when the display indicates PUMP READY TO USE
DIAL NOT SET
Pump dial is between two dial positions e.g. between RUN and HOLD
Turn the dial to the desired position directly aligning the two dots (on the dial and pump casing). Continue setting up and operating pump as normal
DOOR OPEN
This means the set door is open while feeding or priming the feeding set
Turn dial to HOLD and close the set door. Turn dial to RUN to restart pump or attempt to prime the feeding set again
9
19
Screen display Possible cause Action to take
DOSE DONE
This shows the pump has completed delivering the programmed dose
If you have finished feeding: turn dial to OFF/CHRG as the dose has been delivered (VOL FED has reached your set dose).
Or, if there is more feed to deliver: turn dial to CLEAR VOL (after 5 seconds, volume will be cleared). Then turn dial to SET DOSE, and use the Up and Down arrows to set the remaining dose to be delivered. Turn dial to RUN to restart the pump
ER## SYSTEM FAIL
This indicates a pump malfunction
You should remove the pump from the patient immediately. Turn the dial to OFF/CHRG and contact Abbott Nutrition
FEED EMPTY
This means that air has been detected in the feeding set
If you are just beginning a feeding:
• Open the door. Gently press the tubing to ensure it is fully seated in slots below the cassette. Close the door firmly.
Or… If there is more food to deliver:
• Turn dial to HOLD to stop the audio alarm • Remove feeding set adapter from your enteral feeding tube • Refer to INSTRUCTIONS FOR USE to prime the air out of the feeding set • Securely re-attach the feeding set to your enteral feeding tube • Turn dial to RUN to begin feeding
Or… If you are done feeding:
• Turn dial to OFF/CHRG. This message is displayed because pump was programmed to feed until container is empty (SET DOSE at INF DOSE).
LOCK PUMP LOCKED
Lock-out disables the SET RATE, SET DOSE and CLEAR VOL dial settings, as well as the pump’s prime features
Turn dial to SET RATE or SET DOSE. Deactivate the lock by pressing the Up and Down arrows simultaneously. Repeat these steps to reactivate the pump
Troubleshooting guide

20
Screen display Possible cause Action to take
NO CASSETTE
This means that either there is no cassette installed or that the cassette was installed incorrectly when attempting to run pump or prime giving set
Turn dial to HOLD and insert cassette correctly and close set door. Turn dial to RUN to start pump, or attempt to prime the feeding set again
OCCL INTO PUMP
or
OCCL OUT OF PUMP
Flow has stopped due to blockage between the feed container and the pump, or between the pump and the patient
Turn control dial to HOLD. Remove feeding set from pump. Clear obstruction; check for kinked tubing or empty container. Reinstall feeding set. If this alarm appears during priming, attempt to prime the set again, then connect the feeding adaptor to the enteral feeding tube. Turn dial to RUN to begin feeding
PUMP READY TO USE
The battery charge has reached the minimum level to operate and the pump can now be used
Turn dial to any position to clear message. Confirm all settings are accurate. Turn dial to RUN to continue feeding
– HOLD MINUTES
This display counts down the remaining time the pump will be on hold
Turn dial to HOLD. If desired, adjust the HOLD timer to any duration (in 1 minute intervals), between 1 to 90 minutes by using the Up and Down arrows
If you have any problems setting up your Abbott FreeGo® pump and feeding system, please telephone the Hospital2Home Freephone Helpline: 0800 0183 799
Troubleshooting guide
10

21
Pump accessories

22
Abbott FreeGo® portable backpack
• Backpacks are available for adults and children to carry the Abbott FreeGo® system
• They are available in three colours Abbott FreeGo Adult Backpack / Carry Bag (S405) - Black
(S530) - Red (S532) - Blue Abbott FreeGo Paediatric Backpack / Carry Bag (S404) - Black (S531) - Red (S533) - Blue
• Both backpacks will hold the 500ml RTH containers and 200ml/220ml plastic bottles. The adult backpack will also hold the 1000ml and 1500ml RTH containers

23
If you need further information about portable backpacks, please contact your healthcare professional or call the Hospital2Home Freephone Helpline: 0800 0183 799
1. Set up your pump and giving set as normal. Then push the pump into the padded support in the backpack, making sure you haven’t caught the giving set tubing behind it
2. Position your feed bottle in the backpack as indicated by the printed lines and secure in place with the Velcro straps and the looped elastic
3. Secure the tubing using the Velcro and coil any excess tubing
4. Fasten the zip allowing the tubing to move freely out of the bottom of the backpack
5. Connect the giving set to the feeding tube. Open the lower pocket and set the pump to run
6. The back panel can be positioned so the backpack will stand upright
Using the Abbott FreeGo® system in the backpack
Abbott FreeGo® portable backpack

24
Adjustable angle pole clamp (S415)
Standard pole clamp (S406)
Table drip stand (S407)
Abbott FreeGo® accessories

25
Patient’s name
Name of feed
Feeding RATE:
Feed (1st container, ml/h) Feed (2nd container, ml/h)
Feeding DOSE: (total volume to be given, ml)
Make and description of feeding tube:
Other information:
Feed details

26
Dietitian:
Other healthcare professional:
Hospital2Home Freephone Helpline
Other:
Important contact numbers
0800 0183 799

27
Notes

28

Abbott FreeGo® is a registered trade mark of Abbott Laboratories Ltd.
Further information is available from Abbott Nutrition, Abbott House, Vanwall Business Park, Vanwall Road, Maidenhead, Berkshire SL6 4XE. www.abbottnutrition.co.uk
Date of preparation: August 2012 © 2012 Abbott Laboratories Ltd. RXANI120296
Hospital2Home Freephone Helpline: 0800 0183 799
Freedom for life